FTL: Faster Than Light


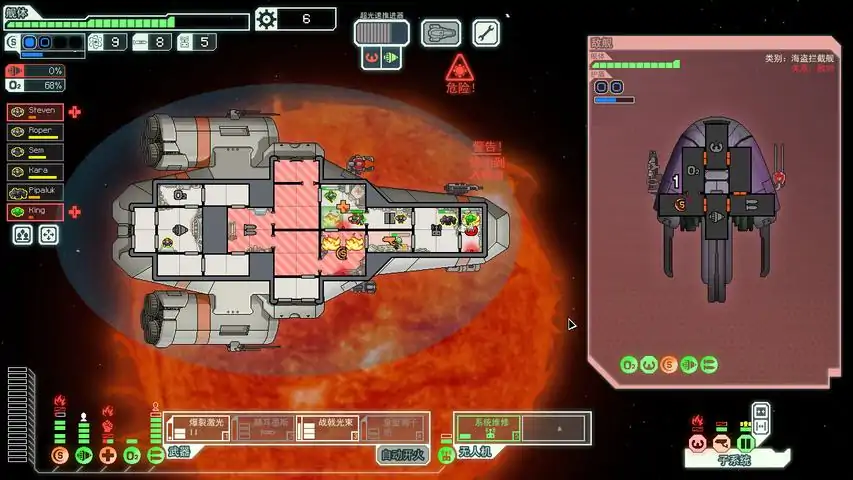


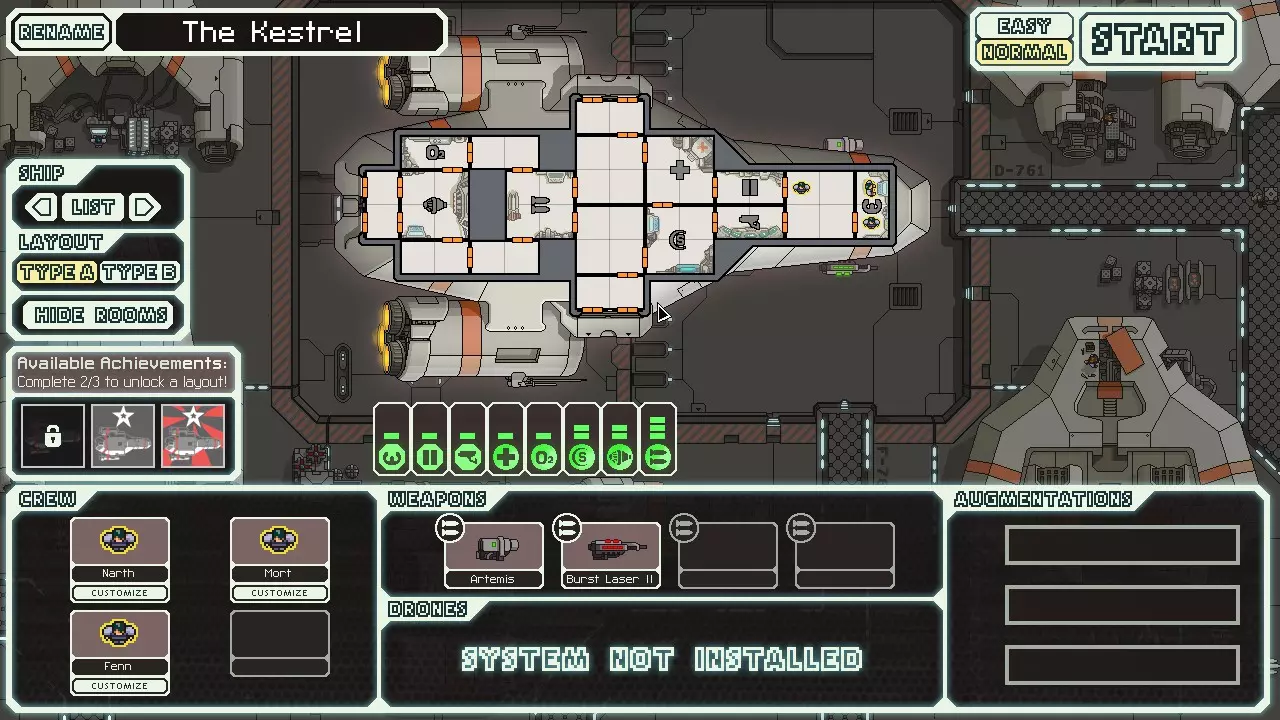
At 200 hours played, a set of tips for you to thrive in FTL! I just hit 200 hours played (combined over three computers) in FTL. At this point, Easy mode is a breeze and Normal quite manageable even with the more difficult ships. And of course, I've unlocked all the ships and types. But I remember a time when Easy mode provoked me to say things like "DANG THIS IS ONE HARD GAME!!!". So... with that in mind... and knowing that there's probably plenty of folks who feel this game is way too hard... here's some tips to help you along. Like all knowledge, it's one thing to know and another thing to be able to do... but at least I hope to point you in some right directions. These are in no particular order. Feel free to add to them if you also feel you are an FTL master and want to contribute (or disagree). The 42 Top Tips Revised 12.25.2015 to reflect changes, better information... it's about time! 1. Develop a boarding team as soon as it is safe to do so. This is critical for the additional scrap & fuel recovery you get from capturing ships (rather than blowing them up) as well as for the final boss, where you can use two man teams of boarders to disable the big ship's gun pods (less applicable on hard mode, where only two of the mothership's gun pods are isolated). 2. Time your shots. It is often better to wait for all your guns to charge up and then chain them rapidly together (in the new version you can fire as one big salvo... in the older versions it was often better to chain shots). That way you can hammer down shields before they can regen. 3. Ideal Positions: Pilot: Slug (vision) Rock (fireproof, tough), Lanius (o2 proof, deadly o2-less aura), Crystal (o2 resist, tough, lockout boarders) Engine: zoltan (if he needs to leave in hurry it won't uncharge weapons or drop shields), rock, engi weapons, shield: engi door, sensor: mantis *zoltans are good for other positions too, just be careful when pulling them out to avoid discharge 4. Grind jump points. It's not a race to get to the exit - plot a course that lets you get exposed to as many open points as possible. 5. Level 2 shields are good up to sector 4 on normal, sector 5 on easy. Level 3 is good until the end of the game on all levels. In the same way, Engines at 25% and then at 45% to the end of the game. 6. For most ships and situations, level 1 cloak is better than 2 or 3 as it rapidly recharges. Use it only when missiles are incoming (or you really need a recharge break). 7. Use a defense drone for stage 2 of the final boss to take out boarding drones. (or anti-drone, but unreliable) 8. Try to kill all crew but the guy manning the heavy laser pod in the very first fight with the final boss. In the second fight, dump all your crew into the enemy drone room right away. Priority to disable on the boss is always 1) missile pod 2) ion pod 3) beam pod. Exception is if you are having a very slow time disabling the drone room, then take out the beam pod before ion. 9. Fighting the first battle is too complex to detail here. But suffice to say it goes like this: 1) disable missile pod. 2) with your transporter at level 2, send another 2 man team to the ion pod while your first team is still dismantling the missile pod. 3) wreck shield room 4) return all boarders and heal them 5) switch to medbay, destroy it 6) transport boarders to door control room; if you have the four man transporters, send them all into the medbay, shield, or cloak rooms. 10. Upgrade doors to level 2 by the end of sector 2, level 3 by sector 5. with level 2 doors you can kill off most boarders by simply venting rooms (and forcing them to break through doors only to go into more vented rooms). 11. Having an AP or boarding drone will kill all the pesky spiders. 12. Have medbay at level 2 and a transporter when visiting the mantis sector. 13. Don't be afraid to send EVERYBODY over if you have those 4-man transporters. I do it even with 2 man transporter rooms - just be aware of the risk of having a burning ship that you can't come back to. 14. Always destroy medbays! sometimes even before you disable their guns. 15. killing engines or the bridge will prevent a ship from fleeing. if you board their ship and they send their pilot to help fight, that will also disable the ship (no pilot). 16. The best bang-for-buck gun in the game is burst laser mark 2. buy them at every opportunity. two BLM2s will beat a glaive beam (the most powerful single weapon) any day. after that, it's the flak I cannon. 17. the best augments are: weapon pre igniter, drone recovery arm, scrap recovery arm. note that the drone arm can't retrieve boarding drones. you can also recover hull repair drones but ONLY if you warp out before it gets to "finish" the repair job. 18. level 2 transporters will be able to send two men over to automated sentry ships and get them back before they asphyxiate. I often send two mantis over to knock their shields over, then pull them back right before they gasp out. 19. crystals are incredibly powerful as boarders. Pop all three of them (two if you don't have the carnelian ship / type b yet) into the enemy weapon room, freeze it, bam bam bam... freeze again.... bam bam bam... freeze again... disabled ship. you can also use it to trap enemy crew in a room with your boarders - no trip to the medbay for you! 20. don't every buy repair past where the drone bracket ends on your hull health bar. IOW, leave 5-6 units unrepaired. that way, if you rescue a benevlonent ship you can benefit from the free repair they're reward you with. 21. also, try to keep your hull right about there in terms of health. 22. rockmen + fire bomb in enemy medbay ... hahahaahhhaahhaa come get some. fire beam rather sucks .. unless you have a way to take out their shields easily. 23. the antibio beam is a novelty only unless you really are good at this game. it takes an obscene amount of timing and planning to use well. but it IS very deadly. problem is, it deals no damage and cant get through shields. ps: it kills spiders in blue text - thanks titanphallus! 24. hull and pike beam suck but can be used to decent effect. just don't buy those things unless you really need a 2nd weapon and there' snothing better. halberd beam, on the other hand, is an incredibly useful little beast. 25.You can hit 4 rooms at a time with the halberd beam against most ships. 26. If you have a great crew, don't take stupid risks - especially ones like giant spiders and the great zoltan eye. If your crew is middling and the game is early, why not... but still avoid spiders. it is the absolute worst in terms of always failing miserably. (unless you have clone bay, which protects against EVERYTHING except for the rare Zoltan death or Plague death). 27. burning space station? don't send your guys in. just dock. you can't lose a man if you dock, only get a few points of hull damage. now if you have a rockman or repair drone.. 28. Engi and Rockmen have the most blue options. try to have one or both on yoru ship. 29. slugs have a few, mantis has one against slugs, zoltan gets you a boarding pass to a store in zoltan worlds (but you usually want to fight your way in anyway), humans have one to help you rescue a confused mantis, crystal can open the wormhole to crystal world. lanius has two (one in engi, one lanius) 31. the best bang-for-buck missile weapon is the humble artemis. the rest kind of suck when compared to bombs. swarm isn't bad but slow, pegasus great but also very slow. either of those + missle replicator = missles all day 32. with that said, ANY weapon in the game can be used to good effect with some thoughtful planning. 33. don't be greedy! greedy captains soon find themselves in empty ships. take good, calculated risks... and if a ship starts looking bad, get your crew out of there! 34. you better know what you're doing if you decide to board in asteroid belts or fire novas. 35. defense drone II - you don't need it if you have defense I. 36. beam and anti ship drones are good only if you have ion III or multiple lesser ion guns. 37. no need to fly around with the hull repair drone equipped. only use it between jumps. keep soemthing better in the slot. 38. don't bother going to the store if you have less than 45 scrap unless you want to sell or repair. 39. if you meet a ship with puny guns that can't ever hurt you, stick a man in the shield room, one in the engine room, one in the pilot room.... then go make a sandwich. they'll be experts at evading / recharging in no time. 40. nothing wrong with dismissing crew in favor of zoltans. but weigh the benefits carefully... 41. to get mantis ship, you need teleporter + level 2 medbay or clone. in mantis world 42. be mean to the engi for more $$ Addenum A: Feb. 15th, 2013 - Defense drone II is indeed in many ways only a small benefit over DD1. Personally, I always sell them unless I have to use them - as we know, FTL is a game where you really have to be very fluid and constantly make the most of what you get. this is not the kind of game where you can do a set order of steps and then achieve an easy victory. Why do I not use DD2? Because often it will waste its shot on a laser that my shields can block, and then let the fat 4-point missile through. Doesn't always happen, but it does happen enough that it just isn't worth 4 power to me. - Yes, I do like boarding a lot. It's not so much about powergaming for me as I really like the feeling of sending an elite death squad over to wipe out the enemy. But FTL has TONS of playstyles, not just Boarding / Weapons / Disabling. Some examples: -- Fed Cruiser: Fed Beam build -- Zoltan: Glaive / BLIII build (taking advantage of extra shield time) -- Crystal A: Ion + Heavy Crystal build (ie., 2 ion blasts and a heavy crystal) I enjoy them all, and one of the best parts about FTL is that you really don't know which strategy you'll eventually wind up with. - mantises... yes, they make nice boarders, but they are not the only ones nor are they the best. In order of best to good: #1: the crew that you have. be flexible! I have done well with a single Engi boarder. How? I just make him run all over the enemy ship, disrupting their crew and kiting their defenders until I can get them into a single room. Then, fire all shots into that room while simultaneously warping my engi out. -- crystal men -- mantis -- rockmen (these move up one notch if you have firebomb) -- regular humans. why? because no one ever cries when they lose a human.... - Breach Bomb II is a very high quality weapon. Not only will it severely disable any system (with at least one shield guaranteed), it prevents crew from easily repairing that room. It cannot be blocked, cannot be put out, and mantis ships find it incredibly difficult to handle them. - Board ships with upgraded doors only very cautiously. You do NOT want to get trapped in a room. With unupgraded door ships, you can easily kite the entire enemy crew all over the ship, dodging most shots until your transporter is ready to beam you back. This is another reason to buy upgraded sensors. The same is true of ships with cloaks as you cannot teleport while the enemy is cloaked. - Double boarding with lvl2 transporters is a very strong strategy. Send a first team into the O2 room (which will almost always be undefended and containing only two spaces). Follow up the first team with a second team to either bridge or weapon room. If your first team is badly damaged, send all four into a 4-man room. with some kiting you can get the defenders to attack the new team in melee, allowing your injured first team to shoot at them without retaliation. - If your team is doomed, with no way to get them back in time, try to draw as many enemy as you can into a single room. Then bombard that room. - The federation beam is not to be relied upon, ever. it is nice to have around but doesn't become a real threat until fully upgraded. even then, you cannot count on it - and you must be careful that you don't kill your own boarders or destroy a ship prematurely. that said, it is a very good bonus support weapon that can go through even super shields. The Mantis Ships The Mantis ships are both ideal for boarding-happy players. Gila M has just enough firepower to be a highly versatile ship that can easily run any strategy from the start, with a crew transporter built in. - single shot laser - small bomb - lvl 1 shield, transporter - no sensors. 1 engi, 3 mantis. Mantis Pheremones (+25% speed for all crew, on your ship or theirs) It is best to use the Engi for a pilot, and two mantises for boarding. The third mantis can have engine room duty until new crew show up. Use the bomb to disable enemy weapons, giving your mantises time to kill off the crew. You will also need to use the bomb to take out med bays - then move your mantises into the med bay to make their stand there. Conserve your bombs! You will need to rely on them until you can get better weapons. Upgrade the shield to lvl 2 as soon as you can. If you're good at the game you can get away with putting this off a little longer, but weak shields + weak weapons = taking lots of hull damage = unable to afford good buys at stores. The engine also needs to be upgraded, at least to lvl3. It's cheap up to lvl3 and you will need it if you run into heavy sentry bots or zoltans. Your puny single shot laser and bomb will take FOREVER to take down a zoltan shield. It's probably better to flee. Mantis Pheremones are nice (esp with rock men) but they are also 40 scrap and don't hesitate to sell it if you need money to buy decent laser gun. If I see a heavy laser 1 at the store in sector 1, I would not hesitate at all to sell MP for it. Basic Laser is a godawful weapon and is akin to going to war armed with a single-shot .22LR squirrel gun. It's pretty much only good for kicking the enemy when they are already down. don't bother buying sensors too early. you ARE going to board that ship, regardless of what might be on board. besides, you're mantis. who's there to be afraid of? The Basalisk.... ahh, yes. Severely underpowered out the gate, but with some TLC can become an absolute terror by sector 4. - boarding drone - defense drone - no weapons!!! - teleporter, lvl 2 shields. 2 mantis. Mantis Pheremones. You will be going "all-in" for each fight, at least in the beginnng. As soon as you warp into a fight, send both mantis to the transporter. What follows will then be a desperate race to kill the crew before your ship takes on too much damage. You need a 3rd crew member, STAT. Rockmen or Engi are ideal, but any joe will do as anything is preferable to being a sitting duck. You desperately need a gun. Any gun. Unfortunately, the Basalisk tends to run into gun-free stores more often than most (the same is true of Crystal B). If you are lucky, you'll find a store selling Heavy Laser I in sector one. Buy it - even if you have to sell Mantis Pheremones or even the boarding drone. Otherwise, the only thing you'll be able to do against bots and zoltans is run away. If you get another mantis as your first crew member find, consider staying with the "all-in" strategy. 3 mantis boarders all at once in the weapon room is a deadly thing.... and your shields can take quite a beating at least early on. If you have no crew staying on board, consider venting the whole ship when boarded. Be aware that this is a very risky strategy as you may wind up unable to return to your ship. Then again, if you wanted a low-risk, average return investment you wouldn't be playing the Basalisk, would you? 4 Elite mantises are a true terror. However, 2 rockmen and 2 mantis are also very good. If a fire breaks out in the enemy ship, send the rockmen over.... Hope these help! Remember that being flexible is most important... (Contributor Notes) Eegxeta's Boarding Tips Eegxeta 55 minutes ago Unless you catch the fire immeditely before it has spread a single crew member can put it out, but once it has spread only a single Engi or Rockman can put it out the rest you need two and Mantis three. Eegxeta 1 hour ago So to put out a fire you need send a minimum of one of the following to the room 1 Engi, 1 Rockman, 2 humans, 3 Mantis, ? Zoltan. As soon as I find out the minimum for Zoltan crew I'll post it. Comments must be less than 1000 characters?!? That is just, ah I don't even know what to say. Eegxeta 1 hour ago NEVER EVER not have at least level 2 sensors and doors those are quite litterly the two most important things on the ships besides the engines and cockpit. sensors so you can see what the bloody hell your shooting at and doors so fires don't consume your ship. Fire is one of the most lethal things in the game because to put it out your crew uses their repair skill. It is practically impossible for a single non-Rockman or Engi crew to put out a fire, it spreads slightly faster than they can put it out so they will burn to death before they can put it out. I have tried this serveral times. You need at least 1.5 repair speed(like having three mantis crew) to put a fire out before the crew burns to death, Zoltan's have less health so I am not sure what they need to put the fire out before they burn. Eegxeta 1 hour ago I have done plenty of boarding now and I can say I have pretty much lost crew because I did something stupid like fireing a boarding drone after I beamed my team in on a ship with upgraded doors or forgot to turn off auto-fire and beamed the team in then shoot them lighting the room on fire. Hear it a nice tid bit level 2 transporters are fast enough to beam and team in and beam them out before they die from fighting, as much as I like to send my team running around in circles on the enemy ship and watch as the crew hopelessly chases them while playing circus music(note have not actually played circus music, but it would make a great youtube video). Having two sheild blocks in sector 1 and 2 literlly makes you invincible, unless the guy has missles or bombs, making it easy to train crew. Neoviper's guide to the Red-Tail The Red-Tail is the B variant of the game's starting ship, the Kestrel. It can be unlocked without too much trouble compared to some of the other ships in the game, and is quite a bit better than most of them in my opinion. It's main strengths are superb early game firepower, a diverse crew, and a great room layout. With upgraded doors and good use of venting there are very few situations where you will be anything more than annoyed by fires or boarders. In terms of weaknesses, the initial weapons lose a lot of their effectiveness once enemies start getting more shields, so finding new weapons is very high priority. So, here is my early game list of priorities, in order: 1. Get two shield bars and level two doors. 2. Stockpile a bit of scrap to use on stores in sector two and three. 3. Buy a crew teleporter, as soon after upgrading shields as possible. The thinking behind that first one is that the majority of early deaths come from lasers or beams, both of which are heavily mitigated or outright negated by shields. Engines are very good later on, but in the beginning shields are the best defensive upgrade you can buy. Don't wait to get the necessary power before upgrading shields, that can always be pulled from engines or o2 should the need arise. Put some points into the reactor after you get the second shield layer. Get level two doors after that, I can't overstate how valuable they are; this goes for essentially every ship in the game. Once you've got two shield layers there is next to nothing that will do more than scratch your hull. At this point, the focus shifts to getting a crew teleporter and/or additional weapons. If something like a burst laser two shows up then grab that, but if no good weapons present themselves buy the teleporter. Your initial mantis crewmember can be sent along with one of the humans to board quite successfully. A useful tactic that can be used for battles your crew couldn't win normally is to lure enemy crew into a room, and then shoot it with your lasers. Shortly after the lasers are fired, move your crew out of the room; if you timed it right the enemies will still be in the room when the lasers hit, damaging them heavily. This is a somewhat risky maneuver so only use it when you would otherwise lose the fight, and be especially wary if your crew are low on health. It's also a good idea to upgrade sensors when you get the spare scrap, it lets you spot an easy fight, or avoid a particularly tough one. Doors are very important as well, since you'll be leaving only two crew on your ship while boarding theirs, so fires and enemy boarders can cause a lot of trouble if left unchecked. If you've gotten the teleporter and a few defensive upgrades, you're in a very strong position to complete the run. Continue to save a decent amount of scrap, ideally 80+, and keep an eye out for stores. Everything might be going well right now, but starting around sectors four and five ships will start getting more shielding than the basic lasers can handle. If you haven't gotten any additions to your boarding crew or weapons, things can get pretty rough, but it is still possible to continue on. Try to use your boarding crew to get the pilot of the enemy ship to leave his station, usually forcing a couple enemies to retreat to the medbay can lure him into trying to attack your crew. Avoid auto-ships as much as possible if you get to this point, as boarding is very dangerous given the lack of oxygen, and their elevated rate of dodging negates your lasers almost entirely. Most of the time this won't happen though, most weapons found either at random or bought at a store can be used to keep you going for a long time. But until you do get one, always be on the lookout for stores while keeping enough scrap on hand to buy a weapon from them. There's a ton of information out there on how to beat the flagship, but the quick version is board the weapons systems, kill as many crew in the main compartment as you can, and hope the drones don't tear you a new one in stage two. If you do go for killing the crew of the ship, try to leave one alive, specifically the one triple laser room. If you kill all of the crew then the flagship switches to AI mode, and begins automatically repairing systems. Not a good situation to be in, avoid it if you can. Hopefully this guide has helped you to understand the Red-Tail some more, and allow you to use it to better effect. I really enjoy having the power to kill any ship in the first couple sectors without breaking a sweat, and then putting together a nice little boarding team to go raiding with. I've found this ship to be very reliable for beating the game, so if you're having trouble give it a few tries and see how you like it. Good luck and happy hunting! The Stealth Ships The Stealth ships are notoriously difficult to use as they suffer from both narrow layouts and a complete lack of shields. However, they also pack some of the most potent weapons available in the game. To master the Stealth ships, you need to learn timing - much more so than the other ships. Perhaps these tips may help you on your way. The Zoltan belongs in the Engine room. You do not want your glaive beam dependent on whether the zoltan stays in the room or not. Do not cloak right away when you are in combat. Rather, save it for -just- before the first shot impacts your ship. This gives you maximum cloak benefit. If you are facing an enemy with missles, especially large missles, take the initial laser hits. A hit from a laser or ion cannot is far better than a hit from a Breach missle which can potentially lead to catastrophic ship failure. Right before the big missle hits, cloak. As you are depending heavily on the cloak for defense, the first priority using either ship is to upgrade the cloak. For Stealth A, level 2 is sufficient (though not ideal). For Stealth B, level 3 is necessary. This is so you can cloak right before a major hit, stay cloaked (and thus preventing enemy weapon recharging), then pop out of cloak with a glaive strike right away. For this same reason, the next order of business is NOT to buy a shield. Rather, invest in your engine. You want that cloak to be near foolproof and the engine will still help protect you even when not in cloak. Caveat: if you happen to be going into a nebula, it is likely worthwhile to buy Pilot level 2. [/i] The Stealth ships are lousy boarding craft, but you can still make it work for you. Use the hints in the addenum and main article to best use your two boarders (and tiny med bay). Essentially, use your boarders to prevent enemy repair; run your guys into empty rooms so you can get alpha strikes on the first guy who walks into the room and then run again to keep repeating alpha strikes with little retribution; and run your guys back and forth through the med bay to heal more than 2 at a time. The glaive beam should always hit at least 3 rooms. In most ships, you can do 4. Remember, all you need is a tiny bit of the beam to reach the room. Use auto-fire so you don't have to keep finding the perfect beam line-up. Don't sell long-range scanners until late in the game. You need that badly to avoid asteroid belts. If you do happen to get into an asteroid belt, don't fire your weapons (esp the glaive beam) until the enemy ship gets at least one hit from an asteroid. Remember fire order: Ion, Laser, then lastly Beam. Contrary to popular belief, the Stealth ships do not come with Stealth Weapons. That makes it a very good choice to buy if you get the opportunity. You don't really need Titanium Hull. It's better to not get hit, period. But if you have money to burn, it's nice to keep. [/list]


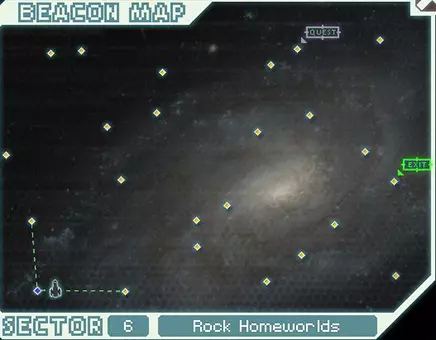

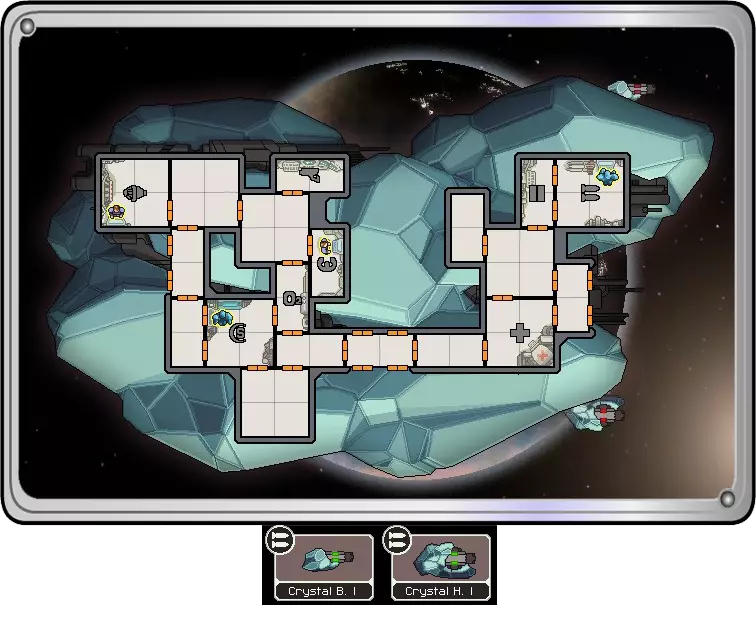

Frustrated by the Crystal Cruiser unlock? Using these methods, I unlocked this ship in four hours of game time. Your luck may vary, but the hints and spoilers in this guide are certain to speed up this unlock dramatically. Advanced Edition I got this unlock without much trouble before the Advanced Edition came out, but you can improve on this strategy using variant C of the Rock Cruiser. The procedure below assumes you don't have access to the Rock C ship. If you do, you can use Rock C to start with a crystal crew member, making steps 3-4 unnecessary. Step 5 will become somewhat harder, since there will no longer be a quest marker in the Rock Homeworlds, so you will have to stumble upon the Crystal Sector entrance by chance. If you rename your starting Crystal crew member "Ruwen", the quest market will appear anyway -- this is arguably an exploit, but makes the Rock C strategy a slam dunk. The down side is that to play with Rock C, you need to first unlock Rock A (which you pretty much need regardless), then unlock Rock B by completing two of three challenges, and then reach sector 8 in Rock B to unlock Rock C. STEP 0: Unlock the Rock Cruiser A The blue option in Step 3 (below) is only available if you have Rock Plating, which only comes on Rock ships. To unlock the Rock Cruiser A, go to the Rock Homeworlds and seek out non-distress beacons (Long Range Scanners will detect a possible ship). When a Rock war vessel trash talks you, talk back to them and you will get a quest. Go to the quest (which will have a "hot star" hazard) and wait for the ship to escape -- do not destroy it. You will get a second quest marker; go there and the Rock Cruiser A will be unlocked. STEP 1: Start Scum for Long Range Scanners Select the Rock Cruiser, and make sure the game is on Easy mode. You will start with 30 scrap, which is just enough to purchase Long Range Scanners from a store. If you see a store at an adjacent beacon, warp there and check the store for Long Range Scanners. If you're not next to a store, or if the store doesn't have Scanners, restart. Do not bother jumping to any beacons without stores; it's much faster to restart and check a fresh map. You should see a store at least once every minute or three. Unfortunately, each store sells only two of the five item categories. Even if it does sell Augmentations, there is only about a one in four chance of Long Range Scanners being available for sale. So roughly one in ten stores will have Long Range Scanners. This averages out to about 10-20 minutes of restarting before you get Scanners. Do not advance to Step 2 until you have a Rock Cruiser with Long Range Scanners. The time saved by having Scanners is enormous, and the time you spend restarting will pay off many times over. STEP 2: Travel Quickly and Avoid Fights Repeat after me: "do not waste time fighting ships". Fights are time consuming, and you will not need any combat strength to complete this unlock. Avoid beacons with a "possible ship detected" whenever you can. This advice applies to the entire game. If you do get in a fight in the first few sectors, you can blow up the enemy for a reward. Past the first 3-4 sectors, you will be better off jumping away as soon as your FTL Drive recharges. Watch your fuel. Running out of fuel is devastating to this unlock strategy, so always buy fuel at stores (after repairing, of course). You should find enough random rewards to keep your hull and fuel topped off. If you run out of scrap, consider selling your weapons, but don't sell Rock Plating until after Step 3, and don't sell your Long Range Scanners, ever. Avoid nebulas. Nebula sectors are useless for this unlock, and nebula beacons have a chance of a mandatory encounter that's hidden from Long Range Scanners. Stick to normal sectors and beacons when you can. Head to the exit beacon in Sector 1 by the most direct and safe route. Continue traveling through sectors as quickly and safely as possible until you get to the sector types that you need. STEP 3: Find a Dense Asteroid Field Distress Call This event occurs in Engi, Rock, and Pirate sectors. Of these, Engi sectors are by far the most desirable, because they have fewer mandatory fights, and also because they can have a Zoltan Research Station (which is needed for the next step). Whenever you have a chance to go to one of these sector types, take it. Once you're in an Engi, Rock, or Pirate sector, do a thorough search for Distress Beacons. Go to every one you can. If you find a Dense Asteroid Field, congratulations! Use your Rock Armor, take the Stasis Pod, and move on to the next step. STEP 4: Find a Zoltan Research Station This event occurs in Engi and Zoltan sectors. If you just finished the last step, double check if you're in an Engi sector, in which case you can continue exploring. Otherwise, move on as quickly as possible until you find an Engi or Zoltan sector. Zoltan Research Stations occur at normal beacons (no ship, no hazard, no distress beacon, no store marker). Travel to as many normal beacons as you possibly can. Leave no stone unturned. Zoltan Research Stations aren't guaranteed to occur, but most Engi and Zoltan sectors have at least one. When you find a Zoltan Research Station, use the blue option and you will get a Crystal Crew Member. He will tell you what to do next. STEP 5: Find the Rock Homeworlds Unfortunately, the Rock Homeworlds is a unique sector. If you've already seen it earlier in your game, then you'll never see it again. So, if you ever have Rock Homeworlds as a sector choice, and you don't have the Crystal Crew Member yet, you will need to restart. Once you have the Crystal Crew Member, you will want to maximize your chance of finding the Rock Homeworlds. Do this by following a route that gives you the most red sector options. Once you find the Rock Homeworlds, the rest of the unlock is easy. There will be a quest marker; go to it and choose the blue option. This will take you to the Hidden Crystal Worlds, where there will be a second quest marker. Go to that beacon, and the Crystal Cruiser will be unlocked. If you get to the end of sector 6 and don't have Rock Homeworlds as an option for sector 7, then you have failed and will have to restart. Results In four hours of play using these techniques, I got the Damaged Stasis Pod six times, got a Crystal Crew Member three times, and unlocked the Crystal Cruiser. Please post your success or failure stats below so we know how effective this strategy is. Additional ideas and improvements are very much welcomed!

Всё, что вы хотели знать о моддинге и даже больше! Только на русском языке, полное руководство о моддинге FTL от bamalf. 1. Необходимый софт и структура файлов игры. 1.1. Софт. Основная программа, в которой я редактирую код — notepad++ <!-- https://notepad-plus-plus.org/download/v6.8.5.html --> со включённым xml-синтаксисом. <!-- Вкладка "Синтаксисы" -- XML --> Для запаковки файлов игры в архив мода использую 7-zip. <!-- http://www.7-zip.org/download.html --> ftl-файлы мода представляют собой обычный zip-архив с переименованным расширением. Для установки готового мода применяется Slipstream Mod Manager. <!-- http://www.ftlgame.com/forum/viewtopic.php?f=12&t=17102 --> Рекомендую в его настройках File — Preferences отметить галочкой allow_zip, это позволит модменеджеру видеть zip-архивы так же, как и ftl-файлы, что избавит от необходимости переименовывать *.zip в *.ftl при каждом тесте мода. Для распаковки оригинальных игровых архивов использую ftldat. <!-- http://www.ftlgame.com/forum/viewtopic.php?f=4&t=1920 --> Эта программа понадобится лишь один раз, для того чтобы распаковать ресурсы игры. Для редактирования графики подойдёт любой редактор, поддерживающий прозрачность изображений, например GIMP <!-- http://gimp.ru/download/ --> Я использую фотошоп, ссылок не будет :) <!-- ХХХХХХХХХХХХХХХХХХХХХХХХХХХХХХХХХХХХХХХХХХХХХХХХХХХХХХХХХХХХХХХХХХХХХХХХХХХХХХХХХХХХХХХХХХХХХХХХХХ --> 1.2. Структура файлов. Все файлы игры разбиты на 4 папки: audio <!-- содержит звуки и музыку --> data <!-- текстовый код --> fonts <!-- шрифты --> img <!-- графику --> Рассмотрим основную папку data. Изначально весь код игры (доступный для редактирования) записан в xml-файлах, но при русификации мы добавили к ним расширение *.rawclobber, это позволяет модменеджеру переносить код игры без форматирования. Если использовать оригинальное расширение *.xml, то модменеджер "съедает" специально оставленные пробелы в конце строк. Пример: <text name="add_power">Увеличить мощность: </text> Notepad++, начиная с версии 6.8.4, автоматически распознаёт синтаксис XML, даже если расширение файла другое. Для этого в первой строке каждого xml-файла напишите код: <?xml version="1.0" encoding="utf-8"?> Файлы с этим расширением заменяют оригинальные xml полностью, но также есть возможность переписать конкретные части кода, сохраняя при этом оригинальные файлы. Для этого новому файлу с заменяемым участком кода дописывается расширение *.append. Вот пример частичной замены кода в оригинальном файле circle_scout.xml на код из нового файла circle_scout.xml.append: <mod:findLike type="explosion"> <mod-overwrite:gib5> <velocity min="1" max="3"/> <direction min="-180" max="180"/> <angular min="-1" max="1"/> <x>90</x> <y>170</y> </mod-overwrite:gib5> <mod-overwrite:gib6> <velocity min="1" max="3"/> <direction min="-180" max="180"/> <angular min="-1" max="1"/> <x>230</x> <y>160</y> </mod-overwrite:gib6> <mod-overwrite:gib7> <velocity min="1" max="3"/> <direction min="-180" max="180"/> <angular min="-1" max="1"/> <x>100</x> <y>35</y> </mod-overwrite:gib7> </mod:findLike> Здесь мы ищем блок <explosion> в оригинальном файле и заменяем в нём блоки <gib5>, <gib6> и <gib7> на новые. Остальной код в оригинальном файле остаётся без изменений. Но такой метод я почти не использую, а предпочитаю заменять файлы полностью на новые. Деление кода на отдельные файлы условное, оно нужно для облегчения чтения и поиска нужных участков кода. Игра сама объединяет все файлы в определённом порядке в один массив, из которого загружаются необходимые части кода. Если один и тот же код (а точнее код с одинаковым заголовком-именем) написан более одного раза, то код, написанный ниже, перезаписывает код, который расположен выше него в том же самом файле. Пример: <text name="level">Лалала </text> <text name="manned">Управляется экипажем: </text> <text name="status">Состояние: </text> <text name="level">Уровень </text> Код на первой строке будет игнорироваться, т.к. то же самое имя использовано на строке ниже, и эта строка перезапишет все строки над ней с теми же именами. Итак, что же во всех этих файлах закодировано. Я распишу только файлы с расширением *.rawclobber, именно они нас интересуют в первую очередь. achievements.xml.rawclobber <!-- Описания достижений игры. Для редактирования доступно только описание, этот файл нам не интересен. --> animations.xml.rawclobber <!-- Вся анимация игры, включая оружие, дронов, персонажей и прочего. --> autoBlueprints.xml.rawclobber <!-- Содержит списки орудий, дронов, улучшений, кораблей и сами корабли. --> blueprints.xml.rawclobber <!-- Содержит стартовые корабли игрока, оружие, дронов, системы и улучшения. --> bosses.xml.rawclobber <!-- Здесь записаны код флагмана для всех трёх фаз и трёх уровней сложностей. --> dlcAnimations.xml.rawclobber <!-- Анимация, добавленная в дополнении Advanced Edition. Этот код игнорируется при отключённом расширенном режиме. --> dlcBlueprints.xml.rawclobber <!-- Аналогично blueprints.xml.rawclobber — это код для дополнения, здесь также записан код стартовых кораблей ланиусов. --> dlcBlueprintsOverwrite.xml.rawclobber <!-- Этот код замещает аналогичный код из autoBlueprints.xml.rawclobber при включённом дополнении. Содержит также код кораблей типа С. Если в имени списков присутствует префикс OVERRIDE_, то это значит, что данный блок кода заменяет тот же самый код (с тем же именем) без этого префикса, если включён расширенный режим игры с дополнением. --> dlcEvents.xml.rawclobber <!-- События, добавленные в дополнении. --> dlcEvents_anaerobic.xml.rawclobber <!-- События сектора ланиусов. --> dlcEventsOverwrite.xml.rawclobber <!-- Здесь находятся изменения в событиях и списках событий при включённом дополнении. --> dlcPirateBlueprints.xml.rawclobber <!-- Код кораблей пиратов --> events.xml.rawclobber <!-- Основной файл событий игры. Все новые события я пишу в конце этого файла. Разработчики для удобства поиска событий раскидывали их по отдельным файлам, для каждой расы в свой файл. --> events_boss.xml.rawclobber <!-- События финального сектора. --> events_crystal.xml.rawclobber <!-- События сектора кристалинов. --> events_engi.xml.rawclobber <!-- События секторов инжи. --> events_fuel.xml.rawclobber <!-- События, вызываемые при пустых топливных баках. --> events_imageList.xml.rawclobber <!-- Здесь находятся списки задних фонов и планет. --> events_mantis.xml.rawclobber <!-- События богомолов. --> events_nebula.xml.rawclobber <!-- События в туманностях. --> events_pirate.xml.rawclobber <!-- События пиратского сектора. --> events_rebel.xml.rawclobber <!-- События секторов повстанцев. --> events_rock.xml.rawclobber <!-- События роков. --> events_ships.xml.rawclobber <!-- События, связанные с битвами с определёнными кораблями. --> events_slug.xml.rawclobber <!-- События слизней. --> events_zoltan.xml.rawclobber <!-- События золтанцев. --> misc.xml.rawclobber <!-- Содержит описания элементов интерфейса, настроек, статистики, подсказок для разных типов оружия и прочую информацию. --> nameEvents.xml.rawclobber <!-- Здесь разработчики экспериментировали с функциями вызова имён экипажа в текстах событий. Но этот код так и не был доведён до ума и в финальную версию игры не попал. Я рекомендую не использовать подобный код вообще, либо использовать в не несущих нагрузку текстах. Пример: <text>Вам не нравятся звуки, раздающиеся в этом месте время от времени... %req жалуется на постоянные головные боли из-за них.</text> Здесь %req вызовет имя случайного члена экипажа. --> names.xml.rawclobber <!-- Все возможные имена, с которыми вам встречаются персонажи в игре. --> newEvents.xml.rawclobber <!-- Содержит списки событий для первых секторов, списки событий по группам (нейтральные, опасности, туманности, маяки бедствий и т.д.), а также советы, показываемые в стартовом событии первого сектора. Здесь также находятся некоторые простые события. --> sector_data.xml.rawclobber <!-- Описывает структуру секторов. --> sounds.xml.rawclobber <!-- Здесь закодированы звуки и музыка. --> tooltips.xml.rawclobber <!-- Всплывающие подсказки для различных элементов интерфейса. --> tutorial.xml.rawclobbe 2. Моддинг улучшений, систем, оружия и дронов. <?xml version="1.0" encoding="utf-8"?> <!-- ГАЙД ПО МОДДИНГУ FTL --> <!-- Автор bamalf, специально для группы https://vk.com/ftl154 --> 2. Моддинг улучшений, систем, оружия и дронов. Код для оружия и дронов записывается в blueprints.xml.rawclobber (основная часть) и частично в dlcBlueprints.xml.rawclobber. Новые вещи я рекомендую записывать в первом файле, для удобства. 2.1. Улучшения. Рассмотрим пример улучшения. <augBlueprint name="SCRAP_COLLECTOR"> <title>Кран для сбора лома</title> <desc>Позволяет собирать на 15% больше лома из любого источника.</desc><!--ребаланс 10%--> <cost>50</cost><!--ребаланс 50--> <bp>8</bp> <rarity>1</rarity> <stackable>true</stackable> <value>0.15</value><!--ребаланс 0.10--> </augBlueprint> Код улучшения начинается со строки имени улучшения <augBlueprint name="SCRAP_COLLECTOR"> и заканчивается закрытием кода </augBlueprint>. Знак / обозначает конец кода этого элемента. Каждый тег в треугольных скобках должен быть закрыт! В закрывающей строке может быть написано в принципе что угодно. Например, </augGorshok> игра корректно воспримет и закроет код элемента. Но такого, разумеется, писать на надо :) Все последующие строки для удобства восприятия отделяются табуляцией. Можно вообще писать весь код в одну строку, но я рекомендую придерживаться того же форматирования, что и разработчики. Далее используются простые теги в одну строку, их порядок не принципиален, но я также рекомендую использовать порядок, который выбрали разработчики. Каждый тег обязательно должен быть закрыт в конце строки. <title>Кран для сбора лома</title> Название улучшения (и вообще любого другого предмета в игре). <desc>Позволяет собирать на 15% больше лома из любого источника.</desc> Его описание. Далее идёт закомментированный текст <!--ребаланс 10%-->, который не является кодом и служит для создания пометок и комментариев. Чтобы быстро закомментировать выделенный фрагмент текста, нажмите Ctrl+K. <cost>50</cost> Цена. Цена продажи генерируется автоматически, она равна половине от цены покупки. <bp>8</bp> Видимо, это некая система градации по степени крутости предмета. Похоже, что в игре это нигде не применяется. <rarity>1</rarity> Группа редкости предмета. Предметы с редкостью 1 будут встречаться чаще всего, максимальная редкость 5 используется для самых редких предметов. Возможно, можно назначать и редкость выше пяти, но я не пробовал. Предметы с редкостью 0 вообще не будут встречаться в магазинах и случайных событиях, такие предметы можно получить только в качестве особой награды в событии. <stackable>true</stackable> Значение true позволяет иметь несколько таких предметов одновременно, false запрещает это делать. <value>0.15</value> Цифровое значение для этого улучшения. Не все улучшения имеют цифровые значения, но даже те, которые их имеют, не всегда зависят от этой строки. Например, ремонтный гель слизней имеет цифровое значение, но как бы вы его не меняли, скорость зарастания брешей не изменится. Добавлять новые активные или пассивные улучшения нельзя, однако вы можете добавить своё улучшение, которое в игре не будет ничего делать, но при этом можно будет проверять его наличие у игрока в событиях. Тем не менее, я не рекомендую злоупотреблять этим, добавляя такие улучшения, вы снижаете вероятность получения и использования стандартных улучшений. <!-- ХХХХХХХХХХХХХХХХХХХХХХХХХХХХХХХХХХХХХХХХХХХХХХХХХХХХХХХХХХХХХХХХХХХХХХХХХХХХХХХХХХХХХХХХХХХХХХХХХХ --> 2.2. Системы. Далее рассмотрим пример кода системы щитов. <systemBlueprint name="shields"> <type>shields</type> <title>Щиты</title> <desc>Снабжает энергией ваши щиты. Каждый дополнительный слой щита блокирует одно попадание.</desc> <startPower>2</startPower> <maxPower>8</maxPower> <rarity>1</rarity> <upgradeCost> <level>100</level> <!-- level 2 --> <level>20</level> <!-- level 3 --> <level>30</level> <!-- level 4 --> <level>40</level> <!-- level 5 --> <level>60</level> <!-- level 6 --> <level>80</level> <!-- level 7 --> <level>100</level> <!-- level 8 --> <level>120</level> <!-- Imaginary level 9 --> </upgradeCost> <cost>125</cost> </systemBlueprint> <systemBlueprint name="shields"> Первая строка содержит имя системы. Именно на имена ссылаются, когда хотят вызвать систему (или что-то другое) в коде события. <type>shields</type> Тип системы, используется для вызова всплывающей подсказки к этому элементу, а также, видимо, используется для взаимодействия с исполняемым файлом игры (хардкод). <title>Щиты</title> Название. <desc>Снабжает энергией ваши щиты. Каждый дополнительный слой щита блокирует одно попадание.</desc> Описание. <startPower>2</startPower> Уровень питания, с которым эта система покупается в магазине. <maxPower>8</maxPower> Максимальный возможный уровень прокачки системы. <rarity>1</rarity> Редкость. <upgradeCost> <level>100</level> <!-- level 2 --> <level>20</level> <!-- level 3 --> <level>30</level> <!-- level 4 --> <level>40</level> <!-- level 5 --> <level>60</level> <!-- level 6 --> <level>80</level> <!-- level 7 --> <level>100</level> <!-- level 8 --> <level>120</level> <!-- Imaginary level 9 --> </upgradeCost> Стоимость прокачки. Первая строка показывает цену прокачки на второй уровень, последняя строка в игре не используется, т.к. она отвечает за прокачку на 9 уровень, а максимальный возможный только 8. Зачем она нужна, я не знаю. <cost>125</cost> Цена системы в магазине. </systemBlueprint> Конец кода, закрытие строки. В некоторых системах используется строка <locked>1</locked>. Она означает, что после использования системы, она уходит на перезарядку. Топливо, ракеты и детали дронов имеют схожие теги параметров, их я рассматривать отдельно не буду. Про расы тоже добавить особо нечего, ни создать новую расу, не отредактировать какие-то характеристики существующих невозможно, только перерисовать их графику. Одна раса осталась недоделанной разработчиками, но её код доступен для включения в игру в виде мода. Речь идёт об аватарах, если кто не понял :) Соответствующий блюпринт называется <crewBlueprint name="ghost">. <!-- ХХХХХХХХХХХХХХХХХХХХХХХХХХХХХХХХХХХХХХХХХХХХХХХХХХХХХХХХХХХХХХХХХХХХХХХХХХХХХХХХХХХХХХХХХХХХХХХХХХ --> 2.3. Оружие. Пример: <weaponBlueprint name="LASER_HEAVY_1_SP"> <type>LASER</type> <title>Тяж. проникающий лазер</title> <short>Тяж. проник.</short> <tip>tip_laser</tip> <desc>Тяжёлые лазеры способны нанести больше ущерба, нежели их меньшие аналоги — импульсные лазеры. Данная модификация проникает сквозь 1 слой щита.</desc> <tooltip>Делает 1 выстрел, нанося 2 единицы повреждения с низкой вероятностью нарушить целостность корпуса или начать пожар. Проникает сквозь 1 слой щита. </tooltip> <damage>2</damage> <shots>1</shots> <sp>1</sp> <fireChance>3</fireChance> <breachChance>3</breachChance> <cooldown>10</cooldown> <power>2</power> <cost>50</cost> <bp>6</bp> <rarity>4</rarity> <image>laser_heavy1</image> <launchSounds> <sound>heavyLaser1</sound> <sound>heavyLaser2</sound> <sound>heavyLaser3</sound> </launchSounds> <hitShipSounds> <sound>hitHull1</sound> </hitShipSounds> <hitShieldSounds> <sound>hitShield1</sound> <sound>hitShield2</sound> <sound>hitShield3</sound> </hitShieldSounds> <missSounds> <sound>miss</sound> </missSounds> <weaponArt>laser_heavy_1</weaponArt> <iconImage>heavyL</iconImage> </weaponBlueprint> <weaponBlueprint name="LASER_HEAVY_1_SP"> Имя блюпринта оружия. Дальнейший порядок тегов не принципиален. <type>LASER</type> Его тип. Различают следующие типы оружия: LASER — лазеры, MISSILES — ракеты (не имеют принципиальных отличий от лазеров, любой лазер можно сделать ракетой), BEAM — лучи, BOMB — бомбы, BURST — осколочные снаряды. Иногда после этой строки пишут подтип оружия, например <flavorType>Тяжёлый лазерный снаряд</flavorType> такой код выведет во всплывающее окно после строки "Тип: Лазер" строку "Тяжёлый лазерный снаряд" <title>Тяж. проникающий лазер</title> Полное название оружия. Следите за тем, чтобы оно помещалось в окошке описания о 3. Корабли. <?xml version="1.0" encoding="utf-8"?> <!-- ГАЙД ПО МОДДИНГУ FTL --> <!-- Автор bamalf, специально для группы https://vk.com/ftl154 --> 3. Корабли. Все корабли в игре можно разделить на 3 типа: - Корабли под управлением игрока. 8 штук по три типа и ещё 2 по 2 типа. Итого 28. - Корабли противника. Этих в принципе может быть сколько угодно. - Корабли босса. Их целых 3 штуки для каждой фазы, и ещё по 3 для каждого уровня сложности. Итого 9. 3.1. Начну с самых распространённых — кораблей противников. Они в основном записаны в файле autoBlueprints.xml.rawclobber. Итак, возьмём пример типичного корабля противника: <shipBlueprint name="CIRCLE_SCOUT" layout="circle_scout" img="circle_scout"> <class>Разведчик инжи</class> <maxSector>7</maxSector> <systemList> <pilot power="1"max="3" room="5"/> <doors power="1" max="3" room="2" start="false"/> <medbay power="1" max="3" room="6" start="false"/> <oxygen power="1" max="3" room="3"/> <shields power="2" max="8" room="1"/> <engines power="1" max="5" room="7"/> <weapons power="2" max="8" room="4"/> <drones power="2" max="8" room="0"/> </systemList> <weaponList missiles="6" load="WEAPONS_CIRCLE"/> <droneList drones="4" load="DRONES_DEFENSE"/> <health amount="7"/> <maxPower amount ="8"/> <crewCount amount = "2" max="5" class="engi"/><!--CHANGED was 2 3--> <boardingAI>sabotage</boardingAI> <aug name="NANO_MEDBAY"/> <cloakImage>circle_scout</cloakImage> </shipBlueprint> <shipBlueprint name="CIRCLE_SCOUT" layout="circle_scout" img="circle_scout"> Первая строка описывает имя блюпринта, layout отвечает за планировку отсеков, а img за изображение корпуса. Можно создать корабль с тем же самым корпусом, но отличной планировкой, это будет выглядеть, например, так: <shipBlueprint name="CIRCLE_SCOUT_2" layout="circle_scout_2" img="circle_scout"> <class>Разведчик инжи</class> Это имя корабля, которое будет написано в окошке врага вверху справа. <maxSector>7</maxSector> (есть аналогичный параметр <minSector>2</minSector>) указывает, в каком максимальном по счёту номере сектора может появиться этот корабль, если корабль вызывается из списка. Например, мы находимся в 5-м секторе, и у нас есть список из двух кораблей. В первом корабле максимальный сектор не ограничен, а во втором есть строка <maxSector>3</maxSector>. Таким образом, второй корабль из списка не может выбраться, а значит нам выпадет первый корабль. Если этого тега нет в коде корабля, на него не накладываются ограничения по номеру сектора. <systemList> <pilot power="1"max="3" room="5"/> <doors power="1" max="3" room="2" start="false"/> <medbay power="1" max="3" room="6" start="false"/> <oxygen power="1" max="3" room="3"/> <shields power="2" max="8" room="1"/> <engines power="1" max="5" room="7"/> <weapons power="2" max="8" room="4"/> <drones power="2" max="8" room="0"/> </systemList> Здесь перечислены все возможные системы на этом корабле. Параметр power определяет минимальное значение для этой системы. Минимальные значения встречаются в начальных секторах игры, и плавно возрастают до значений max ближе к концу игры. Параметр start="false" означает, что данной системы может не быть в начальных секторах. А может и будет, на всё воля рандома :) При отсутствии этого параметра, или же при start="true" система всегда будет присутствовать на корабле. Параметр room показывает, в каком отсеке будет находиться данная система. О планировках и расположении отсеков и дверей я расскажу позднее. <weaponList missiles="6" load="WEAPONS_CIRCLE"/> Параметр missiles задаёт количество ракет на борту, а load загружает список орудий для этого корабля. При этом рандом набирает необходимое количество стволов из этого списка, в зависимости от прокачки орудийной системы. Дополнительно можно прописать конкретное число орудий, которое будет на этом корабле, например три: <weaponList missiles="8" count="3" load="WEAPONS_AUTO"/>. Если хотите ограничить максимум слотов для оружия, добавляйте строку типа <weaponSlots>3</weaponSlots>, здесь стоит ограничение на 3 слота. <droneList drones="4" load="DRONES_DEFENSE"/> Аналогично для дронов, где drones — число деталей дронов. Ограничение по слотам задаётся так: <droneSlots>3</droneSlots> <health amount="7"/> Количество здоровья корпуса корабля. <maxPower amount ="8"/> Максимальный размер реактора. Бесполезный параметр, т.к. игра всегда делает реактор таким, чтобы все системы были запитаны по максимуму. Не знаю, для чего он нужен. <crewCount amount = "2" max="5" class="engi"/> Число экипижа минимум/максимум и раса. Для беспилотников эта строка выглядит так: <crewCount amount = "0" max="0" class="human"/>. <boardingAI>sabotage</boardingAI> Тип поведения ИИ при абордаже. Существует 2 типа поведения — sabotage и invasion. Первый — обычное поведение противника, враги атакуют до тех пор, пока у них достаточно здоровья. При втором типе поведения каждый персонаж нападает не более одного раза, этот тип поведения используется на третьей фазе битвы с боссом. <aug name="NANO_MEDBAY"/> Тут мы можем вставить до трёх улучшений на вражеский корабль, каждое пишем с новой строки. Надо иметь в виду, что не все улучшения враг может использовать. Например, предзажигатель орудий он не умеет применять. <cloakImage>circle_scout</cloakImage> Изображение корабля при включённой маскировке. К названию файла изображения нужно приписать префикс _cloak, например anaerobic_cruiser_cloak.png. Если корабль не использует маскировку, это изображение можно не рисовать. Рассмотрим подробнее планировку отсеков. За планировку отвечает параметр layout="circle_scout" в первой строке блюпринта корабля. В папке data должны находиться 2 файла с таким именем (circle_scout), один с расширением xml, а другой с txt. Так как этот корабль в моде остаётся без изменений (ну почти), рассмотрим планировку circle_scout_2. <img x="-42" y="-47" w="300" h="282"/> Здесь указываются координаты смещения изображения корпуса корабля относительно некоторой точки с нулевыми координатами. Игра автоматически размещает корабль так, чтобы его отсеки были в центре окошка, поэтому следите за тем, чтобы отсеки находились в центре корпуса, иначе в одну сторону корпус будет ближе к краю окошка. Далее идут размеры изображения по высоте и ширине. <offsets> <floor x="0" y="0" /> <cloak x="19" y="15" /> </offsets> Здесь пишутся координаты смещения графики полов (если они есть) и маскировки (аналогично). Для вражеских кораблей полы обычно не создаются, а маскировка есть не у всех кораблей. <weaponMounts> <mount x="32" y="70" rotate="false" mirror="true" gib="1" slide="left" /> <mount x="226" y="70" rotate="false" mirror="false" gib="2" slide="right" /> <mount x="135" y="32" rotate="false" mirror="false" gib="1" slide="up" /> <mount x="268" y="160" rotate="false" mirror="false" gib="4" slide="right" /> </weaponMounts> Здесь находятся координаты орудийных стволов, они могут быть повёрнуты (rotate="true"), отзеркалены (mirror="true"), прикреплены к определённому обломку корабля, вместе с которым ствол будет перемещаться при его взрыве (gib="1"), а также задаётся направление, в какую сторону ствол выезжает при включении орудия (slide="left"). Если выдвижение оружия не нужно, ставьте параметр slide="no" Последний блок отвечает за взрыв и разлёт осколков. <explosion> <gib1> <velocity min="0.10" max="1.00" /> <direction min="20" max="160" /> <angular min="-1.00" max="1.00" /> <x>0</x> <y>0</y> </gib1> <gib2> <velocity min="0.10" max="0.30" /> <direction min="280" max="350" /> <angular min="-1.00" max="1.00" /> <x>74</x> <y>0</y> </gib2> <gib3> <velocity min="0.40" max="1.00" /> <direction min="190" max="260" /> <angular min="-0.40" max="1.00" /> <x>11</x> <y>92</y> </gib3> <gib4> <velocity min="0.10" max="0.60" /> <direction min="-40" max="40" /> <angular min="-0.50" max="0.50" /> <x>123</x> <y>104</y> </gib4> <gib5> <velocity min="1.00" max="3.00" /> <direction min="-180" max="180" /> <angular min="-1.00" max="1.00" /> <x>90</x> 4. Списки и события. <?xml version="1.0" encoding="utf-8"?> <!-- ГАЙД ПО МОДДИНГУ FTL --> <!-- Автор bamalf, специально для группы https://vk.com/ftl154 --> 4. Списки и события. 4.1. Списки. Любые однотипные объекты в игре могут объединяться в списки. Если какое-то событие ссылается на такой список, игра случайно выбирает один из элементов списка. Например, нам нужно вызвать случайный пиратский корабль золтанцев, список таких кораблей выглядит так: <blueprintList name="OVERRIDE_SHIPS_ZOLTAN_PIRATE"> <name>ZOLTAN_FIGHTER_P</name> <name>ZOLTAN_BOMBER_P</name> <name>ZOLTAN_FIGHTER_P_DLC</name> <name>ZOLTAN_BOMBER_P_DLC</name> </blueprintList> Ссылаясь на имя блюпринта SHIPS_ZOLTAN_PIRATE (Префикс OVERRIDE_ игнорируется, т.к. он обозначает включённый режим АЕ), мы получим один из этих 4-х кораблей. В списки помимо кораблей могут объединяться оружие, дроны, улучшения, расы, а также события и тексты событий. Создавая новое оружие или корабль, не забывайте добавлять их в списки, чтобы игра могла их случайно выбирать среди других орудий или кораблей. Например, вы создали оружие, похожее на тяжёлый лазер. С помощью поиска сначала найдём сам тяжёлый лазер, его блюпринт называется <weaponBlueprint name="LASER_HEAVY_1">. Затем опять же поиском ищем все списки, в которые входит тяжёлый лазер LASER_HEAVY_1. Включайте галочки "только целые слова" и "учитывать регистр", чтобы отсеивать лишние результаты. Вы найдёте блюпринт тяжёлого лазера в нескольких списках, причём даже в разных файлах. Теперь после каждого тяжёлого лазера вставьте строку с именем блюпринта вашего нового орудия, таким образом вы добавите его в каждый список, где уже есть тяжёлый лазер. <blueprintList name="WEAPONS_LASER"> ... <name>LASER_HEAVY_1</name> <name>LASER_SUPER_HEAVY_1</name> <name>LASER_HEAVY_2</name> ... </blueprintList> <!-- ХХХХХХХХХХХХХХХХХХХХХХХХХХХХХХХХХХХХХХХХХХХХХХХХХХХХХХХХХХХХХХХХХХХХХХХХХХХХХХХХХХХХХХХХХХХХХХХХХХ --> 4.2 События. Возьмём для примера событие с гигантскими пауками: <event name="DISTRESS_INFESTATION" unique="true"> <text>Вы обнаружили несколько небольших кораблей, спасающихся со станции. Вы приветствуете их и интересуетесь, что случилось. «Помогите! На нас напали какие-то огромные инопланетные пауки!» — отвечают они.</text> <distressBeacon/> <choice hidden="true"> <text>Отправить экипаж на помощь! Гигантские инопланетные пауки — это не шутки!</text> <event load="DISTRESS_INFESTATION_LIST"/> </choice> <choice hidden="true"> <text>Оставить их в покое.</text> <event> <text>Вы не можете рисковать, сражаясь с неизвестными пришельцами на каждой захудалой станции, которая вам попадается. Вы готовитесь к прыжку.</text> </event> </choice> <choice hidden="true" req="DRONES_BATTLE"> <text>(Противопехотный дрон) Послать вашего боевого дрона на помощь.</text> <event> <text>Вы разворачиваетесь в сторону станции и выпускаете через воздушный шлюз дрона. Очень быстро большая часть мерзких существ была перебита, с минимумом потерь. Хозяева кораблей выражают свою искреннюю благодарность.</text> <autoReward level="MED">stuff</autoReward> <item_modify> <item type="drones" min="-1" max="-1"/> </item_modify> </event> </choice> <choice hidden="true" req="DRONES_BOARDER"> <text>(Абордажный дрон) Отправить дрона на станцию.</text> <event> <text>Вы запускаете дрона, и он пробивает их корпус, оставляя огромную дыру. Вы наблюдаете, как дрон прорывается сквозь чудовищ, а обломки и трупы вылетают через дыру. Владельцы станции не очень восторженны, когда благодарят вас и предлагают только скудное вознаграждение. Наверное, самое время уходить...</text> <autoReward level="LOW">standard</autoReward> <item_modify> <item type="drones" min="-1" max="-1"/> </item_modify> </event> </choice> <choice hidden="true" req="BEAMS_BIO"> <text>(Анти-био луч) Использовать луч, чтобы перебить пауков.</text> <event> <text>Вы дали им указания опустить щиты, и вам удалось убить чудовищ, не повреждая станцию. «Мы наблюдали, как монстры воспламенялись. Какое ужасное оружие... Вот, возьми это за помощь, друг».</text> <autoReward level="HIGH">stuff</autoReward> </event> </choice> </event> <eventList name="DISTRESS_INFESTATION_LIST"> <event> <text>Ваш экипаж высадился на станцию, осторожно передвигаясь между коридорами. Внезапно из системы вентиляции вырывается паукообразное насекомое размером с человека, а за ним следует множество других. Вы с боем прорываетесь к шлюзу и вынуждены покинуть станцию, не дожидаясь всех членов экипажа. Кому-то не удалось вернуться.</text> <removeCrew> <clone>true</clone> <text>Вы с надеждой идёте в клон-отсек, и, к вашему облегчению, клон потерянного члена экипажа уже готов.</text> </removeCrew> </event> <event> <text>Ваша команда осторожно подкрадывается сзади к скоплению существ. Неожиданно гигантские арахниды разворачиваются и атакуют. Впрочем, ваша команда сохранила самообладание и без промедления откинула тварей назад.</text> <choice hidden="true"> <text>Связаться с владельцами станции.</text> <event> <text>Они в восторге от вашего успеха и предлагают вам награду.</text> <autoReward level="HIGH">stuff</autoReward> </event> </choice> </event> </eventList> Обратите внимание на форматирование кода. Каждый новый тег сдвигается табуляцией на одну строку вправо, за исключением тегов, идущих за тегом <text>, такие теги пишутся на одном уровне: <text>Они в восторге от вашего успеха и предлагают вам награду.</text> <autoReward level="HIGH">stuff</autoReward> Закрывающий тег ставится с таким же отступом, что и открывающий: <event> <text>Они в восторге от вашего успеха и предлагают вам награду.</text> <autoReward level="HIGH">stuff</autoReward> </event> Я очень рекомендую придерживаться такого стиля форматирования, он очень облегчает чтение кода. Итак, разберём первую строку. <event name="DISTRESS_INFESTATION" unique="true"> Каждое событие в игре должно иметь уникальное имя. После имени может указываться параметр уникальности unique="true", он означает, что в текущем секторе не может появиться второе такое же событие (но оно всё ещё может встретиться в последующих секторах). Большинство событий в игре имеют параметр unique="true". Если этот параметр не задан или задан unique="false", игра может выдать то же самое событие в текущем секторе снова. А может и не выдать. На второй строке видим описание события в текстовом теге. Далее на этом же уровне отступа следует короткий тег без параметров <distressBeacon/>. Запомните, все такие короткие теги без параметров закрываются слэшем справа, в отличии от сложных тегов, состоящих из двух частей! Этот тег означает метку сигнала бедствия, которая отображается на карте маяков при прыжке. Существуют следующие виды меток: <distressBeacon/> — сигнал бедствия <store/> — магазин <repair/> — ремонт Неважно в какой последовательности идёт метка, до или после описания события в тегах <text>, но я предпочитаю написать сначала все метки, а уже потом вставлять описание события. <!-- Что ещё может быть в начале события, кроме метки и его описания? Конкретно в этом событии с пауками больше ничего нет, но есть ещё варианты: --> Событие может иметь уникальный фон и планету на заднем плане. Если ничего не прописано, то по умолчанию загружается <img back="BACKGROUND" planet="PLANET"/>, то есть событие с пауками на самом деле выглядит так: <event name="DISTRESS_INFESTATION" unique="true"> <img back="BACKGROUND" planet="PLANET"/> <distressBeacon/> <text>...</text> ... </event> Списки фонов и планет находятся в events_imageList.xml.rawclobber. Часто в событие нужно вставить обитаемую планету, в этом случае вам подойдёт такой список планет: <imageList name="PLANET_POPULATED"> Если нужно вставить только фон, без планеты, код будет выглядеть так: <event name="DISTRESS_INFESTATION" unique="true"> <img back="BACKGROUND" planet="NONE"/> Если нужно вставить конкретный фон или конкретную планету, Скачать этот гайд в xml-файлах Ссылки на xml-файлы с этим гайдом: 1 раздел[www.dropbox.com] 2 раздел[www.dropbox.com] 3 раздел[www.dropbox.com] 4 раздел[www.dropbox.com]


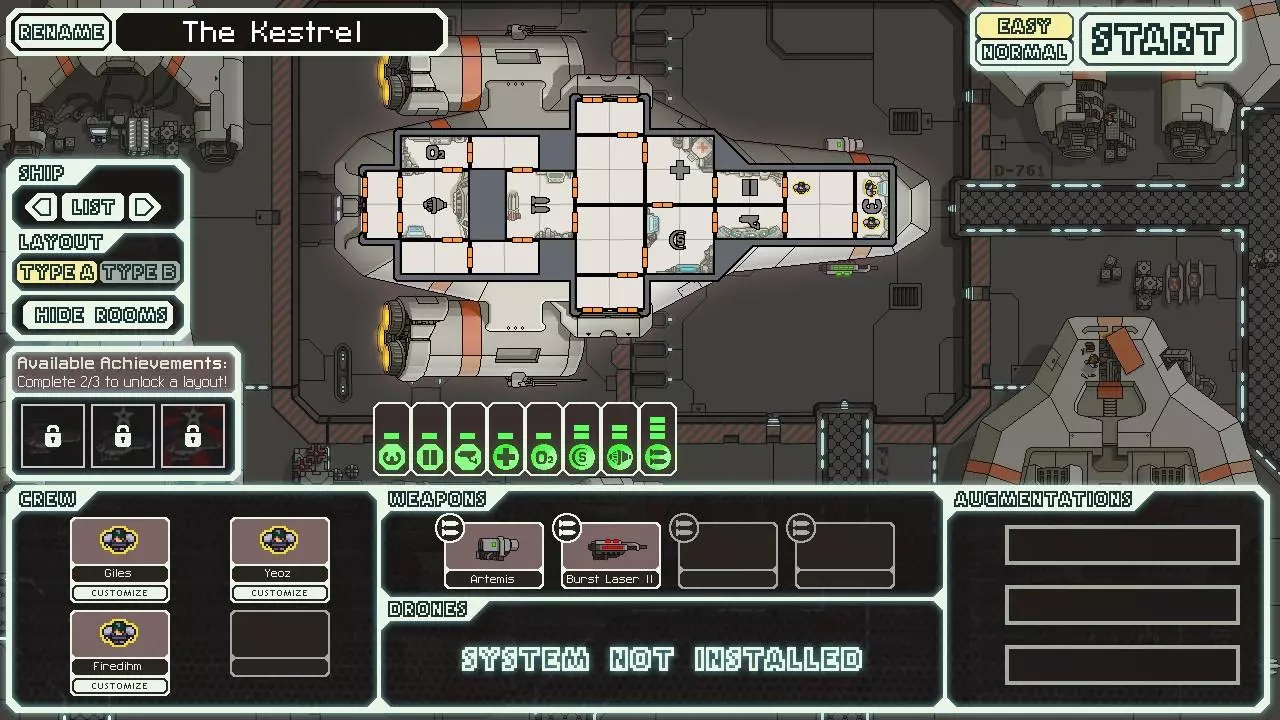


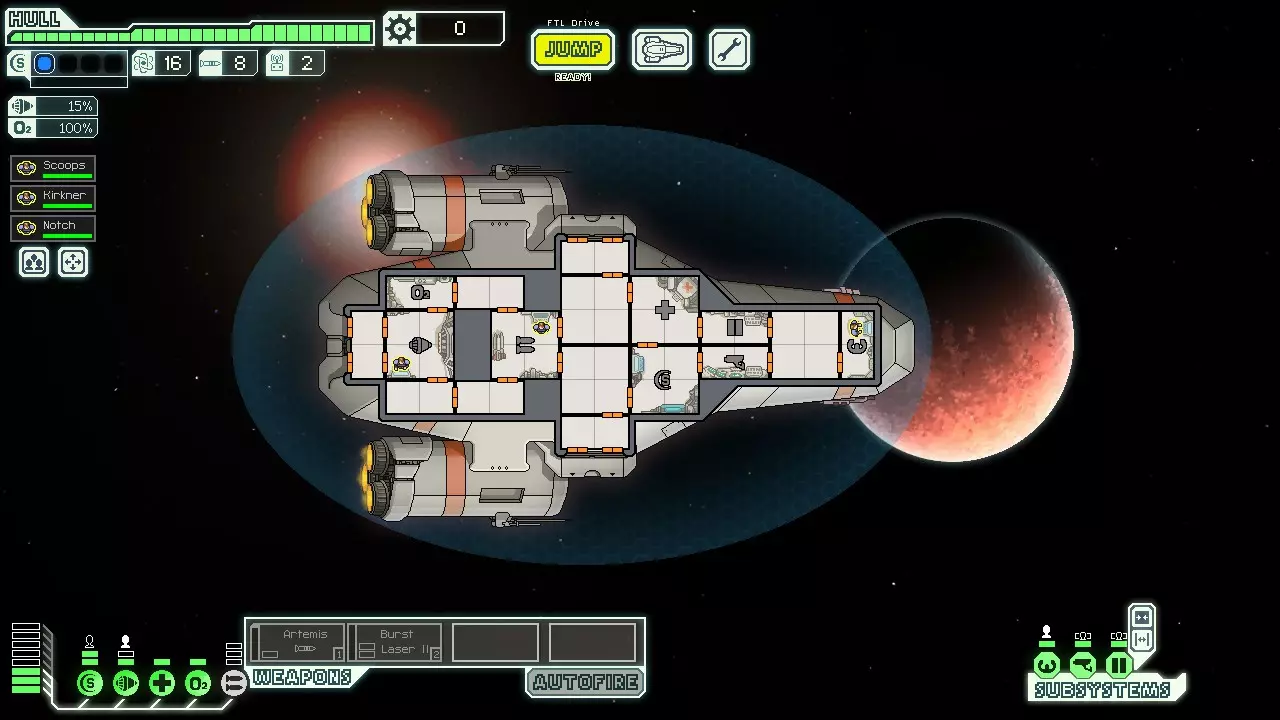

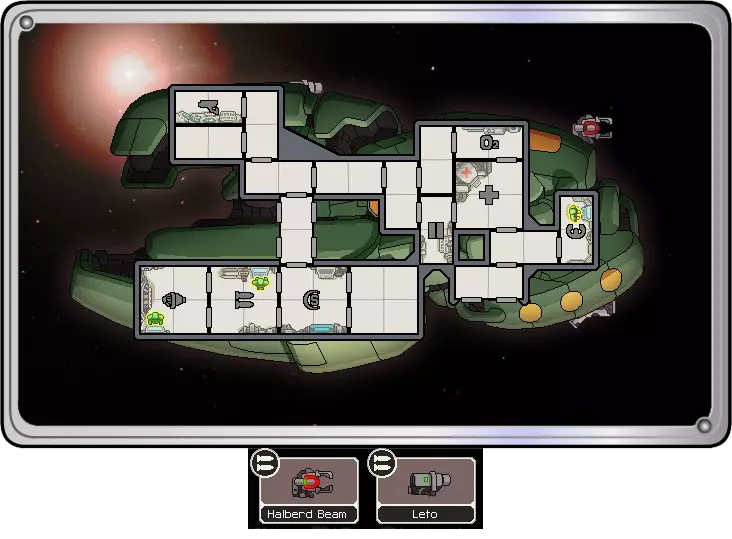

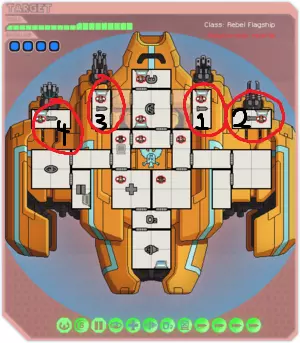

This guide aims to give advice on unlocking each and every ship, and all ship achievements. Intro Welcome to my guide! As the title and description suggest, the goal of this guide is to help you unlock any ship and layout you want! Although I can give you tips on how to unlock them, you still need to put in the effort to perform the tasks in game, and trust me, it is MUCH more rewarding to unlock all the ships legitimately instead of using a save game editor. Each section of this guide is dedicated to one ship. The section will walk you through the unlock quest for the ship (aside from the Kestrel, obviously) and how to get each achievement for the ship. In case you are unaware, each ship in FTL has three layouts (aside from the crystal and lanius ships, which have two) named layout A, layout B, and layout C. Layout A is unlocked through the ships quest, or by beating the game with the previous ship. Layout B is unlocked by obtaining 2 of the 3 achievements available for each ship. Finally, layout C is unlocked by getting to the 8th sector with layout B, and requires that you have Advanced Edition enabled. But enough about the theory, you just want to unlock that awesome ship! Onward! Kestrel Cruiser Unlock Quest Walkthrough: The kestrel cruiser layout A is immediately unlocked upon starting up FTL for the first time. Required Aspects: Purchase FTL: Faster Than Light Suggested Aspects: Don't pirate it :p Achievement Walkthrough: 1: The United Federation - Have six unique aliens on the Kestrel Cruiser simultaneously. Including the humans already present on the ship, have 6 different races on the ship. Five of the seven other races (all but lanius and crystal) are commonly available in stores or through random events. Having a versatile crew is beneficial, so this achievement should be unlocked through normal play without much effort. If you actively want to get this achievement, save up your scrap, and visit stores often to see if they have any aliens you don't already have as crew. Slaver events also work well for this achievement, because if you kill the enemy crew of a slaver ship there is a chance you will get your choice of three different races. 2: Full Arsenal - Have every system and subsystem installed on the Kestrel Cruiser at one time. The description is slightly misleading. With advanced edition enabled it is impossible for the cruiser to have every single system installed at once, but the achievement can still be unlocked by having the maximum amount of systems installed. To unlock this achievement, you must purchase the backup battery, and three of the following systems; drone control, cloaking, crew teleporter, hacking (AE), and mind control (AE). 3: Tough Little Ship - As the Kestrel Cruiser, repair back to full health when it only has 1 HP remaining. This achievement mainly is unlocked by chance, as it is hard to escape a fight and find a store with only 1 hull point remaining. To easily unlock this achievement, look for a ship in an early sector that only has a single 1-damage weapon. Disable your shields and let the ship attack you until you have one HP left, then jump away or destroy the ship. Another strategy is to go to an asteroid field, and disable the shields after the fight (if there is one). Keep crew members in the shield room to repair any damage, and once you have one health bar left, quickly jump out. Engi Cruiser Unlock Quest Walkthrough: The engi cruiser is unlocked immediately upon reaching sector 5. Required Aspects: None Suggested Aspects: None Achievement Walkthrough: 1: Robotic Warfare - With the Engi Cruiser, have 3 drones functioning at the same time. The engi cruiser immediately comes with a drone control system and one drone, and acquiring additional drones is quite easy, as they are found commonly in stores and through random events. However, you need all three drones online at the same times, so you will need to upgrade your drone control system and possibly your reactor to give enough power to each drone. 2: I hardly lifted a finger - With the Engi Cruiser, destroy an enemy ship using only drones. This achievement requires you to destroy a ship with only drones, meaning you can't use any weapons, even ion weapons. However, things like asteroids and fire will not invalidate the achievement. This achievement is very easily unlocked on the unshielded auto-scouts in the first few sectors, as the combat drone that comes with the default engi cruiser can easily dispatch it. 3: The guns... They've stopped - Have 4 enemy systems or subsystems ioned at the same time while using the Engi Cruiser. This achievement can be difficult to unlock, as systems don't stay ionized long enough to have several ioned at once. This achievement can be unlocked by having an enemy ships systems be ionized in a pulsar hazard, making it easy to then ionize another system to gain the achievement. Federation Cruiser Unlock Quest Walkthrough: The Federation Cruiser can be unlocked through a random even in a rebel stronghold sector. When you get to the beacon, it will give you the following event text: You arrive at the beacon to find yourself in a huge Rebel shipyard, scaffolding and construction drones filling the sector! The entire system looks devoted to ship construction, the nearby planets and moons ruthlessly mined to harvest resources for a ship of immense size... You will then be given two options, investigate or leave. Obviously if you want to unlock the ship you should choose the former option. After looking around you will be forced to fight a re-vamped third stage rebel flagship. However, unlike the rebel flagship, killing all the crew will count as defeating it, opening up more options for victory. Required Aspects: None Suggested Aspects: Good defensive aspects to survive the triple-shot lasers and missiles. Boarding also works well here as the weapons rooms are attached to the main ship, meaning a single teleport can give you access to the entire ship. Achievement Walkthrough: 1: Master of Patience - Use only the Artillery Beam to destroy an enemy ship while taking no hull damage. The artillery beam is very powerful, but only does one damage per room, meaning it will take multiple shots for most ships. This is easily unlocked against the low health auto-scouts that appear in the first few sectors. Having a second layer of shields and a defense drone will help against lasers and missiles, respectively. 2: Diplomatic Immunity - While using the Federation Cruiser, use your crew in four special blue events by sector 5. This achievement is rather vague and misleading. This achievement requires you to use four blue events that are caused by your crew, meaning augments, systems, etc.. won't count towards this achievement. Also, the end point is not at sector 5, but rather at the start of sector 6. This achievement requires a high amount of chance, but you can help by diversifying your crew. 3: Artillery Mastery - Get to sector 5 with the Federation Cruiser without upgrading your weapons system. By themselves the burst laser and artillery beam are far from WMDs, but it isn't very difficult to make your way to sector five without gaining new weapons. Note that you CAN upgrade the artillery beam, but not the weapon systems to unlock this achievement. The first few sectors are relatively easy, and it is quite possible to get to sector 5 with less than 10 battles. Having additional systems, like hacking, cloaking, and drones, can help make up for your lack of firepower. Zoltan Cruiser Unlock Quest Walkthrough: The zoltan cruiser is unlocked through a random event in the zoltan homeworlds sector. Note that the zoltan homeworlds sector can only occur at sector three or later. The event will have the following flavour text: An unarmed Zoltan transport vessel is slowly making its way toward the beacon here. They hail: "This is a Zoltan peace envoy. We carry no weapons or shielding and rely on the mercy of others to communicate our message." To unlock the ship, choose the second option, which lets you hear them out. They will give you coordinates to a quest beacon in the sector, or if you are already close to the end of the sector, in the next sector. At the quest beacon, you are given several dialouge options. To unlock the ship, choose the second, first, and then the second option, hailing the enemy, telling them that you might be able to come to an agreement, and then stating true progress can only be achieved without bloodshed. Required Aspects: None Suggested Aspects: None Achievement Walkthrough: 1: Shields Holding - Destroy a ship before it gets through the Zoltan Shield. Quickly taking out the weapon system on an early game ship can make it relatively easy to unlock this achievement. Note that the shield only has 5 points and that it is damaged by all types of attacks, laser, beam, ion, and missile. 2: Givin' her all she's got, Captain! - With the Zoltan Cruiser, have 29 power in systems at the same time. The ship can have at most 25 reactor points at the same time, meaning you will need at least four zoltan for this achievement. Note that the power points have to be in actual systems (subsystems dont count, so if you only have 4 zoltan you will need another race for the pilot), so you will need to upgrade your systems to have a place to put the power in. The backup battery also helps with this achievement. 3: Manpower - Get to sector 5 without upgrading your reactor in the Zoltan Cruiser. Getting new systems means requiring more power, so it can be rather unusual to get to sector five without upgrading the reactor. However, avoiding confrontations when possible, and managing power effectively (powering off medbay when not in use, etc...) can make the achievement rather easy to get. Mantis Cruiser Unlock Quest Walkthrough: This ship can be unlocked in a random event in a mantis homeworlds sector, which only occurs once per game. If you have long-rang scanners, it will be a beacon with a ship detected. The event text will read: You cross paths with a Mantis ship that looks to have had dozens of layers of armor-plating added over what must have been a hundred year career. Its captain is legendary thief KazaaakplethKilik. Your crew looks frightened. To get the ship, you must have a crew teleporter and an at least level 2 medbay or cloning bay. Kill the crew of the ship (destroying it prevents you from getting it), and then choose the blue options to unlock the mantis ship. Required Aspects: Level 2 medbay or cloning bay, crew teleporter Suggested Aspects: Good boarding crew or anti-bio beam Achievement Walkthrough: 1: Take no prisoners! - Kill the crew of 20 ships by sector 6 in the Mantis Cruiser. The mantis ship is built around boarding, so this achievement should be unlocked naturally. To increase your chances of getting it, explore the sectors more, to find additional ships to fight. 2: Avast, ye scurvy dogs! - Kill 5 enemy crew in a fight without taking hull damage or losing a crew member while using the Mantis Cruiser. To gain this achievement you almost require good defensive aspects, as taking no hull damage with basic shields is nearly impossible with a boarding oriented ship. Any defensive systems like cloaking, drones, and additional shield layers will help greatly with gaining this achievement. Since it requires you to kill five crew, this achievement can't be unlocked in early sectors which mainly have crews of 2-4. 3: Battle Royale - While using the Mantis Cruiser, kill the last enemy with your last crew member on their ship. This is one achievement a player would hope never to get while playing normally. To actively get this achievement, send in your entire crew, and when the enemies are down to their last crew member, kill all but one of your crew. To accomplish this you could teleport your crew back and suffocate them, or kill them with a bomb. Once you have one crew member left, send them in to attack their final crew member. Slug Cruiser Unlock Quest Walkthrough: This ship can be unlocked after causing a random enemy slug cruiser in the slug homeworlds to surrender. If it is a correct encounter, the enemy will say: "You have besssted us! Will you accept what is in our storeesss in exchange for our livess?" Most of the time they will give you resources, but if you're lucky, they will offer you a weapon. Instead of taking the weapon (which is an anti-bio beam), ask for information. They will give you coordinates to a quest marker. If you are too close to the beacon when this happens, your quest marker will instead appear in the next sector you go to. At the quest marker, you will find a ship platform with escorts. Choose to tail them without being noticed, and then choose one of two blue options, that require either a slug crew member or level 2 sensors. You will then fight a slug interceptor, and if you win the fight, you will unlock the slug ship. Required Aspects: Level 2 sensors or slug crew member Suggested Aspects: Long-range scanners to find ships Achievement Walkthrough: 1: We're in position! - While using the Slug Cruiser, have vision of every room on the enemy ship without functioning sensors. Slugs reveal all rooms adjacent to the one they are in, so to easily unlock this achievement, teleport your slug crew onto an enemy ship and position them so every room if visible. A hacking system will help if there is one room you can't see. 2: Home Sweet Home - Jump to 30 nebula locations before sector 8. Choose nebula sectors and spend a lot of time exploring them, and this achievement should be a cakewalk. 3: Disintegration Ray - While using the Slug Cruiser, kill 3 enemy crew members with one shot from the Anti-Bio Beam. The anti-bio beam will kill most races in 2 shots, so if the enemy crew is positioned well two well-placed beam shots should do the trick. Causing crew to go to one location (by creating fires, breaches, and system breaks) will make the achievement easier to get. You can also use normal weapons to damage the crew, but make sure to kill them all with the anti-bio beam. Rock Cruiser Unlock Quest Walkthrough: This ship can be unlocked in a random event in the rock homeworlds sector, which only occurs once per game after sector 3. Long-range scanners will detect a ship present. The event text will be as follows: You are immediately messaged by an imposing looking Rock war vessel, "You're the ship off to 'save the Federation,' aren't you? And you expect to survive with that hunk of junk?" Choose either the first or second option and the rock ship will jump away, leaving a quest marker for you. At the quest marker you will face the rock ship at a red giant star. To get the ship the enemy has to jump away. Don't think that you can't attack it, though. Shooting down its weapon system will make the fight easier, but be sure not to destroy the ship. After they jump away, they will leave you another quest marker, where you will unlock the rock cruiser. Required Aspects: None Suggested Aspects: Fire suppression Achievement Walkthrough: 1: Is it warm in here? - Have your crew kill a burning enemy on their ship while using the Rock Cruiser. This requires you to have a crew teleporter. The missiles the ship comes with have a chance at causing fires, but getting a fire weaponis much more reliable. This achievement is annoying to get, as enemy crew tend to leave rooms that are on fire when they are low on health, requiring you to either lock them in or light up the whole ship. However, enemy rock crew will NOT leave rooms on fire because they are immune to it, and this still allows you to get the achievement. 2: Defense Drones Don't Do D'anything! - While using the Rock Cruiser, destroy an enemy ship which has a defense drone deployed using only missiles. Despite the defense drones ability to shoot down missiles, firing missiles in quick succession will allow one or two missilesto get through. Since this is the case, aim immediately for the drone control room. 3: Ancestry - Find the secret sector with the Rock Cruiser. This requires you to get to the crystal sector with the rock cruiser. For more information, look at the crystal cruiser section of this guide. Stealth Cruiser Unlock Quest Walkthrough: This shipis unlocked at a random encounter in the engi homeworlds. The event text will be as follows: You arrive near a small fleet of civilian Engi ships. A simple decryption and translation of their comm frequency tells you that they are having a frantic discussion about something obviously troubling them. You must have an engi crew member, and choose the blue text for them. You will then gain two quest markers. One of them holds the real ship, while the other is fake. There is no way to tell which is real until you get to the beacon. If it's the real ship, the flavour text will have a " at the end of it. If you find the fake ship first, you will still be able to get to the real ship. After destroying the ship you will gain a final quest marker which will require you to fight a mantis ship manned by rebels. After some dialogue you will unlock the stealth cruiser. Required Aspects: Engi crewmember Suggested Aspects: None Achievement Walkthrough: 1: Bird of Prey - Destroy a ship at full health during a single cloak in the Stealth Cruiser. This achievement almost certainly requires the stealth weapons augmentation, as the cloak will run out before the volley finishes. To get the this achievement, the ship must be cloaked from the times the first weapon fires until the end-battle text pops up. A level 2 cloaking system will help, and additional weapons are almost necessary, as the starting weapons are only able to kill the no shield auto-scouts in the first few sectors. 2: Phase Shift - In the Stealth Cruiser, avoid 9 points of damage during a single cloak. This achievement almost certainly needs to be unlocked in an asteroid field, where projectiles will attack you even when cloaked. For best results cloak right after the enemy fires all it's weapons, and hope for the best. 3: Tactical Approach - In the Stealth Cruiser, get to sector 8 without jumping to a beacon with an environmental danger. This achievement doesn't require much strategy, and avoiding environmental danger is already a good idea, so this achievement should be unlocked naturally. Lanius Cruiser Unlock Quest Walkthrough: Unlocking four ships in addition to the kestrel will unlock the lanius ship. Required Aspects: None Suggested Aspects: None Achievement Walkthrough: 1: Advanced Mastery - Have Hacking, Mind Control and the Battery active at once. This achievement is simply unlocked by purchasing the required systems (the ship already comes with hacking) and activating them all simultaneously. 2: Scrap Hoarder - Have at least 600 scrap in your ship storage. Gaining this much scrap without ever buying anything or upgrading is difficult, but by exploring each sector to a good extent should net you with plenty of scrap. 3: Loss of Cabin Pressure - Get to sector 8 without your ship's net oxygen levels exceeding 20 percent (starts after the first jump). Open up the airlocks and doors to all but a few rooms to allow the ship to drain of oxygen. Doing so means that you will probably have to cram all non-lanius crew into a few rooms, but it shouldn't be too much of a crutch. Also be wary of enemy hacking devices, as when they lockdown rooms it allows them to fill with oxygen. In this scenario you should turn off the oxygen until the fight is over. Crystal Cruiser Unlock Quest Walkthrough: Oh boy, here we go. The infamous crystal cruiser quest line. I would say you would have better chances of winning the lottery, but that is an understatement. This quest line will make you rip your hair out more than ever. If you aren't convinced enough, try throwing a dime into a cup 5 feet away. While blindfolded. On a moving truck. With your hands bound. And the cup is upside down. That would probably be easier than unlocking this luck-based ship! [/rant] All kidding aside, this ship is actually pretty luck-dependant to unlock, but I will do my best to guide you through it. First, you need to find the dense asteroid field event, which happens in engi, rock, or pirate sectors at a distress beacon. The flavour text will read: A ship without life forms within a nearby dense asteroid field is giving off the distress call. Shall we investigate? It could be dangerous. Choose to search for the ship, or, if you have the armour plating, choose the blue text to guarantee finding the ship. Otherwise, test your luck and hope you find the remains of the crystal ship. If you find it, you will have the choice between grabbing the weapon or stasis pod. Grab the stasis pod. You will then need to travel to either a zoltan or engi sector and find the zoltan research station. Luckily this event is quite common, so you should have no trouble finding it. Once you find it, you will be given a blue option to revive the alien in the stasis pod. Once chosen, you will gain a crystal crew member. Now, you must travel to the rock homeworlds, so if you already passed it, or you are in sector seven, you will have to restart. If the planets align and you can make it to the rock homeworlds, you will be given a quest beacon in which choosing the blue text will take you to the crystal sector and there unlock the crystal cruiser! NOTE: With the rock cruiser type C it will allow you to bypass the first two parts of the quest. Required Aspects: LOTS OF LUCK Suggested Aspects: Rock armour plating Achievement Walkthrough: 1: Sweet Revenge - Destroy an enemy ship with a shard from the Crystal Vengance augment. To easily earn this achievement, find a weak ship with a low-damage weapon. Attack it until it only has one HP remaining, and turn off your shields to allow it to get more damage in. Hopefully, a piece will eventually break off and destroy the enemy ship. 2: No Escape - While using the Crystal Cruiser trap 4 enemy crew inside a single room using the crystal being power or Lockdown Bomb. It is hard to gain this achievement through boarding, as enemies are rarely ever in the same 4-space room. However, it is extremely easy to unlock in random boarding events, where there is usually 4 boarders. Lead them into the same room by draining oxygen in the rooms they enter, and have your crystal crew member use their power. 3: Clash of the Titans - Destroy 15 Rock ships using the Crystal Cruiser. Go into rock sectors whenever possible, and explore them to the maximum extent, and this achievement should be unlocked naturally. Last Words I thank you for taking the time to read my guide, and I hope you found it useful! If you have any suggestions, praise, or if I made a mistake, feel free to tell me in the comments!