Dragon's Dogma: Dark Arisen


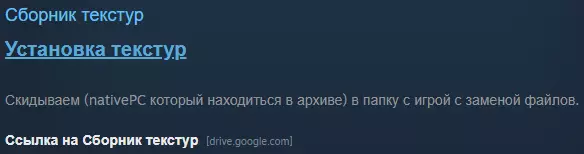


大家好,我决定更新我的模组包,移除了有问题的模组并添加了新的模组。 该模组包包含以下你可以在Nexus上找到的模组: 1. 优秀模组合集 2. 高清环境纹理大修 3. 格兰西斯纹理改进项目 4. 更清晰的女性身体纹理和男性纹理 5. 龙之信条重制版最终预览 - 格兰索伦 6. 龙之信条重制版预览 7. 龙之信条重制版预览2 - 格兰西斯 8. 龙之信条:黑暗觉醒日语语音项目ALLIANCE 俄语本地化补丁 重要提示:请优先安装俄语本地化补丁,之后再选择安装其他模组(日语语音模组除外)。 为获得更佳效果,请将画质设置为最高(部分纹理模组仅支持高质量)。 补充说明:ENB 模组已移除,因其对系统要求较高,2GB 显存不足以流畅运行,帧率仅为 30-40fps。 难度模组因存在漏洞已移除。注意:由于未明确具体游戏名称,以下内容基于通用游戏术语进行汉化。 模组说明: 1. 优质模组合集 - 包含图标、角色纹理、重量等类型的模组集合。 2. 高清环境纹理大修 - 环境纹理(岩石、道路、草地等)。 3. 格兰西斯纹理改进计划 - 改进各种纹理。 4. 更清晰的女性身体纹理与男性纹理 - 男女角色的高分辨率纹理,非裸露。 (注:因原文未提供完整信息,部分内容可能存在不完整)龙之信条重制版最终前瞻 - 格兰索伦 - 格兰索伦城的纹理(尚未测试其与汉化补丁的兼容性) 6. 龙之信条重制版前瞻 - 一些盔甲。 7. 龙之信条重制版前瞻2 - 格兰西斯 - 再次更新各种纹理。 8. DDDA日语语音项目 - 日语配音 9. ALLIANCE的汉化补丁 汉化补丁 安装 运行exe文件并指定游戏路径,游戏必须为英文版且非GOG版本(GOG版本与Steam版本不同)。GOG版本有单独的俄语化补丁可在论坛获取。 Steam版本俄语化补丁获取链接。 纹理包 纹理安装 将压缩包中的nativePC文件夹放入游戏目录并替换文件。 纹理包获取链接。可选模组 重要提示:新角色纹理相关文件需将压缩包中的2个文件解压至以下路径:SteamLibrary\steamapps\common\DDDA\nativePC\rom 包含在所有整合包中的3个模组说明: 1. 男女角色高分辨率纹理 2. 盔甲下所穿衣物的发光效果 3. 更高质量的图标日语语音安装方法:将压缩包中的nativePC文件夹放入游戏目录并替换文件,然后进入SteamLibrary\steamapps\common\DDDA\nativePC\rom文件夹,找到PatchAll.bat文件并运行,等待文件修补完成后关闭,即可体验日语语音。

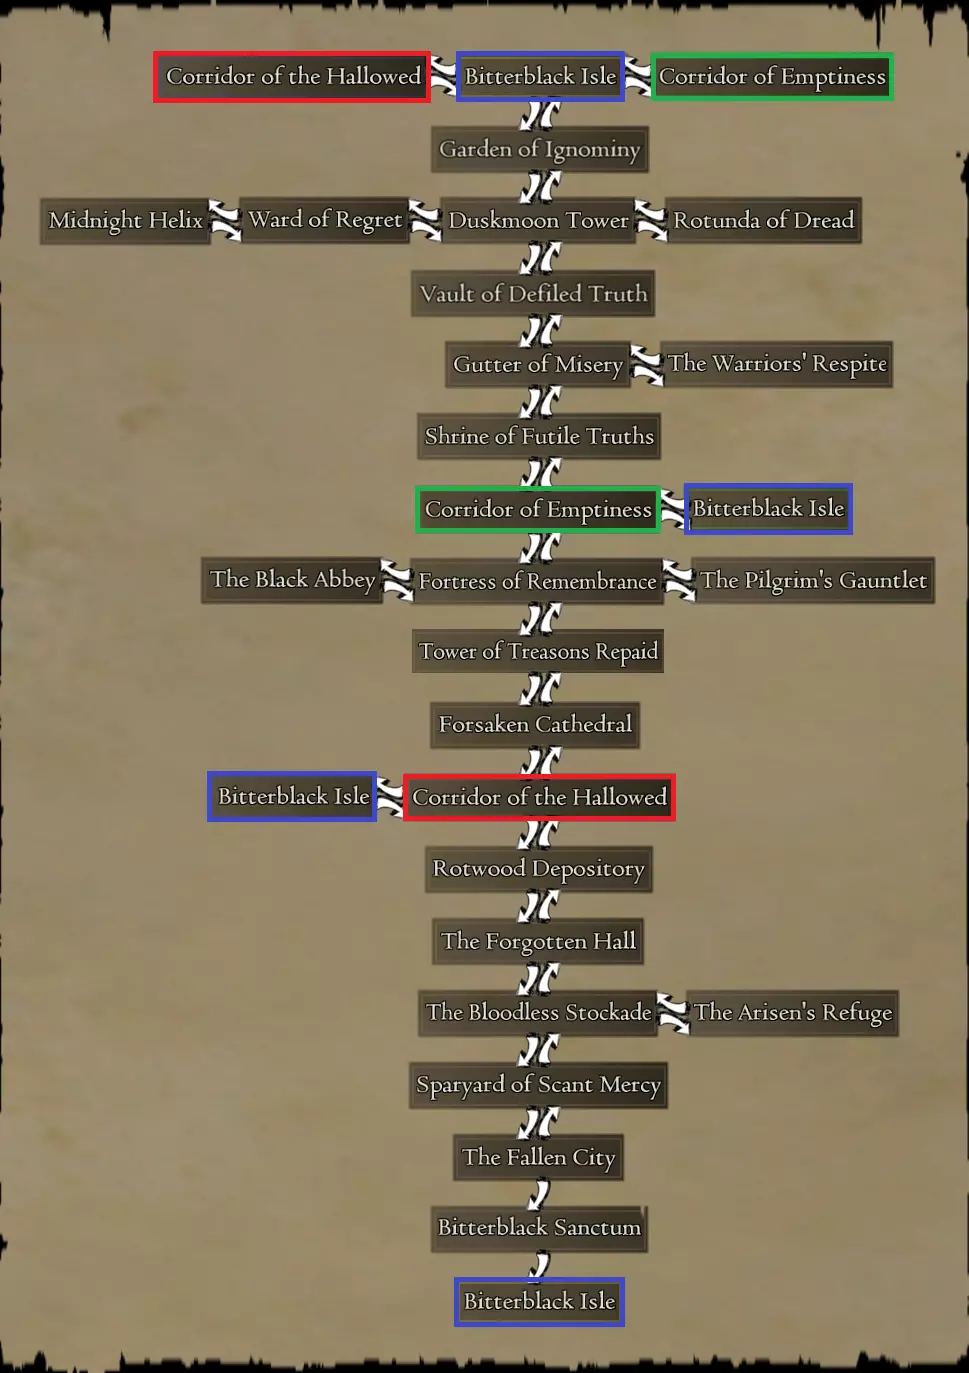
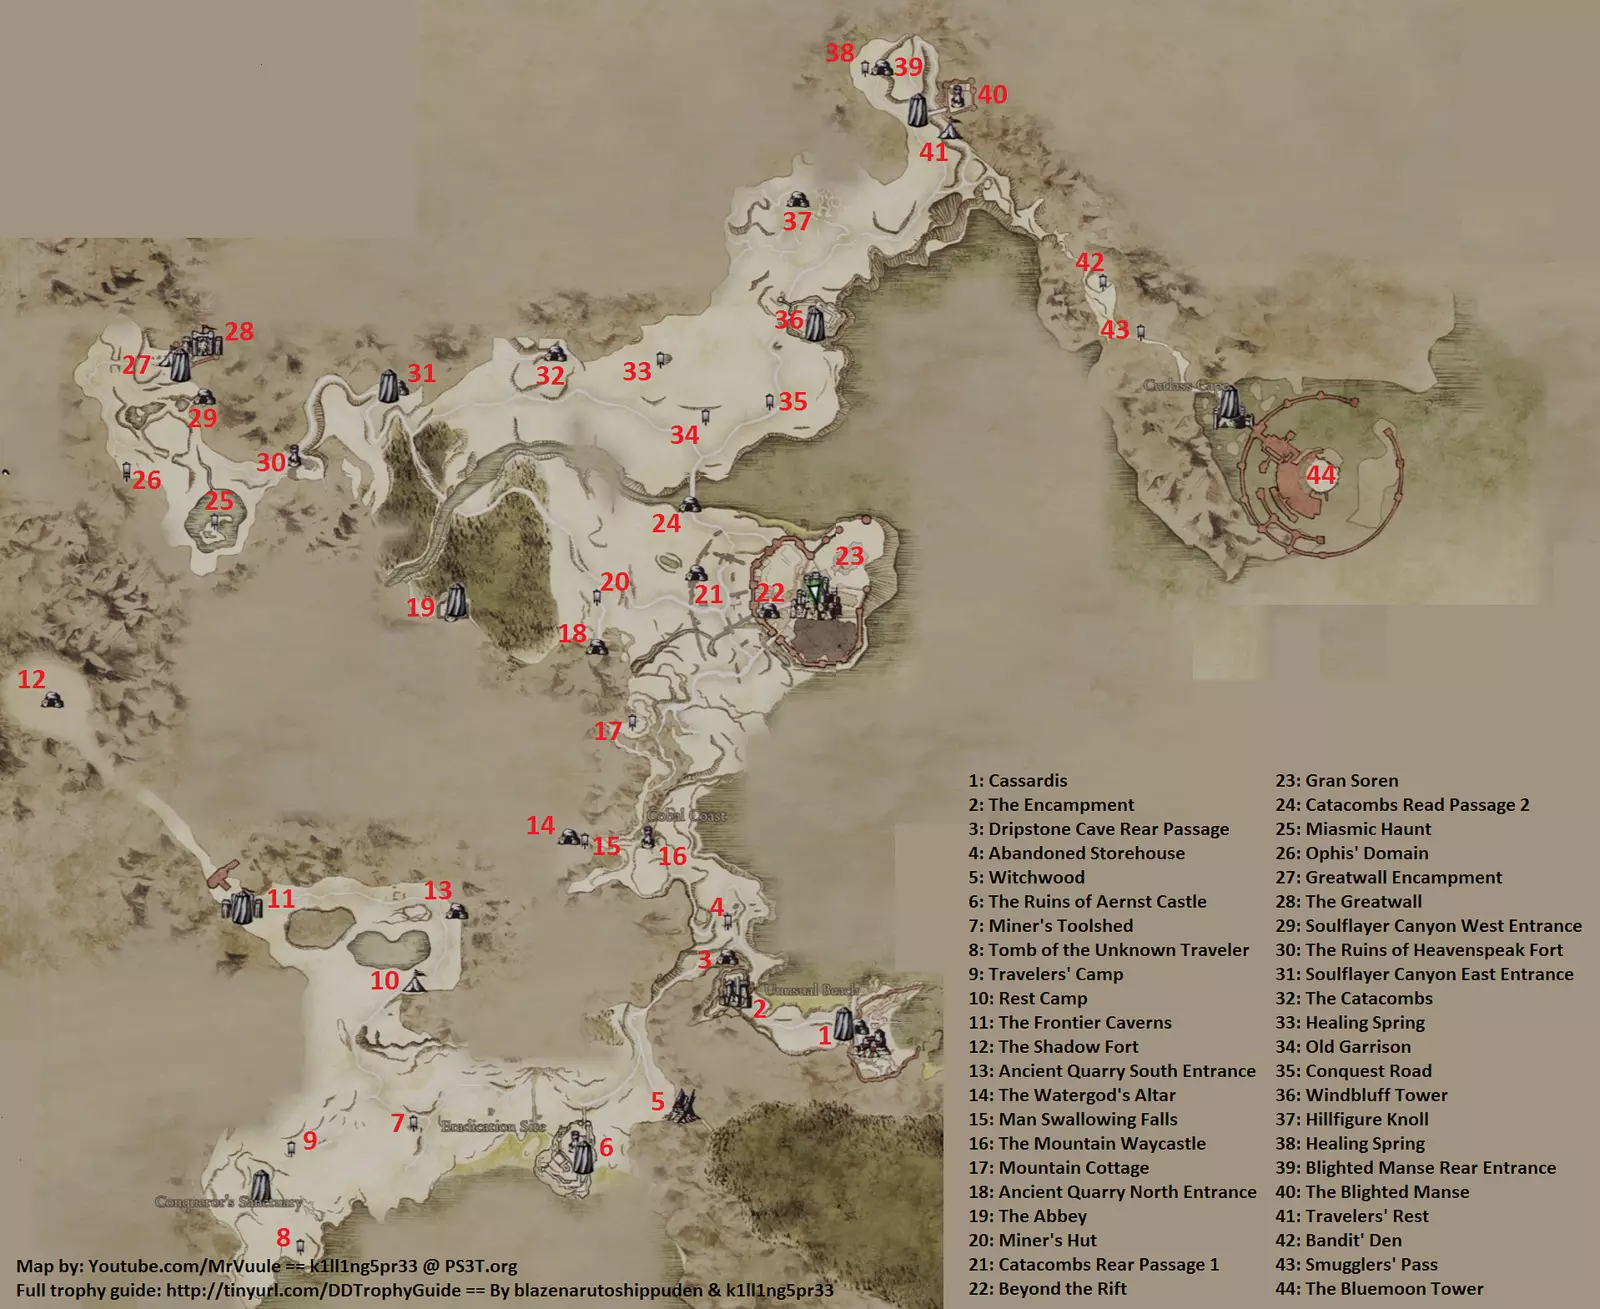
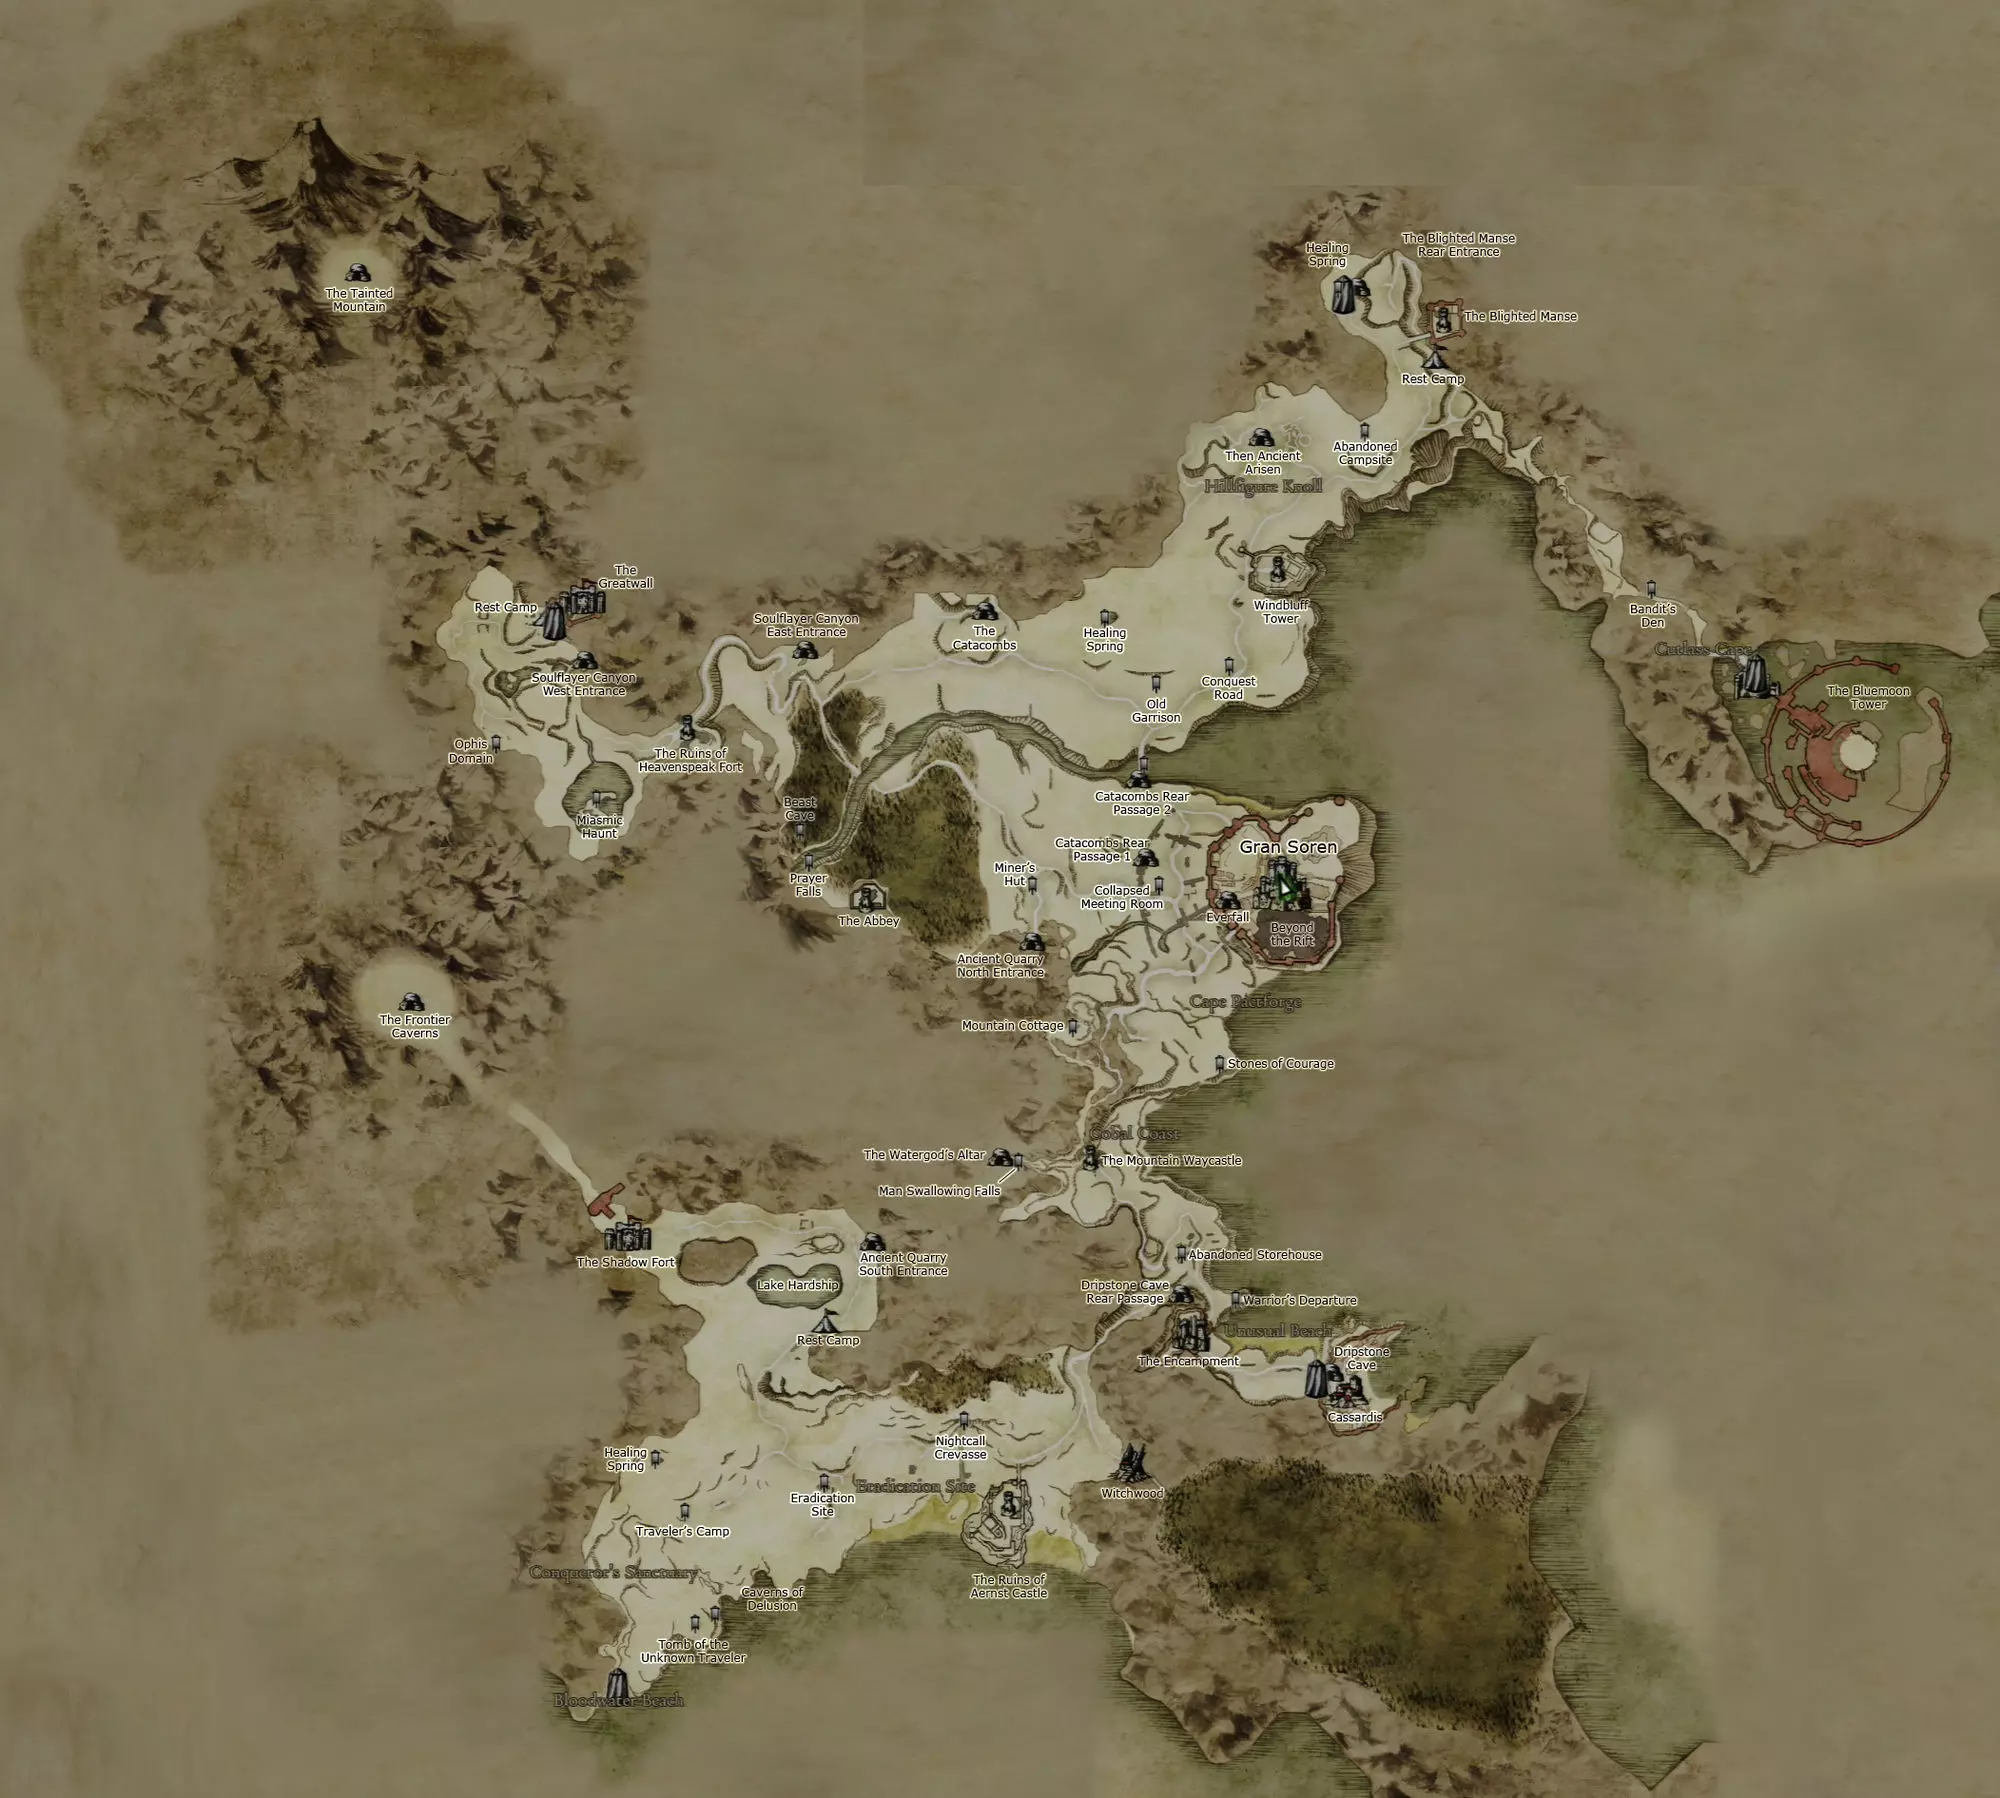
A guide listing every Side Quest and when they should be completed to make sure you unlock the Hero Achievement. The guide has very minimal Main Quest spoilers and is very light on Side Quest spoilers. Introduction Hello Dragon’s Dogma lovers! Follow this guide to ensure you unlock the Hero Achievement (complete every non-Notice Board Quest). Please note a few things below. Don't Panic, There's Always Next PlaythroughFirst, this game features endless NG+ that allows you to do Main and Side Quests over multiple playthroughs to unlock the Hero Achievement. So don’t panic if you mess something up, and feel free to wait until your second playthrough to use this guide. In many ways the second playthrough is much easier since you can set up more fast travel locations. Cut-Off/Cancellation PointsBe aware that the game has certain cut-off points all related to beginning or completing Main Quests. These cut-off points cause specific Side Quests to become unavailable if you haven't started them or CANCELLED if you have started but not completed them. When you are about to reach one of these points in this guide, a CRITICAL WARNING message will be displayed. Read carefully. Be Sure to Do All Main Quests, Too!Several Main Quests are actually missable because Ser Maximilian will offer you a choice of four Wyrmhunt quests, and you only have to do two of them. There will be a note in the guide below reminding you to do all four even though you don't have to! Almost No Spoilers!I have purposefully left out most Quest details as to not spoil things, and no serious Main Quest spoilers are listed. Additionally, I've left out most Side Quest details so you can enjoy figuring them out yourself. However, every Side Quest name is linked to its Wiki page so you can read all the Side Quest details if you wish. When does the Hero Achievement actually unlock?The actual achievement itself does not unlock until you complete every required Quest, which on your first playthrough will be right before the final ending cutscene/credits. If you are on a subsequent playthrough, the Achievement will pop-up whenever you complete the last Quest you've never completed. How to Best Use the GuideI recommend you read ahead to the next MAIN QUEST headings as you play. Always be aware of when the next MAIN QUEST begins to ensure you do not start that quest until you've read and completed the prior Side Quests. Refer back to this guide as you play, always making sure you don't get too far in the MAIN STORY Quests. Credits and ThanksI must give huge credit to Powerman1469’s Missable Quest List[www.xboxachievements.com] from 2012, which I based much of my work upon. Also huge credit to all the Wiki contributors over the years. I modeled my guide loosely based on the Wiki Sidequests[dragonsdogma.wikia.com] page. Thank you also to various commenters who have pointed out improvements and corrections. Stage 1 Side Quests Part 1 MAIN QUEST: The first three Main Quests to be completed now, which last until you get control of your character in the Elder’s house. Floral Delivery[dragonsdogma.wikia.com] - This is in Cassardis by the Inn. Benita needs some flowers found right outside the village by day and night. Lost Faith[dragonsdogma.wikia.com] - Go to the Church in Cassardis and talk to Father Clemente and search for the book. Grim Tidings[dragonsdogma.wikia.com] - Go to the Church in Cassardis and talk to Elvar. He just wants you to talk to Merin. Save Reynard (Unofficial Side Quest)[dragonsdogma.wikia.com] - When you first leave Cassardis on your way to The Encampment you will see Reynard getting beat up by goblins. You MUST save him (kill the three goblins, optionally speak to him) before going on to The Encampment or he will be gone forever. Note: if you missed Search Party[dragonsdogma.wikia.com] in your prior playthroughs, you need to save him now to later unlock that Side Quest. MAIN QUEST: Call of the Arisen to be completed now. Go to the Rift Stone in The Encampment to begin. Strength in Numbers[dragonsdogma.wikia.com] - This is begun automatically immediately after completing the Main Quest Call of the Arisen where you create your main pawn. There are several more stages to the Side Quest you must manually begin by speaking with Ser Berne next to the Notice Board. Guard Duty[dragonsdogma.wikia.com] - WARNING: VERY EASILY MISSED. A Madeleine Quest. Go back to Cassardis Inn to meet her after doing the above Main Quest. She will want an escort to The Encampment. Make sure you SPEAK to her at The Encampment to actually finish the Quest (she will ask for money; give it if you wish). Deep Trouble[dragonsdogma.wikia.com] - This begins in Cassardis after you first reach The Encampment. Talk to the guard by the village gate standing by the well. CRITICAL WARNING: Ensure you’ve completed Grim Tidings[dragonsdogma.wikia.com] AND Strength in Numbers[dragonsdogma.wikia.com] because they BOTH be CANCELLED if you do the Main Quest A Rude Awakening. Note: the precise time they will be CANCELLED is after talking to Mercedes and picking the "Rest" option. So do NOT select the "Rest" option until you are ready. Note: Also ensure you’ve done Guard Duty[dragonsdogma.wikia.com] (escort Madeleine) since it is easily missed if not done by now. MAIN QUEST: A Rude Awakening to be completed now. Accept Mercede’s offer to rest to begin. An Uninvited Guest[dragonsdogma.wikia.com] - Talk to the Inn keeper Pablos in Cassardis to start. Note: if you missed No Honor Among Thieves[dragonsdogma.wikia.com] in your prior playthroughs, you need to do this Side Quest again to later unlock that Side Quest. Lost and Found[dragonsdogma.wikia.com] - WARNING: VERY EASILY MISSED. After the Main Quest A Rude Awakening go back to Cassardis. Find Chief Adaro walking around in Cassardis. He will ask you to go find Quina in Witchwood. This Side Quest is a bit out of the way, so refer to the Wiki if you don’t know where to go. Note: if you missed Talent in Bloom[dragonsdogma.wikia.com] and/or A Parting Gift[dragonsdogma.wikia.com] in your prior playthroughs, you need to do this Side Quest again to later unlock those two Side Quests. CRITICAL WARNING: Ensure you’ve completed these three basic Cassardis Side Quests Floral Delivery[dragonsdogma.wikia.com], Lost Faith[dragonsdogma.wikia.com], and Guard Duty[dragonsdogma.wikia.com] because they will ALL be CANCELLED when you complete the Main Quest Off With Its Head. Note: the precise time they will be CANCELLED is after reaching Gran Soren's entrance and watching the cutscene and dialogue. MAIN QUEST: Off With Its Head to be completed now. Speak with Mercedes at The Mountain Waycastle to begin. CRITICAL WARNING: Once you get to Gran Soren it is recommended that you immediately leave and finish Lost and Found[dragonsdogma.wikia.com] before you start all the Gran Soren Side Quests since this Side Quest is so easily forgotten and is critical to later Side Quests. Stage 1 Side Quests Part 2 MAIN QUEST: A Matter of Myrmidons to be completed now. It starts automatically upon entering Gran Soren. A Troublesome Tome[dragonsdogma.wikia.com] - Talk to Steffen who is usually next to the Inn in Gran Soren, by Fountain Square. This Side Quest is a bit tricky, so refer to the Wiki if you need help. CRITICAL WARNING: Ensure you’ve completed Lost and Found[dragonsdogma.wikia.com] because it will be CANCELLED when you complete the Main Quest Lure of the Abyss. Note: the precise time it will be CANCELLED is upon speaking to Barnaby after you go in to the Everfall, find what you came for, and then exit the Everfall. Therefore, you can freely go in to the Everfall to explore and even complete your task, but do NOT speak to Barnaby upon completion until you are ready. MAIN QUEST: Lure of the Abyss to be completed now. It starts by talking to Barnaby in the Pawn Guild. Reaper's Scorn[dragonsdogma.wikia.com] - This begins at one of the houses outside the Pawn Guild in Gran Soren. Talk to the father named Austine. Chasing Shadows[dragonsdogma.wikia.com] - You can find Mason walking around in front of the Inn in Gran Soren. Speak with him to begin. Note: if you missed Bad Business[dragonsdogma.wikia.com] in your prior playthroughs, you need to do this Side Quest again to later unlock that Side Quest. Land of Opportunity[dragonsdogma.wikia.com] - In Gran Soren talk to Fournival who walks around on a set schedule. This Side Quest is a bit tricky, so refer to the Wiki if you need help. Dying of Curiosity[dragonsdogma.wikia.com] - Go back to Cassardis and talk to Merin the fisherman usually walking around the beach area. This Side Quest is a bit tricky, so refer to the Wiki if you need help. Note: if you missed Farewell, Valmiro[dragonsdogma.wikia.com] in your prior playthroughs, you need to do this Side Quest again to later unlock that Side Quest. Thick as Thieves[dragonsdogma.wikia.com] - This is one of two Bandit Camp Side Quests where you need to go to said camp and peacefully complete the tasks they give you. This Side Quest is very tricky, so I recommend you read the Wiki because it’s unlikely you will be successful on your first attempt. Note: this Side Quest can be done after meeting the Duke, later in the game if you wish. No Honor Among Thieves[dragonsdogma.wikia.com] - This is one of two Bandit Camp Side Quests where you need to go to said camp and peacefully complete the tasks they give you. This Side Quest is very tricky, so I recommend you read the Wiki because it’s unlikely you will be successful on your first attempt. Note: this Side Quest can be done after meeting the Duke, later in the game if you wish. Note: if you missed this Side Quest in your prior playthroughs, make sure you do An Uninvited Guest[dragonsdogma.wikia.com] earlier to unlock this Side Quest. Of Merchants and Monsters[dragonsdogma.wikia.com] - This starts outside the Ancient Quarry North Entrance, west of Gran Soren. You will have to defeat all three large enemies to finish the Side Quest, so be prepared. Search Party[dragonsdogma.wikia.com] - LONG-TERM QUEST. To start this Side Quest you need to buy 10 items from Reynard. He will then ask for certain items that are hidden all over the world. You probably will wish to refer to the Wiki to find the locations of the items and locations Reynard can visit. Note: you have much time to finish all the tasks, but make sure you finish this before doing the Main Quest The Final Battle because it will be CANCELLED then. Note: when you finish this Side Quest Reynard leaves the game forever until NG+, so buy what you want from him before you finish this Side Quest. Note: if you missed this Side Quest in your prior playthroughs, make sure you do Save Reynard[dragonsdogma.wikia.com] earlier to unlock this Side Quest. Deeper Trouble[dragonsdogma.wikia.com] - Go back to Cassardis after going to Gran Soren. When you enter the village a man named Rorric will offer the Side Quest. Stage 2 Side Quests Escort Duty[dragonsdogma.wikia.com] - WARNING: ONCE-PER-PLAYTHOUGH GOLD IDOL EASILY MISSED HERE. Talk to Fournival again to accept a Side Quest to look after his daughter, Symone. If the Side Quest isn’t offered then your affinity is too low, meaning he doesn’t like you enough. If you do this Side Quest correctly, you will be given a once-per-playthrough Gold Idol item that is very helpful. Read the next paragraph to find out how to correctly maneuver through the Side Quest. First, bring a Flask of Water before accepting the Side Quest. Make sure you walk/jog right next to her during the city tour. Stay near her side. NEVER bump or hit her. She will stop near the Inn and want to play Hide-and-Seek. Once she has run away she can be found either in the back of the Union Inn next to the fireplace or at the back of Arsmith's Alehouse. The quicker she is found, the better. Give her the Flask of Water right when she wants it. And when she wants to race you, let the wookie her win (NEVER bump or hit her)! If you don’t get the Gold Idol for some reason, load a prior save to try again. MAIN QUEST: There are four Wyrm Hunt Main Quests now given by Ser Maximilian at the Gran Soren palace entrance. These four Main Quests (The Cypher, A Fortress Besieged, Seeking Salvation, and The Watergod’s Altar) can now be completed in any order you desire. CRITICAL WARNING: Ser Maximilian only requires you do two of the four Wyrm Hunt Main Quests in order to "Hear the Duke's directive", but it is ESSENTIAL that you do all four before proceeding to meet the Duke (picking the dialogue option)! This is because the Hero Achievement requires all non-Notice Board Quests (Main and Side) be completed! Justice Done[dragonsdogma.wikia.com] - This is a mandatory Side Quest you will complete as you play through the Main Quest Seeking Salvation, so don’t worry about it. Note: your choice in this Side Quest has no bearing on future Quests, despite what an NPC says if he disagrees with your choice. So do whatever your missing-heart tells you! CRITICAL WARNING: Ensure you’ve completed Reaper's Scorn[dragonsdogma.wikia.com], A Troublesome Tome[dragonsdogma.wikia.com], Dying of Curiosity[dragonsdogma.wikia.com], and Chasing Shadows[dragonsdogma.wikia.com] because all FOUR of these will be CANCELLED if you start the Main Quest Come to Court. MAIN QUEST: Come to Court to be completed now. This Main Quest starts by picking “Hear the Duke's directive” from Ser Maximilian. It is safest to make sure all Side Quests (except Search Party, and maybe the two bandit camps Side Quests) are completed before beginning this Main Quest. CRITICAL WARNING: During the Come to Court Main Quest, you will leave the Castle after meeting the Duke and an automatic cutscene will play that zooms in to a young lady in the Castle gardens. You MUST, MUST go talk to her BEFORE leaving the Castle grounds or her entire line of Side Quests will be permanently missed until the next playthrough! Stage 3 Side Quests MAIN QUEST: Now begins a whole new portion of the game involving two Main Quests given by Aldous in the Castle and a whole slew of Side Quests. It is best to accept only the Griffin’s Bane Main Quest by picking “Aid the Corps on a hunting expedition.” Then complete all the Side Quests below before you continue to the next Main Quest Trials and Tribulations, which has a four day limit. Rise of the Fallen[dragonsdogma.wikia.com] - Speak to Ser Maximilian at the Gran Soren Castle entrance to begin. The Conspirators[dragonsdogma.wikia.com] - After meeting with the Duke and leaving the Castle grounds for the first time, you can immediately go back to the Castle and speak with Chamberlain Fedel by the royal court to begin. This Side Quest can involve making forgeries. Read the Wiki if you want to explore all the options. Arousing Suspicion[dragonsdogma.wikia.com] - After meeting with the Duke and leaving the Castle grounds for the first time, speak with Mirabelle in the Castle entrance area to begin. You need to intervene during the life or death situation during this Side Quest or you'll be unable to complete another Side Quest. Note: this Side Quest will ONLY be offered if you spoke to Aelinore in the Duchess's Gardens on the first visit to the Duke's Demesne during the Main Quest Come to Court. Note: this Side Quest must be done in order for the later Duchess in Distress[dragonsdogma.wikia.com] Side Quest to be available. Witch Hunt[dragonsdogma.wikia.com] - Right after meeting with the Duke, there will be several townsfolk talking in front of the Gran Soren Inn about Selene. Stand near them and listen to begin. Note: this Side Quest must be done in order for The Dragon's Tongue[dragonsdogma.wikia.com] and Mettle against Metal[dragonsdogma.wikia.com] Side Quests to be available. Note: it is very convenient to do the two following Witchwood Side Quests immediately after this Side Quest. You can simply leave the Witchwood via the back exit and immediately reenter. Note: when you leave the Witchwood via the back exit, you may wish to set up a Portcrystal on the cliff, allowing for very quick access to Selene (she can brew ales). The Dragon's Tongue[dragonsdogma.wikia.com] - Return to the Witchwood and go back to the Guardian's Grave where you talked to Selene when you finished the Witch Hunt Side Quest. Mettle against Metal[dragonsdogma.wikia.com] - Return to the Witchwood and find a golem at the end of the back section of Witchwood. This Side Quest is a bit tricky, so refer to the Wiki if you need help. Note: it is HIGHLY recommended to have your main character be a Bow class for this Side Quest since the ability to hit distant targets is quite critical. Idol Worship[dragonsdogma.wikia.com] - This is a Side Quest Caxton gives you in Gran Soren. He’s at his shop next to Fountain Square. This Side Quest requires you make a choice as to which merchant you prefer, Madeleine or Caxton. You should give one a Gold Idol (full range of items unlocked) and one a Silver Idol (partial range of items unlocked). Read the Wiki for more information. Supplier's Demand[dragonsdogma.wikia.com] - This is a Side Quest Madeleine gives you in Gran Soren. She’s at her shop, which is just past The Black Cat. This Side Quest requires you make a choice as to which merchant you prefer, Madeleine or Caxton. You should give one a Gold Idol (full range of items unlocked) and one a Silver Idol (partial range of items unlocked). Read the Wiki for more information. Nameless Terror[dragonsdogma.wikia.com] - WARNING: EASILY MISSED AND CONFUSING SIDE QUEST. Speak with Ser Rickart, a guard just outside the South gate of Gran Soren to begin. It involves tracking down five different assassin groups across the world. Read the Wiki to find out how to complete the Side Quest since it is hard to know what to do. Talent in Bloom[dragonsdogma.wikia.com] - Travel to The Abbey in the forest a bit NW from Ancient Quarry North Entrance. Your friend from Cassardis, Quina needs you to do something. If you don’t finish this Side Quest quickly it can be FAILED, so read the Wiki if you want to be safe. Note: if you missed this Side Quest in your prior playthroughs, make sure you do Lost and Found[dragonsdogma.wikia.com] earlier to unlock this Side Quest. A Parting Gift[dragonsdogma.wikia.com] - Go back to The Abbey and speak with Clarus, a Nun inside the church to begin. This Side Quest has different ways you can complete it. Read the Wiki page if you want to ensure the best outcome. Note: if you missed this Side Quest in your prior playthroughs, make sure you do both Lost and Found[dragonsdogma.wikia.com] and Talent in Bloom[dragonsdogma.wikia.com] earlier to unlock this Side Quest. An Innocent Man[dragonsdogma.wikia.com] - A little boy named Tomlin is running around Cassardis. Speak with him. Farewell, Valmiro[dragonsdogma.wikia.com] - Talk to Valmiro in Cassardis by a lookout at the beach. Note: if you missed this Side Quest in your prior playthroughs, make sure you do Dying of Curiosity[dragonsdogma.wikia.com] earlier to unlock this Side Quest. Supply and Demands[dragonsdogma.wikia.com] - Speak to Ser Daerio in Windbluff Tower to begin. This Side Quest has different ways you can complete it. Read the Wiki page if you want to ensure the best outcome. CRITICAL WARNING: Ensure you’ve completed The Conspirators[dragonsdogma.wikia.com] and Supply and Demands[dragonsdogma.wikia.com] because they will BOTH be CANCELLED after you finish both Main Quests Griffin's Bane and Trial and Tribulations. Note: the precise time they will be CANCELLED is after talking to Aldous to automatically turn in the last of these two Main Quests. So you can finish the tasks of both any time, but simply do NOT speak to Aldous to turn in the last of the two until you are ready. MAIN QUEST: Griffin's Bane to be completed now. CRITICAL WARNING: Depending on the outcome of the next Main Quest Trial and Tribulations, Land of Opportunity[dragonsdogma.wikia.com] will be CANCELLED and Escort Duty[dragonsdogma.wikia.com] will become unavailable. Make sure you've already done both or make very sure you ensure the right outcome of the Main Quest. MAIN QUEST: Trial and Tribulations to be completed now. WARNING: Despite being able to the rest of the above Side Quests later, it is safest to make sure you do all the above Side Quests before doing more Main Quests from Aldous. Stage 4-6 Side Quests MAIN QUEST: The Wyrmking’s Ring and Pride Before a Fall to be completed now. Bad Business[dragonsdogma.wikia.com] - Go to Madeleine’s shop in Gran Soren and speak with Katlyn. Make sure you pick up the dagger that is sitting on the table, called "Divine Razors". Now go to the Alehouse and talk to Nettie and Arsmith. There are some semi-important choices to make in this Side Quest, so refer to the Wiki if you want to know the options. Note: if you missed this Side Quest in your prior playthroughs, make sure you do Chasing Shadows[dragonsdogma.wikia.com] earlier to unlock this Side Quest. MAIN QUEST: Honor and Treachery to be completed now. CRITICAL WARNING: Ensure you’ve completed Rise of the Fallen[dragonsdogma.wikia.com], Arousing Suspicion[dragonsdogma.wikia.com], Talent in Bloom[dragonsdogma.wikia.com], and A Parting Gift[dragonsdogma.wikia.com] because ALL FOUR will be CANCELLED after you finish the Main Quest Reward and Responsibility. Note: the precise time they will be CANCELLED is upon entering the Treasury with the Duke and then trying to leave the room. Therefore, do NOT enter the Treasury with the Duke until you are ready. MAIN QUEST: Reward and Responsibility to be completed now. Duchess in Distress[dragonsdogma.wikia.com] - Immediately following the completion of Reward and Responsibility, this Side Quest is given by Mirabelle just outside the castle steps as you go to exit the castle area. Note: if you missed this Side Quest in your prior playthroughs, make sure you do Arousing Suspicion[dragonsdogma.wikia.com] earlier to unlock this Side Quest. HOPEFUL MESSAGE: Now you should have completed every Side Quest in the game! Remember you still need to complete the remaining Main Quests for the Hero Achievement (if you haven't done them in a prior playthrough). CRITICAL WARNING: Completing the next Main Quest Deny Salvation is the cut-off point for the Side Quests Land of Opportunity[dragonsdogma.wikia.com] and Bad Business[dragonsdogma.wikia.com]. Note: the exact point of no return for Deny Salvation is when you go through the doorway in the small room where you fight the Skeleton Lord on the Third Floor. Ser Gerrick will warn you the leader is just ahead (if Ser Gerrick survives the Skeleton Lord). Feel free to go up to this point, but do NOT go through the final door until you are ready. CRITICAL WARNING: Completing the next Main Quest Deny Salvation is the POSSIBLE cut-off point for the Side Quests Search Party[dragonsdogma.wikia.com] and Duchess in Distress[dragonsdogma.wikia.com]. Note: Search Party and Duchess in Distress will still be available after completing Deny Salvation if Reynard or Aelinore. respectively, is NOT your Beloved. However, it is very tricky to know if either is or isn't your Beloved. Therefore it is always safest to do both of these Side Quests before completing Deny Salvation. MAIN QUEST: Deny Salvation to be completed now. Begin it by going to the Greatwall Encampment in the far Northwest. CRITICAL WARNING: The next Main Quest The Final Battle is the cut-off point for a slew of Side Quests. Just make sure you've done all the Side Quests by this point! Note: there are only three Side Quests that can be done after The Final Battle, those being Idol Worship[dragonsdogma.wikia.com], Supplier's Demand[dragonsdogma.wikia.com], and Mettle Against Metal[dragonsdogma.wikia.com]. MAIN QUEST: All remaining Main Quests to be completed now, free of worry about Side Quests! Reminder: the Hero Achievement does not unlock until you complete every required Quest, which on your first playthrough will be right before the final ending cutscene/credits. So if this is your first playthrough keep reading to the next section for guidance on unlocking NG+. CRITICAL WARNING: It is technically possible to skip one of the final Main Quests. Just make sure you visit the Duke when the game tells you to visit him! How to Start New Game Plus Once you reach the post-game content, you have the freedom to explore the world again with new and more dangerous enemies. Also feel free to play around in the newly unlocked dungeon as long as you wish. The only thing you need to know is there is a point of no return for your current playthrough: when you give the 20 Wakestones to a certain NPC. Just be aware that this will begin the process of truly beating the game and starting New Game Plus. Reminder: the Hero Achievement does not unlock until you complete every required Quest, which on your first playthrough will be right before the final ending cutscene/credits. Thanks for reading this guide. I sincerely hope it helps you get the most enjoyment out of one of the best games ever made! Stay willful, Arisen! When to begin Bitterblack Isle Dragon's Dogma will make you aware of Bitterblack Isle (the very difficult mega-dungeon originally added in the 2013 Dark Arisen re-release of the game) early on in the game (after leaving The Encampment). The game almost encourages you to go there as a new player with many tutorial pop-ups while in Cassardis. This is VERY unfortunate because this dungeon is clearly designed to be played AFTER you finish the game at least once because of the loot progression. Therefore, I do not recommend you even start this dungeon on your first playthrough. Some masochist players like to go there early, and some more dubious players go there to exploit it by rushing past enemies to swipe loot that is too powerful and breaks the main game loot progression. If you want to experience the game the most ideal way, finish the game and reach around level 60 (dangerous), 80 (decent), or 100 (pretty safe) on NG+ before trying Bitterblack. Helpful Hint: you should never go in to Bitterblack without a good number of Wakestones on your person. This is yet another reason to wait until you reach the place in the main game where you can quickly acquire dozens of Wakestones without much trouble. Or do whatever you want since the game lets you go there almost any time. Just know that you need to have a VERY solid understanding of how to best use your Skills, Items, and group synergies if you hope to do well. NG+ Recommended Side Quests It is very tedious to try to do all Side Quests every playthrough, so after you unlock the Hero Achievement it is recommended to skip all unimportant Side Quests and only do those that offer important items, give access to locations, or provide interesting NPC interactions. Below is a list of what I deem as quality Side Quests. Stage 1 Part 1Save Reynard - Gives access to Reynard, an important merchant. Begin by leaving Cassardis the first time. Make SURE you save him and speak to him the FIRST time you leave Cassardis.Guard Duty - Gives access to Madeleine, an important merchant. Begin by going back to the Cassardis Inn once you get your main pawn but before you accept Mercedes offer to rest at the Encampment.Lost and Found - Gives access to Quina’s later Side Quests and personal story. Begin by going back to Cassardis and speaking the the Chief after you cut off the Hydra head at the Encampment. Stage 1 Part 2Chasing Shadows - Required to finish Madeleine’s Side Quest and story. Begin by finding Mason walking around in front of the Inn in Gran Soren after you go in to the Everfall and escape. Stage 2None. Stage 3Escort Duty - Gives access to Gold Idol, one of the MOST important items in the game. Begin by talking to Fournival after doing several Main Quests in Gran Soren. He has to like you enough, so perhaps do his prior Side Quest or give him gifts.Arousing Suspicion - Prerequisite Side Quest to give access to the Duke’s Northern Manse (good items there), and gives access to Aelinoire’s content and romance. After meeting the Duke for the first time, speak with Mirabelle in the Castle entrance area to begin. You MUST speak with her before leaving the area.Witch Hunt - Gives access to the second area in Witchwood, which contains very good items and two Side Quests. Also helps if you want to romance Selene or brew lots of ales. Right after meeting with the Duke, there will be several townsfolk talking in front of the Gran Soren Inn about Selene. Stand near them and listen to begin.Idol Worship - Can give Caxton a Gold Idol to get access to her best selection of items. After meeting with the Duke, begin by speaking to Caxton.Supplier’s Demand - Can give Madeleine a Gold Idol to get access to her best selection of items. After meeting with the Duke, begin by speaking to Madeleine.Talent in Bloom & A Parting Gift - Not necessary but both have nice dialogue for Quina and they are a good reason to go to the Abbey area. Begin by going to the Abbey and speaking to Quina.Supply and Demands - You can be given 5 quite rare Ambrosial Meats. Finishing the Side Quest helps raise Ser Daerio's affinity, which helps gain access to the Windbluff Tower stores, which contain two interesting armor pieces (although they can be purchased later from several merchants). Begin by gonig to Windbluff Tower and speaking to Ser Daerio. Stage 4-6Bad Business - Gives Divine Razors (found nowhere else) that you can keep if you like. Finishes Madeleine’s story to ensure she’ll be in the Post-Game as a merchant. After the first two Main Quests The Wyrmking’s Ring and Pride Before a Fall, begin by going to Madeleine’s shop in Gran Soren and speaking with Katlyn.Duchess in Distress - This is the ONLY way to ever explore the Duke’s Northern Manse (good items there), and it finishes Aelinore’s story. Immediately following the completion of Reward and Responsibility, this Side Quest is given by Mirabelle just outside the castle steps as you go to exit the castle area. Appendix: Portcrystal Locations Portcrystals[dragonsdogma.wikia.com] are items you can place in the Gransys open-world that allow you to travel to them using a regular Ferrystone or the Eternal Ferrystone (find it in Storage at the Gran Soren Inn). Up to 10 total Portcrystals can be placed in the world, but you can only find 5 in your first playthrough. In NG+ you can buy Portcrystals from The Black Cat for 200,000G, or you can find all five of the Portcrystals again. Below are the locations of all five if you want to make sure you don't miss any: At the very bottom of the Everfall, most easily gotten during the Main Quest The Lure of the Abyss. However, it can be claimed any time before facing the Dragon in the Main Quest The Final Battle. In the cave at Hillfigure Knoll. Can be claimed any time during your playthrough. Inside one of the basement prison cells at the Shadow Fort. Can be claimed any time during your playthrough. At the very top of Bluemoon Tower, which you'll probably first visit during the Main Quest The Griffon's Bane. Can be claimed any time during your playthrough. In the cave passage underneath the Witch's House in Witchwood, during or after the Witch Hunt Side Quest. If you miss the Witch Hunt Side Quest, it is missed until your next playthrough. Appendix: Notice Board Locations Just for the sake of ease-of-access, below are the locations and descriptions of every Notice Board in the game. Remember, none of these Quests have anything to do with getting the Hero Achievement. Cassardis Inn - This offers both "Kill X enemies." and "Escort X NPC." Quests. The Encampment - This offers more specialized "Kill X enemies." Quests usually pertaining to more difficult beasts. Gran Soren Inn - This offers "Escort X NPC." Quests exclusively. Gran Soren Pawn Guild First Floor - This offers more specialized "Kill X enemies." Quests usually pertaining to more difficult beasts. Gran Soren Pawn Guild Basement - This offers the 100 "Badge of Vows" scavenger hunt Quests exclusively. Gran Soren Alehouse - This offers various "Acquire X item(s)." Quests exclusively. There are countless Quests that require fairly exotic and rare items. Bitterblack Isle: Shore - Various Bitterblack Quests. Bitterblack Isle: The Warrior's Respite - Various Bitterblack and mainland Quests. Bitterblack Isle: The Arisen's Refuge - Various Bitterblack and mainland Quests. Also note that in any New Game Plus playthrough, new "Kill X enemies." Notice Board Quests are added to select Notice Boards. These quests offer very large gold rewards such as 500,000G. So be on the lookout for those if you're interested. Known locations: Cassardis Inn - Eradication Quests ("Kill X enemies."). The Encampment - Suppresion Quests ("Kill X enemies."). Gran Soren Pawn Guild First Floor - Fears of a Pawn Quests ("Kill X enemies."). Appendix: Side Quest Chains There are a number of Side Quests that only are available if you complete prior Side Quests or even Main Quests. These are all covered in the main sections of the guide, but they are also listed here just for quick reference. Save Reynard[dragonsdogma.wikia.com] -> Search Party[dragonsdogma.wikia.com] An Uninvited Guest[dragonsdogma.wikia.com] -> No Honor Among Thieves[dragonsdogma.wikia.com] Lost and Found[dragonsdogma.wikia.com] -> Talent in Bloom[dragonsdogma.wikia.com] -> A Parting Gift[dragonsdogma.wikia.com] Chasing Shadows[dragonsdogma.wikia.com] -> Bad Business[dragonsdogma.wikia.com] Dying of Curiosity[dragonsdogma.wikia.com] -> Farewell, Valmiro[dragonsdogma.wikia.com] Main Quest Seeking Salvation -> Rise of the Fallen[dragonsdogma.wikia.com] Arousing Suspicion[dragonsdogma.wikia.com] -> Duchess in Distress[dragonsdogma.wikia.com] Witch Hunt[dragonsdogma.wikia.com] -> The Dragon's Tongue[dragonsdogma.wikia.com] Witch Hunt[dragonsdogma.wikia.com] -> Mettle against Metal[dragonsdogma.wikia.com] Appendix: Cancellation Points Below I've have listed every single cut-off point in the game where Side Quests become unavailable or get CANCELLED if you've started but not completed them. Use this for quick reference as you play through the game to avoid surprises. Arriving at the Encampment: Save Reynard[dragonsdogma.wikia.com] An unofficial Side Quest, technically part of the Main Quest Upon a Pawn. Beginning A Rude Awakening: Grim Tidings[dragonsdogma.wikia.com] Strength in Numbers[dragonsdogma.wikia.com] Completing Off With its Head: Floral Delivery[dragonsdogma.wikia.com] Lost Faith[dragonsdogma.wikia.com] Guard Duty[dragonsdogma.wikia.com] Completing Lure of the Abyss: Lost and Found[dragonsdogma.wikia.com] Beginning Come to Court: Reaper's Scorn[dragonsdogma.wikia.com] Chasing Shadows[dragonsdogma.wikia.com] A Troublesome Tome[dragonsdogma.wikia.com] Dying of Curiosity[dragonsdogma.wikia.com] Completing both Griffin's Bane and Trials and Tribulations: The Conspirators[dragonsdogma.wikia.com] Supply and Demands[dragonsdogma.wikia.com] Completing Reward and Responsibility: Rise of the Fallen[dragonsdogma.wikia.com] Arousing Suspicion[dragonsdogma.wikia.com] Talent in Bloom[dragonsdogma.wikia.com] A Parting Gift[dragonsdogma.wikia.com] Completing Deny Salvation: Search Party[dragonsdogma.wikia.com] If Reynard is your Beloved, the cut-off for Search Party is completing Deny Salvation. If Reyanrd is NOT your Beloved, the cut-off for Search Party is completing The Final Battle. Land of Opportunity[dragonsdogma.wikia.com] Bad Business[dragonsdogma.wikia.com] Duchess In Distress[dragonsdogma.wikia.com] If Aelinore is your Beloved, the cut-off for Duchess in Distress is completing Deny Salvation. If Aelinore is NOT your Beloved, the cut-off for Duchess in Distress is completing The Final Battle. Completing The Final Battle: Deep Trouble[dragonsdogma.wikia.com] An Uninvited Guest[dragonsdogma.wikia.com] Thick as Thieves[dragonsdogma.wikia.com] No Honor Among Thieves[dragonsdogma.wikia.com] Of Merchants and Monsters[dragonsdogma.wikia.com] Search Party[dragonsdogma.wikia.com] If Reynard is your Beloved, the cut-off for Search Party is completing Deny Salvation. If Reyanrd is NOT your Beloved, the cut-off for Search Party is completing The Final Battle. Deeper Trouble[dragonsdogma.wikia.com] Escort Duty[dragonsdogma.wikia.com] An Innocent Man[dragonsdogma.wikia.com] Witch Hunt[dragonsdogma.wikia.com] The Dragon's Tongue[dragonsdogma.wikia.com] Nameless Terror[dragonsdogma.wikia.com] An Innocent Man[dragonsdogma.wikia.com] Farewell, Valmiro[dragonsdogma.wikia.com] Duchess In Distress[dragonsdogma.wikia.com] If Aelinore is your Beloved, the cut-off for Duchess in Distress is completing Deny Salvation. If Aelinore is NOT your Beloved, the cut-off for Duchess in Distress is completing The Final Battle. Completing Fathom Deep: Idol Worship[dragonsdogma.wikia.com] Supplier's Demand[dragonsdogma.wikia.com] Mettle Against Metal[dragonsdogma.wikia.com] Bizarrely, it never shows as CANCELLED, but this is the cut-off point for doing it. No Cut-Off: Justice Done[dragonsdogma.wikia.com] It starts and finishes as part of the Main Quest Deny Salvation.


《龙之信条:黑暗觉醒》的最高等级为200级(∞)。 许多人都想打造完美的角色build,但这需要一些预先规划。也就是说,要能在达到10级后立即更换职业。 本指南将通过简单步骤帮助你达成目标! 简介 现在,你可能会想“这有什么大不了的?”或者“为什么我要在10级时到达格兰·索伦?”简而言之:每当你升级时,获得的属性值取决于你当前的职业。 本指南包含游戏初期的剧透,包括用作基准的某些事件以及提及某些任务的名称。许多创建角色的玩家都希望将角色培养到极致。要做到这一点,需要能够尽快切换职业,以便用不同职业来升级。 有些玩家甚至想达成100%存档,因此不想错过任何初始任务。这里有一个方法可以同时实现这两个目标! 普通模式 在普通模式下不遗漏任何任务,以10级抵达格兰索伦: 开始游戏。 从公告板接取所有任务。暂时不要完成任何任务。 与罗克直接前往营地,但要杀死哥布林救出那个男人并获得披风。 与石碑对话,然后去杀死食人魔。 雇佣并创建自己的 pawn。尽可能雇佣高等级的 pawn。确保暂时保留罗克。在营地完成【人多力量大】任务。 在训练场外接取布告板任务。 返回卡萨尔迪,途中避免战斗。接取所有能找到的剩余支线任务。 完成【信仰迷失】(可通过与教堂/神殿的神父对话接取)、【不祥预兆】(可通过与埃尔瓦对话接取,他通常在教堂/神殿内外走动)和【鲜花速递】(可通过与贝妮塔对话接取,她在酒馆旁的破旧建筑内)。 与玛德琳对话并接取护送任务,将她引导至营地。再次确保途中不击杀任何敌人。确保你有足够的钱支付给玛德琳,她需要1000金币。 回到营地后,与梅赛德斯交谈并杀死九头蛇。 现在不要快速跳过她的对话。她会邀请你和她一起走。选择拒绝。相反,返回卡萨尔迪斯,先与埃尔瓦交谈以触发“失物招领”任务,然后到达卡萨尔迪斯并与阿多罗村长交谈。他通常在井边或酒馆附近。 回到营地,接受梅赛德斯继续前进的请求。进行休息。 出发前,前往裂隙石,遣散除你自己的 pawn(伙伴)之外的所有 pawn(伙伴)。这样可以更容易避免战斗。 一路跑到卫城,尽你所能避免战斗。遇到敌人时直接跑开。一直靠右走,直到能看到大海和一棵苹果树,然后径直往山上走,就能到达目的地。 和梅赛德斯对话前,先去附近的裂隙石招募尽可能高等级的 pawn(随从)。 与梅赛德斯交谈后,前往格兰·索伦。消灭挡路的敌人(你别无选择)。 到达格兰·索伦时,你应该达到10级。 在旅馆更换职业。 现在你可以返回卡萨尔迪斯,完成之前未完成的支线任务。在前往 pawn(随从)公会之前完成此事。 困难模式 首先要说明的是,除非你能雇佣175级或更高等级的 pawn(随从),否则不达到11级是无法到达格兰·索伦的。如果可以,就按照上述步骤操作。不过如果你仍想极致优化,有一种方法可以让你在前往格兰索伦前达到10级并更换职业!方法如下: 从上述步骤7开始,但无需理会“不击杀任何敌人”的说法。击杀必要的敌人,但尽量不要过度。刷级可以稍后再进行。 完成除“深海危机”外的所有支线任务。 护送玛德琳到营地,给她钱,然后去和梅赛德斯对话。之后休息。 击杀九头蛇,然后与梅赛德斯交谈。 现在不要快速跳过她的对话。她会邀请你和她一起走。选择拒绝。相反,返回卡萨尔迪斯,先和埃尔瓦对话接取“失物招领”任务,然后到达卡萨尔迪斯并与阿多罗村长交谈。不要完成“失物招领”任务。接到任务后,从任务列表中选择【深渊危机】任务。如果任务列表中没有该任务,与卡桑德拉水井旁的卫兵对话。 完成【深渊危机】任务。领取该任务奖励可获得2000经验值。如果领取后等级会达到11级,则先不要领取奖励,直接跳至步骤10。 无论是完成【深渊危机】任务还是刷怪升级,此时你应已达到10级且未满11级。如果尚未达到10级,继续刷怪即可。 达到10级后,前往卡桑德拉。在旅店里休息直至夜幕降临。 前往海岸,走到码头。在桥的尽头有一位手持灯笼的女性,她名叫奥尔拉。与她对话并向她提供帮助。当你身处【黑咒岛】时,与奥尔拉对话。通过她你可以变更职业。
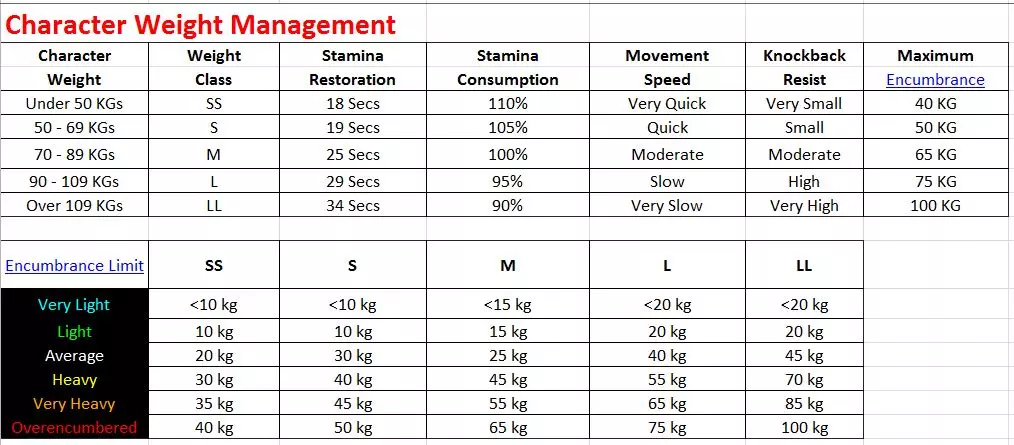
New to the game? Or a veteran looking to refresh your memory? This guide is a gathering of interesting information regarding the game. Here we look at the obscure things most people tend to miss, or things people didn't even know existed from the very start. I hope this guide will serve to aid other players in their quests, and that this community will continue to grow and expand with everyone's help! Introduction This guide is spoiler-free. It will not mention specific quests or rewards. I try to be as vague as possible when it comes to anything even related to spoilers. Most things covered in this guide is unkown facts and things that could be good to know. With Dragon's Dogma: Dark Arisen being released for PC, the game is bound to have both new and inexperienced players, as well as old and experienced ones picking the game up. Dragon's Dogma is a simple game from the outside - But if you dig a bit deeper, you'll find a very in-depth system that you might not have been expecting when you first looked at the game. My aim with this thread is to share with you all what I have discovered for myself, and what I have learned from others. Here's a list of quirks and good things to know before you get into the game! Character Creation When you have played through the tutorial, you'll enter the character creation screen. You'll first notice your characters weight and height being displayed. Many people don't take much note of this, other than it simply being statistics with no other purpose than to inform you about the size of your character. This is wrong, as both height and weight will impact your character's performance in the game. Weight Your weight will affect quite a few things. Stamina restoration, your movement and climbing speed, your knockback resistance and your maximum encumbrance. Your stamina gain per level is also affected by your weight. For each weight class above Medium (70-89 Kgs) your character gains 20 more base stamina upon creation and each weight class below Medium, your character will gain 20 less stamina upon creation. The weight classes are the following: SS: Under 50 Kgs. Movement speed: Very Quick. Stamina Restoration: 18 Secs. Knockback Resistance: Very Small. S: 50 - 69 Kgs. Movement speed: Quick. Stamina Restoration: 19 Secs. Knockback Resistance: Small. M: 70 - 89 Kgs. Movement speed: Moderate. Stamina Restoration: 25 Secs. Knockback Resistance: Moderate. L: 90 -109 Kgs. Movement speed: Slow. Stamina Restoration: 29 Secs. Knockback Resistance: High. LL: Over 109 Kgs. Movement speed: Very Slow. Stamina Restoration: 34 Secs. Knockback Resistance: Very HighYour stamina consumption will go up by 5% for every weight class below Medium, and will go down by 5% for every weight class above Medium. It will also affect other things not noted by numbers. Such as: Heavier characters are able to activate pressure plates faster. Heavier (and larger) characters have a bigger hitbox compared to lighter (and smaller) ones. Heavier characters will have it easier to grapple. Flying enemies will also struggle to fly away with you on top of them. Lighter characters have a smaller hitbox compared to heavier (and larger) characters. Lighter characters also climb faster, as they are more nimble than heavier (and larger) characters. Height Your character height will also affect a certain amount of things, such as walking and running speed (not sprinting), your weapon reach and accessibility to small places. In the game, there exists small tunnels, which you will only be able to enter if your character has a height of 150 Cm or less. Small characters also have it a lot easier walking in-between the legs of large monsters and creatures. Weapons actually scale with your character height. Which means that taller characters have a longer reach with their weapons compared to small characters. Taller characters can wade out farther into the water without being drenched. Taller characters have an easier time to reach high ledges. If you're too small, there's even ledges you won't be able to reach. The camera is positioned relative to how tall your character is. Tall characters will percieve the world from a higher perspective, while shorter characters will percieve the world from a lower perspective. A little something people miss In character creation, during certain sections, you are promted to click a certain button (Square for playstation users, or X for Xbox users) to reveal more customization options. This text is something that appears below the actual window, in a faint and pulsating text. Many people seem to have completely missed this option. Some of the options available are things such as: Having two different colored eyes. Adjusting your head size. Adjusting brow position, along with brow color. Adjusting your mouth position. Adjusting your ear position. Adjusting beard options and facial hair color. Adjusting makeup color.Some of these options will also be displayed under "Edit Features" > "Color Adjustment". But some won't. Difficulty and Game Modes Upon starting the game, you'll notice that you have several options. Namely New Game, Load Game, Hard Mode and after having created a save, Speed Mode will also be accessible from the main menu of the game. You can also change the difficulty from within the game itself, but be warned: If you have started a game on Normal difficulty and you change it to Hard Mode, all your quest progression will be reset, though you will keep all your rewards, levels and items. If you initially started the game on Hard Mode, changing the difficulty to Normal will NOT reset your quest progression and you can keep playing from where you left off, however, you are now unable to claim the end-game rewards that you would have gained if you had completed the game on Hard Mode. Hard Mode Hard mode is pretty self-explanatory, but lets go through the different changes and what this will mean for your experience. Hard Mode is a tougher experience for the player that is a bit of risk and reward. Thought many people believe the reward is greater than the risk, at least later on in the game. In hard mode: Enemy damage is doubled, though enemy health remains the same. A few monster spawns will contain 1-3 more of their kind. The player's stamina usage is accelerated. (Does not affect Pawns) The gold drop-rate is increased several times, rewarding you with tons of gold upon looting. Experience points are doubled, along with discipline points, which are used to buy skills for your vocation. Rift Crystal earnings from Pawns you have rented are increased by double the rate. Meaning that if you're using someone elses Pawns, they will be rewarded with twice the amount. This is not a rental fee you as the player have to pay for though. Upon completing the game on Hard Mode, the player is rewarded with some unique items. I will not mention the what these are.. Reap the unknown rewards! Speed Run Mode Speed Run is a time challenge mode, where you simply put try to beat the game as fast as you possibly could. You can use a previous save game to initiate this mode, in which all of your current equipment, skills and character development will be loaded as well. You will start the game from the beginning in speed run mode. A few restrictions and limitations exist here. Some of which are: A timer will be displayed, counting up when ever you are in control of the game. This timer will pause when ever a cutscene is playing, when you pause the game, when you are in the inventory menu and when you are inside a Rift Stone to hire pawns. When you are renting pawns, only the pre-built offline pawns created by Capcom are available. Online pawns created by players are not accessible. Saving the game is not possible in Speed Run Mode. You must complete the game from start to finish. Sleeping in an inn will not save the game either. Speed Run is a self-contained mode. None of the items you use or gain in this mode will be transferred to your main save game. Experience points, discipline points, levels gained or gold earned will not carry over either. The reward for completeing the Speed Run Mode is the only items that will be carried over to your main game save file. The rewards shall remain a mystery until you have unlocked them yourself! WARNING: Once a Speed Run is completed, and the rewards transferred to your main save game, the game is essentially overwriting some information on your main save file. This will affect the game in the sense that a Hard Mode save will be turned into a Normal Mode save, hence making you ineligible to claim the Hard Mode rewards. This means that if you would like to play the game on Hard Mode and claim the Hard Mode rewards, you'll have to change the difficulity of your save file back to Hard Mode from Normal Mode, which will reset all your quest progress back to the start of the game. Your equipment, gold, levels and character progression will remain. I personally recommend that if you would like to play Hard Mode, that you first finish the game and start New Game Plus before you try out the speedrun mode. New Game Plus/Load Cleared Game New Game Plus, commonly known as NG+ is a game mode that will be unlocked after completing the main game. This will appear as "Load Cleared Game" in the main menu. Do not click New Game to start this mode. Upon starting New Game Plus (or Load Cleared Game), your story will reset. But you will keep all your character progression, level, gold and equipment. Your pawn will also retain theirs. Some changed are made to the game. Here is a list of them: Enemy difficulity and rewards will remain the game. A few new quests will become available in the form of Creature Elimination quests, offering a substantial amount of gold as rewards. Information regarding how many times you have finished the game will be displayed under the History section, in the Pause Screen. Adventuring During your adventures, you'll be rewarded for looking around and exploring. There are tons of hidden loot and interesting locations away from the beaten path. There are also quests that you'll need to find yourself. Day and Night Something that isn't highlighted to the extent I belive it should have been, is that the game has a day and night cycle. During the night, visibility will be severely reduced, requiring the use of lanterns, light spells and other light sources to travel comfortably. During the nights, different encounters can be had with different enemies. I will not go into detail about these enemies how ever. Explore at night at your own peril! Grappling and Climbing. In Dragon's Dogma, grappling and climbing is a big deal. You can climb on terrain, you can climb on certain enemies - Or you can grapple them! Smaller enemies such as humanoids can be grappled. How ever, you can grapple someone in two different ways. One is by holding the grapple button, which will "disarm" and hold the arms of the enemy, exposing their undefended chest to your allies. Another way to grapple someone is to double-click the grapple button. This will lift the enemy, if you are able to do so. Lifting an enemy in this way will enable you to move around with the enemy over your shoulder. Holding an enemy this way will also enable you to throw them! Crafting Did you know there's crafting in this game? Not many people think so initialy. But the game has a crafting system, which is based around the concept of using monster parts, ores and other materials to increase the stats of your equipment. Crafting is easy and not complex at all. Visit a blacksmith, click on Enhance and it will list all your available equipment. You can see how many times its been upgraded and wether or not an upgrade is available based on the materials you have in your inventory. Using a pickaxe, you can mine ores for upgrading or selling. How ever, if a pickaxe is not available, you can also use your weapon, if you are a Warrior, to bash at the ore deposit in order to spawn ores. Shooting an ore deposit with either of the spells Gicel or Frigor will also work! Questing Dragon's Dogma is a game with quite a few quests. Some of these are listed at the Inns and Taverns, on the notice boards. Others you have to find yourself. And many quests have to be found before you move on with the main questline; or they'll simply become unavailable for the rest of your playthrough. This means that certain side-quests will be lost to you until you go into New Game Plus, should you move the story forward without finding and completing them. Without spoiling too much, I advice you to travel back to Cassardis (the starting village) after your business is done in The Encampment. Don't rush the main quest. You'll be missing out on a lot of things. Make sure to visit cities in between the main story quests. Certain quests will have multiple solutions. Many of which the game won't even tell you about. Much is up to you to explore on your own :) Inventory The inventory system in Dragon's Dogma is probably one most people will first feel unfamiliar with, likewise with the equipment system for this sort of game. So lets talk a bit about that! Dragon's Dogma actually has two different pause screens. Pause Menu The pause menu is where you can access general information, such as Save/Quit, History, Map, Status, Options, Share, Quests and Equipment. Clicking Save/Quit will not actually Save and Quit. Instead you'll be given different options, such as Save and Continue, Save and Quit etc. Equipment is where you can access equippable items. Such as weapons, head, torso, arms, legs, cape and rings. In Dragon's Dogma, there is actually two different types of equipment. Namely armor AND clothing. A lot of equipment is restricted to being used by certain vocations only. This will also be displayed with highlighted vocation symbols to the right. When you hover above a piece of equipment, the game will display a text below, saying either "Clothing" or "Armor". You can wear both types at the same time, and they will give you different kind of stats and special qualities depending on the equipment. To the right of this, a section with vocation symbols will be visible. Item Menu The item menu is where you get to access your Curatites, Tools, Materials, Special and Other sections. Here you'll be able to view the health, level and equipment burden of everyone in your party. You'll also be able to use items, and even trade items between pawns. This is easily done by selecting an item and then click the coresponding action. New to the PC release is also the Hotkey function, where you simply hover above the indicated item, like a lantern or food item, then on your Numpad, press any number up to 5. The item will be marked with a small icon on the upper right corner of the item icon, and you can then activate this item in-game without having to open up the menu to do it from there. Leveling Up When you level in Dragon's Dogma, you'll have two different experience meters. One is for your actual level. The other one is for your Vocation level. Vocations are basicly like classes. You start the game with selecting one of three. Then later on, you can chose from a list of 9. Lets refer to these as Character Level and Vocation Level. You can change your vocation in inns and taverns when ever you want. Now, when you gain a Character Level, your stats increase. But the way they increase is based on what Vocation you were when you leveled up. The fighting types get more HP, defense and attack per level, while the magic types get more magick attack and magic defense. The rougish types are somewhere in the middle ground, but getting a vast more amount of stamina. You can also level up your Vocation Level. These will level up by the same means as Charater Level. Killing monsters. Aquiring a Vocation Level will not increase your stats in any way, as with gaining a Character Level. When you gain a Vocation Level, you'll gain access to new skills and augments. You spend Discipline to level these up and aquire them. You can do this at an inn or a tavern. Augments Augments is power ups that you will keep, even if you swap your class for another. So unlocking an Augment for a specific vocation, will also unlock that Augment for all your other vocations. For example: Lets say you start out with your Vocation being fighter. You'll level up a bit and eventually reach Rank 5 Fighter. This will unlock the Sinew augment. This augment will grant you energy to carry additional weight. You can purchase this with Discipline, then change your vocation if you so desire, and still select Sinew as one of your active augments. You may only have 6 augments equipped and activated at a time. But you can change which ones you'd like to use at an inn or a tavern. Did you know's This information isn't really hidden to you in the game, but it is never properly explained either. Debilitations If you step in too deep water, or if something throws a cask of water over you, you will become drenched. Your clothes will look soaked and water will be dripping from you. When you are drenched, you have reduced resistance towards electricity and cold, but increased resistance towards fire. Being drenched will temporarily quench your lantern if you had it equipped. You can dry yourself by using a clean cloth, or drink any potion that cures some debilitations. If someone should throw a flask of oil at you, and it breaks, or if you should be covered with oil by some other means, you become tarred. When you have the tarring status effect, your clothes will look soaked, but as if not by water, but by oil or tarr. When you are tarred, you take increased damage from fire based attacks, which will consume the tarring, but it will also set you on fire for a set amount of time. You can remove tarring by using an Absorbent Rag, or drinking any potion that cures some debilitations. These are genereally speaking, de-buffs, called debilitations; and can likewise be applied to monsters and NPC's, as well as the player and the pawns. There exists more debilitations than just these, and many monsters react differently based on which one it has been afflicted with, or which one it has successfully afflicted you or your pawns with. Consumables & Food In Dragon's Dogma, you will sometimes find consumables, materials and food items. Many of these are time-sensitive, and as such can be either improved or ruined by time. You can find out if an item is time-sensitive by looking at it in your inventory and clicking the "Swap Explanation" button. Certain food items, such as Meat, first start to become sour. When they are sour, they grant the player additional stamina from consumption. You can also sell sour meats at a much higher price compared to normal meat. Other food items such as fruit, will first turn moldy, increasing the amount of restoration they give as well as increasing the value that the fruit can be sold for. Every time-sensitive item will eventually reach a point where it will rot. Many such items become poisonous to comsume, and some can even be used as ingredients to create poisons. Time-sensitive items that has become rotten has lost next to all value to a vendor. Each time-sensitive item will go through a stage of normal > moldy/sour > rotten. The "sweet spot" is when the item is moldy or sour. In Grasys the people seem to refer to these things as delicasies. Ageing food apparently adds very flavorable qualities to the food! In Dragon's Dogma, there is an item called an Airtight Flask, in which you can store a single piece of time-sentitive material, freezing it in its current state. These flasks don't appear very often in the wilds though - But can be bought from certain shops. Another way to store time-sensitive items is to put them in your storage. Your storage can be accessed trough various inns and taverns. Final words I hope that this information provided some of you with some useful information! I want to thank everyone that helped me gather all this information! You guys are awesome :)