ACE COMBAT™ 7: SKIES UNKNOWN


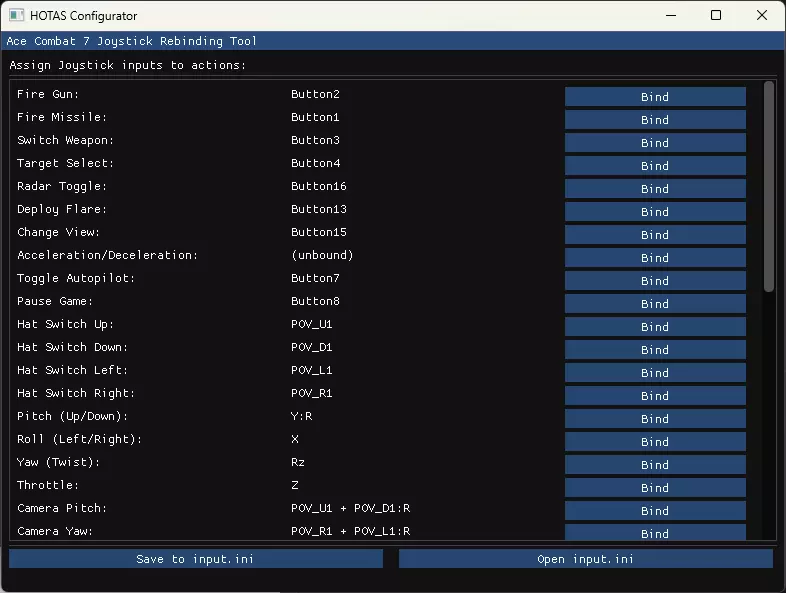
Some random tips and tricks that will help explain some random and vague details in the game and will help you enjoy the game more. Tips and Tricks I noticed many people have difficulty with certain missions or situations so I have compiled a few tips that I didn't exactly know my first run but just made everything a lot easier. 1- I felt that it's a lot more intuitive to assign high G turns to airbrake only (type B in the controls menu) 2- LACM makes mission 9 a walk in the park. Just get the Rafale M with LACM, equip it with extra special missiles, +blast radius, +range, +homing. When you see a distant target (up to 10,000m IIRC), pop out of the cloud and shoot the cruze while angled upwards so it gains more altitude and avoids mountains. 3- When you go named Ace hunting for special skins. Do it on normal difficulty, no need to make your life needlessly hard. 4- for medals, no need to play the campaign continously. S ranking free missions will get you the medals. 5- Use SFFS(Self-Forging Fragments Submunitions). They are tons of fun and can be very devastating in the right situation. 6- Start using the technique of holding (target switch) button on distant targets and pitching up with bombs. You will see the blast radius of the bombs on ground and can perform long range bombing this way (combine this with SFFS and mission 8 will become very fun). Bombs the targets furthest from you from afar while you close in and shoot the nearest with missiles. 7- use the same technique mentioned above (holding target switch) to ID targets that are not in the center of your screen. You can even ID targets behind you this way. It will make your life a lot easier in mission 16 and 17. 8- Standard missile reload time is a must have for me personally. and standard missile homing is a close second. As for body parts queen's custom, ECU software update, and variable cycle engine are also must have. Some missions require very unique builds, but generally speaking these are very useful. 9- in ground assault missions, getting the air targets is usually a good tactic as the game tracks your overall score regardless of target type. Planes are somewhere between 500-1000 (for f22 and su57 and bombers) while ground targets are usually around 200. 10- This brings us to the target score. A glance at the top left corner of the screen will tell you the target score value. 11- When you destroy ships, you automatically get the score for destroying all equipment on board (SAMs, CWIS, Aircrafts in carriers, etc.). So always cycle targets until you have the vessel itself (frigate, Destroyer, carrier, cruiser, Or AEGIS) 12 - To kill ships easily, fly low (100-150 m) and use LASM (can one shot cruisers). That way the CWIS isn't able to aim and shoot down the missile. Pulse lasers are also very effective against vessels. 13- S Rank requires a certain score, but the trick is that the score depends on your total time and destruction points. If you pay attention to the score summary screen after a mission is finished, you'll see time bonus and destruction score with a multiplier (X1.5 for example) I was really struggling with S ranking mission 19 on ace difficulty although I was doing very well. After several failed attempts, I watched a YouTube video of S rank on the same mission and I noticed that the YouTuber's total mission time is 3 minutes longer than mine, yet he still got an X1.5 bonus. This meant that I can spend extra 3 minutes shooting down drones and increasing my destruction score and still be within the same tier of time bonus (X1.5 is the maximum AFAIK). Sadly, the exact time tiers and total score requirements for each mission and at different difficulties are unknown, but knowing this formula will help you compare your results with other people who S ranked and then either adjust for shorter time or more destruction as needed. 14- This brings us to retrying from checkpoints. As soon as you see a cutscene, pause and retry from checkpoint . This will make your life a lot easier as you will restock all ammo and repair instantly. This will not affect the S rank because it will only add an extra second or two to the total mission time. I'll try to explain how that works. Let's say a mission is comprised of two phases, the first one is a fixed 5 minutes and the second one is 10 minutes but can be completed in 6 minutes, and the time tier for X1.5 is anything under 12 minutes total. If you you retry immediately after the cutscene and finish the second phase in 6:30, your total time will be 5 + 6:30 + 3 seconds (between the cutscene end and you retrying) = 11:33 minutes which is still within the best time tier. However, if you complete the first phase, then play 3 minutes in the second phase and then crash/die and have to retry and spend another 6 minutes to complete the second phase again. Your total time will be 5+3+6=14 minutes which will give you maybe X1.2 time tier multiplier and you will not be able to S rank. Fun fact, I S ranked Mission 20 while still crashing in the tunnel and retrying, the time lost in the tunnel wasn't that much and I still got an overall good total mission time. 15- The only exception to retrying from checkpoint is if you are hunting named aces that have a condition in the first phase of the mission and the ace appears in the second phase. In this case retrying from checkpoint will make the named ace disappear. But if the condition of triggering the named ace and killing him happens in the same phase, retrying from checkpoint will still grant you the skin. 16- refueling and landing give you extra score AFAIK, so don't skip them.
In this guide, I would like to give my tips on completing an "S" grade campaign on AC difficulty. Have you reached the AC difficulty level? It means that your LA branch has already been upgraded. ~01. Any high-speed fighter equipped with air-to-air weapons is suitable for the task. A typical example is the MiG—31B with LAAM or SAAM. 02 missiles. When performing this mission, it is advisable to use a high-strength fighter armed with missiles of any class (in the first part, we hit ground targets, and in the second— air targets). The best option is the F-14D model, equipped with LAAM missiles. ~03. Due to the predominance of air combat, it is recommended to use a maneuverable fighter equipped with air-to-air missiles. As an example, the Su-37 with 4AAM missiles. ~04. We need a maneuverable fighter. In the first part of the mission, you need to fly past the red circles without hitting any of them. In the second part, it's enough to fly around, for example, clockwise, and destroy ground targets. After you have destroyed all the targets, you will have new tags. Destroy everything, not just the red ones (primarily the UAVs). In the fourth part, shoot down the UAV next to an ally surrounded by a square. I advise you to use air-to-air missiles, for example, the Su-35S fighter with 6AAM missiles. ~05. In this mission, use a fast fighter with air-to-air missiles, such as the MiG-31B with LAAM missiles. ~06. In the sixth mission, destroy as many targets as possible. Any fighter with air-to-ground missiles will do. For example, the Su-34 aircraft with SFFS. ~07 missiles. Here I strongly recommend using a maneuverable fighter with high stability and Air-to-air missiles, because Air-to-Ground missiles are useless in such conditions, and in the second part of the mission you will have a dogfight. The Su-37 with 4AAM missiles would be perfect. ~08. In the first part, it is recommended to focus on destroying oil tanks and tankers in order to score the necessary points as soon as possible. In the second part of the mission, you need to destroy the oil trucks scattered throughout the map. Link to the map: https://steamcommunity.com/sharedfiles/filedetails/?id=3664178529 I recommend using a Gripen aircraft with LACM missiles. ~09. Perhaps the most annoying mission in the game, if you need an "S" rating, I recommend using the LACM air-to-ground cruise missile. Shoot it from under the clouds and give it a couple of seconds to fly so that it captures the target. Destroy as many targets as possible (preferably all of them). Recommended aircraft: Rafale M. ~10. Use fast aircraft, such as F-22, MiG-31, Su-33. This will help you quickly cover long distances on the map. Keep an eye out for missiles that launch rocket launchers. The first attack almost always misses the aircraft, but missile tracks indicate where they come from. We need to destroy the installations quickly. For convenience, you can use LASM (long-range air-to-ground missiles). If the fighters are approaching an ally. We need to destroy enemy planes as soon as possible. Link to the map: https://steamcommunity.com/sharedfiles/filedetails/?id=3664191242 ~11. Head northwest to the first cluster of oil platforms. After a couple of minutes, the Cyclops-1 wingman will inform you that you should shoot at the junction of the pillars and the platforms themselves. Head towards the northern cluster of targets on the map — the oil platforms again. Repeat the same process. To complete the mission, it may be useful to use air-to-ground missiles, such as LASM, LAGM, LACM. I recommend using Su-30SM. It is also possible to use the Su-33, F/A-18F, and X-02S with EML weapons, as they can destroy oil platforms with a single accurate shot from a distance. ~12 aircraft. Destroy as many enemies as possible. Tu-95 and Tu-160 are a priority. Of the planes, I recommend using the Su-57 with a pulsed laser. ~13. I recommend using fast fighters, such as the MiG-31B or X-02S. Destroy as many enemies as possible. ~14. In the first part, take your time, be careful and don't get caught in the light. In the second part, just destroy everyone. Any plane that suits your taste is suitable for passage, the main thing is that it is not very wide. ~15. There will be three enemy target zones on the map: the center, the southeast, and the southwest. It is important not to waste time in order to meet the timer and score the required number of points. First you need to head to the central area and destroy the ground targets. It is recommended to use air-to-ground missiles for this purpose. Next, you should move to the southeast and attack enemy aircraft, but you should not spend a lot of time on unnecessarily long maneuvering. In the southwest, you need to destroy enemy ships. To do this, it is recommended to use special weapons that hit ships hard, as they can withstand missile strikes. I recommend using MiG-29, Su-57, Su-34 and A-10. ~16. Periodically check the vehicle and destroy everything that can attack it from the main road, both in front and behind. Then you can distract yourself for 30-45 seconds and destroy some random targets, after which you can check the car again. Almost all aircraft are suitable for this mission. ~17. After mopping up the coast at the beginning of the mission, the allied forces are asked to provide support during the escape from the island. You need to fly over the island and scan everything, destroying enemies and protecting your allies. The dispatcher will tell you that a group of unknown people is flying to the island. We need to figure out who they are. Shoot down all the bombers before they reach the island. It is necessary to shoot down only the Tu-160, you can ignore the escort (after the destruction of the last bomber, they will fly away). It is preferable to use the F-22 or F-35C with air-to-ground missiles. ~18. It is recommended to use the F-22A aircraft with QAM missiles. At the start of the mission, destroy everything on the map without making unnecessary movements. ~19. Try to destroy as many UAVs as possible while the bird arsenal has a protective field. From time to time, they get into a bunch of links and catch up with the arsenal bird, which makes it possible to shoot them down with one hundred percent probability with the help of 4AAM. Use a Su-57 aircraft with 4AAM weapons and a microwave radar. You need to reach the points limit in three minutes or so to be able to destroy the aces. The radar will detect Calamity and F-22. ~20. Use a maneuverable aircraft. This will help to avoid collisions with walls. Avoid prolonged dogfight. Upon reaching the camera, it is recommended to fly inside it counterclockwise along the general trajectory of the ADF-11 and launch a missile salvo, getting as close as possible to the drone. The F-22A or Su-57 will do. ~To get the "S" rank, you can use a checkpoint restart. This does not affect the rank, but it restores the aircraft and replenishes ammunition. Checkpoints are usually placed immediately after the in-game cutscenes. If the passage is too difficult for you, then remember that there are various mods that simplify the game. ~In the manual, I recommended the planes that I used myself. You can use planes that are convenient for you, the tactics in missions are the same, plus or minus. ~Thank you for your attention! Play for fun!)


本指南将介绍如何在战役和多人模式中获取所有勋章。信息来源于英文维基。我没有翻译勋章名称和获取条件,因为具备基础英语水平的玩家通常都能理解——但如果有人对某枚勋章有疑问或不理解,我会随时解答并提供帮助。战役 Bronze Ace-摧毁1000个敌方目标。 Silver Ace-摧毁2000个敌方目标。 Gold Ace-摧毁3000个敌方目标。 Bronze Marksman-使用机枪击落50架敌机。 Silver Marksman-使用机枪击落200架敌机。 Gold Marksman-使用机枪击落300架敌机。 Bronze Wings-在普通难度下所有任务获得S级评价。 Silver Wings-在困难难度下所有任务获得S级评价。 Gold Wings-在王牌难度下所有任务获得S级评价。 Raze The Roof-摧毁1500个敌方地面目标(不包括舰船)。 Ship Of Liberty-击沉100艘敌方舰船。 Ghostbuster-击落200架敌方无人机。 Mass Destruction-在战役任务03“双管齐下”中击落30架或更多无人机。沉默是金 - 在战役任务04“救援”中,3分钟内渗透雷达网络。 一次成功 - 在战役任务06“漫长的一天”中,不使用返航线摧毁50个或更多地面目标。 如释重负 - 在战役任务07“初次接触”中,在7名友军发出求救信号前击落所有无人机。 守护者 - 在战役任务10“转移命令”中,摧毁16个或更多地面目标。 千里眼 - 在战役任务13“掩体破坏者”中,5分钟内摧毁所有导弹发射井。 哇哦 - 在战役任务15“法班提之战”中不受到任何伤害。 完成任务 - 在战役任务18“失落王国”中,不使用特殊武器在5分钟或更短时间内击落米哈伊尔。击落巨鸟 - 在战役第19关“灯塔”中不使用机枪摧毁 Arsenal Bird。 精准操控 - 在战役第20关“深蓝”中仅使用机枪摧毁所有目标。 毫发无伤 - 完成战役模式且未受到任何伤害。 机枪狂人 - 仅使用机枪完成战役模式。 光速突袭 - 在累计4小时或更短时间内完成一次战役流程。此成就无法在自由任务中完成,若已完成过剧情则需要重新开始故事。 多人游戏 Bronze Ace - 击落50架敌方战机。 Silver Ace - 击落100架敌方战机。 Gold Ace - 击落200架敌方战机。 Bronze Wings - 在多人模式中出击25次。 Silver Wings - 在多人模式中出击50次。金翼 - 在多人模式中出击100次。 天空追踪者 - 在大逃杀模式中获得3次第一名。 赢得50场团队死亡竞赛游戏。 全为荣耀 - 在团队死亡竞赛中获得MVP。 云中骄傲宣言 - 分别获得"逃脱大师"、"云层探索者"和"捉迷藏高手"三种表现评价各3次或以上。 后记及其他信息 所有信息均来自维基百科,其中也包含多人模式中获取代号的相关信息。如有问题、建议或修正,请留言。我从维基百科获取了所有信息,其中包含多人模式下如何接收呼叫的相关内容。如果你有疑问、建议或修改意见,请告知。


关于如何以及在哪里快速获取MRP的简单信息。 MRP是什么? MRP是通过击落飞机、摧毁地对空导弹等目标以及完成任务所获得的点数。你可以用它来购买升级部件、飞机或新武器。 如何以及在哪里获取MRP? 方法一:游玩多人模式 一局5分钟的游戏(不包括菜单、开场/结束动画和选择菜单的时间,最长10分钟)可获得60000至130000 MRP。 方法二A:自由任务>任务19:灯塔 如果你操作迅速(尤其是在第二阶段的主要部分),大约20分钟内可以获得200000至210000 MRP。(游戏内17至19分钟+1分钟过场动画) // S级评价+55-60K分数对应的收益 // 方案2B:自由任务>任务11:塞壬之歌(若无法进入最后几个任务) 这个15分钟长的任务可获得约110K MRP // S级评价+30K分数对应的收益 // 或 方案3:你可以在4小时内重玩整个战役以获得勋章和大约450万MRP 现在由你选择! 结论 多人游戏选项效率更高,但如果你讨厌太强的对手,另外两个方案压力更小/更省心。 希望本指南对你有帮助。祝你玩得愉快! 补充说明 任务6:漫长的一天 15分钟内获得S级评价和35K分数可获得90K MRP。 任务8:管道破坏 9分钟内获得S级评价和30K分数可获得75K MRP。任务12:巨石阵防御战 16分钟内获得S级评价与50000分,奖励165000MRP。 任务15:法班提争夺战


В этом руководстве я хотел бы дать свои советы по прохождению кампании на оценку "S" на сложности AC. Дошли до уровня сложности AC? Значит, ветка ЛА у вас уже прокачана. ~01. Для выполнения задачи пригоден любой истребитель высокой скорости, оснащённый вооружением класса «воздух-воздух». Типовой пример — МиГ-31Б с ракетами LAAM либо SAAM. ~02. При выполнении данной миссии целесообразно задействовать истребитель повышенной прочности, вооружённый ракетами любого класса (в первой части мы бьём наземные цели, а во второй — воздушные). Оптимальным вариантом может служить модель F-14D, оснащённая ракетами LAAM. ~03. В связи с преобладанием воздушного боя рекомендуется использовать манёвренный истребитель, оснащённый ракетами класса «воздух-воздух». В качестве примера — Су-37 с ракетами 4AAM. ~04. Нужен маневренный истребитель. В первой части миссии надо пролететь мимо красных кружков, не попав ни в один. Во второй части достаточно летать вокруг, например, по часовой стрелке, и уничтожать наземные цели. После того как вы уничтожили все цели, у вас появятся новые метки. Уничтожайте все, а не только красные (в первую очередь БПЛА). В четвертой части сбивайте БПЛА рядом с союзником, обведенным квадратом. Советую использовать ракеты класса "воздух-воздух", например, истребитель Су-35С с ракетами 6ААМ. ~05. В этой миссии используйте быстрый истребитель с ракетами класса "воздух-воздух", например, МиГ-31Б с ракетами LAAM. ~06. В шестой миссии уничтожьте как можно больше целей. Подойдет любой истребитель с ракетами класса "воздух-земля". Например, самолет Су-34 с ракетами SFFS. ~07. Тут настоятельно рекомендую использовать манёвренный истребитель с высокой устойчивостью и ракетами класса "Воздух-воздух", ведь ракеты класса "Воздух-Земля" бесполезны в таких условиях, а во второй части миссии у вас будет воздушный бой. Su-37 с ракетами 4AAM идеально подойдёт. ~08. В первой части рекомендуется сосредоточиться на уничтожении нефтяных цистерн и танкеров, чтобы как можно скорее набрать необходимое количество очков. Во второй части миссии нужно уничтожить грузовики с нефтью, рассредоточенные по всей карте. Ссылка на карту: https://steamcommunity.com/sharedfiles/filedetails/?id=3664178529 Рекомендую использовать самолёт Gripen с ракетами LACM. ~09. Пожалуй, самая раздражающая миссия в игре, если нужна оценка "S", — советую использовать крылатую ракету "воздух-земля" LACM. Стреляйте ею из-под облаков и дайте пару секунд на полет, чтобы она захватила цель. Уничтожьте как можно больше целей (желательно все). Рекомендуемый самолет: Rafale M. ~10. Используйте быстрый самолёт, например F-22, МиГ-31, Су-33. Это поможет быстро преодолевать большие расстояния по карте. Следите за ракетами, которые запускают ракетные установки. Первая атака почти всегда проходит мимо самолёта, но следы от ракет указывают, откуда они исходят. Нужно быстро уничтожать установки. Для удобства можно использовать LASM (ракеты дальнего действия "воздух-земля"). Если истребители приближаются к союзнику. Нужно как можно скорее уничтожать вражеские самолёты. Ссылка на карту: https://steamcommunity.com/sharedfiles/filedetails/?id=3664191242 ~11. Направиться на северо-запад к первому скоплению нефтяных платформ. Через пару минут ведомый "Циклоп-1" сообщит, что стоит стрелять по месту соединения опор и самих платформ. Направиться к северному скоплению целей на карте — снова нефтяным платформам. Повторить тот же процесс. Для прохождения миссии может быть полезно использовать ракеты класса "воздух-земля", например LASM, LAGM, LACM. Из самолетов советую использовать Су-30СМ. А также можно использовать Су-33, F/A-18F, X-02S с вооружением EML, так как он выносит нефтяные платформы с одного точного выстрела издалека. ~12. Уничтожьте как можно больше врагов. Tu-95 и Tu-160 в приоритете. Из самолётов советую использовать Су-57 с импульсным лазером. ~13. Советую использовать быстрые истребители, например МиГ-31Б или X-02S. Уничтожьте как можно больше врагов. ~14. В первой части не торопитесь, будьте аккуратны и не попадайте на свет. Во второй части просто уничтожьте всех. Для прохождения подойдёт любой самолёт на ваш вкус, главное — не очень широкий. ~15. На карте будут три зоны, в которых сосредоточены вражеские цели: центр, юго-восток и юго-запад. Важно не терять времени, чтобы уложиться в таймер и набрать необходимое количество очков. Сперва нужно направиться в центральную зону и уничтожить наземные цели. Для этого рекомендуется использовать ракеты класса "воздух-земля". Далее следует двигаться на юго-восток и атаковать самолёты противника, но не стоит тратить много времени на излишне долгое маневрирование. На юго-западе нужно уничтожить корабли противника. Для этого рекомендуется использовать специальное оружие, которое сильно поражает корабли, так как они могут выдерживать удары ракет. Рекомендую использовать МиГ-29, Су-57, Су-34 и A-10. ~16. Периодически проверяйте автомобиль и уничтожайте всё, что может его атаковать с главной дороги, как спереди, так и сзади. Затем можно на 30–45 секунд отвлечься и уничтожить какие-то случайные цели, после чего снова проверить автомобиль. Для этой миссии подходят почти все самолёты. ~17. После зачистки берега в начале задания союзные силы просят оказать поддержку во время бегства с острова. Нужно полетать над островом и сканировать всё подряд, уничтожая врагов и прикрывая союзников. Диспетчер скажет, что к острову летит группа неизвестных. Нужно разобраться, кто они такие. Сбейте все бомбардировщики до того, как они доберутся до острова. Сбить необходимо только Ту-160, на эскорт можно не обращать внимания (после уничтожения последнего бомбардировщика они улетят). Предпочтительнее использовать F-22 или F-35C с ракетами "воздух-земля". ~18. Рекомендуется использовать самолёт F-22A с ракетами QAM. На старте миссии уничтожить всё на карте, не совершая лишних движений. ~19. Старайтесь уничтожить как можно больше БПЛА, пока у птицы-арсенала включено защитное поле. Время от времени они всей кучей сбиваются в звенья и нагоняют птицу-арсенал, что даёт возможность со стопроцентной вероятностью сбивать их с помощью 4ААМ. Используйте самолёт Су-57 с оружием 4ААМ и микроволновым радаром. Нужно достичь лимита очков за три минуты или около того, чтобы успеть уничтожить асов. Радар обнаружит Calamity и F-22. ~20. Используйте манёвренный самолёт. Это поможет избегать столкновений со стенами. Избегайте длительного воздушного боя. Рекомендуется, достигнув камеры, лететь внутри неё против часовой стрелки по общей траектории ADF-11 и производить ракетный залп, подобравшись как можно ближе к беспилотнику. Подойдёт F-22A или Су-57. ~Чтобы получить ранг "S", можно использовать рестарт с контрольной точки. Это не влияет на ранг, но восстанавливает самолёт и пополняет боеприпасы. Контрольные точки, как правило, расставлены сразу после внутриигровых катсцен. Если прохождение для вас слишком сложное, то помните, что есть различные моды, которые упрощают игру. ~В руководстве я советовал самолёты, которыми пользовался сам. Вы же можете использовать удобные для вас самолёты, тактика в миссиях плюс-минус одинаковая. ~Спасибо за внимание! Играйте в удовольствие!)

So you want to slap an S-rank on each mission for that Sol Emblem and some nicknames? Well you've come to the second best place. This guide takes and partially condenses information from the Ace Combat Fandom site(wiki?), giving you a pocket reference for each mission, excluding DLC, right here in your Steam client both in-game and out. Links to the mission list on Fandom can be found below in the guide. Accuracy Tuned - Part One In regards to time spent on a mission, checkpoint restarts will count against you. If you want to be close to the target time as possible, I would personally suggest a restart from the beginning. Mission 01: Charge Assault Earning an S Rank on this mission requires earning a combined Destruction Score and Time Bonus of 20,500 points or more. The maximum Time Bonus the player can earn in this mission is 10,230 points, awarded for completion in a total of 4 minutes and 50 seconds or less. Completing the mission in that time or faster, 10,270 points from destroying enemies in the mission will earn the S rank. Since the bombers only account for 10,200 points, the rest must be earned by shooting down MIG-21s. Taking longer than 4 minutes and 50 seconds to complete the mission will decrease the Time Bonus by 30 points per second. As the maximum points from destroying enemies in the mission is 13,060 (not including the ace), the S-rank cannot be earned if it takes 6 minutes and 23 seconds or longer to complete the mission. Mission 02: Charge the Enemy Earning an S Rank on this mission requires earning a combined score and time bonus of 33,000 points or more. The maximum time bonus available is 25,550 for completing the mission in a total of 6 minutes or less. If the player can complete the mission in that amount of time, they only need 7,450 points from destroying targets in the mission itself to earn the S Rank. Past the 6 minute threshold, the time bonus decreases by 50 points every second, so the player must compensate by destroying more targets to hit the 33,000 point threshold. Mission 03: Two-pronged Strategy Earning an S Rank on this mission requires earning a combined score and time bonus of 44,000 points or more. The maximum time bonus available is 27,640 for completing the mission in a total of 9 minutes or less. If the player can complete the mission in that amount of time, they only need 16,360 points from destroying targets in the mission itself to earn the S Rank. Past the 9 minutes threshold, the time bonus decreases by 40 points every second, so the player must compensate by destroying more targets to hit the 44,000 point threshold. Mission 04: Rescue Earning an S Rank on this mission requires earning a combined score and time bonus of 50,000 points or more. The maximum time bonus available is 32,440 for completing the mission in a total of 10 minutes and 30 seconds or less. If the player can complete the mission in that amount of time, they only need 17,560 points from destroying targets in the mission itself to earn the S Rank. Past the 10 minutes and 30 seconds threshold, the time bonus decreases by 40 points every second, so the player must compensate by destroying more targets to hit the 50,000 point threshold. Mission 05: 444 Earning an S Rank on this mission requires earning a combined score and time bonus of 35,000 points or more. The maximum time bonus available is 18,040 for completing the mission in a total of 8 minutes less. If the player can complete the mission in that amount of time, they only need 16,960 points from destroying targets in the mission itself to earn the S Rank. Past the 8 minutes threshold, the time bonus decreases by 40 points every second, so the player must compensate by destroying more targets to hit the 35,000 point threshold. Mission 06: Long Day This one is very simple. Score 27,000 or more from destroying targets in the mission. Once reached, AWACS Bandog will compliment Spare Squadron for doing "a hell of a job". Mission 07: First Contact Earning an S Rank on this mission requires earning a combined score and time bonus of 46,350 points or more. The maximum time bonus available is 40,550 for completing the mission in a total of 12 minutes and 30 seconds or less. If the player can complete the mission in that amount of time, they only need 5,450 points from destroying targets in the mission itself to earn the S Rank. Past the 12 minutes and 30 seconds threshold, the time bonus decreases by 50 points every second, so the player must compensate by destroying more targets to hit the 46,000 point threshold. Mission 08: Pipeline Destruction Earning an S Rank on this mission requires earning a combined score and time bonus of 40,550 points or more. The maximum time bonus available is 12,050 for completing the mission in a total of 10 minutes or less. If the player can complete the mission in that amount of time, they only need 28,500 points from destroying targets in the mission itself to earn the S Rank. Past the 10 minutes threshold, the time bonus decreases by 50 points every second, so the player must compensate by destroying more targets to hit the 40,550 point threshold. Mission 09: Faceless Soldier Earning an S Rank on this mission requires earning a combined score and time bonus of 43,000 points or more. The maximum time bonus available is 31,240 for completing the mission in a total of 11 minutes or less. If the player can complete the mission in that amount of time, they only need 11,760 points from destroying targets in the mission itself to earn the S Rank. Past the 11 minutes threshold, the time bonus decreases by 40 points every second, so the player must compensate by destroying more targets to hit the 43,000 point threshold. Mission 10: Transfer Orders Earning an S Rank on this mission requires earning a combined score and time bonus of 27,000 points or more. The maximum time bonus available is 19,240 for completing the mission in a total of 12 minutes or less. If the player can complete the mission in that amount of time, they only need 7,760 points from destroying targets in the mission itself to earn the S Rank. Past the 12 minutes threshold, the time bonus decreases by 40 points every second, so the player must compensate by destroying more targets to hit the 27,000 point threshold. Mission 11: Fleet Destruction Another simple one. Score 40,000 or more from destroying targets in the mission. Once reached, AWACS Long Caster will compliment the squadrons, commenting that "the new recruits certainly pulled their weight too". Mission 12: Stonehenge Defensive Earning an S Rank on this mission requires earning a combined score and time bonus of 50,000 points or more. The maximum time bonus available is 15,330 for completing the mission in a total of 16 minutes and 30 seconds or less. If the player can complete the mission in that amount of time, they only need 34,670 points from destroying targets in the mission itself to earn the S Rank. Past the 16 minutes and 30 seconds threshold, the time bonus decreases by 30 points every second, so the player must compensate by destroying more targets to hit the 50,000 point threshold. CONT. Information in this category comes from Acepedia's mission listing for ACE COMBAT 7: SKIES UNKNOWN[acecombat.fandom.com] Accuracy Tuned - Part Two Mission 13: Bunker Buster Earning an S Rank on this mission requires earning a combined score and time bonus of 38,000 points or more. The maximum time bonus available is 19,240 for completing the mission in a total of 7 minutes or less. This includes time spent retrying from the checkpoint. If the player can complete the mission in that amount of time, they only need 18,760 points from destroying targets in the mission itself to earn the S Rank. Past the 7 minutes threshold, the time bonus decreases by 40 points every second, so the player must compensate by destroying more targets to hit the 38,000 point threshold. Mission 14: Cape Rainy Assault Earning an S Rank on this mission requires earning a combined score and time bonus of 32,000 points or more. The maximum time bonus available is 18,040 for completing the mission in a total of 9 minutes or less. This includes time spent retrying from the checkpoint. If the player can complete the mission in that amount of time, they only need 13,960 points from destroying targets in the mission itself to earn the S Rank. Past the 9 minutes threshold, the time bonus decreases by 40 points every second, so the player must compensate by destroying more targets to hit the 32,000 point threshold. Mission 15: Battle for Farbanti Earning an S Rank on this mission requires earning a combined score and time bonus of 57,000 points or more. The maximum time bonus available is 21,700 for completing the mission in a total of 21 minutes and 30 seconds or less. This includes time spent retrying from the checkpoint. If the player can complete the mission in that amount of time, they only need 35,300 points from destroying targets in the mission itself to earn the S Rank. Past the 21 minutes and 30 seconds threshold, the time bonus decreases by 50 points every second, so the player must compensate by destroying more targets to hit the 57,000 point threshold. Mission 16: Last Hope Earning an S Rank on this mission requires earning a combined score and time bonus of 39,040 points or more. The maximum time bonus available is 19,240 for completing the mission in a total of 18 minutes or less. This includes time spent retrying from the checkpoint. If the player can complete the mission in that amount of time, they only need 19,800 points from destroying targets in the mission itself to earn the S Rank. Past the 18 minutes threshold, the time bonus decreases by 40 points every second, so the player must compensate by destroying more targets to hit the 39,040 point threshold. Mission 17: Homeward Earning an S Rank on this mission requires earning a combined score and time bonus of 44,000 points or more. The maximum time bonus available is 18,930 for completing the mission in a total of 15 minutes and 30 seconds or less. This includes time spent retrying from the checkpoint. If the player can complete the mission in that amount of time, they only need 25,070 points from destroying targets in the mission itself to earn the S Rank. Past the 15 minutes and 30 second threshold, the time bonus decreases by 30 points every second, so the player must compensate by destroying more targets to hit the 44,000 point threshold. Mission 18: Lost Kingdom Earning an S Rank on this mission requires earning a combined score and time bonus of 37,000 points or more. The maximum time bonus available is 25,550 for completing the mission in a total of 12 minutes and 30 seconds or less. This includes time spent retrying from the checkpoint. If the player can complete the mission in that amount of time, they only need 11,450 points from destroying targets in the mission itself to earn the S Rank. Past the 12 minute and 30 seconds threshold, the time bonus decreases by 50 points every second, so the player must compensate by destroying more targets to hit the 37,000 point threshold. Mission 19: Lighthouse Earning an S Rank on this mission requires earning a combined score and time bonus of 67,500 points or more. The maximum time bonus available is 16,840 for completing the mission in a total of 20 minutes and 30 seconds or less. This includes time spent retrying from the checkpoint. If the player can complete the mission in that amount of time, they only need 50,660 points from destroying targets in the mission itself to earn the S Rank. Past the 20 minutes and 30 seconds threshold, the time bonus decreases by 40 points every second, so the player must compensate by destroying more targets to hit the 67,500 point threshold. Mission 20: Dark Blue Earning an S Rank on this mission requires earning a combined score and time bonus of 36,000 points or more. The maximum time bonus available is 25,550 for completing the mission in a total of 10 minutes or less. This includes time spent retrying from the checkpoint. If the player can complete the mission in that amount of time, they only need 10,450 points from destroying targets in the mission itself to earn the S Rank.[note 4] Past the 10 minutes threshold, the time bonus decreases by 50 points every second, so the player must compensate by destroying more targets to hit the 36,000 point threshold. Information in this category comes from Acepedia's mission listing for ACE COMBAT 7: SKIES UNKNOWN[acecombat.fandom.com] Closing. If this guide has helped you, why not take a look at Laika's Bird of Prey Guide? https://steamcommunity.com/sharedfiles/filedetails/?id=1642144158 And please, if you struggle to obtain an S-rank on any mission, do comment and I'll do my best to help you from information you can provide me. If you're looking for the previous Legacy Score Tables, I decided to remove them. They weren't contributing anything and just looked ugly 'cause formatting just isn't a specialty of mine.


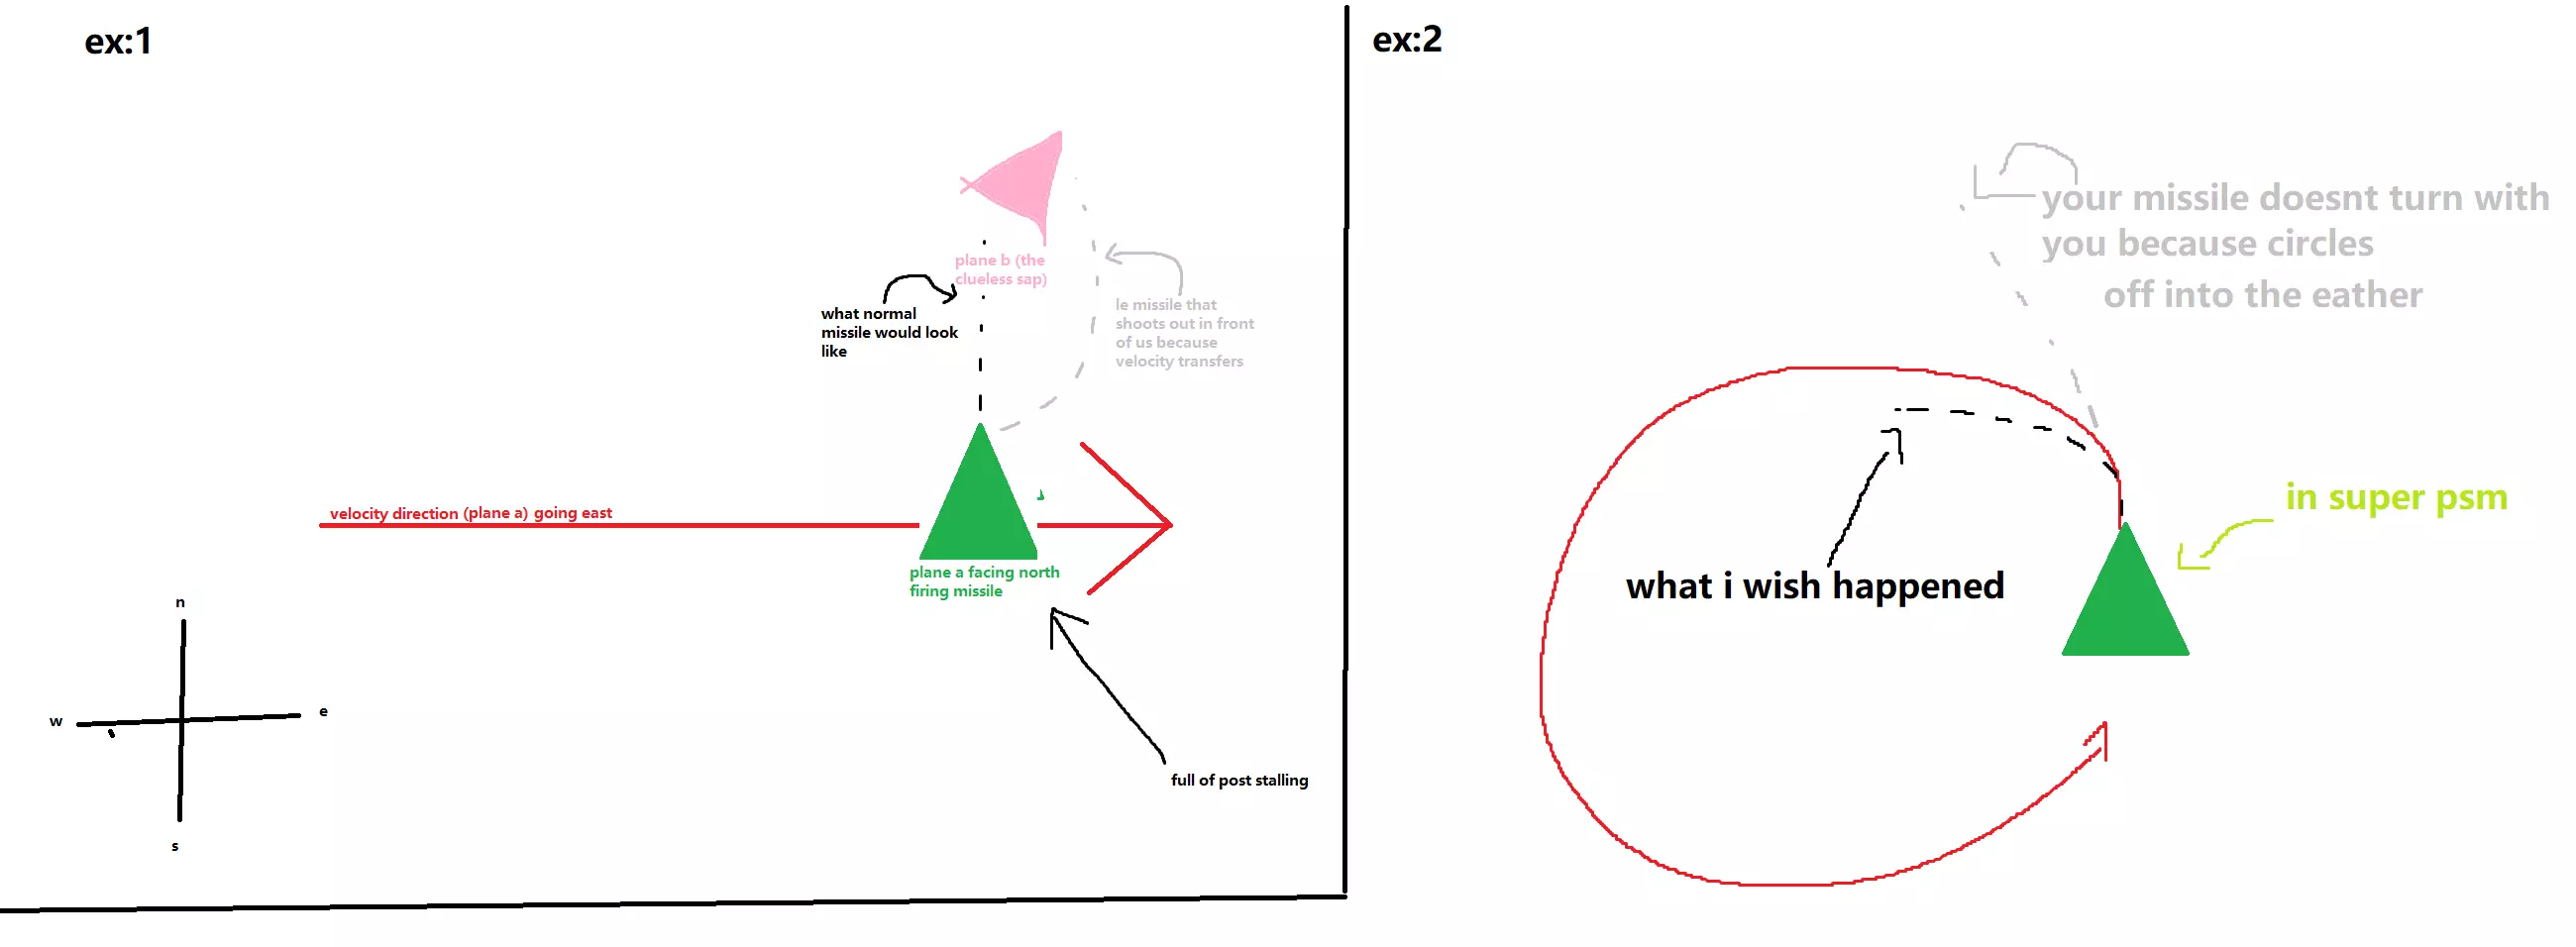
A nugget's guide on how to efficiently spend their limited MRP to become competitive in multiplayer, by picking out the most essential and versatile parts, and calculating how much MRP is needed for a universally applicable but meta-compliant build. Why This Guide - An Introduction Hi, you can call me AP. I've been playing this God-forsaken music discography disguised as a war crimes simulator disguised as an arcade flight sim since Ace Combat 2, and I occasionally play multiplayer these days. I'm not a 1v1 pro, I'm not really even a consistent pubstomper; I'd call myself okay, enough that I can grind up the nuggets, but I definitely struggle against people with real skill. I do, however, have the benefit of hanging around with people who are significantly better than me, and I at least know that in the grand scheme of things I'm nothing fancy. Which, I think, puts me in a decent position to at least impart some of the basic theory of multiplayer into the fresh blood that our community so desperately needs. This is an expanded version of a guide I wrote up some time ago for and with the advice of the Ace Combat community Discord server.[discord.gg] It's full of great folks, and generally is a solid place to go for any questions and tips and to find a decent community. I won't promise that this will turn you into a god among men or anything. But I can at least offer you an explanation for part of why it might feel like an uphill battle just getting started in multiplayer, and point you in the right direction to fix part of it. This guide has nothing to do with imparting skill, it's all theory on where to go for a basic starter build that can run with the big dogs. Or at least, has enough potential that failure after getting it set up is almost guaranteed to be just a skill issue, and not you setting up your plane wrong. The Basics - What's The Issue? So, you're a fresh nugget who's just finished the single-player plane tree, and you're looking for more, and there's only one place left to go. You take a deep breath, navigate to multiplayer, select a plane and a weapon and your finest parts, and fearlessly charge right in... and get absolutely krumped. Your missiles just don't track, the enemy is always turning tighter than you and seem to have way more energy to play with. You end the game with maybe a kill, while XxXWomanSlayer69XxX (he's no longer an incel, his sex woman just goes to a different school, he's just a racist now) ran a train on the lobby inside of three minutes, flying the same plane. What happened? Well, obviously, part of it was probably skill. You're a nugget, they're not, and some gitting gud is absolutely in order, and until then, you're just gonna have to live with the reality of this being something of a skill issue. But a big aspect of it would also have been that multiplayer parts are just way better than what you have access to in singleplayer (barring those chads running the all parts in singleplayer[www.nexusmods.com] mod). Parts make an enormous difference in the performance of aircraft. For example, the difference between no parts and full parts is so vast that, if you exclude the statistical outliers for peak pitch rate (F-4E and F-104 on the low end, Rafale and F-15E on the high end), the worst-turning planes in the game, the F-16C and its statistical clones, will with a full set of parts slightly out-turn the best, the F/A-18E TGM, with no parts. Standard missiles with homing2 and datalink become capable of looping - maintaining lock after launch and continuing to chase - just shy of a full 180 degrees. The gun deals nearly double damage compared to stock with damage2. The list goes on. Notably, the difference between single player parts and multiplayer parts is stark. Bulletproof Tank 1 gives 40 additional health, with planes averaging around 120 by default; Bulletproof Tank 2 yields a whopping 100. Light Blisk 2 has twice the effect of Light Blisk 1. New Flap Actuators 3 has triple the bonus of New Flap Actuators 1. High-Power Enhanced Shells 2 is almost 3.2 times as strong. So single player parts are to be upgraded from as quickly as humanly possible. That leads us to a problem, though. Those parts are expensive. You're looking at many millions of MRP to get them all. And that's a problem. You want to play with the big boys as soon as possible, right? Then you'll need a plan to get competitive as quickly as possible, to minimize the time spent grinding MRP in singleplayer or in getting ground into the dust in multiplayer in inferior aircraft. Fortunately, I'm here to help you with just that. Oh, by the way. The in-game stat bars are, like, completely freaking meaningless. Do not trust them. Use either the Hidden Stats Spreadsheet[docs.google.com] (if you prefer the datamined hard numbers) or the community stat cards[docs.google.com] (if you like a visual presentation) as your basis; if you have further questions, feel free to ask around in the Ace Combat community Discord server[discord.gg]. The Methodology - Planning Babby's First Meta Build First, we need to figure out roughly what capabilities we need. The first thing is to get ourselves a weapon actually capable of consistently scoring points. After all, a match is won by whoever scores the most points the fastest. While it's tempting to gun for the special weapons parts first, I think this is a mistake. Not all special weapons need the same parts, even if they usually share some in common, meaning you'll need to buy almost the whole spread to have a useful build for all the special missiles. This is, bluntly, expensive as hell. Plus, not every plane even has good air to air special weapons. For example, if you fell in love with the F-35, good luck with 4AAMs! They're usable, but among the worst. Also, importantly, special weapon parts are extremely expensive, among the most expensive parts on the tree. No, you're best off getting a standard missile build going first! Make absolutely certain that you're buying the MSL parts, not the Sp. W parts; they are not interchangeable, at all, and you will feel stupid if you buy them by accident here. Especially since MSL parts cost about half as much. Oy. You. Yeah, you. Don't look at me like that. "Missiles are boring! QAAMs let me turn my brain off!" No, shut the ❤️❤️❤️❤️ up, you absolute goblin, sit down and listen. Missiles are an extremely viable weapon in Ace Combat 7, with some unique capabilities, and if you dismiss them in favor of the flashy special weapons, you're only hurting yourself. For one thing, they don't run out of ammunition. You die, you go back to full ammo. Second, with the right parts, they can loop - that is, they can miss and then come back around and try and hit again. Out of all special weapons, only QAAM (limited ammunition), SAAM (generally considered bad), and WUAV (weird) can loop. Third, they're eminently spammable, coming back quicker than you'd think (very quick if you choose to run the reload part), which combined with their large ammo pool means they don't just run out when you get flared or miss, and lets you constantly keep enemies off balance and unable to level out for even a moment without getting thwacked. Okay, so we need to make our missiles good. How? Step one, they need to actually be able to turn. The High-Speed Data Link Antenna part buffs almost every part of missiles, so that goes here - and even if it didn't, you need to buy it before anything else anyway. Homing also goes without saying, so add Thrust-Adjusting Steering Device (MSL). Step two, they need to be able to actually do damage - damage equals points, period. So, naturally, the damage part, Directional Proximity Fuze (MSL). Okay, that's easy enough. Now we need to figure out what stats are important on our plane itself. This is, fortunately, mostly straightforward as well. Ace Combat 7 dogfights tend to be rate fights - that is, you're turning and burning around each other in a circle trying to get on each other's tail with sustained rapid turns. This means you need to be able to turn quickly, and you need to be able to not run out of speed in doing so. There are two parts that make you turn faster, New Flap Actuators and Superior Maneuverability, the first giving straight pitch rate and the latter improving all rates. Not running out of energy means acceleration; it's even more important for planes that have their turn rates max out at higher speeds, like the F-15S, F/A-18E TGM, and MiG-21, but all planes need it. Technically, all engine parts affect acceleration, because of the way it's calculated as a percent of your maximum speed, but the pure direct acceleration part, Light Blisk, is more impactful for most of the flight curve. You also will want to improve your survivability. There's a few ways to do this, but my recommendation is straight up buffing your hitpoints with Bulletproof Tank. First, it directly makes it harder for the enemy to win. Remember, damage equals points... as a percentage of your maximum health. This means that with more HP, the same amount of raw damage dealt to you will be less points for the enemy landing the hit. Importantly, it also works even if you're bad; dodging only helps if you're good enough to not get hit, while armor works regardless. And perhaps most essentially, it puts planes over one-shot thresholds. The most notable is having more health than the 210 damage dealt by a single upgraded EML, and the next is the 122.4 damage dealt by most upgraded special missiles. There are a surprising number of aircraft that will die in one hit to a max damage QAAM - pretty much all mid-range and below aircraft and a few late-game ones. And all aircraft without Bulletproof Tanks 2 will die to full power EML. Adding BPT2 will make most aircraft (all those with at least 111 base hit points) survive an EML on around 90-99%, which is still annoying but at least it's not an instant trip to the respawn timer, and it will make all aircraft survive one hit from all the missile special weapons except HPAA. This will make more sense if you're looking at the Hidden Stats spreadsheet. The eagle-eyed among you will note that I've only bolded seven parts, and there's room for eight on a plane. This part slot is a bit of a flex slot. On early game planes, or if you're willing to sacrifice usually Bulletproof Tanks 2 or rarely Light Blisk 2 or Superior Maneuverability 2, you can run one of a few other body parts - New Aileron Actuators 2 for increased roll rate, Multipurpose Stealth Coating 2 to make yourself disappear from enemy radars at the most inconvenient times (do not underestimate how annoying this is in a knife fight, particularly on planes that have a high innate stealth already, often as a substitute for Bulletproof Tanks), and ECU Software Update 2 to reduce the amount that you slow down when pulling high G turns (this last one being most useful on planes that like to maintain high speed like the F-15C/J). This is a bit advanced, but it's definitely well within reason and there's a few planes for which it's quite good. Still, you're more likely to want to add another weapon part. So, there's a few other suggestions I'd make in the weapons category. First, more goodies for your missiles. Most universally applicable is the reload speed part, Multiple Enemy Detection Device 2 (MSL). It lets you pop out two missiles every 3.5 seconds, cutting the reload time by over a third, and makes you an absolute spamming menace. There's also the flight duration part, Ramjet Propulsion Device 2 (MSL), as a possibility, kicking your missile flight time to nearly 15 seconds (it stacks strangely with the Data Link, so that required some testing), which makes them a menace long after dodging the first time. Don't go with New High Energy Propellant 2; because of how missile turning works (in degrees per second), a higher flight speed translates to a wider absolute turning circle. My own personal taste is the reload time, but as we'll get to in the next section, there's nothing stopping you from trying it. Second, I would be remiss if I didn't mention gun damage. High-Power Enhanced Shells kicks your gun damage up by a whopping 75%, and considering the gun is actually the highest-DPS weapon in any plane's arsenal already, that's quite terrifying. Using the gun is a skill you should absolutely learn; many of the best players absolutely swear by it, and by extension the gun damage part, and for good reason. It's up to you whether it's worth the flex slot in the beginning for you, however. It's worth mentioning, by the way - the stability parts are all almost absolutely useless. Do not buy them, like, ever, until you have everything else. Their effects basically don't exist. The only exception to this is Roll Stability 2 (Cutting-Edge Large Ailerons 2) because it's a prerequisite for better parts. Sticker Shock - Counting the Cost and Cutting Corners Well, Nugget, we've got our immediate goals in mind. We want the following parts: MANDATORY High-Speed Data Link Antenna Thrust-Adjusting Steering Device 2 (MSL) Directional Proximity Fuse 2 (MSL) Superior Maneuverability 2 New Flap Actuators 3 Bulletproof Tank 2 Light Blisk 2 OPTIONAL ECU Software Update 2 Multipurpose Stealth Coating 2 New Aileron Actuators 3 Multiple Enemy Detection Device 2 (MSL) Ramjet Propulsion Device 2 (MSL) High-Power Enhanced Shells 2 What's the cost look like? Well, that's a bit complicated. Just looking at MRP cost for every part, that gives us 50k for Datalink, 150k for MSL Homing2, 150k for MSL Damage2, 450k for Maneuver2, 300k for Flaps3, 450k for Armor2, and 200k for Blisk2, giving us a total cost for your mandatory parts of 1.75 million MRP, and the optional parts add 250k for ECU2, 500k for Stealth2, 350k for Aileron3, 100k for MSL Reload2, 100k for MSL Ramjet2, and 200k for Gun Damage2, for another 1.5m, totaling out to 2.25m MRP. Simple enough, right? However, there are prerequisite parts here that complicate things. For example, Homing2 requires every other missile part except the rather crappy Speed2. Which means that its true cost is actually 950k MRP (we're excluding Datalink just so we don't have to remember not counting it multiple times), and given that it's absolutely, no questions, one hundred percent mandatory, you cannot budge on it, the other missile parts are effectively free. So let's try this again. MANDATORY High-Speed Data Link Antenna (50k MRP) Thrust-Adjusting Steering Device (MSL) (950k MRP) Directional Proximity Fuse (MSL) (Prerequisite) Superior Maneuverability 2 (1.7m MRP) New Flap Actuators 3 (Prerequisite) Light Blisk 2 (Prerequisite) Bulletproof Tank 2 (700k MRP, excluding Blisk 2 and Flaps 2, which are prereqs for Maneuver2) OPTIONAL ECU Software Update 2 (Prerequisite) Multiple Enemy Detection Device (MSL) (Prerequisite) Ramjet Propulsion Device (MSL) (Prerequisite) Multipurpose Stealth Coating 2 (500k MRP) New Aileron Actuators 3 (700k MRP, excluding Blisk2, Flaps2, Aileron Stability 2 [lmao], and Aileron2, shared with Maneuver2) High-Power Enhanced Shells 2 (450k MRP) Now we can at least get an accurate cost figure. The mandatory parts come out to 3.4m MRP, and you can pick one of the three top optional parts to fill out the build for free. Getting all of them adds another 1.65m MRP, for a total of 5.05m MRP. With these parts, you have a viable build in almost every aircraft in the game. We can, however, go cheaper, if you're desperate to get into the action. The first step is probably to go down to Bulletproof Tanks 1, which is available from the single-player tree. This chops off 700k, bringing you down to 2.7m. Further, dropping from Maneuver2 to Maneuver1 is only a 3% (overall) difference in pitch, roll, and yaw, which, while absolutely noticeable, is... technically not the worst loss in the world, and saves another 450k, to 2.25m. Even cheaper, and starting to get to the point that I hesitate to recommend it, going from Flaps3 to Flaps2, losing another 6% pitch rate, saves another 850k, to a bottom end 1.4m MRP. I would strongly advise not to jump into multiplayer with any less than this. Do not under any circumstances cheap out on missile parts. Thus, your bargain bin basement build would be like so: High-Speed Data Link Antenna (50k MRP) Thrust-Adjusting Steering Device (MSL) (950k MRP) Directional Proximity Fuse (MSL) (Prerequisite) Multiple Threat Detection System (MSL) (Prerequisite) Superior Maneuverability 1 (Single-player) New Flap Actuators 2 (200k MRP) Bulletproof Tank 1 (Single-player) Light Blisk 2 (200k MRP) Other than my using the completed version of these parts, this is my go-to for pub lobbies if I'm running a missile build. It will work well enough for you. Conclusion - What Next? Congratulations. Any failures on your part are now solely a skill issue on your end. In all seriousness, these are only the basics. This is the most versatile and accessible starter build, not necessarily the best. You'll find moving forward that there are situations where some other parts might be better. For example, in post-stall duels, or when going up against IEWS users, missile lockon speed is actually an extremely good part, and that missile speed actually makes it possible to kill decent Dark Star users with just standards. On some planes, like the MiG-31, you can afford to just go balls-to-the-wall and load it up with all the speed parts. So on and so forth. Likewise, I haven't touched at all on special weapons parts other than to say to hold off on them. On those... experiment, once you have more MRP to play with, and you absolutely will. You can make all sorts of wacky builds work in this game. My favorite off the wall but actually fairly decent concept is a hybrid FB-22 that, while somewhat starved for weapon part space, manages to slot gun damage 1 and ECU to be able to pick off anyone who's really devoted to ruining your LAAM fun by PSMing on them and gunning them down. And lastly, but perhaps most importantly, pick what planes are fun for you. Yeah, the TGM Hornet, the Rafale, and the Su-35S are the dogfight meta kings. Yeah, the FB-22 and YF-23 are the peak snipers. Yeah, Fishbed MGP go brrrr. But if you like a plane, really gel with it, you can make most things work. I personally actually really like my Mirage, even though I know statistically it's pretty poor. Just... do what's fun. Get some wacky skin mods and go nuts with some crazy off-meta nonsense. Don't take things too seriously, just do what you enjoy most. Unless that's EML with all the parts. If that's what you enjoy the most, the ejection handle is usually located between your legs attached to the seat front.