换一换
换一换 


本指南适用于希望在《幕府将军2:武士的陨落》中挑战传奇难度的玩家。 前言 注意:本指南专为亲幕府/天皇路线定制,自行选择其他路线时可能效果不佳。 请注意,文中包含的图片来自萨摩藩的游戏流程,可能与本指南推荐的建筑和技能选择不完全一致。 此外,这是我第二次尝试制作指南,欢迎大家提出任何反馈意见。 最后,英语并非我的母语,因此您可能会遇到语法错误和不常见的表达方式。 目的 制作本指南的原因是为了分享我的知识和见解。我尚未查看其他攻略,因此可能存在涵盖相同内容的现有攻略,且可能更为全面。 1 基础知识 在本节中,我们将介绍游戏的基本方面。如果您已熟悉游戏,可以跳过本节,直接进入第2节。 1.1 省份概述 要提高获胜几率,深入了解您的省份至关重要,因为它是维持军队所需的主要收入来源。
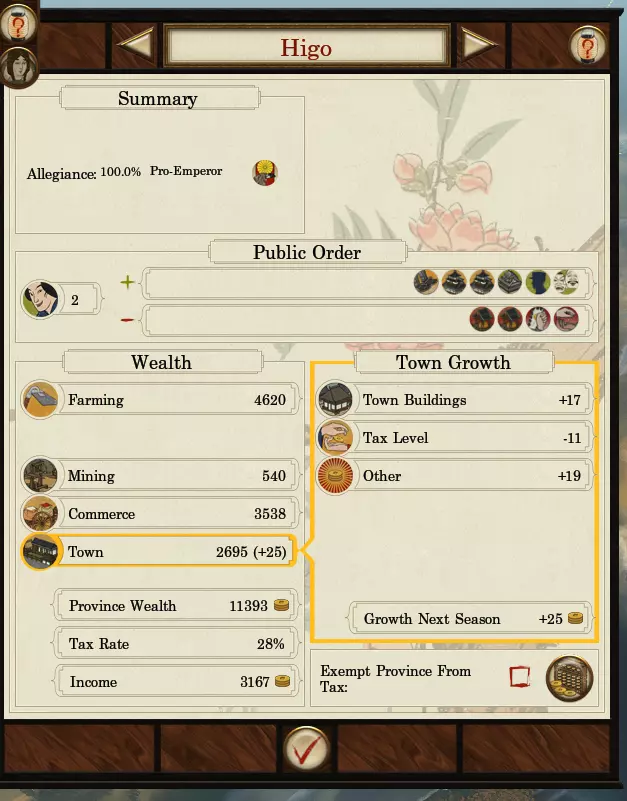
1.1.1 概况 列出省份的效忠情况。将鼠标悬停在百分比上会显示影响因素的更多信息。 1.1.2 公共秩序 显示省份的幸福度,包括正面和负面因素。将鼠标悬停在图标上会提供额外详情。影响省份满意度的因素有很多,以下是我能记住的内容: + 驻军等级 + 城镇内驻扎的部队数量(部队越多,满意度越高) + 事务官 + 大名荣誉(大名荣誉高时) + 将领特性 + 艺术精通 + 事件(临时) - 税收(税率越高,不满度越高) - 领地数量(领地越多,被征服城镇的基础动荡度越高) - 大名荣誉(大名荣誉低时最多减2) - 新征服的省份(每回合减少1,直至降至基于领地数量的固定值) - 现代化(基于省份内的建筑) 满意度为负会导致动荡加剧,若问题未解决,最终将引发叛乱。玩家通常有一回合的时间在叛乱发生前处理动乱。 1.1.3 财富 显示省份财富、税率以及该省份产生的收入。 农业和商业是基础收入,除非玩家决定拆除或升级相关建筑,否则其数值将保持不变。 1.1.3.1 城镇 该数值会根据城镇的发展情况每回合增减。城镇数值高的省份会产生更多收入。掠夺会严重损害省份的城镇数值,但能获得大量【石高】。 1.1.3.2 省份财富 显示该省份拥有的财富总量。 1.1.3.3 税率 显示该省份的税率。将鼠标悬停在百分比上会显示影响该省份税率的具体因素。4 收入 显示每回合从省份获得的金钱数量。 1.1.5 城镇发展 显示决定每回合城镇发展增减的正面和负面因素。 注意:某些事件,如动乱或随机事件,可能会显著降低城镇发展。 1.2 财政 下一步关键是了解财政,因为它在做出决定成败的关键决策中起着核心作用。 1.2.1 税收
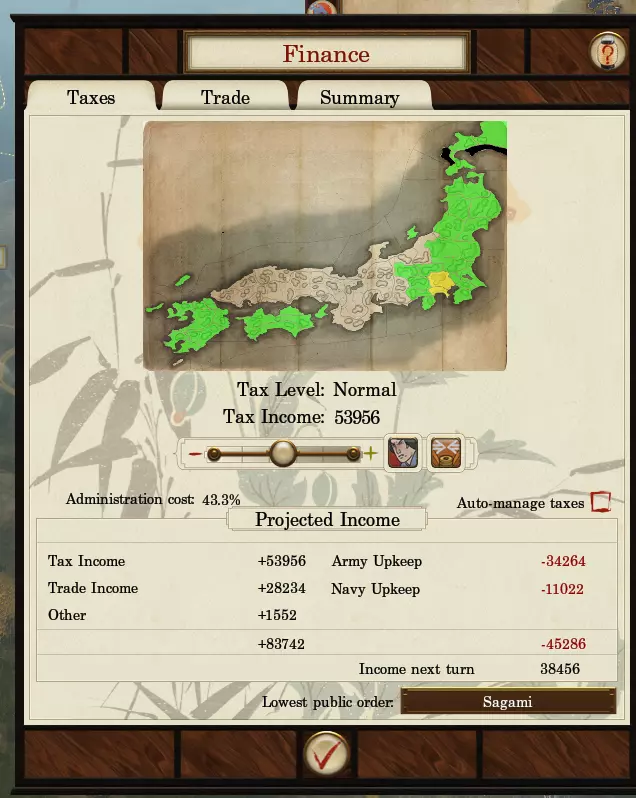
在此处,你可以查看氏族在每个省份的整体满意度、相应的税率,以及氏族的收支情况。 绿色表示满意度高于1。 黄色表示满意度为0。 红色表示满意度低于0,若不解决将引发动乱,进而导致叛乱。 黑色表示该省份免税。 考虑对某个省份免税以帮助提升公共秩序,这也能让你的军队更快行动。这在RD初期尤为重要。 1.2.2 贸易
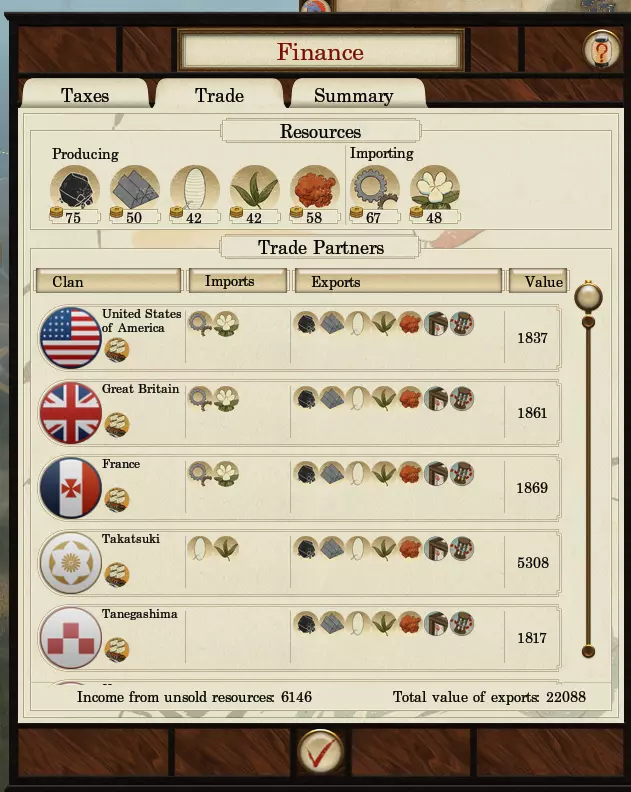
1.2.2.1 资源 显示你的氏族当前的生产、进口以及尚未获取的物品。 将鼠标悬停在图标上可查看正在交易的特定产品数量。显示100%出口的产品意味着所有该产品都在进行交易,这也是你想要达成的状态,以从中获得最大收益。同时还会显示该产品的价值。 1.2.2.2 贸易伙伴 显示你的贸易对象,通过海路还是陆路进行贸易,以及从贸易中获得的收益。船图标表示通过海路贸易,否则马车图标表示通过陆路贸易。船图标上的斜线表示港口被封锁,导致双方都无法获得贸易收入。 请注意,与对方的贸易时间越长,产生的收入就越多,并且对外交也有积极影响。在协商贸易协定时,考虑主动出售而非仅仅接受。这种方法可以获得额外的【石高】。在某些情况下,你可能还需要购买贸易协定。 1.2.3 总结
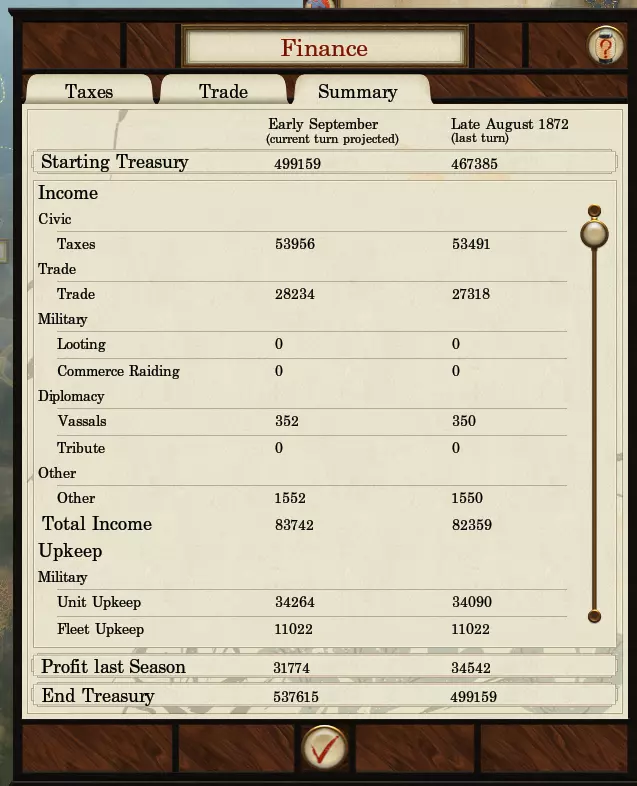
更全面地细分你的氏族收支情况。该标签页提供以下信息: 当前预期收支。 上一回合的收支。 这能让你追踪一段时间内的财务表现并做出明智决策。 1.3 外交 接下来我们将深入了解外交系统。 在游玩《幕府将军2:全面战争-武士之殇》的尊皇/佐幕路线时,我感觉外交根本不算主要玩法,更像是“为了存在而存在”,不像《罗马2:全面战争》中外交占据重要地位。或许选择自立门户时,外交会更重要?
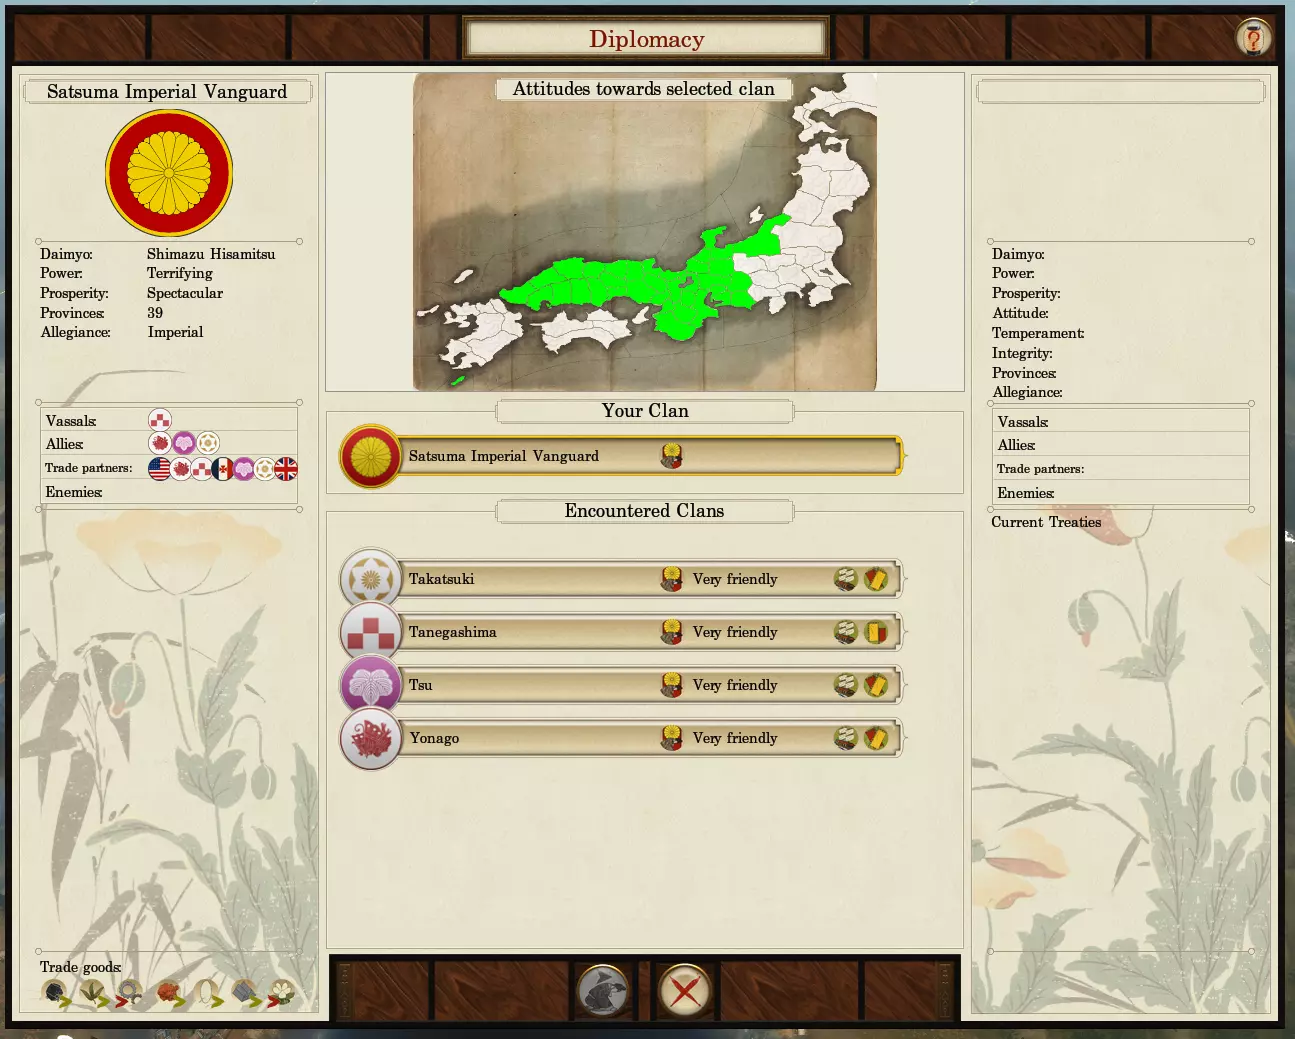
在此标签页中,你可以查看氏族的实力概况、当前在其他氏族中的排名、盟友、贸易伙伴、附庸、敌人以及相关氏族的信息。 白色表示你的省份。 绿色表示友好(绿色越深,他们越喜欢你)。 红色表示敌对(红色越深,他们越恨你;如果有交叉双剑图标,则表示处于战争状态)。 1.3.1 实力 显示你的氏族军事力量,这对于其他氏族是否会向你宣战起着重要作用。你的军事力量越弱,AI向你宣战的可能性就越大。 1.3.2 态度 显示你对相关氏族的立场,包括他们对你是喜欢、中立还是其他态度。3 性情 氏族的游戏风格,即他们是采取防御型还是进攻型策略。防御型氏族更倾向于保卫自己的领地而非扩张,而进攻型氏族则更可能向其他氏族宣战以扩张领土。 1.3.4 诚信度 该氏族的声誉。声誉越高(可靠),当你与他们结盟时,他们越有可能在战斗中援助你,并且在其他氏族向你宣战时站在你这边。不过,这与他们对你氏族的态度密切相关。声誉越低(可疑/背信弃义),他们就越有可能背叛你。 1.4 氏族管理 在深入本指南之前,了解你的氏族以及如何有效管理它是很重要的。
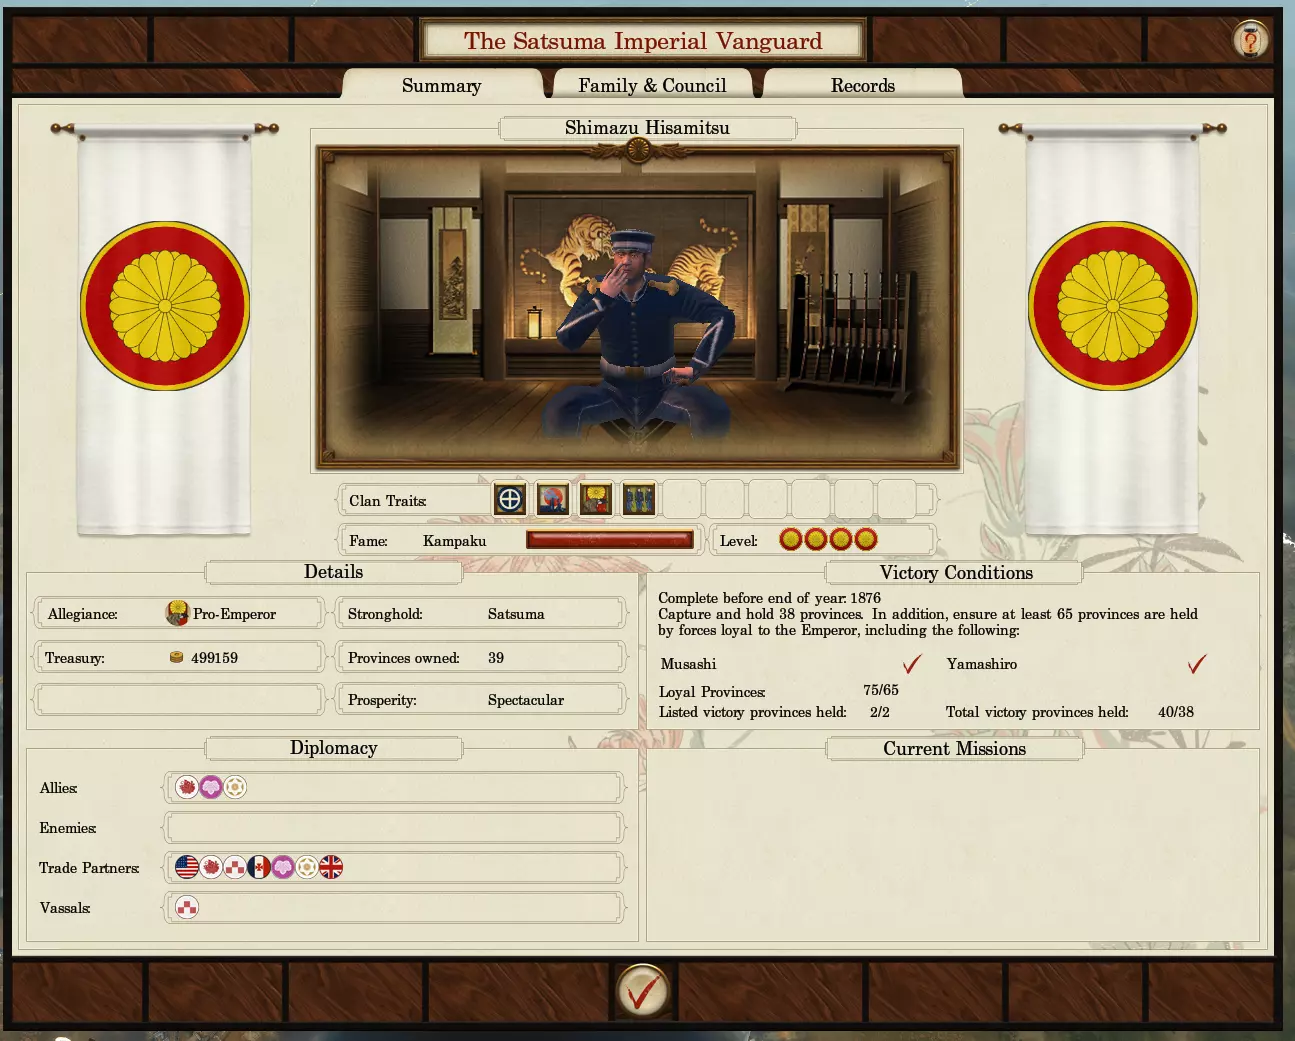
1.4.1 总览 在此处你可以查看氏族的概况,包括氏族特性、胜利条件、声望、外交关系、任务等信息。 1.4.1.1 氏族特性 此处列出你当前的氏族特性,每个氏族拥有一个固定特性,还可通过精通和事件获得更多特性(事件特性为临时)。 1.4.1.2 声望 代表你的氏族的知名度,同时也决定其他氏族对你的威胁程度评估。声望越高,你对其他氏族而言威胁越大。一旦达到传奇声望,除非你与其他氏族保持良好关系或与他们属于同一阵营(取决于你选择的发展路线),否则几乎所有氏族都会向你宣战。 1.4.1.3 详情 列出重要信息,如你的首都(要塞)、阵营归属等。4 胜利条件 达成胜利所需完成的事项。 1.4.1.5 外交 显示你的盟友、附庸、贸易伙伴及敌人概况。 1.4.1.6 当前任务 这些是特殊任务,完成后通常会为你提供奖励。 1.4.2 家族与 council 此处列出氏族的家族树和将领概况,包括大名的荣誉值、将领的忠诚度。你也可以在此处解雇将领、为女儿安排婚姻、进行收养等操作。
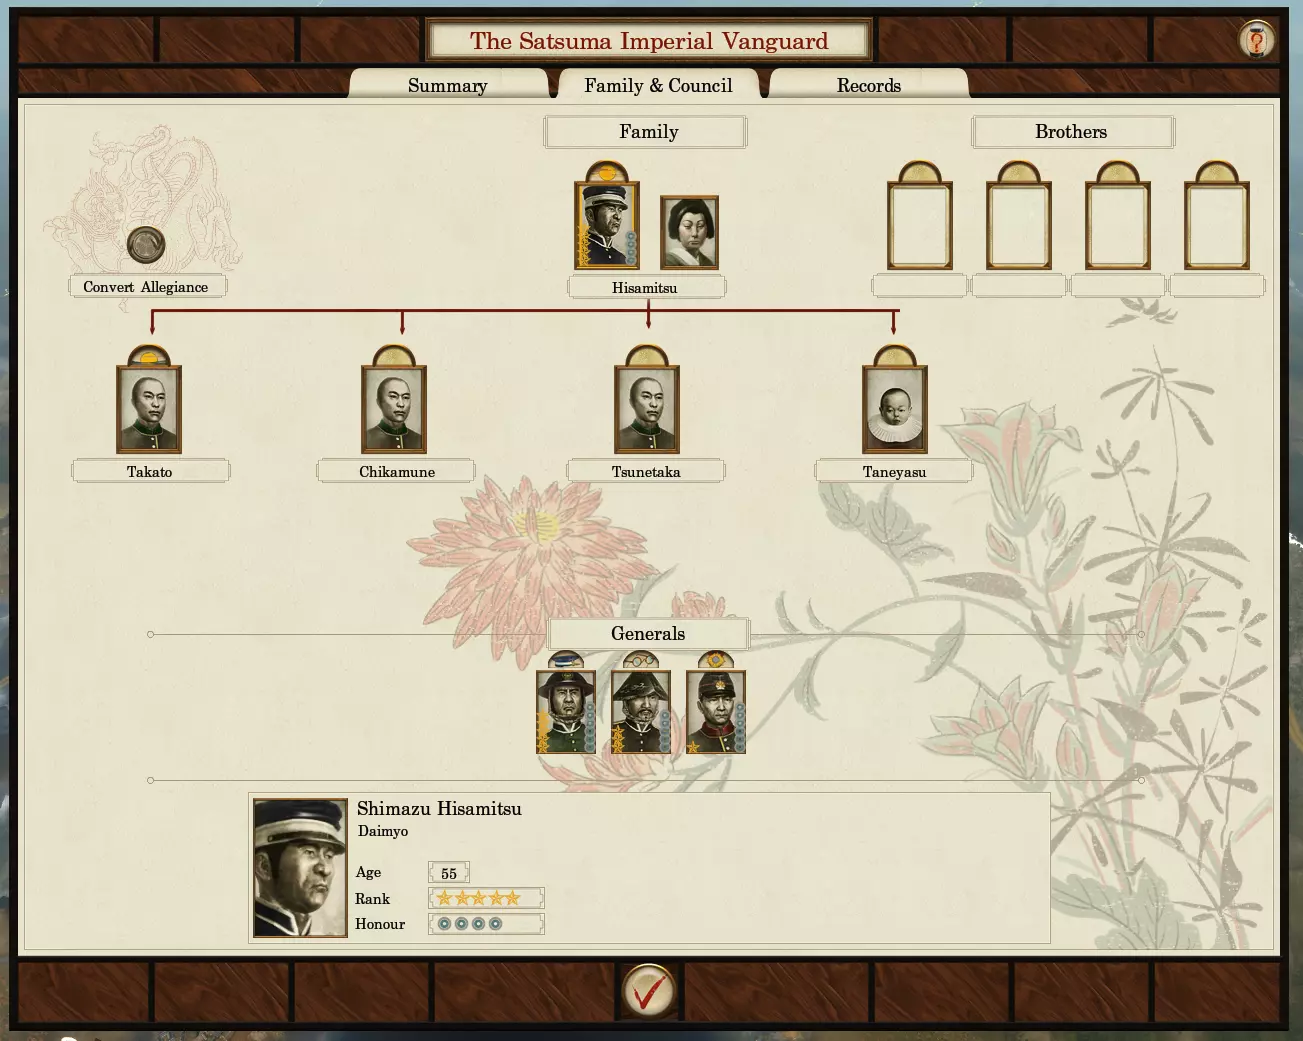
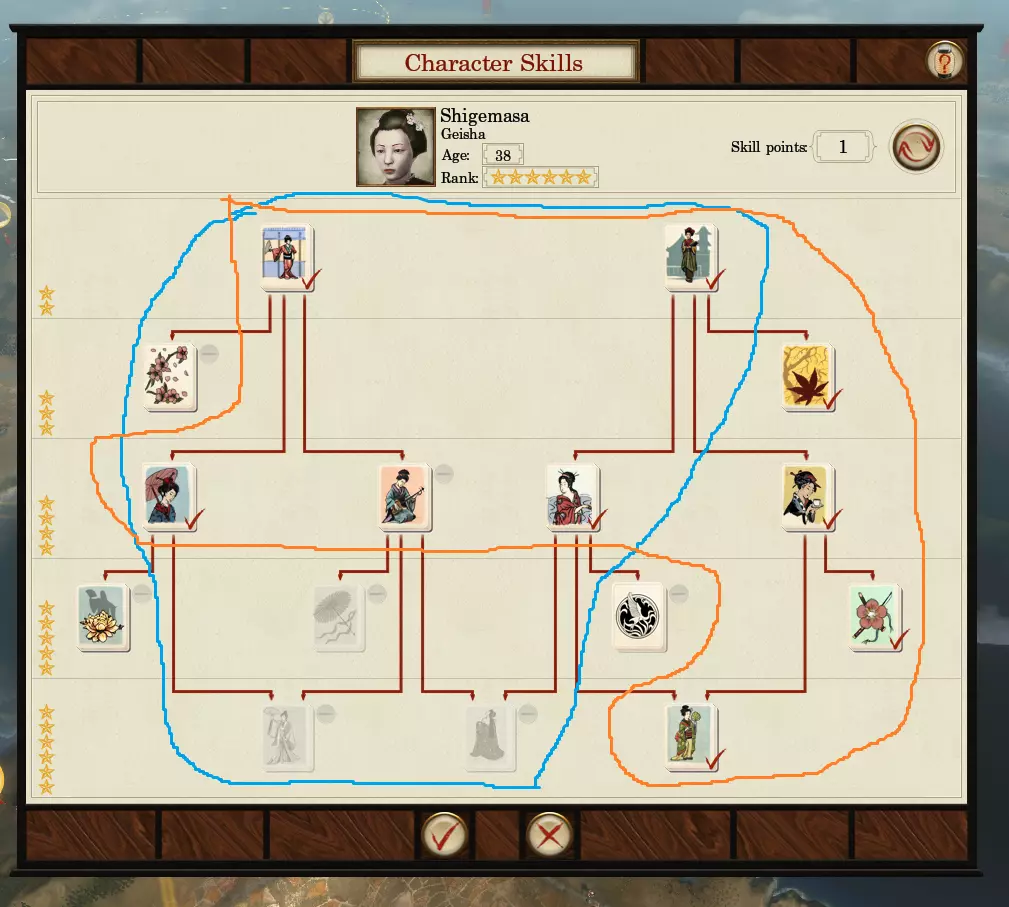
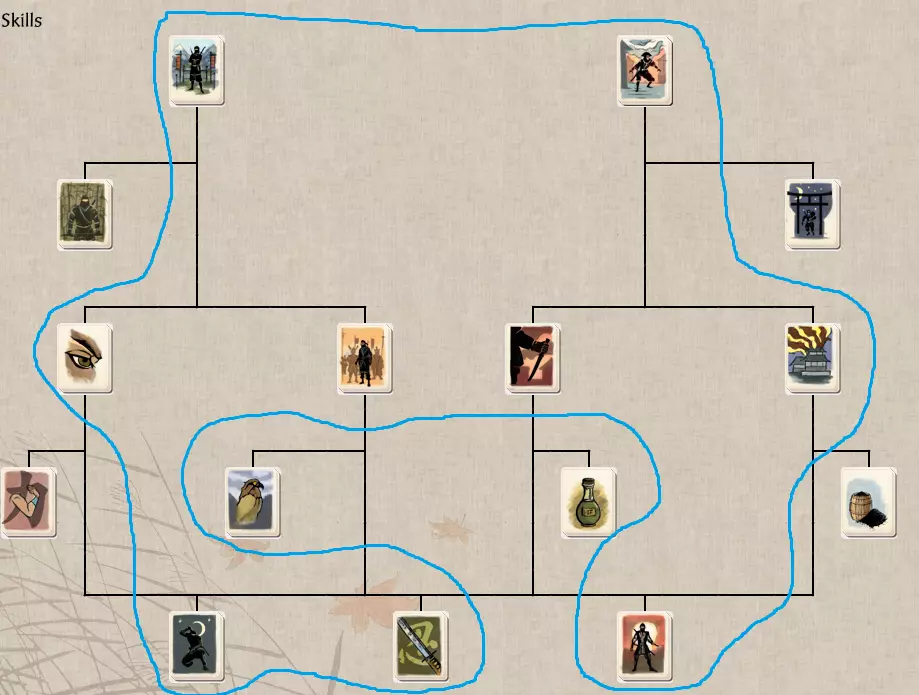
本节中最重要的元素是【委任】。委任共有4个,将鼠标悬停在它们上方会显示更多信息。 将领等级越高,委任带来的收益就越高。每个委任可为相关将领提供+1忠诚度。但如果将领被解除委任,其忠诚度将受到-2的惩罚。 当进行收养、通过事件创建新将领或招募敌方将领时,所有现有将领的忠诚度都会-1。 2 特工 在本游戏中,特工有不同类型,他们对家族的成功起着至关重要的作用。不过,根据游戏进程的不同,每个特工的重要性可能会有所变化。行动与后果: 执行行动时,若行动失败,将扣除初始成本的一半,并可能产生外交惩罚(DP)。若行动成功,将扣除全部成本,但仍有几率产生外交惩罚(DP)。 特工限制: 每个城镇和军队最多可容纳3名特工。若城镇或军队拥有1名以上将军,则仅第一名将军会受到影响。 同一类型的特工最多可雇佣5名。不过,通过特定建筑的最高等级,可将此数量增加1名。 明智选择目标: 使用特工时,必须有选择地进行。应专注于你打算宣战、计划对抗或当前正处于战争状态的敌人。这是因为这需要花费金钱,并且可能会导致外交惩罚。 特工是控制敌人行动和力量的强大工具,尽管在财务方面可能成本高昂。 特工潜行: 忍者是唯一默认对敌人隐藏的特工,除非被发现。 特工持久性: 特工在整个游戏过程中都会为你效力,除非被杀死。一旦招募,他们会一直跟随你直到游戏结束。 技能点: 在最高等级时,每个特工拥有9个技能点。2级和3级各获得1点,4级和5级各获得2点,6级获得3点。 专精: 专注于特定技能树会增加该领域的成功几率。不过,专精并不会妨碍特工执行其既定任务。根据具体情况,你可能需要考虑选择与我推荐不同的技能。 特工升级: 要高效提升特工等级,可找到最低等级的城镇或只有一个单位的军队,反复执行相同行动直至达到目标等级。原因是城镇等级越高,行动成本越高,成功几率越低。军队也是如此。这种方法可能成本较高,但能让你的特工最快升级。否则,你也可以简单地将他们分配到军队或城镇,但升级速度会慢得多。 2.1 艺伎 魅惑:引诱敌方将领或特工加入你的氏族。通过这种方式加入你氏族的将领忠诚度将-1,忠诚度越低,成功率越高。 鼓舞:提升军队士气,并可能使首位将领的忠诚度+1。 牵制军队:使敌军在下一回合无法移动,若受到攻击则会逃跑或作为援军加入。 款待贵族:每回合为省份增加城镇发展度,同时为驻守在该城镇的首位将领增加+1皇室声望。 2.1.1 艺伎的使用 我认为艺伎有两种专精方向,但你也可以随意混合搭配。 诱惑者 - 进攻型艺伎:用于牵制、诱惑(将敌方将领或特工策反至我方)敌人以及鼓舞军队。企业家-防御艺伎:用于促进城镇发展并保持民众满意度。 2.1.2 诱惑者 可用于引诱高等级将领/特工加入己方阵营,或通过干扰为己方调动军队抵御入侵争取时间。也能在战斗中提升部队士气及将领忠诚度,还可用于控制敌军的移动和战力。通过干扰可阻止敌军增援关键区域/征服新省份,限制其军队行动。为此,选择下图中的蓝色技能树,这将提升其干扰和魅惑的成功率。 2.1.3 企业家: 在希望城镇更快发展以产生更多收入时非常有用。在分心技能树中投入点数后,她还能帮助分散敌军注意力,为你争取足够时间防御她所在的省份。为此,选择下图中的【橙色技能树】。一旦掌握特定技能,还能提升该省份的满意度(+2满意度)。她也可以在掌握特定技能后,为全氏族的商业建筑增加10%的收入(如果5名艺伎都掌握此技能,最多可叠加至50%)。 2.1.4 局限性与优势 - 无法魅惑敌方的艺伎、新选组和维新志士。 - 若敌方某类特工已达最大数量,则无法诱惑该类敌方特工。 - 对外国老兵有优势。 - 对忍者处于劣势。
我个人更喜欢【企业家】,因为她能促进城镇发展,还能为氏族提供全范围的收入加成。从长远来看,她不仅能带来更多收入,还能作为最后的防御屏障,拖延敌人占领我最有价值的省份,为我争取准备反击的时间。 2.2 【忍者】 - 建立间谍网络:增加省份视野范围,提高发现隐藏军队或特工的几率,降低叛乱煽动成功的可能性。 - 侦察军队:增加军队的视野范围,并允许军队行军更远距离。 - 间谍(被动):在近距离时,可揭示军队中的单位类型和数量。 - 破坏:破坏建筑或军队。若用于建筑,该建筑将一直处于禁用状态,直至修复。当瞄准一支军队时,它会阻止该军队移动一回合,若受到攻击则会逃跑,或作为援军加入并造成伤亡。 暗杀:暗杀一名将军或特工,将其从战役中永久移除。 2.2.1 忍者的使用 在我看来,忍者并没有什么特殊的培养方式,所以可以按你的意愿来培养。 作为亲幕府/倒幕势力进行游戏时,我不怎么使用忍者,甚至完全不用。这是因为有势力专属特工和外国老兵,而且忍者还需要额外建造一个建筑,这不符合我的游戏风格。 如果一定要说一种培养方式的话,我可能会让他均衡发展各项擅长的能力。为此,可以选择蓝色技能树。2 优势与劣势 对特定阵营特工脆弱 对艺伎单位强势
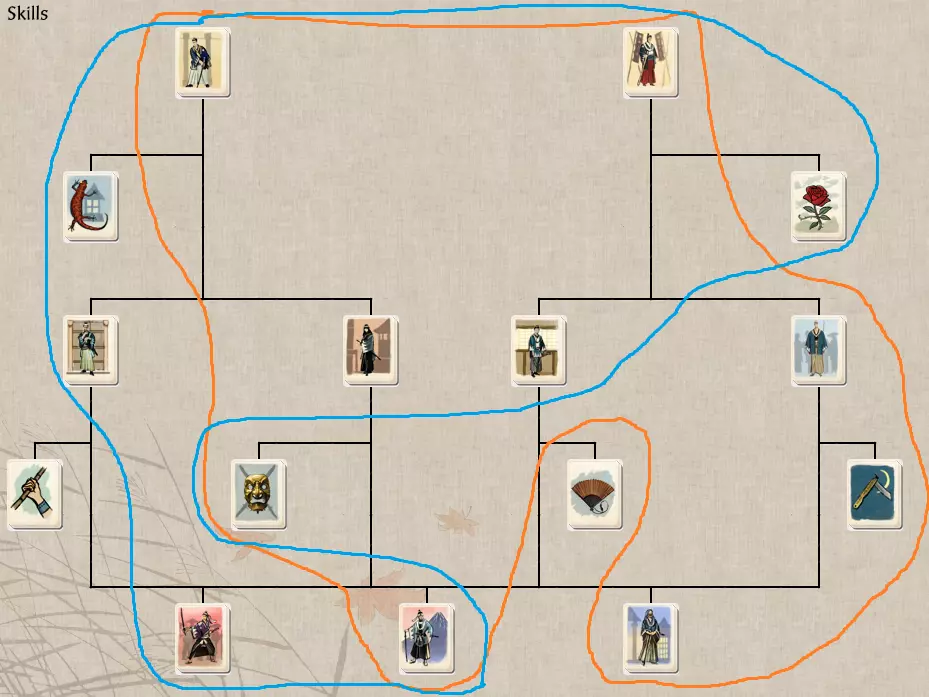
2.3 维新志士 动员民众:根据省份的忠诚度提升该省的满意度。对己方派系的忠诚度越高,满意度提升越多。 劝降:劝说敌军加入己方派系,通常会使敌军大部分单位倒戈。 激发狂热:提升所嵌入军队中单位的冲锋能力。 煽动叛乱:在某一省份内煽动叛乱。 暗杀:在战役中清除敌方特工或将领。 2.3.1 维新志士的使用方式 维新志士有两种专精方向: 暗杀/叛乱 影响/劝降 2.3.2 暗杀/叛乱 适用于无需开战即可削弱敌人的情况。如果操作得当,甚至可以消灭整个氏族,并除掉像高等级将领或特工这类麻烦角色。此流派应选择【橙树】。 2.3.3 影响力/说服力 当想要更快传播忠诚度并让民众更满意时非常有用。凭借说服力,你可以收买敌方军队,然后用其防御自己的省份或征服敌方省份,注意此路线花费很高。此流派应选择【蓝树】。 2.3.4 优势与劣势 对忍者(侦测忍者)和外国老兵有优势。
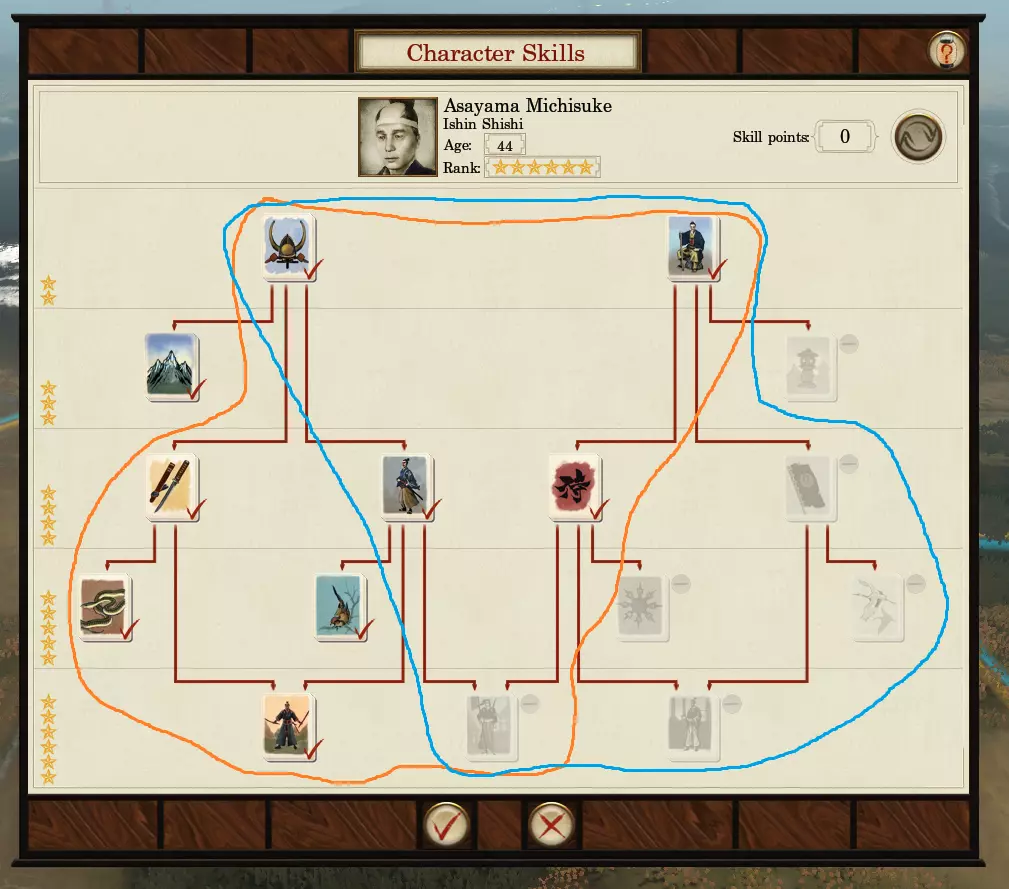
我个人喜欢这两种加点。在这种情况下,你可以选择每棵技能树的主要分支。这种加点方式能有效提升煽动叛乱的能力,因为他在敌方省份时会使公共秩序(PO)降低5点,同时也能提高他的成功率。此外,这还能让他有效刺杀敌方事务官和将领。而且,他能为整个家族提供幸福感(+1公共秩序,且多个事务官效果可叠加),并在本地额外提升3点公共秩序。如果需要,你可以将他编入军队以增加行军距离、提升技能次数,同时更有效地协助省份转化。 2.4 新选组 镇压异见分子:根据省份的忠诚度增加该省份的镇压值。对敌方派系的忠诚度越高,镇压程度就越高。 胁迫:迫使敌方军队加入你的派系,通常会使他们的大部分单位投身你的事业。 灌输纪律:提升编入军队中单位的近战防御。 煽动叛乱:在一个省份内煽动叛乱。 暗杀:在战役中清除敌方特工或将领。 2.4.1 新选组的使用 有两种方法可以使维新志士专业化: 暗杀/叛乱 影响/胁迫 2.4.2 暗杀/叛乱 当希望在无需开战的情况下削弱敌人时非常有用。如果操作得当,甚至可以消灭整个氏族,并除掉麻烦的角色,例如高等级将领或特工。对于这种培养方向,选择橙树。 2.4.3 影响力/胁迫 当想要更快地传播忠诚度并让民众更满意时非常有用。通过胁迫,你可以收买他们的军队,然后用这些军队来防御你的省份或征服他们的省份,注意走这条路需要花费大量金钱。为此,请选择蓝色技能树。为此,请选择蓝色技能树 2.4.4 优势与劣势 对忍者(侦测忍者)和外国老兵有优势。
我个人喜欢这两种加点。这种情况下,你可以选择每棵技能树的主要分支。这种加点方式能有效增强煽动叛乱的能力,因为他在敌方省份时会使公共秩序(PO)降低5点,同时也能提高叛乱成功的几率。此外,这还能让他有效刺杀敌方事务官和将领。而且,他能为整个家族提供镇压加成(公共秩序+1,多个事务官可叠加),并在当地额外提供+3公共秩序。如果需要,你可以将他编入军队以提升近战防御,同时更有效地协助省份转化。 2.5 外籍老兵 监督招募:降低招募成本,并随时间增加部队经验。 训练部队:随时间增加部队经验。破坏建筑:对目标建筑造成伤害并使其瘫痪,直至修复。 袭扰:造成损耗并降低敌军士气。 决斗挑战:尝试在决斗中击杀敌方将领或特工。 2.5.1 维新外籍老兵的使用 外籍老兵有两种专精方向: 决斗/袭扰 监督 2.5.2 决斗/袭扰 适用于消灭棘手的将领和特工,以及在战斗前削弱敌军。此流派应选择蓝色技能树。 2.5.3 监督 适用于在军事省份训练部队以及整训军队。此流派应选择橙色技能树。 2.5.4 优势与劣势 劣势是惧怕艺伎。
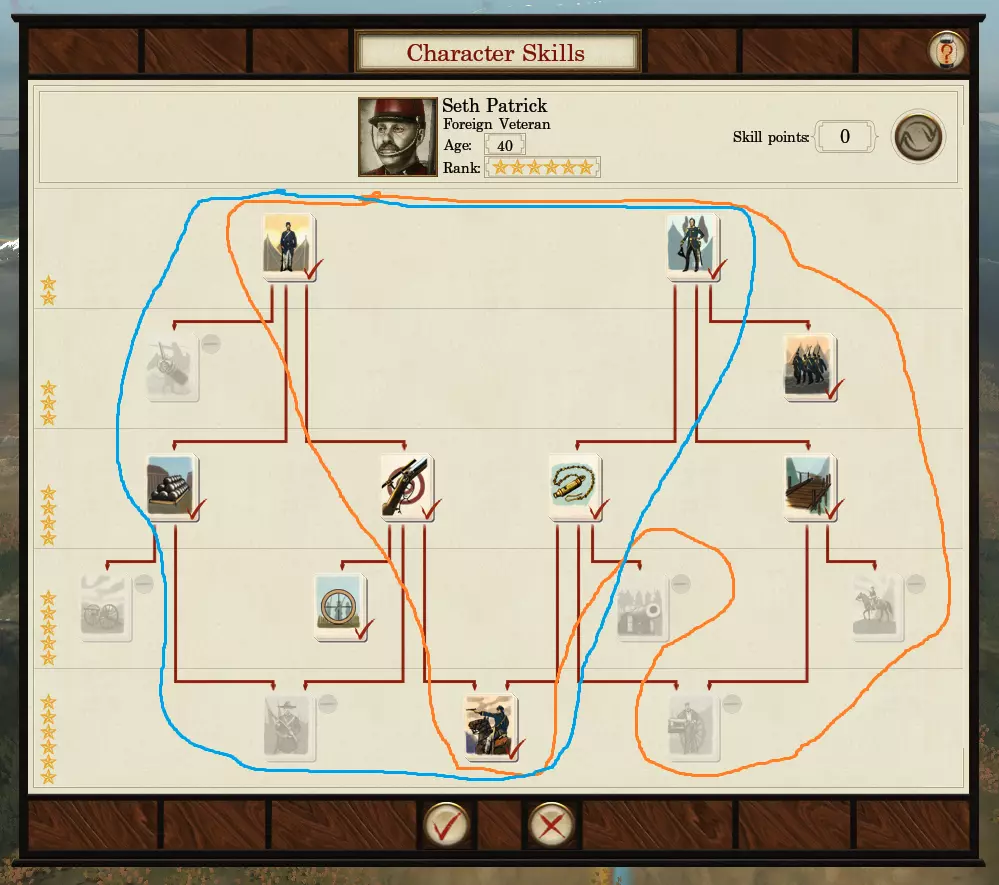
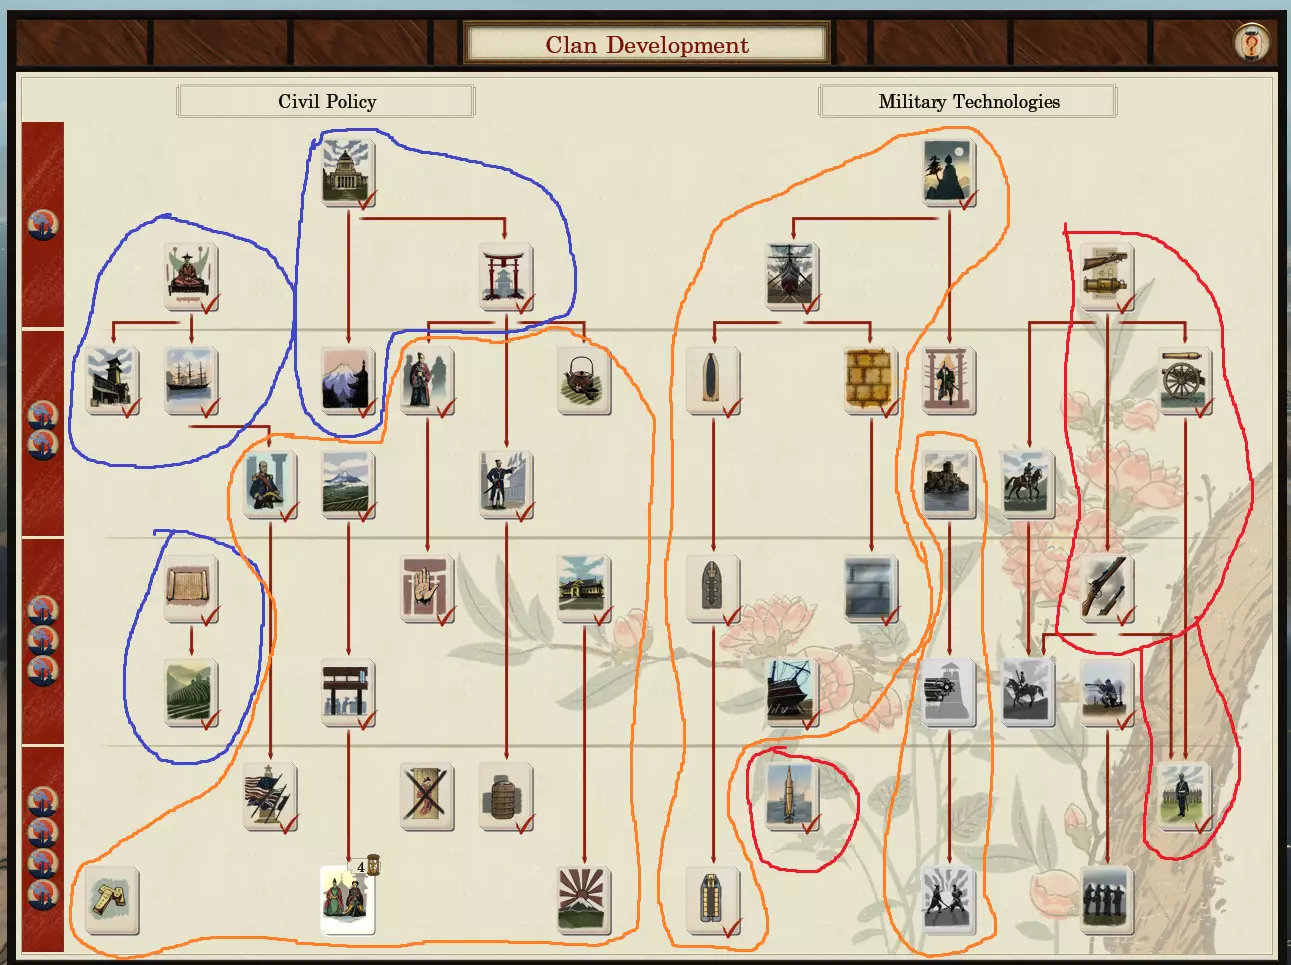
I personally prefer both builds. In this case, you can choose the primary branch of each tree. Depending on the situation, I might consider swapping the last two masteries (Guerrilla and Seasoned Fighter) for Accuracy and Marksmanship. This trade-off makes your infantry more lethal and improves the accuracy of your navy's bombardment. However, it comes at the cost of making your Agent more susceptible to enemy actions and weakening their ability to perform assassinations, harass, and supervise. This build also reduces the upkeep of the embedded army by 15%. 3 Economy To have a strong economy is crucial in this game because money can solve almost, if not all, of your problems. It will also enable you to cover all your expenses, regardless of your playstyle. In this game, I typically categorize the economy into three parts: Tax: Revenue generated from taxing provinces. Trade: Wealth acquired through trade with other clans and the Western. Temporary Income: Wealth obtained from temporary sources, such as raids, selling trade rights, sacking a province, or selling military rights, etc. When it comes to provinces, they are generally divided into two types: Economy and Military. Build military structures exclusively in Military provinces, as this ensures you have enough koku to cover your expenses. 3.1 Economy Buildings Before we go any further into economy, we have first to talk about the economy buildings in this game since they are more or less your main income. 3.1.1 Business and Industrial Chain Please note that when it comes to the last tier upgrade, you can only upgrade it once (The Inn and Cottage Industry). This means you can only have one building of each type unless the province you conquer already has one. The Koku, Growth, Happiness and Modernisation listed here are what you will gain if you were to build said building. Also I usually count tax as 28%. 3.1.1.1 Inn When opting for the Market chain for the Inn, I consider it to generate 0 public order, as the happiness and unhappiness cancel each other out. NameKokuGrowthHappinessModernisationInn360010First UpgradeGambling Den60012-1Market720201Second UpgradeRichi Mahjong Parlour100023-1Financial District1260402Third UpgradeYakuza Office150045-2Junin Ryogae2250804 3.1.1.2 Cottage NameKokuGrowthHappinessModernisationCottage Industry5600-11First UpgradeCotton Weaving Shed12003-23Craft Workshop12501-12Silk Weaving Shed13000-11Second UpgradeFactory17005-23Third UpgradeCotton Processing Plant220015-36Silk Manufactory20005-24 3.1.2 Farming and Port Chain 3.1.2.1 Farm For farms, the values listed here represent their base values without any multipliers. In fertile or very fertile regions, you can take the base number and multiply it by 2 or 3, respectively, to calculate the final wealth the farm generates. NameKokuGrowthHappinessModernisationSubsistence Farming550000Tenant Fields900100Commercial Farming14002-11Zaibatsu Fields18004-12 3.1.2.2 Dock NameKokuGrowthHappinessModernisationHarbour0000Port0200Trading Port7005-12Trading District150010-24 3.2 Special Buildings In this game there exist province specific building and I'll call them special buildings. Most of the province has them. I'll divide them into 3 sections; Cost Reduction Buildings, Commerce Buildings and Military Buildings. 3.2.1 Cost Reduction Buildings 3.2.1.1 Clay Chain building: Generate some wealth (100, 200, (400, 600)) Generate some growth (1, 2, (5, 3)) Reduce building cost (5%, 10%, 15% on province and 5% clan wide) Can give modernisation (3) Can induce happiness penalty (-2) Even though it stacks with multiple Clay Chain Buildings (Clan-wide), and if one were to build it to the highest tier before constructing mid-game buildings, it would mostly break even or yield a small gain. However, I personally don't see its worth. This is because, after the Real Divide (RD), the clan generates so much koku that this building becomes obsolete due to the abundance of money. Nonetheless, do consider upgrading it to the maximum tier if you have extra funds to spare, as it can save you some money when constructing buildings in newly conquered provinces. 3.2.1.2 Coal Mining Chain building: Generate some wealth (200, 400, 600) Generate some growth (1, 2, 5, 3) Reduce ship cost (5%, 10%, 15% on province and 1% clan wide) Generate modernisation (2, 3) Induce happiness penalty (-1, -2) Generate coal to trade Before starting to build a navy, it's advisable to upgrade the Coal Mining Chain to its maximum level. The base wealth it generates will typically cover most of the garrison units needed to offset the public order penalty, with only a slight loss. Additionally, it's worth noting that this chain produces coal, which commands the highest price in the game, and it also contributes to growth. Therefore, consider maxing it out in 1-2 provinces where you plan to establish a Navy Military Base. The more navy bases you have, the faster you can assemble a navy fleet. As for surplus provinces, if you're trading coal at 100%, feel free to upgrade to the next tier. However, if you're not, it's best to leave it as it is, as the public order penalty may not make it worthwhile. 3.2.1.3 Copper Mining Chain building: Generate some wealth (100, 200, (400, 600)) Generate some growth (1, 2, (5, 3)) Reduce mordern unit cost (5%, 10%, 15% on province and 5% clan wide) Can give modernisation (3) Can induce happiness penalty (-2) Generate copper to trade Copper Mining Chain building is questionable, it might be good to upgrade but can also be a waste of money. Before considering an upgrade to tier 2, it's essential to evaluate your copper trade. If you're trading copper at 100%, then it's worth upgrading to the next tier. However, if you're not, there's no need to bother. The wealth it generates doesn't significantly impact your Net Tax, and the growth it provides is minimal. The advantage of upgrading lies in reducing the cost of modern units, and at the highest tier, it grants a 5% clan-wide discount. These discounts stack if you have multiple Copper Mining buildings. However, the drawback is that reaching the max tier is costly, and the discounts may not justify the expense, and you should recruit units in a province with a blacksmith. If, by chance, you're still trading copper at 100% even after the tier 2 upgrade, then consider upgrading to tier 3. Opt for the upgrade that doesn't impose a public order penalty since modernization is generally not a concern. This will increase your trade income, contribute slightly to Net Tax, and grant you the discount bonus. 3.2.1.4 Iron Mining Chain building: Generate some wealth (100, 200, (400, 600)) Generate some growth (1, 2, (5, 3)) Reduce building cost (5%, 10%, 15% on province and 5% clan wide) Can give modernisation (3) Can induce happiness penalty (-2) Generate Iron to trade For Iron Mining Chain, it’s the same as Copper Chain. 3.2.1.5 Holy Site: Increase unit's charge (5, 10, 15) Reduce Traditional unit cost (5%, 10%, 15% on province and 5% clan wide) Reduce modernisation (-1, -2) I have no opinion of Holy Site since I I do not even use it at all. 3.2.2 Commerce Buildings 3.2.2.1 Gold Mining Chain: Generate wealth (800, 1400, (1700, 2000)) Can give modernisation (3) Can induce happiness penalty (-2) I recommend upgrading the Gold Mine to at least tier 2, as the cost-to-revenue ratio is good. However, when considering tier 3, it's essential to exercise caution due to the substantial upgrade cost and the relatively modest increase in wealth generation from tier 2 to tier 3. Consider upgrading it to the maximum tier only if you have surplus funds available. Before upgrading, be sure to assess your province's public order (PO). When upgrading to tier 3, you'll have the option to choose between a wealth gain of 300 koku or 600 koku with a PO penalty of 2. This translates to a Net Tax of 84 koku and 168 koku, respectively. If you select the 600 koku option when your PO is at 0, you may incur a loss, as you'll need to allocate resources for garrison units as well as paying 40% extra in term of construction cost. 3.2.2.2 Silk Chain: Generate wealth (350, 700, 1000) Generate some growth (1, 2) Generate Silk to trade I recommend upgrading the Silk Chain to at least tier 2 due to its excellent cost-to-revenue ratio. Additionally, this upgrade provides more silk for trade, allowing you to generate even more koku without any constraints. As for the final tier, it's essential to assess your trade situation. If you're trading silk at 100%, then it's advisable to proceed with upgrading this building to the highest tier, especially if you have surplus koku to spare. 3.2.2.3 Tea Chain: Generate some wealth (400, 700, 1000) Generate some growth (1, 2) Can give modernisation (3) Can induce happiness penalty (-2) Generate Tea to trade I recommend upgrading the Tea Chain to at least tier 2 due to its excellent cost-to-revenue ratio. However, when contemplating the final tier, exercise caution. It's essential to assess both your trade situation and your province's public order (PO) before proceeding. If you're trading tea at 100% and your province's PO is in the positive, then it's advisable to upgrade. However, if these conditions are not met, refrain from upgrading, as it will result in a PO penalty of 2, necessitating additional units for garrison and causing a loss of 114 koku in Net Tax 3.2.2.4 Smuggling Chain building: Generate some wealth (300, 500, 900) Generate growth (4, 8, 12) +1 to geisha rank As for the Smuggling Chain, I don't find it to have a favorable cost-to-revenue ratio. While it does provide a significant amount of growth, the initial wealth it generates is relatively low. Therefore, I recommend upgrading it only if you have extra koku to spare. 3.2.3 Military Buildings 3.2.3.1 Blacksmith: Increase unit's accuracy (5, 10, 20) Can increase/decrease modernisation (3/-2) Can induce happiness penalty (-2) I strongly recommend upgrading the Blacksmith to the last tier and choosing the option that provides a 20 accuracy bonus. This enhancement will significantly increase the lethality of your units. Even if it comes with a public order penalty, the benefits it brings are well worth it. 3.2.3.2 Railway Chain: Generate some wealth (200, 460, 900) Generate growth (4, 8, 12) Induce PO penalty (-1, -2) Give modernisation (2, 4) I recommend upgrading the Railway to the second tier. As for the final tier, if you have extra funds to spare, it's worth considering an upgrade to the last tier. The reasoning behind this is that the second tier allows for swift mobilization of your army and agents, typically requiring only 2-3 stops depending on the unit type, with each stop covering about 2 provinces. This feature is especially crucial for clans located on the mainland. The Net Tax should help offset most of the costs for the new units needed for garrison due to the public order penalty, and there is also growth. With enough time, the growth should cover these expenses. 4 Mastery of Arts Mastering the right arts at the right time is critical for your campaign, as these arts not only provide bonuses to your clan but also unlock better units and more. It's important to note that, unlike the base game Shogun and RoTS, I find most arts in this game to be useful, although some hold greater importance than others. 4.1 Civil Policy This section not only boosts your economy but also unlocks Western units, additional military buildings, and provides bonuses to tax and tax reduction. In most cases, I would recommend focusing your attention on this tree, at least to acquire the arts that I consider important. Arts that I deem crucial in the Civil Policy tree are marked with Blue. For the Orange Tree, they are additional arts that’s good depending on the situation. Take these if you want to spread your influence faster or want your Geisha to succeed more etc. 4.2 Military Policy This section allows you to upgrade higher-tier military buildings, thereby unlocking access to better units for recruitment. I would recommend focusing on this tree only after you have researched the majority of important arts in the Civil Tree. Those that I consider to be important here in the Military Policy are marked with Red.
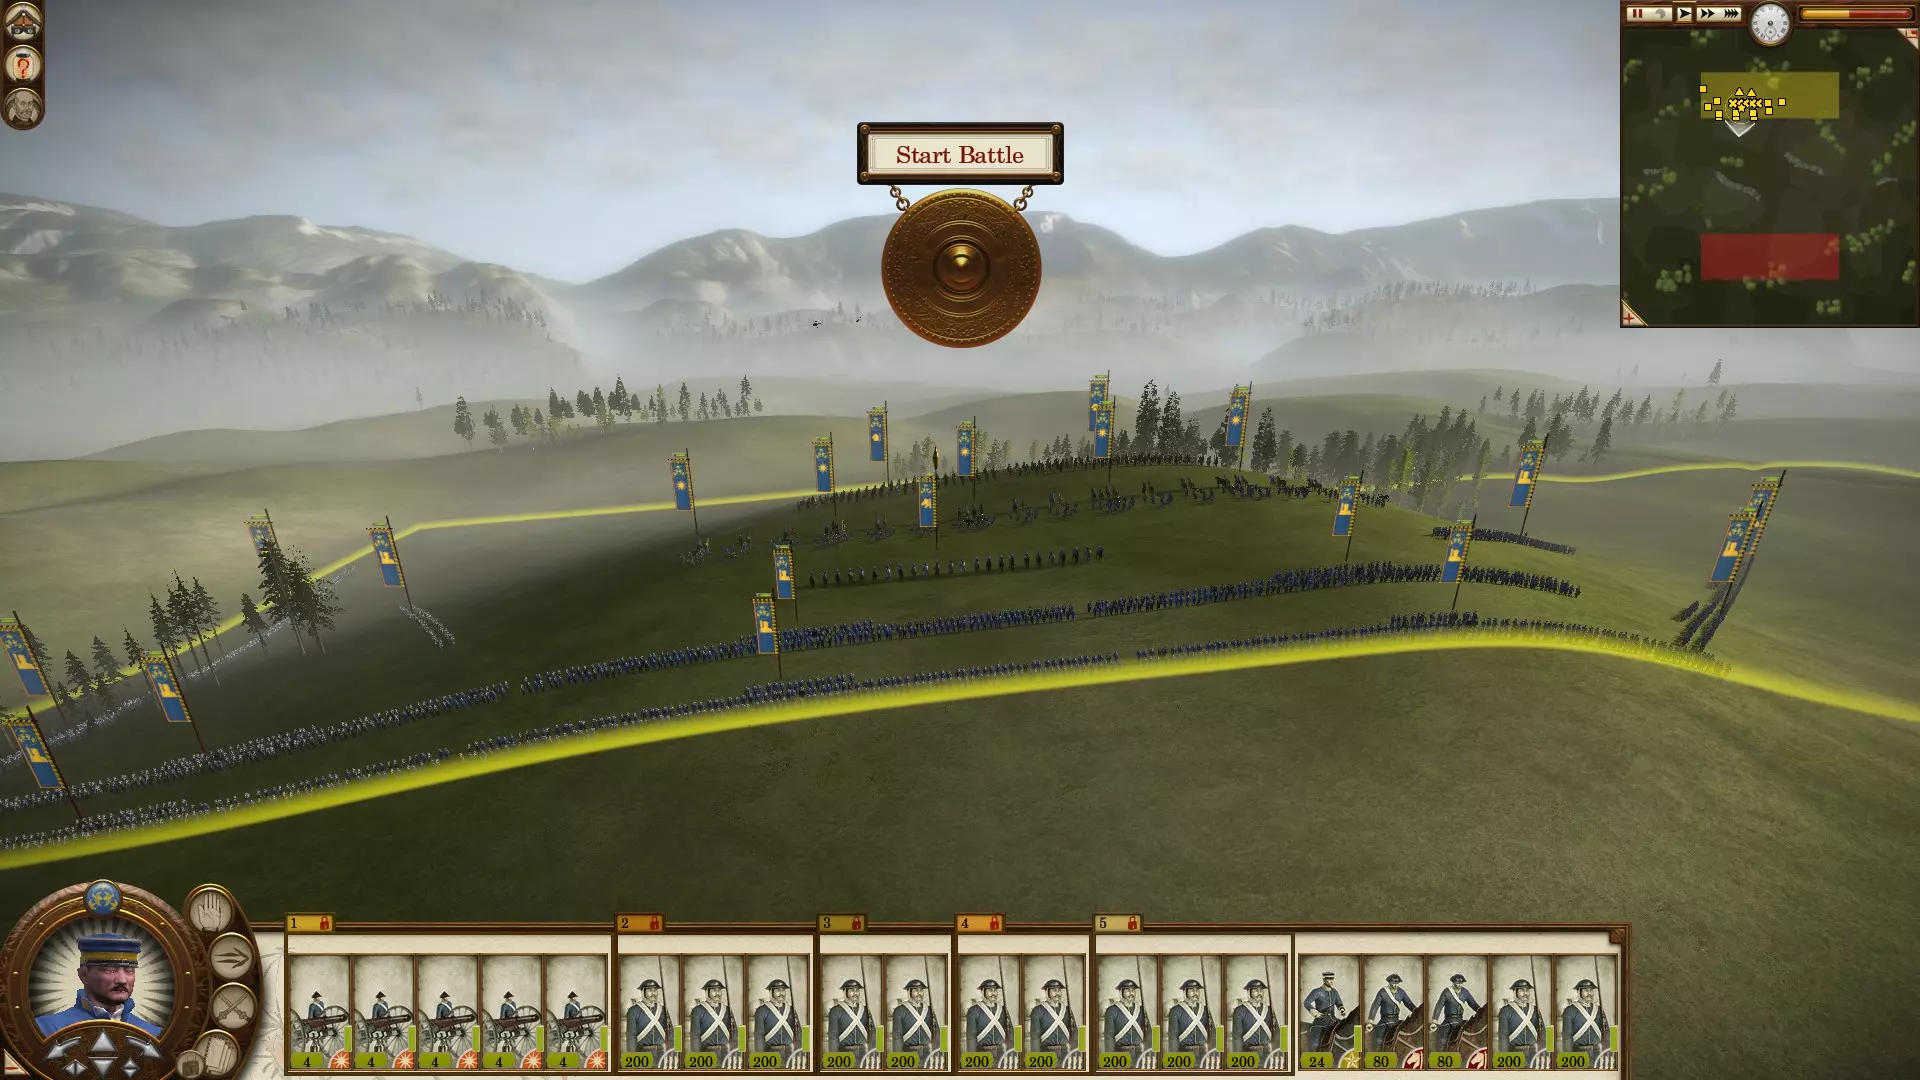
5 Game Phase I will divide the game into 5 phases, early, early+, mid, mid+ and late game. Here I'll go through what I consider is good to build during those phases and will try to explain their pros and cons. Also note that I'll use shortened terms to make it easier to write the guide so here they are: Koku (k) Growth (g) Happiness (h) Modernisation (m) Generally tax is around 28% To keep public order, I'll use the lowest upkeep unit which is 98 koku. 5.1 Early Game This phase marks the beginning of the game and is critically important because establishing a strong foundation is vital for success in Legendary mode. Typically, you start with just one province, and after conquering two additional provinces, your fame level will increase to the next tier. It's worth noting that provinces you capture beyond the first three will have a base Resistance to Invader (RTI) value of -1. Please be aware that if you don't let the RTI runs out (which decreases 1 each turn) for your first two provinces, they will also have a base RTI value of -1. The fame cap during this early game phase is six provinces, and as your fame increases, so will the RTI penalties. For the sake of this early game analysis, let's assume you have a total of six provinces. Additionally, I'll consider that you've researched the first happiness technology to counteract any unhappiness. Please note that famous battles counts towards your fame such as Heroic victory and might not align with provinces count for fame. 5.1.1 Happiness Public order is crucial in this game as it directly affects your economy and also keeps your provinces in check; otherwise, there will be revolts. Public Order (PO): Stronghold: 4 Technology: 1 Total: 5Public Order Penalty: Resistance to invader: -1 Tax: -4 Total: -5Final PO: 0 5.1.2 General Buildings (GB) The buildings I consider to be the foundation across different builds. Port + Subsistence Farming: Total: 550k, 2g, 0h, 0m 5.1.3 Specialise Buildings (SB) Inn: Toltal: 360k, 0g, 1h, 0m Final (GB + SB + PO): 910k, 0g, 1h, 0m Gross Tax: 910 * 0,28 = 255k Public Order Upkeep: 0k Net Tax: 255 - 0 = 255k Cottage Industry: Toltal: 560k, 0g, -1h, 1m Final (GB + SB + PO): 1110k, 2g, -1h, 1m Gross Tax: 1110 * 0,28 = 311k Public Order Upkeep: 98 * 1 = 98k Net Tax: 311 - 98 = 213k Note: If you're playing a faction that start with 1 province then this phase gives you +1 surplus in happiness if you researched the tech that gives happiness. Which means Cottage Industry gives the most Net Tax here. 5.1.4 Analyse Keep in mind that this is the early game, and for now, you only have one building slot available. This means you'll need to choose between constructing an Inn or a Cottage Industry. As you can see, if you were to build Inn in every province in early game you won’t be able to advance to the next level of technology as it lacks modernisation and it’s game over for you. Then what about Cottage Industry? It gives a bit of modernisation, surely it’s a good call, since it allows you to advance to unlock the next level of technology but also counts towards your Military Might since you now have to recruit 1 units for garrison, so it's good right? 5.1.5 Conclusion In this phase, you start with only one province and will soon get your third provinces, and since you'll need one to build a military building, you're left with two provinces so I recommend the following: Second Province: Build an Inn, but do not upgrade it at this stage. I'll explain why in the later phases of the game. This choice will maximize your income without requiring additional funds to purchase garrison units. Instead, you can recruit units to strengthen your army for conquering other provinces. Third Province: Consider constructing a Cottage Industry. The reason for this choice is that you'll need the Inn in the second province to let you move on to conquer the third province faster but also you might need Modernisation to unlock the next tier Art if you're taking your time, else consider building an Inn here as well. Once you've secured three provinces, take a moment to plan your strategy. Aim to reduce the Resistance to Invader (RTI) to 0 by the time you conquer the fourth province. This approach allows your army to replenish its strength before moving on to conquer the fourth province. In some situations, if RTI has not reached 0 and the opportunity arrises to capture the fourth province with minimal resistance then by all means go ahead. Beyond that (Referring to province 4+) build Cottage Industry as needed to unlock the next tier of technology. This choice also contributes to your Military Might and will have a significant impact on other clans, influencing their decisions on whether or not to declare war against you. Regarding Ports, they require an initial investment to upgrade and do not generate direct wealth. However, they enable sea trade with other clans, providing a substantial income boost of approximately 100-150 Net Koku during the early game. This can be a significant source of revenue. 5.2 Early+ Game This phase builds upon our early game phase, and at this point, the Resistance to Invader (RTI) will be at -2, indicating that you now control approximately 9 provinces. I'll assume you have reached tier 2 of technology with a PO penalty of -1 and you have also researched the related technology that provides another +1 to PO, effectively canceling out the penalty. I'll also assume you now have upgrade your Stronghold to Fortress and Town to Large Town. 5.2.1 Happiness Here I will also assume you have unlocked tier 3 of technology already which gives a penalty of -2 to PO, but also have researched the PO related technology that gives another +1 to PO. Public Order (PO): Technology: 2 Fortress: 6 Total: 8Public Order Penalty: Resistance to invader: -2 Tax: -4 Large Town: -1 Technology: -2 Total: -9Final PO: -1 5.2.2 General Buildings (GB) Port + Subsistence Farming: Total: 550k, 2g, 0h, 0m 5.2.3 Specialise Buildings (SB) Gambling Den: Toltal: 600k, 1g, 2h, -1m Final (GB + SB + PO): 1150k, 3g, 1h, -1m Gross Tax: 1150 * 0,28 = 322k Public Order Upkeep: 0k Net Tax: 322 - 0 = 322k Market: Toltal: 720k, 2g, 0h, 1m Final (GB + SB + PO): 1270k, 4g, -1h, 1m Gross Tax: 1270 * 0,28 = 356k Public Order Upkeep: 98 * 1 = 98k Net Tax: 356 - 98 = 255k 5.2.4 Analyse With this phase we will be upgrade the Inn and as you can see Gambling Den (BD) gives the most gain from our Inn at 255 koku to 322 koku. However, what about modernisation? It does give -1 to modernisation. Doesn’t this mean game over? Since we can’t unlock the next technology tier? Then Market should be an obvious choice. Although it only gives a Net Tax gain of 3 koku from our Inn, but it gives 1 modernisation and count towards our Military Might since we need a unit to maintain PO as well as more growth. Right? 5.2.5 Conclusion While the Market seems like a tempting choice at this phase due to its additional growth, it's worth considering that in the long run, it won't generate as much money as the Gambling Den (GD). This is because the GD provides a surplus to happiness, eliminating the need for additional units for garrison duty. Consequently, you'll gain more in net tax with the GD compared to the Market. The drawback of GD here is modernisation since it gives us negative value, however, before upgrading the Inn be sure to upgrade the Town to Large Town, this will give you +1 modernisation and 1 additional slot which will let you build Cottage on previously provinces that only has Inn. Large Town does give -1 to happiness but GD does give you +2 to happiness so it will cancel each other out. With this your modernisation shouldn’t be an issue. Once you have upgraded the Inn or build Cottage don’t forget to upgrade the Stronghold to Fortress as Fortress gives 2PO which will prepare us for the next phase. With this you will get a Net PO of 1 otherwise you will be at -1 PO and thus require unit for garrison which means less unit to conquer other provinces. 5.3 Mid Game This phase builds upon our early phase, and the Resistance to Invader (RTI) here will be at -3. This indicates that you are in control of approximately 12 provinces, giving you a comfortable margin before reaching Realm Divide (RD). 5.3.1 Happiness As you proceed with upgrades, you will eventually reach the last tier of technology, which imposes a penalty of -3 to Public Order (PO). To account for this, let's assume the worst-case scenario. I'll also assume that you've researched the PO-related technology, which provides an additional +2 to PO. Additionally, I'll assume that you have upgraded all your ports to Trading Ports, except for the Navy Base, which will will be a Military Port, and Subsistence Farming has been upgraded to Tenant Fields. Public Order (PO): Technology: 4 Fortress: 6 Total: 10Public Order Penalty: Resistance to invader: -3 Tax: -4 Large Town: -1 Technology: -3 Total: -11Final PO: -1 5.3.2 General Buildings (GB) Trading Port + Tenant Fields: Total: 1600k, 6g, -1h, 2m 5.3.3 Specialise Buildings (SB) Financial District (FD) + Cotton Weaving Shed (CWS): Toltal: 2460k, 7g, -2h, 5m Final (GB + SB + PO): 4060k, 13g, -4h, 7m Gross Tax: 4060 * 0.28 = 1137k Public Order Upkeep: 98 * 4 = 392k Net Tax: 1137 - 392 = 745k Richi Mahjong Parlour (RMP) + Cotton Weaving Shed (CWS): Toltal: 2200k, 5g, 1h, 2m Final (GB + SB + PO): 3800k, 11g, -1h, 4m Gross Tax: 3800 * 0.28 = 1064k Public Order Upkeep: 98 * 1 = 98k Net Tax: 1064 - 98 = 966k Financial District (FD) + Craft Workshop (CW): Toltal: 2510k, 5g, -1h, 4m Final (GB + SB + PO): 4110k, 11g, -3h, 6m Gross Tax: 4110 * 0.28 = 1151k Public Order Upkeep: 98 * 3 = 294k Net Tax: 1151 - 294 = 857k Richi Mahjong Parlour (RMP) + Craft Workshop (CW): Toltal: 2250k, 3g, 2h, 1m Final (GB + SB + PO): 3850k, 9g, 0h, 3m Gross Tax: 3850 * 0.28 = 1078k Public Order Upkeep: 98 * 0 = 0k Net Tax: 1078 - 0 = 1078k Financial District (FD) + Silk Weaving Shed (SWS): Toltal: 2560k, 4g, -1h, 3m Final (GB + SB + PO): 4160k, 10g, -3h, 5m Gross Tax: 4110 * 0.28 = 1165k Public Order Upkeep: 98 * 3 = 294k Net Tax: 1165 - 294 = 871k Richi Mahjong Parlour (RMP) + Silk Weaving Shed (SWS): Toltal: 2300k, 2g, 2h, 0m Final (GB + SB + PO): 3900k, 8g, 0h, 2m Gross Tax: 3900 * 0.28 = 1092k Public Order Upkeep: 98 * 0 = 0k Net Tax: 1092 - 0 = 1092k 5.3.4 Result FD + CWS vs FD + CW vs FD + SWS: FDCWS Net Tax = 745k, 13g, 7m (Before PO: 1137k -4PO cost 400k more compare to CW) FDCW Net Tax = 857k, 11g, 6m (Before PO: 1151k -3PO) FDSWS Net Tax = 871k 10g, 5m (Before PO: 1165k -3PO cost 300k more compare to CW) RMP + CWS vs RMP + CW vs RMP + SWS RMPCWS Net Tax = 966k, 11g, 4m (Before PO: 1064k -1PO cost 400k more compare to CW) RMPCW Net Tax = 1078k, 9g, 3m (Before PO: 1078k 0PO) RMPSWS Net Tax = 1092k, 8g, 2m (Before PO: 1092k 0PO cost 300k more compare to CW) 5.3.5 Analyse As you can see, building FDresults in the least net tax, but it contributes significantly to your Military Might. This is because you'll need to recruit a substantial number of units to garrison your province and maintain public order. On the other hand, RMP provides more net tax but contributes less to your Military Might since fewer units are required to maintain public order. There is, however, one more Public Order (PO) Mastery that grants +2 PO. If you were to master it, then the FD build would yield 943 (FDCWS), 1052 (FDCW), and 1066 (FDSWS), respectively.It's important to note that building an FD costs 600 koku more than an RMP. Even with the last Mastery granting +2 PO, the FD still generates less net tax compared to the RMP. Despite the FD providing an additional two points of growth, it doesn't outshine the RMP in terms of cost and revenue. However, if you have an Agent that provides +1 clan-wide happiness or a Daimyo with high honor (6 points), granting a +2 PO (4 points yield +1, and 6 points yield +2, which can be earned from Heroic Victory and Masteries), then you might consider opting for the FD build, as it will provide the highest income. 5.3.6 Conclusion In this phase, you have the choice between building RMPCWS, RMPCW, or RMPSWS. One option yields less Net Tax but offers more modernization and growth, while the other provides a higher Net Tax return. For my preference, I opt for RMPCW, despite its slightly lower growth. The reason behind this choice is that in the next tier, regardless of the initial build, Cottage Industry will be upgraded to a Factory anyway. Not to mention this build is the cheapest of all builds as well. As for FD build, I don't consider it to be that good, while it counts toward your military might but you will end up with a lot of units that you can't "use" because they have to garrison your province and they are not strong enough to prevent an attack since the AI will come with full force. But also they gives less Net Tax imo. While RMP gives happiness, which makes it more flexibel for you and when conquering new provinces you can also move on faster. Another reason is due to Market, FD and CWS cost more too build and takes 1 turn longer to complete compared to their counterparts. Thus, you will have to pay for the price differences and losing income of 1 turn as well. Example: FD takes 7 turns to complete and cost 600 koku more compared to RMP which takes 6 turns and 600 koku less, if we translate this into profit it would be you losing 1 turn of income from RMP which is an addition of 400 * 0,28 = 112, which gives us a total differences of 712 koku loss. However, FD does gives 73 (Best case senario) koku more each turn and also a 2 more growth. This means the differences will become null at about 10 turns, with growth taking in consideration. Which means any money after 10 turns after it's being built means more income. And the game usually last for about 180 turns for me. That's when I have all the whole Japan either Pro-shogunate or Pro-Imperial. Note: Consider upgrade to Commercial Farming (CF) at this phase on provinces that are fertile or very fertile since it multiplies the income by 2 respectively 3. This means Tenant Fields that gives 900 koku actually gives 1800 koku respectively 2700 koku. Upgrading to CF gives a base of +500 koku so multiple that by 2 or 3 and you will end up with 1000-1500 extra koku (Brutto Tax). Be sure to upgrade the farm in the order of fertility, so very fertile, fertile, etc. 5.4 Mid+ Game This phase is a bit special because there are a few ways to go at it. You can either go with upgrading Tenant Fields (TF) to Commercial Farming (CF) and Cottage build to Factory. Or upgrade your Large Town to City and build Police Station and upgrade it to Magistrate. Or skip this phase all together and just save up some koku for RD. When you’re at this phase try to be at peace, preferably not at war with any clan at all. This is because at this phase we are preparing for RD. Strike peace is the most important here and not to enter RD at any cost. Public Order from the previous phase applies. I'll also assume you have researched the necessary tech needed for Factory. 5.4.1 General Buildings (GB) Trading Port + Commercial Farming: Total: 2100k, 7g, -2h, 3m 5.4.2 Specialise Buildings (SB) Financial District (FD) + Factory (F): Toltal: 2960k, 9g, -2h, 5m Final (GB + SB + PO): 5060k, 16g, -5h, 8m Gross Tax: 5060 * 0.28 = 1417k Public Order Upkeep: 98 * 5 = 294k Net Tax: 1417 - 490 = 927k Richi Mahjong Parlour (RMP) + Factory (F): Toltal: 2700k, 7g, 1h, 2m Final (GB + SB + PO): 4800k, 14g, -2h, 5m Gross Tax: 4800 * 0.28 = 1344k Public Order Upkeep: 98 * 2 = 196k Net Tax: 1344 - 196 = 1148k 5.4.3 City and Magistrate When upgradde Large Town to City you will earn; 2m -1h 2% taxWhile Magistrate gives; 2PO +1 to agent (Ishin Shishi/Shisengumi) This means we will go surplus on PO by 1 and +2% on tax, which gives us on a province that has about 4000 koku in wealth of a extra Net Tax about 80 koku. Please remember that during the construction of Police Station you will suffer a -1PO, so be sure to have a surplus of PO before upgrading the town. 5.4.4 Result FD + F vs RMP + F: FDF Net Tax = 927k, 16g, 8m RMPF Net Tax = 1148k, 14g, 5m 5.4.5 Conclusion Since we went with RMP the FD build is already obsolete because as you can see here RMPF gives a much higher net tax compared to FDF, this means less unit station inside a province and more unit for army to conquer other provinces. Depending on whether you build RMPCWS or RMPCW you might want to consider skip upgrading to Factory and CF but instead upgrade your Large Town to City and Build Police Station then upgrade to Magistrate instead. Alternatively you can mix these 2, on provinces previously build RMPCWS you can go ahead and upgrade to Factory and CF since this will gives the most Net Tax, while on provinces you previously build RMPCW then go ahead and upgrade Large Town to City and Magistrate instead, since this allows for conversion (and) recruit agent. Depending your path. I would advise to go with City and Magistrate if you're going to switch side. This will help you restore PO the fastest but also allows to recruit agent depending on the path you choose. You can also decide to skip this phase and just save money for RD which reduce the length of the game quite a bit. For me, I would probably build Magistrate on 1-2 provinces instead of cottage since I will not change side, this will also let me have 1-2 agents. Once RD kicks in I'll always build police station on newly conquered provinces anyway to help with PO and there I can then recruit agents if I so desire. This means I will skip this phase and build Factory if I have koku to spare or needed it. Usually I will just sack a few provinces right at the start of RD which should gives me 1-2 hundred thousands koku in about 1-2 season. 5.5 Late Game This phase means we are entering RD and are ready for it. It's time to conquer JAPAN! Here just go ahead and continue to upgrade the buildings you have already built to make even more income if you have money to spare, usually getting new province will give you quite a bit of extra net tax so continuing to upgrade your provinces is kind of unnecessary. If you need a lot of koku then consider sacking the province which usually gives a lot of koku right away. Do note that doing so gives penalty to your Honour and high public unrest. However, Honour shouldn't be a problem since it can be earned through many different ways and sacking max out at -3 Honour. As for PO penalty, let the rebel take over the town and fight them again and reclaim it or also kill them before they take the town, this will give you about 5PO towards Military Crackdown and decreases by 1 each turn. 6 Military Base As mentioned previously, there are generally two types of provinces: Economy and Military. In this section, we'll focus on Military Provinces. 6.1 Tera Base When developing Military Provinces, it's advisable to construct Military buildings in a province that combines a Blacksmith with a Training Camp upgrade to a Firing Range. This combination results in your modern units gaining a significant advantage with a total of 35 extra accuracy. Additionally, consider building your Artillery units in this province, as they too will benefit from the increased accuracy, making them even deadlier. To achieve this, it's necessary to upgrade the military province to at least a City level. You should also contemplate upgrading the Stronghold to a Fortress for the extra repression, as modern buildings can result in a public order penalty. 6.2 Navy Base When it comes to your navy, upgrading a Port to a Military Port and then to a Drydock in a province with a Coal Mining facility is recommended. This upgrade path reduces the cost required to recruit ships, ultimately saving you money, as naval units can be quite expensive. However, having 1-2 Navy Bases should suffice. Please note that it might not be ideal to build the Navy Base in your Tera Base, as doing so would limit your ability to recruit Foreign units, which are the best units available in the game. 7 Army and Battle Having the best unit combination but also the cheapest upkeep might be hard. Here I'll try to break it down for both Naval and Land armies. 7.1 Terra Army and Battle When attacking the enemy, consider using Agents to make the battle even easier, especially if you do not wish to declare war while still wanting to claim new provinces. By employing Ishin Shishi or Shinsengumi, you can incite a revolt in other provinces. This means you won't need to declare war on another clan to gain control of a province that's currently being held by said clan. You can also use them to acquire their army and turn it against them, but playing this way requires a significant amount of koku. Before engaging an enemy army, I recommend using the Foreign Veteran to harass the enemy and Assassinate their General with another agent. Harassment causes attrition and reduces morale, making the battle even easier for that mass rout. Early-Mid Game: In the early game, I would recommend skipping Levy Infantry altogether or just get about two of them. This is due to their very low accuracy, slow reload rate, and weak in melee combat. The only thing they are good is to inflict moral penalty since gun reduces moral quite nice. Therefore, go with Line Infantry until you get better gun units. To recruit Line Infantry, you'll need a Cadet School (CS), so consider demolishing a building in your "temporary" military town to make room for a CS. Because once the AI got Line Infantry, it will be quite a tough battle if you’re still running around with Spear Levy and Levy Infantry since Line Infantry melee combat is more or less even with Spear Levy. Early+ Army Composition: I recommend going with: 10 Line Infantry 2 Parrot Gun 2 Cavalry You should get Parrot Gun and Cavalry as you enter Early+ to Mid game and you don’t even need a full army either. The reason for this is because in the Early - Mid Game, there are a lot of things happening. Everyone is at war with each other, therefore, the AI usually running around with Line Infantry or Levy Infantry. This also means more income for you to build and expand your economy provinces instead of putting in a lot of money in military and on expensive units that's unnecessary. What about Sharpshooters? Their unit size is about 60% of Line Infantry, they have slightly longer range, better accuratcy but a bit worse reload, I would recommend skipping them, once you get kneel fire ability the line infantry absolutely destroy Sharpshooters. So they are not worth it compared to line infantry. Late Game: Keep in mind that you can recruit a maximum of 8 units of Elite Infantry, meaning you can have 8 Guard Infantry and 8 Marines. For late-game unit composition, I recommend having at least 2 Armstrongs, 2 Cavalry, 6 Infantry, and 1 General, with the remaining slots open to your preference. But why those units? Why not other? Well, you can build whatever you want, but for me, those gives the best result based on my playstyle. Armstrongs are useful for enticing the enemy to attack you instead of you having to run towards the enemy, and they excel in Siege Battles, particularly when built in a province with a Blacksmith and Training Camp. This means that by the time the enemy reaches you, they've already suffered casualties, and you might even eliminate their General with some luck. Unlike Shogun 2 where I use Cavalry as flank, kill General, engage archers and chasing down fleeing units, I only use Calvary to chase down fleeing units in FoTS so I don’t have to spend additional action points after the battle to chase and finish them off. This is because using Armstrong and Infantry, it’s enough to shatter the enemy, and depending on the combination, you could even rout them before they even get close to you. As for my preference, if I were to recommend a build, I would recommend going with: 5 Armstrong 12 Faction Specific Infantry (Use elite ones if you can, they are even more deadly) 2 Cavalry 1 General For this build, it’s crucial that your Armstrong units are positioned high on the hill with a clear line of sight — they are your primary damage dealers. Line your Infantry about 2.5 rank deep. Have about 3 units deploy to the front, 2 units on each sides, making it a total of 7 units. Use the remaining 5 units to create the second line of defence but in a higher position if possible. The second line of defence will consist of another 3 lines upfront and 1 line on each side. Keep your Calvary ready to intercept or keep enemies away if there are reinforcements by drawing their attentions. If you want challenge use traditional units only, else reduse Armstrong and Infantry to recruit Spear Levy to about 6 of em. I find it more fun and more challenging. In siege battles, when using Armstrongs against units stationed on walls, target the walls themselves instead of the units. Try to evenly damage the walls so that they explode simultaneously, effectively eliminating the stationed units. Also, even if a wall is at 100% damage, you can still target it if you target it correctly. This is what you want to do instead of attacking the unit. The splash damage from the cannon ball is enough to kill of a chunk of the unit, with only 1 hit from a canon you usually got a lot of kills. This means it will be a lot of micromanagement, but you will get the most kill out of it and also allowing you to move up your army in a safer way. Here you can see how I would set up my lines.
7.2 海军与海战 在海战方面,你需要进行大量的微操作。这是因为你需要不断移动舰船并下达新命令,以确保胜利并减少损失。因此,通常不建议对海战使用自动解决选项,除非你能承受损失,否则这往往会导致大量舰船损失。 手动进行海战时,始终专注于操控舰船以最大化其火力。这包括让舰船转向,使其能够从两侧开火,因为重新装弹可能很耗时。合理的航行可以让你输出更多火力并躲避敌人的攻击。 你所需的海军舰队数量取决于游戏的进展情况。在我的游戏过程中,我会根据我方阵营在对抗敌方阵营战争中的进展,使用1到4支完整舰队。 舰队组成: 关于海军组成,我通常采用以下配置: 1. 【海阳丸(护卫舰)】作为旗舰,尽管其维护费用较高,但拥有高士气、大量船员和众多火炮。高士气至关重要,因为旗舰撤退可能导致战败。庞大的船员数量确保敌方几乎不可能俘获旗舰,而众多火炮则有助于击溃敌人。 2. 5艘【春日(轻型护卫舰)】,构成主要战力。它们是回天级的升级版,维护费用略高,但拥有更多火炮和船员。 3. 4艘【千代田型(鱼雷艇)】,作为支援舰艇。这些舰船体型较小,火炮数量少,但机动性强,可为你的春日级舰船提供支援。它们需要更多微操作,因为能协助击沉敌舰。要让它们远离接舷战,一旦被接舷或成为敌方火炮目标就会非常脆弱。注意这类舰船最多只能拥有8艘。如果需要组建超过2支完整舰队,可以使用火炮型,其效果虽较差但仍能发挥作用。 你也可以根据需要配备2艘甲铁级铁甲舰。它们速度缓慢,但能承受大量伤害,还可以撞击敌舰。不过其维护费用很高,我因为成本问题通常不会使用它们。 在游戏的早中期,你无法获得所有类型的舰船,敌方的舰船数量也不会很多。在这个阶段,你可以考虑使用2艘炮艇和2艘回天鱼雷艇。随着游戏进程推进,更多舰船解锁后,你可以按照推荐或自行决定组建海军。记住,拥有强大的海军能通过 bombardment让陆战变得轻松许多,但这也会增加游戏时长,因为你需要管理海战。