换一换
换一换 


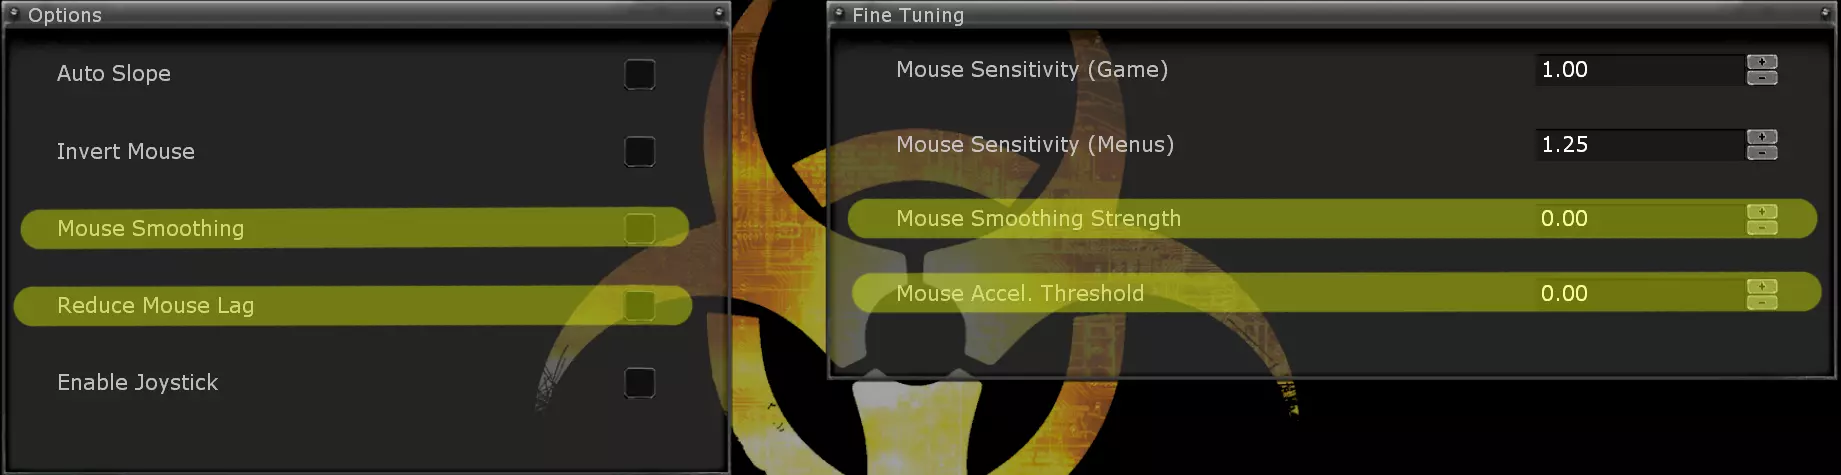
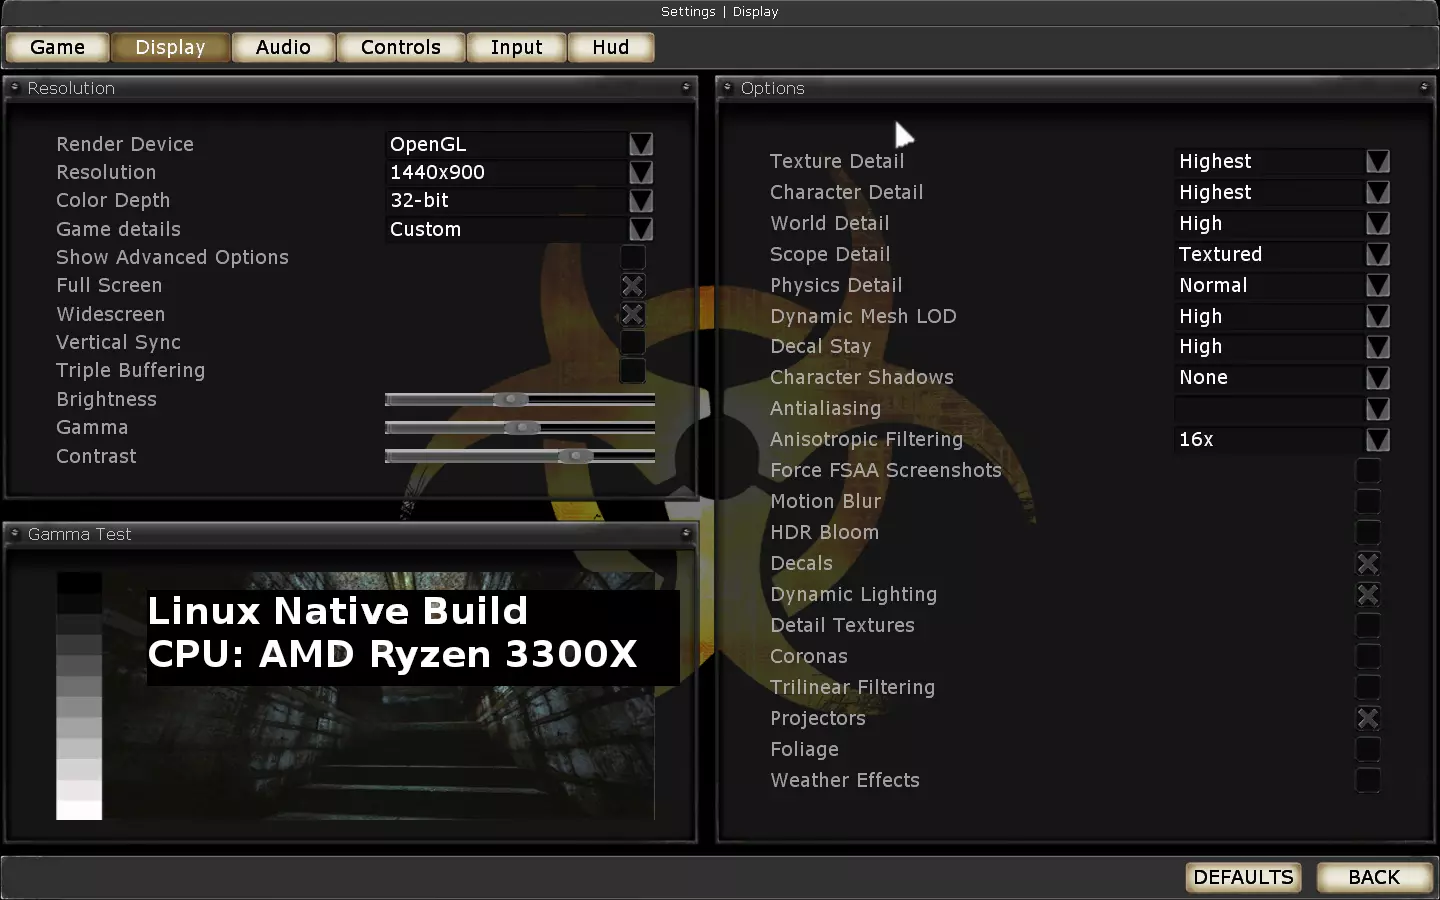
Fixing Perkprogression and Achievements on Linux incl. Cache Extractions Scripts. Some other issues with fixes/workarounds. In short - Summary Added this section on top of guide. Everything got little big and bad for the overview. Since 2014 the switch to linux and the big f*ckn mess with Killing Floor. Several 100 hours of testing on different devices/kernels/drivers/versions/combinations. For more details/information you can still read the other sections. As summary my advise, preferred settings. Some Notes: #1: This Guide was written with a lot of beer #2: Linux is the future, once Einstein said 100 years ago. #3: Pushing the upratebutton would be nice *thumbs up* #4: Sharing information to give community best experience in most awesome game in history At first: Why wanna run KF via D3D9 instead of OpenGL, while OpenGL without nearly no tweaks runs perfectly fine? Projectors in KillingFloor via OpenGL has no function. No Blooddecals are rendered. -> Key feature of this game. Other parts for projectors same missing, like red laser dot for mbr, projected lights etc... Overview of steps:Force Killing Floor via Proton 10, use GE custom build or which comes with steam. In combination with D3D9 and Proton use dgvoodoo2 as D3D9toD3D12 wrapper, to fix stutter with activated projectors. Optimize killing floor and dgvoodoo settings. Edit: Proton10 fixes bugs again which causes newly with Proton9: Game starts directly in fullscreen again. Ingame brightness, gamma, contrast settings are reconized again, doesn't need be adjusted with dgvoodoo color, brightness, gamma settings. Part1: Forcing Killing Floor to use Proton10 Right click Killing Floor in steam library and select Properties. Compatibilty, select your prefered Proton10version or custom ProtonGE 10 version https://github.com/GloriousEggroll/proton-ge-custom Part2: Optimizing Killing Floor Start Killing Floor and go into Settings Game: Connection LAN/T1 Display: Activate Widescreen Disable Vertical Sync Disable Motion Blur Disable HDR Bloom Scope Detail Textured Input: Disable Mouse Smoothing Disable Reduce Mouse Lag Mouse Smoothing Streng: 0.00 Mouse Accel. Treshold: 0.00 Close game, open killingfloor.ini located in: .../.steam/steam/steamapps/common/KillingFloor/System/ section: [WinDrv.WindowsClient] DrawDistanceLOD=1.0 to DrawDistanceLOD=0.0 (backround objects renders only very close - visual g*y. Improves performance. I do not recommend and left it by 1.0, decide on your own/perfomance on your device) section: [D3D9Drv.D3D9RenderDevice] ReduceMouseLag=True to False (if not already done in ingame settings) UseVSync=True to False (if not already done in ingame settings) CheckForOverflow=False to True (reduces heavy framedrops a lot with firebug spam and DynLight on) section: [Core.System] PurgeCacheDays=0 (nothing to do with performance, downloaded server files will not be deleted after x days) save file. open user.ini located in .../.steam/steam/steamapps/common/KillingFloor/System/ section: [Engine.Input] MouseX=Count bXAxis | Axis aMouseX Speed=2.0 MouseY=Count bYAxis | Axis aMouseY Speed=2.0 to MouseX=Count bXAxis | Axis aMouseX Speed=1.0 MouseY=Count bYAxis | Axis aMouseY Speed=1.0 section: [Engine.PlayerInput] change to following (if not already done in ingame settings) MouseSmoothingMode=0 MouseSmoothingStrength=0.000000 MouseAccelThreshold=0.000000 save file. Delete the 6 Movie.bik files in .steam/steam/steamapps/common/KillingFloor/Movies/ to avoid crashes. Part 3: dgVoodoo2Author Dege: https://dege.freeweb.hu/dgVoodoo2/dgVoodoo2/ Download dgVoodoo2_79_3 https://github.com/legluondunet/mlls-tools/tree/master/dgVoodoo2 (later releases of dgvoodoo refuses to run via linux/proton) Extract Files. Copy dgVoodoo.conf + dgVoodooCpl.exe and D3D9.dll from /MS/x86/ into Killingfloor System folder: .../.steam/steam/steamapps/common/KillingFloor/System/ Launch game to see if it's working, you will see in right corner dgvoodoo logo. If so, you can directly close Killing Floor again. Note: with actual Proton9 version ingame gamma/brightness/contrast settings are not recognized It have to be adjusted via dgvoodoo. Maybe it gets fixed with newer Proton releases, on older ones like Proton7 it worked fine. If it gets fixed let dgvoodoo brightness/color/contrast settings at original 100% Configure dgVoodoo2 with GUI or with .conf edit:You need once run dgVoodooCpl.exe with wine and select the path even .exe file copied in system folder and run from there. Noticed it on different machine, while changing only .conf to d3d12 to force vkd3d, it was still translated through dxvk. Like still dgvoodoo running with preset for api "bestavailable" which is D3D11. GUI: open dgVoodooCpl.exe with Wine Make sure in Config folder / Running instance: your ... Killingfloor System folder is selected Section General: Output API: Direct3d 12 (feature level 11.0) Brightness: 236% (close to my original kf settings, find your own sweeetspot) Color: 89-93% (close to my original kf settings, find your own sweeetspot) Contrast: 96% (close to my original kf settings, find your own sweeetspot) Select/Activate: Center app window (Only Proton9 needed adjusting in B/C/C, fixed with Proton10) Section DirectX: Videocard: dgVoodoo Virtual 3D Accelerated Card VRAM: 4096 MB Deselect/Disable dgVoodoo Watermark ---------- Configure dgVoodoo2 with .conf open dgVoodoo.conf with editor Section: [General] OutputAPI = d3d12_fl11_0 or you can set manual to feature level12 (no difference on linux compared to windows) OutputAPI = d3d12_fl12_0 Brightness = 236 (close to my original kf settings, find your own sweeetspot) Color = 89 (close to my original kf settings, find your own sweeetspot) Contrast = 96 (close to my original kf settings, find your own sweeetspot) CenterAppWindow = true Section: [DirectX] VideoCard = internal3D VRAM = 4096 dgVoodooWatermark = false save file. Done with all that stuff. Advantages: You will have best performance with KillingFloor D3D9 on linux you ever had. KillingFloor ingame D3D9 with dgvoodoo to D3D12 translated via proton to VKD3D. Blood/weapon decals are rendered and zero stutter with activated Projectors in ingame settings. My ingame settings all maxed out at 1080p and run's awesome, nearly close to windows performance. Disadvantages current state. Proton9 starts game always windowed. Every gamestart you have to reselect Fullscreen in ingame options, not a big thing. dgvoodoo in combination with Proton9 ingame gamma/brightness/contrast settings not recognized. Have to be adjusted with dgvoodoo. With Proton10 fixed again, starts directly fullscreen, gamma/brightness/contrast ingame works Screenshots from laptop CPU: AMD 5600h, GPU: AMD 6600MLinux Mint 22 (64 bit) Kernel Version: 6.13.6-x64v3-xanmod1 Mesa 25.0~git2503060600.d2e943~oibaf~n Settings
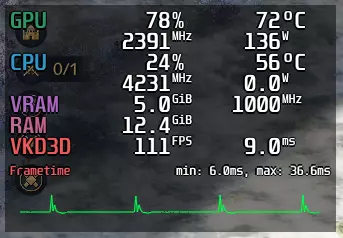
5人在线 西伦敦 150帧(通过kf.ini和网络速度限制为144帧)
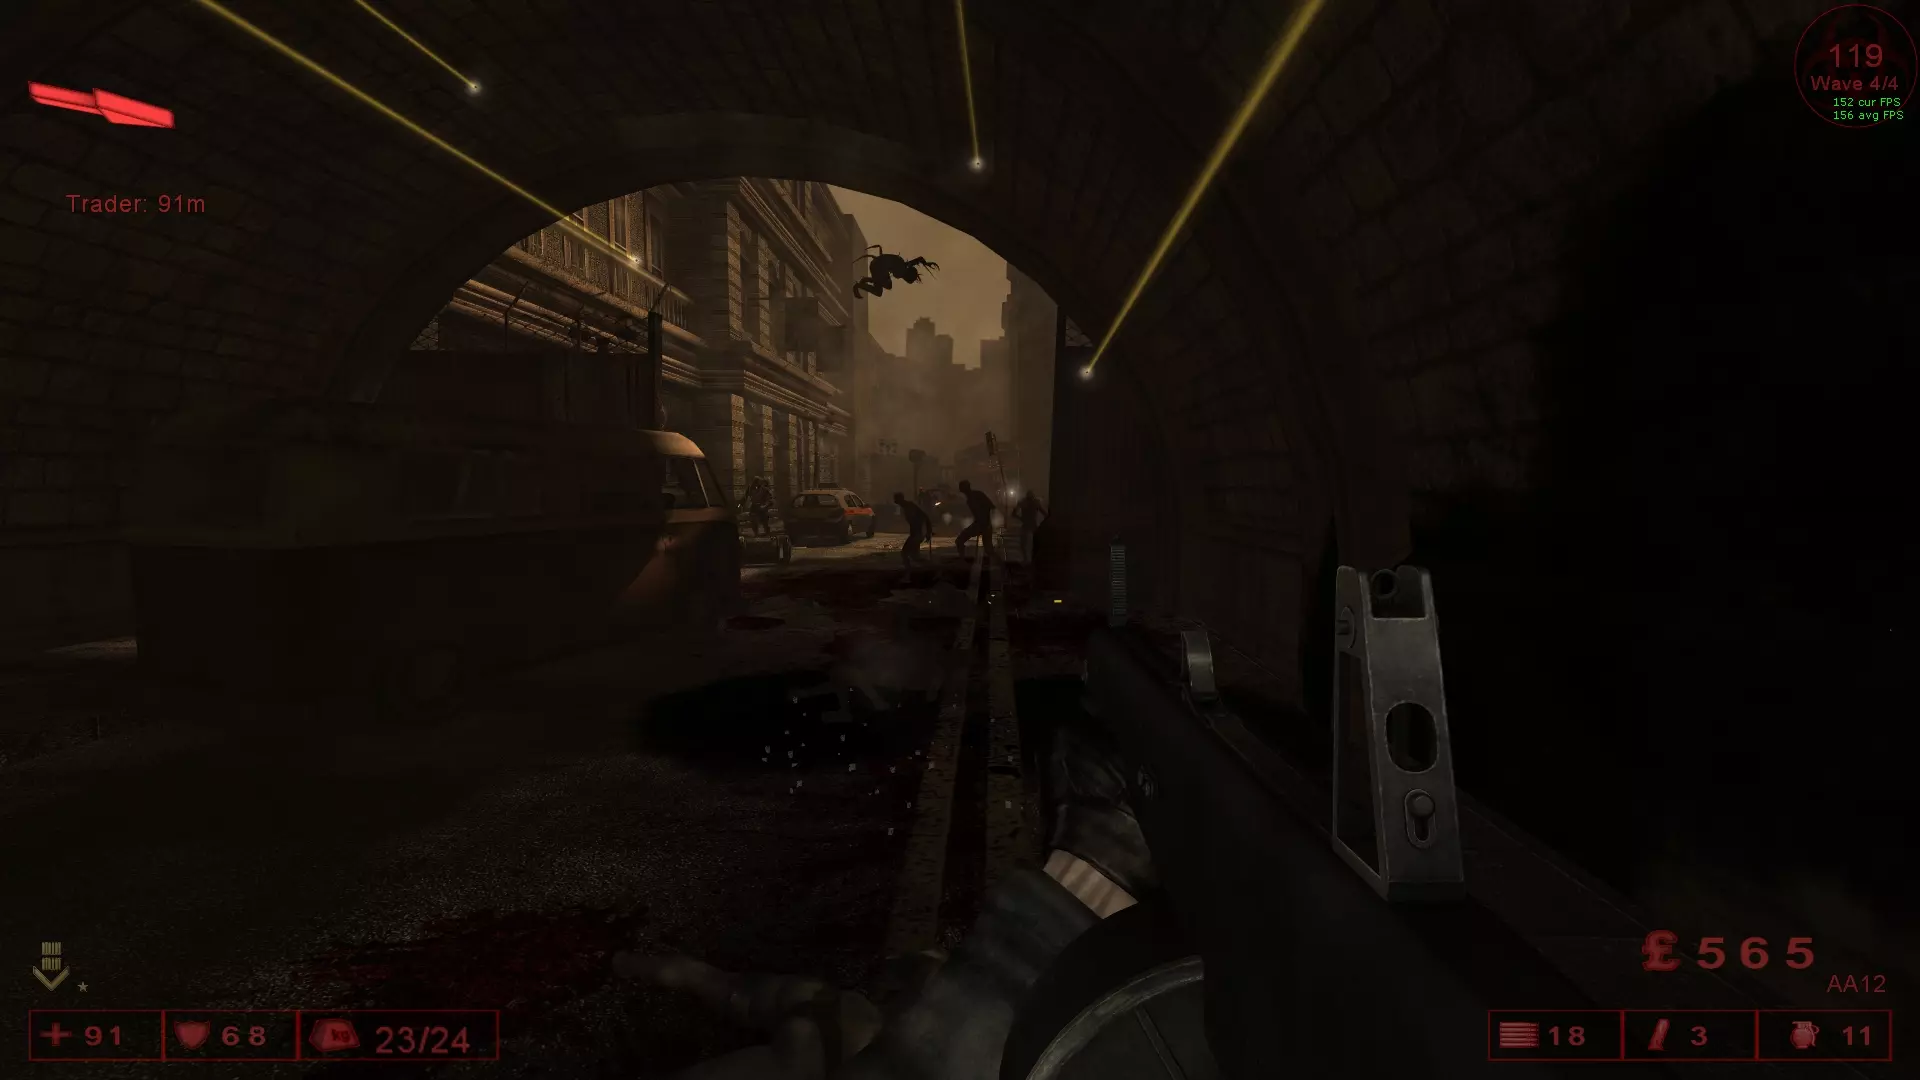
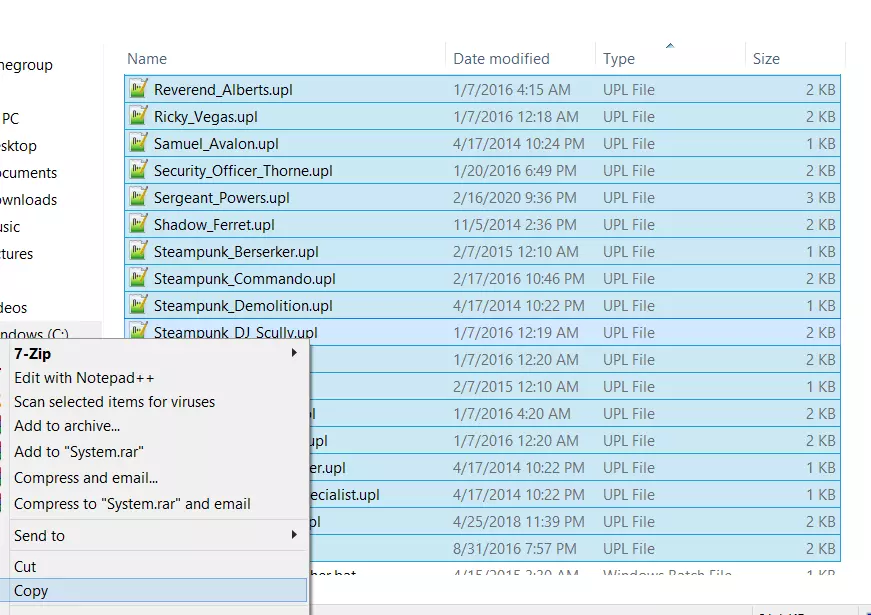
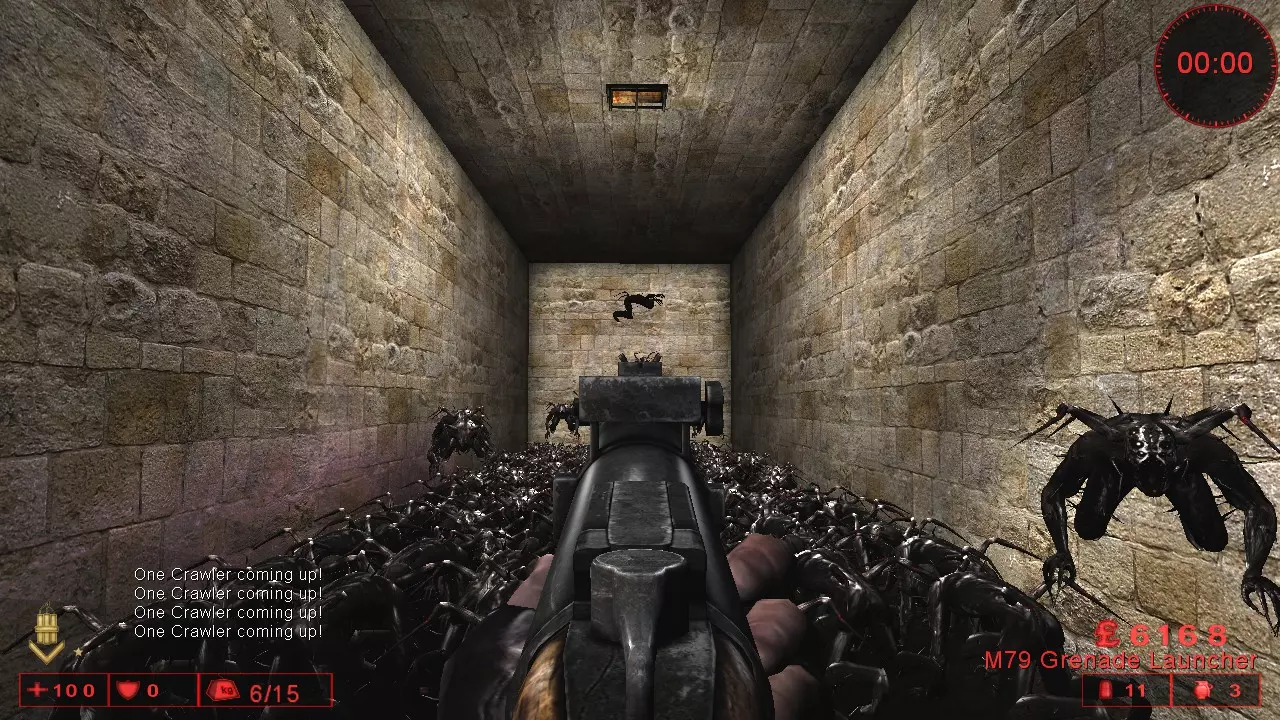
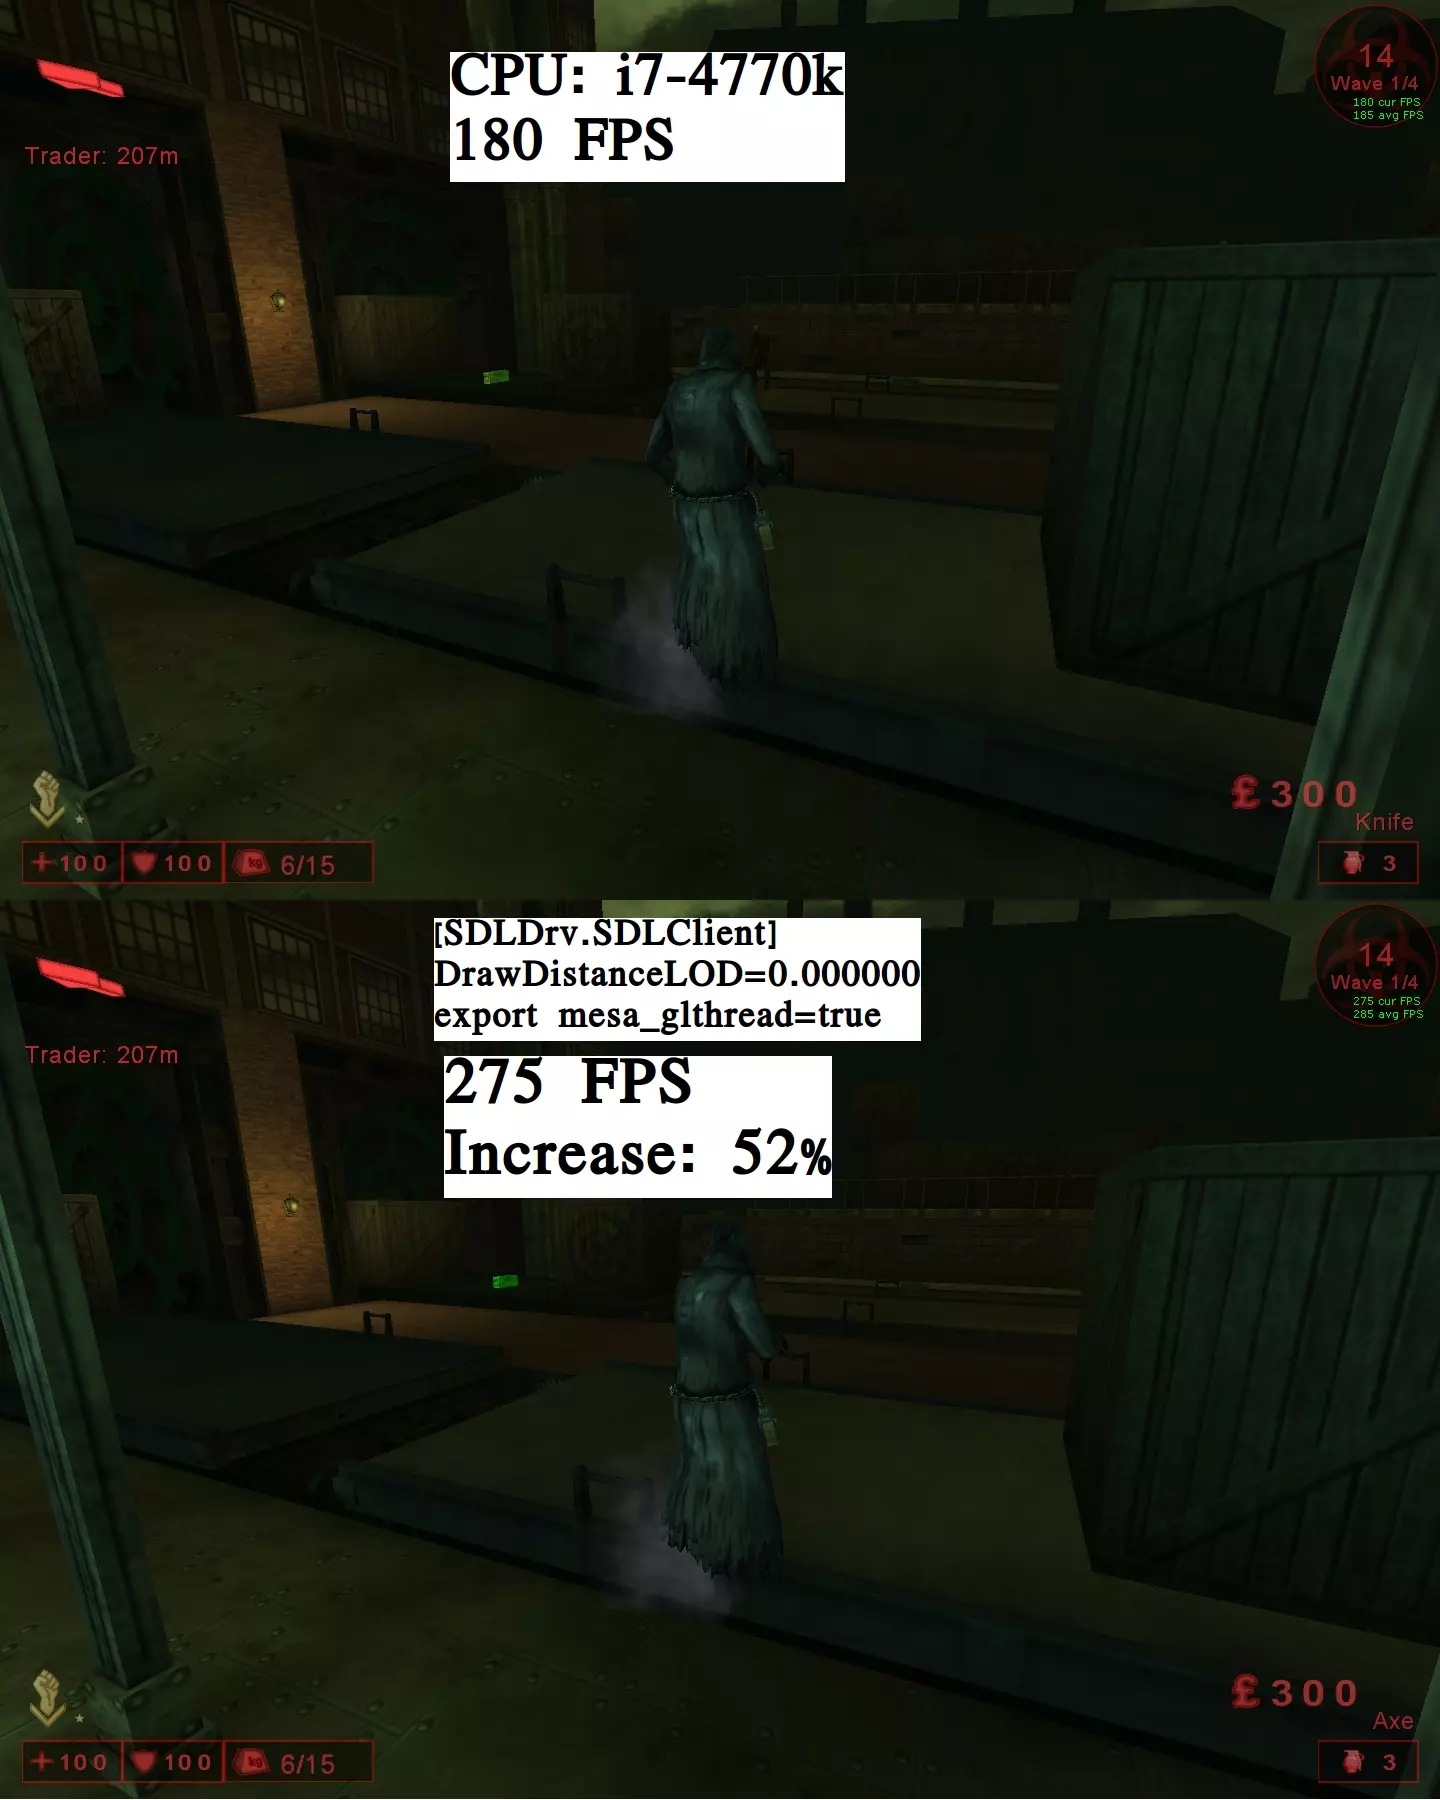
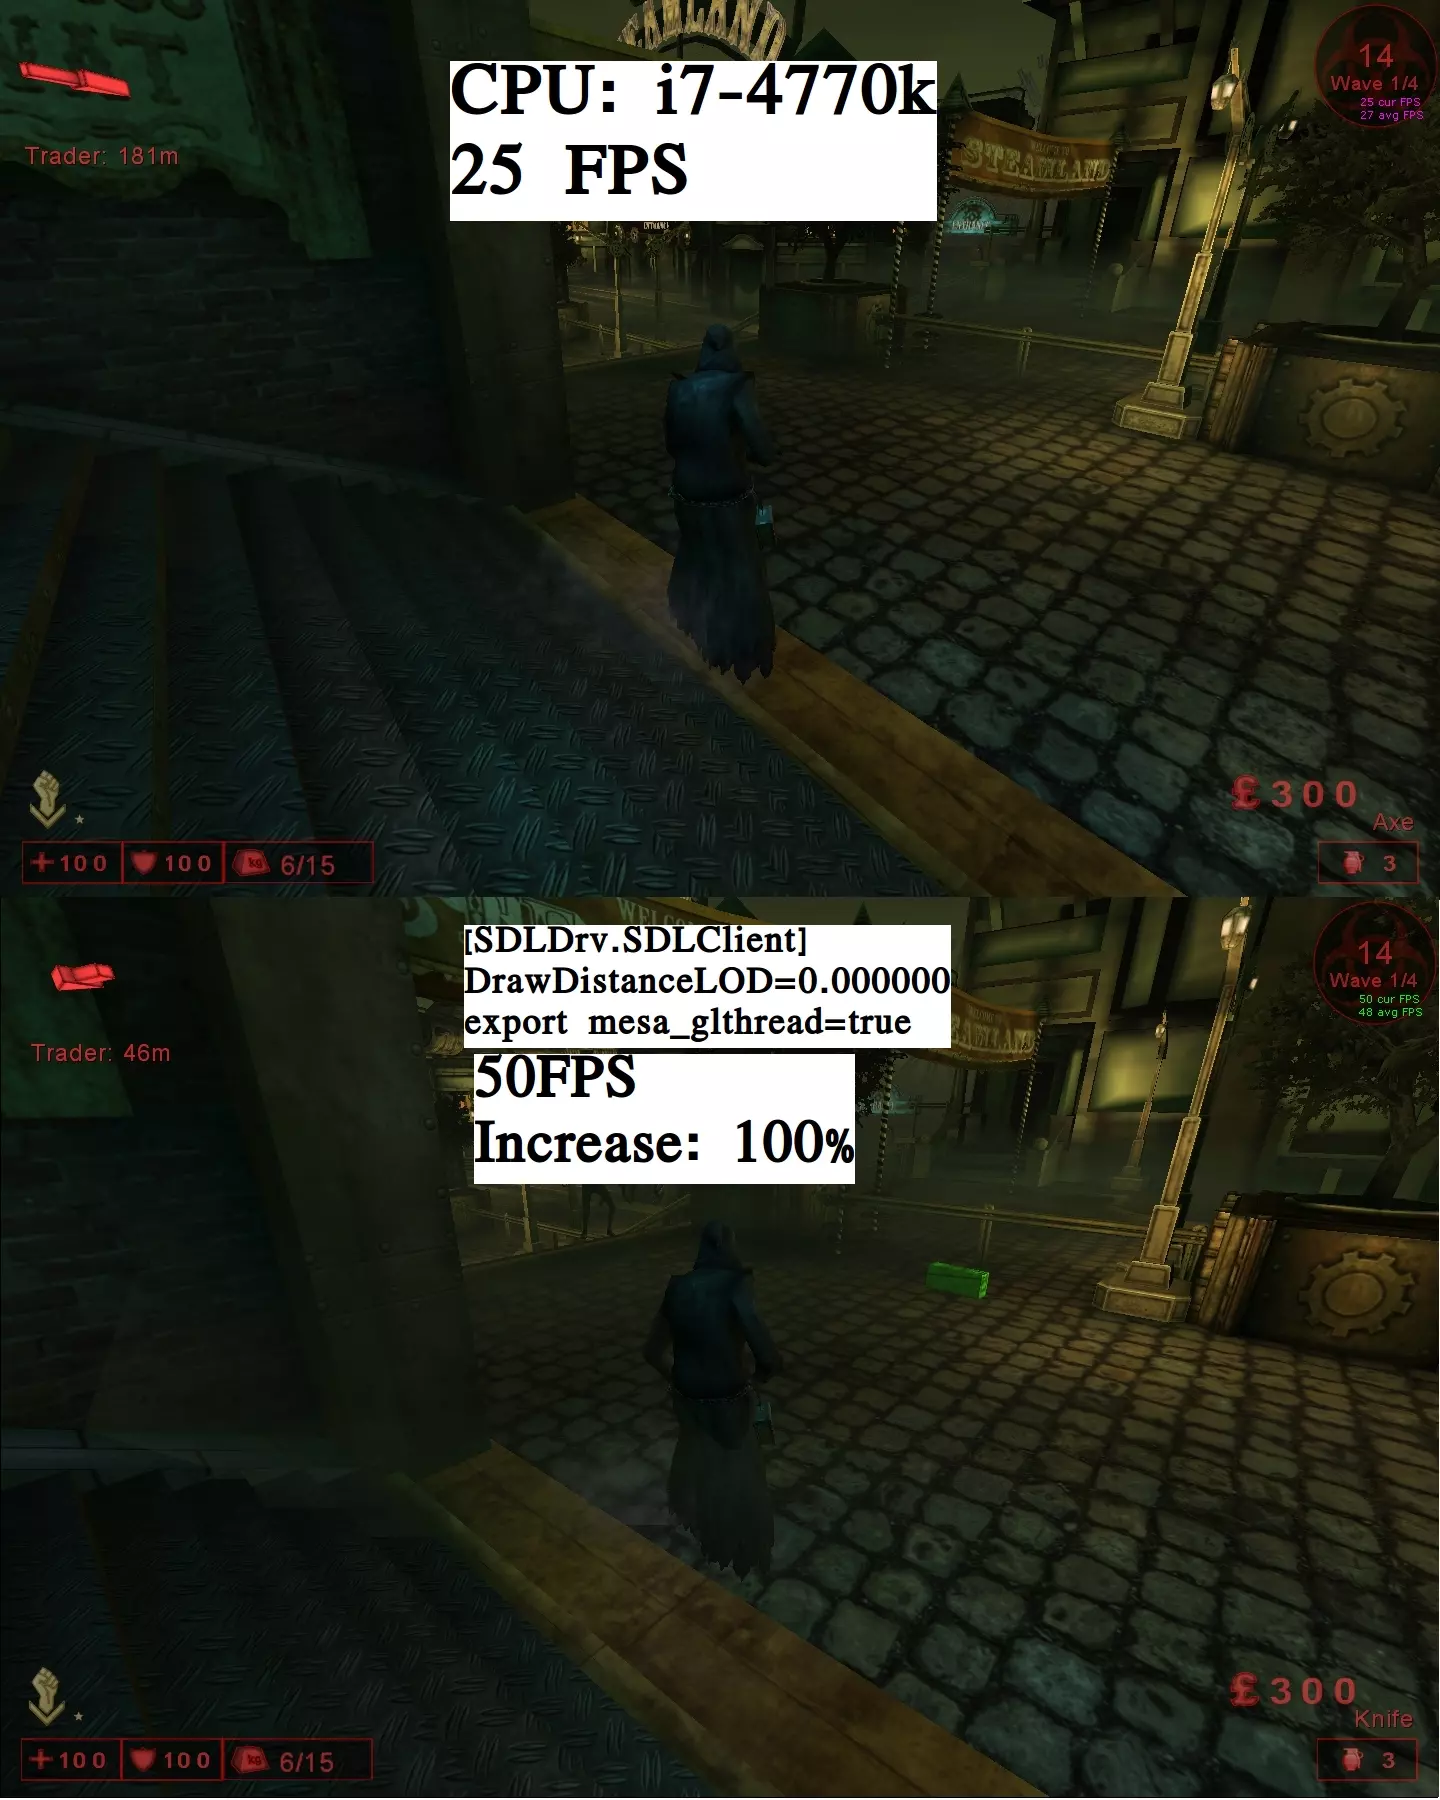
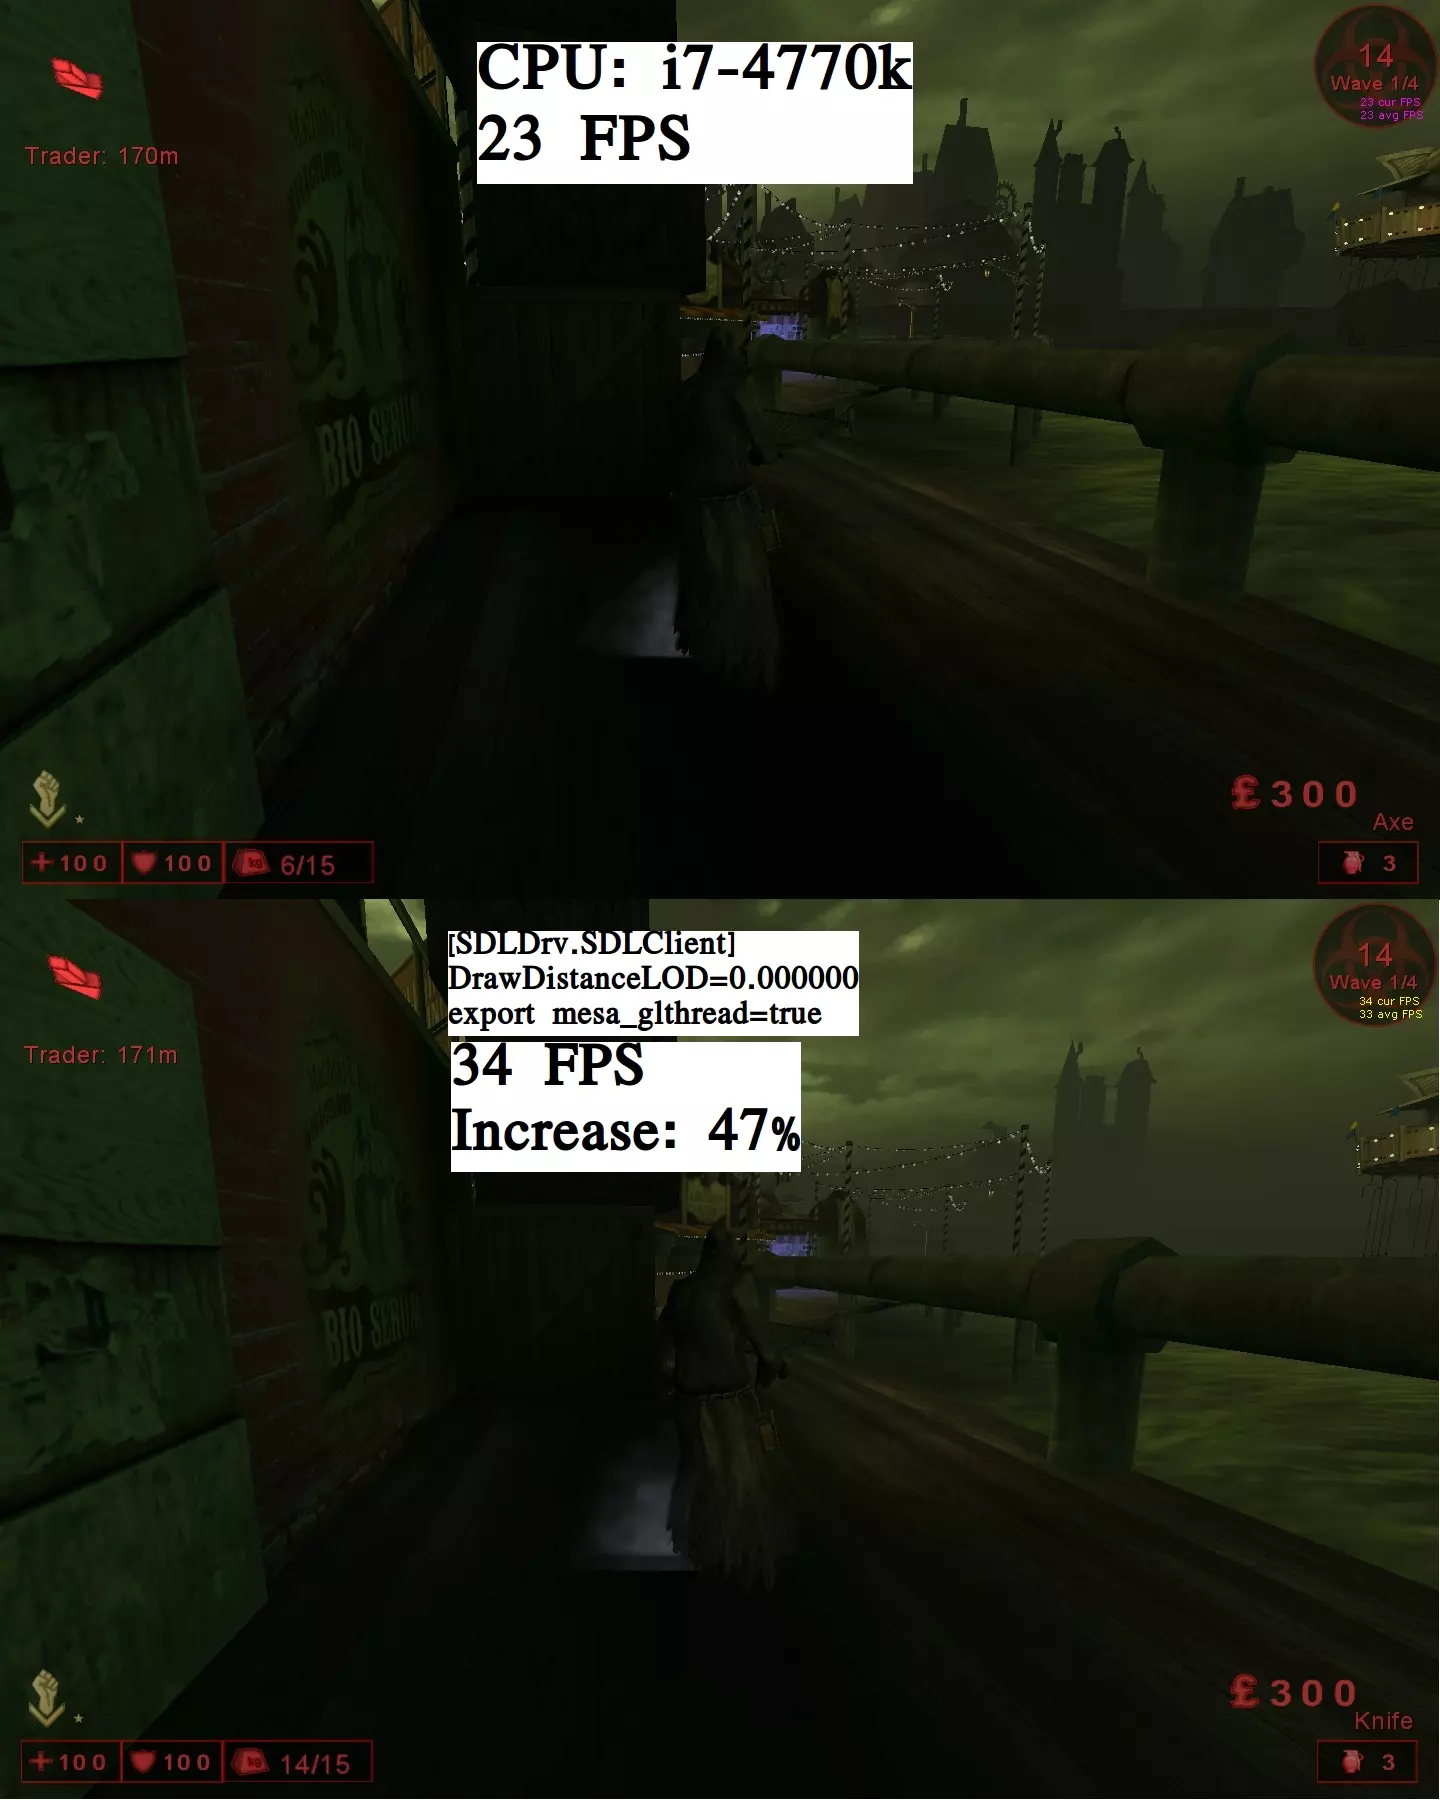
Perkprogression/Achievements (Native) Fix Perkprogression/Achievements You have noticed your Perkprogression always resets after Mapchange or leaving the Server on Linux? And you did not get the Achievements on the beaten Maps? Here a Guide how to fix it. - Follow the Guide and do the steps manual per hand - Or download the package with all whitelisted Mutators - Or use the #binbash I wrote for extracting the Mutators from the Cachefolder (Guide is for Mac-Users too, just different paths, they will be written below) At the end some other issues with the Linux native build and fixes/workarounds. Introduction: If you join a server which is running any whitelisted Mutator your Steamstats will be immediately disabled. This means your client will be handled like using a greylisted mutator. You have access to your leveled perks, during gameplay your progression will increase, but after leaving/mapchange your progression resets to the same value which was before. This also disables to gain any Achievement. The Linuxbuild has a different folderstructure. The game itself can read the hashvalue of files, you get directly a mismatch error of files with different versions. The checkroutine of the implemented whitelistening system is coded bad. The checkroutine doesn't read/hash the Package-GUID of cached files and your perkprogression is disabled. You can reread this in your killingfloor.log-file. There will be an entry with: Log: STEAMSTATS: SECURITY CHECK FAILED - ../System/*****.uxx (for ***** is the mutatorfilename written which causes the nonprogression) #Note: Even if the serverbrowser shows the server isn't running any mutators, this can be false. This feature is bugged - depends how the server is configurated. Marked checkbox "Perks Enabled" does the same way not work proper. Let's go specific: The different folderstructure: On Windows you have only one Killing Floor folder within Steam. "... Steam SteamApps common KillingFloor" On Linux you have two folders splitted with the gamefiles. 1. /home/USER/.killingfloor/ contains Cache-folder including cache.ini and your downloaded serverfiles contains System-folder with your killingfloor.ini, user.ini, logfile; ucl's 2. /home/USER/.steam/steam/steamapps/common/KillingFloor/ contains second System-folder with the Game-Binary, dll's, int's and so on contains all the the other folders: Animations, Maps, Sounds, Textures and so on If you join a server which is running any custom-content (Mutators, Maps, Sounds, Textures...), your client is downloading these files to your cachefolder. All this files get stored with the Package-GUID as filename and with the fileending .uxx (uxx is the Unreal Tournament Cache filetype) 引用自 Cachefolder (short output): C48089614C255368A6C437AA943EE203-1.uxx 14914BEC4F35A3578EF6C39E7820EAD5-1.uxx 1F126EC14FBC553F61AA0CAA6CBAB571-1.uxx 4D4B098843E4E5E7B12B258AF1CF0851-1.uxx 5F7D5C104E70F82AD6CA1EBE79A116A4-1.uxx 6E4392A041BCEA191255168D475A44D4-1.uxx Your cache.ini gets automatically an entry from the downloaded file. With the Package-GUID and with "=" the original filename and fileending. 引用自 cache.ini (short output): C48089614C255368A6C437AA943EE203-1=KFDamagePopup.u 14914BEC4F35A3578EF6C39E7820EAD5-1=KF-Doom2-Final-V7.rom 1F126EC14FBC553F61AA0CAA6CBAB571-1=KFDoorMessagesV3.u 4D4B098843E4E5E7B12B258AF1CF0851-1=KFARGChat.u 5F7D5C104E70F82AD6CA1EBE79A116A4-1=KF-Mario_Bunker_ex.rom 6E4392A041BCEA191255168D475A44D4-1=Mario_tex.utx Now the Mutators have to be edited. Mutators have the fileending .u Within the cache.ini you can get the information which Package-GUID belongs to what file. Copy the filename with the fileending .u from cache.ini and rename the specific file located in the cachefolder. After renaming the file, move the renamed .u file to the folder: /home/USER/.steam/steam/steamapps/common/KillingFloor/System/ This has to be done with ALL whitelisted Mutators. After a while, joining different servers you will have all files together. If done, you have no problems anymore in the future and your Perkprogression and Achievements are working fine. For the overview which Mutators are whitelisted here two links: http://www.kf-wiki.com/wiki/List_of_whitelisted_mutators https://forums.tripwireinteractive.com/index.php?threads/all-whitelisted-packages.103899/ Practical Example: Locate to: /home/USER/.killingfloor/Cache/ Open cache.ini Now we see the entries: C48089614C255368A6C437AA943EE203-1=KFDamagePopup.u 14914BEC4F35A3578EF6C39E7820EAD5-1=KF-Doom2-Final-V7.rom 1F126EC14FBC553F61AA0CAA6CBAB571-1=KFDoorMessagesV3.u 4D4B098843E4E5E7B12B258AF1CF0851-1=KFARGChat.u 5F7D5C104E70F82AD6CA1EBE79A116A4-1=KF-Mario_Bunker_ex.rom 6E4392A041BCEA191255168D475A44D4-1=Mario_tex.utx Now pick up the whitelisted Mutators: KFDamagePopup.u; KFDoorMessagesV3.u; KFARGChat.u Rename the files located in the cache-folder: C48089614C255368A6C437AA943EE203-1.uxx to KFDamagePopup.u 1F126EC14FBC553F61AA0CAA6CBAB571-1.uxx to KFDoorMessagesV3.u 4D4B098843E4E5E7B12B258AF1CF0851-1.uxx to KFARGChat.u Move the renamed files KFDamagePopup.u; KFDoorMessagesV3.u; KFARGChat.u to the folder: /home/USER/.steam/steam/steamapps/common/KillingFloor/System/ Done. Not necessary but for the overview you can delete the specific processed lines from the cache.ini ---------------------------------------- Downloadlink - Speeding up this process: To speed this up and not have to do this steps manual per hand I packed all whitelisted Mutators to an Archive. Extract the file and move all the .u files to /home/USER/.steam/steam/steamapps/common/KillingFloor/System/ https://gamebanana.com/mods/640177 (upload.2019/new_package2020/....reupload/....06.02.2023/16.09.2023/27.02.2024) If the downloadlink is down, write a comment, i will reupload it. ---------------------------------------- This Guide is the same for Mac-Users, here the two paths: 1: Library/Application Support/Killing Floor/ The equivalent to Linux: /home/USER/.killingfloor/ 2. Library/Application Support/Steam/steamapps/Common/KillingFloor/System/ The equivalent to Linux: /home/USER/.steam/steam/steamapps/common/KillingFloor/System/ If extracting the Package, the files have to be moved to: Library/Application Support/Steam/steamapps/Common/KillingFloor/System/ Ultimate Performance Boost (Native) Standard tweak: Disable Reduce Mouse Lag, disable Mouse Smoothing and disable Vertical Sync in ingame settings. or directly via .ini killingfloor.ini in section [OpenGLDrv.OpenGLRenderDevice] ReduceMouseLag=True to ReduceMouseLag=False UseVSync=True to UseVSync=False user.ini in section [Engine.PlayerInput] MouseSmoothingMode=0 MouseSmoothingStrength=0.000000 Ultimate Performance Tweak for the native linux port. The old UT-Engine needs CPU-Power. The power of the GPU doesn't matter, is nearly not used. Engine uses only 1 Core of CPU. While on Windows a low-mid CPU is enough to get max and stable fps, the native Linux port runs very bad. Tweaks like disabling precaching, reducemouselag, vsync has nearly no effect to performance. Closed maps run fine with nearly high and stable fps. Maps like Steamland, Frightyard, Hillbilly Horror, Stronghold will kill your fps, dropping down to 20 or lower fps. If a flamethrower kicks in the game, say goodbye to your frames, no matter which map or spot. 1 Core always run at limit 99% workload, the other cores are chilling at 3-9%. At spots there the CPU provide 20-80 fps the GPU is about 3% in use. At spots there the CPU provide 80-120 fps the GPU is about 5% in use At spots there the CPU provide 100-200 fps the GPU is about 10% in use. At spots there the CPU provide 200-300 fps the GPU is about 12-17% in use. At the Mainmenu the CPU (i7-4770k) provides ~1300fps the GPU is about 37% in use. (GPU for this results: ATI Radeon RX480 8GB) With this tweak you have up to 100% more fps on bad locations, on heavy bad spots up to 40%. (to show fpscounter, open console and type: stat fps) Deactivate DrawDistance Level of Detail open killingfloor.ini and edit in Section: [SDLDrv.SDLClient] DrawDistanceLOD=1.000000 to DrawDistanceLOD=0.000000 Save file up. Activate glthreaded, this will increase the performance a bit too, special on low fps bout ~+10% Command for mesadriver: export mesa_glthread=true Edit your steam-startupscript. #!/bin/sh export vblank_mode=0 export mesa_glthread=true steam To have a great overlay to see the workload of your hardware use the Gallium HUD. Edit the cores with hyperthreading to your CPU. #!/bin/sh export vblank_mode=0 export mesa_glthread=true export GALLIUM_HUD='.dfps:120,frametime,cpu+GPU-load:100=gpu,cpu0+cpu1+cpu2+cpu3+cpu4+cpu5+cpu6+cpu7:100' steam Tested deactivating Draw DistanceLOD on Windows, gives little more avg fps only with deactivated Dynamic Lighting. Not the same performance boost compared to Linux. LOD edit for Windows in killingfloor.ini [WinDrv.WindowsClient] DrawDistanceLOD=1.000000 to DrawDistanceLOD=0.000000 (Note: [SDLDrv.SDLClient] is only for the native port) Settings and some comparison screenshots. Settings: Set Texture, Character and World Detail to low/lower. You will see no strong difference from low to highest ingame. You only see a difference on "lowest"-setting, but even this won't give you more fps. Do not compare these settings with Windows-D3D/9, win on low looks terrible, on linux with OpenGL still high detailed.
“普通”场景下帧率提升52%
“卡顿区域”帧率提升100%
在【性能杀手】区域提升47%帧率
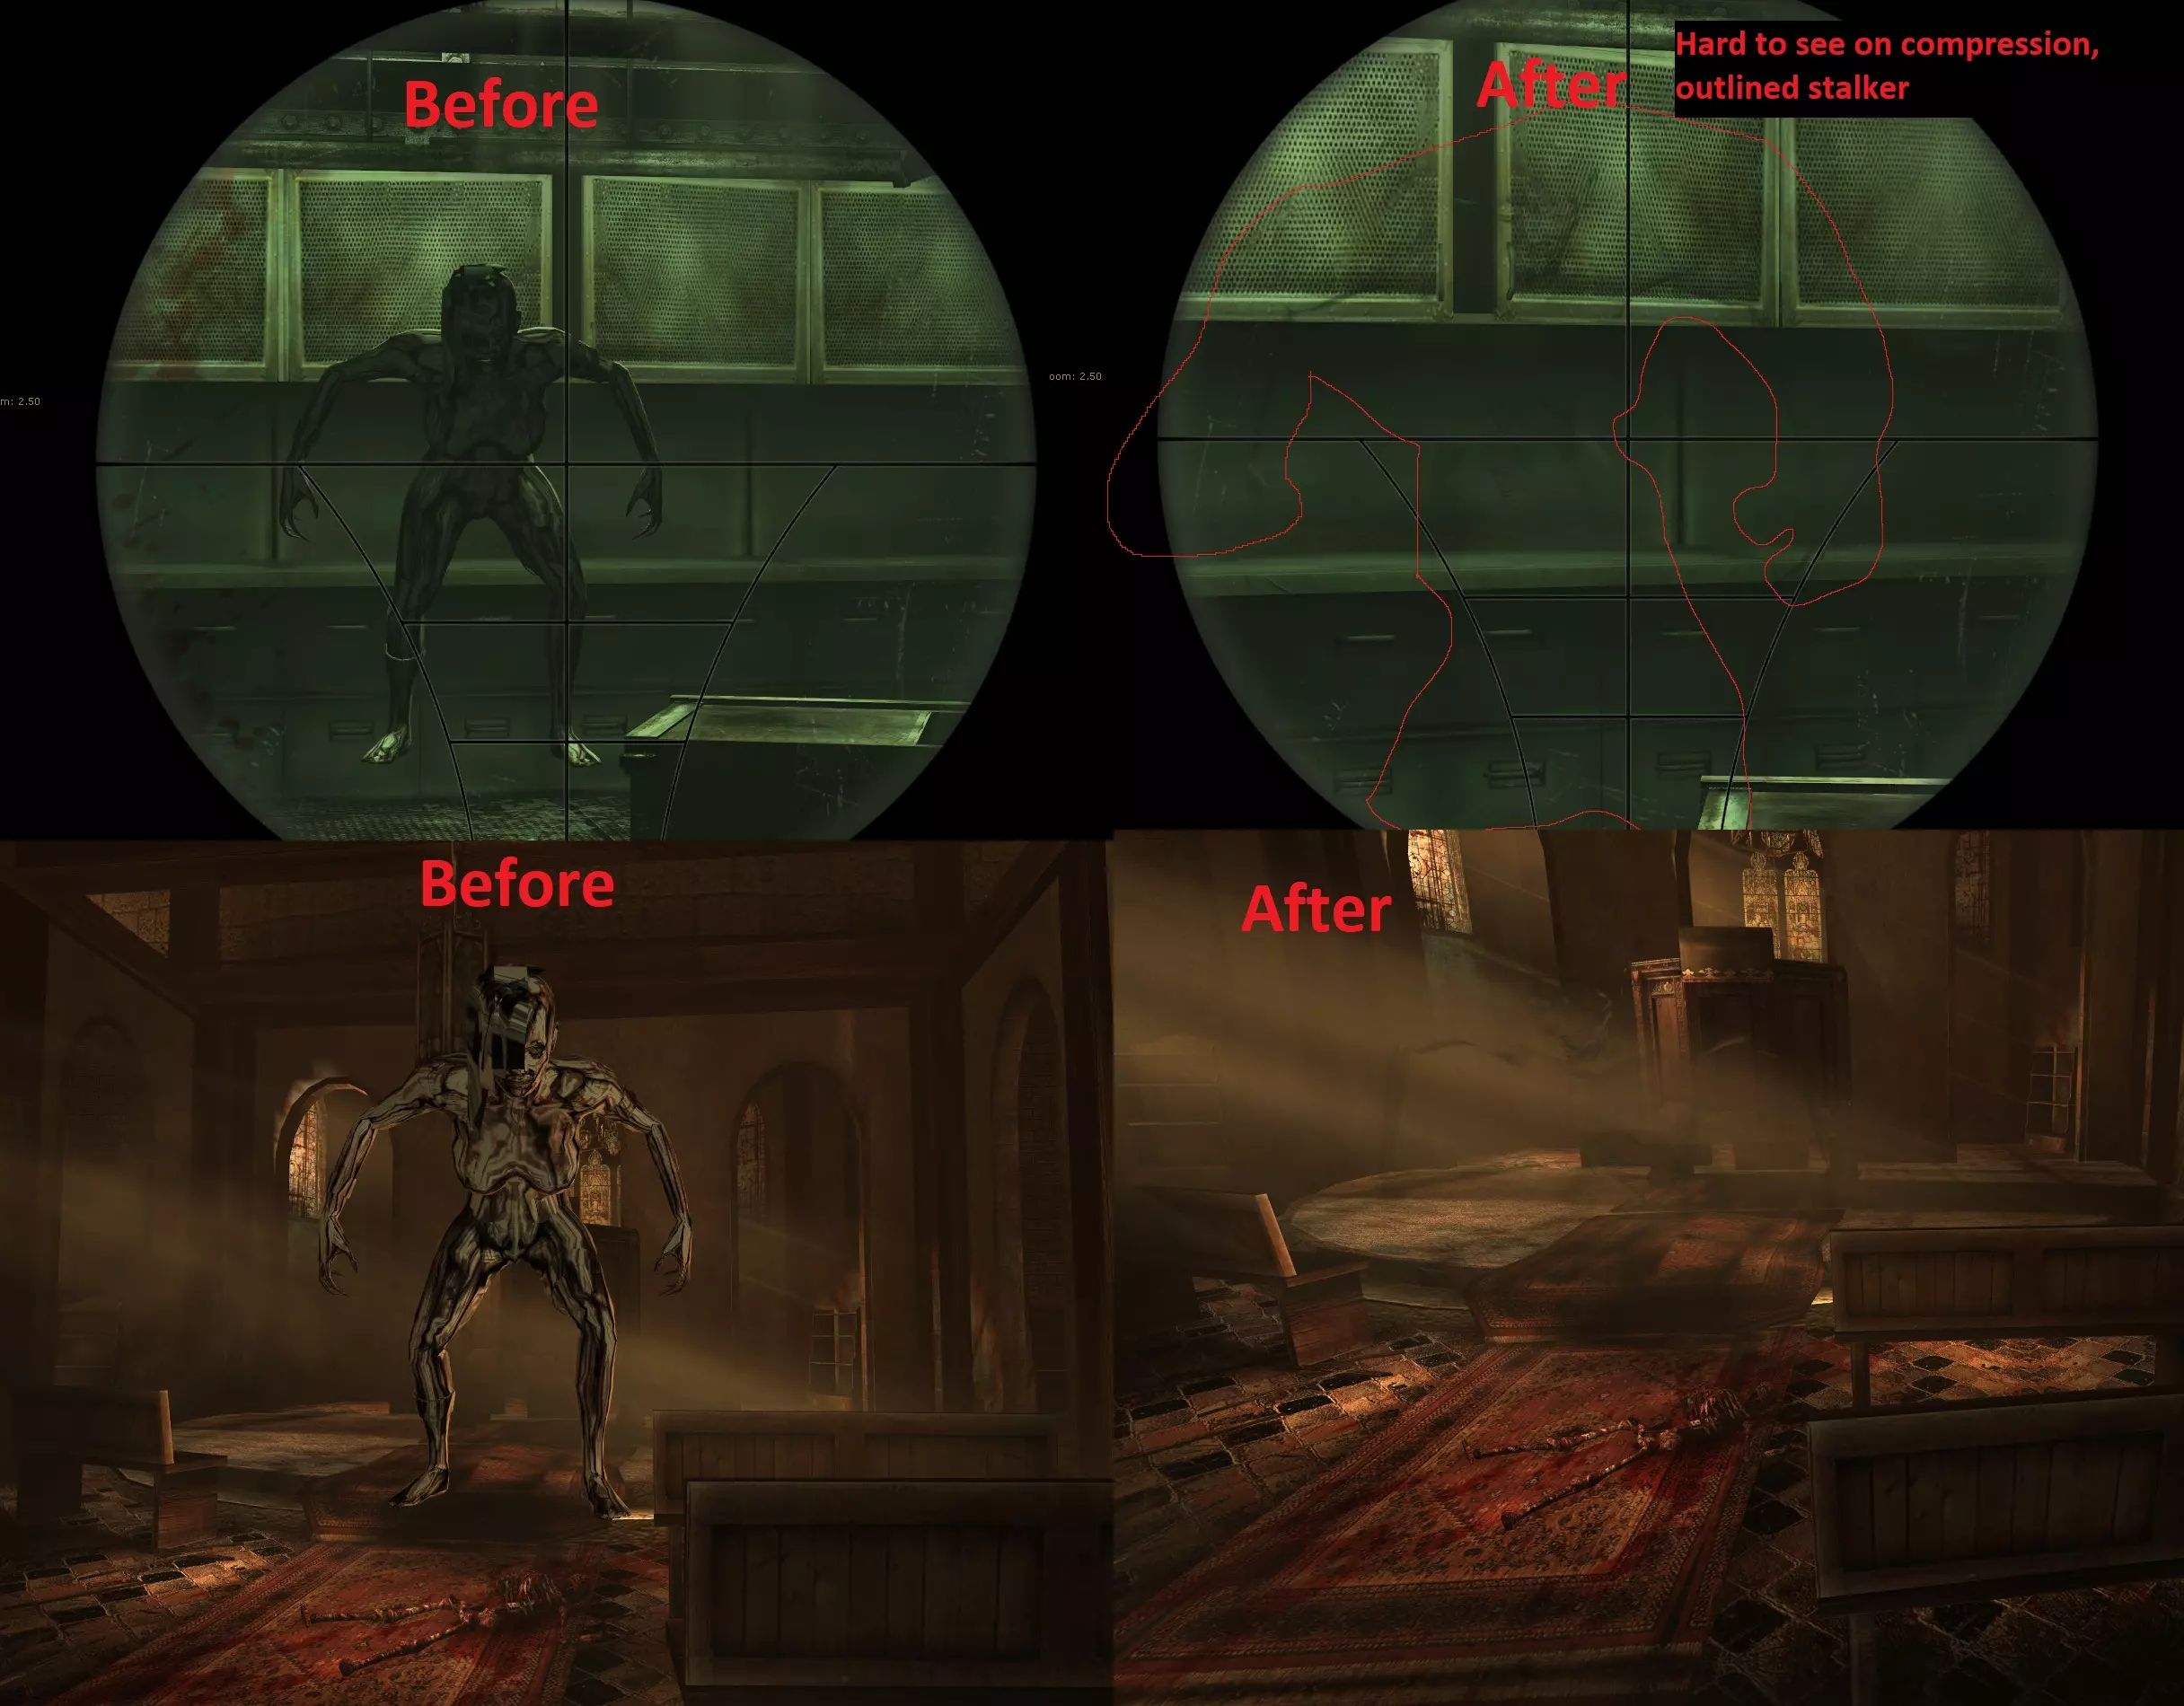
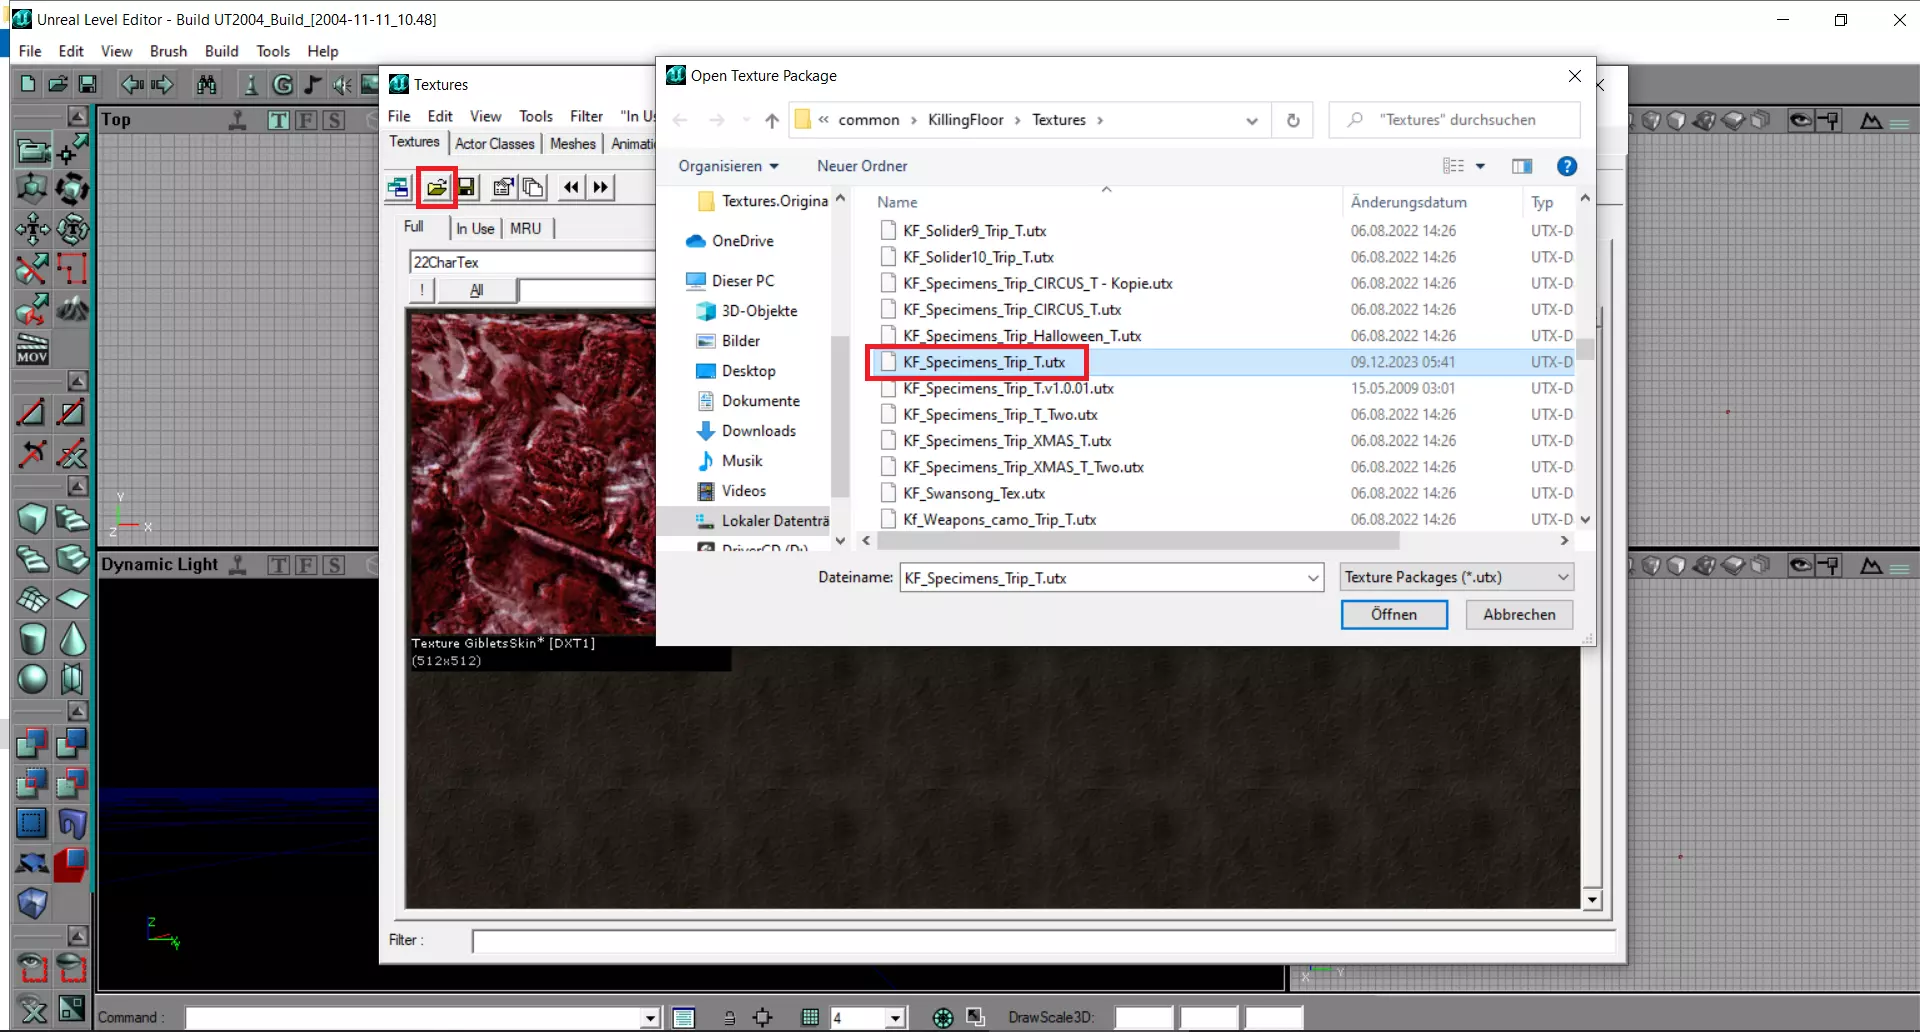
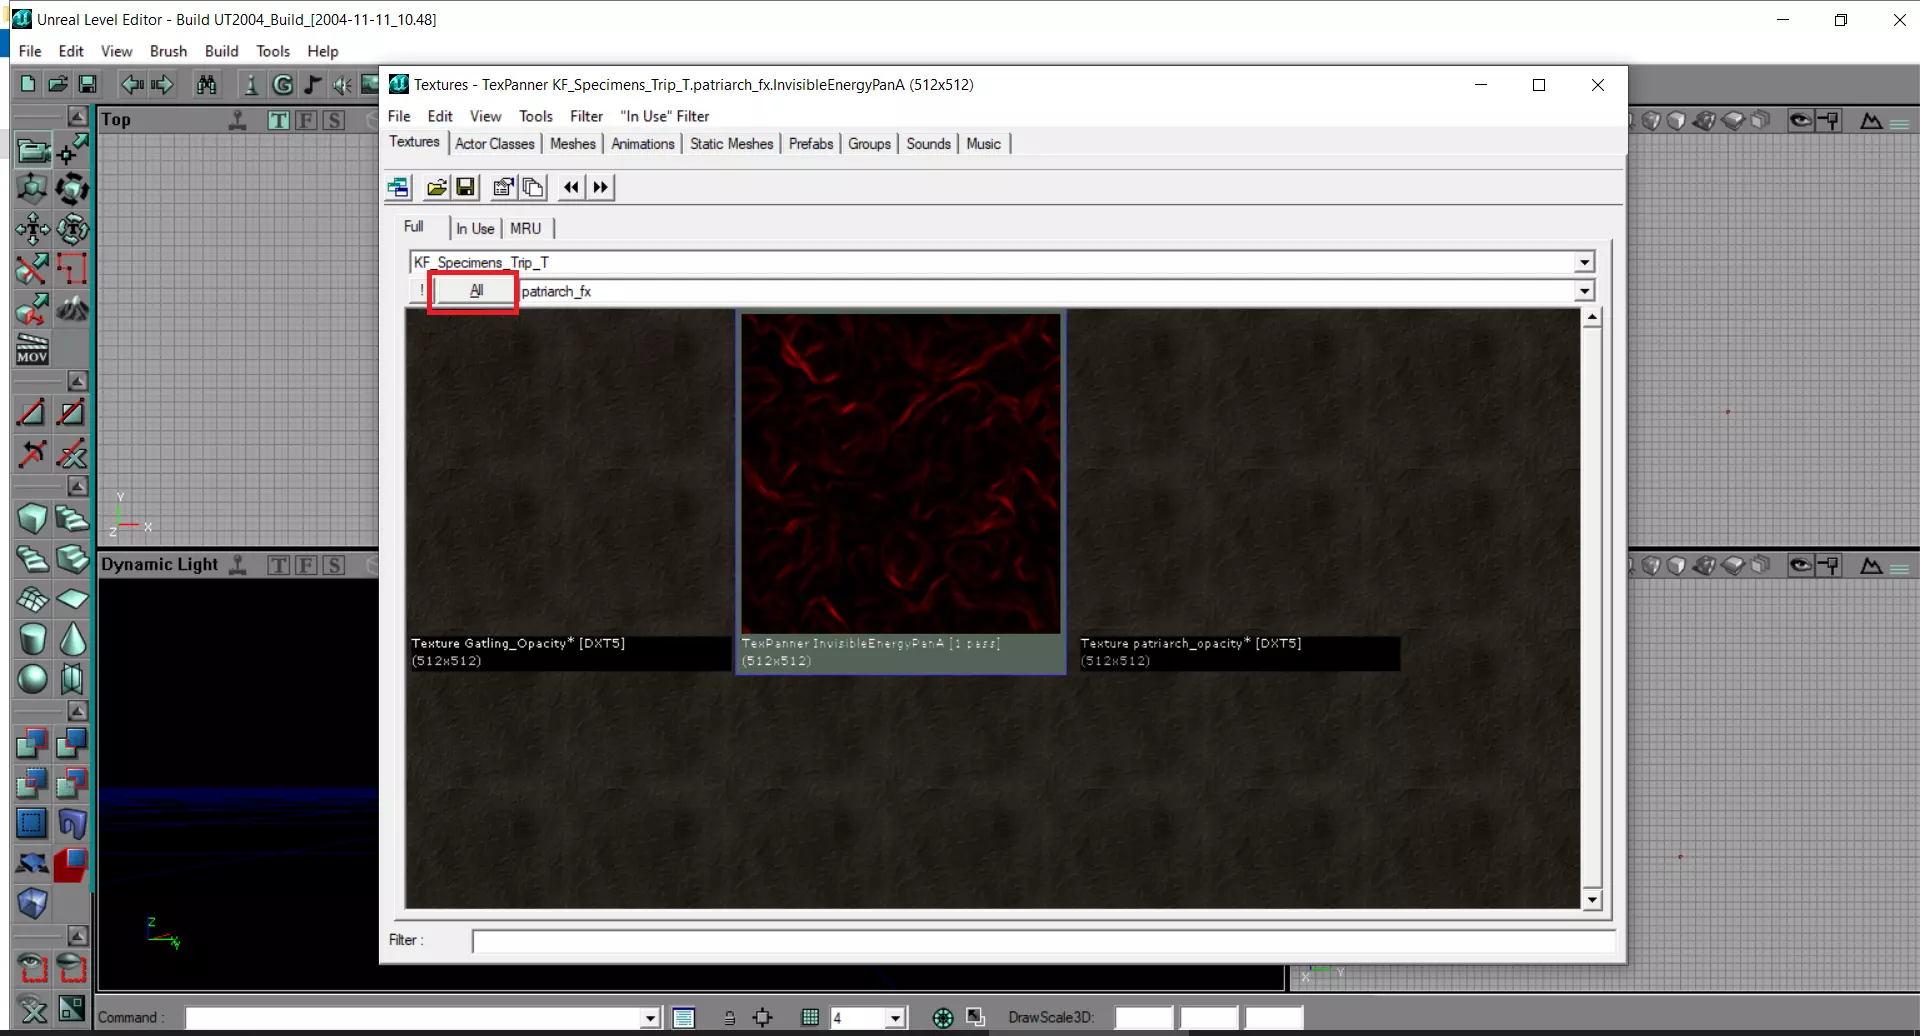
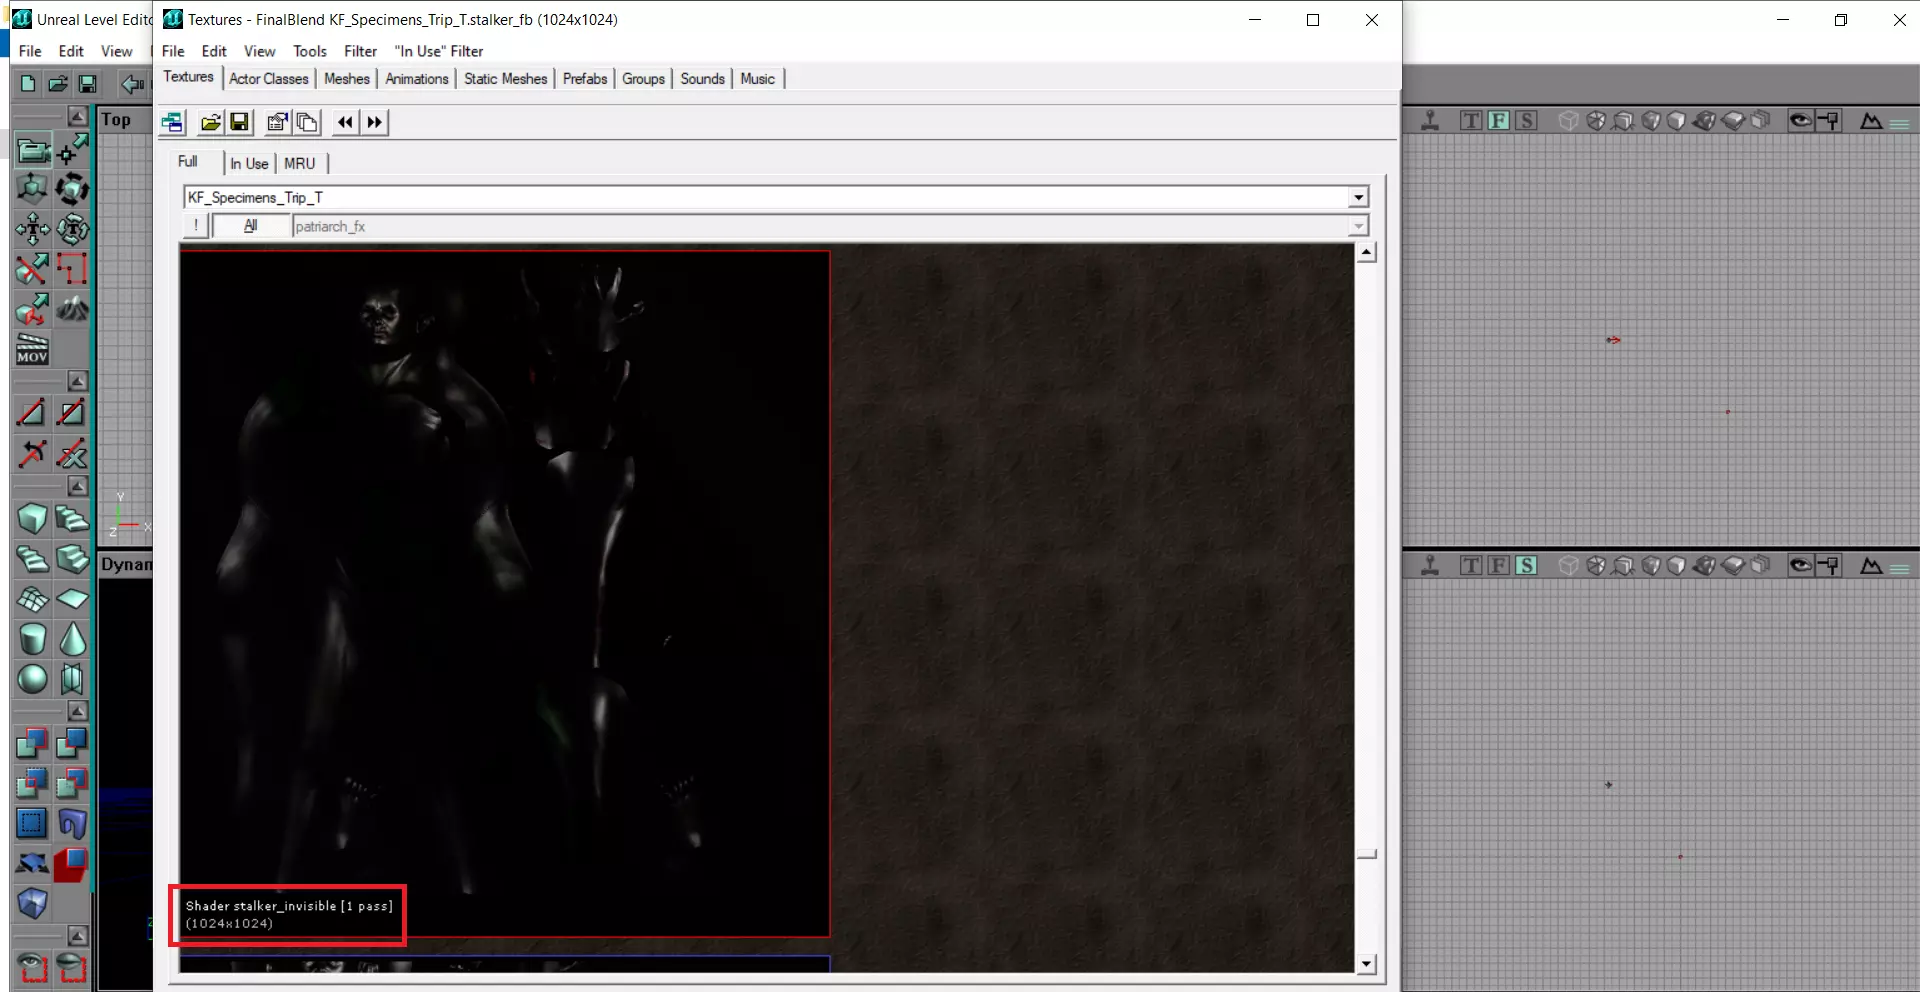
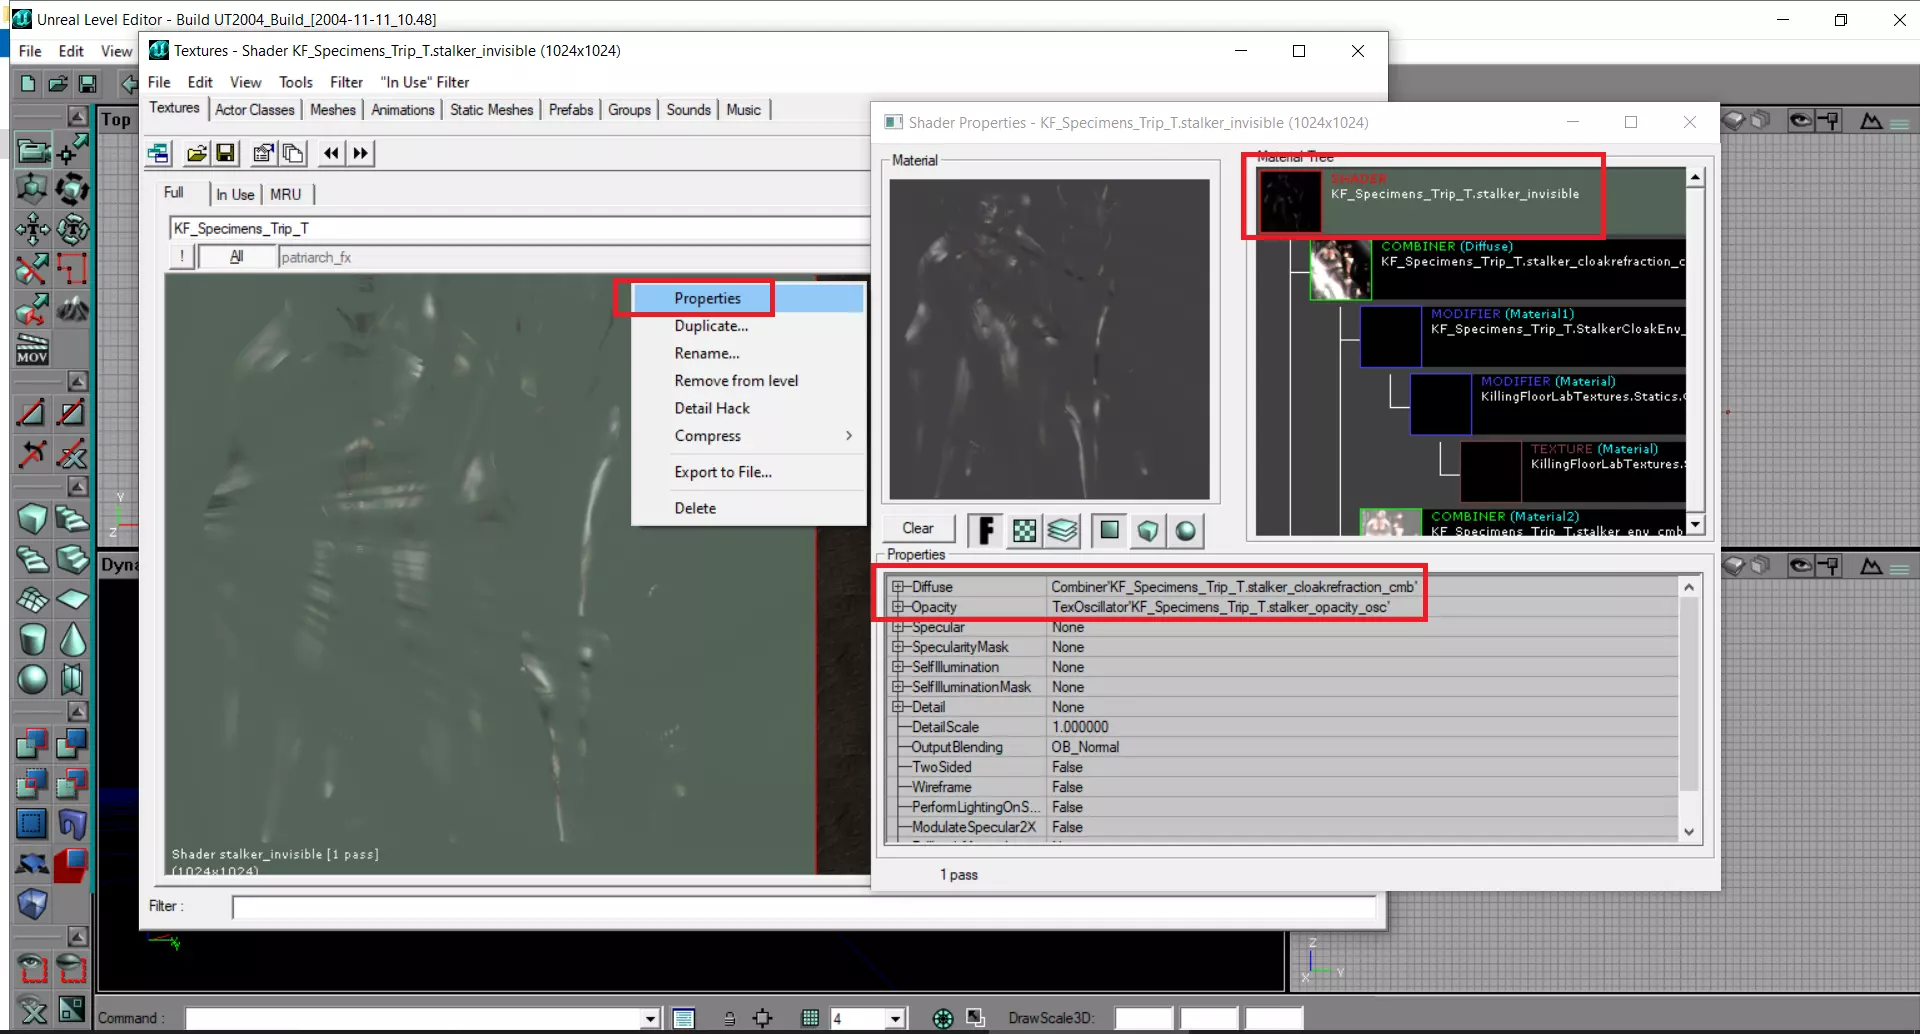
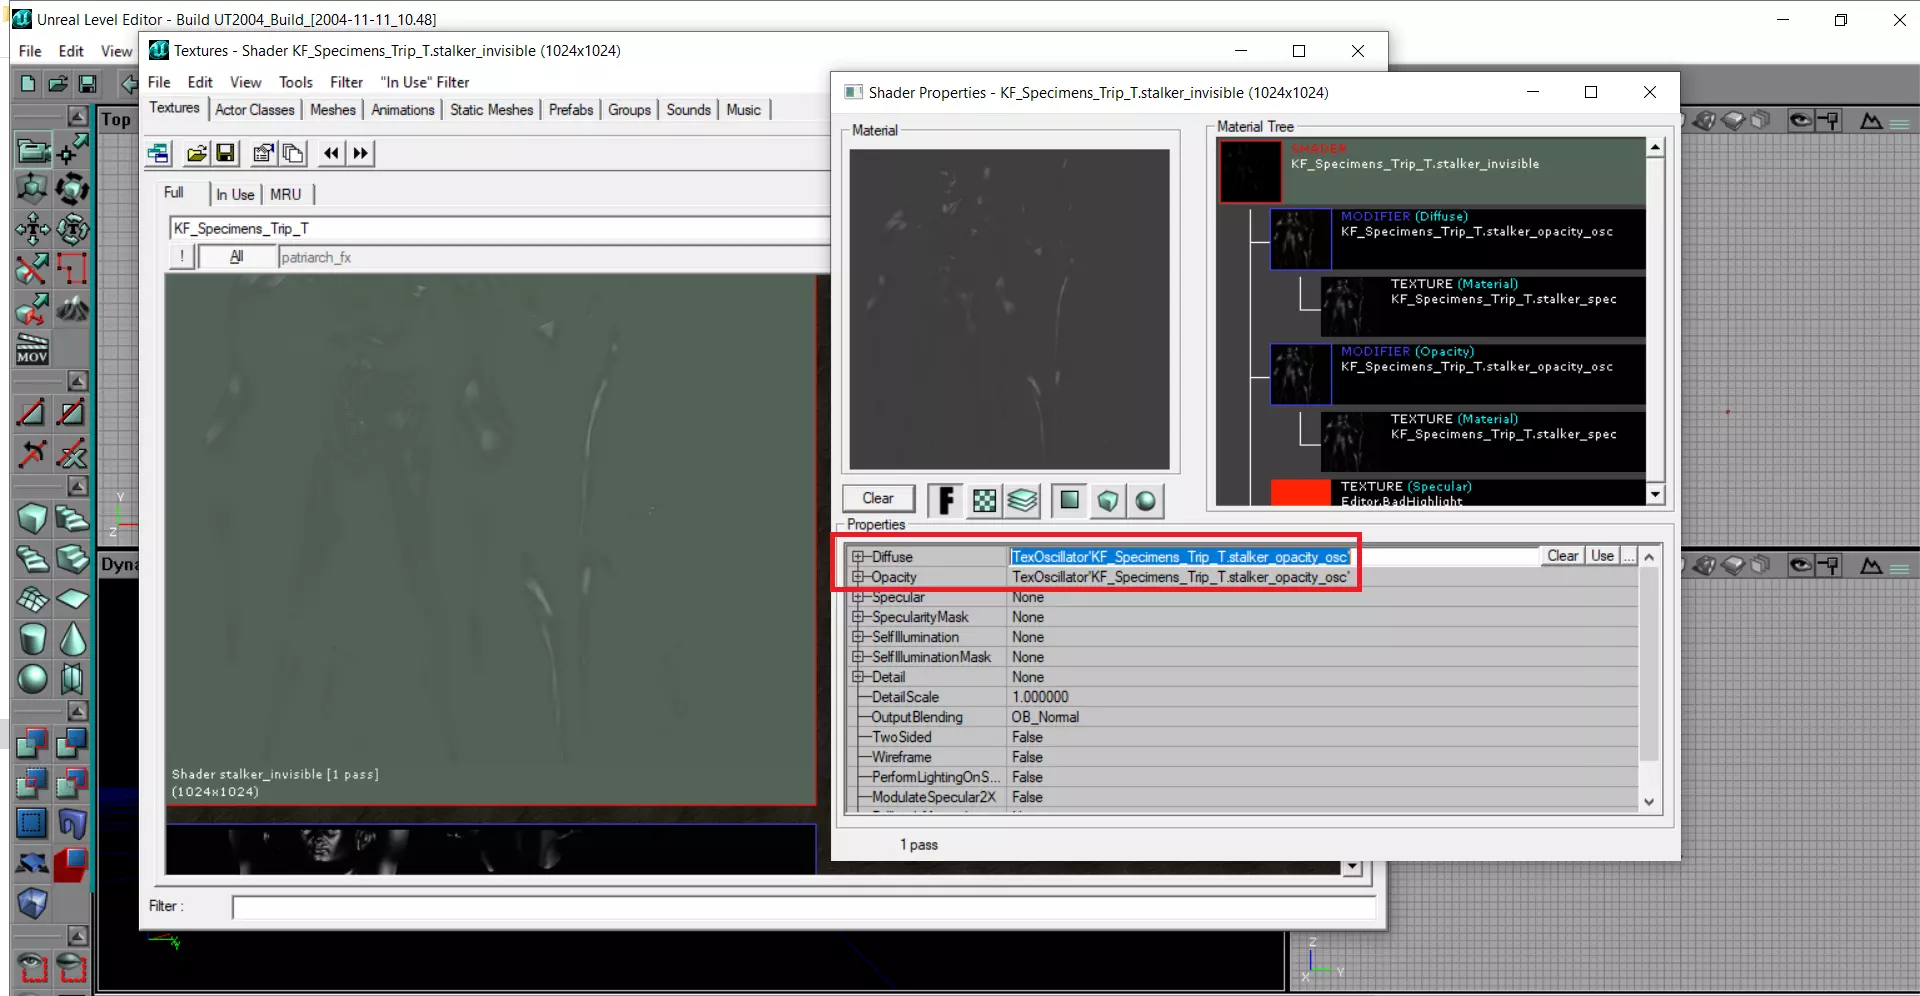
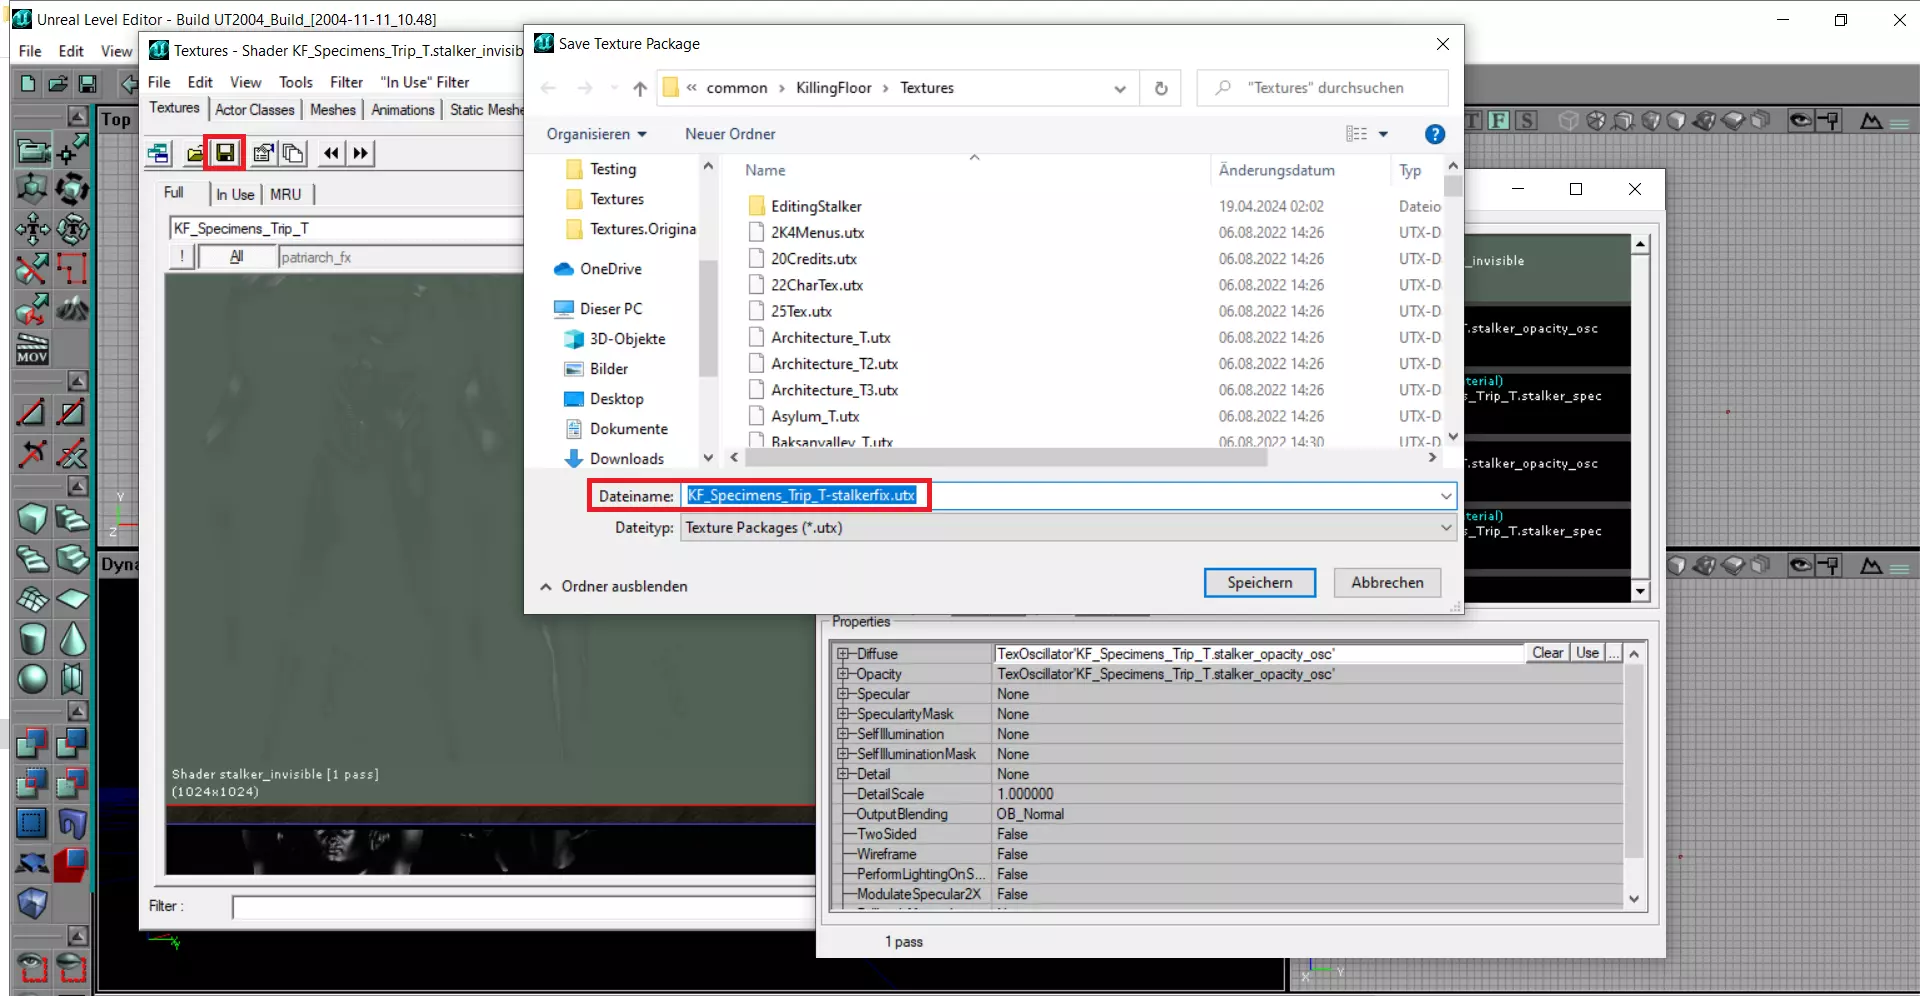
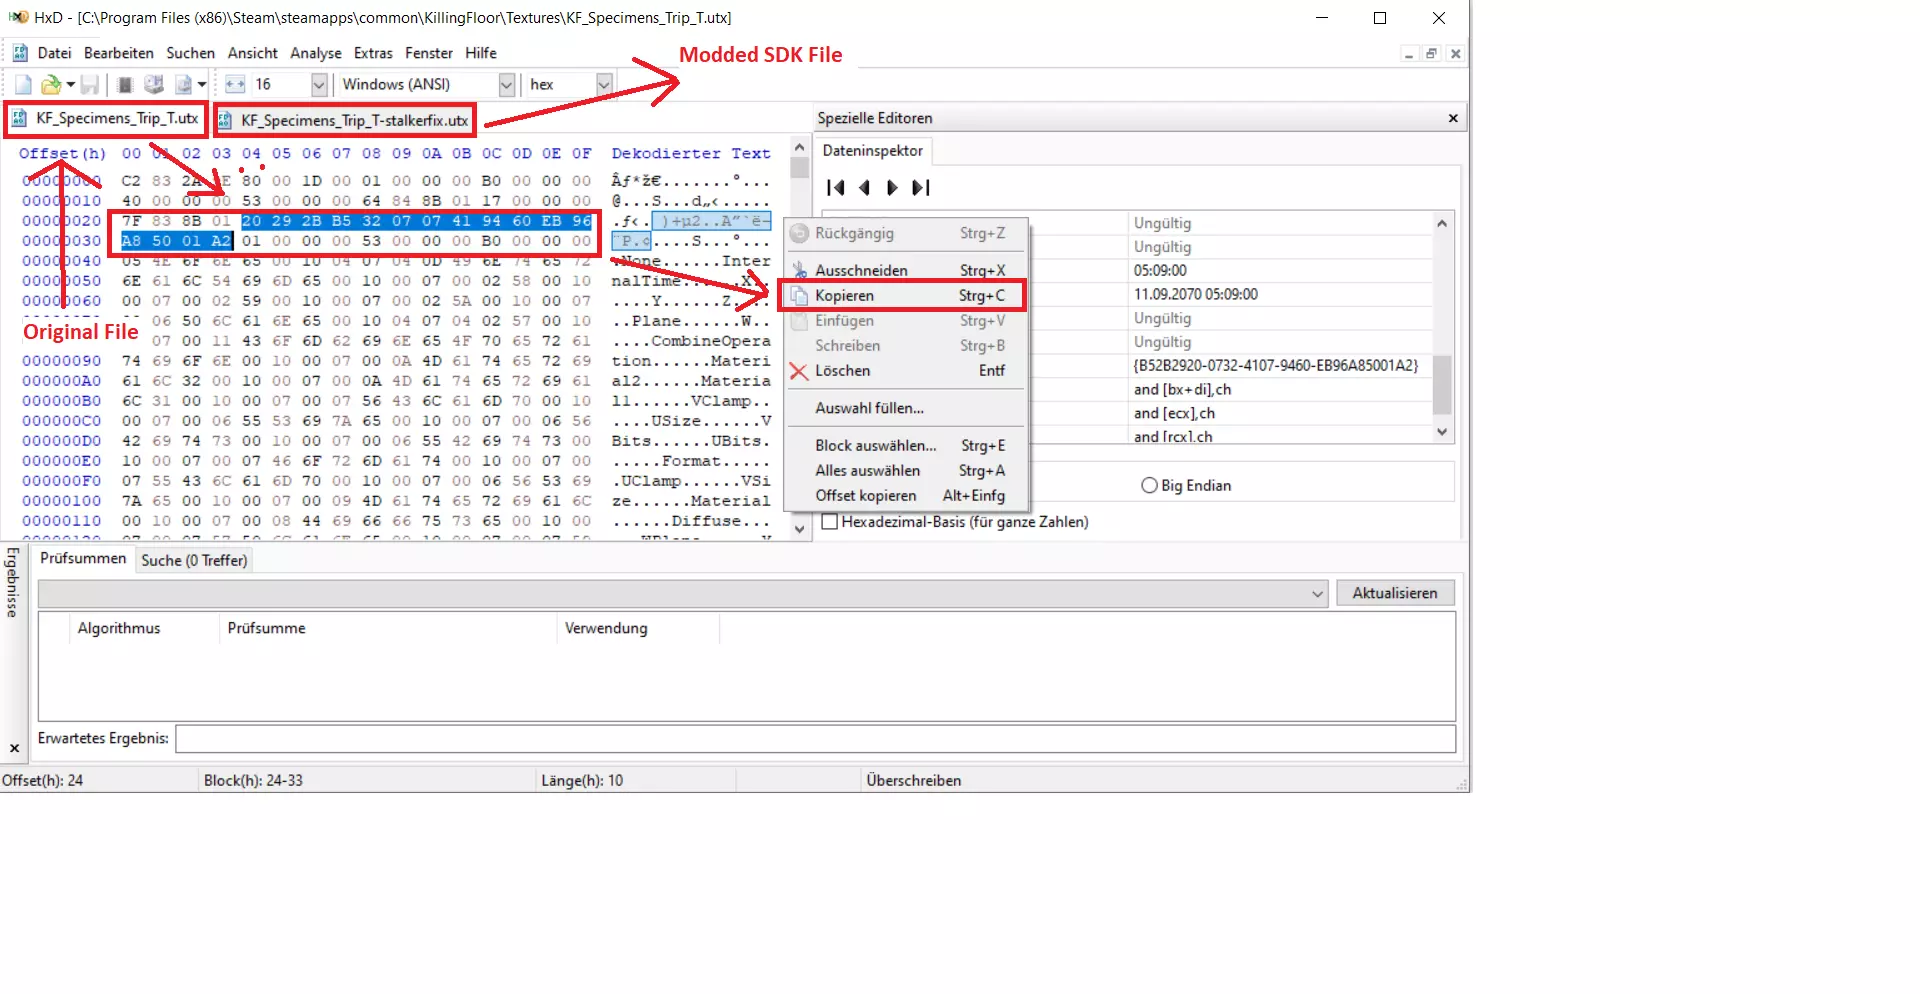
Other issues with the Native Port At least some Issues with the Linux Version. Start Steam without fps lock at 60fps(Only for Mesadriver - radeonsi, i965, iris, noveau....) Create file with .sh extension and start steam with it. #!/bin/sh export vblank_mode=0 steam 1 Performance: Yap with OpenGL and Linux you have poor perfomance and on some maplocations huge fps drops, or if a firebug hardcore spams the flamethrower. (Dropping from 90fps to ~13) Edit: Flamethrower fps drops with activated DynamicLighting can be fixes with mesadriver, have a look at section: Dynamic Lighting - Ultra Performance 2 Tilde: „tilde“ is not working, you have to rebind the key. It is also not possible to open the console in the mainmenu or in the awaitinglobby. 3 Projectors/OpenGL: You have no red laser dot with the „mbr“ (m14 ebr), even if projectors are activated in the graphic options, no part of OpenGL. Same for Blood Decals. 4 Copy&Paste: If you copy a IP-Address you cannot paste it in the server browser or in the console. It has to be typed manually. 5 Crash changing Resolution: If you change your resolution your game will crash insta. A Workaround for this. Before you change resolution, switch to windowed-mode (disable in graphic options full screen), change resolution and switch back to fullscreen. Or edit killingfloor.ini in /home/USER/.killingfloor/System/ to desired resolution [SDLDrv.SDLClient] FullscreenViewportX= FullscreenViewportY= 6 Nvidia Texture Glitches: Nvidia Graphic Card Bugs only, with ATI/AMD this glitches doesn't exist. Stalkers are not invisible, they have a „metallic terminator texture“. Some minor graphic glitches in detailing the textures of maps and models. If you flashlight some textures, textures are gone and you only a see a gray bubble structure. Carnivore "Securty Officer Thorne" DLC from Nightfall Character Pack has in preview and ingame no skintexture. On kf_transit you can see only through one side of the window, on other side there's a milky closed structure. You can't adjust brightness, gamma, contrast while ingame, only doable in mainmenu The closed Nvidia driver per se is very good, but here is to see how wrongly they implements the api-specification of OpenGL. 7 HotKeys Keyboard: You can‘t change the volume with your keyboard if Killing Floor is running. Workaround for this: Tab to SteamOverlay while InGame, adjust Volume and switch back to Killing Floor. 8 illumination: Some mapareas are a lot darker than they should. For this genre it looks nice :) 9 WhiteBlurEpilepsy: White-Blur-Grain (nearly blind) if getting attacked -> Disable Motion Blur 10 Mouse Capture: If you're moving your mouse it is capturing out of the screen. I had this problem on one of three systems. The Game starts with wrong "Displaysetting-Information". (Updating the systembuild fixed the problem). But here a workaround if using Cinnamon. Restart your cinnamon-session. At your login screen switch to OpenBox 0x Your System starts now fully naked with no overlay. RightClick on your desktop -> Open Terminal and start Steam via Terminal. Start KillingFloor as usual with Steam. Game fails to launch OpenGLThe native port is always forced to use the opengl-render, even if in killingfloor.ini a other render device is selected. There's one bug on the native port. If you launch the game and switch ingame to Direct3D your game will crash. In your killingfloor.ini the line for opengl rendering device is fully removed. (RenderDevice=OpenGLDrv.OpenGLRenderDevice), Duo no support for D3D-Rendering game tries to launch PixoDrv and will fail. Fix with more solutions. 1. Set Launch Option: -opengl RightClick KillingFloor in Steam, Propeterties, General -> Launch Options. 2. Add line back manually in section [Engine.Engine] Navigate to /home/USER/.killingfloor/System/ open killingfloor.ini and paste line: RenderDevice=OpenGLDrv.OpenGLRenderDevice remove the ";" from Pixodriver to uncomment. Order of lines does not matter [Engine.Engine] ;RenderDevice=PixoDrv.PixoRenderDevice ;RenderDevice=D3DDrv.D3DRenderDevice ;RenderDevice=D3D9Drv.D3D9RenderDevice ;RenderDevice=Engine.NullRenderDevice RenderDevice=OpenGLDrv.OpenGLRenderDevice 3. Delete killingfloor.ini Navigate to /home/USER/.killingfloor/System/ At gamestart new killingfloor.ini will be generated and be forced to start again with OpenGL-Rendering. Note for solution 2: you not even need to uncomment Pixodriver with removing ";" and there can also be a ";" infront of RenderDevice=OpenGLDrv.OpenGLRenderDevice. It is only needed that RenderDevice=OpenGLDrv.OpenGLRenderDevice in section [Engine.Engine] is placed, as written above the native build forces the game to launch with opengl, requires the opengl entry. After first game start opengl will be automatically uncommented, others commented. Problems with alt-tab, key grabbing and mouse sensitivityThx Heatray and GNU/PizzaDude for the input updating libSDL-1.2.so.0 in Killing Floor folder. (I have not tested) Heatray: Download latest libSDL12-compat-32bit from http://download.opensuse.org/repositories/home:/khnazile:/libSDL12-compat/openSUSE_Tumbleweed/x86_64/ Copy library from this package and replace libSDL-1.2.so.0 in KillingFloor folder. GNU/PizzaDude For Fedora compat is directly aviable. Install sdl12-compat.i686 via packagemanager or terminal: sudo dnf install sdl12-compat.i686 Replace libSDL in KillingFloor folder $ cp /usr/lib/libSDL-1.2.so.1.2.50 steamapps/common/KillingFloor/System/libSDL-1.2.so.0 (Maybe set "SDL_VIDEODRIVER=x11 %command%" in launch options) NvidiaGPU OpenGL Model Texture Fixes Note: only required with NvidiaGPU+OpenGL (Native&Proton) with Proton&D3D* not required. Invisible Stalker Fix Linux NvidiaGPU After 12 years since KF Linux native release, I have found out how to fix the invisible stalker. (Bug even earlier, since release of game in May 2009) Old .utx from 2009, v1065 different version
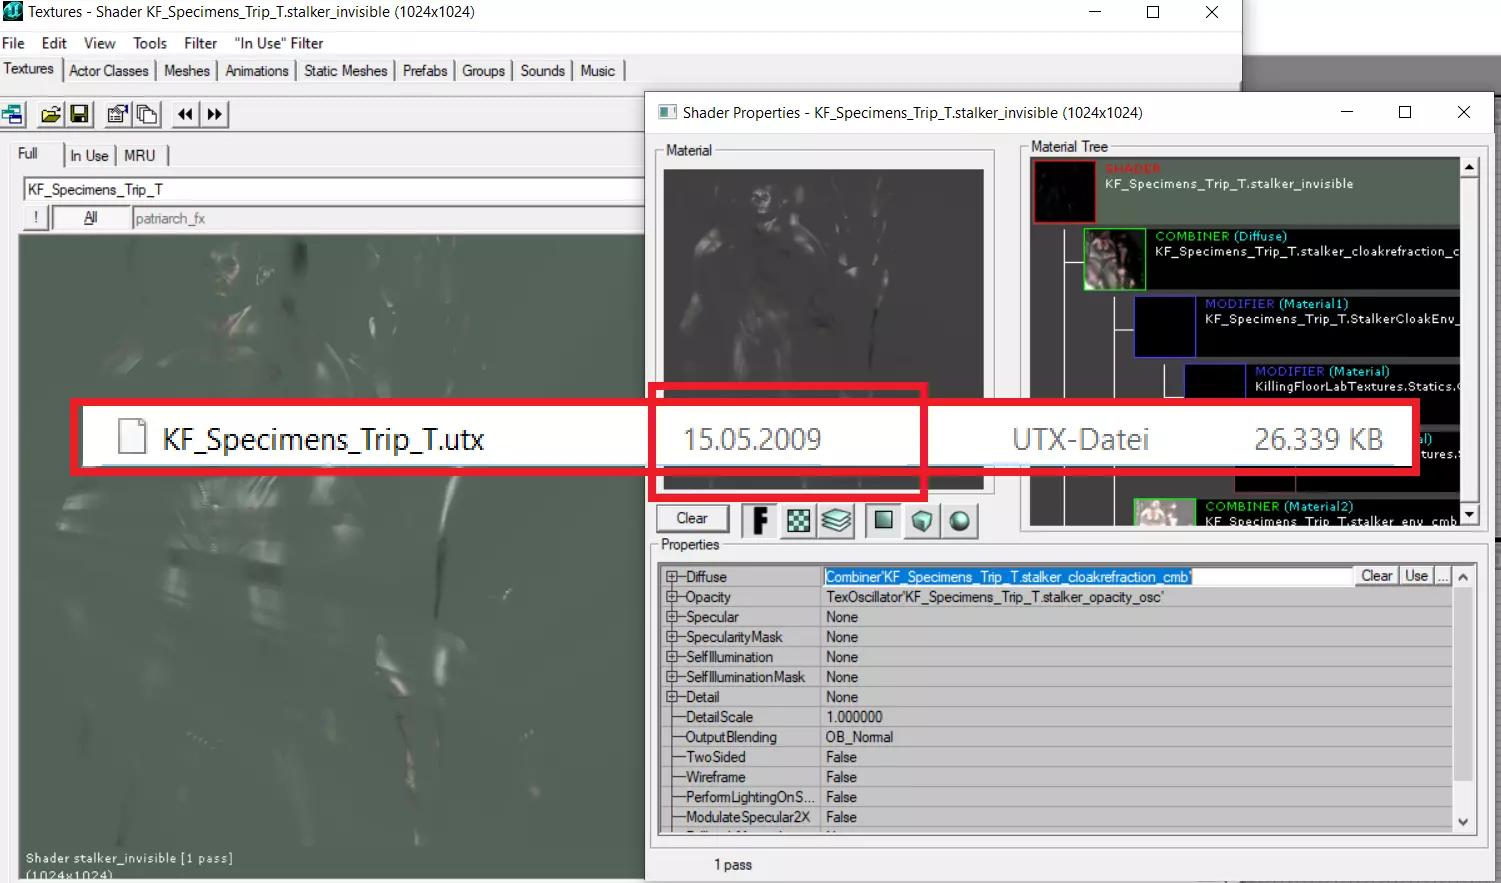
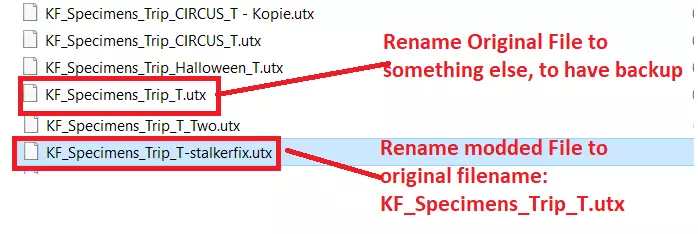
Linux系统搭配Nvidia显卡时会出现此问题,而AMD显卡搭配Mesa驱动则无此故障。潜行者并非完全隐形,而是呈现金属质感的终结者纹理。现在潜行者在远处会如预期般隐形。Windows系统下Nvidia显卡搭配OpenGL时也存在相同问题,此修复同样适用。 修复了KF_Specimens_Trip_T.utx文件并编辑了GUID,以确保在线游戏时不会出现版本不匹配错误。 操作步骤: 1. 导航至:...steamapps common KillingFloor Textures 2. 备份原始文件:KF_Specimens_Trip_T.utx 3. 将压缩包中的KF_Specimens_Trip_T.utx粘贴到该文件夹 2025年12月30日新增第二个压缩包,现包含常规、圣诞、万圣节以及SCRN版本的潜行者隐形问题修复。 文件包:stalkerfix_reg_scrn_xmas_hween.7z 包含文件: - KF_Specimens_Trip_T.utx - KF_Specimens_Trip_XMAS_T.utx - KF_Specimens_Trip_HALLOWEEN_T.utx - ScrnZedPack_TSCRN原版模组:PooSH,感谢允许重新上传带有Nv OGL修复的ScrnZedPack_T.utx文件。 享受游戏。 感谢Psyche提供的GUID编辑指南,没有它我只能让模组在单人模式下运行。
逐步截图展示操作方法,稍后将添加文字说明。若想使用未审查版、更写实风格、更写实N7风格、圣诞主题或万圣节主题的僵尸,也可采用相同方法。

索恩警官皮肤修复(Linux Nvidia系统)
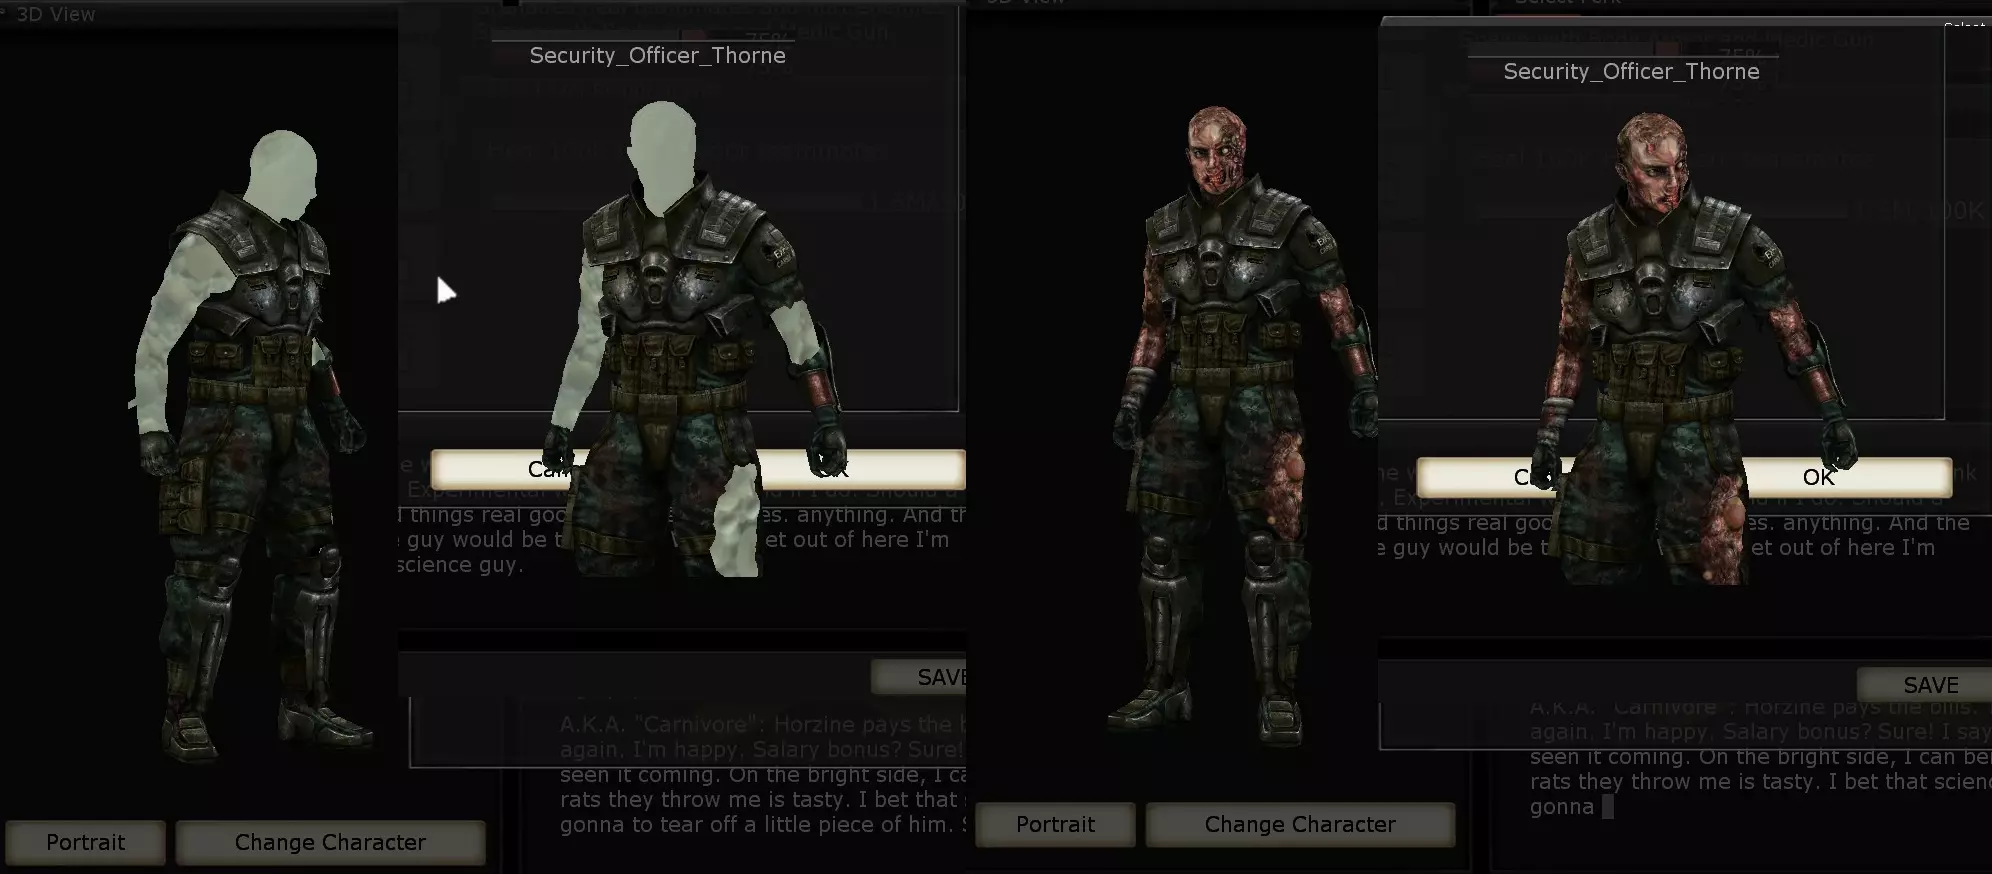
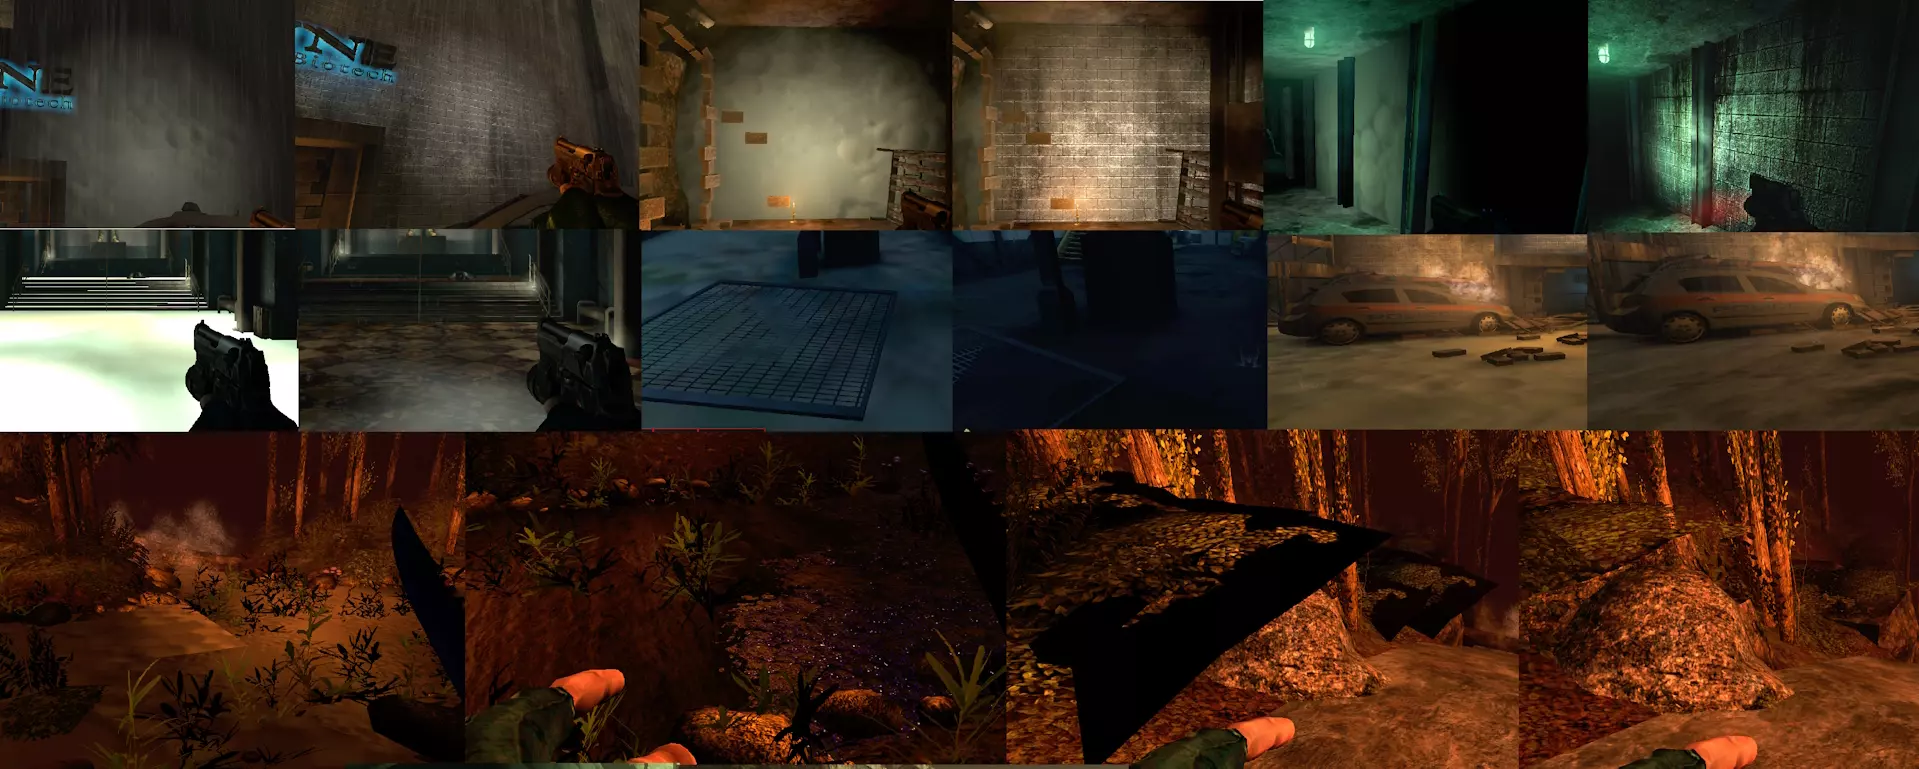
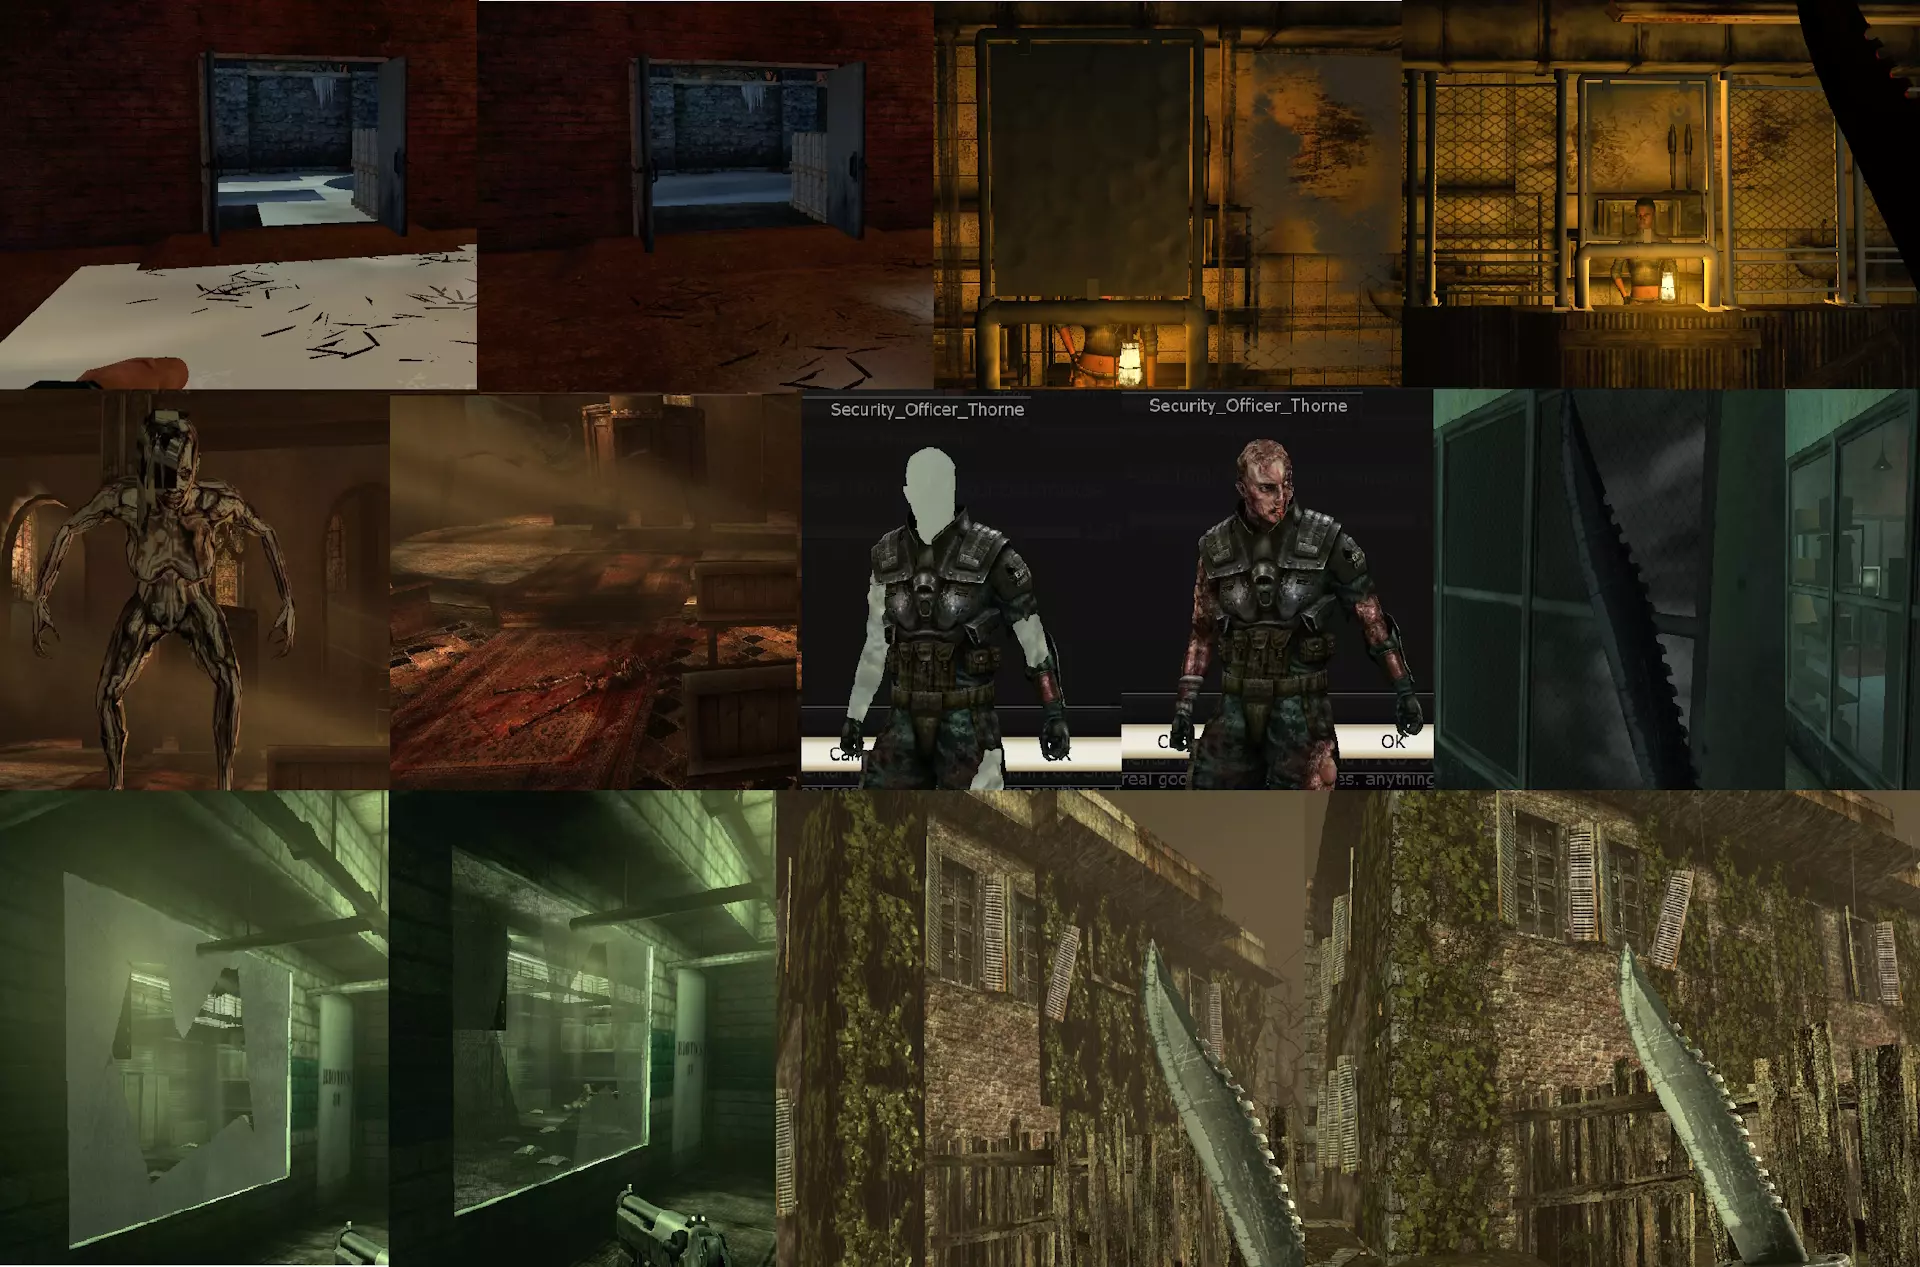
为英伟达显卡创建了另一个纹理/角色修复补丁 修复了Linux英伟达系统下安全官索恩的皮肤纹理问题 适用于《杀戮空间》夜袭DLC包中的安全官索恩 仅英伟达显卡搭配OpenGL使用时需要,AMD/Mesa系统不存在此问题 操作步骤: 1. 导航至.steam/steam/steamapps/common/KillingFloor/Textures/ 2. 备份原始文件:KF_Soldier2_Trip_T.utx 3. 解压压缩包,将文件粘贴到该文件夹 英伟达显卡OpenGL纹理修复包 献给《杀戮空间》社区,本人不使用英伟达显卡(在测试电脑上测试) 英伟达未修复OpenGL驱动,因此需要修复游戏 修复了英伟达显卡搭配OpenGL时的另一个纹理错误 - 原生系统及Proton均适用 (使用Proton D3D8/9时无需此修复) AMD/Mesa系统不存在这些错误 客户端修改目前支持在线游玩,且技能进度和成就仍可正常获取。请勿使用压缩包(v1版本)中的KillingFloorTextures.utx文件(该版本已移除)。目前已重新上传v0.9版本压缩包,并删除了该特定文件。请勿使用压缩包(v1版本)中的KillingFloorTextures.utx文件,其中错误打包了文件,会导致第三武器/动画等出现问题。压缩包中其他.utx纹理文件均可正常使用。后续将发布v2版本,其中将修复KillingFloorTextures.utx文件。UTX仅用于出生点外地板的kf_office地图。感谢Devtros提交的bug报告。抱歉造成混淆——不透明的破碎玻璃纹理(例如在BioticsLab地图上)——手电筒照射的纹理变成灰色气泡,例如:Westlondon地图监狱商人前的墙壁、Office地图的房屋墙壁纹理、Wyre地图的走廊——Foundry地图的白色地板纹理——Sirensbelch地图出生点和建筑的白色地板纹理——Icebreaker地图的气泡地板纹理——Manor地图房屋处的黑色不透明植被纹理——Office地图出生点的气泡纹理——Wyre地图出生点附近瀑布岩石平台上的黑色不透明植被——Wyre地图瀑布下方水和植被处的气泡纹理——商人窗口,商人前方的气泡纹理,其他网格窗口不透明——Transit和Departed地图,只能从窗户的一侧透过。已修复以下内容: - 索恩警官气泡皮肤,修复皮肤及变异体白眼抖动问题 - 潜行者金属终结者材质在远处显示异常(不再隐形)(已将上述部分的材质修复添加到此压缩包中,因此只需下载一个文件) 此修复可解决基础游戏/地图的大部分材质错误。若发现其他材质问题,请告知我,我可能会在之后进行修复。 此修复同样适用于使用特定.utx相同资源的其他大量地图。 安装步骤: 1. 解压压缩包 2. 导航至:.steam/steam/steamapps/common/KillingFloor/Textures/ 3. 备份原始文件 4. 将压缩包中的文件粘贴到Textures文件夹 压缩包包含: DepartedTextures.utx Foundry_T.utx Icebreaker_T.utx KF_Soldier2_Trip_T.utx KF_Specimens_Trip_T.utx KillingFloorLabTextures.utx KillingFloorManorTexturesKillingFloorOfficeTextures.utx KillingFloorTextures.utx 压缩包 v1 - 已移除,现首次上传 v0.9 PatchTex.utx WyreTex.utx 压缩包文件大小:350 MB。解压后:720 MB
.
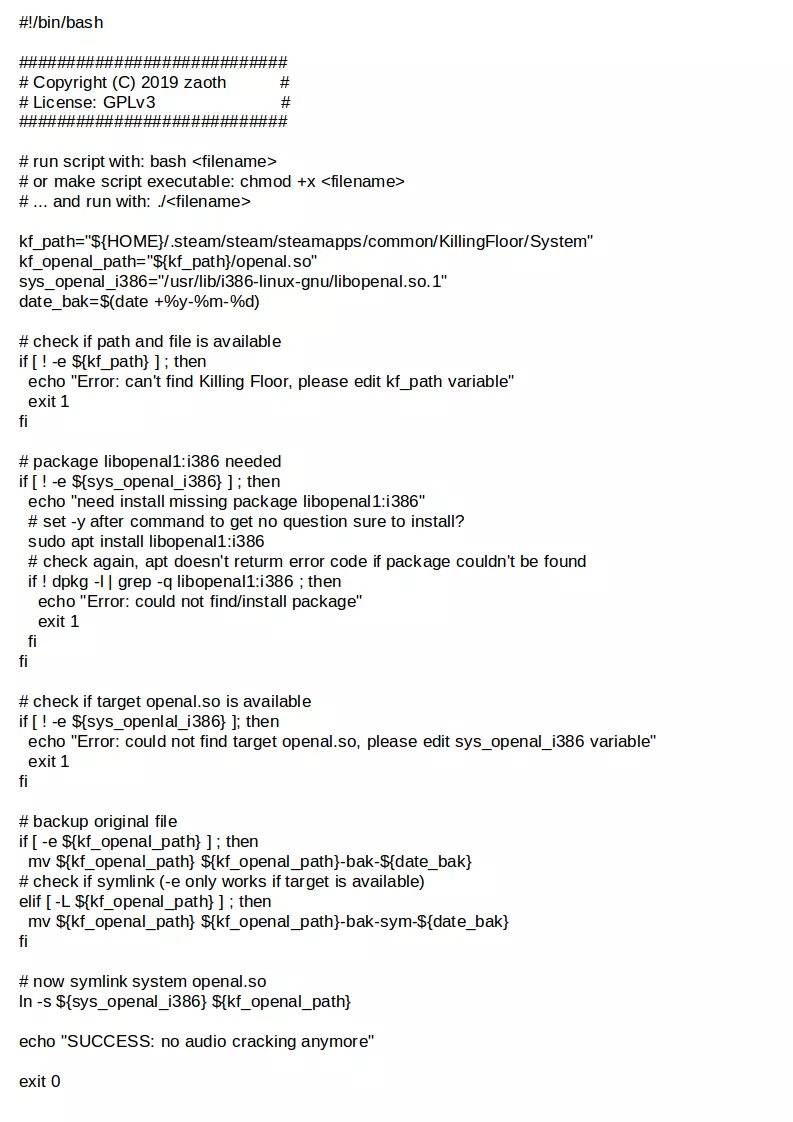
《杀戮空间》声音问题修复(原生系统) Linux/Ubuntu系统修复方法 《杀戮空间》使用自带的openal.so(用于多声道3D音效的开放音频库),其位于:.steam/steam/steamapps/common/KillingFloor/System/ 部分情况下可能出现烦人的爆音,或在部分7.1系统中出现单声道问题。 若要修复,需创建指向Linux系统自带的libopenal.so.1的符号链接,该文件位于:/usr/lib/i386-linux-gnu/ 方法一:文件管理器+终端 1. 打开文件管理器,导航至Steam/SteamApps/common/KillingFloor/System 2. 将原始文件openal.so重命名 3. 在文件管理器中右键,选择用终端打开;此时终端已定位到《杀戮空间》的System目录路径 4. 创建指向libopenal.so.1的符号链接:ln -s /usr/lib/i386-linux-gnu/libopenal.so.1 openal选项2:仅终端操作 - 打开空白终端 - 浏览至杀戮空间文件夹:cd .steam/steam/steamapps/common/KillingFloor/System - 通过终端为openal.so创建安全备份:mv openal.so openal.so.bak - 设置指向libopenal.so.1的符号链接:ln -s /usr/lib/i386-linux-gnu/libopenal.so.1 openal.so 注意:如果删除杀戮空间文件夹中的openal.so,符号链接将会消失。重命名备份文件即可重新使用原始文件。 声音修复脚本(原生) 或者使用我为此问题编写的脚本。 该脚本会检查路径是否正确 若libopenal.so.1不存在则进行下载 创建openal.so的备份 设置指向libopenal.so.1的符号链接 (代码以图片形式重新发布。Steam在2021年年中至年末期间对其网站进行了调整,导致半数代码在公开视图中被移除或无法显示)
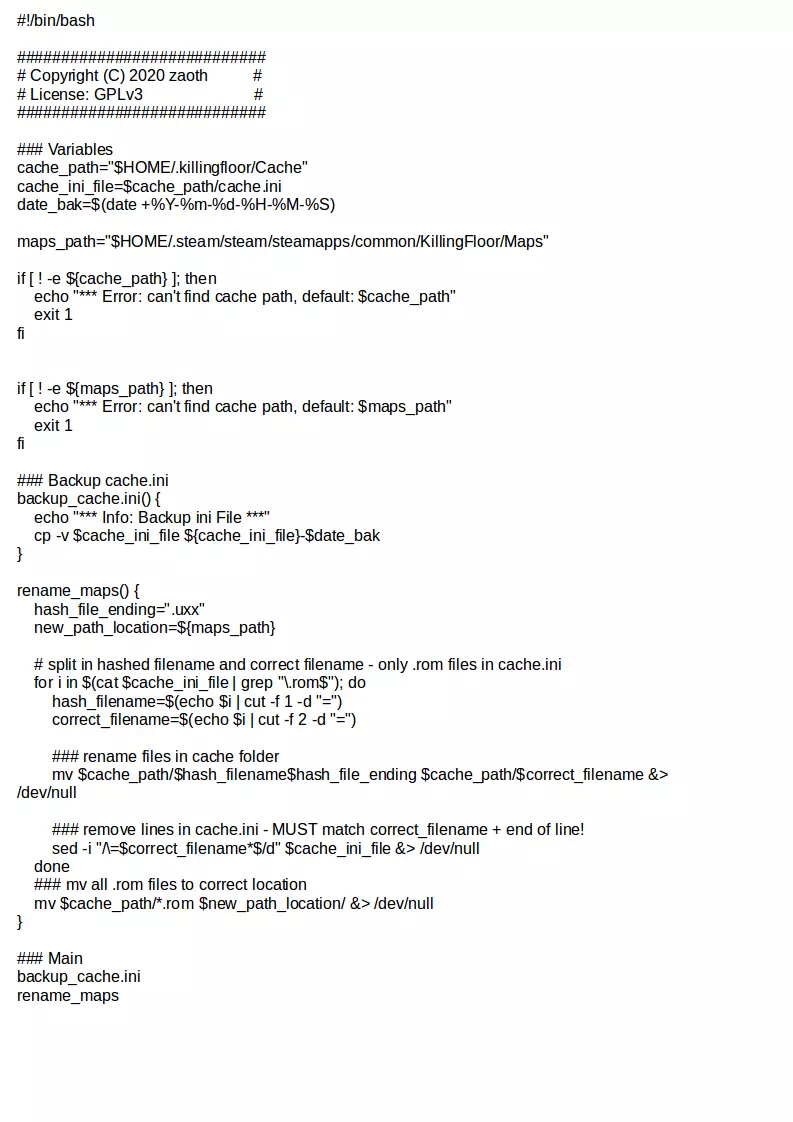
脚本变异器提取(原生) 此脚本会自动检查路径是否可用。 创建cache.ini的备份。 将所有缓存的变异器重命名为正确的文件名和文件扩展名。 将文件移动到正确的文件夹,并从cache.ini中删除已处理条目的特定记录以保持概览清晰。 (代码以图片形式重新发布。Steam在2021年年中至年末期间出现网站故障,导致半数代码在公开视图中被移除或无法显示)

脚本地图提取(原生) 如果你想在单人模式中使用已下载的地图。 此脚本会自动检查路径是否可用。 创建cache.ini的备份。 将所有缓存的地图重命名为正确的文件名和文件扩展名。 将文件移动到正确的文件夹,并从cache.ini中删除已处理条目的相关概览信息。 (将代码重新发布为图片。Steam在2021年年中左右对其网站进行了调整,导致公开视图中一半的代码被移除或无法显示)
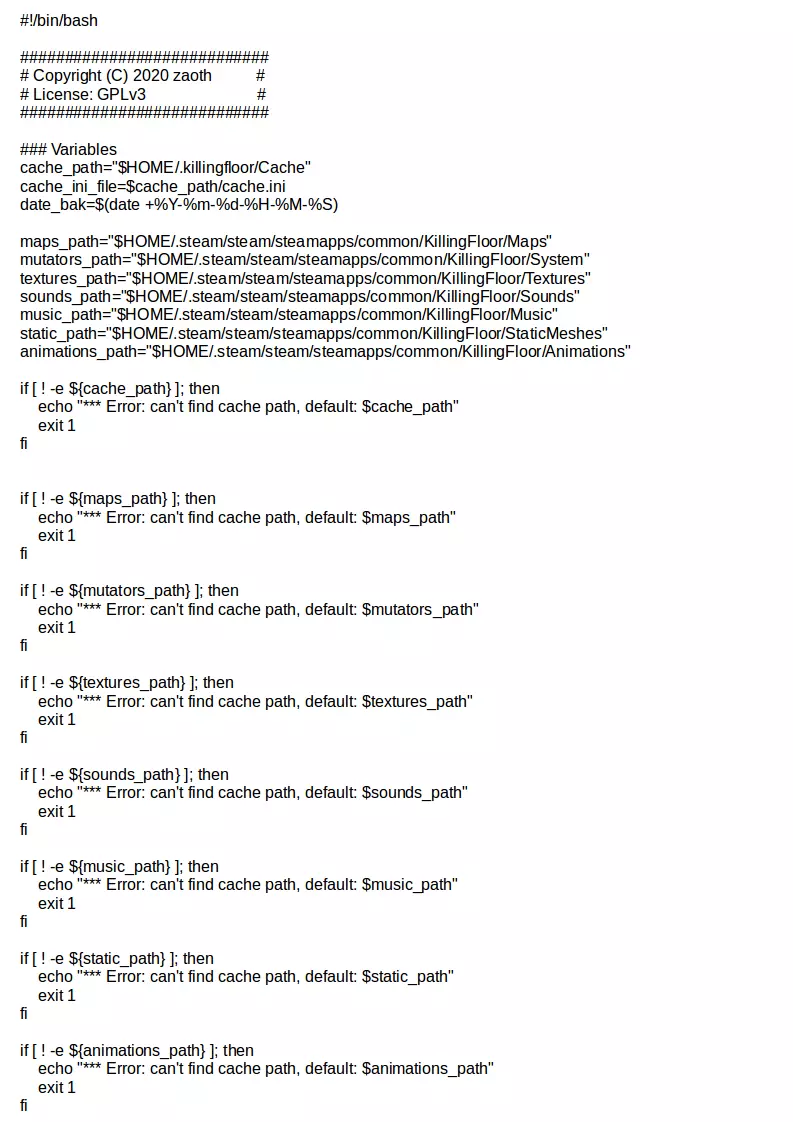
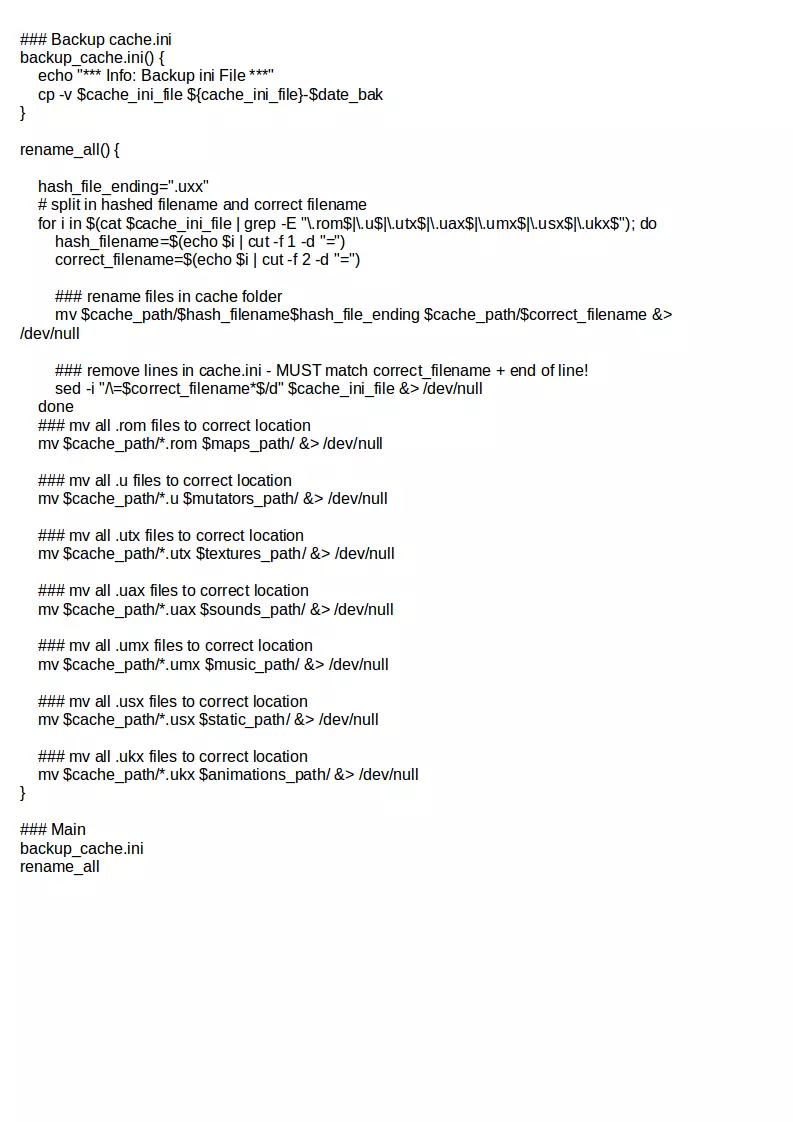
完整缓存提取脚本(原生) 此脚本可提取包含所有文件的完整缓存文件夹。 例如,某些地图需要在单人模式下游玩时,仅复制地图文件(.rom格式)是不够的,此时就需要使用本脚本。或者你可能希望获取所有缓存文件,并保持原始文件名和正确路径。 路径=../System/*.u 路径=../Maps/*.rom 路径=../Textures/*.utx 路径=../Sounds/*.uax 路径=../Music/*.umx 路径=../StaticMeshes/*.usx 路径=../Animations/*.ukx 此脚本会自动检查路径是否可用。 创建cache.ini的备份。 将所有缓存文件重命名为正确的文件名和文件扩展名。 将文件移动到正确的文件夹,并从cache.ini中移除已处理的特定条目以便查看。Steam在2021年年中至年末期间出现网站故障,一半的代码被移除或未在公开视图中显示。
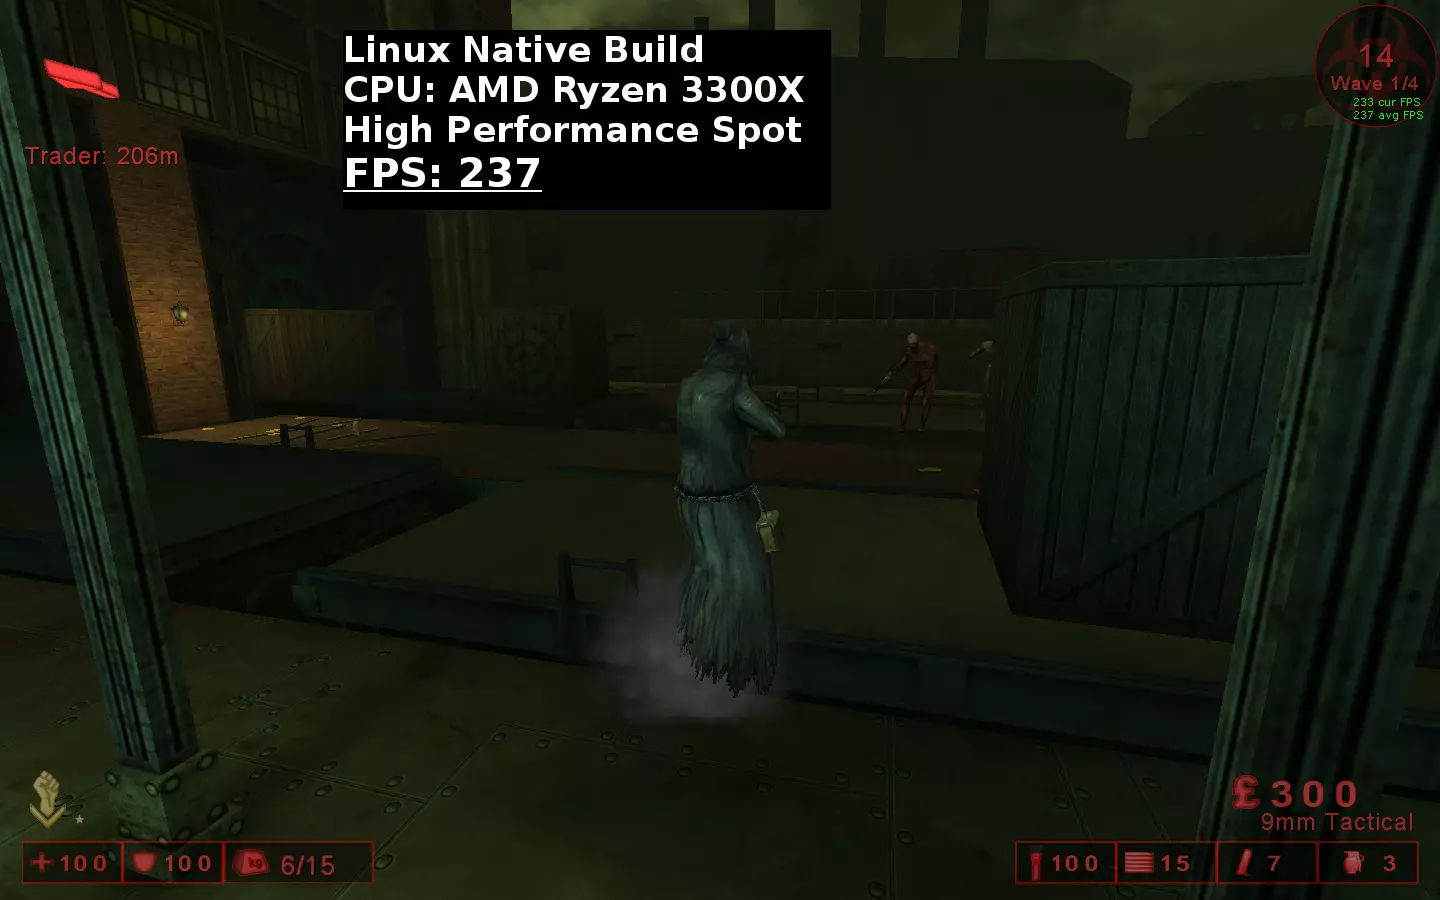
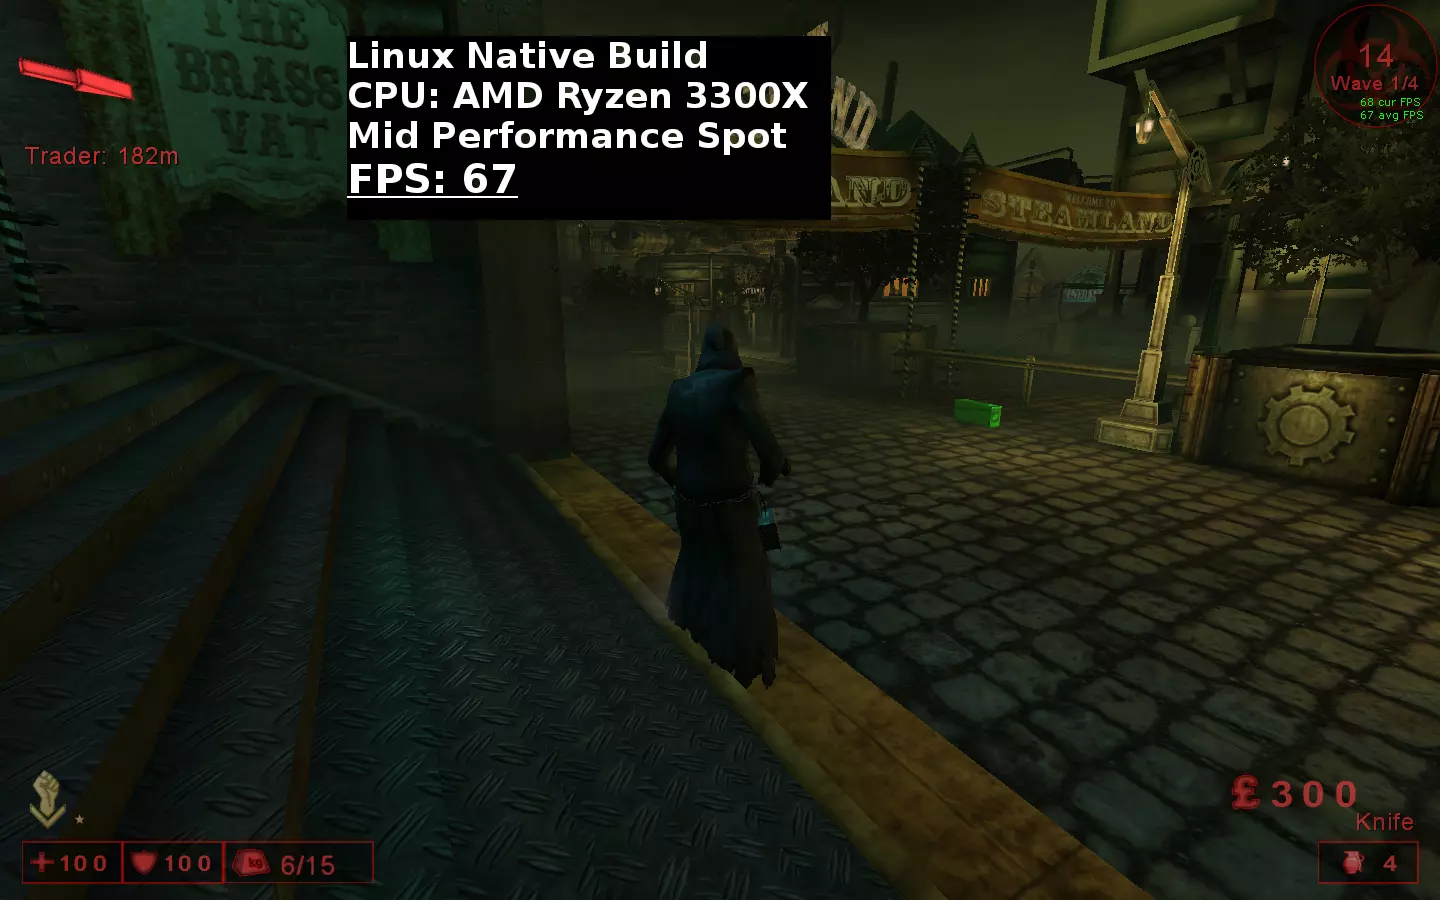
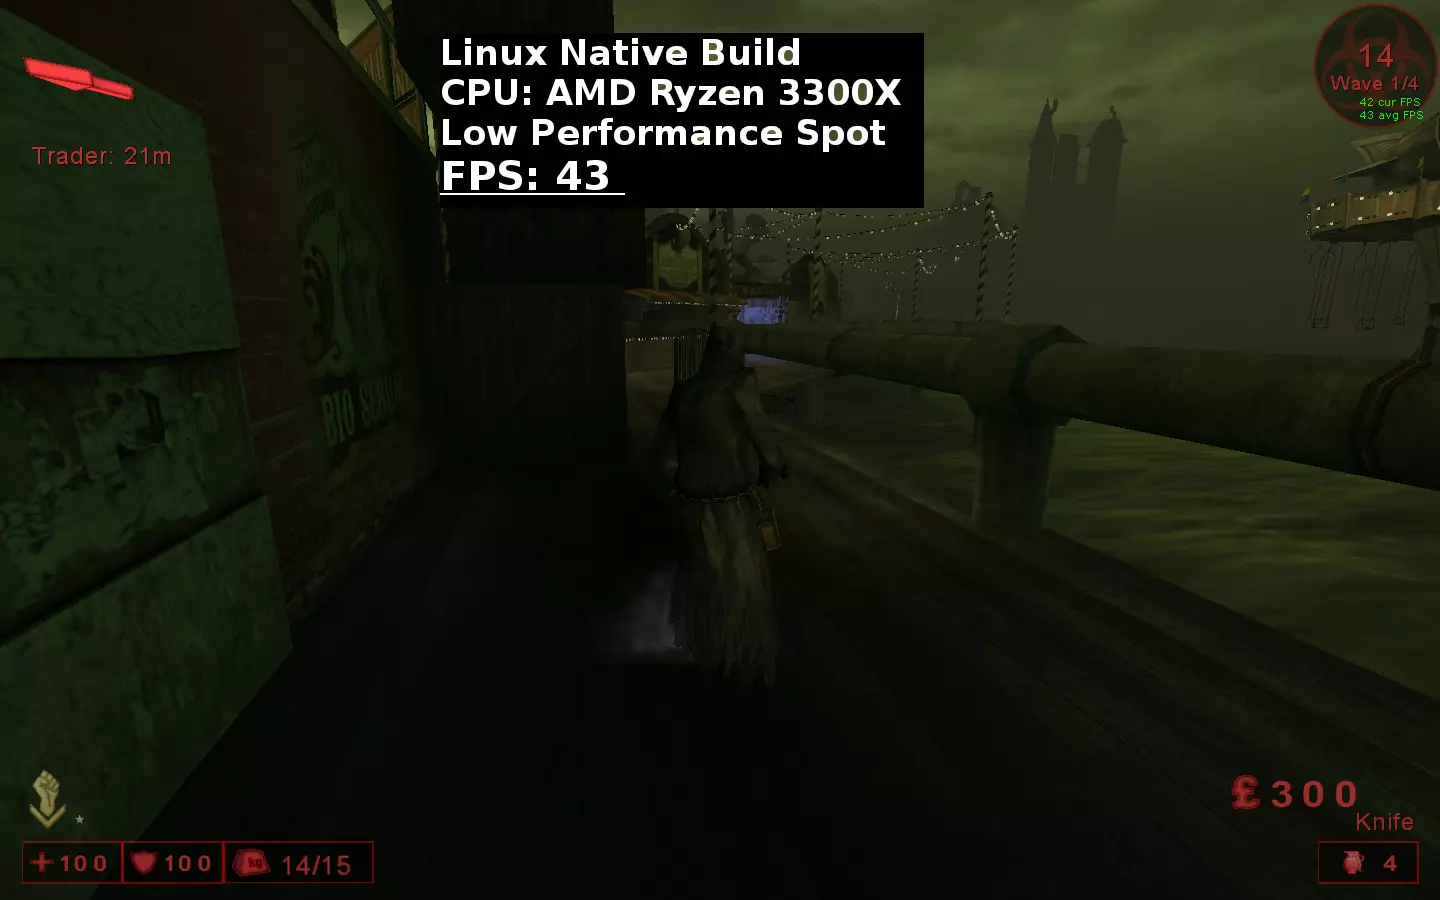
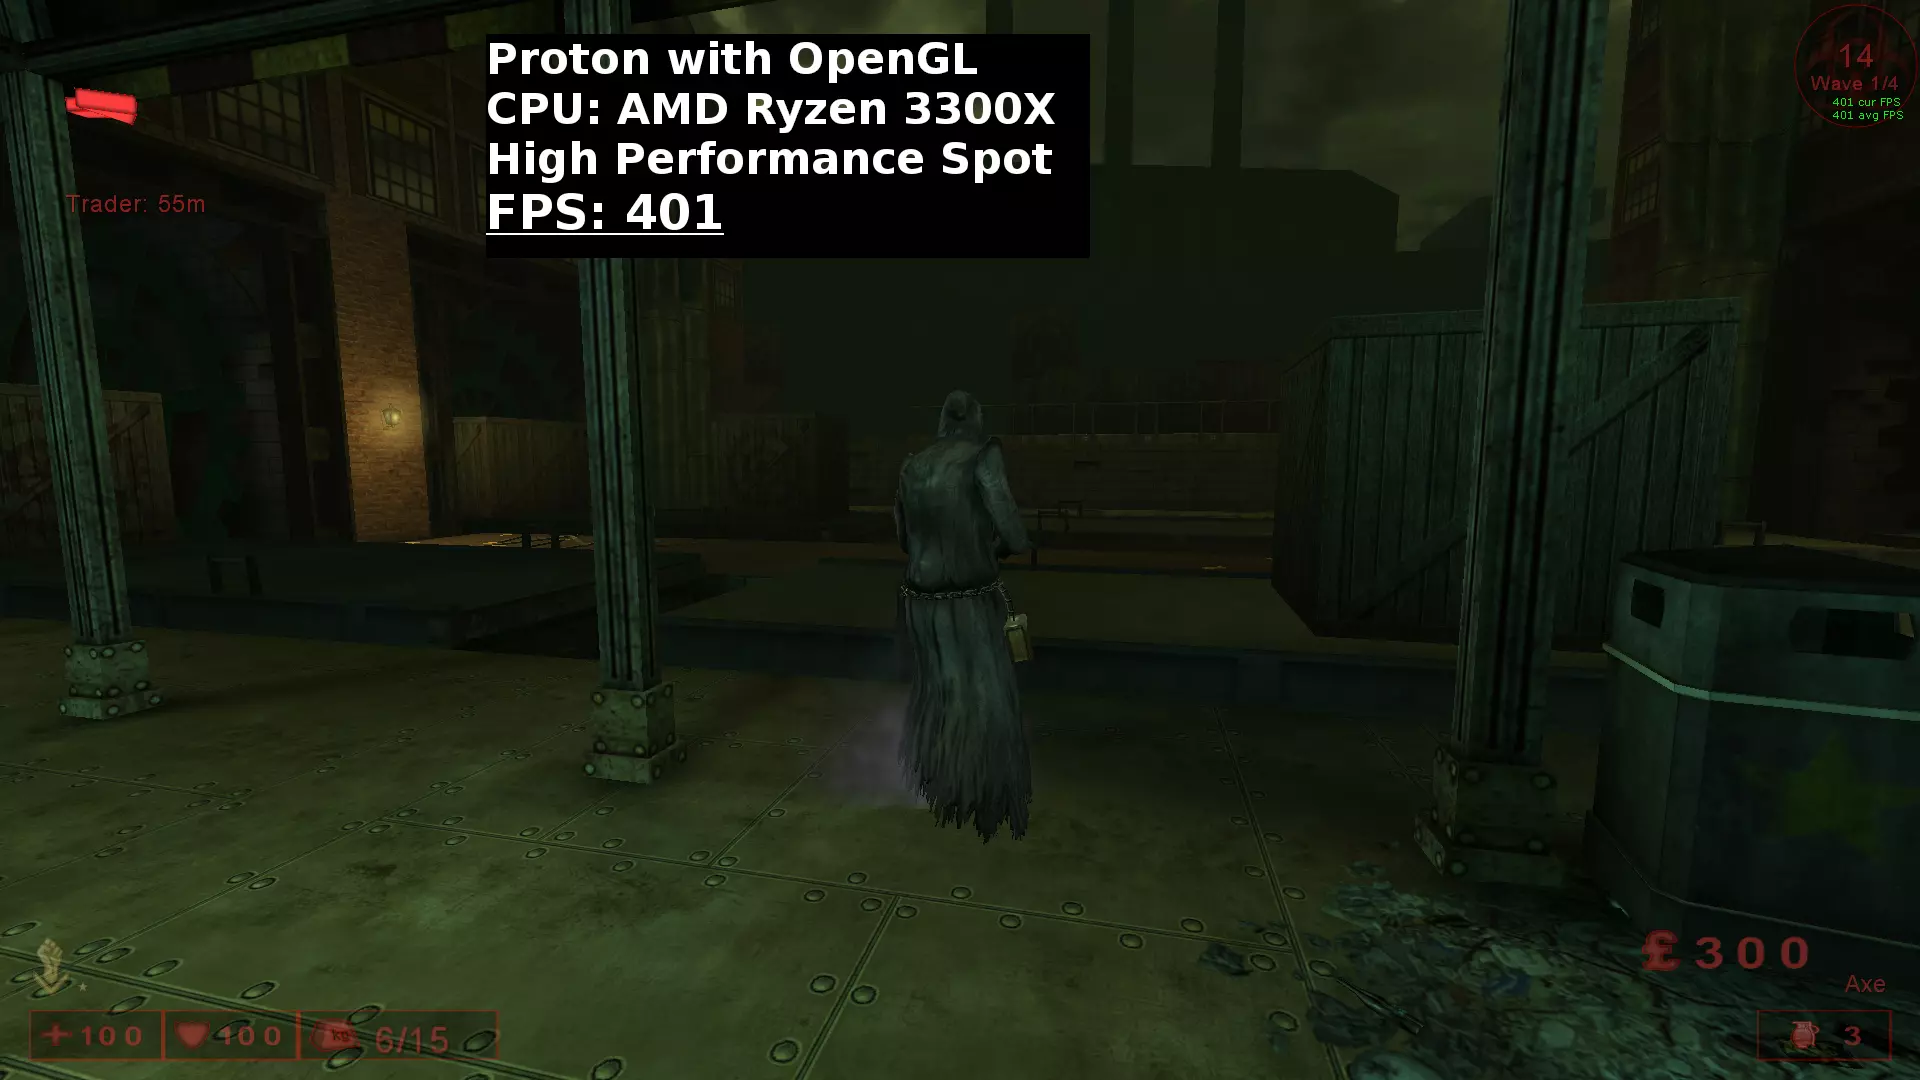
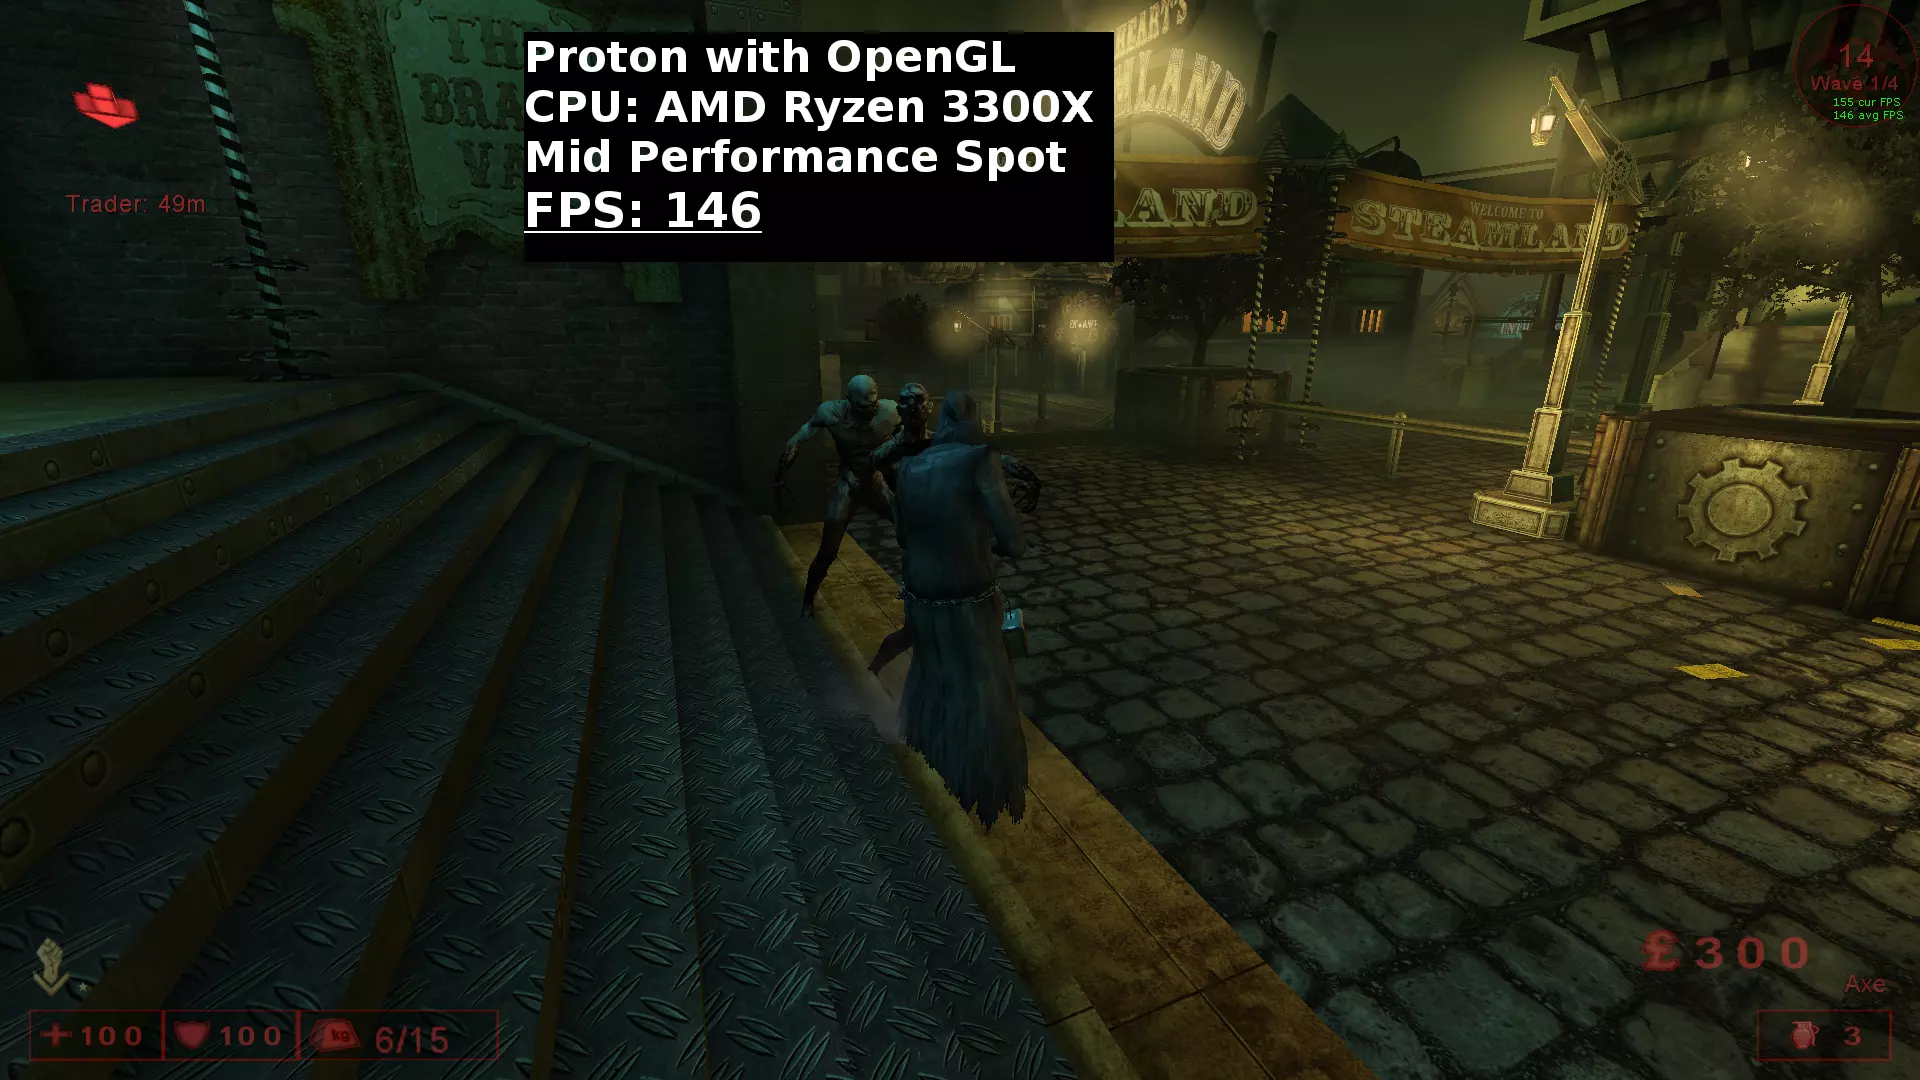
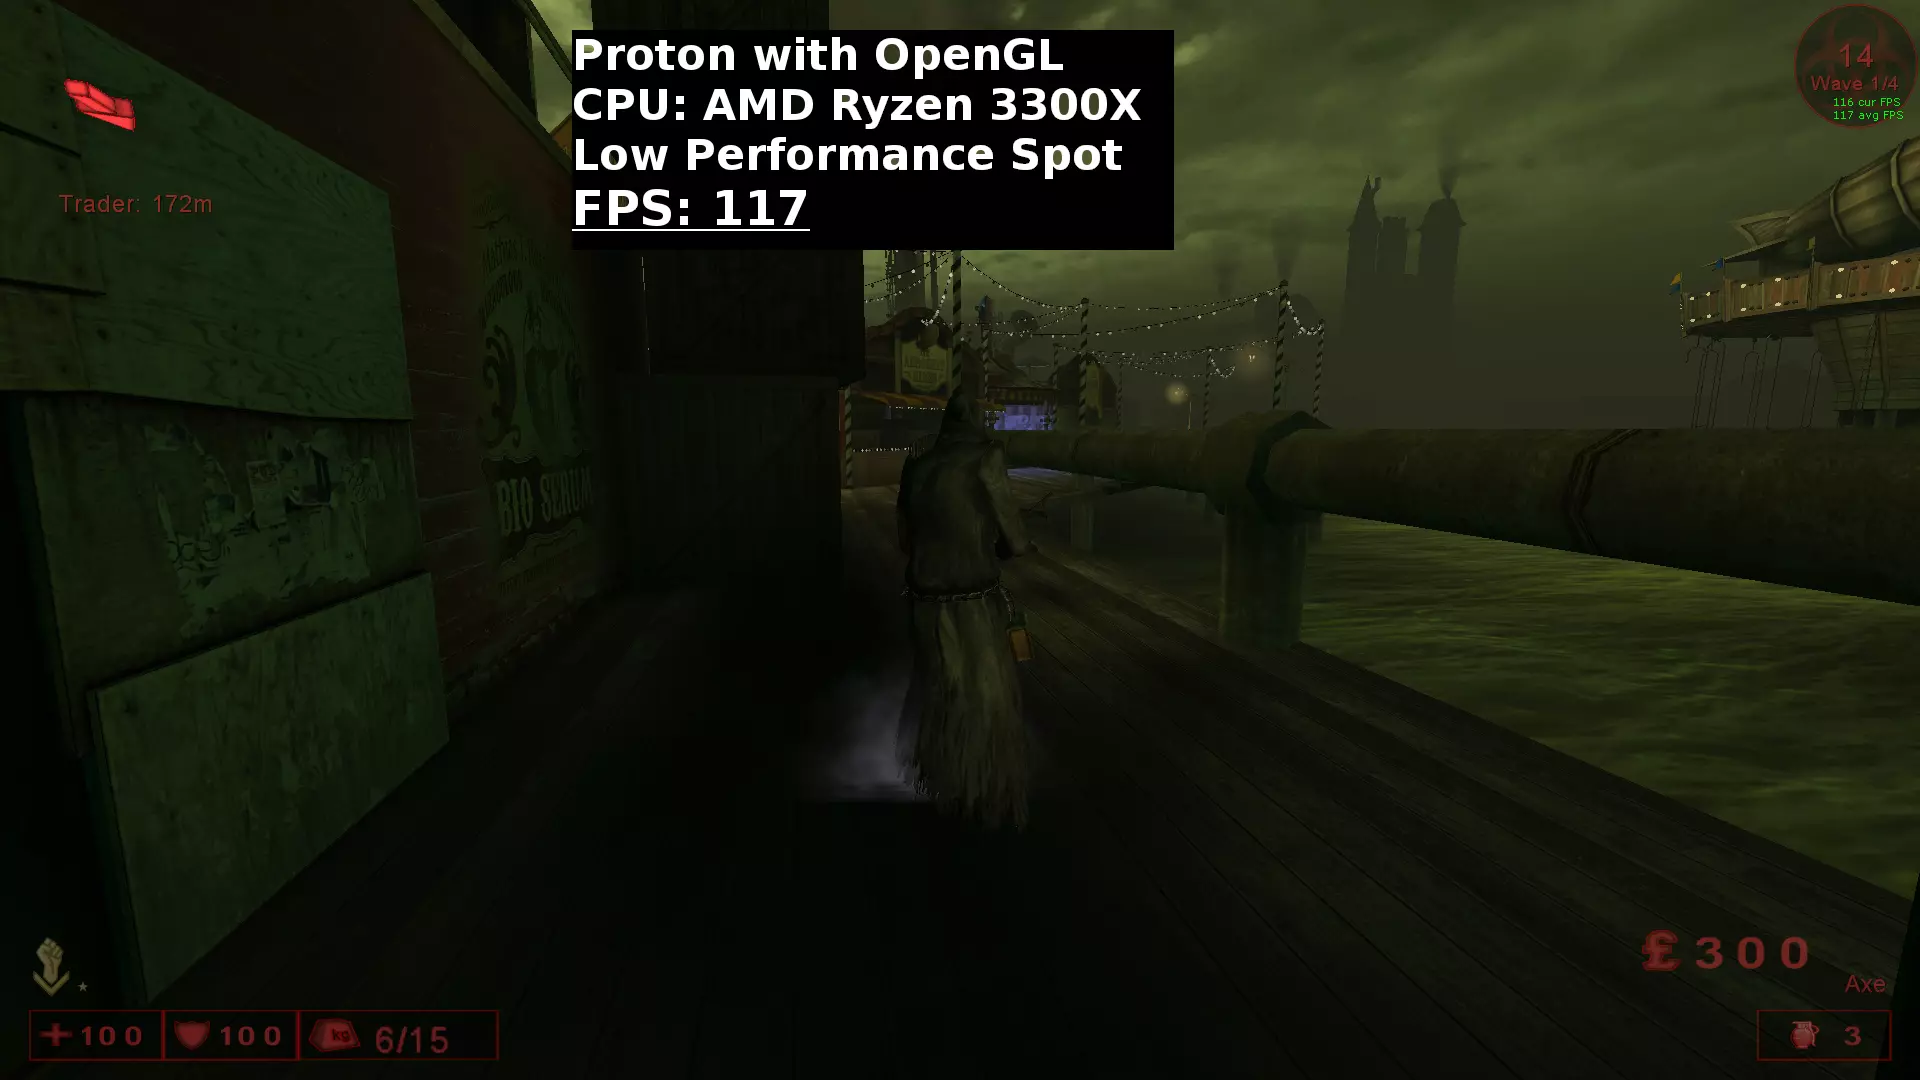
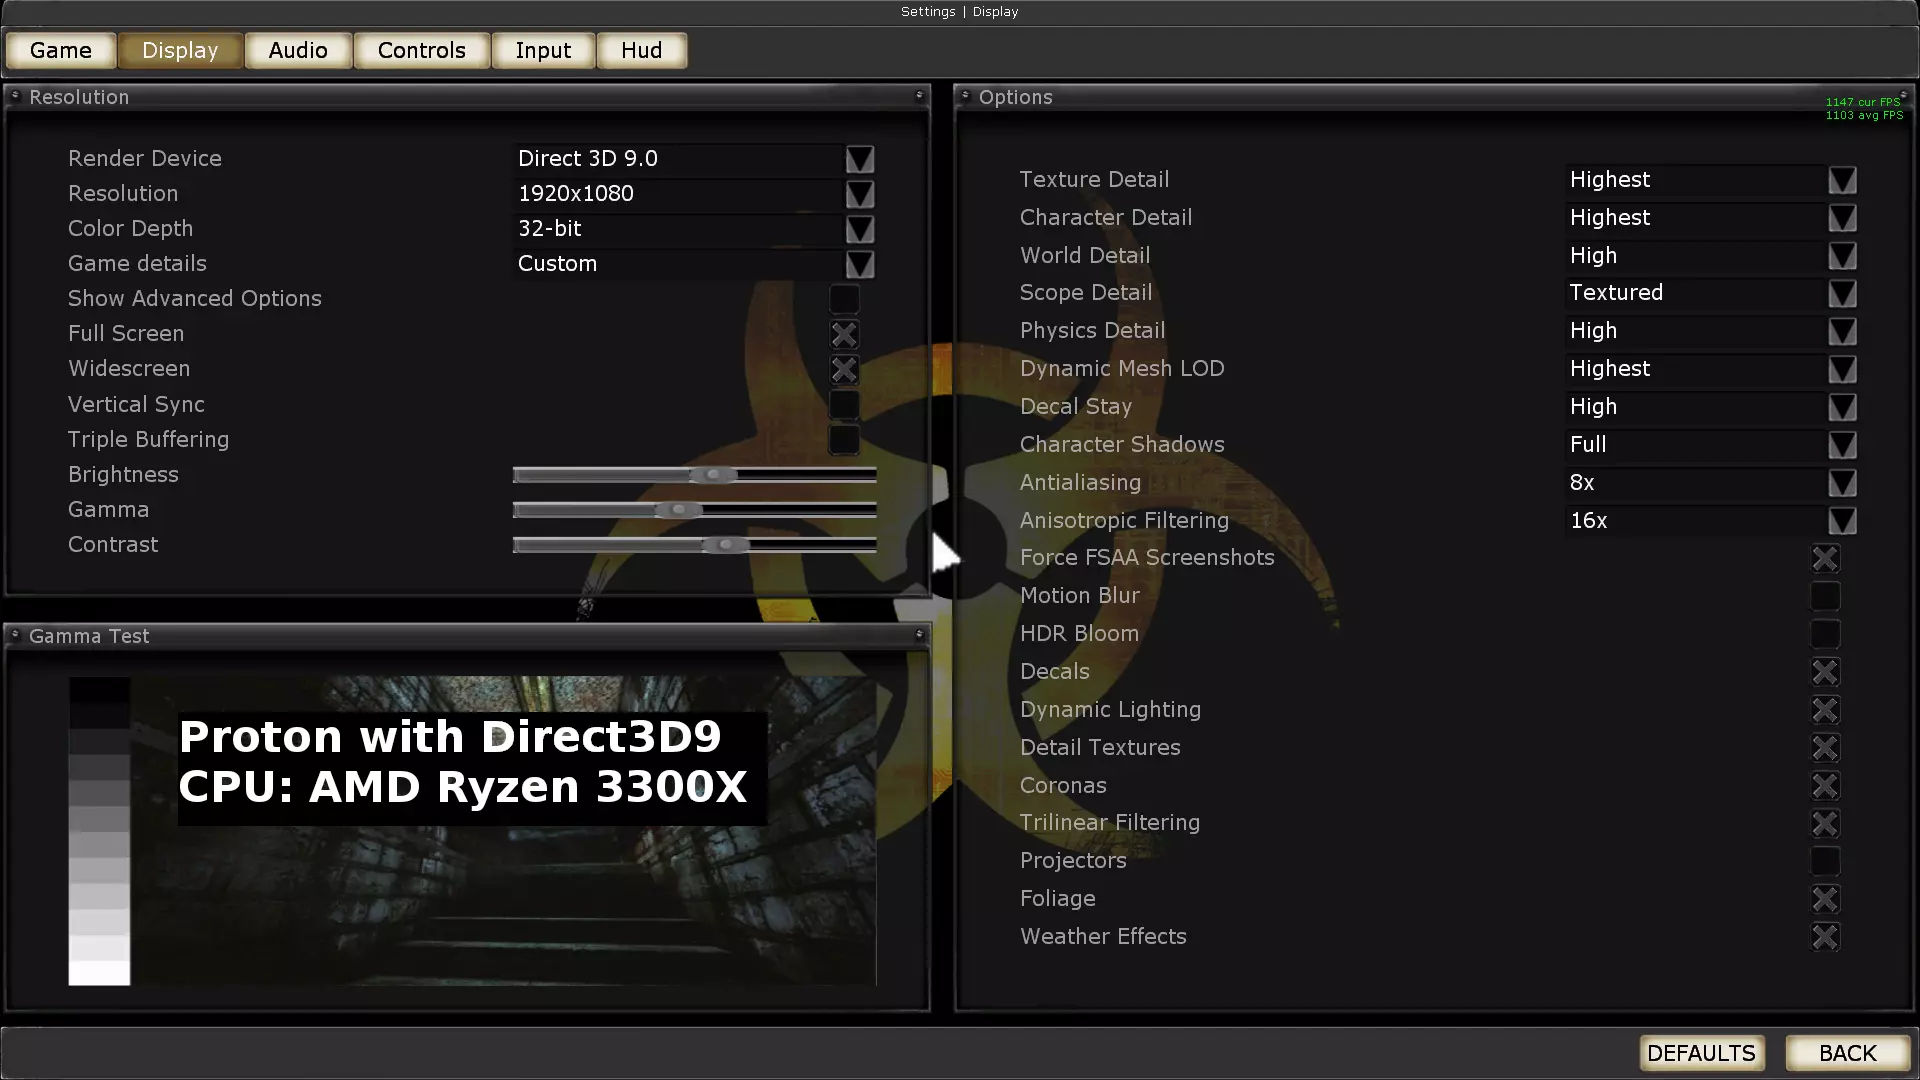
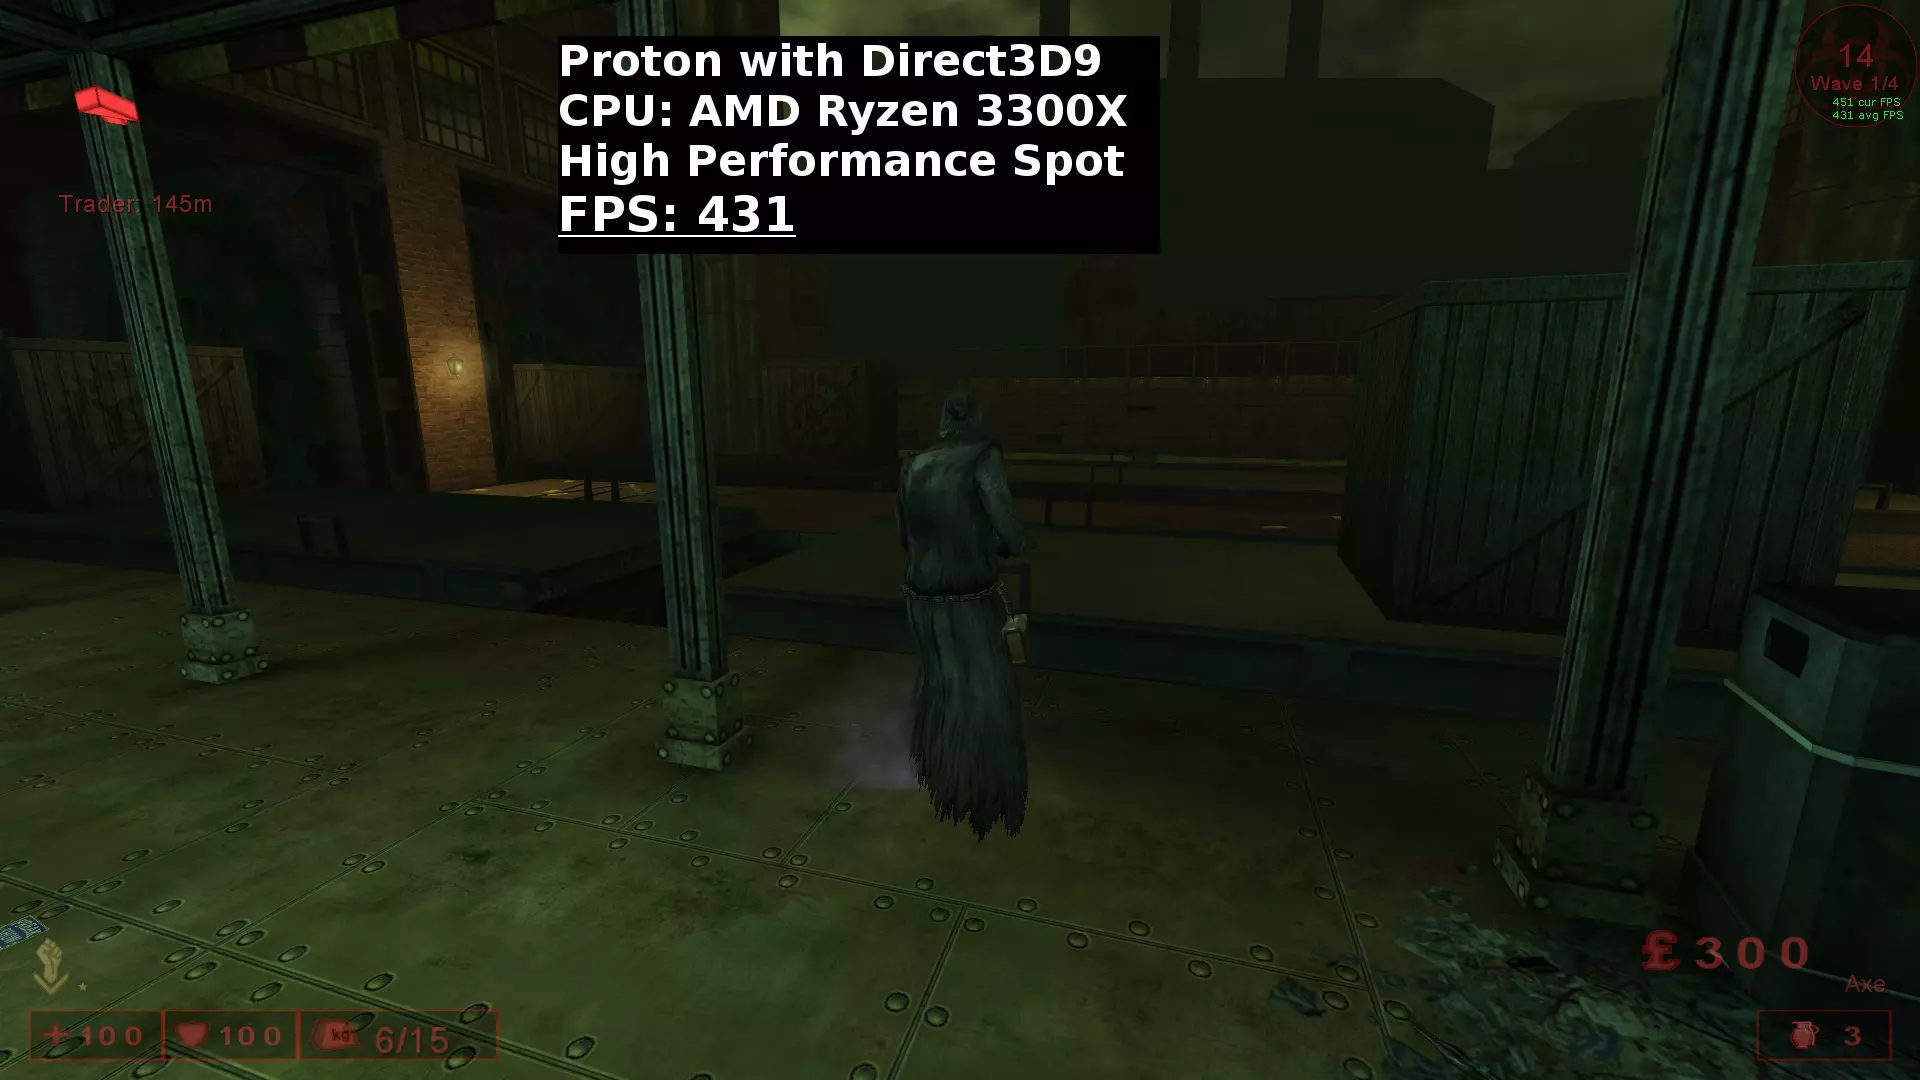
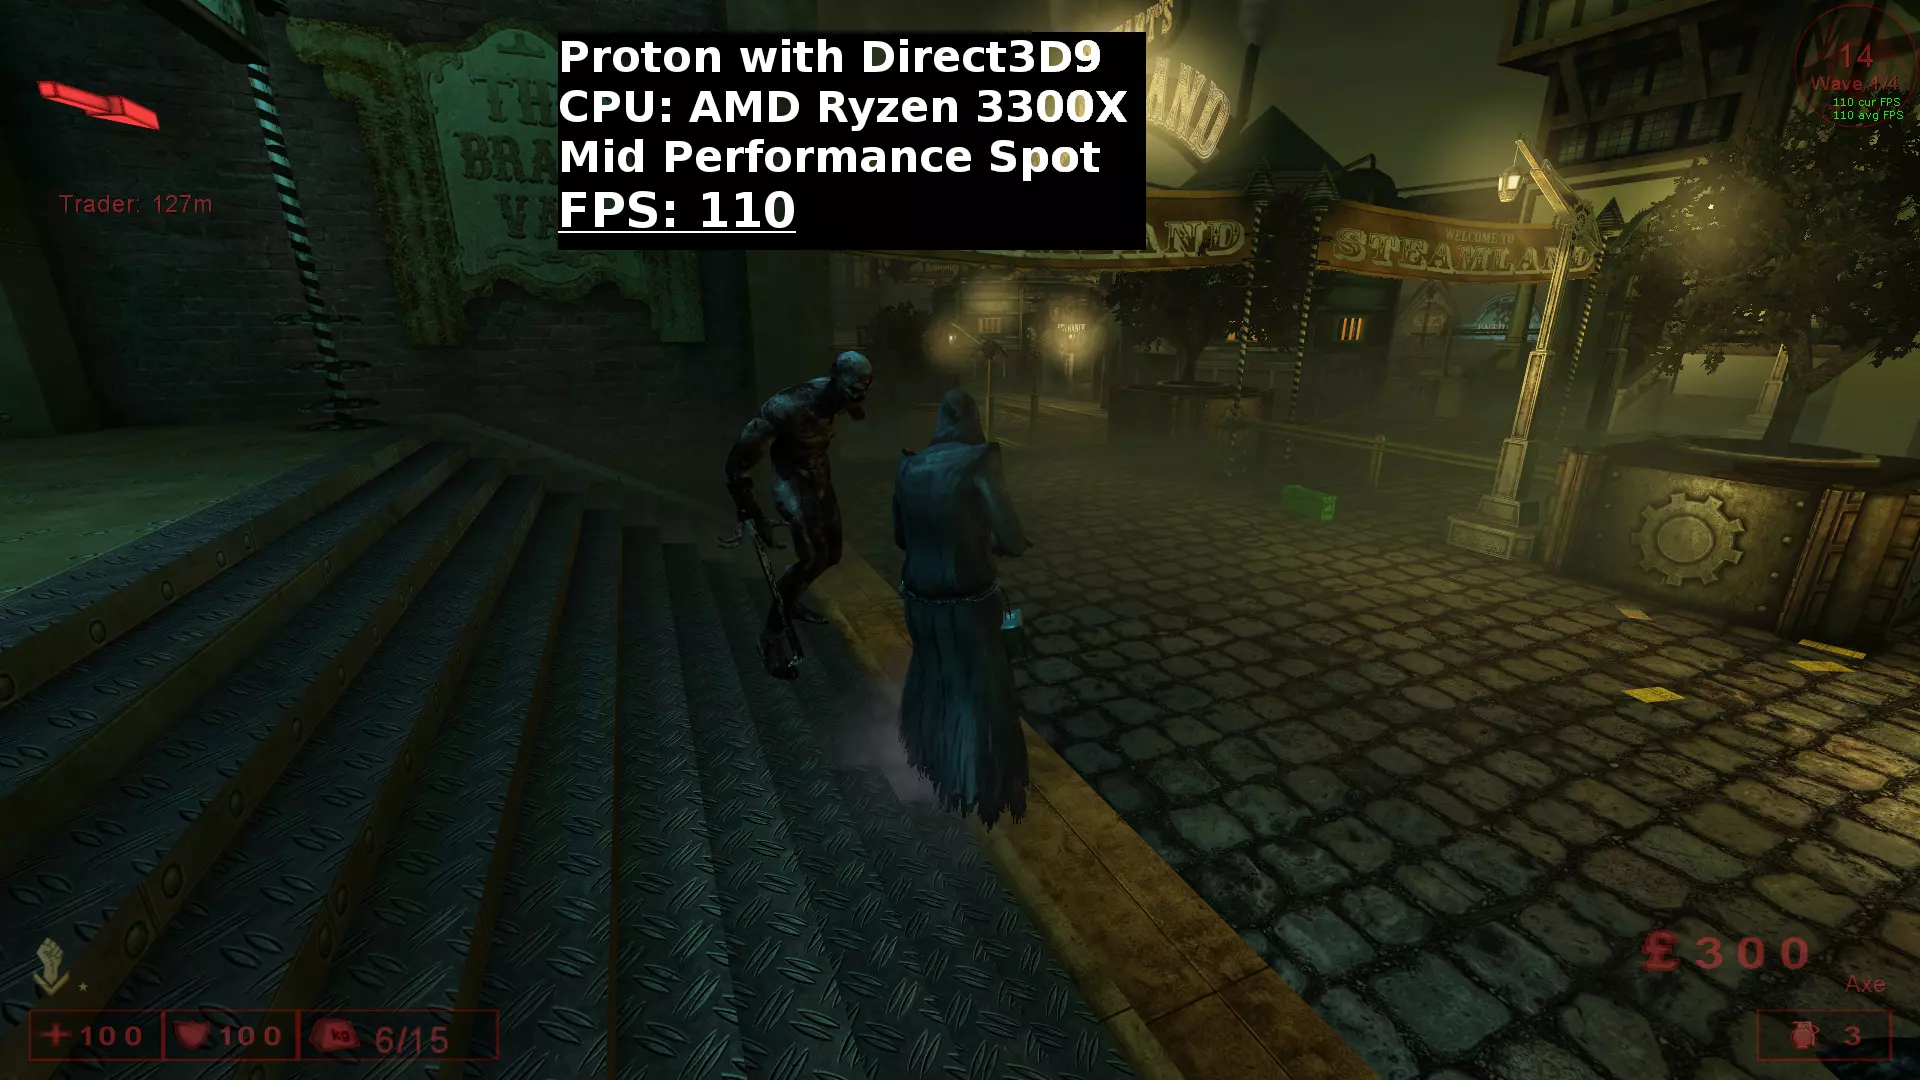
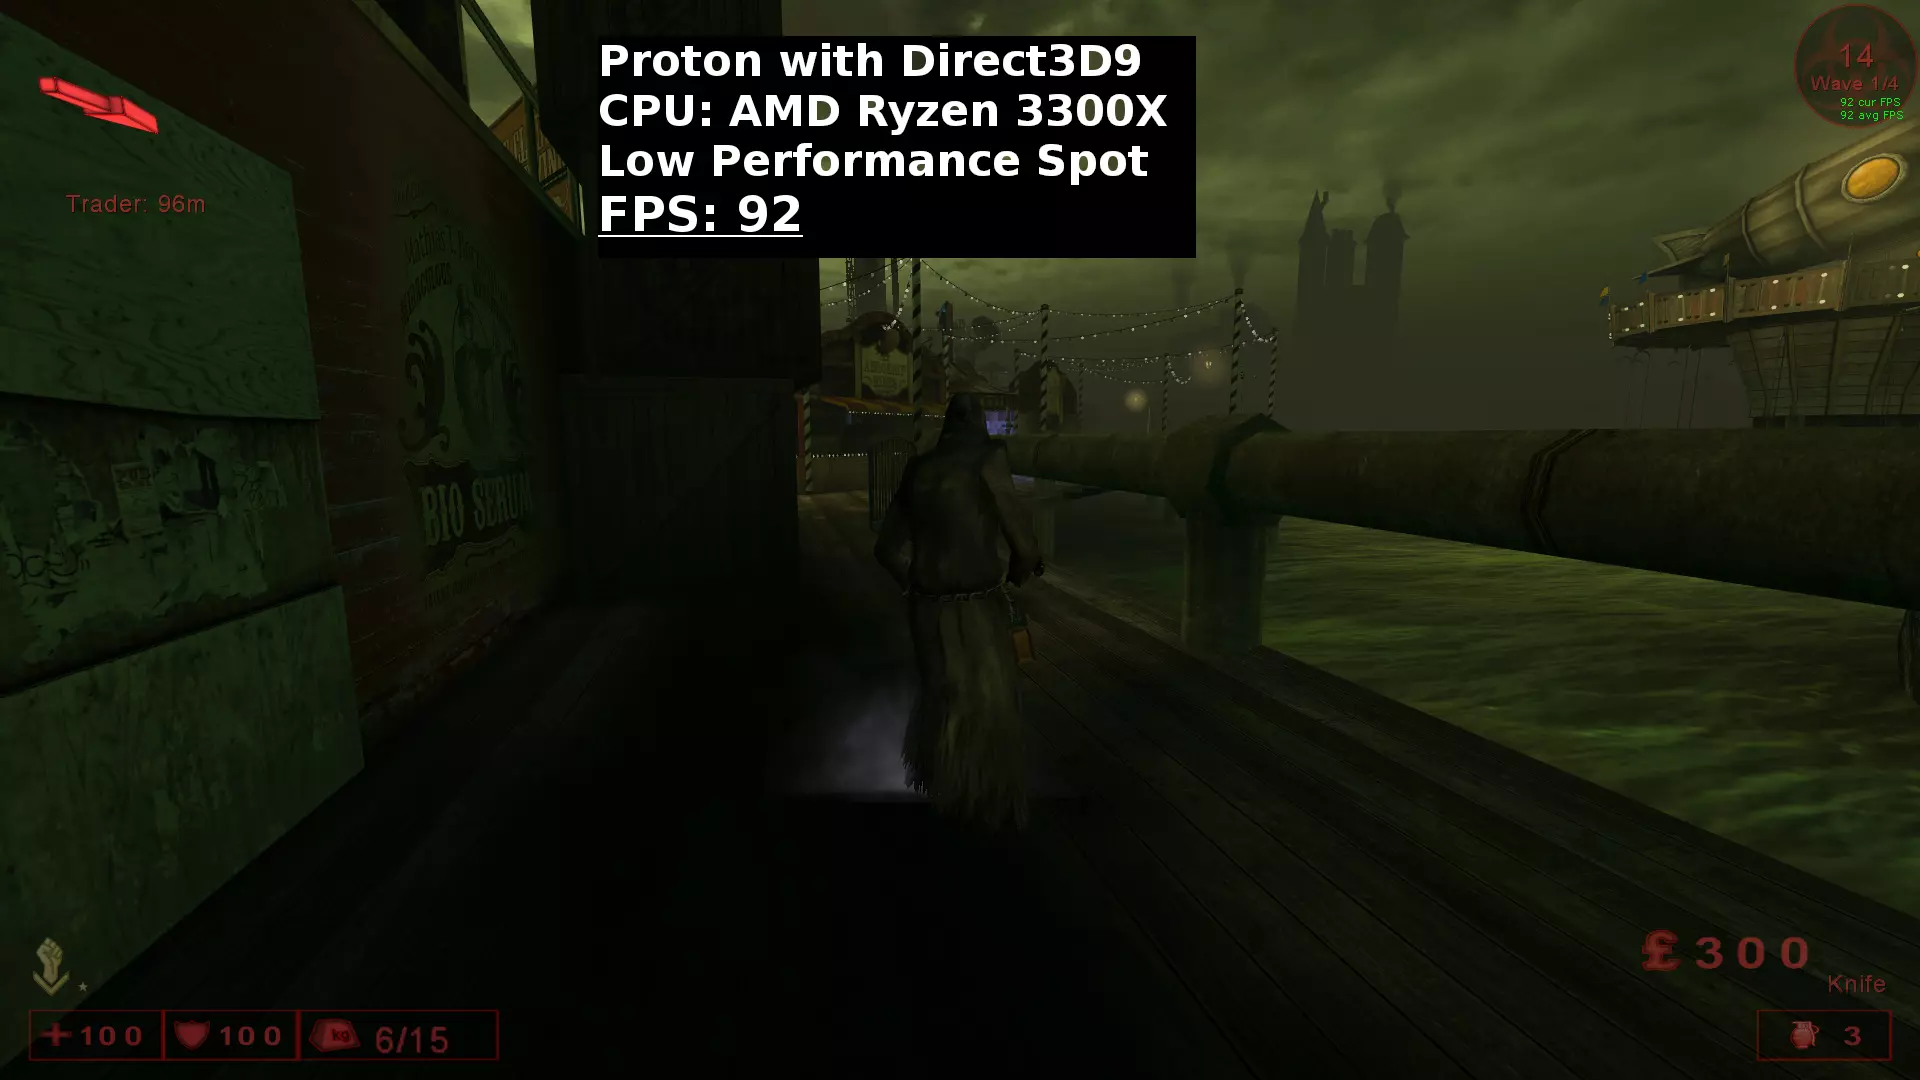
Proton - Steam Play The Proton rebuild is preferable to the poor ported native. Great performance. Perkprogression Fix not needed anymore, same folderstructure like windows. For low pc's OpenGL Rendering may recommend. - You can change to OpenGL Render via ingame options - or set Launchcommand: -opengl - or edit KillingFloor.ini located in: /home/USER/.steam/steam/steamapps/common/KillingFloor/System/ Edit [Engine.Engine] RenderDevice=D3D9Drv.D3D9RenderDevice ;RenderDevice=D3DDrv.D3DRenderDevice ;RenderDevice=Engine.NullRenderDevice ;RenderDevice=OpenGLDrv.OpenGLRenderDevice ;RenderDevice=PixoDrv.PixoRenderDevice to [Engine.Engine] ;RenderDevice=D3D9Drv.D3D9RenderDevice ;RenderDevice=D3DDrv.D3DRenderDevice ;RenderDevice=Engine.NullRenderDevice RenderDevice=OpenGLDrv.OpenGLRenderDevice ;RenderDevice=PixoDrv.PixoRenderDevicecomment D3D9-Render via semicolon ";" uncomment OpenGL-Render via removing semicolon ";" Problems/Performance with D3D9/D3D-Render later in text. At first bout Proton. Use Proton 7 or higher. Fixes with various Proton Releases that impacts Killing Floor: Avoid Proton 6: For D3D and OpenGL Gamma/Brightness/Contrast now adjustable, but shading of textures are fully messed up, only D3D9 is still fine -> Fixed with Proton 7 Proton lower than 6: Gamma/Brightness/Contrast only adjustable with D3D9-Render and DXVK+D9VK-api. With WINE3D and D3D9 the same not possible. With Proton less/equal 5.13-6, ALT-Tab out of game worked only with OpenGL-Rendering, After 5.13.6 works with D3D/D3D9 too. Since Proton 5.13-5, your mouse is not clicking anymore ingame while tab'd into Steamoverlay. Killing Floor Proton: Rightclick KillingFloor within Steam, select Properties and switch to Compatibility Enable "Force the use of a specific Steam Play compatibility tool" Select Proton *** Game is now downloading the Protonfiles. With Proton, KillingFloor uses only folder: /home/USER/.steam/steam/steamapps/common/KillingFloor/ Folder and files from the native-port are not used anymore: /home/USER/.killingfloor/ (Note: Don't copy killingfloor.ini from the native if you favorited any gameservers. The formating of this entries are different and the game won't start without a error message, or remove this entries first.) Preparing the Protonbuild:At first gamestart after Protoninstallation your game will maybe crash, without any error message. Game is set to D3D9 by default. Since Proton 5, without launchcommand DXVK-api is used. Library for Vulkan are missing. Drivers for 32bit are required too. Install Vulkan for AMD with mesadriver: Install Vulkan lib: sudo apt install libvulkan1 mesa-vulkan-drivers vulkan-utils Install Vulkan 32bit: sudo apt install mesa-vulkan-drivers:i386 Install both in one line: sudo apt install libvulkan1 mesa-vulkan-drivers vulkan-utils mesa-vulkan-drivers:i386Restart your system after installation! (Without installed vulkans libs: Game starts with DVXK/DV9K-api only with OpenGL and D3D. Forcing wine-api "PROTON_USE_WINED3D=1 %command%" game starts with OpenGL and D3D+D3D9.) Optimations after first gamestart within the Game - Go to Settings: Game: Change Connection to LAN/T1. Input: Disable Mouse Smoothing. Disable Reduce Mouse Lag (or do it in killingfloor.ini) Display: Disable Vertical Sync (or do it in killingfloor.ini) Why wanna use D3D9, while OpenGL runs perfetcly fine with Proton?OpenGL does not render blood decals, visual key feature of game OpenGL RenderOptimations in killingfloor.ini: Edit in [WinDrv.WindowsClient] DrawDistanceLOD=1.0 to DrawDistanceLOD=0.0 (backround objects renders only very close - visual gay, improves performance. Decide on your own) in [OpenGLDrv.OpenGLRenderDevice] ReduceMouseLag=True to ReduceMouseLag=False UseVSync=True to UseVSync=False OpenGL-Render and Proton summary/result: + Awesome Performance, no stutter in any situation +/- Framedrops while fireweapons, special flamethrower are spamed then Dynamic Lighting is activated. For AMD with mesa it can be fixed, force_s3tc_enable=true -> Have a look at section: "Dynamic Lighting - Ultra Performance". For Nvidia idk if similar tweak is possible or needed, no real system to test. If spaming gets to hard, disable in Options: Dynamic Lighting for the current session. (Note: With disabled Dynamic Lighting you have no Flashlight anymore) - Same as the native, activated Projectors has no effect (No feature of OpenGL-Rendering) No red dot for MBR, no weapon/blood decals. - With Nvidia same texture bugs like in the native port. Metallic stalkers, some other texture bugs. - At gamestart your Taskbar still may be in foreground. Just press ALT+ENTER, sometimes has to repeat multiple times, and/or turn multiple times in ingame options Fullscreen on/off. D3D9 / D3D RenderOptimations in killingfloor.ini: SET NEVER UsePrecaching to False in [D3DDrv.]+[D3D9Drv.D3D9RenderDevice] like other tweak guides suggest! This will result in heavy stutter! Leave it as it is: UsePrecaching=True Edit in [WinDrv.WindowsClient] DrawDistanceLOD=1.0 to DrawDistanceLOD=0.0 (backround objects renders only very close - visual gay, improves performance. Decide on your own) Using D3D9-Render: in [D3D9Drv.D3D9RenderDevice] ReduceMouseLag=True to False (useless, cost lots of performance) UseVSync=True to False (useless, cost lots of performance) UseCompressedLightmaps=True to False (for anti stutter with Projectors) CheckForOverflow=False to True (for no heavy frame drops with flame spam and DynLight on) Using D3D-Render: in [D3DDrv.D3DRenderDevice] ReduceMouseLag=True to ReduceMouseLag=False UseVSync=True to UseVSync=False UseCompressedLightmaps=True to UseCompressedLightmaps=False CheckForOverflow=False to CheckForOverflow=True What about?: [ALAudio.ALAudioSubsystem] UsePrecache=True to UsePrecache=False Does not affect performance, only bout 100MB RAM is less cached. [Engine.LevelInfo] bNeverPrecache=False to bNeverPrecache=True No difference, does not affect performance [Engine.GameEngine] increase CacheSizeMegs=* Bullsh!t, it's just reservation at gamestart. Games uses what it's need [D3DDrv.D3DRenderDevice] + add in [D3D9Drv.D3D9RenderDevice] AvoidHitches=True Nothing, no feature of Killing Floor D3D/D3D9: Extreme Stutter with activated Projectors If you have Projectors activated you will have heavy stutter/framedrops as soon as a flashlight by your own or teammate kicks in the game. Same with using red dot with MBR. Setting UseCompressedLightmaps=False is important, reduces this spikes, but still present. (Note: If Projectors disabled - as long Dynamic Lighting in Options is enabled. flashlight still works. With disabled Projectors, coverage of shadows for objects and characters are changed and no weapon/blood decals will be showed) D3D/D3D9: fps drops while flamethrower spam with activated Dynamic LightingWith D3D/D3D9-Render same fps drops like with OpenGL while fireweapons get spamed. Setting CheckForOverflow=True eliminates the framedrops enormously. If in current session flamethrower get spamed to hard disable in options Dynamic Lighting. (Note: With disabled Dynamic Lighting and Projectors you have no Flashlight anymore) Dynamic Lighting - Ultra Performance (Extra section, to point out the fix for most performance loss with Dynamic Lighting) OpenGL+AMD-GPU+MesaWith OpenGL while you have Dynamic Lighting activated in options, your fps will hardly drop down to 10-30 fps if a firebug kicks in the game. Spaming fireweapons special the flamethrower will kill your fps even on a overpowered pc build for killing floor. Drops with flashlights are the same. The simple Ultimate Performance Boost is: force_s3tc_enable=true Only for mesa driver: Add line to startupbash to start steam. #!/bin/sh export vblank_mode=0 force_s3tc_enable=true steam Start steam via bash. Now do a 6player flamethrower spam party without any significant fps drop with activated Dynamic Lighting :) Note: Duo patent rights which expired October 2, 2017 - At mesa 17.3.0 Release s3tc is officially supported. Older builds require installation of dxtn packages. Just look for libtxc-dxtn packages: aptitude search libtxc dxtn. Install dxtn0 or patentfree s2tc0 packages. Note2: Other games may cause trouble with forcing s3tc, restart steam without s3tc command. Direct3D9 + Direct3DThis section was only supposed for the mesadriver tweak and OpenGL, for D3D/D3D9 just a repeat from the proton section: As mentioned in Proton section above. Set in Rendering Device CheckForOverflow to True. Without editing, frames will heavily drop with flamethrower spam and activated DynamicLighting. Depending on your hardware, fps will stay very stable, prevents framedrops by 80-90%. Edit in killingfloor.ini: Using D3D9-Render: in [D3D9Drv.D3D9RenderDevice] CheckForOverflow=False to CheckForOverflow=True Using D3D-Render: in [D3DDrv.D3DRenderDevice] CheckForOverflow=False to CheckForOverflow=True Text beneath just for documentary from testing which had no effect for Dynamic LightingTesting different tasksets - advising core/thread affinity make no difference. Check for affinity in Terminal: taskset -cp PIDofKF -> pid ****'s current affinity list: 0-7 (Ryzen 3300x - 4 Core CPU with Hyperthreading) Set Launch Option in Killing Floor Properties: taskset -c 0-3 %command% You can set x-variations for affinity. with "-" set range of cores with "," set specific cores. A combination as example.: taskset -c 0,1,4-6 %command% Testing disabled SMT (more or less the same above with advising affinity) no difference. sudo bash -c "echo off > /sys/devices/system/cpu/smt/control" to enable SMT again: sudo bash -c "echo on > /sys/devices/system/cpu/smt/control" Testing disabling HPET no difference (systemrestart required): sudo cp /usr/local/share/confs/grub-hpet-off /etc/default/grub sudo update-grub to enable HPET again: sudo cp /usr/local/share/confs/grub-hpet-on /etc/default/grub sudo update-grub Tested every ProtonLaunch Command no difference. Even with lowest Settings at 480p the fps hardly drops with activated Dynamic Lighting. dgVoodoo2 - D3D9 Anti Stutter King dgVoodoo2, D3D9 to D3D11/12 wrapper there is 100% zero stutter with activated projectors anymore, runs awesome. D3D12 is rendered through VKD3D and has much higher performance than D3D11 via DXVK. Disadvantage: Significant lower performance in multiplayer with more player/zeds in action compared running game directly through proton. With Proton9/10 huge performance boost compared to older Protonversions. Proton 7: - D3D12 better performance than D3D11, both zero stutter - both significant lower performance compared running directly via Proton 7Proton 8: - D3D12 unplayable hard framedrops even in mainmenu - D3D11 zero stutter, lower performance compared directly via Proton7Proton 9: - D3D12 zero stutter. - D3D11 zero stutter, lower performance Disadvantage: - Always starts windowed, ingame have to reselect fullscreen - Game does not recognize ingame gamma/brightness/contrast settings, have to be adjusted via dgvoodoo2. Sweetspot at my backend is in dgvo: Brightness 235, Color 89, Contrast 96. These settings looks close to original presets from ingame settings.Proton 10: - D3D12 zero stutter. - D3D11 zero stutter, lower performance - Proton10 fixes bugs again which causes newly with Proton9: Game starts directly in fullscreen again. Ingame brightness, gamma, contrast settings are reconized again, doesn't need be adjusted with dgvoodoo color, brightness, gamma settings. source, author Dege: https://dege.freeweb.hu/dgVoodoo2/dgVoodoo2/ Latest versions of dgVoodoo2 refuses to work on linux, didnt have a closer look on which backend it fails. Downloadlinks for older versions are broken. Oldest working download on site is - dgVoodoo v2.82.2, which refuses to run. Latest versions what i found on my disc which work is: dgVoodoo2_81_3 Download dgVoodoo2_79_3.zip from: https://github.com/legluondunet/mlls-tools/tree/master/dgVoodoo2 Between 79.3 and 81.3 noticed no difference, so use this source Extract Archive. Copy dgVoodoo.conf and D3D9.dll from /MS/x86/ into KillingFloor System folder: steam/steam/steamapps/common/KillingFloor/System/ Start game, if it works you'll get no error msg (protection fault - setting resolution) and will have in right corner dgvoodoo watermark Close game again. open dgVoodoo.conf with editor from KillingFloor Systemfolder Section: [General] CenterAppWindow = false to CenterAppWindow = true Section: [DirectX] Remove watermark, edit: dgVoodooWatermark = true to dgVoodooWatermark = false increase VRAM, edit: VRAM = 256 to VRAM = 4096 (without increasing VRAM in conf, game will crash shortly after start, out of VRAM) CreateVertexBuffer failed(D3DERR_OUTOFVIDEOMEMORY). You can also copy dgVoodooCpl.exe from archive into KillingFloor System folder. Run this file with WINE and configure .conf with dgvoodoo GUI. edit:You need once run dgVoodooCpl.exe with wine and select the path even .exe file copied in system folder and run from there. Noticed it on different machine, while changing only .conf to d3d12 to force vkd3d, it was still translated through dxvk. Like still dgvoodoo running with preset for api "bestavailable" which is D3D11. default preselected output api is: best available one Recommendation using api: D3D12 (feature level 11.0) gives best performance dgVoodoo.conf section: [General] OutputAPI = d3d12_fl11_0 *no difference between D3D12 feature level 11.0 and 12.0 If wanna use D3D11, feature level 11.0 works best through D3D11 api's OutputAPI = d3d11_fl11_0 Performance/fps highest settings 1080p. Menu and testing spots on steamland, solo. Results on laptop: cpu amd 5600h, gpu amd 6600m API Menu High fps spot mid fps spot low fps spot Proton 7 DXVK 730 202 152 93 Proton7 dgvo D3D11 f-lvl 11.0 697 157 129 76 Proton7 dgvo D3D12 f-lvl 11.0 686 178 140 86 Proton9 dgvo D3D12 f-lvl 11.0 712 233 152 94 Windows 10 D3D9 681 220 164 94 Win10 dgvoodoo D3D12 756 237 175 101 Win10 dgvoodoo D3D11 846 192 143 88 *On win10 tested with latest dgvoodoo2 release. D3D12 feature level 12.0, huge performance boost compared to D3D12 feature level 11.0 avoid crashes, not dgvoodo specific: Delete the 6 Movie.bik files in .steam/steam/steamapps/common/KillingFloor/Movies/ Native vs. Proton vs. Win10 Comparison Performance: Native Build vs. Proton and Win10. Steamland on 3 different spots within map. High/Mid/Low-Performance Spots. Captured/tested in Solo-Mode duo reproducing results. While Native Build only with a resolution of 900p duo lack of performance. And disabled DrawDistanceLOD=0.0 [SDLDrv] Proton is captured with 1080p and higher graphical options. Proton and Win10 same options/tweaks. Disabled DrawDistanceLOD=0.0 [WinDrv] CPU: AMD Ryzen 3300X, GPU: ATI RX480 8GB Proton Version: GE-Proton 7-19 Launchcommand for Killing Floor in Steam: gamemoderun %command% -> All Cores are fulltime running at boost clock (Ryzen 3300X at 4,3 GHz) (Feral GameMode dependencies required) +% compared Native to Proton Performance Location High-Spot (+ in %) Mid-Spot (+ in %) Low-Spot (+ in %) Native Build OpenGL 237 FPS 67 FPS 43 FPS Proton OpenGL 401 FPS (= +69%) 146 FPS (= +118%) 117 FPS (= +172%) Win10 OpenGL 490FPS 182 FPS 124 FPS Proton Direct3D9 370 FPS (= +56%) 176 FPS (= +162%) 122 FPS (= +183%) Win10 Direct3D9 435 FPS 182 FPS 128 FPS (Screenshots outdated with fps count, older kernel+proton version, For Proton+Win10 Projectors were activated with results above) Linux Native Build:
使用OpenGL渲染的Proton

使用Direct3D9渲染的Proton
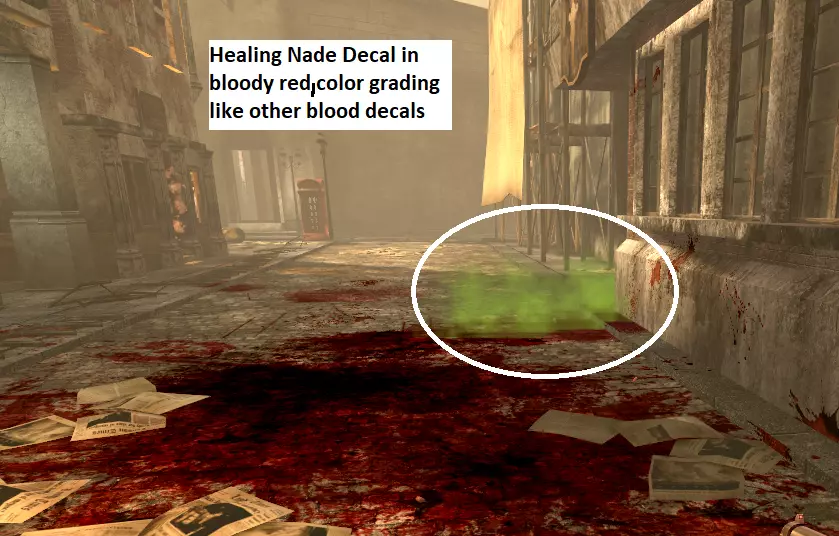
Proton - Crashes Fix Crash while in awaiting LobbyGame may crash with D3D9 while loading content of the annoying lobbyvideos. 引用自 Example: Build UT2004_Build_[2004-11-11_10.48] OS: Windows NT 6.2 (Build: 9200) CPU: AuthenticAMD Unknown processor @ 3800 MHz with 4095MB RAM Video: AMD RADV POLARIS10 (ACO) (65535) General protection fault! History: UTexture::Update <- FD3D9RenderInterface::HandleCombinedMaterial <- FD3D9RenderInterface::SetSimpleMaterial <- FD3D9RenderInterface::SetMaterial <- FCanvasUtil::Flush <- UCanvas::DrawTile <- UCanvas::DrawTileStretched <- UCanvas::execDrawTileStretched <- (LobbyMenu Package.LobbyMenu @ Function KFGUI.LobbyMenu.DrawPerk : 040F) <- UObject::ProcessEvent <- (LobbyMenu Package.LobbyMenu, Function KFGUI.LobbyMenu.DrawPerk) <- UObject::ProcessDelegate <- GUIPage::Draw <- (LobbyMenu Package.LobbyMenu) <- GUIController::NativePostRender <- UInteractionMaster::MasterProcessPostRender <- FPlayerSceneNode::Render <- UGameEngine::Draw <- UWindowsViewport::Repaint <- UWindowsClient::Tick <- ClientTick <- UGameEngine::Tick <- Level KF-Clandestine <- UpdateWorld <- MainLoop <- FMallocWindows::Free <- FMallocWindows::Realloc <- 726F6F6C 0 FArray <- FArray::Realloc <- 0*2 <- FMallocWindows::Free Delete the 6 Movie.bik files in .steam/steam/steamapps/common/KillingFloor/Movies/ No video is played anymore in awaitinglobby. Mouse Sensitivity, Misc & Keybinds The problem: Mouse sensitivity is much to high even in the configuration it is set to a low decimal value 0.** If you don't want to mess around with xinput/xorg.conf use the feature within the UT2004-Engine. Beside the standard sensitivity setting edit the entry for X/Y-Axes too. navigate to ... steamapps common KillingFloor System folder native: /home/USER/.killingfloor/System/ Open user.ini Edit: MouseX=Count bXAxis | Axis aMouseX Speed=2.0 MouseY=Count bYAxis | Axis aMouseY Speed=2.0 to MouseX=Count bXAxis | Axis aMouseX Speed=1.0 MouseY=Count bYAxis | Axis aMouseY Speed=1.0 This will slow down your sensitivity enough, so you can increase the standard value of the sensitivity again. For your perfect ingame experience/aiming you can also set a different value to the x/y-Axes. Note: Changing MouseX/Y=Count in user.ini does not affect the menu-sensitivity only the ingame sens. Changing fontsize in ingame-serverbrowserFontsize in serverbrowser does not scale with resolution like other fonts do. Depending on ingame resolution and monitor, fonts can be very small. navigate to ... steamapps common KillingFloor System open GUI2K4.int search for section: [fntUT2k4ServerList] change font size via editing number after Vr, standard is 8 FontArrayNames=("ROFonts.ROBtsrmVr8") for example font size 18 FontArrayNames=("ROFonts.ROBtsrmVr18") save file example screenshot with 1920x1080 https://steamcommunity.com/sharedfiles/filedetails/?id=3161031610 Increase DecalStaytimeIncrease time of blood and weapon decals before they disappear. Disadvantage: Affects decal of healing nades too and explosion decals. On closed maps like bioticslab, explosion decals looks ugly if stay to long. *healing nade decal can be modified in bloody red, that you won't see ugly green decal on floor, screenshot beneath. Requirements: Decals and Projectors must be set to true/activated in graphic options. If you're on OpenGL-Render, projectors has no effect, so there won't be any decals. open killingfloor.ini navigate to section: [Engine.LevelInfo] look for entry: DecalStayScale=2.000000 change it to value you prefer, example 10: DecalStayScale=10.000000 Two example screenhots how bloody it can look: https://steamcommunity.com/sharedfiles/filedetails/?id=2886429044 https://steamcommunity.com/sharedfiles/filedetails/?id=2877011701 Info for binding WinDrv: Keybinds ingame editing WinDrv.WindowsClient should not be used. Triggers something ingame to blacklist client - no perkprogression/achievements during session. After mapchange/leaving perks only as lv0 available, game has to be restarted. Disable/Enable Projectors via keybind Disable/enable Projectors via keybind in user.ini. No need to switch into graphic options to turn on/off. Enable: KEY=set WinDrv.WindowsClient Projectors True Disable: KEY=set WinDrv.WindowsClient Projectors False Disable/Enable DynamicLighting via keybind Disable/enable DynamicLighting via keybind in user.ini. No need to switch into graphic options to turn on/off. Enable: KEY=set WinDrv.WindowsClient NoDynamicLights False Disable: KEY=set WinDrv.WindowsClient NoDynamicLights True Adjust Gamma comfy ingame Some Maps/Areas are lot darker. Adjust/Swtich Gamma via keybind comfy ingame. Bind one Key with your standard value and another with higher one. Example: KEY=set WinDrv.WindowsClient Gamma 1.710000 KEY=set WinDrv.WindowsClient Gamma 2.100000 Can be the same way binded with Brightness and Contrast, one is enough to dumpen up. Fast join ServerIP(This does of course not work if someone creates server without port forwarding, like topics "can't join friends game") Feature within steam, pressing join button as known for kf does not work proper. Get server ip you wanna join: from buddy via chat, friends list via game info, from profil via copy link address from "Join Game" to get IP. Valve/Tripewire could fix it in 5 min. actual launch command "Join Game": steam://connect/255.255.255.255:7705 Need launch command: steam://run/1250/255.255.255.255:7705 *255.255.255.255:7705 fictional IP startparameter need to be replaced from: steam://connect/ to steam://run/1250/ Casual way is to start Killing Floor, open console and type: open serverip Or navigate to server browser and add serverip to favorites, than join it. Faster ways: (edit 255.255.255.255:7705 with real server ip) Option 1: Use killing floor desktop icon Select properties, default entry: steam://rungameid/1250 just edit it with copied IPaddress: steam://run/1250/255.255.255.255:7705 Option 2: Open windows start menu. In search bar, type: run steam://run/1250/255.255.255.255:7705 Option 3: create .bat file: @echo off set /p server_ip="Enter the server IP: " start "" "steam://run/1250/%server_ip%" run .bat, cmd will open and paste ip adress. Option 4: in steamoverlay rightclick Killing Floor. Select Properties. Section General. Launch Options: Paste IP Address: 255.255.255.255:7705 Launch game via steamoverlay (Do not forget to remove entry in launch options after closing kf, or you are addicted to specific server) More Bloody Gore Modification More more blood Downloadlink:https://gamebanana.com/mods/640178 Files modded clientside which works same way online without mismatch error. Whitelisted, Perkprogression/Achievements still working. Make sure Projectors and Decals are activated in InGame DirectX Rendering Options. Does not work with OpenGL, Projectors no feature of OpenGL Render. Paste .utx you wanna use into folder: ... steamapps common KillingFloor Textures For best bloody experience change time of decalstay to higher value, for example 10 this increases the staytime of blooddecals. edit killingfloor.ini located in: ... steamapps common KillingFloor System [Engine.LevelInfo] DecalStayScale=10.000000 use texture/modification what you want, you do not need to replace all of them. original files in archive as backup. -------------------------------------------------------------------------------- Descriptions: Efects_Tex_Blood_and_Colorgrading_v3: Effects_Tex.utx #Replaced splatter004.tga fully duo sh!tty look, others little more blood and some darker colorgrading KF_trip_fx_HealingNade_BloodyRed_v2: kf_fx_trip_t.utx #Changes floor decal from green to bloody red. #Green smoke is not affected, can't be modded clientside. Green is set via colorscaling using standard smoke texure. #KFNadeHealing.uc #ColorScale(0)=(Color=(G=255,R=128,A=255)) #Green smoke staytime is not affected by increasing DecalStayScale KFX_MoreMoreBlood_v2.2: KFX.utx #Edited blooddecals (.dds) with more blood and some in colorgrading. MBR_Blue_Laser: kf_fx_trip_t.utx, KF_Weapons2_Trip_T.utx #Change red laser from MBR to brighten blue MBR_Blue_Laser+HealingNadeBloodyRedv2: kf_fx_trip_t.utx, KF_Weapons2_Trip_T.utx #Change red laser from MBR to brighten blue and HealingNade in BloodyRedv2, same use of kf_fx_trip_t.utx
血腥近战武器纹理 替换所有标准近战武器纹理为血腥版本。 -无需先击中僵尸即可呈现血腥的标准近战纹理。 附带组合修复功能的黄金武士刀,确保正常使用。 客户端修改,支持联机,已加入白名单。 为节省空间,压缩包未包含原始文件,请自行备份。 将你想要使用的.utx文件复制到纹理文件夹中。Steam steamapps common KillingFloor Textures 过热的笔记本电脑 使用非游戏笔记本电脑时,由于散热方案未优化,系统可能会因过热而关机。这是因为CPU会被长时间限制在99%的使用率,并运行在睿频模式下。 通过一行命令禁用CPU睿频。 创建扩展名为.sh的文件。 #!/bin/bash echo 0 | sudo tee /sys/devices/system/cpu/cpufreq/boost 在终端中运行该文件。输入系统密码后,CPU睿频将被禁用。 其他测试/未来测试 仅作记录,不深入细节 Gallium Nine D3D9+AMD+MesaGallium Nine是最快的Wine DirectX 9后端,与DXVK和Wine内置的wined3d DirectX 9转OpenGL转换层相比,其渲染路径更短。 wined3d DirectX 9渲染路径为:Direct3D 9 ▸ OpenGL ▸ Mesa的Gallium硬件状态追踪器 ▸ GPU硬件。 Gallium Nine将其简化为:Direct3D 9 ▸ Mesa的Gallium硬件状态追踪器 ▸ GPU硬件。 曾尝试多种方式,包括独立版、旧版支持的Proton版本、覆盖设置等,但均未能成功运行,也未深入查看输出日志。无论如何,未来Mesa将增强Gallium Nine的性能。netborg-afps:dxvk:2023_06_fixing_ut2004_stutters 引用自 netborg-afps: 由于我之前的修改让我确信,将一些变量移至着色器后,游戏实际上在很大程度上可以消除卡顿,因此上周我进行了真正的修复。如果有人想通过dxvk玩《虚幻竞技场2004》或任何虚幻引擎2游戏,可在此处获取该修复: 不过该修复的缺点是顶点着色器的编译时间大约增加了一倍,因此对所有游戏都有效的唯一真正解决方案是使用无需在运行时编译的单一超级着色器。 已编译,测试过一次,无法运行,未深入查看输出。 DXVK_ASYNC与D3D9和卡顿没有区别。DXVK_ASYNC=1 %command% dxvk.conf dxvk.enableAsync = true 最新的GE版本附带异步功能7-44,其他来源包括Sporif/dxvk-async和Ph42oN/dxvk-gplasync NTSYNC已激活,对于这款游戏,在D3D9模式下NTSYNC没有效果且会导致卡顿。 此内容仅作为7月25日中旬的记录,需手动检查/激活。使用更新的内核和Proton版本时,NTSYNC可能会/将会自动激活。检查/输出是否禁用ntsync:PROTON_USE_NTSYNC=1 %command% ProtonFixes[16738] 信息:未找到《杀戮空间》(1250)的全局protonfix 无法打开/dev/ntsync:没有该文件或目录 # 默认设置下不可用 $ ls -l /dev/ntsync ls: 无法访问'/dev/ntsync':没有该文件或目录 # 在系统运行时加载模块 $ sudo modprobe ntsync # 停用ntsync内核 $ sudo modprobe -r ntsync # 加载模块后,所需设备可用 $ ls -l /dev/ntsync crw-rw-rw- 1 root root 10, 123 7月 10日 22:45 /dev/ntsync # 或检查ntsync是否已激活: lsmod | grep ntsync # lsmod显示已激活的模块 # 每次重启时自动加载 $ echo ntsync | sudo tee /etc/modules-load.d/ntsync.配置 --------------------------------------------- #禁用内核中的ntsync sudo rm /etc/modules-load.d/ntsync.conf