换一换
换一换 


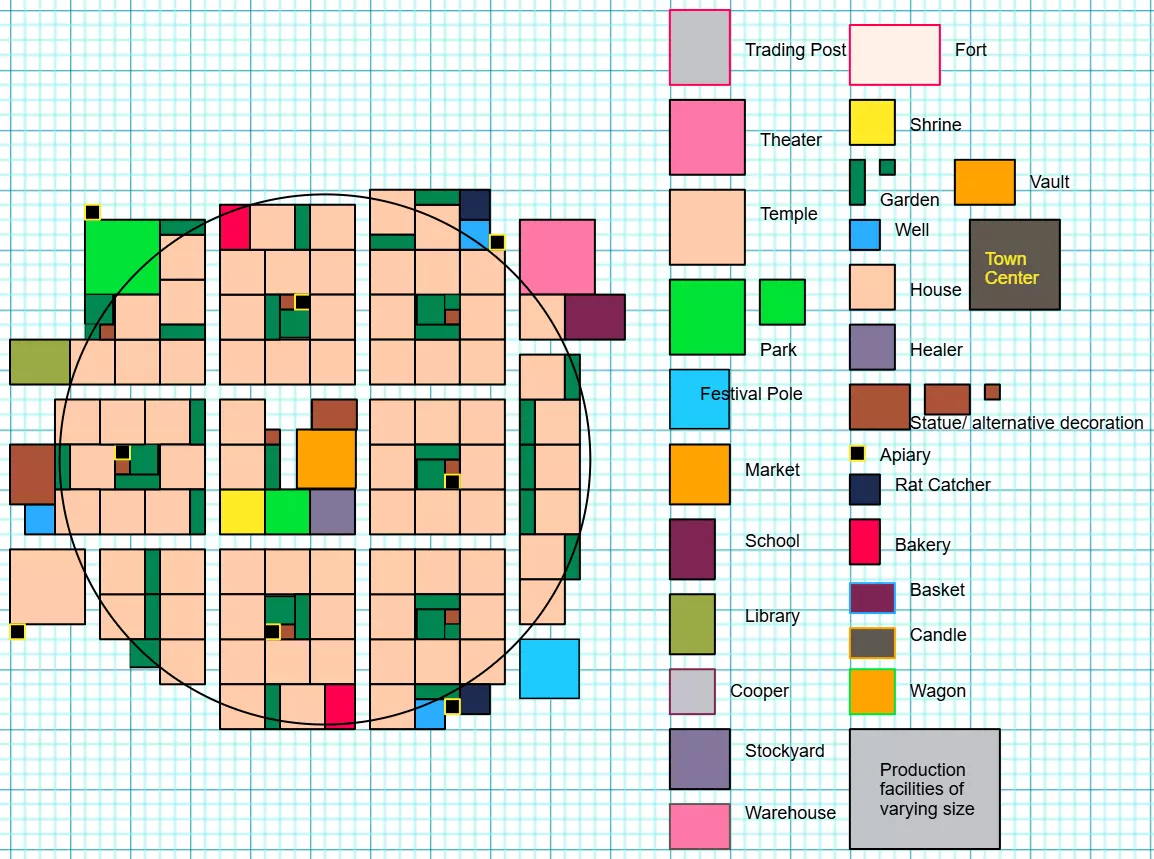
一份全面详细的建筑布局与科技树优化指南。 单市场住宅区布局 以下是住宅区布局,以单个市场为中心规划,为其范围内的住宅提供加成并配送生活物资。 设计目标是打造易于建造的道路系统,包含足够数量的住宅,并配备“所需”的短程装饰,以便顺利升级到4级城镇中心(旧版本中400人口要求是关键限制因素)。 幸运的是,新的2级市场配送范围扩大了3格,相当于增加了整整一层住宅。此布局具体包含75栋住宅(若要达到400人口,在旧版本中至少需要67栋住宅,且其中除2栋外均需升级到3级)。如果你想尝试和实验的话,是可以再塞进大约5个甚至更多房屋的,尤其是在不考虑道路的情况下。作为参考,我也必须兼顾简单性,这样才更容易理解。
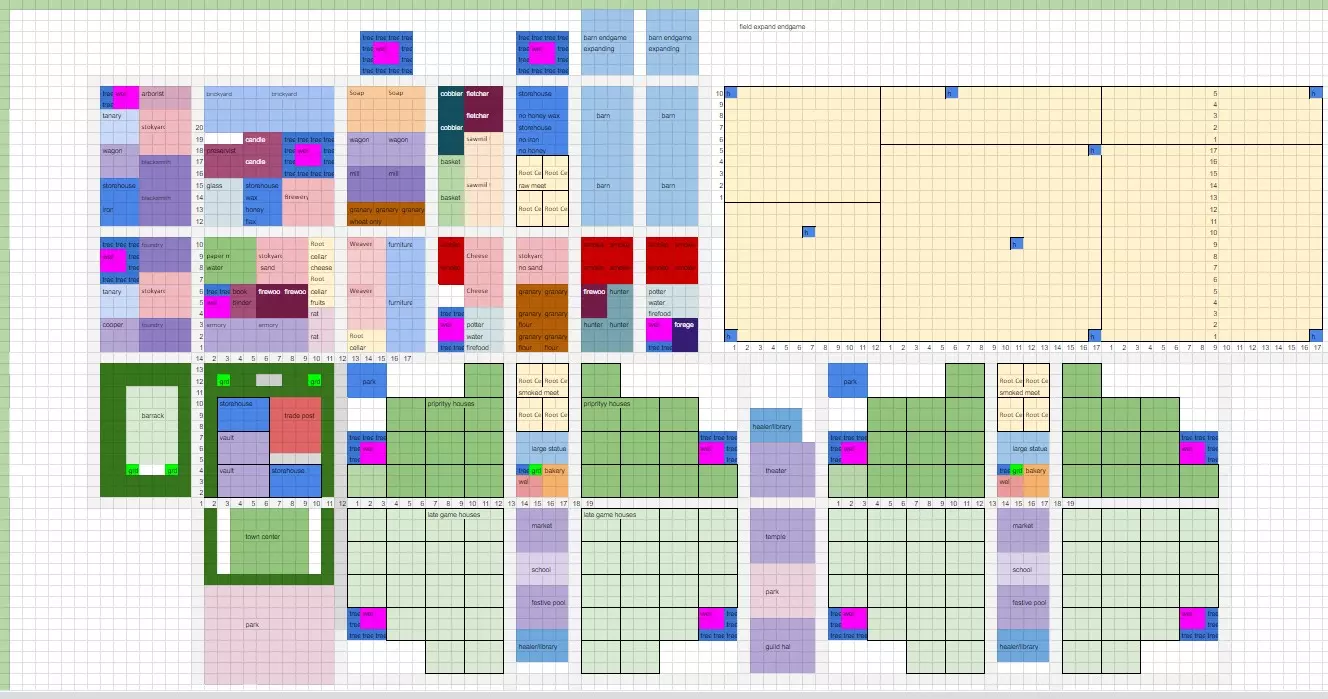
双市场住宅布局与生产核心 这是一个针对大规模最终人口的规划(请考虑加工限制!)。 该规划还包含了游戏内的大部分生产设施,其布局经过优化,甚至可支持多层加工。 规划中包含2组63户住宅(主要限制因素是剧院的125人容量——总会有人无法获得娱乐!)。 除此之外,基本原则保持不变,你可以尽情尝试。我最初在每侧成功安置了74户住宅,因此有足够空间容纳更多人口。
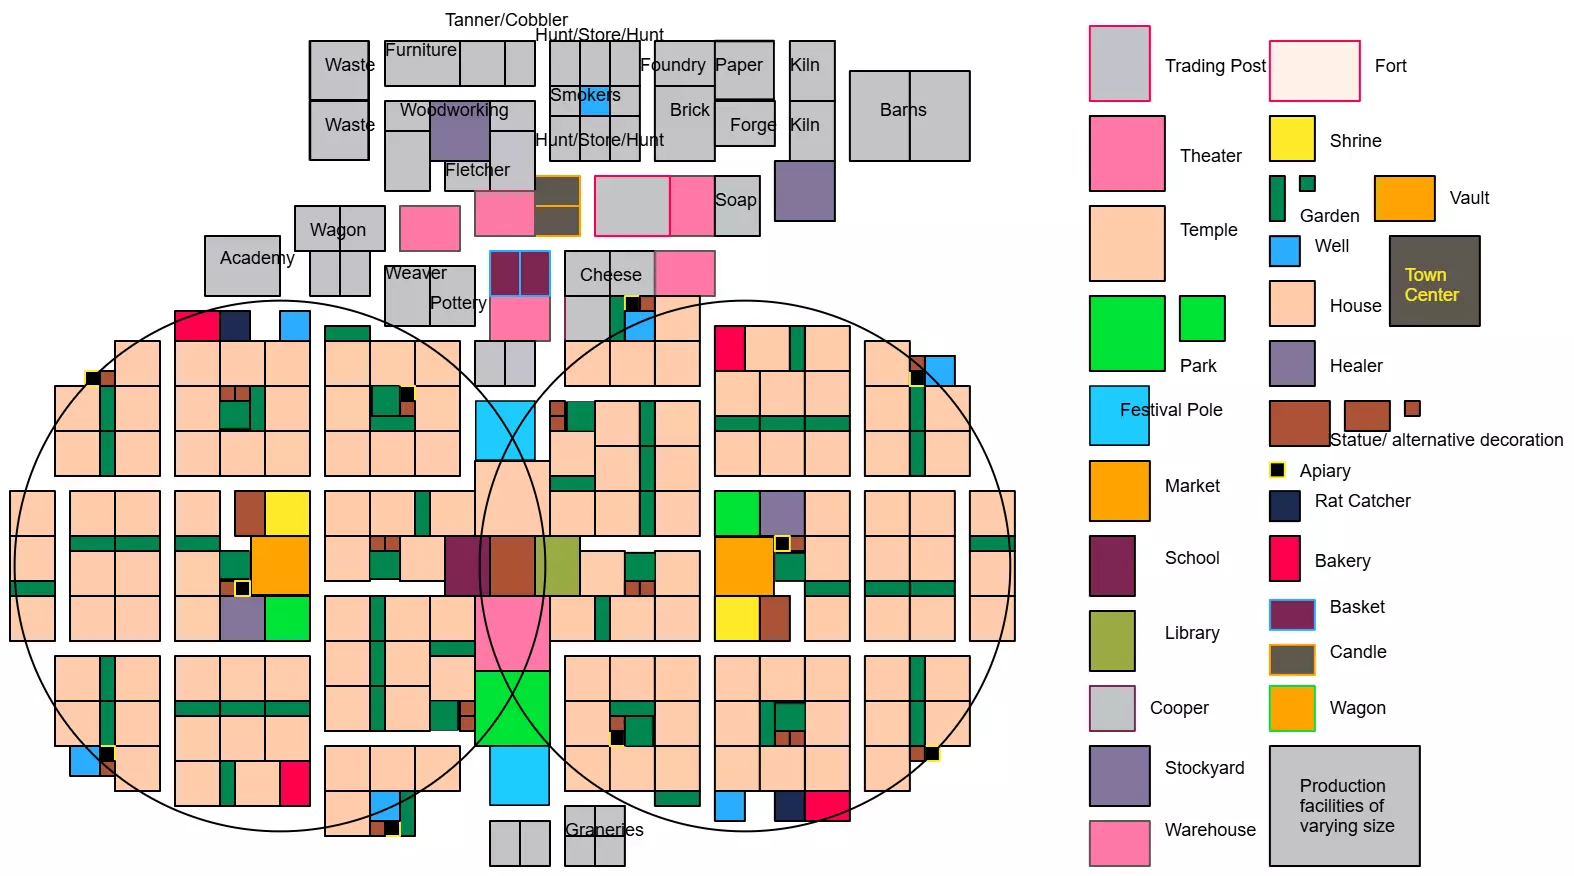
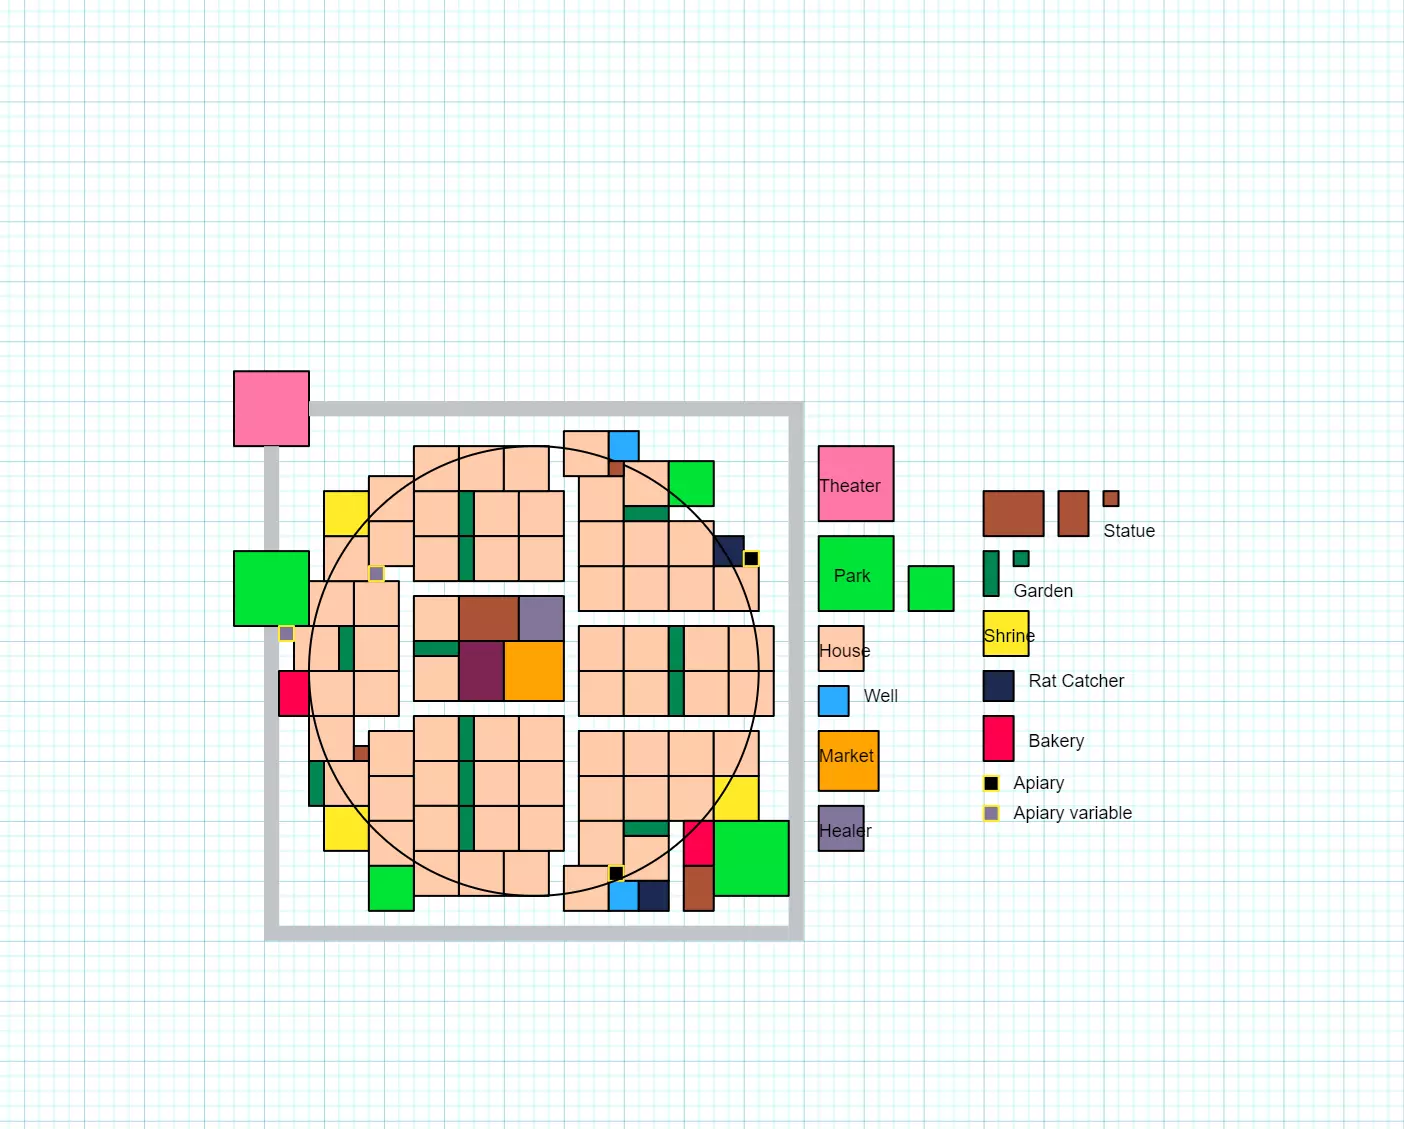
The Production Core's smaller nodes can be separeted well enough, if you have a more limited space to set up your base, the main thing to watch out for in relocation plans, to have 9+ tiles space for the sawmill and similar buildings (the Compost Yard is 11+ tiles - people seems to dislike the smell of sh*t more, than loud noises). Research Tree Absolute first pick: Natural Philosophy Affects the whole game, after ~4-5 research point, you're net positive already Resource techs are a high priority to improve gathering speed, so Stonecutting and Silvaculture are a high priority too. I'm not sure what's wrong with the townsfolk, but they're snorting clay and bricks, so start Mining through Stonecutting as soon as your population numbers allow at least 1 full clay deposit to be operational. Also high priority to unlock Market Forces through Taxation, after the key resources. Food wasn't that big of an issue for me, so outside of unlocking barns with Animal Husbandry, so you can slowly breed them, when you need them, there's no need to rush food techs in the first 10-15 points. Only unlock Healer's Home through Nursing, if you have the income to support it or for some reason, you have significantly moret, han 2-3 sick people at a time.or they start to die from sickness. When you're at tier 2 town center and stabilized the growth, look for Forging and Smithing through Production Logistics and Production Management, and look for an Iron source. Around this point, start looking for Forestry, so you can upgrade the Work Camps and replant trees, so you don't have to micromanage them anymore. Once you've built an Academy, Scientific Method is the same as Natural Philosophy, simply a must have. Paper Press is also a great single point investment, although the building is quite expensive, a single worker can provide enough paper to sustain the Academy indefinitely. It's roughly a 30% research time cut, if they have paper available at the Academy. The other Researches are not too crucial inthe city development. Around 200+ pop, you should start investing into food techs, but I haven't entered Grains even with 400+ pop. These techs are more map dependent, on how early you should invest into them. Personal Pick order: T1 - Natural Philosophy, Stonecutting, Production Logistics, 2x Taxation T2 - Mines, Market Forces, Nursing, Production Management, Forging, Smithing; Forestry, Animal Husbandry, Farming startup T3 - Quarry, Woodworking, Trade Center, Convenience tax, Wagon upgrades, Heavy science T4 - Heavy weapon production, then slowly grind out Citadells General Gameplay Early Game: Although it's dependent on the map, I'm personally opening up with 2-3 hunters all the time for food and 1 forager. After rushing Fletchery, I'm going up to 4-6 (depending on ow many hunts are close) hunters, but after that, I'm often adding on fishermans and 2-3 foragers (also depends on the area). Farm management:I'm using 5x15 plots (first build 5x7 or 8, but not longer, then expand to the required direction by 7 or 8 tiles - important note, that you need to expand at least 7 tiles or you'll get the error of 'too small'). Based on my experience, it was enough to employ 3/8 workers on the fields. 3 5x15 plots makes it easy to create the rotations. My preffered setup for slowgrowing fertility from the very start as a set and forget: (other version is to set Maintenance; 2x Clover for 3-4 years, then start using the fields properly) Flax-Hay setup: - Maintenance; Hay - Clover; Flax - Pea; Clover; Turnip Flax only setup: - Maintenance; Flax - Turnip; Clover; Turnip - Pea; Clover; Turnip Animal feeding (Hay only) setup: - Maintenance; Hay - Turnip; Clover; Turnip - Pea; Clover; Turnip So you get a bit more Turnip if you break them up on 2 separate fields - good when you grew 500+ pop. Lategame Grain setup: - Maintenance; Hay - Clover; Wheat - Vlover; Clover; Turnip Naturally, there are other good setups, like a year of /Carrot; Beans/ or so, but these are working well for me. Woodcutting: After the storages are filled, you only need 1 Forester Camp (upgraded Work Camp) to sustain the need for firewood and other wood requirements for ~400 pop. Mining: The claysnorters must be appeased, so Mining is a tech rush for me personally, but can be delayed 2-3 picks after unlocking the potential to get mines. I was not able to generate enough clay to get any surplus until I've employed 3 full clay deposits and same goes for bricks with 2 Brickyards. And this is also after the settlement is already at tier 3 mostly. Before that, even these won't be able to mine enough for those maniacs. Around 10-12 iron miners are enough for the fully employed Foundry and Forge (only tools and heavy tools, but with clear surplus production). 2 Charcoal kilns are great to have, just set up 2 Firewood Splitters early. Storage Management: In general, I'm mainly specializing one Stockyard for building materials, and the other for ores and heating materials. The Storehouses are harder to set up, I like to use one for Hay around the grazing areas, the others are as you can see, in between the production and the residential area for optimized logistics and they store whatever production is close by and the required materials. Important note, it's good to have a full Storehouse for arrows in the lategame just to be safe, if you plan to go survival mode, they'll start chewing through arrows like candy. Defenses: Don't bother too much with it, just get crossbows and constant supply of fur for the Tannery. Hide coated hunters are perfect for the first 2-3 raids. 4-6 hunters can easily kill up to 20-30 raiders without loss, maybe ~50 with good micro and expectable loss of a few. Around 10-15 years, you'll start to get raided a bit more heavily, I'm still fine with 12 archers from a Fort or two. 12-24 archers (with crossbows) are doing fine (with obvious losses expected against 40-60+ raiders), but I had no problems defending with slowly built up archer-only forces before jumping to the heavy infantry teck. Don't even bother with Horses outside of roleplay, they're too expensive for what they provide. You can get 6 archers for the cost of a single Lancer... guess which one is more Valuable, but 2 Heavy infantry is also significantly more useful. They're definitely not bad and it might just be my playstyle, but 1,5 extra fully employed Citadell with 12-12 split seems better, than 12 Lancers (or alternatively, 3 full archer eployed citadells). Relics:I found the best setup to be: - Coin purse (a must for late game army) (20% upkeep cost reduction) - Ashes of the Martyr (25% extra HP) - Markovian's Blade (15% Soldier and Guard damage) Tusk and Eye of the Hunter might also be great alternatives, especially Eye replaced for Blade, but I'm not sure about the effects - haven't datamined anything - Markovian's, based on the wording, might be the same bonus as the Eye for the army, since it says all soldiers, so it should also affect archers. If not, then naturally the Eye is probably better. Lategame transition and setups: Important notes for lategame preparation (T4-T5 homes): - Get food production surplus and ~12-18 months of storage capacity, so you have a buffer. - Prepare fields preemtively! - Buy Food if you fall under 6 month even with the preparations The jumps are quick and brutal in terms of food drain and say goodbye to your planks, bricks, and glass at T5 during the transitions. From 450 to 600 will be the most intense if you we just geting by with food, but it's managable. (Still, don't underestimate the 600-750 transition either.) Triple Turnip + some extra rotations are realy good for burst food productions, you can even sacrifice some fertility to get extra if you've miscalculated something. Once you max out T5 population: Woodworking: 2 Foresters, 2 Sawmills and 2 Firewood Splitters are needed to keep up with the material burns, fortunately 1 Furniture Workshop is more than enough. Food: - 3 T2 Barns (6-6 handlers); 4 Chicken Coops (2-2 handlers) - (for T2 Bakery pastry massings egg requirements) - 2 Cheesemakers with 3-3 people employed were able to use all the milk from the 3 Barns - 2 sets of Wheat fields were enough for me to provide flour for 4 Bakeries at max capacity; they need 3-4 Windmills too - Glass Recycling is crazy, once you unlock that, and set up a Guild Hall for Miners Guild, you will only need 1 full Deep sand mine and 8 people in the Glassmaker to provide a surplus of Glasses for everything in the town, including a fully employed Preserver and Apothecary - Little space management trick for Barns and fruits: use 16x16 fields instead of 15x15 and put an Arborist inside, use the grazing area for fruit trees too, they fit perfectly; same goes with the 4 grazing areas for the chickens - Honey... well, just spam those, Medicine and Pastry will burn it all, don't expect a too large surplus of it once you start using it Industry: - 1 Deep mine were enough in most cases... except Gold - Paper is fine, after you've built up your reserves and you're only refreshing used up books; 1-2 fields on Flax are more than enough to keep up with clothing and everything - Although I'm only using 4 Hunters on top of the Barns, Pelts are a bit scarce, soyou might want some trap-heavy hunters to get more pelts, maybe goats (haven't tried them), but it's managable with 2 Cobblers and 1 Tannery with some occasional trader extra - 1 full Soap is also producing significant surplus if materials are provided for continuous work - 4/8 Pottery is already producing surplus, so you won't need more than that, unless you want to also bump up clay miners to sell it to traders - For all the iron and gold incoming from the mines, I'm using 3 smelters; 2 for iron only and 1 for iron-gold at 1-1 ratio So at the moment with not too much surplus, 1 full deep iron, 1 full deep sand and 1 full deep coal were doing fine; 4/16 quarry and 8/16 Clay also seems to be fine, after heavy building phase is finished, but I like to keep around 2 Brickyards, because they work slow :/ This setup is able to field 4-5 full Barracks with 12-12 archer-heavy infantry setup, but it needs trader gold income occasionally, since the gold-flow otherwise slightly negative. I personally get so much gold, that I'm often paying the attackers if it's an option, just to get rid of it. Building capacity info In case you want to expand the cores, here are some info about the building limitations. I haven't tested if the Temple and Altar are providing the same or not (they provide spirituality). Library - 100 Residences Temple (T1) / Grand Temple (T2) - 100 / 120 Residences Theatre (T1) - 125 Residences Festival Pole (T1) / Paved Festival Pole (T2) - 80 / 100 Residences Shrine (T1) / Altar (T2) - 18 / 18 Residences Storehouse (T1) / Warehouse (T2) - 2000 / 4000 unit capacity Stockyard (T1) / Large Stockyard (T2) - 1500 / 3000 unit capacity Root Cellar (T1) / Brick Root Cellar (T2) - 1500 / 2500 unit capacity Market-centered large module <> Old baseplan, concept remains valid <> This is a rotateable module (around the theater, but can be redesigned for solo-use for smaller scale settlements too just by using the additional areas inside the / gray / lines, but naturally those are just guides. The goal of this layout was to squeeze in the absolute maximum number of houses around a single market, school and healer. (which is 65 homes) There is a lot of 'spare' area around the corners, where you can fit in any neutral facilities or even forts as you like. In a rotated module use, the 4 sections support each other with the bakeries and other decorations/ facilities. In a singular use, you should build a 3rd well and bakery roughly in a triangulated form around the houses to cover the whole. NOTE: 2 Rat Catchers can't cover all the houses, you need a 3rd one in singular use and even in the rotated modul version, there might be issues, so you'll either need a 3rd one or just micromanage a single one in case of a rat infestation :)