换一换
换一换 


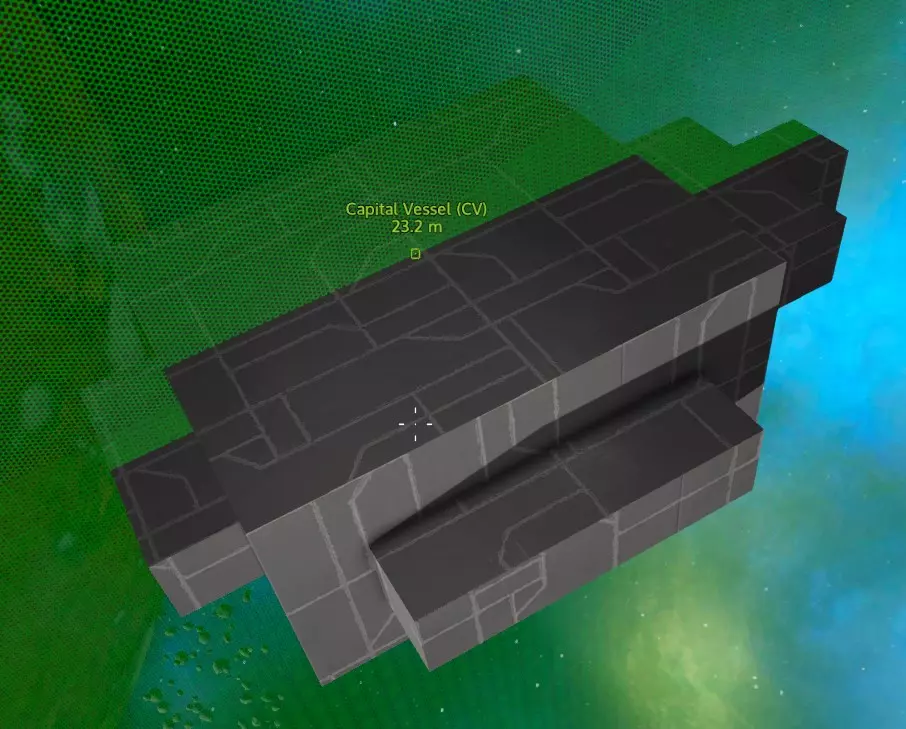
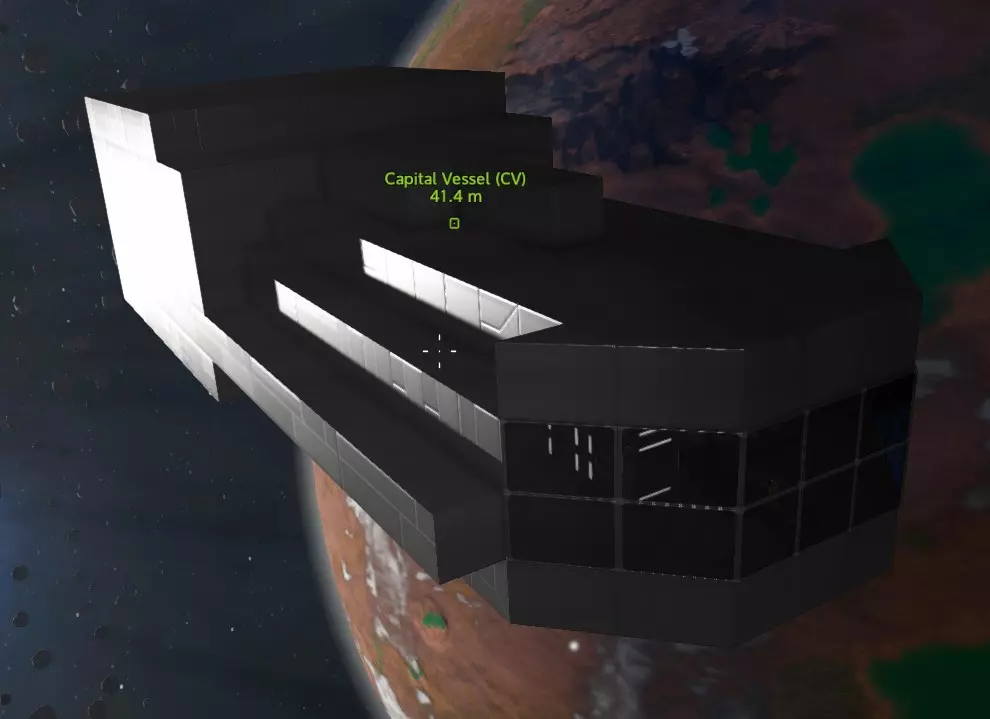
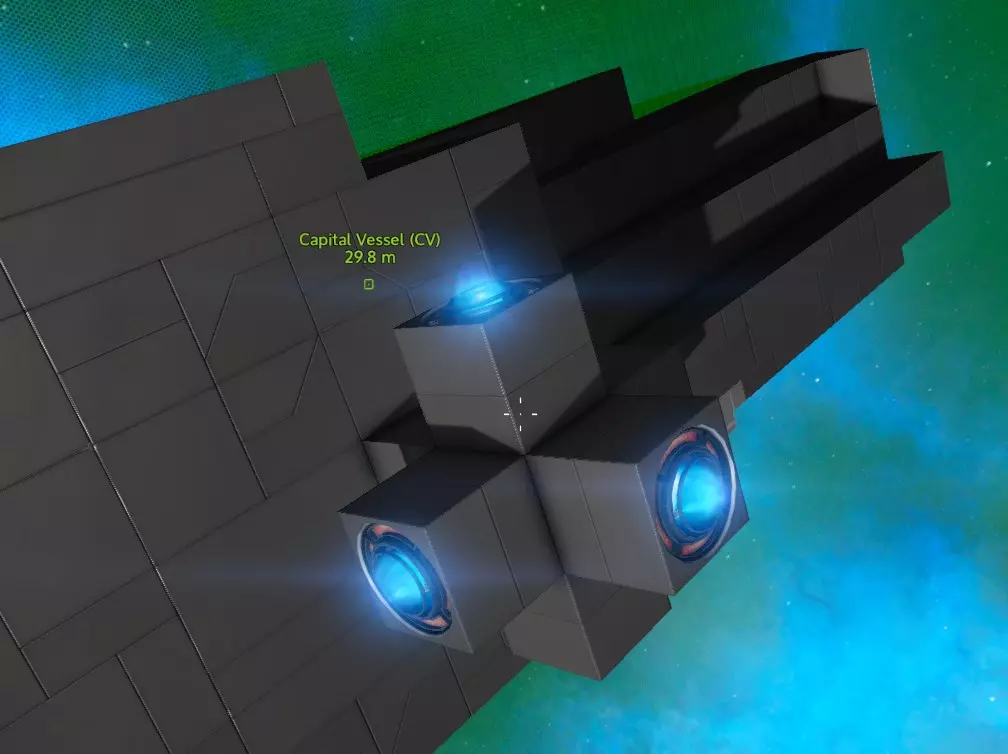
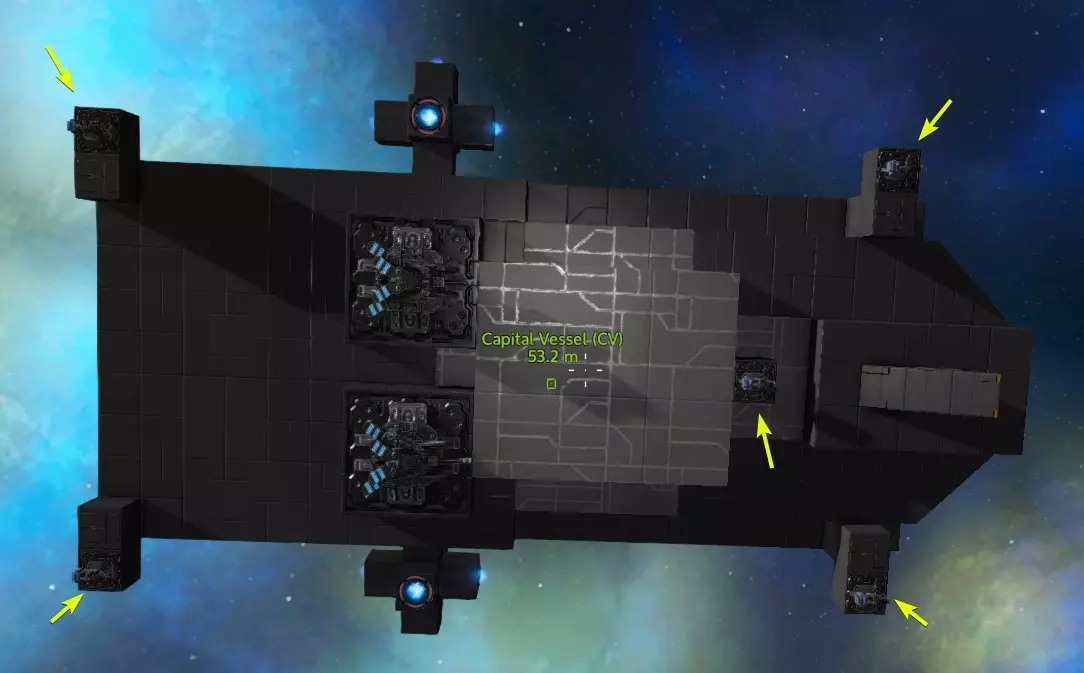
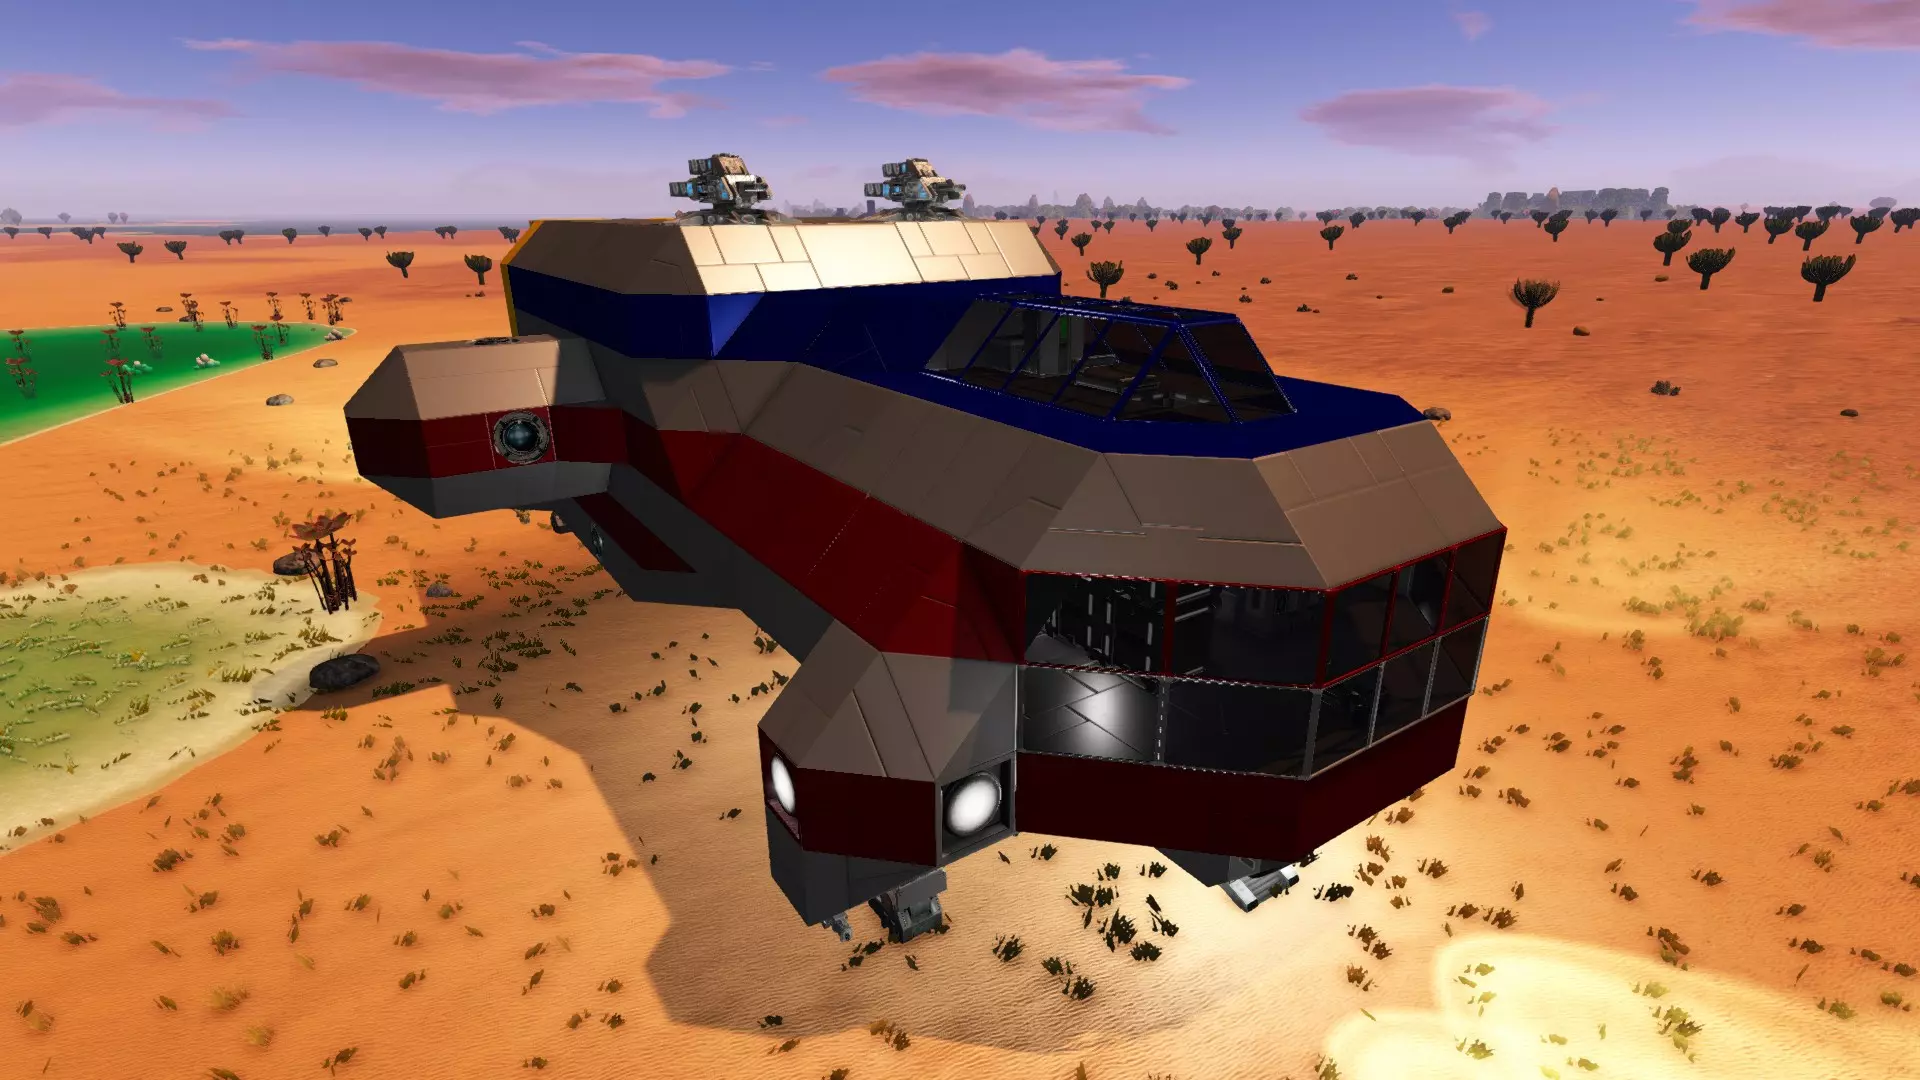
Want to build a CV (Capital Vessel) so you can have a flying base but aren't sure how to start and don't want to waste all your materails? Sure you could subscribe to a workshop blueprint for a small starter CV, but you want to do this yourself. Well, just read this. It's not that hard especially with this walkthrough. I made this because the other guides I can find are out of date and/or not that good. I don't consider myself an expert or a ship artist but I know enough to get the basic functions online and have done some testing. This will tell you what you need to know to get the functional skeleton of a difficult-for-NPCs-to-kill CV built. It's up to you to make it look good on the outside and come up with a nice efficient layout on the inside. Version note: This is current as of A9 but some new A10 features like shields aren't covered yet. What is covered is still valid though. How to build a CV There are two ways to do it. One is safer and less trouble but not so much in the survival mode spirit, and the other is really not much harder but keeps you in survival mode the whole time. Build the stuff you need, then fly into space and build your CV. Exit from your survival mode game, create a "scratchpad" creative mode game, go into that, build your CV there, and save the blueprint. Then go back to your survival mode game and build the blueprint with the factory. I'm going to recommend that you just do this in survival mode the first time because it really isn't that hard especially with a walkthrough like this. Blueprint Option If you do want to use this option, here's what you need to know. As previously mentioned, start a creative mode game. Hit H to bring up the item selection screen and select your items. You'll also want a T2 multitool, a color and texture tool, fuel and oxygen. Build as described below. Once done, point at the CV and hit Alt-O then save as a blueprint. Other than that, it's just a matter of going back to survival mode and obtaining the needed ore to build the blueprint. Pure Survival Option This is what I recommend and it isn't that difficult. What you need: Build a base. If you haven't built a base yet, that's pretty much required so you can use the large constructor to build the blocks you need. So make sure you have your base going. Your base can be in space if you want. Build a SV (small vessel) first. You'll need one to fly into orbit. You can build a CV on the ground, but it's more difficult for various reasons. You could build yourself a column on a base and put the starter block on top of it, but it gets to be harder to add to the bottom and top (due to limited drone range). So I'm just recommending doing this in space where these headaches don't exist. You're going to want a SV anyway if you don't already have one. Even the lowest tier required parts will require Cobalt, Neodymium, and Sathium. So either use your warp-capable SV to warp to a planet with these ores, or get them from POIs and deconstructing stuff (takes much longer usually). You may want some Erestum and Zascosium to build the T2 RCS and other stuff like the T2 repair bay or repair station but it's not strictly required. You will absolutely need an EVA Boost to fly around in orbit by yourself. Without one you will freeze to death. If you don't have one (typically you will have found one by now as loot) then fly to the trading station in orbit around the starter planet, or any trading station really, buy yourself a gold ingot, and craft one. Better yet, buy more gold ingots, craft several, and sell the extras to the traders to make some money. But what it comes down to is you need an EVA Boost equipped. Even if you use your drone while standing in the warm doorway of your ship, the drone range is too limited so you'll need to move around and this will become more trouble than it's worth without an EVA Boost. You'll also need to be high enough level to unlock at least the most basic CV blocks, so make sure you have at least the lowest level fuel tanks, cockpit, RCS, thrusters, etc, unlocked. If you're not high enough level or don't have the unlock points yet then just set this aside for a while until you do. (Tip: kill wildlife with a HV and the wood harvester to get some easy and safe XP early on.) Checklist of Required Parts Once you've met those requirements, here's an approximate inventory of what you need to craft before heading into orbit in your SV:
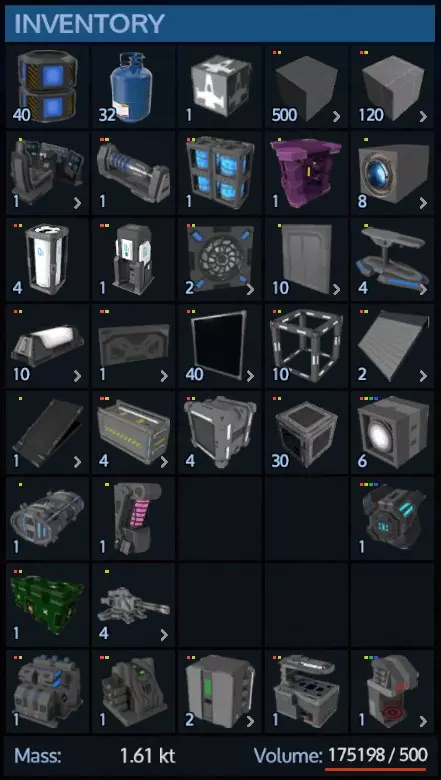
First make sure you build the CV versions of these blocks and not the SV versions or you will get to orbit and be disappointed when you can't use them. Fuel: 40 Large Fuel Packs, 20 Fusion Cells, or 200 Small Fuel Packs minimum. This is enough to fill a 6000 capacity T3 fuel tank or equivalent. This is a decent safe amount of fuel. Oxygen: 32 O2 Bottles minimum, which is enough to fill four large O2 tanks (8000 capacity). CV Starter Block: obviously required and you only need one. In Alpha 8 it comes with a cockpit so no need to build one. In Alpha 9 you don't get a cockpit with the starter block so build a cockpit. Steel Blocks L: I would build about 500 of them to start out. You don't really need the Hardened Steel ones for your basic building block. Just start with minimum 400 but ideally 500 regular steel large blocks. Combat Steel Blocks L: Build about 120 of these, minimum 100. You need this many to cover a 3x4x1 area with two layers on four sides, one on the top, one on the bottom, and some in the edges. Then you want a few blocks to protect the cockpit and other stuff. CV COCKPIT: For Alpha 8 it is included in the starter block. For Alpha 9 it no longer comes on the starter block so build one in Alpha 9! T1 Large Generator: you can use two small ones for now if you want, but that will be too little power to operate the T2 repair bay which you will want to use as soon as you can. Only the smallest ships will be OK with one small generator so I'd recommend a miminum of two if not the large T1. You do not need the large T2! That's a carrier/dreadnaught/titan-sized generator and it is BIG. Fuel Tank(s): Minimum 1 x T3 tank, 2 x T2, or 4 x T1 tanks. The T3 can hold 6000 fuel, and four voxels worth of the others can hold almost that much (you get slight capacity bonus with the T3). RCS: Build ONE T2 RCS if you can. These are very strong so one will be enough. If you can't build the T2 version yet then build 2-3 of the regular T1 version. Thrusters: Recommended minimum is 16 Thruster S or 8 Thruster M. The Small ones will allow finer grained control of thrust and fuel consumption. O2 tanks: Mnimum 2 x Large O2 Tank, Recommended 4 x Large O2 Tank. These are pretty cheap and don't use that much space. Oxygen station: this is pretty important especially if you lose O2 pressure due to damage so build one. Landing Gears: 4 should be enough. Regular unarmored doors: just make 10. Ventilators: minimum 2. I only use one in the example because the interior is small and is one big air-sharing area. But I say minimum 2 in case you start getting creative, 4 is probably the most you'll need unless you start building very big or elaborate. Lights: again just make 10 or so. Windows L: up to you but I'm going to say minimum 20, 40 recommended, more if you want to build glassy stuff. Note that for PvE you don't absolutely need armored windows as NPCs don't seem to target your cockpit. You can live without windows but will need to use 3rd person view. Elevator Blocks: As usual, just build 10 of the cheap stuff like this. You may also want some stairs, but elevators are more space efficient. Ramps: Build two if you want to have ramps for HVs to drive into a hangar. Build a third one if you want a ramp to a door, or build the new Bording Ramp (Alpha 9). Cargo containers: however many you want but I'd say minimum 4. If using the new weight/volume limits you'll probably want 4 controllers and 10 or more extenders. Wireless Connection (Alpha 9): For now just build one. Spotlights: Recommended minimum of 4. Warp Drive: You only need one and can only use one. Not strictly required right away but I'd highly recommend it because it's big and thus more of a pain to add later. Warp drive tank: Only need one, can only use one. Ammo Box: Build one or (Alpha 9) an Ammo Container Controller and some extenders. Projectile Turrets: Almost optional but sort of like a base you really need something to shoot down drones that attack your ship while you're away. I'd recommend a minimum of 2, but if you can build them I'd recommend 4 30mm cannons. NOTE that the only turrets that work on a planet are miniguns and cannons! So for now there is very little point in building anything else unless you're doing PvP or plan to attack something in space. Drones don't come after your ship the way they do with a base, but unless your ship is parked near friendly turrets it will be at risk of serious damage without some drone killing turrets. Sentry Guns: Optional, but I like to put 4+ on the underside in the corners to kill hostile wildlife in the landing zone. They're not much good for killing anything but wildlife and hostile alien soldiers etc but it's pretty nice to have a bunch of guns shooting if you happen to land near a squad of hostile creatures. Don't forget your multi-charges because you will make changes. Emergency Oxygen Bottles of the sort you can just right click to consume. You should always have these on you in unbreathable environments. Color/texture tools: optional but you might want to bring these along. That's pretty much the minimum and the critical stuff. Other highly desirable things you are going to want: Large Constructor or Advanced Constructor: So useful that I should probably say it's required. Cloning Chamber OR Medical Station (The medical station also functions as a cloning chamber so no need for both.) Another thing that is so useful as to almost seem required. Hangar door: optional, should only need 1 at most for your first ship. But you don't absolutely need this because you can just dock an SV or HV on an open landing pad or "docking strip". Repair Bay and Repair Console: These are very useful so definitely build one of each if you can. If not you can add them later. Note that you can only have one repair bay block on a ship or base. Armor Locker: Another almost requirement. Passenger Seats if you're in multiplayer. Repair Station Fridge Food Prep (cook those steaks you find) Armored Doors (not usually necessary unless you're replacing a combat armor block with a door). Gravity Generator (Not really that necessary honestly. I never use them. They just add more weight.) Sensors/Levers if you want to mess with that (make your ramp come down automatically etc.) I didn't include farming plots because it's not worth the effort. Just build plots on a base and make emergency rations. A base with four 3x3 clusters of plots can make 4 survival rations per harvest faster than you need them, especially if you cook loot meat and eat loot food as you go. I also left out decorative iterms and things like toilets that aren't purely decorative but aren't that useful. These things aren't worth messing with unless you're making a larger ship with more resources spent on cosmetics than utility. So craft at least the minimum stuff and head to orbit with it. Tip: Obtaining Structural Blocks Bug which should be fixed now: When you destroy a core a place a new one, the faction defaults to "No Faction". For the base/etc to be considered "yours" you need to Press P and change the faction to Private. Then you will be able to salvage complete blocks just like before. Keep in mind that in addition to mining, you can also salvage whole blocks from POIs and derelect ships. (If you haven't done the missions yet, do those first to make sure you aren't messing those up.) Normally you can't use the multitool on a hostile structure. BUT if you find the core and destroy it (shotgun, explosive charges, rocket launcher, etc.) then you will be able to salvage the blocks into components, but only into components even if you use the Retrieve Blocks mode of the multitool. BUT if you place your own core on the base or ship after destroying the hostile core, and press P to change the faction to "Private" it will become your base/ship and now you can retrieve whole blocks. Make sure to remove your core last because as soon as you remove it the base goes back to "neutral" and you're salvaging components again. You can get hundreds or thousands of already constructed blocks this way including hardened steel and combat steel. (Incidentally you can also claim and "renovate" an existing base/ship this way, not just tear it down.) So if you don't have the 400-500 blocks I recommend to start on a CV, and you don't have the ingots, consider tearing down an enemy structure as previously described. But don't waste your time doing this without a T2 Multitool or an HV with a Multi-Turret. If you're lacking the T2 multitool, buy it from the trade station. If you need money, visit the weapons dealer (he's in the "conference room" on the Temperate starter planet station) figure out what he will buy that you can make, and make weapons to sell him. Also buy gold ingots from the mining trader and make EVA Boosts to sell to both the mining trader and the hardware trader. You'll have tons of money to buy all the ingots from the mining guy and all the medical supplies from the medical guy in addition to any other tools/weapons you need. ALSO once you get a minimal CV built, there is the Tool Turret you can put on it to use for salvaging derelect ships. So you may not want to spend too much time salvaging derelect ships until you get a minimal CV with a tool turret to help speed that up. Summary: Find and destroy hostile core. Put down your own core anywhere on the structure (not a stater block, just a core). Press P and change the faction from "No Faction" to "Private". Salvage complete blocks with "Retrieve Blocks" on the multitool/turret. Symmetry Mode and Building Tips Notice you can drag to place whole lines of blocks. Dragging and holding down Ctrl will create a "plane" of blocks. Use Symmetry mode when it makes sense to do so. This will speed things up and help you keep your ship symmetrical. To use it, hit N, click Symmetry Mode: YZ, then click on the centerline of the ship. (This will not place a block because you're in "N" mode.) Hit N to close the window. Notice (!) you can place the plane either between voxels or in the center of a voxel. If your ship is an odd number of blocks wide (like 9 or 11) you want it in the center of the center voxel strip.
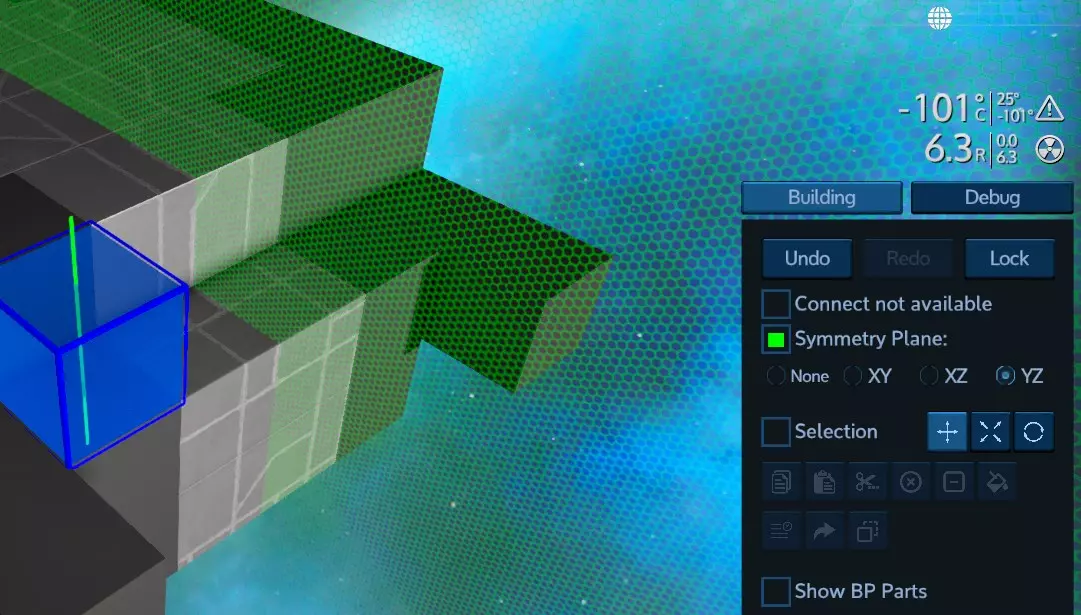
现在你放置的所有物体都会围绕该平面进行镜像。显然,你也可以选择其他平面进行镜像,比如XY平面或XZ平面。 不过话说回来,你的飞船并非一定要对称。你完全可以建造各种奇特的不对称星际战舰,只是使用对称模式建造第一艘飞船会快一些。 为关键系统建造装甲保险库 驾驶你的SV(小型飞行器)携带建筑材料前往轨道。移动到距离行星约2000米的位置,并远离小行星等物体。 确保你的SV已开启自动刹车,以防它飘走。确保你已装备EVA推进器。确保你的氧气充足,并且SV内的氧气站储备了大量氧气。确保你的物品栏中有应急氧气,这样当你没注意到氧气条时,就不必在窒息的情况下艰难返回飞船而不死亡。然后进行太空行走。让你的工具栏和/或连接的工具栏看起来像这样:

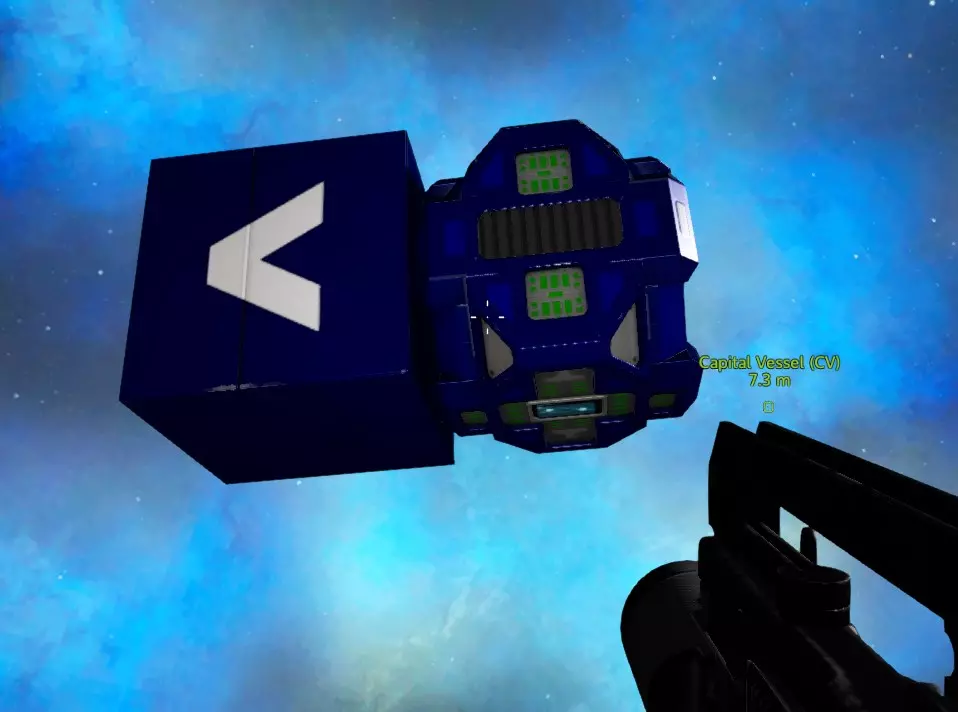
哦,我是不是忘了提颜色和纹理工具?别担心,如果你忘了,之后也可以调整这些设置。 离你的飞船50-100米远,放置起始方块。现在用多功能工具把它拆解成这个样子。暂时不要移除驾驶舱(只有A8版本有驾驶舱,A9版本和HV等载具的起始方块一样,会有一个标记),否则你可能会搞不清哪个方向是前方!
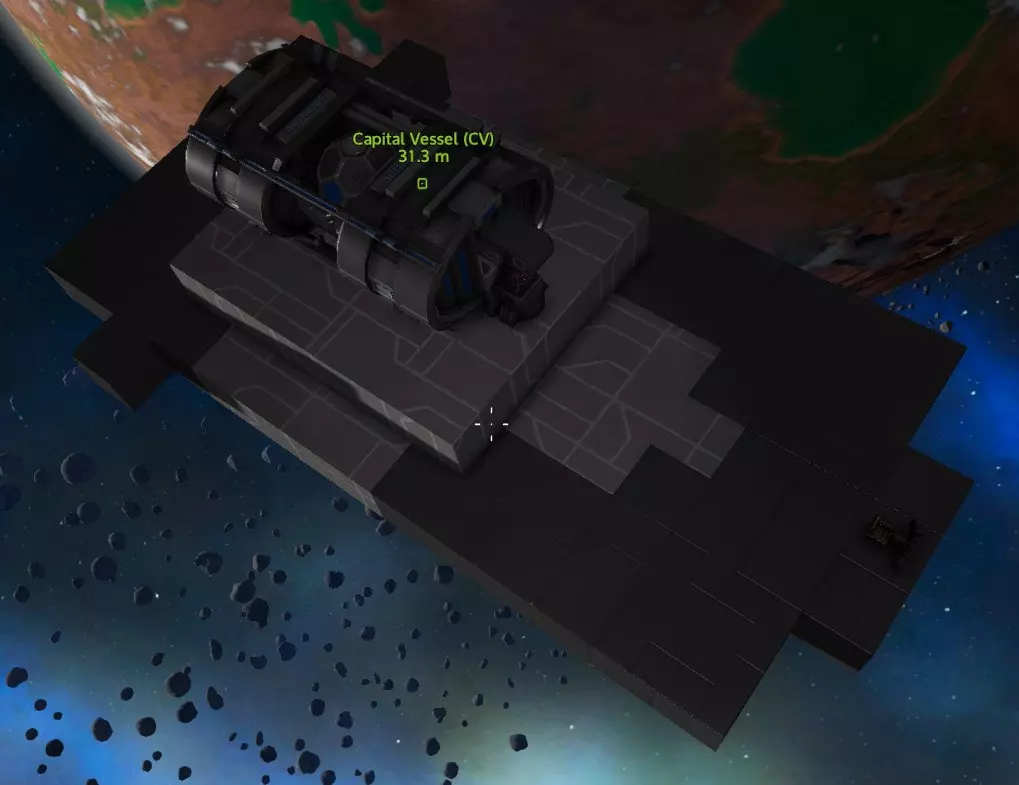
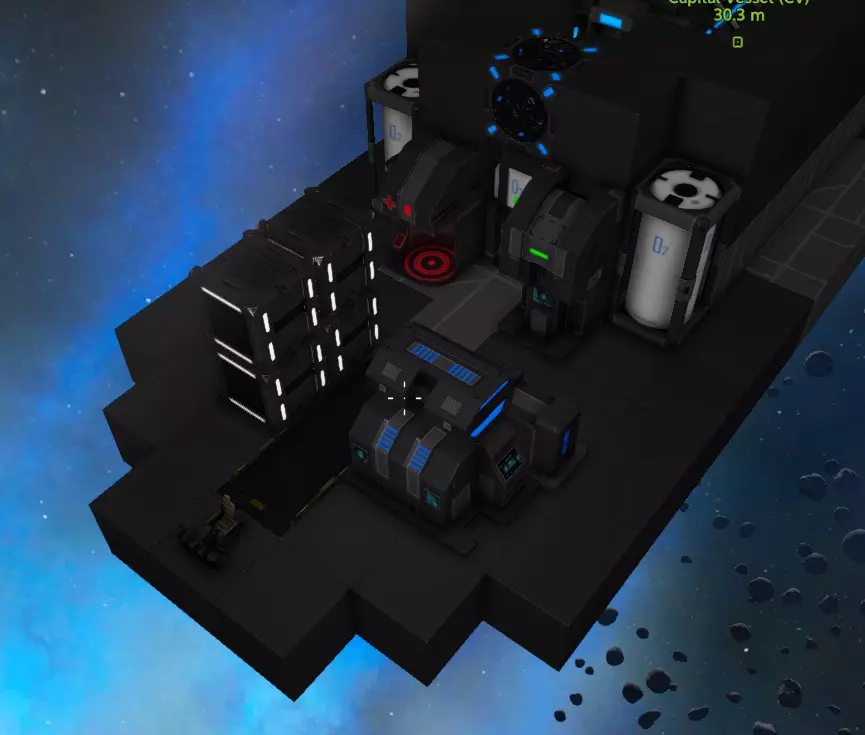
完成后,尝试将发电机、燃料箱、RCS和核心部件装入一个3x3x1的空间,就像这样:
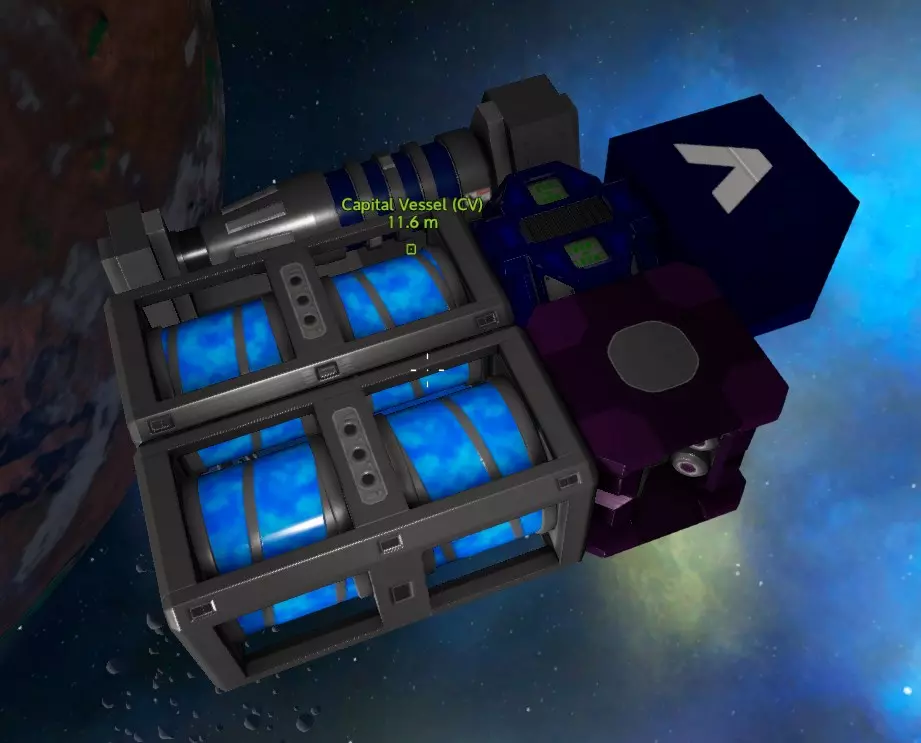
如果你建造了T1 RCS,那么在这里添加其他部件。如果你建造了T2 RCS,那么你可能需要添加弹药箱和其他一些模块(我在这里使用无线连接模块),就像这样:

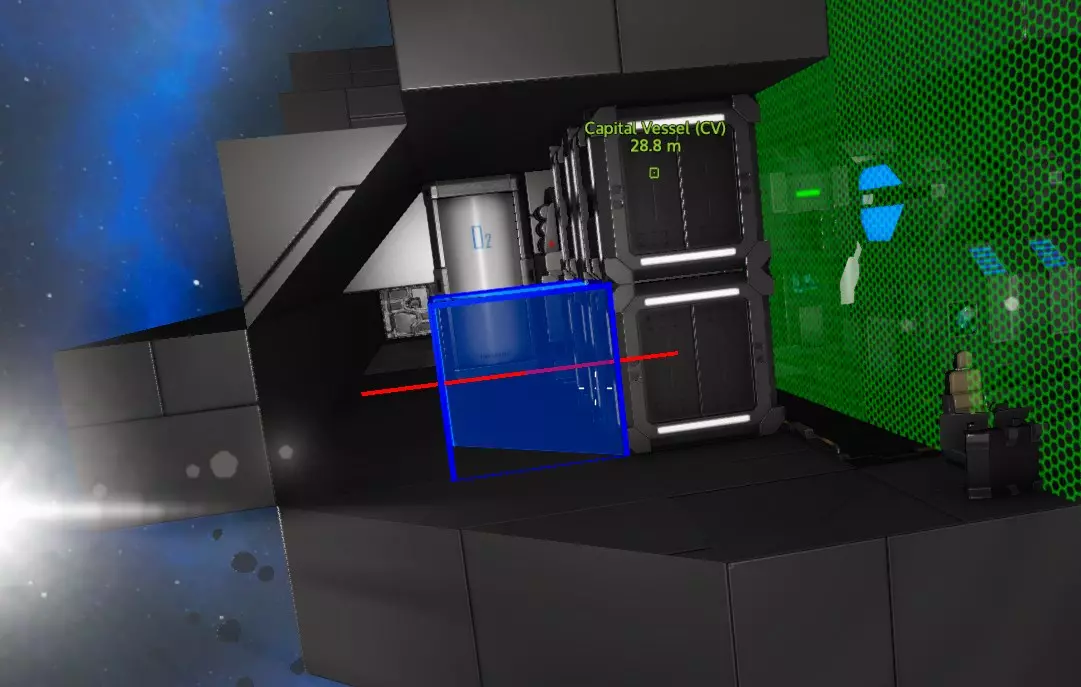
总之,现在你需要用战斗装甲方块覆盖关键区域的每一面。侧面、正面和背面要做两层厚,顶部和底部做一层厚。

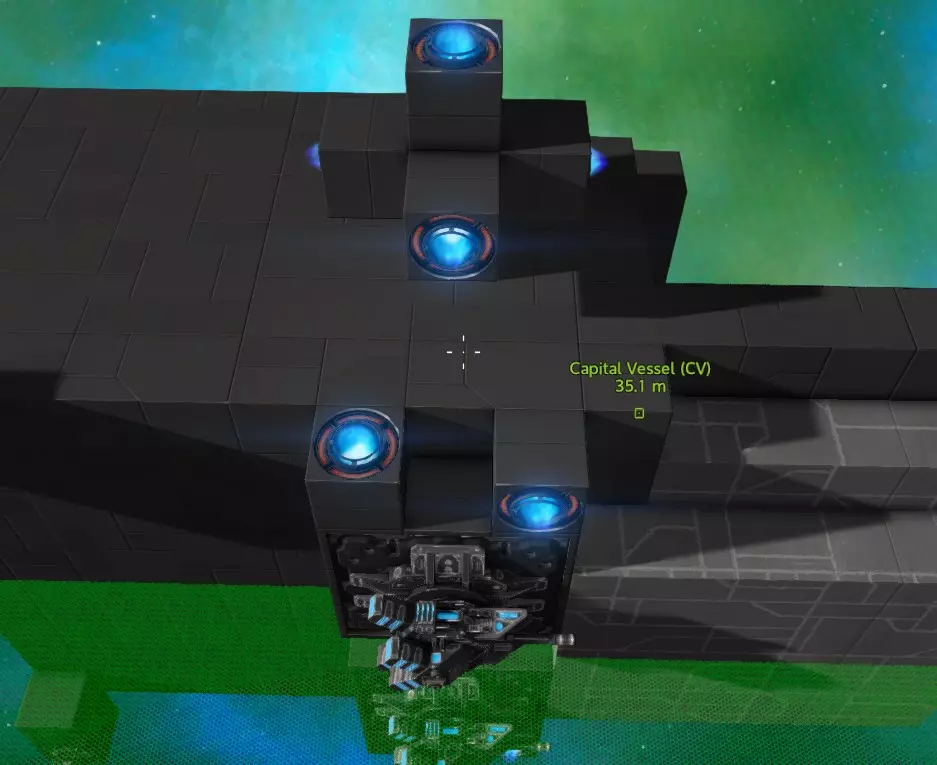
NPC喜欢攻击你的发电机,所以大多数敌人的火力都会被这个银行金库吸引。用等离子炮、激光炮和迷你机枪之类的武器,几乎不可能在合理时间内击穿它。唯一真正的威胁是导弹发射器、炸弹和火炮,即便如此,它们也需要一些时间才能打穿。所以这里相当安全。 现在在边缘添加一些额外的方块,这样敌人即使攻击边缘,也必须射穿两个方块才能打到发电机。
在前方制作一个突出部分来标记预定的正面。 如果你发现自己在地面着陆时被轰炸机无人机轰炸,可以在飞船顶部增加一层额外的装甲。 这样你就拥有了一个极难被摧毁的安全舱区域,里面放置核心、发电机、燃料箱等关键部件,以及RCS(其实RCS可以放在其他地方,但这里可能有空间,而且保护RCS比保护推进器更重要)。 这个安全舱真的有必要吗? 并非绝对必要,但它成本不高,却能帮你省去大麻烦。主要目的是在你对操作更熟悉之前,让你的小型CV很难被击落。如果你发现有任何方块缺失,那就说明在那种情况下,仅用单层防护你早就扛不住了。 关于这种设计的实际效果,我做了个测试:在生存模式中,我驾驶一艘核心区域采用这种设计的飞船,配备8门30毫米火炮,连续摧毁了4个POI(兴趣点),期间没有进行任何维修,核心区域的方块也没有被摧毁一块。之后我前往轨道,击毁了一艘“集群无人机”飞船。核心区域依然完好无损。飞船侧面和前部的推进器全部被摧毁,一些炮塔也几乎报废,其他部件也受损严重,但飞船仍能正常飞行,敌人始终没能击穿这个核心区域。不过需要注意的是,测试中的敌人没有配备导弹或火炮,否则情况可能会更棘手。但即便如此,摧毁发电机也需要大约10发以上的炮弹。所以对于休闲移动基地类型的航母使用来说,这是相当安全的。 言归正传,回到建造上来。 布局规划 此时进行一些布局规划会有所帮助。我在这里要展示一个相对平坦的设计,而且不会用到侧面,但以下是大致思路和一些可能性:

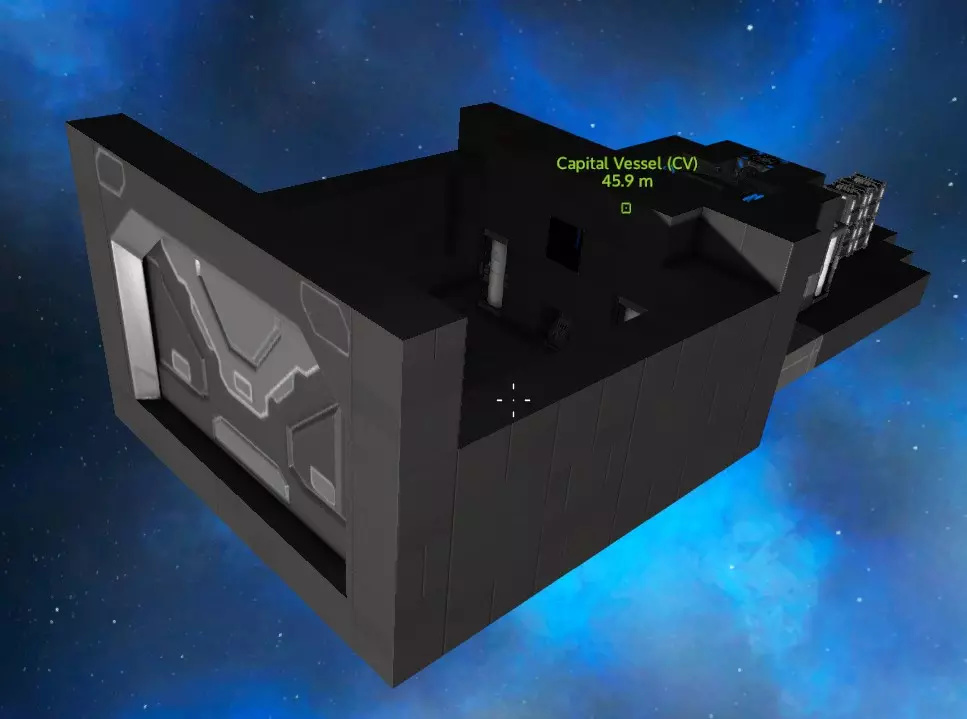
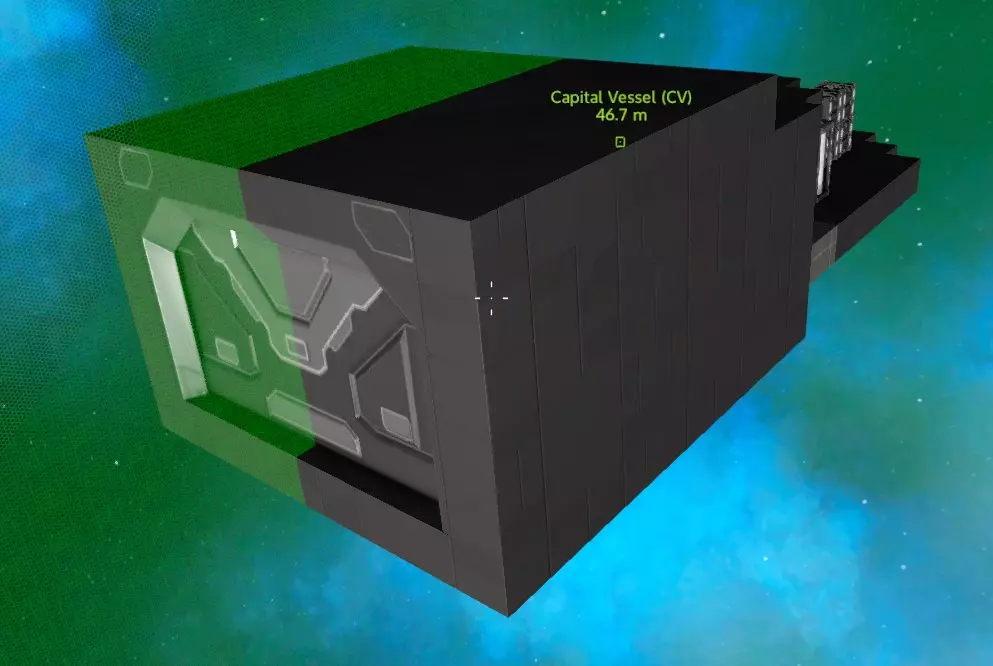
接下来,我打算把“工作区”和驾驶舱放在太空舱前方,曲速引擎安装在太空舱顶部,机库则设在后方。两侧将只保留通往机库的通道。 船体、曲速引擎、氧气系统和设备 好了,现在拿出你的普通钢块。除非你看到有什么特别需要保护的东西,比如可能存放贵重物品的地方,否则你不用再担心战斗模块了。大多数部件就算被击中受损,飞船依然可以飞行,之后你可以进行修理或更换。 首先我会先安装曲速引擎,因为它体积较大,然后在其前方放置曲速燃料罐,并搭建驾驶舱和工作区组合区域的地板。
曲速引擎在热量和辐射方面都非常高,所以我希望它和走道之间能有一些间隔。我可以在这里使用碳复合方块,但如果能有一些保护措施就更好了。
我会在这里安装两个氧气罐,连接氧气站和通风机。我已经放置好了通风机,它会为曲速引擎区域和舰桥通风。这样,如果需要的话,我就可以用通风机给后部加压。 理想情况下,你应该尽量把这类设备分开一点放置,这样即使它们被击中并爆炸,也不会引发连锁爆炸和设备损坏。
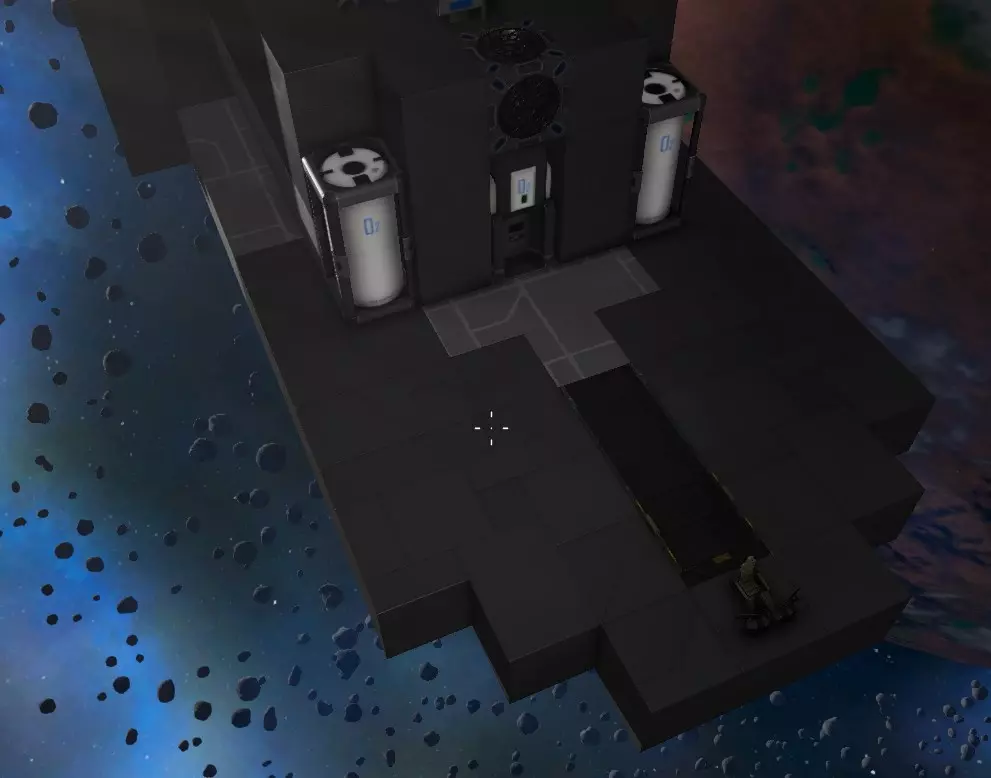
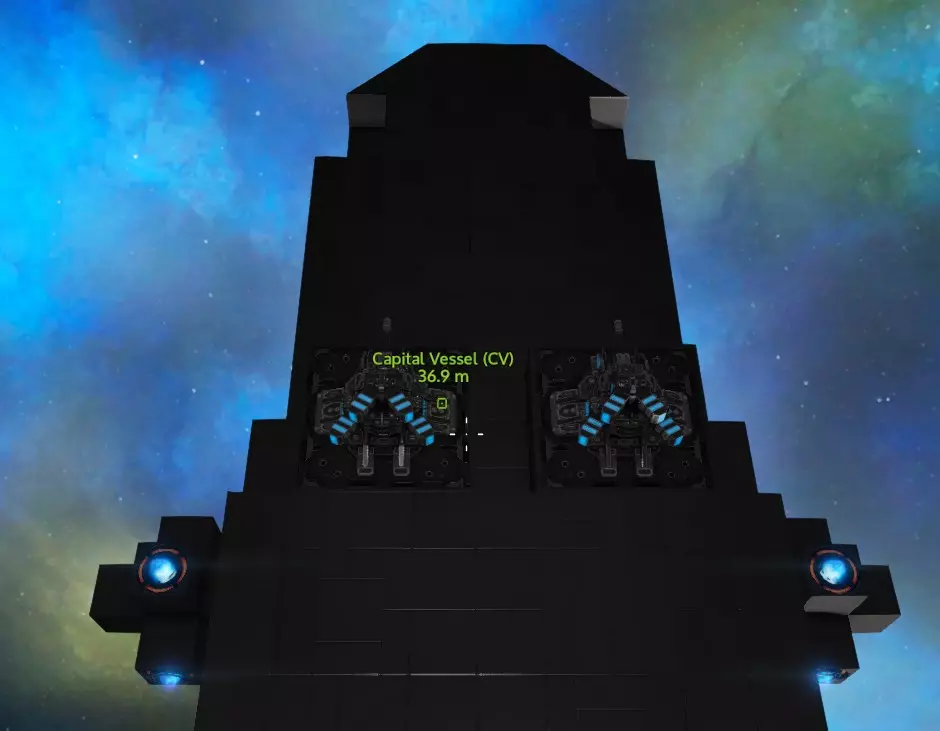
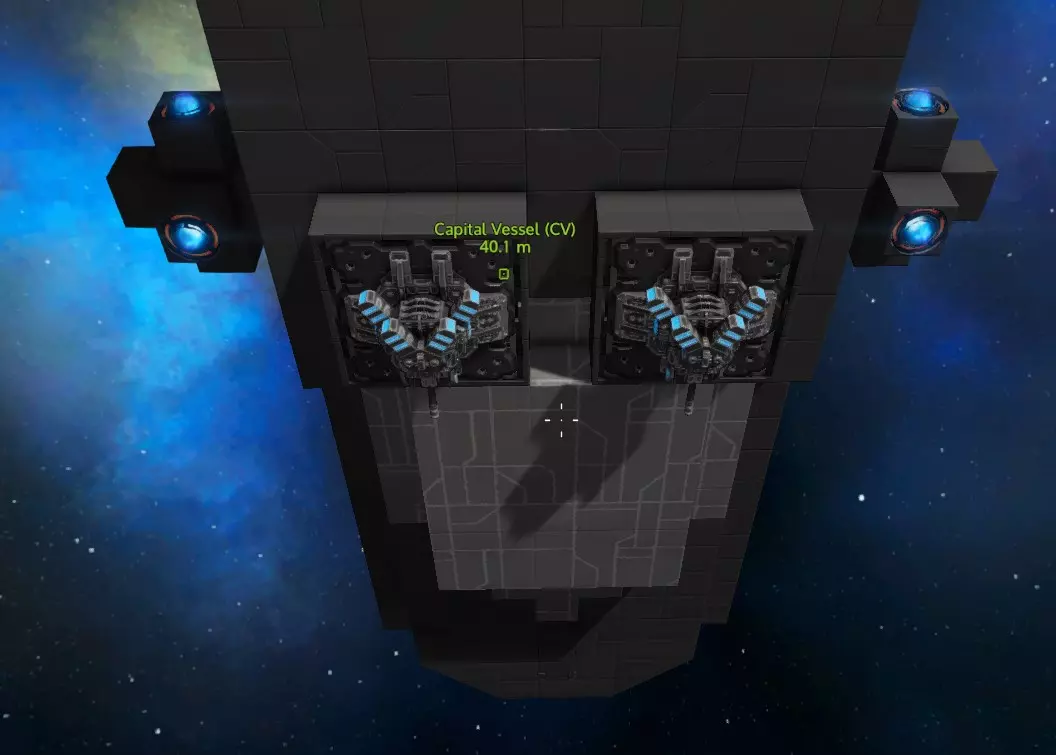
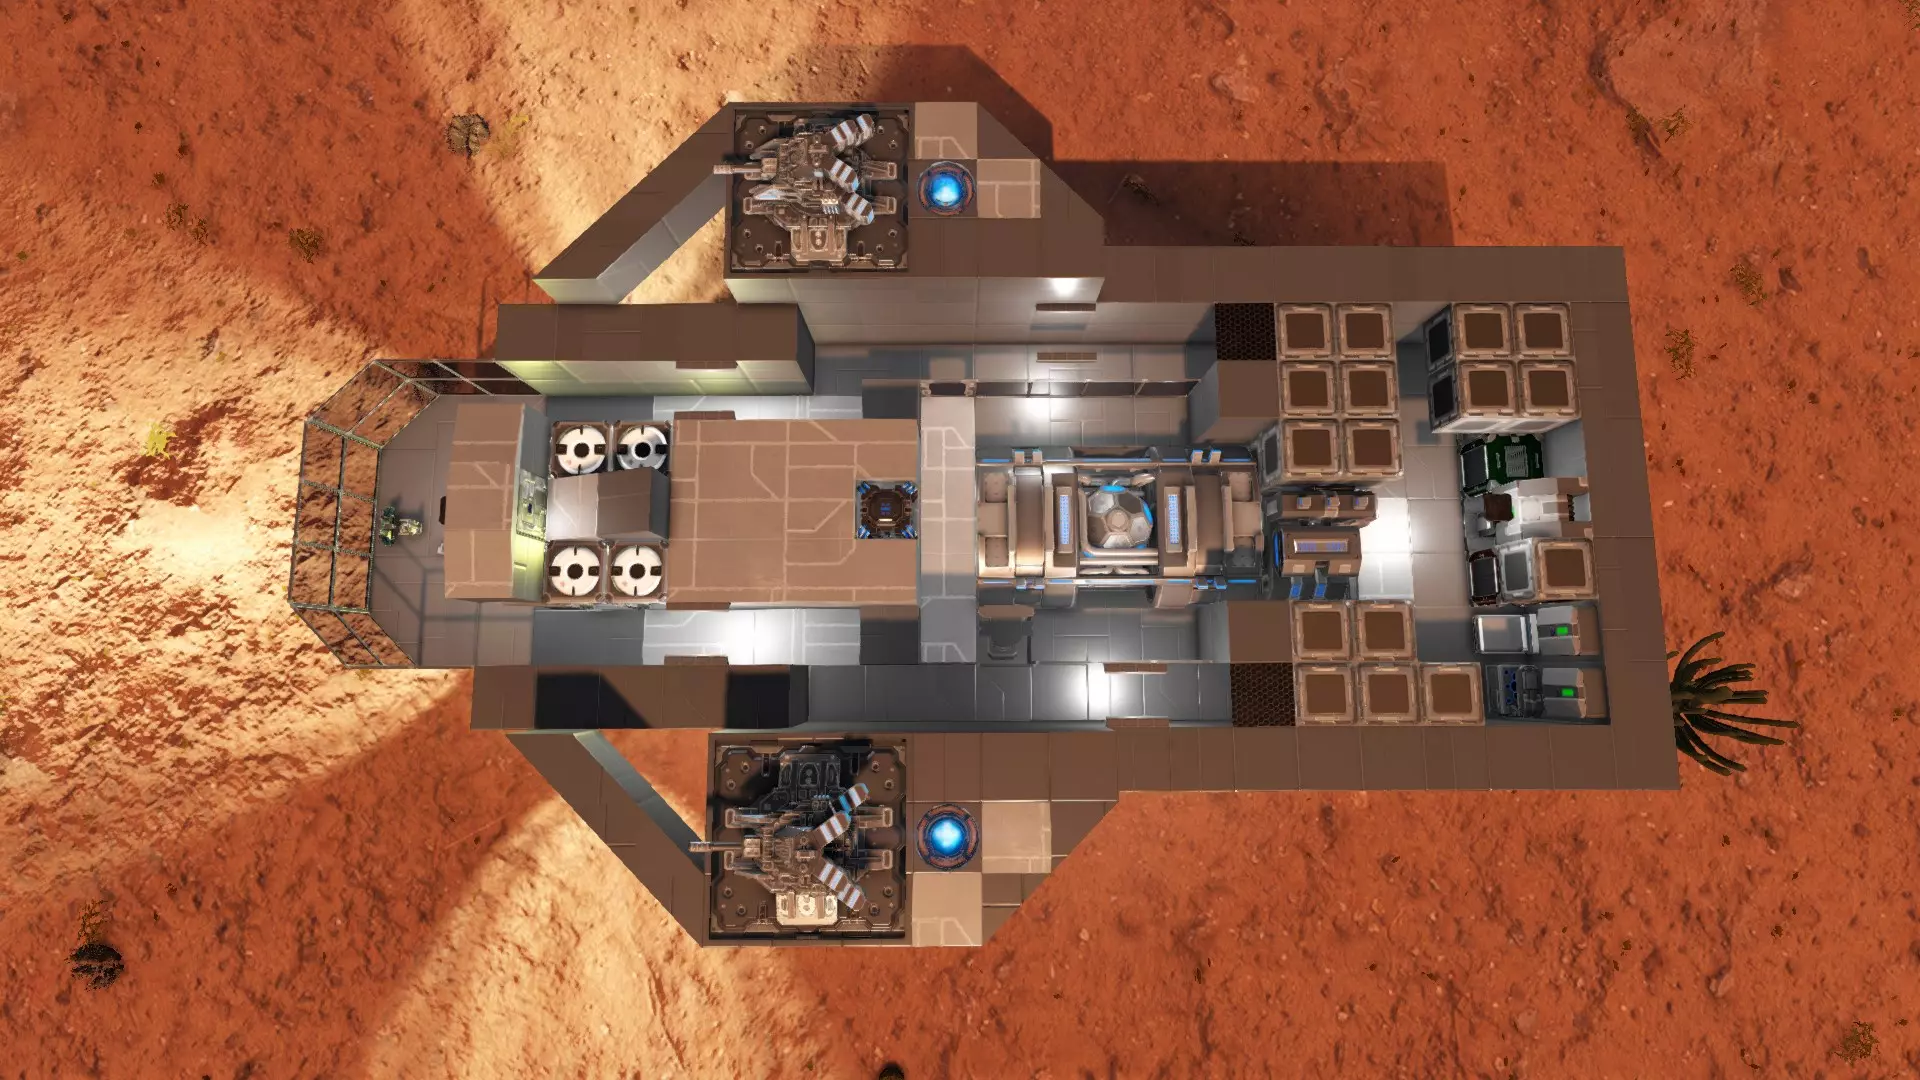
由于我们正尝试削减成本,我会把医疗站、维修站、建造器和容器放在这里。理想情况下,这些容器应该有更好的保护措施,但目前这样也可以。
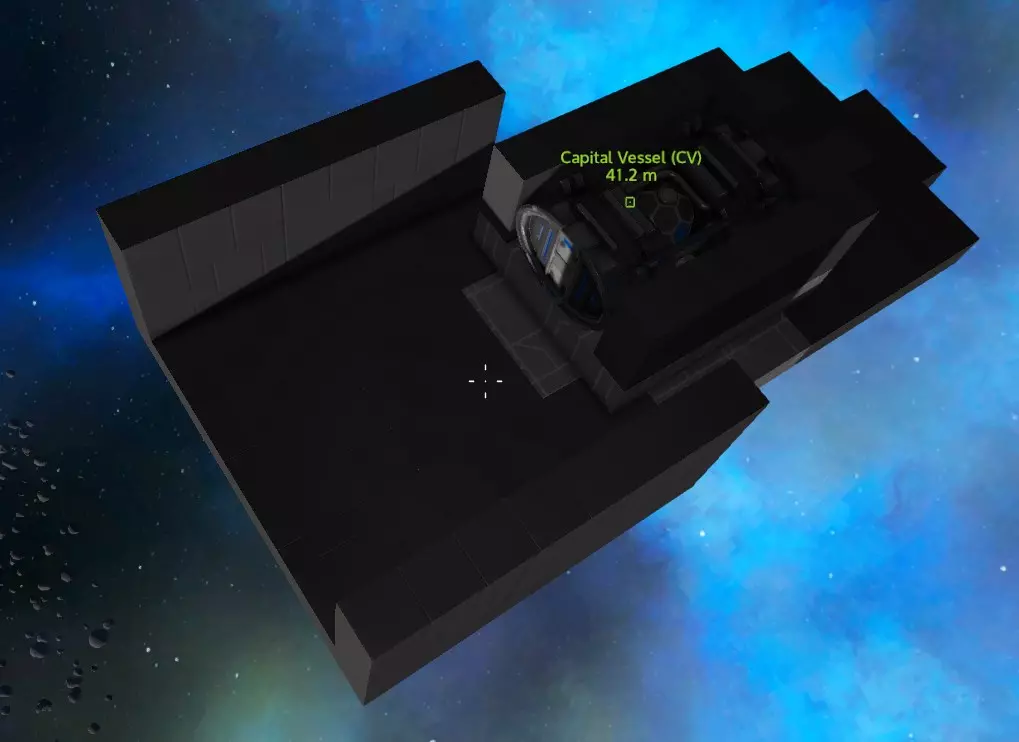
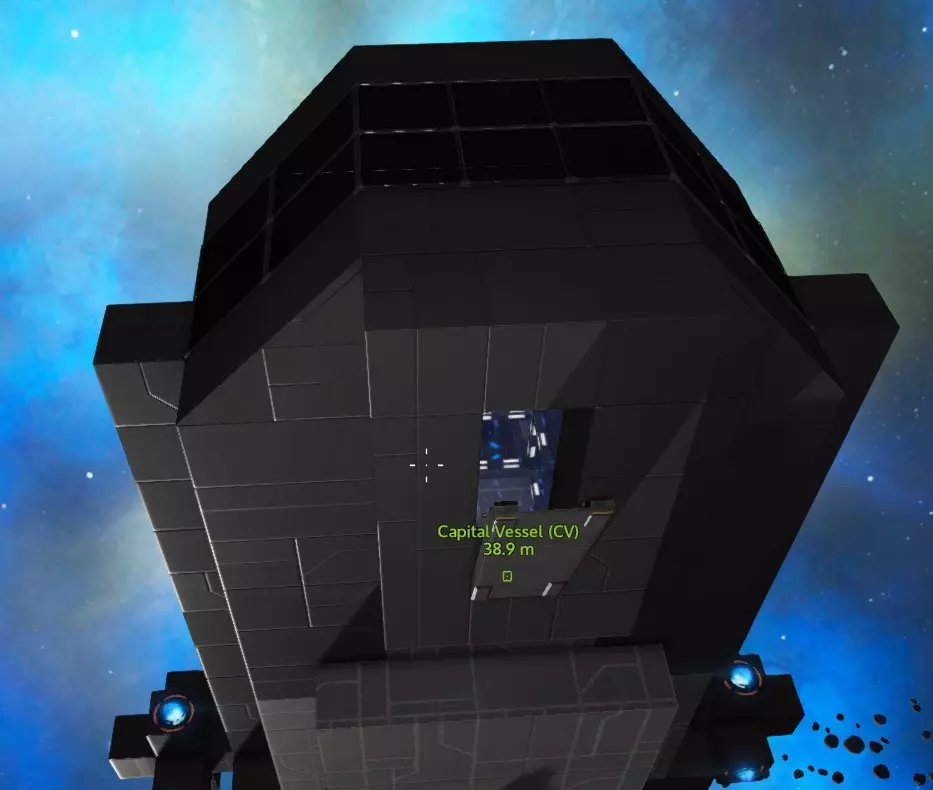
驾驶舱位于前方。我还使用新的登船坡道作为前舱门。 机库与后部区域 在保险库后方,我创建了一个内部尺寸为7x7的区域,并用7x5的机库门将其围起来。
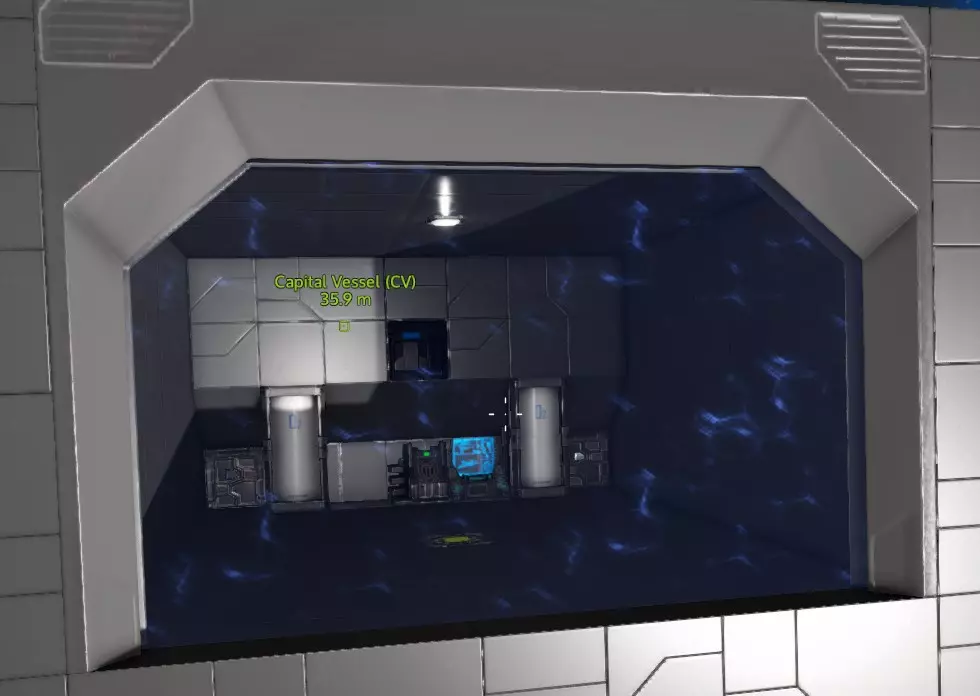
我还在后面放了两个氧气罐和一个装甲储物柜。那里有个小窗户对着曲速引擎,不过这个窗户只是为了让你能大致知道曲速引擎的位置。 因为曲速引擎和曲速储罐不是密封模块,如果我拆掉这个窗户,就能不用额外添加通风机也能给机库加压。但目前我不打算给机库加压,因为这样一来,如果飞船被敌人火力击中受损,失压的可能性就会增加。
密封船体 机库现已封闭,接下来让我们完成所有部分的封闭工作。 我打算先搭建一个框架,暂不美化外部外观。 封闭走廊……
你可能会注意到这里有一些空间,我们可以在那里移动一些氧气瓶。或许我应该用一些斜坡楔块,让这里变得更精致些……
我把所有东西都封好,然后把窗户放在前面。
这是一个块状骨架,你可以使用不同形状的方块对其进行修复,使其看起来更好。不过现在它已经完全封闭并密封好了。 关于窗户的小提示:窗户有一个着色面和一个“透明”(着色较浅)面。你可以使用多功能工具的“旋转”功能(并非真正旋转整个方块)来交换哪一面是哪一面。记住,你只是在切换哪一面着色,而不是完全去除着色。通常你希望着色面朝外,这样就不会影响视线。 此时你可以添加氧气并检查加压情况,但我通常会等到添加推进器后再一起测试所有功能。关于放置通风机的提示 通风机消耗的电力相当可观,因此用一台通风机能为越多房间增压,飞船的能源效率就越高。所以,将通风机安装在能同时为两个独立房间通风的墙壁上是个不错的主意。 当然,你可以使用非密封门,将整艘飞船打造成一个大型压力区域,这对于小型飞船来说完全可行,但这意味着当船体出现破损时(这种情况迟早会发生),你会损失更多氧气。 如果空间允许,你还可以建造通风管道,就像你在NPC兴趣点可能已经见过的那样。这些管道并非只是装饰;它们能让一台通风机有可能为六个不同区域增压(不过六个区域可能难以管理)。例如:
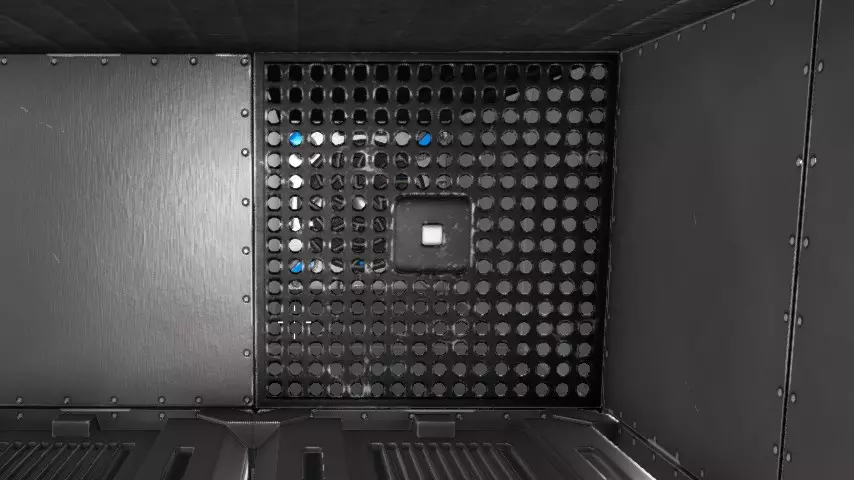
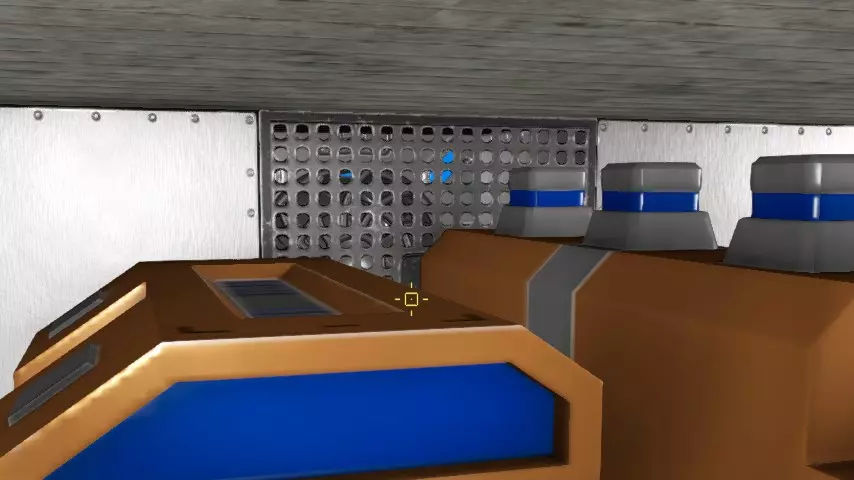
这个通风装置为这两个房间加压,并且可能有隧道通向其他4个方向,为另外4个房间加压。你可以用这些“走道”面板(一种扶手类型)或非密封的“百叶窗”(看起来像水平百叶窗)来阻挡通风管道。不过,实际上任何非密封的方块都可以用作通风屏障。(这个例子实际上来自一个基地,但在飞船上的工作原理相同。)唯一的问题是管道需要额外的空间,但对于本身就很大的大型飞船来说,这样做是合理的,而且设置不同的压力区域更好,这样你就不会损失一整艘充满氧气的大型飞船。 添加推进器 我将采用一种简单的方法,在每侧创建一个由S型推进器组成的“五推进器舱”,如下所示:
缺点是推进器大致位于同一位置,更容易被瞄准,因此确实需要在其周围安装装甲。即便有装甲,这也是个非常糟糕的主意,因为一枚导弹就可能摧毁所有这些推进器。(我这样做主要是为了减少展示各个方向推进器所需的截图数量。)所以,更好的做法是将小型推进器分散布置在各处,这样在失去一侧的所有推力之前,需要逐个摧毁多个推进器。 但在对称模式下,我设置了2个向上、2个向下、2个向前、2个向后以及每侧1个推进器。 对于S级推进器来说,这数量不太够,尤其是在重力超过1G的星球上,所以我打算在底部再添加两个,并像这样利用对称模式在每侧各增加一个。
如果某个方向的所有推进器都被摧毁,那么你将无法停止朝该方向移动,也无法在不转动飞船的情况下向相反方向加速。这虽然不算彻底的灾难,但会给操控带来极大不便。显然,在某些情况下你将无法从地面起飞,如果是在星球上,重力会导致飞船坠向地面。 重力与地面起飞能力: 1G重力产生的力为9.8米/秒²,为方便计算可视为10。但这只能抵消1G重力以保持悬停。若要实际向上加速,则需要额外的推力,因此通常认为12米/秒²是应对1G重力的最低要求。你可能觉得只需要某个方向的额外推力,但如果飞船被树木或地面附近的其他物体卡住,就可能会翻滚。这种情况下,你需要侧面提供更大的推力才能让飞船重新扶正。如果没有足够的侧面推力,你就得制作一个推进器,然后到外面去解决这个问题。 但要是你降落在一个重力为1.2G的星球上呢?这时你需要12米/秒²的推力才能保持悬停,要起飞则需要更大的推力。所以为了应对这种情况,你底部方向的推力最好能达到14米/秒²以上。 刚开始的时候,你只需确保一个方向(比如底部)至少有12米/秒²的推力,之后再考虑提升侧面的推力。现在我们仍在为飞船增加重量,所以暂时不用去管物理面板里的数值。 节省燃料 推进器功率越大,燃料消耗就越快!因此,在任何情况下,尽量使用推进器S来获得刚好足够起飞的加速度是个好办法。如果你为了更快的加速度安装了额外的推进器,那么最好使用信号来关闭飞行和着陆时不需要的额外推进器。简单来说,就是创建一个【全功率】信号来控制这些额外推进器的开关。 炮塔、起落架、登船坡道 安装炮塔很简单。我打算使用可伸缩的30毫米机炮,顶部2个,底部2个。
现在来说说起落架。我用的是新型全收放式起落架,当你着陆时它会自动弹出。旧款的大多能收起,但不能完全收进去。

我会添加一些哨戒炮(需要像这样贴近地面放置)。
当你降落在一群16只蜘蛛或蝎子中间时,这些东西会派上用场。现在我注意到登机坡道无法一直延伸到放下的起落架高度,所以我用电梯对其进行了改造,使其能够向下延伸。这样一来,通道看起来也更好了。

如果你有幸能够建造T2(或者T1也一样)维修站,如果你还没建造的话,现在是个不错的时机。
现在也是添加一些聚光灯、室内灯和其他外部灯光的好时机。 检查物理效果并测试着陆 如果尚未添加燃料和氧气,请添加燃料和氧气,然后启动电源。推进器开启后,检查控制面板中的【统计信息】选项卡。
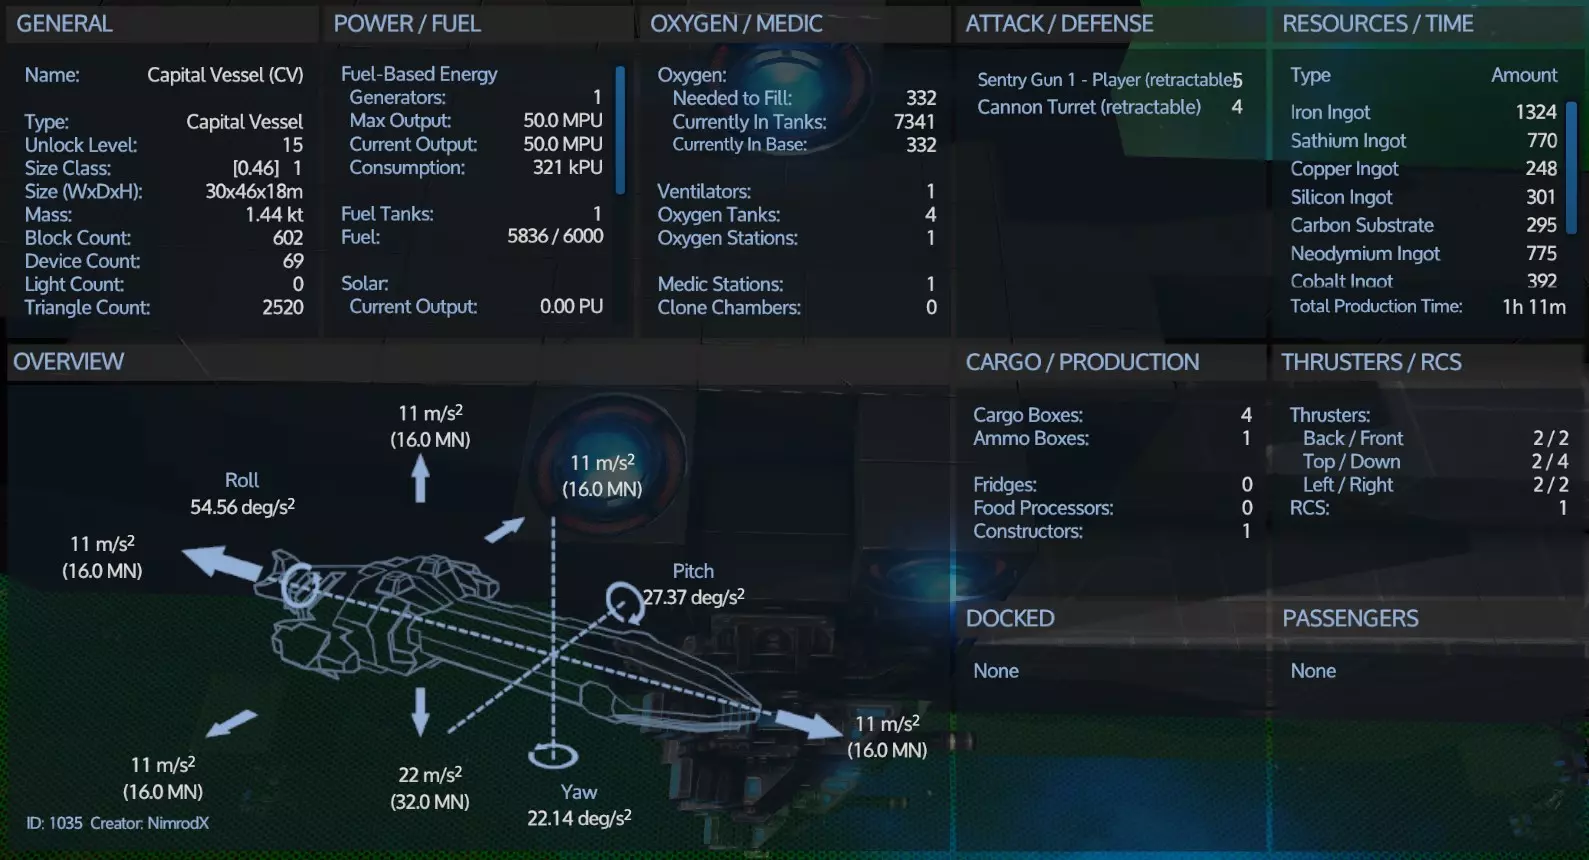
还不算太糟。或许还需要一些微调(我们确实需要在多个方向上超过12米/秒²的加速度才能安全应对超过1G的情况),但目前这样也可以。那么我们准备着陆吧。
我忘了在后面装斜坡,而且我们可能还需要更多的灯光。斜坡能让HV更容易驶入机库,不过它们也可以用悬浮推进器跳进去。(这艘CV甚至小到可以让它们用悬浮推进器直接跳到顶部。)
和机库门类似,我们没有完全符合预期尺寸的斜坡,所以只能先用这个。HV(重型载具)应该能轻松通过中间的间隙。 最终费用 移除T2维修舱和控制台后,最终成本为:
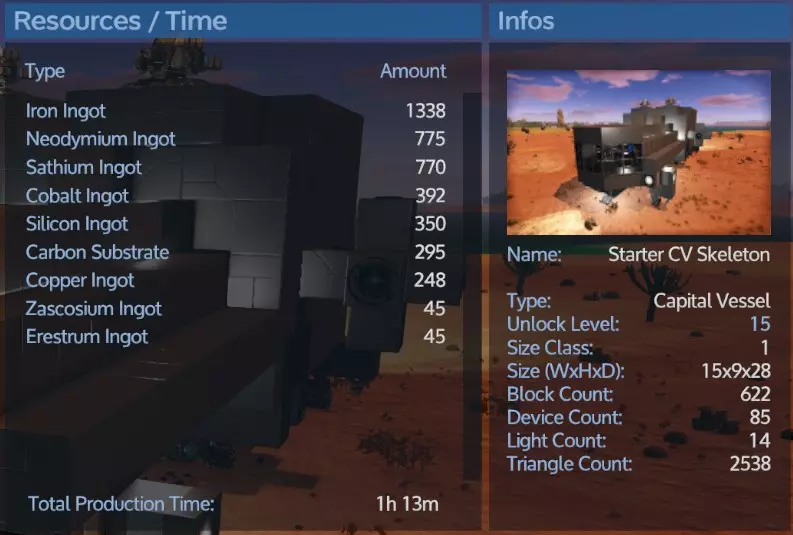
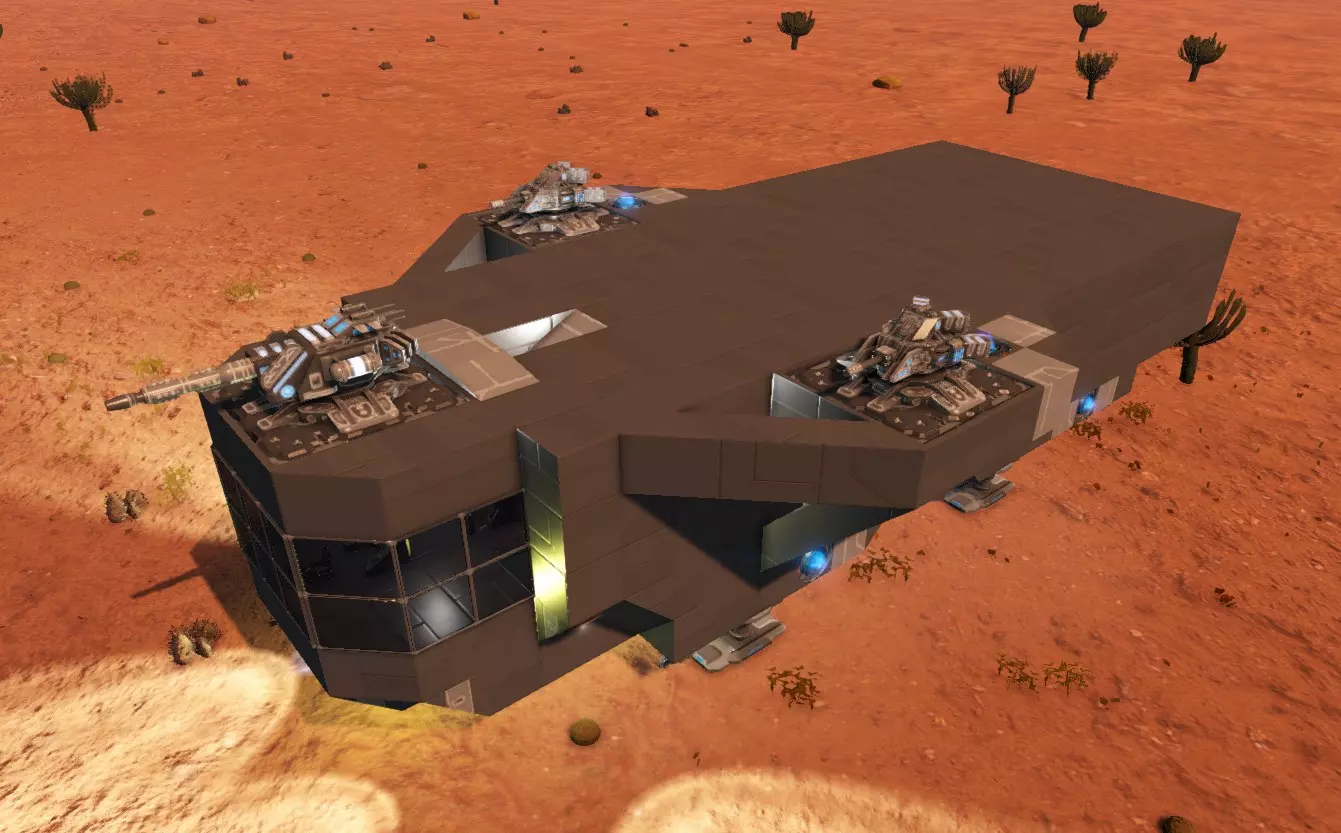
我本可以通过使用T1 RCS而非T2来避免消耗扎斯科西姆(Zascosium)和埃雷斯特姆(Erestum),而且我使用的其他东西比如维修站可能也消耗了一些。总之,重点是埃雷斯特姆(E)和扎斯科西姆(Z)并非绝对必需。 信号与控制面板配置 当你添加了多种工具和武器后,你可能希望设置控制面板按类别开关它们。你可能还需要一个【节能模式】,以便在离开飞船去探索时关闭所有非必要设备(如建造器等)。这就是信号和快捷开关派上用场的地方。关于这方面有一个单独的指南。你可能甚至不需要电路,但了解如何使用控制面板中的信号开关和快捷开关还是值得的。所以你其实可以只浏览指南中关于快捷开关和信号开关配置的部分,把电路部分留到以后再说。 收尾与扩展 到目前为止,我只用方块建造了这个。当你只想弄清楚基本布局和框架时,这是一个合理的方法。 你可以驾驶一艘方块飞船四处飞行,从游戏机制上来说,它实际上可能比外观更好看的设计更坚固(我认为一些小体积的方块生命值更少),但你肯定想让它看起来更美观。所以你需要使用一些不同形状的方块。以下是一种使用基础倾斜方块、拐角和更多窗户来完成这个设计的可能方法。(我在顶部搭建了一个带床、冰箱和食物处理器的小木屋。)我稍微上了点漆,但懒得给整个建筑都涂漆和添加纹理。
顺便说一下,它现在变得更重了,即使在1G重力下也必须依靠底部推进器才能进入轨道。(其他推进器可以移动它,但只有底部的推进器才能抵消1G重力,所以需要对推进器进行一些升级。) 进一步扩展 随着你的需求变化,对这些进行扩展是合理的。以下是一些关于如何扩展此基地设计的想法,以便为更多内部设施腾出空间或停靠更多飞船。
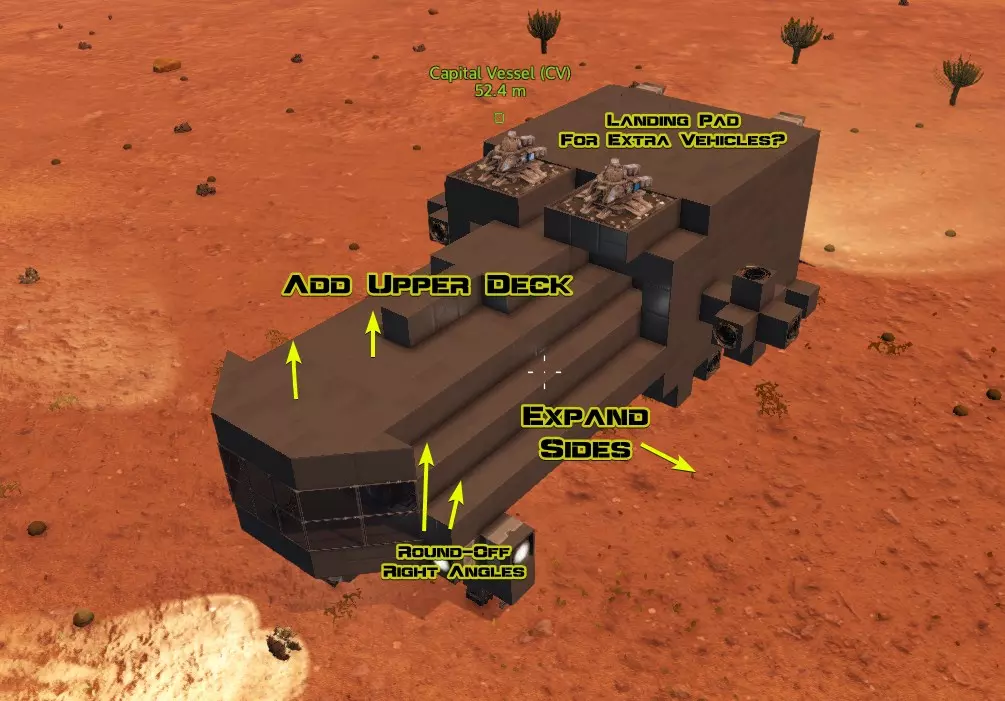
记住,它越大,所需的推力就越大,因此消耗的燃料也会越多! 无机库设计 这是另一种设计。
这是一个简单的平顶设计,没有机库。直接停靠在平顶上即可。前方有工具炮塔,两侧各有两门加农炮。我主要使用新的小型引擎,这有助于节省能源。我是在严重缺乏钕元素时不得不建造这个的。 下面是移除顶部后的样子,以便你查看布局:
你可能会注意到所有氧气罐都堆放在同一个地方,这可不太妙。这意味着一旦其中一个氧气罐被摧毁,其他所有的都会跟着一起爆炸。(这种情况已经在我身上发生过一次了。) 要注意,你可以把货物扩展器装在目前暂时用不到的任何空间里。 这个设计做得很扁平,保险库的尺寸是4x3x1,不过目前有一些空间算是浪费了。我需要在侧面增加更多装甲(外面其实有一些,只是你看不到)。
外部的桥梁:
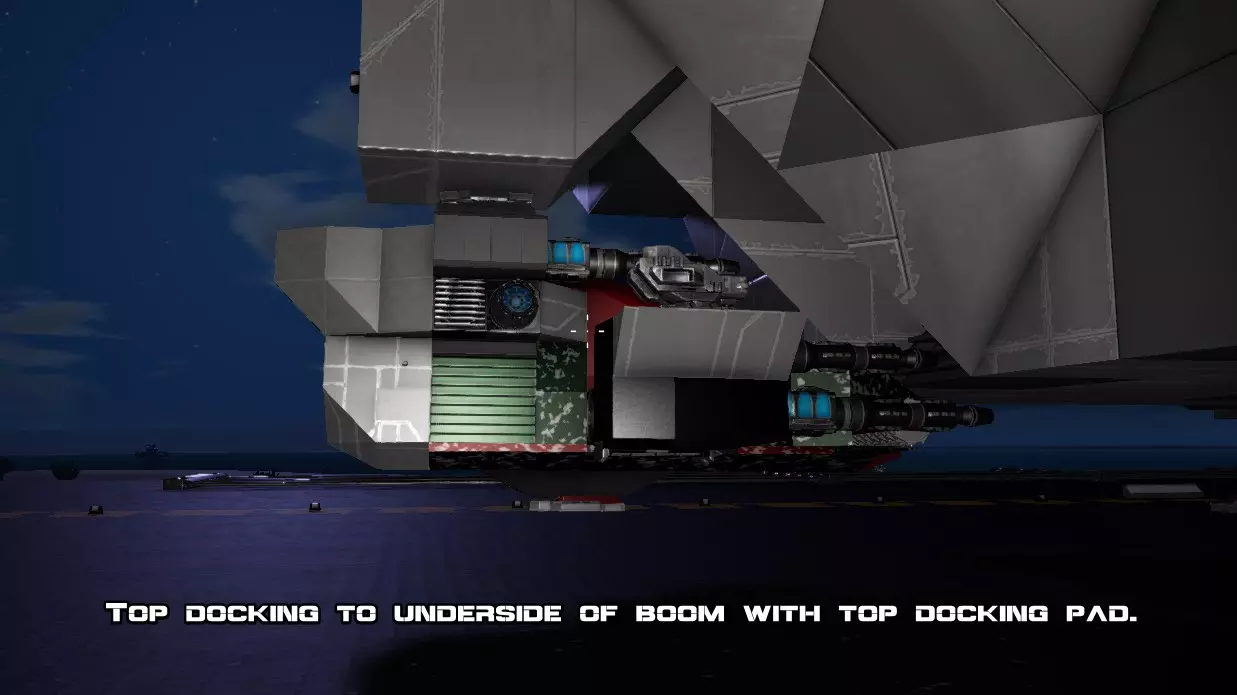
总之,希望这些能给你足够的设计思路。 平顶部分日后可以根据需要改建成机库,或者再增加一层“甲板”。无论如何,这种布局很容易进行扩建和延伸。 底部、后部、前部及侧面对接 记住,舰船顶部不一定需要着陆平台或机库。 你也可以在HV(地面载具)或SV(小型飞行器)的顶部安装对接平台,然后对接至舰船的底部。甚至可以在HV或SV的侧面或背部安装对接平台,与CV(航母)的前部、后部或侧面进行对接。
如果飞船下方空间不足,你可以在侧面或尾部悬挂吊臂,并停靠在吊臂下方。或者,你可以直接在飞船的侧面或尾部安装一个舱门,然后将HV或SV的尾部或前部停靠在舱门旁边。
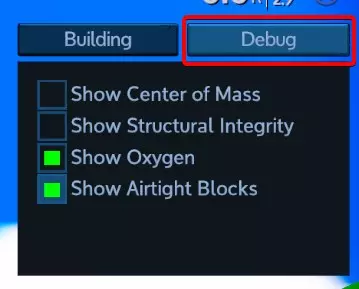
机库的优势在于它们具备气候控制功能。如果你将一艘已关闭电源的飞船停靠在航母外部,飞船内部温度会与外部环境温度一致。一旦启动飞船电源,内部温度会开始向22摄氏度调节,但在极端环境下,这个过程可能需要一段时间。 到目前为止,我只在极热的熔岩星球上遇到过这种问题,在飞船最终冷却下来之前,我可能得喝些水。 避开【热点】 你可能已经注意到,像发电机这类设备会在其周围产生热量。 推进器同样会产生热量,而曲速引擎和曲速燃料箱还会产生辐射。 因此,在尝试打造紧凑型航母时,现在又多了一个需要应对的挑战。热点问题其实没那么严重,只要它们处于你不太可能长时间逗留的位置,并且不在植物种植区域就行。热点会杀死植物! 但如果你想完全避开它们,确保推进器、 warp 相关设备与任何有人活动的区域或走道之间有两个方块的距离。可以放置墙壁或其他“冷却”设备来阻挡,以避免意外的体温过高。 把推进器当墙壁用也是个坏主意,因为 NPC 会攻击它们,而且推进器的耐用性不高,这样你最终会面临更多的船体破损问题。 调试空气密封问题 游戏中与建筑结构相关的居住环境问题有两类: 气候控制:这能为你提供 22 摄氏度的室温,让你不会死于过热或过冷。要实现气候控制,只需在一个已启动的建筑内,用密封方块围出一个区域,确保该区域与外界完全隔绝,且附近没有发热设备。满足这些条件后,该区域即被视为【室内】,你不会冻伤或过热。但这并不意味着该区域有可呼吸的大气。 【氧气】或【可呼吸大气】:这能让你无需使用宇航服氧气,可以摘下头盔,也能脱下 armor 进行修理等操作。要实现这一点,你需要一个密封区域,以及一个未被阻挡的通风器,且通风器连接的氧气瓶有足够氧气充满该区域。可能会出现有气候控制但没有氧气的情况。 某些氧气“泄漏”会同时破坏气候控制和氧气供应,而有些泄漏只会导致氧气不足。 方块要么是【密封:是】,要么是【密封:否】。如果一个方块是密封的,那么它会将空气保持在其占据的整个体素内。这一点很重要,因为像窗户这样的薄板可能不会完全如你预期的那样工作。记住,即使某个物体看起来像薄板,它仍然占据着整个体素立方体。整个立方体是“密封的”(它会容纳氧气,但不允许氧气通过)。 相反,有些看起来应该是密封的方块实际上并不密封。例如,如果你用采矿钻头堵住墙上的洞,它不会密封房间,因为采矿钻头即使看起来是密封的,实际上也不具备密封性。 调试 你放置了通风器,并确保控制面板中的氧气已开启,但却没有看到O2图标亮起。问题出在哪里?首先,使用调试面板显示哪些体素被密封方块占据。按下N键,点击【调试】,然后启用【显示密封方块】。
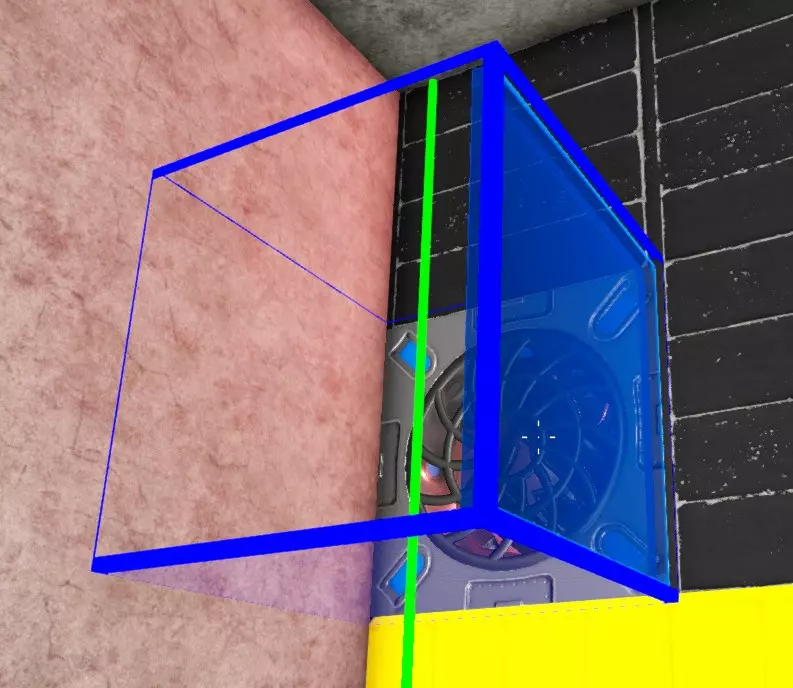
请注意,玻璃门并不像舱门式舱门那样气密。 这个问题现在可能很明显,但如果不是的话,根据我的经验,原因通常是以下情况之一: 1. 你用一个非气密方块挡住了另一个非气密方块,而你以为那里有一个气密方块,但实际上它后面的某个方块并不气密。也就是说,某个非气密方块隐藏了泄漏点。解决方法:移走房间内的所有设备,确保房间密封后,再在墙壁前放置其他方块。 2. 类似窗户或其他薄板的物体实际上挡住了通风器。解决方法:检查通风器前方或通往通风器的路径上是否有实心绿色方块。例如,由玻璃面板构成的狭窄走廊,如果面板之间没有留出体素的空隙路径,就会阻挡空气流通。换句话说,不要这样做:
This issue becomes more of a problem when you're trying to build a very compact ship, cramming lots of blocks into the smallest possible area. A less common problem is that your oxygen tanks are too small to hold enough oxygen to fill the volume of the rooms you have. For example you have one small oxygen tank and massive rooms. (Notice when you turn on the oxygen that it drops suddenly as it removes enough O2 to fill the empty room space.) Care and Feeding of a CV: Some Advice So that's an example ship skeleton. I'm sure you can figure out the rest and manage to make something look better. Plenty of ideas are possible as all of the submissions in the Workshop show. So get to it! Some advice on using and not using a CV in the game: Remember I said I tested it against some POIs? Well, don't use this to attack POIs! In a real survival mode game this is often not cost effective though it kind of depends on how heavily armed they are. The only weapons that work are miniguns and cannons, and even with the ship not getting destroyed it's going to take damage and cost more to repair than a hovertank or combat SV. So don't expect a CV to be any good for POI busting! It's usually a waste even when it works unless maybe you build a crappy combat-only CV with tons of cannons on it that you probably wouldn't want to use for exploring or anything else. And that would also usually be more expensive than a decent HV or SV. The best use for a CV is as a mobile base. Take it to another planet, undock your SV and fly around looking for ore and stuff, then fly back and get your mining or hovertank HV and mine ore or take out some POIs. Then load up all the loot, take it back to the CV, and fly back to your base. Warning! After losing a day or two of effort to save game corruption, I recommend backup saving every time before switching playfields! (A playfield is a "zone" like a planet, an orbit, or a moon. So when you climb to orbit you switch playfields to <planet> Orbit. When you warp you switch playfields, etc.) Basically just backup your game all the time because even if crashes seem kind of rare (I get one maybe every 20 hours) they can still involve data loss. At your base, build a flat landing pad big enough to land your CV and put your repair bay there. You can use a repair bay to repair a CV even if it doesn't "dock" with the base. When you leave your CV sitting on a planet and fly off in another vehicle, shut everything down to save fuel but leave the turrets on. If you don't have lots of turrets on the bottom already, add sentry guns to kill hostile wildlife and NPCs that wander toward the ship and of course have at least two cannons on top to kill any drones that wander along. The ship won't usually take much damage in most situations with this level of defense. Don't use the CV to explore planets because they burn a LOT of fuel flying around planets having to fight gravity all the time. Pick a landing spot, land there, fly your scout SV around, and if theres some reason to move the CV later then move to the new location once you've found it. If you need to fly the CV a long distance like > 2-3km on a planet, just fly to orbit and try to make most of the distance in orbit and drop back to the planet. It's more fuel efficient to fly in orbit than on the planet, though harder to navigate. Disable Auto Brake (press I) when you're not trying to land or stop! For a CV, treat autobreak like a parking break. (Default key for autobreak is I.) Flying around without autobreak can save a lot of fuel, especially far enough out in space that there's no drag and you can just accelerate and coast. Disable unnecessary engines when you're cruising and not in combat trying to run or outmaneuver etc. Use signals to create a "cruise mode" or something with extra engines disabled, if applicable. Cruise mode looks like 12m/s^2 thrust back and down, and less than that in other directions. This is enough to take off and land on most planets around 1G or less. Combat Advice Most Weapons Can't Fire on Planets As previously mentioned, most turrets, all forward-mounted weapons, and tools can't be used on a planet. You'll get an error message if you try to use them and nothing will happen. Only miniguns and cannons work on planets so you need at least two of those in any combination on the top. There are also sentry guns, but those are useless except for defense on the ground. They have a very limited ability to move up and down, so need to be either very low on the sides or on the bottom of the ship. These can be quite useful if your chosen landing location turns out to have 20 or so spiders, scorpions, or other stuff running around. Weapon Arcs and Fields of Fire Notice that turrets have this problem where they can't aim down very far and usually can't aim up too far either. Sentry guns are even more limited. This is why your cannons need to be on the top and bottom, and you will need to position your ship for maximum field of fire. To get a sense of the weapon arc, take manual control of one of the turrets and notice how much the gun can move and whether anything is obstructing it. Turret Targeting When you use a CV for combat, you really need to select targets for the turrets intelligently. Otherwise they'll ignore the enemy turrets and keep shooting at the generator which may be impossible for them to destroy before your ship generator is destroyed. Go into the control panel, autogroup everything, then click on the Turrets group.

确保将瞄准目标设置为仅【炮塔】和【固定武器】。这样你的炮塔会优先攻击敌方炮塔,从而减少对你飞船的伤害。如果不这样设置,你的飞船会尝试攻击发电机,这通常和坐以待毙没什么区别。 使用【应用到组】功能,一次性将整个炮塔组设置为此目标。 如前所述,用【航母】攻击【兴趣点】并非经济有效的做法。但如果你非要这么做,只需先摧毁兴趣点上的炮塔,然后离开飞船,亲自携带【 demolition explosives( demolition explosives)】或【火箭筒】冲进去摧毁核心。通常这比等待飞船完成任务更快,还能获得更多战利品。使用30毫米机炮或其他较弱武器攻击NPC航母时,应先摧毁炮塔,再摧毁推进器。当舰船停止后,你可以进入其中并进行任何操作。除非你拥有更强大的武器,否则这种方法可能比直接摧毁发电机更容易。但要记住,你可以在太空中使用像 artillery gun(火炮)这样的更强大武器,这当然是推荐的,能更快瘫痪敌人,从而减少己方舰船受到的伤害。同时,你也可以在太空中使用前置武器。 采矿建议 航母可以用于开采小行星(但当然不能用于行星上的采矿)。 目前小行星比较难找到,但如果你碰巧发现了一颗,做好准备是值得的,因为它们含有大量矿石。别费心用采矿钻头炮塔了。你一次只能控制一个,只有在还没解锁舰载钻头时才用它。 相反,在你的CV(母舰)上安装几个前置采矿钻头。平时保持关闭,直到遇到小行星再开启。就算你不打算打造专门的采矿母舰,也要在CV上装钻头。装两个效果就不错,当然也可以装更多。至少装两个吧,它们不占多少空间,关闭时还能收起。 CV的采矿钻头能很快融化小行星,所以你可能需要至少两个收集箱,以防遇到多个小行星。不过如果你不打算把小行星的碎石都采完,一个收集箱也够用。 总结:以上就是我能想到的所有建议了。如果我遗漏了什么内容,或者你有什么建议,请在下方评论区留言。 版权与许可 本作品由NimrodX于2018年在Steam社区发布,采用CC BY-NC-SA 4.0许可协议。这意味着你可以创作和再分发翻译内容,但必须注明出处。请在翻译中包含指向本页面的链接。