


SS0B
SS0B

转载steam社区指南,侵删

 发帖达人Ⅰ
发帖达人ⅠSS0B
游戏档案
0
玩过游戏数量
0秒
总游戏时长
动态

如何解锁全部3颗永恒之星 步骤1 完成“尽可能大”3、4、5中的大小和速度任务,以解锁3个不同的永恒关卡。我不需要在关卡中获得最佳分数,首次完成它们就足以解锁永恒之星。 步骤2 完成上述步骤即可。 尽情享受永恒关卡吧。
许多人不确定在哪里可以下载杰克盒的补丁,以及哪些游戏已经被翻译。我们已将所有这些信息汇总在一个页面上。你可以在该页面找到所有下载、信息、指南和鸣谢。链接网页下载链接实验性版本Discord服务器模组化控制面板
PC 使用方向键移动 跳跃:空格键 击球:Shift键或Ctrl键 超级扣杀:快速连续点击跳跃键,然后按下击球键 控制 移动玩家:摇杆 跳跃:1号按钮 击球:2号按钮 超级扣杀:快速连续点击跳跃键,然后按下击球键
本指南将详细解释《毁灭战士:永恒》中各项设置的作用、实际游玩时视觉效果的差异程度,以及对帧率的影响。此外,还列出了一些针对实际电脑系统的优化调整和技巧,帮助你流畅游玩,避免卡顿。 简介
《毁灭战士:永恒》已按计划于3月20日发售(幸好没有再次延期),该作采用全新的id Tech 7引擎,并仅支持Vulkan API。尽管游戏运行流畅且优化出色,与前作《毁灭战士4》(2016年版)一样表现良好,但仍有玩家反馈存在一些掉帧、卡顿和画面停滞的问题,本指南将为你提供相关解决办法。 本指南详细说明了游戏中各项图形设置的作用及其对性能的影响,以便你自行决定哪些设置需要调高或降低。此外,还包含一些电脑相关的优化调整以及游戏本身的便利性设置建议,希望能对你有所帮助。 系统需求
以下是开发者提供的系统需求,尽管要求相当高,但你可以尝试让自己的电脑运行超出他们认为的配置。作为参考,我的配置几乎与推荐配置相同(内存更多),但我可以毫无问题地以高画质或超高画质运行游戏。更令人印象深刻的是优化方面,高画质预设已经超过了《毁灭战士4》的最高画质,而且这还不是《毁灭战士:永恒》的最高设置。 最低配置(低画质下1080p/60帧) 操作系统:64位Windows 7 / 64位Windows 10 处理器:Intel Core i5 3.3 GHz或更高,或AMD Ryzen 3 3.最低配置: 处理器:1 GHz 或更高 内存:8GB RAM 显卡:NVIDIA GeForce GTX 1050Ti(4GB)、GTX 1060(3GB)、GTX 1650(4GB)或 AMD Radeon R9 280(3GB)、R9 290(4GB)、RX 470(4GB) 存储空间:50GB 可用空间 推荐配置(1080p/60fps,高画质预设): 操作系统:64 位 Windows 10 处理器:Intel Core i7-6700K 或更高,或 AMD Ryzen 7 1800X 或更高 内存:8GB RAM 显卡:NVIDIA GeForce GTX 1060(6GB)、GTX 970(4GB)、AMD RX 480(8GB) 存储空间:50GB 可用空间 注意:在 GTX 970 上,由于显存限制,高画质预设无法运行,除非将纹理池大小设置为中等。《毁灭战士:永恒》超噩梦画质配置要求(超噩梦预设下4K/60帧或1440P/120帧) 操作系统:64位 Windows 10 处理器:Intel Core i9-9900K 或更高配置,或 AMD Ryzen 7 3700X 或更高配置 内存:16GB 系统内存 显卡:NVIDIA GeForce RTX 2080 Ti(11GB)或 AMD Radeon VII(16GB) 存储空间:50GB 硬盘空间 显卡设置(视觉效果与性能影响)
纹理池大小 视觉影响:此选项控制一次可加载和缓存的高分辨率纹理数量。它在视觉效果或性能方面不太重要,但建议尽可能调至最高。需要注意的是,如果选择使用DLSS/FSR或光线追踪,你必须降低此设置以补偿增加的显存占用(除非你拥有高端显卡)。 性能影响:性能影响不是很高,这在意料之中,因为它只是纹理设置。以下是各设置的显存要求。按1到10的评分标准,此处的性能影响为2/10。 低:2942MiB 中:3454MiB 高:3966MiB 超高:4990MiB 噩梦:6014MiB 超级噩梦:6526MiB 最佳设置:根据你的显存容量尽可能调高。阴影质量 视觉影响:此选项控制游戏阴影贴图的分辨率。据我观察,低和超高画质之间仅提升分辨率,而噩梦和超噩梦画质仅增加动态阴影的绘制距离。它对视觉效果的影响并不显著,毕竟你应该忙着终结魔像而不是观察它的影子。 性能影响:这实际上是游戏中对性能影响最大的图形选项,但由于视觉上不太明显,这是我为提高帧率首先会调低的选项。性能影响评分:9/10。 推荐设置:高/超高。反射质量 视觉效果:此选项会提升游戏的屏幕空间反射质量,请注意这与光线追踪不同!将该选项调至较高设置时,反射效果会相当出色,尤其是游戏中存在大量反光表面的情况下。其视觉效果往往十分显著。 性能影响:如果调低此选项,你其实不会明显感觉到缺失了什么,所以若需要更高的帧率,建议降低该设置。此选项的性能影响为7/10。 推荐设置:高/超高。 方向遮挡 视觉效果:此选项本质上就是环境光遮蔽(应用的技术应为SSDO),它对游戏的视觉效果有着深远影响,能让阴影更加真实。性能影响:这个选项我会作为最后的手段才关闭,因为它对画面保真度的影响极大。其性能影响为6/10。 甜点设置:超高。 光影质量 视觉影响:据我观察,此选项控制着同时渲染的动态光源数量,以及游戏在切换到烘焙的低质量光照之前,动态光照的渲染距离。通常情况下,它对游戏画面的影响不大,但在后期关卡(和DLC)中,当出现大规模、开阔的竞技场战斗时,它的重要性就远超平时了。 性能影响:这个选项能为你提升一些帧率,但会以牺牲视觉质量为代价。其性能影响为7/10。 甜点设置:超高。粒子质量 视觉效果:此选项不会立即产生太大影响,但当你开始战斗时,它会控制枪口闪光、爆炸产生的火花和火焰以及恶魔碎块的质量。在中高画质以上,其效果并不明显。 性能影响:如果你只在战斗中遇到帧率下降,最好调低此设置。不过,大多数时候它对性能的影响并不严重。评分:4/10。 推荐设置:高。 贴图质量 视觉效果:这会改变可同时渲染的血液贴图和子弹撞击痕迹的数量。变化确实存在,但并不十分明显。 性能影响:由于贴图在游戏中是非常细微的细节,这应该是你优先考虑调低的设置之一。此选项对性能的影响为4/10。 甜点设置:超高。 水体质量 视觉效果:此效果会改变水(以及血液和紫色粘液)的透明度和高光贴图(反射)质量。将其调至高于高画质时,在画质提升方面并没有太多增益。 性能影响:这应该是你优先考虑调低的选项之一,因为即使调低,你也不会感觉失去太多。性能成本为3/10。 甜点设置:高。 体积效果质量 视觉效果:这主要会改变光柱、烟雾等效果的质量。其画质影响不是特别明显,但如果你的电脑配置足够,将其调高会很不错。 性能影响:除非你对光柱的锯齿问题非常挑剔,否则调低此选项可以免费提升帧率。性能影响为4/10。甜点设置:超高。 纹理过滤质量 视觉效果影响:这就是各向异性过滤。对于不了解的玩家来说,它能确保纹理在倾斜视角下不会丢失细节或变得模糊。如果设置较低,效果会非常明显。 性能影响:除非你使用集成显卡或极低配置的电脑(不过如果你想玩这款游戏,这种情况应该不太可能),否则几乎不会对性能造成影响。 甜点设置:超噩梦。 几何质量 视觉效果影响:与光照质量类似,此设置控制游戏在多远的距离内渲染高多边形模型和网格,之后会切换为低多边形模型。在高设置以上,效果差异不太明显。性能影响:开启此选项对性能要求较高,若需要提升帧率,请降低该设置。此选项的性能影响为6/10。 最佳设置:高。 后期处理设置性能影响
动态模糊质量 视觉效果:顾名思义,“哈哈,快速移动时东西会模糊”。效果比大多数游戏都要好。 性能影响:较高设置下对性能影响相当大,为了你的体验,建议设为高(如果不喜欢也可以关闭)。此项性能影响为8/10。 色差 视觉效果:与景深效果相辅相成。 性能影响:几乎无影响,可根据个人喜好开启。性能影响为0/10。 景深 视觉效果:在一些场景(如荣耀击杀)中添加眼部聚焦效果。 性能影响:会带来一定性能消耗。此项性能影响为3/10。景深抗锯齿 视觉效果:为景深模糊区域的锯齿边缘添加平滑处理。 性能影响:相当大,如果关闭此选项,你不会真的感觉到缺失。该选项的性能影响达到6/10(较高)。 错误修复
《毁灭战士:永恒》启动黑屏、游戏崩溃及性能不佳问题解决方法: 1. 若使用Windows 10系统,请确保【游戏模式】已关闭。 2. 验证游戏文件完整性。 3. 更新显卡驱动。 4. 更新芯片组驱动。 5. 若要运行ReShade,请先为Vulkan启用全局设置(选择《毁灭战士:永恒》作为目标游戏后会出现相关按钮,且游玩时需保持ReShade窗口开启)。 6. 禁用游戏的全屏优化(首先进入游戏文件夹,然后右键点击DOOMEternalx64vk.exe和/或idTechLauncher.exe,选择【属性】进行设置)。进入兼容性选项卡,勾选【禁用全屏优化】并点击【应用】。 黑边/画面失真问题: 我最近发现,游戏时屏幕出现黑边和画面失真闪烁的问题并非由垂直同步开启或景深效果导致,而是新的英伟达驱动造成的。【Game Ready Driver 442.75】版本是该问题的真正原因,将驱动回滚至442.74版本应能缓解此问题。 武器模组故障修复方法: 1. 仅开启【IDKFA】作弊码,加载一个关卡(不要选择第一个关卡,其开场动画较长)。 2. 尝试使用战斗霰弹枪(或其他出现故障的武器)的两个模组,确保它们能正常工作。 3. 在档案菜单(按【TAB】键打开)中,通过按【X】键将两个模组都卸下。 4. 返回主菜单。5) 关闭所有作弊码,然后加载同一关卡。 6) 掏出你的霰弹枪(或其他武器),按下【鼠标2】应该会显示“未装备模组”的提示。 7) 在【Tab】菜单中,按【X】装备霰弹枪的自动开火模组(或武器菜单中靠下方的任意模组)。 8) 测试模组的准星是否正常。 9) 现在在菜单中按【X】装备粘性炸弹模组(或武器菜单中靠上方的任意模组),应该能正常使用。 注意:如果你想修复多把武器,在退出关卡前对每把武器都执行步骤2和3,然后在退出关卡或继续正常游戏前对所有武器执行步骤6到9。卡顿问题 《毁灭战士:永恒》与《毁灭战士4》不同,它仅支持Vulkan API运行,而《毁灭战士4》默认使用OpenGL,Vulkan只是可选选项。此问题并非游戏本身的问题,而是Vulkan API导致的。出于某种未知原因,任何类型的覆盖层(无论是否可见)在游戏运行时都会导致随机的帧率下降和卡顿。 解决方法很简单,就是关闭所有覆盖层,包括:微星Afterburner/Rivatuner的覆盖层、Steam覆盖层、Discord覆盖层、NVIDIA GeForce Experience覆盖层、Windows 10游戏栏等所有覆盖层!运行这款游戏时,任何覆盖层都可能导致卡顿。 另外,如果你有足够的磁盘空间,建议将游戏安装在SSD上,游戏体验会因此得到改善。需要注意的事项(硬件方面) 确保你的VR头显已断开连接 务必确保,如果你有多个显示器,它们都连接到同一块显卡上 生活品质优化
跳过开场视频 在游戏启动选项中添加以下命令:+com_skipIntroVideo 1 禁用鼠标平滑/加速 在游戏启动选项中添加以下命令即可:+m_smoothing 0 降低游戏模糊感 降低伽马值以增加对比度 禁用色差、景深、动态模糊和胶片颗粒效果 提高锐化度(建议最高调整至50%) 禁用抗锯齿(4K及以上分辨率适用) 在游戏启动选项中添加以下命令:+r_antialiasing 0


Steam上购买《中年失业模拟器》29元 这个游戏是一款单机游戏,一个35岁的油腻大叔有老婆和两个孩子,突然失去工作需要自谋生路赚钱养家还房贷,给父母治病等等…… 游戏有两种模式,一种可保存(容易)一种不可保存(困难)。 个人物品中的新手指南教你赚钱的多种方式,包括送外卖,搬砖,打鱼捕虫,炒房,投资,炒股,炒币,拉货,摆摊,做主播,开公司,卖垃圾…… 等到主播赚够30万,打开地图前往港口购买船只,通过船只捕鱼,大约3天就能赚回30万成本,继续捕鱼可积累300-400万资金。 前往商业中心租下8楼和9楼的办公室,发售总计600万的理财产品。 乘船前往中央商务区,租赁私募基金公司,发行1000万理财产品。此时资金约有1600万左右。 可投资地点包括:投资中央商务区的工厂800万,投资荒岛农场200万,以及其下方的养猪厂80万(养猪场雇佣工人更方便),投资荒岛农场上方问号处的矿洞,回到暗牛街投资最左边日文招牌的游戏厅70万,前往城中村买下垃圾回收站25万,到商业中心购买3号办公室创办直播公司,去铁皮街的一家游轮店将自己的船改造成游艇并出租。即使游艇已出租,仍可每天开出去捕鱼。暗牛街、小区、学校、早点摊,每个摊位花费1万雇佣人员看管,每天可赚取700多元;货车二手车出租每天能有几百元收入。 剧情线:剧情线主要围绕老婆展开。老婆后续会要求老公给100万家用,在还完所有借贷并赚到3000万之前,尽量不要给老婆这100万,否则父母会立刻生病,并要求你在30天内筹备3000万。父母会因为保健品被骗,而那家保健品公司就开在你的私募公司隔壁,之后你需要去闹事。 体力值过低回家通常是指体力低于10时,可能会触发骨折,需要赔偿医药费,并且之后好几天体力值减半。如果不尽快在手机的其他市政功能里购买医保,陷入贫困后情况会雪上加霜。晚上回家可能触发儿子生病事件,会导致头发减少100并清空体力。因此,后续若有可居住的外部地点,建议早上回去,以享受老婆提供的福利,获得体力及预防疾病能力加成。 贷款方面: - 城中村可借高利贷60万,高利贷需连续偿还30天利息。 - 手机电脑的金融软件中可申请银行贷款10万,支持提前还款。 推荐还款顺序:公司理财→银行→房贷。 炒房相关: - 城中村的房价在60万到114万之间浮动,每日价格不同,可低买高卖。将房产挂到中介处,待价格达到114万时卖出,之后可再次买入卖出。 - 朝阴区有价格约1000万的房子,目前尚未购买,欢迎有购买经验的朋友分享心得。 可外住的地点包括:农场、养猪厂、卫星基地、城中村的房子和垃圾回收站等。后续若有新进展将继续更新。除了游戏厅和垃圾站,其他地方基本每日收入都在10万以上。不过每天有赚有赔,总体算下来,这些加起来每天收入约100万左右。你可以选择继续捕鱼,或者通过私募公司购买股票,进行低买高卖操作,且股票交易仅限白天进行。投资卫星项目需要3亿资金,这个项目非常赚钱。在暗牛街、小区、学校、早点摊这几个地方,各花1万雇佣人员看摊,每天能赚取700多。港口的货车租出去,小区的二手车租出去,每天也能有几百块的收益。 剧情线:剧情线主要围绕老婆展开。老婆之后会要求老公给100万家用,在还完所有借贷并赚到3000万之前,尽量不要给老婆这100万,否则父母会立刻生病,并要求你在30天内筹备3000万。父母会因为保健品被骗,而那家保健品公司就开在你的私募公司隔壁,之后你需要去那里闹事。体力过低回家通常是指体力值低于10,此时可能会触发骨折事件,需要赔偿医药费,并且后续好几天体力值会减半。如果不及时在手机的其他市政选项中购买医保,贫困状况将会雪上加霜。晚上回家可能触发儿子生病事件,导致头发减少100、体力清空。 所以后面有房的话可以选择住在外面,早上回去能享受老婆福利,获得体力和预防疾病能力加成。 贷款方面: - 城中村可以借高利贷60万,高利贷必须还够30天利息。 - 手机电脑的金融软件里有银行贷款10万,可提前还款。 推荐还款顺序:公司理财→银行→房贷。 炒房相关: - 城中村的房价在60万到114万之间浮动,每天价格不同,可低买高卖,挂在中介那里,等到开价114万时卖出,卖出后可以再次购买和出售。 - 朝阴区有1000万左右的房子,最便宜约90万买入,110多万卖出,但需要支付10万中介费,利润不高,买过的朋友可以分享经验。可以外住的地点:农场、养猪厂、卫星基地、城中村的房子和垃圾回收站…… 后续若有新进展将持续更新。 对《中年失业模拟器》的建议: 1. 建议保留一些投机取巧的小漏洞,例如通过食用黑暗料理从战场返回。这类小技巧和漏洞能让玩家在尝试过程中获得额外乐趣,避免游戏过程过于平铺直叙。 2. 阿巴的专业技能目前为空,希望能增加其武力值提升途径。目前赚钱后缺乏学习武术防身的渠道,导致角色容易被击败;同时希望增加植发相关功能,当前只有假发售卖且无法增加发量,建议医院开设整形美容科提供植发生发服务。 3. 希望尽快开放服装店功能,满足玩家对服装的需求。各职业后期能不能都形成一个发展路线,正所谓行行出状元。雇佣兵通过不断提升武力值上战场赚钱拿功勋,最终能成为什么?货车司机有没有可能成为港口一霸,拿下全省的运输业务?网约车司机有没有可能自主创业开办新的网约车公司?做厨师最后是不是能在朝阴区帮富人办宴会,或者给富人当全职厨师,又或者上游船兼职、网上接单等?搬砖有没有希望成为包工头?摆摊有没有希望开店?当然,这些后期发展的可能性并非一蹴而就,以上仅为参考意见。如果后期真能实现这样的发展,那么朝阴区初始0元的房子问题或许就可以恢复了。不过我觉得大概率不会做成那样,毕竟会耗费人力和资金,而游戏售价毕竟只有29块钱。还有一个问题,这个游戏我觉得bug是我买了生发剂却不能在平时用,平时不用战斗的时候。特别是保健品打保安,打一次他们就能打死我,如果我选择喝生发剂虽然他们打不死我,但是我也不再能出招了!!!!这个是操作有什么技巧还是他就是个bug? 第一章2021/2/2 截止2021/2/2 Steam上买《中年失业模拟器》29元 这个游戏是一款单机游戏,一个35岁的油腻大叔有老婆和两个孩子,突然失去工作需要自谋生路赚钱养家还房贷,给父母治病等等…… 游戏有两种模式,一种可保存(容易)一种不可保存(困难)。个人物品中的新手指南会教你多种赚钱方式,包括送外卖、搬砖、打鱼捕虫、炒房、投资、炒股、炒币、拉货、摆摊、做主播、开公司、卖垃圾等。 赚钱路线: 一开始可以打开电脑和手机做主播,发布搞笑视频和失业生活相关内容。 当主播赚够30万后,打开地图前往港口购买船只,用船进行捕鱼,大约3天就能赚够30万回本,通过捕鱼可以积累到300-400万。 之后去商业中心租下8楼和9楼的办公室,发售总额600万的理财产品。 再坐船前往中央商务区,租用私募基金公司,发行1000万的理财产品。此时大约能拥有1600万左右资金。可投资地点:投资CBD区域的工厂(800万),投资荒岛农场(200万)及其下方的养猪厂(80万),养猪场雇佣工人更为便捷;投资荒岛农场上方标记为问号的矿洞;返回暗牛街,投资最左侧日文招牌的游戏厅店铺(70万);前往城中村购买垃圾回收站(25万);前往商业中心购买3号办公室用于经营直播公司;前往铁皮街的游轮店,将自己的船改造为游艇后出租,即使已出租仍可每日开船出海捕鱼。除游戏厅和垃圾站外,其他投资项目基本每日收入可达10万以上,虽存在每日盈亏波动,但总体而言上述投资项目合计每日收入约100万。此外,还可继续捕鱼或通过私募公司进行股票交易,低买高卖,交易仅限白天。投资卫星项目需3亿资金,该项目收益丰厚。
《GearBlocks》新手术语与概念指南 对齐 当冻结的部件靠近时,它们会自动对齐。其中一个部件的位置和旋转会“吸附”到另一个部件上以实现对齐。 要移动冻结部件,需选择一个枢轴点并使用操纵器,当它靠近另一个冻结结构的部件时,就会发生对齐。 对齐后,通过取消选择枢轴点,这些部件可以连接在一起。 连接 连接用于将结构中的一对部件连接起来,连接类型决定了相连部件的移动方式。 连接类型:
已修复 - 不允许相对移动,部件之间刚性连接。
旋转轴承 - 允许围绕单轴进行相对旋转。
直线轴承 - 允许沿滑动方向进行相对平移。
线性旋转轴承 - 结合了前两种轴承的特点,可同时进行平移和旋转运动。
球形轴承 - 允许在多个方向上进行相对旋转,同时保持位置锁定,类似“球窝”结构。
等速万向节 - 允许在多个方向上进行相对旋转,但绕主轴方向除外。例如,在允许悬架运动的同时,可用于向车辆的驱动轮传递扭矩。
指节关节 - 允许围绕单轴进行相对旋转,但运动范围有限,类似膝盖或肘关节。
空连接 - 零件未物理连接,但仍属于同一建造物的一部分。 瞄准连接点并按E键可更改其类型。可用类型取决于所连接的特定零件。 连接位置 根据所连接的零件,它们的连接位置可能有以下两种: 表面 - 在零件表面,例如连接梁和板时。 内部 - 在零件内部,例如连接轴和梁时。 建造物 建造物由一个或多个组装在一起的零件组成。 瞄准建造物并按住左Shift+Q键可打开建造菜单。该菜单包含可对建造物执行的各种操作,如冻结、保存等。冻结 当处于冻结状态时,建筑不会移动或与其他物体发生交互。冻结的建筑会以蓝色轮廓高亮显示(若被选中则为橙色)。 进行建造操作(例如添加或移除部件)时,建筑必须处于冻结状态。 可通过建筑菜单切换建筑的冻结/解冻状态,或(取决于当前激活的工具)将目标对准建筑后按下左Ctrl + F键进行切换。 齿轮 一种可与其他齿轮部件啮合的零件,通常用于将旋转运动和扭矩从一个轴传递到另一个轴。 直齿圆柱齿轮 - 可与其他直齿圆柱齿轮平行啮合,也可与冠齿轮、齿条、蜗杆和差速器齿轮啮合。 锥齿轮 - 可与其他锥齿轮成直角啮合。 冠齿轮 - 可与直齿圆柱齿轮成直角啮合。齿条 - 可与直齿轮啮合,实现旋转运动与直线运动之间的转换。 蜗杆 - 可与直齿轮啮合,能在蜗杆和直齿轮之间提供较大的传动比。 差速器 - 内部需要锥齿轮(或直齿轮与冠齿轮)。可与直齿轮啮合。 齿轮啮合 当齿轮相互之间处于正确的位置和方向时,它们会被视为处于啮合状态,运动将从一个齿轮传递到另一个齿轮。 在冻结的结构中瞄准某个齿轮时,会显示绿色箭头,以指示该齿轮当前正在与哪些其他齿轮啮合。 齿轮传动比 一对啮合齿轮的齿数之比。这会影响两个齿轮之间的相对速度和扭矩。例如: 假设你有一个由电机驱动的8齿直齿轮,它与一个连接到轮轴的24齿齿轮啮合。在这种情况下,轮轴的旋转速度将是电机速度的1/3,但扭矩是电机的3倍。 现在假设你将齿轮调换位置,让24齿齿轮由电机驱动,而8齿齿轮连接到轮轴。此时,轮轴的旋转速度将是电机速度的3倍,但扭矩仅为电机的1/3。 最后,你可以替换成一对12齿的齿轮,分别连接到电机和轮轴上。在这种情况下,轮轴的旋转速度和扭矩将与电机相同。 连接 同一结构内两个部件之间的逻辑关联。部分零件具有连接节点,使用连接工具在这些节点之间左键点击并拖动,即可创建连接。
电力 - 将电力消耗设备连接到能源储存装置,例如将电动机连接到电池。
数据 - 将数据使用者与数据源相连接。
滑轮 - 用于连接多个滑轮。 操纵器 用于变换当前选中的物体,当选择了一个枢轴点时,操纵器可用。
移动 - 始终处于激活状态,拖动圆形控制柄可向任意方向移动所选部件。
翻译 - 按R键激活,拖动控制柄可沿X、Y、Z轴平移所选部件。
旋转 - 按T键激活,拖动控制柄可围绕X、Y、Z轴旋转所选部件。
调整大小 - 按下Y键激活,拖动控制柄可调整所选部件的大小(仅在选中单个可调整大小的部件时可用)。 每个操控器也有键盘快捷键,按住左Shift键并使用W、S、A、D、Q和E键。 材质 部件的构成物质,会影响其外观和物理属性(质量和抗损伤能力)。 部分部件可通过材质工具更改其材质。 电机 一种产生旋转运动的部件类型。 电动 - 可沿任一方向持续旋转。 伺服 - 可沿任一方向旋转至指定角度。 步进 - 可沿任一方向按指定角度增量旋转。 部件 单个组件,例如横梁、轮子或电机。部件行为 部分部件(如马达)所具备的特殊行为,可进行配置和/或激活。 要激活单个部件的行为,瞄准该部件并按下E键。或者,可通过建造菜单一次性激活某一建造物中的所有部件行为。 部分部件行为可进行配置。若要配置,瞄准部件并按下左Shift+E键以打开部件行为菜单。 pivot point 选中部件上的一个位置,用于将该部件与其他部件对齐,同时也是操控器应用变换时的中心(例如旋转中心)。 通过左键点击部件上的某处来选择pivot point(必须是已选中的部件,即呈橙色高亮状态)。当选择一个枢轴点时,所选部件会与结构的其他部分分离,此时操纵器将可用。 可以通过点击同一部件或其他所选部件上的其他位置来选择不同的枢轴点。 要取消选择枢轴点,左键点击空白区域。如果此时正在对齐所选部件,它们将被连接。 滑轮 滑轮是一种可以相互连接的部件,用于将旋转运动和扭矩从一个轴传递到另一个轴。 滑轮的功能与齿轮类似,但它们不需要直接相邻就能工作。 如果两个滑轮成一直线且相距不太远,可以使用链接工具在它们之间创建链接。这会用皮带将它们连接起来,旋转运动将在它们之间传递。 滑轮也遵循类似齿轮传动比的原理,其相对速度和扭矩取决于一对滑轮的直径比。 RPM 每分钟转数,是衡量旋转速度的单位。 场景 当前的地图,以及当前生成在其中的所有零件和建造物。 任务关卡 与开放式的“创意模式”玩法不同,任务关卡更具结构性。它可能包含需要完成的目标、有限的零件选择或工具可用性,或者其他一些限制条件。 例如,任务关卡可以是教程、挑战、小游戏,甚至是全新的游戏模式。场景通常包含一个已保存的场景,以及一个Lua脚本。该脚本会在场景启动时加载,用于配置游戏并实现场景行为。 脚本模组 一个独立的Lua脚本,可随时加载,用于在游戏中实现扩展功能,例如新的用户界面和工具。 选择(或选中部件) 已冻结的建造物的部分可通过左键点击进行选择。 可以选择多个部件,例如按住左Ctrl键并点击以添加单个部件,或使用左Ctrl+A选择建造物的所有部件。按住鼠标右键打开选择菜单,可使用各种选择方式。 当前选中的部件会以橙色轮廓高亮显示。选择部件后,可通过再次点击其中一个部件上的某处来选择一个枢轴点。这会将它们与所有未选中的部件分离,并允许移动所选部件。 要取消选择所有部件,在空白处左键点击即可。 瞄准 准星当前对准的部件、连接件或结构被视为目标。 当前瞄准的部件会以白色轮廓突出显示。 工具 工具用于建造和修改结构。
建造工具 - 按1键激活。可生成或销毁零件及建筑,选择并移动零件,连接或分离零件,以及更改连接类型。
材质工具 - 按2键激活。更改零件材质。
链接工具 - 按3键激活。可在部件行为之间创建链接。
涂装工具 - 按4键激活。可为部件涂装或移除涂装。
抓取工具 - 按5键激活。可拖拽或推动未固定的建筑结构。
场景工具 - 按0键激活。可对场景中的任何建筑进行操作,即使它们离玩家较远。 按住Q键打开菜单,其中包含当前激活工具的选项。 扭矩 旋转力。 例如,施加在车辆驱动轮上的扭矩越大,车辆加速就越快,能攀爬的斜坡也越陡。 可以通过齿轮或滑轮来增加电机的扭矩,但这需要以牺牲速度为代价。


本指南主要面向【成就猎人】。达成100%成就所需时间不到45分钟。若不是为了成就,建议正常游玩并享受游戏乐趣。Just Getting Started
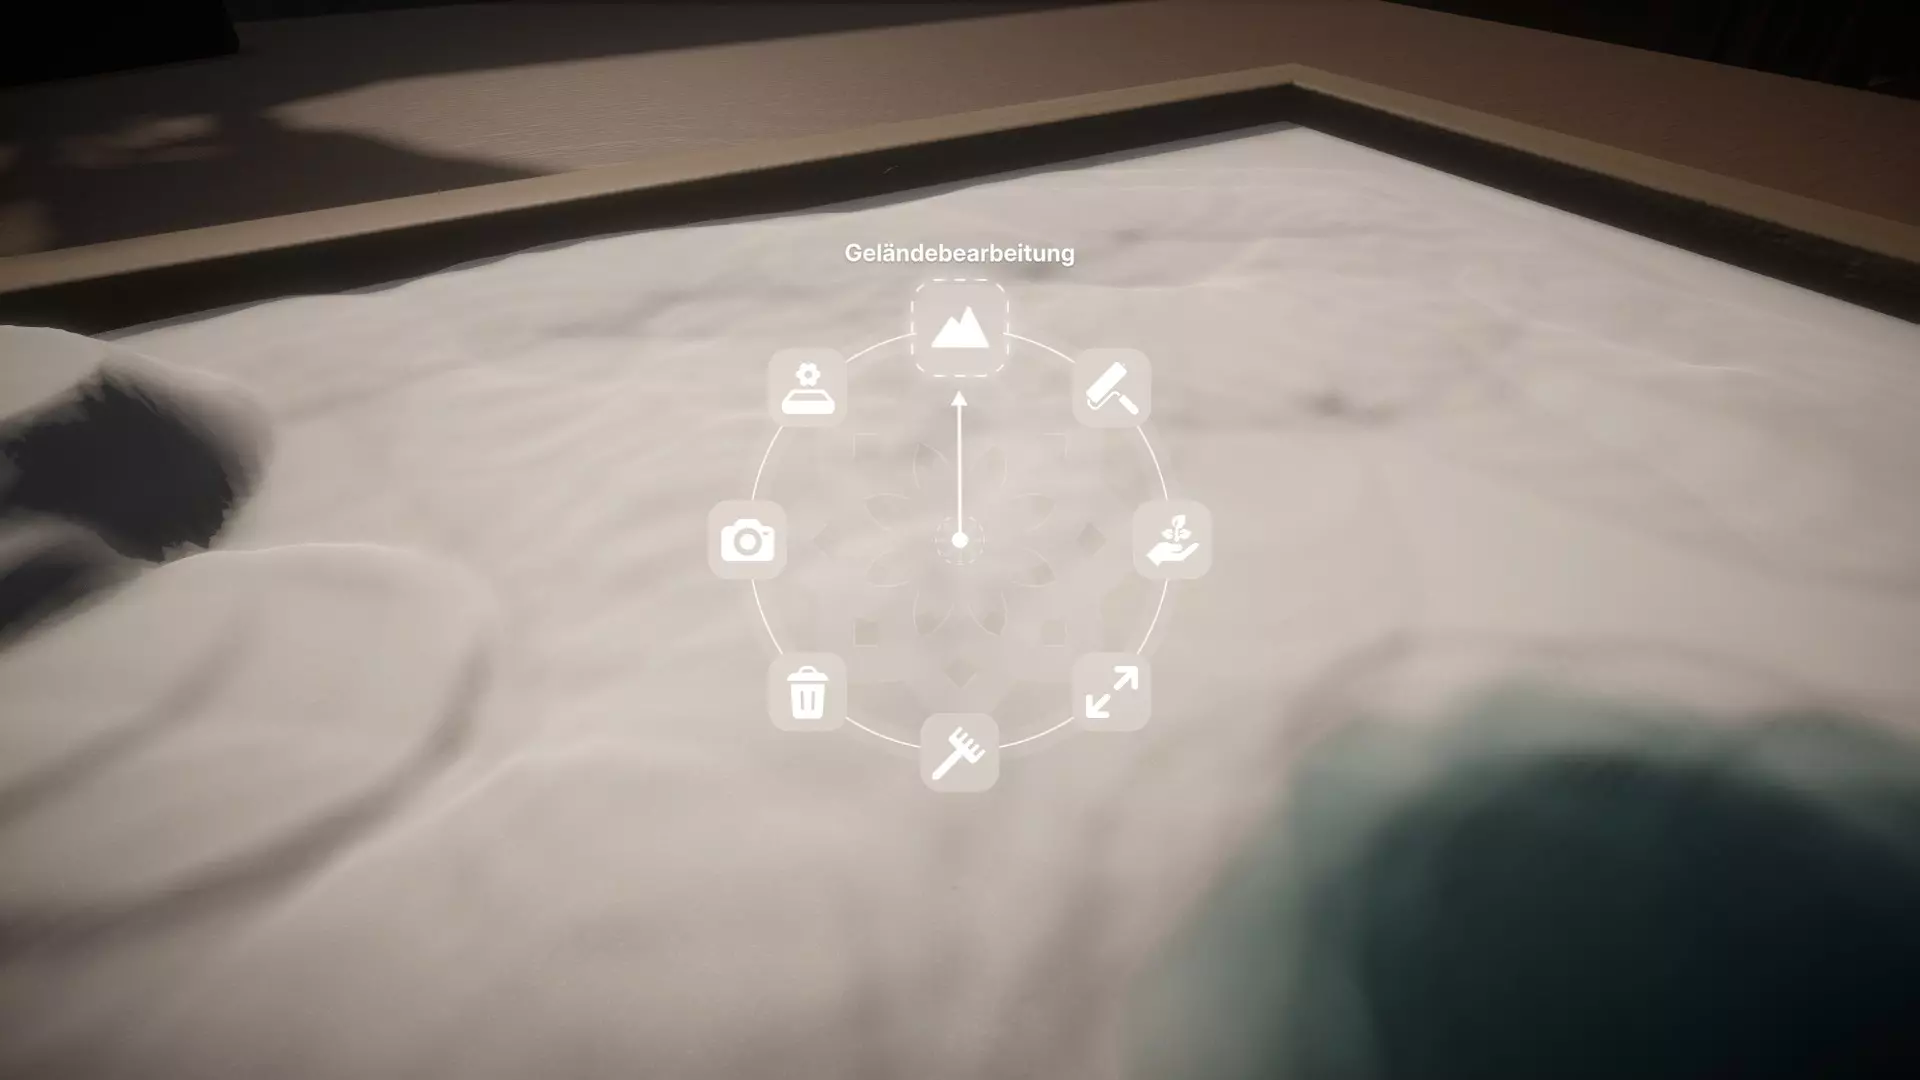
- 创建你的第一个花园 当你开始你的第一个花园时,将自动获得此成就 Shaping Gently
- 编辑地形10次 按住空格键打开建造菜单,选择地形编辑。然后在花园中任意点击10次——无论你是创建山丘还是池塘。重要的是只有点击才算数
养育,收获,循环往复
编辑地形50次。查看【Shaping Gently】成就的描述,只是这里需要点击50次。景观设计师
- 编辑地形500次 查看【Shaping Gently】成就的描述。只是在这里你需要点击500次 【Placed with Care】
- 放置10个物品 按住空格键打开建造菜单,选择放置物品。现在只需在花园中放置10个物品——我推荐小石子
填充空间
放置50个物品 查看【精心摆放】成就的描述。在此处总共放置50个物品 自然建筑师
放置500个物品 查看【Placed with Care】成就的描述。在此处总共放置500个物品
保持禅意!
- 拍摄你的花园照片 按住空格键打开建造菜单,选择拍照模式。按空格键拍摄照片
掌上天气
- 更改天气 按住空格键打开建造菜单,然后选择视觉设置。按住鼠标左键将中间的圆圈向上或向下拖动。
一抹色彩
- 改变物品颜色10次 在你面前有一块石头,点击它并简单地改变10次颜色
调色板探索者
将物品颜色更改25次 查看成就【A Touch of Color】的描述。只是现在你需要更改颜色25次 【Color Aesthete】
- 更改物品颜色100次 查看成就【A Touch of Color】的描述。只是现在你需要更改颜色100次 生命之地
放置10只动物:按住空格键打开建造菜单,选择放置物品。然后进入动物标签页或动物爪印图标,放置动物。但我是在放置了整整50只动物后才解锁了该成就。
帷幕轻落
- 观看制作人员名单至结束 按ESC键并选择【制作人员】。让制作人员名单完整播放,只需几分钟 万千花园,同一灵魂
创建10个花园 按ESC键并开始新花园。最多重复此操作10次


大家好!今天我将简要介绍如何不用鼠标完成游戏。 往下阅读了解详情。 》开始 有些人不知道这里可以使用数位板。 30个成就是不太容易的,尤其是最后8个(硬核难度)。 但总有解决办法。让我们开始吧! 》步骤1 1)安装并运行游戏! 》步骤2 2)连接你的数位板,检查是否一切正常! 》步骤3 3)进入设置。在下方,默认显示的是鼠标,将其更改为带触控笔的数位板。 》步骤4 4)退出设置,开始游戏! 》步骤5 5)前6个成就你就能顺利获得,以此类推! 》完成
《恶霸鲁尼:奖学金版》游戏内课程答案。课程:语法。
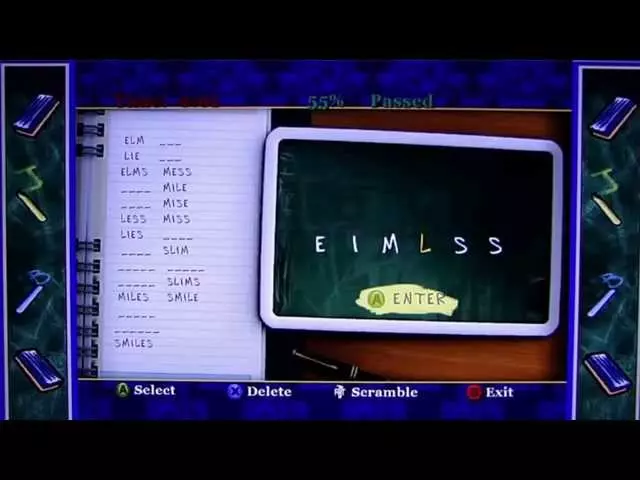
这门课由盖洛威先生授课。 课上需要用给定的字母组合拼出各种单词。 每完成一节课后,吉米要么更擅长道歉,要么更擅长嘲讽。完全学完所有语法课会很有帮助,能带来非常不错的增益。开始回答所有语法课的问题: 第一课: 猫 吠 果汁 吵架 汗 摇滚乐 嘴 奶酪 半兽人 电流 山岭 小奶酪 体育 飞溅 完成该课后,霍普金斯向小混混道歉的效果会更好。 第二课: 鼻子 黄蜂 嘴 健康 睡眠 吵架 音调 山岭 音符 洞穴 生长 玫瑰 队列 种类 呻吟 姿势 山岭 王座 绳子 躯干 肿块 完成第二课的奖励: 推搡时的嘲讽效果变得更好。第三课: 阿拉 伽姆 马特 莫尔 罗格 罗姆 罗特 托姆 托尔 阿加特 阿尔戈 原子 戈拉 格罗姆 格罗特 马特 莫尔格 奥马尔 拉玛 罗塔 塔拉 托加 托拉 托尔格 主动脉 奥塔拉 阿罗马特 格拉莫塔 完成第三课的奖励: 可以为轻微违规向学长道歉。第四课: АКТ АУЛ АУТ КИТ ЛАК ЛИК ЛУК ТИК КАНТ КЛАН КЛИН КНУТ ЛУНА ТАНК ТИНА УТКА ЛУНКА НИТКА ТУКАН УЛИКА УЛИТА КУТИЛА ТУНИКА УЛИТКА ЛУНАТИК 完成第四课的奖励: 吉米·霍普金斯的恶作剧变得更加精巧了。最后是第五课: 瓦尔 瓦尔 沃尔 沃尔 伊娃 帕尔 皮尔 波尔 罗夫 拉夫尔 利帕 里拉 奥瓦尔 奥帕尔 帕里 皮沃 皮拉 普洛夫 波拉 波拉 奥利瓦 波瓦尔 波利夫 普拉沃 普里瓦尔 普罗瓦尔 普罗利夫 普拉维洛 完成最后一课的奖励: 现在吉米·霍普金斯可以就轻微违法行为向警察道歉。 语法课结束,接下来是下一课:数学! 课程:数学。
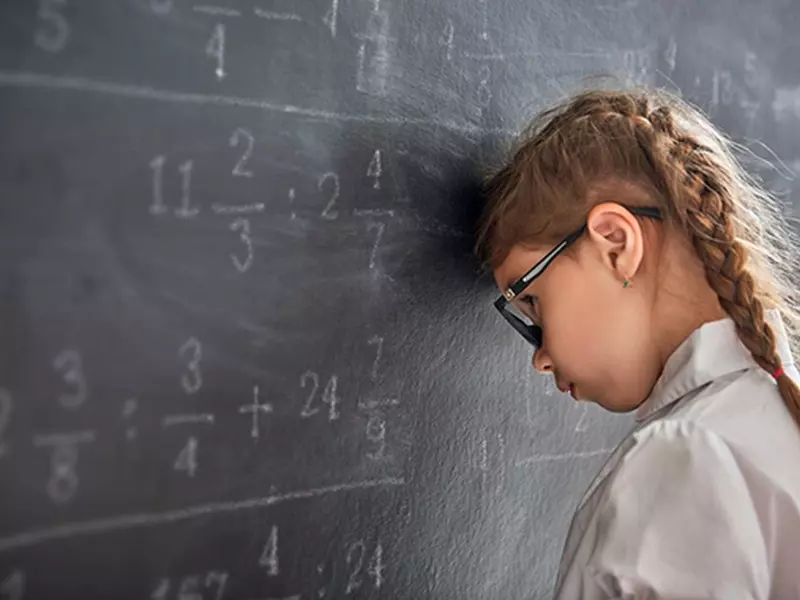
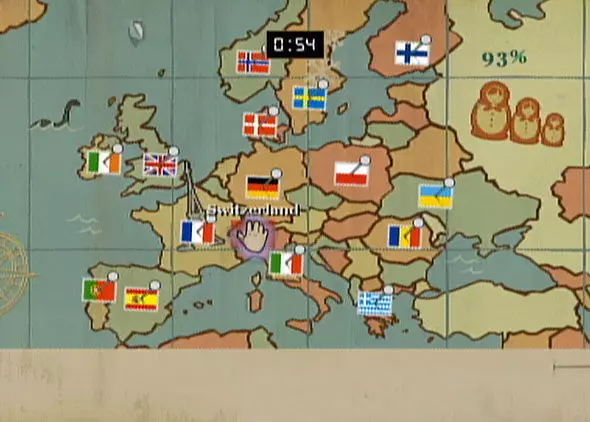
这门课由哈特里克先生授课。 这是最简单的课程。考察的重点不在于你的数学知识掌握程度,而在于你的计算速度。题目难度相当于小学一到三年级水平,但时间非常紧张。要完成课程,需要答对一定数量的题目。 第一节课:时间1分30秒,正确率不低于70%。 第二节课:时间1分20秒,正确率不低于75%。第三课:时间1分10秒,正确率不低于80%。 第四课:时间1分10秒,正确率不低于85%。 第五课:时间1分20秒,正确率不低于90%。 奖励:各种服装。 第一课: 3 + 4 = 7 50 = 5 + 45 6 x 6 = 36 三角形数量:2 哪个更小?蚊子 12 = 20 - 8 哪个更大?行星 哪个更小?203 8 + 3 = 11 1/2 = 0.5 哪个更慢?树懒 120 = 3 x 40 7 - 5 = 2 哪个更快?卡车 99 = 11 x 9 12 + ?= 21 答案:9 35 = 7 x 5 哪个更快?火箭 正方形数量:5 0.5×34=17 15-6=9 什么更快?:赛车 0.5=1/2 什么更高?:金字塔 什么更大?:-79 7+3=10 24=12×2 第一节课程的奖励是物品:【天才面具】。 第二节课程: 什么更小?:西瓜 什么更快?:树懒 三角形:3 1500=30×50 18-?=5 答案:13 什么更高?:埃菲尔铁塔 100=25×4 2=9-7 什么更大?:大教堂 什么更大?:771 什么更短?:小鸟屋 什么更慢?:乌龟 1/4=0.25 8+2=10 三角形:2 144=12×12 什么更短?:小鸟屋 55=1×55 13-?5等于8 圆形:6个 什么更快?:飞机 0.75等于3/4 15等于3乘以5 什么更小?:677 什么更大?:卡车 奖励您一件印有“I <3 Math”字样的T恤(翻译:我爱数学) 喘口气了吗?继续,第三节课: 1千克等于1000克 36等于6乘以6 什么更高?:大教堂 0.5等于1/2 360等于180乘以2 什么更小?:披萨 什么更慢?:蜗牛 16加10等于26 2加9等于11 400等于20乘以20 什么更小?:蜗牛 什么更大?:行星 10减10加7等于7 什么更小?:2234 6加5等于11 三角形:7个 6/18等于1/3 1克等于0.001千克 17减11等于6 2加7加2等于11 哪个更小?:鲸鱼 哪个更快?:鲸鱼 190减?等于30 答案:160 正方形:7个 13加8加2等于23 奖励你一件T恤 “闭上你的嘴”... 第四课: 哪个更快?:飞机 哪个更小?:0.09 三角形:7个 49等于57减8 0.625千克等于625克 圆形:8个 0等于0乘以125 哪个更大?:建筑物 6加8加?等于17 答案:3 哪个更快?:苍蝇 四分之一等于0.25 13加8加2等于23 哪个更快?:火箭 哪个更短?:麻雀 15减?等于6 答案:9 三角形:3个 哪个更慢?:乌龟 正方形:7个 3000等于50乘以60 1加4减2等于3 哪个更小?钥匙 17 + 8 = 25 1200 = 20 x 60 48500克 = 48.5千克 完成第四节课的奖励: “Hip 2 Be Square”T恤 最后……第五节课: 13 + 8 + 2 = 23 哪个更小?2234 哪个更短?狗窝 2 = 9 – 7 689克 = 0.689千克 正方形数量:8 ? + 6 – 3 = 11:8 哪个更快?飞机 三角形数量:4 哪个更大?33.8 255 = 5 x 51 0.75 = 3/4 哪个更大?桥 哪个更快?飞机 1.25 = 5/4 哪个更慢?金字塔 12 + 6 – 11 = 7 3.14 = 314 x 0.01 三角形数量:7 7 + ? + 3 = 17:7 哪个更快?火箭 哪个更短?墓碑 哪个更大?:大教堂 1/8 = 0.125 奖励是植物学家服装! 成就:账目 课程:地理。 授课老师是马瑟斯先生。 小游戏是一张特定大陆的地图,吉米需要在限定时间内用图钉标记出不同国家或州的旗帜。每次错误会使计时器减少5秒。课程及格分数为70%。 第一节课:
这里的一切其实并没有看起来那么复杂,作为奖励,你将获得一顶埃菲尔铁塔造型的帽子。 第二课:
作为奖励,你将获得赛车服。 此外,现在地图上会标记出橡皮筋的位置,这很不错! 第三课:
作为奖励,你将获得精美的熊猫服装。 此外,现在地图上会标记出【吉格】卡片的位置。 第四课:
作为奖励,你会获得一顶热带巴拿马帽。 现在地图上已标记出晶体管的位置,你可以用这些晶体管和流浪汉交换,让他教你格斗技巧。太棒了,去上最后一节第五课吧。 第五课:
作为奖励,你将获得旅行者服装。 地图上现在标记出了地精的位置。 地球仪造型的奖杯。 课程:化学。
你的任务是当按键经过屏幕底部的深色窗口时按下相应按键。每完成一节新课,按键数量会增加,移动速度也会变快。你有三次机会正确输入完整的按键组合。完成化学课后能获得什么奖励呢? 第一节课程会激活房间里的炼金工作台,此外吉米还会学会制作鞭炮。第二课——现在你可以制作臭弹了。 第三课——发痒粉末任你使用。 第四课——所有武器的制作数量翻倍。 第五课——你可以每天无限次使用工作台,而不是像以前那样每天只能使用一次。 课程:音乐
不同课程的操作方式有所不同,但课程的核心玩法保持不变。屏幕上方会掉落音符,当音符到达屏幕底部的窗口时,你需要按下指定的按键。与相对简单的化学课不同,这里需要花些功夫才能掌握按键的时机,尤其是在后面的课程中难度会更大。 要完成任务,需要积累一定数量的正确音符。每正确弹奏一个音符获得1%,每弹错一个音符扣除1%。第一节课需达到至少65%(可获得音符衬衫)。第二节课需达到至少75%(完成课程学习可获得新T恤)。第三节课需达到至少80%(本节课奖励为音符睡衣)。第四节课需达到至少85%(你将获得游行服装)。第五节课需达到至少90%,你将获得摇滚歌手服装!课程:绘画。
第一课: 需要以矩形形状揭开画作的碎片。如果成功完成,将获得新技能。你将能够通过亲吻女孩来恢复生命值。 第二课: 与第一课内容相同,但难度更高。获取加速或冰冻奖励,你就能轻松完成任务。 第三课: 任务内容不变,但障碍物更多。制作小矩形,这样你就能及时完成所有操作,不会撞到障碍物。完成这个任务后,女孩的吻会使生命值增加75%。 4级: 成功通过课程后,女孩的吻会提供100%的生命值加成。 5级: 最后一级课程会让你有机会亲吻女孩,无需赠送礼物。 课程:生物
你需要在时间结束前解剖动物。可使用以下工具:放大镜用于放大目标区域,针用于将目标部位固定在托盘上,手术刀用于切割,镊子用于取出已切割的器官和拨开已切开的皮肤。 1 课:需要解剖青蛙。奖励是肌肉图案的T恤。第2课:在这节课中需要解剖老鼠,并移除四个器官,所以请快速操作。完成课程后将获得化学防护头盔。 第3课:这节课需要解剖梭子鱼。事情并不复杂,但和往常一样,所有操作都要迅速完成。完成后将获得印有鱼图案的棒球帽。 第4课:在这节课中研究鸽子。这节课比上一节课简单。完成后将获得外星人服装。第5课: 解剖完猪后,你会在自己的房间里得到一具人体骨架和一顶猪头形状的帽子。你们成功完成了这门课的学习。 课程:体育
第一节课和第三节课是格斗课。老师会教你新的招式,这些招式你可以在打架时使用。其他课你得玩躲避球(不要和击球游戏弄混)。这个游戏的规则是用球击中对方队伍的队员,把他们淘汰出局。你可以翻滚躲避投掷,也可以把球传给其他玩家,还能跳跃。 比赛从夺球开始。快速按下相应的按键来抢夺球权。接下来需要击败对手。最有效的攻击方式是跳跃后投掷。使用这种方法,有95%的概率能击败对手,而且球很可能会弹回你这边。 奖励如下:第一和第三节课会获得新技能;第二和第四节课会提升弹弓的射击精度;第五节课再次提升弹弓的射击精度,此外你还可以在课后玩弹珠游戏。若获胜,你将获得现金奖励。 课程:摄影。
你需要在规定时间内拍摄特定物体或人物的照片。这些课程只有在第二章之后才会解锁。使用相机的方式与弹弓大致相同:切换到第一人称视角,进行变焦后拍摄。如果操作正确,你会看到相应的提示文字。 1 课程: 需要拍摄学校建筑上的旗帜照片。它们的位置已在地图上标记,因此寻找起来不会有问题。奖励是相册,你可以在其中保存照片。 2 课: 需要拍摄任意三名学生的特写照片。奖励为学校相册。 3 课: 需要在新考文垂地区拍摄四张狗或流浪猫的照片。流浪猫更容易找到。奖励是相册可容纳15张照片。第4课: 需要拍摄城镇和学校的各种景点。地图上标记了拍摄位置。奖励为彩色相机。 第5课: 在游乐园需要拍摄五个怪人,分别是美人鱼、疯狂的彩绘人、长胡子女人、连体双胞胎、骷髅人。奖励为在游乐园游戏中获胜可获得双倍票数。 课程:劳作
屏幕上会周期性出现需要按下的按键。最困难的部分是正确转动鼠标。你有三次尝试机会来完成任务。主要难点在于按键出现得很突然,你可能来不及做出反应。作为奖励,你会获得不同的自行车。 第一节课——你会得到标准BMX自行车。第二节课——你会得到复古BMX自行车。第三节课——你会得到绿色BMX自行车。第四节课——你会获得一辆蓝色BMX自行车。第五节课——你会获得一辆红色BMX自行车。此外,完成第一节课后,你将解锁游戏中的所有车库。特技自行车实在太多了!祝你游戏愉快!
大家好,我附上了当前版本的村民地图,每个红点代表一个避难所、小型敌营、战利品箱或无任何内容。我建议学习快速旅行技能并在每个地点建造快速旅行站,这样你只需看着指南针,朝着最近的标记跑去就能在各个地点之间穿梭。 城镇附近的避难所未被标记。 如果有人发现我遗漏的地点,请告诉我,我会进行更新。 避难所地图
SS0B
简介
转载steam社区指南,侵删
发帖达人Ⅰ