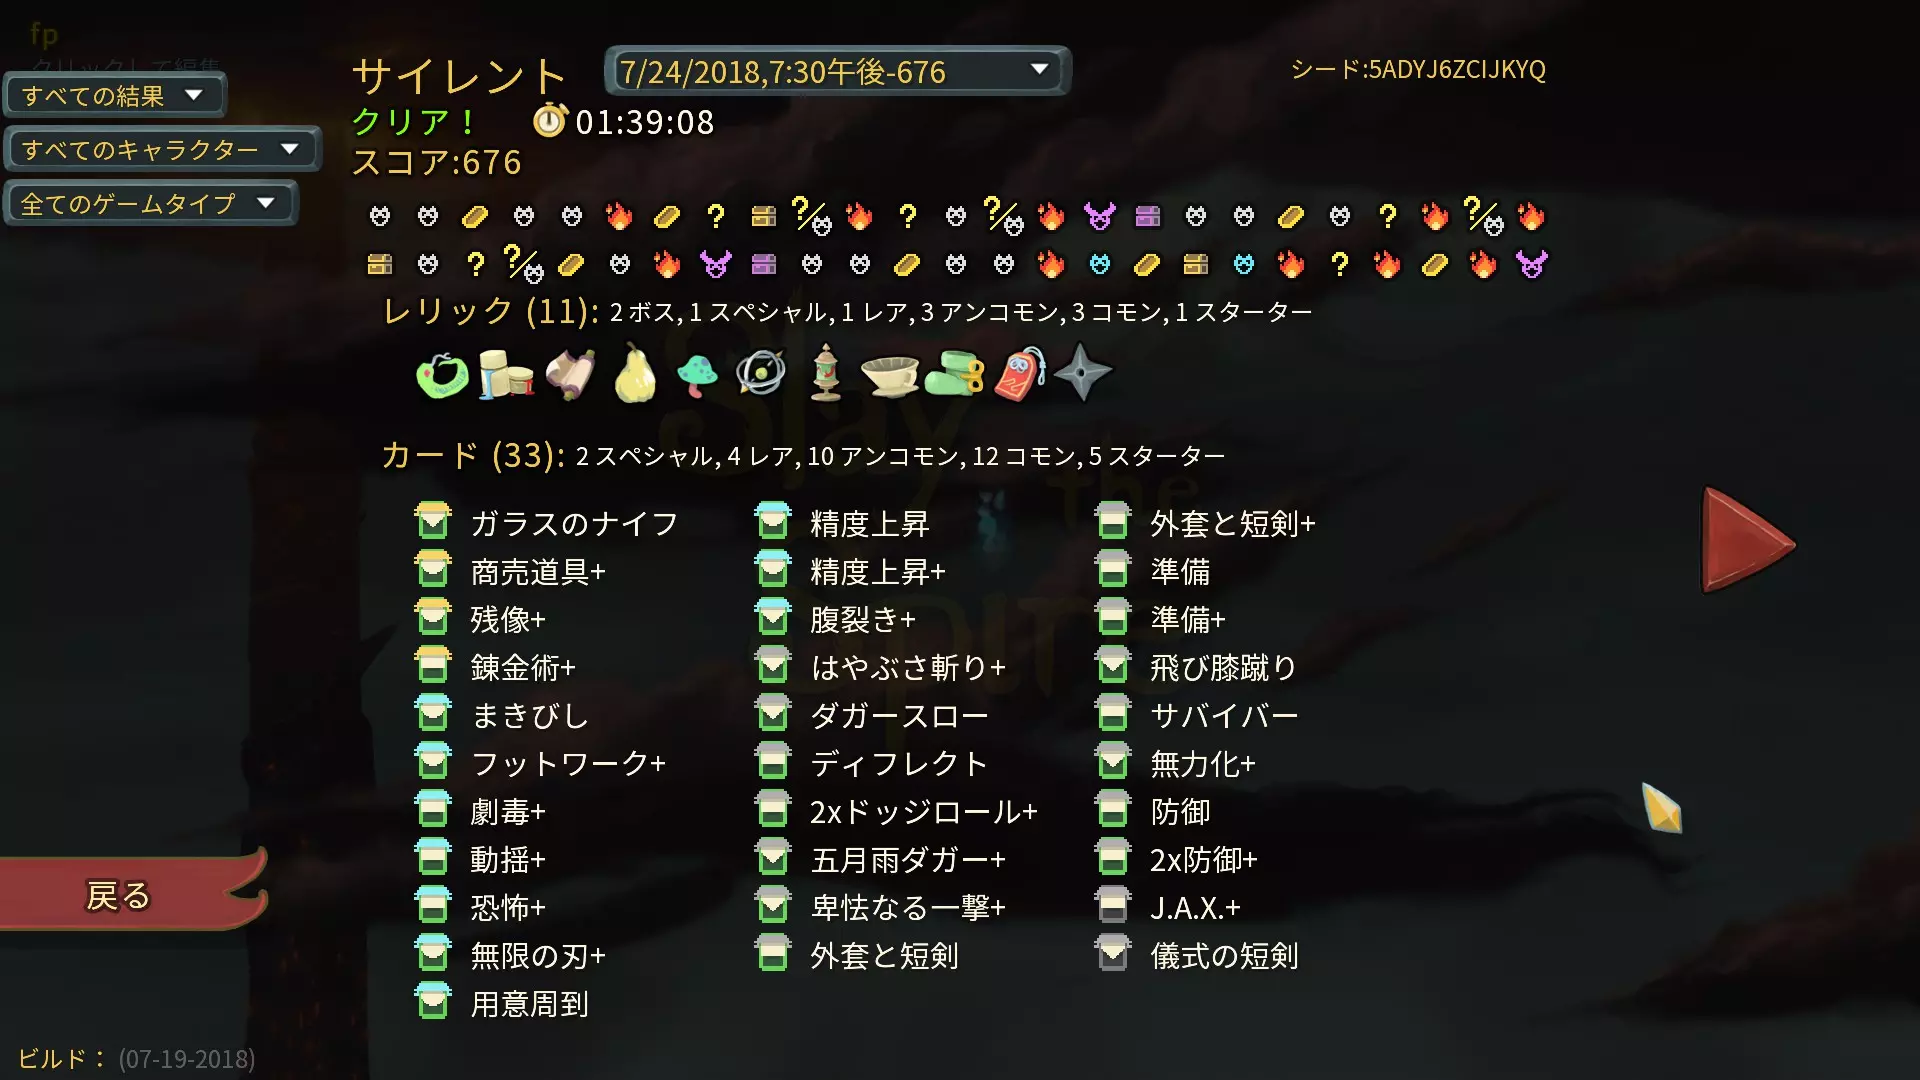
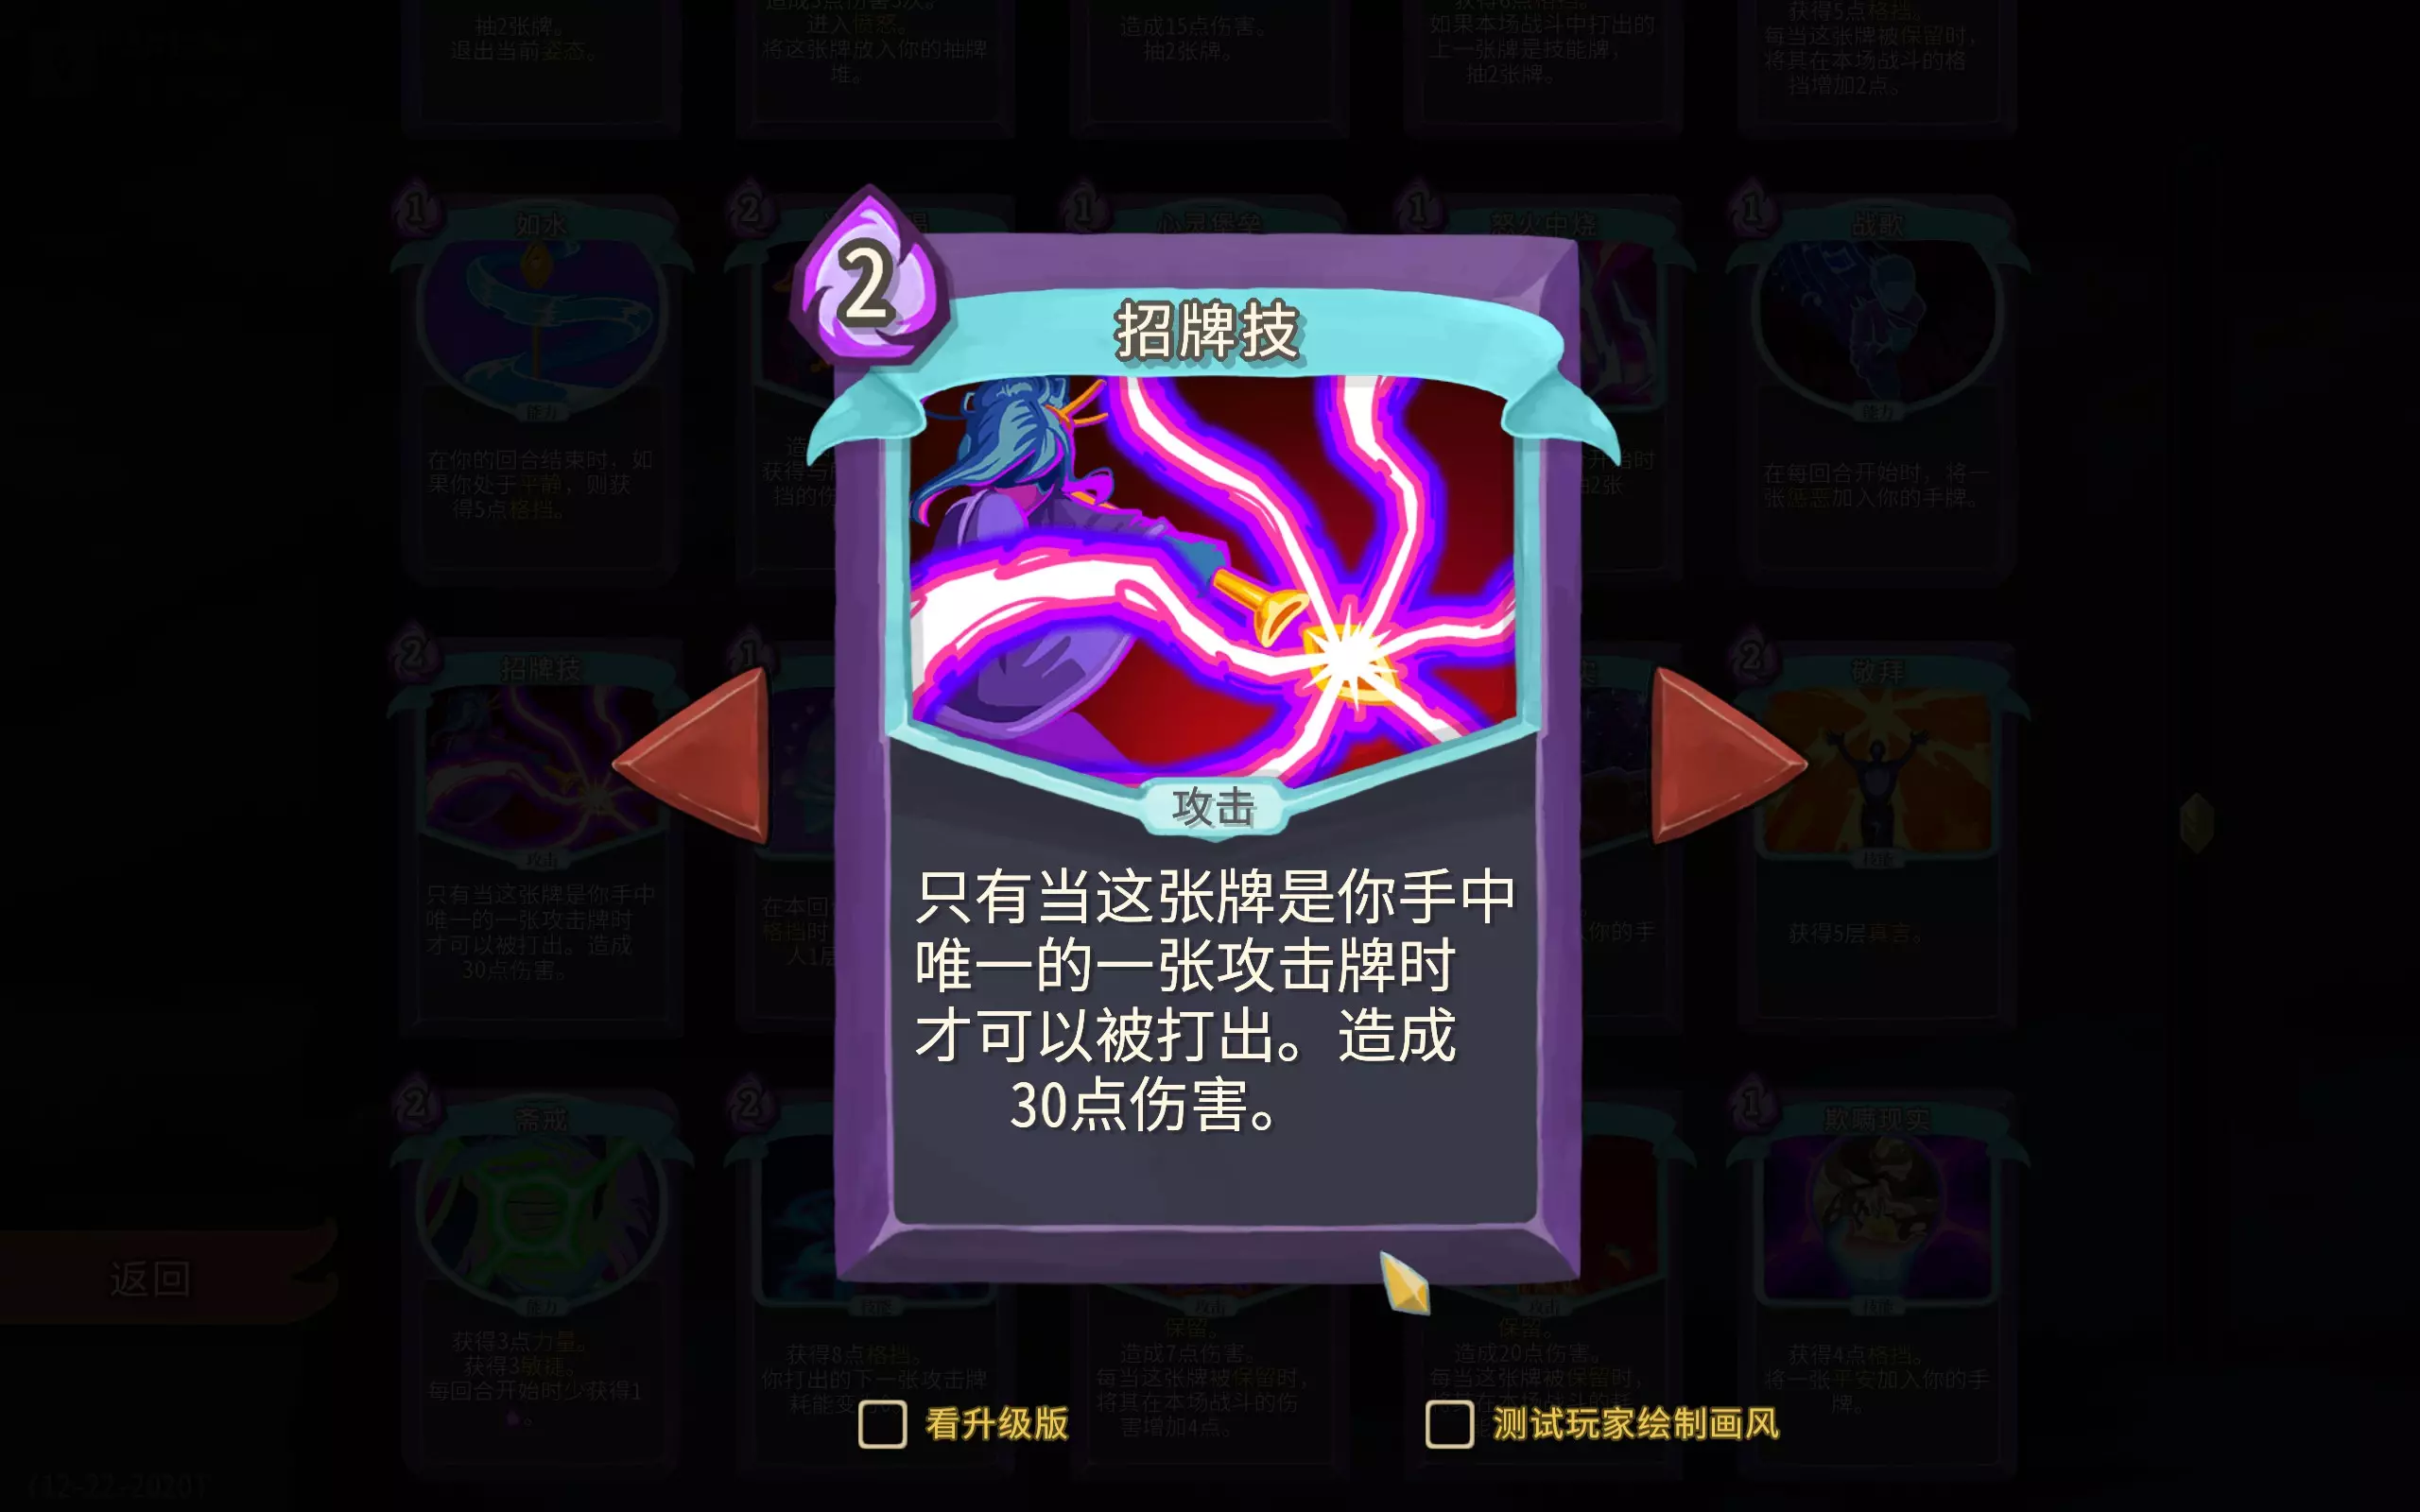
Slay the Spire

Slay the Spire

Slay the Spire

欢迎来到Slay the Spire社区! 
关注
49帖子·1新帖
游戏详情
全部
官方资讯
攻略创作
组队交友
问题反馈

修改游戏文件以显示合适的控制器图标! 步骤1:找到游戏目录 方法一: 1. 导航至“Program Files (x86)SteamsteamappscommonSlayTheSpire” 方法二: 2. 在Steam库中右键点击游戏->管理->浏览本地文件 步骤2:用WinRar打开“desktop-1.0.jar” 1. 右键点击desktop-1.0.jar->用WinRar打开 2. 导航至Images/ui/Controller,找到包含你手柄图标的文件夹 3. 将该文件夹中的内容提取到桌面上的一个空文件夹中(例如步骤3:用桌面上解压的文件覆盖“xbox360”文件夹中的文件 1) 选择新文件夹中的所有文件 2) 将它们拖入WINRAR并覆盖images/ui/controller/xbox360路径下的内容 3) 退出WinRar 步骤4:启动游戏,检查结果并享受游戏! 现在游戏中应该会显示你想要的图标了!
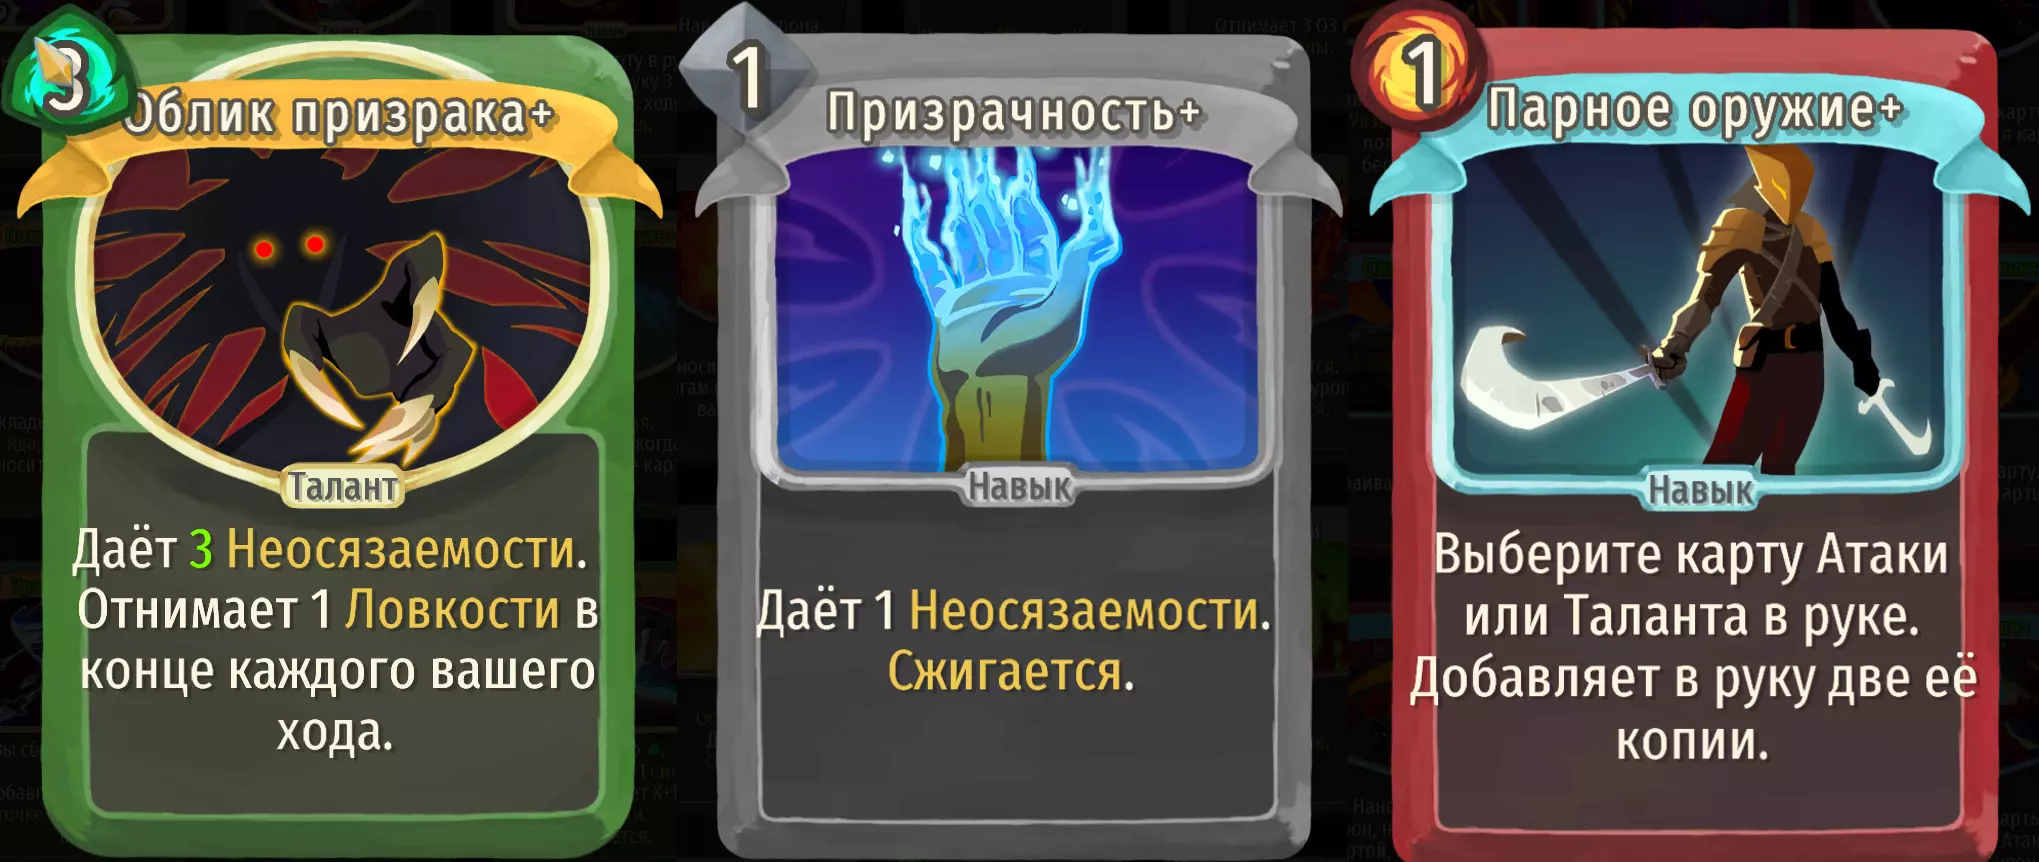
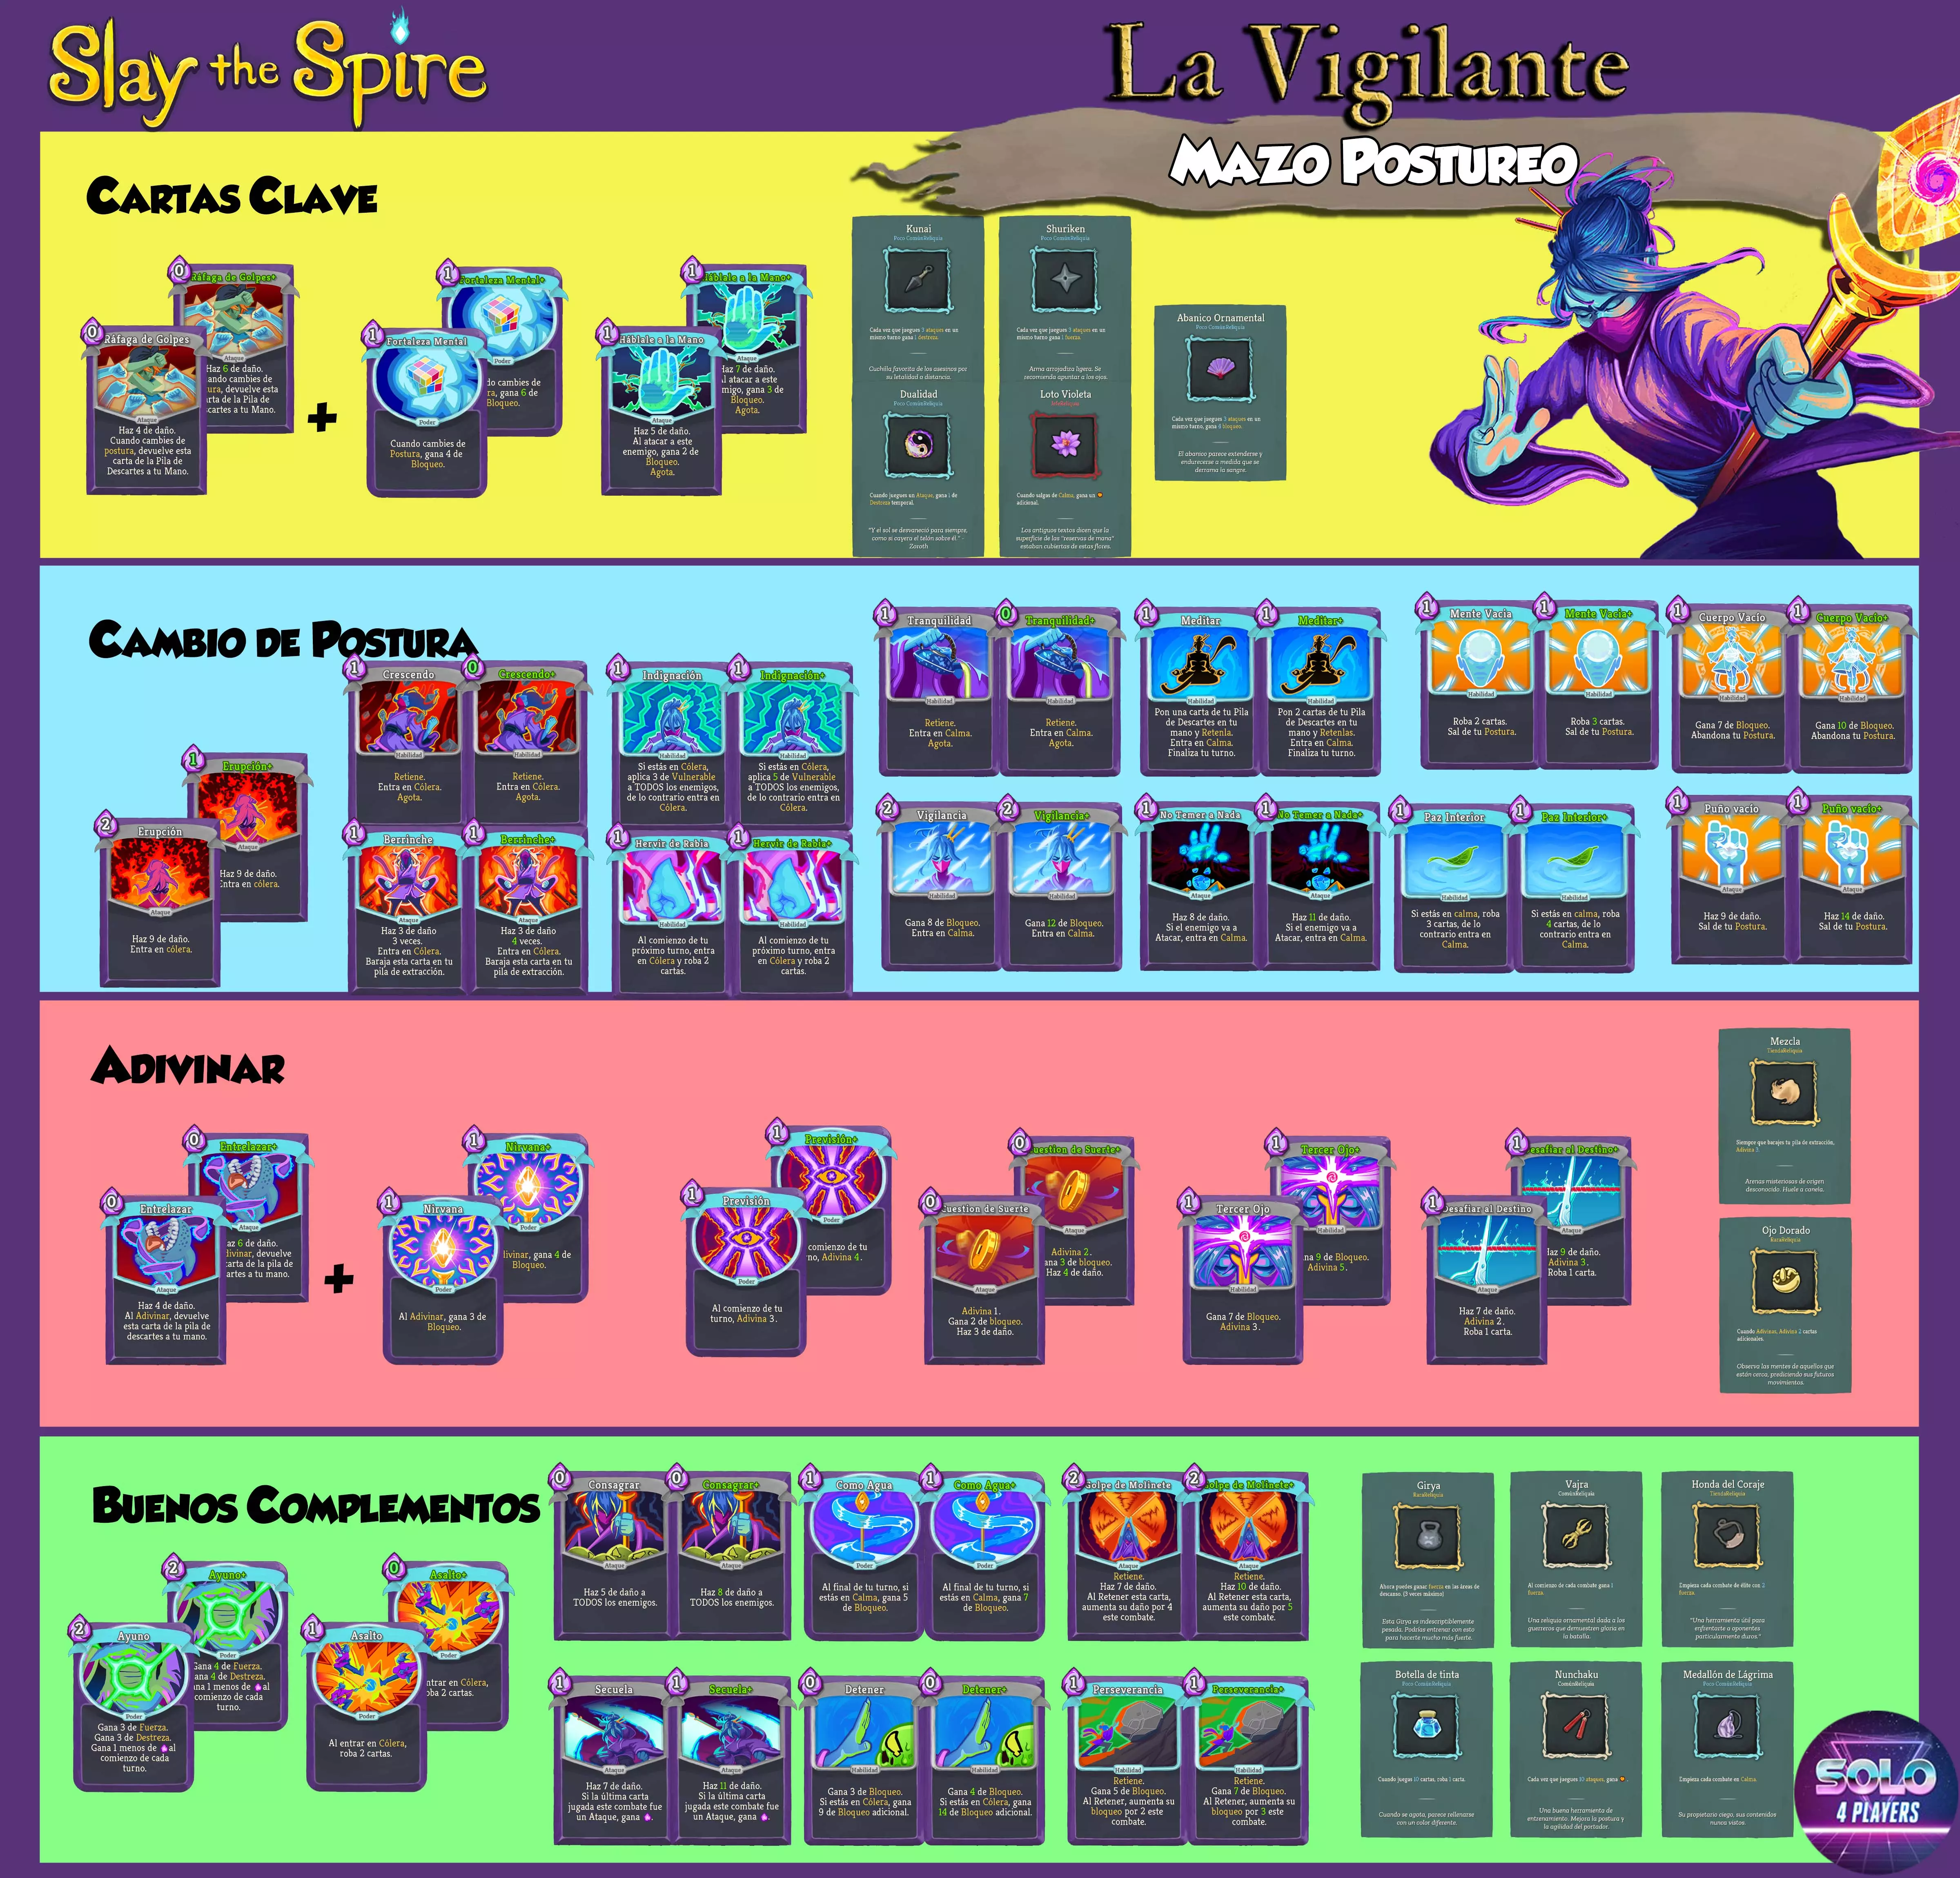
2
--
--
--
14
--
--
--

This part of the guide series deals with the basic mechanics of the game such as characters, relics, potions and more. General Background Slay the Spire is a deck-building game. Each character starts with a deck comprised of strikes, defends, and some unique cards as well as a character-specific starter relic. Each floor you ascend within the Spire will see you deal with challenges that change with every run. When you first play the game, you are restricted to Ironclad, with each subsequent character being unlocked by playing as the previous character. The Characters Ironclad's color is red. Ironclad's world is relatively binary compared to the other characters: deal damage and block damage. Ironclad treats HP as a resource, as he heals after every combat and has several cards that can either increase or decrease his HP in exchange for other effects. Ironclad also has synergy with exhausting cards, which makes removing cards not quite as necessary. Ironclad is usually much more pressed for energy than the other characters, who have more 0-energy cards and ways to acquire energy or deal damage/generate block without it. This is especially an issue with Ironclad's powers, as they're generally more expensive than the rest. Silent's color is green. Silent generally relies on shivs and/or poison, but there are runs where she may rely upon neither. She has more 0-energy cards and ways to keep her deck moving than Ironclad. Rather than exhausting cards like Ironclad, her deck is all about drawing and discarding cards. Defect's color is blue. Defect's wrinkle is his orbs. Orbs make it so no turn is a waste, as they have various effects they carry out before turns begin or after turns end along with the possibility of being evoked. Like Silent, Defect has many 0-energy cards. For Defect, the important thing is to understand what the orbs are doing and what orbs you need out. If you need block, prioritize frost orbs. If you need damage, prioritize lightning orbs. Note that dark orbs also deal damage, but only come in handy if you can evoke them, meaning you need to keep your orb generation moving to make dark orbs useful. Lastly is the best orb, plasma, which you want to safeguard if you generate it, meaning if you are to evoke it, make sure you put that energy to use. Watcher's color is purple. Watcher has stances. Wrath deals and takes double damage, Calm generates energy when you leave it, and Divinity deals triple damage and generates energy when you enter it. The generally accepted method to playing Watcher is called stance dancing, which involves changing between the Wrath and Calm stances as often as possible. In general, you do not want to end a turn in Wrath stance due to taking double damage, but it's okay to stay in this stance if the enemy isn't attacking or if you have enough block. Conversely, finishing a turn in Calm stance if you don't need the energy that turn is best as you're effectively banking energy for next turn. Watcher's deck has many retained cards, so keep the hand limit of 10 in mind, as you may sometimes need to use cards just to prevent them from limiting your card draw. Some Watcher cards also have the Scry ability, which lets you look ahead and discard upcoming cards in your draw pile. In terms of offensive to defensive, the order goes Watcher, Ironclad, Silent, then Defect. In terms of energy availability from most energy to energy starved, the order goes Watcher, Defect, Silent, then Ironclad. Deck Building For most deck-building strategies, you want your deck size as small as possible. Watcher benefits the most from a small deck. Ironclad's reliance on exhaust and Silent's reliance on draw and discard help them manage larger decks. Defect has several more nuanced cards that deal with larger decks, such as Hologram and FTL. Note that while these three characters all have ways to deal with larger decks, if you don't find their deck management cards but have been adding cards throughout the run you may find yourself in trouble. To shrink your deck, for Ironclad/Silent/Defect get rid of strikes and then defends whenever possible while for Watcher you want to do the opposite and remove defends first. If you have cards that exhaust other cards and don't have any curses to use them on, removing these isn't as critical but still good to do if you can. Also, if you find yourself with many block cards but not many attack cards, you can violate this rule and remove a Defend instead. This also means avoiding curses when you can, as they gum up your deck among their other negative effects. If you end up with a curse, it takes top removal priority, so note that it can make sense to accept a curse if the benefit is good enough and a shop is coming up. If you have reliable exhaust capabilities then it can also be okay accepting a curse. Because of this way of thinking, most colorless cards are actually a waste of gold, as they clutter your deck. Colorless cards worth considering are ones that involve card draw, cost 0 energy/invoke playing cards for 0 energy, or "Apotheosis" as their effects are good enough to ignore the trade-off. I mention Apotheosis because once it's in your deck, upgrading cards becomes much less of a priority and you can instead use campfires to rest or skip them entirely. Your card choices can also be affected by the artifacts you come across. For example if you have artifacts that limit your card plays, card draw and extra energy isn't as valuable. If you have artifacts that provide additional energy, you don't need cards that provide extra energy as much. If you have artifacts that want you to play certain cards, either in one turn or over time, those cards gain additional value. An example of this would be Orange Pellets, which tasks you with playing an attack, skill, and power in one turn to receive its effect. A trap players often fall into is planning ahead with their deck. What I mean by this is taking cards that may be useful later but currently are not. This can make it very difficult to pass Act 1 and can hurt you further if the cards you need to complete your deck don't appear. For Ironclad, an example of this is Heavy Blade, a card that is useful if you already have ways to acquire strength but sub-optimal if you have no strength. Limit Break is another example of this, where it is completely worthless without strength so it effectively acts like a dead card. Because of this, there are times where the best choice is taking none of the cards being offered. For Silent, an example would be Catalyst, as it's only useful if you have ways to apply poison. When I was new I took this when I saw it because I thought it would come in handy. I proceeded to not see any poison cards for most of the run. To expand upon this, do not start a run thinking you'll be playing a certain type of deck, like a strength deck, a poison deck, etc. There will be runs where you see zero cards for your chosen deck type, and by the time you realize it you'll have skipped too many card rewards to build a winning deck. Card and Potion Rewards The chance of seeing a rare card in the rewards increases each time combat occurs and a rare card isn't seen. Each card reward generated is affected by and affects the counter, meaning the chance of seeing a rare card increases between the first and last reward card you see after combat assuming the first and second cards aren't rare. This hidden counter resets when a rare card is seen. This hidden counter also affects shop cards, but seeing a rare card in the shop does not reset the counter. Bosses drop only rare cards. Elites are more likely then regular enemies to drop rare and uncommon cards. Upgraded cards won't drop in Act 1 (without a relic), but can drop throughout the rest of the run. The chance of seeing a potion in the rewards is set to 40% at the start of each Act. When a potion drops, the chance drops 10%. When a potion doesn't drop, the chance increases 10%. Keep this in mind: if you haven't had a potion drop in a while and all of your potion slots are occupied, consider using a potion as you're likely to receive one at the end of combat. Some potions can be used outside of battle, use this to your advantage if you need to clear a potion slot. Relics The order in which relics appear is randomized in each run. Whenever you see a relic and don't take it, it is returned to the bottom of the relic pool and will not be seen again until every other relic of its type is seen. After defeating a boss, you are provided a choice of three boss relics. Some boss relics are class-specific, and every class has a boss relic that replaces their starter relic. A unique feature of some boss relics is they have both an upside and a downside. No other relics in the game can both help and hurt you. The rightmost relic in the shop is from a pool of shop-exclusive relics. These relics can only help you. Some relics can only be found by completing events. These relics can have either upsides or downsides, but not both (except Necronomicon). Oftentimes obtaining a beneficial relic from an event means paying a price of either HP, Max HP, a potion, a card, or gold. The remaining relics are either common, uncommon, or rare. Some of these relics are class-specific. These relics can be found by defeating elites or opening chests. Chests come in three sizes, with the probability of receiving an uncommon or rare relic increasing as the chest's size increases. These relics can only help you. Conclusion After reading this guide, you should have an understanding for the game's framework. Please continue to Part 2 of this guide to learn more about traversing the Spire and what a run of the game actually entails. The second part can be found here.

--
--
--
--
--
--
--
--
--
--
--
--

Climbing Ascensions is hard. Here's a breakdown of what your goals should be as you craft your deck in each Act. The cards I mention are Ironclads, but the principles apply to all characters. Foreward What up y'all, I play Ascension 20 Slay the Spire and watched a bunch of vids and streamers to figure out the game before I got consistent, so here's some general deckbuilding principles I learned so you don't have to take as long as I did. I use Ironclad cards as the examples, but the principles apply to every character, just with some different nuances. Also note this guide doesn't take your current relics into account and they're obviously a huge part of the game, so use some common sense on if your relics make certain cards and builds better or if they shore up gaps you would need to fill with new cards otherwise. In general, if it's a full mechanic I never bring up, it's either decently obvious or too complex to talk about, and either way it's on you to piece together. As always with anything with as many nested decisions as StS, the ultimate goal is evaluating every situation individually, but even starting to assess a card pick like that requires extremely in-depth knowledge of every possible card, relic, enemy, and event in the game. This isn't meant for players who already have the game experience to evaluate their choices like that; it's just meant to help guide the learning process for newer players who are having trouble climbing Ascensions or need to get very lucky to beat A20, to hopefully turn them into 25-30% winrate A20 players and give them the foundation to improve further. If you want better results than that, you'll need a LOT more info and simple game experience than you can get in a Steam guide, but this will provide some fundamental knowledge and help you start asking the questions you need to grow. I wish I could say this is a well-thought out and masterfully written guide I've put months of work into, but in actuality it's mostly a massive comment I dropped on some dude who asked for tips in Discussions before my meds kicked in, lmao This has gone through slow and steady refinement since it was first written, and the formatting still might be flawed but frankly it reads perfectly fine, has better info than 95% of the bad takes and 'card tier lists' you find for this game, and I'm proud of it. Terminology Some of these are real, some I made up on the spot and people will look at you really funny if you say them, but they make sense to me so meh. Block: Stuff that keeps you from dying. Obviously cards that generate Block are block cards, but so are Disarm, Feed, Clothesline, and Apparition. Scaling: Anything that becomes stronger over the course of the fight, like powers, exhausting your bad cards, strength gain, or poison. Utility: Anything that doesn't directly contribute to damage or block, like card draw and energy gain. Synergy card: Card that becomes stronger when you do x thing, such as Double Tap playing a strong attack twice or Rupture giving you Strength when you deal damage to yourself. The key concept is that they do LITTLE TO NOTHING if they don't have a strong card to activate it. Generally, you don't want to take these unless you already have an Enabler. Enabler: Card that does x thing to activate a synergy card, such as Combust activating Rupture's effect or Shockwave changing Dropkick from 'deal 5 for 1' to free damage and infinite potential. A good enabler is strong enough to take on it's own. Special mention to Feel No Pain and Evolve: while they seem like Synergy cards, enough enemies will add status effects to your deck, and enough Ironclad cards will say 'exhaust' anyways that I consider both enablers. Exploiter: Card that does x thing to activate a Synergy card, but it's pretty bad unless you have the Synergy card in play. Examples: Bloodletting exploits Rupture, Fire Breathing and Wild Strike exploit Evolve, Exhume exploits Feed and Reaper. Typically, only take if you have the Synergy card. If you add too many Exploiters, you lower your chances of drawing your Synergy card, and your deck becomes far worse. But, some of the strongest combos in the game are Exploiters and Synergy (Power Through and Evolve+, Corruption and Dark Embrace, Nightmare and *insert Silent combo of choice here*). The line between Exploiter and Enabler can be a bit blurry, so use your judgement on which a card is when you're offered it. Special mention to Dark Embrace, which feels like it should be a Synergy card, but because drawing after you spend energy and exhaust cards is much, much worse than drawing after you play a 0 cost exhausting skill, I consider to be an Exploiter. Act 1 The first enemies have tiny HP pools and don't do much too much damage. All elites have low HP, but scale very quickly, so you need to kill them in very few turns. Find any 2-3 damage cards ASAP, then a mix of good block and utility cards + 2-3 more high-quality damage cards. Card draw sucks right now, because you have no energy to work with and very few strong cards to draw into. 0-cost cards take advantage of your low energy and excess draw though; Anger is particularly strong in Act 1 especially and helps solve a lot of early fights by offering both front-loaded damage and scaling after the first reshuffle. Energy gain is also pretty trash, because it'll usually only let you play an extra Strike. Exhaust-other cards aren't that strong yet either, for the same reasons. Long story short, get enough damage so that your card draws are meaningful and you can spend energy in efficient ways, then worry about filling out your deck. Elites in this Act make the front-loaded damage priority even bigger. Nob punishes adding too many skills + requires dealing ~90 in 3 turns, Lagu demands killing in ~7 turns max (not counting sleep time), and Sentries punish not being able to deal 40 damage in 2 turns by usually just killing you. Think carefully if you can meet these numbers; Ironclad gains a lot from early elites, and some relics and Rare cards will go a long way towards winning the run already, so very heavily consider adding subpar damage cards if it means you can fight an extra one. Probably don't skip many card offers, probably don't take any Exploiters. Enemies have low HP, so don't prioritize scaling yet unless you're offered a premium card. Ironclad removes Strikes over Defends in almost all runs, since his damage commons are pretty good and (arguably more importantly) Corruption makes Defends free + remove themselves. Priority changes based on Bosses: Slimey Boy: Take a bit more damage, esp. energy efficient damage like Anger. You'll block the least against this boss, compared to the other two. Vulnerable makes it much easier to get a good split before the big attack. Only time I'll get much into actual fight strategy, but the decision on whether to split before or after the first slam is one that will heavily influence your card picks during this Act. Guardian: No real changes. Grab some extra block if you can afford to, ideally you'll make about 10 per turn during Defensive phase. Flame Barrier and Disarm are particularly good here. Hexaghost: Find at least one scaling card, preferably more if you aren't offered garbage. His HP pool is huge and he scales pretty hard with strength gain and adding Burns to your deck. Bash+ is also a huge boost against this boss. You probably won't win if you take more than 8 turns to kill, since after the first Inferno about a third of your deck will be Burn+'s. Once again, Flame Barrier and Disarm are very strong against the many multiattacks, but scaling damage is more important than against Guardian. If you've got everything you need, start the Act 2 priority list to prep for next Act. I usually finish with ~18 cards in deck. Your First Boss Reward I won't talk about relics much in this guide, but this is a good time to get some general ideas out because the Boss Relics have a huge influence on the power of cards. Ironclad has pretty expensive cards in general, and some of his most important are 2 or 3 energy. Having 4 energy is a huge benefit for this character, and it's pretty well-accepted Ironclad is the best character for Snecko Eye. Keep this in mind, it'll be very rare you can win only the base 3 energy unless you have a really, really good way to go infinite quickly. Ironclad's unique Boss Relics are pretty trash though (shoutout to Runic Cube having anti-synergy with his 'end of turn' self damage and just discarding cards for you, real neat mechanic /s). Your first 3-choice rare is here as well, and it's often the hardest pick in the run. Corruption is a doozy here; it's not at it's best yet in Act 2 and is usually a serious detriment during the first few hallway fights (which are extremely testing for every character), but it's pretty undeniably Ironclad's best card in the long run and has the potential to give basically free wins with any combination of Dark Embrace, Dead Branch, Feel No Pain, or an infinite which is now 100x to exhaust into. Feed is a similar short-term detriment with potential to win the run for you later, but it also is solid damage for the cost and so is a bit easier to work around. Author's note: Not sure why I backtracked so much on this when I wrote it. Unless you have an incredibly good reason not to, just take Corruption. The benefit of building a high-damage Act 1 is it lets you take enablers that may single-handled win the run but aren’t at their best yet. If you have enough game knowledge to know that Offering is 2.5% better because of x synergy and y upcoming fight, you’re probably not the target audience. If you are the target audience and some of this has been new information, you can probably benefit from taking Corruption more. Leaving it up for context though. On the other hand, there's plenty of options to help you stabilize for Act 2. Immolate solves a lot of AoE fights, Fiend Fire is incredibly good front-loaded damage with an upside (easier infinites, only 2 energy so you can still play a good card first before you exhaust your trash Strikes, Defends, and damage commons), Impervious is insane against some of the big-damage turns coming up, and Offering is useful for nearly every Ironclad deck ever. Like I said, this is a hard choice and has a serious impact on your run, so think long and hard on whether you can leave the early Act 2 hallways ready to fight elites already, or if you need to shore up your weaknesses now and find solutions for late game later. I can't give you a universal answer, but if you're stuck lean towards early power; fighting Act 2 elites is essential to finding the strong relics and rares you'll need to beat Act 3, and you'll have plenty more card picks before then. Second author's note: I lied, this is only a hard choice if you aren't offered Corruption. Act 2 Get ready, because enemies now hit much harder. The first floor of Act 2 is infamous for making your deck look like trash. On the brighter side, hallways don't have too much more HP yet, so flat damage is still pretty strong. There's a few notable hallway fights that need a specific answer to watch out for; Birds need to be answered with non-attack damage or 4+ attacks per turn (Flame Barrier, Whirlwind, 0-cost attacks, multi-hit attacks are common solutions), multiple fights will punish overly defensive decks with Frail, scaling, or unique curses (mostly the Chosen), and Snecko will punish relying on an infinite already. There's also PLENTY of fights that don't demand a specific answer but hit like a truck, so some solid defense is becoming essential. Find an answer, a bad hallway will lose the run if you can't fight any elites this Act, even if it doesn't kill you outright. Ironclad is too reliant on rare cards and relics to have a subpar Act. 2 out of 3 elites are multiple enemies (Slavers and Gremlin) so strong AoE is much better, and 2 out of 3 also scale hard (Gremlin and Book) so some combination of fast damage, scaling block, or rapidly scaling damage is needed. Act 2 boss is typically the first time in the game scaling is 100% essential, so find SOMETHING before then. Act 2 events have some of the best in the game: Upgrade all Strikes/Defends ,Book (Necronomicon!!!!!!!!), Apparitions, Coliseum. Consider prioritizing events over hallway fights based on whether those are good for you, because Act 2 fights are particularly hard and several events are nearly run-winning. Priorities: Adequate burst and AoE, way more block than Act 1, and at least 1 scaling card. Start looking to pick up strong Enablers like True Grit+, Fiend Fire, and Evolve if you don't have many Synergy cards yet; they're important to overall strength, so widening the pool you can take from helps a lot with consistency. Take Synergy cards if you have their Enablers. Potentially pick up a strong Exploiter or two, but don't go overboard. You're pretty screwed if you add so many that you can't draw your good cards in the first place. Skip more than you would Act 1, since you're probably strong enough not to take every card you're offered by now. I usually end with somewhere between 22 and 28 cards for a rough estimate of how often I skip. Priority changes based on boss: Champ: Prioritize slow scaling. Pick up extra scaling cards, pick up extra block cards so you can keep him in his passive state for longer, and ideally find some way to take him from 221 to 0 hp in three turns. Special mention to True Grit+, which lets you exhaust to a high-damage hand while still blocked during Phase 1. Infinites are particularly good here; you have all the time in the world to set them up. Enrage cleanses all debuffs, so lower your priority on applying debuffs and Disarming. Bronze Automaton: Either prioritize decently fast scaling, or raw damage. Most decks will need to find a way to survive Hyper Beam on turn 6 (usually block ~25, take 25 damage or something), but the bigger problem is eventually it'll just alternate between buffing strength and double-attacking for a ton of damage. Kill it before then; with only 320 max HP, either scaling up to it or just attacking it a bunch are both viable options. Collector: Building a deck towards Collector is very similar to building a deck towards killing Act 2 elites, so the priority doesn't change much. Act 3 Enemies now do broken things, nearly always have scaling damage, and have massive health pools. Elites also do broken things, scale, and have high health. Shockingly, Act 3 and 4 bosses do too. Your main goal of this Act is therefore pretty simple. Add scaling to your deck, and also do broken things. Priorities: Scaling, scaling, scaling. Synergy and relics will be your main sources of it, since Ironclad doesn't have many single-card scaling engines (besides Corruption). Add premium exploiters and enablers like Exhume, Dark Embrace, and Burning Pact. You also need to survive long enough to play your synergies and scale; premium block cards like Flame Barrier, Power Through (with enablers), and Impervious are great additions, and premium card draw like Burning Pact or Pommel Strike+ help you draw your strong cards. Skip nearly anything that doesn't help you do one of these things; odds are, your deck is very strong now, and just needs a few key cards to help finish it. Removing Strikes or Defends is also incredibly good now (always has been tho). I usually end with ~28-32 cards. Priority Changes based on boss: Straightforward enough I considered not writing this, plus on A20 you have to fight one you don't know in advance so you need to prepare for all of them. Donu/Deka: Some extra scaling, mostly just a hard, no gimmick fight. Time Eater: You want to play less cards, so add scaling so your cards do more. Dodge 0-cost cards. If you've been relying on an infinite, figure something out ASAP. Execution for this one can be particularly hard, play to your outs, do the math if you have to, and be careful drawing a Void at the wrong time doesn't ruin you. Awakened One: Powers are obviously worse than usual. Burst damage helps with Cultists, but otherwise just more scaling. Scale enough in phase 1 and phase 2 is free. Ironclad's best option here is usually exhausts. Big block cards like Impervious and Flame Barrier get extra mention, because the multi-attack turns hit much harder than the normal ones. Act 4 I considered whether or not to 'plan for' Act 4 in the rest of the guide, and ultimately decided it'd be easier to make a single section of the general things you need to win a Heart fight, and where to pick them up instead. The Act 4 elite is hard, but doesn't test for anything unique. If you've built your deck for Act 3 bosses and the Heart, odds are it'll be reasonable for the elite as well. Some extra front-loaded damage to try to kill Spear in 2 turns (180 HP) can help shore up a weaker deck though, since Shield will hit for 40 on turn 3 and ideally you have defensive scaling or at least all of your energy free to block it. The biggest change in Act 4 is the Heartbeat, which punishes you for playing lots of cards, the damage limit per turn, and the statuses shuffled at the end of turn 1. At bare minimum, it takes 4 turns to kill the Heart, and infinites that don't generate at least 2 block per card will start damaging you (Rage is a good solution if you aren't using a Shrug It Off or gaining block from relics). It also generates Artifact charges, so you need a way to remove them if debuffs are essential to your gameplan. A deck therefore requires plenty of block and plenty of scaling to win, along with enough card draw to mitigate the missed draws from status effects the Heart shuffles in. Typically the decks that kill the Heart will be pretty balanced decks, that sometimes add in a few Heart-specific cards to help. Some examples of Heart-specific cards are Flame Barrier(+), which deals 60 (90) damage against the multi-attack turn, Disarm and Dark Shackles, which can mostly nullify the multi-attack if the Artifact charges are removed, and Fire Breathing (+), which isn't necessarily amazing but does deal 30 (50) damage just on one full draw of Heart statuses. Remember this is also an execution test; don't be the guy who breaks their buffer on a Heartbeat or draws all but 2 cards turn one and has nothing but statuses to block 40 the next turn. As for building during Act 4 itself, you just need to evaluate a pair of fights, and what will deal or block the most total damage during it. Use your last shop wisely! A Few Notable Ironclad Cards Card value changes very, very dramatically based on the deck, relics, and the upcoming fights, so take this with a grain of salt. This list is best used by either new players who are having trouble evaluating how good a card is in a given situation, or just people who don't quite understand how I categorized cards. Cards don't lie in a single category either; Clothesline is reasonable damage in Act 1 and solid block in Act 3, and if you're dealing 60 damage turn 1, Anger might be the best block card you're offered if it lets you kill the average Act 2 enemy before it attacks. Keep infinites in mind too, they're listed on the wiki and Dropkick is easiest to reach. Ironclad has the unique ability to exhaust down to an infinite while still having the advantages of a 30+ card deck, so give extra thought to picking up a card that could potentially allow an infinite if you've got the tools to exhaust your deck quickly and vice versa. Here's a non-exhaustive list with a few cards to look out for, very roughly by 'tier' in each category: Good damage commons/uncommons for Act 1: Carnage, Uppercut (w/ upgrade, much lower without), Anger, Blood for Blood, Whirlwind Premium damage: Immolate, Fiend Fire, Bludgeon, Dropkick (if deck has potential to go infinite) Premium block: Feed, Feel No Pain, Impervious, Reaper, Flame Barrier, Disarm, Power Through (if deck can kill in one-two shuffles, or has exhaust/Evolve synergy) Premium utility: Offering, Evolve, Battle Trance, Shockwave, Burning Pact Premium scaling: Corruption (take this 99% of the time), Feel No Pain, Spot Weakness, any 'exhaust a card' Premium Synergies + Exploiters if you have an enabler: Dark Embrace (with Corruption), Barricade (with Corruption or weird decks with a ton of block), Exhume, Power Through (Evolve, Fiend Fire), Blood for Blood, Juggernaut (usually armor relics, not cards. Metallicize is still bad), Rage (infinite support) Trap Cards These are some cards that look really good and new players gravitate towards them, but aren't nearly as good as they look due to requiring a specific synergy or just being flashier than the effect deserves. Please note this doesn't mean these cards are BAD, just that you should probably evaluate them lower than you are. Think carefully before you take them; sometimes the synergy is run-winning, other times it's an easy way to lose the game. And remember, "themed" decks are almost always suboptimal (fall under for the "too many exploiters" issue), but individual pieces of the package are often good enough already. Barricade and Body Slam, + Juggernaut: These both have the same problem; they're at their best when you can make a ton of block every turn. But the thing is, if you can make a ton of block every turn, any damage scaling will win the fight, and you don't need to do Barricade + Body Slam or Jug damage to win. It's also often too slow a strategy against some hard-hitting enemies like Reptomancer in Act 3, and can be difficult to put into play without taking high damage. I rarely take Barricade, but it can sometimes be very strong with solid block (especially Impervious) and an Entrench already. Juggernaut should be treated as a low-tier damage card, and outside of some niche relic synergies probably only taken if you have plenty of block and desperately need any damage. Fire Breathing and "status decks": Long story short, decks filled with Curses, statuses from Wild Strikes and Power Throughs, and Evolves are only good once Evolve and Fire Breathing are in play, and having Curses and bad status cards in your deck make it harder to draw them. I'll pick up a Power Through if I have an Evolve, and only a Fire Breathing if I am desperate for damage and have a lot of statuses already (or really, really need to beat Hexaghost). Limit Break: If you have enough Strength that this is noticeably more scaling than Spot Weakness or Inflame, you've probably already scaled enough to just win the fight. Also, does nothing if you draw in the wrong order. I'd usually only take it if I have a particularly small deck, and I'm looking to exhaust down into a Limit Break+, some block cards, and an attack. In rare cases where relics give ~3 or more starting strength, it could be quite good though. Heavy Blade: Same general weaknesses as Limit Break, with the addition that Twin Strike and Sword Boomerang will offer about the same amount of scaling at 1 energy. Demon Form: Too slow, too much energy. You can't afford to take 24+ damage for playing a 3-cost card in Act 1 and 2, and it's a bit too slow for most fights in Act 3. BUT, it's basically Ironclad's only single-card scaling engine, so it could be a necessary pick if you have none going into Act 2 bosses and Act 3. Final Notes Slay the Spire is a complex game, and the notes here will never be able to cover every situation. This guide is only meant to be a very general idea of what to look for as you pick cards, and absolutely is not a surefire method. Keep an eye out for special synergies, opportunities to go infinite, and cards you absolutely NEED to win an upcoming fight. There's also 1,001 ways to win in Slay the Spire. You might absolutely love Barricade decks, but building towards it from floor 1 is almost never the most consistent way to win, nor is taking every Barricade that's offered. This guide is meant to aim towards consistent wins, not the strongest possible decks. I also don't play the game perfectly (no one does), so use your best judgement there too! Good luck on your future runs!

--
--
1
--
--
--