换一换
换一换 


本标题可能存在商标侵权问题,但本指南包含我关于《杀戮尖塔》玩法的原创思考。本指南主要针对【静默猎手】,但其中一些通用思路也适用于其他角色。本指南的目的是教你如何更深入地思考《杀戮尖塔》,而非提供一步一步的流程攻略。我们假设你大致了解游戏玩法,并且希望学习如何玩得更好。我们将一起进行一场A20难度的游戏,我会尝试向你解释我的决策过程。我认为本指南非常出色,因为我在进行游戏的同时开始撰写,因此游戏的结果完全不确定。已更新至V2.2版本补丁。免责声明: 本指南基于A20难度撰写。原因是A20难度下可行的策略在A0-A19难度下同样适用,但反之则不然。 本文可能包含一些讽刺性评论,特此提醒。 状态:95%完成 A20难度心脏击杀是在V1.0版本中完成的。 本指南已基本更新至V2.2版本。 本指南最后更新时间为2020年12月20日。 本指南已基本完成。虽然还有一些内容我可能会考虑完善或补充,但我目前比较忙,有其他事情要做,还要支付账单。如果你希望我更快完成本指南——那很遗憾。这只会在我有空余时间中的空余时间(也就是当我足够无聊愿意去做的时候)完成。已完成:A20心脏击杀,包含卡组构建/决策点的截图 整体通关分析 附录: -精英怪说明 - Boss遗物说明 - Boss说明 -药水说明 待办事项: -整理分析内容,使其更易读 -补充之前提到需要添加更多细节的部分可能的讨论方向: - 商店中值得购买的遗物 - 事件选择 - 初始奖励讨论 - 需避免的卡牌/泛用性强的卡牌/卡牌相关讨论 静默猎手: 初始属性:59/66(当前/最大)生命值 99金币【从A6+难度开始,每次 run 初始时处于受伤状态;从A14+难度开始,最大生命值降低】 初始牌组:5张打击(5点伤害) 5张防御(5点格挡) 1张中立(3点伤害并施加1层虚弱) 1张求生(8点格挡并弃置1张牌) 1张攀登者的诅咒(诅咒牌,无法使用,无法移除,仅在A10及以上难度出现) 第一幕(第一部分): 开始:当你开始 run 时,尼奥会提供初始奖励(以下简称“立志攀登尖塔者的超棒队友”或DATASS)。如果你在上一轮游戏中未到达第一个 Boss,将获得 2 个初始奖励选项;若已到达,则会获得 4 个初始奖励选项。
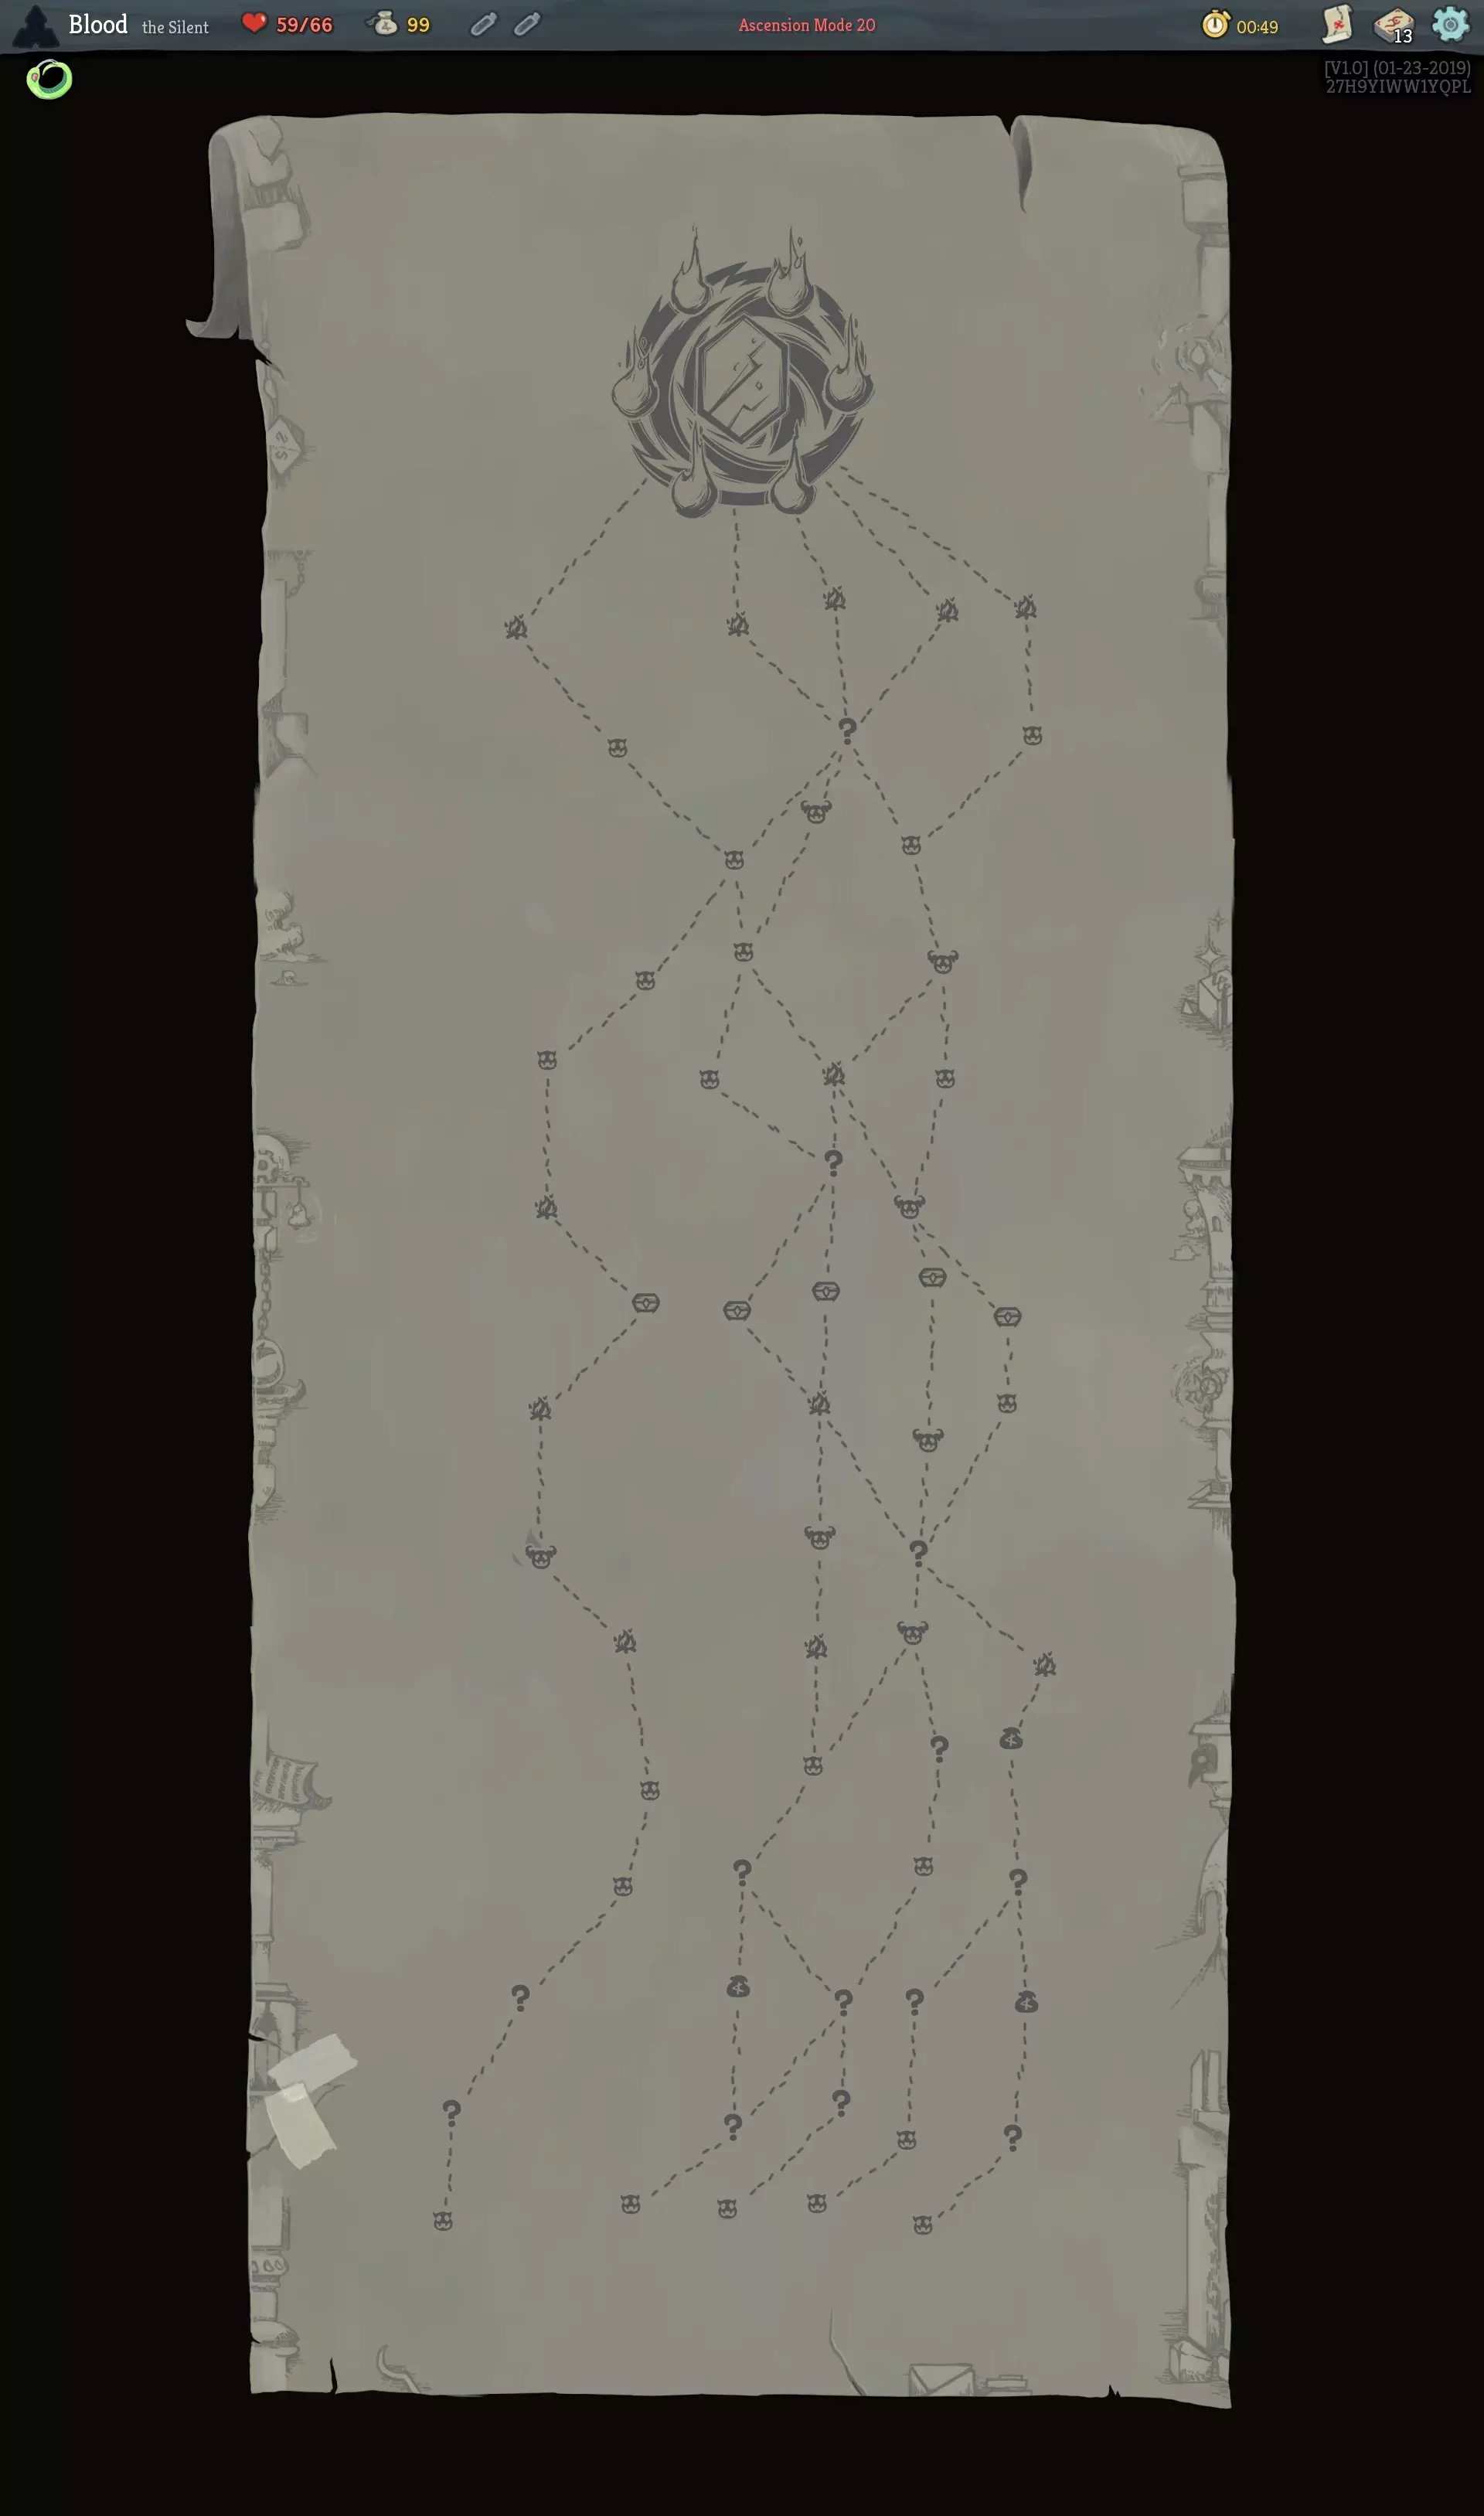
请仔细考虑你的初始选择,因为它们可能会对你的早期路线规划产生重大影响。现在查看地图:
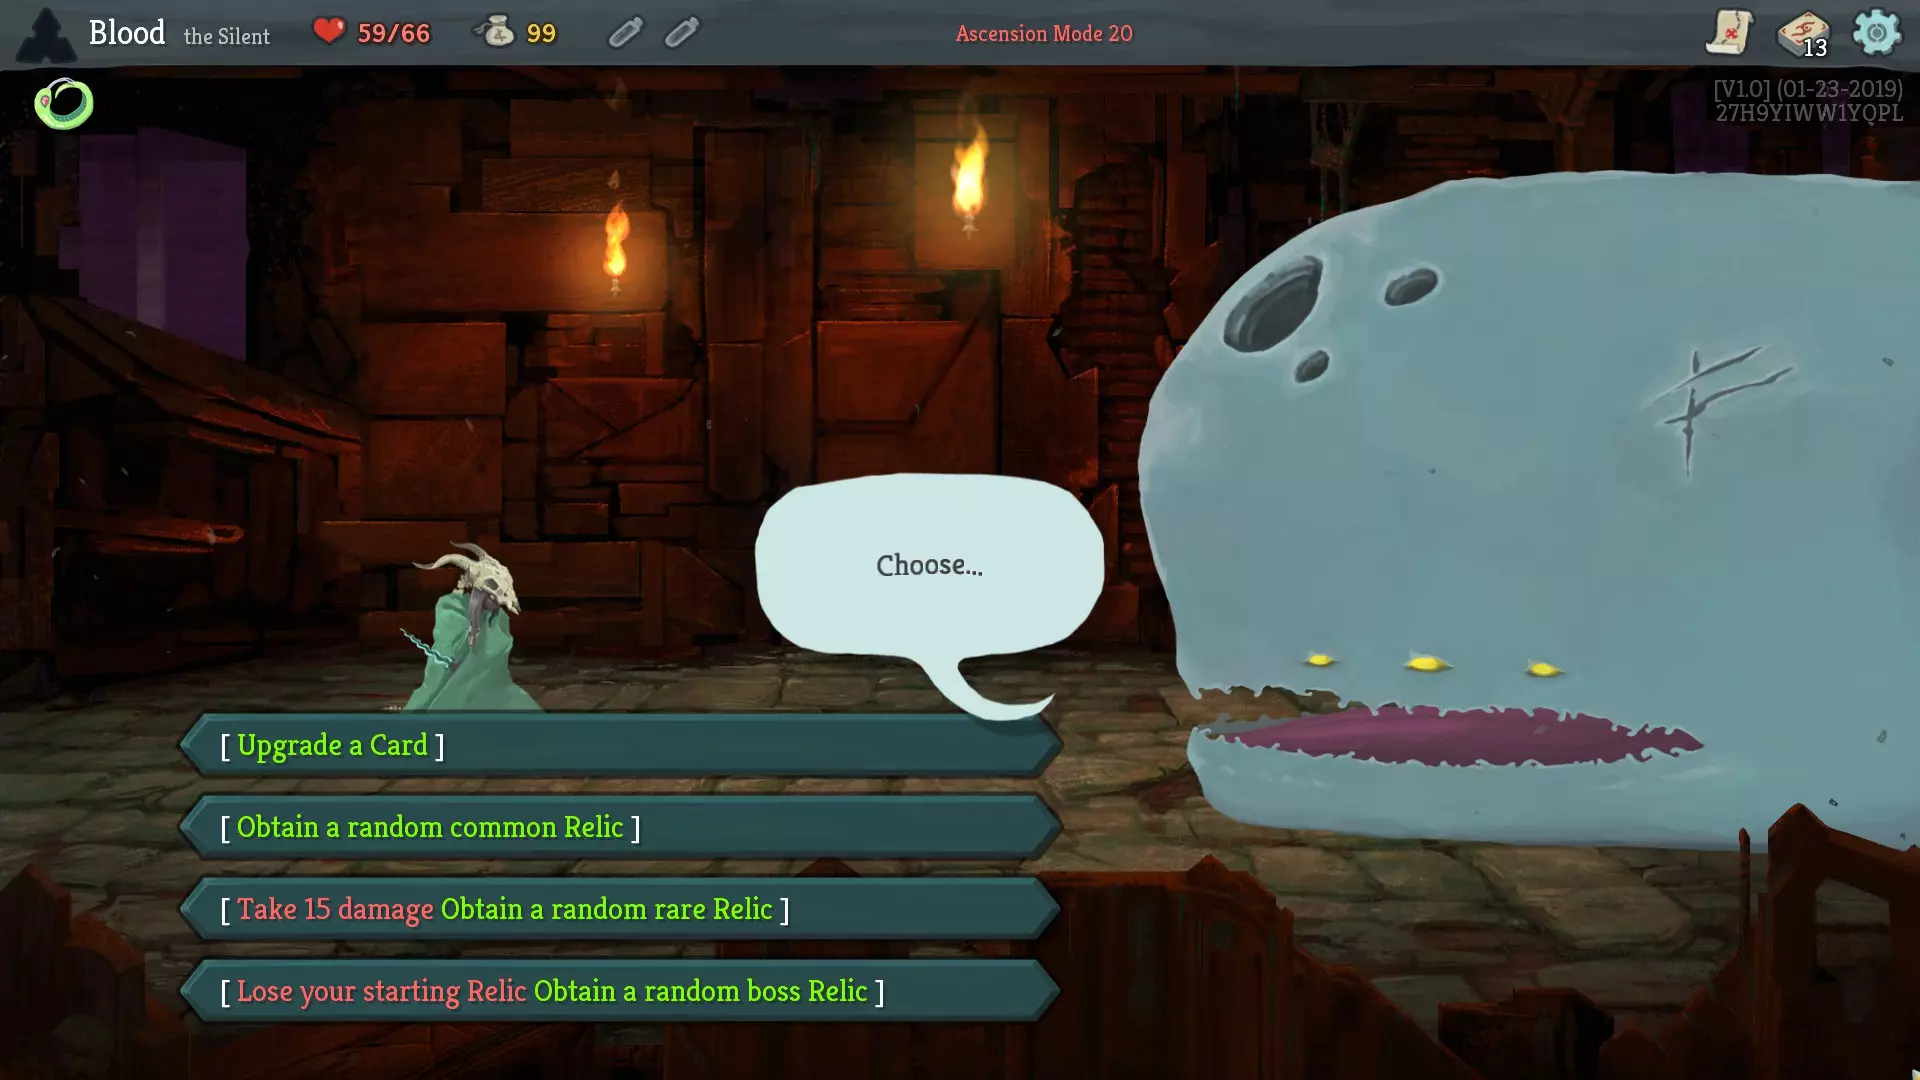
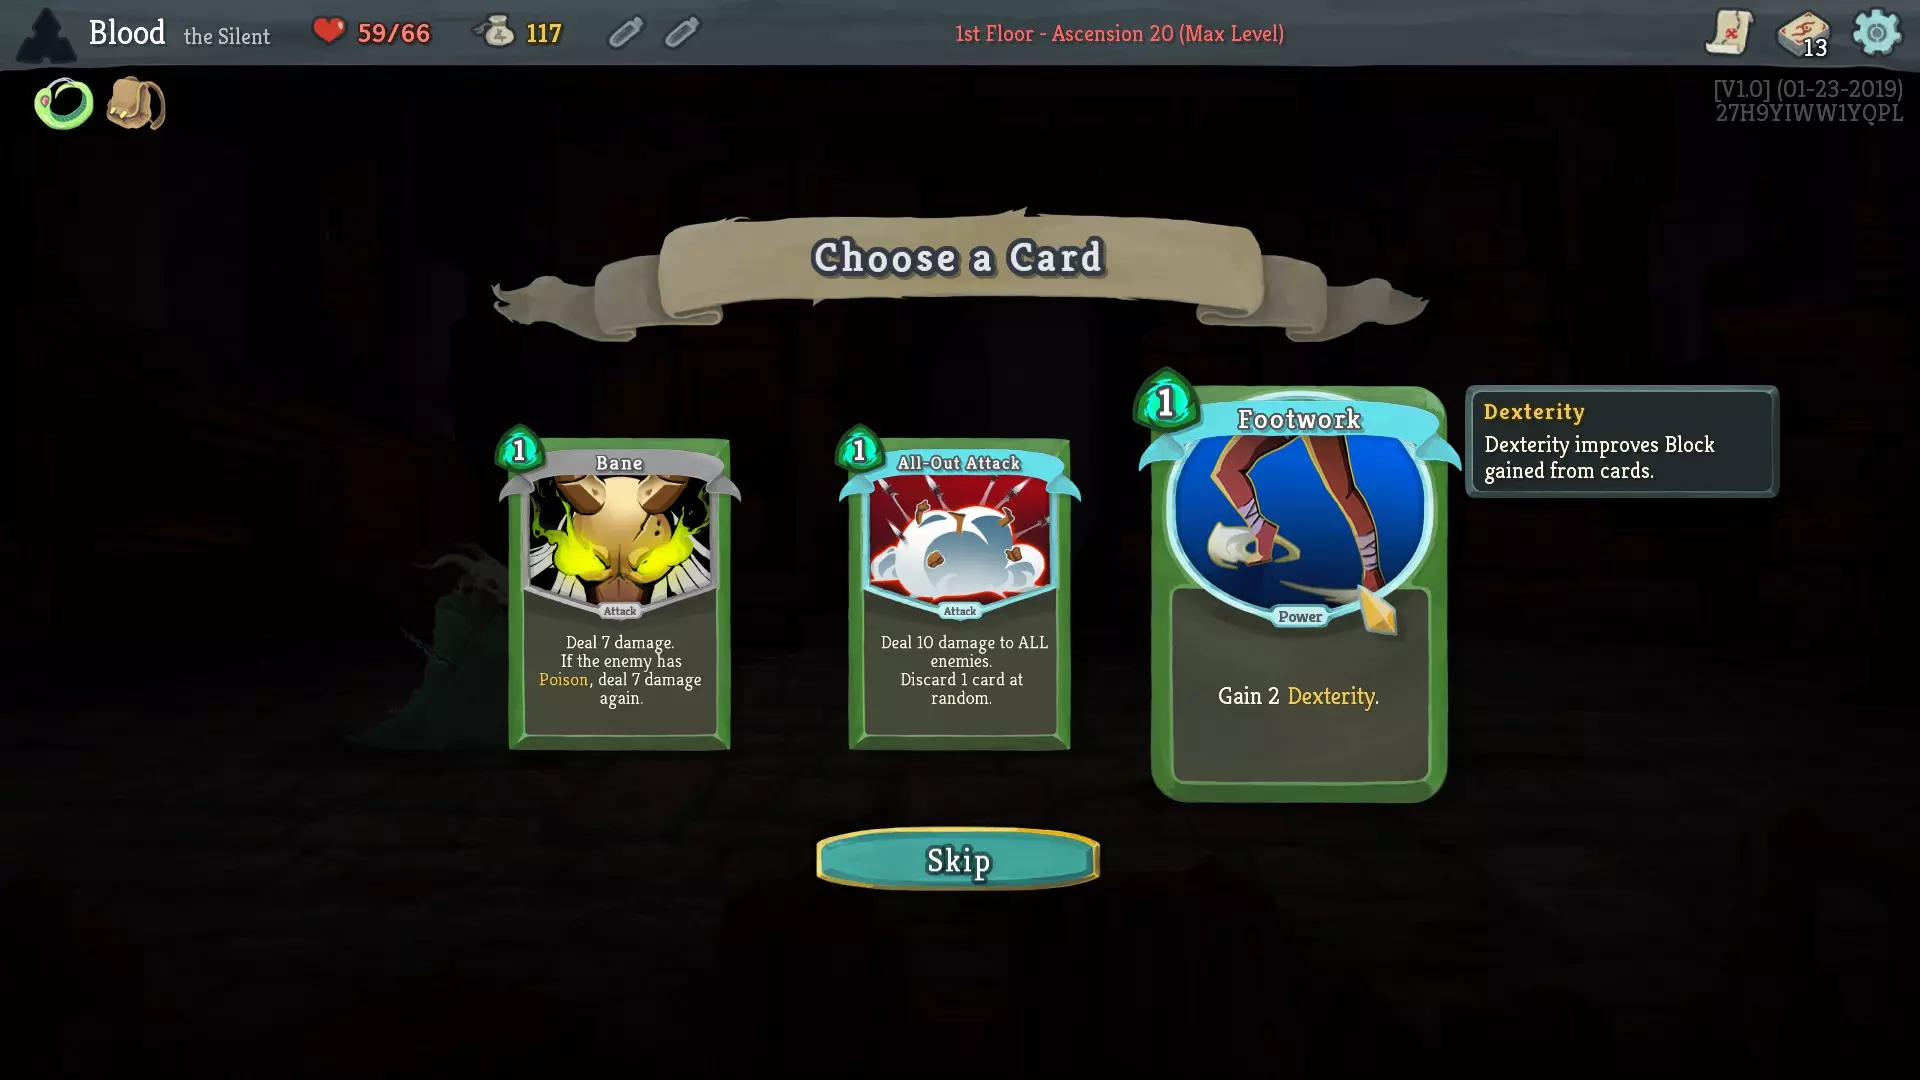
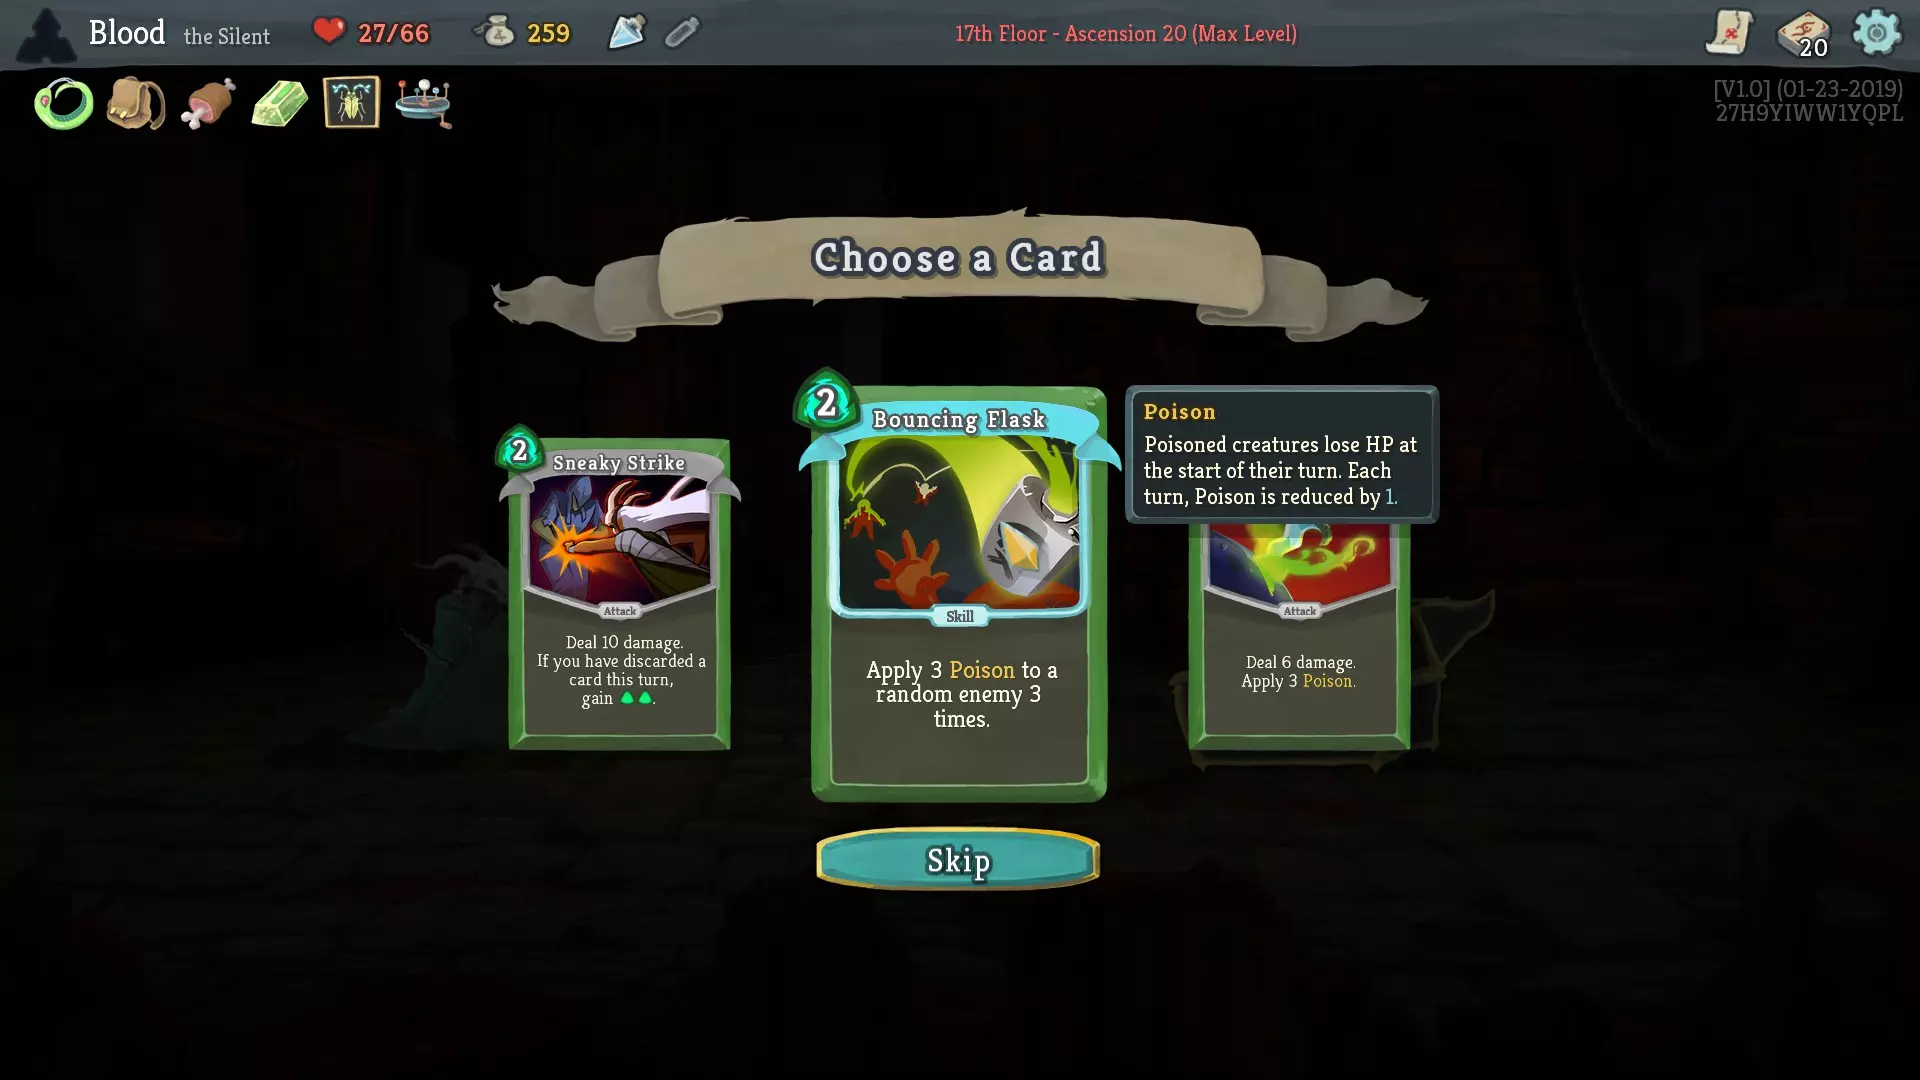
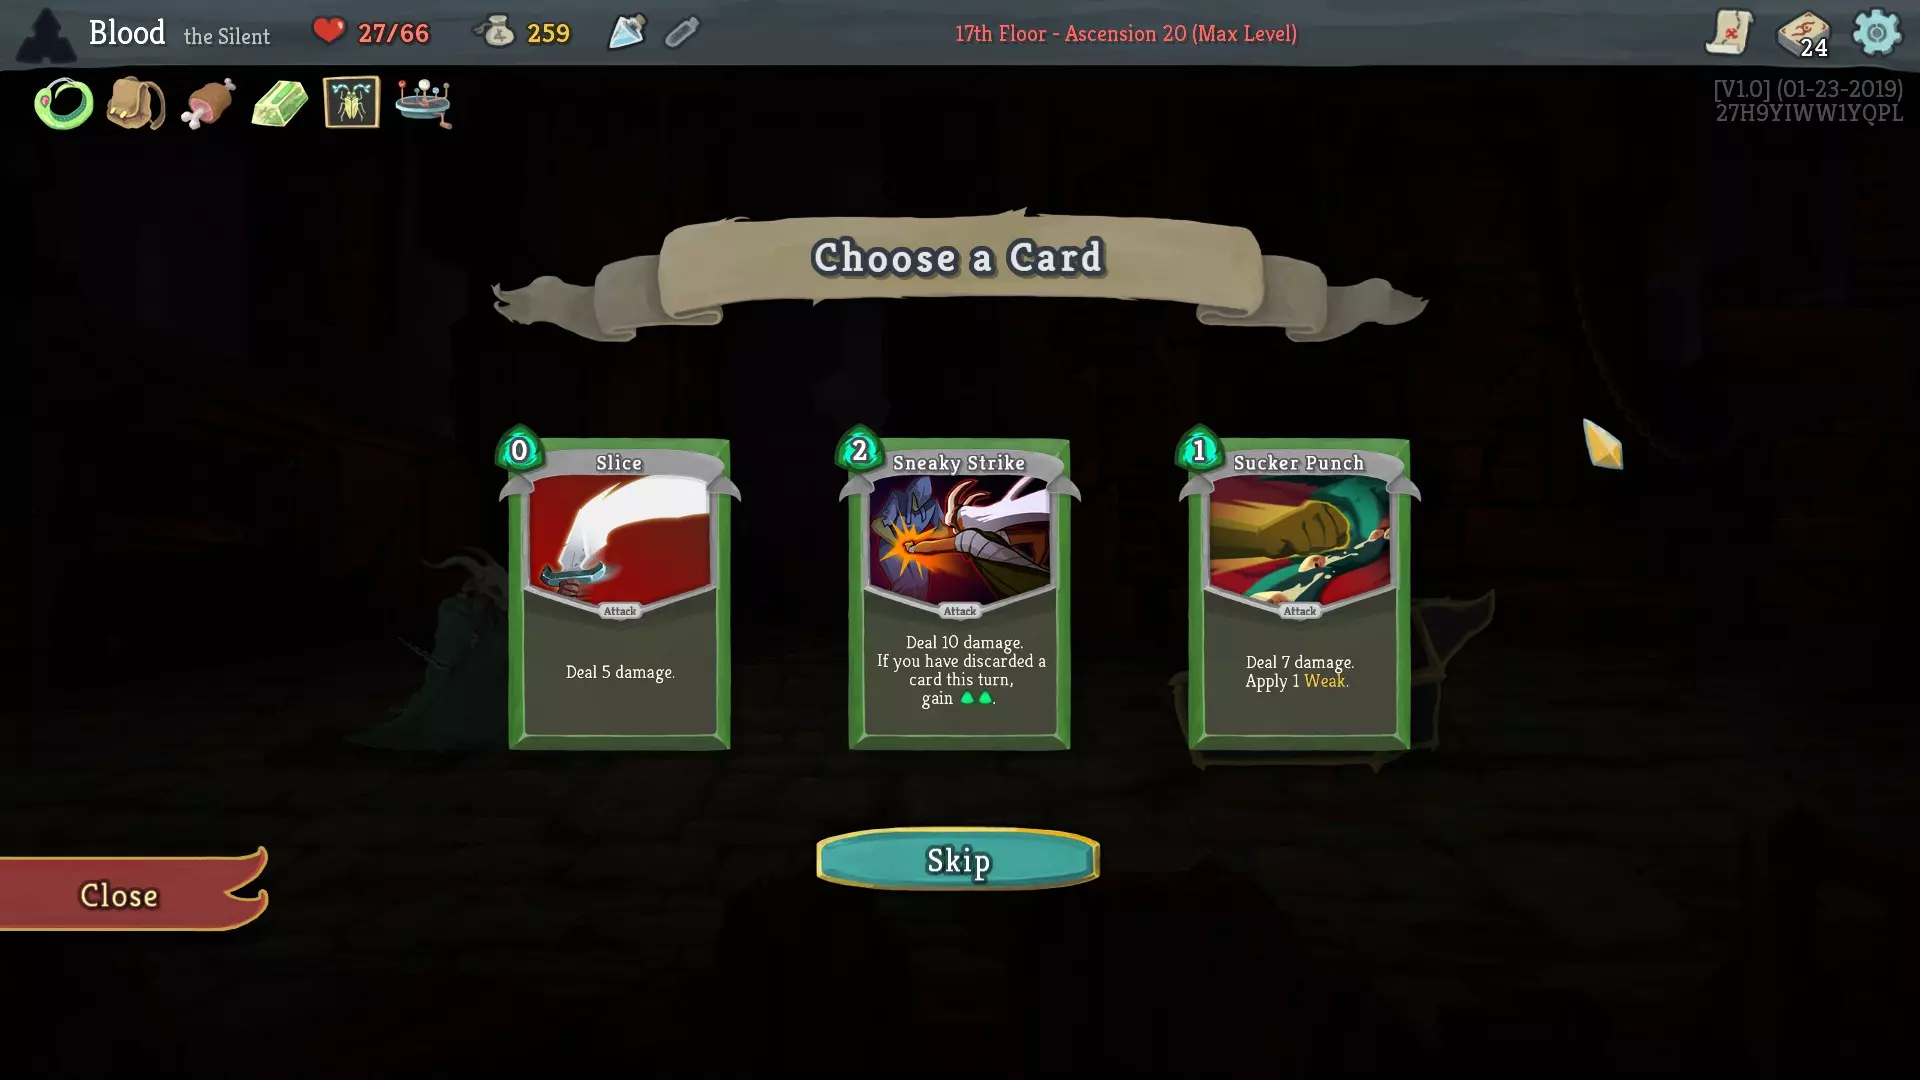
非常感谢Siri提供的这张图片。 请注意,这张地图有5个起始位置,其中1个(最左侧)在接近本幕末尾前只有一条路径。 你应该计划在本幕至少与2个精英敌人战斗,但可以有一定的灵活性(以便根据当前游戏进程选择多打一个或少打一个)。同样重要的是,本幕的前3场走廊战斗来自一个【较简单】的敌人池。关于这一点我不会详细说明。看到最左侧路径需要先与火焰精英战斗,如果你想立即重新开始以获得【下三场战斗中的敌人生命值为1】的增益效果用于下一轮游戏,就可以选择这条路线。 将右侧的四条路径从左到右编号为1-4: 路径1能让你很早就访问商店,但我们的初始奖励没有提供任何金币,仅靠大约110左右的金币不太可能买到什么好东西。 路径2与路径1基本相同,但无法访问那个早期商店。 路径3和路径4彼此非常相似,不过路径4提供两个早期商店。 回想一下,我们曾说过这次游戏至少要与两个精英敌人战斗。路线3和4最多能让我们遭遇3场精英战斗,但该路线上只有3个营火(假设我们至少要进行两场精英战斗)。路线1和2则能提供4个营火和两场精英战斗。由于我们不太在意早期商店,我会选择路线1或2。在这两条路线中,路线1提供了一个保底商店的选项,以备不时之需。因此,我们选择路线1。 现在,回到初始奖励选项: 第一个选项“升级一张卡牌”是保底的正面奖励。但价值不大,因为我们目前唯一值得升级的卡牌只有【幸存者】和【中和】。 第二个选项“获得一个随机普通遗物”同样是保底的正面奖励,且价值相当不错。第三个选项“承受15点伤害 获得一个随机稀有遗物”通常是净收益加成。为了一个遗物(尤其是稀有遗物)失去15点生命值确实是笔不错的交易。不过,由于遗物是随机的,很难说在游戏早期一个随机稀有遗物会比一个随机普通遗物好多少。此外,因为我们选择走路径1或路径2,在第一次精英战斗前我们只有2次固定的机会获取卡牌。这意味着承受15点伤害去换取可能只与选项2相当的东西很可能不值得。 第四个选项“失去你的初始遗物 获得一个随机Boss遗物”是一场赌博。然而,既然你正在阅读本指南,你可能是想提高你的胜率。如果你想赌博,那就去赌场吧。因此,我们选择了选项2“获得一个随机普通遗物”作为初始奖励。 第一幕(第二部分): 我们获得的普通遗物是准备之袋(每场战斗开始时,额外抽2张牌)。总体来说,这对静默猎手相当不错,因为她非常依赖在第一回合打出关键卡牌。不过在第一幕初期,这个遗物没什么用,因为第一回合多抽一张打击和防御牌仍然是徒劳。 我不会详细讨论战斗过程,因为那通常只是简单的计算和熟悉敌人模式。以下是击败第一个敌人(一名教徒)后的卡牌选择。
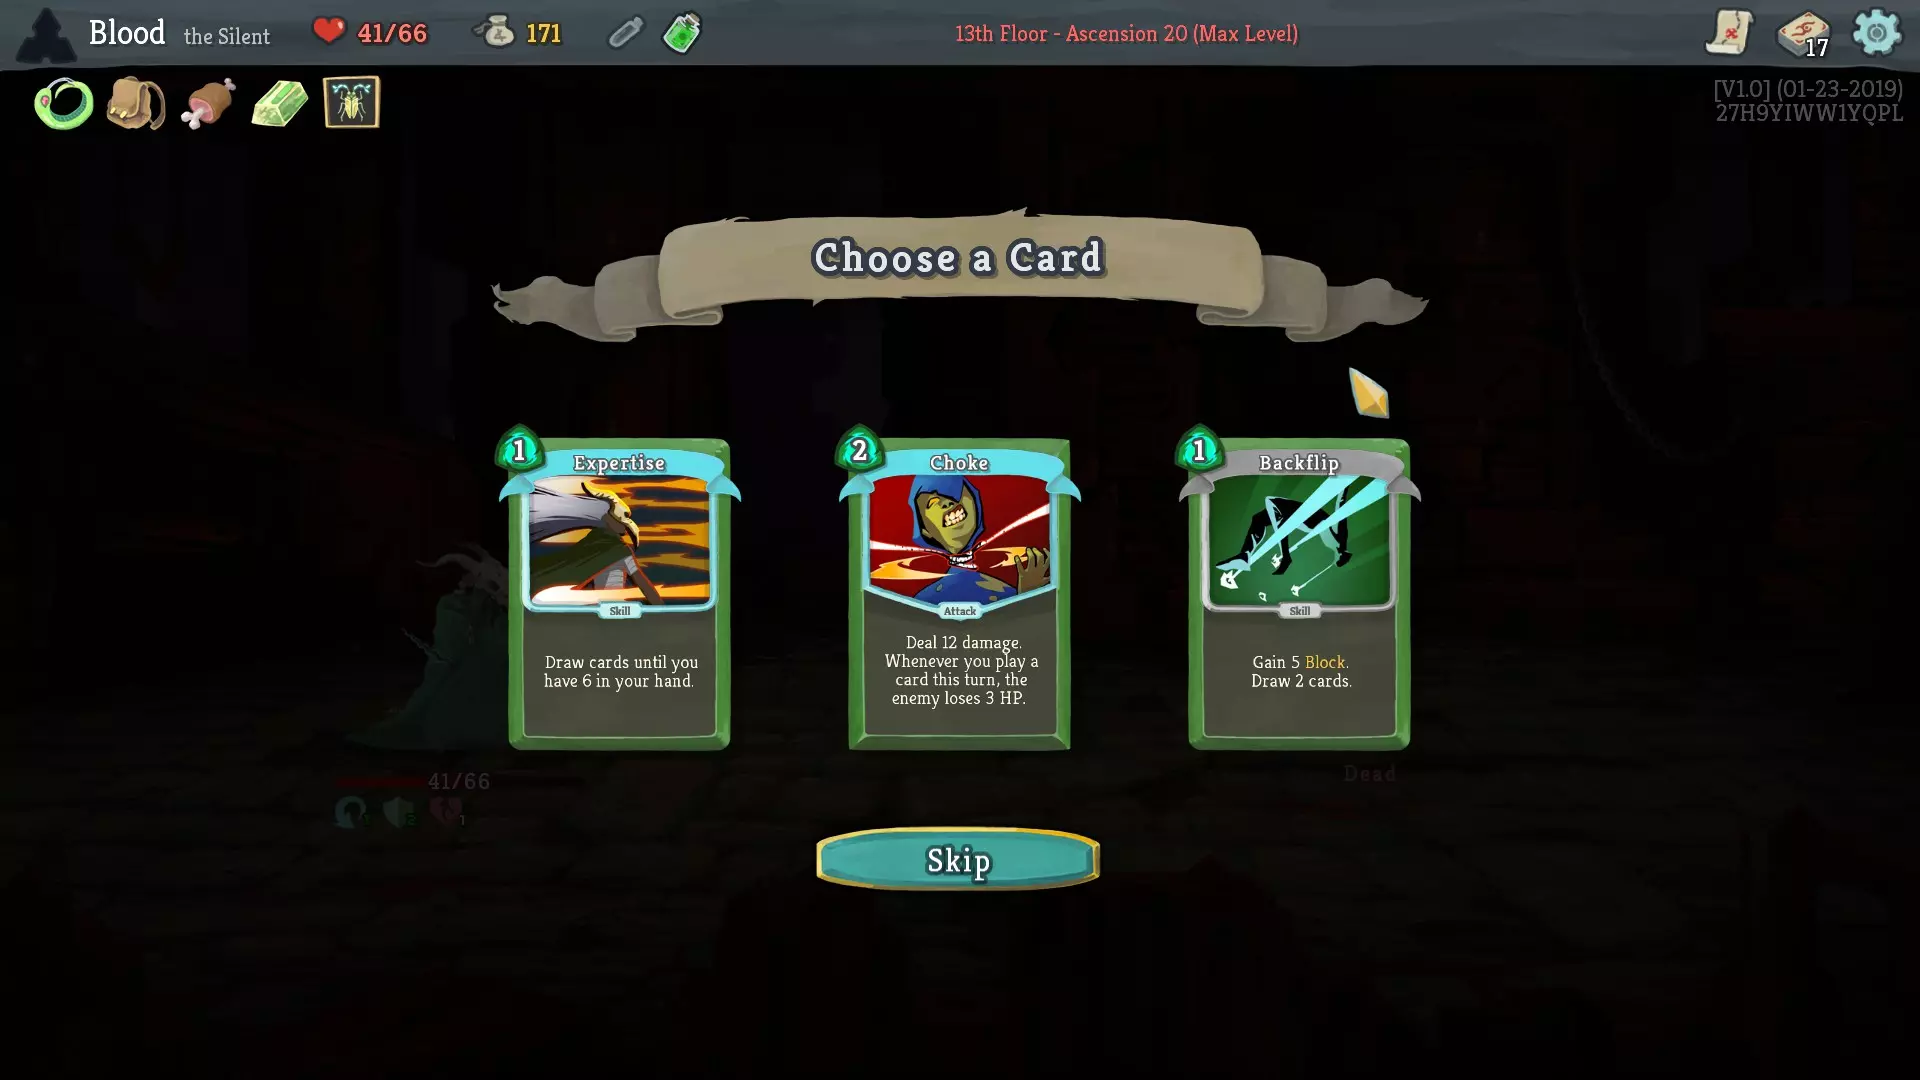
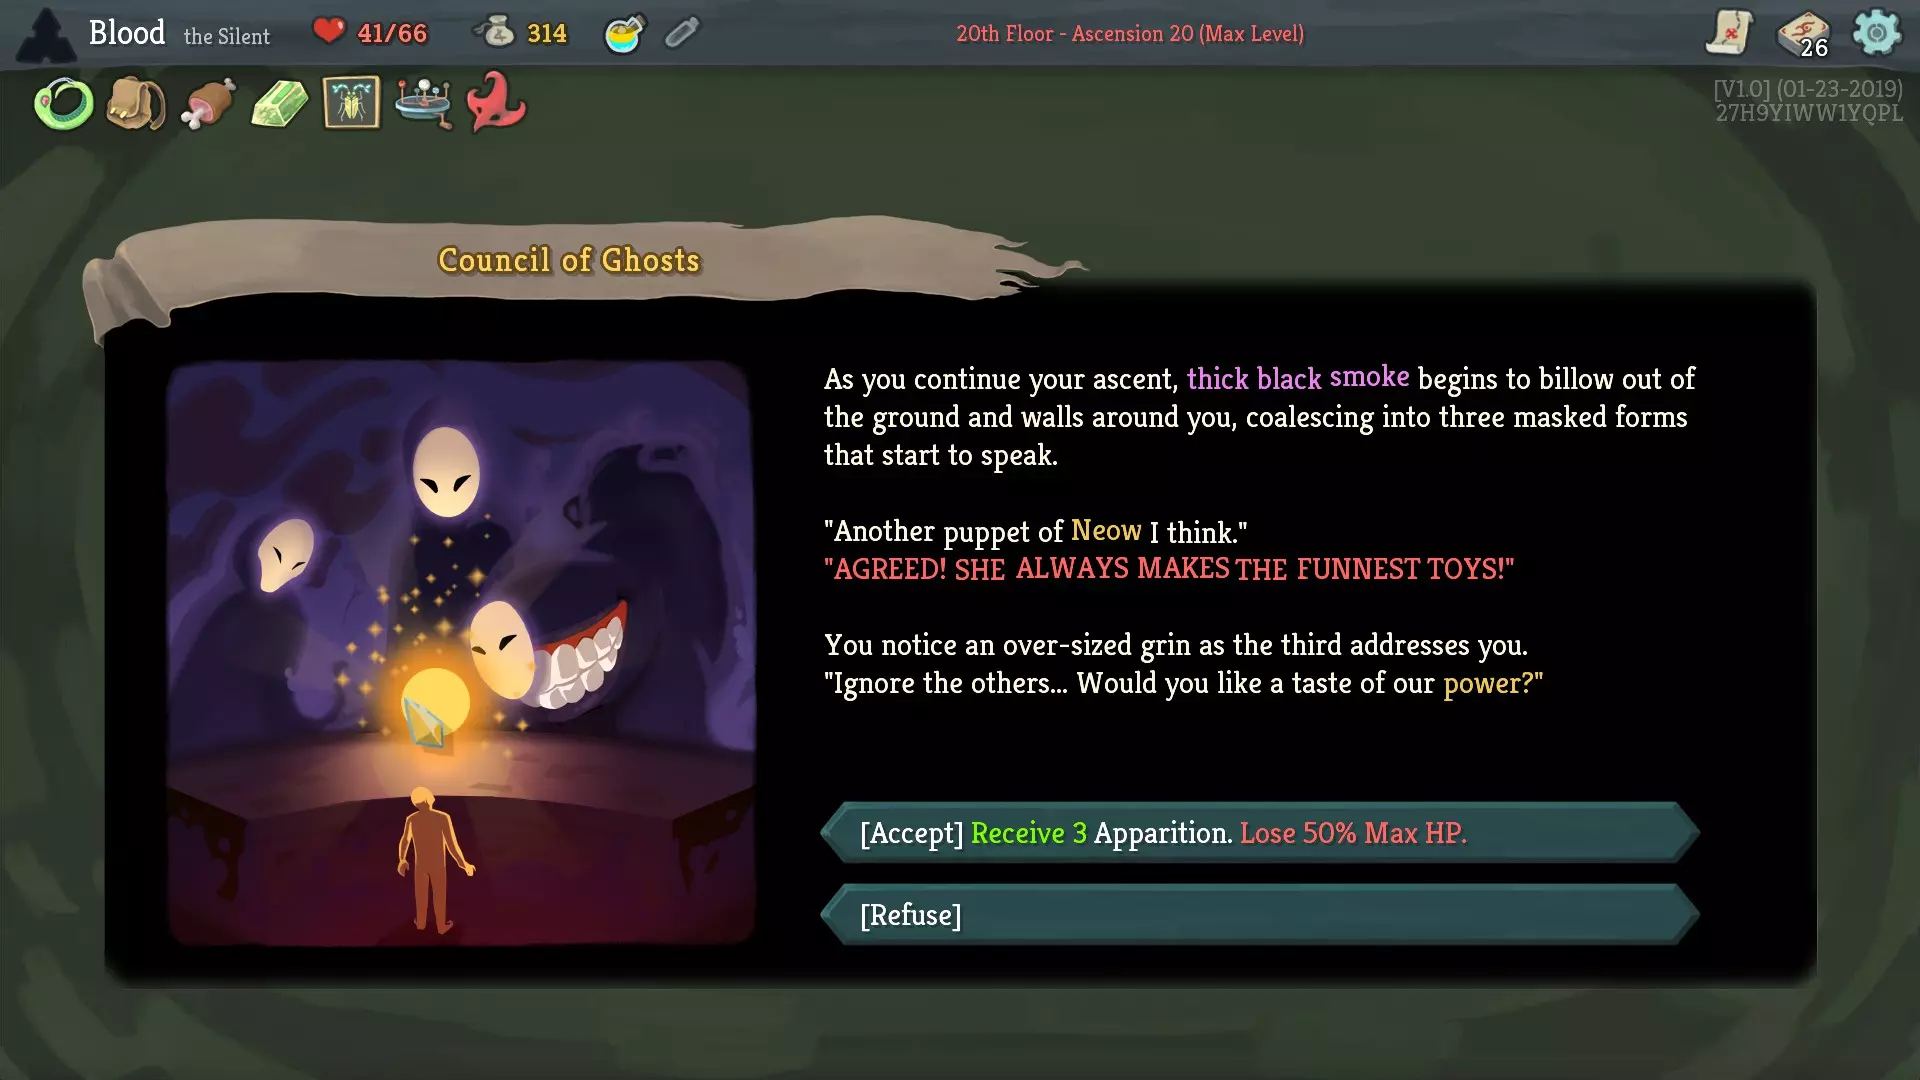
如果能让敌人中毒,“祸根”在第一章表现相当不错。但我们没有中毒手段,所以不选它。 “全力攻击”(AoA)在游戏前期是张非常好的牌。它在走廊战斗中表现出色,对付“岗哨”也很有效,甚至在第二章也能发挥一定作用。 “步法”可以说是“静默猎手”的核心牌。由于我起始回合有9张牌,我认为在大多数战斗的第一回合抽到“步法”的概率相当高。考虑到它的成长性,即使它现在可能不如“全力攻击”,我还是选择了它。 我进入了问号房间,触发了这个事件:
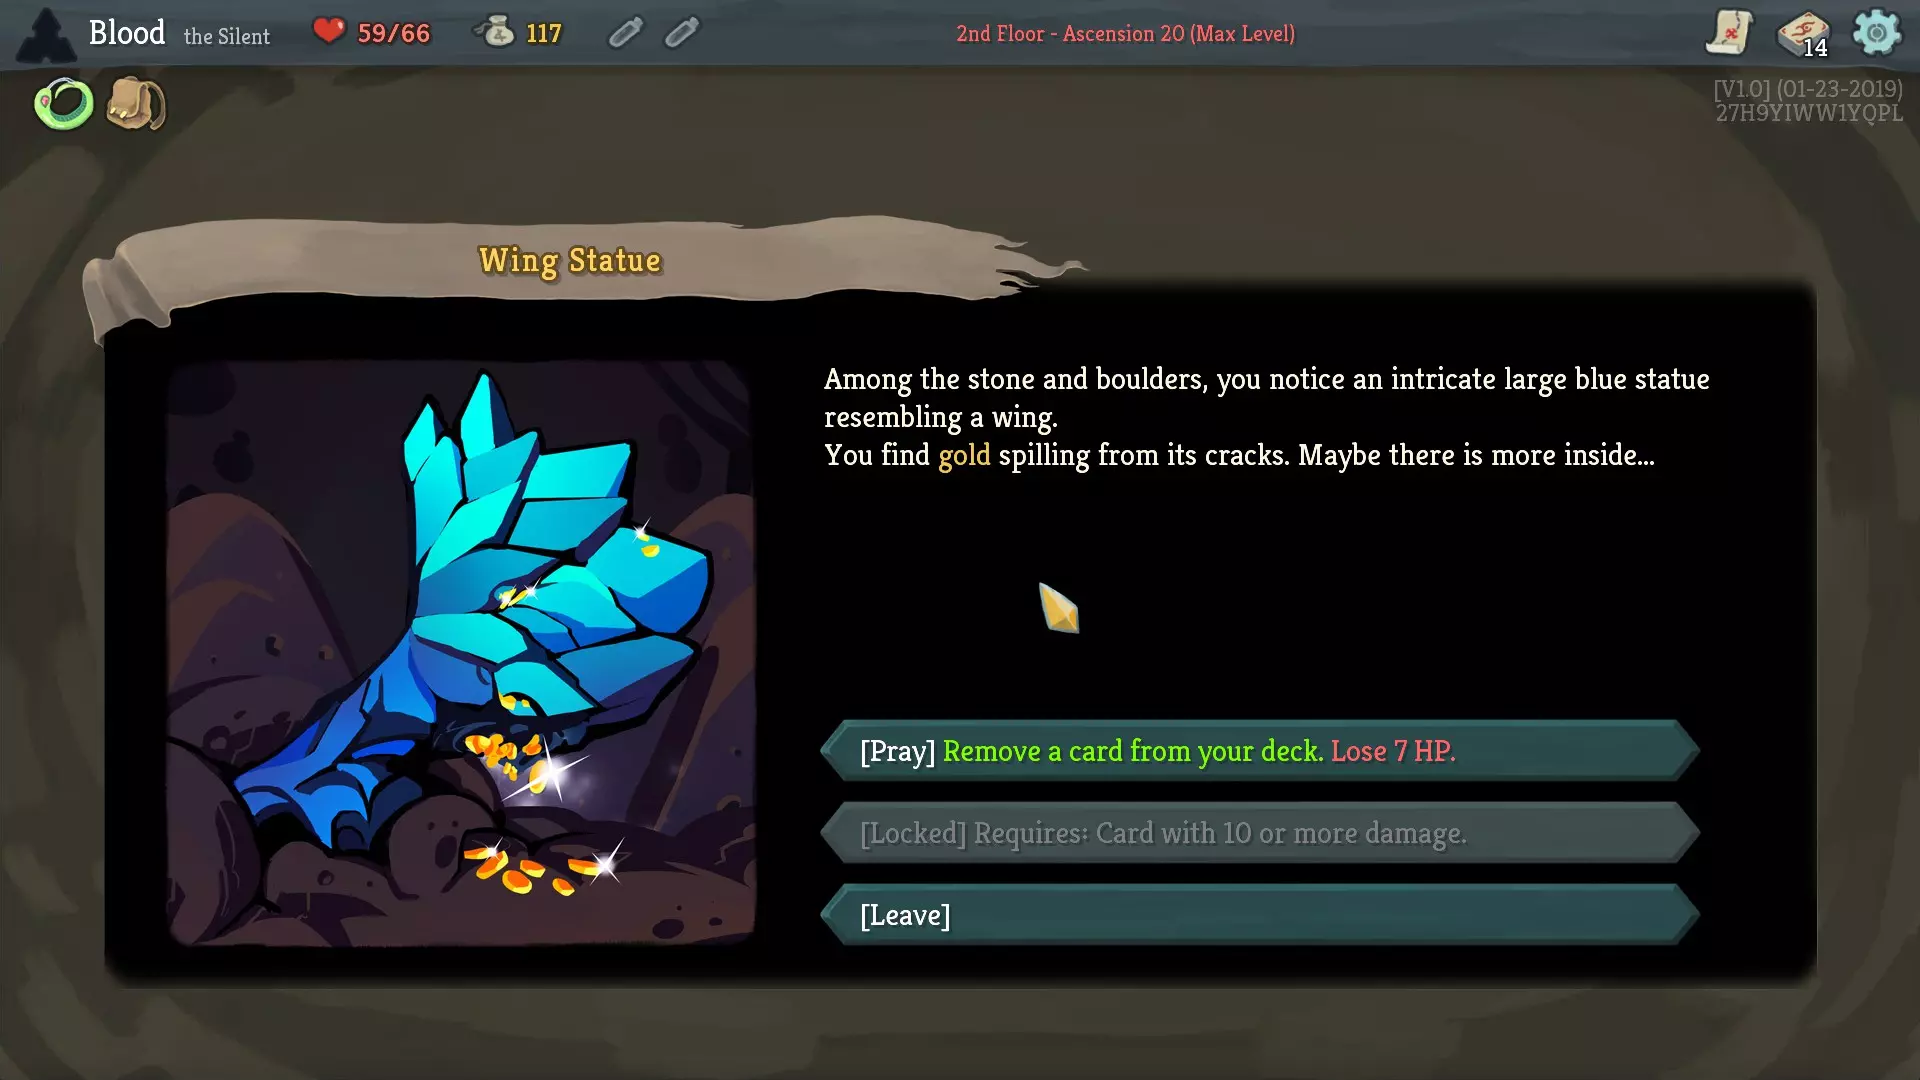
花费7点伤害移除一张打击牌并非世界上最糟糕的事情,不过这确实有点不明智,因为我们仍然没有很好的方法来击杀地精首领或熔岩史莱姆(尽管打击牌也帮不上什么大忙)。我们选择移除打击牌而不是防御牌(如果你此时考虑移除生存、中和或我们刚拿到的步法,那你可能需要考虑《杀戮尖塔》可能不适合你),因为我们的牌组里有一张步法。即使我们的牌组里没有步法,5点格挡也比6点伤害更有价值。

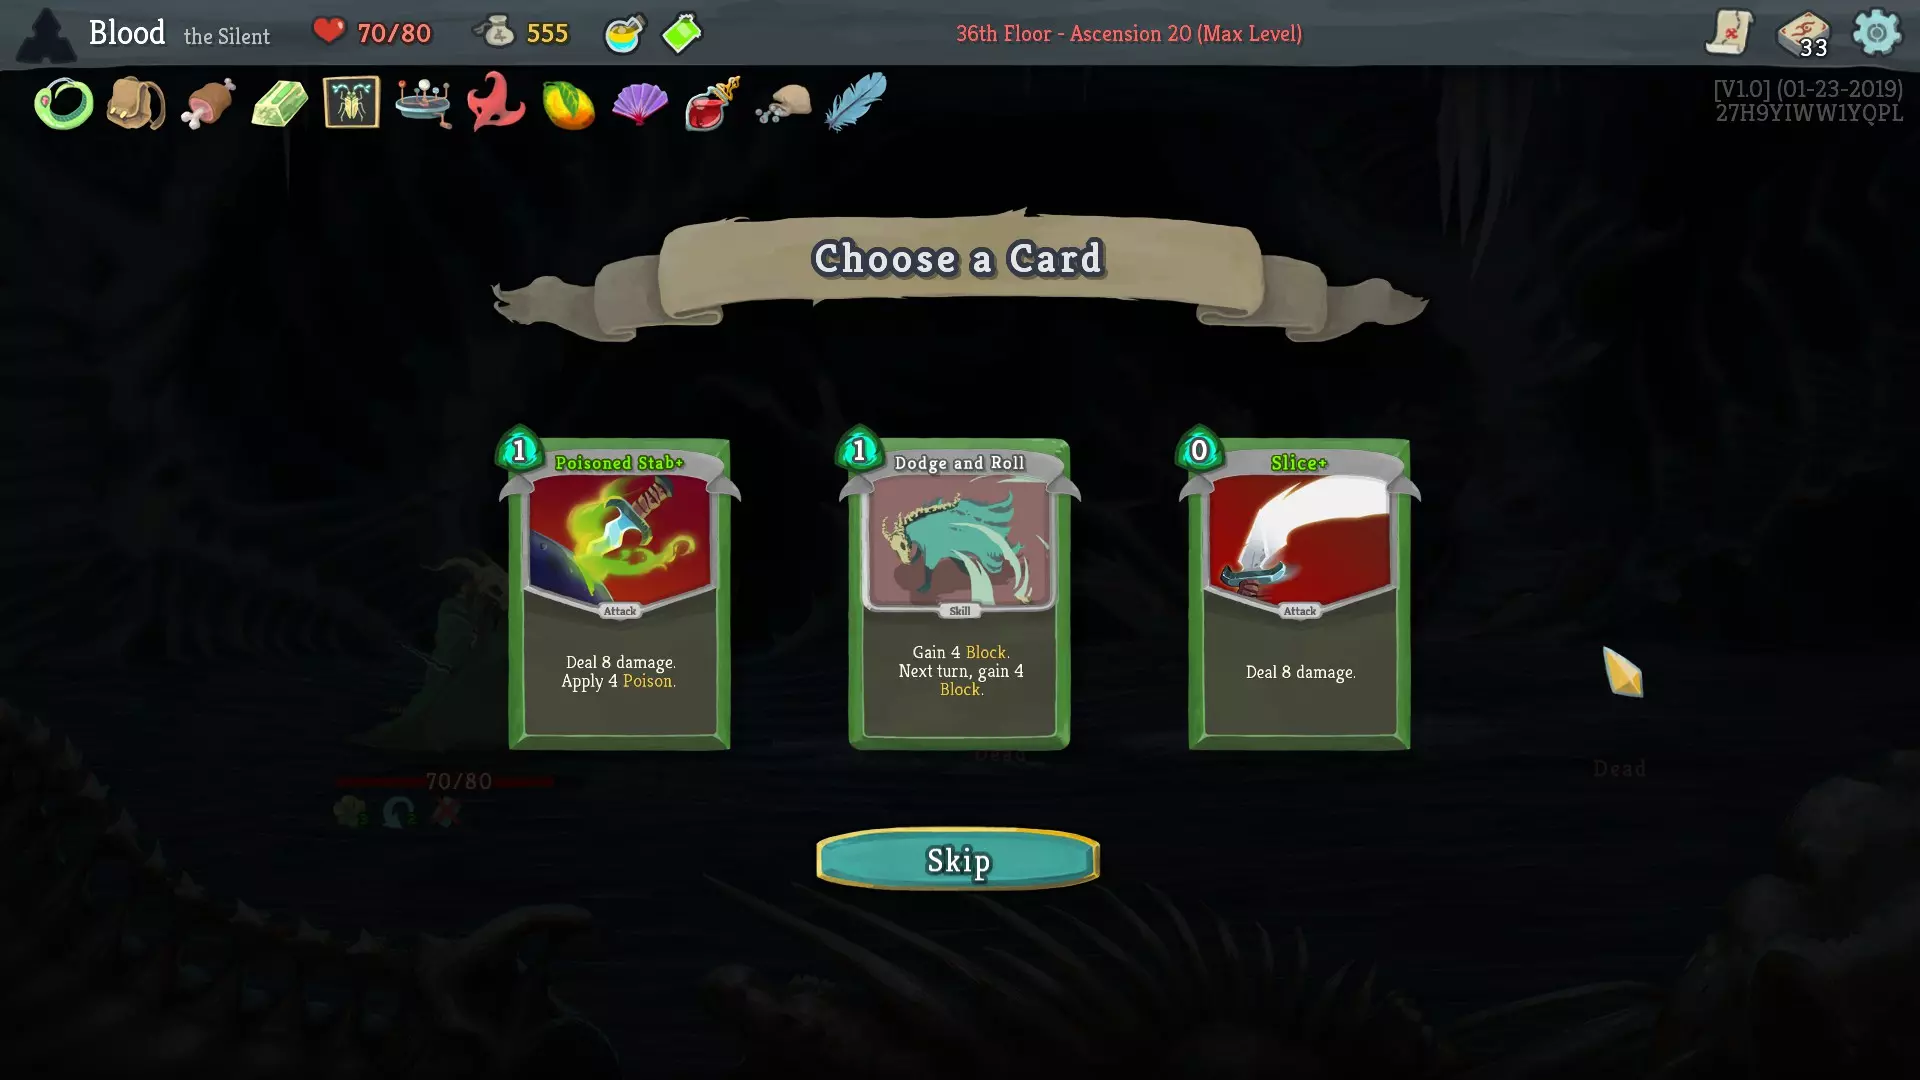
不过,这让我们陷入了一个两难的境地。在精英怪之前,我们要么会遇到2个问号房间、1场简单的走廊战斗和1个营火,要么会遇到1个商店、1个问号房间、1场简单的走廊战斗和1个营火。如果这些问号房间中有任何一个是走廊战斗,那么跳过商店应该没问题。但如果两个都不是走廊战斗,我们可能会缺乏足够的卡牌来赢得精英怪战斗。因此,尽管我们没有足够的金币购买什么好东西,还是得去商店一趟。
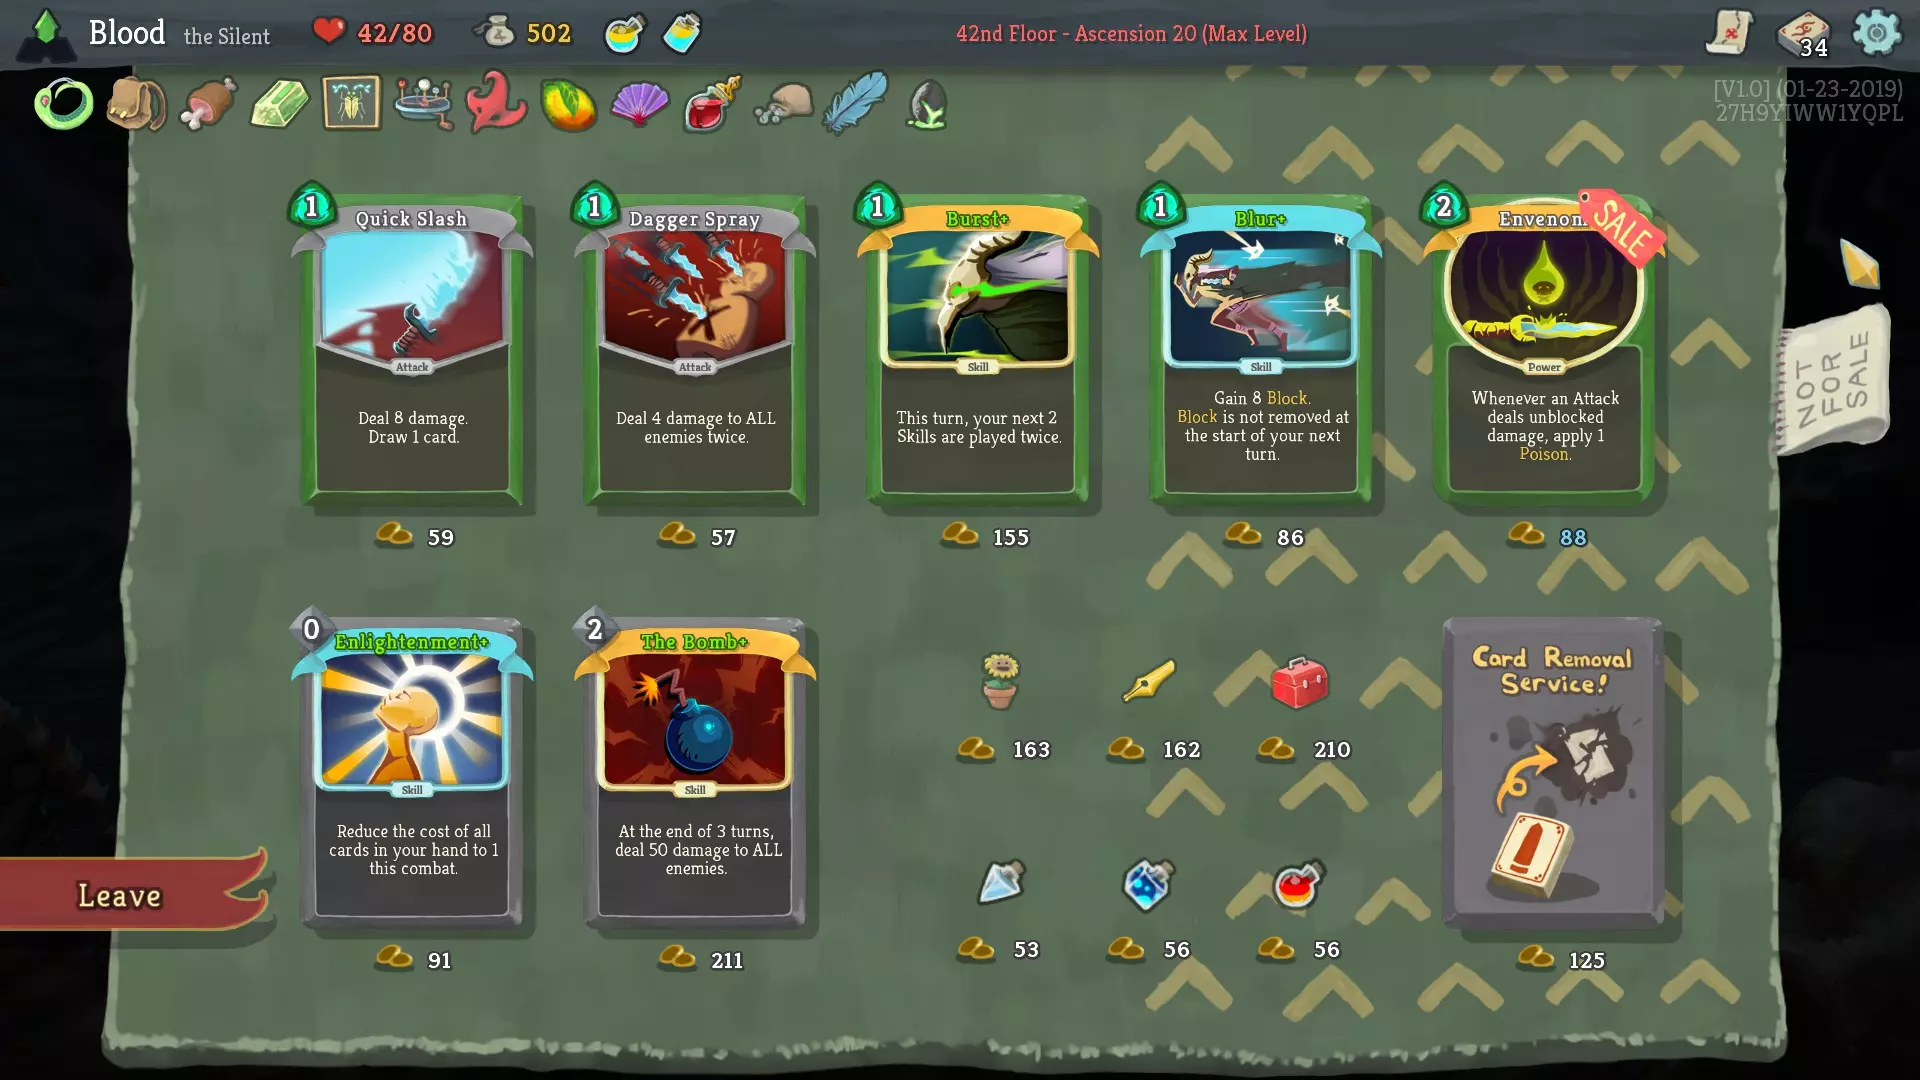
快速斩击(QS)现在很弱。我们不需要抽牌,8点伤害和匕首乱刺相同,但它不能攻击多个目标,升级后伤害也一样。只有当下一个精英是拉加武林时(其减益效果会对匕首乱刺生效两次),快速斩击才会更好用,但在几乎所有其他情况下都更差。 匕首乱刺(DS)相当不错。它对岗哨、走廊战斗很有效,在第二幕表现也还行。我们也确实需要一些造成伤害的手段。 闪避翻滚(DR)配合敏捷(恰好步法能提供敏捷)效果很好。但如果选了这个,我们仍然没有伤害输出,最终会被精英怪杀死。 干扰就是很垃圾。升级后还算过得去(但还不够好),不过一张消耗1点能量、基本能用随机技能替换自身的卡牌会给我们的游玩过程增加不稳定性。还记得赌博那回事吗?还是去赌场吧。 步法之前已经解释过了。但它和现在的【伤害减免】存在同样的问题。 深呼吸(垃圾无色卡牌1号,简称CCC1)毫无用处。我们还是会被精英怪打死。 暴力(CCC2)会把我们的打击牌放进手牌。没错,我就是想输。 遗物是给有钱的人准备的。这就是为什么你应该大学毕业找份正经工作。 脆弱药水(VP)还不错。但你目前的攻击很弱,所以这基本是浪费。 中毒药水还可以。它能在6回合内造成21点伤害。我们现在确实非常需要伤害,而且由于目前我们的攻击效果太差,对抗精英怪的战斗可能会非常漫长。 类固醇药水(SP)在你拥有多段攻击时效果不错,而我们只有普通打击。 卡牌移除是给那些已经拥有卡牌并且有多余金钱的人准备的,这算是一种奢侈消费。不过要记住,我们现在很穷。 因此,我购买了一瓶防御药水(DS)和一瓶毒药药水。 下一个问号房间是一个事件:
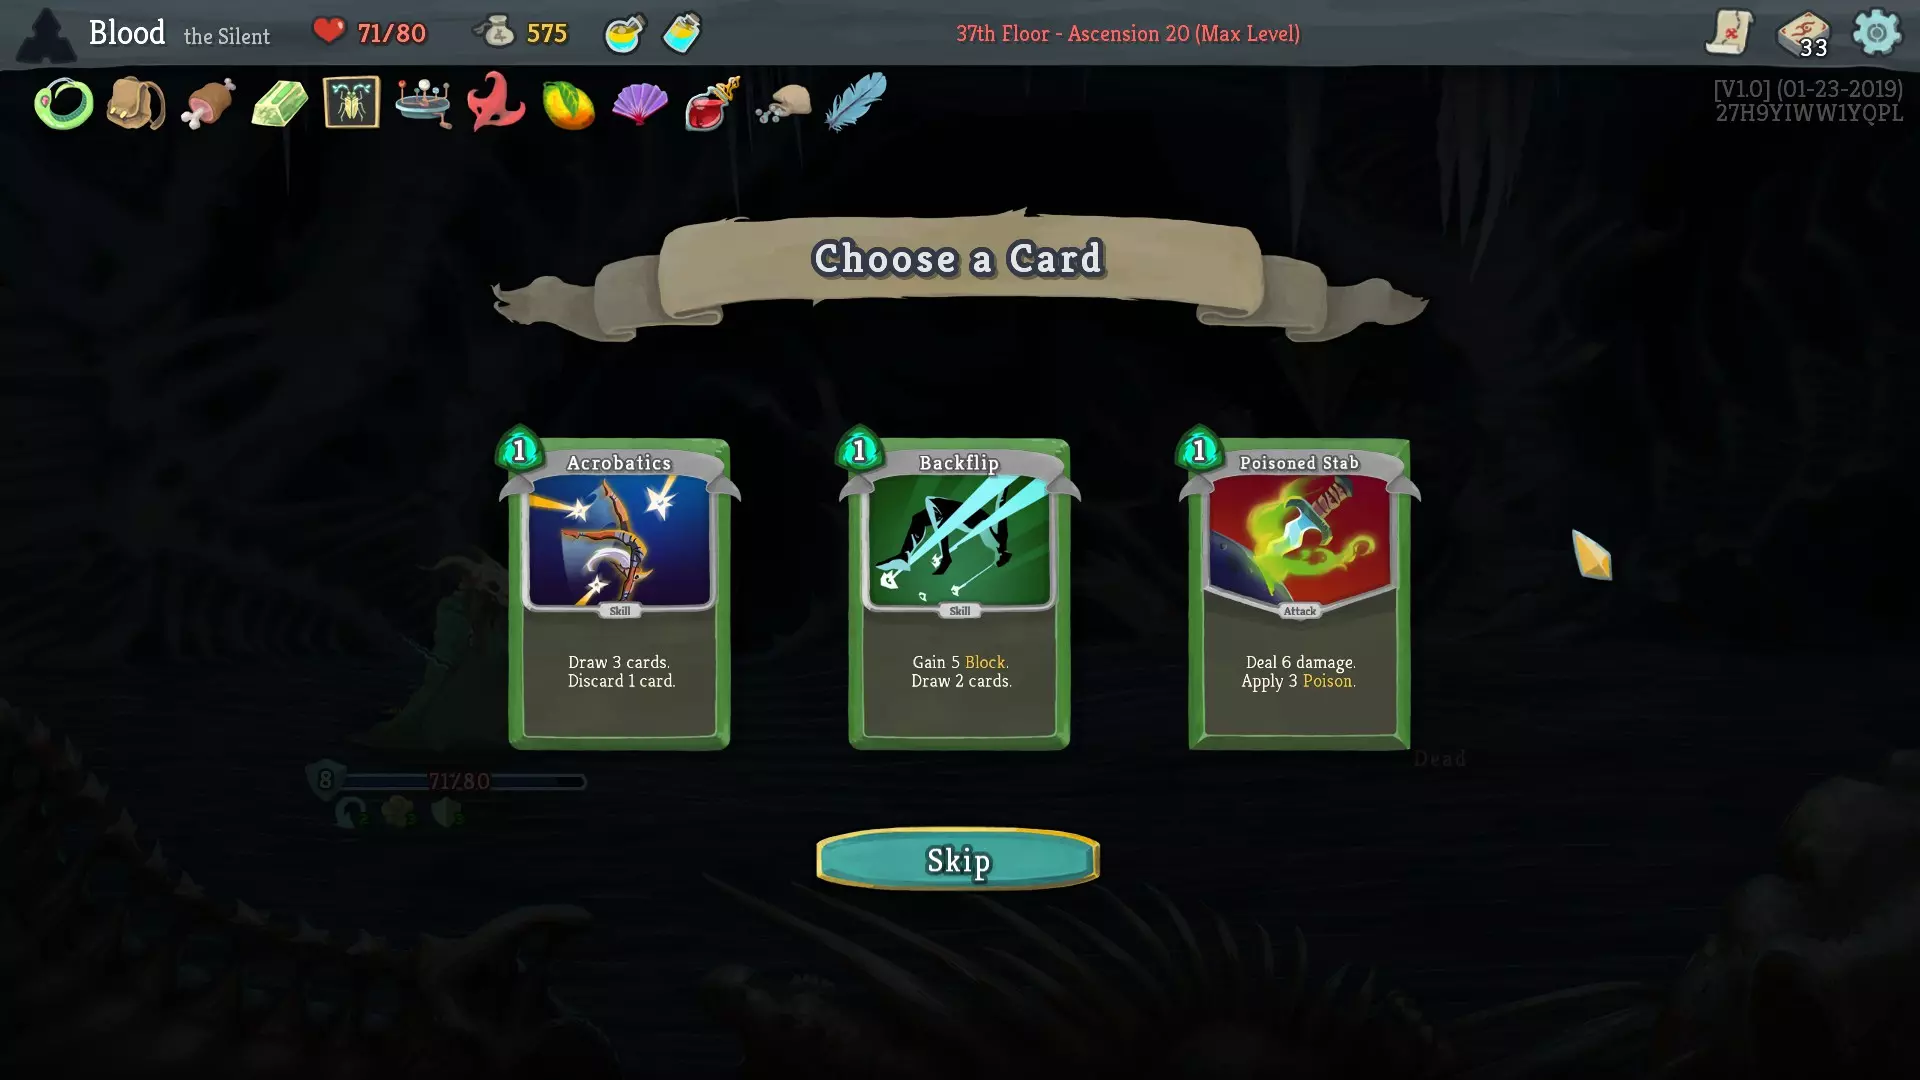
这游戏简直是在嘲讽我。 如果我们拿了钱,诅咒就会在精英战里害死我们。这感觉就像是拿钱捐器官,只不过不是捐肾,而是决定把脑子捐出去,毕竟你显然也不用它。 简单的走廊战斗给了我们这些卡牌选择:
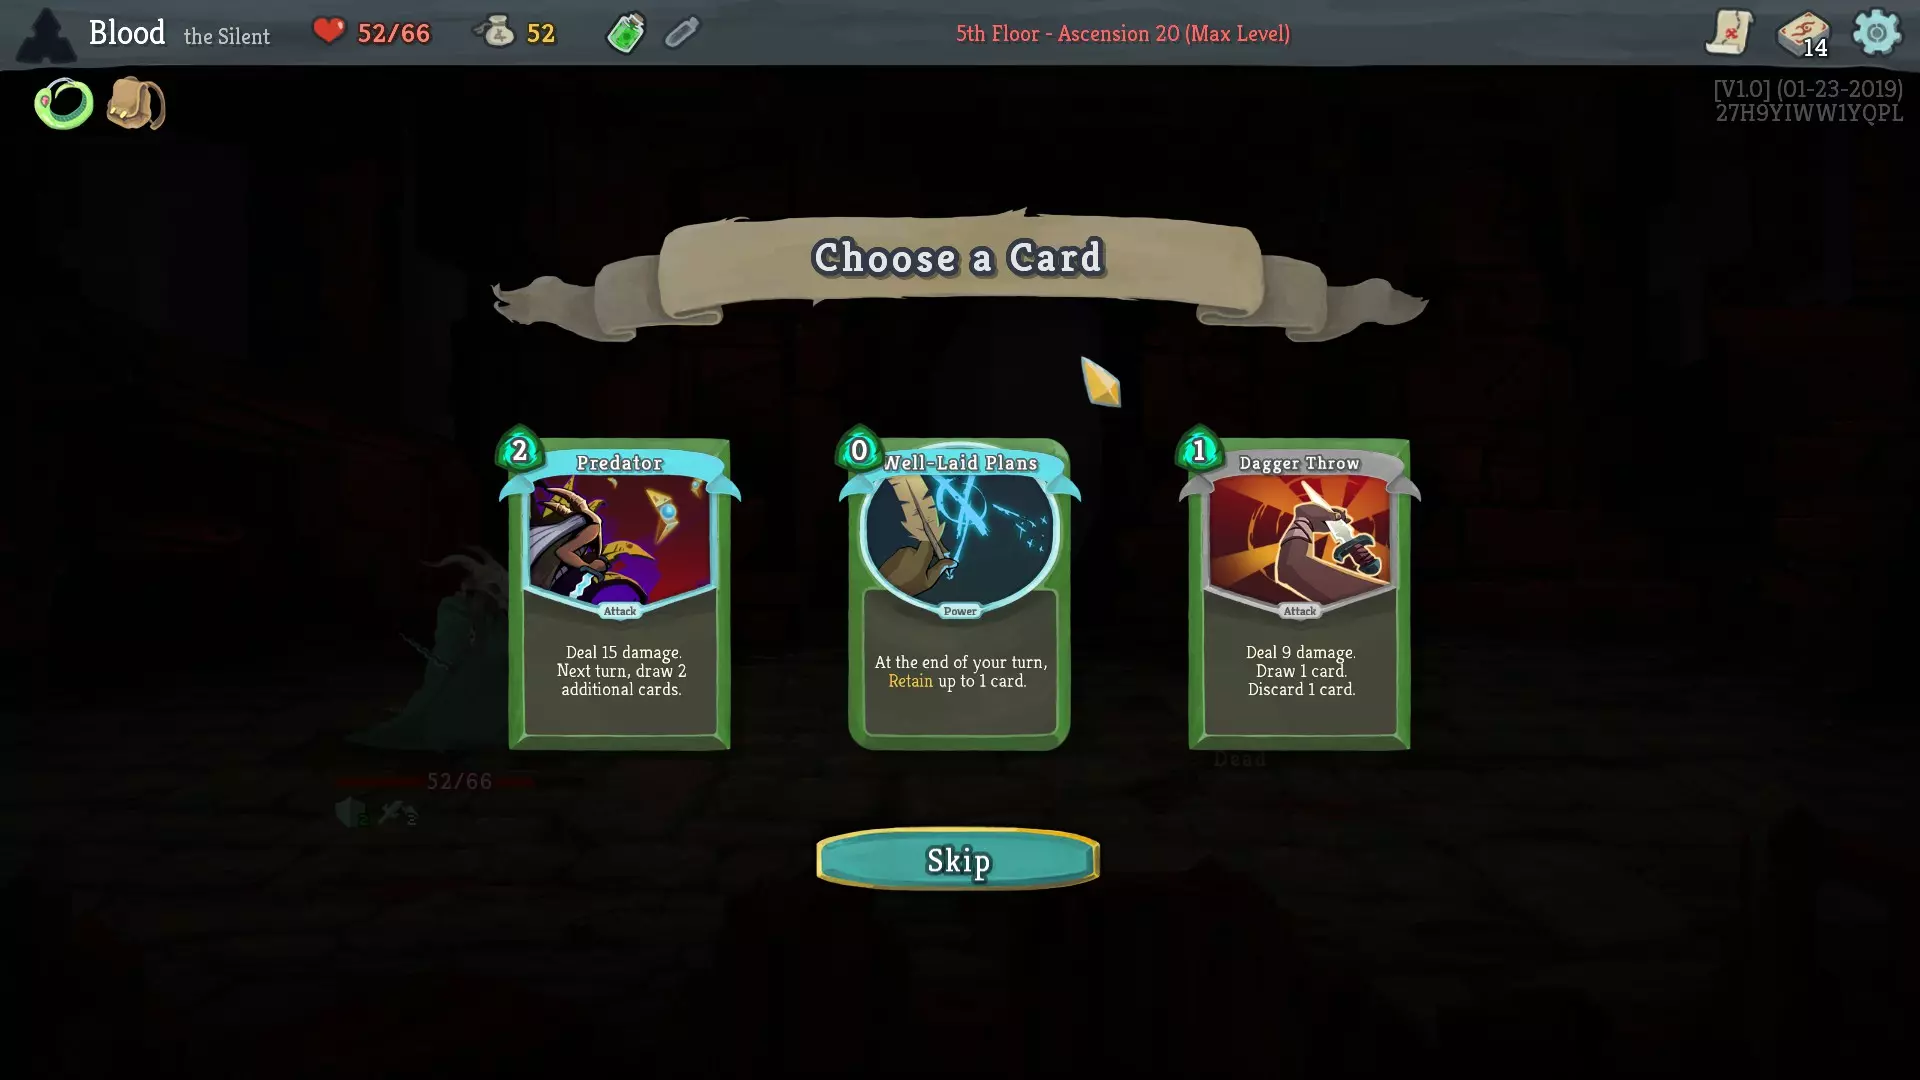
【捕食者】没什么用,因为我们不需要延迟抽牌。我们确实需要伤害,但它只比两张【打击】多3点伤害,还是没用。 【周密计划】(WLP)是张神卡,是【静默猎手】最好用的卡牌之一,实用性极强。打【地精首领】和【拉加夫林】时尤其好用,因为你可以把【中和】(未升级状态下只能虚弱1回合)留到关键回合使用。 【飞镖投掷】造成9点伤害,抽1张牌并弃1张牌(净抽牌数为0)。如果你玩【终极技】卡组需要抽牌的话,有时会选这张卡。但我们没有【终极技】。我们确实需要伤害,而且它的每能量伤害比【捕食者】高不少,但这张卡其实也不怎么样。另外,我们靠【毒药药水】或许能勉强撑过下一场精英战。我们选择【周密计划】。
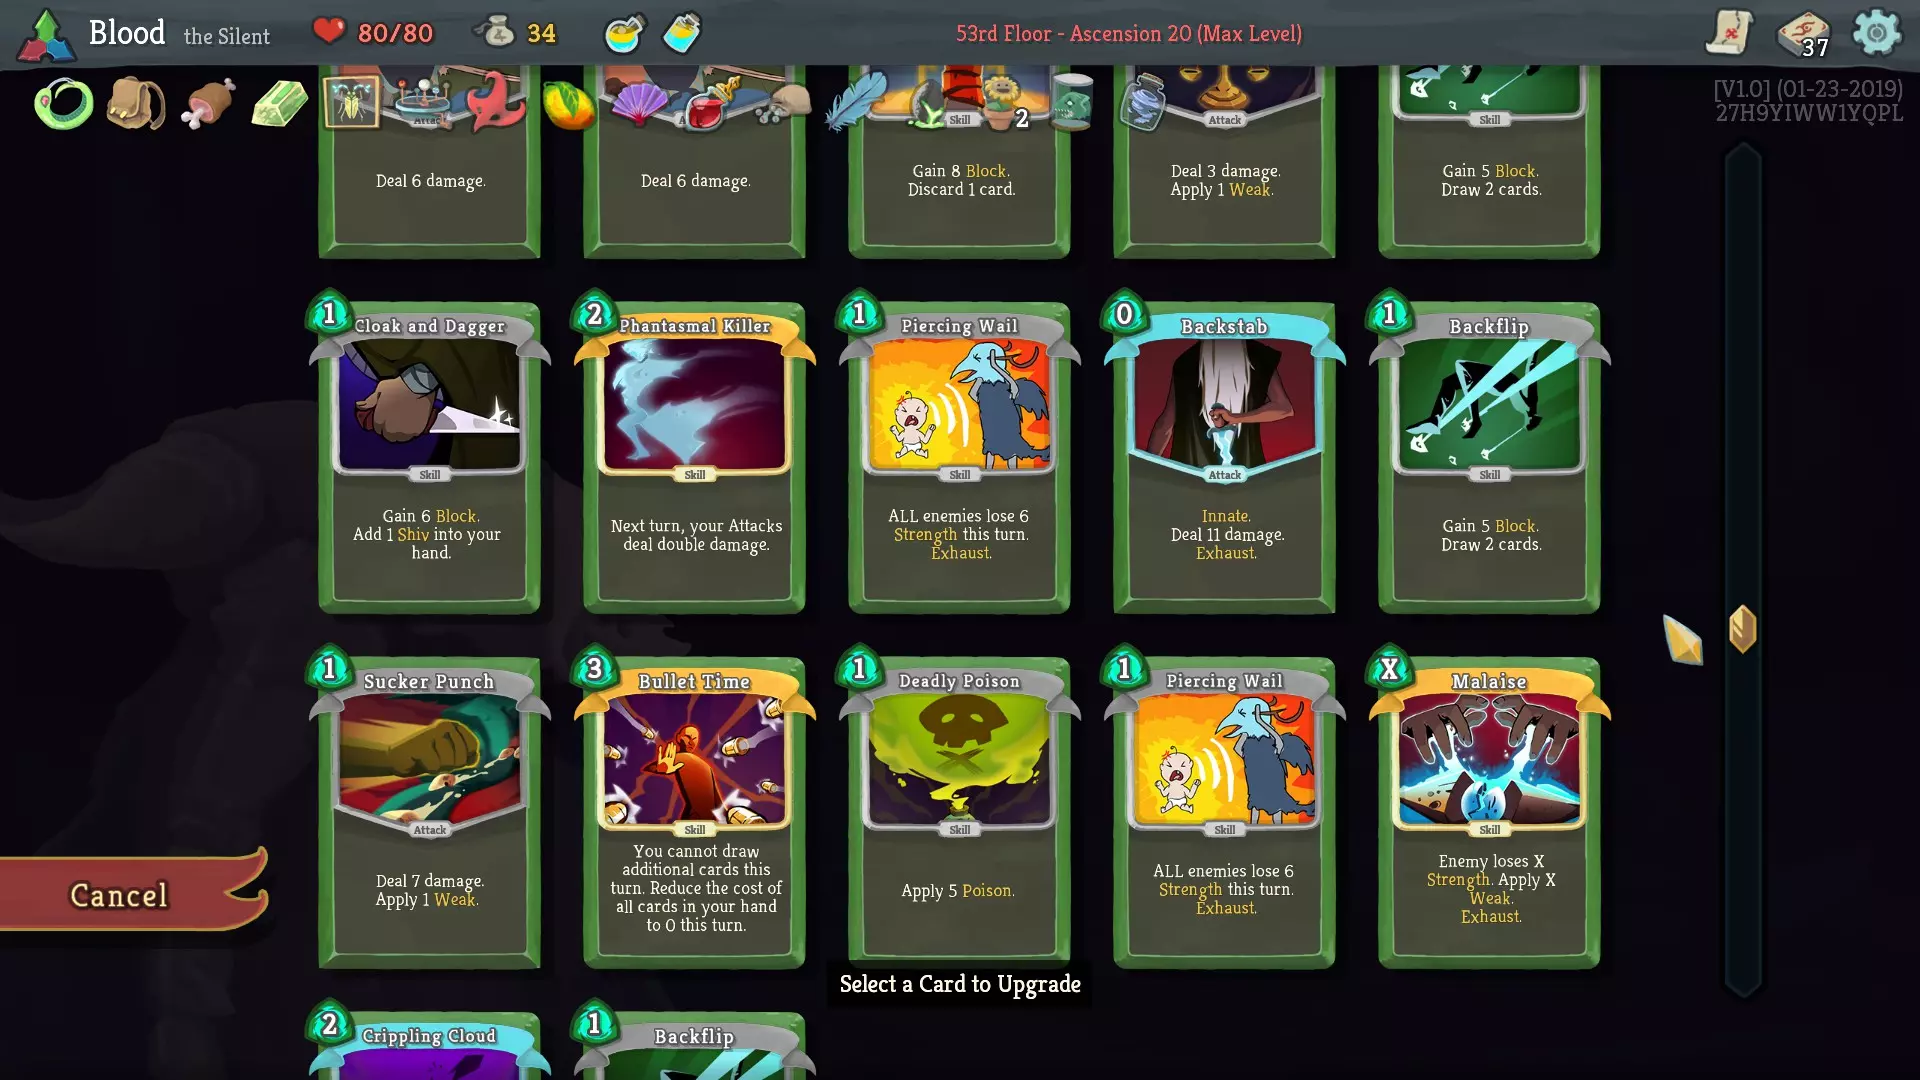
在营火处我们选择升级一张卡牌。52点生命值应该足以撑过精英战……而且剩余的生命值还能让我们恢复比当前缺失量更多的血量。 我们不会升级打击或防御。抱歉,就是不升。不管你多想要升级它们。 幸存者+没有伤害输出。我们需要打伤害。 强酸毒+只是多1点伤害,外加额外一回合的虚弱效果。不过,由于有【意志力药水】(WLP),我们并不急需那第二回合的虚弱。 步法+同样没有伤害输出。 致命毒药+(DS+)对所有目标额外造成4点伤害。这对岗哨非常好用,对付哥布林首领效果不错,对熔岩史莱姆就有点糟糕了(因为第一回合的减益会立即抵消这次升级的效果)。但这是目前我们能选择的最佳伤害升级选项。WLP+的效果是保留2张卡牌而非1张。这并非伤害效果。 我们将DS升级为DS+。如果能从DS升级到3DS当然更酷,但那样我们就成任天堂了。 最终精英战的对手是熔岩史莱姆。战斗过程虽然有些胶着,但我甚至毫不费力。
我们获得的遗物是【骨肉相连】(若以不高于50%的最大生命值结束每场战斗,战后恢复12点生命值)。我现在开心得像只猫。 【无尽痛苦】(EA)并非一张烂卡,但也算不上好卡。你也可以用类似的描述来形容EA的游戏。 【倾泻】能造成伤害且不会消耗。我们接下来只需经过一场必定出现的走廊战斗,就会遇到一场精英战。它还会弃掉所有非攻击牌,包括状态牌,比如【六面兽】会丢进我们牌组的【烧伤】。虽然不是【静默猎手】最爱的卡牌,但目前对我们来说相当有用。 【杂技】是抽牌(净获得2张牌)。我们现在不需要抽牌。就算抽到15125234234张【打击】也没用。 我们选择了【倾泻】。 在营火处,我们选择休息。 问:这样做很蠢吗?你获得了成就【Meat on the Bone】! A:赶紧去赌场吧。 第一幕(第三部分): 我们在宝箱处获得了一块山铜(若回合结束时没有格挡,则获得6点格挡)。蓝宝石钥匙没什么用,而无需出牌就能获得6点格挡有时会很有用。有时有用总比永远没用强。 在下一个问号房间,我们运气不错,找到了两瓶免费药水。
这是一瓶毒药和一瓶虚弱药水。没什么特别的,但聊胜于无。
我们选择在营火处升级一张卡牌。我们没有休息,因为我们并不担心在走廊战斗中死亡,而且【骨肉相连】会在战斗后为我们恢复生命值。我们牌组中唯一新增的卡牌是【倾泻】。事实证明,我们仍然需要伤害,而升级后的【倾泻】能以1点能量造成4点额外伤害。未升级的【打击】卡牌们在角落里瑟瑟发抖。

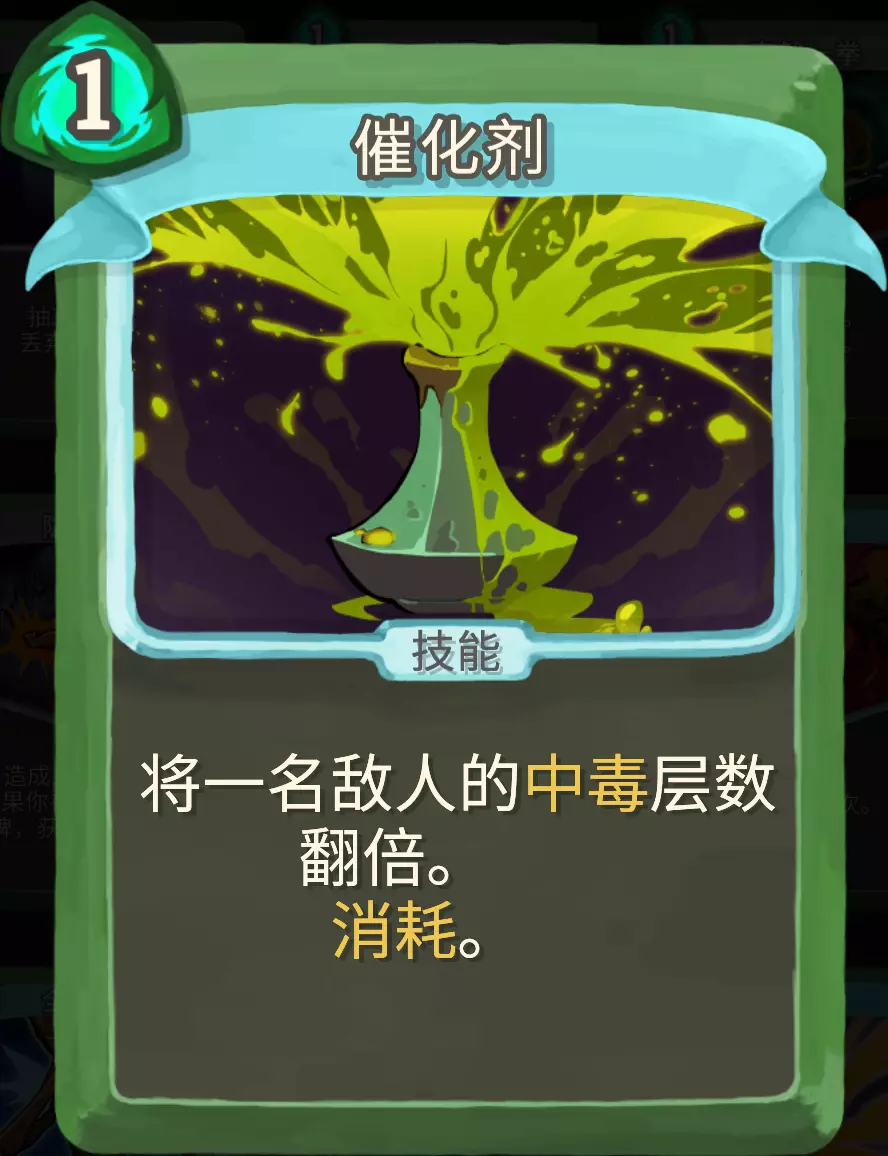
打赢这场走廊战斗后,我们恢复了12点生命值,达到45点生命值(这是目前我们能达到的最大生命值)。我使用了虚弱药水,以避免受到伤害,从而保持可能的最大生命值,为可能遭遇的【地精首领】做准备。更重要的是,战斗后获得药水的初始概率为30%,每经过一场未获得药水的战斗,概率就会增加10%。由于我们之前还没有获得任何药水,所以这场战斗获得药水的可能性相当大。我们得到了另一瓶剧毒药水。事实证明,【地精首领】注定要完蛋了。 命中率就像是中学里那个发育不良、总被欺负的孩子。也许有一天他会变得很了不起,但更多时候,他只会成为一个有心理创伤的普通人。潜行突袭这张卡实在太糟糕了。它可能比精准打击还要烂,简直就像是因为被欺负得太厉害而转学的孩子一样惨。 催化剂这张卡,如果你没有施加中毒的手段,那它就完全没用;但如果你有办法施加中毒,它就会变得非常好用。事实证明,我们的卡组里没有施加中毒的手段。不过等等!我们有两瓶毒药药水。天啊,这可能造成24点中毒伤害!精灵贵族绝对会哭出来!而且,如果运气好的话,我们只需要对精灵贵族用一瓶毒药药水,另一瓶可以留着对付六面鬼……这样一来,催化剂就不会是张废卡了!但如果在那之后我们找不到任何中毒相关的卡牌……那它就还是超级没用。还记得我说过不要赌博吗?我撒谎了。这次我们可以赌一把。我们只需要确保我们的胜率比赌场概率更高就行。那两瓶剧毒药水?它们能把我们的胜率从大约33%提升到95%。 结果下一个精英怪是地精首领。游戏本可以安排岗哨,但没有,来的就是地精首领。
击杀地精首领后,我们获得了这个不错的【保存的昆虫】(精英敌人生命值降低25%,并且变得更可爱了)。要是能早点拿到就好了…… 【精通】能提供抽牌,虽然我们现在抽牌有点少,但【精通】实在太花里胡哨了,现在真的不值得拿。这就好比你独自在酒吧时,遇到一个大概4分(满分10分)的人。你确实想要个伴,但还没到那么饥不择食的地步。 【窒息】在那些能打出大量卡牌的卡组里还不错。但我们的卡组不是这种类型。 【后空翻】对静默猎手来说是张好牌。通常它在游戏后期效果更好,但我们已经有【步法】提供敏捷加成了,而且确实需要一点抽牌…… 我们选择了【后空翻】。 下一个问号房间是一场战斗。

后空翻这张牌不错,但这么早拿到两张可能不太需要。 隐匿 dagger 是张好牌。它有点像铁甲战士的铁浪,不过在静默猎手这里能和很多牌形成配合。当然它也和少数牌存在反配合,但短期内应该不会遇到这种情况。 技巧这张牌目前评分还是4分(满分10分),不过我们已经在讨论一张8分的牌了。 我们选择拿隐匿 dagger。 篝火处我们选择升级,因为41点生命值对付六面鬼通常是足够的。不过说实话,以我们现在的卡组打六面鬼还是有点吓人,但有剧毒药水和催化剂应该没问题。
催化剂+会使中毒效果变为原来的三倍(造成18点中毒伤害),但这有点不确定,因为我们可能不会很快拿到中毒卡牌。 迅捷步法+仍然是相当不错的升级。提升对抗六面鬼时的格挡值也不算差。现在我们不缺伤害了,这个升级就更好了。 意志力+能让我们保留两张卡牌。这也不算特别差,但我们其实并没有两张值得每回合都保留的卡牌。 后空翻+基本上和升级一张防御牌效果差不多。 斗篷与匕首+能生成两张 Shiv( Shiv 为游戏内专有名词,指一种快速攻击卡牌)。如果我们有能和 Shiv 配合的卡牌,这个升级会非常好。但我们没有。 就选迅捷步法+! 第一幕(第四部分): 我们与六面鬼战斗并获胜(险胜)。
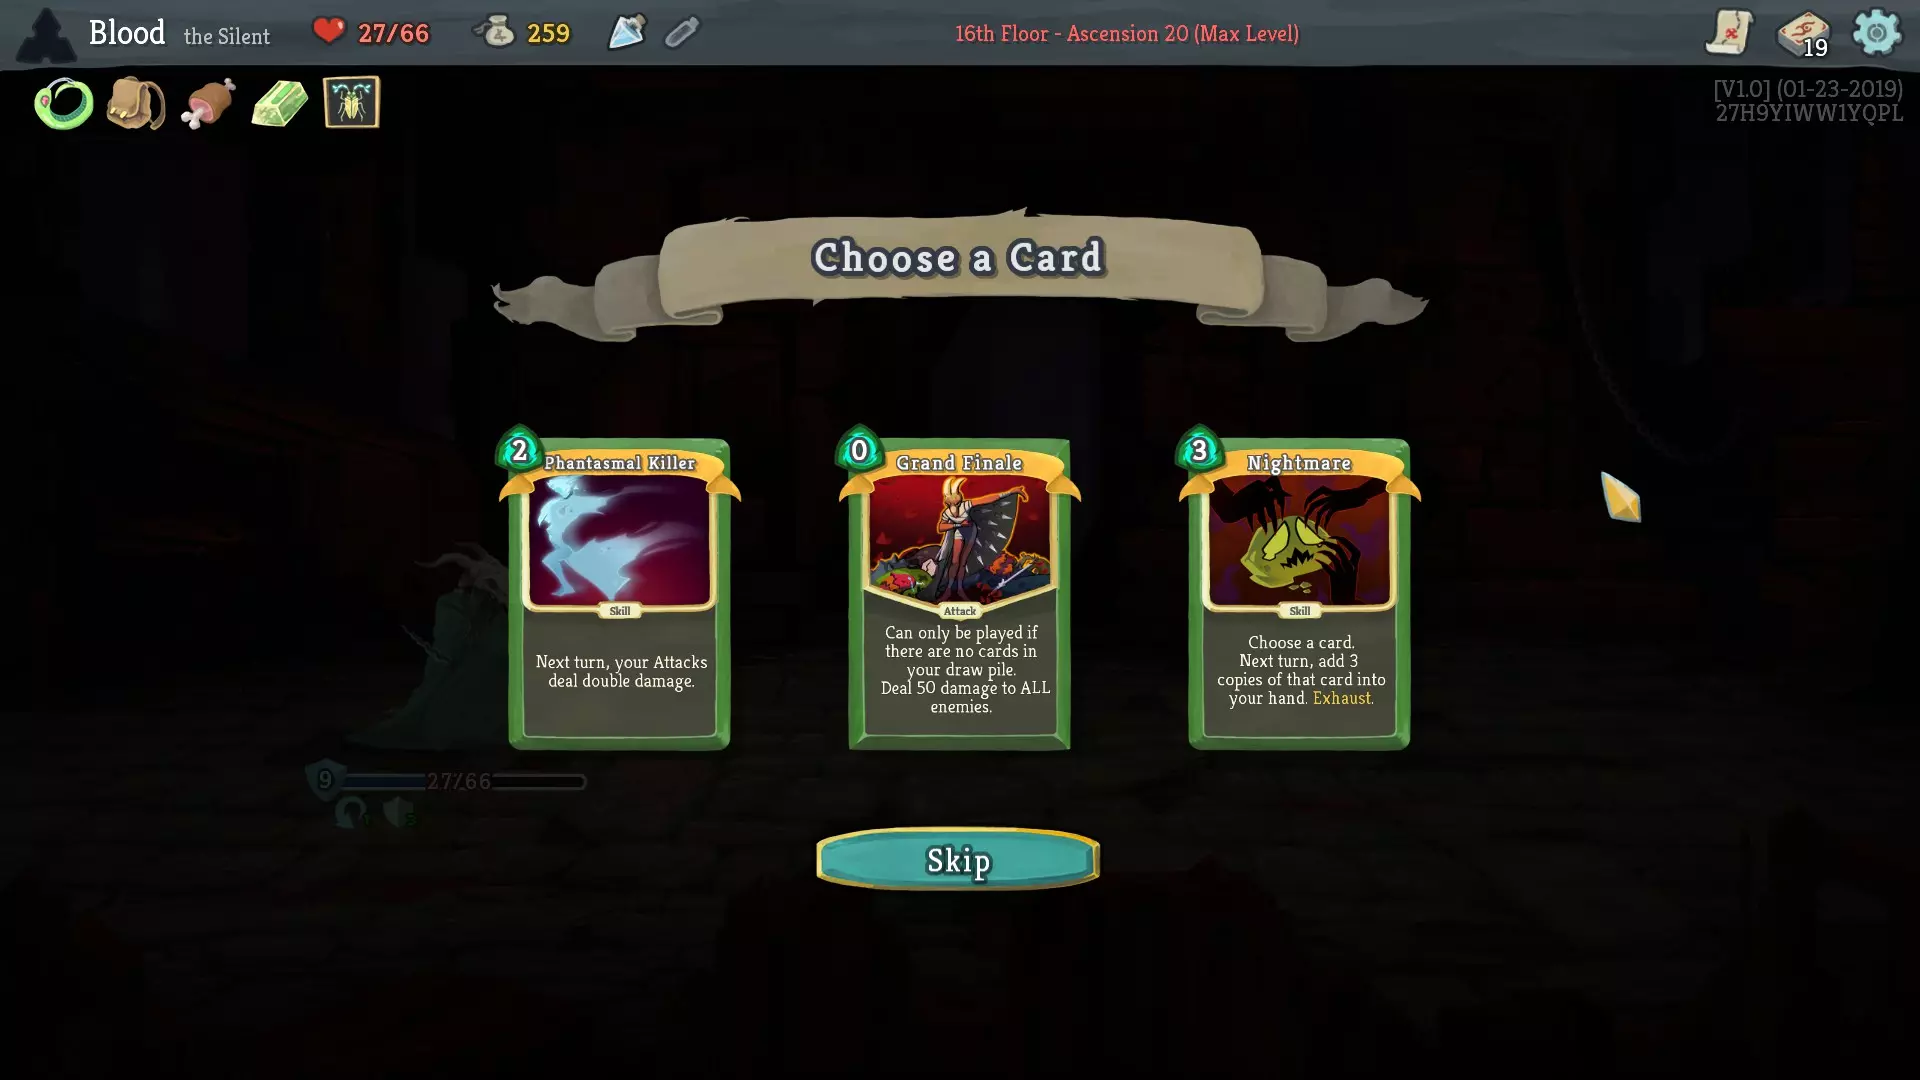
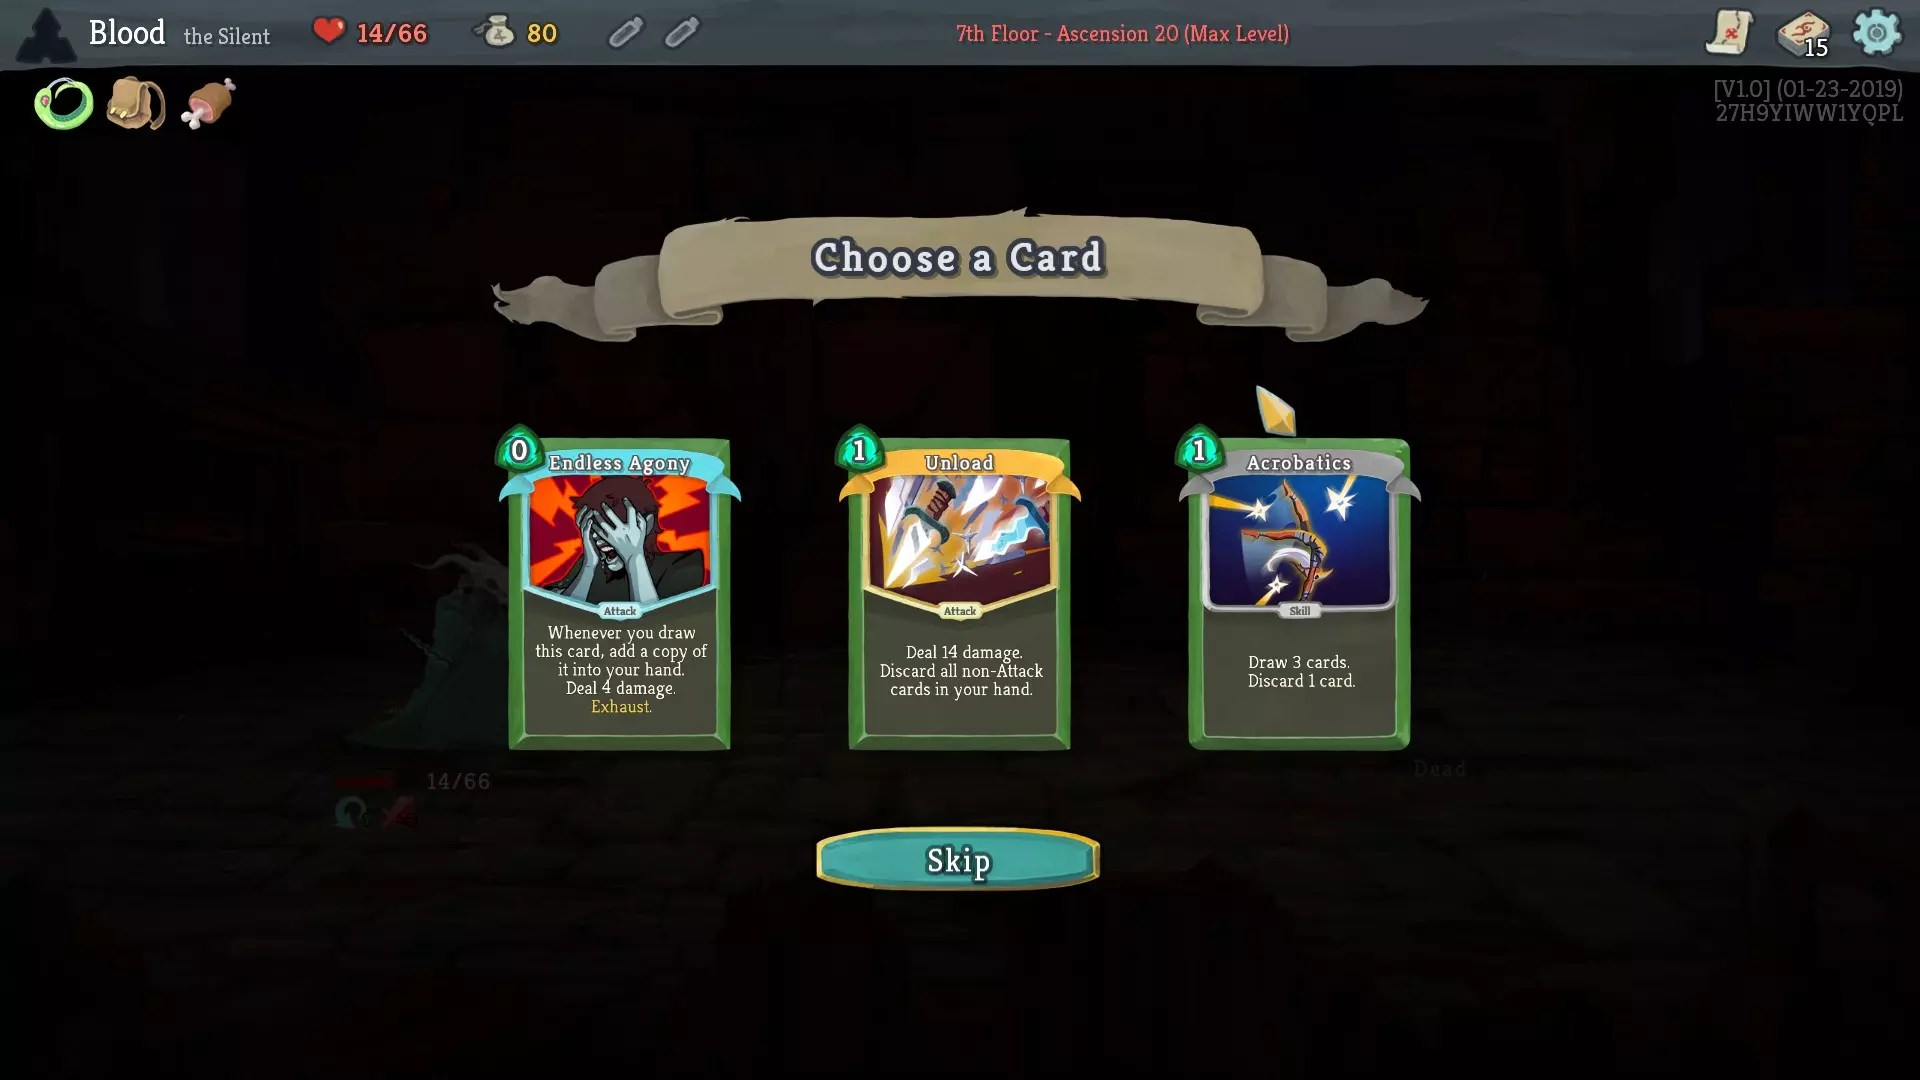
幻象杀手单卡通常表现很差。不过配合【等待与准备】的话还不算太糟,至少能为下回合保留一次强力攻击。实际上,【卸载+】能造成18点伤害,翻倍的话效果也不算差。(编辑:在2.2版本中,幻象杀手得到了大幅增强,现在仅需1点能量即可使用) 终局是一张使用难度极高的卡牌。如果我能在接下来的几场战斗中稳定打出它,我确实会选它。但现在牌组有19张牌,这意味着如果在抽到终局之前没有抽到【等待与准备】,而且终局不在牌组首轮循环的最后5张牌里,那这场战斗我基本就打不出终局了。 梦魇是一张非常出色的卡牌。梦魇和步法是很棒的组合。【等待与准备】也很适合用来配合梦魇的释放。不过,我可能在第三章之前都没法玩噩梦难度。我倒是很乐意带一个“躺尸”的噩梦难度角色到第三章,但我们的套牌还不够强,做不到这一点。我们只能对着随机数生成器(RNG)的坑爹结果叹气,然后选了灵能杀手。
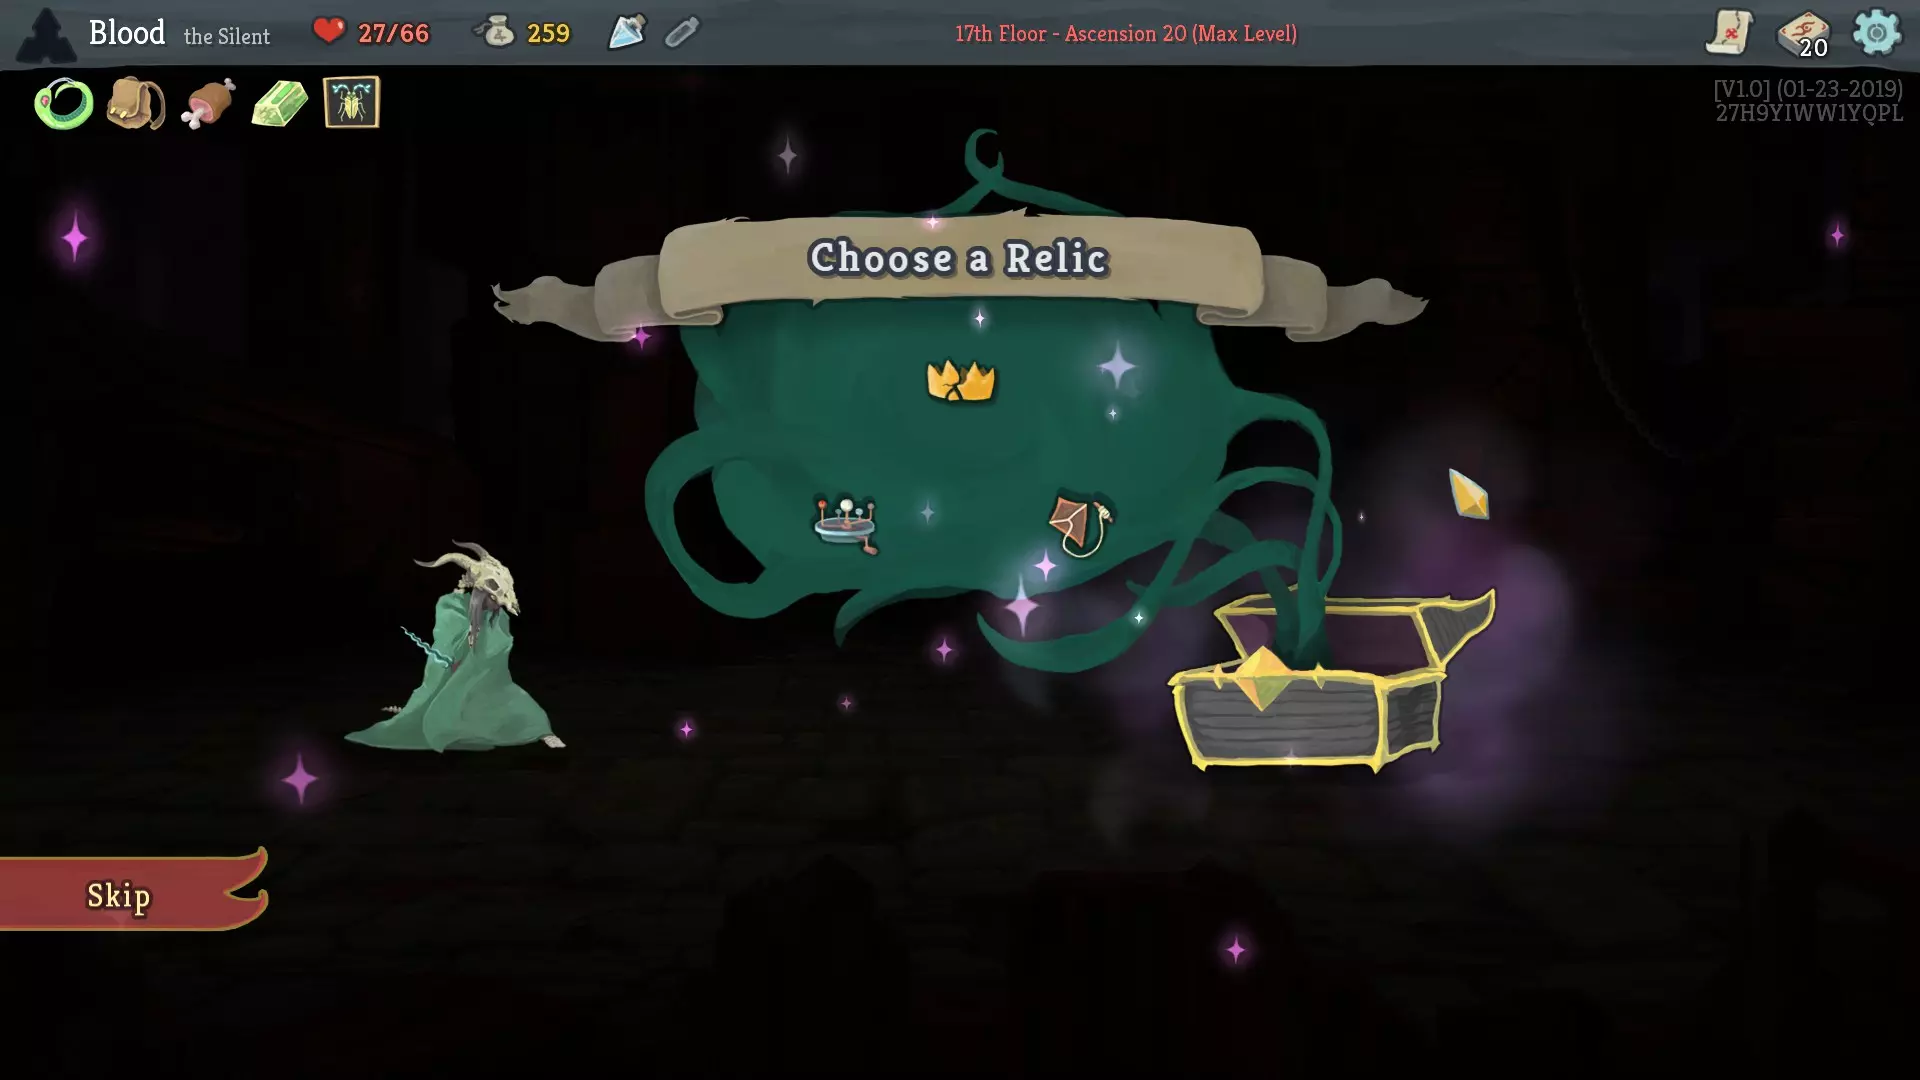
我们的遗物选项令人失望。 星盘还算不错。目前我们正好需要好用的卡牌……尤其是给【死亡催化剂】用的中毒卡牌。 破碎王冠基本意味着我们输定了。我们的牌组一点也不强。我们需要能看到更多(好用的)卡牌。 悬浮风筝也基本意味着我们输定了。我们没有足够的抽牌能力来维持每回合弃掉2张牌(第一回合还能承受,但也就仅此而已)。说实话,我从不选风筝。 我们选择星盘,祈祷能抽到可用的卡牌。
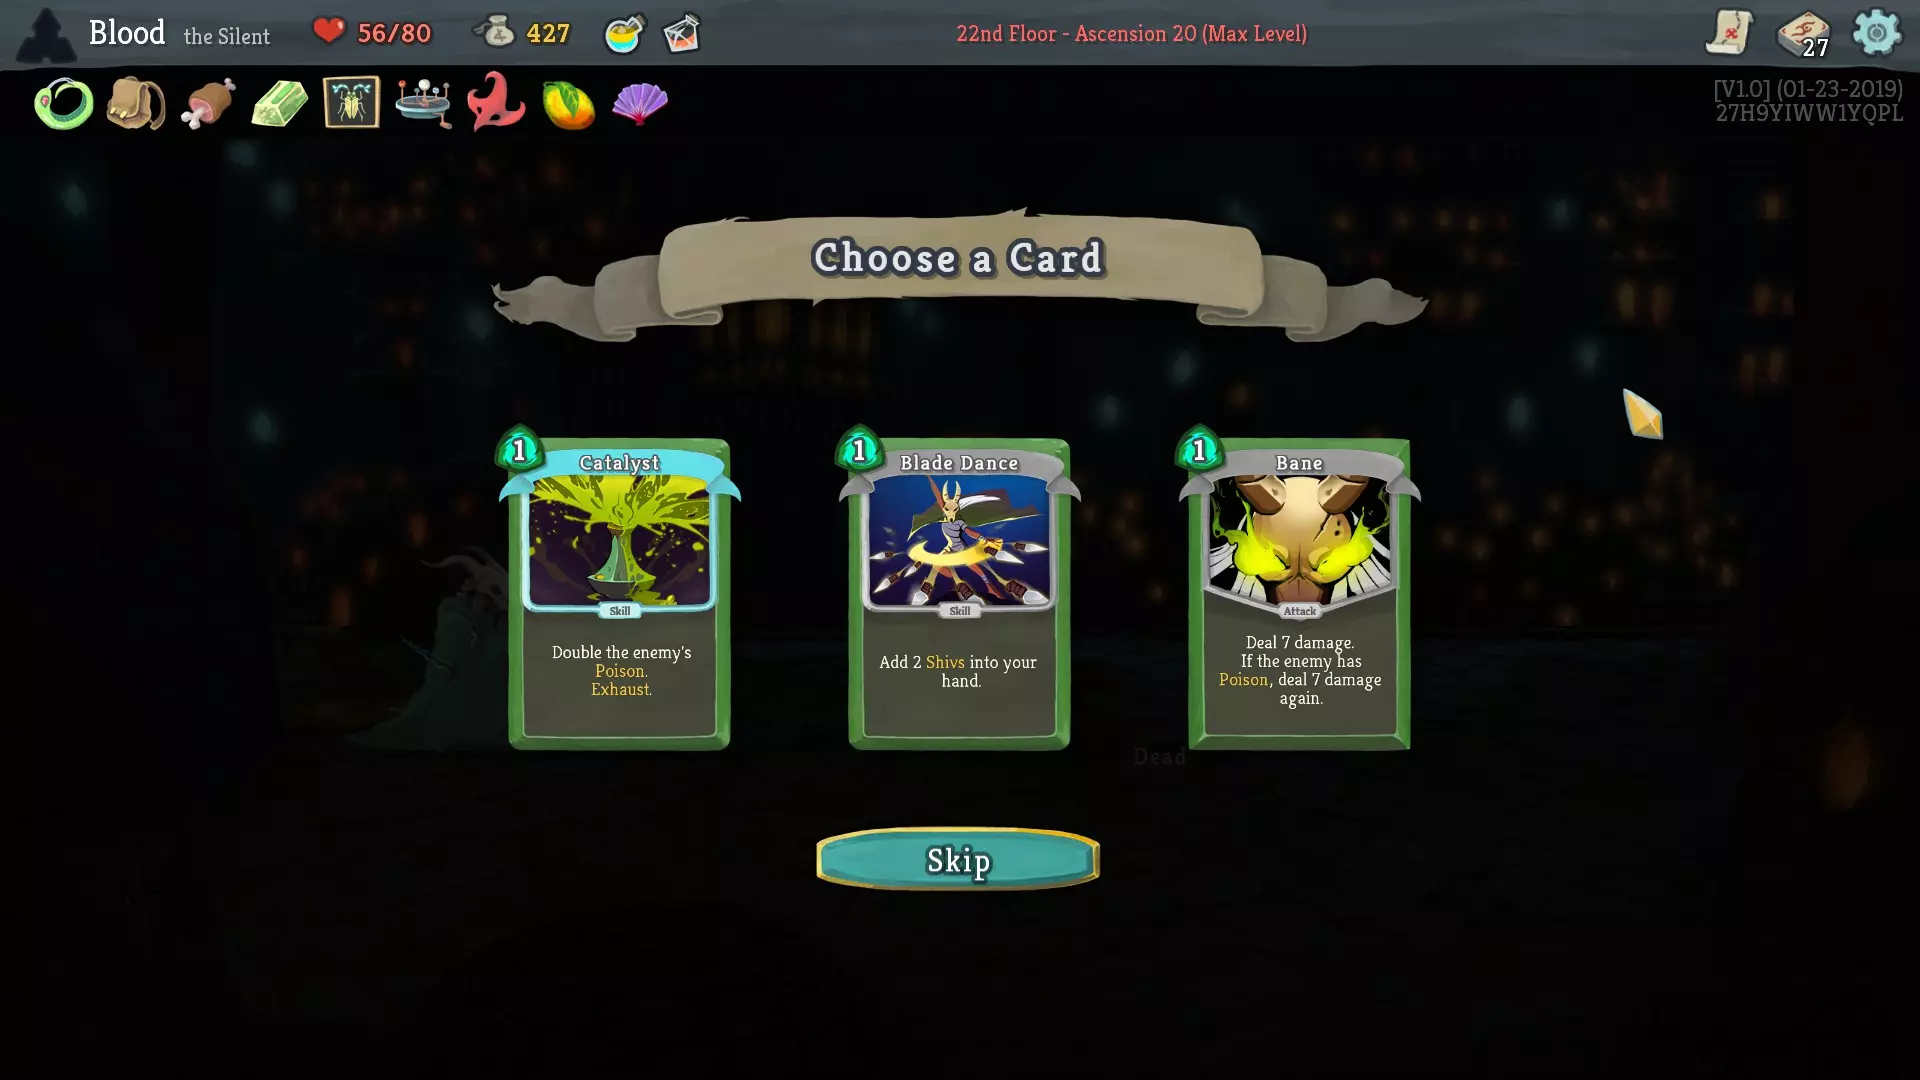
潜行突袭依然很糟糕。虽然它周围的环境有些变化,但它本身确实没什么改变。 弹跳烧瓶和催化剂有极佳的协同效果。18点 poison,太厉害了! 淬毒匕首其实是张相当不错的卡牌,但弹跳烧瓶要好得多。1点能量就能造成9点即时伤害,并且在接下来2回合额外造成3点伤害,这效果很棒。 我们选择弹跳烧瓶。
又是偷袭。你怎么老是回来。停下。求你了。 穿刺哀嚎(PW)是第二章的一张好牌。第二章有很多敌人拥有多段攻击,因此穿刺哀嚎对它们的效果显著提升。此外,第二章的许多战斗都是面对多个敌人,而穿刺哀嚎作为范围(AoE)减伤牌表现出色。 横劈有点像是略强版的打击,但只适用于那些能量不足以打出所有想要卡牌的卡组。我们并没有这个问题,而且略强版的打击依然相当糟糕。 我们选择穿刺哀嚎。
飞镖是一张有趣的卡牌,只有当你拥有大量抽牌能力,并且牌组中有很大一部分是技能牌时,它才会发挥作用。如果我们在第一回合抽到这张牌其实也不算太差(因为我们第一回合有9张牌,在没有额外抽牌的情况下最多能造成32点伤害),但它感觉太依赖于各种条件的完美配合了。 致命毒药是一张不错的卡牌,但既然我们已经有一张了,它的价值就没那么高了。 背刺在第一幕相当好用。在第二幕也还可以,但关键在于这张牌是固有牌,并且会消耗(这样就不会在后续回合堵塞你的牌组)。我们第一回合有9张牌,根本不可能在第一回合打出9张牌。背刺消耗0点能量,我们可以在第一回合打出背刺。道理就是这样。 我们选择背刺。
后空翻是张好牌。既然我们要往牌组里加入更多卡牌,我觉得多一点抽牌能力也无妨。 毒刺同样是张好牌,但我们已经拿了弹跳烧瓶,所以它看起来不是特别必要。 刀刃乱舞升级后还不错,没升级时就很一般。我们有很多其他卡牌想要升级,而且也没有什么 Shiv 协同效果。 我们选择后空翻。
切割已经提过了。 偷袭可以去死了。 欺诈攻击不是一张很好的牌,但我们的牌组确实缺乏低费牌(只有中和)。 我们选欺诈攻击。 前往第二幕! 第二幕(第一部分): 让我们看看第二幕的地图:
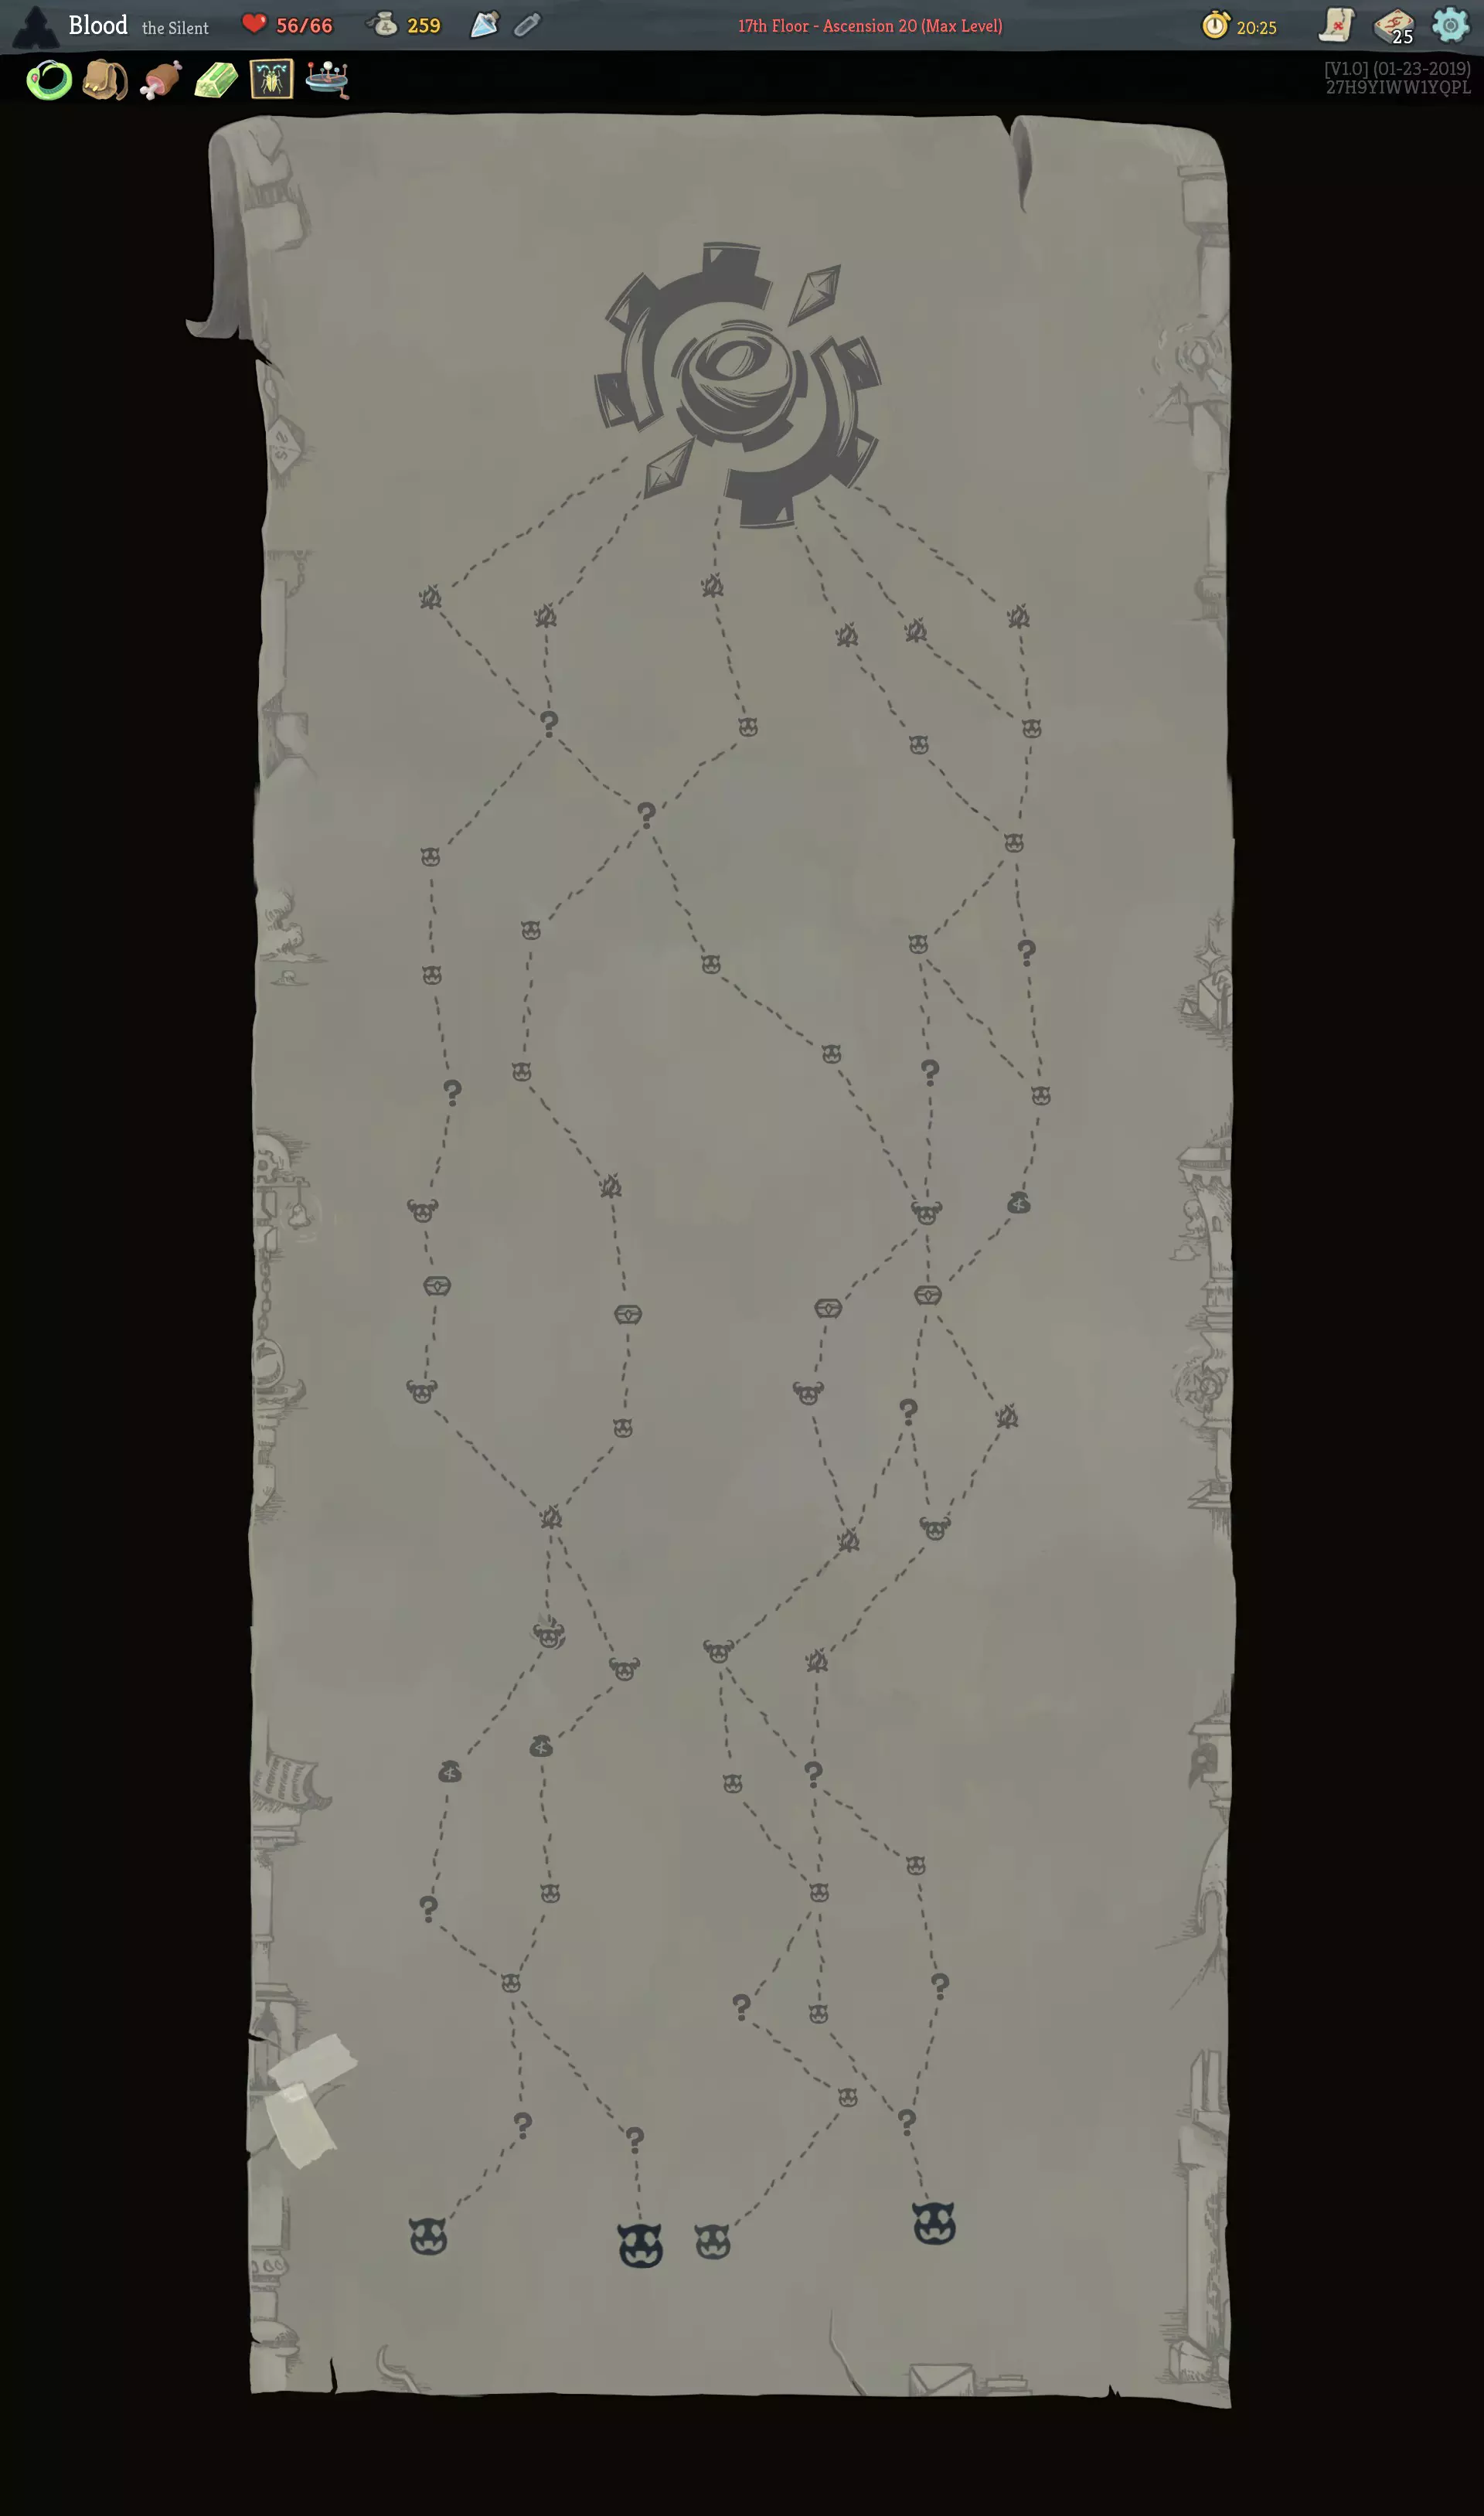
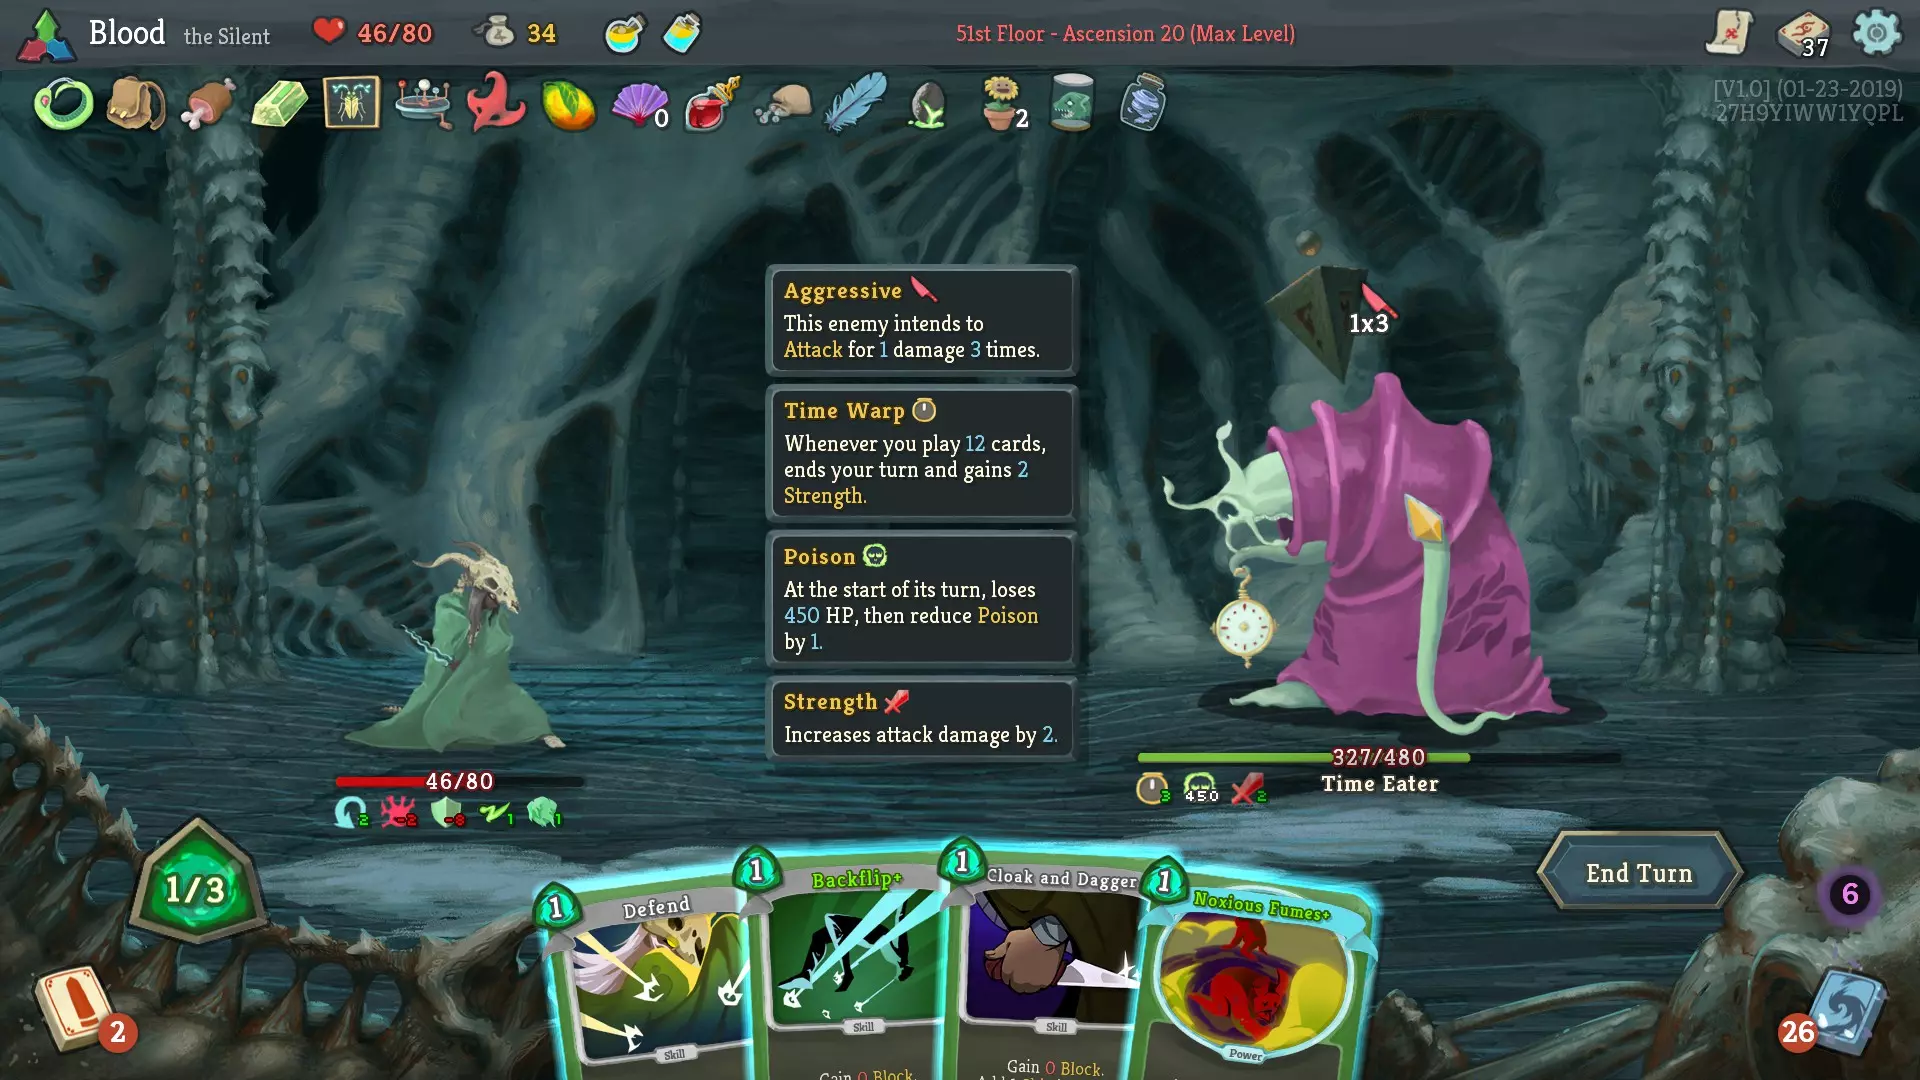
非常感谢Siri也为我们提供了这张图片。 需要考虑的事项: 1. 我们遇到了【Hyper Beam】Boss(他真的有真名吗……?)。这对我们来说是个特别好的消息,因为他不会清除减益效果,而且他的随从被击杀后不会重生。【Catalyst】的冒险现在看来回报巨大。 2. 我们目前有3点能量,而我们的范围伤害和范围减伤……往好了说也只是平平无奇。即使有【Meat on the Bone】和【Preserved Insect】,我觉得如果遇到的两个精英怪是【Gremlin Leader】和【Slavers】,这套卡组也撑不过去(不过我们对付【Book of Stabbing】时表现还不错)。 3. 我们有很多金币,本幕肯定要去一趟商店。我们或许能撑到第三幕再花金币,但那会非常危险。此外,在第三章中,我们会被锁定在火焰精英所在的路径上,而该路径可能没有商店。我们不要用赌场的概率来冒险。 第二章的走廊战斗格外糟糕。我们其实并不想打这些战斗。但我们又确实想获得不错的卡牌,尤其是如果我们无法进行两场精英战斗,那么这次 run 相比之下就会少一个遗物。为此,我想尝试将较难的走廊战斗安排在后面,但还是要打几场。 有4个起始位置(从左到右称为路径1-4): 路径1和路径2是相同的。在岔路口,可以选择挑战火焰精英或普通精英。如果那个火焰精英是地精首领或奴隶主,以我们目前的卡组状态,我们必死无疑。岔路的另一边会让我们经历一场艰难的走廊战斗,但在精英怪之前可以去商店(可惜篝火在精英怪之后)。我们现在的金币数量相当不错(肯定够买些东西),但稀有遗物超出了我们的购买力,而普通遗物会让我们花光所有金币,无法再做其他事。之后的下一个岔路,我们可以选择连续面对两个精英怪,或者一堆艰难的走廊战斗加一个篝火。 路线3和路线4很相似(只在开始部分有所不同)。路线3意味着我们需要进行一场艰难的走廊战斗。路线4则不需要。比起路线3,我更喜欢路线4。我们肯定要走岔路的右侧,因为它在精英怪前后都各有一个篝火。我们也需要去商店一趟,到那时我们应该能有大约400金币。然后可能会有4场艰难的走廊战斗集中在后期(嘿,我们不是说过非常想要这个吗?)。 暂时,我选择在每个岔路口走第4条路径的右侧。 第一场战斗是鸟类敌人。这场战斗可能会很棘手,但我们的牌组里有【DS+】,还有给鸟类敌人上毒并让它们死于中毒的能力。
那场战斗我们失去了1点生命值。对于基础职业来说已经相当不错了。 祸根这张牌还可以……在第一章如果你有施加中毒的方法的话。如果这张祸根能升级,我或许会考虑(20点伤害比14点好太多了),但目前,我们有太多卡牌需要升级了。 准备这张牌很糟糕。它实际上并不会让你抽牌。它确实能稍微循环一下你的牌组,但说实话,除非你有非常特定的需求去抽一张牌然后弃掉一张,否则它不是一张好牌。升级后的准备还算可以,但也不算优秀,我们肯定不会浪费一次升级机会在它身上。 杂技这张牌还不错,但我们已经有两张后空翻和一张【精准】,牌组循环和留存能力已经相当不错了。而且我觉得我们实在没必要花费1点能量去单纯循环牌组。 这张牌我选择跳过。 在问号事件处我们举办了这个有趣的活动
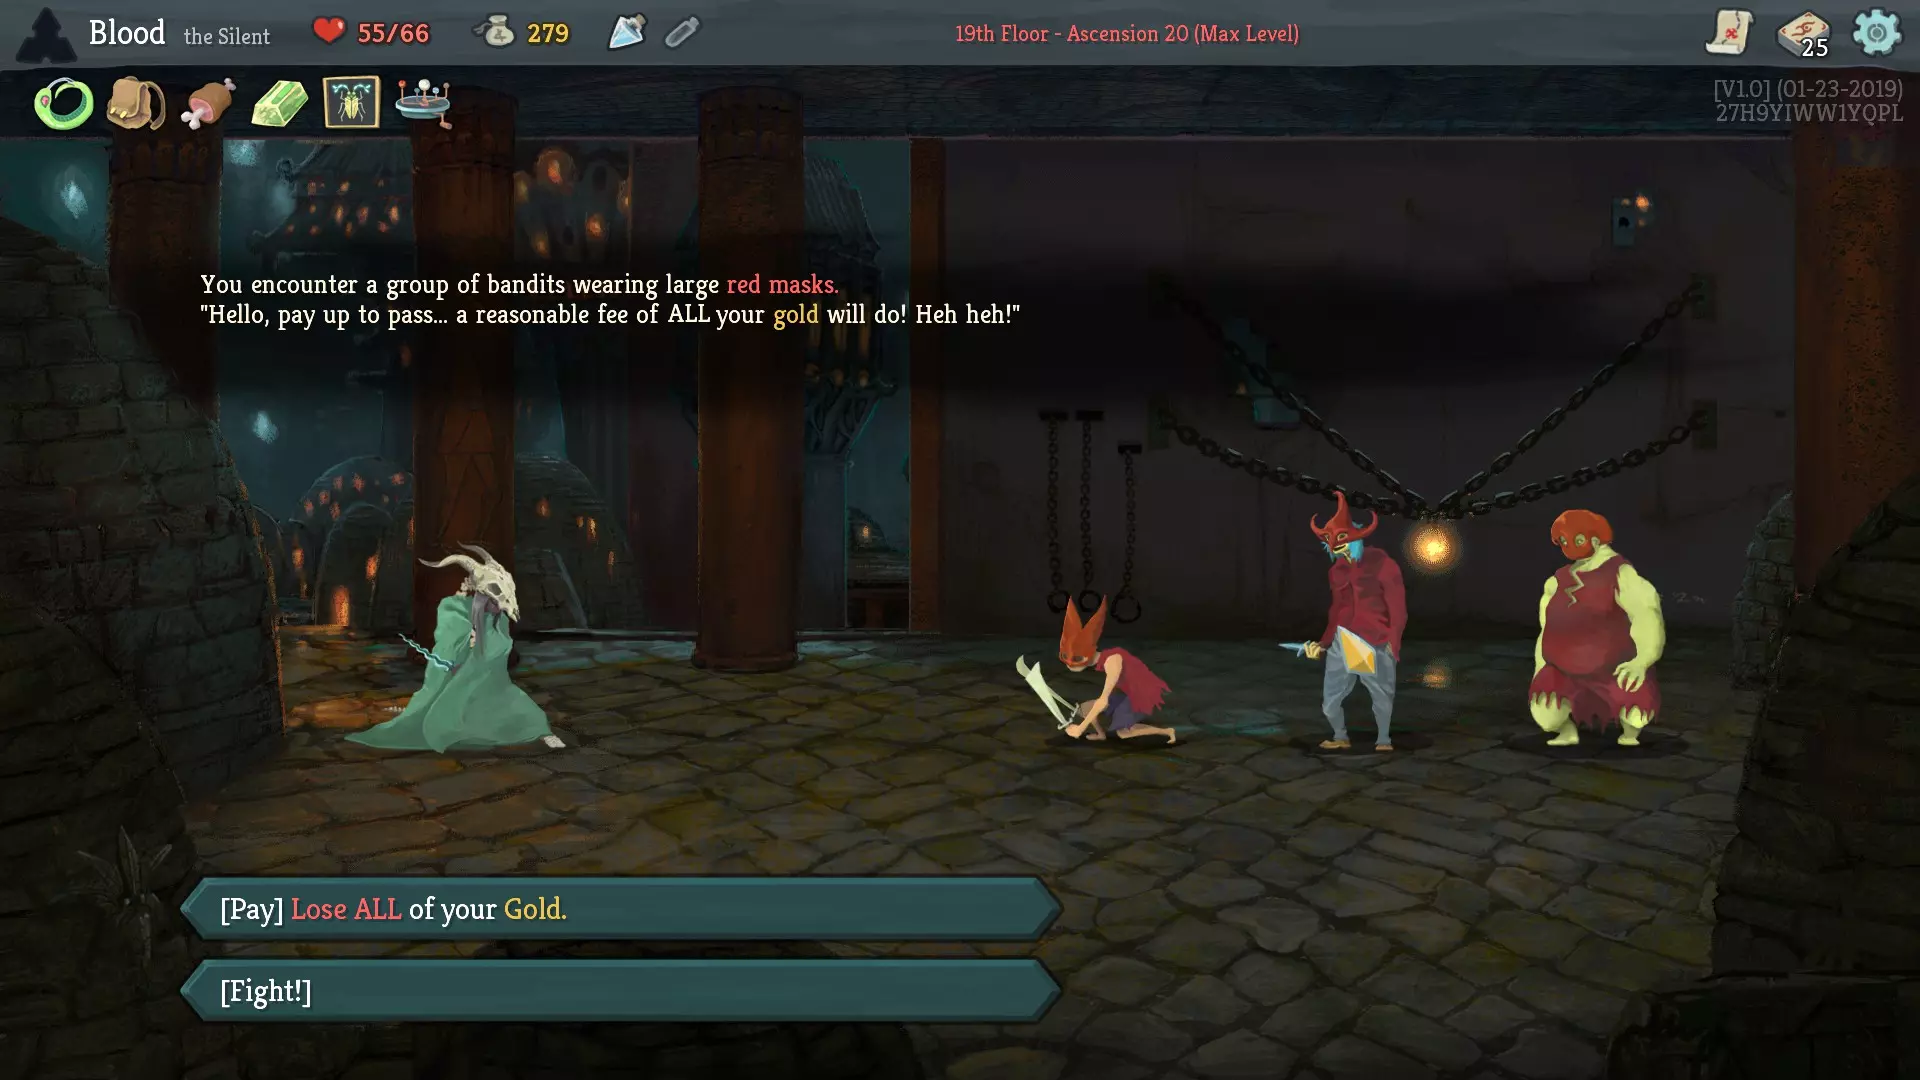
显然我们不会给他们付钱。我们的卡组足够强,大概一两回合就能干掉其中一个。之后战斗就相当简单了(而且战斗结束后我们有肉可以治疗)。另外,他们给的遗物恰好能在第一回合施加1层全体虚弱。还记得我之前虚弱层数不够的事吗?

我不得不使用格挡药水,但效果还不错。他们给了我们一瓶荆棘药水(我希望能留到心脏战再用,但看看情况吧)。 bane+出现了。他们是在监视我还是怎么的? 剑刃乱舞没什么用,因为我们没有匕首协同效果。 力量祝福真的很强。不过我们拿了红色面具来进行范围伤害减免,而且牌组里已经有一张力量祝福了。我不太确定现在是否需要第二张,而且我确实需要一些伤害来杀死那个超光束家伙召唤的随从。 我选择了bane+。 在下一个问号房间,我遇到了幽灵议会事件:
实际上,大多数时候这是个相当不错的活动。问题在于,你需要升级获得的幻影(使其不再是虚无状态)。幻影+搭配WLP效果非常好。然而……我们又回到了那个问题,你得明白我还有很多其他卡牌需要升级。灵能杀手在3费的情况下基本就是张废卡。WLP真的很想升级成WLP+。我也很想升级中和,以更稳定地施加虚弱效果。此外,催化剂+和弹跳烧瓶+对于超光束 boss 来说几乎是必备的。不过,对我来说最关键的问题是有血肉之躯这张牌。由于我们的最大生命值与血肉之躯的治疗时机相关,降低最大生命值会让获得治疗变得非常危险。这也让治疗的价值更高(按百分比计算),而且我们受到的伤害也会更少,但我担心我们的牌组不够强,无法在3回合的无形状态内赢得一些更难的战斗。对我来说,这是一个放弃的选择,但这可能会让我后悔。 第二幕(第二部分): 下一场走廊战斗很简单。我决定承受一些伤害,将生命值精确降至一半,以获取【肉类】值。

子弹时间(BT)非常好用。如果我在第一回合抽到它,就能多打出8张牌。它和【WLP】的协同效果也异常出色,还解决了我的3点能量问题。太棒了! 潜行与匕首还是老样子。 飞膝在第一幕还算不错……如果我没有一堆低伤害攻击牌的话,我会考虑选它(前提是它能单独使用,而不是要和子弹时间竞争)。 我们选择了子弹时间。 在下一个问号房间,我们遇到了这个有趣的事件:

幸运的是,凭借【背刺】和【卸弹+】,我们轻松解决了红色奴隶主,同时依靠【骨上肉】和【奥里哈鲁根】硬扛蓝色奴隶主的伤害。这部分战斗相当简单。接下来要面对的是奴隶主精英中的中型奴隶主和一只地精首领。由于我们有【保存的昆虫】,而且卡组本身就设计得能够击败地精首领,所以我认为这场战斗也会很轻松。
这场战斗给了我们一瓶不错的类固醇药水。这和我们的【痛苦增强】以及【致命打击增强】搭配效果相当好。 我们拿到了一个芒果(增加14点最大生命值,同时恢复14点当前生命值)。我太激动了。幽灵议会啊,求你们带我回去吧!我们还捡到了一把装饰扇(每打出3张攻击牌获得4点格挡)。我在拿这个的时候有点犹豫,因为在没有 Shiv(刀瓣)的牌组里,它实际上和【奥里哈钢】有反协同……但在有【子弹时间】的回合可能还不错。而且,在游戏的这个阶段,【奥里哈钢】的价值不大。 【催化剂】和【催化剂】有协同效果。四次肯定比两次好得多。 既然我们有了装饰扇,【 blade dance】现在其实还可以。不过,它真的没那么好用。 【痛苦】不是【痛苦增强】。而且我可能也不想要第二张【痛苦增强】。获得第二个催化剂! 在营火处我们选择升级,因为我们希望保持半血左右,以最大化【骨上肉】的效果。此外,我们的牌组现在已经足够完善,应该可以轻松击败任何精英敌人。
我们在这里有很多选择: 子弹时间+会消耗2点能量,让我们可以先使用后空翻。这虽然不是特别有用,但有一定潜力。 弱点感知+依然不错,但不是急需的。 魅影杀手+将不再是一张近乎废卡。不过,我们现在已经通过2张催化剂完全走毒系路线了。 催化剂+可能不错,但我们只有一个中毒来源,所以在施加中毒效果之前拿到催化剂+是毫无价值的。 弹跳烧瓶+增加一次弹跳次数。当有多个敌人,且部分弹跳目标不是你想要的目标时,这很有用。这对超光束敌人也很有好处,因为如果运气好的话,我们可以在第一回合就对他叠加12层中毒。 我选择升级弹跳烧瓶+。现在,我们祈祷这个精英怪是【穿刺之书】,因为那会简单得离谱,或者是【地精首领】,因为它比【奴隶主】能稍微好受一点。
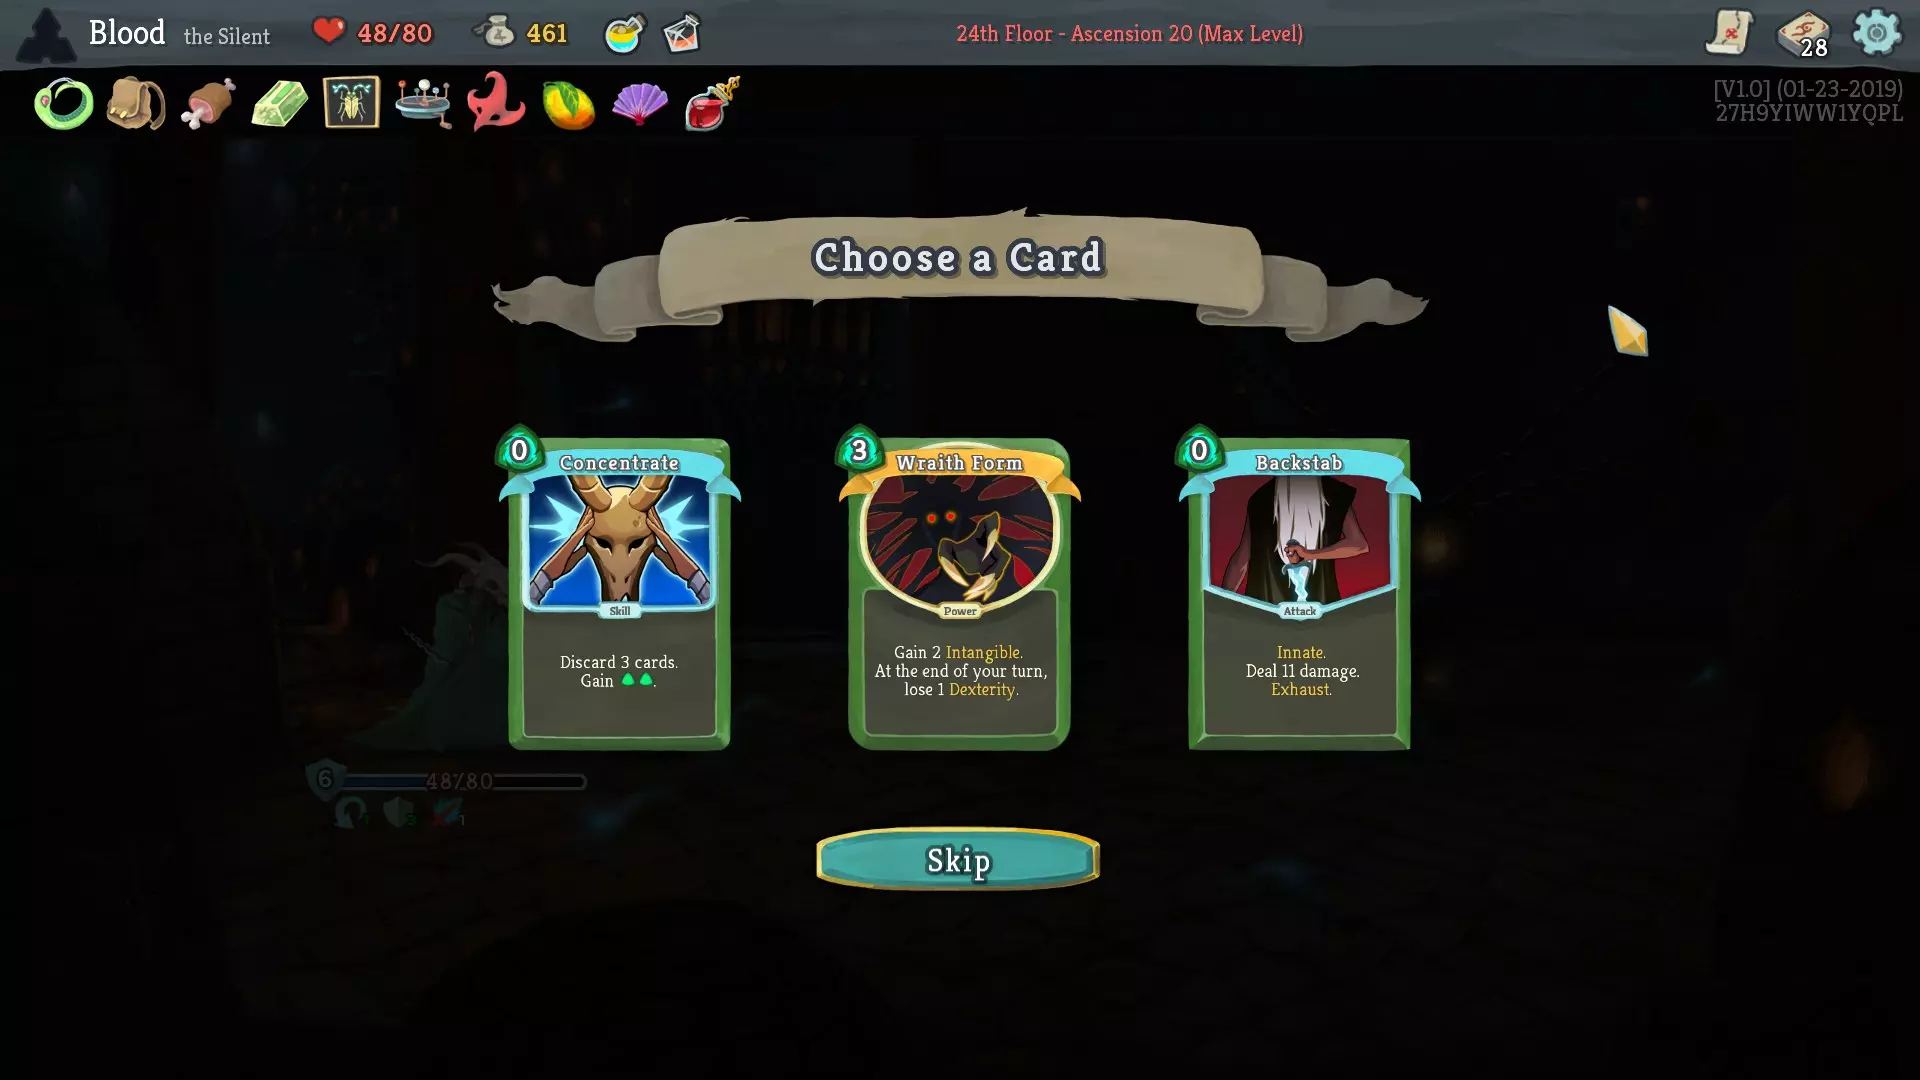
那是地精首领。我们只损失了一点生命值,所以总体来说不算太糟。我们又得到了一瓶类固醇药水(所以之前那瓶一直没用上有点浪费),但比起再拿一瓶类固醇药水,我更愿意留着荆棘药水对付心脏。我们还获得了一个血瓶【进入战斗时恢复2点生命值】。这是个还不错的遗物。 专注在你有三点能量并且第一回合有9张牌时还算可以。但它并不出色,因为如果没有升级,后续回合就会变得有些鸡肋(而且别忘了我们有多少牌想要升级)。 幽灵形态(WF)就是爱。幽灵形态就是生命。你怎么对抗超光束男?WLP和幽灵形态。你怎么用毒叠加赢心脏战?叠加毒素和催化剂多次,然后使用【意志力药水】和【幽灵形态】。背刺也不错,原因和之前一样。不过……【幽灵形态】是真爱,【幽灵形态】就是一切。我们选择【幽灵形态】。我太喜欢它了,甚至都不用缩写。下一个营火我们会出于同样的原因再次升级。
这里我们升级了幽灵形态。其他方面没有太多变化,而幽灵形态的升级是优先级非常高的。 在宝箱处,我们可以选择【弹珠袋】(战斗开始时对所有敌人施加1层易伤)或蓝宝石钥匙。记住那句关于有时有用总比永远没用好的话吧?另外,弹珠袋和背刺配合效果很好,而且它能移除【超级光束】敌人的一层Artifact,让我们能更快地对他叠加中毒效果。 现在去商店(求求了,伟大的随机数之神,给我点好东西吧)。

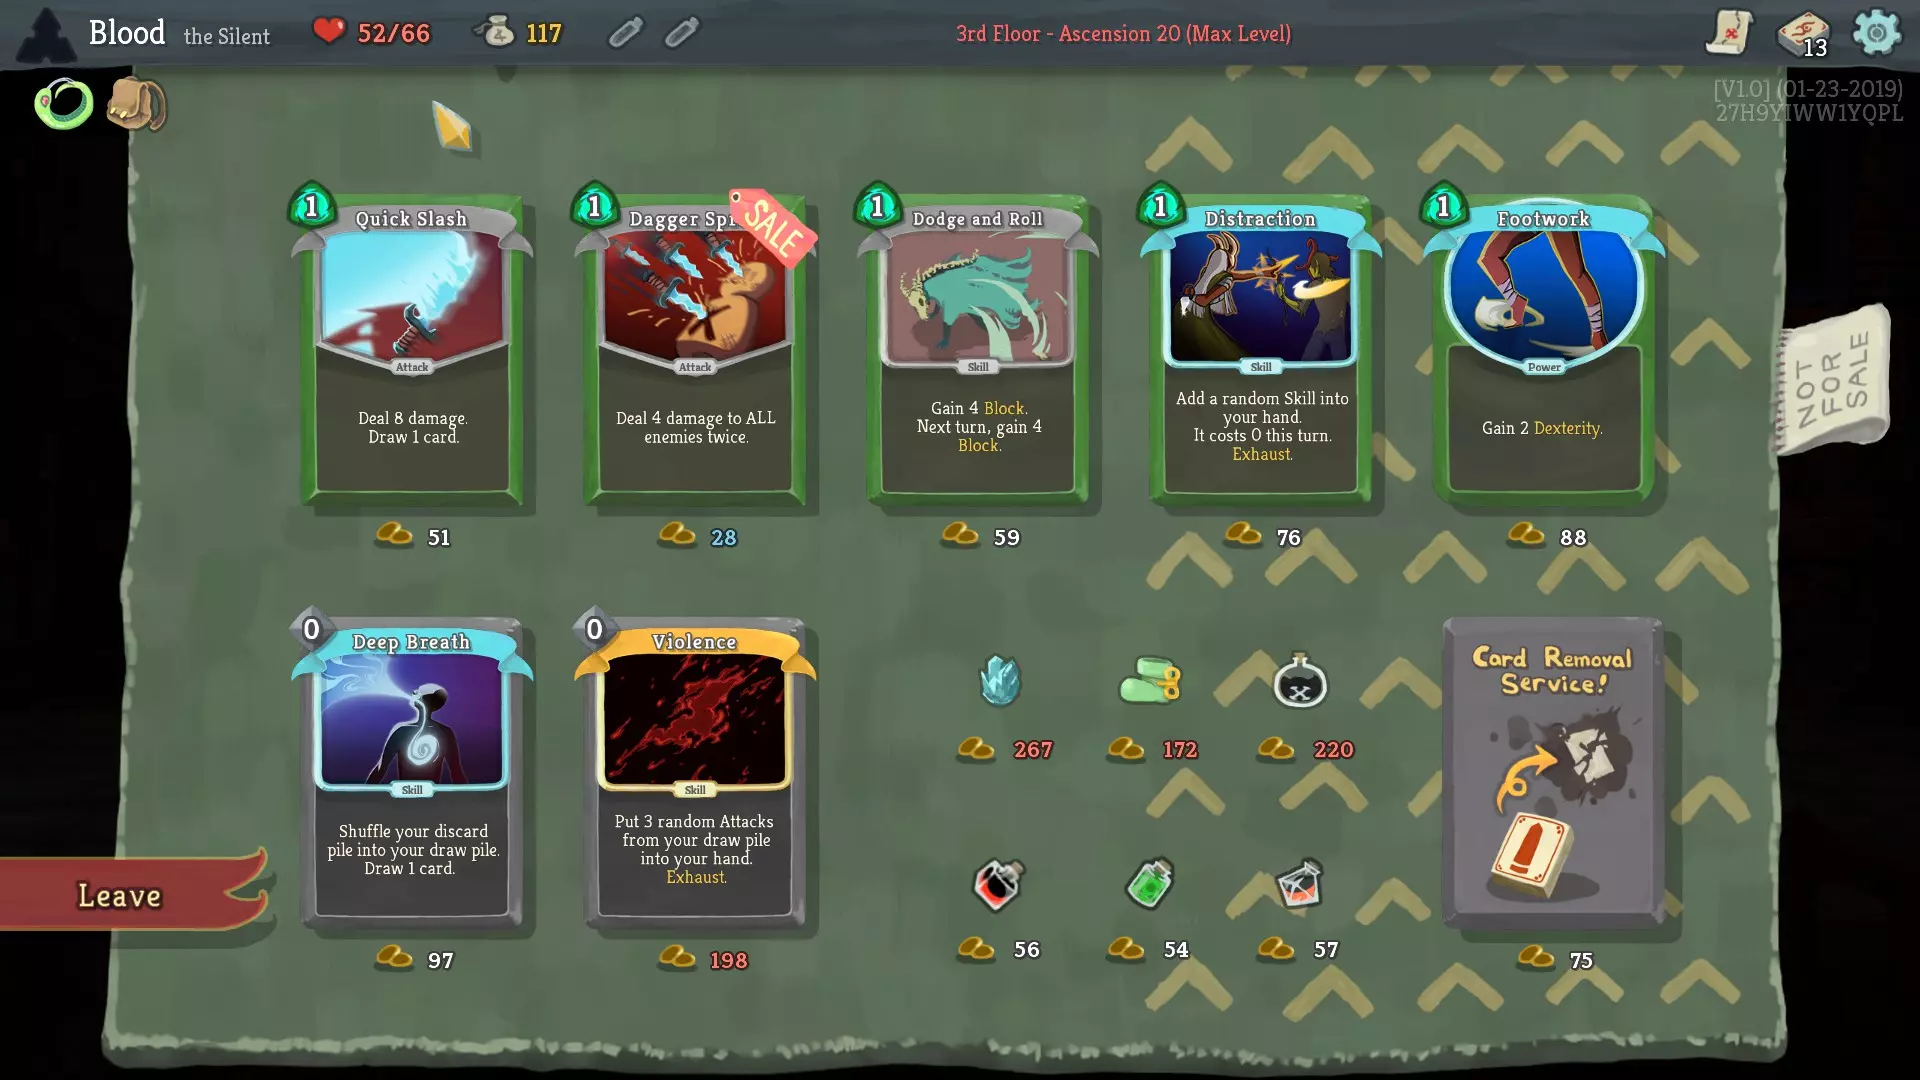
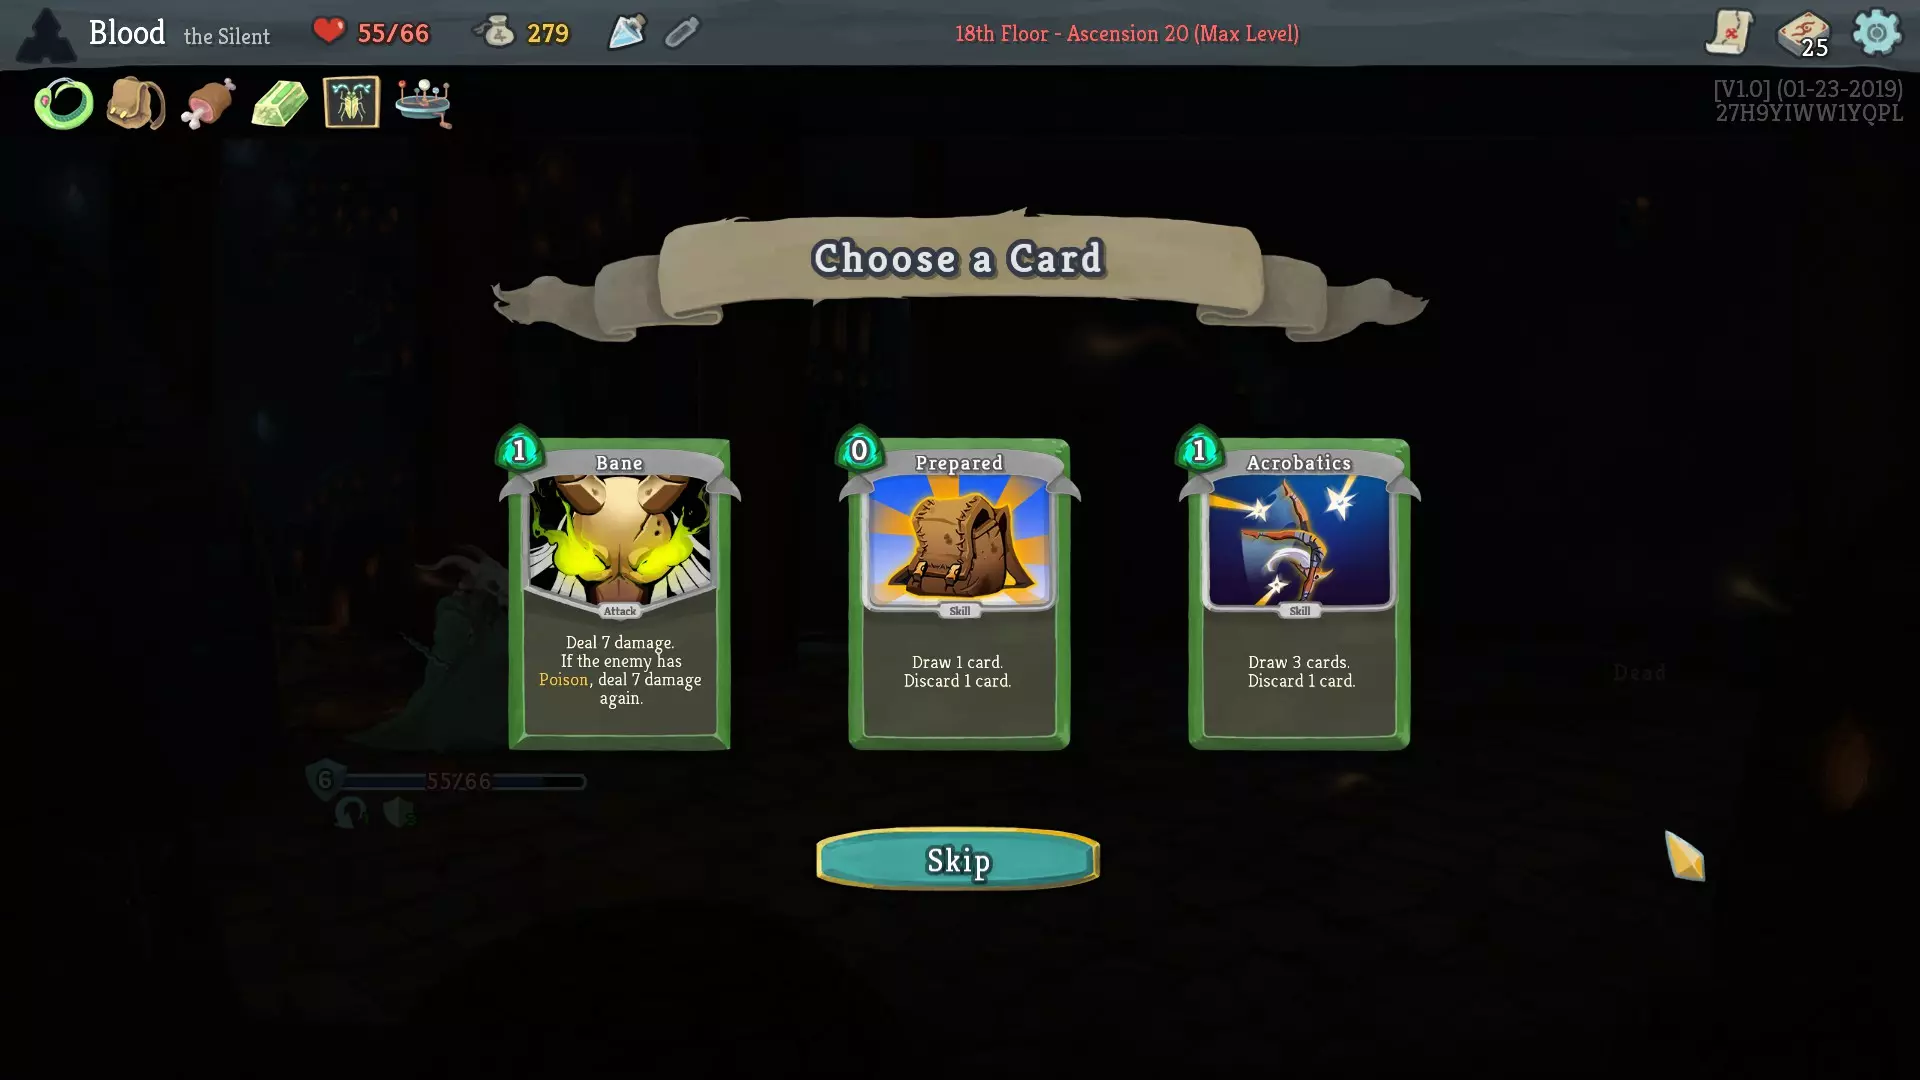
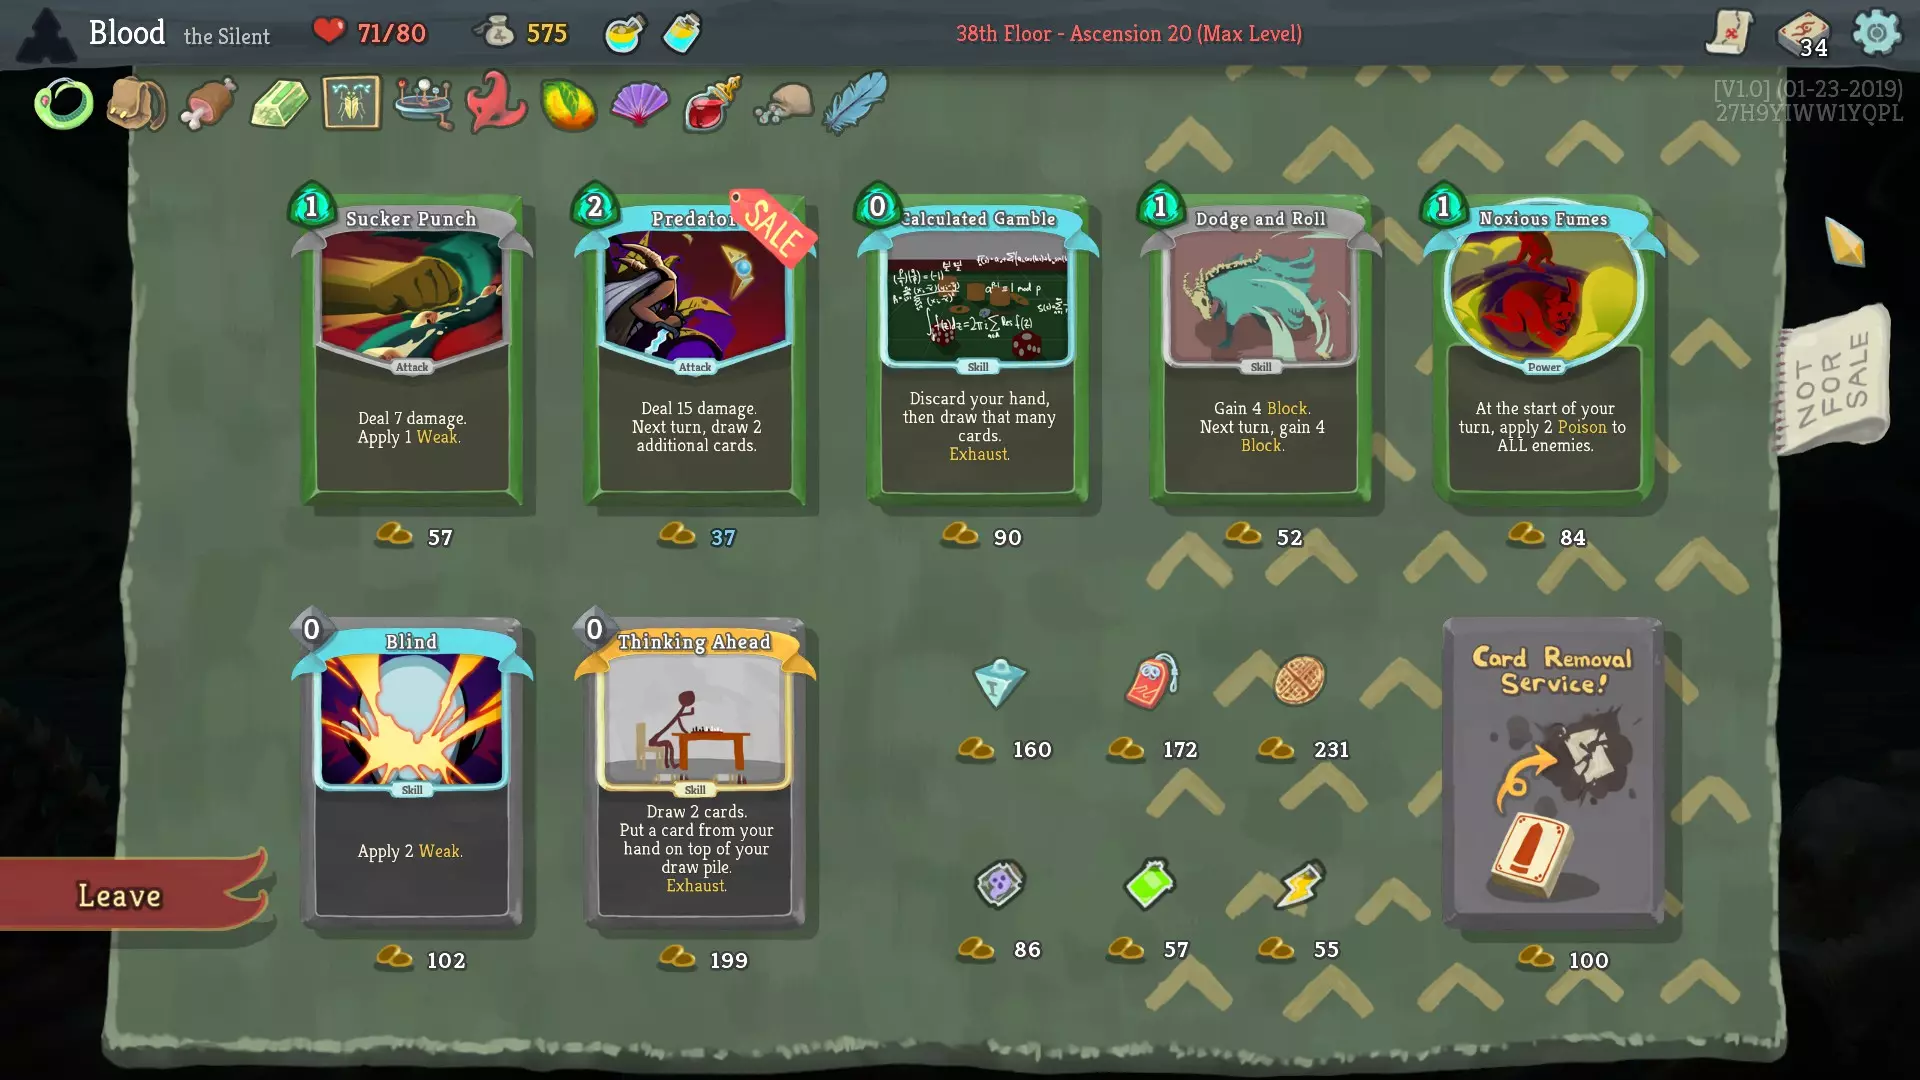
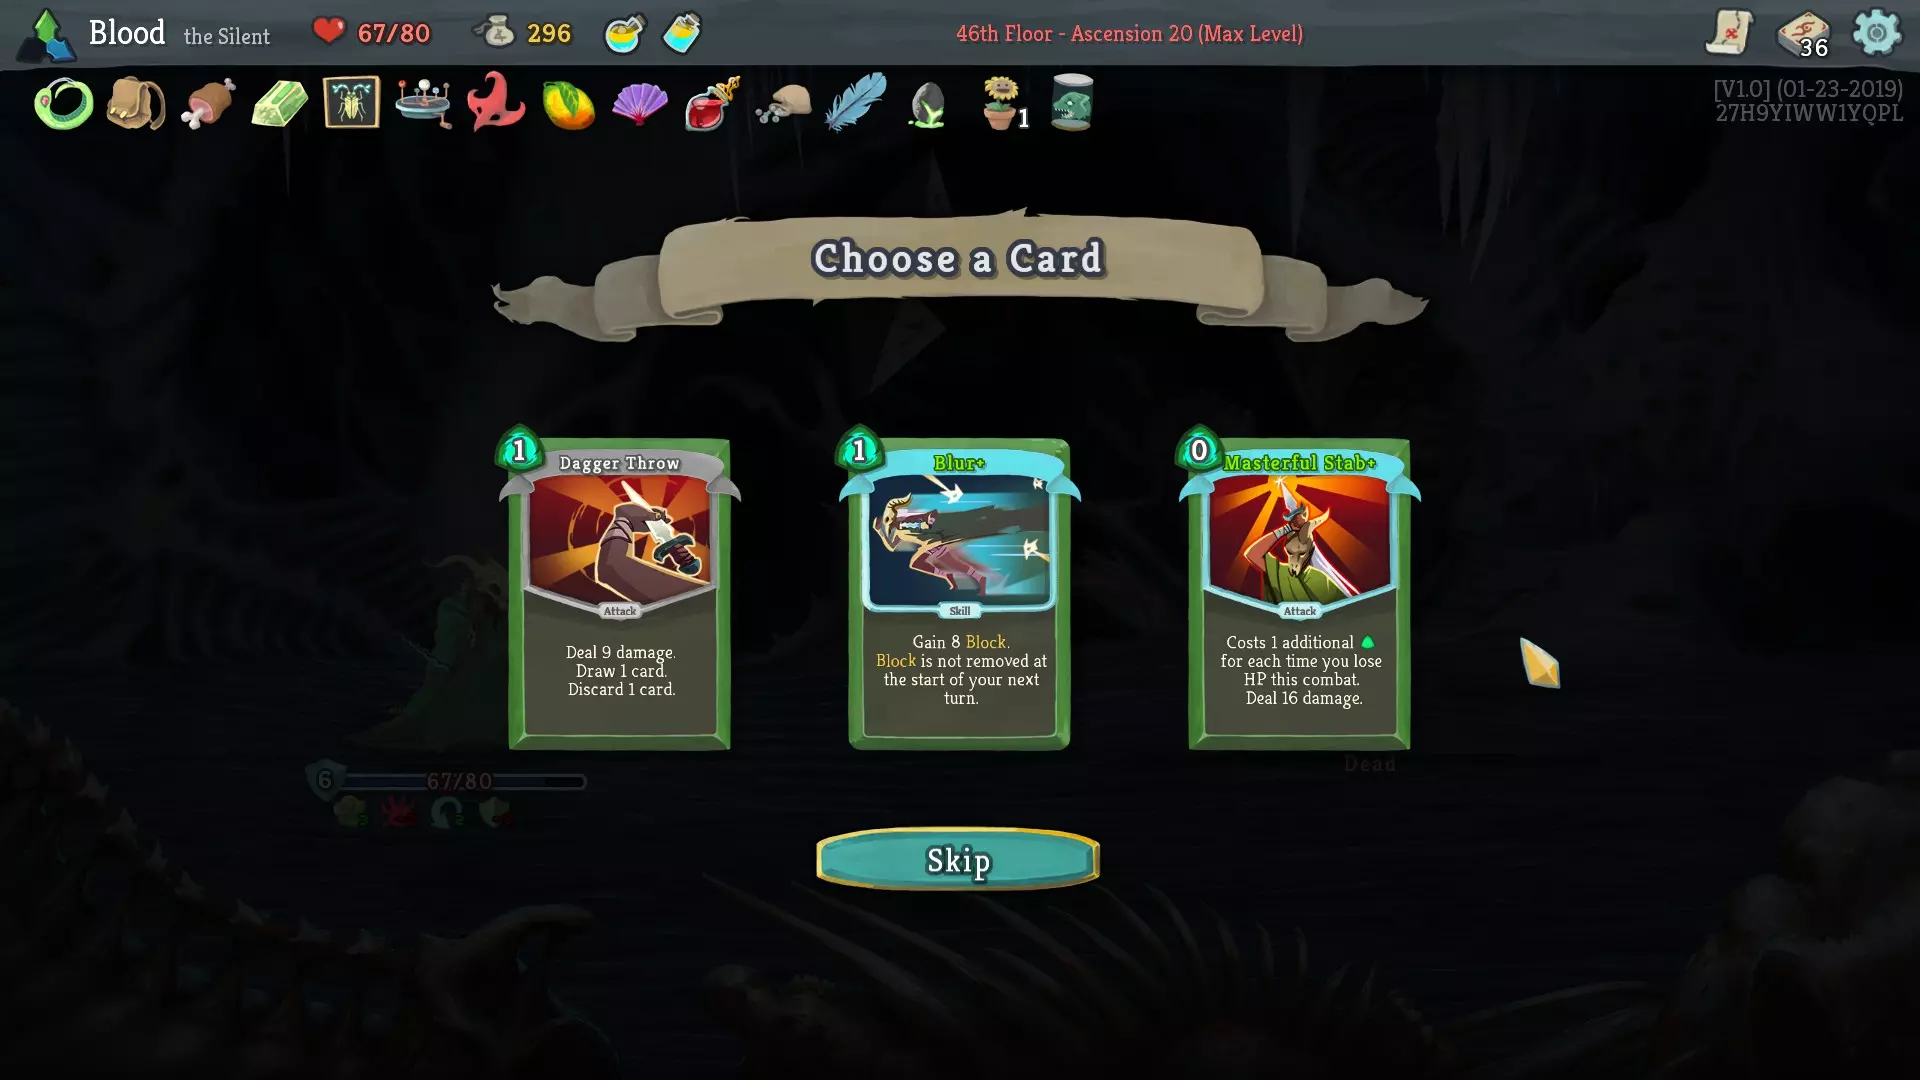
所以,这该死的随机数之神又给了我们一堆垃圾。 现在【DS】已经没用了。 【Unload】现在也没用了。 【PW】还行,但我们已经有一张了,实在不值得再买。 【Outmaneuver】是张很奇怪的牌。当你有【WLP】并且有3点能量时,它其实还算能用,但我觉得我们并不真的需要它,而且在抽到它的回合,它实际上会消耗1点能量,还占一个卡牌槽。我希望打完这个 Boss 战后能拿到一个能量遗物。 【WLP】很棒。不过第二张的效果就差多了。 【CCC3】和【CCC4】很烂。这里我就省点时间不多说了。 【Whetstone】买了就是亏。我6张未升级的攻击牌里有4张是【Strike】,1张是【Neutralize】,1张是【Sucker Punch】。不行,绝对不行。捕梦网很糟糕,只有在别人免费送给你,而你刚好需要休息时,才勉强能用。我们有【骨上肉】这张牌就够了。 棱彩碎片……有点问题。它会给这次跑图增加很多不确定性,而我们并不想要不确定性。 药水确实不错,但我现在用的这些药水就挺合心意的。 删牌算是一种奢侈的选择。不过我们现在钱很多,又没什么地方花。嘿,偶尔奢侈一下也无妨! 所以我们删掉一张打击牌,继续前进。 第二幕(第三部分): 接下来的走廊战斗是一场艰难的遭遇战。不过我们现在已经强得离谱了,尤其是有了【幽灵形态】这张牌。简直是小菜一碟。
飞膝仍然不是个好选择。 快速打击也仍然不是个好选择。 致命毒药在这里其实相当不错。我目前只有一个中毒来源,它需要消耗2点能量才能使用,而且如果第一次没使用的话,我还得洗牌才能再次抽到它。这有助于稍微提高我们的稳定性。 我选择致命毒药(这个技能的明显缩写有点不太合适……) 现在我们的下一个选择是再来一场艰难的走廊战斗,还是问号房间。我们已经遇到了两个非常棘手的事件,并且都安然度过了。我们还有一个血瓶,这让吸血鬼事件变得相当不错……不过之前在商店移除了那张打击牌现在看来有点不明智。我倾向于选择问号房间。房间里剩下的很多事件对我们来说都相当不错。 我们遇到了【不祥锻造】事件(有人能发一下这个事件的图片吗,我忘了截图)。我不想让诅咒卡进入我的牌组,所以我要升级一张卡牌。 现在【能量药水+】显然是最佳选择。我有一张【幽灵形态+】、一张【子弹时间】和两张【催化剂】。现在能多保留一张手牌非常重要。 接下来是艰难的走廊战斗。或许我现在应该不再强调“艰难”二字了。以我们现在的牌组,这些战斗真的很简单。
毒刺已经讨论过了。我们不需要另一个中毒来源。 致命毒药也已经讨论过了。不过既然我们已经拿到了一份,就不需要另一个中毒来源了。 PW也已经讨论过了。这次它也是免费的。当然,为什么不呢? 我们选择PW。 下一场走廊战斗:
【剧毒烟雾】(NF)太强了。如果你只能带一张中毒牌,那一定是它。这是能叠加的范围伤害。你知道我们的卡组一直以来缺少什么吗?就是能叠加的范围伤害。 【剑刃之舞】还是不太行。 【终结技】和我们的卡组完全没有协同效果。 对不起了,随机之神。你们终究不是那么讨厌。我选择【剧毒烟雾】。 在营火处我们进行了升级,因为我很确定那个【超级光束】小子其实已经死了,只是他自己还不知道而已。在一场走廊战斗后,我还拿到了一个能量药水,并用它换掉了类固醇药水。我们主要靠中毒来击杀敌人,而且我也不介意偶尔能多获得一点能量。
除了新增【剧毒烟雾】外,其他内容没有变化。【剧毒烟雾】升级也非常强力。我本可以详细解释一番,但现在你只需知道它真的很厉害就好。
那个会放超光束的家伙基本就是自毁。又一局了,我还是没记住他的名字,因为实在懒得把鼠标悬停在角色上看。玻璃匕首在第一幕表现不错,第二幕也还行。我们正要进入第三幕,那里所有精英怪和部分普通敌人都有100多生命值。【交易工具】这张卡真的很烂,就是张废卡。【虚弱诅咒】非常强力,对付多段攻击效果拔群。它是另一种施加虚弱状态的手段,剩下的很多敌人都有多段攻击,我们不介意再多一个施加虚弱的途径。虚弱诅咒!至于遗物,我真的很想要一个能量遗物,但说实话,能拿到像星盘这样还不错的遗物也行。

我讨厌这个游戏。 召唤铃会在我们的牌组中加入3个诅咒,并给予3个随机(非Boss)遗物。我们其实并不想要3个诅咒(不过以我们现有的金币,确实可以移除其中一些)。而且目前我们对遗物的需求也不是特别迫切。这又是一次赌博。这次的概率比赌场的略高一些,但也高不了多少。注意:这个遗物已被修改,现在只会给予1个独特(不可移除)的诅咒,因此变得好很多。 白色野兽雕像会在每场战斗后给予我们1瓶药水。记住,我们要把荆棘药水留到与心脏的战斗中使用。这本质上意味着我们只有一个可用的药水槽位,如果我们获得任何好的药水(如【幽影迷踪瓶】或另一瓶【荆棘药水】),那么我们将没有药水槽位可用,【白色野兽雕像】也会变得无用。 【永恒羽毛】的效果是每次前往营火时,你的牌组中每有5张牌,就会为你恢复3点生命值。我们大约有30张牌,所以每次前往营火时,这将为我们恢复18点生命值。它与【骨上生肉】的配合效果不佳,但也没有任何实际的缺点(除了如果我们没有受到伤害,它就会变得无用这一点)。我们并没有过多依赖防御(主要依靠【幽灵形态+】来作为终结手段),所以这或许是一个不错的选择。 在一番关于哪个遗物最不糟糕的激烈争论后,我选择了【永恒羽毛】。 注:截至V2版本补丁。0、【白色野兽雕像】和【永恒羽毛】不再是 Boss 遗物。 附注:对于那些发帖抱怨随机数生成(RNG)不佳的玩家……这才是你们应该抱怨随机数生成(RNG)的情况。 第三章(第一部分): 让我们看看第三章的地图。请记住,我们必须选择有火焰精英的路径才能到达第四章。
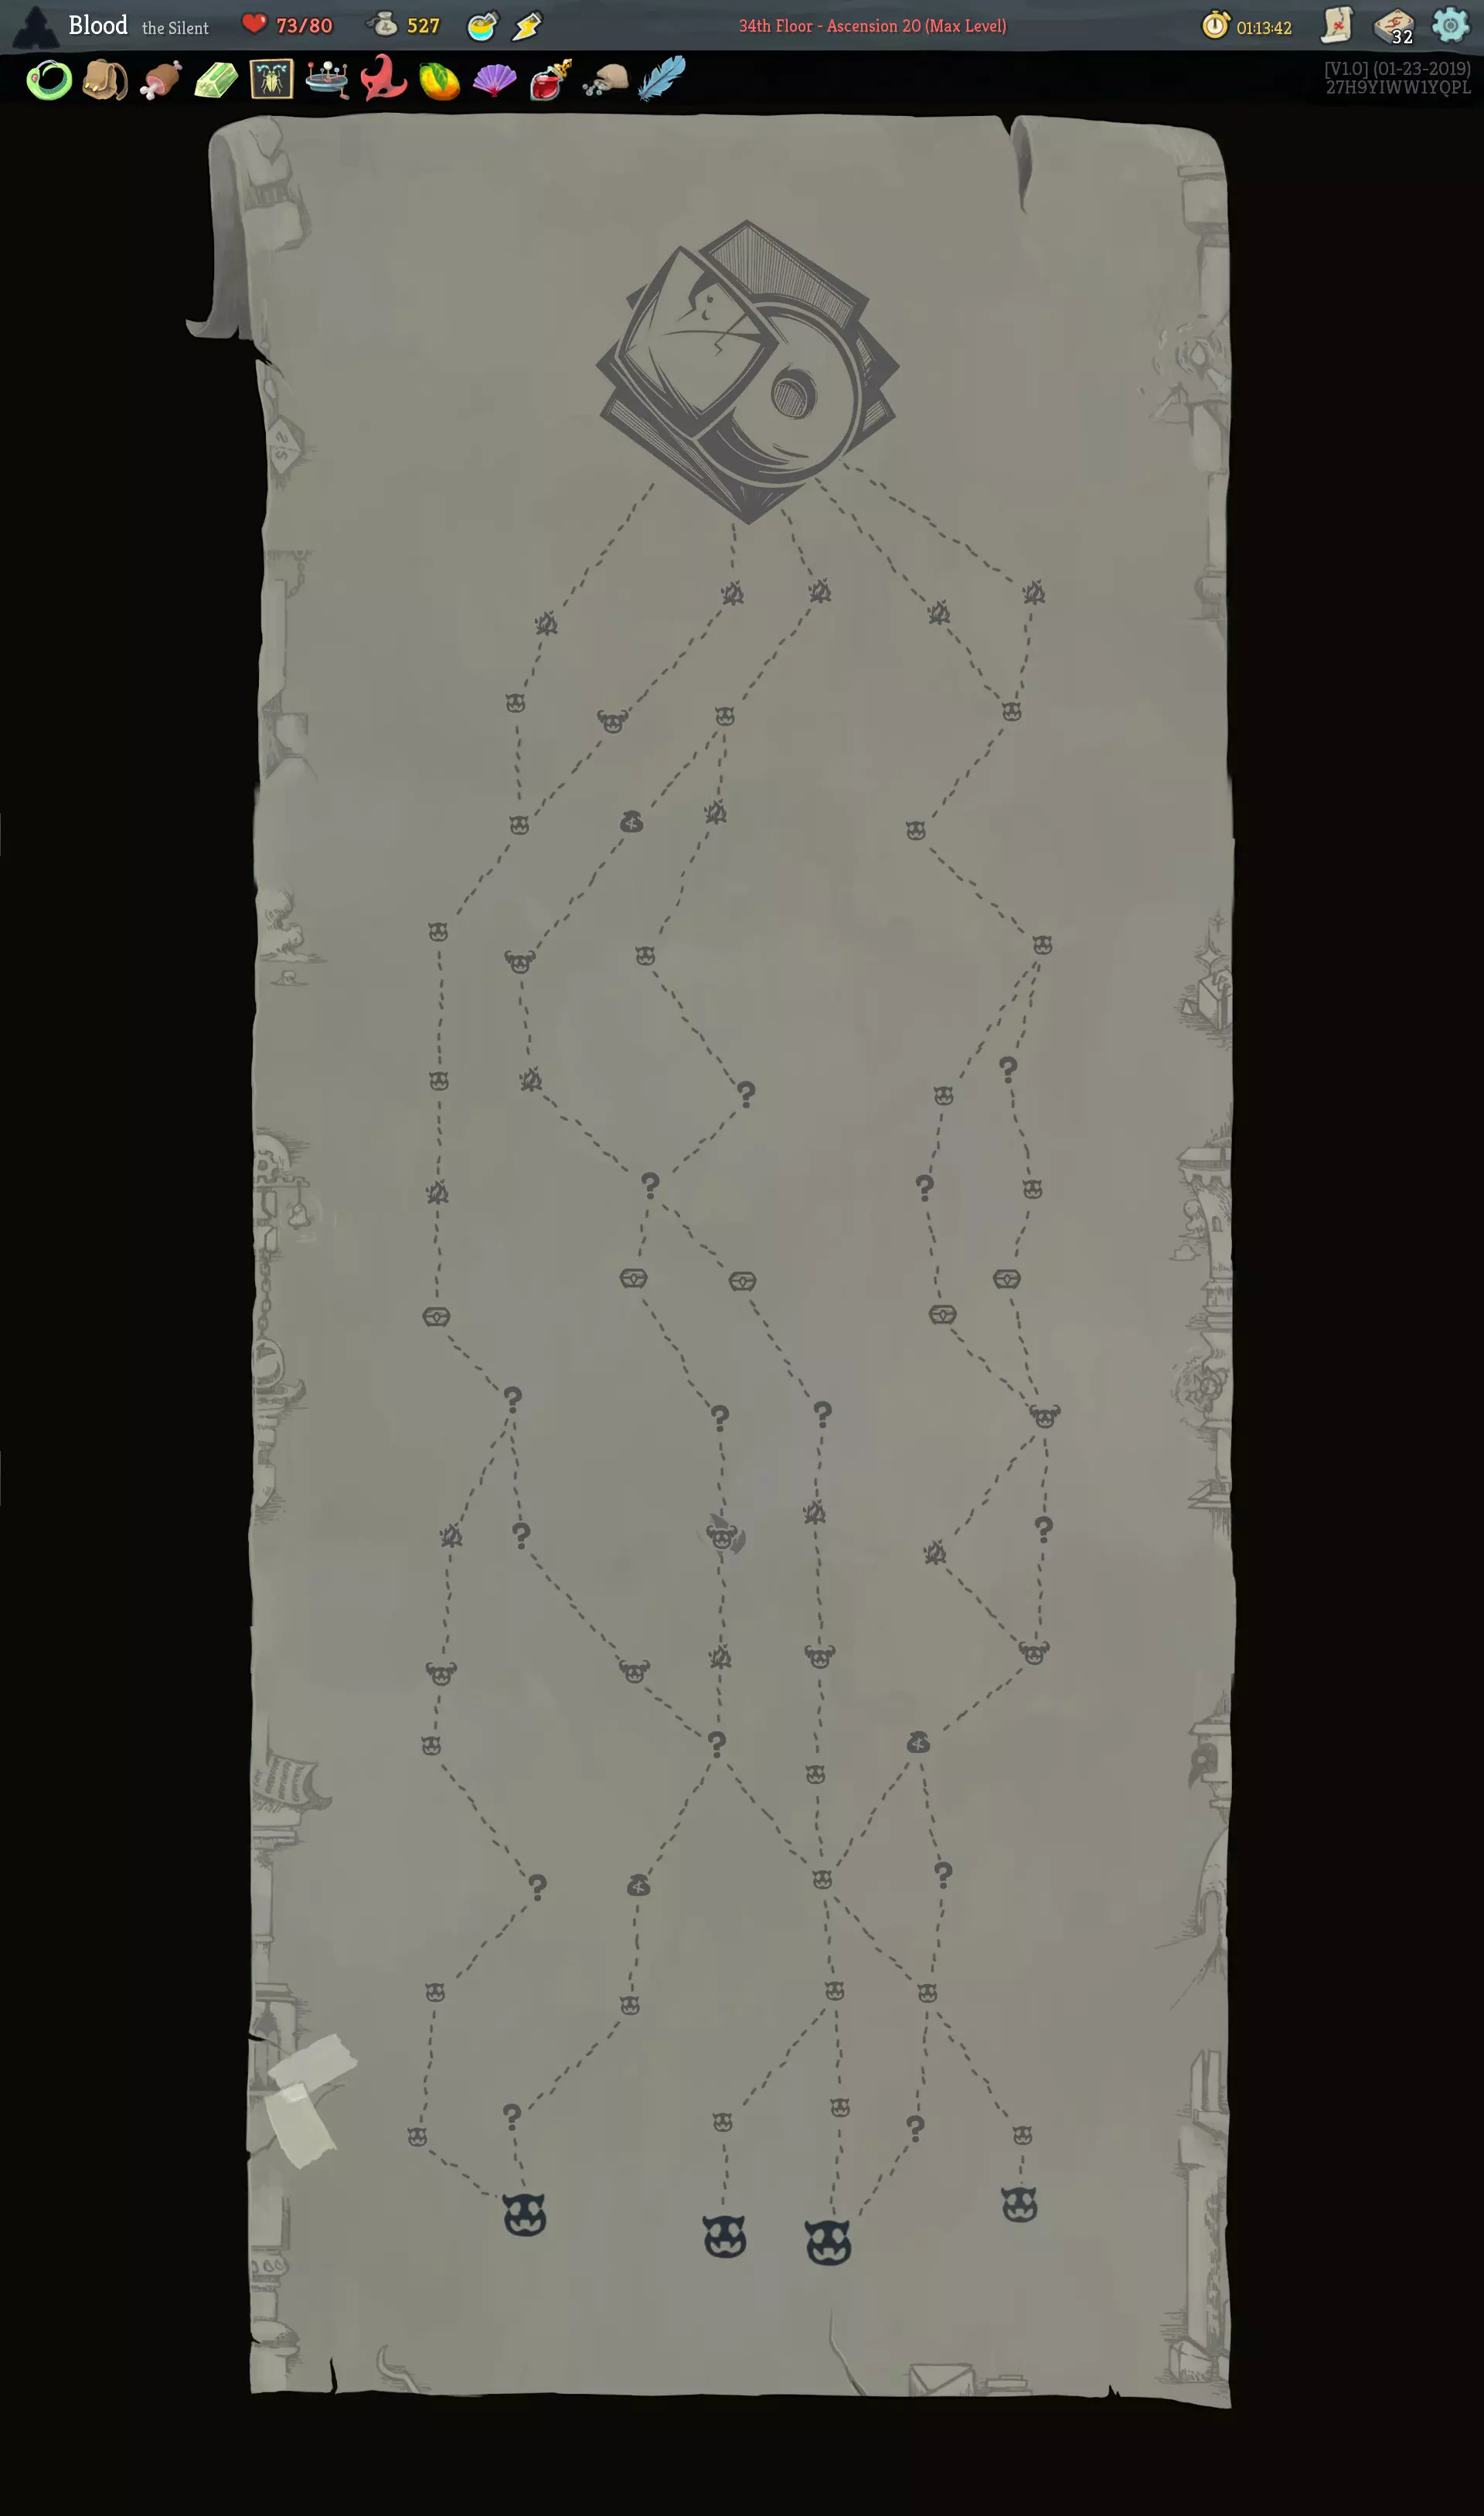
我把这个合并了。(此处应有匹诺曹鼻子变长的画面) 还是多亏了Siri。 需要考虑的事项: 1. 我们需要击败火焰精英才能进入第四幕。 2. 20级进阶难度下,第三幕有两个 Boss。我们确定第一个 Boss 是多努与迪卡。这可能是对我们最不利的 Boss,因为它们各自初始带有3层Artifact(神器),而且两个 Boss 的存在会干扰【弹射烧瓶+】的效果。不过【红面具】和【大理石袋】每次可以各移除2层Artifact(神器)。 3. 无论第三幕的第二个 Boss 是谁,应该都不会造成太大问题。不过相比【觉醒者】,我们可能更希望遇到【时间吞噬者】,因为【时间吞噬者】没有帮手,而且如果我们在它生命值降至一半之前用两个【催化剂】对其造成巨额伤害,它的净化技能就不会有太大作用。 4. 我们有很多金币,最好能遇到一些商店。我们想收集一些遗物。现在我们的卡组相当强力,对抗精英怪应该不会有太大难度。 这里有四个初始地点(从左到右依次称为路径1-4)。所有四条路径都能到达火焰精英怪处。路径1让我们有机会早期访问商店。其他三条路径则有更多的走廊战斗。我们的卡组已经很强了(卡牌数量超过30张,相当臃肿),所以可能不需要通过大量走廊战斗来寻找更多卡牌。路径1明显更好。 第一场走廊战斗:
这场战斗的奖励是敏捷药水。敏捷对静默猎手来说确实不错,但我们对幽灵形态已经相当满意——这意味着能量药水可能更有价值。 算无遗策对于循环牌组来说很有用,但它与【WLP】存在反协同效应。如果我能将其瓶装并在第一回合(我们有9张牌时)使用,那它会是个相当不错的选择,但这并不能保证。 偏斜并非一无是处,尤其是考虑到我们只有3点能量和一个用于敏捷叠加的步法。不过,由于我们主要依靠幽灵形态生存,所以它并非必需。 致残迷雾是一张很棒的卡牌。它兼具范围伤害和范围减伤效果。由于我们已经有很多施加中毒的手段,所以为了伤害而升级这张牌也不是很重要。我们拿到了本应在第二章开头就能找到的【致残之云】。问号房间是一场走廊战斗。
【淬毒突刺+】在游戏前期是一张非常不错的卡牌,在游戏后期表现也相当出色。不过,我们已经有了大量的卡牌和多种施加中毒效果的方式。 【闪避翻滚】与敏捷属性的协同效果极佳(消耗1点能量可获得2点敏捷加成)。我们只有一张【步法+】,而且在使用【幽灵形态】后,每回合敏捷值都会下降(理论上使用【幽灵形态】后战斗就应该结束了,所以这应该不成问题)。但同样,这与【幽灵形态】存在反协同效应。 【横劈+】就像是在没有能量的牌组中一张更强的【打击+】。我们确实没有能量,但也并不需要一张更强的【打击+】。 这张牌选择跳过。 下一场走廊战斗:
我们使用了能量药水,还捡到了一瓶熵变药剂。我可能会一直留着这瓶熵变药剂直到打心脏,因为在使用荆棘药水后,它会给我两瓶药水。 杂技对我们来说会很不错,但我们实在没有能量来使用它。 后空翻对我们来说仍然是一张好牌。我们现在有很多牌了,所以抽牌也不会有什么坏处。而且它还能格挡,这点和杂技不同。 毒刺之前已经提过了。我们已经放弃了更酷的2.0版本,所以可能也不会想要旧版本。 我们再拿一张后空翻。 现在去商店。希望能买到些好东西。
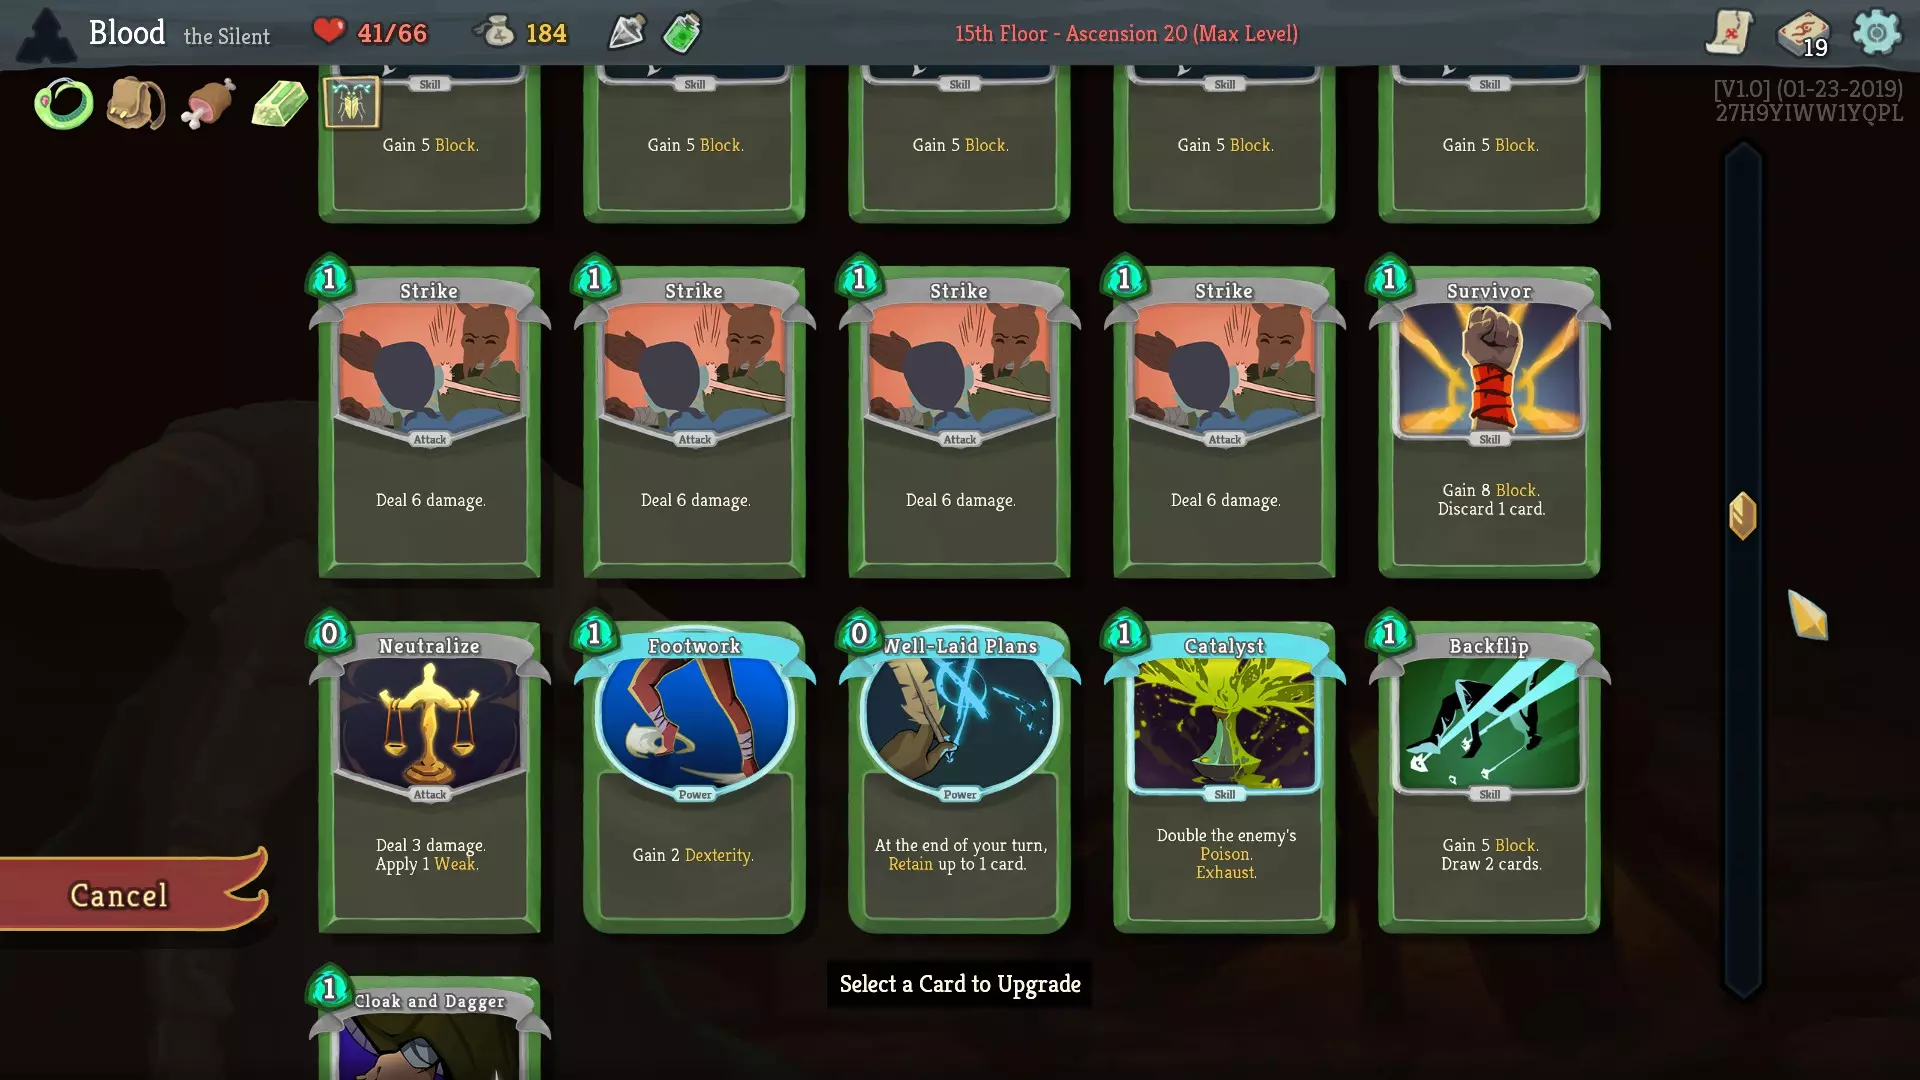
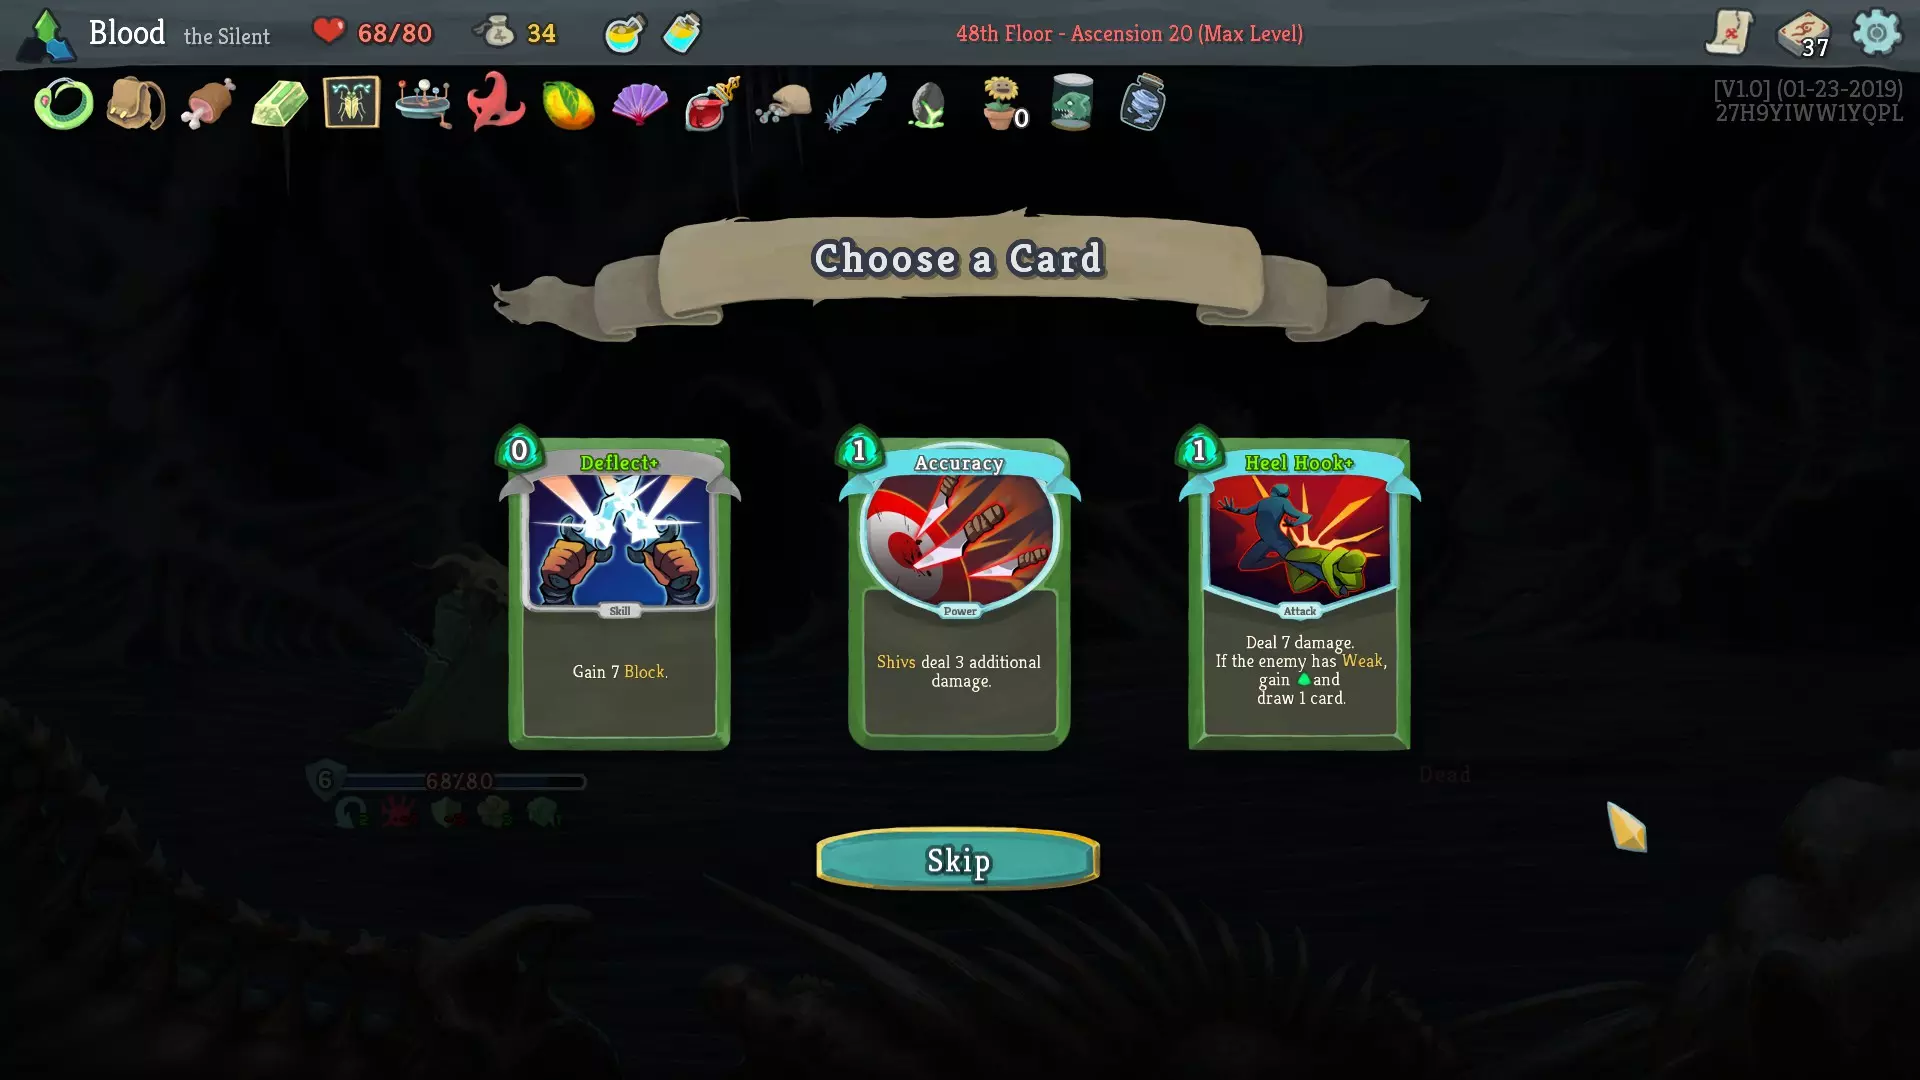
这些卡牌之前都提到过。我们不会再拿第二张【剧毒烟雾】,因为第二张的效果比第一张差很多(第一张本质上意味着你施加的任何毒素都不会减少,只会增加)。 如果我们之前没有拿到【致残迷雾】的话,【致盲】会是个不错的选择(因为升级后它能对所有敌人施加2层虚弱)。 【深谋远虑】对我们来说不是很有用(它真的有用吗……)。 【百年谜题】(每场战斗首次失去生命值时抽3张牌)相当不错。我们不介意多一些抽牌,但我想还是再等等,因为前面还有两家必去的商店。 【御守】(抵消接下来获得的两张诅咒牌)在游戏后期用处不大。大概是这样。我当初选召唤铃的时候,这玩意儿跑哪儿去了? 华夫饼(最大生命值+7并完全治疗)还行,但我们到下一个营火就能回满状态,而且现阶段7点最大生命值对我们来说也不是特别出彩。 药水不错,但我们手里的那些更好(因为熵变药剂本质上相当于两瓶药水)。 卡牌移除是个合理的选择,因为我们的牌组太大了,很想把打击牌去掉。 我们移除了一张打击牌,继续前进。 下一个问号房间是复制器事件:
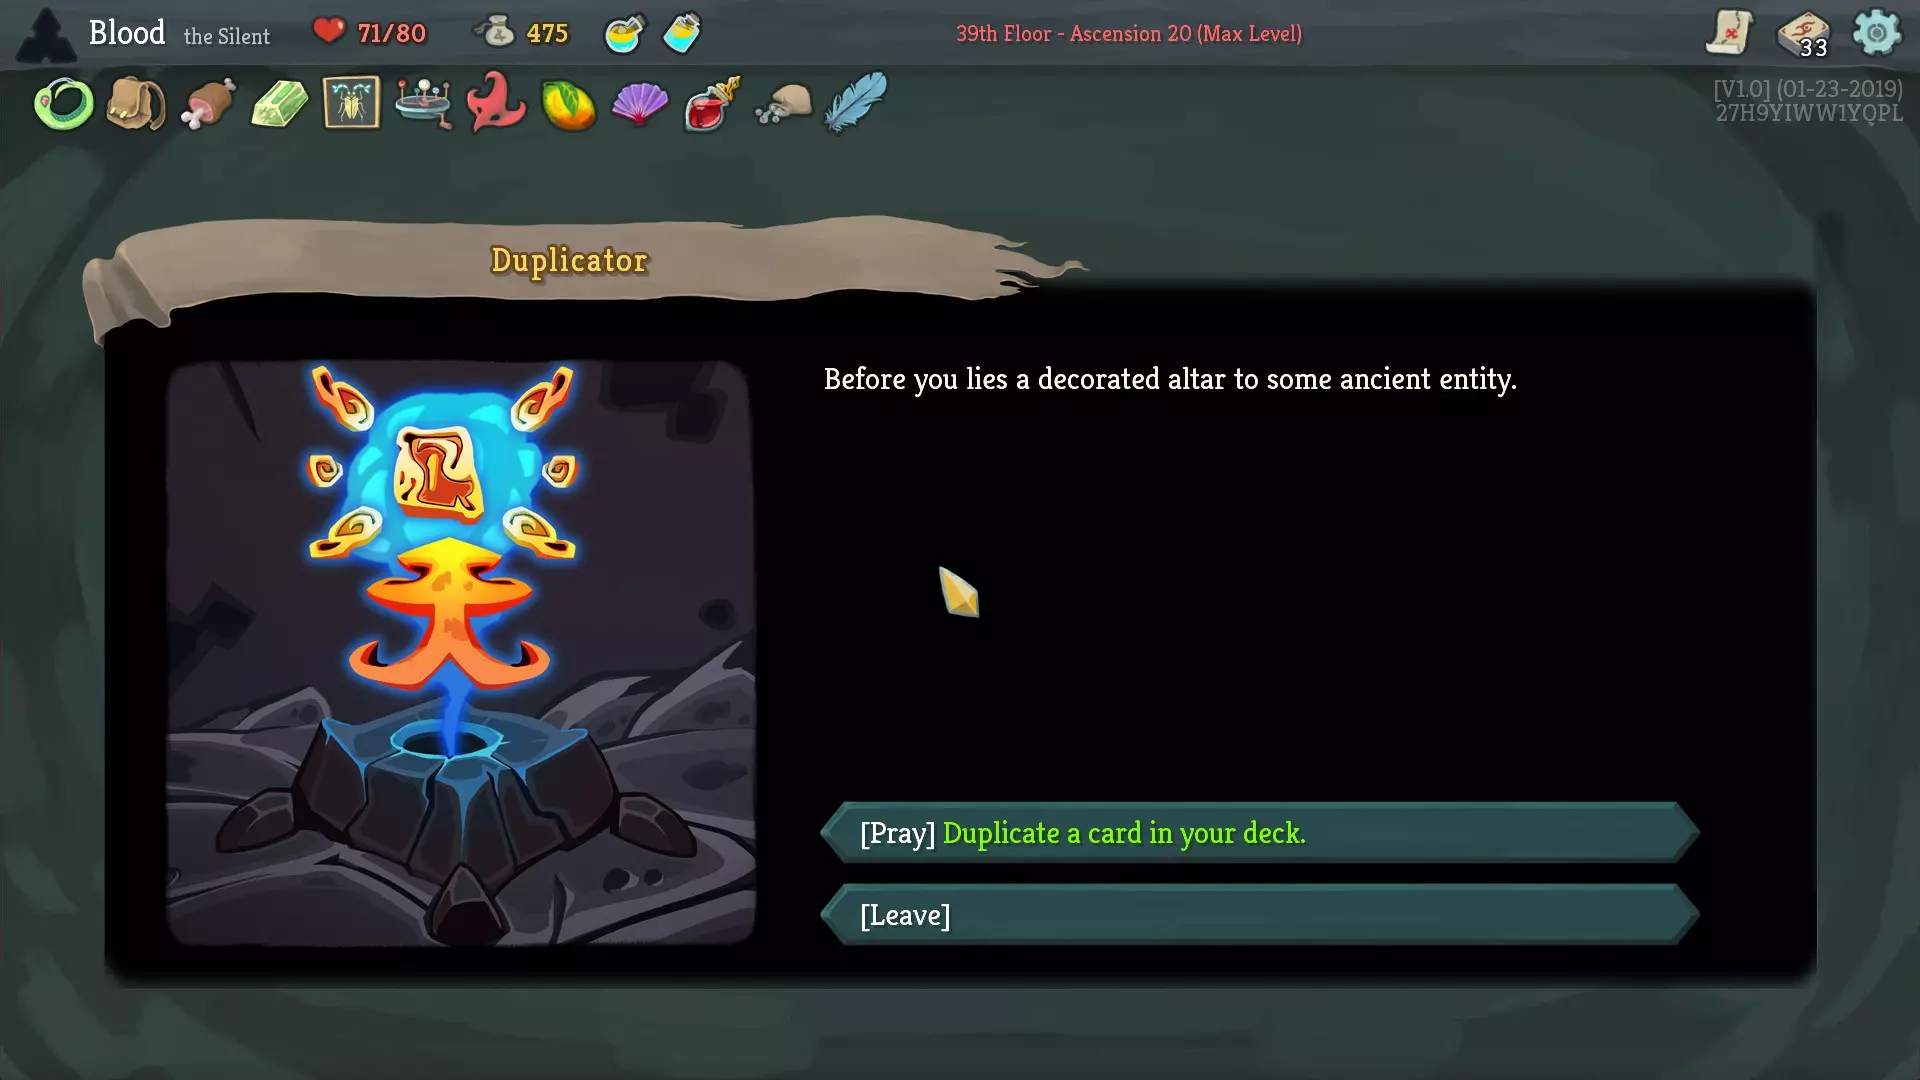
什么能比3回合的无形状态更厉害?当然是6回合的无形状态。我们复制了【幽灵形态+】。 在营火处,【永恒羽毛】能将我们的生命值回满,所以无需休息。以下是我们可以升级的内容:

后空翻+不是个好升级。+3防御和升级防御技能效果一样。 潜行匕首+不是个好升级,原因之前已经列出。 魅影杀手+能让它变得可用,但我们其实不怎么靠攻击打伤害。 力量祝福+是8力量对6力量,实在不值得升级。 背刺+只是在一张会耗尽的卡牌上+4伤害,相当没用。 子弹时间+依然是个不错的升级,但不是优先项。 致残烟雾+是个不错的升级,但也不是优先项。 虚弱+在你想用0能量打出这张牌(并让它生效)时很好用,但我们现在对此不太在意。 致命毒药+不错,但不是优先项。 催化剂+现在会非常好用,敌人的平均生命值已经飙升了。我们已升级至Catalyst+。 现在是烈焰精英的时代。他就是【复仇女神】(其加成效果为初始拥有4点力量值)。

我们损失了大量生命值,最终刚好处于【骨肉相连】的生效范围之外。不过这也不算太糟,因为我们很可能在下一场战斗中就能激活【骨肉相连】,然后【永恒之羽】会在下次营火时为我们恢复生命值。 我们获得了【翡翠钥匙】和一个【毒性蛋】(当你向牌组添加技能时,会将其升级)。要是在【幽灵议会】事件之前拿到这个【毒性蛋】就好了。 【DS】目前没什么用。 【反射+】对我们来说也没用,因为我们只有一张能弃牌的卡牌(【幸存者】)。 【穿刺】和【弱点看破】、【魅影杀手】配合效果很好,但我们只有3点能量,这让【穿刺】显得有些鸡肋。 我选择跳过这个。 第三章(第二部分): 下一个问号房间是商店:
快速打击已经不行了。抽牌效果不错,但8点伤害太糟糕。 致命毒药也还是不行。 爆发+对我们来说很棒。还记得我们有的那两张催化剂吗?没错。一旦这两张都升级后,使用爆发+,再跟上催化剂+和催化剂+,就能让中毒效果乘以81倍。 模糊+还不错。不过我觉得我不想在它上面花钱,因为我们主要用的是幽灵形态+卡牌。 毒液对刀扇套牌来说很好用。但我们不是刀扇套牌。 启迪+对我们来说还是没用。我们有很多高费卡牌,但把它们减到1费也还是意味着我们只能打3张牌。 炸弹+对我们没什么帮助,因为3回合后我们的中毒伤害可能远不止50点。这张牌不算差……但在这次特定的 run 里对我们没什么帮助。快乐花现在对我们来说很合适。还记得我们现在没有任何能量吗?快乐花每3回合能为我们提供1点能量。虽然它不是世界上最有用的东西……但聊胜于无。 钢笔尖(每第10次攻击造成双倍伤害)和魅影杀手有非常好的协同效果。可惜我们没有什么好用的攻击牌(倾泻+在第三章不再生效了)。 工具箱(每场战斗开始时随机将一张无色牌加入手牌)在你需要抽牌时还不算太差,因为很多无色牌都能提供抽牌效果。不过,它不值这个价——而且它带来的不稳定性也是我们并不真正需要的。 这些药水比不上我们的药水。移除卡牌确实不错,但在购买其他东西后我们不会剩下太多金币,而且牌组里本来就没几张打击牌了。另外,买了强化爆裂后我们的牌组会有35张牌,这样永恒羽毛就能多给我们3点生命值。 我们购买强化爆裂和快乐花。 在下一个宝箱,不管遗物是什么,我们都必须拿蓝宝石钥匙。这是我们能遇到的最后一个固定宝箱,我们想去第四章。

我完全感觉不到疼痛,因为我无视了第三章的锚点(战斗开始时获得10点格挡)。接下来的问号事件给了我们一个选择:与两个球体行者战斗,以获取一件稀有遗物。
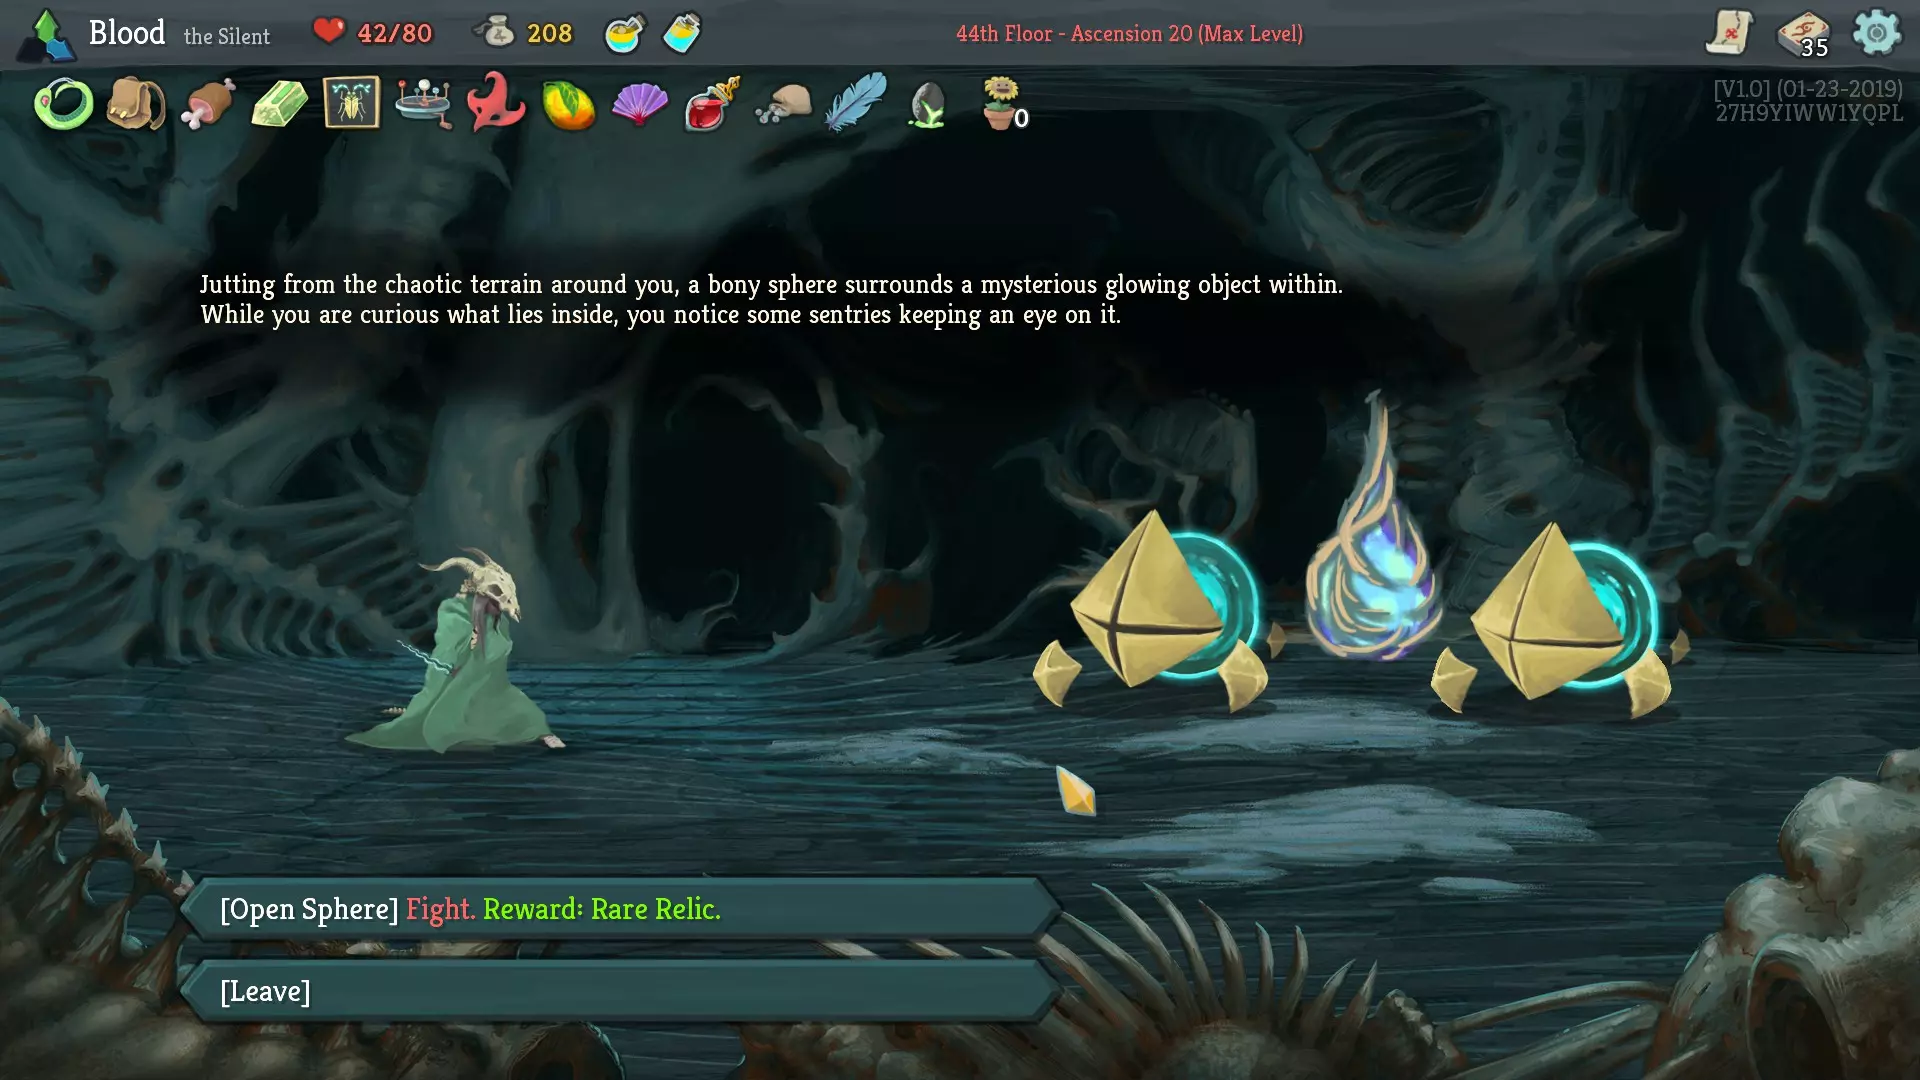
我希望我们能在这场战斗中承受一点伤害,以激活【骨肉相连】。
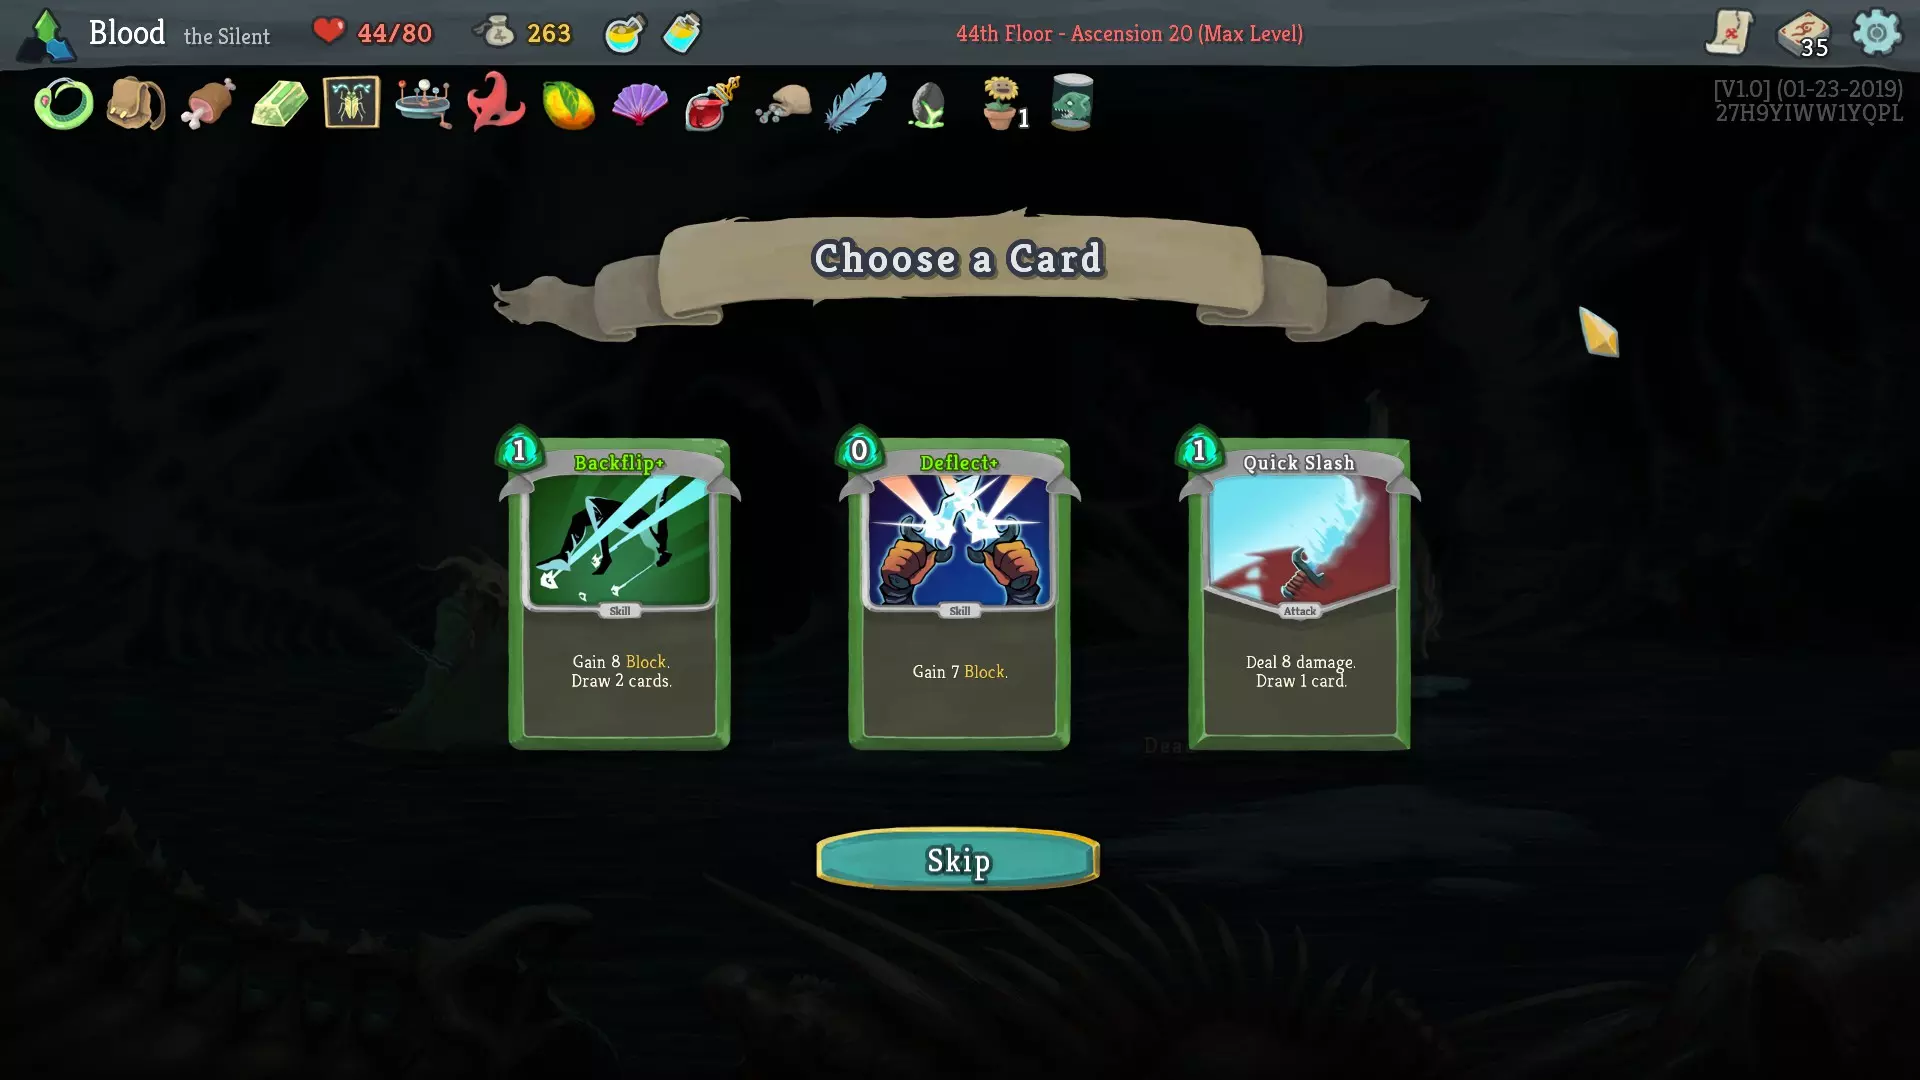
相反,我们没有受到任何伤害,但通过血瓶仍获得了+2生命值。该事件奖励了我们【样本】(当敌人死亡时,将该敌人身上的所有中毒效果转移给一个随机敌人)。这基本上确保了我们能赢得多努与迪卡的战斗以及第四幕精英战。啊……这局游戏的随机数之神真是让我体验了一把过山车。 后空翻+之所以相当不错,和后空翻本身不错的原因相同。 偏转+并不比偏转好多少。 QS仍然很糟糕。 我们选择了后空翻+。 在岔路口,我选择了左边的路径,因为它提供了一场精英战斗以获取更多遗物,而且我们还有很多金币可以在商店使用。此外,我们可以在营火处升级另一个催化剂。 我们没有治疗,因为永恒羽毛会为我们治疗。
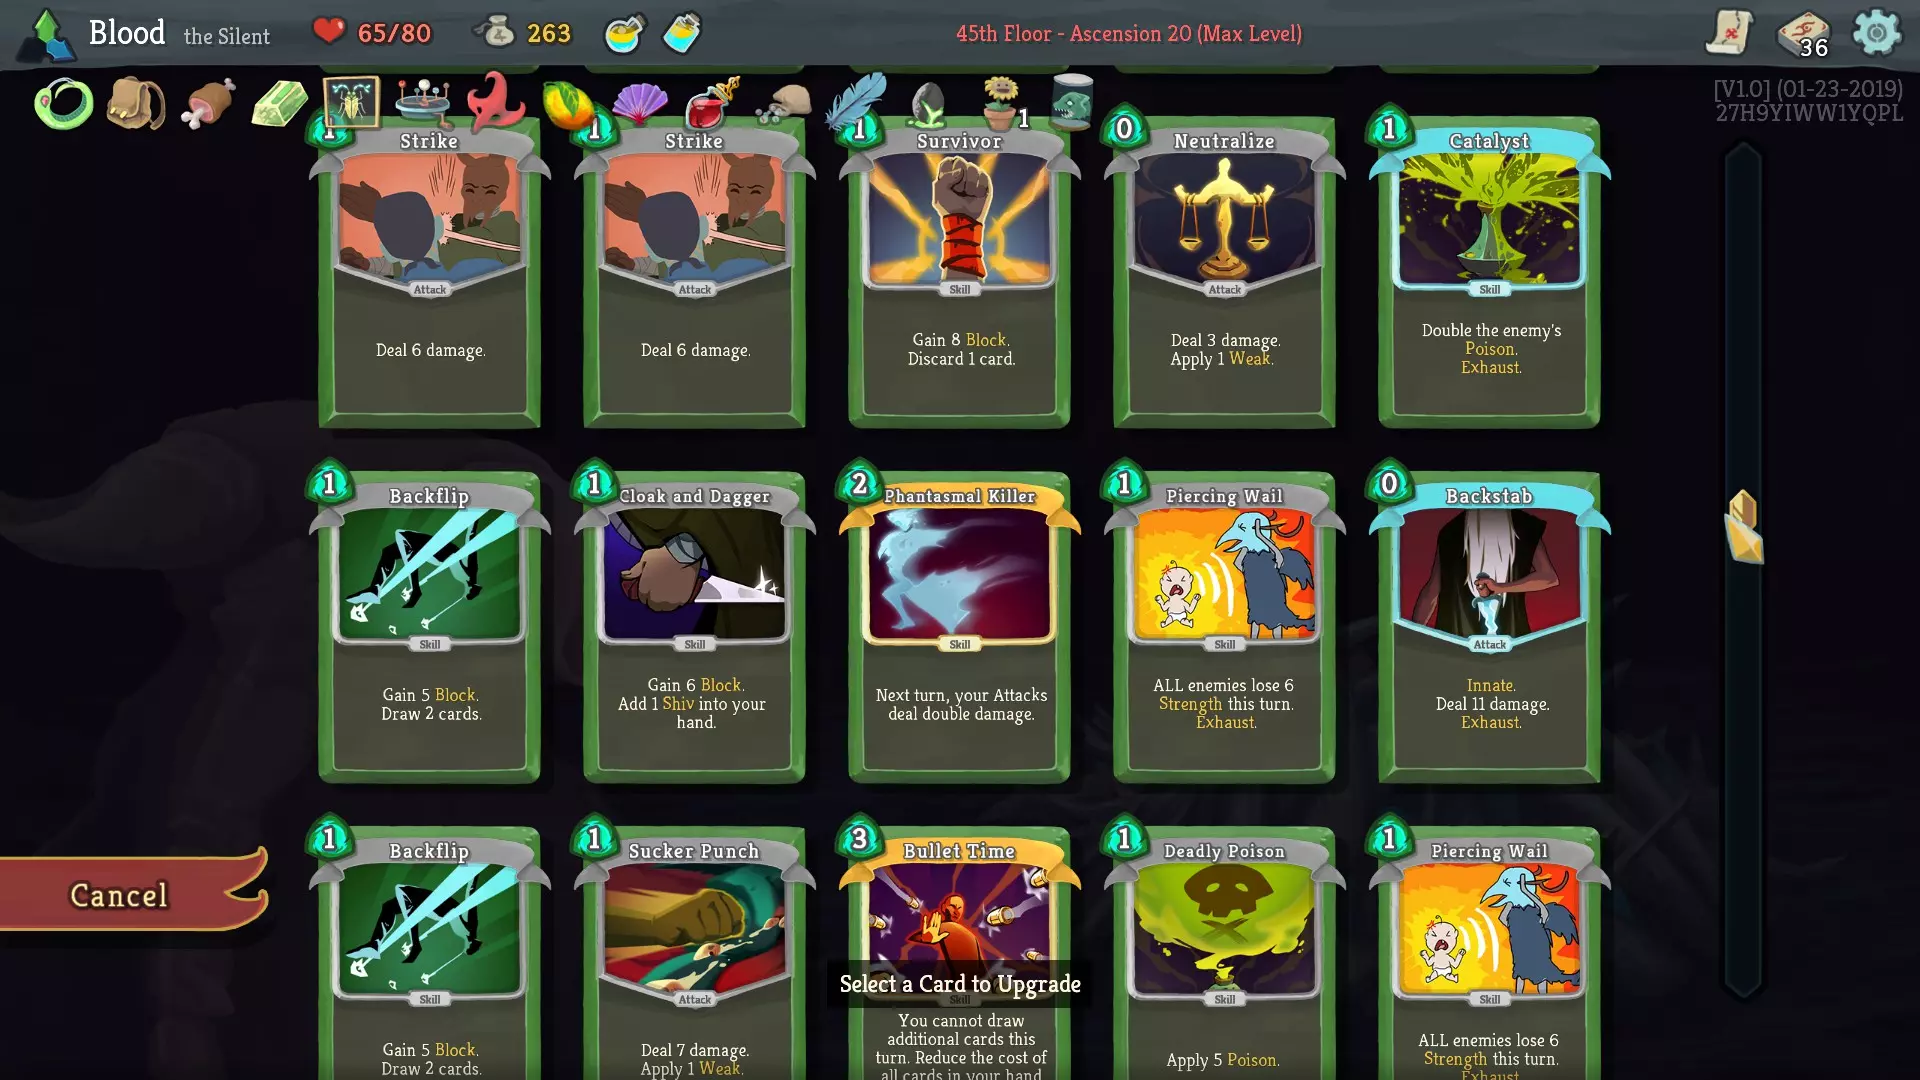
我其实已经透露过我们要升级什么了,就是催化剂。自从上次在营火之后,我们还没往牌组里加过任何新卡(除了那些已经升级过的),所以之前的那些理由现在依然成立。 第二张催化剂+意味着这次的 run 应该稳了。 现在来打精英怪。这次是巨头怪(这个战斗在有保存的昆虫时真的很简单,因为打巨头怪的关键在于要在它倒数的3回合内杀死它,而且它的生命值高得离谱——对我们来说就更简单了,因为我们有2张幽灵形态可以进一步延长时间)。
我们击败了巨头。 飞镖投掷仍然不太好用,原因和我们在第一幕列出的一样。 模糊+还不错。虽然不值得花钱购买,但好在这个是免费的!它值得拿的原因是,心脏在每3回合循环的第1回合会给自己加 buff 而不攻击。在这些回合能保留格挡也不算太差。 精准突刺+在你从不被击中的情况下其实挺好用(我们确实很少被击中)。不过16点伤害相当一般……尤其是考虑到我们95%的伤害都来自中毒。 我们选择了模糊+。 你可能注意到我没提巨头掉落的遗物。如果你没注意到,那或许该提高一下观察力了。
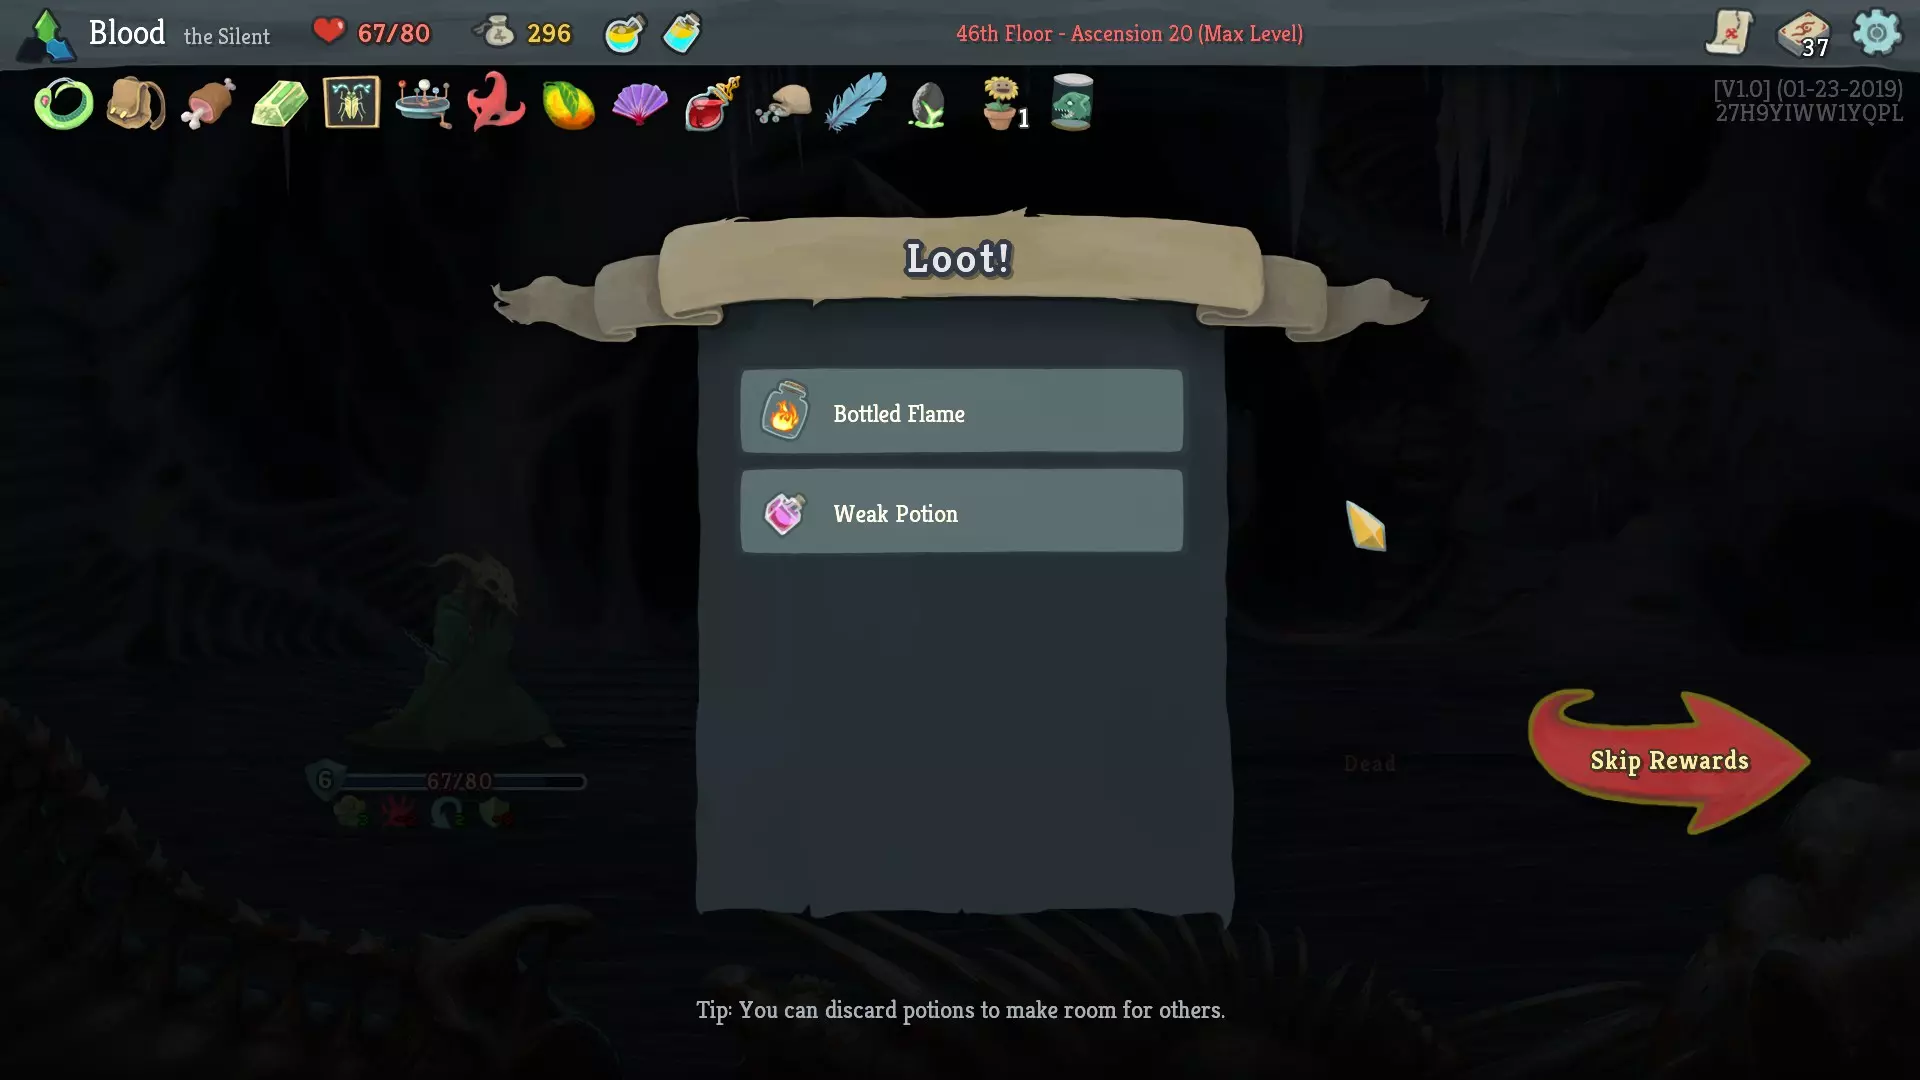
虚弱药水比不上我们现有的东西,所以直接跳过。瓶装火焰【Bottled Flame】(每场战斗的第1回合选择一张攻击牌抽到手牌)是个有趣的遗物。如果你有一张强力攻击牌并且想在每回合1都使用它,这个遗物通常会非常好用(比如,如果你有旋风斩【Whirlwind】之类的牌,再配上一堆能在回合1增加力量的遗物)。你知道吗?我们的攻击牌太弱了。我甚至觉得背刺【Backstab】现在也很垃圾,因为我们现在更想看到其他重要的卡牌,就算在回合1的9张牌里我们没法打出所有牌也一样。将一张牌装入瓶中会让你无法移除它,所以我们也不会把背刺装瓶,就算这实际上不会改变抽牌情况。这是少数需要跳过遗物的情况之一,因为拾取它实际上弊大于利。 第三幕(第三部分): 接下来是另一家商店:
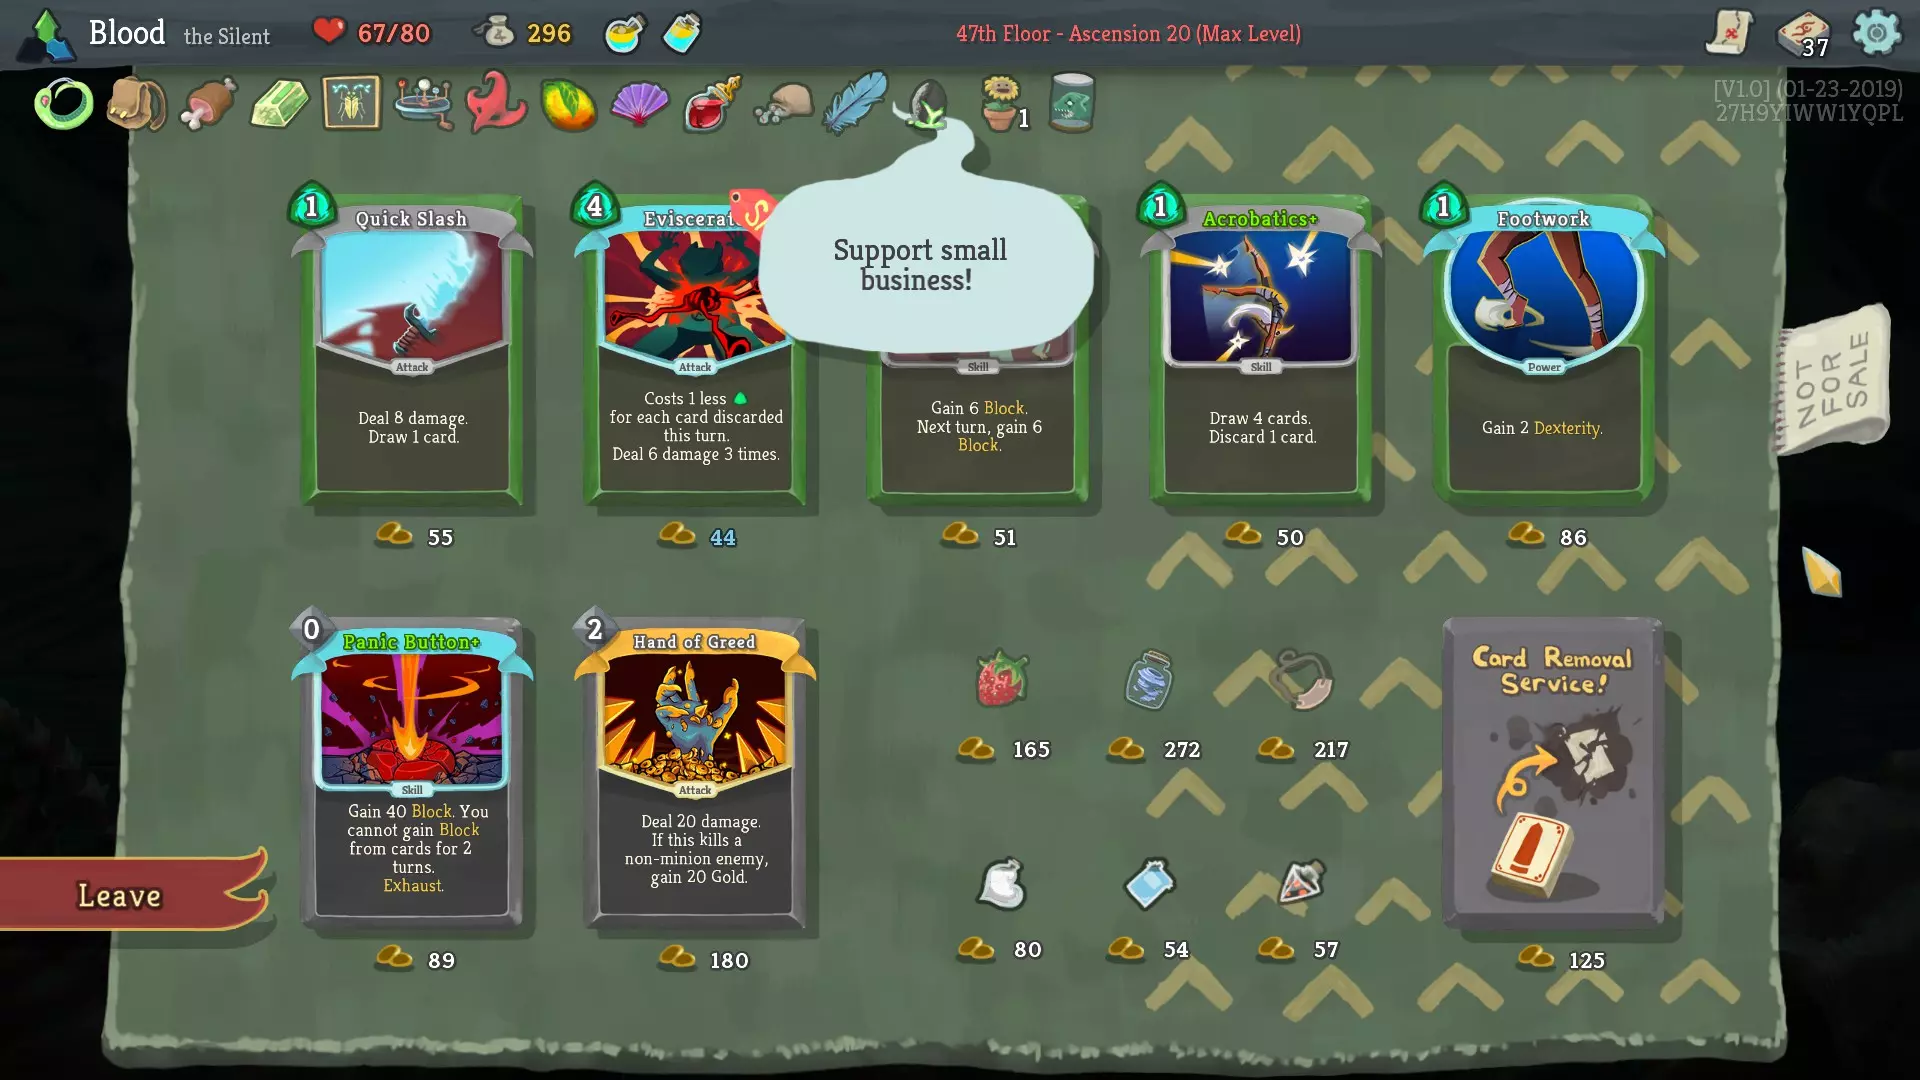
快速打击依然很弱,就像那个黏人的前任,明明之前的关系糟糕透顶,却还总想复合。 割裂是张非常奇怪的牌,极难使用。说到这个,我们基本没法用它,所以肯定不会加入卡组。 闪避翻滚+还不错,但我们不会选它,因为装备两张幽灵形态后,敏捷值基本都是负的。 杂技+还算可以,但我们还是没有足够的能量单独用来抽牌。 步法也还行,但它和幽灵形态存在反协同效应。 紧急按钮+是张挺特别的牌。我觉得这对静默猎手来说其实没那么好用(因为她几乎总是围绕敏捷属性加成和每回合生成大量格挡来构建卡组),但在这次的对局中可能也不会太差。 贪婪之手……很弱?我得击杀9个非随从敌人才能收回最初的投入。 草莓(+7最大生命值和当前生命值)还不错,但我们目前并不缺最大生命值。 瓶装旋风(选择一张力量牌,在每场战斗开始时将该牌置于你的手牌中)对静默猎手来说堪称完美。你知道什么能提高稳定性吗?那就是能确保在第一回合抽到一张重要的力量牌。勇气投石器(每场精英战斗开始时获得2点力量)对我们来说帮助不大,因为我们没有真正能随力量成长的牌,而且整个流程只剩下一场精英战了。 药水方面,它们也比不上我们已有的两瓶。 移除卡牌是种奢侈。买了【瓶装旋风】后,我们负担不起这种奢侈了。 我们购买了【瓶装旋风】。 我选择将【强化旋风斩】装入瓶中。为什么?因为它比其他任何能力都更能提升我牌组的稳定性。从9张牌的第一回合开始就能保留2张牌,这给了我很多选择。 下一场走廊战斗的对手是蠕动之群。
用我们的套牌打这场战斗相当轻松,但重要的是我每回合都要用【WLP】保留一次攻击,以防它试图往我们的牌组里塞【寄生诅咒】。我更倾向于用中毒直接杀死它,不想碰运气赌随机数。 它会给我们一个【技能药水】,我们选择跳过,因为技能药水通常是最差的药水类型,而且我们已经有两瓶不错的药水了。 【偏转+】仍然跳过,原因之前已经说过。 【精准】还是被嫌弃。 【足跟勾+】在游戏后期相当不起眼。我们确实有足够的虚弱效果可以配合它使用……但说实话,我现在不想把它加入牌组。所以我们跳过。 在营火处,我们必须【回忆】来获取【红宝石钥匙】,以便进入第四幕。
现在是时候对抗多努和迪卡了。
拥有【样本】能让这场战斗轻松不少,但像这样的第一回合,我们可能还是会受到一些伤害。我打算使用【弱点看破+】,对【多努】使用【背刺】(总是优先攻击多努,因为他会持续提升他们的力量),用【力量祝福】移除【神器】效果,然后使用两次【防御】。我选择在本回合承受一些轻微伤害,以保留【无形】状态,因为本回合我们没能施加任何【中毒】效果。
经过一场漫长而艰苦的战斗,我们击败了多努和迪卡,但过程中损失了36点生命值(好痛)。接下来是下一个 Boss,也就是时间吞噬者(我们运气不错)。觉醒者很可能会迫使我们喝下两瓶药水。
时间吞噬者的战斗很简单。我们用血液瓶回复了2点生命值,并且没有受到任何伤害。 现在进入第四幕。 第四幕(第一部分): 这是第四幕的地图。这是我自己合并完成的。

需要考虑的事情: - 其实没什么。我们没钱,所以那个商店只是用来嘲讽我们的。 在营火处,我们借助永恒之羽(Eternal Feather)恢复至满血(这次冒险中它的价值意外地高……通常它没什么用)。现在我们要升级什么呢……
如果没有苦无/手里剑,【隐匿与匕首+】打心脏实际上非常乏力。 【魅影杀+】对我们来说相当没用。 【穿透弱点+】在对抗心脏的大部分战斗中,效果基本和【穿透弱点】一样。 【背刺+】依旧很弱。 【后空翻+】依旧很弱。 【求生+】依旧很弱。 【防御+】依旧很弱。 【猛击+】尤其弱。 【偷袭+】不算最糟,多一回合的虚弱效果对心脏可能挺强的……前提是那一回合我没有获得无形状态。 【中立+】比【偷袭+】稍好,因为效果相同且消耗为0费。 【致命毒药+】不会太差……不过需要注意的是,一旦我对心脏施加200点中毒效果,就没有必要再施加更多中毒了,因为心脏每回合最多只能受到200点伤害。致残烟雾+也不算太差,但致命毒药+会更好,因为它只需1点能量就能造成相同的中毒效果。虚弱+不是很有用。虚弱在对抗心脏的一个循环中效果不错,但心脏会在其强化回合清除力量降低的减益效果。子弹时间+仍然不错,因为我们可以先打出后空翻,而且我们的牌组中有4张后空翻卡牌,所以在有子弹时间的回合抽到后空翻的几率相当高。这是一个非常艰难的决定——但我认为我会选择致命毒药+。原因在于,我真正想做的是尽快施加23层中毒效果,然后使用爆发强化和催化剂强化。接下来只需依靠幽灵形态待机,就能自动获胜。 商店里的物品如下:
除了【潜行打击】之外我们什么都买不了,所以我不打算谈论其他东西。不过,如果我没记错的话,之前我曾说过【潜行打击】去死吧。 好吧,我说过不谈论其他东西,但【符文十二面体】对我们来说其实是个不错的能量遗物,因为运气好的话,我们不会从精英战中受到任何伤害,从【心脏】那里受到的伤害也会非常少。 现在来谈谈精英怪:
第一回合还不错。我本希望这回合能拿到【幽灵形态】,这样就能用【意志力药水】保留它了,但问题应该不大。
我有没有说过我讨厌这个游戏?直到第四回合我都没抽到【幽灵形态】……(我没用药水是因为【尖刺之塔】上一回合已经被毒害死了,所以这家伙本回合会被【样本】杀死)。唉,就当是【血肉价值】吧……
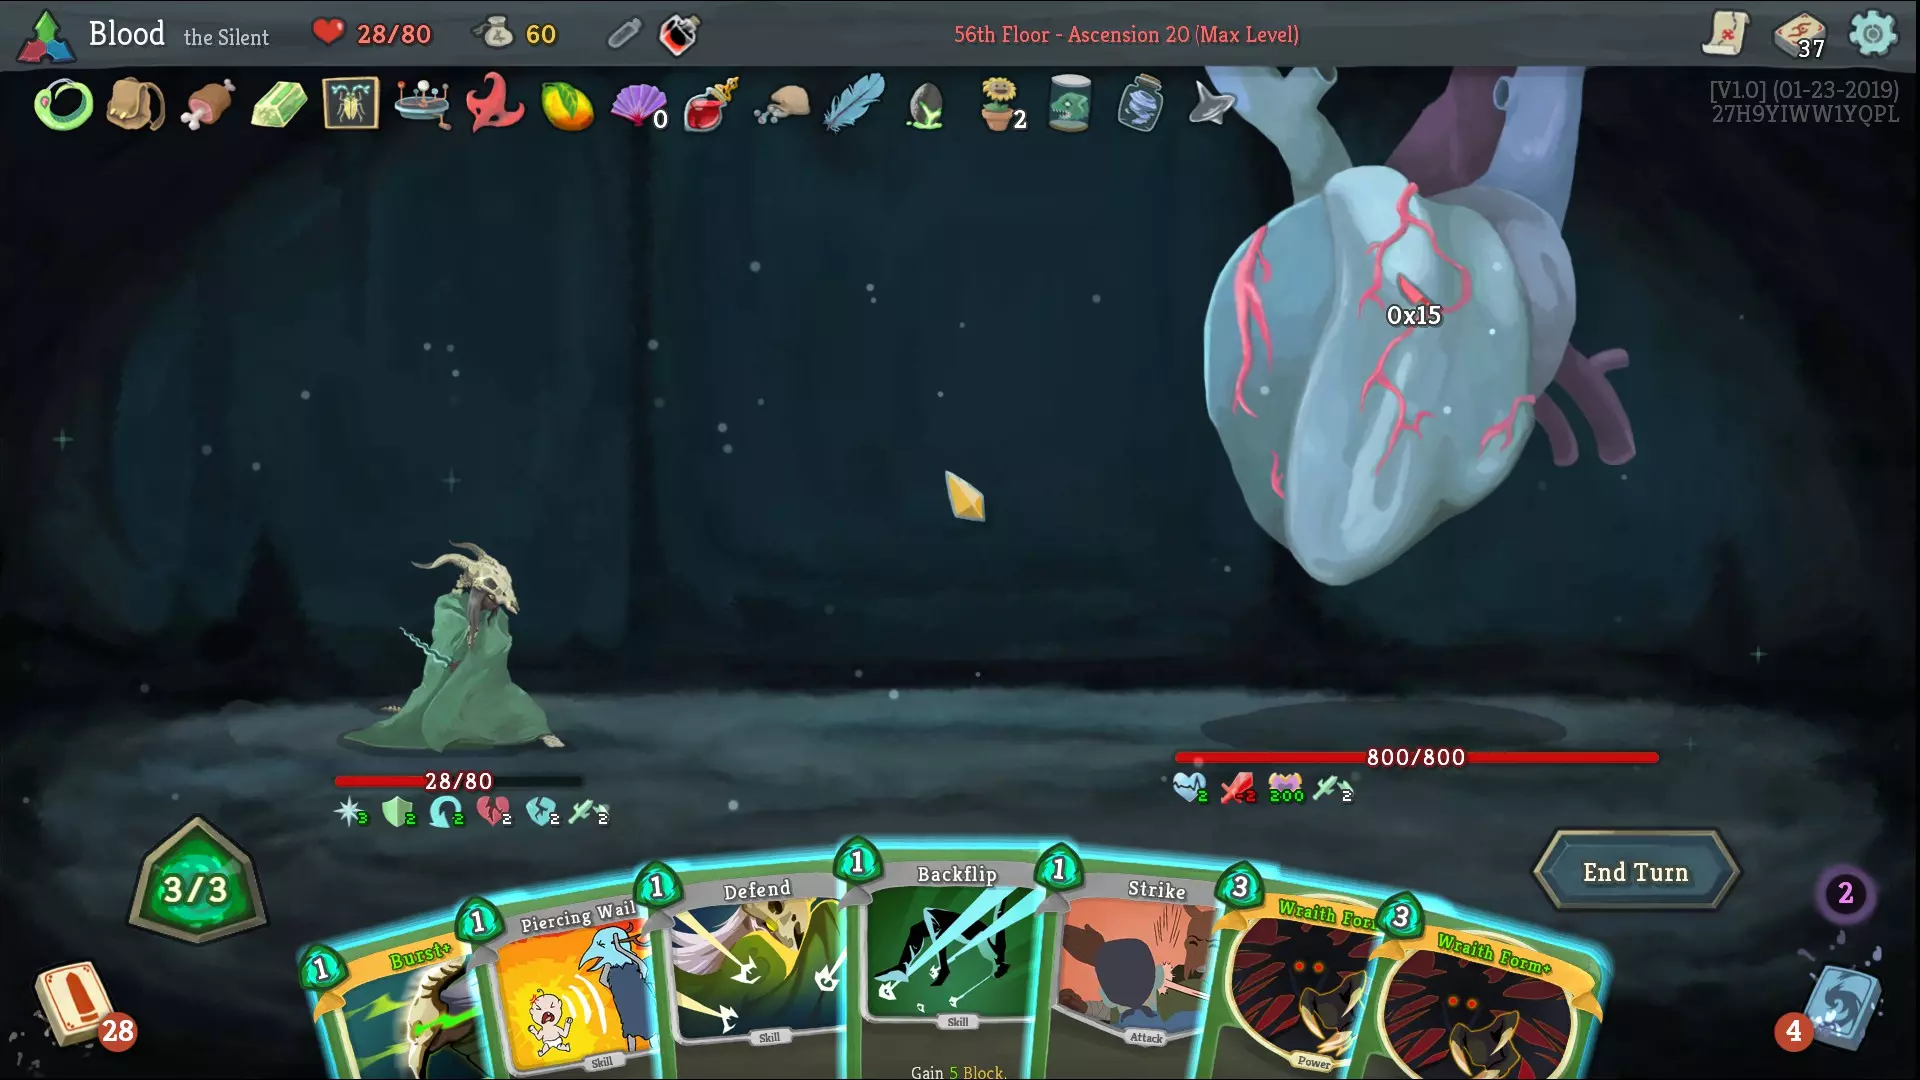
他们给了我们【不息陀螺】(当你手牌为空时抽一张牌)。这张卡超级没用。 终结技在我们的卡组里表现不佳,因为我们没有相关的配合。 【蒺藜】其实对心脏效果很好,但我们已经不需要伤害了,因为我们知道获胜条件是堆叠200层中毒,然后依靠【幽灵形态】等待。加入这张卡只会延迟我们抽到更重要卡牌(如【爆发+】、【催化+】、【幽灵形态+】等)的能力。 【偷袭】在游戏的这个阶段也不好用,因为我们已经不再急需【虚弱】状态了。 所以这张卡选择跳过。 现在要去击败腐化之心了。 第四幕(腐化之心): 既然我们已经到了最终战,我不介意给大家展示一下我在战斗中的逐步决策过程。既然我已经决定这么做了,那很可能会出现某种宇宙失衡,而我也会输掉这场战斗。
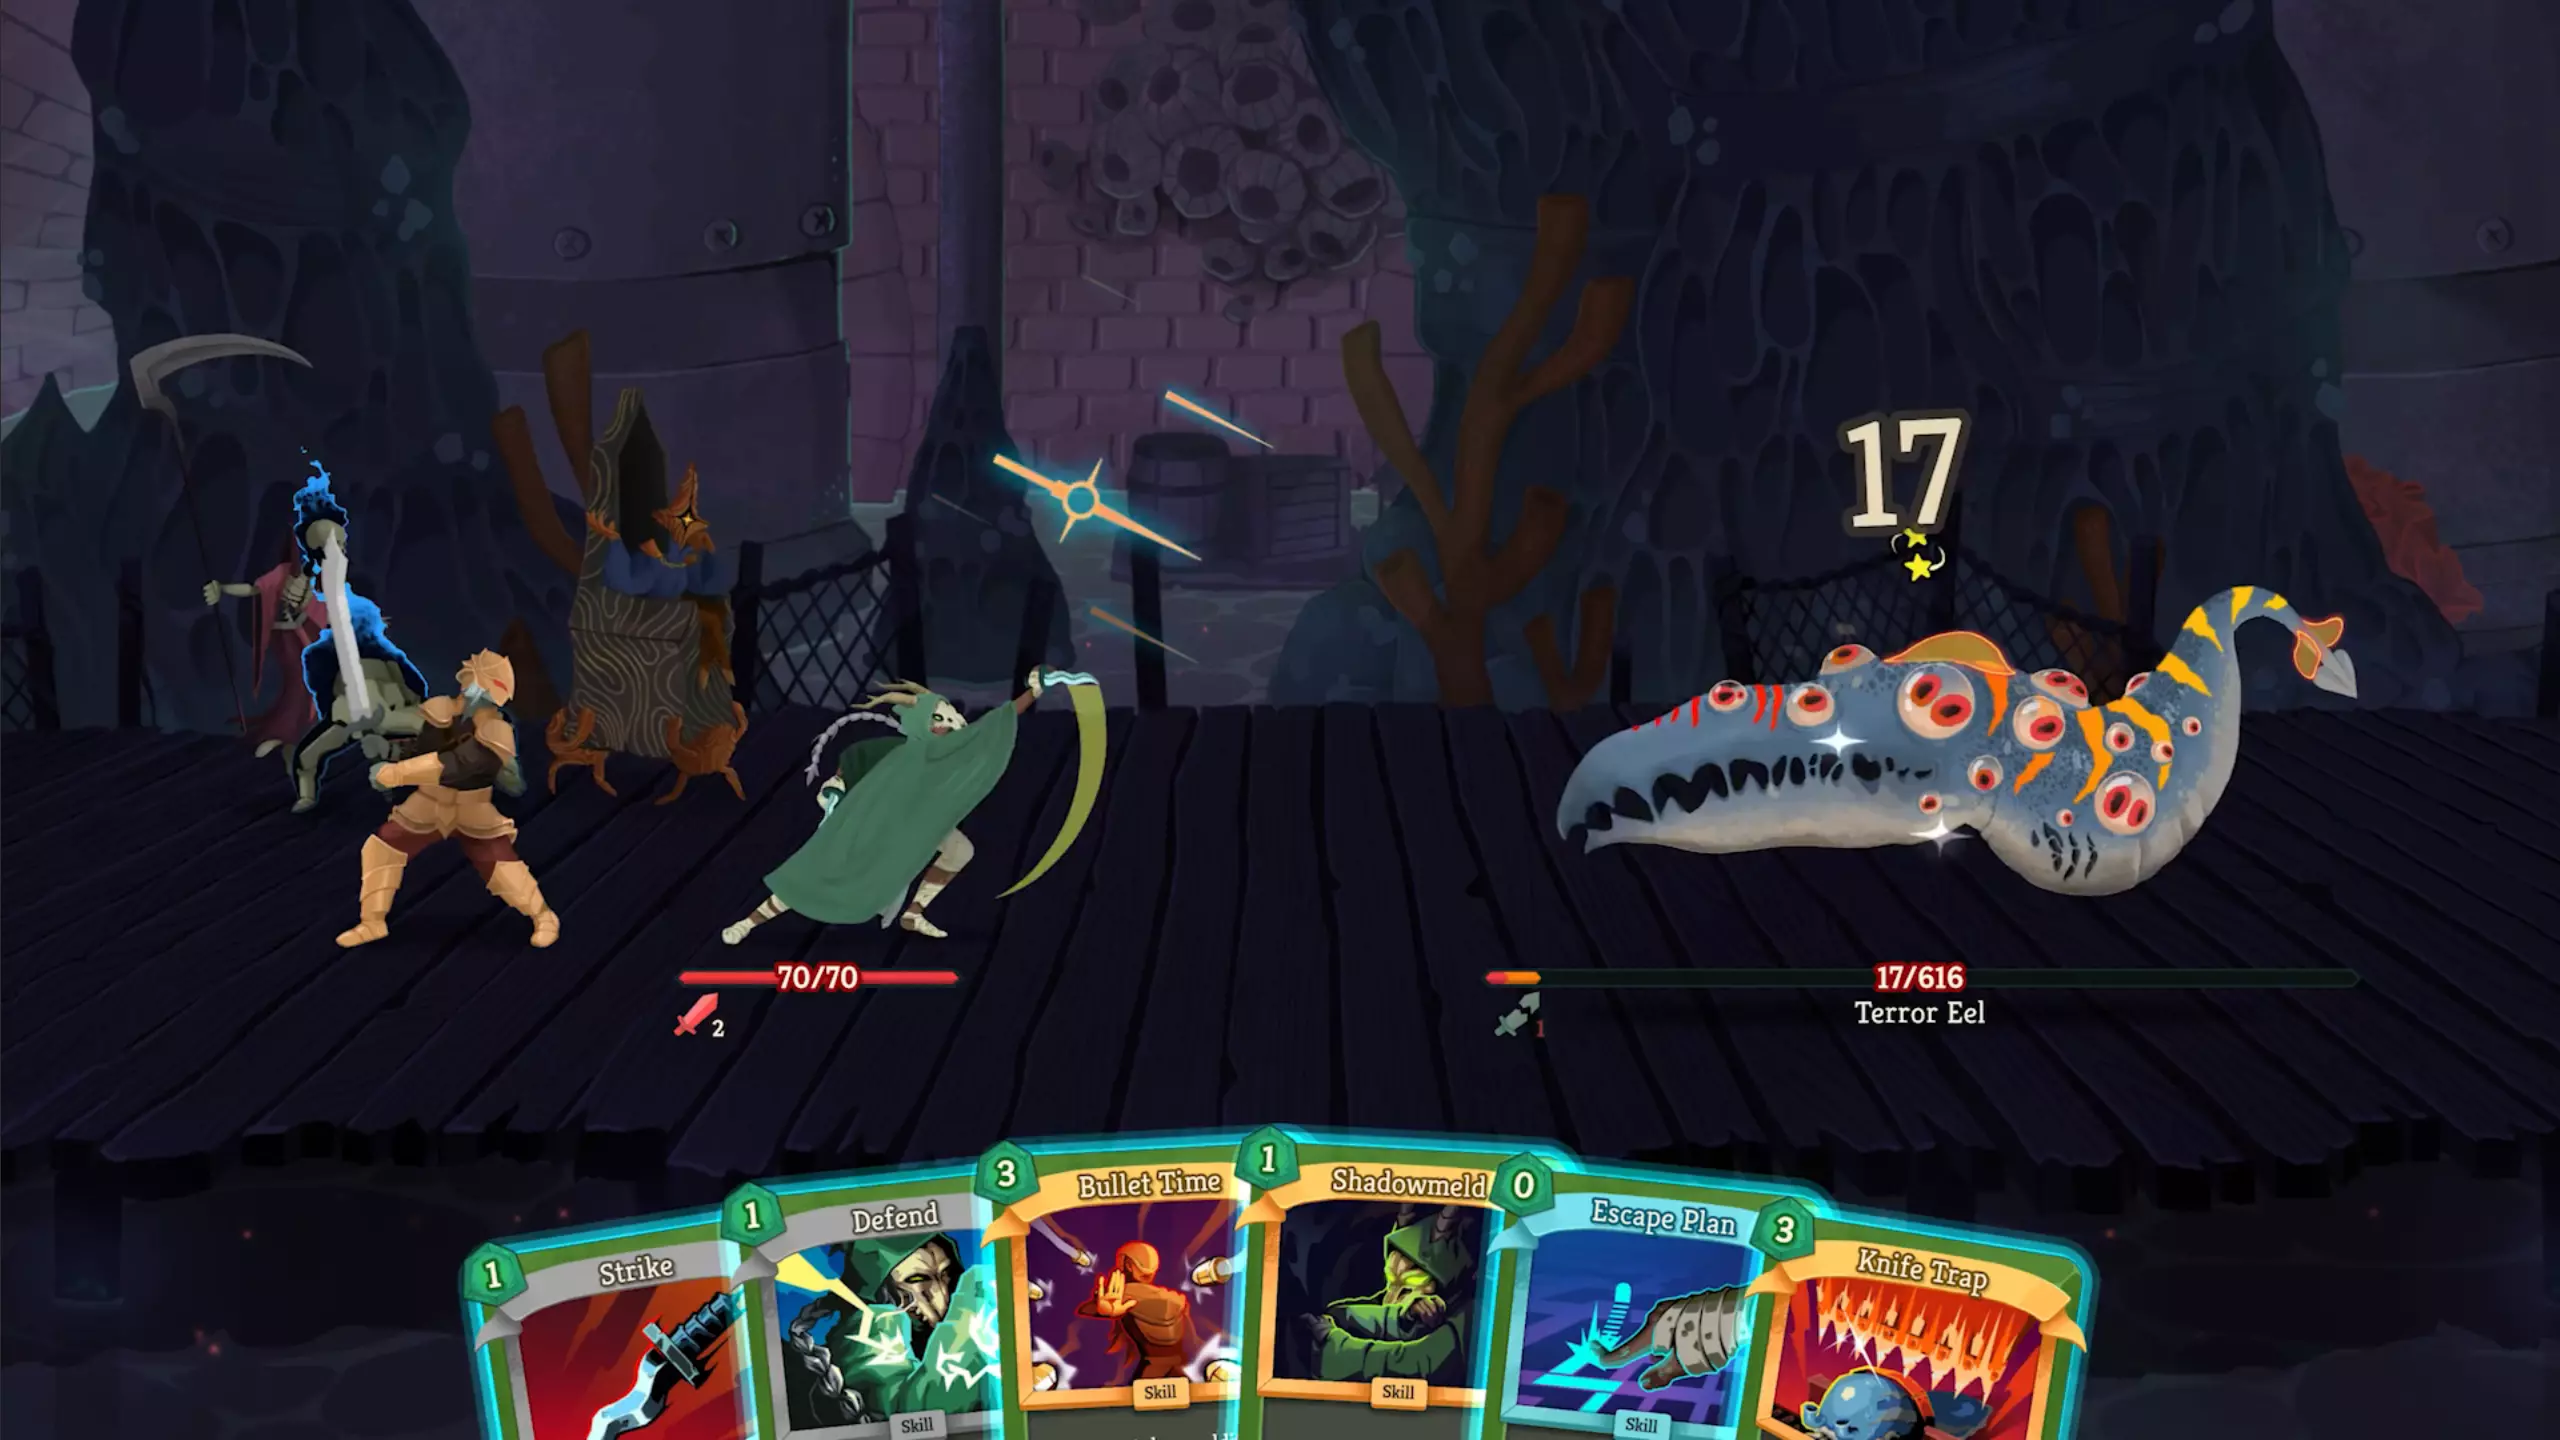
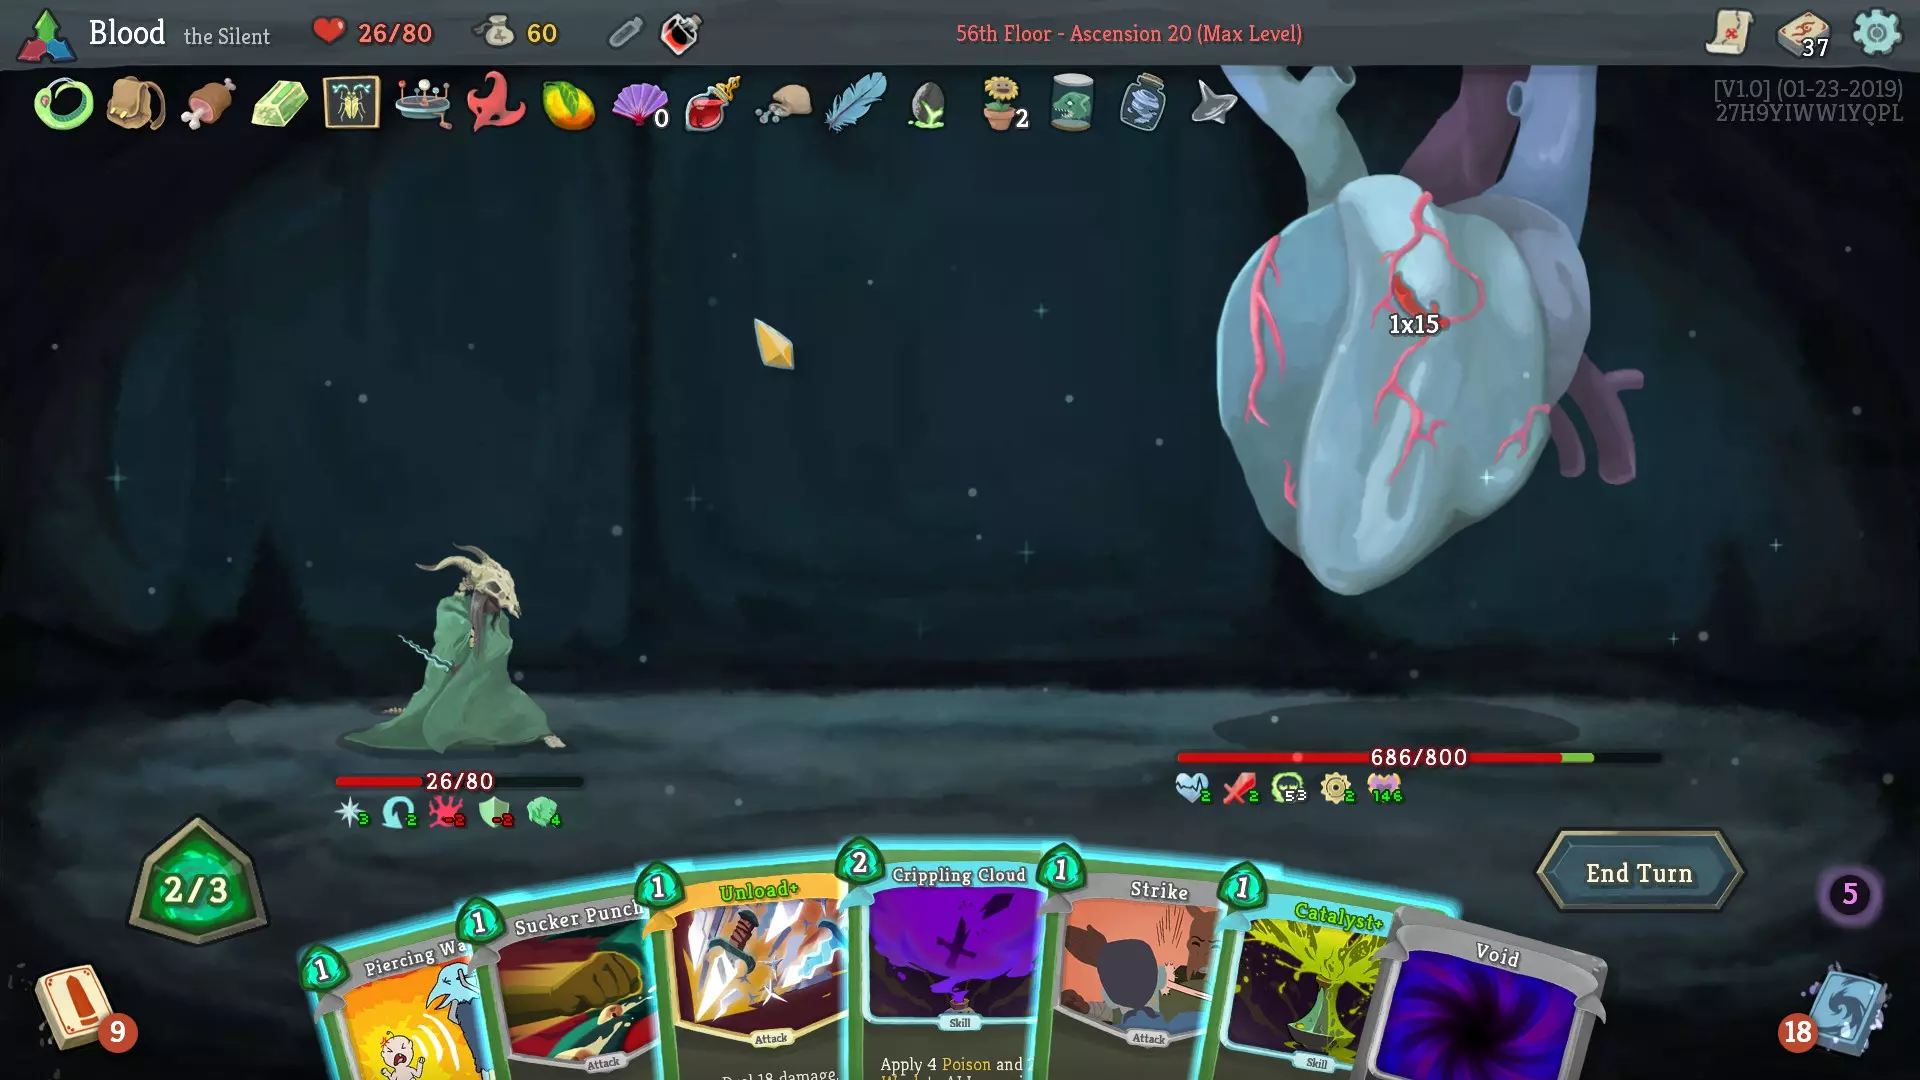
在20层晋升难度下,腐化之心初始拥有2层【死亡节拍】(BoD)被动效果(每打出1张牌,每层死亡节拍对玩家造成1点伤害——此效果在所有卡牌效果结算完毕后触发)。 第一回合会施加一个减益效果,按顺序使玩家获得2层虚弱、易伤和脆弱状态,并向玩家牌组中加入1张燃烧、1张虚无、1张眩晕、1张黏着和1张伤口。 好了,开始吧。
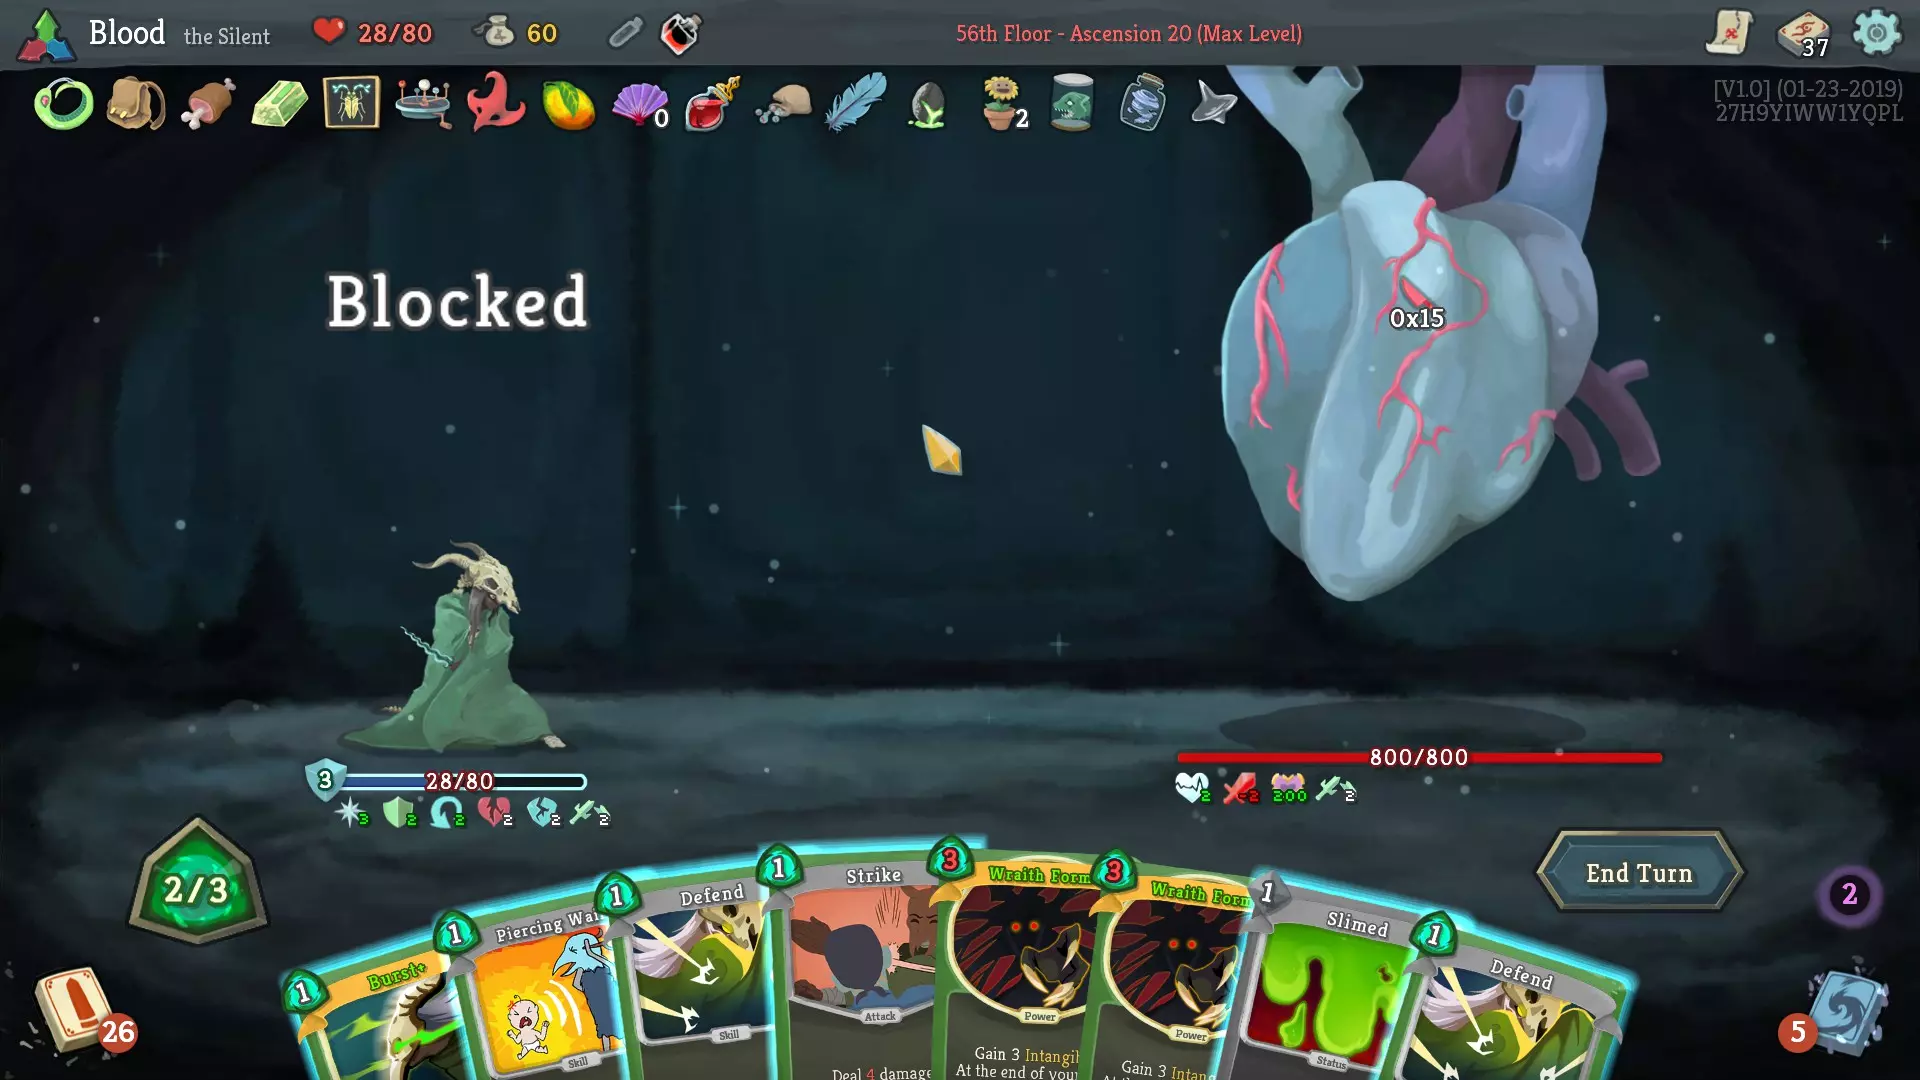
我使用荆棘药水,这样就能将熵变药水分解成两瓶药水。分解后得到一瓶敏捷药水和一瓶易伤药水。
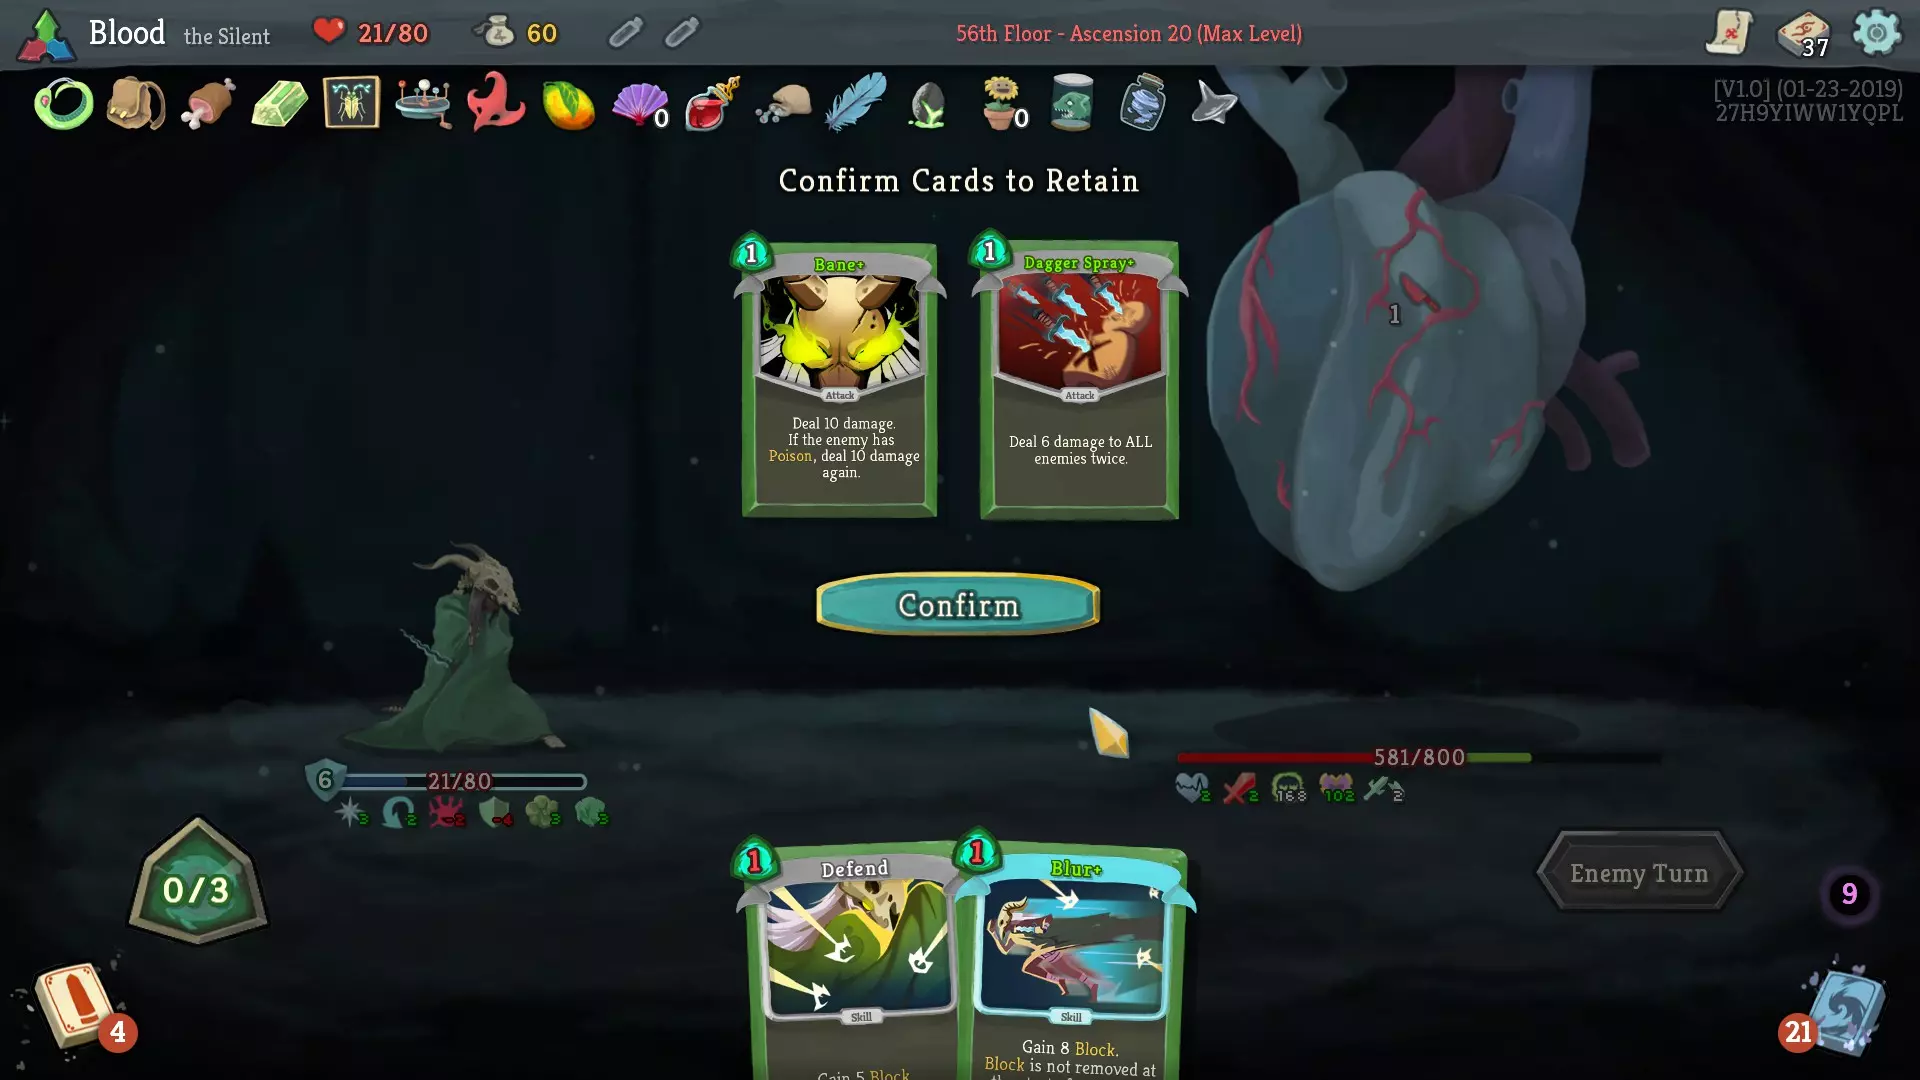
我使用了敏捷药水。我暂时留着易伤药水,因为现在还不需要。 这一回合,如果我使用强化爆发和防御,最多能生成14点格挡(被BoD减至10点)。但这样会严重浪费强化爆发。所以我们最多只能生成7点格挡(被BoD减至5点)。这意味着如果不想受到伤害,本回合我只能再打出2张牌。 我知道下一回合,心脏要么使用2次15点的攻击,要么使用一次重击(具体伤害值我记不太清了,但应该在45左右)。我现在需要记住,我会受到易伤(受到的伤害增加50%)和虚弱(生成的格挡减少25%)效果。如果心脏决定使用多段攻击,由于我身上的易伤效果,它会对我造成3次15点的伤害。不过碰巧的是,使用【防御】后,我正好还剩2点能量。消耗2点能量的【虚弱】能将心脏的攻击力降低2点,使其变为1×15的攻击,而【脆弱】效果会将这1×15的攻击进一步减为0×15。哇,我可以受到0点伤害!而且【脆弱】效果持续2回合,所以即便是它的强力攻击,这也是相当可观的伤害减免。 决定之后,我按顺序使用了【防御】、【周密计划+】和【虚弱】。结束回合时,我保留了【爆发+】(因为我们需要用【爆发+】、【中毒】卡牌和【催化剂+】)以及【尖啸】(因为它是我所有选项中提供最多伤害减免的)。
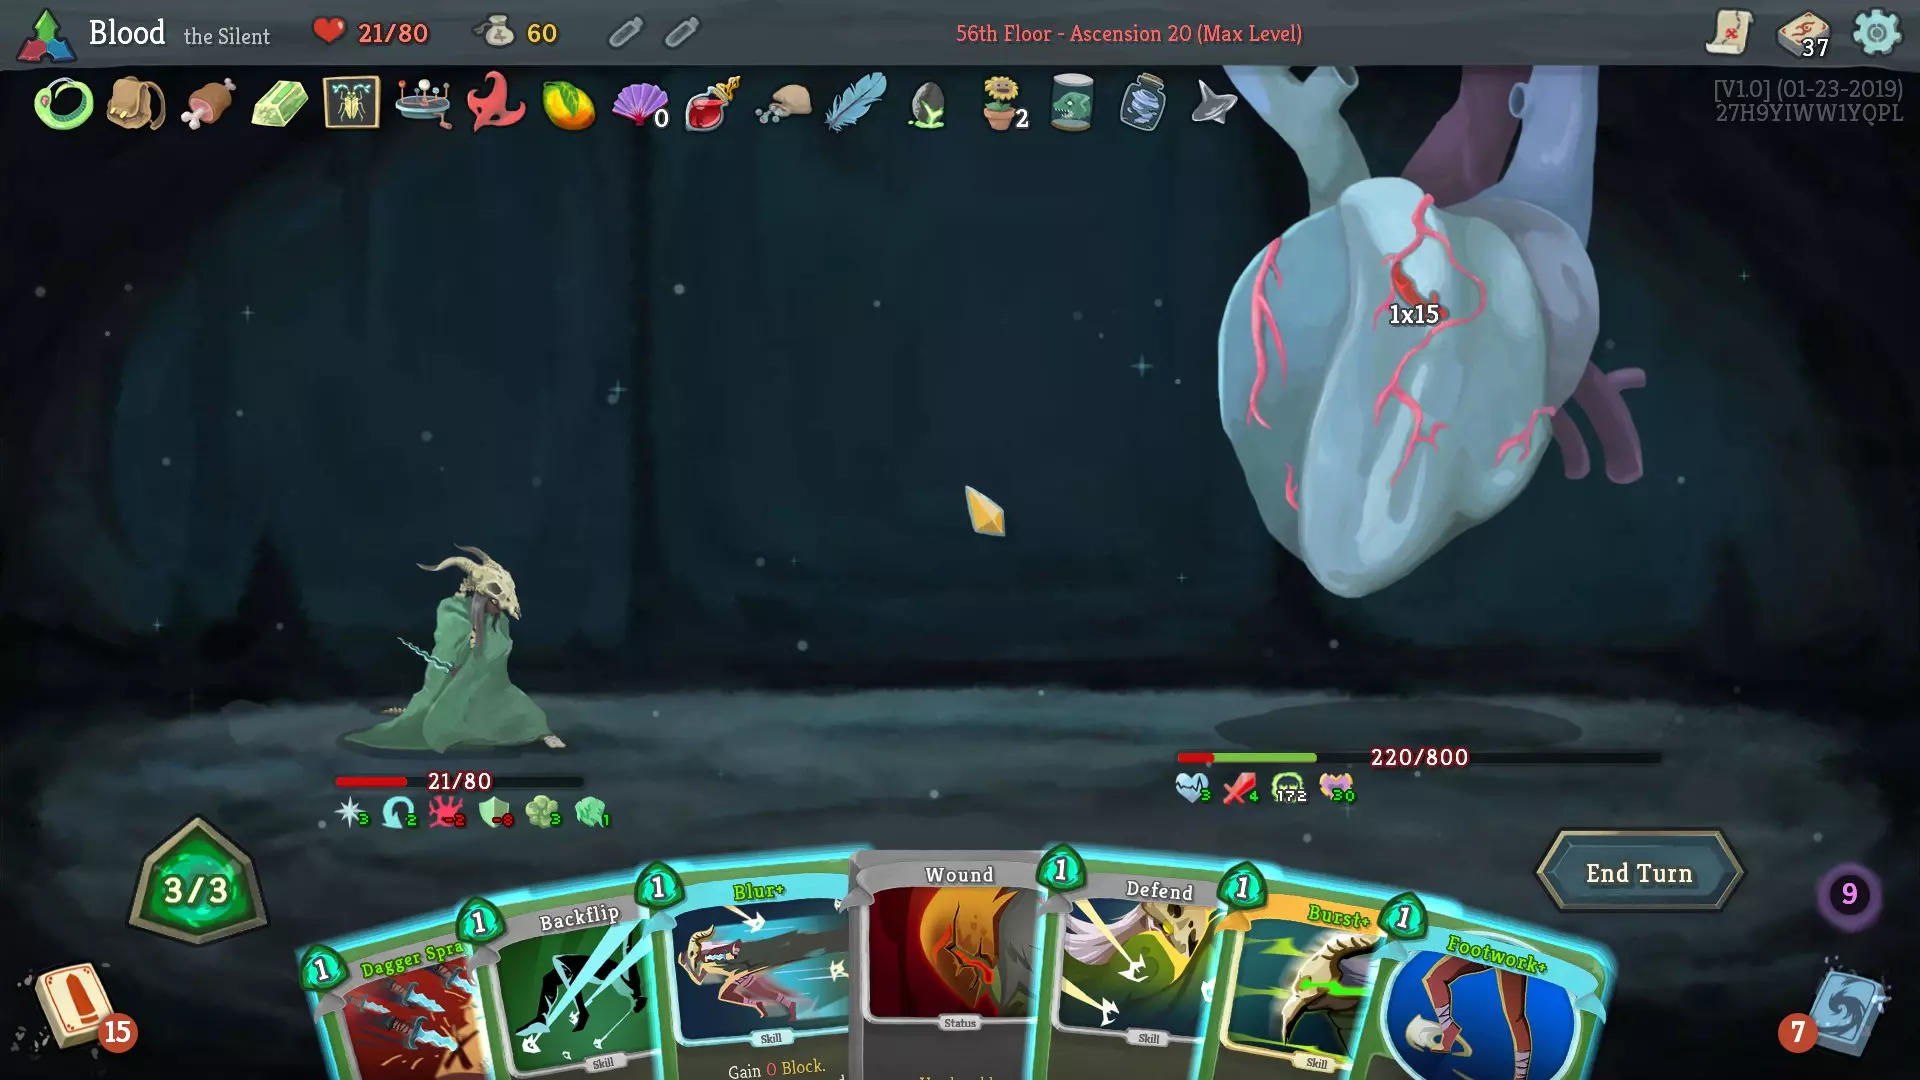
它决定发动多段攻击,所以我们受到了15点伤害。不过就算是发动重击我们也能应对,因为本回合我们抽到了【鬼影形态】。但不幸的是,本回合我们抽到了两张【鬼影形态】。注意我们的抽牌堆还剩28张牌。这情况很糟,因为如果我们弃掉其中一张【鬼影形态】来保留【能量爆发+】,可能要等到4-5回合后才能再次抽到那张【鬼影形态】……甚至更糟,要等到7-8回合后。我决定,既然本回合我们没什么其他事可做,不如用【后空翻】试着抽一张中毒牌。
运气不佳。我们抽到了【黏滑】和【防御】。虽然我本可以用【后空翻】配合【爆发+】(反正我们早晚要弃掉【爆发+】),但这样做会受到2点伤害,而且会让我们只剩下1点能量。这意味着如果抽到【弹跳烧瓶+】或【致残迷雾】,两者都将无法使用。【致残迷雾】还好,但【弹跳烧瓶+】确实必须使用,因为我们很长时间内可能都不会再抽到【爆发+】了。 所以,我只是打出了【黏滑】就结束了回合。我们保留了两张【幽灵形态】。
我忘了截图这个回合的开始,但因为【快乐花】我们有4点能量,所以我使用了【后空翻】额外抽了两张牌(【幸存者】和【眩晕】)。 接下来该怎么做似乎显而易见: 先使用【子弹时间】,再用【幽灵形态】(现在我有0点格挡,但没有受到伤害,因为【幽灵形态】将【暴食】的伤害降低到1点),然后使用【幸存者】并弃掉【灼烧】(弃掉【灼烧】很重要——不是因为它会造成伤害,毕竟反正你会格挡,而是因为它会在回合结束时自动弃掉。这样你可以保留【伤口】,不用再抽到它)。然后我就把剩下的牌都打出去了。 问:为什么不留着另一张【幽灵形态】? 答:这是第3回合。回合3:强力攻击→获得6回合无形状态 回合4:增益→剩余5回合无形状态 回合5:攻击→剩余4回合无形状态 回合6:攻击→剩余3回合无形状态(如果我没有重复使用【幽灵形态】,本回合可能就需要消耗3点能量来使用它了) 回合7:增益→剩余2回合无形状态 回合8:攻击→剩余1回合无形状态 回合9:攻击→失去无形状态 现在如果我保留【幽灵形态】到回合8-9使用,我可能还是会在回合6被迫使用它,但那样就得支付3点能量(这意味着本回合我基本做不了别的事),而且反正我应该能在回合8结束前击败心脏。
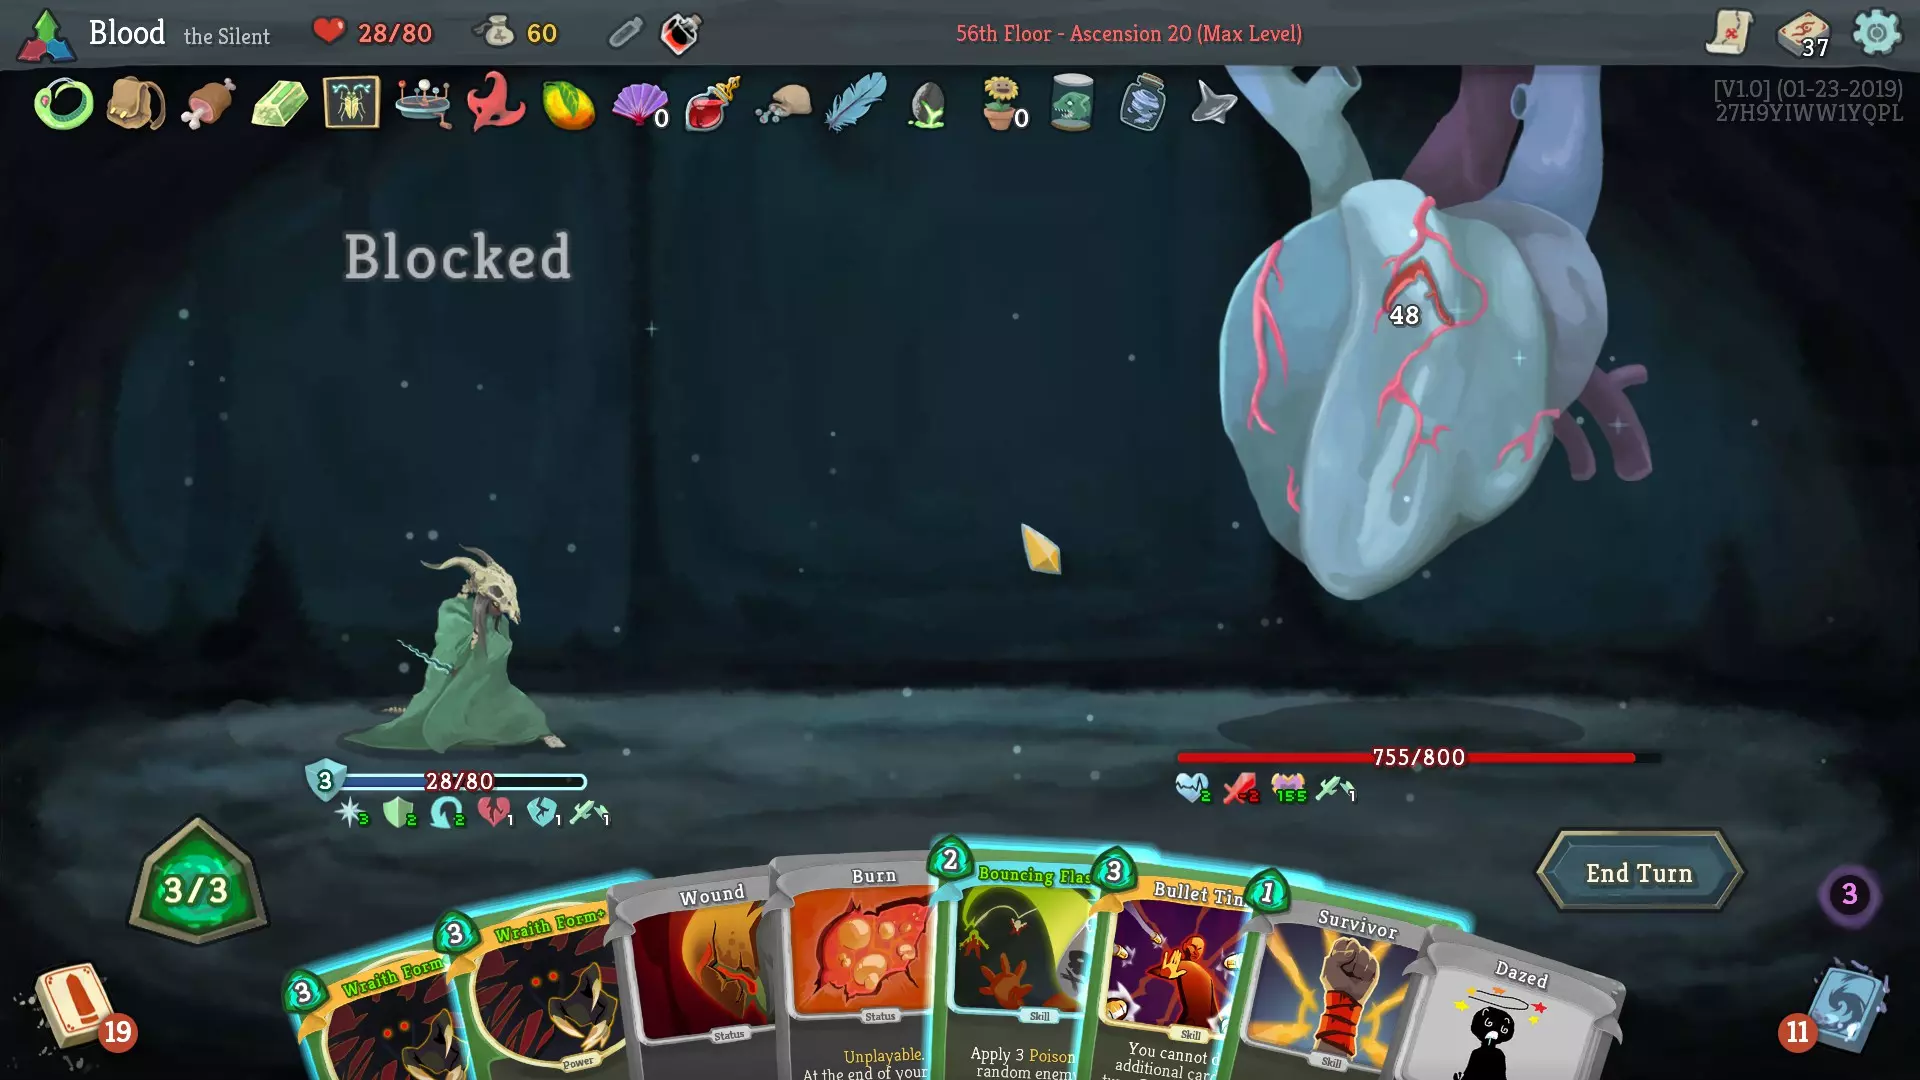
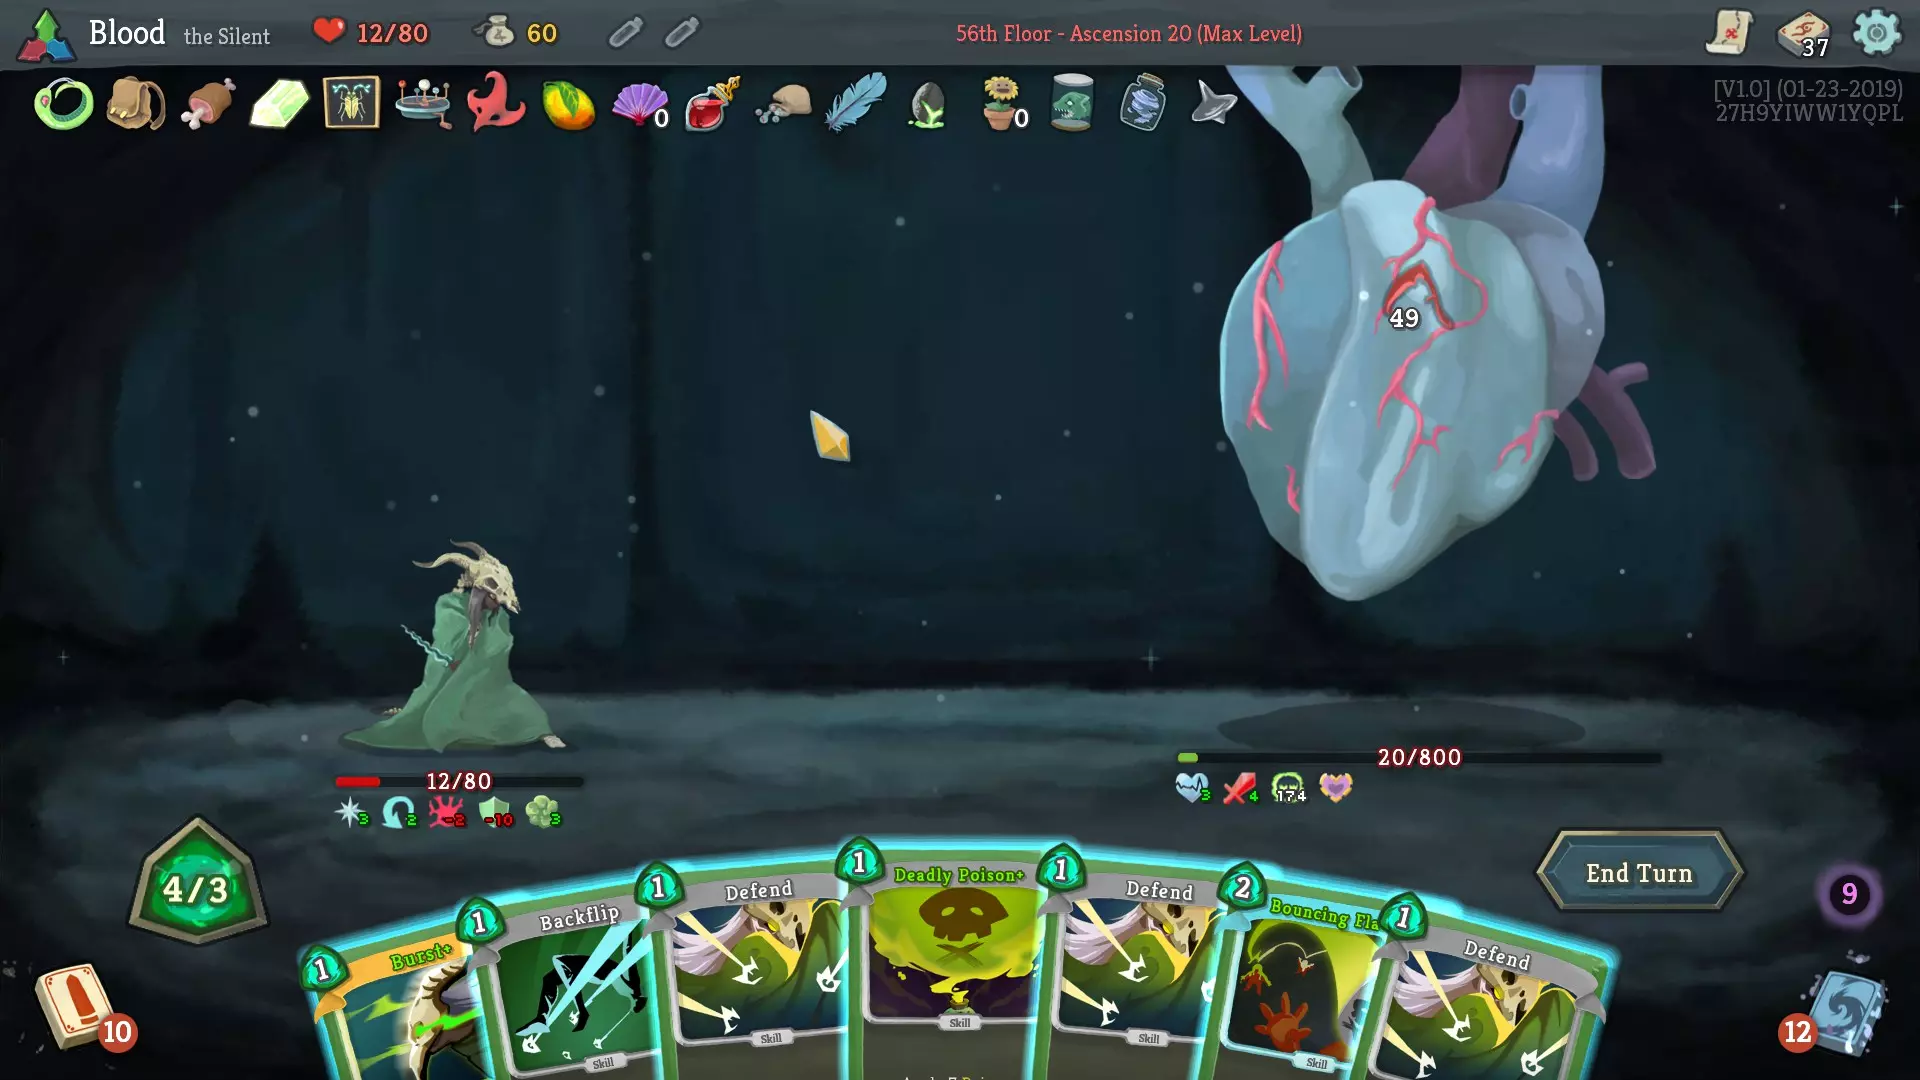
我总是忘记在回合开始时截图。不过,我在这里只使用了致命毒药+和催化剂+(失去2点生命值)。现在,重要的是为下一回合保留穿刺哀嚎和欺诈攻击。心脏会在下一回合开始时清除力量减益效果并获得2个遗物。这非常糟糕,因为我们还需要用另一个催化剂+施加更多毒药。此外,如果心脏决定使用多重攻击,当你只有26点生命值时,1次15点伤害仍然非常痛苦。
于是心脏决定在本回合使用多段攻击。但不幸的是,本回合我们抽到了虚无卡,这意味着我们没有足够的能量来打出所有想要的牌。使用脆弱药水,我们可以移除心脏的一层Artifact( artifacts)。使用猛击(失去1点生命值),我们可以移除第二层Artifact( artifacts)。 现在回想起来,我这部分打得不太好(或者说也不算差,这真的取决于看问题的角度)。如果我在本回合使用催化剂+,就能造成致命伤害,但我会受到9+1点伤害。 计算如下: 本回合:心脏生命值-159,我失去11点生命值 下一回合:心脏发动强力攻击,生命值-158,我失去0点生命值 再下一回合:心脏自我强化,生命值-157,我失去0点生命值 再下一回合:心脏发动任意攻击,我最多失去9点生命值,但心脏生命值会-156 再下一回合:无论心脏做什么都无关紧要了,因为它会因生命值-155而死亡。我转而使用【穿刺哀嚎】(失去1点生命值)造成0×15的伤害,并保留【致残迷雾】和【催化剂+】到下一回合(这样依然能达成击杀,而我受到的伤害最多为13点,而非之前的最多20点)。
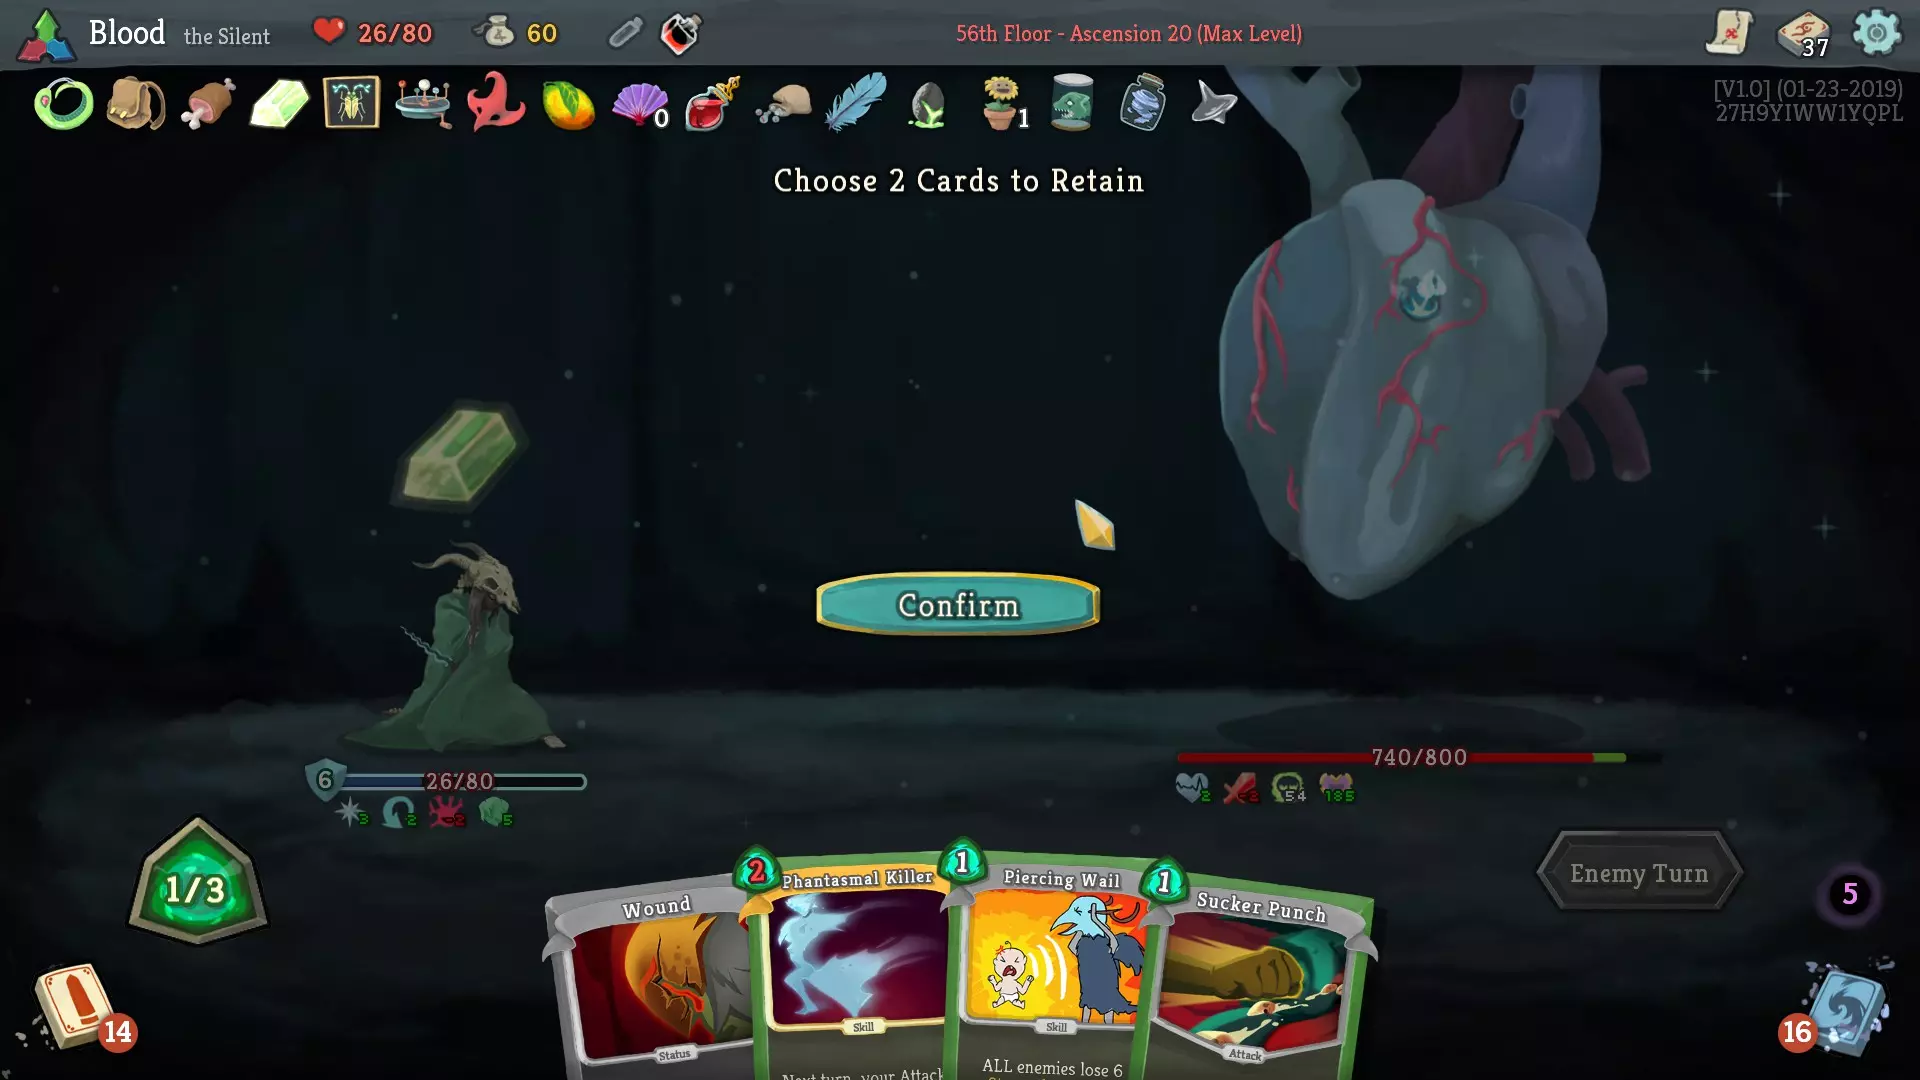
我突然意识到自己真的很不擅长记得在回合开始时截图。不过,我使用了【致残之云】和【催化剂+】(-2生命值),并且我们已经达成了斩杀条件。

这回合我随便操作一下。反正已经是致命一击了。只要别被【BoD】弄死就行(不过应该也不可能,毕竟在心脏死掉之前,我甚至都没有足够的能量把自己弄死)。
又在瞎搞。-9生命值
再见。

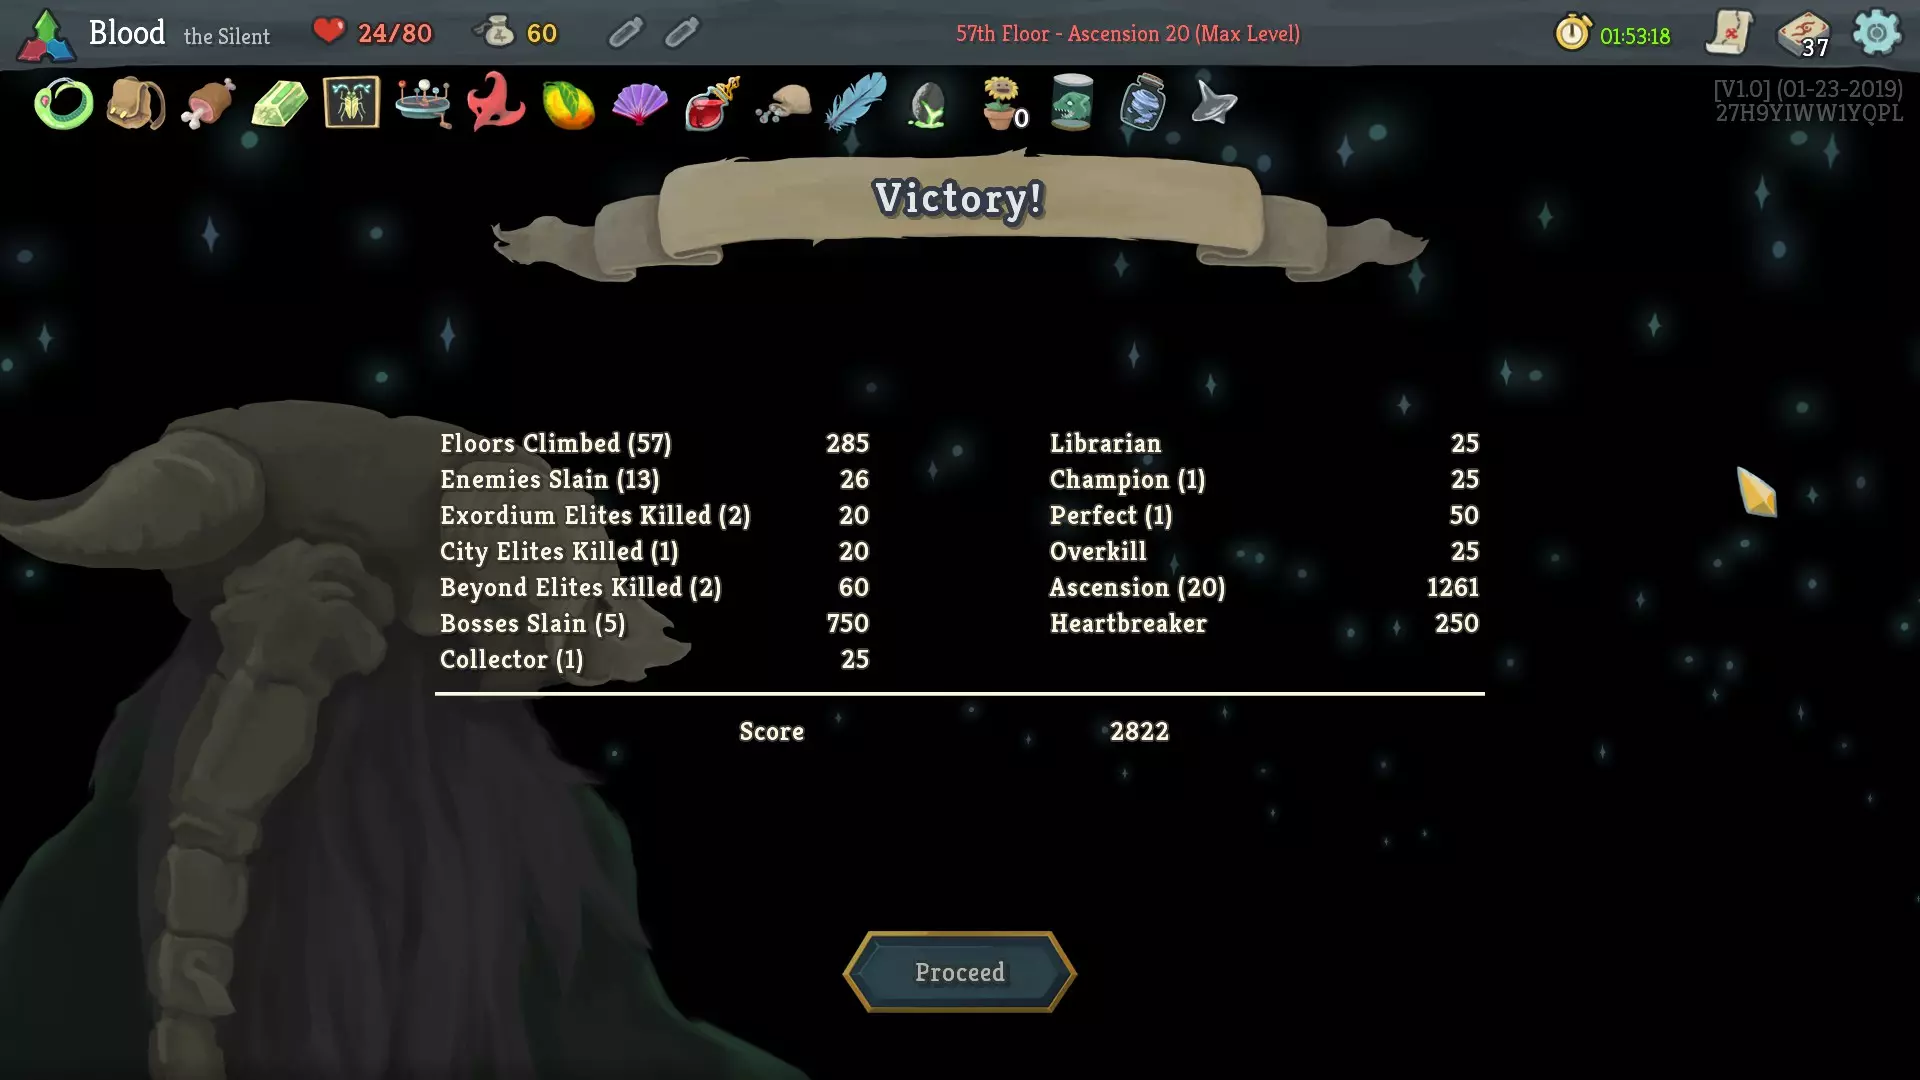
赛后分析: 来自DATASS的客串
得分明细
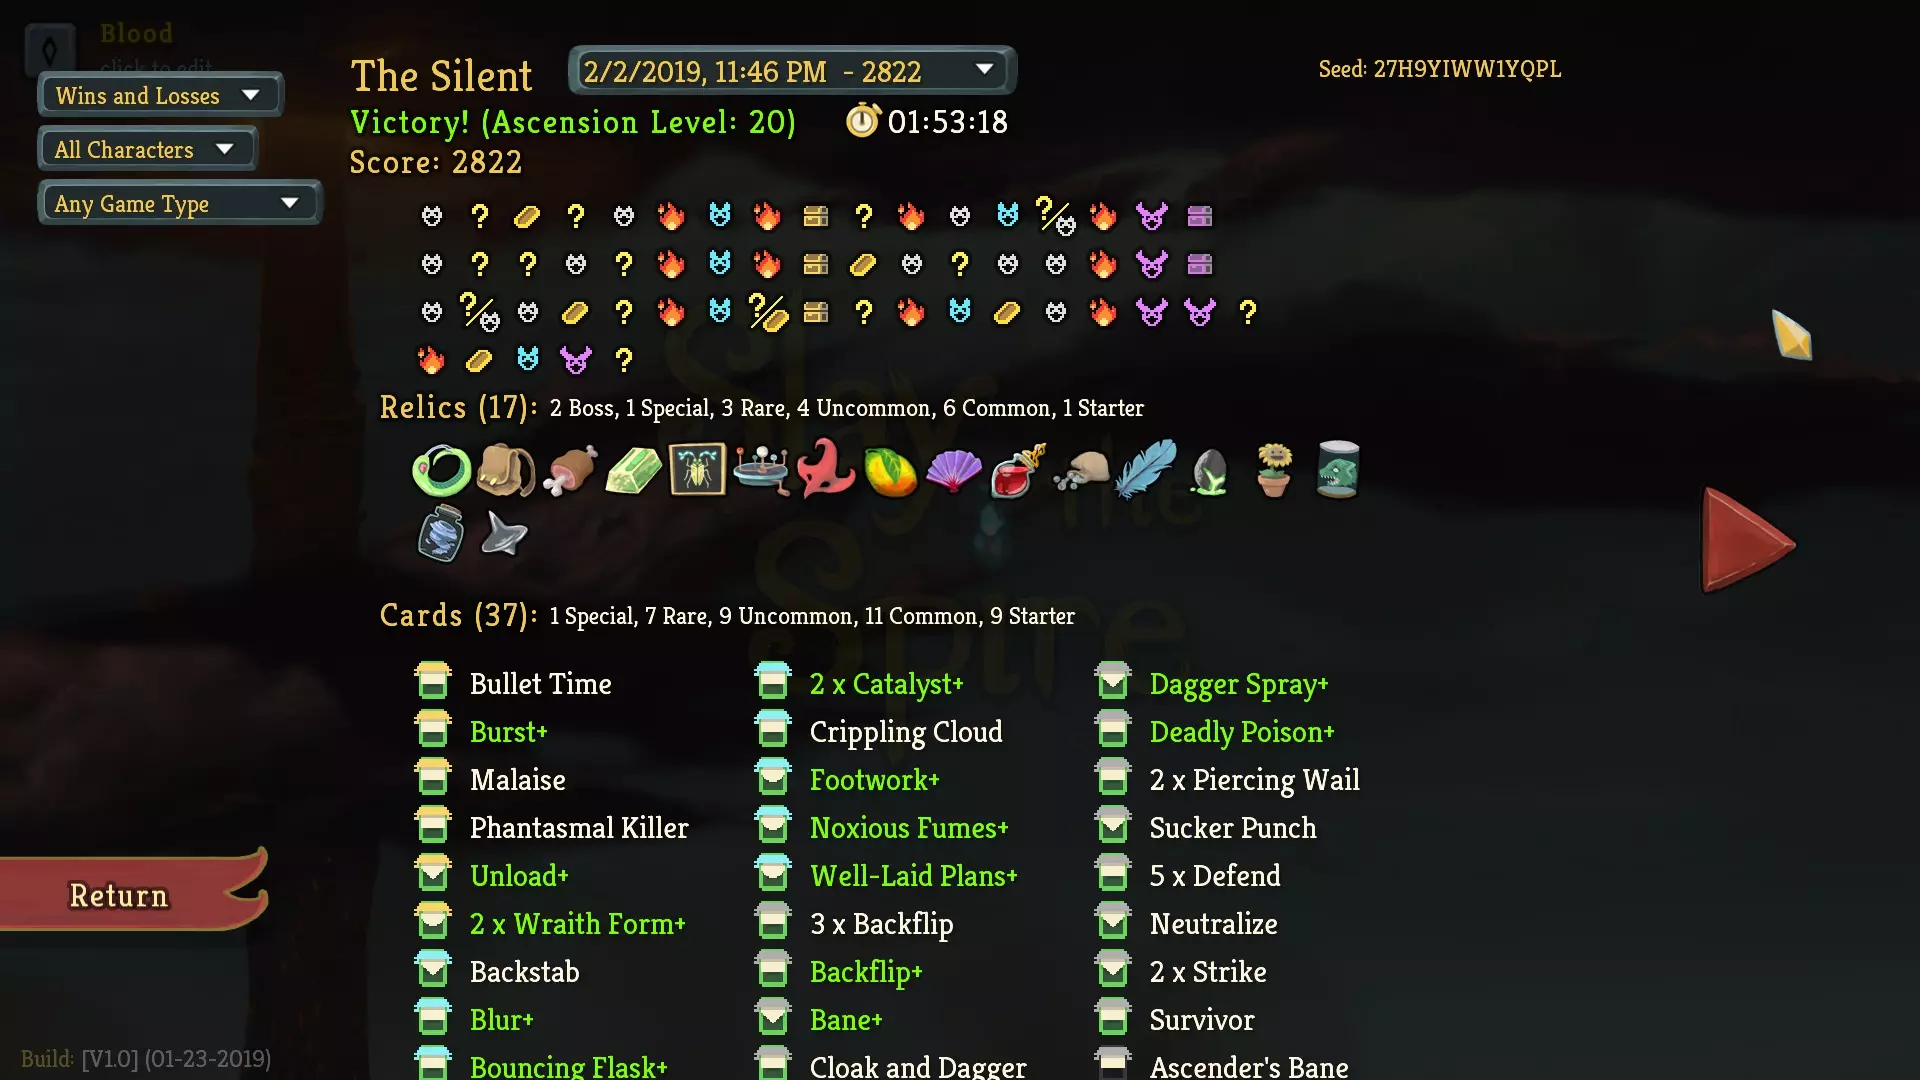
运行历史
Analysis: This part may take a while. Bear with me as I slowly update it. I'm probably going to add things in as I think of them at random. I'll also eventually go back and make the formatting suck less. An interesting point was brought up in the forums about my choice of starting bonus and path selection in Act 1. Khor brought up a valid point that you could gamble with "Take 15 damage Obtain a rare Relic" start and then take Path 3. [I'm going to ask him if I can borrow his screenshot of his run through Act 1 of the seed] Anyways, his screenshot shows him being far better off than I was at the end of Act 1 (but this is mostly due to card reward RNG). Here's why I still don't agree with his strategy, even in retrospect: The goal of this thread is to improve your win rate. Improving your win rate is slightly different than just trying to win. The strategy given by Khor is a good one for just trying to win. What I mean by this is this strategy goes in with the mindset that you have a 10% chance to win and a 50% chance to lose and 40% chance of either depending on RNG (this RNG being the rare Relic pool - if you draw something that has immediate value then add that 40% to win... but if you draw something useless early on like Girya or Calipers then you add that 40% to lose). If that 40% chance ends up being on the side of "win" then you are sitting at a 50% chance to win. However, if that lands on "lose" then this run becomes 90% chance to lose. Taking the common Relic instead just puts you at 30% to win and 70% to lose. What does this mean? It means if you're just trying to fish for a single win in A20, Khor's strategy potentially puts you in a better position to win. If, however, you are trying to be able to win consistently, then taking the common Relic and not taking damage is probably better. During the elite fight in Act 2, I ended up taking a bit of damage because I did not use the Steroid Potion during the fight. At that point, I think I was at like a 70-80% chance to get a potion after that fight, so I probably should have used that Steroid Potion just to save HP. 20/20 hindsight indicates that because it gave me a Steroid Potion after the fight, I would have traded even on potions (instead of potentially something that would have been worse than Steroid Potion - such as a Skill Potion). Author's Thoughts:I may add some more stuff to this guide like what to consider if it was X boss and how to fight Y elite. My impressions during the run (statements in bold print turned out to be true): How Act 2 will go: After Act 1: I'm sort of expecting that this deck is going to struggle to beat Act 2 (maybe barely). After Act 2: I ended up stomping Act 2. How Act 3 will go: After Act 1: I might be able to scrape by in Act 3 depending on RNG. After Act 2: I'm probably going to win Act 3. However, what the heck are those Act 2 boss relics? After Act 3: That was friggin' easy. I'm a little sad that I didn't find more elites to fight. How Act 4 will go: After Act 1: It definitely loses in Act 4 unless I pick up some real good relics and cards. After Act 2: This deck now has a decent chance to beat Act 4. That chance increases if I pick up some nice relics on the way. A lot will come down to what cards are in my hand on turn 1 of the Heart fight. After Act 3: No problem. Easy. Won't even be close. After Act 4: I hate you RNG. Eternal Feather low-key carried me to victory though... (Not really, since it didn't heal me for 12 hp. But hey, it's still fun to meme about.) When people complain that you cannot beat the the game on 3 energy or that small decks are arbitrarily better:Send them here :) The Title:Also, please, someone enjoy the pun on how this is called "The Silent Edition" and the entire guide is text and images. No audio included. Ha ha ha. ... Okay, I'll see myself out. Appendix 1 (Elites): Act 1: Gremlin Nob: It always does buff (gain STR when you play a skill) on turn 1, followed by 8 damage and apply 2 vulnerable on turn 2, followed by deal 16 damage on turns 3 and 4 respectively. Because of the existence of Gremlin Nob, it is not always advisable to pick up too many skills in Act 1. Also, during the Gremlin Nob fight, it is very important to consider Gremlin Nob's remaining HP and the amount of damage you will likely be able to do on the next turn. You will have to carefully consider whether or not it is worthwhile to play skills on the current turn but make Gremlin Nob stronger on the next turn (e.g. if Gremlin Nob has 18 health remaining and your current hand consists entirely of skills while your draw pile contains 5 cards, 3 of which are Strikes, it is worthwhile to attempt to mitigate damage on this turn by playing useful skills). Cards such as Dash, Terror, Sucker Punch, Glass Knife, and others are very good for killing Gremlin Nob. Lavagulin: This is typically the most painful elite to get if you're choosing to path into an early elite. Lavagulin is tricky to handle without poison, as most of the Silent's attacks do lackluster damage (especially after you get hit with the debuffs). Lavagulin is asleep for 3 turns (will be woken up if it takes damage) so use those turns wisely to prepare. It is important to note that if you wake up Lavagulin before the end of your turn, it will not attack on that turn so there is rarely a reason to wait until it wakes up naturally on turn 4. Lavagulin will always cycle through 2 turns of attacking (20 damage each) and 1 turn debuffing you after it is woken up. It is generally better to take damage from Lavagulin's attacks early on, before you are hit with the debuff, in order to get more damage out and hopefully kill it before it kills you. Cards such as Noxious Fumes, Crippling Cloud, Leg Sweep, and other similar cards are very good for killing Lavagulin. Sentries: They are the easiest elite to handle in Act 1. You will rarely find yourself dying to Sentries, even if your cards are awful. However, the typical strategy for Sentries is to kill one of the outer ones (whichever has lower health) before then killing one of the remaining two (whichever has lower health). It is advisable to take damage early to kill off one of the outer sentries rather than have both outer sentries stay alive longer. Picking up cards like Dagger Spray and All Out Attack will help with killing the Sentries. Act 2: Book of Stabbing: This elite is a race against time. It tests your deck's ability to put out a high amount of single-target damage while also mitigating damage from multi-hits. Whenever the Book of Stabbing deals unblocked damage to you, it will add a wound to your discard pile; in combination with its multi-hit attack that iteratively increases the number of attacks each time it is used, this effectively puts you on a serious deadline for killing this elite. If you think your deck is kind of weak when you encounter this elite, I recommend focusing more on dealing damage than mitigating since the multi-hit attack will constantly increase in number. Effective cards against the Book of Stabbing are strength lowering cards such as Malaise or Piercing Wail and cards that apply weak such as Crippling Cloud or Leg Sweep. Gremlin Leader: This elite is also a race against time. Gremlin Leader spawns with 2 gremlin minions (can be any of the gremlins) and has three actions: it can choose to buff (increases the strength for all enemies), summon more minions (at most 2 at a time to a maximum of 3), or it can do a 3-hit attack. Gremlin Leader, done properly, can be extremely easy (as he sometimes just never attacks) or reasonably difficult. The trick to this elite is that it has a very high probability of choosing to summon if you kill the minions (fairly high probability if there is only 1 minion alive). The turn after it summons, there is a fairly high probability that it will choose to buff. You can abuse this by killing the minions on the turn they are spawned and thus Gremlin Leader will (hopefully) enter a cycle of endless summoning/buffing until you kill him. Multi-target cards tend to be very high value here (for instance, an upgraded Dagger Spray from Act 1 or Corpse Explosion). Taskmaster, Blue Slaver, and Red Slaver: If you hadn't guessed by now, the theme of Act 2 elites is a race against time. It is recommended to kill the Red Slaver as soon as possible. It applies 2 vulnerable (guaranteed on turn 1), which hurts real badly with three enemies hitting you. It also has a chance to apply Entangled (starting from turn 3) which will hinder you significantly if your deck relies on attacks (or not at all if your deck doesn't). After killing the Red Slaver, you can choose to kill either the Taskmaster or the Blue Slaver based on the situation. Typically, if I kill the Red Slaver quickly enough (1-3 turns), I will kill the Blue Slaver since he tends to be lower health and to get rid of the weak application. However, if the Taskmaster has been adding tons of wounds (3 per attack) to my deck over several turns, I may focus him down if my deck does not have sufficient card draw. Cards that provide multi-target damage mitigation and multi-target damage are of high value against this elite (e.g. Crippling Cloud, Corpse Explosion, Piercing Wail). Act 3: Reptomancer: This elite tests... I'm honestly not sure what this elite tests. Reptomancer is such a weird fight. You should have so many ways to deal with this fight by Act 3 that it's typically trivial even when it's the flaming elite. Turn 1 it is guaranteed to summon 2 daggers. Daggers deal 9 damage on the turn they are summoned and then deal 25 damage on the next turn and die. Reptomancer itself does fairly trivial damage so just kill the daggers it summons (it can have at most 4 summoned and it has a 33% chance to summon 2 daggers if 2 or less daggers are alive). Alternatively, just apply some poison to the Reptomancer and use a Catalyst+. Honestly, I don't even know what advice to give, this fight is so easy if you have a half-decent deck. Giant Head: This elite tests your ability to deal large single target damage. It has a debuff that makes it take an additive 10% increased damage for each card you play. Starting from Turn 4, it starts to deal 40 base damage that increases by 5 per turn up to 70. There are so many ways to deal with this boss. Some decks with sufficient dexterity/block generation can just straight up tank him forever if need be. Other decks can just kill him in 1-2 turns. Trivial boss unless you have neither single target damage nor good block generation. It is a race against a head with no legs... Nemesis: It goes intangible every other turn, but it deals low damage (for Act 3) and has low health. The only real concern is the 5 burns it sometimes adds to your deck. Fairly trivial elite by Act 3. Act 4:Spire Shield and Spire Spear: Honestly, the biggest gimmick of the Act 4 elite is simply that it forces you to draw 2 burns on turn 2. The other gimmick is that you also take 50% increased damage from the enemy that you are not facing (you can use cards and potions that target a specific enemy to change which direction you are facing). Kill the Spire Spear first, since it has a multi-hit attack and gains strength. There are a few ways to deal with the 3 card turn 2 gimmick that can be essentially summed up as having a sufficiently strong turn 1 that you don't really care what happens on turn 2 or having a method to have additional cards on turn 2. Useful cards against the Act 4 elite are Wraith Form, Well-Laid Plans, Piercing Wail. Corpse explosion is a fun way to save a little time, but doesn't really add anything to this fight since the fight is trivialized once the Spire Spear dies. Appendix 2 (Bosses): Act 1: Slime Boss: Slime Boss is the tax collector (and probably the hardest boss for the Silent). Rest before this fight because it hurts. Once at or below 50% (75) HP, Slime Boss splits into an Acid Slime (L) and Spike Slime (L). Slime Boss attacks in a cycle of add 5 Slimed to discard pile, do nothing, and deal 38 damage. Ideally, you want to get him as close to 76 HP as possible and then on the subsequent turn get him as low as possible. Then kill the smaller slimes before you die. The Guardian: The trick to beating this boss is that it deals fairly trivial damage if you can force it to change into the spike form quickly. Stacking poison and then just blocking while waiting for it to die tends to trivialize this fight. Hexaghost: Hexaghost basically gives you a bunch of free turns to kill it before hitting you with a 6x6 attack and tons of burn+ statuses. It has an attack on turn 2 that will hit you 6 times based on your current health (less at lower hp). If you can stack poison, this fight is fairly trivial. If you can't stack poison and have garbage single-target damage, this fight becomes really rough race against time. Act 2: The Collector: This fight is extremely obnoxious if you reach turn 4 as it applies a 5 weak, 5 vulnerable, 5 frail debuff on you. Either burst the Collector or if you're in for the long haul, make sure to kill one of the minions (whichever has more strength) so as to lower the amount of attacks. The Champ: The difficulty of the Champ depends on whether or not you have a Catalyst+ (and some poison stacking). The first phase is fairly weak and deals trivial damage. The second phase is reached when it falls below 50% (220) HP. It removes all debuffs and starts to deal tons of damage. Sort of like Slime Boss, your goal is to burst it for tons of damage before he starts attacking during Phase 2. Ideally, you want to stack enough poison so that it kills it (or puts it very low) in 2 turns while it is still in phase 1 (first turn puts it under 50% and second turn kills it before the cleanse). Bronze Automaton (AKA Hyperbeam): This boss is extremely easy or extremely hard depending on your deck. If you have a way to guarantee significant mitigation on specific turns, this fight is trivial (e.g. Well-Laid Plans and intangible). If you have a way to stack enough poison to kill it before its big attacks begin, this fight is trivial. Typically you want to kill the minions first (as they each steal one of your most rare cards), but bursting hyperbeam guy is also an option. If you're forced into a drawn out fight, having cards that apply multiple turns of weak is highly valuable. Act 3: Awakened One: If your deck relies on powers, you are going to have a bad time. If you rely on cards that exhaust, you are going to have a bad time. Kill the two cultists immediately. Play powers as necessary (but be careful, since the Awakened One will gain strength for each power you play during its first phase). There is a trick with Piercing Wail (and Dark Shackles) where if you use it on the turn that you kill the first phase, the second phase will revive with a permanent strength debuff (down to at minimum 0). Consider this when playing powers: is the power necessary for you to kill the Awakened One? Will it mitigate more than 2 damage each turn (+2 strength per power and the x4 attack is 25% chance)? Additional consideration: if you are already blocking all of the normal attacks, but are losing health to the multi-hit, is playing the power worth it? Time Eater: If your deck relies on spamming lots of cards, you are going to have a bad time. If you don't have sufficient card draw, you are going to have a bad time. Time Eater will end your turn (and gain strength) each multiple of 12 cards played. It will also heal to half HP and cleanse all debuffs on the turn you get it under half HP. Avoid ending your turn if the counter is at >8 cards since your subsequent turn will be severely limited. You can sometimes burst Time Eater in 2 turns (1 turn to get it under half and another to finish it before it heals). Decks that play a lot of cards per turn are sometimes okay against Time Eater if you can consistently play 12 cards per turn and end the fight fairly quickly. Donu and Deca: This fight tests your ability to kill Donu quickly. The bosses alternate turns attacking/buffing. Donu gives 3 strength to both enemies. Deca gives some block and 3 plated armor to both enemies. Poison is ideal for this fight, since it ignores block. Kill Donu as soon as possible since he increases their damage by 6 every other turn. Corpse Explosion helps make this fight easier since you will only need to kill one of the two. Act 4: Corrupt Heart: Turn 1, it will always apply 2 vulnerable, 2 weak, 2 frail and add 1 of each dazed, slimed, wound, burn, and void statuses. It starts with 2 beat of death (deals damage equal to number of stacks per card played) and can only take 200 damage on each turn (note that poison is applied on the next turn). After this first turn, it will always do a multi-hit attack (2x15) followed by a big attack (45) or the reverse, followed by a buff then repeat. The buffs will remove all strength debuffs and give it 2 strength plus an additional buff (2 Artifact, then another Beat of Death stack, then Painful Stabs (wound per unblocked hit), then Strength +10, and then all subsequent buffs are Strength +50). This means Malaise is only moderately useful since it will be cleansed. It also means if you for some reason use Piercing Wail or Dark Shackles on the turn it buffs... you have just given it more strength. I recommend only using energy on Malaise during the first cycle to try to mitigate the initial 2x15 damage. The heart fight is a race against time where you want to be dealing as much damage as possible. You only need to mitigate enough damage to stay alive for longer than the heart. Make sure to save Wraith Form for both damage turns (and note that intangible is less useful against the multi-hit attack but also applies to beat of death) but Wraith Form+ can be used on any turn. Things that are strong against the heart: Thorns, Catalyst+, Intangible, After Image, Torii, Tungsten Rod, weak, Piercing Wail, Dark Shackles. Appendix 3 (Energy Boss Relics): Philosopher's Stone - excellent energy relic for the Silent - You don't really care about giving enemies 1 STR, especially with as much access to weak/STR down/block as is available. Coffee Dripper - excellent energy relic for the Silent - You have access to tons of damage mitigation meaning resting is not always necessary depending on the strength of your deck. I would take this unless you know your deck is very weak for the upcoming act (e.g. no AoE mitigation or damage and heading into Act 2). Other reasons to take this are if you have access to significant healing outside of resting (bites, toy ornithopter & potion source, etc). Cursed Key - excellent energy relic - Curses are removable and having one or two in your deck will generally not be a major issue. This is better if you receive it as an option after the Act 2 boss (as then there is only one guaranteed chest) than if you receive it after the Act 1 boss. Sozu - good energy relic - Potions tend to be more valuable in Act 2 (i.e. a 20 damage fire potion is pretty useful for finishing off a slaver in Act 2 but useless vs Giant Head in Act 3). There are obviously some exceptions to this (Ghost in a Jar). Still, it's not terribly bad to go without potions (and you can still save the ones in your slots for when you need them). Obviously this is bad if you have things like potion belt, sacred bark, white beast statue, alchemize, etc. Runic Dome - good energy relic This is a better pick after Act 1 because the enemies in Act 2 have far more predictable patterns than the enemies in Acts 3 and 4. Note: This is only a good relic if you know the attack patterns fairly well. If you have access to consistent intangibility, then Runic Dome becomes incredibly powerful. This has anti-synergy with Piercing Wail (since you won't be able to tell if multi-hit attacks are coming for enemies that choose their attacks based on percentages). Ectoplasm - mediocre energy relic - Picking this up after Act 1 will often cost you ~700 gold and it still feels bad even after Act 2, but far less bad (especially because the thieves do not appear in Act 3). Slaver's Collar - mediocre energy relic - This is not too bad if you pick it up in Act 1 with no better options. You get free energy against elites and bosses with no negative effect. The obvious downside is that you will not get the energy for hallway fights, but hopefully you will not need the energy as badly there. Busted Crown - bad energy relic - Picking this up after Act 1 will probably lose you the run. It is still bad in Act 2, but less so if you already have a fairly strong deck. Some exceptions for when you can take this are if you have a Question Card. Fusion Hammer - bad energy relic - The Silent has a lot of cards that are significantly better once upgraded (Noxious Fumes, Wraith Form, Well-Laid Plans, to name a few) and she does not function well without upgrading her cards. This is less bad if you take it after Act 2 and already have a lot of your core cards upgraded. Exceptions where it would might be good to take hammer: You already have either Frozen Egg or Toxic Egg, you already have Apotheosis (preferably bottled), or you are otherwise offered Tiny House and Wristblade. Velvet Choker - bad energy relic for the Silent - Choker is better when you have less cards to play, but the Silent has a lot of 0 or 1 cost cards, card cycling, and energy gain. You will tend to have less card draw/energy/etc in Act 2 than Act 3, so this is less painful when you pick it up after Act 1. Additionally, since the patch that buffed the viability of shivs, Choker should be taken with even lower frequency. Hovering Kite - variable energy relic - This was reworked to grant 1 energy the first time you discard a card each turn. It becomes very powerful if you have access to consistent discards (tools of the trade, acrobatics, calculated gamble, etc). It's also absolutely useless if you cannot discard. Bear in mind that even if you have tools of the trade, hovering kite is not a guaranteed energy source until after you play the card (this can be offset by drafting a couple acrobatics to improve card draw + discard options). Snecko Eye - variable energy relic - The confused debuff/buff is dependent on the base energy of the cards in your deck. If your deck is heavily filled with 2 (or greater) energy cost cards (such as Crippling Cloud, Leg Sweep, Dash, etc) then Snecko Eye becomes more valuable. It also makes it so that you do not need to upgrade cards where the only change in the card is the energy cost (as that will be irrelevant with the confused debuff/buff) and it enables you to pick up cards that would otherwise require an upgrade to make the card efficient energy-wise. If your deck is heavily filled with 1 or 0 energy cost cards (such as Footwork, Defend, Strike, Backflip, etc) then Snecko Eye will probably be more harmful than helpful. Some noteworthy synergies and anti-synergies: Runic Pyramid is extremely bad in conjunction with Snecko Eye (you will end up with a hand full of high cost cards that you cannot play and then you will also be unable to draw any new cards), Orange Pellets can cleanse the confused making it so that even if you have a lot of low cost cards Snecko Eye becomes useful just for the card draw. Note: Some of the descriptions are specifically for the Silent and may be less correct for other characters (though it also may be correct for the other characters). Relics that are not available to the Silent are not mentioned. Appendix 4 (Other Boss Relics): Runic Pyramid: - good boss relic - Very powerful relic for the Silent, but necessitates some card cycling ability. It has great synergy with Concentrate and Calculated Gamble. It has negative synergy with Well-Laid Plans because it is essentially a forced Well-Laid Plans for all the cards in your hand (and you get it from turn 1). Ring of the Serpent: - good boss relic for the Silent - It increases card draw which means the consistency of your deck is improved (as long as you spend more than 2 turns). Has some negative synergy with decks that are looking for specific cards on turn 1 and Gambling Chip. Astrolobe: - good boss relic - This is like a safer version of Pandora's Box and it upgrades the cards too. It's a good way to get rid of your strikes. Calling Bell: - usually good boss relic - As of Patch V2.0, this relic has become significantly better. For the price of a single unplayable, unremovable curse, you are now given 3 relics. This becomes even better if you have other relics that have synergies with curses. Eternal Feather: - decent boss relic for the Silent - This is no longer a boss relic as of Patch V2.0. Still fairly decent on the Silent. Empty Cage: - decent boss relic - You remove two cards. It's not amazing, but it's not mediocre either. Removing two strikes improves the consistency of your deck. I'd still take one of the better energy relics over this in most cases, but it's definitely an okay boss relic. Orrery: - decent boss relic - As of patch V2.0 this is now longer a boss relic. It's probably not worth wasting your gold on if you have to buy it in the shop except in specific situations. Lizard Tail: - bad boss relic - In most cases, you'd probably rather have something that prevents you from being in a situation to need to be revived. It's still got decent value though (probably worth more than Tiny House at least). This is no longer a boss relic as of patch V2.0. Wrist Blade: - bad boss relic for the Silent - Underwhelming for a boss relic. The bonus damage can be useful in Act 2 (so take after Act 1 boss) if you have synergies (typically shivs) already. I no longer call this relic completely awful just because of the increased viability of shivs early. White Beast Statue: - bad boss relic - As of patch V2.0, this is no longer a boss relic (which actually makes this quite a good relic). Tiny House: - awful boss relic - This is like... maybe worth 150 gold on average. Worse, because if you had the 150 gold you could at least choose what to buy at a store. I would only ever take this if I was literally offered Wrist Blade, Tiny House, and Busted Crown on Act 1 while I had literal garbage cards. Black Star: - variable boss relic - You are basically forced to hunt as many elites as possible in order to get value out of this, especially if you take this in Act 2. I typically only take this if my other options are bad, or I have a reasonably strong deck by the end of Act 1. It can make the game trivially easy if you get enough relics though. Sacred Bark: - variable boss relic - This was added in patch V2.0 and it doubles the effectiveness of potions. This relic is awful with Sozu. It becomes significantly better if you already have White Beast Statue or Potion Belt. You pretty much need Alchemize if you don't have White Beast Statue to get good value out of this. This can be a complete game winner with potion belt, 2 Alchemizes and a Burst (effectively 8 potions every fight). Throw in a Toy Ornithopter and you just pretty much win. Pandora's Box: - variable boss relic - Very risky. If you high roll some good cards it can make your deck incredible. If you roll some useless cards you have basically lost your run. Only take this if you have enough block outside of your standard defends to make your deck still reasonably playable. You also lose value on this if you have already removed several strikes/defends. Note: Some of the descriptions are specifically for the Silent and may be less correct for other characters (though it also may be correct for the other characters). Relics that are not available to the Silent are not mentioned. Appendix 5 (Potions): Potion rarity is 65% for a common potion, 25% for an uncommon potion, and 10% for a rare potion. Potion drop rates start at 40% at the beginning of each act and will increase by 10% (if a potion does not drop after combat) or decrease by 10% (if a potion does drop after combat). Potion usage guidelines: potion usage is typically based on individual decision making in each situation. Typically you want to try to maximize the value of each potion while retaining certain potions for difficult fights such as elites or bosses. Common Potions: Attack Potion - Most of the Silent's attacks are lackluster, so just use this whenever it would help finish off an enemy or you need some extra damage. Blessing of the Forge - Added in patch V2.0, this is extremely powerful on the Silent (not sure why this is a common potion, but hey I'm not complaining) due to the 7 card turn 1. Block Potion - This is a decent potion in the first two Acts that becomes fairly lackluster by Act 3/4. Use it whenever you would block 12 damage with it (or if you have full potion slots and need to block any damage while expecting a potion drop soon). Colorless Potion - On average, this potion is fairly lackluster for the Silent. In some edge cases, it can be amazing (e.g. Apotheosis). Dexterity Potion - An incredibly strong potion for the Silent. It's two free dexterity. Use immediately in any fight where you expect to need the dexterity boost. Energy Potion - A generically good potion since it just gives two free energy on demand. Use it whenever you deem necessary since it isn't exactly mindblowing. Explosive Potion - This is really only good in Act 1 (and maybe very early in Act 2 if you need help with birds). If you have Slime Boss, save this potion. Fear Potion - This potion is only useful if you have an attack heavy deck. Unless you are going a shiv deck, this potion should probably just be burned on any elite or boss. Generically decent in Act 1. Fire Potion - This potion is only really useful in Act 1. Save it for Slime Boss on the turn you intend to split him. Poison Potion - This is a generically good potion. It's a free 21 damage even if you have no other poison. Significantly speeds up your initial poison stacking. Great potion for any elite/boss. Incredible synergy with Catalyst and other poison cards. Power Potion - Incredibly powerful potion on the Silent since you have many incredibly powerful powers. Typically you want to use it early (unless you are hoping to roll a Wraith Form on a specific turn, in which case you want to use it on the turn you need it... but that's a rare situation). Skill Potion - The Silent has pretty decent skills on average (but she has a lot of skills, so the odds of getting a particularly good one is also fairly low). Use it fairly liberally - similar to how you would use an energy potion. Speed Potion - Use this whenever you need to block on steroids. Powerful surge of dexterity if used in conjunction with artifact/debuff cleanse. Flex Potion - Pretty garbage on the Silent unless running a shiv deck or for some reason are running a bunch of multi-hit attacks. Strength Potion - Same as the Flex Potion, but typically a little better in Act 1 since you will need to cycle a lot of strikes against most Act 1 elites. Swift Potion - Treat as you would a Skill Potion or an Energy Potion and use it liberally whenever you need a little extra card draw. Weak Potion - Save this for certain enemies with big hits. You can still use it fairly liberally. Uncommon Potions: Ancient Potion - Gaining 1 Artifact is surprisingly really powerful. It can be used in conjunction with a Speed potion to gain 5 dexterity for the rest of that combat. It is also especially useful in Act 2 since many of the enemies apply frail and you can also use it against the Chosen since the Hex debuff is obnoxious. It also tends to block vulnerable against most of the bosses that apply multiple debuffs. Cunning Potion - This potion can range from lackluster (non-shiv deck with no strength scaling), to decent (burst of damage in Act 1), to amazing (dead branch/shiv deck). Use as your situation dictates. Distilled Chaos - Generically pretty decent potion. Depending on the average energy cost of your deck, it is essentially a free 3-4 energy (though with less control over the efficiency). Be careful using this if you deck relies heavily on a single Catalyst (or other cards that exhaust). Duplication Potion - I try to save this potion for important fights as much as possible. The Silent has so many cards that have great synergy with this potion. Some examples: Catalyst, Wraith Form, Footwork, Noxious Fumes, Crippling Cloud, Adrenaline, and more. Essence of Steel - Honestly kind of garbage. Just use it whenever you need an additional 4 block. Gambler's Brew - This potion is AMAZING for turn 2 of Act 4 elites (if you have no way to deal with the 3 card turn 2, this potion basically solves it for you). Additionally, it's very powerful for decks that need specific cards on turn 1 (since you have a 7 card turn 1 with the starter relic). It's also just generically good on most Silent decks. Use or save as your situation dictates. Liquid Bronze - If you for some reason have trouble with Birds, this is a wasteful way to solve that problem. If you need help against Hexaghost (or Guardian for some odd reason) this potion can also help. Ideally, however, you want to save this potion for the Heart since it is a free 48 damage every cycle. Liquid Memories - This potion has potential to be very impactful on the Silent in specific scenarios. If you are playing a deck that does not have Well-Laid Plans and rely on card combos such as Burst/Catalyst or Nightmare/Whatever, this potion is very helpful in setting up those combos. Regen Potion - Free 15 HP. If your potion slots are full, use it immediately whenever you can heal 15HP. Otherwise, wait to use it since many events cause you to lose less health the lower your current health. Rare Potions: Cultist Potion - This potion ranges between basically useless (poison decks in later Acts) to insanely powerful (Hexaghost with a weak deck or against anything with a Shiv deck). Entropic Brew - Generally very powerful potion. Insanely good if you have a potion belt. Use whenever it is your only potion and you desperately need some extra power. Fairy in a Bottle - Save it for a rainy day. Sometimes this potion isn't very useful if you're not expecting to be killed with your current deck. Other potions may improve your current consistency more than this potion. Significantly better as of patch V2.0 (gives 30% max HP). Fruit Juice - Use this the instant you get a third potion (or whenever you need an extra 5HP to survive something). Ghost in a Jar - A turn of intangible on demand. I typically use this if it would save me >30 damage (or a killing blow obviously). Typically, I try to save this potion for the Heart or one of the Act 3 bosses. Smoke Bomb - This potion is pretty awful. Use it in the very rare scenario where you might take >30 damage on a hallway fight. Snecko Oil - I will admit to having used this potion like twice ever (and that was prior to the patch V2.0 changes). As of patch V2.0, it's still not super useful but has niche scenarios where it can help and the negative effects are lower. Use or toss liberally.