


会长天下第二
会长天下第二

TA什么都没有写

 发帖达人Ⅰ
发帖达人Ⅰ会长天下第二
游戏档案
0
玩过游戏数量
0秒
总游戏时长
动态

你是一个感到无聊的200级玩家吗?你是不是觉得再也没有什么能对你构成挑战了!?再好好想想吧……对于这些为200级以上玩家准备的传奇挑战,你可能都还不够格。这里有60个独特的挑战,以及基于游戏内成就设计的地图挑战,由传奇人物罗恩·格雷亲自打造。 简介:预期与说明 这是我多年来为自己设计的一系列自定义挑战,并且我个人已经全部完成,所以它们是可以实现的。但要说其他《雷霆一击》玩家能完成这份清单中的哪怕一小部分,那几乎是难以置信的,甚至可以说是不可能的。这些挑战的难度不等,有些只有像我这样的传奇人物才能完成。如果你不是200级或更高等级的玩家,我甚至不会让你看这份列表,哪怕只是瞥一眼都可能让你感到挫败。 《雷霆一击》地图挑战: 干旱: 坚持到明天 - 在干旱入侵模式的最终点作为防守方获胜。 圣殿骑士轮班 - 在干旱入侵模式中仅使用圣殿骑士build作为进攻方获胜。 撒拉逊人的周日之夜 - 在干旱地图的一场比赛中用骆驼击杀10人。 营地: 别惹麻烦 - 在营地入侵模式中骑马摧毁敌方投石机。 野猪永不投降! - 在营地入侵模式的最终点作为防守方获胜。 大人您还好吗? - 仅使用十字bow build赢得营地部落模式。 城堡: 自由卫士之怒 - 使用自由卫士外观在城堡入侵模式的第一个点作为防守方获胜。不败的败北者 - 在卡斯特罗入侵模式中,作为进攻方击败一名击杀数超过100的守卫者。 神偷之胆 - 在卡斯特罗入侵模式中,使用1/1/1或更低护甲的匕首构筑偷取3箱黄金。 十字路口: 国王的赎金 - 在十字路口入侵模式中,使用1/1/1或更低护甲的匕首构筑对国王造成最后一击。 加冕成就 - 在十字路口入侵模式中,在前推车经过塔楼前击杀国王。 加农炮的哀悼 - 在十字路口前线模式中,单场使用加农炮击杀15人。 地牢: 恶魔召唤 - 在单场地牢模式中,使用隐藏房间内的匕首击杀6人。 献祭烧烤 - 在单场地牢模式中,作为自由守卫将6人推入中央火坑。危险囚徒 - 在【地牢】地图中,作为铁卫公司成员,使用0/0/0护甲配置在单场比赛中击杀6人。 【费托利亚】地图: 酒水我请 - 在【费托利亚】入侵模式的酒馆区域建造一面旗帜,并使其存续5分钟。 饥饿野猪 - 在【费托利亚】入侵模式中,作为铁卫公司成员,在贵族们之前吃掉6个食物道具。 以信条之名 - 在【费托利亚】入侵模式中,从屋顶跳下后于空中击杀一名玩家。 【格拉德】地图: 以我誓言 - 在【格拉德】入侵模式中防守典狱长,并保证其存活。 种豆得豆 - 在【格拉德】地图中,作为农民仅使用镰刀在单场比赛中击杀10人。 啪叽! - 在【格拉德】入侵模式中,作为铁卫公司成员用巨石击中指挥官。 【山峰】地图: 午夜梦魇 - 在【山峰】入侵模式中,骑乘马匹击杀典狱长。迷雾山脉 - 在山峰地图中,以矮人身份在单场比赛中击杀35人。 几乎不可能 - 在山峰地图中,使用冰锥或巨石击杀一名骑兵。 诺里亚: 阿尔卡利德守卫 - 在诺里亚入侵模式中,仅使用弯刀或长柄刀作为主近战武器并以防守方获胜。 这片土地是我的 - 在诺里亚入侵模式中,整场比赛以十字军或自由卫兵外观着装并以进攻方获胜。 沙之低语者 - 在诺里亚地图中,以哈希辛构筑在单场比赛中击杀15人。 泰加: 亨利的伙伴们 - 在泰加地图中,以库曼人外观着装在单场比赛中击杀45人。 泰加猛虎 - 在泰加地图中,躲藏在灌木丛中,然后在单场比赛中对3名毫无防备的玩家进行偷袭击杀。 深入地下 - 在泰加入侵模式的最终点,以矮人战士身份作为防守方获胜。托滕瓦尔德: 青蛙过河的终结:在单场比赛中,将3人推入托滕瓦尔德的河流。 雷击:在托滕瓦尔德地图中,使用找到的发光武器在单场比赛中击杀15人。 神圣守护者:在托滕瓦尔德入侵模式中,作为防守方守住教堂并获胜。
(自由卫队总司令) 《雷霆一击》60项杂项传奇挑战: 1. 愿你安康 - 从多人混战中救下一名队友,然后为其扔下一件治疗物品。 2. 幸会! - 在单场比赛中仅使用农民技能组合击杀15人。 3. 非也非也 - 在单场比赛中使用马匹击杀10人,但不能使用双手武器或远程武器。 4. 为何拉长脸? - 在单场比赛中作为骑射手击杀20人。 5. 不择手段 - 在单场比赛中使用钩镰击杀50人,且死亡次数少于20次。 6. 刺客遍地 - 在单场比赛中使用1/1/1或更低护甲的匕首组合击杀15人。 7. 头号悬赏 - 在回合剩余5分钟或更少时间内,使用十字弓击杀敌方得分最高的玩家。 8.I Do Not Know Death - 单条命内使用绷带治疗3次。 9. God Slayer - 在前线或入侵模式的一场比赛中,击杀一名拥有超过100次击杀的玩家。 10. Slayer Of Edgelord's - 单场比赛中击杀15名隐藏段位玩家。 11. Hill Giant - 使用0/0/0护甲的坦克职业,仅用木制武器和石头在单场比赛中击杀25人。 12. Grievous Encounter - 用从其他200级玩家身上捡取的武器击杀10名200级玩家。 13. Champion Slayer - 击杀一名拥有超过40次击杀且0死亡的玩家。 14. Rock-Solid - 用投掷岩石作为终结技击杀一名200级以上玩家。 15. Lobster Hunter - 单场比赛中击杀某个龙虾人5次。 16. Engineer's Bane - 单场比赛中击杀10名工程师并破坏5面旗帜。 17.Size Doesn't Matter - 用匕首在单场比赛中击杀5名双手剑士 18. Size Matters - 单场比赛中仅使用双手剑击杀50人 19. That's Not A Knife - 单场比赛用砍刀击杀80人,或单条命用砍刀击杀15人 20. Better Than Ronin - 在前线或入侵模式的单场比赛中获得超过203次击杀 21. Thor's Hammer - 单条命用铁匠锤击杀10人 22. Wanna Know How I Got These Scars? - 单场比赛用雕刻刀获得3次击杀 23. Side Arm's Surprise - 主武器被打落后,用副武器完成击杀 24. Farm Boy - 单场比赛中使用农民 perk 和镰刀击杀10人 25.农夫本色:在单场比赛中使用农民 perk 搭配生锈的叉子或生锈的铲子击杀30人。 26. 击剑大师:在单场比赛中使用 rapier(细剑),仅通过格挡、假动作和刺击击杀15人。 27. 碎肉成泥:在单场比赛中仅使用锄头击杀20人。 28. 穴居人玩法:在单场比赛中使用重树枝或棍棒,且穿着0/0/0护甲击杀40人。 29. 刺客之纱:使用烟雾弹和匕首击杀敌方队伍中的最佳玩家。 30. 愤怒的番茄:摧毁工程师的防御设施,并在单场比赛中使用燃烧瓶击杀3名工程师。 31. 大卫?差不多得了:使用雕刻刀击杀坦克玩家。 32. 别为采石场操心:在单场比赛中使用石头和巨石击杀10名玩家。轻取胜利 - 在前线或入侵模式中,用训练剑击杀一名未使用训练剑的玩家。 34. 远程狙击 - 在单场比赛中仅使用长弓作为主武器击杀30名玩家。 35. 数据录入 - 在决斗服务器上击败某位传奇决斗者。 36. 马戏笑颜 - 在单场比赛中,身着小丑套装仅使用捕熊夹、鲁特琴、燃烧瓶和飞刀击杀20名玩家。 37. 剑刃交锋 - 击败一名装扮成撒拉逊战士的十字军玩家。 38. 叛逆吟游诗人 - 在前线或入侵模式的单场比赛中,作为吟游诗人击杀15名玩家并占领一个据点。 39. 兰斯洛特爵士 - 在单场比赛中用 lance 击杀15名玩家,或在单次生命中用 lance 击杀5名玩家。喜剧效果 - 单局内以小丑外观使用战锤击杀10人。 41. 叮铃铃!!! - 仅在前线或入侵模式中,全程使用拳头作为近战武器击杀一名玩家。 42. 小心脚下 - 作为工程师,在单场比赛中用尖刺击杀3名毫无防备的敌人。 43. 第三只眼 - 在前线或入侵模式中,以僧侣外观使用长棍在单场比赛中击杀10名玩家。 44. 跑酷忍者 - 在隐藏地图Funland2TheRefunening完成趣味乐园标志跑酷挑战。 45. 正中靶心 - 在单场比赛中使用任意投掷武器或远程武器命中头部击杀8名玩家。 46. 爆破平底锅? - 在单场前线或入侵模式中,仅使用平底锅作为近战武器击杀9名玩家。 47.时尚设计师 - 让六位传奇时尚豪裁判之一给你的某套装扮打出8/10或更高评分。 48. 007 - 使用护甲值为1/1/1或更低、配备匕首或反曲弓的构筑,在单场比赛中击杀20人且未死亡一次。 49. 猎头者 - 在单场比赛中使用投掷斧击杀40人。 50. 钢铁连队! - 在单场比赛中使用战斧击杀40人,或在单次生命中使用战斧击杀8人。 51. 自由护卫! - 三次保护典狱长或指挥官且自身未死亡,同时不让其死亡。 52. pyromancer - 在单场比赛中使用燃烧瓶击杀10人,并在同一场比赛中烧毁两处工程师的防御工事。 53. veni, vidi, vici - 身着罗马风格服饰,使用短矛或短剑击杀一名使用长柄镰刀的玩家。Giant Slayer - 在一局前线或入侵模式中击杀10名坦克玩家。 55. Skirmisher - 在一局比赛中用标枪击杀15名弓箭手。 56. Forbidden Knowledge - 在Funland2TheRefunening中找到开发者未完成的隐藏武器。 57. Champion Boxer - 在一局比赛中不失败的情况下击杀5名其他拳击手。 58. Empress of Weapons - 用长剑在一局比赛中击杀80人或在单次生命中击杀20人。 59. Star Child - 用晨星在一局比赛中击杀120人或在单次生命中击杀30人。 60. What Legend? - 在一局前线或入侵模式中击杀10次灰袍浪人。
(钢铁连队指挥官)结论:钦佩与争议
如果你无法获取它 说明 文件位置:C: Users(用户名)AppData LocalLow Daedalic Entertainment GmbH ChildrenOfSilentown 你可以通过Win+R快捷键并输入%AppData%来快速访问,从那里进入AppData,再找到所需文件夹 打开存档文件:Save1、Save2和Save3是你的存档,即使你只创建了一个存档,它们也应该存在 右键点击想要的存档,选择“用记事本编辑”,如果文件不为空,删除其中所有内容 输入代码:三击下方代码,复制并粘贴到文件中 最后一步:加载存档,向左走,解决一个谜题并获取成就
冬季仙境DLC收集品成就指南 收集品地图
蓝色标记为雪人:【雪人在哪里】、【寻找Flaky】 红色标记为礼物:【失落的快递】 黄色标记为观光点:【岩石山丘】、【雪橇之旅】、【冰冻湖泊】 绿色标记为你需要跟随的路径点,用于完成【No Winter Service】 这张地图是我自己制作的,希望能帮到大家!
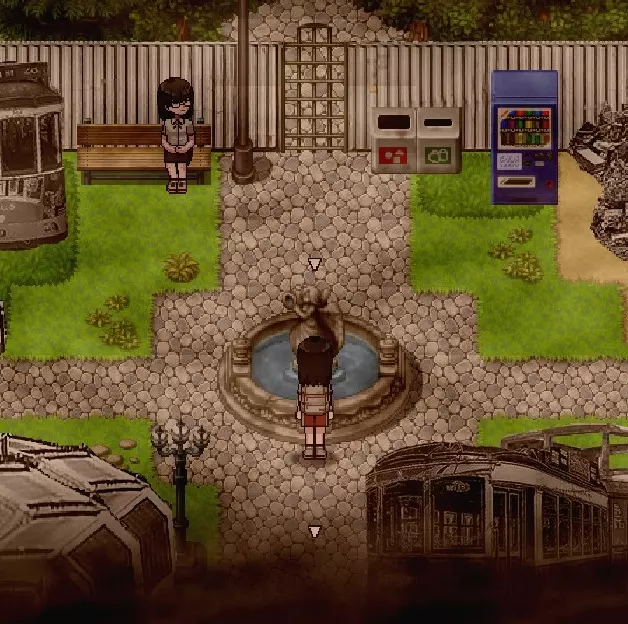
这是车站关卡的第一份攻略。本攻略包含对游戏进程有帮助的隐藏路径和物品位置。建议您先体验游戏,在卡关感到困扰时再查看本攻略。祝您游戏愉快! 车站关卡攻略
《怒潮:被侵蚀》游戏进行困难玩家的简易指南。 游戏内容包含剧透,建议先体验游戏后再查看本指南,以免影响游戏乐趣。 若在查看指南时遇到不便,或发现内容有误、缺失,欢迎提供反馈。 1. 森林 2. 工厂指南 3. 车站
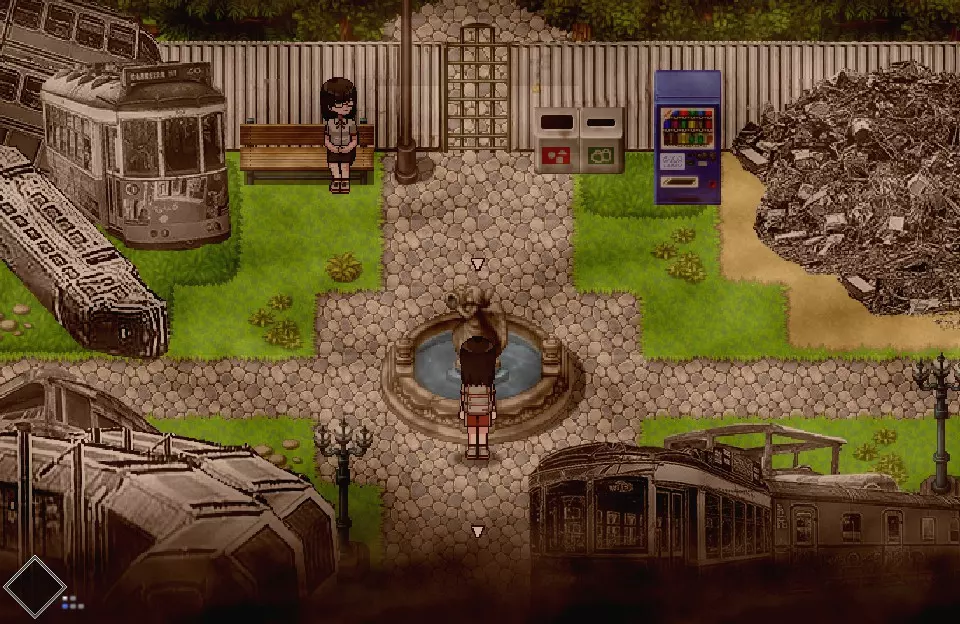
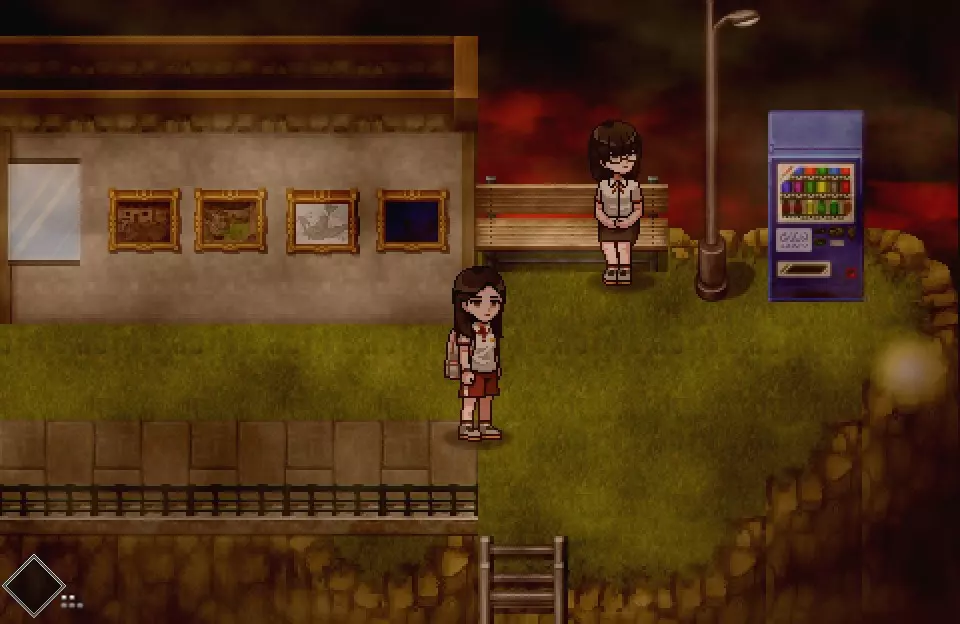
“一直往右走,就能找到爱你的妈妈……左边则有曾悉心照顾你的爸爸。无论选择哪一边的爸爸……” ——姐姐 【车站】正如其名,是连接各个不同区域的重要交叉路口般的地方。
这是车站的地图。
这是车站下水道的地图。 红色箭头是常规路线,紫色箭头是需要道具或完成事件才能开启等有条件才能通行的路线。灰色箭头是隐藏路线。蓝色箭头是通往隐藏房间的路线。黑色箭头代表其他关卡。地图上的编号是为了方便说明而标注的。点击图片可以放大查看。 车站可获取的道具
项链之卵x3 看似毫无用处的项链之卵。是在这随处可见的普通物品。 获取方式:两个可通过交易获得,一个可在完成家园关卡后获得。 -获取位置:地图03、地图18、地图35 1.第一个项链之卵可通过与隐藏森林(地图03)内的蜘蛛交易获得。 给予5块面包碎屑后,蜘蛛会给予项链之卵并消失。 ※进入后期后,即使不进行交易,蜘蛛也会消失,请注意。
2. 第二个项链的蛋可以通过给【地图18】的猪11个硬币获得。 ※给猪11个硬币后,如果去其他地方再回来,猪就会死亡,所以想要达成隐藏结局的玩家请注意。
3. 通关第三个项链的蛋之屋关卡后,通过梯子(地图20)前往森林(地图35)即可获得。
【方块先生】周边贴纸 旧周边。小时候见过的神奇角色。看到它获得了很多灵感。 :这是用于挑战任务的6个贴纸中的第3个贴纸。 -获取位置:地图11 1. 向索要面包屑的蜘蛛(地图03)的右侧走,在围墙下方可以发现。
【红先生】周边贴纸 旧周边。... :挑战任务的6个贴纸中的第4个贴纸。 -获取位置:地图15 1. 在移动的人体模型追击的路段的树木之间可以发现。
金枪鱼罐头x1 某个老牌公司生产的罐头。我不喜欢。 【用途】开启【箱子里的猫】挑战任务的道具。可在需要用开锁器打开的房屋内找到。 -获取位置:地图10 1. 在有假人模特的村庄(地图08),用开锁器打开上锁的门后进入,调查水槽即可获得。
面包x1 + 交易 这是面包。吃了也许能恢复体力。 使用时可恢复1格体力的面包。可在地面获取一个,也可通过下水道的蜘蛛进行交易持续获取。 -获取位置:地图10、地图23 1. 第一个面包可在获得金枪鱼罐头的上锁房屋(地图10)内,调查煤气灶获取。
2. 给下水道的蜘蛛(地图23)硬币或开锁器,会分别兑换1个面包。
额外背包口袋x1 可附加在背包侧面的额外口袋。单靠这个来赚钱售卖,心里很不是滋味。 效果:使用时可携带的矿泉水数量增加1个。 获取位置:地图(08) 1.需要让地图08中正在谈论天气的人体模型让开才能获取。 进入地图10中可用右侧撬锁工具打开的房子后再出来,人体模型就会消失。
撬锁工具x3 依稀记得偶尔用过。在迷茫的时候,经常会用到。 :这是用来打开锁着的门的撬锁工具。其中两个可以在地面获取,一个可以在下水道获取。 -获取位置:地图07、地图12、地图27 1.第一个撬锁工具可以在车站右侧道路(地图07)的蓝色垃圾桶中找到。
第二个锁匠位置可以从假人聚集的街道(地图11)进入。原本是没有门的墙壁,但进入用锁匠打开的房屋(地图10)后出来,假人就会消失并出现门。
当你试图走上台阶进入门内时,会有一个面容怪异的怪物挡住去路。被怪物抓住不会受到伤害,但会被传送回之前的区域(地图08)。在怪物完全挡住门之前快速跑过去,就能从门的边缘进入屋内。
之后进入家中调查衣柜即可获得。初次调查时会显示什么都没有,但在之后在家中四处走动时,衣柜会发出晃动声,之后再次调查就能获得了。
3. 第三个密码可以从地图18中猪的后方下水道进入获取。给猪11枚硬币以获得项链的珠子后,前往其他地方再返回,此时猪已死亡,铁窗开启,即可进入下水道。
掉进下水道后,调查聚集着蚊子的垃圾堆最内侧即可获得。
【触手先生】周边贴纸 旧款周边。一位端庄又可爱的蓝色章鱼先生! 在不同关卡收集齐6张贴纸后,可向下水道的独眼树领取奖励。 -获取位置:地图31 1.从猪身后方(地图18)的下水道落下,避开对声音敏感的蚊子后一直向左走,就能遇到独眼树。收集齐6张贴纸后与其对话,即可获得周边贴纸作为奖励。
箱子 我藏起来有点小。这能用来做什么呢? :是用于获取【箱子里的猫】挑战任务的物品。 -获取位置:地图32 1. 从猪后面的下水道下去后,经过白树走到左边尽头就能获得。
睡眠诱导剂 能让人好好入睡。如果在拒绝你的地方使用…… :进入家关卡的道具。可通过与猪交易获得。 -获取位置:地图18 1. 给铁窗里的猪装备硬币后,给予3个即可获得。
奇怪的门环 将其插入特定的墙壁,可显现隐藏空间。这是小时候想象的小游戏。 【装备后可进入秘密房间的道具。可通过与猪交易获得。】 -获取位置:地图18 1. 向铁窗内的猪装备硬币并给予7个,即可获得。
这是继车站第一个指南后的第二个指南。
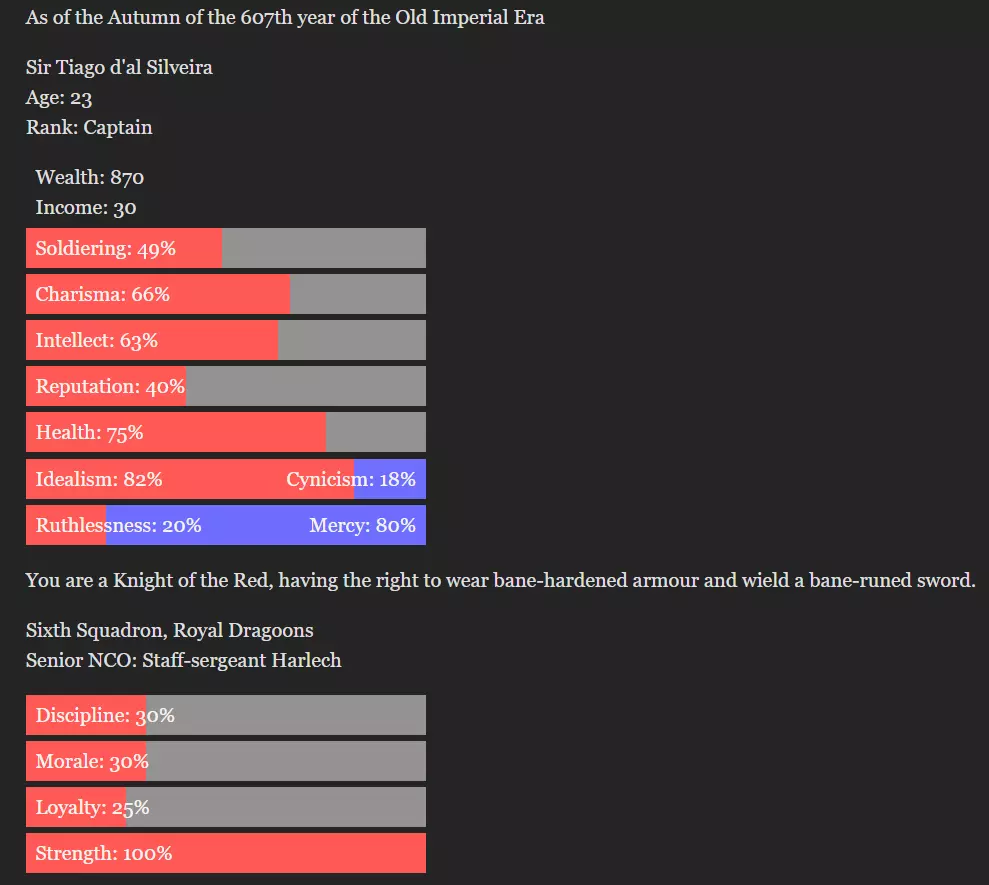
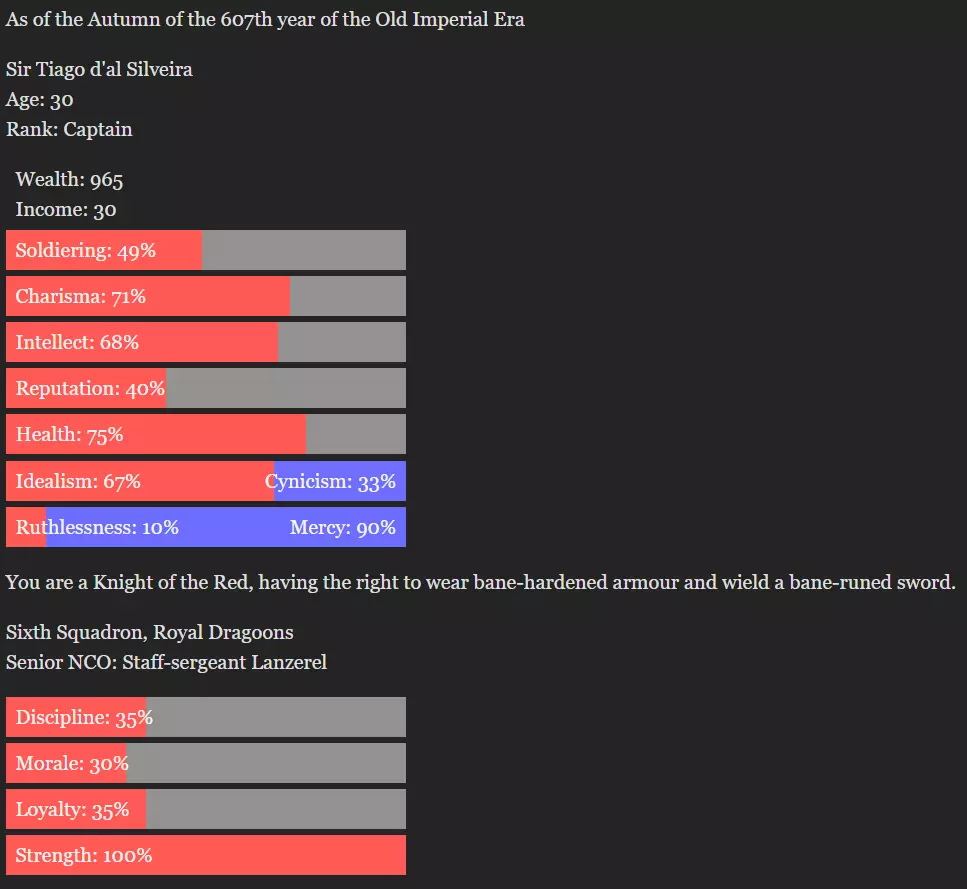
《无限之剑》角色培养攻略:打造最佳主角以加入船东贵族会,以及其他所有俱乐部或庄园路线的最优选择,同时尽可能结交所有朋友:卡扎罗斯塔、勒菲弗尔、埃尔森,以及与库纳里斯、兰泽雷尔、马里昂、坎波斯和洛克建立良好关系的一半进度。 简介: 最初制作本攻略是为了展示如何培养一位年轻主角(初始年龄不满30岁),使其能够通过贵族会最严苛的综合属性检查(智力+魅力需达到130),后来经过改进,展示了如何为其他俱乐部和庄园路线打造优秀主角。 同时,本攻略还旨在结交所有可能的朋友,并在提升属性的同时最大化自主性。 共设计了两种培养方案,一种是低年龄方案,适用于除加入船东贵族会之外的所有路线,另一种是专为船东贵族会优化的方案。 方案1导入结果 方案1A:埃托里亚路线
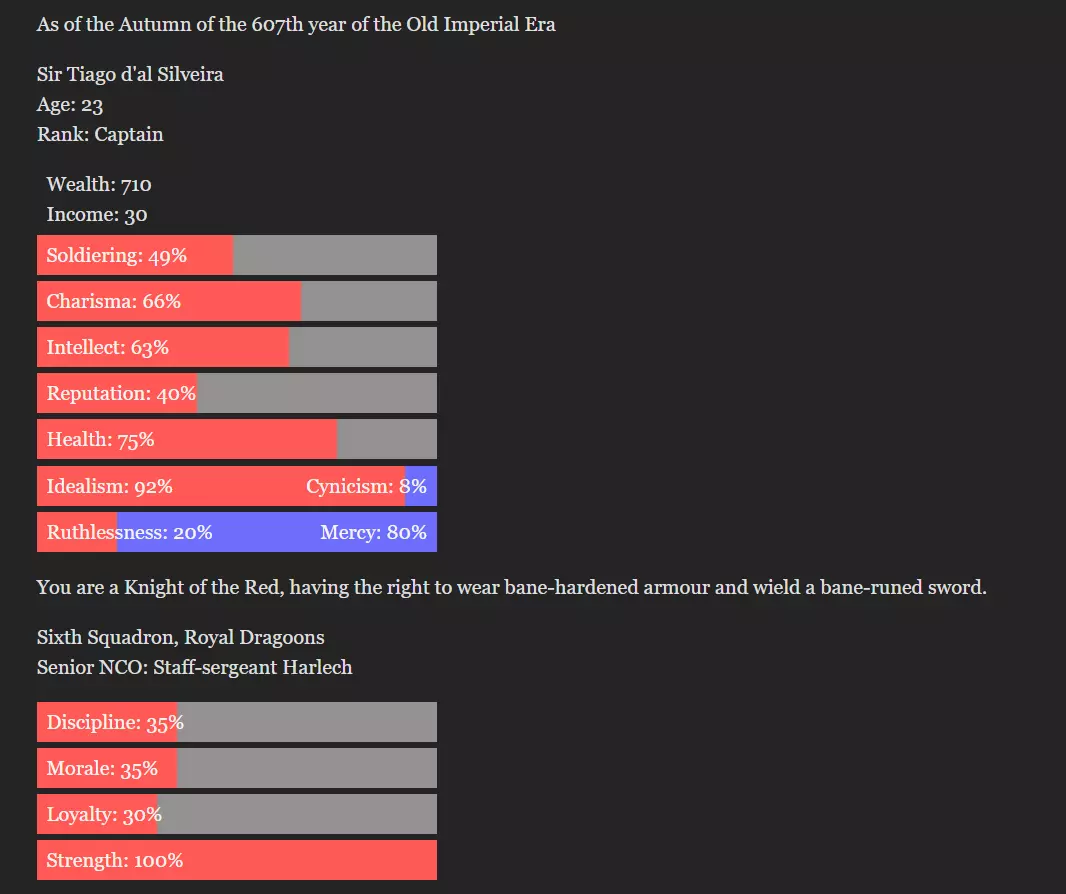
《无限之剑:庄园之路》1B版本更新内容
Build 2 导入结果
Build 3 导入结果
第一章 #尝试找些借口解释自己的迟到。 #艾托利亚,首都,文化与教育中心。 对于方案1和3: 至少:#18岁。 对于方案2: 至少:#25岁。 #一套关于哲学与自然科学的书籍。 第二章 #“科内特·$!{firstname}·德阿尔·$!{lastname},听候您的差遣。” #向卡扎罗斯塔询问关于他自己的事。 #这个训练制度简直不可能完成!我几乎撑不下去了! #我还行,但学术从来不是我的强项。 #我已经和许多同僚成为了朋友。 #与卡扎罗斯塔练习剑术和射击。 #留下来:我必须尝试帮助埃尔森。 第三章 方案1和2: #尝试与普通水手们社交。Build 3: #我重温了关于安塔尔联盟的知识。 #发号施令!我们不能把战斗指挥权交给一个区区中士! #我拦截了登船小队,试图弄清楚他们的目的。 #保持谨慎:我们可以守住船中部,迫使安塔尔人向我们进攻。 第四章 #当然。在接到命令前,我不会拒绝放松的机会。 #玩塔森斯沃德。 Build 1: #我先去弄一匹马。 #从官方马厩征用一匹马。 #挑选哈勒奇作为我的中士。 Build 2和3: #我先挑选中士并组建我的部队。 #觉得这些人都不行。兰泽雷尔还未被分配,我是否可以请求调他过来? #从官方马厩征用一匹马。 第五章 #对我的士兵进行严格训练。 #一个取得光荣胜利的机会。#该死的马!全速前进! 对于方案1: #严格按照图纸设置封印。希望亨特上尉知道自己在做什么。 对于方案2和3: #尝试更高效的排列方式,把剩下的封印收起来以后卖掉。 #缩短射击循环。 #照顾好马匹。 #封锁道路。 #“上马!我们要向敌人发起冲锋!” #按照规定:一半分给我的士兵,剩下的120克朗留给自己。 #请求担任骑兵预备队任务。 第六章 #“没有问题,长官。” #额外的弹药,以备持久战。 #为任何情况做好准备。 #这个蠢货很快就会让他所有的人都送命。必须处理掉他。 #“卡雷科特中尉,你是国王陛下军队的耻辱。既然你似乎如此不愿意拯救你的士兵,那我就得替你去做了。”“我接管指挥权。” #我是个更优秀的领导者。 #尝试正面进攻。 #卡雷科特中尉显然在指挥艺术方面还有很多要学的,斥责他。 #把武器留给自己。 #返回巡逻任务。 第七章 #我选择西路。更艰巨的任务能让士兵们保持战斗状态。 #走近他们:问问他们在说什么。 #尝试说服他们。 #尝试说服勒菲弗给我更多答案。 #亲自寻找其他失踪的掷弹兵。 对于1A版本: #把他们用锁链拖回来。 其他版本: #将他们作为客人护送回来。 #保持沉默。 第八章 #我感到非常自信!我相信很快就能获得新的指挥权! #留在公爵麾下以讨好他。 #询问公爵我是否可以阅读他的书籍。 #我挑选那些体型最大、看起来最危险的人。# 士兵们最需要的是纪律。我会训练他们直到他们晕倒! 若选择1A: # 我当然可以为我的士兵们说情,为他们找到更好的住处! 否则: # 如果军队拒绝为我的士兵们提供合适的住所,我将不得不自己出钱为他们租更好的地方。 # “我的士兵们已经准备就绪。他们不会让你失望的。” 第九章 # 这可能很危险,保持警惕。 # “把这个人带到营地外面,割开他的喉咙。” # 埃尔森上尉的计划。 # 允许敌人逃跑会更仁慈些。 # 和卡扎罗斯塔一起用餐。 # 实际上,我有自己的计划,更希望我们能采用。 # 我绝妙的计划将确保我们取得辉煌的胜利! 第十章 # 我会让卡扎罗斯塔去做。 # “长官,我认为你应该去做。”#俘虏安塔里指挥官以索取赎金。允许其余人离开。 第十一章 #我向埃尔森保证,我们最近的胜利足以让我们的制服被轻易认出。 #让他们报上我的全名、 regiment(团)和军衔,让他们记住我。 #加入亨特和哈蒂根的谈话。 #声称安塔里轻骑兵是最危险的。 #与卡扎罗斯塔交谈。 #“或许你是对的。我会去别处找人作伴。” 第十二章 #“当然,长官,我对我们获胜的机会充满信心。” #提醒埃尔森我们 regiment(团)的任务可能至关重要。 #埃尔森说得对,如果我们战胜骠骑兵,我们的光荣事迹将永垂不朽! #“我们下一步该怎么做?” #主动提出与卡扎罗斯塔一起守卫城堡。我的技能在这里比在战场上更有用。#我试图让他相信让我继续指挥部下具有战术价值。 #“从战场上撤退?这算什么懦夫行为?” #“好吧,那我们就坚守这个阵地。” #问维特尔布鲁克他回到这里做什么。 #“我当然会。告诉我们真相。” #让维特尔布鲁克相信他提议的行动会带来可怕后果。 #用卡扎罗斯塔的人支援我的部下,封锁两座城堡塔楼之间的通道。我可以得到帮助。 #用演讲鼓舞士气;如果他们士气高昂,战斗会更出色。 如果选择1A: #我会提醒部下们作为国王士兵的职责。 否则: #我会向他们发誓,在这危急时刻我不会抛弃他们。 #我不能离开,但我可以允许我的部下离开。我会让所有不愿拼死战斗的人活命离开。 要聪明点:想办法把骠骑兵打下马,在他还没缓过来的时候给他开膛破肚。 继续使用枪械
单人的新手套牌构筑指南! 指南 简介 本指南主要为新手玩家打造,不过我也希望老玩家能从中获得一些参考价值。虽然我并非《无限战争:动画卡牌游戏》的顶尖玩家,但我相信自己能够为那些在套牌构筑领域感到迷茫的玩家提供一些帮助。 限制条件: 套牌规模 - 一副套牌必须包含至少40张卡牌,但不能超过100张,不包括3张指挥官牌。 重复卡牌 - 一副套牌中同一张卡牌最多可包含3张,指挥官牌除外。【无限】类型的卡牌不受此规则限制。算上指挥官牌,一副套牌最多可包含3张技能牌、4张独特角色牌(其中1张为指挥官)以及6张非独特角色牌(其中3张为指挥官)。某些卡牌可以忽略此规则,例如将【抉择大师瓦里乌斯】作为指挥官时。 纯净度: 纯净度由你的3名指挥官决定。每名指挥官贡献1点纯净度,总计3点。 你可以组建三派系套牌,包含3个不同派系,各占1点纯净度;也可以组建双派系套牌,其中一个派系占2点纯净度,另一个占1点;或者组建单派系的三纯净度套牌。 无派系指挥官不计入任何纯净度,因此若选择无派系指挥官,会限制你的总纯净度。未来特定卡牌可能会排除此规则。 所有非无派系卡牌都需要特定的纯净度(指挥官配置)组合。这一信息可在每张卡牌的左上角查看。无派系卡牌没有纯净度要求,可以在任何套牌中使用。 选择: 纯净度 - 纯净度是《无限战争》在套牌构筑时创造有趣选择的独特方式。三派系套牌能为你提供大量实用卡牌,带来更多选择和灵活性。同时,单派系套牌能让你专注于一个派系的核心机制和协同效应(从保守角度看,这往往灵活性较低,但一致性更高)。构筑套牌时明确目标很重要,了解自己的获胜条件是关键问题,在成功构筑套牌前你需要知道这一点(不过“娱乐型”套牌不需要如此!)。卡组规模 卡组规模是在考虑灵活性和稳定性时需要注意的因素。选择最小卡组规模能带来更稳定的游戏体验(就你抽到的卡牌而言)。使用更多卡牌会降低抽到特定卡牌的几率,但总体上能提供更多选择。另一种思路是加入许多具有相似作用的不同卡牌,通过增加卡组总规模来保证稳定性(例如:带2张【刺杀】和2张【精准射击】,而不是只带3张【刺杀】)。 重复卡牌 和卡组规模类似,重复卡牌能提升稳定性但会降低灵活性。你可以在40张卡牌的卡组中放入40种不同的卡牌,从而拥有40种不同的选择(因此灵活性很高)。同时,一副由60张卡牌组成且每张卡牌有3个复制的卡组,理论上会带来更高的稳定性(共20种卡牌选择)。 最常见的卡组仅使用40张卡牌来提升稳定性。这类卡组包含3个复制的重要卡牌(这些卡牌在游戏早期至中期较为关键)、2个复制的后期所需卡牌或可选响应卡牌(【破坏】就是一个很好的例子),有时还会有1个复制的极少需要但可通过交易站“筛选”出的卡牌。 卡组构筑: 卡组通常围绕一个核心概念构建。 这个概念可以是一个总体思路——“这套卡组偏向进攻”。 也可以是特定的卡牌——“这套卡组围绕【巨龙计划】构建”。它可以是两者的结合,比如“这套卡组是围绕【不朽工匠阿莱塔】和【动能超载无人机】构建的快攻卡组”。 它也可以是一套针对卡组,例如“这套卡组通过使用【无法被选中的角色】来针对维罗尔阵营”。 在构建新卡组时,首先要挑选那些能真正定义你核心思路的卡牌。如果是快攻卡组,就查看快攻型卡牌选项(通常是火焰黎明阵营)并以此为基础开始构建。围绕核心思路进行扩展时,可以选择增强其优势的卡牌,或者平衡其弱点的卡牌。例如,一套火焰黎明快攻卡组可以通过添加中后期控制型卡牌(维罗尔阵营)来增强实力,或者添加中期支援型卡牌来为其提供增益(龙族后裔阵营)——这其中包括针对你核心思路可能面临的问题的解决方案。一副套牌必须至少包含一个制胜手段,大多数套牌会有更多。识别你的制胜手段并确保能够使用它们极为重要。如果你的飞行单位是制胜手段,不要让它们在你确保胜利前阵亡。要尽可能长时间地保证一个制胜选择的安全,但当胜利机会出现时要抓住它。重要的是不要在制胜手段能够实现其作用前就打出,但适时使用它们也同样重要。 在你确定了套牌构思、制胜手段和辅助卡牌后,就该精简套牌了。我推荐两种方法: 1. 按实用性精简——移除那些明显不如其他卡牌有用的牌,或是任何容易长时间卡在手中的多余卡牌。这包括那些与你的套牌核心概念不太契合的卡牌。 2. 按费用曲线精简——移除任何会“抬高”你资源费用曲线的卡牌。在《无限战争:动画卡牌游戏》中,拥有平衡的费用曲线至关重要。费用曲线会根据套牌的核心概念有所不同,但它在很大程度上决定了套牌的“手感”,当然还有节奏。需要注意的是,并非所有卡牌的费用都如其表面所示,例如——你通常不会在5费回合打出【恐惧恶魔】,但在你的统计曲线上,它会占据5费的位置。 上述两种方法通常需要结合套牌的实战测试,以此来判断哪些卡牌是无效抽牌,以及你的费用曲线运作得如何。在进行游戏测试时,同样需要注意的是,你可以添加那些能解决组牌初期未预料到的情况或问题的卡牌。比如缺乏【去除】卡牌,或是缺乏对具有【飞行】能力单位的防护。 设计套牌时,考虑“环境主流”(即热门套牌)也很重要。即使你的套牌思路新颖,也可以通过与热门套牌对战来测试其可行性。如果你不确定当前的“环境主流”是什么,只需进入匹配队列进行一些游戏,观察你最常遇到的套牌类型即可。 希望这些内容能对部分玩家有所帮助。
特殊成就获取提示 成就 今晚:机器人狂欢派对! 位置:关卡包2,关卡X5 将镜头移至关卡左下角边缘,会看到一些正在跳舞的角色。只需旋转大炮前的镜子,使其对准这些角色,然后发射大炮即可。 机器人忍者 位置:关卡包1,关卡15 你需要在两步内通关该关卡。 1. 发射大炮。 2. 当子弹到达其初始位置旁边的格子时,将镜子移至最终位置,这样移动的镜子会在途中反射电荷。 福尔摩斯欧姆 位置:关卡包2,关卡X3 这与时机有关。我将初始位于左侧的可移动垂直镜子称为VM,初始位于右侧的水平镜子称为HM。 将VM移至磁铁正上方,使电荷能反射向HM。 尽快发射两个电荷。 当两个电荷都击中VM后,立即将其移至机器人左侧(回路的最右角)。 当第一个电荷击中HM后,将HM移至红色电荷转换器上方。这样第一个电荷会飞向VM,而第二个电荷在HM移动时会被重定向至红色转换器。 当第一个(蓝色)电荷击中VM后,迅速移动VM,使其接住并反射第二个(红色)电荷,使其也飞向HM。 让一切稳定下来,此时你应该还剩六步,之后按常规方式完成剩余操作。三步调整镜子位置,一步发射炮弹,总共需要十步操作。我已经全力以赴了,舰长!位置:关卡包2,第20关。你需要让大量能量同时传输。这是我找到的路径足够长的关卡,或许还有其他选择。在该关卡中,将五面镜子排列成一条路径,然后持续发射炮弹。
各冒险无需额外药剂强化即可自动成功所需的最低支柱值列表 简介 目前我发现的各冒险获得【高成功率】所需的最低支柱值。 这些数值是在添加食物和金钱后,但不包括背包栏位中的任何物品。 本指南按冒险所属地图分组,且按我建议的顺序排列。这是因为部分冒险会提供能提升后续冒险所需支柱值的神器。 如果您发现比我更低的数值,请留言并附上显示您所用数值的截图,我会进行核实。 更新日志 25年8月31日 版本0.1:初始版本上传包含前三张地图的数值:城市附近的森林、河流后方的丘陵和歌唱山谷。包含前两张地图的神器奖励。 2025年5月9日 版本0.3:新增神器信息及第三组地图的推荐顺序。新增地图【遥远山脉】的信息。 2025年7月9日 版本1.0:现已添加所有地图、神器及顺序。如果我重玩游戏,会按冒险分别添加推荐的冒险者以及招募时建议达到的最低属性。我还想添加各地图所需的药剂,以便提前准备。地图:城市近郊森林 冒险 镜像 面纱 虚空 歌谣 痛苦 神器奖励 其他奖励 约里曼家族旧避难所 3 穿刺荆棘之衣 +3痛苦 三体神废弃教堂 4 3 仪式护符 +3面纱 城市近郊森林 4 3 蓝图:优质材料 半身人绝迹村落 3 必备工具腰带 +3歌谣 地图:河后山丘 推荐冒险者:学生(虚空为主属性),报酬2银币。消耗:120饥饿值 冒险 镜像 面纱 虚空 歌谣 痛苦 神器 奖励 其他奖励 克利波兹墓地 4 6 三体徽记 +6 面纱 深渊之主圣所 4 6 躁动香炉 +3 虚空 卡塞之战遗迹 6 4 恋人护符 +3 镜像 河后山丘 4 4 太阳第三骑士要塞 4 4 地图:歌唱山谷 推荐冒险者:怪物杀手(主镜像),报酬为1金币2银币。消耗:160点饥饿值 冒险 镜像 面纱 虚空 歌声 痛苦 神器奖励 其他奖励 天空之眼湖 10 12 8 凯尔派之靴+6 镜像 瑟尔卡之锤高原 6 8 11 阿霍斯的沙塔拉加+6 歌声 石之本身圣所 9 6 失落宝箱修行地 8 10 15 歌唱山谷 12 11 8 蓝图:皇家材料 地图:远山 推荐冒险者:法师,花费2金1银(虚空系为主) 消耗:180点饥饿值 冒险 镜像 面纱 虚空 歌声 痛苦 神器奖励 其他奖励 远山 10 18 20 千手大教堂 0 0 0 海怪瀑布 18 14 20 伊伊波的生命循环+9 面纱 巨野猪林 16 14 16 蒂纳什的断骨+6 痛苦 troll巨石阵 16 12 8 Raja亡灵破布+6 虚空 地图:世界尽头海岸 推荐冒险者:法师,花费2金1银(虚空主要) 消耗:180 饥饿值 冒险 镜像面纱 虚空之歌 痛苦 神器奖励 其他奖励 无名神殿 18 20 22 世界锻造者巴尔 +9 之歌 唱诗班绿洲 22 24 20 世界倒影特奥马奇 +9 镜像 三姐妹阶梯 27 30 24 穿肉者乌尔娜 +9 痛苦 水下上下密室 26 28 30 碎骨者奥斯塔利博恩 +9 虚空 世界终结海岸 18 30 16 18 25 国王烙印钻石 皇家材料
本指南将为你介绍所有成就以及获取方法。达成100%成就大约需要2-3小时,甚至更少,具体取决于你找到特定垃圾的速度。难度:非常简单。 100%成就 垃圾车成就 选择一个模式或路线,驾驶每辆垃圾车各一次。获得成就后,你可以返回主菜单并选择另一辆。不需要侧装式垃圾车。三辆垃圾车分别是: 2R型 秃鹫型 鲨鱼型
有3个街道收集任务。你需要完全完成它们:大型垃圾、生活垃圾、废纸。这些任务有时间限制,但你处理多少垃圾或获得多少分数并不重要。时间必须归零,任务才算完成。
有3个清理任务,你需要全部完成: - 诊所 - 酒吧 - 房屋 时间和车辆类型不限,但我发现使用【鲨鱼】型号的车辆速度最快。屏幕左上角会显示需要处理的物品数量。注意要确保所有物品都被破坏,且没有遗漏。你可以慢慢来,排行榜只是用来比较的。
剩下的成就几乎都能在一个任务中完成。为此,开始带有大件垃圾的无尽模式。找到某些特定物品可能需要一段时间,这取决于运气。比如,我轻松地花了40分钟寻找滑板。你们可以驶过所有站点,只挑选需要寻找的物品。
司机们,坐到驾驶座上(从驾驶侧上车)
猎枪:坐到副驾驶座上(乘客上车)
意外触发:收集到带有火焰标志的气瓶。或者有时在生活垃圾任务中会发现电动滑板车。还有其他一些物品,我目前还没全部找到。关键是,这些物品必须会爆炸并导致扣分。
超级干净 当你一次性压缩大量垃圾时,通常总会有东西从车里掉出来。把这些东西从地上捡起来,扔回垃圾车。可能需要尝试多次,直到游戏顶部中央出现【Super Clean】提示。
最后的派对 收集一个舞台灯。如果你们的情况不同,可能还有其他物品也计入在内。
4分钟,700瓦 回收一台微波炉
Conga Down 收集一个邦戈鼓
回头见,孩子 收集一个滑板
牛奶与糖 收集一台白色咖啡机


会长天下第二
简介
TA什么都没有写
发帖达人Ⅰ