换一换
换一换 


欢迎阅读这份全面指南,旨在帮助玩家掌握《铁拳》中冯威的使用技巧。作为一名休闲冯威玩家,我整理了一系列条理清晰的笔记,希望能分享我的知识并为其他玩家提供有价值的见解。希望本指南能对那些希望有效使用冯威的玩家有所帮助。此外,本指南专为熟悉《铁拳》术语、帧数,并且注意到万代南梦宫尚未推出完整冯威角色指南的玩家量身打造。如果您对帧数或《铁拳》术语不熟悉,欢迎在评论区询问相关概念。 简介
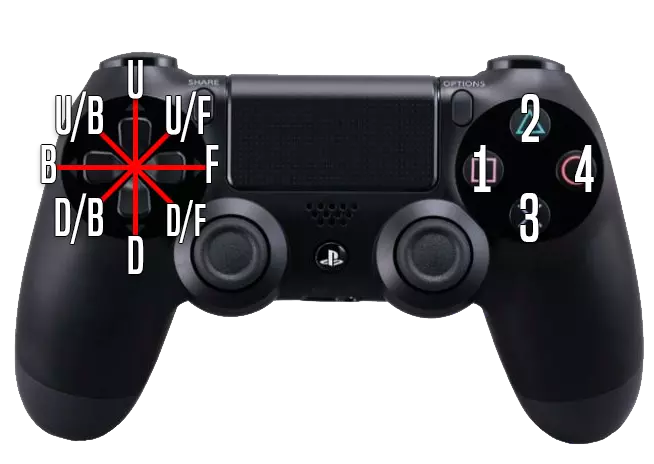
冯威是《铁拳7》中一名实力强大且多才多艺的角色,以其极具侵略性的玩法和极具惩罚性的招式而闻名。凭借快速的打击、闪避动作以及强力的反击,在熟练玩家手中,冯威能成为一股强大的力量。本指南将帮助你了解冯威的招式组合、玩法风格以及策略,以最大限度地发挥他的实力。 优点: - 自由式玩法,意味着他能非常轻松地适应对手的游戏风格。 - 出色的戳击。 - 拥有全角色中最具闪避能力且难以被压制的角色特性。 - 全角色中最优秀的紧急应对招式之一。 - 招式简单且具有非常有效的挥空惩罚。 - 当冯威处于进攻状态时,拥有最危险的50/50择。 - 墙壁连段能力高于平均水平。 - 出色的 rage drive( rage 驱动)。 - 强大的起身压制。缺点:站立惩罚在11-14帧时效果非常弱。 拥有全角色中最差的跳踢,意味着其范围非常小。 连招伤害平庸,大部分在后续更新中得到了修复。 对左横移非常脆弱,但拥有一些跟踪招式来牵制对手。 接近对手的手段仅限于蹲取消或下后+3。 需要使用更复杂的招式才能成功打开对手的防御。 总结:冯威适合新手使用,并且能在较高水平的对战中对抗许多对手。他是游戏中非常扎实且灵活的角色。冯威确实是一个不容小觑的角色。按钮映射控制说明 基本控制信息: f = 前进键 b = 后退键 u = 上键 d = 下键 Ch = counter hit( counter hit) 1 = 左拳键 2 = 右拳键 3 = 左踢键/左闪避(史蒂夫角色专用) 4 = 右踢键/右闪避(史蒂夫角色专用) df 或 d/f = 下+前键 uf 或 u/f = 上+前键 db 或 d/b = 下+后键 ub 或 u/b = 上+后键 WS = 站立状态 FC = 按住下键完全蹲伏 QCF = 四分之一圆前(操作方式:按 d、d/f、f) QCB = 四分之一圆后(操作方式:按 d、d/b、b) SSL = 向左横移 SSR = 向右横移 S!= 螺丝步 冯威的架势说明: 空手道步 = 后 3+4 流云步 = 前 3+4 蛇形架势 = 下前 背身 = 后+3、4 冯威的架势 以下是冯威的架势,冯威的策略和游戏计划均围绕这些架势展开。 空手道架势 KNP 流云步 STC 蛇形突进 QCF 背身 BT 空手道架势(KNP)

【拳法架势】可通过按下(b+3+4)来施展,这是一个防御性架势选项。它是风间仁闪避能力的关键组成部分,也是他在中立状态下用于防御的最佳架势。在中立状态下,此架势对于创造对手招式打空的机会极为有用,通常能惩罚那些急于冲进来的过度激进对手,因为它会使风间仁向后移动足够距离,让对手的招式落空,从而允许他用后续招式进行惩罚,这些后续招式将在架势部分列出。该架势还具备自动格挡功能,可格挡上段和中段攻击,但会被下段攻击命中。它最适合在中距离使用,因为自动格挡要到第19帧才会激活,而在第一季中这一帧数为14帧,因此现在使用【拳法架势】时需要更加小心,因为它更容易被打断。KNP 1【起手:20帧 确反15帧左右 格挡:-13帧 命中:+8帧】是一记高压制性下段攻击,命中时能造成不错的伤害。使用冯(Feng)蹲姿命中后你将获得+8帧优势,但对手会保持站立状态。任何17帧或更快的招式都无法被打断。所有d/b+3的后续选项在此处同样适用。 counter hit时,对手会被击倒,你可以选择稳定的CC Stomp或F,F+3,根据个人喜好决定。目前没有可靠的中段招式能与此下段攻击形成混合进攻,因此需谨慎使用。此招格挡后为-13帧,部分角色可以用浮空技进行确反。 KNP 2【起手:14帧 确反15帧左右 格挡:-9帧 命中:击倒】是快速的挥空惩罚技。此招较为安全,命中时会像counter hit状态下的b+1一样击倒对手,因此你可以衔接免费的b+1+2以造成可观伤害。这是一记上段攻击,因此可以被蹲防躲避。KNP 3【启动:22帧 js15~ 格挡:-12 命中:浮空】是你抓住对手大破绽时的首选招式,因为它能打出完整的连段。除非你确认对手已经破绽,否则不要使用此招,因为该招式速度慢,格挡时惩罚值为-12,破绽时也极易被惩罚。 KNP 4【启动:31帧 js15~ 格挡:-7 命中:击倒】是一种孤注一掷的招式,可用于拉近与对手的距离。它与布莱恩的b,b+4非常相似,冯也会以倒地状态结束。理论上此招在格挡时是安全的,但它的攻击轨迹非常直、速度慢,而且容易被快速轻拳浮空。由于其较低的受击判定框,惩罚起来可能有点棘手,但大多数角色都有能击中地面目标的招式来应对。命中时会击倒对手,但由于冯自己也会倒地,所以无法进行后续连招。此招式也可作为快速躺地拖延时间以获取超时胜利的选择。后续可接KNP 4,3+4,其特性与【地面面朝上3+4】完全相同。如果对手格挡了4,你或许能根据对手的行动用【地面面朝上3+4】击中他们,但这通常行不通,因为对手很可能会使用地面打击招式,所以无论如何你都会受到伤害。在较高水平的对局中,此招式通常最好避免使用。 【流云步】(STC)

此架势同样为进攻架势。按下F+3+4,冯(Feng)会挥舞双臂,反弹所有上段和中段的拳脚攻击。若仅反弹一次攻击,局面基本会重置为中立状态。若反弹两次攻击,他会自动施展一击将对手击倒并造成墙壁冲击。如果对手操作精准,可进行即时帧格挡,这种情况虽少见,但一旦成功,此格挡会使自身处于-17的不利帧,因此大部分角色都能在即时帧格挡后发动浮空连击。理论上,此架势既能用于夺取对手的进攻回合,又能在对手不上当时衔接择攻击,在理论层面看似十分强大。问题在于每个选项都很容易被向左回避,而且考虑到其明显的起手动作(他几乎是在挥舞手臂),再加上如果你不按任何按钮,风间仁会处于长时间的 vulnerable 状态,这使得该招式风险巨大但回报甚微。总的来说,这个架势对于喜欢贴身持续用连续技压制的对手来说是个不错的反击手段,偶尔使用也可能打对手一个措手不及,但在较高水平的对局中通常最好避免使用。 STC 1【起手:20帧 格挡:-14帧 命中:击倒】相比《铁拳Tag 2》有所加强,但遗憾的是仍然不是一个很好的选择。这是一个中段技,接 dash f+1+2 可以打出完整连招。你可以通过拉开距离来获得更多的反击空间,但很多角色仍然可以进行惩罚,尤其是当他们背靠墙壁时。 STC 2【起手:15 帧 被防:-13 帧 命中:浮空】是你在此姿态下的中段选项。这是一个完整的浮空技,可以与STC 4混用,因为对手往往会蹲防以应对下段。它在被防时为-13帧,因此具有风险。 STC 3【起手:20 帧 被防:+8 帧 命中:击倒】在你已经对对手进行过混合进攻后是一个不错的选项,因为这是一个上段选项。被防时为+8帧,但在第三季中被防后的击退距离显著增加,现在能衔接的后续招式仅限于下后+1、下前+4和下后+3。命中时,对手会被击倒,你可以获得一次免费的踩踏机会。 STC 4【起手:20 帧 被防:-14 帧 命中:+2 帧】是一个不错的下段戳击。优秀的对手会留意这一招,所以可以用STC 2来进行择。在Counter Hit( counter hit )时,对手会被击倒,你可以接一个冲刺踩踏,或者前前+3。 STC 1+2及其后续招式在中立状态下毫无用处,但当你压制对手且他试图出招时,你可以用这一招来干扰对手。这一招仅在帧数上略有优势,因为它是STC中最快的选项。 stance转换:KNP(knockdown parry)在命中b+3+4后按住前可以转换为STC,你也可以在STC中按住后转换为KNP。转换到STC时具有该stance的反击属性,并且你可以使用该stance的所有招式。具体操作有:b+3+4接前、后,以及f+3+4接后。你也可以通过输入QCF+3+4,从他的QCF翻滚冲刺中使出STC,并且可以通过按住后方向取消进入KNP。在使用这些转换时你的破绽很大,只有在你诱导对手犹豫后,才能将其用于心理博弈。 蛇形冲刺(QCF)

Feng’s QCF is a roll dash that Feng can use to approach as well as access certain moves by inputting d,d/f,f. You can also access While Standing moves by holding d/f briefly so you still get the movement, but then you are placed in crouch and can access WS. Holding d/f longer grants you access to Feng’s Full Crouch moves, like FC+d/f+1 or FC+d/f+2 for another layer of mixups and mind games. A movement option from QCF is called Snake Dash. Essentially, you are cancelling your QCF by inputting up to sidestep. You can use this to cancel the roll dash and block, or you can input another QCF and repeat. This movement option can be used for spacing, mixups and to induce hesitation. QCF+1: [Startup: 22 cs6~ Block: -14 Hit: +2 Counter Hit: Launch] A chunky long range low. This deals a good chunk of damage, and has good range. On normal hit, they are pushed away, essentially resetting the situation to neutral. It can crush highs once it starts up(No crushing properties during QCF animation), and sometimes can slip under mid attacks too. On counter hit, this launches for a full combo in open ground and at the wall. The tracking on this move is very interesting, as it can catch sidestep both ways, but loses to sidewalk both ways. This move is great to mix with qcf+1+2 or qcf~ws+1, which are both safe mid options. You can also use QCF+2 for a launch as the startup looks similar to QCF+1, though this is also risky at -14 on block. Another thing to keep in mind is that this move is a shoulder, which makes it one of the very few lows in the game that cannot be low parried. This move starts up slow, so sharp opponents can see the move and block on reaction. It is -14 on block, which means a decent amount of the cast can launch punish(Ganryu, Bob, Jin, Master Raven, Lucky Chloe, Eliza, Miguel, Josie, Kazuya, Akuma and Eddy). Also note that the move’s hitbox can be really funky, Feng can go right under and past an opponent in some situations. Be ready when this happens, you can use BT 4 for a quick option, BT d+3 or BT d+4 for a high crush, or just hit b or d/b to turn around. QCF+2 [Startup: 22 Block: -14 Hit: Launch] is a mid launcher option. This can be used as a mid mixup in conjunction with QCF1, since they have the same startup speed at 22 frames, and look similar to each other on startup. This is also -14 like QCF 1, so it is very risky. QCF+3 [Startup: 15 Block: 12 Hit: Launch] is Feng’s WS+3. It is a natural hit launcher that leads to a full combo. It’s not the most usable from QCF, as it is best used as a WS block punisher, and it is punishable at -12. QCF + 4 (WS+4): [Startup: 11 Block: -7 Hit: +7 Counter Hit: +29G] Feng’s 11 frame while standing punisher. It is weaker than other WS+4s because the damage is comparatively low, and it’s not good to use against opponents that use slides, as the pickup grants limited follow-ups. You still have to use it as a while standing punish, and this move and has its frame advantage on hit buffed from +4 to +7, however they are still pushed back a bit, so your best options for follow up are d/b+1, d/f+4 and d/b+3. This move is good to use as an uninterruptible follow-up to moves like d/b+3. The counter hit will make opponents scared to press buttons. It is also accessible from QCF as a fast option, so it can counter hit often, which it great as it deals the exact same stun that d/f+1 grants on counter hit, leading to free mixups. QCF+1+2: [Startup: 16 Block: +4s Hit: +8s Counter Hit: KND] A great pressure tool that is quick for a crouch dash move, and is excellent to throw out because it sets up for pressure. On block, Feng is +4 with the opponent in crouch. Jabs and b+4 are uninterruptible, d/f+1 and d+4 will trade with a full crouch jab, b+4 and d+4 cannot be sidestepped in most matchups(Characters with great sidestep like Lili/Alisa can sidestep b+4 when blocking QCF 1+2 at tip range), D/f+1 can be sidewalked up by all characters(Characters with great sidestep like Lili/Alisa can sidestep it). D/F+1 can be back-dashed reliably, but jabs and d+4 cannot be and b+4 can only be back-dashed when QCF 1+2 is blocked at tip range(characters with excellent backdashes like Alisa/Zafina can back-dash this reliably). This move is good in open ground, but becomes amazing at the wall since they can no longer backdash anything, they have to take your offense at that point. On hit you're left at +8 so all of the options from d/f+1 on hit are great to use here as well. f+1+3 or f+2+4 generic grabs also reach and are uninterruptible. Since good players will rarely try to attack after getting hit, doing slower moves like d+2 and d/b+3 for low options, d/f+3+4 for a safe mid, even Back Turned mix ups can work, but all these can be interrupted if the opponent is not respecting your plus frames. On Counter Hit, the move grants a knockdown and Feng gets a guaranteed stomp for nice damage. If the move connects with an airborne opponent, this will floor break. Another thing to note is that this is a headbutt, so it is immune to most parries/reversals, except for Jin’s, Geese’s, and Leroy's. All Options out of QCF qcf+1 qcf+2 qcf+3 qcf+4 qcf+1+2 STC (qcf+3+4) 1+4 d/f+3 d+3 d/b+3 d/f+3+4 (Hold 4 before inputting QCF) Any move with an u/b, u, or u/f input All Options out of d,d/f WS+1 WS+2 WS+3 WS+4 WS+1+2 (Punch Parry) 1+3 or 2+4 (Generic Throws) FC d/f+1 FC d/f+2 downjabs FC d+3 FC d+4 Back Turn (BT)

Back-Turn Stance is a mixup stance with a lot of options from it. This can be used as a mixup Oki option after a knockdown, and whenever the opponent is respecting you, for example if you have a lot of plus frames (like after counter hit d/f+1 and WS+4), or hold mental frame advantage for example when the transition is covered by the next hit in the string (f+4 series). The scariest options are low/high options, so ducking beats both options, but he has good mids to keep the opponent standing. While this is used often by high-level players, it is quite risky since you can’t block in BT, and most of the moves are very linear, so this stance is all about commitment. Transitions into Back-Turn: B+3~4 2,4,1,b (Cancel) 3,3,4 3,3,4,b (Cancel) 1,2,2,b 3~4,b f+4,b SS+2 SS+3,b SS+3,2 Back-Turn Options: BT 1 [Startup: 12 Block: -3 Hit: +14] is a 12 frame high jab with good range. This is a good quick move to use when you need to throw a fast move out. On block, this is very safe at -3. On hit, you are +14 and you get a guaranteed b+1+2 for good damage, and it is easily hit-confirmable due to the read-able stun. It is high, so it can be ducked. BT 2 [Startup: 16b Block: -6 Hit: +5] is a mid option used to poke the opponent. This keeps Feng in BT for another mixup, and on hit, you are at a decent advantage with the opponent right next to you. On block, the situation is the same as f+4~b (Can be jabbed punished, but d/b ducks jabs, mid options beat d/b). Opponents sometimes won’t hit buttons after the first hit because of the follow-up option BT 2,2 [Block: -13s Hit: KND]. This is a natural combo that knocks down on hit for a good oki scenario. You can also delay the second hit to try to bait your opponent to hit a button, as the second hit on counter hit leads to a full combo. The full string is -13, so Kazuya, Josie and Eddy can launch punish this string. ff+3 / BT3: [Startup: 32 Block: +8s Hit: +8s] This is a very chunky mid, and is now an excellent tool for wakeups along with 4~3. It is now +8 on block (It was +4 previously) and hit, and the opponent is forced into crouch as well, so moves 17 frames or faster are uninterruptible . On Counter Hit, the opponent is launched for a full combo, and this is Feng’s highest damaging counter hit launcher. This move hits grounded opponents, and you can use it in the same Oki scenarios as 4~3. The move also floor breaks, and is used in certain floor break combos. You can also do this move from Back-turn Stance with 3, and it has the same properties. Note that this move is really slow, so it's not great to throw out in neutral. BT 1+2 [Startup: 16b Block: -5 Hit: KND] is Feng’s best mid option out of BT. This is a safe double elbow mid that crumples on hit for some great oki options (such as BT 3). On block, the same situation as f+4,b and BT 2 applies here too. At the wall, you get a conversion into a wall combo. This move is very integral if you are going to use BT stance, as Feng’s scariest options are lows and highs, so this is used to keep them standing. BT d+3 [Startup: 18 cs6~ Block: -26 Hit: Launch] is Feng’s scariest low option. A high-crushing low sweep that tracks both ways and launches for a full combo in open ground and at the wall, and is the reason why you can’t just sidestep BT all day. This is the move that everyone is aware of when playing against Feng, and will on occasion twitch duck so they can block it for a launch punish, as this move is death on block. This move only launches on clean hit, and is negative on hit if the hit is not clean. Only use this after you have mixed up your opponent with mids out of BT. BT 1+4 or 2+3 is Feng’s most damaging command throw. It deals 50 damage and also gives decent oki as well. This is another option out of BT that opponents tend to duck out of fear and to also cover BT d+3. Once you’ve conditioned the opponent with mids, you can go for the throw more often. It is a 1+2 break, and is the only command grab in BT, so opponents can easily break it. However, a tricky thing about Feng’s BT is that generic throws also look like 1+2 grabs, so you can use them to force the opponent to guess a break. On Oki, d+4 is the best option as it will hit everything except when the opponent taps up to quick stand. They can low block, but not low parry that low. BT 4 [Startup: 10 Block: -8 Hit: KND] is Feng’s fastest option out of BT, a generic high kick that sends the opponent flying away with no guaranteed follow up. This can also wallsplat for a wall combo as well. This move is high, so it can be ducked. BT d+3+4 [Startup: 10s cs1~ Block: -11 Hit: +3] is a very fast generic low poke. If you want to catch out stepping opponents and don’t want to commit to d+3, d+4 is a good option that high crushes on frame 1, so after a BT 2 on block you can successfully evade highs with this. It also has good tracking, is considerably safer on block, and plus 3 on hit to keep your offense going. BT u/f+4 [Startup: 21 Block: -10 Hit: Launch] is a generic back-turned hopkick that launches for a full juggle. This is a good mid to use if you want more reward than if you use BT 1+2. You can also duck in BT to trick the opponent into thinking you’re doing BT d+3 and then hit them with this. BT d/b is a slippery movement option to back away from the opponent. You are left in crouch, so you can use WS moves if the opponent tries to chase you down. BT d/f is another option to turn around, you can go into any WS or FC option. The duck can be used to make the opponent think you’re doing BT d+3 and hit them with WS+3 for a launch. Important Moves
d/f+1: [Startup: 14 Block: 0 Hit: +6 Counter Hit: +36G] One of Feng’s key mid pokes. This d/f+1 is unique, it starts up slower at i14 (Most character’s start at i13), however this move is neutral on block unlike most d/f+1's in the game, which are usually slightly negative on block. This works for Feng because he has many good follow up options. b+1 will trade with their jab, and interrupt anything 11 frames or slower for a strong counter-hit. d+2 and d/b+3 are good low pokes that high crush, you can also use d+1(generic down jab) as a safer high crush option, though all these options can be low-parried. You can use Fish Hook(b+4) to poke them out of a sidestep attempt. Alternatively, you can also just do a normal jab (1 or f+1) if you think they aren’t going to do anything or they try to do a low crushing move, such as hop kick, which will float them for a full combo. If you want to get really tricky, you can also do u/f+2 as an evasive poke, f+3+4 (STC) to reverse strings, and Hop kick (u/f+4) to low crush an opponent trying to duck your b+1, however all these options carry some kind of risk and are only meant for hard reads. Doing nothing after a blocked d/f+1 to see what your opponent is going to do, as well as sidestepping are also good options. On hit, you can follow up with d/f+1, b+1, jabs, b+4, throws, d+4 and d/b+3, none of these cannot be interrupted. Keep in mind throws, jabs and b+1 can still be ducked. d/b+3 can be low crushed but d+4 cannot by generic hop kicks in this situation. On counter hit, the opponent goes into a fallback stun (A similar stun occurs after CH WS+4 as well). Nothing is guaranteed, but you get a lot of frame advantage, so Feng gets a free mix-up. For basic options, you can use d+2 or d/b+3 for low options, with d/b+1 variations or f,f+2 for your mid options. Dash-in Throws are also decent too(Only if your opponent can't break throws). Your big options are: dash~SS+4 or dash~SS~d/f+3 (At the wall, replace the d/f+3 with SS+1+2), any option off QCF, STC+4/STC+2, and dash into Back-Turned Stance (b+3~4) options. If you can confirm the counter hit at the quick enough when you have the opponent’s back against the wall, you get guaranteed follow-ups(SSL U/F+2, or SSR B+1+2 is hell of a dirty as it can wall splat) Do be careful, d/f+1 has pretty bad tracking, being easily stepped to the left, and can also be SWR. It also has slightly less range than other characters' d/f+1, which can make it more difficult to lock down your opponent. d/b+3 (The James Brown): [Startup: 16 cs6~ Block: -15 Hit: +4s] An amazing low. It's fast, high crushes, has good range and good tracking both ways. On hit it is +4 and forces crouch, which is very good for a low poke. You have an uninterruptible option with WS+4, which on counte-rhit, gives Feng a free mix-up. If the opponent is not pressing buttons, you can mix in other follow-ups. WS+1 is a safe option that can keep up the pressure and float hop kick attempts, but will trade with full crouch jabs. You can also mix up with lows (When they're conditioned to not hit buttons) like FC d/f+1, a high crush low poke that catches sidestep on Player One side (You can mix this up with FC d/f+2 for a mid launcher that catches Sidestep on Player 2 side, but this is very risky as it is -14), CC d+2 or CC into another d/b+3. Since Season 4 it now has a new transition on Counter hit that deals a good chunk of damage, leaves the opponent grounded and Feng in Backturn at Neutral frame advantage. Your options are limited since you are in Backturn. BT D+3+4 and BT D+3 beats most options except for generic spring kick and back getup (BT D+3 will hit here but it’s not a clean hit). BT+3 is the best option against back getup since you get plus frames on block. For Spring Kick, tapping forward and blocking it and punishing it or holding D/B~B to make it whiff or block it are the current best ways to deal with that. It is -15 on block, which means most of the cast can launch it. However, if you are not predictable with this move, it rarely gets blocked unless the opponent makes a clutch read. WS+1: [Startup: 13 Block: -1 Hit: +5] Another great mid poke. This move is very safe at -1, so you can still use many of the same options as d/f+1, although the opponent can jab interrupt b+1. The move naturally advances Feng forward a bit, and it can be done out of crouch dash by doing d,d/f,n+1 (you can hold d/f for a little bit to maximize the forward distance of his roll dash) making this Feng’s best option to approach the opponent.. WS+1 is also the move to use for floatable lows (e.g. Law/Shaheen/Lee’s slides, Ling’s AOP 4~3). Note that this move has pretty poor tracking, being especially weak to SSL. WS+1,2 [Block: -10 Hit: +1] is a natural combo, and is also his 13 frame WS punisher. The second hit can also be used to catch SSL, even if the first hit whiffs. On block this is unsafe at -10. WS+1,2,1 [Block: -12 Hit: KND] is the end of the string and is delayable, making it good to use on opponents who try to punish the second hit of the string, and it wall splats for a wall combo. Since Season 4, the third hit knocks down on counter hit guaranteeing Feng’S B+1+2. It can be punished if the opponent doesn’t swing. d+2: [Startup: 20s cs6~ Block: -12 Hit: -1 Counter Hit: KND] Another great low poke. This is a good move to use in close range, as it deals decent damage, and it high crushes reliably. Compared to db+3 it is safer on block at -12, and on Counter Hit you get a free Crouch Cancel into stomp (If you have good execution, you can CC into d+4, 1+2 for wall carry and really good Oki). It is slightly negative on hit and leaves Feng in crouch, so isn’t as effective at enforcing pressure, with many of Feng’s options afterwards being stopped by SS or SWL. d+2 is itself also weak to SSL, with the opponent often ending up behind Feng. Due to Feng’s weird hitbox this can actually make this move hard to punish in this situation. QCF+1+2 : [Startup: 16 Block: +4s Hit: +8s Counter Hit: KND] A great pressure tool that is quick for a crouch dash move, and is excellent to throw out because it sets up for pressure. On block, Feng is +4 with the opponent in crouch. Jabs and b+4 are uninterruptible, d/f+1 and d+4 will trade with a full crouch jab, b+4 and d+4 cannot be sidestepped in most matchups(Characters with great sidestep like Lili/Alisa can sidestep b+4 when blocking QCF 1+2 at tip range), D/f+1 can be side walked up by all characters(Characters with great sidestep like Lili/Alisa can sidestep it). D/F+1 can be back-dashed reliably, but jabs and d+4 cannot be and b+4 can only be back-dashed when QCF 1+2 is blocked at tip range(characters with excellent back-dashes like Alisa/Zafina can back-dash this reliably). This move is good in open ground, but becomes amazing at the wall since they can no longer back-dash anything, they have to take your offense at that point. On hit you're left at +8 so all of the options from d/f+1 on hit are great to use here as well. f+1+3 or f+2+4 generic grabs also reach and are uninterruptible. Since good players will rarely try to attack after getting hit, doing slower moves like d+2 and d/b+3 for low options, d/f+3+4 for a safe mid, even Back Turned mix ups can work, but all these can be interrupted if the opponent is not respecting your plus frames. On Counter Hit, the move grants a knockdown and Feng gets a guaranteed stomp for nice damage. If the move connects with an airborne opponent, this will floor break. Another thing to note is that this is a headbutt, so it is immune to most parries/reversals, except for Jin’s, Geese’s, and Leroy's. Important Moves

B+1(A.K.A Iron Palm, A.K.A Talk To The Hand) : [Startup: 10 Block: -10 Hit: +1 Counter Hit: KND] One of the best counter hit tools in the game. It comes out at the same speed at a jab, 10 frames. On normal hit, you get some advantage. However, on counter hit the opponent is knocked down and Feng gets a guaranteed shoulder (b+1+2) for a good chunk of damage. The counter hit property still works on trade, so you still get the follow-up if you trade with moves like a jab. This move can used when opponents uses strings you can jab in between (e.g. Jin’s laser scraper), if they are using predictable patterns of attack, or mash after certain moves where you are neutral or plus on block, such as d/f+1 or ss+1+2. It is also a good option to use if the opponent does a move or string that is neutral or -1 on block (e.g. Law or Shaheen’s d/f+1) to stop any additional pressure. Do be careful though, as it can be sidestepped to the right, side walked left, ducked, has very short range, and is punishable by jabs at -10. Though you may be able to get away with this sometimes as it can be quite tricky to punish, of course it’s not something to bank on though. B+4 (Hook): [Startup: 12 Block: -9 Hit: +2] B+4 is a move that covers a lot of bases. This is a 12 frame mid, and will catch the opponent’s sidestep reliably due to its excellent tracking up close. This is also your best mid option to close out a round with a quick mid option. It also hits low to the ground and will hit many low stances. At the wall, this move becomes oppressive, preventing them from sidestepping to get away from the wall, and allowing Feng to apply further wall pressure. You can also use this after you have knocked the opponent down at the wall or after a wall combo, as this will clip an opponent trying to get up, but will whiff against a grounded opponent. On block, this is -9, so you can’t keep up the offense afterwards, and it has poor range. B+1+2 (Shoulder): [Startup: 13 Block: -19 Hit: KND] A fantastic block/whiff punisher. It is a fast, hard-hitting shoulder with good range that knocks down on normal hit and wall splats as well. This is Feng’s punisher for moves that are -13 on block and will also reliably hit -15 moves with push-back that his hop kick will not reach. It is one of Feng’s key whiff punishers due to its range and speed, and deals a nice chunk of damage to any opponent that makes an error. This move also hits low to the ground, so it will actually hit certain characters out of their stance (Eddy’s Relax), and will even hit certain characters on the ground. He also has a Rage Drive version of this move which will be covered in the Rage section. This move has a key flaw: It is very punishable at -19, that means that everyone in the game (even Steve and Bob) can launch punish a badly timed shoulder. F+3,4: [Startup: 21 Block: -16 Hit: Launch] Another great whiff punisher. It is a long range natural combo 2 hit string that is Feng’s most damaging launcher, and is one of the best get up kick whiff punishers in the game. While you can't hit-confirm the string, there is a window before the first part hits you can use to whiff or counter-hit confirm if you see your opponent flinching or pressing a button. Be careful and confirm the whiff first as the string is -16 on block. A good thing to keep in mind is that f+3 [Startup: 21 Block: -3 Hit: +9] alone is a pretty decent entry tool at -3 on block, however don’t overdo it as it is slow and very linear. u/f+2: [Startup: 18 Block: -10 Hit: +3 Counter Hit: KND] A very evasive poke. This move is a great panic move as Feng steps to his left and strikes while moving, and is a key part of his evasiveness, and will even evade moves that a regular sidestep can’t. It is a really good counter for the opponent’s pressure, and can even be used after safe but disadvantageous moves to essentially “steal your turn” (Match-up Tip: u/f+2 is a good option select against Katarina’s 4,4,4 Harrier mix-ups). The move is -10 but is nonpunishable by most of the cast due to the push-back on block. On counter hit, the opponent goes into a crumple-stun where you can get a small conversion with a micro-dash into D+4 or B+1+2. At the wall, you can convert into a wall combo, though the opponent needs to be positioned with their backs right against the wall, as they might get pushed back too far at weird angles. The counter hit property doesn’t happen much, as more often than not, you will be hitting the opponent’s side, which does not trigger the stun. This move is also riskier at the wall on offense or defense. On offense, it can give the opponent more room to maneuver, and there is less push-back on block, allowing more characters to punish it, but can still be used to keep the opponent at the wall if they try to move away from the wall. On defense when Feng’s back is to the wall, it can aid in escaping, but is not good to use if the wall is to his left. It also loses to moves that track to Feng’s left, and homing moves. This move’s biggest weaknesses are it’s short range and vulnerability to SSL. d/f+3: [Startup: 18 Block: -7 Hit: Launch] A safe close-range launcher. This move doesn't look like it launches due to the weird flip animation on the opponent. However, on normal hit you get a full combo. It’s best property is that it is safe on block at -7, making this a great move to use in mix-up scenarios since the risk/reward ratio is in your favor. It is perfect to mix up with SS+4 since you can do d/f+3 out of a sidestep. Since it is a low-hitting mid, it will hit characters out of their low stances (and it can hit certain characters on the ground, especially off-axis), but it is a slower option. The biggest drawbacks are that it is slow, highly linear, and has poor range. SS+4: [Startup: 20 cs10~ Block: -31 Hit: Close: KND, Far:-2] A high-risk, high-reward sweep. One of Feng’s better close-range mix-up tools, this grants a full combo on hit in close range (clean hit). At further range, you are left at negative frames on hit, but on counter hit the move grants the same knockdown at tip range as well. This move is also great at the wall because you still get a combo there as well. This is mainly used in mix-up scenarios, using it in conjunction with SS~d/f+3 in the open and SS+1+2 at the wall. It will also catch SS, which is those moves' biggest weakness. Make sure you're not predictable, because this move is death on block. SS+1+2: [Startup: 22 Block: +1 Hit: KND] Another excellent mid, this wall-splats on hit and is +1 on block, leading to more pressure at the wall, with b+1 being a strong option afterwards as it will now splat on ch for even more damage. In open ground there is too much push-back to capitalize on the plus frames. This move replaces d/f+3 as the mid option for the 50/50 with SS+4 at the wall. It’s got more range than SS+4, but you want to use this as close as possible to your opponent to force more of a 50/50 scenario and keep them guessing. Note that this is also slow and highly linear. Important Moves
SS+2: [Startup: 15 Block: +3 Hit: +9] A homing move that is very advantageous on hit with decent range, and is a great way to get into Back-Turned stance. In Season 3 the advantage on block was increased to +3 from +1. Now you get solid pressure off of this. BT 1 and BT d+4 are uninterruptible, but can be back-dashed or ducked by the opponent, except at the wall where they cannot backdash to avoid these. BT 1+2 has enough range to force the opponent to block when they backdash, but is interruptible. On hit, you are at +9 and can do any back-turned mixup that you want. Note this is a high, and people tend to duck this move in fear of SS+4, so using this in conjunction with his other SS options will mitigate the risk of the opponent ducking. df+3+4: [Startup: 23 Block: Hit: KND] A long range homing mid. This move is used to keep the opponent’s sidestep in check from mid range, and is also completely safe on block at -8. On hit, the opponent is knocked down and Feng gets a guaranteed 4~3 for a follow-up. Since the season 2 patch it now also screws airborne opponents, though it’s use in combos is quite limited. It’s main drawback is that it is very slow. f+1+2(The Turkish Slap): [Startup: 19 Block: -9 Hit: KND] A new addition to Tekken 7. It is a high homing move that is his main tail-spin from his juggles. It has good range, moves him forward, and tail-spins the opponent on natural hit for a juggle. It can also punish moves that are -19 on block with pushback, so this is a good punisher option for certain moves. It is a high move, so it can be ducked, and it is slow at 19 frames. Also on block it’s -9, which is safe, but does mean your turn is effectively over, which can be a very bad position to be against characters with strong 50/50s. f,f+2:[Startup: 18 Block -9 Hit: KND] A long range mid that wall splats on hit, and a decent approach tool. It is good at the wall as you can approach and wall splat from range. It is -9 on block, and while you technically lose your turn, there is some slight pushback. With good spacing, you can do some scummy setups like making their jab whiff and punishing with b+1+2. This move is another that is weak to SSL, but you can sort of cover that with a deep dash to re-orient. f+4: [Startup: 18 Block: -9 Hit: Launch] f+4 is a decent keep-out tool while spacing, and up close can lead to some decent mixups. It launches on normal hit, so you can punish -18 moves on block that hopkick can’t punish due to pushback(Julia’s d/v+2,1; Law’s WS+2). It is also safe on block at -9. It is a little bit slow to come out though, so it’s generally recommended to use it from a distance, and due to its myriad of string extensions, the opponent should always be second guessing their approach if you use this move properly. f+4,B (Block: -5 Hit: Launch) Leads to Feng’s back-turned state. This is generally your best option from f+4 since you have many options to snuff out overly aggressive players and can create a lot of space with B to d/b to potentially bait out whiffs. On hit you still get a full combo, just tap df to turn around and use WS+1 to convert. On block you are at -5, and in BT the opponent can punish with jabs or magic 4 strings. Against highs Feng can tap d/b to duck under, though if the opponent uses a mid they can punish this heavily. From BT Feng also has some scary mixups, but first the opponent needs to respect you. f+4, 3 and f+4, 4 serve as a canned mixup in and of themselves, and can be used in moderation to stop opponents from pressing buttons after f+4. f+4,4 ( Block: -12, Hit: Close: KND Far: -1) leads to a low sweep that is very similar to his SS+4, as you get a full combo on clean hit, and will even go under many mids. It is -12 on block, which can throw off your opponent since it looks like SS+4, but don’t rely on this happening. This isn’t really recommended at higher levels of play since it can be low parried on reaction. However it is a decent 50/50 when used sparingly in conjunction with f+4, 3. f+4,3 (Block: -10 Hit: KND) is a good mid option that knocks down on hit. If you land both hits, this will result in a knockdown that also floor breaks. This extension is also uninterruptible by anything. If the 3 hits by itself, the opponent is forced into a hard knockdown that gives you a guaranteed stomp. It is -10 on block, but it can still be made safe if blocked at the tip. 2~1 [Startup: 24 Block: -3s Hit: 0] Is a mid keepout tool with a very active hitbox. Being only -3 on block you can throw this move out when you feel the opponent is about to Dash in at you. If you connect with the first hit, you can consistently confirm into the second hit 2~1, 1[Block: -13 Hit: Launch] and launch for a full combo. Practice hit-confirming this, you can confirm the second hit whenever the first hits(even at the tail end of its active frames). Keep in mind, this has very slow startup so opponents can stuff it out on their approach if you mistime it. The first hit recovers slow too, so opponents can whiff punish it effectively, make sure it does not whiff. d/f+2,2: [Startup: 20 Block: -6 Hit: KND] Another powerful mid, mid string near the wall, especially now in season 2 since it serves as Feng’s Wall Bounce move. This is a damaging safe on block mid, mid string. d/f+2 by itself should never be used as it is less safe than the full string, so only use the full sting. This is safe at -6 (Matchup tip: Yoshimitsu can block punish this move with Flash, so do not throw this move out against him), and on natural hit it grants a juggle off the wall. The wall bounce can occur even at 2 back-dash cancels away from the wall, making this more of a threat to your opponent. However, it comes out slow at 20 frames and is very linear, but if you’ve trained the opponent to stay put with b+4, this is a terrifying tool to deal with. In Season 3, a universal change is that Wall Bounce occurs now on side wall hits, so the wall bounce happens more consistently. d+4 [Startup: 14 Block: -11 Hit: 0] is a very fast low poke at 14 frames. This move is great to throw out if you need a quick low poke to harass the opponent, and is a great option to close out a round, as it has some surprising range as well. This move also tracks sidestep both ways, so you can use this like a low Fish Hook. This move doesn’t high crush and does very little damage, so it gets overlooked, but this is a good poke as every other key low poke Feng has is either slow (d+2 at i20) or risky (d/b+3 at -15 on block). It also has a follow up with d+4, 1+2 [Block: -10 Hit: KND ]. It is a counter hit low mid string that knocks down on hit and wall splats and can also Wall Break/Balcony Break for a full combo. This is not a natural combo, and the second hit is punishable on block at -10. Important Moves

d/f+4:【起手:15帧 被防:-6 命中:+5】这是一个远程中段戳击技,与德拉古诺夫和艾丽莎的d/f+4类似,具有不错的射程,命中和被防时都有一定的击退效果,可用于诱骗对手出招打空后进行反击。冯威的这个版本起手较慢,为15帧,但被防时更安全,为-6帧。d/f+4最适合在对手处于中距离时作为中段选项来终结回合,冯威在近距离有更好的中段选项。注意此招线性很强,可以被侧闪。 d/f+4,3(被防:-6 命中:+13帧有利)是第四赛季新增的中段、上段连段。这个招式是冯的工具库中的一个出色补充,因为它是一个自然的连击,以芭蕾舞眩晕结束,命中时能提供巨大的帧数优势(如果对手的背部直接靠在墙上,还可以造成墙壁冲击),从而继续压制对手。此招命中后,冯有不少无法回避的后续招式。如果你不想使用B+1+2,这可以作为风险较低的挥空惩罚技;当旋踢会挥空时,这也可作为15帧的格挡惩罚技。这个连击也是一个回旋招式,它基本上让下后+1,4变得过时,因为它伤害更高、恢复更快,并且在第四赛季为冯提供了新的连招选择。它在被格挡时是安全的,但这是一个上段招式,所以尽量不要一直使用。d/f+4,2(格挡:-11 命中:+1)是第三季新增的中段、中段连段。命中时为自然连招,但格挡时为-11。当对手开始蹲防d/f+4,3连段时,可用此招进行择。d/f+4,2,1+2(格挡:-19 命中:击倒)在中立状态下表现极差。其为-19,因此全角色均可对其进行浮空连,且可被13帧或更快的招式打断。不过,此连段可作为连招中的另一种选择。现在,该连段是你在开阔场地的最大伤害终结技,且拥有不错的墙壁搬运效果。作为墙壁连招也十分出色,仅比1,3;b+1+2少1点伤害,并会造成翻转效果,从而获得良好的起身压制机会。 f+2,1:【启动:16~17帧 格挡:-5 命中:+6】一个可确认 counter hit 的连段。你可以使出前两招,因为第二击的安全性最高,为-5。第三段攻击本质上是b+1+2,被格挡时的风险相同。如果第一段攻击打出 counter hit,你可以用第二段攻击确认 counter hit 并完成连段。三段攻击均可延迟,因此你能轻松确认前两段攻击。无论第二段攻击是普通命中还是 counter hit,第三段攻击都能命中,但你需要快速确认第二段攻击已命中。第三段攻击同样可造成墙壁冲击,因此若三段攻击均在墙边命中,你将获得伤害极高的墙壁连段。此招式可追踪向左的侧移和横移,这与他的大多数关键招式不同(若延迟第二段攻击,即使命中也可能打空)。 WS+2:【启动:15帧 格挡:-7 命中:+7】一个可靠的站立中段招式。此招式命中时能提供不错的有利帧, counter hit 时则能造成与下前+3相同的浮空效果(后续连招也相同)。如果对手在你使用下后+3后没有出招,这是个不错的选择;同时,通过下、下前、中立的输入方式,也可以在蛇步(Snake Dash)后使用此招,使其成为风间仁在立回中可靠的 counter hit 工具,毕竟风间仁在立回中安全的中段 counter hit 工具并不多。注意,此招式的范围不算大。 situational moves

d/b+1: [Startup: 16 Block: -12 Hit: +4] A long range, reasonably fast mid poke that can go under highs sometimes(Not a true high crush). As with many of Feng’s moves it is weak to SSL. This move gets its strength from all the options that stem from it. db+1,4 [Block: -2 Hit: KND] is a natural combo string, a new addition to Tekken 7. This is a 16 frame punisher that knocks down on hit, wall splats, and is a good whiff punisher. It has about the same range than Feng’s Shoulder, so you can punish whiffs for 5 more damage than b+1+2. This is also one of Feng’s two Tail-spin moves in the game, so this is used in certain combos. d/b+1 can catch an airborne opponent, meaning you can float for a combo with the full string. On block, it is very safe at -2, so you can still easily put Feng’s evasion to good use, but the 4 is a high and doesn’t jail, so can be ducked. If your opponent is not ducking, you can abuse this move. db+1,2 [Block: -11 Hit: +7 Counter Hit: KND] The mid mixup to d/b+1,4, this move is another natural combo string. The second hit is a mid, so it can be used if the opponent is ducking d/b+1, 4. On counter hit, the second hit knocks down guaranteeing a B+1+2. It is punishable on block, however. Both d/b+1, 4 and d/b+1, 2 can be heavily delayed to bait retaliation, but won’t combo at max delay, even on counterhit. d/b+1,B [Startup: 16 Block: -9 Hit: +7] Holding back after d/b+1 will transfer Feng into Deceptive Step, A.K.A, Kenpo. This is great for baiting whiffs from the opponent and punishing them when you have confirmed the opponent pressed a button. However, an opponent can use a long range move to interrupt if they anticipate the stance transition, so be careful. d/b+1,F [Startup: 16 Block: -16 Hit: 0] is used to transfer into his Shifting Clouds stance for mixups. The transition to STC is the same and has the same properties as using f+3+4 (this will be explained in further detail in Stances). This is the riskiest option, only use it if the opponent is hesitating, or if you notice the opponent pushing buttons after d/b+1 to hit Feng’s Kenpo transition. Be wary, sharp opponents can backdash after d/b+1 on block as an option select, and it will make the 4 option whiff, Block the 2 and bait out Kenpo and STC stances for punishment. u/f+3: [Startup: 21 js9~ Block: -2 Hit: KND] A move that is often overlooked, but is a decent tool to add to your arsenal. Similar to Dragunov’s u/f+4, this is a low crushing move that gives you a small combo. It is very safe at -2, and on hit you get a guaranteed follow-up with 4~3. If the wall is to Feng’s right, he can convert into a full combo with 1+4 (You can also use d+4, 1+2 as an easier option since 1+4 pickup can be inconsistent depending on the angle of the wall). Keep in mind, it is slow at 21 frames, has a poor hitbox, and has weak tracking, especially against SSL. d+3 [Startup: 16s cs4~ Block: -17 Hit: -3] is a weird looking low poke. It high crushes very fast, and deals decent damage. It is negative on hit and is launch punishable on block, but if spaced right some characters struggle to punish it. d+3+4 [Startup: 12s cs4~ Block: -13 Hit: -2] is a generic low that is still usable. This move is Feng’s fastest low at 12 frames, high crushes on frame 4, and is a great option to close out a round. It deals very low damage, is -2 on hit, and -13 on block, so it is a little risky and can be launched by certain characters (Kazyua, Josie). u/f+4: [Startup: 15 js9~ Block: -13 Hit: Launch] Feng's hopkick, it is a mediocre one due to the poor range and stubbiness of the move. Many -15 moves cannot be punished by this due to pushback. You have to use a different punisher, which more often than not, is b+1+2. Nonetheless, it is still a hopkick that crushes lows and is a juggle starter, so it still has its uses. b,f+1: [Startup: 25 Block: -15 Hit: KND] A very evasive move. Feng takes a big step back and strikes out. The move knocks down on normal hit and wall splats. On counter hit it leads to a mini combo with ff+3 (which also floor breaks on Forgotten Realms). The move is launch punishable on block, and more often than not, Feng can get hit out of it. It is a risky gamble, especially when Feng has a safer evasive option with his Kenpo Step, but it is still good if you have the right read. d/b+4: [Startup: 30s cs6~ Block: -26 Hit: KND] A low sweep that starts a full combo. This sweep is a homing move and high crushes, so it can be used on a hard read. You can also use this at range 2 to 3 as this can be hard to whiff punish, as long as you’re not predictable. Use sparingly, as it is quite slow and is death on block. WS+4: [Startup: 11 Block: -7 Hit: +7 Counter Hit: +29G] Feng’s 11 frame while standing punisher. It is weaker than other WS+4s because the damage is comparatively low, and it’s not good to use against opponents that use slides, as the pickup grants limited follow-ups. You still have to use it as a while standing punish, and this move and has its frame advantage on hit buffed from +4 to +7, however they are still pushed back a bit, so your best options for follow up are d/b+1, d/f+4 and d/b+3. This move is good to use as an uninterruptible follow-up to moves like d/b+3. The counter hit will make opponents scared to press buttons. It is also accessible from QCF as a fast option, so it can counter hit often, which it great as it deals the exact same stun that d/f+1 grants on counter hit, leading to free mixups. f,f,f+3: [Startup: 20 js5~ Block: +6 Hit: KND]A standard running 3, A.K.A., Slash Kick. This is a decent move to use on approach, as it gives great frame advantage on block and pretty solid tracking. On hit, the opponent is knocked down, and you get a free f+3+4 Stance mixup that is uninterruptible if they tech roll. If you’re able to execute Instant While Running moves, you can use this up close. It is one of the slower Slash Kicks, and can be sidewalked if you are predictable with it. Situational Moves

FC+d/f+1: [Startup: 21 cs1~ Block: -12 Hit: -1 Counter Hit: Hit: KND] A high crushing low poke. This is going to mainly be used after d/b+3 on hit for a mix-up, but you can also access if from QCF stance as well. The counter hit is just like d+2 as you get a guaranteed Crouch Cancel into stomp. It is not that risky on block at only -12, and is -1 on hit, similar to d+2 as well. FC+d/f+2 : [Startup: 18s Block: -14 Hit: Launch] A crouching mid launcher, similar to King’s FC+2. This is a new addition to Tekken 7, and it gives a full combo on natural hit. This is also Feng’s i18 WS punish. It isn’t used often as a punisher as WS+3 covers most launch punishable lows as it is consistent and deals more damage. It has more range than WS+3, so it’s still useful as punishment for moves that WS+3 can’t punish, such as Law’s Dragon Tail or Jack’s Debugger. It is punishable on block at -14. d/b+2: [Startup: 20 cs6~ Block: -11 Hit: 0] Another decent low poke. It high crushes, has decent tracking and is also only -11 on block, so is not a huge risk to throw out every once in a while(compared to other lows). What makes the move interesting is the string extensions. d/b+2,2 [Block: -17 Hit: KND] is a very risky low follow-up that launches for a full combo with f+1+2. If the first hit counter hits, this second hit is guaranteed, and it still launches. If the first hit connects, the opponent won’t be able to low parry the second but can still block the second hit and launch. However, you can also cancel the second hit by inputting d/b+2,2,b [Block: -15 Hit: -4] for mind games to mess with the opponent. However this is still launch punishable if the first hit is blocked and leaves you at a bad disadvantage on hit, preventing you from pressuring further. This is somewhat alleviated by the third hit, d/b+2, 2, 2(The Baby Tantrum)[Block: -8 Hit: KND]. The third hit is mid and safe, and on hit knocks the opponent down in front of you. The full string is a bit cheesy against lower level players, but higher level opponents can use a reversal to parry the third hit or use a Rage Art to blow through it if the opponent has rage, although the opponent could still die depending on how low their HP is. Grounded face up 3+4: [Startup: 30 js28~ Block: -3 Hit: KND] A get up tool that grants a full combo if it hits. This replaces the generic 3+4 spring kick that characters have when they are Face Up, Feet Towards on the ground. The move can be used to whiff punish opponents who use mids for Oki, but it will lose to lows and low-hitting mids. You get a full conversion if this hits, and this also tends to irritate people when they get hit. ff+1+2: [Startup: 23 pc6~22 Block: -12 Hit: KND] Feng’s Power Crush. Unfortunately, this is not a good Power Crush in terms of using it as a get-off-me tool like other armor moves in the game. However, this move is useful for pressuring at the wall. This move wall splats on normal hit, but is -12 on block. Similar to Akuma’s Focus Attack, you can hold 1+2 to charge the move [Startup: 39 pc6~22 Block: +3 Hit: +14]. This move has been reworked in Season 3. It is now +3 on block up from plus 1, and the pushback and block was reduced noticeably, so this is now more solid at the wall for pressure. On hit, the opponent is left in a stun state at and the pushback on hit was reduced as well. Before in open ground, you had to do a difficult dash into b+1+2, but now the opponent is much closer. B+1+2 is guaranteed anywhere with no dash needed. 4~3: [Startup: 27 js15~ Block: -4~+4 Hit: +4~+13s] A really good oki tool and is one of the few moves that can hit meaty in Tekken 7. These types of moves are seen more often in 2D fighters, where using a move on an opponent’s wake-up makes it so the move hits later in its animation, giving more frame advantage than usual on block and hit. This is used after Feng’s open ground combos ending with f+3,4. Follow up with a short dash into 4~3 and Feng can be +4 on block if timed perfectly. You can on occasion throw it out in neutral as it does and it goes over lows at the tail end of the move(from frame 15 of the animation) and if it counter hits, the opponent is knocked down and D+2 is fully guaranteed. However there is a good bit of risk in neutral because it is slow, can be floated for a full combo, and can be sidestepped pretty reliably. Reversals (Parry)
Feng在你有预读时拥有一些有趣的返技选项。 f+3+4(STC)【返技窗口:i3 ~ i18】具有自动格挡效果,能够格挡拳脚攻击,在格挡两次攻击后会造成击倒。对连段很有效。 1+2【起手:21帧 格挡:-12 命中:击倒】【返技窗口:i2 ~ i9】是一记肘部攻击,在起手阶段集成了拳击砂防(sabaki)格挡。这招是游戏中最出色的拳击返技之一,因为当你返中拳击时,可以通过dash f+1+2打出一套完整连招。普通命中时会造成崩地状态,可接必中的B+1+2;在墙边时,则可以用1+4、b+1+2衔接连招。对于这个反击技,有很多不错的使用时机。当冯的招式被格挡后处于-5到-7的负帧时(对手在此情况下通常会尝试出刺拳来抢攻并发起进攻),比如d/f+3、1,3、d/f+2,2、WS2、D/F+4,3,该反击技可以稳定格挡住刺拳。它还能格挡住一般的冲撞攻击。 此招式被格挡后有-12的负帧,属于可被确反状态,并且无法格挡踢击或一些双臂攻击,因此主要应在有明确预判时使用。 WS+1+2【启动:23帧 格挡:-9 命中:+3】【反击窗口:3帧起~8帧】是另一个内置拳法格挡的招式。该招式在第三季中进行了一些调整。在普通命中时,冯以前能击倒对手并使其撞墙,现在对手会保持站立状态,导致冯在命中时仅有+3的优势,这对这个本就很少使用的招式来说是个重大削弱。该招式过去是-10且被防御时不安全,现在变为-9且被防御时安全,但被防御时的击退距离缩短了,因此对手能更容易地反击。当此招式逆转对手的出拳时,对手会进入类似完全蓄力ff+1+2后的眩晕状态,这部分机制也进行了类似的调整。命中时的击退距离显著缩短,命中优势也从+30降低至+16。在开阔场地,冯以前可以突进接f+1+2打出完整连招,在墙边则可以接f+3,4或d/f+2,2。现在,冯在任何情况下都能稳定衔接d/b+1,4。此格挡可用于应对特定连招,例如保罗的b+2,1,但适用范围仍然非常有限。 b+1+3或b+2+4【反击窗口:i2~i10】可格挡拳法以及使用双臂的招式。无法被晃招破解,且会发生侧向交换。 快速连招
以下是冯的刺拳选项列表,他拥有多种可用选项: 1. 【起始帧数:10,格挡后:+1,命中后:+8】标准刺拳。此招与下前+1在大多数情况下用于展开进攻。这是一记扎实的刺拳,你可以使用前+1来获得稍远的距离(也称为前手刺拳)。 1,1【格挡后:-11,命中后:+2】及其延伸招式是冯近距离压制手段的不错补充。虽然有一定风险,但如果整段连段能有效混合使用,会让对手很难应对。这是一个上中段连段,第二击在 counterhit 时可衔接连招,因此尝试蹲伏并惩罚冯是非常危险的。尽管此招为-11,但后续连段会阻止对手进行惩罚。1,1,2【格挡:-14 命中:-3】用于衔接1,1,使对手难以进行惩罚。此连段在第二季中有所调整,现在无法延迟第三段攻击,因此必须确定要出连段的第二段还是第三段。如果1,1打出 counter hit 后按2,对手会保持站立状态,而非仅使用1,1时造成的崩解硬直。此连段格挡后同样为-14。 1,1,2,1【格挡:-14 命中:-1】格挡后同样不安全,但这是冯的10连击的起始部分。因此对手需要在格挡惩罚和下段格挡之间做出选择,因为10连击的后续两段(3,4)是自然连段。在3,4之后不要继续10连击,因为接下来的攻击总是下段,很容易被格挡。1,2【格挡:-1 命中:+7】是一套优秀的1,2连段。其格挡值为-1,因此非常安全。由于此连段在对手格挡时会形成压制,且命中后能带来良好的优势,可用于持续施压。 1,2,2【格挡:-13 命中:+3】是他伤害最高的10帧确反技,总体而言也是相当出色的10帧确反技。在第三季中,该招式得到加强,命中优势从+1提升至+3,使你能更轻松地保持压制。1,2,2,b【格挡:-13 命中:+5】是一种不错的进入背身状态的方式,相比单纯的1,2,2,它在命中时能提供+5的更高优势。冯(Feng)在此招式命中后会处于有利局面,与SS+2被格挡时的情况完全相同。背身1和背身下+4是不可被打断的,但对手可以后 dash 或蹲伏躲避。背身1+2拥有足够的范围,能迫使后 dash 的对手进行格挡,并且能命中蹲伏的对手,不过它可被快速轻拳打断。只有在确定1,2,2能命中时才使用这个连招。如果操作不到位会很危险,因为它在被格挡时是-13帧,而背身状态下的-13帧意味着对手可以进行强力确反,他们能使用15帧的起手技进行确反。 1,3【格挡:-5帧 命中:+6帧】是另一个不错的10帧确反技,它只比1,2,2少2点伤害,且命中时能提供略高的有利帧。它在被格挡时也是安全的,所以即使确反失误也不会有风险。第二击可以被蹲防躲过,但如果打出 counter hit,你就能获得一个免费的肩撞(或下+4,1+2来进行墙壁搬运),还能造成墙壁冲击。 2【起手:10帧 格挡:-3帧 命中:+5帧】单独使用时不太实用。2,4【格挡:-12帧 命中:-1帧】是一个自然连招,所以可以用作确反技,但并不是一个好的选择。只有当你想用2,4,1,b【格挡:-13 命中:-2】进入背身状态时,此招才有用。这是一个不错的进入背身状态的方式,你可以将其与2,4,1【格挡:-13 命中:击倒】混合使用,后者是一个能造成墙壁冲击的中段击倒技,可以打断那些急于惩罚2,4的对手。如果第二击命中Counter,那么第三击必中。在Counter命中时,第三击后可接b+1+2。注意这两个选项在被格挡时都可被确反。 连招
连招1:7击69伤害(2 1)1,下前4 3,前前4连3,后1+2 连招2:8击94伤害 前3 4,1,前1+2,下前3 4,前下前下前下后3 连招3:10击52伤害 空中下前1,前前4连3,1,疾冲1,疾冲1,疾冲下前4 3,3连4 3 连招4:13击110伤害 前3 4,3 3,下前1,下前4 3,前前,下前4 3 站立状态,前前,后1+2 站立状态,1 3,后1+2 连招5:11击85伤害(3 4),下1,站立状态1,下前4 3,前前,下前4 1+2 1+2,站立状态1 3,后1+2 连招6:9击70伤害(3 4),下1,站立状态1,下前4 3,前前,下前4 1+2 1+2,站立状态后1+2 连招7:9击69伤害 前3 4,下前1,下前1,下前4 3,前前,下前4 1+2 1+2 连招8:13击105伤害 前3 4,前3 4,1,下前4 3,前前,下前4 3,前前,后1+2,1 3,后1+2 连招9:17击150伤害 1 1 2 1 3 4 2 4 3,前3 4,1,前1+2,下1+2连击10:8次命中 77点伤害 1+2,前,前1+2,(3 4),1,下前(4 3)破招!,疾退1+2 怒气爆发与驱动技
暴怒驱动:b+1+2(按住)[启动:13帧 格挡:+3(墙边+9) 命中:击倒] 冯的暴怒驱动是其b+1+2的强化版,能从较远距离将对手击向墙壁,类似里奥和保罗的暴怒驱动。这是你暴怒状态下的首选使用方式。命中时,你可以打出完整的墙壁连段,也能在连段中作为简单的墙壁搬运选项使用。在开阔场地格挡时,暴怒驱动为+3且会将对手推开。这并非最佳使用方式,但作为推开对手、重置为中立局面并争取几秒钟时间的手段还算不错,这在需要拖时间获胜时也有帮助。不过,此招在墙边效果最佳。墙边格挡时,冯处于+9帧有利,因此他可以使用任何18帧或更快的招式,而对手必须应对择。大多数对手在此之后会不敢轻易按键,所以你也可以进入BT架势或使用侧移选项来获得更多的择手段。当对手被推至墙边时,还会受到5点的破防伤害,因此可以用 rage drive( rage drive)来终结残血的对手,这感觉非常爽快。 rage art:下+1+2【启动:20帧 8~17 格挡:-22 命中:击倒】 冯的rage art和90%的角色一样。除了它是中段之外,没什么好说的。惩罚技 以下是冯(Feng)对负帧招式的惩罚方法: -10帧: 1,3:24伤害,+6帧优势 1,2,2:26伤害,+3帧优势 1,2,2,b:26伤害,+5帧优势 -13帧: b+1+2:33伤害,良好范围,击倒,墙壁冲击 -15帧: u/f+4:15伤害,浮空,范围较差 d/f+4,3:34伤害,中等范围,帧优势,墙壁冲击 -16帧: d/b+1,4:35伤害,中等范围,击倒,墙壁冲击 -18帧: f+4:17伤害,浮空 -19帧: f+1+2:28伤害,旋转浮空 -21帧: f+3,4:30伤害,浮空 站立惩罚: -10帧:FC+d/b或d+1:6伤害 -11帧:WS+4:18伤害,+7帧优势 -13帧:WS+1,2:29伤害,+1帧优势;仅WS+1可应对滑步浮空 -15帧:WS+3:20伤害,浮空,判定框不稳定 -18帧:FC+d/f+2:25伤害,浮空 -23帧:u/f,n+4:25伤害,浮空 反制策略

Shut down his evasion: While Feng is a very evasive character and can be tough to pin down, knowing how to deal with them takes away many defensive options. Kenpo and b, f+1 both move feng backwards, so advancing moves will shut these options down and will hit Feng out of them, especially since Kenpo had its autoblock startup 5 frames later in Season 2. u/f+2 can be very tricky to deal with as it can evade moves that a regular sidestep can’t, especially if the Feng player is good at being unpredictable with it. If you catch a pattern, you can blow up u/f+2 with homing moves or moves that track right, and it can be sidestepped left reliably as well. Play the Player, Not the Character: Since Feng is an open-ended character, players can play Feng how they want to. While character knowledge is important, no two Feng players are exactly alike and can have different tendencies and timing to their offense. A lot of the time, especially in a tournament setting, you will have to guess what they’ll be doing until you’ve gotten a grasp of their habits. Some good options to limit Feng in general include Sidestep left (which can shut down key pokes such as d/f+1, b+1), fuzzy-guarding his lows and backdashing to avoid obvious Sidestep Mixup attempts. Note that Feng has options to counter these strategies, so keep attentive, and adapt to the situation. Weak Punishment: Do not be afraid to throw out moves on occasion that are -12 on block. Feng has no 12 frame punisher and only has jabs from i10 to i12, and might even be safe depending on the pushback. Also, note your character’s launch punishable moves that have pushback. Feng’s Hopkick has horrible range, so he has to use b+1+2 or D/F+4,3 to punish any -15 moves with even the slightest amount of pushback on block. Also keep in mind his 13 frame WS+1, 2 is one of the weaker 13 frame while standing punishers and his while standing 3 also has bad range and a bad hitbox. Depending on the move blocked, Feng might not be able to launch it consistently. Stay Patient, Turtle Up: Don't retaliate after blocking close range moves such as d/f+1, WS+1, and his 1 or 1,2 options. Most Feng players will follow these up with uf+2 or b+1, which can crush or beat most options. Stay patient, and try to space out Feng at spacing 2 (2 Character Spaces away) to get the life lead, then turtle him out to cause frustration. This will force Feng to come in, and his options are limited to his WS+1, QCF options and long range options such as f+3 and f,f+2 that can be sidestepped. Strings To Watch out for: 3,3,4 high high low -12 On block low parry. On hit you must block. Feng can cancel 3,3,4 b which goes into back turned, which is -6 on hit, -17 on block. 3~4,3 mid low -26 Very easy to see and low block, low parry for style points. F+4,3 high mid -10 F+4,4 high low -12 Block for a couple frames after the high, then low parry. Feng can go into back turn at -5 on block. His fastest option is i10 which are BT 4 and BT d+4. A simple d/f 1 will stuff his options. D/F+4,3 mid high -6 D/F+4,2 mid mid -11 D/F+4,2,1+2 mid mid mid -19 Ducking is usually better here because the D/F+4,2 doesn’t deal much damage and is only +1 on hit. If they try the third hit, you can still block and launch even if the second hit connects, natural or CH. D/b+1,2 mid mid -12 D/b+1, 4 mid high -2 The high extension comes out a little bit slower so you can delay the duck by a little bit and still block the mid. D/b+2,2,2 low low mid -8 Not a natural combo. 2nd low can be blocked, if Feng doesn’t finish the mid extension it is -18. Punch Parry or Rage Art/Power Crush the third hit as it is safe on block if possible. D/b+1+2,2 mid low -11 On block, low parry. On hit you have to block the low. B+2,3,4,2 mid low mid mid -5 Must low parry the 2nd hit. u/f+3+4,3 mid high high high -6 Last hit duckable. No high extension string is -10. Launch punishable if the last couple hits whiff. b+3,3 mid high -6 Second hit duckable on block 1,1,2,1,3,4 high mid mid mid low mid -17 2nd hit counter hit launches. String can be delayed. 5th hit must be low parried. Most Important Moves to punish B+1+2: -19 F+3, 4: -16 b, f+1: -15 QCF+1: -14 (Cannot Low Parry) d/b+3: -15 b+1: -10 d+2: -11 1+2: -12 Round Up
Feng is a versatile character with a strong neutral game due to his strong Mid and Low pokes to pressure the opponent, as well as a good selection of mix-up options that he can choose depending on the situation. He is also very hard to lock down due to his many panic and evasive moves, as well as good movement options that allow a player with good spacing to be at the range they want to be, which combines well with his simple and effective whiff punishment. Feng excels at range 0 to 1, as all of his best pokes are able to reach the opponent at this range and it allows him to control the pace of the match. Feng is an absolute monster at the wall, due to his rage drive and his oppressive mid and low pokes to keep the opponent in check. Many of his mix up options, such as SS+4 and SS1+2, QCF+1 and QCF+1+2 and his BT options still combo at the wall, forcing the opponent to guess constantly and allowing Feng the freedom to bully his opponent effectively. Feng's punishment is overall below average. While he doesn't excel at punishing mistakes, his i10 and i13 punishers are good. However, he has no good i12 punish and his hopkick has bad range, meaning unlike many other characters, Feng can struggle to punish -15 moves. His WS punishment isn’t very strong either, his WS+4 has low damage (+7 on hit, however), his i13 punish gives only +1 on hit for 29 damage. His i15 frame WS+3 does launch, but it has a bad hitbox and can whiff against certain moves. Due to his sheer number of usable moves, Feng is tougher to use than other characters due to the fact that you have to do more decision-making in a clutch situation. However, his simple execution and reliance on good movement and punishment makes him a good character to learn the game with. He is one of the few characters who actually becomes more interesting the better you get with him. Feng is recommended for players who want a character with strong poking, evasion and a versatile toolkit. Feng Wei - Season 2 Changes 2,4,1: Opponent reaction on counter hit was changed. - This now knocks down for a guaranteed shoulder. 3~4, 3: Changed from -15F to -26F on block. Feng reaction on block changed. - Feng goes into stagger state when blocked, the move is now much easier to launch punish. This move is only used as a combo ender, and is rarely used in neutral, so this is a negligible change. b+3+4 / f+3+4,B / d/b+1,B: “Block timing slower by 5F.” The autoblock for Kenpo stance and all transitions to Kenpo now activates at frame 45 instead of frame 40. This means the opponent is more likely to stuff Feng out of a misplaced Kenpo. d+2 / d/b+3 / f+3+4,4 (STC 4) / During sidestep 4 / b+1: “Opponent closer on block”. Reduces the pushback on block, making the moves slightly easier to punish. A negligible change overall, since d+2 and d/b+3 are hard to see and aren’t blocked often. STC 4, SS+4 and b+1 were already easy to punish, so these moves don’t change in useability. d/f+2,2: “Causes Wall Bounce on hit”. d/f+3+4: Causes Screw on mid-air hit. d/b+1+2,2: “Opponent reaction on counter hit was changed”. - The second hit now has the same Counter Hit Property as d+2. This string is still not great, since the opponent can easily low parry it. f,f+3 (or back toward enemy 3): Changed from +4F to +8F on block. Opponent reaction on counter hit was changed. f,f+4,3: Recovery for both players increased by 1F. Changed to -14F on block regardless of input timing. - This is now easier to react to and punish. A negligible change since this move is used rarely in the neutral. 1,1 / 1,1,2: Opponent reaction on counter hit for 1,1,2 was changed. Input window changed from 26F to 24F. Feng Wei - Season 3 Changes 1,2,2: Changed the frame advantage upon hit from +1 frame to +3 frames. 1,2,2+b: Changed the frame advantage upon hit from +3 frame to +5 frames. - Both of these changes were covered in Jab Strings. Overall a buff to his 10 frame punishment. 3: Decreased the distance between the character and the opponent when the move hits or is blocked. Negligible change, the first hit is not great in neutral 3,3,4+b: Shortened recovery time by 4 frames. - Negligible change, the string is very bad, -17 on block and -6 on hit. 2~1: Changed the frame advantage upon hit from +5 frames to +8 frames. Decreased the distance between the character and the opponent when the move hits or is blocked. The move can now also be performed with “During sidestep 2~1”. - Potentially decent move now. The issue is that the move starts up slow at 24 frames. However, it is -3 on block, and is now very hit-confirmable into the extension. Now can also be done from sidestep, but you cannot do it immediately after a sidestep stills as SS+2 still comes out if performed too early. 2~1,1: Changed the frame advantage when blocked from -12 frames to -13 frames. Shortened the recovery time after the move hits by 2 frames. Changed the opponent’s behavior when hit from the side. Increased the distance between the character and the opponent when the move is blocked. Decreased the distance between the character and the opponent when the move hits. - Feng can now connect f+1+2 consistently for his best BNB. The same knockdown occurs when Feng connects at the opponent’s side (Not at their back), combos will need to be adjusted since f+1+2 is less consistent off axis. 3~4: Changed the frame advantage when blocked from -12 frames to -7 frames. Shortened the recovery time after the move hits by 5 frames. The move can now also be performed with “During sidestep 3~4”. - 3~4 now can combo into d/f+4, 2, 1+2, but does not get a full combo. On Bears, d/f+1 does pick up for a full combo. The move can now be performed when sidestepping. 3~4+b: Changed the frame advantage when blocked from -7 frames to -2 frames. Shortened the recovery time after the move hits by 5 frames. -3~4 back gets a full combo with BT 2, BT 1, d/b+1, 4. Negligible changes, as 3~4 is still too slow and linear to be effective with it. f+4,3:Changed the attack startup from frame 21 to frame 22. Decreased the distance between the character and the opponent when the move is blocked. - The pushback on block was reduced, making punishment a little easier for your opponent. The string is still uninterruptible, the startup increase doesn’t matter and still can be made safe on block by spacing the move properly. F+4,4: Changed the attack startup from frame 31 to frame 32. Decreased the distance between the character and the opponent when the move is blocked. Changed the startup of the character’s crouching status from frame 24 to frame 10. - This can be interrupted and be punished on block slightly more consistently. It now high crushes a lot faster and on the same frame as SS+4. F+3+4,1: Shortened recovery time after the move hits by 2 frames. - Feng can now combo into Dash f+1+2 consistently. F+3+4,3: Increased the distance between the character and the opponent when the move is blocked. - Major pushback on block now. Big nerf on a rarely used move. d/f+4: Changed the damage from 15 to 14. Decreased the distance between the character and the opponent when the move hits. - The damage decrease is not a big deal. d/f+4,2,1+2: New move. - See Situational Moves for more information about this string. d/b+1,2: Changed the frame advantage upon hit from +5 frames to +7 frames. - Good buff, more frames to pressure more effectively. d/b+2,2+b: Changed the frame advantage when blocked from -17 frames to -15 frames. Changed the frame advantage upon hit from -6 frames to -4 frames. - Negligible change, still launch punishable on block, still cannot pressure effectively on hit. d/b+2,2,2: Changed the damage from 5, 10, 30 to 10, 10, 25. Decreased the distance between the character and the opponent when the 2nd hit is blocked. - The damage increase to the first hit makes it a slightly better low poke, the damage total is the same if all three hit as it was in Season 2. d/b+3: Changed the damage from 12 to 14. - Good buff, this is a key low, and the damage will add up a little better now. B+2,3,4,2: Changed the damage from 15, 8, 12, 21 to 15, 10, 13, 22. Increased the range of the 1st and 4th hits of the attack. Changed the input window for the 4th hit from 27 frames to 37 frames. - This is a much better wall combo option due to the last hit being delayable, it now deals the same total damage as 3,3>4. Back-Turned 1: Changed the frame advantage when blocked from -1 frame to -3 frames. Increased the recovery time for both the character and the opponent by 2 frames upon hit to slow down the interaction. Increased the lower range of the attack. - A small nerf, since Feng is still safe enough to sidestep. It is now easier to hit-confirm into b+1+2. The attack now has a slightly bigger hitbox, always nice. KNP 4,3+4: Changed the frame advantage when blocked from -5 frames to -3 frames. Shortened the recovery time after the move hits by 2 frames. Decreased the distance between the character and the opponent when the move hits. - Safer on block, and leads into a combo more consistently with new options such as d/f+1. u/f+3+4: The character is now counted as crouching from frames 6 to 23 of the 1st hit. - Now high crushes from frame 6-23, making this a slightly more effective panic move. F,f+2: Changed the frame advantage when blocked from -10 frames to -9 frames. - Overall great buff, as this is a key approach tool that had to be spaced properly to avoid being punished. Gigas and Jack could punish it consistently, but not anymore. Feng now has a proper Demon’s Paw. f,f+1+2 Hold: Changed the damage from 28 to 25. Changed the frame advantage when blocked from +1 frame to +3 frames. Changed the frame advantage upon hit from +23 frames to +14 frames. Decreased the distance between the character and the opponent when the move hits or is blocked. - Major Re-Work, overall more useful for wall pressure. Move Details are explained in Situational Moves. QCF 1: Increased the strength of the pushback to reduce the frequency at which the character would switch places with the opponent. - Second attempt to fix an infamous bug where Feng teleports behind the opponent. We’ll see how this works out. QCF 1+2: Changed the damage from 23 to 21. Changed the frame advantage when blocked from +5 frames to +4 frames. Changed the frame advantage upon hit from +9 frames to +8 frames. Decreased the distance between the character and the opponent when the move is blocked. - Major Re-Work. Move details are listed in Important Moves. While Standing 1,2: Changed the damage from 11, 12 to 13, 13. - Small buff, 14 Frame punish now deals 26 damage now from 23. First hit is also buffed as this is a key approach tool. More damage is always nice. While Standing 4: Changed the frame advantage upon hit from +4 frames to +7 frames. - Good buff. Feng Wei - Season 3 Changes Full Crouch d/f+1: Changed the damage from 18 to 19. Changed the frame advantage when blocked from -13 frames to -12 frames. Changed the frame advantage upon hit from -2 frames to -1 frame. - Good buffs, it cannot be launched anymore by Kazuya, Josie and Eddy. Move Details in Situational Moves. Sidestep 2: Changed the frame advantage when blocked from +1 frame to +3 frames. - Good buff, more BT pressure. Move Details in Situational Moves. Sidestep 4: Changed the startup of the character’s crouching status from frame 13 to frame 10. - Same change as f+4, 4. High Crushed on frame 10. Faster crushing is always nice. While down (facing up) 3+4: Changed the frame advantage when blocked from -5 frames to -3 frames. Shortened the recovery time after the move hits by 2 frames. Decreased the distance between the character and the opponent when the move hits. - Same changes as KNP 4,3+4. (Ver.3.10) d/f+4,2,1+2: Shortened the recovery time after the move hits by 3 frames- Less recovery on the string at the end means it’s now easier to dash in for a wall combo after this is used to carry to the wall. Good change, as the move can now fulfill its intended purpose. (Ver.3.10) Forward Dash: Fixed an issue in which pressing " D/F+(button)" simultaneously during a forward dash would accidentally perform the move for “FF+(button)"- Bug fix, before when dashing into d/f+4 you would get ff+4, this issue has been fixed. Feng Wei - Season 4 Changes 1+2: Changed the Frame Advantage when blocked down from -13 Frames to -12 frames. Shortened the recovery time upon hit by 1 Frame. Increased the range of the attack. Changed the time of punch parry effect from 2-7 frames to 2-9 frames. Buff. Less punishable on block, has slightly more range, slightly easier to convert off the move, punch parry window is slightly longer. D/F+4,3: New Move Covered in Important Moves. D/B+1,2: Changed the frame advantage when blocked from -12 Frames to -11 Frames. Changed the opponent’s behavior when the move lands as a counter hit. Buff. Less punishable on block, now guarantees B+1+2 on Counter hit. D/B+3(Counter Hit): New Move Covered in Important Moves. D/B+4: Adjusted the motion since it was difficult for the opponent in jump status to land a mid attack. Bug fix. Attempt to prevent the move from crushing hopkicks/orbitals. BT D+3: Adjusted the motion since it was difficult for the opponent in jump status to land a mid attack. Bug fix. Attempt to prevent the move from crushing hopkicks/orbitals. B+2,3: Increased the range of the attack. Negligible change. Slight Range increase on the second hit of the string. B+4: Decreased the distance between the character and the opponent when the move hits. Minor buff. Pushback was slightly reduced on hit. U/F+3: Increased the lower range of the attack. Minor buff. Hitbox was lowered slightly. U/F+4: Increased the lower range of the attack. Minor buff. Hitbox was lowered slightly. FF+2: Increased the range of the attack. Minor buff. Slight range increase. FFF+3: Increased the lower range of the attack. Minor buff. Hitbox was lowered slightly. WS+1: Changed the attack startup from frame 14 to frame 13 Huge buff. Can now punish -13 frame lows more effectively. WS+1 comes out faster in neutral. WS+1,2,1: Changed the opponent’s behavior when the move lands as a counter hit. Minor buff. Guaranteed shoulder when third hit is a counter hit. WS+2: Changed the frame advantage when blocked from -9 frames to -7 frames. Changed the opponent’s behavior when hit. Shortened the recovery time after the move hits by 2 frames. Reworked. On hit does not give small combo anymore. Leaves opponent standing at +7 on hit. Safer on block at -7. Counter hit gives the same combos as D/F+3. FC D/F+2: Decreased the distance between the character and the opponent when the move hits. Minor buff. Leaves opponent slightly closer to make combos consistent. SS4: Adjusted the motion since it was difficult for the opponent in jump status to land a mid attack. Bug fix. Attempt to prevent the move from crushing hopkicks/orbitals. (Ver.4.20) 1+4: Damage was changed from "7,10" to "10,12". The homing performance of the 2nd hit is improved. “Since it was a high-risk move with low return, damage was increased. After the 1st attack was successful, the 2nd attack sometimes unnaturally whiffed. This is now fixed and it can hit the opponent more easily.” (Ver.4.20) F+4: Damage changed from 15 to 17. “Since the aerial combo damage was low compared with other characters, the damage was increased.” (Ver.4.20) D/F+4,3(Second Hit only): Damage changed from 18 to 20. “Since the damage of the aerial combo was lower compared with other characters, the damage is increased.” (Ver.4.20) B+1+2: We changed the damage from 30 to 33. “Since the aerial combo damage was low compared with other characters, the damage was increased.” (Ver.4.20) Rage Drive: Damage changed from 35 to 38. “Damage increased in order to maintain the damage difference with B+1+2” (Ver.4.20) U/F+4: Damage changed from 13 to 15. “Since the aerial combo damage was low compared with other characters, the damage was increased.” (Ver.4.20) WS+1,2: Damage changed from 13 to 16. “Since the return was low when used as a punisher, the damage was increased.” (Ver.4.20) WS+3: Damage changed from 16 to 20. “Since the aerial combo damage was low compared with other characters, the damage was increased.” Credits Taken Notes from KDQ|CoffeeYello Discords: Tekken Zaibatsu, Feng Wei Players to Watch: Yuu Nashi Sunchip Callmenoob Hao Joey Fury Mateo Knee Heera Malik