换一换
换一换 


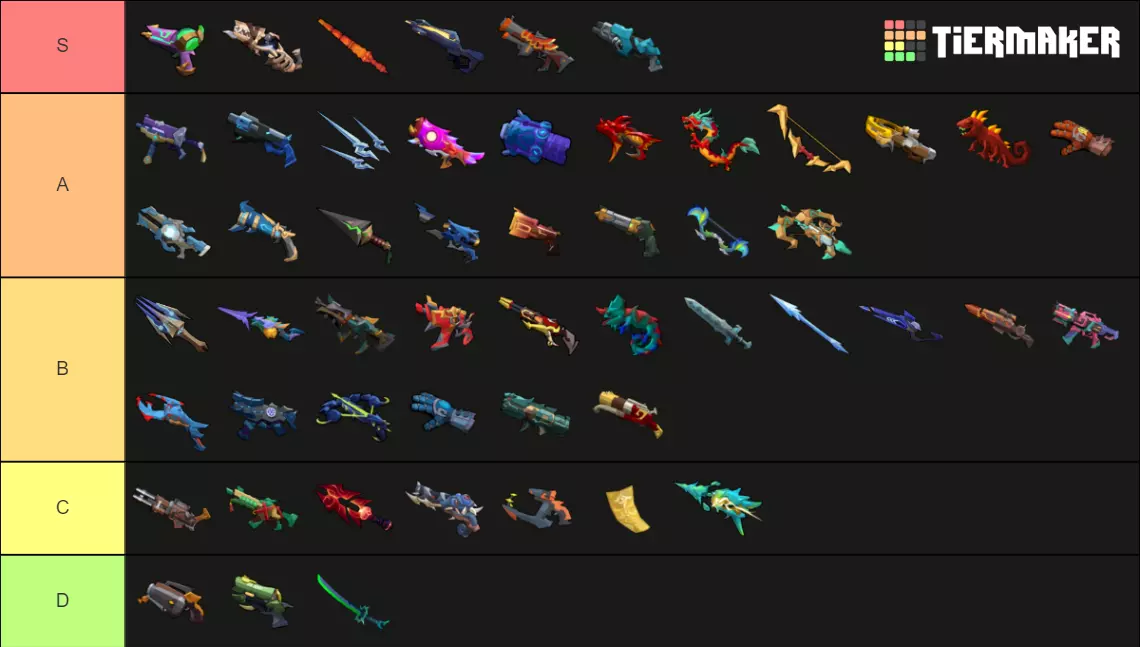
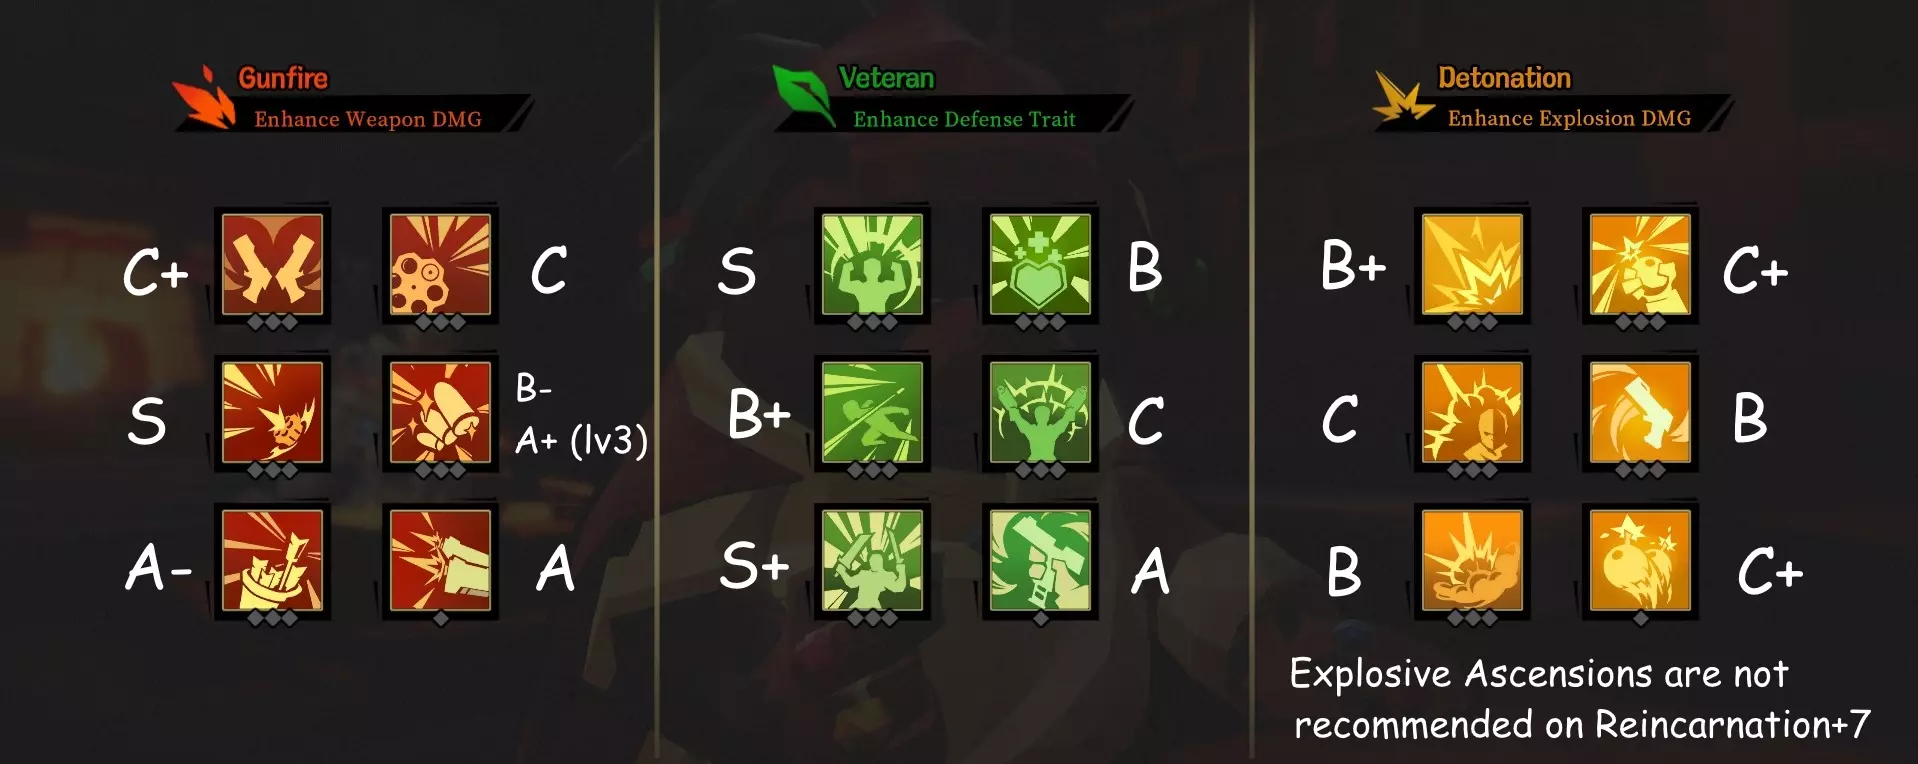
Rating all of Ao Bai's Ascensions, along with miscellaneous gameplay tips. This guide is focused on Reincarnation+7 difficulty and Solo Play. Occult scrolls are not factored, as this is a general guide and you cannot rely on getting specific scrolls. Impact of Talent 2.0 and Reincarnation changes *Added new sections to the guide, and updated the ascension ratings and descriptions. -Ao Bai's HP sustainability is now a serious issue when even the weakest enemies on Reincarnation+7 can break your shield in a single hit. It's very sluggish to recover HP after taking multiple hits. -The burst damage protection talents in talent 2.0 are far less effective on Ao Bai because of his high HP:shield ratio. -Ao Bai Spiritual blessings aren't that good, except for the newer 'One Dog Armor' that tries to put a band-aid over his other core issues. (see the Spiritual Blessings section for details.) -Explosive weapons are in the worst state they've ever been in; as most lack crit scaling or elemental effects they have trouble keeping up with the high enemy HP scaling. I do not recommend Explosive specific ascensions at high Reincarnation levels because they are only viable with specific builds (such as damage gemini 'justice' or magazine gemini 'tiger cannon') that you cannot reliably expect to get. Overall all of Ao Bai's weaknesses have become even more exaggerated and he did not get any significant benefits from the update. He's definitely a weaker choice if aiming to play Re+7. Taking the 'One Dog Army' blessing mitigates some of these downsides, though it also results in a very basic playstyle. Why to Play Ao Bai (or why not to play) +Powerful Dual-Wielding skill that massively improves his damage +Easy access to fusion effects by Dual-Wielding elemental weapons +Secondary Grenades are fast and can stagger enemies =Gets to use a couple of HP based occult scrolls no one else wants -Overly reliant on Dual-Wielding for his damage. -Explosive weapon tend to have poor damage scaling ability. -Many talents/ascensions are weaker than average or don't even do anything if not Dual-wielding. -Spiritual Blessings are mostly on the weaker side. -Poor shield/hp distribution. Anti-burst talents especially do not favor high HP ratios. -Can't effectively use 2-handed weapons (they prevent dual wielding). This limits some of your gemini options. -Dual wielding elemental weapons can make it impossible to see through all the particle effects (this can legitimately get you killed) Important notes about Launchers Launchers are fun to use. Many people will probably pick Ao Bai just because they want to blow everything up. While Launchers can end up being powerful, they are an inherently restrictive weapon type that needs more support to do well by the lategame. Some enemies (and anything with the 'defensive' prefix) are very annoying to deal with if you can't land criticals or fusion effects (though some launchers can land crits). Additionally, most explosive weapons have a relatively low damage output against a single target, and require specific inscriptions or occult scrolls to compensate. Since most launchers lack good element effect rates, they can't rely on fusions either (which is unfortunate because dual-wielding fusion builds are extremely strong). Unless your build is very powerful and you know what you're doing, I recommend only taking a launcher in your second weapon slot (if taking a launcher at all). Reserve the first weapon slot for a stable automatic or semi-automatic weapon that can cover cover for its weaknesses. This is typically much more reliable than having launchers in both weapon slots (especially since some powerful ascensions require an automatic weapon to function properly). Dual-Wielding 2 heavy weapons also destroys most of your mobility, so you really need strong offence and/or defence capability for that. For a typical launcher, you will primarily use it to clear rooms, and rely mostly on your other weapon (and Dual-Wield) to be able to handle elites and bosses. As a result it's usually better to invest in ascensions that improve the whole build, rather than the dedicated explosion ascensions that will only help your offhand weapon. Not taking dedicated explosive ascensions also retains your build adaptability; Ao Bai can use a wide variety of weapons and there's a very high chance you will be offered some especially powerful non-explosive weapons. Your build will be worse if you want to swap to a new weapon and you have a bunch of explosion ascensions that end up doing nothing. However sometimes you find an especially powerful launcher; either through strong inscriptions or a good combination of scrolls you end up with a 'boss viable launcher' (you'll be able to judge this after enough experience, but it typically involves bonus projectile inscriptions or being able to mitigate or avoid the reload time). After you obtain a launcher you determine to be 'boss viable' then both primary explosion ascensions become significantly higher priority, as they offer heavy benefits if you're using launcher as a primary weapon. Unfortunately due to harsher enemy scaling, the likelihood of having a viable launcher decreases as the game difficulty increases. Since you cannot properly determine if you can get a strong one until area 2 at the earliest, it's not recommended to invest in pure explosion ascensions in Reincarnation+7. !! Don't over-commit to explosive ascensions before you have a good launcher !! Stagger 101 (new) This section will explain how the stagger mechanic works, as it's very important to surviving the early game as Ao Bai, and remains effective throughout the game at preventing incoming damage. Staggering not only disables and knocks the enemy back for a short duration, but it can also interrupt enemy attacks and put them on cooldown. For example, a Longbow-Man or Bandit Retainer who has their attack interrupted will not be able to use it again until their internal cooldown is up. (These specific enemies also have an interesting property where staggering them; it also deletes all of their current airborne projectiles). Proactively using stagger with Ao Bai's grenades is a core component of his gameplay and you should do your best to make use of it. How to stagger: -Hitting a regular (non-elite/boss) enemy with an attack that has a 'stagger property' normally has a 100% chance to stagger the enemy. -Attacks with the 'stagger property' include, most explosive weapons, explosive fusions, certain other weapons (ex. Argus, Goshawk, Swords), and most importantly Ao Bai's secondary explosive grenades. When enemies can resist Stagger: -Enemies cannot be staggered again if they were staggered within the last ~5 seconds. You cannot stagger an enemy again until this timer finishes. -Some enemies, such as Dark-faced bandit and White Shark are permanently immune to stagger. -Some enemies are immune to stagger only during certain animations (ex. Octopus is immune while firing, some enemies are immune during their dodge animation) -The Resistive prefix that some enhanced enemies have creates an aura that gives all enemies within range a ~50% chance to ignore stagger. Spiritual Blessings (new) (These buffs are available from a vendor unique to reincarnation mode. They cost 150 soul essence each and are not permanent, so players without a maxed talent tree may want to pass on taking them.) One Dog Army "When not Dual-Wielding, +150% weapon/skill DMG, -20% DMG taken, and +3% HP recovery per second." The band-aid blessing. This can carry your damage for the first half of the game before you get a gemini weapon, and the survivability bonus is significant enough that it's often just not worth even bothering to Dual-Wield. Having this makes an overall run much easier, basically autopick this if you see it offered at the start of the run. Also of note is that the 'Close Call' ascension becomes significantly better with this (as you have always have a stable source of healing) and all the dual-wield related ascensions become worse. The downside is that you end up playing as a character with no real abilities or any interesting ascensions; it results in an extremely basic playstyle. Weapon Genius "When Dual-Wielding: +100% weapon DMG if weapon types match, otherwise +50% lucky shot chance." By 'weapon types', it's referring to the specific class of weapon, like Assault Rifle, SMG, Injector, etc. (check the in-game logbook for details). The damage bonus is decent enough regardless of if the weapons match or not, but for a blessing the numbers are a bit underwhelming for a conditional damage bonus without any other benefit. Dual-Wield restricted benefits aren't ideal since they don't do anything Ao Bai during his weak downtime state. Still, the effect isn't bad, and Ao Bai's next two blessings aren't exactly good so you'll probably pick this by default if 'One Dog Army' isn't an option. Battle Scarred "When under 50% HP, have a 50% chance to recover 20% of max hp when taking damage." A 'survival' talent that can only activate when you're already probably one hit away from death. The 50% HP threshold is at a mere 75 HP by default and only heals 31 HP. That's assuming it even activates and you don't just die instead. It's also not uncommon to take over 75 damage which prevents this from even having a chance to do anything. Don't bother with this. Atomic Bomb "30% chance when throwing a grenade to throw your entire grenade stock at once." This talent is a joke, but at least it's a funny joke. On top of an extremely unreliable activation chance, just dumping your grenade stock is actively detrimental for most builds that just reserve them for staggering enemies. Even a dedicated grenade build wouldn't want this to activate randomly and lose their stock (not that grenade builds are very worthwhile on Reincarnation+7 to begin with). You're basically relying on the 'Grenade Master' ascension's chance to not spend grenades on throw so you can get the effect for free, but that's another layer of randomness you have to deal with. Gemini Etching (new) This is the new core strategy for basically every character at higher reincarnation levels. It let's you setup endgame gemini weapons as early as area 2, before enemy HP starts to scale to a silly degree. Gemini inscriptions can be etched onto any weapon for a fee at the craftsman if either one of two conditions is fulfilled: 1. The weapon already has 4 inscriptions before etching (every naturally dropped weapon starting in Area 2 qualifies for this). 2. The weapon is enhanced to +5 (This lets you bring a weapon from the first area, but is more expensive as you have to spend money to upgrade it first. Usually used for bringing a secondary weapon, though if sometimes you may have a good primary you want to bring instead). As Ao Bai, the Gemini to aim for is usually the 'share damage type' Gemini (alternatively you can do Magazine share gemini with an automatic weapon and a Tiger Cannon, but that is generally less effective). You will have one Fire/Lightning weapon and one Corrosive Weapon. Lightning Weapons are the safer pick at the moment because Miasma is very strong at higher difficulties. Normally for the secondary weapon (the 'gemini fodder') the only stat that matters on it is 'elemental effect chance'. This stat is directly applied to the first weapon on top of its existing elemental effect chance (ex. Lightning Blast gemini'd with Fire Tower results in Lightning Blast having a 20% chance to inflict shock AND a 50% chance to inflict burning with every bullet). However since Ao Bai can dual-wield and will often use the secondary weapon in combat as well, you can just pick a weapon that has good application rate and not necessarily a high elemental effect rate (like the Pupil or Porcupine shotguns). Also while there are Two-handed weapons with high elemental effect chance, using them as gemini fodder will still disable your dual-wield skill, so it's typically a bad idea to use those. Most of your money should be reserved for etching and reforging the gemini's until they match. Do not waste money upgrading weapons you don't intend to use for gemini etching as the process can be expensive and the sooner you get it done the better off you will be. Ascension Tier List This list covers Ascensions in a vacuum. Specific ratings will shift as your build progresses in a run. Use your own judgement. (ex. defensive Ascensions may have more value if you have only found offensive occult scrolls) Some Ascensions are also rated differently depending on how many points you have in them already. (ex. lv3 rating assumes you already have 2 points invested). The Tiers are divided as follows: S: Excellent Ascension. Almost always pick if it doesn't conflict with your build, A: Great Ascension. Can't usually go wrong with these. B: Good Ascension. Good to have, just not as high priority. C: Mediocre Ascension. Not necessarily 'bad' but you probably shouldn't pick these over other ones.
ćŞĺŁ°

双枪专家:双持武器时,武器伤害+100%→+125%→+125%,弹药消耗翻倍。等级3时弹药消耗不再翻倍。 该技能即使只投入1点,伤害加成也相当高,但弹药消耗翻倍对大多数武器来说是显著的负面效果。即便你能管理好弹药储备,增加的 reload 次数也会使该技能带来的整体伤害提升比看起来要小。对于不太在意该负面效果的武器,或者你已选择其他能帮助减轻此负面效果的升华(例如神射手和弹药专家),这个升华会更有用。双持本身就有天然的伤害加成(除了能同时使用两把武器外),所以它并不真的需要来自【升华】的额外伤害支持,尤其是那些在双持处于冷却状态时毫无帮助的【升华】。此外,【升华-身经百战】存在一种交互机制,即有时你可能需要消耗更多弹药。

持续火力:击杀敌人或摧毁物品后,武器伤害和爆炸伤害提升50%..75%..100%,持续6秒..6秒..20秒。 这是敖白仅有的两个可在双持状态外生效的通用武器伤害加成之一,且明显是两者中更优的选择。它能提供稳定的伤害提升,触发条件相对简单(尤其是在3级时),6秒的持续时间足够你完成下一次击杀并刷新持续时间。你也可以通过破坏任何可摧毁物体来触发此效果,因此大多数 boss 战都有激活它的方法。不必局限于爆炸武器就能获得伤害加成的价值不容小觑,在游戏后期拥有武器适应性会让你的游玩体验更加稳定。

弹药专家:双持武器时,每秒恢复5..10..15点备用弹药。等级3时,射击有20%几率不消耗弹药。即使在等级1,这也可能解决你在游戏过程中遇到的大多数弹药问题。它能让你同时使用两把大型(蓝色)弹药或特殊(橙色)弹药类型的武器,而不必担心弹药耗尽。弹药恢复效果会针对你武器上的每种独特弹药类型各触发一次,装备两把普通弹药武器将每秒恢复5点普通弹药,而装备一把普通弹药和一把大型弹药武器则会每秒分别恢复5点普通弹药和5点大型弹药。由于弹药掉落机制对你有利(当你弹药不足时,极有可能获得弹药补给),所以这个天赋通常不是必需的,但敖白往往会被诱导浪费弹药,而这个天赋可以对此起到弥补作用。你想升级多少级取决于你的射速加成,以及你拥有的其他弹药相关天赋和卷轴,这由你自行决定。此外,虽然天赋【幸运弹药】3级是另一种节省弹药的方式,但作为一个3级天赋,相比之下获取它并不稳定。

余烬爆发:当弹匣内剩余弹药不超过30%、40%或50%(或仅剩1发)时,武器伤害提升40%、80%或120%。 这是阿奥的第二个通用武器伤害增益。“通用”一词或许并不准确,因为目前实际上只有3种适用武器(弹匣容量为1)能让阿奥充分受益于该效果。对于弹匣容量为10的武器,此效果仅能提升12%、32%或60%的总体伤害,表现相当糟糕,但聊胜于无。若不打算使用特定武器,选择该技能的意义不大。不过,若获得【高级弹药库】秘卷,可手动将任意武器的弹匣锁定为1发,这种情况下该天赋的实用性会显著提升。

幸运弹药:双持武器时,幸运一击几率提升20%..30%..40%。等级3时,击中敌人可恢复消耗的弹药。 乍一看,这个词条似乎不太强力,数值相对较低且仅在双持时生效。但作为幸运一击加成而非武器伤害加成,如果你已有武器伤害加成且缺乏幸运一击加成,它通常能带来比表面数值更高的伤害提升。若将其升至3级,对自动武器而言更是巨大优势,你几乎可以随心所欲地射击而无需担心弹药问题。需要注意的是,由于弹药返还在命中时触发,带有弹道飞行时间的武器可能会在命中判定前就触发换弹动画,因此它们从这一机制中获得的收益会较少。

潜能释放:双持武器时,若持续射击,每0.5秒获得1层效果,每层提供+3%武器伤害和+1%幸运一击几率(最多叠加20层)。停止射击时,每0.5秒失去5层效果(即失去+15%武器伤害和+5%幸运一击几率),直至所有加成消失。 只需投入1点技能点,该升华在20层时可提供高达+60%武器伤害和+20%幸运一击几率,但条件是你至少使用1把自动武器并按住开火键不放。通过恰当的 timing 发射半自动武器可以防止层数减少,但仅使用半自动武器很难叠加层数。重新装填武器不算作射击,因此如果可能的话,尽量确保在自动武器装填时能够使用副武器射击,以防止层数掉落(【神射手】升华也可以通过减少装填时间来提供帮助)。在前两个区域,这一点本身就能提升你的首领 dps,但拥有其他不限于双持模式的伤害加成对清房仍然有帮助。 老手

肾上腺素激增:击杀敌人或摧毁物品后,受到的伤害降低20%..30%..40%,并在6秒..6秒..20秒内恢复最大生命值的1%..2%..2%。 这是阿奥最可靠的防御和续航手段。其触发条件与【持续火力】升华完全相同。防御加成效果显著,而生命值恢复是阿奥除双持外,不依赖卷轴或饺子的唯一回血方式。战斗中的持续时间几乎是永久的,即使房间内所有敌人都被消灭,如果你仍需要治疗,也可以通过破坏罐子来触发此效果。如果你已经有通过卷轴恢复生命值的方法,这个技能的重要性会略有下降,但仅伤害减免效果通常就使其成为一个值得选择的技能。

濒死体验:当最大生命值降低25%、25%、10%时,分别获得2秒、3秒、4秒的普通伤害免疫。 该天赋会在你陷入交火时随机挽救你的生命,但它在抵御伤害时不会提供任何视觉或听觉反馈,因此很难判断它何时真正救了你。每次受到相当于最大生命值25%的伤害时,伤害免疫就会生效;不需要来自单次攻击,所以它的触发相当稳定。3级时,几乎每次受到攻击都会触发,但低等级时,它可能在发挥作用前就已激活并失效。不要忘记,此技能不能保护你免受元素伤害,例如火球或章鱼加特林机枪,所以在这些危险附近不要掉以轻心。虽然这个【升华】本身不算特别强,但如果你有生命偷取来源,或者通过卷轴获得了大量生命值回复,它就会变得非常好用,因为在免疫伤害的持续时间内,你可以轻松回满整个生命值。

久经战阵【双持持续时间提升50%..75%..100%。等级3时,双持状态下每消耗20发弹药,双持持续时间增加2秒。】 如果出现这个升华,通常是必选的。阿奥的伤害主要依赖双持技能,因此延长其持续时间总是有用的。在等级3时,使用自动武器并配合弹药管理手段(例如“弹药专家”或“等级3幸运弹药”升华),你将在本局剩余时间内永久处于双持模式。其作用不言而喻。如果你的武器射速不足以维持双持计时器,也可以选择“双枪射手”或“超载”升华来增加弹药消耗。这次强化也是双发射器配置表现不佳的另一个原因,因为更难快速消耗弹药以维持双持状态的持续时间。此外,如果你获得了秘术卷轴【能量储存】,仅需投入1到2点技能点就能维持极高的双持 uptime,且无需担心弹药消耗。因此,如果你获得了该卷轴,请相应调整你的优先事项(装备【能量储存】后,若【久经沙场】等级为1/2/3级,双持状态的冷却时间分别为9秒、4秒、0秒)。

生存本能【最大生命值+20…+40…+60。双持状态下此加成翻倍。等级3时,双持状态下有50%几率根据受到的伤害值恢复生命值。】 将生存技能与双持绑定并不理想,因为当双持未激活时,苍(Ao)处于最脆弱的状态。至少该技能在双持状态外也能提供收益,每级20点最大生命值虽然不算多,但足以作为缓冲,抵御一些可能造成超过100点伤害的危险攻击。等级3时的加成在双持状态下能使有效生命值提升50%-100%,这实际上相当不错(不过对致命伤害无效)。

黄金逆袭:双持状态下,受到的伤害降低10%..20%..30%。双持等级3时,受到致命伤害时不会死亡,而是双持剩余时间减少3秒。 将另一个生存能力提升与双持绑定并不理想。它比“肾上腺素激增”提升差很多,提供的减伤更少、持续时间更短,还缺乏生命值恢复。理想情况是将此提升升到3级,并搭配3级“身经百战”,这基本上能让你无敌。但期望将单个提升升到3级并不现实,更不用说同时获得两个特定提升以及合适的弹药支持了。虽然理论潜力很高,但大多数时候它只是一个普通的减伤来源。

神射手:双持状态下,立即填满两把武器的弹匣。双持期间 reload 时间减少 50%。 这是一个非常实用的升华技能。 reload 时间减少对几乎所有武器都有帮助,而弹匣立即填满的效果让你在紧急情况下可以随时激活双持,无需先等待 reload。如果你想在副手使用重型发射器,这个技能尤其有用;重型发射器的 reload 速度很慢,而该技能是打造“能对抗 Boss 的发射器”的关键要素。它还与升华技能“潜能释放”有很好的协同作用,能降低你失去 buff 层数的风险。唯一的问题是,当某些【秘术卷轴】与武器组合使用时,你可能永远不需要实际装弹,这使得该功能在这些情况下毫无用处(此外,像【棱镜】和【微光】这类投掷武器也不会触发装弹)。 Detonation

爆炸强化:“爆炸范围增加2米、4米、6米,伤害提升30%、45%、100%。” 这是一个专注于清场的优秀爆炸类升华。在升到3级前,伤害加成较为一般,但爆炸半径的提升非常显著,对清场帮助很大。需要注意的是,减少爆炸半径的武器词条会在该加成之后生效,因此应尽可能避免这类词条。如果你不打算使用爆炸类武器,这个升华作用不大;如果还没有合适的发射器,不建议投入点数(仅为了强化手榴弹并不值得)。虽然这种强化效果很强,但通常不值得携带两把爆炸类型武器,因此这通常不会像其他选项那样大幅提升你的单体伤害输出(即使你有一把“可用于 boss 战的发射器”)。遗憾的是,爆炸武器在更高难度下往往存在伤害缩放问题,因此在更高轮回等级下投入此强化并非最优选择。

疯狂炸弹客【爆炸伤害增加20%..40%..60%,且爆炸每击中一个敌人,伤害额外增加5%..7%..9%。等级3时,爆炸每击中一个敌人,造成双倍伤害的几率增加9%。】 这是一个平庸的伤害提升,且仅限于爆炸物。你需要用爆炸击中3个及以上目标,这个进阶才能提供一个完全普通的伤害加成。一个仅限于爆炸物的伤害加成需要比这好得多才行,它几乎不值得优先于其他任何选项选择。

精准爆破【爆炸攻击若命中不超过1、1、3个敌人,伤害分别提升30%、45%、60%】 关于这个升华的一个重要区别是,它是一种特殊的伤害乘数,而非标准的 additive +伤害加成。这意味着它与+伤害来源的协同效果非常好(例如,如果你已拥有总计+100%的武器/爆炸伤害,此升华实际上会提供+120%伤害,而非+60%)。这能带来相当显著的伤害提升,但在3级前,它对发射器的常规使用场景(清理房间)帮助不大。不过,如果你有一把“可用于 Boss 战的发射器”,在叠加其他伤害加成后,它会对你有很大帮助。与【爆炸强化】不同,这个升华不介意【爆炸半径减小】的铭刻,实际上还能从中获得不少收益。你只有在拥有【可用于 Boss 战的发射器】时才应该选择它,否则如果它停留在 1 级或 2 级,就不太值得了。遗憾的是,爆炸类武器在更高难度下往往存在伤害成长问题,因此在更高轮回等级游玩时,投入这个升华并非最优选择。

【手榴弹大师】“手榴弹基础伤害提升100%..150%..200%。投掷手榴弹时有30%..45%..60%的几率不消耗弹药。等级3时每10秒获得1枚手榴弹。” 如果你想利用手榴弹伤害,那么“双重爆炸”进阶技能是必选的。现在手榴弹有了基础伤害加成,它们可以在一定程度上进行伤害缩放。然而,要在更高的轮回等级发挥作用,你还需要能使次级伤害翻倍的通用灵魂天赋,同时大量投入到这个技能、“双重爆炸”中,最好还要有其他伤害加成来源。考虑到手榴弹流派非常依赖随机数生成,其回报并不足够高。由于在轮回+7难度下敌人的生命值膨胀得非常高,你无法用单个未升级的手榴弹杀死小型突袭敌人,所以这一点在任何build中都可能是可行的。

超载:“重新装弹后,获得30%、45%、60%的射速加成,持续时间分别为3秒、3秒、6秒。” 与该类别中的其他升华不同,此增益效果会影响所有武器,而非仅针对爆炸类武器。射速加成相较于武器伤害加成更为少见,因此能与后者良好叠加。不过,射速加成存在一些问题,它会增加弹药消耗和整体装弹时间,从而在一定程度上削弱伤害收益。如果你有办法减轻这些缺点(例如【神射手】和【弹药专家】升华),或者使用对此不太敏感的武器,那么仍然可以充分利用该升华。如果你已将【久经沙场】升华升至3级,增加的弹药消耗也可能带来益处。由于基础持续时间不是很理想,因此双持模式下该效果收益更佳,因为两把武器都需要装填,这会增加其生效时间。与“神射手”天赋类似,你可能会遇到无需装填的情况,这会使该天赋失去作用,请注意这一点。

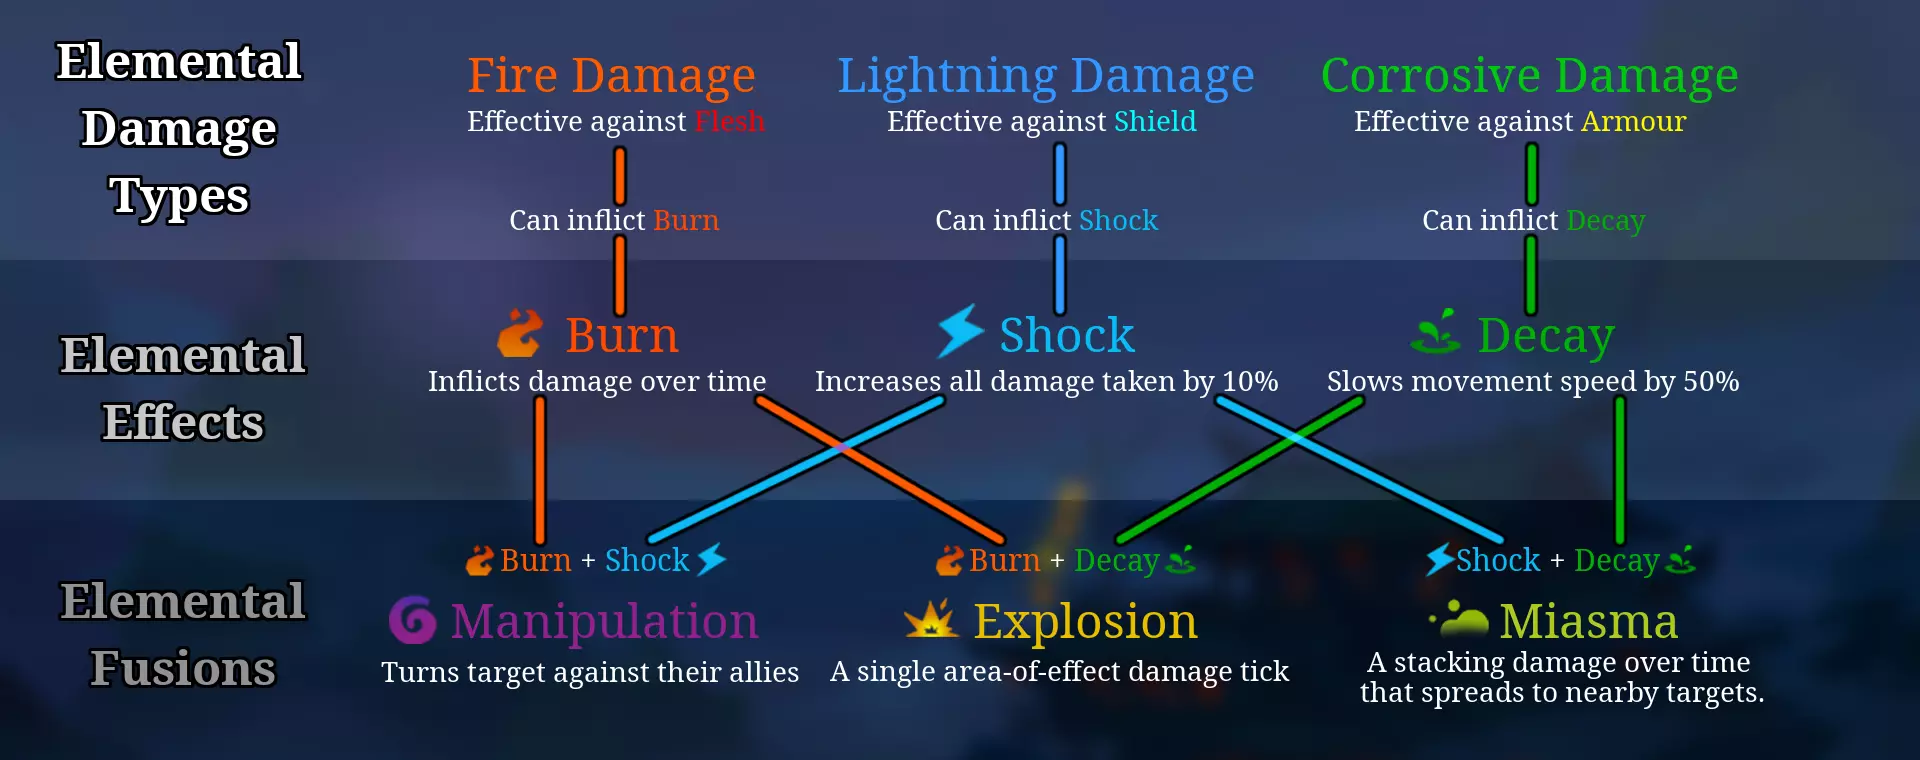
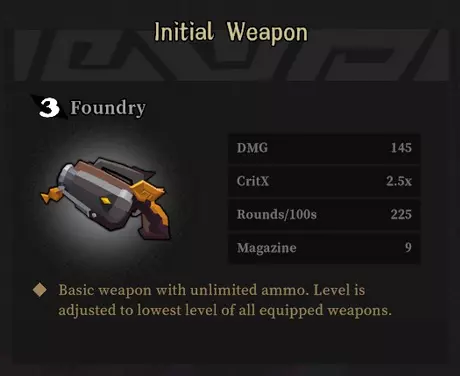
Double Explosions "Toss 2 grenades instead of 1 with no additional consumption." Every grenade throw now throws a second freebie grenade, functionally making each grenade throw do double damage. Mandatory if you're investing in grenade damage through 'Grenade Master' and worthless otherwise. See the 'Grenade Master' ascension description for more details. A point in this can also be ok in any build since in Reincarnation+7 the enemy hp bloat is high enough that you can't kill small rushdown enemies with a single non-upgraded grenade. General Tips About Dual-Wield -Since his generic damage boosting ascensions are very limited, Ao Bai's damage is often mediocre when Dual-Wield is on cooldown. It's important to hold onto it for the start of waves or potential elite spawns if possible. Don't use it as soon as its cooldown ends if you don't need to. -The 1%/s HP recovery while Dual-Wield is active is the only kind of sustain Ao has early on past his tiny shield (if he doesn't have 'Adrenal Rush' or certain scrolls yet). You can wait out the cooldown on it and keep casting Dual-Wield to fully restore your health, if you can endure how tedious this process is. -When Dual-Wielding, the weapon in your offhand has perfect stability. Having a stable weapon in the mainhand can entirely negate the poor stability of a normally unstable weapon in the offhand. -If you don't need to make use of the HP regen (or ammo recovery from 'Ammo Expert') you have during Dual-Wield, you can cancel it by switching to your Foundry pistol (or pressing the cancel skill /charge button) when after you clear a room to start the cooldown earlier. About your Weapons -Ao's weapon selection is extra important because he can use both of them at once, and he is less restricted than the other characters for his options. It's good for both your weapons not to have drastically different aiming patterns, otherwise they can be hard to use at the same time. -2-Handed weapons completely disable Dual-Wielding if they're in your inventory, so there's very little reason to consider picking them up. -Deciding on your elemental combination is important. I'll briefly explain the benefits of each setup here: ---Normal (no element): Most launchers don't have a natural element, and even if they do their elemental chance is usually poor. If you're using a normal launcher as one of your weapons, pairing it with another neutral weapon is perfectly fine. If you're using a combination of automatic or semi auto weapons, then picking an elemental combo is more ideal, though a double normal setup can still work. ---Manipulation (fire+lightning): The most defensive combination, immediately renders enemies harmless as they completely ignore you and only attack other enemies for the duration of the effect. However, this may indirectly reduce your damage as the erratic enemy movement can make it harder to land critical hits on them (though if there's no other enemies near, they'll stand completely still and become free kills). Decent option if you already have strong damage output, and less reliant on having a high elemental chance than the other two fusions. ---Explosion (fire+corrosive): The middle ground combination that offers some offence and some defence, each trigger causes a small explosive aoe immediately around the target. This explosion effect can stagger, and the damage is based off of the shot that triggers it. This is a nice option if your damage output is already solid, and there are many good fire based automatics you can pair with a corrosive secondary weapon. However since the explosion damage is based on the damage of the shot, you can't use this effect to compensate for a low damage output. ---Miasma (corrosive+lightning): The purely offensive option, causes a stackable damage over time effect that deals bonus damage to 'red' HP (not shield or armour). This damage is independent of the shot used to trigger it, so it is the best way to compensate for weak damage output. This is a very effective fusion to help Ao kill tough enemies while Dual-Wield is on cooldown. This also scales very well at higher difficulties since the damage is a percentage based on enemy hp. In the current game state at Reincarnation+7, it's typically easiest just to go Miasma most of the time as the damage it provides is massive. About Enemies -Ao Bai is one of the slower characters, especially when wielding heavier weapons. Because of this you can have difficulty sidestepping homing projectiles from bandit retainers and longbow-men, and may have to rely on cover more. -Be careful about walking too far forward in rooms and triggering the second set of enemy spawns if your Dual-Wield cooldown is not ready. Having a big enemy pile (or an elite spawn) can quickly lead to getting overwhelmed. -Make use of your grenades (or explosive weapons) to stagger annoying enemies like arsonists and bandit retainers and interrupt their attacks. Just be aware that stagger doesn't work consecutively and some enemies (ex. octopus/white shark) are immune during their skills. Closing Words Check out my other guides here: https://steamcommunity.com/sharedfiles/filedetails/?id=2448428883 https://steamcommunity.com/sharedfiles/filedetails/?id=2387633898 https://steamcommunity.com/sharedfiles/filedetails/?id=2390092673 Good things about Dog: +Dual-wield[[/strike] one dog army +Hotdog shaped Bad things: -Everything else Most issues inherit to Dog have remained mostly the same, maybe one day dog will get the love he deserves :( Credits to the Wiki contributors for providing the skill icons and descriptions. If you have a different perspective on something in this guide, feel free to leave a comment.