换一换
换一换 


在《最后的咒语》中难以应对更高难度?这里有大量关于法力与波次管理、英雄升级与站位、材料优化使用、建造顺序等方面的技巧,助你攻克最高级别的启示录难度! 本指南已更新至游戏版本1.1.3.3(Runenberg DLC) 介绍与更新 大家好!本指南的重点是帮助玩家击败更高难度,但其中提到的所有技巧适用于从普通难度到启示录6级的所有游戏水平! 每次进行游戏时,请记住,在《最后的咒语》这类游戏中,游戏知识是极其强大的工具。没有什么比练习更重要,所以坚持下去,你一定能获胜! 本指南默认你正在游玩启示录4级或更高难度,并且已经解锁了大部分基础预兆。假设没有额外预兆生效(即【无尽模式】)。 你可以将相同的建造方案应用于较低难度,不过此时你会多获得20%的金钱,因此能够更快完成建设。关于优先建造顺序的思路同样适用。 如果想了解其他未提及的游戏机制说明,或有其他问题,欢迎留言告知。 更新说明:除非针对某个补丁对指南进行全面更新,否则指南基本描述中列出的补丁版本不会更新。 当新补丁发布时,指南的更新内容会在此处汇总,直至更新完成,之后会更新基本描述中的游戏版本。 末日等级解析
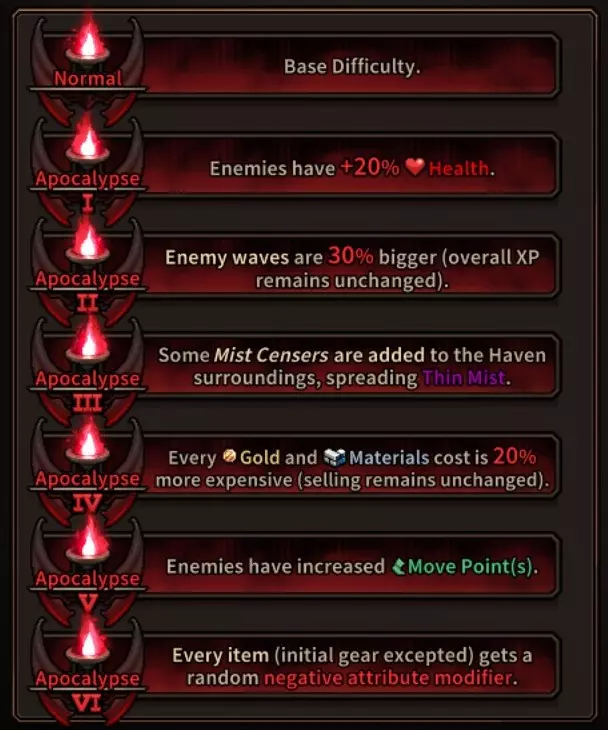
I and II These two are self explanatory. More enemies with everything having more hp! III Mist Censors are placed throughout the map outside of the Haven's limits (the maximum distance you are allowed to place buildings or wooden walls). These Censors have 150-600 hp and respawn every day. If a hero is near them, they reveal enemies in the mist up to 3 tiles away. Thin Mist will dissipate immediately once the Censor is destroyed. Thin Mist does not stop propagation effects from hitting enemies, but can affect skills that require a direct target such as the Catapult's attack. See the "Mist Censor Info" section for more details on handling this level's mechanic. IV Arguably the most difficult change. Increasing the cost of everything by 20% adds a lot of strain to the economy. It also makes your defensive options such as towers and walls more expensive. This level will require you to change your build orders and be a lot more careful with your material usage. See "Making the Most of your Materials" section. V Increased Move Points of enemies is a lot more of a nasty change than perhaps it sounds at first. With increased move points, enemies will appear on the screen faster as well as reach your base faster. This adds a ton of difficulty in achieving the night rewards as it is significantly easier to get higher panic with more enemies to handle more quickly in the wave. You can most readily notice this difference on Glenwald. Try playing on apoc4 for night 1 then apoc5 for night 1. You'll notice it seems like there is more enemies in apoc5. There is not. The wave size doesn't change, however, their speed puts more of them in the play area faster. So it feels like more. VI This level will add a negative modifier to all items in the night rewards and shops. However, it does not affect gear that heroes spawn with. It should be noted, this does not effect other modifiers. If a piece of gear is suppose to roll 3 positive stats... it will now roll 3 positive AND 1 negative. IMO: Sadly, as it is at this moment, this level only adds a layer of RNG to the game. Frankly, the only reason to play it is to say that you did it. Mana Management Managing your mana is critical to your survival. If you overuse your mana you'll end up in a very tough position in future nights. For example, on Lakeburg, if you spam too much night 1-4 you'll end up on night 5 with the mist very close and no mana to recover! Ideally you want to pick up 1 or 2 secondaries for daily mana regen. Hopefully uncommon(green) or rare (blue) quality ones, this will help you a ton. Mana is a very powerful tool for pretty much every weapon. Every weapon has at least one mana using skill, and all of them are more powerful than the basic attacks of said weapon. Perks like Harvester come in handy because it can end up giving you a lot of daily mana regen. There have been nights where harvester has given me over a dozen mana back at the end of the night. Here are some very important perks that can help you with mana management: Harvester is an extremely powerful mana management tool early-mid game especially. Thrifty can cut expensive spells in half for you which, if used optimally, can double the amount of skill casts you do each night. Mana Collector is a potent tool. With at least 30% crit, you can typically regenerate 5 to 10 mana each turn. This is because this perk can proc off of each target hit excluding those hit by propagation. It can proc off of skills that don't use mana as well and caps at 10 mana restored per turn. Blood Magic removes mana from your hero. I would not recommend going this route unless you are playing a melee hero and have also rolled the Vampire perk. With this combo, you can make mana a non-issue as you'll always be healing for more than your abilities cost. Another thing to keep in mind is that the Thrifty perk synergizes well with the Mana Collector perk later. Say you have a Shortbow and the two above mentioned perks. If you hit with Rain of Arrows, attacking the maximum of 7 targets and critically strike only TWO of the 7 hits. You'll refund 2 mana at the end of your turn, effectively making the ability free. If you critically strike more than twice, you will actually be gaining mana each turn. So how much mana should I use each night?Well, your goal should be to use as much mana as you can recover. For example, if your hero has a mana regen of 10, try to use no more than say, 10-12 mana on that hero each night. There are exceptions. On Lakeburg I find that the toughest nights are the following: 5, 9, 10. If you start to struggle on any of these nights, feel free to spend a little heavier. If I am on night 5 and my hero has a mana pool of say 30, daily regen of 10. I might spend 15-20 mana that night. Then try to slowly recover that mana in future days until again night 9 I might over spend again. Night 10 I will completely empty my mana pool. Obviously, don't be recklessly wasteful. Use it as effectively as you can but don't try to conserve on night 10. It is almost always the toughest night. If you end up completely out of mana for night 11, your daily mana regen will bump you back up (hopefully at this point to at the least 10-15 mana) and then you'll fall back on the Mana Collector perk and/or Mana Wells to save you for night 11 and 12. Why build a Mana Well?It may seem tempting to skip building the Mana Well but it comes with a fair bit of benefits. First, every production phase all heroes gain +1 max mana. This bonus is permanent and costs nothing after the Mana Well is built. It is also cumulative so 2 mana well will each provide this bonus to your heroes. Secondly, each Mana Well comes with a free use ability called Benediction each production phase. You can restore 8 mana on a hero for free. For a pretty low cost you can upgrade Benediction to restore 12 mana. This might not sound like a lot but with 2 Mana Wells, even without the benediction+ upgrade, you are restoring 16 mana to your heroes for free on top of increasing their max mana each day. That's a handful of extra spells each night on top of the extra free max mana (which helps you if you pick up blood magic and for the final night of any haven as you can dump more spells then) Late Game Mana SetupsOnce you reach late game, night 10+ for Lakeburg and night 8+ for Glenwald, you'll want to ensure your heroes are able to generate a ton of mana. For final night on these towns, perks like Harvester won't help you. This is because the benefit is given at the end of the night and therefore won't be useful to you. Especially on the final night, you'll want powerful mana setups to enable you to push hard against enemy waves and have time to attack bosses. My suggestions are: Have the Mana Collector T5 perk with at least 30% crit. As mentioned before, this is exceptionally powerful. With high crit, you can machine gun out spells each turn and it could still take many turns to actually run out of mana. This perk allows up to 10 mana to be restored each turn. Melee only, have the Vampire T4 and Blood Magic T4 perks. This removes mana from your character (converts it into resistance!!) and you'll restore the HP you spend on skills when you slay enemies. Effectively, you have unlimited mana and greatly increased tankiness. Very potent. Buy a Magic Crystal with the "Profound Inspiration" skill for your trinket slot. This may seem like an unattractive option as the base always comes with -5% damage and it costs 1AP and 3MP to cast. It also takes up a trinket slot which could otherwise provide a lot of powerful benefits to your hero. However, this will give you a substantial amount of mana (14) each turn. So the trade of is +14mana per turn, -1AP -3MP. For specific heroes this could be a bargin. For example if you have a Tome hero and you want to Chain Lightning and Fireballx2 each turn. Buy a T5 mana potion from the shop. This is a viable option if the above 2 are unavailable to your hero. A tier 4 mana potion can restore 15 mana in total each night. A tier 5 mana potion can restore 21 in total each night. If your hero has a particularly small mana pool in general, maybe even consider buying them 2 T5 mana potions, but that is rarely necessary. Wave Management Managing the enemy wave is another method of mitigating damage to your base and obtaining the night reward each day. Not to mention keeping your heroes alive, healthy, and hopefully not spending too much mana (see the Mana Management section). Each turn, your goal should be to optimize mitigating damage to your walls and your heroes. General Priority: Energized Elite > Misty Elite > Accursed > Bulky > Boomer > Crawler/Runner > Ripper > Hunter > Splitter > Archer > the rest Managing the wave, and the enemies in that wave is not just about killing them. Sometimes, disabling an enemy is far more useful than killing it. Disable dangerous enemies instead of killing themIf an elite spawns in a nasty position, especially an energized one, you need to target it down immediately right?? Wrong. For example. If you have a melee elite spawn that is energized. You don't actually need to kill this immediately. If you have no momentum heroes around for an easy kill, maybe a hand crossbow hero is nearby? Use your Slow Death skill to reduce its movement speed down to 0. Now this elite is unable to move for 3 turns. You are free to completely ignore it for 3 turns now and deal with it later. Similar logic can be applied to Bulkys, who's rock throw is a serious issue. If you can't 1 shot them this turn (or get them to badly wounded, which is 10% hp, they'll stun themselves at this point). Then you are putting your heroes in danger. Keep them far out of range, or try to disable their movement. Doubling up Tight Volley on a Shortbow is another example of reduction to movement speed. Each shot will reduce the enemy's movement speed by 2. The rifle can also reduce movement speed by 3 for 2 turns with Suppressive Fire. Druidic Staff can use Entangle to reduce movement speed by 3 for 2 turns. Great Axe can use Leap to apply -2 MP for 1 turn. IF you are utilizing your disables you can make Boomers work for you. Wound them (remember, similar to heroes, when enemies are wounded they lose MP as well) and/or slow them and keep them alive until they are surrounded by enemies. Use their explosion to get extra damage on enemies. As long as they aren't going to be within 1 tile of a wall, building, or hero you should do this whenever possible! It is a huge help! Elite BoomersThese elites can be very nasty, typically spawning with over well 2000 hp. If they spawn with the Regeneration trait, killing them might not actually be worth your time. Check the damage it will do by clicking on the Elite Boomer and hovering over it's abilities. Typically they do between 300-600 dmg, however, dealing this damage kills them. NOTE: You can check this by selecting the Boomer, and hovering over its abilities. This will tell you the exact damage they are doing and this DOES take into account debuffs like damage reduction from the 1h axe's skill Indimidating Scream or the Tome of Secret's Weakening Touch skill. An option for dealing with these would be to kill nearby enemies so only the Elite Boomer is around. Move a hero into range of the elite and buff up this heroes armor as much as possible. The idea is for your hero to only be hit by the Elite Boomer the next turn. As tanking this huge chunk of damage AND being hit by another enemy or two could start to seriously hit your hero's hp. The explosion does NOT deal extra damage to armor. So tanking this elite's explosion is generally the best option as it can save you a lot of AP. However, if no heroes can reasonably tank it, try slowing its move speed and killing it with poison or take the hit on a hero with vampire so you can recover the lost HP in the next couple of turns. Picking Targets Each TurnEvery time it is your turn you want to look at the wave and try to make goals for your heroes this turn. What enemies are the biggest danger? Not just to your heroes, but also to your buildings and towers.
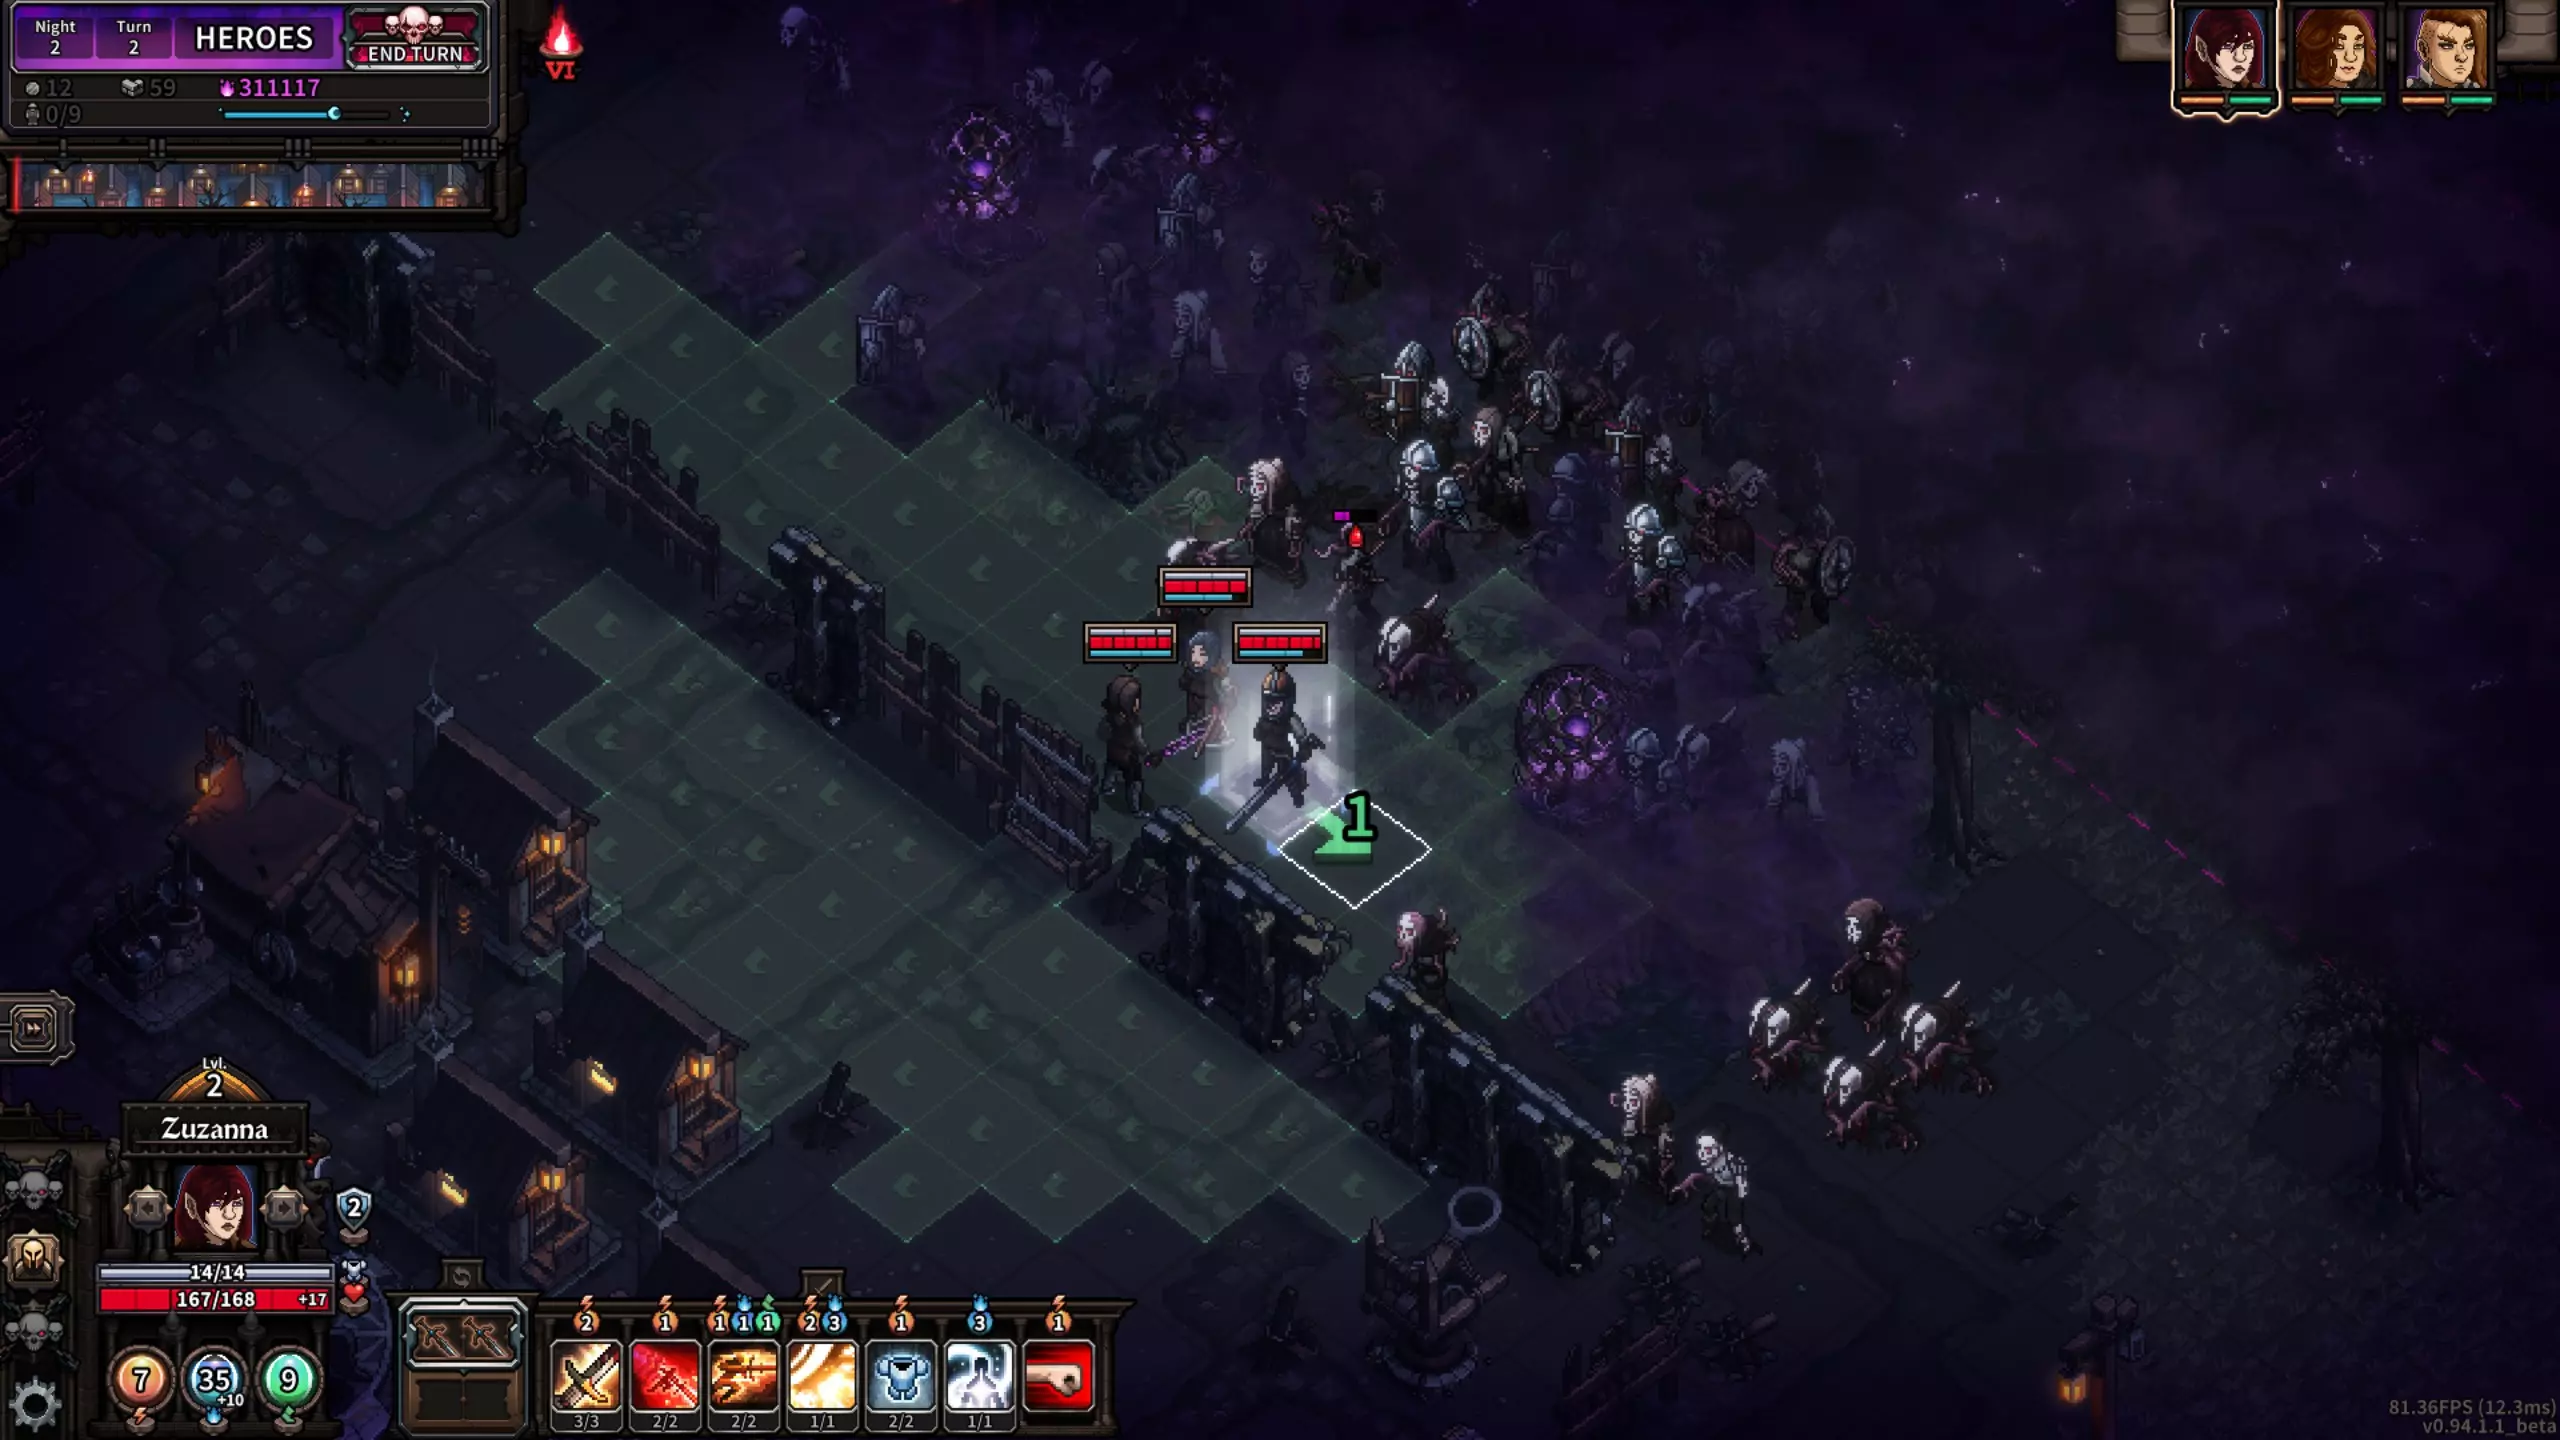
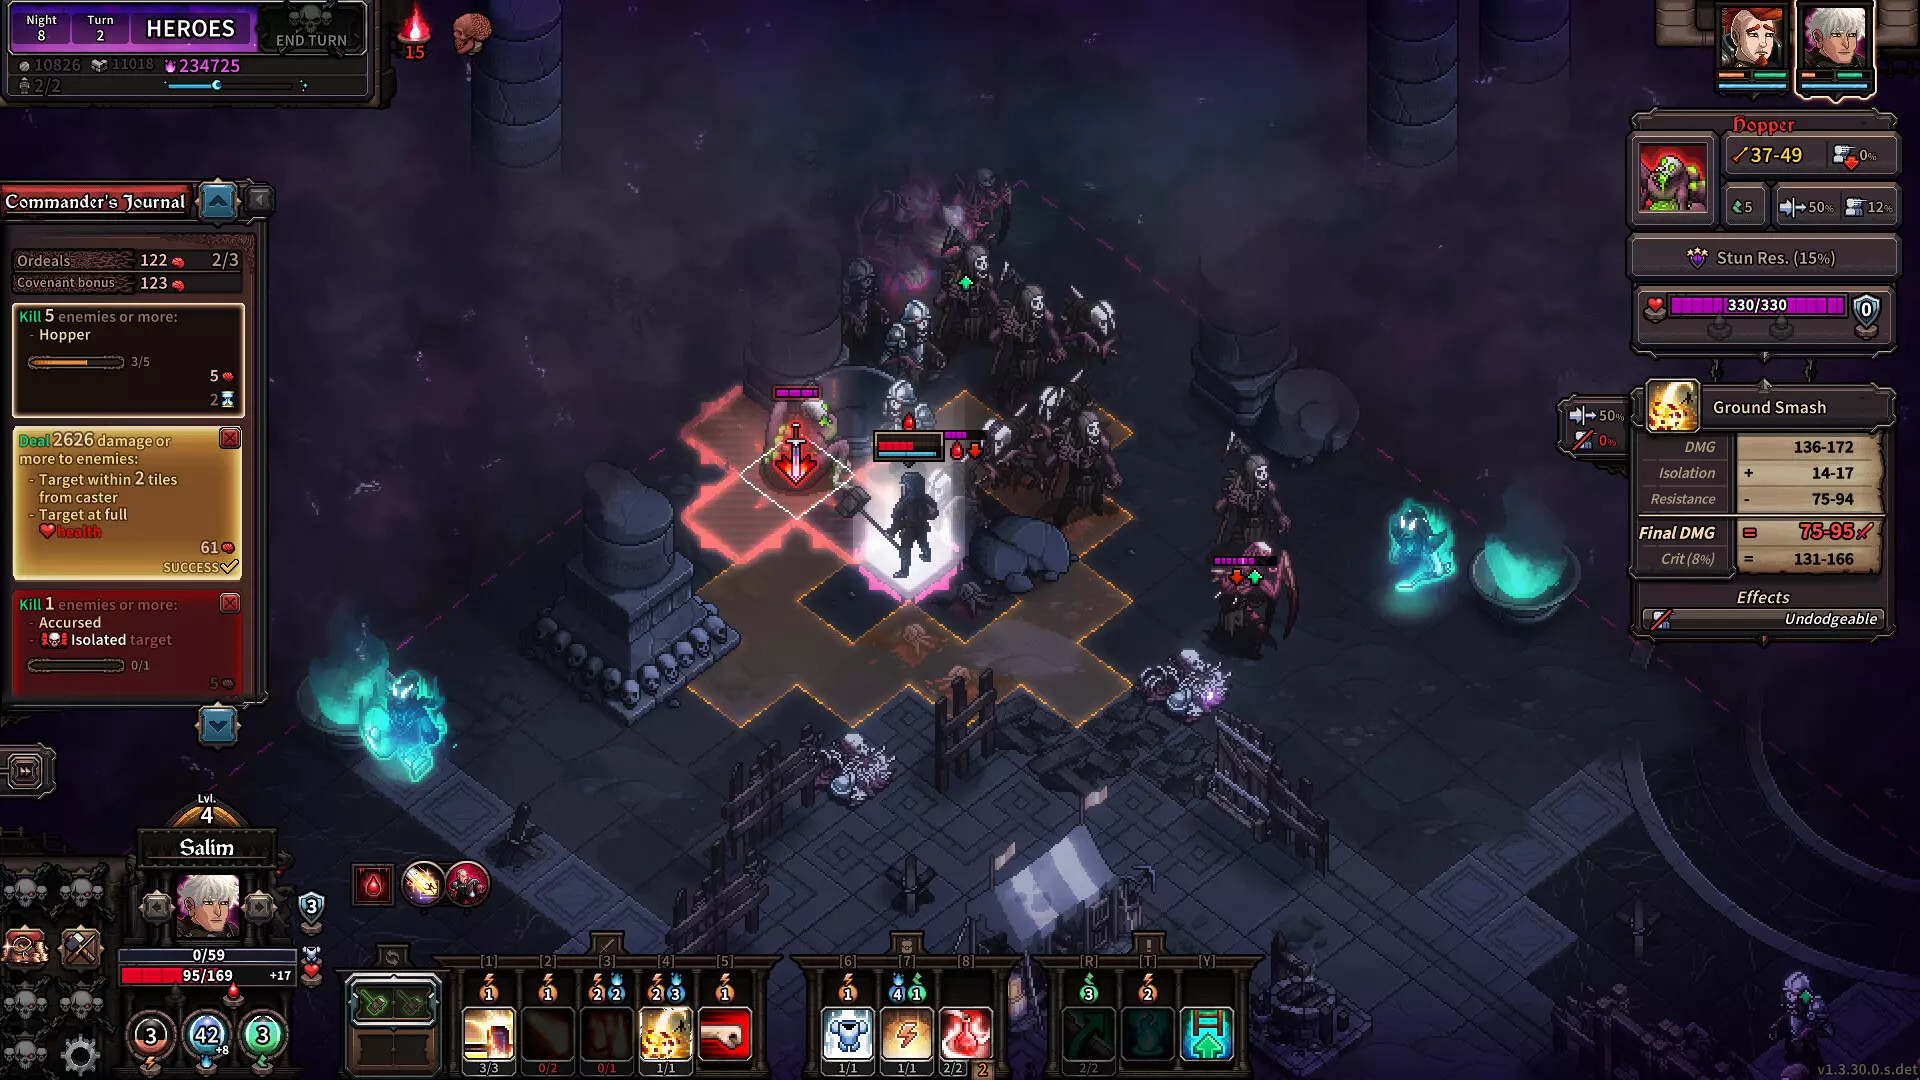
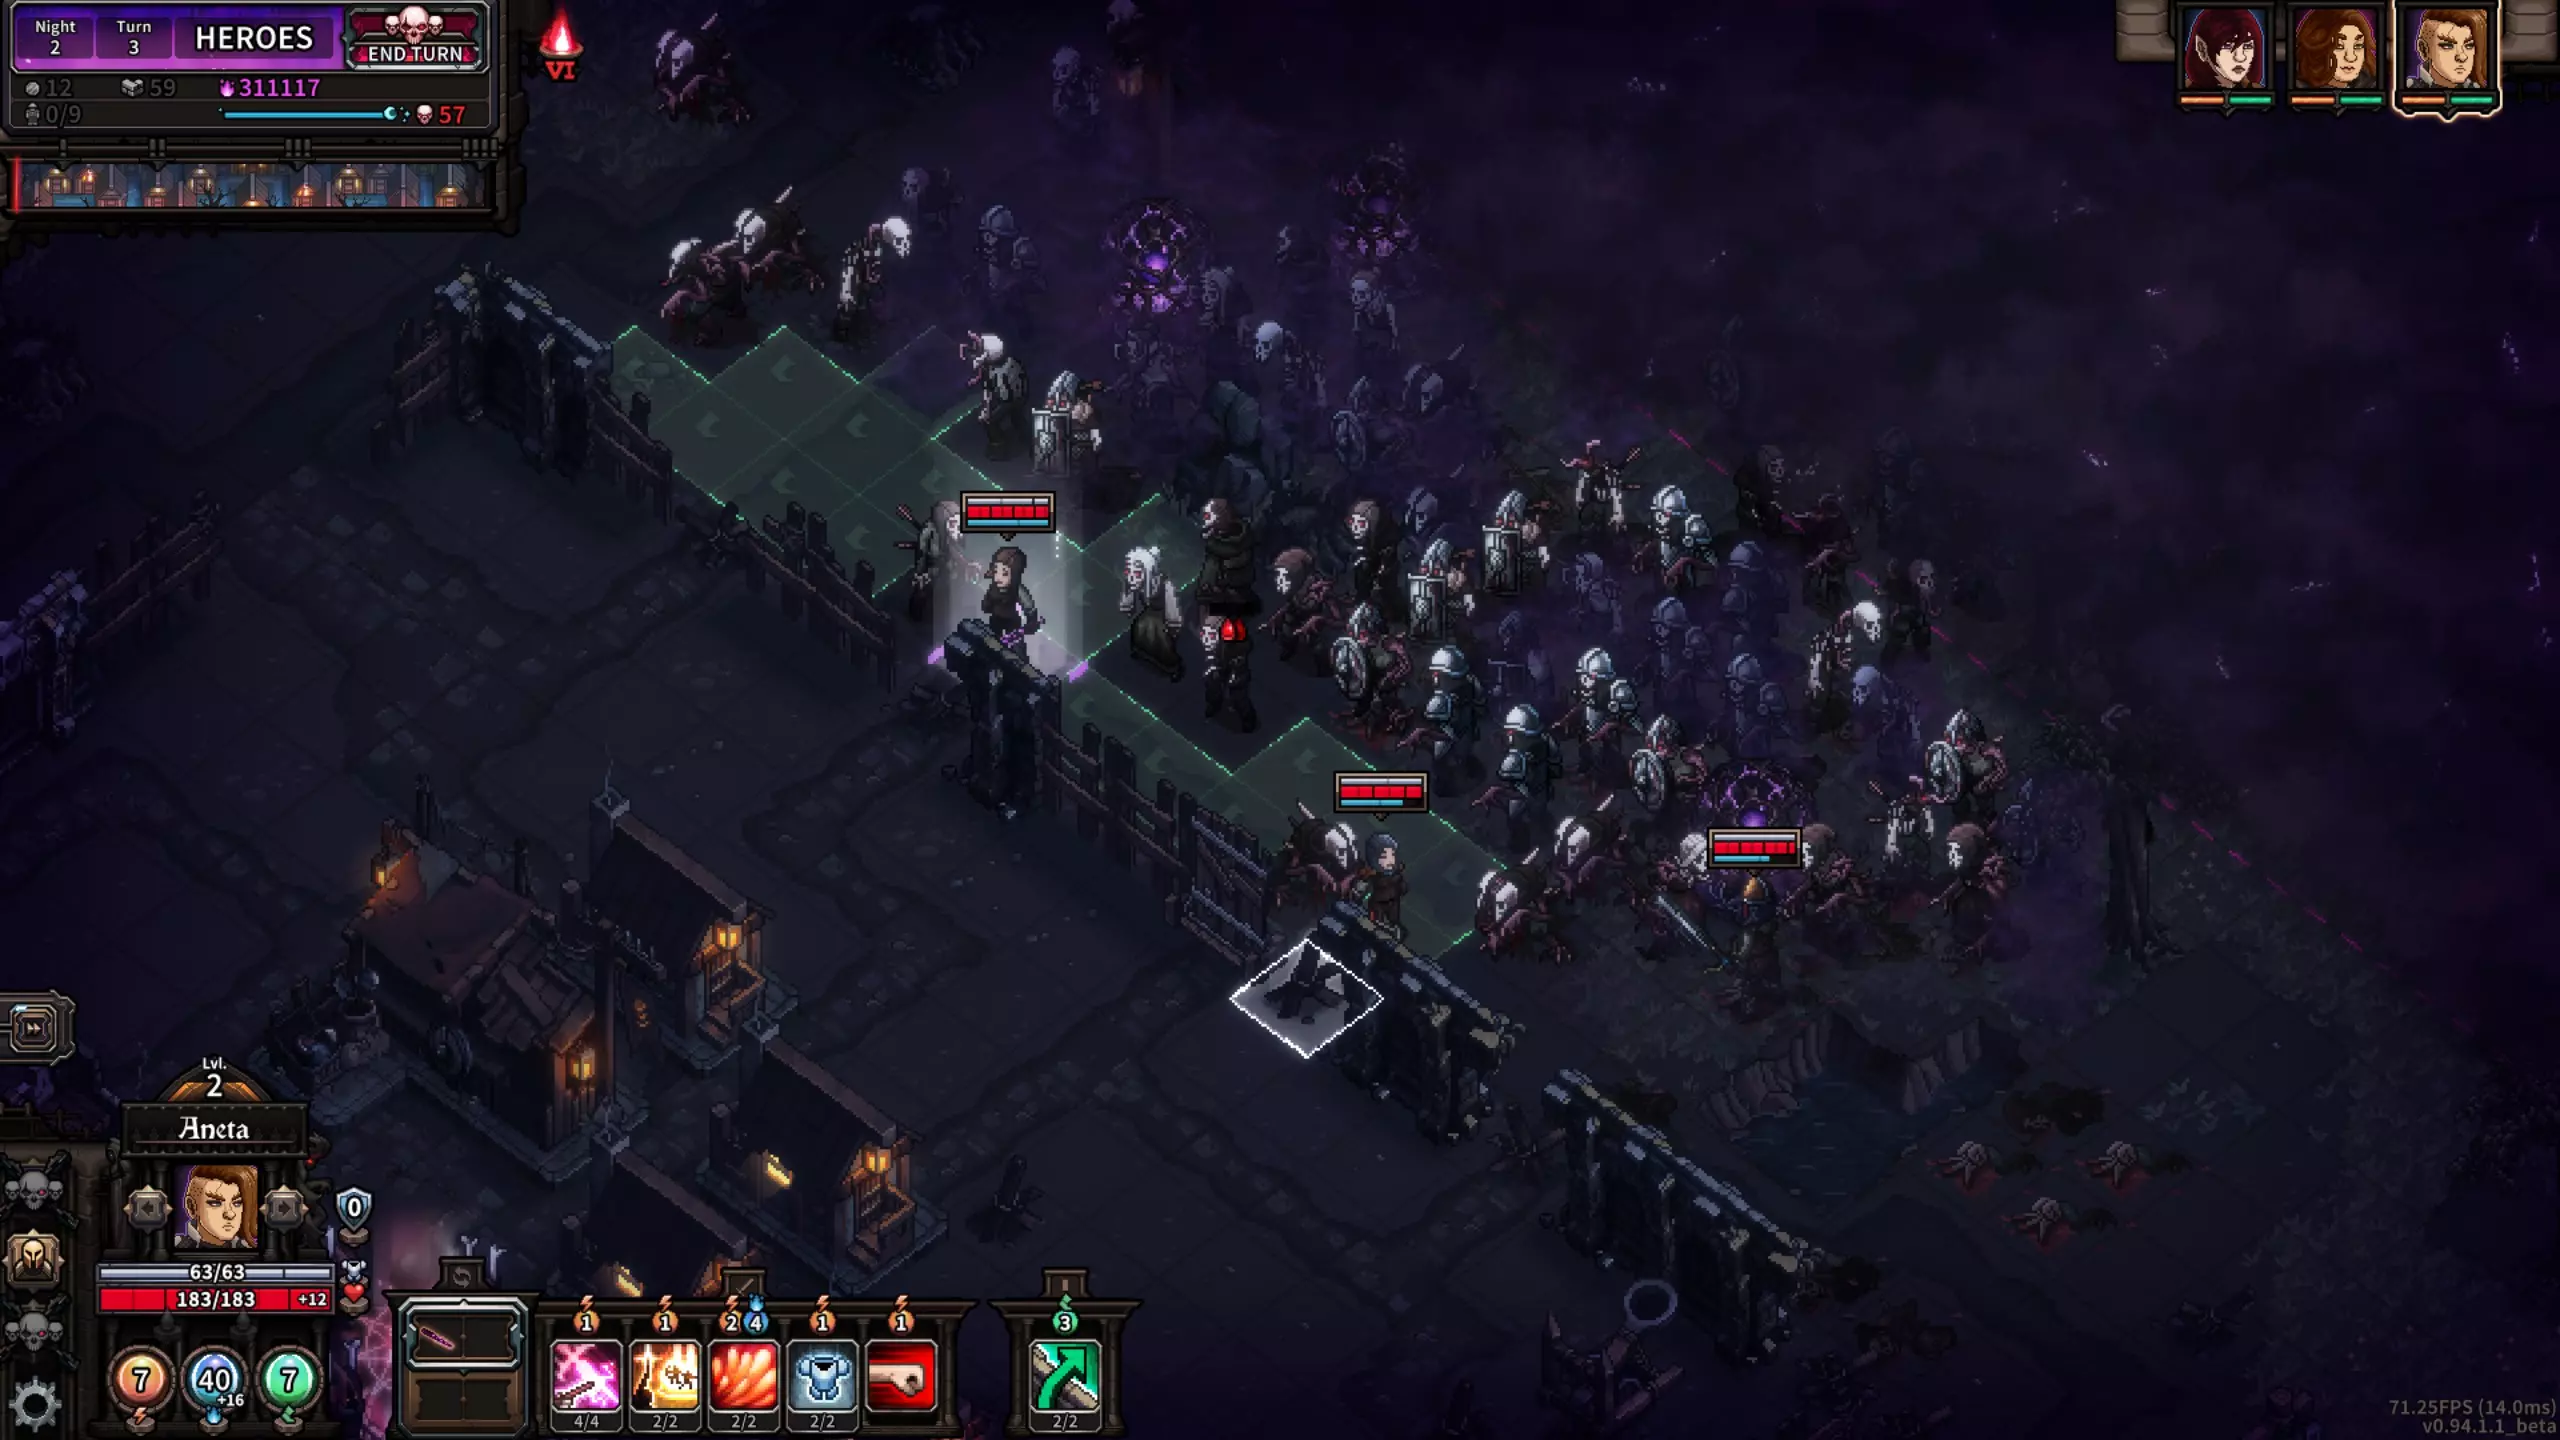
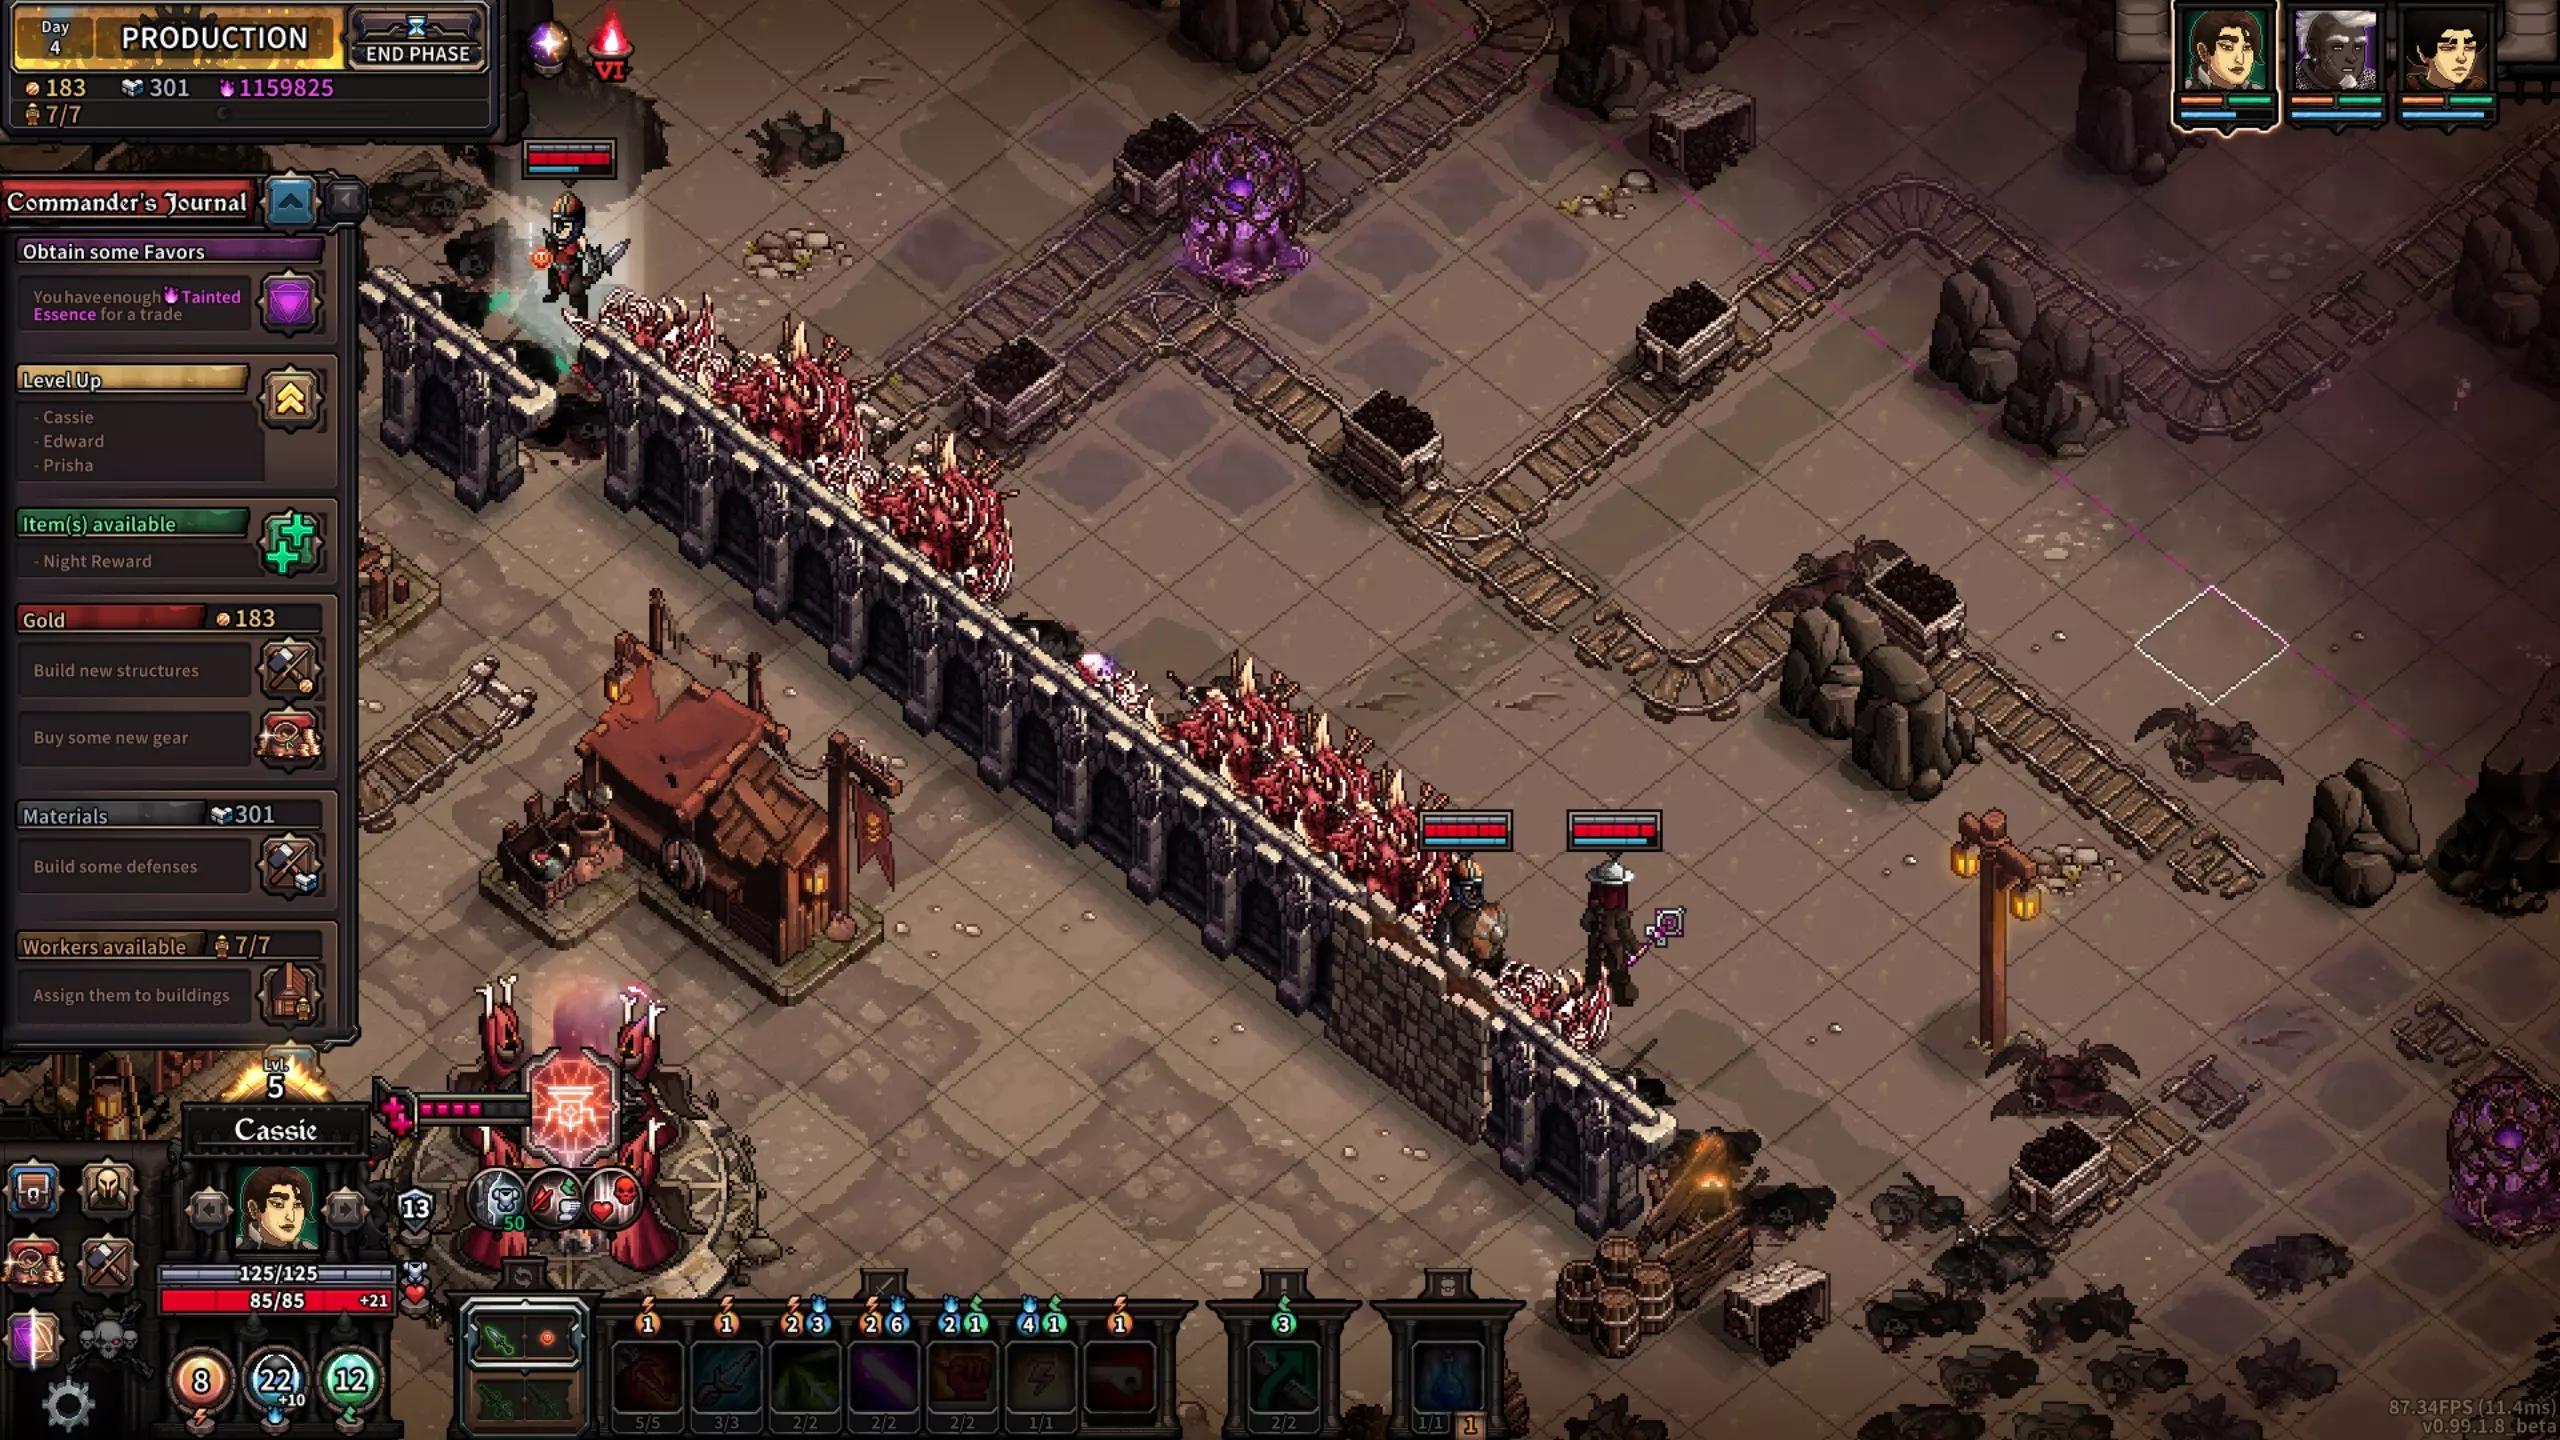
我的目标是消灭那些已经在城墙边的敌人,以及所有在下一回合会抵达城墙的敌人。 我会先从英雄们南边的敌人开始行动。让我的弩手英雄移动到双手剑英雄和城墙之间。使用两次强力射击来击杀一排中的两个敌人,然后消耗一些法力释放爆炸箭,以消灭那3个奔行者。选择用爆炸箭对付奔行者的原因是,它能确保一次性杀死所有3个奔行者,这样奔行者就不会冲过来攻击城墙。它们会绕到基地的东南侧,这会给我带来滚雪球般的麻烦。因此,把它们从战局中清除出去非常重要。剩余的行动点,我会用直线射击来尝试击杀城墙附近仍活着的敌人。接下来我会用双手剑英雄清理中间区域。法杖英雄可以使用两次传送技能,让双手剑英雄获得额外一次挥砍机会。他的伤害很高,这样做非常值得。我会移动法杖英雄去清理左侧附近的几个敌人,然后将英雄们部署在狭窄通道或墙壁旁。将剩余的所有行动点都用于你拥有的护甲增益技能上。
我的剑士英雄位于右侧的位置,确保他最多只会被2个敌人攻击,而这些伤害应该会被我上一回合的护甲增益所抵消。更妙的是,敌人的攻击路线被切断了。这会导致AI在下一回合将敌人聚集得更紧密,从而让范围攻击更有效。
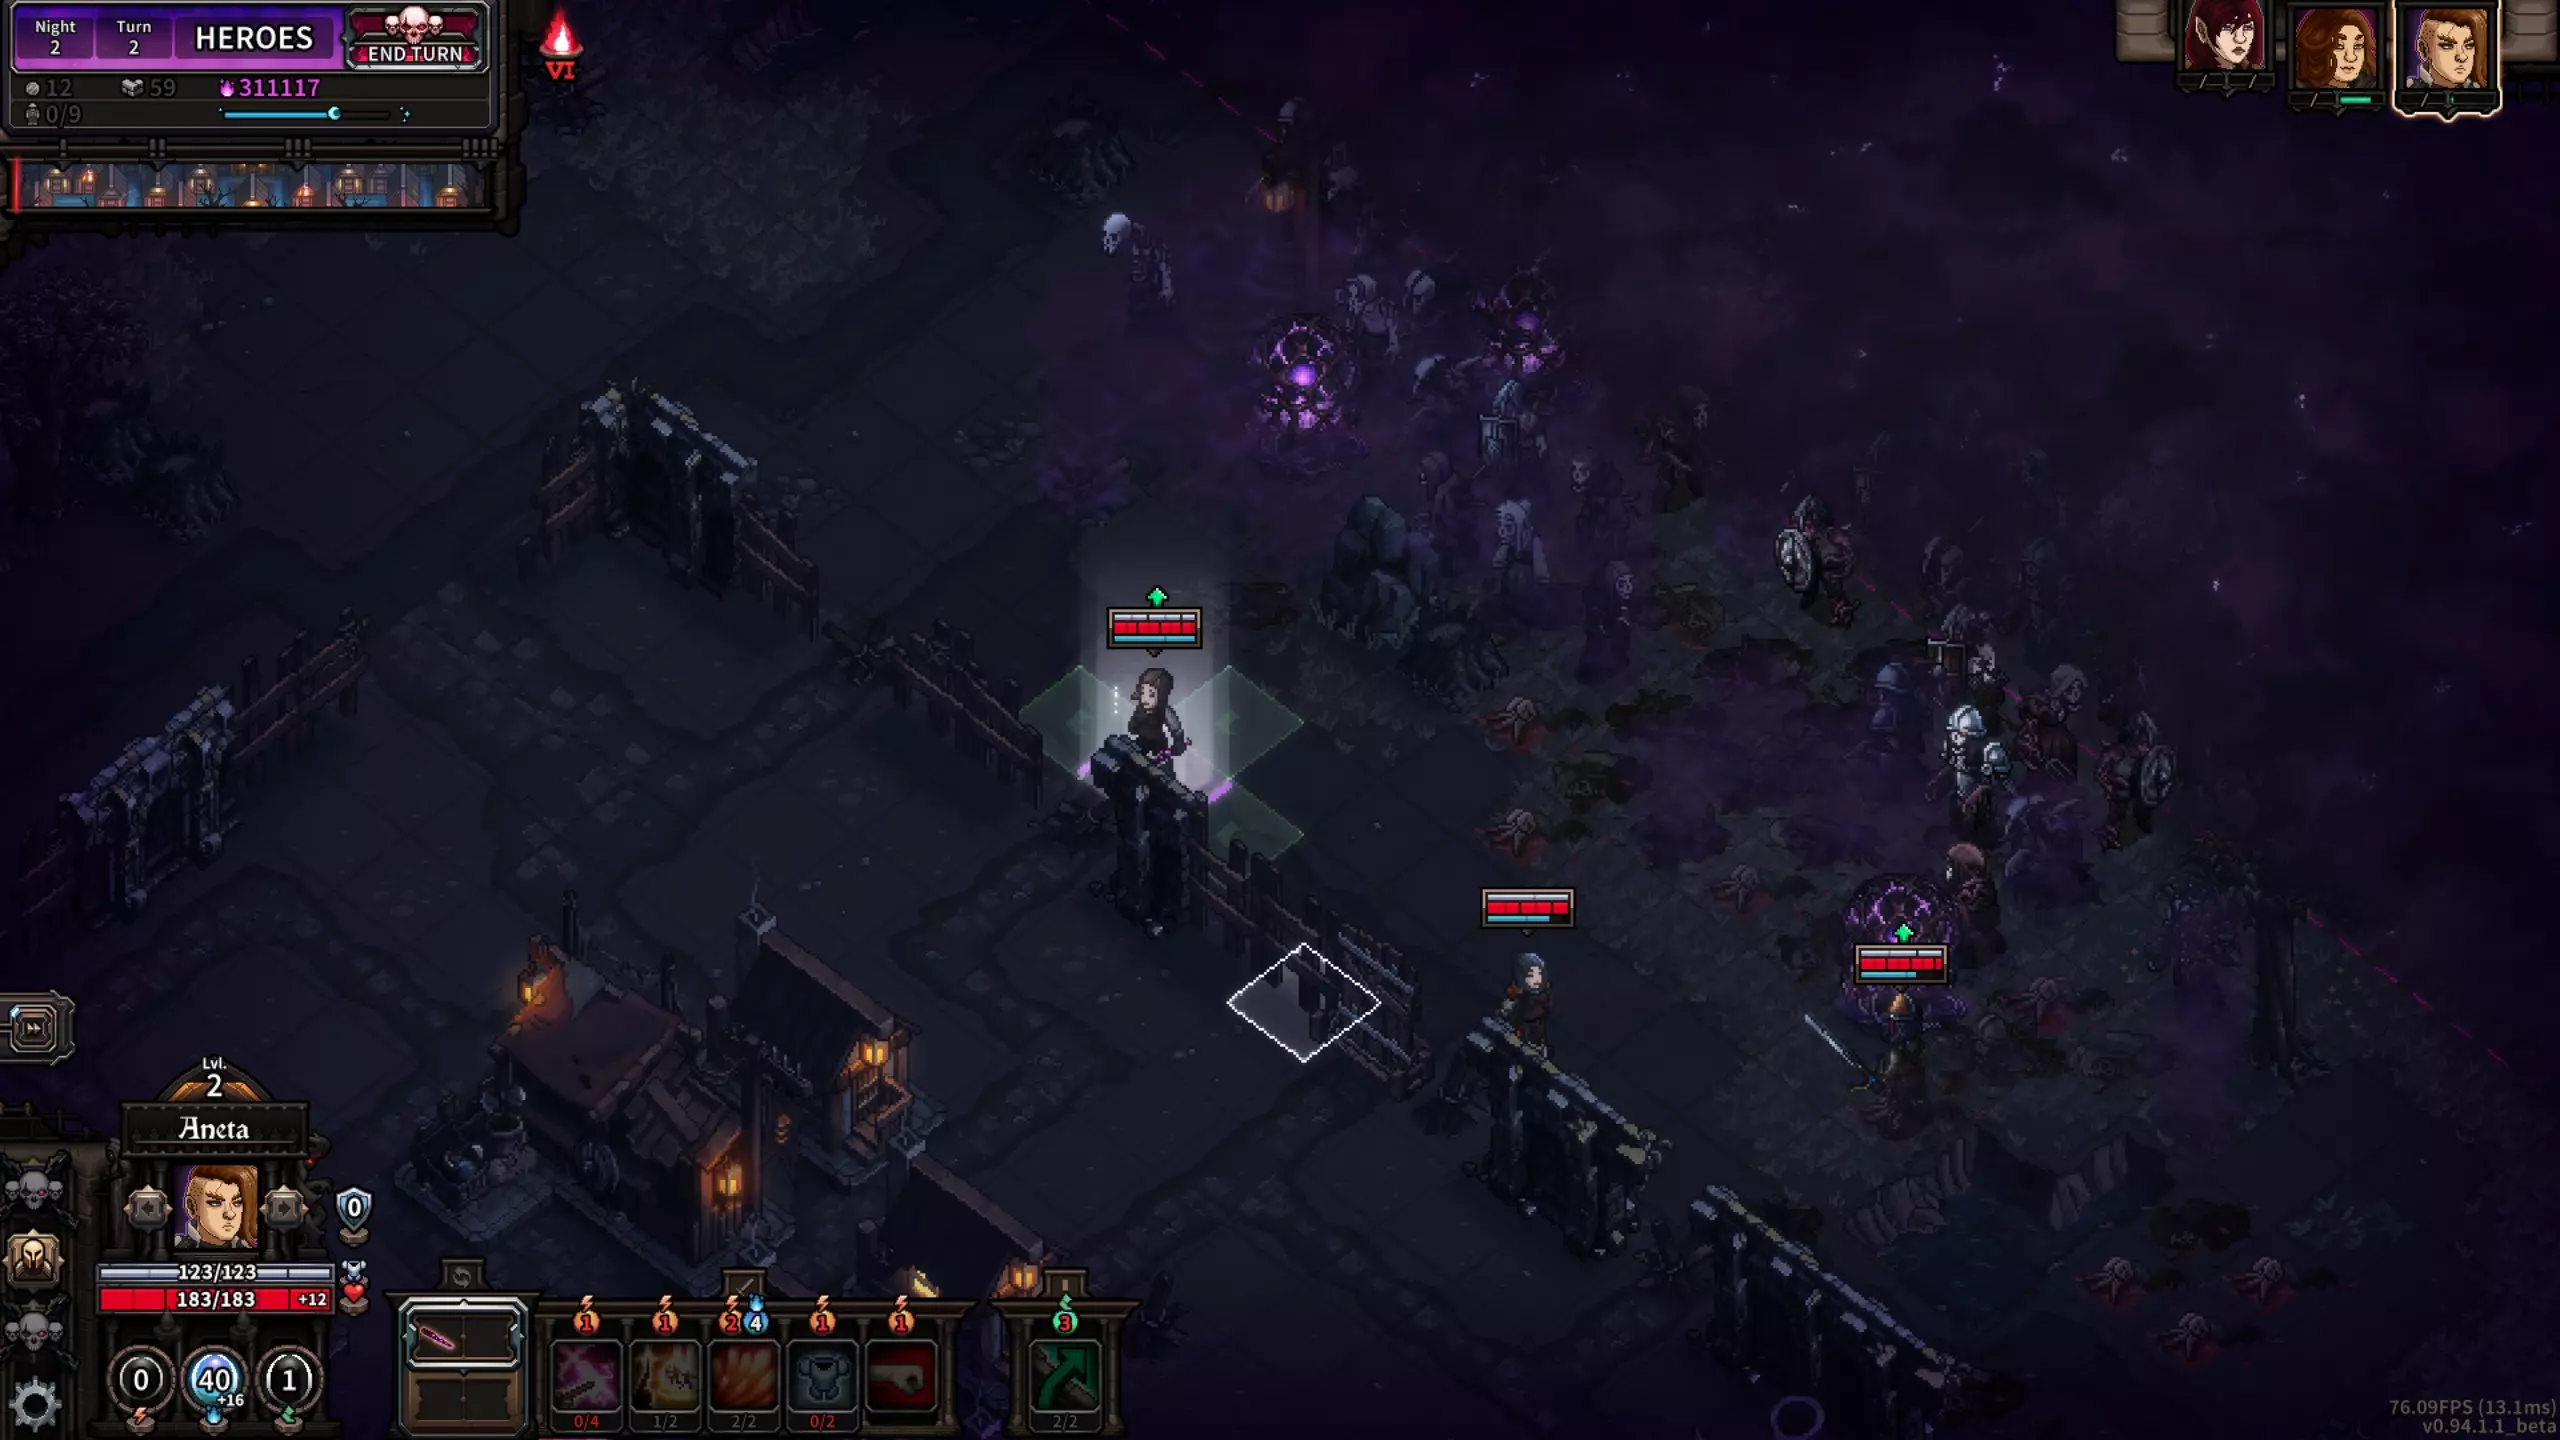
我看到中间有一大群敌人。敌人也已经停止刷新,是时候使用投石机了!我会尽可能获取视野,然后用投石机轰击中间区域。用远程英雄清理右侧最近的敌人,同时让双手剑英雄向左移动,这样法杖英雄本回合就能再次给他施加两次增益。在让两个英雄沿着墙壁后撤之前,用法杖英雄的魔法飞弹清理左侧的残兵和靠近的敌人。
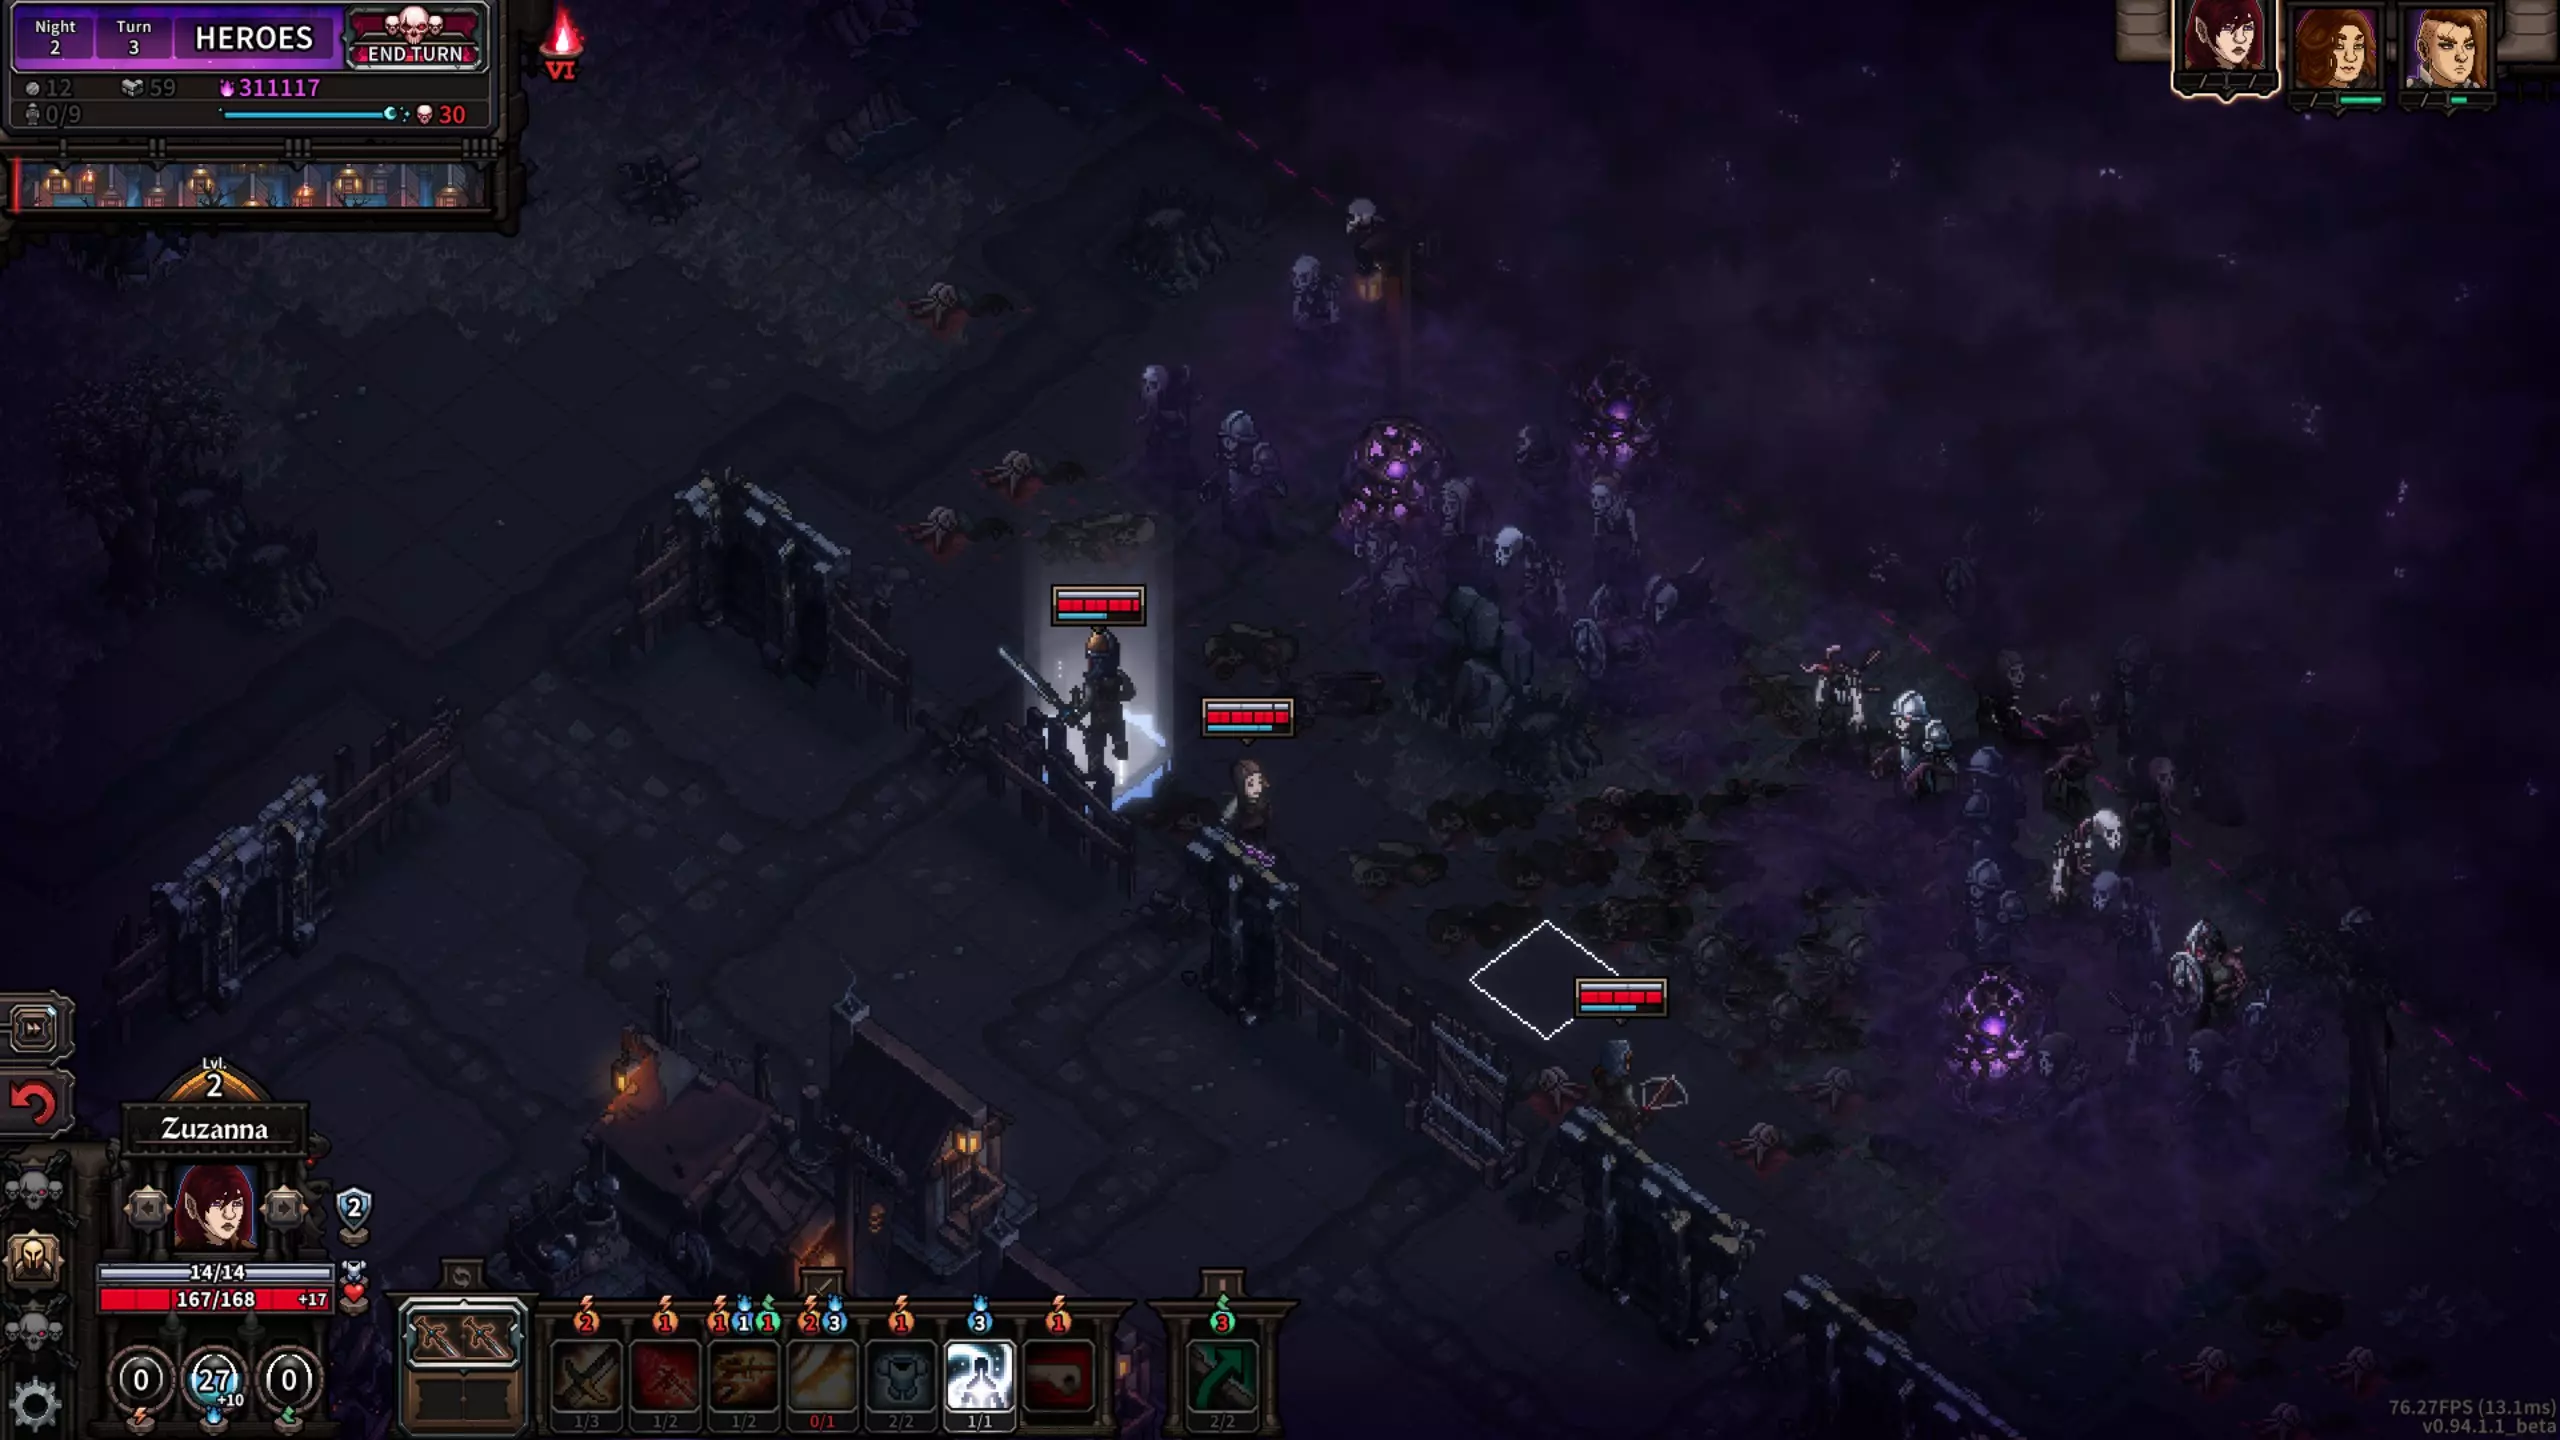
从现在开始,清理工作会很简单,我可能不会再受到任何城墙伤害。我不会再使用任何法力来完成这一波敌人。 充分利用你的材料 和金币一样,材料也是你用来保护基地的资源。塔楼是不错的工具,但英雄在造成伤害方面要好得多。 城墙为你的英雄争取时间,在莱克堡和格伦瓦尔德,你只需要使用三种类型的城墙: 路障:这些非常适合堵住城墙的缺口,尤其是在前5个晚上。我通常会等到第4天才建造木墙。在前2个晚上,敌人通常不会一击破坏它们,但也有可能。无论如何,这至少能阻止它们前进到你的基地一回合,这非常有用。木墙:通常在游戏中,敌人需要攻击2次才能摧毁木墙,精英或特殊类型敌人除外。在末日6难度的游戏初期,无需投资更昂贵的墙体选项。在游戏进行到后期之前,都不应该考虑升级木墙。 木门:价格与木墙相同,但生命值少5点。使用木门可以节省英雄的移动点数,但不要在所有墙体位置都大量建造! 建造更昂贵的墙体类型是不必要的,浪费材料建造它们会导致你拥有更少的防御塔,或者墙体出现缺口,甚至两者皆有!这都不是好结果! 在较长的地图或游戏后期,你可以考虑建造强化木墙甚至石墙。但在游戏前期甚至中期,这个选项几乎总是个糟糕的主意。 双层墙壁:在某些情况下,你会想要建造双层墙壁。
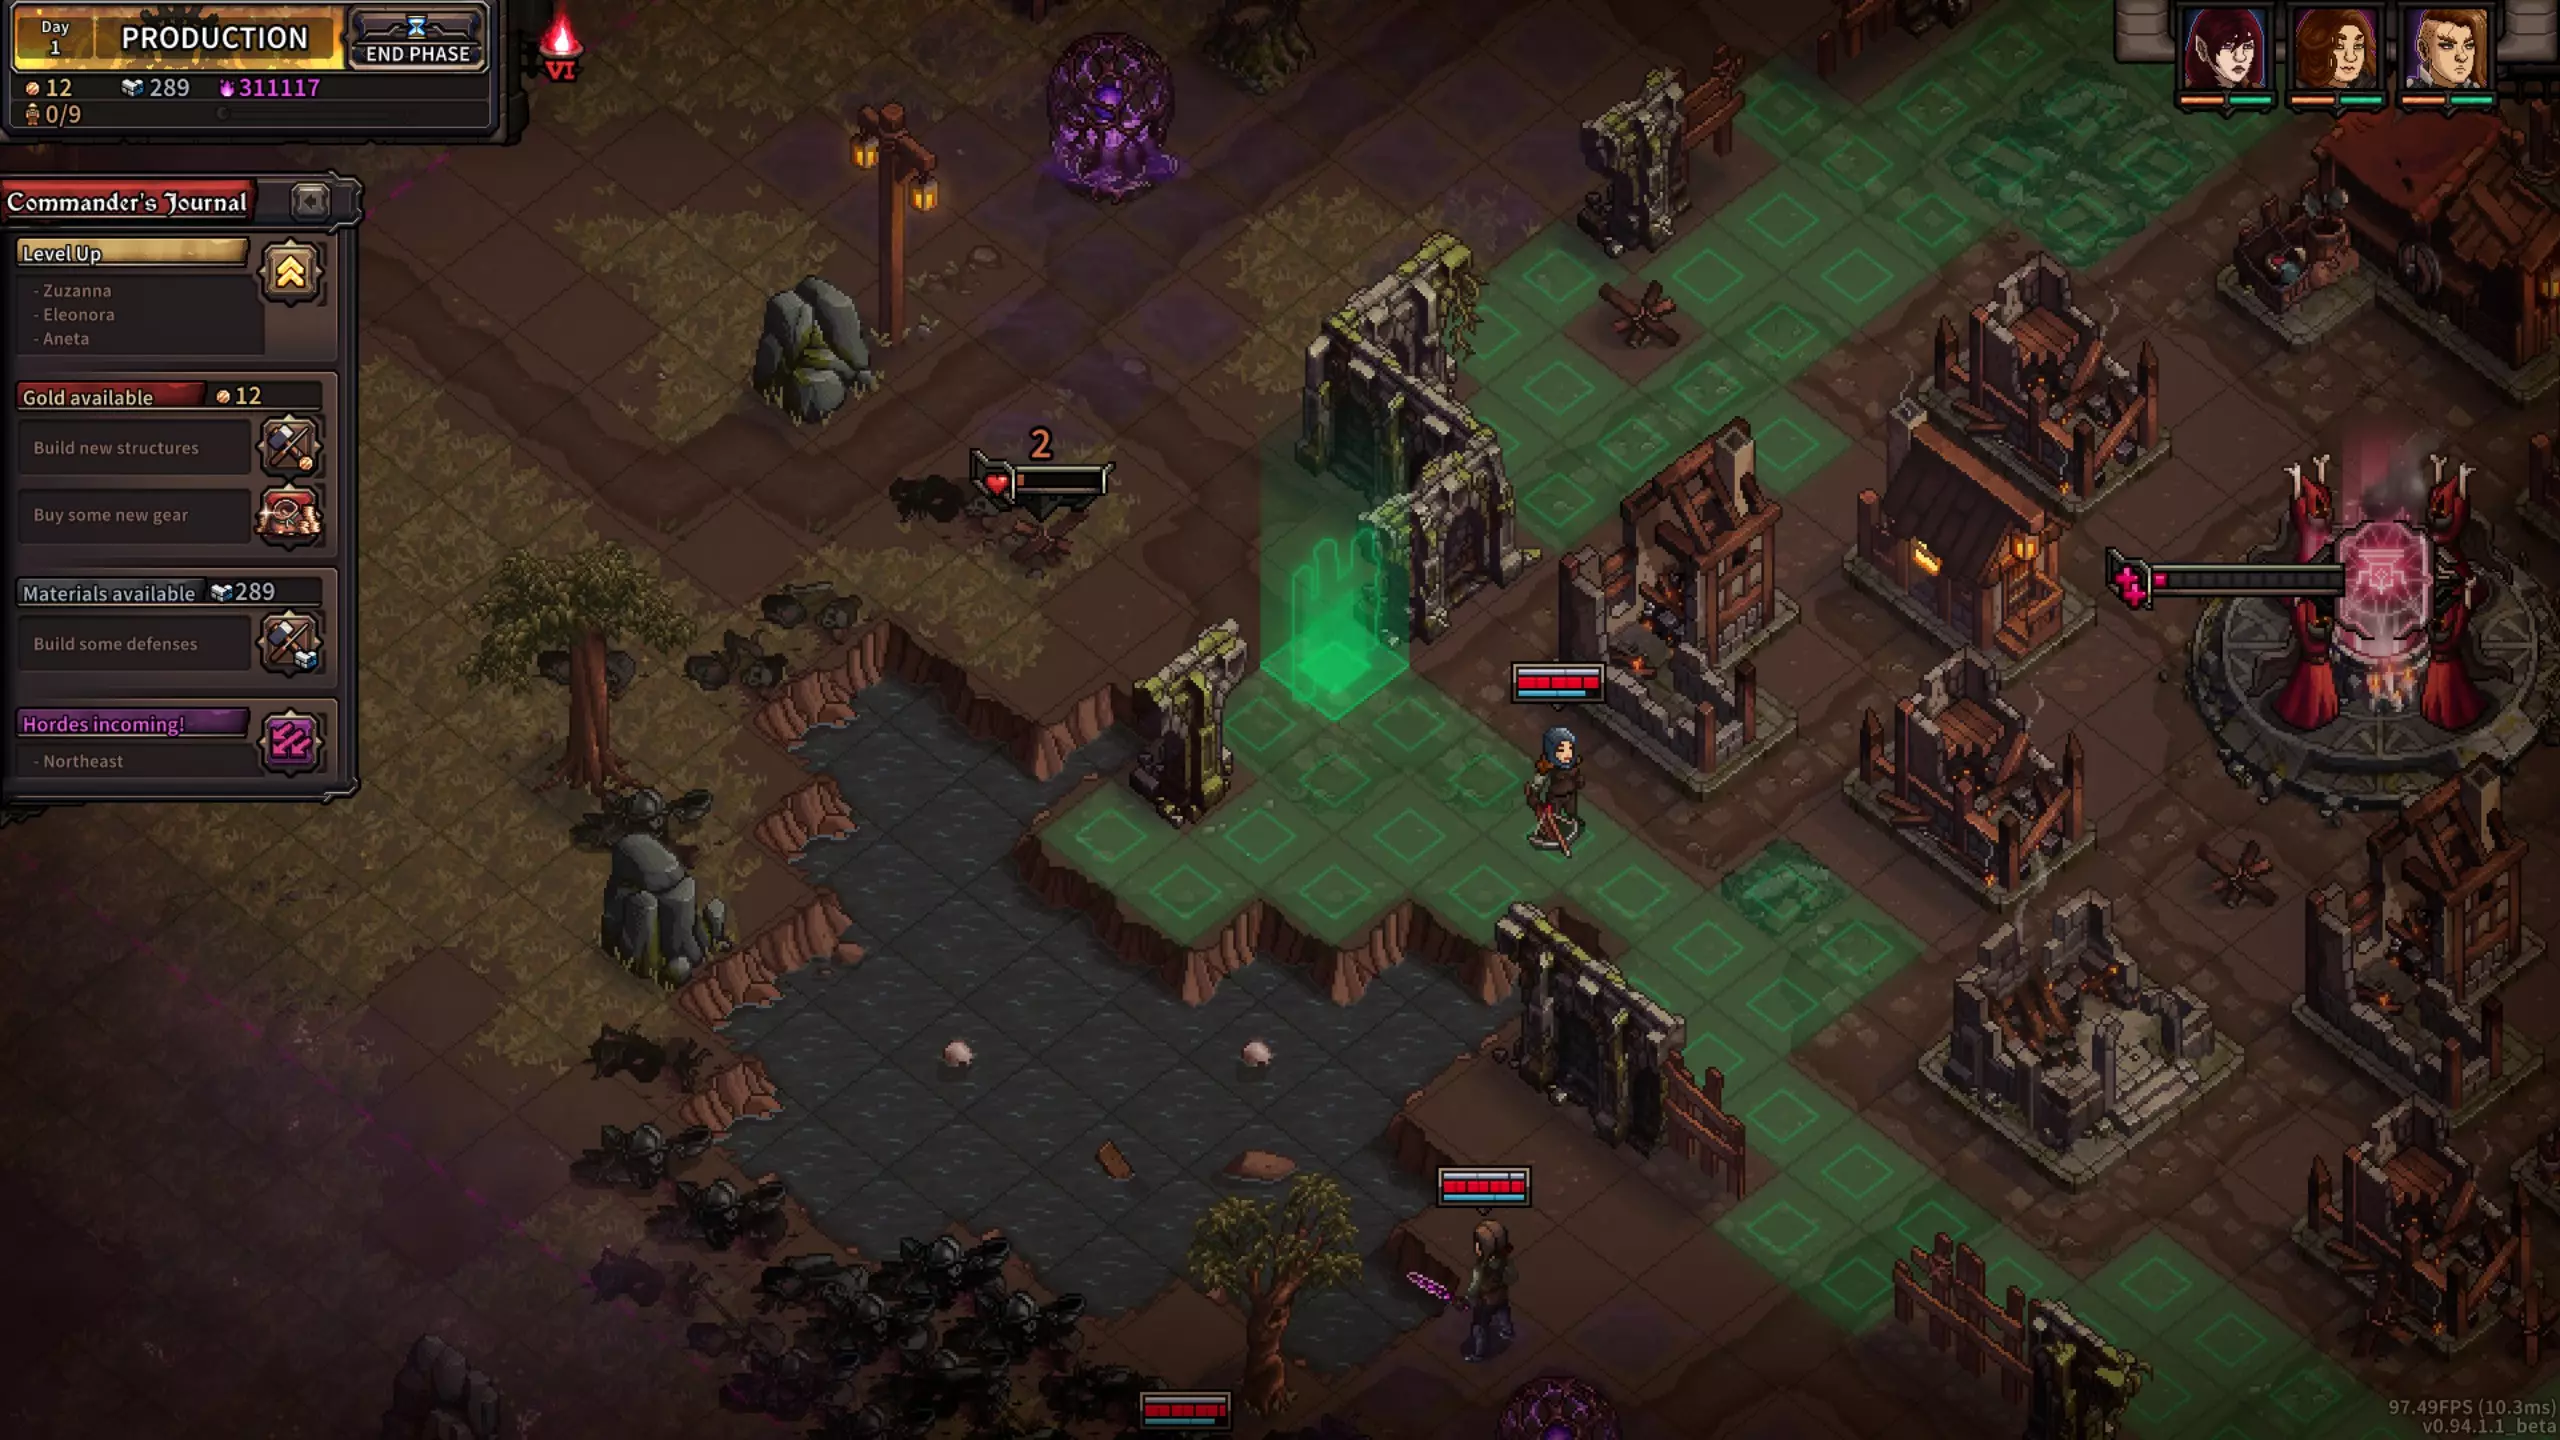
这是一张老莱克堡的图片,但这种情况也适用于当前地图的许多场景。 每次都要尽可能将墙建在最外侧。你需要用墙来阻止敌人产生恐慌等级。因此,理想情况下,你会希望将它们建在城市边缘(只有路障可以建在更远的地方)。
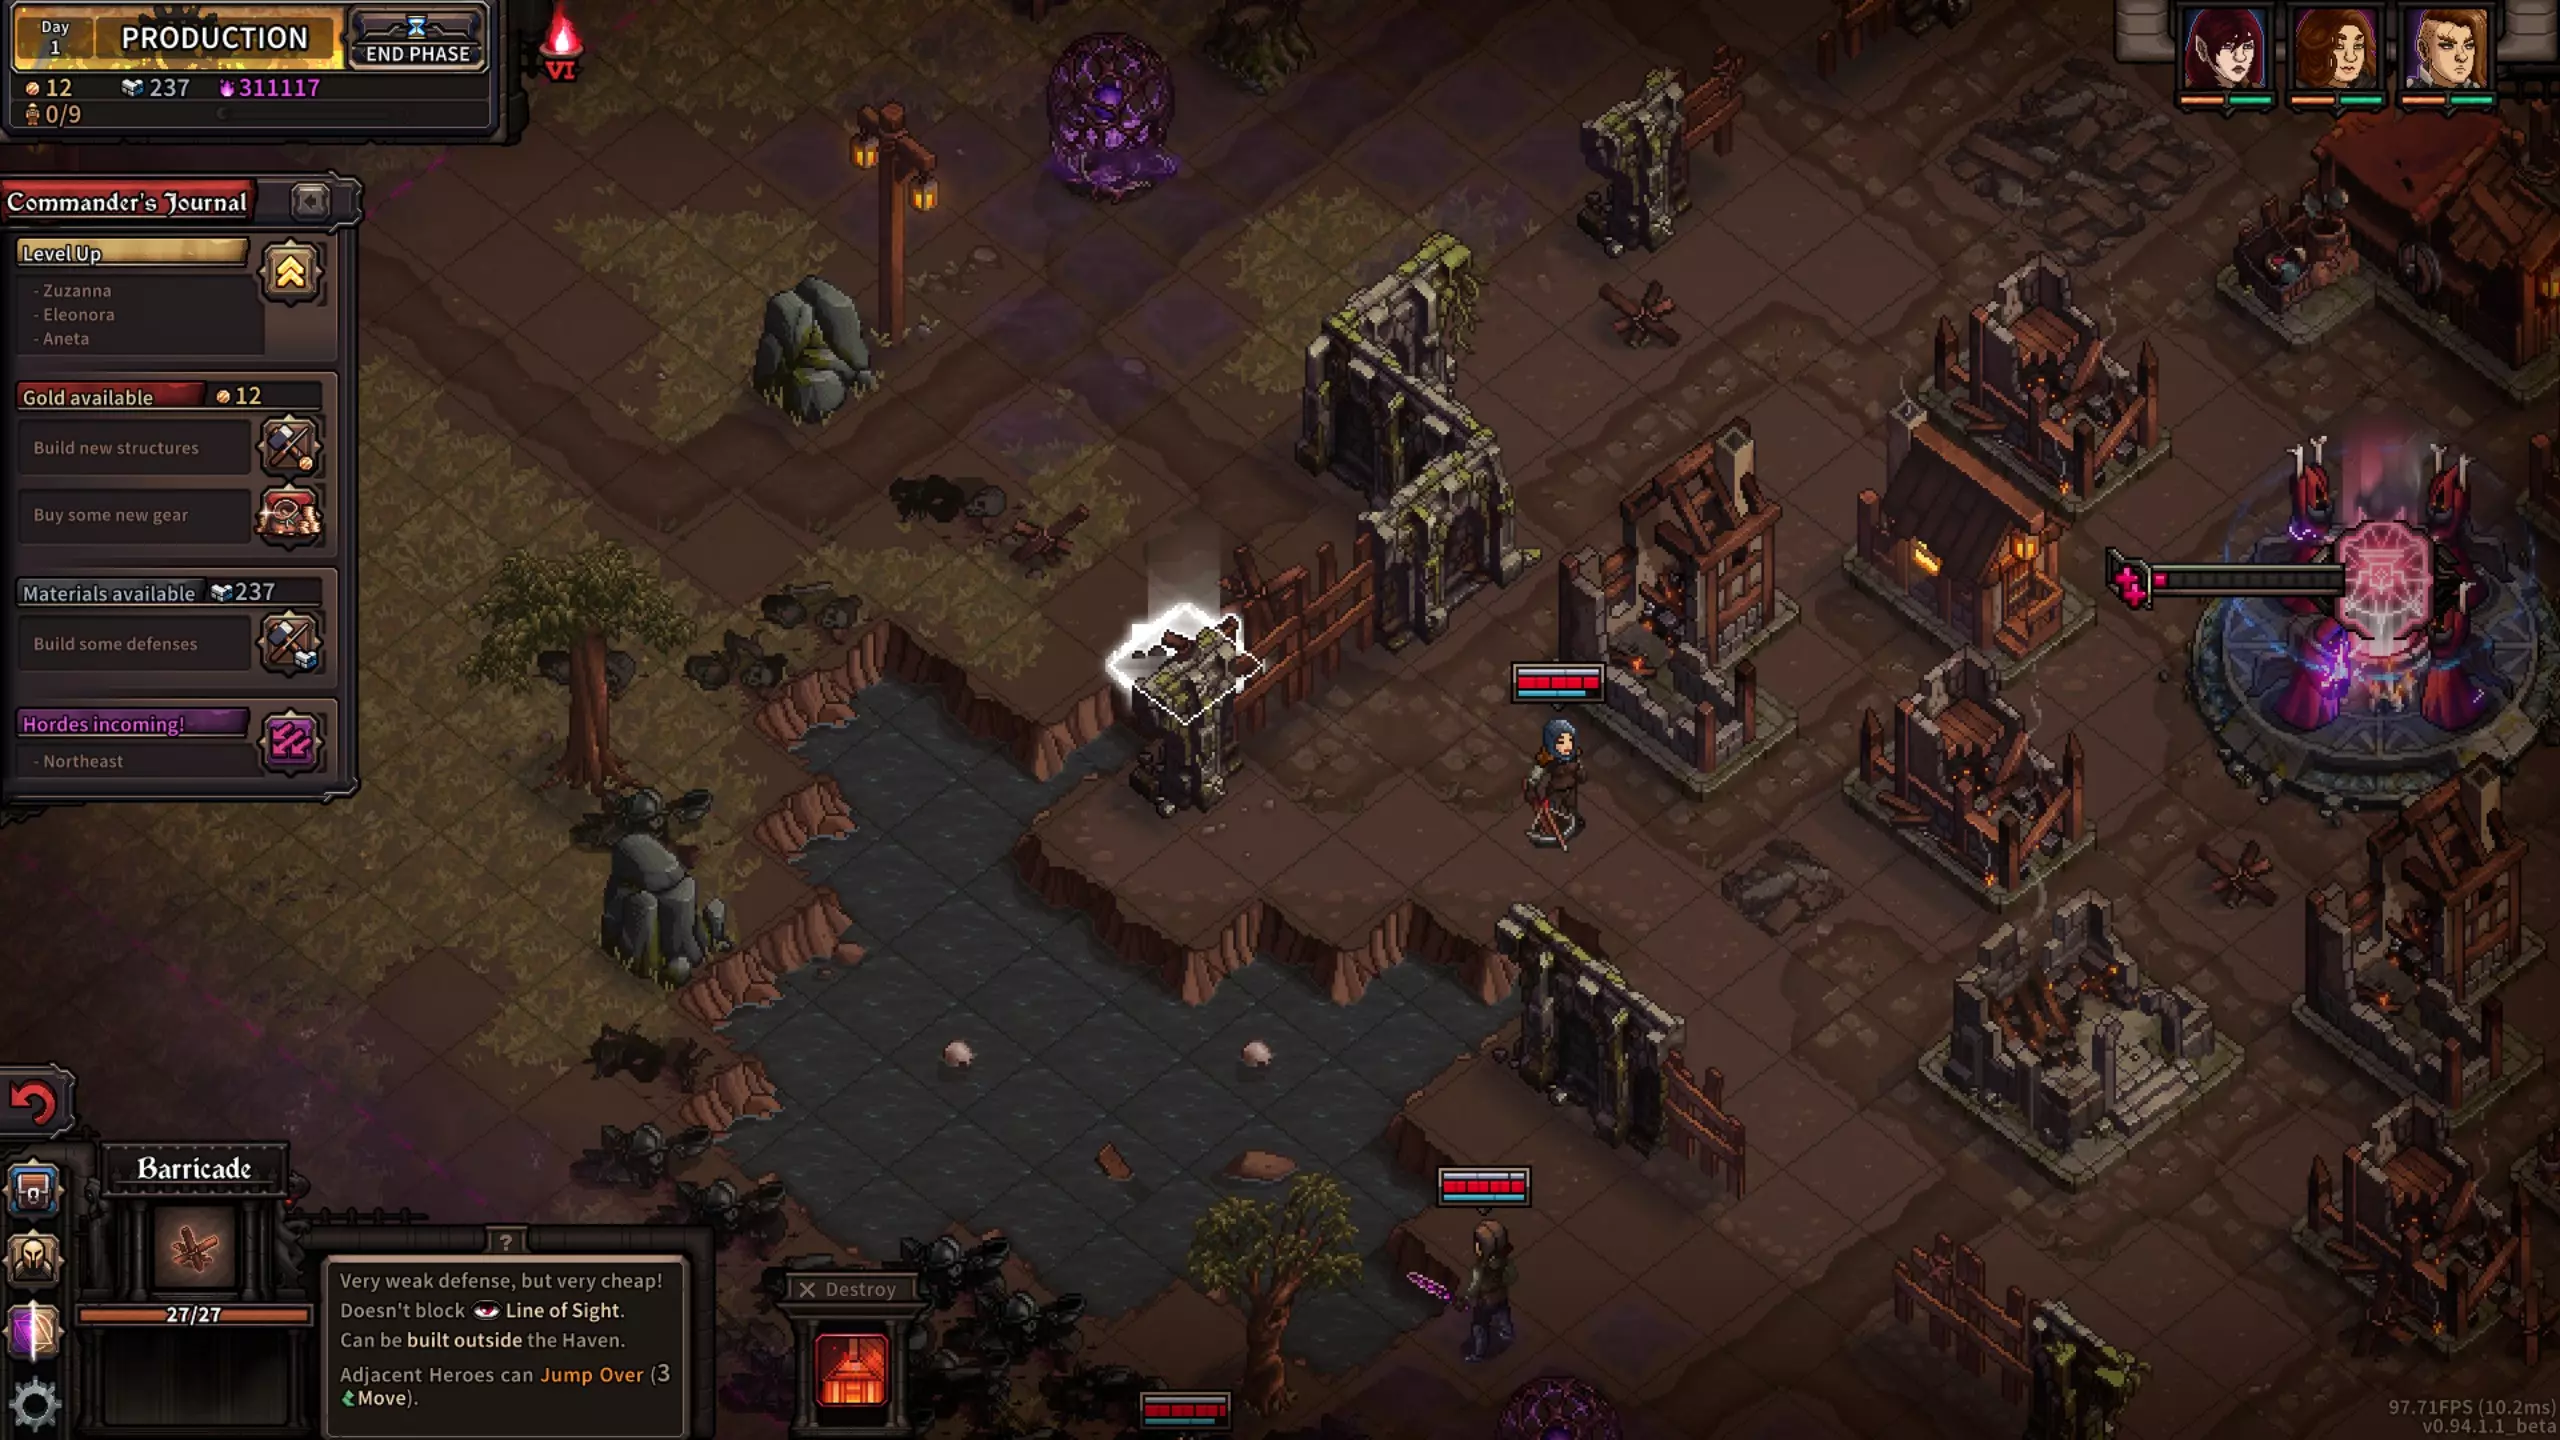
然后你要在它旁边立即放置一个路障,位置再往外一些。这个路障位于避难所的城市边界之外,因此在受到攻击时不会引发恐慌。 路障是唯一可以在城市边界外建造的墙体。 通常,在那些尚未建造木墙的城墙区段,你会想要像这样设置双重路障。换句话说,如果你用路障填补了一个缺口,可以按照上述方法再放置一个路障以增强安全性。 到了后期的夜晚,如果材料允许,你会希望过渡到使用1个木墙。 原因是到那时你可能会有更多机动英雄,而如果墙体厚度为2,他们就无法跳过墙体。传送门是在地图上移动的一种方式,但使用它需要消耗3点法力值,并且所需材料与建造一座塔相同。这意味着你需要消耗相当于建造两座塔的材料才能使用它们,这可能不是最优选择。在启示录4+难度下,金币和材料都会非常紧张。 迷雾审查者信息 迷雾审查者会给你带来很多麻烦。处于这些审查者产生的薄雾范围内的敌人无法被直接瞄准。不过,你仍然可以用范围攻击瞄准他们,法术也能扩散到薄雾中的敌人。但要做到这一点,有些技能可能需要一个直接目标。 例如,如果你试图用投石机攻击处于薄雾中且你无法看到的敌人,除非你直接攻击迷雾审查者,否则投石机将无法发射。那么如何摆脱这些烦人的东西呢? 造成伤害。 迷雾审查者在第一晚初始生命值为150,后续夜晚生命值会逐渐提升至600。
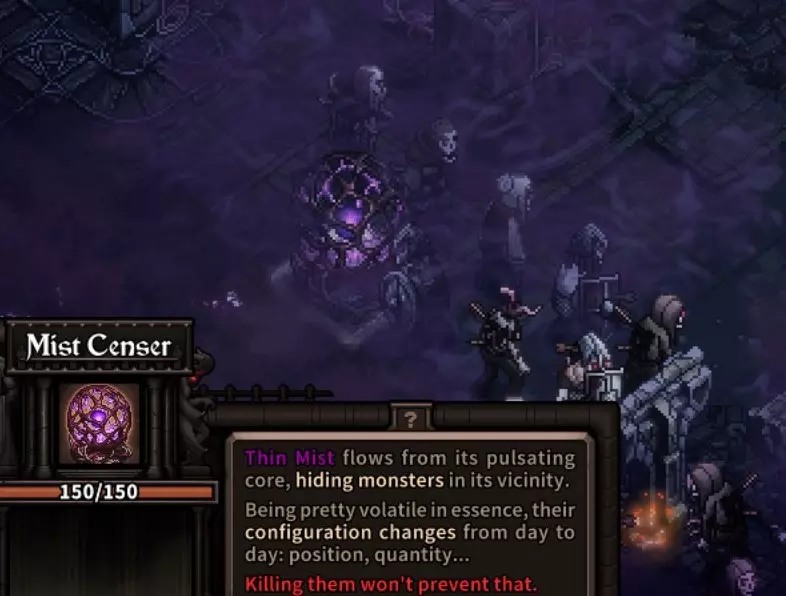
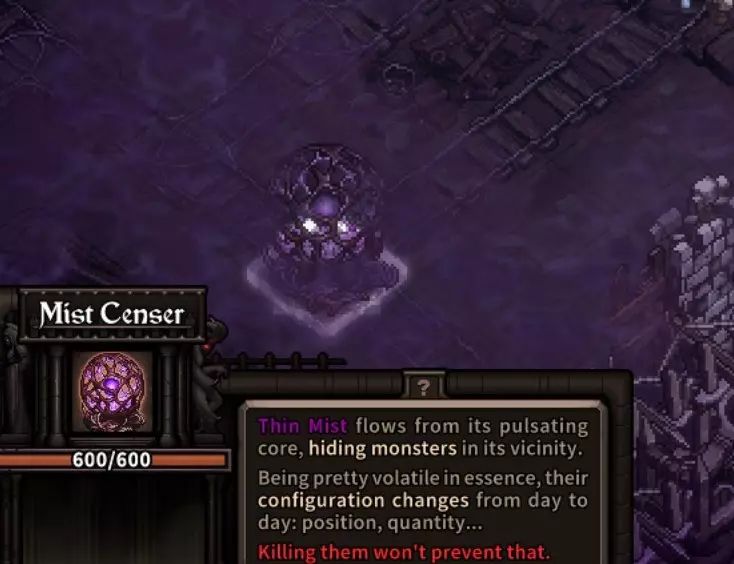
迷雾审查者会在每个夜晚结束时消失。 但别担心!它们会立即重新出现,并且可能出现在不同的位置! 这意味着你每晚都得应对这些家伙。 应对迷雾审查者的技巧:范围攻击可以击中迷雾审查者。短弓的箭雨或法典的火球术能快速解决它们,还可能同时击中附近的一些敌人! 你对迷雾审查者的攻击不会落空!使用十字弓的重箭或短弓的强力射击等技能完全没有风险。 你无法向迷雾审查者传播效果,也无法从迷雾审查者身上传播效果。记住,如果你使用法典的闪电术或德鲁伊法杖的蜂刺等法术,传播效果将会消失,即使附近看似有有效的目标也是如此。迷雾审查者的运作方式与建筑类似。例如,如果你拥有T5 perk【魔力收集者】,在对它们造成暴击时无法生成魔力。 尸体机制 游戏中每夜循环最实用的机制之一是,敌人能够生成尸体、尸堆、尸山和精英腐肉。 这4种类型的尸体在每个生产阶段都能为你提供额外选择,并极大影响你建设避难所和/或为英雄装备的方式! 然而,游戏并未对此进行详细说明。它们生成的具体机制在游戏中并不明确。 因此,根据我自己的测试以及在Ishtar Games相关社区中的多次讨论,大致总结出其运作方式如下: 地图上的格子被划分为不同区域。每个区域中,敌人在格子上死亡时生成尸体的概率各不相同。 区域1(绿色):概率极高,位于避难所内或避难所外1格的任意格子 区域2(黄色):概率高,避难所外2格 区域3(橙色):概率中等,避难所外3-5格 区域4(红色):概率低,避难所外5格及以上
敌人必须死在完全相同的格子里,才能增加生成尸体的几率。在同一格子里死亡的生物越多,生成尸堆或尸山的几率就越高。 请注意,精英腐肉只能从精英敌人身上掉落。无论你在同一格子里杀死多少敌人,除非你在那里杀死了精英敌人,否则精英腐肉永远不会生成。 每晚能生成多少更高等级的尸体存在一些尚不明确的限制。此外,精英腐肉在某种程度上也是有限制的。例如,假设你在一个晚上遇到3个精英敌人,并将它们全部引诱到绿色区域后杀死。即使你在不同的格子里杀死每个精英敌人,你也可能只能获得2个精英腐肉。以下是击杀精英怪时需要考虑的一些基本规则: 1. 一阶精英(如爪牙):在绿色区域有几率掉落精英腐肉,其他区域掉落几率极低。 2. 二阶精英(如翼兽):在绿色区域必定掉落精英腐肉。 3. 三阶精英(如撕裂者):即使在黄色区域击杀也会掉落精英腐肉。 4. 四阶精英(如巨怪):即使在橙色区域的第一排击杀也会掉落精英腐肉。 再次强调,这一切都假设你在当晚尚未达到精英腐肉的获取上限。 利用这些基本规则,你可以选择让你的城墙承受严重损伤,但在此过程中,尽可能只在绿色区域击杀怪物。这样做可能会带来一些非常可观的结果。以下是在吉尔登堡第3晚启示录6难度下的一次典型尝试。
I saved my materials day 1 and 2, on day 3 I built the strongest wall on that side possible and then tried to only kill enemies in the green zone. This yielded 5 Mountains of Corpses on Day 4! Corpses are limited based on the day on each Haven. So since patch 1.0.2.16 it is unlikely you can get 5 on Day 4. However, you can still get a few and the benefits of corpses can be wild. It is worth keeping in mind that it is generally a catch-up mechanic. But with some clever strategy you can utilize it for outrageous early boons. If you generate 3 Mountains, you can choose between using 6 workers in your GMs that day (If upgraded you can use 1 worker at a GM for 40g, so that would total 240g), Scavenging (resource focus) all 3 Mountains for 216g and 384 materials (this is almost enough for 3 fully upgraded Mounted Ballista), Scavening (item focus) the Mountains for 9 items, or any combination of the previous 3 choices. Generally speaking, although you get slightly less gold from resource scavenging Mountains, the amount of materials you ALSO obtain is worth it. Early on you almost always want to Scavenge (resource focus) Mountain of Corpses. A note-worthy benefit of scavenging Mountains for items is once you are in mid-late game in any Haven. The items that come could be T3-T5 and they start to sell for quite a bit. Later on into any Haven it's generally worth it to take the items. With some clever play you could viably execute builds that do things like cutting out gold mines entirely. It's a fun thing to play around with but you will need to be very confident in your game knowledge as playing like this requires your build order to be dynamic. Notes about Build Orders The build orders listed in this guide for each Haven are designed to be able to be followed every round (as reliably as possible). With that in mind, 19/20 times you should be able to follow the builds exactly, I have used the build orders to find successful and smooth victories in each of the Havens on apocalypse 6 (otherwise I would never suggest them! :P) All parameters for them are a bit loose... meaning that with exceptional play you'll have some additional resources for wiggle room. On top of that, once you have obtained a high level of game knowledge you'll be able to play much more dynamically. This is optimal. There will always be small adjustments that you can make based on your circumstances that will beneficially alter the suggested build order. For example, if you manage to get an Elite Carrion on Night 2 Glenwald, or a Mountain of Corpses on Night 3. There are also playstyles that embrace the less controllable aspects of the game, such as trying to focus on Corpses day 1. Much more info on this in the above section, "Corpse Mechanics". Keep in mind these build orders are not the only way to win. Experiment with other hero builds, omens, and build orders. Trying out something different is how you'll learn and gain more game knowledge. As stated all over this guide, game knowledge is by far your most powerful weapon. Leveling Your Heroes - Lakeburg Below you'll find my suggestions on what perks and stats to take when leveling a hero on Lakeburg. Keep in mind that leveling up efficiently takes a lot of experience. At the end of the day you want to try to focus on flexible stats that allow you to make heroes strong regardless of equipment or gear. This way, if you have say a melee hero constantly putting points into crit and accuracy, transitioning into being an archer doesn't really hit the hero very hard stat wise. Leveling TipsIf you hit that level up button and are presented with 5 choices you don't like, you can click the little arrow to the right to shift to selecting the secondary first. This way, you'll know whether or not you want to use your reroll here or on your secondaries page. Perks - Lakeburg To start, it should be noted there is a lot of talents after the perk rework. Many not mentioned here have there place and can be very useful in certain circumstances. I primarily am mentioning the ones I heavily use and frequently find great value in. That being said, with perks we have to be a little dynamic and plan a bit in advance. On day 1, take a look at each of your heroes and try to plan a route for them. You can right-click a perk to pin it, this will help you remember what your path was later. For example, I might see Harvester on my melee hero’s T1 (tier 1, the first tier) perks. Harvester is extremely good! However, I see this hero also has Vampire and Blood Magic. In the future this hero won't use mana and the blood equivalent isn't as significant. The Vampire/Blood Magic combo is extremely powerful and too great to pass up on a melee hero. So instead of picking up Harvester, I’ll go straight for Coagulation (best synergy), Back Protection or maybe even Fatality. Godly PerksSome perks are extremely powerful and will work in the vast majority of cases. Below are the perks that will generally be amazing on all heroes. Contamination (T2) - There is a separate section to explain the high usefulness of this perk. It comes highly recommended on all maps. Please see "Contamination's Power - Elderlicht" for more info. Human Ballista (T4) – Always take this. There is never a reason to skip it. The damage scales with your hero’s highest damage type so it is amazing on EVERYONE. Never skip this and always pick it up first. It is arguably the best perk in the game. Definitely the best non-T5 perk. Back Protection (T1) – This has very high value on all characters. The armor scales as you level making it stronger as you grow. A hero with this can block holes in your walls and feel moderately safe doing so! Highly useful. Night Owl (T5) – This perk gives you +2ap/mp every turn after the 4th of the night. You’ll find this extremely beneficial in the later nights, especially night 12, where the turns can go well past 5. On lakeburg, aim to take this as your 2nd T5 perk if it is available. Potent Toxins (T5) - if you are planning on using a Druid Staff, this perk is crazy good. Keep in mind the +% poison damage cap is 500% so even if you already have a lot, this will add a lot of damage. It is worth 2.5 rare +%poison dmg secondary rolls! BOOM! (T5) – This perk is only going to really shine on a melee hero. It leads to a LOT of extra kills especially when using AOE abilities. Be careful with your other hero’s positioning when using this though as the damage can splash onto your other heroes (not the one using this perk though). You can use this with a ranged hero, such as a shortbow or pistol or even a Tome. However, you will need to make sure you are within 3 tiles of the unit you kill in order for it to activate. Mana Collector (T5) - This perk can easily make mana a non-factor for a hero. With decent crit (at least 30%) it is quite powerful and allows you to be fairly reckless with your mana consumption. At 45~% crit, it becomes absolutely ridiculous. You can usually fire off spells non-stop and never fear coming close to running out of mana. It can proc off of each hit in a multi-strike or multi-target attack (like Rain of Arrows from a Shortbow, it can proc up to 7 times from that 1 attack - meaning the spell cost 4 mana but can regenerate up to 7!). This is capped at 10 mana restored per turn. It can only proc ONCE from propagation attacks. Things like a Druidic Staff's Bee Sting can only possibly proc this perk one time per cast. Mana Collector does proc on non-mana consuming attacks! Strong PerksDefensive Training (T2) and Avid Learner (T2) – If you have these available you should take them. They are pretty high value early on. Since the build is relying early on Catapults you can effectively duplicate EXP from kill bonuses with Defensive Training. On this map, without any extra exp gains it's possible you won't hit level 11 on which is the last level that grants a perk. Extra levels for more T5 talents is pretty much always the best route. To be clear, I wouldn't recommend taking both. One or the other is usually a good idea though. Overload (T2) – This is a “will pay off later” perk. You will not find this useful until at least mid-game most likely, as you won’t have many… or any… potions until then. However, once you do have potions, it’s amazing. Shorter Weapons (T3) – great option on any melee hero especially. I even take this sometimes on ranged heroes because the 15 accuracy is worth it for -1 range. Even more especially if I’m getting very unlucky on accuracy rolls. Quantity Vs Quality (T3) – Particularly powerful on a druid hero. You won’t be killing too many enemies with the propagation of your poison, but more so with the poison tics themselves. Because of this, it is unlikely you’ll kill the 32 enemies with propagation to make this talent nullified. As a bonus, druids don’t really care that much about the upfront damage of their propagation so the -6% is fine. If you're planning on using a Tome, probably best to avoid this. Specialist (T4) – On Apoc6 there are often times you don’t want to be managing 2 weapons, it is possible you won't have the resources or luck to get something better than +50% dmg and +1 charge to each skill. This bonus has no other requirements and is always active. Very reasonable option especially if you fall behind or have a hero with less than 8 AP. Volatile Reaction (T4) – Powerful on any hero heavily utilizing propagation, such as a Druidic Staff, Tome, or Hand Crossbow hero. Surgical Strike (T5) – This shouldn't be your first T5 choice unless you are struggling with accuracy. Typically you should be attacking new targets with each hero so this should have very high usage (same can be said for First Blood). 50% reliability can be extremely good on some heroes. It depends on your weapon. A couple of good examples would be Tome of Secrets, 2h axe, Shortbow, and Longbow. General Perk TipsOn a melee hero, you will pick up whatever talent is in the T3 (3rd tier) for melee. Vampire or Relentless. Both are exceptionally good, I would never recommend skipping these. If Back Protection (T1) is unavailable on your hero and you have a fair amount of HP regen, consider picking up Coagulation (T1). All heroes will occasionally have to tank a hit and you don’t want their actual HP to be effected if at all possible. Coagulation can help with this and is particularly good on a Blood Magic/Vampire hero. So much so that I have opted to go Coagulation on that type of hero and skip Back Protection, even if both are available! Harvester (T1) is a must on any hero that rolls it. The only exception is a melee hero that rolled Blood Magic (T3) AND Vampire (T3). Early on, this perk is crazy good.. it only falls off late-game if you have Mana Collector, but even then I sometimes do not skip it because of how powerful it is early/mid game. Fatality (T1) scales throughout the nights. Because of this, it is worth picking up and can save you a ton of a AP in early-mid game. Even late game I’ve found opportunities to use this and save a couple AP. Generally speaking, I'll only pick this up on melee heroes. It is skippable but viable if Back Protection is not available. Steady Aim (T1) and Mark (T2) are decent talents but there are often better options (such as simply taking Omen of Dexterity and aiming for another accuracy roll or two during level ups) instead of putting a perk here. If you use these, remember you have to manually activate Mark and you can't move for Steady Aim or it deactivates for the rest of the turn. Perks - Powerful Combos to Look For When you are planning a route for your hero (you should do this Day 1), here are some perk combos that work particularly well together and can create a powerhouse hero! Weapon: Any Melee Vampire (T3) + Blood Magic (T3)Avoid taking Harvester if you see this combo is available. It's blood equivalent is not as powerful. Take Vampire first. Also consider taking Coagulation instead of Back Protection as it will work well with Blood Magic. If you have a melee character that rolls both of these you would be shooting yourself in the foot by skipping this combo. Really any melee weapon works for this combo, but I would suggest 2h sword or spear in one weapon set and then something with mobility in the second weapon set, like 1h sword or 2h Axe. Weapon: Any Mana Collector (T5) + First Blood (T2) + Glass Cannon (T2)If you see First Blood and Mana Collector available, I am 99.9% sure I would take this setup EVERY time. The only exception would be if it is a melee hero with Vampire/Blood Magic. In order to set up for Glass Cannon, while leveling look for an opportunity to take a rare(blue) or uncommon(green) HP roll to offset the -60hp. This effectively makes that HP roll instead a +15% crit roll. This extra crit will help us with Mana Collector and, unlike First Blood, applies regardless of enemy HP. Energized (T3) is another strong option for this combo. Especially on a Tome hero as you can generate yourself 2 AP each turn. something to keep in mind is that propagation will only proc Mana Collector on the first target. Things like Rain of Arrows can proc it up to 7 times for a total of 7 mana back. Fireball from a Tome hero can restore up to 5 per cast, but Chain Lightning can only restore 1 per cast. Note: Mana Collector is limited to 10 mana restored per turn. Weapon: Druidic Staff Potent Toxin (T5) + Epidemic (T4) + Quantity Vs Quality (T3) + Volatile Reaction (T4)Even if I only see the first 3 perks on a hero, I will typically try to build them into a druid. Druid Staff is a very powerful weapon and it is for sure the best when it comes to dishing out poison damage. In other words it makes the most use of Potent Toxin. The great thing about Quantity Vs Quality with a Druid Staff is that you aren't typically scoring kills with your poison's propagation dmg. More often than not, you are killing enemies with the poison tics themselves. Poison kills grant the hero the kill bonus exp and count towards proccing perks. Epidemic adds even more to this, allowing you to more easily spread your poisons whenever you land kills on poisoned targets. Weapon: Scepter ChoiceT5 + Relentless (T3) / Inertia (T4) + Nimbleness (T2) + Shorter Weapons (T3)Choice T5 perks: BOOM!, Legendary Assassin, Adrenaline Rush, Berserk, Blessing (Ideally you'll have at least one of these) BOOM! on a scepter hero creates some nasty splash overkills as your momentum attacks can really dish out crazy damage. This should be your priority for T5 perk choices. it take late game Scepter builds from good to excellent. Since Magic Bash can be used from range, make sure you are always within 3 tiles of enemies so this perk works! Legendary Assassin requires you to kill 3 isolated targets to regen 1 AP. This can occur multiple times per turn and as a Scepter hero you'll have many opportunities to kill isolated targets. With this perk, you may even find yourself running out of skills to use before running out of AP! Adrenaline Rush is a fantastic choice as you will almost definitely dodge every turn if you position semi-close to enemies. This is almost a guaranteed +1 ap each turn! Berserk is a fantastic choice for a scepter hero as well as you should be at 95% dodge every turn. Be sure if you pick this up to intentionally leave your scepter hero in harms way to optimize how many procs you get each turn. Blessing is a great T5 talent for a Scepter hero. This will make it so you only have to use Wind Walk to cap your dodge every other turn instead of every turn. It's possible you'll need this if you didn't pick up Nimbleness and/or the Shorter Weapons perks. If you roll at least 2 of these T5 perks on a Scepter hero you’ll see the power. It’s quite crazy allowing you absolutely insane movement (likely 20+ a turn) with continuously growing damage each turn. The real kicker is that Scepter heroes can very easily obtain 95% dodge each turn (which is the cap). This means the likelihood of you actually taking any damage is low. Even more easy with Blessing as the dodge from Wind Walk will last 2 turns instead of only 1. Relentless, Inertia, Nimbleness, and Shorter Weapons will aid the combo further (and early on before you have T5 perks) lending even more movement and dodge. Relentless DOES proc off of the main Scepter attack as long as you are in melee range when you kill something. Inertia works because Magic Bash is a momentum attack, so it will proc every time. Nimbleness is not required, but very helpful as it increases your base dodge and movement. But if you are ever injured it will be disabled. Shorter Weapons is ideal as you don't care what-so-ever about that -1 skill range (you want to be in range to proc BOOM! anyways). It gives some base dodge and accuracy so it is quite strong for this weapon. Primaries to Focus On - Lakeburg 0. Action PointsThis always wins. It is always the best option for any hero under any circumstance I can think of. Unless capped (extremely unlikely), always take this! 1. +% DamageAlthough the next 2 attributes are extremely important as well, damage is going to generally win. With the exception of an action point roll, I would never pass up on a rare (blue) damage roll. The only scenario I can think of is if the hero has already had a few damage rolls and is seriously lacking in accuracy. This attribute does not diminish. 2. AccuracyA close second, accuracy is extremely important. I would take a uncommon (green) accuracy roll over an uncommon damage roll until accuracy is at least 25%. Including gear and perks, you should aim for ~35+% accuracy on each hero. If your hero is at this point, you should de-prioritize accuracy. However, if you are using an inaccurate weapon such an an axe, a little more wouldn't hurt. This attribute starts to lose value after 35%, including gear. 3. Movement PointsEvery character should have at least 8 movement. Melee I would say need a minimum of 10. If you hit these points, the value of movement absolutely tanks. Only prioritize this trait if you have a hero sitting at a base movement of 5 or 6. Otherwise, just take it if you get a blue roll (or even a green perhaps). Avoid settling for common rolls. After your hero has 10 or more mp (move points), the value of this attribute drops heavily. 4. CritCrit is extremely effective for ALL builds. Even poison builds. Having high crit will spike the initial damage of poison spells and synergize with the Mana Collector perk. With high enough crit (30%+) and the Mana Collector T5 perk, aoe spells are nearly always effectively free of mana cost. A common crit role beats any other common level roll. I would take a common crit over a common dmg or accuracy nearly every time. Leveling up crit, even when building for the Mana Collector perk, begins to falls off around 30%. With first blood adding another 15% when hitting full hp targets, your aoes should have no problem proccing Mana Collector if you are over ~30% crit (as first blood will make this ~45% per target!). More is not bad, it is simply not AS valuable. You can start prioritizing flat damage after your base crit is 30%. Although, I'd still take a rare crit roll likely until my base crit is around 45% The value of this attribute diminishes after your hero has 45% crit (including gear). 5. Armor/Block/HPif you are going to take a defensive stat, take armor when possible. Block is fine, and hp is not worth it usually. The exception is if you rolled the "Glass Cannon" perk. You can take one rare (blue) HP roll to offset the -60hp as a rare HP roll is +50hp. So keep in mind, Crit, Accuracy and Move Point level ups fall off! Do not endlessly focus them! Having 17 move points, 55% accuracy, or 90% crit is wasteful! Secondaries to Focus On - Lakeburg 0. MultihitRolling this trait is pretty crazy. There is a very high chance that you'll get at least ONE +multihit piece of gear each run. I would say it is almost always worth taking even if you don't have a hand crossbow or other multihit gear yet. The gamble is almost definitely going to pay off. In the apoc6 runs I've done, I've always gotten at least 1 or 2 pieces of multihit gear by the end. If you roll this on a ranged hero or a melee you plan to setup with a Spear, take it! 1. Experience Gain Only target this with high priority if you roll a green or blue rarity of it on the three or four days. After that this stat's effectiveness diminishes rapidly. However, even on day 5 or 6 I'd still take a blue roll. The earlier the better, but it's not "not worth it" until day 8+. 2. +% Physical/Ranged/Magic DamageConsider your hero's mana situation. If you have to make a choice between this attribute or a rare Daily Mana Regen, you might want to go with the mana. Otherwise, a rare roll of this only loses to a good (and early) +% exp roll. Of course, this is assuming you rolled the correct one for your hero. If you roll a rare of this attribute for physical, and the hero that rolled it is all set up for ranged, skip it! 3. Daily Mana RegenBelieve it or not, especially in the first 5-6 nights this trait is very strong. Mana regen is very powerful as it allows you to use those mana abilities with higher frequency each night without having to ever build a Mana Well, or buy mana potions. The more regen you have each day, the more reckless you can be with your mana in tough spots. You might be thinking "But what about Mana Collector?" Yes, this perk is godly, but you can't unlock it until much later in the round. So, for the first 8 or 9 nights, you'll have to manage your mana. Generally speaking, I try to never take common rolls of this. Usually each hero only needs 1 or 2 uncommon (green) or rare (blue) rolls of this trait and then you can use some mana management to get you through. Another thing to consider if whether the hero has the Harvester (T1) perk. If you do, you could get by with 1 or maybe even 0 secondaries for mana regen. 4. Isolation / OpportunityBoth of these choices are highly dependent on your playstyle and you'll benefit from them a great deal more if you are more strategic and apply more negative alterations. Isolation can always apply to any attack on any target. This includes bosses which can make it very powerful against them. When your hero has a high amount of Isolation, try to make sure elites or bosses do not have adjacent allies when attacking them. 123 456 789 For example the above 9 numbers represent enemies. If there is an elite on position 5, you only need to ensure 2, 4, 6, and 8 are enemy spaces in order to have it isolated. 1, 3, 7, and 9 can have enemies present and 5 will still be considered Isolated. Opportunity only applies to targets that have a negative alteration on them. This includes poison, debuffs, or a stun. So for example, if you hit a target with the Hand Crossbow's Slow Death ability it will now have a -2 mp debuff. This means the next hit against the target will include increased damage based on your hero's opportunity (even if they weren't the one that applied the alteration). 5. Critical PowerOnly consider this roll if is rolls rare (blue). For heroes with 40 or higher crit chance, this can definitely be a solid choice once. If your hero has fairly high crit, even uncommon rolls could be quite good. 6. ReliabilityA lot of weapons and their abilities have very wide ranges of damage. This secondary can be just as good as a damage roll. Depending on your weapon choice (Shortbow, 2h Axe, or Tome's Lightning Strike are good examples), this might be nearly as good as rolling a +% damage attribute. EX: 5% damage or 15% reliability? Say you hit for 100-200. with a 5% damage buff you now do 105-210. You increased your damage by 5-10. Median dmg is 157.5 with a 15% reliability buff you now do 115-200. You increased your median damage to 157.5. Reliability can be good because your low end damage is improved. This will reduce the number of enemies surviving at very low hp. Again, keep in mind your hero's weapon. This makes a huge difference. Reliability will have such a small impact on a 1h sword it is practically never worth getting for example. 7. Healing ReceivedHealing Received (only useful on melee!) This can definitely be valuable for physical weapons with the Vampire (T4) perk only but is not worth focusing. This synergizes with the Vampire perk, which heals you 4 hp per kill. +25% and 49% Healing Received you heal 5 hp per kill. +50% and 74% Healing Received you heal 6 hp per kill. +75% and 99% Healing Received you heal 7 hp per kill. +100% and 124% Healing Received you heal 8 hp per kill. +125% and 149% Healing Received you heal 9 hp per kill. +150% and 174% Healing Received you heal 10 hp per kill. +175% and 199% Healing Received you heal 11 hp per kill. +200% Healing Received you heal 12 hp per kill. Hero Composition - Lakeburg The movement speed granted by Apoc5 is more dramatic than one might think. Some enemy types only gain +1 movement, but a few gain more. This is extremely problematic for melee heroes and is why I mention in the leveling section of the guide that movement is such an important primary stat. Because of this, I generally find it easiest to follow this composition: (Note, I typically use Specialist, I'm saying a hero using A/B as in A or B) 4 ranged heroes: Shortbow/Longbow, Shortbow/Longbow, Hand Crossbow/Shortbow, Hand Crossbow/Shortbow 1 Melee Hero: Ideally 2h sword, but Spear works as well. 2h Axe is not terrible, it just doesn't have a momentum mechanic. 1 Magic Hero: Ideally Scepter. The Scepter is a very powerful weapon since its rework. It provide a strong avenue for an EXTREMELY mobile melee character with a ton of dodge! With some dodge gear, you can reliably get to 95% dodge every turn due to the natural flow of this weapon's kit. Secondarily, you can go with Druid Staff or Orb. Tome is a strong choice too but I only recommend this if you have the T5 perk Mana Collector. Otherwise Scepter or Druid Staff will outshine it.
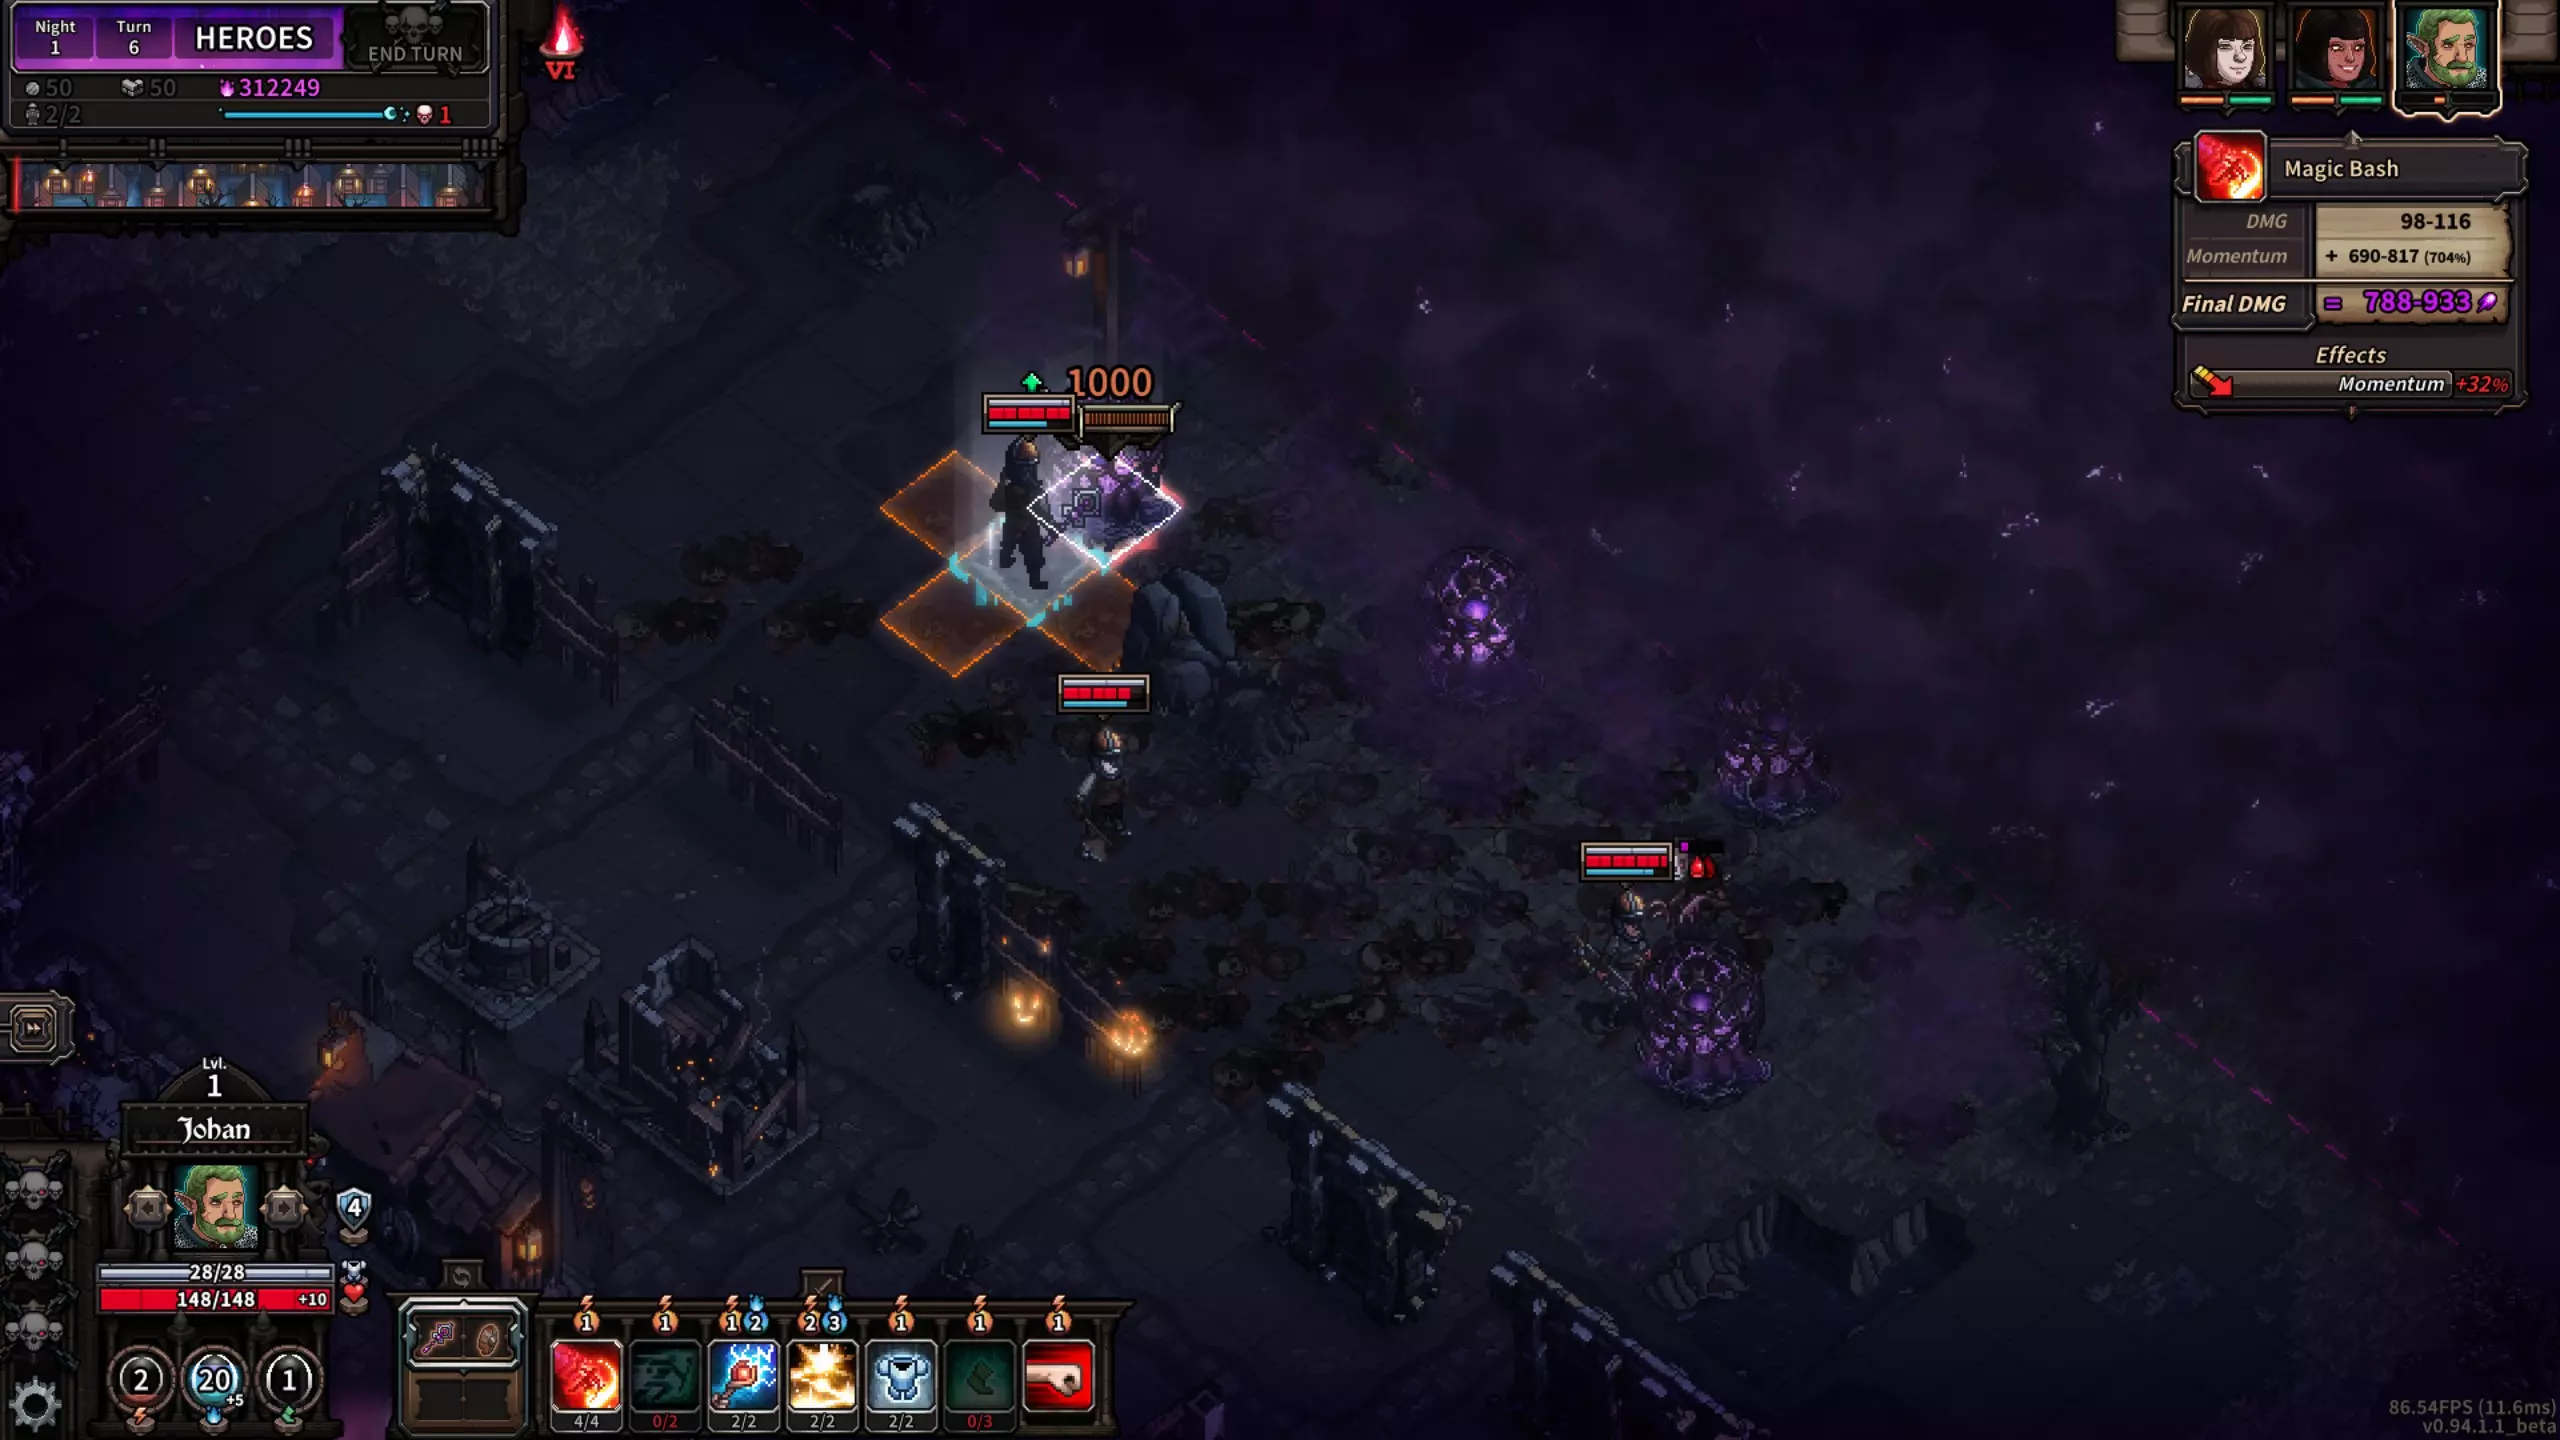
如上图所示,你可以看到在第一晚使用权杖能造成的惊人伤害。 当然,通常情况下你不会移动12格然后只攻击一次。不过,即使只移动一格并使用权杖的1点行动值动量技能,也能造成约140点以上的伤害。 这使得权杖在双人队伍中非常强大,它们可以帮助清理残敌,并一击秒杀精英怪或其他危险敌人。 请记住,许多英雄组合在莱克堡都表现不错。实际上,你可以按照自己喜欢的方式组建队伍。但我发现上述方法对游戏知识的要求最低,因此是前几次尝试时最简单的组队方式。 站位思路是让单人队伍使用手弩(至少有+1多重射击)或短弓……另一个选择是德鲁伊法杖或权杖英雄。当然其他英雄也可以,但使用这些英雄会最轻松。 较重的一侧由以下英雄负责: 短弓/长弓英雄和近战英雄 另一侧由以下英雄负责: 短弓/长弓英雄和魔法英雄 通用提示 - 莱克堡 【关键】:如果尚未执行动作(攻击或使用药水),可以按删除键撤销移动。 理想情况下,你需要在最初6个夜晚中至少有5个夜晚获得恐慌等级S。虽然在建造方面对A等级有一定灵活性,但在莱克堡你应该能稳定获得S等级。 投石机在最初几个夜晚尤其强大。我建造的前8座塔总是投石机,在基地的每个角落各放置2座。这样一来,投石机的大部分射击死角都位于基地内部(我们希望永远不需要在那里射击),并且每个投石机可以覆盖两个方向。 为什么选择投石机而不是弩炮塔呢?弩炮塔的伤害确实比投石机高。但是,弩炮每回合只能攻击1个敌人,升级后最多2个。而投石机每次射击最多可击中13个敌人,且每晚可以射击2次,这样最多能击中26个敌人。 弩炮即使升级了,考虑到大多数回合只有5到6轮……最多也只能对10-12个敌人造成伤害,这还是假设它每回合都能攻击的情况。
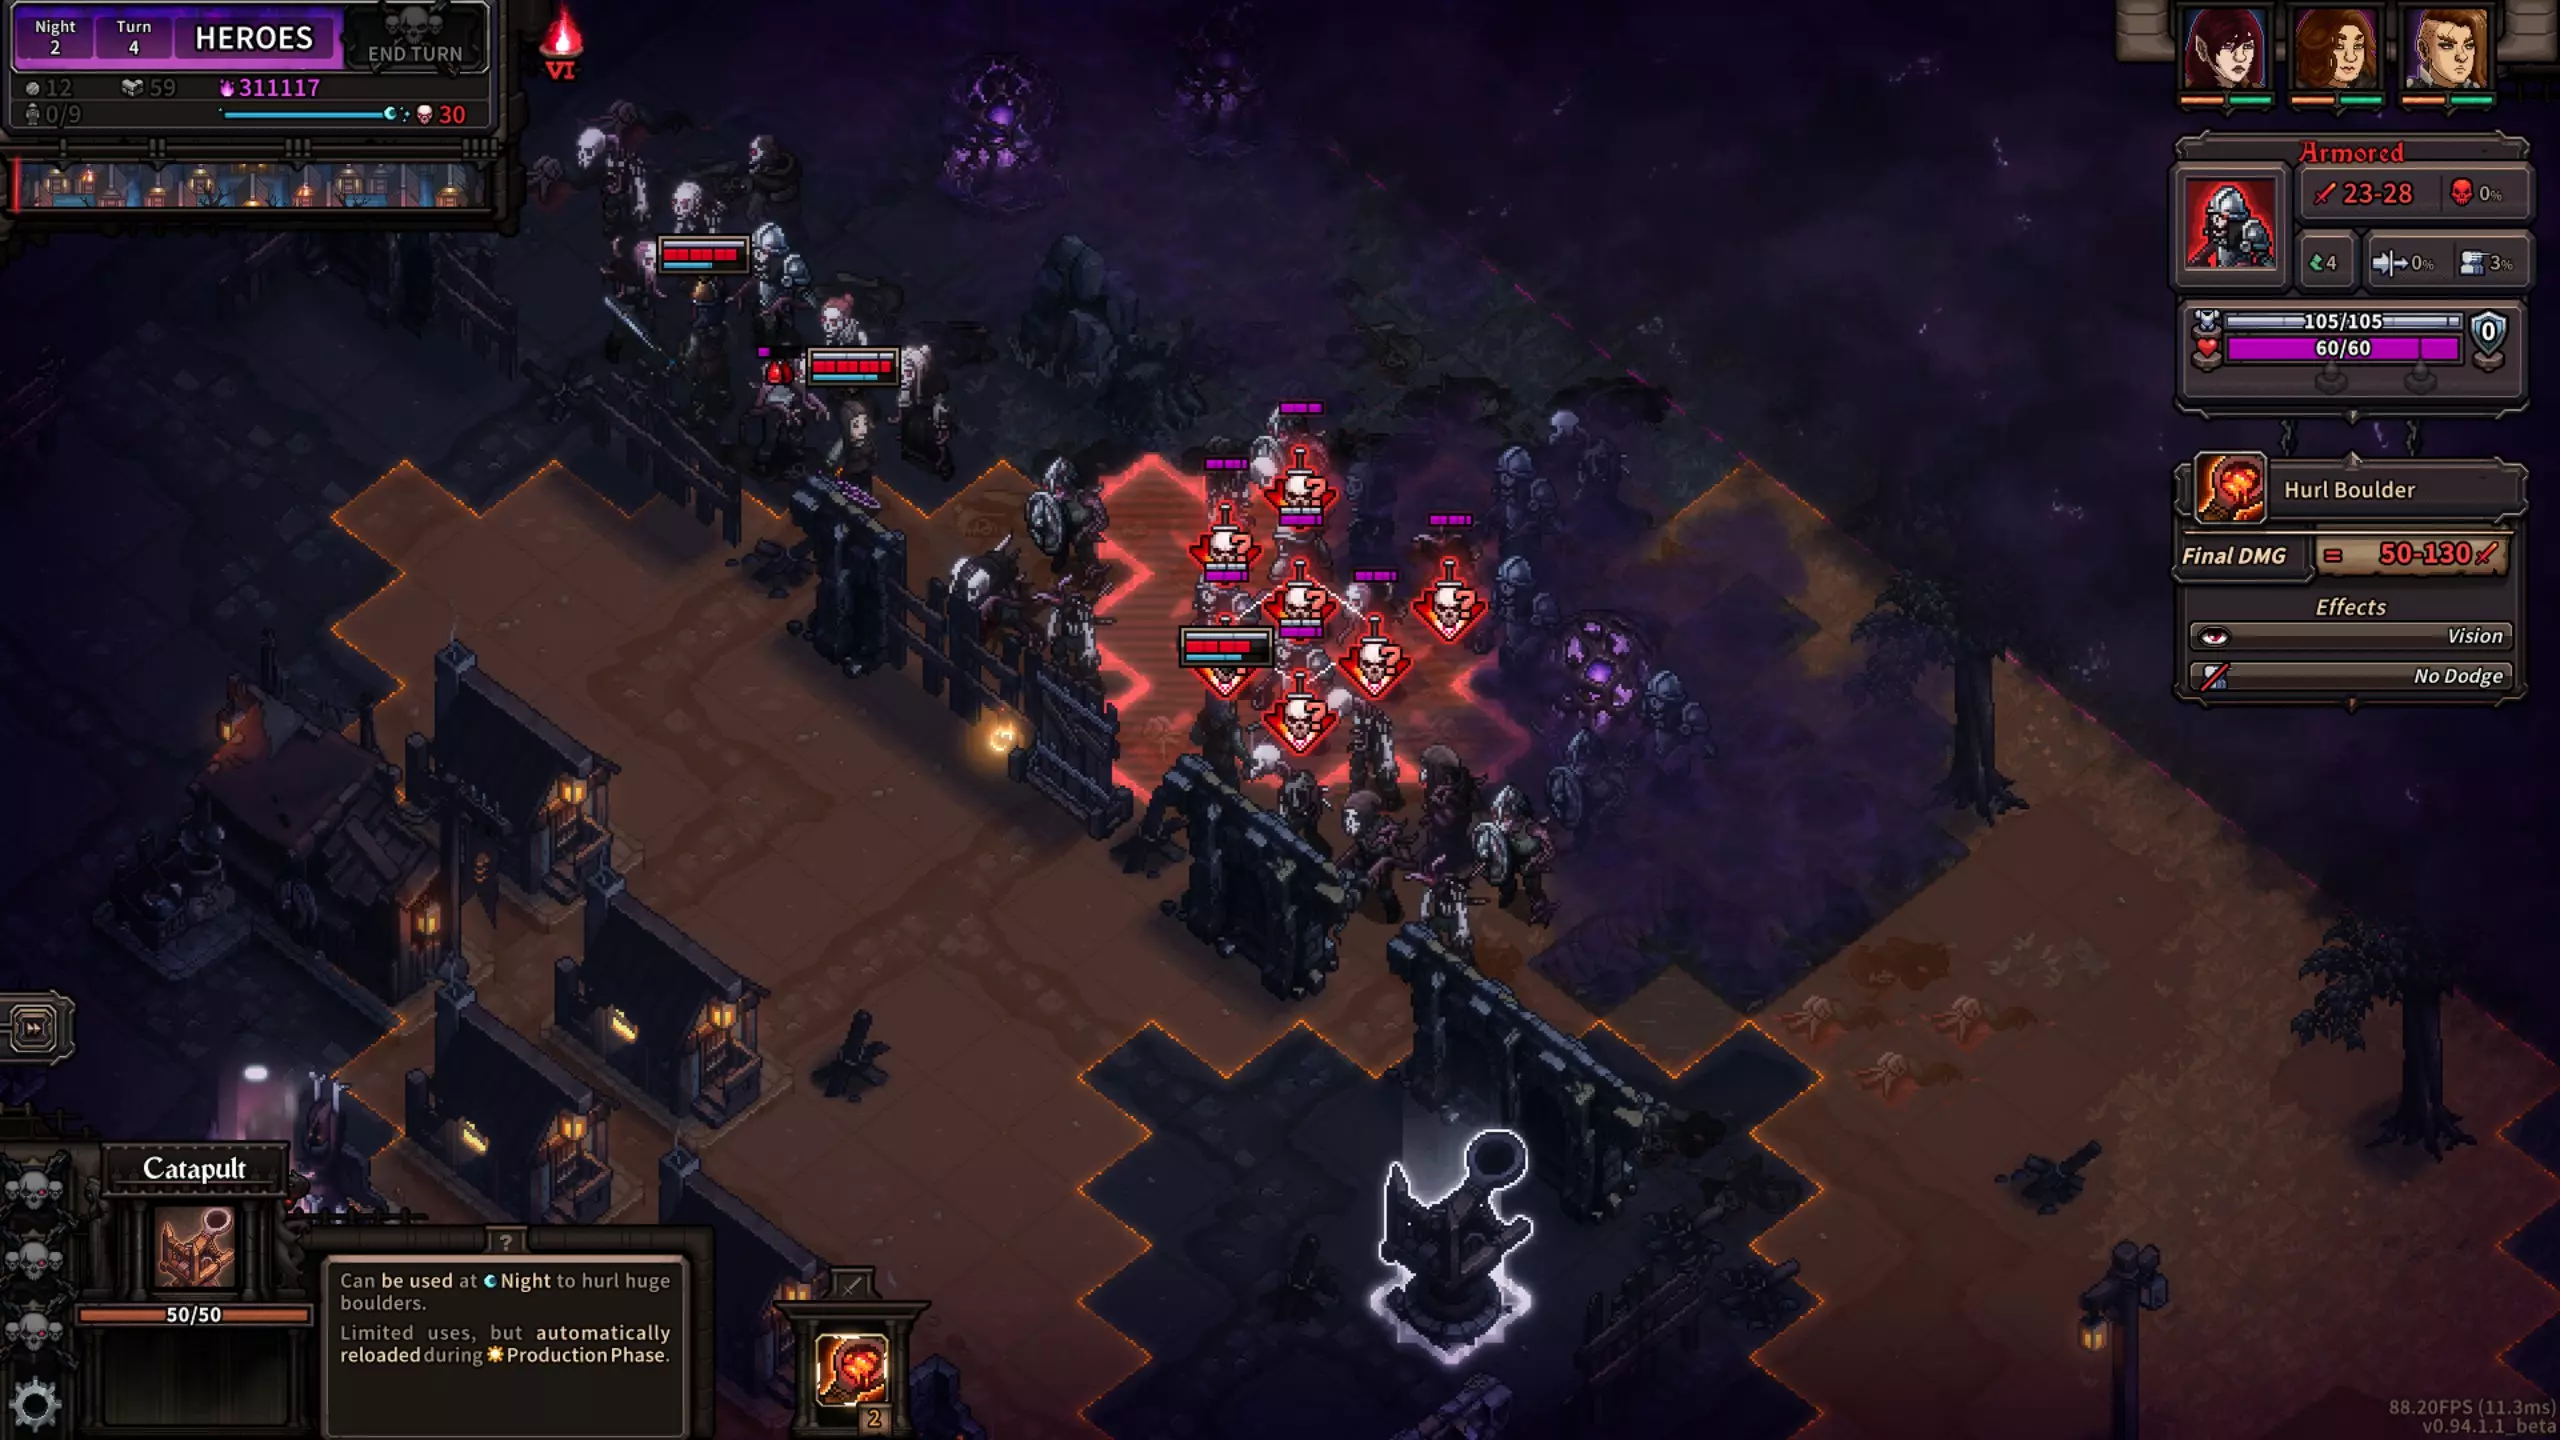
如上图所示,这台投石机攻击了7个敌人,总计造成14次命中。 此时的弩炮可能最多只能攻击4次。而且其中至少有1个回合,它很可能会处于射程之外。 尤其是当迷雾没有阻挡你的时候(例如在后期关卡中,会有一大群敌人非常靠近你已经破损的城墙),投石机造成的伤害会更高。 尽可能密集地建造建筑将帮助你稳定获得夜间奖励。只有当建筑受到攻击,或者回合结束时仍有敌人在城市范围内存活,才会产生恐慌值。 预兆建议 - 莱克堡
1. Wanderer - 3 slots This is arguably the most powerful Omen in the game. There are a couple of factors that play into making this one amazing. First, economically this Omen eliminates the need to purchase a 4th hero. This also means we can delay building an Inn for 2 days on Lakeburg. So it saves us 240g on the hero, and allows us to work on economy for longer and earlier! On top of that, with an entire extra hero the first few nights are significantly easier. The only downside, and it is minor, is that you have a 4th hero in play immediately. This means the available EXP is being shared more. This makes perks like Avid Learner and Defensive Training even more valuable (and of course the +% EXP gained secondary attribute) 2. Dexterity - 1 slot A flat 12% accuracy bonus is something that every single hero of every type will always greatly benefit from. This is effectively giving all your heroes a rare (blue) accuracy roll immediately! Extremely powerful for 1 omen slot. 3. Fieriness - 1 slot Again, every hero of every type benefits from flat % damage. This will help a lot especially in early game where enemies will often survive with very low HP. This little damage boost will help you in that regard greatly. This is a flexible Omen slot and there are a few suggested alternatives if you would like to swap it out. Alternatives choicesDexterity and Fieriness are not required omens on Lakeburg. I do highly recommend Dexterity as missing attacks is very frustrating and devastating to you early on. However, below are some viable options to consider. Omen of Steel - 1 slot If you aren't feeling exceptional confident, this is a good option. It gives your heroes some beefiness for the early game. It provides 40 armor to all heroes which will allow them to tank some hits in the early game usually for free without effecting their HP. Violence - 1 slot This is another omen that provides a flat bonus to all heroes. 8% crit is potent and will really shine in mid-late game. Early crits can be nice but they aren't the focus here. Omen of Mercenary Training - 2slots This is a solid option as we have 11 days, by the time you are fighting the boss you'll be up to +28% damage. However, to take this option, you'll have to also drop Dexterity. So the trade off is 10% damage and 12% accuracy for a scaling dmg buff that will be 3% day 1, but 28% day 11. However, keep in mind, this bonus is not cumulative. Meaning your 5th and 6th heroes will not get the full benefit. If you buy a hero on day 6 --> on day 7 that new hero will have a bonus of +2% from this omen, but your original heroes will be at +20% by that point. There are many viable options for the remaining 2 slots, including Scavenging (+20% resources from ruins/corpses). However, until you are more comfortable, I'd recommend going with the above substitutes. Or just simply stick with Dexterity and Fieriness, they are very strong bonuses and apply to all your heroes, including the ones you purchase from the Inn later in the run. Day 1 - Lakeburg Demonlish (do not scavenge!!) 4 of the 1 worker ruins. They are never needed. Be sure to leave one. Build 2 Houses. Scavenge (gold focus) a 4 worker ruin for 80g. Upgrade 2 of your Houses with House Expansion for 48g each. Scavenge (gold focus) a 2 worker ruin for 28g. Upgrade another House with House Expansion for 48g. Scavenge (gold focus) the final 1 worker ruin. Build 2 Catapults. Keep in mind, building them in the northern part of the base is much less effective and should be avoided. Ideally, by the end of Day 3, you want 2 Catapults in the East, West, and South corners of the base. Our economic boost is coming on day 5 instead. This is due of Omen of the Wanderer, which is paying for our first hero for us. This effectively saves us ~240g on day 5 as well as allowing us to delay building an Inn for an additional 2 days. Be sure to use your Catapults each Night going forward as needed. The way that experience works is that all kills are communal and all heroes benefit from them. However, the hero that landed the killing blow gets a bit of extra exp. So, that bonus is lost when defenses (ballista or catapults) land killing blows. However, it is well worth it if it saves your S rank Night Reward! Use your catapults when needed! Don't forget them! Try to only injure enemies with them and allow your heroes to clean up. Keep in mind this is not critical, it is perfectly ok to let the Catapults score some kills to save your panic ranks!! Catapults are great for injuring enemies as they deal physical damage (which does double dmg to armor!) Day 2 - Lakeburg Upgrade a House with House Expansion for 48g. Scavenge (gold focus) both 4 worker ruins for 80g each. Build 3 Gold Mines (GMs). Build 2 Catapults. Day 3 - Lakeburg Upgrade a House with House Expansion+ for 82g, bringing your worker count to 9 total. Scavenge (gold focus) a 3 worker ruin for 54g. Upgrade GM1 with Production+, Mine+ and Mine++. Use 2 workers at GM1 for 40g each. Upgrade GM2 with Production+, Mine+, and Mine++. Use 2 workers at GM2 for 40g each. Upgrade GM3 with Production+ and Mine+. Use a worker at GM3 for 40g. If you have enough money, get Mine++ at GM3 now and use your final worker here. Otherwise scavenge a corpse for gold and remember to do Mine++ tomorrow. You should have enough if you've had all panic 0 wins so far. You should have north of 200 materials to use on defenses today. I feel it is best to save them here since you already have a catapult at each corner of your base. Tomorrow you can assess the damage to your walls and go from there with a big chunk of materials. However, if you don't feel safe enough, feel free to build some walls now -- or even double up on Catapults. This will leave you with an odd ~50g for tonight. There is nothing majorly beneficial to use it for. You could build a Mana Well here if you are struggling on mana or a T2 AP potion from the shop if one is available. However, this gold is better off saved to accomplish tomorrow's build order. Day 4 - Lakeburg Upgrade all remaining Houses with House Expansion+ for 84g each. Scavenge (gold focus) a 3 worker ruin for 54g. Build a Seer and use 'Repel Mist' for 2 workers. Scavenge (resource focus) a Pile of Corpses. If you only have a Corpse, that is ok instead you just miss out on some materials and 2g. Build 2 Scavenger Camps. Build an Armor Maker. You can opt for a different production building but Armor Maker is universally useful regardless of build. You should have over 400 materials to build defenses with. Use them to start filling out your walls on the sides under attack. I recommend at least Reinforced Wooden Walls. NOTE: It is very cost effective it to repair the walls that were generated on the map. You can opt to build 2 Catapults in the Northern corner of the base (around the docks) but it is fine to skip this. Building there will be less effective than the other corners of the base. There should be an elite in the wave tonight. Try to kill it on top of your wall if at all possible… this is because it will greatly increase the odds that it will drop an Elite Carrion corpse. Proximity to the haven effects whether or not elites will drop an Elite Carrion. For more info please see the "Corpse Mechanics" section. Day 5 - Lakeburg Once you have level 7 heroes, remember Human Ballista is extremely good and should be taken on priority 99.999% of the time. Use 'Repel Mist' at the Seer for 3 workers. Use 6 workers at your GMs and collect the 240g. Build 4 Production Buildings. Any you'd like but I would recommend Alchemist and a second Armor Maker. For the next 2 you should suit your needs. For example, if you have 3 heroes using a melee weapon, then build a Blacksmith. You can also opt to build a second Armor Maker. Upgrade Item Level+ at one of your production buildings for 180g. If you obtained an Elite Carrion, it is always worth breaking the build order to acquire it. Scavenge it! Do not worry if you didn't, even if you kill the elite right against the wall it may not spawn last night. Otherwise use your last 3 workers to scavenge Pile of Corpses. Alternatively, you can Scavenge the final 3 worker ruin, but you obtain far less materials (the same gold though) doing this. Another option is to upgrade "Help Armor Maker" and use a single worker there for another piece of gear. Repair all defenses and then use the rest of your materials to continue filling out your walls (on the sides under attack, use Reinforced Wooden Wall or better). Don't forget to use the "Repair All Defenses" button as well, again, those original walls/gates that spawned around the haven are worth repairing! You'll likely end tonight with an odd ~50-100 gold. You could buy a T2+ AP potion in the shop or some other exceptional item or simply opt to save it. There is no need to spend it tonight. Day 6 - Lakeburg This coming night is usually the most rough one so far. Be sure to take the safe route on step 4 if you aren't 100% confident. Use 'Repel Mist' at the Seer for 3 workers. Use 6 workers at your GMs and collect the 240g. Upgrade Item Level++ in your production buildings. Choose 2 production buildings to upgrade with Production+ for 144g each. If you are struggling or just want to be safe, you can instead use this 288g to build Mana Well(s) and/or a Temple. They come with 1 free use ability per day so they are a solid option. Another option, although it is not necessary, is to upgrade Production+ in your Scavenger Camps. Use your final 3 workers however you see fit. I recommend using them at your production building if you upgraded "Help X" at any of them. If you built a Temple or Mana Well(s), you can use workers there to globally restore HP/mana to heroes on top of the free use ability. You could also simply scavenge with them. For materials, today would be a good time to build some extra catapults. If you don't have 2 in each corner of your base already, add some extras now because it will likely be a tougher night than the previous ones. Also, the sides under attack should have completed walls (At least reinforced wooden). Day 7 - Lakeburg Under attack from 3 sides tonight, so we need to pick up our 5th hero now. Use 'Repel Mist' at the Seer for 3 workers. Use 6 workers at your GMs and collect the 240g. Build an Inn. Upgrade Accommodation+ at the Inn and buy your 5th hero. I went with a level 8 for 334g. You will have 3 remaining workers, use them as you see fit. If you have a Mountain of Corpses, definitely scavenge that for items. With your remaining gold you can build any of the following: Temple, Mana Well(s), a second Scavenger Camp. Day 8 - Lakeburg Use 'Repel Mist' at the Seer for 3 workers. Use 6 workers at your GMs and collect the 240g. Upgrade Item Level+++ at your production buildings. Upgrade the Shop with Shopkeeper's Friend and Best Friend. Sell all excess items in the city stash. You have 3 workers remaining. There is no direct need at this point, so use them as you see fit. You can use both workers in any of your production buildings to target an item -- or, in my opinion a much better option would be to scavenge 2 Pile of Corpses. If you have Mountain of Corpses, definitely prioritize scavenging them. If you obtained an Elite Carrion, use a worker to scavenge it. Never skip scavenging these. It is worth disrupting the build order any time it happens. Again, sell all excess items in the city stash. You should have well over 350g after selling excess items to the shop. Use this gold to upgrade 2-3 of your production buildings with Production+ for 120g each. Another option at this point would be to upgrade your Scavenger Camps, but only do this if you are seriously struggling on materials and your walls are in bad shape. If you haven't built Mana Wells yet, now would be the time. Even if you are managing your mana just fine you could always use more and Benediction restors 6 mana (12 if upgraded) to 1 hero each day. As well, they give +1 max mana per night to ALL heroes. Spend your materials continuing to build up your wall. Once everything is at Reinforced Stone Wall, then start building Mounted Ballista. Day 9 - Lakeburg Use 'Repel Mist' at the Seer for 4 workers. Use 6 workers at your GMs and collect the 240g. If you have a Mountain of Corpses available, only use 5 workers on this step. Use your final worker as you see fit. Preferably on a Mountain of Corpses, if you saved a worker last step. Sell excess items in your city stash to the shop. Upgrade your Inn with Accommodation++ and buy your 6th hero. I usually get a level 9 for 383g. If your walls are in bad shape, this is the last opportunity to build Scavenger Camps. Effectively, if you don't upgrade them, it would be trading 72g for 80 materials by day 11. This isn't usually worth it, so unless your walls are really hurting, don't bother. Shop! Go for broke! Hunt for major upgrades and T4/T5 AP potions! Warp Crystals and Teleportation Scrolls are excellent buys as well if you don't have Blink on any of your heroes. Day 10 - Lakeburg Use 'Repel Mist' at the Seer for 4 workers. Use 6 workers at your GMs and collect the 240g. If you have a Mountain of Corpses available, only use 5 workers on this step. Use your final worker as needed. Preferably on a Mountain of Corpses (if you saved a worker last step) Sell excess items in your city stash to the shop. Shop! Go for broke! Hunt for major upgrades and T4/T5 AP potions!NOTE: There will be elites tonight. If you can manage the wave safely, try to kill them on top of your walls! The closer to the outer wall of the haven they are when they die (or of course if they are inside of the haven) the more likely they are to spawn Elite Carrion for you to scavenge! Day 11 - Lakeburg Repel Fog will be unavailable today. Use 6 workers at your GMs and collect the 240g. Scavenge all Elite Carrion you obtained today. Use remaining workers as you see fit. Sell excess items in your city stash to the shop. Shop! Go for broke!Check out the next section on Cetusia before you start the night! Cetusia - Lakeburg Boss Cetusia is the final boss you'll face on Lakeburg and will spawn turn 1 of night 12. Cetusia has 3 colors that indicate stages of the fight.
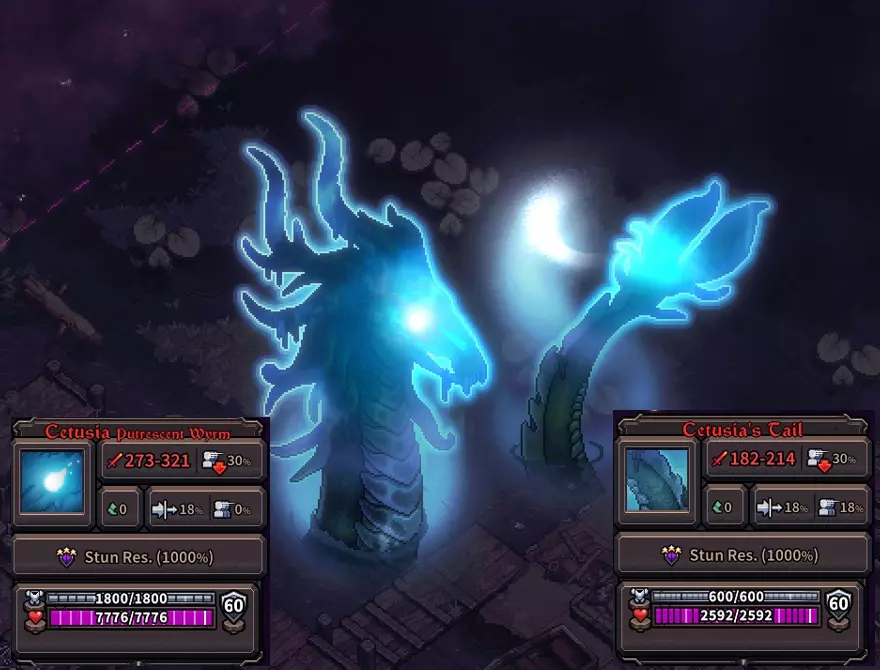
当塞图西亚首次生成时,会出现蓝色的头部或尾部。在此阶段,首领仍会施放法术、破坏防御,并进行大范围攻击。
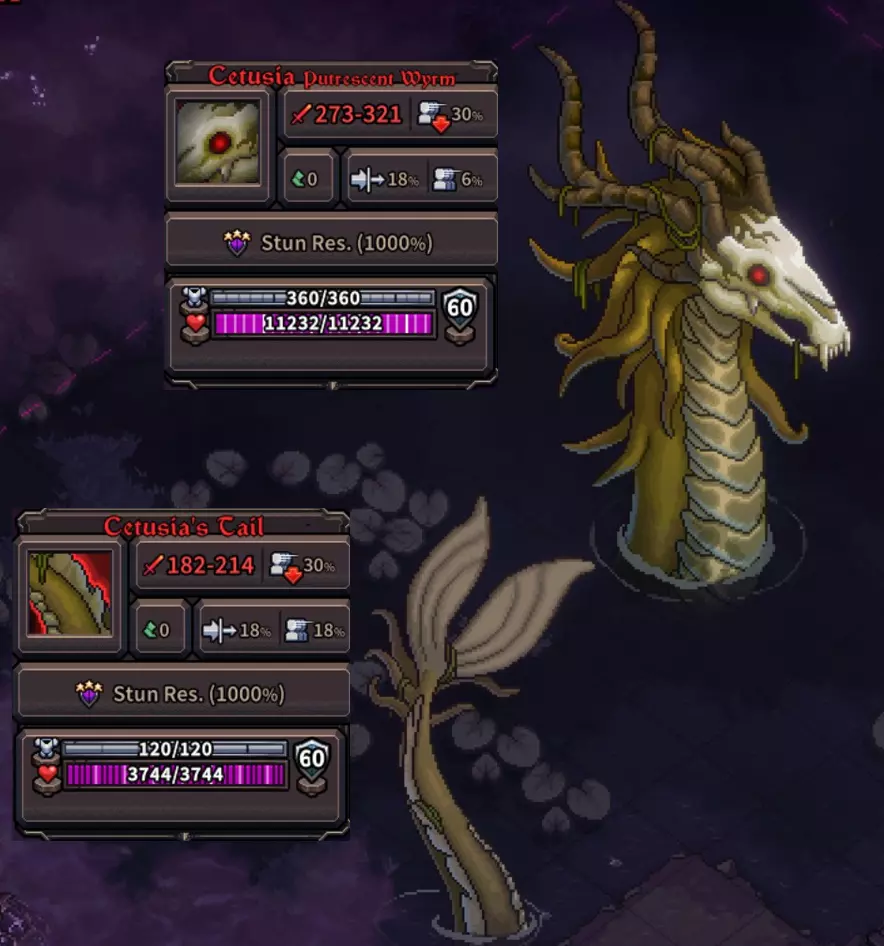
黄色的头部或尾部表示首领处于第二阶段。塞图西亚在此阶段生成时会移动到湖中心,然后在下一回合进行远程攻击。在第三回合,它很可能会向你最近的英雄移动(头部和尾部都能做到这一点!),并且每次移动时都会释放范围攻击。

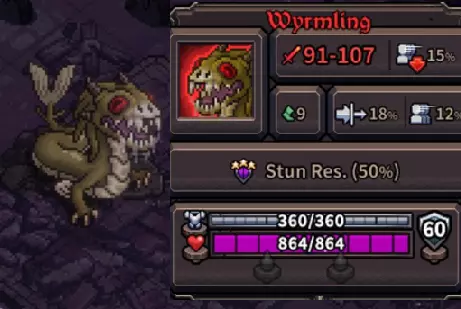
该 Boss 能够生成这些小型幼龙蛋,并会在战斗期间在地图各处、你的基地外围生成数个。它只会每隔几回合进行一次该操作,且在所有阶段(蓝色、黄色、红色)均可进行。 幼龙蛋拥有极高的抗性,但处理方式与处理【迷雾审查者】类似。你对这些目标的攻击不会落空。使用高伤害技能,例如【强力射击】,因为你有 0% 的失手几率! 如果在幼龙蛋生成的回合未将其消灭,它们会在下一回合孵化成幼龙。幼龙的抗性低得多,但拥有极高的移动力和两倍的生命值。 如果无法在幼龙蛋生成的回合将其消灭,请尝试让一名英雄移动到附近,以便在下一回合应对孵化出的幼龙。记住,这些蛋在死亡时会爆炸,蛋周围相邻或对角线的格子中的任何单位都会中毒(每回合15点伤害,持续3回合)!与迷雾审查者不同,法术传播对这些蛋有效。
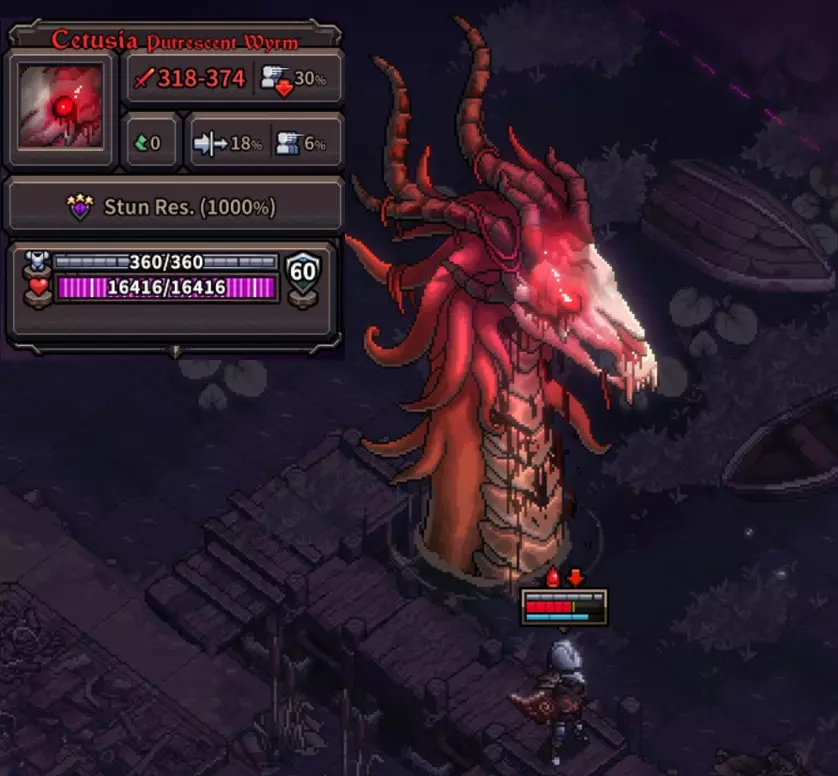
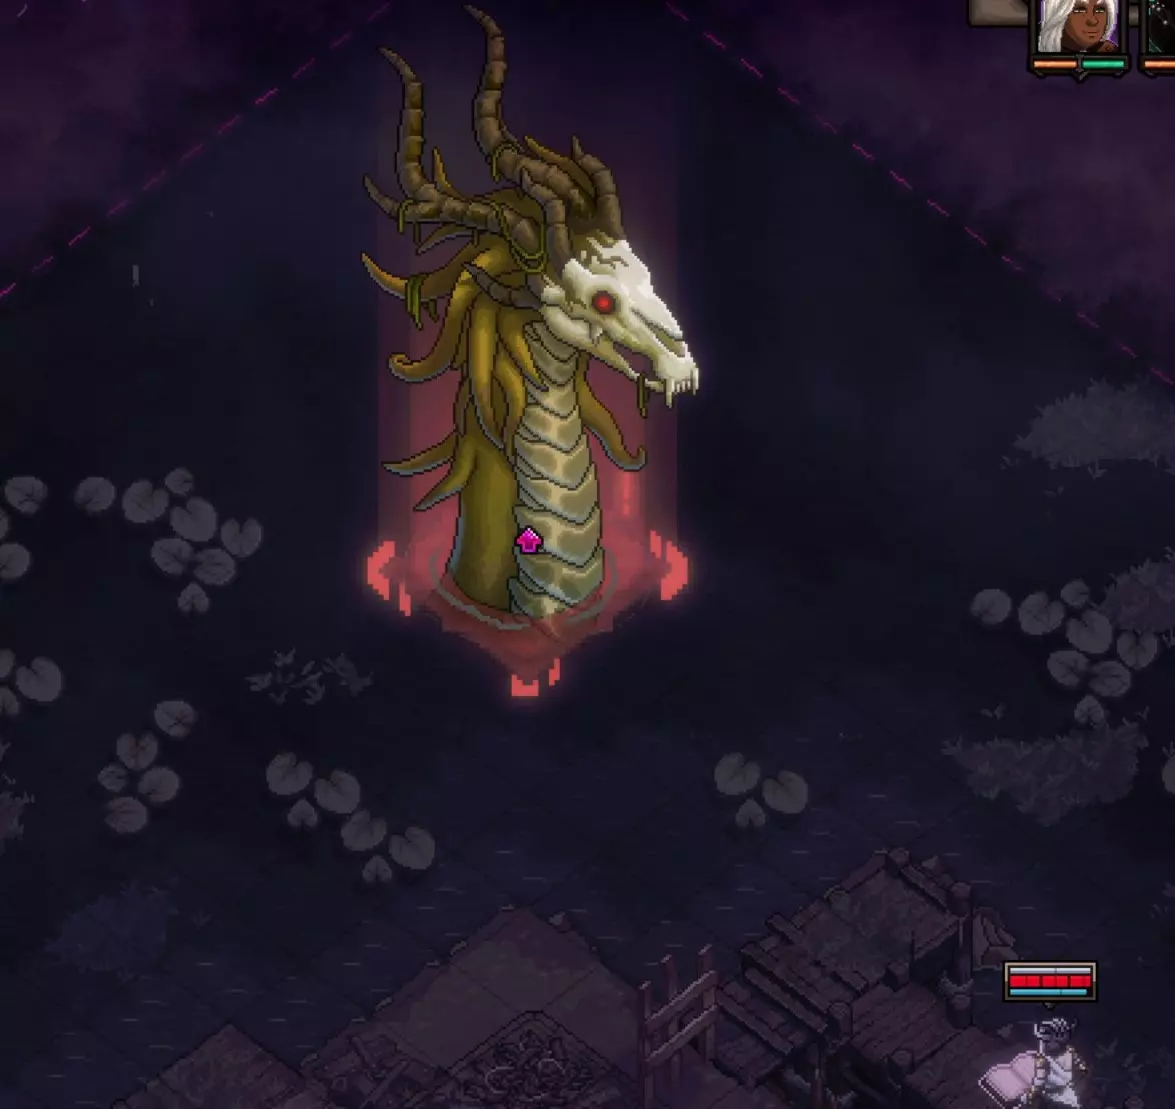
当 Boss 的头部和尾部各被击杀两次后,红色头部将很快生成。此阶段的 Boss 会更加具有攻击性,且尾部将不再重生。击杀它即可获胜! Boss 生成逻辑: 红色 Cetusia 头部被击杀后,Cetusia 即被击败。在当前存活的头部或尾部(或两者)被击杀前,Boss 不会进入下一阶段。Boss 数据请参考上方图片。 第一回合: Cetusia 的头部和尾部将生成。此时它们呈蓝色,但已不像之前版本那样无敌。 它们会移动到码头北部的某个位置,并摧毁那里的所有建筑。 当你同时击杀头部和尾部后,将有 2 个回合的间隔它们才会重生。 例如,如果你在第 3 回合同时击杀它们,它们将在第 5 回合重生。 重要提示:不要先击杀尾部!如果本回合无法击杀头部,那么击杀尾部毫无意义。只要头部仍然存活,尾部就会在下一回合立即满血重生。 如果你处于可以攻击尾部但无法攻击头部的情况,那么将尾部血量压低但不要击杀它。 头部和尾部第二次生成: 头部和尾部会再次一同生成,它们的行动方式大致相同,但塞图西亚的头部会传送到北部湖泊的中心。该位置距离码头最北端有3格(对角线)距离。通常情况下,1回合后它会移动并攻击附近的英雄,从而再次进入近战英雄的攻击范围。 激怒状态的塞图西亚(红色头部): 你需要第二次击杀头部和尾部才能使其生成。当头部和尾部均被击杀后,会在2回合后生成【狂暴头部】。 若你在第7回合击杀第二个尾部和头部,【狂暴头部】会在第9回合生成。 【狂暴头部】生成时不会伴随尾部。 击杀此头部即可获胜! 最快击杀方法:假设你在头部和尾部生成的同一回合就将其击杀,那么有可能在第5回合击杀塞图西亚。具体流程如下: 第1回合:击杀头部和尾部。 第3回合:击杀头部和尾部。 第5回合:【红色头部】生成,在回合结束前将其击杀。 即可获胜! 塞图西亚战斗技巧: 塞图西亚的墙体攻击不会命中英雄。 塞图西亚的头部在生成时非常喜欢移动到湖中央。这会导致使用 momentum 攻击(动量攻击)或近战英雄难以快速对其发起攻击。
唯一可能够到的技能是手枪的【手枪射击】,而且你需要站在码头的最边缘,或者拥有射程升级才能打到它。 你可以为此做好规划,在当晚将你最强的魔法/远程英雄部署在西北和东北两侧。 塞图西亚的生成点是半固定的。它总是会从地图北部的湖泊或码头开始出现。 不要在塞图西亚附近的区域建造防御塔。这绝对不值得。 boss生成时会立即摧毁其周围2格内的所有建筑。此外,它还会持续摧毁基地北部整个码头区域的防御塔。在那里建造的防御塔几乎得不到任何使用。格伦瓦尔德信息与武器 格伦瓦尔德比莱克堡难度高很多,尤其是最终夜。如果无法在启示录5+难度下通关,也不要气馁。如果招募到的英雄资质平平,这张地图的前期夜晚会异常艰难。若在前5个夜晚未能获得最大金币/材料,尤其是全部5个夜晚奖励,那么在启示录5+难度下通关会变得格外困难。 每波敌人的刷新位置也会造成巨大影响。例如,第1夜敌人在基地东南侧刷新会比在西北侧明显更难应对。 但这并非不可能!通过大量练习、精心规划每一步行动以及优化策略,你一定能击败格伦瓦尔德!从这张地图中能学到的一点是移动的重要性。拥有长途移动的能力将是这张地图上的重要工具。
Weapons Ordered from most strong to leastIf a weapon is not mentioned here, it is not because it is unusable. There are always situations where X will be better than Y for this build or those rolled stats or what-not. This list is with "all else equal" in mind. Magic:Tome > Scepter > Magic Orb = Druid Staff > other Tome: If you roll Volatile Reaction (T4) and Mana Collector (T5), this hero can be a monster. However, Mana Collector is a requirement or you'll tank your mana each night in order to be effective. If you do not roll the Mana Collector perk, consider one of the other options for that magic hero. Scepter: With specialist (T4), you'll have +45% dodge every turn, and access to 6 momentum attacks. With Blessing (T5), you will only have to use Wind Walk every other turn, as each +15% dodge buff will now have a 2 turn duration. However, with minimal dodge gear, you won't even need the bonuses from Wind Walk or Blessing to reach dodge cap each turn. If you are able to pick up the BOOM! (T5) perk, this hero will be a monster! The momentum scaling is very good as well so you run around with your high mobility picking off nasty elites and special enemies. The dodge makes you quite difficult to kill as you should be able to reach the cap of 95% dodge at the end of every turn. A momentum hero is very convenient for Glenwald. There are many Dryads to slay on Night 10, so this hero type will come in handy. Orb: A great choice for Glenwald. The mobs positioning typically puts them in very odd loosely spread positions. This makes the poison ability very potent on this weapon. They also consistently form long lines... perfect for the death beam! Not to mention, enemies are very frequently isolated.... perfect for the weapon's basic attack! Druid Staff: Excellent weapon for Glenwald, make sure to use the poison ability at least once per turn on the biggest pack around, the propagation and poison works well with this map as most of the mobs will have enough time alive to actually receive the full damage of the poison tics. Druid might even outshine Magic Orb if you get the right perks. However, the Sprayer plants on Night 10 can disable a lot of your effectiveness. Be wary to target Sprayers down immediately to avoid turns where packs of enemies are immune to your poison! Ranged:Hand Crossbow > Shortbow = Crossbow > Longbow > other Hand Crossbow: Only caveat here is that the hand crossbow is not the best ranged weapon without at least 1 piece of multi-hit gear or a roll from a level up. If you rolled the Initiator (T3) perk you could still make Hand Crossbow work, and it would be a strong pick even at +0 multihit. However, this requires a lot of micromanagement and you could easily mess up and land a kill too early to disable Initiator for the rest of that turn. So, hand crossbow is still very good for this map but I'd say the #2 and #3 choices can outshine it relatively well if you do not have any multi-hit gear. That being said, the first piece of multi-hit gear is a +50% damage increase for this weapon, the second one is another +33% more damage. The 3rd +multi-hit is still a +25% damage increase! How is this? Well lets say you attack with Quick shot for 50 damage per hit. +0 multihit, 2 attacks = 100dmg +1 multihit, 3 attacks = 150dmg (+50% more dmg!) +2 multihit, 4 attacks = 200dmg (33% more damage than you would have done at +1 multi-hit) Keep in mind that Slow Death applies a -2mp debuff to enemies. This means it is possible to reduce a mob's movement to ZERO with relative ease. If you've never experienced a Hand Crossbow with +2 or more multihit, try it out. You'll see the power. It is the best weapon in the game with some multi-hit. In my experience, you will typically find at least 1 +multi-hit piece of gear in the shop, whether a trinket, chest, helm, or otherwise. Uncommonly, you'll even find pieces that give +2 multi-hit. Shortbow: Overall, similar strengths to the crossbow for this map, but has better aoe capabilities. Tight Volley for the move debuff and 6 target strike, and Rain of Arrows hits exceptionally hard. Especially on a hero with the Mana Collector perk, this thing can shred! Crossbow: Effective on this map as it's Explosive Bolt ability is often perfect for the weird formations the mobs move in. Usually you can hit 4-5 enemies per shot with this and its damage is great. Be sure to use all Heavy Bolts each turn! Longbow: Great for dealing with isolated targets and scattered packs. Very good for low mobility ranged heroes especially as it can utilize its long range to help you get in range to pick off Dryads on Night 10. Melee:Dagger > 1h Sword > 2h Sword > 2h Hammer > 2h Axe = Spear > 1h Hammer > 1h axe Dagger: With any multi-hit gear and the Mana Collector (T5) perk or simply a Vampire/Blood Magic roll and the dagger can become a monstrous weapon. Heavily rely on the Poison Daggers ability and pick off enemies with Throwing Daggers/Backstab. Throwing Dagger can be used to set up isolation kills with Backstab. Backstab is an isolation skill so it works very well on Dryads! 1h Sword: Good momentum scaling on it's primary skill and provides, frankly, ridiculous mobility. Although it's wave clearing potential isn't super strong, it's single target is great. Aim to use this with Inertia perk and/or as an secondary weapon. 2h Sword: The sword as a 1ap momentum ability. This is extremely good for handling Dryads on Night 10. As well, it has fairly good AoE capabilities and solid movement. The movement ability does cost 1 mana, however, it can possibly kill 3 enemies. The multiple use 1ap momentum skill Thrust makes this the strongest melee weapon for this map. 2h Hammer: The 2h hammer is honestly pretty similar to the 1h hammer except it has more usable AoE that can target a couple of cells away. It also has a strong propagation ability, some minor movement attacks on kill, and although its main attack, Hammer Strike, is only single target... it is also 1ap... but it also has a 40% chance to stun all enemies around the target! Give this weapon a shot if you roll a good one, especially with the BOOM! (T5) perk, it is a monster on this map. 2h Axe / Spear: These 2 weapons are very close to each other in power. The spear as a momentum ability and some powerful AoE. However, the 2h Axe has much better mobility and it's mobility skill also applies a significant resistance debuff on the target. So both weapons have means to deal with Dryads. IMO, this comes down to preference. other 1h weapons: 1h axe/hammer are simply weak on this map for Night 10. Avoid using if possible. General Tips - Glenwald The strategy for Glenwald has a fair amount of flexibility to allow for many A rank night rewards. However, the better you do going forward, the easier time you'll have with Night 10. As well, you'll have slightly more money to play with allowing for even greater flexibility in the build. Catapults are going to be your best friend here. You will need to build and use all 12 of them eventually. Do not build Ballistas until you are maxed out on Catapults. As mentioned in the Lakeburg General Tips, Catapults have a lot more damage potential then Ballistas do each round. It can be extremely difficult to obtain the night reward some nights on Glenwald without Catapults. NOTE: It is always worth breaking the build order to use a worker and scavenge an Elite Carrion. Keep in mind these spawn from elite enemies and their proximity to the Haven effects whether or not the elite will drop one. If you kill an elite along the perimeter wall (meaning they are touching your perimeter wall) you have a very high chance to spawn one! When going with a condensed base, killing them inside the haven is basically a guarantee the elite will drop one. It is viable to maintain the perimeter wall and in fact the general build order will assume you are attempting to do so. However, if you want some extra power defensively, check out "How the Base Should Look Day 9" for a more condensed base setup. This allows you to push out more Catapults early on giving you some extra power in early-mid game. Anytime you see a Guardian in the waves on any night in Glenwald, be sure to focus them if at all possible. They give extremely nasty buffs to the enemies so it is great if you can pick them off immediately. On the final night, try to pick off Twisted whenever possible. They have a lot of nasty magic. They can hit fairly hard or buff allies move points. Beginning Your Glenwald Attempts When you start a run on Glenwald Apocalypse 6 I would highly recommend taking a look at your heroes inventories before starting the first night. Any items they have equipped that reduce EXP gain -- remove them. Even if the other stat is +1 AP. Exp reductions will hurt you in later nights when that hero ends up being 1 or even 2 levels behind your other heroes. With Glenwald there is a combination of factors that determine the difficulty of a run and some of these can make the first 3 nights significantly harder.
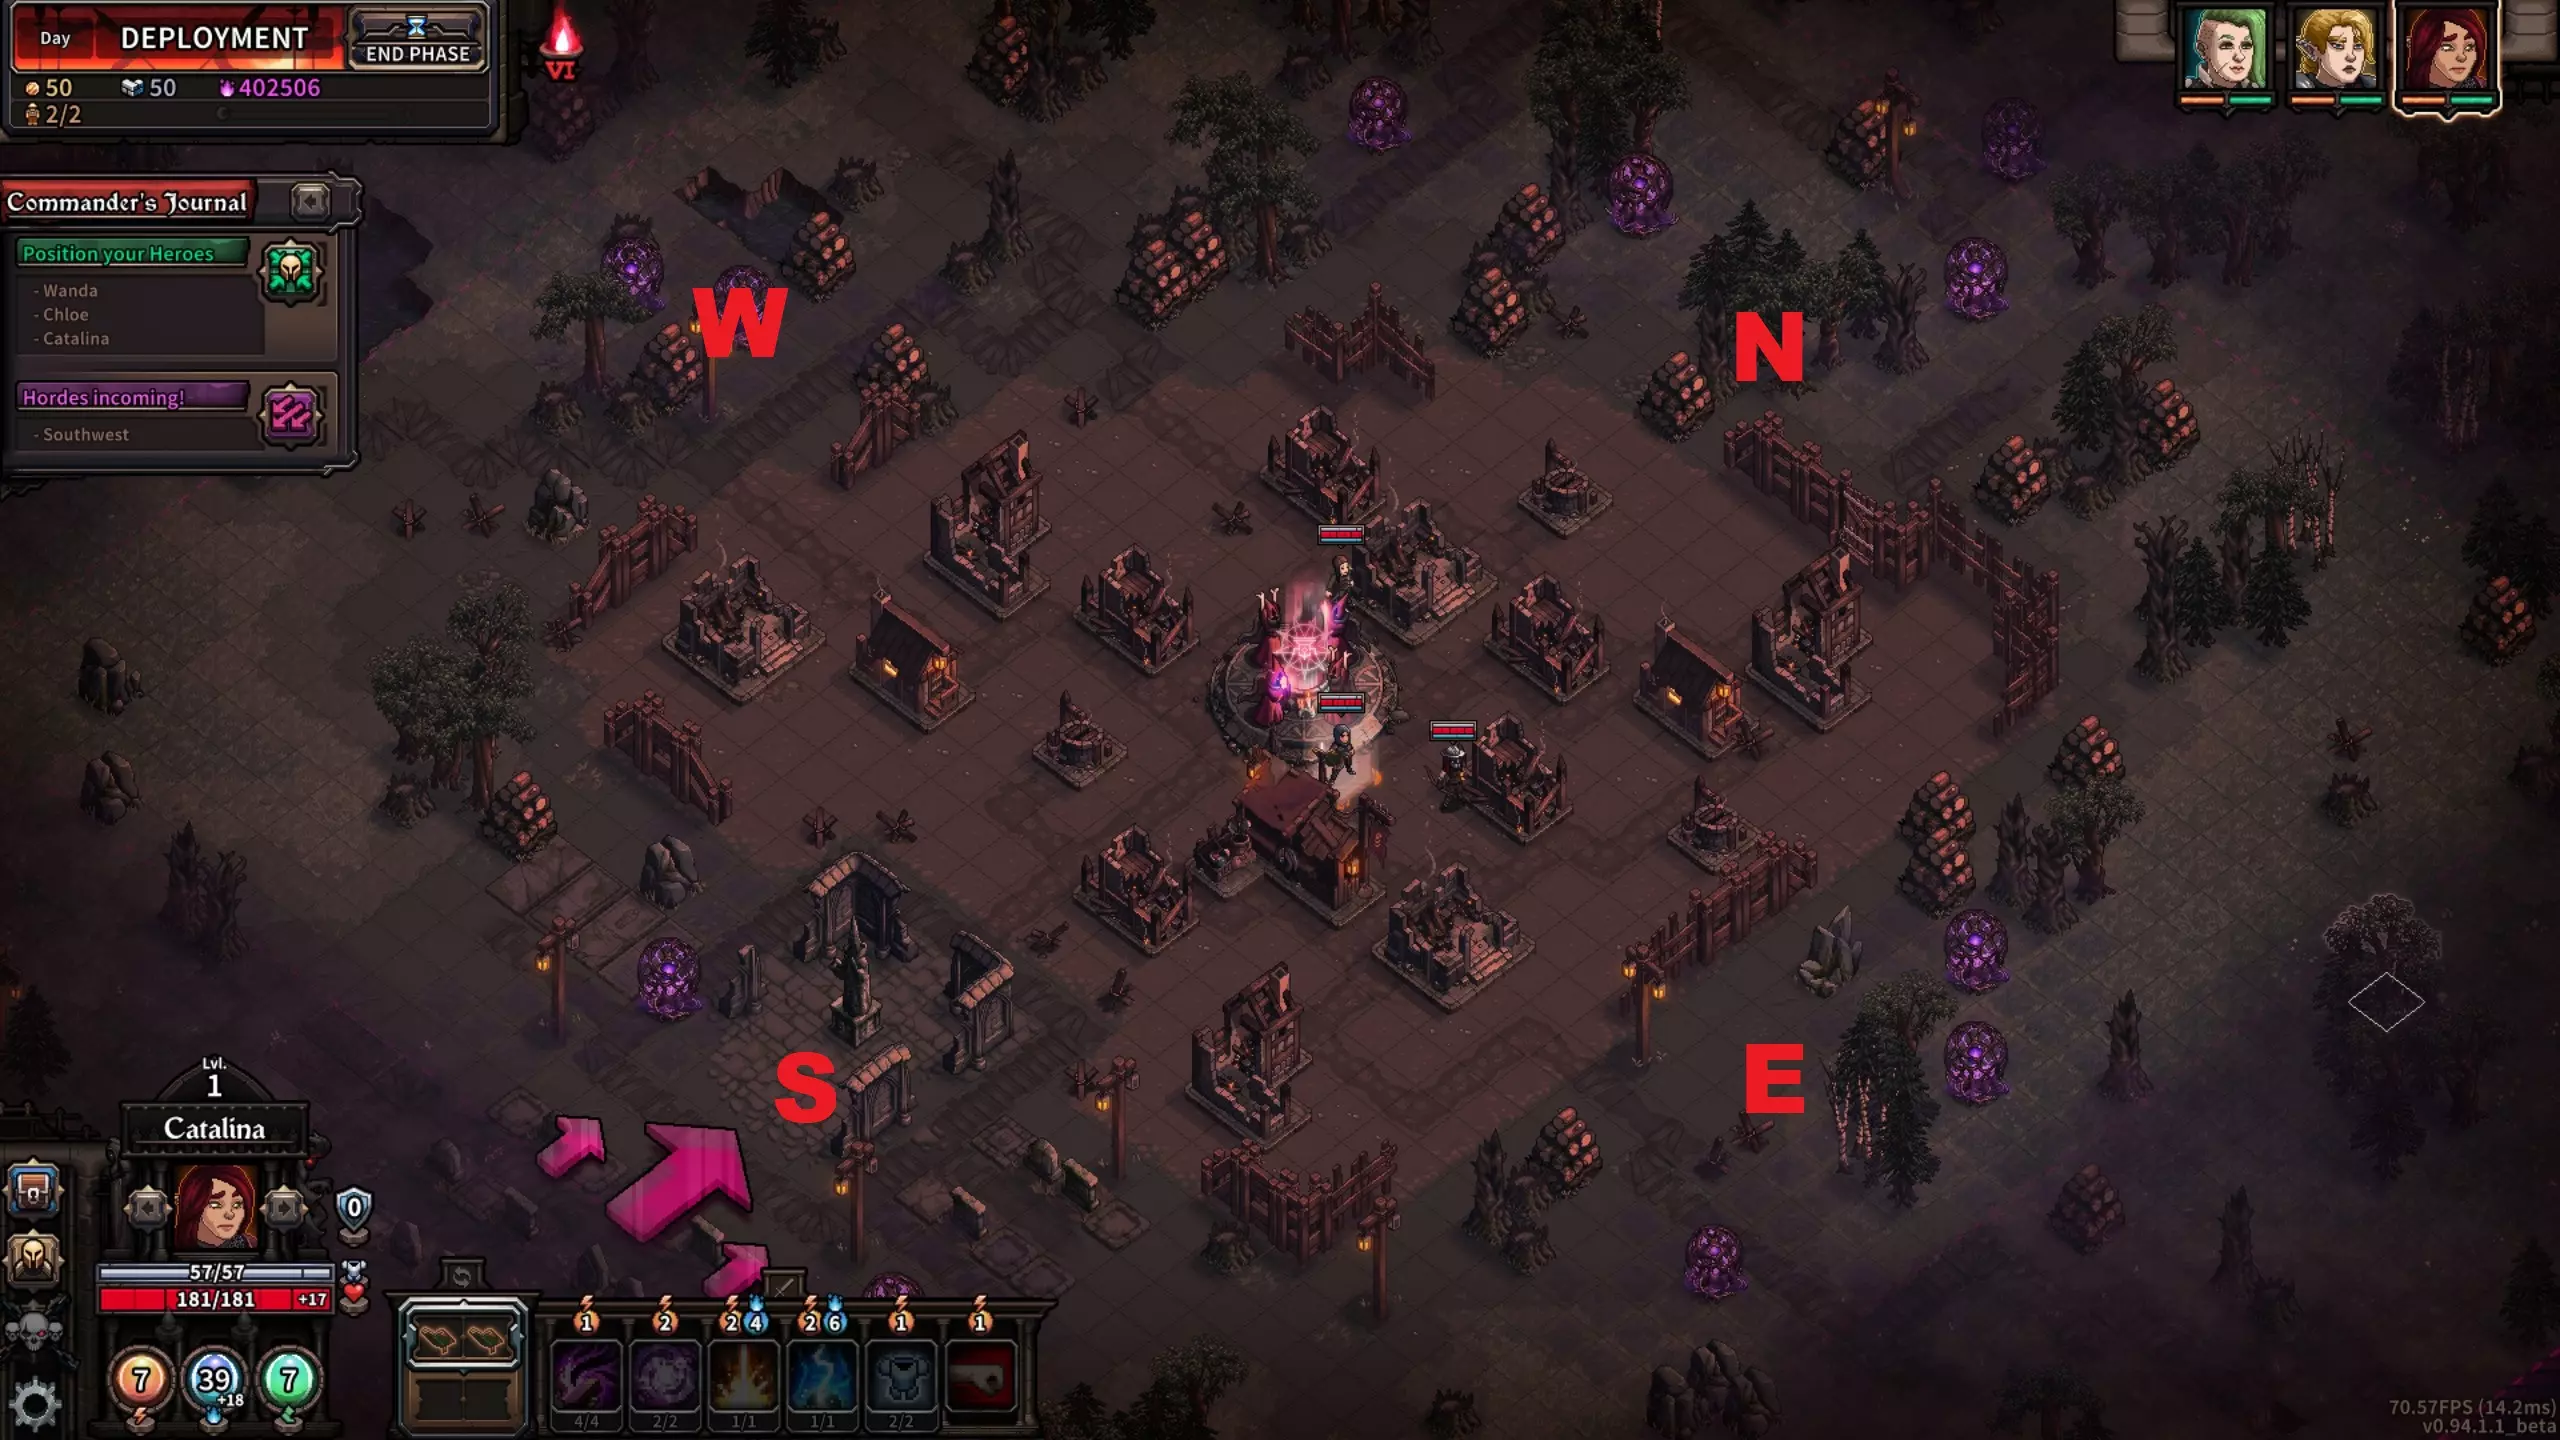
For example, if you spawn with some of the weaker early weapons (such as say Longbow, 1h axe, and power staff), your heroes have particularly bad traits (Glenwald seems super fond of spawning heroes with the -5mp regen trait....), or the attack wave is coming from the Eastern side of the base night 1 (this is the most difficult side). Any combination of the above mentioned factors -- you might actually not be able to obtain the night reward on night 1. That doesn't make it impossible to win. However, to recover you will need to have the game knowledge and strategies to dynamically play as you go. Not to mention, being in a recovery route will make it significantly more difficult as you progress. When you are starting off I would recommend as mentioned above... Try for a while on the first night, practice practice practice! Perks - Glenwald It should be noted there is a lot of talents after the perk system rework. Many not mentioned here have there place and can be useful in certain circumstances. I primarily am mentioning the ones I heavily use and frequently find great value in. That being said, with perks we have to be a little dynamic and plan a bit in advance. On day 1, take a look at each of your heroes and try to plan a route for them. For example, I might see Harvester on my melee hero’s T1 (tier 1, the first tier) perks. Harvester is extremely good! However, I see this hero also has Vampire and Blood Magic. Well… In the future this hero is going to operate with NO MANA. So taking Harvester would be a waste. The Vampire/Blood Magic combo is extremely powerful and too great to pass up on a melee hero. So instead of picking up Harvester, I’ll go straight for Back Protection or Coagulation. Fatality isn't a horrible option if you didn't roll Back Protection as there are generally a lot of opportunities to use it early on. For some powerful perk combos to look out for, see the Lakeberg section "Perks - Powerful Combos to Look For" Godly PerksContamination (T2) - There is a separate section to explain the extreme usefulness of this perk. It comes highly recommended on all maps. Please see "Contamination's Power - Elderlicht" for more info. On Glenwald there will be less opportunity to use this to it's full effectiveness due to the nature of most of the waves. However, you'll still find great value in it each night. Avid Learner (T2) – I would NEVER skip this on Glenwald. It is crucial to level your heroes quickly. Always take this as your second perk if a hero has it. Ultimately, this is an investment option. If you are really struggling early on you can opt to skip it. However, I feel that this option is often best as it results in you hitting level 7 generally at least 1 night earlier. This makes mid game nights easier and will very likely result in your hero being at least 1 level higher then they would have been in later nights. How so? Say your hero at the default 115% exp gain ends up level 10 and 40% towards level 11 on Day 9. If they instead had Avid Learner for 140% exp gain, they would be level 11 with some progress towards 12. The investment pays off at the end and helps you hit the T4 breakpoint for mid-game levels. Human Ballista (T4) – Always take this. There is never a reason to skip it. The damage scales with your hero’s highest damage type so it is amazing on EVERYONE. Never skip this. It is arguably the best perk in the game. Specialist (T4) – Similar to Lakeburg however this is notably more useful on Glenwald. This is because you have 2 less days and your heroes will generally be a few levels lower as well. Meaning that +50% dmg is more significant and you are even more likely to have trouble getting a strong second weapon on apoc 6. Back Protection (T1) – This has very high value on all characters. Especially on Glenwald where you will need to take hits even more frequently than Lakeberg. The armor scales as you level making this even better than it's original version. Big Game Hunter (T5) – This perk will get a ton of mileage on Night 10 Glenwald. Unless you have a strong momentum attack to contend with the Dryads then you'll need this. Legendary Assassin (T5) - A very strong perk especially on Dagger, 1h Sword, Shortbow or Scepter. It is possible to generate multiple AP per turn with this if the circumstances are right. Which means this has the potential on some builds to be pretty amazing. Night Owl (T5) – Especially on Glenwald, this perk gives you +2ap/mp every turn after the 4th of the night. In the later nights of any map, you’ll find this extremely beneficial. Potent Toxins (T5) - if you are planning on using a Druid Staff, this perk is crazy good. BOOM! (T5) – This perk is only going to really shine on a melee hero. It leads to a LOT of extra kills especially when using AOE abilities. Be careful with your other hero’s positioning when using this though as the damage can splash onto your other heroes (not the one using this perk though). Very strong on Scepter heroes, or momentum attacks in general. Mana Collector (T5) - This perk can make mana management much easier for a hero. With decent crit (at least 30%) it is quite powerful and allows you to be fairly reckless with your mana consumption. At 45~% crit, it becomes likely you'll cap it each turn (10 mana restored is the cap per turn) It can proc off of each hit in a multi-strike or multi-target attack (like Rain of Arrows from a Shortbow, it can proc up to 7 times from that 1 attack). It can only proc ONCE from propagation attacks. Things like a Druidic Staff's Bee Sting can only possibly proc this perk one time per cast. Mana Collector does proc on non-mana consuming attacks! Strong PerksShorter Weapons (T3) – great option on any melee hero especially. I even take this sometimes on ranged heroes because the 15 accuracy is worth it for -1 range. Even more especially if I’m getting very unlucky on accuracy rolls. Blink (T4) – This is a great addition if you are struggling on MP potions and have had no luck getting blink scrolls from your Alchemist. Well worth considering as the mobility will help immensely on night 10. Quantity Vs Quality (T3) – Particularly powerful on a druid hero. You won’t be killing too many enemies with the propagation of your poison, but more so with the poison tics themselves. Because of this, it is unlikely you’ll kill the 32 enemies with propagation to make this talent nullified. As a bonus, druids don’t really care that much about the upfront damage of their propagation so the -6% is fine. Volatile Reaction (T4) – Powerful on any hero heavily utilizing propagation, such as a druid or tome hero. I've found this well worth it on Hand Crossbow hero as well because it allows your Blaze skill the extra flexibility. Overload (T2) – This is a “will pay off later” perk. You will not find this useful until at least mid-game most likely, as you won’t have many… or any… potions until then. However, once you do have potions, it’s amazing. General Perk TipsOn a melee hero, you will pick up whatever talent is in the T3 (3rd tier) for melee. Vampire or Relentless. Both are exceptionally good, I would never recommend skipping these. If Back Protection (T1) is unavailable on your hero and you have a fair amount of HP regen, consider picking up Coagulation (T1). All heroes will occasionally have to tank a hit and you don’t want their actual HP to be effected if at all possible. Coagulation can help with this and is particularly good on a Blood Magic/Vampire hero. So much so that I have opted to go Coagulation on that type of hero and skip Back Protection, even if both are available! Harvester (T1) is a must on any hero that rolls it. The only exception is a melee hero that rolled Blood Magic (T3) AND Vampire (T3). Early on, this perk is crazy good.. it only falls off late-game if you have Mana Collector, but even then I sometimes do not skip it because of how powerful it is early/mid game. Steady Aim (T1) and Mark (T2) are both great talents for some early-game accuracy. Don’t forget to use them though! Steady Aim requires your hero to not have moved and Mark has to actually be cast on the target. Third Eye (T2) consider this for Glenwald, especially on a longbow hero. It’s not required but could come in handy. Primaries to Focus On - Glenwald 0. Action PointsAs you would expect, absolutely nothing beats having another action point. Unless capped, ALWAYS take this. The chances of you having a capped character on apoc 6 Glenwald are quite slim. 1. Move PointsAlthough mp is extremely important on this very large map I think it is very unlikely you should ever take a common roll (the normal quality roll for move speed is +1 point) However, if you have a hero that has less than 9mp and you roll an uncommon (green) or rare (blue) quality mp roll... it should be highly considered. Moving around and positioning correctly at the end of your turn on this map is extremely valuable. Also to consider, you'll frequently have to move large distances on Night 10 to kill Dryads. After your hero has 10 or more movement points, the value of this attribute drops heavily. 2. +% DamageAlthough the next 2 attributes are extremely important as well, damage is going to generally win. The only time I would pass on a rare (blue) damage roll is if I also rolled a rare accuracy and the hero is under 20% accuracy. Or if the hero has (or will have) the T5 perk Mana Collector and rolled a rare crit. This attribute does not diminish 3. AccuracyAccuracy is extremely important. I would take a uncommon (green) accuracy roll over an uncommon damage roll until accuracy is at least 25%. Including gear and perks, you should aim for ~35+% accuracy on each hero. If your hero is at this point, you should de-prioritize accuracy. However, if you are using an inaccurate weapon such an an axe, a little more wouldn't hurt. This attribute starts to lose value after 35%, including gear 4. CritIt is quite powerful to occasionally get a crit on your abilities. There are a lot of times you will have to expend 2 or even 3 attacks to kill a single enemy. Crit can fix that for you and save you AP. If you have a hero with the Mana Collector T5 perk you should prioritize uncommon or rare crit rolls over flat dmg rolls until you are over 30% crit. With a Mana Collector hero, I would take a rare crit roll over a common or uncommon flat dmg roll, even after my hero is at 30% crit. The value of this attribute diminishes after your hero has 45% crit (including gear). 5. ArmorIn your priorities, if a character has very low armor and the above options are not available. A rare (blue) armor roll will be worth considering. It is going to be very frequent, early nights especially, that you'll have to tank a hit from an enemy. More importantly, having some solid base armor means you can set up to allow a boomer to explode on you without any danger. Depending on the night these do between 70-172 dmg, while the elite versions can do north of 300. This means that you can use some base armor + back protection + an armor buff or two (using AP that turn) to fully mitigate the damage of one exploding into you instead of bothering to kill it. Considering the elite boomers here can have over 2000 hp... this is a very powerful option... so having any hero with low base armor can be an issue. However, if you are sitting at ~60 base armor already, then the value of this attribute is significantly diminished. Look for other options in that case. 5. HPGenerally speaking, I only intentionally take hit point rolls when they are rare (blue) and my hero has the Glass Cannon perk. Taking 1 rare hp roll can offset the negative of it. 5. Resistance / BlockResistance rolls are a decent last option if you have nothing else. An equal quality block roll beats a resistance roll imo. If you have to pick between rare resistance and rare block... go with block. The reason is that block is better to stop damage from things that pierce armor. Lets say for example that your hero has 100 hp, 100 armor, 0 block, and 0% resistance. A Lancer attacks your hero for 30 dmg. Which is more valuable to you, 8 block or 10% resistance? (those are the values for both rare rolls) The hero hit by this Lancer with: the +8 block, takes 30 - 8 = 22 dmg, and is now at 78 hp. the +10% res, takes 30 - (30*.1) = 27 dmg, and is now at 73 hp. However, generally speaking, resistance is going to be slightly stronger against most enemy types. I find the lancer's ability to hit my hero's hp directly far more troubling so I prefer block. Secondaries to Focus On - Glenwald 0. MultihitThis is only applicible if you have a ranged hero. Always take this attribute and then transition into a Hand Crossbow (if you don't already have one) as soon as possible. Even if you don't have access to a hand crossbow yet, take this attribute anyways and keep it in your mind to swap when you are shopping the last 3 days. 1. +Exp GainedGlenwald has 2 less days than Lakeburg but the final boss is a significantly more demanding fight. Because of this, you want to target some additional EXP gain, either through traits, gear, perks, or secondaries. Ideally you'll want to pick up 1-2 uncommon (green) or 1 rare (blue) roll of this trait on every hero. The goal it to be over 140% exp gained if possible. If your hero has the Avid Learner perk, you can skip prioritizing this. However, if you roll a rare one in the first 3 days, I'd still highly recommend you take it. After day 4, you can give this significantly less weight and opt to skip it, even with higher quality rolls. 2. +% Physical/Ranged/Magic DamageThis is a great one to focus on if you already have enough experience gain. Pick up the respective type for your hero, as the other 2 are usually worthless! This attribute never loses value. 3. Daily Mana RegenMana Regen is an extremely powerful attribute on Glenwald. Until you reach at least 20-25 daily mana regen, I would recommend always taking a rare (blue) roll of this attribute. I would avoid trying to ever take a common roll of this. However, if your hero has Harvester (T1 perk), you could value this trait a bit lower. This is because proper usage of Harvester can easily net you more than 12 mana back per night. This loses its value after you reach about 25 daily mana regen. 4. Isolation / OpportunityBoth of these choices are highly dependent on your playstyle and you'll benefit from them a great deal more if you are more strategic and apply more negative alterations. Isolation can always apply to any attack on any target. This includes bosses which can make it very powerful against them. When your hero has a high amount of Isolation, try to make sure elites or bosses do not have adjacent allies when attacking them. 123 456 789 For example the above 9 numbers represent enemies. If there is an elite on position 5, you only need to ensure 2, 4, 6, and 8 are enemy spaces in order to have it isolated. 1, 3, 7, and 9 can have enemies present and 5 will still be considered Isolated. Opportunity only applies to targets that have a negative alteration on them. This includes poison, debuffs, or a stun. So for example, if you hit a target with the Hand Crossbow's Slow Death ability it will now have a -2 mp debuff. This means the next hit against the target will include increased damage based on your hero's opportunity (even if they weren't the one that applied the alteration). 5. MomentumThis is only valuable on 3 hero types: 2h Sword, Spear, and Scepter. (I don't recommend using other weapons that have momentum like the 1h sword or pistol on this map) Scepter heroes can take this over equal quality magic damage rolls!! 6. Propagation BouncesThis exclusively applies to Druidic Staff, Tome, or Hand Crossbow heroes. An extra bounce is an extra target hit each turn. If you rolled rare +% phys/magic/ranged damage I might consider taking that over this. For Druids, you aren't going to run into endless situations in Glenwald where you can bounce your poison around for 10+ bounces on unique enemies. It's more likely you'll double or triple up on a cast on 3-5 enemies which can be good... I would typically only take a rare roll of this (which adds 2 additional bounces) 7. ReliabilityAs explained in the Lakeburg section, reliability can be stronger than lesser quality damage rolls. You need to look at what weapon you are using and what the spread of the damage is. This is most noticible on things like Lightning Strike from the Tome. Use your best judgement for this one! Poison DamageFor Druid Staff heroes, this is better than equal quality damage rolls. For Magic Orb heroes, this is better than lesser quality damage rolls. Meaning that I would take uncommon poison damage over common magic damage. I don't recommend using a dagger on Glenwald but if you do, the same as the Magic Orb hero applies. Healing ReceivedThis is only valuable for a melee hero and even then, you really should only take it as a last option. See the Lakeburg secondaries section for more details on how this works with the Vampire perk. How the Base Should Look Day 9
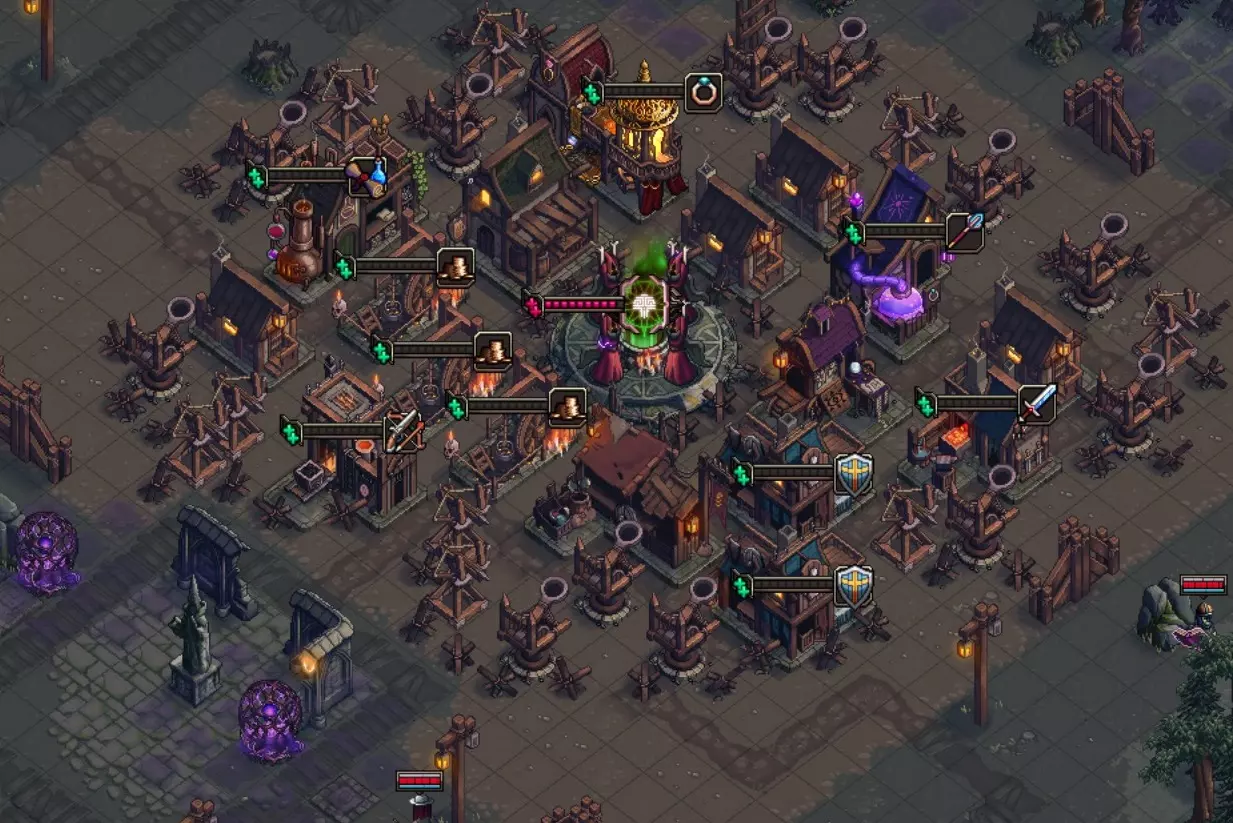
我将上述配置称为紧凑型基地。这种布局让我们无需维护外围围墙,从而能更早建造更多投石机。 这样做的好处是防御能力更强,并且可以搭配能力一般的英雄,因为投石机每晚都能覆盖3面,甚至可能覆盖全部4面围墙。 这主要是因为我们将使用【流浪者预兆】,它能提供大量早期战力。这意味着我们实际上可以在前几晚安全地防守围墙,而不必让围墙承受攻击。 需要注意的是,自从预兆更新后,在这张地图上该策略已不再必要。 现在,像弩炮和投石机这类防御建筑可以贴着其他建筑(包括魔法阵)建造。所以这种策略肯定仍然可行,甚至可以说是一种更强的策略,但并非必需。 不过——压缩基地仍然会让你变得更强大。你将拥有更多的防御塔,因此在游戏早中期会少很多麻烦。你需要注意每回合的漏网之鱼,但这很少会成为问题。 当选择压缩基地路线时,你肯定会造满投石机。如果可能的话,尽量让你的英雄学习【防御训练】 perk。每次选择这个perk,当防御塔击杀敌人时,你都会获得额外的经验值。举个例子,假设你有4名英雄,当一个敌人被击杀时,会产生400点经验值并分配给所有英雄(即4名英雄各获得100点经验值),此外,击杀该单位的英雄还会获得额外的击杀奖励,数值为分配经验值的33%,也就是133点经验值。 如果是防御塔击杀了单位,那133点击杀经验值就会永久损失。 但如果拥有【防御训练】 perk,你就能获得这部分额外经验值。 若3名英雄拥有该perk,那么这3名英雄都会获得133点经验值。这意味着原本价值400点经验值的击杀,最终会给你的英雄们带来总计799点经验值(400+133+133+133)! 若4名英雄都拥有该perk,那么这次击杀最终会价值932点经验值(400+133+133+133+133)! 如果你打算压缩基地布局,请始终记住上述情况。 永远不要将防御塔直接放置在一起。这将防止分裂者或爆破者在靠近时攻击多个塔楼。 开始第10夜之前,确保魔法阵被 barricades 完全包围。 不必尝试第10夜的夜间奖励。因为没有第10天,所以这完全无关紧要。专注于加强中心魔法阵的防御,同时使用 barricades 作为诱饵。 如果在第9天有多余的材料,建议建造更多的弩炮。如果此时你没有损失任何投石机,应该还能再放置价值约500材料的弩炮,这些在上面的图片中没有显示。 在开始第10夜之前,在你的密集基地外围设置一圈 barricades 是个好主意。如果刷出烦人的敌人,比如带有充能效果的精英奔跑者,这会对你有很大帮助。预兆建议 - 格伦瓦尔德
1. Wanderer - 3 slots This is an extremely powerful economic choice. This effectively will save you 200g or possibly even more as you don't have to buy your 4th hero as well as allowing us to delay building an Inn. Although this isn't a day 1 economy omen, it will make your mid game (therefore your end-game as well) a lot more powerful. As well, having a 4th hero on Night 1 provides a very large power boost. Keep in mind with this omen you should prioritize +% EXP more early on as you have an extra hero on the field immediately. 2. Dexterity - 1 slot Another extremely powerful option. This is effectively giving 1 rare Accuracy roll to all your heroes. This is very strong for 1 slot and is highly recommended. Especially in the earlier nights, you'll notice this one! 3. Fieriness - 1 slot Gives all heroes a flat 10% damage increase which works with or instead of Mercenary Training. This omen will stack with Mercenary Training. It is very reasonable to consider swapping this omen out for Violence as 8% crit is a potent choice as well. 4. Mercenary Training - 2 slots A scaling Omen that gives +3% damage to all heroes for the first 6 day cycles, and then +2% dmg going forward. This means that by the time we fight the Dryads on Glenwald, this will be giving our heroes +24% increased damage. This is a flexible option since it takes up 2 omen slots. Keep in mind, this bonus is applied on each production phase and does not retroactively apply to heroes you buy later at the Inn. I would say Wanderer and Dexterity are not optional and both should always be used. Mercenary Training is optional but recommended. Alternatives for Mercenary TrainingI would recommend trying the following omens if you want to swap out Mercenary Training. It can be exchanged for any of the below omens in whatever combination you feel suites you and I feel any combination of these instead of Mercenary Training is viable. Steel - 1 slot Gives all heroes +40 armor. This is primarily an early game omen that will have high effectiveness the first couple of nights. Sturdiness is a viable alternative, however, ideally you don't want a hero getting attacked from 3 sides ever. Sturdiness can be better on occasion if you are being hit 3 or more enemies, but generally speaking you want to avoid ever being in those situations so Steel will provide far more value the majority of the time. Violence - 1 slot This omen effectively gives all your heroes an uncommon crit roll. I like to aim for 30+% crit on all heroes so this single slot omen is well worth it. Due to heroes being less leveled than the previous map (they'll generally be 1 or 2 levels lower than they would be fighting the boss on Lakeburg) this omen is a bit stronger. Highly recommend taking Violence. Readiness - 1 slot This is a viable option as it gives all starting gear +1 tier. This includes potions, weapons, armor, trinkets, etc. Since Glenwald only has 9 days, it is entirely possible you'll end up with a few items that simply never get replaced. Because of this, Readiness will be useful all the way through the run, as well as giving you some early game power. Leaps - 1 slot It may sound odd if you never use the perk, but if you plan on building more melee oriented (lots of scepters and 2h weapons, etc) then this is a great option. It will help you position for your AOEs as well as get to priority targets for your momentum attacks (especially on night 10!). It's a great choice for mobility in general so if you were considering taking Omen of Swiftness, always take this instead. Day 1 - Glenwald For the first few days, the idea is to take some risks and focus completely on our economy. Focusing on scavenging the first few days also allows us to build a couple of extra catapults each night. This is a substantial advantage especially on higher Apoc levels. Before you begin, keep in mind the "How the base should look day 9" section. You want a condensed base. However, since the omen patch, it is now completely reasonable to attempt to maintain the perimeter wall on Glenwald. If you are confident then feel free to do so. Otherwise, the condensed base shown in that section is a great alternative. Especially Day 1 and 2, extreme focus on +exp secondaries. These are VERY good. NEVER pass up a rare (blue) +exp roll on your heroes the first 2 days. The tier 2 perk "Defensive Training" is extremely good on this map. Your catapults will definitely get a lot of use every night. Having a hero, or two soaking up free bonus EXP is extremely useful. Keep in mind, if you have 2 or more heroes with Defensive Training you are effectively generating additional total EXP each time a defense kills something. Super good! Never skip the Avid Learner T2 perk on this map unless you replace it with Defensive Training. Demolish (do NOT scavenge!) the following: Two 1 worker ruins Two 3 worker ruins Four 2 worker ruinsNone of these are going to be used so it is best to get them out of the way now. Even though these are ruins they can still cause panic when struck by an enemy. Since they won't be used it is best to just demolish them now. Build 2 Houses. Scavenge (gold focus) a 4 worker ruin for 72g. Upgrade 2 of your houses with House Expansion. Scavenge (gold focus) a 2 worker ruin for 28g. Upgrade a house with House Expansion. Scavenge (gold focus) a 1 worker ruin. If you obtained a Pile of Corpses, instead scavenge that and destroy the 1 worker ruin. Build 2 Catapults on the side under attack tonight. (See below before building)Keep in mind the "How the Base Should Look Day 9" section if you are going for a condensed base, otherwise try to build in the corners of the base as was suggested on Lakeburg. This way the Catapults effectively cover 2 sides. Again, condensed base is not needed since the Omen patch but is still a good option. Remember to try to always kill any elite either in the Haven or 1 tile outside of it. This greatly increases the chance of an Elite Carrion drop. Please refer to the section "Corpse Mechanics". Day 2 - Glenwald Upgrade your last house with House Expansion for 48g. Scavenge (gold focus) both remaining 4 worker ruins for 72g each. NOTE: Always change the build order to accommodate an Elite Carrion. If you got one last night, scavenge it and adjust. Build 3 GMs. Build 3 more Catapults.At this point you should have a read on whether your heroes are powerful or mediocre. If you have solid heroes then I would recommend considering maintaining the perimeter wall. So, build your catapults primarily in corners, maybe 1 space back from the wall. The reason you want to place them, ideally, 1 space away from the wall is to prevent Boomers from exploding into your wall AND towers. Hopefully this never happens, but it doesn't hurt to be prepared! Day 3 - Glenwald Build a Seer and use 'Repel Fog' for 3 workers. If you have aced all 3 nights so far you can scavenge a pile of corpses here for an item. Otherwise, scavenge it for gold. You need 96g for the next step! Upgrade GM1 with Production+ and Mine+ for 72g and 24g respectively. Use a worker at GM1 and collect the 40g. Scavenge (gold focus) a 3 worker ruin for 48g. Upgrade GM2 with Production+. Build 2 more Catapults and use the rest of your materials to build or repair reinforced wooden walls.NOTE: If going for a condensed base, save the remaining materials and use them for more Catapults or barricades near your buildings. Going forward, I'll assume you are attempting to maintain the perimeter wall. Again -- it is still viable to condense your base on Glenwald! In earlier patches, maintaining the perimeter wall was extremely risky on apoc 4+, since the omen patch, the risk is not nearly as great. Day 4 - Glenwald Because we don't need an Inn yet thanks to Omen of the Wanderer, we are in a powerful position here. For this and the next day we can simply upgrade our item production. Use 'Repel Fog' at the Seer for 3 workers. Upgrade Mine+ at GM2. Upgrade Production+ and Mine+ at GM3, use 1 worker at each GM and collect the 120g. Upgrade House Expansion+ at one of your houses for 84g. Upgrade Mine++ at all 3 of your GMs for 36g each. Use a worker at each GM and collect the 120g. Build an Alchemist. We want to start filling out our hero's inventory slots, especially with +AP potions. You should have at least 1 Pile of Corpses. If so, upgrade House Expansion+ at a house and use that new worker there. Otherwise, build another Production building (I suggest an Armor Maker). At this point, it is a good option to build a Mana Well or Temple. They both have free abilities once per day cycle and can help a lot with sustain and recovery for the rest of the round. However, if you are doing well and do not need either, build another production building. Build 1-2 more Catapults and use the rest of your materials to build or repair reinforced wooden walls. Going forward it will be assumed you built a Temple today as well as upgraded a house and scavenged a Pile of Corpses for an item. Day 5 - Glenwald Use rerolls if needed to try to get an AP potion from your Alchemist. Use 'Repel Fog' at the Seer for 3 workers. Use 2 workers at all three GMs, collect the 240g. Build an Inn and upgrade Accommodation+. Purchase your 5th hero. Scavenge a Pile of Corpses for an item. At this point, you can make a choice: Build 1 or 2 Mana Well(s) or a Temple. Build another production building. Whichever you need most. Upgrade a house and scavenge another Pile of Corpses for an item.The guide will proceed assuming you built another production building. Build 1-2 more Catapults and start filling out your walls with at least Reinforced Wooden. Day 6 - Glenwald Use 'Repel Fog' at the Seer for 3 workers. Use 2 workers at all three GMs, collect the 240g. With your final worker you can either scavenge an item from a Pile of Corpses or you can use it at your temple/mana well for recovery. If you have no need to recover and no pile of corpses to scavenge for an item, then you'll want to burn it on a Corpse for gold. Upgrade Item Level+ and ++ at your production buildings. Build 2 more production buildings. (I'd recommend an Armor Maker and then whatever suits you) Build or repair reinforced wooden walls. Day 7 - Glenwald Use 'Repel Fog' at the Seer for 4 workers. Use 2 workers at all three GMs, collect the 240g. Upgrade Item Level+++ at your production buildings. Build your 5th production building. Continue filling out walls around your base and if you struggled at all last night, build another catapult or two. Day 8 - Glenwald Use 'Repel Fog' at the Seer for 4 workers. You could opt to skip this if you are comfortable with the distance and instead want to scavenge 4 Pile of Corpses for items. It is reasonable to do so and up to your discretion. I had one round where I scavenged 3 piles of corpses and used my 4th worker to restore 8 mana to all heroes at my mana well. The extra distance of pushing the fog back makes the night slightly safer but so does 3-4 high tier items! Use 2 workers at all three GMs, collect the 240g. Upgrade Shopkeeper's Friend and Best Friend for 36g and 84g respectively. Sell all excess items in the City Stash. Upgrade the Inn with Accommodation++ and purchase your 6th hero. Shop with your remaining gold! See below... Shopping Spree!Now it is time for you to start dumping all of your extra money into the shop. This is because this map ends on Night 10 instead of Night 12 like Lakeburg does. Buying items at the shop is very tricky to optimize. This comes down to judgement and experience. You are gambling. You want to primarily look for tier 4/5 weapons and armor or potions right now. However, items which give extra AP should always be heavily considered. These benefit your hero greatly. Apart from that, you are trying to fill out some inventory spaces on your heroes. Look for T4 AP or MP potions or even a blink scroll. Each hero will need an AP potion and either an MP potion or blink scroll ideally on Night 10. Have a quick look over the rest of the inventory in the shop as well. If you see something particularly beneficial to one of your heroes then pick it up! There was a Glenwald run where my melee was seriously struggling with accuracy. I saw pants in there with -30hp, +30armor, +17 accuracy -- perfect! Another thing to really look out for is +multi hit gear. It is surprising how frequently I come across 2 or more pieces of multi-hit gear each run in the shop. Even more so, I uncommonly come across trinkets with +2 multi hit. If you ever see a piece of gear with +2 multi hit there is a 99.99999% chance the best move would be to buy it and put it on a ranged hero. Get that hero a hand crossbow ASAP and see the power! Even if you can't transition a hero to hand crossbow (for some crazy reason), multi hit gear can make dagger heroes extremely powerful as well! Buying strong upgrades for your chest and legs is a great option! It can not only buff your characters damage potential but also make them significantly more beefy in case they need to face tank something. Day 9 - Glenwald Use 2 workers at all three GMs, collect the 240g. Use your remaining 4 workers however you see fit. You do not have the option to use the Seer today. Scavenge Piles of Corpses or use them at your production buildings, mana well, or temple. Your heroes should be at max hp and mana ideally. If there is any Mountain of Corpses or Elite Carrion, prioritize those. Shop!Ensure your Magic Circle is FULLY SURROUNDED WITH BARRICADES. Completely surround your Magic Circle with 12 barricades. 3 on each side. This provides another layer of security if a straggler does manage to get deep into your base. Remember, it is a very good idea to have AP potions on all 6 of your heroes. Ideally, all 6 should also have MP (move point) potions or Blink (scroll or the perk) to help with getting into position on the Dryads as they spawn. Please check out the next section "Dryad - Glenwald Boss" before beginning Night 10. Dryad - Glenwald Boss
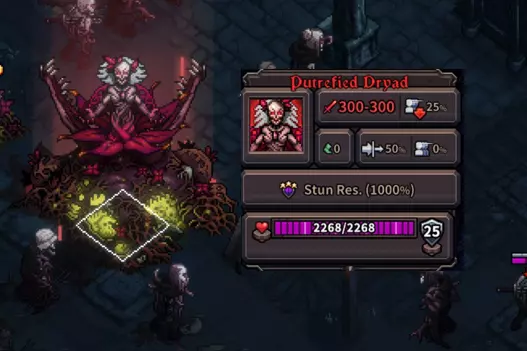
在格伦瓦尔德的第十夜开始时,树精首领将立即生成。这一波总共会有12个树精,它们是你的胜利条件。
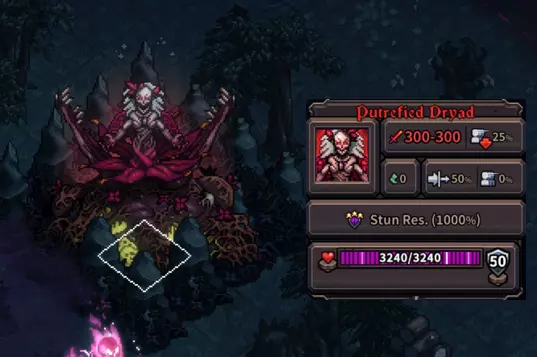
最后3波树精在生成时,会在自身周围生成相对较弱的石头。你必须先摧毁这些石头,才能获得视线或进入近战范围攻击树精。 此效果不会再次释放。 这些树精的生命值也会比之前的树精略高。
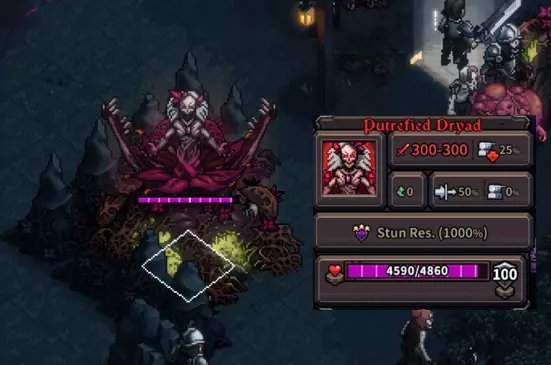
夜间的最后一只树精再次获得生命值加成。 消灭所有树精即可获胜! 若未被消灭,树精将遵循以下行为模式: 如果附近有英雄,就会攻击该英雄。请注意,这是物理伤害,对护甲会造成双倍伤害。 如果附近没有英雄,就会对最近的英雄施加一个讨厌的减益效果。该效果范围极广,会造成诸如1回合内-2攻击力、-3魔法值之类的效果。 最好在树精生成的同一回合就将其消灭! 树精植物仆从 在第10夜期间,树精会在地图各处生成3种类型的植物。 这3种植物各有不同的危险之处,应尽可能及时处理。

孵化厂除每回合生成1个敌人外,没有其他攻击或技能。它有3个阶段,会在每回合逐渐变大,最终生成某种危险的东西!

喷雾植物可能会非常讨厌。它会强化附近的怪物,使它们对中毒或眩晕等负面效果完全免疫。它还能在一回合内为怪物增加100点护甲。 快速消灭它们,否则你的毒系(或减益系)英雄将会陷入苦战!

种子迫击炮是最危险的植物。它是唯一具有攻击性的植物,且攻击力相当高。需要注意的是,它还会造成 poison damage【中毒伤害】,因此每次被它蜇到,你的英雄都会受到持续3回合的 nasty DOT【负面持续伤害】! 注意不要在种子迫击炮附近结束回合,如果必须这样做,一定要先消灭它! 树精生成顺序 以下列表按回合排序:“1”代表“第1回合” 1 树精生成 2 树精生成 2 树精生成 3 树精生成(周围有墙壁) 3 树精生成(周围有墙壁) 1 树精生成(周围有墙壁) 这些生成发生在你每回合都消灭所有树精的情况下。 这意味着有可能在第6回合获胜。自10月20日预兆更新起,若你未能在树精生成的回合将其击杀,它们将不再延迟该回合下一波树精的生成。 务必在树精生成的同一回合将其击杀,这一点至关重要。如果你无法做到或至少无法跟上击杀节奏,在第4波和第5波生成时,你将被同时出现的3只树精彻底压制。 如果在游戏后期陷入被压制的局面,请查看天赋建议部分和英雄升级相关内容。格伦瓦尔德地图相较于莱克堡或吉尔登堡难度更高,若你在高启示录等级下觉得异常困难,无需气馁。 在启示录4级及以上难度完成此地图需要进行一些优化。 当所有12只树精被消灭后,你将立即获胜!你无需清理地图,甚至不必完成当前回合。因此,一旦最终的树精(Dryad)大概在第6回合生成,就尽快消灭它! 通用信息 - 伦贝格(Runenberg)
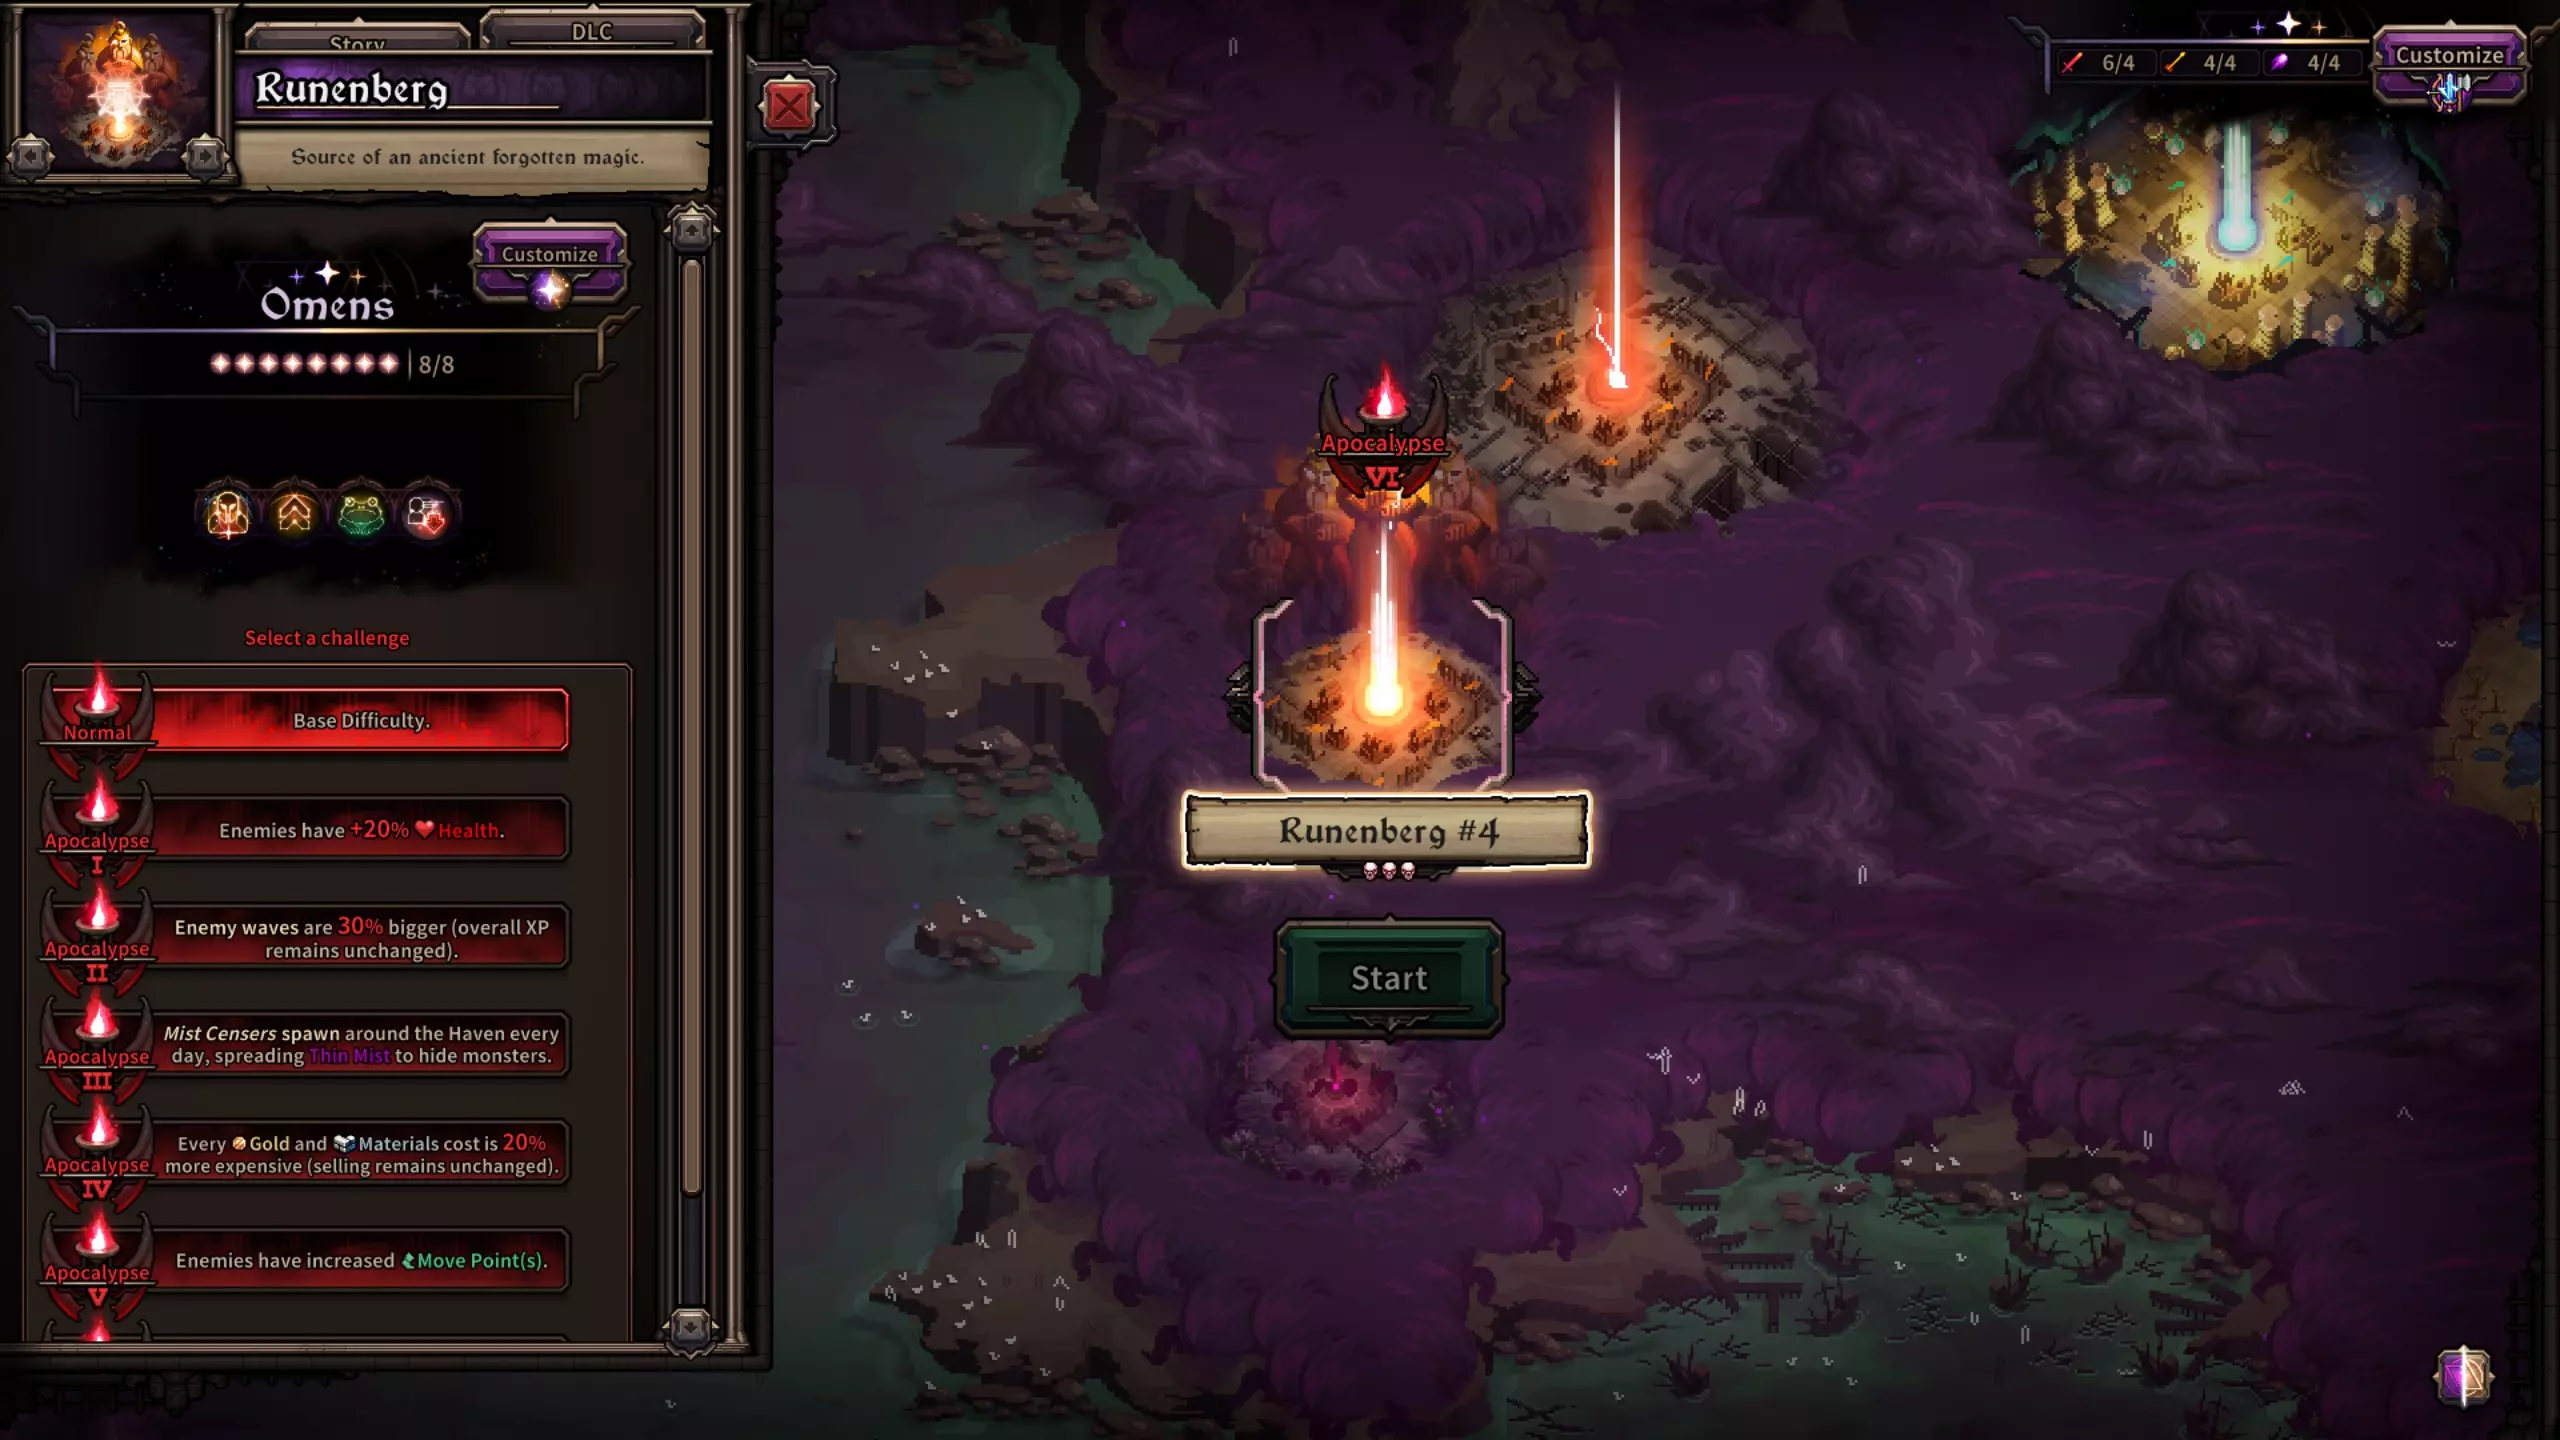
You should be able to consistently reach panic 0 wins while maintaining the Haven Wall night 1-7, however, you'll definitely find the most success on this map utilizing the corpse farming strategies. This is because you should squeeze every drop of money out to gear your heroes for night 8. This is flatly more easy when you are producing Mountains of Corpses for Day 6/7 especially. It also indirectly makes it significantly more easy to obtain Elite Carrion since elites will always die inside the Haven. As I mentioned in the section, "Notes About Build Orders" doing corpse farming is a dynamic strategy. As such, pretty difficult to define in a guide. On other maps it is perfectly viable and can work out even better. To be clear, maintaining the Haven Wall is a viable strategy even on Runenberg, although it may not stay standing night 8! What to focus onFor this map you'll want to heavily rely on momentum heroes, similar to Elderlicht, you'll want at least 2, if not more, heroes built for momentum. Movement is going to be crucial here for night 8. If you have a hero that rolls BOOM! on their T5 perks, I suggest trying to build them into a momentum hero. Even if you already have many momentum heroes. I kid you not, I would build 6 momentum heroes on this map. You're primarily building heroes for high mobility and burst damage to handle the boss (and it's mechanics) night 8. Godly Perks for this MapEscape Tunnel (dwarf only) can literally get you from one side of the map to the other letting you travel farther than 2 blinks could in some cases. Blink -- If you have this in T4 you should almost definitely pick it up on all your heroes that roll it. Night Owl -- the final night on Runenberg is a minimum of 12 turns. Night Owl has huge value for the last couple of nights but especially the boss night. BOOM! -- since you are going to be focusing on momentum heroes, BOOM! will come in handy big time. Especially the last night where the first 6-7 turns the enemies will be heavily spread out making them very obnoxious to handle on most other builds. If you see a hero with this perk and they also rolled either Relentless or Inertia -> BUILD MOMENTUM! Omens - Runenberg Wanderer (3 slot), Talent (3 slot), Leapfrog (1 slot), Dexterity (1 slot) Wanderer: as always, is for early game power as well as not needing to purchase a 4th hero. Economically this is a powerful advantage. It should be noted that if you are going the corpse farming route, this is entirely viable to skip. Talent: This could be reasonably change out for Growth, especially since we are running Wanderer. I've have success with both as both should generally allow you to pick up 3 T5 perks on all your heroes and our focus is night 8--- which is exceptionally brutal right now (4/27/24) I feel that Talent makes +% exp secondary rolls on Day 1 or 2 still very valuable which is another reason for picking it over Growth. Leapfrog: This omen comes in handy far too often to skip for 1 omen slot. Replace it at your peril! Dexterity: For our remaining 1 slot this omen comes with the biggest bang for your buck. 12% accuracy is very useful on our 4 starting heroes and even on our 2 extra heroes later. Possible AlternativesGrowth instead of Talent. As explained above, it's hard to say which is better tbh. Talent is definitely stronger early but Growth could result in the same effects on night 8 but with more stats due to level ups. Day 1 - Runenberg Panic 0 assumed 1 elite spawns last night, kite into the base and kill it at or inside of the haven for your best chances at an Elite Carrion. Use a worker to harvest the elite carrion. Any time an elite carrion spawns it is ALWAYS worth changing the build order to accommodate it. Build 2 more houses. Upgrade one of your houses with House Expansion for 48g, bringing your total works up to 4/5. Scavenge a 4 worker ruin for 80g 67m. Upgrade 2 of your houses with House Expansion for 48g each, bringing your worker count to 2/7. Scavenge one of the following: If you have 2 Pile of Corpses then use your 2 workers on those for 36g 64m If you have 1 Pile of Corpses AND a Corpse, use your 2 workers on those for 34g 32m If you only have "Corpses" instead scavenge (gold focus) a 2 worker ruin. 32g 28m Upgrade your last House with House Expansion for 48g, bringing your worker count to 1/8 Scavenge a Pile of Corpses if possible (18g 32m) otherwise scavenge a 1 worker ruin (14g 13m) If you have the money, build Mana Wells now instead of waiting until tomorrow. You will likely be able to build at least 1 of them now. Keep in mind, you can overspend slightly on a hero as the free benediction ability will recover your mana. On top of that, Mana Wells permanently increase your max mana on all heroes each day. Ensure the gold mine (gm) and Inn both have walls to defend them if you are under attack from those sides. After that your priority is Catapults. Similar to other maps, we'll want 1-2 in each corner of the base eventually.Keep in mind, Catapults do physical damage and therefore shred armor. It is very useful to shoot a large cluster of enemies at the start of a turn ONCE to soften them and allow a hero to easily clean up. That way you don't miss out on the kill exp bonus. It isn't a huge deal if a catapult kills things but you'd prefer to kill them with a hero for this reason. Another major benefit of Catapults on this map is that they can be used to trigger runestones, generally with 1 shot. Day 2 - Runenberg Panic 0 assumed Scavenge (gold focus) both remaining 4 worker ruins for 80g each. Build 2 GMs. Build your second Mana Well if you haven't already. Upgrade all GMs with Production+ for 72g Ensure your Inn/GM is well protected tonight if you are under attack from that respective side. Make sure there is a Catapult on both corners of the sides under attack tonight. After that, complete the wall on that side with wooden walls. Repair wooden/reinforced wooden that is heavily damage only on the sides under attack. Day 3 - Runenberg Panic 0 assumed Scavenge (gold focus) both 3 worker ruin for 54g 46m each. NOTE: If you have piles of corpses, at least 2 of them you can instead scavenge those. They are worth 18g and 32materials each. So you'll actually generate much more materials and only 4 less gold if you have at least 2 pile of corpses (your 3rd worker would then be used on a regular corpse or a 1 worker ruin (-2 more gold)). Typically I'll have generated 5+ Pile of Corpses even with everything dying away from the wall last night. (Example below) As long as they are dying in close proximity to each other you should have gotten at least 3. So, to be clear, if you had say 4 Pile of Corpses you should instead only scavenge one of the 3 worker ruins and then use 3 workers scavenging 3 of the 4 Pile of Corpses. It is definitely worth doing this if possible as you'll generate a lot more resources and similar or equal gold. Upgrade 3 of your houses with House Expansion+ bringing your worker count to 3/11. Build a Seer. Use "Repel Mist" at the Seer for 3 workers. Upgrade Mine+ at 2 of your GMs and then use 1 worker at each. Upgrade your last house with House Expansion+. Upgrade Mine+ at your last GM and use 1 worker there. Under optimal circumstances, you'll have enough money for an Armor Maker OR Scavenger Camp. However, if you are 2-4g short, maybe sell an item to make the cut. If you cannot work it, don't worry about this step and just complete it tomorrow. I like the scavenger camp as it ends up resulting in a 72g investment now for a total of 160 materials. REMINDER: Don't forget to use your mana well! For defenses tonight, you may be under attack from 3 sides so we'll want to close off our walls as best as possible. Ensure you have a Catapult in all 4 corners of your base now and then build Wooden Walls around the sides under attack as best you can.
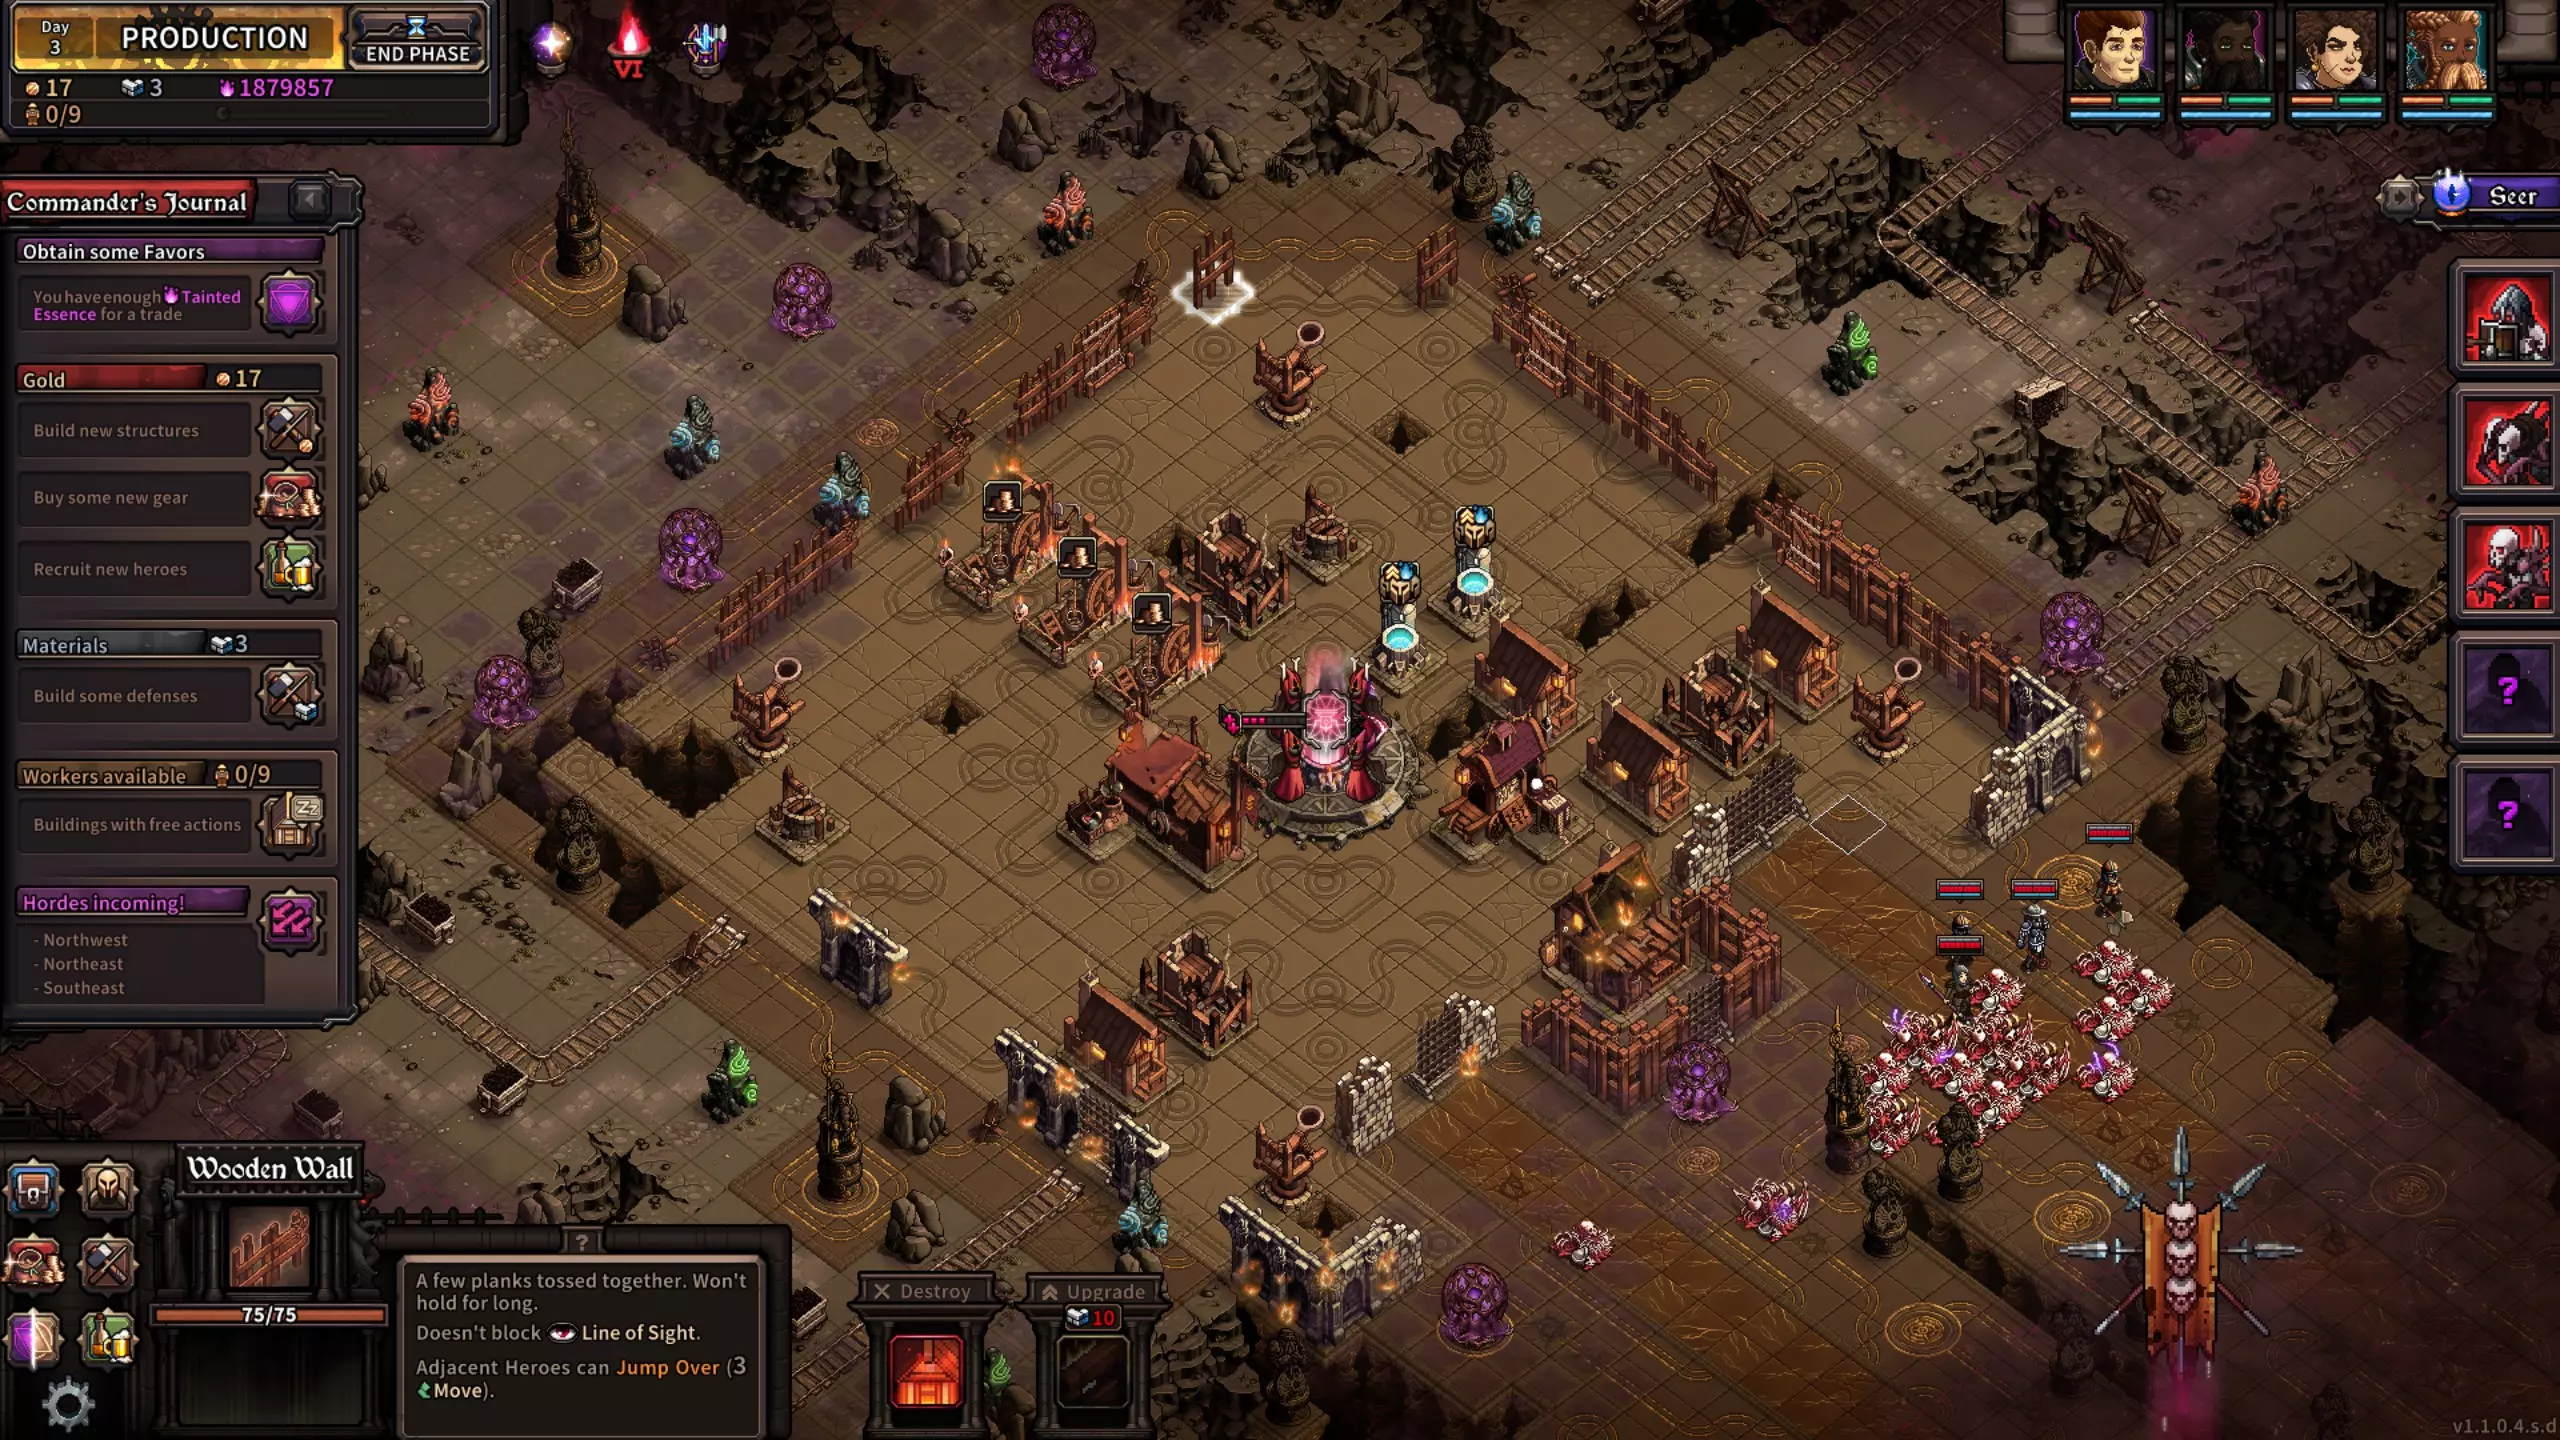
There seems to always be a hunter elite in the wave tonight, unless you can kite it INSIDE of the haven, you likely won't get an elite carrion spawn from it. If possible, it is worth doing of course --- but twice I have kited it along the wall and killed it without getting an Elite Carrion. So, it is quite dangerous sometimes. Don't feel bad about just killing this hunter elite immediately and foregoing the elite carrion. Day 4 - Runenberg Panic 1 assumed -- today included, panic 0 wins are very doable on this map. You should strive to get the panic 0 wins but for the guide's purposes I'll assume p1 going forward. Use "Repel Mist" at the Seer for 3 workers. Upgrade all GMs with Mine++, then use 2 workers at each. Build an Armor Maker. (if you already have one from earlier, you can pick something else if you prefer) Upgrade Item level+ at your Armor Maker. Build 2 more Armor Makers and 1 more production building of your choosing. You should have 4 total production buildings. With your remaining 3 workers you can scavenge Pile of Corpses for items. However, if you were short on gold, you can instead scavenge them for money to complete the above mentioned steps. Scavenging at least 2 Pile of Corpses for items here is significant as you can obtain T3 weapons for your heroes. For defenses, again prioritize your Inn's walls and ensure it is strong. Be careful of flying enemies tonight as they like to target it and it has very low HP. Strengthen your walls around the 2 sides under attack tonight. Do not bother building Reinforced Wooden or higher walls. Repair what already exists, even some of the stone walls if you think it is worth keeping them in those locations --- but try to be frugal with your materials. At this point we kind of want to save up to build a cluster of Ballista around the Magic Circle for Night 8. Day 5 - Runenberg Panic 1 assumed Should have been 2 elites last night I'll assume you only got 1 carrion, however, always remember to break the build order to accommodate Elite Carrion --- it is always worth it. Harvest your Elite Carrion. Use 2 workers at each GM for 240g. Use remaining workers to harvest Pile of Corpses or any Mountains you have for gold/materials. Upgrade your Inn with Accommodation+ and buy your 5th hero, I usually get one for 286g at level 7 or 8. Upgrade Item Level++ at one of your production buildings. You'll get to use this for 2 more day cycles which works out to 4-5 higher level items twice. Generally this will more than pay for itself before the final night. If you have at least 120g remaining, upgrade Shopkeeper's Friend and Best Friend and then sell all excess items in your city stash. Shop with your remaining money if needed. Repair walls on the sides under attack but again, we want to save materials at this point. If you're good on Wooden Walls around the base and the outer perimeter is repaired (don't repair all of the stone walls, it can be rather expensive and unnecessary --- just repair some of them to act as sponges)... Then you can start building Ballista around the Magic Circle. You should get the upgrade so they can attack 2 targets as well. These defenses likely won't come into play until later into night 8--- but you'll likely need them then. Day 6 - Runenberg Panic 1 assumed Use "Repel Mist" at the Seer for 3 workers. NOTE: If you feel the mist is back enough and your heroes are strong --- opt to skip this to harvest Piles/Mountains of Corpses for items with these 3 workers instead. You definitely need the items. However, having the mist pushed back makes the night easier. Use 2 workers at each GM for 240g. You can opt to skip some of these if you don't need the gold to buy your 6th hero. Upgrade your Inn with Accommodation+ and buy your 5th hero, I usually get one for ~340g at level 8. Use remaining workers to harvest Pile of Corpses or a Mountain for ITEMS. You likely need them at this point. If there aren't enough then use the rest in your GMs or scavenging ruins. Generally you'll have at least 3 Piles today. If you didn't already, then upgrade Shopkeeper's Friend and Best Friend and then shop until broke! Sell excess items in your city stash. If your walls are doing well, you can opt to maintain the perimeter still, however, it is more likely they are crumbly by now. Continue to put Ballista around your Magic Circle and upgrade them so they can hit two targets. This allows you to largely ignore stragglers as you should have 6+ upgraded ballista around your magic circle by now. As well, the broken up pieces of walls you have should divert the attention of any elite boomers so you can safely ignore them in future nights. Day 7 - Runenberg Harvest all elite carrion. Use workers as you see fit, highly suggest you use them to scavenge (item focus) mountains or piles of corpses. Use all resources on Ballista AT the Magic Circle. Even Immediately around it. If you have holes in your wall don't fill them, it doesn't matter as Boomers will just blow up into your walls even if they could have walked around them CRITICAL: Do not place your heroes within 2 tiles of the Magic Circle at ANY point tonight! The statues regularly attack your heroes and they do it in a radius of 5x5 attack on your hero. If you are within 2 tiles of your Magic Circle (or any building for that matter) then the statue's attack on your hero will damage or destroy your stuff! Please take a look at the boss section below before starting the night! Dwarven Corruption - Runenberg Boss Statues have 800 armor, 5700hp, 40% res Quickest KillIt is possible to end the night on turn 9. One Corrupted Runestone Spawn Two Corrupted Runestone Spawn Rest Turn -- nothing happens Four Corrupted Runestones Spawn Statue Spawns (all Corrupted Runestones MUST BE DESTROYED FIRST) Five Corrupted Runestones Spawn 2 Statues Spawns (all Corrupted Runestones must be destroyed first) Five Corrupted Runestones Spawn Statue Spawns (all Corrupted Runestones must be destroyed first) You do not have to finish the wave (as with every other map) so as soon as that 4th statue is up, rush it!! Tips for the NightAs mentioned in the general information section, momentum heroes. Build many, build as many as you can. If you have a hero that rolls the T5 perk BOOM! and it has either Inertia or Relentless then make that thing a momentum hero! If all 6 of my heroes fulfilled that criteria then, on this map, all 6 of my heroes would be momentum heroes. Pistol, 1h Sword, Scepter work best as they all provide movement options as well. The idea should be that you have 8+ upgraded Ballista around your Magic Circle so stragglers getting through to your base shouldn't matter. Don't chase them. Let your Ballista kill them --- if they hit buildings, who cares. Ignore it xD In the wave whenever your hero isn't chasing a Corrupted Runestone or Statue you'll want to be prioritizing Splitters, Hunters, Bulky, and Elites. In no particular order. Clear as much as you can of course but those are the enmies you want to take out ideally before they are anywhere near those Ballista. Don't forget to use your Catapults. They can be used to trigger a non-corrupted Runestone usually in 1 shot tonight! Very handy. General Tips - Elderlicht
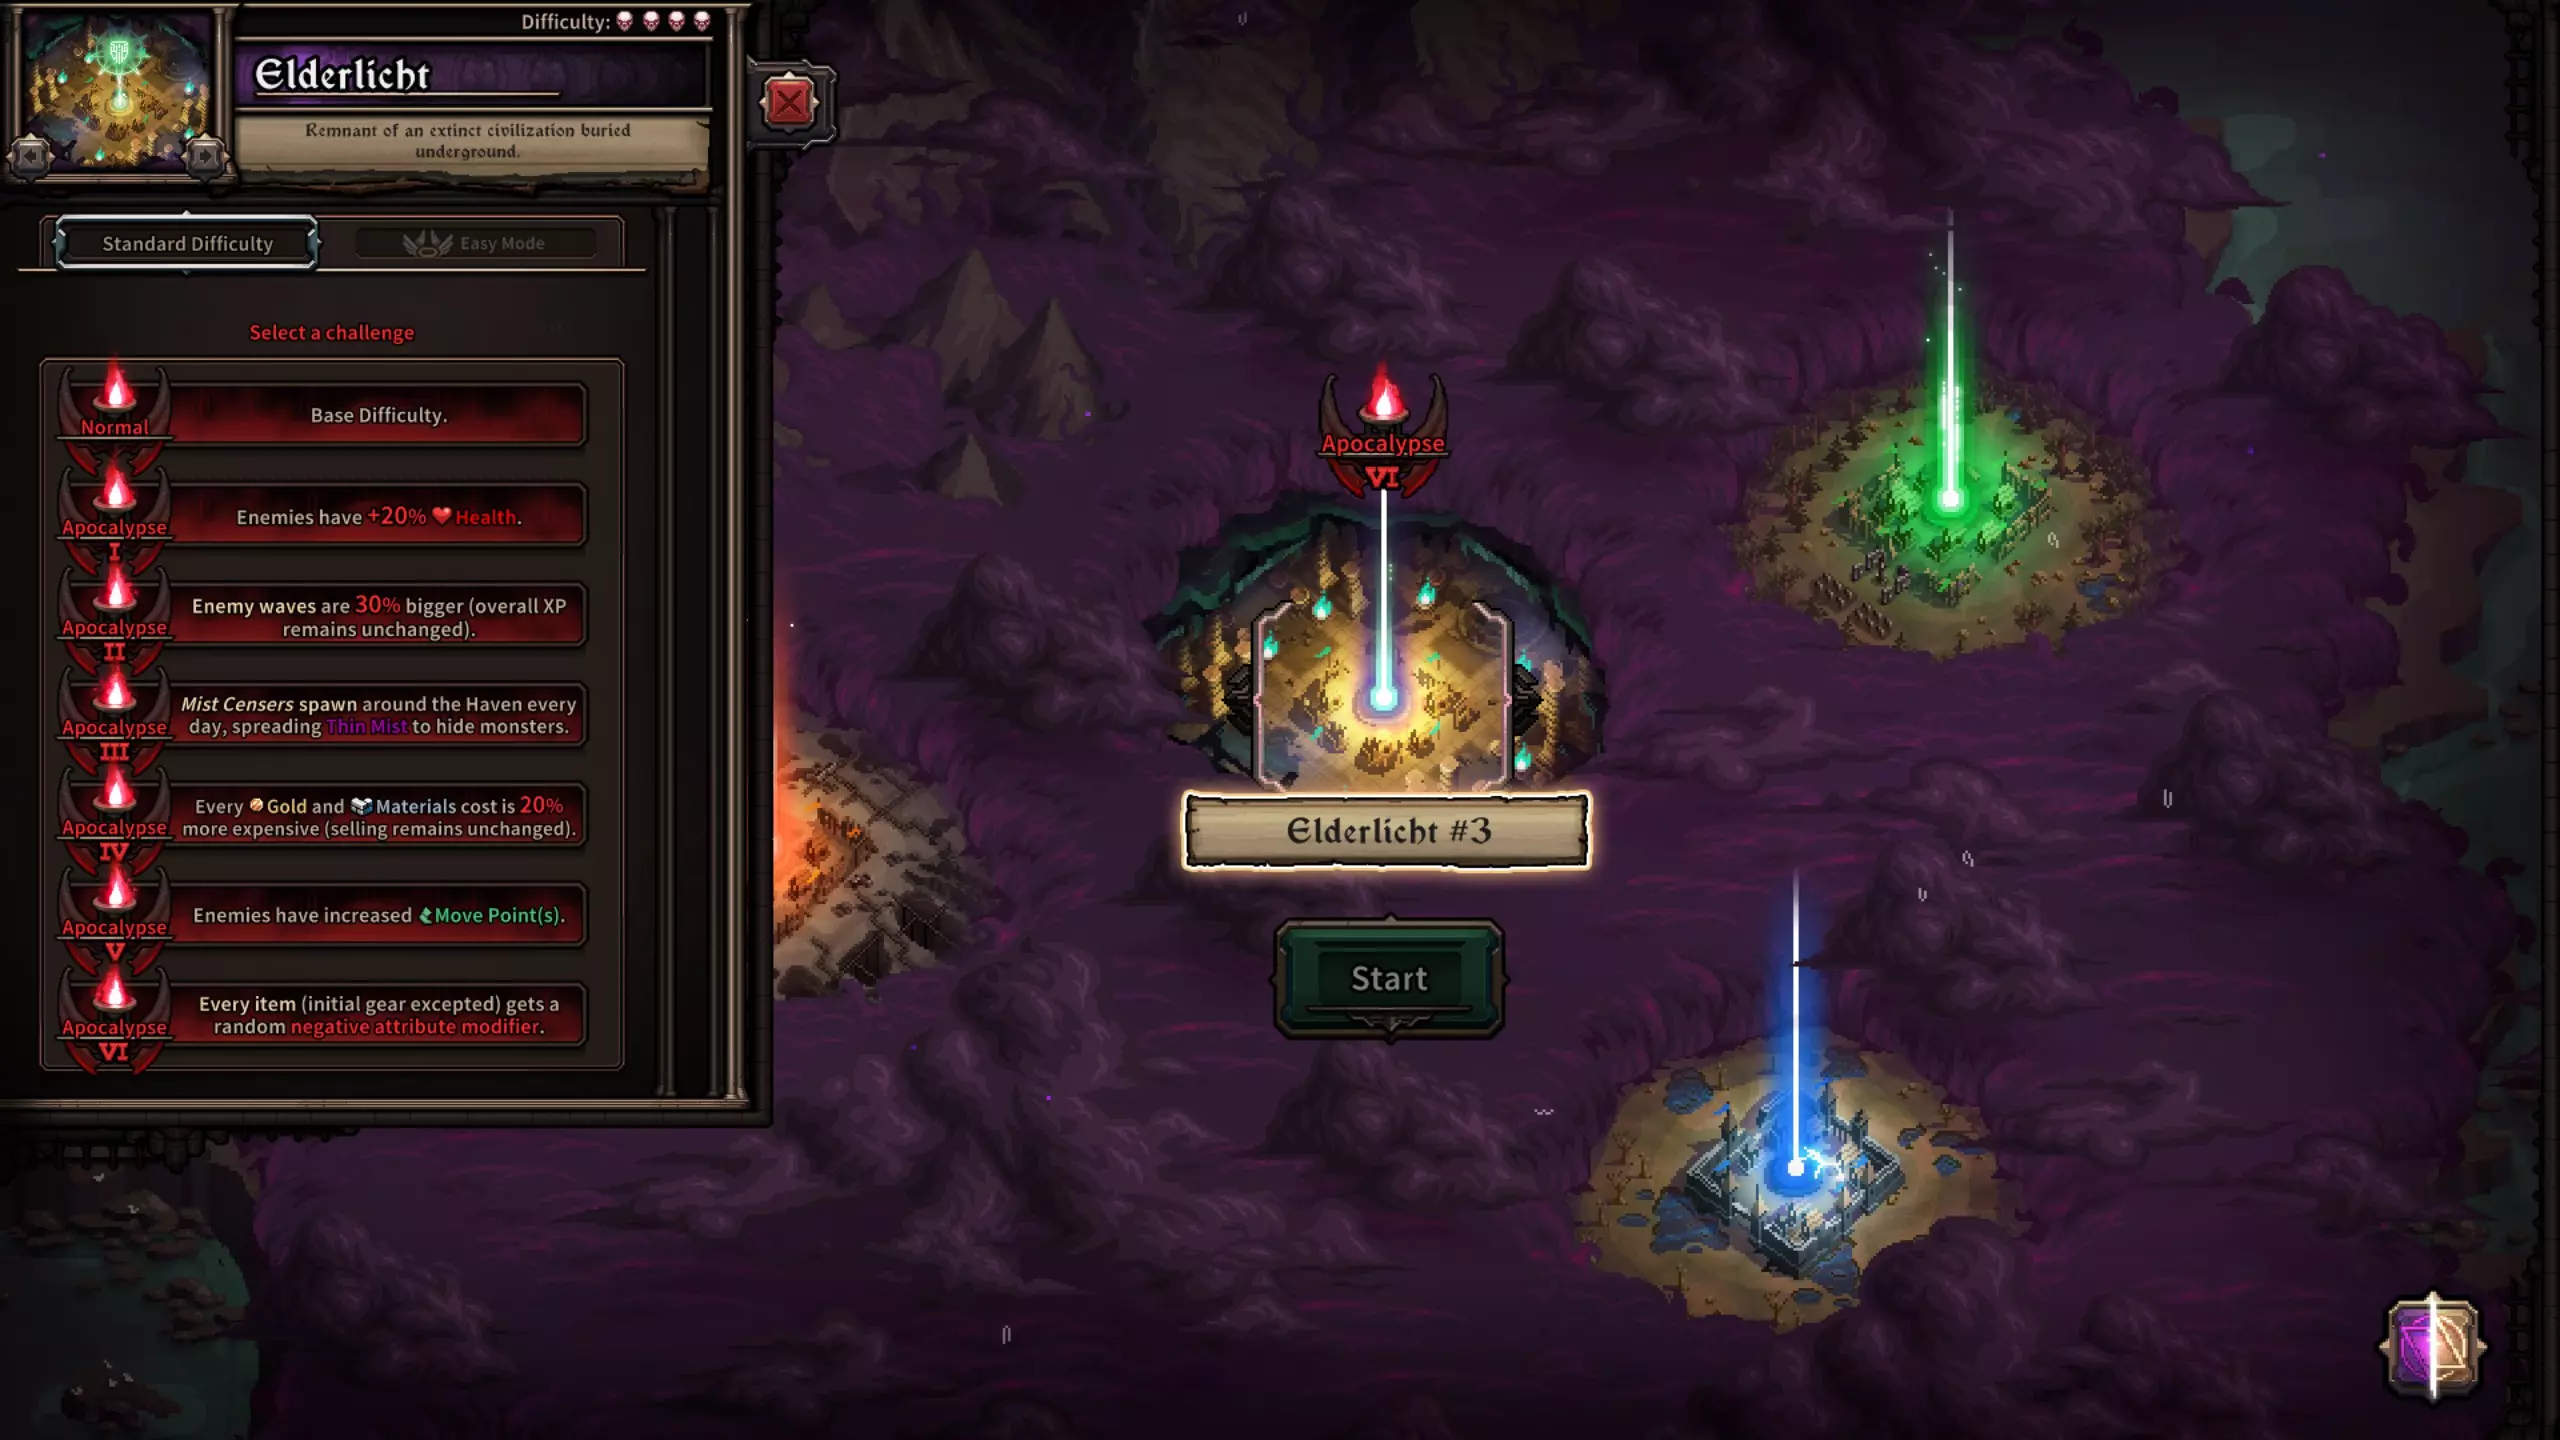
《Elderlicht》和《Glenwald》一样,想要成功需要你的技能组合有所创新。 《Glenwald》让机动性的重要性凸显出来,而《Elderlicht》则在此基础上,考验你平衡波次管理与任务目标的能力。机动性仍将是你实现这一点的关键因素。 如果你之前玩过《Runenberg》(需要DLC),那么你对此已经有了丰富的经验。

Soul Vessels are a core mechanic of this map. They require AP to extinguish and if not extinguished their respective invulnerable minion will wander about causing havoc. All of your heroes will have a new ability next to "Jump Over" called "Extinguish". This costs 2 AP and will remove 10 flame points from a Soul Vessel. At the start these will have 10 points, then 20, and later nights will have 30 or even more flame points. This increases the value of the already valuable AP potion (Potion of Energy). It is highly recommended that you obtain and equip AP potions for each of your heroes ASAP. The day-to-day build guide works to get an alchemist into the mix as early as possible. Once you have an alchemist your rerolls should be focused on it each day so you can obtain AP potions. Because of the Soul Vessel mechanic you will need to further improve your wave management skills. Generally speaking the first turn of each night will include you positioning to eliminate Soul Vessels on turn 2 which will consume most of your AP that turn. You'll then have to put out the ensuing fire so to speak. Planning each hero's turn will be important here, carefully consider this balance before you act. It's viable in a lot of circumstances to not extinguish and instead just kite them the entire knight. It is okay to overspend a little on mana the first night of Elderlicht. The following day, you'll pick up the T1 Harvester perk or more mana regen from secondaries. As well, for Night 2 you'll have Catapults to rely on. This means you can under-spend if necessary on Night 2 to recover. Weapon's tier list for ElderlichtI would keep everything the same as Glenwald's with one exception... Scepter is the best overall weapon on this map. However, in it's current state (99.0.21) the Scepter has a fairly weak early game. For late game if possible, try to run with 2 of them and keep them on opposite sides of the map. Their insane mobility will be a huge help in late game. Another very strong option instead of Scepter is 1h Sword for it's absolutely ridiculous mobility. Its momentum skill also now has the same base momentum as the Scepter's momentum skill. Scepter is still stronger (although less mobility) due to it being magic damage. There will be a lot of high value targets in the waves, especially in the later nights (things like Twisted, Bulky, and Elites) that will make this weapon valuable to have. I think the Scepter strikes a good balance between power and mobility vs other similar momentum weapons. Momentum will be an extremely powerful tool for killing the boss on night 14. Due to the nature of the map it is absolutely critical that you are able to run around extinguishing on night 14 to end the night as fast as possible. Momentum builds will be critical for this so having at least 2 of your 6 heroes built this way will be extremely useful for you. Any hero that has the T5 perk BOOM! and the T3 perk Relentless should be considered. Perks - Elderlicht A lot of the perks here are going to be the same as Glenwald. Please refer to the "Perks - Glenwald" section. However, there are a few exceptions worth mentioning: Contamination: There is a separate section to explain the extreme usefulness of this perk. It comes highly recommended. Please see "Contamination's Power - Elderlicht" for more info. Specialist (T4): On Elderlicht it is very reasonable to skip this perk. However, take some careful consideration.... +50% damage can be a life saver in the mid-game on the map, which is when you'll have access to this perk. Just keep in mind if a hero is strong this is such a long format map you will definitely have time to find a secondary weapon with solid stats and therefore it is reasonable to skip this perk. Overload (T2): This is a great perk to pick up late on your hero's build or even early if you rolled good potions (such as 2 mana potions). Elderlicht is a 13 day map, meaning all of your heroes will reach well over level 11 (which is the last time you receive a perk point). This will have a lot of value here, so keep it in high consideration once you are towards the end of a hero's build. Not only does it unlock an extra inventory slot for the hero, it also gives all items in their inventory +1 charge each night! Runic Gift (T3): Worth considering since the map is a long one. You will have enough time and money to fully gear all 6 heroes, even if all 6 of them have additional trinket slots! Riftic Gift could end up being a very powerful addition. This is particularly good on a hero that does not have a good mana management tool (Vampire/Blood Magic or Mana Collector). Why? Because Runic Gift also give you a good chunk of mana (not mana regen). This is particularly useful for the last night, as your mana management tool then can simply be a huge mana pool! I also like to pick this up on any ranged hero who plans on using a Hand Crossbow. Trinkets with +multi-hit are somewhat common. Blink (T4): This perk is well worth picking up here as mobility on Elderlicht has even more value than it did on Glenwald. If your hero doesn't have enough inventory slots for a Blink scroll then you should consider this. Ideally, at least 3 heroes should have access to the Blink perk or a Blink scroll by Day 13. Contamination's Power - Elderlicht An extremely powerful tool at your desposal (especially after the update on 11/4) is the Contamination tier 2 perk in the blue hex tree. This allows you to cast, twice per turn, the Contagion debuff on an enemy. When an enemy dies with this negative alteration on them, it will randomly spread to 2 adjacent enemies (this doesn't include diagonals). When it spreads, it will also apply all negative alterations that the enemy had when it died. This includes any quantity of poisons, stuns, contagion itself and any debuffs such as slows, -resistance, -accuracy and -damage. Contagion multiplies the value of any AP spent on a negative alteration (poison, stun, or debuff) ability, in some cases many times over.. effectively increasing the value of each AP spent by factors of 2, 4, or even upwards of 16. To be more specific, say you use 'Slow Death' on a Hand Crossbow, applying it to a weak enemy that is adjacent to a cluster of strong enemies. This costs 1 AP and applies a fairly strong poison and slow to the target. Next, apply Contagion. If the debuffed enemy is adjacent to two targets who do not have Contagion, the slow and poison will spread to both targets if the Contagion target is killed on this turn or next turn. If the enemy is adjacent to 3 or 4 targets, you may also use your second Contagion charge to block the path on one adjacent target, reducing the possible paths by 1, or kill two adjacent targets to direct the path of Contagion to the only two remaining targets when you kill the debuffed enemy. This is important for 'channeling' the contagion onto desired targets such as high priority lancers, twisted, archers, bulkies etc. which have high armor but must be dealt with. Another example is with the Druid, contagion can be used to effectively 'roll' poison up by sequentially killing each poisoned Contagion enemy, and then passing the 'ball' of poison to a big target. A third strategy is to spread two contagions in a pack, apply poisons or slows, and then use high damage to destroy both Contagion targets, killing several targets while spreading the poison to 4 more targets. If AP permits, the process can be repeated on the 4 targets, likely applying Contagion upwards to 8 targets. Just be careful not to waste AP killing targets which are adjacent to a Contagion enemy, or the 'channel' will end. Lastly, Contagion is also an investment in the next round. Any enemies left with Contagion and Poison will be weakened next round and it will be easier to spread it to the next wave. This makes using slows on Contagion targets valuable as it will help ensure they are trapped in the midst of the next wave, instead of making it to your walls. T2 Hand Crossbow's Slow Death will do 56 damage per turn. In the images below, the hero I had happened to roll the "Shaman" trait as well as +30% poison damage for a total of +60% bringing that 56 up to 90. Neither of these are necessary what-so-ever.
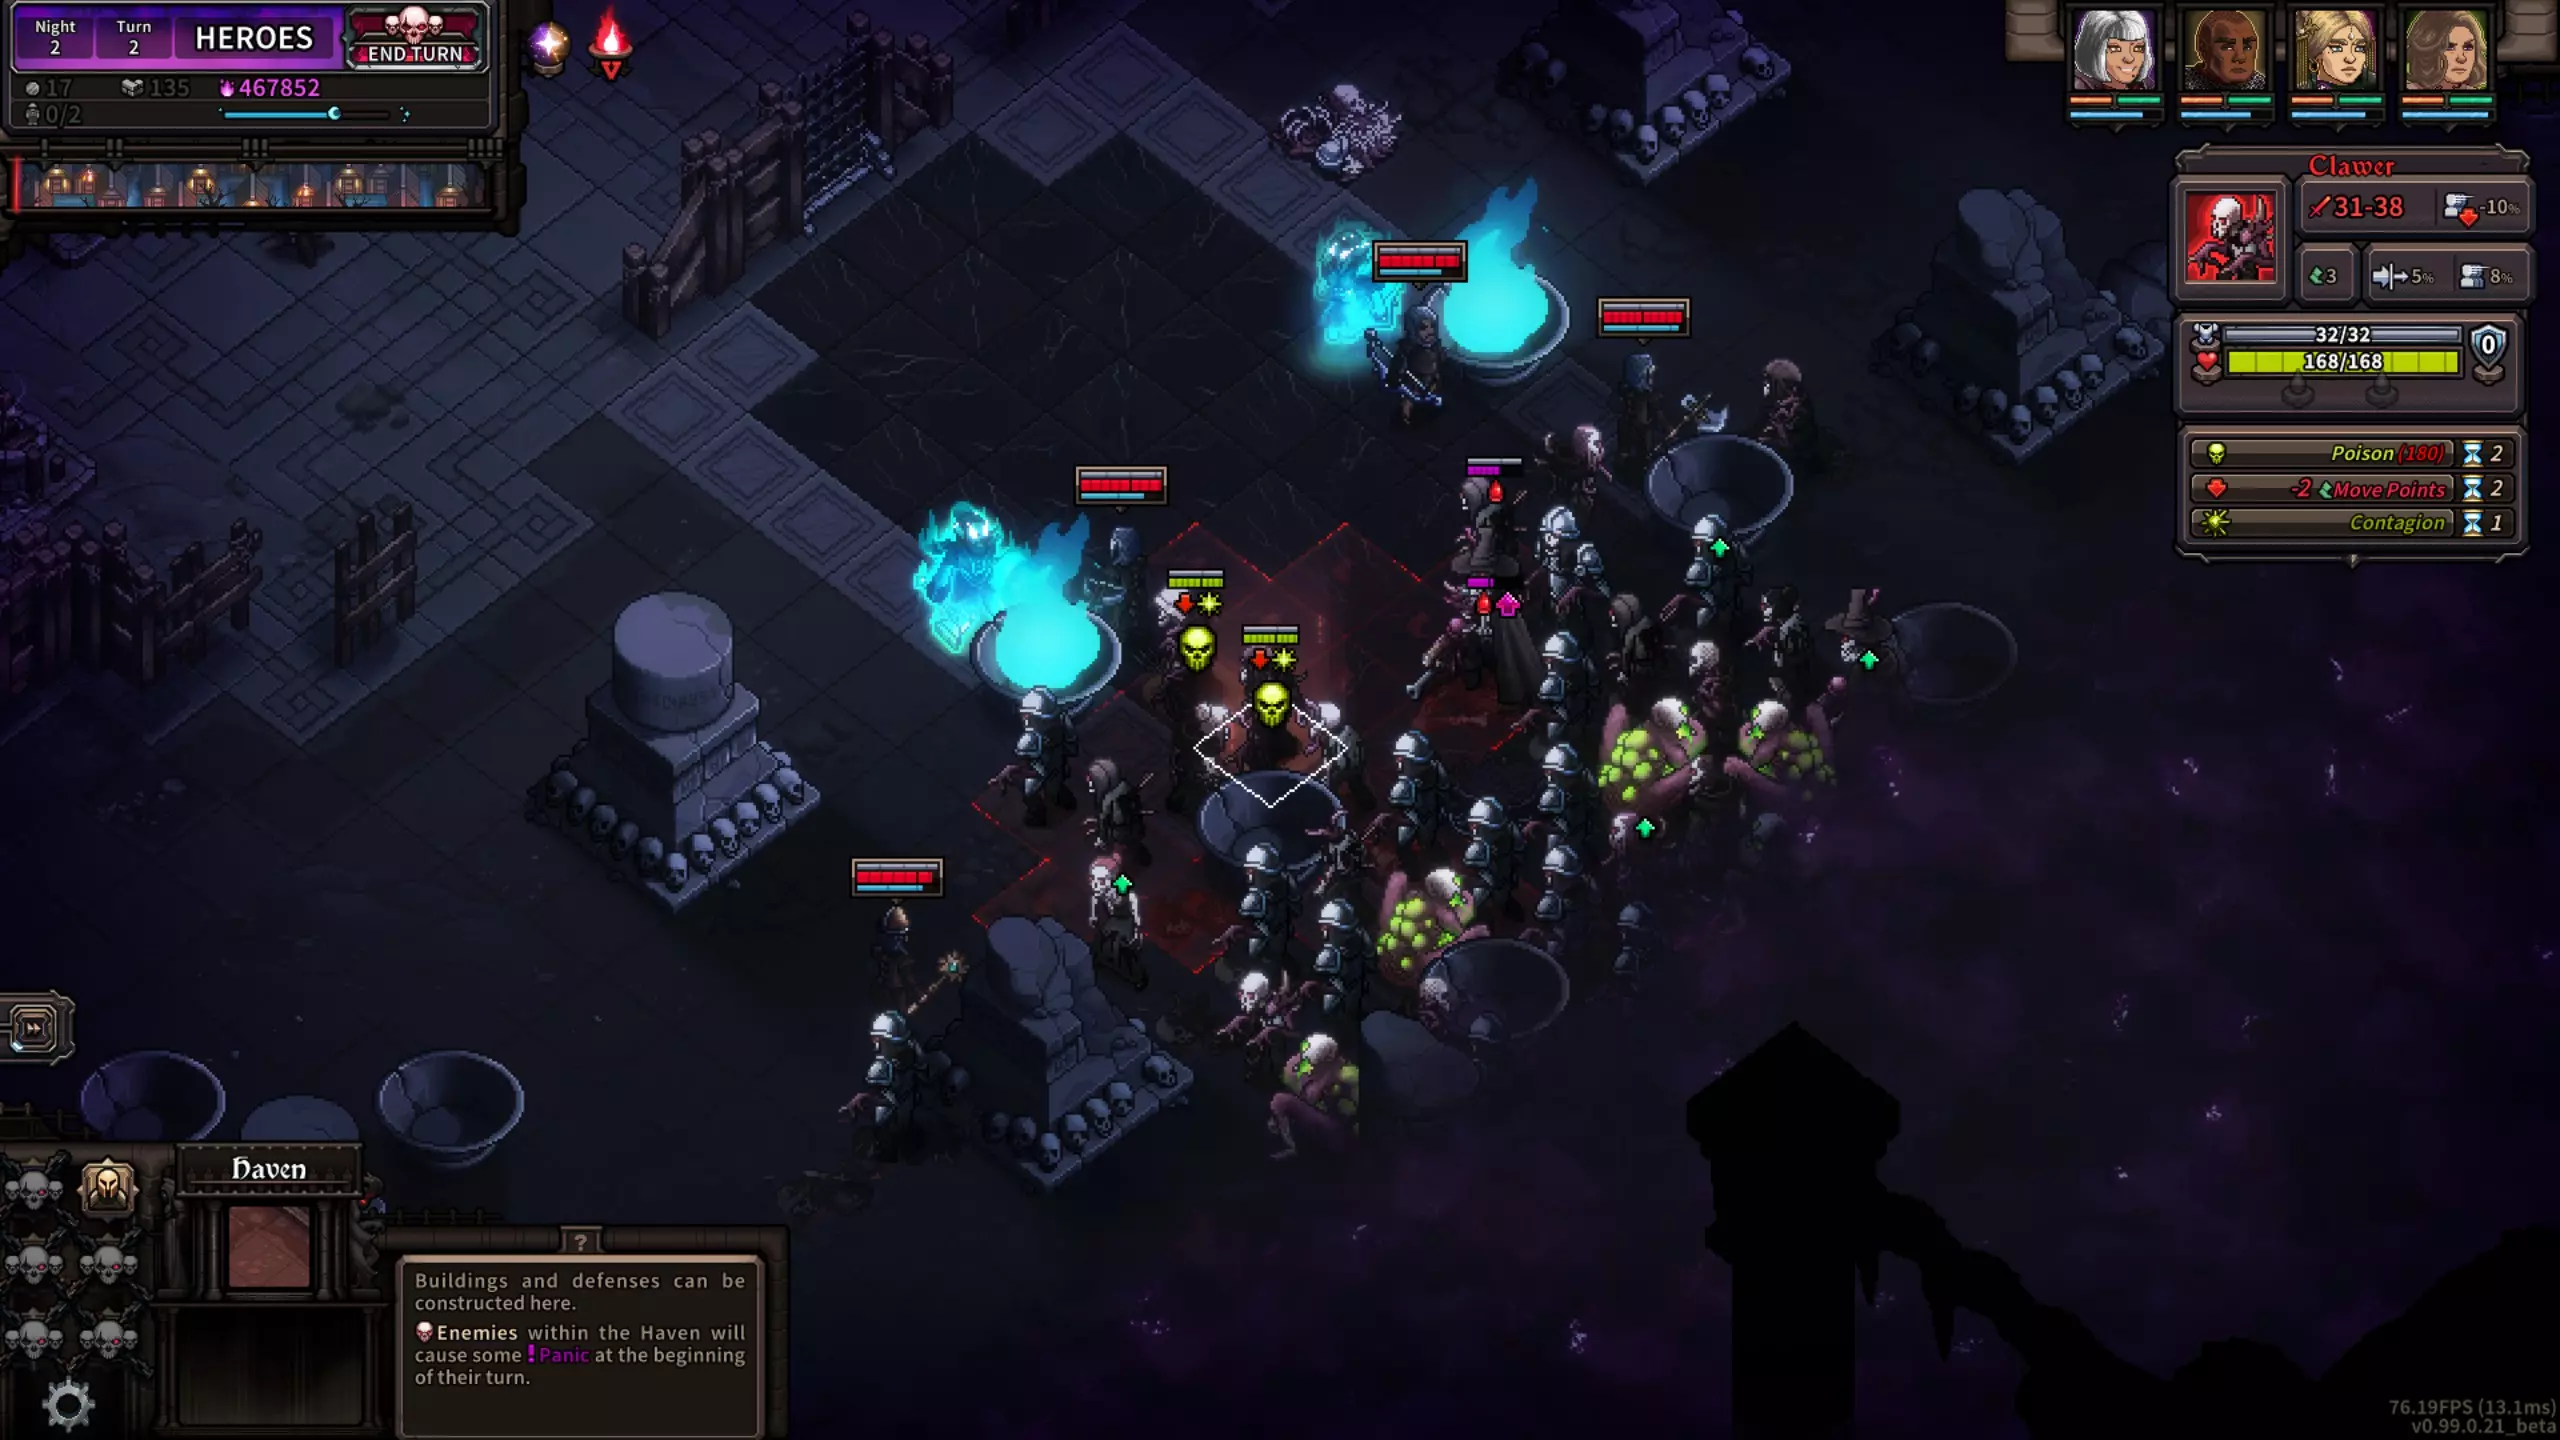
这里可以看到我在夜晚第一回合施加的毒药。我选择了一个目标,对其使用了【感染】技能,然后施加了两次【缓慢死亡】(每次90伤害)。那个目标在第一回合结束时死亡,并将毒药传播给了上面你看到的两个目标。因此,这两次【缓慢死亡】施法不仅杀死了1个目标,实际上到目前为止我已经杀死了3个。
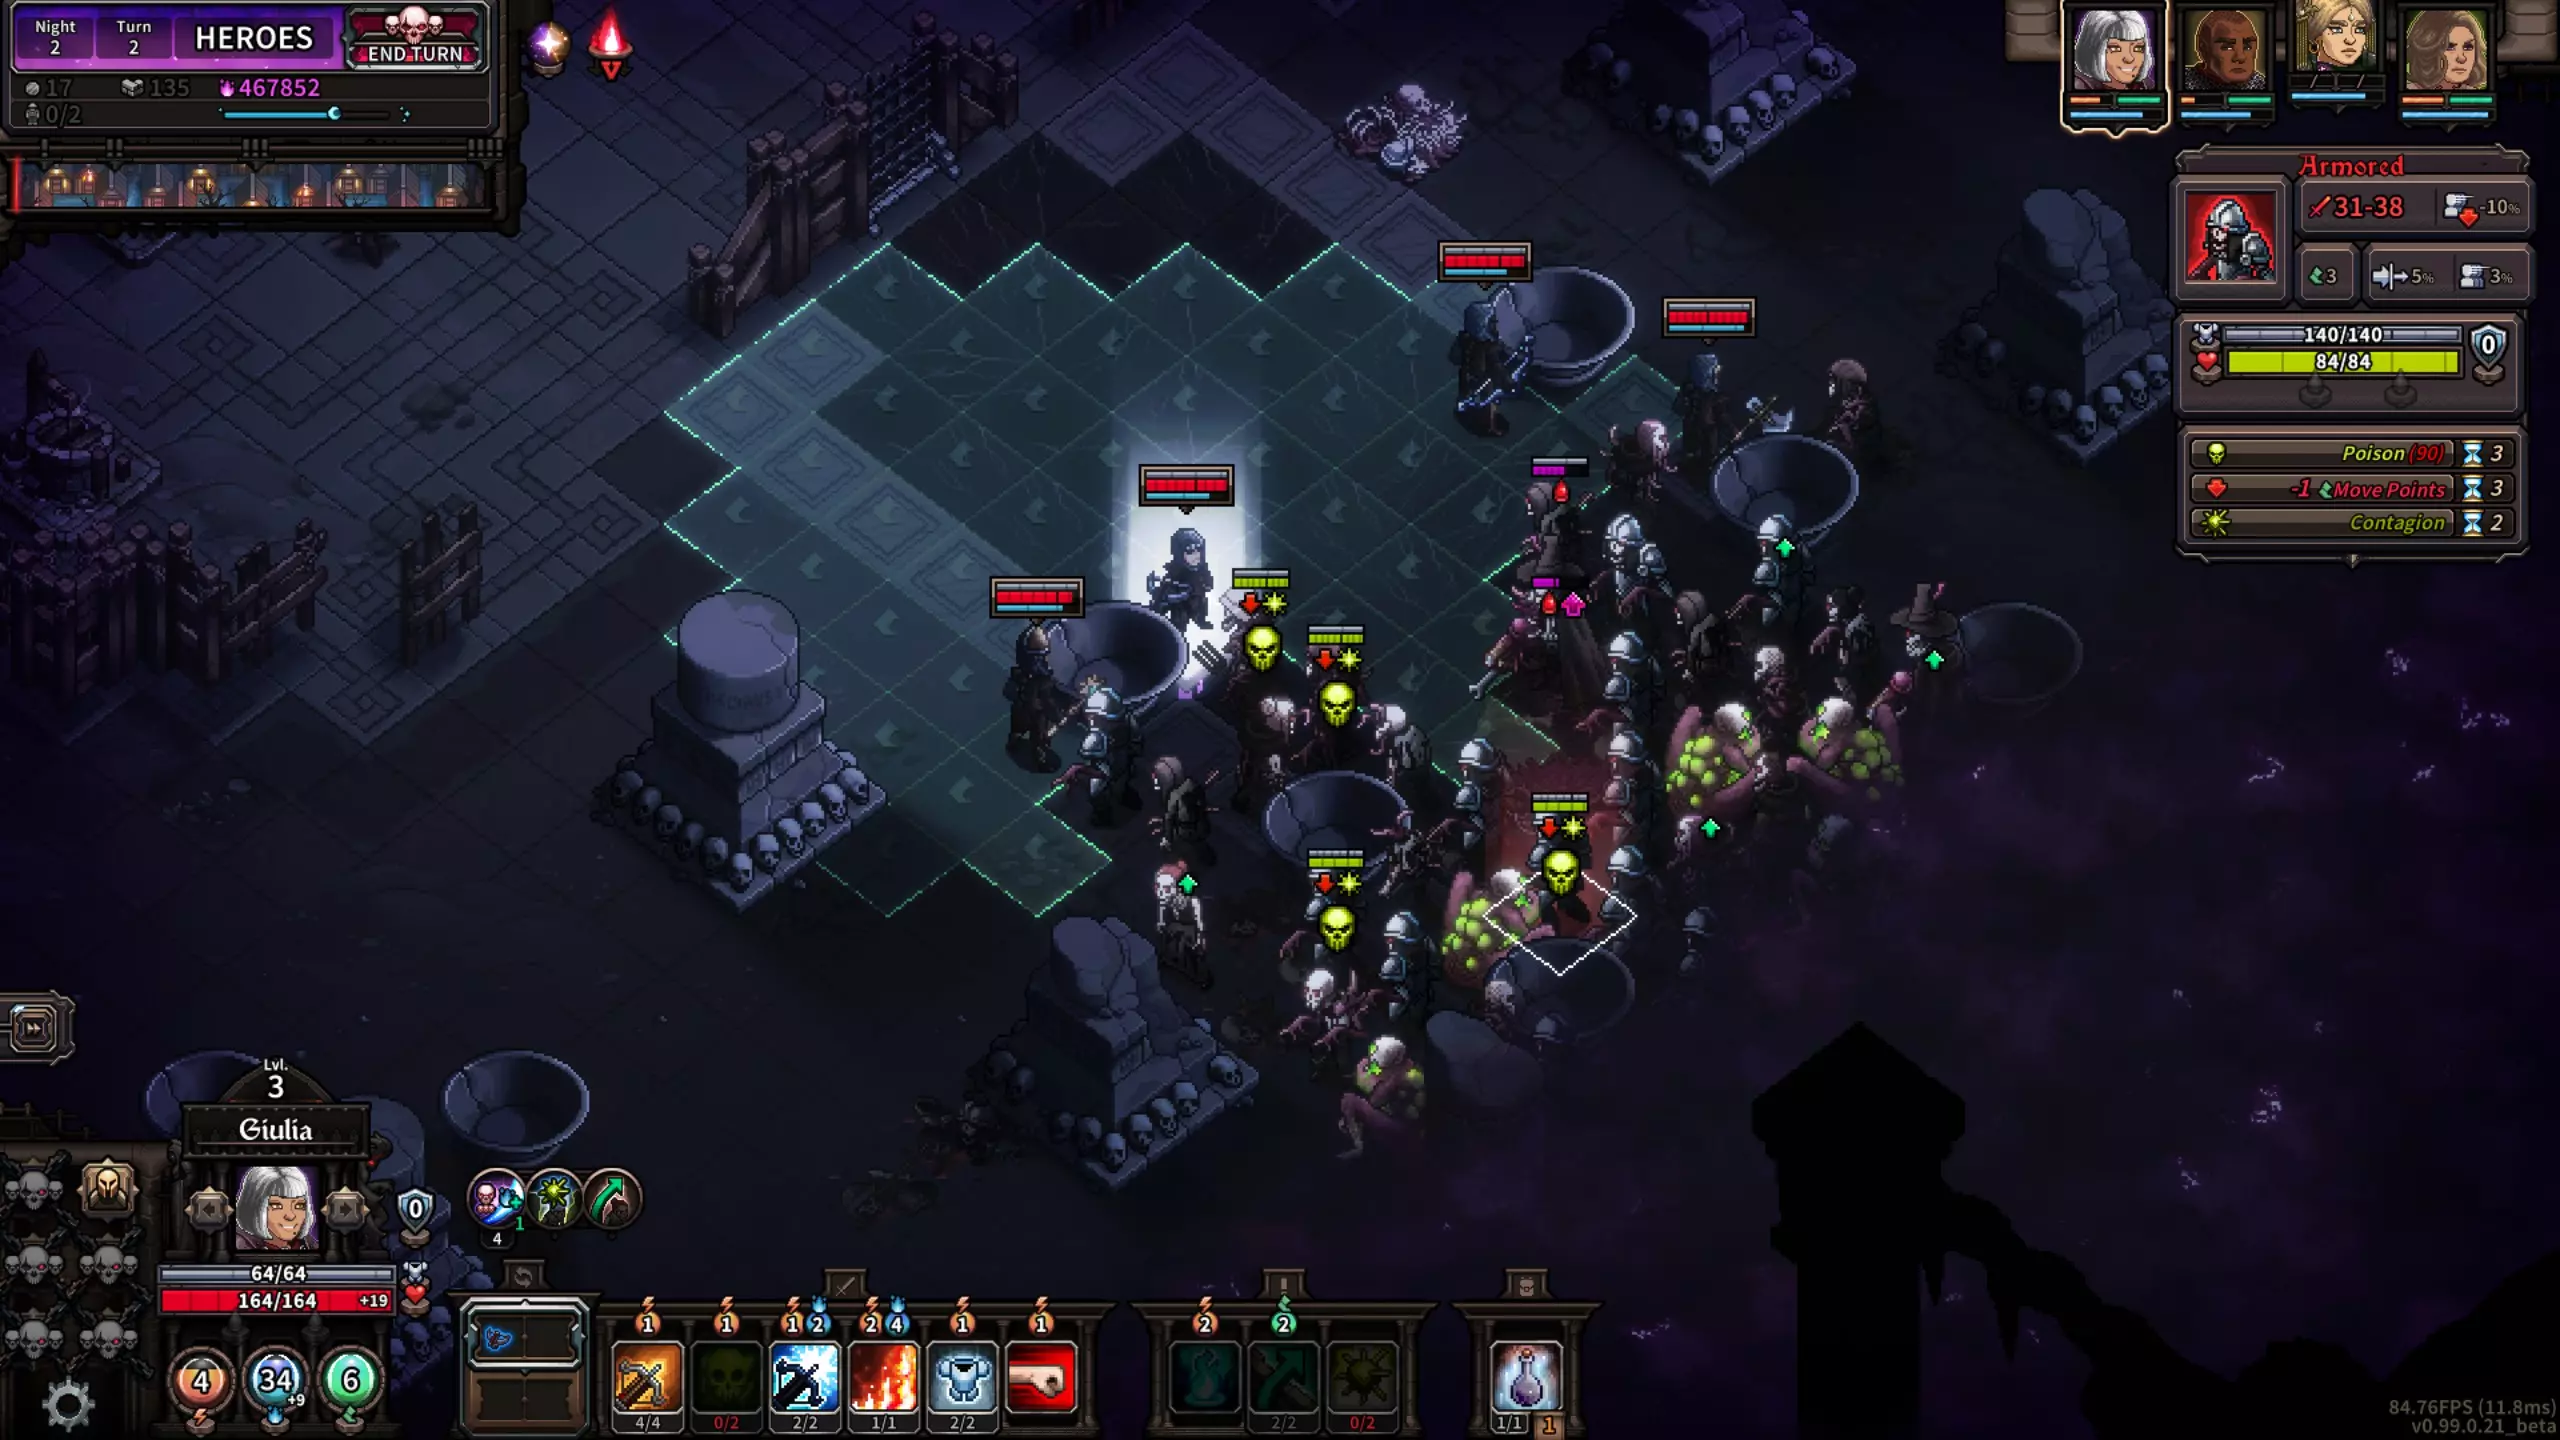
让我们选择新的目标,因为这个英雄本回合的毒素效果很强,所以我们不用只使用1次【感染】,而是用2次。可以看到,我选择了2个带甲敌人来下毒并施加【感染】。 当敌人死亡时,【感染】会扩散到2个相邻(不包括对角线!)且尚未带有【感染】状态的敌方单位身上。 我选择这些目标是因为它们有不少护甲,但生命值很低。因此毒素对它们效果显著。此外,它们周围还有很多其他带甲敌人!这意味着本回合结束时,毒素很可能会扩散到更多敌人身上!
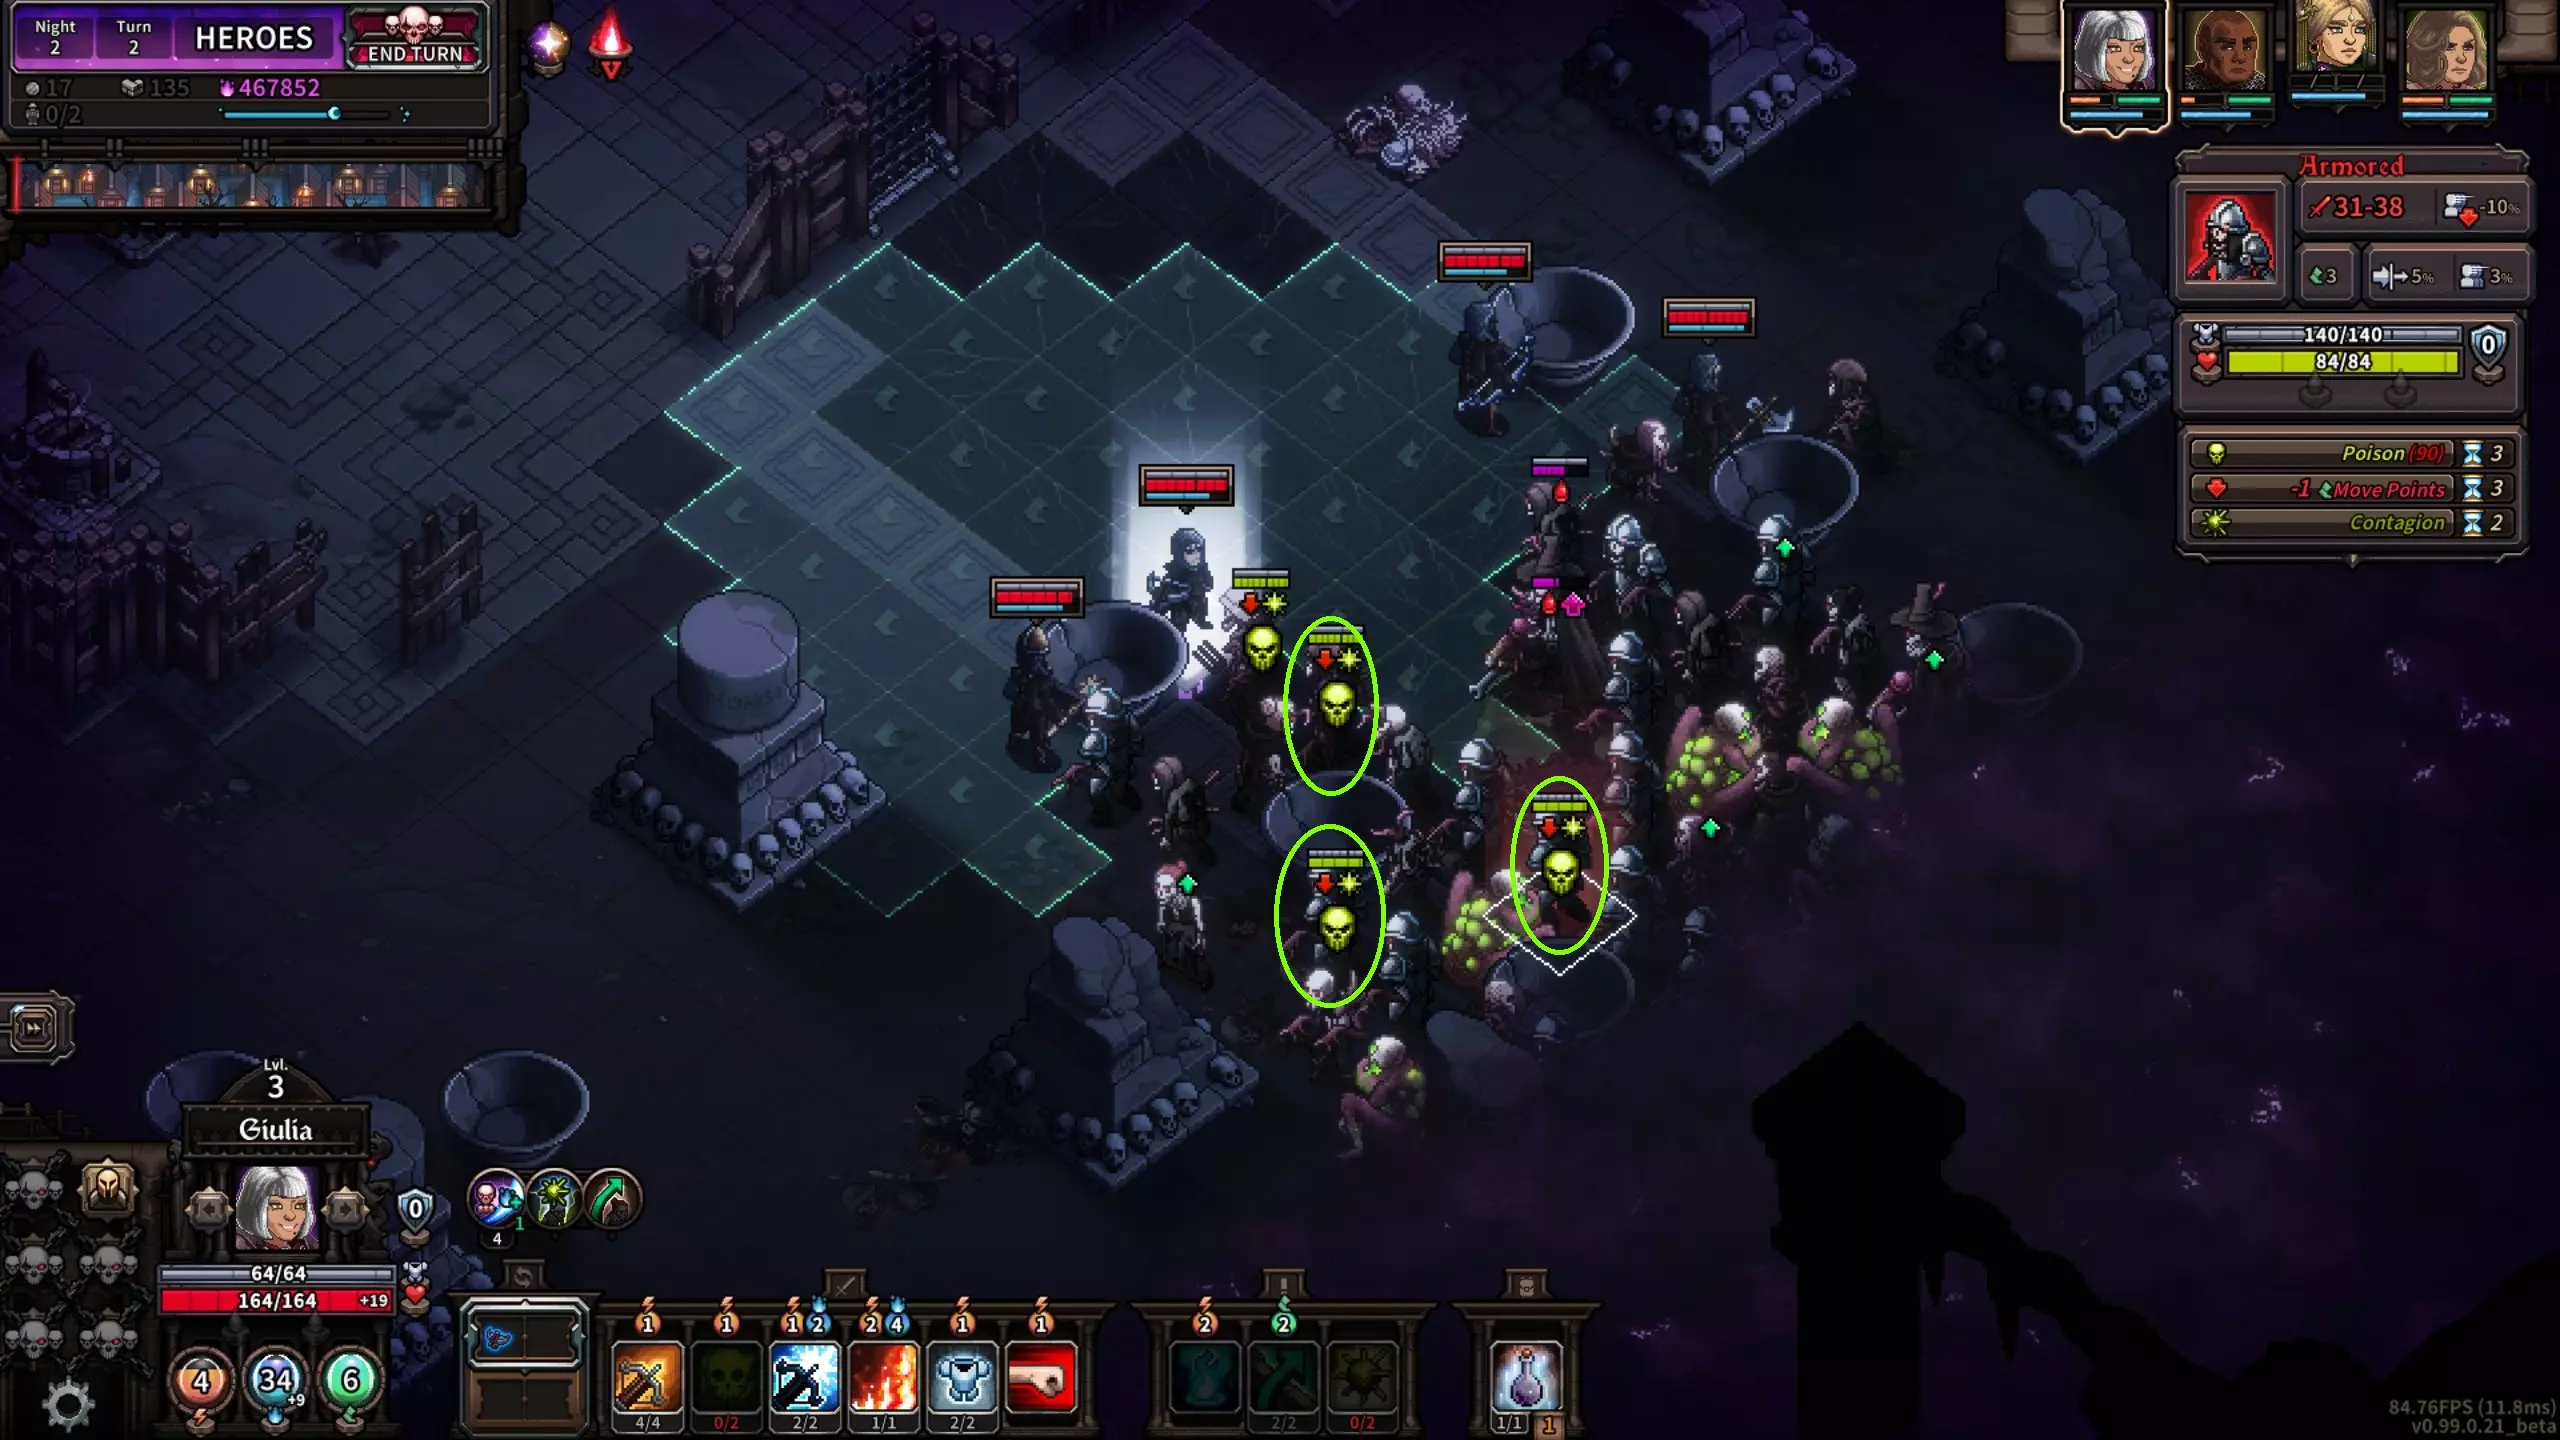
如上所示,本回合结束时我们实际上会有4个敌人死亡,还有3个敌人会传播毒素,这些敌人已在图中圈出。这意味着下一回合我们将使6个敌人中毒。 请记住,我的其他3名英雄甚至还没开始行动。

现在我们开始下一回合。在我用4名英雄采取任何行动之前,本回合结束时将有5个敌人被击杀,还有4个敌人(如上图红色圆圈所示)会在回合结束时中毒。 如你所见,这种效果会在整个夜晚不断滚雪球,持续造成大量伤害。
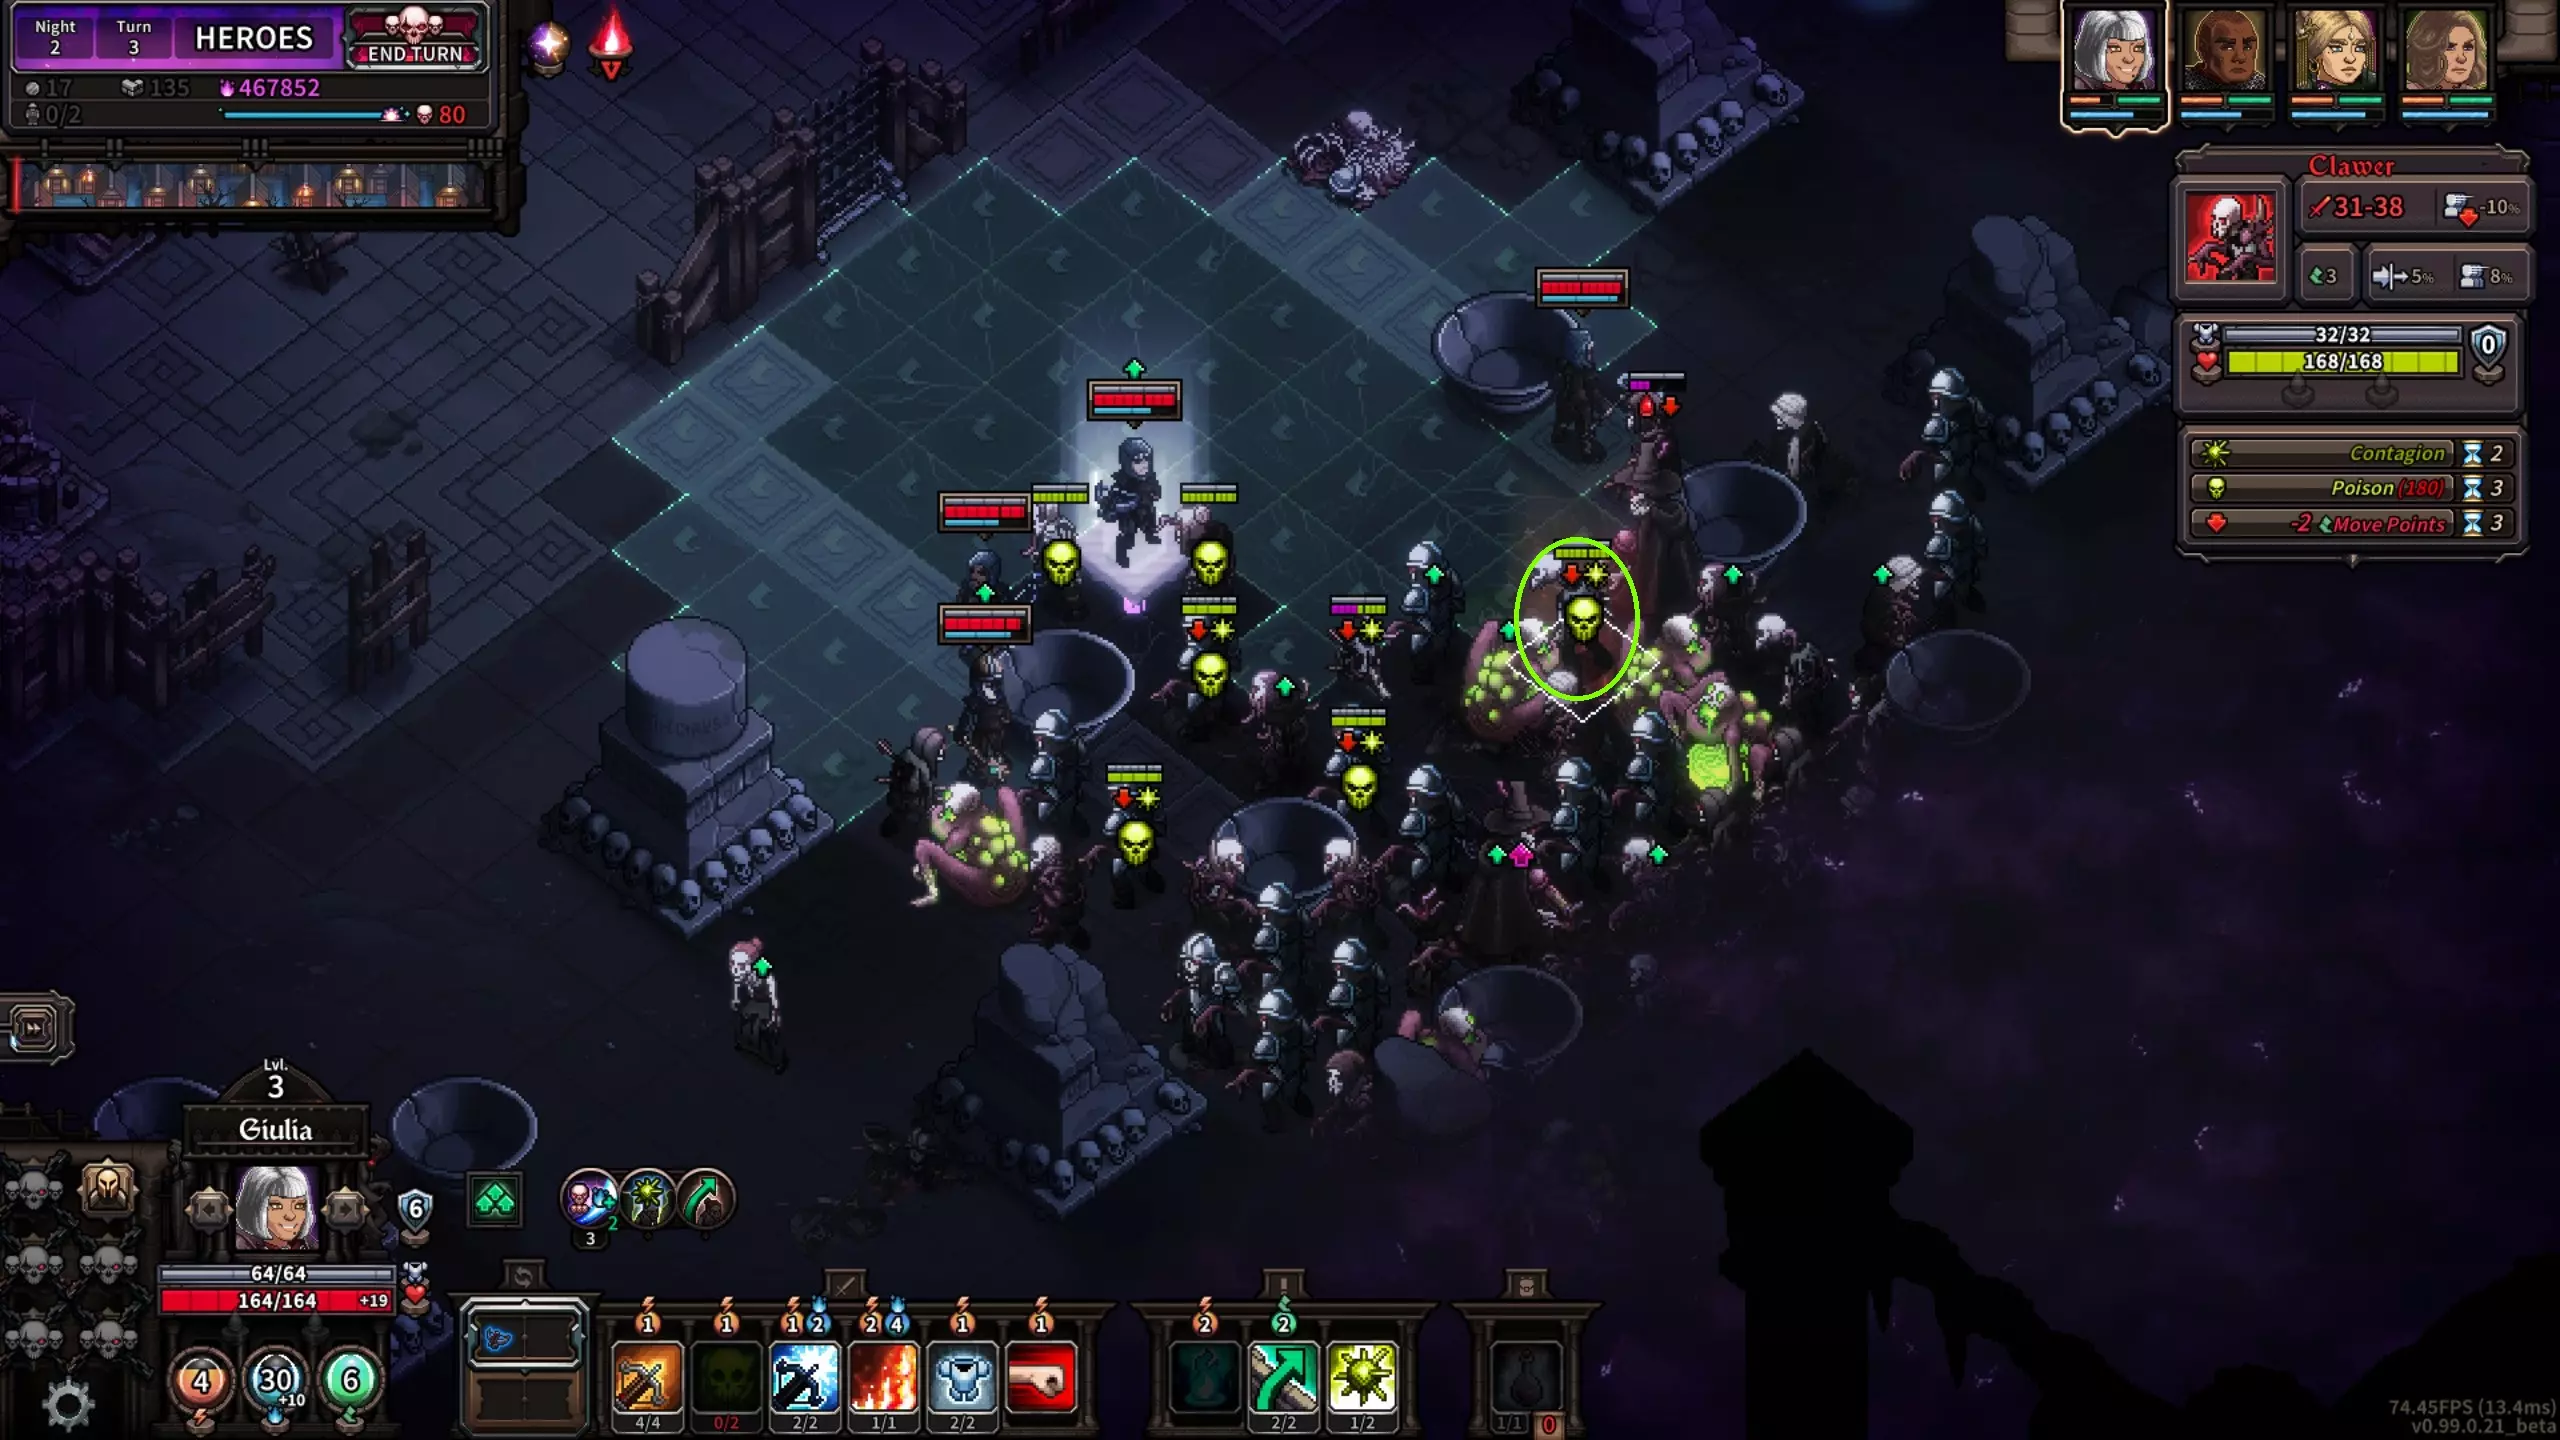
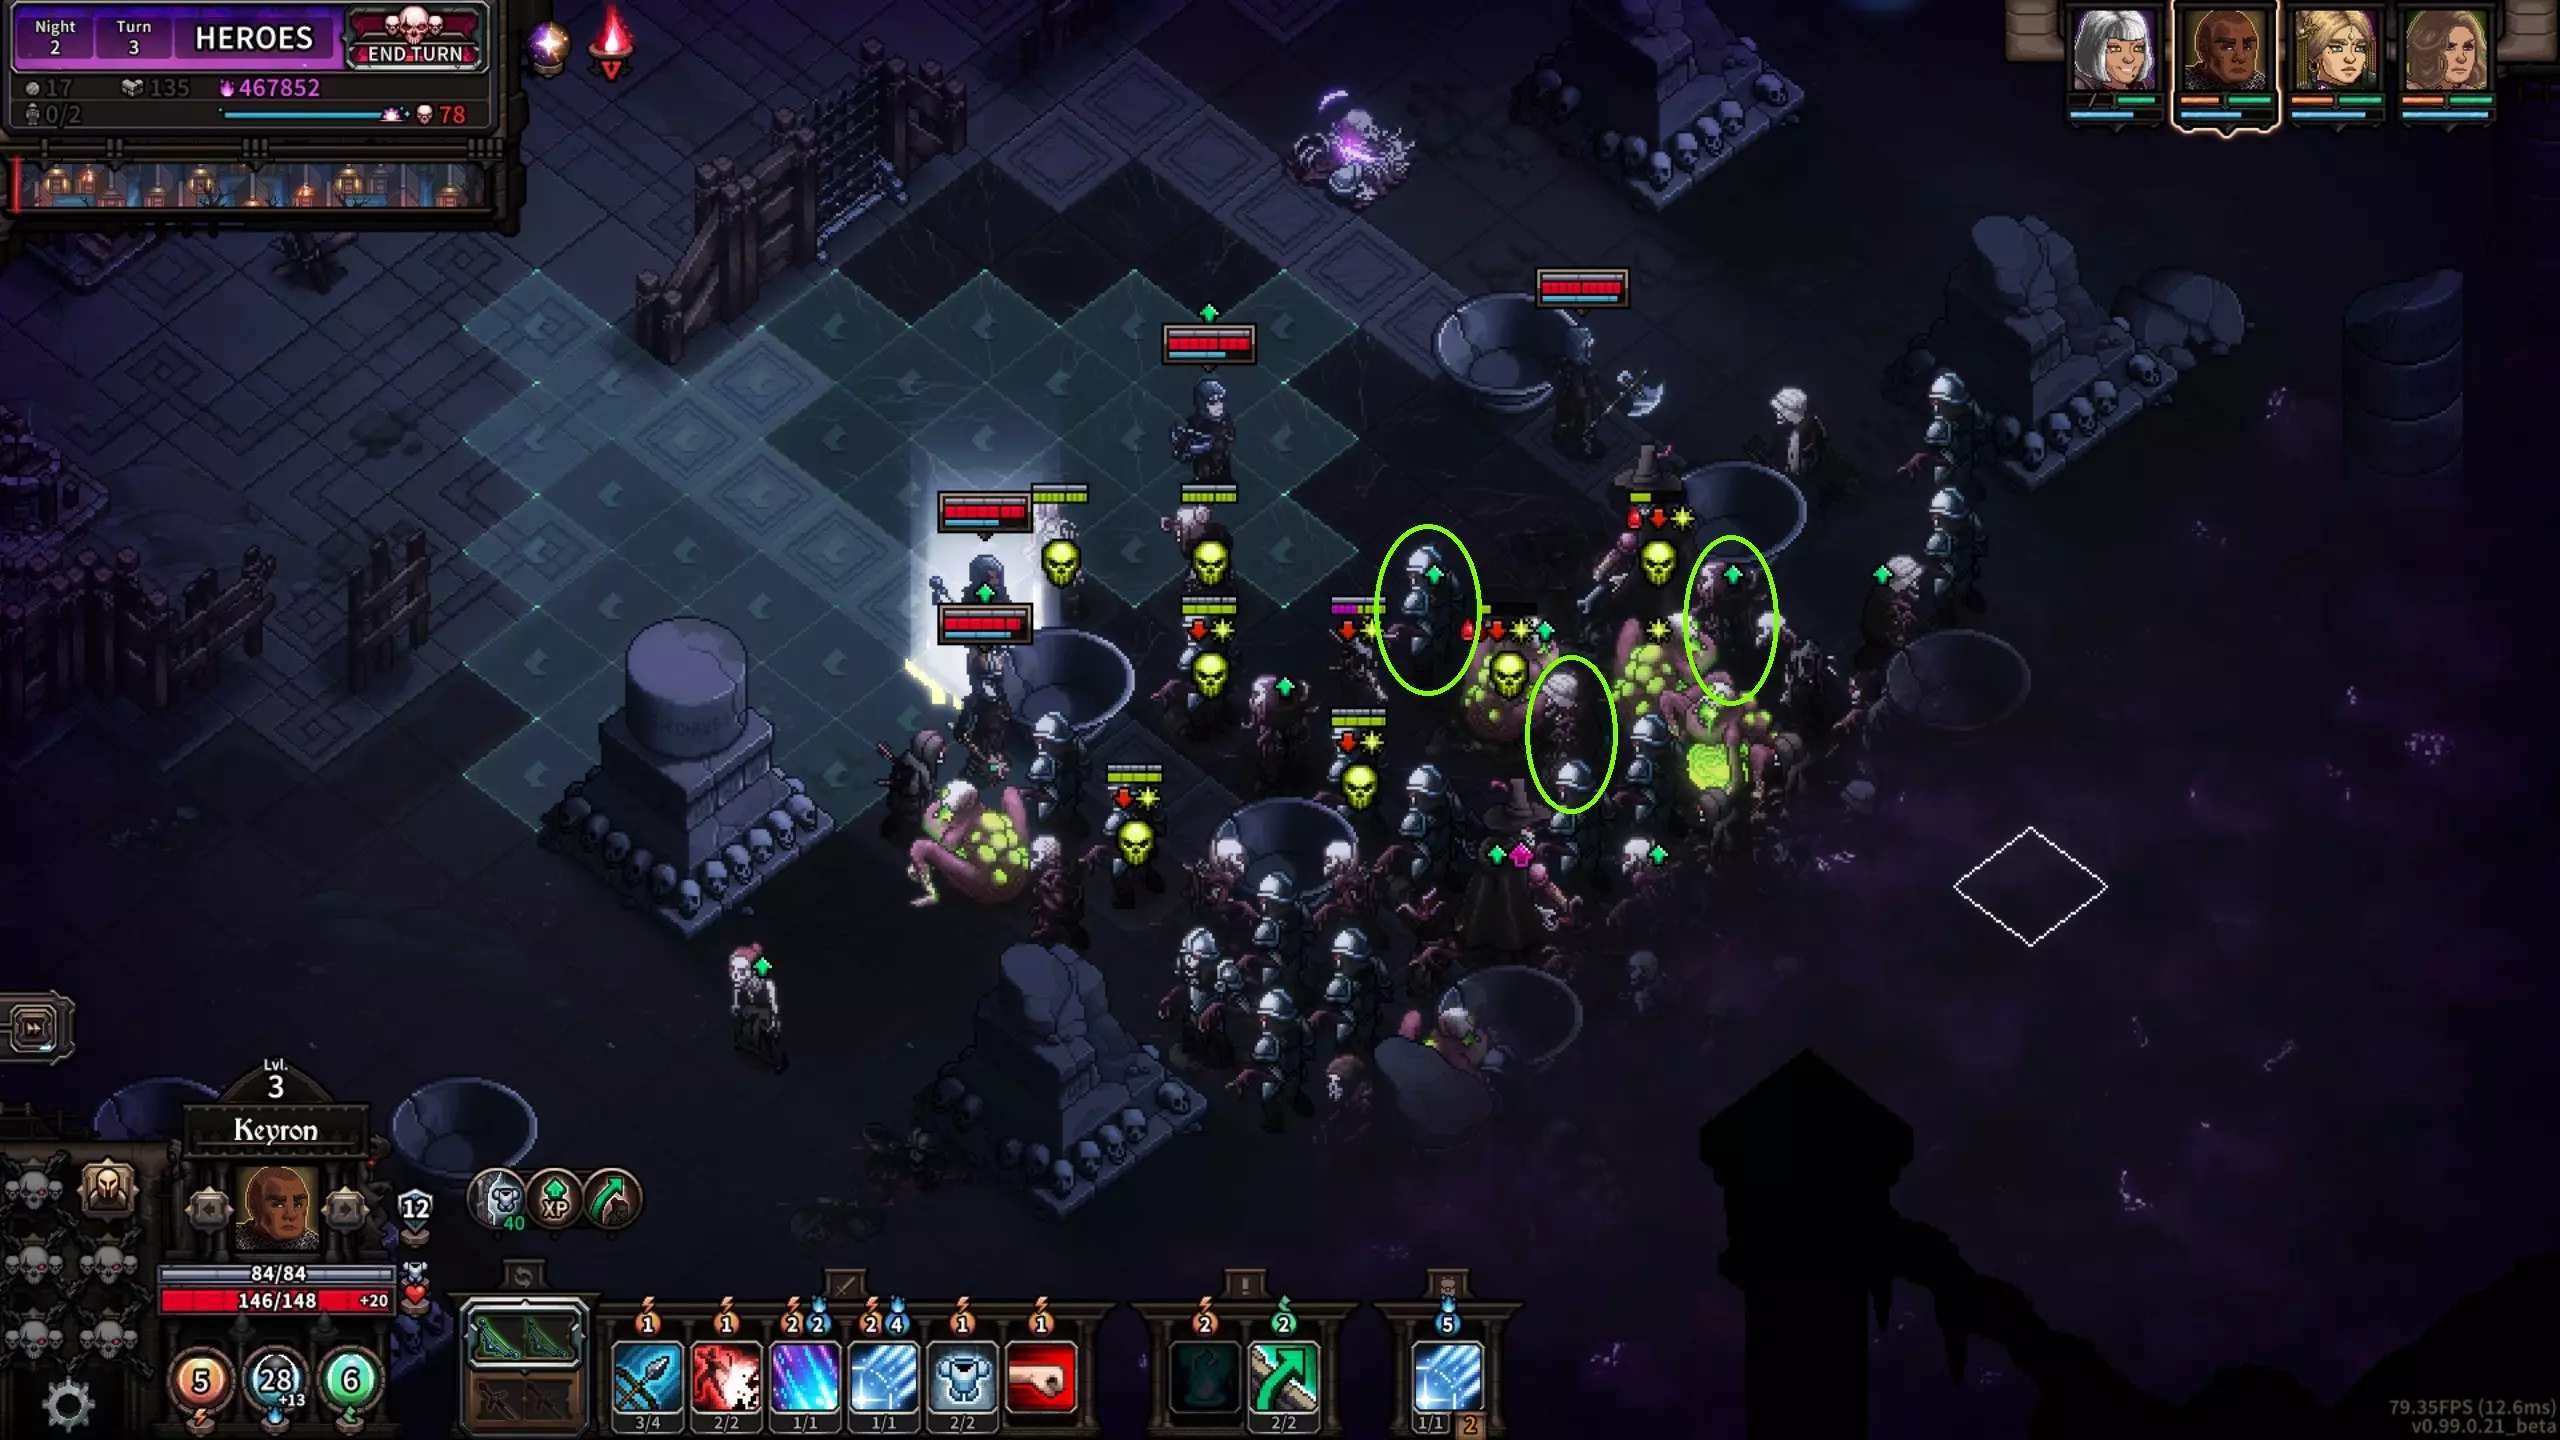
你可以看到另一种传播毒素的策略,能让两次【缓慢死亡】消耗2点行动点的操作更有效。 左侧,我对一只爪行者施加了毒素并释放了【传染】。随后我击杀了它,毒素立即传播给了猎人与跳跳虫。 右侧,我对猎人与跳跳虫造成了刚好足以让它们死亡的伤害。现在这毒素会杀死两个目标,并且【传染】效果还剩2回合——理论上本回合结束时它能传播到4个目标,但图中我恰好只有3个。 不过,下一回合这3个新目标身上会已被施加两次【缓慢死亡】,同时也会带有【传染】效果。如果我在击杀爪牙之前对猎人施放了传染,那么传染就无法扩散到猎人身上,而是会确保扩散到两只跳跳兽身上。这样一来,我下回合本可以毒杀4个新目标,而不是像上面所示的只有3个。 这个工具不仅在埃尔德利希地图上有效,在所有地图上都适用。不过在这里,它可能就是惊慌0胜和惊慌4胜之间的区别。其产生的影响可能是巨大的。 如果你的构筑在任何环节难以实现惊慌0-1胜,答案就在这里,就是这个 perk。 它与手弩的缓慢死亡和德鲁伊法杖的蜜蜂蛰刺技能搭配时效果尤其显著。记住,如果你多次对目标反弹毒素,然后在击杀目标前施加传染(或在回合结束前施加并让毒素杀死目标),那么堆叠的毒素也会一同扩散。 同样的效果适用于其他负面状态,例如双手斧、步枪、德鲁伊法杖、手弩施加的【-魔力值】减益,以及法典或单手斧施加的【-伤害】减益——任何减益都能扩散。 甚至眩晕也能扩散(但每次眩晕都有相同的触发几率,因此每次通过传染扩散眩晕时,都需要重新进行百分比判定以确定是否实际造成眩晕)。 所有负面状态都可以通过传染转移。主武器与副武器 请参考格伦瓦尔德的章节:【优先关注的主武器】和【优先关注的副武器】 格伦瓦尔德的优先级同样适用于埃尔德利希特。 在此特别提醒,建议优先选择【经验值获取加成】属性。 原因是将英雄升至7级并解锁部分人类弩炮后,会显著降低中期游戏乃至后续夜晚的难度。这使你能在构筑中需要时购买更高等级的英雄。除此之外,在开始手动升级英雄并降低某一属性的重要性之前,你仍需为英雄设定一些目标值: - 命中率:35%(如果你喜欢使用精准度较低的武器,可以略高一些) - 暴击率:45%(即使对于魔力收集型英雄来说,这个数值也足够了,超过60%就是浪费) - 移动点数(MP):约10点 - 经验值加成(+% EXP):170%以上(第5-6天后优先级降低) 不过,实际上,更高的经验值加成并非坏事,关键在于时机。随着游戏进程推进,其价值会逐渐降低,但在游戏初期影响较大。我曾在游戏中让英雄达到220%的经验值加成。大约在第7天之后,你就可以不再重点关注经验值加成了。 再次强调,这些只是大致目标,并非硬性要求或固定上限。你可以将它们视为这些属性的【软上限】。在为英雄升级做决定时,请记住这些要点。 第12天基地应该是什么样子
在《Elderlicht》的前10天左右,你应该主要将资源集中在基地的四个角落。 是否值得用石墙或更好的墙体包围基地,而不是像上面所示那样只保留强化木墙?自从预兆更新后,我强烈建议甚至在第12天之前就升级到石墙。相比建造更多的弩炮,更坚固的墙体能带来更大的价值。建造几座塔楼是完全可以的,尤其是你需要投石机来顺利度过前6天。但在此之后,主要应专注于加固角落的墙体,然后升级到强化石墙。 到第13天,将所有墙体升级到强化石墙会带来巨大优势。它自身通常能将敌人波次拖延到第5回合。这意味着你在最终夜晚可以基本无视敌人波次,专注于灭火。即使城墙被攻破,敌人通常仍需要1到2个回合才能到达你的核心区域并将其摧毁。考虑到你应该在第4回合获胜,最坏情况也能在第5回合,这一点至关重要。预兆建议 - 古光
流浪者之兆 - 3个槽位 和其他地图一样,流浪者之兆的强度高到不容错过。它就是最顶尖的选择。 敏捷之兆 - 1个槽位 与莱克堡和格伦瓦尔德类似,英雄初始命中率+12%的效果相当强力且实用,尤其在前期夜晚。 炽热之兆 - 1个槽位 第4和第5晚是游戏流程中的艰难阶段。我们需要为此尽可能提升自身实力。 跳跃之兆 - 1个槽位 在埃尔德利希特地图,跳跃能力对每个英雄都极为常用。简单来说,假设有一个未点亮的灵魂容器,你想跳过它去到达一个已点亮的容器,而它们通常相隔2格。越过障碍物需要消耗3点魔法值,但使用蛙跳技能只需2点魔法值,而且还能从1格距离外发动。这意味着每次使用蛙跳越过障碍物都能节省1-2点魔法值! 不过,跳跃预兆的效果不止于此。现在你还可以对敌人使用跳跃技能!这样你就能穿过敌人浪潮,直达关键目标,或者调整近战英雄的位置以释放更有效的范围攻击——此外,在最终夜晚,你还能通过越过敌人来抵达最后那个棘手的发光灵魂容器! 跳跃技能在这张地图上会非常实用,绝对值得投入。 以下是跳跃技能强大效果的示例。

我们有一个点燃的灵魂容器被敌人包围着。现在,我需要用行动值(AP)来熄灭它,所以不能直接强行突破敌人,否则那个无敌的敌人会施加减益效果或者对我造成重创。这处境非常棘手。那我该怎么办?

当然是跳跃啦!有了【跳跃预兆】,我只需消耗2点魔法值就能跳过未点燃的灵魂容器和敌人!

在我熄灭灵魂容器后,就可以对原本站在旁边的灵魂容器使用【跳跃穿越】,直接跳出困境!做完这些后我还有一些魔力值可以移动!
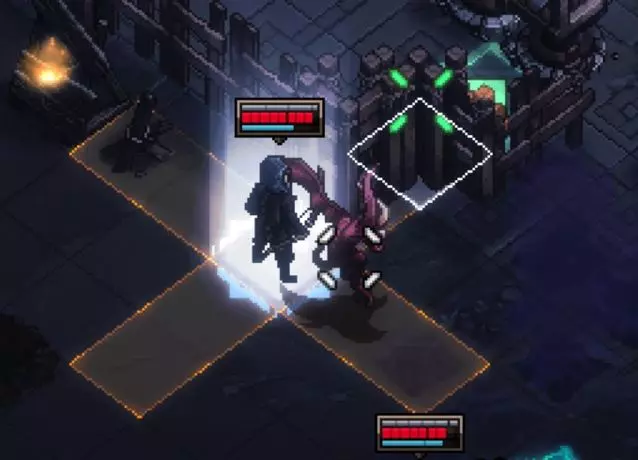
Here we have another example of Leaps usage. That pesky Winged enemy won't be able to tuck itself in next to my Catapults next turn now! On top of that, you can utilize 'Jump Over' like this even more frequently to hide your heroes behind walls due to the reduced cost and increased use distance. My preference for the last 3 slots is: Mercenary Training and Restraint This is because we are looking to make our heroes are powerful as possible for Night 4 and 5. Mercenary Training will take us (with Fieriness) up to +19% dmg for all heroes on night 4, and 22% on night 5. It will then continue to scale on all heroes. Just remember, Mercenary Training gives it benefits at the start of each Production phase so it does not retroactively apply to heroes you buy later. Those new heroes will only benefit from Production phases after they are bought from the inn. Why Restraint? This is an extremely useful tool for Elderlicht, allowing you to save 1 AP for the next turn softens the blow of extinguishing for those pesky ghosts! As described, if your hero had 7AP and 10MP and ends their turn with 1 AP and 3 MP left.... Next turn that hero will have 8AP and 12MP. As well, you'll find there are tons of turns that you end a hero with a couple MP and a remaining AP. This will continue to store up to 1 AP and 2 MP each turn on each hero. It's application comes into play more than you'd think! A Strong Option for the last 3 slots is: Siege and Engineer. With this, you should utilize the T2 perk Defensive Training whenever your heroes have it. This way, you won't have to worry about relying on your Catapults or Ballista because when they score kills it will still give the bonus exp to your hero (and if multiple heroes have this perk then all of them get the full bonus exp). Omen of the Siege - 1 slot Defenses are going to be your bread and butter in the early game. They'll hit a lot of targets and do a ton of damage which ensures you have strong performances Night 1-3 and can survive Night 4. Omen of the Engineer - 2 slots This omen improves the value of Omen of the Siege. This is because it increases the number of targets that the Catapults hit from a maximum possible 13 to 25 and gives Ballista a 2 tile attack. Now, the extra 12 possible targets take less damage than the primary ones, but they still take a fairly large hit. This is more significant than you might think. The secondary area where these additional 12 targets can be hit only does 80% of the Catapult's damage. However, this is still 90-170. Lets think about Night 4, the truly nasty night on Elderlicht. If we assume an average hit of 100 (which is an underestimation for sure --- Catapults do physical damage so they shred armor!) and lets also assume only 5 of your 6 Catapults are in range and usable that night. That's 10 hits (2 from each Catapult). There can be up to 12 additional targets, so lets assume only 3 extra targets get hit each time (which is 1/4th of what is possible). 10 hits at 100 damage per hit on 3 targets ends up being 3000 damage. That's a ton of extra damage in the mix for night 4! With better than 3 targets getting hit by the secondary effect (which is extremely likely) you could get easily end up dealing more than double that for 6k. I would guess on average you end up doing 6-8k thanks to Omen of the Engineer just on night 4 and with some luck could end up doing far more than that. To summarize, relying on your defenses here is a very powerful option. You should sacrifice a T2 perk to Defensive Training if possible in order to optimize this. Other Options to Consider for the last 3 slots Omen of Readiness - 1 slot Since 1.0 the scaling on Elderlicht changed a bit and it is much harder to acquire T2 weapons prior to Night 4. With, this your heroes could end up being in a significantly stronger position to handle Night 4 and 5. Omen of Growth - 3 slots This seems like a reasonable option, especially since you are running with 4 heroes at the start. However, by Day 3, this only nets you part of the way through level 5 whereas typically you'd be level 4 (close to 5) This is simply not enough power to help you with mid-game, which is currently the only dangerous part of this map. However, this is quite powerful late if you survive mid-game! Omen of Softening - 1 slot On the previous maps, I would go as far as to say this would be a wasteful pick. However, this is not the case on Elderlicht. Here an absolute ton of mobs have base resistance and you will be getting a ton of mileage out of this omen immediately. By night 4 you'll be seeing some enemies with 30+% resistance! Omen of Violence - 1 slot As discussed in previous Havens, all heroes starting with +8% crit is potent. A viable option to pair with something else if you choose to forego the Siege/Engineer route. Omen of Vigor - 3 slots +1 AP is powerful, it will help early game and you are extremely unlikely to hit AP cap even in late game. So this will be effective all the way through. The major issue with Elderlicht is Night 4. This can work but I find Engineer and Siege offer too much reliable damage to pass it up for this. State of Elderlicht UPDATE: 3/14 This opinion was based on the 0.99 patch (the patch prior to the full release). Elderlicht has had its nightly wave strength/size reduced slightly as of the 1.0 release. After playing on the new slightly tweaked scaling I'd say it is in a good place now. However, I am keeping this section in the guide so newer players can get an idea of all the factors that can impact a run. There is still a lot of variance, lots of factors, that can go into whether or not a run is super difficult. Similar to how Glenwald was when it first released, Elderlicht is in a weird state with the omen patch (0.99). Personally, I felt the difficulty was fine previously, perhaps could have used a little buff in some places. Overall the run felt relatively easy in late game. This patch it seems pretty reasonable in early game (night 1-3) but outright ridiculous in mid-game (night 4-8). Late game seems pretty reasonable. Many enemies have very high (+30% and upwards of 70%!) resistance and even fairly high block (commonly seeing enemies with 30-50 block, non-elite) This comes with the extremely high health pools as well. To be clear, most of these changes are positive. However, due to the density of high value enemies in the waves even in early nights of Elderlicht it is an issue for that map. This is compounded with the dramatic spread of starting power you can have. So what do I mean by that?Power from traits has a huge range right nowYour hero could start with traits like these... Royal Guard: +12% phys and ranged damage, +12 block Demonic Blood: +12% critical, +5% resistance Hero: +1 AP, +1 move, +40HP Surgeon: +12% critical, +30% crit power, +20% reliability (many other amazing ones not listed here) Or traits like these.... Gravedigger: +5% resistance, -30% healing received Charlatan: +8% Opportunism, -10% damage Hemophiliac: -10 Daily HP regen, -5% resistance Nihilist: -1 AP One Armed: Right weapon slot disabled, +10% dodge. (this disables 2h weapons as well) (many other terrible ones not listed here.. some even worse...) There is a potential for a difference in damage, run to run--- hero to hero... of over 20%. That's just from starting the game. You had no hand in that what-so-ever. There will be greatly varying levels of durability, damage, AP, etc just from traits alone this patch. The potions you start with have a massive impactThe potions you start with have a massive impact as well. Starting with block or cleansing potions currently feels relatively worthless. However, starting with mana or even HP potions is a strong advantage. If you happen to roll 2 mana potions on 2 of your 4 heroes, you'll see a notable power spike immediately. You'll be able to spend at minimum 10 more mana per night which can be a very big difference. Having 1 or more HP potions also helps immensely as you have a strong form of early recovery for your heroes. And it isn't specific to that hero. You can use whatever hero has the hp potion to heal someone else --- or just move the potion around each day cycle to the person with the lowest current hp. So to summarize...Potions and especially traits can have an absolutely massive impact on your early game right now. This is without mentioning that corpse spawns or even the wave composition and position each night can also have massive impacts. Sometimes the wave is attacking from 1 side right in the middle, sometimes it splits and attacks the 2 corners of the side. The latter makes it a significantly more difficult wave (especially early when you have very low mobility). Couple these issues with the extremely high resistance, block, and hp pools of many of the enemies on Elderlicht and it starts to become clear why it seems so ridiculous sometimes. The variance can be COLOSSAL so keep trying! Run to run it will feel very very different. Alternative Build Order - Elderlicht This build will require significant dynamic play and is very difficult to put into a set day-to-day written build. You will have to utilize corpses frequently and make a lot of decisions based on your circumstances. Overall, I recommend you use the more economy focused build after this section. However, this build works well to make your mid game less harsh -- at the expense of making your late game a bit worse. It's a strong option if you are really struggling in the mid-game nights (starting night 4)... but again, you'll notice a massive economy difference by Day 5/6. So, for day 1: Build 2 Houses. Scavenge (gold focus) both 2 worker ruins. Build a Magic Shop. (Or a Bowyer) The reason you want these is because you should be focusing heavily on poison builds. Especially the Debuff tree if you get it (Contamination) so you can make use of Contagion. This is a very effective way to manage waves early. Then, for Day 2, you'll want to upgrade "Help X" at that production building and use a worker there. This is because it is possible to get T2 weapons immediately from Production buildings without upgrading Item Level. Going forward, you should use a worker at the production building at least on Day 3 as well and then continue if you deem it worth-while. This build path does set you back economically and will result in you being a little weaker in the last couple of days. However, it does make Night 4 significantly easier as all your heroes will likely have T2 weapons. This is a big damage difference but also a big mid-game economy difference. Day 1 - Elderlicht Note: Above this section you'll find an alternative build path. This alternative build smooths out your early/mid-game a lot but sacrifices some late-game power. I find the day-to-day build below to be far stronger by late-game. However, if you want to try something with more power mid-game, give the alternative build a shot. Be dynamic and carefully consider your options each day before you spend gold or workers with that build as I've only really detailed the first day. Because of the nature of this map I'll be baking in some fairly flexible day cycles. The build will accommodate high panic wins for a couple of the mid-game nights. Be sure to check out the section on Contamination (T2 perk) as it is a massive help here and can be the difference between panic 1 and panic 4 mid-game nights. It is assumed you obtained a panic 0 Night 1. Try to roll a T2 weapon with the night reward, use your rerolls! Day 1 it is pretty tough, so if you get something particularly amazing, don't worry about it. Build 2 Houses. Scavenge (gold focus) both 2 worker ruins. Build a Gold Mine (GM). Build 2 Catapults, one on each corner of the side under attack tonight. If you are feeling confident, don't build any. Save them for Day 3 so you can ensure all possible defenses are on the 2 sides under attack on that night. NOTE: It is viable to instead just build Ballista. They can handle runners fairly well and will likely get to fire almost every turn the first couple of nights. However, Catapults have significantly more potential.It is possible there will be an elite in the wave tonight. If this happens, it is critical that you kite it to your Haven's perimeter wall -- or to inside the haven. Killing it at the perimeter or closer to the Magic Circle generally guarantees an Elite Carrion will drop from it. Killing them further away may result in it not spawning. (See the "Corpse Mechanics" section) Highly recommend you pick up "Defensive Training", the T2 perk. For Night 4. This is because you'll be heavily making use of defenses such as catapults. With this perk all defensive kills from your catapults (and ballista) will be more effective (experience wise). This is because when a defense kills a unit, all heroes gain EXP, but no one gets the kill bonus. This T2 perk fixes that issue, and still gives that hero the kill bonus. If multiple heroes have it, the kill bonus exp is duplicated so each hero receives the full bonus exp still. Very strong for us if using Omen of the Siege and Engineer! Do not skip it if its available. Keep in mind, with the length of this map, all heroes will be well over level 11 by the end. You no longer gain perk points after level 11 but you still gain a primary and secondary roll. Day 2 - Elderlicht Assumed you obtained a panic 0 or 1 win here. If Defensive Training is available on any hero then learn this perk today!! You will kill a lot of enemies over the next 3 nights with Catapults so this perk will get a ton of value. Keep in mind, having more than 1 hero with it means that kill exp is being duplicated so it's amazing to have on multiple heroes. Scavenge the Elite Carrion if you were lucky enough to get one. Use rerolls on this as needed. It is always a top priority and worth breaking up the build order to accommodate scavenging an Elite Carrion. Try to roll a T1-2 weapon with the night reward, use your rerolls! Again, it is unlikely tonight, but use both rerolls and only stop if you get a T2 weapon or an amazing piece of armor. Upgrade your GM with Production+ and Mine+, use 1 worker here and collect the 40g. We need to scavenge with 2 workers now. Use the following priority: Scavenge (resoruce focus) a Pile of Corpses. Use all workers here if possible. Note: It is highly unlikely so don't worry even if you have 0 If you do not have any additional Pile of Corpses instead use all remaining workers to.... Scavenge (gold focus) a 1 worker ruin for 14g and 12materials.Demolish the 1 worker ruins you don't use. So if you have 2 extra Pile of Corpses at this point, demolish 2 of the 1 worker ruins as they are unneeded. Build 2 more GMs. Build 1 or 2 Catapults. You are under attack from all 4 sides tonight. If you were able to scavenge an Elite Carrion or Pile of Corpses you'll have enough resources to build a second Catapult and thus have 1 in all 4 corners of your base. If not, place your 2 strongest heroes on the sides that share the corner without a catapult. Again, if you are feeling extra confident in your heroes at this point, you can once again opt to not build defenses tonight. This will optimize your catapult placement for tomorrow. Night 4 is typically the most rough in the run. Day 3 - Elderlicht It was a small and very spread out wave last night. As such, it's very unlikely you obtained many (sometimes 0) Corpses to scavenge. As well, your walls likely got beaten up a little. A panic 2 win last night is rough. Mainly because you lose the night reward. Night 4 is the most difficult in the run in my experience. If you reached this, you won't be able to afford the last house upgrade today and definitely won't be able to pick up a potion from the shop. Try to roll a T2 weapon with the night reward, use your rerolls! Upgrade Mine++ in GM1 and use 2 workers there, collect the 80g. Upgrade Production+ and Mine+ in GM2 and 3, use a worker at each and collect the 80g. Upgrade a House with House Expansion for 48g. Upgrade Mine++ in GM2 and use a worker, collect the 40g. Upgrade another House with House Expansion for 48g. Upgrade Mine++ in GM3 and use a worker, collect the 40g. Upgrade a House with House Expansion for 48g. Scavenge (gold focus) a Corpse for 16g. NOTE: If you were extremely lucky you may have obtained a Pile of Corpses. If so, scavenge (material focus) that Pile of Corpses. Check the shop, if there is an AP potion for 18g, buy it. A tier 2 AP potion for 37g is a tough choice but generally still worth it. It may effect your ability to complete a step tomorrow if you aren't getting strong wins each night. However, tonight can be tough so it is likely worth it. If your heroes are not all healthy, even consider buying an HP potion here. It can be passed around night-to-night to heal those in need. Build 2 Catapults. Ensure both new Catapults are covering the side under attack with 3 skulls. If you opted to skip building defenses on Day 1 and/or 2, build them now! You need as many Catapults as you can for tonight. Night 4 very frequently has a large amount of hunters and usually 4+ elites. This night is the toughest in the run due to your circumstances. Make sure you utilize your Catapults to their fullest. Do not use them for stragglers as you will need them to damage as many enemies as possible with each shot. REMEMBER, Catapults do physical damage. This means they shred armor! Use them to soften waves before you clear with your heroes to ensure kills. Your only goal here is to not lose any buildings. You will likely reach panic 3, or even 4 tonight. If you lose some defenses, that's fine. Even a panic 4 win this night is manageable. However, ideally, do as well as you can! Also, it should be easy to do tonight (as you might even be forced to) try to kill the elites along the wall or in the haven to force Elite Carrion spawns. If you manage to get the night reward tonight, DO NOT use your rerolls on it! Day 4 - Elderlicht Assuming a panic 4 win last night. DO NOT use your rerolls on the night reward today! Save them for Elite Carrion. You survived! Well done. Again, Night 4 was the most difficult night. Night 5 will be rough but not nearly as bad. It is important to make the most of the corpse spawns tonight. This makes making the guide consistent a little difficult. I'll try to accommodate variety but typically you should be able to follow the steps -- you'll need to be a little dynamic going forward though. It is possible for you to have multiple Elite Carrion from tonight and a panic 0 win! It all depends. However, for the sake of consistency the guide will assume a panic 4 (!!!! on the meter) win, 0 Pile of Corpses, and only 1 Elite Carrion... Which is about as bad as it can get. Use 2 workers at each GM and collect the 240g. (If you have 5 elite carrion then only use 5 workers total and collect 200g) Upgrade House Expansion+ in 2 of your houses to bring your total workers to 11. (5 remaining) Use 'Repel Fog' at the Seer for 2 workers. Build an Alchemist. Getting more potions into the mix is a major benefit. Scavenge all Elite Carrion. Again, assuming you have only 1. If you have more then skip step 6 (building a Temple) and instead upgrade your last House for 84g so you can scavenge it. Elite Carrion always takes priority. As previously mentioned, always break the suggested build order to accommodate scavenging one immediately. Build 2 Mana Wells or a Temple. Remember, the Temple gives +8 max hp each day cycle and the Mana Well gives +1 max mana on top of their respective free daily use abilities. Use your final workers either at a Scavenger Camp (Upgrade Scavenge+ for 24g first) or simply use it at a Mana Well or Temple to recover mana/hp for your heroes. If you are absolutely sure you're fine, instead just Scavenge Corpses for 16g. Ensure the side that is under attack tonight with 4 skulls has at least 4 Catapults to cover it. Again, Catapults should be in the corners of your base, avoid placing them in the middle of a side. If you lost some Catapults last night you may need to rebuild them. Use the rest of your materials to build Wooden Walls. Try to fill out of the side under a 4 skull attack. Day 5 - Elderlicht It will be assumed you obtain at least a panic 2 win here and have at least 1 Pile of Corpses to scavenge. (a panic 0 win is possible here and going forward, so I won't mention it again -- the build will continue to assume a more "worse case" scenario) Use 2 workers at each GM and collect the 240g. Use 'Repel Fog' at the Seer for 3 workers. Build an Inn and upgrade Accommodation+. Buy your 5th hero, I usually get a level 6 for 240g. With your remaining 3 workers you need to scavenge Piles of Corpses or Corpses. If you do not need to build a Temple or Mana Well at this point, Scavenge (item focus) otherwise Scavenge (material focus). At this point you should have both Mana Wells and/or if needed a Temple. Build all these if you don't have them already. 1, 2, or all 3 of them if you have enough money. Build defenses. This is up to your discretion, however, tonight could be a rough night. More Catapults never hurt! Ballista with the Seasoned Operators upgrade is a great choice too especially against Runners. Day 6 - Elderlicht Assumption will be a panic 3 win here. Use 2 workers at each GM and collect the 240g. Use 'Repel Fog' at the Seer for 3 workers. Upgrade Item Level+ and ++ at your production buildings. Build an Armor Maker. If you lack gold for this, alter the next step and instead use 1 worker to scavenge (resource focus). If you are extremely close to the required gold, instead sell 1 or 2 items to the shop. Scavenge (Item Focus) with your remaining 3 workers. If you do not have at least 3 Piles of Corpses, then scavenge for gold or use 2 of your workers at one of the production buildings (after completing the next step!). Day 7 - Elderlicht Assuming a panic 1 win last night. Use 2 workers at each GM and collect the 240g. Use 'Repel Fog' at the Seer for 3 workers. Upgrade Accommodation++ at your Inn and buy your 6th hero. I got a level 7 for 286g Upgrade Shopkeeper's Friend for 36g and Best Friend for 84g at the shop. We are doing this now because even in a particularly bad scenario you should at the very worst still end up making back more gold than you spend on these upgrades by selling to the shop today. Use your final 3 workers as needed, if your heroes aren't hurting for HP/mana, then instead scavenge (item focus) Piles of Corpses. Sell all excess items in your city stash. If you didn't previously build a Mana Well, do so now. Unless your heroes are quite exceptional they will not all be full mana at this point. Benediction, the free daily use ability at the mana well, restores 6 mana to any 1 hero. It is up to your discretion, there have been runs where I didn't need to build a temple or mana wells. However, it will be assumed you build both mana wells and a temple going forward -- because even in those circumstances the daily +max hp or mana was useful. Upgrade the Alchemist with Production+. If you have enough remaining gold, build more production buildings. Build more Catapults or even some mounted Ballista on the side under a 4 skull attack. The other sides can be handled even without defenses. Day 8 - Elderlicht Assuming a panic 1 win. Again, dynamic play is encouraged. There was one run where I obtained 4 Mountain of Corpses. So, instead of using 6 workers in my gold mines, I only used 5. That way on step 3, I had an additional worker. 2 items beats 40g, especially at this point in the run. Use 2 workers at each GM and collect the 240g. Use 'Repel Fog' at the Seer for 3 workers. Use your final 3 workers as needed, if your heroes aren't hurting for HP/mana, then instead scavenge (item focus) Mountains or Piles of Corpses. Sell excess items in your city stash. --- You should have about 900g now. Upgrade Item Level+++ in your production buildings. Build you last 3 production buildings. (Any you'd prefer) Upgrade Benediction+ in your Mana Well(s). (You can skip this step if you are fine on mana) If you still have gold remaining, build a Scavenger Camp. (It's fine if you can't complete this step, it is completely unnecessary) Build more defenses and continue focusing on the corners of your base. Once you have a fair amount of Catapults/Ballista then start upgrading the walls in the corners to at least Reinforced Wooden. Then move on to getting walls along the entirety of the sides. NOTE: The wave was slightly nerfed on the 1.0 release, the elite spawns may be tomorrow night instead of tonight. Tonight will have a lot of elites in the wave. Remember, the chances of Elite Carrion dropping from them is greatly increased if they are adjacent to the haven limits (the furthest out you can build a Wooden Wall) or inside the haven. Try to optimize your spawns for this if at all manageable. However, tonight is going to be the a rough night as well! It gets easier from here so push through, you got this! Even if you lose 1 hero tonight and nearly all your defenses -- it's fine. Don't panic! You can absolutely win, even if that comes to pass. The only thing you can't suffer is losing your Inn (if a hero dies).. Other buildings are replaceable. Just try to minimize damage. It is possible to get a panic 0 win tonight, but again, not even close to needed. Day 9 - Elderlicht Assuming a panic 2 win. It should be noted at this point in the run your economy as well as supporting buildings are established. The only things left to build now are scavenger camps. In large part, the rest of the day cycles will be up to your discretion. There is room to have even lost a hero last night. Today we can skip using Repel Fog at the Seer. This is because we are going to need to scavenge Elite Carrion. Last night was tough, but you should have been able to produce at least 6 Elite Carrion. My record for this night is 10 Elite Carrion and 1 Mountain of Corpses. At this point you'll have to be dynamic, you have 6 workers that can be used in your gold mines. However, if there are Elite Carrion or Mountain of Corpses to scavenge, always prioritize those. Think of it this way, say you get garbage that you end up vendoring from Mountain of Corpses scavenging right? You get 2 items. At this point in the run, everything you should be rolling, even normal quality will be worth at least 40g. That's the same amount you get from using your gold mines! So scavenge away! Today is the day for it! It is perfectly fine if you end up using all 12 workers on scavenging today. The priority with your workers is: Elite Carrion > Mountain of Corpses > Pile of Corpses > Gold Mines Once you claim your scavenged items and itemize your heroes, be sure to sell excess items to the shop! Replace any dead heroes at the inn -- rebuild lost buildings if necessary. Build all Scavenger Camps and upgrade Production+ in all 3 of them. Upgrade Production+ in at least 2 of your production buildings, your choice. Shop with your remaining money or upgrade Benediction+ at your Mana Wells. Ensure your heroes are as healthy on mana as possible. Day 10 - Elderlicht Again, use the same priority with your workers as you did yesterday. It's viable to skip the Seer again if you have justifiable Mountains or Piles of Corpses to scavenge. Use 'Repel Fog' at the Seer for 4 workers. Scavenge or use your remaining workers in your GMs. Another option is to upgrade "Help X+" in some of your production buildings so you only have to use 1 worker to obtain an item roll from them. This will get use today and for 3 more day cycles so at this point it is worth it. Keep in mind, even if you get garbage, you generally can sell it to the shop for more than the 40g a GM would give you. A third option is to spend workers on your Scavenger Camps. This is 60 materials for 1 worker. If your walls are in seriously bad shape, this is a viable option as well. Be sure to upgrade Scavenge+ beforehand. If you haven't already, this is the time to start using Repair All Defenses. By now you really want to be safely maintaining your walls. By Day 13 you'll want your base surrounded by Reinforced Stone Walls ideally, but even stone walls would do. Day 11/12 - Elderlicht Again, it is unnecessary to use Repel Fog but still a fine choice. The farther back the fog is the more time you have to react and plan each turn. So its up to you. If you don't have enough Piles/Mountains/Elite Carrion to scavenge today, it should be considered. Otherwise, use your 12 workers as you see fit, don't forget about production buildings if you upgraded them with "Help X+". Over these 2 days, you want to be building towards surrounding your base in at least Reinforced Wooden Walls. Ideally by Day 12 you'll want some or all Stone Walls and by Day 13 you want all Stone or even Reinforced Stone. Use your extra money to shop! Hunt for T4/T5 blink scrolls and AP potions or any critical upgrades. AT LEAST 3+ heroes should have access to blink for Night 14. This is very important! Either the Blink T4 perk, or a Blink scroll is CRUCIAL. Day 13 - Elderlicht Same priorities as the previous days for workers. Use all materials you have available to you to upgrade your walls. Do not build any Ballista/Catapults unless your base is fully surrounded with Reinforced Stone Walls. Do not forget to build a layer of barricades around your Magic Circle! (3 on each side for a total of 12) Before starting Night 14, please refer to the next section for details on the boss, The Archivist! The Archivist - Elderlicht Boss
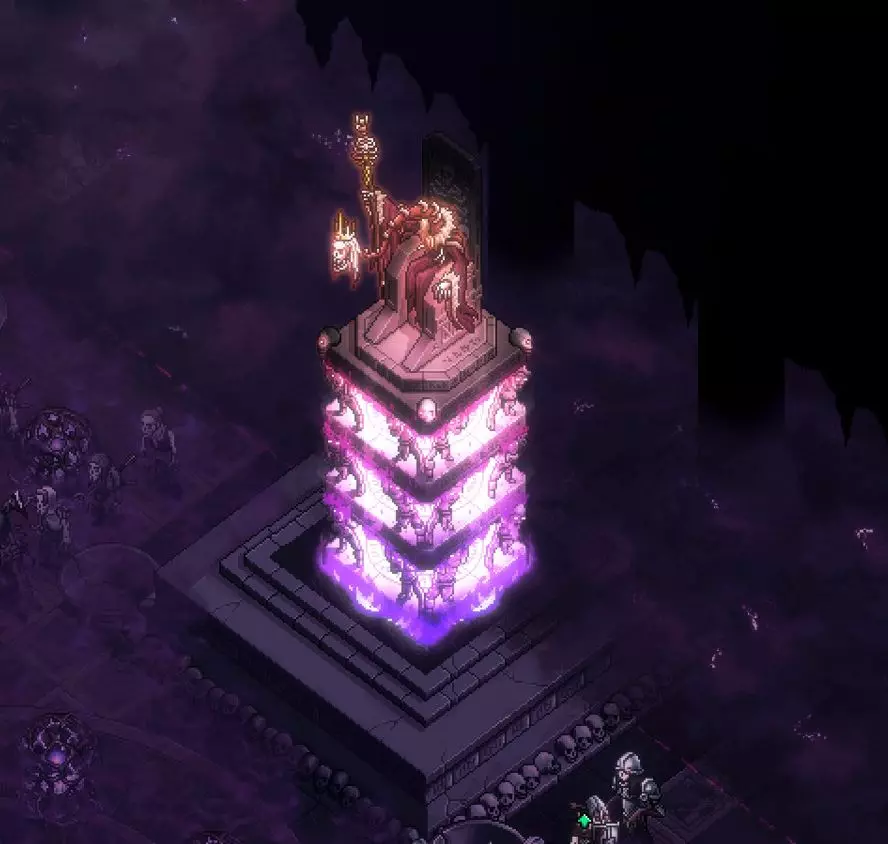
档案管理员会在第14夜开始时生成在其王座上。如上图所示,王座有3层发光魔法,需要先将其禁用,他才会下来并进入战斗状态。

今晚地图周围将生成无敌的小怪,从第一回合开始出现。这些小怪的机制与之前夜晚出现的类似,它们完全免疫所有伤害、减益效果和控制效果。但与之前不同的是,熄灭点燃的灵魂容器【不会】摧毁它们! 它们会整晚都在那里! 一定要特别避开锤子小怪,因为它会击晕你! 目前游戏中没有其他应对方法,所以关键在于躲避。

处于无敌状态时,档案管理员会点燃地图各处的灵魂容器(如图左侧所示)。熄灭这些容器每10点需要消耗2点行动值。如果容器数值为30,就需要施展3次熄灭技能才能将其完全扑灭。这与前几晚的容器机制相同。
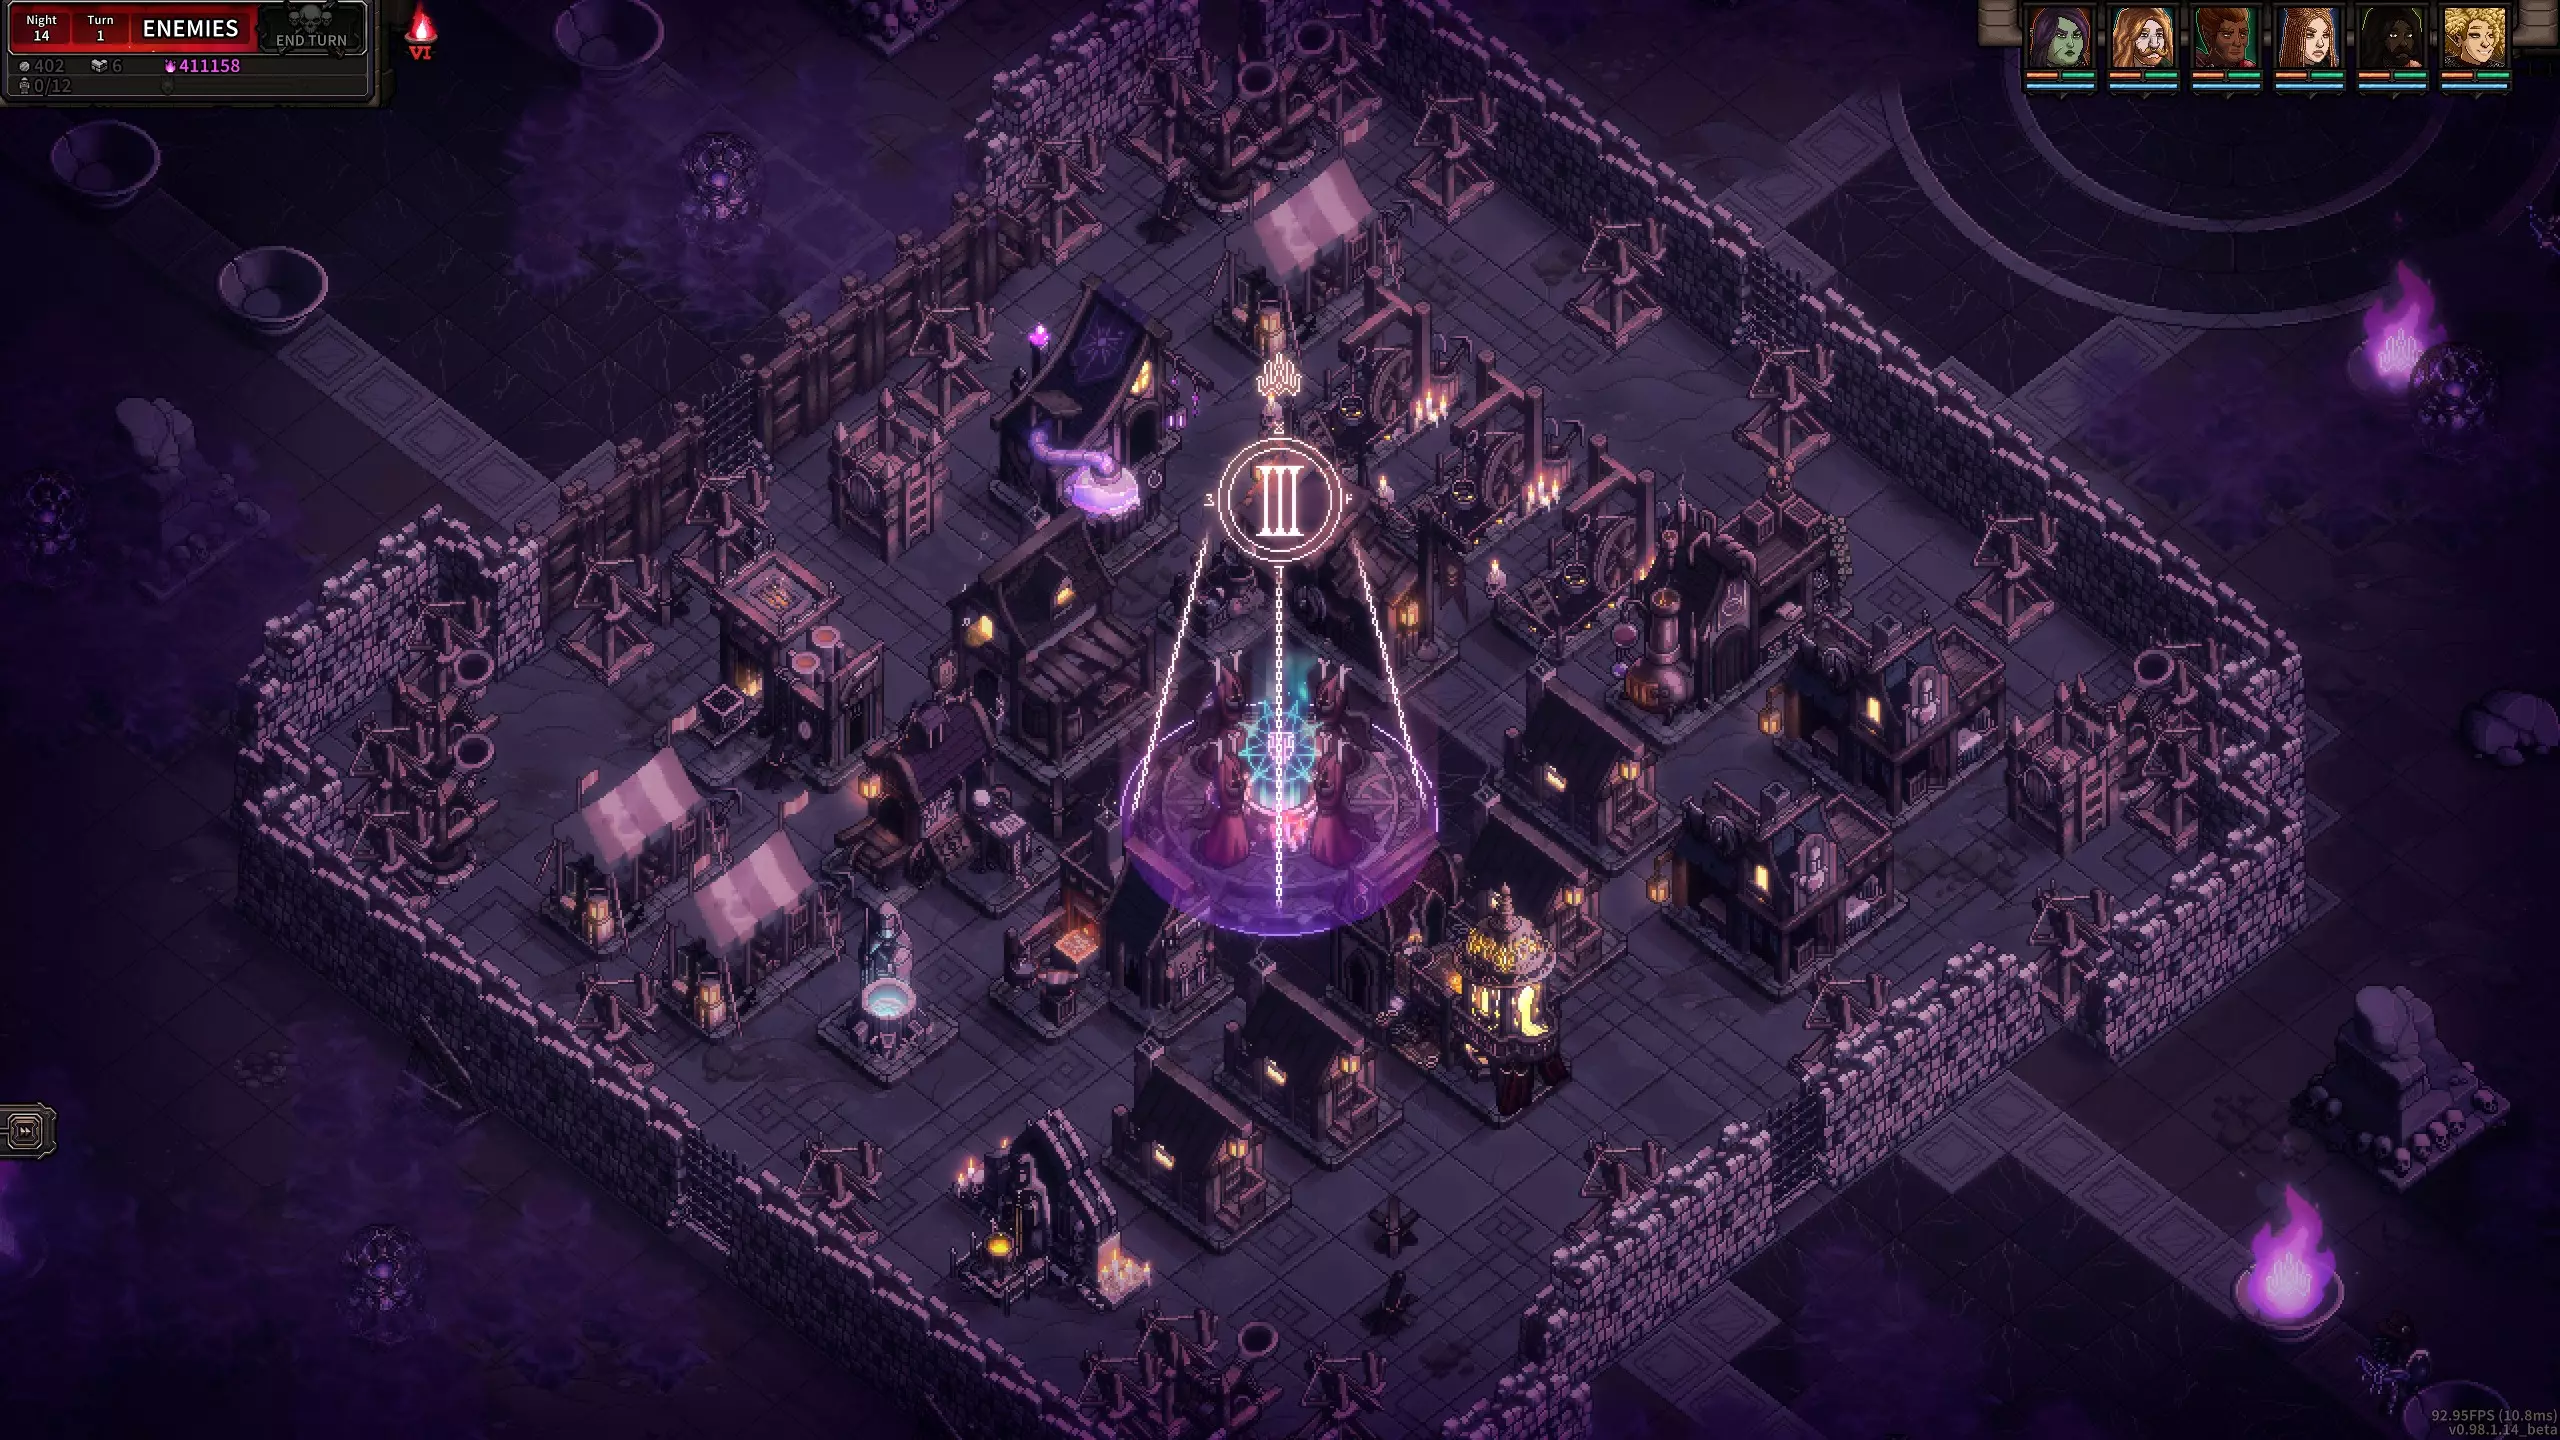
此外,每组被点亮的灵魂容器会在你的魔法阵上开始倒计时。在这里的左侧,你可以看到显示为【III】,这意味着在档案管理员直接对你们的法师施放魔法攻击前,你还有3回合! 如何阻止这一情况?在4回合内熄灭所有被点亮的灵魂容器。 如果你成功做到这一点,王座的一层会被摧毁,新的灵魂容器会被点亮,倒计时也会重新开始。 然而,如果你在第4回合未能熄灭所有被点亮的灵魂容器,档案管理员会直接对你们的魔法阵施放法术,对其造成280点伤害(超过其一半的生命值)并摧毁附近的建筑。 之后倒计时会再次开始。 首领机制:档案管理员会一直坐在王座上,直到3组被点亮的灵魂容器全部被熄灭。每套装置会摧毁其王座的1级,当3级全部被摧毁后,王座会坠落并传送至你的一名英雄处,立即对其施加减益效果(通常是距离最远的英雄)。
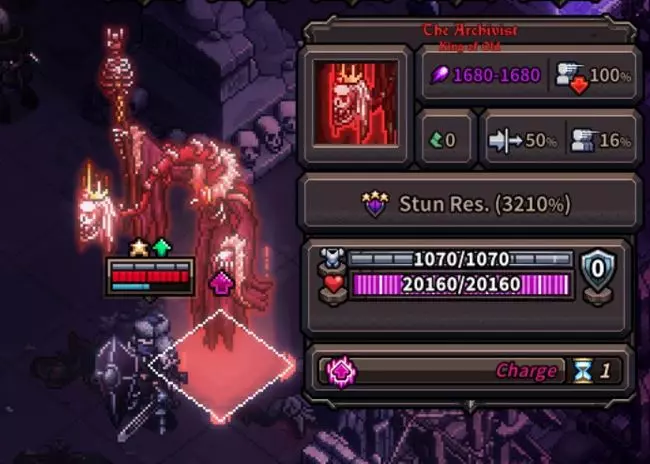
此时你需要迅速行动,因为没有减益效果的档案管理员几乎肯定能一击杀死你的任何英雄。 逃离这个 boss 是行不通的,它会再次传送到某个英雄身边! 一旦 boss 的这个形态被击败,你就赢了! 最快击杀方法:有可能在第 14 夜的第 4 回合杀死档案管理员并获胜。 为了实现这一点,你的至少 2 或 3 名英雄应该拥有闪烁技能,并且所有英雄都应具备出色的机动性(基础魔法值 10 左右,拥有闪烁专长/卷轴和/或魔法值药水)。 第 1 回合扑灭所有点燃的灵魂容器,第 2 回合再次扑灭,第 3 回合继续扑灭。 一旦档案管理员在第 4 回合传送下来并对一名英雄施加减益效果,就让所有英雄冲向该位置,并在同一回合杀死 boss。档案管理员小贴士:闪烁卷轴或其相关技能应至少在6名英雄中的3名身上配备,越多越好。这将帮助你安全且快速地灭火……希望能让档案管理员在第4回合前离开王座。 AP药水在第14夜至关重要。6名英雄都应至少携带1瓶。这不仅有助于前几回合的灭火,还能辅助波次管理和击杀首领本身。 当首领离开王座时,它总会传送到离它最远的英雄身边。你可以据此制定策略,确保其他英雄在该回合使用剩余的MP开始向离首领最远的英雄移动。 档案管理员的命中率极高,这使得闪避型英雄基本无效。即使闪避率达到上限,敌人仍经常能成功命中你。 如果你无法在档案管理员生成的回合击败它,尽可能对其施加减益效果。这种情况下的有效技能包括【虚弱之触】(法典)、【恐吓尖叫】(单手斧)和【压制射击】(步枪)。否则该首领很可能一击秒杀你的英雄。 通过减益效果可以将首领的伤害降至0! 如果档案管理员身边有小怪,你可以利用【虚弱之触】(法典)的传播效果在小怪和首领之间反复弹跳。该首领拥有相当高的抗性(64%!),但减益效果可将其抗性降至-50%,因此在开始攻击前务必充分利用减益技能! 另一个巧妙技巧是使用其他英雄(而非法典英雄,因为传播效果不会弹回施法者)。将另一个英雄放在 Boss 旁边,然后让持有魔法书的英雄施法,这样减益效果就会在 Boss 和该英雄之间反弹。不过,要先使用这个英雄的行动点,否则你将在承受巨额伤害减益的情况下进行攻击。 通用技巧 - 格林芬
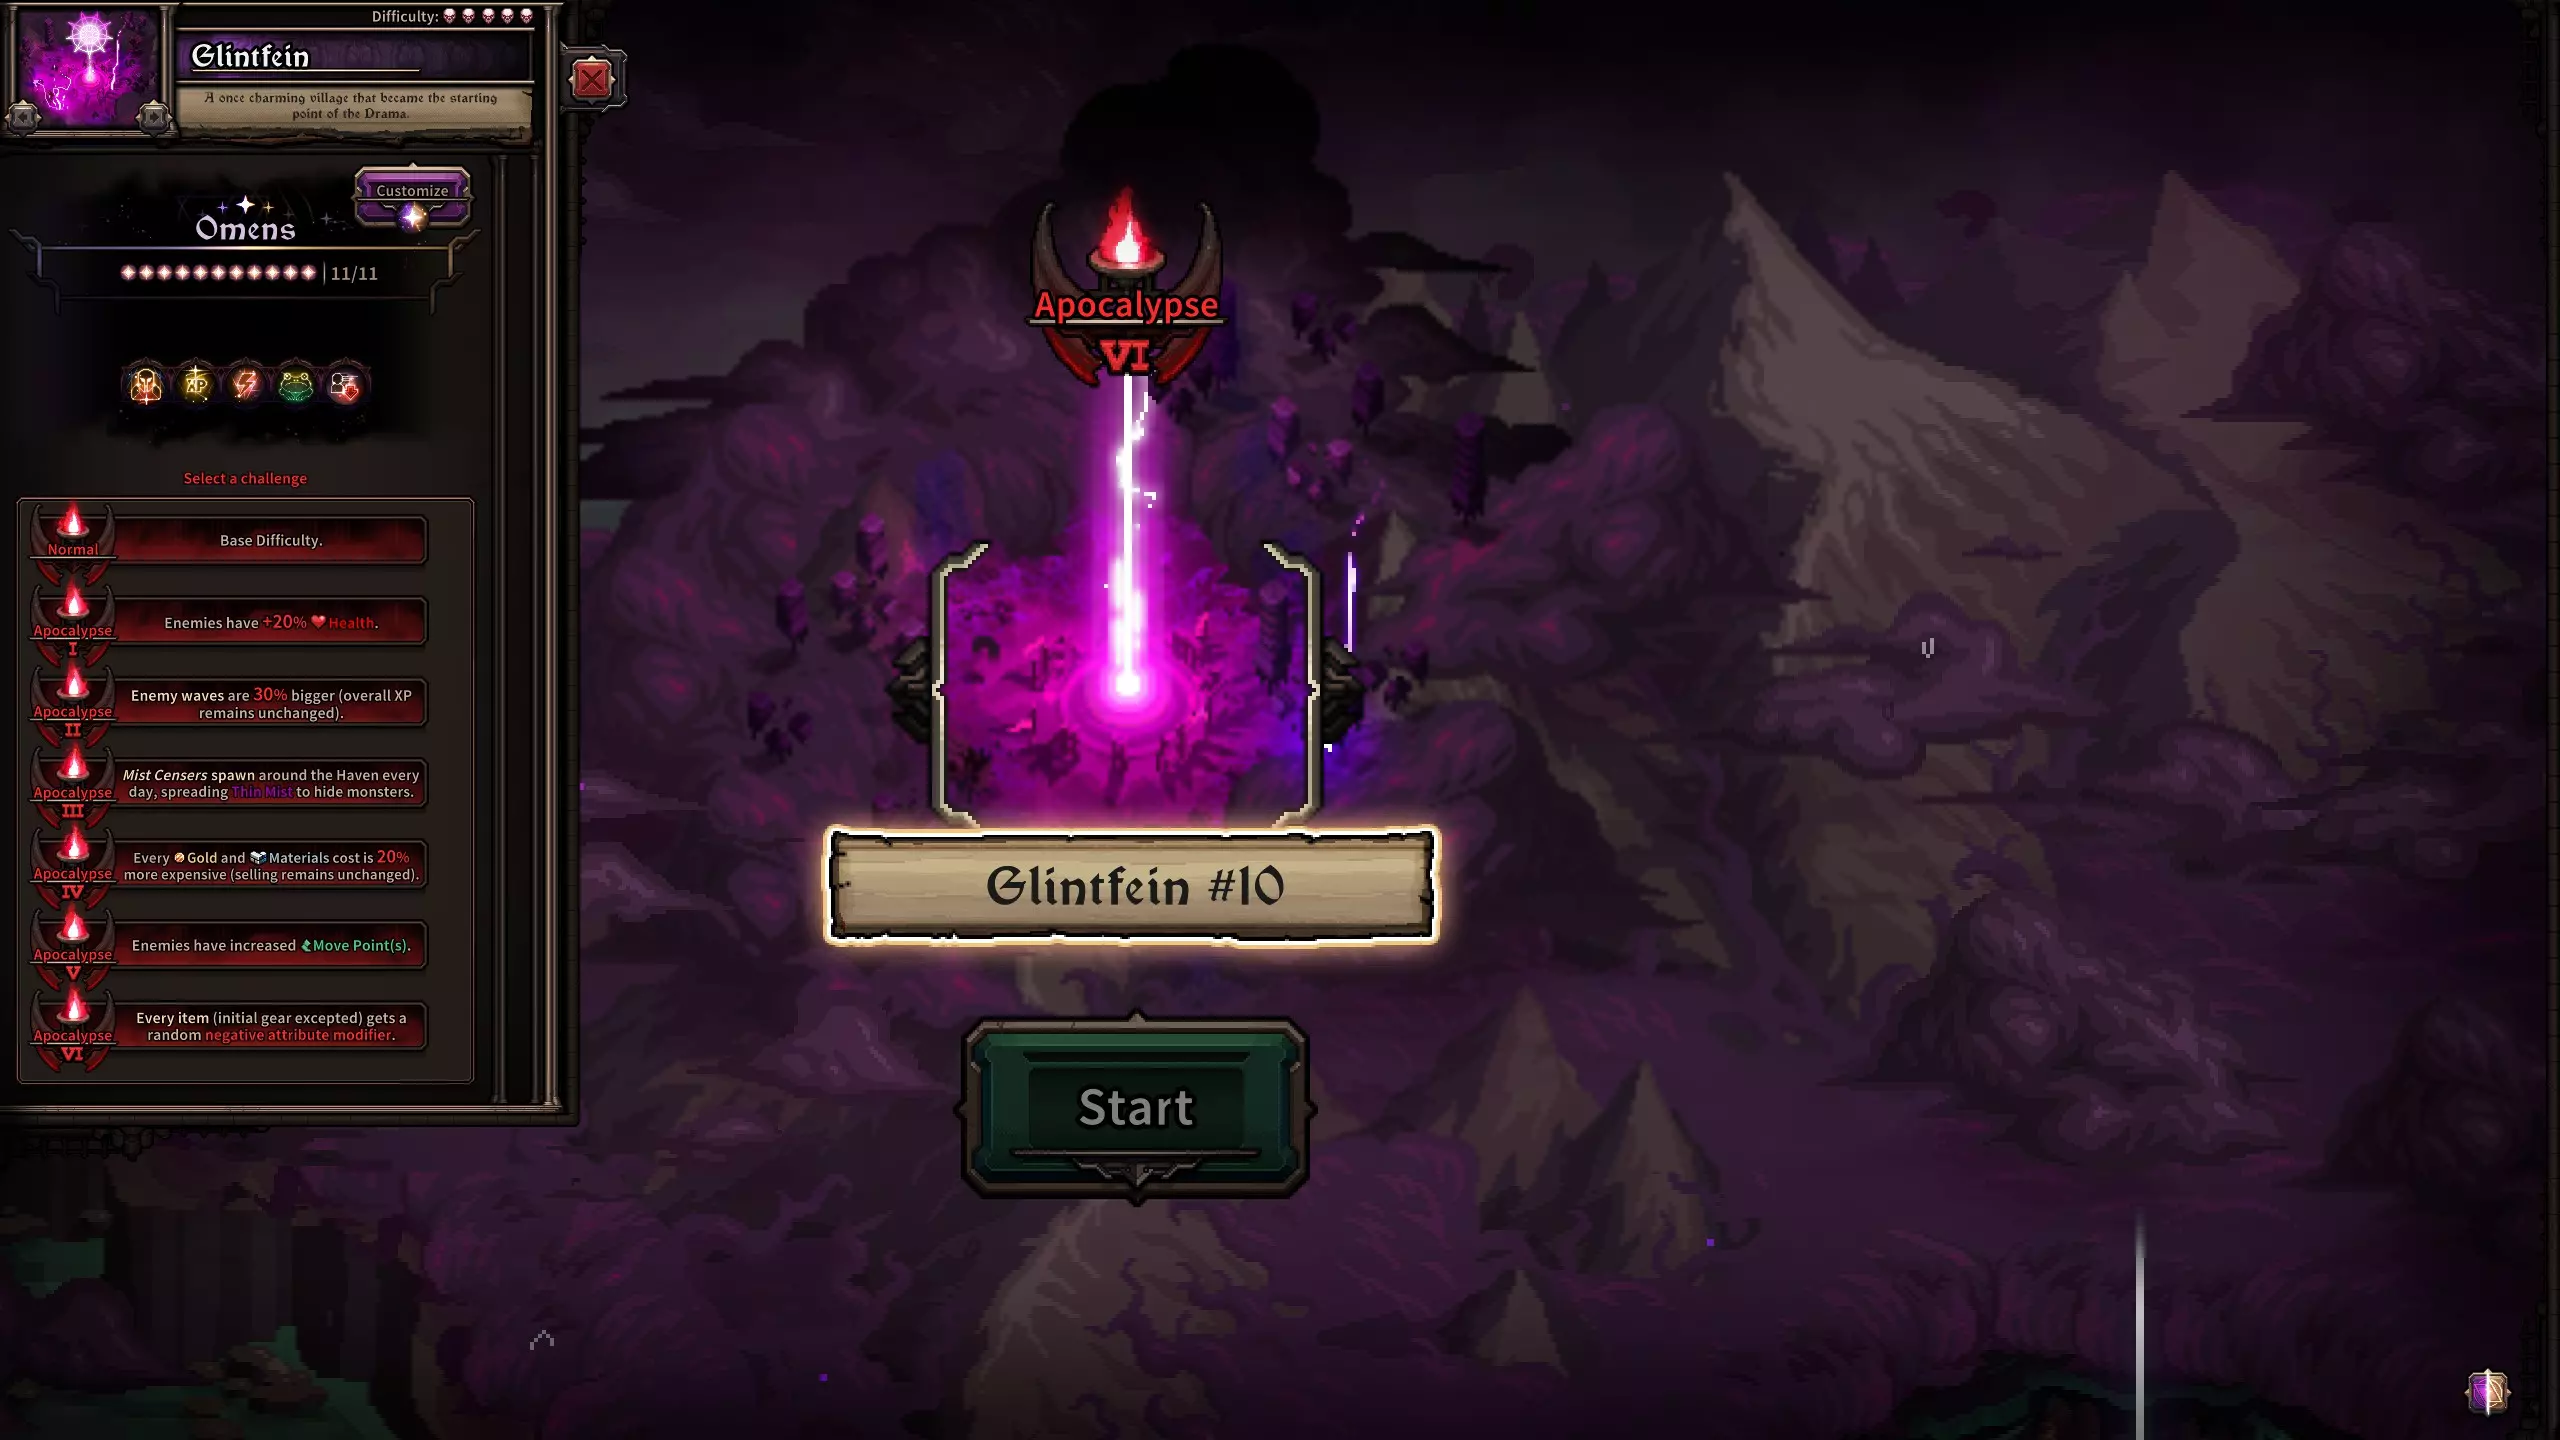
【Glintfein】是一个残酷的避难所,做好准备吧!这将是一场硬仗! 这个避难所将从生产阶段开始,这是有史以来第一个这样做的避难所。我强烈建议你在第一个生产阶段不要消耗任何材料,然后在第一晚尽可能多地利用尸体机制来制造尽可能多的尸山。 有关更多信息,请参阅指南顶部附近的“尸体机制”部分。 这意味着很难制定一个具体的逐步流程,但我会尽力!这个避难所的每日指南假设你没有以每晚创纪录的尸体产量实现恐慌值0胜利,但要在末日5+难度下击败它,强烈建议你至少在第一晚利用尸体机制。稳定药水是这里最后一夜的不错选择。它并非必需,但绝对能帮上忙,用来清除你即将受到的讨厌伤害减益。如果你打算使用多段攻击英雄,他们可能需要一瓶,因为复仇减益会对每段攻击生效。预兆建议 - 格林芬

Omen of the Wanderer - 3 slots As with other Havens, this one needs no introduction. It's economic and early game power are unbeatable. Omen of Growth - 3 slots This is a relatively short map so the idea behind Growth, especially since we are starting with 4 heroes, is to push the exp gain as hard as possible. Since we are going to be using a lot of defenses and hopefully a lot of the T2 perk Defensive Training, we want to ensure all of our heroes are getting to at least level 11. This will help us get to the T4 breakpoint earlier as well as push us to possibly even level 13 heroes for the final night. Omen of Vigor - 3 slots +1 AP to all heroes. This omen is a little expensive at 3 slots. Because of this, it would be very viable to exchange it for Siege + Engineer to greatly improve our Ballista. If you happen to not roll any defense perk trees on your 4 starting heroes though (and therefor Defensive Training is not available to you), Vigor blatantly wins out. Omen of Leaps - 1 slot This omen provides very high mobility throughout the entire run. Very powerful and highly recommended here. Please refer to the Elderlicht omen section for more details on this. Omen of Dexterity - 1 slot As with other havens, starting with 12% accuracy on each hero is very powerful. Alternatives for Growth or Vigor Omen of Talent - 3 slots I would highly recommend swapping out Growth if you want to pick this omen. It is a very acceptable tradeoff as you'll start with 1 perk point you can apply to each hero before night 1. On top of that, this also increases the perk cap by 1. Although you'll very likely end up lower level than you would with Growth, you will have an additional perk to work with early on and if you happen to still reach level 11+, you'll have 1 more perk than normal. Omen of Restraint/Scavenging/Fieriness/Readiness - 1 slot each I would recommend removing Vigor and using Talent instead of Growth if you are going to play around with these. Any combination of these four 1 slot omens is viable. Restraint+Fieriness+Readiness worked well. If you replace any of them for Scavenging you'll have a bit more money and some more ballista to work with each night. This means you'll have to deviate from the build order. That is not a bad thing and is arguably better. However, you'll have to depend on your own ability to be dynamic in your production phases. Perk Suggestions - Glintfein Vampire + Blood Magic is a major victory on this map. Mana management will be ugly here so being able to remove that from the equation will be a life saver. Any time you see this on a hero, try your best to reorganize them into a Physical damage dealing role. Night Owl - All of the nights on Glintfein run past turn 5. This will see extremely high use. I highly recommend you always take this perk. Blink - Like Night Owl another one that I highly recommend you always take is blink. The level of mobility it offers to any hero build is exceptional. If all 6 of my heroes roll it, it is extremely likely all 6 of them will take it. The only exception would be if I happened to obtain a T3+ blink scroll before taking it or perhaps was running an Inertia double 1h sword hero (since their mobility is already ridiculous). Specialist - This perk it is simply amazing in certain circumstances. If you reach the tier 4 perks and are finding your hero with under 50% +damage... this should be highly considered. Primarily because it will be challenging to get 2 powerful weapons in a short map like Glintfein on all 6 heroes. However, you don't want every single hero you have to pick this up, 2 or 3 heroes -- sure. This way you can focus your super good secondary weapon search on the remaining heroes. Glass Cannon is another highly recommended perk. This may put you in a situation where you have a hero running around with 80-90 hp. That's acceptable. Be sure you really plan out the end of a hero's turn to ensure they aren't getting slapped by a Lancer and their armor can take whatever hit any enemy in range can dish out. flat 15% crit is simply too good to pass up and with solid planning you won't be in any significant danger. Defensive Training - there is no real way around this one. You will need to use Ballista to find success on this Haven. There are an absolute ton of stragglers and runners in these waves and having Ballista to pick them off is a life-saver. However, as mentioned in other sections of this guide, when a mob dies it gives an additional +33% of its exp to the hero that landed the killing blow. Defenses aren't granted this exp, so it is lost. With this perk not only does your hero get it, but every hero that has this perk gets the FULL bonus killing blow exp. This will get some notable mileage on this map, especially if you are playing with Growth. Flexability - This perk is a little bit of a pain to use, but as long as you're confident you'll remember, it's very good to pick up on a momentum hero. I love using the 1h sword + Scepter with this perk! It's great! Use the sword to get around and clear mobs and the Scepter to 1 shot elites or Bulky, etc. Legendary Assassin - Especially on a hero you've setup for momentum, this talent is insane. It's also exceptionally viable on 1h crossbow heroes. This can end up generating multiple extra AP each turn, there may even be times you simply run out of abilities you can cast this turn before you run out of AP! Big Game Hunter - This gives you a flat 50% +damage on any elite, boss, Bulky, Twisted, etc that you come across. quite powerful for picking off those nasty enemies. Primaries and Secondaries - Glintfein Priorities don't change too much from previous havens, your goals for each hero as far as shared stats are concerned should be: Note: these values include gear so take that into consideration when making choices ~40% accuracy 35+% crit 10+ MP As much +dmg you can get. It doesn't really diminish. You should ideally plan to have at least 2 momentum builds in the mix by the time you have 6 heroes. With that in mind, heavily consider momentum rolls for your secondaries. Remember, AP always wins. If you roll AP, you ALWAYS take it. If you ever roll multihit, see if it would be viable to swap that hero into a Hand Crossbow build. It isn't always worth doing this, but the majority of the time it is a good idea. Resistance Reduction is a fairly powerful stat for this Haven. Do not shy away from it unless the hero that rolled it is planning on playing with a magic weapon. Even then, 1 rare or uncommon roll would still be valuable. Isolation is not a bad roll either and is worth having even for general use. Keep in mind this attribute applies to any attack. This also helps a lot with bosses and elites, as it is generally pretty easy to kill enemies surrounding them to activate this bonus. It will of course get high value on a boss. Day 0 - Glintfein GOAL: Utilize the corpse mechanic on 1 side under attack tonight. What you'll want to do is pick a hero that is good at wounding enemies. For example, a hand crossbow hero. Use Quick Shot to injure but not kill all the enemies in the wave. on that side. You will have to kill some, it's completely fine. Once the wave starts to get close on that side you may need to pull 1 of your other heroes that is doing exceptionally well elsewhere to help start clearing. The idea is to kill enemies either inside of, or on the tile immediately outside the Haven. You can tell where this is by the coloration, the Haven has a noticeably lighter color to it's ground. Please see the section "Corpse Mechanics" near the top of the guide for more clarity. For the other sides under attack, kill normally and as quickly as possible. Or if you are feeling super confident, do the same thing there. Your goal is to produce at least 2 Mountain of Corpses. CRITICAL -- You must kite elites until they are in the haven or on the tile immediately outside of the haven. Elite Carrion is guaranteed to spawn this way and you absolutely never want to miss out on an Elite Carrion. Keep in mind, there are other things that go into spawning Corpses so not every single elite will always spawn an Elite Carrion. However, the first one you kill as described always will. If you took Omen of Talent, spend your heroes perk point! Build 2 GMs (Gold Mines) Build a Mana Well Build 2 Catapults. You will have remaining materials, but just save them for tomorrow. You want to focus on spawning at least 2 Mountain of Corpses tonight and Catapults are great for controlled damage, injuring enemies, and shredding armor (because they do physical damage) You'll want to use the free ability Benediction every single day on this map. Not to mention the Mana Well is providing max mana to your heroes each production phase. Overspending on mana on this Haven is going to be extremely useful on Night 2 and 3 especially. So, don't be scared to spend a little extra tonight. Day 1 - Glintfein Panic 2 assumed If any hero rolled the Defensive Training T2 perk, make sure you pick it up! Elites do not always spawn on night 1, because of this, you'll need to be slightly dynamic with the build order going forward. However, there is quite a bit of flexibility built into the order and it should be able to accommodate various strokes of luck. Build your 3rd GM. Build 4 Houses. Scavenge (resource focus): You should have produced at least 2 Elite Carrion and 2 Mountain of Corpses or if no elites spawned last night, you should have been able to obtain 3+ Mountains. However, if you obtained less Mountains, just scavenge Pile of Corpses instead. Order of Operations for Corpse scavenging is always: Elite Carrion > Mountains > Piles Ideally, you'll harvest with all 4 workers on Elite Carrion or Mountains. Upgrade a House with House Expansion for 48g. Repeat step 3 with this new worker. Build a Scavenger Camp. Build your second Mana Well. Upgrade GMs with Production+ (if you have more Mountains to Scavenge, instead upgrade a house for 48g, you can upgrade the GMs tomorrow). You usually will have enough money to upgrade at least 1 of them, sometimes even 2. It depends on your panic level last night. If you did hit 4, you may not be able to upgrade any. If you have money left over or just not enough to upgrade another gold mine, try to complete a step from Day 2. Such as upgrading another house or upgrading Benediction+. Use your Benedictions from your Mana Wells! Demolish Corpses that remain in your Haven. Outside the Haven is fine, ignore those. However, Corpses in the Haven still generate panic (although less than buildings do). So unless they are strategically placed you should demolish them. For example, in the image below you can see 3 corpses in the top right that I should demolish before starting the night. Build 6+ Ballista -- not Mounted Ballista Upgrade all of them with Seasoned Operators. Do not place them at the absolute edge of the Haven. On day 5 we'll be placing walls in front of them for cover. Try to cover half of your base (2 sides) -- see image below. (NOTE: Image is out of date, it is not possible to have as many Ballista as are shown as of 1.0.2.14) If you want more control (and less protection against runners/spread out enemies) then instead you could only build 3-4 Ballista with Seasoned Operators and throw in a Catapult or 2 instead.
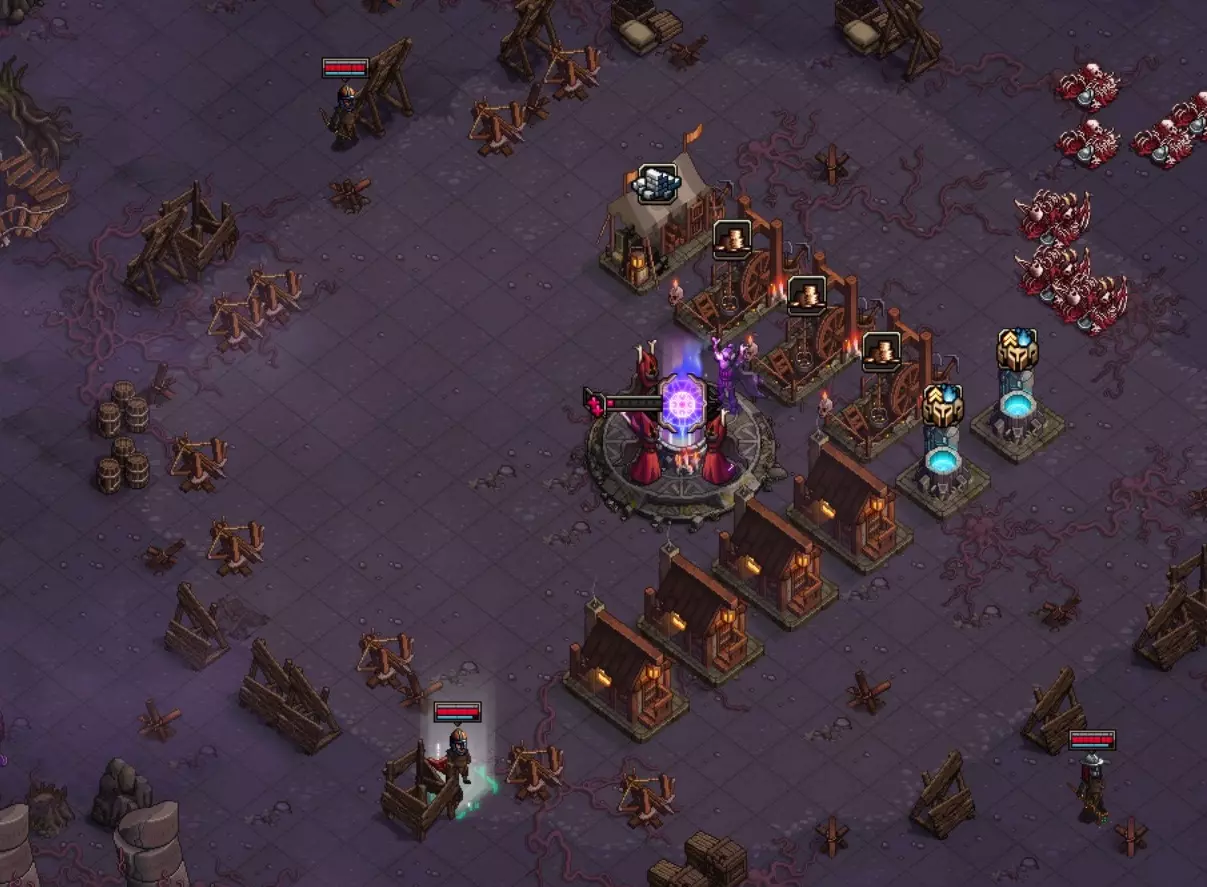
你可能会剩下大量材料……有时候我在建造完上述内容并用老练操作员升级后,还能剩下300个材料。 如果有多余材料,现在就用来建造更多弩炮吧。 城墙根本不值得建造。理想情况下,你今晚应该会再次召唤一座或多座山脉,而且这波敌人会相当棘手。所以,你需要尽可能多带有老练操作员升级的弩炮,以帮助你在避难所附近或内部造成伤害、击杀敌人,从而生成尸体。 第二天 - 格林芬 假设恐慌等级为1 你今晚本应生成2座以上的尸山,但我假设只生成了1座。 在任何尚未升级【生产效率+】的通用模块中升级该选项。在任何尚未升级房屋扩建的房屋中,花费48金币升级房屋扩建。 对所有已有的尸山进行【资源集中】搜刮。 花费84金币为一座房屋升级房屋扩建+。 在所有3个通用模块中升级矿场+,并在每个矿场安排1名工人,总计花费120金币。 如果难以生成2-3个尸山,将剩余工人用于【资源集中】处理尸堆。 再建造2个拾荒者营地。 在其中一个拾荒者营地升级生产+。 在两个法力井中都升级祝福+,并计划每晚使用。这些额外的法力在地图后续进程中非常有用,花这笔钱是值得的。 建造弩炮(不要建造骑乘型!)并为其升级老练操作员。(注意:图片已过时,自1.0.2.14版本起,无法拥有图中所示数量的弩炮) 我通常在这个阶段会有超过120金币,并且选择将其保存起来。现在花费这些金币的价值不大。你可以选择为另外2个拾荒者营地升级【生产加成】,但存钱能让你在明天建造酒馆和先知塔,同时仍能招募到第5位英雄。
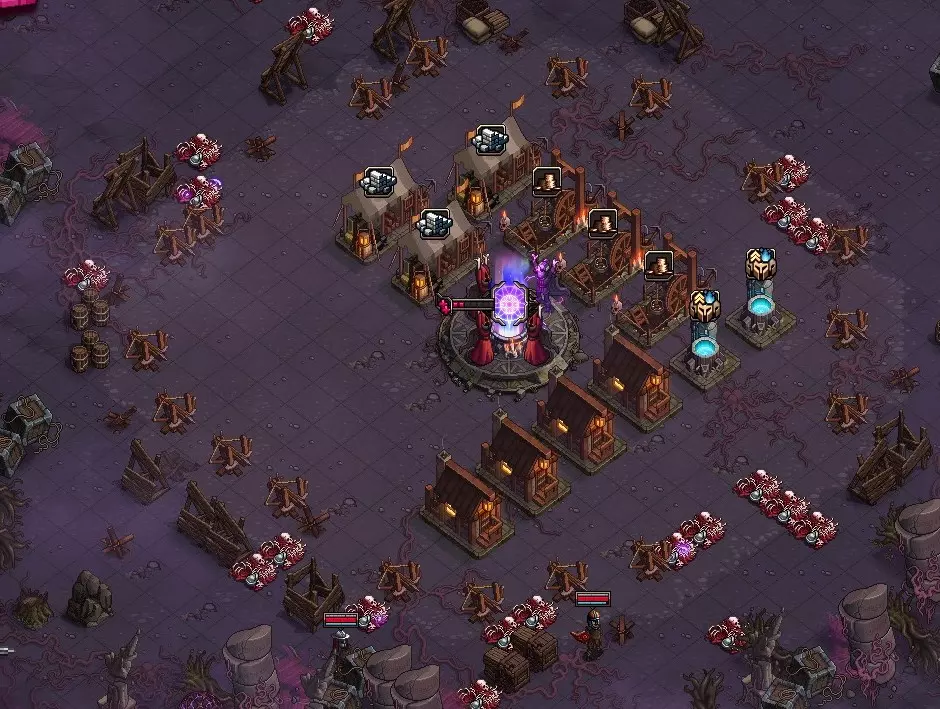
这里的目标是不让任何东西进入避难所,远离你的弩炮。此时你无需刻意制造尸体,因为这自然会发生,而让敌人靠得太近可能会让你损失一座弩炮。 第三天晚上异常残酷。 你很可能会在这个晚上陷入苦战。明智的决策或许能帮你保住夜间奖励。通常情况下,我在这里最多只能险胜1到2次。 我常用的一个策略是干脆放弃对付爆炸怪,任由它们摧毁一些东西。这绝非理想选择,应尽可能避免。不过,如果你看上面的图片,会发现我刻意避免将两座弩炮直接相邻放置。这样的话,如果今晚真的遇到这种情况,我最多只会损失一座塔。 有时候,花大约100材料(弩炮加上升级)来无视约1000点高抗性生命值是值得的! 今晚你将对抗双子之一。她将永久免疫伤害。 你的目标就是单纯地生存下来,抵御来袭的敌人,所以全力杀敌! 不要在boss附近结束回合,因为她有一个名为【虚无之口】的技能,会立即杀死你的英雄。这个技能目前需要充能(但在后续夜晚就不需要了!),不过要记住,即使你满血,它也能一击秒杀你。 关于宝珠的注意事项:今晚boss会在地图各处生成宝珠。它们是紫色的,无法移动。如果你的回合结束时,有英雄处于这些宝珠的范围内,宝珠就会爆炸。它们不考虑视线问题。 要小心,它们可能会生成在建筑物之间或 Boss 下方,这使得它们很难被发现。 如果英雄移动到某个宝珠的半径范围内,该半径会高亮显示。 与“Boomers”类似,你可以选择攻击这些宝珠来引爆它们,爆炸会对其他敌人造成伤害。 敌人无法攻击这些宝珠,而且它们自身永远不会爆炸。只有当英雄在范围内时,它们才会爆炸。再次强调,这些宝珠不考虑视线问题! 第三天 - 格林芬 假设处于恐慌等级 2 使用你的免费祝福! 搜寻(以资源为重点)你拥有的任何“尸山”。通常你会获得 3 个,所以这里假设获得 1 个。如果你拥有超过1个,就将它们拆解以获取2个物品,或者等待确保你有足够的钱在今天晚些时候购买英雄。(如果在步骤5之后你仍然资金不足,资源专注可能会帮你补足差额) 如果在任何夜晚你的恐慌值超过了预期值,你可能需要在此处进行一些计算。 通常情况下,在尸山部署2名工人是正确的做法,尽管在【GM】部署2名工人能获得80金币,而尸山(资源专注)只能提供72金币,但尸山还会产出大量材料。 建造一个先知。 使用3名工人执行驱散迷雾。 为什么要在这上面投入这么多工人? 驱散迷雾能创造额外的操作空间。敌人的进攻波次会从更远的地方开始,这让你有更多时间进行规划,并且在敌人到达你的弩炮之前多获得一个行动回合。针对今晚,也就是第4晚,你的弩炮甚至可以在第1回合就对敌人开火——即使迷雾已经被驱散。这能优化你的战略空间。 使用金矿中所有剩余的工人。(你应该只剩下1到2个工人可以派去那里) 建造一个酒馆并升级住宿+。招募你的第5位英雄。我会选择7级英雄,花费286金币。如果只有6级英雄可用也没关系,它们只需花费240金币。 建造更多的弩炮!同样,不要建造骑乘弩炮,并再次用老练操作员升级它们。 【注意:图片已过时,在1.0.2.14版本中无法拥有图中所示数量的弩炮】
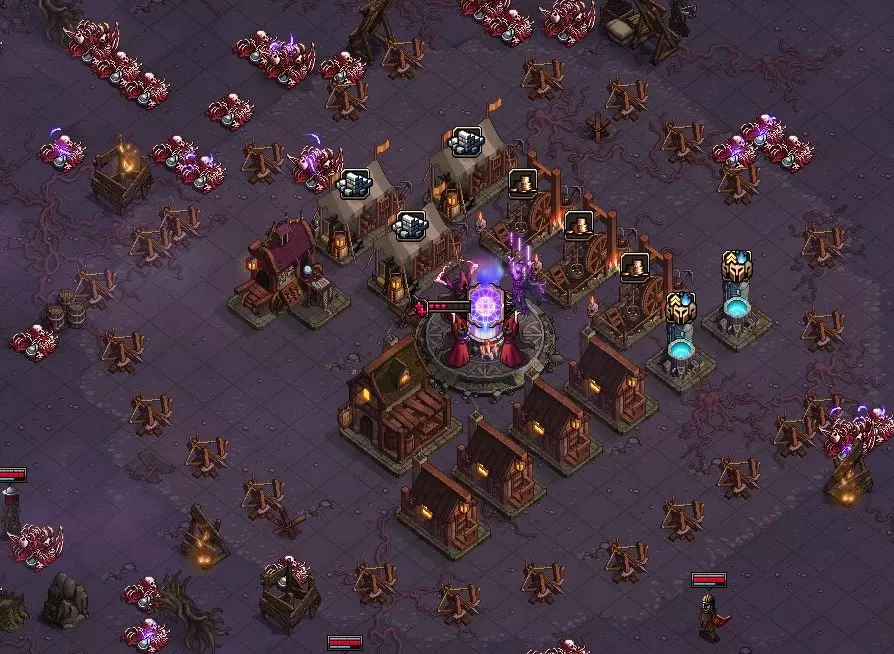
第四天 - 格林芬 假设已达成恐慌等级1 在此阶段,你应该能稳定以恐慌等级1获胜,达成等级0也完全有可能。 这意味着你可能没有产出太多山脉,甚至一座都没有。因此我假设你获得了0座山脉。 在先知处使用【驱散迷雾】,消耗3名工人。 再次强调,花费3名工人来为自己争取更多操作空间是非常值得的。 在每个【通用市场】各安排1名工人,获取120金币。 使用你的免费【祝福】! 如果你现在正面临 mana 不足的问题,可以考虑在某个 mana 井升级【 mana 恢复强化】并安排一名工人在那里。这48金币的投入是有价值的,因为你今晚可以再次超支 mana,明天及之后的日子里也能安排工人在那里工作。 用你剩余的工人去搜寻【尸堆】。通常你需要搜寻物品,但如果因任何原因需要金钱来完成下一步,那就改为以资源为重点进行搜寻。 升级酒馆的住宿+并招募你的第六名英雄。如果你已有9级英雄且没有刷新出8级或9级英雄,可以花费30金币使用【刷新英雄列表】,这样你会获得一名8级或9级英雄。我通常会选择这样做,因为这些经验值非常宝贵。 我会尝试在这里花费383金币购买一名9级英雄。 如果还有剩余金钱,花费84金币使用【房屋扩建+】升级一座房屋,然后再搜寻一件物品。 此时我喜欢围绕魔法阵进行布置。通常我会在两侧中间放置2座【弩炮战车】(现在就可以这样做!),然后放置10个路障。不需要更高等级的城墙,因为其花费的材料太多了。这2座弩炮(无需用老练操作员升级)能够狙击任何潜入深处的狡猾跑者。作为最后的防线,它们是非常有用的备用方案。因此,你可以将这2座弩炮视为保险措施。
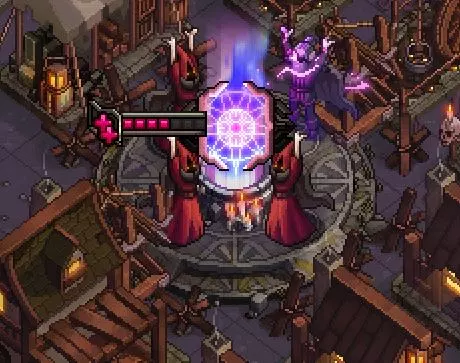
按照下图所示,继续在基地边缘部署配备经验丰富操作员的弩炮。如果情况稳定,我们明天会添加一些墙壁。
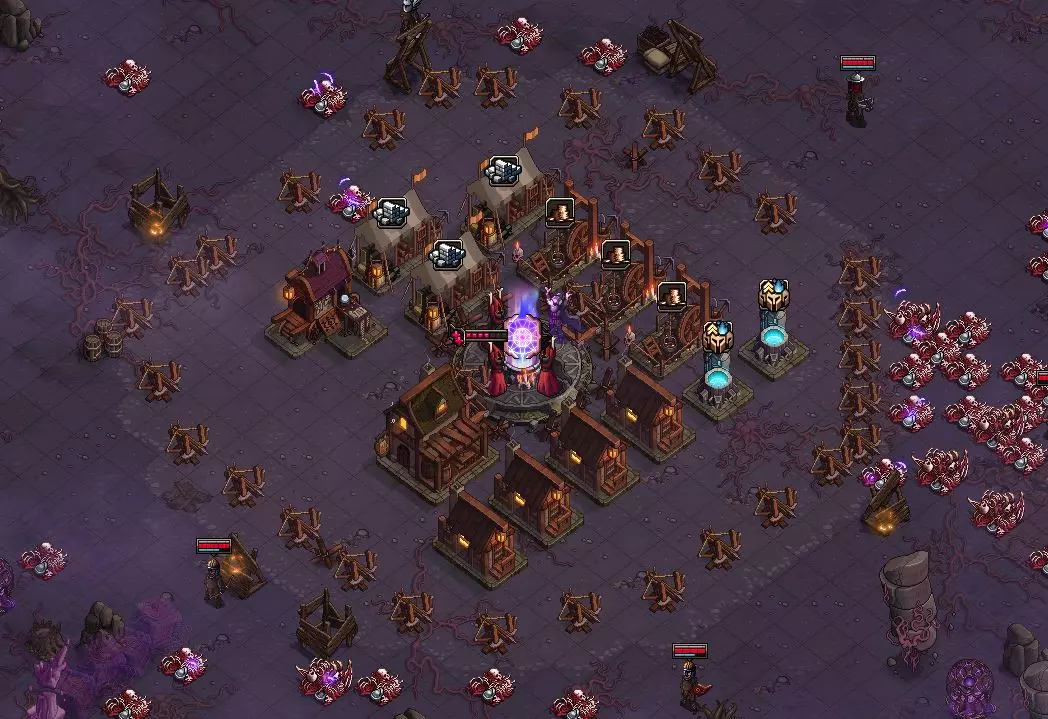
今晚你将与另一位双子战斗。和她之前的姐妹一样,她整晚都完全免疫伤害! 目标不变,像往常一样单纯地生存下来,抵御来袭的敌人。 记住,回合结束时离 Boss 太近会让她将你击晕! 第 5 天 - 格林芬 假设恐慌等级为 2 今天不一定需要使用【驱散迷雾】。不过这取决于你。如果你希望有更多活动区域,尽管使用,因为其消耗还不到 4 个工人。 如果你生产了大量【尸山】(4 个及以上),那么你可能需要选择跳过【驱散迷雾】,以便集中搜刮所有【尸山】来获取物品。 决定是否花费 3 个工人使用【驱散迷雾】。今天你不需要必须这么做。 集中搜刮你生产的所有【尸山】以获取物品。你可以按以下顺序安排剩余工人: 在已升级“恢复法力+”的法力井恢复法力。 使用免费的祝福! (物品优先)搜寻尸堆。 前往你的行会大师处。 在拥有“生产+”的拾荒者营地升级“拾荒+”,并在那里安排1名工人。考虑是否升级房屋。如果你决定使用“驱散迷雾”,今天可能需要额外1名工人。这将花费84金币,该工人可使用今天和明天,因此可视为“每名工人42金币”。 建造商店,并升级“店主之友”和“店主至交”。 装备所有搜寻到的装备后,将城市储物箱中的多余装备卖给商店。 疯狂购物!使用商店进行升级,直到你的金币不足200g,此时不要再刷新商店,将剩余的钱留到明天。 提示: - 购物时,寻找能提供AP的重要升级,尤其是【盗贼护甲】,它非常出色,因为它能让你每回合额外获得6点MP。 - 此外,为没有闪烁 perk 的英雄购买【闪烁卷轴】。最终夜至少需要3名拥有闪烁 perk 或携带闪烁卷轴的英雄,这一点至关重要。 - 使用【修复防御】功能,将所有受损的【弩炮】完全修复。 - 如果你觉得有必要,可以建造更多弩炮。否则,用剩余材料开始在基地周围建造【强化木墙】。 - 不要建造比强化木墙更高等级的墙。1. 因为你没有足够的资源来覆盖你的基地;2. 因为你的弩炮在升级为骑乘弩炮之前无法穿透石墙。关于城墙的建议,请参见下方图片。
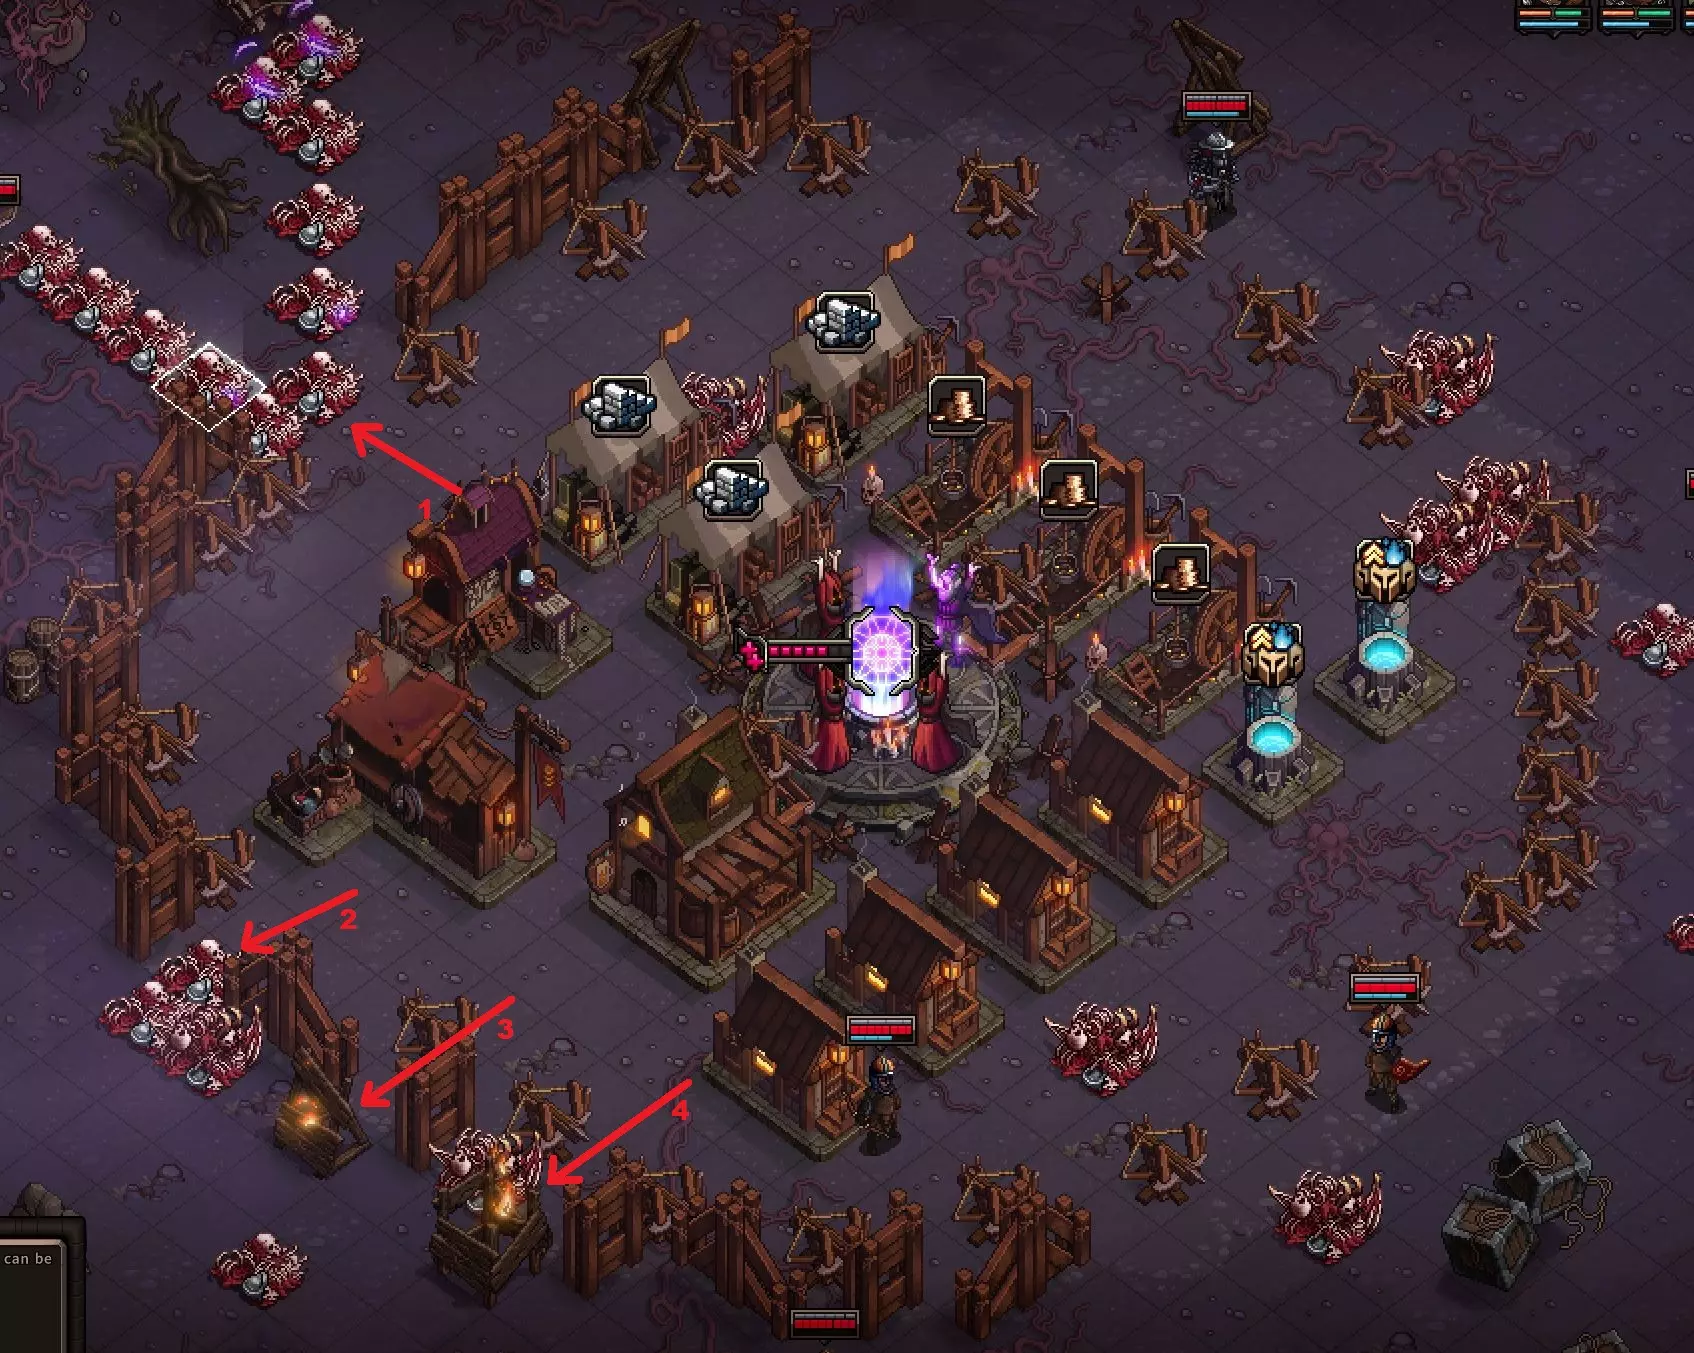
你需要按照这种方式在基地周围建造围墙。 你会注意到我留了一些缺口——这些缺口位于其他障碍物阻挡敌人直接路径的位置。 例如…… 箭头1指向先知旁边,你可以看到围墙外3格范围内的格子里有很多尸体。今晚不需要填补这部分,因为这些尸体会充当我的屏障。 箭头2的情况相同,这里被阻挡,而且其正外侧的格子也受到保护。那个格子不需要建造任何东西。 箭头3的位置本可以建造围墙,但由于仍有1个障碍物挡路,所以我选择在这里留个缺口。 箭头4和箭头3的情况相同。 你现在留下的这些缺口将在明天填补。第六天 - 格林芬 假设进入恐慌2状态 1. 搜刮所有【尸山】以获取物品。 2. 决定是否在【法力井】中派遣工人进行【法力恢复】(确保使用升级后的法力井!)。 3. 派遣剩余工人专注于【尸体堆】的【搜刮(物品优先)】工作。 4. 疯狂购物!全力以赴! 5. 优先购买【稳定/生命药水】,以便免疫或清除今晚将受到的减益效果。 6. 【传送卷轴】优先级极高。对于没有【闪烁】 perk的英雄来说,它们非常实用。 7. 尽量确保所有6名英雄都装备【T4武器】。如果英雄没有【专精】,则确保其两个武器槽都装备【T4武器】(或第二套武器拥有极佳属性)。 8. 尝试为所有英雄装备【T4+ AP药水】,尤其是拥有【惯性】的动量型英雄。用强化木墙包围你的基地。替换所有已损失的弩炮,并升级为配备老练操作员的弩炮。 如果还有剩余材料,将部分弩炮升级为车载弩炮。 在开始夜晚之前,请参考下一部分【双子 - 格林芬首领】。 双子 - 格林芬首领

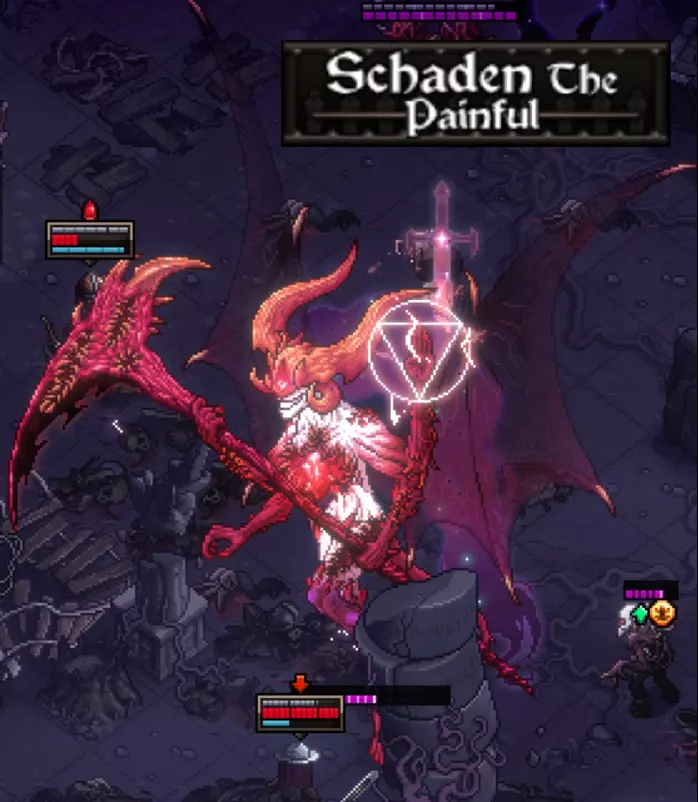
格林特芬的最后一夜,你将与双子战斗,而指挥官则试图打破最后一道封印。 这场战斗分为4个阶段。 阶段1 - 双子:首先你将与没有各自武器的双子战斗。 接着你需要分别对抗每个双子的武器。首先是沙登的镰刀,然后是弗罗伊德的剑【温柔慰藉】。 最后他们会拿起武器,你必须同时击败他们两人。
弗罗伊德在第一阶段有3个技能需要注意。她的眩晕和敌方增益能力详情可参考温柔慰藉(第三阶段)。此阶段她唯一的独特技能是召唤精英怪。该精英怪会在据点附近生成,且生成后会自动行动一回合。
此阶段的沙登拥有4个技能。 关于暗影裂隙及其减益效果,请参考布利斯 Nacht(第二阶段)。 与你在之前战斗中遇到的沙登类似,她会施放虚无之口,该技能能立即处决即使是满血的英雄。确保你的英雄在回合结束时与她的距离不小于3格,否则该英雄将被击杀。 此处没有其他特殊机制,击败敌人即可,但要注意沙登的镜像护盾。 第二阶段 - 布利斯 Nacht
布利斯 Nacht 是沙登的武器,会在你完成第一阶段后 2 回合出现。此阶段你需要摧毁布利斯 Nacht,因为沙登本人是无敌的。除了棘手的镜像护盾外,它还对毒素免疫。
布利斯纳赫特的第一个技能是暗影裂隙。该技能拥有相当大的范围和直线攻击。 直线长度为7个单位,可从南北或东西方向发动,也可从上图中你能看到的任意格子开始释放。 例如,不仅我的英雄会处于危险中,而且如果我的英雄处于左侧图片中被点燃者的位置,他仍可能被击中。除非他处于最左侧被点燃者的位置。 第三阶段 - 温柔慰藉
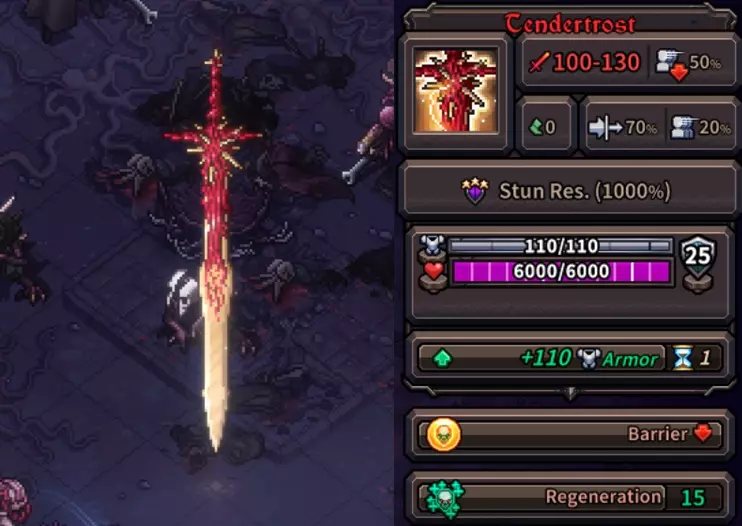
在战斗的第三阶段,你将面对名为【温柔创伤】的武器。这把剑拥有两种棘手的能力。和往常一样,最好在它生成的同一回合就将其消灭。 当这把剑被摧毁时,该阶段结束。 它对所有负面状态免疫,这意味着你无法对其施加减益效果,也无法使用【机会主义】技能。
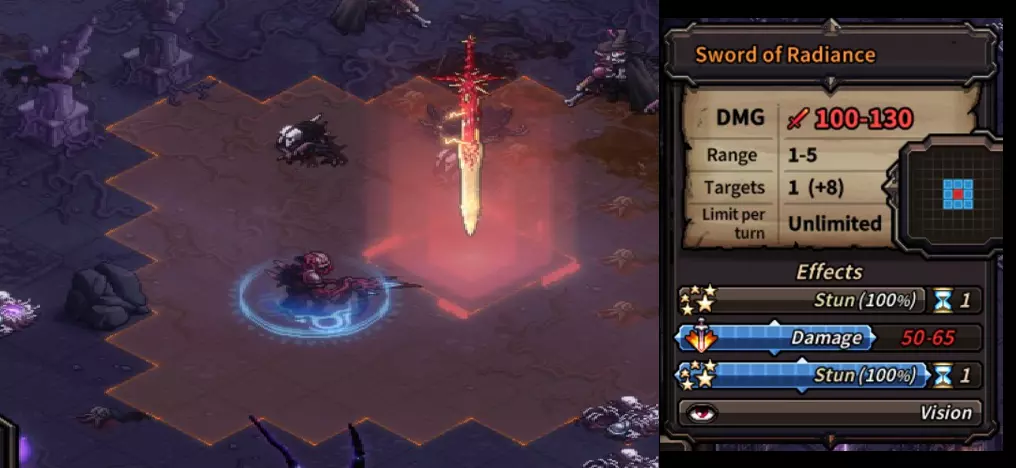
如果你没有在【光辉之剑】生成的回合将其摧毁,那你必须应对的最棘手能力就是它的技能。该技能造成的伤害不高,但会使你眩晕!如果你结束回合时英雄处于该剑的攻击范围内,务必给该英雄使用稳定药水,这一点至关重要。

若回合结束时坦德特罗斯存活且无英雄处于光辉之剑的范围内,它将施放【恩赐】。这本质上是对其3x3范围内敌人的强力增益,不仅会为他们永久增加500生命值、100%伤害,还会赋予【免疫】效果。 阶段4 - 双武器 此阶段相对简单直接,双子对所有伤害免疫,但它们的两把武器都会出现在场上。你需要在同一回合内摧毁两把武器。若只摧毁其中一把,回合结束时它会立即重生。两把武器必须在同一回合内被摧毁。 此阶段相当于前两个阶段同时进行,摧毁两把武器即可进入阶段5。第五阶段 - 强化双子 在此阶段,你将同时面对装备各自武器的双子。它们的属性与前几个阶段非常相似。
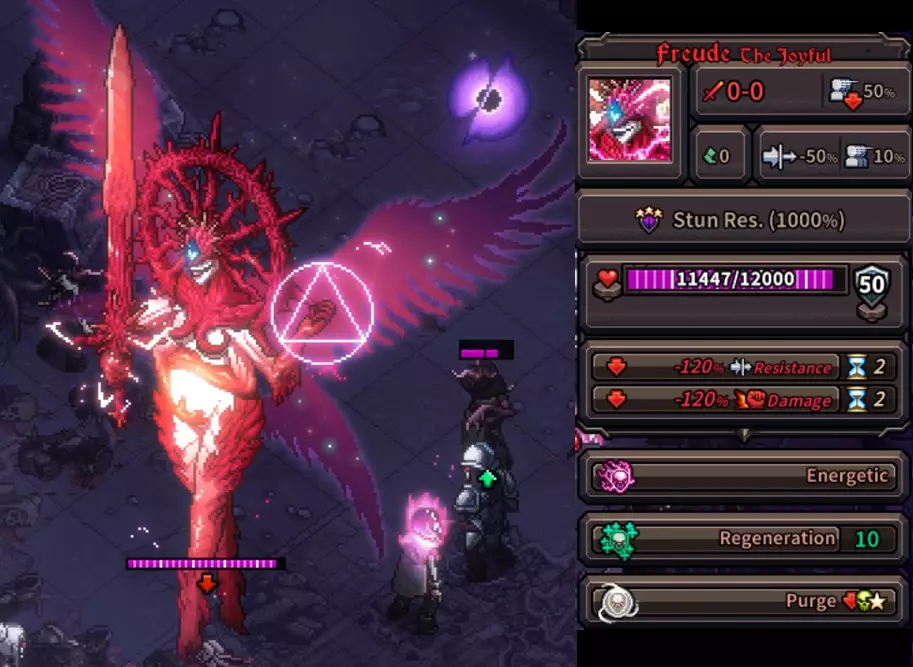
弗罗伊德每回合将恢复自身总生命值的10%。在你的回合结束时,她还会移除所有负面状态。但她没有免疫能力。正如你在上面她的属性面板中看到的,我已通过法典的传播技能【虚弱之触】对她施加了减益效果。 如果你没有魔法武器(或【纯粹力量】特长),请务必利用这一点,因为在没有减益的情况下,她拥有极高的抗性! 弗罗伊德仍能施放【光辉之剑】来眩晕英雄,以及【伟大恩赐】。 不过,她现在还能施放【双生精英的重生】。这会召唤2个精英单位,而不像第一阶段那样只召唤1个。
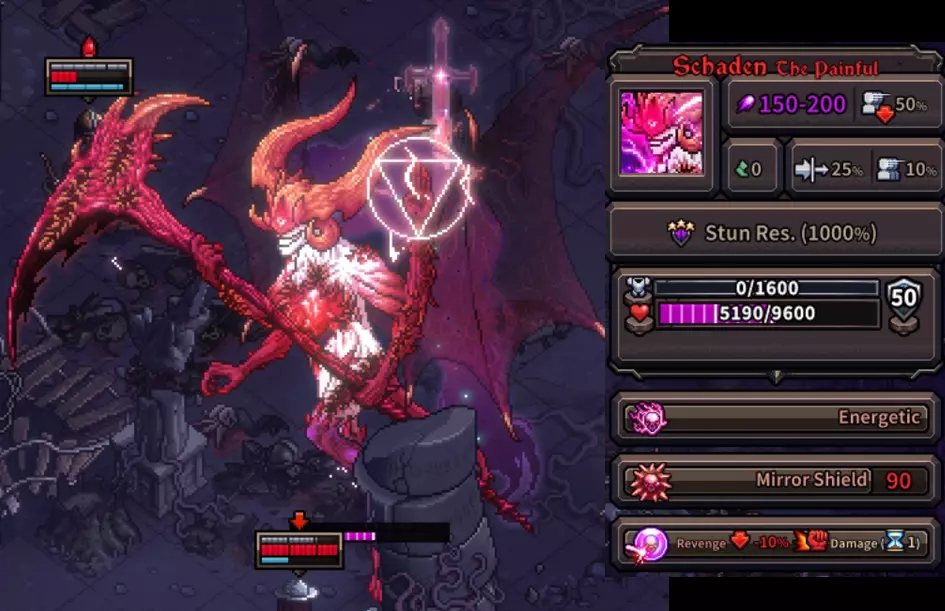
沙登的生命值比她姐姐略低,但她凭借非常棘手的【镜像护盾】和【复仇】机制弥补了这一点。这两种机制会作用于每次攻击中的每一次命中。这意味着,如果你用手弩的速射在一次攻击中对她攻击5次,你将受到5次90点的镜像护盾伤害,并叠加5层减益效果,总计减少50%伤害。因此,面对沙登,你需要尝试在一次攻击中对她造成尽可能高的伤害。理想情况下,你可以在尝试攻击她之前先对其施加减益效果。沙登仍能施放【暗影裂隙】和【污染邪能】,并继续生成更多【不稳定奇点】。不过,在此阶段她无法再施放【虚无之口】(前几个阶段的处决技能)。最快击杀可能:有可能在第10回合获胜。以下是各回合的流程,“1.”代表“第1回合”: 1. 敌人生成。 2. 第一阶段开始,本回合需击杀两个双子。 3. 敌人持续生成。 4. 第二阶段开始,本回合需击杀【Blissnacht】(镰刀)。 5. 暗影镰刀开始在据点周围生成。它们无法被任何方式摧毁,因此在回合结束时需避开它们,否则会受到攻击并被施加减益效果。 6. 第三阶段开始,本回合需击杀【Tendertrost】(剑)。 7. 敌人持续生成。 8. 第四阶段开始,本回合需击杀两把武器。 9. 敌人持续生成。 10. 第五阶段开始,击杀两者即可获胜。 双子提示:【Schaden】可以立即处决英雄。在第3晚见到她时就是如此(不过她当时需要先充能)。但在第一、二、四阶段,她无需充能即可发动处决。不过在第五阶段,她不再拥有这个技能,必要时你可以在她附近结束回合。 整场战斗中都可以对这些首领施加减益效果。它们有相当高的抗性,但主要好处是你可以将其抗性降低至-50%。这意味着你对它们造成的伤害会增加。 如果可以,攻击前务必施加减益效果,尤其是在对抗Blissnacht/Schaden时。 唯一无法施加减益的情况是第三阶段的Tendertrost,它完全免疫减益。 Freude并非免疫,她只会在你的回合结束时清除负面状态。 多段攻击英雄可以快速击败Freude和Tendertrost。这两个首领没有反击或镜像护盾机制,全力输出吧!由于沙登和布利斯纳赫特拥有高额护甲,使用德鲁伊法杖施放酸液喷射是值得的。即使对沙登使用也效果显著,因为它不会造成伤害,所以不会触发复仇或镜像护盾机制。 稳定药水对击杀沙登非常有用。我还建议在最终夜晚让你的英雄们携带几瓶,因为它们也可以用于其他英雄来清除debuff。