换一换
换一换 


A guide to explain the mechanics of the game to newcomers, written without spoiler so as to be usable from the start of the game (past the tutorial). If you are new to the game and a bit lost as to how things work, this guide should hopefully help you out. I. About and Table of Contents Hopefully, this guide will teach you the basics of the game and the underlying mechanics specific to Code Vein. This is entirely meant for beginners, and I doubt any veteran will learn anything but you never know. What this guide will not do is give you outright setups that are to be copied 1:1. In short, this guide will teach you about building, not builds. The goal of this guide is to help people figure out how the game works so they can decide for themselves what they feel most comfortable playing, without spoiling elements of the story. This guide assumes that you have finished the tutorial, and met with your first companion. If not, I advise you do so before reading onward. I know the In-Game Hints are similar to what is said here, but I don't find them easy to access and looking only one at a time is a pain. Hopefully this guide will help at least some people. I.Table of Contents II. Lexicon III. Gameplay Basics III.a Blood Code, Stats and Scaling III.b Blood Veils III.c Gear Requirements III.d Stamina and Focus III.e Mobility III.f Drain Rating and Drain Attacks III.g Charged Attacks III.h Light and Dark Gifts III.i Trading Valuables III.j Upgrading and Transforming III.k The Importance of Leveling (or not) III.l Learning and Inheriting Gifts IV. Blood Code Sheets and How to Read Them V. Blood Veil Sheets and How to Read Them VI. Weapon Sheets and How to Read Them VII. General Archetypes VIII. Tips and Tricks This guide was written in version 1.20. I will do my best to keep it up to date. II. Lexicon Since Code Vein uses a lot of specific terminology, if you ever get lost in it here is a quick breakdown : Block : Regular block activated by holding down the block button and facing the enemy Blood Code : Set of properties unique to each individual revenant. Blood Veil : Armor. Drain Attack : Any attack that will replenish your Ichor, uses a different stat than the regular attacks. More on that below. Gaol of the Mists : aka Vein. The name of the place the game is set in. Gifts : Skills (both passive and active). Haze : Money/Experience/Souls. Ichor : Mana/MP/SP, is used to cast active Gifts. A type of Revenant blood. Lost : Enemies. Former Revenants who have succumbed to Frenzy/Bloodthirst. Mistle : Checkpoints/Bonfire. Disperse Miasma when activated. Parry : Timed block that will result in a special drain attack. Red Mist : Red-tinted mist-like substance that delimits the Gaol of the Mists. III. Gameplay Basics III.a Blood Code, Stats and Scaling Blood Codes are what the game uses as classes, simply put. Each blood code has specifics that are unique to it. Finding a Blood Code that fits your gameplay is essential, as everything you can or cannot do is tied to the Blood Code. They are the foundation of your build. Unique to each Blood Code is a specific Stat spread. 引用自 イーディス's Guide: STR: Scaling stat for weapon attacks & HP. DEX: Scaling stat for weapon attacks & drain rate. MND: Scaling stat for stamina, drain rate & light gifts. WIL: Scaling stat for status resist & dark gifts. VIT: Scaling stat for damage resist & HP. FOR: Scaling stat for element resist & stamina. The game uses a scaling system, so many values are an additive total of both the Base value and the Scaling value. The higher your value in a given Stat, the better the scaling, so the better the outcome. III.b Blood Veils Blood Veils are the armor in Code Vein. They come in a single piece and have four different types, each with their own animations for drain attacks and different timings for Parry Drain Attacks. The four types are : Ogre, Ivy, Stinger and Hound. Of those four types, each has some variants with a unique stat spread just like the Blood Codes. Finding the correct Blood Veil to use will make a massive difference. Once obtained for the first time, you can also buy colored variants, because the most important thing after kicking ass is looking good while doing it. III.c Gear Requirements All gear in the game has requirements to be used properly. Not meeting this requirement will result in harnessing only a tenth of the power of the corresponding piece of gear. The requirement is dynamic, meaning it will update accordingly if you equip a stat giving passive Gift, or if you use an active Gift to buff yourself. Because of this, stat giving passive Gifts are particularly important, as they allow some gear to be used on Blood Codes that otherwise would not be able to. III.d Stamina and Focus Attacking, blocking and dodging will eat away at your Stamina. The heavier your weapon the more Stamina needed per attack. If you have no Stamina, you cannot do any of those things. The better your weapon is at blocking (check Weapon Sheets for more info) the more damage you will block and the less Stamina you will use. Dashing will also empty your Stamina continuously, and you will be exhausted and slow down for a while should you empty it entirely. Stop dashing just before the end to bypass the problem. Getting hit, blocking, and dodging (at the right time) will make your focus gauge (the blue bar above your HP bar in the bottom-left, only visible while active) grow. Once it's full, it will immediately replenish your Stamina and grant you a temporary resistance to stagger. There are also a number of passive Gifts that only work while you are focused. This effect also applies to enemies. Once filled, it will gradually decrease until it's empty. You retain focus from one fight to the next if the gauge was not filled, but it will decay at a slow rate. On top of all that, you will gain the ability to use a Aerial Drain Attack, which enemies do not get. Note that during animations both you and your opponent's focus gauge will not be frozen, and will continue to decrease. III.e Mobility Mobility affects your dodge. There are a total of three different dodges, for three different states of Moblity : Quick, Normal and Slow, Quick being the highest and Slow the lowest. The faster you are the farther you can dodge towards and the longer your total dodge. Your Mobility is a factor of your Blood Code, the weight of your currently brandished weapon and the currently equipped Blood Veil. If you are between 1-50% of your maximum weight allowed by your Blood Code, you will move up a Mobility notch. If you are between 51-100%, you will move at the default speed of your Blood Code. If you are above 100%, you will go down a Mobility notch, or be forced in Slow depending on how far above that limit you are (I believe 150% is the mark). A Quick dodge is easily spotted by the blue particles it leaves behind. III.f Drain Rating and Drain Attacks Each weapon in the game has a specific Drain Rating, which is the speed at which you will gain Ichor from hits on the enemy. The higher the value the faster you will gain Ichor. Generally speaking, weapons have a fixed Drain Rating per category (so most One-Handed weapons have the same value) but there are exceptions so keep an eye out for that. There are five different kinds of drain attacks, and for those the game will not use your regular attack value nor your weapon Drain Rating but the Drain Attack value and Drain Rating value of your Blood Veil (more on that below). On top of draining a lot of Ichor from your foe, you will also gain a maximum Ichor increase (until the Blood Code allowed cap). Do note that the type of animation you will play is depending on the type of your Blood Veil (Ogre, Ivy, Stinger and Hound), which affects all timings differently. Backstab Drain Attack : by backstabbing an enemy you will play a special animation, during which you are invulnerable. Note that bosses cannot be backstabbed, but minibosses can. Grants +2 maximum. Charged Drain Attack : holding down the drain attack button until it's fully charged will let you unleash this attack. You are not invulnerable while charging it, and if canceled it will cancel the attack entirely. Takes a solid couple of second to charge, and will leave you with a lengthy recovery period once it goes off. (Ivy-type Blood Veils charged attacks can be used at some range). Grants +2 maximum. Combo Drain Attack : a faster, lighter drain attack that can be chained after a regular hit. Grants +1 maximum. Parry Drain Attack : Timing your Parry correctly will result in a similar animation to the Backstab, during which you are also invulnerable. Grants +2 maximum. Aerial Drain Attack : Once in Focus you can use this attack, and should it connect it will play a different animation to the Backstab and Parry one, during which you are also invulnerable. Grants +2 maximum. Ichor is an incredibly important part of the gameplay so I suggest familiarizing yourself with those attacks early on. Some enemies have a special, long animation during which they are highly resistant to damage but not to drain attacks. III. Gameplay Basics Part Two III.g Charged Attacks and Dash Attacks There are two different stages of Charged Attacks, and those are unique and vary from weapon to weapon. First stage is when you press the Strong Attack button and immediately let go. This is also the same attack that will result from using a Strong Attack after a Normal Attack. Second stage is triggered by holding on to the button and will result in a sometimes vastly different effect, according to your weapon. You are vulnerable while doing this so use it wisely. If you attack while dashing, you will perform a running attack with extra reach, at the cost of more recovery time. Similarly, if you press dash while attacking in an attack string, you will perform a different attack also with extra reach and similarly extended recovery time. III.h Light and Dark Gifts The game divides a lot of Gifts in two trees : Light and Dark. They scale with the appropriate value from your Blood Veil, however Light Gifts will scale with the MND Mind Stat and Dark Gifts will scale with the WIL Willpower Stat. This core stat, MND or WIL, has a direct impact on your Blood Veil scaling and will affect the performance of the Gifts drastically if they have scaling. Generally speaking, Light Gifts are about buffing and Dark Gifts are offensive, direct-damage skills. Note that attack Gifts that will use your weapon are in the "Skill" Tree and as a result are not affected by either Light or Dark Gifts scaling. III.i Trading Valuables Throughout the game you will gain some items that have no combat use, and only serve as gift to your fellow NPCs. Each will react differently to different items, if you want the corresponding values for each character and each time go to Reepz' Guide (contains some light spoilers). This is important because some weapons and some materials can only be obtained from the corresponding character, which brings us to... III.j Upgrading and Transforming One of the most essentials aspect of the game, upgrading your gear. This will cost you some Haze and the corresponding materials, but will in return grant you a direct upgrade of either your weapon or your Blood Veil. This is extremely key for both, I cannot stress that enough, as the cumulative upgrades will have a significant impact on your performance. If you struggle, try upgrading your gear. Upgrading your Blood Veils do not enhance their defensive properties, only the Drain Attack stats and the Gifts stats. Transforming your gear will modify the properties of the weapon or the Blood Veil, which can change its scaling, but also give it different properties. The Devour transformation, particularly, will make the corresponding object lose some damage but in return will add a +50% flat increase (multiplicative of the innate value) in Drain Rating. III.k The Importance of Leveling (or not) Leveling will add +10 HP, +1 Stamina, and some flat damage for the corresponding cost of Haze. Because stats (STR, DEX, MND, WIL, VIT, FOR) are carried in Blood Codes, leveling has no effect on them or the scaling. This is extremely important, since, as of writing this guide, while the total leveling will add up to your power in the long run, it brings another problem : level cap. If you are over the level cap for the area you are in, you will find learning Gifts extremely slow. You are thus faced with having to choose whether to keep your level low to keep learning Gifts without too much grinding, or to level up and only learn and inherit the gifts you want at a Mistle. It also appears that the power of your companion is tied to your level, so if you play with them and they get constantly killed, consider leveling up to add more punch to them. III.l Learning and Inheriting Gifts Learning a Gift costs some Haze, and can only be done at a Mistle. There may be requirements before you can buy the corresponding Gift. Generally, the later the gift comes, the higher the price and the more kills you need to fully inherit it. Only Gifts that are currently equipped as you kill Losts will gain experience and progress towards inheriting them. Once fully maxed, a Gift is "inherited" and can be used on other Blood Codes without problem (so long as you meet the requirements). Note that some Gifts require no experience and as such can only be used on the Blood Code they are affixed to. You can also spend some Haze and some materials to learn a Gift instantly at a Mistle. The cost depends on the Gift for both the Haze cost and the material cost. IV. Blood Code Sheets and How to Read Them
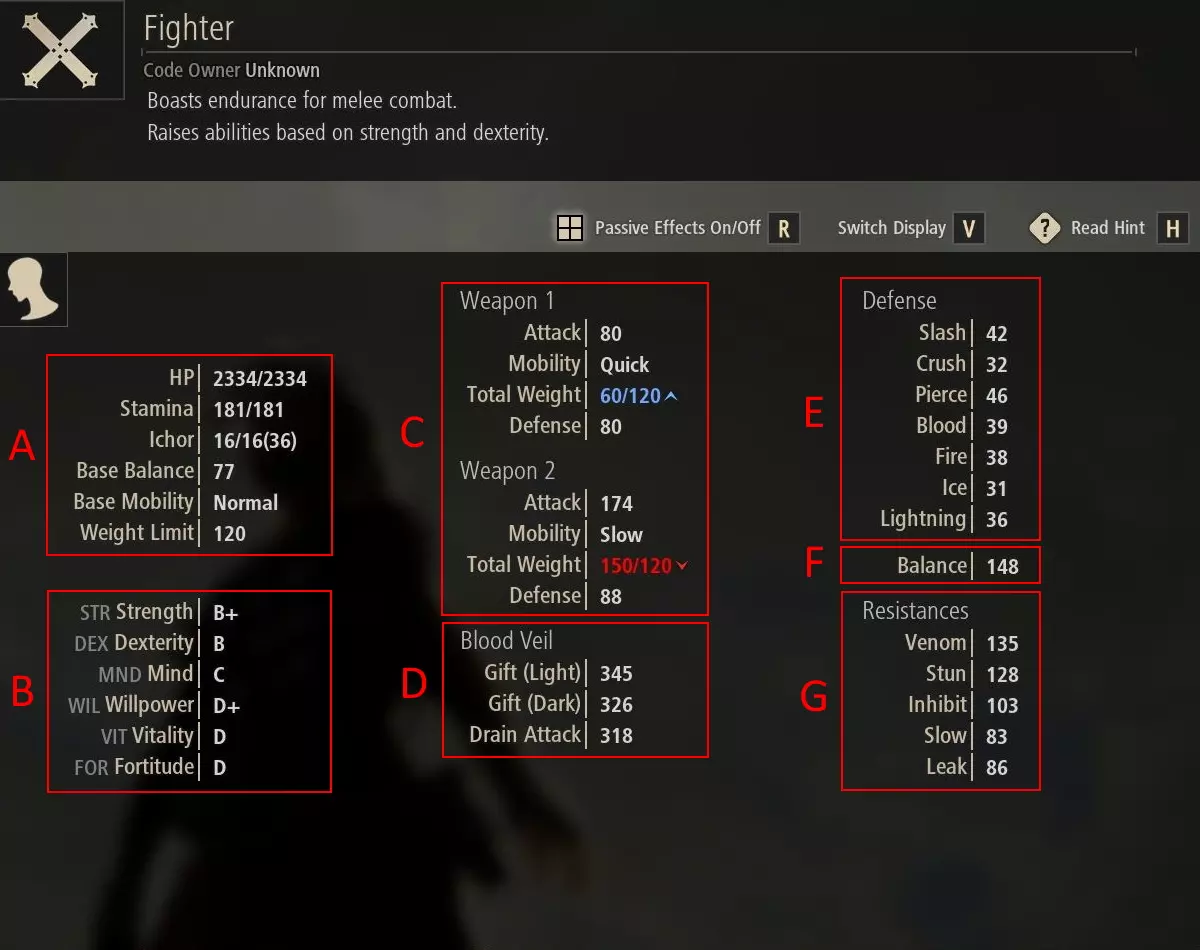
A - 基础属性 HP:生命值。含义自明。数值会随等级提升而增长。 耐力:总耐力值,用于攻击、闪避和格挡。数值会随等级提升而增长。 冥血:初始最大冥血值(总最大冥血值)。装备血码后的初始值即为你的最大冥血值,而括号内的数值是你通过多次吸血攻击可达到的最大冥血值。 基础平衡:平衡值代表你的抗硬直能力。数值越高,你越难被硬直,攻击也越难被打断。 基础移动性:根据你的总重量,应用于闪避的移动性修正值。重量上限:游戏中最重要的属性之一,代表你可以装备的总重量,装备超过此重量将受到惩罚。这包括武器重量和血之面纱重量。注意,两把武器的重量是独立计算的,即武器1的重量不影响武器2,反之亦然。 B - 属性分配 不同血码的属性分配各不相同,这决定了每个血码的优势和劣势。查看血码属性时,要注意是否激活了被动效果,因为这会极大地改变属性对比。所有血码都是独特的,但通常来说,越后期获得的血码越强。C - 武器属性 攻击:总预期伤害(基础值+属性加成)。 机动性:装备该武器时的机动性。双武器的机动性会分别计算。 总重量:当前装备的血之面纱与该武器的重量总和。此数值用于判定机动性。 防御:武器的最高防御值,用于计算使用该武器格挡敌人攻击时受到的伤害。 D - 血之面纱 恩赐(光):光属性恩赐的总属性值(基础值+属性加成),用于光属性恩赐的属性加成计算。 恩赐(暗):暗属性恩赐的总属性值(基础值+属性加成),用于暗属性恩赐的属性加成计算。 吸收攻击:各类吸收攻击的总属性值(基础值+属性加成)。 以上为当前装备的血之面纱属性,而非特定血码的属性。E - 防御力 当敌人攻击命中且未格挡时生效的防御数值。数值越高越好。 此为当前装备的血之面纱的属性,而非特定血码的属性。 F - 平衡值 平衡总值(血码提供的平衡值 + 血之面纱提供的平衡值),决定你的攻击被打断的难易程度。数值越高越好。 G - 抗性 用于判定你对相应异常状态的抵抗难度的数值。 此为当前装备的血之面纱的属性,而非特定血码的属性。 五、血之面纱属性表及解读方法
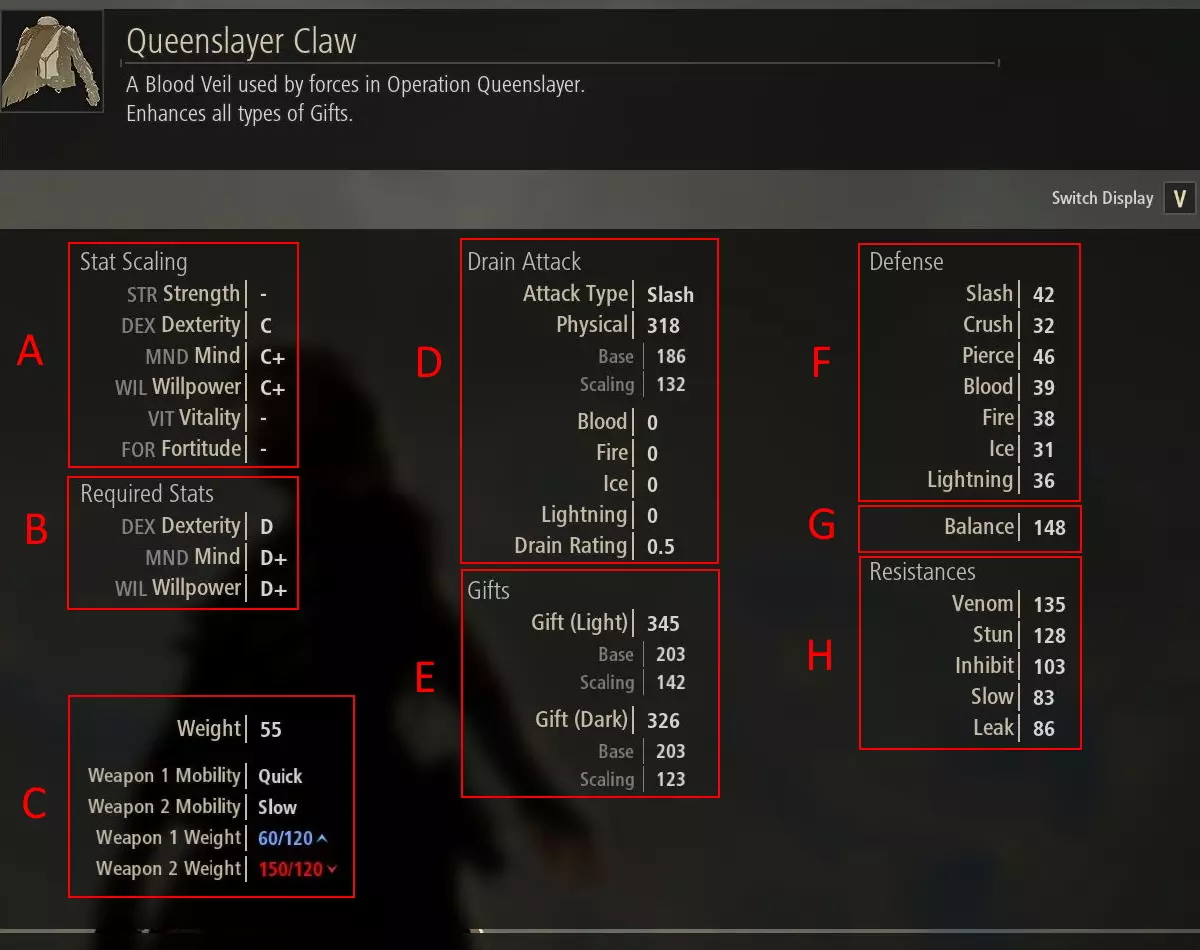
A - 属性加成 这些属性是用于加成你的吸血攻击的属性。它们对普通攻击的效果没有任何影响。不过,考虑到吸血攻击的前摇相对较长,如果你想让吸血攻击拥有可观的伤害,这就是你需要注意的属性。 B - 需求属性 如果不满足这些属性要求,你将无法正常使用血之面纱,因此必须满足这些属性,否则你将损失血之面纱90%的力量。 C - 重量与机动性 此处的重量值仅为血之面纱的重量,下方的数值分别是你的武器机动性以及双武器的总重量。武器1和武器2的重量是血之面纱重量与武器重量的总和。D-吸取攻击 攻击类型:决定吸取攻击发动时会检查何种防御。敌人对不同类型有不同抗性。该类型始终为物理类型(斩击、穿刺、打击)。 物理:基础值与缩放值的总和。 基础:此伤害为吸取攻击的固定伤害,由血之面纱决定。 缩放:此伤害会根据你的属性与血之面纱的缩放匹配程度(在A处查看)而增减。 血液、火焰、冰、雷电:若你的血之面纱已变形,此处会显示吸取攻击的附加伤害。 吸取等级:决定吸取攻击从敌人处吸取的血之英华量。此数值仅用于吸取攻击,不适用于普通攻击。E - 恩赐 光明恩赐:基础值与缩放值的增加值。决定光明恩赐的强度。 基础值:血之面纱的固定值。每个血之面纱的基础值固定且唯一。 缩放值:该伤害会根据精神(MND)属性的高低而增减。 黑暗恩赐:基础值与缩放值的增加值。决定黑暗恩赐的强度。 基础值:血之面纱的固定值。每个血之面纱的基础值固定且唯一。 缩放值:该伤害会根据意志(WIL)属性的高低而增减。 F - 防御 当受到攻击且未格挡时,这些不同数值将帮助减少所受伤害。此数值为血之面纱的固定且唯一属性。在适用情况下,还会附加角色的属性加成。G - 平衡值 你的平衡总值(血码提供的平衡值+血之面纱提供的平衡值),决定你的攻击被打断的难易程度。 H - 抗性 你对游戏中各种异常状态的抵抗能力。此属性为固定值,且每种血之面纱的抗性都各不相同。 VI. 武器数据表及解读方法
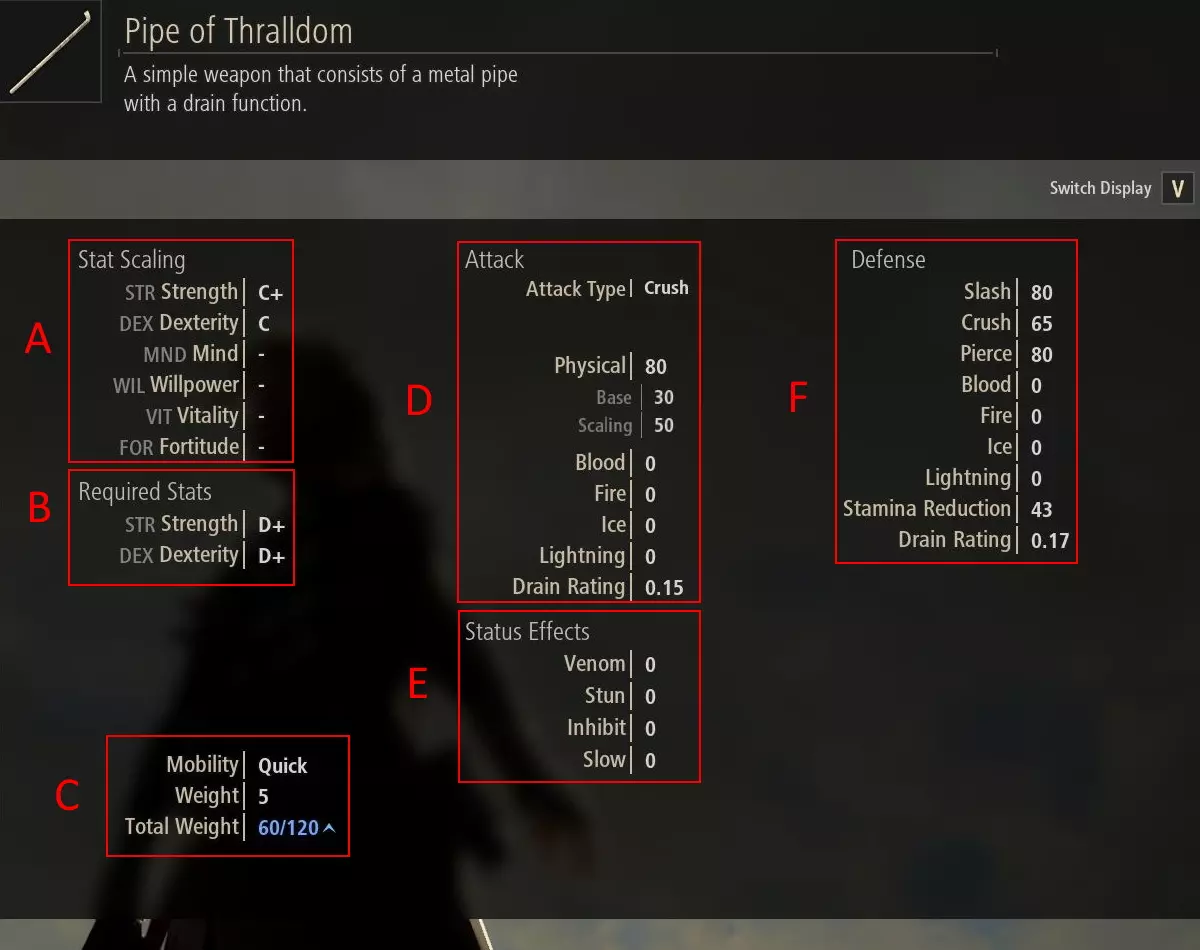
A - Stat Scaling The stats that will let you bring out the most damage out of this weapon. The higher the corresponding stats the more damage your weapon will do. B - Required Stats If you do not meet these stats your effectiveness with this weapon will be 10% of what it should be. C - Mobility and Weight Mobility is the current mobility you have with this weapon, Weight is how heavy that specific weapon is, Total Weight is both Blood Veil and weapon weight added. D - Attack Attack Type : which of the three physical attack types this weapon does. Note that some weapons have two different types. Physical : combined value of both Base and Scaling. Base : this damage is the flat damage of your attack, determined by the weapon and unique to it. Scaling : this damage is going up or down based on how well your stats mesh with the scaling marked in A. Both values are enhanced upon upgrading. Drain Rating : how much Ichor you will gain with your normal attacks when they connect. This is the most important value if you play something heavily reliant on Ichor. E - Status Effect The values of how much of each effect you add on attack. Once you have stacked the value high enough with multiple attacks the enemy will get afflicted with the corresponding ailment. The higher the value the faster you stack said ailment. F - Defense Slash, Crush, Pierce, Blood, Fire, Ice, Lightning : the values that will be used to decrease damage if you block with said weapon. Those values are multiplicative and not additive, so if you have 100 in a particular stat and block an attack checking said stat, you will take no damage. Otherwise, blocking will always result in chip damage being done to you. Stamina Reduction : unfortunately named, this stat is extremely important if you play a tankier build, as it effectively reduces the stamina needed for a successful block. Contrary to what the name may imply, higher is better. Drain Rating : how much Ichor you will gain per successful block. VII. General Archetypes If you need general guidelines, this should be it. Warrior : you want to build around STR and use weapons that scale with this stat. VIT, and FOR are both really important a well. On top of that, look out for Blood Codes with a heavier weight allowance if you want to be fast on your feet, and higher Balance if you want to use two-handed weapons. Two-handed weapons can take a while to swing for the heavier ones, and the Balance stat will help you actually go through with an attack even if a stray hit lands on you. Ichor allowance is not too much of a problem, but do not underestimate the attack gifts of two handed weapons as they are extremely devastating if they connect. Rogue/Swashbuckler : DEX, obviously, but pay particular attention to weight allowance of Blood Codes and weight of weapons. FOR is also very useful for the Stamina you will expend while dodging. Having a Quick Mobility weapon can be an insane boon that you should definitely look out for. Look for DEX reliant weapons. Ranger : with the use of Bayonets, you can have a projectile weapon, but each shot will cost Ichor. Also, not all Bayonets share the same bullet pattern, and some act like a shotgun on Charged Strong Attack while some fire a long-range but slow projectile. DEX will help, FOR as well, but importantly pay particular attention to the Drain Rating as you will spend Ichor. Mage : WIL is the general offensive Fireball-in-your-face option here. High WIL, and a Blood Code with a big Ichor allowance, as well as high Drain Rating on your weapon (and your Blood Veil if you can). Because of the reliance on spells, the damage of your weapon is not as relevant, only how much Ichor you can drain while you are in melee. The offensive stats for Mage archetypes are actually the Gifts values of Blood Veils. Those are just general ideas and I highly encourage you to break free from those archetypes and find something you enjoy playing. The flexibility of the system in Code Vein is amazing and allows you to do specific setups that work just for you, so I advise you explore said system and build your own loadout. This is in case someone needs more direction to begin with more than anything. If you really want optimal builds, we have search engines to help you with that. VIII. Tips and Tricks - If you've never played a Soulslike/Soulsborne game : take it slow. Slow and steady wins the race, here included. Take the time to explore and master your kit before going for long stretches. Those games are not as hard as they are punishing, but only if you are unprepared or careless. - The game loves ambushes. Seriously. If it looks like an ambush, it's probably one. - Look up, down, left and right. There is stuff everywhere. - Breakables often hide various things, so break what can be. - Ladders that can be lowered will drastically alter the level and are one of the most important aspect of exploration. Keep an eye out of those. - You can dash up and down ladders. - Healing takes somewhere north of 10 000 years and heals for little. Healing too soon can leave you exposed to another attack, so mind your timing. - If you don't remember killing it, a tap or two to check doesn't hurt. - Attack Gifts do not cost any Stamina and can be performed as you run out, but they freeze the Stamina bar while being performed. - Blocking reduces your Stamina regeneration, even if no attack is hitting you. - Daggers can help you grab the attention of a foe, but will not push it out of a ledge if it was hiding there. Being extremely common and usable by anybody, use them liberally to force foes to come to you. - Being invulnerable does not make you untargetable : watch out for the moment you come out of invulnerability as someone might be readying something. - Companions provide different boons and different utility, try each and find what suits you the best or who you like the most. - If there is a boss, there is a Mistle nearby. - Bosses can be staggered and during their stagger do not get a resistance boost. Make the most of those moments. - Minibosses, unlike bosses, can be both backstabbed and Aerial Drain'd. - The game does not show you Gift values, so if you are interested in those you either have to try it out or look around internet. Some Gifts have values far above what you might expect. - Don't be afraid to try out new stuff, and once you find something you like, build around it. - Using the mirror in the Home Base will let you edit your appearance, and if loading a saved appearance you can even change things you can't usually change once the game has started.

如果你不知道该做什么,基地里的这块公告板会为你指明方向。

基地中的温泉可以让你重看过场动画,如果你无法或不愿取回失去的雾霭,还能取回一半,但代价是另一半将永久失去。

- 据我所知,游戏里没有该死的宝箱怪,所以箱子里真的是战利品,不会让你吓一跳。 - 如果你不介意剧透的话,网上有很多攻略,不过我已经尽力在写这篇攻略时不包含任何剧透。这里有两个有用的攻略:Reepz的物品价值指南、イーディス的全方面指南。 希望这篇攻略能对你有所帮助。祝你在《噬血代码》中好运!