


羽羽斩
羽羽斩

TA什么都没有写

 发帖达人Ⅰ
发帖达人Ⅰ羽羽斩
游戏档案
0
玩过游戏数量
0秒
总游戏时长
动态

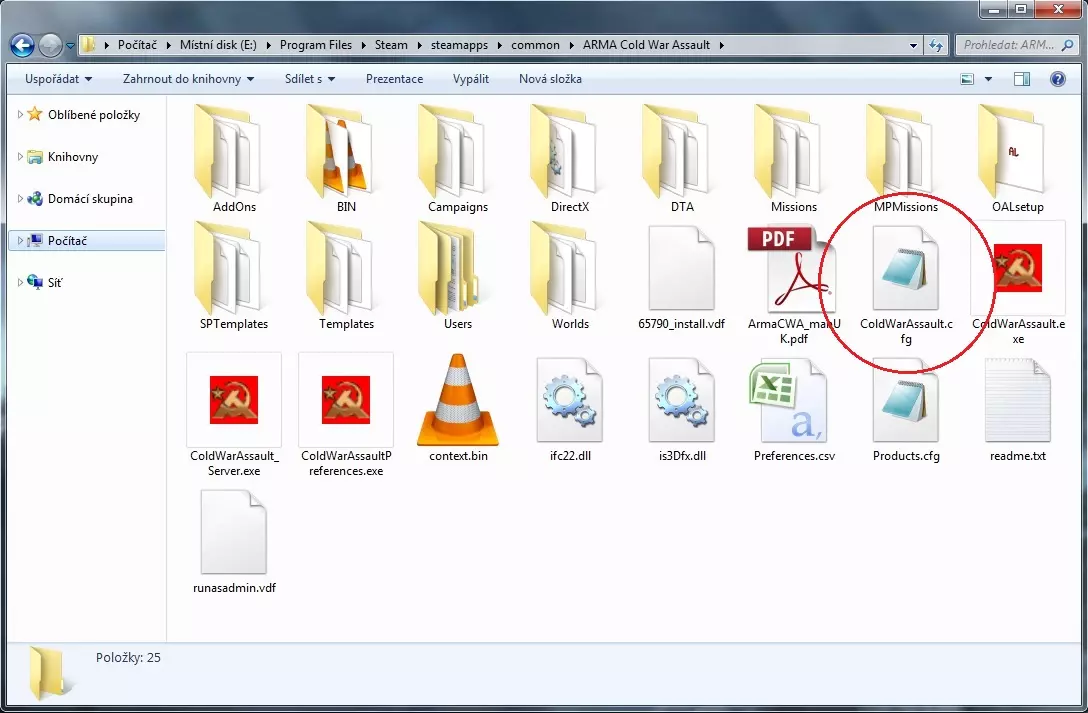
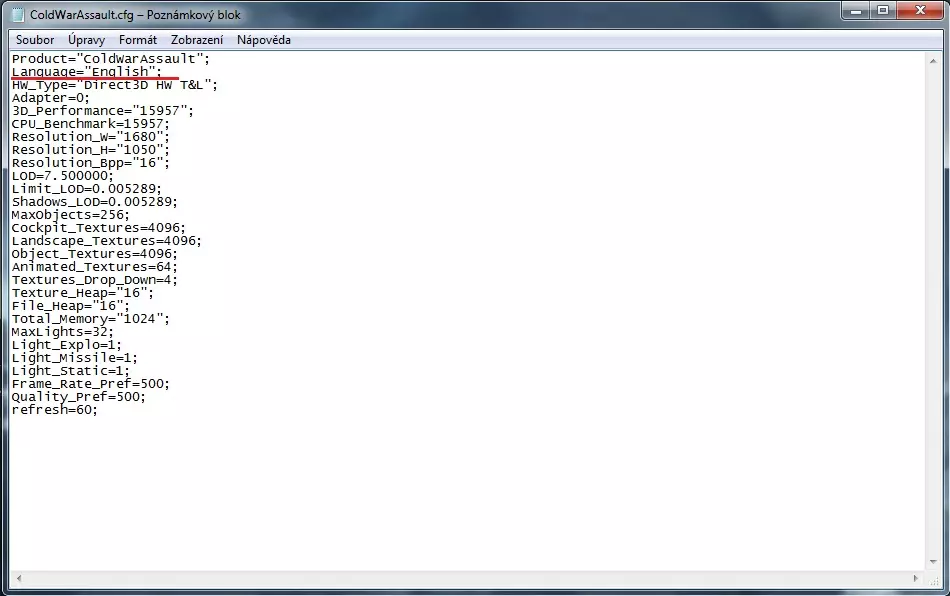
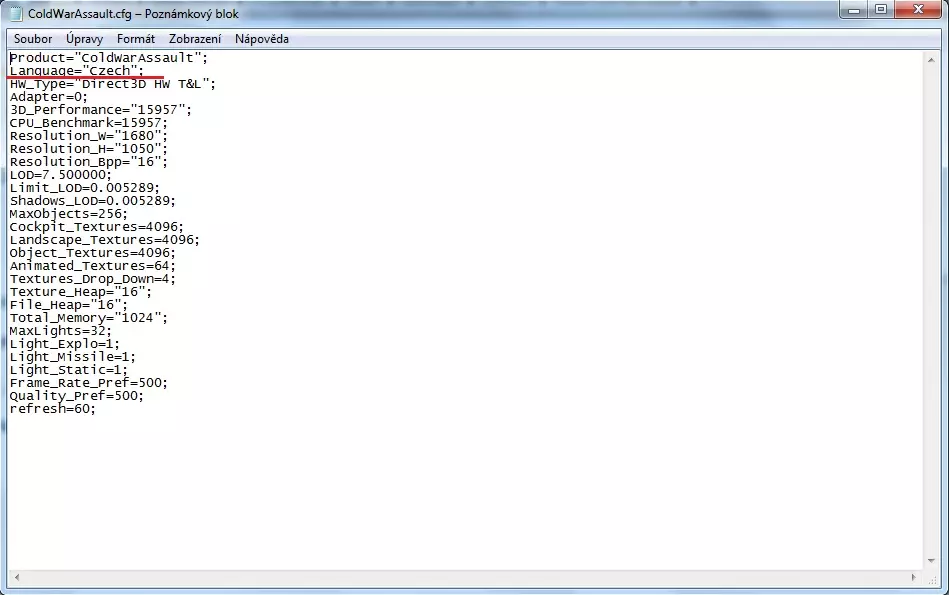
《武装突袭:冷战突击》默认设置中没有捷克语选项。不过游戏内存在捷克语字幕,好在有一个简单的启用方法,具体步骤如下: 教程 在游戏的主文件夹(标准路径为C: Program Files (X86) Steam steamapps ARMA Cold War Assault)中,首次以英语启动游戏后,会出现ColdWarAssault.cfg文件。用记事本或其他编辑器打开该文件,找到Language="English";这一行,将"English"改为"Czech"。保存更改后,下次启动游戏时就应该是捷克语了。
注意事项 + 配音说明 尽管此方法能启用原始捷克语标题,但游戏中部分文本(例如独立任务的描述)可能仍为英语,且完全缺少原版《闪点行动》所包含的捷克语配音。不过,希望这种形式的捷克语本地化至少能满足您的需求。 捷克语配音文件以及本应包含配音的捷克语版本任务,可通过额外下载获取。 感谢QiN3TiX的提醒 来源 此方法最初由波西米亚互动工作室的社区及公关经理David "Dwarden" Foltýn于2011年在BI论坛上描述。本指南更像是一种提醒,并在Steam指南中加入了更为详细的操作步骤。
无创伤后应激障碍击杀步兵 操作指南 闭上眼睛。 扣动扳机。 不要多想。 专注于扳机。 不要多想。 步兵感觉不到疼痛。

第一种方法: 要在《英灵神殿》中使用拍照模式,只需执行一个操作。在冒险的任何时刻,你可以按下【Left-Control + F3】,此时你的HUD会完全消失。请注意,你需要再次按下【Left-Control + F3】才能让HUD恢复。如果不这样做,屏幕上将不会显示你执行的任何操作。这包括访问您的制作菜单和物品栏,因此如果您处于危险环境中,不建议使用拍照模式。 第二种方法: 执行与第一种方法相同的操作,然后按F5键打开开发者控制台,并输入以下命令:devcommands,接着输入freefly,然后就可以自由操作了。
虽非100%完整,但会有所帮助。 简介 我以侦探身份在第三难度下玩了这款游戏,想分享一些生存技巧。游戏中有许多机制并未解释得很清楚。我会讲讲经验值及其使用方法、说服的重要性以及战斗机制。 经验值与属性:如何获取与分配 经验值是唯一可用于升级的值。可通过固定数量的怪物战斗、调查以及说服他人加入来获得。由于敌人不会重生,经验值的获取量是固定的,因此正确使用经验值非常重要。有一个非常重要的事情需要了解,那就是随着剧情的推进,提升属性的经验值消耗会增加。一开始提升一项属性需要消耗3点经验值,进入主精神病院后会变成6点,进入地下墓穴时则会增至9点。因此,在进入新区域前——通常是在击败一个主要 Boss 之后——花光所有经验值是非常重要的,这样可以避免出现从之前区域获得大量经验值,却要为所有东西支付双倍成本的情况。幸运的是,敌人也会提供更多经验值来平衡这一点,而且还会解锁新的技能。尽管几乎所有敌人都可以避开,但无论这听起来有多困难,我建议你在进入新区域前消灭所有敌人,并几乎用完所有经验值。记住,如果你在战斗中勉强存活并消耗经验值进行休息,无论如何你都会有一定的收益。 经验值也可以用于休息,并且在高级区域中,休息所需的经验值会增加。建议只在紧急情况下或 boss 战前使用经验值休息,因为通过利用防御机制,你可以在每场战斗结束时保持满血状态,这一点我稍后会详细说明。 物品也可以转化为经验值,有时这是一件很重要的事。 如何分配经验值? 虽然我稍后会解释原因,但重要的是要立即分配点数以获得【说服】1级天赋。之后,应专注于提升生命值以利用防御机制,并提升勇气和战斗能力来造成伤害和进行防御。如果你想使用智力进行攻击,应提升该属性而非战斗属性,并立即购买技能【心灵冲击】。 拥有伙伴的重要性 你应该用最初的6点经验值立即购买【说服1】。这个天赋是增加队伍获得新伙伴的唯一途径。如果前期没有它,你很快就会失去另一名队员。由于游戏在第二章难度很高,独自行动是不可能完成游戏的。此外,在地下墓穴的末尾,说服能力再次变得至关重要,它能让你获得第三名队员,而且是一名极其强大的队员。 防御和生命值是生存的关键 防御是游戏中一个解释不足但对生存至关重要的机制。防御机制与其他角色扮演游戏大不相同,在那些游戏中防御通常只会减少敌人攻击造成的伤害。而在本作中,角色防御时会恢复生命值和魔法值,这是最佳的免费治疗方式。游戏没有明确说明的是,防御所恢复的生命值百分比与角色的最大生命值成正比。因此,前期至少将生命值提升至60点非常重要。这样一来,通过防御恢复的生命值就能轻松超过所受到的伤害,使你的角色近乎无敌。 这对于避免通过休息来消耗经验值也非常有用。当只剩下一个敌人时,只需一直防御直至完全恢复,然后再将其消灭即可。利用格挡机制是生存的最佳方法,通常唯一的死亡原因是受到负面状态的不幸影响。掌握这个简单技巧能让游戏轻松不少。 技能与战斗 对于侦探来说,基础技能【精准射击】非常实用,它能降低敌人的物理防御(勇气值),偶尔还能造成流血效果。在通过格挡回复生命值和能量值时,这应该是你的主要攻击手段。 第一个支援角色彼得虽然没什么用,但可以充当治疗者和减益施加者。尽快购买【恐惧话语】技能,它对降低 Boss 或能提升自身物理攻击的敌人(如僵尸)的物理攻击非常有用。此外,在地下墓穴中,【神圣祝福】技能能完全治愈一名角色,非常实用。彼得在击败第二个 Boss 后会变得更有用。在回答关于寻找学生的问题时,如果说服力足够,他将获得一项有用的技能,该技能能同时提升角色的物理和魔法防御力。 第三个角色是一名灵能战争机器,既能治疗又能造成高额伤害。千万别错过她! 秘密(开发中) 特定战斗和 Boss 可以通过特定技能避免: - Boss 1:未知 - Boss 2:拥有【调查 2】技能后,你可以在战斗前射击一个桶,直接将其击杀! - Boss 3:使用【说服 2】可以招募玛丽亚(强烈建议!) ... 秘密 Boss 和逃脱路线: 如果你在游戏初期尝试逃离精神病院,可以前往守卫房并解锁主大门,但前提是之前已经尝试过逃离。这将触发一场秘密 Boss 战,进而触发一个秘密结局。进入地下墓穴后,此路线将无法使用。
Vel及其他《索拉斯塔:法师之冠》DM创作者制作的有趣战役和地图列表 简介 本指南列出了有趣的《索拉斯塔:法师之冠》战役。 向下滚动,还有许多其他创作者(DM)的内容可供查看。 如果你刚开始体验《索拉斯塔:法师之冠》的DM内容,建议查阅索拉斯塔爱好者维基上的自定义模组游玩指南。 选择你的风格 你想玩哪种风格的战役?以下是各类别中的优秀战役: 开放世界:Vel Explorer 经典桌面DND:Silverquick制作的Ruins of Ilthismar 地城探索:Vel Ode to YendorRoguelite RunVel 逃离索拉斯塔 - 一款Roguelite游戏 Short and Sweet, Low LevelDagalothar冒险:Farron矿坑(作者:Solanchi) Dungeon Crawl地牢制造者之冠1(作者:SirmadnessTV等人) Vel的索拉斯塔战役与地图 Vel探索者 难度:普通 特点:非线性“开放世界”探索,等级1-12 战利品:适中 核心玩法:探索 游玩时长:15至35小时Vel Ode to Yendor 难度:普通到困难 特色:地城探索,等级1-12 战利品:少量 核心玩法:晋升 游玩时间:>30小时 -- Vel Leverage Remastered 难度:中等至极难 特色:史诗故事,等级1-12 战利品:非常丰富 核心玩法:战斗,探索 游玩时间:15至30小时 -- Vel Escape from Solasta 难度:中等至极难 特色:类rogue,快速升级,数小时内达到1-12级 战利品:中等 核心玩法:速度,战斗 游玩时间:2至15小时 --Vel 山丘之王 难度:中等 特点:仅限12级,新增DM功能 战利品:普通 主题:喜剧 游玩时长:1-5小时 -- Vel 把他们带回来 难度:极难 特点:大型地图,内容丰富 战利品:非常丰厚 主题:战术战斗 游玩时长:3-10小时 -- CODM - Vel 难度:困难 特点:小型地图,内容丰富 战利品:中等丰厚 主题:战术战斗 游玩时长:2-5小时 -- Vel 的所有创意工坊内容。 其他创作者 你可以在Steam上找到最受欢迎的战役列表。 Silverquick是一位多产的创作者,制作了许多忠实于龙与地下城(D&D)战役根源的战役。如果你是创意工坊的新手,可以从【伊尔西斯玛尔遗迹】开始体验。 【九指的格威迪恩的蠢事】是另一个备受玩家喜爱的作品,它的故事性很强,不过采用的是旧地图物品的呈现方式,而非新战役模式。 【Sirmadness举办的地下城制造者之冠比赛】中有许多精彩的参赛作品,都是可供游玩的单张地图。 【Tscharod的幽暗森林】是一个不断扩展的战役。【Lucky13的后启示录怪物杀手】则是一场有趣的地下城冒险。 资深玩家会喜欢【Vincto的铁人训练营】。 【Innil的英雄之墓】是另一个受欢迎的地下城探索类作品。 【Cervando】的一些作品能带来原汁原味的龙与地下城(D&D)体验,并且氛围营造出色。SirmadnessTV制作了多个优秀的战役,其中包括广受欢迎的开放世界【霍尔登·伯格编年史】,该战役有英语和法语版本。
这或多或少是我选择做的一件事,目的是突出那些在其他地方没有真正被提及的特殊事件。 开始阶段 在刚开始,完成教程后,如果你开始你的第一个任务,并且除了完成任务之外什么都做,当你回到出生点时,你会发现那些声称这里是死者领地的人现在就在那里,谈论着不要吵醒“她”。如果你进入然后离开,在你离开之前,你会看到一个教程中的敌人跑过去。 军事基地
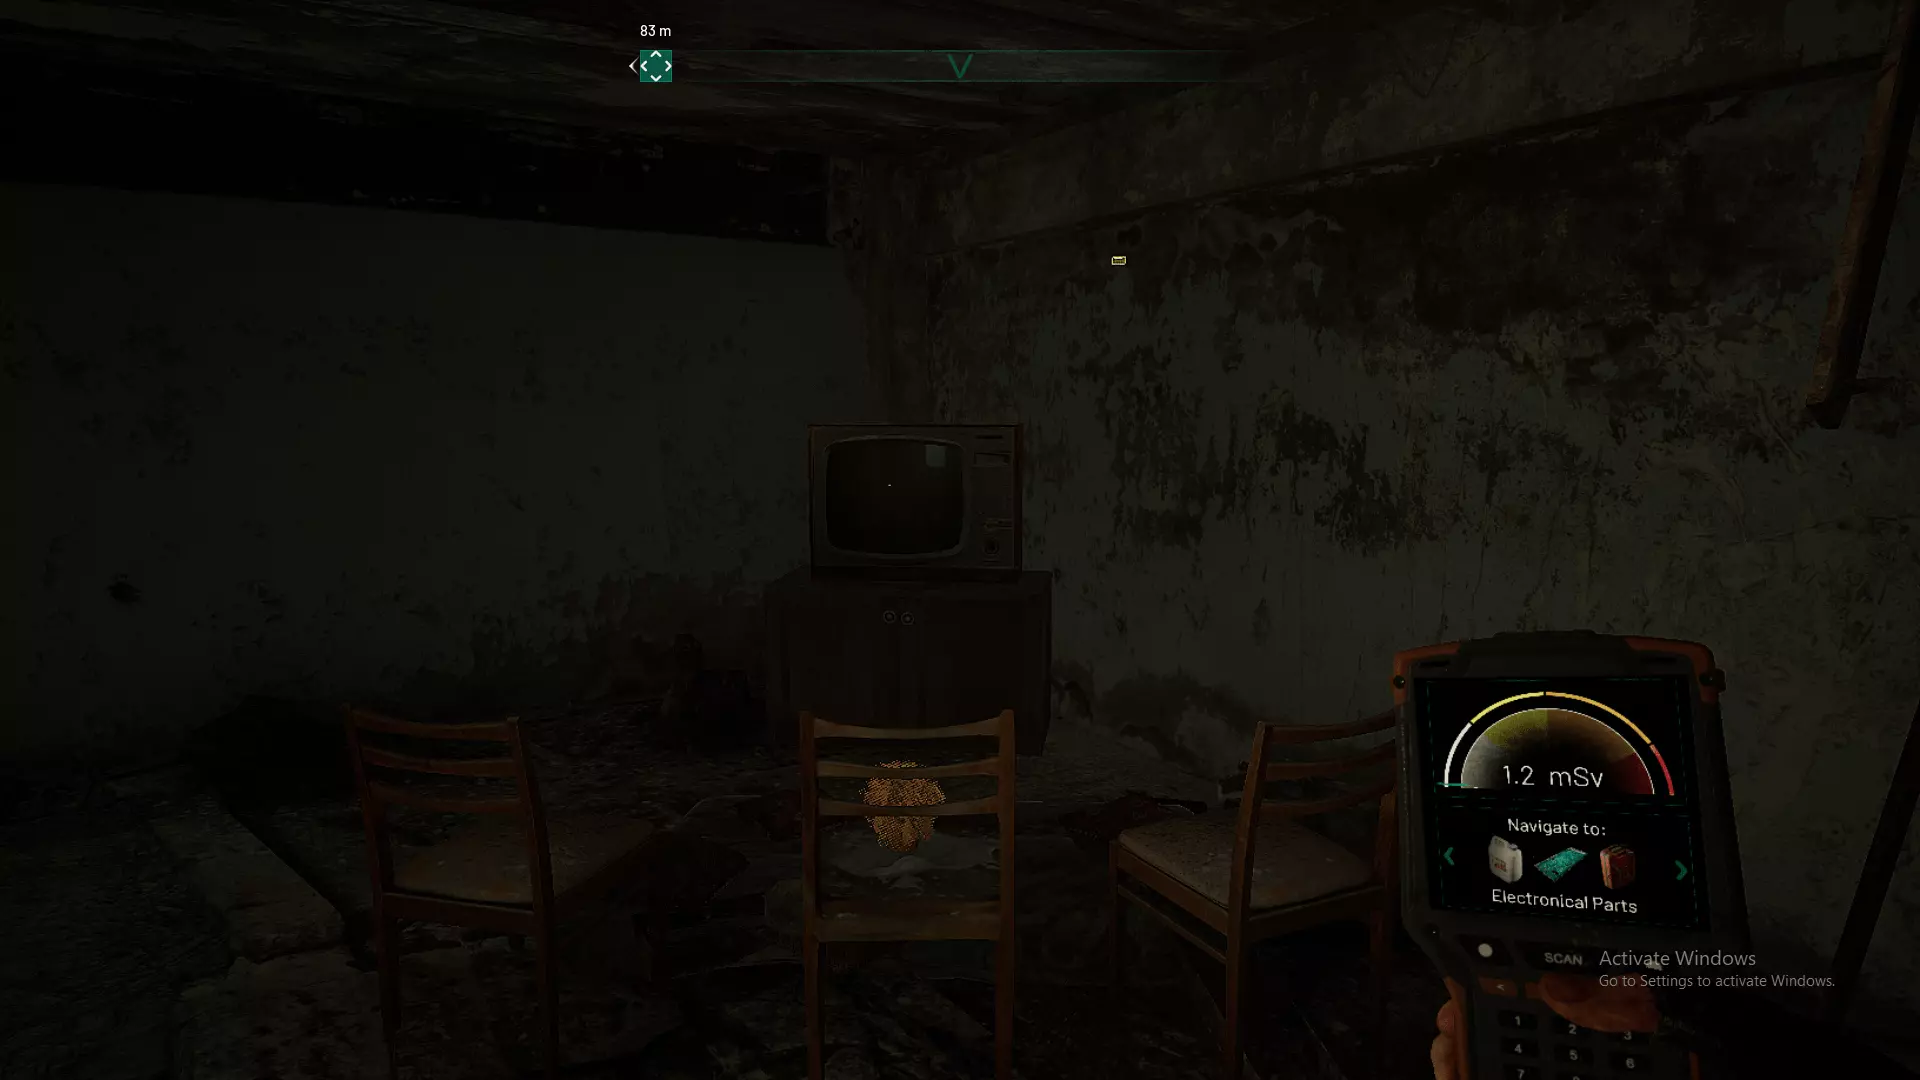
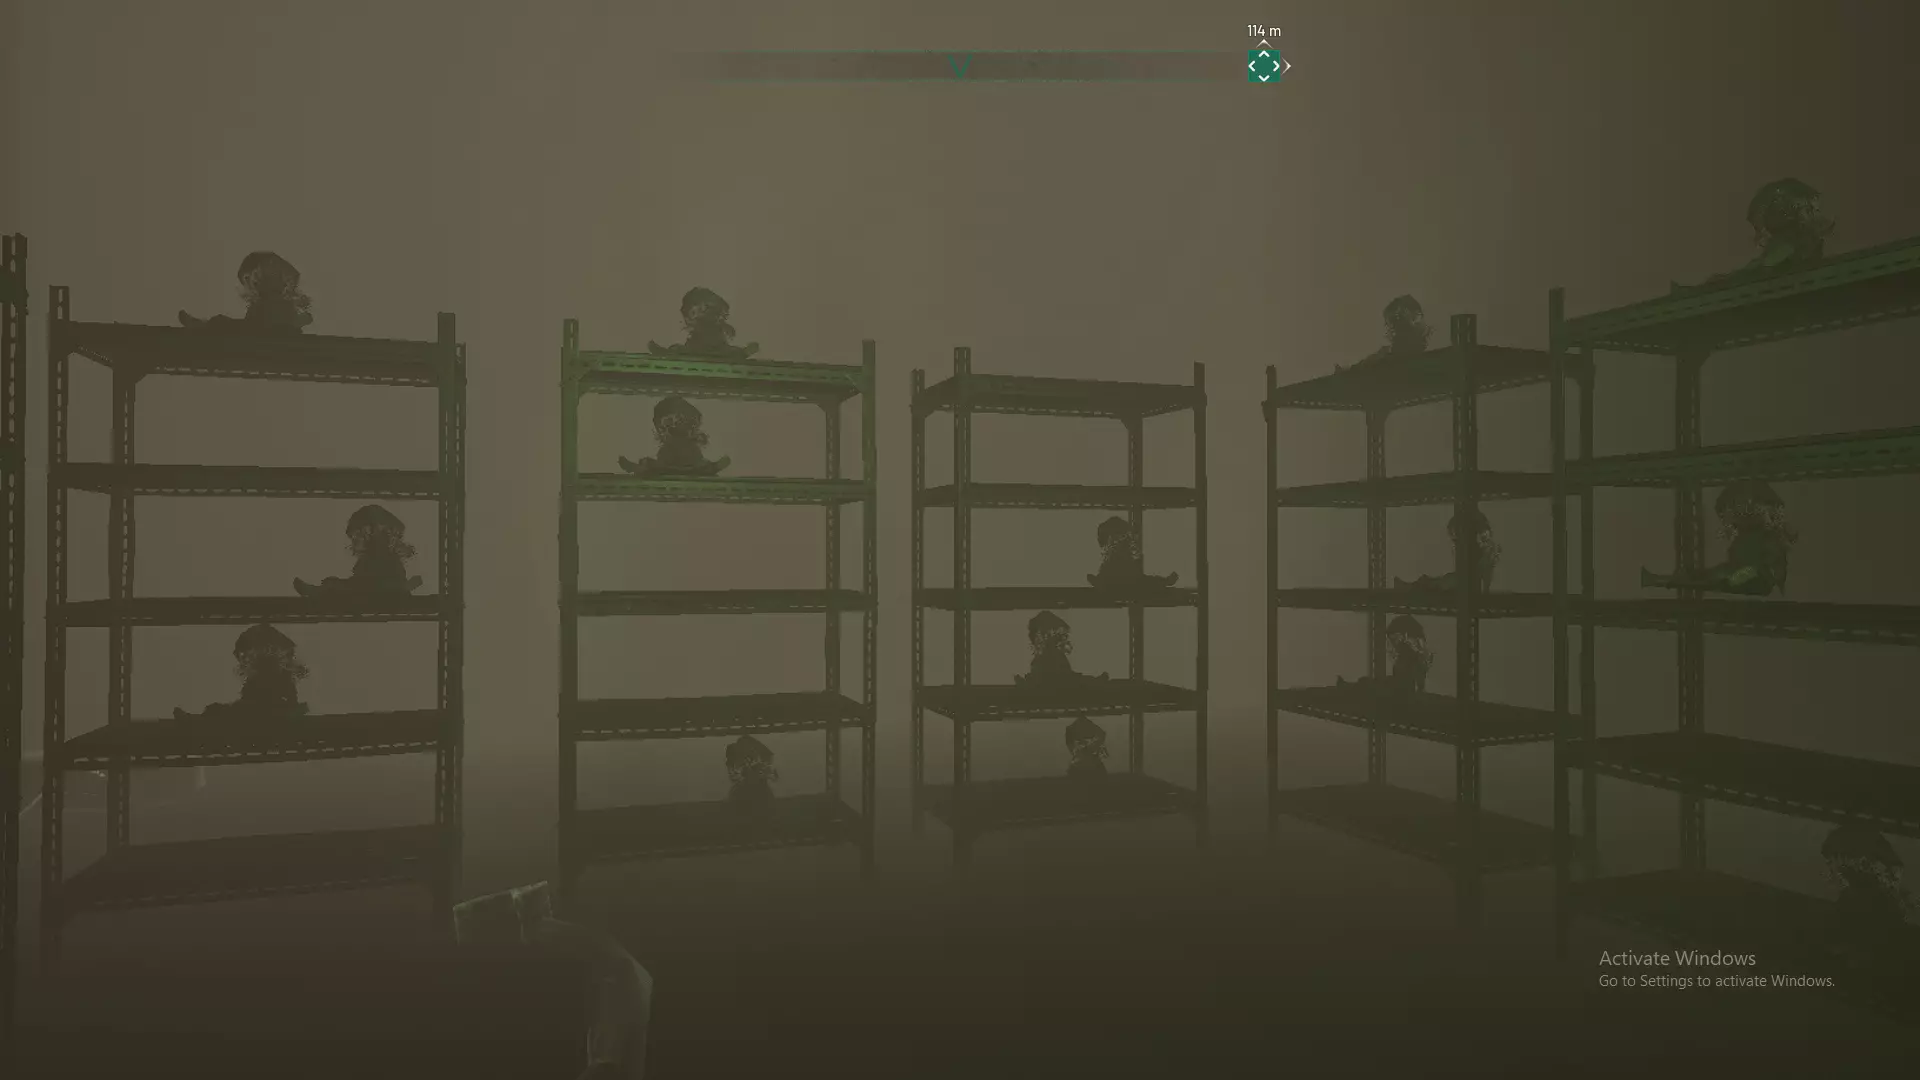
军事基地里有一个地方,你能发现一大堆玩偶正看着一台电视。如果你靠近并关掉电视,会出现一个小小的惊吓,之后一切恢复平静,回到之前的状态。塔季扬娜
接到请求并前往塔季扬娜要求的地点后,在探索一条小路(该地图的迷你标记之一)时,你会发现上述地点。 剧透旁注: 如果你与士兵交谈并放他走,就能救下他。用于释放他的切尔诺贝利石就在汽车正前方。 理论:蜂巢意识 按照塔季扬娜的要求行动后,在另一个标记点有一个疯狂挥舞着枪的男人。与他交谈,他的话语会变成塔季扬娜的声音。对话结束后,他随即开枪自杀。我认为这很可能是《切尔诺贝利人》中创造的蜂巢意识的一部分,这个蜂巢意识由核爆炸导致的熔毁中丧生的死者组成,塔季扬娜也在其中,这也是为什么只有那些拥有切尔诺贝利石的人才能听到她声音的原因。这也是她在一开始要求你不要按下按钮的原因,如果你按下了,你就会重温切尔诺贝利核爆炸发生的那一刻,否则这一幕不会发生,这暗示着那天是你按下了按钮,而且过去不会改变,即使你不按下按钮,塔季扬娜和那些声音也同样经历了这一切。
这是你开始为《玩具大作战》创建模组所需的第一份指南。其中还包含了所有模组合集指南以及其他信息,方便模组制作者轻松浏览各类不同的指南和教程。 ★《玩具大作战》:玩具箱介绍★ ★《玩具大作战》- 玩具箱:关卡创建编辑器和沙盒模式。你可以直接在《玩具大作战》游戏内创建地图/关卡,并发布到创意工坊。如果你仅打算使用官方游戏内物体来创建地图/关卡,则无需遵循以下模组指南。 你必须接受Steam订阅协议才能上传和发布你的玩具箱。
【玩具大作战】MOD制作工具介绍 【玩具大作战】的MOD支持功能已随2022年12月10日推出的【玩具大作战:五周年纪念版】一同上线!现在你可以成为【玩具大作战】的MOD制作者!创建并与他人分享你的玩具作品! 玩具世界是无限的,你可以将各种类型的玩具组合在一起,不用担心它们看起来不协调。 这正是【玩具大作战】MOD的特别之处,你可以同时融合二战玩具、中世纪玩具、太空玩具以及其他类型的玩具……因为它们都只是玩具,这正是它们的特别之处,不会破坏任何世界观,反而能融为一体!《玩具大作战》模组的另一大特色是,你可以轻松地将各种不同的模组添加并组合到一个玩具箱创作中!这样一来,玩具箱构建者和模组构建者社区就能携手合作。为了确保你的玩具箱关卡创作能正常运行,你还需要列出所使用的模组,这也是向模组构建者致谢的好方式!视频教程即将在N7T-GAMES的YouTube频道上线。在进行模组制作时遇到问题或疑问,开发者或社区或许能为你提供帮助。上传和发布模组前,你必须接受Steam订阅协议。请记住,使用模组会增加你的电脑内存占用。游戏将把所有【已启用的模组】加载到您的电脑内存中 首次设置(简易教程版本)
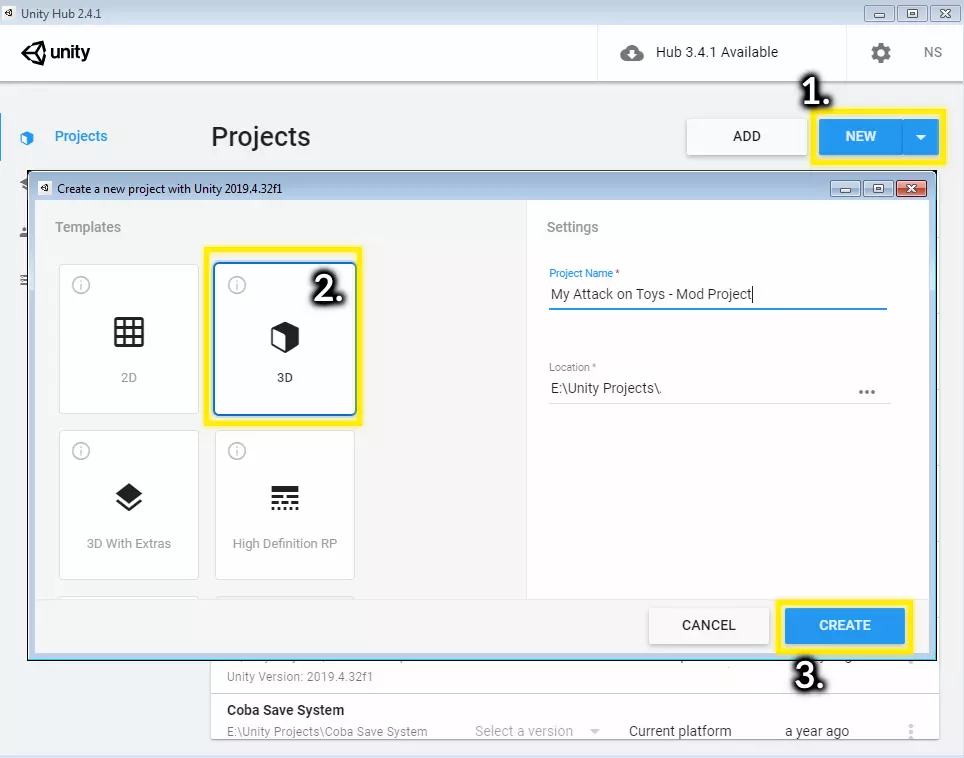
⚑ 首次设置 下载【玩具大作战】- 模组制作工具:在您的STEAM®库的“工具”中下载(必需) 下载Unity 2019.4.41f2:通过Unity Hub或Unity编辑器安装程序获取(必需) 下载Blender:Blender 2.79b(可选,或使用其他3D软件) (确保.blend文件默认运行,并且至少以管理员身份运行一次Blender以避免错误) 注册Adobe Mixamo:(可选)(使用Mixamo有助于生成动画并以最少的工作量移动您的3D士兵模型!) 下载Paint'net:Paint'net及附加组件包1、附加组件包2获取Add-ons Pack-3(可选,或使用其他2D软件) 下载Audacity(可选,或使用其他音频软件) A. 创建 - Unity空项目
B. 从Steam库的【工具】中下载玩具大作战:模组生成器
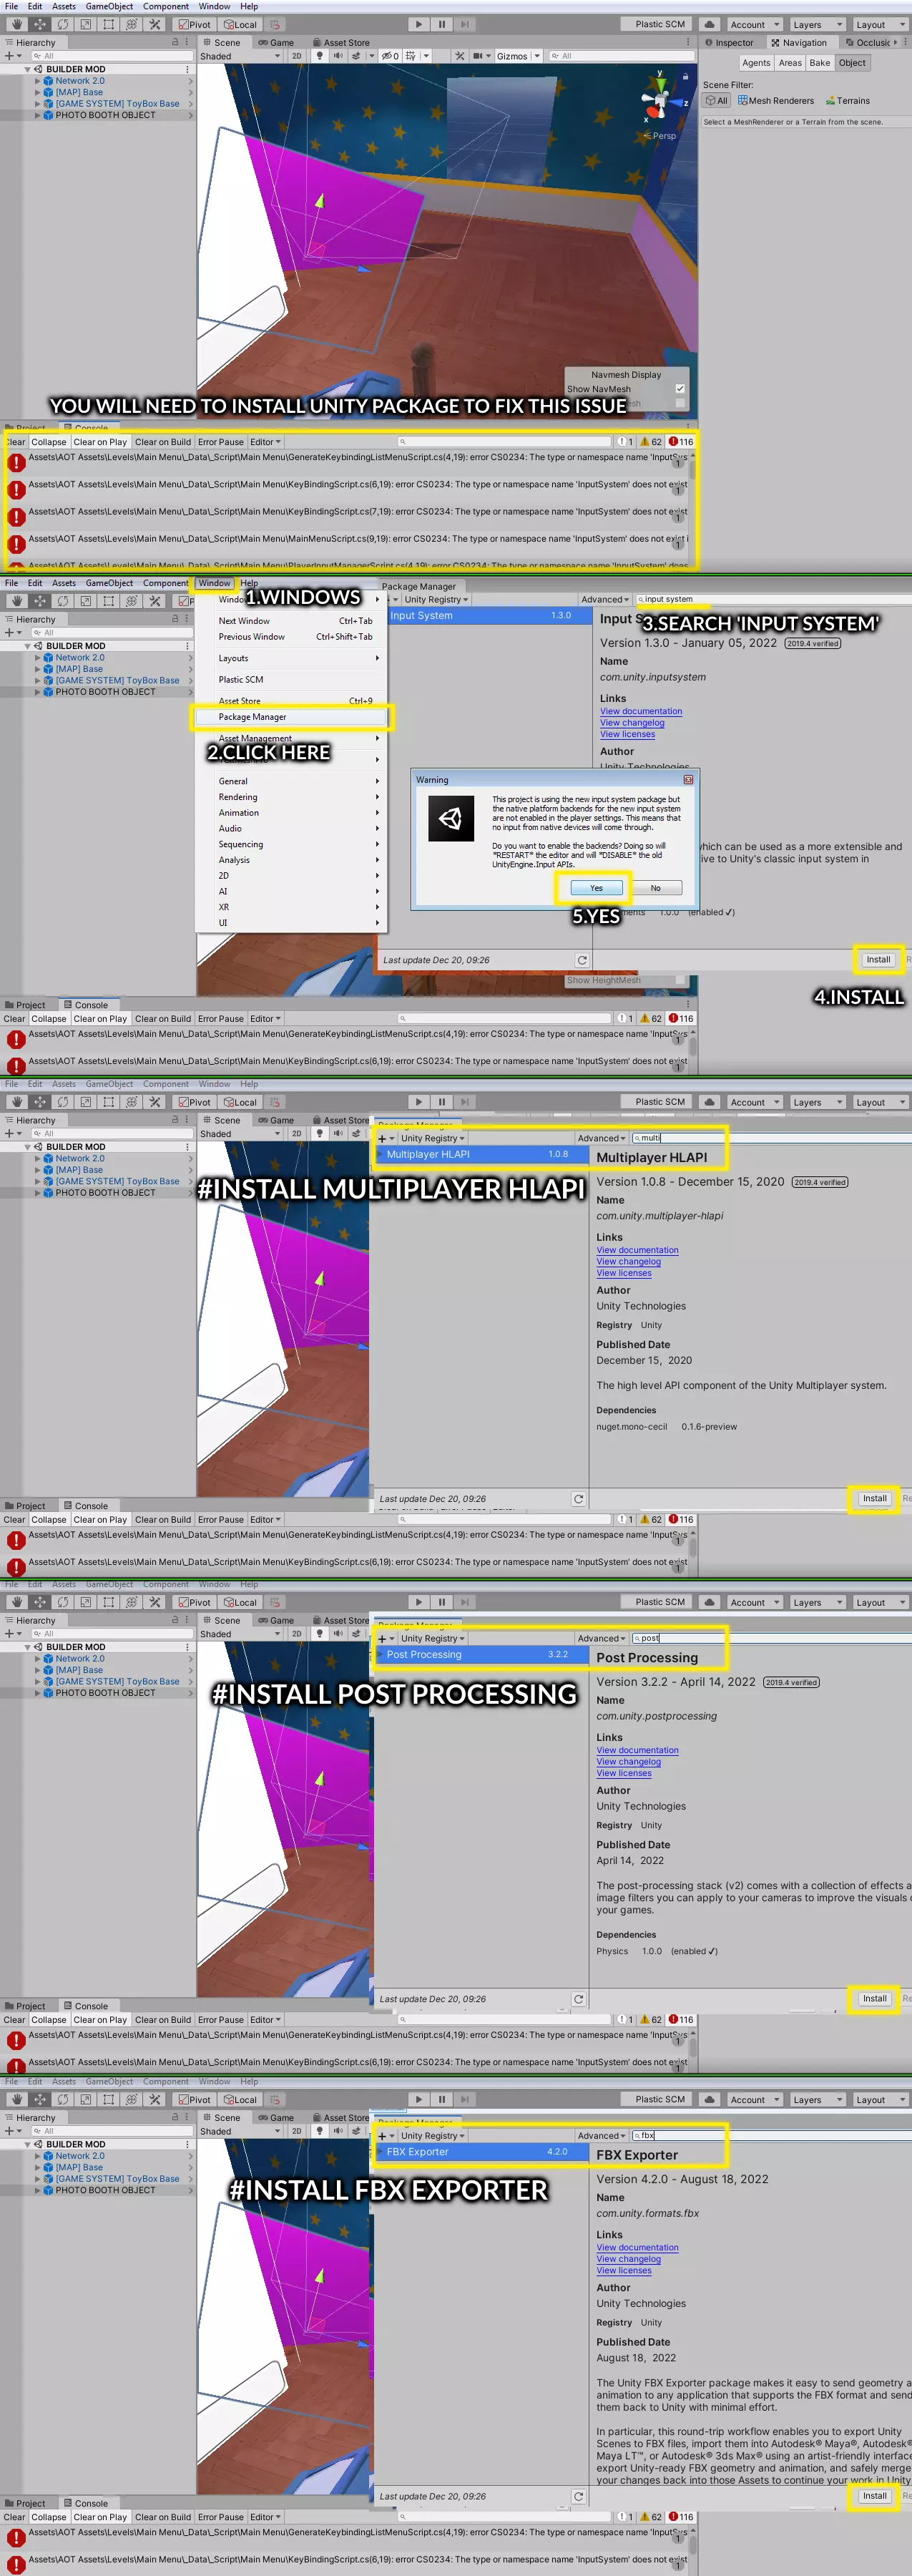
C. 下载 - 所需的Unity包
D. 修复深色着色器/阴影 - 将伽马值更改为线性
●《玩具大作战》-模组构建工具包含以下部分文件:《玩具大作战》-模组构建工具.zip:解压并将内容移动到你的Unity空项目中。如果你想更新Unity项目中现有的模组构建工具,可以再次使用此步骤。 • 示例:将Unity项目中之前的4.08版本模组构建工具替换为4.12版本 《玩具大作战》(模组项目示例):一些已完成的模组项目示例,你可以将其用作参考,以便轻松复制并根据示例项目修改部分内容。按照步骤5到步骤7的相同操作来安装模组项目示例。 《玩具大作战》4.0菜单模组测试器:测试游戏模组并设置你的我的模组菜单 《玩具大作战》4.0 快速模组测试卧室:快速测试游戏模组“卧室地图” 玩具大作战 4.0 快速模组测试水域:快速测试游戏模组“水域地图” ★ 作弊码 按住【Z】并按下【C】:获得塑料硬币 按住【Z】并按下【左Ctrl】:恢复生命值 按住【Z】并按下【Tab】:为当前武器补充弹药 按住【Z】并按下【Q】:解除物品武器限制 按住【Z】并按下【V】:解除载具驾驶限制 • 这些实用的作弊码可能有助于测试你的模组! ⚑ 首次设置你的Unity项目
Mod测试器【Attack on Toys.exe】路径示例: • C: Program Files Steam steamapps common Attack on Toys Mod Builder Attack on Toys.exe • C: Program Files Steam steamapps common Attack on Toys Mod Builder Attack on Toys 4.0 Quick Mod Tester Bedroom Attack on Toys.exe • C: Program Files Steam steamapps common Attack on Toys Mod Builder Attack on Toys 4.0 Quick Mod Tester Water Attack on Toys.exe 你可以将【Game Tester】设置为在构建Mod后立即启动Mod测试器,这样就能更快地测试和调试你的Mod! 完成啦!现在是时候开始你的Mod创作冒险了! 【玩具大作战】:官方N7T-GAMES MOD指南合集 部分指南仍在制作中,很快就会更新!• 入门指南: 《玩具大作战》:玩具盒指南(仅游戏内关卡创建器)(可选,与模组制作无关) 《玩具大作战》模组:基础规则、3D及模组预制件复制 《玩具大作战》模组:Blender基础3D功能及快捷键(即将推出) 《玩具大作战》模组:官方资源及模组常规设置 《玩具大作战》模组:轻松为士兵创建动画 • 模组创建指南: 《玩具大作战》模组:道具与地图 《玩具大作战》模组:玩具音效 《玩具大作战》模组:子弹(可选)(即将推出) 《玩具大作战》模组:武器 《玩具大作战》模组:玩家物品(教程即将推出) 《玩具大作战》模组:玩具士兵 《玩具大作战》模组:玩家与进度 《玩具大作战》模组:玩具载具《玩具大作战》模组:玩具载具空中型(教程即将推出) 《玩具大作战》模组:玩具载具水上型(教程即将推出) 《玩具大作战》模组:玩具塔 《玩具大作战》模组:玩具塔商店(教程即将推出) 《玩具大作战》模组:玩具塔出生点(教程即将推出) 《玩具大作战》模组:玩具塔入侵生成器 《玩具大作战》模组:玩具塔总部(教程即将推出) 《玩具大作战》模组:玩具能力(可选) 模组指南最终确定中: 《玩具大作战》模组:档案数据与描述 《玩具大作战》模组:幽灵与出生点设置 《玩具大作战》模组:玩具烘焙与最终步骤! 《玩具大作战》模组:错误与故障排除

羽羽斩
简介
TA什么都没有写
发帖达人Ⅰ