换一换
换一换 


关于熔火残部氏族的全面深入讨论。卡牌策略、机制解析以及充分利用你华丽烛灵的指南! 简介 大家好!我是一名《怪物火车》老手和狂热爱好者,希望分享数百小时游戏中积累的经验,既有胜利的喜悦,也有惊险的时刻。本指南面向游戏新手和老玩家,旨在帮助他们扩展对《怪物火车2》各氏族的了解和运用。如果你已是专家,可能不会从中获得太多新内容! 如果你是《怪物火车2》的全新玩家,对游戏系统尚不熟悉,且难以取得胜利,我建议先阅读我的新手指南,其中涵盖了多种主题,可能有助于你开始提升游戏表现。

《怪物火车2》新手入门指南 此类其他指南可在此处获取
火裔氏族战略指南
放逐之城 氏族策略指南
月神女巫氏族战略指南
地下军团氏族攻略指南
拉撒路联盟氏族战略指南
地狱号角氏族攻略指南
苏醒氏族攻略指南
冥府守卫氏族攻略指南
暗影氏族攻略指南
无官方中文译名,无法准确翻译,故删除。

熔火残党与蠕虫氏族说明 本氏族指南在描述策略时不会固有地假设契约等级,但由于我们常玩契约10并定期对抗泰坦,一些偏好会融入本指南中,因为某些在低等级“还行”的策略在后期可能效果不佳,而有些卡牌/策略在更高难度下比其他的更能克服严峻挑战。总之,让我们来讨论一下组成熔火残党的那些偷窃盗贼和华丽的资产阶级吧! 卡牌稀有度关键提示:(C)=普通,(U)= uncommon,(R)=稀有 熔火残党:概述

Overview: Let’s hope you had a good life before, because it turns out your social status carries with you to the underworld! Measuring in equal parts Peaky Blinders & Downton Abbey, the Melting Remnant is a clan full of wax, flame, and ruin, who both feeds off the defeat of others and grows stronger with their own demise. Whether their flame burns out or someone pummels them into oblivion, they can be back at full Health ready for another round at a moment’s notice, giving players a new strategy for both surviving and countering the hordes of enemies in the game. Largely lacking in big flashy damage spells, they instead support your run with loads of high-Health tanks, multiple ways to earn Gold throughout your run, and a host of debilitating effects to shut enemies down. And even when all seems lost, a single re-lit flame may be all it takes to turn the tides of battle!... as long as you don’t let it burn out again =) Offensive strategies: Melting Remnant solves problems entirely with melee weaponry, including good ol’ fashioned fists! Wax-fists. Essentially, that means most of what Melting chooses to do is simply Attack their way through enemy lines, and win by simply swarming the enemies with Attack damage. That’s somewhat of an oversimplification, mind you… one of their support Tomb units does a hefty explosion of damage that’s hugely powerful when it’s offered, and there’s a few offensive spells in their deck, though they’re limited solely to the Uncommon tier of cards. They also have a unique spell that instantly destroys a random non-boss enemy, which is a delightful trick to pull out of your hat when staring down Avowed Gladiators & Terrifying Amalgams. Their unique Reform effect strengthens your units, multiple of their units allow you to grow in power throughout the fight through various means, and there’s even a scattered array of Attack boosts and Rage in the clan as well. Defensive strategies: Melting Remnant is a clan with tremendous defensive presence on the battlefield, from its host of Champions and Banner units with big Health pools, to its ability to completely resurrect defeated units with full Health, and even its ability to easily clog up the battlefield with disposable blockers. The Remnant are mighty defenders of the train due to their combination of extremely hearty units, and the fact that it’s the only clan that can have the entire train of allies wiped out without fear of losing the battle entirely. Interestingly, they go even a step further, having some defensive buffs & debuffs available in their kit through some very powerful Daze & Stealth effects, giving you yet more ways to keep the fight going. There’s a famous phrase about one’s ability to kill a creature, and let’s just say: Wax doesn’t bleed. Stat-influencing strategies: Numerous stat-gain effects are present in this clan. Their unique Reform effect directly increases the stats of defeated units, although this effect is gentle compared to some others we’ll mention. One Champion & one Uncommon unit gain both (potentially huge amounts of) Health & Attack throughout the battle off Harvest triggers. Another Uncommon unit gains Attack alongside her Burnout effect. Multiple Spells & Champion paths exist for increasing the Attack values of your units. The exiled Champion has a path that also buffs the Health stats of all allies on her floor as well. And both her and a Rare unit have some permanent Attack-scaling paths as well. Stat gain is a viable path to simply overwhelm your opponents with numbers, and this clan is loaded with stat boosts. Support strategies: It would almost be quicker to list the effects they don’t have. The most unique effects they have is the ability to gift a unit Endless (otherwise limited to a Mechant of Steel upgrade and one rare Celestial Alcove event), and to clear away buffs & debuffs, which is incredibly strong as this game is loaded with onerous enemy effects. Though most of their effects are scattered and not frequently seen throughout the deck, Melting Remnant has: Ember gain, Ember discount, Gold gain, Card Draws, Descend, Daze, Stealth, Rage, and even a tiny bit of Healing/Armor/Spikes. One way or another, Melting Remnant will be able to support your run with useful effects! Sweep/Backliner Strategies: Maybe you saw this coming with all the positives above but yep, here we’ve reached Melting Remnant’s biggest weakness. Remnant has precious few ways of hitting backline enemies, and many of those that do exist will not even show up until the run progresses beyond Common cards. There are no traditional sweepers in this clan, and the effects that do any Sweep damage are limited to a single spell, a single artifact, and a single rare support unit. Beyond that, there’s only two targeted Attack spells (one of which only works on damaged enemies and is more meant for the Daze effect), and one very-low-Health Champion path with some Spike damage to hit backline foes. You’ll either need to bash your way through the enemy lines, get some support effects from your sub-clan, or be creative with the various support effects offered to you here. Cards Changed from Monster Train 1 Note: Monster Train 2 has a significant escalation in enemy Stats, so the majority of MT1 cards have had adjustments to increase their potency. This section only focuses on cards that have gained new functionality, new restrictions, or changed their properties entirely.

【熔毁之忆】(原是获取余烬的法术)在效果和用途上发生了巨大变化,现已更改为新的房间卡(U)【熔毁纪念碑】,它能使楼层上所有友方单位获得无尽效果。这是该卡牌用法的重大改变,也是一个极具价值的新工具,尤其对于那些在战斗中处于劣势时渴望获得第二次机会的其他氏族而言。

【神圣滴落】现在也会为处于 burnout(过载)状态的单位提供少量攻击加成。这只是一个早期提升伤害的小奖励,因为【熔渣残响】在游戏早期的进攻能力略逊一筹。

【Votivary】现在会在下一回合赠予卡牌+2抽牌(而非立即抽牌),这与【Stygian Guard】的【Offering Monument】之前的改动类似。开发团队最终一定是发现了太多由即时抽牌效果产生的无限连招,因此决定对这些策略进行一定限制。至少现在即使没有【Waxer Snuffer】神器,他也能净增抽牌数了。
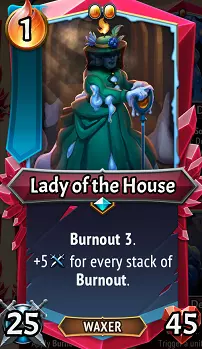
【宅邸夫人】现在会根据其拥有的每一层【倦怠】获得额外攻击力。这也是开发者针对其进攻能力下降所做出的调整,如今这位迷人的夫人无论是【归正】状态还是保持点燃状态(最好搭配【归正者夫人】),都会变得更加强大。

【R】赏金追猎者获得了倦怠1效果,而锻造铁轨DLC补丁提升了他的属性,使其超越了之前的版本。我猜是因为太多玩家一开始就给他使用维克石,所以开发者直接赋予他倦怠效果来帮助他更快提升伤害。 熔渣残响的冠军路线已从《怪物火车》初代的设定更改。

《怪物火车2》熔渣残党新卡牌 相较于在Resolve上触发此效果,教区长闪烁的黑暗召唤路线现在获得了【墓穴召唤I/II/III】技能,让你可以按需获得相同收益。这意味着他不再像《怪物火车1》中那样自动将被击败的单位返回手牌,但这本质上是对其性能的增强:玩家可以灵活选择在自己回合立即重塑被摧毁的盟友,或等到手牌空间充足时再进行操作。此外,配合焰生族的冷却缩减技巧,他能在自己的回合多次使用该效果。总体而言,这是对《怪物火车1》中我最喜欢的英雄路线之一的简单却实用的增强。

【树脂之刃】是一张新的装备卡牌,它能提升该氏族的攻击力,为一个单位赋予多重打击和燃尽效果,但在该单位被击败后会返回你的手牌(类似于拉撒路联盟的嫁接效果)。对于保持该氏族的持续进攻来说,这是一件非常有用的装备!但请注意,当它返回手牌时,其余烬消耗仍为2,所以如果你习惯了改良单位消耗0余烬的话,在单位被击败后继续使用它需要更多的投入。 融化残党独有的效果

倦怠:大多数传统角色扮演游戏会将这种效果称为“厄运”,它本质上是一个计数器,当数值归零时单位会被摧毁,或在战斗回合结束后数值降低。但与传统的厄运效果不同,倦怠严格来说是一种增益效果,可以通过多种方式叠加,比如直接增加倦怠值、来自下层军团的传播效果,或是与同样能提升倦怠值的重整效果配合使用。熔毁残响的许多单位都围绕着高输出的概念设计,但缺点是它们最终会因自身的倦怠值而被击败,这就需要玩家额外进行操作,要么维持倦怠值,要么确保在它们被击败后能够重整。不过,【收获与扑灭】效果也遍布于他们的牌组中,这意味着【倦怠】也能被策略性地用于自动消灭己方单位。此外,游戏中存在一些效果,仅会强化身上带有【倦怠】效果的友方单位,若友方单位的生命之火因该效果而逐渐燃尽,其性能将获得额外提升。最后需要注意的是,【拉撒路联盟】的【复活】效果存在独特的互动机制,该效果可防止单位被消灭。如果处于【倦怠1】状态的单位即将因【倦怠】效果被消灭,他们会消耗一层【复活】层数,而【倦怠】计数器将保持在1。

Reform: Crazy to think that Necromancers spend so much time on the dark arts when all they really needed was a mold and a bit of wax. Reform drags your defeated creatures back from the abyss, restoring them to full Health, granting them an additional +5 to both Attack and Health, a reduction in Ember costs to 0, and uh, a “free” Burnout 1 for their troubles. The tooltips importantly clarify that these effects persist through the rest of this battle… meaning your resurrected Spear Steward that’s now burning out for will remain burning out this battle even if given Endless or Reformed again, but fortunately is not “forever a candle” heading into the next battle. By default, the Burnout 1 given from Reform is rarely a good gift to your defeated allies, as the majority of units do not have any Burnout, thus dooming them to a single turn back on the train before they’re defeated again. This is meant to be a price to pay/punishment for bringing any unit back from the dead. However, Reform’s effects are cumulative, so even if that Burnout 1 Spear Steward is defeated/burnt out again, Reforming it again will now have a unit that’s Burnout 2 and has gained +10/+10 in stats from Reforms as well. Further, multiple Melting Remnant units have additional reason to pursue this strategy, either because they have Burnout by default (e.g. (U) Lady of the House has Burnout 3 by default. If Reformed, she comes back to life with Burnout 4 instead), or because they have Extinguish triggers, so Reforming them and having them defeated repeatedly is part of their strategic use. Merchant of Steel: Wickstone: +15 Attack +5 Health & Burnout 1. Remember Battlestones?! Anyway, this is a nice unique upgrade for two reasons. For one, it’s a nice, cheap upgrade that significantly increases the performance of units like (C) Draff & (C) Dreg, and even (U) Lady of the House. Two, it can be given to units that don’t have Burnout to deliberately have them trigger Extinguish quickly. Particularly if playing with Little Fade and her array of (C) Primitive Mold cards, it might help to have some units Burning out by default to increase their performance. Burnout vs. Reform vs. Endless If you weren’t exposed to these waxfolk in MT1, there may be some confusion about how best to utilize these various effects. The answer?... It depends! =D Thanks for coming to my helpful TED talk. Anyway, how you approach keeping your units alive & functioning properly will often come down to the composition of your deck and what you want out of the unit in question. So I wanted a specific section to discuss the ramifications of each of these. Burning out and extending Burnout: Units with Burnout on them typically have higher-than-normal stats compared to typical units of their size & Ember costs, and the Burnout status in this case is meant to be a penalty – the game’s way of stopping you from having an army of cheap, powerful units everywhere on the train at once. One strategy to combat this is to simply increase their Burnout to keep them alive longer: use cards like (C) Wicklash, (C) Purifying Cleanse, or (C) Hallowed Drippings to keep them in the fight, or pair them with a (U) Lady of the Reformed. It’s worthy of note that only a single unit in the game actually tangibly benefits from increasing Burnout stacks, the powerful (U) Lady of the House. Otherwise, Reforms are a valid strategy in place of this. However, if you’re not utilizing Little Fade’s (C) Primitive Molds, it’s important to realize that Burnout-extending effects are more common early on than Reform. So keeping them around on the train by extending their Burnout may be the ideal way to mitigate this strategy… losing four Burnout units in a round and only pulling one Reform spell is a lot riskier than simply “re-upping” their Burnout ahead of time. Further, there are other buffs like Rage from (U) Paraffin Enforcer & the Fade’s First Blade artifact, or effects from your other clan that might be on your units… it’s a lot better to keep them around enjoying those buffs rather than being defeated and Reformed to “start over” without any other buffs. Reform and Deliberate Defeat: Particularly if you’re not boosting up your Burnout units with strong buffs, Reforming comes with some very noteworthy benefits over the added maintenance of extending Burnout. For one, a Reformed unit is 0 Ember, which is awesome since this applies even if you’re reforming a normally-6-Ember Shadowsiege. They’re fully healed, which can be particularly helpful if your unit was a tank on death’s door, or a backline unit bleeding out from Corruption/Spikes. Knowing the unit is intending to be defeated, you can easily put it in the line of fire to block some hits for more tender allies in the process. Reformed units also lose all other buffs/debuffs, particularly helpful against bosses like Seraph Aeternus the Entropic, who may have Sapped your units to oblivion, and Seraph the Dominant who may have loaded them up with Corruption. Finally, due to the addition of Burnout 1 and a small boost in stats, each successive Reform increases the unit’s performance overall. For example, a baseline (C) Draff unit is 15x2 Attack, 5 Health, and Burnout 1. If Reformed once, it’s now 20x2 Attack, 10 Health, and Burnout 2. Reformed three times and it’s now 30x2 Attack, 20 Health, and Burnout 4! However, crucially, Reform effects are not as common as Burnout extensions early in the game if playing with Rector Flicker. The majority of Reform effects only apply to 1 or 2 units at a time as well, which can make it challenging to maintain a cast of defeated & reformed allies if you’ve had numerous allies defeated. Endless: Though Endless is randomly available in the Merchant of Steel shop, Melting Remnant also provides the ability to add Endless effects to any unit, including Champions, through the use of the Votive Key Artifact, unique Room card (U) Memorial for the Melted, and their (R) Remnant Pact tome. Endless is an incredible benefit to give to a host of units in the game, but also carries some downsides compared to Burnout-extension or Reform. An Endless unit maintains its Ember cost, which can make it difficult to replay a unit. An Endless unit takes up one of the Card Draws for your next hand, effectively slowing your progress cycling through your deck. And for Burnout units, Endless does nothing to increase their performance. In our example above, a Draff Reformed 3 times can do a total of 30>40>50>60 Damage when it’s played each turn, and it costs 0 Ember after the first play. An Endless Draff is stuck at 30 Damage and continues to cost 1 Ember instead. However, Endless doesn’t depend on any other cards to function! Our Reformed Draff example requires you to play a Reform effect three times in comparison. An Endless card dutifully returns to your hand immediately, which is a fantastic benefit for Tank units that are defeated and have left their backline allies exposed. It’s also a lot more reliable for defeating bosses during the Relentless phases, as an Endless unit is guaranteed to be in your hand for Round 2; a Reform effect is only guaranteed if you’re utilizing a Holdover or Permafrost effect. Finally, as mentioned in the Reform section, if you have numerous allies dying in battle, it may not be plausible to have 4 Reform effects drawn into your hand to replenish their ranks, so something like a room full of Endless units in a (U) Memorial for the Melted Room may be a more reliable effect. There’s even a host of Melting Remnant units that have no Burnout effects at all – Endless is simply a more reliable effect for them than starting them on a Burnout > Reform cycle. Finally, for units meant to be Extinguished, Endless & Burnout 1 (say, from the Wickstone Merchant of Steel upgrade) can be an amazing combo. The unit gets played, Burns out in a turn even if the enemies fail to defeat it, you gain the benefit of their Extinguish trigger, and they’re back in your hand to repeat again next round! Okay but which is best for which units? …it depends! =D I’ll make a point when we discuss each unit if they have any strategy that’s stronger than others. But in many cases, the answer is it will simply depend on the kind of effects you’ve taken in your deck. To wit, a unit like (U) Lady of the Reformed is a poster child for “anything works”. You can simply heal her up and keep her Burnout going to function as a tank. You can let her be defeated and Reform her with a bit of extra Burnout/Health to keep going. Or you can give her Endless and have the guaranteed option to Draw & replay her once defeated to keep her effects going. Conversely, something like Wickless Baron blatantly favors Endless as a strategy, since he gains huge stats while alive and gains no special benefit from Reform/Burnout. Should I grab a Melting Remnant banner? Melting Remnant Banner thoughts: TANKS!! Ahem. Melting Remnant has a big preference for high-Health units, with only two of their Banner units effectively being low-Health damage dealers. As with many things in this game, that distinction is malleable, because high-Health units like (U) Lady of the House & (U) Wickless Baron can also have incredibly strong offensive presences. As with many other clans, there’s a fair amount of synergy in the effects of Melting Remnant Banner units, so I would never hesitate to grab one of these if playing Remnant as my primary clan. However, there’s still some potential dead-pulls here. It’s perfectly possible that your early seed of cards & Common spells taken don’t heavily feature Burnout or Reform effects, and 50% of Melting Remnant’s Uncommon units feature effects based around Burnout. The other half are agnostic to it, but there’s at least that risk that you get an underperforming unit because you had no Burnout/Reform effects to capitalize on their performance. Despite that, I don’t think that’s a huge concern. The majority of these Banner units cost 1 Ember, are 2 Size, and have good stats, allowing them to fit into most builds even if not performing their best. This is among the “safer” clans to grab a banner from, in my opinion. Finally, because of Remnant’s “meat & potatoes” approach to Attacking its way through enemy lines, the majority of its Banner units cry out for Multistrike as an upgrade, so consider if your existing ranks don’t also have units crucially begging for a Frenzystone upgrade! Keep that in mind as we discuss Melting Remnant Banner Units! Melting Remnant Banner Units: Uncommons pt. 1 Uncommon (U) Banner Units:
家族女士:拥有极高的初始属性(召唤时攻击力实际至少为40),并具备【倦怠】成为有利状态的专属效果,这位优雅的女士目前在战场上是令人畏惧的存在。不过,【倦怠3】的效果不算太强,因为相比普通的劣魔,她在战场上只剩下一回合,所以她的发挥必须以延长【倦怠】状态或让她【重塑】为前提。由于在游戏初期可能会出现多个施加【倦怠】的法术,你应该能较早判断是否能为她提供支持。如果可以,你将获得一个强大的单位,既能轻松承担肉盾坦克的角色,又能展现出残暴的进攻能力。升级/搭配:多重打击是我最喜欢给她的升级,能让她在燃尽状态下的手杖攻击多个敌人。给她装备一块烛火石效果很好,可以提升燃尽状态和当时的初始攻击力。如果她需要承受伤害或担任坦克角色,大晶石是个不错的选择。如果和【U】归正女士搭配,我甚至很乐意使用小块晶石,因为你可以在天界井复制她,在归正女士身后形成一排小型燃尽强化的角色。说到搭配,【U】归正女士和【U】石蜡执行者是非常棒的盟友。最后,如果出现【R】树脂之刃装备,那一定要兴奋起来,因为它赋予的多重打击和燃尽效果对她来说非常出色。倦怠-延长/重塑/无尽/维持:倦怠-延长优先于重塑。由于她的攻击力会因倦怠而提升,她是游戏中唯一能通过叠加大量倦怠层数来自然变强的单位。优先延长倦怠,若无法实现,则将重塑作为备选方案。

革新女士:另一位持有《火爆狂飙3》的普通女士,但这有点误导人,因为她会在复仇时延长自己的燃烧状态。她拥有40点的可观生命值,很容易持续触发复仇效果,除非你用太多坟墓阻挡她。她的效果是少数能可靠维持战场上燃烧单位数量的方法之一,因为在【神圣滴落】(C)中只有一个法术能同时延长多个单位的燃烧状态,而【火光小消退】需要无尽/革新才能反复触发效果。总的来说,这使得【改良者女士】仅凭属性就是一名可靠的坦克,是【(U)家族女士】的绝佳盟友,并且如果你希望让其他【倦怠】单位(如【燃烧牧师弗利克】、【(C)渣滓】或【(C)德拉夫】)在战斗中坚持更久,她也非常有帮助。 升级/搭配:总的来说有很多潜在选择。传统的坦克型升级,如【泰坦石】、【大宝石】、【心石】都很有效。虽然她本身体型不算特别大,但如果你想在她身后部署大量【倦怠】单位,【小块石】也不错。【烛芯石】升级能温和提升【倦怠】/攻击/生命值,还算可以,但如果你希望让她和盟友的【倦怠】效果大量触发,【二元论】则尤其强大。对于常规功能来说可能有些多余,但如果她身后有【U】家之主,那就相当不错了! 倦怠-延长/重塑/无尽/维持:说实话,这些在这里都能用。如果她身后的盟友特别脆弱,无尽可能比重塑的随机性更受欢迎。否则,重塑她并保持她的治疗状态/延长倦怠的效果相似。

石蜡执行者:“你这些蜡烛看起来真不错……要是出点什么事就太可惜了。”好吧,我刚意识到这个玩笑不太成立,因为他其实是让你的蜡烛变得更强。不管怎样,这位执行者是个混合型辅助,拥有一些适中的属性,必要时你可以把他培养成坦克。他的攻击触发效果对自身来说毫无意义,除非他获得了燃尽状态(最有可能是通过【C】鞭挞之焰或小火光小 fade),这个效果其实是为了帮助他身后那些“不友好”的蜡烛,尤其是像【C】德拉夫这样的单位。他发动攻击,他那些处于燃尽状态的伙伴就会变强。大致就是这样——如果你完全放弃了燃尽单位,或者没有空间把他放在燃尽单位所在的战场上,那抽到他可能就是个废卡。不过它的体型/属性仍然比持盾侍从要好。 升级/搭配:如果想提升他的 buff 效果,多重打击和二元论都可以使用。如果需要坦克,泰坦石、大石块和心石等升级能让他存活更久。最适合给他的装备之一是无氏族(U)的铁舌装备,这会赋予他横扫效果,每次攻击都能触发多次“打击”……配合上述的多重打击或二元论,这将带来巨大提升。此外,将他与任何 burnout 攻击者搭配,都能增强你的战斗能力。倦怠-延长/重塑/无尽/维持:他的狂怒效果不会对自身生效,除非他获得倦怠状态。因此,从技术上讲,如果你重塑他并在之后延长其状态,就能从他身上获得更多的进攻能力。否则,无尽是最佳选择。 熔毁残响旗帜单位:非普通单位 第2部分

石蜡暴徒:如果说《熔火信徒》中的守财奴无论表现如何都能为你逐渐积攒一些金币,那么石蜡暴徒则是来“打”出金币的——每次触发击杀效果就能获得可观的30金币。它拥有极高的基础攻击力40,在游戏初期相当容易达成击杀,帮助你的回合获得一些现金注入以便购买更多物品。10点生命值使它成为两个无法真正承受伤害的熔火残党旗帜单位之一,因此大多数情况下需要安全地躲在其他单位后面。重要的是,要让它在后期保持实用性,就需要一些支援,因为熔火残党的大多数强化手段要么是对燃尽单位的增益,要么是重塑策略,默认情况下这两种都不适用于石蜡暴徒。因此,该单位在早期非常强大且有帮助,但如果没有辅助,其表现将被拥有其他提升实力途径的单位超越。 升级/搭配: - 多重打击有几个好处,部分原因是40×2的攻击伤害相当可观,而且这能让他有机会击杀多个单位以获取更多金币。 - 力量石完全可以用来进一步提升他的初始攻击力。 - 火焰石会赋予他单次 burnout(过载)效果,若没有可靠的重整能力则存在风险,但与小火光小 fade(微光)搭配时是一种可行策略。 - 速度石也可以作为选择,但要记住,敌人的波次往往会将坦克单位放在前排,他可能无法一击击杀坦克。和我们其他的石蜡伙伴一样,无氏族(U)铁舌非常强大,因为他在横扫敌人时会触发多次击杀效果。如果你玩的氏族组合能提供尖刺,甚至可以给他装备巨石和尖刺,因为尖刺造成的击杀也会算作击杀触发效果。我最喜欢的用法是让他装备铁舌时搭配多重打击和迅捷——我们在解决遗迹后方敌人问题的同时还能赚得盆满钵满! burnout-延长/重塑/无尽/存活:让他活下去!在大多数情况下,重塑这家伙并不是特别好。无尽对他来说也没什么作用。如果你想将【倦怠值】给他,用于【倦怠值】增益策略,例如配合【石蜡执行者】、【火光小 fade】或【fade 的第一之刃】神器,那么维持他的【倦怠值】将是此技能的最佳用途。

无面男爵:神圣成长,蝙蝠侠!不要被男爵不起眼的初始属性所迷惑,因为在收获阶段每项属性+5是一个巨大的逐回合提升,尤其是这一效果同时适用于敌人和盟友的死亡。最佳搭配是能稳定击败后排敌人的效果,以及像(C)渣滓和坟墓这样可牺牲的盟友,男爵可以在战斗中实现从零到英雄的转变,随着其所在楼层单位的死亡获得大量攻击和生命值。如果不使用渣滓,你可能需要来自副氏族的一些支援才能充分发挥他的潜力,因为在死亡和破坏频繁的楼层,他的表现会显著提升,而且他通常需要几个回合才能用自己的手杖造成那样的效果。升级/搭配:对于这个角色,你有两种主要发展方向。【多重打击】是将其转变为进攻威胁的非常稳妥的选择,因为在多种构筑中,每回合多次获得+5攻击力都很容易实现。如果你想让他成为前排护盾,【大块石头】和【泰坦矿石】是不错的升级选择。【无尽】在这里也特别好用,因为每次【收获】触发的属性增益在他被击败后,都会延续到【无尽】形态上。【渣滓】、【德拉夫】、【坟墓】以及其他氏族的可牺牲盟友都非常适合搭配他,能让他在自己的战场上从这些单位的死亡中获得额外收益。熔火残部在清理后排敌人方面并不擅长,因此其最佳表现在于你获得弥补这一缺陷的能力时,例如其他氏族的横扫效果、为地面上的坦克施加尖刺、使用攻击性法术清理敌人,或为其某个盟友赋予无氏族【U】铁舌。 倦怠-延长/重塑/无尽/存活:无尽无疑是这里的最佳选择。在首领战中,只需在每层让其无尽复制体重新投入战斗,就能轻松过关。

无烛大亨:嘿,一个金钱坦克!到目前为止,所有产金的旗帜/支援单位都是后排,但这次熔渣残部又给了我们一种被动收入的方式。大亨令人印象深刻的40点生命值让他能轻松在前排发挥作用,和上面那位无烛伙伴一样,随着他所在楼层的友军和敌人被击败,他能获得越来越多的收益。与男爵不同,大亨除了为盟友阻挡伤害和提供被动收入外,没有真正的成长性或实际增益,所以他在游戏初期表现最佳,此时40点生命值非常可观,额外获得的金币能显著改善你的卡组。和男爵一样,他最适合搭配能可靠击败后排敌人的效果,以及像(C)渣滓和墓穴这样的可牺牲盟友。升级/搭配:大亨实际提升金币获取的唯一途径是让友方和敌方单位在其楼层死亡,而他的【钢铁商人】升级对此并无实质帮助,除非与【觉醒者】阵营搭配以获得【荆棘石】升级。若想让他在游戏后期持续充当坦克,传统的坦克升级如【泰坦石】和【心石】效果显著。【巨石】能大幅提升他的生命值,但这会减少其楼层上可部署的消耗型友方单位的空间。【渣滓】、【德拉夫】、【陵墓】以及其他阵营的消耗型友方单位在此处表现出色,它们在大亨楼层被击败时能为其带来额外收益。熔火残部在清理后排敌人方面并不擅长,因此当你获得弥补这一缺陷的能力时,它才能发挥最佳性能,例如其他氏族的横扫效果、为地面上的坦克施加尖刺、使用攻击性法术清理敌人,或者为它/它的某个盟友装备无氏族(U)铁舌。 burnout-延续/重整/无尽/存活:无尽是目前为止最好的选择。它的增益效果会在被击败时消失,因此重整和burnout对它没有帮助。 熔火残部旗帜单位:稀有 稀有(R)旗帜单位:
赏金追猎者:他是熔渣残党阵营的常驻刺客,也是该阵营对标 Lazarus League 的【重整软泥】的单位。赏金追猎者初始拥有30点攻击力,但这一数值不会保持太久,因为他的设计初衷就是被摧毁,并且理想情况下通过【重整】或【无尽】效果反复被摧毁,每次被摧毁后可获得可观的+10攻击力。他所在的阵营恰好热衷于为盟友提供【重整】和【无尽】效果,这可真是太方便了!他的【潜行1】确保他能在【燃尽1】效果将其送入蜡制英灵殿之前发动一次攻击。除非你在战斗后期才获得他,并且完全没有使用过【重整】或【无尽】效果,否则这家伙绝对是必选单位,因为随着游戏进程的推进,他的攻击力很容易达到极高的数值。升级/搭配:多重打击是此处的首选升级,能让他的十字弩弹匣中装填多支箭矢。如果你希望他快速摧毁坦克单位,速度石是个不错的选择。无尽升级是提升成长的强力选项,因为幸运的是他只需消耗1点余烬;而且如果你不对他进行重塑,他将保持1级 burnout 状态并持续获得攻击力。除了不朽石/无尽升级外,他也可以放入【熔化者纪念堂】房间,每回合获得+10 熄灭值;或者在【神圣大厅】上施加滞留效果,让他在每回合被摧毁后重新回到战场!需要注意的是,如果他总是在一回合内进入 burnout 状态,那么在无情 boss 阶段会非常脆弱,因此可以考虑搭配一些延长 burnout 持续时间的效果或增殖效果。燃烧殆尽-延长/重塑/无尽/存活:你需要他频繁死亡,因此无尽或重塑是理想选择。如果能控制好,无尽的优势在于能触发更多【扑灭】效果,但重塑同样有效,且能让他在对抗首领时表现更佳。燃烧殆尽延长仅在需要他存活更久时有用,例如应对无情的首领阶段。

大泥怪:大泥怪是个敏感的灵魂——他所诞生的这个世界充满暴力,这让他怒火中烧,即便这暴力来自他自己的拳头。戴着俏皮圆顶礼帽的泥怪简直就是台愤怒机器,【收获】属性高达5点,当周围的友军和敌人被击败时,他的攻击力会迅速提升。30点生命值让他能承受几次攻击,也能往坦克方向培养,不过3点体型值和2点余烬值让他比其他熔火残响单位(目前而言)更具操作挑战性。总之,5点愤怒值的提升幅度相当可观,尤其是在能在一回合内多次触发效果,或者获得二元升级的情况下。想办法让他置身于死亡环绕的环境中,他就会开始亲自收割敌人!升级/搭配:再来一个残响,再来一个多重打击升级——有了怒气值的加成,不这么做简直是疯了!小块石对这家伙来说是个不错的升级,还可以和大块石搭配,让他在前线拥有不错的生命值和攻击力组合。二元论能让他的怒气值获取翻倍,所以最具进攻性的组合就是二元论和多重打击。和男爵与大亨一样,他与(C)渣滓、(C)德拉夫、陵墓以及其他氏族的可牺牲盟友搭配效果最佳,这些盟友在他所在的楼层被击败时能让他获得额外收益。熔火残部在清理后排敌人方面并不擅长,因此其最佳表现通常出现在你获得弥补这一缺陷的能力时,例如其他氏族的横扫效果、为前排坦克施加尖刺、使用攻击性法术清理敌人,或者为其某个盟友赋予无氏族【U】铁舌。 燃尽-延长/重塑/无尽/续命:让他保持存活!狂怒是一种增益效果,若他被击败则会消失。改为利用其所在排的燃尽和无尽效果来持续触发收割。

蜡之军团:这蜡也太多了!蜡之军团是个名副其实的疯狂单位,被击败时会生成两个蜡之双子单位,而蜡之双子被击败时还会召唤两个蜡之微粒。这个庞然大物不仅体型为4,会占据大量空间,其新召唤的盟友也会继续占用列车空间,因此会完全堵塞一层。该单位的成长性在游戏中独一无二,任何施加于它的效果都会分裂成多个副本,使效果从初始状态开始变得更强/累积叠加。作为一个单位,它在最终被击败前会触发七次收割效果,但一旦其“军团”形态被击败,就立即符合重塑/无尽的条件。这个思路简单却在实际操作中充满趣味……通过【钢铁商人】或【天穹凹室】的升级来提升其属性/效果,在战斗中增强其属性,为其施加强力增益,配备出色的装备等等——然后当它被击败时,就能看到这些效果自我复制并对敌人造成伤害。 升级/搭配:【微光石】是《怪物火车1》中不易获得的好物,能帮助你在初始阶段或【重塑】时更轻松地将其安排到列车上。不过,它的分身和微粒之后会占据额外空间,所以一旦它开始被击败,这就没那么有利了……除非与大生命石搭配,那样你就有极高的生命值让 Boss 先去消耗了 X) 同样,多重打击在这里非常出色,因为军团的每个新单位也都会进行多重打击。力量石/速度石对进攻很有帮助,如果你想让它在前线坚持更久,生命石也很不错。这是一个非常适合叠加 buff 和装备的单位。它的多次死亡使它成为收割单位的好盟友,尤其是在经过改造后,每个形态都会带有 burnout( burnout 指一种战斗状态效果,通常表现为使用后暂时无法再次触发或属性下降)并持续连锁自我消亡。倦怠-延伸/重塑/无尽/存续:无尽在这里有点冒险,因为它默认4点身材和2点灰烬的设定使其难以轻松重放。如果你想反复触发收获效果,重塑可以奏效,但同样,如果你通过涂抹为其腾出空间,效果会好得多。通常,它最好的用法矛盾地在于既要让它存活,又要让它被击败,这样它的双子和微粒就能蜂拥而至。熔火残部支援单位 每个氏族都有一些非旗帜卡牌单位,熔火残部也有不少这类单位……包括能触发熄灭效果的支援型陵墓、手持锋利镰刀的蜡人、一个稀有的无烛芯灵魂炸弹、一个长着大手且能帮你增加手牌的小家伙,以及游戏中唯一一个无需通过重塑就能将已被击败单位返回手牌的单位!

熔岩外壳(C):一个有用的烟雾之墓,在被击败时会使你所在楼层的友军进入潜行状态。需要注意的是,如果它被摧毁,即使还有更多敌人排队准备攻击,当面对一整层新潜行的单位时,他们会立即停止攻击。对于生存能力有限的氏族来说,这是一个不错的盟友;如果用来对抗狂怒者塞拉芙的狂暴友军,或是支配者塞拉芙的腐蚀攻击友军,它可能会真正改变战局。与地下军团搭配使用时也非常强大,尤其是其(U)生长室,能在整场战斗中传播这种潜行效果。它可能值得无尽模式使用,特别是如果你能给它双重特性以获得惊人的4层潜行,其效果将堪比双重叠加的(U)烟雾笼罩!

【被埋葬的炸药】:考虑到这是一张普通卡牌,甚至可能在游戏开始时就被随机分配到,这个单位炸弹在游戏早期极其强大,能对首领造成可观伤害,即使在高契约等级下也能一击秒杀堕落冠军。由于它还能为你阻挡一次攻击,对于消耗1点余烬来说,回报相当丰厚。缺点是,除非获得【蜡剪】神器,否则其效果在整个游戏过程中都不会增强,因此它的影响力会随着时间逐渐下降。因此,【无尽】升级在早期会非常强力,但到后期可能就不那么值得了。提醒一下,你可以给它装备【烛石】,确保它即使在楼层后排也能爆炸,这样就不用担心它炸到像畸形恶魔这样的弱小敌人了。

余烬宿主:(U)乍一看这可能有点奇怪,因为它召唤的德拉夫可能会立即被击败,或者在一回合内就会燃尽。但要注意,这个氏族的多个单位都有收割触发效果,这意味着这个0余烬的单位在它和它的德拉夫被击败后,至少能触发3次收割!如果德拉夫没有被击败,它们本身可以造成4次15点攻击的打击。如果你给余烬宿主一个引火石,让它自行燃尽而不是在前线被攻击,这可能更容易实现。特别是它只需要0余烬,用来触发无尽效果也不错!

死亡吞噬者:(稀有)作为熔渣残部少有的范围伤害选项之一,死亡吞噬者会在每次触发“收割”效果时储存一个灵魂,最终对敌方单位造成灵魂数量乘以15的范围伤害。你可能还记得“灵魂”效果与炼狱使者的(独特)灵魂熔炉武器类似,但请注意这里的触发条件是更灵活的“收割”,而非“虹吸”。这意味着死亡吞噬者既可以在楼层后排积攒灵魂,待所有敌人被击败时释放一次大型终结爆发;也可以放置在第二道防线,从前排被击败的友军处获取灵魂,随后爆发范围伤害。配合【余烬宿主】的多种【收割触发】效果时尤为强大,但需注意【吞噬者】是一张稀有卡牌,通常要到游戏后期才会出现,因此围绕其构建新卡组会更具挑战性。

渣滓:(C)小型、略带锋利的小家伙,是雷ctor·弗licker独有的单位,比在《怪物火车1》中稍微有用一些。天堂之光神器提供的额外空间、触发丰收效果的友军以及游戏中倾向于向你投掷大量敌人的设定,让它们有了更多用武之地。默认情况下不算特别强,通常只能持续2回合,但如果你打算维持它们的倦怠状态或重塑它们,可以轻松给它们装备烛火石或力量石升级。关键是,它们不能与小fade的(C)原始模具卡牌一起出现,所以除非你早早抽到(C)塑形,否则重塑它们可能在一段时间内都不是一个选项!不过,简单地把它们派出去触发丰收效果,并造成一些伤害或进行阻挡,可能就是你所需要的全部了。

德拉夫:(C)物哀!德拉夫的短暂存在充满暴力,在1格距离时其攻击值甚至能与地狱号角族的角斗士相匹敌。不过,一回合的持续时间实在太短,而且作为支援单位,它通常无法部署。这些凶猛的野兽很适合触发收割效果(尤其是它们可能会带着一些敌人一起倒下),如果持续进行重塑来延长其倦怠状态并提升属性,它们会变得更加强大。它是倦怠狂怒/延长类楼层(如(U)重塑女士和(U)石蜡执行者)的绝佳盟友,与小 fade 的火光流派搭配效果惊人。
Votivary(U):机制相当简单,放置Votivary无需消耗任何资源,默认具有无尽特性,并且能让你在下一回合获得+2抽牌……其中一张必定是Votivary自身。因此,只要你有位置放置它并让它被移除,这就可以视为一次“免费”的收获触发、一次免费的伤害格挡,以及一次免费的抽牌。你也可以给它装备Wickstone,确保即使没有敌人来摧毁它,它也能在每个回合结束时被消耗掉。

无形之子:(稀有)作为游戏中极为独特的单位,无形之子是游戏内除了通过“重整/无尽”效果外,唯一能让已被击败单位复活的效果。+40攻击力是相当不错的加成,但如果在战斗中一直通过击败友军来获取资源,其“随机”目标这一特性可能会带来问题。复活的单位会以类似拥有“无尽”效果的方式回到你的手牌,因此会保留其属性、余烬消耗和体型。由于无形之子本身默认消耗2点余烬,这也使得这种组合需要较高的余烬投入。在我看来,如果无形之子自身经过“重整”,其新的0余烬消耗会使其更容易使用,从而变得更加强力。这里存在一些非常强力的潜在联动(例如,从深渊中召回另一个氏族的强大勇士),但也可能是浪费余烬来获得一个+40攻击力却只能持续2回合的渣滓,因此如果你选择使用它,需要仔细规划其用法。 如果你获得了蜡剪神器,那么无定之子触发的双倍扑灭效果会带回两个已被击败的单位,并为它们各自提供+40攻击力,而不是带回一个单位并给予其+80攻击力。了解一下~ 勇士:瑞克托·弗利克 瑞克托·弗利克(标准)

起始卡牌
渣滓:体型微小、略带锋利的小家伙,比《怪物火车》第一代中更有用一些。天堂之光神器带来的额外空间、触发丰收效果的盟友以及游戏中大量敌人出现的设定,让它们有了更多用武之地。雷科特·弗利克的两条流派路线通常会用到它们;雷科特·弗利克在没有渣滓的情况下也能发挥作用(例如使用统治之焰时),但渣滓能为他的流派提供相当显著的增益,所以我通常不建议这么做。

燃烧之光: 策略:这是教区长最基础的路线,他拥有庞大的属性值,但这些属性只会在列车上维持3回合。一方面,对于一个2体型单位来说,这样的属性值非常可观,能让他轻松承受大量伤害并予以反击。不过这条路线有两个重要的注意事项。其一,此路线不会提升他的攻击力或生命值……当然,他的攻击力确实很高,但如果没有【践踏】或【多重打击】,200点攻击力可能只能击败一个弱小的敌人,或者对【宣誓角斗士】造成重创——并非压倒性的效果。其次,由于他的“残渣”特性对缓解其“倦怠”状态或提供改造潜力毫无帮助,因此这条构筑路线需要其他卡牌的配合才能生效。例如,需要改造效果的卡牌在他被击败后将其复活,延长“倦怠”状态的效果卡牌,如【普通】鞭挞、【普通】净化涤罪、【普通】神圣液滴,或者与【稀有】归正女士搭配。 需要注意的是,我刚才提到了三张普通卡牌,这意味着你有一定几率在初始卡牌中获得其中一种效果。只要有其中任何一种,就能让教区长的作用超越其默认的3点“倦怠”值。如果是这样,那你就拥有了一个相当不错的坦克/攻击者。不过到了游戏后期,你会非常希望【传说】树脂之刃能够出现,这样他高额的攻击力就能作用于多个目标了!

蓄能者: 策略:希望大家已经清楚,熔渣余烬是一个极具坦克能力的氏族,而现在,准备迎接史上最肉的坦克吧。在这里,教区长初始属性平平,但在“收获”时会获得巨大的属性加成。通过让本区的残渣和陵墓被击败,以及/或者在本区击败敌方单位,就能轻松触发“收获”。随着友方和敌方单位的被击败,教区长的属性会飙升,通常能轻松赢得无情难度的 boss 阶段。三级时“收获”获得的+20 生命值非常可观,甚至能让教区长在【R】炼狱房间中存活,通过击败敌人和友军获得的生命值超过受到的 50 点伤害。这是个好主意吗?或许并非如此,但这种可能性确实有点疯狂! 总之,这是一条强大且易用的路径,若与能反复触发【收获】效果的技能(比如横扫伤害,或(U)残响宿主)相结合,帮助他恢复不断增长的生命值,或是获得【无尽】效果以在被击败后保留庞大的属性值,这条路径的效果会变得尤为夸张。说实话,这条路径最大的“问题”在于你是否真的需要它,毕竟熔毁残响阵营拥有数天的坦克能力和生存能力,而且其(U)无烛男爵单位功能类似,还能进行定制化升级。
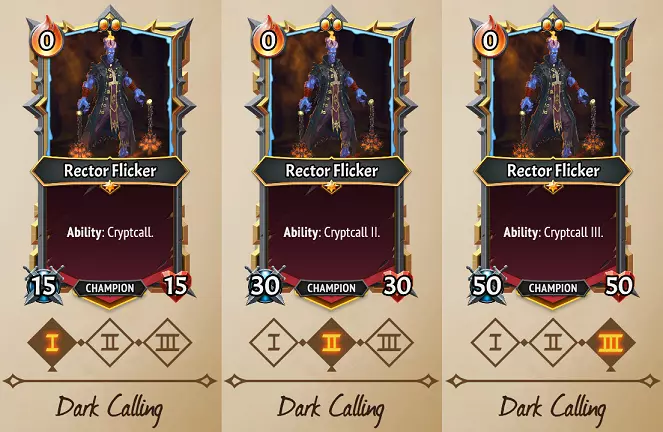
黑暗召唤: 教区长弗利克获得亡者召唤技能,冷却时间1,效果为复活两个随机已被击败的单位,并且: 亡者召唤I:额外增加10点攻击力 亡者召唤II:额外增加15点攻击力 亡者召唤III:额外增加25点攻击力 策略:这是我在《怪物火车》中最喜欢的冠军路线之一,很高兴看到它回归并略有改进。教区长的基础属性确实一般,但获得亡者召唤技能后,他能持续复活阵亡的盟友,不仅能通过默认的重塑效果提供+5/+5的属性加成,还能额外增加攻击力。重塑后的盟友消耗的余烬始终为0,因此你可以轻松地在列车周围重新部署已被击败的单位,额外的攻击力加成也很有帮助。我发现这条路线玩起来非常有趣,你可以用它来立即复活刚被摧毁的坦克,或者让一队【进攻渣滓】持续攻击敌人阵线,在耗尽后还能回来继续战斗。 因为他每回合可以重整两个单位,这使他成为游戏中重整效果效率最高的角色之一,通常类似的效果需要固有能力或法术链才能实现。他可以通过故意反复击败相同的友军来创造伪无限单位,并且他能大幅提升拥有横扫/践踏/多重打击等效果的友军的攻击力,这些效果非常需要更高的攻击属性。他对于会逐渐变强的【改革】单位和需要稳定【改革】单位供应来触发【收获】效果的【收获】单位来说,都是极佳的盟友。这是一条有趣且强大的路线,赋予他与其他两条路线截然不同的独特功能。 灵活性潜力:【教区长·闪烁】相当固执,不是一个特别灵活的角色。【燃烧殆尽】路线如果切换出去会损失大量属性,而切换进来则会带来【倦怠3】的沉重负面效果,这很可能比其属性提升带来的收益更像个负担。如果你也需要该路线提供的坦度,【蓄能者III】在【收获】时提供的惊人+20生命值加成很难让人放弃。相反,【黑暗召唤】和【蓄能者】路线则可以有一定的相互配合!Cryptcall的关卡不会改变生命值/倦怠值/已重塑单位的数量,只会改变它们的攻击值。因此,如果你认为不需要为了提升攻击力而重塑单位,混合这些路径可以让他获得收割触发效果以及重塑盟友的能力。 英雄:小 fade 小 fade(流亡者)


初始卡牌:原始模具 这绝对是整个游戏中最不稳定的初始卡牌。原始模具可能完全没用,比如在你的盟友被击败前抽到它,或者它随机选择重塑一个高倦怠值1的护盾管家,而不是你想要的关键倦怠盟友。然而,考虑到它可以复活游戏中任何被击败的盟友,与你通常从初始卡牌中获得的温和治疗和攻击性法术相比,它的潜在收益是惊人的。小褪色者有两条路线通常也会使用这些卡牌,所以即使它们的抽取时机和随机性可能让你感到沮丧,也要准备好利用它们。另外提醒一下,如果你抽到带有【倦怠1】的“不理想”盟友,可以选择不使用该盟友,将其保留在牌组中,这样后续的【原始模具】就能重塑出其他盟友了。
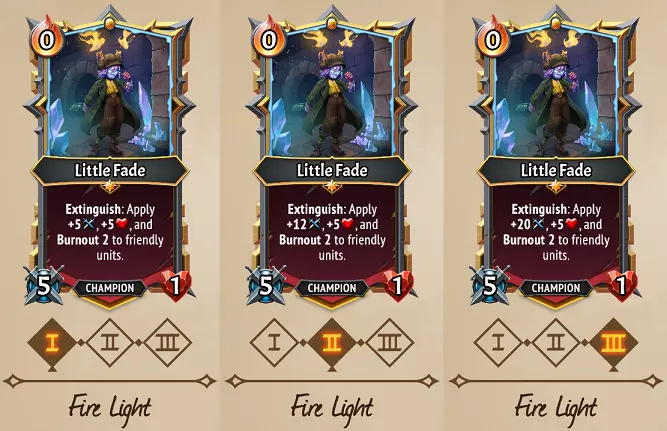
火光: 策略:我们这位小小的街头顽童初始走的是增益型路线,她自身没有真正变强的机会。每当菲德被击败时,她会为盟友提供全新的属性加成,同时附加2层 burnout( burnout)。这里有一个关键区别:(U)革新圣女和(C)神圣水滴只会对已有 burnout 的单位叠加 burnout……而小菲德会将所有盟友都变成燃烧的蜡烛,无论他们最初是否有 burnout!因此,这是一把双刃剑,虽然那些属性加成相当可观,但如果不能很快让菲德再次被击败,你的盟友可能很快就会全部 burnout。幸运的是,这并非“游戏结束”,因为她的【原始模具】卡牌不仅能让她自己复活,还能帮助你复活她那些处于【燃尽】状态的盟友。 我个人一直很喜欢这条路线,因为【熔毁残响】有很多小型盟友能从这些属性加成和【燃尽】增益中获益,这让原本就很强大的单位,比如(C)德拉夫和(U)宅邸夫人变得更强。同时,只要你能让她保持在火力范围内,她也能和其他氏族完美配合。你可能需要考虑【持留改革】效果或【无尽】(例如来自(U)熔毁房间纪念碑,或是灵活选用【永恒火焰】)来维持这些增益,因为该效果相当强大,而且反复击败像【凋零】这样低属性的1体型单位也相当容易。
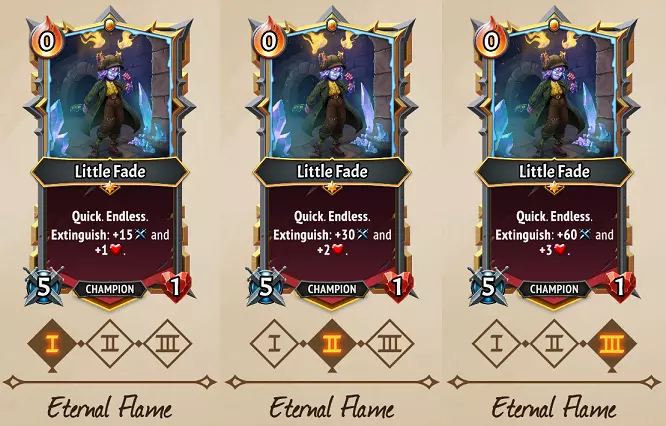
永恒火焰: 策略:这种渴望究竟是什么?一条我们前所未见的有趣又奇特的道路。菲德成为游戏中唯一的无尽冠军,初始属性平平但拥有迅捷状态,每次被击败后攻击力会逐渐大幅提升。她生命值低、体型小巧,很容易被击败,但她会发动一次攻击后被击败,然后再次复活!通常在战斗中你需要不断重复这个过程,当进入无情阶段时,反而要将她置于其他盟友的安全保护之后,这样她就能获得多次行动机会,利用迅捷状态造成伤害。如果 boss 进入下一阶段,她也已准备好再次投入战斗!总体而言,这条路线是不错的 bosses 击杀路线,也是“按需”输出的良好选择,因为你可以根据需要让她上下楼层来造成高额快速伤害。此外,如果你有任何在回合开始时抽牌的效果(例如【多用途烬火法杖】或【翼钢】之类的神器),你可以尝试在自己的回合故意让她被摧毁,然后抽一张牌将她拿回手中,从而在一回合内多次触发【熄灭】效果!你可能还需要寻找【践踏】和【多重打击】之类的效果,因为她后期的高额攻击力如果浪费在单个不值得她出手的单位身上会很可惜。不过这条路线有一个非常重要的注意事项——由于她是【无尽】单位,且初始状态相当弱小,所以这条路线只有在她被反复击败的情况下才能良好运作,这也意味着你需要不断地重绘她,这实际上相当于每回合少抽1张牌。因此,这条路线和其他任何围绕【留存】或【无尽】循环单位的路线一样,如果按预期方式利用她的效果,最终会减慢你抽牌的速度。
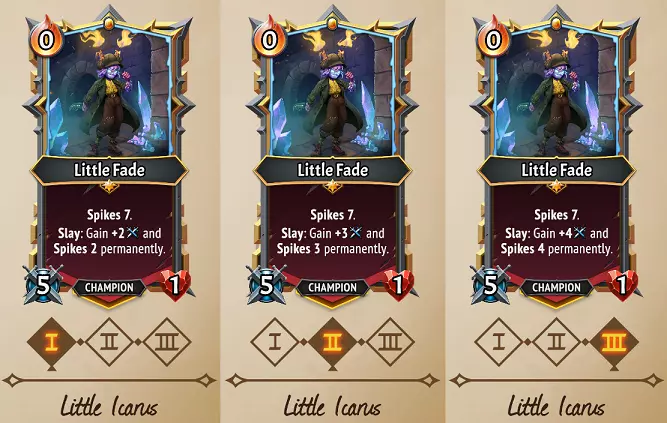
Little Icarus: Strategies: Normally it’s her knife that’s mighty sharp, but here, Fade herself is the sharp one. A very unusual path that has a caveat similar to Solgard the Martyr’s Coldchannel path… Little Icarus Fade is a lot stronger if you utilize effects from other clans than her own. Permanent Spikes & Attack on Slays is a great effect, but by default, both her Health and Attack are pitiful, making it extremely difficult to repeatedly trigger this. Note that there’s no Health gain between levels I to III, meaning a Reform effect only gains her a measly 5 Health by default, hardly enough to survive the game’s escalating enemy effects. However, give her effects like Valor, Armor, or Health gains, and suddenly this path makes a lot more sense. As those Spikes grow in potency, her ease of getting Slay triggers grows easier and easier, eventually letting her easily surpass the Spike values of Champions like Bristling The Sentient. Effects that increase her Health, grant her effects like Armor, and Equipment like (R) Overgrowth Carapace are fantastic here, and due to the ease of getting Slays, you can even give her an (U) Iron Tongue to comfortably gain Sweep-kills from the backline instead. Little Icarus needs some TLC to function properly, but has a terrifyingly spiky ceiling if you can foster her growth. Be cautious of clan combos that can’t easily support this though, as this will be far too weak if you’re only gaining a few kills each battle. Flex potential: Eternal Flame is an awesome path to Flex into other paths, granting both Quick & Endless in one go, alongside the added Attack boost on defeat. This is a pretty noteworthy gain in effectiveness since it allows her to not be beholden to her Primitive Molds or other Reform to keep her triggers rolling (though note, you’ll be down a Card Draw each turn you redraw her as Endless). Little Icarus gains nothing but stronger Slay triggers as it develops, so feel free to flex out of that into either other path if you’re unable to reliably keep it going. Fire Light’s Health & Burnout triggers never increase, so if that’s the primary benefit you want from that path, feel free to flex out of that too! Eternal Flame III is a pretty good path to take all the way though, as +60 Attack is pretty helpful for keeping up with the late-game escalation in enemy Health pools. Other Melting Remnant card clarifications (C) Molded is the only “choice” Reform effect available early in the game, so particularly if you aren’t full with Fade’s Primitive Molds, don’t pass this card up if you think you’ll be deliberately Burning out and Reforming your units. (U) Wicked Blaze typically won’t come until later in the game, and (U) Sacred Wicks is both random units and a Consume card in comparison. Speaking of very powerful Common cards, (C) Dripfall is an incredibly good card that will disappear from the loot pool after a few fights. Descend cards can be very useful for over-stacking your floors, particularly if you want to get the most out of room-wide buffs. Slowing an enemy’s ascent to the Pyre is a nice way to buy yourself some time if you need to build up more Attack, or simply stall out while you beat a Relentless boss. However, some of its absolute best uses come late in the game, where it can stop Stryx or Titan Savagery from Looping, Daze the Attacks and awful Resolve Triggers against Seraph Aeternus, stop Titan Dominion from striking your Pyre, prevent scary attackers like Chosen Assassins from Sweeping your backline units away… the list goes on. There’s almost no situation where this card isn’t useful in a run. (C) Purifying Cleanse is, weirdly enough, the only Healing card in Melting Remnant’s entire kit. It’s also a very potent heal for its cost, but note that it will add Burnout regardless of who it’s used on, so this is better for emergency top-offs of Health damage and best on units that already have Burnout stacks. While we’re on the topic of Adding vs. Extending Burnout, let’s have a quick reminder that only two cards Extend Burnout without granting it to a unit: (U) Lady of the Reformed & (C) Hallowed Drippings. Every other effect will Add Burnout to a unit that didn’t have it, including (C) Wicklash, (C) Purifying Cleanse, (R) Waxen Spike, (R) Resin Blades, the Reform effect, and Fire Light Little Fade’s Extinguish effect. (U) Subsuming Blade starts out pretty weak, but note that it’s remarkably easy to get Slays with this card by either using it on your Tomb allies or Little Fade to trigger the extinguish effects. Because it’s Piercing, this makes it one of the few spell cards that work immediately against Purified Soul enemies. (C) Hallowed Drippings and (C) Wicklash are good standard cards for increasing both Offense & Burnouts of your units early on. Because she gets added Attack from Burnout, these are especially worth grabbing if using (U) Lady of the House. (C) Draff can be a very powerful support unit for this clan in multiple different types of setups. That may not be surprising given its stats, but what’s noteworthy is that it’s a Common card, meaning it will disappear from the loot pool after a few battles. Grab it early if you think you’ll have Burnout-extension or Reform-based offense! (C) Entombed Explosive is also Common and very powerful early, but it doesn’t have as many options for scaling late-game as Draff does. Stealth is a rare buff in this game, so it’s noteworthy that Melting Remnant has two sources of it in both (C) Molten Encasement and (U) Engulfed in Smoke. Paradoxically this is a clan that often likes being extinguished & destroyed, but these can be incredible survival tools for Wickless units or other clans that need more protecting. Engulfed in Smoke can be given Doublestack for a huge Stealth 4, or even given Holdover to perpetuate it each turn. Encasement can do this with Endless + Dualism as well. This won’t help your offense, but it can be a potent way to avoid Corruption strikes and make Titan Savagery’s huge offense go to waste. If you expect entire floors of units to be defeated, you have a few options for handling situations like this. Dark Calling Rector Flicker bringing two back each turn is quite nice. (U) Sacred Wicks will grab two units cheaply, and can be given Spellchain to make it four, or Eternalstone to allow you to even give it Holdover for two each turn. Or, simply utilize the powerful Room (U) Memorial for the Melted so every defeated unit comes right back to your hand. This can nerf your performance a bit if you’re bringing back several weak units back into your hand (and not cycling your deck), but the ability to instantly resurrect multiple units is incredibly powerful for overcoming the enemies’ late-game offense. (U) Crushing Demise can be an incredibly strong card, given it can one-shot even very high-Health enemies like Avowed Gladiators and Terrifying Amalgams. You don’t really want it killing off important allies accidentally, but you can use it on empty floors, or floors that exclusively have allies meant for Endless or Extinguish triggers. Freezestones are fantastic upgrades here to wait for the opportune time to nuke a scary foe. (U) A Fatal Melting is Melting Remnant’s only AoE damage spell in their kit, and unfortunately it isn’t very powerful unless you’re using lots of Reform+Harvest triggers to keep the friendly unit kill count high (say, with a (U) Remnant Host). You can however, still add a +10 damage or +20 Consume damage upgrade to it so it will hit all enemies with some offense even without many friendly deaths. Not very powerful for 2 Ember, but it may be your only option with this clan at times. **(U) Resin Removal** was one of the few MT1 cards they had to ‘nerf’ because of how good it is (it was originally 1 Ember, you monsters). This card can clear away all Melee Weakness from Seraph the Savage, all Sap from Seraph the Entropic, all Corruption from Seraph the Dominant, all Spell Shields from Purified Souls or Titan Dominion, all Rage from Titan Savagery, all Emberdrain from Umbra cards… the list goes on. A solid choice for a Freezestone upgrade to ensure it’s utilized once the debuffs have accumulated, or even Intrinsic against Seraph the Savage to instantly strip away those Melee Weakness effects. (R) Wickless Recruitment is similarly one of the only cards in the game that can clear debuffs, and interestingly is the only one that entirely removes Burnout. Very helpful for a 0 cost card, particularly for Tanks that might get overwhelmed by Corruption by Seraph the Dominant or Melee Weakness from Seraph the Savage. There’s also an interesting interaction with the Fade’s First Blade artifact… using this card counts as “losing a stack” of Burnout, meaning every Burnout stack they have will convert to 3 Rage! (R) Sacrificial Resurrection may not sound amazing, given it will Consume every card in your hand, potentially even good ones you couldn’t otherwise play. However, note that it consumes all cards in your hand… meaning Blights and Scourges too! If you have this in hand, you can completely skip playing any Vengeful Shards, Curses of Entropy, or other Scourges/Blights in your hand, making them all go away and become a helpful Draff instead! (R) Intent on Death is certainly a helpful card if you’d like to invest in (R) Bounty Stalker’s Attack, quickly boost Eternal Flame Little Fade’s Attack, set off a (R) Devourer of Death’s Soul-explosion etc. Remember that other clans have Extinguish triggers too though, so this could be used for a free Dragon’s Hoard with a Pyreborne’s Gildmonger, an additional Spawn 4 from the Underlegion’s Green Recruit, or give 12 Armor to all friendly units with Lazarus League’s Makeshift Golem too! Speaking of good cards, (U) Mortal Entrapment may be expensive and limited to units that are already damaged, but Daze 3 is a very strong effect, particularly considering this can be Doublestacked to 6. That’s enough to neuter a boss for a good chunk of the fight, or borderline-guarantee an enemy is destroyed by the Pyre without damaging it in the process. Equipment Merge Considerations (R) Resin Blades is a very strong card for this clan that’s quite welcome for escalating your units’ offense. It will gladly Merge with other cards, but importantly, its effect of returning to your hand on defeat can be a big concern if you’ve increased its Ember cost to be too high! So be careful about Merging it, unless you’re confident you can keep the unit alive, or that you’re sure you’ll have the Ember to replay it afterward. Melting Remnant Artifacts This section will briefly highlight the artifacts of the Melting Remnant. Artifacts can range from "nice bonus" to "run-defining power" and though there are too many potential interactions to discuss, I'll make a point of ones that are particularly potent. Lots of strong ones in this clan! As a reminder of which Melting Remnant units qualify as Tombs, they are the four “blobs”, i.e.: Remnant Host, Molten Encasement, Entombed Explosive, and Formless Child. There is no other distinction between Waxers & Wickless units.

对多种构筑极为有用,能显著延长单位的持续作战时间。若将【家族贵妇】与【归正贵妇】或【火光小 fade】搭配使用,可形成极为强大的组合。不过有个小问题,如果你原本依靠【烛石】快速触发【燃尽1】来消灭敌人,这一改动会将其变为【燃尽4】,从而使该策略失效。

还不错。这个氏族对余烬的需求不算高,但其他氏族可能需求较高,尤其是在改革/无尽模式下,很容易反复触发这个效果。如果与冻石尖刺/X卡牌搭配使用会很不错。

我很惊讶他们没有从MT1起就提升这个技能的伤害。5点伤害在初期表现良好,但除非能在你的回合中反复触发这个效果,否则对于清理后排单位来说并不是一个很高的伤害阈值。它有利于早期触发收割效果,对付净化之魂类敌人时表现不错,或者与炎生族的Pyregel配合使用,但除此之外就相当弱势了。

【优点】相当强力,因为它本质上是每个回合为你的倦怠单位提供一次免费的狂怒3。这与【R】无烛招募也有很强的联动,移除倦怠被视为“失去”倦怠,这意味着它会将每一层倦怠转化为3点狂怒!

一件相当惊人的神器。只要在列车上放置足够多的单位,它就会逐渐让你整手牌的费用变为0灰烬。你甚至可以通过策略操作,比如先打出1灰烬的低费卡牌,把3-4灰烬的卡牌留在手中。在大多数情况下都很出色,尤其与【黑暗召唤导师·闪烁】或【融化房间纪念碑】搭配时效果拔群。

这个氏族的生存能力再次提升!如果你在游戏过程中仍缺乏生存保障,这个技能可能会派上用场。【燃烧1】无论在何处使用,都能确保触发【熄灭】效果。不过对于这个氏族来说,你很可能并不需要它。如果与【易燃蜡油】搭配使用,该技能将变为【燃烧4】。

如果这个东西很晚才出现,那可真是太扫兴了,而且只有在免费提供时才应该选择它——购买它的可能性非常小。当渣滓和坟墓被消灭时获得一些黄金注入是相当不错的。即使只是小凋零在大多数回合中死于永恒之火,这在整个游戏过程中也能获得相当数量的现金。

总的来说,5点护甲在这款游戏里不算多,有时甚至可能会干扰围绕多次熄灭触发的策略。不过,如果你在真正的坦克后面使用无尽格挡者,或许也不算太糟?

为围绕无尽和/或重塑的重复使用而构建的任何策略或英雄路线提供一个有趣的小增益。

这件神器的影响非常大,因为它能轻松创造无尽的冠军和单位,甚至可以来自其他氏族。它能让击杀首领变得轻而易举,让消灭策略更容易实施,并且是对抗泰坦狂暴或永恒炽天使等可怕敌人的绝佳后备手段。不过要注意,你可能不想每回合都把“无尽”浪费在渣滓或残片上。

(++) The Holy Grail for two of Little Fade's paths, and pretty darn good for the Tomb units and Legion of Wax as well. Reminder that this includes other clans' units as well, so Gildmonger, Green Recruit, and Makeshift Golem are all happy to have this as well. Pyre Heart considerations Healing is limited to a single card in this clan, and there are some massive Health pools here that would theoretically call out for use with Wyngh’s Spirit. However, given that units are fully restored with Reform and Endless effects, this is likely not a very helpful choice. Pyre of Savagery is my favorite choice for this clan. With only a few exceptions, this entire clan tends to physically fight their way through enemy lines, so the constant Slay triggers to escalate their Attack over time is very helpful here. It’s also a physically powerful Pyre which helps if you want to utilize Daze effects before an enemy reaches the Pyre. All of Melting Remnant’s early cards are cheap, and you often won’t need to play every one of Fade’s Primitive Molds anyway, so Aquath’s Reservation is unlikely to be a good option. I would only choose this if you’re likely to be spending on expensive sub-clan cards. Lifemother’s Pyre is one of those options that works on just about any clan or any build. This can be important since several Melting Remnant Common cards are extremely useful, and there’s multiple Gold-gaining cards scattered throughout this clan. Units like Paraffin Enforcer and Fire Light Fade love it if multiple strong, copied-allies are behind them, for instance. Herzal’s Hoard is a safe option for any clan, but for Melting Remnant this is a mixed bag as all of its Uncommon units only cost 1 Ember. Deploying a (R) Resin Blades Equipment card can be very important though, so it can still be helpful, particularly if your sub-clan has more expensive allies. Fhyra’s Greed is a pretty helpful pyre for generating some extra cash, particularly at higher Covenants where you can simply choose not to play a Vengeful Shard to get 10 Gold. This might be overkill with this clan, given its extra infusions of Gold, while not having any cards that are stronger with Gold reserves like the Pyreborne have. Echoes of Time Father is a little better than average as several of Melting Remnant’s cards are best with optimal timing, especially for Little Fade early on when you can easily pull her crucial Primitive Molds before any units have been defeated. Several cards later on are also great when Frozen like (U) Resin Removal, (R) Wickless Recruitment, (U) Mortal Entrapment, and (U) Crushing Demise. Malicka’s Shifting Pyre is better for Spells than it tends to be for units; many of Melting Remnant’s spells are likely to benefit from free upgrades on them (since very few are tied to Damage upgrades), meaning you can get a lot of well-boosted cards from this. Take care that this can put ill-fitting upgrades on units, which can be a real problem if it clogs up the spaces of units that need specific upgrades to support your builds. It’s always a bit of a gamble, because some of Melting Remnant units have high ceilings that can be nerfed by clogging them up with a bad upgrade… or it might just give you a Lady of the House with a free Frenzystone, you never know! Pyre of Dominion is a strong Pyre Heart for many clans, but for once this one isn’t particularly great. Dregs factor in pretty heavily to Rector Flicker’s Accumulator & Dark Calling paths, even though you could get lucky and draw some cheap Tombs & Draffs instead. Only one of Little Fade’s paths has Endless on it, meaning her Primitive Molds will be the only way to resurrect her unless you get lucky and draw a (C) Molded card early instead. It’s a little safer for Rector though, as he’ll start with Melting Remnant unit drafts that could easily outperform Stewards with Dark Calling, or have a chance of pairing him with a Lady of the Reformed for his Burn Bright path. I frequently dislike Bogwurm’s Growth, but big floors are very helpful when paired with Fire Light Little Fade, or for units like Paraffin Enforcer or Lady of the Reformed that buff all the allies behind them. Dregs being free and having allies resurrected for 0 Ember makes Heart of the Pact very easy to trigger with this clan, particularly with Dark Calling Rector Flicker. I don’t really like that Pyre myself, but it’s admittedly better than usual here. Sub-clan considerations Pt. 1
被放逐者: 正当理由(大幅推荐):总是优先选择这个而非激励。它具有很强的实用性,某些被放逐者单位如果无法使用这个技能会变得非常虚弱。 激励(强烈不推荐):永远不要选择这个。它是最糟糕的氏族起始卡牌,并且会封锁某些策略。 你的天使伙伴有很多方法可以让单位在楼层间上下移动,这对于设置大型燃尽楼层非常有帮助。被放逐者的勇气对于熔渣残党来说并不是一个特别好的组合,因为它不会延续到被击败单位的无尽/重塑版本身上,而且被放逐者单位通常不会以支持重塑策略的方式提升属性。不过,如果你能为小伊卡洛斯小法德持续提供足够的护甲,勇气是使用她的最佳方式之一。相反,这个组合的真正优势在于流放者派系基于生命值的法术和装备,因为熔火残部单位的巨大生命值池能让这些技能轻松完成击杀。例如,“炽燃”或“蓄能者·雷科特·弗利克”搭配“翼恩之盾”几乎是自动获胜的局面。从其赞美者单位那里获得“践踏”或“多重打击”效果极为重要,因为熔火残部喜欢通过攻击突破敌人阵线,而这个组合在通常情况下难以瞄准后排单位。最后,考虑到“宅邸夫人”和“永恒火焰·小 fade”等多个单位的极高攻击上限,流放者的“近战弱点”卡牌能对高生命值敌人实现快速击杀。
Pyreborne: Firestarter:一张简单的卡牌,可造成少量伤害并施加Pyregel。尽管熔火残部在定向伤害方面颇为欠缺,但肿胀幼兽能提供额外的收割潜力,这正是其急需的。 肿胀幼兽(+):它们具有自我摧毁并造成少量伤害的能力,在游戏初期表现不错,但到后期效果会大幅下降。不过,它们的自毁算作收割触发条件,这使得它们在此处成为比通常情况下更好的选择。 Pyreborne通常为任何氏族提供两项相同的增益,即a)Pyregel,一种用于提升伤害输出的简单减益效果,以及b)金钱和遗物获取。考虑到熔渣残余派系同样资金充裕,这是围绕金币构建的最强组合,能让你有机会买下商店里所有想要的东西。炼狱派系通过大量针对后排敌人的手段,弥补了熔渣残余派系最大的弱点。无尽和重塑效果很好地解决了炼狱派系生存能力不足的问题,还能形成非常强力且独特的组合:拥有无尽/重塑效果的贪婪龙会不断触发其召唤效果,获得惊人的属性提升。携带烛火石的无尽铸金师能为你承担伤害,并且每回合提供1个巨龙宝藏,让你轻松在每场战斗中掠夺宝藏。此外,炼狱凝胶对于使用渣滓和劣渣等单位的铺场策略也非常有效。一套非常有趣的连招!
月神女巫团: 织法巫术:在没有灵导强化其微弱治疗效果的情况下表现并不突出,但如果你成功叠加了一些灵导,它就成了打击后排单位的必要手段。 月神仪式:对大多数氏族来说是稍好的选择,如果你打算使用一些月神女巫团单位,它对其中几个单位至关重要。不过,灵导的增益效果不会延续到重塑/无尽状态,因此这不一定是完美搭配。 理论上这是个奇怪的组合,但却有着一些出人意料的良好收益。月神女巫团拥有法术和横扫能力,可以解决熔火残响在对付后排单位时的问题,这总是很有帮助的。月神女巫团有像暗影守卫和占星师这样能在战斗中持续获得属性的单位,当它们被重塑或变为无尽状态时,会保留所有已获得的属性。熔火残部通过法术或火之微光小 fade 获得的属性加成,若施加给夜莺或月神侍祭这类高伤害攻击者,效果会非常显著。星象馆和月之精灵可以在楼层中布满可消耗的坟墓与渣滓,以便轻松从导管获得最大加成。这两个氏族的技能组中也都有眩晕减益效果,可大量利用该效果来削弱敌人。
地下军团: 狂热新兵:如果你想触发地下军团单位的集结效果,或者需要一些早期生存能力,这是一个不错的选择。故意让你的真菌部队被击败也是反复触发收割的好方法,所以这张卡相当有用。 孢子之触:通常这是我首选的卡牌,尤其是因为熔融残响缺乏针对后排单位的手段。不过考虑到通过真菌部队触发收割也很有帮助,所以这两张卡我都可以选择。 熔融残响的两个常见增益效果—— burnout( burnout )和潜行,都是非常适合赋予传播效果的增益(相比之下,狂怒就比较一般),尤其是当你希望更轻松地维持像火光小 fade( Fire Light Little Fade )或炽燃教区长 flicker( Burn Bright Rector Flicker )这样的冠军路线时。多情金针菇提供的生命值加成将在无尽模式和重整阶段延续到单位身上,这能进一步增强该氏族组合的极致生存能力,十分有趣。由于蘑菇人部队一回合内可能有大量单位被摧毁,如果你能故意让部队堆叠被击败,收割策略会非常有效。无尽/重整单位以及渣滓、墓穴等一次性单位非常适合为你提供更多集结触发机会,或在感染室中为部队堆叠提供养料。这里有大量的防御和协同效果,只需确保你已制定针对后排敌人的方法,以防他们有漏网之鱼的倾向。
拉撒路教派: 【秘密配方(+)】:我首选的选项,因为混合剂能提供多种效果,包括对付后排敌人的方法。 【古怪助手(-)】:它们的伤害、实用性和易用性在提供额外伤害方面可能不错。但它们会和渣滓争夺位置,而且虽然触发收割效果还行,但如果被改造就很糟糕,所以通常我会避免使用。 拉撒路教派的纯粹多功能性对任何氏族来说都是一种馈赠。他们的注入卡牌和不稳定效果为熔渣残余提供了多种对付后排敌人的方法,这非常棒,因为尖刺能让单个单位触发大量的击杀和收割效果。【复活】对于这个氏族来说是个非常强大的增益效果,它能让带有【熄灭】触发效果的单位重复获得这些效果,同时还能与【收割】机制形成联动——正在复活的单位会让【收割】效果反复触发。【小消逝】的技能路线在搭配【复活】后会变得异常强大。【黑暗召唤导师·闪烁】甚至能与【临时魔像】这类单位产生有趣的协同效果,他可以通过【重塑】临时魔像来快速触发额外的【护甲熄灭】效果。【嫁接】单位能提供出色的【践踏】或【多重打击】效果,这对【消融残响】氏族的多个大型攻击单位都极为有用。这是一套很棒的组合,但要注意避免在弱小的【嫁接】单位消失后陷入只能重塑它们的困境! 子氏族考量 第二部分
地狱号角: 火炬(+):一个刻意设计的弱势初始法术,通常用于清理脆弱的后排单位;它能稳定瞄准后排,还可用于刻意摧毁坟墓/渣滓/小fade。 女王的小妖精:比火炬造成的伤害高得多,但仅对前排单位有效,且占用1个空间。作为早期爆发伤害足够出色,之后也容易被击败以触发收割效果。不过对于重塑来说不是特别好用,所以火炬更受青睐。 熔融残响的卡牌带有一些狂怒效果,所以你知道什么很棒吗?更多的狂怒。像熔融残响这样偏好高攻击楼层的派系,会很乐意拥有来自幼魔和烙印战士等单位的全楼层狂怒加成。小鬼在这里表现相当出色,因为它们拥有实用的召唤效果。你既可以击败它们来免费触发收获效果,也可以赋予它们无尽/重塑能力来反复触发这些效果。地狱号角氏族的技能组中包含一些晋升效果,这使得这个氏族组合在各个方面都具备一定的机动性。如果熔渣余烬的坦克单位仅依靠重塑/无尽效果还不够的话,地狱号角的护甲能提供一定帮助,并且对于让小伊卡洛斯的消逝效果在大多数情况下生效至关重要。尽管并非顶尖水平,但地狱号角也有一些针对后排敌人的法术,若你正为此类问题困扰,这些法术能帮助解决。
觉醒: 恢复:这是一个有助于解决早期生存问题的可靠选择,不过熔渣残部其实并不太缺乏生存能力。但如果你打算获取觉醒派系的单位,其中三个单位能与这类卡牌的治疗/再生效果产生互动。 根种(+):曾经是MT1中最好的初始氏族卡牌之一,现在只能算“还可以”,因为+2攻击力的意义没那么大了,而且抽牌也更容易获取。不过这些强化效果会延续到重塑/无尽模式,所以这一次它可能比恢复更有用一些。 这里有一个非常强力的组合,因为觉醒派系有多个熔渣残部喜爱的优势:大量的后排清场潜力、能够轻松触发斩杀和收割效果的尖刺伤害,以及一系列能延续到重塑/无尽单位身上的属性增益效果。觉醒派系的清道夫和多段攻击的魂灵单位很喜欢熔火残党各类卡牌提供的攻击加成。虽然熔火残党通常不需要纯粹的治疗,但觉醒派系有两张能完全治疗单位的卡牌,这对像蓄能主教·闪烁或无烛男爵这类能获得极高生命值的坦克单位来说非常强力。说实话,为这个组合选择野蛮火葬,你应该能毫无问题地无情击溃敌人阵线,尤其是因为保持这个队伍的存活和健康状态应该不成问题。
冥府守卫: 冰封长枪:作为MT1中最差的初始氏族卡牌之一……不幸的是,它依然很弱。不过,它在前期进攻以及叠加+20消耗值方面还算能用。 遗忘之力(+):我的首选。0费更易打出,它能配合冥府献祭卡牌触发弃牌效果,更重要的是可以弃掉灾祸与枯萎卡牌以避免它们的留存效果。 冥府守卫为这个组合带来了一些非常有用的补充:1) 大量的后排清场潜力,这对于解决熔火残部的这一问题以及反复触发收割效果非常有帮助。2) 冻结类卡牌,这比通常情况下更有用,因为适时使用改革甚至像致命陷阱这样的卡牌都可能改变战局。3) 一系列强大的效果,如【眩晕】/【沉默】/【诱捕】,可削弱敌人。4) 通过抽牌和弃牌来循环你的牌组,并跳过【天灾】/【枯萎】效果。5) 像【海之塞壬】和【泰坦哨兵】这类单位,在【无尽】(甚至【重整】)效果下表现极为出色。这些效果大多是互补的,而非超强协同,因此主要是相互弥补弱点的情况。
Umbra: Shadesplitter: An okay card that guarantees a Morsel, which is helpful for Umbra units in particular. Plink(+): I prefer Plink as it does a bit of damage and gives a starting offensive spell that can take Merchant of Magic power upgrades. Less reliable at giving Morsels if you intend to grab Umbra units. Morsel benefits can go multiple ways, either enjoying eating them for their raw stat boosts that will carry over to Reform/Endless, eating them for status effects like Lifesteal that can perpetually keep Melting Remnant tanks alive, or damage shields to help Little Icarus Fade… or let them get defeated by enemies for Harvest triggers instead. Defeating them vice eating them puts them in the pool of Reform units though so ensure you’ve factored that into your strategy! Umbra has multiple strong cards with the Emberdrain debuff on them, which is nice here since Melting Remnant can clear those off with Resin Removal or Wickless Recruitment. Umbra brings multiple ways to gain Space on the train which can help for building up big Burnout/Harvest floors, and Ember gains that can help play some of Melting Remnant’s late-game Spells with hefty Ember costs. Umbra’s Glutton’s Maw equipment is very fun to deliberately Chomp your Tombs and Dregs to trigger both Harvests & stat gains simultaneously! Final Bosses vs. Melting Remnant The Savage – Seraph AeternusMr. Savagery loves melting through even modestly-beefy units by Enraging floors of attacks and sweepers, and any tank on Floors 2 or 3 at the outset will have to contend with 60 or 90 damage (Titan trial) first turn if you don’t have a way to block that hit. Theoretically this isn’t a problem if you can Reform your defeated units, but they’ll continually regain Melee Weakness on being resummoned, so this strategy has its issues. Melting Remnant is the only clan with debuff-clearing effects, which can be helpful if you need to clear Melee Weakness off entirely (Resin Removal also clears enemy Rage – very nice!) Your three biggest problems to solve here are 1) Ragewing/Chosen Assassins, which must either be picked off from the backline, or will do massive damage to your floors. 2) Huge damage on floors that Seraph is enchanting with Rage, to levels you haven’t see before if you’ve been utilizing mid-tier Health tanks. And 3) the necessity of beating Avowed Gladiators & Terrifying Amalgams with gigantic Health pools. Melting Remnant has some strong cards for addressing these problems like Dripfall and Crushing Demise, and Endless/Reform are good fall-back options if the damage becomes too much. The Entropic – Seraph AeternusThis is potentially Melting Remnant’s worst fight, simply because there are so many Triggers on this clan that aren’t helpful if Silenced by Deafening Heralds, and the Sap effect can completely neuter the offense of your candles, even stopping the Strike effects from something like Paraffin Enforcer. Outside of a Holdover Subsuming Blade or Fatal Melting, Remnant does not have easy ways to stop the Defeaning Heralds, so you’ll want to consider how your clan combo can either address theses, or stop your Trigger-happy floors from being Silenced by these. Make sure to take Resin Removal if offered on your run so you can clear away the Sap effects that might otherwise weaken your Attackers, with the bonus that it also removes Spell Shields from Purified Souls. Sap effects don’t carry over if Reformed or Endless, so this can be a way to “reset” your unit if the effects have become too debilitating. If you can keep your Triggers coming and find a way to resolve the escalating Sap, Melting Remnant can definitely handle this fight. Otherwise, the escalating Sap plus Entropic’s huge Health pools can be a big concern for this combo. The Dominant – Seraph AeternusFortunately, Melting Remnant have some pretty hard counters to this Seraph. The worst thing here is the fact that Mr. Dominion loves flooding his floors with numerous enemies & Reanimating Deformed Duos; very obnoxious to a clan without Sweep/Trample effects. Dominant also like tucking Supplicants in back that Melting has a hard time reaching, resulting in some unpleasant Scourge cards if not dealt with. Beyond that though, Melting Remnant has numerous counters to Seraph’s strategies. The huge escalating Corruption on your tanks can be reset via Reform/Endless, cleared off with Resin Removal/Wickless Recruitment, or even avoided entirely with Stealth! Speaking of, Stealth is ridiculously good here since the Deformed Duos, Blightbound Guardians, and Seraph himself will simply not Attack, massively reducing the amount of Corruption damage that goes around. Champion paths like Dark Calling Rector Flicker and Fire Light Fade can easily deal with any backline allies that would otherwise succumb to Corruption. Daze effects are strong here too, and Resin Removal again can also strip those Reanimating stacks off the Deformed Duos. Plenty of counters here! The TitansMelting Remnant is a high-tier clan for tackling the Titans. Some of the biggest problems that clans have with the Titans is the sheer amount of damage dealt by Savagery & Entropy as the fight goes on, a fact that’s made completely irrelevant by effects like Daze, or the reality that an Endless/Reformed unit can tag right back in upon defeat. The almighty Resin Removal can clear Corruption, Sap, and even remove the spell shields from Dominion if you want to hit him with some spells. Melting Remnant’s eminently useful Dripfall spell both Dazes and slows Savagery’s ascent through the train, completely neutering his escalation. If that’s not available, Stealth can resolve those concerns as well. Daze can also stop Dominion from attacking your Pyre, so this clan can win even the most protracted battle against the Titans imaginable simply by stalling them out. It doesn’t have Pyreborne’s insane ability to destroy them in a few turns, but few clans can even come close to rivaling Melting Remnant’s ability to survive the Titans. Wrapping up/Change Log Oh my goodness, that’s clan #10! X) Theoretically that means I’m done until my beloved Wyrmkin crawl out of their tunnels and join the front lines… but in reality I have more I’d like to do. Clanless cards effect every run to some degree, so they deserve a shorter strategy guide. I also have plans to do a guide more focused on beginning players to help understand how Monster Train’s mechanics work and what to look for when helping to solve the game’s problems, and one based around Celestial Alcove events. We’ll see; for now, a brief break! I’ll still update these guides occasionally as we find more strategies we haven’t come across, any card changes happen etc. I think I spent a lot of time covering various important aspects about playing a clan in detail... I don't personally think it would help to go over every single card or sub-boss. But if I'm wrong, this guide is useful to you, and you'd like to see some other point of discussion, please let me know! We've got enough practice and wins under our belts that I'm ready to write up guides for each clan, but this takes more than a bit of time to do, so stay tuned for future installments as I chip away at this. Thank you for reading, and enjoy your runs with these illuminated lumieres! =) Change Log: 2/5/26: Multiple changes to accommodate Bounty Stalker's buffs & usage.