换一换
换一换 


Noobs guide for AoE2[docs.google.com] 0.1 Introduction Summary: This document is an organized arrangement of gameplay concepts simplified and explained out. It will be categorized and each category will be written in order from most important to the less important. Hi, I’m ptee, a Finnish noob who has been hanging around the AoE2 community since Jan 2019. I played my first AoE2 games back in the 2000's at my friends place and over the years in every LAN party I attended AoE2 was one of the games played. Sadly my friends were always better than me at AoE2 and most other games as well. At some point during university studies I decided that I’d learn to actually play this game. It was a learning project focused on improving and learning to do things I was not able to understand or execute before. I spammed hundreds if not thousands of games against Barbarian AI on UserPatch version of the original AoC. After a month of practice and playing against the hardest AI I started beating it consistently with proper build orders collected from a variety of sources. After going into the ladder at the time I started streaming as well on my twitch channel and made decent progress fairly quickly. Then life happened and work got busy and I had to put the improvement project on the back burner and progress slowed down. I am currently sitting somewhere around 1700ish 1v1 Elo in DE and have been making progress slowly. I’ve been aiding a lot of players over the past couple of years with their gameplay by either coaching, reviewing recs or just by explaining things about the game. To summarize all of the things I usually explain about I made this guide. This guide is meant so that you take a single chapter, focus on fixing these issues in your gameplay and then moving on to the next one. If you try to do it all at once, that might prove to be counter productive for your improvement. Going through your recorded games and inspecting them for mistakes, will allow you to find major mistakes and figure solutions with the help of this document. Feel free to share this document as you like, if there are issues with it you can contact me through discord or maybe even reddit. Ptee builds Here is another thingy I made, in case you’re interested.[docs.google.com] [intro 0.1] Introduction Google docs of this same guide.[docs.google.com] Summary: This document is an organized arrangement of gameplay concepts simplified and explained out. It will be categorized and each category will be written in order from most important to the less important. Hi, I’m ptee, a Finnish noob who has been hanging around the AoE2 community since Jan 2019. I played my first AoE2 games back in the 2000's at my friends place and over the years in every LAN party I attended AoE2 was one of the games played. Sadly my friends were always better than me at AoE2 and most other games as well. At some point during university studies I decided that I’d learn to actually play this game. It was a learning project focused on improving and learning to do things I was not able to understand or execute before. I spammed hundreds if not thousands of games against Barbarian AI on UserPatch version of the original AoC. After a month of practice and playing against the hardest AI I started beating it consistently with proper build orders collected from a variety of sources. After going into the ladder at the time I started streaming as well on my twitch channel and made decent progress fairly quickly. Then life happened and work got busy and I had to put the improvement project on the back burner and progress slowed down. I am currently sitting somewhere around 1700ish 1v1 Elo in DE and have been making progress slowly. I’ve been aiding a lot of players over the past couple of years with their gameplay by either coaching, reviewing recs or just by explaining things about the game. To summarize all of the things I usually explain about I made this guide. This guide is meant so that you take a single chapter, focus on fixing these issues in your gameplay and then moving on to the next one. If you try to do it all at once, that might prove to be counter productive for your improvement. Going through your recorded games and inspecting them for mistakes, will allow you to find major mistakes and figure solutions with the help of this document. Feel free to share this document as you like, if there are issues with it you can contact me through discord or maybe even reddit. Ptee builds Here is another thingy I made, in case you’re interested.[docs.google.com] [intro 0.3] Terminology I use some of these words and terms in the document, which might be unfamiliar to a lot of people. That is why a list will be added here, I will add new words into the list if requested. Some of them are not used at all in the guide, but they are still here because why not. gg = good game gl = goodluck hf = have fun noob = ptee the writer of this document pleb = plebeian (also one of ShadowCrystallux’s many nicknames.) Macro = "macromanagement;" refers to how efficiently a player collects resources and builds buildings and army units. Sometimes it can include moving the army to a certain location as a whole. Micro = “Micromanagement” controlling single units or smaller unit groups in fights in order as an example to dodge arrows between firing shots. Even using monks can be considered micro. Trash unit = Any unit that does not cost gold is referred to as trash unit. Idle time = When the building or unit is not doing anything. Sometimes idle time is called out when talking about build orders, this refers to TC idle time. pkt = pocket in team game (player who gets to play in a position between allies) flank = player who has to play next to the enemy in a team game. drush = 3 militia from dark age rush or dark age rush itself prush = pre-mill drush, some people like to make the distinction flush = feudal follow up or heavier feudal play grush = galley rush trush = tower rush fc = fast castle fi = fast imp Civ = Civilization (playable civilization) rax = Barracks LC = lumbercamp pali = palisade WB = wheelbarrow HC = Horse collar/Handcart/Hand cannoneer dbit = double bit axe dba = double bit axe BBT = bombard tower BBC = bombard cannon Res = resource(s) Xbow = Crossbow Kts = Knights maa = man-at-arms scts = scouts arch = archer skirm = skirmisher or elite skirmisher mango = mangonel scorp = scorpion chonk = elephant halb = halberdier arba = arbalester champ = champion SO = siege onager UU = Unique unit (civ specific unit) Treb = Trebuchet fire = fire ship fish = fishing ship or fish clown = player who plays arena mostly (This is no joke, they call themselves this.) gollum = player who plays only weird maps or niche maps like nomad, mega random, african clearing etc. might refuse to play arabia completely. (This is term used in Finnish AoE2 community.) Strat = strategy, sometimes tactic that is pre-planned. Trash bow = Xbow with persian unique tech smush = siege monk rush (Originally smush was Saracen monk rush) condo = condottiero italian unique barracks unit grocery store = market [Foundation 1.1] Hotkeys First thing to learn is to use hotkeys, ideally your mouse never clicks anything from bottom left, but rather you use the hotkeys to press a button to get the upgrade or unit into the production queue. Select all TC’s, select all barracks, select all ranges, select all stables, select all siege workshops, select all castles and select all docks are absolutely crucial hotkeys to know and have for efficient gameplay. Alternatively if you’re simpleton like I am, you can use control groups and control group your buildings, but remember this makes microing multiple army groups or army composition harder as you can’t control group them. Useful building goto hotkeys such as lumbercamp, mill, mining camp, blacksmith and university should be mapped out so you can use them when needed, this makes getting techs much easier. Idle villager hotkey is something you need to learn to spam in a never ending manner. Select all idles hotkey is very useful as well and select all idle military has good uses as well. In the end what is most important with hotkeys is that you are comfortable with them and can use them efficiently, nothing else is more important than you knowing which button to press and it being easy. tldr; 1. You never want to touch the bottom left of your screen with your cursor. 2. You don't want to select your buildings by clicking them with cursor. 3. You don't want to have to go between TC and army by clicking minimap [Foundation 1.2] Controls Controls in nutshell, you move the cursor, you click things and they do things. Not complicated, right? Well there is stuff like setting gather points for TCs and other production buildings which can be super important. As an example, setting a gather point on a tree will make the villager coming out of TC to go chop that tree. You cannot however right click a boar, but you can use set gather point hotkey to get the same effect with a boar. The vill goes and shoots the boar. This simplifies boar luring a little bit in most cases. Other interactions with gather points like this would be market, when you’re setting a gather point in another market the trade carts will immediately start trading with that market. Then you can do the same with trebs, petards and rams on enemy buildings and they will deploy to destroy that building automatically, saving you sometimes some time from controlling the units. Patrol and attack move are extremely important when moving military units around, the issue is that if you simply move army from one side of the map to another, they might get killed on the way without reacting to enemy units. But with patrol or attack move, they will automatically attack any enemy units in their path. Gather points work like move command so be sure to set your gather points far enough back that the units won’t run into enemy units during their travel. Shift queue, the godlike QoL improvement added in DE. This will be one of the most important methods of managing your economy to ensure no villagers are idling. In short, what is shift queue? When you select a unit and hold shift and right click around the map, the unit will move through those spots. Well that’s cool, but what are some practical uses for it? Shift queue villagers from sheep to another, this will improve the villager pathing and cause less idle time when villagers move from one sheep to another. Shift queue a vill after commanding it to build a building to a resource, will cause the vill to go directly to work on that resource after finishing building. Shift queue a resource to the next one is possible as well, let’s say you want a villager to collect one tree, one berry bush and one pile of stone, you can shift queue the villager to work on those one after another and it’ll do as it’s told. So if you have a gold pile that is about to end, you don’t have to remember to go back to check up on it later, but rather you select the vills and shift them to trees so once the pile is empty, they will continue to work on another resource. Attack ground, some siege units such as trebs, bombard cannons, mangonels as an example have an option to shoot at ground. It might not seem significant at first but sometimes manually targeting the units on a specific spot is the only way to win a fight against xbows which are being microed. Also to note if your mangonel is shooting a standard sized building 3x3 or smaller, it will damage the units next to the building. To avoid this you can actually attack ground on top of the building to prevent this from happening. So if you have knights or pikes or something hitting the building at melee range you won’t be killing your own units. It is really recommended to have a hotkey for this. Another useful control for military units is using the stances. There are four different stances for the units: Aggressive = units will attack/shoot and chase any enemy unit that comes within their vision range. Defensive = units will attack/shoot and chase a certain distance an enemy unit that visits their vision range. Stand ground = units will attack/shoot anything that comes within their attack range. With melee units this means colliding with the unit and with ranged units it means the attack range of the unit. No attack stance = Units will refuse to attack anything These stances can be extremely handy when you want to keep your archers/xbows from running into TC fire or when you want to keep your man-at-arms attacking enemy buildings/units in certain area. Clicking any unit to attack any building or any units with most of these chances will cause the unit to chase and attack that unit indefinitely, so these are meant to be more of a passive thing. Patrolling however with these stances will retain the characteristics of the stance, while move command yet again ignores all of it and the units act as if they are in “no attack stance”. Attack move is similar to patrol but the units do not attempt to return to point of origin. There is also a very handy button for the units called “stop” which will make the unit stop any movement and any action they are doing right now, sit still passively for half a second before returning to their stance command. This way you can micro as an example archers by clicking them to move towards some location, then stopping them and they will continue shooting anything that is within range and not move at all if you are using stand ground. Town bell also gets a noteworthy mention, just unbind the whole damn thing. What you want to do when the enemy attacks you, is select the villagers and use the manual garrison hotkey/button with only those villagers under attack. Using town bell makes all vills run around and sometimes it does not even garrison the ones under attack, it also halts most of your economy so good luck trying to produce units to clear the threat while your resource income idles. There is also a way to only select military units by holding ctrl (control) while dragging the selection box, likewise if you hold alt while dragging the selection box it will only select civilians. (There are surprisingly other units also which are civilians besides villagers.) [Foundation 1.3] Creating villagers Creating villagers from start to the finish of the game seems like a very small task, but surprisingly over 90% of the playerbase cannot actually not idle their TC. (This percentage can be and probably is a lot higher.) I can’t stress the importance of this and no one really cares as they are “casual” players, but the impact of not idling is huge. Now let’s say the game is 8:40 in game time, you’re at approximately 21 villagers, you have idled for one villager worth of time. That is 25 seconds of your TC time, does not sound significant right? Well if the game lasts for 50 minutes, we got 42 minutes of work time being lost for one villager… Well that is not much you might think right? Let’s calculate it out. 42 minutes is 2520 seconds and each second a villager at worsts gathers wood at a rate of 0.39 per second. That is 982 wood you’ve lost over the course of the game. “But I saved 50 food” that villager collecting wood would have gotten without wood upgrades in 153 seconds the wood for one farm and in 94 seconds paid for itself. So in a bit over 4 minutes of game time the villager has already gathered over double the resources that was spent on it. It’s very easy to think that you being down 2 villagers only means being behind 50 seconds, but sadly the resource difference might keep climbing over time as additional TCs come into play and the opponent might have more army that trades cost efficiently against your army. We’ll get back to this later in lanchesters law chapter. Now if this does not seem significant nor important to you, you might as well give up trying to understand the math behind it and accept that good players do not idle their villager production under normal circumstances. [Foundation 1.4] Build orders If you’re active in aoe2 community, you’ve probably heard build order this, build order that and so on forth without realizing what it actually is in depth. So here is an explanation of what a build order is. Let’s say I give you a task of getting out 3 man at arms in the lowest amount of time possible in game, without idling TC. Now you go into singleplayer game and start figuring out how to do it, you try and try over and over again, finally you reach a point where you know how to do it and you end up with something like 22 population then feudal upgrade and distribute the villagers correctly and produce the militia during uptime and get the upgrade instantly in feudal age. Build orders are this exact thing written out, simplified, tuned into a format where villagers move between resources as little as possible. (Nowadays there are faster builds, this example is old.) A lot of people refuse to learn set build orders using all sorts of excuses. But the fact is still that it's completely pointless and unnecessary to reinvent the wheel. There are already plenty of well fine tuned builds out there, they are well thought and written out for use. Most of them are better than what any beginner can come up with, so save the effort and spend it on something more useful. 22 population archers build order (arch), man at arms (maa), dark age rush (drush), scouts, 20 population archers, fast castle (FC), Fast imperial (FI) and many other build orders exist out there. In general all of them have a goal in getting up at a certain age for certain units and techs as fast as possible. Which one is most beginner friendly? Depending on what sort of maps you like playing, open maps scouts or archers would be easiest for new players. Closed maps are generally more FC oriented and you’d have to learn a variation of FC build made for xbows, monks, knights or boom (booming means adding extra TCs and growing your economy rapidly). Which one is best for learning? In general best for learning would be maa and drush opening in an open map like arabia. Arabia is the most popular map in the ladder for the reason that you always have something you can do at any stage of the game, which makes it better for learning everything there is to aoe2 (besides of water play). Later on once you are very familiar with a build order and think you are an expert at it, you become comfortable with adjusting the builds lightly and the concept of build order becomes more or less irrelevant, even if it’s at the core of your gameplay still. High level players who claim they do not use builds, do have a backbone to their openings still and just have a lot of optimizing going on so it might not look anything like the set in stone build orders. This optimization comes with experience and experimentation on trying to improve something that is already good. And finally, after you have learned your build order and gotten the units out, what then? Obviously openings have follow ups and you can transition into archers or skirms out of drush or maa, or you can race to castle age. This is dependent on other factors like civs, map generation and how you are using your units from the initial timing the build order gave you. Here are some build orders for those in need.[docs.google.com] When you’re learning build orders you want to pay attention to your idle TC time and the ability to produce the wanted units as soon as possible. You can review the recorded games of your practice singleplayer games against AI, if you feel like you’re doing everything right to find flaws. Any idle time greater than 25 seconds means you are down a single villager already from the start of the game, which means you could possibly be playing from a very disadvantageous position.
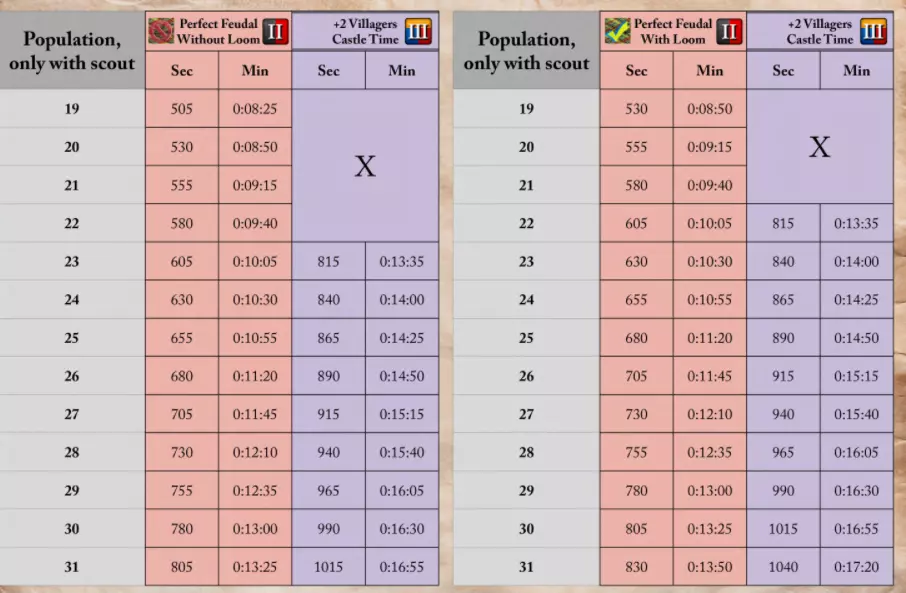
(不确定这张图片的来源,若无意中盗用了他人攻略内容,在此表示歉意。) 以下是一张图片,展示了游戏结束后在科技面板中可以查看的【封建时代升级时的启动时间】,该时间与你点击升级封建时代时的人口数量相对应。每个村民对应25秒,织布机(loom)也是如此。人口低于19时,你需要自行计算,但这并不难,例如18人口对应8分25秒,17人口对应8分00秒,以此类推。 接下来是关于早期封建时代和封建时代的一些进阶建议,你可以选择跳过,或者不必过于关注,因为在第三章会重新探讨这些内容。3 运营节奏 在后续的建造顺序方面,有些建造方案比如侦察兵流,你只需继续生产侦察兵,或者在某些情况下建造一个靶场来生产弓箭手或长矛兵,并根据局势切换你正在生产的单位。通常在这个后续阶段,你需要建造尽可能多的农场,并目标在拥有14-16个农场时研发【轮耕】科技。如果你在封建时代有过多的木材闲置,这将极大地影响你进入城堡时代的速度。记住,所有这些都必须在你使用单位与对手战斗的同时进行,因此这绝不是一项容易完成的任务,可能需要很长时间才能学会管理。1. 围墙与建筑布局 本章内容可能略显独立,因为我暂时无法确定其在指南中的最佳位置。本章的核心是提供一些关于建筑布局和围墙建造的指导。 不要在游戏初期过早建造围墙,在黑暗时代大规模筑墙会减缓你的升级速度,并严重影响你的建造顺序。因此,你应该先达到既定的时间节点,训练出部队,然后调整经济平衡,之后再开始建造围墙。 你可以通过将所需建筑作为围墙的一部分来简化筑墙过程。例如,将兵营放置在基地前方,这样你就可以利用兵营作为围墙的一部分来封锁基地前方。同样,马厩和靶场应建在前方,以缩短单位的移动距离并有助于筑墙。 农场应尽可能靠近磨坊和城镇中心,建造第三排农场是非常不利的,当你要建造第三排农场时,就应该建造一个磨坊了。伐木场应尽可能接触更多的树木,就像磨坊应尽可能接触更多的浆果一样,以获得最大效率。这种采集效率来自于每个资源点最多分配4个村民,这样其中两个村民就能在资源点和建筑旁即时放下资源。不过,采矿营地是这条规则的例外。石料堆和金矿堆的持续时间很长,最终你通常会安排超过4个村民采集金/石,因此资源点和采矿营地之间需要留出一格的间隙。但如果能根据地形形状实现即时卸货,那或许值得尝试。 这些资源建筑的摆放建议通常在几分钟内只能带来10-50资源的优势,但它们会逐渐累积起来。 至于城墙本身,通常有几种不同的建造方法: 资源墙,即把伐木场、浆果丛、金矿及其村民围起来,以保护它们免受侦察兵、黑暗时代快攻、民兵或偶尔出现的其他近战单位的袭击。
矮墙通常用于团队游戏中,以便快速建造围墙,因为资源点可能距离较远。这样你可以在基地附近轻松围起围墙,防止侦察兵骚扰负责筑墙的村民。同时,要确保资源点不在弓箭手的射程范围内,避免少量弓箭手守在墙外就能阻断你所有的黄金采集。这一点对PostponingCamel尤其重要。
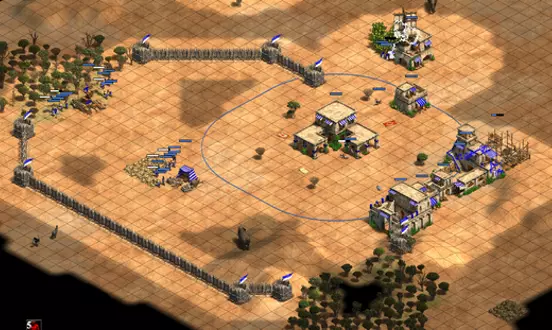
大型城墙的作用是为你自己获取地图上的大片区域。建造它们需要消耗大量资源和村民时间,目的是长期确保你在地图上的领地。这并非在所有情况下都高效,但可能会带来巨大回报。即使像MBL这样的职业玩家也经常建造这类城墙,但这通常是一种权衡——你会失去早期进攻能力,并向对手表明你想要快速发展经济,或者至少在封建时代采取被动打法。
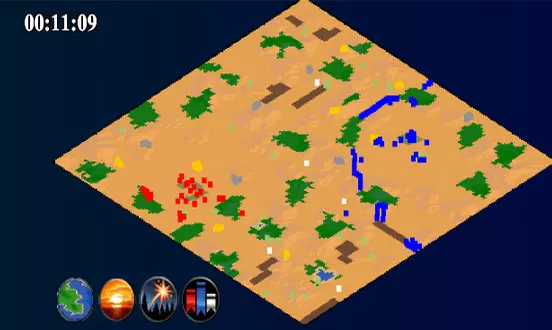
【帝国时代2决定版】1.5版本 侦查指南 侦查时,你可能会忍不住直接点击自动侦查按钮就完事,但这并非高效的侦查方式。实际上,侦查兵的真正作用是寻找资源、了解敌人动向以及地图上的额外资源点。 游戏开始时,你的目标是首先侦查城镇中心(TC)周围的地形,找到两群各2只的绵羊,以及两头野猪,还有木材资源点和金矿。在标准阿拉伯地图中,通常会生成2组4堆的金矿、1组6堆的金矿、1组5堆和1组4堆的石矿,以及6丛浆果灌木。此外,附近还会有3-4只鹿。你不需要找到所有这些资源,但至少找到两个金矿、一个石矿和一片优质木材资源会很有帮助,木材资源可以在基地侧面或后方。利用这些资源,并在遭遇攻击时考虑如何防守它们,这一点很重要。 侦查敌人时,你想了解的信息和了解自己基地的信息完全相同:敌人的金矿、木材资源、浆果丛、高地等位置在哪里。如果你发现敌人所有的金矿都在前方,并且那里有一座高地,通常这意味着如果你能将后续部队部署在那座高地上,就能很容易在进攻时获得优势。 额外资源方面,通常地图上有2组各3个的金矿堆、5个圣物和2组各3个的石矿堆。在游戏后期,你需要利用侦查来了解对手的动向,比如他拥有哪些建筑、正在研发哪些单位以及单位有哪些升级。当你看到敌方单位时,点击它就能看到单位身上的+1、+2甚至+4等升级数值,这在后期尤为重要,但最好从早期就开始养成这种习惯。 由于收到一些反馈,我需要进一步解释侦查的操作方法。移动侦查单位时,将屏幕移到侦查单位在地图上的位置(最好使用编队操作),点击侦查单位让其移动到有视野的区域,然后返回自己的经济运营并进行其他操作,之后重复这一过程。通过这种方式,你可以在侦查单位遭遇敌方基地中心之前,提前发现敌方的资源、建筑等信息。
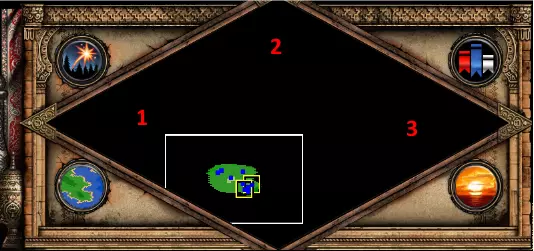
侦查路线示例图:侦查完己方基地后,你应按1-2-3或3-2-1的顺序行动。

Another example picture of successful scouting of your own base and scouting around your opponent’s TC. You can keep scouting what buildings your opponent builds etc. after you have scouted his map, so you don’t have to leave his base as information can be valuable. [Core fundamentals 2.1] Economy upgrades Double bit axe? What is that? - Salted Pepper No but seriously, economy upgrades are really important. Imagine being ahead by 2 villagers? Well that is what it does when you research double bit with 10 villagers on wood and the enemy does not do that. Best thing about these upgrades is that they do not cost TC time, so you do not need to stop producing villagers for them. All lumbercamp upgrades are extremely important and should be prioritized very highly. Farm upgrades like horse collar, heavy plow and crop rotation however are effective wood saving upgrades. They increase the amount of food in a farm (heavy plow does give some farming speed, but it’s insignificant enough to be ignored), this means you do not have to spend 60 wood as often to refresh farms. Quite often higher level players end up skipping heavy plow and crop rotation until much later into the game, due to the fact that the resources for these upgrades are better used elsewhere. Quite similarly during feudal age the mining camp upgrades are usually left until you’re researching age up already, the low food cost might seem insignificant but you’ve to remember 75 food is nearly 10% of the food cost of castle age upgrade, so it does indeed slow you down. Wheelbarrow and handcart, these are the two purely food income upgrades, but problematic with the calculation with these is that they are researched at TC. Wheelbarrow effectively increases the efficiency of your farms (food income) by 25-35%. This might seem like amazing numbers, but in order to research wheelbarrow your TC “idles” for 75s which is effectively worth of 3 villagers. So when you calculate it out, you end up with 14-16 farms needed for the wheelbarrow to cover the 3 farmers you’d end up having extra. This is just income side and not total resource cost as that is highly irrelevant comparison (175f 50w vs 150f 180w WB obviously wins.) Handcart however is a whole different ordeal, with the whopping 500 total resource cost, if those resources are put towards imperial age, you’re using nearly third of the resources required for imperial age for this upgrade. This is why it is constantly being delayed as you’d have to cut your army numbers or your imperial timing significantly to be able to afford this upgrade during castle age. So everyone has just accepted it’s not worth it in castle age and rather research it in imperial age or after clicking to imperial age if they do have the excess resources. You can check how much each of these upgrades actually increases the gather rates for villagers, but that is kind of irrelevant as all you need to know is that it affects your resource income A LOT. So just get them instead of skipping them. (Disclaimer, I know that wheelbarrow and handcart do affect with few % effect for other resources too, but that is in general an irrelevant increase unless you have 100 vills on wood as an example. This is why I do not take it into account in these calculations.) [Core fundamentals 2.2] Economy balance You can’t lose eco, if you don’t have an eco - Rubenstock What is an economy, it’s anything that brings you constant resource income: villagers, trade carts, relics, fishing ship and even feitoria. So what does economy balance mean, it's the amount of excess resources you are getting in. The less excess you have the better your economy is balanced. Size of your economy varies depending on how long the game has been going because there is an absolute limit to the amount of villagers you can have. So when one player has a more efficient eco, he has all the resources incoming being used for either growing his economy or to increase his army numbers. Ideally players do not bank resources unnecessarily and keeping your resource count low is important. Floating food up slowly as an example is good though, because all age up upgrades do cost food. So while you’re spending all of your resources, you want to be slowly stacking up food and gold for the next age up. There are a countless number of cases where players at lower levels have 1000 wood unnecessarily, even as early as in feudal age in bank. That 1000 wood does not actually do any good for you. You might think that you can just make a market and sell all of that wood to save the situation, but it’s not quite like that. You end up losing ~30% of your resources when using the market and you’ve to support the excess cost of 175w as well. When you see pros or higher level players doing market stuff in feudal age, they actually know how to balance their eco so that the market is advantageous. Gathering gold is faster than gathering food, so in small amounts buying some food actually gets you to castle age faster at times, it’s not efficient, but the point is not to be efficient, point is to be up faster. So in exchange for a worse economy and lost resources your uptime is accelerated for strategic purposes. I’d not recommend playing with a market economy, unless you know what you are doing. So what to do to prevent having too much excess of wrong resources? You keep track of your resources, ideally make new farms each time you have 60 wood extra, unless you need some other building like a blacksmith or something else. In the case of stone and gold, you can simply task villagers to work elsewhere. Finding ways to spend your resources takes a lot of attention and can be very difficult to learn. [Core fundamentals 2.3] Continuous production You should never stop producing army - TheMax This is the case in 1v1 especially, whenever you place down an archery range or stable, ideally it does not ever idle so you can have superior army for contesting map control. It might seem very simple, but it’s really difficult to do this as it's the same deal as keeping your TC running constantly. There are resource income requirements for keeping each stable or barracks running constantly. Not many even pay attention to this, but as an example you need 3.5 villagers on gold to run one archery range to produce archers. But there is no such thing as 3.5 villagers right? Well that means you’ll have to put 4 villagers on gold and you’ll get excess gold of 0.5 villager. There are sites like this one https://aoe2-de-tools.herokuapp.com/villagers-required/ where you can select and see how much on each resource you need to produce a single unit non-stop or composition. It does not give you the exact, but rather full villager numbers. This is a guideline however, there are cases like adding siege workshops where you might need 1-3 mangonels and then idle the building as you don’t need more and it’s too expensive to produce more. It’s very easy to check from a recorded game if your stables or archery ranges did idle or not and it's a very important aspect to the game as you’ll realize in next chapter. [Core fundamentals 2.4] Lanchester’s law “Lanchester's Linear Law states that, where combat between two groups is a series of one-on-one duels, fighting strength is proportional to group size, as one would expect. However, Lanchester's Square Law states that, where combat is all-against-all, fighting strength is proportional to the square of group size.“ So what does this mean in simple terms? When you have 10 units against 11 units, you’d expect to be 1 unit left over after the fight. This is however not the case, where you have 2 units killing 1 of the enemy units during the fight the unit that is being killed by two dies faster and you’ll end up with 3 on 1 and 4 on 1 etc. until you run out of time with the 1 on 1 fights. So one player will be left with a few more units after a fight with equal units and a small numbers difference. This case gets even worse when the numbers difference are 10 to 15 or 20 to 25. Numbers do matter, much more than you’d expect. This ties into the earlier chapter where we were trying to achieve constant production in order to maximize our numbers out in the field and makes a good example of how big of a difference idling for 2-3 units might actually make when the opponent is constantly producing. A lot of aoe2 games are won simply through the sheer number units being greater than what your opponent has, wrecking enemy army and rinse and repeat. Imagine taking a fight 10 knights against 11 knights, the enemy is left with 3 extra after the fight, next fight is 10 vs 13 and now he is left with 7 extra, now next one is already 10 vs 17 and that is more than 12 knights left over for the opponent. So things can indeed escalate and snowball out of proportions quite quickly. [Core fundamentals 2.5] Using your army So now that we’ve gone over how to actually set up your economy and how to actually have an army, we will get into using said army to win games. As stated in the earlier chapter, the importance of numbers is really big, you can even win fights against counter units as long as your numbers are high enough. So don’t be afraid to take a fight against 10 pikes with 20 knights or 20 skirmishers with 45 archers, you’ll end up winning as long as you don’t let him freely kill your units. Ideally you will never fight a fight that you lose, that is one of the most important concepts, run away at any cost if your numbers are not there, try to avoid getting trapped and keep everything alive at any cost. Even a single militia late in feudal can actually absorb a full volley of arrows from 40 archers, thus giving you an extra volley over the enemy's army. What to do if you’ve less numbers or you cannot disengage? Try to make the fight as efficient as you can by stacking and microing your soldiers backwards, positioning yourself on a hill to get the extra 25% dmg and 25% reduced damage on your units, even cliffs can help even if they give you only +25% damage. This is what it literally means to have the high ground. But ideally you don’t put yourself in a position where you have to just accept a bad engagement. What to do if the enemy's smaller army is sitting on a hill and you don’t feel like you can take the fight? Force him off the hill, go somewhere where he is not or where he can’t get faster than you, hurt and poke his economy and take the fight when he has to respond to your army. Idling his economy can interrupt his production or cause other inconveniences which will indirectly lead into even greater numbers advantage. You should aim to always do something with your army, unless you have just clicked to castle age and you have nice archer mass inside your walls in your base, then it’s quite alright to wait for the xbow/bodkin powerspike as those upgrades do tend to affect everything a lot as we will learn in the next chapter. But even then these powerspikes are temporary, they are evened out as soon as the enemy gets to castle age, so it’s time sensitive to get your units in the right position to abuse these advantages as greatly as possible. [Core fundamentals 2.5.1]Unit counter interaction elaboration Well I got a little bit more inspiration to elaborate on counter units a little bit. So we all know spearmen counter scouts, skirmishers counter archers and scouts counter skirmishers in feudal age. Things like archer armor missing from skirms can be crucial still as enough archers will kill low amounts of skirmishers and having bloodlines and +1 damage on scouts will make spears nearly useless against scouts. Scouts ultimately become the most population efficient unit in feudal age with full upgrades compared to the other units, but they are still not cost efficient against spears. Starting from castle age however things get much more tricky. We are no longer countering just the unit, but we have to start take into account the possibility of unit compositions as well as the fact that unupgraded feudal units have 0 weight in the matters at this point most likely. Let’s make an xbow example, you have 25 archers left and you upgrade them to xbows and get bodkin on them. Right at that very moment in game those 25 xbows cannot be beaten by anything from the opponent, unless he has somehow gotten to castle age faster and with 10+ e-skirms which are also getting bodkin and armor on them. Or he was so much faster that he has actually managed to put up a siege workshop. But besides of those two exceptions, opponents can’t have many units like knights or unique units or such in the field, so you are free to deal damage to the enemy as much as you like. If he is later to castle age the situation is even worse for him. This is one of the main reasons why people like playing xbows, this power spike is undeniably strong and annoying to deal with. The thing is even with a mangonel opponent is not countering you, he is challenging you to micro down his mangonel. With skirms he is waiting for the slower upgrades and even then you can just run away from him as he would need ballistics to decimate your army. Not to talk about the option of adding your own siege and just making one mangonel and rendering the skirmishers useless. Also there is the fact that skirmishers require more upgrades, have much higher stress on your economy and make it very inconvenient to afford adding TCs early on. Especially if you’re adding a siege workshop too. Simply countering your enemy is not necessarily enough and there are a lot of things that can go wrong. Xbows having +1 range over elite skirmishers and them being able to absolutely decimate non-elite skirmishers is brutal. If you have the bright idea to add knights and mangos, that is just as expensive on your economy and any single knight cannot handle 25 xbows, you need actually a small mass of knights to deal with those numbers. So as this example should have explained, there are more to counter units than just making the counter unit. Counter unit is not a counter unit if it: 1. can’t kill the enemy unit 2. takes too long to fulfill the conditions in order to counter 3. It counters only on paper but not in actual situation because the opponent can micro. Let’s make another example to drive the point home, let’s say one player reaches castle age and starts making knights. He is up 2.5 minutes faster which means there can be 3 knights for 1 minute out in the field before any castle age units will face them. Even if you use fully upgraded feudal spearmen, you will need 9 spearmen to counter those 3 knights. This is super expensive and very hard to play out properly, you have to remember knights point is mobility more than anything. It quite literally can make playing the game impossible. Countering and dealing with your opponent is not only about which units to make, it’s to make your economy efficient while doing it, so you do not fall behind in terms of time too much. If you fall behind in time, you might be down in upgrades and if you are down in upgrades, you might need more army than you realize and investing into more army is more costly and instantly reduces the available resources towards economy growth and/or uptime. [Common edges 3.1] Military Upgrades Why is there a chapter about military upgrades? Don’t numbers always win? Well yes numbers are generally much better, but there are cases where upgrades actually can decide games too. Let’s go over one example scenario about upgrades: Knight has 100HP, 2 armor and 2 pierce armor. Archer has 4 pierce damage. So an archer deals 2 damage to a knight, you’d need 50 archers to kill a knight in a single shot. Now we get fletching to the archers, we’re suddenly dealing 3 damage per shot (+50% increase), so we need only 34 archers to kill a knight with a single volley. Crossbowman has 5 damage, so one more than standard archer, the number goes up again and now we’re dealing 4 dmg (+33% increase), so 25 crossbows. Now we get bodkin which adds 1 more damage (+25% increase) and that leaves us at 17 crossbows. So in total we need less than half of the army number to get the same damage output with crossbows. This is much cheaper than producing 33 extra crossbows and much more efficient. Now let’s go through from a knight's perspective. We get +1/+1 armor on the knights, we reduce the damage from the xbows by 20% effectively 5dmg -> 4dmg. Now we get the second armor upgrade which again gives +1/+1 4dmg -> 3 dmg (25% decrease). Now on top of that we can get bloodlines which give +20 HP to the knights. So the enemy will need 40 crossbows to kill a knight with a single volley. We increased the number of xbows required from the opponent over 100% with the upgrades. Now there are cases where the difference is not this clear cut, as an example you are playing scouts in feudal age. Getting bloodlines gives you +20HP on the scouts sure, but is it better than getting another full scout with its own damage and HP. Lanchesters law is strong here too and it’s actually not worth getting bloodlines unless you have at least 6-7 scouts out in the field. Damage upgrades and armor upgrades during feudal age are problematic because they do cost food which delays your castle age time. While with archer units the benefits are so large with 4 dmg -> 5 dmg that it’s problematic to not get the fletching upgrade. Scouts can choose when they fight and how they fight, so mobility allows you to play a bit more greedily. General rule of thumb, melee units and skirmishers need armor upgrades first especially when fighting ranged units. Ranged units need fletching and damage upgrades asap. But with some unit matchups, you can’t help but calculate these things and try to remember when to get the upgrades. [Common edges 3.2] Counter units and transitions This chapter is about counter units and transitions from one unit to another. So obviously if you’re doing knights as an example and the opponent starts creating pikemen as an example, you don’t want to run your knights into pikes, but rather would add a counter to the unit. Now you’ve got options like xbows, skirmishers, scorpions and even longswords you could start creating as a response to add to your army composition of full knights. But before we can start adding the units we have to realize that the production cost of these units is not free, so you have to transition your eco more heavily onto wood and gold or food to produce these units. Sites like this one I mentioned earlier: https://aoe2-de-tools.herokuapp.com/villagers-required/ are very helpful tools in cases where you start to wonder how should you exactly rebalance your economy. Same thing applies when swapping from xbows to knights, you suddenly have a huge need for farms and much less need for wood, if you do this sort of transition. You have to understand these transitions don’t come for free either, so for a temporary chance to take map control, you’re sacrificing a significant amount of time from your uptime. So it is not recommended to do these transitions or additions unless you absolutely have to as your imperial time will be worse than average. In order to know which unit counters which I recommend using wiki or such a site, that is easier than having me list all the counters here. Addition to this, if you are doing full composition transition from cav into ranged units like CA or arbalest and hussar, or the other way around. It is recommend you have around 100 vills atleast and you don’t stop the production of the old unit before you’ve managed to research all of the techs for the new one first. [Common edges 3.3] Uptimes So in earlier chapters we got some references to uptimes. Here we elaborate on that a bit. Getting up to the next age is very crucial in terms of certain timings, first we have the feudal timings with the 3 man at arms as an example, fletching archers (3-4 of them) and 3 scouts timing. These might not seem like amazing numbers of an army, but getting them as fast as possible can cause catastrophic damage to the enemy economy simply by killing villager or two before the enemy has any units to respond to it. This is just one type of timing, there are upgrade timings as well, like having 35 archers being upgraded with xbow and bodkin from feudal is a huge power spike. This is very crucial timing as there is no feudal unit that can contest with xbows. Same is true for knights to a degree a single knight can be brought down by 3 spears or a huge mass of archers, but overall if there are multiple knights there are no feudal units that can actually deal with them. So how can we actually reach timings? Build orders in themselves are fairly good guidance on how to get to the feudal age efficiently. Uptimes for feudal age vary depending on your population. As an example, the absolute minimum to get to feudal with 22 population (21 villagers + scout + loom) is 10:05. Each villager takes 25s to produce, loom as well takes 25s to produce. So you can calculate naturally 10:30 is 23 pop + loom uptime. “But absolute minimum is impossible to achieve”, no since DE has the shift queue and other features getting perfect uptimes has become a common occurrence even among the mid tier players. It’s nothing special, you just learn to pull off the dark age cleanly enough and anyone can achieve that. Fighting vills with man at arms while the opponent is still in dark age is one of the best ways to finish games quickly, the lower the level of play the weaker players are against early aggression. In my opinion if you can’t handle early aggression, you’ve no business getting higher in the ladder either. Then the castle age uptimes, in general just by keeping your wood count low and seeding farms and transitioning to gold at proper time and getting the buildings for age up right before you have the resources is good guideline for getting good castle age timings. This balance of economy while producing and using your army is difficult to perfect. Of Course there are builds like maa-arch where you end up getting both archery range and fletching early and you have to be on gold for archers, which can make it easier to a degree to click up to castle age as long as you remember to make farms. You can test out the minimum times for each of the different follow ups after drush, maa, scouts or archer builds into castle age in singleplayer and try to get it faster. This is usually the best method to practice and improve your gameplay in this department. Imperial age is very similar to stacking the resources for castle age upgrade, however there are multitude of ways to play during castle age. Everything from 1TC all in to 3TC boom and faster imperial are valid options and variance on how to manage eco in all of them to get optimal uptime is just too complex to simplify. General benchmarks for let’s say standardized 3TC arbalest would be anything under 32 minutes, fastest being something among the lines of 26-28minutes with special builds for certain civs with very strong archer bonuses. This comes apparent in team games especially. This game plan is also very common in 1v1 setting as 3TC build up with xbows used for defense/offense during castle age allows very flexible play and you can transition into multitude of different things in early imperial with the arbalest powerspike covering for any weakness. Scout-knight play which is also common for team games is also very standardized. There are however 1 stable and 2 stable variations, you can reach imperial age at 32 minutes earliest. This is because of the food cost of the unit and the unit production cost being much heaving. It’s much harder to stack up food when you’ve to chop trees and then place farms only for part of the income being spent on the units. 36 minutes is somewhat average minimum that should be reachable with any civilization specializing in knight/cavalier play. In 1v1 however the knight play is not super strong and has huge vulnerabilities on top of the fact that it is slow. So it is not recommended to use this sort of team game build in 1v1. For super fastish 1TC arbalest plays I’d say something along the lines of 26-28 minute imperial age is good. Considering most archer builds with 2 ranges get to castle age at 20 minutes, getting to imperial only 6-8 minutes later is really strong. This is yet again a team game build, but it has some uses in 1v1 setting as well. Then there are the arena clowns who like doing straight up builds to fast imperial, but those are not realistic to be used in open map 1v1 setting, but they can reach uptimes to imperial which are even below 20 minutes in game time. [Common edges 3.4] Unit interaction So cool, now we have units, we have eco, we know how to get upto the next age in a reasonable manner. But why don’t I win games anymore? Most likely you’re fighting in the wrong manner against the wrong units. Yes I’m not even talking about running 20 knights into 30 pikemen. I’m talking about reasonable fights which you should win but you don’t. Let’s say we have a huge mass of xbows we need to eliminate and we have 1.5x the amount of knights at our hand. The xbows however are sitting on a hill next to a choke point and you can’t get a surround on them. This is one of the interactions with kiting included (kiting where you run backwards and shoot in between with your army) that make life a living hell at times. So in small numbers knights completely eliminate xbows out of the field, while in larger masses getting a good surround with knights is very difficult. 1:1 knights would always win against xbows, but the inner part of the formation is completely impossible to get knights hitting. So you’re eating the xbow mass from the sides. One way to deal with this problem is to include mangonels in your army composition or skirmishers as you can trap the units with knights and simply eliminate them with force (mobility ftw). Similarly you might think that knights beat CA, but this is not the case. Due to the increase in speed CA actually are a valid option against both Camels and knights, it’s very hard to trap CA or catch up to them, so you nearly always end up with weaker composition against CA civs. However CA are really easy to deal with using skirms or xbows/arbalest, which are much much more cheap and you also get to place 3TC’s fairly fast to cover your eco from raiding attacks. One way to play against this kind of high mobility compositions is to produce a push which they have to respond to and thus it’s near perfect to play xbow/skirm into faster imperial with greater eco into it and start pushing them down before they have time to develop their own eco after having to produce such an expensive unit. Why is this listed under unit interactions? Some units and their interaction with other units is very difficult or impossible to deal with in conventional means of just using your units correctly. So sometimes we’ve to build gameplans around the enemy units. Another example of this is if you’re playing skirmishers against archers in feudal age and opponent reaches castle age first. You’ve to be aware of the danger of losing all of your skirms as soon as opponent gets bodkin and xbow upgrade done for his army. Feudal units cannot really counter castle age units without heavy losses. So on paper you have got counter, but in practice you’re in a situation where opponent can do whatever they want until you get elite skirmisher and possibly armor and bodkin both. This is an example where you can actually plan to use your uptime in order to eliminate opponents forces with up time advantage. [Common edges 3.5] Map awareness Map awareness, what is this? It quite simply means being aware of what is going on in the map. It might seem obvious but it isn’t always quite so, you get so easily distracted while microing armies and while spamming farms that you might even forget to look at the minimap. Because of this players tend to miss villagers passing their armies, red dots in the map are not very easy to spot all the time. This is why using the team colors option during 1v1 games can be super helpful as some players tend to pick colors such as gray, orange and green to camouflage their units in the minimap a slight bit. Ideally you want to be checking minimap as often as you can, so while you add vills and army in the queue, while you walk around with your army or even during microing your army your eyes don’t need to constantly watch the army or them shooting. You can check the minimap while at it to not miss things. People at intermediate level start to abuse opponents' lack of attention on this to sneak the leftover man at arms into the enemy wood line and those units will freely kill everything especially if the notification is hidden behind an actual engagement taking place somewhere else. There is no real way to solve this issue except to get used to the habit of checking minimap while doing certain tasks constantly. So you get more used to reading the minimap. Scouting also plays a huge part in this as it’s easier to determine what might be happening in the fog of war even if you don’t see things in the minimap. You can always determine where the opponent might be trying to expand his eco and you can use that vulnerability to attack and hurt their economy. There are plenty of manual tasks such as setting gather points, making farms, queue filling and such during which you can easily check the minimap as those are just key presses more than anything else. You can also abuse this for your own advantage by causing an attack alarm on opponents units while having raiding party enter their base from another location while they are checking what is happening at the initial alert site. [Niches 4.1] Opening interactions This chapter is for the more intermediate players who start facing properly executed openings from opponents. It’s going to be quite in depth about the economy behind an opening and how different openings stack up against each other. There can be mistakes in this chapter as I am only a noob myself still as well. These scenarios are thought out as having equal strength of civilization eco without tricks to them. Small description of the nature of different builds: Scouts build in general is an economy focused build that gives you good transitions into anything in the castle age and a strong economy for building a strong army. There are all in feudal options with this build. Man-at-arms is a heavy early impact build which can cause catastrophic damage on opponents economy early on, even if you do not succeed finishing the game in feudal age, it still leaves you with a mass of archers about to be xbows. Drush is meant for delaying your opponent so you can have your way with them later. Its sole purpose is to slow down any timings that the opponent wants and you can respond to them easily and safely right after. Fast archers is often thought of as a defensive build as a response to man-at-arms or even scouts, but contrary to this belief you can play archer builds fairly aggressively. Low pop archer builds have become more and more common in the past year or so (6/2023). With this raise in popularity more ways to play with the build have been figured out, while it is not as friendly to your economy as scout build is, it still has huge perks in terms of getting the units out fairly fast and you’ll end up safely with a huge mass of archers upon reaching castle age. Man-at-arms vs Scouts: In general due to the nature of man at arms build, you’ll end up having 3 militia + scout in an enemy base before he has even a stable up. This is due to the building time of the stable. It is recommended that when facing scouts you send at least 1 spear before clicking man at arms upgrade to help out with the militia. Approximately 5 scouts are required to clear 3 man at arms and 1 scout. 3 militia, scout and spear take about 6 scouts to clear comfortably without massive outplay in micro department and once you have the man at arms upgrade on top of that the number just keeps increasing for a comfortable fight where scout player does not lose everything can be taken. In this match up the scout player might choose to send the scouts forward to your base instead to raid and get a range at home for defense. This is why it’s quite important after doing man at arms to add a spear or two at home while you’re doing your own ranges as follow up. These spears together with small walling will prevent any sort of damage at home while your man at arms force everything to be small walled at the enemy’s base. Now after you have a few archers, a spear you want to combine these forces with the hopefully alive man at arms or remnants of them if the enemy chose to fight with villagers. This will be an uncontested moment of power you have with your units at an enemy base as long as you can combine these two forces without getting them picked off by scouts on the way. You can now harrash enemy woodlines, golds and berries even beyond walls. If an enemy comes in with skirms and scouts and tries to fight, it is recommended that you micro the archers backwards a bit and try to kill the scouts as fast as possible while attempting to send the man at arms at the skirms to soak any of the damage. Once you are only against skirms, it’s very easy to meatshield with the man at arms while microing the archers and attempt to take down the skirms. However if the skirm numbers start to get massive, it is recommended to add your own skirms or fall back and accept that you cannot deal more damage or finish the game with this single early attack. Walls and hiding in your base with the remaining archers and heading to castle age is recommended. Now depending on the damage you’ve managed to cause, you might end up in castle age a bit earlier than scout player, but by standard these builds stack up badly against each other in terms of scout player having a fairly large lead in castle age time, if both players are unhurt and you’re reliant on walls until your xbows come online and you’ve to be prepared for a huge push coming your way possibly at the same time. Drush vs Man-at-arms: The goal of drush is always the same, cause idle time and if you’re lucky pick off a villager. Drush is extremely annoying especially the pre-mill variation that hits earlier to deal with. You don’t want to fight with the militia ever, rather your goal is to cause as much idle time as possible to slow down the enemy game plan allowing you either pull off decent feudal time into archers behind it or even fast castle in some cases. How to deal with a drush? You can’t do anything but hope that enemy over commits in a fight against vills and just loses it and you get minimal idle time on your vills. Also resource walls are a valid option. The problem with drush is that it can actually slow down your man at arms build so much that you cannot even afford a man-at-arms upgrade or your man-at-arms will run into enemy archers already when they arrive at the enemy base. Drush is for all purposes an extremely safe opening which has simple and easy to achieve goals of slowing down the enemy. No opening is really good against it, but rather the user of the drush has to use the units very well and manage their eco while at it well. It can also be extremely difficult to get larger walls done against a drush opening, which can be very crucial depending on follow up. Scouts vs Drush: Similar to earlier paragraph scouts run into huge troubles, you might be able to afford 2-3 extra scouts and end up with nice 4 scouts, you do not want to stay at home clearing a drush with the scouts, it’s extremely important to run straight at the enemy with scouts and try to get some damage done, before the archer follow up appears. Non-stop scout production is usually difficult to achieve especially with <20pop builds when you’re hit with a drush too. You want to just ignore the drush as much as possible and perhaps later on after your first skirms/archers are out you clear it with one that stays behind at home. “But I don’t want to do archers or skirms” no seriously, you cannot play against drush without adding archers or skirms unless it’s drFC in which case you might be completely lost already in terms of castle age time, you’re under pressure of time to make something happen to make it at the very least even game as his eco should get a slight lead. There are cases where you can play uninterrupted clean build into scouts and their follow up as a drush might not deal any damage and you find excessive amount of damage with scouts, this is exception to the rule however and you just should try to safely close the game after that sort of damage dealt to enemy economy. Scouts vs Man-at-arms: This is the reverse of the first explanation, as stated there scout player should in all cases run their scouts directly to the enemy base and cover their resources with walls. The best case scenario, you will be able to pick off villagers, archers and perhaps even spears if they are low in numbers. 3 scouts can easily pick off a single spear without micro and with a little bit of micro you might not even get hit by the spear. You should have a swift 1 or 2 range follow up to this, just remember that going full skirmishers might become a problem in terms of castle age uptime, spending too much food on units will slow your castle age time but as long as you are able to get just enough scouts and skirms out, you should be faster up than the maa-arch player and due to the nature of maa builds missing horse collar, your economy will be even stronger. So the goal should not be to kill the maa player but rather kill his strategy and make it irrelevant. You have to always keep in [Niches 4.2] Army composition planning To compose your army properly, you need a few different elements in it. Trash units (non-gold costing units), siege units and a power unit (gold unit). The job of trash is to effectively attempt to counter enemy army composition, so if the enemy is playing halb and arbalest, you want skirms as it’s the cost efficient trash unit. If the enemy is playing cavalry, you obviously want halberdiers. Job of the power unit is to destroy anything in its way when engaged in a fight or have high sustained damage from behind a “meat shield” of trash units. Siege’s purpose is to counter other siege and destroy buildings. The importance of siege is nearly always underestimated. So what does army composition planning mean? Well to get from A to B there has to be steps taken in between right? If you start a game as Portuguese vs Mongols, you can already determine what is the ideal army composition you want to get into right? Mongols as an example love their mangudai, drill siege and hussar in front of it all. The Portuguese however don’t have amazing late game composition but their bombard cannons do well against siege, so you’d be building trash around that and most likely arbalest and skirmishers to protect it. But yea the real question is how do we get from the dark age to this position comfortably and hopefully ahead in eco. Mongols obviously have very fast openings with their faster hunt gathering, so they will be hitting with something like low population, scouts/maa/archer build. Best response to that as portuguese is drushing and doing resource walling. You’d rather enter the archer/skirmisher fight as you want to stick to those units instead of trying to wall and you do have an “eco” bonus from the saved gold on archers, so you might get a slight uptime advantage even to be able to attempt to leverage your xbow spike against the mongol player. Now let’s look at this from Mongols perspective, let’s say you play scouts because you recognize the map is very open, now after you’re closer to reaching castle age, you realize that you can play either knights or go into CA because upgrading either of them actually helps your future army composition. Downside of going knights in this case though is that there is a good chance that the enemy will start adding pikes quite soon, if you intend to play with the hussar in early imperial. So it might be better to play the CA route and get the skirmisher/xbow coming out of the opponent and thus in early imperial have fun with your hussar against the skirm/arbalest before any of the halberdier come out as it’s not as easy to produce without the initial investment in pikemen in castle age. This kind of thinking process starts in the minute 0 of the game and you’ve to adapt your plans to the map and game state constantly during the game. But planning and having a general idea of what both of the civs can and want to do is very important. (This is also a little bit old example from time when steppes were not good and Portuguese did not have the berry eco bonus.) I guess one more example of this sort of planning is opening man-at-arms against Mayans, Aztecs or Incas. This helps you in future if the opponent does indeed decide to swap into eagles after reaching castle age or in some cases even during feudal age. Without the man-at-arms upgrade made beforehand it is a very slow process to tech into longswords in general. [Niches 4.3] Game plans So next up we get to game plans. How does this differ from army composition planning? We take into consideration map generation and civ power spikes and start moving from there, that is how we make game plans. So game plans are a combination of everything, you open man-at-arms with the intent to play heavy feudal with two ranges and archer skirmisher mix, in order to get a lead in the match up which could be devastating in castle age. Good example of this is playing against something like Burgundians. The civilization is very strong economically and will often get ridiculous resource leads over the course of the game and by the time imperial age comes into the picture, they can already wipe you off of the map at ease. So you’re essentially put on a timer to not allow the enemy to just boom away right? Now let’s say you’re playing Malians, you recognize that your civilization sucks in imperial against enemy civilization, but you remember that the biggest economical lead Malians get from their saved wood on buildings and gold mining actually starts to be in effect early castle age. You’re saving so much and it’s stacking up, but over the course of the game the saved resources become more or less irrelevant, early on you have not saved enough yet for you to have an effective economical edge. So you’ll build your gameplan on the fact that you are saving resources in buildings and gaining eco lead and play man-at-arms into archers into xbow + knights in castle age in an attempt to leverage your resource advantage to full capacity and get opponent out of the game. Now how does map generation work with game planning? You recognize that the enemy has vulnerable woodlines as an example, he has two close woodlines in front of his base. Now it would be a shame if your archers would be guarding the sides of his base preventing expanding while you just happen to build two towers behind the woodlines, this way you are preventing the opponent from taking the most valuable resource in the game and using it properly. You can get away temporarily without gold, but without wood your whole economy just halts. In some cases, like an enemy having all golds forward, you have keep track of the extra golds out on the map and figure out a way to solidify your control over those front golds while knowing that the opponent WILL try to reclaim them either during feudal age or early castle age most likely. Water maps add another extra layer of complexity with the importance of fish. So quickly go over the importance of fish: You have a TC that works in the dark age, now what if you had two TCs you’d have twice the eco. This is what dock does, it provides you with another eco production building that produces units which produce resources. This is why having a dock and being able to fish is extremely beneficial for your economy. This has been figured out even as far as people making docks and fishing ships in Black Forest map which has huge ponds with only shore fish, so you’d have to get to feudal fast to get fish traps out to replace the farms. You’re still getting extra “villagers” when the ships are producing food out of the fish traps and you don’t need farmers but rather gain extra wood. This is why wiping and perhaps even focusing on fish economy can be crucial, game winning and super important depending on the map and available resources. And no fish booming in stupid lake is not gonna win you a game in 1v1 unless the map is completely closed or very easy to make into a closed map. [Niches 4.4] Decision making This is the achilles heel of every player who has gone above intermediate level and are starting to perfect their economy management, production and such, getting good or decent gameplans and decent army compositions going and understand how to win games in depth. Decision making refers to evaluating the information available to you and deriving from the lack of information as much. Do I go left or right with my man at arms, do I send the archers forward instantly to meet up with the man at arms, or is the enemy scout going to snipe them on the way? Am I going to do X Y Z or A B C depending on the game state. Your gameplan can be valid, but your decision making and use of the units you gain through gameplan or how the things are going can turn in an instant disadvantageous for you. Giving a minute extra time to an opponent while waiting for an upgrade that you don’t actually need can be a crucial decision making mistake. Decision making is still a mystery for me to an extent, and solving it is not as simple as making “see X do Y thing” . There are multiple sides to these questions and the answer is always depends until you’ve defined the answer to the question well enough. In isolation, opening interactions, army composition planning, game plans are theoretical questions which might have definitive answers to them, but introducing actual gameplay into the mix makes everything a big old “it depends” problem. Part of decision making is also splitting your attention, you have to know what part of the map you’ve to watch at any given time. Problem with this is that you might not want to look at your eco even if there is an attack alert there, but also you cannot just ignore some things. So you have to make the decision, check what is there and send the minimum amount of things to deal with it so that you can cross it off the list of things to do. Attention is a resource too and choosing where to spend it requires right decisions. These things might have to be split into two different explanations some day, but as I’ve said I am still learning and feel like these questions are quite difficult to answer still. [Miscellaneous 5.1] Fitting everything together Miscellaneous This whole miscellaneous part contains information that might prove to be useful, but is absolutely not necessary. It contains tips and advice on various different topics, which might or might not be relevant for your gameplay. This chapter especially is something I’ve been thinking about and since it is a bit outside of the gameplay information provided so far by the guide, I thought about adding it in the end. Take it also with a grain of salt as everyone has their personal way of dealing with this. Also to note, this is not for everyone as not everyone has the same level of commitment in the path to improvement and some would lose motivation after following these sorts of thoughts and practice ideas. Recently I had a chat with someone about how to actually learn to be able to do all of the various things at once. As referred to in the guide, you’ll have to be doing all of the things like continuous production, economy balance and build orders while thinking about military upgrades, opening interactions and et cetera. It actually is quite an overwhelming task. The answer to this problem is to build muscle memory and habits, this takes repeats and practice and applying yourself in order to automate some of these tasks. Someone at the level where I am currently sitting would out of habit keep their resources low during feudal age and castle age. It is not something I’d have to pay extra attention to. Making houses is another one of these things and constant villager and army production. Sometimes you ofcourse fumble, nothing is perfect, but in general you can keep things in order. This is something I like to call macro cycle, building one is quite simple. As an example figure out 25 second loop in your head like this: Make vill Check population Look at minimap Look at scout Look at resource bar Check army etc etc. go back to start This is basically the most simple method of building habits and so called “macro cycle” once you are doing the actions without thinking about them too much, you can actually start thinking about decisions during the game. But this is also not everything there is to the macro cycle or this approach to building habits. What you need next is speeding it up. Like if you are microing scouts against spears or archers against archers, how do you keep doing the macro while at it? Well you split it up, while microing you do each action in that list in between microing, if you can afford it without losing army. In the end you don’t have to look at your base to know if you have 60 wood to make a farm or not, if you got the wood, you use TC hotkey, grab a vill, make a farm, spam the hotkey to the army and boom you continue microing. But most likely attempting things like this will end in failure, you might feel like you just don’t have the APM for it or something like that. I’d not worry about it too much, just by attempting things like this you actually get better at it and faster. Anyone can push themselves to do more, but you have to at least try. It might take hundreds or perhaps even thousands, maybe even tens of thousands attempts, but it is doable for nearly everyone to an extent. How I personally built up some of these things, as I said at the very beginning I picked up the hardest build order I knew, spammed it against the hardest AI I could and learned by failure. As soon as I messed up, I quit and remade the whole game in order to get fresh map generation. (Even nowadays if I idle for 2 seconds, I might restart the whole game.) Once I managed to do things “perfectly” in my opinion (far from it actually and probably still am very far from it) I started playing ladder to an extent to get the variables from playing a player in the practice. However I did not completely abandon the AI practice, even nowadays I might fire up four lakes with fast speed in DE and use one or two extreme AI’s as an opponent to spam a build and try to manage the eco. There are many builds on other maps like Four Lakes and Budapest which are far harder to execute than any arabia build will ever be. This has actually proven to be good practice for APM and with higher apm it gives me more ease while playing the ladder games against actual players in normal maps. In the end all that I’ve mentioned so far is still personal, requires commitment that a lot of people do not have and requires amounts of effort that are not reasonable for simple reasons like “getting good at a game”. This is by no means something you should do, if you find it at all demotivating. Motivation is the most important thing in order for you to keep learning. Finding the game fun and interesting is even more important. [Miscellaneous 5.2] Water maps Many people struggle with playing water maps, most just because they have never tried them and others because they just can’t understand the way these maps are played. This part is about maps which are like Islands or team islands etc. Water maps in all honestly were not difficult couple of years back, all you had to do was to make galleys and the guy with more galleys won. Landings were not optimal because of the cost of getting the transports as well as the fact that transports were available only during feudal age. So the very basic way of playing water maps comes from there, you use the build and gain control of water and block any attempts to transport. As long as you’ve control of the water, there is no way opponent can win and you just have to keep army superiority. So water maps were just 1TC fiestas where you just try to progress trough the ages while spamming galleys whole game and microing them against opponents galleys. This gameplay is not the case anymore. As I said earlier, now that you can do transports in dark age and there are fires and demos etc. in the game, it has become a bit more complex than that. It has become more of a default that you end up playing both water and land at the same time. So how do you know when to do what? Well in all honesty it is a lot about preference. Some people just want to play straight out water and defend the landing on their island, while others feel like they want to be the one doing the landing. Sometimes people just focus on playing water and you get the more “old style” gameplay. Either way these are the options so how do you deal with someone landing you. Simplest way is to scout and know that the opponent is landing first and foremost. Then you can try to wall them off and if you gain control of water you can easily prevent them from transporting over again. Alternately, depending on the state of the game you might have to spend some resources in stone walls or even units to deal with the forward. But as long as you’ve retained water and not lost fish, you should be in a fairly comfortable position as a defender. However if the opponent wins the water, then you have lost the game most likely. Transport will move the units around and you can’t really wall everything off and even if you boom, there is no guarantee you can get water back. Though sometimes you might be able to use a castle to gain shoreline and get docs down and get back on water before the opponent gets to imperial age. If you are the one landing the opponent, your goal is to disrupt his eco as soon as possible. The problem with landing is that you’re investing A LOT of resources on buildings. You’re nearly guaranteed to lose either land or water. Winning water means you get to keep fish and can actually play more peacefully with the freshly gained eco lead. But if that does not happen then you really have to hurt the opponent on land and possibly even kill them on land completely. In some rare cases you end up in a situation where the defender over invests in the defense and you can get a boom behind your aggression running and actually out eco the opponent. But this is not a reliable method in the end. What is most important however no matter which water map strategy you choose, you need to have a build for it. Water maps are highly execution based, even more so than your normal arabia games. It’s just a fact that the eco increase from having the water, having to contest the water and land that you just have to have a good build to not waste the res or units or timings. It just snowballs harder and can be more difficult to recover from. I’ll be talking about this in the mixed map section as well. [Miscellaneous 5.3] Mixed maps What is a mixed map? Well it’s a map that has water and land in all simplicity. There are many different versions of this as well, you have something like Scandinavia which has two waters that are shared, you have mediterranean, nomad and four lakes. Main difference between these maps is how you approach water, some maps like medi play a lot more like water maps but still retain few of the characteristics of mixed maps. While something like Four Lakes is more of a land map with extra fish eco. So how to play these maps then? Mainly in these maps there are different sets of build orders, you have to have a build for these maps even more urgently than in arabia or other full land maps. Some of the builds are even map specific, not every mixed map plays the start even the same way. Why is it so important to have good builds? Like earlier in the guide we referred to the difference having extra vills makes, mixed maps are like that but on steroids. Fishing ships cost only wood, which is much easier to gain than food and on top of that you produce them out of a separate building than TC. So you can grow your economy at twice the pace. What is even more fun is that fishing ships bring in food which is the more difficult resource to get. Having just 10 fishing ships already is a significant economic lead which can be impossible to overcome. But keeping the docs and TC and military production running at the same time and managing your resources can be extremely overwhelming. Not only that but people tend to play the “dumb” way on these maps and focus on only land and then push you with a bit earlier timing. So you’ve to be able to read the situation extremely well to know what units you should make and when to stop investing on fish in order to retain the lead. Mixed maps are definitely something you really want to have a good build for and you need to actually play each of them slightly differently as well. Some you might want to invest less on fish by nature while others you really want to go ham on the fish. There is no one set way in doing it. Mastering this style of play and actually being able to manage multiple docs, TCs and military production while playing the fine line of having just enough army is so difficult that even some of the top 1000 players can’t do it anywhere near correctly. (6/2023 this might change in future) I’d advise you to just straight out find a build and practice it a lot, if you indeed want to go down the route of learning mixed maps. Also you need to learn map specifically how to play it and what civs are good for the map. Just to note, in these maps it is very important also to figure out the feudal to castle and castle to imp transitions, it is absolutely ridiculous how much resources you get in a short amount of time, so every phase of the game feels super accelerated. [Miscellaneous 5.4] Closed maps Go ask clowns about it, we have arena professionals for that reason. Nah but seriously, I am not an expert at these maps and I don’t pretend to be. They have different meta and it is apparently nearly sacred information… No but seriously there is own meta for closed maps, I do not know of it in extreme detail but I can explain some of the characteristics of these maps. I won't write about it a lot, but I’ll write the little I think I know to be good information. Expect fast castle builds always Expect booming Expect monks always Expect castle drop possibilities Expect 1TC plays Expect Fast imperials Expect tower rushes Expect castle age pushesThose are the main points of what people do on this map, the most notorious thing for me personally is monks. I’ve seen 60 Aztec monks converting hussars and then killing the rest with the converted units, even if I had 80 hussars… I hate that this is a thing and I hate that it exists in the game. But you just have to live with it. Monks and siege are such a low economy way of playing and when you get freely to FC you usually do not possess economy for a lot of military production, so it is perfect for maps like Arena. It is also perfect for 1TC gameplay and works great against booming because usually when people invest into boom they do not possess the resources to instantly swap to military production. Also monks in the arena can pick up the relics while doing this, giving a couple of vills worth of gold income. This is actually significant and the later the game goes the more important having infinite gold source is. Tower rushing, even if it is a bit rare at times, is surprisingly one of the more effective methods of breaking into opponents' bases. This sets you up in a nice position because while doing FC it can be extremely difficult to respond to the towers and hold off the opponent with walls and/or towers. Your slower feudal time will nearly guarantee that your opponent will get into your base. People in general either tower rush with civs which are good at it, or when they have huge civ disadvantage and they can’t use any of the fast imp or castle age push options. It’s like a hail mary in order to get a lead. Just like in arabia tower rushing, your goal is to deny opponents resources temporarily or for good and try to cause as much damage as possible and force the opponent to interrupt their boom in order to regain the map control. What comes to booming, that can actually be done with a FC + scouts build and you can get a few monks to contest the relics. This is actually one of the better ways to do it because it also prevents a lot of the aggression options during the whole castle age. I won't go too much into details with this, because it’s you know booming and if you scout the opponent doing something weird, you just respond according to the situation. [Miscellaneous 5.5] Team games Now what comes to team games, also map specific things do apply here and quite a big time as well. But in general I can explain some of the things about the nature of team games. First of all, you should use only gold units in team games, unless you have a solid reason to do halb + siege push. That is about the only acceptable trash unit in team games, sometimes you can compensate for temporary lack of gold with hussars if you are playing cavalry. The reason why you use only gold units is because gold is unlimited through trade, you should always start trading before gold runs out, but you also need to be careful to not start trading too soon because it is a huge resource sinkhole to start the trade. General rule of thumb in team games is to start trading once you get to imperial age, this is with standard resources. Some mega random maps you have to do it sooner or can do it much later. Why are trash units bad? Well the most powerful team game unit composition that nearly every civ combination has access to is Knights + Xbows. You’ll generally have pocket player going scouts into knights and flanks playing archers into xbow. This combination will beat spear + skirm or pikes + skirms or any other combination of units that has trash in it. That is simple enough. While playing team games, one of the more important things is to keep an eye on your allies. The game is not lost unless one of your allies quits and this can happen because of opponents or because of your and your teams actions. As long as player does not resign and has villagers for re-booming chances of winning exist. To aid in this I’d recommend you don’t throw your flank under the bus and you don’t argue with allies, apologize even if you did not do anything wrong or even if an ally is blaming you for his mistake. It’s pointless to argue with someone who is raging and being unreasonable, it’s more important that he/she does not quit. But you have to take into account as well the general game state, if your side of the map is losing you have to have the other side of the team at least pushing or winning his/hers/their side. Holding 1v2 is possible to some extent with some smart play and choices, but there is only so much time you can buy. Everything is afterall reliant on how each of the teams play. Playing with one resigned player can be viewed as disrespectful, but on the other hand there are many cases where the team with no resigned players is just in such a bad position that winning is impossible. But in the end you’re playing to have fun and if one guy resigning early ruins your fun, it’s better to just tap out as well. In general it is smart to play some aggression in feudal age, unless the map conditions do not allow it. Playing no army in feudal can result in your and your ally’s loss, recovering from deficits can be even more difficult than in a 1v1 game. [Miscellaneous 5.6] Slinging What is slinging? Slinging is a teamgame "strategy" where one or multiple players after reaching feudal age get market as soon as possible and start sending all their resources to their allies. This strategy is so unfairly powerful when in capable hands that it is banned in most of pro tournaments. Only reason why I am writing about it is because you need to be aware of this strategy, if you are playing in even remotely serious setup. The power of sling is that only one player has to get the researches for powerful units. Accelerating one player unnaturally fast in the game with extra resource income will allow that player to reach castle age/imperial age while creating units and produce massive amounts of army even while booming. How to deal with sling? Well you just have to do it yourself. There is nearly no way to beat capable player who is being slung even 2v1. What if you kill the dude throwing the res? Well the damage is already done by the time you can do that earliest into the game. You'll still end up playing 2v1 against a player whose upgrades and economy are so far ahead that it can actually deal with two players alone. There has been attempts to balance against this strategy trough mods in past tournaments by tournament admins, but from what I've seen even if the resource sending tax is increased significantly this strategy still remains valid.