


怪物猎人:荒野 双剑指南与配装汇总
为r/MonsterHunterMeta和怪物猎人集会堂Discord频道制作的《怪物猎人:荒野》双剑官方指南与配装合集。这里包含了毕业配装、双剑使用指南、进阶攻略以及其他实用信息。已针对《怪物猎人:荒野》1.020.01.00版本更新。由Team Leviathan撰写。
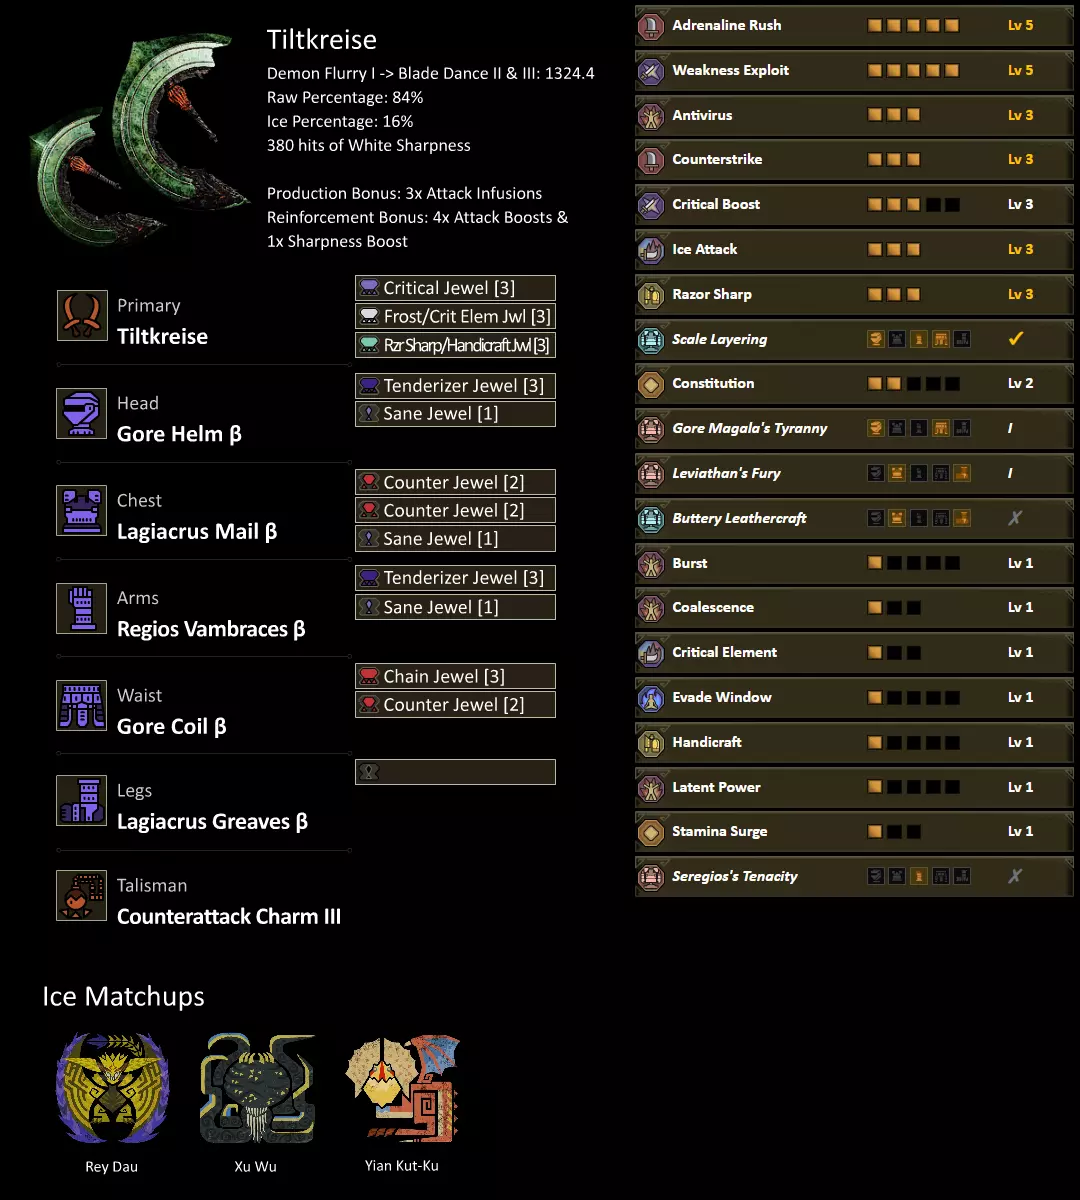
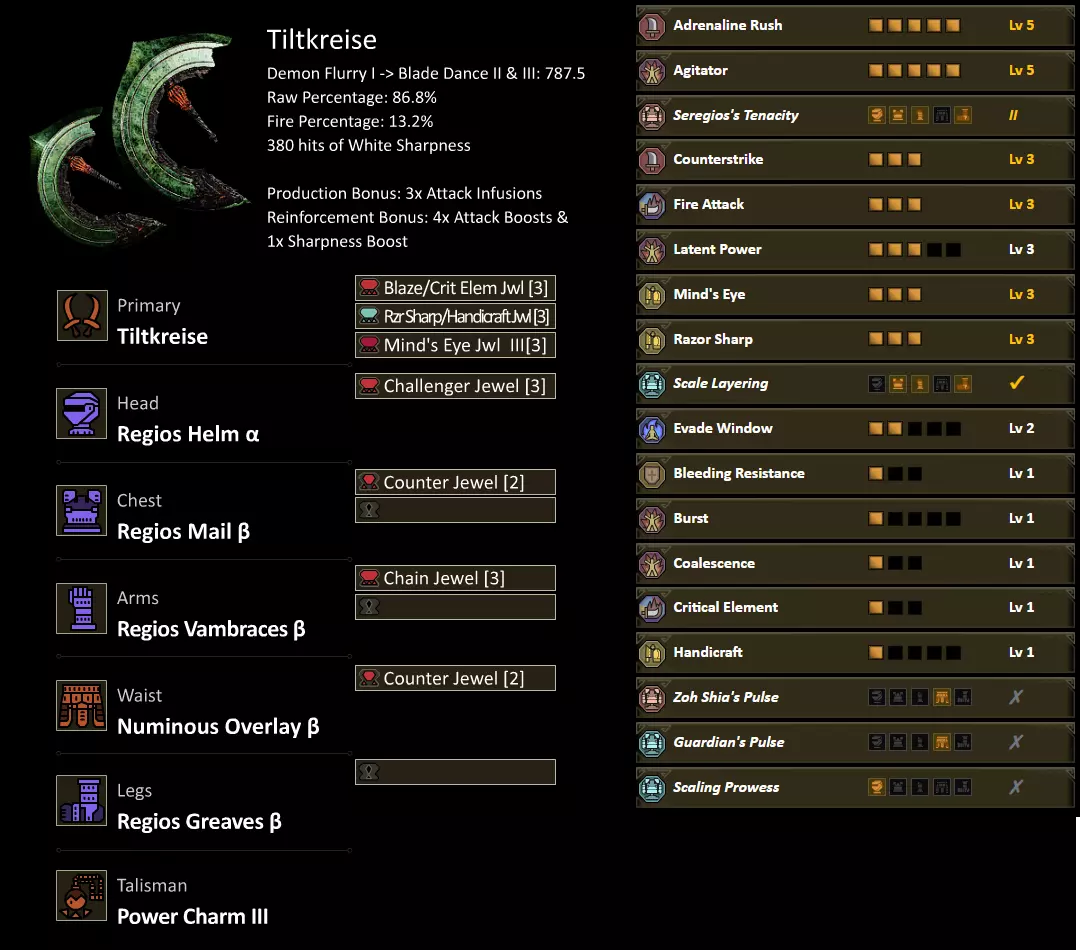
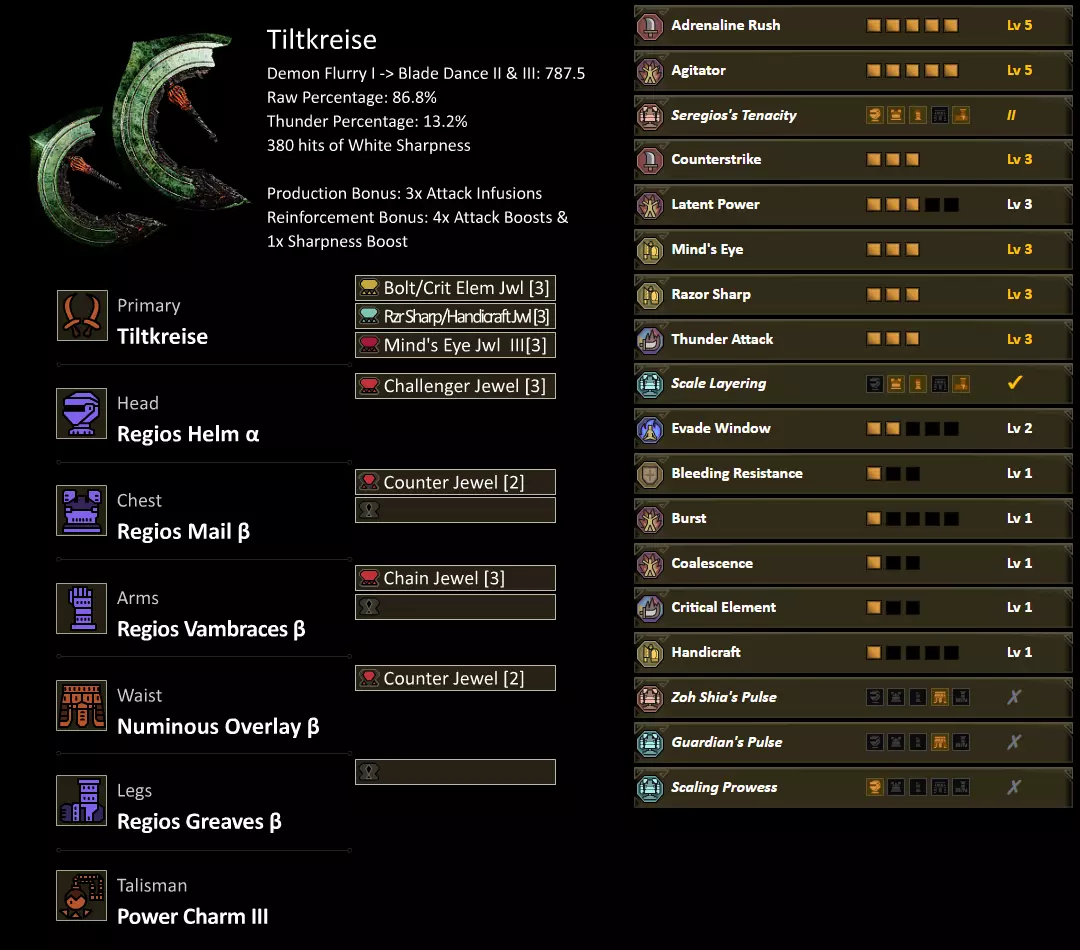
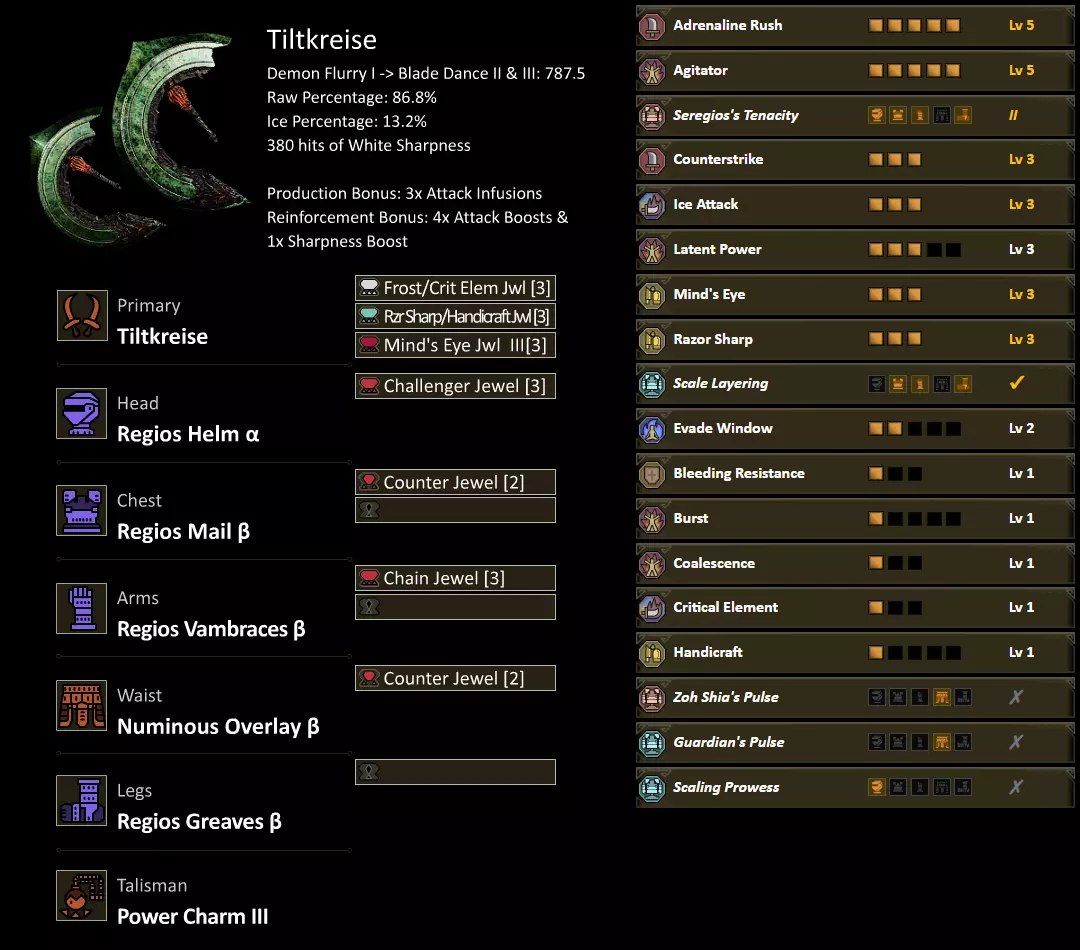
Bro4U July KreaTV1 OreoPancakes Pilgrim2092, author of Dual Blades Guide (Rise)[docs.google.com], Dual Blade Guide (Sunbreak)[docs.google.com], and Dual Blades Guide (World & Iceborne)[docs.google.com] Refia❤️, author of Dual Blades Progression (World & Iceborne)[imgur.com], DB Rise Endgame Builds[imgur.com], and Quick Wilds DB Gearing Guide (Wilds)[docs.google.com] Slott For the primary and original source, click here[docs.google.com]. Tired of Raw gaming? Are you sick of missing your True Charge Slash or Zero Sum Discharge and losing out on hundreds of damage? Want to make good use of Element weapons? You might be hearing the call to try Dual Blades! Dual Blades are the fastest Blademaster Weapon in the game and prioritize optimal damage towards the opposition by sticking to the monster like an irritating mosquito. Dual Blades are designed to utilize Element damage. They have lower Motion Values so pure Raw sets tend to fall behind quickly to their Element counterparts. As hunters, you will select the right equipment for the right job. Don't think of your weapons as just two swords, but as the silver bullets specifically designed to hunt your target. This guide intends to help improve your sets and understanding of opposing monsters. Hunters with Dual Blades should always focus on the monster’s weakest Hit Zone to maximize damage output. In addition, having higher levels of Sharpness buffs not only Raw Damage but Element Damage as well! The damage averages posted are tested via the Demon Flurry I into Blade Dance II & III combo against Sever Hit Zones of 60 and Element Hit Zones of 20. There is an additional section dedicated to Sever Hit Zones of 30 and Element Hit Zones of 10 as well for the non-Weakness Exploit matchups. If you would like to support Pilgrim and his coffee addiction and the super secret but not that secretive project, check out the buy me a coffee page.[www.buymeacoffee.com] 1 - Supplementary Material 1.1 - Version History and Calculators Version 1.020.01.00 (4 July 2025): - Title Update 2 released; adjustments made. Version 1.010.00.00[docs.google.com] (12 April 2025): - Arch-tempered Rey Dau event; not relevant to Dual Blades meta (2 May 2025). - Emergency edit, better armour variant is found. - Title Update 1 released; adjustments made. Version 1.000.05.00[docs.google.com] (28 March 2025): - Guide released. Calculator - Coming at some point. 1.2 - A Conversation on Sharpness — wait, it’s different!? One of the struggles of writing this guide and as a Dual Blades user altogether is figuring out what the hell to use for Sharpness comfort. The problem with being the fastest weapon in the game is that they dull fast. Skills like Handicraft, Master’s Touch, and Razor Sharp help ease the pain, but the question is, how can we calculate this mathematically? First off, let’s talk about the jargon… wait. Something is different. Dual Blades DO NOT have a natural Sharpness loss modifier of 66.667% like others in the franchise. Wilds introduces a new variable which will be referred to from now on as Wear & Tear. Wear & Tear is defined by the dedicated multiplier each move has for how many Sharpness points are removed from the Sharpness Gauge. It is no longer random or chance, and how many hits can be deduced based on the attacks used. Effectively, Blade Dance and Heavenly Blade Dance have low Wear & Tear (good), while the majority of Dual Blades’s other moves have high Wear & Tear (bad). Okay… back to basics. A sliver of Sharpness is five points on the Sharpness Gauge. Handicraft adds two slivers worth of Sharpness. Razor Sharp or Master’s Touch adds a natural Sharpness modifier that confuses the hit count by adding a random chance if Sharpness is reduced or not. Master’s Touch is also a unique calculation, as its natural Sharpness is only as common as how high your Affinity is, and many hunter’s Affinity percentages heavily utilize Weakness Exploit. Simple, right? So you can see how this becomes confusing. The next question: How long should Dual Blades last before requiring a Whetstone? There’s also Protective Polish, which makes a weapon impervious to durability loss for thirty-ninety seconds. Sharpening has also introduced a new mechanic where the hunter can cancel out of sharpening with partial gains. Whetfish is similar to the old system, but requires a commitment of two sharpenings. It would be fantastic to go through the entire fight without having to sharpen, but then you may be losing damage output using Combat Decoration slots. Oh, that is the other thing. Sharpness-specific decorations are only available on weapons now, meaning things are tighter than ever. To stabilize set building, expectations are that builds have 300 hits minimum assuming Wear & Tear is equal to Demon Flurry I into Blade Dance II and III. Optionally, Sharpness skills can be substituted with Protective Polish if hunters prefer that playstyle. The builds below are recommended based on this philosophy (Pilgrim2092). 1.3 - Comfort Skills, Meta, and Speedrunning To understand the point of this article, it must be understood that it is for developing meta-builds. We will not be giving a pinpointed explanation about what dictates meta, but for Monster Hunter, a meta-build is designed for the fastest clear time with the highest chance of success. This can vary depending on a build’s pilot, but that specific pilot might not be well-practiced yet and may need additional comfort. Speedrunners desire specific builds and optimal scripts based on the matchup, but a non-runner focuses on tactics more than strategy. Meta-builds marry these different thought processes. What dictates comfort? In essence, any skill that makes playing more user-friendly. Skills that improve durability are comfort but are also negated by their necessity. With Dual Blades in Wilds, hunters now use the Demon Gauge often to use Demon Flurry and Blade Dance, making Focus and Power Prolonger more useful. Power Prolonger also increases the Demon Boost Mode duration, making it significant. Evade Window synergizes with Adrenaline Rush and Perfect Dodging, and Constitution enables us to dodge more often. Team Leviathan has decided to forego comfort skills for the time being until it becomes apparent when one becomes relevant. It is up to the reader if they wish to drop skills for additional support. Yes, this guide can be considered “opinionated,” but this is not a critical assumption. The article intends to balance both sides harmoniously and offer an optimal experience for the hunter. Hunters who wish to build around specific monsters need to consider modifying a build for that specific target; this article is meant to universally tackle all monsters (Pilgrim2092). Another important point to keep in mind, to understand builds and reasons we take certain skills, is “uptime”. Some skills are passively active from the get go such as Attack Boost which is present at all times, while some need to be triggered like Adrenaline Rush which needs hunters to actively dodge enemy attacks or Agitator which requires the monster to be enraged, thus, they aren't active whole hunt and we can’t make calculations based on 100% uptime for them: it wouldn’t be realistic, making skills look more important than what they actually are. Two main skills we look for proper uptime is Agitator and Adrenaline Rush. Agitator depends on how fast and how long the monster is Enraged while we are hunting it. If the monster is not enraged due to not reaching damage threshold, due to being tired, or due to special mechanics, Agitator value is effectively 0 raw and 0 affinity, so in cases of Guardian Monsters, it would be better to run something else since uptime will be really low, or in case of Zoh Mama, it is activate at all times on last phase. Enrage no longer has a cooldown period post-Enrage in Wilds, making Agitator and enrage more difficult to gauge (Bro4U & Pilgrim2092). Adrenaline Rush will always depend if we keep dodging enemy attacks, like we should since it also helps our Demon Boost Mode uptime. It's worth emphasizing that it will not be able to be refreshed while it is active; there could be moments where we dodge an attack but Adrenaline Rush is already active and about to end, thus losing the buff for some time until we can dodge again. For multiplayer, it is important to mention that uptime for Adrenaline Rush could be actually lower, due to the monster focusing another player and not being able to dodge the attack or teammates using traps, paralyze, mounting, etc (Bro4U). As things get more complicated, it is better that we are up front with uptimes. The uptimes the team expects are (Pilgrim2092): Adrenaline Rush: 75% (85% if the hunter has Razor’s Edge I/II enabled) Agitator: 75% Burst is always maxed Coalescence: 0% (38% if the hunter has Black Eclipse I/II enabled) Convert Element: 50% Counterstrike: 50% Elemental Absorption: 50% Frenzy onset is expected to last 20 seconds with Black Eclipse I/II enabled) Latent Power: 40% Leviathan’s Fury: 40% (50% if the hunter has Azure Bolt II enabled) Seregios’s Tenacity: 50% 1.4 - tl;dr what changed? Title Update 2 (July 4/5th, 2025): New weapon skills have been added. Bladescale Honing adds +6 unique points maximum of Sharpness to the gauge whenever the hunter successfully dodges an attack. The points are unique because they influence the Sharpness Multipliers. Instead of whatever Sharpness Colour the weapon is at, the Sharpness Multipliers change to x1.4 Raw and x1.25 Element. Convert Thunder Resistance is simple and effective. For each point of Thunder Resistance, add +4 Thunder. There are lots of ways to gain Thunder Resistance, so this becomes powerful quickly. New Set Bonus skills have been added. Usually, Adrenaline Rush lasts about thirty seconds. With Razor’s Edge, the skill’s duration changes to 45 seconds, as well as allows one reset with another successful dodge. With the second bonus, the hunter also receives a x1.05 Raw increase on the second dodge. Azure Bolt is a mix of Scorcher and an Affinity bonus. Azure Bolt I’s damage trigger is 30 plus Thunder hit zone multiplied by 0.7, while Azure Bolt II’s damage trigger is 60 plus Thunder hit zone multiplied by 2. The Affinity bonus is +15% and lasts 20 or 30 seconds respectively. After the Set Bonus fades, there is a 30 second cooldown before triggering again. Lots of changes to moveset. Motion Value buffs, Element and Status Multiplier nerfs, movement speed increase, Demon Boost Mode changes (now x1.15 Raw and x1.3 Element), one new action, and attack speed increase. Title Update 1 (April 3rd/4th, 2025): Corrupted Mantle is nerfed. who would have guessed Raw multiplier is nerfed from 10% to 5% and Affinity is nerfed from 30% to 10%. The duration is also reduced from 120 seconds to 90 seconds. On top of it, all of the additional attacks had their Motion Values, Element Multipliers, and Status Multipliers cut in half. Saying this, the mantle is still good. Other mantles received duration and other various buffs. If hunters are comparing Evasion Mantle to Corrupted Mantle, be aware that only its use duration is buffed, not its damage duration of 10 seconds. New weapon skills have been added. Depending on conditions, Slicked Blade can add either 0% up to a maximum of 30% Affinity. As cool as it is, it is extremely strict. The hunter has to be hunting in the rain, waterblighted, or in a body of water, and/or have been hit by one of Mizutsune’s bubbles or have Bubbly Dance II. Whiteflame Torrent is an oddball skill. It activates only on specific moves and is a flat 50 damage trigger. When equipped alongside Scorcher, it completely modifies how the skill functions. The formulas look like so: Scorcher I & Whiteflame Torrent = 60 * (1 + ((Fire hit zone / 100) / 2)) Scorcher II & Whiteflame Torrent = 80 * (1 + (Fire hit zone / 100)) New Set Bonus skills have been added. Dodging with Bubbly Dance II enough times triggers the hunter to have minor bubbleblight, which is useful for Slicked Blade and Coalescence. Yet, for some reason, the Mizutsune armour does not have Resuscitate which would have made great use of the skill. Like its predecessors, Super Recovery allows the hunter to regenerate health beyond the red portion. Nothing cool to mention here. It is pretty slow. Be aware that Recovery Speed only works on the red portion of the health gauge. New Group skill has been added. Guts (Tenacity) is Felyne Moxie as a Group skill. The hunter can survive a strong hit if their HP is beyond a specific threshold. It also modifies Attack and Defense based having either yet to trigger the lethal threshold and after. Before is +5% more Raw and -5% less Defense, and after, +5% more Defense and +3 additional Elemental Resistance. Skills with “Flayer”-like functions have been reworked. Supposedly, after one hit with a trigger-able move, a three second cooldown occurs before the next trigger can happen. Each time a trigger fails, the odds of a successful occurring doubles, starting at 25%. The third trigger will always succeed. 2 - Endgame Sets Alright, so how has Title Update 2 spiced up Dual Blades? To begin with, no, Black Eclipse I is still a thing when considering builds with Tiltkreise. Yet, the first smithable Dual Blades to overcome the Artian threshold has made an appearance! Say hello to Levin Acrus. May its reign be long and healthy. Tiltkreise sets mix Black Eclipse I and Azure Edge I, mostly for their Affinity bonuses. Levin Acrus is hungry for Thunder Resistance, so it prefers Rey Dau γ armour for Guts (Tenacity) Group skill, as well as Lagiacrus armour for Azure Edge. Both of these sets have high Thunder Resistance. Black Eclipse I is used for its ability to self-inflict Frenzy Virus. The reason for Frenzy is the built-in Affinity bonus it gives when Cured, and the easy-to-insert Lv 1 decoration “Sane Jewel” gives the new skill Antivirus which when maxed, provides +10% Affinity during the Frenzy-Cure status. Coalescence also activates after being Cured of Frenzy for thirty seconds, which activates a +10% Element boost. A quick explanation of Critical hits: When should hunters start using Critical Boost over Critical Eye? When the hunter has a consistent Affinity of 34% and above. With the above skills, hunters now will get a better damage average from Critical Boost. Burst Lv 1 is mandatory; the first hit, it is inactive. The following four hits grants +5 Raw and +30 Element, and then any further hits add +8 Raw and +40 Element. Damage skills prioritized are Weakness Exploit and Adrenaline Rush. The former grants +30% Affinity on 45 Sever hit zones and an additional +20% Affinity on wounds at Lv 5, while the latter grants +30 Raw at Lv 5 whenever the hunter successfully dodges an attack. Adrenaline Rush activates under the same conditions as a Perfect Dodge making it an important synergy skill. The buff is a little easier to activate than Perfect Dodge but cannot be reactivated while it is triggered like Demon Boost Mode. Although ignored in previous guide versions, Counterstrike and skills like it shall be considered from now on. When the hunter is knocked back, the hunter receives a +25 Raw increase at Lv 3. This skill is extremely easy to slot in and does a weird amount of damage for what is essentially a band-aid skill. The best infusions and reinforcements are to max Attack Infusions, four Attack Reinforcements, and one Sharpness Reinforcement. Unfortunately due to the changes to Dual Blades moveset, Element was nerfed enough to make it actually the worst Reinforcement. Reinforcement preferences go from Attack, to Affinity, to Element now. The last thing to mention is whenever there are empty Lv1 slots left over. These slots can be filled with whatever the hunter desires, though the team advises either Constitution or Marathon Runner (Pilgrim2092). 2.0 - READ ME BEFORE LOOKING AT SETS The sets listed here are endgame sets. It is expected that you have at minimum defeated Arkveld in High Rank and are at HR31. If you’re looking for progression sets, check 4.1 - Progression Sets. There is no best universal Dual Blades set. Each set below is tailored for specific foes. It is time to get good, son. Weakness Exploit is not good in every matchup. For monsters like Gore Magala, it may be smarter for the hunter to use a Mind’s Eye set. This is up to the hunter, but the primary sets for meta Dual Blades are immediately below. For those who do not wish to use Weakness Exploit, go to 3 - Mind’s Eye Sets. For monster matchup tips, refer to the Endgame Sets. Heroics are not suggested in any of the meta-templates. It is an extremely powerful boost but requires the hunter to play very dangerously. None of the sets listed will be using Flinch Free Lv1. What does this do? It prevents you from being tripped, which can be super helpful in multiplayer if you are getting side-swiped by teammates. Should you be adding it? It’s up to you. Demon Mode has built-in Flinch Free Lv1, but outside of it and with poor stamina management, there’s a good chance getting tripped can get you carted. It’s definitely a skill worth considering. While this guide covers what Elements you should be using against each monster, you should consider using Kiranico’s website for a general look on hit zones. There is also a 4.5 - Cheat Sheet at the bottom of the article. 2.1 - Fire ~ Tiltkreise
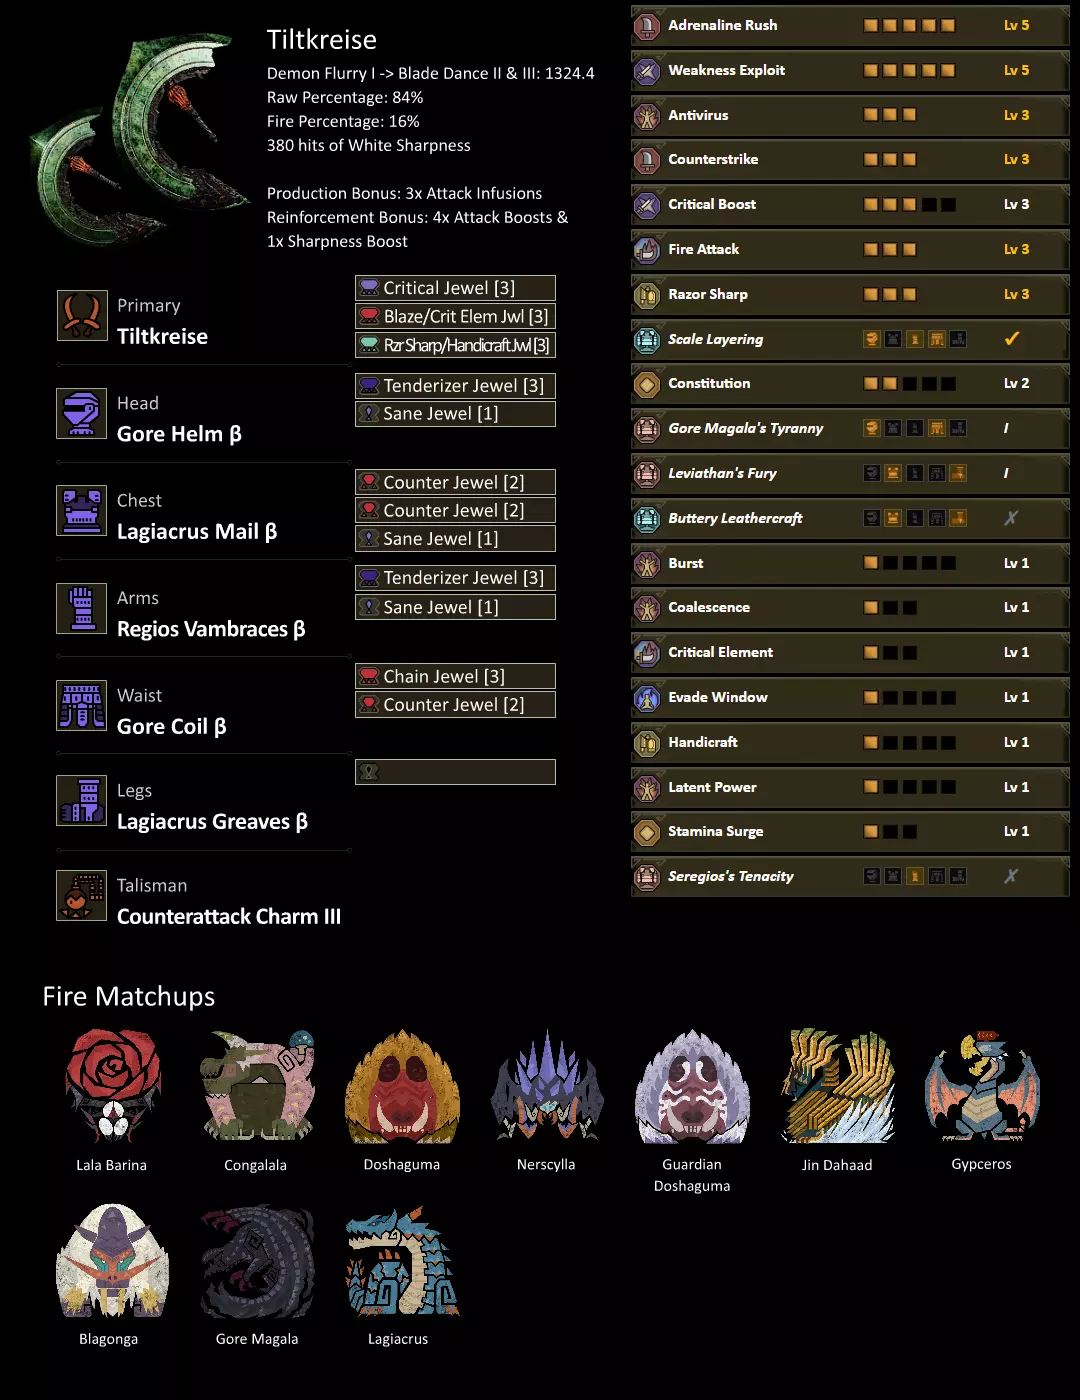
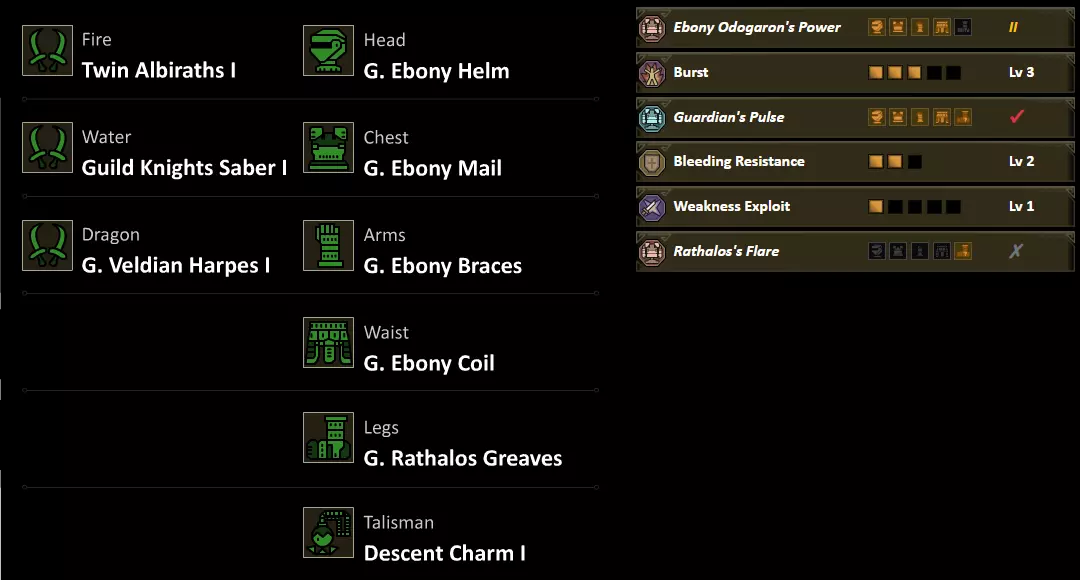
Most monsters in Monster Hunter Wilds are weak to Fire. There is not too much to be said about Congalala, Blangonga, Gypceros, or Gore Magala. These fights are mostly “aim for the head” type fights when the hunter can, each tends to maneuver around the arena a lot. Doshaguma and its Guardian variant also have a weak head hit zone, but due to their stature, it can be difficult to reach. The hunter should aim for the forelegs with the intent of reaching the head. For the Temnoceran encounters, Lala Barina and Nerscylla, the brunt of your attacks should be focused on their abdomen. It is a large target with good hit zones. If a Wound appears on the legs, they will provide a valuable topple when the Wound is popped. It is recommended to not Focus Strike these Wounds. Break them normally with attacks as the Focus Strike swings the hunter around too much to take full advantage of a leg break topple. The hunter should generally avoid Focus Striking Lala Barina especially, as it has an annoying spore spread mechanic that will paralyze the hunter if they touch them. Focus Strike often causes the hunter to get paralyzed through its violent swings as the spores are also in the air (July & Pilgrim2092). Gypceros is the original Tzitzi-Ya-Ku, but more fun. It will play dead, but hunters will not fall for it (we hope). Be aware that when Gypceros begins its flash attack animation, the head can be Focus Striked and cancel the animation. Destroying the beak will also cause the flash attack to fail (Pilgrim2092). Jin Dahaad is a mini siege battle with multiple phases and a rather large health pool. The primary tactic will be to topple Jin multiple times by breaking the legs repeatedly and taking advantage of topples by hitting favorable hit zones. Each of Jin’s legs can be broken twice. When Jin is toppled, the hunter should focus on breaking Jin’s various weak hit zones. The Tail Plating, Abdominal Plating and Head Plating can each be broken once, exposing the Large Plating on his upper back. When the Lg. Iceplate on his upper back is destroyed, Jin loses the ability to use a majority of his cold based moves. In addition to turning off his moves, each Plating is a 95/20 hit zone until destroyed (Head is 75/20). When all 4 platings are destroyed, the hunter should focus on either the Abdominal Plating or Lg. Iceplate for the rest of the fight during downs (75/10). The Lg. Iceplate cannot be destroyed until after Jin does his ultimate move, as such a hunter can take advantage of that 95/20 Weak Point far more than intended. Jin has forced health transitions and will stop taking damage at 90% life and move to the second area. At 68% health, Jin moves to the 3rd area, and at 40% to the last area. As such, it’s recommended to hold onto the corrupted mantle until one of the later stages. Focus Strike is actually not a bad move here, as it forces a knockdown and deals quite a bit of damage (Slott). One quick note about Jin Dahaad is that almost all of its body is not weak to any Element and is Raw favoured, the only areas where a Fire weakness appears are the head and the two separate iceplates when toppled. Since for the majority of the fight hunters will not be wailing on its head, they should consider Raw related skills for this matchup such as only 1 level of Burst and more levels of Adrenaline Rush and including Weakness Exploit and Agitator. It is also recommended to either use Fire DB with the Raw favoured armour skills (No Blaze Jewel, use Critical Jewel instead) or start with Blast and switch to Fire during the first or second transition (July & Slott). A triumphant roar for the Lagiacrus fans as it finally returns in 4k glory. This fight has an underwater portion that this guide will not go into depth. As for the fight on dryland, Lagiacrus’ juicy hitzone is the chest. The body part that is beneath its long neck. You will find yourself constantly hitting this as Lagi’s head is too high or too long to reach (the hitzones are also worse). Focus on wounds whenever they present themselves. An additional hitzone can be its back spikes where you will see Lagi uses it to charge electricity. If you are able to land hits on this zone, you will topple it on a break and you will additionally be able to damage it more. These backspikes are the best hitzones for Lagi but you will not always be able to hit them. While it may be tempting to focus strike the long lizard of the shocking torrents when weakpoints present themselves, it is still not recommended unless you can guarantee you will end up at its face instead of its tail or if you really really REALLY need breathing room. The damage of our spineride is still too low to consider as a proper damaging combo. As for movesets, just pay attention to the head movements. Those give the biggest tells on which moves it will be doing. Lagi has a few AOE electric attacks that are heavily telegraphed and easily avoidable (July). 2.2 - Water~ Tiltkreise
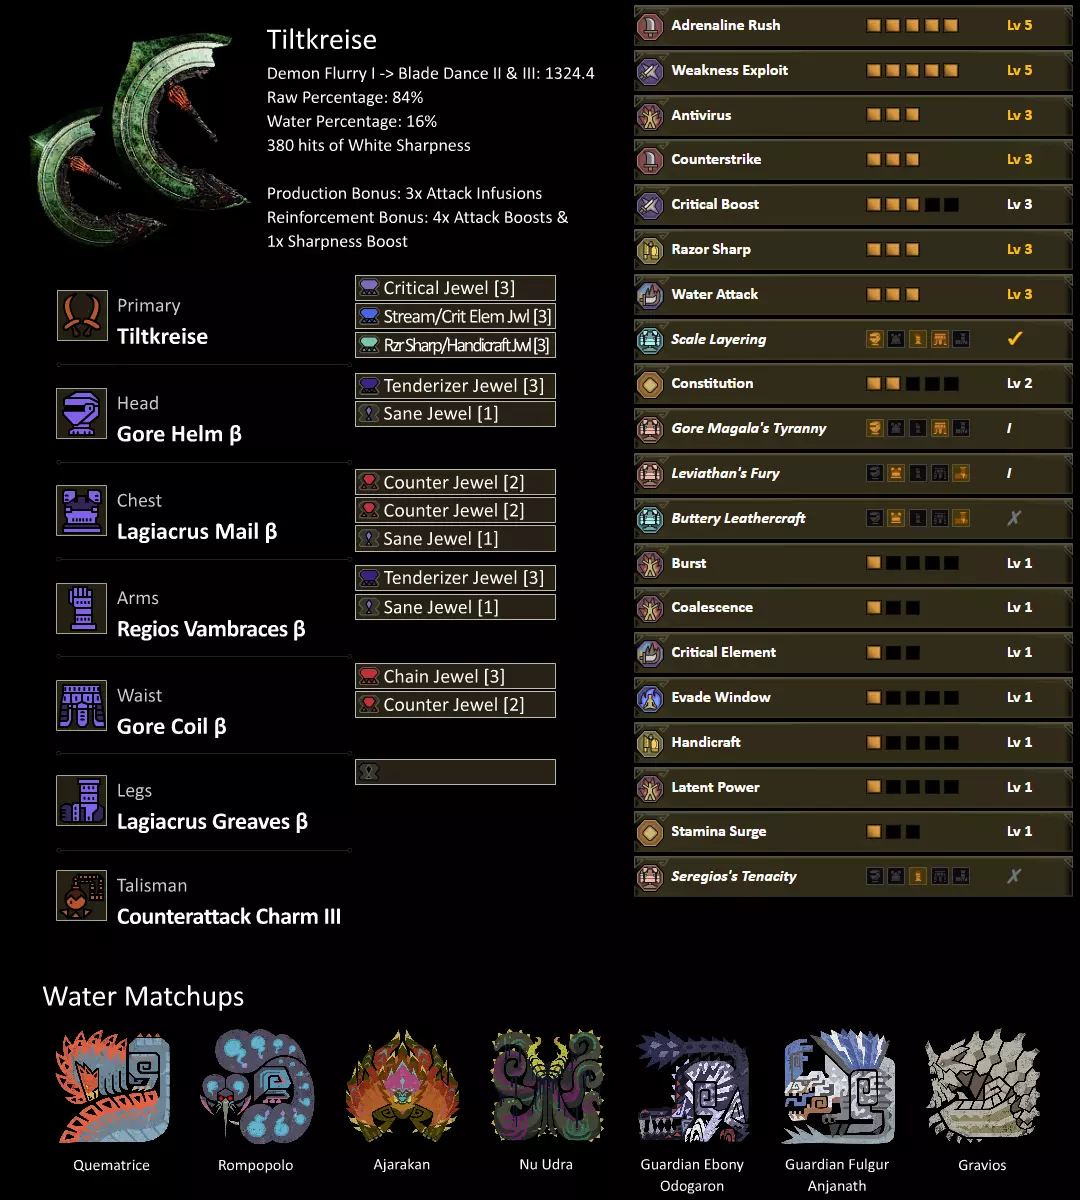
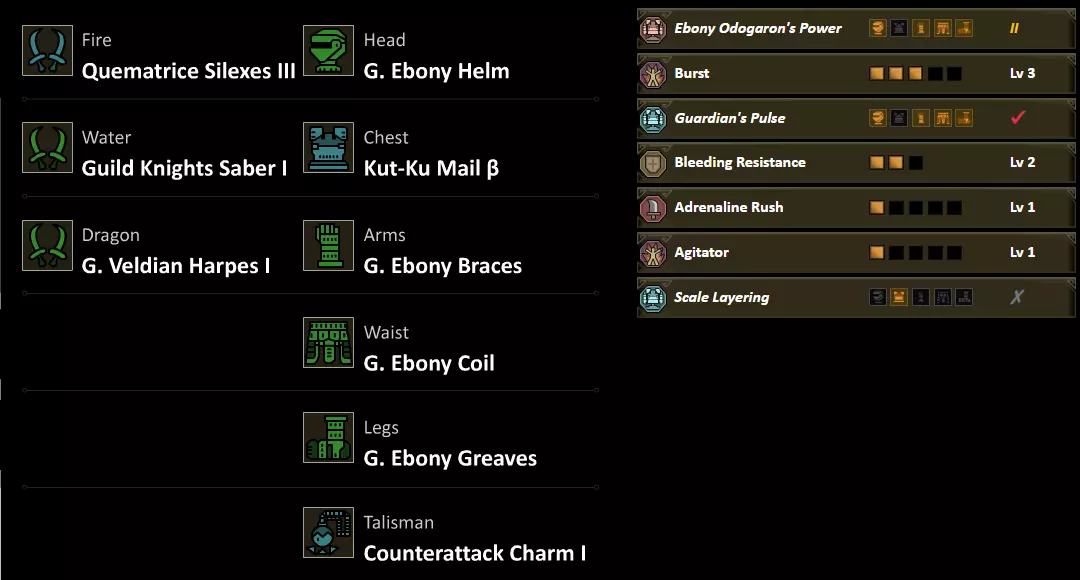
守护黑炭凶爪龙是这几只怪物中最常规的对手,其头部拥有极高的40水属性肉质。猎人应始终尝试瞄准它的头部。守护系怪物在使用发光爪击攻击地面时会产生额外爆炸,并造成龙属性异常状态。猎人必须对这些攻击做好准备,避免过早或过近地进行回避。其他战斗则有所不同。 由于阿贾拉坎和努乌德拉的招式与身体结构设计,猎人应优先攻击它们的手臂/触手。对于阿贾拉坎,即使在其倒地时,猎人也应始终瞄准手臂,因为手臂拥有更高的物理和属性肉质。在努乌德拉(Nu Udra)身上,猎人应瞄准其巨大的手臂/触手,有机会时优先攻击头部/口部。 对于非守护兽的兽脚龙,如奎玛特里斯(Quematrice)和隆波波洛(Rompopolo),攻击头部是首要目标。这两只怪物的尾巴也有易伤区域,因此有机会时应优先集中攻击这些部位。守护兽雷颚龙(Guardian Fulgur Anjanath)的战斗主要围绕腿部展开。猎人应瞄准并破坏雷颚龙的腿部使其倒地,然后在有机会时猛击其尾巴、翅膀或头部。 铠龙(Gravios)可能是双剑最容易对付的对手。由于水属性弱点异常明显,格拉维欧斯坚硬的外壳很容易被猎人高元素伤害的输出击碎。要最快击败格拉维欧斯,猎人应瞄准它的腹部。最终,腹部会被破坏并留下一个永久性的攻击破绽(Pilgrim2092)。 2.3 - 雷电 ~ Tiltkreise

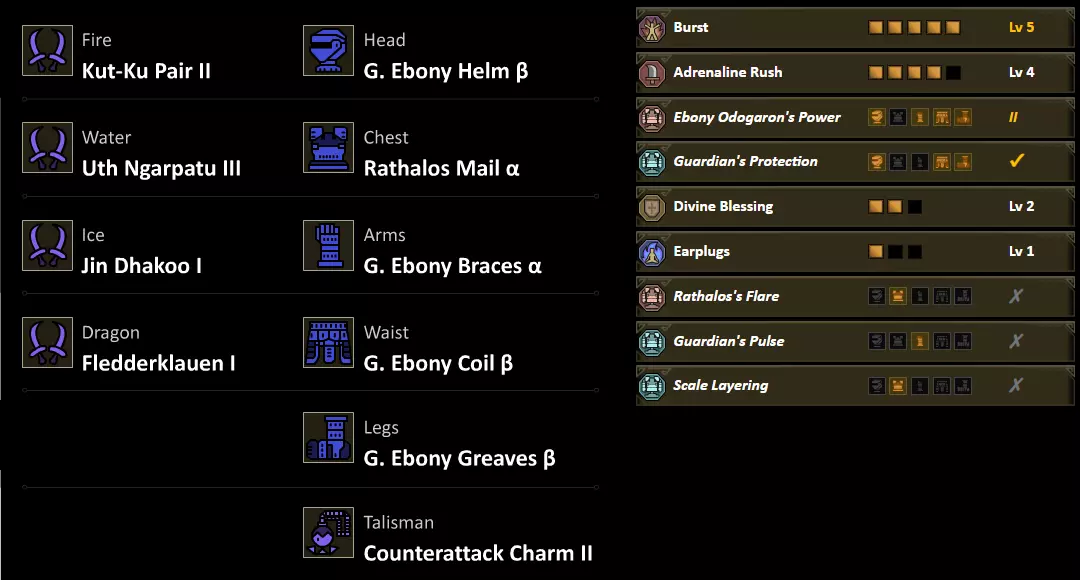
Oh my lord, is this a set that does not use an Artian weapon!? Yes, indeed! Levin Acrus has overcome this stupid threshold! How? Convert Thunder Resistance is REALLY strong. With it, it steals the Hirabami matchup from Fire Tiltkreise. The armour pieces that come with Guts (Tenacity) and Azure Edge I each have 4 Thunder Resistance, allowing us to push the meta forward. Make sure to eat a village meal! Chatacabra and Balahara are a couple of the earliest new monsters in Monster Hunter Wilds and are designed to be tutorials. Chatacabra’s whole body is weak and is designed to teach hunters what a good hit zone looks like. Balahara is also designed to teach hunters to Focus Strike on certain attacks — When it opens its mouth, a red aura will appear and offer an opportunity for the hunter to Focus Strike and knock it down. The area Balahara likes to rest in also has a fixed event where it tries to climb fulgurite and attack hunters with projectiles. The hunter can pull the fulgurite down with the slinger and cause the Balahara to fall with it. Uth Duna has one of the most unusual mechanics in Monster Hunter. The apex leviathan has unusual modifiers applied to its veil which covers most of its body. It can be identified when the hunter sees their damage score as light blue with a shield symbol beside it. The veil is a super weak hit zone that’s Raw values are modified to become significantly less (the 90 Sever hit zones become 25.714 for Dual Blades). Every attack on the veil will trigger hitstop, which can be quite irritating. Element values are unaffected by the modifier. Due to being a weak hit zone, Weakness Exploit works on it but Mind’s Eye does not. The hunter’s goal is to remove the veil by attacking it so they can reach the hind legs, forelegs, and torso areas. If Uth Duna dives into the river or the lake to retreat, hunters should pay attention to collapsible roofs. Pulling it down should force Uth Duna out of the water and knock it back for a time. Hirabami is probably the most irritating monster. Due to its levitation and unusual rhythm, it makes hitting it quite difficult. Most of its body is weak, so the strategy is to get it on the ground and keep it there (Pilgrim2092). Mizutsune’s weakest hitzone throughout all phases is the head, which takes significantly more Raw damage but less Element than the rest of its body. Due to how much of our damage comes from Raw, hunters should focus on the head when possible. After entering soulseer mode (glowing blue eye), Raw damage improves substantially on the rest of its body, so the damage loss from hitting other parts becomes smaller. While still receiving less damage than the head, hitting the front claws will cause topples when they break, and the tail is severable. Mizutsune is very agile and aggressive, and its tempered version becomes one of the hardest hitting monsters in the base game, capable of one shotting with its tail slam. Hunters should get used to utilizing Demon Flurry I to gap close and shorten their combo lengths to be ready to dodge incoming attacks. Bubbles can also be used to easily trigger perfect dodges by dodging into them, since you will enter the hitbox while i-framed, triggering it at no risk if spaced properly (OreoPancakes). Seregios’ fight has gone through multiple iterations across the series. This time in Wilds, we are focusing on the legs. The legs have the best hitzones and also force topples on wound and part breaks. The legs are your one and only target. Against tempered versions, the tempered wounds might be an alternative but these will only create topples rather than allow for proper damage. If, by the grace of bad rng, you find yourself unable to hit the aforementioned chicken feet, then the chicken head is a serviceable alternative for that moment. The fight itself boasts some new moves that will require you to manage stamina much more efficiently as Seregios loves to use multi-hit combos. Many of these moves will force bleed so this fight truly tests your ability to manage stamina and time your perfect dodges. Use flash pods if you find yourself struggling against Steve. These help to keep it focused in one direction; just keep in mind that flash pods do not topple Steve as long as they do on Rathalos (July). Seregios is a perfect fight to practice getting used to Demon Dodge -> Blade Dance II -> Blade Dance III, as many of its final attacks in its sequence will land it in close proximity to you, under the assumption that you actually managed to dodge that attack (July). 2.4 - Ice ~ Tiltkreise
雷道的主要受击部位一如既往是头部。在释放一次闪电攻击后,其头部会出现红色 aura(气场),此时猎人可进行蓄力一击,使雷道短暂倒地。但可惜的是,由于雷道体型较长,猎人在骑乘其背部后往往难以调整到理想位置。当雷道位于巢穴时,猎人需留意上方,那里有可坠落的崩塌式龙击炮,能对毫无防备的雷道造成打击。风漂平原生态区的许多区域都有类似的机关。 徐武对冰属性极为脆弱,但这种头足类怪物滑溜的动作仍会给灵活移动的猎人带来不少麻烦,猎人需要频繁调整位置。徐武的大部分受击部位都比较脆弱,若将其掀翻,其腹部中央则是超级弱点。无论是狂暴状态与否,大怪鸟的小小身躯几乎全是攻击判定区。猎人最好多加小心,因为它的单次攻击通常就能将猎人击飞。首选攻击部位是它的头部。它的生命值通常较低,所以只要猎人稍微留意这只鸟龙种的攻击倾向,战斗应该会很快结束(Pilgrim2092)。 2.5 - 龙 ~ 倾斜角度
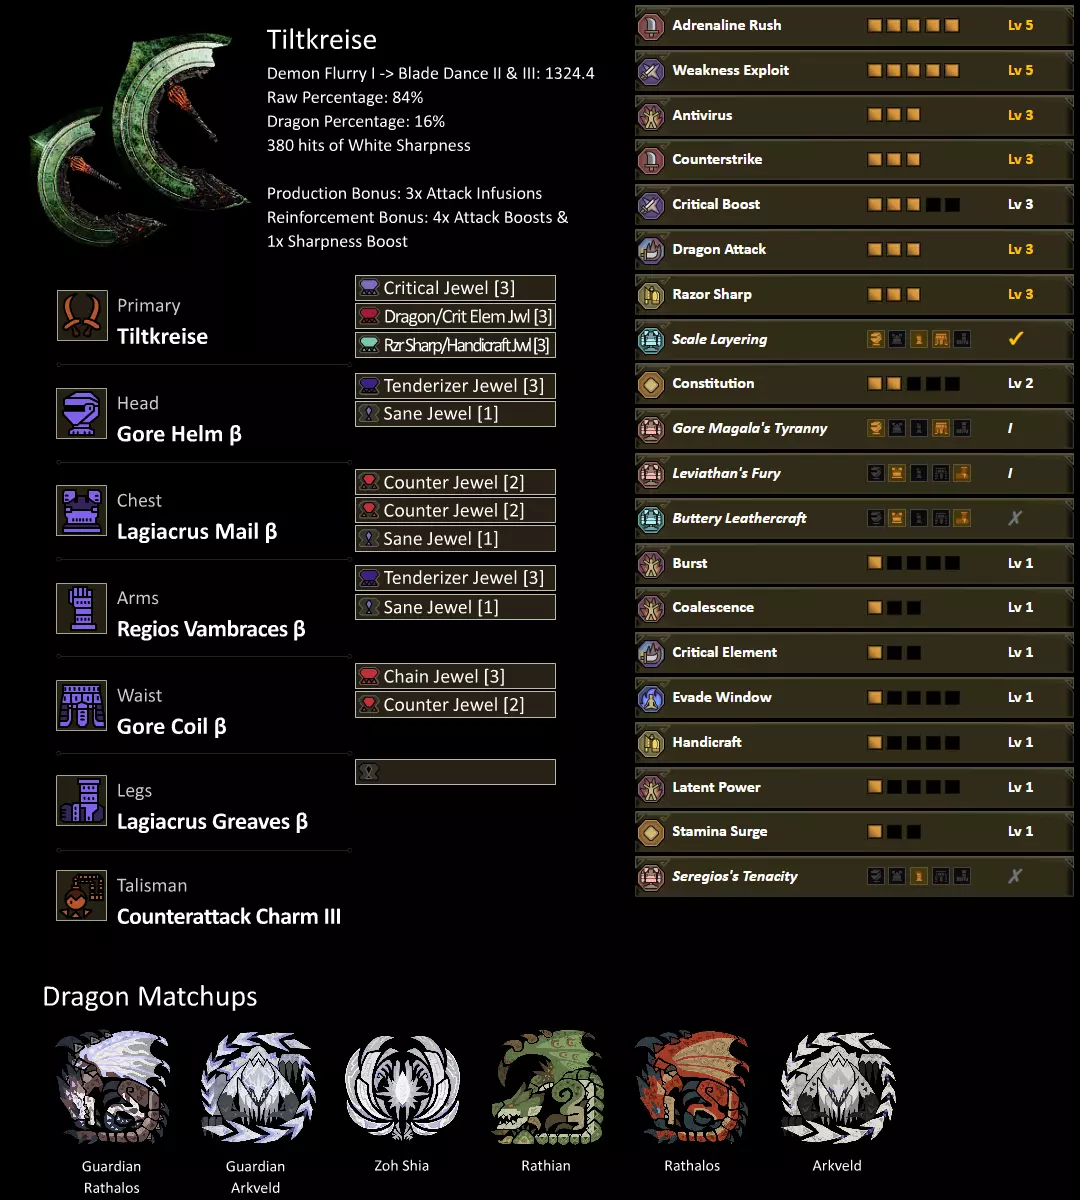
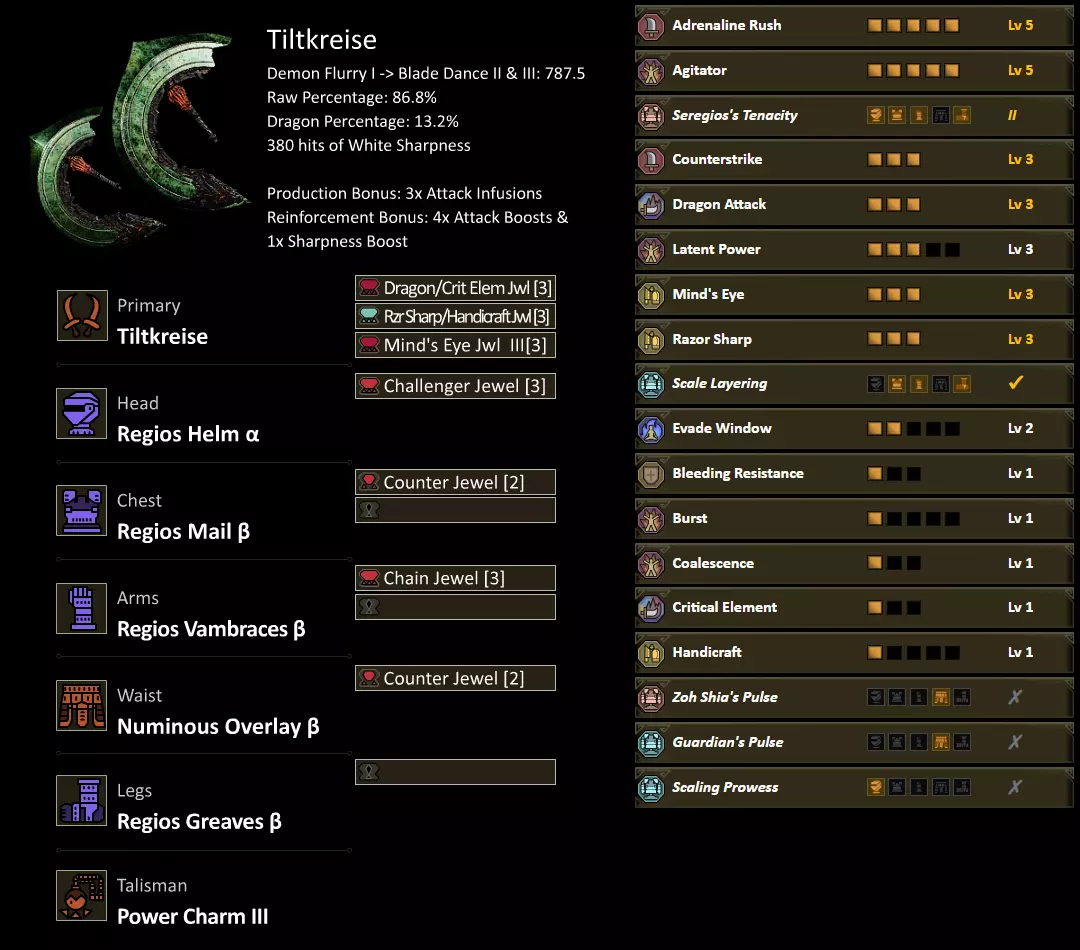
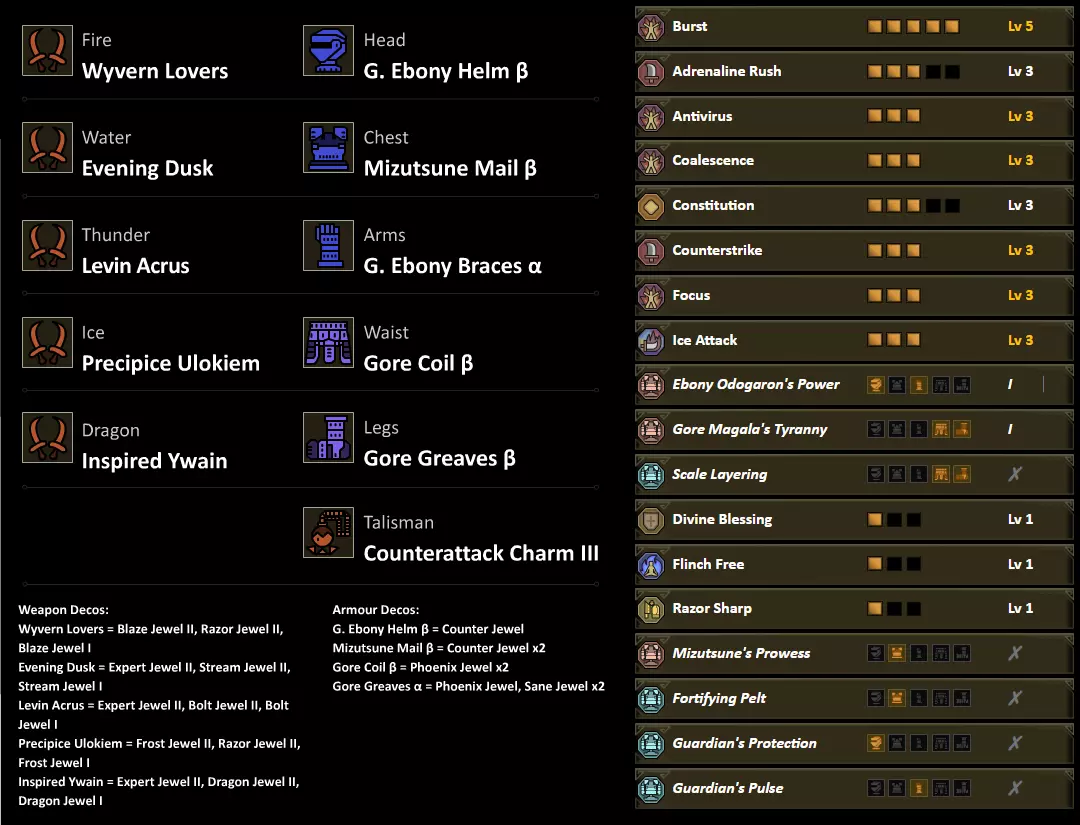
Arkveld是猎人最常狩猎的怪物之一,对于属性武器而言是个棘手的对手。在常态下,它的属性弱点部位是游戏中最差的之一,唯一值得注意的只有头部(5点)。它对龙属性的弱点只有在伤口出现时才会真正显现。Arkveld锁链上的伤口是其所有身体部位中承受伤害最高的。 雌火龙与雄火龙是经典回归的飞龙种怪物。和往常一样,它们会使用毒和火球攻击,这是激活恶魔强化模式的绝佳时机。雄火龙似乎更喜欢空中作战,因此猎人应抓住任何击倒它的机会全力输出。有时,当雄火龙处于空中时,若使用 blade dance(剑舞)对其攻击,镜头会拉远,能看到雄火龙在原地挣扎。在此状态下持续攻击它,它就会倒下并露出巨大破绽——类似于投掷闪光弹的效果。 守护雌火龙与普通雌火龙有着相似的特性,同样会被击落。守护亚种的大部分爪击都会引发爆炸,还会用龙奶生成结晶。这些结晶在接触火球后1秒便会爆炸,只要掌握好爆炸时机,就能稳定触发恶魔强化模式(KreaTV1)。 祖希艾是一场多阶段战斗。该怪物在战斗开始时全身覆盖着“Wylk”,因此受到的伤害会降低。在此阶段攻击时,它会生成威尔克水晶。猎人可以用在场地内拾取的元素弹破坏这些水晶,使其爆炸并造成元素伤害。有时这样做会迫使佐赫倒地,猎人也可借此机会触发恶魔强化。猎人应优先攻击它的翼臂和头部。 战斗后期,它会显露体内的黑龙,开始使用火焰攻击。同时,当它显露黑色部位时,这些部位对龙属性伤害更为敏感。对佐赫造成更多伤害后,它会飞到场地中央,并在全场生成威尔克水晶。猎人应尽可能多地破坏水晶,以在大范围蔓延的火焰吐息中创造尽可能多的安全区域。在这段过场动画式的攻击后,竞技场会生成两个神社碎片,猎人可将其击落并砸向佐赫(Zoh),使其倒地并造成大量伤害。在战斗的最后三分之一阶段,它会褪去所有维尔克(Wylk) armor,使猎人更容易对其造成大量龙属性伤害,并且它会使用红色闪电攻击(Refia❤️)。 3 - 心眼套装 心眼套装优先考虑物理伤害加成,而非属性或会心。由于恐暴龙(Seregios)的“不屈”技能拥有众多强力技能,因此它最终成为不依赖弱点特效的最佳配装选择。元素与属性强化最终表现欠佳,这是由于“心眼”技能极大地提升了物理伤害。考虑到“心眼”的适用情况,“雷光迅斧”并非主流选择。不出所料,就像“熔山龙”宣传的那样,所有套装看起来都一模一样。 简单解释一下“心眼”的机制:当攻击部位的肉质值在44及以下时,该技能就会触发。当猎人预计难以攻击到优质肉质区域时,就应该使用这些套装。“心眼”等级3时,会额外增加1.3倍物理伤害。这个增益能让像“ Gore Magala”这样艰难的战斗变得顺利许多。 3.1 - 火 ~ Tiltkreise
3.2 - 水 ~ 倾斜圆(Tiltkreise)

3.3 - 雷鸣 ~ 倾斜圆环(Tiltkreise)
3.4 - 冰 ~ 倾斜圆(Tiltkreise)
3.5 - 龙 ~ 倾斜圆环
4 - 流程、招式表、速查表与常见问题 4.1 - 流程阶段 《狂野之心》的流程体验总体较为流畅,但老玩家会注意到前期雷属性和冰属性的装备较少。雷属性装备要到猎人进入最终流程阶段才会变得重要。剧情节点会限制猎人在事件结束前无法休息,而且下位任务的开放度并不像想象中那么高。直到上位任务的最终Boss被击败后,世界才会真正开放。尽管各阶段的装备套装都是针对游戏特定部分优化的,但猎人应将这些套装模板视为里程碑,并在感觉到难度提升时对其进行升级(Pilgrim2092)。 初始下位装备(从开始到击退UTH DUNA)
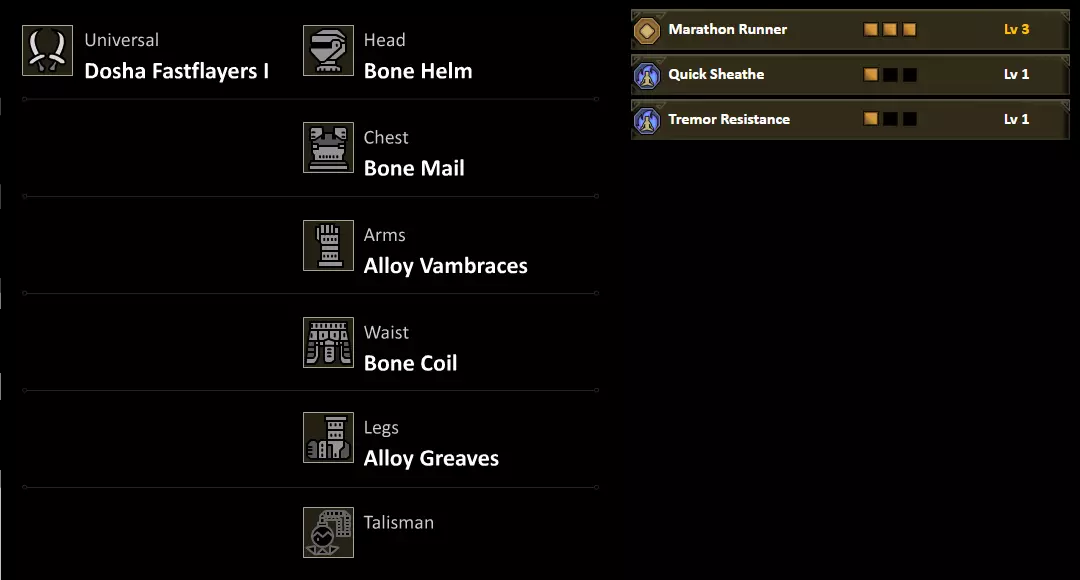
击败土砂龙后,早期最强的双剑是土砂迅刃Ⅰ。游戏此时没有值得期待的主要 armor 部件。所选的 armor 会对耐力有所帮助,但优化方面基本也就这样了。击退火山龙后,猎人将开始发现有用的属性选择。 中下位装备(至黑炎龙被击败)
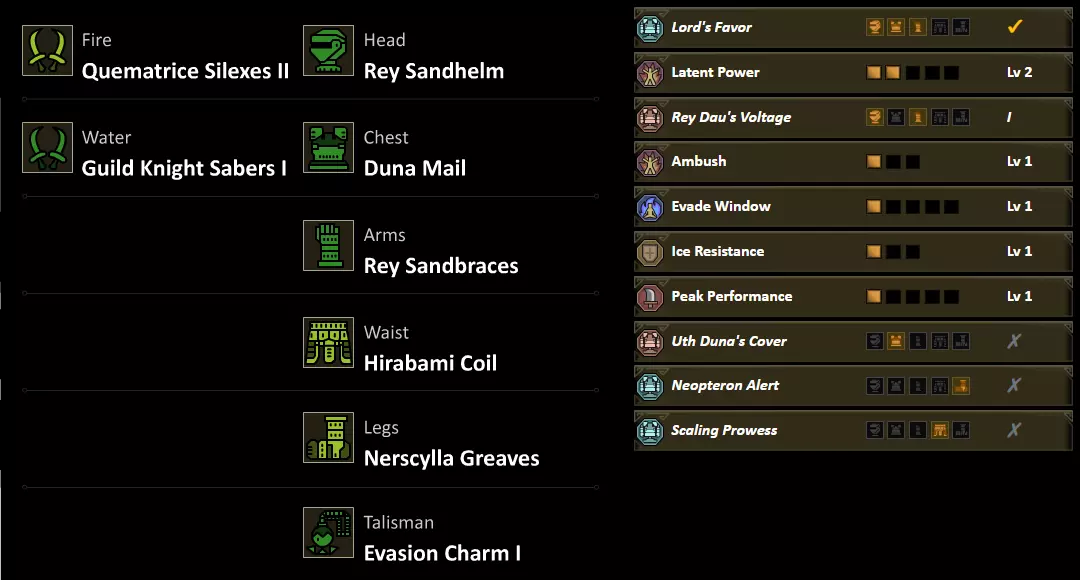
公会骑士 saber 是极为强大的双剑,在大多数情况下都堪称最佳选择。奎玛特里斯·西莱克斯 II 能应对部分场合,但有一种观点认为,猎人仅凭水属性双剑就能轻松度过游戏的这一阶段。 下位毕业装备(直至下位结束)
到目前为止,双剑一直没有值得期待的重要防具技能。现在,时机已到——“爆发”(Burst)是双剑最核心的技能。该技能的强度过高。猎人还能利用“黑狼鸟”套装的套装效果“爆发强化II”(Burst Boost II)。有了这套装备,猎人已为挑战下位最终Boss做好充分准备。 上位初期装备(直至讨伐“狱狼龙”)
进入上位后变化不大。猎人可以制作白速龙β套装来获得“ agitator”技能,以及“反击护符I”来获得“肾上腺素”技能,在重新进入龙人族遗迹之前基本就是这样了。“肾上腺素”会在猎人闪避攻击时激活,因此与双剑的配合效果很好。 中上位装备(至击败Arkveld)
随着新版守护者乌木盔甲的推出,猎人有了装备“肾上腺素激增”的空间。需要注意的是,此期间可获取雷电双剑,但在任何战斗中都派不上用场。 游戏后期前的高等级装备
这是猎人获得终局装饰品和工匠武器前的过渡装备。仅考虑可制作或熔合的装备。 4.2 - 弱点与创伤 虽然前作中存在对应怪物正常、激怒和破部位等状态的肉质值,但《怪物猎人:荒野》引入了两种新的不同状态: 创伤 - 每个肉质部位的创伤次数有限。猎人会看到白色创伤形成,随后变为红色创伤,接着形成结痂。一旦结痂出现,该部位在一段时间内无法产生新的创伤。 红色创伤在破裂并形成结痂前,会根据创伤肉质值受到额外伤害。红色创伤也可成为集中攻击(Focus Strikes)的目标。破坏特定的红色伤痕、对伤痕使用蓄力攻击,或破坏强化伤痕,通常会迫使敌人倒地。 弱点——在特定条件下,敌人的受击区域会在专注模式中呈现红/粉色发光效果。这是一种额外的受击区域状态,通常会使敌人受到额外伤害。例如金·达哈德的装甲(破坏前为一次性弱点)以及各种吐息攻击。这些区域在特定持续时间内会受到显著更高的伤害,之后恢复为非弱点状态。 猎人应利用这些伤痕和弱点,这可能会缩短狩猎时间(Slott)。 4.3 - 腐化披甲 在讨论连招和招式前,需要先介绍腐化披甲。免费标题更新1对该披风进行了大幅削弱,同时延长了其他所有披风的持续时间。其强度基本减半,活跃时间比以前减少了30秒。这一改动旨在让猎人能更自由地选择披风,避免某一款披风成为无可争议的最佳选择。不过,它仍然是双剑最高的伤害增益来源,但如果猎人能保持足够的 uptime(持续生效时间),在较长的战斗中回避披风也值得考虑(KreaTV1)。 该披风的明显效果是根据类似爆发的机制增加0-5%的物理伤害和5-10%的会心,一旦激活且披风仍在生效,这些加成就是永久性的。披风持续时间为90秒。它还会为基础攻击增加额外的打击次数,例如圆形斩连击、六重连击和恶魔乱舞冲刺。而像 blade dance(剑舞)或恶魔乱舞这类更复杂的攻击则不会获得额外打击次数(Pilgrim2092 & KreaTV1) 对于想要突破主流配装的速通玩家来说,有一些有趣的方式可以利用这件披风。“腐化连击”(在相应章节中会详细说明)能让猎人保持在狱魔形态,因此不会消耗耐力。这为“极限会心”的各种操作提供了可能性(Pilgrim2092)。 此外,无需收刀即可装备或卸下披风。只需按住前L键并按下后R键即可切换披风的开启或关闭状态。这在战斗中尤其有用,能让战斗更加流畅(KreaTV1)。 4.4 - 连击与招式

Just button mash lul. /guide. (I'm kidding.) The Basics Dual Blades are a relatively simple weapon that play extremely reactionary. If hunters button mash, they will get locked into more lengthy animations and probably get punished for it. A good majority of basic moves flow into each other really well, including interrupting combos to dash out of the way. Stay mobile, reposition, and keep up the pressure. The standard combo is done by pressing Up Face Button/Left Click three times. In standard stance, press Right Face Button/Right Click to use Lunging Strike. To activate Demon Mode, press Rear R/MB4. In Demon Mode, Demon Flurry Rush used by pressing /Right Click by itself. Press Right Face Button/Right Click multiple times to use Left or Right Roundslash. Blade Dance is activated by pressing Up and Right Face Buttons/Left and Right Click simultaneously. In Monster Hunter Wilds, things get quite a bit more complicated. Managing the Demon Gauge Underneath the Sharpness Gauge is the Demon Gauge which is a total of 100 points. The Demon Gauge is used to activate Archdemon Mode which replaces the standard stance. Blade Dance and Demon Flurry also use up Demon Gauge, making it more important than ever. When in Demon Mode, hunters can use Sixfold Demon Slash Combo, Demon Flurry Rush, and Focus Strike: Turning Tide to fill the Demon Gauge. The gauge will also be filled whenever popping a Wound with the Focus Strike. Below is how much each move fills the gauge by: Sixfold Demon Slash combo (61.5) Demon Fangs = 7.5 Twofold Demon Slash (R) = 5 Twofold Demon Slash (L) = 5 Sixfold Demon Slash (L1) = 2.5 Sixfold Demon Slash (R1) = 2.5 Sixfold Demon Slash (R2) = 7.5 Sixfold Demon Slash (L2) = 7.5 Sixfold Demon Slash (L3) = 12 Sixfold Demon Slash (R3) = 12 Demon Flurry Rush (20) Demon Flurry Rush (R1) = 2.5 Demon Flurry Rush (L1) = 2.5 Demon Flurry Rush (R2) = 2.5 Demon Flurry Rush (L2) = 2.5 Demon Flurry Rush (R2) = 5 Demon Flurry Rush (L2) = 5 Rising Slash (5) Rising Slash = 5 Double Roundslash (37.5) Spinning Slash (1) = 2.5 Spinning Slash (2) = 5 Spinning Slash (3) = 10 Double Roundslash (1) = 5 Double Roundslash (2) = 5 Double Roundslash (3) = 10 Focus Strike: Turning Tide, no Wound (5) Focus Strike: Turning Tide (R) = 2.5 Focus Strike: Turning Tide (L) = 2.5 Perfect Dodge (7) Perfect Dodge (R1) = 1.5 Perfect Dodge (L1) = 1.5 Perfect Dodge (R2) = 2 Perfect Dodge (L2) = 2 Screw Slicer (14) Screw Slicer (R1) = 2 Screw Slicer (L1) = 2 Screw Slicer (R2) = 2.5 Screw Slicer (L2) = 2.5 Screw Slicer (R3) = 2.5 Screw Slicer (L3) = 2.5 Filling the Demon Gauge is very important. With Archdemon Mode, hunters gain Demon Flurry and Demon Flurry Rush. Without Archdemon Mode being available, stamina management with switching between Demon Mode and standard stance is much more difficult, as the /Right Click attack is just the average Lunging Strike. More importantly, there is Dual Blades’ new bread and butter. Dual Blades users' new main tech is mixing Demon Flurry and Blade Dance. To use, Demon Gauge is required, although being in Archdemon Mode is not. On using either of the moves, the Demon Gauge is reduced by the below values: Blade Dance I = 5% of Demon Gauge Blade Dance II = 10% of Demon Gauge Blade Dance III = 15% of Demon Gauge Demon Flurry I = 5% of Demon Gauge Demon Flurry II = 10% of Demon Gauge Managing the gauge is the lifestyle of the Wilds Dual Blades hunter. Focus and Power Prolonger help significantly with maintaining Blade Dance and Demon Flurry’s high damage per second, but learning effective strategies through knowledge of each combo give and take, and practice will propel the hunter to great success! Absolutely Perfect Shrouded Dodgy Adept Vault of Evasion… & Screw Slicer In either Archdemon Mode or Demon Mode, Down Face Button -> Up Face Button In either Archdemon Mode or Demon Mode, Space Bar -> Left Click Moves: Demon Dodge (turns into Perfect Dodge if conditions are met) -> Screw Slicer Motion Value Total: 22 (Perfect Dodge) + 55 (Screw Slicer) Element Multiplier Total: 1.2 (Perfect Dodge) + 2.6 (Screw Slicer) Hit count: 3 hits (Perfect Dodge) + 6 hits (Screw Slicer) Silly names aside, Perfect Dodge is Dual Blades most important new tool. It is a repeatable dodge that requires good timing and to connect with an attack hitbox. What is meant by repeatable is that the only cooldown is the hunter’s stamina, for there is no Hunter Art or Wirebug cooldown. It also activates Demon Boost Mode, which is a buff that triggers a 20% increase to the hunter’s Raw stat and a hidden 20% Element post-multiplier for 24 seconds. The hunter’s red aura will be replaced with a blue aura. If the hunter sheathes, Demon Boost Mode will wear off. If the hunter successfully Perfect Dodges while in Demon Boost Mode, a few seconds is added to the buff timer. The other cool tech with Demon Boost Mode is that it turns Demon Dodge into an attack and changes the followup attack to Screw Slicer, increasing Dual Blades mobility. Learn the monster’s behaviour and timings and the hunter will become the greatest of mosquitoes!
剑刃乱舞 在恶魔模式下,上+右面部按键→上+右面部按键→上+右面部按键 在恶魔模式下,左键+右键→左键+右键→左键+右键 招式:剑刃乱舞I→剑刃乱舞II→剑刃乱舞III 总动作值:393 总元素倍率:20 连招持续时间:5.39秒 命中次数:27次 剑刃乱舞获得了一项有趣的实用性强化——通过反复点击上+右面部按键,猎人可以延长连招,造成极高伤害。此连招较长,最适合在怪物倒地时使用。该连招的另一大优势是磨损度较低,使得猎人最强的通用连招同时也是最不浪费武器耐久的。安吉尔会为此感到骄傲。
乱舞刃 在 demon mode( demon mode)下,上+右面部按键→Rear R→Rear R→Rear R→Rear R 在 demon mode( demon mode)下,左键+右键→R→R→R→R 招式:刃舞 I→ demon flurry( demon flurry) I→刃舞 II→ demon flurry( demon flurry) II→刃舞 III 动作值总和:393(刃舞)+110( demon flurry( demon flurry)) 属性倍率总和:20(刃舞)+7.2( demon flurry( demon flurry)) 连招持续时间:7.25秒 命中次数:35次 《怪物猎人:荒野》中双剑的新核心机制是刃舞的模块化。这意味着什么呢?猎人在开始刃舞或 demon flurry( demon flurry)后,可以通过按下Rear R在连招中途切换至 archdemon mode( archdemon mode),反之亦然。他们也可以再次按下上+右面部按键来继续当前模式的连招。现在,猎人需要注意的是,这套连招的伤害效率并不高,但理解其机动性是重要的知识,因为它能让猎人重新调整位置。恶魔乱舞的损耗效率同样较低。
4.4 - 连招与招式(续) 魔空闪I接剑舞II & III 在魔化状态下,上+右面部按键 -> 后R -> 上+右面部按键 在魔化状态下,左键+右键 -> R -> 左键+右键 招式:魔空闪I -> 剑舞II -> 剑舞III 动作值总计:255(剑舞)+ 60(魔空闪) 属性倍率总计:10.8(剑舞)+ 4(魔空闪) 连招持续时间:4.14秒 命中次数:19次 猎人可能会问:“剑舞与魔空闪的最佳组合方式是什么?”答案是先使用魔空闪I,然后衔接剩余的剑舞连招。这种组合机动性最佳,能让猎人最快进入最强攻击状态。“恶魔乱舞II”的威力相当弱,因此“利刃之舞II”是更优的后续技能。猎人若想达到最佳伤害输出,应使用“利刃之舞”完整连招,或采用此技能。
八重腐蚀披风 恶魔模式下,上方向键→上方向键→上方向键 恶魔模式下,左键→左键→左键 招式:恶魔獠牙→二重恶魔斩→六重恶魔斩 动作值总计:116(六重连击)+14(腐蚀披风) 元素倍率总计:5.4(六重连击)+1.5(腐蚀披风) 连击持续时间:2.27秒 命中次数:14次 需求:装备腐蚀披风 腐蚀披风拥有为基础攻击附加额外攻击的特殊机制。许多标准连击都带有这些额外攻击,但没有像剑舞或恶魔乱舞那样复杂的招式。六重连击会额外增加两次攻击,从而实际变为八重连击。就每秒伤害而言,它对“六连”的提升不大,肯定比不上那些基础核心连招,但真正的亮点在于它能为“恶魔计量条”充能更多。
梗骑手 按住右后方键 -> 前右方键 按下Alt键进入专注模式 -> Shift键 招式:专注攻击:逆转浪潮 脊柱骑手招式回归,其对物理定律的突破更上一层楼。“按需召唤利维坦”在怪物即将撤退时非常实用,因为该招式通常能造成怪物僵直。猎人可使用《怪物猎人:崛起》中的“御龙飞翔”作为接近敌人的手段或触发“裂伤”状态,随后衔接“天彗龙刃舞”。从每秒伤害来看,这是一个表现平平的攻击,且往往会让猎人处于不利的站位。此外,该招式还存在一些bug,可能导致猎人向奇怪的方向飞行,并且与怪物的连接时间过长。不过,其优点是通常能填充三分之二的“鬼人槽”。
腐化连击 在恶魔模式下,上方向键→上+右方向键 在恶魔模式下,左键→左键+右键 招式:双重斩击→恶魔乱舞I 动作值总计:79 + 4(腐化披风) 元素倍率总计:5.2 + 0.6(腐化披风) 连击持续时间:1.31秒 命中次数:8次 需求:装备腐化披风 真正的新强力技巧是腐化连击。该连击速度极快,连击之间没有任何延迟。双重斩击还会使猎人向前移动一小步,因此站位很重要。其每秒伤害可与“恶魔乱舞I接剑舞II和III”的连击相媲美,只是略低一些。“腐化连击”不再是双剑猎人在长时间控制下的最强连招,但如果猎人希望节省恶魔槽,它仍是值得考虑的技巧。该连招仍需装备“腐化披风”才能生效,因此请在猎人能充分利用披风持续时间时使用此连招。
强化版剑舞 在恶魔强化模式下,下方向键→上+右方向键→上+右方向键 在恶魔强化模式下,空格键→左键+右键→左键+右键 招式流程:回避→剑舞II→剑舞III 总动作值:277 总属性倍率:12 连招持续时间:3.82秒 命中次数:18次 双剑猎人在Title Update 2中获得了新连招。若恶魔强化模式激活,猎人可在回避后直接衔接剑舞II!那么,该连招与其他剑舞变体相比表现如何?从DPS角度而言,恶魔乱舞I接剑舞II和III仍是最强的技术流派,但这一新增连招为快速爆发提供了另一个出色的手段。
投射器 按住左扳机键 -> 按下左摇杆 按住Alt键进入专注模式 -> 鼠标3键 投射器弹药是猎人必备的实用工具。猎人可能不知道的是,投射器可以在武器出鞘的状态下使用! 投射器目前有两个主要用途:使用闪光弹让飞行怪物坠机或暂时致盲怪物,以及使用引诱弹。引诱弹可用于将怪物引向环境陷阱、吸引其注意使其远离其他猎人,以及阻止它们撤退!过来吧!
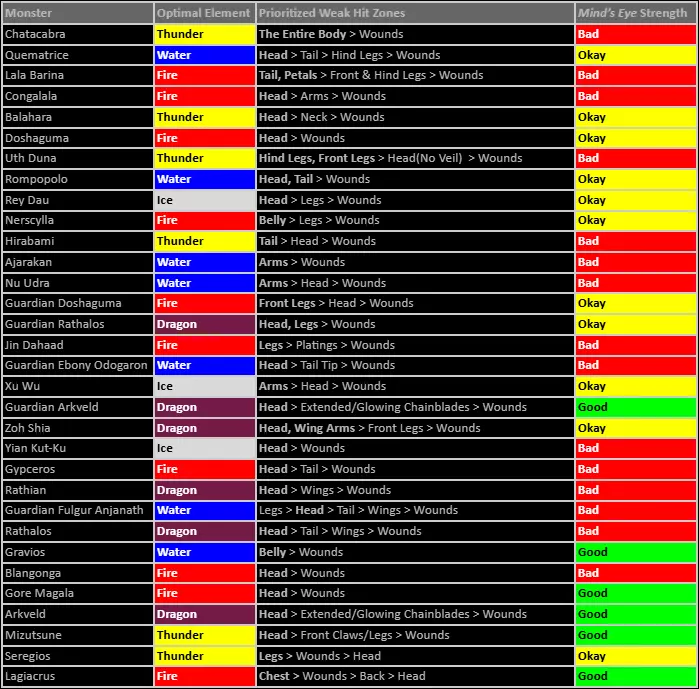
4.5 - 速查表 鉴于当前…简单的游戏环境,默认猎人都了解双剑的最优配装中,不同颜色对应双剑的哪种元素属性…这些元素属性大多名称相同。
4.6 - Frequently Asked Questions Q: “Should I go Raw or Element?” A: (Really? C’mon man…) To quote the introduction, “Dual Blades are designed to utilize Element damage.” The hunter should prioritize Element sets and learn the appropriate matchups (Pilgrim2092). Q: “What if I want just one set?” A: Stop it. Q: “I don’t like the Artian Dual Blades, what do I use instead?” A: By crafting the final version of a weapon branch, you gain the option to layer your current weapon with the skins of that weapon branch (KreaTV1 & Pilgrim2092)! Q: “I don’t like Protective Polish.” A: Cool, it is optional (Pilgrim2092). 👍👍 Q: “What's my skill priority?” A: In general for a mixed build in endgame, Sharpness comfort (durability should be 300 hits minimum or 120 hits minimum with Protective Polish), Burst Lv1, Adrenaline Rush Lv1, Weakness Exploit Lv1-5, Adrenaline Rush Lv2-5, Agitator Lv1-5, then Burst Lv2-5 (Pilgrim2092). Q: “Do I want X or Y Reinforcement on my Artian Element Dual Blades?” With Title Update 2, it is recommended to get one Sharpness reinforcement and as many Attack reinforcements as possible. This is followed by Affinity, then Element (Bro4U & Pilgrim2092). Q: “I found a better set” A: There is always room to improve with your own preferences. These are just our recommendations for places to start making endgame Dual Blades’ sets (Pilgrim2092). Q: “I saw a speedrunner using X.” A: We appreciate the extreme proficiency runners have with their weapons, but you should not assume that the builds they use are the best possible builds because the said runner is using it. Use math and what applies to you to decide what you should build instead of simply copying that runner. They may be fighting with a different philosophy for that specific hunt (Pilgrim2092). Q: “I like to use X set/skill.” A: There is no wrong way to play. If you are having fun, you do not have to adjust to the uniform meta. Some people like to play in their own unique ways. As long as you are having fun, that is okay! That being said, if you are coming to a set guide for validation in your personal sets, we cannot really help you (Pilgrim2092). Q: “Should I use Flinch Free or Shockproof?” A: Completely up to you. Demon Mode has built-in Flinch Free. It will only be useful in the other stances, but is a valuable skill in cooperative play (Pilgrim2092). Q: “Dual Blades love to dodge! Why aren’t the sets using Evade Extender?” A: Evade Extender actually may make playing Dual Blades worse. You can absolutely get used to it, but more often than not, you will overshoot your destination (Pilgrim2092). Q: “Dual Blades love to dodge! Why aren’t the sets using Evade Window?” A: Evade Window is a fantastic skill! It is now a utility skill over a comfort skill, as it improves Demon Boost Mode uptime by improving your ability to dodge through attacks (Pilgrim2092)! Q: “Does Evade Window increase the Perfect Dodge window?” A: It does! Each level of Evade Window increases the base iframes by another 5% (KreaTV1). Q: “Do Dual Blades use Focus Mode?” A: While our Focus Strike Turning Tide, as further explained in the Combos and Moves, it is unreliable in practice, using just Focus Mode to aim your hunter’s attacks is a very strong new tool. Sixfold Combo and Blade Dance Combo should almost always be accompanied by Focus Mode (KreaTV1). Q: “Ok, so I want to be in Focus Mode all the time?” A: Hunters will want to operate in and outside of Focus Mode. Though there are lots of advantages in utilizing the Focus Mode during combat, it should not be turned on all the time. For example the move Screw Slicer (after a Perfect Evade) suffers from being used in Focus Mode because it’ll ignore directional input and always lunges toward the center of your screen. This is problematic after a Demon Boost Mode Dodge when trying to close the gap and the monster is not perfectly centered. It may therefore send off-target. To fix this, briefly disable Focus Mode before using Screw Slicer for better control (KreaTV1). Q: “When do I unlock layered weapons?” A: As soon as you complete any weapon branch (Pilgrim2092)! Q: "Why is Sharpness such a big deal?" A: It is because each tier of Sharpness increases Raw and Element via a multiplier. Getting to white is going to be the best source of damage for a lot of meta options. Sharpness loss mitigation is required because Dual Blades eat through Sharpness as an owl goes through tootsie pops. If you want to stay at your optimal Sharpness levels without stopping to sharpen too often, you're going to need the appropriate weapon skills (Pilgrim2092). Q: "Should I be using Dash Juice?" A: Up to you. Dual Blades can manage their Stamina pretty well in Wilds, even with the restriction of getting forced out of Demon Mode at empty Stamina, so it is not a necessary buff but can certainly help. Dash Juice reduces the effects of both the Stamina lost on evading, as well as Demon Mode’s continuous Stamina drain. It is a 25% Reduction to both, stacking with the skills Constitution and Marathon Runner multiplicatively. However, a fixed cap of 50% reduction is forced upon the stacking of the stamina reduction buffs. The buff provided by Dash Juice will therefore greatly decrease in combination with the highest level of either Stamina Skill (KreaTV1). Q: "What ingredients should I eat?" A: Hmm… This is a tough question. In the game’s current state, ingredients are difficult to come by without spending a bunch of resources and wasting lots of time. We would advise taking advantage of any Village meal event which occurs randomly and can be seen on the World Map, as they last an hour and offer the best bonuses for free. Otherwise, for now, just basic meals of Meat. We are meat lovers. If you are to optimize a meal, it would be Meat, Tumbler Meal (Hi), and whatever Secondary Ingredient sounds best for the situation (Pilgrim2092). Credits

2026-02-11 14:01:05 发布在  Monster Hunter Wilds


说点好听的...
收藏
0
0