


如何解锁怪物职业
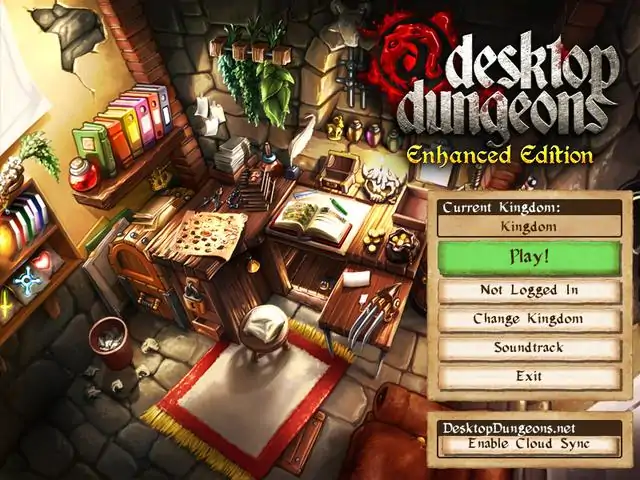
《桌面地下城》全怪物职业解锁指南 简介 欢迎阅读《桌面地下城》的全怪物职业解锁指南! 除了15个常规英雄职业外,游戏中还有4个可玩的怪物职业——羊人、吸血鬼、蛇发女妖和半龙。解锁每个怪物职业都将获得相关成就,并允许你在创建新英雄进行地下城冒险时使用该职业。 本指南概述了解锁每个职业的要求,以及完成必要任务的一些技巧。 羊人

山羊人是随《山羊人》DLC推出的独特可玩怪物职业。当你在游戏中解锁四位神明,并至少遇到过一次契约者祭坛后,山羊林地建筑便会解锁。你需要花费3000金币建造该林地,之后就能使用山羊人职业,并可接取三个超难的三重任务。从这个角度来说,山羊人与其他三个怪物职业有所不同,它无需完成任何任务即可解锁。 吸血鬼

The quest to obtain the Vampire ("Razor Blade Smile") and the Vicious Steel dungeon both become available after you beat the "Vicious Edge" quest (complete Halls of Steel with 4 different classes). "Razor Blade Smile" requires you to complete the Vicious Steel dungeon with 3 different classes in order to unlock the Vampire. The vicious version of the Halls of Steel differs from the original in quite a few ways. First, as with all Vicious-level dungeons, monsters have +40% damage and health. Second, there is no free Orb of Lusory on the map (+50% magic resist). And third, instead of the random second LV10 boss, you get to fight a particularly mean Vampire that makes even The Indomitable seem like a pushover. And speaking of The Indomitable, if you thought an Animated Armour with 10 layers of Death Protection was hard to beat, try a boss that has 50 layers. And corrosive attacks. Yep. This guide assumes that you find nothing useful from shops nor bring any items from the Guild locker. If you can use a powerful item that could make the challenge easier, such as a Dragon Shield or an Amulet of Yendor, then by all means go for it. It's still very possible to succeed even without overpowered items though. http://steamcommunity.com/sharedfiles/filedetails/?id=264697230 Bosses: The Indomitable (LV10 Animated Armour, 73 damage, 222 HP, 50 x Death Protection, magical attack, corrosive). Count Blahblah (LV10 Vampire, 120 damage, 1110 HP, undead, 30% life steal, magical attack, blink) Preparations: First and foremost, prepare Taurog and bring the Bear Mace. The Mace lessens the drawback of prepping Taurog and helps out against both bosses (prevents blink for the Vampire and removes an extra layer of Death Protection from the Armour). Taurog makes The Indomitable very easy to kill thanks to the deity's equipment completely negating his damage (more on that later). Also prepare a Burn Salve to remove the corrosion once The Indomitable is defeated. Other potions to take are the Can of Whupaz, Quicksilver and Reflex potions. Take a Compression Seal as well, since you'll need the extra space due to Taurog's equipment. Extra mana boosters are also useful (especially for the Berserker), because you'll be severely reducing your max mana with Taurog and you might end up unable to effectively cast BURNDAYRAZ. Classes: Berserker. The "easy mode" for this particular dungeon. Thanks to his starting +50% magic resist and a huge damage bonus (you'll always be fighting higher-level enemies anyway), he pretty much makes this a walk in the park. You'll barely be able to use any glyphs though, so plan accordingly. Suggested race: Orc. Priest. Has by far the easiest time with the Vampire boss thanks to double damage and full-health potions. Also easily able to kill Wraiths 2-3 levels above him to help him level up quicker. Benefits a lot from a Binlor conversion after Taurog. Suggested race: Halfling. Assassin. Has an easy time with enemies other classes can't really fight (Illusions and Golems) thanks to Swift Hand. He can also one-shot lower-level Animated Armours regardless on any Death Protection. This makes a double level catapult during the boss fight entirely possible. Benefits a lot from a Dracul conversion after Taurog. Suggested race: Goblin. Run: Taurog's altar will be placed near your starting location, so find it and start worshipping him. Take the Blade as soon as you can. Remember that knockback will remove Death Protection layers when enemies are knocked into walls, so you can kill a LV1 Animated Armor in one shot by smacking him into a wall, for example. Once you've gotten all the mileage out of Taurog that you can, convert to another god to help you further. Taurog is excellent for racking up piety, but doesn't offer much help when fighting the bosses here. Binlor, Dracul and the Earthmother are all good choices. Even Jehora Jeheyu is quite viable, because whenever you knock an enemy into blackspace, revealing him again triggers a new piety boost from Jehora. Chaos Form is a nice option to have during the final fight. However, when playing any other class than a Berserker, Binlor is probably the best choice thanks to the high amount of resistance stacking and an easy means of generating piety in the form of the Bear Mace. You can realistically start fighting The Indomitable at levels 5-6 (yes, really). Of course, the higher level you manage to reach, the easier it is to fight the second boss. Especially with the Berserker, you might even reach LV8 before you take on The Indomitable. Take care not to have any curses on you when you attack the boss. Also remember that you can't convert Taurog's equipment without invoking instant punishment (even if you have switched deities). For this reason, Taurog's Armour (+15% physical resist) is not needed as it takes up precious space. Clear all available blackspace before you start the battle, because you'll be taking on the second boss immediately after, so you'll want to avoid him blinking anywhere. Save your subdungeons to explore for blackspace during either boss fight if needed. Don't pick up any health or mana potions before the boss fight to conserve space in case you found a useful item in shops or brought something from the Guild locker. Boss fight (The Indomitable): 1. hit the boss as many times as you can 2. cast BURNDAYRAZ on the boss 3. kill popcorn to remove a Death Protection layer 4. cast BURNDAYRAZ on the boss again 5. kill popcorn to remove another layer 6. use a level catapult 7. keep smacking the boss into things and using BURNDAYRAZ Once The Indomitable's damage drops down to 5 or less (with about 34 layers of Death Protection remaining), you will no longer take any damage from him thanks to Taurog's Shield (-5 damage). Corrosion stacks are irrelevant here. 8. keep whaling on the boss until he's dead 9. pick up the trophy and drink a Burn Salve to remove the stacks of corrosion If you manage to position him next to Count Blahblah, you can get some "free" hits in against the Vampire thanks to Bear Mace (and/or the Stone Fist boon from Binlor), because knockback damage doesn't trigger the blink. Boss fight (Count Blahblah): If you positioned the boss next to The Indomitable during the first fight, you should already have done 100-200 free damage to him via knockback. 1. drink the Quicksilver (dodge) Potion 2. use Can of Whupaz 3. hit the boss If you manage to keep hitting him into walls with the Bear Mace, that would not only prevent him from blinking, but also add a decent bit of damage. 4. use the Reflex Potion for extra attack 5. keep hitting / fireballing the boss Honestly, as long as you have sufficient magic resistance, you don't even need to use potions or any deities here. Otherwise, leverage all remaining resources to finish him off. The aforementioned gods all have useful boons to make the boss fight much easier, plus you should have all your health and mana potions remaining at this point. In terms of Vicious-level dungeons, this is one of the easier ones. Gorgon

The quest to obtain the Gorgon ("Snakes? SNAAAKES!") and the Naga City dungeon become available after you beat the "Challenge Accepted" quest (complete Ick Swamp with the Thief, Rogue and Assassin). "Snakes? SNAAAKES!" requires you to complete the Naga City dungeon with 3 different classes in order to unlock the Gorgon. The main dungeon of Naga City itself is unique as there are no altars or bosses to be seen. You will only encounter a Hooded Figure who offers to take you to a subdungeon once you've leveled up enough and prepared yourself to face the real challenge of this foreboding dungeon. The real challenge of this dungeon is the fact that you need to beat a rather large number of bosses in order to win. You will have already beaten dungeons with two and maybe even three bosses before, but this dungeon requires you to kill TEN bosses in a row. Bosses with +20% increased health and damage. Yay! http://steamcommunity.com/sharedfiles/filedetails/?id=271611402 Bosses: Kinisssch (LV10 Naga, 90 damage, 475 HP, magical attack, corrosive, 50% magic resist, 5 x Death Protection) The arena boss lineup is as follows (in random order): Super Meat Man, Jörmungandr, Frank the Zombie. Lord Gobb, Tormented One, Tomithy Longdall, the Iron Man, Aequitas, Tower of Goo. In other words, every common dungeon boss except the Firstborn, Medusa and Bleaty. Preparations: The key to beating this challenge is preparing a deity at the Church. While no altars normally appear in the main dungeon, using the preparation option to select a specific deity allows you to circumvent that restriction. The deity you pick largely depends on your class and preference. You can then use the deity to amass tons of piety and pick useful boons even before you enter the subdungeon, giving you a huge edge while fighting the bosses. Binlor, Mystera Annur, Jehora Jeheyu and the Glowing Guardian are all great choices here. Elite items from the Guild locker, such as Elven Boots or Dwarven Gauntles, are also very useful. The Dragon Shield (+18% physical and magical resists) is an especially good item for this dungeon, because the boss fights are all about regen-fighting, and in regen-fighting, resists are king. Also prep a Burn Salve to negate the Earthmother desecration (explained later). Bear Mace also helps with gaining piety with Binlor if you pick him as your god. Extra health / mana / attack boosters are always useful, as is the Can of Whupaz for troublesome bosses. Classes: Monk. The obvious choice, as the Monk is perfectly tailored for regen-fighting. With the Dragon Shield prepared, your ludicrous physical resists enable you to plow through monsters and bosses alike. The best deity to prepare is probably Binlor. Suggested race: Orc. Paladin. Another class that starts with physical resists, plus with one of the best glyphs for regen-fighting - HALPMEH. Can abuse gods like none other. The best deity to prepare is probably the Glowing Guardian. Suggested race: Human. Assassin. APHEELSIK is the ultimate regen-fighting glyph. The high bonus damage and first strike allows you to finish off most bosses very quickly. The best deity to prepare is probably Jehora Jeheyu. Suggested race: Human. Run: Find the altar of your deity and start praying. Level up normally, rack up piety and start picking boons. Depending on the god you chose, try to get Stone Form and Stone Fist from Binlor, Humility and several Absolutions from Glowing Guardian, Petition and Health + Mana Boosts from Jehora Jeheyu, or a pair of Magic boons and Mystic Balance from Mystera Annur. You should enter the arena with a level catapult ready at LV7 or LV8, depending on how well you did during the leveling process. If you gathered several stacks of weakening from the Nagas, buy a Fortitude Tonic from the apothecary to clear it up. You can't return to the main dungeon once you leave, so explore every inch that you can. The arena: Once you accept the invitation from the Hooded Figure, you will be transported into a small subdungeon with altars for all eight deities and the Pactmaker. The altars each cost 20 gold to convert into a specific god or to desecrate a specific altar. Don't worry, you'll soon have a large amount of gold thanks to all the boss trophies you'll end up collecting. It should be fairly obvious that Agnostic's Collar is ridiculously good here. You can still get in a "free" desecration of Mystera Annur before going any further, as the punishment of "+15% to all enemy resists" will affect no one, because the first bosses haven't spawned yet. The same applies to Tikki Tooki. The Burn Salve can be used to offset desecrating the Earthmother if you need even more extra piety. Boss fight: Three random LV10 bosses spawn simultaneously as you enter the arena. One random monster will also spawn in each corner. There are three shops in the southern side of the arena. They sell: Keg o' Health (+3 health potions, costs 25 gold) Keg o' Mana (+3 mana potions, costs 25 gold) Amulet of Yendor (+50 XP, costs 45 gold) Each boss drops a trophy, which can immediately be sold for 25 gold. You may then spend the gold to unlock altars or buy items from the three shops. Once you kill the third boss, you'll be teleported back to the entrance of the area, the blackspace in the middle of the arena is replenished, three more bosses spawn in the center and one more monster spawns in each corner. If you decide to convert to another deity here, consider the fact that the monsters in the corners are bloodless, so the effectiveness of Dracul's boons is greatly diminished. These monsters can still help remove the curse from Blood Swells, however. With enough desecrations for extra piety, Dracul might be a viable choice. The Glowing Guardian is likely better, though, at least once you run out of potions, which should happen after the first wave of three bosses, as you're still weaker (lower-level) when fighting them and need those potions to beat the first three. The Protection boon offers an extra method of healing and Cleansing helps combat the bosses with physical resists. Obviously avoid the Glowing Guardian if you're using poison or lifesteal. Since the bosses appear in a random order, it's difficult to outline a specific strategy to defeat them. They're all common dungeon bosses with buffed stats, so you should already have some experience in beating them. Use blackspace as much as you can, because it's replenished anyway after each wave of bosses. Use regen-fighting to pick the bosses off one by one. Time your level-ups to restore health and mana when you need it most. Use boons and shop items if you're out of other options. After you kill the third boss in the last wave, the final boss will appear - Kinisssch. The boss becomes cowardly once he's down to 50% health. Try to attack him at a good angle, so he doesn't flee into blackspace and mess up your combat math. If you still have BURNDAYRAZ, you can knock away his Death Protections very fast by igniting the burn stacks with the help of the remaining popcorn. Like any other enemy with Death Protection, his damage also decreases substantially the more layers you remove. After beating the nine other bosses, he shouldn't be too hard to kill. Half-Dragon

The quest to obtain the Half-Dragon ("Here Be Dragons") and the Dragon Isles dungeon become unlocked after you beat the "Muu..." quest (complete Labyrinth with the Berserker, Fighter and Warlord). "Here Be Dragons" requires you to complete Dragon Isles with 3 different classes in order to unlock the Half-Dragon. The trick with this dungeon is that you first need to beat the LV10 Dragon boss above ground and then head into a special subdungeon to hack your way past several powerful LV9 Dragon Guards and fight the "real" Dragon boss. Like any other vicious-level dungeon, all monsters also have +40% damage and health. The main dungeon area is divided into several small islands, which severely restricts exploration and limits the effectiveness of regen-fighting. http://steamcommunity.com/sharedfiles/filedetails/?id=271611422 Bosses: The Firstborn (LV10 Dragon, 105 damage, 666 HP, magical attack) Matron of Flame (LV10 Dragon, 75 damage, 954 HP, magical attack, retaliate: fireball) Preparations: Preparing Taurog makes this dungeon very manageable. You may also prepare a Slayer Wand to easily remove one of the LV9 Dragons guarding the final boss. Taking the Transmutation Seal helps you bypass two more Guards (explained later). Take extra attack / mana / health boosters if needed, depending on your hero class. Also take the usual kit of potions - Health Potion, Can of Whupaz, Reflex Potion and Quicksilver Potion. Once you've beaten Dragon Isles for the first time, you get the Dragon Shield (+18% physical and magical resist). Feel free to locker it and prepare it for the following runs if you don't plan on using any glyphs or choose to prepare a Compression Seal to save inventory space. Classes: Berserker: Similar to the Vicious Steel dungeon, both bosses have magical attacks, which makes the Berserker the obvious choice. As long as you can remove curse stacks by killing popcorn above ground, you shouldn't have any problems with beating the subdungeon. Suggested race: Orc. Assassin: Thanks to his Swift Hand trait, the Assassin can easily bypass the LV9 Dragon Guards. If possible, also prepare the Balanced Dagger to reach LV10 faster. As long as you reach LV10 before entering the subdungeon, this challenge is fairly easy. Suggested race: Goblin. Crusader: The curse / mana burn / poison immunity greatly helps against the Dragon Guards in the subdungeon. As long as you keep a few popcorn for added momentum, you should have little trouble against the boss. Suggested race: Orc. Run: Find Taurog's altar and start picking up equipment to start killing higher-level enemies. The Berserker can kill Druids and Dragons about four levels above him without even using any glyphs. The Assassin is a very efficient regen-fighter with APHEELSIK and can level up quickly (especially with the Balanced Dagger). The Crusader can tackle much higher-level Serpents thanks to his poison immunity. You will want to stick with Taurog to use his Unstoppable Fury boons during the boss fights, so take every piece of equipment you can. Prepare to take on the first boss (The Firstborn) at LV7 with a level catapult to LV8 (As an Assassin, LV8 to LV9 is more likely). Boss fight (The Firstborn): It might be best to use the Can of Whupaz on this boss if you lack enough blackspace to effectively kill him. The Firstborn is identical to its common counterpart, albeit with buffed stats. There is no real gimmick for killing this boss, just use the same strategy that you would use with the normal Firstborn boss: tank a hit, use up your mana, level catapult, tank another hit, use up your mana again, regen-fight or use potions if needed. You can also use up one of your Death Protections from Taurog during the first boss fight, because you'll likely hit 100 piety again before fighting the second boss. Boss fight (Matron of Flame): Once the Firstborn is dead, the passage to the subdungeon opens up. Take a second boon of Unstoppable Fury after the first boss kill and head down. Upon entering, you will be flanked by two LV9 Dragon Guards (63 damage, 167 HP, mana burn, cursebearer, 50% physical resist, magical attack). Killing both removes the wall in front of you, allowing you to progress. Alternatively, use an ENDISWAL glyph or the Transmutation Seal to break the wall and avoid fighting the guards altogether. You will then encounter two more LV9 Dragon Guards on a narrow path, but there are ways to bypass them as well. Either use your Slayer Wand or WEYTWUT (the latter blocks off the way back). Otherwise, fight them straight-up. You can go back above ground to kill popcorn if you need to remove the curse stacks. After those, you'll need to kill two LV9 Dragon Elites (63 damage, 167 HP, poisonous, cursebearer, 50% magic resist). The monsters in the subdungeon aren't affected by the cowardly trait caused by Taurog's preparation (or any other global buff / debuff for that matter). Once you kill both elites, the way to the final boss is clear. Use your Quicksilver and Reflex potions here (and Can of Whupaz, if you saved it). The boss has fairly low damage, which means that high resists, potions and regen-fighting should bring her down. BURNDAYRAZ is useless here thanks to the boss' retaliate: fireball trait. However, LEMMISI is particularly effective, as there is a ton of inaccessible blackspace in the subdungeon (although you can't rely on Taurog if you choose this tactic). Use up your remaining potions and the Unstoppable Fury boons to land the final blows. You can desecrate the altars of other gods as a last resort if you need more piety for an extra layer of Death Protection. Overall, this is a tricky dungeon, probably the hardest out of the three vicious dungeons described in this guide. The main cause for frustration will likely be the LV9 Dragon Guards and Elites with their curses that eat up your resources before the actual boss fight. Therefore, any items, strategies or race/class combinations that allow you to effectively deal with them will likely be enough to seal the victory over the actual boss as well.
2026-02-13 16:00:18 发布在  Desktop Dungeons


说点好听的...
收藏
0
0