


《暴战机甲兵》重金属更新1.8版夏默指南
《暴战机甲兵》夏默进阶指南 本指南是一份全面的进阶指南,内容远超基础层面。 指南涵盖以下内容: - 机甲战士的角色定位、技能及技能协同 - lance( lance)编队组成 - 战斗机甲的角色定位与设计理论 - 战场战术、威胁评估、防御及进攻玩法 - 雇佣兵公司的运营经济,以及“资金/战利品分配滑块应如何设置?”这一问题的解答 2018年12月更新 - 我正在修订本指南,以纳入1.4版本更新的改动,并涵盖《闪点行动》DLC内容。 2020年2月更新 - 我再次修订本指南,以纳入截至1.8版本更新的所有改动,并涵盖《城市战》和《重金属》DLC内容。标题标有**的任何章节尚未经过审核和更新。 引言
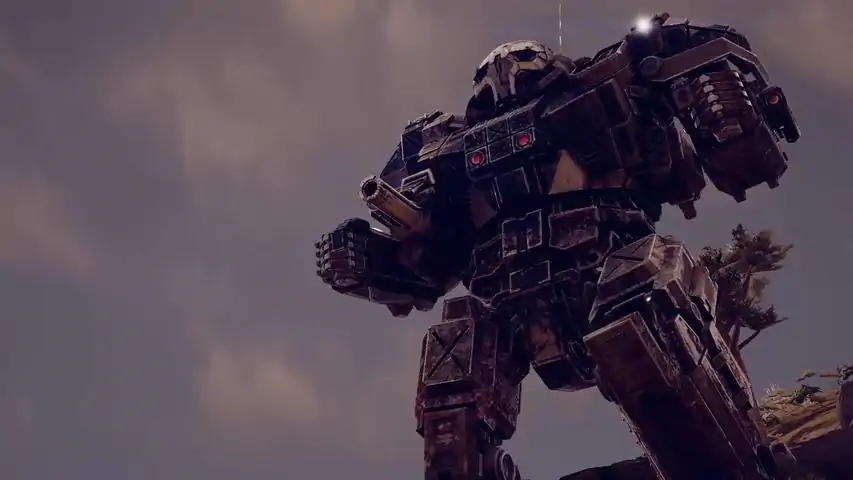
欢迎来到《暴战机甲兵》——一款以31世纪巨型战争机器人为主题的游戏。该系列始于20世纪80年代的桌面战棋游戏,此后衍生出众多书籍、游戏、角色扮演系统及其他作品。《暴战机甲兵》拥有深厚悠久的历史和庞大的粉丝群体,我本人也是其中一员,我们都热爱其世界观,并热切期待所有基于《暴战机甲兵》宇宙创作的作品。 《暴战机甲兵》是该系列于2018年推出的最新改编游戏。这是一款精心设计的战术回合制任务驱动型游戏,上手简单,但精通需要时间,且在不同层面都为玩家提供了丰富的实验空间。本指南假设你已完成教程,对用户界面、战斗操作和可用武器有基本了解,并开始探索游戏中技能系统、机甲建造、 lance 配置和战术细节的深度内容——无论是为了寻找提升游戏水平的方法,还是单纯为了乐趣和(虚拟的)收益(以 C-Bills 计算)而尝试不同的技巧与策略!
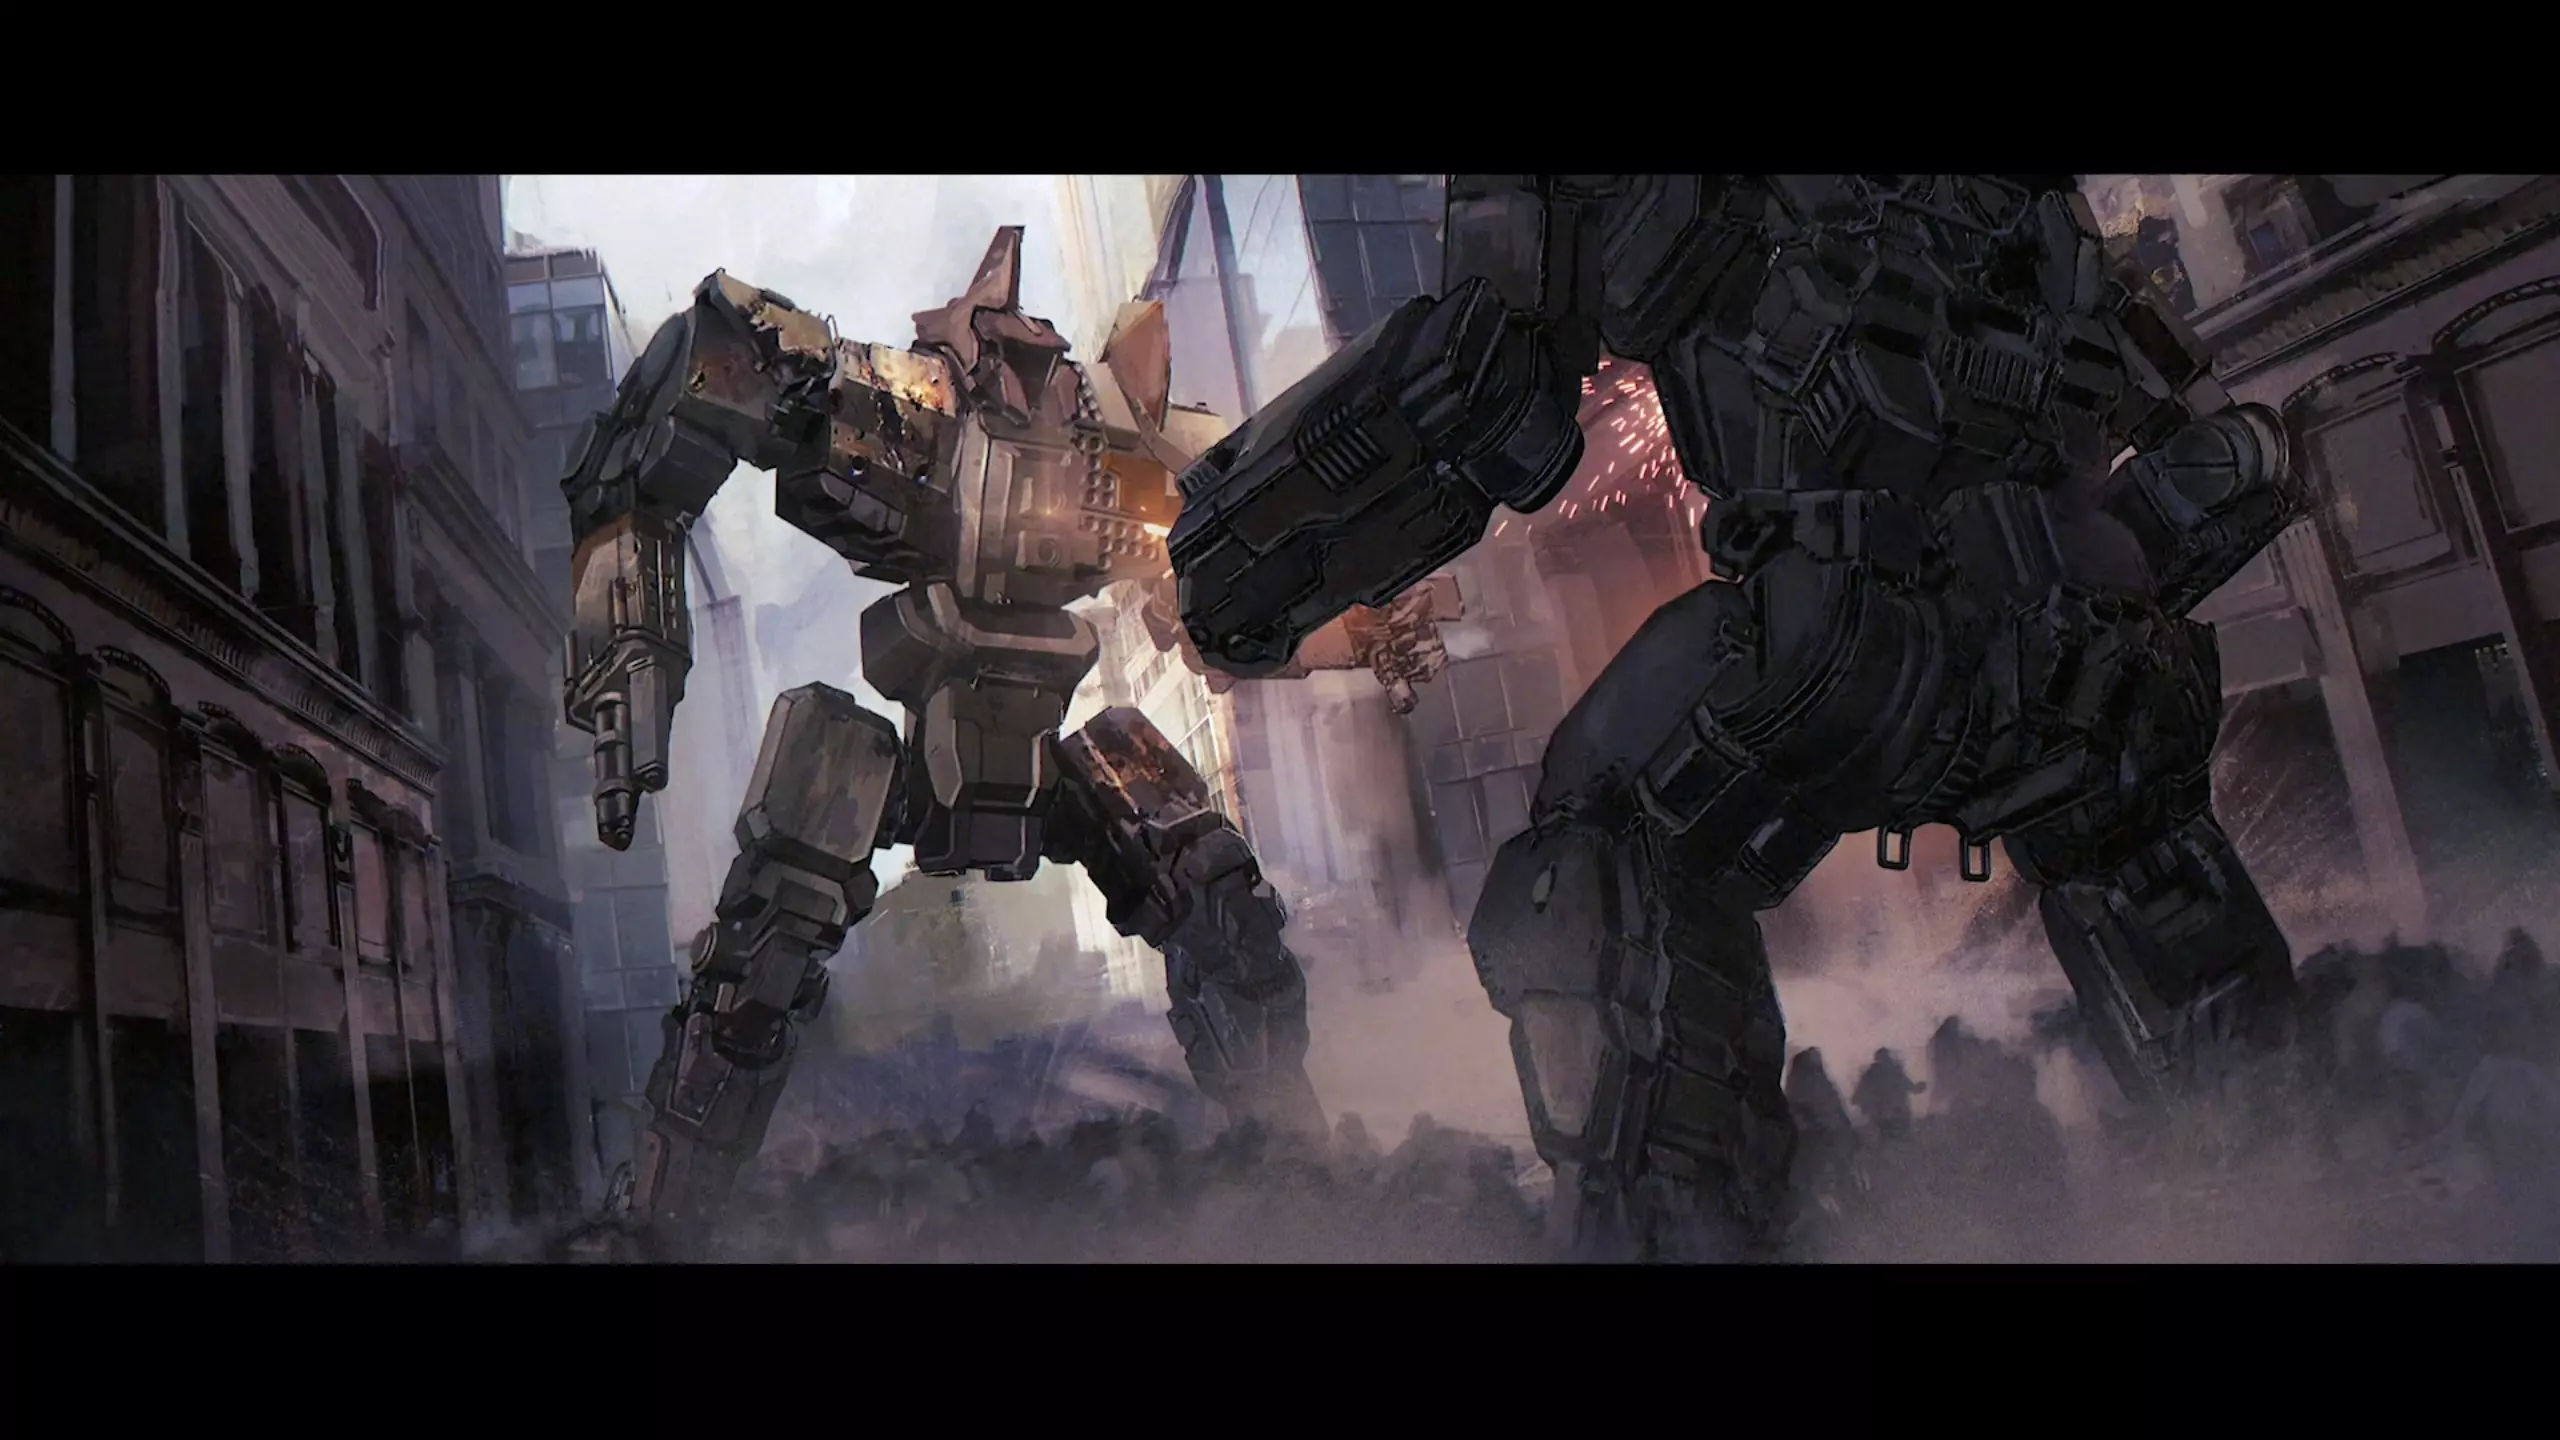
快速入门 人类已在地球周边殖民了数千颗行星,但此前由地球实施的集中政治统治(最初是泰伦霸权,随后是星际联盟)已然瓦解。如今,行星群由各大势力家族及小势力家族分别统治,每个家族都由少数几个强大的家族和血统所掌控,它们无不觊觎权力与资源。 数百年来,战争从未停歇。随着工厂被系统性炸毁、科学家与工程师惨遭杀害或绑架、领袖遇刺,人类就连制造基础电子产品的能力也已衰退。如今,军事力量以两百年前最先进的武器平台——“战斗机甲”(Battlemech)的形式存在。这种机甲是一种能够行走、奔跑,有时还能跳跃的坦克,装备有高能武器和先进系统,但其中许多系统如今因备件持续短缺而出现故障。 《机甲战士》的主题包括政治、背叛与忠诚、权力、失落的科技、为生存而搜寻物资,以及封建骑士与皇室的传奇色彩。
Game modes When you start the game, you are given the choice between Campaign or Skirmish modes, and since the 1.3 update, a Career mode. Skirmish is a one-off battle, which can be played multiplayer, or against AI enemies. It also has a 'Mech bay feature, which allows you to experiment and tinker with 'Mech designs. The Campaign Mode involves "The Restoration Campaign" which follows a narrative involving a lone 'Mechwarrior forced into a mercenary life, but then dragged into interstellar politics and family feuds. The story has some cut-scenes, text-based unvoiced dialogue and is punctuated by slightly scripted story missions. There are tons of side contracts to build your mercenary group from humble light lance beginnings to massively well-equipped assault class organisation, albeit with limited drop abilities (limited to a lance of four 'Mechs). The Flashpoint update introduces optional scripted story missions, adding up to 30 hours more content, according to the DLC blurb. The missions often involve more difficult (3+ skull) missions, often with consecutive drops without an opportunity to repair. Also many feature a decision that can determine the nature of the follow-on mission. The rewards are excellent, though, with new technology, rare 'Mech components and other goodies on offer. Urban Warfare adds the excellent city maps to missions. Missions in cities suffer from difficulties and opportunities with line-of-sight, environmental hazards, and collateral damage mechanics with collapsing buildings. Three new vehicles, two new 'Mechs, the introduction of active probes and ECM systems, and a new challenging mission-type "Attack and defend." Heavy metal introduces 8 new 'Mechs, some of them classics, a new flashpoint mini-campaign involving legendary characters from the books, and new weapon systems with novel mechanics and new tactical choices. Players are encouraged to have completed the Campaign mode before selecting the Career mode. That's because career mode assumes you know the basic mechanics and economics behind the game. First thing to know so you can enjoy the game Difficulty Some players will find BATTLETECH difficult. In part this is because the game pits the player's selection of four 'Mechs against an enemy force consisting of up to twelve enemy vehicles, turrets, and 'Mechs on relatively small battle maps where it can be difficult to avoid engaging them all at the same time. In defence of the design decisions behind this gameplay feature, the player is given a mission difficulty rating prior to going on the mission. It's not precise, but it can be used as a guide, alongside the contract value, as to whether to take on the mission or not. The enemy units, particularly the 'Mechs, are sub-optimal stock builds, many with profound weaknesses, such as ammunition placement in vulnerable locations, or weak armour components. The enemy AI is somewhat predictable and does not play a perfect game. Also, the player has access to some special abilities that can be incredibly potent (called shot and vigilance, for example). There are game settings that can make the economic and strategic game easier, increase salvage and money that can be obtained from missions, allowing a player earlier access to bigger and more capable 'Mech chassis and, by extension, greater chance of success in missions. However, the observation stands. BATTLETECH can be a difficult game, and on the face of it, it can feel like the AI is cheating by always outnumbering the player. If that doesn't charge your particle cannon, then you may not find the game to your taste. All I can advise is to make the most of your options, as lance commander Choose your missions carefully Optimise your 'Mechs Understand and use your pilot's abilities Match your pilot to the 'Mech Create a lance of four 'Mechs that complement each other Master movement, line of sight, armour facing, terrain and morale abilities Engage one enemy group at a time, pulling back or kiting to reduce the numbers Master threat assessment, shot selection, and target the weak points of enemies Focus on one enemy at a time and move to reduce the number of enemies shooting at you Don't be afraid to pull back, eject pilots, and/or withdraw from the mission Mechwarriors: Skill levels 1-5 Your Mechwarriors have four stats that identify how good they are at certain skills. Gunnery, Piloting, Guts, and Tactics. Each skill is rated from 1-10, the higher the better. Those skill levels determine base stats such as chance to hit with a range weapon, chance to hit with a melee attack, number of hit points, and modifiers to weapon minimum ranges, recoil penalties, or the point at which a ‘Mech overheats. Your Mechwarriors gain experience points through battles, or time in simulators on-board your dropship if you have purchased that upgrade. Those experience point can be spent improving their skills. Before any of their skills reach level or tier 5, pilots are “Recruits” and have no speciality or expertise.
In addition to the stat bonuses, the first two times that you increase a stat from 4 to 5, the Mechwarrior unlocks a talent associated with that stat; Gunnery 5 will give you Multi-Target, Piloting 5 will give you Sure Footing, Guts 5 will give you Bulwark and Tactics 5 will give you Sensor Lock. Once a particular pilot has two of these talents, the other two tier-5 talents are locked away from them. As a consequence, you can only choose a combination of two of the four talents for each pilot. Tier-5 talents - descriptions Multi-Target (Class description “Gunner”) This active speciality allows the Mechwarrior to select up to three targets in their firing arc and then can select groups of weapons for each target. Clearly better for ‘Mechs with several weapon systems, weapons with differing range profiles, or reducing enemy evasion of three ‘Mechs by 1 each. Synergises with Breaching Shot, which only activates if only one weapon is fired at a target. A general principle in ‘Mech combat is to focus down individual high threat targets one at a time, rather than spreading your damage between targets and Multi-Shot would seem to be counter to this principle. However, it can be used to dispatch several light targets at once, or finish off a weakened opponent and make a start on the next one, rather than wasting shots through overkill. As such it is generically useful in many playstyles. When you click on multi-target, you then need to select your three targets by clicking on them. The first will be labelled A, then B, and then C. In the weapon list at the bottom right of the HUD, you can see that letters have appeared next to each weapon. You can click on the letter to cycle it through the targets, if they are valid for that weapon (ie. in LoS and in range) - the chances to hit will be updated accordingly. Sure Footing (Class description “Pilot”) This passive speciality adds one to the number of evasive charges built up by a ‘Mech through movement, which can exceed the maximum for the unit. Each charge reduces the chances to be hit by 10% (+2 difficulty to the shot), and only one charge is lost each time the ‘Mech is fired at. In addition, the 'Mech gains ENTRENCHED if it makes a simple move or stands still, which halves stability damage taken. All ‘Mechs move and so having additional evasive charges is never a bad thing and so this talent is generically useful - particularly for lighter ‘Mechs that are going to be relying on not being hit - or minimising the number of missiles from particularly large volleys that can hit in one go. Bulwark (Class description “Defender”) Bulwark has been changed in the 1.3 patch. The change has meant that 'Mechs no longer gain the protection by standing still. You just get a boost when using the BRACE or VIGILANCE abilities (to give you GUARDED) and when hiding in COVER. It increases the damage reduction for COVER and GUARDED - from 20%, to 40% individually, or 60% if you are both GUARDED and in COVER. This change has reduced the synergy issues with 'Mechs that move, and means that cover becomes potentially of greater value than previously - since, for the most part, you would want to be shooting more than using BRACE. Sensor Lock (Class description “Tactician”) This active talent replaces your ability to attack a target. It does three things. The first thing is that it can reveal units that are detected as blips on sensors, but not identified - allowing other units to fire long range weapons at them. The other thing is that it reduces a target’s evasive charges by 2 (increasing chances to hit by 20%). This is only twice as effective as shooting at the target, even if you miss since each 'Mech shooting at a target reduces its evasion by 1. The third is that the target suffers a +2 SENSORS IMPAIRED effect. Sensor Lock reduces your lance’s potential turn firepower by 25% because one of your ‘Mechs is not firing in order to activate the talent. As such it is only really useful for allowing extreme and long range bombardment of targets outside of LoS. It can be an option when you are inside sensor range for those moments where a ‘Mech cannot, for some reason, engage in weapon’s fire against a target. Perhaps because it is a melee build or has very short-range weapons, it's carrying a lot of heat, or it has poor battlefield position/mobility. With two ‘Mechs armed with long-range weapons (perhaps LRMs) and Multi-Shot, one can conceive of an approach which involves two ‘Mechs firing at three targets with LRMs, reducing each target’s evasion by 1 as well as potentially causing some damage. Each of those three targets will then have the same effect as having a Sensor Lock on them - bar the impairment to sensors. Sensor Lock may be useful on scouts, recon and ‘Mechs with limited shooting options (brawling or short-range builds, high heat builds), but otherwise you would not necessarily want too many of your pilots to have it - unless you aim to get Master Tactician. Anti-synergy with anything that modifies shooting, like multi-shot and breaching shot. Mechwarriors: Skill levels 6-10 In addition to two tier-5 talents, there is also a talent unlocked at tier 8. Your pilot can only have one of these - and only in a skill which they have the talent unlocked at Tier-5. Those abilities are; Gunnery 8 - Breaching shot, Piloting 8 - Ace Pilot, Guts 8 - Coolant Vent, Tactics 8 - Master Tactician.
八级天赋 突破射击 突破射击是一项被动专长,可使单个武器系统对目标开火时无视护卫状态和掩护。它能显著提升单发武器对处于护卫状态或掩护中的目标的效果。该天赋与多重射击配合效果出色,尤其适用于配备三门主武器的机甲,但需注意避免将火力分散到多个目标,而应集中攻击单个目标。它也适合那些拥有一门大型主武器(如AC20、LRM20等)和数门小型武器的机甲。 在HUD中,处于护卫状态的目标头顶会显示一个小盾牌图标。如果所选机甲可以通过此能力突破护卫,该盾牌图标会闪烁。王牌飞行员 “王牌飞行员”是一项技能,允许飞行员先射击再移动,而非必须先移动再射击。对于高机动性和高主动性的机甲(轻型机甲)而言,这可能让你有机会将移动保留到回合结束,移动至射程内进行射击——然后在下一回合开始时,先射击再移出视线范围。对于某些机甲配置,例如装备多火焰喷射器的“纵火者”,这会是一种极其强大的手段,既能瘫痪敌方机甲,使其容易受到队友的后续火力攻击,同时又能保证轻型机甲相对安全。 随着机甲重量等级的提升,该技能的收益会逐渐减弱,但如果对缺乏机动性的敌人使用“打带跑”战术,它在一定程度上能增强机甲的防御能力。冷却液喷射 这项主动技能允许机甲立即额外降低50点热量负载,但代价是在接下来的3回合内热量消耗增加8点。该技能有4回合的“冷却时间”(请原谅这个双关语)。此技能更适合阿尔法打击型能量武器构筑,而非持续输出型构筑。使用策略可能是:先用高热量武器进行阿尔法打击,触发冷却液喷射,下一回合再次进行阿尔法打击,然后撤退并等待技能冷却。 有多种机甲底盘适合此天赋——例如“火精灵”、“驼背”(配备激光的P型变体)——这些机甲搭载了 PPC 和 AC20 等高热量、高冲击力武器。这种断断续续的游击战术可能并不适合所有人的口味。若搭配合适的机甲底盘,这项天赋将变得极为强大,能够连续发动两次阿尔法打击。 **战术大师** 战术大师是一项被动专长,可使机甲的 initiative 提升1点,并且能通过保留行动来减少稳定性伤害,这对承受伤害的机甲非常有用。Initiative 是一项微妙的机制,在游戏后期面对多个能一击摧毁你单位的威胁时,其作用可能会更为强大。 **机甲战士:角色与可用能力评估** 共有六种5级天赋组合,每种组合在8级时又有两个后续天赋可供选择——这意味着总共有十二种可能的天赋组合。部分技能组合能产生良好的协同效果,这提示了特定的游戏风格,或是与机甲及战场上角色的适配性。 需要注意的是,尽管当你在5级选择两个天赋、8级选择一个天赋后,未选择的天赋将被锁定,但这并不妨碍你在没有对应天赋的情况下,继续花费经验值提升相关技能。因此,只要先选择两个5级天赋,你完全可以培养出战术技能达到10级的机甲战士,而无需选择“传感器锁定”天赋。角色 等级5技能1 等级5技能2 等级8技能 评估 散兵 多重目标 稳健步伐 突破射击 良好 侧袭者 多重目标 稳健步伐 王牌飞行员 优先侦察 枪骑兵 多重目标 壁垒 突破射击 良好 角斗士 多重目标 壁垒 冷却通风 良好 神射手 多重目标 传感器锁定 突破射击 存疑 突击者 多重目标 传感器锁定 战术大师 存疑 先驱者 稳健步伐 壁垒 王牌飞行员 良好 格斗家 稳健步伐 壁垒 冷却通风 良好 侦察兵 稳健步伐 传感器锁定 王牌飞行员 良好 斥候 稳健步伐 传感器锁定 战术大师 优先侦察 哨兵 壁垒 传感器锁定 冷却通风 一般 先锋 壁垒 传感器锁定 战术大师 一般
A note on Shymer’s assessments My assessment is not based on whether a particular combination of talents and specialisations are without merit, but only where you can consistently make use of those talents and specialisations without impeding or denying use of the others. Breaching shot only works with single weapons, but synergises with multi-shot as long as you split fire one weapon per target. Multi-target and Breach Shot are useful when shooting at targets, but Sensor Lock means you cannot be shooting - and so it seems to make more sense (to me) to have you pilots with Sensor Lock take other talents that may still be useful, like Sure Footing and Master Tactician. Bulwark and Sure Footing are your defensive boosts, and so you would ideally want at least one of these. Sharpshooter and Strikers have neither, which is why I question whether these are as useful as other combinations, particularly with Sensor Lock. Mechwarriors: Matching pilots, 'Mechs, and playstyle Pilot type and ‘Mech type synergies Skirmisher Primary skills: Gunnery, Piloting Abilities: Sure Footing, Multi-Target, Breaching Shot This pilot role is ideal for general ‘Mech combat. They are likely to close with the enemy to optimum range and shoot at them. Each skirmisher moves as far as it can each turn (build up evasive charges and use positioning to influence hit location) whilst maintaining its ideal range and focusing on taking down the highest threat target. It tries to maintain facing to present armour and empty locations to the majority of enemy fire, but can be cycled out if chunks are being knocked out of it. Examples: Any ‘Mech too light to be able to tank damage effectively and so reliant on mobility for defence, but too slow for it to be reliable. Most medium ‘Mechs. General combat role. Flanker / Recon Primary skills: Piloting and either (Gunnery or Tactics) Sure Footing, Ace Pilot and either (Sensor Lock or Multi-Target) These pilots are best in ‘Mechs that are highly mobile and flank enemy forces using routes that are out of sight or provide maximum cover; to strike from behind, or disable targets with sudden attacks at the right time. Getting behind the target means that breaching shot is not as necessary, and you should aim to abuse the reserve function to move behind and shoot, then the ace pilot to shoot and then withdraw at the very start of the next round. I prefer Recon (Sensor Lock) over Flanker (Multi-target) as the aim is to isolate a single target, and the 'Mech can provide sensor lock services as it closes to range. Examples: Often more suitable for lighter ‘Mechs - Commandos, Firestarters with a melee/disabling build, or Centurions with an AC20, Kintaro with bunches of SRMs. Jump jets and high speed movement are often essential combined with a big-hitting weapon or punishing melee capability. Lancer / Gladiator Primary skills: Guts and Gunnery Bulwark and Multi Target and either (Breaching Shot or Coolant Vent) These pilots provide an anchor for any lance formation, being the focus for enemy fire, but dishing out as much targeted damage as possible. They approach from the front or sides, using cover rather than evasion for defence, Lancers making use of breaching shot, Gladiators combining high heat alpha strikes with dropping out of sight to cool down, or switching to melee. Examples: Most slow-moving direct fire support ‘Mechs and indirect fire support ‘Mechs and sniper builds can fit into this category - the more heavily armoured the better. Jump jets can be advantageous in finding good high ground. ‘Mechs fitting this mould might be the Urbanmech, Blackjack, Jagermech, Catapult, Griffin, Orion and the like. Scout / Recon Primary skills: Piloting, Tactics Sure Footing, Sensor lock, and either (Ace Pilot or Master Tactician) These pilots excel in ’Mechs that range ahead of the lance. They are the first to spot enemy contacts (and usually the first to get shot at as a consequence). They ideally find a spot behind LoS blocking cover, or better, moving at maximum speed to get behind different LoS blocking cover, and use sensor lock to improve hit chances against targets with high evasion. They are likely to come under indirect missile fire and soak up enemy sensor locks, rather than contributing greatly to lance offence. A brave commander may sprint them into LoS of multiple enemies to draw fire, relying on maximum evasion for survival. Their weight/build often precludes anything other than the most limited offensive actions as they are most vulnerable to being hit in melee by something bigger than them. Potentially good at chasing down escaping light vehicles. Examples: Anything with speed and not much else; Spiders, Locusts and the like. Please don’t store ammo in the centre torso or legs. Brawler / Outrider Primary skills: Piloting and Guts Bulwark, Sure Footing and either (Ace Pilot or Coolant Vent) There is clearly space in Battletech for ‘Mechs designed around maximised melee capability and these are the pilots that fit the role. You need a chassis with weight (for damage), speed (to close range quickly), arms/hands/fists (for damage), and plenty of support weapon slots (Small lasers, machine guns and/or flamers). The combination of Bulwark and Sure Footing can get you into range with maximum defense. Ace Pilot is good for light brawling and escape, because melee doesn't create much heat, Outriders probably edge it for me. Good platforms for focused melee at different weight categories are: Firestarter Shadowhawk (2D) [only 2 support weapons, but quick, heavy and robust] Grasshopper Banshee (3M) Lance composition and different builds Your lance is made up of four members. It is possible to have every member of the lance in exactly the same build of ‘Mech and cover for each other in a 100% generic and flexible format - but each ‘Mech would need to cover multiple ranges and capabilities - perhaps without ever excelling. It is also valid to have each ‘Mech being completely focused on a specific role with no overlap. This might maximise performance in individual areas, but can be more fragile - if one of the ‘Mechs is disabled or destroyed - can the others do without that role - or make do? The choice is yours.
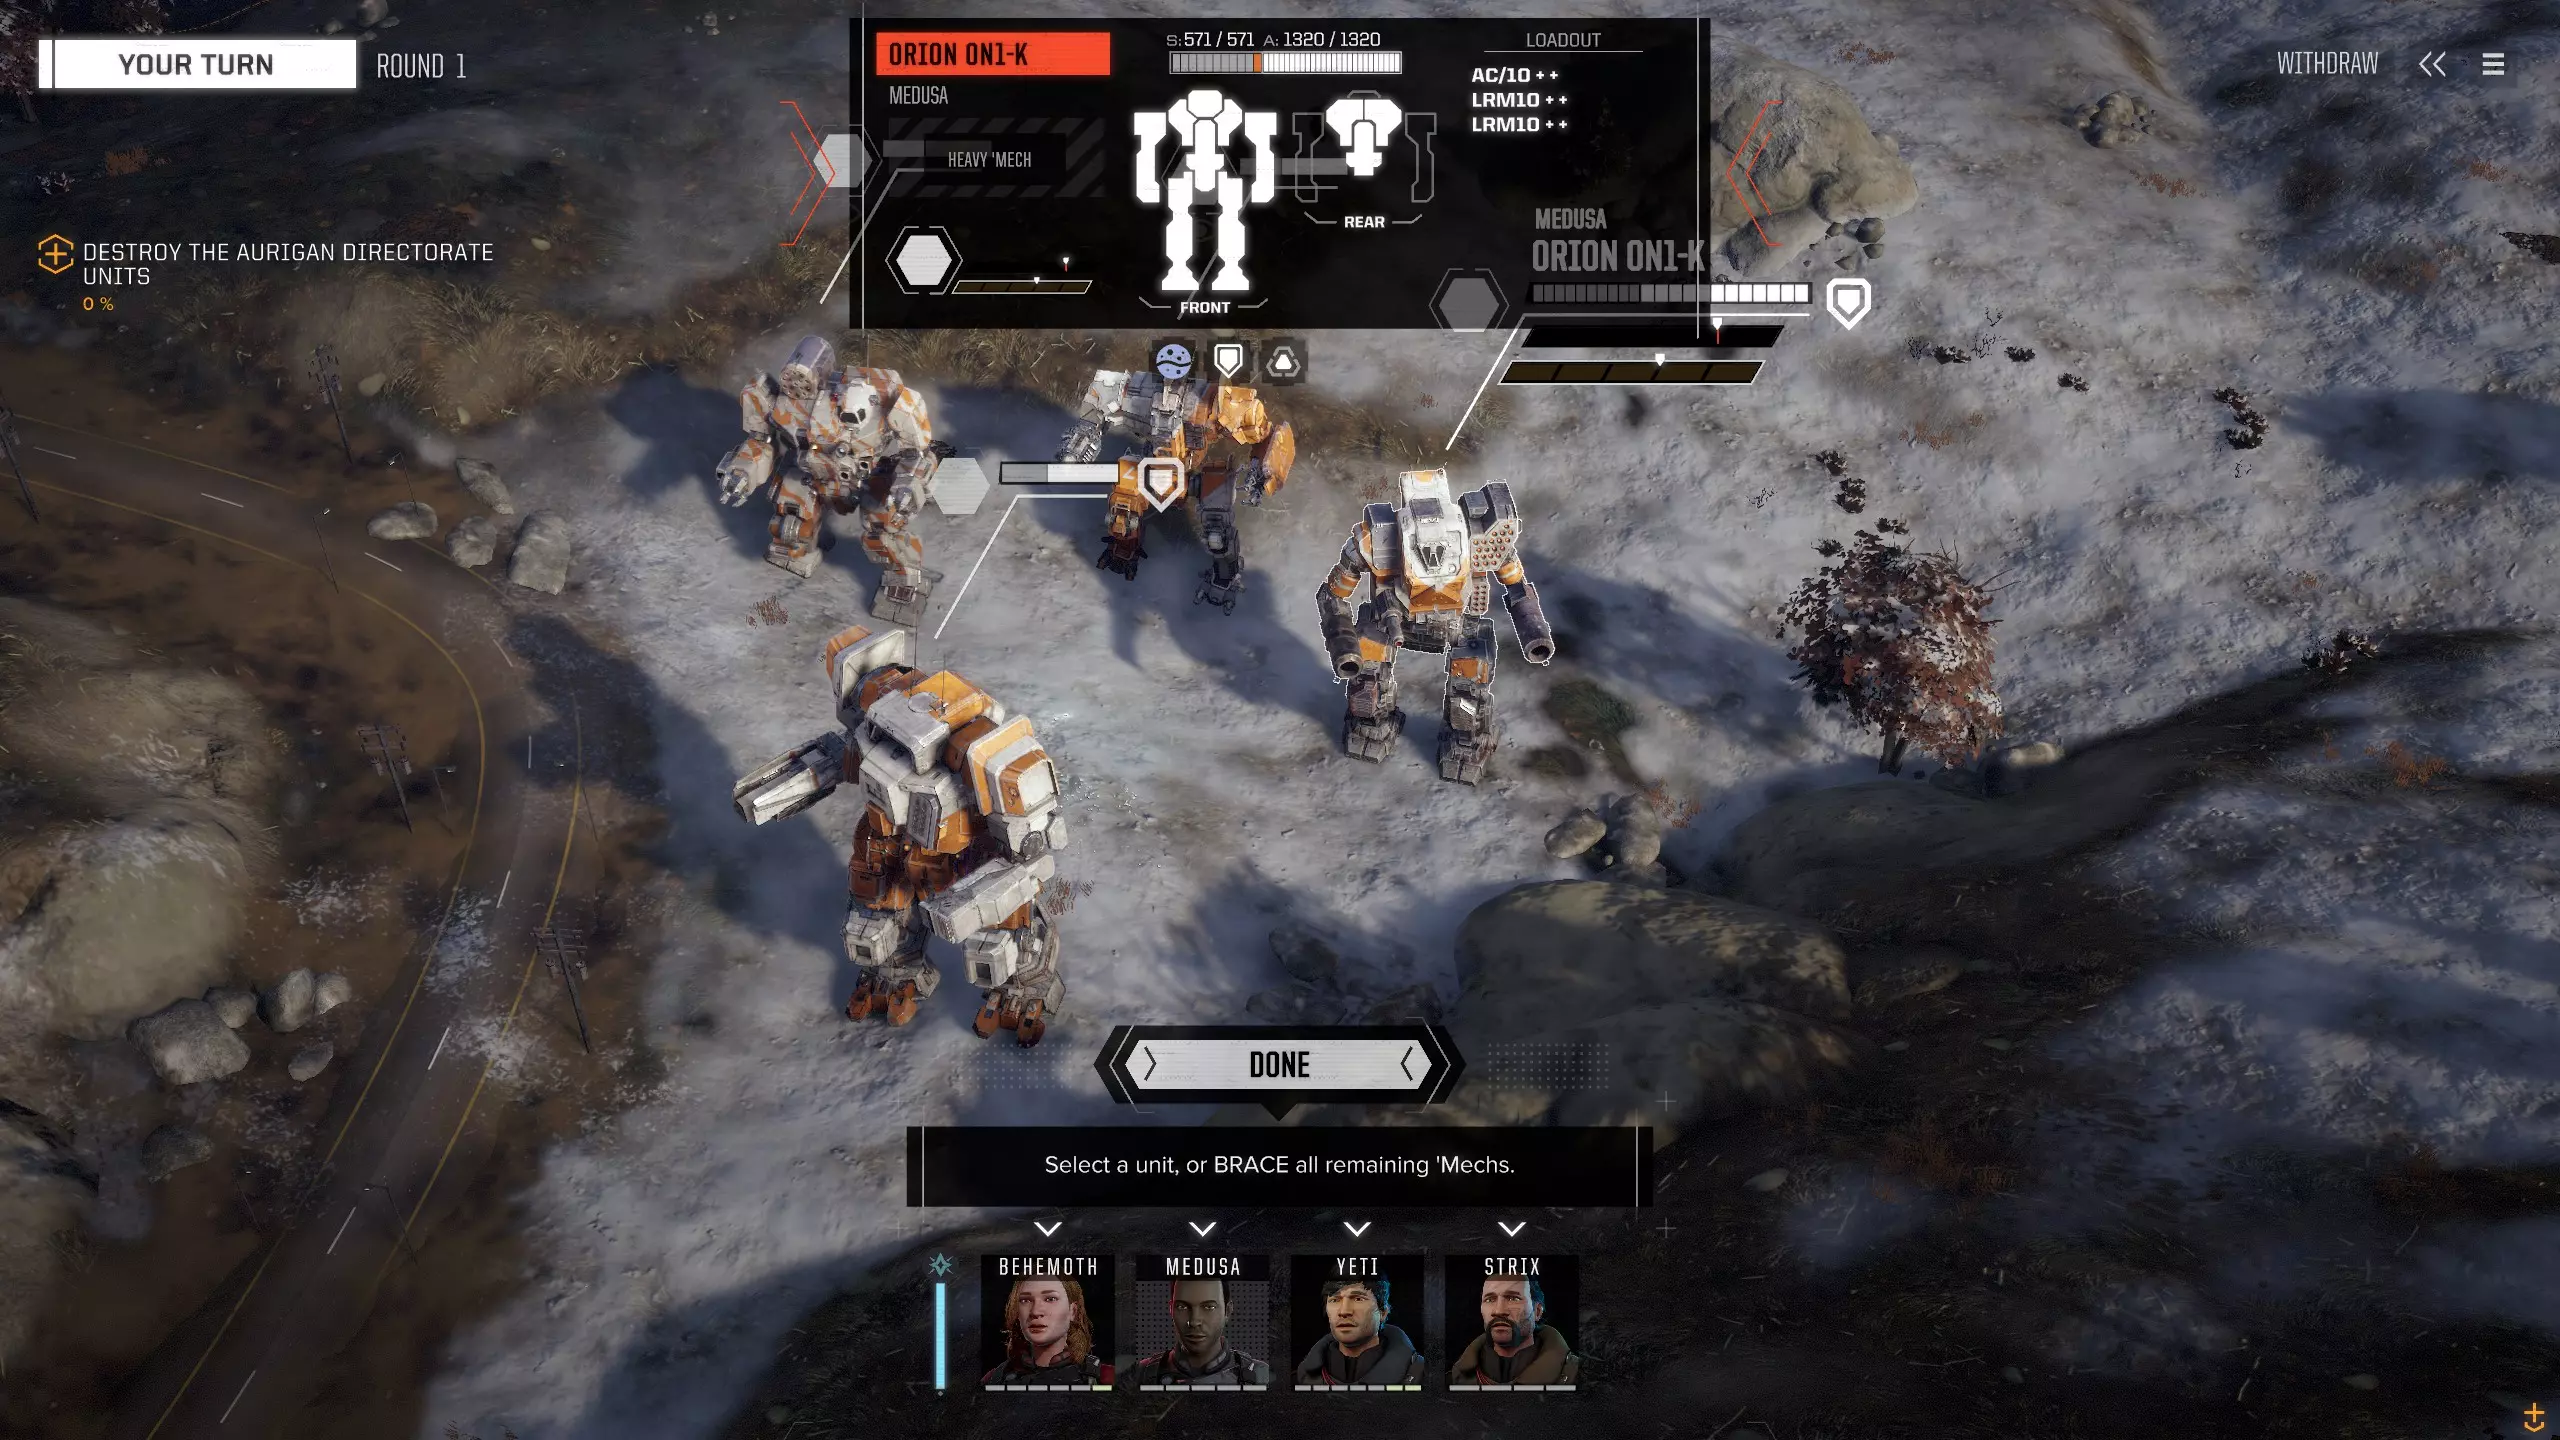
我们要讨论的是 lance 编队——即机甲与机师如何协同作战,形成一个 lance 单位。这涉及到战术策略、在地图上的移动方式,以及如何通过决策优化整个单位的作战效能。编队方式多种多样:有的偏向谨慎,有的更为激进;有的适用于不同的地图和环境;有的能逐步消灭敌人并留下少量残骸;有的则能精准摧毁目标;还有的玩起来更具乐趣。以下是我的一些想法,但我鼓励大家亲自尝试。 通用型:4 台任意机甲 这种编队可能缺乏规划。每台机甲的配置仅依据现有底盘条件和/或指挥官的个人喜好而定。单个机甲没有明确的定位,它们兼具远近程作战能力,部分配备喷射背包,部分则没有;有些机甲在掩体中能获得更好的保护,有些则在全速移动时防护更佳。整个 lance(机甲小队)会抱团移动,并尽可能地参与战斗。 均衡型:1台侦察型、1台格斗型、2台游击/突击型 该小队在特定角色与灵活性之间取得了平衡,能够适应其他任务目标,并应对行动中的机甲损失。侦察型机甲提供视野和机动性,格斗型机甲则在掩体间移动,利用强大的集火攻击打击目标,随后进行冷却和重新部署。另外两名成员的设计可以更通用,但应靠近最高威胁目标,并在另外两人的支援下,逐个消灭威胁。 前沿观察员:1名侦察兵/侧袭兵/侦察机,3名枪骑兵/散兵/突击骑兵 这支机甲小队是一种保守的配置,旨在最大化远程火力,并远离敌人的反击范围。配备传感器锁定的最轻机甲前出,保持在视线之外,利用掩护,尽可能地进行守卫和/或其他方式的保护。它在移动后对目标使用传感器锁定,或者尝试获取视线并仅向一个敌人射击。同时,他的小队成员可能停留在高地的最大射程处,等待用密集的远程导弹(或许还有AC2机关炮)以纯粹的火力密度将指定目标击溃。炮兵配置:4台“枪骑兵”机甲 为何要使用脆弱的轻型机甲进行传感器锁定,从而损失25%的潜在火力呢?你只需要一台能保持视野的机甲,就能让所有导弹从各处对目标进行打击。这支机甲小队协同推进,只需将射程内的首个目标炸成碎片即可。缓慢推进,保持距离,重复此过程。多重射击和突破射击能力使“枪骑兵”可以对三个目标进行分火攻击,无视掩护和防御姿态,并能移除三个目标的闪避标记。因此,先用配备3联装远程导弹发射器的轻型机甲开火,再用配备3联装15/20发远程导弹发射器的机甲给予致命一击。鼠群小队:4台先驱者机甲 该组合是一套高机动性(但可能较为脆弱)的机甲配置,由快速移动和配备跳跃喷射器的机甲组成。它们会绕到敌人侧翼,挑选敌方阵型边缘的目标进行攻击并摧毁,然后在选择下一个目标前撤退。想象一下四台金塔罗机甲,每台都配备三联装SRM6导弹发射器,一同攻击同一个目标——或者四台百夫长机甲装备AC20自动炮。先在视野外等待,保留行动直到敌人完成移动,然后全体逼近一个目标,发动两轮齐射,接着在下一回合初期撤退。 全近战小队:4台近战型机甲 这可能是鼠群小队的衍生配置,虽然不太实用,但或许是个有趣的挑战。仅使用近战攻击和支援武器能否通关整个战役呢?你可能需要避开包含大量炮塔的任务——或者为摧毁炮塔制定某种例外规则。
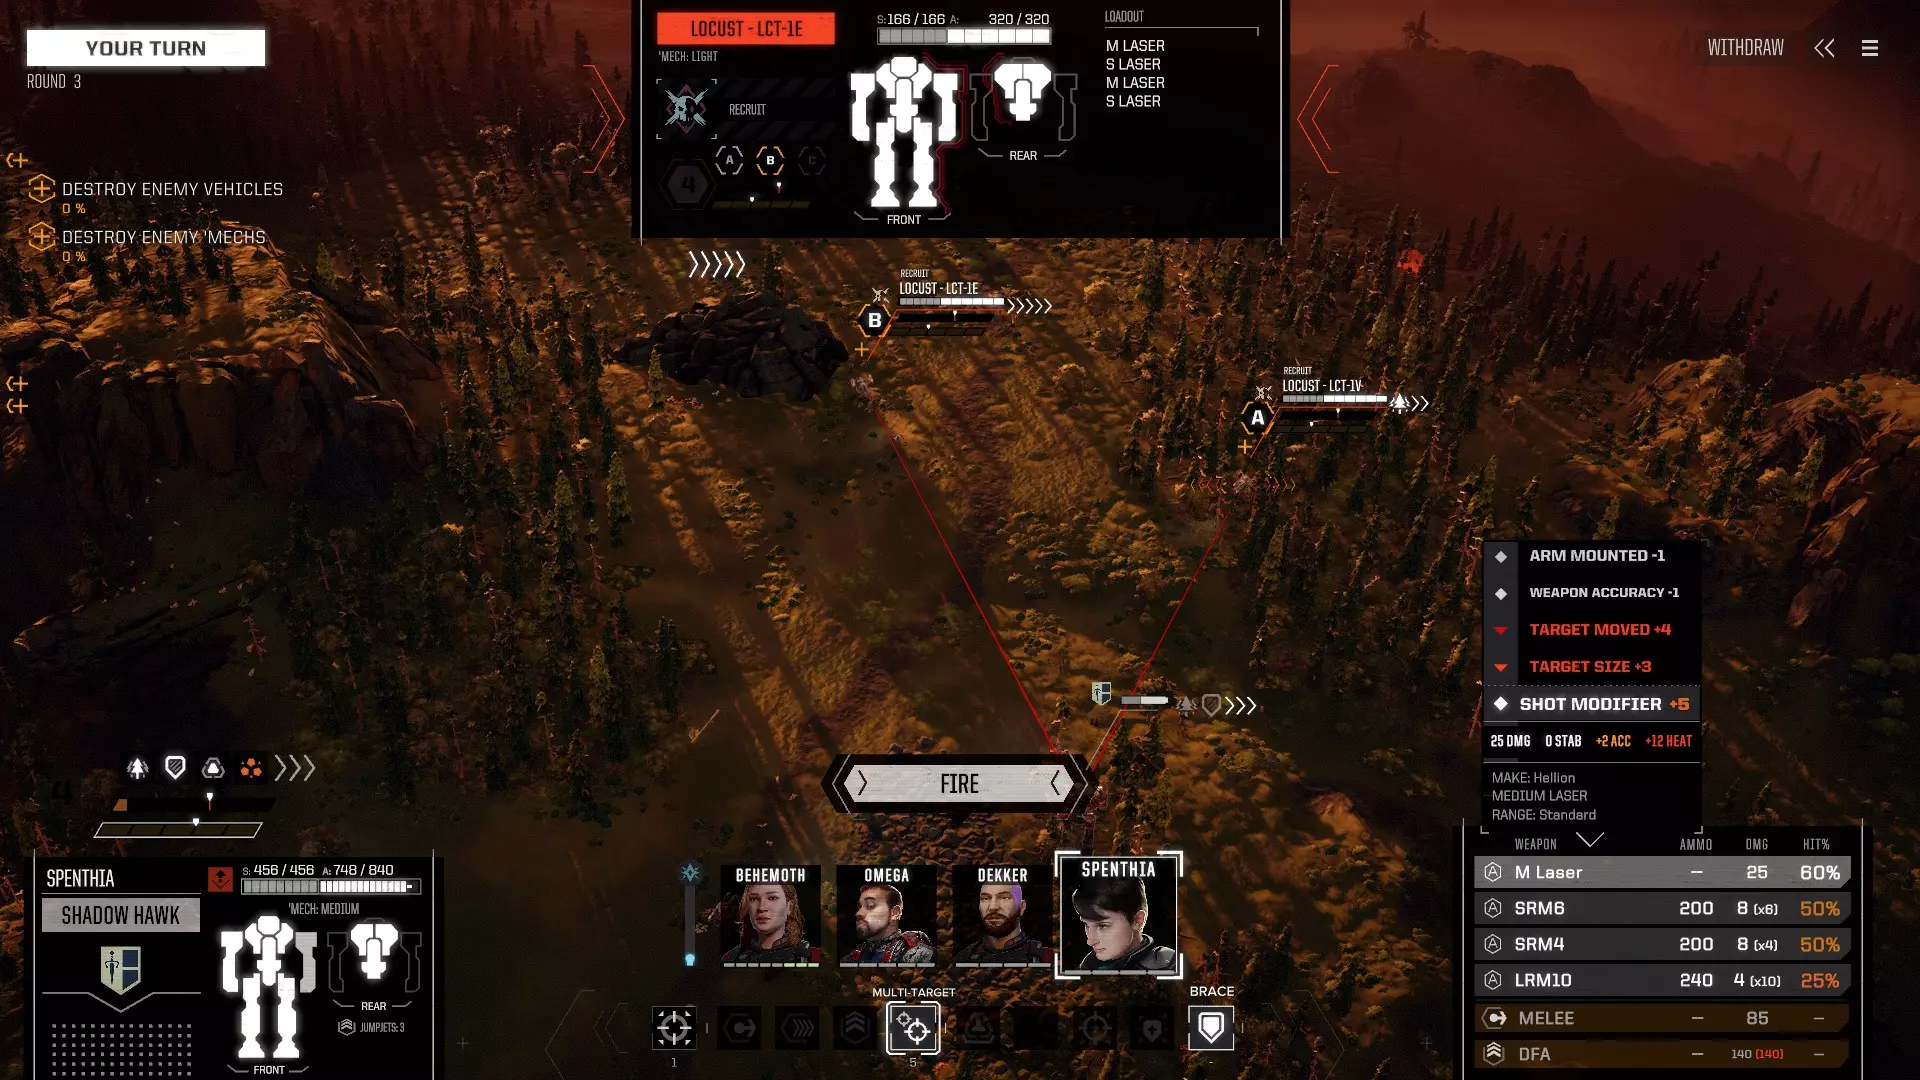
战斗 - 近战与DFA 存在两种物理攻击类型(区别于远程攻击):简单近战,包括拳击/冲撞或踢击;以及DFA(“天降正义”),即攻击者使用跳跃喷射器尝试着陆在目标机甲顶部。 在DFA攻击中,无论是否命中目标,攻击者自身都会受到腿部伤害,甚至可能导致腿部瘫痪或摔倒。若成功命中,敌人会受到稳定性伤害,头部、躯干和手臂也可能承受大量伤害。但整个过程相较于武器射击,其结果更不确定且难以预测,通常机甲使用枪械能造成更多伤害,甚至可通过精确打击选择攻击部位。与原版《机甲战士》桌面游戏不同,你可以找到可安装到机甲上的手臂和腿部改装件,这些改装件能提升机甲的近战或DFA(死亡从天降)伤害输出,同时保护机甲免受DFA带来的伤害。这或许让系统性、常规性使用DFA的机甲设计成为可能,但这似乎仍存在风险,而且可能需要花些时间才能找到合适的改装件以及在吨位方面具有适当收益的机甲底盘。 未经规划的DFA在大多数情况下更像是一种孤注一掷的举动,虽然有趣,但并非长期划算的选择。自1.3版本更新后,AI进行DFA的频率似乎不像以前那么高了。如果敌人确实使用了DFA,你可以瞄准它们的腿部将其击倒并终结它们。有趣的冷知识:驾驶95吨的“高地人”机甲用DFA(死亡从天降)摧毁轻型机甲的行为,被称为“高地人埋葬”。 近战攻击对部分载具至关重要,能造成双倍伤害,这可以放大轻型机甲原本对载具构成的威胁。近战对于拥有大量闪避值的目标也很有用,因为它能完全移除目标的闪避。但如果目标处于无法进行近战的高处位置(包括许多炮塔),近战就完全没用了。 驾驶技能对近战build显然很重要,因为它直接提升你的命中率。“稳固步伐”对于更安全地拉近与敌人的距离也很有用——如果前进途中有掩体,“壁垒”技能同样如此——如果你想强化近战攻击后将要站立的任何掩体的话。 战斗 - 敌人威胁评估 《暴战机甲兵》的核心技能之一是根据现有信息评估主要威胁,并确定优先消灭目标的能力。通常情况下,你应集中火力逐个处理最大威胁,无论是通过摧毁目标,还是破坏其武器系统和/或机动性——而非将伤害分散到多个目标上。即使严重受损但仍有武器的机甲,依然能进行射击或近战攻击。右键点击你看到的目标,游戏会显示敌人可用的武器系统——这些武器系统要么以所有《机甲战士》老玩家多年来都熟悉的缩写形式呈现(但对新玩家来说可能难以理解),要么以稍长的形式显示,例如“M Laser(中型激光炮)”。以下是一份31世纪常见武器的小清单。
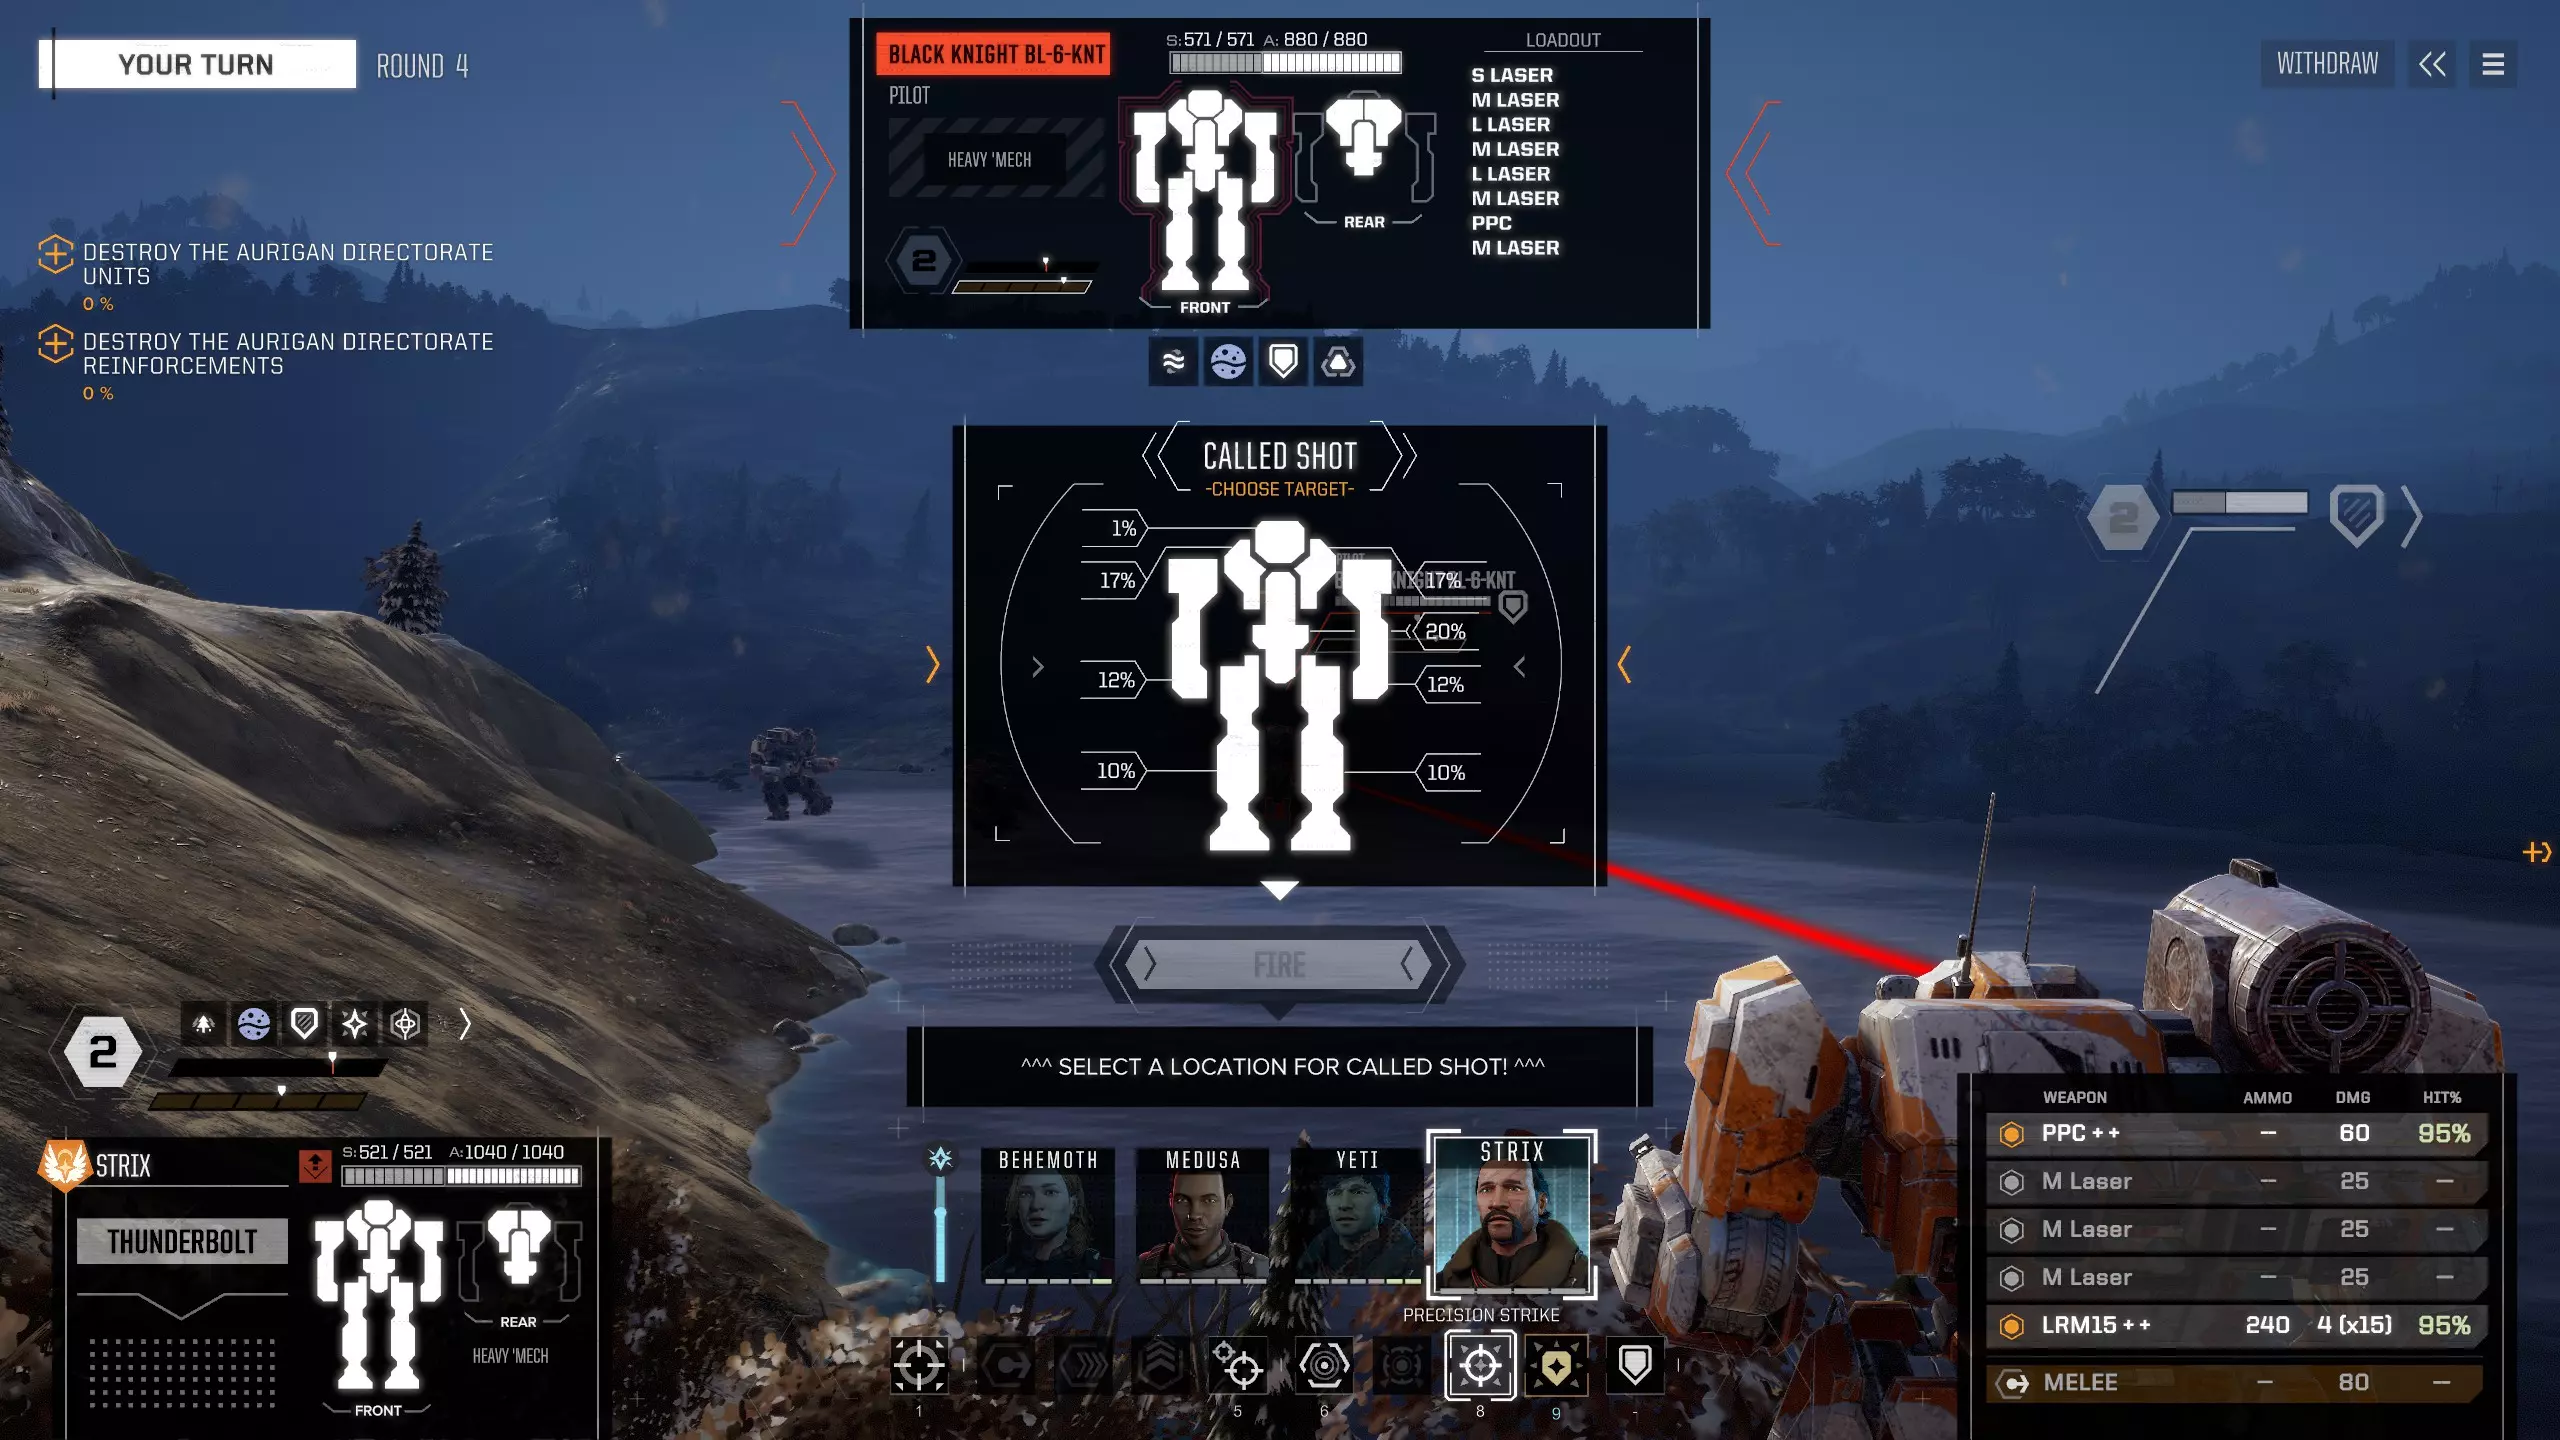
SL/ML/LL = 小型激光炮(Small Laser)、中型激光炮(Medium Laser)、大型激光炮(Large Laser) PPC = 粒子投射炮(Particle Projector Cannon) SRMn = 短程导弹(Short range missiles),每次发射n枚导弹,每枚造成8点伤害(n=2、4、6) LRMn = 远程导弹(Long range missiles),每次发射n枚导弹,每枚造成4点伤害(n=5、10、15、20) MG = 机枪(Machine Gun) FL = 火焰喷射器(Flamer) ACn = 自动加农炮(Autocannons),型号数字越大,伤害越高,但射程越近(n=2、5、10、20) 游戏中还会出现其他更稀有的武器,例如高斯步枪(Gauss Rifles,GR)、增程武器(Extended Range weapons,如ERPPC或ERLL)。这些武器的命名规则至少是简单易懂且可推测的。 每种武器都有其有效射程,了解这一点十分重要。如果敌人无法用火力攻击到你,你就可以优先应对其他能对你造成威胁的目标。其中尤其值得注意的是威力强大的AC20。这是一种仅在近距离有效的可怕武器。 有些武器系统单独使用时伤害极高,而有些则在大量集火时威力惊人。 需要警惕的单体武器系统是那些能一击爆头机甲,或造成灾难性部件损坏及/或稳定性破坏的武器:AC20、AC10、LRM20、LRM15、PPC。这些武器大多还具备远程攻击能力(AC20除外),你可能需要优先处理它们。 对单个部件造成的直接大量伤害,初期比分散在机甲各处的大量小伤害更致命——例如,战斗开始时AC10可能比LRM15更危险。LRM和其他“追求暴击”的武器在装甲出现多处破损时更为危险——通常是在激烈战斗的后期。根据战场情况,你可能需要在比赛后期优先处理这些武器。 当你将大量小型武器组合使用时,威胁也会成倍增加——比如“驼背-4P”机甲设计配备了7-8门中型激光炮,而SRM和LRM运载车则安装了多个SRM或LRM发射器,这些武器组合起来能对专注于摧毁机甲而疏忽防御的指挥官造成沉重打击。 大量火焰喷射器可用于构建一种特殊的瘫痪型配置,它能为目标的热量条增加热量——阻止其使用高热能武器,在某些情况下甚至会导致目标完全关机。火焰喷射器的弹药极为有限,因此你必须谨慎选择目标,避免浪费。拥有火焰喷射器配置的王牌飞行员能以最快速度瘫痪突击机甲。 战斗 - 命中部位与暴击机制简介 瞄准机甲部件、暴击与你 《机甲战士》拥有“命中部位”系统。每个目标都由多个独立的离散部件构成,这些部件可能会被分别击中。 机甲由头部、左臂、右臂、左躯干、中央躯干、右躯干、右腿和左腿组成。和武器一样,这些部件也用首字母指代:H(头部)、RA/LA(右/左臂)、RT/CT/LT(右/中央/左躯干)、RL/LL(右/左腿)。注意区分左腿(LL)和大型激光炮(LL)。 每个部件都有一定容量的结构来吸收伤害。它还受到具有独立防护值的烧蚀装甲的保护。头部、手臂和腿部无论朝向如何都只有单一的装甲值——躯干部位则分为前装甲和后装甲——通常后装甲更为薄弱。 机甲的每个部位还搭载了一门或多门火炮、散热片、弹药舱或其他装备。每个组件都有其自身的伤害吸收能力(称为“结构点”)。大多数装备只有一个结构点位置,但其他装备可能会占用两个、三个、四个或更多的槽位。当足够多的结构点位置受损时,该装备将被摧毁且无法再使用。部分装备在被击中时还会引发额外效果。具体来说,弹药在受到伤害时会摧毁其所在的部位。这就是为什么不建议将弹药储存在机甲的头部或中央躯干。 如果某个部位的结构被摧毁,该部位内的所有装备以及与其相连的装备都将丢失。右臂和左臂分别连接在右躯干和左躯干上,腿部与中央躯干相连,头部同样如此。 你可以通过以下四种方式摧毁一台机甲: - 摧毁中央躯干(“核心摧毁”) - 移除两条腿部(“断腿”) - 斩首(移除头部) - 使驾驶员失去行动能力
Coring the target is simply a matter of doing sufficient damage to the centre torso (CT) structure. As damage is transferred after bits are blown off the target from the outside in, eventually you will destroy the centre torso, just by attrition - and so this is the most common way for beginners and general builds to defeat an enemy ‘Mech. However if you face the enemy front on, or better from direct behind, and can use Precise Strike on the Centre Torso, you may be able to consistently (75%+) one-shot light ‘Mechs with a single shot from a big gun. CT destruction give you the least amount of salvage from the target. Legging is popular in Mechwarrior Online because pilots often lightly armour legs, store ammunition in legs, and if you aim low at even a fast-moving ‘Mech, you only have two possible hit location areas, rather than six above the waist. In Battletech is is harder to consistently leg ‘Mechs (except for those that have just performed a DFA). Legs tend to carry a lot of armour and are a bit trickier to focus on than torsos and contain fewer pieces of equipment to destroy. Early on in the game, even with Precision Strike, the chances of hitting the target’s armoured cockpit are small - typically 2%. Later on, when your pilot has unlocked bonuses to Precision Shot, and finally Precision Shot Mastery, then the chance to hit the head increases to 17-18% from the front or side. I have a Cyclops with six medium lasers (+3 acc) and a TTS (energy), and a pilot with Precision Hit Mastery, and can regularly decapitate enemy 'Mechs. Precision shots work best with one shot weapons like autocannons or lasers. Missile systems, particularly LRMs, the called shot bonus diminishes after the first missile - meaning you can often injure a pilot with a head hit, but it may not penetrate the cockpit armour. In Battletech, pilots can take damage from a number of different circumstances - head hits, loss of side torsos, falling over, and ammunition explosions. Pilots can only take three or four of these injuries before they are incapacitated. Head hits are hard to plan for, but taking the torsos off a mech and aiming at locations containing ammunition, and causing stability damage through autocannon, missile or melee are easily doable. It is possible to create a build around causing stability damage and continually knocking ‘Mechs over to shake the enemy pilot to incapacitation before stealing their ride for spare parts and C-Bills. Combat - Manipulating hit locations; also vehicles and turrets Manipulating hit location using positioning When you attack an enemy, your chances for the shot to hit a particular location are influenced by where your ‘Mech is in relation to their facing. If you are on their right-hand side, your are more likely to hit their right arm, right leg and right torso. Even if you select a Precision Strike, it adds to your chances, but if you are not on the correct side of a target, you may not be able to aim for the component location you want. Part of a target threat assessment is to identify where the enemy has their “big gun.” Take, for example, a Panther light ‘Mech. It’s slow for a light ‘Mech and the torso-mounted SRM4 might not be that scary. However, the Panther has a PPC which can be intimidating. It is mounted in the Right Arm. If you can attack a Panther consistently from the right hand side, the chances are - even if you are not using Precise Shot, that the right arm will catch much of the damage. In some cases, the arm is just as heavily armoured as the associated torso - and the torso may have the additional benefit of housing ammunition and causing damage to the pilot if it is destroyed. So it is often the case that Precision Shots are best employed when aiming at a side torso, preferably from the rear straight on, or at an angle from the front. If you can take the torso out, the arm drops off as well. Take a look at the next Griffin GRF-1N you come across. It has all of its weapons attached to its Right Torso. It seems clear that the AI knows about this technique because I have observed several times where an enemy has targeted the arm with the heaviest weapon mounted in it. Also the AI does twist to position their shield arms towards your 'Mechs. I don't think this is cognitive bias at work - but I haven't done the numbers, so it could be. Other ways of manipulating hit location If a ‘Mech has fallen over, you can call shots for free if you only target that ‘Mech. Also if a ‘Mech shuts down because of heat you can call shots for free. This is a great way of permanently destroying or hobbling bigger ‘Mechs - and also the most likely way one of your pilots will die - knocked over by someone followed by many enemy shots aimed at the centre torso. Hit locations, vehicles and turrets ‘Mechs are not the only target on the battlefield, there are turrets and vehicles too. Vehicles are like side torsos, in that they have a single internal structure, but several different armour facings. The armour is typically much, much greater than the internal structure. This makes it imperative to focus fire on one location, rather than spreading it out, and preferably hitting it in the back. Given that a lot of vehicles are incredibly dangerous for their size (Demolishers have twin AC20s, SRM and LRM carriers have many, many weapons, Shrecks mount triple PPCs and don’t suffer from heat), hitting vehicles early and focusing them down might be a good idea. Remember that melee damage causes double damage to vehicles. Turrets have a single armour rating and single structure rating, but can also pack some serious firepower - quad AC2s, multiple LRM10s and 15s, AC20s and multi-PPC turrets can all cause bad problems. If you cannot see a convenient turret generator to kill, then clearing out turrets can be a vital priority. They can’t evade, so can usually be sniped or pummeled from long range, and it also gives you the option of using LoS-blocking scenery to avoid contact with them until you're good and ready. Combat - Crit seeking Once a component location’s armour is stripped off, every hit thereafter has a chance of causing a critical hit on a piece of equipment mounted inside that location. That means that some weapons that cause multiple hits have a greater chance of causing critical damage - we call these crit seeking weapons. The ultimate crit seeker is the humble machine gun. It has no range, but each “shot” is actually five hits, each of which could cause critical damage. If you have a melee build ‘Mech with machine guns as your supporting weapons, then you can open up the armour with a punch, and then crit seek with the machine guns with great potential effect. LRMs and SRMs are also crit-seeking to some extent. In general, if a target has multiple breached armour locations, then hitting them with missiles is a good way to cause them additional inconvenience. It would also suggest using missiles and crit seekers after your big hole-punching weapons. The principle thing to note about this is that many stock 'Mech builds have ammunition in certain locations, and a critical hit on ammunition means an explosion. If the ammo is in a side torso, the 'Mech can lose the side torso and associated arm. If the ammo is in the centre torso, any ammo explosion will destroy the target entirely. There are many enemy 'Mechs, such as Thunderbolts, that are particularly prone to being destroyed in this way. Stripping the armour from the centre torso, or centre torso (rear) and then crit-seeking can often result in complete destruction of an enemy unit with no hassle. Combat - Defensive positioning and builds It is relatively easy to grasp the idea of turning your ‘Mech’s most damaged side away from incoming enemy fire, yet still keeping your target in your firing arc. As the UI displays the front of your ‘Mech, it is also easy to get muddled up about which side should be facing the enemy. When designing your ‘Mech, bear in mind that you may wish to have a default “side” to act as a damage sponge, and to position your ‘Mech to enable this side to face the enemy. For example, I outfit my Centurion with an AC20 in its right arm and all of the ammo in the right torso. I commit my Centurion to the left-hand side of the map, but always twist the ‘Mech to be facing into the map at the end of movement or jumping, so I can keep my empty “shield” left arm and torso towards the enemy whilst still being able to shoot my weapon on the extreme of the firing arc. Many ‘Mechs are right-handed in this way, which means that the left side of the map can be popular and this factor might be useful in building for multiplayer or skirmishes. You may want to consider using football terminology for “left wingers” “centre midfield” or “right wingers” depending on whether the ‘Mech is balanced, or asymmetrical in build. Asymmetrical builds of heavy ‘Mechs with Bulwark, Steady Footing, and various mods can be very powerful tanks with correct positioning - soaking up tons of damage and shots. However they are better at range where an enemy has less chance of positioning to take advantage of hit location to focus on where your gun and ammo are stored. If an enemy gets into your rear arc, or an enemy turret is behind you. then your cover could be for naught. Later on in a game, when your default “sponge” side has been stripped of armour and you are at risk of losing limbs and torsos, don’t be afraid to turn your back on an enemy if your rear armour can take a hit or two - or even lead with your weapon arm instead of your shield arm if the armour is still intact. Your C-Bill bank balance will thank me. Where (and where not) to store the ammunition Some weapons require ammunition and that’s a risk. If ammunition is hit, it explodes and destroyed the location it is stored inside. This is an opportunity and a threat. The opportunity is that some stock ‘Mech designs store the ammunition in the centre torso. The Locust-1V is a notable example. There is very little armour here. Any crit through the CT has a chance of destroying the ‘Mech in one hit. Some large ‘Mechs also have this design flaw, but it might be easier to seek to penetrate the CT(Rear) armour than the front. Regardless - any ammo explosion in the CT destroys the ‘Mech. Don’t make the same mistake when building your ‘Mech. Ammunition in the head is a brave choice for similar reasons and also uses a slot best reserved for electronics. However the benefit of this location is the relative difficulty in targeting the head deliberately. I’ll leave it up to you to experiment. I have heard that the chance for head hits seems higher in the 1.3 patch. I have no data to confirm or deny that. The advertised hit rate with precise shot seems to max. out at 17% - and only then with called shot mastery. My pilots do get hit in the head a lot from MGs and LRMs during missions, but usually only once. You can put ammo in a leg location - but be aware that if you lose the leg, the ‘Mech slows right down and so this won't be good for 'Mechs that are designed around evasion as a defence. Arms and Torsos are likely places to store ammunition. If an arm is destroyed, then it doesn’t matter too much. Asymmetric designs can comfortably store ammo in an arm that is then positioned away from the enemy. However the enemy is most likely to hit the arm if they flank you. A Torso offers a greater density of armour, but is harder to prevent Precision Strikes and positioning from hitting that location - and, on top of that, loss of the torso is damage to your pilot and loss of the arm too. Pay your money - make your choice. Crit stuffing or crit padding If a weapon scores a crit on an internal structure and the only thing in that location is ammunition, then it can explode. When you are building ‘Mechs with ammunition, you can fill the location that houses the ammunition with other components that might take the crit instead - weapons, heat sinks and mods. I call this crit stuffing or crit padding. ‘Mech rotation With the principle of focusing one enemy at a time firmly established, the implication for defence is to cycle your ‘Mechs to spread the enemy’s damage over all of them rather than allowing them to focus on any one - as well as prioritising removal of high-impact weapons such as AC20s, AC10s, PPCs compared to ones that spread damage such as LRMs, SRMs and lasers.
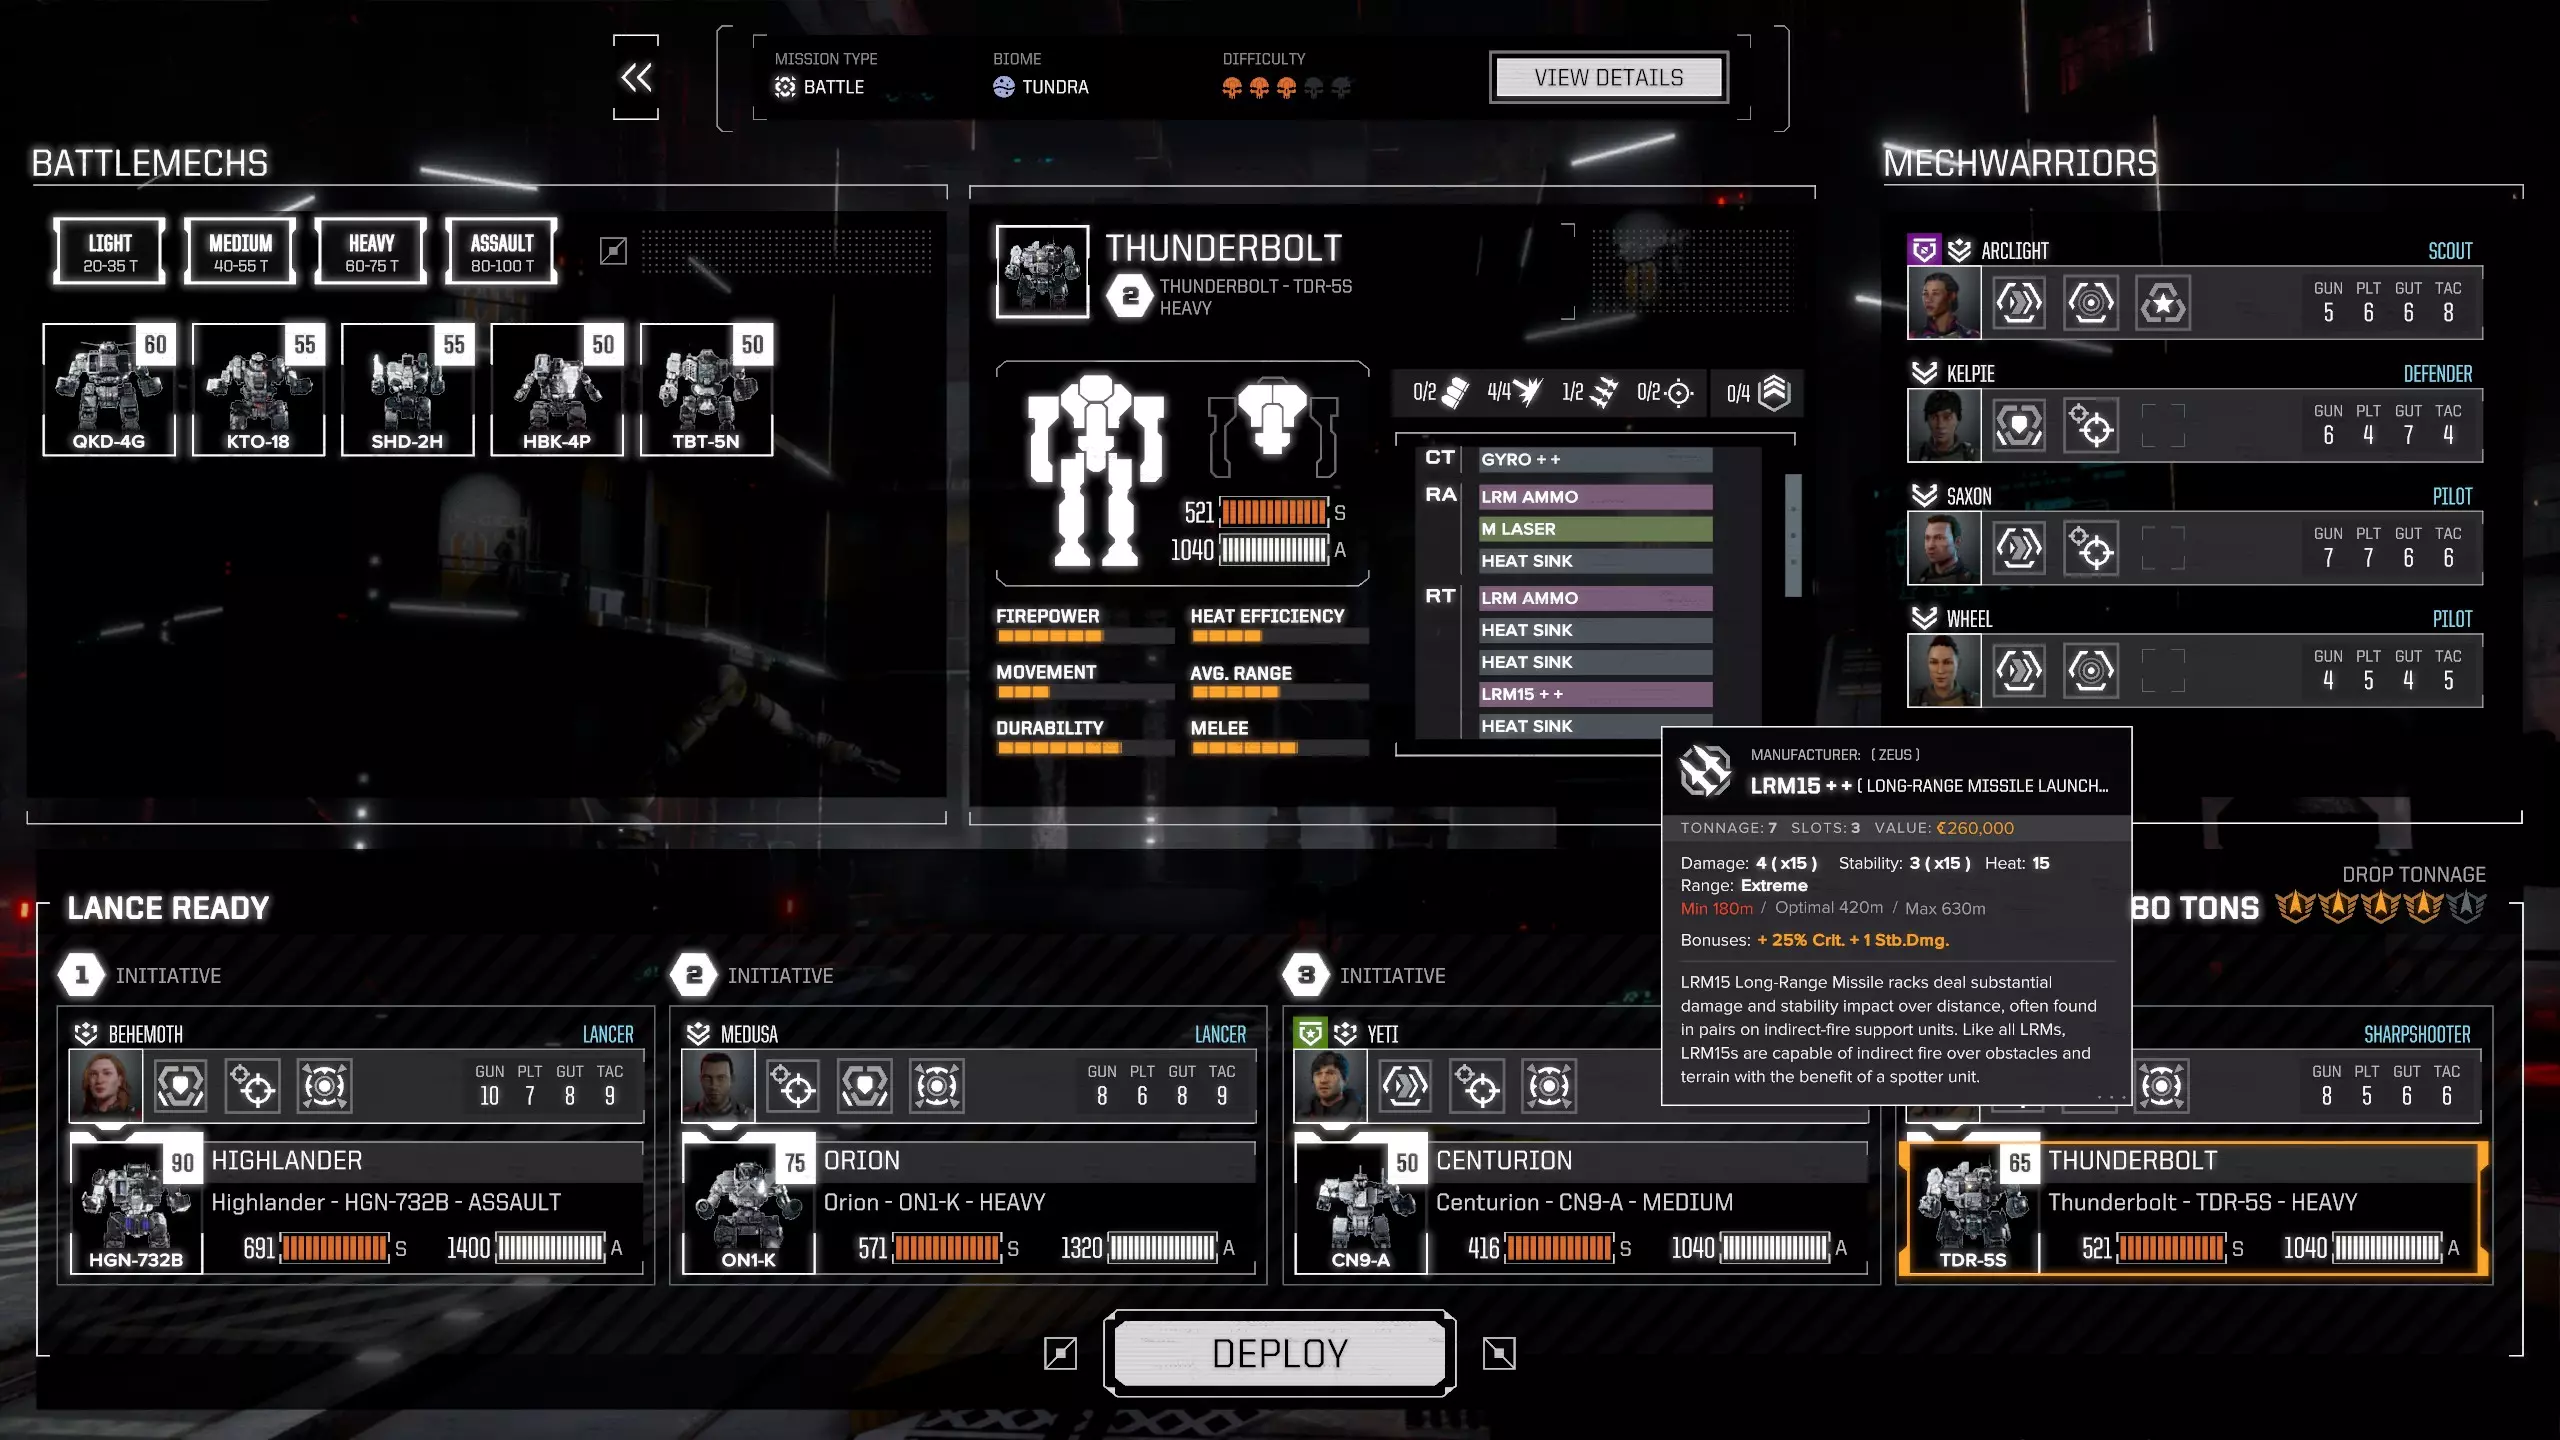
机甲轮换可能更适用于通用或平衡的 lance 编队,而非那种有指定坦克或侦察机甲的编队。但无论如何,你都应确保拥有足够的机动性来进行机甲轮换,让未受损的机甲顶到前线,受损的机甲则撤到掩体后方或脱离敌方视线(LoS)。 如果你的某台机甲正被集火,那么要检查它是否是“矛头”(即离敌方单位最近的机甲)。如果是,你可能需要让另一台机甲上前吸引部分火力。当编队中多台机甲脱离敌方视线并进行远程轰炸时,其缺点在于这些机甲的装甲无法分担承受的伤害。如果你能识别并摧毁具备传感器锁定能力的敌人,将其消灭,就能保护较轻或受损的机甲免受支援炮塔和/或载具的间接火力攻击。 机甲设计——机甲实验室 机甲设计 机甲设计有多种方法,但通常无论机甲吨位如何,这些方法都适用——不过遵循不同的设计原则会产生不同的机甲配置或变体,这些配置或变体可能更适合某些战场角色和驾驶风格。 标准配置 你在少数剩余工厂中遇到的大多数机甲都是标准化变体,并被赋予不同的代码,以标识它们是标准(或称“库存”)变体。这些代码大多由机甲名称中的三个字母、一个数字和一个字母组成。命名并不统一,但在某种情况下,末尾的字母可能代表开发、赞助或拥有该变体最多的家族之一——因此你会看到很多“M”“L”“D”“K”和“S”字母代码。 标准配置是完整的——它们会用尽每一吨可用载重。然而,它们并非基于单一设计理念构建,也未针对特定作战区域或驾驶风格进行优化。许多标准配置在载重利用和/或武器负载方面明显不够理想。简而言之,标准配置通常表现不佳,仍有改进空间。
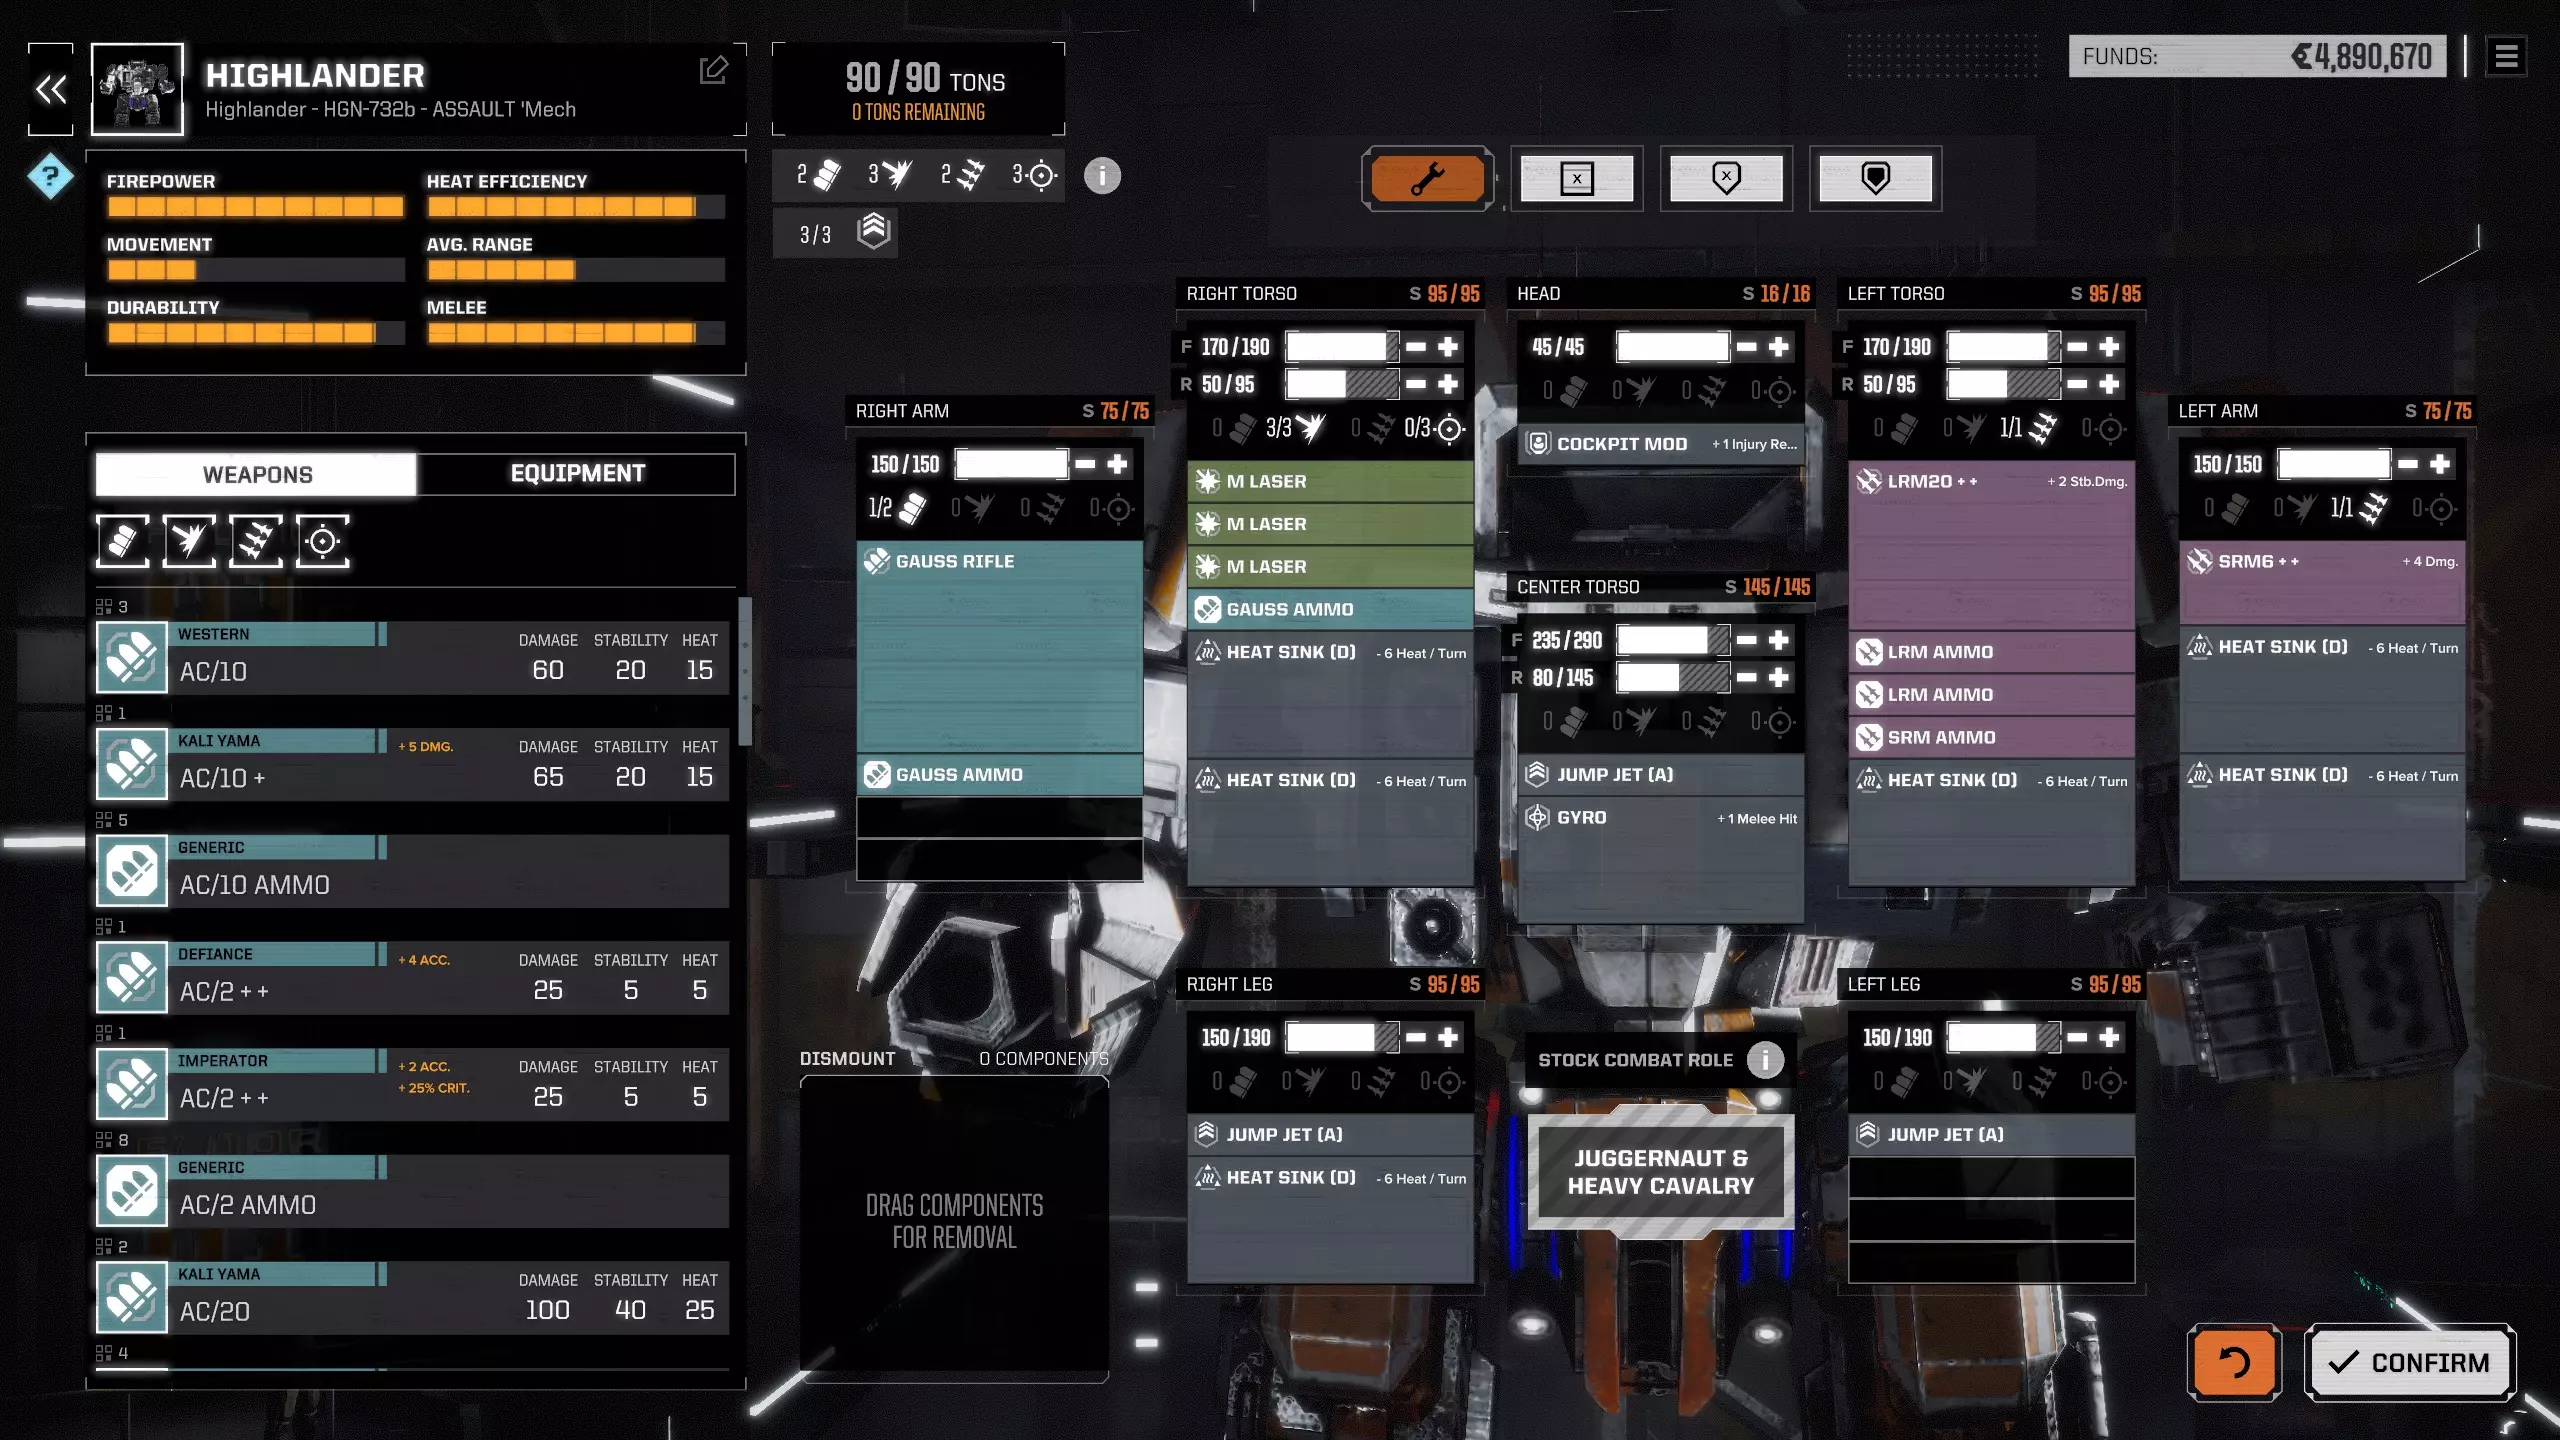
BATTLETECH the game has simplified the ‘Mech design process by ruling out the ability to swap engines between chassis, or separately accounting for the weight of the cockpit. A basic Gyroscope is also included, although more advanced ones are available. This simplification is not to everyone’s taste, but probably reflects the difficulty of modifying a ‘Mech built on technology that was lost hundreds of years in the past - mercenary units do not have a magical capability to rebuild these machines - just jury rig repairs and sometimes swap weapons out - although the canon material suggests even that was not always possible. Design variables In the game, movement is a fixed function of the chassis - as is the maximum number of jump jets the chassis can mount. The number of slots in each hit location is also fixed - and the hardpoints are fixed by the variant of the chassis you are working with. This means that, when you start designing, you have a fixed weight allowance to work with and a number of hardpoints and slots to use. Weapons, armour, jump jets, mods and cooling The design process you will follow will see you selecting a balance of weight spent on several interlocking systems: weapons and ammo, armour, jump jets, mods and heat sinks for cooling. Weapons all have a weight in tonnes, and some require separate ammunition (missiles and ballistics). The weapon can only be installed on a hardpoint designed for it in one of the locations. Ammunition can be placed anywhere there is space for it regardless of how far from the actual weapon it is - including, if you desire, the cockpit, centre torso or a leg. All items take up space inside the ‘Mech and need to be placed in a location. Unlike some other versions of battletech, where space is at a premium, BATTLETECH has generous slot limits in locations and has no space-consuming technology such as ferro-fibrous armour or endo-steel. In general this means that space is not a constraint for most 'Mech designs, and actually allows some builds that would otherwise not have been possible in other versions of the game. Armour weighs one tonne for every 90 “hit points”, spread how you like across the ‘Mech, but it takes up no internal space, is free to repair after battles and can be moved around in the ‘Mechlab instantly. Jump jets vary in weight depending on the weight class of chassis - the bigger the chassis, the heavier each jet becomes to a maximum of 2 tonnes per jet for the biggest ‘Mechs. This means that the most efficient use of weight is for ‘Mechs at the top end of their respective weight category: 55 tonnes, 85 tonnes and 100 tonnes. Each jet takes up one space and can be placed anywhere - although legs and torso sections seem the most common places. Light and Medium ‘Mechs are considered a single weight class from a jump jet perspective. Mods are a new feature that BATTLETECH introduces that have never really been used in ‘Mech design systems this extensively. There are various mods, all of which take space, some of which also weigh an amount. Each mod provides a certain bonus to ‘Mech performance. Some mods have to go in a certain location - such as cockpit mods, gyros, arm mods or leg mods. Some are more general and can be placed anywhere there is space. Arm mods - bonus to melee damage (Coventry) or melee stability damage (Friedhof) Cockpit mods - Additional pilot hit points Rangefinder - Additional view distance Comms system - Additional morale gain per turn Leg mod - Additional DFA dmg (Rawlings), reduced self-dmg from DFA (Pitban) Gyro - Reduced stab.dmg taken (Rawlings) “Hit Defence” (Friedhof) “Melee Hit” (Coventry). These can make your ‘Mech harder to hit by a certain amount in melee, or both in melee and at range. TTS - Bonus accuracy for Missiles (Hartford), Energy (RCA) or Ballistics (Kallon) Heat bank - Increased max heat and overheat capacity Thermal exchanger - Reduce weapon heat by a percentage Heat sinks are systems for cooling a ‘Mech. All ‘Mech activity generates heat - walking, running, jumping, and mainly, firing weapon systems. The ‘Mech comes with a certain amount of cooling built in, but can install heat sinks to increase this rate of cooling (heavily modified by the environment the ‘Mech is operating in). If the ‘Mech overheats, it takes structural damage, which will need repair after a battle, and may destroy very weak parts of the ‘Mech mid-battle. If a ‘Mech overheats too much, it shuts down. Enemies can get a free called shot on a shut-down ‘Mech - and it also takes a full turn to reboot, which means it misses its next turn. The Mechlab In Skirmish mode you can examine all ‘Mech stock variants, and begin to design and test your own designs. The first and foremost design principle is - experimentation. Try different approaches and see what works for you. There are many guides and posts that tell you “the right way” to design ‘Mechs, but none of them can tell you what will give you the most joy. LRM10s may be mathematically inferior, but 10 might be your lucky number - or ten tubes might look fantastic on your favourite ‘Mech. 'Mech design - Armour, Jump, Symmetry Design aspects 1 - Maximum armour Stock ‘Mechs rarely mount maximum armour on the chassis as a design choice. One design approach starts with the idea that maximum armour is ideal - and so in the Mechlab, you strip all armour and equipment and them hit the Max armour button before thinking about anything else. Armour is free to repair and if you have more of it, you are less likely to incur costs resulting from structural damage - so the investment is most protected. The obvious downside to this is that some ‘Mechs, with maximum armour, don’t have much weight capacity left for anything else - and so your offensive capacity for that chassis is diminished - meaning that the time to take down an enemy may stretch over more turns than strictly necessary, which means that you will be shot at more, so you will end up suffering more damage than strictly necessary. Rather than building for maximum armour, you may choose to experiment with a percentage of maximum that suits the ‘Mech’s role and likelihood of coming under fire. Extreme indirect fire platforms may spend most of the game out of line of sight and thus require little in the way of armour for maximum tubes and/or ammunition. High mobility skirmishers and brawlers may be used as tanks and deliberate targets to soak up shots and sensor locks to allow other lance elements to focus on damage dealing rather than defence. Light ‘Mechs are very fragile and probably benefit the most from maximum armour. Whether your 95T Banshee is substantially improved by 100% maximum armour compared to 95% maximum armour is debatable. Design aspects 2 - Jump Jump jets add a great degree of tactical flexibility to your ‘Mech which suits some play styles more than others. Some of the maps have locations which requires jump jets to traverse - leaving ground-pounding ‘Mechs and vehicles having to take the long way around. You can use this fact to split up enemy forces and defeat them piecemeal - and you don’t want one of your frontline ‘Mechs getting stuck in a similar way. Heavy and assault ‘Mechs may find jets the only way to make good use of evasion charges at all, which can be a boon defensively. Because of their ability, in ‘Mechs designed to be on the frontlines of engagement, to boost evasion charges, use blocking terrain to manage engagement, pick side and facing freely and navigate maps quickly - I am of the opinion that they offer significant value per tonne spent - particularly for ‘Mechs at the top end of their weight class - 55 tonnes, 85 tonnes and 100 tonnes. Light and medium ‘Mechs both use the smallest of the jump jets, which means the 55 tonne ‘Mechs have maximum value per jet. Jump jets generate about 7.5 heat per jump jet, with range increasing from 2 spaces for 1 jet, to 9 spaces for 7 jets in a roughly linear progression (although pairs of jets are a bit better than an odd single jump jet after the first.) Design aspects 3 - Symmetry and asymmetry Given the capability to target attacks at certain components under certain conditions (‘Mech shutdown, ‘Mech fallen over, even through attacker positioning) where you place your equipment is important. It is human nature for symmetry to appeal to a sense of the aesthetic - ‘Mechs with symmetrical silhouettes such as the Marauder, Warhammer, and Rifleman are very popular. However there is a functional aspect to equipment placement which is about defence. If you are able to dictate the position of your ‘Mech with respect to the incoming damage, it is possible to shield your offensive equipment (weapons) from incoming fire - increasing the amount of time that your ‘Mech can continue offensive operations. The Centurion is a ‘Mech with a specific “shield arm” - its left arm - and naturally its primary weapon is in the right arm. A specialist Centurion pilot learns to angle the shield arm between the ‘Mech and the enemy and let the arm and left torso absorb incoming fire that could otherwise not have been avoided through evasion or blocking line of sight without impairing the Centurion’s ability to twist and fire at its target. The Griffin GRF-1N is another ‘Mech characteristically designed with asymmetry in mind. All of its weapon systems are on its right torso, and the left arm commonly sports a “baffle plate” designed to be used as a shield. Asymmetry has a weakness, however, in that if you forget, or lose the positional advantage, or the enemy manages to surround you, you could find all of your eggs in one basket - and give the enemy pilot an obvious choice about which ‘Mech component to target when given a choice. Hunchbacks typically suffer from the problem that the Hunch on the right torso, is a clear target for enemy fire. The Hunchback is also typically too slow and lacks jump jets to be able to dictate the terms of where the incoming fire is hitting it, and so a Hunchback is often the target of precision strikes aimed at knocking out 90% of its offensive potential by destroying the right torso. Asymmetry is a high risk, high reward strategy that benefits commanders that employ jump jets, mobility and/or ranged combat over melee and close quarters. It may also lead to asymmetric armour loading to focus armour on locations that contain equipment prone to crits, sacrificing hit locations that have nothing but internal structure to protect. Not to say that internal structure is not important. In the campaign, it costs more money to fix internal damage than it does armour damage - and so you may find that choices of ‘Mech symmetry may differ depending on whether you are in a Skirmish or a campaign, playing against the AI or playing multiplayer. Symmetrical designs are aesthetically pleasing, but also offer the lowest risk of complete loss of combat capability if one or other torso/arm is taken out. The spread of equipment over the hit locations and lack of concern about where the enemy is shooting from is possibly best employed by 'Mechs in a role of tanking damage, or regularly using Vigilance, and a more balanced distribution of armour. 'Mech design - Weapons Design aspects 4 - Weapons The bulk of ‘Mech design is about weapon selection and so a thorough understanding of the weapons is required. There are plenty of spreadsheets and resources online that provide tables of damage, heat, range, weight, slots and the like and I won’t repeat them here. This is one I have found useful: https://docs.google.com/spreadsheets/d/1fnaqQv8nnYpy9gtQm75-D6fmYfNJ5u3OALSIe8ckOuo/htmlview?sle=true# Some initial questions to consider are: How many shots do you need per mission? How much heat per turn can you build up and disperse (30 + 3 per heat sink)? Are you building to punch holes in armour (big damage, single shots) or look for critical hits (small damage, lots of shots) and is that something you want on a single ‘Mech in your lance - or is it something you will spread across every ‘Mech? Weapon types There are four types of weapons in BATTLETECH - Ballistic (B), Energy (E), Missile (M) and Support (S). Ballistic weapons tend to be for punching holes in armour. They are very heavy in and of themselves, and require ammunition, which can also be heavy. They are reputed to not generate much heat, but this is only in comparison with energy weapons - the larger the autocannon, the more heat it generates - up to the AC20 which generates 24 heat per shot. They all have a recoil penalty and suffer from increasing difficulty to hit, which can be modified by pilot GUTS stat. Range is inversely proportional to the size of the weapon, which may be counter-intuitive. Most modern tank guns have a higher effective range the bigger they are. AC2s have the longest range of any weapon in the game - AC20s only operate effectively at ranges under 200m. Missile weapons come in Long or Short range flavours. Long range missiles are individually weaker, but come in larger racks (20 maximum per shot). Short range missiles are individually potent, but their rack sizes are small (6 maximum per shot). Because the missile damage is the same across all launchers in each of these two families, one can compare each launcher to work out which is the most efficient. Energy weapons - lasers, and the mighty PPC, tend to be quite light, and require no ammunition, but they generate the most heat of comparable weapons. Lasers are also a touch more accurate (+5%) and PPCs can cause enemy targeting issues (-5% to hit). Support weapons only work at very close range (inside 90m), but, unlike other versions of Battletech, are used immediately after a melee attack - potentially adding significantly to the potency of ‘Mech melee. The three different support weapon systems have very different characteristics and uses. Machine guns have a massive bonus to inflict critical damage to hit locations that have been stripped of armour. Small lasers offer the greatest armour penetration. Flamers are a special weapon system with incredibly limited ammo, but able to overheat enemy ‘Mechs causing structural damage, forcing them to cool rather than fire, and possibly shutting them down. Comparing weapons Weapon capabilities are best explored by comparing them to a base, or unit, weapon. The weapon usually chosen for this comparison is the Medium Laser. The reason this weapon is useful as a unit weapon is that it takes up one slot and weighs one tonne and so all other weapons are easy multiples of medium lasers based on weight, allowing you to easily compare damage, heat and other criteria per tonne of weight. Comparing ballistic weapons If you plan for 20+ shots per weapon and preemptively add in the tonnage for ammo, then the AC2 and AC5 are 3 tonnes apart (7 vs 10), and the AC10 and AC20 are also 3 tonnes apart (15 vs 18).The AC5 and AC20 offer more damage per tonne than either the AC2 or the AC10 and, unless constrained significantly by weight, one would like to go for an AC5 or AC20 by preference. Comparing energy weapons There are few weapons that offer the damage to tonnage ratio of the medium laser. Even with four heat sinks to make it heat neutral it is lighter than an AC2 and does as much damage, albeit at a smaller range and without causing stability damage. Large lasers have nothing but range over medium lasers even after the reduction in heat that came in a balance patch. They are less damage efficient and less heat efficient. If you have the slots, Medium Lasers are likely to be better value. The PPC is an interesting weapon. Its heat load is so high that a stationary ‘Mech with no extra heat sinks can only fire it half a dozen times before overheating. Given its profile it seems closest to an AC10 - slightly less damaging, but just as much stability damage, no refire penalty and makes it harder for enemies to hit you as well as having a range advantage. Four heat sinks would allow a stationary ‘Mech to fire a single PPC every turn and maybe even walk or run without undue build up of heat. However, putting in a second PPC is going to make the “heat sink tax” increase quickly. Two PPCs together generate 70 heat, which is 40 above standard sink capacity, requiring 13 heat sinks for neutrality. So it appears that a PPC on its own can be good if combined with low heat or a small number of additional weapons, but that mounting more than one of them, or blended with other energy weapons might blow the heat budget without a great deal of care about cooling. It may be best not to combine it with large numbers of jump jets either. Comparing missile launchers When comparing missile weapons, it is useful to modify the damage potential by 75% to take into account the fact that a number of missiles will miss the target - and the average/base hit chance unmodified is 75%. So an SRM6 has an absolute maximum damage potential of 8x6 = 48, but for comparison purposes, you may wish to use 75% * 48 = 36. Comparing Ballistic, Missile and Energy weapons An LRM20 compares most easily with an AC10 - and also a PPC - creating a nice framework with which to compare ballistic, missile and energy weapons. At 75% to hit, you are likely to get 60 damage from an LRM20, 30 stability damage and 14 tonnes would buy you more than 20 shots in a match with extreme range and indirect fire to boot. It is less compact (ammo is easier to hit), has bad minimum ranges and is not *quite* as heat efficient as the AC10. The PPC needs lots of heat sinks for sustained fire and so won’t perform as well in biomes which make heat sinks less effective. Also not as easy to pair, or operate with other high heat systems (jump jets or weapons). LRMs simply get more potent as gunnery skills increase because more missiles will hit per volley. Defensively strong as well because they can be fired indirectly without too much impact on accuracy. Because access to precise strike is much more readily available during the campaign, LRMs are likely to be stronger there. However, in Skirmish, or against other players, or where Precise Strike is less readily available, you may begin to find that LRMs spread damage too much for quick takedowns of high threat targets. Alpha strikes The term Alpha or Alpha Strike is used when a ‘Mech shoots all of its weapons at once. With its capability to sink heat a fixed and finite level (assuming that a pilot does not have Coolant Vent talent), most ‘Mechs can only Alpha fire a certain number of times before overheating. This is an important design variable to be aware of. 'Mech design - Weapons 2 Weapon heat The idea of heat neutrality is one where a ‘Mech can disperse as much heat as it can generate - therefore never increasing its heat load. The problem is that this probably indicates that the ‘Mech has spent too much weight capacity on heat sinks - that actually some heat gain per round is optimal. The heat track can be used as a way of monitoring whether you have the balance of weapons and heat sinks correct. Each ‘Mech starts with 10 heat sinks built into the engine, which means each ‘Mech has the ability to ‘sink’ 30 heat in one turn. If a ‘Mech stands still and fires three medium lasers (10 heat) every turn, it will remain heat neutral - but if it walks, sprints or jumps as well as firing weapons, then it will build up heat along the heat track. Each additional heat sink adds the ability to sink an additional 3 heat per turn. The heat track runs from 0 - 100. Normally, ‘Mechs start taking internal heat damage when the track hits 60 heat and above. At 100, the ‘Mech will shut down. High guts skill increases the overheat threshold, so the ‘Mech can run a bit hotter without damage, but it will still shut down at 100. Each weapon generates a fixed amount of heat per turn - some weapons are much hotter than others. Weapon damage type Each weapon generates a certain amount of maximum damage. Some weapons (PPCs, ACs, lasers) do all of that damage in one hit location, whereas others spread it across several in smaller “damage packets.” The latter is notable because the chance to hit is calculated per damage packet, rather than per shot. This means that LRMs can usually be relied on to get at least some damage on a target, even if the % chance to hit is low, but the weapon is also not going to do maximum damage as often - and, as mentioned, spreads its damage over a number of locations, rather than focusing on one. You can broadly group weapons into those that “punch holes”, which cause 20+ damage per hit, and “spread damage”. As already noted in this guide, a valid principle is to punch holes in enemy armour first, and then spread damage to “crit seek”, looking to destroy equipment or make ammunition explode. In addition, some weapons cause high (10+) stability damage and the Flamer has an impact on target heat levels and so can cause overheating and shutdown, debilitating their target. Hole-punching weapons: All autocannons, all lasers, PPC, Gauss Rifle, Melee Spreading weapons: All LRMS, all SRMs, Machine guns De-stabilising weapons: AC5-20, PPC, Gauss Rifle, SRM4-6, All LRMs Debilitating weapons: Flamer Knocking an enemy over can cause them a variety of problems. Firstly, similar to shutting an enemy ‘Mech down through heat, a ‘Mech on the ground can have its locations hit with a called shot for free without using Precision Shot. Secondly, it causes a level fo pilot damage. It also inflicts a +4 shot difficulty penalty on shots on the turn it stands up. ‘Mechs have a stability bar (0-100). After a certain level (probably 60, like heat) the ‘Mech becomes “unstable”. If it reaches 100 stability damage, it falls over. At a lance level, it is desirable to have a blend of these capabilities at your disposal. If you have too much spread damage, you may find it difficult to kill of enemies efficiently, leading to more drawn out battles. If you have too little stability damage possible, or spread it around, rather than focusing on one enemy, you may find it harder to take down big threats. Specialising a lance in a particular damage type can be fun, though. A melee-only build with Firestarters all mounting maximum flamers and maximum jump jets is a good example. Weapon accuracy A pilot with level 1 gunnery has a base +2.5% chance to hit. A pilot with level 10 gunnery has a base +25% (+5) chance to hit. Strangely, other aspects of shooting talk about +1, or +2 difficulty, rather than percentages (for example, indirect fire is a +2 penalty to shot difficulty, TTS mods appy a +1, +2 or +3 bonus to weapon accuracy). I have not seen anywhere that directly relates +1 to a percentage, but it appears to be a 5% swing to hit chance per bonus point. I’m not sure if the game engine rounds up or down. The base chance for a shot to hit appears to be 75%, modified upwards by gunnery skill and any accuracy boosts from equipment (TTS, accuracy of lasers), and is then modified by shot difficulty (which you can see when hovering a mouse over the hit percentage). There appears to be a maximum of 95% chance to hit. A height difference in your favour applies “+1”, which is a 5% bonus. Arm-mounted weapons have a +1 bonus too. Evasion provides a 10% swing in hit chance per evasive charge (max 60% to hit penalty), light ‘Mechs have a 10% penalty to be hit because they are small, medium ‘Mechs this is just 5% with no penalty to shoot heavy and assault ‘Mechs. So shooting at a light mech (+2) with indirect fire (+2) beyond optimum range (+4) where the target moved with maximum evasion (+12) is a +20 shot, which means -100% chance to hit. That’s a bit extreme, but shows you the limit of what you may be expecting on the battlefield. Weapon range There are a number of range categories that weapons in BATTLETECH belong to, some of which may not be “realistic”, but they suit the nature of the size of the battlefields and provide a design decision which relates to a balance between engagement range, mobility and battlefield role. Support/close range weapons operate from close combat up to 90m only. Standard range weapons operate from 0-270m with an optimum range of 180m Long range weapons operate from 0-450m with an optimum range of 300m Very long range weapons operate from 90m-540m with an optimum range of 360m There are currently two extreme range weapon systems: LRMs operate from 180m-630m with an optimum range of 420m AC2s operate from 120m-720m with an optimum range of 720m Mono-task ‘Mech designs have a single comfortable engagement range, which means that all of their weapons will come from a single range category, or two neighbouring categories that overlap. It makes sense that mono-task ‘Mechs will beat generic ‘Mechs for firepower and capability at their chosen range because they specialise. However, they need mobility to allow them to choose the engagement range, which means capacity spent on speed and/or jump jets. If they lack mobility, but are mono-task, then there is a possibility that they can find themselves in positions where they have to engage at sub-optimal ranges, or a more mobile enemy can weaken them by selecting a range of engagement which does not suit them. Multi-task ‘Mechs mount weapons that mount weapons giving them a broader engagement range. Long range missile racks (extreme range, but 180m minimum range) are often paired with medium lasers (0-180m optimum range), for example, to give the pilot more choices. Multi-task ‘Mechs don’t necessarily need to choose the engagement range with the enemy as they always have an option - so mobility may not be as important. They can also optimise their cooling systems based on firing either one set of weapons, or another, but not both. The classic idea of using LRMs to “soften up” an enemy before switching to close and standard weapons when you are in close range. When you look at weapon composition at a lance level, it is clear that either of these design choices can work, but mono-task ‘Mechs can limit your lance’s capability if your choices are not taken into account across all of your ‘Mechs. If all of your ‘Mechs are built for melee and close range engagement, and the enemy can successfully stay at range, then you will lose more often than not. Also if you lose a mono-task ‘Mech, it could be that your remaining lance members cannot fulfil the demands of the role left vacant. 'Mech design - Sustaining fire Sustained fire You can only maximise lance firepower if all of your ‘Mechs can fire all of their weapons, every turn. If they are out of ideal range, out of heat capacity, out of ammo, then they cannot meet their potential. How much ammo you need will depend on your idea of how often you need to be able to fire your weapon before all of the enemy is destroyed. The answer to this question may depend on whether you are playing a campaign level or a skirmish, how many and what type of enemies you are facing. A typical campaign level, in my experience, might consume 20+ turns, and most, if not all, of those turns will be spent in combat with only 2-3 turns before starting a fight, and then possibly, a few turns at the end to reach an objective. LRM ammo comes in packs of 120 missiles per ton. This will provide an LRM20 with 6 shots, an LRM15 with 8 shots, an LRM10 with 12 shots and an LRM5 with 24 shots. LRM threat radius is high (walk/jump radius + weapon maximum range) and I will be shooting them constantly if I can. I aim to have 20 or so shots from each launcher, which means supplying an LRM20 with a minimum of 3t of ammo, preferably 4t. An LRM15 with 3t, an LRM10 with 2t and an LRM5 with a tonne. SRM ammo comes in packs of 100 missiles per ton. This will provide an SRM6 with 16 full salvoes (with a bit left over), an SRM4 with 25 salvoes and an SRM2 with 50 salvoes. Similarly to LRMs, I aim to have 20 or so shots from each launch, which means supplying an SRM6 with a minimum of 1t, preferably 2t, an SRM4 with 1t and two SRM2s with 1t. With a lower engagement range than LRMs, I may reduce the amount of ammo because I won’t always be in range. If I do the same calculation for weapon heat capacity, I am going to assume a target of 10 turns of sustained fire before I can take a break, perhaps between engaging a main force and reinforcements (if there is any gap at all). Heat calculations have to be performed on the total weapon heat load of an alpha, if the ‘Mech is designed to fire all of its weapons every turn, or a proportion of that number if the ‘Mech has two distinct range bands and the pilot is disciplined enough to stick to certain weapons at certain ranges. Of course, the biome will impact this number too - and can be taken into account at this stage of the planning if you wish. 'Mech design - Summary Design summary So what have we learned here? Designs are about balance, aesthetics, efficiency, elegance and, in regard to BATTLETECH, about the Lance as well as about individual ‘Mechs. I could create a list of bullet point “design dos and don’ts”, such as “‘Mechs lacking mobility should probably mount longer range weapons.” or “Lances should be able to cover engagement at any range.” or “Asymmetrical ‘Mech designs are superior in skirmishes against AI.” but there’s a point where “right and wrong” stop being important. Mech design - Tweaking the campaign starting lance When you start the Restoration Campaign, you have a stable of five 'Mechs. An SHD-2H Shadowhawk, a Vindicator, a BJ-1 Blackjack, an SPD Spider, and a LCT-1V Locust. At least three of these 'Mechs (the Shadowhawk, Blackjack and the Locust) have ammo in the centre torso, and the stock builds are not necessarily that good. However, you don't want to waste time and money trying to get Yang rebuilding all of the 'Mechs before you get going. So, here are a few recommended tweaks to the starting 'Mechs that won't take too long, won't cost too much, and can be easily fitted in during long spaceflights between the starting missions. Shadowhawk The first job is to move the ammunition out of the centre torso. I tend to move it to the left leg. I do not like the mixed ranges of the weapons, or the fact that they do so little damage. The LRM5 is particularly weak, to my mind. I like to drop the LRM5 and upgrade the SRM2 to an SRM6 when time and stock levels allow. Eventually I tend to specialise the Shadowhawk in close range brawling, and so I drop the AC5 in favour of a second SRM6, second laser, additional armour and systems. Vindicator The PPC is the Vindicator's strength and so I build around a long range support mode. I drop the small and medium lasers and upgrade the LRM5 to an LRM10 to create a "mini Griffin." Blackjack The Blackjack's main issues seem to be the weight of the AC2s, and the heat the 'Mech generates. After moving the ammo out of the CT, I am happy to keep the 'Mech as-is, at least for the first missions. The firepower is OK and the heat load manageable. Eventually I would drop the AC2s and think about what to do with the freed up weight - bigger lasers? bigger autocannon? Spider The Spider is fine, but I prefer a little bit more armour and melee potential and so I swap the medium lasers for small lasers. I make sure the pilot has sensor lock so they have something to do if they are not in small laser range. Locust Like all Locusts, this 'Mech is a make-weight. I drop the medium laser for an additional MG, and I make sure I move the ammunition out of the CT. I have it attack any enemy that has breached armour locations, and use melee, and the MGs to look for criticals on ammunition. Instead of the leg, I will sometimes put it in an arm, so if it explodes, I may get away with it, and still be able to use my speed to escape danger. This 'Mech will typically be the first one benched, and then sold. 'Mech design - Shymer's favourite 'Mech builds (WIP) Light Panther - LRM15, 2 x ML Urbanmech - AC20 Firestarter - 6 x SL Medium Vindicator - PPC, LRM10 Centurion - AC20 Centurion - 3 x LRM10 Hunchback (P) - 6 x ML, 3 x SL Shadowhawk - ML, 1 x SRM4, 2 x SRM6 Heavy Grasshopper - 6 x MG, 4 x ML, 1 x PPC or LL Orion - 3 x LRM10, 2 x ML or LRM20, LRM10, 2 x ML Assault Zeus - AC20, 3 x ML Cyclops - 6 x ML Strategy - Mercenary company economics How do you best keep your unit afloat in career mode? Career difficulty When you start a new career, you can select how difficult it is going to be for you by adjusting some of the difficulty settings. Some can only be modified at the start of the game the number of parts you need to build a full ‘Mech (defaults to 3, but can be increased to 8 for more difficulty.) whether your ‘Mech comes without stock equipment when you have collected the requisite parts (defaults to yes, but you can, instead, choose to gain a fully equipped ‘Mech if you want things a good deal easier.) Most of the other settings can be chosen on the fly and adjusted to suit your desired challenge level. ‘Mech destruction and lethality options are brutal since ‘Mechs and pilots are expensive to replace. I’ve not found a lack of rare items in salvage as much of a problem since you can win them as rewards for Flashpoint missions, or locate them in stores. If you're aiming for high scores in career mode, then pay attention to maximising enemy OpFor weight, salvage, and C-Bills from missions and avoid slowing down EXP gain. Mercenary economics 101 You have to pay some money each month out of your mercenary company’s cash reserves to keep the Argo and your unit ‘Mechs running, and your pilots will expect to be paid each month. If you cannot meet your payments, the business folds. You lose. When you start your career, you will be spending 140,000 CBills a month on the ship and ‘Mechs, and 76,000 CBills a month on the pilots. Because you start with, roughly, 1m CBills in the bank, if you do nothing, you will run out of funds in month 5. The little white pips to the right of the date gives you a quick view as to how many months your unit can survive on your current cash ‘burn rate.’ There are only a limited number of missions available in each system before you have to move on, and, at the most, you can squeeze in three systems in a month because of travel times. Keeping your monthly running costs low is as important as bringing in money. Here are some simple tips to reduce your monthly outgoings, and increase earnings: Put ‘Mechs you are not using into storage, rather than keeping them in a ‘Mech bay. Do not recruit experienced pilots, instead train rookies, they demand lower wages. Upgrade warrior skills in blocks at the start of a month and only when you need to Check on monthly costs of ship upgrades before investing in them Sell ‘Mechs from storage, rather than selling them for scrap, you’ll get more for them Strategy - Running costs Argo running costs
你的飞船“阿尔戈号”开局时状况糟糕。三个居住舱中只有一个是密封的,因此最多可容纳8名机甲战士。仅有一个机甲舱能正常运作,这意味着你在任何时候最多只能部署6台机甲。你拥有基础的驱动系统、基础医疗设施,以及足够暂时维持飞船运转的胶带和绳子。即便如此,每月仍需花费80,000 C-Bills(星际币)才能让它继续飞行。
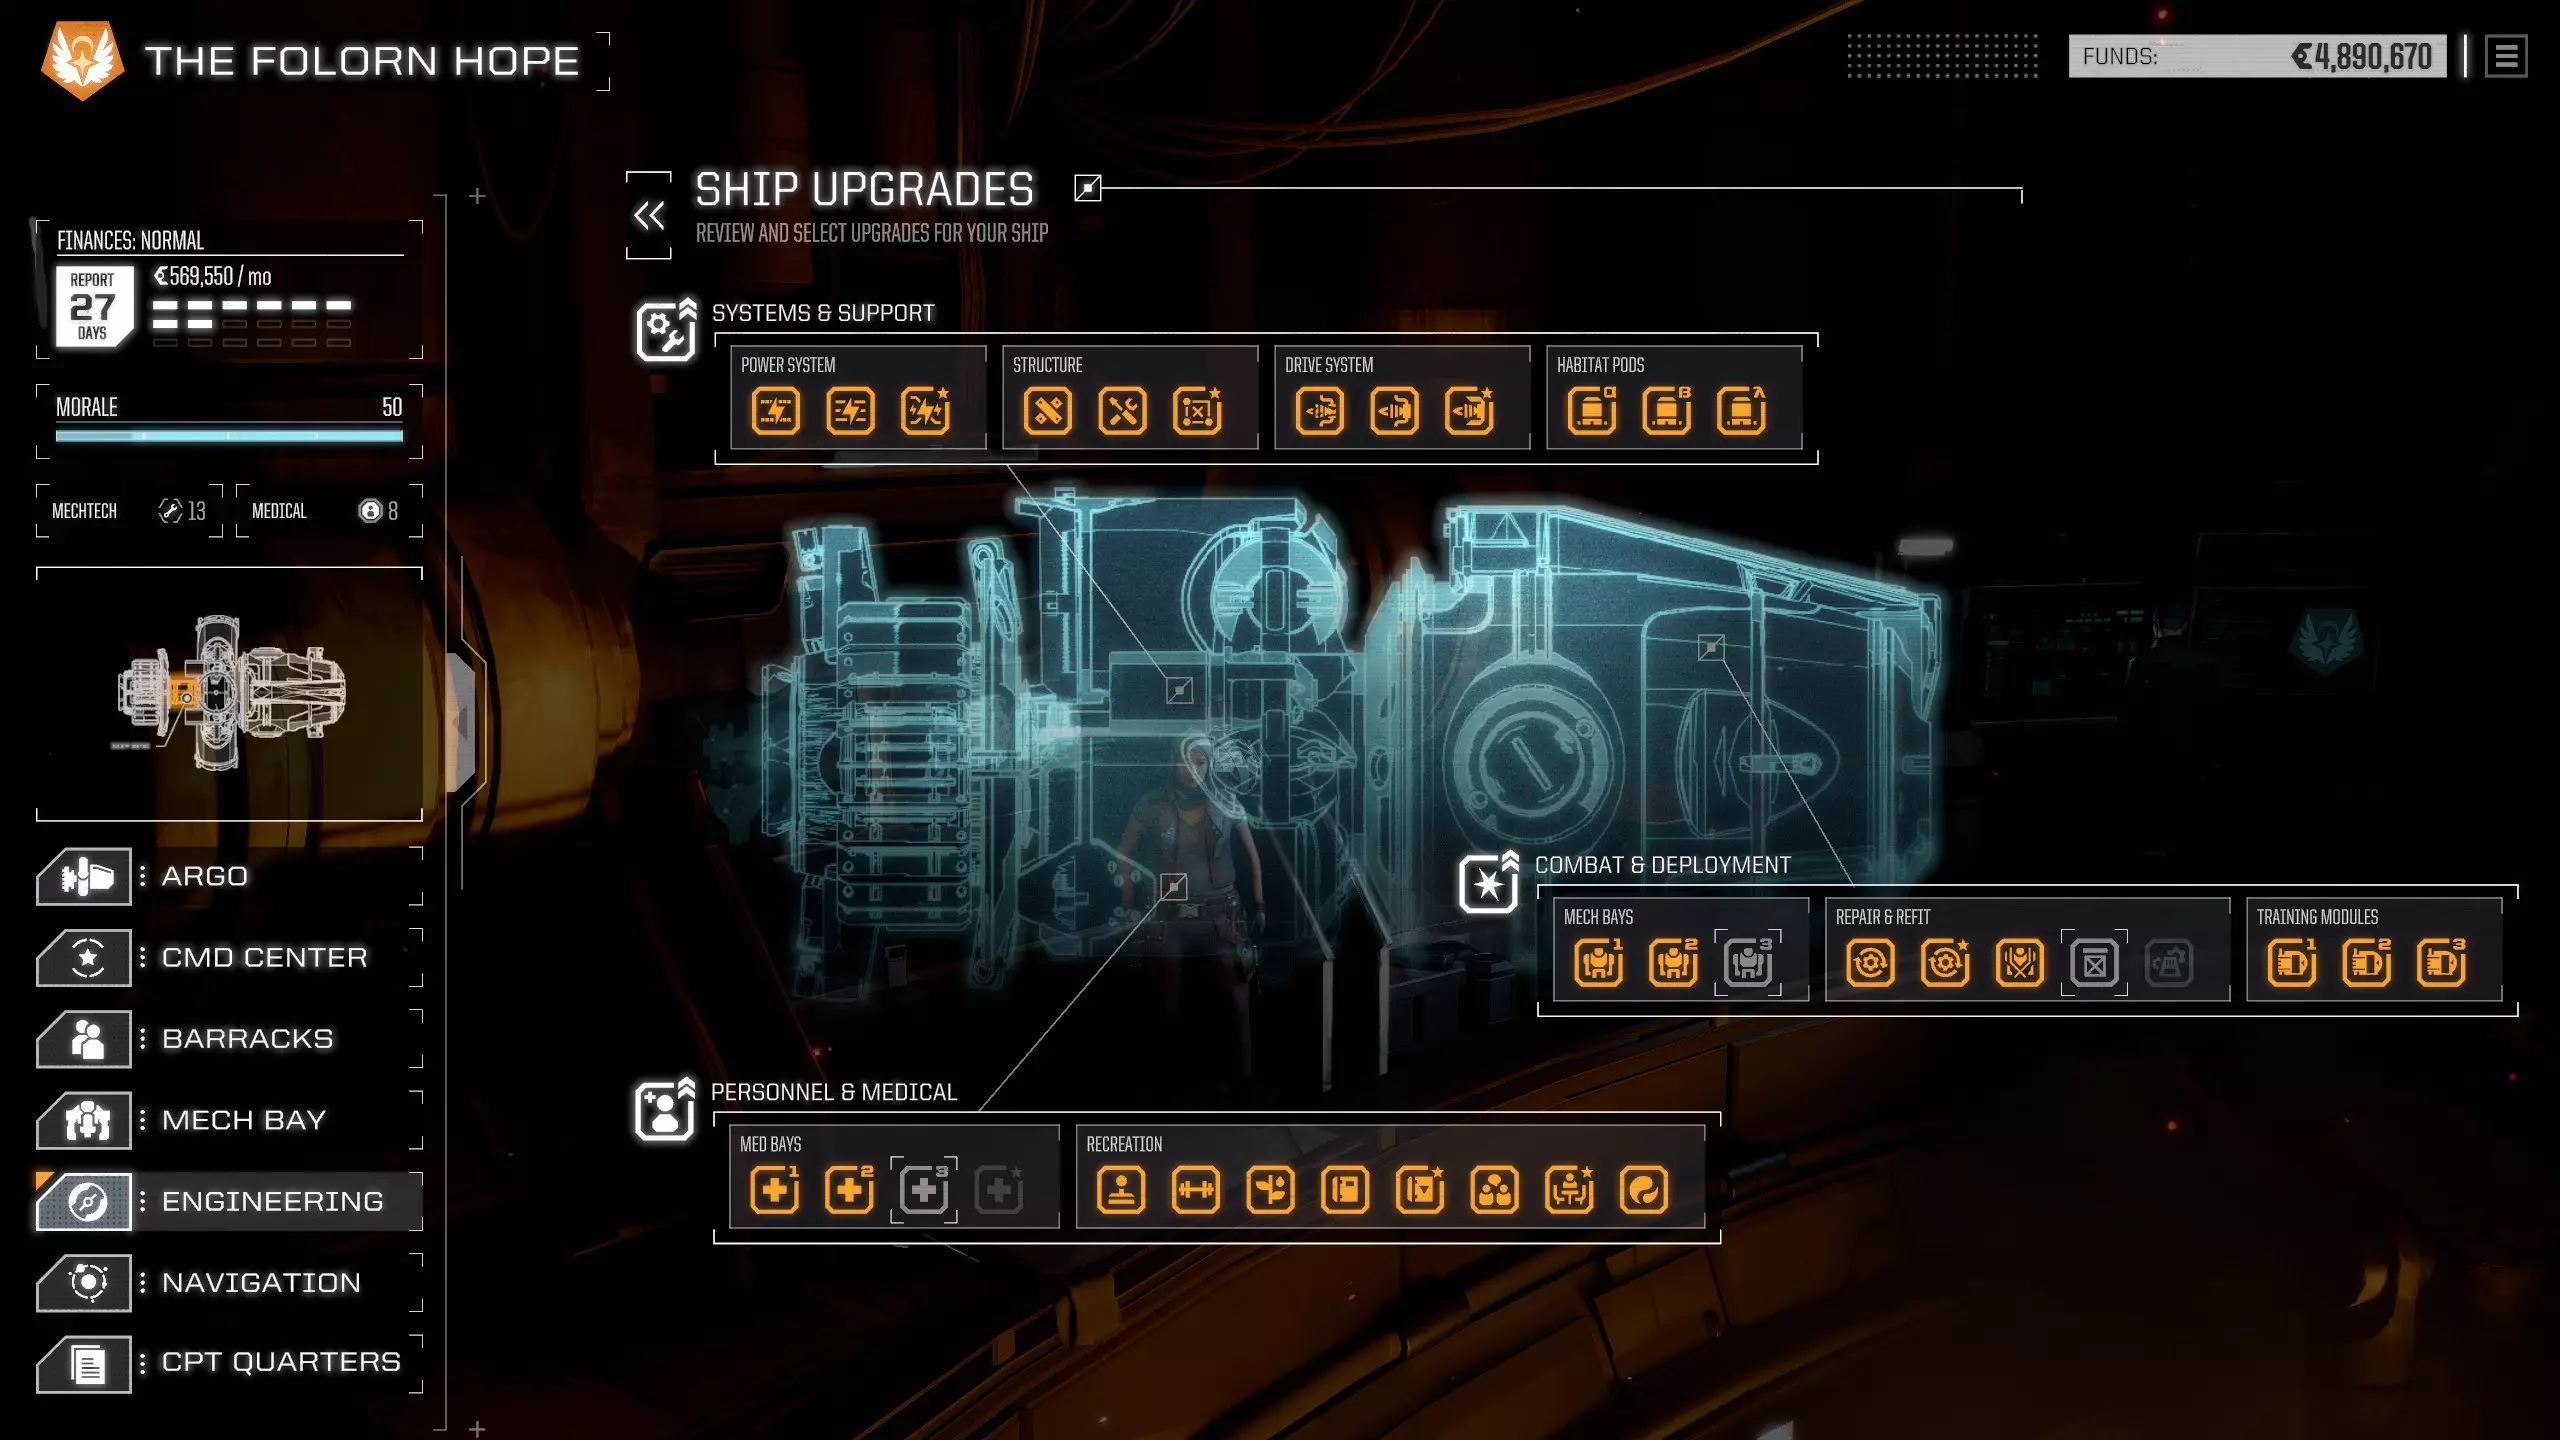
当然,你可以投入资金逐步升级“阿尔戈号”,以扩展你的雇佣兵公司的能力。每次升级都需要花费一定数量的星际币(CBills),并且需要一些时间来完成。但关键是,一旦完成建造,你的运营成本就会相应增加。重要的是要注意哪些升级会最大程度地增加你的运营成本,因为你每月必须赚取更多的钱来支付这些额外开销。 例如: 医疗舱2级升级会使你的运营成本增加13,500星际币(CBills),而3级升级则会再增加18,500星际币(CBills)。不过,这可能比雇佣一名备用机甲战士并让他们留在薪资名单上,以应对有人受伤或因其他原因无法执行任务的情况更划算。 第二个机甲舱每月的费用为25,000星际币(CBills),第三个则在此基础上再增加50,000星际币(CBills)。这还不包括每个机库中机甲底盘的月费。这些是主要的升级点,让你可以在维修期间轮换机甲,从而执行更多高风险任务——在这些任务中,内部损伤和关键部件损坏是不可避免的。 机甲战士薪资 你雇佣人员的薪资为每月每点属性2000 C-Bills,但如果你用经验值提升他们的属性,每点属性的薪资会增加1000 C-Bills。这意味着培养自己的飞行员比雇佣经验丰富的飞行员更便宜。这种差异非常显著。如果你有八名机甲战士,培养他们每月可能需要20万以上C-Bills,而直接招募高等级飞行员的花费则更高。 如果你不将经验值用于技能提升,他们就不会产生额外费用。这可能意味着让飞行员保持较低(更便宜)的等级积累经验值,直到你有能力一次性提升他们的等级,以达到某些关键属性的提升——例如“勇气”达到4级,从而增加1点生命值。 经验等级 | 技能点 | 招募薪资 | 训练薪资 ---|---|---|--- 新兵 | ~10点 | 20,000 CBills | 20,000 CBills 正规兵 | ~20点 | 40,000 CBills | 30,000 CBills 老兵 | ~30点 | 60,000 CBills | 40,000 CBills 精英 | 40点 | 80,000 CBills | 50,000 CBills **策略 - 任务选择(开发中)** 任务 当然,作为雇佣兵赚钱意味着要接受合同来完成任务。每个任务合同都有以阿特拉斯“死亡之首”图标表示的难度等级——从1/2个阿特拉斯到5个阿特拉斯。该挑战通过吨位衡量敌对势力(“OpFor”)的实力,敌人通常以最多包含四台炮塔/载具/机甲的 lance 形式出现。一个典型的任务会有两支敌方 lance,如果你运气好,它们不会同时出现。如果你能将它们各个击破,那就再好不过了。 #AtlasesOpFor lance weight 预期吨位等级 1 125吨 全轻型,或部分轻型/中型 2 175吨 全轻型/中型,或部分中型 3 225吨 全中型,或部分中型/重型 4 275吨 全重型,或部分重型/突击型 5 3225吨 全重型/突击型 每个任务合同都提供最高 C-Bills(星际币)报酬、一定数量的战利品,并会影响你与雇主及 OpFor 派系的声望。你可以调整滑块来要求更多战利品,或最大化报酬。这其中的含义我将在之后以数学方式进行探讨——以回答“滑块应该放在哪里?”这个问题。 随着时间的推移,你会逐渐熟悉各种任务合约,而每个合约都与少数几种任务结构/目标相关。所有合约都有主要目标,部分合约设有次要目标,还有一些合约则包含隐藏的 tertiary objectives(第三目标)。完成次要目标和第三目标能为你带来合约协商最高报酬固定百分比的额外奖励。 策略——生涯模式评分 在我第一次进行生涯模式游玩,进度达到三分之二时,我才弄明白游戏是如何计算“分数”的。如果你点击屏幕左上角的绿色按钮,可以查看详细数据,该按钮会显示距离“分数”结算还有多少天。
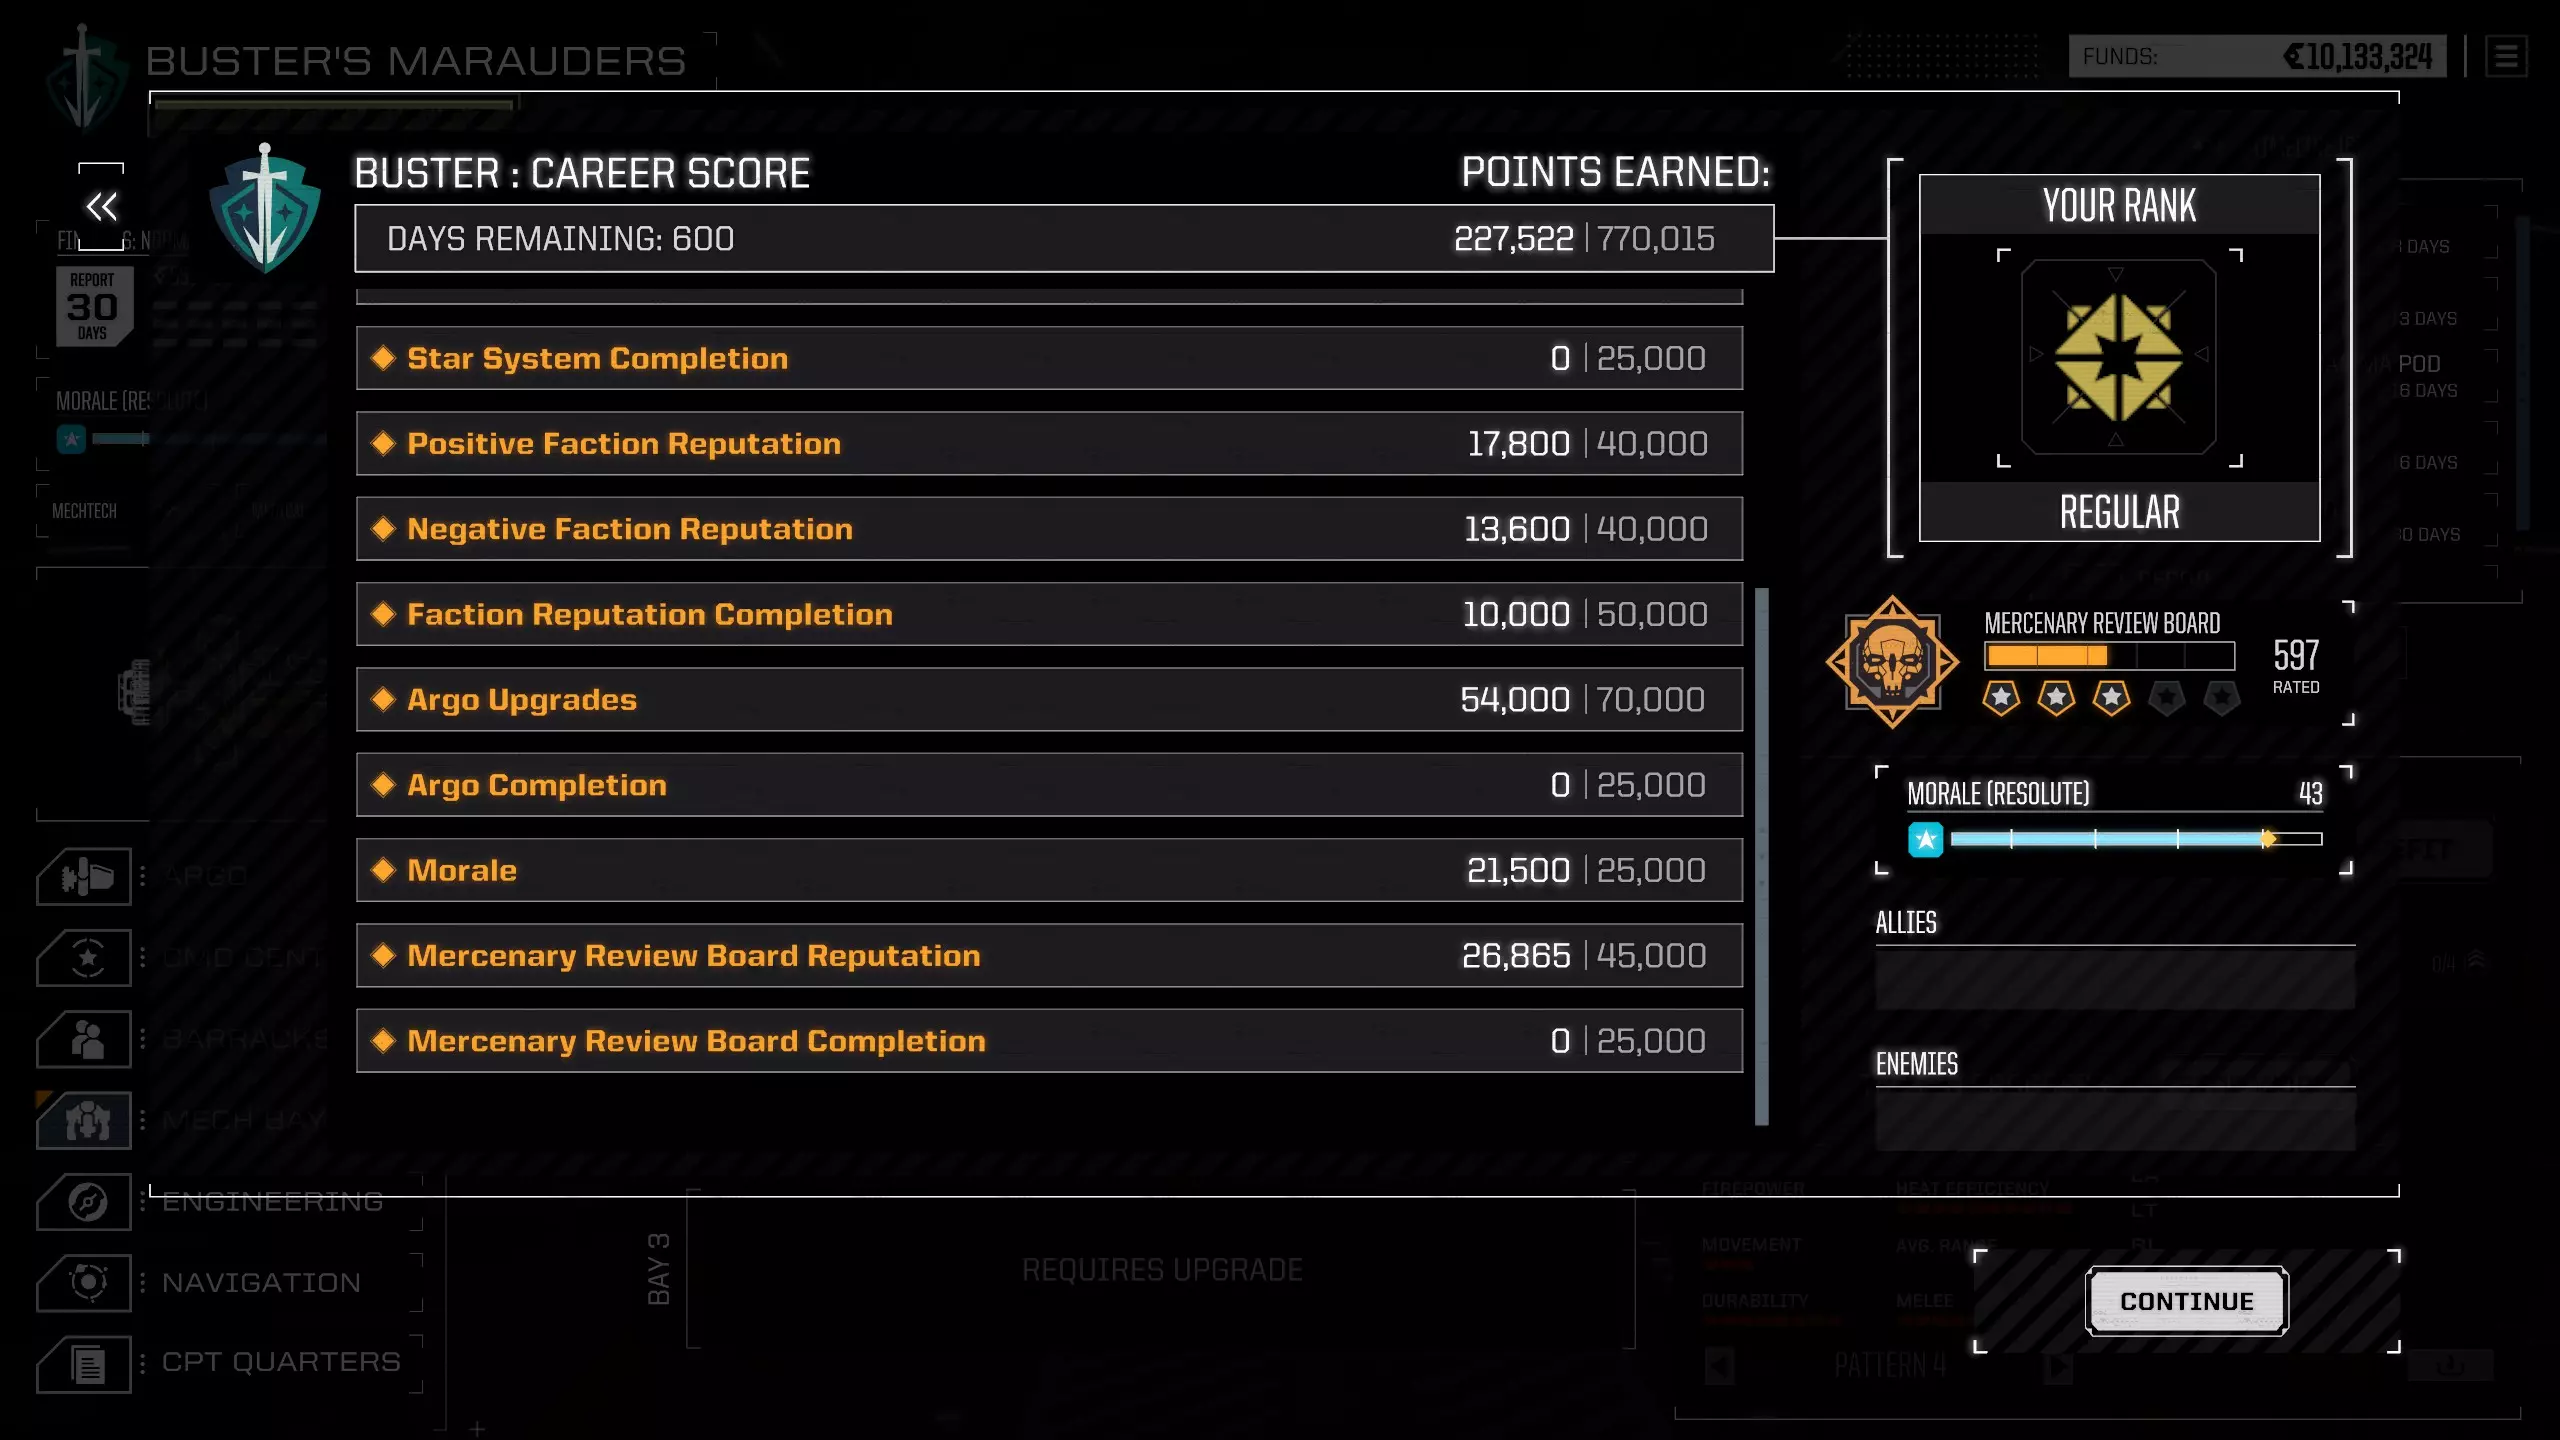
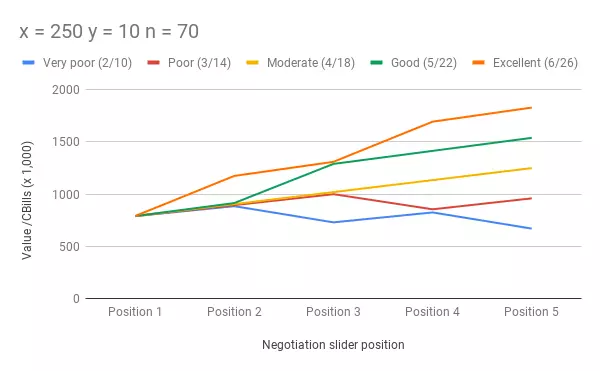
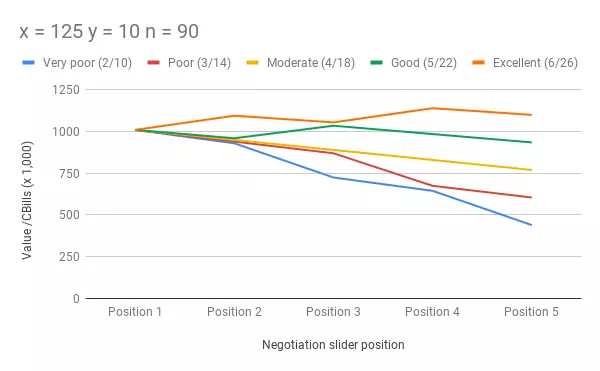
You earn career points through completing a variety of challenges, with running totals based on performance characteristics, and bonuses based on completing various targets. These points are added up over the course of your career, and compared to a maximum possible total. You can keep playing after the timer reaches zero if you wish. CriterionDescriptionMaximum pointsNotes C-Bills 1 point per 10k earned 80,000 800m C-Bills target Contracts 50 points per contract skull 70,000 1,400 skulls Mech chassis collected 1273/unique chassis in bays or storage 70,015 55 unique chassis to find Mech weight class completion 10k per weight class completed 40,000 Chassis complete bonus 25,000 Mechwarrior experience 2 points per 100xp in barracks 55,000 Does not include the Commander Star systems visited 500 points per system 85,000 170 star systems Star systems complete 25,000 +ve faction rep 100 points per point of +ve reputation 40,000 -ve faction rep 100 points per point of -ve reputation 40,000 Maximum reputation with factions 10,000 points per faction 50,000 Argo upgrades 2,000 points per upgrade installed 70,000 35 upgrades Argo upgrade complete bonus 25,000 Morale 500 points per point of morale 25,000 MRB reputation 45 points per point of MRB rep 45,000 Maximum MRB rating bonus 25,000 Strategy - Where to put the (money/salvage) slider? WARNING! unashamed algebra and "back of an envelope" calculations follow. It's just for fun. Each mission has a maximum amount of salvage (picks/random), then the slider allows you to pick from one of five different amounts of picks/random to the maximum. Max salvagePosition 1Position 2Position 3Position 4Position 52/100/21/41/62/82/103/140/21/52/82/113/144/180/21/62/103/144/185/220/21/73/124/175/226/260/22/83/145/206/26 You can adjust sliders to demand more salvage, and more picks of premium salvage, or to maximise the payment. You could decrease your fee and/or your salvage demands for more reputation with the faction you are contracting with (but additional reputation lost with the faction targeted.) We will deal with reputation a bit later - for the moment, let’s just look at the raw financial impact of the decision “Where do I place the slider?” In position 1, you are choosing maximum pay (11n), but only two pieces of random salvage. In position 5, you are choosing maximum salvage, but minimum pay (n). The question then might become “What’s the value of salvage?” Let’s say that x is the financial value of a pick of salvage, and y is the financial value of random salvage. By selecting one of the five slider positions, we are selecting one of the following equations. Max salvagePosition 1Position 2Position 3Position 4Position 52/100x + 2y + 11nx + 4y + 8.5nx + 6y + 6n2x + 8y + 3.5n2x + 10y + n3/140x + 2y + 11nx + 5y + 8.5n2x + 8y + 6n2x + 11y + 3.5n3x + 14y + n4/180x + 2y + 11nx + 6y + 8.5n2x + 10y + 6n3 + 14y + 3.5n4x + 18y + n5/220x + 2y + 11nx + 7y + 8.5n3x + 12y + 6n4x + 17y + 3.5n5x + 22y + n6/260x + 2y + 11n2x + 8y + 8.5n3x + 14y + 6n5x + 20y + 3.5n6x + 26y + n Calculating y (value of random salvage) Most random salvage has a low value. Support weapons, medium lasers, heat sinks, and ammo are only worth a couple of thousand CBills each. The resale value of weapons and mods is 10% of their retail value, and so random salvage tends to span a range of 2,000 CBills to 30,000 CBills. I’ve not bothered to do a full analysis of random salvage, I have just picked 10,000 CBills to represent a reasonable mid-range value for a piece of random salvage. This cuts down my work considerably, but does lead to some missed observations. Easy missions have less salvage because there are fewer enemies and if you take too much salvage, you can run out. Also the average value per item is lower because easy enemies seldom mount expensive weapons. I’m just ignoring that for the moment. y=10,000 CBills for analysis purposes - although earlier in the game it will be lower and increase slightly as the game goes on and bigger, better, and augmented weapons appear alongside a greater number of ‘Mech-equipped enemies. Calculating x (value of first picks of salvage ) All missions will involve you fighting at least one ‘Mech. Every ‘Mech will leave, at least, one piece of partial ‘Mech salvage. The scrap (lowest) value of the Locust, the smallest ‘Mech there is, at default difficulty (where 3 pieces of a ‘Mech make one full ‘Mech) is over 40,000 CBills - or four times that of random salvage. From this, it is fair to say that most first picks of salvage are going to be pieces of ‘Mechs. A completed ‘Mech is worth more than the total of scrap value. So for maximum value, you should keep the pieces and sell them when you have completed a full ‘Mech. A good rule of thumb is that you can sell a completed ‘Mech for a bit under 10,000 CBills per tonne - so selling a 35 tonne ‘Mech will get you a bit under 350,000 CBills. A 55 tonne ‘Mech will get you a bit under 550,000 CBills. This means that each component is worth, roughly, (Tonnage x 10,000) / Number of partial chassis required for a full ‘Mech (from 3 to 8) Pieces per ‘Mech35t55t75t100t3 (default)120k180k250k330k490k140k190k250k570k110k150k200k660k90k125k170k750k80k110k140k840k70k90k125k So, the value of x changes with difficulty level, and weight class of enemy ‘Mechs you are facing. The difficulty level you set at the outset of your career. The latter, with one or two exceptions, is a function of the number of skulls in the missions you choose. We’ll look at the default (3 pieces for one complete ‘Mech) and the maximum (8 pieces for one complete ‘Mech) to see how the campaign difficulty might affect where you place the slider for maximum financial return on your missions. #skullsEnemy classx (Default)x (8 pieces)0.5-1Light120k40k1.5-2.5Medium180k70k3-4Heavy250k90k4.5-5 Assault330k125k Total salvage value (C-Bills) based on slider position for 0.5-1 skull missions (@300k pay)
基于1.5-2.5 skull任务(50万C-Bills报酬)的滑块位置计算的总打捞价值(C-Bills)
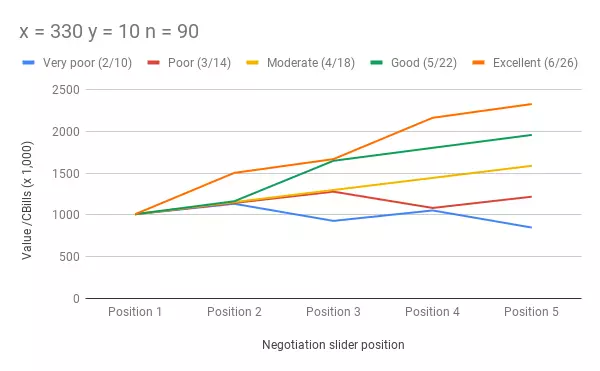
基于3-4 skull任务(@700k报酬)的滑块位置计算的总打捞价值(C-Bills)

基于滑块位置的总打捞价值(C-Bills),适用于4.5-5 skull任务(@900k报酬)
观察与结论 在默认难度下,若获得3/14或更优的战利品分配比例,选择最大战利品数量永远不是坏选择。只有当最大战利品为2/10且金钱奖励不错时,才应改为选择位置2。 在最高难度下,选择更为困难。通常情况下,除非获得优于4/17的战利品分配权,否则优先选择最高报酬可能更好,但选择位置2以保留一些底盘选择机会也未必不可。若获得包含5个或更多战利品选择的优质战利品分配权,除非金钱奖励异常丰厚,否则位置4或5会更具吸引力。鸣谢 非常感谢以下各位的帮助,没有他们,本指南可能会有更多错误: LeeTheMan——指出了闪避点数与命中率之间的正确关系 OwlRaider——讨论防御天赋并推荐“主宰者” [CoH] Joker——提供了众多评论和观点 RecklessPrudence——纠正了我对突击机甲跳跃喷射器的错误理解 Dedmosh——促使我撰写经济与战略层面的内容 Icthyic——推荐“打击者”飞行员 danko9696——对导弹和精确射击提出了深思熟虑的反馈 **战略 - 闪点任务(制作中)** 游戏流程 - 复兴战役(铁人模式,八片碎片,原版) 以下是我游玩复兴战役时的剧情任务战役——如果你想了解整个系列的剧情,中间的任务等内容可以在YouTube上找到。 Majesty Metals
Axylus - 阿尔戈号的崛起 First Strike - 韦尔德瑞解放战 Perdition - 潘济尔解放战 Black Box - 史密森解放战 Served Cold - 摧毁联邦 Raising the Dead - 盗墓行动 第一部分 Dead in Space - 盗墓行动 第二部分
2026-02-14 07:00:12 发布在  BATTLETECH


说点好听的...
收藏
0
0