


《无尽传奇》战斗指南
正如标题所示,本指南将介绍《无尽传奇》中时而令人抓狂但极为复杂的战斗系统。 前两节内容对新玩家最有帮助。本指南基于单人游戏、默认游戏设置撰写。 计划内容: 1. 基础知识 - 系统运作方式 2. 如何让部队执行指令 3.1 战斗定位 - 单位 3.2 战斗定位 - 英雄 4. 战略层面规划与区域防御原则 5. 战役层面规划 6. 部署阶段 7. 围城规则 8. 双军队配置 9. 如何快速攻占要塞 10. 1.2版本平衡调整及其对你的影响 11.1 守护者扩展包 11.2 守护者单位及有效使用方法 12. 暗影扩展包 13.1 变形者扩展包 - 概念 13.2 变形者扩展包 - 单位 1.基础机制 - 系统运作方式 《无尽传奇》采用独特的同步回合制战斗系统,战斗在从本地战略地图中提取的战术战场上进行。战斗由一方军队攻击另一方军队引发,这些军队被称为主力部队。攻击者通过右键点击选择要攻击的敌方军队或城市,此时会显示战场范围以及可能参与战斗的军队。如果攻击者对显示的情况不满意,可以在该阶段取消攻击且不会受到惩罚。防御者可以选择让其主力部队撤退,但需付出部队50%生命值的代价,被围困时除外。 任何处于战场区域内的额外军队,都可以选择作为援军加入战斗,或者不参与战斗且不会受到惩罚。双方均可调整增援顺序。注意,战场范围将扩展至其射程内的所有城市。
Armies can - and should - be led by a hero but can fight without one. The right hero with the right skills and equipment can transform a mediocre army into an ungodly killing machine. For example a high level Wild Walker hero can push his Rangers attack values over 1000 and increase their combat range to 5. A support or infantry hero can increase the number of reinforcements per combat round to 4 and many other deadly buffs are available. Units can be refitted and upgraded in Endless Legend. As each Era & weapon/armor technology is unlocked more options become available. To allow a refit of an existing design, select Edit in the Army Management screen. To create a brand new design, select New, then the template the new design will be based on. If you are planning on any early game combat one of the first things you should do in the game, probably the turn after your first city is founded, is refit your starting units as they start without armor. For more information on unit outfitting, see section 3, Roles. Each battle consists of a deployment phase, then up to 6 rounds of combat. The AI deploys first, then the player. During this phase positions on the battlefield are adjusted, once the player is happy, the battle is launched. Each round of combat both sides give orders to all of their units. Once both sides are happy with their orders, the round is launched and the units will attempt to carry out those orders in sequence, with the highest initiative unit going first, left to right through the initiative order bar. Orders include - adjusting stance (aggressive, defensive, hold position), act on a unit (buff a friendly, attack a hostile), move to a unoccupied tile (CTRL), move to a currently occupied tile (ALT) or any combination thereof. So very detailed orders can be issued but this is often unwise with units further down the initiative order, see section 2 for more on that. As in real life, terrain has a massive impact on the battle results. For example, never attack the Wild Walkers uphill, into a forest on a map that has a choke point. See section 5 for more on this. So, attributes. Each unit has a base health, initiative, damage, attack, defense and battle movement value. Health is pretty self explanatory, run out of it, you are dead. Note, units operate at full strength until they are destroyed. Initiative controls the sequence in which units act and is in many ways the most important attribute. Actual damage can be a critical, the base value, reduced, or nothing at all. The system will compare the relative attack and defense values of the two units then a dice roll will happen. Very high relative attack values will result in 20% critical/80% base/0% reduced/0% no damage. Very high relative defense values will result in 0% critical/0% base/75% reduced/25% no damage. Usually, the possible results will be somewhere between those ranges. The units base values will be adjusted by many factors including: being adjacent to friendly units (+morale which gives + attack and defense), being adjacent to hostile units (-morale for some units, i.e. ranged/support), having a height advantage (high ground, + attack), being in forests (+defense), charge bonus, hero equipment/skills, standing on a city tile (+ lots of morale), etc. In other words, there is lot going on and the actual army strength may bear little resemblance to it's paper values. Battle movement is again fairly self-explanatory being the number tiles a unit can move each round. However, some tiles, such as forest or rocks, cost 2 movement points. Flyers are immune to this slow down and can also fly over ridges, cliffs and even hostile units. They cannot fly over water, however. Values range from 1 for certain Defenders to 7 for some Tacklers, usually cavalry or flyers. See, section 3 for more on combat roles. After 6 rounds, or after all one side is dead, the battle ends. Note that draws are common, especially if there are many armies involved. Each army has one action point per turn and attacking uses that up, as do some other things. Defending and strategic movement do not use up that action point so counter-attacks are common and it's best to be prepared for them. 2. How to get your guys to do what you want Many people's first experience of combat in EL is a frustrating one as units seemingly develop (very small) minds of their own and blithely disregard the player's instructions. This results in shouting at monitors and needless deaths. In game results are not pretty either ^^ Luckily, there is straight-forward and easily understood key to avoid this. If you take nothing else away from this guide, take this: The initiative order is the key to battle, if you know this and issues orders accordingly your units will always, without fail, do as they are told. The problems mentioned above happen when the player issues an order to a unit that is impossible to comply with by the time their turn to act arrives. Then, they do start thinking for themselves and you do not want that. For example, the tile you told your tank to move to now has a hostile in it, or the flyer you told your ranged unit to shoot is now dead. What your unit will then try to do is very unpredictable and will be influenced by it's Stance, what targets are available, what state they are in, etc and is therefore to be avoided.
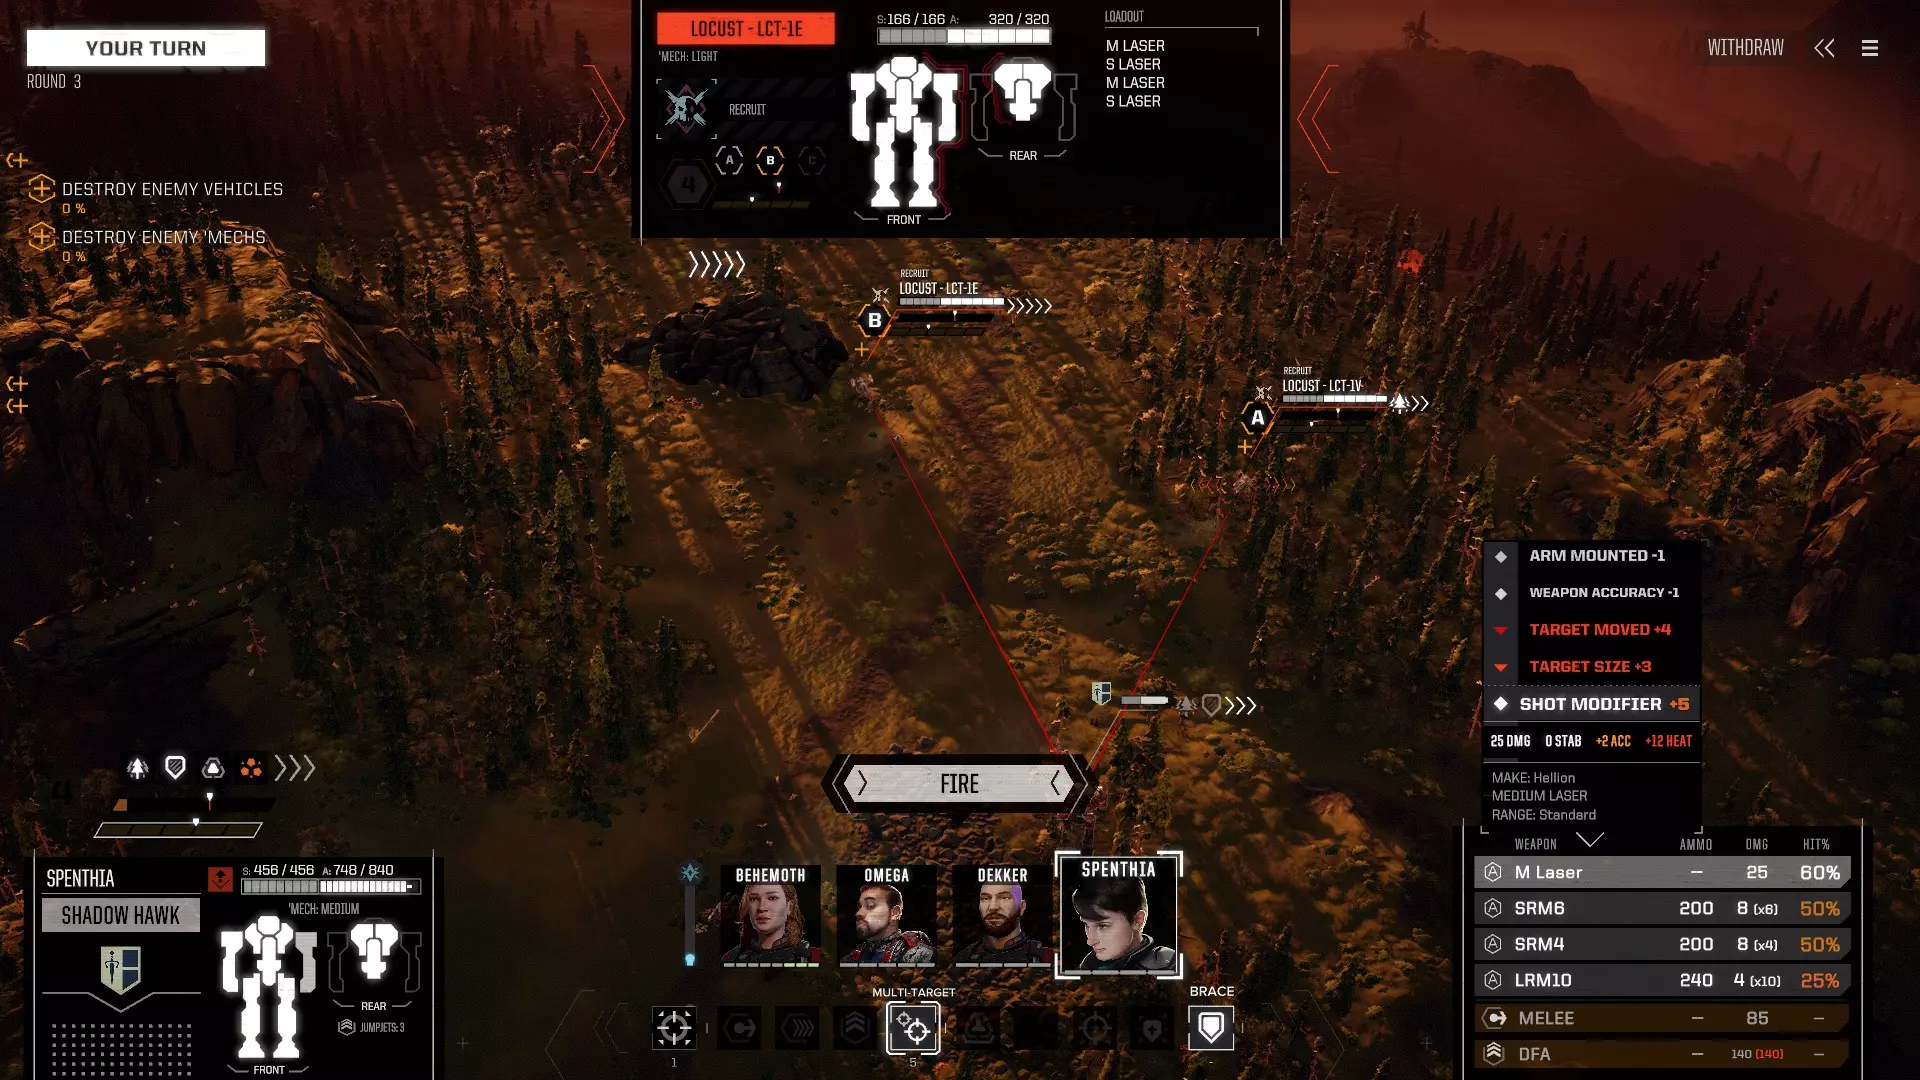
As you can imagine, having higher initiative than the enemy makes this all much simpler. It's not necessary for all your units to have higher initiative than all the enemies, this is where the Tackler role comes in (see section 3). Furthermore, some units actually benefit from lower initiative, notably healers and special counter-attack Defenders. So what do all these words mean in practice? Each battle is different but there are some rules that apply across the board: - Always issue orders to your units in the Initiative Order sequence. - The ones with higher initiative than all hostiles can be given orders as complex as you like, i.e. move to this tile and attack that specific unit. For these units Stance is irrelevant, you have total control. - If you plan to have multiple units attack the same hostile, make sure it is still alive when your last unit attacks. Look carefully at the maximum damage your units can realistically do and plan accordingly. It's often far better to damage 3 hostiles on round 1 and definitely kill them on round 2 than risk chaos. - Pin down the higher initiative enemy units so you know where they will be, killing them should be a high priority. - For low initiative Defenders, setting Stance to hold position or just giving them a movement order is often wise. - For low initiative units with a ranged attack, most likely support, tell them to move to safe tile behind your tank wall and let them choose their own target. They will then attack, heal or buff as appropriate and won't go running forward (if on aggressive stance) to shoot a wounded hostile. - Defensive stance can't be trusted, avoid it and use Hold Position or a safe movement order for ranged/support/defenders, or Aggressive for Assaults if that seems sensible. - The further down the initiative order your unit is the more cautious you need to be. Don't issue multi-step orders unless you certain they can be complied with. 3.1 Combat Roles - Units While there are only three unit templates per faction and the option to add three more via assimilation there is a bewildering array of ways to equip these units. It's best to add a new design for each role and label it clearly. On an empire level there are two main army set-ups. Those who have ranged units as the primary damage dealer, i.e. Wild Walkers, Vaulters. Then we have those who have melee Assaults in that role, i.e. Drakken, Necrophages. As a result the ranged factions need Defenders, the others do not. Conversely, a ranged set-up doesn't need an Assault. As this is Endless Legend there's always someone being awkward and here that would be the Broken Lords. They start with an infantry unit in an Assault role as key, then later switch to a ranged lead with the rather awesome Dust Bishops, this requiring the infantry to perform a Defender role. As always, exceptions exist. Key unit roles are as follows: Garrison: These units will have basic equipment, no strategics and can be mass produced and sold as required. Unless you have extremely high production via Industry or Dust it is unlikely to be worth bulk outfiting them with even Iron accessories. Filling those slots greatly increases production cost and as of the recent balance changes, the benefit is reduced. Ensure at least one unit has the Improved Vision ability to help track any nearby hostiles. Garrisons should always be a mix of units, balanced enough to take care of themselves should something go wrong. Scout: Base game: A high mobility unit with + move and + vision, likely to be operating alone. Cavalry and flyers are best in this role. In Shadows things are rather more complicated for these units. Forgotten units can be equipped as previously as all start with Stealth. For other units it might be wise to fit a Camouflage (stealth in forests) accessory in place of either the + movement or + vision depending on map type and threat level. Tackler: This is an essential role to have in your order of battle, though it will not be required in every fight. These units have two jobs: Firstly, to tackle and pin down high initiative enemy units so they are not free to create havoc and instead can be killed by the rest of your army. Secondly, to block enemy reinforcement positions. These units need higher initiative than at least all non-Guardian hostiles and great mobility, again cavalry or flyers. Generally should be fitted with + movement (especially those with Charge), + initiative accessories, and strategics that add yet more initiative. With 1.2 various other set-ups are viable for units that already have sufficient initiative and mobility, i.e. +Defense, Death or Glory, or Free Counter. Most of these units are fragile so once they have done their job get them out of trouble or use them as bait and kite.
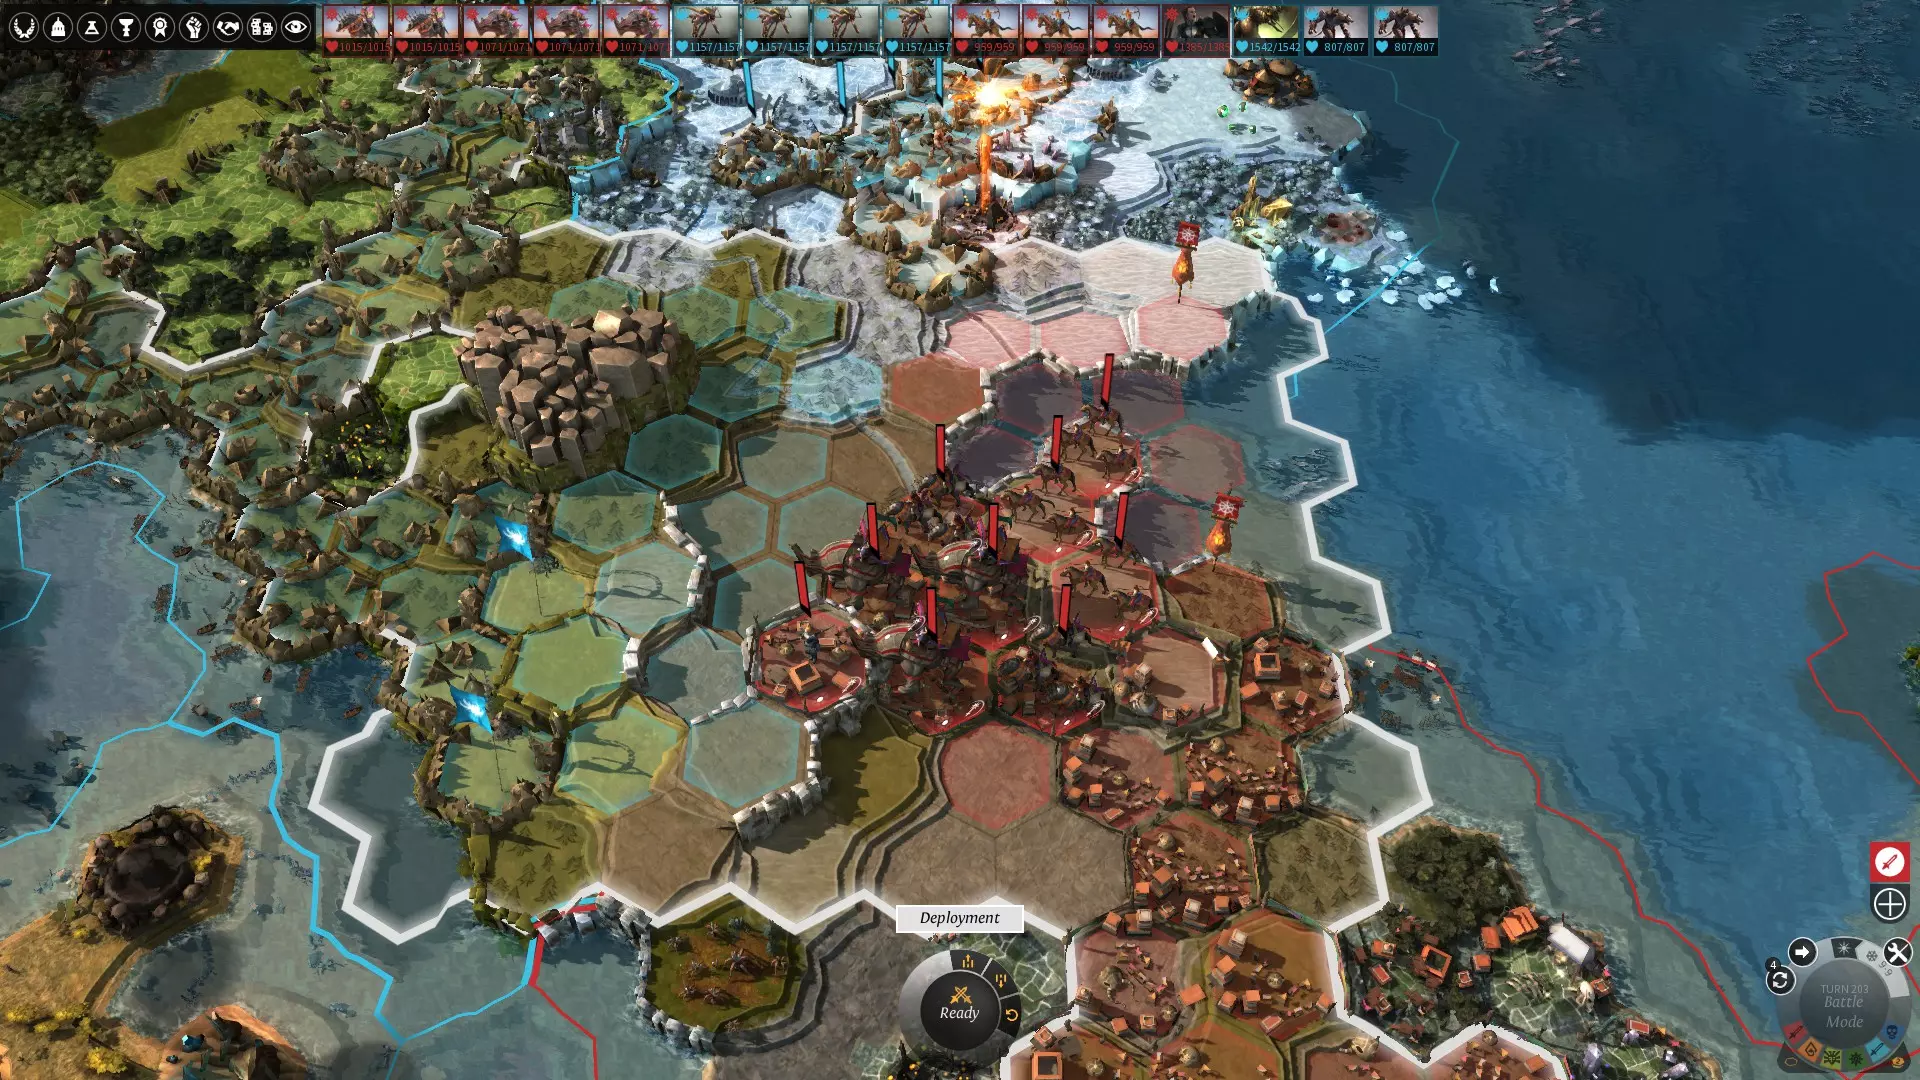
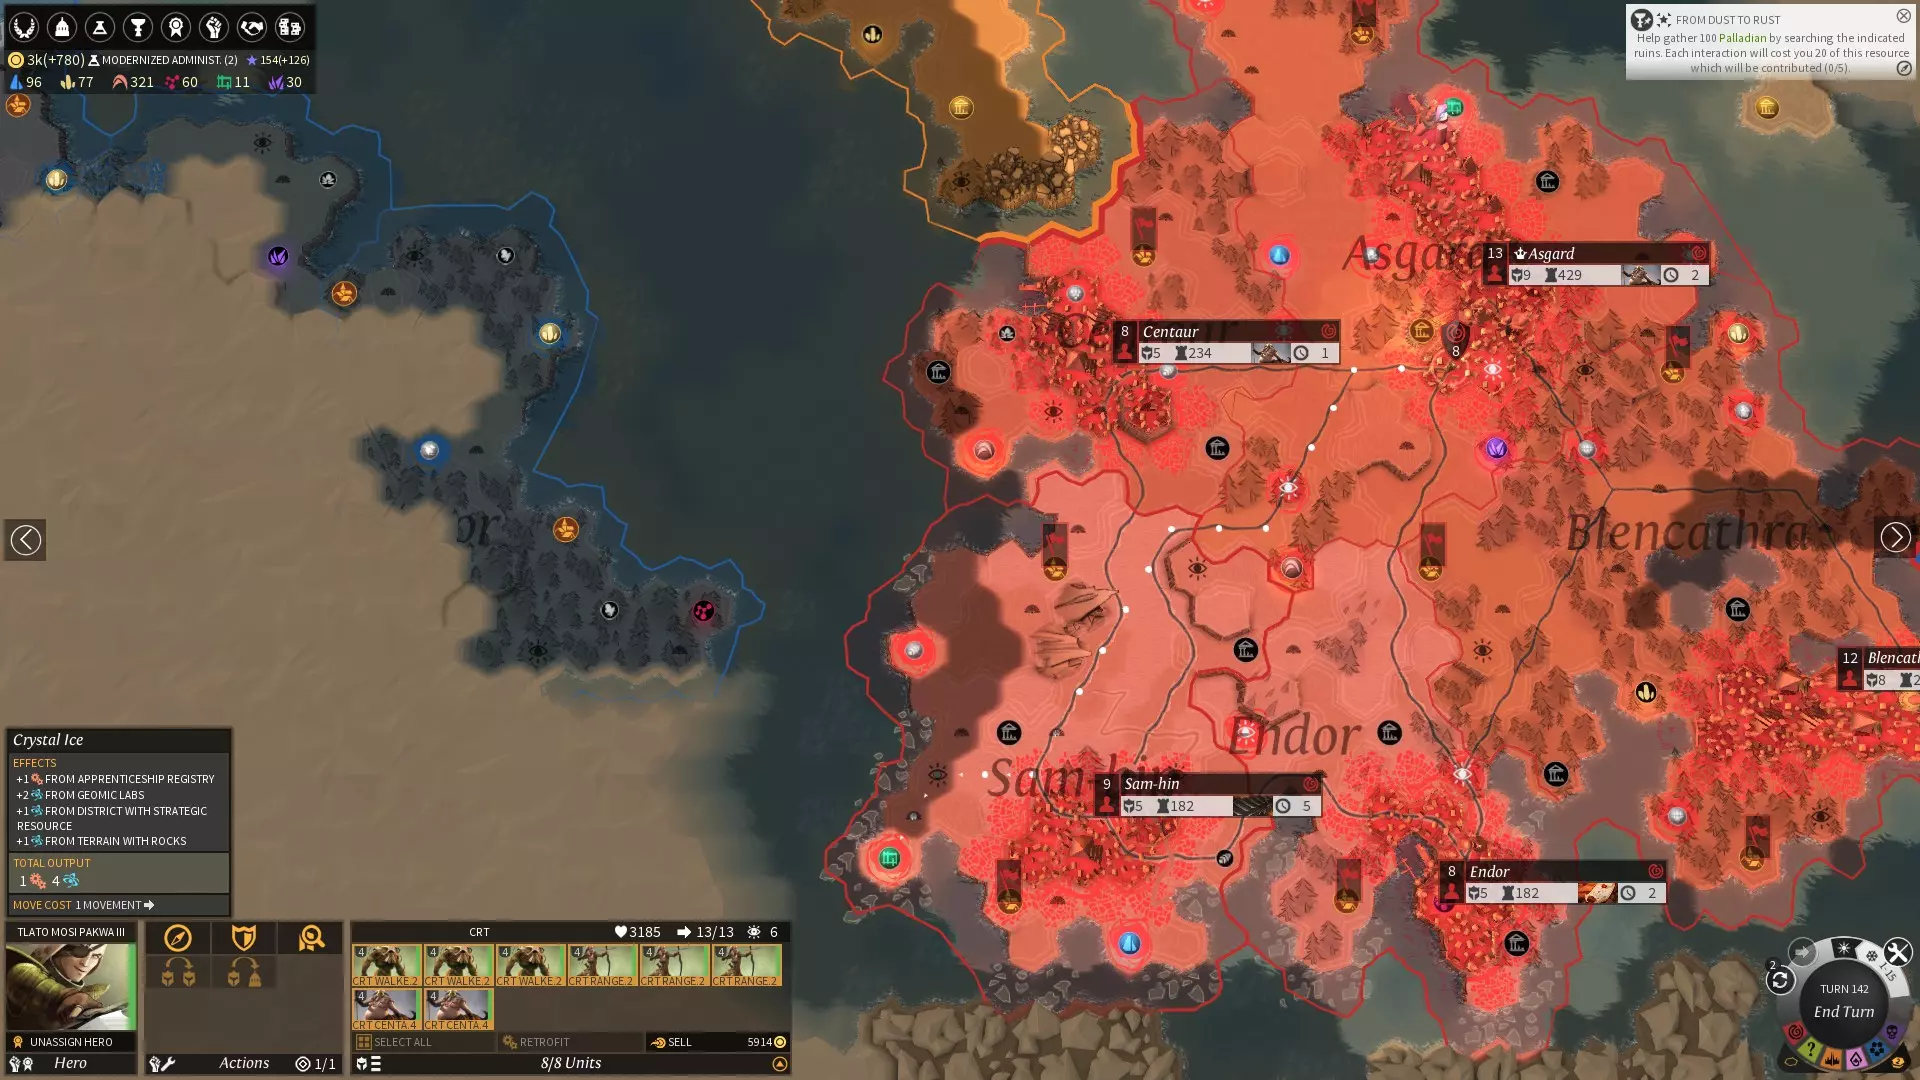
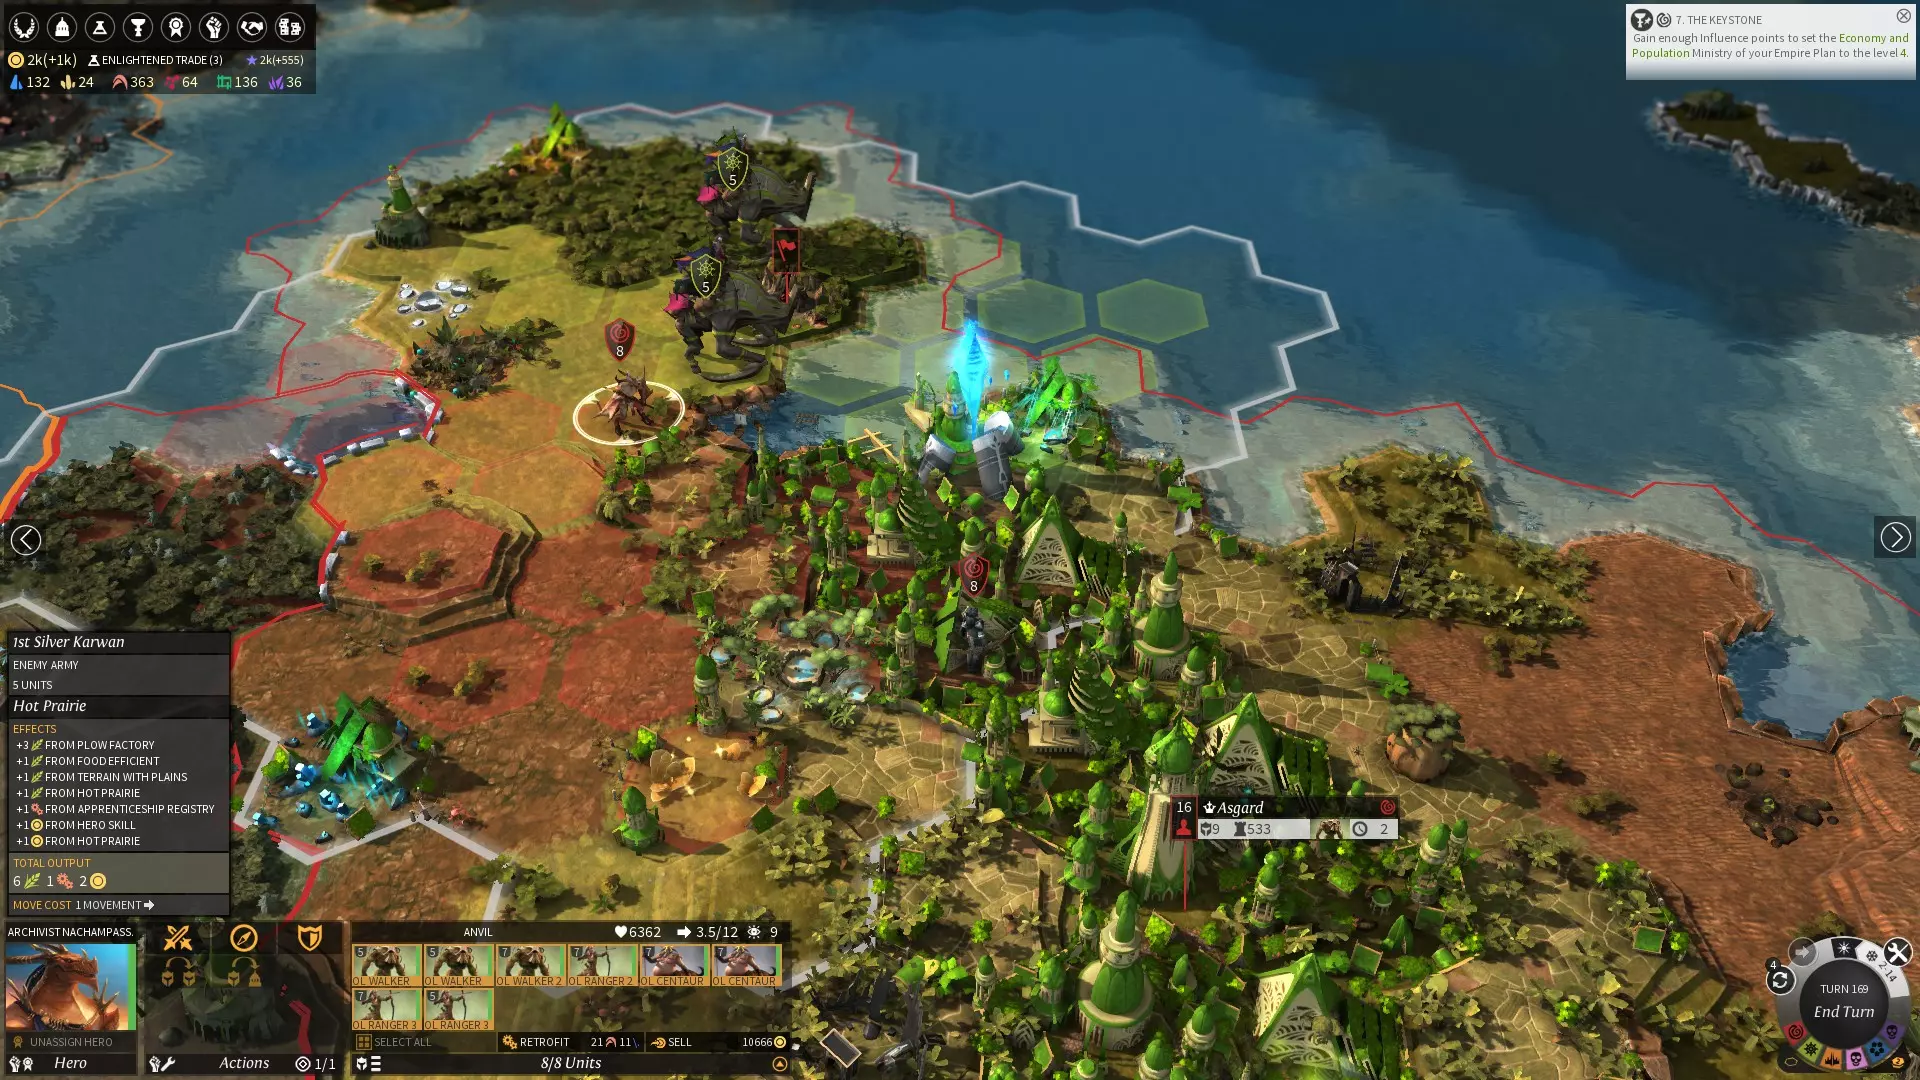
Above, the screenshot shows the Tackler role in action. The Centaurs will be blocking both enemy reinforcement positions on round 1, giving us control of the battleground. Defender: These guys, often infantry, are there for one purpose, to stop hostiles getting at your vulnerable Ranged and Support units. Use them to form a tank wall, they don't need high initiative, get them to Hold Position or slowly fall back and take advantage of their special counter attacks as the hostiles fling themselves at them. Fit for durabilty and damage by whatever means are suitable. Assault: For some factions these will be the primary damage dealers so require mobility and decent initiative. Use them to focus fire on units pinned by Tacklers, then any other high value targets. Good examples of this role are the Drakkenling or Necrodrone. Specific outfitting advice is difficult, it depends. Ranged units: For other factions this is the main damage dealer. High initiative is essential to enable focus fire and increased mobility surely helps, so glassteel and paladium are good strategics to fit as weapons. Accessories would ideally be + initiative and the other is matter of taste. However, resist the urge to add straight-out extra damage via a titanium accessory, instead, if resources allow, add + attack or + movement. Better to get into the 20/80/0/0 results range than have potentially high but unpredictable damage, this can cause more problems than it solves. Support: These units vary wildly in abilities and function. Essential for certain factions, i.e. Dust Bishops for Broken Lords, others, not so much. Again, hard to give specific advise due to unit variety. Units that heal, damage/debuff or give passive buffs to adjacent friendlies are extremely useful. Ones with a targeted buff are poor value and should be avoided unless no other ranged attacks are available, the battles do not last long enough for this role to shine. Be aware Support will be a high priority target for the AI and use this against it. A note on flyers: These can perform a variety of roles but are not one in and of themselves. For example the Haunt is a fantastic Assault, whereas the Nidya makes a an excellent Tackler. However, all flyers are very vulnerable to Longbow attacks and therefore be wary of taking too many into battle, especially against factions that are ranged heavy. The AI is, surprisingly, capable of spotting a one trick pony set-up and countering it. It will even assimilate and mass produce a counter from a minor faction if required, should it be hit over the head enough times. 3.2 Combat Roles - Heroes Each faction has a number of heroes, each of the same role but with differing attributes. Note, any hero can be recruited through the mercenary market by any faction. For example, if you are playing the Drakken, you can recruit a Necrophage hero if you so desire. Other heroes from other sources can be acquired but those will not covered here. As this a combat guide, only military aspects of the heroes will discussed. Basic abilities and main advantages of each faction's heroes are as follows: Ardent Mages: Support, with ranged damage/debuff and targeted buff, + 1 battle movement Broken Lords: Assault or Defender, can be healed with Dust, only hero that can use 2H'd swords Cultists: Defender: Can be equipped with claws for special counter-attacks Drakken: Support, with ranged damage/debuff and targeted heal, + 1 battle movement, can heal, gains XP 25% faster, huge health pool. Note their heal has been reduced as of 1.2. Forgotten: Assault or Defender, starts with Stealth, can use 2H'd Swords, claws, can dual-wield 1H sword and axe giving both Slayer bonuses at the same time, can give entire army Stealth with correct promotions. More on these guys later ^^ Necrophage: Assault or defender, + 1 battle movement, immune to disease, can use any melee weapon apart from 2H'd swords Roving Clans: Ranged damage, +1 battle movement, + 2 strategic movement Vaulters: Ranged damage, + 1 range. Ironically this makes them the best leader for a Wild Walker army as their hero is out-ranged by his own units Wild Walker: Ranged damage, +1 battle movement, + 50% attack in forests On hero recruitment What role and therefore which heroes are suitable to recruit should be fairly clear, however, not all heroes are created equal. Indeed, from a combat aspect some are far better than others. Red Warning: Endless Legend let's us stack almost anything except the inherent hero abilities (see the far right of their character sheet) and accessories with the same name. In other words, if a hero has the ability Army Initiative Boost 3, fitting the glassteel accessory giving Army Initiative Boost 2 will do nothing. This needs to be considered when recruiting. As of 1.2 Hero inherent abilities to look out for as they are arguably the best for army leaders: Army Defense 3 and Army Attack 3, these values have been heavily buffed. Army Boost, a buff to various abilities which stacks with accessories. Any other specific combat skill at level 3, i.e. Initiative, health, damage, etc. To fit an accessory as good as the level 3 abilities you will need the appropriate tech at level 3 and a lot of strategics, both of which can be hard to acquire. 4. Strategic level planning and area defense principles So we know the basic rules of the combat system, how to control our units and what roles they should be performing. Surely that's all that's needed, you ask? Sadly, no, more words are required because that only covers the tactical level and Endless Legend is a strategy game. So, brave reader, let us plunge into the murky world of strategy... Endless Legend does an excellent job of presenting the player with many things that can be done but not enough resources to do them all. So the smart strategy is to use those resources as efficiently as possible, that way we can have more things. The main limiting factor is usually strategic resources, to a lesser degree, industry and dust. As was described in section 3, roles, garrisons do not need strategic resources and few field army units need titanium. This is helpful because industry, fortification and science buildings all require loads of it. You are still likely to run out if pursuing an industry production strategy and turn your cities into super-fortresses. Luckily, city fortification buildings are not needed if an efficient military strategy is followed. Each borough you build and level will raise the defense of the city and it's primary defense will in any case be a large garrison. City garrisons should be maintained one unit below capacity, be balanced so they can fend for themselves and be activated as a reinforcement army if required. Units in a garrison cost minimal or zero dust maintenance and help level those heroes that are city governors more quickly - each construction and unit managed increases XP gain. Getting heroes early and leveling them fast is essential to your military strategy. As soon as is possible recruit one or more suitable heroes to manage cities and level the left side of their skill trees, making a straight run for the Cold Operator skill. As you will see having this skill is vital for area defense and extremely handy for leading offensives. Joyous news:The problem with Cold Operator has AT LAST been fixed and we can now give our heroes that promotion as soon as it becomes available. If the hero changes assignment after getting this skill the benefit is no long lost, let there be dancing in the streets! While you are leveling your future army leaders start building the units that will be in your field armies. If strategics are still short, give them iron & dust gear and re-equip them later. Be aware that refitting to a different strategic wastes the previous one, refitting to a different item that uses the same strategic is free, as long as it is the same tier. Example: Your army leader is leveling in a city so the + science accessory is very useful. If you refit to + army damage boost when you place them in an army this will cost nothing. So, area defense. Your hero has Cold Operator and they are leading your first fully tooled up field army. Place the army in the center of your territory and do whatever it takes to ensure they can hit every tile of that territory in one turn, even in the winter. This might require Endless Mechanisms or Empire Plan + movement, fitting the entire army with the + movement accessory or further efforts, exactly what is required depends on circumstances. I refer to this army as the Crash Response Team (hat-tip to Peter F Hamilton).
This way any threats to your empire can be smashed on the beaches where they cannot deploy properly. If required activate one of those large, cheap, balanced garrisons you built earlier and call them as reinforcements. This is somewhat harder on a Pangaea map, in that case, again look for an opportunity to hit the enemy where they cannot deploy fully, there almost invariably is one. Clearly, you want full visibility of your perimeter so your CRT can do it's job. Either build watchtowers or play the Wild Walkers, in that case The Sharing will warn you of inbound hostiles in time. If you have Shadows, Watchtowers are pretty much essential regardless of who you are playing and the CRT leader should have a Detection Accessory fitted. The CRT strategy means your land is safe so if you are pursuing a peaceful, Civ-like play style you don't need any more military and can get on with building all the nice things you wanted, having hardly spent any strategics on military. If you do want to go out and crush your enemies another couple of armies will likely be needed. Either two more balanced armies able to operate independently or a dual army set up (as of 1.2 this is probably wise), see appropriate section for that. One last thing on the strategic level, the Empire Plan. If you know serious warfare is likely in the next 20 turns, adjust your influence spending to at least level 2 for + attack or ideally level 4 for + health. If the threat is the Necrophages the + health is of less value but still has a use if your influence pool allows. 5. Operational level planning This is the activity that takes just before combat starts and can make all the difference between victory and defeat. To quote Sun Tzu "Victorious warriors win first and then go to war, while defeated warriors go to war first and then seek to win." Please feel free to read that in the voice of Leonard Nimoy. So, things you should be doing at this stage include: Activate your combat boosters: These include the somewhat creepy Pixie Blood (+ health regen) and the very powerful Blood Crystal (+attack). Don't waste combat boosters as approval modifiers, it's easy to get all your cities Fervent by other means. As you will have seen from the previous sections, Attack is a very important attribute. Reshuffle your assimilated minor factions: Change the ones that give economy buffs to those that give combat bonuses. For example, you currently have a minor assimilated that gives + food, while you have another pacified, unassimilated, that gives + initiative who clearly is going to be more help right now. After the war is over, swap them back once influence allows. Look at the enemy forces arrayed against you: Consider what do you need to bring unit-wise to counter them. For example, the Vaulters are bringing 2 full armies of Dawn Officers, both led by heroes. These will have insanely high initiative, mobility and Ranged Slayer so the last units you want on the battlefield are ranged units. However, Defenders will slaughter those armies, so bring them instead. If need be, refit your units, remember there is no strategic resource cost when swapping items that use the same material, as long as they are the same tier. Decide on Reinforcements: Ask yourself these questions - Is there a city whose defenders can help as a reinforcement army? Can they help and get back where they belong in time to avoid the risk of their city being attacked without their presence? Do you need reinforcements at all? Lastly, be aware there is a situation where you don't want a crowded battlefield, this is fighting a Necrophage army. Their disease ability will spread throughout your armies if that's the case and this is bad. Choose your ground: If your army is Assault based you most likely want a nice, flat, open space with no choke-points. If your army is Ranged based the opposite is true. As mentioned above, always hit the enemy where they cannot deploy properly, then you can turn the battle into a turkey shoot. This would include where the enemy is on the beaches, against a ridge, or one of your cities etc. The absolute perfect place for a killing field is the end of a peninsular, there they might only deploy one unit at a time. If you have the option to have the high ground, take it. Be aware direction of attack matters as well as location, i.e. attack directly towards the beach = victory, along the beach = messy. Also, beware of cliffs if using an Assault based army, especially if facing ranged or flying units. You can get blocked very easily and this results in events of spectacular grisliness.
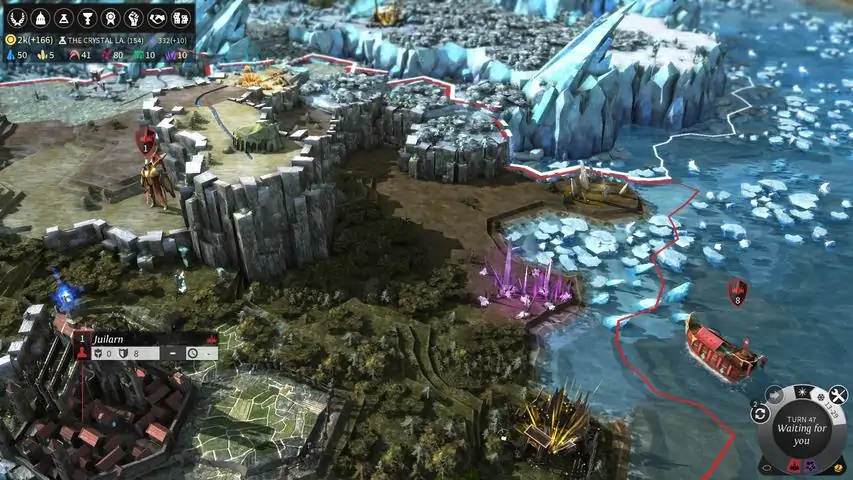
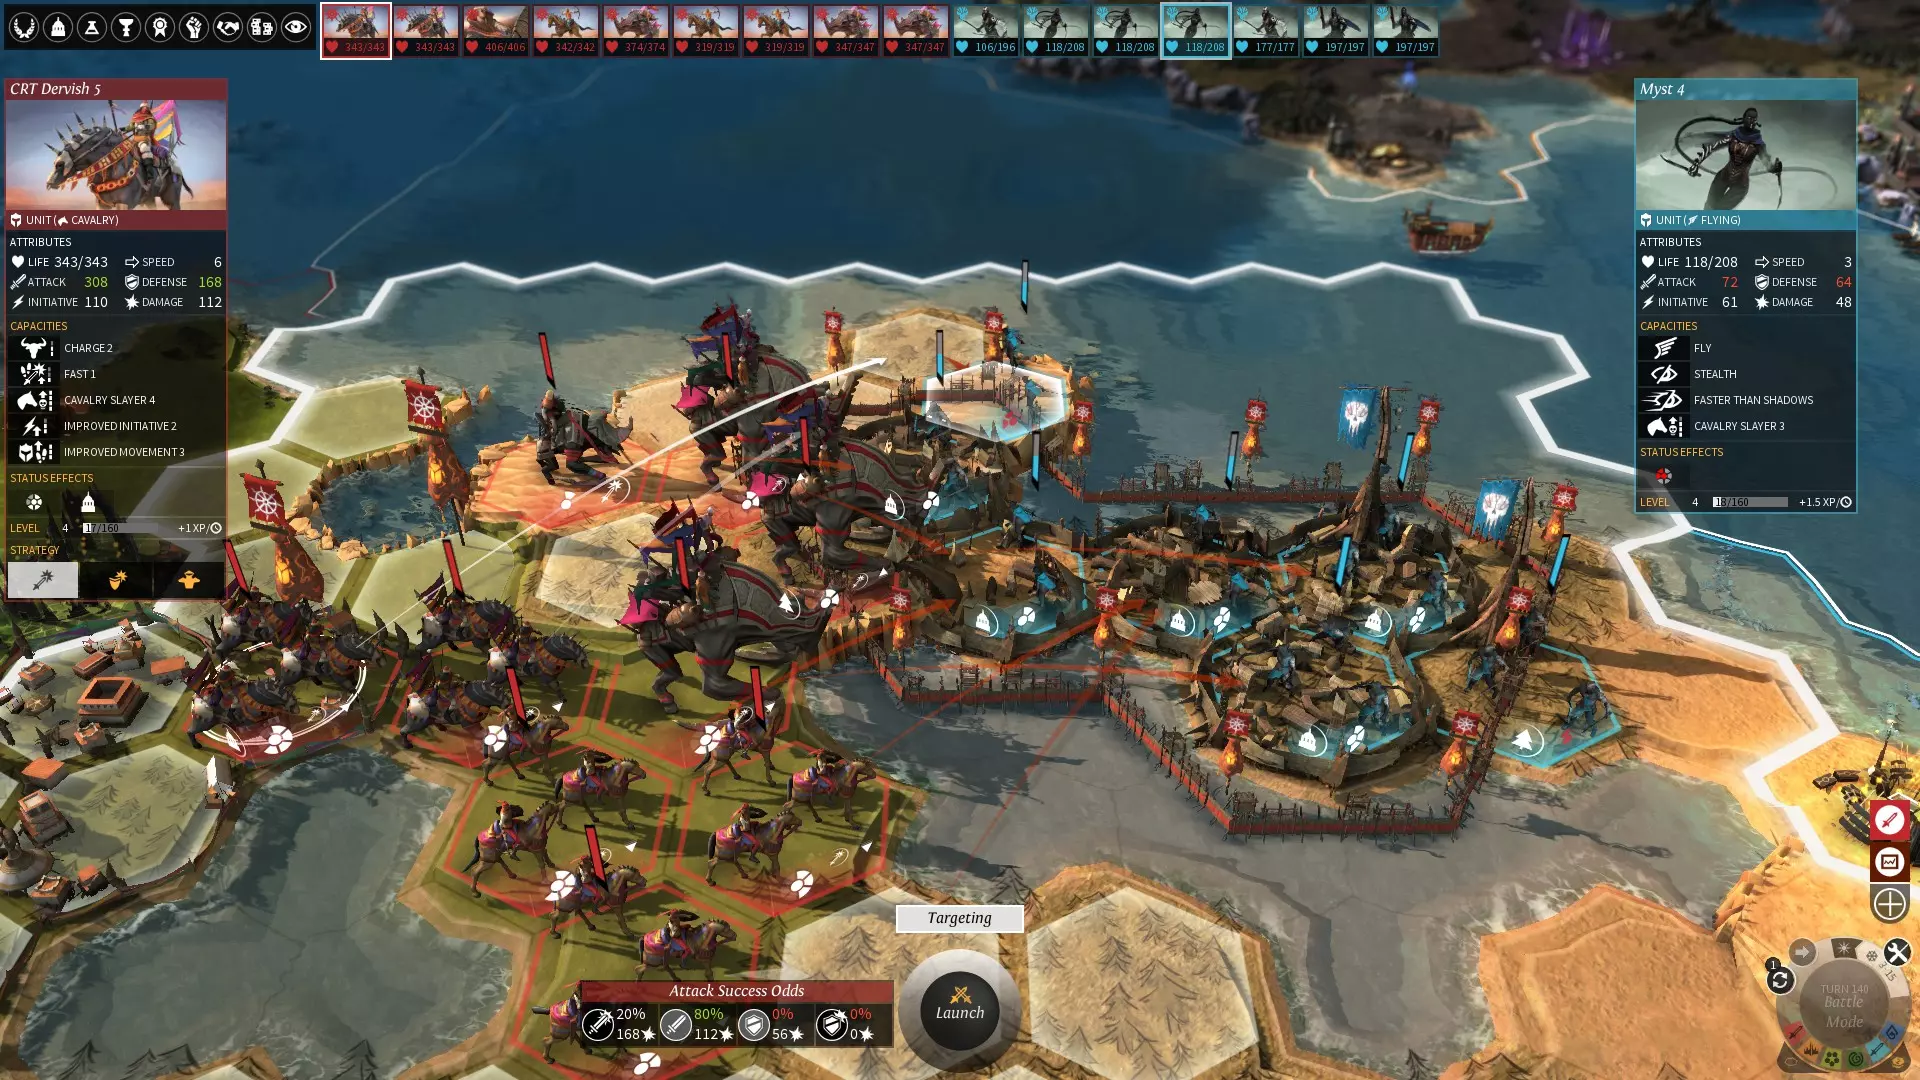
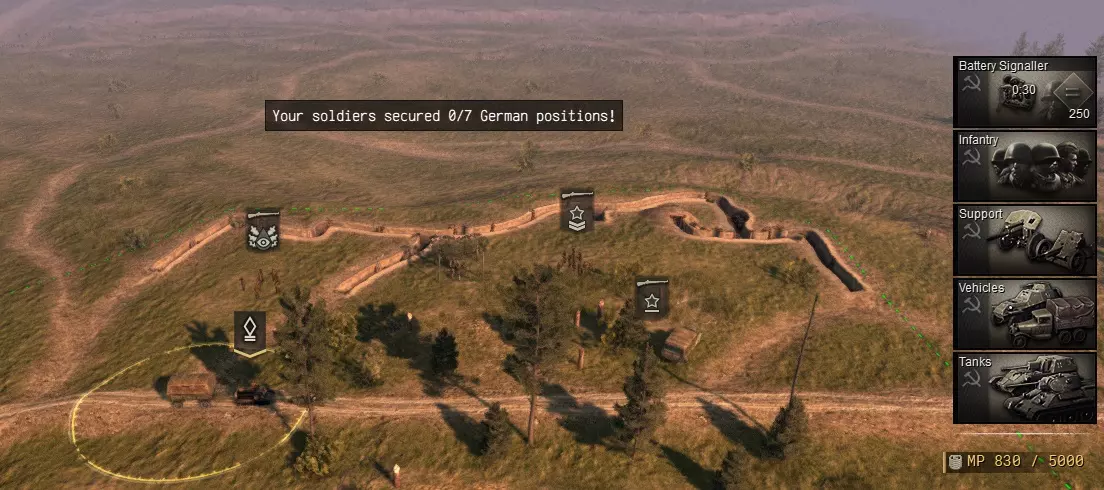
不要做的事: 不要坐以待毙:在《无尽传奇》中,被动就意味着失败。不要让敌人决定战斗地点,不要让他们发动围攻。作为玩家,你需要主动推动事件发展,而不是让AI主导。 6. 部署阶段 这部分很简短。嘿,后面的别欢呼了! 总之,部署阶段是玩家在战斗开始前进行最终调整的机会。这看似不是游戏的主要部分,但稍有疏忽就可能葬送之前的所有努力。我们在这里有个巨大优势,因为AI总是先部署,我们可以利用这一点。所以: 仔细观察战场。留意任何悬崖、山脊、台阶和其他瓶颈地形。由于地图的布局方式,从某些角度看,很容易将悬崖误认为楼梯,或者将楼梯误认为悬崖。记住,悬崖不会对飞行单位造成影响,但会阻止非飞行单位进行近战攻击。
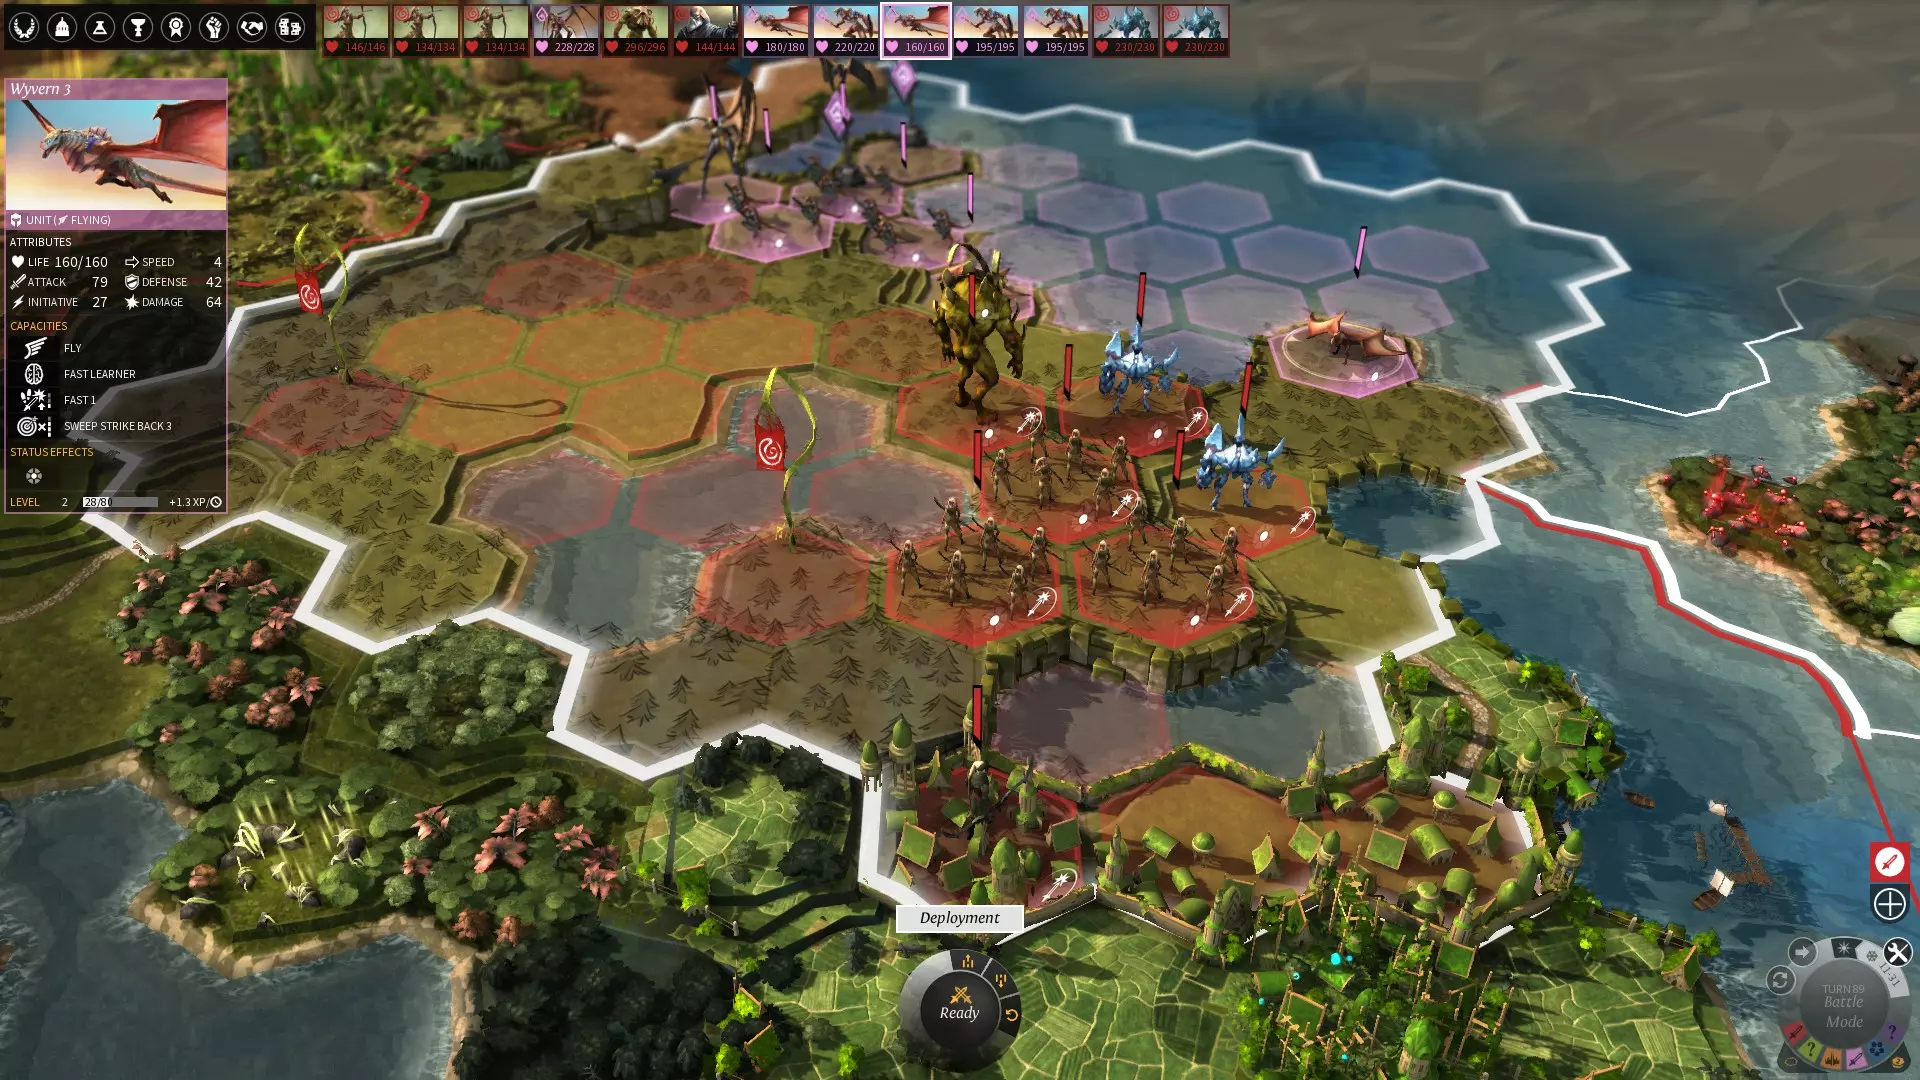
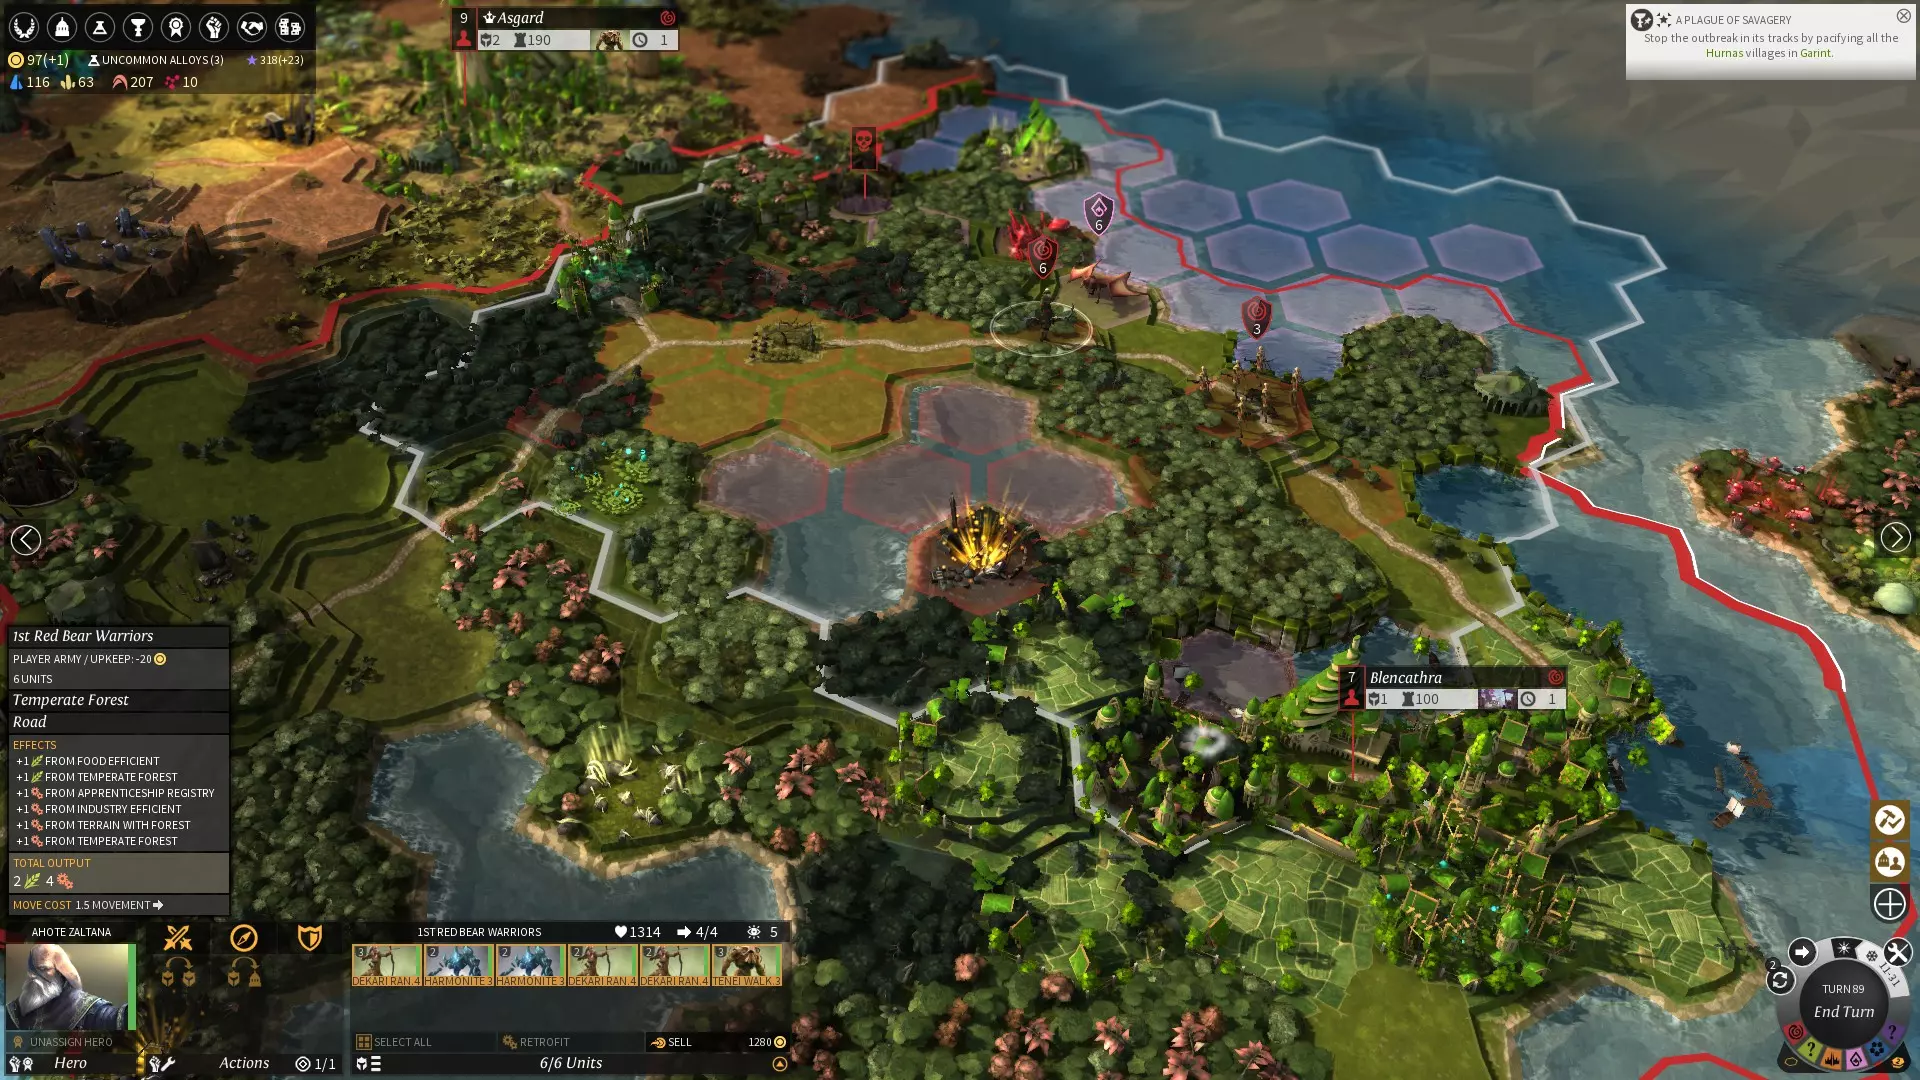
上面的截图很好地说明了在部署阶段谨慎操作的重要性。 我们看到我方军队在海滩上迎击入侵的德拉肯。他们有两只战斗移动力为4的双足飞龙,这些飞龙可以飞越我方防御者,这很不利。 其中一只飞龙可以在第一回合被树人牵制,因为树人拥有更高的 initiative( initiative ),但另一只必须在它行动前被消灭。图中的部署确保了这一点,并且我方增援部队的位置不会被阻挡。如果采用默认部署,战斗结果可能会胜负难料,而现在敌人几乎只能坐以待毙,这很不错。 在 initiative order( initiative order )阶段,要考虑所有战场特征来调整部署位置,确保我方单位在第一回合不会互相阻挡。如果你打算采用防御者/坦克壁垒加后撤的战术,就特别容易出错。 试着预判AI在第一回合会采取什么行动。AI的攻击优先级通常是:受伤单位、英雄、支援单位、远程单位,以及任何它有“杀手”(Slayer)效果的目标,然后才是其他单位。这并非100%可靠,但要结合行动顺序考虑AI可能采取的行动,必要时进一步调整部署。 如果你要召唤援军,注意不要将主力部队的单位停放在自己的援军位置上,也就是带有己方旗帜的格子,除非万不得已。 在重要战斗中,永远不要接受默认部署。围城规则 在《无尽传奇》中,围城战通常是最为复杂的战斗,玩家需要了解一些相关规则。本节不会提供具体建议,仅解释适用于战斗的规则,经济影响不在讨论范围内。 若城市中有“Vault”派系英雄,情况会变得尤为复杂。如果你正在使用该派系,建议阅读相关的派系专属指南。 围城战的大部分复杂性源于判断防御加成是否生效。若判断失误,可能会因过度谨慎而错失良机,或者意外面对27支拥有超过1000额外生命值的部队——显然,这种情况结局往往不妙。规则如下: - 开始、结束或重新开始围城不会消耗军队的行动点,也就是说,你可以在同一回合先攻击,然后在需要时进行围城。敌方同样可以如此操作,请注意。 - 若军队位于城区地格上,则无法被攻击,此时攻击将直接变为对城市的进攻。 - 敌对军队无法占领城区地格。我们需要注意这一点,因为这通常会限制围城的可能起始位置,尤其要考虑到军队也无法占领村庄、废墟或山脊地格。特别狡猾的玩家可以通过布置城区的方式,使城市极难安全围城,因为一旦发生反击,仅有的有效围城地格将无法让军队完全展开。 - 围城只能在与城区地格相邻的陆地地格上开始,即行政区本身、城市中心以及与敌对城市位于同一区域的传奇建筑。 每回合结束时若围城状态持续,城市的防御加成将会降低。也就是说,如果围城开始后,围城军队在同一回合被摧毁或撤离,防御值不会损失。防御值的损失量取决于围城单位的数量、强度,部分英雄技能和装备也能提升此效果。对于高防御值的城市,将其防御值降至零可能需要很长时间。由于回合结束时的状态才是关键,攻击者可以先撤离、消灭部分单位,然后返回继续围城,且不会受到惩罚。当城市防御值降至零时,守军将开始受到伤害,此时无需实际战斗即可通过这种方式消灭他们。不过这种情况很少发生,因为守军在意识到坐以待毙等同于自杀时,会尝试突围。 如果围城玩家在防御工事被摧毁前选择攻城,剩余的防御值将作为固定的免费生命值加成附加给所有守军。例如,无论是可怕的埃涅奎亚之翼还是普通的民兵,都能获得相同数量的额外生命值。该生命值加成在战斗之间会完全恢复,即使战斗发生在同一回合。进攻单位需要先消耗掉这部分加成生命值,才能对守军造成实际伤害。注意,即使只有1点缓冲值,也能完全抵消攻击造成的“实际”伤害。 战斗中,剩余的生命值缓冲值会以白色部分显示在防御方彩色血条的上方,当缓冲值被消耗时,白色部分会变为灰色。 对有防御工事的城市发动攻击时,防守方的所有单位(无论是否在城市内)都会获得生命值缓冲。可想而知,在这种情况下发动攻击是极其危险的。在其他任何情况下,生命值缓冲都不会生效。
围城期间,战略地图上栅栏标记的地块,双方均无法派遣军队通过。 被围困的单位和英雄有时无法进行休整或变更任务。如果你的某座城市不可避免地将被围困,建议在围城开始前更换英雄和装备。 只要围城状态在回合结束时持续,所有被消灭的民兵单位(通常会在下一回合重新出现)将不会再生。 城市防御值每回合会恢复一定点数。部分建筑和英雄技能可以提升该恢复值。 如你所见,围城战可能会持续过长时间,也可能充满风险。关于如何避免这两种情况,可参考《如何快速攻克要塞》。双军队配置 在经历了令人头疼的围城规则后,接下来是有趣的部分——如何组建一支势不可挡的杀戮机器。 如果你计划入侵科技水平相当或更高的派系领地,大多数人认为最好派遣两支军队。如果只派一支,无论它有多强大,你操作得多好,都有可能被逐渐消耗殆尽,这主要是因为在己方领土外,部队的生命值回复会降低。 最简单的选择是组建两支均衡的军队,它们既能协同作战,又能在需要时独立战斗。虽然机动性总是有帮助的,但CRT(原文保留)所要求的对速度的过度追求在这里并不那么重要。在很多方面,进攻时部队的耐久性更为关键。由于选择理想的进攻地点可能会更加困难,因此在携带哪些单位时需要更加谨慎。如果有可能,首先要侦查到敌人的动向,这样你才能知道需要用什么来克制他们。和往常一样,由于派系的多样性,很难给出更详细的建议。如果敌人是“遗忘者”(Forgotten),或者使用了大量潜行单位,那么让一名英雄装备侦查类饰品,并让每支军队中都有一个单位通过饰品获得+视野,以避免遭遇令人不快的突袭,可能是明智的做法。
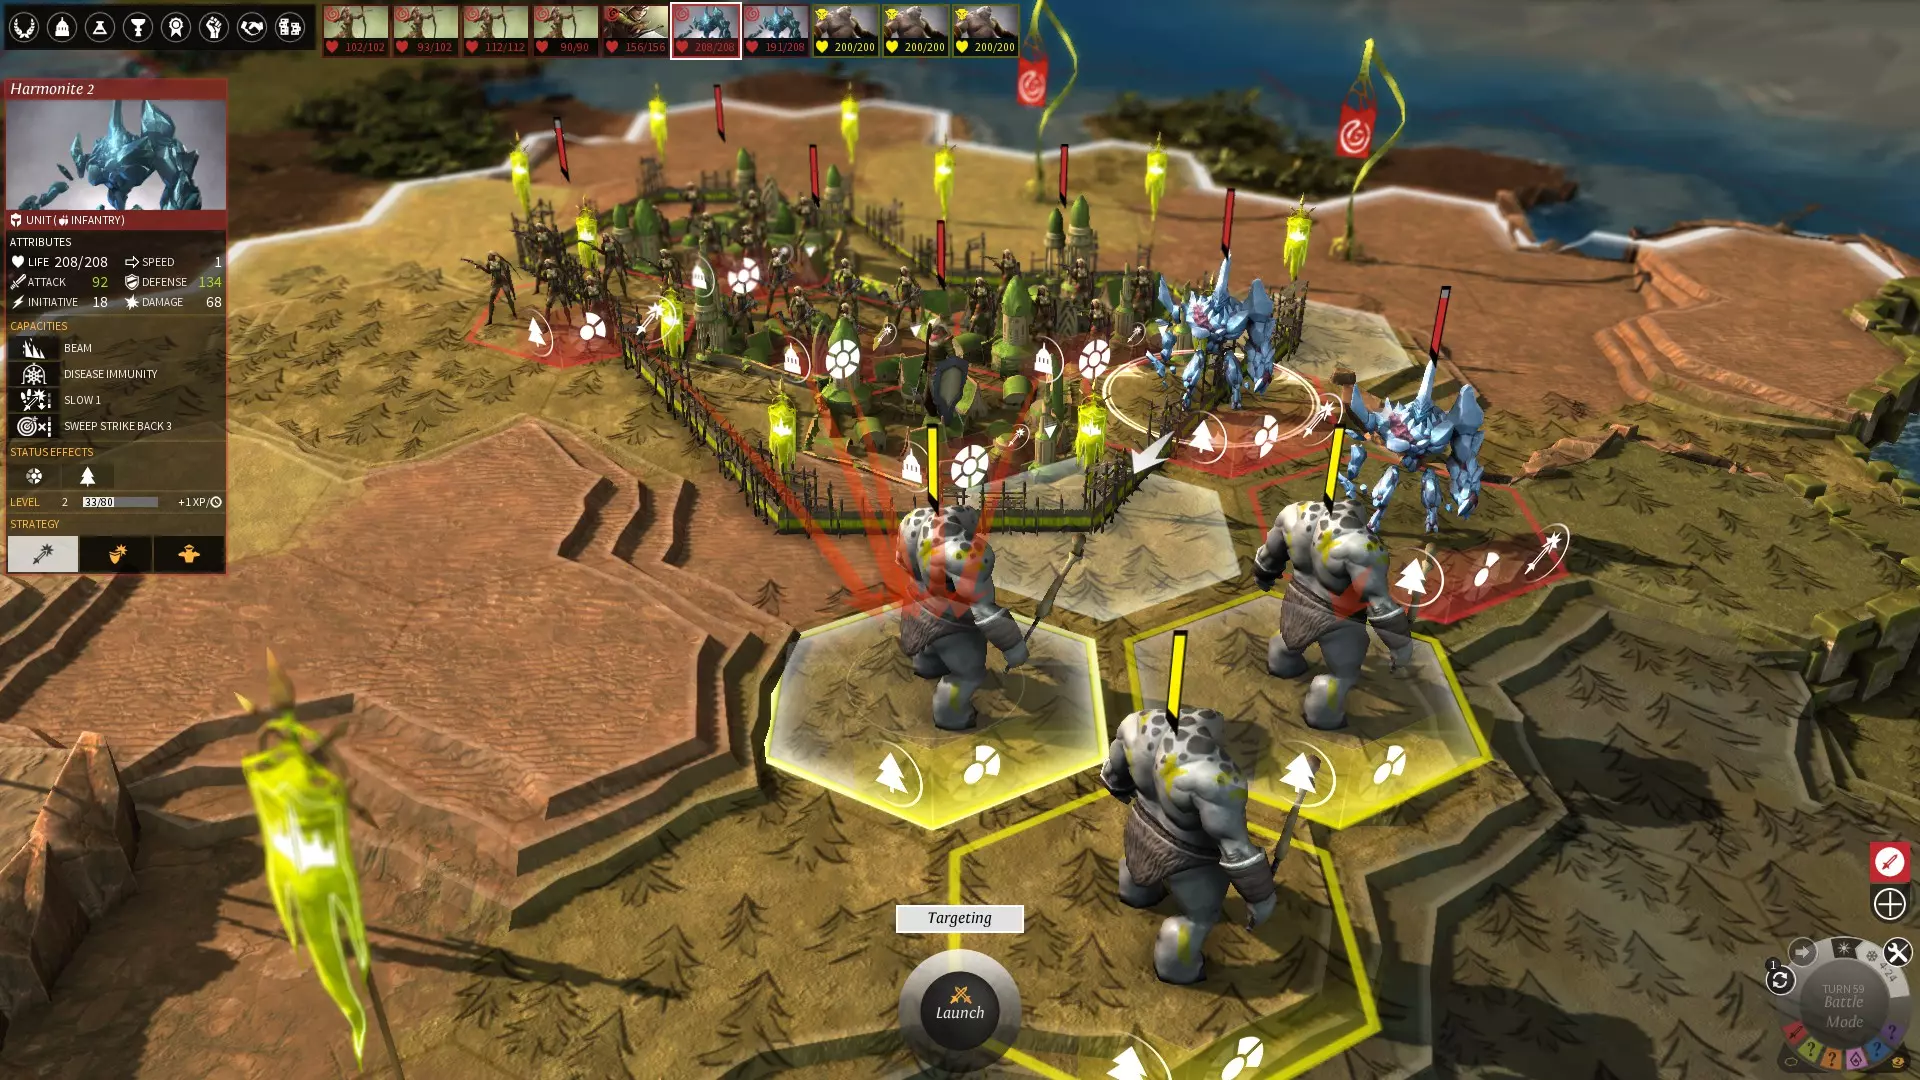
上面的截图展示了两支协同作战的均衡部队。注意,由辅助英雄率领的那支是主力部队,能获得每回合额外增援的增益效果。增援部队已被撤回并驻守在城市区域,在那里它是绝对安全的,不会受到攻击。在这种情况下,完全的防御姿态其实并非必需,但这样做也并无坏处。 对于你的入侵部队而言,更复杂但也更强力的选择是采用双部队配置。这些部队旨在协同移动和作战,分为一支主力部队和一支增援部队。
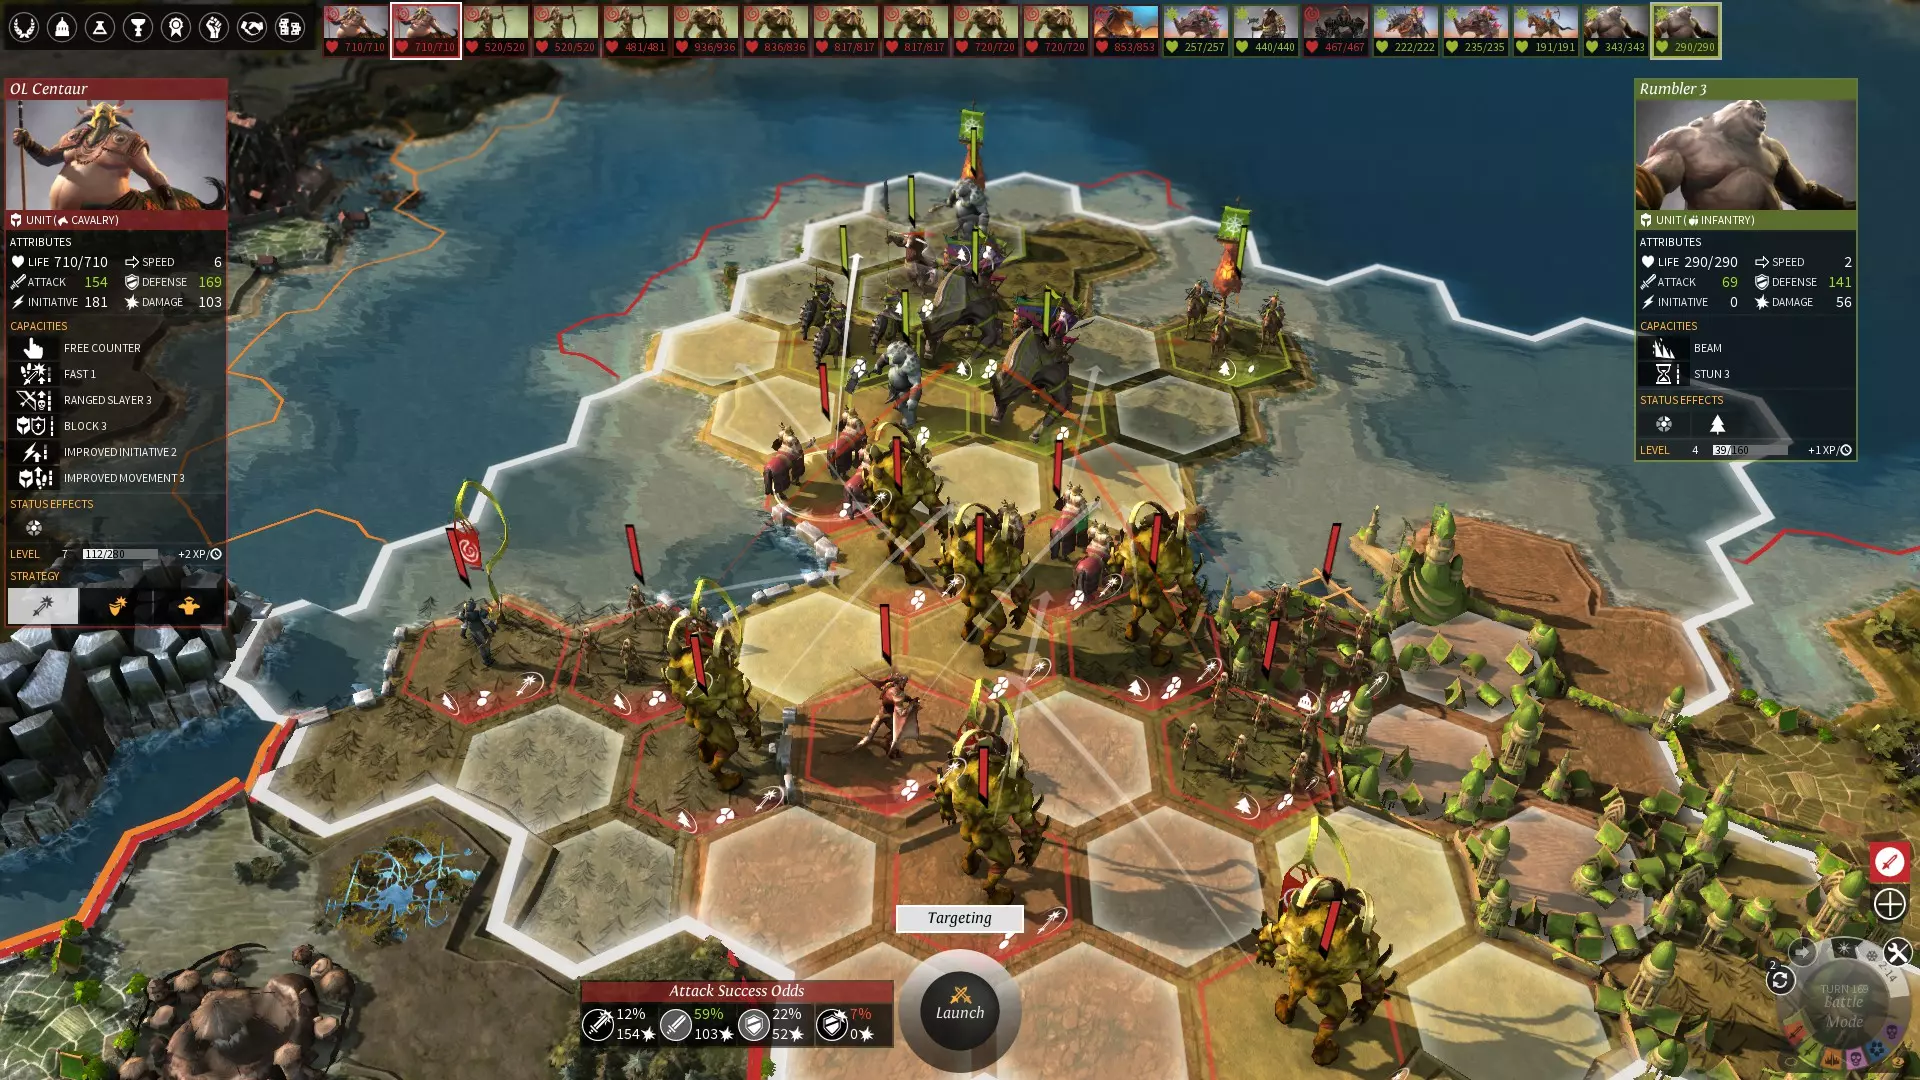
上方为完整的双军队配置,铁砧军团率先行动并掌控战场,随后铁锤军团作为援军每回合投入4个单位,粉碎所有敌人。 主力军团需配备拥有“增援位置+”技能的步兵或支援型英雄,这样第二军团每回合就能投入4个单位而非2个。这能确保你的援军尽早加入战斗,发挥有效作用。建议为主力军团的英雄和单位都增加防御力,他们需要足够耐打以撑过6回合的战斗,其他装备则视情况而定。 增援军团的指挥官可以是任意英雄,但如果你有远程单位,远程英雄会带来最佳效果,因为其拥有射程加成、视野加成以及更高的军队攻击力加成。增援部队和英雄都可以增加攻击力,其他装备可根据喜好选择,因为它们本身不会受到太多攻击。 主力部队应全部由拦截者和突击者或防御者组成。使用拦截者封锁敌人的增援位置,或通过其他方式控制战场。突击者应采取主动进攻,向前推进为你的增援部队腾出空间,并进一步限制敌人的移动选择。防御者则应像往常一样建立坦克墙,但位置要比平时更靠前一些。 增援部队需要远程单位、支援单位(尤其是治疗者)或高机动性的突击者。如果这支军队以远程单位为主,情况会简单得多,因为这类战斗可能会变得非常拥挤。出于类似原因,飞行突击单位在这里也非常好用。拥有远程攻击能力的单位可以集火攻击混乱的敌人,快速且安全地消灭他们。最晚在第2或第3回合,你应该已经封锁了所有敌人的增援位置,然后可以决定每回合允许多少敌人通过。注意不要用自己的单位占据所有敌人的增援位置,并且在同一回合内消灭战场上所有已出现的敌人,否则战斗将在此时以平局结束。一旦你完全掌控局势,在剩余回合中,在确保安全的前提下尽可能消灭更多敌方援军,同时进行治疗并采取一切措施,确保军队能以良好状态从战斗中脱身,以便再次投入战斗。 需要特别注意的一点是,援军部队本身绝不能受到攻击。它们非常脆弱,因此要让其尽可能后撤,同时保持在能够支援主力部队的范围内,以防主力部队遇袭。 9. 如何快速攻占要塞 正如你在第7节中所了解到的,如果不够谨慎,围城战可能会变得复杂、耗时,甚至让玩家失去耐心(或许只是我在解释时的个人感受^^)。 无论如何,我们应尽可能避免这种情况,让围城战尽快结束,对吧?需要记住一点,若敌方有增援部队,切勿直接进攻城市。除非你确定直接攻城绝对安全且时间紧迫(例如,你知道下一回合将有几支危险的敌方野战部队抵达),否则应优先攻击这些增援部队。
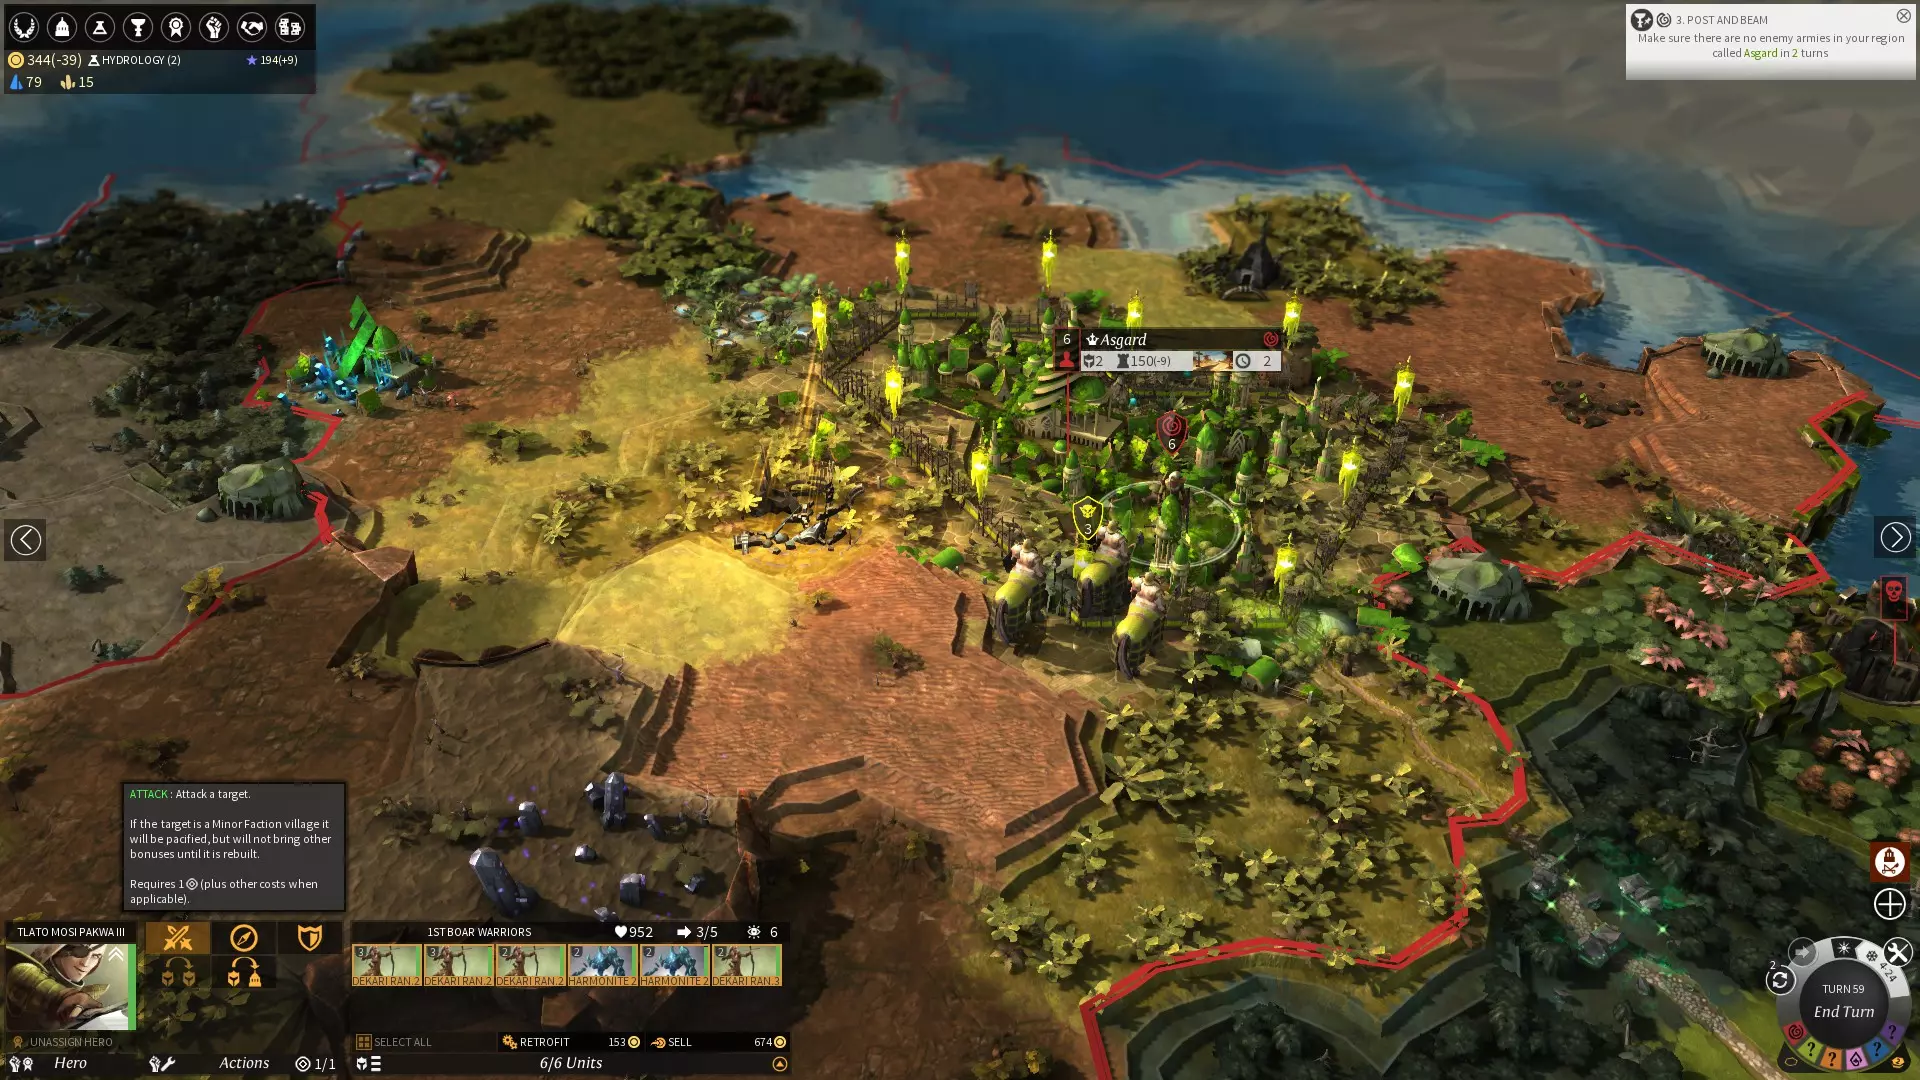
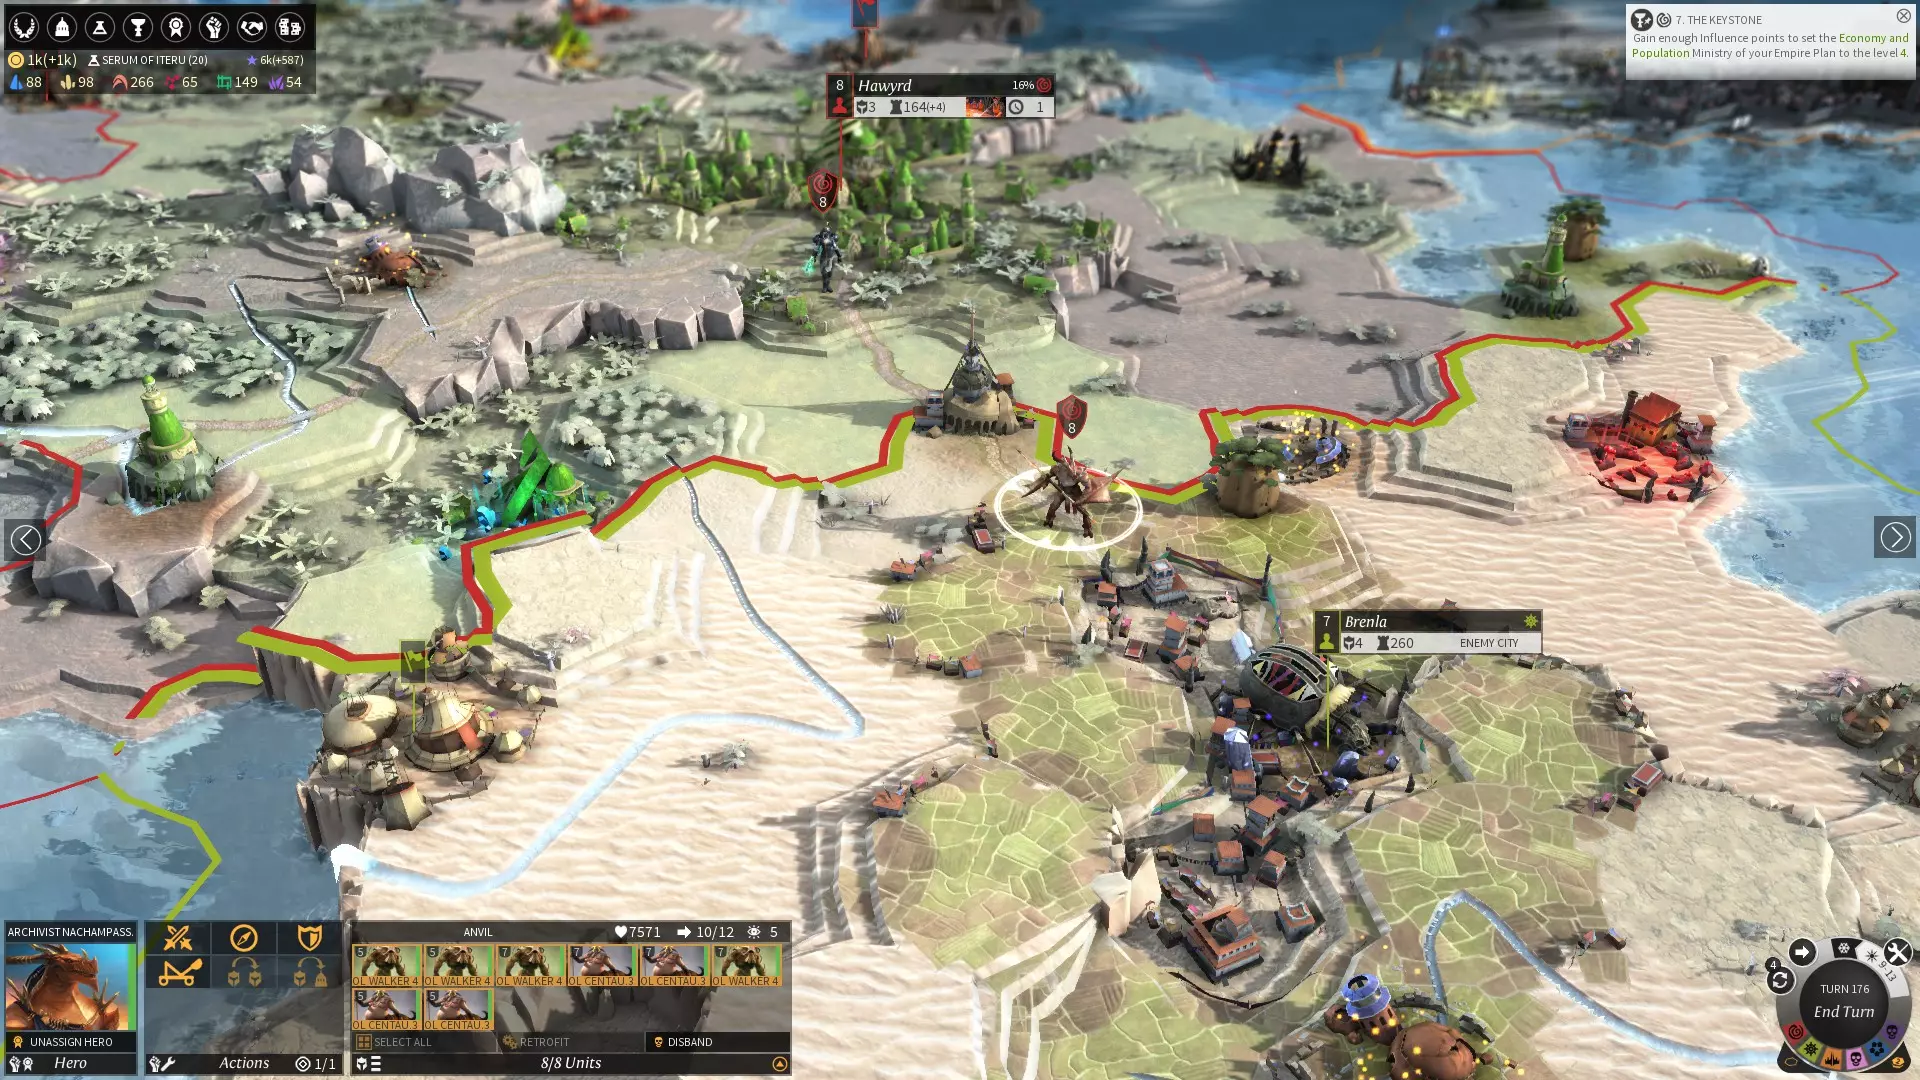
上方的城市可以安全强攻,无需围城。其防御不仅薄弱,更重要的是我们对战场拥有完全视野。注意我们的军队已包围城市,而非直接从海岸发动进攻,这是为了确保全面部署。 幸运的是,大多数城市并非堡垒。如果城防值不够高,你按前一节部署的那两支军队就可以直接将其强攻拿下。 如果城防极高但守军数量不足,只需发动攻击并确保消灭部分敌人即可。可能需要多次进攻才能清除所有守军,但只要你的军队有足够的耐久度,这应该不成问题。记住,防御工事只会增加生命值缓冲,无论这个缓冲有多大,都能在6回合内被清除。在这种情况下,你需要持续围城以阻止民兵重生,并从整体上阻碍敌人的行动。 然而,最终我们的运气会耗尽,不得不面对一座真正的堡垒。我对堡垒的定义是:防御工事高到无法强攻,拥有完整且均衡的驻军,可能由英雄领导,并且附近还有其他各种敌对军队。更糟糕的是,这些通常是大型城市,几乎没有或根本没有可以安全围城的地块。虽然守军或附近的野战军发动反击会使他们失去防御工事的生命值缓冲,但如果你无法妥善部署,灾难就极有可能发生。 那么,该怎么办呢?首先,你要明确敌人能够召唤哪些援军。消耗型侦察兵,或者在你的每支军队中至少安排一个装备了+视野饰品的单位,在此处都极为有用。如果是与遗忘者作战,牺牲一个英雄的饰品栏位来装备侦测(Detection)饰品,也很可能会带来回报。

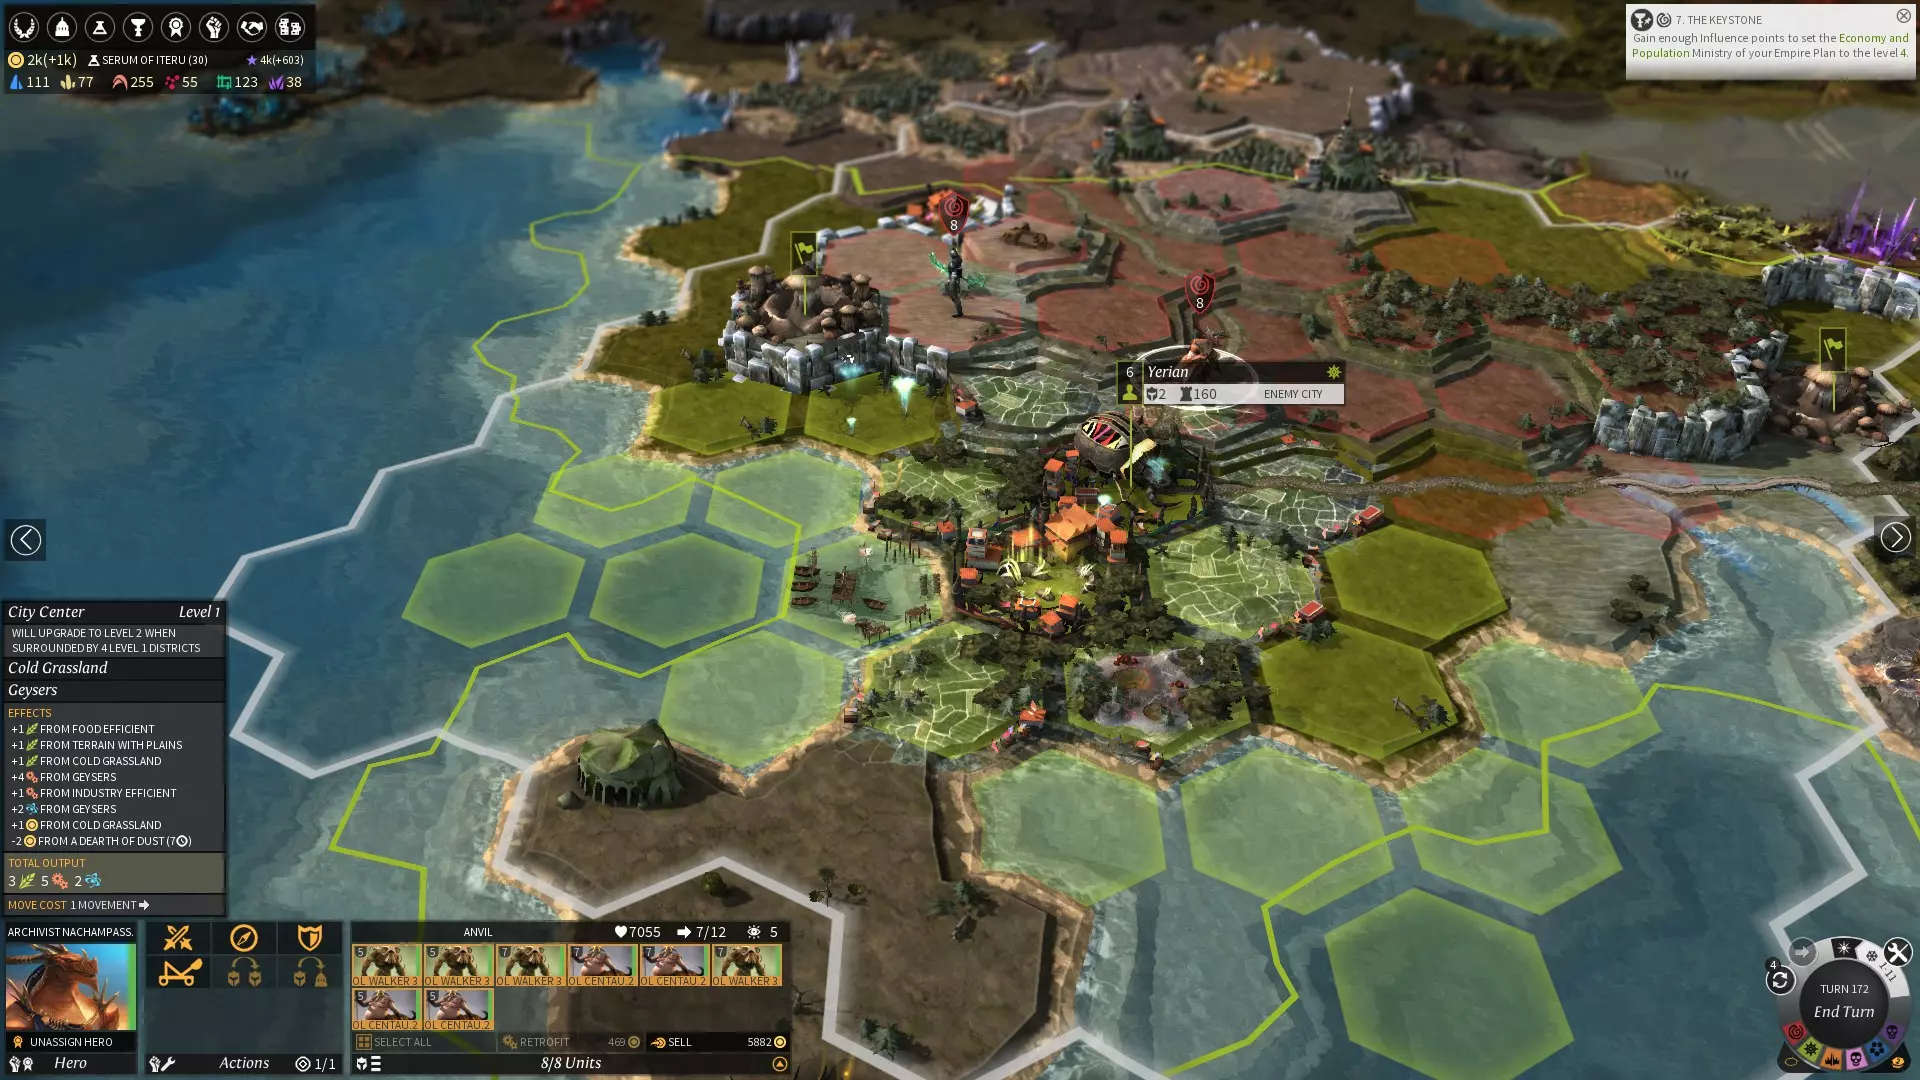
The above city is a real fortress, it has fortification strength well over 3000, a reasonable number of defenders, a full strength enemy field army and a Guardian nearby. Do not rush to start the siege, this will hamper the cunning plan, which is as follows: Attack an enemy field army on a tile that will trigger a battlefield that includes the city in it's radius. It is likely the enemy will call the city defenders as reinforcements. If this occurs, prioritize killing the non-militia garrison units while they do not have the health buffer. If there are more field armies, or remnants of the first one to attack, still don't start the siege. Sieges are bad, no one likes them. Continue attacks on the field armies as above, to bait the remaining garrison out until all those field armies are destroyed. When you get to the point you are having the last possible fight in the open, feel free to kill the militia and finally start your siege, preventing them from respawning. By this point virtually all the garrison should be dead; simply roll into the city on the next turn. As well as avoiding all that protracted siege nonsense, this gives the additional benefit of capturing a city with nearly maximum fortifications rather than one with none. This makes holding the city yourself much easier. If you have Shadows, planting a spy and getting them to disable the fortifications or otherwise cause havoc is very useful but this requires some long term planning. 10. The 1.2 Balance changes and what they mean for you. A major rework of the combat system is being applied to all versions of the game the same day the Shadows expansion is being released. All players need to be aware of these changes and their implications. Many things have been changed: Cultists now have one additional Militia slot compared to other factions. Necrophages Militia units now have the "Disease immunity" capacity. Added the Sharp Sense capacity to shields. Changed Titanium Shields Damage bonus (5%/10%/20%) to a 5%/10%/20% Life bonus. Decreased Damage bonus granted by Glassteel on weapons (-50%). Decreased Attack bonus granted by Titanium on weapons (-50%). Increased bonus granted by Glory of Death capacity on Titanium Talismans: Tier1: +0.5 Morale per adjacent enemy, Tier2: +1, Tier3: +1.5 Reduced Vision bonuses granted by Improved Vision capacity on Iron rings: Tier1: Improved Vision 1 (+1 vision) + Sharp Sense 1. Tier2: Improved Vision 1 (+1 vision) + Sharp Sense 2. Tier3: Improved Vision 2 (+2 vision) + Sharp Sense 3. Reduced Damage bonus granted by Improved Damage capacity on Titanium rings: Tier1: +10% / Tier2: +20% / Tier3: +30%. Reduced Initiative bonus granted by Improved Initiative capacity on Glassteel rings: Tier1: +10% / Tier2: +20% / Tier3: +30% Reduced by 30% the base price of Heroes on market. +1 on unit military upkeep when in armies. -1 Military upkeep on army units in Game Difficulties higher than Normal (this is for the AI only) Decrease to 15% Healing Halo capacity bonus Reduced by 30% Damage base attribute value of Drider, Eyeless Ones and Drakkens Heroes. Decreased by half the effect of the Guardian earthquake on tiles that are not the target. Reduced from 50% to 35% of Damage value the Dust Bishop Healer capacity Multiplied by 2 instead of 3 Healing speed bonus from the Hero Skill Fast Healer Level 1 and Level 2 Increased by 2 Life Drain capacity bonus of the Broken Lords Ryder. Increased by 30% healing cost when a hero gets disabled Remove retreat possibility when being in a besieged district Reduced from 50% to 35% the bonuses granted by the 2 Cultists quest Items called "The Wordless Will" and "Order of Isiver" Increased Army Defense bonus granted by Adamantian Insignia, to Tier1: +15% / Tier2: +30% / Tier3: +40%. Increased Army Attack bonus granted by Palladian Insignia, to Tier1: +15% / Tier2: +30% / Tier3: +40%. Increased Unit Defense bonus granted by the Adamantian Ring, to Tier1: +25% / Tier2: +50% / Tier3: +75%. Increased Unit Attack bonus granted by the Palladian Ring, to Tier1: +25% / Tier2: +50% / Tier3: +75%. Increased Unit Strike-Back Damage bonus granted by the Palladian Talisman, to Tier1: +30% / Tier2: +50% / Tier3: +70%. Tweaked Improved Movement capacity granted by iron accessories:Tier1: +1 Map Movement, +1 Battle Movement, +3 Initiative, Tier2: +2 Map Movement, +1 Battle Movement, +5 Initiative, Tier3: +3 Map Movement, +1 Battle Movement, +7 Initiative. So, all change! What does this all mean, you ask? I shall attempt to explain the implications in a few words as possible ... Elite, i.e. strategic fitted, armies are noticeably weaker in the initiative department and have lower maximum damage output. Happily, we can still make them capable of doing terrible things to the enemy, it will just be somewhat more complicated. Far greater care with their composition, equipment and use will be required. Even more than before, they need to be led by a hero, luckily these are now cheaper. Shields will now reduce ranged damage in the same way that only previously could be achieved via use of an accessory slot. If it is likely you will be coming under heavy ranged attack and can go 1H & Shield, do so. With the reduced effectiveness of the Iron accessories bulk fitting Garrison units with those items is probably not worth the Industry or Dust, better to spend it elsewhere. The (slight) reduction to max army speed and (large) reduction to Improved Vision mean area defense will be somewhat harder. Especially if you have the Shadows expansion it may be worth patrolling your territory until you have full Watchtower coverage rather than simply leaving the area defense army/AKA Crash Response Team parked in the center of your road network. If you have Shadows it's probably worth fitting the hero leading your CRT with a Detection accessory to reveal any stealthed/camouflaged armies. It can always be swapped for a +Army Health one if serous combat is going to happen. The above and increased army slot cost means scouting is more expensive and slower. However, if you have the Shadows expansion it can be done more safely at the cost of further reduction in speed of territory exposed. Guardian units are more viable vs elite armies and are worth acquiring. On the other hand, your elite army can now expect casualties vs a Guardian as they can't kill them as fast, so be warned! Healing, particularly that of the minor faction Drider & Eyeless Ones, has taken a big hit. The way the damage changes stack it's my view they no longer have a place in elite armies, (other than in the reinforcement half off a dual-army invasion force) their healing output is now too low to be worth the sacrifice of those vital elite army slots. Are still of use in standard reinforcement armies/garrisons, however. With reduced vision and healing, invasion forces will have to be a lot more careful. 50% nerfs to the damage and initiative accessories and big boosts to various other ones mean it's no longer the case that you should slap one of those two items & the + movement accessory on all elite armies. + Movement on your CRT is probably still a good idea, as it needs above all to be able to respond to threats fast enough and reinforcements should be available in your own territories. For invasion forces, as there are now more really good hero accessories it may well be worth considering removing the + movement from most units. All 4 hero slots might be better used for something else and an army can only move at the speed of it's slowest member, which now might be the hero. With the ability to now boost attack and defense by viable numbers a dual army invasion set up really now is the way to go. The lead army should have + defense accessories on both the hero and their units, the reinforcement army can have the + attack versions. It's probably worth hand-crafting each armies units and selected use of strategic resource armor pieces may also be worth considering. For Tackler units to be able to perform their role successfully they must have better initiative than, at least, all non-Guardian hostile units. Due to the nerf to the + initiative accessory it may be necessary to add Palladium Helms to achieve this, especially for those who cannot equip boots. (Note Dust boots add + initiative) Some factions will now be more dangerous, notably the Necrophages and Broken Lords. The reduced healing will make the Necrophage disease much more dangerous and their Foragers will benefit from the ranged damage reduction. While the halo healing of Dust Bishops has been reduced they are the only healer not to get their base damage (and therefore heal) clobbered, plus taking down their Stalwarts will be considerably more difficult if they are fitted with a shield. I believe that covers the biggest implications of the changes, if you spot anything I've missed please let me know! 11.1 Guardians Expansion This section will, as far as possible, focus on the military implications of the first expansion, for a more comprehensive guide to the thing as a whole, see one of the specific guides to it. Overview - Guardians provides five main additions to the game: More buildings as rewards for researching various technologies, generally the ones that needed some love, making research decisions even more difficult. The new military buildings are Defensive Wards (+45 fortification per population) and National Military College (+100% attack for garrisoned units in it's city). While both those are useful they can only be built once in your empire and are probably not worth researching their techs specifically for unless you are playing the Cultists. World-wide events and quests. Some helpful, some extremely nasty. Legendary Buildings unlocked by era. One for each of the first 5 eras, all of which provide powerful economic boosts but nothing directly military related so with some hand waving can be disregarded here. My policy in game in any case is to let the AI build them for me, then "liberate" them :p Much like Civ Wonders, it's 1 per game. Legendary Deeds, again unlocked by era.There are two for each of the first 5 eras, each with 1 of a possible 2 prerequisites. Several give exceptionally powerful boosts to your military and cannot be acquired afterwards through conquest so more on these shortly. Note, only one empire can get each Deed, so it's a race to get them. The Guardian units themselves. Again, 5 of them, each unlocked through research or if you are lucky, quests. Each guardian tech unlocked allows construction of any 1 Guardian of the designs so far unlocked. In other words, if you have all 5 techs researched you could build 5 Fire Guardians, 1 of each or any other combination. More on Legendary Deeds So, Legendary Deeds. These are probably the most game-changing aspect of expansion and to get them will generally require effort, risk and changed strategies. This is further complicated by the varying prerequisites. First of all let's look at the LD rewards themselves: Visionary Leader (Era 1) +15% initiative to all units Wealth Harvester (Era 1) +150 of a random tier 1 luxury Master of Markets (Era 2) Allows building giving +50% trade route bonus Warriors' Warrior (Era 2) Accessory giving Free Counter, can be fitted by heroes and units, requires strategics. Market Alchemist (Era 3) +200 Adamantian or Palladian Leader of Leaders (Era 3) Extra 20% of total max health regenerated per turn Glorious Father (Era 4) Allows building giving +100% Dust bonus as long as city is at least happy Immovable Force (Era 4) Guardian only accessory reducing the cool-down on their special strategic abilities by 2 turns, requires hyperium Beloved of the People (Era 5) 50% reduction in expansion disapproval Hero of Heroes (Era 5) Hero only torso armor piece giving +168 Health & +52 Defense, requires strategics As can be seen, several of the Deeds give perks that can totally change the game around, i.e. if you are fighting the Necrophages it's almost impossible to emerge from a major battle without badly damaged units. Get the Leader of Leaders Deed and that problem is pretty much solved. Which Deeds you want to focus on and how to get them will vary with their prerequisites, your faction & play style so it's not practical to walk through them, it would require many, many words, which no one wants, I trust ^^ Instead let's go through a fairly simple one as an example, note some of the later ones have wildly differing pre-reqs. It's good policy to look through them on turn 1 and plan your strategy from there; some might be totally impractical, others not too difficult. Visionary Leader walk-through: +15% initiative, we want that, we wants it badly but it's not always going to be practical to get it. To get it we either need to be the first to pacify 8 villages or destroy 10 armies. Normally it's good policy to only pacify villages that are a threat or in regions that are about to be settled or the AI will come waltzing in and get the benefit after we have done all the work. Clearly, if we want this Deed that playbook is going out the window. After the first few turns it is usually clear how many villages will be in reach for pacification without Seafaring, which will be too late in all likelihood, especially if the Necrophages are present, they are really good at this one. If it's "be the first to pacify 8 villages" that's needed and it looks like there are that many, build more military and ruthlessly stomp on the required number, it's unlikely you will have the time to pacify through quests. If it's "be the first to destroy 10 armies" and there at least 5 villages in range, again build more military and don't pacify them until they have spawned at least 1 roaming army each. So, as you can see, getting this Deed is probably going to require building several units in Era 1 when normally the focus would be getting the economy going, having your units scattered and general over-reach. So even though that initiative bonus is so, so handy, a decision in the first few turns is going to be needed - whether to go for it or not. It's a similar situation with the other deeds too, best regard them as a Civ Wonder and go all in or not at all. 11.2 Guardian units and how to use them effectively More on Guardian units and how to use them effectively All five Guardians are very powerful but not strong enough to take out an elite army alone. They all have certain traits in common - they can't join an army or be led by a hero, they are immune to all negative battlefield effects (i.e. winter penalties, any debuffs, poison, etc.) apart from -Morale, have strategic as well as tactical abilities, a choice of 3 weapons, no armor slots & can fit 2 accessories. There are 5 Guardian Only accessories to choose from giving Shared Wisdom (+1 morale to adjacent friendlies), Intimidation Aura (-25% to adjacent hostiles fighting the Guardian), Death or Glory 3 (+1.5 morale per adjacent hostile), Free Counter (extra counter attack) & the Jewel of the Azure Wind, unlocked via a Deed (-2 on strategic ability cool-down). First, some general advice on their use, then a quick walk through of each unit: Don't leave them isolated where they can be attacked without support. While a hostile army will take losses it is likely to kill the Guardian if it's alone. On defense keep them on city districts where they cannot be attacked, on offense place them behind the lead army where they can be called as reinforcements. As a rule they should always be used as reinforcements, exceptions being the Earth Guardian with a certain fit or if you have several of them available for a battle. Build them in your city with the highest bonus to starting XP, don't build them till you need them and make sure you have the strategics saved to kit them out to fit your strategy. Each one requires a tech to be researched, a lot of production and strategics to build and you absolutely do not want to be wasting yet more strategics refitting them. So, the famous five are:
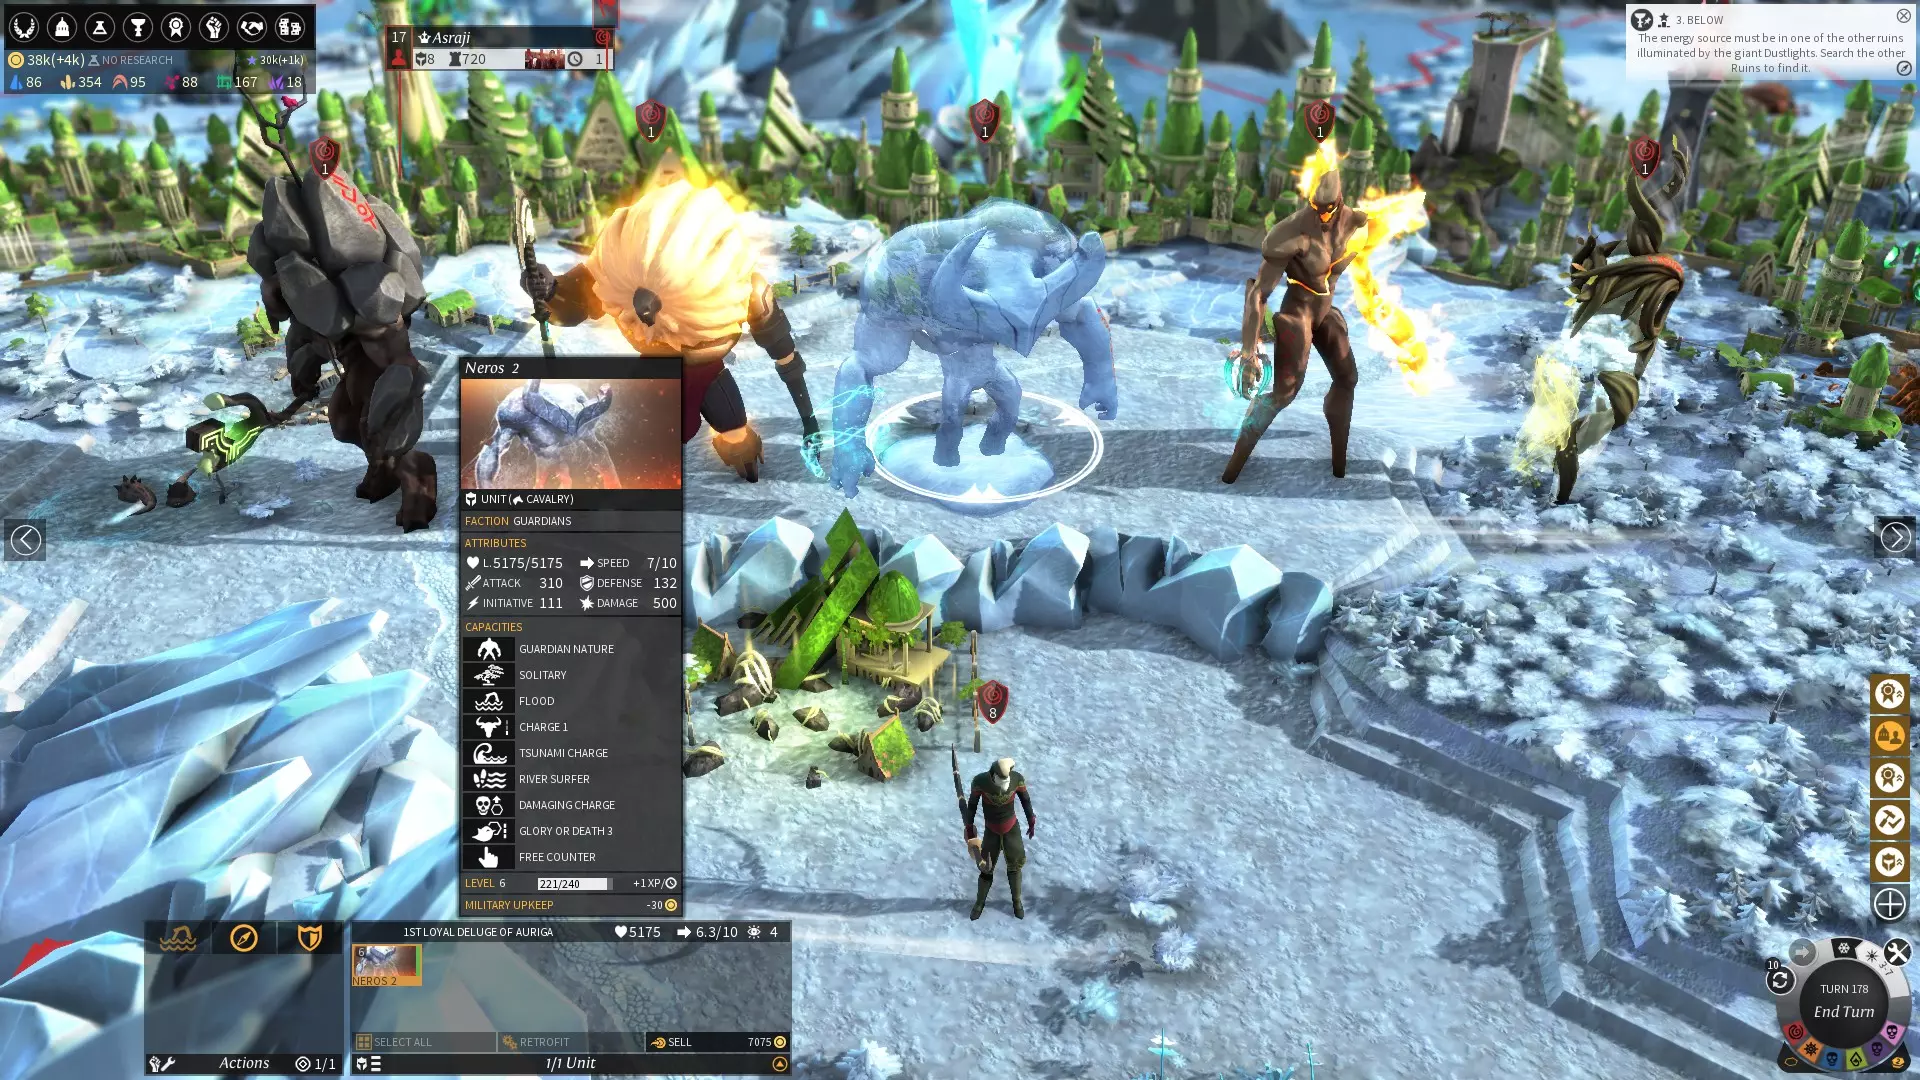
Dust, Skoros (Support): Can fully heal all adjacent armies on strategic map, in battle can use Mind Control (50% chance to temporarily take control of hostile unit), weapon choice allows Heal (a pretty rubbish one TBH), Increased Fire 3 (+75% attack for friendly unit) or Acceleration (doubles friendly unit speed). Great for speeding up other Guardians, creating havoc with Mind Control and mass strategic-healing an invasion force. Earth, Gios (Infantry): Doubles fortification strength of a city, ignores terrain penalties. Attacks (not counters) do 25% Earthquake damage to all hostile units on the battlefield, only has battle movement 1. Weapons give Sharp Sense 3 (+40% defense against ranged attacks), Ranged Slayer 4 (+50% damage) or Circular Attack Strike Back (half damage to all adjacent hostiles. Very tough unit & hard to kill but hard to use effectively. Only attacks trigger the Earthquake, only the Ranged Slayer weapon give high enough initiative to make this likely and the battle movement of 1 is horrible! Team up with Skoros and and an elite army, fit with Ranged Slayer and trigger Earthquake OR send in as lead army with Free Counter & Circular Attack Strike Back. Fire, Fotios (ranged): Can reveal map in 10 tile radius, any unit attacked or countered is set on fire for 6 rounds taking 15% damage per turn, weapons give Infantry Slayer 4 (+50% damage), Precision 3 (+3 attack range, that's range SIX) or Wood Burner (+25% damage to any unit on a forest tile). Use as a reinforcement, fit for extra range, set everything on fire. Water, Neros (Cavalry): Can destroy watchtowers & extractors, reduced movement cost on rivers. Starts with Charge 1 (+25% attack if moves +10% per movement point spent), if moves does damage to all hostiles in a cone 1 deep per movement point spent. Weapons give Flying Slayer 4 (+50% damage), Infantry Slayer 4 or Damaging Charge (+25% damage if moves +10% per movement point spent. Neros has decent initiative but needs to be teamed up with Tacklers to ensure that it can get that Charge off. Underrated and most deadly unit in the game if used correctly. Air, Atmos (Flying): Can Teleport with 10 tile range, +2 strategic moves in the winter, does 50% extra damage if previous target dies same round it was attacked, weapons allow Cavalry Slayer 4 (+50% damage), Stun 4 (40% chance to stun for 2 rounds) or Sweep Back Strike 4 (counter damages units adjacent to attacker, extra 25% damage). Pure damage dealer with lots of mobility (base 10 strategic move unaffected by terrain). Excellent initiative with first two weapons, last one coupled with Free Counter is deadly. A quick comment on fighting against Guardians: If they are in the field attack them first, block any reinforcements and focus everything on killing the Guardian as fast as possible. You really want extremely high intitiative Tackler's to prevent it getting any special attacks off ... and try to avoid attacking them on city tiles, you do not want them to have the fortification health buffer or to be shielded by a full, deployed army. 12. Shadows Expansion Overview - Shadows also provides five main additions to the game: The espionage system, with which it is quite possible to ruin another factions ability to fight, at least in the short term. Stealth, it's poor relation Camouflage and their counter, Detection. The ability to Pillage other empires' regional buildings, which does not require a war declaration. A bunch of new technologies giving buildings and equipment that support the above. There are now so many useful technologies players really need to decide on turn 1 if they are going to go for a science victory. A new faction, the Forgotten, who specialize in the expansion's content. Now a quick run through of the features, as usual focusing on the military implications: Espionage: This is done by heroes, each of whom have now have a "Spying" value which can be boosted though equipment and selecting certain promotions. To place a spy select "Infiltrate City" from the Academy and select the target from the list of visible cities. Note you need eyes on the target city at that point, having seen the city earlier is no help if it's now in the fog of war. Unsurprisingly, Forgotten heroes are the best at spying and should be acquired for this purpose whoever you are playing. Now your hero is in place their spying ability is compared to the security level of the city, the better that ratio is, the faster they will gain points towards the various possible actions. Mouse hovering over the city Security level will show the possible consequences of carrying out an action, hovering over the actions will show all the possible future actions of that type if enough points are gained. The city base security level is influenced by approval level, buildings and hero skills.
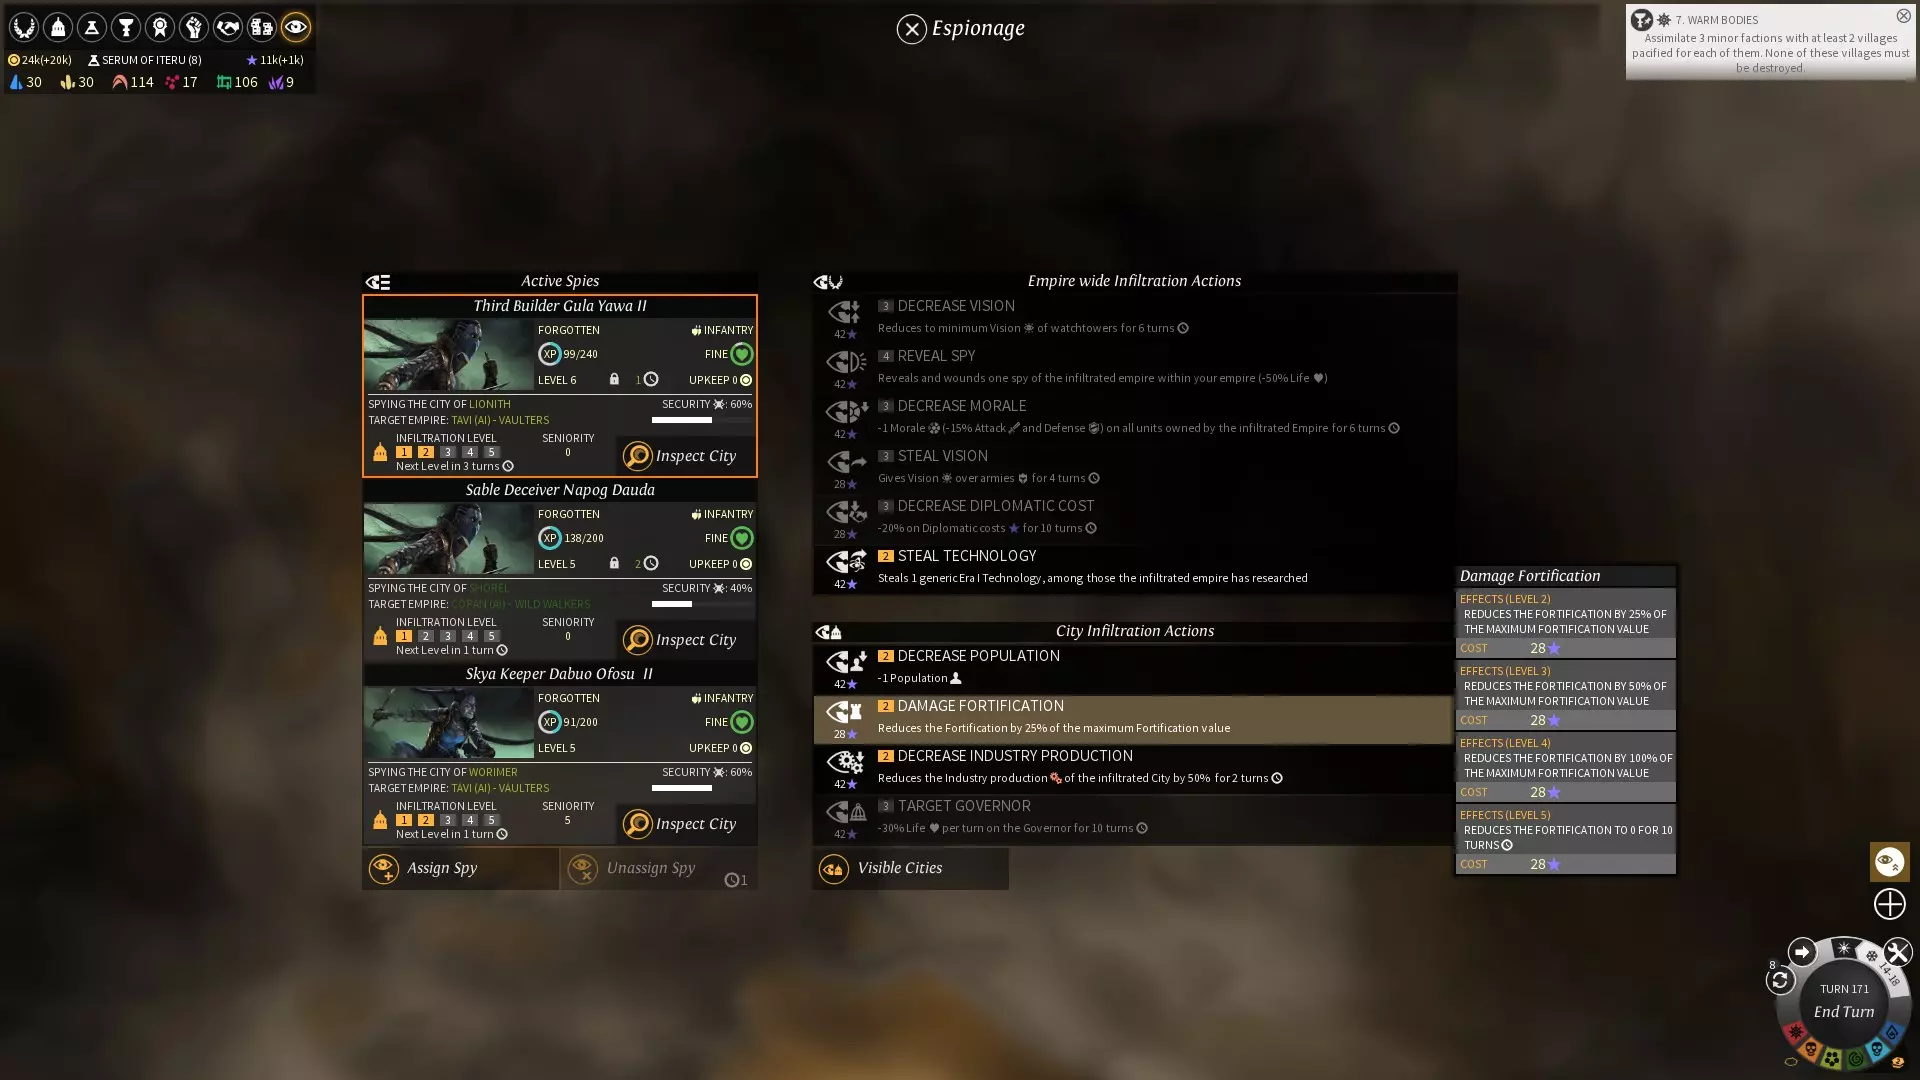
注意,城市可以被下令尝试执行间谍“围捕”行动,但这会以降低生产为代价。当场被抓或在围捕行动中被抓的后果包括外交惩罚、间谍受伤、被遣返回学院甚至被监禁。 建议:许多间谍行动都是可行的,但从军事角度来看,有两项尤为突出。非常值得获取间谍并将其安插在你下一个目标的城市中,这样你就可以瘫痪单个城市的防御工事(如果提前规划,就不用再进行可怕的围攻了 o/),并给予敌方帝国范围内的士气惩罚。记住,每降低1点士气,攻击和防御就会降低15%,而且这些惩罚可以叠加。
Stealth/Detection: Stealth makes units invisible anywhere on the world map unless detected, Camouflage provides that too but only in forests. Detection occurs if the otherwise invisible army is next to a hostile army, within the vision range of a watchtower or the vision range an army lead by a hero equipped with a Detection accessory. It can be tricky to work out if your stealthy army is visible or not as there is no Detection Detector accessory :p. Full Stealth is only available to Forgotten units and armies led by Forgotten heroes with the Ghost Force skill. Camouflage & detection are available to all but require research of the Pillage technology. Advice: If you are fighting the Forgotten, Detection is vital. On defense it can be provided by watchtowers, on the attack a least one hero really needs the accessory if assaulting a city with fortifications to avoid surprises. Or get your spy to blow up those fortifications, which is far more fun. Pillage: Requires the technology of the same name, when carried out disables the regional building for a number of turns and gives the pillaging faction Dust &/or resources. Pillage rates can affected by hero equipment and buildings. The AI absolutely LOVES doing this, as a player you may have more important things to do with your armies, however. Advice: This addition makes maintaining good relations in Cold War much more difficult than previously. If long term good relations are desired, move to Peace as quickly as possible. Otherwise, or if playing a Pitiless faction, move up an army strong enough to annihilate the pillagers, this will prompt them to stop their nonsense and run away. Failing that close borders. If you don't care about future relations, feel free to destroy the blighters^^ The new technologies: Pillage (pillaging, camouflage & detection), Unexpected Allies & Security Theory (both giving buildings requiring strategic resources that provide a degree of protection from pillaging & improved city security). Advice: Whether you need these or not will vary from game to the next. Sometimes the AI seems not to get involved in sabotage, on other occasions it can really cause trouble, in which case higher security levels may be needed. Note that one of your own spy's can expose & wound hostile agents in your cities through the Reveal Spy action, empire wide at level 5, which is viable alternative to the +Security buildings. The Forgotten Units & Heroes: All these guys have full stealth, various special moves & attacks, can do an appalling amount of damage but are rather fragile. A quick breakdown of their abilities and suggested roles follows: Heroes: See section 3 for the basics. Of very limited use as city governors, the best spies, decent army leaders and open up the possibility of stealth for non-Forgotten factions. Assassin: Infantry with Stealth, +1 Battle movement, Dual Wield, very high damage output, Acrobat (can move through hostile units). Best used as an Assault with Sword & Axe for Infantry & Ranged slayer simultaneously. Have seen hits for over 1500 when coupled with Predatore. Predatore: Ranged unit with Stealth, Dual Wield, Predator's Mark (+20% damage for future attacks per Mark up to 60% on target by any unit - basically a target painter). Very difficult to get these units initiative higher than the Assassin's so best used as Support, painting the targets that will be melee attacked next round. Two crossbows do a lot amount of damage themselves and a Forgotten army with Predators is very good at taking Guardians down fast. Myst: Flyer with Stealth, moderate damage and Faster Than Shadows (an ability much like Chain Lightning), base battle move 3. Fit with spears and use as a Tackler, the good initiative and ability to fly make up for the middling speed in most cases. When fighting against the Forgotten it's usually best to get all of them engaged as their high damage and special moves means if they are free to focus fire it's very likely you will lose units. 13.1 Shifters Expansion - Concepts Shifters adds yet more content to the game, most notably: A rework of the Winter season Pearls of Auriga which spawn each Winter Lots of new improvements & equipment related to the new Winter features & Pearls Retaliation, a new defense for cities & regional buildings A new faction, the Allayi, who specialize in the new content As usual, a quick over-view of the new stuff, where possible sticking to the combat impacts: The Winter rework: First thing to note is you can now customize Winter in the game settings, go to Game Settings Summary/Advanced Settings/Miscellaneous, select Advanced Winter. Then you can adjust Winter Difficulty & Harshness if you so desire. On a related note, no longer are all Winter effects something bad to be mitigated but they can have greater impact on play and there are a lot more possibilities. For example, the seas might freeze meaning your land units can move & fight across them as they would on land ... beware of the seasons end though, as the ice will melt as Sumner returns & you could get an unwanted Steam achievement! If you also have the Tempest expansion bear in mind your ships will get stuck in the ice if near the coast when ice shelves form and this would also prevent you building any more ships. If ice shelves might be forming build your navy during the summer & then get your fleets well away from the coast before Winter arrives.

从军事角度来看,你现在需要更加密切地关注可能即将到来的冬季影响,了解它们可能持续多久,并防止对你不利的情况发生。例如,如果世界对飞行单位有大幅加成,而对远程单位有惩罚,那么当你使用“野性行者”派系并与“食尸妖”交战时,这可能会是灾难性的。 奥里加之珠:每个冬季,这些珠子会出现在地图各处。单位可以收集它们,特定单位、装备或英雄技能还能获得额外的珠子。当你收集到10颗珠子后,就可以建造“奥里加之祭坛”——这是一种城市区域类建筑,能为你提供各种增益效果。珍珠可用于祈祷(以影响未来冬季的效果)、祝福(以解锁新的改良设施和装备)以及建造这些设施。第一个冬季可解锁内圈区域,第二个冬季解锁中圈区域,第三个冬季解锁剩余的外圈区域。如果想通过祈祷影响下一个冬季的效果,请在前一个冬季结束后立即进行,时间越久,祈祷的成本就越高。
Warning - collecting Pearls in another faction territory really, really annoys them so don't do it unless you want war. They also get fairly upset if you do it in territory near them they view as theirs. New Improvements & Equipment unlocked through the Altar of Auriga: Not going to go through them all here but: Must haves: Ward Of Auriga (50% Retaliation, see below) & Winter Boroughs (massive city-wide outputs bonus during Winter) Ones you really want if you will benefit: Luxury/Strategic Intensifiers, Abbey Of Anomalies. These are districts (only one of each per city) again giving big bonuses but a great deal of care is needed with city expansion as they can only be built on the specific resource/anomaly tile and cannot be be retroactively be built over an existing district. Iceworks give +10 industry per frozen river or water tile so if that winter effect kicks in and you have cities with suitable terrain, you want this. If you have a spare hero to run around hoovering up Pearls it would be worth unlocking Pearl Crafting and giving them the Eye of Auriga accessory as that gives a bonus to the number collected per cluster as well as more XP each time you do it. Which is, of course, nice. Another Pearl accessory greatly boosts Retaliation, see below. The rest are somewhat specialized, marginal or situational IMO but your mileage may vary! If you have Pearls to spare, go right ahead. If you are playing as the Allayi, this will not be the case, see below. Again, as the Allayi you might well need the Chapel of Auriga for quest related reasons Retaliation, a new defense for cities & regional buildings: What the hell is this, I hear you ask. Well, each city has a Fortification value as we know and high values mean very risky assaults, shenanigans of some kind or long sieges, which as anyone reading this far knows, I do not like and neither should you. What Retaliation does is takes a % of the city Fortification value and spreads damage across hostiles units in it's area of effect. An example to make it a bit clearer: Your city has 1400 Fortification and a 6 unit hostile army lead by a hero turns up and starts to besiege it. Luckily, you have built Ward of Auriga (0.5 Retaliation) in the city meaning the enemy army will take 700 total damage each strategic turn, in this case 100 each. This number can be boosted to much more impressive figures by equipping a high level city governor with the Tome of Auriga's Wrath accessory as it gives +10% per the hero's level. Towers of Truth & Fidelity sometimes boost this value and sometimes cause the effect to be applied region wide or even in adjacent regions. Sorry to be so vague on this point but the code is either bugged or is misunderstood. However, besieging hostiles will always be hit, so be aware of it, especially if there is an Open Wounds event in effect in which case Retaliation will prove deadly. The damage it causes can be halved by the besieging army's hero equipping the Brooch of Auriga's Chosen. Long and the short of it is, if the AI has built/equipped stuff that gives a city a decent Retaliation value, all the more reason for avoiding those sieges. Bait the defenders out or use a spy to blow up the defenses, don't get bogged down! The Allayi Faction: A rather fly-by-night overview of the new faction here: They are all about the Pearls. If you play them be aware that while they get bonuses to the numbers gained and discounts spending them you will never have enough. You have to be utterly ruthless about what Altar unlocks to choose and what to build where. The issue is they need Pearls to build their version of city districts, called Garths. Like the Necrophages they can build one per population and each one built in a city makes future ones there more expensive. Do not, ever, over-expand. Firstly because they get a -25 expansion penalty per city rather than the standard -10. Secondly, too many cities means you will run out of Pearls even faster than you would otherwise. Lastly, their quest requires you to capture 3 cities late game and this can cause all kinds of excitement. My opinion is you don't want more than 3 cities before the end-game bloodbath starts. As you can't go wide, going tall is the only option but that isn't made any easier by their cities requiring more food than normal to gain a population point. They do assimilate captured cities much faster than other factions, however. They get exact Winter start/finish information from the get-go, can see Pearl clusters on all explored tiles and can use their Skyfin units to boost relations with others, while gaining resources. Battlefield Symbiosis gives +15% Initiative per adjacent unit in battle in addition to the normal Morale bonus. This is an incredibly strong trait and coupled with their excellent units makes their armies very strong if played correctly. As you can guess from the above this faction is not newbie friendly. Their main strength is in their units. These are not easy to use well as their abilities change with the seasons or by spending Pearls to Shift forms and require a fair bit of micro-management. Done right though and they are absolutely deadly. 13.2 Shifter Expansion - Units: To follow
2026-02-14 07:00:23 发布在  无尽帝国
无尽帝国


说点好听的...
收藏
0
0