换一换
换一换 


这是一本像素风格的法典。其文字部分是由NimrodX撰写的详尽指南,内容涉及人类农民转变为大师级工匠以及最终建造【杰作】要塞的黑暗秘密。文章主题转换清晰,整体文风虽冗长但尚可接受。 你已经完成了游戏内的快速教程,起初感觉还不错,但现在你想知道如何像大师一样游玩,而不是像新手。或许你想生存下去,但即使【失败也是一种乐趣】,当你以大师的方式失败时也会更有趣——比如在一个可怕的冰冻蛮荒火山生物群系中,缺胳膊少腿却仍以传奇的拄拐方式行走。或许你已经厌倦了手动为堆满破旧缠腰布的工坊添加单个任务,想要一些合适的管理和记账方法。这份中级指南将尝试涵盖所有你想了解的主要游戏机制。 本指南的第一部分大致按照建立新要塞的最佳“待办事项”顺序排列,即使在危险环境中也适用。但随着指南的深入,顺序会逐渐从严格的线性排列转变为可由玩家根据具体情况决定的可变顺序。 用辛勤的劳动挖掘安全的住所,开拓大地吧! 关于游戏 本部分是为那些尚未购买高级版,可能想通过本文更好地了解游戏内容的玩家准备的。二十年来,《矮人要塞》本质上是一场对每一个细微事物进行极致细节模拟的实验,而在易用性和画面方面则大多被忽略。这正是它闻名的原因。由于其类似研究项目的性质,它更多地属于具有影响力而非商业成功的类别。喜欢这款游戏的玩家通常也热衷于摆弄高度复杂且细节丰富的模拟系统。相比之下,大多数同类游戏都更为休闲,这也使得本指南的篇幅十分庞大。 随着“高级版”的推出,游戏的画面和易用性开始得到一些改善,但开发的重点仍然放在模拟细节上。“经典版”仍然免费,游戏机制也保持不变,所以我建议那些对购买高级版犹豫不决的玩家先试试经典版。 这款游戏是抢先体验阶段吗?Tarn和Zack Adams于2002年10月开始开发《矮人要塞》,这意味着该游戏已有20多年历史。但他们认为,只有在实现了几乎所有能想到的功能后,游戏才算“完成”(1.0版本)!因此,从某种意义上说,它应该被视为“抢先体验”(无论其在Steam上的分类如何),而且最早可能要到2031年才会结束抢先体验阶段。不过,它并非技术演示版,在过去20年的大部分时间里都具有很高的可玩性。由于游戏的复杂性和新特性而产生的意外且常常滑稽的行为,已成为该游戏【邪典魅力】的一部分。 像专家一样使用维基、论坛和群组 维基 我正尝试将所有可能的内容链接到相应的维基文章,但仍有许多内容未被提及和链接。由于仍有很多内容需要查阅,最重要的专业建议是:使用维基。这款游戏已经存在20多年了,人们积累了大量关于它的信息。
别忘了,尽管近几年游戏界面有所更新,但这款游戏实际上已经很老了。所以如果你发现了什么问题并需要更多信息,可以查阅维基,它就像是参考手册。 要注意的是,维基上的部分内容可能会有些过时,但大部分内容对于当前的高级版和经典版仍然适用。 经典版 如果你暂时不想购买新的高级版,或者出于任何原因只想玩经典版,可以免费获取经典版或“入门包”(包含实用工具): 经典版下载和安装信息 入门包【论坛】同时也不要忘记“像专家一样参与论坛讨论”,因为《矮人要塞》的大部分讨论都发生在官方论坛和Steam之外的其他地方:官方论坛以及维基主页上列出的其他论坛。【Steam群组】有一个专门用于本指南、其他指南、可能的未来指南以及《矮人要塞》相关内容的Steam群组:Dwarf Fortress ☼Masterwork☼ !!FUN!!。如果你想支持本指南和其他指南的编写,特别是如果你觉得本指南有用或有意见,可以考虑加入。【像专家一样失败】人们说失败很有趣,但只有像专家一样失败而不是像新手一样失败时,才真的有趣。像新手一样失败,意味着你让所有矮人都饿死了——他们在没有床的土洞里徒手喝水,却从未酿造过第一杯酒、制作过第一个杯子,也没雕刻出第一个装饰华丽的宴会厅。这种失败方式毫无乐趣。 而高手的失败,则可能是因为有吸血鬼造访要塞,吸干了一半矮人的血,接着一头被遗忘的野兽 rampage 而至,把一切都砸了个稀巴烂。
当母矮人抱着婴儿冲向战场,而婴儿被杀后,她们就会陷入暴怒状态。哦,然后她们会因暴怒而失控,开始互相残杀。你得承认,这比所有人在没有酒杯、床铺粗糙的土洞里饿死要有趣得多。 其中一个矮人可能在死前在墙上刻下了巨兽屠杀其他矮人的场景,之后其他矮人在探寻究竟时可能会发现这些壁画。 所以,如果你像个大师一样失败了,别担心,只需开始建造新的要塞,因为你废弃的要塞废墟仍然是世界历史的一部分,当冒险模式回归后,它可以被重新占领或被冒险者探访。你可以认为自己成功创造了原本不存在的有趣世界历史和特色,而这些内容在之后的游戏中确实可能再次发挥作用。这种情况有时是会发生的。 新手可能会选择放弃,但老手会直接新建一座要塞并从头再来,之后再去探访那些遗迹。最终,他们的世界里会遍布废弃的要塞遗迹,然后他们会在冒险模式中一一探访这些遗迹,获取那些可能还散落在各处的珍贵装备。 DFHack 你现在不必下载它,我也建议在刚开始游玩时不要使用它,因为这会让事情变得更加复杂,超出必要的程度。但我只是想确保所有人都知道它的存在。有一个名为DFHack的免费工具(可在Steam上下载),你最终可能会想了解一下。它包含许多功能、解决方法、便利性改进和问题修复,这一点值得日后留意。 约定 键盘快捷键表示为a-b-c时,意为“先按a,再按b,然后按c”。 按键区分大小写,因此T表示按住Shift键并按T。 我尝试将所有内容尽可能链接到其维基百科文章,但在某些情况下,当链接似乎没有必要时,会使用加粗和大写来表示用户界面按钮的名称或游戏中的技能、物品等内容。 提示框 需要特别注意的事项,例如关于错误的警告,或者只是一些稍微偏离主题的建议,会像这样放在一个框中。像大师一样生成世界 世界生成或许是《矮人要塞》的核心特色。托迪没有去写《指环王》,而是编写了一个能根据你的需求不断生成全新“指环王”故事的电脑程序。因此,了解相关的配置参数是很有意义的。 生成世界并不难,一开始你可能会对默认设置感到满意,但之后你或许想尝试一些极端设定,比如创建一个丛林世界,或者一个充满邪恶与野蛮气息的冰封火山世界。这些极端参数可能会导致世界生成过程中所有可玩种族灭绝,所以看看情况能有多糟却依然能维持生存,也是件挺有趣的事。我不会在这里详细介绍世界生成,因为维基上有很多关于世界生成的详细信息,包括所有高级参数。不过这里有一些关于基本选项的提示:
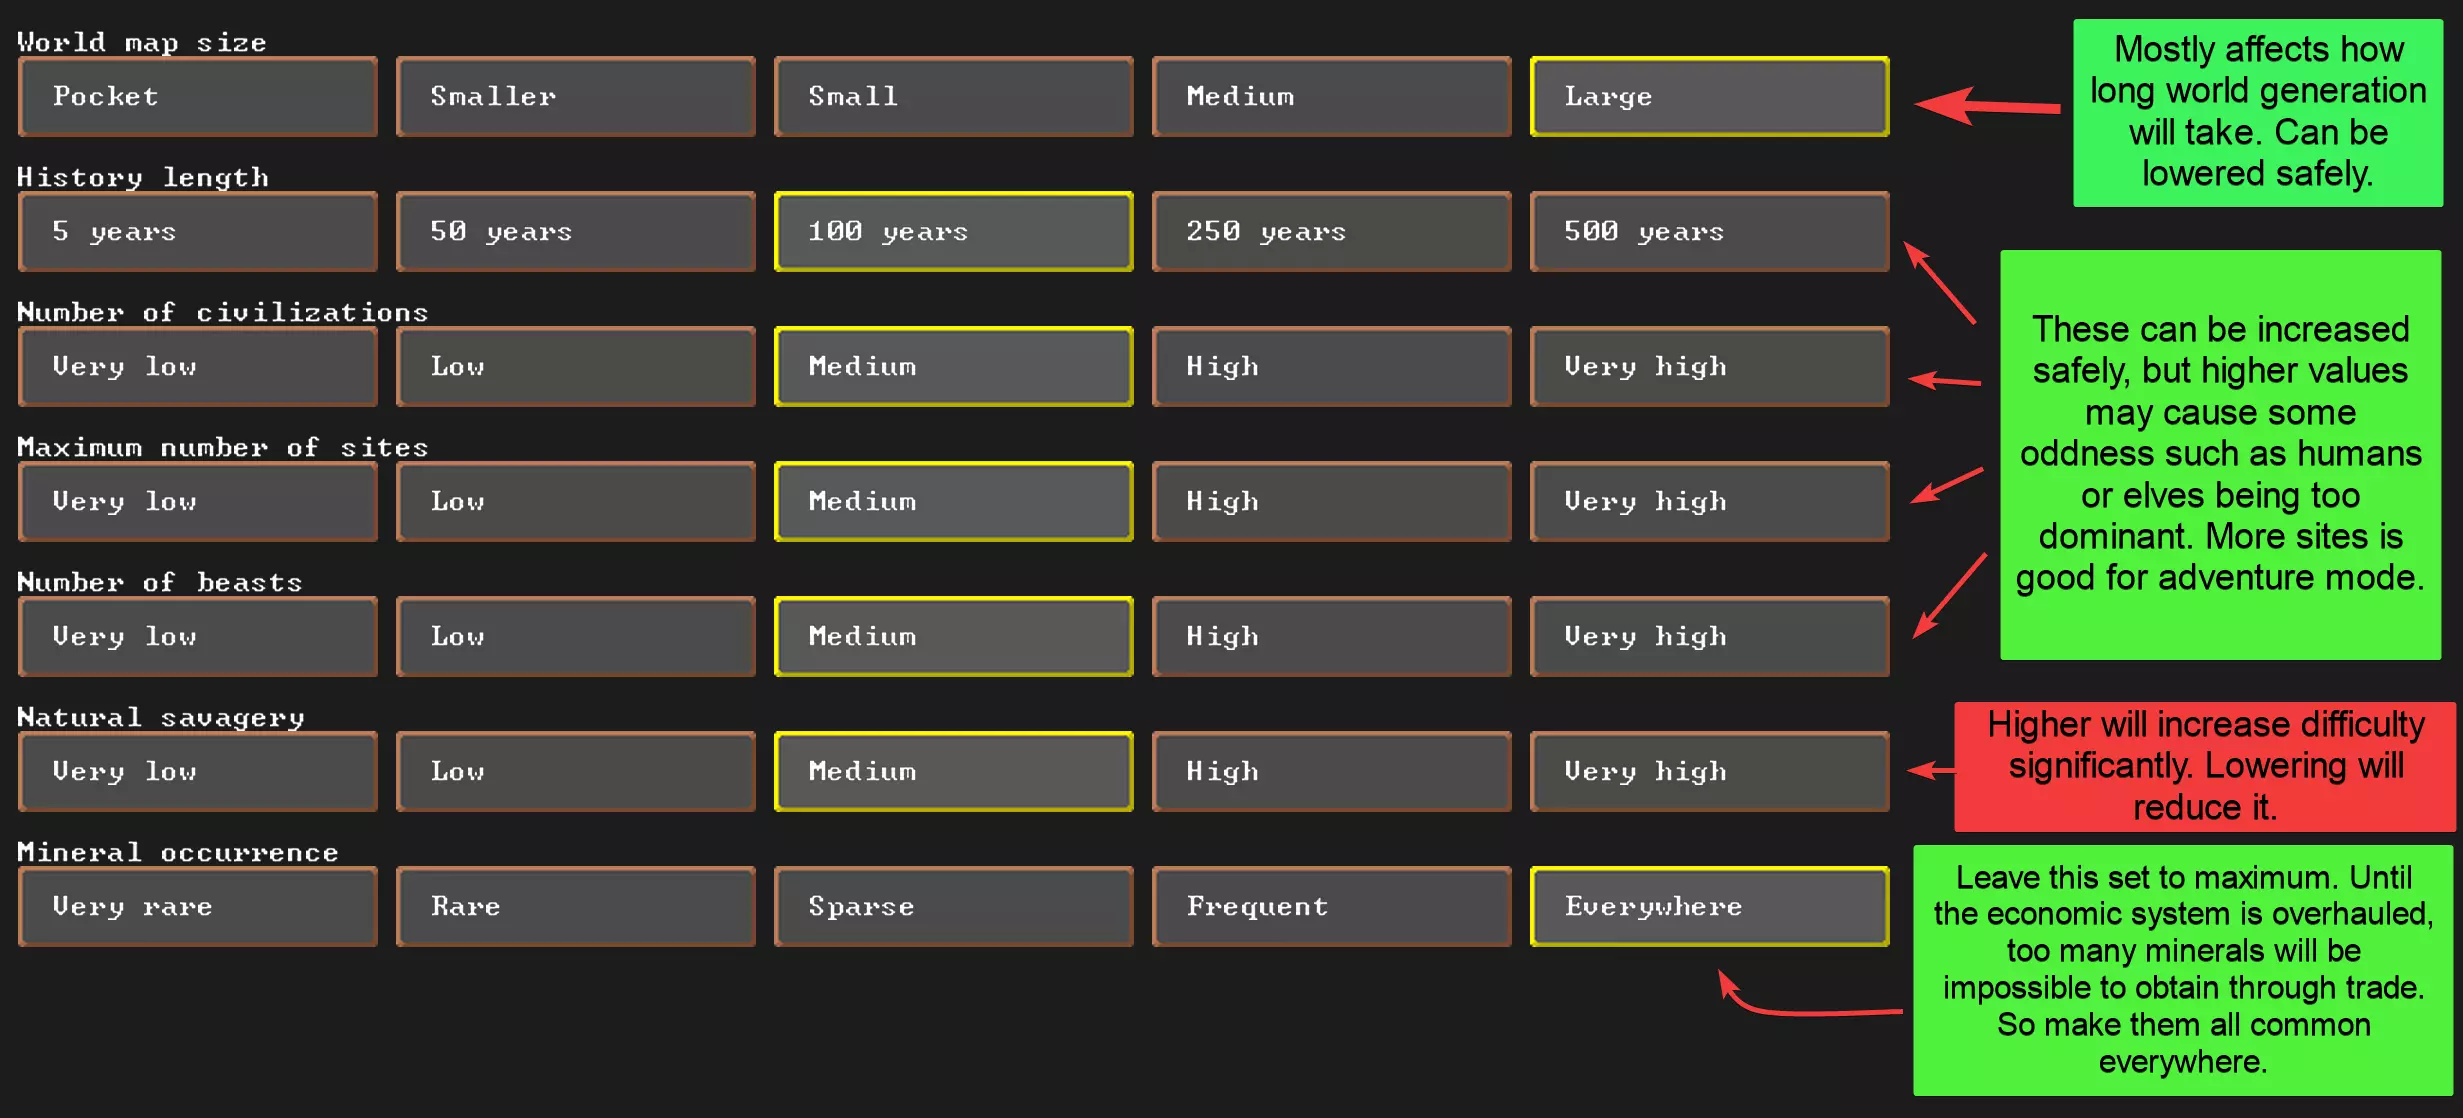
关于基本选项的一些提示。【常见】矿物设置是可行的,但低于此等级会使金属变得稀有。 关于如何使用高级参数进行极端设置的示例,可参考世界生成示例(原链接已屏蔽),不过其中部分内容可能因世界生成系统的更新而过时。 像大师一样选择殖民地位置 新手建议选择“快速开始和简短教程”,它相当快捷且能展示基础知识,但很快你就会希望像大师一样选择殖民地位置,精确寻找你想要的地点。 如果你还没完成快速开始教程,建议去完成它,因为它确实很快,只需浏览大约10个面板的内容。如果你想重新开始游戏,只需点击右上角的齿轮图标,放弃当前堡垒,然后开始新游戏。 因此,本指南的后续内容将基于以下假设: 1. 你已经完成了简短的教程。 2. 你拥有一个相对正常的世界,其中矿物设置为“随处可见”,其他基本参数接近默认值。
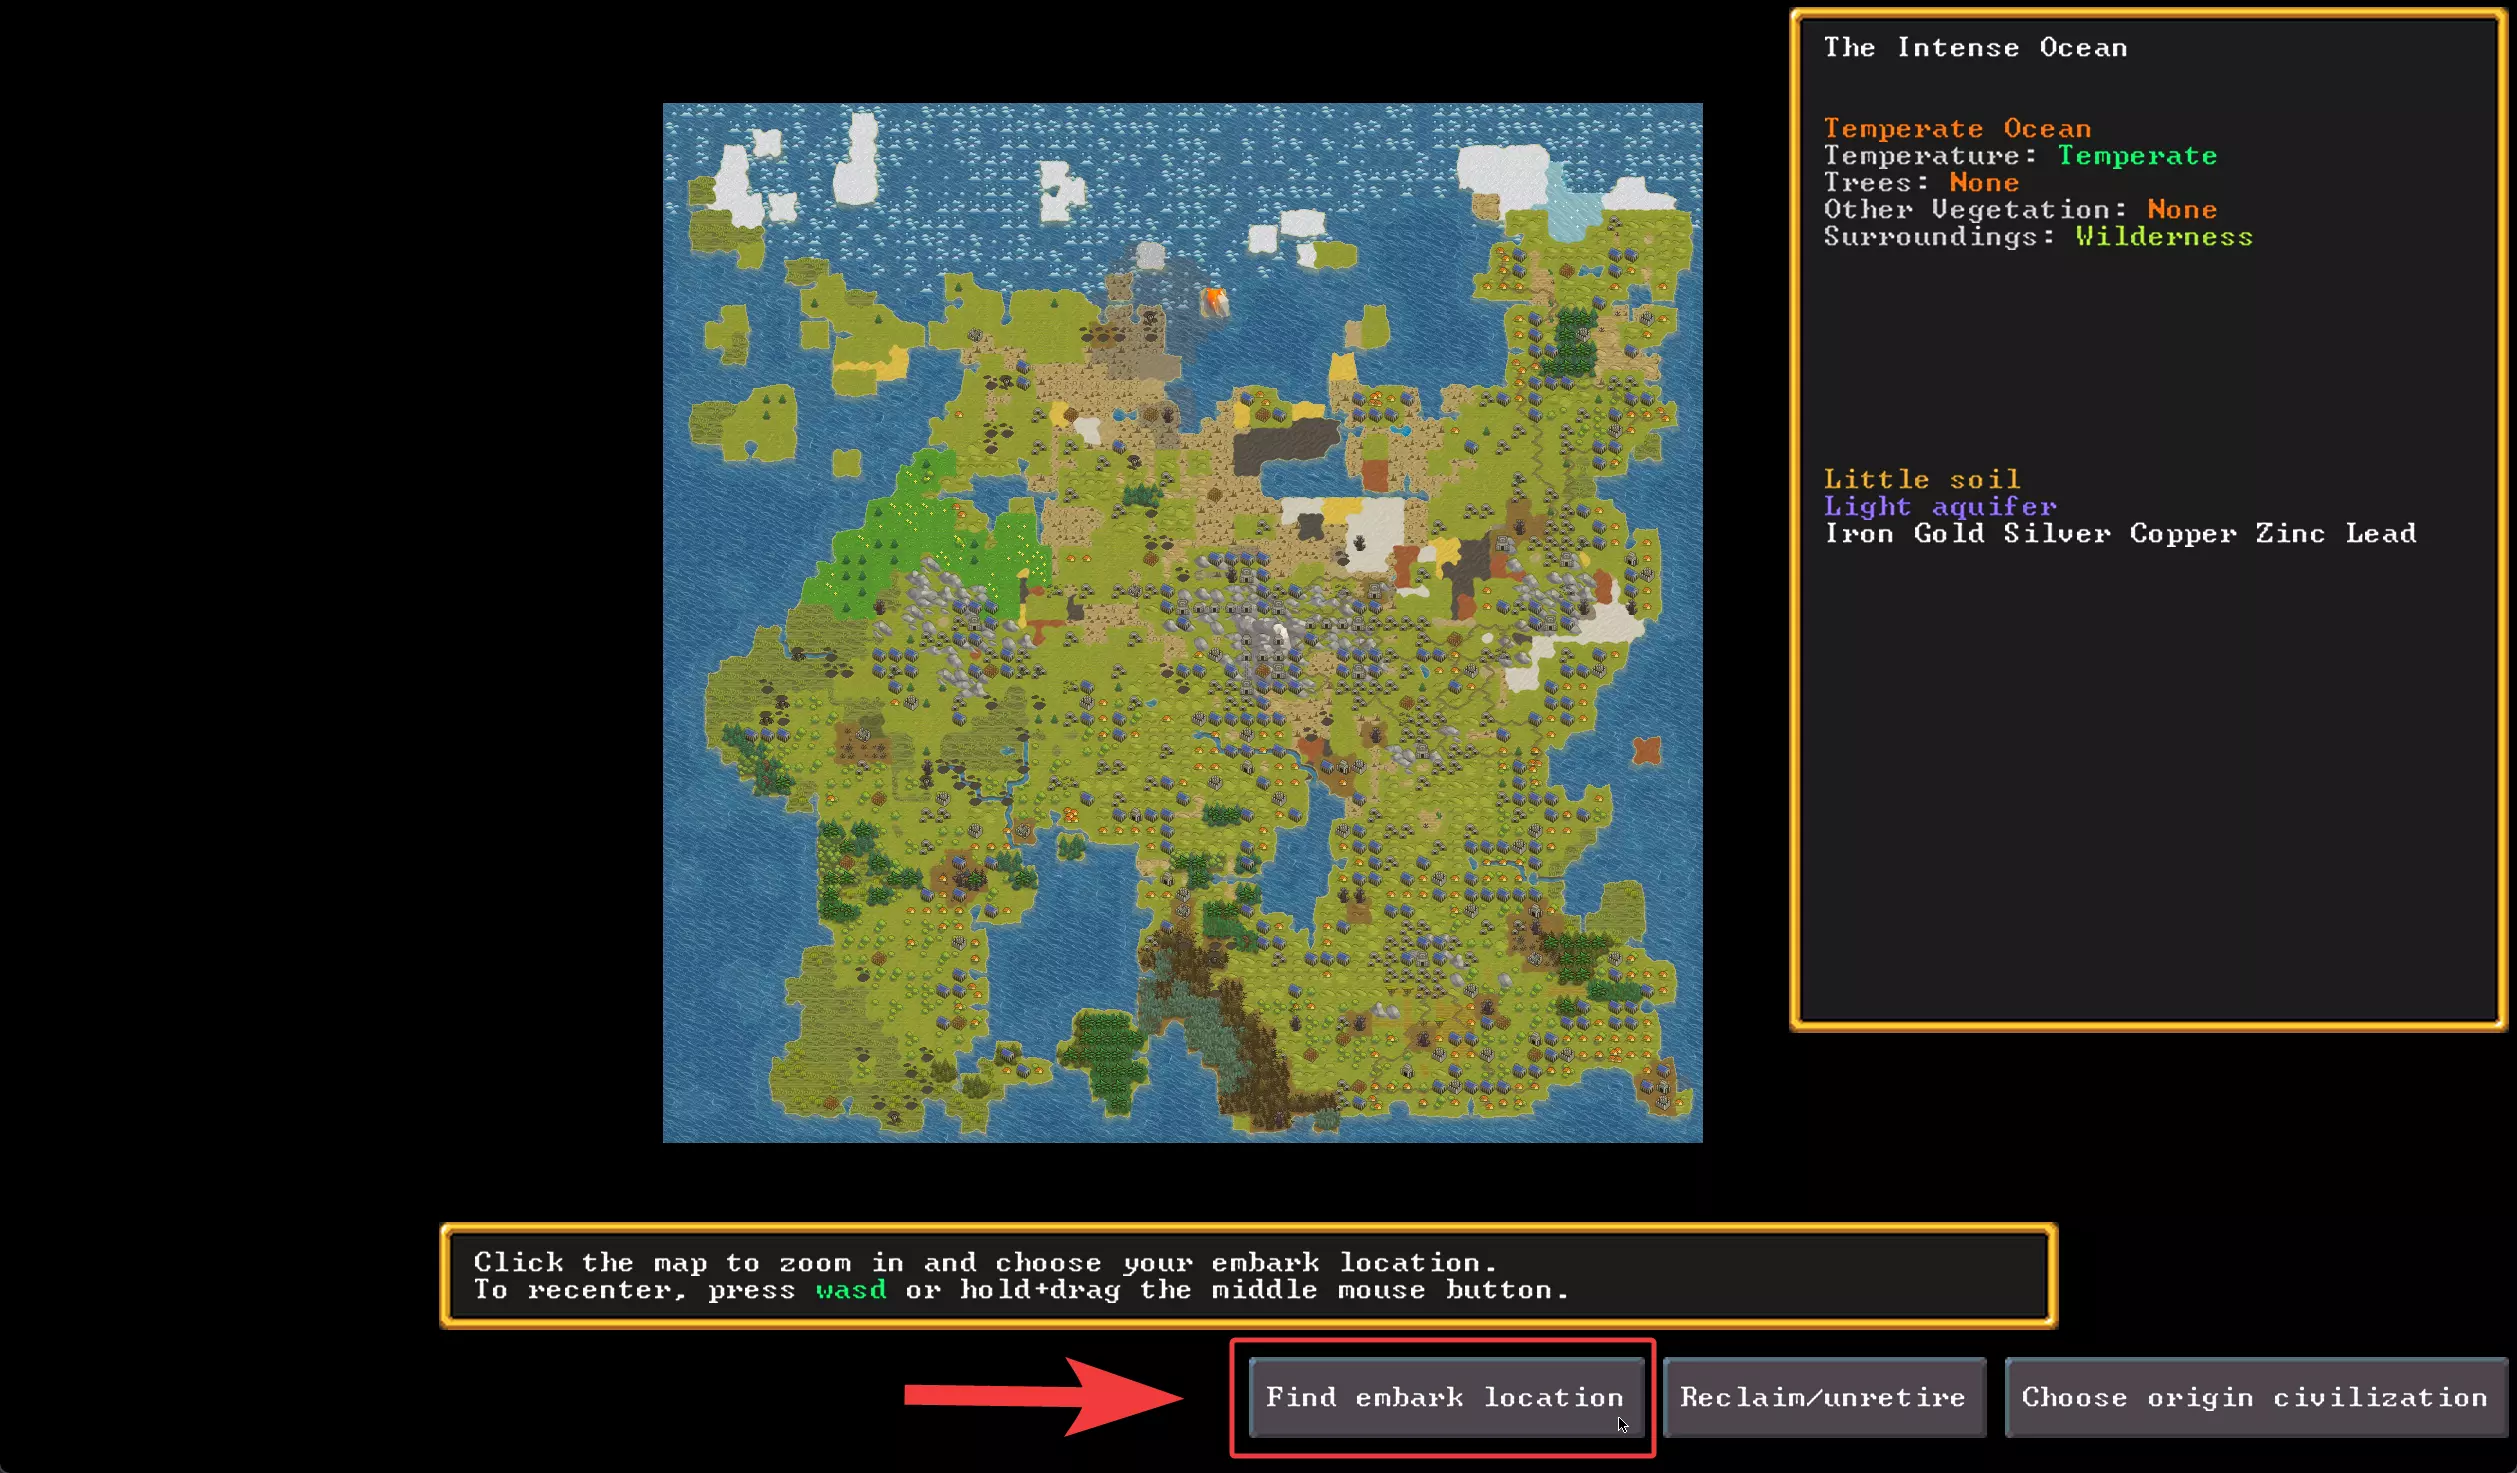
一个符合(至少按照矮人标准)正常的世界。 到目前为止,你可能已经发现可以用WASD键滚动地图,用鼠标按钮放大和缩小。如果你愿意,可以手动环顾你的世界,但浏览完毕后,请选择【寻找 embark 地点】,并将搜索工具设置为寻找矮人能够应对的地点。 不过等等,让我们稍微绕个路,来谈谈…… 起源文明
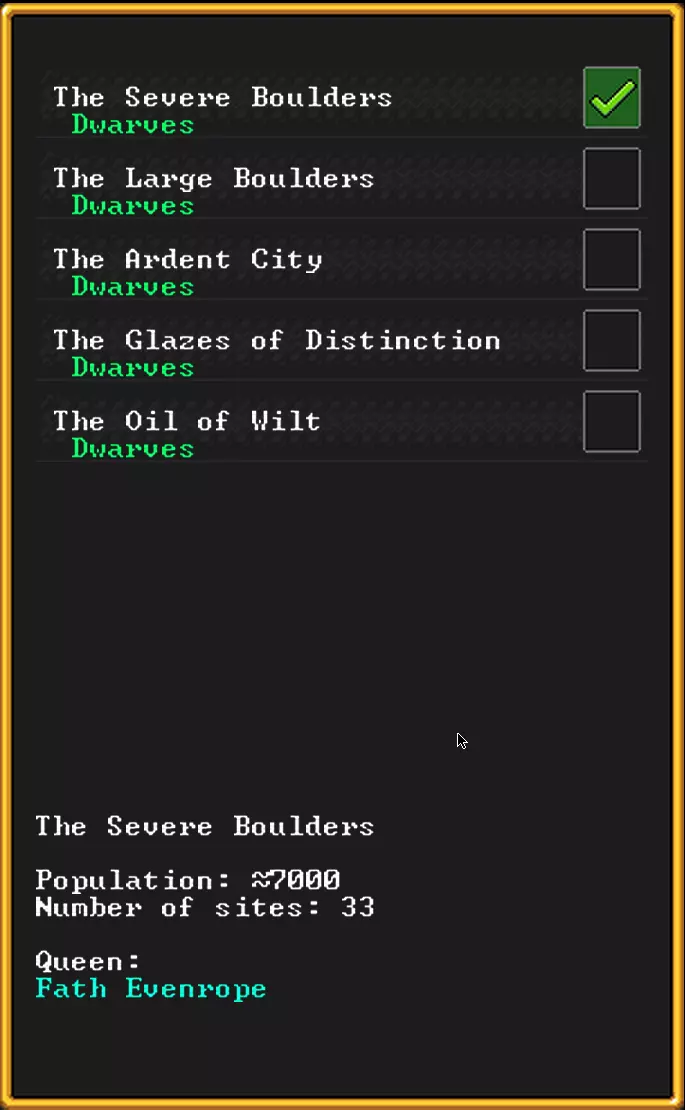
这其实不是特别重要,但你可能需要浏览一下选项,选择最大的文明。所有选项都会是矮人文明,因为这是《矮人要塞》,不是娘娘腔的精灵树屋或人类村庄之类的东西。这个决定的主要影响是,更大的文明应该会有更多移民来到你的要塞。 所以在这个例子中,我会选择截图中显示的那个,对于我当前的世界来说,它的规模还不错。选大的就对了。 寻找 embark 地点 在你真正成为大师之前,你需要选择一个你能够应对的 embark 地点。右侧截图中是需要关注的主要设置。关于每一项的更多提示如下:
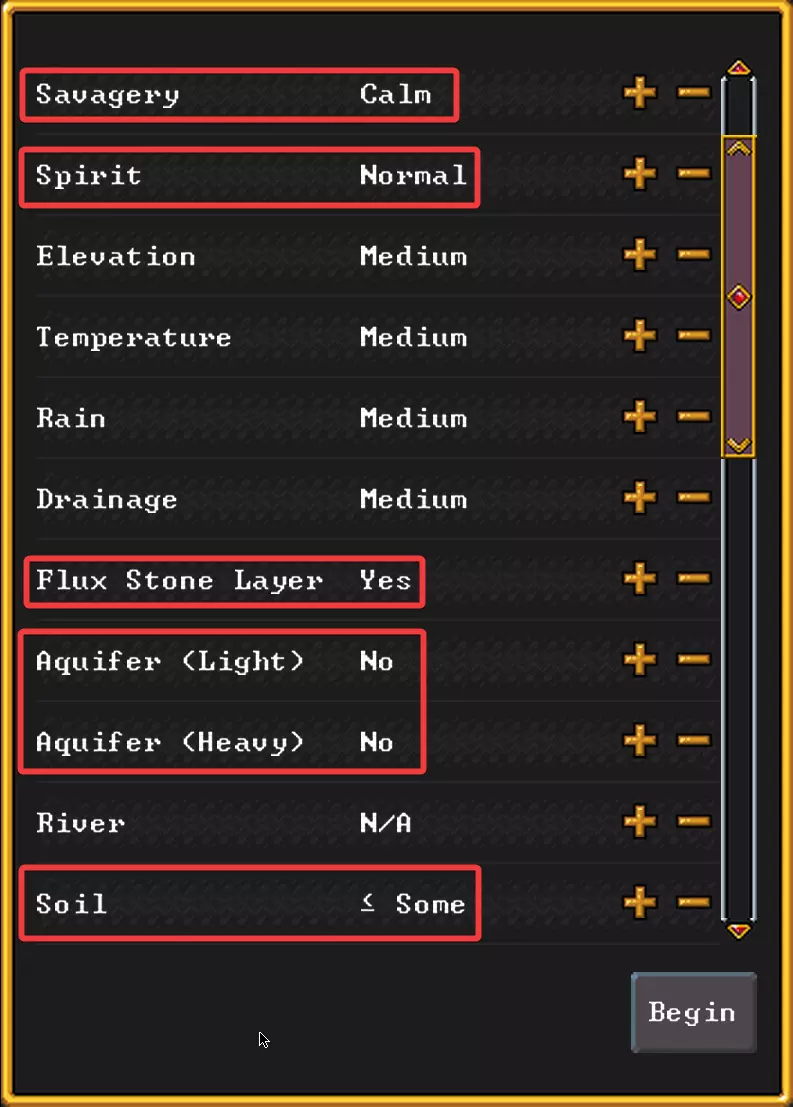
X和Y维度 - 请记住,你的 embark 尺寸限制为6x6,较大的 embark 矩形可以包含较小的矩形,因此请将其设置为2x2或4x4等较小尺寸,以防止搜索失败并获得更多多样性。 野蛮度 - 这主要与野生动物的体型大小有关。在你希望在此方面获得更多挑战之前,请选择“平静”。野蛮区域有巨型动物和动物人,但动物人通常不具攻击性。 灵气 - “良好”和“普通”都可以,但“良好”区域会带来一些奇特的挑战和好处。邪恶生物群系中生活着讨厌的怪异邪恶生物,在你希望进行更多战斗之前不应选择。 海拔【海拔】:虽然不是特别关键,但低海拔地区更容易出现平坦地形和大片水域。高海拔地区则多为山脉,有更多悬崖。 【温度】:和你预期的一样,极端温度更难生存。在你对沙漠、丛林或极地环境产生兴趣之前,选择中等温度。 【 rainfall】:降雨会让矮人不开心,但能填满“浑浊水池”区域,从而提供水源。 【排水】:这并不影响排水功能,而是与世界生成时的侵蚀有关。高排水区域会有丘陵和山脉,低排水区域则会有湖泊和河流。 【熔渣岩层】:在经济系统彻底改革之前,总是选择“是”。制作钢铁需要 flux stone( flux stone),所以你肯定会想要一些。在游戏进行经济系统大改后,你应该可以通过交易获得稳定的 flux stone 供应,但在此之前,缺少它会让你感到有些棘手。 含水层 - 为了方便搜索,这里建议选择“否”,因为你希望地图上有部分区域不存在含水层。你确实需要地图上有一部分区域存在含水层,但可以按照下文所述,通过包含一些不符合搜索条件的区域来手动处理。尽量避免整个地图都被厚含水层覆盖。薄含水层是可以接受的,因为它们很容易穿过,但本指南假设你的地图上有一些无含水层的区域。 河流水源:这完全取决于你,但你确实需要一些水源,河流还能提供动力。河流通常有鱼类,有时也会有一些麻烦的生物。 土壤:除非你知道如何将泥浆淹没到石头洞穴地面上,或者在危险的洞穴中耕种,否则你可能至少需要一层土壤来让耕种变得更容易。一旦你更擅长控制洪水或保卫洞穴地面,就不再需要土壤了,但在此之前,一点泥土会很方便。 黏土和沙子:除了制作黏土和玻璃工艺品外,这些并不重要。目前你可以先忽略它们。 铁:铁非常重要,所以即便你不选择其他东西,对于铁也一定要选“是”,就像你已经对 flux stone( flux 石)选了“是”一样。没有铁和钢你也能生存,但矮人就是为钢而生的。 黄金和其他金属——这些其实不那么重要,只会过多地限制搜索结果,或者导致搜索失败。所以我建议忽略它们。总之,在理想的和平区域中,你最不希望遇到的情况按麻烦程度排序如下: 覆盖整个移民区的大型含水层(但你确实需要至少部分区域有小型含水层覆盖) 邪恶环境 野蛮环境 极端温度(问题不算太大) 你最希望拥有的条件按重要性排序如下: 一层或多层土壤层 河流或至少覆盖移民区部分区域的含水层 铁矿 熔渣石

点击开始后地图将进行扫描。扫描完成后,已发现的区域会以亮绿色显示,如果只找到一两个区域,可能会有点难以辨认。它们看起来就像右侧显示的图像。红色矩形是已存在的定居点,你无法在那里定居。 放大到看起来不错的区域,点击“启程”开始选择你将用于生存尝试的特定矩形区域。 选择启程区域
现在需要特别注意右上角的信息面板,它会显示鼠标光标所在单个地格的资源情况。该面板仅显示光标下的单个地格,而非整个移民区域。因此,请检查你考虑作为移民区域的每个地格,确保获得所需资源,避开不需要的。 另外,你可以这样操作:先找到没有含水层的小区域,然后选择更大的移民区域,使其包含这些无含水层的地格以及一些有含水层的地格。 与敌对生物保持更远的距离可能也会有所帮助。难度设置(如新手或大师) 我通常会将这些设置保持默认,将敌人和经济设为普通是合理的,但《矮人要塞》的一大优点在于你可以按自己的方式游玩。如果你只想专注于特定内容且不想被打扰,“专业”的做法有时是禁用围攻、提高攻击阈值或进行其他你想要的调整。 有时你希望一切保持正常,但会发现某件事特别烦人。比如我觉得早期的吸血鬼很烦人,所以这次我提高了移民到要塞的吸血鬼比例的除数。希望能到更晚的时候才遇到吸血鬼。或许在某些时候,你会觉得围城战太过简单,于是尝试将难度调到近乎不可能的程度,这样就能在地图上打造出更有趣的堡垒废墟。 简而言之,你可以随心所欲地玩这款游戏,但至少要以“普通”难度玩一两次,了解一下默认设置是什么样的。你不会想一直错过所有乐趣,或者甚至不知道乐趣是什么。 精心准备,大师风范1:技能 你可以跳过自定义你的矮人小队这一步,但值得学习如何去做,因为在一些特别具有挑战性的情况下,比如试图在一个可怕的北极火山生物群系定居时,你需要确保没有任何点数浪费在无用的东西上。 挑选矮人
You don't really get to pick your dwarves. Instead you get a random bunch with different mental issues. These can affect their skill aptitudes tremendously. But you can decide which one to assign what skills to. You can ignore this detail and play casually, but its worth at least glancing at all of them and if you want to know more see Attribute[dwarffortresswiki.org] on the wiki. Of particular note is the info in the screenshot on the right about leader attributes (provided by Kasa), and some info here[dwarffortresswiki.org] about doctors and soldiers. Otherwise just guess and you'll usually be right about what attributes work well with what skills. Picking SkillsThe first tip here is to remember: You don't need most skills at first. Dwarves learn by doing.You could start out with completely unskilled dwarves, just assign them work, and they would skill up in whatever they're doing. Often you end up having to do this anyway with immigrants that arrive with worthless or no skills. And speaking of immigrants, remember you're going to have other dwarves show up with random good skills too. Starting skills are only for what you want a leg up on immediately and don't have much of an impact after a few fortress years. The two types of skills you want to pick to start out with are: Things that are immediately needed that you don't want to wait for. Things like medical, combat, social, and other non-labor skills that have limited opportunities to train up because you can't swing a pick at them. You usually want at least some of these at the start even if they're not immediately useful.What this amounts to differs depending on what the main goal is. Here the main goal is to make things easier at the start for those with less experience, so here are some decent expeditionary roles that try to accomplish that. Most of them have an immediately useful skill and a secondary skill needed relatively soon. Some are purely hard-to-acquire skills like the broker. Expedition Leader/Broker- Appraiser: 3 - Judge of Intent: 3 - Persuader: 2 - Negotiator: 2 Miner/Mason- Miner: 5 (faster mining) - Masonry: 5 (faster constructions) Stone Carver/Armorsmith- Stone Carver: 5 (faster higher quality large items at a Stoneworker workshop) - Armorsmith: 5 Trinket Crafter/Weaponsmith- Stonecrafter: 5 (faster higher quality rock trinkets at a Crafter workshop) - Weaponsmith: 5 Farmer/Carpenter- Planter: 5 (higher crop yield) - Carpenter: 5 (faster higher quality large items at a Carpenter workshop) Cook/Brewer- Cook: 5 (higher quality meals) - Brewer: 5 (faster booze production) Doctor- Diagnostician: 5 - Surgeon: 5 Optional: Combat SpecialistIf desired, replace the cook/brewer with a combat dwarf: - Dodger: 4 - Axedwarf: 2 - Shield User: 2 - Observer: 2 Strategy VariationsThe skills suggested above assume you want to show up with food supplies in a reasonably safe area and start farming immediately. It's also possible to do other things like show up with survival skills (Ambusher, Fisher, Herbalist) and no food, then hunt and forage, but that's more difficult. Some people even start with something like three doctors and four scholars, sacrificing all immediately useful skills for the longer term benefit of starting with skills very hard to acquire later except by chance. Here's a quick breakdown of which of these skills are most immediately useful and which are difficult to acquire with training: Used first: Miner - Easy to train by digging dirt especially, but helps to have one dwarf with some skill in this area. The others will learn on the job, just bring more than one pick. Carpenter - Carpenter will help a dwarf crank out higher quality wood items faster and you will need some wood items immediately. Woodcutter isn't really needed because that only increases speed and you don't need to do much of it compared to mining. Stone Carver - Making better quality furniture-sized items at a Stoneworker workshop. This is important because you usually have more stone than anything else. Planter, Brewer, Cook - Planting determines crop yield so is most important out of these. Cook determines meal quality which helps keep dwarves happy. Brewing skill only increases speed so is least important. Ambusher, Fisher, Herbalist - These are best selected if bringing no food. If you try this then go all in but at least start with some of each underground seed type. Used soon but not immediately: Appraiser, Judge of Intent, Persuader, Negotiator - These are very useful for caravan trading and are hard to train up later. Mason - Speed for building certain constructions, so having some skill will speed up early construction. At first you will mostly be digging, so this is not so important. Stonecrafter - This is for turning junk stone into trinkets for trade using a Crafter workshop. Skill here will crank out more dwarfbucks of mechandise before the first caravan shows up. This makes starting a little easier but isn't critical. Gem Cutter - This is also good for producing trade items, but with gems instead of the more common stone. Also not critical and the points are probably better spent on Stonecrafter for reasons described later. Weaponsmith, Armorsmith, Blacksmith - You will probably have less metal to train dwarves with especially early on, so it helps to start out with dwarves with some skill in these areas. Ideally they should be secondary skills on different dwarves because they won't be used immediately unless you bring ore with you. Medical Skills - These are very difficult to train so it makes sense to start with some. Diagnostician is most important since no other treatment can happen without it, and surgery affects success rate. The others only affect speed, but arguably suturing and wound dressing are important to stop bleeding sooner. A quick guide to combat skills for starting in more hostile situations: Dodger - The best defensive skill. This seems to be the highest priority of experienced players. Fighter - Weapon-independent attack skill. Axedwarf (and any weapon-specific skill) - More attack bonus than Fighter, but requires the specific weapon type. Also affects defense in the form of parrying ability. Shield User - Shield blocking skill. Not quite as good as dodging. Observer - Avoids surprises so dodging and blocking are possible in more cases. Armor User - Mostly affects movement speed in armor, but requires getting hit to skill up. Discipline - Avoids panic, shock, and fleeing from battle. Swimming - Avoids drowning death when a dwarf dodges into or is forced into deep water. Leader and Teacher - Hard to train. Helps one dwarf better train others with skills they have.For the love of the dwarven gods, don't pick Fish Dissector. There are some useless skills in the game currently that relate to unimplemented mechanics. For a full skill reference, see the Skill[dwarffortresswiki.org] page, but for now the safe starting build described above is pretty good. Preparing Carefully Like a Master 2: Items and Animals ItemsThe default equipment you start with is ok, but here are some things you must not remove and some things that you can ditch if you want to gain some points for more stuff: Anvil - This is absolutely critical! You need an anvil to make an anvil, and they must be made of iron or steel. So if you are somehow dumb enough to start without an anvil then you will do no metal working until you can trade for one. Maybe some people are ok with crossing their fingers for the first caravan to have one, but everyone else should have one. Steel anvils gain you nothing and just waste points. Pick - This is even more critical! You must have one or you are screwed! Not having a pick will be even worse than not having an anvil. Without a pick, you might as well plan to live in the trees like an elf. You will be unable to dig. Ideally you should bring at least 2 (preferably 3) picks to allow more dwarves to mine, or in case a pick is lost. Material doesn't affect digging, only weapon value of the pick. Axe - You need at least one or you are similarly screwed when it comes to obtaining wood. With no pick or axe you'd be super screwed. Material doesn't affect woodcutting, only combat. Food, Drink, and Seeds - Don't start with less than the overall default amount of food, drink, and seeds unless you've picked wilderness survival skills and know what you're doing. Especially don't ditch the seeds. I recommend doubling the seeds. But you can definitely exchange default food for cheaper food and save points. Always bring some seeds even if you bring no food. Cloth, Thread, Ropes, Bags - These are useful for different things, and tougher to produce. So bring some of them all, but you can pick cheaper materials for the same things (leather, spider silk) and save some points. Weapons, Shields, Armor - If starting with a combat dwarf, get them at least copper armor and a shield. If possible, get iron equipment. Battle axes can double as weapons and tree choppers. Picks can be used as weapons, but any proper weapon like a battle axe is superior to them.The rest of the stuff is a clue as to what is good to have so only substitute it, don't remove it, unless you really have a plan to construct it immediately, then construct it immediately if you do. Wood things like buckets and crutches can be removed and easily constructed on site, especially when not immediately needed. For now at least bring a log for each "unnecessary" wood item removed. Things to possibly add or change: 1-2 more copper picks, total 2-3. Double the default number of seeds. Diversify your starting booze for more variety. This helps with dwarf mood. Charcoal or Coke. Bringing a single block of fuel will jumpstart coal refining as soon as coal ore is found. (Fuel or magma is needed to refine coal, and bringing a charcoal allows you to skip building a wood furnace to make one.) If there are no trees, this becomes more important. Replace meat with one each of the cheapest type of meat from each animal species to get a free barrel per specie. Take one unit of each type of milk to get a free barrel per milk type. These can be emptied quickly by making cheese at a Farmer's workshop. Ore and fuel can be brought to make metal items like extra picks and axes rather than bringing the items themselves, but this makes things more difficult if you're less experienced so it isn't recommended for our example. Some people bring stone or blocks for specific difficult situations. By default, put all excess points, if you have them, into some standard material like logs. But also don't forget more un-boxable stuff (such as barrels and logs) means the move-in hauling takes longer.You can make almost everything on site, so usually just go cheap to save points. AnimalsFor animals[dwarffortresswiki.org], I think this is a good absolute minimal recommendation: 1 Male, 2 Female Dogs[dwarffortresswiki.org] 1 Male, 2 Female Cats[dwarffortresswiki.org] At least 1 Male, 5 Females of at least one of the following poultry types: Chickens[dwarffortresswiki.org] (more eggs, less meat, faster early reproduction) Blue peafowl[dwarffortresswiki.org] (best middle compromise, most optimal overall) Turkeys[dwarffortresswiki.org] (most meat and eggs but slow reproduction due to 2 year adult growth)The minimum recommended dogs and cats is so a bunch will breed for vermin control. Dogs can be trained as war or hunting dogs, but they can be trained almost instantly on site even with no skill. After conserving points as described above, you will be able to spend more on animals, and the birds are cheap, so you can easily bring more. Bringing multiple poultry types is a good idea, as is doubling the turkeys due to their 2 year growth lag. The poultry are super cheap, easy to take care of, and will really crank out the eggs and lots more birds. Eggs can be cooked or hatched, raised, and butchered for meat and fat to make the tallow you need for soap. The skin can be used for parchment for books or leather which can easily supply the whole fortress with bags, clothes, armor, and other leather gear. The bones can be used for crossbow bolts or crafts/decoration and the skulls used for authentic dwarven skull totem souvenirs to sell. About the only thing you can't do with poultry is brew booze. See sections below for more on raising poultry and keeping grazing animals alive. More on Embark ItemsFor more ideas on embark items, see here: https://steamcommunity.com/sharedfiles/filedetails/?id=2898947117&tscn=1672848169 Save ProfileOnce you come up with something good, don't lose you're work. Hit Save Profile at the bottom so you can just load it next time. This is especially useful if you came up with a special purpose SWAT team like "Dwarven Assault Miners" or somesuch and want to accumulate some special-purpose builds like this. Embark!Change any names you want and make sure you spent all the points you can, then finally you're ready to actually Embark on your journey to your new home. Get Organized Immediately Like a Master The map appears, you get an intro text about your journey, stout labor and bla bla, and hit the button to continue..... Pause and Unpause the Game SmartlyShould you unpause the game and let the clock run while you look around? No! While this might not be a disaster in easy situations, we're trying to train you up to handle the worst cases. So always keep the game paused until you've done all your set up and your initial task designations. Generally speaking it's best to pause the game until you've designated everything that can be done in parallel at the moment, then unpause it until something is completed that makes more designations possible. This way dwarves can be working in parallel as much as possible. For example designate rooms to be dug out, then unpause, then pause again once one is dug out and designate a workshop to be constructed, then unpause, and so on. Assign Administrative PositionsBefore doing anything else, hit Nobles[dwarffortresswiki.org] (n or the crown icon) and do this:
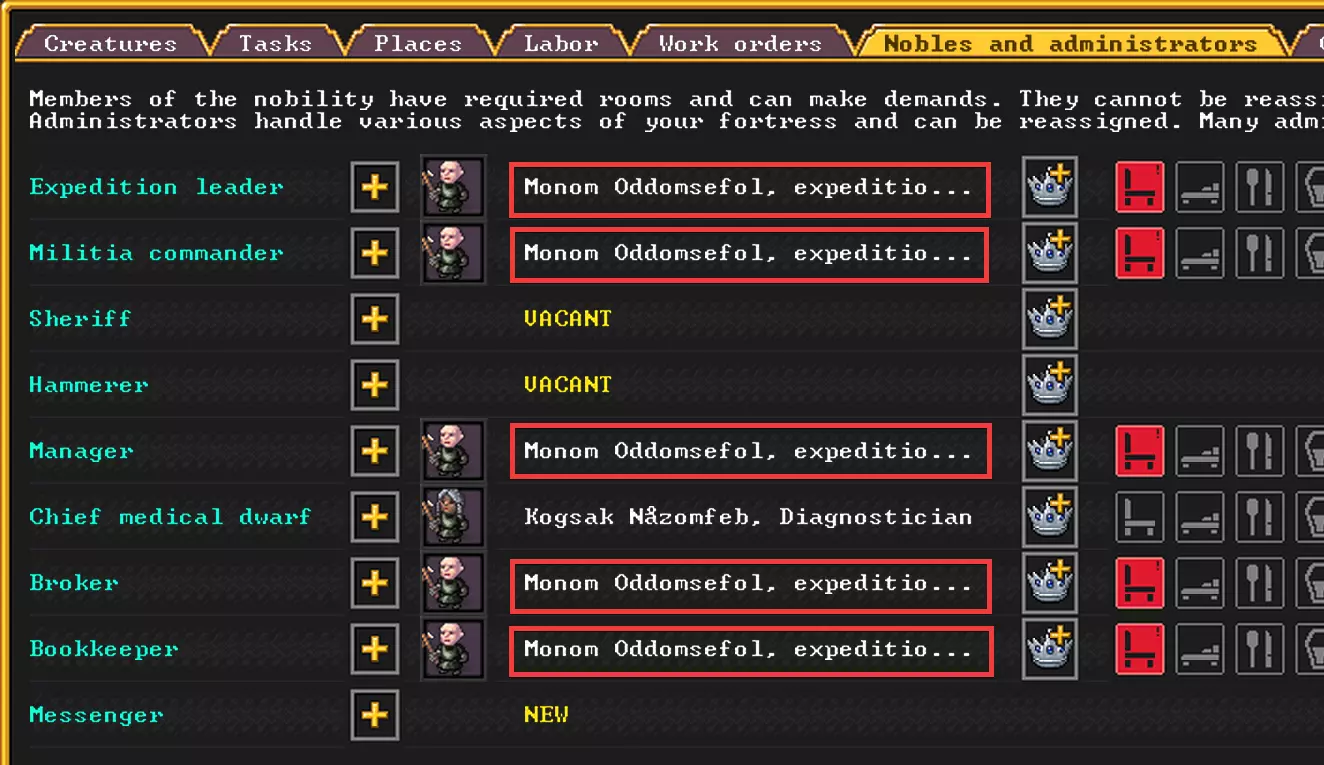
贵族与管理者界面。 将探险队领袖分配到所有这些职位,但首席医疗矮人除外,首席医疗矮人应设为你的医生。 立即执行这些操作的原因如下,这完全是可选的,但还是建议进行,毕竟这是《矮人要塞》,任何事情都可能发生。 创建小队:这是可选的,如果你不打算在危险区域定居,并非必须立即执行,但我还是会介绍一下,让你至少知道如何在初期尝试消灭任何可能造成麻烦的东西。毕竟这是《矮人要塞》,你永远不知道会发生什么。 工具劳动与小队冲突:矿工、伐木工和猎人的工作细节会相互冲突。避免让任何一名矮人同时加入多个工作小队。另外,不要将你创建的小队的日程常规设置为“就绪”(“装备/始终”),因为他们的小队制服装备很可能会使从事工具劳动的矮人无法携带必要的工具。更多细节在下方的工作小队和军事训练部分提供。 点击屏幕右下角的小队侧边栏(q),然后执行以下操作:
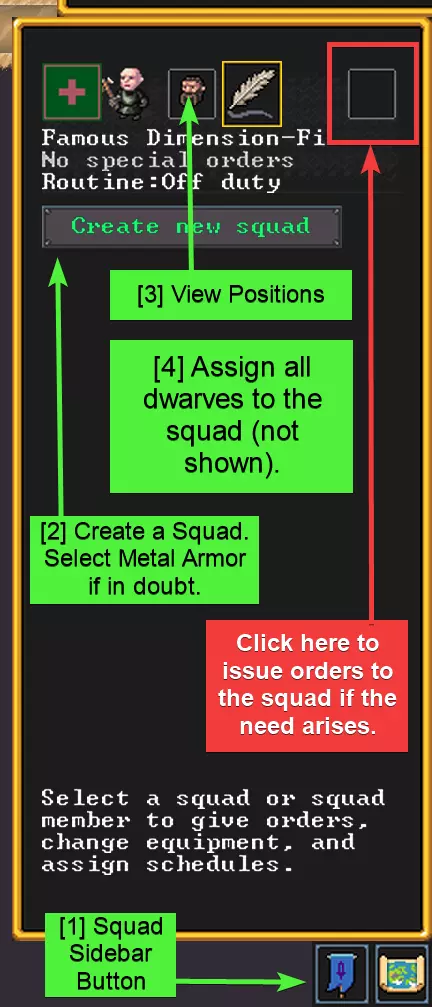
“小队侧边栏”。 将所有矮人编入一个大型小队。你现在不需要开始训练他们或建立正式的军事组织,但我们希望将他们全部编入一个大型小队,以便在需要时命令他们全部去攻击某个目标或移动到特定地点。
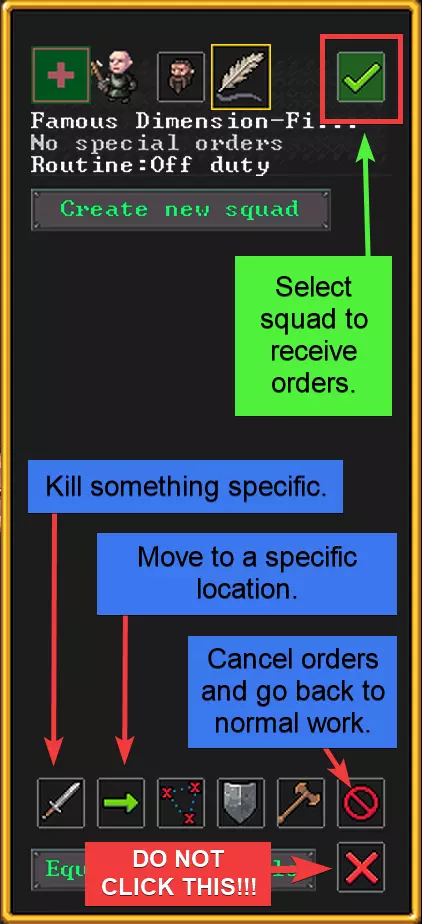
下达小队命令时,注意不要误点X按钮解散小队,尤其是你只想关闭侧边栏的时候。这可能是用户界面中最糟糕的设计。 你可能一开始没有小队理想情况下所需的大部分装备,但没关系,因为目前的目标只是能够指挥所有矮人合力用徒手、牙齿攻击敌人,或者在需要时转移到更安全的地方。即使是一些比较棘手的生物,当矮人以7比1的数量优势围攻时,通过拳打、脚踢、撕咬也能将其击杀,如果矮人使用镐和斧头,效果会更好。 现在关闭小队侧边栏,直到需要时再打开。 管理方面,接下来我们将设置一个办公室。【组织】用于管理和记账,我们目前还没准备好,但至少我们已经完成了职位分配。事实证明,如果你的人口少于20人,这些功能在没有办公室的情况下也能运行。 像大师一样开拓大地 假设你已经完成了基础的快速入门教程,本节将从中级视角介绍要塞的启动,前提是你已经了解挖掘和设置储物区的基本知识。现在是时候在房间规划、防御和储物区配置方面更具战略性了。立即转移到安全地带 通常情况下不用着急,但我假设某天你可能想在一个可怕的冰冻蛮荒火山或类似地方定居,这时就需要立即找到避难所和安全区域。所以让我们来介绍在必要时如何做到这一点,同时又不过多牺牲规划。 挖掘斜坡 通常你会先挖楼梯井,但既然你已经知道怎么做了,而且我们要开始为最终也会有 wagon 的商队做准备,那就来了解一下使用斜坡的方法。 游戏中的每个 3D 方块实际上由两部分组成:该层的主要空间和一个薄的地板“板”。我会像 wiki 那样称它们为墙壁部分和地板部分。当你“正常挖掘”时,方块的墙壁部分会被移除,而地板部分会保留。 但当你在墙壁部分为空的方块上“开凿”时,会执行两个操作:1)移除当前层该方块的地板部分;2)将该地板下方方块的墙壁部分转变为斜坡(可通行但非空)。 这意味着进行开凿操作时,不仅当前层的地板部分会被移除,其下方一层对应方块的墙壁部分会变成半填充的“斜坡”。矮人随后可以向下走一层到达这个可通行但未完全挖空的方块区域,并像挖掘其他墙壁一样“正常挖掘”水平方向。如果需要一些时间来适应,或者在某些时候犯了需要修正的错误,也不必担心,因为这确实有点让人困惑。

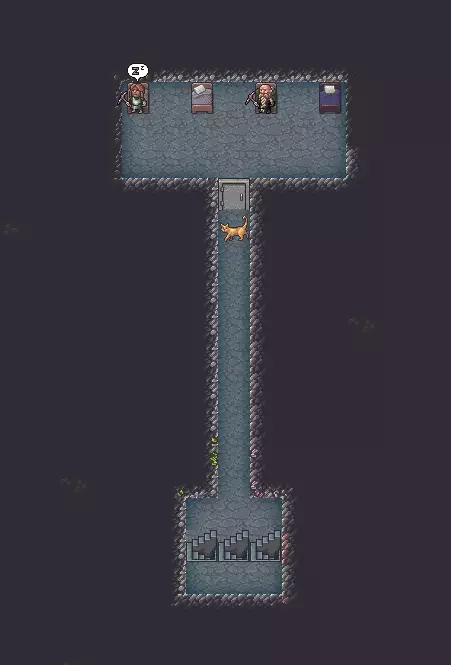
墙壁、地板和不同采矿选项的工作原理示意图。浅蓝色薄瓷砖表示已移除的地板部分,绿色瓷砖表示仍存在的地板部分。 楼梯问题:在游戏的经典版本中,你可以手动指定上楼梯、下楼梯或上下楼梯,因此你总是可以建造上下楼梯,并随时向上或向下延伸它们。在高级版本中,游戏强制你至少指定2个Z层的楼梯,并强制顶部和底部分别为仅上和仅下。虽然这允许你向下延伸现有的楼梯,但在向上延伸现有楼梯时会产生问题。解决方法:始终将楼梯指定为比需要的高一层,然后使用X键移除顶部的仅下楼梯指定。在某些情况下,你可能还需要手动建造每一层的斜坡,然后挖楼梯返回下方。 回到入口斜坡:最终我们希望入口斜坡有三格宽,但现在先挖一格就好。 所以,选择【挖掘】(m),然后选择【挖掘通道】(u),点击马车正北方的其中一个地面格子两次。注意,“挖掘斜坡”实际上是在墙壁中挖出一个斜坡,然后挖掉斜坡上方的天花板,所以这不是我们向下建造斜坡所需要的。使用“挖掘通道”。 取消暂停游戏,直到斜坡挖好,然后再次暂停。 注意,如果你周围有山坡,也可以直接水平挖进山坡,但我想确保涵盖斜坡的建造方法。所以这里假设你在平坦的地面上,并且想从当前位置开始挖掘。向下移动视角,从斜坡处挖掘一条短隧道,然后挖一个7x7的房间。我们选择7x7是因为最终想把这里改造成贸易站,并且希望将斜坡和隧道拓宽到3格宽,但目前这里将作为通用仓库。如果你现在想把隧道和斜坡拓宽到3格宽也可以,因为不会花太长时间,但在危险情况下,最好保持1格宽,这样可以更快地用墙封锁隧道。
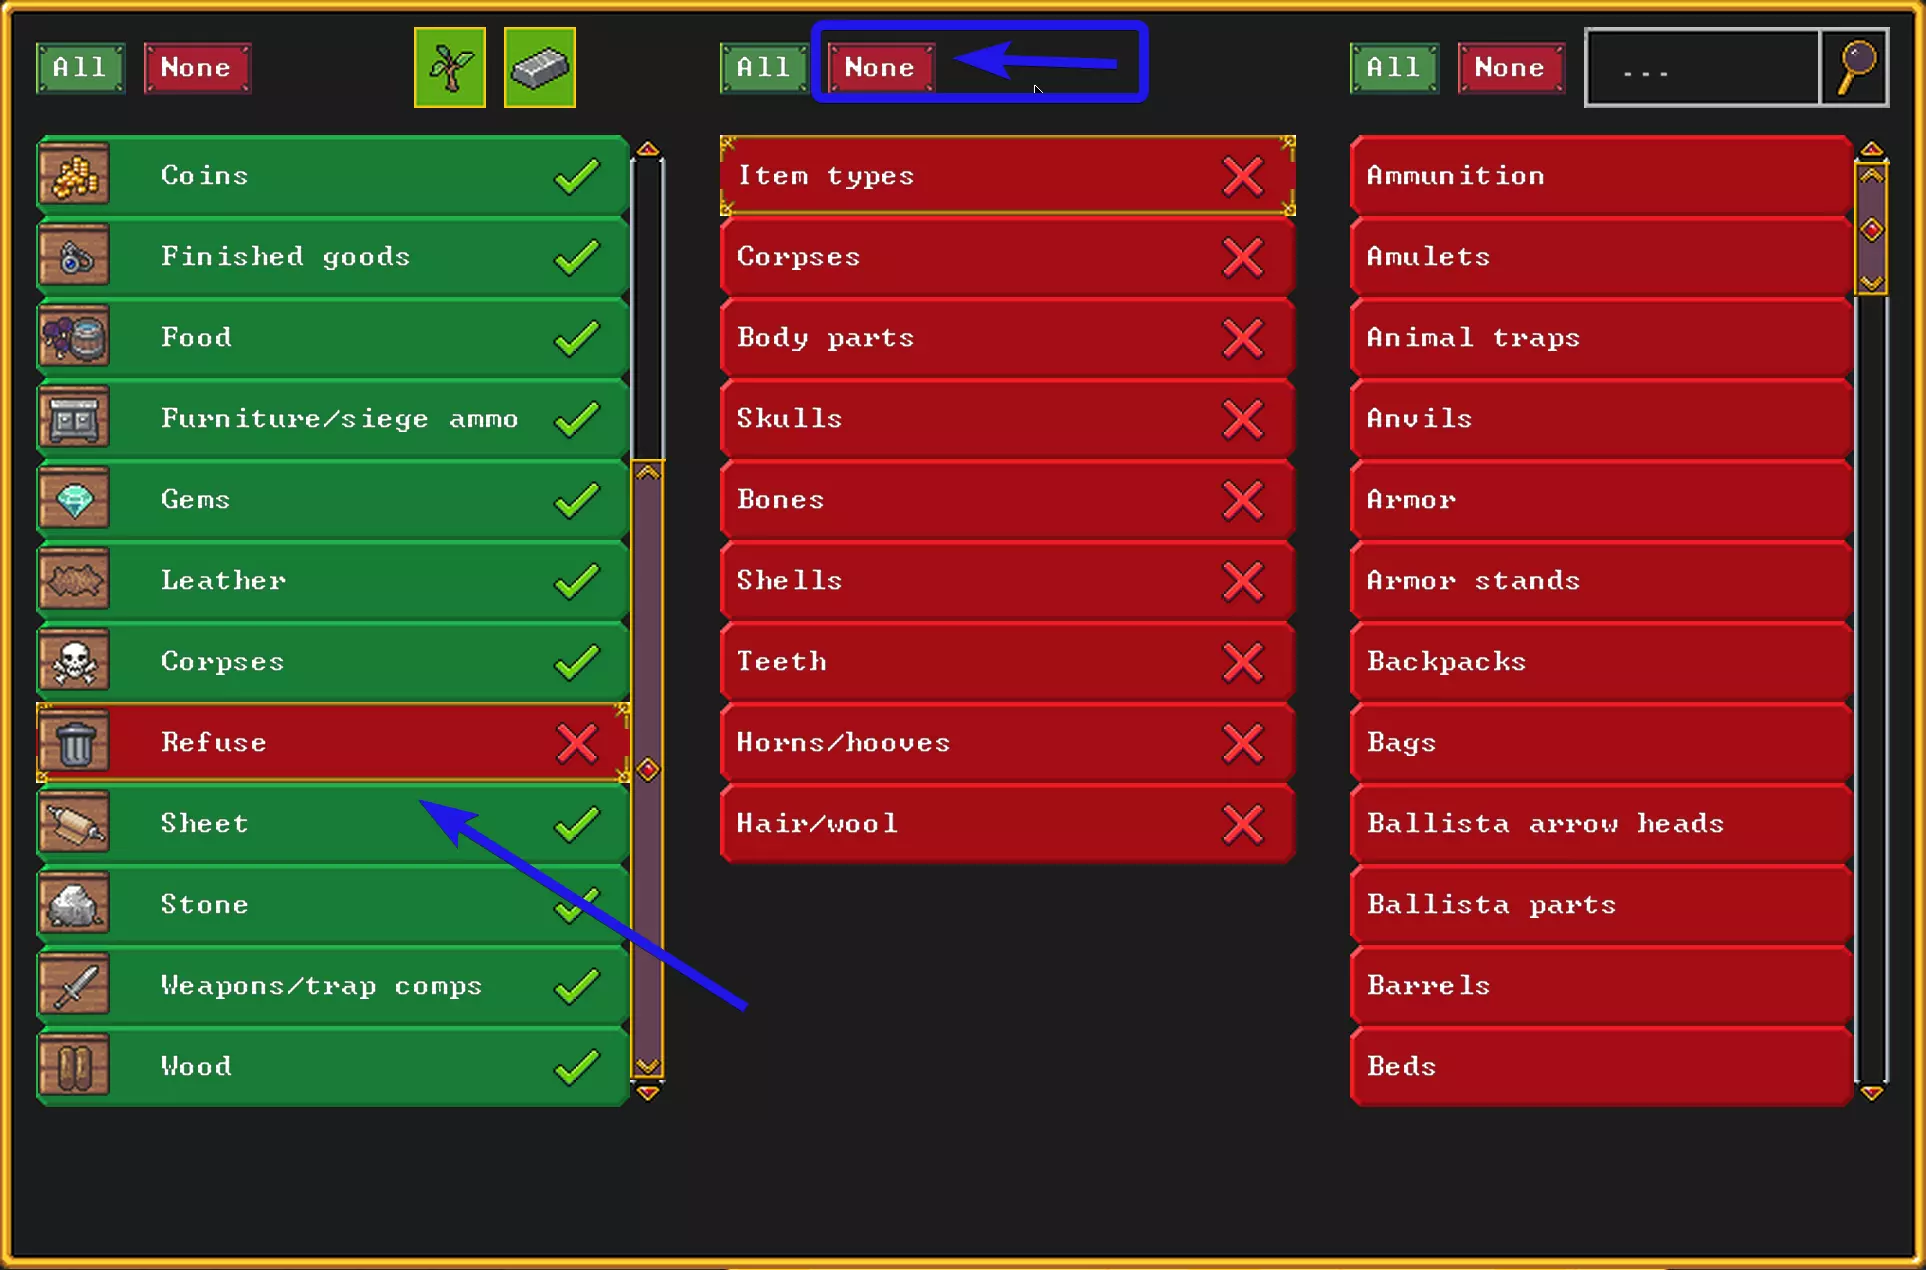
初始挖掘规划。如果不着急,你其实可以挖多个斜坡向下延伸多层,以进入石质层。这样可以获得可平整的墙壁、用于制作物品的石料,以及更好的防御挖掘敌人的能力。较长的入口通道可能也不错。 取消暂停直到挖掘完成,然后再次暂停。 迁入:在整个房间上方创建一个储物区,然后在配置中选择【全部】,接着点击【自定义】并像这样禁用【所有垃圾】。
同时也要关闭尸体显示。我在截图前忘记这么做了。 第二件我们要做的事是设置集会区域,这样可以防止矮人在危险的室外闲逛。 选择区域(z),选择集会区域,然后拖动覆盖整个房间,使其范围与仓库相同。不用费心命名,因为它不会在这里存在太久。长期让矮人把丑陋的土洞当作集会大厅,他们是不会开心的。 最后,将视角移回上方,选中 wagon(可能因为上面坐满了矮人和动物而有点困难),然后点击移除图标。

拆解货车获取木材。 货车本身毫无用处,但在树木稀少的情况下,拆解它获得的木材可能会非常有用。把货车留在那里而不去拆解获取急需的木材,这是新手常犯的错误。 注意,7x7的储物区看似很大,但你目前还没有任何储物箱,所以可能需要更多的储物空间。在第一个储物区的北侧再挖掘一个约7x7大小的房间,并在该房间内放置另一个【禁止垃圾和尸体的全品类】储物区。 【Safe At Last】:取消暂停一段时间后,在储物空间充足的情况下,你会看到货车被拆解,所有物品被移至储物区,而矮人则在集会区域附近活动。如果外面有很多“乐子”,那么现在就是你想要把你的矮人围起来,把其他所有东西都挡在外面的时候了。你可以用他们能找到的任何材料来建造围墙(可能只有马车上的木头,但理想情况下是石头)。要做到这一点,你需要使用【b-n】下的建造菜单。最终你应该会得到一个类似这样的结构。
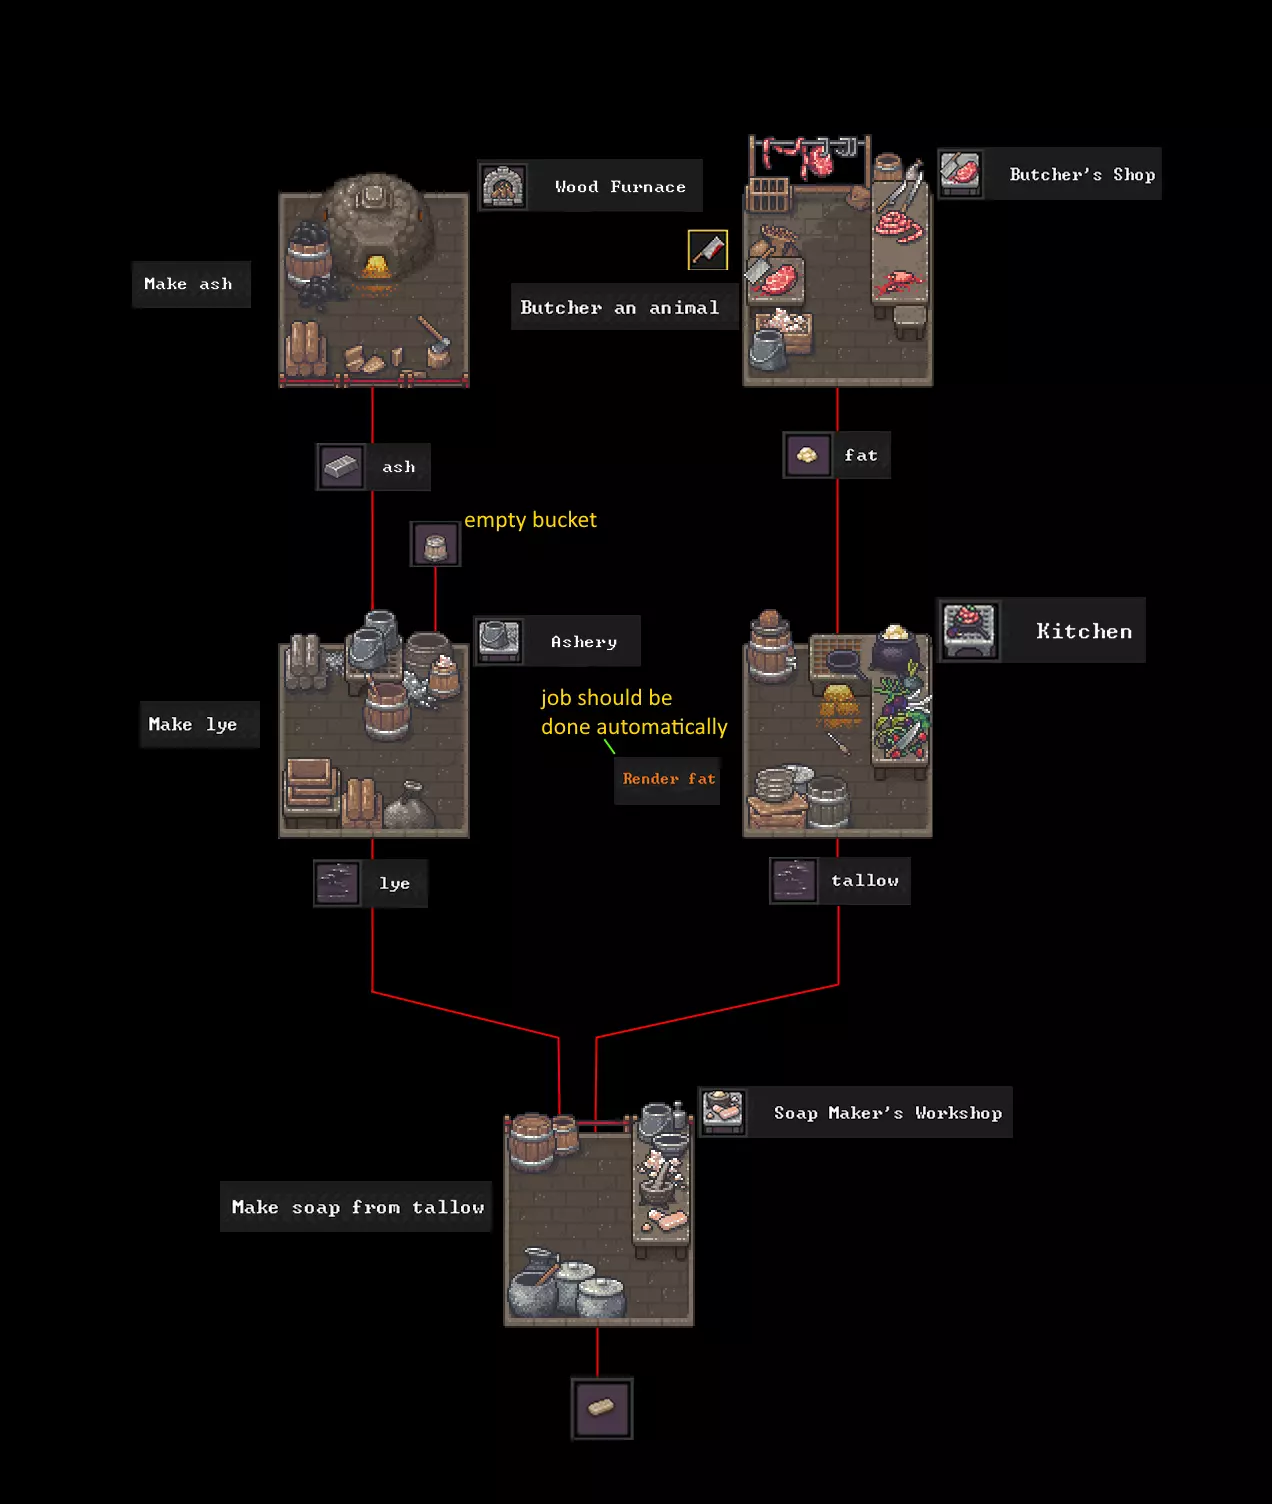
我只把斜坡向下挖了一层到沙子,因为我比较懒,而且挖沙子更快。之后我可以建造石墙和石地板,也可能会建造地面上的墙壁和地板。 要进行三维思考。尽管这里的大多数截图显示的是平面单层布局,这只是因为这样更容易在一张截图中展示,但值得一提的是,更高效的设计理想情况下应该利用三维空间。例如,工坊的输入和输出储存区可以位于工坊的上下方,每个角落有四个楼梯连接。任何能缩短物品拿取和存放路径的设计都可能是个好主意。而且到了后期,当你需要引导和储存水与岩浆时,【三维】设计会变得更加重要。大师级垃圾管理 接下来的问题是你没有垃圾堆放区,腐烂物会堆积在你不希望的地方。 新手常犯的错误是任由垃圾堆积、腐烂,产生瘴气,导致矮人不开心,进而引发暴怒并互相攻击。 但这很容易避免,只需创建一个垃圾“储存区”,最好放在室外。 如果地表足够安全,直接上去创建一个较大的储存区,比如10x10大小,并将其设置为垃圾区。如果不安全,就在远离其他区域的地方挖掘一个大房间,在里面设置同样大小的储存区。尽快给这个房间装上门,以帮助控制气味,但初期可以先用一条长长的走廊。 最终你会希望要塞内有一个垃圾堆放区,因为当发生围城时,你最终会想要关闭要塞,但如果你还没有用围墙将自己与外界隔开,现在可以暂时搁置这件事。 确保进入“全部”堆放区的自定义设置,并如前所述禁用垃圾。新手常犯的另一个错误是直接点击“全部”而不排除垃圾,结果导致主要的综合储存区里堆满了腐烂的垃圾。 稍后我们会讨论其他丢弃物品的方法,但现在只需将垃圾堆放区建在矮人不会经常活动的地方。 此外,你可能需要进入自定义设置,确保垃圾储存区允许存放尸体。之后我们需要一个带棺材的合适陵墓,这样能在矮人的朋友去世时让他们保持心情愉悦,但在你完成陵墓之前,如果有人去世,垃圾堆放处可以充当临时停尸房。你还需要一个地方来处理死去的怪物和动物。 【新手才会挨饿】 食物、 farming 和烹饪 矮人平均每个季度需要2单位食物和4单位饮品。如果你带了一些食物和饮品,即使不烹饪,短期内也应该没问题,因为很多植物和肉类可以生吃。这应该能给你一些时间来建立农场、牧场和烹饪设施。 紧急情况下,你可以采集地表植物,其中一些无需加工或烹饪就可以食用。让食草动物活下去 现在你已经安顿下来,并且在确实需要时可以用墙把自己围起来,但如果不是必要的话,这其实不是个好主意。接下来我们要解决的问题是,你的食草动物正和矮人一起待在堆满食物和酒水的地方,却没有草吃。(即使你在 embark 点数上没有花费,你的 wagon 也会免费附带两只食草动物。) 新手常犯的错误是任由它们挨饿,然后对所有食草动物相继死亡感到困惑。 如果你打算筑墙围起来,那么最好的做法是尽快建造屠宰场和厨房,屠宰这些食草动物,然后烹饪这些美味的肉类来节省其他食物供应。既然你无法妥善照料它们,它们最好的归宿本该是厨房。但目前我们先假设没必要这么做,让它们活着留待日后或许更好。 将视角移回地面,然后点击区域(Z键),接着点击围栏/牧场。这个区域需要相对大一些,这样才有足够的草。土地肥力越低,区域就需要越大,所以宁可建得大一点。 添加好区域后,你需要给它分配动物。点击那个看起来像+兔子的按钮,然后选择可放牧动物。这指的是牛、马之类的动物,不包括猫和狗。那些会四处跑动、在不跟矮人待在一起时吃害虫的宠物,没必要关起来。

Pen/Pasture Zone. Unpause the game and you'll see your dwarves drag the animals out to their new pasture. Later you might want to try to protect the pasture from predators and enemies with a wall or something, but for now don't worry about it. You might also just want to slaughter them soon if you don't have a breeding pair, or you could keep them for milking. FarmingInitially you don't need a huge farm[dwarffortresswiki.org]. We will describe four 3x9 plots but you could initially get away with only two. Some dwarven science studies have shown that 3x9 is an ideal size. (They could be smaller but this size will last you a long time and they don't take long to make.) Dig Out Some Soil LayerCreate a stairwell adjacent to one of your rooms if needed, and dig out a room in a dirt/soil layer with at least two 3x9 areas of dirt floor in it. These must be underground (not exposed to the sky) and not on the surface because the seeds you have will only grow underground, not in surface plots. What if there's no soil layer?If you don't see a soil layer immediately but are pretty sure you embarked to a map with a soil layer, try digging around different parts of the map. Sometimes the soil isn't one layer thick over the whole map. If you really don't have a soil[dwarffortresswiki.org] layer anywhere then you're going to have trouble for a bit because you will either need to farm in a natural cavern[dwarffortresswiki.org] or you will need to gather surface plants and try surface farming. You can also flood an area with water then shut the water off to create muddy floor, but that will be covered later. If necessary, abandon the fortress attempt and re-embark elsewhere with deeper soil to minimize this difficulty. There's no dwarven shame in re-embarking if the destination isn't as expected. Build the PlotsFor now we will assume you have some dirt floor in a dirt layer somewhere and this will be good enough even if underground dirt layer farming is not ideal compared to natural caverns. b-o-f-p is where the farm plots are. That's Structures->Workshops->Farming->Farm plot. Designate at least two but no more than four 3x9 farm plots and unpause long enough for your farmer to construct them. Then repause the game. Planting ScheduleClick each plot to set up their growing schedule like this, in order of priority: PlotSpringSummerAutumWinter1stQuarry BushFallowPlump HelmetsFallow2ndFallowCave WheatFallowPlump HelmetsOptional 3rdFallowPig TailsFallowDimple CupsOptional 4thSweet PodsFallowPlump HelmetsFallow (If you only built 3 plots ignore 4, and if you only built 2 then ignore 3 and 4.) The fallow periods are helpful because dwarves don't always get started on planting soon enough. So we only plant the seeds at the beginning of the growing season and not in the second half. In an emergency you can grow plump helmets in the fallow seasons, but normally you don't want too much of any one thing. Plump Helmets[dwarffortresswiki.org] are your main dwarven staple and can be eaten raw, cooked, or brewed. They're good to have when all else fails. Quarry Bushes[dwarffortresswiki.org] produce leaves which are your most productive food source but they can't be brewed. The seeds (rock nuts) can be made into oil if needed. Cave Wheat[dwarffortresswiki.org] can be directly brewed for some important booze variety, but it needs to be milled into flour for use in cooking. Pig Tails[dwarffortresswiki.org] are good for both making thread for cloth and for more booze. Dimple Cups[dwarffortresswiki.org] are only for making blue cloth dye and aren't really needed right away, but it's good to get them growing to produce seeds to farm more of them later. These are low priority since they don't help much early on. Sweet Pods[dwarffortresswiki.org] are good for an extra source of booze, but need processing for cooking. With all that set up and seeds available your planter will go to it, but don't unpause yet because your farmer will be working while others are executing some activities you need to designate. Pretty soon we will want to set up cooking and brewing, but we will get to that in a bit. Obtaining SeedsSeeds are produced when a plant is eaten raw, brewed, milled, or processed, but not when it is cooked. For this reason it's a good idea to disable cooking on plants when you want to get seeds from that type. We will describe how to do this a little further down. More Info on CropsA list of crops, including what can and can't be eaten raw, is available on the Crop[dwarffortresswiki.org] wiki page. Manage and Bookkeep Like a Master Now lets take care of the office. Since we might not have stone just yet, lets just use wood for a table and chair. Low-Population ManagementAn office is not required for work orders if your population is less than 20, as long as you have a manager assigned. It's easy to create an office right away anyway, but you can put this off. Dig out a 5x5 room near your main stockpiles and build a Carpenter[dwarffortresswiki.org] Workshop[dwarffortresswiki.org] in the middle. Use junk stone as the material if possible so you can save the wood for other things. Then create a new stockpile[dwarffortresswiki.org] surrounding the workshop and select Wood as the type. This exact design isn't needed, but in general it seems to help a bit to place workshops adjacent to stockpiles of their input material, and to have a stockpile that accepts the output nearby. This won't be a very large stockpile so don't disable wood on the main stockpiles just yet. If you feel like it, configure the new wood stockpile to transfer from the "all" stockpiles, but this isn't strictly necessary right now. Queue up one wood chair[dwarffortresswiki.org] and one wood table[dwarffortresswiki.org]. You can also try creating work orders for these, but it's just one of each so probably not worth the trouble. Once those are done, place the table and chair next to each other anywhere, and drag a two tile office zone around them like this example of a stockroom corner turned into an office desk:
仓库办公室。 实际上你可能只需要一把椅子,但再建张桌子也不麻烦。 将你的领袖/管理者/记账员分配到办公室。 检查贵族界面,确保办公室需求图标现在是绿色的。如果是这样,从现在开始,即使人口较多,你也应该能够为所有物品排队下达工作订单(按O键)。 下达你的第一批工作订单(像专家一样)点击工作订单图标(看起来像一个剪贴板)或按O键,然后排队下达一些我们一直需要的东西:
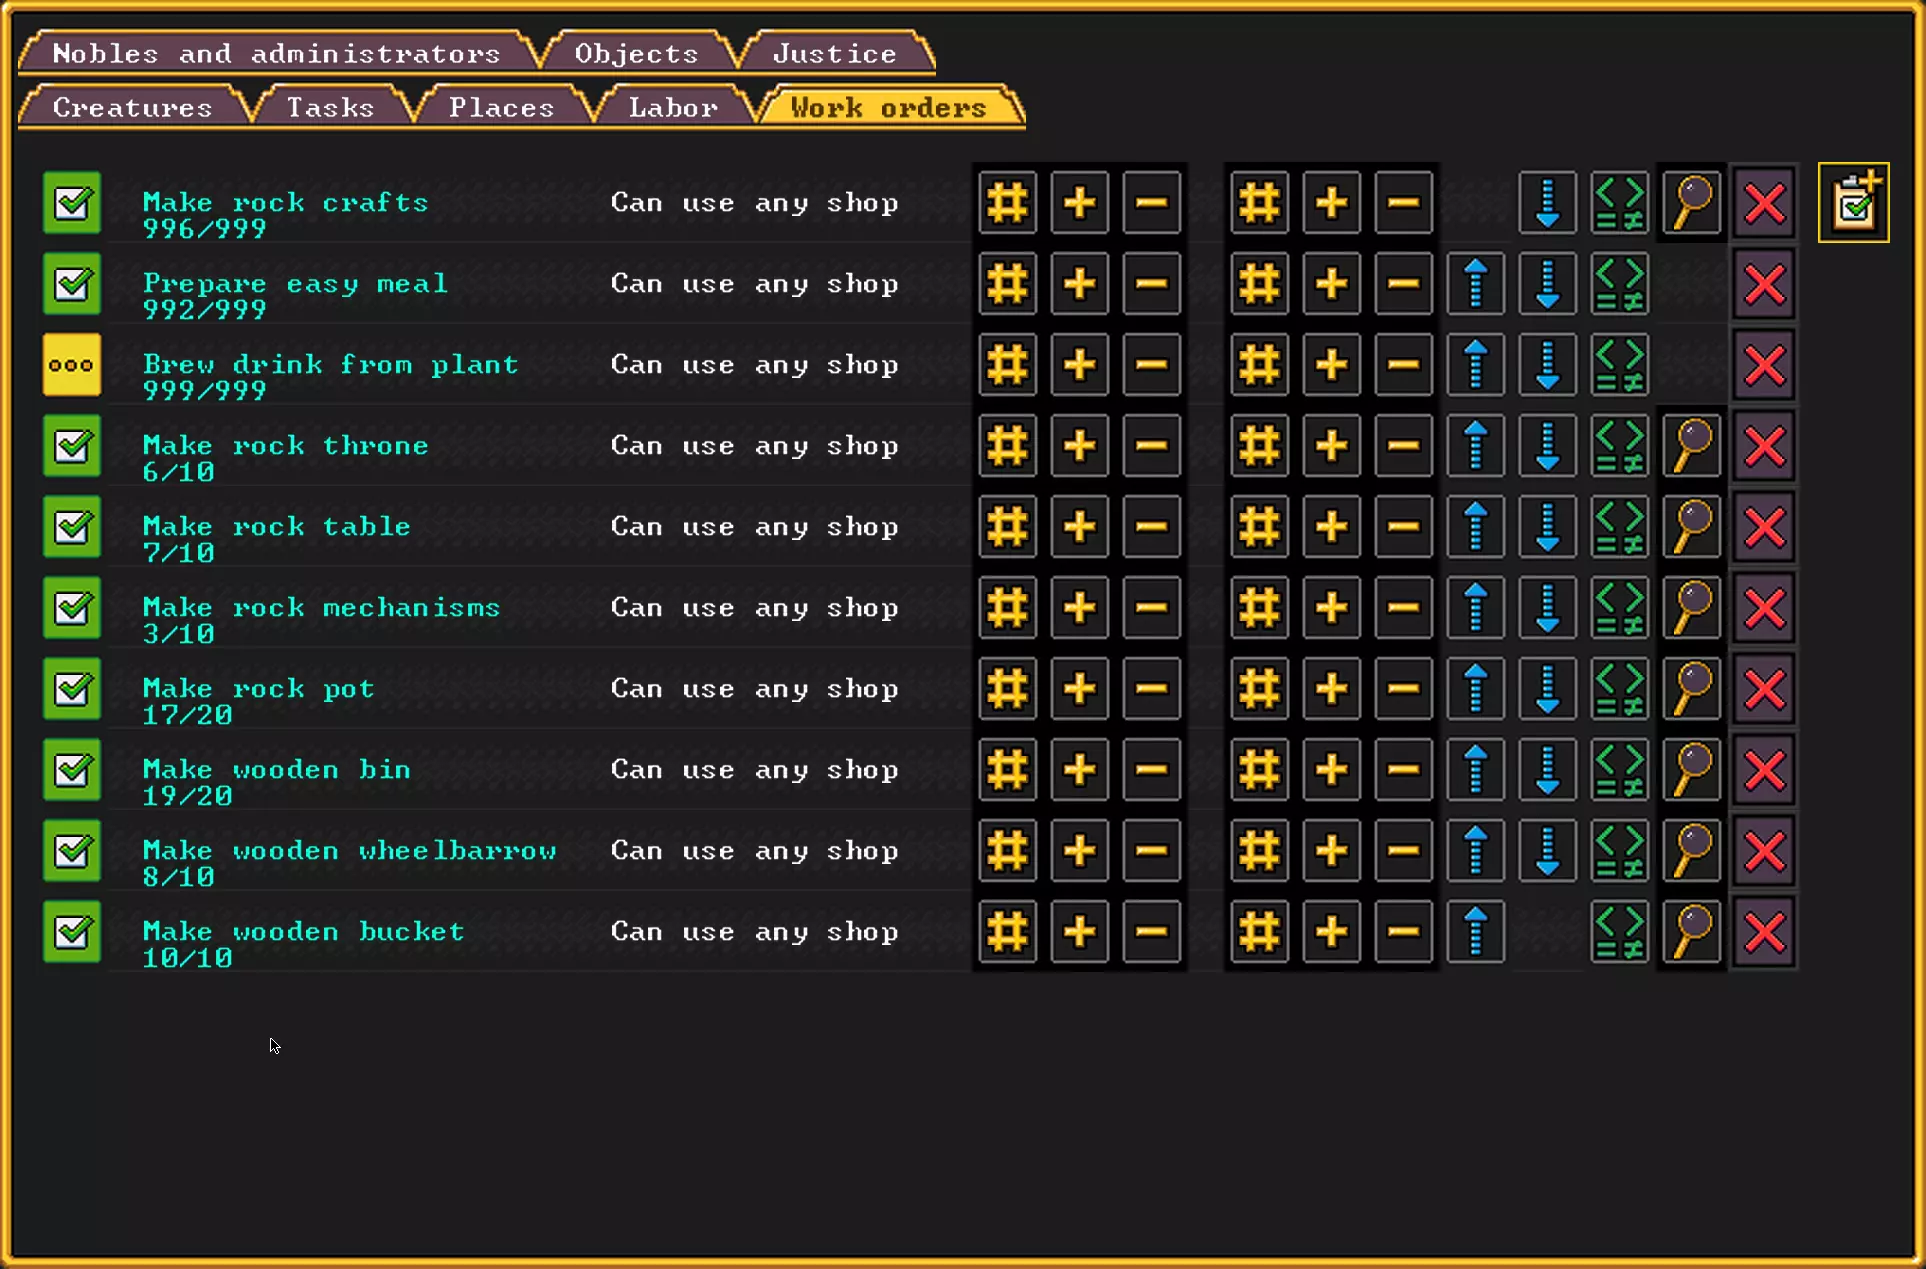
工单界面。 这是一个不错的初始任务列表。截图时我可能遗漏了一些内容,但大部分都在这里了。要完成所有这些任务,你需要更多的工坊,但我们正在逐步实现。 条件工单:如果你真的想专业地进行管理,可以将需要持续生产的物品设置为生产1/1,然后设置条件,当该物品数量低于特定数值且材料可用时,运行1/1的生产任务。例如,当未腐烂的熟食数量少于10时,准备1/1的简易餐食;当床的数量少于10且至少有5根原木可用时,制作1/1的床,等等。你可以优先安排材料的使用方式,例如将最后5份原木留作紧急木材需求,而不会将它们用于制作床。某些木制奢侈品可能需要在你储备了大量原木(比如超过50份)后才会开始生产,并且可能不会有任何工单消耗最后5份原木。 每当你需要生产新物品时,只需回到这里添加工单即可。当然,你需要确保拥有所需的工坊和材料,以及启用了相应劳动的可用矮人,但我们正在逐步实现这一点。【大师级睡眠】 现在矮人睡在地板上会不高兴,所以他们至少需要3-4张床放在宿舍里。之后他们会有自己的卧室,宿舍将用于临时容纳溢出人员,但目前宿舍已经足够了。 你不需要7张床,因为他们不会同时睡觉。 如果你已经用木头建造了办公桌和椅子,那么你应该已经有了制作床所需的木工工坊;如果没有,现在一定要建造一个。进入工作订单界面(o),至少排队制作3张床。如果你有足够的木材或可以砍伐一些树木,那就制作5张。岩石桌、岩石王座和岩石门床需要木材,但其他物品我们可以节省木材,为将来拥有大量废弃石料做准备。挖掘另一片区域来建造石匠工坊,然后像之前一样在工坊周围创建一个储物区,并将其类型设置为石料。 你要尽可能用石料而非木材制作物品。目前至少要制作5扇石门,以帮助保持一些房间的舒适度。很快你还会需要一些石桌和石王座来打造一个像样的宴会厅。(注意,某些物品的石料版本有不同的名称,例如“岩石王座”而非“石椅”。)之后我们会详细说明如何尽可能多地使用石头,从而节省木材用于那些绝对需要木材的物品。 宿舍 在制作床等物品时,找一个合适的石材层位置,挖掘出一个足够放置床的房间,考虑到可能需要添加更多床位,尺寸可以是3x7。 石头最适合用于建造宿舍,因为石头可以打磨和雕刻,这能让矮人感到开心。 挖掘好区域后,安装一扇门并放置床。然后使用区域(z)将该房间指定为集体宿舍(而非个人卧室)。 这样的设置目前来说已经足够了。
宿舍位于主楼梯不远处。 现在矮人们有了合适的床睡觉,会开心很多,但我们仍需改善他们的会议厅环境,并确保他们不会断酒。 如果宿舍还没进行打磨和雕刻也不用担心,你可以稍后再处理。不过这是值得的,因为在你能为他们建造独立卧室之前,这能让他们保持开心。 派对大师风范 目前你的初始补给中应该还有大量的酒和食物,但这些不会维持太久。这听起来可能有点傻,但酿造酒精必须作为相对优先的事项来安排,因为天生爱喝酒的矮人如果不能持续获得酒精供应,就会变得不健康且不开心。喝水是精灵才干的事,对矮人来说是非常丢脸的。矮人还需要一个不错的集会和餐厅,最终会变成酒馆。 幸运的是,酿造和烹饪并不难。 建造大厅:最好的做法是开始挖掘一个石头集会大厅,并附带一些侧室作为厨房和酿酒坊。这些都是3x3的工坊,所以一个5x5的房间来放置它们,可以为两者提供足够的库存空间。不过你也可以在它们旁边建造一个大型食品储藏室,这样能节省空间。 虽然你现在可能还不需要,但要开始考虑屠夫工坊和渔场的位置了。这些设施通常气味较大,建议将它们建在厨房和食品储藏室的后面。另外,要在餐厅/会议厅、厨房和酿酒厂安装门,以防有东西腐烂时控制异味扩散。一般来说,任何可能有东西腐烂并产生瘴气的房间周围都应该安装门。 最终的布局应该类似这样,但你需要在各个房间之间都安装门,并且很快就需要摆放桌子和石制王座了。
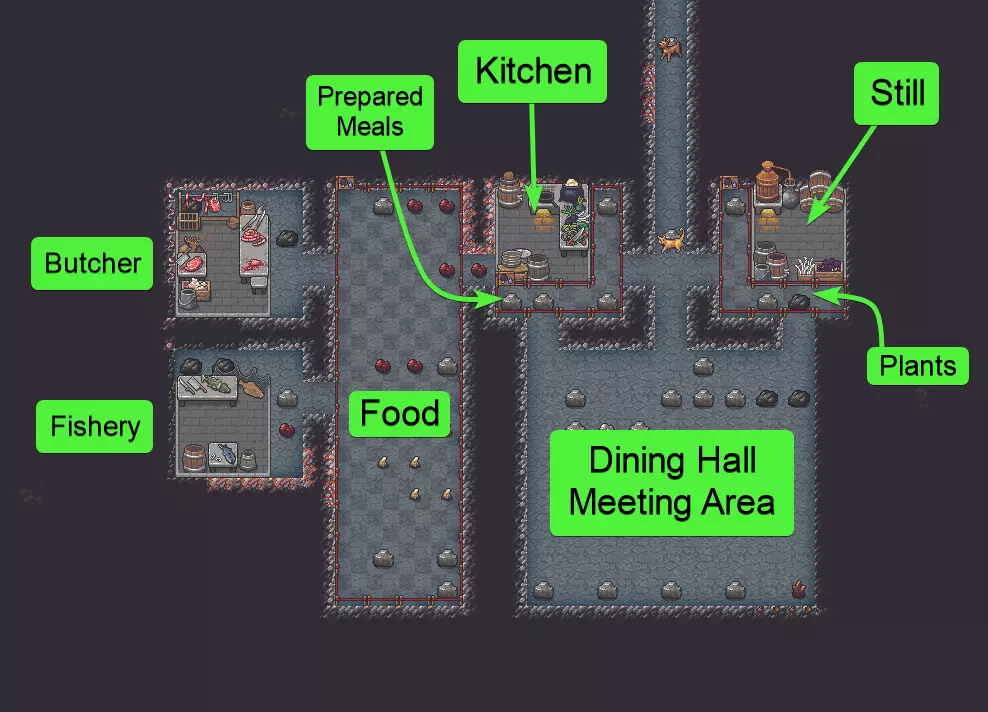
示例用餐与集会区域。更好的设计是将工坊设置在仓库的上下方,并更合理地利用z层。制革工坊应靠近屠宰场,因为动物皮毛若不及时鞣制会很快腐烂。 最终,你还需要将集会/用餐大厅进行打磨和雕刻。 目前,先在大房间内划定集会大厅和用餐大厅区域,并移除第一个仓库中旧的临时集会区域。之后,你会需要独立的用餐区和集会区,每个区域都配备门和精致的装饰,让矮人对自己的家园感到自豪。别浪费好酒 新手常犯的另一个错误是允许用酒水来烹饪,这会极大消耗酒类储备,导致矮人口渴。我们可以这样操作来禁用此功能:打开【劳动】(y)界面(屏幕左下角的锤子图标)。
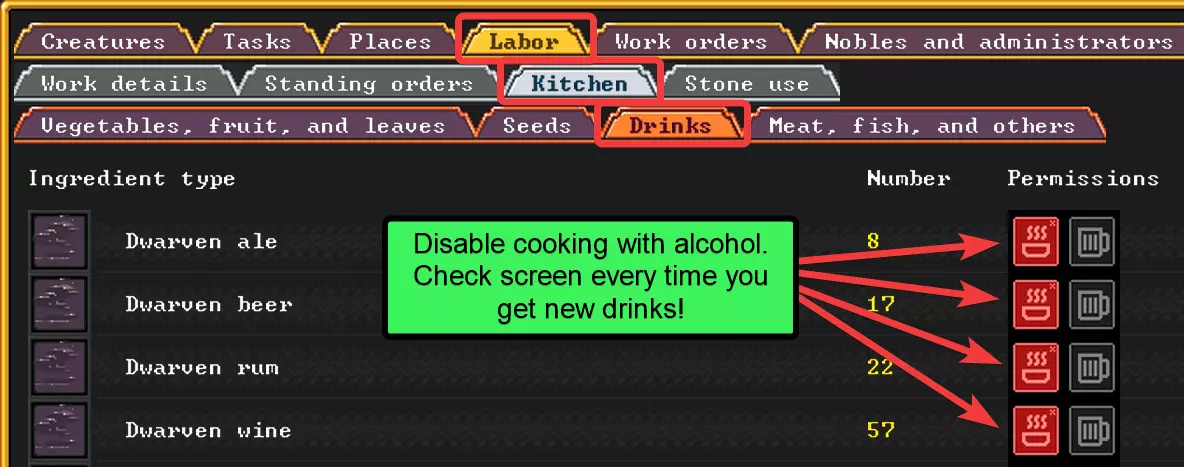
禁用浪费优质酒类的行为。 当你拥有足够的食用植物和肉类时,你可能也希望禁用用优质酿酒植物来烹饪。不过,在储备足够的预制餐食之前,你可能不希望这样做。

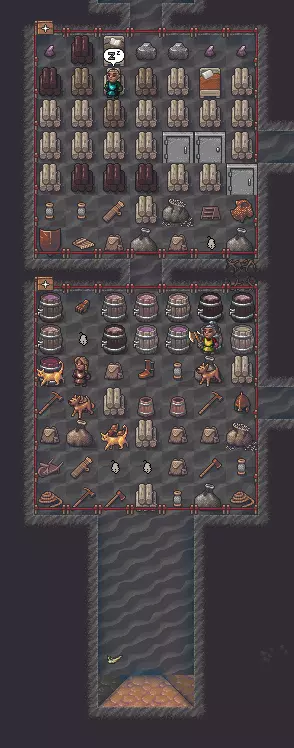
当你只有饱满头盔可吃时,不必立即着手处理,但很快你就会想把酿酒植物留着酿酒! 收尾工作:注意你也可以自定义食物储存区来移除种子,还可以在蒸馏室周围放置一个只存放植物的储存区。 开始通过“酿造饮品”任务大量生产酒类,但暂时不要开始大量排队制作餐食或打磨雕刻墙壁,因为接下来我们要建造更多工坊并处理其他优先事项。 像大师一样处理岩石:我们马上还需要两个工坊:工匠工坊、机械工坊。 岩石工艺品:到现在你可能已经注意到自己有很多石头,并在想这些石头是否只是废物。对于矮人来说,这并非毫无用处,因为他们至少可以用石头制作石杯和其他工艺品。大多数工艺品,比如小雕像,对你来说基本没什么用,所以可以把它们卖给商队,换取各种更有用的东西,比如布料、皮革、食物、武器、盔甲、金属或其他任何有价值的物品。 你可能觉得页岩小雕像一文不值,但总有人会非常喜欢这类东西,如果你大量制作,它们就能换回大量其他物品。 最高效但也更无聊的批量制作工艺品是石杯。每块石头可以制作三个石杯,所以即使每个石杯的价值往往低于“制作石头工艺品”选项下的其他物品,你也能更快地大量生产。不过“制作岩石工艺品”的效果也相当不错,而且可能更能让矮人感到愉悦。(不过你需要一些杯子来建造酒馆。) 机械装置 另一件你需要的东西是至少几个机械装置,稍后我们会解释原因,但现在只需建造机械工坊,并制作大约10个机械装置。最终你会需要大量的机械装置,所以如果你制作了50个也不用担心,你会用到它们的,但目前不需要那么多。你最终应该会得到类似这样的结果。
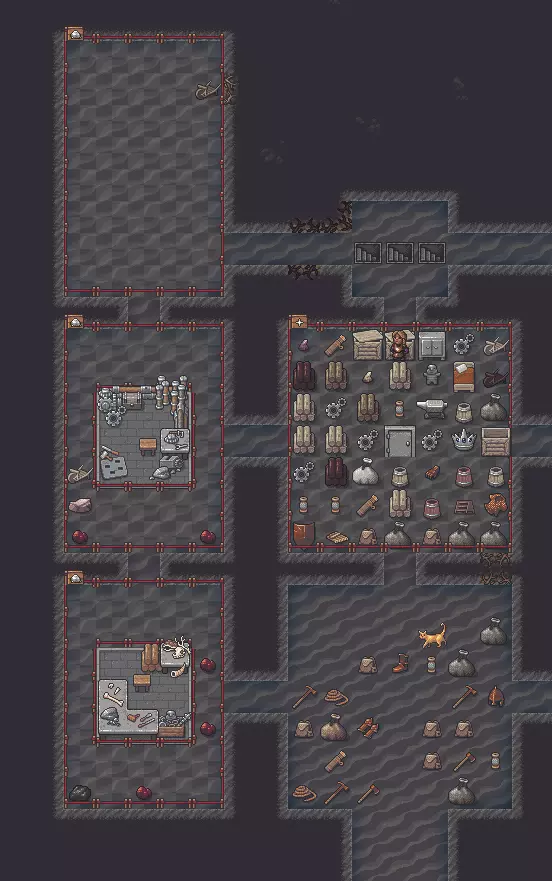
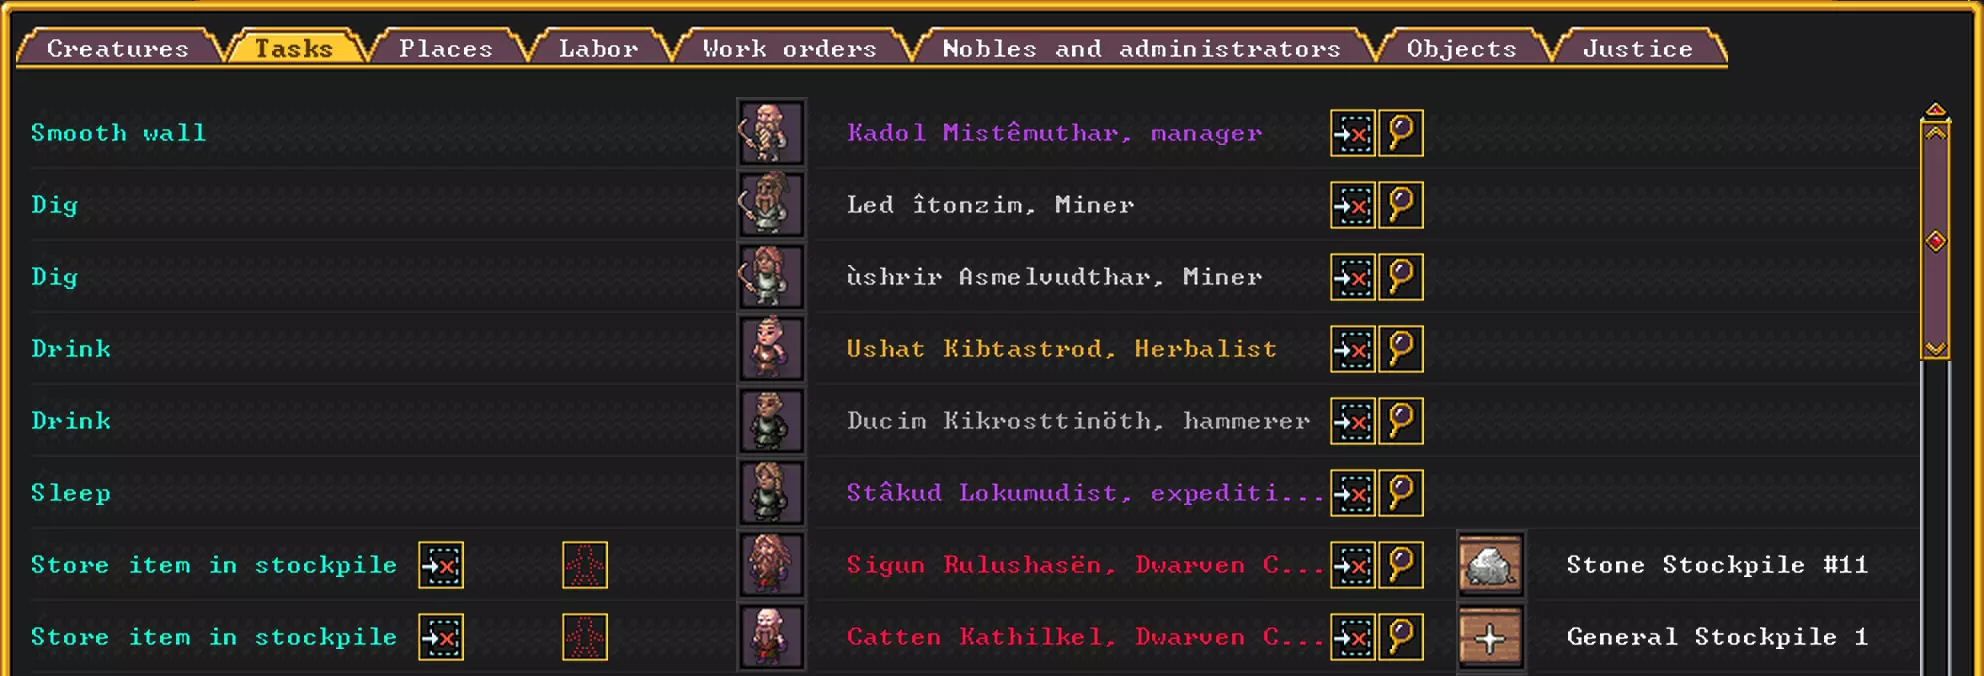
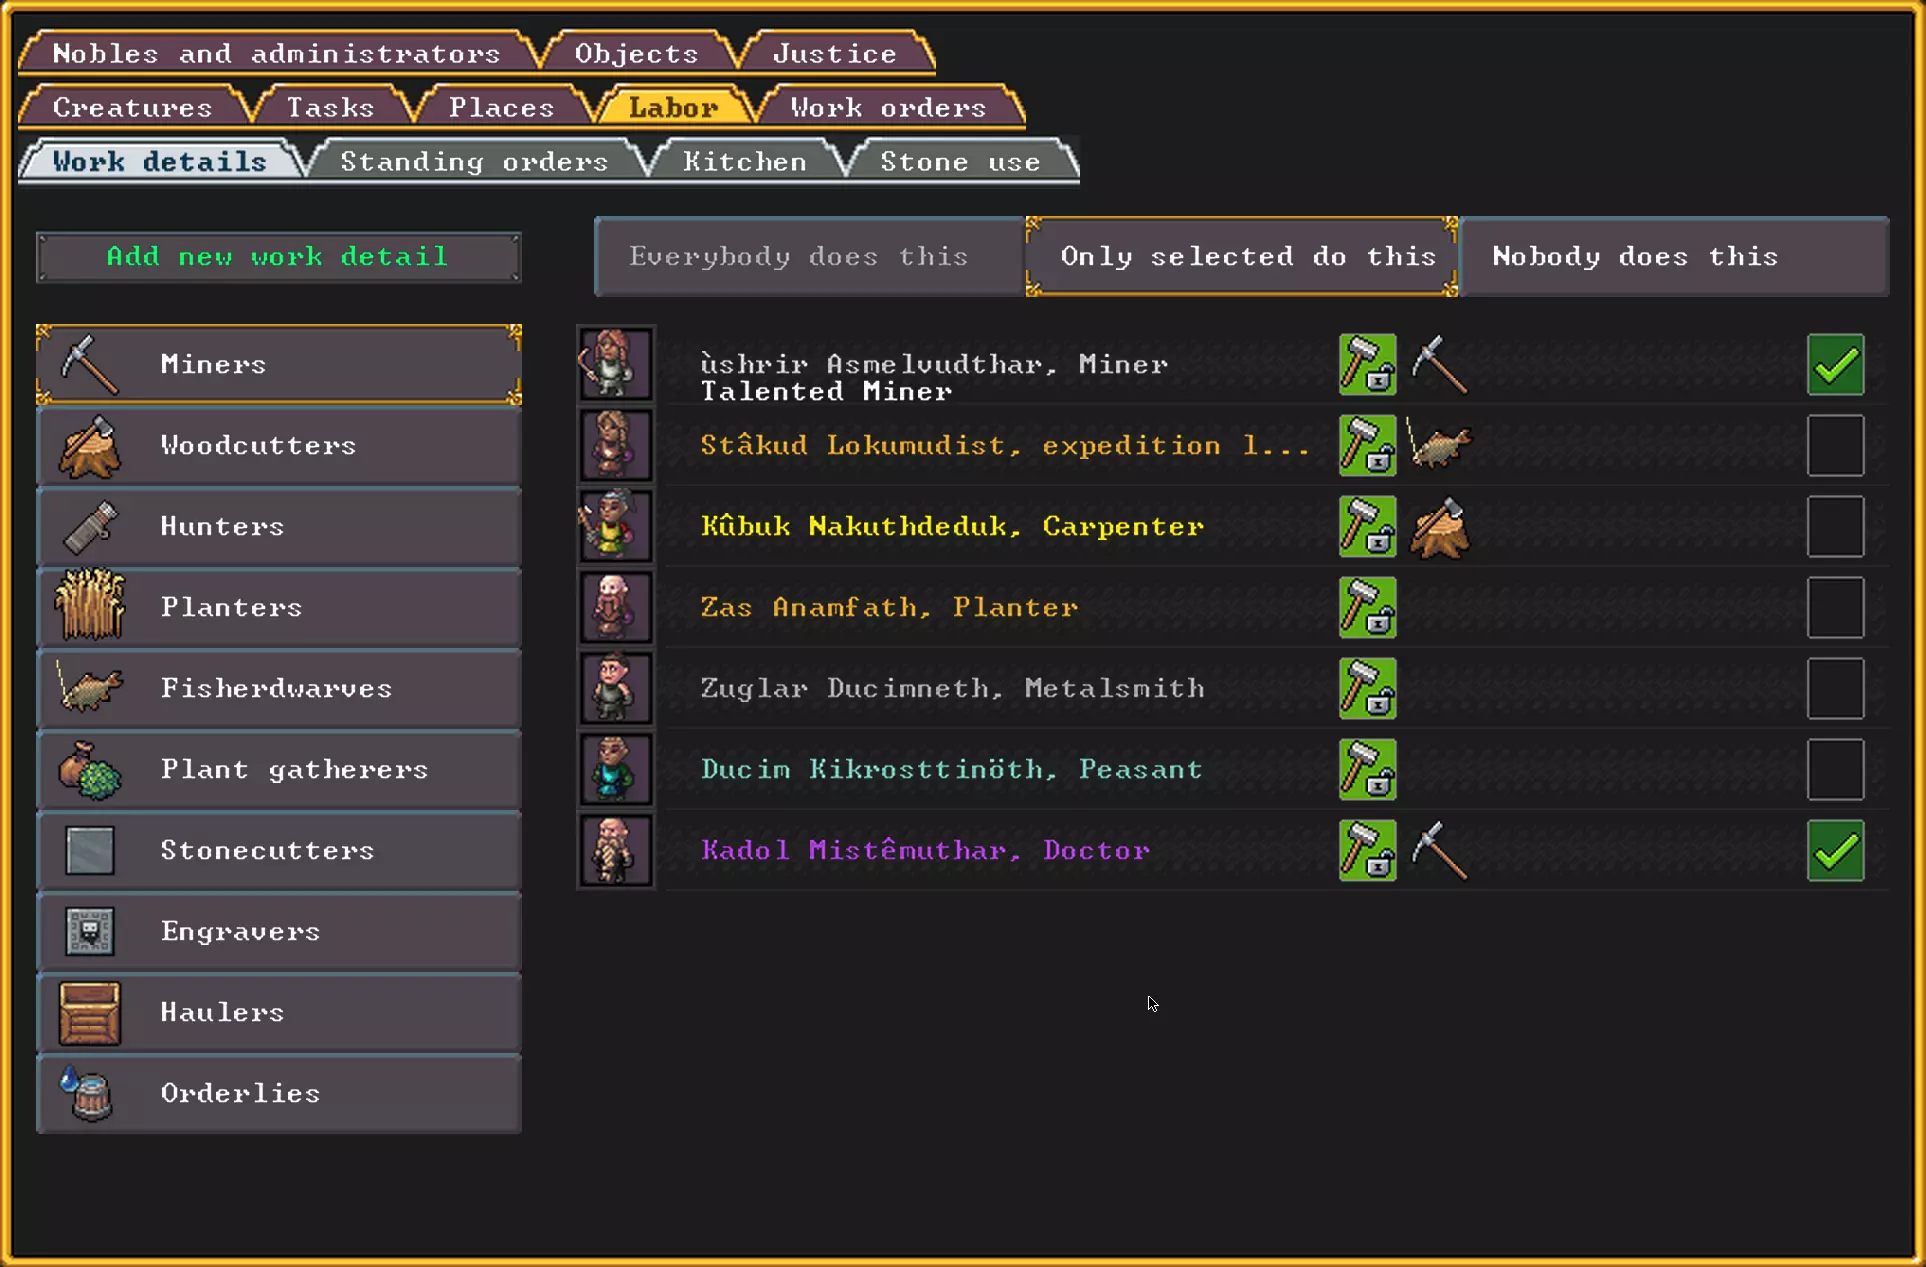
注意初始的储存区已被移除,但物品尚未全部转移。新增了两个工坊,并且在顶部我添加了另一个石头储存区,以方便矮人工匠取用材料。 关于石块,有一个我很长时间都没注意到的小技巧。石块并非必需,但非常实用。一块开采出的原石可以制作4个石块,而且石块比“粗糙”的原石轻得多。因此,在石匠工坊设置工作订单,保持一定数量的石块储备是个好主意。其他类型的方块用途远不如石块广泛,但可以用各种材料制作。方块可用于建造工坊和墙壁等建筑,其较轻的重量能加快施工进度。在某些情况下,更高的石料利用率可能也很重要。还有一些东西特别需要方块。 工作细节 现在可能也是时候提一下关于【工作细节】(y键)的更多内容了。到目前为止,你可能一直在使用默认设置。这在相当长一段时间内应该足够了,因为矮人通常会选择他们擅长的工作,但有一些事情需要了解。 任务 不同的条件会导致不同的【任务】被添加到矮人的待办事项列表中。这些任务可以是自动生成的,也可以是指定或工作订单的结果。 个人自动任务——这些是矮人自己为自己做的事情,比如吃饭、喝水、睡觉等。它们通常会优先于其他任务。公共自动任务:例如清理以及在不同储物区之间搬运物品。矮人会根据你对储物区的配置,或是存在的各类问题来识别需要完成的工作,并为这些工作排队。 指定任务:由指定区域、放置或建造物品的指令,以及在工坊手动添加的任务或工作订单明确生成的任务。 每项任务都属于一个劳动类别。例如,所有的挖掘矿石、开凿通道、修整斜坡或挖掘楼梯的工作都被归类为采矿劳动。
任务窗口(t)可以让你查看每个矮人正在做什么以及计划要做什么。如果需要,可以手动将矮人从任务中移除,但通常你不需要进行微观管理。 劳动分配 在内部,每个矮人都有一个复选框,用于标记他们被允许执行的劳动。但用户界面不再允许你为单个矮人启用或禁用单独的劳动。相反,你可以使用工作详情来在必要时为每个矮人明确启用一组劳动,或者将任务设置为“所有人都做这个”。 要设置工作详情,你可以点击单个矮人并设置他们启用的工作详情,或者(通常更好的方法)查看劳动菜单(y),然后从矮人列表中选择哪些矮人属于哪个工作详情。“工具劳动”与小队制服之间的冲突 采矿、伐木和狩猎这三种劳动比较特殊,它们需要工具,并且不能设置为“所有人都做这个”。当一名矮人被分配到其中一项劳动时,他们只会拿起所需的工具(镐、战斧或十字弓/箭袋/箭矢),并且会一直持有该工具。这种“工具组合”被称为“制服”。矮人一次不能拥有多个制服(携带多个工具或武器),也不会自动切换制服。如果矮人所在的小队的日程安排例程设置为“就绪”(或任何设置为“装备/始终”的例程),那么即使他们目前“没有特殊命令”,也会全天装备小队制服。因此,你必须避免让一名矮人同时承担采矿、伐木或狩猎中的多项任务,并且承担这些劳动之一的矮人不应编入日程例程设为“就绪”或其他“装备/始终”例程的小队。否则,他们可能只会执行其中一项劳动,甚至一项都不执行。但例如,如果一名矿工所在的小队,其日程例程设为带有“装备/命令”的例程,那么他们应该携带镐,而当接到军事命令时,他们会切换制服(放下镐并拿起武器和盔甲)。 “所有人都执行此任务”和专精标记 除了工具劳动的工作细节外,工作细节可以设置为“所有人都执行此任务”,但如果你希望除一名矮人外的所有人都执行诸如搬运之类的任务,该怎么办?其实,有一种比勾选所有方框再取消勾选一个更简单的方法。注意工作详情窗口中的这个红色图标:

【专业】标记。 若要让矮人免于执行“所有人都做”的工作明细,或其他因未设置自定义工作明细而默认“所有人都做”的劳动,可点击专业切换按钮使其变为红色。这样,你可以将大部分工作(尤其是搬运和整理)设为“所有人”,同时让一些熟练的专业人员免于从事任何随机工作。 关于工作明细的一些建议 工作明细的主要用途似乎是: 选择哪些矮人从事采矿、伐木和狩猎这些工具劳动。这些劳动不能设为“所有人都做”,因为它们是互斥的。尝试为一名矮人分配多个此类明细,会导致该矮人因上述工具携带冲突而只能执行其中一项劳动。通常你会将工作细节设置为“所有人都做这个”,让矮人根据自身的空闲时间和技能水平来决定做什么。 在某些情况下,你可能不希望所有矮人都去处理你指定的同一项大型任务,这时可以将一些工作细节(如墙壁打磨或雕刻)限制在一部分矮人范围内。 使用“专精”标记,将极少数矮人专门分配给一项你不希望被中断的重要任务。例如,你可能希望一名矮人在贸易商队到来之前全职生产石头饰品,而其他矮人则处理当前需要做的其他事情。如果一名专家没有专注于默认工作明细中的项目,例如采矿或伐木,那么你就需要创建自定义工作明细来确定他们将被限制从事哪些特定劳动。但通常情况下,所有没有默认工作明细的劳动都默认为“所有人都可以做”,而拥有相关技能的矮人往往会实际承担这些任务。因此,你并不需要为每一种可能的事情都创建自定义工作明细。 家禽养殖大师指南:如果你有家禽,就可以生产大量的蛋,但你需要一个地下鸡舍。幸运的是,这很简单,因为鸟类会吃害虫,而且不需要喂食。(我通常以鸡为例,因为它们最常见,但这也适用于其他鸟类,而且事实证明,从长远来看,《矮人要塞》中有些其他鸟类通常更适合产蛋和提供肉类。) 鸡舍:使用工作订单,在工匠工坊中排队制作一些巢箱,每只鸡一个巢箱。巢箱可以用石头制作。 为鸡挖掘一个安全舒适的房间,并将其设为围栏/牧场区域。将所有鸡(产蛋鸟类)分配到这个区域。这个房间只需足够容纳巢箱即可,但更大的空间有助于防止动物拥挤问题,比如争斗。巢箱就像需要放置在这里的家具,但你要从“工坊->农业”子菜单中进行操作。 食用或孵化鸡蛋:鸡会占据巢箱并下蛋。如果你想让鸡蛋孵化,需要将它们标记为“禁止使用”,或者从库存和食物生产项目中移除。此外,也可以将鸡舍的门标记为“禁止通行”以防止矮人接触鸡蛋。 同时要确保公鸡能够进入巢箱。但如果一直尝试孵化所有鸡蛋,很快就会产生过多的小鸡,所以更好的做法可能是手动禁止一部分鸡蛋。

这是宏伟鸡群及其有羽伙伴们的巨大地下鸡舍的一小部分。 分配雏鸡 当雏鸡孵化后,别忘了立即将它们分配到区域,否则要塞会开始被流浪雏鸡淹没。这不是什么大问题,但之后要把它们都拖回鸡舍让它们使用巢箱会占用大量矮人时间。 不过,你可以稍后再担心引发“鸡群爆炸”的问题。现在,建造并放置巢箱,开始产蛋和收集鸡蛋吧,因为你可能需要食物。如果最终鸡蛋过剩,可以将多余的鸡蛋卖给商队。 其他动物繁殖 其他动物也可以用类似的方式繁殖,只是如果它们不下蛋,就不需要巢箱了。如果你想繁殖狗,只需将一群母狗和至少一只公狗关在同一个房间里即可。 屠宰:将屠宰店和厨房放在鸡舍旁边可能是个好主意,这样可以缩短将鸡拖到屠宰店的时间,而且附近的厨房能让鸡的脂肪立即被提炼成油脂。一旦你孵化出一些小鸡,并且有了足够的鸡蛋,你可以进入【生物-> livestock】界面,将所有成年鸡设置为待屠宰。一旦你得到一些油脂,记得禁用油脂的烹饪功能!把它留着做肥皂。 要塞访问控制(大师级):你现在已经扎实地完成了所有主要的食物、饮料、住所和生产活动的设置,所以接下来的首要任务是加强防御,抵御敌人。如果我们在外面玩得“不亦乐乎”,那一开始就该把自己围起来,但即便如此,我们可能还是想设个门,偶尔让商队进来,其他时间则把自己与外界隔绝。就算在和平时期,如果突然出现一群哥布林或僵尸,我们还是需要一种快速封闭要塞的方法。 要做到这一点,我们可以使用【吊桥】,即便没有什么需要跨越的地方。这是因为吊桥可以升起形成一道墙,这是制作多格门的主要方法。 我们可以用石头制作吊桥,并使用机械装置建造拉杆来控制它们。 按b-n-b打开【建筑】-【建造】-【吊桥】,在入口处建造一个3x3的吊桥(或者1x3的吊桥),就像这样:
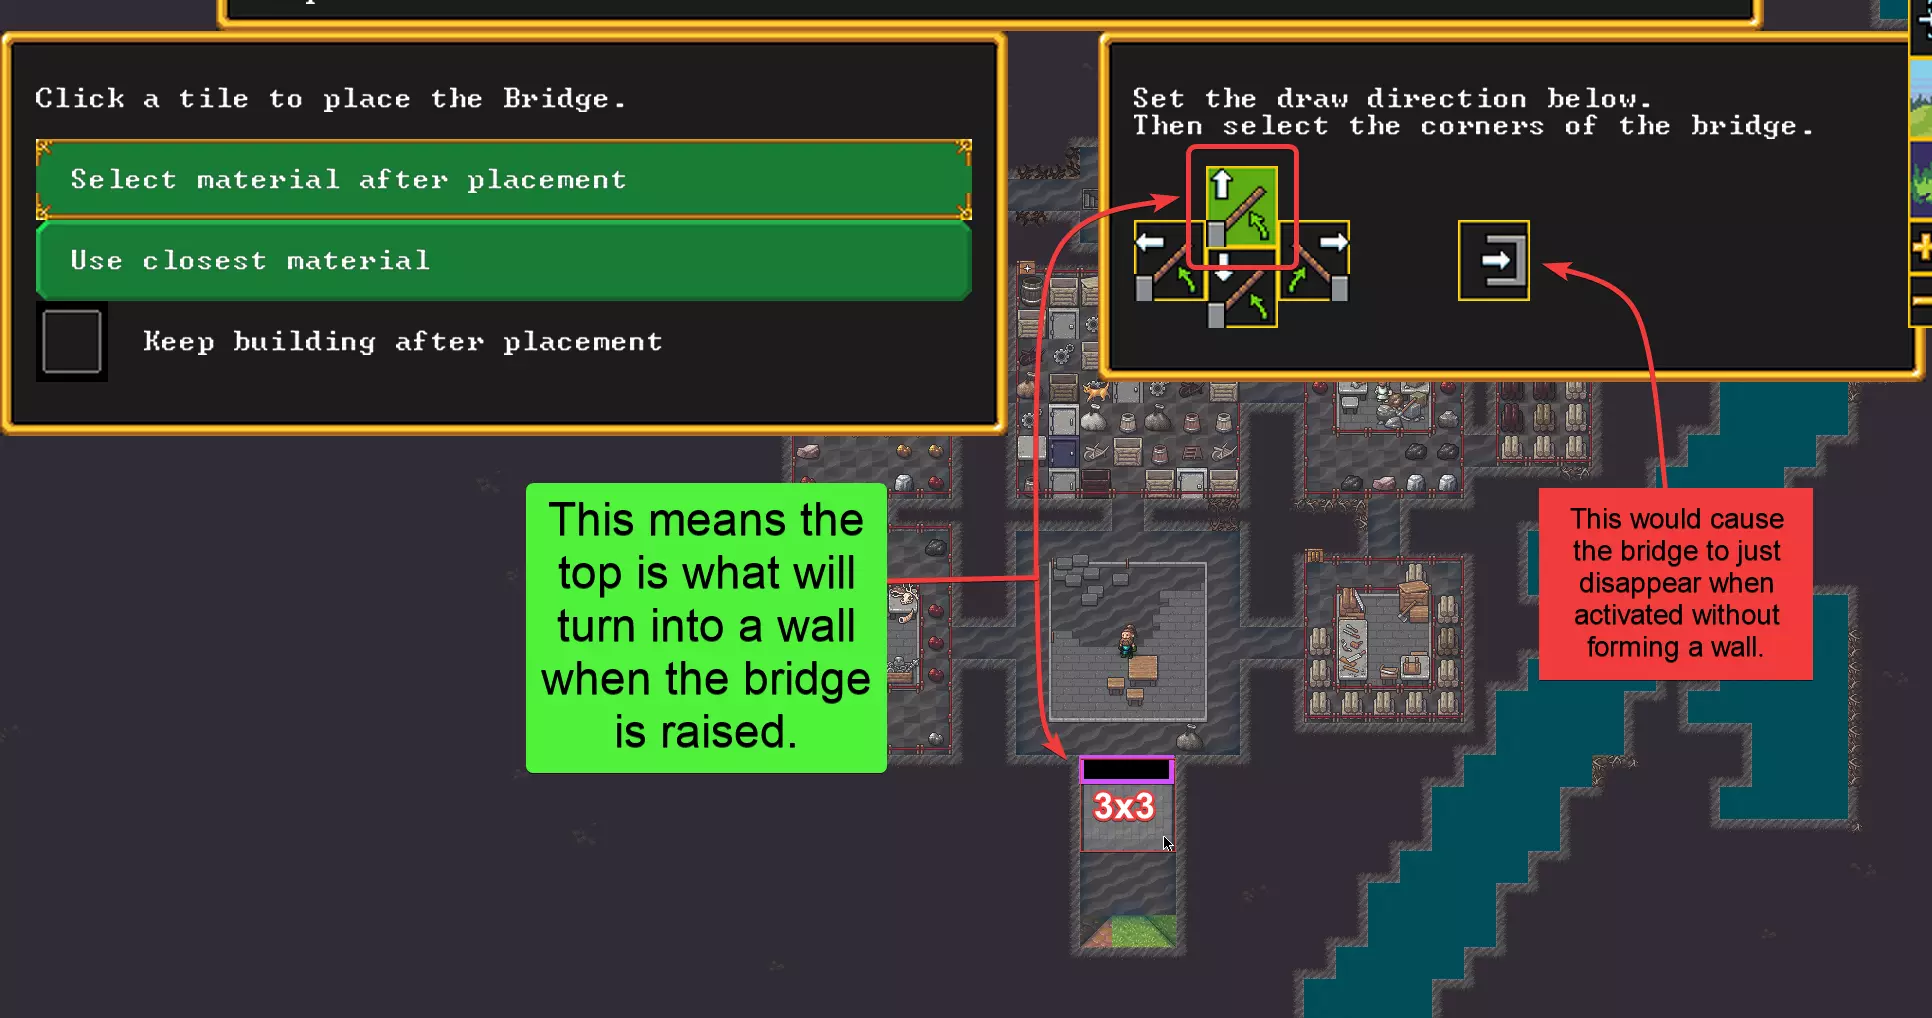
Configuring the bridge raise direction with the still confusing UI. As you can see, in this case we need to select the top icon so the bridge will raise up at the top edge and form a wall. If your entrance is oriented in another direction then select the appropriate direction. Whichever direction you pick, that side of the bridge's rectangle will turn into a wall when the bridge is activated by lever pulling. Once you've placed the bridge, move on to using those mechanisms you made to place the lever for it. Warning: Dwarven Atom Smashers!Bridges are essentially dwarven atom smashers[dwarffortresswiki.org] that annihilate anything they come down on including creatures and their equipment. Try not to lower a bridge onto anything that you don't want to cease to exist. Unlike lowering, raising or retracting a bridge will throw anything on it which can damage things and injure or kill creatures, but isn't instant guaranteed annihilation. This means that a single tile long bridge might be the best idea if you're not going to dig a moat, but a digging a dry moat is a good idea too. Levers and MechanismsThe best place for the bridge control lever[dwarffortresswiki.org] is not next to the gate, it's where the most idle dwarves are hanging out most often. Don't worry, dwarves are really good at mechanical linking over long distances and distance doesn't matter when you link levers. Go down to your meeting hall and hit b-m-l for Structures->Machines->Lever. Build a lever. A lever works like a workshop, except only two jobs are allowed to be queued: link the lever and pull the lever. Unpause the game until both the bridge and the lever get built. Click on the bridge to see if it has been completed yet because it might look complete on the screen even if it is not, and you can't link it until it is finished. Once the bridge is done, go back to the lever and click on it. Notice that the panel looks like a workshop. Click "Link lever" then move back up to the bridge and click that as the target. This will queue a lever linking job in the lever's "workshop". A dwarf with the Mechanic labor[dwarffortresswiki.org] will go get a mechanism, bring it to the lever, go get another, bring it to the bridge, and then it will be linked when he is done. Test it out by going back to the lever and selecting "Pull lever". This queues up a lever-pulling job which a dwarf with the lever pulling labor (everyone by default) will have to get around to doing before the lever is actually pulled. (This is why it's good to place levers near idle dwarf hangouts.) Once that has been done, there's a short delay and the bridge will raise to form a wall, closing off your fortress. Pull the lever again to open it back up. Levers always act as toggles, so pulling it is always toggling it. Levers can also be linked to doors, floodgates[dwarffortresswiki.org], and other things that can be opened and closed or activated and deactivated. They are your main user interface for dwarven contraptions, but others like pressure plates also exist. Congratulations. You now have some proper access control to your fortress. DoorsThe simplest form of access control is just a door[dwarffortresswiki.org]. The main problem with those is that they're only one tile wide, but they can be locked without a lever simply by clicking on them and clicking the lock icon. They can also be linked to levers just like the bridge, but then they become entirely controlled by the lever and can't be opened or closed normally by dwarves. This form of access control can still be very convenient for back entrances or locking dwarves out of rooms or other areas like dangerous caverns. Traps and DefenseYou're also going to want traps[dwarffortresswiki.org], other entrances, and more than just one giant gate. More about traps later. But for now we just want to make sure you know how to at least do the minimum of blocking off the fort to keep things out while you do other stuff. If you want to get started on traps sooner, skip down to the section about traps. These need mechanisms, which is part of why you're going to use up lots of mechanisms. You will also want to eventually set up squads to train[dwarffortresswiki.org], but usually not with many dwarves until you get more immigrants. "Emergency Shelter" Burrow You probably have dwarves are running all over outside the place doing stuff. After building a gate to close off the fortress from invaders, you might be wondering how to get everyone to run inside before they get locked out. This is pretty easy to set up, so I will try to be brief. Click the Burrows[dwarffortresswiki.org] (U) icon and create a single burrow over the safest area you have right now, such as your meeting and dining area. Assign all dwarves to the burrow. Name it something like Emergency Shelter, or whatever you want that makes sense to you. Click the thing that looks like a pause button to "suspend" the burrow so they will ignore it.Now you can mostly get them to run for safety to this location any time you need to, just unsuspend the burrow. If you have a subset of them in a squad and you order the squad to do something then the squad members should ignore the burrow even if unsuspended, so no need to worry about it interfering with squad orders. When new dwarves show up youl'll need to manually add them. A good thing to do is just check to make sure they're all assigned next time you need to unsuspend the burrow. Lack of Civilian AlertsUnfortunately a feature called "civilian alerts"[dwarffortresswiki.org] is missing from v0.50. Without this feature, dwarves (especially children) can't be made to place a very high priority on getting to the emergency shelter burrow. Keep an eye out for this feature to get added back though. Mining Like a Master Your next priority, at least for your miner, is to start digging to obtain regular stone to make things with while also looking for ore, gems, and "economic stone" such as flux stone and coal. About MineralsBy now you've probably noticed that this isn't minecraft and none of the rocks are named "iron ore" or anything like that. Instead you get the actual geological name of the mineral. While you could go get a geology textbook, the easier thing to do is just look up what each type of rock is good for. You can actually look this up in-game using Labor (y)->Stone use->Economic stone, and there's also this guide on the wiki: The Non-Dwarf's Guide to Rock[dwarffortresswiki.org]When you mine out something new, you can click on a rock boulder of that type and get the usage in the description. Note that pretty much any low-value stone will become much more valuable in the hands of a skilled master craftsdwarf, so there's no need to try to exclude that from trinket production. Going ExploringLeave the game paused while you designate some mining[dwarffortresswiki.org]. First designate a short tunnel north or some other direction away from your rooms and then designate a staircase at least 10 levels deep but for now no deeper than 20 or 30 levels. You probably already have a short central staircase by now, if you're like me, so you can also dig that one deeper. But it can be helpful to create a new staircase for the mine that you can barricade off from the rest of the fort more easily if you need to. Early on you will ideally avoid digging into a cavern, because those are generally more dangerous than the surface, but that may not be possible to avoid. So if you dig into one then use b-n and wall it back up for now. That is unless you want to see interesting things happen sooner rather than later. Designate some tunnels off in all directions on several levels and start exploring for minerals. Don't worry if you end up with lots of boulders because you need those to build buildings and craft all sorts of stuff, so even the junk rock will be very useful. And your miner will be gaining skill. Generally speaking you want to eventually form a grid of large squares, but early on it's better to dig a little on each level rather than dig all over one single level. Keep the tunnels relatively minimal and focus on probing around at this point until you get some more rooms you need dug out. You just want to make sure there's always stuff for at least one miner to do. If any of your dwarves are too idle then set them to mining as well using Labor (y) - Work Details and those extra picks you brought. The new guys will be slow but they will get better and digging out dirt or whatever needs digging is the best way for them to learn.
看来这位医生目前没什么病人。让他别闲着,拿起镐头干活去! 劳动力管理:另一件要做的事是,关闭你主要矿工的其他劳动选项,让他“专精”采矿,这样他就会专注于挖矿,而不会被搬运物品或清理杂物这些事分心。不过次要矿工可以保留那些杂活。 如果你现在不想让任何人从事狩猎和捕鱼,就把所有人的这些劳动选项都关闭。 总的来说,对于当前工作特别重要的矮人,要让他们专精一项。想确保石匠在下次商队到来前赶制出大量小饰品?那就只保留他的石匠劳动选项,关闭其他所有劳动。当你只有7个矮人时,不能让太多矮人从事这类工作,否则几乎没人去搬运东西。所以在更多矮人到来之前,最多只让一到两个矮人进行专业化分工。 自动采矿 一开始你应该以探索为主,但我还是先提一些有助于开采已发现的矿石和宝石矿脉的方法。
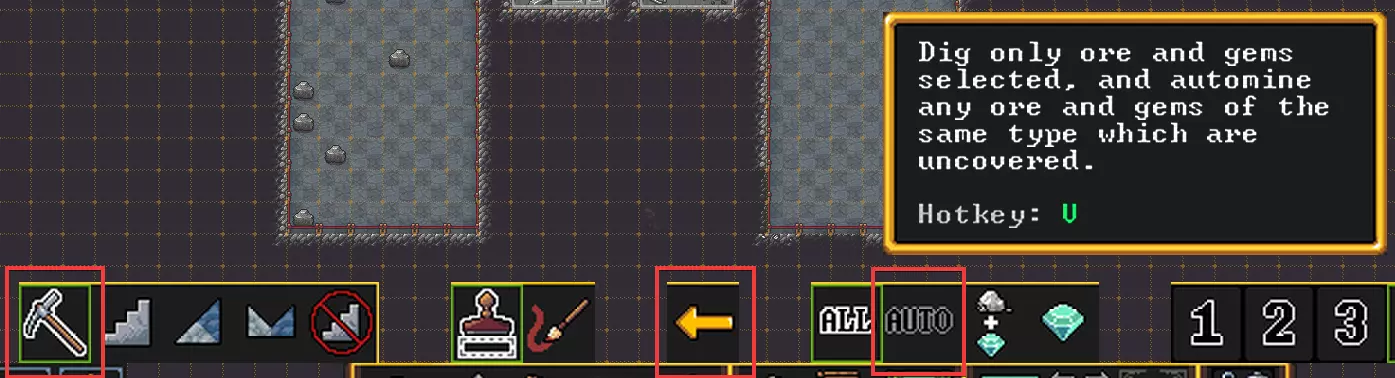
自动采矿选项 这里有三个选项,但通常你会想要【自动】模式。请注意,这存在一定风险,因为矿工们会不断挖掘所有相邻的矿石,而矿脉可能会通向危险的地方。所以如果你想稳妥一些,在矿工开采出相当数量的矿石后,用x键取消采矿标记。不过大多数时候,自动采矿还是安全的。 独轮车 最后,确保建造大量独轮车。它们能显著提升搬运速度。独轮车可以分配给特定的仓库,也可以让矮人自行决定使用。每个矮人配备一辆独轮车是合理的数量。 像大师一样锻造 你可能早就该进行一些金属锻造工作了。你或许已经找到了一些矿石。到目前为止,希望你已经收集到了一些烟煤或褐煤。如果没有这些,你总是可以用树木制作木炭。如果你不幸没有任何燃料,就需要找到一个有蘑菇树的洞穴,或者向下挖掘到岩浆,以建造岩浆熔炉和岩浆冶炼炉。 通常的初始流程是建造一个木材熔炉,并用木柴制作一些木炭。只需在你的木柴堆附近挖出一些空间,在b-o-u-f(建造-其他-实用设施-熔炉)下建造木材熔炉,然后制作一两块木炭。实际上你只需要一块就够了。你也可以在初始准备阶段携带一块木炭来快速启动焦炭制作流程。如果你预计会进入一个没有树木的环境,这尤其有用。 现在找一个合适的位置,建造一个熔炉(b-o-u-l)和一个金属锻造厂(b-o-i)。我建议像这样建造:
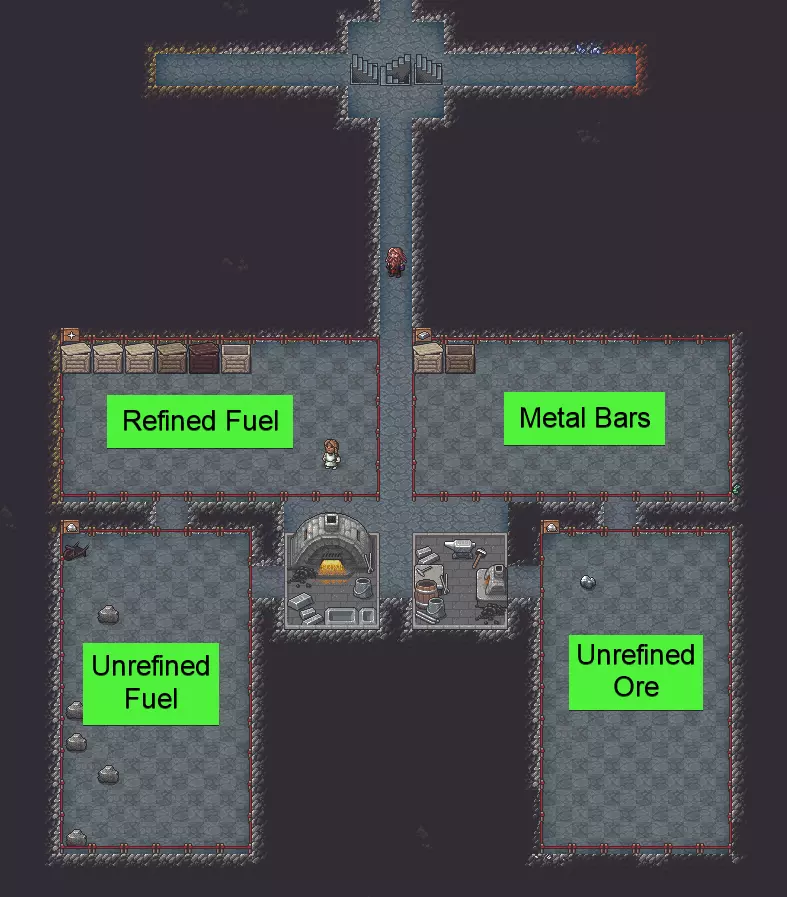
As always this is just a crude example. You might also want an output stockpile for finished metal items closer by, but I'll leave that to you. The custom stockpile configurations look like this: Unrefined Fuel - Stone:Economic: Bituminous Coal and Lignite Refined Fuel - Bars/blocks: Other material: Coal Unrefined Ore - Stone: Metal Ores: All and Stone: Economic: (flux stones for steel) Calcite Chalk Dolemite Limestone Marble Metal Bars - Bars/blocks: Bars:Metal: AllAfter that, add work orders to "Make coke from Bituminous coal" and "Make coke from Lignite" 1/1 times any time there is at least one Bituminous coal or Lignite respectively. This will get you to producing fuel. More on Custom StockpilesSee here for a guide with more detail about custom stockpiles. https://steamcommunity.com/sharedfiles/filedetails/?id=2911372702&tscn=1672752140 Rather than constantly trying to immediately smelt all ore as you find it, I would click the Stocks (k) button at the top middle of the screen and see how much ore you have of each type, then decide how to most wisely use your fuel supply on whatever metal you want to start with. Then queue up a work order to smelt that as many times as you need bars of that metal. After that it's up to you to produce whatever seems most useful at the moment. I usually make 3 more anvils immediately for more workshops. You could produce more picks to put some useless Fish Cleaner immigrants on mining duty. Or you could start making weapons. Early on I would highly discourage you from cranking out lots of crafts with valuable metals like gold, platinum, or steel because this will make you too wealthy and attractive to attackers. The best kind of metallic wealth to produce at first is the sharp and pointy kind, or the blunt and smashy kind, or the solid armor kind. You could still make some metal crafts to trade, just don't make them of platinum or gold, or don't make many. And you want to be able to arm some dwarves with at least copper armor and weapons before using metal on anything else besides maybe picks. Metal can also be used to make containers like bins that would otherwise have to be made of wood, but this is not worth it unless you're short on wood and have enough ore and fuel. SteelMaking Steel[dwarffortresswiki.org] is a little more complicated than usual, so I will briefly outline the process here. Keep in mind steel is as valuable as gold so going whole hog on steel production early is probably a bad idea for avoiding early trouble. Obtain materials: iron ore (hematite, limonite, magnetite), flux stone (calcite, chalk, dolomite, limestone, marble), and fuel (coke from bituminous coal or lignite, or charcoal from wood). Make iron bars (4):: iron ore and fuel (or magma smelter). Make pig iron bars (1): 1 bar iron, 1 stone flux, 1 bar fuel (for carbon), 1 bar fuel (or magma) for energy. Make steel bars (2): 1 bar iron, 1 bar pig iron, 1 stone flux, 1 bar fuel (for carbon), 1 bar fuel (or magma) for energy.For the curious, pig iron[dwarffortresswiki.org] is like extremely brittle cast iron and is useless in reality for fabricating anything due to the huge amount of carbon and silicon contamination. Similarly, in the game it is not worth much as a crafting material, though you can try using it for some types of items if you really want. Gemcutting Like a Master You probably already found some gems[dwarffortresswiki.org] in your mining exploration. Cutting will increase their value quite a bit and allow them to be used to encrust things, so dig out some space and build the following: Jeweler's workshop[dwarffortresswiki.org] (b-o-j) Rough gem stockpile Cut gem stockpile Check your stocks and make sure you have some extra bins[dwarffortresswiki.org]. If not then create a work order for some. This will speed up moving the cut gems to the trade depot later. Like stone crafting, cutting gems can also produce a lot of valuable trade goods. Don't worry about not starting with any gem cutting skill, just put some dwarf on it anyway. A jeweler's workshop also allows gemcutters to "Polish stones", which means they fancy up normal rock. These aren't worth much but they do help train up the gemcutter using junk stone. They can still be used to encrust items which increases item value without using up valuable materials. Attracting TroubleIf you mine out and cut too many valuable gemstones, you could be in danger of cranking out too much wealth[dwarffortresswiki.org] and attracting the greedy violent creatures of your world. While you can safely crank out stone trinkets or polished stones at full speed without much worry, as those aren't that valuable, gems have a higher potential to generate too much wealth especially if they're the rare type. So if you're having no trouble buying what you need from caravans, don't get too carried away with the gem mining and cutting yet. Same thing goes for mining valuable metals and making things with them. You usually want your defense capability to be very solid before you go all out on wealth production. Prioritize and Conserve Materials Like a Master This brings us to our next tip which we have already touched on somewhat: using the most common materials as much as possible to save the others for things that really need it. Make Everything Possible From Rock (Usually)In general you want to make as little as possible out of wood so you can save the wood for stuff that really needs it. It's a little confusing how to do this sometimes because it's not always obvious what the rock equivalents of wood items are. Here is a list of the most common rock equivalents to make instead of the wood items. The main theme here is look for the word "rock" in the item list. Rock tables instead of wood tables Rock thrones instead of wood chairs Rock doors instead of wooden doors Rock pots instead of wood barrels Rock coffers instead of wood chests Rock mugs instead of wood mugs or metal gobletsThose are the main things you might be tempted to make unnecessarily out of wood. Note that sometimes you still need the wood version for some reason. Like a rock pot usually serves the same purpose as a wood barrel, but some workshops and such require the wooden one. Other more commonly useful rock things: altar, armor and weapon stands, bookcase, cabinet, coffin, floodgate, grate, hatch cover, mechanisms, pedestal, and statues. There are others like jugs but their usefulness is more limited. Save Wood and MetalSome things can't be made out of rock. For example, beds and display cases must be made of wood. Bins can be made of wood or metal but wood is usually the better material for those, unless you have tons of fuel and ore. Buckets similarly require wood or metal. Other things that can't be made of rock but can be made of wood or metal: crutches, splints, cages, animal traps, stepladder, wheelbarrow... and others. This should give you an idea of why you want to save your wood and metal for things that need it. Other MaterialsThere are other materials things can be made of like cloth, bone, ivory, pearl, shell, wax, yarn, glass, clay, ceramic, and leather. But most of these (except maybe glass or clay) are hard to get a consistent supply of. Clay and glass use up fuel though, and dwarves are usually more inclined to use fuel on metal. But you want a little of everything for strange moods (see further down). Summary Make everything possible to make out of rock using rock. Things that can be made of wood or metal should usually be made of wood unless you're just swimming in metal and are short on wood. Save metal for things like weapons that really need metal for physical mechanics reasons. Obviously save things like gold for fortress bling (gold statue) and trade items. Get creative with other materials as you happen upon them. Save up some of each material to handle "strange moods" (see below). Once you're rich, you may find more exotic materials have weight advantages. Build the Trade Depot and Trade Like a Master Finally it's time to turn that initial all-purpose shelter and storeroom into the trade depot[dwarffortresswiki.org]. You can actually delay this until the first caravan shows up because they will hang around long enough for you to build it, but it only requires three stone (or blocks) and doesn't take too long. So if you want just skip ahead and come back when they show up. Remove the stockpile if you haven't already, then remove any zones that are still there that you might have forgotten to remove. Hopefully you already did this and the dwarves managed to clear all the stuff out of the room and move it into other stockpiles, but if not just go ahead and place the trade depot anyway. Hit b-T and build the Trade Depot. As always, just use junk stone (or blocks made from it). You should end up with something like this.
现在当商队到达时,你就可以开始交易了。 你唯一需要做的另一件事就是大量生产岩石工艺品,或许还可以按照后文所述制作一些切割宝石,这样你就有一些东西可以用来交易了。 与商队交易 交易流程如下: 1. 在贸易站请求经纪人(确保你已在贵族/管理者中分配了一名经纪人,最好具备相关技能)。 2. 将交易物品运送到贸易站。这可能需要一些时间。 3. 进入交易界面。 4. 将你的物品添加到报价中。 5. 将商队的物品添加到需求中。 6. 点击交易以确认并提议交换所选物品。 前两个步骤操作如下:点击贸易站,请求经纪人,然后选择要运送到贸易站的物品。

贸易站窗口 将你计划交易的任何杂物,比如石头、其他手工艺品和切割好的宝石,移到贸易站。希望你制作了一堆箱子来装东西,因为这会极大地加快搬运速度。 如果你不确定自己是否有足够的东西进行交易,或者想处理掉一些物品,可以将容易制作的额外物品,比如门、石箱或其他类似物品移到贸易站。这些东西可能不值多少钱,但积少成多。 烦人的精灵伦理 如果你确实需要和精灵交易,不要向他们提供木材或其他有机物品,否则他们的伦理观念会受到冒犯。这包括装有所售物品的木制容器,以及物品上的装饰。他们会因为你的伐木行为或非素食主义而感到不满并离开。不过他们确实很喜欢石头、金属和宝石,因为这些东西他们自己都不生产。 利润与交易 商人不会接受不赚不赔的交易,因为他们希望为自己漫长而危险的旅途赚取一些利润。所以你必须给他们一些利润。不过具体要给多少,取决于经纪人的技能。
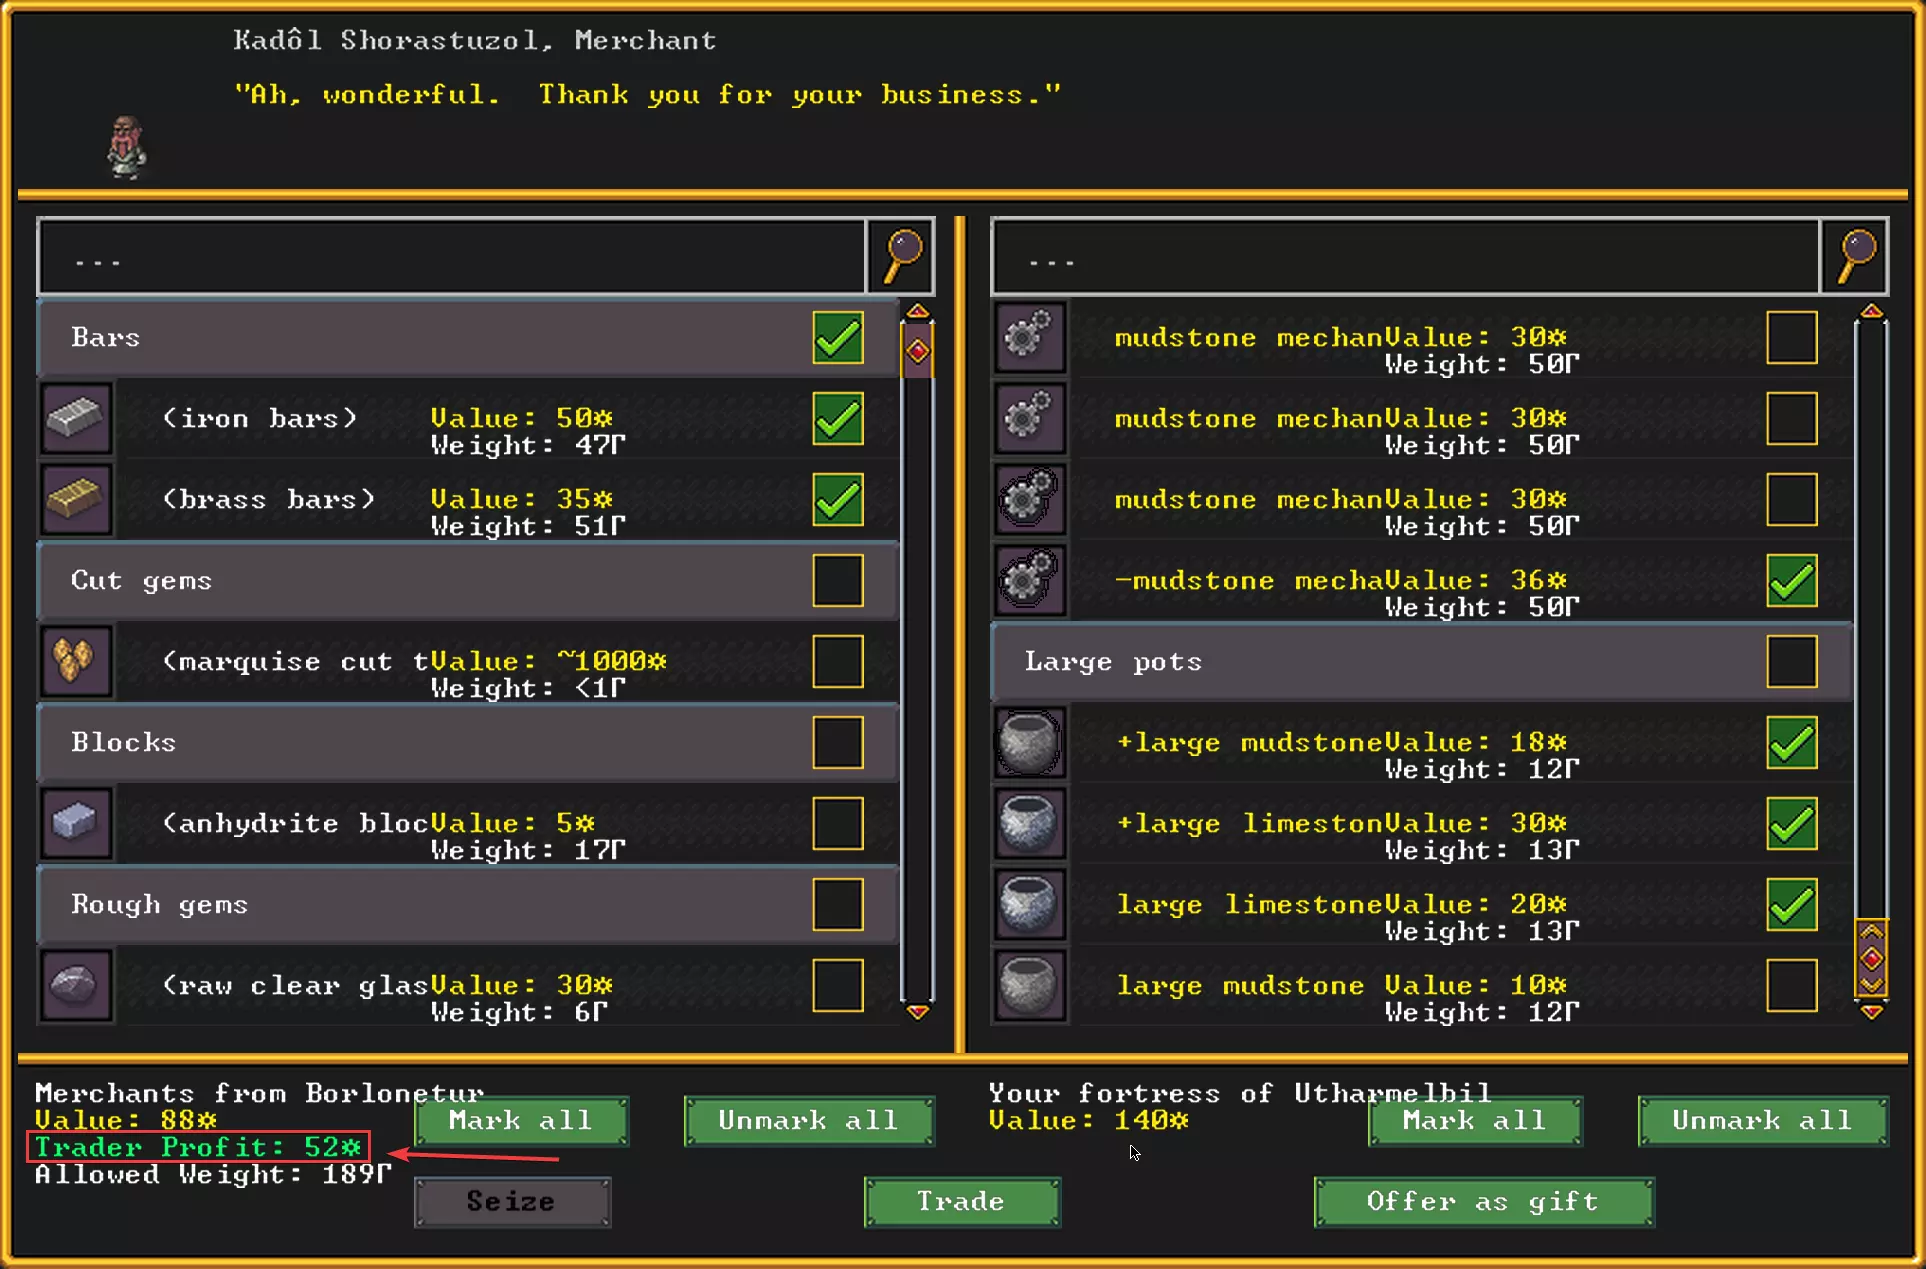
交易议价窗口。 注意,当交易利润显示为绿色时,对方很可能会接受交易。如果是黄色,对方很可能会还价,要求更多货物。不过有时即使显示黄色,对方也可能接受,尤其是如果他们对之前的交易已经感到满意的话。颜色代码的准确性以及交易是否被接受取决于技能,但具体机制并不明显。 另外要注意,商队有重量限制。这会限制你向他们出售大量沉重的石头类物品,除非你能从他们那里拿走更多沉重的东西。有时候他们会带来一些蠢东西,比如一堆黏土块,这些东西很重但很便宜。这时候买下它们是合理的,这样可以释放他们的负重空间,让他们能接收你更多的物品。 频繁试图压价可能会让谈判变得更糟(他们会要求更高的利润),或者把商人惹恼到直接收拾东西离开,不进行交易。 你可以进行多次小额交易或一次大额交易,但较少次数的大额交易更有可能达成接近接受阈值且不会超出太多的更好交易。另一方面,大量的小额交易可能有助于更快提升你的经纪人技能。 先给商人一个非常优惠但金额很小的交易,可能有助于让他们态度软化。外交 通知区域会新增一个【外交】按钮。你可以通过此按钮申请下一年度的物资,但这些物资的价格会上涨。如果你需要更多皮革、布料、异域食物或其他难以自行生产的物品,这就是你的机会。 他们还会告知你哪些物品在下次交易中会被认为更有价值。如果你能生产这些物品,那么这样做是有意义的,因为你将能够抬高这些物品的价格。 如果你忘记了所做的安排,可以点击屏幕右下角的世界屏幕图标。该用户界面部分仍存在一些问题,但你可以在那里获取一些信息。施肥农田与地表种植 如果你在地下的泥土层中种植,土壤会被视为劣质土壤。解决这个问题的方法包括寻找天然存在的危险洞穴进行种植,或者通过施肥来改善土壤。只要有足够的木材供应,施肥并不困难。不过施肥的方法并不十分明显,因此写下了这些说明。 如果你收集植物或通过交易获得必要的种子,也可以进行地表种植。地表农田可以用墙壁来保护。 施肥 除了需要持续供应木材外,施肥过程相当简单。施肥使用的钾肥按以下步骤生产: 建造一个木材熔炉,用木材“制作灰烬”。这个工坊也可用于制作木炭。建造一个灰窑来“从灰烬中提取钾肥”。这在之后制作肥皂所需的碱液时也会用到。设置一些条件性工作订单:当木材数量较多(例如超过10个)时,下达“制作灰烬”的任务,维持少量灰烬(比如3个)。然后再设置一个订单,当钾肥储备低于9个左右(或你需要的数量)时,下达“从灰烬中提取钾肥”的任务。这样就能自动保持少量钾肥的库存。接着设置农田进行施肥:

Selecting 2 is optional, but will keep the plot fertilized all the time. Even if you select 2, click 1 to get started fertilizing immediately. Surface FarmingSurface farming[dwarffortresswiki.org] is pretty obvious because it all works the same way as underground farming, just with surface plant species instead of cave plants. Farm plots can be created outdoors, and farmers can be protected from danger by constructing walls and even roofs around the plots. The plots can also be fertilized but this isn't nearly so important if the soil is good. Surface plant seeds can be obtained by gathering surface plants and eating or brewing them. They can also be purchased from caravans and aren't that expensive as long as the annoying bastards didn't put them into fancy expensive bags. Like underground crops, surface plants exist that can be used for food, drink, textiles, oil, and such. The "Greenhouse" TrickYou can surface farm underground using a trick. Channel out a pit exposed to sky, put a farm plot at the bottom, and cover it over with stone or any constructed floor material. The tiles will still be considered "outside" tiles. If it makes you feel any better, make the roof out of glass block flooring and call it a greenhouse. Muddy Stone FarmingBriefly I will mention that if you flood a stone floor with water it will leave behind mud[dwarffortresswiki.org] which then becomes valid placement for underground farm plots. Surface plants won't grow this way even if the plot is exposed to sky. See more info on creating muddy stone farm plots at Irrigation[dwarffortresswiki.org] or see the section on water below. Immigration and Naturalization Services At this point you may have had some immigrants[dwarffortresswiki.org] arrive, either because they're unhappy where they were or because they're attracted by tales of your success. These are dwarves from your civilization, so they're not really foreigners, just non-locals. (You could get foreigners, but they show up as visitors, request residency, then possibly request citizenship after a year or so.) When immigrants arrive you need to do some stuff to put them to good use. Here's a quick checklist of things to do: Assign DetailsIn premium they don't arrive with work details set, so go through your work details and assign them in some way that makes sense. Sometimes you'll get a Legendary craftsdwarf who you should both put to work immediately and exempt from menial tasks so he or she stays focused on doing legendary stuff. Other times you get a Peasant[dwarffortresswiki.org] (unskilled) or someone with totally worthless skills like a Legendary Fish Dissector[dwarffortresswiki.org] (they extract things like blood and venom from fish which is currently useless in the game). It's up to you what you want to do with these individuals to make them useful, but I would give them all the crap work plus assign them a variety of other jobs to see what they skill up at quickest. Check BedsBuild more dormitory beds or more individual bedrooms. Check Meeting SpaceKeep an eye on whether you need more meeting areas as the population grows. Check BurrowsIf you have burrows set up for some special purpose, like an "emergency shelter" burrow used to (try to) make all the civilians take shelter somewhere during an attack, make sure to add the immigrants to it. Add to SquadsUseless dwarves should ideally be the first to get used as battle fodder and if they spend lots of time on military training then you're not losing out on any skilled work from them. So when you eventually get military training set up, useless Peasants are perfect candidates for full-time military training, as are the fish dissectors. Check LocationsLocations like Hospitals, Taverns, Temples, and Libraries can benefit from certain skills and some immigrants might be good for one of the positions at those places. Start assigning the position in one of those places to see who has relevant skills. Check Pen/Pasture ZonesImmigrants usually show up with some animals, so check your pasture and bird pen and such and make sure any animals they show up with are assigned to the proper zones. Otherwise they may starve or not produce things. Tombs and Memorializing the Dead Tombs[dwarffortresswiki.org] are pretty easy, and it can be helpful to start making a mass tomb sooner rather than later so that when dwarves die later the survivors will suffer less distress. Seeing their dead friends corpses laying around makes them unhappy, and smelling their rot makes them even more unhappy. Unmemorialized dwarves also like to come back as ghosts[dwarffortresswiki.org] to harass the other dwarves, which also causes lots of bad unhappy thoughts. This kind of horror can drive the whole fortress into insane destruction. Communal Mass TombsThe first type of tomb is the easiest type. Just queue up 20 or so rock coffins and when they're done, dig out a room and place the coffins in the room like furniture. They're under b-f-x. Currently, every coffin needs its own individual 1x1 tomb zone. These tombs can be left unassigned though, and they will get dynamically used to entomb deceased dwarves (and pets if allowed). Make sure the toggle to enable their use for dwarves and/or pets is set. You might also create a stockpile of type Corpses:Dwarves in the middle of the room if there is enough space so it will get used as a morgue as well. That's it. You don't need to assign any dwarves. When they die they will get automatically allocated to coffins. Something like this is typical and it can be placed at the edge of the map:
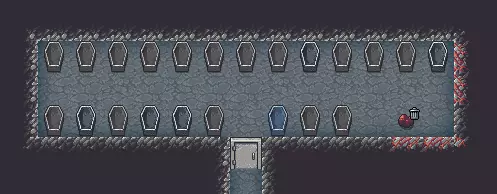
集体陵墓。 像往常一样,打磨和雕刻虽然不错,但对于公共地下墓穴来说并不是优先事项。 【指定陵墓】这些是为那些要求提前建造陵墓并确保其具有足够价值的挑剔贵族矮人准备的。用户界面会显示具体要求,不过和特殊的个人卧室及办公室类似,只需挖掘一个房间,制作一个由优质材料制成的高品质 burial object(墓葬物品)并放置在房间内。如果需要提升价值,可以对房间进行打磨和雕刻。在房间上划定陵墓区域,并将爱抱怨的贵族分配到该陵墓。 【纪念逝者】与现实生活中一样,有时逝者的遗体可能会以某种方式完全遗失,无法进行安葬。为妥善处理这种情况,请先安排“制作石板”的工作,提前制作一些岩石纪念石板,以备纪念逝者之需。之后,你需要在石匠工坊进行“雕刻纪念石板”操作,然后像放置其他家具一样,将雕刻好的石板安装在某处(例如集体墓穴)。这样可以让逝者安息,被纪念的鬼魂也会消失。恭喜。
如果你已经看到这里,那么你已经掌握了基本要塞生存所需的一切知识。你的矮人不会挨饿,也不会出现酒精戒断反应,他们会在自己的床上安然入睡,在大厅里愉快地宴饮。你可以用墙壁将矮人保护起来,抵御敌人;可以命令矮人消灭威胁;可以制作生存必需品;可以通过交易获取你无法制作的物品;还能妥善安葬那些不幸牺牲的矮人。 如果此时颁发成就徽章,你现在就能获得一枚。 接下来,我们将深入探讨更复杂的要塞机制,这些机制能让更多的矮人保持快乐,并且在面对攻击时不再仅仅依靠筑墙防御。如果你发现地图有任何问题,或者希望以不同方式进行设置,现在重新开始也不错。只需放弃要塞,你的下一次设置将会快得多。 奇怪情绪 在某些时候,你会看到一条消息,提示某个矮人陷入了奇怪情绪。这种情况相当怪异,而且发生的原因并不十分明显。 似乎矮人会周期性地被某种创作艺术品的执念所驱使,并且会获得某种魔法能力,即使这超出了他们正常的技能水平,也能进行创作。当这种情况发生时,矮人会占据一个工坊并赖在那里,阻止其他人继续使用该工坊,直到他们获得所需材料并完成神器,或者因无法完成而发疯为止。

一种奇怪的情绪。 失败与避免:为了防止他们发疯并攻击他人或因抑郁而死亡,你唯一能做的就是确保他们获得所需的一切。根据情绪类型的不同,他们可能不会直接表达自己的需求。点击他们认领的工坊(不是矮人),如果他们缺少所需物品,你会看到他们胡言乱语或通过其他方式表达需求的文字。(如果他们拥有所有所需材料,就会收集材料并开始在工坊工作。) 他们可能会对任何材料产生执念,这就是为什么收集或获取你能得到的每种材料至少少量是有意义的。如果你不尝试收集所有种类的物品,可能就无法及时获得所需材料,而且心情古怪的矮人对他们想要的东西可能非常挑剔。你或许无法确切弄清楚他们到底想要哪种材料变体。 成功了!好处是,如果他们成功了,你将获得一件珍贵的 artifact。它可能不是特别有用,但你可以展示它来让矮人开心,并提高有价值要求的房间的价值。所以,一件传奇 artifact 地板格栅可能看起来很蠢,但你可以在地板上挖个洞,把它放进去,房间价值就会大幅提升,即使你在那里根本用不到地板格栅。成功后,矮人也会获得某项技能的传奇等级,除非他们处于着魔状态。神器与展示家具 如果奇怪的情绪成功触发,就会产出一件带有名称的神器品质物品。这件物品价值不菲(以矮人工钱计算),一旦丢失或损坏,你的矮人会感到不开心。因此,这些神器需要保护起来,防止常见的窃贼。 储存神器的一个好方法是使用基座。展示柜则更为精致,需要木材和玻璃窗,而玻璃窗又需要玻璃,玻璃的制作则需要玻璃窑、燃料和沙子。尽量准备一些基座或展示柜,这样你就可以将它们放置在对价值敏感的房间里,以提升房间价值,同时还能用陷阱、护卫犬或其他方式保护神器。 不过,有些神器本身就是家具,因此可以直接单独放置在房间里。奇怪情绪的类型 奇怪情绪在很大程度上取决于矮人是快乐还是悲伤。以下是从最有利到最不利的类型列表: 【入迷】- 这是最基本、最直接的奇怪情绪,会清晰地显示所需材料。 【隐秘】- 与入迷类似,但指示会稍微模糊一些,因为矮人会通过画画来描述他们需要的东西。 【着魔】- 指示变得非常晦涩,而且与其他情绪不同,矮人在制作神器时不会获得任何技能。 【恐怖】- 矮人希望用骨头和类似物品来制作神器。 【堕落】- 情况开始变得糟糕,因为矮人会谋杀另一名矮人,并使用受害者的骨头来制作神器。关于决定情绪类型的因素,似乎包含随机性和快乐度。有些情绪类型似乎完全随机,比如【着魔】。 应对异常情绪的最佳简单建议是:收集至少少量的每种材料,并熟练掌握收集方法。 建造额外的工坊 这里可能需要提一下,对于像石匠工坊和工匠工坊这类常用工坊,你确实需要不止一个。 这些工坊建造起来非常便宜且快速,最少需要9格已开采空间,外加一块或一块废弃石料。因此,为所有重要的工坊建造2个或更多的额外工坊。这样做不仅能在你拥有更多矮人时实现并行生产,而且当某个矮人陷入奇怪情绪并占用工坊时,也不会阻碍其他物品的生产。 部分工坊需要多花一点功夫,但不会太多。例如,金属锻造坊需要铁砧,但只要你找到任何铁矿,就能轻松打造出大约3个铁砧,并用它们建造更多的金属锻造坊。 大师级废物管理(第二部分):传奇倾倒 有时候,无论出于什么原因,矮人就是不愿意优先清理那些在他们看来没什么问题但在你看来很碍眼的东西,比如随意堆放的石块。或者,手动设置倾倒优先级会更简单,尤其是当这些东西造成麻烦时。这时候就该把物品扔进垃圾场了(即使这些物品可能只需要移动一下,而且可能还有价值)。 垃圾场建造 你可能只需要一个垃圾场,尤其是现在。建造方法如下。

几乎所有人都使用这种简易设计。 其主要特点如下: 1. 内部仅1x1大小,因为任何数量的物品都可以倾倒在单个格子中。 2. 房间设有一扇门,以防我们倾倒任何有害物品时控制瘴气。 3. 我将它放置在石材储存区旁边,因为它通常会存放废弃石材,供附近的石材工坊使用。 要建造这种垃圾倾倒区,按图示挖掘一个房间,添加一扇门,然后使用区域(z)命令在内部的空格里设置垃圾倾倒区。 使用方法:使用i-p指定命令,该命令在用户界面中显示为【i-p】。

对象标记的用户界面,例如【丢弃】和【禁止】。 标记为丢弃的物品将被运送到此丢弃区域,同时会取消其丢弃标记并标记为【禁止】。这会阻止矮人对丢弃区域内的物品进行任何操作,除非这些物品被(重新)认领(即取消禁止)。 让丢弃物品重新可用:通常你并不希望所有东西都留在丢弃区,因为其中可能有可用的石块,或者是最终需要移到垃圾堆放处的废弃物等。因此,定期使用i-F【认领禁止物品】命令,并在丢弃区域的地砖上点击两次。 如果物品被禁止,地图地砖的角落会显示一个小锁图标。单个物品的窗口也会显示锁边框略微高亮。

虽然很难看清,但目前情况就是这样。 使用i-F(“认领”)功能可以清除物品堆中物品的“禁止”标记,之后矮人就能按需使用这些物品了。如果暂时没有用途,也没有库存区可以存放,它们就会留在原地,直到有需要移动的时候,这种情况通常没什么问题。不过要注意,取消物品堆的标记可能会引发一阵将物品搬运到库存区的忙碌景象。 另外别忘了,你可以手动为其他物品设置禁止状态,这对于防止矮人乱动你不想让他们碰的东西很有用。建造独立卧室 宿舍在一段时间内确实够用,但如果你希望矮人能保持愉快的心情,以便他们在最恶劣的情况下也不会放弃生活或陷入狂暴,那么确保他们都有自己的卧室会很有帮助。 这些房间不需要很大。一个简单、高效且省时省力的策略是: 1. 挖掘1x3或2x2的房间,并预留一个格子用于放置门。 2. 打磨墙壁。 3. 雕刻墙壁。 4. 安装门。 5. 为每个房间添加一张床。 6. 添加一个柜子和一个保险箱,这些都可以用石头制作。 7. 为每个房间划定卧室区域,或者使用【多重】功能一次性为整个房间群划定多个区域。核心思路是在最小空间内实现最大程度的改善,床仅使用木材制作,其他所有物品则用石材打造。如果有一位高等级的石匠能制作出高质量的家具,会很有帮助。即便这些家具只是用低价值的岩石制成,石匠高超的技艺也能让矮人感到开心。 你可以为矮人分配独立的卧室,也可以让他们自行认领。这样他们就能尽可能选择周围有自己喜欢的石材种类或颜色等的房间。 柜子可供他们存放衣物,而箱子则能用来收纳他们已认领的其他小物品。一些贵族和管理者会对卧室、餐厅、办公室和陵墓有更高的要求,游戏会对此进行提示。只需为他们建造更精致的房间,并根据需要为他们单独分配即可。 关于卧室建筑群设计,有一篇非常详尽的维基文章可供需要灵感的玩家参考。最简单的建议是将所有卧室集中在一个三维立方体空间内,并设置多个出入口。 区域与重叠:如果错误地重叠区域,会出现红色文本警告,但要注意区域可以共享墙壁瓷砖。例如,像这样放置区域是可以的:
噪音与睡眠 噪音可能会影响矮人睡眠。挖掘、砍树、雕刻和拆除建筑会向四周4-8格范围内散发噪音。工坊不会产生噪音。据报告,寺庙和酒馆可能会因歌唱和音乐产生噪音。尽量让卧室远离噪音源,距离可能只需8格。还要记得垂直距离,因此靠近采矿作业的卧室最好位于其上方或下方8层以上。 水井与水源 既然你已经在四处采矿,并且可以关闭要塞以应对围攻,或许是时候考虑要塞内部的水源了。如果有充足的酒类供应,水就不会被大量用于饮用,更多是用于清洁[矮人要塞维基]。这一点对受伤的矮人来说很重要,他们需要水来清洁和饮用,但医院的相关内容我们稍后再谈。 处理水和岩浆可能会变得复杂,但我会尝试描述一些相对省力的方法,在要塞内部获取可靠的水源。最省力的方法是在自然水源旁边指定一个水源区域,但我们确实想要更方便的方式。首先让我们谈谈水的来源,然后再讨论如何获取水。 所有的水都必须来自自然水源。以下是主要水源及其简要说明: 河流及其他水体 河流通常横贯地图,上游边缘的地格以最大速率生成新水,下游出口地格则以相同速率排水。这意味着河流是无限水源。湖泊和海洋的运作方式类似,但海洋的问题在于其为咸水。 这些地表水源的主要问题在于它们位于地表,若不慎将其引入错误区域,很容易淹没整个要塞。因此,处理这些水源时必须非常小心。总是在各处建造带有水闸的旱渠,将水闸的控制杆放置在河流水位之上,这样它们就不会被洪水堵塞。在确定可以根据需要关闭水闸之前,不要挖通最后一块阻挡水流的 tiles。 含水层:这些通常是地下的岩石 tiles,会向相邻的空白空间滴水或涌水。如果你从上方挖一个坑进入含水层,坑壁会漏水,空坑会被填满。重含水层的坑壁几乎会立即淹没坑洞,而轻含水层则会非常缓慢地淹没坑洞。 由于水已经在你想要的地下,你只需在含水层顶部挖一个水池,水池就会充满水。这其实很容易处理,除非整个地图都被厚厚的含水层覆盖,否则不会成为问题。在含水层中挖出的空间里的水可以通过隧道引走。 尤其是厚含水层,如果你从侧面在连接主要塞的隧道中挖入,可能会淹没含水层水位以下的整个要塞,这是很危险的。 洞穴湖泊和河流 地下洞穴中也可能有湖泊和河流。这可能很方便,因为水源可能远低于主要活动区域,你可以在竖井顶部打井取水,但也可能不方便,因为井桶需要长途运输,速度较慢。可以使用泵组将水抽到更高处的蓄水池,但这需要更多工作量。浑浊水池:这些是地表的特殊地块,挖掘时会排水,但下雨时会重新注满。它们含有不流动的脏水,虽然不连续,但有时可能仍有用处。 简易水井示例:虽然可以挖掘蓄水池并从河流引水,但这里只介绍较简单的情况——部分横跨地图的含水层,我们可以在其顶部轻松建造水池,直接使用或用于水井。 使用河流:如果需要使用河流,这里有相关指南。我在选择移民区域时格外小心,确保移民点所在的方形区域西侧有浅层含水层,而东侧没有。于是我开始在东侧定居,并向下挖掘以避开含水层。但现在我想要一些不费力就能获取的水源。作为探查矿物的一部分,我在好几个楼层都挖了一条隧道,一直通到地图西侧。
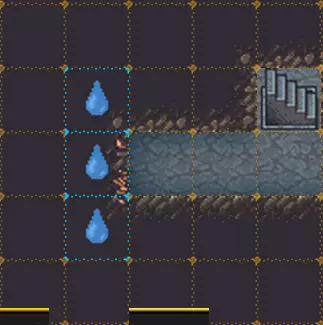
32级。 哦,天哪,这里有一些潮湿的石头,所以我找到了含水层。现在我想找到顶部,于是我向上挖了一层,然后再次向西挖去。
第33层。 好吧,还是潮湿的石头,但位置不完全一样,因为含水层是地下形状不规则的3D物体。所以我把潮湿石头旁边的方块用墙围起来,以防万一,然后继续向上挖了一层。
34级。 这次没有潮湿的石头,我往西挖了不少地方也没再找到。看来我现在在它的上方。 于是我挖了一个7x7的房间,在地板上开凿出一个5x5的水池,然后在它下面那一层开凿出一个3x3的空间,形成一种倒金字塔结构,这样可以为含水层的墙壁提供更多暴露的表面积,让水滴滴落来填满水池。
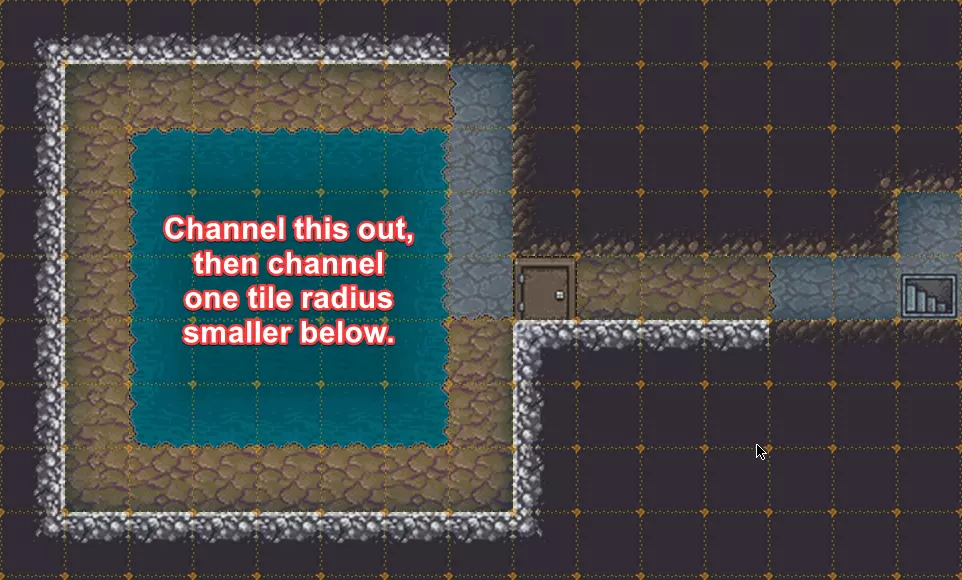
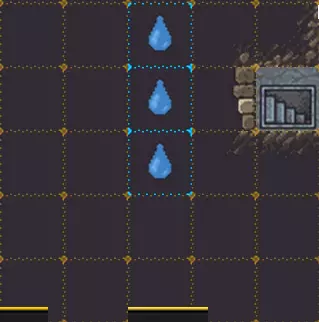
挖好一个带有地面引水渠的房间并等它注满水后,我升到了34级。 用斜坡挖掘的原因是,对于不会游泳的笨拙矮人来说这样更安全。如果他们掉进去,可以从任何一侧轻松出来;而且如果他们在挖掘时水灌得太快(比如遇到强含水层),也能更快走出坑洞。 所以在35层,我在水池中心上方挖了一个小房间,在地板上凿了个洞,并在洞上建了一口井。
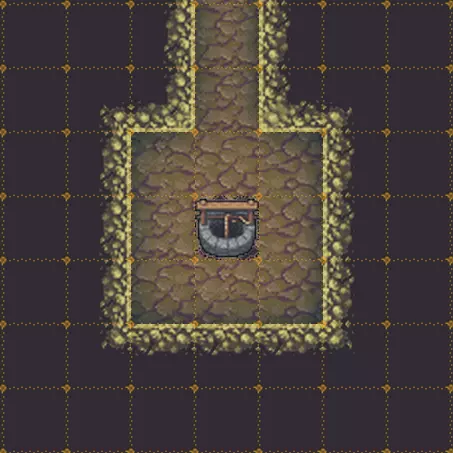
35级。 这里正好和我的用餐区、厨房之类的区域在同一层,所以我就挖了一条长长的隧道通向那个区域。 现在这个水井不是最方便的,因为它离所有东西还是有点远,但至少有个水井了。我本来也可以直接在那里建个楼梯下去,让他们直接从水池里舀水。 不过之后我可以尝试把水引到一个水井房下面,就在一个居住人口更多的区域旁边。 当你掌握了这个简单的情况后,就可以尝试更复杂的矮人土木工程了,比如抽水、注满蓄水池,或者为困住的哥布林建造溺水室。习惯使用大量的杠杆和机械装置,看在矮人诸神的份上,一定要把杠杆安装在水位线以上或其他不会被洪水淹没的安全位置,这样用于控制洪水的防洪装置才不会被它们本应控制的洪水淹没,从而无法使用! 蒸发 注意,深度为1/7的水(有时更深的水也会)如果长时间静置就会蒸发。这意味着如果你使用的是像浅层含水层这样的慢速水源,水可能在到达目的地之前就蒸发了。如果你遇到这种情况,可以挖掘更多的含水层岩壁表面,让水流入更低层的蓄水池。 进阶用水:含水层突破 这并非完整的含水层教程,但我至少想帮助大家入门。新手建议从只有部分区域被含水层覆盖的地图开始,或者选择没有含水层但有河流的地图,这样可以避开含水层问题,专注于其他事情。但最终你会希望在至少被轻度含水层完全覆盖,甚至可能是重度含水层覆盖的地图上开始。 轻度含水层
These drip water so slowly that they're actually quite easy to deal with. You can do a slow "chicken run" through them using a 2x2 stairwell and priority 1 designations. Just keep digging a 2x2 stairwell down, re-designating cancelled designations until you get one level below the first dry layer. Then dig out a little bit of space around the bottom, even 7x7 will work. The screenshot on the right shows water dripping out of a 5 layer light aquifer down a 2x2 stairwell and you can see how little space it takes to disperse and evaporate the water. So even just 6x6 empty space at the bottom is usually enough. You can then dig out the aquifer tiles adjacent to the stairwell (you don't need the corners) and build walls out of anything in their place to stop the dripping. But you can take your time doing this because of the drainage area you created below. a 1x3 or 1x2 stairwell could also work but it's more likely to start filling up with more than 1/7 water before you finish digging down, especially if there's more than two aquifer levels. Here are some links to tutorials: Light Aquifer Tutorial Light Aquifer Quick Tutorial Light Aquifers[dwarffortresswiki.org] on the wikiHeavy AquifersThese are a lot more trouble to breach than light aquifers because water floods out of them like crazy, instantly flooding tiles, but they also have the advantage that they absorb infinite water just as quickly. So eventually you may actually prefer these for some tricks that can be done, but it will take some focus and effort to learn the techniques for dealing with them. The wiki mentions multiple techniques for dealing with heavy aquifers[dwarffortresswiki.org], but here I will primarily refer you to the double slit technique since that is the most refined way of breaching them in minimal space. It requires components for two screw pumps (easy to make out of wood) and some puzzle-like fiddling with the order in which tiles are dug out and walled over. Once the tactic is learned it's not too difficult though. Double-slit Method[dwarffortresswiki.org] described on the wiki Double Slit Method Video Tutorial Older double-slit method video Smooth and Engrave Like a Master Smoothing[dwarffortresswiki.org] walls and floors is rather helpful. It keeps dwarves happy. Once walls and floors have been smoothed they can be engraved[dwarffortresswiki.org]. This not only keeps dwarves happy but by looking at what they engrave you can see what they've been thinking about. They'll carve their favorite things and even events that happen. Enable smoothing for all dwarves except for the ones on important jobs you don't want to have distracted. This helps give idle dwarves something to do and raises their skill . You may want engraving enabled only for a few skilled dwarves. Prioritize smoothing and engraving gathering and sleeping areas first. The unskilled dwarves will start out very slow and won't be creating any masterwork engravings at first but they will get better. You may not want to get too carried away too quickly though because this raises the value of your fortress and makes it more attractive to attackers. Designate one large room or some smaller rooms at a time then designate more when those are done. Don't designate everything or dwarves may get too focused on smoothing and engraving when other things need to get done. Just go small areas at a time as you notice dwarves being idle. Passive Defense: Traps Traps[dwarffortresswiki.org] are quite useful because they can neutralize or kill problematic creatures with little or no risk to the dwarves. Trap TypesThe stone fall trap is the easiest trap to construct, requiring only stones produced by mining and a mechanism, but they don't usually kill anything. Instead they just soften enemies up. Unlike others though they can be constructed almost immediately from just rocks and rock mechanisms, but they're not that good and are the least useful trap type. Cage traps are more useful because cages aren't difficult to make and they will neutralize any creatures caught in them. Additionally, trapped creatures are still alive and can be used for other purposes later. Cage traps won't trap everything though since a number of creatures are immune to them or can usually bypass them. They can be constructed almost as easily as stone fall traps though, so are very doable rather early. Weapon traps are like stone fall traps but much more deadly. They can be made from normal weapons or the trap-only weapons such as spiked metal balls and serrated discs. These can be nasty when made from high quality mechanisms and high quantity/quality weapon components. Expect a pile of gore as a result. Upright spear/spike traps, unlike the previous kind, don't trigger automatically and must be triggered by mechanisms such as a lever or pressure plate. See the wiki for design ideas involving these.Other more elaborate schemes can be implemented with mechanisms, bridges, pits, water and magma, and such. Placing TrapsIf you want to keep things simple at first and not focus too much on traps yet, just put lots of cage traps in your entrance tunnel. A simple trick with traps is to create a long hallway into a hill or something outside the fort, either disconnected entirely from the fort or cut off by a lever-controlled door, then fill the hallway with traps and chain up a stray kitten or other animal at the end. Dumber more aggressive creatures will tend to be lured into the hallway in their kittencidal bloodlust and fall prey to the traps. (Really a kitten is not the best bait animal due to their adoption rate and any tame friendly animal can be used.) Building destroyer creatures are attracted to furniture to smash and will be baited by that instead. For more on traps, check out the Traps[dwarffortresswiki.org] and Trap design[dwarffortresswiki.org] wiki pages. There are a very large number of elaborate trap plans described on the wiki. Guard AnimalsWhile not a trap per se, one good way to spot sneaky creatures trying to sneak in to the fortress is guard animals chained[dwarffortresswiki.org] up at the entrance or in the entrance tunnel. Dogs work fine for this and they don't need to be anything special, but other animals can be used too. A small pasture at the entrance can also be used to coup up some animals there. They can be used in conjunction with traps since they can startle, push, or otherwise cause some trap-bypassing creatures to stumble into a trap anyway. Active Defense: Military Training We already created a squad at the beginning and learned how to order them around, but at some point you're going to want a real squad with proper equipment and training. You're going to need more dwarves than what you started with so that you don't lose too much work capacity by having a bunch train. Conflict Between "Tool Labors" and Squad UniformsThe labors of Mining, Woodcutting, and Hunting are special because they require tools. When a dwarf is assigned to one of these, they will pick up the required tool (pick axe, battle axe, or crossbow/quiver/bolts) and always keep them. This tool set is called a "uniform". They can't have more than one uniform (carry more than one tool or weapon) at a time and will not switch automatically depending on task. If they're in a squad with their Schedule Routine[dwarffortresswiki.org] set to "Ready" (or any routine set to "Equip/always") then they will equip a squad uniform full-time, even if they have "no special orders" at the moment. Thus you must avoid assigning more than one of Mining, Woodcutting, or Hunting to a dwarf, and a dwarf with one of these labors should not be in a squad that has their schedule routine set to "Ready" or another "Equip/always" routine. Otherwise they may only ever do one of, or none of, those labors. But if a miner, for example, is in a squad with it's schedule routine set to one with "Equip/orders" then they should carry their pick, and then switch uniforms (drop the pick and get weapons and armor) when they have military orders. Early SetupA squad can have 10 members, but doesn't have to. The best thing to do might be to pick at least one dwarf in your first wave of immigrants, or your most skilled one, and start a squad with even just one dwarf training. He may be able to teach the others later. Dwarves with no work skills are good candidates for recruitment. Just start small with 1-3 otherwise useless dwarves and add more later as ideal recruits arrive. Military FacilitiesNot much is required. Here's a crude layout that I slapped together. I'm sure you can do better.
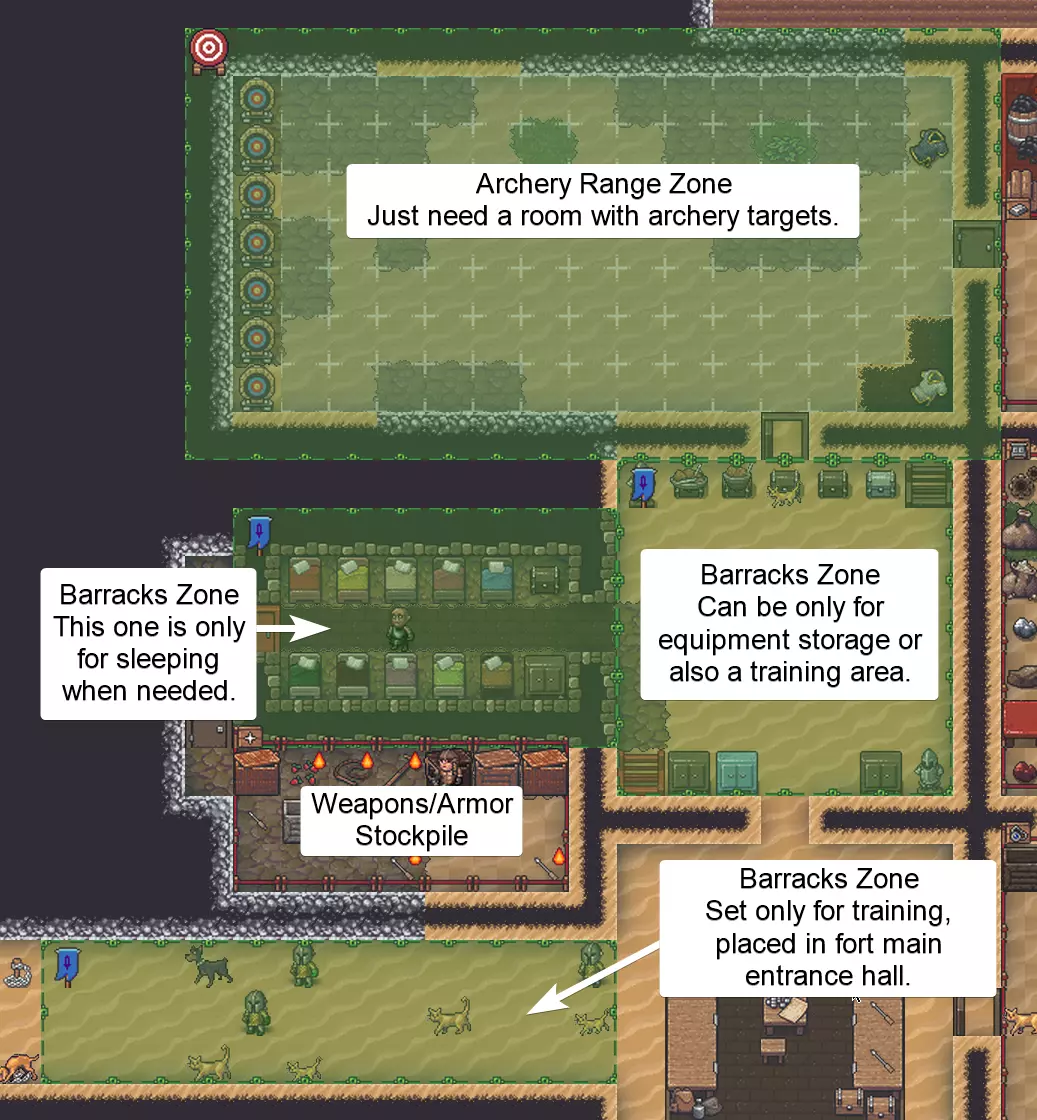
一些适合小队的基础区域。睡眠区并非必需,而箭术训练场则要到你打算训练弓箭手时才需要。箭术训练场的长度或许应该更长一些。训练小队的最低要求是有一块可供训练的空间,不过除箭术训练场之外,所有功能都可以分配在同一个区域内。 以下是根据不同用途,每个区域应具备的一些设施: 近战训练:无需其他设施,只需足够的空间。 箭术训练场:只需要箭靶,以及一个与箭靶保持足够距离的房间。在箭靶前方挖掘一条通道是个不错的主意,这样箭矢会掉落到下一层,从而避免它们损坏。装备存储:小队中的每个矮人会使用放置在兵营内的独立容器(如箱子、柜子或盔甲架)来存放他们的装备。放置容器后,它们会自动分配给各个矮人。 睡眠:只需床铺即可,不过放置箱子和柜子或许也无妨。小队并非必须设置专属睡眠区域,只有当你希望在让他们进入高度警戒状态时将其集中安置,才需要设置。多个小队可以共用同一区域。一个兵营区域可用于除弓箭训练外的所有功能。 装备:遗憾的是,这是用户界面中需要改进的较为令人困扰的部分之一。要进入装备界面,需打开小队侧边栏(按q键),勾选一个小队,然后点击底部的“装备”选项。该小队的装备窗口应该会打开。 装备通常通过装备窗口顶部的两个按钮来分配为制服。遗憾的是,似乎无法编辑现有制服,必须创建新制服才能进行任何更改。不过,如果你点击单个矮人旁边的【详情】,可以编辑该矮人的制服,然后将结果保存为新制服。这样至少可以加载现有制服来创建新制服。 至于制作装备,我建议为近战小队配备某种金属盔甲。如果你能炼制钢铁,那么我会先制作钢铁武器,然后只制作足够招募小队所需的武器和盔甲。 金属头盔对于防止严重的训练受伤似乎很重要。训练安排 开始训练最简单的方法是在军事侧边栏中选择小队(点击右下角的旗帜按钮或按Q键),然后点击斧头图标下达立即训练的命令。不过,这会让他们日复一日地全天训练,直到取消为止,这可能并非你想要的结果。如果矮人整天只做训练这一件事,往往会让他们感到不开心。 更复杂的做法是设置训练日程。虽然相关的用户界面不太友好,但还是可以弄明白的。勾选选择一个小队,然后点击“日程”按钮即可。

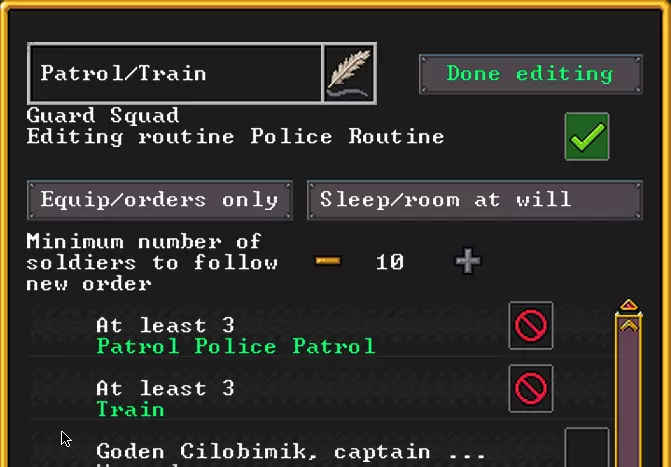
小队日程窗口。【日常安排】更像是任务状态。这些不仅仅是日程安排,还决定了当前的常规命令,例如在营房睡觉、全天穿戴装备等。 点击【查看月度日程】,你将能够按月查看日常安排。【月度命令】意味着日常安排无法在一行中显示,因为它会逐月变化。 交错训练是个好主意,因为矮人如果全职训练似乎会变得不开心,尤其是当他们没有足够频繁地进行实战时。 点击命令单元格上的【编辑】,你会看到此屏幕。这里快速解释一个我觉得不太明显的内容。
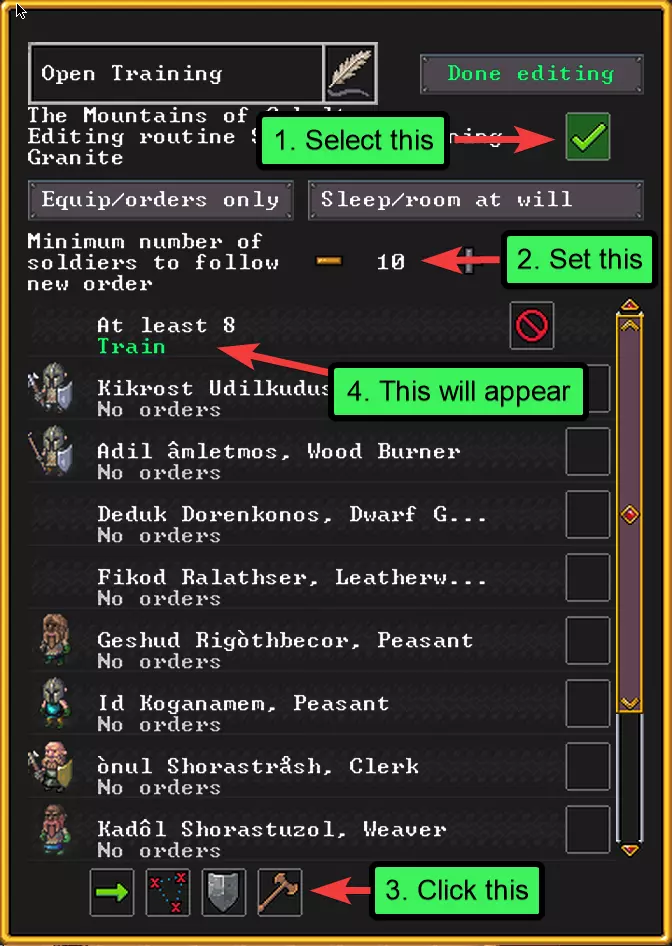
如何为特定训练等指令分配最少数量的小队成员,而非按具体职位来下达命令。 自定义一个单元格后,你需要将其复制粘贴到其他任何你想要的单元格中。名称似乎更像是注释,而非可选择的模板。 弓箭手:弓箭手通常最好穿着皮甲以提升速度。如前所述,他们需要一个射箭场进行训练。你还可以让他们成为猎人,这样他们在狩猎时就能获得弓箭手的练习机会。虽然狩猎不是快速获取大量食物的方式,但无论是为了武器练习,还是让他们在地图上巡逻寻找潜行的敌人,都是值得的。训练猎犬并分配给猎人会有所帮助。更多关于军事战略与组织的资料: 军事快速入门 军事 训练(军事) 更多军事指南 关于军事训练和战略有很多内容可以探讨。以下是更多相关指南。 司法系统 司法界面相当繁琐,但尽早建立司法体系(任命治安官)会很有用,因为一旦你拥有神器,生物、矮人以及访客就会图谋偷窃它。有了治安官,相关报告就能立即送达。如果有狡猾的杀人吸血鬼出现,这也能带来同样的好处。职位 治安官或卫队长——这是你的警察局长。市民会向他报案。他需要一个成本相对较低的卧室、餐厅、办公室、一个盔甲架和一个武器架。当你拥有市长后,治安官会升级为卫队长。为他创建一个小队会给他配备副手,副手可能会帮助调查犯罪和执行处罚,但这并非必需,尤其是在早期阶段。 锤矮人——这是执行死刑和体罚的刽子手。任何人都可以担任此职位,也可以与其他职位由同一名矮人担任。 地下城主——这更像是你的情报主管,而不是喜欢鞭打他人的皮衣矮人。可以把他想象成矮人宗教裁判所的头目之类的角色。该职位并非必需,但你可能会获得一些情报,且房间要求相当低,类似于卫队长。同一个矮人也可以担任此职位。就连维基编辑也不确定这个职位的具体运作方式。

你需要一个划分为地牢区域的囚犯房间。制作一些锁链和/或笼子,并像放置家具一样将它们放在房间里。这些束缚工具也可用于其他不受司法系统管辖的麻烦生物。在【司法->要塞守卫】标签页可以查看你是否拥有足够的笼子和锁链。 警队:如果你将卫队长设为某个军事小队的指挥官,那么该小队成员将成为能够协助执行司法职能的守卫。你也可以通过军事界面将该小队设置为巡逻队以应对麻烦情况。
新增了名为【警察日常】的日程程序,并将所有月份的护卫队指令设置为此程序。 【司法执行】 除了查看呈现的信息外,你唯一能执行的操作就是审问和定罪人员。这些选项会显示在每个案件下方。不过,被指控次数最多的人会出现在审问/定罪列表的顶部,且此处缺乏排序或搜索功能,导致很难通过姓名找到特定人员。 有时你没有任何线索,只能审问随机人员或所有人,但这可能会花费很长时间。有时所有人都说什么都没看见,你就没有进一步审问或定罪的对象信息。理论上,拥有一支随时有人巡逻的护卫队应该能有所帮助。至于“情报”等其他标签页,目前还没有明确的信息。不过它可能包含一些关于审问对象的线索。
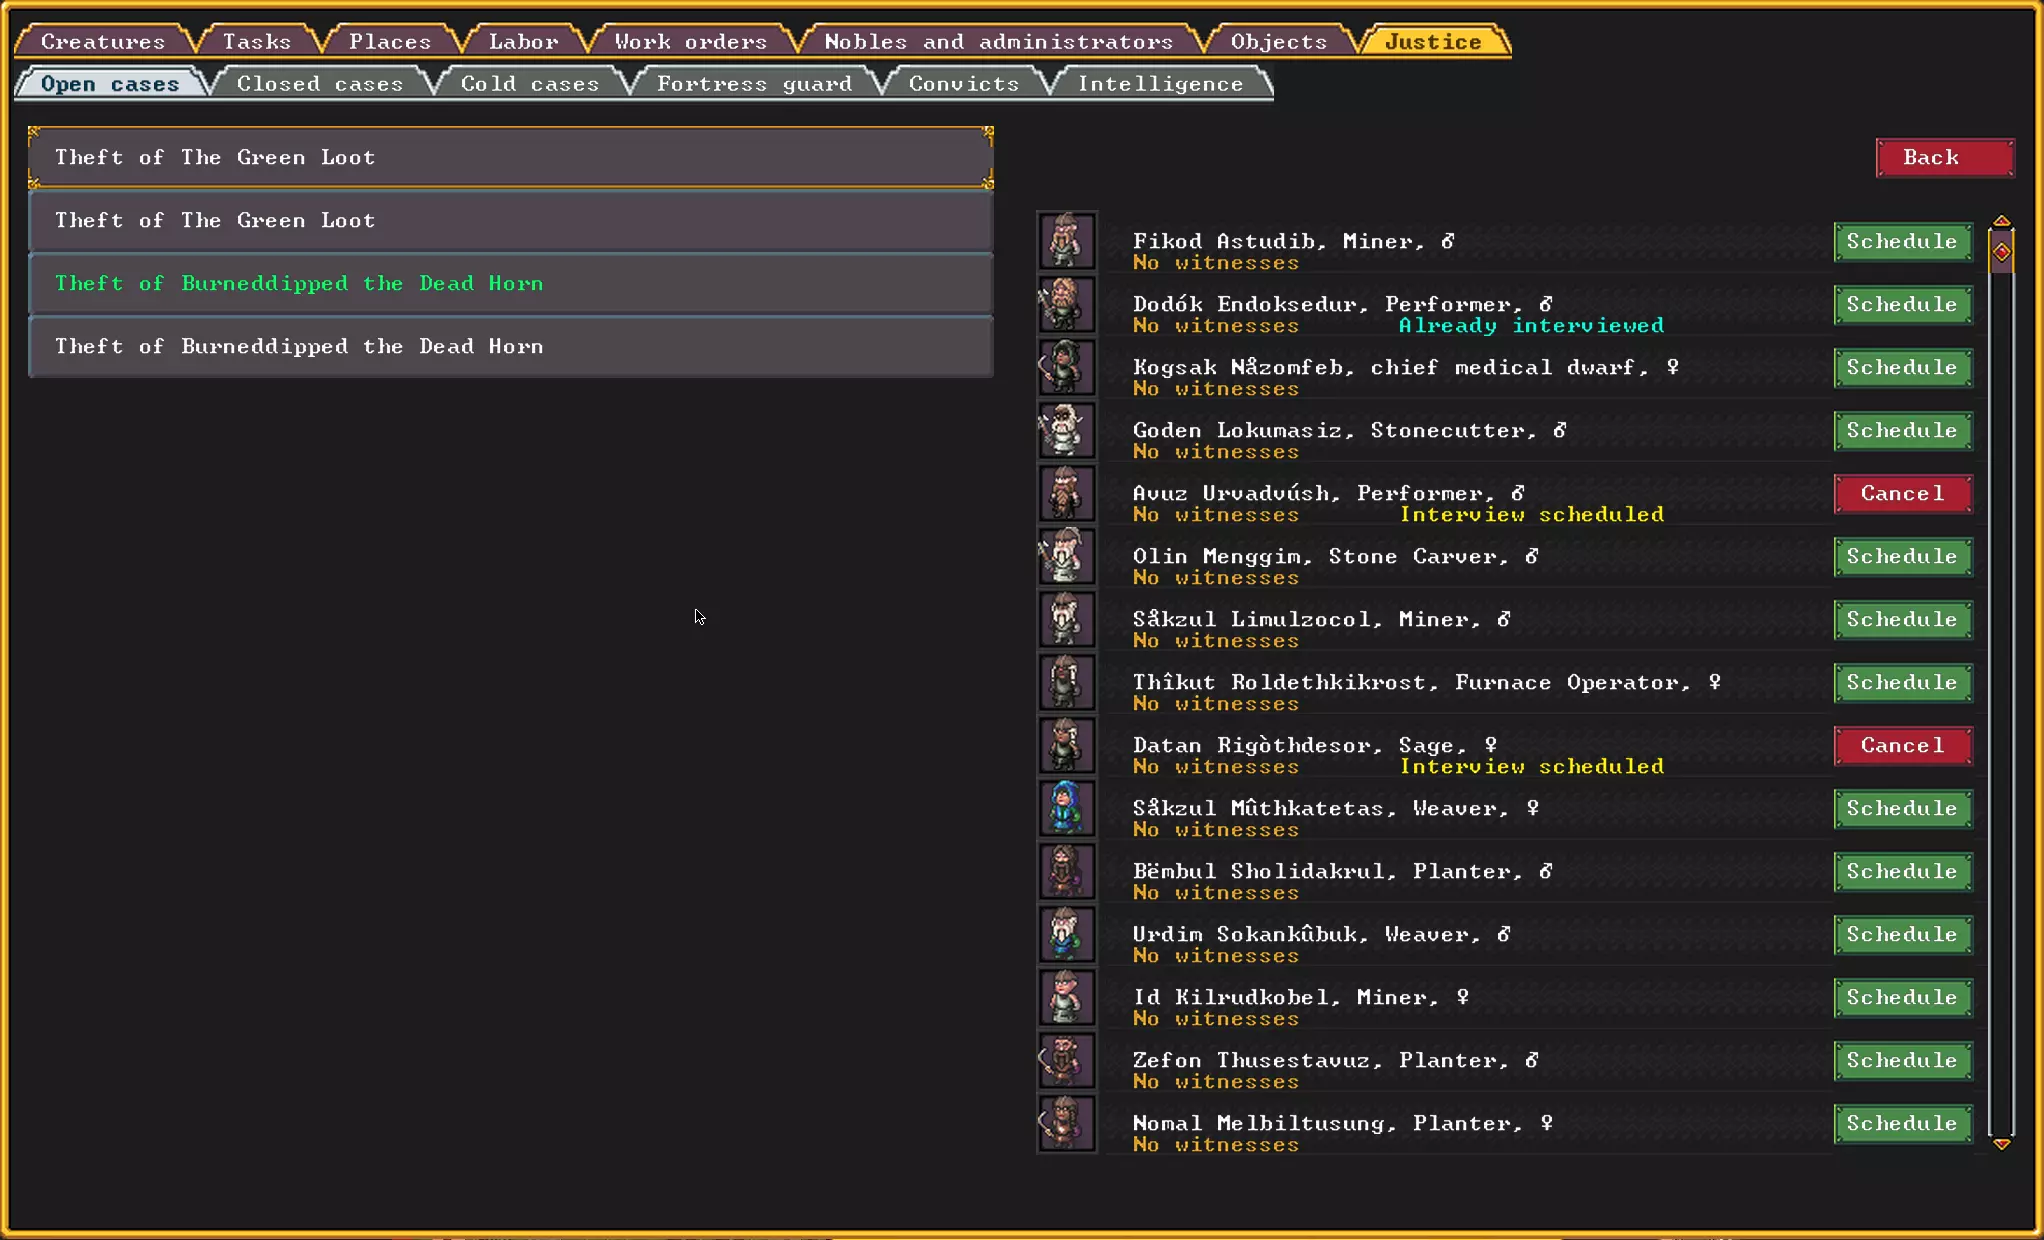
Some things to look forward to in the justice screen. "Locations" So far we've barely mentioned Locations[dwarffortresswiki.org], but they're sort of like "zone groups" that are also associated with a particular special game mechanic. They don't have a rectangle of their own like a zone, but instead group one or more zones areas together for a special purpose. Locations all consist of at least one zone, and some really only need one zone, but they can consist of multiple zones if needed. Some zones don't really make sense for Locations, like an animal taming zone in a library, but hey this is DF so you can try all kinds of stuff if you want. Most of the time they need a meeting zone. Locations usually have chests that hold the objects used by the zone. Like taverns use mugs and musical instruments, and hospitals use medical supplies. Several locations need large "dance floors" which are empty floor area with no furniture in them. Several are also sensitive to the value of their walls and furnishings and will get upgraded to a higher classification of that zone type as the value of the walls and furnishings is increased. Locations also have special location-specific positions for dwarves that do special work in the location. This is separate from the nobles/administrators screen. Locations: Hospitals and Dwarven Health Care Hospitals and medical care[dwarffortresswiki.org] are one of the more complicated and difficult aspects of the game to set up. This trouble can be especially worthwhile, though, for saving your Legendary craftsdwarves and axedwarves from death. A hospital is perhaps the most complicated type of "Location" in the game so far even if it really only needs only one zone to work, but once you know what they need and how to supply them they aren't that difficult to understand, just more annoying than usual to keep supplied. Medical Skills and LaborsMedical care in the game works approximately like this: A Diagnostician does triage and diagnosis, then queues up tasks for procedures that need to be performed. These types of tasks are queued based on the diagnosis: Surgery (such as removing dead/infected tissue, or internal organ stitches) Suturing (stitching wounds closed) Wound dressing (bandaging) Bone setting (splits and casts)Before anything else, even with no hospital, assign your best Diagnostician as the Chief Medical Dwarf to handle the triage. Building the HospitalThe first thing to do is build a Dorm zone almost exactly like any other dorm, but put 10 beds in it and make it larger than normal because we are going to want to fit the following into the room: 10 Beds 5-10 Chests 3 Tables 2 Traction Benches As close as possible to a well or water source of some sort.Immediately click the button in the zone window to add the dorm zone to a new "Location" and select Hospital as the location type. The beds, chests, and tables you already know how to make and might already have some of on hand, but the traction benches require a "chain" of some sort. Make a chain out of any metal, or use a rope, and construct 2 traction benches. Construct another chain and make sure you have some mechanisms to build the well later. A well is useful because the hospital needs a lot of water for cleaning and infirmed dwarves have to drink water, even though it seems like booze would still be more appropriate. Supplying the HospitalHospitals are also one of the more difficult things to keep supplied. These are the supplies that they need which you're going to need to make or otherwise obtain: Thread of any sort (for sutures) Cloth of any sort (for bandages) Splints (wood or metal) Plaster powder (for making casts) Buckets (wood or metal) Soap (almost as good as antibiotics in this game) Water Some crutches (wood or metal)Ideally try to keep at least one of each of these things per bed in the hospital, but preferably more if possible. Here is some information on how to create or obtain each item type: ThreadThis can be traded for, or produced at a Farmer's workshop by using "Process plants" (Thresher labor) when you have textile plants like pig tails available, or you can use both "Shear creature" and "Spin thread" (Shearer and Spinner labors) when wooly animals are available. A Loom can also be used to collect spider silk webs (Weaver labor) and turn those into thread. ClothThis can also be traded for, or woven at a Loom using the previously mentioned thread. See Textile Industry[dwarffortresswiki.org] for a lot more details on these. Splints and BucketsThese are easy and can be made of wood or metal at a Carpenter's workshop or Metalsmith's forge. Plaster PowderThis is made at a Kiln out of gypsum, alabaster, selenite, or satinspar. It also requires fuel if magma isn't being used. SoapMaking soap[dwarffortresswiki.org] is probably the biggest pain of all this, but it is worth making because it is almost like antibiotics. Making soap requires several stages like this: Make Ash from wood at a Wood furnace Make Lye from the ash at a Ashery. Lye must be stored in Barrels. Now you need either tallow (animal) or oil (plant). Obtain those like this: Tallow - mark an animal (such as a chicken) on the creatures screen for butchering at a Butcher shop, then use the "Render fat" job at a Kitchen, which will be done automatically with default standing orders. Tallow doesn't require a container but can be stored in barrels to save stockpile space. Go into the Labor->Kitchen->Meat screen and disable tallow for use in cooking meals so it doesn't get wasted on meals! We always need to save tallow for soap or other more useful stuff unless everyone is starving. Oil - First "Mill seeds to paste" (not slurry or flour) at a Quern[dwarffortresswiki.org] (manual) or Millstone[dwarffortresswiki.org] (needs external power). Then use a Screw press[dwarffortresswiki.org] (manual) to "Press oil from paste". This requires a Jug (can be made of rock) as a special container type for the oil. Rock nuts are the usual dwarf oil plant, but other seeds can be milled to paste. Olives are a special case that can be pressed to oil without needing milling first.Finally, use the Soapmaker's workshop to make soap from the lye and tallow/oil.Work orders to maintain a small supply of ash and lye any time it drops below 5 or something can be very helpful. Try to use work orders as much as possible to keep small amounts of prerequisites in stock and at least one soap per hospital bed in stock. If the work orders are set up properly and you keep up with butchering/farming and wood collection then the soap should get produced automatically. WaterHospitals use a lot of water so if possible you want a well or other water access right next to or in the hospital. See the section on Water for some ideas about how to accomplish that. At a minimum you want a water source somewhere in the defendable area of the fort where it can be accessed when the fort is locked up, but it may not be a complete disaster if dwarves have a walk a little ways. It will slow down medical treatment some though. Medical Positions in the Hospital LocationThere are some fancy options to assign dwarves to different jobs in the hospital, but for now just make sure your best diagnostician is assigned as Chief Medical Dwarf in the nobles/admins screen, and make sure he and any other with medical skills are assigned as "doctors" in the hospital Location configuration. Locations: Taverns Taverns are locations that consist of a meeting zone, at the very least, and possibly some bedrooms and dining rooms. This is where dwarves will socialize, just like they do in a plain meeting area zone, but taverns also attract Visitors who can be either helpful or annoying. Common visitor types include performers and adventurers such as beast and monster hunters. They will drink your booze so better have extra. They need chests placed to hold the mugs and goblets used to serve booze, but that's about all they really need. Musical instruments are good to have but not absolutely required since dwarves and visitors can still perform without them. Having a stockpile for booze nearby is helpful but it doesn't have to be part of a zone. A dwarf can be designated as the tavern keeper and this will cause him to skill up in social skills. So it's a good job for your broker, mayor, and such. Unfortunately there may still be some lingering bugs with tavern keepers killing people with alcohol poisoning by serving them to death, so be on the lookout for that and remove the tavern keepers if it happens. Taverns usually make dwarves happy but they can also result in fights between dwarves, visitors, or both. For more information on how to produce musical instruments, see "Lesser Industries" below. Locations: Guild Halls Guild halls can be annoying at first because dwarves will start petitioning to build them, but they can also be useful as the dwarves will use these places to teach each other professional skills similar to a training barracks for civilian work. These are sort of like your vocational schools where dwarves learn the less bookish skills. There's no performing or drinking in guild halls. They should be meeting zones and they only need bling to raise their value. They also need 10 or more dwarves that identify themselves as the given profession to be that useful. Build a decent sized room for more than 10 dwarves, then bling it up by smoothing and carving it and placing bling furniture along the walls. If the hall is to satisfy a petition then it's going to need to be worth at least 2,000 dwarfbucks in value, so you will need some bling. Bring on the platinum statues of Urist McUrist, greatest Legendary Fish Dissector in history, some gems or an artifact in a display case, or whatever is needed to raise the value. Whereas most other zones want equipment and/or supplies, guild halls don't use either, just lots of bling to bring pride to the profession. Locations: Temples Temples are actually somewhat similar to taverns in that there is socializing and performing in temples, but not so much drinking. They're also like guildhalls in that they need empty space and bling to raise their value. They can use chests to store musical instruments but that's about the only furniture required by game mechanics. They primarily allow dwarves to pray and worship because apparently dwarves can't do this on their own and they get less happy when they don't. Similar to guild halls, sometimes you will also get a petition to build a temple if there are more than 10 citizens following a particular religion. Also like guild halls, this means that the room and contents needs to be worth at least 2,000 dwarfbucks to satisfy the petition. A temple to no particular deity is usually a good one to start out with as this will be good enough to meet most basic "pray" needs, but It's a good idea to establish more temples for specific gods or religions worshiped by larger numbers of your population even with no petition. Dwarves seem more impressed by worship and prayer in a dedicated temple, and organized worship services are much more likely to happen in them. Temples are sensitive to the value of their contents and will get upgraded to a higher classification as fancy stuff is placed in them. Shrines can still have performers assigned to them, but higher class temples can have priests and such assigned. Overall, temples aren't too difficult to deal with and the main problem is that, like guild halls, you may need more than one to keep some dwarves happy. They don't necessarily need to be that large though. Even a 5x5 room could be loaded up with enough bling to raise the value above 2,000, but 7x7 is probably a better minimum size for the larger "dance floor" eventually needed for larger crowds. Also keep in mind that temples and taverns will both be noisy since they involve lots of banging on musical instruments and hooping and hollerin' and such. Temples also get visitors called pligrims. For more information on how to produce musical instruments, see "Lesser Industries" below. Locations: Libraries Libraries are a little more elaborate like hospitals because they require a production tree to supply writing materials. They need chests to hold writing materials and bookcases to hold codices and scrolls that are written. They're sort of like your universities where dwarves will school up on book knowledge and bookish skills. Visitors will show up to study at your library, or even contribute to it, once you get it going. RequirementsLibraries need Tables, Chairs, Chests, Bookcases, and Writing Materials. Tables and ChairsThese are needed for readers and writers to sit at while reading and writing. You're going to need lots of them if you end up with lots of library users. You could start with 5 of each but soon you will need at least 10 when lots of visitors start showing up. ChestsChests are needed to hold writing materials. Any chest will work. BookcasesLibraries also need bookcases to hold the codices and scrolls they produce. You don't need many at first (even 5 is plenty at first), but plan to dig out a wall to expand for more tables, chairs, and bookcases eventually. Writing MaterialsThis one is the main supply difficulty. The writing materials needed are Quires and Scrolls. Once quires are written on they can be bound into a codex using thread and a book binding. Scrolls are made blank and can just be put on the shelf once written on. Quires are made from one thread and one sheet. A sheet can be papyrus, parchment, or paper. Papyrus is made directly from papyrus sedge at a farmer's workshop. Parchment is made from raw animal skin and milk of lime at a tannery. Paper is pressed at a screw press from slurry ground at a quern from textile plants. Scrolls are made from one sheet and one scroll roller. Book bindings and scroll rollers can be made of different materials at different workshops depending on material. See the Paper industry[dwarffortresswiki.org] wiki page for detailed information about keeping a library supplied with writing materials. UsefulnessThe trouble can all be worthwhile because some dwarves can skill up on more bookish skills by reading the books and scrolls. As for who writes them, that's why you need to assign Scholars to the library. Scribes can be assigned to make extra copies of writings. Visitors also appear who are scholars of different types and they can both write books and leave them and take copies of books in exchange. So the main benefits are: dwarves skilling up, the writings can have entertaining descriptions, and the less useful scrolls and codices still have dwarfbuck value for trade. Ideal visitor example: Legendary doctor comes to visit, writes books on medical skills, dwarves read medical books and gain medical skills. At least that would be nice, but often the visiting scholars will be more useless or will write about secondary stuff like critical thinking and help dwarves skill up some useful but indirect skills like that. Animal and Vermin Training Animal training[dwarffortresswiki.org] can be worthwhile since it will allow you to train normal dogs (and some other animals) into war dogs or hunting dogs. It doesn't require much effort either. More effort is required to train a wild animal like a gorilla or panda, but you have to admit a war gorilla would be pretty cool. Trapping Animals vs VerminThe game language is a bit confusing when it comes to what applies to animals vs vermin. These are different classifications of creatures, the main difference being that vermin doesn't have a persistent presence as a unit on the map. VerminThe Trapping[dwarffortresswiki.org] skill and Animal Traps[dwarffortresswiki.org] are only used to catch vermin, and the Vermin Catcher's Shop[dwarffortresswiki.org] can be used to tame them for use as pets. Trapping vermin is not very useful at the moment as it is not nearly as efficient as cats are for pest control, and until Alchemy is implemented there's no use for catching newts to extract "eye of newt" from them. (One or two things can be trapped and extracted at a Butcher's Shop[dwarffortresswiki.org], but the extracts are only trade goods at this point.) The only other uses for trapping vermin is that some dwarves think they're tasty, and you can create a glass cage (terrarium or aquarium) to display them in. AnimalsThe easiest way to obtain animals is to bring them at embark or trade for caged animals with a caravan, but it's also possible to trap them (and other creatures) using a Cage Trap[dwarffortresswiki.org]. TrainingWild animals need to be tamed before anything else. Domestic animals like dogs and cats are already tame, but some of these can additionally be trained up as war or hunting animals. First you need an animal training zone, and it's a good idea to put a pen/pasture zone inside it to assign non-caged animals if you want to keep them in the room after training. Animal cages can either be manually placed in the room or you could create an animal cage stockpile for the desired animal types. Something like this will work, though the vermin catcher's shop isn't needed if you're not trapping vermin.
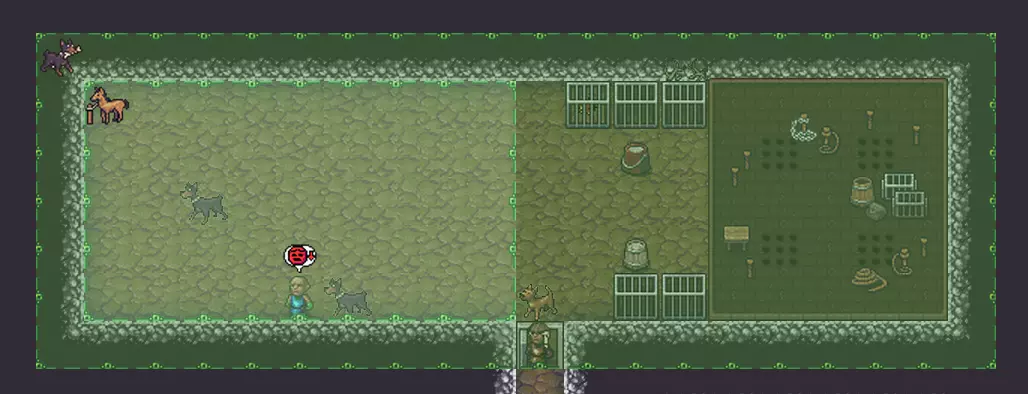
动物训练区内部包含一个围栏/牧场区域。 笼中的野生动物应将其笼子像家具一样放置在训练区内。你也可以尝试在该区域为野生动物笼子设置一个储存区。 要分配动物进行驯服/训练,请进入【生物】(u)下的【宠物/牲畜】,点击口哨按钮,然后选择【任意未分配的训练师】。你需要让一些矮人分配到动物训练的劳动。 你还可以点击口哨旁边的按钮,为某些已驯服的动物将训练设置为【战斗】或【狩猎】训练(如果可能的话)。遗憾的是,没有模组的话无法训练一群战斗鸡,但如果没人制作这个模组,我可能会去做。经过训练后,战争和狩猎动物可以通过哨子(训练)按钮同一位置的按钮分配给单个矮人。 布料、皮革与衣物 你的矮人衣物需要一段时间才会磨损,但最终还是会损坏。如果没有为衣物设置垃圾堆放区,你会发现破烂的衣物丢弃得到处都是。这可能是个好主意,因为破烂的衣物在与商队交易时仍有一定价值(不过破烂衣物的价值已大幅降低)。 但在此之前,你可能需要袋子、背包、水袋(或水壶)和箭袋,这些物品的制作方式也是如此。解决布料和皮革需求的一个办法是从商队那里买下所有的皮革和布料,不用自己费心生产。商队通常会带来不少,所以最终你可以囤积大量的皮革和布料。我讨厌生产布料和皮革,所以我倾向于从商队购买。不过这里有一些关于自己生产的信息。 皮革:皮革来自屠宰动物,因此生产起来最麻烦。据我所知,大量生产皮革的唯一方法是养殖鸡,然后将鸡皮鞣制成鸡皮革。在游戏中,鸡皮革和其他任何皮革一样好用。但到目前为止,从商队购买皮革是最划算的,因为它价格便宜,而你自己生产却很麻烦。我通常会把鸡皮留着制作鸡皮纸,因为大量购买纸张比较困难。通常,三件不错的石器工艺品就能换一箱皮革。 【常设订单】会自动鞣制兽皮,所以如果你想制作【羊皮纸】,需要关闭该功能,并根据你想要的生皮数量设置鞣制和制作羊皮纸的工作。 生产流程概述: 动物在【屠宰场】被屠宰,会产出包括生皮在内的各种部件。 生皮在【鞣皮厂】被加工成皮革或羊皮纸(制作羊皮纸需要生石灰)。 【皮革工坊】用于制作所有皮革制品,包括衣物、盔甲、袋子、背包、水囊和箭袋。你首先要制作的东西可能是袋子、背包、水囊和箭袋,然后是皮甲和衣物。布料获取材料相对容易,因为你可以种植猪尾草,然后在农夫工坊进行“加工植物”来获得线。布料不一定需要染色,但染色可以增加其价值。

On the right is an image from the Textile industry[dwarffortresswiki.org] page on the wiki that shows all the options for producing cloth. Here's a brief summary of producing plant cloth and items from it: Grow pig tails or other plants processable into thread (see wiki). Optional: grow dimple cups or other dye-producing plants, then "Mill plants" at a Quern or Millstone to make dye powder (needs bag). "Process plants" at a Farmer workshop to get thread. Optional: "Dye thread" at a Dyer. "Weave thread into cloth" at a Loom. Optional: "Dye cloth" at a Dyer if it wasn't woven from dyed thread. Optional: "Sew cloth image" into cloth at a Clothier's Shop. Make cloth into clothing, bags, or ropes at a Clothier's Shop. Optional: "Sew cloth image" into finished clothes (cloth or leather) at a Clothier's Shop.I would avoid dying thread because it could get used for stuff other than cloth where the dye job is worthless. See the wiki for info on wool and spider silk. ClothingOnce you have cloth and leather you can make clothing. The thing to do here eventually is to just set up a conditional work order to make clothing of each type when the number of free items of that type is lower than 10 or some number. That way new clothing should get produced as dwarves claim it for themselves. Having enough bins and a clothing stockpile for old clothes should help keep tattered clothing from accumulating all over the place. Machine Components, Minecarts, and Seige Engines This is just a very brief introduction to some of the more obscure constructs in the game: Machine Components[dwarffortresswiki.org], Minecarts[dwarffortresswiki.org], and Siege Engines[dwarffortresswiki.org]. Machine ComponentsThese can be used to take power from wind and water and use that to drive pumps, millstones, and minecart rollers via axles and gear assemblies. Power SourcesCurrently the power sources are Windmills[dwarffortresswiki.org] and Water Wheels[dwarffortresswiki.org]. Windmills have the problem that your map may not have any wind on it (this is a global constant per map and you can't change it), and water wheels require moving water. But at least with water wheels you can probably find some tiles on your map that generate water and then dig a trench to the edge of the map where you can drain it by carving fortifications into the edge tiles. Wood is the only material these can be made of. Power TransmissionThough sometimes you can power a directly adjacent device, you usually need to use Axles[dwarffortresswiki.org] and possibly Gear Assemblies[dwarffortresswiki.org] to transfer power further away. Wood is also required for these. Powered DevicesThe things you can power are: Archimedes-style Screw Pumps[dwarffortresswiki.org] (which can also be cranked manually by a dwarf), minecart Rollers[dwarffortresswiki.org] for propelling Minecarts[dwarffortresswiki.org], and Millstones[dwarffortresswiki.org] which are faster querns. TricksAs you might guess, some not so straightforward things are possible with these components such as water flood traps or even digital logic[dwarffortresswiki.org], but most people use them for their straightforward purposes most of the time. MinecartsThese can be a pain to figure out because the UI for them isn't very good. The basic requirements for making them are very low though so you can start trying them immediately, but expect to do a lot of tinkering to figure out how to use them effectively. Here's a quick absolute minimal summary of what's required: Carve minecart tracks into the floor. This is done in Smoothing->Carve Track (v-t) but the floor does not need to be smoothed first. (You can also construct tracks using b-n-k which can be done with stone or stone blocks.) Not absolutely required, but to stop a free-rolling minecart you need to construct minecart stops onto track tiles. This is under Build->Construction->Track Stop (b-n-K). You can use stone or (better) stone blocks. These are required to auto dump cart contents. Create source stockpiles, and optional destination stockpiles. Minecarts are always loaded from stockpiles, and unloaded to stockpiles if they aren't auto dumped onto the ground. Build one or more minecarts. These can be made of wood or metal like wheelbarrows. Use the Hauling Routes (H) window to add at least one route and configure each stop on the route. Route stops do NOT require a track stop, but without one the cart won't stop by itself and will need a dwarf guiding it. This is the part that is annoying: Make sure to unambiguously name the stop because there is no "jump to stop" option to see which stop is where. You might want to start out by creating a single linear track from one point to another with only two stops to get an idea of how the hauling routes UI works before trying anything more complicated. Use "push off" in the appropriate direction at route stops for fastest/easiest movement, but the tracks may need to be rather straight and north-south or east-west.To really figure this out will take looking at the Minecart[dwarffortresswiki.org] wiki article. Siege EnginesThere are two Siege Engines[dwarffortresswiki.org] in the game, the ballista and the catapault. These are essentially large un-aimed ranged weapons built like buildings that fire projectiles directly north, south, east, or west. Though they can do considerable damage, they don't have much chance of hitting anything unless enemies are forced into a narrow area like an entrance hall that they can't escape from easily. Quality and Decorating Items Decorating[dwarffortresswiki.org] things is how you get your items to "menace with spikes of <material>" and such. Decorations add another "layer" of craftsdwarfship to existing items and usually serve to increase their value. Since some of the materials[dwarffortresswiki.org] you can use aren't terribly valuable by themselves, such as bone, this can be a good way to use up some low value materials. As always though, don't use up all of anything in particular since you ideally want a few of every material type to satisfy strange mood demands. The main problem with decoration is that you can't pick exactly what to decorate in a work order, and the only workaround seems to be to use stockpiles near the workshop in use to place the desired items closer to the decorating task. Game NotationWhen you see an item with double angle brackets like «item» then it is decorated. Quality[dwarffortresswiki.org] and Wear[dwarffortresswiki.org] markers for the item itself are inside the brackets and markers for the decoration quality are outside the brackets. Here's a quick reference for item status/quality notation: !!item!! - item is on fire (increases damage level quickly over time, with some exceptions) (item) - item was not constructed in your fortress and doesn't count as created wealth, but could still be decorated {item} (curly braces) - item is forbidden (font can make this hard to differentiate) «item» - decorated item, but material used is not shown (only quality) XXitemXX = wear damage level 3 (0.25x) XitemX = wear damage level 2 (0.5x) xitemx = wear damage level 1 (0.75x) item = base quality (1x) -item- = Well-crafted (2x) +item+ = Finely-crafted (3x) *item* = Superior quality (4x) ≡item≡ = Exceptional (5x) ☼item☼ = Masterful (12x) Unique Name = Artifact (120x)So -«+item+»- indicates a "Finely-crated" item with "Well crafted" decorations while «item» is a base value item with base value decorations. Notice that with the quality indicators, the more elaborate the number of lines in the surrounding characters, the higher the quality. Decoration Types and RequirementsHere's a quick reference for what materials can be used and which skills and workshops they require: MaterialJob NameLabor/SkillWorkshopBone Horn/Hoof Ivory/Tooth Shell"Decorate with"Bone CarvingCraftsdwarf's workshopCut Gems Polished Stones"Encrust <type> with"Gem SettingJeweler's workshopMetal"Stud with"MetalcraftingMetalsmith's forge (doesn't need fuel)Cloth"Sew <cloth/silk/yarn> image"ClothesmakingClothier's shopLeather"Sew leather image"LeatherworkingLeatherworks For more info on what can be decorated with what, and other stuff, see the wiki page on Decoration[dwarffortresswiki.org]. Making Very Specific ThingsIf you want to make very specific things, here's a guide that will help with that. https://steamcommunity.com/sharedfiles/filedetails/?id=2901220282 Lesser Industries I'm calling these "lesser" because they're not usually the most critical to your survival, but they can be helpful. The main place to go to learn more about other industries in DF is the Industry page[dwarffortresswiki.org] on the wiki, but I'll mention some of the ones that are more interesting that haven't been mentioned already. Musical InstrumentsMusical Instruments[dwarffortresswiki.org] are a bit of a pain to deal with because they're procedurally generated at world gen and usually consist of multiple pieces which require different materials, but they are worth producing because of their value in locations, such as taverns and temples, and their high dwarfbuck value in trade. One useful trick is to always have a conditional work order for "assemble <instrument>" any time at least one of each component is available. To figure out how to make each component you will have to do some clicking through workshops to find all of them, though most should be in the craftsdwarf's workshop. You can then set up work orders to make all the components that you have materials for and the assembly work orders should kick in and assemble them when all the parts are finished. Assembly work orders are a good way to discover all instrument types (except the single piece type) and what their components are (under suggested conditions). Note that some instruments are large furniture (similar to pianos and organs) and must be placed as furniture. They won't get stored in the tavern coffer automatically. Detailed how to information about making musical instruments: https://steamcommunity.com/sharedfiles/filedetails/?id=2910881734 Animal PartsTechnically these are the more obscure parts of the meat industry[dwarffortresswiki.org]. Don't use up all materials in these categories because dwarves in strange moods tend to need some. Bones and the bone-like materials use bone carving and the craftsdwarf's workshop. BonesYou tend to end up with a bunch of bones whether you want them or not, so might as well do something useful with them. See the Bones[dwarffortresswiki.org] wiki page. Some good uses for them are: Bone bolts - cheap practice ammo and not too bad in combat either. Bone crafts - if nothing else, might as well make crafts and trade them. Bone decorations - a cheap way to add value to other items. Skulls - don't count as bone and can only be used to make totems, but if the skull is from a rare or valuable creature these can have a high base value. Don't expect chicken skull totems to be worth too much, in other words.Bones can also be made into armor, and are required for some musical instruments. Horns and IvoryHorns and hooves are not considered to be bone, but can be made into stuff or used for decoration at a craftsdwarf's workshop using the Bone Carver skill. Teeth and ivory are considered to be a separate category from horns/hooves for crafting and decoration purposes. They're both more stuff to find a use for if you can manage it. HairAnimal hair only comes from butchered animals, and it can be spun into thread at a farmer's workshop with the spinner labor, but it can't be used to make cloth. It is still good for suturing wounds and possibly making quires for books. This is not the same as wool which is used to make thread that can be used like any other thread. Clay and GlassThese have the advantage that the clay and sand can just be "collected" rather than requiring digging out like stone, and the crafts are considered more valuable than wood or stone equivalents, but they have the disadvantage that both require fuel and wood for ash to make clear glass and glaze. Clay/CeramicThis requires clay, ash from wood, and fuel. See the Ceramic industry[dwarffortresswiki.org] page for more info. GlassGlass has some special uses that can make it worthwhile to produce at least some. Green glass can be made from only sand and fuel, but clear glass requires pearlash which is made from wood. One major practical use of glass is magma-safe pumps used to pump magma. See the Glass industry[dwarffortresswiki.org] page for full details. Farming and FoodThese are the usually less practical ways of producing food and drink. FishingUnfortunately there doesn't seem to be a good way to fish farm yet, but if near an ocean or significant body of water then fishing could be worthwhile. See Fishing industry[dwarffortresswiki.org]. Fish can get depleted. HuntingHunting[dwarffortresswiki.org] can bring in some food, but has the same problem as fishing. Fishing and hunting do have the useful side effect of placing some lookouts around the map to help spot sneak attacks. MilkMany female mammalian animals can be milked using a Farmer's workshop. The same workshop can also be used to turn the milk into cheese. This can produce some food from animals you don't have enough of to slaughter. Milk is not a drink. It can only be used for cooking or cheese. Both milk and cheese can't be eaten raw and must be cooked. See the Milk[dwarffortresswiki.org] page. BeekeepingIt's possible to craft beehives and produce honey, royal jelly, and wax, but there must be a colony of bees on your map to get started. Currently this is of relatively limited value. Honey can be used for cooking or brewing, royal jelly is for cooking, and wax is used for some very low value crafts. See the wiki page on beekeeping[dwarffortresswiki.org] for more details. Other EggsIt's possible to get eggs out of things other than the frequently-mentioned birds. See the Egg production[dwarffortresswiki.org] wiki page. Animal and Plant ExtractsThis is not really a fully implemented industry yet so is usually not worthwhile unless you happen to find exactly the right creature on your map. Many extracts have no current use in the game except as trade goods. It is probably intended as a prerequisite for the planned Alchemy which is not implemented yet. See Extracts[dwarffortresswiki.org] on the wiki for more details. Dwarf Mental Health This is rather complicated and a lot has been written about it already. If previous advice is followed regarding bedrooms, feast halls, taverns, and such then most of your dwarves are probably pretty happy most of the time. But sometimes they can get unusually stressed out by lots of them getting massacred or other negative events and may still get unhappy. Preventing Dwarf InsanityThe number one thing to do is handle strange moods so that they end in success rather than insanity. Failed strange moods is the main cause of insanity if no disasters are going on. This has already been covered. They basically need happy thoughts to be happy so try as much as you can with all the previously mentioned stuff about feast halls, drink, fine meals, individual bedrooms, and high-value items/engravings around. Mist GeneratorsDwarves like waterfalls and the associated mist. This pretty much always gives them a generic happy thought. Some methods of constructing these are described on the Mist[dwarffortresswiki.org] wiki page. The easiest method is using a light aquifer to drain a little water down into statue in a meeting area two floors below. Therapy SquadEspecially unhappy dwarves might need special treatment and you'll have to check their descriptions to see what they're unhappy about. But trying to put them all in a sanitarium burrow with exactly what they want might require too much micromanagement. Trying to cater to specific dwarves is usually too tedious unless they're unusually important. One technique mentioned on the wiki is the "Therapy Squad". Put the unhappy dwarves into a squad with a "Therapy" uniform with no equipment requirements and set them to train full time, but do not assign them to a training barracks. This is supposed to cause them to spend all their time pursuing whatever makes them happy rather than military training or working. More Detailed InformationA useful article on dwarf stress where the therapy squad is described is the Stress[dwarffortresswiki.org] article with much more info. While meeting needs doesn't necessarily result in happy thoughts (these are actually separate things), a list of needs is in the Need[dwarffortresswiki.org] article. Fortress Design Advice As previously mentioned, probably the number one helpful thing is to try to think in 3D terms and use z-levels to your advantage. Reducing the distance between different stockpiles and workshops, and planning ahead to minimize the amount of massive rearrangement hauling, can save a lot of dwarf work time. Often the easiest way to locate something the shortest distance away is to locate it on the level above or below whatever it needs to be next to. It can be a little difficult to get used to this due to the nature of 2D maps. As usual, people have spent years writing up advice on all aspects of fortress design on the wiki. See the page on Design Strategies[dwarffortresswiki.org] for a bunch of advice plus links to other pages with advice on more specific aspects like stockpiles, traps, and defense. Due to the fact that an abandoned fortress can be reclaimed, putting some effort into design is worthwhile since the construction is largely reusable even after a fortress has hopelessly collapsed. Here are some reference guides related to fortress design: https://steamcommunity.com/sharedfiles/filedetails/?id=2904996675 https://steamcommunity.com/sharedfiles/filedetails/?id=2906863835 World Information Screen The World Information[dwarffortresswiki.org] screen (accessed using the icon in the very lower right of the screen) allows you to view information about the rest of the world and also initiate Missions[dwarffortresswiki.org] where you can raid other sites for various purposes. This is a newer part of the game and I personally have almost zero experience with it. It's something else that really need a guide of its own, but I thought I should at least mention that it exists. Copyrights and Credits This work © 2022 by NimrodX on Steam Community is licensed under CC BY-NC-SA 4.0[creativecommons.org] That means you can create and redistribute translations as long as credit is given. Please include a link back to this page in the translation. ContributorsKasa provided info on skill attributes, the farming schedule, a poultry analysis, and other things. Feedback below from comments on the guide have been incorporated into the guide. Thanks to all who have commented with ideas. Image CreditsMost images are game screenshots by me, but some are from the DF Wiki. The guide icon was created by me based on a public domain artwork from https://commons.wikimedia.org/wiki/File:Dwarf.jpg Dwarf Cartoon by Kruggsmash[kruggsmash.com] on YouTube. Table on leader attributes created by Kasa. Ramp mining diagram by Loci[dwarffortresswiki.org] on the DF Wiki. Join the Group or Leave a Comment If you learned some things from the this guide or just want to support it, please join the group for this and future guides: Dwarf Fortress ☼Masterwork☼ !!FUN!! https://steamcommunity.com/groups/dfmwfPlease leave questions or comments in the group or below as to what you think should be added, anything I missed, or anything that seems incorrect. I especially need to know about errors and need to know what's most important to people to add. I will also consider requests for other more detailed guides on different topics.