换一换
换一换 


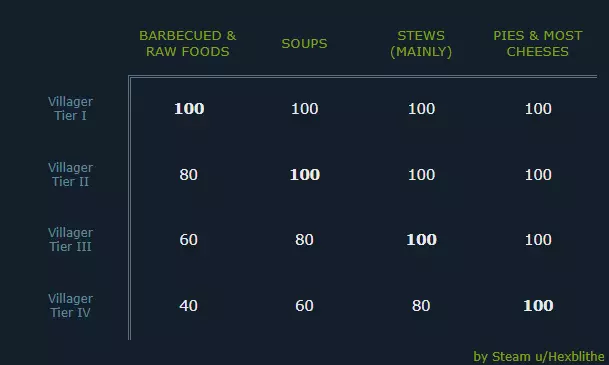
| "Who needs a Wiki?" | Basic Stats Explained | Survival Needs 101 | Morale Mechanic Breakdown | The Calendar & A Year By Numbers | FULL Perk Review (With Stats!) | Optimal Schedules | The Thousand-And-One Wisdoms of The All-FatherChosen of Odin, hear my sorrowful words... and fearThe one foe that won't be felled by swords... and fearThe Tale that is so taught but never learnedThat came to pass, and since returned... and fearThe mists that close in from the woods,The heavy, ashen, cloudy sky that broods... and fearThe clouds snuffing out the Sun, the dwindling light of Day,The time of Winter has begun, the Night's now here to stay... and fearThe chill that sunders rain and forges everfalling snowWhich chokes the earth, allowing nothing new to grow... and fearThe blood freezing in wretched veins and naked headsOf those poor souls not blessed in time by woven threads... and fearThe chilling grasp of icy hands, shaking, reaching for the fireExhausting all the coal and wood, leaving but the empty pyre... and fearFenrir's blizzard baring teeth, a howl! The sickly choir cries in woeTheir bedding's pestilence and famine, their slumber is death's throe... and fearThe raging, marching on of the cursed, hungry dead that cannot restAgainst their roars, their teeth, their bronze you try your best... and so, with fearYou fall, o joyous King of Summer who once knew not despair... unlessYou've heard my words and further more, these noble lessons you will hear Once finished, this guide will not show you how to survive the first two Winters... It will teach you how to conquer them. Let's begin! "The First Of Many" A Villager Of Your Very Own The Eye of Odin has been built! The Jotun Blood has been committed. The new Settlement awaits its 1st Villager. But which one of them to choose? And once chosen, how to best put them to Work? Who Is This For? First and foremost this is meant to be a guiding compass for all newcomers to Aska. Secondly, this is meant to be a repository of data, a collection of research and experiences that I've personally compiled and ordered. I hope it will offer clarity and guidance to all players. Disclaimer: The All-Father's All-Guide is 100% human-made! No AI has been or ever will be used. The layout of the Guide has been designed by me. All of the data in the Guide has been gathered or double-checked by me. All of the words you will read will be my thoughts arduously inked into this virtual space. These are my typos. These are my quirky non-native turns of phrase. I am doing my best to have this guide be as easy to read and as useful as I can make it. I've put a lot of time and love into this guide and I honestly hope it helps you! 引用自 Hexblithe, Feburary 5th:On What Is To Come Hi Friend! Welcome back or simply Welcome! The scope of the Guide has grown too large but the time I have available to work on it did not grow with it. I'm currently considering having this Guide be a single Volume of what currently looks like a four part... anthology? almanac?!? As I continue to make progress I will also continue to give it more thought. My original idea was to have all of the information a newcomer could ever need in a single place and I'm still hoping that I will be able to make that happen. We'll see! There is still more to come, so much more! I will continue to update this area with what is to come. the Table of Contents is an absolute mess! I thought I could keep working on adding new content to the Guide and then fix the formatting and everything at the end but it's driving me crazy and I have to do something about it so I guess that's what I'm working on now. Part 1 — The Stats: 0.5% done; every time I open up the Guide, I'm haunted by the fact that the first and most basic part is entirely missing from it. Part 2 — Survival Needs: 2% done; Ive gathered so much more information about the Survival Needs and there's some basic information scattered throughout the Guide that needs to be collected, reorganized, proof-read, and then it's going to be an amazing and actually useful cornerstone of the Guide. Part 3 — Morale Overview: 40% done; I've gathered more information, it has to made readable and mashed with what's already in the Morale chapters and it's going to be solid Part 4 — The Calendar & A Year By Numbers: 99% done; genuinely proud of all of my work here and the 'breakthroughs' I've had in the visual design of my images, I hope you like them as much as I do. Part 5 — Perk Overview: 85% done; The Devs streamed, I asked questions, they answered, I have new data I wasn't able to get before! I've updated some of the Perks but the visuals and the formatting needs a severe update. The content is reliable, it's just difficult to easily access and navigate. Part 6 — Profession Tier Lists & Schedules: 5% done; I'm so looking forward to this, it's going to be awesome and useful, it's going to be built on top of the other five parts and it's going to be a reliable and easy to check resource for anyone who needs it, I can't wait to get to this Part. Part X — Winter, Cold Resistance, Fimbulvinter: 40%; yeah, this where it gets crazy. I'm gathering weather and temperature data from over 10 years of play in order to math out the best Schedules for everyone who's going to be in freezing temperatures, as well as how to linearly plan the Clothing production chain. I want this to be a Part of this Guide but there's so much here that I might have to make it its own thing. Regardless, I don't see myself being able to finish gathering the data and compiling all of the numbers before Part 6 is done so it will take some time. On Navigating This Guide Steam Guides don't let us create quick access links within the Guide themselves. For example, if I mention a perk or a debuff and you, the reader, want to quickly know what it does, using a CTRL-F may result in dozens of different results all throughout the Guide. In order to try and make as many things within the Guide as easily searchable as possible, I'm trying the following idea: I'm talking about `Perk X in a sentence. The single ` at the start of the word shows that this is a searchable item that has a definition or at length explanation / overview somewhere else in the Guide. `Perk X` is featured a very lengthy paragraph that goes into minute details of what it does and how to best apply when Villagers have it. This is the definite overview of `Perk X in the Guide and therefore it features a ` both at the start and at the end of the word. Therefore, whenever `Perk X is mentioned, the reader can CTRL-F, copy the text, paste it in the search bar and then just add another ` at the end.] On US keyboards, the ` character is to the left of the 1 key. On non-US keyboards, I'm sorry you're on your own :)) This was the best method I could think of, I hope it works. Updating the guide will take some time. Thank you for your patience. As this a starter meant to be a starter Guide for newcomers, all of the information presented in this guide has been gathered from a random seed using the Default World Settings. Different settings may lead to times and durations being different. Any reference to time in this guide is by default in Aska time. The exceptions will be denoted with IRL time. For example, the guide may have such statements as "sleeping in a Shelter for 15 minutes gives us `Energized for 4 hours". This translates as "sleeping in a Shetler for 15 IRL seconds gives us `Energized for 4 IRL minutes". Part III — MORALE Morale is the most complex need/meter that Villagers have. That doesn't make it a difficult need to fulfill, it just means that there's lots to talk about. Morale can be interpreted as overall happiness and unlike Hunger, Thirst, or Warmth, it won't affect Health once it hits 0. Instead, a Villager with 0 morale will just dramatically turn into a murder of crows and disappear from the island. A Villager's Morale is observed in the right-side list of their menu, and while some extra tooltips could've been more helpful here, we have enough bare-bones information to be able to tell how to keep morale high. Both bonuses and penalties to morale are listed as "+" or "-", "++" or "--", and "+++" or "---". Just from this, we can immediately tell that we want the total sum of +s to be higher than the total sum of -s. However, a Villager's bonuses and penalties change throughout their day, based on their Schedule and circumstances. Let's have a look at the Good, the Bad, and the Ugly... in reverse! But before we do that, please, please for the love of the Aesir and the Vanir do not leave Villagers homeless! Everyone needs and deserves a bed and a Home! > The Ugly Schedule Balance"All work and no play makes Jack a dull boy." What's stopping us from setting a Schedules that have 20 hours of work and 4 hours of sleep forever? Schedule Balance does! Too many Work hours in a Schedule and not enough Leisure and Sleep to make for it will lead to an overall negative Morale. Schedule Balance is probably the most difficult aspect of Morale to keep track of as it's the most dynamic effect throughout the day. During Work hours, this will always be shown as a Morale penalty, and during Leisure and Sleep hours this should always be a Morale bonus. But wait, there's more! During Work hours, the degree of the penalty is affected by both the Profession Tier of the Villager, as well as the total number of hours in the day that are dedicated to working. And, during Leisure and Sleep hours, the degree of the bonus is affected by availability of Leisure activities as well as a bonus or penalty from the Housing Score ((Decorations + Furniture) * Crowding) Thus, it's very much recommended that until we get some comfort and defense for our settlement, starting out Villagers should have schedules featuring 14 hours of Work, and 10 hours of Leisure and Sleep combined! > The Bad Work HoursNobody likes having to work, not even Vikings. Regardless of job, Villagers will have a Morale penalty. The more Work hours in a daily Schedule, the higher the drain on Morale will end up being. PreventionVillagers working jobs that they have higher profession tier skills in get to have a decreased penalty. A Tier 4 Cooking Villager is happier with working the Barbecue more than a Tier Cooking Villager is. The penalty never fully goes away but high Tier Villagers will be okay with working longer schedules everyday. AnxietyWisps, Wulfar, Bears, Skeletons, Wights, Draugar, and Followers are scary! Yes, Villagers are afraid of the lowly Wisp because it can in fact kill them. Anxiety is always a "-" Morale Penalty which can come in two flavors - Work Anxiety and Sleep Anxiety. Until canceled, Anxiety is a minor penalty that's always active in one way or another. However, it can be canceled and it is therefore an issue only when starting out. PreventionA closed Wall-chain or Proud Warriors on active guard duty are the ways to deal with mass Anxiety. The former requires a massive investment in both settlement planning and resources. The latter requires combat buildings, initial training time, and then enough Proud Warriors to cover the Settlement during both the day and the night shifts. Neither of these are solutions easily achievable early on but Flimsy Fences (both regular and Short) and Flimsy Gates do count as walls and are the cheapest option. On Walls when building fences and gates, make sure the green arrow is pointing TOWARDS the Settlement. once upgraded to a Hedge Wall, Wall Spikes can be added but they will always be built opposite of the green arrow. Short Fences and Walls cost half as much as regular Fences and Walls and will usually cover half the length. There is no grand incentive to use one over the other, apart from aesthetics and available building space. when the Map shows the Wall-chain as green, it is closed and successfully warding off against Anxiety. new Walls and Gates can be linked to an already planned/ built one but this doesn't always work. Manually placing elements next to each other so that the edges are touching is good enough for the purpose of creating a closed Wall-chain. There is no drag-and-drop Wall-chain building in Aska. Instead, pressing "L" (default keybind) on the keyboard will bring up the last structure selected for building and this is the fastest way to build a wall. In order to get the best out of the buildings that grant high Housing Bonuses, such as the Eye of Odin, it's already a good idea to build our housing close together. In order to ward against Sleep Anxiety, we can then Wall-chain off this residential area first. Finally, Villagers with the Steadfast Resolve Perk are immune to Anxiety, a very useful bonus to have early on, as well as still useful for Villagers working outside the Settlement's walls. Please note that Proud Warriors and Hunters never suffer from Anxiety. However, regular Militia do have Anxiety. Villagers who received combat training in their past but currently have non-combat related jobs will also still suffer from Anxiety. FamishedFamished is a "-" Morale penalty that can stack with itself. A Villager gets this debuff when their Hunger and Thirst drop below certain levels, especially Hunger. If they eat and hydrate before clearing the debuff, and their Hunger again drops under the threshold, they will receive another stack of the debuff. The stacking might not be capped. For the purpose of experimentation, I've let a villager go Famished four times in a row and the debuff stacked four times. Famished Villagers seem to require going to bed fully fed and hydrated and then also sleeping for more than 5 hours without interruption in order to get rid of one stack of the debuff. For all intents and purposes, they will have to be on "sick leave" for a number of days equal to their Famished Stacks +1. It's a horrible debuff to see and should be avoided at all times. PreventionKeeping track of villagers who need to eat and hydrate more often is a must. Having accessible stockpiles of food and water is also a must. These villagers should rarely be sent far away from the settlement. Please note that the Iron Stomach Perk's description states that it is less affected by Famished. I've yet to observe this Perk having an impact in regards to how the Famished debuff either stacks or drains Morale. OvercrowdingEach Cottage and Longhouse has a multiplier that gets lower as the number of Villagers assigned to the residence gets higher. Cottages start with two beds but they can humanely host up to six beds and Villagers. For the purpose of this guide, we will not be looking over how many Villagers we can sardine inside a single Cottage. Longhouses are post-Iron Age residences and we will have a look at them later on. On ResidencesIn order to maximize the Decoration bonus from high-rating structures (such as the Eye of Odin), it's better to have residences built around these structures. Additionally, fencing off a closely built Residential district is the most cost-effective way to ensure the most Villagers benefit from Sleep without Anxiety. However, in order to minimize travel time, it's very helpful to consider a Villager's Work and Leisure areas, as well as any Warehouse(s) that have the food, water, tools and clothing that they need, and to have their assigned residence close to these. Profession TiersVillagers gain an additional Tier whenever one of their Skills reaches the 25 (Tier II), 50 (Tier III), and 75 (Tier IV) thresholds. A Villager that has a rating of 25 in four or more Skills will still be Tier II, Tiers only look at the highest Skill ratings, not the sum of all Skill ratings. Villagers like to eat cooked food of the same tier as they are. If they don’t have access to same-tier food, their Morale receives a (-20) cap deduction. For example, a Tier II Villager who has no access to Soups and only has Cooked Meat (or Raw Veggies) available will have their Morale capped at 80 instead of 100. Meanwhile, a Tier IV Villager who has no access to Pies and only has Cooked Meat (or Raw Veggies) available will have their Morale capped at 40 instead of 100.
It is much more difficult to balance positive and negative Morale when dealing with a maximum cap of 40, so having Tier-appropriate foods is one of the cornerstones of managing our Settlements. > The Good Optimistic OutlookFreshly summoned Villagers come with the Optimistic Outlook buff which has a duration of 43 in-game hours and 20 minutes. This buff grants a beautiful "+++" bonus to Morale, making it a real challenge to get a newcomer to leave in the first two days. While not really ethical, taking advantage of this buff can in most cases translate as a bonus to settlement productivity. Although it can be annoying after a while, it can be very efficient to set a custom Schedule for newcomers to the Settlement where they Work for 20 uninterrupted hours since they arrive, and then Sleep for 4, for their first two days on the island. It’s very important to remember to change this to a more humane Schedule afterwards, which can also get annoying quickly. Decorations and FurnitureDuring Leisure time, Villagers receive a Morale boost based on their Housing Score, as long as it is a positive number (otherwise, they get a penalty). The Housing Score can be seen in the menu of the assigned Villager’s Shelter, Cottage, or Longhouse. The max positive bonus caps at 200. It’s recommended to build structures with high a Decoration Score (Eye of Odin, Chieftain’s Hut, Yule Trees, Wooden Altars, Raven Altars, Wells, Rain Collectors, and Gardens and Decorative Trees, etc.) close to houses. Multiple structures of the same type have stacking scores, but diminishing returns, so variation is welcome. Warehouses and Food-Related buildings all have positive Decoration Scores. Residences have quite high ranges when it comes to gathering Decoration Score. Cottages have a range of 12 squares, and Longhouses have a range of 14 squares. This means that we can easily build two rings of Cottages around an Eye of Odin for an incredible Decoration boost all-around. Industrial Buildings (and the Outhouse) come with negative Decoration Scores so it’s recommended to have industrial areas farther away from the residential (or to make sure to have lots of additional decorative structures in the area as well). Early on, it’s a good idea to space out the industrial buildings and to consider leaving room for Warehouses, some decorations, and walls between them and the residential area. Room for Furniture is quite scarce in Cottages but with a six-bed layout, there’s enough room for some additional Walls, and maybe a Firewood Storage or Small Item Storage. Food stored in Furniture degrades at a regular pace, so while it would be convenient to have food (and water) at home for everyone, it will lead to more waste than efficiency. In this regard, it’s heavily recommended to have a Warehouse with Cooked Food Storage and Water Barrels close to the residential area. It’s also recommended to have multiple storages of each type so multiple Villagers can use them at the same time. The Wooden AltarThe Wooden Altar is perhaps the most useful structure when it comes to keeping Morale high. During Leisure time, Villagers will have a sit at a Wooden Altar and receive a “+++” Morale boost for as long as they continue to sit. If there are no needs to be met, Villagers will happily spend every Leisurely minute doing this activity. We have doomscrolling, our Villagers have the big wood head and they swear they just saw it move! Villagers getting the Morale boost also feature the Wooden Altar buff, making it easier to see who’s actively getting the maximum benefits from their Leisure time. The caveat is that it only allows for three Villagers at a time to use it and therefore many Wooden Altars will be necessary throughout the Settlement. However, Wooden Altars are quite cost-effective to build and do not have a large building footprint. In addition to that, having alternating Schedules (the same Schedule but one of them is one or two hours later than the other) ensures that each Wooden Altar gets more use. A single Wooden Altar can sufficiently keep a dozen Villagers happy, as long as half of them have alternating Day shift Schedules, and the rest have alternating Night shift Schedules. This means that, with efficient residential assigning, we need one Wooden Altar for every two Cottages. Proud WarriorsProud Warrior is a buff bestowed to all Villagers training or working at the Barracks, Archery Ranges, or Watchtowers. This buff grants a “+++” Morale boost. The Morale boost is so good, that once the Settlement is set up with a few good Decorations and enough Wooden Altars for everyone, Proud Warriors will be perfectly happy with a Schedule that has one less hour of Leisure, replacing it with more Work. The Best And The Worst Proud WarriorsCombat Proficiency Perks, such as Mighty Vigor, Retired Bowman, and Winter Huntsman (during Winter of course) are very useful for early training of individual Villagers. However, an active Earth Runestone grants a global 100% Melee Combat Proficiency and an active Air Runestone grants a global 100% Ranged Combat Proficiency, making mass training considerably more accessible, as long as Resin and Fish Oil supplies last. Stamina and Stamina Regen Perks such as Mighty Vigor, Iron Lungs, Sunrise Vigilant, Athlete, and Springtime Vitality (in Spring), and Winter Huntsman (in Winter)will help Villagers train faster and longer as these Villagers will be able to get winded slower and/or catch their breath more easily, overall leading to lower downtime. Perks that add stats, such as Mighty Vigor and Bear Power will help those in the Barracks hit just a little bit harder and therefore train just a little bit faster. However, getting them better weapons that hit faster and harder is always much more efficient in the long run. Resilient Surge seems to sadly be bugged so it’s best to avoid for now. Perks that add more health, such as Battle-scarred Veteran and Thirsty Giant are excellent as they keep Proud Warriors safely in the fray for longer. Meanwhile, it’s best to keep those with Monk Body away from the front lines. Villagers who have had the misfortune of having one or more negative Morale Perks, such as Soggy Discomfort, Stormrider Unease, or even Chill Sensitive (since Proud Warriors will have easier access to warmer armor) can balance them out by becoming Proud Warriors and keeping the Settlement and its outskirts safe and Anxiety-free. Positive Morale Perks such as Daylight Devotion and Rain Dancer are mostly wasted on Proud Warriors as they don’t really need the extra Morale, even on a Schedule with reduced Leisure time. Lastly, Proud Warriors get absolutely no benefit from Steadfast Resolve as they are already immune to Anxiety Morale penalties and do not get Spooked when seeing enemies. Part IV — THE CALENDAR And The World Spins Madly OnWhen loading into a new world, we start on Day 0 at 9 o'clock sharp! Remember to turn around and wave at the nice Jotun.
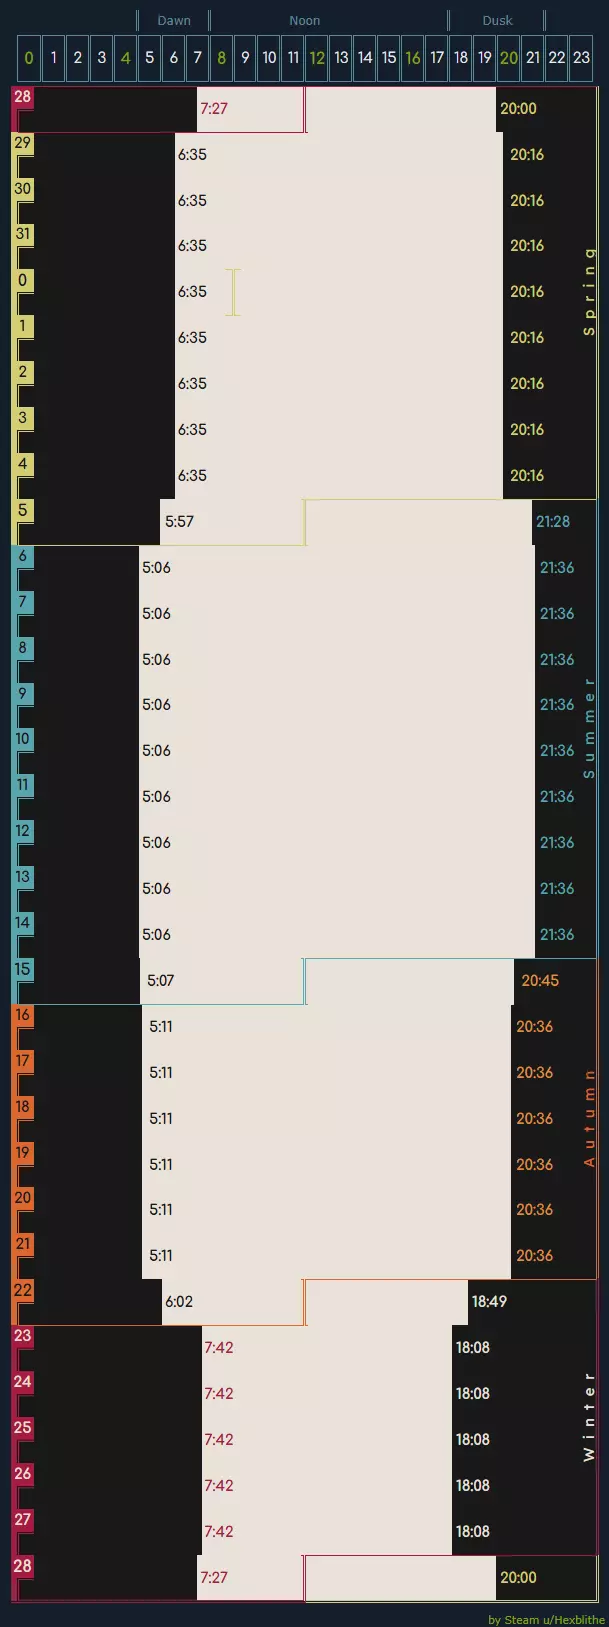
每个日出都会增加“存活天数”的计数,我们会通过视觉和音频提示得知这一情况。不过,这些提示可能会延迟或不准确。 “夜影”的“情绪波动”始终准确,因为其增益-减益的切换是即时的,这使其成为在不借助外部资源的情况下追踪黎明和黄昏时间的最精确方式。 建立日班和夜班时间表的基准:查看日历会很快发现,冬季白天最短,为8点到18点。 对于日班,我们利用这一信息设定基础工作时间,确保始终能享受到日间增益的好处。无论季节如何,日间增益的效果在这些时段内都始终可用。 对于夜班,我们设定了一个最大可能的睡眠时间窗口。由于在这些时段始终是白天,所以夜班人员在这段时间睡觉是最合理的。不过,这个时间窗口比所需的5小时睡眠时间更长,因此也可以规划其他轮班安排。 之后,我们用同样的思路来看夏季最短的夜间时间,即22点到5点之间。 对于白班人员,睡眠时间最好在这些时段内选择。白班人员的最大潜在睡眠时长窗口比夜班人员的要小。仍然可以制定交替排班表,并且建议这样做。如果我们希望两个班次的排班表对称,就必须调整夜班人员的睡眠时间。 对于夜班人员,夏季的日历为我们提供了夜间增益全年都能生效的时段。【阿斯卡的一年】数据解析 黎明与黄昏时间让我们能够准确计算每个季节以及全年的白天和黑夜时长。 我们还可以观察每个季节的持续时间,以此判断季节日程表是否能提供更多实用功能,并评估各季节增益的效率和生效时间。
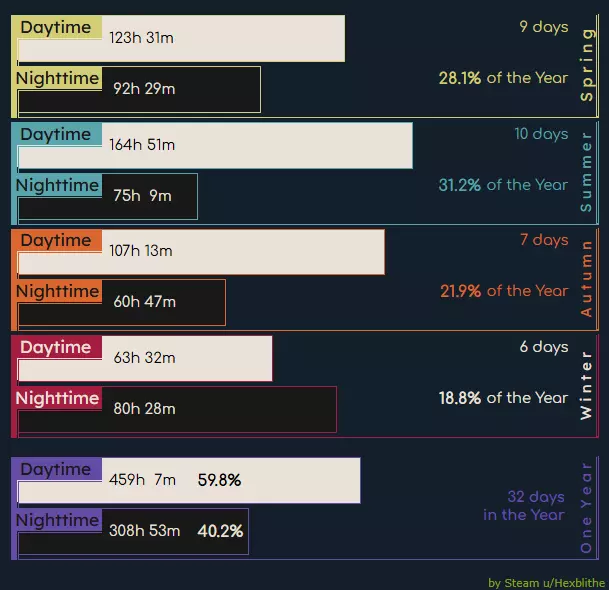
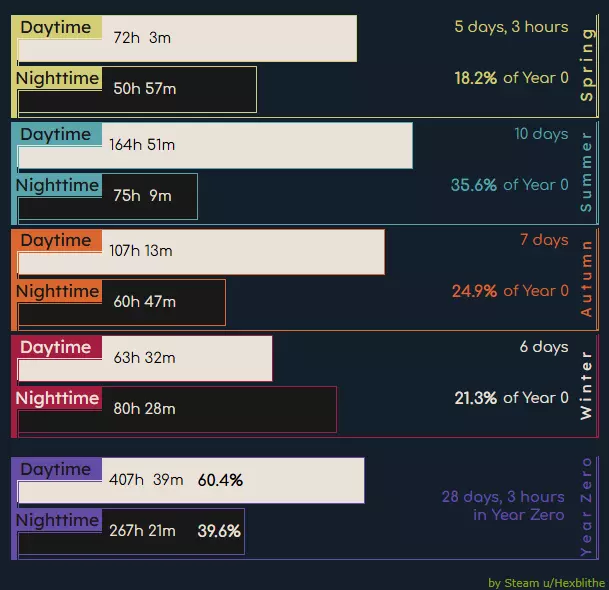
┣⪢ 零年数据统计 开始新游戏时,我们的冒险从第0天上午9点开始。 由于起始时间大约在仲春,零年的时长会比后续所有年份都短很多。 这意味着在效率计算方面,零年将采用独立的计算方式,其结果会与后续所有年份略有不同。
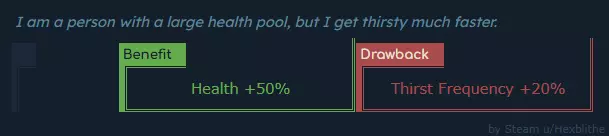
┣⪢ Diurnal VS Nocturnal Of Vigilance and DevotionThere are more Daytime hours both in Year Zero and in the following Years. This means that Day Shift Villagers benefit from Sunrise Vigilant and Daylight Devotion for longer times, on average. Sunrise Vigilant brings a small bonus to Stamina Regen. and, on average, this stat ends up being more valuable than a bonus to the Stamina bar. There's no question that any profession that uses Stamina will get to benefit from Sunrise Vigilant. Daylight Devotion proves to be a must-have for all Shamans (Runestone, Healers, and Tinkerers), but only while the Water Runestone is already active. One of the global effect of the Water Runestone is a +10 bonus to Intelligence. Daylight Devotion adds another 20% to that. While the full effects of Intelligence have not yet been discovered, we can confirm that higher Intelligence does level up Shamanism faster. Apart from that, Daylight Devotion also comes with a very good early days bonus to Morale. This bonus is higher than the Morale penalties that come with Work Anxiety and Sleep Anxiety, present on all Villagers that do not have Steadfast Resolve. The Perk can also perfectly counter the Stormrider Unease Flaw, as long as the Stormy Weather is ongoing during Daytime. Daylight Devotees make for potentially very efficient Villagers in the very early stages of the Settlement, when Wooden Altars and active Runestones aren't available for everyone. The morale bonus is high enough that they can squeeze in one more Work hour in their early Starter Day Shift Schedules. Shadows In The DarkSince there are overall less Nighttime hours than Daytime hours throughout the Year, it can feel like Nocturnal Perks may not be as potent. However, this is not the case. Both Nocturnal Perks definitely have their uses. Night Shadow has the same Stamina Regen. bonus as Sunrise Vigilant. In addition to that, the Perk also has a minor Morale boost during Nighttime hours, and a minor Morale penalty during Daytime hours. Since Daytime hours outnumber Nighttime hours, the latter can feel like a drawback more than a benefit. However, Night Shift Villagers want to have their 5 Sleep hours be efficiently set during Daytime. When taking this into account, the Morale math leads to it pretty much cancelling out over the duration of a Year. Worth stating that in Year Zero, Night Shadow does end up actually brining on average a Morale bonus but when looking at everything on a macro scale, it's overall negligible. Night Shadow primarily excels on any Villagers tasked with the defense of the Settlement during Invasion times. Blood Moons and Fimbulwinter Invasions happen during Nighttime. Both Melee and Ranged Combatants need endless amounts of Stamina so any additional bonus to Stamina Regen. is greatly appreciated. Nocturnal Resilience features the highest potential bonus to Cold Resistance out of all of the Perks. On a per Season basis, Nighttime temperatures are lower. Winter is the coldest Season and it's also the only Season when Nighttime is longer than Daytime. Although it requires an investment in Clothing in order to be efficient, Nocturnal Resilience is the only way to maximize the chance of having 16 hours of Work without interruption for Villagers working outside the Settlement Walls and away from Heat sources. Apart from increasing the time it takes to start freezing to death, it also increases the time until Villagers without Stout Constitution can catch the Sore Throat debuff. It's also worth noting that because Nighttime is longer than Daytime in Winter, Nocturnal Resilience will also partially help Villagers working the Day Shift. ┣⪢ The Four Seasons With A Spring In Our StepBlossom Tender and Springtime Vitality are both very good Perks, especially if we get both of them on the same Famer. However, in Year 0 these Perks bring pretty much no practical value due to us already starting mid-Spring and also needing some time to build the Eye of Odin, start recruiting, and, in the case of Blossom Tender getting the Farm operational takes even longer. From the end of the 1st Winter onward, regarding on how Springtime Vitality compares to Sunrise Vigilant and Night Shadow, after some number crunching, it's confirmed that on a per-Year average this Perk overtakes its Diurnal and Nocturnal counterparts. Hunters, Anglers, Farmers, Warriors-in-training, and Archers-in-training all enjoy the extra Stamina Regen. However, the performance difference outside of Spring will be noticeable. Nice Day For Fishing, Ey?Summer Angler is the only Summer Season Perk and it's a great Perk to have for any Angler, regardless of Year. In Year Zero, we should have Fishing Huts up and running before Summer starts and anyone with this Perk will have an excellent head start to leveling up Fishing and also bringing in Fish faster during the Season. Not Falling For ItHarvest Blessing is another Perk that's clearly best on a Farmer but Foragers and Teamsters can benefit from it as well. After Year Zero, Autumn is shorter than Spring. It's overall less powerful than Blossom Tender and it's at its best on a Villager that already has Green Thumb. Keepin' It CoolWinter Huntsman is actually best used on Sentinel defenders than Hunters. If one of these Sentinels has both Retired Bowman and Winter Huntsman they've earned the right to have the best Bow and Arrows as they can make quick work of any Shield-less Invader that makes the mistake of entering the Sentinel's range of attack. Winter Resilience is, unfortunately, a trap. It's not a Flaw but it is pretty much a waste of a Perk Slot. This Perk will not stop Warmth from degrading in any noticeable way. Cold Resilience is better and Nocturnal Resilience is streets ahead of both. ┗⪢ And Now The Weather It Windy! Wind degrades the Warmth meter faster when Villagers with low Rain Protection get wet from Rainy or Stormy Weather. Being next to an active fire dries off the wet Villager. Otherwise, Villagers with both a Thick Linen Hood and a Basic Linen Cape have enough Rain Protection to the point where the effects of Windy Weather do no harm. Wind Rider is a Perk that is best at perfectly fixing something that is legitimately barely an inconvenience. The Rainin' ChampionRainy Weather can show up in Spring, Summer, or Autumn. Based on personal observation over several years, Rainy Weather can be present for 50% of Springtime, 33% of Summertime, and 66% of Autumntime. An estimated maximum uptime is at about 38.9% but it's entirely random and the only guarantee is that the mileage will definitely vary. Also, Rainy Weather has a chance of being Stormy Weather instead so the actual uptime will probably be closer to 25%. Apart from the ASMR, the best part about Rainy Weather is that it will irrigate crops. Rain Dancer is a less reliable Daylight Devotion without the Intelligence boost. It has the highest value on Villagers that have Soggy Discomfort or Daylight Devotion or both. Soggy Discomfort is a Flaw and it features one of the highest Morale penalties. Its best and most reliable counter is being a melee or ranged Proud Warrior. The 2nd best counter is to spend all the available Leisure hours at an active Runestone. Uneasy Riders On The StormStormy Weather is what happens when Rainy Weather 'crits'. It's a lot more common in mid-Spring, late Summer, and throughout all of Autumn. Benefits and Drawbacks that apply to Rainy Weather do not carry over to Stormy Weather, they're mechanically different. Stormforged is unfortunately another trap. It's only slightly less of a trap than Winter Resilience but it's still stuck at the bottom of the Perk barrel. Stormrider Unease is another Flaw that comes with a Morale penalty but it's only half as bad as Soggy Discomfort. It also has less uptime than the latter, making it a much lesser curse; regardless, it's still a curse. Let It Snow!Snowy Weather is present during Winter but it doesn't always snow in the coldest Season. We will also see the weather be generally Winter Cold, Cloudy, or Foggy. There's also a small chance that a late Autumn Storm will carry over through the first hours of Winter but that's an exception. Snow Strider is the only Perk that has Stamina Cost Reduction. It's a very strong stat to have. It's like having both Athlete and Iron Lungs at the same time, except that it multiplicatively stacks with any other Stamina and Stamina Regen. Perks or Buffs. It's godlike when it's active but in a Year, it's unfortunately active less time than Winter lasts. After a lot of data recording and some math, Snow Strider has a current uptime estimate of 12.37%. It's extremely low but it can prove to be one of the best Perks for anyone tasked with defending the Settlement against the Fimbulwinter Invasion. Part V — PERKS ┣⪢ Increased Thirst & Hunger Drawbacks Rather that copy and pasting the same paragraphs over and over again whenever the same drawbacks show up, the most common drawbacks will be discussed here instead. `Increased Thirst` AKA Thirst Frequency +20%Villagers with higher Thirst Frequency need to re-hydrate more often. Thirst is an always active Survival Need. It affects Villagers during their Work, Leisure, Sleep (Thirst Frequency gets a 0.5 multiplier while Sleeping) hours, as well as during Invasions. Also, this drawback additively stacks with itself so a Villager with `Athlete and `Thirsty Giant feels the needs to re-hydrate 40% more often. Considering that the base Waterskin can store up to 5 liters, or 5 charges, this Perk Drawback isn't going to be that difficult to manage. The risk that Villagers with this drawback will die of dehydration is actually quite low. Instead, this drawback impacts Work efficiency by forcing a Villager with an empty Waterskin to stop what they're doing, run to the nearest Well, and draw Water from it until their Waterskin is completely full. Having a Water Wells built close to most Workspaces helps. Having Warehouses with `Water Barrels close to most Workspaces helps even more. An active Water Runestone adds a 0.8 multiplier to Thirst Frequency and in the math, and this multiplier is applied before any percentages. This means that a while a Villager with Increased Thirst is benefiting from an active Water Runestone, they have an overall slightly more reduced Thirst Frequency than a Villager without any bonuses or penalties. Later on, certain Villagers will be happy to swap out their default Waterskin for a Leather Waterskin. There are medium sized items and they do have durability but they can also hold twice the regular amount of Water. Considering that a Villager with multiple empty Waterskins only fills up one when they're thirsty, the Leather Waterskin further lowers any chance of a dehydration-cause death or of having to take an impromptu Work break to run and get more Water. Lastly, some Foods from Tier 2 and onwards do replenish Thirst slightly, with Soups being the best choice. However, the values are less than a single swig of a Waterskin and the variable nature makes this an unreliable option. It's noteworthy and most important when most Villagers are in their 'Soup Era'. `Increased Hunger` AKA Hunger Frequency +20%Villagers with higher Hunger Frequency need to munch Food more often. Hunger is an always active Survival Need. It affects Villagers during their Work, Leisure, Sleep (Hunger Frequency gets a 0.5 multiplier while Sleeping) hours, as well as during Invasions. Also, this drawback additively stacks with itself so a Villager with `Shrimpy Woodsman and `Bear Power feels the needs to munch on food 40% more often. In inventories, Cooked Foods from Tier 2 and above are found in stacks of 2 or 3. Considering a Waterskin can hold up to 5 liters of Water, this may make starvation appear more likely than dehydration but a Villager's need to munch is roughly half that of their need to re-hydrate so it balances out to being roughly the same. However, with only 2 or 3 meals in their inventory at a given time, Villagers are more likely to take impromptu Work breaks to run to the nearest Food Storage or Cooking House and refill on Food, leading to overall less Work efficiency. Having Warehouses with Cooked Food Storages at the center of production and industry areas helps in this regard. Nevertheless, Villagers with Increased Hunger who Work outside the Settlement Walls are always at risk of running out of Food during their Work hours. To maximize their chances of at least starting their Work shift both Well Fed and with a full stack of Food, we apply a Schedule alteration where we move 1 Leisure hour before the last Sleep hour. When switching from Sleep to Leisure, Villagers are prompted to eat, hydrate, and restock their Water and Food. When switching from Leisure to Sleep, the same check is done again. And then, when switching from Sleep to Work, the check is done once more. By having 1 hour of Sleep right before the start of the Work shift, Villagers get as much benefit from `Energized as their commute to the workplace allows. Apart from reduced Work efficiency (and potentially starving), the biggest issue brought on by Increased Hunger is the added strain to the Food Production chain that happens whenever a new Profession Tier is reached for the first time. When the Cooking Hut is just starting out, having multiple Villagers with the munchies all switch from Cooked Fish/ Meat to Soup increases the chances that other Tier II Villagers won't find any Soup for themselves. The same event can happen when switching from Soup to Stews. And again when switching from Stews to Pies or Fancy Cheeses. The only way to prevent and manage this issue is to keep track of how many Villagers suffer from `Increased Hunger, and plan for additional Food production and storage when moving from one Tier to the other, and of course, during Winter. This drawback isn't apocalyptically bad. `Increased Hunger perks come with very good benefits, especially `Wildling (and especially not `Bear Power). However, this drawback will always be present. As the Settlement grows, the more Villagers we get, the more extra Food we have to end up producing in order to ensure that 'getting the munchies' doesn't lead to any physical or emotional complications. ┣⪢ Perks [A-C] `Athlete`
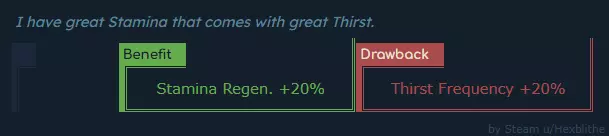
只要实际上有足够的水供所有人使用,【口渴加剧】状态就很容易应对。该状态的增益效果为+4耐力回复,除非村民受到【喉咙痛】等极低倍率减益效果的影响。【运动员】通常是目前最佳的耐力回复专长!它具有永久生效时间,而其他所有提升该特定属性的专长要么受季节影响,要么基于一天中的不同时段。许多职业都能从耐力回复中获益,而这个专长很可能是所有这些职业的最佳选择。【战场老兵】
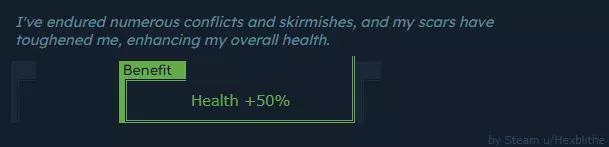
该增益效果可转化为额外100点生命值。由于生命值会随着护甲值的提升而增加,因此该 perk 对任何装备护甲的前线战斗单位都非常有用,例如勇士、散兵、战士、现役民兵以及首领队伍。 以沃尔法尔(尤其是熊类)为狩猎目标的高级猎人也能从【战场老兵】带来的生存能力提升中获益。 最后,该 perk 能让面临脱水、饥饿或严寒致死危险的角色分别延长125分钟、120分钟和100分钟的生存时间。这有望为他们争取到足够的稳定状态的时间。此 perk 非常实用。 【熊之力】
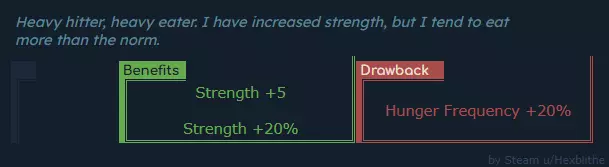
饥饿值增加总是很烦人,但很少构成实际危险。 引用自 Hexblithe: 嗨,朋友!开发者已确认,据他们所知,力量、敏捷和智力不会加快升级速度。这些属性是职业效果的乘数,与增加伤害、减少耐力消耗或缩短行动间隔冷却时间有关。 力量加成在纸面上看起来不错,但物理伤害的提升很小。【熊之力】在搭配【饱食】、【强效活力】和激活的【大地符文石】时效果最佳。更高的伤害可以加快砍树、碎石和击杀入侵者的速度,但在所有这些情况下,拥有更高的技能等级和更高的技能熟练度(除非技能已满级),或者更高的耐力恢复、更多的耐力(或两者兼具),总体上比略微提升伤害数值对效率的提升要大得多。 熊之力的增益在最需要的时候(前期)几乎无法察觉。同时,其缺点可以说大于优点。这个技能是个陷阱! 【开花守护者】
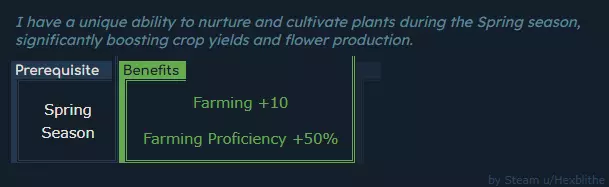
在零年,我们可能需要2-3天才能快速建成亚麻农场。这会让我们在春季还剩下2-3天时间,之后则会有23天的停滞期。 虽然数字看起来不太理想,但如果我们足够迅速,在夏季开始前整整3天就建成第一个亚麻农场,那么开花照料者就能全程参与我们的首次收获——可以说,此时我们所有的建设和产业都完全依赖于我们拥有的纤维数量。 第一个冬季过后,任何农民都适合拥有这个专长。 园艺能手更好,且全年生效。开花照料者在辅助已拥有园艺能手的村民时价值最高。没有直接缺点的熟练度专长对于各自的职业来说始终是最佳选择。拥有【园艺能手】、【花朵呵护者】和【春日活力】特质的村民,真是受到了神明的眷顾。 【畏寒】——缺陷
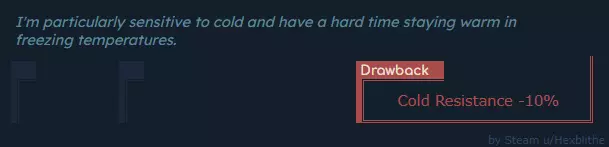
缺陷会占用一个 perk 槽位且不提供任何增益效果。它们还需要额外的特殊处理来应对。 虽然在冬季之外也存在会导致温暖值下降的温度,但这些温度每次持续时间不会超过几个小时,并且对工作效率没有影响。因此,畏寒这一缺陷仅在冬季有限的持续时间内才会成为问题。不过,有此缺陷的村民若在冬季必须在城墙外工作,那他们的处境会非常糟糕。 畏寒会显著削弱从其他 perk、衣物或 armor 获得的寒冷抗性。最佳的应对方法是从事在明火附近工作的职业:烧烤师、烧炭工、厨师、鼓风炉工或金属工匠。火守以及其他在定居点围墙内活动的职业,可以在其工作场所旁设置有盖营火。 【夜间韧性】可抵消【寒冷敏感】。 【寒冷韧性】(又称寒冷抗性)

虽然在冬季之外也存在会导致温暖值下降的温度,但这种温度每次持续时间不会超过几个小时,且对工作效率没有影响。因此,寒冷抗性的增益仅在冬季的有限时间内有用。 这是日班最佳的寒冷抗性 perk!然而,当查看我们能从衣物中获得多少寒冷抗性时,很明显这个加成非常小。这个 perk 顶多算是安慰奖。 当整个 16 小时工作日的平均温度达到 -10°C 及以下时(基本上就是在冬季),拥有寒冷抗性和最佳衣物的村民,如果没有简易毛皮斗篷,就没有足够的寒冷抗性来完成完整的不间断工作轮班! 工匠
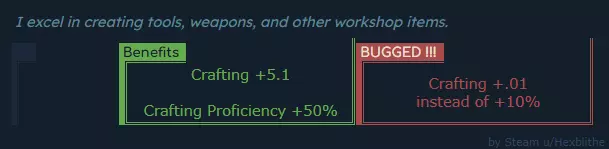
要让我们不再乐于见到拥有此特性的村民来到定居点,这将会非常困难。 在工坊(坑屋/小屋/房屋)内使用工作台的任何人都能从工匠特性中获益。此外,该收益还适用于织工和皮革匠。此特性对于启动服装生产链并使其良好运转至关重要。后期,它也将对 armor smiths( armor smiths)有所帮助。 然而,遗憾的是,它对金属工匠、木匠或修补匠的职业没有帮助。 还有一些建筑、扩展建筑和物品也有 crafting skill( crafting skill)先决条件。没有直接缺点的熟练度特性对于各自的职业来说总是最佳选择。 特性 [D-H] Daylight Devotion
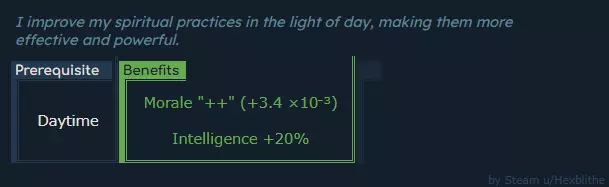
日间增益和效果全年的生效时间都非常充裕,但在冬季的可靠性会降低。 对于日班而言,【日光虔诚】提供的士气足以弥补【工作焦虑】和【睡眠焦虑】带来的负面影响,这种情况会一直持续到第一个冬季来临。届时,主动巡逻机制将开始生效。 在聚落建立初期,该增益能支持一种非常安全的“虔诚者起步”日程安排,具体为15小时工作、4小时休闲以及5小时睡眠。 一旦我们为聚落中的所有人都配备了足够的木制祭坛,拥有【日光虔诚】的村民就可以调整为“日班”或“日班祭坛”日程。如果我们足够大胆,可以为那些有幸没有【士气缺陷】【食欲亢进】或【口渴加剧】的村民安排“虔诚信徒夏日”日程。这个夏季专属日程包含17小时工作、2小时休闲和5小时睡眠。 智力加成会间接帮助【水之符文萨满】更快升级,也对其他拥有智力系职业且在水之符文激活时工作的村民有帮助。这是因为智力会缩短其对应职业的行动冷却时间。这个增益至少是有用的。 【虚弱伐木工】——缺陷
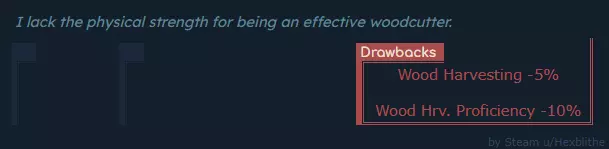
其他一些攻略可能会说“不要让有这个特性的村民当伐木工!”……这说法有一定道理。不过,有个更好的建议:不要主动招募有这个特性的村民!当大地符文石的一个全局效果激活时,会将所有人的木材采集熟练度提升至上限,从而抵消掉-10%的负面效果。 【觅食本能】
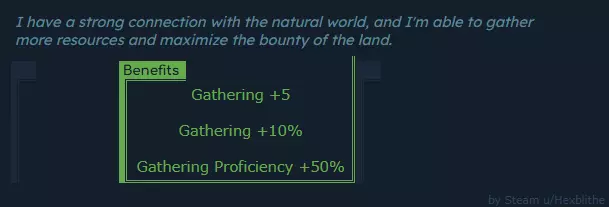
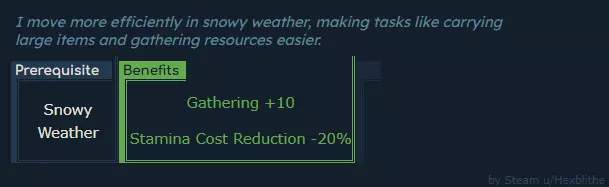
这项熟练度很少会被浪费,因为受益的不仅仅是觅食者。采集是启动食品生产链和服装生产链的首个重要技能。早期在采集中提高效率,能在这两个领域带来额外收益。 采集技能适用于以下情况: - 木材采集者从芦苇中收集茅草,从浮木和矮云杉中收集树枝。 - 农民收割作物时。 - 任何人从自然集水器(岩石)、雨水收集器和水井中取水时。 关于【水桶】:从水桶中取水不需要使用采集技能!从水桶中取水是即时完成的,并且可以一次性取完。装满一个皮革水袋需要与水桶互动1次,而与水井互动则需要10次!让厨师、铁匠以及其他所有人都从水桶取水会更节省时间。农民也需要大量的水,但他们在收割作物时已经在使用和提升采集技能了。因此,只有运输工(仓库工人)在最初从水井和雨水收集器取水时才需要使用采集技能。不过,这种策略在零年不可行,因为它需要额外的仓库空间和资源(包括材料和人力)以及相应的存储空间。采集本能与丰收祝福相辅相成。没有直接缺点的熟练度专长始终是各自职业的最佳选择,尤其是这个专长,因为它在聚落中具有广泛的实用性。【园艺能手】
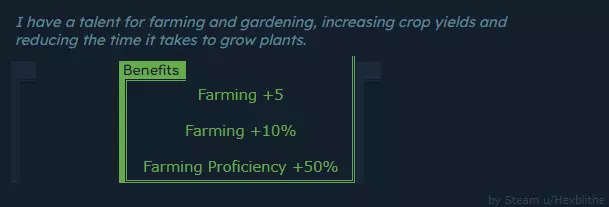
采集是食物生产链和衣物生产链的第一基石,而 farming 则是紧随其后的第二基石! 要征服第一个冬天,必须尽快建立并运行亚麻农场。 当村民达到二级时,我们需要一个已投入使用的食物农场,以便为烹饪小屋供应用于制作二级食物的生蔬菜(和浆果)。 除了 farming 外,农民的采集技能高也大有裨益,因为从水井取水和收割作物时都会用到采集技能。 园艺能手技能可与采集者直觉、花朵呵护和丰收祝福技能相辅相成,同时也能与任何耐力或耐力恢复类技能搭配。对于各职业而言,没有直接缺点的熟练度技能始终是最佳选择。丰收祝福
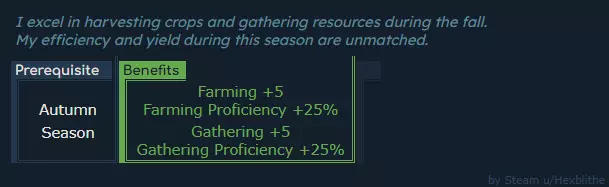
通常秋季比春季短,但在【零年】并非如此。采集者能从这场丰收祝福中获益良多,因为这个季节将首次出现冬季唯一可种植蔬菜的种子,有助于快速为农民获取芜菁种子。 简而言之,之前在讨论【采集者直觉】和【园艺能手】时已涵盖了采集和 farming 相关内容。丰收祝福能让优秀的农民更出色,让顶尖的农民更卓越!没有直接缺点的熟练度专长对于各自职业而言始终是最佳选择。 【 hydration expert 】
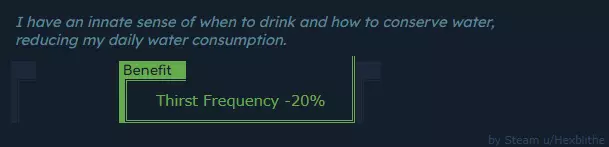
在工作时,没有口渴频率加成或惩罚的村民每4小时需要补水一次,他们在工作班次内会补水4次。 【水分专家】在没有【口渴加剧】效果时,每4小时48分钟需要补水一次,工作班次内补水3次。 【水分专家】在没有【口渴加剧】效果且有激活的【水之符文石】加持时,每5小时46分钟需要补水一次,工作班次内补水2次。 【水分专家】可以抵消一次【口渴加剧】效果,该效果是【运动员】和【渴巨人】的负面特性。 通常在第一个冬季之后,整个聚落会逐渐拥有最好的衣物,仓库也开始积累备用衣物。战斗人员至少拥有基础护甲,而猎人带回的兽皮则越来越多。此时,制皮匠的任务列表中开始添加皮革水袋。至此,【水分专家】技能已完全过时,除非在某些特殊情况下,需要保持中型物品栏槽位不被皮革水袋占用以提升效率。 归根结底,对于更希望从熟练度、耐力恢复、额外耐力、额外生命值甚至提升士气中获益的玩家而言,这个技能不过是个华而不实的安慰奖。 ┣⪢ 技能 [I-M] Iron Lungs
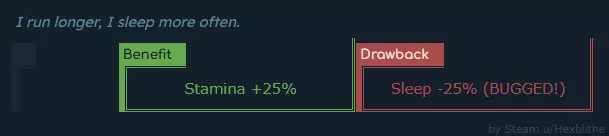
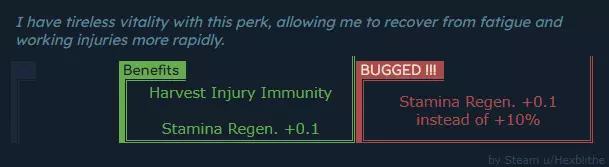
一旦缺点bug修复后,拥有此特性的村民将需要【7小时睡眠】的日程安排! 如果打算保持16小时工作班次,【铁肺】特性必须搭配其他士气特性,例如【日光虔诚】或【雨舞者】。该村民还必须是【自豪的战士】。最后,他们需要在仅有的1小时休闲时间内尽可能多地坐在激活的【符文石】旁。即使采取了这些对策,我们最终可能还是得将他们的工作时间减少到15小时,甚至(颤抖)14小时。但由于该缺点目前存在bug,所以我们暂时无需担心这些问题。 【水分充足】和【精力充沛】都会为【耐力】提供额外加成。【铁肺】特性在能够同时增强这两种 buff 时效果最佳。该特性还能与【强大活力】进一步叠加额外加成。然而,无论我们给村民增加多少【耐力】,他们仍然需要【耐力恢复】。【铁胃】
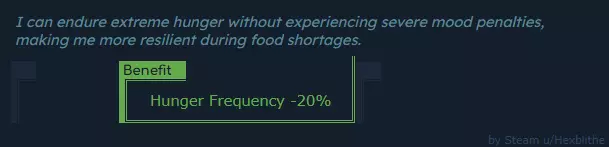
铁胃:未受其他技能影响而增加饥饿频率的村民,可确保食品生产链的稳定性提升。 此技能可抵消【增加饥饿】效果。但遗憾的是,铁胃本身没有其他额外收益,因此吸引力有限。 虽然【增加饥饿】非常令人困扰,但【减少饥饿】的正面影响相对较小。其他任何能提升食品链效率或产量的熟练度或耐力技能,最终都更具价值。 当然,早期拥有多名具备【减少饥饿】的村民,可减少投入食品生产的人力。这反过来有助于提高整体聚落效率,并更快进入铁器时代,进而增加所有人在第一个冬季拥有合适衣物的几率。 僧侣之躯进一步补充了这个 perk,否则这个 perk 最多只能算不错,除非村民的职业不需要熟练度、耐力恢复、耐力、额外生命值,甚至不需要提高士气。 伐木工之力

伐木技能的收益仅在砍树、收集倒下的树干或清除树桩时生效。 早期拥有几名伐木工是让建筑工保持忙碌的关键。进入铁器时代后,桦木的需求量会增加,因此既需要熟练的伐木工,也需要新的伐木工来填补晋升人员的空缺。 伐木工非常适合所有能提升【耐力恢复】或【耐力】的 perk。最后,较高的【力量】可以略微提升砍树速度。 当地球符文石激活时,此 perk 的价值会下降,因为地球符文石的全局效果之一是【最大石材采集熟练度】。因此,只有当大地符文石未激活时,即萨满正在打盹,或者没有足够的树脂或鱼油时,伐木工的力量才能发挥全部加成效果。不过,大地符文石通常是符文石队列中的最后一个。最好在第一个冬季之前、期间或之后建造它。没有直接缺点的熟练度 perk 始终是各自职业的最佳选择。Mighty Vigor

“水分充足”和“精力充沛”都会为“耐力”提供额外加成。“强效活力”对“耐力”的增益效果在同时强化这两种 buff 时达到最佳。该 perk 还能与“铁肺”进一步叠加额外加成。不过,无论我们给村民叠加多少“耐力”,他们仍然需要“耐力回复”。 考虑到带有多个巡逻点的兵营是早期消除“睡眠焦虑”和部分“工作焦虑”的经济有效方式,对于早期兵营学员努力快速达到近战格斗 25 级上限而言,熟练度加成的价值最大。激活的水符文石会提供100%的近战战斗熟练度加成,而熟练度上限为100%,因此强力活力会失去其最主要的增益效果之一。只有当符文石因燃料耗尽或萨满未工作而处于未激活状态时,该增益才会恢复生效。 最后,额外的力量可能会为最终伤害数值增加几点,但随着武器品质提升和技能等级提高,这一加成的重要性会逐渐降低。 无论如何,即使在最差情况下,强力活力也是强化版的熊之力与铁肺的结合体,且没有二者的任何缺点,因此即使对于非战士职业而言,它也是最佳的专长选择。 僧侣之躯
该缺陷意味着-50生命值,这足以成为僧侣不应在定居点城墙外活动的充分理由……除非他们同时是【战场老兵】或【饥渴巨人】,或者两者兼具——要是村民能有这种好运就好了。 如之前讨论【铁胃】时所述,降低饥饿度作为独立增益并不那么理想,即便它能抵消另一个【增加饥饿度】的特性。 【僧侣之躯】也能与【铁胃】互补(超级僧侣万岁!),但在大多数情况下,它顶多算是个不错的特性,除非村民的职业不需要熟练度、【耐力回复】、【耐力值】、额外【生命值】甚至【士气】加成。只有在这种千载难逢的情况下,该缺陷几乎不存在,而这个专长可能会成为【毕业选择】。 ┣⪢ 专长 [N-R] `夜影`
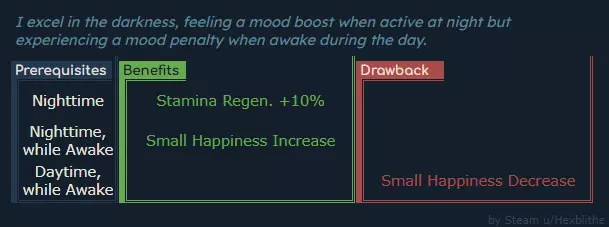
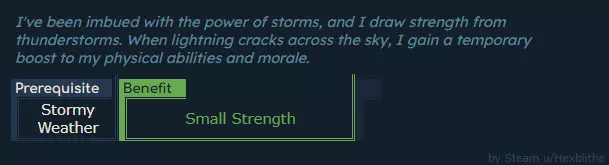
【小幅快乐提升】——增益效果 激活时,士气获得(1.5×10⁻³)的加成 【小幅快乐降低】——减益效果 激活时,士气受到(-1.5×10⁻³)的惩罚 除冬季外,夜间的持续时间不如白天长。尽管如此,夜间相关的增益仍有其价值,原因之一是血月和芬布尔之冬都只在夜间发生。 从士气角度来看,若统计全年并考虑睡眠时间,夜影带来的净收益是9小时的(1.5×10⁻³)额外快乐值。因此,可以说士气的增益和减益相互抵消了。 话虽如此,夜影是【日出警觉】的夜间版本,它能提供耐力回复。收益体现为+2的加成,这看起来可能不多(实际上也确实如此),但最终会产生影响。 对于【骄傲勇士】职业,更高的【耐力回复】意味着能够更频繁地进行攻击。无论是训练还是战斗,这都非常有用。 在未被打扰的情况下,芬恩族人会在夜间入睡,这让夜行的【芬恩猎人】拥有干净利落且精准的首次攻击优势。由于【退休弓箭手】是最优秀的猎人之一,【夜影】 perk通过抵消这一劣势提供帮助。 还有许多其他消耗【能量】的职业,因此它们也能从提升的回复速度中受益。 在上述任何情况下,这个perk对于任何夜班工作都非常实用。 【夜影】是判断黎明和黄昏时间的最佳“工具”。日历能精确到分钟,这都要归功于这个perk。夜行者韧性

夜间的持续时间不如白天长,冬季除外。尽管如此,夜间相关的增益效果仍有其价值,原因有几点,其中之一是无论季节如何,夜间天气都会变冷,冬季尤其明显。 夜间韧性可能是最好的寒冷抵抗增益!它的潜力非常高,考虑到冬季白天时间较短,它可以让日班和夜班人员在最冷的季节都保持安全。 一旦冬季来临,无论工作班次如何,对于任何在定居点围墙外远离热源的人来说,这个夜间韧性增益都是必需的。 穿着铁器时代前最好的衣物并拥有这个增益,日班人员可以工作整整16小时,但他们有患喉咙痛的风险。城墙外没有此 perk 的村民需要自定义日程表,将工作时长限制在 13 小时。 同时,夜班需要【夜战韧性】、最好的衣物、【毛皮披风】和【厚亚麻 Gambeson】才能几乎撑过一整个工作班次。即使有这种近乎完美的初期装备,运气不佳的猎人以及采集点离定居点很远的采集者,不仅可能会【喉咙痛】,甚至可能在返回途中开始冻死。不幸的是,在最初的几个冬天里,为了让所有人活下去,必须对日程进行微管理。 即便如此,【Rain Dancer】无疑是最佳 perk,这一点也不足为奇。
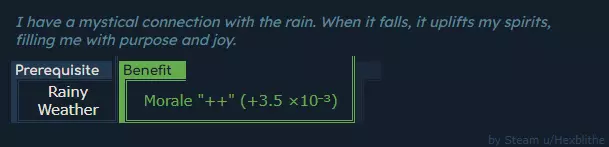
雨天生效时间非常随机。其增益效果无法提供稳定的加成,因此该技能不如日光虔诚和坚定决心实用。 如果村民同时拥有雨舞者和潮湿不适,后者的惩罚效果会减半,这种罕见情况是该技能的最佳使用场景,但这无疑只是一种安慰奖。 坚韧 surge
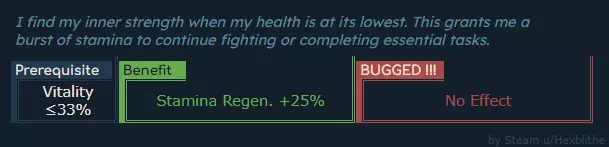
该增益存在漏洞,没有任何效果! 非战斗人员的【生存需求】中至少有一项达到0%时,其【生命值】会降至33%以下,并因濒死状态每分钟持续损失【生命值】。一旦村民的【生命值】低于25%,他们将无法继续工作,转而前往巫医小屋。在这种情况下,【坚韧激增】的平均生效时间为8-10分钟。 对于战斗人员而言,这是“背水一战”类的 perk。根据面对的敌人不同,大多数【骄傲战士】能迅速将+5【耐力回复】转化为2-3次远程或近战攻击。 面对精灵、幽灵、骷髅甚至沃尔法时,【坚韧激增】最终只是一种“锦上添花”的增益。而面对熊、追随者和 draugar 时,该增益的效果则大打折扣!如果没有合适的护甲,【自豪勇士】的活力值会在敌人的几次攻击内从33%骤降至0%。 该 perk(技能)真正的可取之处在于,它能帮助受伤的角色勇敢地逃离战场。 【韧性激增】并非可靠的救命稻草,而是一种傻瓜式的冒险。相反,更好的选择是做好准备、使用更精良的武器、穿戴更优质的护甲、提升生命值,以及拥有更多并肩作战的伙伴。 这个 perk(技能)就是个陷阱,别来反驳我。 【退休弓箭手】

在箭术训练场训练时,我们最能感受到这种不足。一旦训练结束,培养出的猎人、弓箭手和守望者受到的影响就没那么大了。 退休弓箭手非常好用!但如果与【运动员】搭配,效果堪称完美!【夜之暗影】、【黎明警戒者】或【春日活力】也是不错的选择。 退休弓箭手的效果是【强力活力】的4倍,因此训练中的弓箭手达到远程战斗25级所需的时间,比兵营中士兵达到近战战斗25级所需的时间更短。然而,由于存在一个不幸的bug,许多瞄准射击无法被记录,因此也无法获得经验,导致训练总时长大致相同。 猎人在服装生产链中至关重要。在铁器时代之前,它们是皮革碎片的主要来源,早期的皮革工匠会用这些碎片来制作和鞣制兽皮,而兽皮是制作优质服装的必需品。在所有人都有衣服穿之前,我们永远都不嫌皮革碎片多!在工作中训练的猎人,其表现不如在靶场接受同等时间训练的猎人。一定要训练猎人! 空气符文石激活后,其全局效果会赋予最大远程战斗熟练度,但退休弓箭手仍保留其他增益。如果没有更好的武器、盔甲和/或民兵,获取这种符文石并不容易。此外,对符文石燃料的需求可能也会促使人们在铁器时代之后建造这种符文石。 没有直接缺点的熟练度加成,对于各自的职业来说始终是最佳选择。虽然这个特长存在缺点,但真正的问题是射箭场靶子的bug。
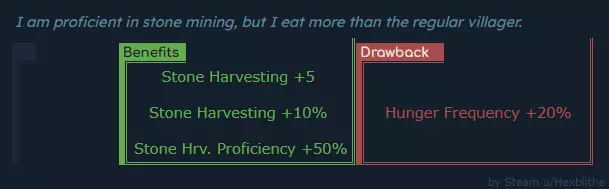
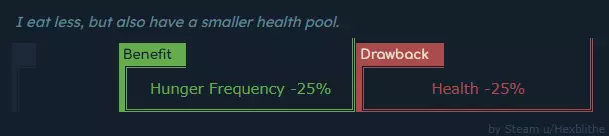
饥饿加剧总是令人恼火,但很少构成实际危险。 “摇滚矿工”是“碎石者”的劣质版本,只有在我们急需矿工以进入铁器时代,且尚未获得大地符文石的情况下,才应选择它。 虽然“瘦小伐木工”和“伐木工之力”在同一名村民身上能相互补充,但“摇滚矿工”和“碎石者”却并非如此,因为后者的熟练度加成更高,且能更快达到上限。 由于大地符文石的全局效果以及“饥饿加剧”的潜在影响,尽管熟练度相关的特性通常备受好评,但这个特性顶多算是聊胜于无。 ┣⪢ 特性 [S级,第一部分] “瘦小伐木工”

饥饿加剧总是令人恼火,但很少构成实际危险。 矮小樵夫是樵夫之力的劣质版本,只有在地球符文石出现前,当村民同时拥有樵夫之力时才应选择,因为前者能很好地补充后者。 由于地球符文石的全局效果以及饥饿加剧的潜在影响,虽然精通类 perk 通常备受好评,但这个 perk 顶多算是值得拥有。 雪地行者
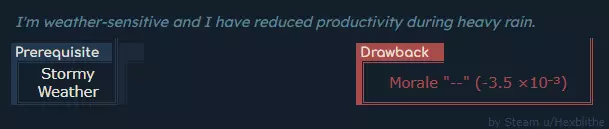
极低的持续时间实际上是一个间接缺点,毕竟这很可能是阿斯卡世界中最佳的【耐力】相关增益! 战斗训练是最持续消耗【能量】的活动。雪行者在一年中最冷的天气里擅长战斗训练,尤其是当他们还受到激活的水符文石或风符文石加持时。 此外,如果一名【骄傲战士】拥有雪行者特性,并辅以【强大活力】或【运动员】特性,他们更有可能在【能量】耗尽之前先耗尽【活力】。 此特性的采集加成对【冬季】的觅食者和农民最有用,尤其能帮助刚分配到这些职业的村民。不过,需要记住的是,雪行者全年约有87.63%的时间处于非活跃状态。 然而,没有 snowy weather 相伴的芬布尔之冬(Fimbulvetr)是不太可能出现的,因此尽管从全年来看,这个特长的可用时间有限,但几乎可以肯定它会在一年中压力最大的时期生效。对于所有在冬季活跃的骄傲战士(Proud Warriors)来说,这个特长是最佳选择。对于其他使用耐力(Stamina)的角色,这是最好的安慰奖。 潮湿不适(Soggy Discomfort)——缺陷
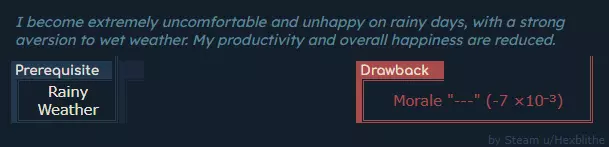
缺陷会占用一个特长槽位却不提供任何增益效果,还需要额外的特殊处理来应对。 在讨论【雨舞者】时,我们发现【雨天】的随机性很大,导致该特长无法产生稳定的积极影响。而【潮湿不适】则会双倍抵消【雨舞者】的增益效果。 在第一个冬季来临前,这个缺陷是个实实在在的威胁,尤其是当它与其他任何会对士气产生负面影响的特长或缺陷搭配时,比如【夜影】或【风暴骑手不安】。 应对【潮湿不适】最有效的方法是将受影响的村民永久分配为【自豪战士】。 否则,如果村民必须被分配到其他职业,他们的日程安排可能需要减少一小时工作时间,增加一小时休闲时间。冬季无需采取此措施,因为在最冷的季节不会有下雨的风险。或者,如果他们能在整个休闲时间内都在任意活跃的【符文石】处获得预留位置,就可以保持原计划不变。其中一种选择会使工作效率降低6.25%,另一种则需要更多的微操。【春日活力】
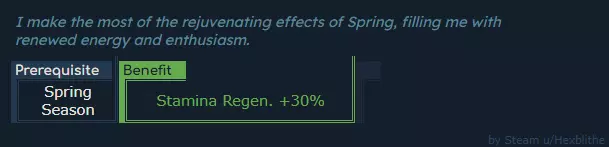
这个特长在【零年】期间不应优先选择(除非与【花朵呵护者】搭配),因为其生效时间非常有限。在【第一个冬季】之后,【春日活力】提供的+6耐力回复加成,其全年总体收益会高于【黎明警觉】和【夜幕暗影】。 该特长的最佳应用场景为湖边钓鱼(最佳用途)、战斗训练(可能是第二佳用途)以及 farming(尤其是与【花朵呵护者】搭配时)。 考虑到其不错的生效时间(不包括【零年】),以及对最佳属性之一的高额加成,【春日活力】对于任何依赖耐力的职业来说都是一个值得选择的特长。 【坚定决心】
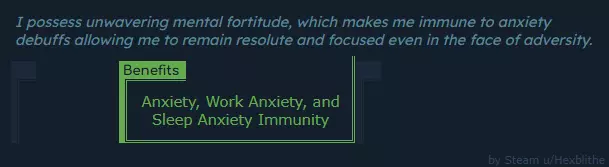
【焦虑】— 负面状态 施加时:能量 -70 生效中:近战战斗 -20%,耐力恢复 × 0.05(该属性上限为1),生命值 -75% 骄傲的战士、现役民兵、现役族长 party 成员以及猎人(?)对工作焦虑和睡眠焦虑免疫,因此这个原本很棒的特性对这些村民来说尤其浪费。 与日光信仰的情况类似,在聚落早期,拥有此特性的村民可以工作更长时间,只需更少的休闲时间就能保持较高的士气。“坚定的开创者”日程安排(15小时工作、4小时休闲、5小时睡眠)对日班和夜班同样有效。一旦建造好定居点围墙,采集者、伐木工、采石工、渔夫和矿工是一些最常见的在围墙外工作的职业,因此他们是【坚定决心】的最佳人选。 引用自 Hexblithe: 你好,朋友!开发者已确认【坚定决心】不会让村民获得对受惊状态的免疫。如果存在村民经常受惊的区域,最好的办法是安排一名守望者或设置一个具有延长守卫时间的活跃巡逻点。遗憾的是,这对矿工没有帮助。 对于所有在定居点围墙外工作的人来说,这是一个非常有用的 perk。 【石头笨拙】——缺陷
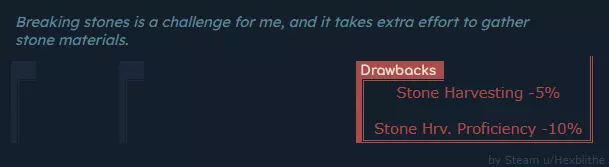
其他一些攻略可能会说“不要让有这个特性的村民当伐木工!”……这说法有一定道理。不过,有个更好的建议:不要主动招募有这个特性的村民!当大地符文石的一个全局效果激活时,会将所有人的采石熟练度提升至最高,从而抵消掉-10%的负面效果。【碎石者】
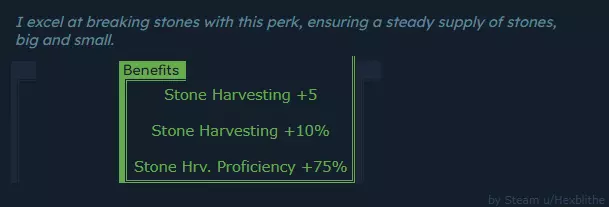
采石的收益仅适用于敲碎巨石、攻击洞穴墙壁或开采矿石时。 当大型建筑项目需要时,我们可以自己砍树碎石,让村民负责搬运。不过,一旦我们建造了矿场……受过训练的采石工具备优秀矿工所需的素质!采石工渴望进入矿场!为了岩石与矿石! 任何提升耐力恢复或耐力的增益对采石工都大有帮助。最后,较高的力量属性会略微增加镐的伤害,有可能减少敲碎石头所需的挥动次数1次。 当地之符文石激活时,此 perk 的价值会下降,因为其全局效果之一是最大采石熟练度。因此,碎石者的全部加成只有在大地符文石未激活时才能生效,这可能是因为萨满当天已下班,或者没有足够的树脂或鱼油。不过,在符文石队列中,大地符文石是最后一个,最好在【第一个冬天】来临前建造。没有直接缺点的熟练度专长对于各自的职业来说始终是最佳选择。专长【S,第二部分】:风暴锻造
【小幅力量】— 增益效果 激活时力量+3 【雨舞者】因【雨天】极难预测而被归类为不可靠技能。考虑到【暴风雨天气】是【雨天】的“暴击”状态,前者更难准确预测。 抛开生效时间不谈,其收益微乎其微。它就像是【饱食】的暴风雨版本。【风暴锻造】就是个陷阱! 【风暴骑手的不安】
缺陷会占用一个 perk 槽位且不提供任何增益,还需要额外的特殊处理来应对。 好消息是,就缺陷而言,这可能是危害最小的一个。【Stormy Weather】的生效时间比【Rainy Weather】短得多。【Stormrider Unease】的惩罚值也是【Soggy Discomfort】的一半。 和【Soggy Discomfort】一样,应对这个缺陷的最佳方法是让村民成为【Proud Warrior】。如果他们的其他 perk 使他们适合其他职业,与【Soggy Discomfort】不同,他们不需要特殊的日程安排来弥补士气惩罚,只要他们在木制祭坛或更好的祭坛度过休闲时间,士气就会随着时间慢慢恢复。 【Stout Constitution】
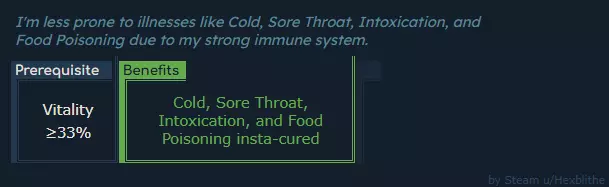
寒冷 - 负面状态 生效时:耐力恢复 -30% 当村民没有任何寒冷抗性或防雨保护,且在寒冷天气下远离热源时,会触发寒冷状态。 除了此特性外,从符文萨满处获得任何祝福都可治愈“寒冷”负面状态。食用生大蒜、大蒜汤或大蒜酱也能治愈该负面状态。 喉咙痛 - 负面状态 施加时:能量 -30 生效时:耐力恢复 *0.05 当温暖值低于或等于35%时,会获得喉咙痛状态。 食用生大蒜、大蒜汤或大蒜酱也可治愈该负面状态。此负面状态在冬季最常见,因为冬季大蒜不生长。因此,强烈建议在早季就有先见之明地储备预防物资。为什么喉咙痛这么难受 当【温暖值】降至35%或以下时,村民会出现喉咙痛症状,但在工作时间,只有当温暖值降至15%时,村民才会开始寻找热源。 耐力恢复倍率最终会将该属性上限锁定为1。一旦村民耗尽【能量】,他们将被迫走回定居点,无法 sprint。 根据村民的寒冷抗性、当前温度以及到达热源所需的总距离,温暖值很可能会降至0%。此时他们会开始【冻伤】,每分钟损失1点【活力】。 当活力降至25%时,他们会进入“虚弱得无法工作”状态。这种状态可能导致他们在尚未到达热源时就停下脚步。他们的活力会逐渐降至0,最终死亡。我们可以通过以下方式尝试解决此问题:更改受冻村民的日程安排,让他们一直处于睡眠状态,希望新的日程安排能让他们重新活动;或者走到他们身后,然后冲刺推动他们前往最近的活跃热源;或者(以某种方式)在他们死亡前,在他们旁边建造一个足够强大的新热源。 引用自Hexblithe: 你好!大地符文石的全局效果说明是移除喉咙痛。但它很可能由于bug或文本描述过时,实际上并未生效。 【中毒】— 负面状态 生效时:活力 -0.2(持续伤害),耐力恢复 *0.05。当建筑技能较低时,对建筑进行染色会导致中毒。使用厕所也可以治愈此负面状态。 【食物中毒】— 负面状态 生效时:活力 -0.5(持续伤害),口渴 -0.2%(持续效果)耐力回复。食用任何“耐久度”低于50%的食物后,会有0.05的食物中毒效果。使用厕所也可以治愈此负面状态。【强壮体质】在第一个冬季最为有用,此时并非所有人都能准备好大蒜储备。它是第二好的寒冷抵抗 perk(仅次于【夜间韧性】),尽管它不会直接提升该属性。对于任何需要在冬季在定居点围墙外工作的人来说,这都是“值得拥有”的。【夏日垂钓者】
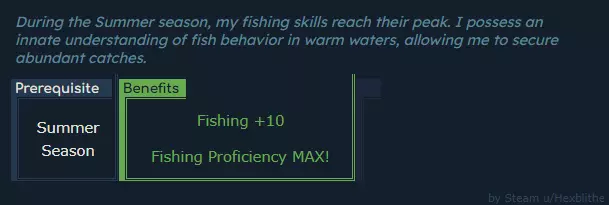
如果我们能在起始沉船附近或建造定居点的位置找到足够近的湖泊,【夏日垂钓者】将极大提升食物产量。 除了所有的生鱼外,夏季获得的额外钓鱼技能还能在冬季产出更多鱼脂。进入铁器时代后,更多的鱼脂能让更多的卢恩石同时激活更长时间。 食用熟鱼的一级村民从储备中消耗的食物比食用浆果、生蔬菜或贻贝的村民少40%。食用熟鱼可恢复25%的饥饿值,而食用熟蔬菜仅恢复10%,浆果、生蔬菜或贻贝则只能恢复3-7%。食用生食还会使饥饿感增加150%。没有直接负面效果的精通专长始终是各自职业的最佳选择。 【日出警戒者】
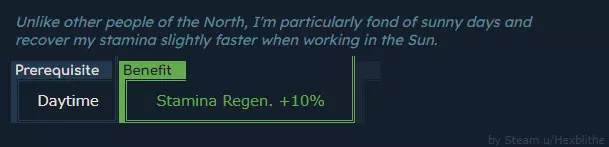
这项增益效果转化为+2【耐力恢复】。这一加成看似微不足道(实际上也确实如此),但最终会产生显著影响。 对于【骄傲勇士】职业而言,更高的【耐力恢复】意味着能够更频繁地发动攻击。无论是训练还是战斗,这都非常有用。 此外,还有许多其他职业会消耗【能量】,因此也能从提升的恢复速度中受益。 在上述任何情况下,这个 perk 对于任何日班工作者来说都非常实用。 ┗⪢ 特长 [T-W] 【饥渴巨人】
只要确实有足够的水供所有人使用,【口渴加剧】就很容易应对。它与【身经百战的老兵】效果相同,但这次附带了一个负面效果。村民可以同时拥有这两个特性,这样的个体应该充分利用每一点生命值,挥舞伤害最高的近战武器,频繁与最凶狠的尸鬼进行一对一战斗。当运气好到让村民同时拥有【口渴的巨人】和【僧侣之躯】时,前者还能抵消后者的负面效果。【不知疲倦的活力】
收获伤害 - 负面状态 激活时【活力-0.6(持续伤害)】 如果【耐力恢复】数值没有bug,【不倦活力】会比【日出警觉】和【夜影】更强。 低等级的伐木工、碎石工和矿工从负面状态免疫中获益最多。收获伤害可能会对新分配到这些工作的【僧侣之躯】造成危险,但除此之外,所受的任何伤害都可以在4小时睡眠后轻松恢复。 【野性之灵】

饥饿值增加总是令人恼火,但很少构成实际危险。 剥皮是猎人的必备技能。对于烧烤师、部分运输工以及在改良矿场工作的矿工(首领派对成员)来说,这也是一项非常实用的技能。 考虑到剥皮是提高食品生产链效率的关键技能,【野人】或许是所有饥饿值增加特性中最佳的选择。无论其拥有其他何种特性,【退休弓箭手】野人注定要进入猎人小屋工作。 【风行者】

Hexblithe 表示: 开发者提到,他们记得大风天气的作用是:当人物同时被雨水打湿时,会加剧温暖值的下降。 我已确认,在冬季,大风天气不会产生任何影响。防雨和防风都无助于减缓温暖值的流失。 如果防风效果达到最大且没有任何副作用,可能会让这个特性显得非常强大……不过,装备厚亚麻兜帽和基础亚麻斗篷就能提供足够的防雨效果。只需装备这两件衣物,村民在雨天甚至暴风雨天气下都能安全工作16小时,而不会有患咽喉痛的风险。 当前版本中,“风行者”是个陷阱。 “冬日猎人”
“冬日猎人”在与“退休弓箭手”和“雪地行者”搭配时效果最佳,能打造出一名专业的冬季猎人或弓箭手。此外,“夜间韧性”是完成该build的必要条件。自然且有机地获得这四个perk,简直像中了彩票一样。再加上“野人”perk,何乐而不为呢? 空气符文石的全局效果可提供最大远程战斗熟练度,这使得该perk在符文石激活时相当于一个华丽的+10远程战斗加成。如果我们足够细心,会发现这个perk还能提升寒冷抗性,但提升的数值简直是个笑话。 没有直接缺点的熟练度perk对于各自的职业来说总是最佳选择……这个perk也是如此,只是在列表中的排名不是很高。 “冬季韧性”

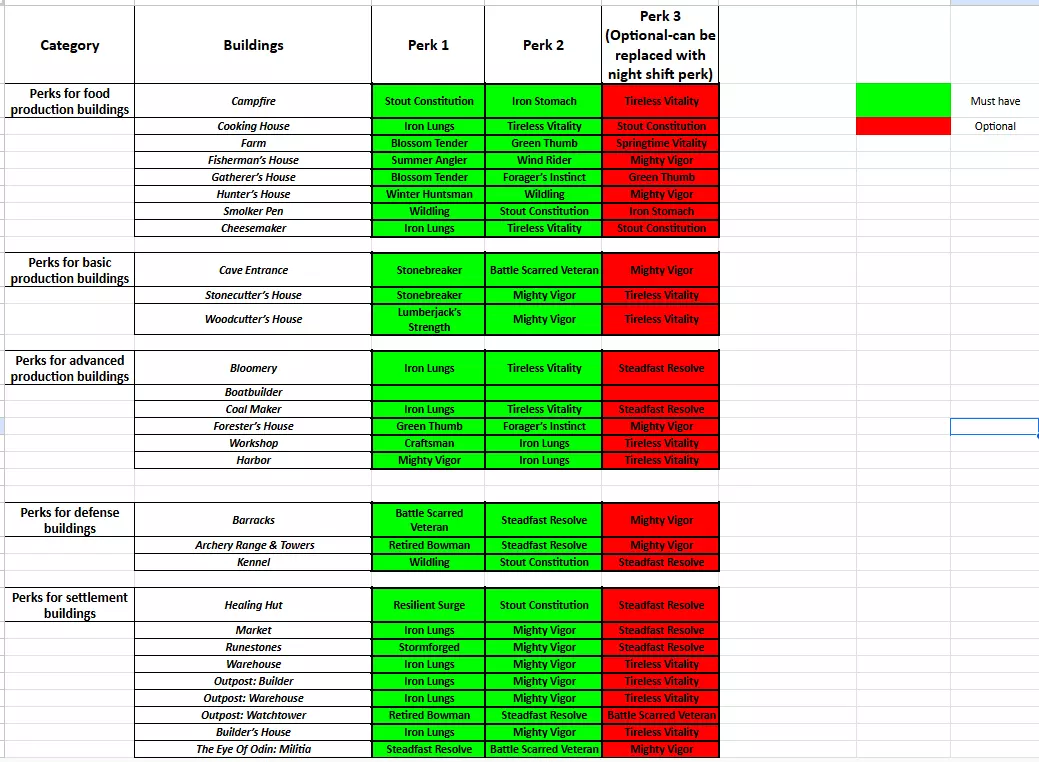
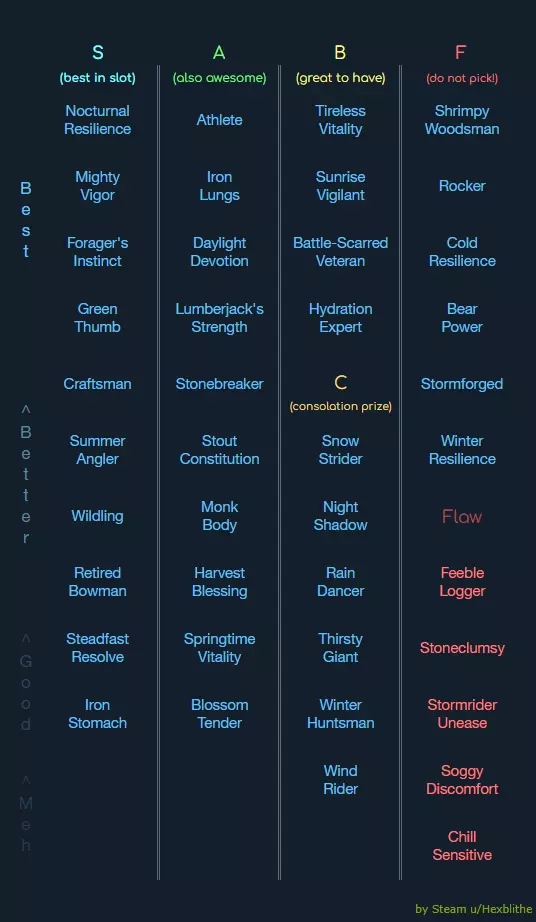
【冬季韧性】的效果是【寒冷韧性】的一半,但“弥补这一点”的是它仅在冬季可用。陷阱! 第六部分——技能强度分级表 既然大家(包括我自己,我也是大家的一员)都喜欢看强度分级表,以下是最终的强度分级表。 引用自Hexblithe:基于个人经验以及反馈,我会持续更新这份强度分级表!
> Scheduling Your Workforce Is Half The Battle We can set custom schedules for our Villagers by pressing TAB, selecting a villager, and going to their Schedule window. We can also save Presets which will be very useful to do as scheduling is done per villager, not per workplace. Preset names have a very limited character count but we can still make the best of it. Ideally, we want some quick-access Presets where we can "set it and forget it" but the depth of how much we want to interfere with our villagers' schedules is down to preference. Do we want no night shift early on? Do we want seasonal day and night shifts? Do we want three shifts instead of two? Do we want to reduce Leisure traffic by alternating schedules? All of these questions have answers that cater to how we want to individually direct and control our village's production and expansion but before making any decisions, let's look at some facts. ExhaustionVillagers with no negative drawback from Perks can normally work for 24hrs before collapsing from exhaustion (the exhaustion meter is the one that has a closed eye as its symbol) as long as they have access to water and food. This amount of work, however, will impose a severe morale penalty that can be seen as both "Schedule Balance" and "Work Hours" (we can see all bonuses and penalties to morale for our individual villagers on the right sidebar in their menu). Taking note of this penalty, if absolutely necessary, we can keep villagers working in 24hr crunch mode, for up to a couple of days. When they get exhausted, they'll drop whatever they're doing, go to their assigned residence (kind reminder to always make extra sure no villager is ever homeless in our settlements and outposts), sleep for a couple of hours until they recharge about one eighth of their exhaustion meter, and then go back to work. Morale will dip quite quickly, however, so before they die of exhaustion, there's a big chance they'll just leave the settlement. SleepingA fully exhausted villager will recover their entire exhaustion meter in five hours of sleep, regardless if they're assigned to a Shelter, Cottage, Longhouse, and also regardless of the type of bed they sleep in. In this currently build, the Tireless Vitality Perk doesn't affect how quickly the exhaustion meter drains or replenishes, most likely due to a bug. So all villagers who don't have any Perks telling them that they have to sleep more (such as Iron Lungs) only needs 5 hours of sleep. Villagers who sleep for 15 minutes will receive the "Energized" buff, which grants villagers +150 to Stamina and +20 to Stamina Regen! This is an amazing buff that lasts for 4 hours if they slept in a Shelter or for 6 hours if they slept in a Cottage or Longhouse (regardless of bedding). Ragnar and Aska can also gain this buff and it's recommended to have it available as often as possible. LeisureFive Hours or sleep isn't however a long enough part of a villager's day to give them any positive morale from Schedule Balance so more time needs to be added via Leisure. Leisure drains the exhaustion meter just as much as work does. While it will balance out the work-life schedule and give a bonus that will help recuperate any lost morale during work hours, it's not considered active resting. Even if a villager has only Leisure scheduled for a whole day, they'll still collapse from exhaustion. Villagers don't need to Leisure time to catch up on hydrating and eating but whenever their schedule switches from one activity to the other, they will check if they're thirsty or hungry and do something about it. Although villagers start with a couple of hours of Leisure between their Sleep and Work hours, it's not recommended to keep that going for most of the professions. The Energized buff is incredibly good but only lasts for a limited amount of time. Keeping two hours of Leisure between Sleep and Work will waste either 50% (if sleeping in a Shelter) or 33% of Energized's uptime. It's also not recommended to give most jobs a mid-work break because once Leisure time kicks in villagers will drop whatever they're doing and immediately go chill. Builders who drop logs and stones in the middle of road will rarely pick them up again after a break, Cooks will leave food cooking until it's ruined, and bloom workers will waste both coal and bloom. All of these are resources we'd rather not see wasted at any point, but especially in the first couple of years. Note that one other reason why it's a good idea to not work your villagers to the bone is because most activities grant points in a certain skill. All villagers start out as Tier 1 but when one of their skills reaches 25 points, they become Tier 2 villagers. These villagers require better foods and if they don't get those better foods, their morale will be capped to a lower value. If we don't have the necessary production chains up to keep Tier 2 and Tier 3 villagers happy, we may end up with a very unhappy workforce very quickly. So some early Leisure hours can get us that extra time we need to set everything up for the higher villager tiers. A Perfectly Reliable Starter ScheduleSo starting out from a 100% work-life balance outlook we can set villagers to Work for at least 12 hours, Sleep for 5, and Leisure for up to 7 hours. That sounds absolutely wonderful and this original starting point will give villagers more than enough morale to prevent them from leaving any village, regarding of decorations, religious buildings, or work and sleep anxiety. However, we do have access to decorations, and we do have access to religious buildings. We will also have fixes against anxiety soon enough. Not to mention that villagers aren't all blank copies of each other, they come with Perks. And some of those Perks affect morale as well. So, before we look at how to set up the most efficient schedules, let's a have a look at what boosts our villagers' morale so we don't have to worry about it. Optimistic OutlookStarting out with not a Building, nor a Perk, but a buff - Optimistic Outlook. Newcomers to the settlement arrive with the Optimistic Outlook buff which gives them a "+++" bonus to morale for 2600 in-game minutes (which translates into 43hrs 20min) meaning that from a morale standpoint, we can schedule newcomers to work themselves until exhaustion without any risks to their health or morale whatsoever. Efficiency is rarely ethical or humane, so make these choices however you wish to play. And on that note, while it's tempting to set an Optimistic Outlook Preset that's 24hrs of Work and then just change it the next day there's more labor to be gained by setting it be 19 hours of work and 5 hours of sleep for two days. Whenever we do go down this route, we'd better also remember to change that schedule to something more humane after those first two days lest we suffer the consequences. > Schedules Revisited
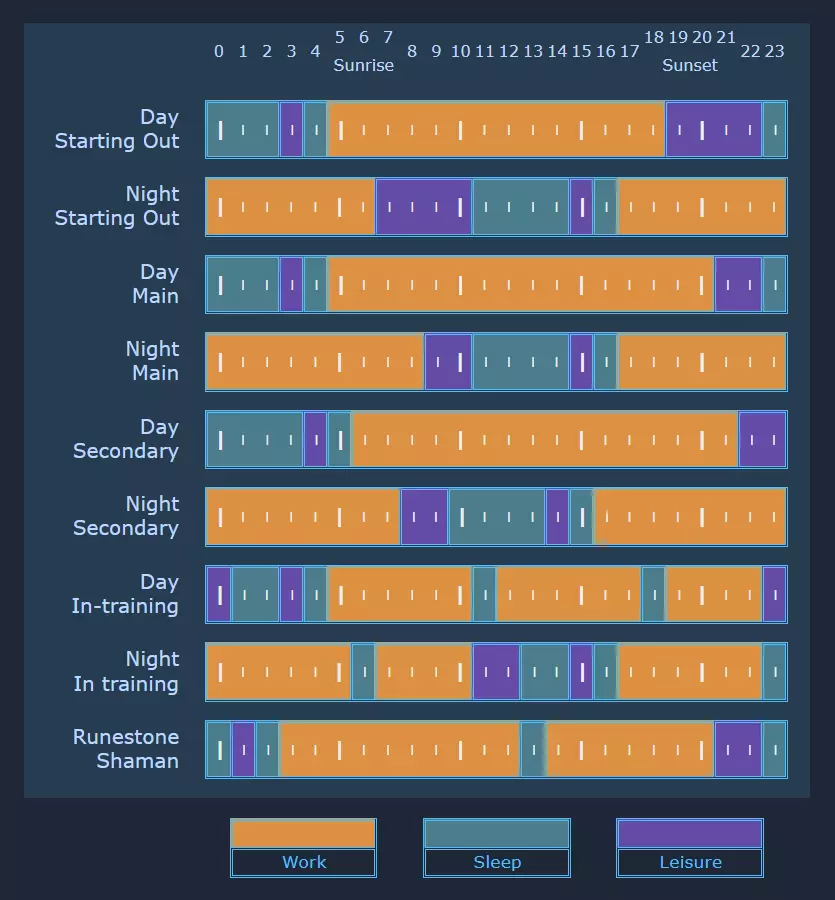
这些时长是综合了过去4-5个冬天的平均“最不寒冷”温度时段后选定的,能让村民有最大可能工作满16小时,而无需跑去篝火旁取暖。 工作开始前的睡眠时段之间安排1小时的休闲时间,目的是消除村民白天食物或饮水不足,或是以较低状态开始一天的任何可能性。 从睡眠直接进入工作状态,可确保【精力充沛】 buff 的持续时间达到最长,从而为他们提供最佳的性能加成。 兵营和箭术场的日程为“训练中”,它们设有额外的小睡休息时间,以便【精力充沛】 buff 能始终保持激活状态。萨满比最早的日班人员醒得更早,因为他们必须在日班人员享受最后一小时休闲时间前生火并开始仪式,这样日班人员获得萨满增益的概率会非常高。 新来的村民拥有持续近48小时的【乐观前景】增益,该增益提供(5.5×10⁻³)的士气“++”加成。在增益持续期间,这些村民不需要任何休闲时间,从抵达定居点开始,他们可以完全按照自定义日程表活动:20小时工作,然后4小时睡眠。如果我们选择使用这个自定义日程安排,需要注意两点:冬季在定居点围墙外工作的村民,如果被安排工作20小时将会冻死,我们不能凭良心要求他们这么做;无论什么季节,在村民醒来且没有增益效果后,我们都要记得将他们的日程安排更改为合适的类型。 朋友你好!你已经看到指南的结尾了,为此我向你表示感谢。 请放心,本指南完全由人工制作,在我的任何作品中都未曾使用过人工智能,将来也不会使用。这些都是我自然且真实的打字错误、语法问题以及非母语者的表达方式。希望你能喜欢这一切! 特别感谢Zendman制作了他那篇很棒的指南。本指南最初只是我想在他的指南下留下的一条评论。这条评论不断扩充,变得越来越长,而且至今仍未完成。感谢所有的支持、鼓励,以及一直以来成为我的倾诉对象! 感谢Steam用户凸~0~凸,他教会了我如何从游戏文件中获取本指南中99%的数值信息。 感谢Sand Sailor制作了这款我一直想玩的游戏。 感谢你,因为你真的很棒! 时间追踪:224小时……目前为止。 版本历史:1.4.2 目录中包含每个 perk 虽然对导航很有帮助,但这让我抓狂!我开始将它们整合为章节,并且在谷歌表格上花费了大量时间来保持理智,为所有特长设计了新的先决条件+收益+缺点布局;虽然耗时很久,但它们从未像现在这样清晰明了! 1.4.1 我提出了问题,开发者在直播中进行了回答,相应地,我用更准确的数据更新了一些相关的特长描述 1.4 日历系统大改终于完成。我对新的日历布局感到非常自豪。还为常规年份添加了匹配的“年度数据统计”表格,以及起始年份(又称零年)。新增了一些章节,简要讨论了日/夜特长以及所有季节和天气特长的效率 1.3 新的特长总览!已审核各个特长!新的特长强度分级! 1.2.4 2026新年快乐1.2.3 更改了指南介绍中的诗歌,使其更符合芬布尔之冬的氛围 1.2.2 补充了关于村民士气的部分信息 1.2.1 指南获得25个评分(非常感谢大家),开始重新调整指南结构,为更丰富的内容做准备 1.2 添加了第一张日程表图片 1.1.1 对格式进行了一些整理,并对分级列表做了小修改