换一换
换一换 


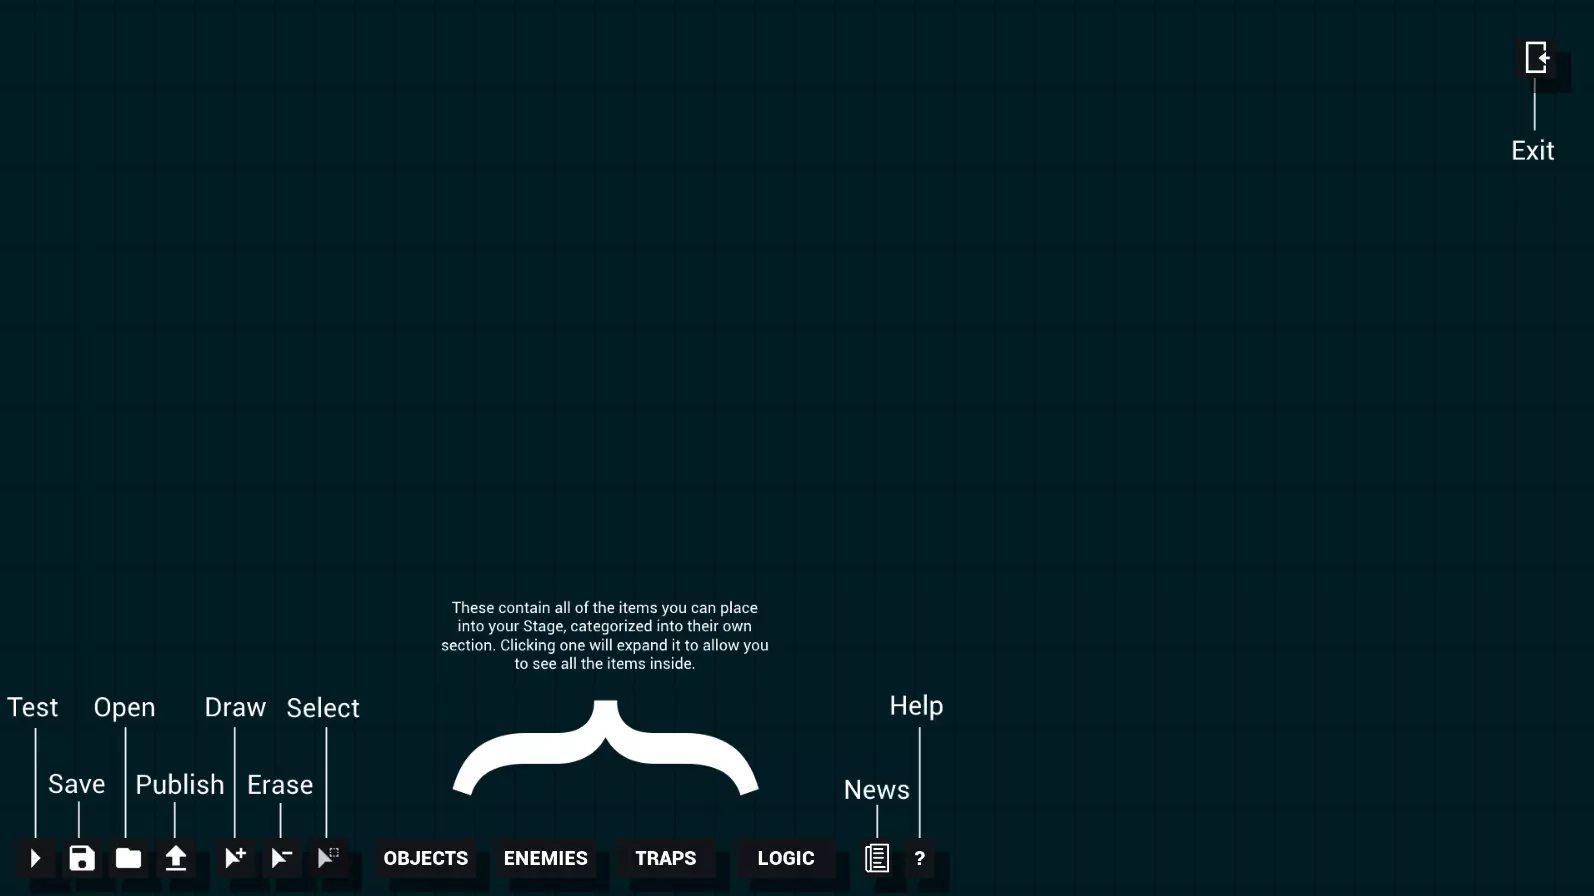
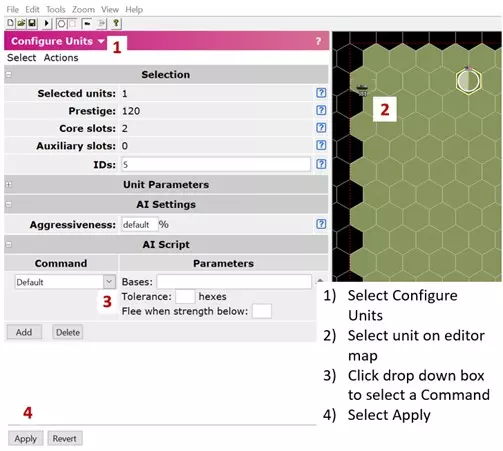
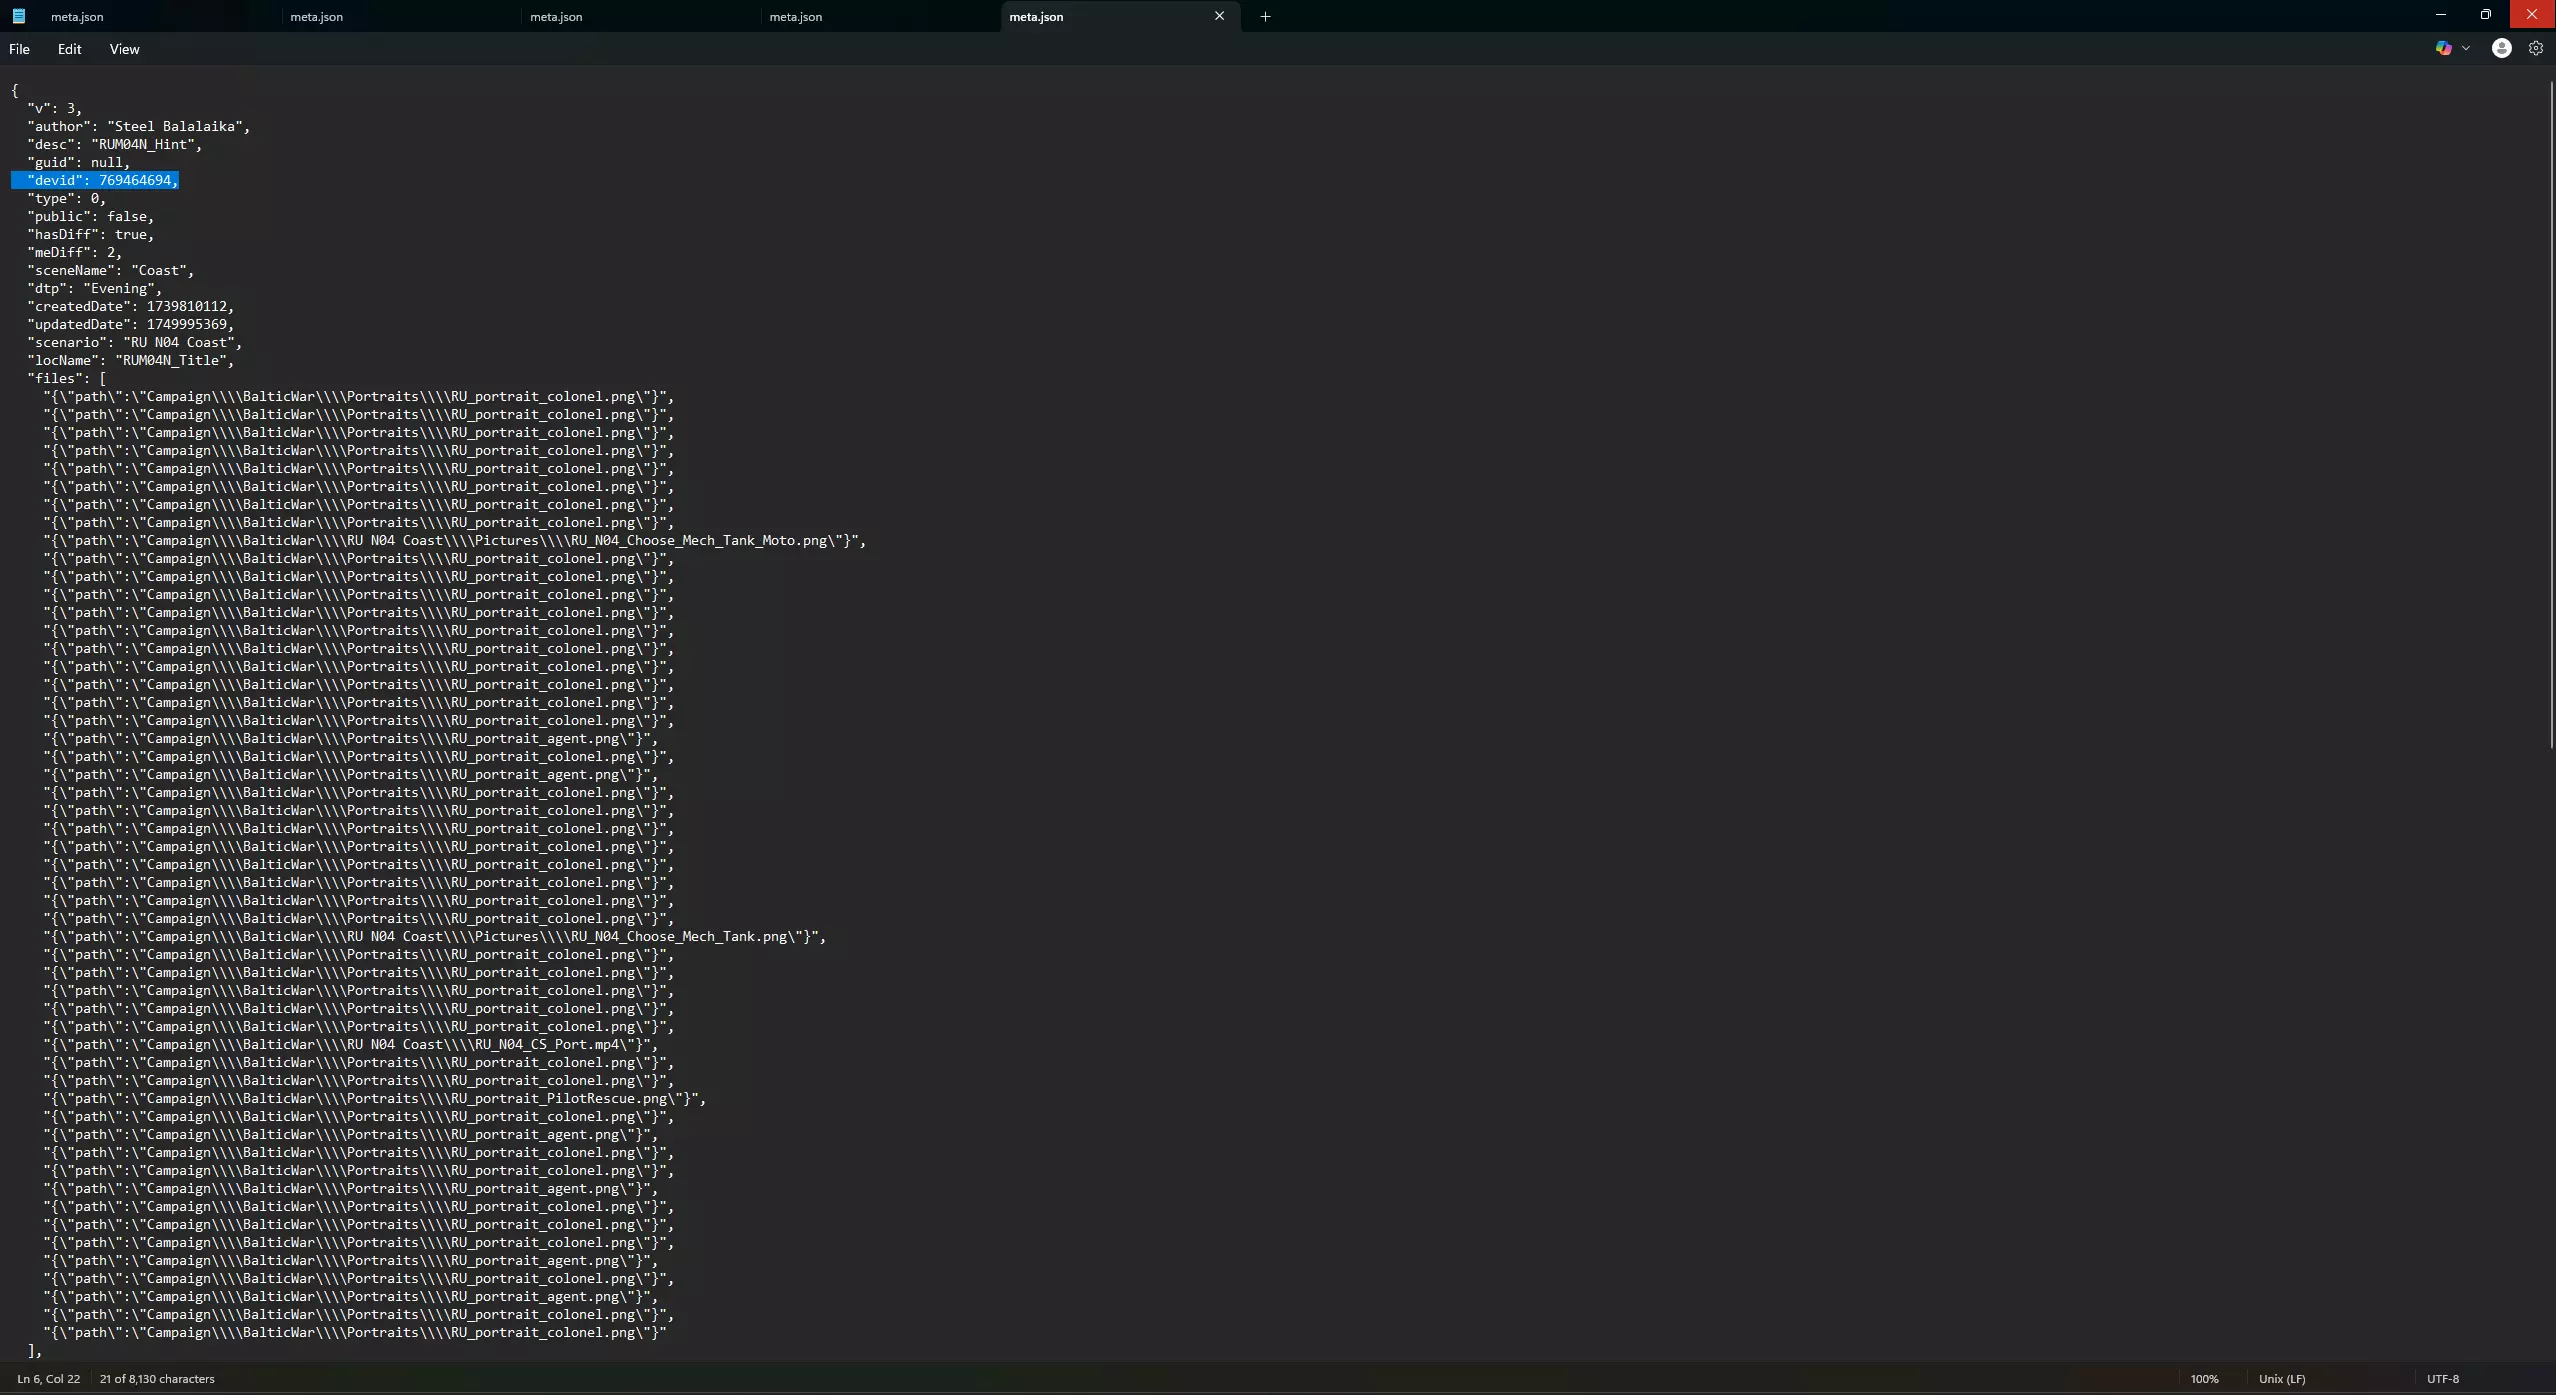
Covers all core editor tools: placing units/objects, configuring teams and objectives, using scripts, and testing missions. Ideal for beginners who want to build scenarios without losing their mind. New Unit In the top left corner of the editor from top to bottom you will see the NEW UNIT button, clicking this will open a sub-menu that allows you to pick from every unit in the game. These units can be filtered by the following areas by - Name - Type (Recon, Infantry, Logistics, etc) - Nation (By clicking on the flag of the country) - Specialization (By clicking on the specialization(s) of the country - Whether they have infantry slots - Whether they have cargo slots (for supply) In order to place a unit down, after filtering with your desired settings, click on the unit you wish to place and left click on the screen where you want them placed. You can modify the height of the placement by holding shift, however to my knowledge this does not matter for most units. You can rotate a unit after placing it down by left clicking it and the right clicking and dragging in the direction you want it to face. New Object In the top left corner of the editor from top to bottom you will see the NEW OBJECT button, clicking this will open a sub-menu that allows you to pick from a variety of entities used for missiong flow and scripting. These can be - Trigger zone (Area that will detect when something is inside it or not inside it) - Playable zone (Area that the players are restricted to) - Objective zone (Area that can be captured should a force be inside with no opposing force.) - Tag (Not fully sure, used for marking logic locations for things like airdrops, artillery and anything requiring a point in order to function.) - Spawn location (Point where units from player deck will spawn, has four options, multiple can be placed to spawn helicopters, planes, boats, and ground units.) - Waypoint (Allows units to move, secure buildings, or change aggression distance for ground, helicopter, and air based units at each point) - CameraPath Origin (For cinematic rendered in mission) - CameraPath Waypoint (For cinematic rendered in mission) - Marker (Visual indicator for player) - Props Scenario Config You’ll find the Scenario Config tool in the left toolbar of the Broken Arrow editor—click it to define core mission settings. It’s where you name your mission, assign authorship, write a description, and toggle gameplay rules that affect how players experience your scenario. - Scenario Name – Sets the title shown in menus and mission selection. - Author – Your tag or handle. Pure vanity. - Description – Optional mission briefing or background story. - Enemies Has One Color – Forces all enemy factions to share the same color for clarity. - Difficulty Selection – Enables a difficulty menu for the editor before mission start. - Disable Non-Mission Editor Spawn Points – Ensures only editor-defined spawn locations are used. - Day Time Preset – Sets lighting and weather (e.g., Overcast, Night). - Game Mode – Defines mode type (e.g., Singleplayer or Multiplayer mainly). - Started Playable Zone – Selects which zone is under player control at mission start. Leave empty if handled via scripting. - Music Engine – Sets the soundtrack logic. Choose Random for variety or tie music to player actions in scripts. - Start Difficulty (debug) – Forces the mission to launch with a specific difficulty setting for testing purposes. Doesn't affect final player selection if Difficulty Selection is enabled. Team Manager The Team Manager sets up which factions, players, and AI participate in your mission. Found on the left toolbar, it lets you define team composition, assign player slots, and apply restrictions. - Player Deck – Lets the player pick a deck at scenario start. You can override this with a pre-built deck (must be made or imported in the editor). - Lock Icon – Disables that player slot entirely. Use this for empty positions or to force only specific players. - Mandatory – Mission won’t start unless a player (or AI) is assigned to this slot. - Deck Restrictions – Opens a menu where you limit what countries/specializations a player can use (e.g. only Russia, only Naval). - AI Toggle – Intended to let the AI control the deck. Not fully functional yet, so don’t rely on it unless it’s patched. Task Manager The Task Manager is where you create and organize mission objectives. Found on the left panel, it’s used to define goals like "Capture Point A" or "Defend Base" and tie them to scripting logic. - New Task – Adds an objective entry to your mission. - Title Text – Name shown to the player (e.g. “Destroy the Convoy”). - Type – Sets whether it’s a Primary, Secondary, or Bonus objective. - Status – Controls visibility: Hidden, Revealed, Succeeded, or Failed. - Hint – Optional description or tip shown to the player under the objective. Medal Manager The Medal Manager is used to define optional challenges tied to your mission—complete them to earn medals at the end. Think of them as mini-achievements for players to unlock during a scenario. - New Medal – Adds a new reward to the mission. - Title Text – The name of the medal (e.g. “No Losses” or “Speed Run”). - Medal Image – Choose one of three preset visuals to represent the award. - Condition Text (1–3) – Describe what needs to be done. These are just labels—logic must be enforced through the Script Editor. - Status (1–3) – Determines when a condition is met: Success, Fail, or Ignore. Public Options Dunno Script Editor The Script Editor (aka Node Editor) is the heart of mission logic in Broken Arrow. Found on the left toolbar, this is where you build conditions, triggers, and effects using a visual node system. If you want anything to happen beyond units just sitting there, it starts here. - Events – Green nodes like On Unit Dead, On Trigger Entered, or Once. These fire when something happens in-game. - Actions – Purple/blue nodes like Spawn Unit, Move Unit, Set Income, Update Task. These do stuff when an event is triggered. - Conditions – Light green/yellow logic nodes like Count Units, Equal, AND, Get Difficulty. Use these to check if something is true before doing something else. - Delays – Add wait time between actions. - Comments – Gray blocks for keeping your logic readable (you’ll need it). - Variables – Store mission data to check/set later (e.g., track unit deaths, timers, flags). - Flow Lines – Yellow lines show event flow; white lines usually carry data/variables. This doesn't answer my question/You forgot this If you're stuck, confused, or just wondering "how the hell do I make X happen?" — drop a comment. Ask how to set up triggers, win conditions, unit spawns, or anything else. This guide’s still growing, and your questions help what gets added. How do I support this? ☕ Buy Me a Coffee[coff.ee] Questions Answered Q: Hello, may I ask how you managed to open the official campaign files with the editor? I know the campaign files are in *broken_arrow/BrokenArrow_Data/StreamingAssets/sharedmissions*, but I can't seem to read these files with the editor. A: You have to go into the meta file for the mission located in that same directory and remove the entire line with devid and the string of numbers, after this you should be able to edit it in the editor. looks like "devid": 769464694, , delete the entire line so there is no gap
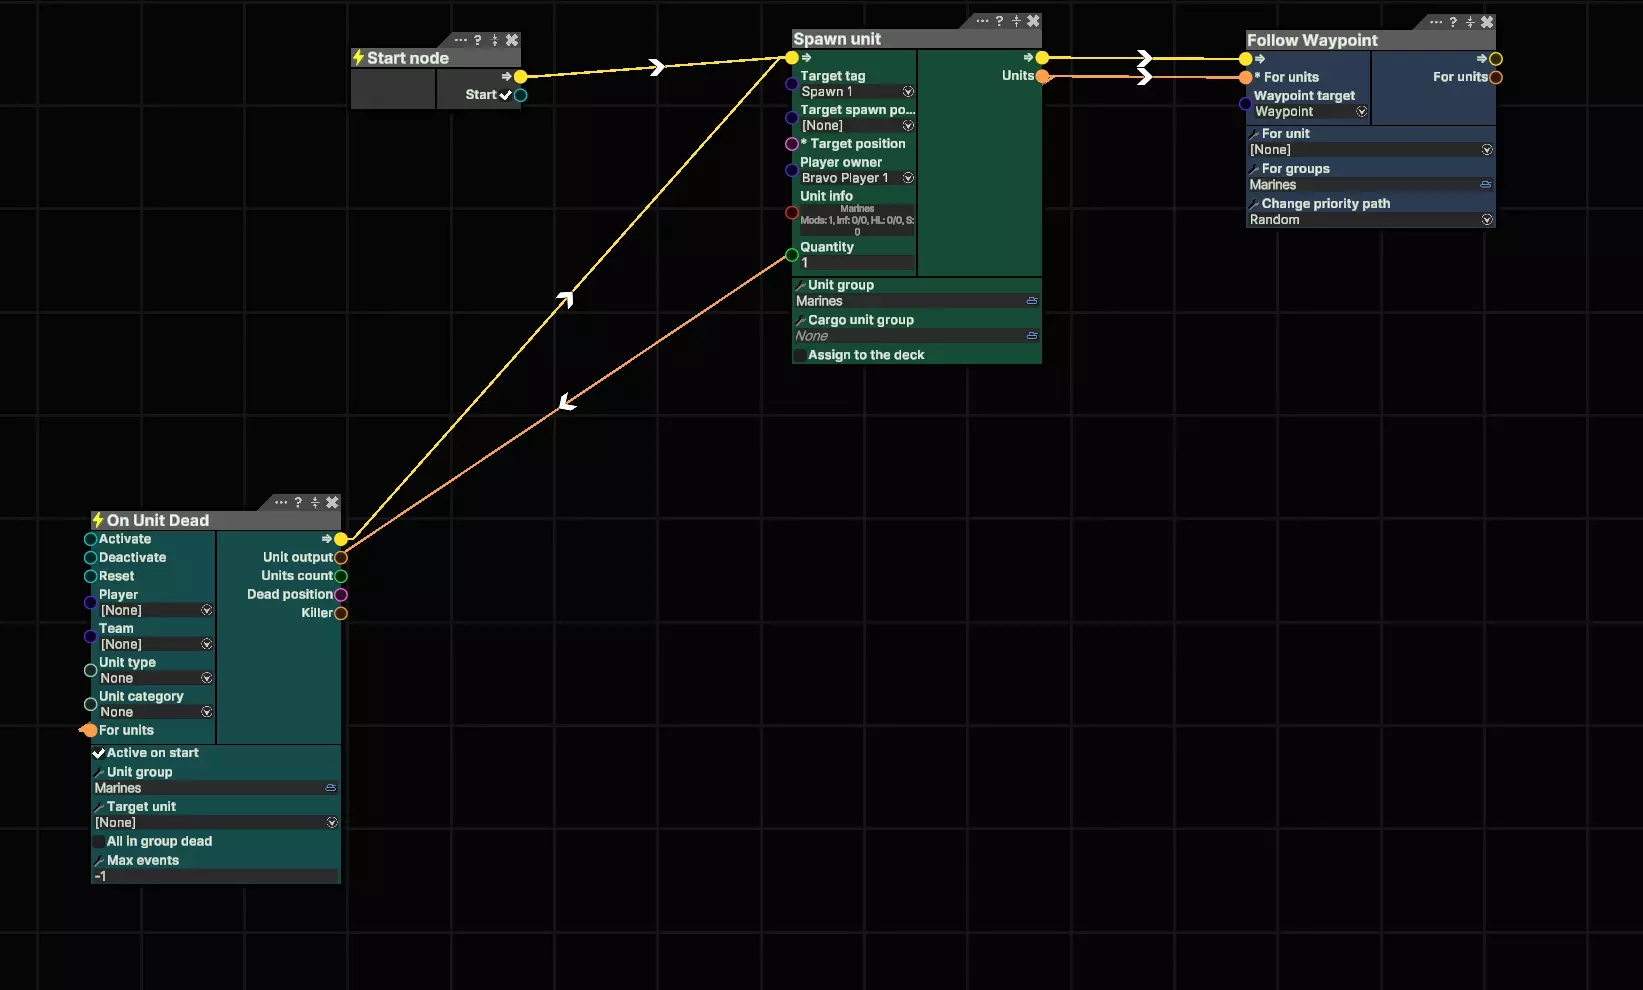
问:我已经向你发送了好友请求,我需要通过游戏截图来询问关于编辑器的问题。目前我可以通过脚本编辑器生成单位,但不知道如何让所有生成的单位被杀死后再次重生!“单位死亡时”触发条件在这方面处理得不太好。 答:是的,只需使用“单位死亡时”触发条件,然后将其连接回你的“生成单位”节点。这样每次所有单位死亡后都会完全重生——就像我的截图中那样。
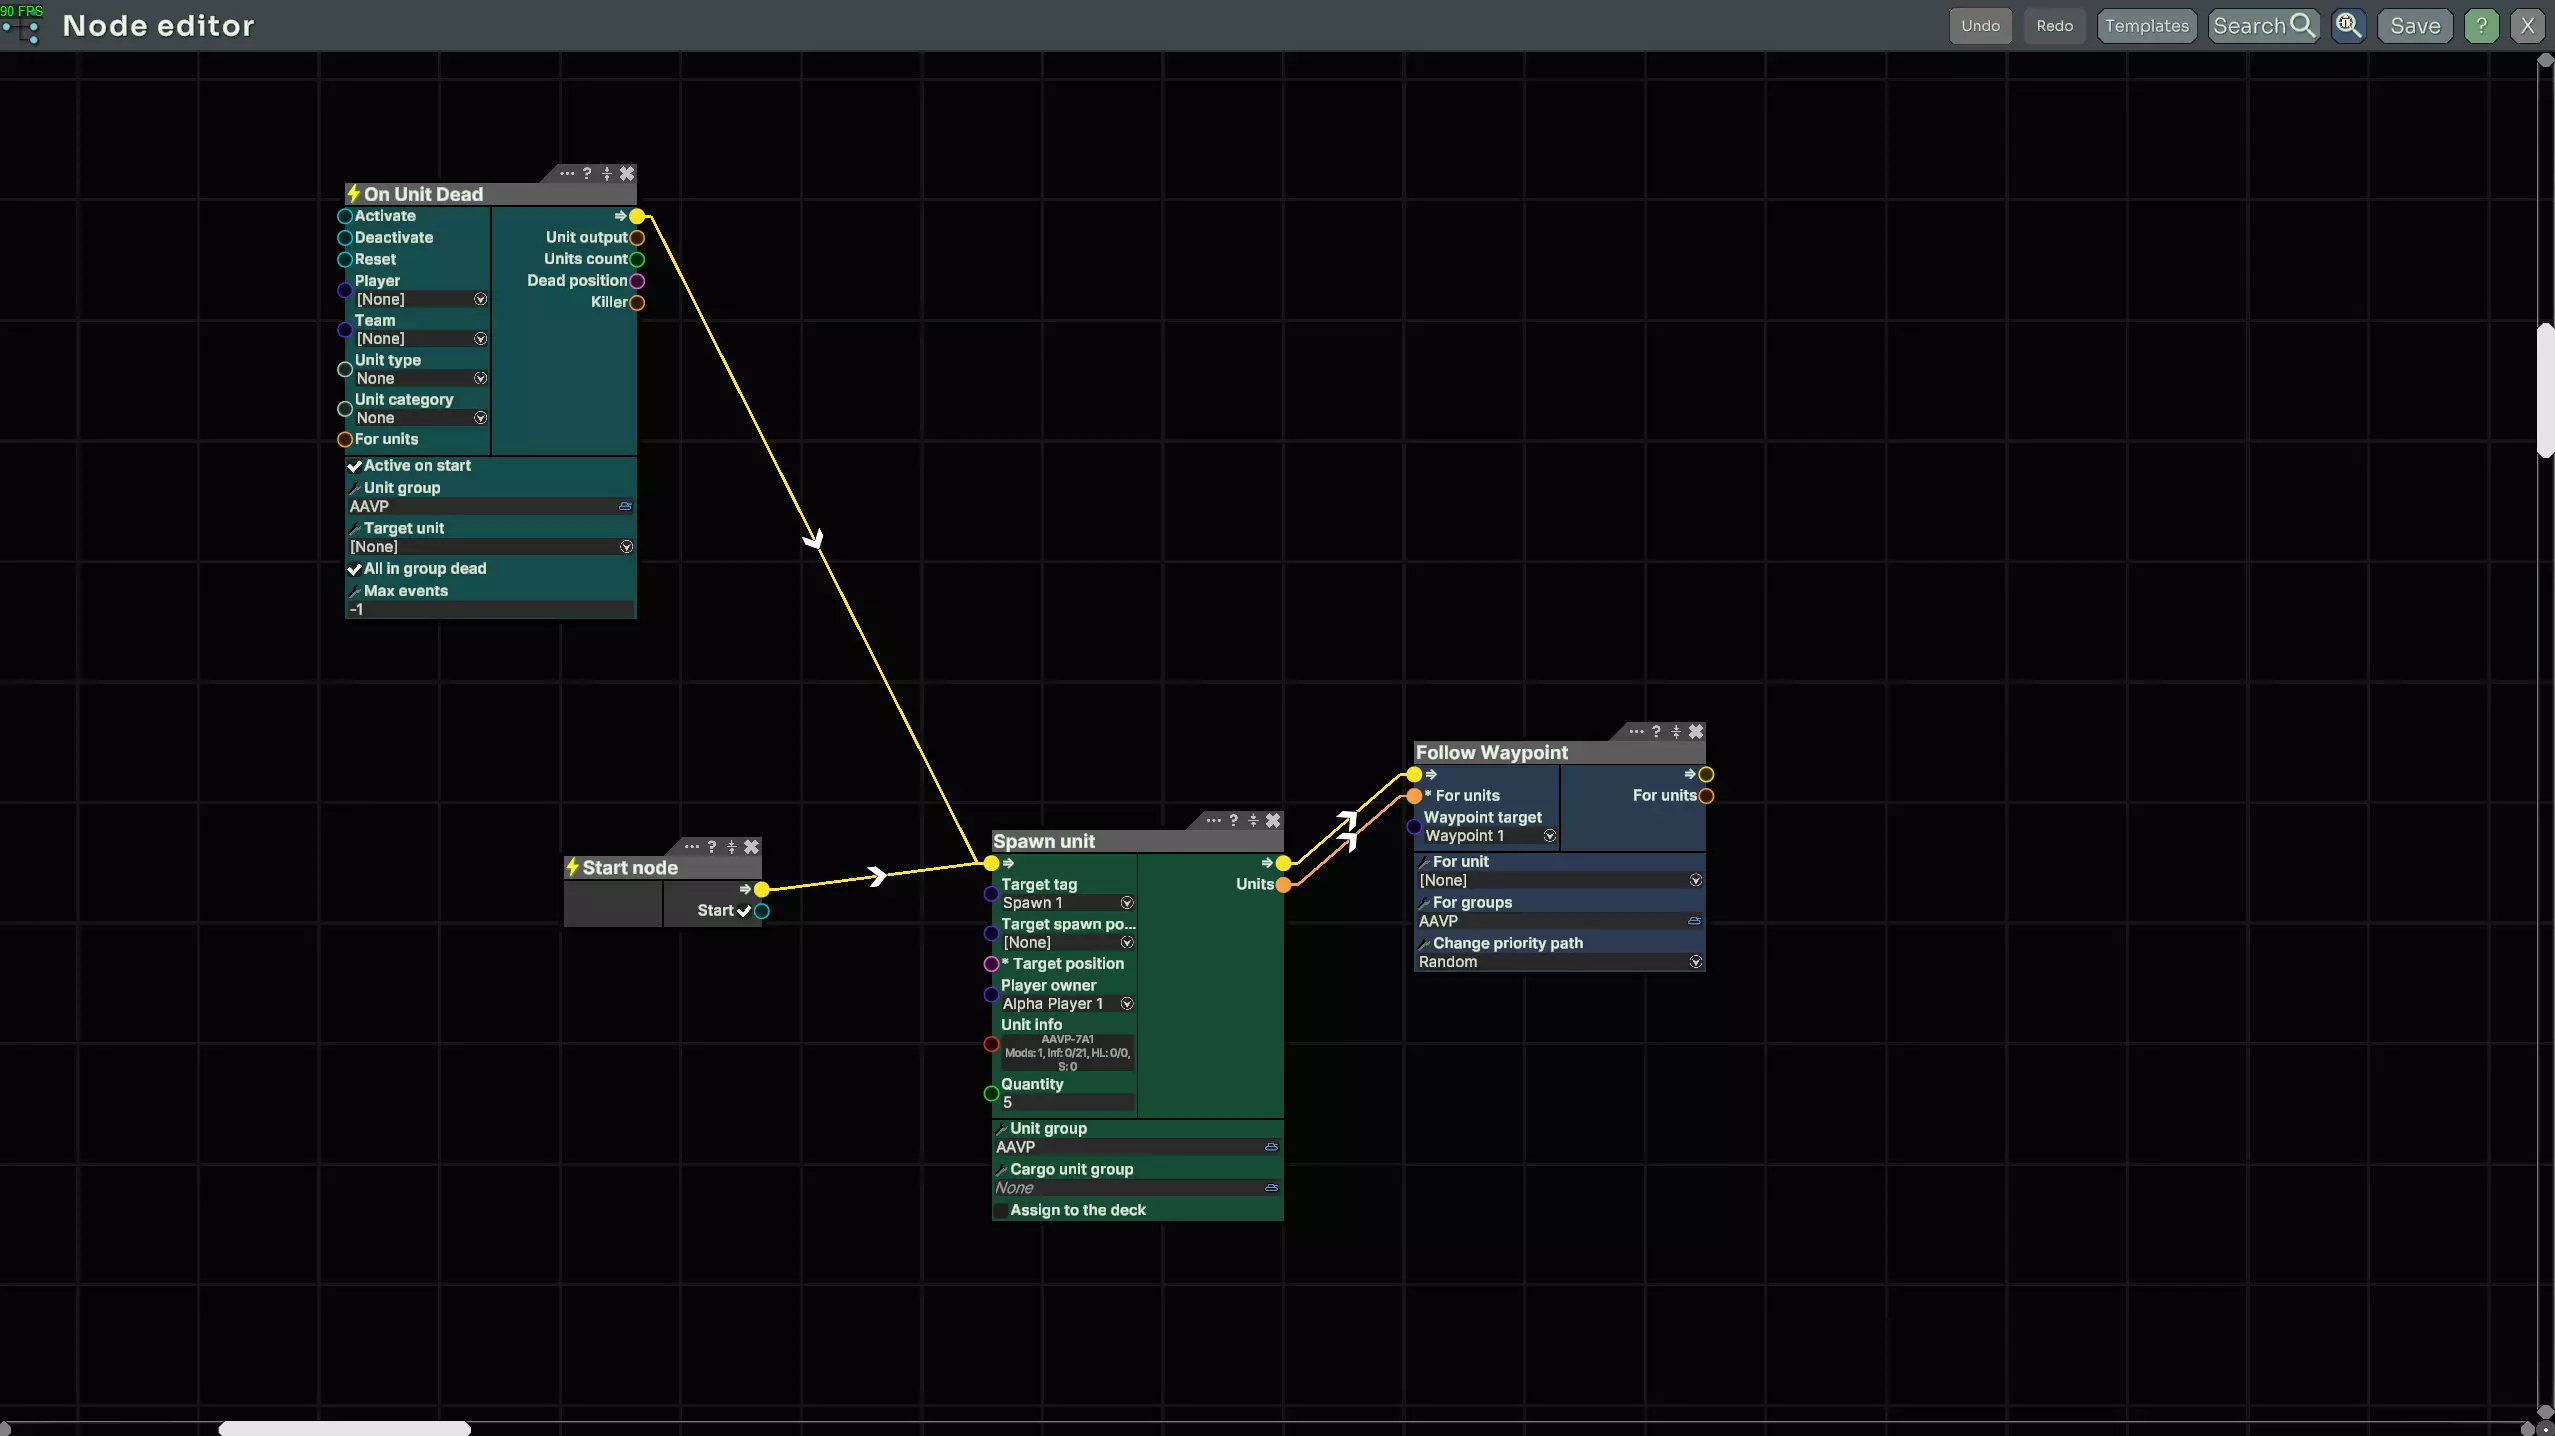
问:我看了你的脚本,基本和我的一样,但我希望的是,当第一批生成的两名士兵全部阵亡后,才会重复生成这一波士兵,而不是现在这样每次有一名士兵被击杀就立刻刷新两名士兵! 答:创建单位组,确保所有单位都使用相同的组名。例如,如果组名是AAVP,且组内有五个AAVP单位,那么只有当这五个单位全部被摧毁后,才会重新生成这五个单位。
问:如何删除东西? 答:做一个后空翻两周 问:嘿,我在空投单位(比如T-90)方面遇到了问题,我想知道在它落地后如何让它移动并执行任务目标? 答:所以使用货物名称为它设置一个可调用标签,然后创建一个触发器来检查该名称(在单位落地的位置),接着为你设置的货物名称创建一个跟随航点,将其发送到所需的航点。