换一换
换一换 


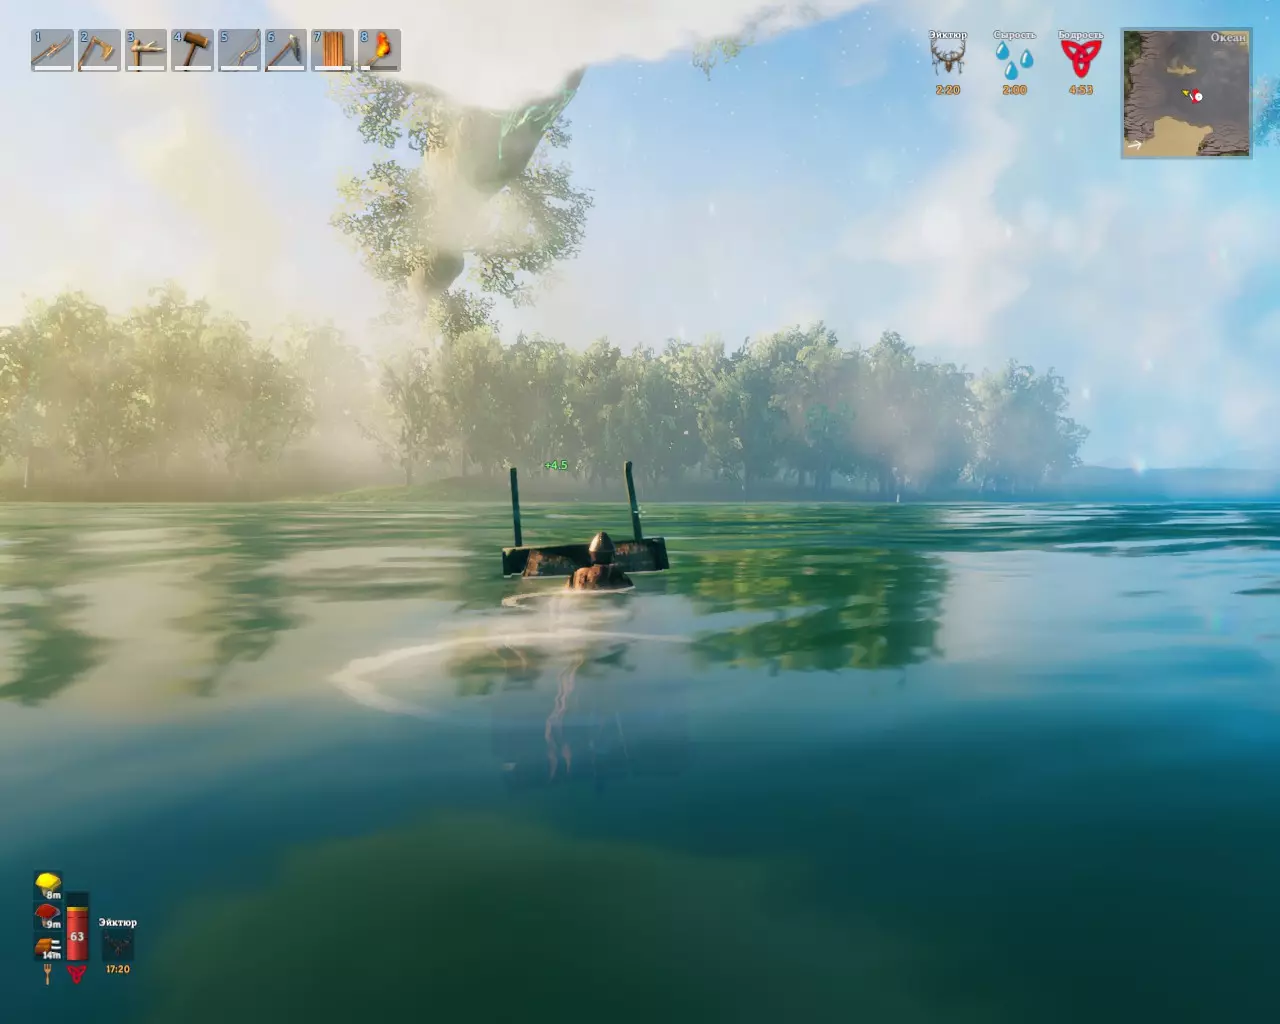
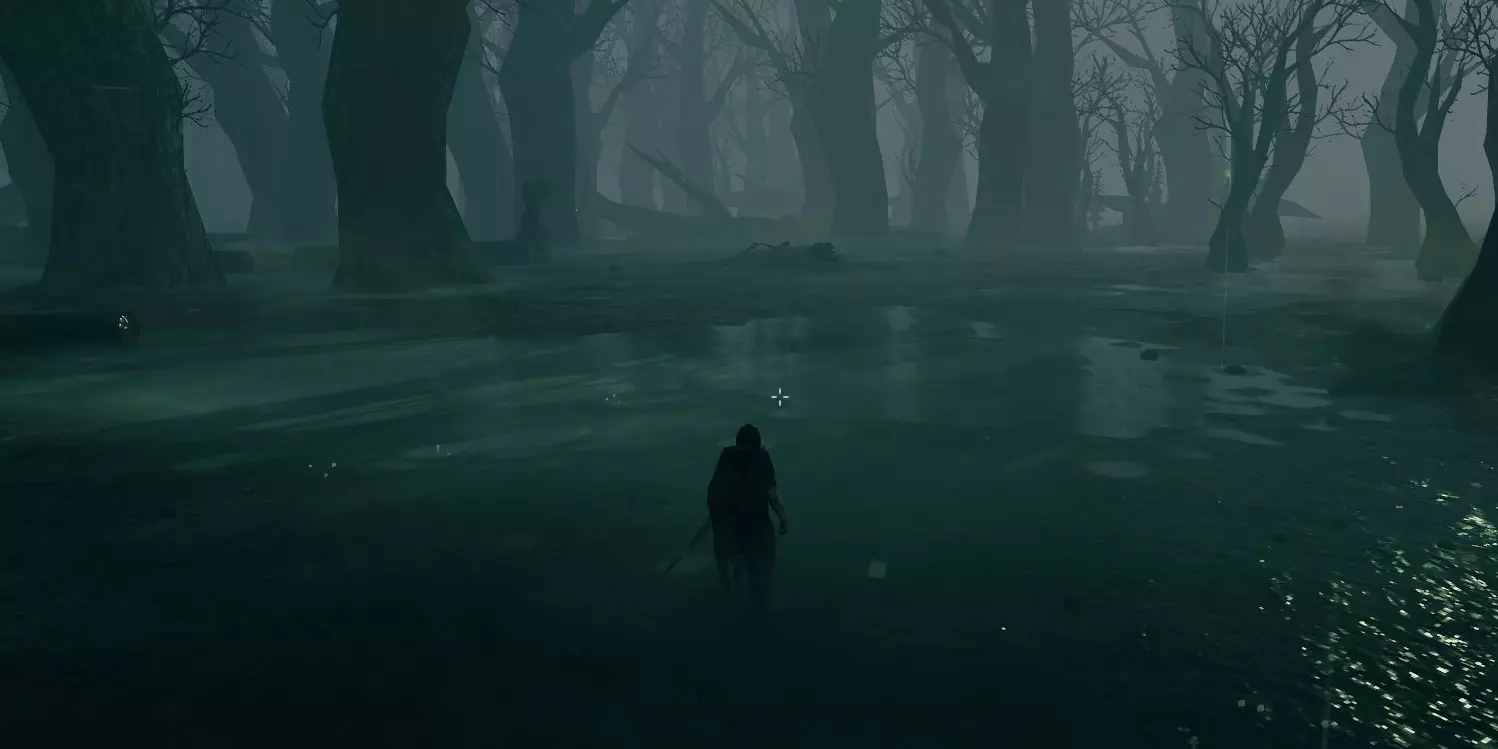
这是一份为(不那么)勇敢的旅行者准备的详尽指南,适合那些希望确保自己生存下来的玩家。凭借超过2000小时的单人及多人游戏经验,本指南将为你提供游戏中第三个生物群系(大家的最爱:一直备受喜爱的沼泽)的技巧和窍门,以及一些重要剧透,这些剧透在指南底部会有相应标记。 注意: 这是(即将成为)系列指南的第四部分: 第一部分(介绍、一般游戏机制及多人游戏技巧) 第二部分(探索草地、繁殖机制及一些可选的重要剧透)第三部分(探索黑森林、熔炼/制作、航海、技能升级、 farming、获取木材、传送门使用、更深入的基地安全以及一些可选的重要剧透内容)已省略。 简介 欢迎你,(不那么)勇敢的旅行者! 首先,我强烈建议你先查看本指南的第一部分(已省略),在那里我们已经介绍了游戏最重要的基础知识(看看其他部分也无妨,因为我会根据游戏进度来组织所有提示和技巧)。这样,我们就能在需要注意的所有事项上达成共识。我可能会重复一些内容,但如果你觉得遗漏了什么,可以再去那里看看以确保没有问题。在这部分内容中,我们将介绍关于令人向往的沼泽区域需要了解和去做的事情——我知道你已经迫不及待想去那里了。如果你觉得我遗漏了某些内容,或者对这个生物群系还有疑问,欢迎在评论区告诉我,我会尽量回复你。 我会尽量分享最有用的信息,同时避免过多硬核剧透——部分剧透内容会在文末标记出来,供那些想稍微“走捷径”玩游戏的玩家参考。但请注意,这可能会破坏你的游戏乐趣,或者让游戏变得过于简单,甚至可能不值得你这样做。是否使用这些信息完全取决于你自己。 在评价本指南时,请记住我正在制作一系列指南,并且已经在另一篇指南中涵盖了所有最重要的基础知识,具体可以参考上方内容。注意: 本指南底部包含严重剧透, 各主题内包含部分剧透(已标记为剧透) 关于此生物群系 很高兴你能来到这里,不是吗?不开心?说实话我也一样。 在沼泽中,你必须习惯糟糕的能见度和持续的潮湿效果,因为那里总是在下雨。 阴暗的氛围并没有让情况变得更好,但为了推进游戏进度之类的,我们还是开始吧……注意脚下。或许还要小心树桩。进入时建议你的主武器技能达到30级以上,这只是个能让你轻松一点的建议。 不确定自己的装备和食物是否适合进入沼泽?可以查看黑森林的第三篇指南,在首领章节下方有相关推荐。 如何停靠船只:虽然你可以在沼泽边缘安全地掌舵,只要保持移动且不让任何东西损坏你的木筏,但我建议:不要尝试在沼泽内停靠或登陆船只,水蛭一有机会就会开心地攻击你和你的船。相反,尝试寻找旁边有草地或黑森林的沼泽(远离任何你还不了解的其他生物群系)。在离沼泽有一定距离的地方建造一个小码头,最好用地面材料建造一个4x4米的小平台,通过抬高地形在上面搭建一个小型传送门小屋(包含传送门、工作台,可能还有一个用于存放矿石的箱子)。理想情况下,那里应该有浅水区,以防矿石掉落或船只被毁,因为钉子和许多其他物品会沉没。 探索/美化沼泽 根据你对待在那里的厌恶程度,幸运的是,至少有几种方法可以让你的生活稍微轻松一些: 用锄头把沼泽彻底整平!确保锄头等级达到3级,这样它能更耐用,方便你开辟行走路径。一定要不惜一切代价避免进入水中或水坑,这些地方很容易变成死亡陷阱。 尽可能砍掉所有树木,这样能让你更好地观察周围环境。此外,还能获得一些木材(以及后期需要的古木皮,不过古木皮也可以通过刷地下城获得,所以是否砍树由你决定)。但要注意周围环境,砍树会导致怪物更频繁地攻击你。 合理使用传送门,我们会在本指南的下一部分详细说明。只需确保附近总有一个传送门,以防紧急情况或进行尸体寻回。 经典原则:不要尝试近战攻击带星号的怪物,尤其是二星怪物。经典模式:夜间四处跑动可能会受到惩罚。以下是可能的惩罚示例:
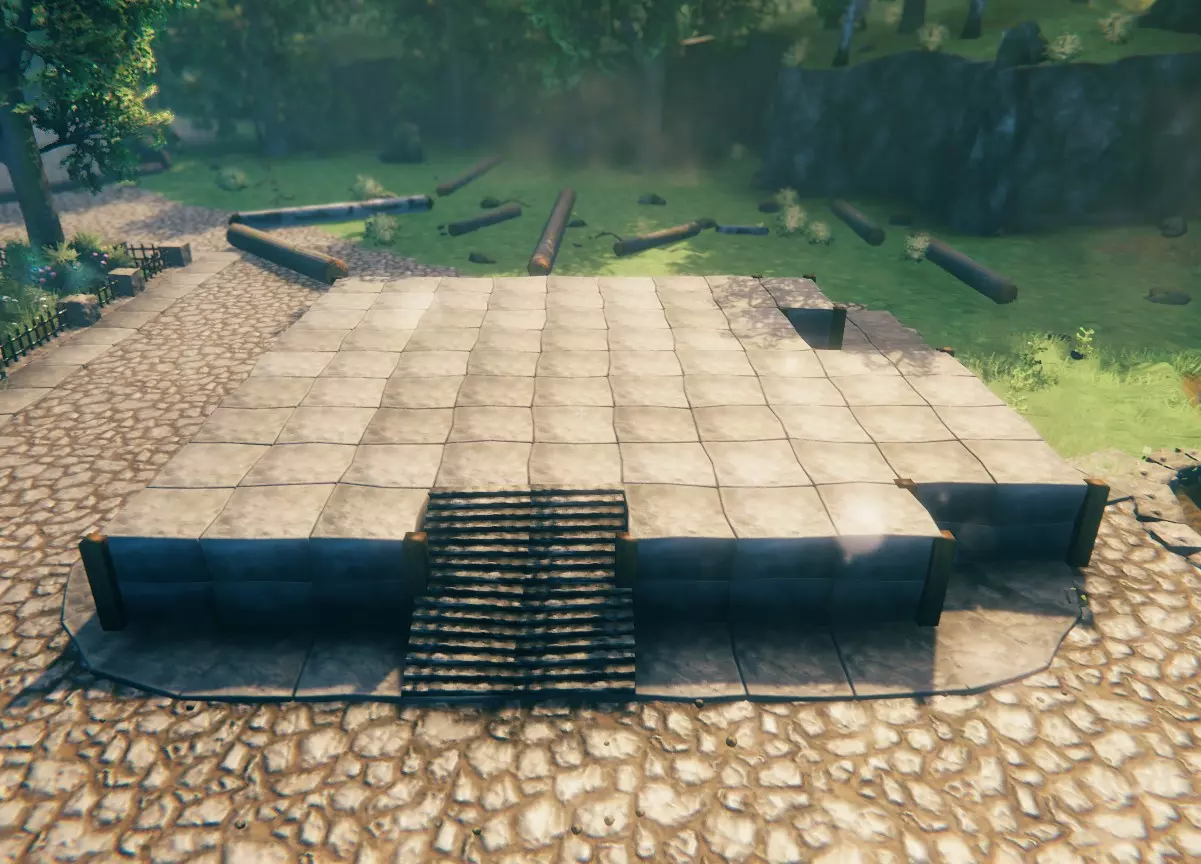
当然你的能力有限,但在中心区域(例如与强敌战斗时),这已被证明非常有帮助。 【传送门定位】
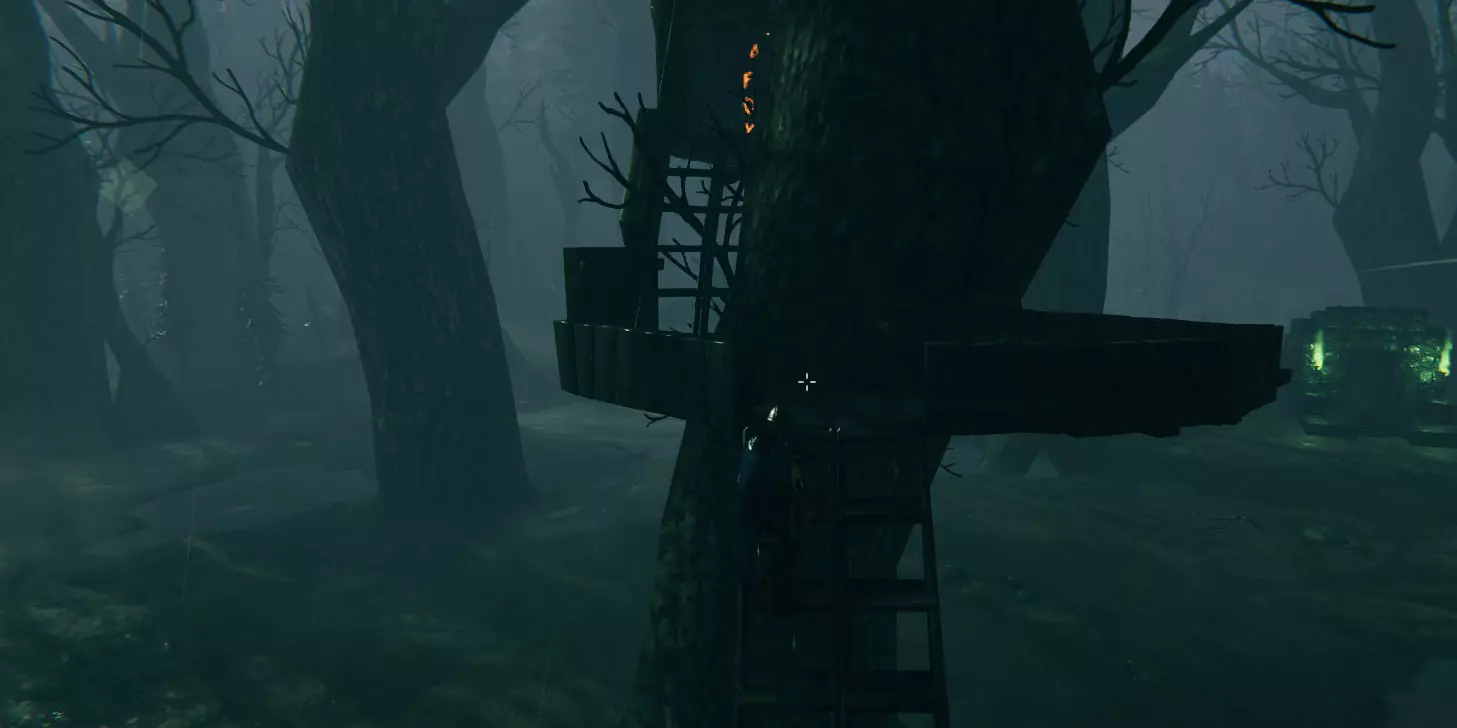
There are mainly two good options here which I will mention, although I will always prefer the tree-version (both structures are indestructible): Dungeon-TopIn most cases, you should be able to jump on top of the dungeons, allowing you to have a (pretty safe) spot for portals. However I prefer higher spots, so the second option will be ... Tree-Top-Portal-HutIt will require quite a bit of wood, but will allow you to build platforms and walkways around/on top of the big indestructible trees. I like using those for sniping/farming or killing certain mobs which I do not want to hit me or my portals. Basically just build one of these platforms/huts in central spots of the swamps with a distance that you feel comfortable with. Suggestions / Ideas You could combine those two by having the tree-portals in central spots and build a temporary portal at/on top of each dungeon you're currently doing In theory you could build a walkway up there all throughout the whole swamps. Just keep in mind, that if there are 3 'base'-items within a radius of 40m of each other, those might trigger raids. I have explained this HERE under GTFO (Base-Building, Safety & Raids) Note If you're building any kind of elevated hub/hideout etc. with ladders, make sure to leave at least 2m space from ground to the steps above - you will need to jump, but mobs who cannot jump won't follow you. Having Trouble Exploring The Swamps? This biome has always been the topic of many threads by players, who are stating, that they're having a hard time progressing from the black forest to the swamps. Since this will come up again regularly, I'll try to address this and make a few suggestions here: New to the biome? Maybe it's better to stay at the edge so you can safely escape if needed. Take it slow, only take on one enemy at a time and only test if close-range battle works, if you're really prepared for it. Take another look at your armor: Are you wearing a fully upgraded bronze-set? If so, you might lack speed in case of something going wrong. Hunting a few more trolls to get the upgraded troll-leather set instead could be an option. It will only have 6 armor points less all in all but you will be able to move 10% faster. Are you using the right weapons? Maybe try something else and test it in the black forest first - would another style of fighting or type of weapon actually suit you better? Have you ever tried using a bow? I'll heavily recommend using one (at least as backup) in the swamps. With a sneak attack, some mobs will only need one shot and poisoning can almost be avoided completely if done right. Do not sprint everywhere; it will only leave you with less stamina while making quite a bit of noise, attracting monsters nearby. Make sure to use the right foods (see the last guide): I will always use 2x HP and 1x Stam. Use the meads that you can craft using the cauldron & fermenter (see last guide). If needed, have a few in a chest somewhere, so you won't have to wait for them to finish or go without them despite needing those. The game will keep on spawning enemies, as soon as you have killed some. But if you feel like you're being overwhelmed or even overrun by starred mobs: Take out your bow and sneak around to see if there is any spawner around. If you find one, try to destroy the body piles from afar. You cannot avoid to run into starred mobs, but this will lower the chances of it happening. If it's possible somehow, try to get the turnip seeds to get foods that will boost your stats a little more. Should you have found some but still have trouble, please have a look at the serpent-foods that I have listed. You could have a quick look at the spoiler-section on other ways to get iron if all else fails (once you have these foods, you should be fine). Do you maybe want to level your skills a bit more? And gather a few resources for building and portals while doing so? The greydwarf-nests probably would be a good option (explained HERE under Level Up! (Leveling Your Skills)).If needed, weapon suggestion for the swamps: Bronze Mace& Shield (upgraded to max) & Finewood Bow (upgraded to max) Most mobs in the swamps are weak against blunt damage Some people seem to like using the atgeir for mob-groups as it seems to be able to stagger multiple enemies - if you're into melee. Mobs / Enemies Check the details if needed, most of the swamp-mobs are undead and resistant to poison, as they will use it themselves to inflict damage: Skeleton Ranged- and melee-versions may spawn throughout the swamps and at spawners. Starred- and non-starred versions possible Weakness: Blunt, Fire Resistance: Pierce, Frost Immune: Poison Leech Will spawn inside water / mud puddles in the swamps and will do poison damage (DOT) if you get too close/get bitten Starred- and non-starred versions possible Weakness: - Resistance: Poison Immune: Fire, Spirit, Stagger Blob Doing poison-damage / Randomly spawned throughout the swamps and in crypts; one oozer will turn into two blobs if 'killed' Only non-starred versions possible Weakness: Blunt, Frost, Lightning Resistance: Fire, Pierce, Slash Immune: Poison, Stagger Oozer Doing poison-damage / Randomly spawned throughout the swamps during nighttime and in crypts; one oozer will turn into two blobs if 'killed'. They have a small chance to drop one scrap iron. Sometimes one will await you in front of a crypt, 'guarding' them. Only non-starred versions possible Weakness: Blunt, Frost, Lightning Resistance: Fire, Pierce, Slash Immune: Poison, Stagger Draugr Ranged- and melee-versions may spawn throughout the swamps and in crypts Starred- and non-starred versions possible Weakness: Spirit Resistance: Fire Immune: Poison Draugr Elite Melee-versions may spawn throughout the swamps during nighttime and in crypts (as well as most likely at spawners) Starred- and non-starred versions possible Weakness: - Resistance: Fire Immune: Poison Surtling Fire-demons that will spawn at geysers which can sometimes be found in the swamps, will do ranged attacks and sometimes will make it hard targets because of their movement (The damage they do can be neglected). They might drop coal and surtling cores. Only non-starred versions possible Weakness: Frost, Water Resistance: - Immune: Fire, Poison, Spirit Wraith Ghosts doing a good portion of damage in melee if you should get hit. Might be spawned near abandoned buildings in the swamps or spawn randomly throughout the swamps during nighttime. Fire-arrows might help to get their health down while they're coming down at you. Only non-starred versions possible Weakness: Fire, Spirit Resistance: Blunt, Pierce, Slash Immune: Frost, Poison Abomination These are the 'trolls' of the swamps and might catch you off-guard while just wandering around minding your business. If you want to spot them from afar to avoid triggering them, look for slightly smaller 'rotten treestumps' than the usual ones with green fluid dripping down. For melee it is advised to take them on with a (minimum) maxed out bronze shield and axe - for the attack patterns try your luck or have a look at youtube. If you want to do them with a bow, you will probably need around 30-50 fire arrows; shooting, letting it tick down and renewing the DOT. They will however drop nice mats if you want to buff your bow-skill, see Armors below. Another way would be to lure them into geysers or build a bonfire, surtlings won't attack them directly. Note: If you're killing them with a bow, make sure that they're not within deep water! You might be able to get the loot, but swimming there really isn't fun at all. Only non-starred versions possible Weakness: Fire Resistance: Blunt Immune: Frost, Poison, Spirit Dungeons / Getting Iron You will need to use the key which you got from the elder to unlock the iron gates (just once on the entrance). Once again, you will deal with randomly generated underground-structures and I wish you good luck for finding a few with a lot of iron in them... The rooms will often be blocked by big clumps called Muddy Scrap Piles. By using your pickaxe, they have a chance of dropping iron scraps, which can be smelted into iron. If you are lucky, you can find some iron scraps within chests. How to find them:
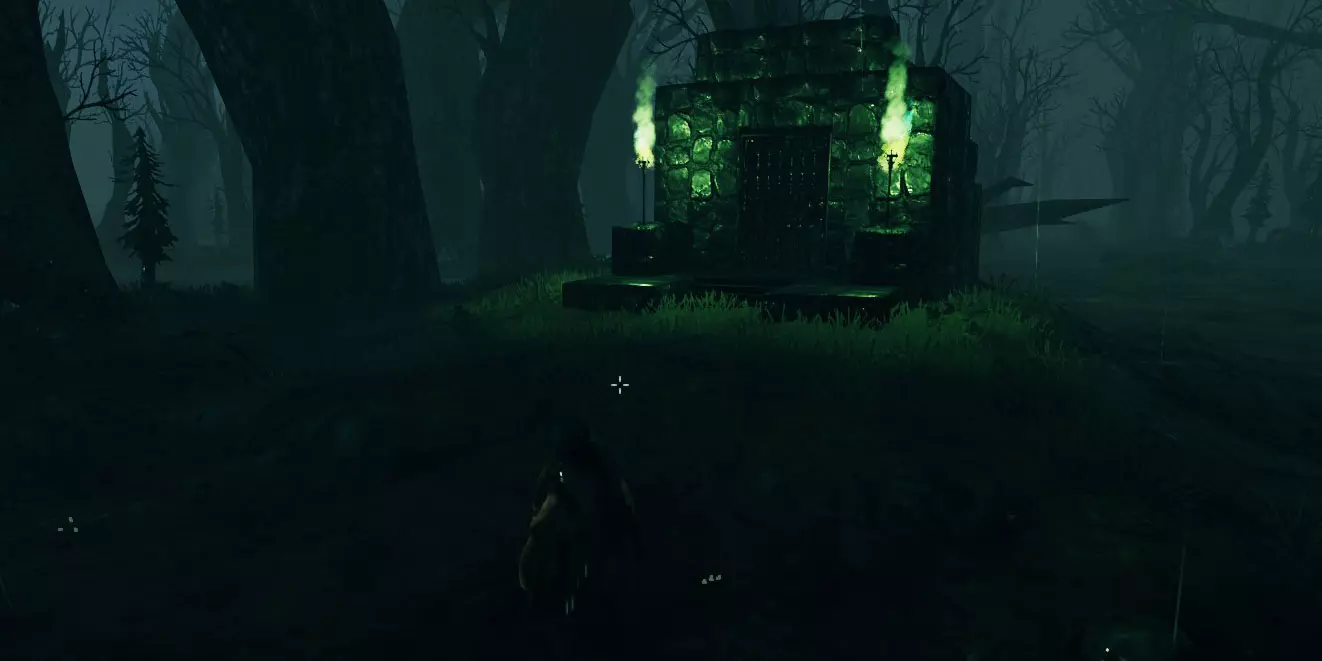
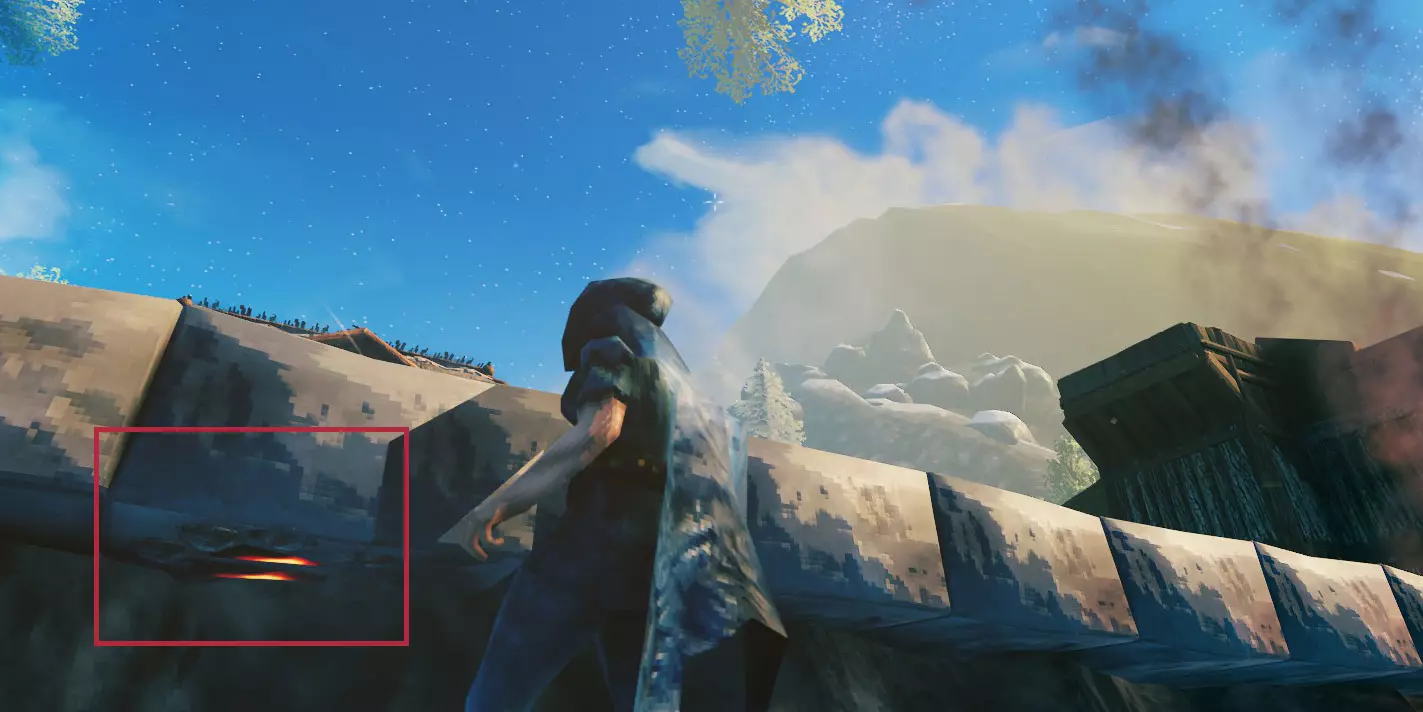
它们主要生成在较大的沼泽中。寻找面积至少为几百平方米到几平方公里的沼泽。沼泽越小,生成地穴的可能性就越低。 和寻找芜菁种子的建议一样:沿着沼泽生物群系的海岸航行,看看能否发现任何特殊结构(它们看起来像地穴的砖墙入口,入口处有两盏绿色火炬)。 如果你碰巧发现了关于第三个 boss 位置的线索/提示(或者只是偶然发现了祭坛——它是一个巨大的头骨):那个区域周围很可能有不少地牢。 一些警告

There might be mobs awaiting you at the entrance. If you do not have a good armor-rating/food or are just insecure, maybe use a poison-mead before entering and sneak to look how the entrance-part looks. They might contain rooms with spawners - you can hear them by loud noises of flies (even louder than having a draugr standing next to you). If you have a spawner in a room, open a part of the entrance and either shoot at it with your bow, use a AOE-weapon like the stag breaker (AOE = area of effect) to slam on the ground if it's within range. Third option if it's further away: Try to kill anything that has stars or the name 'elite' in it, open the doorway, grab your weapon and shield and then go for the spawner. Sometimes you will be lucky and manage to just mine away enough to jump through to the next room. If there's some parts of it left on the ground, enemies will usually not be able to follow you if you need to temporarely flee. You can store the iron you found in one of the chests in there or put a campfire at the entrance and just throw it there. If you throw it in there without the fire, it will despawn after some time. For orientation purposes (knowing which parts you've already done): I usually only completely mine out all the muddy scrap piles if I'm done with that room & everything beyond in that direction; that way I won't need to remember everything. So to get through just mine as much as needed, grab everything from in there, store it somewhere and when it's done, mine out the rest of the scrap parts. Note: You do not need the bronze-pickaxe to mine the scrap piles; alternatively you could just take 2-3 antler pickaxes with you and port back to your base for repair if needed. Longship Never forget to craft a few nails once you've acquired a new metal. I will now happily announce to you: You're now able to build the long ship (best ship in the game so far)! Longship 100x Iron Nails / 10x Deer Hide / 40x Fine Wood / 40x Ancient Bark Durability/Health: 1.000 (karve only has 500) Storage Space: 18 (karve only has 4) Is faster than the karve but harder to maneuver Forge Upgrades Most of the following upgrades will be available to you once you've smelted and had some iron in your inventory (there's no order in which to build them, they will just add up): Smiths Anvil 5x Wood / 20x IronForge Toolrack 10x Wood / 15x IronForge Bellows 5x Wood / 5x Deer Hide / 4x Chain Chains can be obtained by killing wraithsGrinding Wheel 25x Wood / 1x Sharpening Stone In order to craft the Sharpening Stone: Stone Cutter 10x Wood / 2x Iron / 4x Stone Can be used to craft the sharpening stone when it has the same protection as a workbench Is needed to build stone-structures, create the stone-paths etc. Weapons & Tools Note: For the weapons I will only list the stats of basic version and their primary attacks here. Higher tier weapons and tools will usually do a bit more damage but also use a bit more stamina. WeaponsAncient Bark Spear 4x Troll Hide / 10x Deer Trophy / 10x Ancient Bark Pierce: 55 / Staggering: 55 / Knockback: 20 / Durability: 100 / Stam: 10 Spears can be thrown (will need to be picked up again) or just used for single melee-attack.Battleaxe 35x Iron / 4x Leather Scraps / 30x Ancient Bark Slash: 70 / Chop: 40 / Staggering: 105 / Knockback: 70 / Durability: 200 / Stam: 16 2-hander, used to crowd-control/AOEIron Sword 20x Iron / 2x Leather Scraps / 2x Wood Slash: 55 / Staggering: 55 / Knockback: 40 / Durability: 200 / Stam: 10 Faster 1-handed weapon, for mobs that are weak to slashIron Axe 20x Iron / 4x Leather Scraps / 4x Wood Slash: 60 / Chop: 50 / Staggering: 60 / Knockback: 50 / Durability: 175 / Stam: 10 1-handed weapon, also used for chopping wood (not actually needed, but you will need at least a bronze-axe for the ancient trees. Otherwise this would be an option - or if used as a weapon).Iron Sledge 30x Iron / 10x Ancient Bark / 1x Draugr Elite Trophy / 4x Ymir Flesh (Trader) Blunt: 55 / Staggering: 110 / Knockback: 200 / Durability: 100 / Stam: 20 2-hander, counter-part for the mace, AOE-damage.Iron Mace 20x Iron / 3x Leather Scraps / 4x Wood Blunt: 55 / Staggering: 55 / Knockback: 90 / Durability: 200 / Stam: 10 1-handed weapon. Quite fast and with a nice knockback and damage.Iron Atgeir 30x Iron / 2x Leather Scraps / 10x Wood Pierce: 65 / Staggering: 65 / Knockback: 30 / Durability: 175 / Stam: 14 2-hander (polearm), single-target or AOE-damage with staggering-effectAbyssal Razor 20x Chitin / 2x Leather Scraps / 4x Wood Pierce: 20 / Slash: 20 / Knockback: 10 / Durability: 200 / Stam: 8 This is the swamp-tier knife, to get it you need to find a leviathan (fake islands) in the ocean and mine the abyssal barnacles. Knives have 6x backstab-damage, do not use as much stamina for each attack, are fast and do not slow you down while running around with them.Huntsman-Bow 20x Iron / 2x Deer Hide / 10x Feathers / 20x Fine Wood Pierce: 42 / Staggering: 42 / Knockback: 10 / Durability: 100 / Stam: 8/s / Backstab: 3x According to the wiki this bow is very silent so good for stealth-focused players. But I mainly always look forward to getting it because of the higher damage and accuracy when aiming. ToolsIron Pickaxe 20x Iron / 3x Core Wood Pierce: 33 / Pickaxe: 33 / Staggering: 33 / Knockback: 50 / Durability: 150 / Stam: 10 Probably a good idea to get one. Shields Since there are now a few versions available and you're slowly getting a bigger stamina- and health-pool while progressing, one quick note on shields in general and the options you will have by now. As briefly mentioned in the guides before: Shields will use a combination of stamina, max-health and armor / shield-rating to determine if a block/parry will be successfull. In general, there are three options to choose from: Round-/buckler-shields & tower-shields Buckler-shields are mainly used for parrying while still providing rather good basic protection. The tower-shields will provide an enormous amount of block-might, but will also heavily slow you down and it is not possible to do a parry with them. You'd probably only want to use those maybe during some bossfight or when needing to remove a spawner in close-range and the like. Round-shields are a mix of the other two; the focus lies heavier on block-armor with a simple bonus for parry Parry-Bonus (from the WIKI [valheim.fandom.com]): "The amount of Block armor is multiplied by the Parry Bonus of the weapon or shield". While staggered, the damage on an enemy is 2xTo get a better overview and understanding, maybe compare the stats below, it just depends on your timing/if you are able to parry your oppontents: Available shieldsBanded Shield 8x Iron / 10x Fine Wood Block-Armor: 42-63 / Parry-Armor: 63-94.5 / Block-Force: 40 / Parry-Bonus: 1.5x / Durability: 200 Movement-Speed: -5% Round-shield - slightly better for normal blocking but still has a basic parry-bonus.Iron Buckler 10x Iron / 4x Ancient Bark Block-Armor: 28-42 / Parry-Armor: 70-105 / Block-Force: 30 / Parry-Bonus: 2.5x / Durability: 200 Movement-Speed: -5% Buckler-shield, slightly better for parrying while still providing protection with normal blocks.Iron Tower Shield 10x Iron / 15x Fine Wood Block-Armor: 52-78 / Block-Force: 100 / Durability: 200 Movement-Speed: -20% Tower-shield, used simply for blockingSerpent-Scale Shield 4x Iron / 10x Fine Wood / 8x Serpent Scale Block-Armor: 60-90 / Block-Force: 100 / Durability: 250 Movement-Speed: -20% Tower-shield, used simply for blocking If you want that one: You'll need to find a leviathan in the ocean > mine the abyssal barnacles to get chitin > craft the harpoon > use that to drag sea serpents on land to kill them there, as their scales would sink otherwise. [/list] Armors Once again you'll have two choices here. If you're unsure if it will be good enough for the bosses of the biomes you're currently doing, going with the higher armor rating probably won't be a bad idea. I'll list them so you can have an overview; sometimes (depending on how long progressing through one biome will take you) it can also make sense to craft and use both while working your way towards the bosses. Root Set (base armor-rating) If wearing all 3 pieces, you will get a bonus of +15 to your bow-skill: Root Mask: 10x Root / 10x Ancient Bark / 4x Leather Scrap 8 Armor, will provide resistance vs. poison & weakness to fire Root Harnesk: 10x Root / 10x Ancient Bark / 2x Deer Hide 8 Armor, will provide resistance vs. pierce (arrows) & weakness to fire Root Leggings: 10x Root / 10x Ancient Bark / 2x Deer Hide 8 Armor, will provide weakness to fire Durability per piece: 800 / Weight for all 3: 23 The upper- and lower armor parts each have -2% movement speed. The roots can only be obtained by killing abominations Iron Armor(base armor-rating) Does not come with any fancy buffs but will provide a solid armor rating (even more so if fully upgraded of course): Iron Helmet: 20x Iron / 2x Deer Hide 14 Armor Iron Scale Mail: 20x Iron / 2x Deer Hide 14 Armor / Movement Speed: -5% Iron Greaves: 20x Iron / 2x Deer Hide 14 Armor / Movement Speed: -5% Durability per piece: 1200 / Weight for all 3: 33 Yes you'll need a lot of iron but depending on your playstyle and experience you might consider it. Arrows In the swamps, you'll have the chance to find or craft the following arrows: Ironhead Arrows (20x) 8x Wood / 1x Iron / 2x Feathers Pierce/Staggering: 42 / Knockback: 10 Poison Arrows (20x) 8x Wood / 4x Obsidian / 2x Feathers / 2x Ooze Pierce/Staggering: 26 / Poison: 52 / Knockback: 10 Ooze is obtained by killind blobs & oozers / obsidian will be available only in the next biome Getting Turnip-Seeds
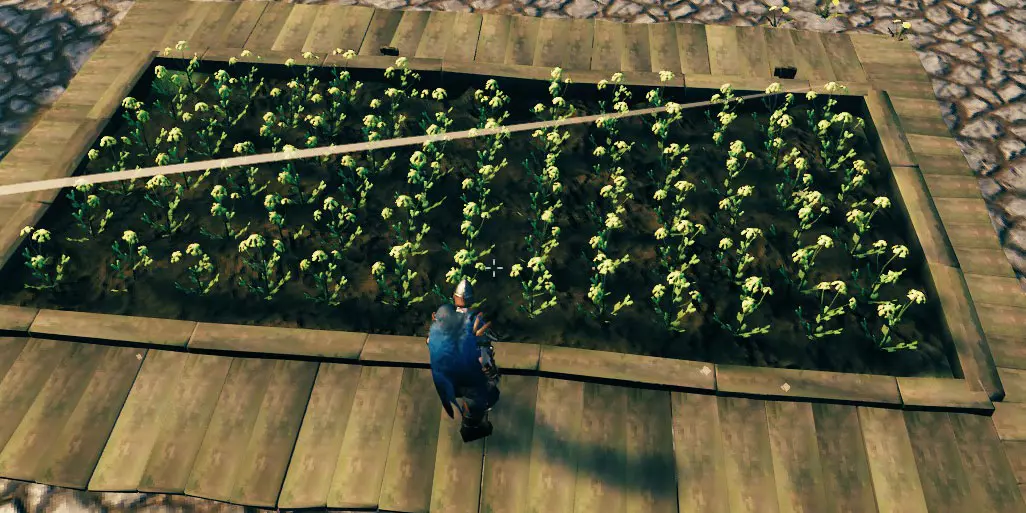
为了能够获取下一级食物,除了铁之外,你的首要任务是寻找一种亮黄色的花朵。 这种花可能非常非常稀有,所以如果运气不好的话,你可能需要花相当多的时间才能找到它们。我能给你的加快这个过程的最佳建议是,沿着附近沼泽的岸边航行,尝试寻找这种花。如果你找到了:迅速在地图上标记它,注意不要停下你的船。最好先侦察一下周围区域,看看能否在该区域附近的草地或黑森林登陆,然后步行前往那里,这样可以避免丢失你的船。 注意:我最近开始了一个新游戏,即使花了几个小时在很多很多沼泽的海岸边航行,也没能找到任何种子。如果你和我一样不走运:穿上不会拖慢你速度的盔甲(可能是升级后的 troll 盔甲),准备好优质食物,然后在整个沼泽里四处跑动。到目前为止,我主要在边缘地带找到它们——如果你在沿海区域运气不佳,试试其他区域。请确保每隔几百米附近至少有一个传送门,以防万一。你可以快速冲到一个新的中心位置,迅速在那里建造一个传送门,根据时间情况可能需要等到第二天,然后再去寻找!至少我成功找到了一株植物。 食物、升级和蜜酒
食物与升级 当你的物品栏中拥有实际的芜菁后,下一级坩埚升级的配方将会解锁: 香料架 所需材料:3个蒲公英、2个胡萝卜、5个蘑菇、3个蓟、3个芜菁 新食物 放置香料架后,你将能够制作/烹饪以下食物: 芜菁炖肉(1份) 所需材料:1份野猪肉、3个芜菁 属性:生命值18、耐力55、持续时间25分钟、每秒生命恢复2 香肠(4根) 所需材料:4份内脏、1份野猪肉、1个蓟 属性:生命值55、耐力18、持续时间25分钟、每秒生命恢复3 黑汤(1份) 所需材料:1个血袋、1份蜂蜜、1个芜菁 属性:生命值50、耐力17、持续时间20分钟、每秒生命恢复3 淤泥奶昔(1份) 所需材料:1份软泥、2个覆盆子、2个蓝莓 属性:生命值16、耐力50、持续时间20分钟、每秒生命恢复1 我强烈建议你尽快建造以下物品(实际上甚至不需要)芜菁/升级:铁烹饪站需要3个链条和3个铁锭。这将让你能够烹饪 serpent meat,我非常推荐刷这种肉(烹饪时需要两个小火堆或下方的大型石砌壁炉)。 熟 serpent meat(1份):1份 serpent meat 属性:生命值70/耐力23/持续时间25分钟/每秒生命恢复3/重量10/堆叠上限50 你可能不会在背包里带着50份熟 serpent meat到处跑,但你很可能会明白为什么我认为猎杀 serpent 是值得的。实际上,当查看建造上述升级后解锁的食谱时,情况更是如此: 蛇肉 stew(1份) 所需材料:1份蛇肉 属性:生命值80 / 耐力26 / 持续时间30分钟 / 每秒生命恢复4 / 重量1 / 堆叠上限10 由于这些属性不言自明,接下来的两个 Boss 战,我会一直使用1份熟肉和1份 stew(再加上1份当前的耐力食物),这样做绝对不会出错。 备选食物 这其实更适合黑森林,因为在这个阶段没有专门的食谱,但如果你愿意且已经找到了商人(或者有鱼自动跳进你的背包): 熟鱼(1份) 所需材料:1份生鱼 属性:生命值45 / 耐力15 / 持续时间20分钟 / 每秒生命恢复2 蜜酒 蜜酒基底:中等治疗 所需材料:10份蜂蜜 / 4份血袋 / 10份树莓 / 1份蒲公英 发酵需要2天。将为你提供6份中型治疗蜜酒:10秒内恢复75点生命值,冷却时间2分钟。蜜酒基底:冰霜抗性。制作材料:10份蜂蜜、5份蓟草、2份血袋、1份灰矮人之眼。发酵需要2天,将产出6份冰霜抗性蜜酒:获得10分钟冰霜抗性,冷却时间10分钟(效果消失后需立即重新使用)。 技能升级:你可能会遇到石制结构或塔楼/废墟形式的刷怪笼。初入沼泽时,建议避免过于靠近这些建筑。如果想冒险尝试,可拿出弓箭从远处攻击刷怪笼,目前我这样做从未遇到过问题。不过,如果你需要一个刷骷髅兵/尸鬼的地点,或者想提升技能等级,这些地方或许是不错的选择。记住,它们会生成2星尸鬼;这些家伙非常危险。 想试试运气吗?确保在附近安全的地方有一个传送门。 如果你是弓箭手,不想处理这类情况: 很好!你迟早会遇到一些憎恶(树怪)。它们对穿刺伤害有抗性,因此弓箭不会造成太多伤害。不过,如果你能引诱它们四处移动,或者有一个平台可以从上面射击它们,那倒是提升弓箭技能的好方法。杀死一只可能需要30支火箭,具体取决于技能和弓(让火焰伤害持续生效并及时补充)。如果你打算这么做,建议随身携带一整组火箭。 基地建造与安全 基地安全 - 用石头建造
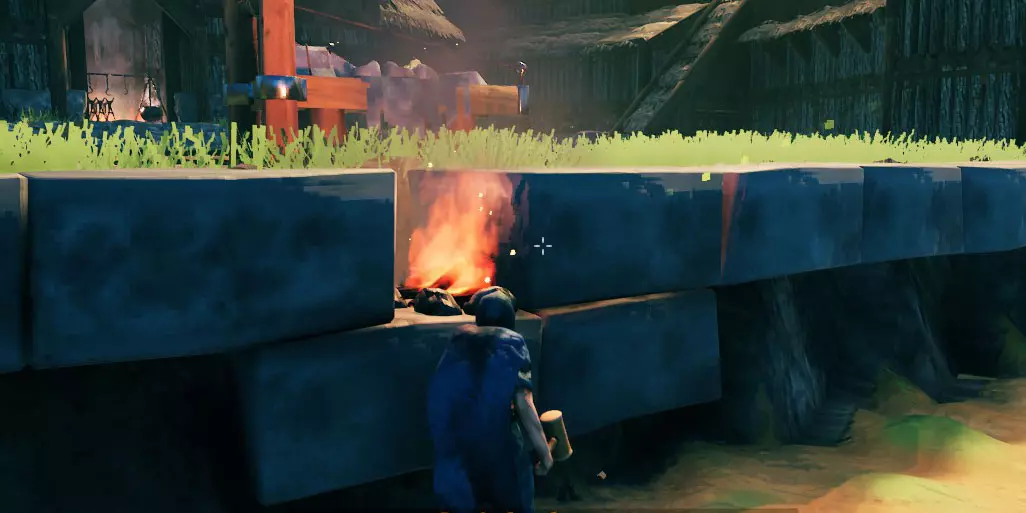
下面我会指出第三份指南【黑森林】中的重要信息,为确保万无一失,不妨再回顾一下那份指南,确认你已完成基础准备工作,避免基地被摧毁。 获得第一块铁后,你就可以制作并使用石匠台(参见上文的【熔炉升级】部分),从而终于能够用石头建造建筑了。以下是不同墙壁的对比: 木墙 - 耐久度:400 stake墙 - 耐久度:1000 石墙 - 耐久度:1500 由于是石头材质,例如 troll 之类的敌人对其造成的伤害会更低。 但不要被误导:如果你没有按照我在上述链接中给出的建议去做,那么所有这些建筑部件都只能为你争取时间,让你有机会出去战斗。不过这样做也没什么问题!至少如果你足够快能及时逃出去,不像我…… 基地建造:结构完整性 另一个需要注意的是,使用石头可以建造得更高。 石头结构有其自身的完整性数值,在达到该数值之前,如果你在石头结构上建造木制部件,这些木制部件会显示为蓝色。因此从技术上讲,对于木制部件来说,石头结构会被视为地面/地板。 使用铁以及木铁梁/铁柱可以进一步延伸建造高度,你可以稍微尝试一下——你可以轻松地将它们隐藏在石头内部,或者在木墙、芯木梁等结构之间。如果你需要或想要尝试建造非常高的建筑(例如法师塔): 你可以通过将地面抬高8米,然后使用石头、铁梁和木材来达到最大高度。 如何获取大量石头: 建议不要挖掉所有的小岩石。否则地形可能会变得空旷乏味,而且获得的石头数量也不多。 有一些大型(相当平坦的)巨石——通常在草地的海岸线上,在黑森林中也遍布整个区域。开采这些巨石可以获得几堆石头。 为了高效开采,你可以在那里放置一个可移动的传送门:快速传过去,采集一些石头,卸载,再返回。当你挖完一个巨石后,就转移到下一个。 海岸边的巨石有时很难完全开采。如果你不想冒险让它们的某些部分残留(因为水太深),那就选择那些在较浅水域的。 暴风雨期间,海浪有时会把水从你身边移开,所以你或许有机会用镐子挖得更深一点。 或者你也可以去多挖些铜,反正你可能也需要铜来制作装饰。 如果你在沼泽探索过程中不是特别急需它们,也可以等到进入下一个生物群系。那里会有很多巨大的岩石和圆石。 为你的基地增添乐趣(装饰与实用兼具) 隐藏工作台和其他阻止生成的物体 要是能用一些既实用又美观的方法来隐藏基地里的物体,那不是很好吗?我很乐意至少提供一些建议,这样你就不必把整个区域弄得乱七八糟,也不用在杂物间绕来绕去了。我会以自己当前的游戏进程为例,给出一些建议。 注意:我主要喜欢使用工作台来实现这一点——这样我就能轻松修理(至少是所有木制结构),并且能在建筑菜单中选择建筑部件时,查看是否还有任何未受保护的缺口。 石板与火 在这个区域,我不想掩埋任何东西,因为我希望保留正常的地面。因此,我决定在码头的石板内隐藏一些火堆(我的基地周围通常有陡峭的边缘,我在这个位置使用石板来覆盖它们,让外观更美观)。
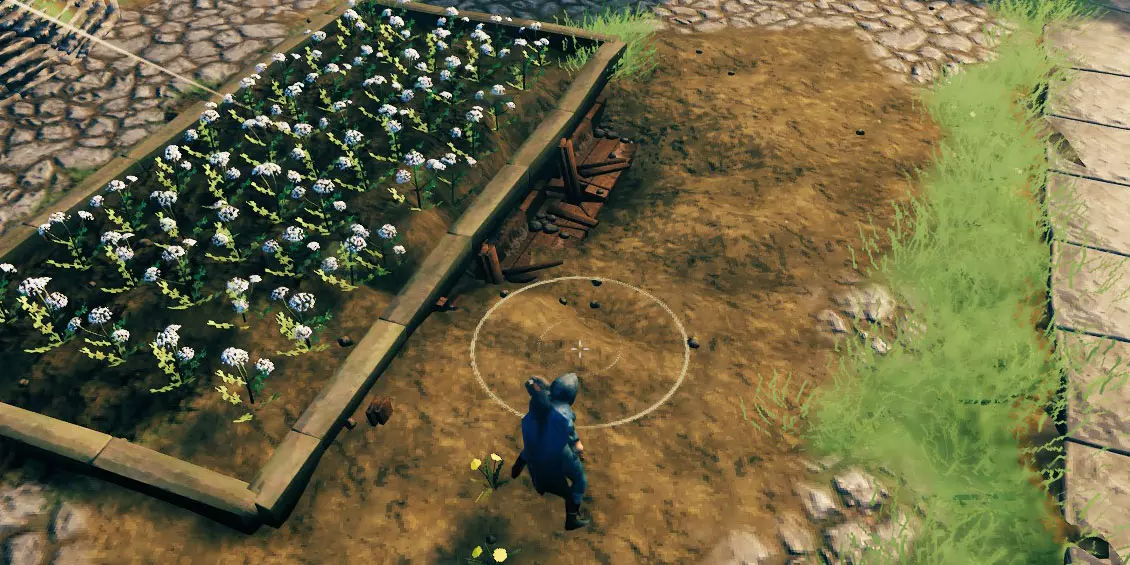
楼梯/梯子、储物空间和工作台 我比较懒,不想总是跑来跑去整理种子和胡萝卜,所以我觉得在田地附近设置一个小型储物空间会很方便(梯子是为了在遭遇袭击时能登上墙壁)。梯子下方的墙壁里嵌着一个工作台,台面上放了几个箱子。为了方便取用,我还装了木门作为柜门。
工作台与 stakewall(尖桩墙)防御 我的整个基地目前至少被两道尖桩墙包围(外侧一道,间隔2米,内侧一道)以作防御——码头区域除外。你可以利用那里的空间快速到达某处,或者在那里放置一些基地设施,比如工作台(或者……需要空间来升级工作台/熔炉?)。至少它们不会直接暴露在敌人面前(中间还有一条壕沟和8米的安全距离来防止这种情况)。
工作台与石墙 你可以自由建造任何你喜欢的东西!例如,如果你需要用双层石墙来围绕你的基地,你可以这样做:
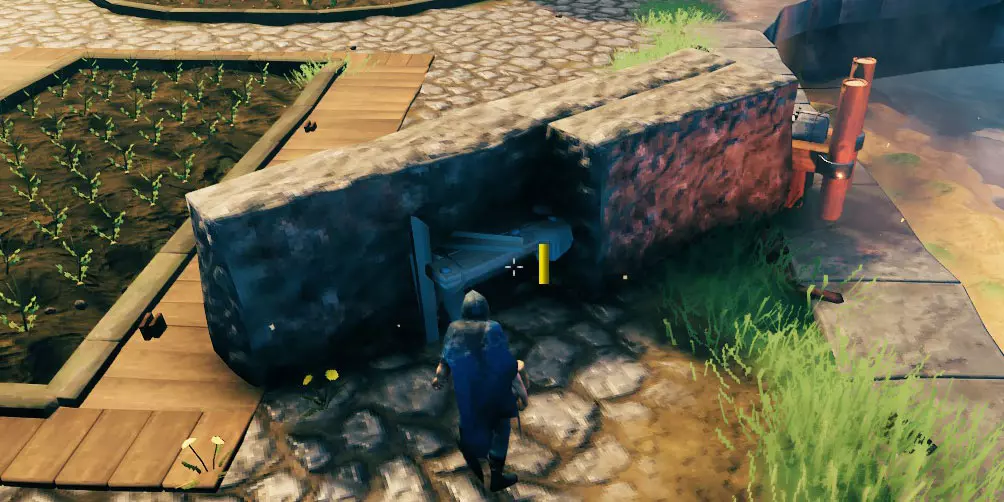
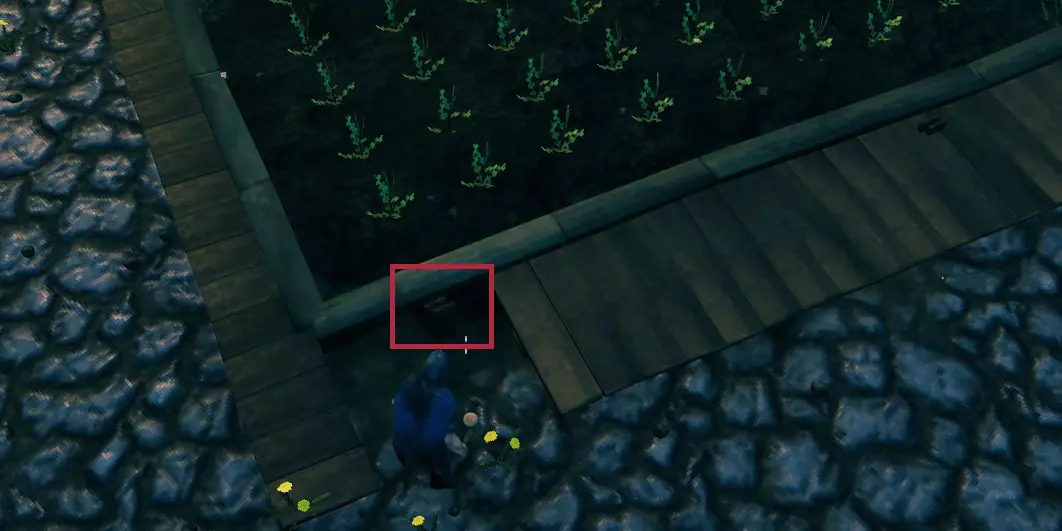
埋藏的工作台 - 外部 我也需要在基地中心设置一些防护,但不想为此专门建造任何东西。于是我在那片小型种植区埋藏了一些工作台,并用几块木地板隐藏了其余部分。注意:不能将物品完全掩埋,否则它会损坏并只会返还木材。必须留下一小部分暴露在外(如果你挖得足够深但无法放置工作台,可以在那里铺一些木地板,然后将工作台放在上面)。
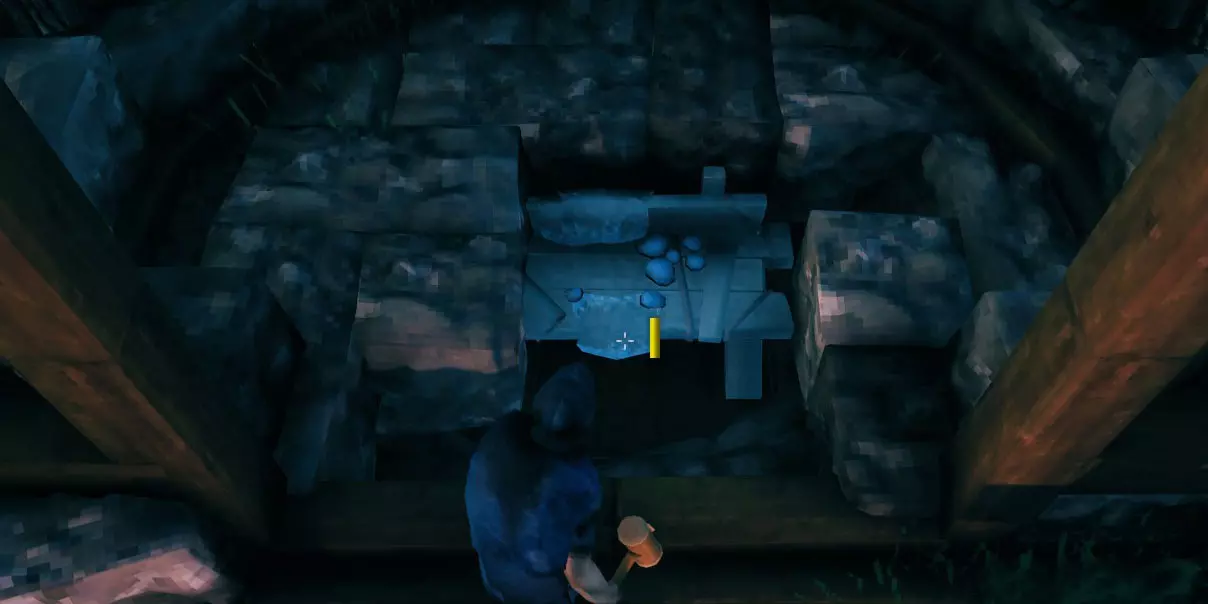
埋藏的工作台 - 内部 因为我喜欢在建筑物内也使用真实的泥土/地面作为地板,所以我只会用一小部分石马赛克。有一个小“台阶”向上延伸约0.5米到石质地板上——在下面,我将一个工作台半埋起来,并在上面铺了地板。只要整体空间不太大,这些石块应该能相互支撑。
You will also have to option to use devcommands for spawning in plants or rocks Sadly, the placement and finding the right ID is a bit (or very) tedious. I'd recommend to try and work with the above mentioned for now, as some dev-spawned things can break parts of your game. If you're going to try it anyway - please do me the favor and at least do a backup before jumping into it :) Base Raids / Events (See also Base-Safety) After killing the elder (second boss), your beautiful builds might be in serious danger: A Foul Smell From The Swamp Will spawn draugr and skeletons, which will either attack in melee (close-range) or do ranged attacks with their bows. The Ground Is Shaking The game will spawn two trolls at once which will both go for you or your structures/animals if you are not within range yourself. Killing one of them will have another one spawn while the event-timer is still ticking down. After it's over (message disappeared), you can safely kill both. The Trader I will assume, that by now you will probably have found or at least have already heard of the trader-npc in the game. Your best bet is to look around the area where you found the elder and if you're not lucky there, make sure to sail within about the same radius from spawn to there in all other directions. He has several possible spawn-locations and will appear on the one you found first. Will always spawn in a black forest, so sail along the shores there Will usually not spawn less than a few 100m away from the spawn, so you will have to 'earn' finding him and using his services When sailing out and getting closer to the edges of the map: He should not be as far away as to spawn near the mistlands . If you get a message that you entered this biome > turn back and take a different route. If you managed to get close to one possible spawn-location, a giant 'sack'-icon will appear on your map. You will not get a message or sound, so check the map from time to time. But why is the trader so important?That's a good question and the answer is easy: Aside other (maybe useful) stuff, he will sell you a fishing rod, bait and most importantly a belt, which will increase your maximum carry-weight when equipped. I will strongly encourage you to try and get that thing in order to speed up carrying stuff around. Note It probably wouldn't hurt to buy everything he has (except for the wearables) at least once, in case they might unlock some recipes. Some might be unlocked later or his offer might change after killing bosses, so make sure to pay him another visit from time to time. Blob Ross (Boss: Bonemass) Note: As soon as you managed to kill him, please put up the trophy and get the boss-buff immediately Once you have acquired the needed items to spawn him (if needed see spoilers-section), you are ready. Make sure, that: You have the weapons of your choice upgraded as high as possible You at least have a full set of iron-armor, possibly upgraded to max. You have the best foods at hand that are available to you at this point (advised is 1x serpent stew, 1x cooked serpent meat, 1x turnip stew) You have a rested buff that will last long enough It is still morning / early when starting the fight (sometimes they can last quite a few minutes, depending on the circumstances and preparations done) Level the ground all around the boss-locationso you won't get into unnecessary trouble Sometimes it might help to chop a few trees around a fighting ground in order to have enough space to maneuver. You can do it the other way and have bosses need to navigate around obstacles like trees or boulders, just like normal mobs. There are no other enemies nearby that may decide to join the fight, once summoned (he will spawn adds but by that point they should just be a nuisance). There is a well-protected portal within close distance (treetop, no real safety-distance needed, as long as it is placed higher) in case of death. Have a few healing meads with you Once the boss is summoned: I would like you to give it a try using what you have learned so far. If you still need to know or cannot beat him on your own / with your chosen method: Use poison-mead or the head-piece of the root-armor for poison resistance I have only done him using maxed iron armor so far, but had absolutely zero trouble doing so, especially with the overkill-food mentioned above. He is resistant to pierce (arrows) and you probably won't even do enough damage on him with a bow - he will just recover too fast He is weak to blunt, so I will strongly recommend a max upgraded iron mace and shield - those will even get you through the following biome if you want! Try to run around him when he's spilling out his poison mist and punch him in the back or belly while he's busy You can parry his one-handed attack, I would try to avoid the other one. If you should take a few serious hits, just run away for a bit, regaining stamina and take a healing mead if needed. If you prepared as necessary, it should be totally possible to beat him. Should you still have trouble, I would suggest to check out the spoilers section or watch some guide on YouTube, look for other guides on steam and the like. You will get a hint on which biome will be next on your journey by paying attention to the recipes that were unlocked with stuff from the swamps. Good To Know Just a few sidenotes and stuff that does not fit anywhere but should be mentioned:
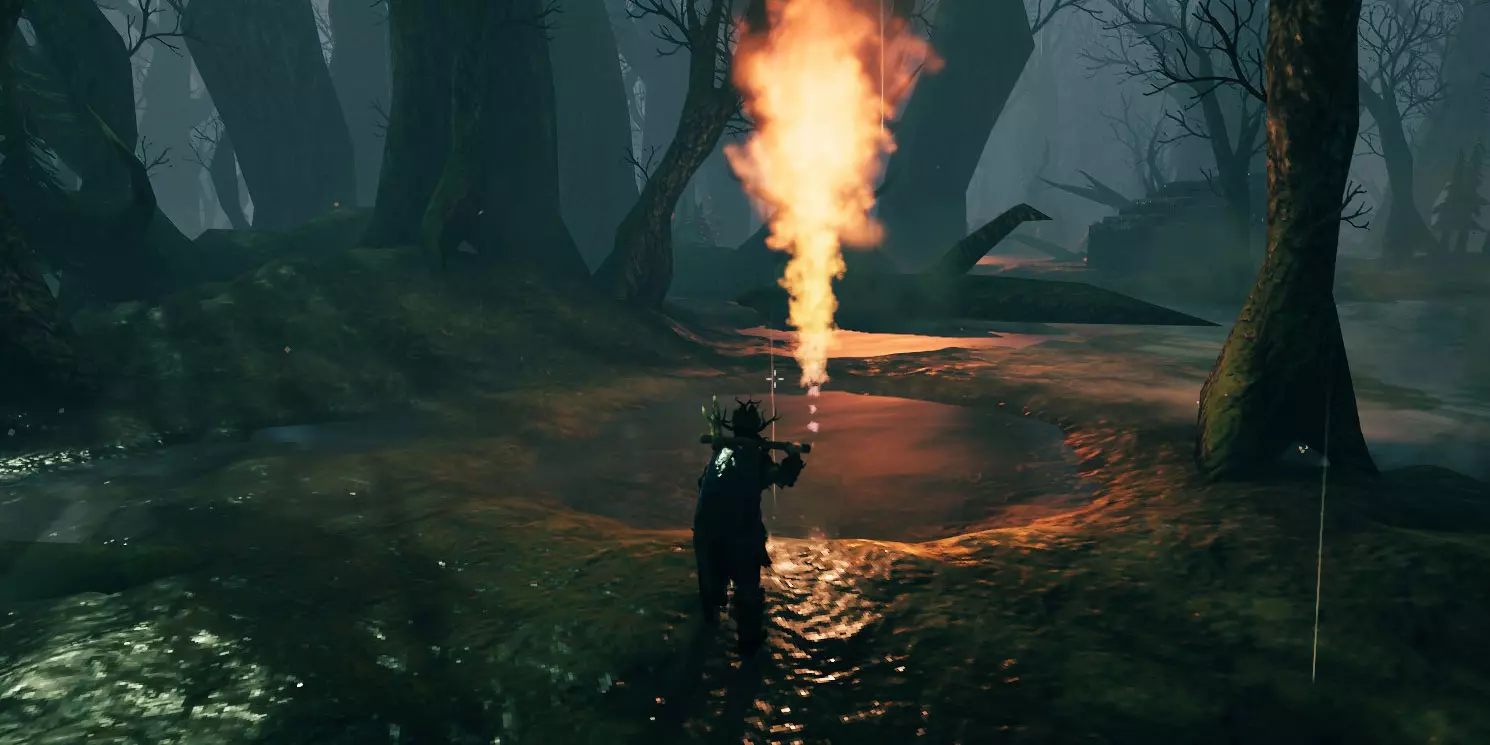
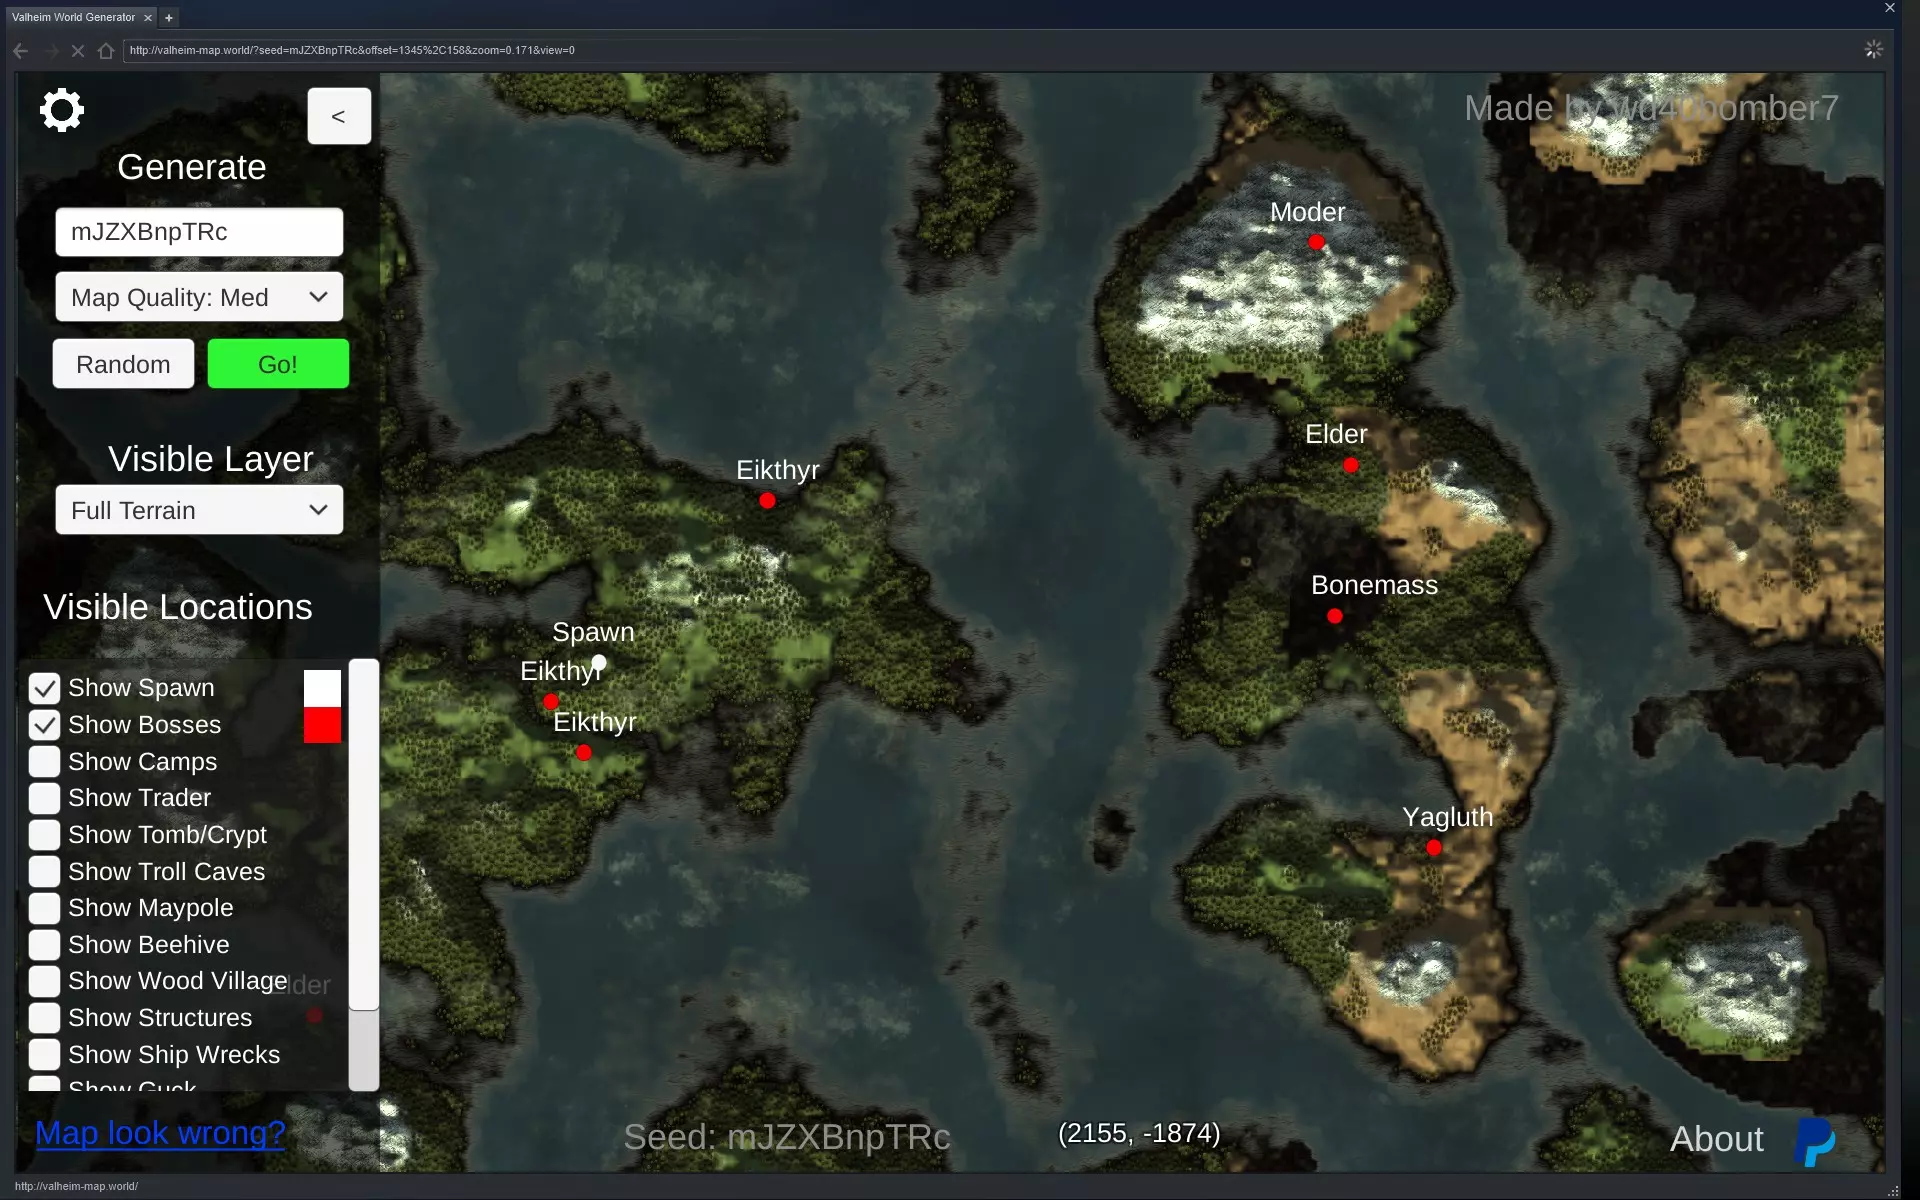
In some swamps, there are geysers, which will spawn surtlings. If you find a place with 2 or more of them (1 might even be enough if needed), you can put a portal there to farm them for surtling cores and coal. If you want them dead right after spawning, have the area around it being shallow water. In case you did not find any chains yet: It's possible to find them in chests at spawners or in crypts, or simply by killing wraiths. SPOILER - Third Boss In order to summon/spawn him, you will need 10x withered bone found in the crypts / muddy scrap piles. I heard that people actually did him with a bow, using around 200+ frost arrows they got from the following biome (mountains, killing drakes and farming obsidian). Since in the mountains you will be looking for silver (the weapons crafted with it will have a damage-bonus against anything undead), you could just venture out and see what options these would give you (aside from the next tier of armor from there). If you're going to try and find silver without killing him first (you'll get an item which will react to ores/metal in the ground): Use the stagbreaker-method mentioned below for finding iron or simply look for any partially exposed silver-veins. It may take some time, but usually you should be lucky and at least find 1-2 (given that the mountain you're exploring is at least high enough for golems to spawn; they will usually spawn next to silver or abandoned buildings). Best way to kill him is really just going melee with an upgraded mace and shield. SPOILER - Killing The Third Boss (Raid Triggers) Killing him will 1x trigger the next 'normal' base-raids but also the first raids that can and will occur while you're either within the mountains or the plains-biome. A lot of people are having trouble with this specific raid since you can only partially prepare for it (there will be a lot of mobs spawning) You can prevent this by waiting with killing the third boss and trying to find the silver as mentioned above. You will miss on one of (if not THE most useful) boss-buffs, which will give you a high physical resistance during the uptime - that one is supposed to get you through the above mentioned raids. If you however have some kind of disability or should have other aspects that might make the game harder for you, maybe try to find some silver first. At least if you are in singleplayer; in multiplayer you might be able to just help each other. There are ways to do some preparations within the mountains to avoid getting overwhelmed by this event like building simple, small platforms on the large and steep boulders which you have to jump onto. However, it will take a good portion of wood and time. But it CAN be worth it. AFAIK there is an update planned which will allow the use of difficulty-sliders, but so far there is no date on it yet. So I will just give you the information above for now. SPOILER - Continue The Journey The game will give you a hint pointing to the mountains by unlocking a recipe for the frost-resistance mead (have you killed and looted some leeches yet?). Make sure to craft some before venturing out! SPOILER - Other Ways To Find Iron You don't need the crypt key which you will get from the second boss if you've got a bit of time and want to level your skills while doing so. However, this method is only meant for smaller amounts of iron out in the open. I will usually do this before killing the elder just to get the longship, better food and stone-structures earlier... How to do it: 1. Use stagbreaker on the ground everywhere to find iron scrap piles by looking for a 'too hard' when doing this. 2. I've read that you can also find them by the sound (a drippling sound like in crypts, only worked once for me). 3. If the swamps borders some other biome like the black forest (will usually be steep): Excellent! Just use the hoe everywhere to lower the ground as far as possible - you'll probably find a bit of iron by doing this. 4. Kill the Oozers that will spawn in the swamps at night or near to dungeons, they have a chance of dropping scrap iron as well. SPOILER - Trader-Location If you are in dire need and just cannot find him, go HERE [valheim-map.world] and enter your seed. SPOILER - Serpent Hunting If you want to get more than one or two serpents by chance while transporting or exploring: Will only spawn in the ocean biome Spawns can happen either during nighttime or during storms The ones spawned during storms will stay there even in day-time, the nightly spawns will disappear at daybreak. Often times you will actually miss and sail past them, as the distance can be rather big. If you don't hear a howling or splashing water, look for a bigger area of water splashes on the ocean-surface. There might be one but maybe it's too far away to render in the actual creature. I would advise to only fight them with at least lvl 30 bow skill, at least the fine-wood bow, preferably better arrows than the wooden ones and good stamina food (as you don't want to jump in and just punch them - so while on the ship, you won't really need health). Sometimes you might be able to catch their trophies by waiting with the last hit when they're right in front of you before killing them. However, so far I did not manage to get any scales like this. I guess you'll need the harpoon if you need them. Try to do a 'sneak' attack (while they're not aware of you yet) to do 3x damage with your bow. If you manage to do this, they will be way faster to kill and thus less of a threat for your ship. SPOILER - The Leviathan There are sea creatures in the ocean biome, that will look like strange little islands with some rocks and small pine trees on top. You can land your ship next to those, jump on top of them and mine their abyssal barnacles for chitin - you will need it for a mid-game knife and for building the harpoon in order to drag the serpents to the shore (as otherwise their scales will sink). Beware tho! After mining a few of them, they will start to dive under water. Better make sure to have enough stamina left and a ladder for entering your ship close enough. With the chitin you will be able to craft the following: Abyssal Razor (Knife) Pierce/Slash: 20 / Durability: 200 / Staggering: 40 / Stam: 8 4x Fine Wood / 20x Chitin / 2x Leather ScrapsAbyssal Harpoon 8x Fine Wood / 30x Chitin / 3x Leather Scraps Can be used to drag Sea Serpents onto shore in order to kill them there (melee if you want) and gather the scales, which would otherwise sink and are hard to get otherwise. Note: Once they are underwater, they will not come to the surface again, which will make the chitin a finite resource. If you are maybe playing with a bigger group of several people and want to make sure that you will get enough of it, you could try the following... Wait with harvesting until you have a stronger pickaxe, which does more damage and thus will make it faster (iron might be good) Have all players come to one leviathan and have everyone each mine a different node of chitin at the same time, as the creature will usually sink after like 2-3 nodes are mined. If you're going to approach it like this, make sure that there is enough space for everyone on the ship/s to quickly get back to safety. About This Guide In case you will use this guide - or simply just parts of it - I'd love to know if it actually helped you in hindsight, as the premise is, that in theory most people using it will be new players and thus cannot really judge it, but instead have to trust. Of course this also applies to the other guides! Thank you.