换一换
换一换 


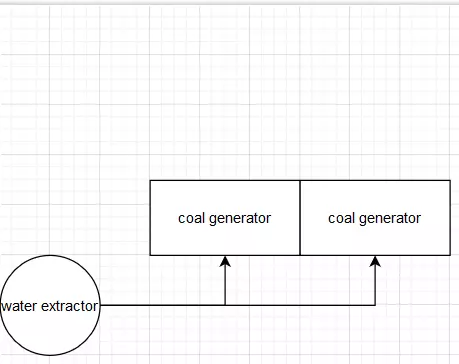
A quick list of valuable tips for beginners and intermediate players. Tips Writing tips down from the top of my head. No spoiler-free guarantee! I will however hide some stuff I feel new players should discover themselves behind spoiler tags. Mouse over the black areas in the text only if you already know most of the game or are fine with spoilers. Let's start! Your first and most urgent task in the game is neither building a great nor a beautiful factory, it's no longer having to manually fuel it! Coal power is the first fully automatable source of energy so you should push hard to get there. There is a manual crafting bench for a reason, use it to speed up production of necessary parts for the research that leads you towards coal. There is no need to automate everythingin the early game just because you can. To extend the previous tip: Early research and the first two tiers of the space elevator profit quite a bit from manual crafting. The most advanced parts at this stage of the game can be time-consuming to set up with their respective automation, so while you should OF COURSE do this eventually, there is no shame creating them yourself to speed up your progress towards power automation. This helps you reaching coal power ASAP and this in turn will free up a lot of time (and nerves) spent gathering biofuel for your manually filled generators. !! Quality of life, don't miss it !! Clicking your mouse wheel (aka MMB) will select whatever you are looking at for building. Meaning you no longer have to use hotkeys OR the building menu (Q) as long as what you want to build is already near! This QoL feature makes your life SO much easier in Satisfactory. And too few players even know about it. !! Quality of life, don't miss it !! While you have anything selected for building (say, a conveyor belt), pressing E lets you browse through similar buildings! This is a complete gamechanger since you no longer have to bind all the buildings to hotkeys (or use the building menu (Q)). Instead you can e. g. select a Mk 3 conveyor, then press E to comfortably tab through the other tiers (4,5,1,2,3...). No more need to bind hotkeys for splitter AND merger AND intelligent splitter AND programmable splitter. No sir, now you just select ANY of those and tab through the rest with 'E'. Simple as that. !! Quality of Life, don't miss it !!* While you are limited to your own two feet, run, slide (press C while running), then jump. Sliding is faster than running and slide jumping is faster than sliding. You can make an infinite slide-jump combo by pressing C shortly before you touch ground. Note sliding only works on even or declining surfaces, not uphill. Once you have coal power set up, you can spend some time building proper factory floors. It helps you a lot since floors allow precise placements of other stuff (like machines) on its grid. Speaking of coal power, put a overclocking power shard (researched in the MAM using some slugs) into a water extractor and it will produce 180 m³ water/min which is exactly enough for four coal power generators. Factory layouts vary greatly between players. Some prefer to get basic resources all to one place and have their production centered. Others prefer baby factories all over the map and only produce the highest tier products in a central location. Both ways have their merits (and disadvantages), it's just important you are aware of these alternatives. USE SIGNS. It will take you some time to unlock them as they use among other things quartz crystals. But once that time comes your factory is likely so big that signs will really come in handy. Why is that, you ask? Because keeping track of your conveyor belts and production in- and output becomes trickier the more you progress in the game. Put signs on every major in- and output belt! At the very least, have a sign on output belts where they start transporting their product. Write something like "240/480" on them, where 480 is the load on the belt (i. e. what is produced) and 240 is how much of that is used (i. e. what is consumed). Then add a sign PER CONSUMER with the amount used. Like "240 -> Iron Rods". Now you know that a) this output transports 480 and b) that 240 of those are used for Iron Rods. And c) that you have another 240/min not used right now on this belt. When doing so, consider the belt tier (Mk 4 belts can carry 480 max.). UPDATE these numbers every time (every time!) you add more consumers or add to the production. It's important to do this per output and per belt or you will spend a lot of time (and I mean a lot!) roaming through your factory trying to find out what is used where in which amounts. Updating the signs can feel tedious at times but trust me, it's worth the time a thousand times over. Gigafactories have their merits but you want to start with separate production buildings. Trust me on this. Unless you are a pro who plans his factory beforehand (with online tools), splitting production into satellite factories is the way to go. It helps IMMENSELY to keep track of what is what, it allows a lot of space for conveyor belts between those satellites and generally helps you avoid misbuilding. Keep some space between the satellites for belts and movement. If you are particularly motivated, try and build them to suit at least Mk 4 belts (480/min). Do this from the start and you will not have to mess around later on, trying to extend your satellite length just to find it now overlaps with another. You CAN also use the max belt tier (780/min) if you are really serious about it. Note that each product has different amounts for input/min and output/min so for some you need longer production floors than others. This is usually offset somewhat by the amount required overall. Overclocking is great, did you know however you can also UNDERCLOCK? Both help dealing with 'weird' numbers because you can quickly adjust the in-/output of a machine so it perfectly matches your production. A famous example is oil- or aluminum industry which sometimes can end up with just a tiny bit of excess fluid. This WILL eventually block your production (or make it stutter). By clocking one of the involved machines you can avoid this. Keeping your own excel sheet is really useful. Many players rely on online tools like 'Satisfactory calculator', which is perfectly fine. I found that writing down stuff yourself helps you memorize all you have built, though. It's also much easier to identify bottlenecks this way. Up to you. Vehicular exploration is dead. It's a little sad but there it is. With the new big power towers, you can cover vast distances and heights by moving along power lines. Other modes of transporation later on let you ignore most obstacles in the world. So, don't build trucks or cars to move around. And speaking of trucks, their use is very limited now. When you unlock them, your factory should not even be close to the complexity that requires vehicular automated transport. Truck stations are tedious to set up because you need to record the path it shall take yourself. Trust me, building a conveyor belt to your base is easier and faster. When your factory becomes so big that you really need DISTANT resources, you will have unlocked better transport modes. FICSIT coupons are super-important for unlocking critical new buildings in the Awesome shop. One quick way to get them is to hunt creatures and convert their parts into DNA tubes. Feed these to a AWESOME sink and you will quickly amass coupons. Speaking of the AWESOME sink, it may be tempting to simply send all excess there. Make sure though that FIRST you fill at least one container (as a buffer) as well as your grab storage. Tips II What's a grab storage? A room where you pool excess from most of your items (except maybe ores and ingots) for handy access. You do NOT want to keep running around your facilities and collect each item separately in its production location. That's a big waste of time. Fed up with dangerous mobs taking so many bullets to kill? Get explosive Rebar and stay with it. It's much better than the rifle and kills even the biggest enemies in maximum 3 hits. (small ones 1 hit, medium ones 2) On the workbench, no need to hold Space. Just tap it once and it will keep producing until you walk away or run out of resources. !Quality of Life! When collecting stuff on the ground (like gras, branches, flowers...), you can just HOLD the E key and you will automatically continue collecting what you mouse over. No need to mash E like crazy. (thanks to AdApt for this tip) If you have trouble placing splitters or mergers, the best way to do this early/mid game (before hoverpack) is to stand ON TOP of one of them and then look the right way. Drones are excellent long distance transporters but have limited carry capacity. They are only efficient for transporting processed goods in smaller quantities, not to transport e. g. ores or most ingots. In addition, drone ports only make sense for far-away products since starting and landing take up quite a lot of time. This means longer flights are more efficient. Press N to open a text search that lets you select specific items or buildings much faster than having to search them in other menus. Just start typing the name and results will show up. The console also remembers your last search. I find it very useful to quickly check recipes to know in- and outputs of certain products. N can also be used as an ingame calculator! (thanks for this tip to Fallen Dog) Open the map with 'M' and place markers for each product you produce. You can also make the markers appear on your compass. This helps orienting yourself in your plethora of buildings (that you WILL have at the latest in midgame). Hypertubes are the first mode of transport for the player that is quicker than your own two feet. They stay useful all through the game as a fixed route to distant places. They are more reliable than trains (you gotta wait for a train and it may take detours), faster than jetpack and hoverpack in most cases, you can go AFK while tubing... As a tip, build a perimeter tube circling your main base with at least 4 stops (north, west, east, south) on the way. And once you have a grab storage, you can also add tubes from there to all important locations. Tubes are also great for crossing large patches of water, to cover height differences (since they have no 'too steep' angle) AND can be made into a hypertube cannon, if you like to cheese a bit. (check videos about it online) Sliding (see tip in part 1) has the SAME BENEFIT WHEN YOU USE THE JETPACK! Slide-jump, then activate it (hold Space) and you will fly much faster. During flight with the jetpack, it's enough to give the Space key regular little taps instead of holding it. This saves a lot of fuel and lets you cover great distances with a single fuel charge. Fed up with your conveyor belts criss-crossing all over the production floor? Consider using a 'service layer' floor (max 2 walls high) and only fill the machines above via conveyor floor holes! It takes some clever planning and careful placement of splitters and mergers but it means your production will look and feel very tidy. Not for early to mid game! Some of the most useful unlocks in the AWESOME shop: - ladders (only for the beginning). They help a lot in the early game while you cannot cross heights easily. bidirectional wall power plugs. No more having to deal with those ugly power poles! And connecting them can be done on the outside which means less cables hanging around your production floor - conveyor belt walls. No more ugly holes in your wall to let belts through! - wall holes for pipelines. Same, but for fluids. - The mug o' coffee. Because it's THE symbol of Satisfactory. The coffee it contains is infinite and will NEVER SPILL. Fancy that. They got endless, gravitationally indifferent coffee but still need to build factories in the future. Trains can be a little confusing when first you encounter them. Normally you will want to start with a 'there and back again' route. Place your stations so their arrows (seen when placing) point away from each other <--- ... stop1 .. stop 2 .... ---> Then, build a train on the tracks and put a locomotive on EACH end. They have to face the right way too, check where their cockpit and windows are. One needs to face <---, the other -->. If you have just a start and stop station, that's it. If you have stations in between (stop1, 2....), take care to orient their arrows correctly. NORMALLY you want your train to only stop there either going back or going forth. Going forth point the arrows -->, going back <--- . Trains are not allowed to STOP at a station if the station points towards the train but they can ALWAYS GO THROUGH. So an example could look like this: <--Start station... --> stop 1 --> stop 2 --> stop 3--> ... end station---> Or, if you collect from the end: <---start station ... <--stop 1 <-- stop 2 <-- stop 3 ... end ---> Depending on your hardware, very big factorites can cause lags eventually. However, the game only calculates fully stuff that is within a certain range of the player character. The rest of the world is simulated in a much more simple way (but still 100% precise) that goes easy on CPU and GPU. Meaning once you go big (and that can be a different definition dependant on your hardware power), think about outsourcing certain production steps to far-away places on the map. For example, no need to smelt your caterium into ingots in your central base. You can do that perfectly fine right at the resource deposit. You might even want to create e. g. quickwire from it right there and then only send back the finished quickwire to your base. You can take this game all the way up to the hightest tier products, of course. Some players eventually have ONLY separate factories all around the map without any real central base. to be continued!
新手与中级玩家快速技巧

导读
这是《幸福工厂》新手与中级玩家快速技巧帖,核心围绕尽快解锁煤炭电力展开,建议前期用手工制作台加速关键部件生产以推进煤炭电力自动化,还分享了滚轮选建筑、E键切换同类建筑等大量实用操作与工厂布局、运输选择的技巧,助力玩家提升游戏效率与体验。

评论
共0条评论

《幸福工厂》新手与进阶玩家101个技巧
本指南包含101个新手及进阶玩家技巧,能让你在游戏前期和中期更加轻松。《幸福工厂》101个新手及进阶玩家技巧,带字幕视频(德语|英语)
2026-02-18 03:010赞 · 0评论

简短实用的技巧
以下是一些能在开拓过程中为你提供巨大帮助的“高智商操作”。 本指南仍在持续完善中。 刚接触《幸福工厂》?不喜欢和朋友一起玩?因为不看主播而跟不上进度?那么这份指…
2026-02-14 02:310赞 · 0评论

幸福工厂 - 技巧与窍门
本指南包含大量实用技巧,助你在《幸福工厂》中更智慧地建造、更快速地自动化生产,并延长生存时间。 公会链接:Æsir Universe 若有任何事需联系我,可通过…
2026-02-11 10:310赞 · 0评论

《幸福工厂》实用技巧
本指南将聚焦《幸福工厂》中一些不太为人知的功能,了解并运用这些功能能从多方面提升你的游戏体验。其中包括实用的键盘快捷键、设置配置以及建造技巧。 实用的第三方资源…
2026-02-25 02:010赞 · 0评论

3个物品工厂
3个物品工厂
2026-04-07 01:000赞 · 0评论
行星前物流:新手组织方法、环形传送带与分拣器动态
本指南旨在帮助那些因各种原因在早期游戏阶段(尚未启用行星物流系统前)遇到困难的玩家。虽然不会涉及优化布局和资源比例,但会提供一种行星结构组织方式,帮助玩家整合和…
2026-02-19 13:000赞 · 0评论
铸造厂紧凑布局与其他数学运算
一堆数学计算和优化布局作为参考 更新内容 2025-05-24 --------------- 尽管游戏已大幅转向商业和机器人生产,研究系统变得像《幸福工厂》一…
2026-02-14 07:000赞 · 0评论
强化板与转子 - 工厂方程式
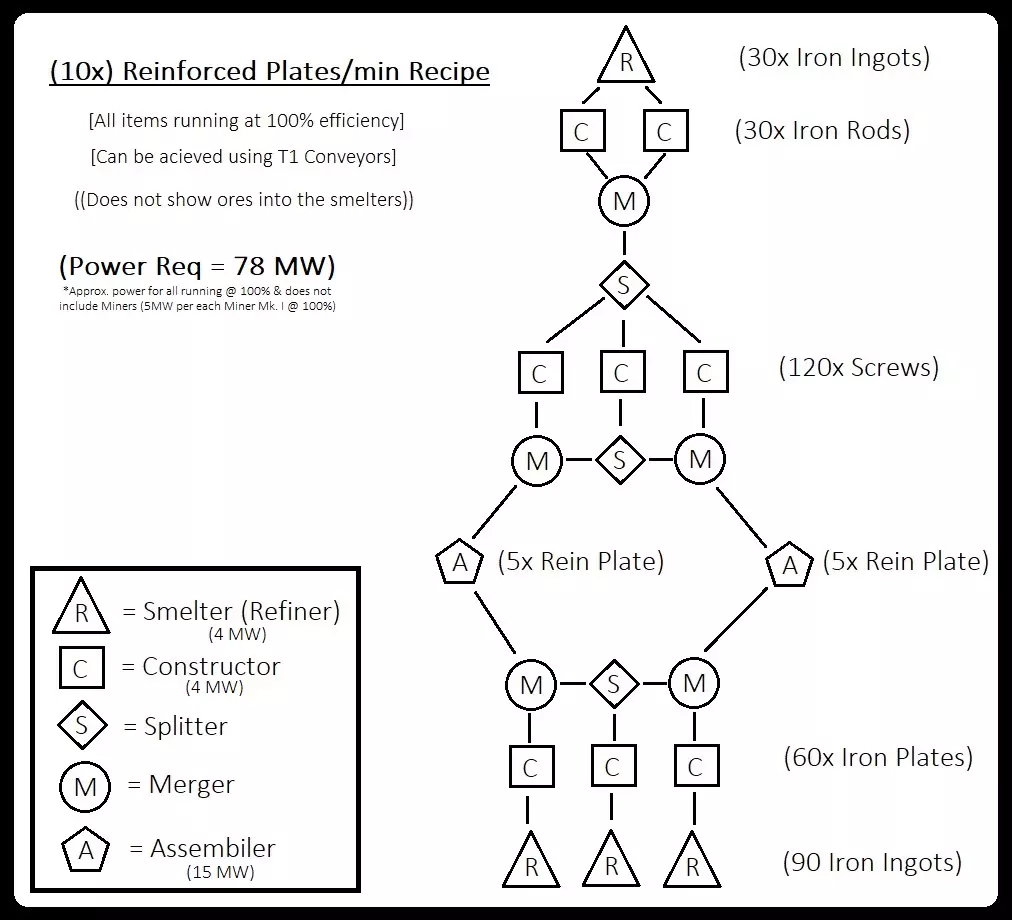
想要一个能以100%功率运行的高效布局吗?那么本指南将帮助你实现这一点,当然……是针对强化板和转子的! 强化板与转子工厂布局 话不多说……以下是强化板和转子的工…
2026-02-14 02:310赞 · 0评论
《星裂》基地建造基础
你知道在《星陨传说》中建造基地时可以做到这些超棒的事情吗?我们准备了一段短视频,展示一些你在搭建首个工厂时可能忽略的功能。这些技巧对于重新规划更高阶的设施也非常…
2026-02-05 14:000赞 · 0评论
实验性热修复 v1.1.3.1
各位开拓者!《幸福工厂》实验版本修复公告 1.本次我们为当前实验版本发布一个小型但必要的热修复。此更新不包含新的重大修复或新增内容,但将有助于我们改进当前解析崩…
2026-02-19 17:530赞 · 0评论
暂无更多
最新更新
- 《幸福工厂》1.2 实验性热修复版本 v1.2.2.2 更新内容 — 各位先锋们! 大家好,这里是又一个小型热修复补丁,希望能解决所有遗留的重大问题。 输入被阻止的问题相当棘手,所以如果你们在其他地方遇到此类问题,请通过我们的QA…
- 《幸福工厂》1.2 实验性热修复版本 v1.2.2.1 更新内容 — 各位先锋们! 大家好,今天我们为所有使用实验版的玩家推出一个热修复补丁,该补丁将解决上一个更新中出现的大部分问题。 对我们来说,了解此补丁是否引入了新问题至关重…
- 《幸福工厂》1.2实验性版本更新 - V1.2.2.0 — 各位先锋们! 大家好,距离上一个补丁已经有段时间了,不过这次我们带来了大量修复,这些修复应该能解决目前发现的大部分问题和崩溃情况,希望能让1.2实验版更加稳定。…
- 如何快速通过 hypertube( hypertube )移动 — 目前游戏中最快的移动方式。 建造 首先你需要建造一条 hypertube 支架线路,每个支架后需要留出一个间隔。支架可以放置任意数量,但这一点需要小心,因为可能…
- 运输规划:一种系统方法 — 继《一名系统工程师玩转幸福工厂》之后,本指南将探讨如何规划与游戏内传送带和载具能力相匹配的运输系统。本指南不涉及美观或建造技巧,而是专注于帮助你根据具体情况选择…
- 如何创建Windows专用服务器 — 本指南介绍了如何在Windows系统上运行专用服务器、进行设置以及控制台命令列表。 欢迎辞 本指南直观展示了如何通过Steam客户端在Windows系统上运行《…
- 使用Steam的自定义控制器支持 — 为不支持控制器的游戏映射控制器!在《幸福工厂》中使用Xbox控制器 简介 2023年如何为《幸福工厂》设置控制器。出于无障碍需求,我需要控制器支持,对于大多数不…
- 生产计算表 - 德语 — 用于计算生产综合体所需建筑的计算表格。 版本 V1.0.0.2 Build 367101 - 2024年9月21日 计算表格 - 德语 这是一个根据需求计算生产…
- 如何通过幸福工厂结识女生 — 和女生聊天时,可以试试这样说:你是更新5吗?因为我想获得你的权限。
- 《幸福工厂》1.2实验性更新 - v1.2.1.0 — 各位先锋们!我们非常高兴看到大家在体验版中享受1.2版本更新,也十分感谢大家至今提供的所有反馈以及报告的所有漏洞,因此今天我们准备了一系列修复内容:)如果你们听…