换一换
换一换 


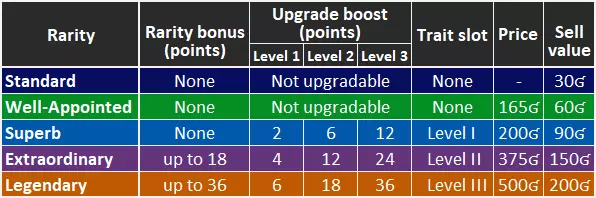
《霍格沃茨之遗》各阶段获取最佳装备的大量实用技巧,以及基于深入游戏数据和经验总结的关于升级、战利品、 beasts、金钱等相关游戏玩法通用方面的诸多建议。 简介 在我第三次通关并观看了大量YouTube视频、阅读了许多指南、帖子和讨论后,我对游戏机制有了更好的理解,明白了哪些因素能真正提升游戏体验,以及提升自身实力的最优化方法。我还对游戏中可能犯的主要错误以及在做出游戏决策前最需要了解的事项得出了自己的结论。我撰写本指南的初衷是想分享一些自己的思考、总结和心得体会,希望能对他人有所帮助。 起初,我只想分享自己关于获取最佳装备的策略和技巧,因为我认为这是提升实力最重要的因素(我在第2、2a和2b节中对此进行了详细阐述)。但在撰写过程中,我意识到这个问题与游戏的其他方面紧密相关,比如升级、赚钱、获取野兽副产品和特性等。因此,我也想分享这些方面的许多实用技巧。最终,本指南扩展成了一份完整的游戏玩法指南。即使你认为自己已经了解这款游戏的一切,我仍然建议你阅读本指南,或者至少浏览一下这些提示——希望你能从中发现一些有用的、自己不知道或没想到的内容。 本文包含明显的游戏玩法发展剧透,还会透露一些支线任务的次要细节,但没有剧情剧透,也不会给出任何谜题的解法(有少数几个,但已放在剧透标签下)。所有提示、图片和表格都已编号,方便查阅。 游戏机制的所有数据均来自Reddit上的一篇经典帖子。基础要点与基本信息 获取尽可能好的装备是提升角色实力最基本也最重要的事情。 提升角色等级的主要目的和好处是什么(除了解锁任务、天赋以及增加生命值外)? 显然,是能够获得具有更强魔法力量的装备,因为从战利品中掉落或在商人处购买的物品,其力量取决于你的角色等级。 一些基础知识:【装备】指具有防御和进攻魔法力量的附魔可穿戴物品(力量值范围为0到114点)。你可以穿戴3件防御装备(面部装备、头部装备和服装)和3件进攻装备(手部装备、颈部装备以及斗篷/长袍)。每件物品都属于五个稀有度类别之一,每个类别都有其独特的特性和特点: 表1:
你可以通过两种方式获取新装备:一是开启散布在世界各地的装备宝箱,二是在商人处购买。你获得的每件装备都有特定等级,通常与你拾取或购买该装备时的角色等级相匹配(有10%-15%的几率获得高1级的装备,但你需要升级后才能装备这些物品)。 按“I”键或控制器上的对应按键可打开装备界面。
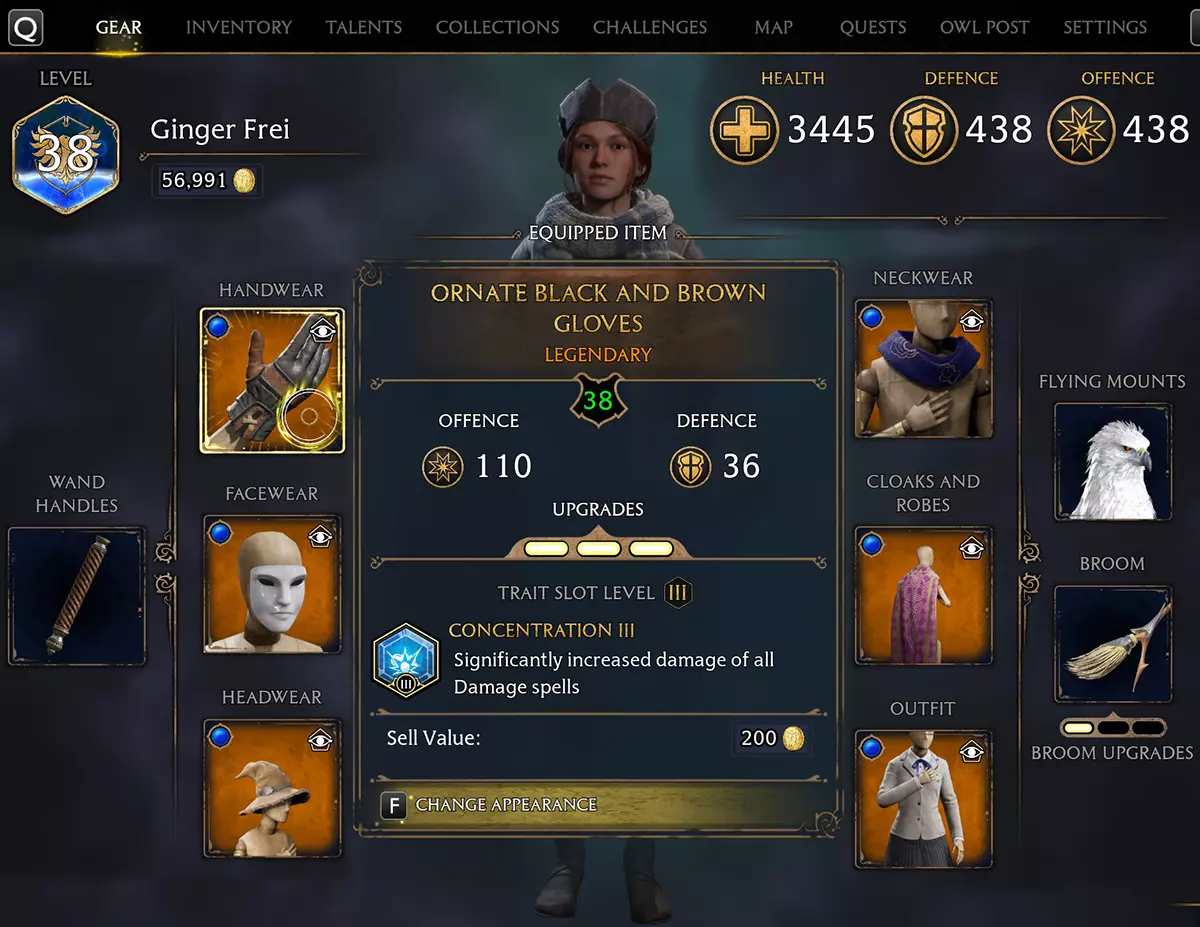
你可以在屏幕右上角查看装备的综合攻防能力(本示例中为438)。要查看任何已装备物品的具体属性,将鼠标指针指向该物品,即可看到其等级(上方示例中为38,与角色等级相同,当然也可以低于角色等级)以及攻防能力(110和36)。注意,未升级的物品只有一种属性,当你学会捕捉魔法生物后,可以通过升级来为攻击型物品增加防御点数,反之亦然。 另外,你可以通过按【F】键来【更改物品外观】(查看上方图片底部)。更多详细信息可参考第2a节的提示12。浏览装备商店的库存时,指向任何物品都会打开类似物品的属性窗口(参见第2b节图片11)。 当你拾取或购买新物品时,屏幕右侧会出现通知,通知旁有绿色或红色箭头,用于指示该物品的强度与你当前装备的同类型物品相比是更高还是更低: 图片2:

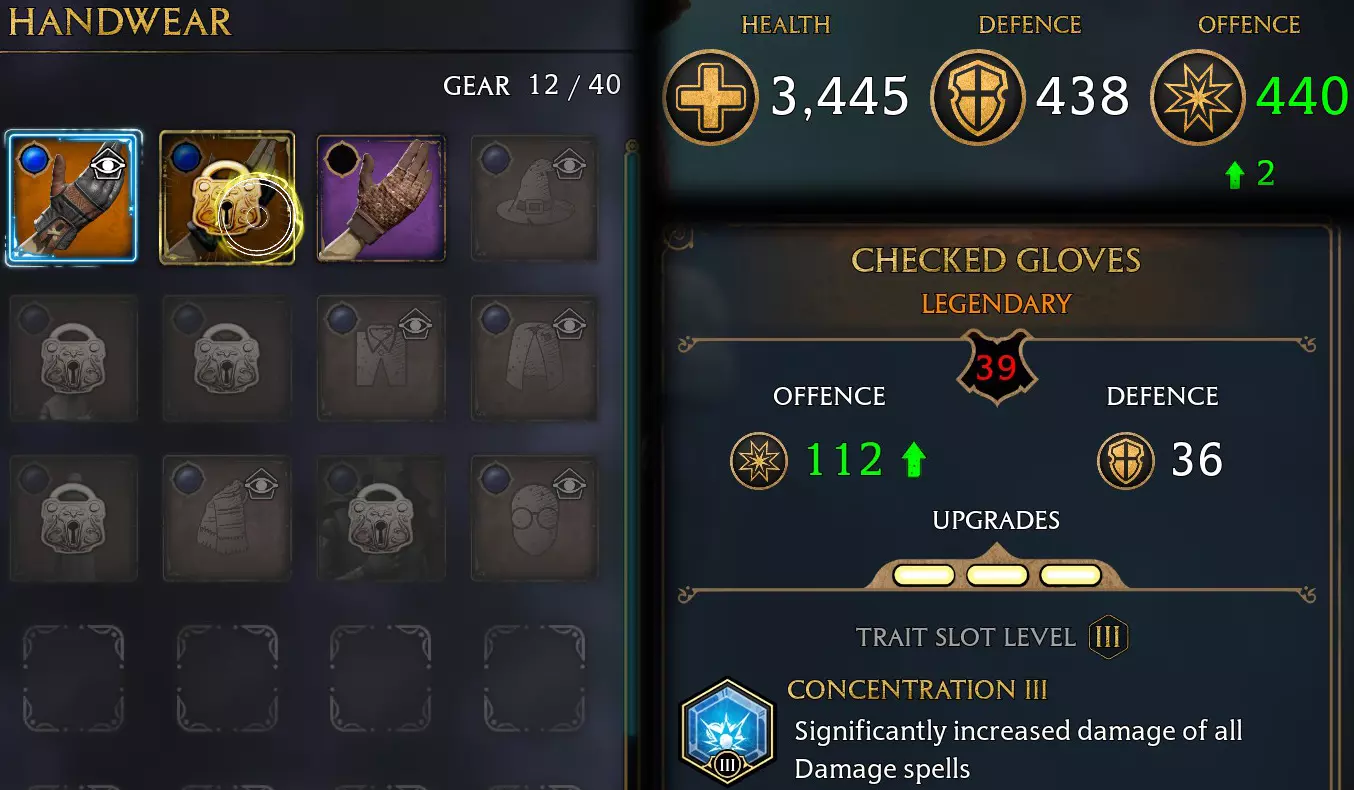
若要查看背包中所有同类物品,请在主装备界面点击该物品。以上述示例中点击手套(图片1)为例,将打开如下界面: 图片3:
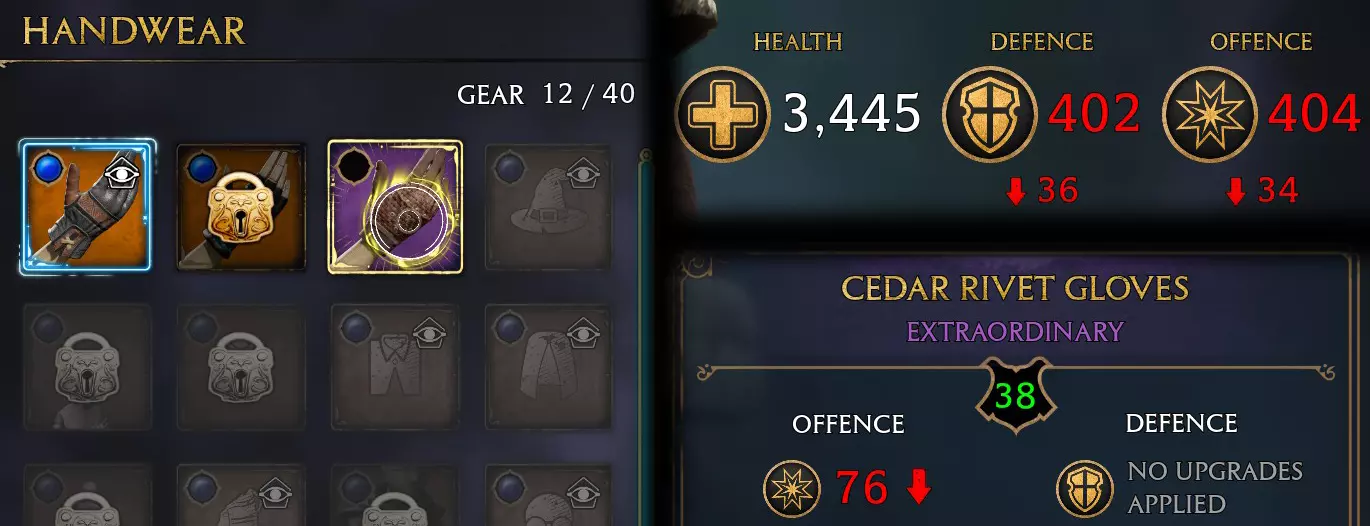
当你指向任何物品时,可以查看其属性,还能对比装备该物品后与当前穿戴装备的综合战力变化。如果你不知道,只需点击已穿戴的任何物品即可卸下,无需用其他物品替换。 顺便一提,这是唯一能查看背包中装备数量的界面(示例中为12件,而我的最大携带量是40件)。 注意中间的手套等级为39级且处于锁定状态,需达到下一级才能装备。尽管目前无法穿戴该物品,但可以对其进行升级和添加特性。
一些重要且发人深省的数据:你的进攻能力在很大程度上取决于装备质量,而非其他因素。 对敌人造成的任何伤害都有一个数值(你可以在屏幕上看到敌人每次受到伤害时从其生命值条中减去的点数)。这个数值最初是根据多种因素计算的,包括法术或伤害类型、敌人的浮空/冰冻/眩晕/混乱等状态、使用的药水、天赋、特性等。但随后,得出的数字会乘以一个伤害乘数,该乘数是你综合装备进攻能力的函数。你的综合装备防御力会按一定百分比减少你受到的任何伤害,但你的防御能力并不完全依赖于这一特定因素——你的生命值会随着等级提升而增加,你还可以格挡、闪避和使用生命药水。 以下是两张图表,展示了你的整体防御和进攻能力如何具体依赖于综合装备强度(上方为防御,下方为进攻): 图表1:

ĺžčĄ¨2
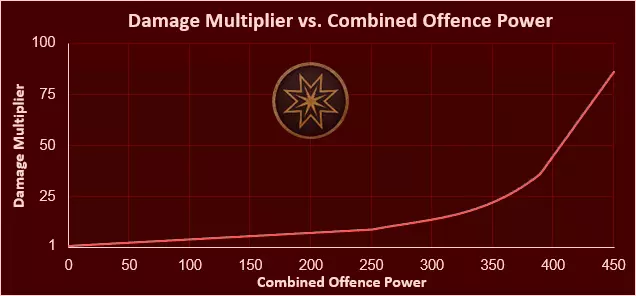
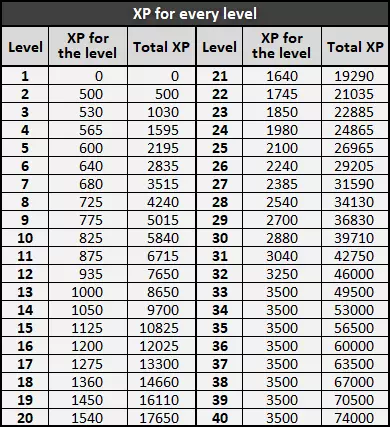
如顶部图表所示,防御值在1到16点之间时,每增加1点防御值带来的减伤提升最大(每点额外减少1%伤害),之后减伤提升降至每点0.112%,在防御值达到350点后又回升至每点0.283%。 而装备的低数值与高数值之间差异最明显的是攻击属性(底部图表)。当攻击属性值达到32时,攻击的破坏力翻倍(伤害倍率=2),63时增至三倍(伤害倍率=3),94时增至四倍,以此类推,直到250点。之后攻击属性开始呈指数级增长,在390到450点(装备可达到的最高总属性值)之间则呈现非常陡峭的线性增长。与250点时相比,390点时的伤害提升4.1倍(伤害倍率分别为36.8和)。与390相比,在450时分别提升了8.97倍和2.33倍。 当你达到40级并获得防御和攻击综合最大可能战力为450的装备时,与没有魔法力量的装备相比,你造成的伤害提升86倍,受到的伤害减少82%。 任何物品的战力由什么组成? 基础战力,取决于物品等级(以及概率,因为每个等级都有一个小的属性范围【最小值和最大值】,数值是从该范围中随机选择的)。 非凡或传奇加成,这也取决于物品等级。 (例如,10级物品的战力最低为14,最高为27【带传奇加成】,20级时在34到62之间,30级时在51到94之间,39级时在60到112之间。)你可以在下方第2节的表3中查看每件装备在各等级的最大可能战力值,更详细的装备属性(包括所有等级的数值范围图表)也可在此处查看。 升级等级。这是最重要的部分——完全升级的传奇装备可增加36点战力(对于3件同类别装备而言,这是高达108点的额外加成)。 结论:为了获得更好的装备,你应追求以下3个目标: 尽快提升等级。 想办法获取当前等级下属性最高的装备(无论是通过掉落还是从商人处购买)。 获取升级所需的所有资源,包括野兽副产品(以及部分资源需要支付的金钱)。 1. 等级提升 以下表格显示了每项活动可获得的经验值: 表2:
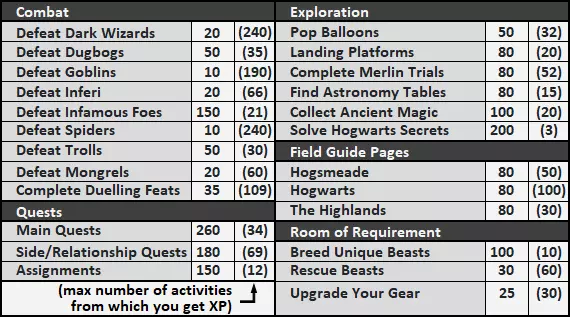
čĄ¨ć ź2a
记住这一点非常重要:游戏中所有活动的经验值获取都与挑战相关联。当你完成一系列与某项特定活动相关的挑战后,你将无法再从该活动中获得经验值。 例如,当你击败35只(5+10+20)沼泽蟹后,再击败其他沼泽蟹将不会获得任何经验值。 在霍格莫德收集50张(2+8+15+25)魔法指南书页后,继续在霍格莫德收集书页也不会获得经验值,而霍格莫德总共有55张书页。诸如此类。 以下是我建议你遵循的几个主要要点,以快速高效地升级: 1. 探索!从表格中可以看出,探索活动和 Revelio 书页能为你提供比击败敌人(除了臭名昭著的敌人外)更多的经验值,因此即使不参与任何战斗,你也能快速升级,尤其是在游戏初期。 提示1: 一旦抵达霍格沃茨,你只需寻找魔法指南书页和完成支线任务就能提升许多等级(详见下一部分的替代策略!)。学会飞来咒和悬浮咒后,你就可以探索整个城堡——再加上 Revelio 和荧光闪烁咒,除了一种(需要火焰才能获取的)魔法指南书页外,你将能够找到所有类型的魔法指南书页。同时,在前往霍格莫德之前,你可以接取全部4个可用的支线任务【像飞蛾扑向画框】【书架上的飞行物】【大量的高布石】和【决斗俱乐部:第一轮】(你可以在下方了解如何在地图上寻找新的支线任务)。一旦到达霍格莫德,你也可以探索这个地方并找到几乎所有书页,而不是急于推进主线剧情。 你甚至可以在霍格莫德的 trollfight 之前达到16级。为此,你需要完成4个支线任务并找到128页书页(不包括罗南教授作业中的2页飞行书页)。或者,如果你选择稍后再进行“交叉魔杖:第一轮”,则需要收集130页【书页】(此时你可以找到82页霍格沃茨【书页】、52页霍格莫德【书页】(其中50页可提供经验值)以及1页高地【书页】)。(同样,请阅读1a部分) 阅读2a部分的提示13,了解如何尽快解锁梅林试炼——每个试炼将给予80经验值。 提示2: 在游戏后期,你可以比剧情要求的时间更早潜入世界南部区域。使用【幻身咒】,你可以潜行穿过海岸洞穴,无需与所有巨怪和哥布林战斗(只有在洞穴尽头,尽管你进行了隐蔽,仍可能被发现,但届时只需与4个哥布林战斗)。这里会开启大量探索活动、支线任务和可搜刮的宝箱,你可以随时通过快速旅行前往此地。 2. Revelio是你的好帮手。尽可能频繁地施放Revelio,尤其是在空中,它会在你周围很大范围内显示许多感兴趣的物品。 提示3:解锁天赋后,建议优先学习【Revelio精通】天赋来扩大Revelio的范围,这绝对是必点天赋。 3. 不要拖延学院任务!完成它们能解锁新咒语,还能获得大量经验值。 提示4:在主线任务【地图密室】后解锁的小川夫人任务,很容易在开始珀西瓦尔·拉克姆的试炼前被忽略,而这些任务能为你提供对试炼非常有用的新咒语!有时候你需要查看你的猫头鹰来接收新的任务或作业! 4. 完成支线任务!大多数支线任务都非常容易完成,除了180点经验值外,还会给予金钱、外观、召唤物等奖励。 要查看高地和霍格莫德的支线任务,请打开相应的地图并寻找
图标。查看霍格莫德村或霍格沃茨城堡中所有可用任务的列表也非常简单——在世界地图上指向该地点,你就会在侧边看到所有相关数据: 图片5:

图片6:
要在霍格沃茨地图上查看新支线任务的确切位置会稍显复杂。你需要选择正确的区域,只有这样才能在地图上看到任务图标(寻找带有黑色旗帜的区域,然后在这些区域之间切换以找到任务)。

图片8:
Some useful piece of info regarding 4 interconnected side quests later in the game: Tip #5: Small tip how to visit Henrietta's Hideaway (in Manor Cape) and Clagmar Castle only once to complete 4 side quests which are related to those locations: 1. Steal a map from a table inside a tent on the edge of the Poidsear Castle, it will initiate 'The Hippogriff Marks The Spot' quest. 2. Take 'Rescuing Rococo' quest from the vendor in Bainburgh hamlet in Manor Cape. (It's unlocked after 'The Elf, the Nab-Sack, and the Loom' and 'In the Shadow of the Estate' main quests (you also need min level 25).) 3. Go to Henrietta's Hideaway and do 3 things inside it (besides looting and fighting wizards and inferi): solve the Hippogriff statue puzzle; find and catch Rococo; find the Musical Map, which is a part of 'Solved by the Bell' quest. 4. Come back to Agnes Coffey in Bainburgh hamlet and bring her Rococo. Sell all excessive items to free space in your bag for a new loot. 5. Go to Clagmar Castle, defeat Sylvanus Selwyn and all his buddies in the camp, then solve the musical bells puzzle inside the castle (while you're there, don't forget to loot all chests in the castle). 6. Go to Cragcroft hamlet in Cragcroftshire, find Hyacinth Olivier and take 'Sacking Selwyn' quest from her. At the end of the conversation, tell her you already took Sylvanus Selwyn down, it will complete this quest. I really wish I new all this during my 1st play-through, I had to return to Henrietta's Hideaway twice to complete all the quests, and it is not a very nice place to say the least... ;) 5. When you encounter an enemy, pay attention to the Duelling Feats that pop-up in the bottom-right corner of your screen. They can give you a good advice on how to fight different enemies, and completing a feat gives you 35 XP. 6. After you learn to catch magical beasts ('The Elf, the Nab-Sack, and the Loom' mission), you get 30 XP for every beast you catch (up to 60 beasts), and you need many beasts anyway to get byproducts for upgrades and earn money (each upgrade of your gear will also give you 25 XP). 7. Some people recommend Battle Arenas as a good way to level up quickly. First, it's only good before you completed most of your combat challenges. And personally I think you will encounter plenty of enemies while exploring, and this way you have almost total control on whom, when and how many at a time to fight in much less chaotic environment... You can also read the Special Tip at the end of Section 2 to learn another unconventional way to get a lot of XP (and many excellent gear items). 1a. Alternative strategy for the early stage of the game: Instead of leveling up as soon as possible (as I describe in Tip #1), you can choose entirely different strategy early in the game: During the early stage of the game you can progress through the levels very quickly, but if you're actively collecting gear by looting chests and sacks along the way from the start, your chances of finding better gear on higher levels are much smaller, since then you draw from much smaller pool of chests you haven't opened yet (as I explain in Tip #6 in Section 2a). So the most logical thing to maximize your chances of finding better gear on higher levels is to leave the chests unopened until your level is high enough. But, the problem is, if you level up quickly without improving your gear by looting, you will be at a big disadvantage against your opponents in combat, since one of the key elements of the game mechanics is that it scales the enemies you encounter with your level – usually their level match yours, unless you’re in a region where the lowest enemy’s level is higher than your current level (or the enemy is of “super-strong” variety). And the worst possible combination is being high level with low power gear (or no power at all if you postpone looting entirely). You may have more HP, but so will your opponents, and their attacks will be more devastating while yours will be weak, since their offensive power scales with their levels, unlike yours, which only depends on your gear. And you will also have little or no damage reduction from your defensive gear items. So the possible solution is to level up by performing non-combat activities (as I show in the previous section). But to unlock enough of these activities (like main/side quests and Merlin Trials), you have to progress trough some of the main quests, which does involve some combat. And the key is to attend all these mandatory early combat missions while your level is as low as possible, so that the enemies you’ll have to fight will be with lowest possible levels as well, since, as I said before, the game scales your enemies with your level. So the alternative strategy I’m going to suggest in this section is based on the following key principals: Phase I:Since you arrive at Hogwarts and until you reach a certain point of your initial progression along the story, hold off on looting and stay at lowest possible levels at every stage.Phase II:Then rapidly level up to a highest possible level while engaging in no or minimal combat. At this stage still refrain from looting chests and sacks to which you can easily come back later.Phase III:Finally, crucially improve your gear by extensive looting (and you will have all the chests and sacks still intact for that purpose). Here’re the main points and steps of this strategy (some minor spoilers of early story development ahead): Phase I:On your path to Hogwarts you should obviously try to find and loot all the chests along your way to get as much cash as possible from the locations to which you will never return, but once you arrive at the Castle, stop looting until your level up significantly at the end of Phase II. Avoid ANY side activity that gives you XP until you complete ‘Trials of Merlin’ main quest – no side quests, no Field Guide pages, no fighting random foes. If you accidentally revealed a page with Revelio, simply don't take it – XP from just a single page can put you (and your enemies) one level higher in critical moments! (The page will be hidden again when you move 300 yards away from it, fast travel or reload the game.) You can explore the Castle and Hogsmeade village and unlock Flue Flames, but refrain from taking or summoning pages! There will be students around the Castle asking for help – if you stopped and asked them what they want, this will initiate side quests. You can take these quests, but don't complete them until after the ‘Trials of Merlin’ quest! Simply come back to your current main quest by clicking on its line in your quests list, the side quests you took can wait and be finished later. During this period, attend every mandatory story quest or assignment which involves combat, when your level is as low as it can be:After completing ‘Welcome to Hogwarts’ quest, go to Defense Against the Dark Arts Class and after that straight to ‘Crossed Wands: Round 1’ (you will have to complete this quest anyway for a mandatory Prof. Hecat’s Assignment 1, so it’s better to do it as early as possible with lowest possible level). This way you and your rival duelists will be level 2, which makes defeating them quite easy even with zero power gear on hard difficulty. If you went through all the mandatory missions up till the critical moment near the end of ‘Welcome to Hogsmeade’ quest without collecting pages (there must be only 3 collected pages from ‘Welcome to Hogwarts’ quest and Prof. Ronen’s assignment), at this moment you (and your enemy) will be only level 3. After you return from Hogsmeade and talk to Prof. Fig, go straight to Prof. Hecat and complete her 1st assignment. This way you will be level 4 during ‘Crossed Wands: Round 2’ and following ‘Secrets of the Restricted Section’ main quest (you can leave all the loot during this quest as well, since you can always return to the Athenaeum in the Restricted Section of the Library and enter the Antechamber, it will be empty after the quest). After completing ‘Secrets of the Restricted Section’ quest, come back to Prof. Fig, complete ‘Tomes and Tribulations’ quest and then attend Prof. Hecat’s Assignment 2 (avoid 10 attacks by dodge rolling and hit enemies with Incendio 5 times). This assignment will reward you with Expelliarmus spell, which will be very helpful for the following ‘Trials of Merlin’ quest in the next step 5. If up to this point you refrained from getting any XP from pages, fighting or side quests, you will be 195 XP short from level 6, and you want to stay at level 5 during the fight in the final quest of Phase I. You will receive 150 XP for the completion of the assignment, so you should avoid getting any additional XP in the process. The best way to do this is to find a dugbog * and do your 10 dodge rolls and 5 Incendio casts against it, but not kill it! On hard difficulty, if you don’t hit the dugbog with any other spells and too many basic casts, it will survive your five Incendio blasts. On any other difficulty it will survive only three, but when you see that it won’t live through your next Incendio, go away from the fight, make a manual save and reload it – when you return there will be another unharmed dugbog, so you could complete the assignment without killing it (or just temporarily set your difficulty to 'hard' before engaging the dugbog). To minimize the damage, you can also unequip any gear item which power is higher than zero, for example, the robe you've got from Augustus Hill (and don’t forget to put these items back on before the next quest ;). ___________ * There's always a dugbog just north from 'Dogweed and Deathcap' shop past the northern edge of Hogsmeade. Finally go meet Natty in Lower Hogsfield (‘The Girl from Uagadou’ quest). The end of your talk with Natty will trigger the start of ‘Trials of Merlin’ quest nearby, during which you and your enemies will be level 5, if you followed all my recommendations above. (The ending is in the next section due to the unreasonable Steam restriction of 8000 characters per section.) 1a+. Alternative strategy - ending: Phase II:After you complete ‘Trials of Merlin’ main quest, still hold off on looting*, but now switch the mode completely and gain as many XP as possible by doing non-combat activities (see Table #2) and completing quests that also don’t involve any combat. * While exploring the Highlands, you can loot some occasional chests along your way, but leave clusters of loot to which you can easily come back later (like the Hogwarts Castle, Hogsmeade and hamlets). If you wish to gain some XP by defeating enemies and completing dueling feats, better do it before you level up significantly and in the regions with lower enemies’ levels (which are South and North Hogwarts Regions and Hogsmeade Valley, you can see the enemy levels in each region on the in-game map if you zoom out and hover over the region, and they’re also shown on my map of the northern half of the Highlands below). First, I’d go to the Greenhouses and farm as many free plants as I can using the method described in Section 3 of my other guide (they will include Mallowsweet, needed to unlock Merlin trials).
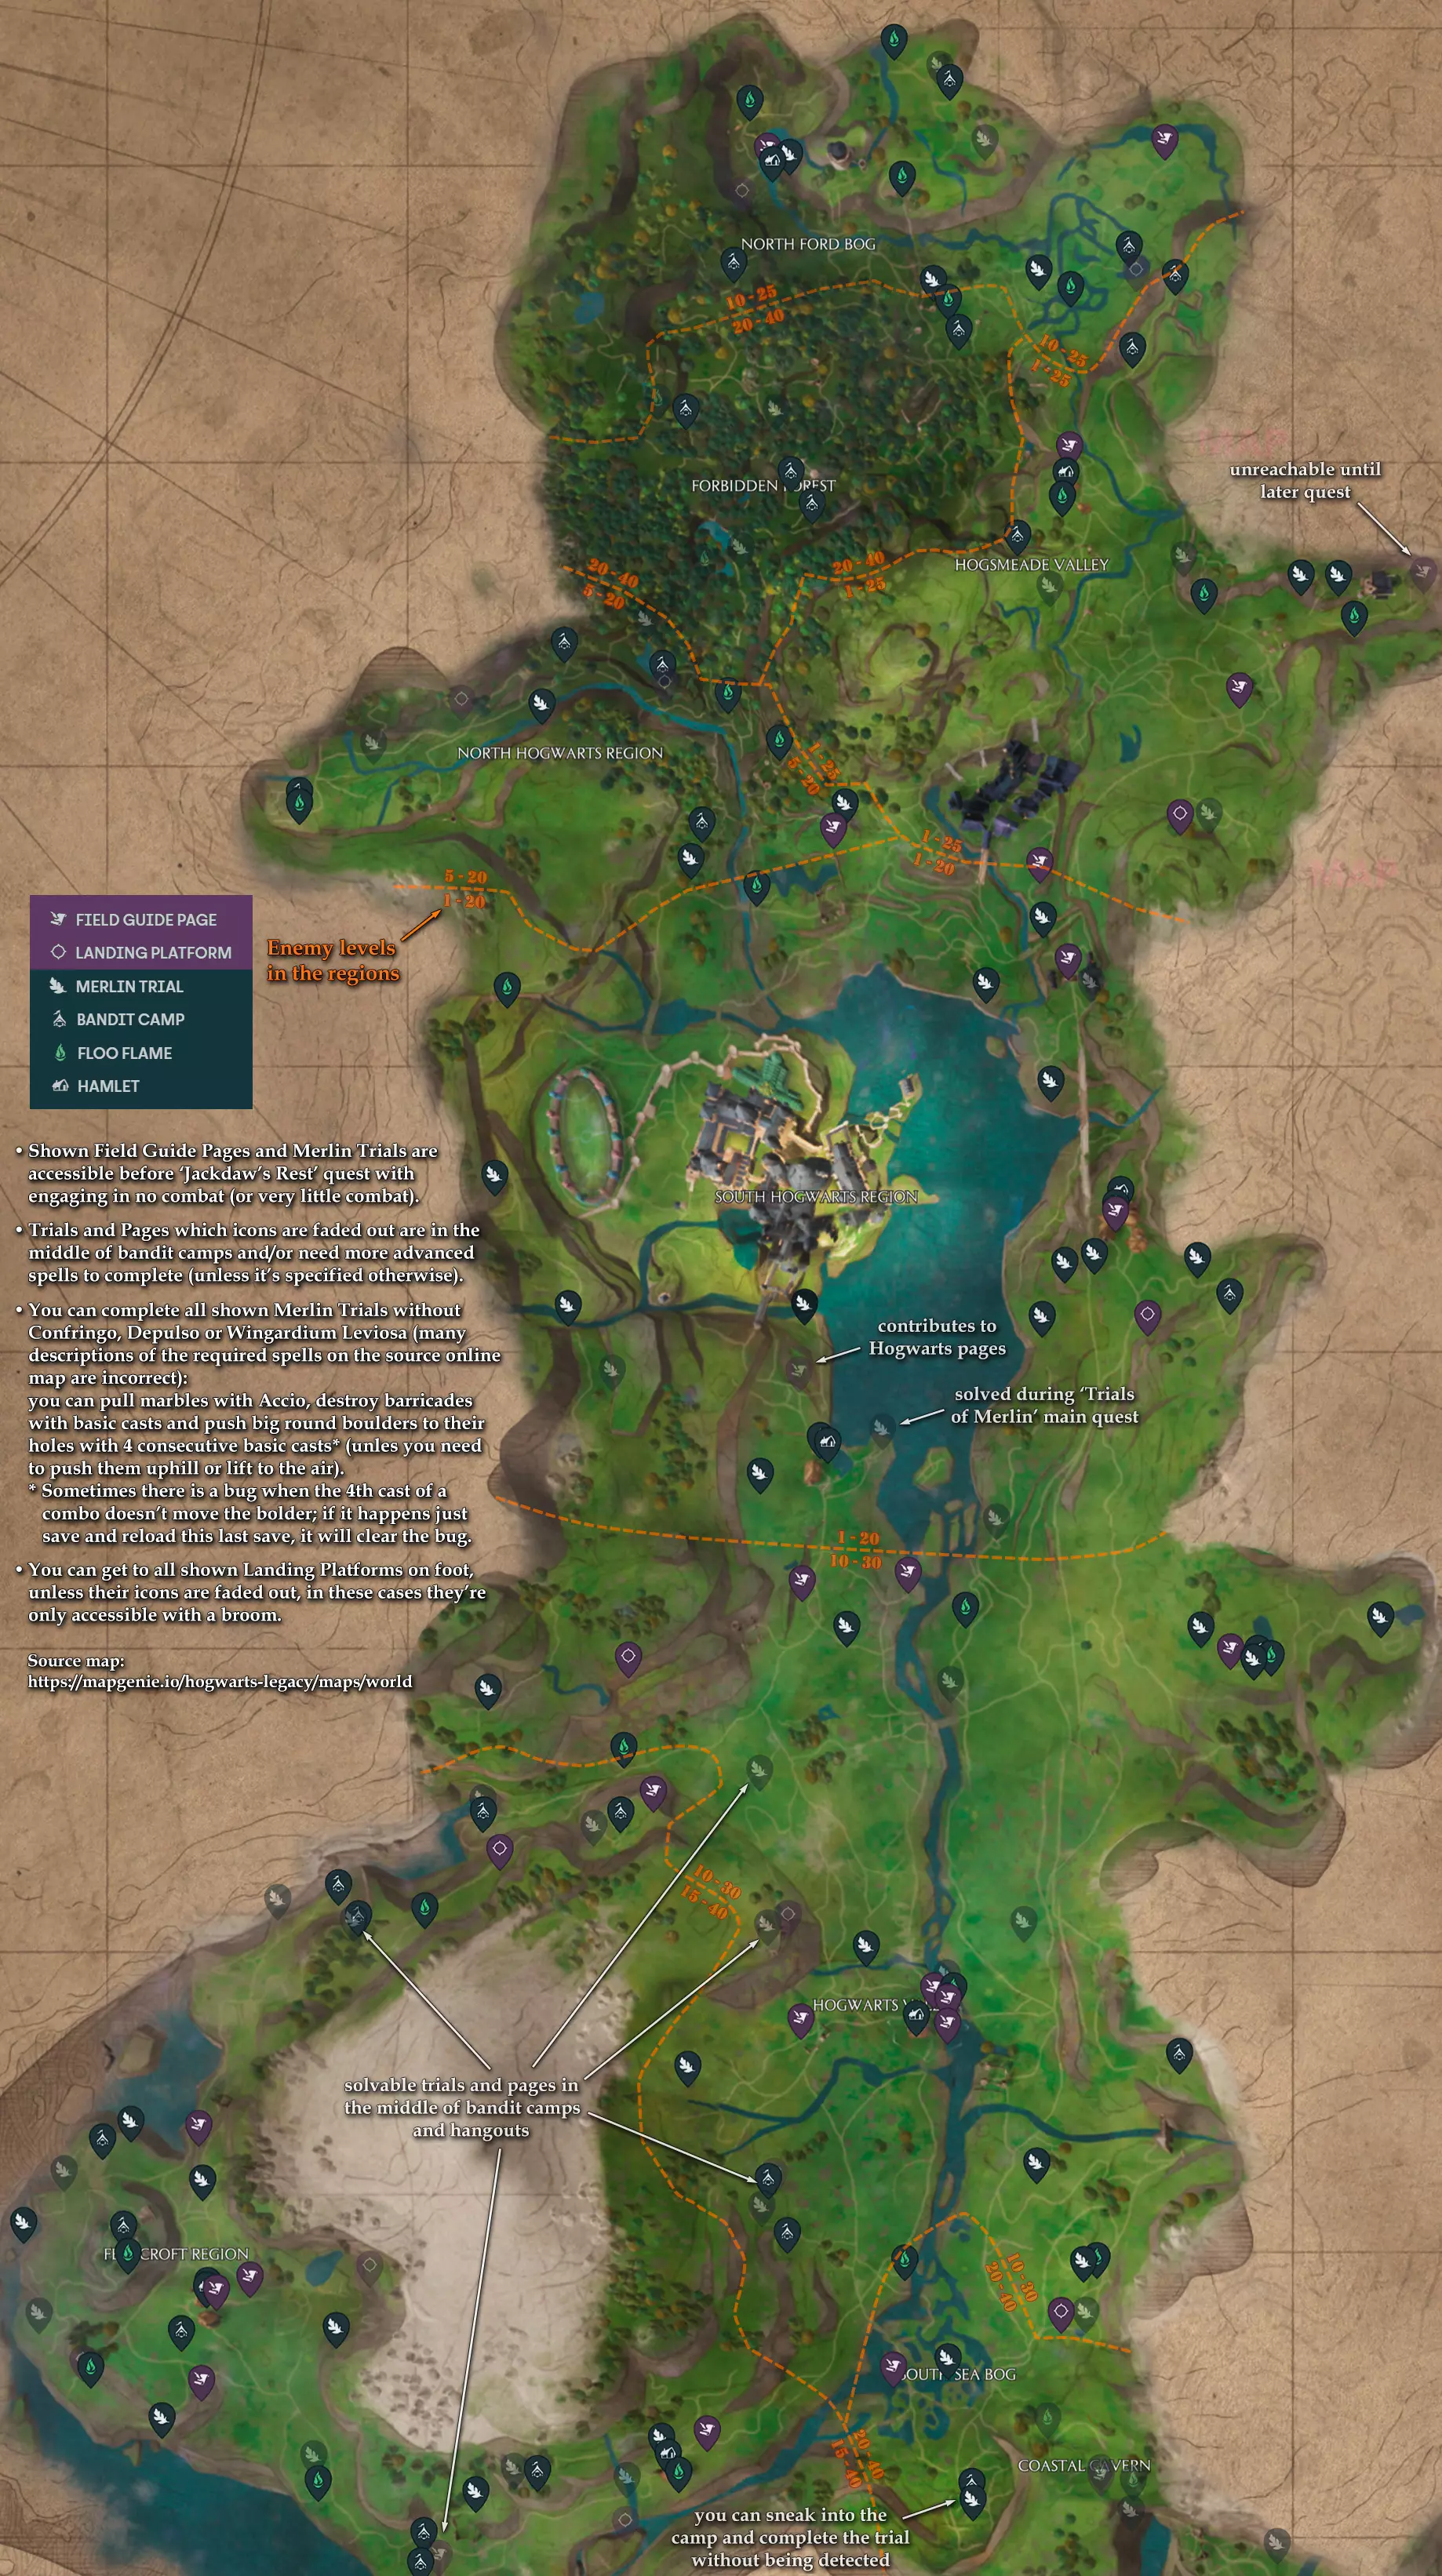
Then I’d explore the Highlands (while hiding from enemies in the most dangerous regions), find Field Guide pages and landing platforms and solve Merlin trials (and also unlock Flue Flames to be able to fast travel there later). If you explore the countryside first, your level (and matching levels of your enemies in less dangerous regions) will still be low enough so that meeting and fighting occasional foes won’t be too challenging (Disillusionment + Petrificus Totalus and Accio + Incendio from the higher ground are your best combat techniques at this stage). Look at the map on the right*, where I show accessible Highlands pages, Merlin trials which are solvable at this point and landing platforms you can reach without a broom (you can also use this interactive online map[mapgenie.io], from which I created mine, but be aware that its descriptions of the required spells to solve many Merlin trials are exaggerated). * To expand the map, you need to click on it and then click on the address line of the window that opens, then expand the 3rd window (or you can use this link to open the map in your browser and save the picture, if you want). Then you have a plenty of non-combat quests to complete – Herbology Class, Potions Class and 8 side quests in Hogwarts Castle: ‘Like a Moth to a Frame’ ‘Flying off the Shelves’ ‘Gobs of Gobstones’ ‘Cache in the Castle’ ‘Venomous Valour’ ‘Spell Combination Practice 2’ ‘Summoner’s Court: Match 1’ (unlocks after Potions Class) ‘Dissending’ for Sweets’ (unlocks after Potions Class) At the same time as running around the Castle while carrying out the quests, you will be able to collect at least 100 Hogwarts pages to complete this chain of challenges and earn 8000 XP (here's the video showing all Hogwarts pages). And don’t forget to initiate ‘The Daedalian Keys’ quest – you won’t complete it at this stage, but in the process of running around the Castle you will also start to collect tokens. In addition to that, there are very easy ‘E-Vase-Ive Manoeuvre’ quest in Irondale and ‘The Lost Astrolabe’ in Lower Hogsfield, but I’d leave the latter for later, since during this quest you’ll gather several gear items with good chances to get some epic and legendary ones, which will be more useful after you level up. You can also complete your house quest leading to ‘Jackdaw’s Rest’ story mission, it doesn’t involve any combat too, unless you’re Slytherin (even in this case you can choose to avoid fighting by swimming around the dangerous zone). This quest will also unlock short and easy ‘Ghost of our Love’ side quest (though, figuring out the place from the sketch can be somewhat challenging, and you have to remember this quest can only be done after sunset). Even if you haven’t found the Map with Floating Candles during your house quest, side quest icon will appear at its location on the map (the roof of the Owlery for Ravenclaw, Hogsmeade cemetery for Gryffindor, Squid cave underneath Hogwarts for Slytherin or behind Claire Beaumont’s vendor stall in Upper Hogsfield for Hufflepuff). There’s also one of the Hogwarts secrets at the Viaduct Bridge you can solve at this stage of the game for 200 XP reward. And finally, you can collect at least 50 Hogsmeade pages for a nice sum of 4000 XP (here's the video that shows all 55 pages). While collecting pages in Hogwarts Castle and Hogsmeade, don't forget to loot eyeball chests (see more details in Tip #21), each will give you 500ʛ, so you can collect up to 13,000ʛ if you find all 26 of them (the remaining 4 eyeball chests are behind locked doors).If you complete all the activities I listed above (3 main quests, 10 side quests, solve one Hogwarts secret and collect 100+50 Hogwarts and Hogsmeade pages), you will only need to complete 7 Merlin trials* and find 9 Highlands pages/landing platforms to reach level 21 (and this is without defeating a single enemy). And you can reach even higher levels if you explore and fight more. * – 2+6 completed trials (including the one from 'Trials of Merlin' quest) will allow you to increase the number of gear items you can carry from 20 to 28. Phase III:Now is finally the time to improve your gear by looting chests and sacks, and you will have a huge pool to draw from, as you haven’t touched any of them ever since you arrived at Hogwarts. I suggest to save all the big ornate gear chests (see Tips #8 and #8a) for the 1st Keepers' Trial ('Percival Rackham’s Trial'). As I explain in Tip #8, then you will get from them items matching your updated level, and they will have random traits already applied, which you cannot do by yourself at that stage. It would be a waste to open these chests earlier.In addition, now you have unlocked many Floo Flames to move quickly around the map; and you also have more room in your bag to store more gear items after you've completed a number of Merlin trials. Use my tips in Section 2a, they will help you get the best gear from looting in the most efficient way. Moreover, you will earn a lot of money by selling excessive gear items, and this will allow you to buy recipes and brew potions in the Potions classroom even before you get the Room of Requirement, and even buy the best gear at Gladrags (as I describe in Section 2b) once you have really excessive amount of cash, of course (you can read my money management tips in Section 4b). All this will make you much stronger, so that you could take the remaining combat-extensive quests and truly explore the world, engaging different enemies along the way with much more confidence. 2. Getting items with the maximal possible stats for the level First, how can you know what is the max possible power of an item at any given level? There is no conventional way to find this out, but fortunately we're lucky to have someone who dug it out of the game data files for anyone to see and use. Here's the complete list of max item's powers for all levels: Table #3:
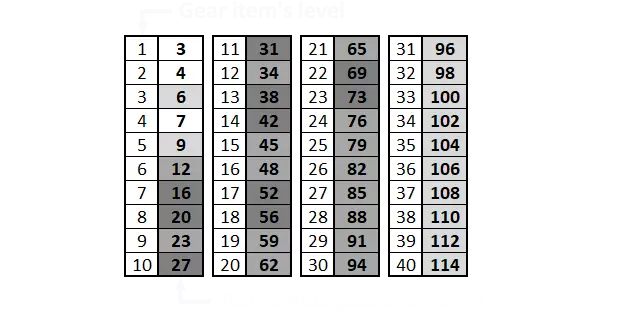
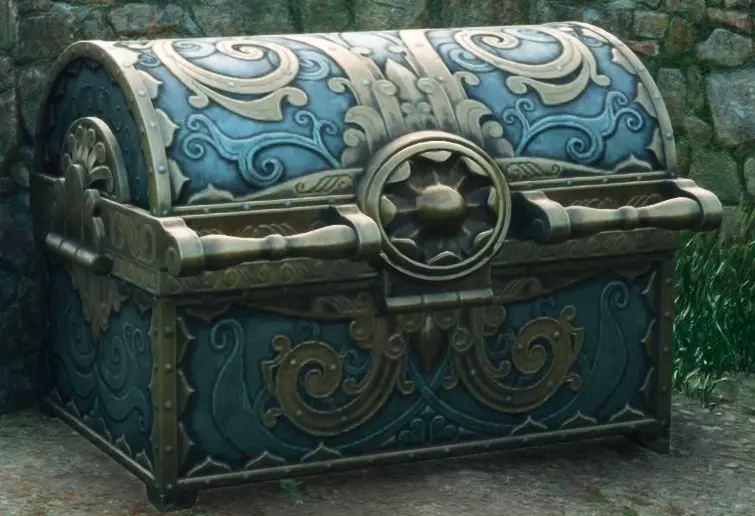
(As you can see, from level 1 to 5 it grows every level by increments of 1 and 2, from level 6 to 23 by increments of 3 and 4 (darker grey), up to level 30 by increments of 3 and from there to level 40 by increments of 2.) So how do you get gear items with max power for your level, when, as I mentioned before, the value of every item that drops from looting or found at vendors is randomly selected from a certain range? – I will explain this in detail in the next two sub-sections (2a and 2b). Why did I split this into two parts? – From my experience and cost/benefit analysis, the strategy should be different before and after you learn to catch magical beasts and upgrade your gear. Earlier in the game you should get your gear from looting rather than buying it, because of four reasons: If you follow my advice in Section 2a, the gear you'll get from looting won't be much weaker than the very best you can buy. After you get the Room you can find and use items with some useful traits already applied, and you can't buy items like that at vendors and can't apply traits by yourself before you learn to catch beasts and get the Enchanted Loom. You get much less benefit from each power point added to your gear with lower powers at lower levels compared to higher ones (see Charts #1 and #2 above). The most important reason: It's not wise to spend your money before substantial and important expenses by the time when you learn to fly and get the Room of Requirement.The only* two exceptions to this rule: 1. I recommend buying a new set of max powered legendary items (as I describe in Section 2b) before Jackdaw’s Rest main quest, if you can afford it. – To determine this, compare the contents of your wallet with the list of upcoming expenses I provided at the end of Section 4b (with added cost of 6 legendary items minus what you can get by selling your current gear). If you're tight on cash, pass on defensive items, since you gain only 1% additional damage reduction from every 10 points you add to your defence. 2. Also, buy max powered legendary items before embarking on Percival Rackham’s Trial (in addition to items with useful traits already applied, which you found in legendary chests by using my advice in Tip #8 below. Traits that are useful for the trial are 'Ancient Magic', 'Control', 'Herbology', 'Concentration', 'Laceration', 'Destruction', 'Scorching' and 'Disarming', all other traits are useless at this stage - you can check all traits' effects in this table[docs.google.com]). This is one of the most challenging quests where every additional bit of strength is important, and at this point most of your biggest expenses are behind you and you should be able to afford this investment. —————————— * - If you're exploring and looting really extensively from the very beginning and hence have a lot of money for your disposal even early in the game, you can sure buy gear items more frequently. Just don't waste your cash on defensive items, since, as I already mentioned, the actual gain is minimal – adding 10 points to your defence power gives you only 1% more damage reduction from enemy strikes (when your initial power is between 16 and 340). You can always check how much of actual improvement you can get from additional power points with this table[docs.google.com]. After you learn catching beasts and upgrading your gear, the only logical thing is to buy your gear every time you level up. There is no sense in being content with anything but the very best if you don't have to spend much time and effort to acquire the very best. I describe my method of quickly obtaining the best possible items from vendor in Section 2b and give my advice on upgrading your gear in Section 3. Special Tip: There's another secret way to get a lot of extraordinary and legendary items, but it uses a glitch – one of the Infamous Foes, Belgruff the Bludgeoner in the Rookwood's Castle, resurrects every time you take him down, after three in-game days. In addition to 150 XP reward for defeating an Infamous Foe, he always drops extraordinary or legendary item. The game allows you to skip time, so you can literally farm excellent gear items (and XP, up until you defeat 21 Infamous Foes in total). Though, Belgruff the Bludgeoner disappears from the castle after you complete Charles Rookwood's Trial (or appears only one time if you never killed him before that). See more details in my Reddit post. 2a. Getting best quality items from looting: The rule is very simple: The more you loot, the higher the chance of finding better quality gear. Before you can upgrade your gear and have enough money to buy it, the way of constantly improving your gear is also very simple: When you see that the item you've just looted is better than one you wear (there's a green arrow pointing up next to it's notification icon) - equip it instead of your current item and sell the old item as soon as you can, regardless of the rarity of both items. (See Tip #12 below about changing the appearance of any equipped item.) The rarity doesn't matter until you can upgrade your gear, and if your old legendary item is less powerful than your new green/blue one, there's no point keeping it - when the time comes to buy best possible items to apply upgrades, you'll sell it anyway. Tip #6: If you see that you are just about to jump to the next level, consider postponing looting, especially if you near a cluster of lootable stuff to which you can easily return after you leveled up (like a village or a hamlet). If you loot the same chest when your level is higher, better quality item will drop. For example, during my 2nd play-through I decided not to loot chests and sacks while I was leveling up by collecting Field guide pages and doing side quests between 'Welcome to Hogwarts' and 'Welcome to Hogsmeade' missions (as I describe in Tip #1). Only when I reached level 16, I started to loot chests and sacks in Hogsmeade. To show you the difference – at level 5 looted items have powers between 5 and 9, at level 10 – 14‑27, and at level 16 – 26‑48. (Or you can follow a different strategy from Section 1a and postpone looting even further.)Now, when you open any chest, a random item will drop, so it's like rolling a dice. Is there any way to "re-roll the dice" to get better item from the same chest? Yes, there is a very simple way: Tip #7: Before opening the chest, make a manual save, and if you don't like the item that dropped, load this save and open this chest again and repeat the process till you get something you wanna keep. But, although this is useful for conjurations and traits chests (as I describe in Section 5), save scumming until max power item drops is a waste of time. Even with legendary gear chests (see Tip #8 below), the chance of max power item dropping is so small, that the time which usually takes to finally get one is better to invest in earning money, you will earn much more than you save by save-scumming an item instead of buying it. I'd only use this method if one of my items (say, gloves) is really weak and I just want to get better gloves, but not necessarily with max possible power. Or to just get more expensive items (at least purple from bigger chests and blue from the rest). Here are several main points to remember (some are similar to ones regarding leveling up, but here I also give a lot of info specific to looting): 1. Explore – the more ground you cover, the more stuff you find. Don't ignore treasure vault icons on the map – you may not yet have the spells needed to open the vault or reveal the chest inside (at your current stage of progression), but it's always worth checking. Read Tip #2 in Section 1 about unlocking the southern part of the world early. 2. Again, use Revelio frequently! As I wrote in Tip #3 in Section 1, get 'Revelio Mastery' talent to increase the range of Revelio. 3. Put your nose into every corner. When you're in some cave or dungeon during a quest, don't rush – there are always many dead-end tunnels/corridors on the right and left with many goods. If after casting Revelio you see something lootable to the right, left, bottom or top of you – don't ignore it, it's all reachable, even if it requires solving a small puzzle. This way you will also be sure not to miss any collection chests. Tip #8: Best items are found in the big ornate gear chests – each gives you a legendary gear item.
My advice is to save these chests for the 1st Trial (which is the hardest quest in terms of combat) – you will get items matching your updated level, and they will have random level I traits already applied, which you cannot do by yourself at this stage. I you find these chests earlier than that, you can make screenshots of them and the map with their locations and move them to a dedicated folder called something like "Unopened chests", so you could easily find them later.Tip #8a: There are 5 big ornate gear chests hidden in 5 Hedge Mazes (these chests get refilled once in a while, so you can loot each more than once): https://www.youtube.com/watch?v=e6j0uQBjwWs Important advice: sometimes a Hedge Maze doesn't spawn; if it happens, just save the game (make a manual save), exit to main menu and load back in.Tip #9: You should figure out how to solve the Door Puzzles in Hogwarts Castle, there are one gear chest and one conjuration chest behind each door. The only thing you should know is to start counting from zero, after that it's a piece of cake. If you still have trouble solving them, there are plenty of other guides to help you, just type "door puzzle" in the search bar.Tip #10: You should learn how to pick locks as soon as possible ('The Caretaker’s Lunar Lament' quest after Percival Rackham’s Trial). It is very easy to collect 8+13 Demiguise statues to be able to pick every lock in the game. Here are 3 great videos that show you the locations of all Demiguise statues in Hogwarts Castle, Hogsmeade and The Highlands. I also highly recommend to install "Better and instant timeskip" mod (see Tip #14 in Section 2b). It will make setting the time of day much easier, which will help you collect the moons.Tip #11: After you learn to pick level III locks, you can get into the headmaster's office much earlier than during 'Polyjuice Plot' quest. You can fly to the Great Tower and land on the balcony, then enter both upper and lower studies where you can loot a lot of chests and also get the key to open the big door above the Trophy Room. 4. Make it your habit to sell all excessive loot at any opportunity to keep as much free space as possible for a new loot. Tip #12: You can change the look of any item you wear – in your main GEAR screen (see Picture #1), point to the equipped item and press 'F' to 'Change Appearance' to any appearance you have in your collection (watch this video for more detail). You keep appearances of every item you acquire, even ones that are level-locked, so you can sell them too if they have poorer stats than your equipped gear. Only items you shouldn't sell are unidentified ones, identify them first, then their looks will be forever stored in your collection.Tip #13: You should unlock Merlin trials as soon as possible so you could increase the number of gear items you can carry. When you complete 'Tomes and Tribulations' main quest, you receive a message from Natty to meet her in Lower Hogsfield ('The Girl From Uagadou' main quest). After you go there and talk to her, 'Trials of Merlin' mission will immediately start nearby, which will unlock all Merlin trials. 2b. Buying best quality items from a vendor: Acquiring ability to catch beasts ('The Elf, the Nab-Sack, and the Loom' main quest) is a huge deal and the biggest turning point in the game because of two reasons: Now you can upgrade your gear which will drastically boost it's power; Now you have never-ending source of income – at any time you can get as much money as you need by catching and selling beasts.From this point the fastest way by far to get the best gear is to buy it from vendor (and by "vendor" I only mean Augustus Hill from 'Gladrags Wizardwear' in Hogsmeade, there is no point going anywhere else). As I already said in previous section, even with big ornate gear chests (as in Tip #8) the chance of max power item dropping is so small, that it can easily take 30–40 minutes to get one desired item with save-reload method, and believe me, I tried... So trying to save money this way is absolutely pointless, since you can earn much more than 300ʛ in much less time. From this point of the game all gear chests become just a source of money (unless by some chance max power item accidentally drops from one of them). In comparison, with the method I'm going to describe below you get a full set of 6 max power legendary items in 5–10 minutes (on average, it can be less than 5 minutes if you're lucky). This is much faster compared to chests, because it's like rolling several dice at once (as the number of items in the store's inventory, and Augustus Hill may offer up to 20 legendary items at the same time). The Method:All vendors renew their stocks every 2,5 days, so you're supposed to wait 60 hrs to see the new set of items for sale. But fortunately there's an option to skip 12 hrs ('wait to advance time from day to night or night to day'). To apply this option you open the map with 'M', then press 'F' to "wait" and confirm with Space. So if you repeat this procedure 5 times in a row it will update all vendors' stocks. So skipping time is exactly the way to find anything you need in any shop – in this case legendary items with max power for your current level (you can check the value in Table #3 in Section 2): You skip 60 hrs, open the shop's inventory, see if one or more items you need are in stock, then skip another 60 hrs and repeat this until you find and buy all 6 items with max power for your level. The problem is, skipping time the regular way is a tedious process where you have to wait through the animation each time you advance 12 hrs etc. Skipping 60 hrs this way takes about a minute and you will have to do it a lot of times until you get all 6 items. But fortunately, there's a great little mod that makes skipping time seamless and instant (with this mod it takes literally 2 seconds to skip 3 days): Tip #14: Download and install 'Better and instant timeskip' mod from Nexus:https://www.nexusmods.com/hogwartslegacy/mods/1158 It works with 3 buttons of your keyboard: When you press 'PageUp', this question pops on your screen:
然后再次按下【PageUp】键来增加小时数:
或按“PageDown”键减少小时数。如果从初始状态按下PageDown键,时间跳跃将从24小时开始。
要确认时间跳跃,请按下【End】键,随后会出现通知。
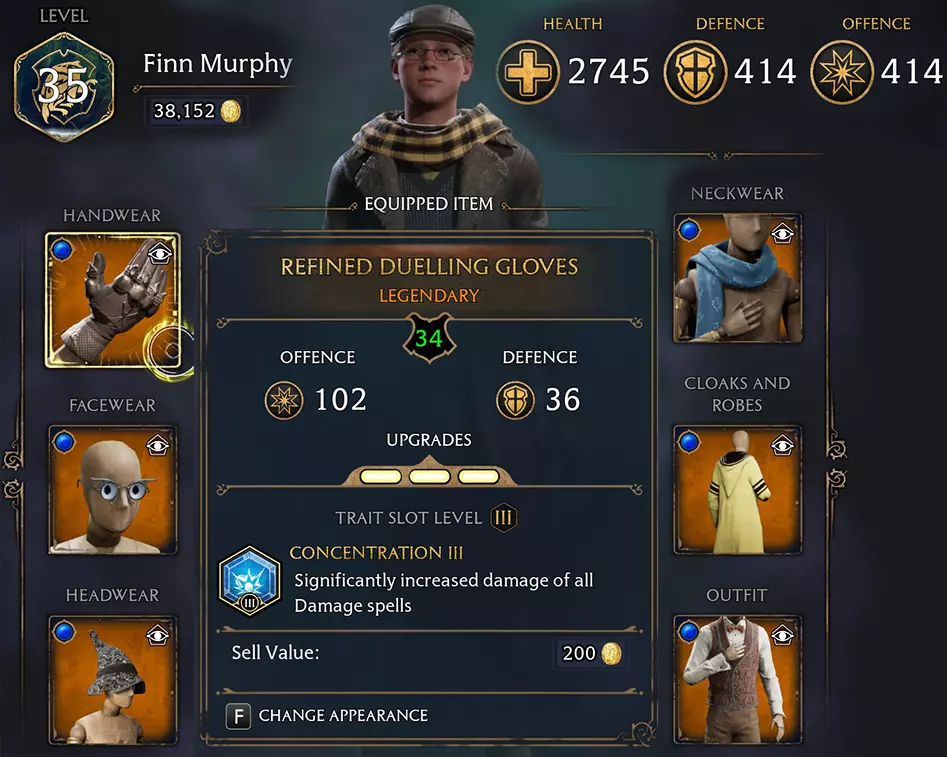
无需打开不同界面并等待动画,你可以随意来回调整时间,不再受限于12小时的跳跃(例如,如果你想将时间设置为比当前时间早3小时,只需按4次【PageDown】键(跳过21小时),然后按【End】键确认)。 【重要提示】该mod在Nexus页面描述中的安装说明已过时!如需正确安装此mod,请阅读并遵循我的另一篇指南中“Better and instant timeskip”mod的正确安装说明部分! 那么,当我刚升到下一级并想用6件传奇物品购买一套全新装备,且每件物品都达到该等级的最大威力时,该如何操作呢? 0.在下面的图片中,我刚从34级升到35级,但仍然穿着34级的装备(攻击和防御的最大战力为102×3,加上所有装备的3级升级,攻击和防御各增加36×3,总计攻击和防御战力为414点): 图片9(点击放大)
1. 现在我前往霍格莫德的【风雅巫师服饰店】,打开背包查看是否有35级满强度(根据上文第2部分的表3,35级满强度为104)的传说物品。如果一开始就幸运地看到一件或多件这样的物品,我当然会买下它们,然后进入下一步。 2. 我退出背包,通过按PageDown→End键3次来跳过3天:


3. 我再次打开背包查看是否有其他需要的物品。如果有的话,我就购买: 图片11:
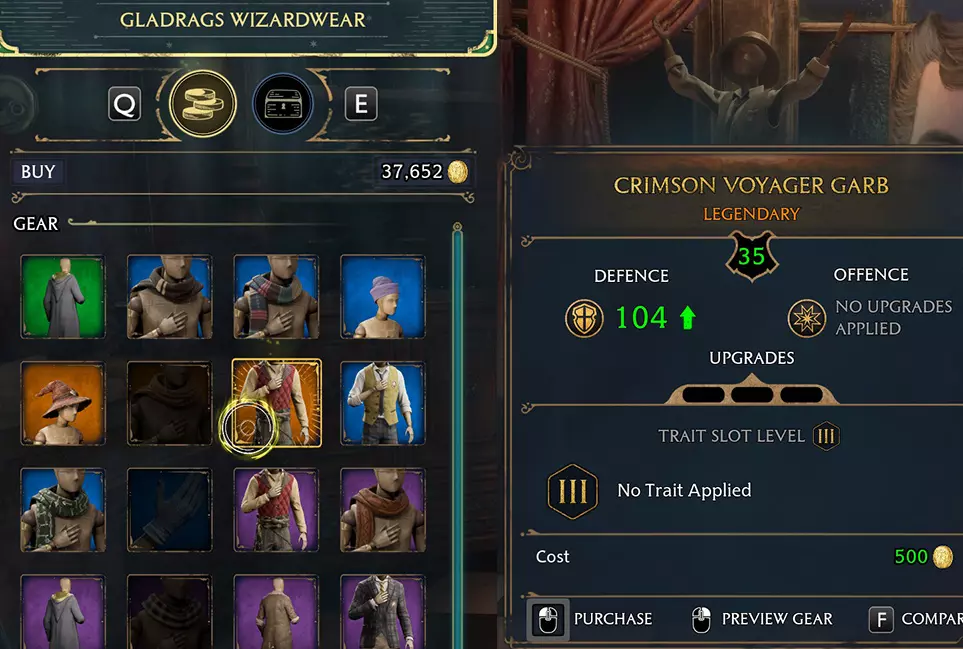
阅读本节末尾的提示15! 4. 我重复步骤2和步骤3,直到获得全部6件新物品。平均需要5-10分钟。 5. 离开商店前,我装备所有6件新物品并出售旧物品。 6. 然后我快速旅行到有求必应屋,前往我的魔法织布机,升级所有新装备: 图片12:
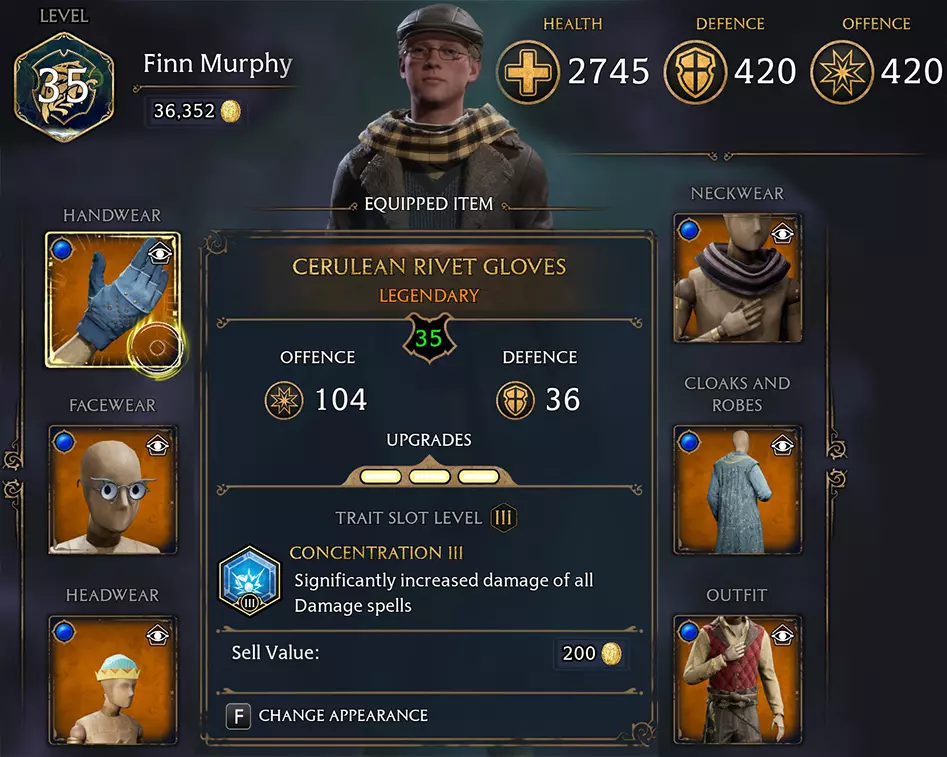
你可以看到我给进攻和防御各加了6点能力值。这算多吗? 根据游戏数据,现在我的攻击威力提升了9%,受到的伤害减少了6%。(我的计算方式如下:进攻方面,伤害乘数为61.4/56.48=1.087;防御方面,伤害减免百分比为(100%−73.7%)/(100%−72%)=0.94) 更换一整套传奇装备的成本是1800货币(6×500−6×200)。 完全升级需要花费更多钱,因为升到3级需要3个角驼兽之角和3个凤凰羽毛(参见第3节的表4),每个副产品的价格是700货币(所以6件装备总共需要4200货币)。当你获得凤凰和角驼兽后就不用再花钱买这些材料了,但这要到游戏后期才能实现。例如,你可以选择每升一级更新一次攻击装备,每两级更新一次防御装备(每隔一级节省3000货币),但我认为每级额外赚取6000货币非常容易(参见我在4a部分关于赚钱的建议,尤其是技巧22)。 技巧15: 如果在步骤3中看到下一级的满级装备(以我的例子来说,就是36级、106点战力的装备),购买它们,这能为你节省之后的几分钟时间。此外,虽然你还不能使用这些装备,但你可以升级它们并附加特性(如图片4所示),这意味着当你升级时它们就能立即装备,如果你在任务中途升级,这会很有用。 3.装备升级 升级装备能最大程度提升其威力——将3件同类别传说装备完全升级可获得高达108点的额外加成。 因此,当你最终获得这项能力时,在我看来,你应该暂停所有其他活动,去获取装备完全升级所需的全部资源。 同时,你还会解锁一种无限且轻松的赚钱方式,所以当你集齐所有必要资源后,最合理的做法就是购买与你等级相匹配的满属性装备,再对其进行升级(正如我在2b部分所述)。从游戏的这个阶段开始,你只需要传奇物品,原因有三:首先,它们拥有对应等级下最高的属性值;其次,升级传奇物品能带来最大的属性提升;最后,这是唯一可以附加三级特性的物品类型。 你能获得多大的提升呢? 举个例子,在这个阶段我30级时的属性变化如下: 防御:从268提升到390,这意味着受到的伤害减少37%; 攻击:从271提升到390,这意味着破坏力提升232%。 再加上6个叠加的三级专注特性,它们总共为所有红色法术增加68%的伤害,这使得这些法术的伤害几乎是升级前的6倍(3.32×1.68),你会真切地感受到这种差异。以下是全套传奇装备升级所需的所有野兽副产品清单: 表格#4:
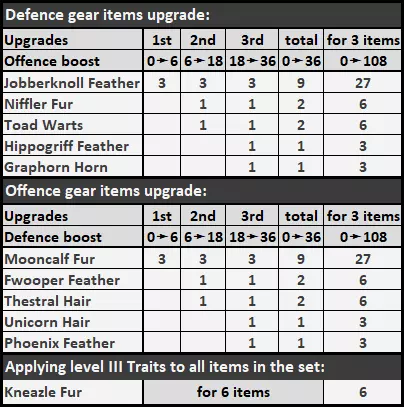
如果你只给装备施加三级特性(如何获取所需特性详见第5节),就不需要蒲绒绒或球遁鸟(如果之后想繁殖它们,可以再去捕捉)。你会需要大量的角驼兽羽毛和月痴兽毛皮,但它们一次能产出5个副产品,而不是3个(另请阅读下方提示19)。 遗憾的是,在获得凤凰和角驼兽之前(这会在游戏后期才发生),你必须购买凤凰羽毛和角驼兽角。只有两个商人出售这两种物品——皮特福德的英迪拉·沃尔夫和艾恩代尔的帕德里克·哈格蒂;此外,你可以在霍格莫德的布罗德与佩克商店购买角驼兽角。所有这些商人每次只有1个此类副产品,每3天刷新一次库存,但你可以按照我在上一节描述的方法通过反复跳过时间来购买所需数量。 以下是一些较难找到的野兽位置: 图片13和14(点击放大)
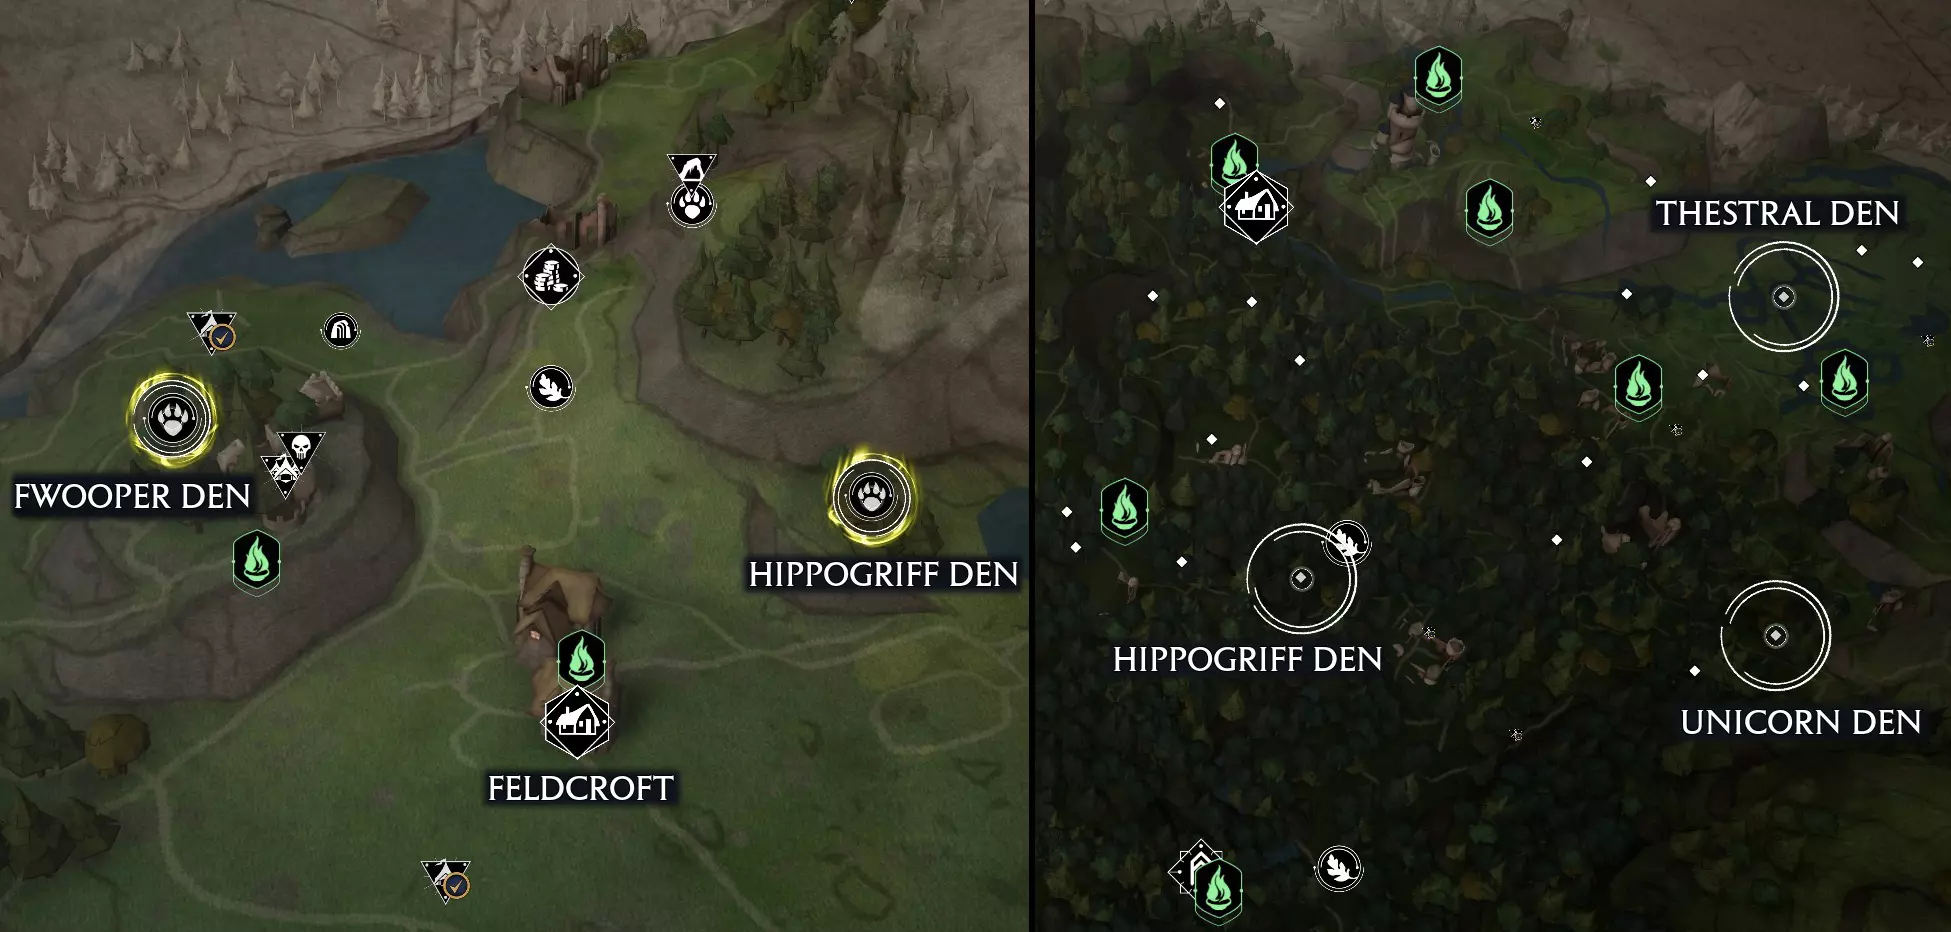
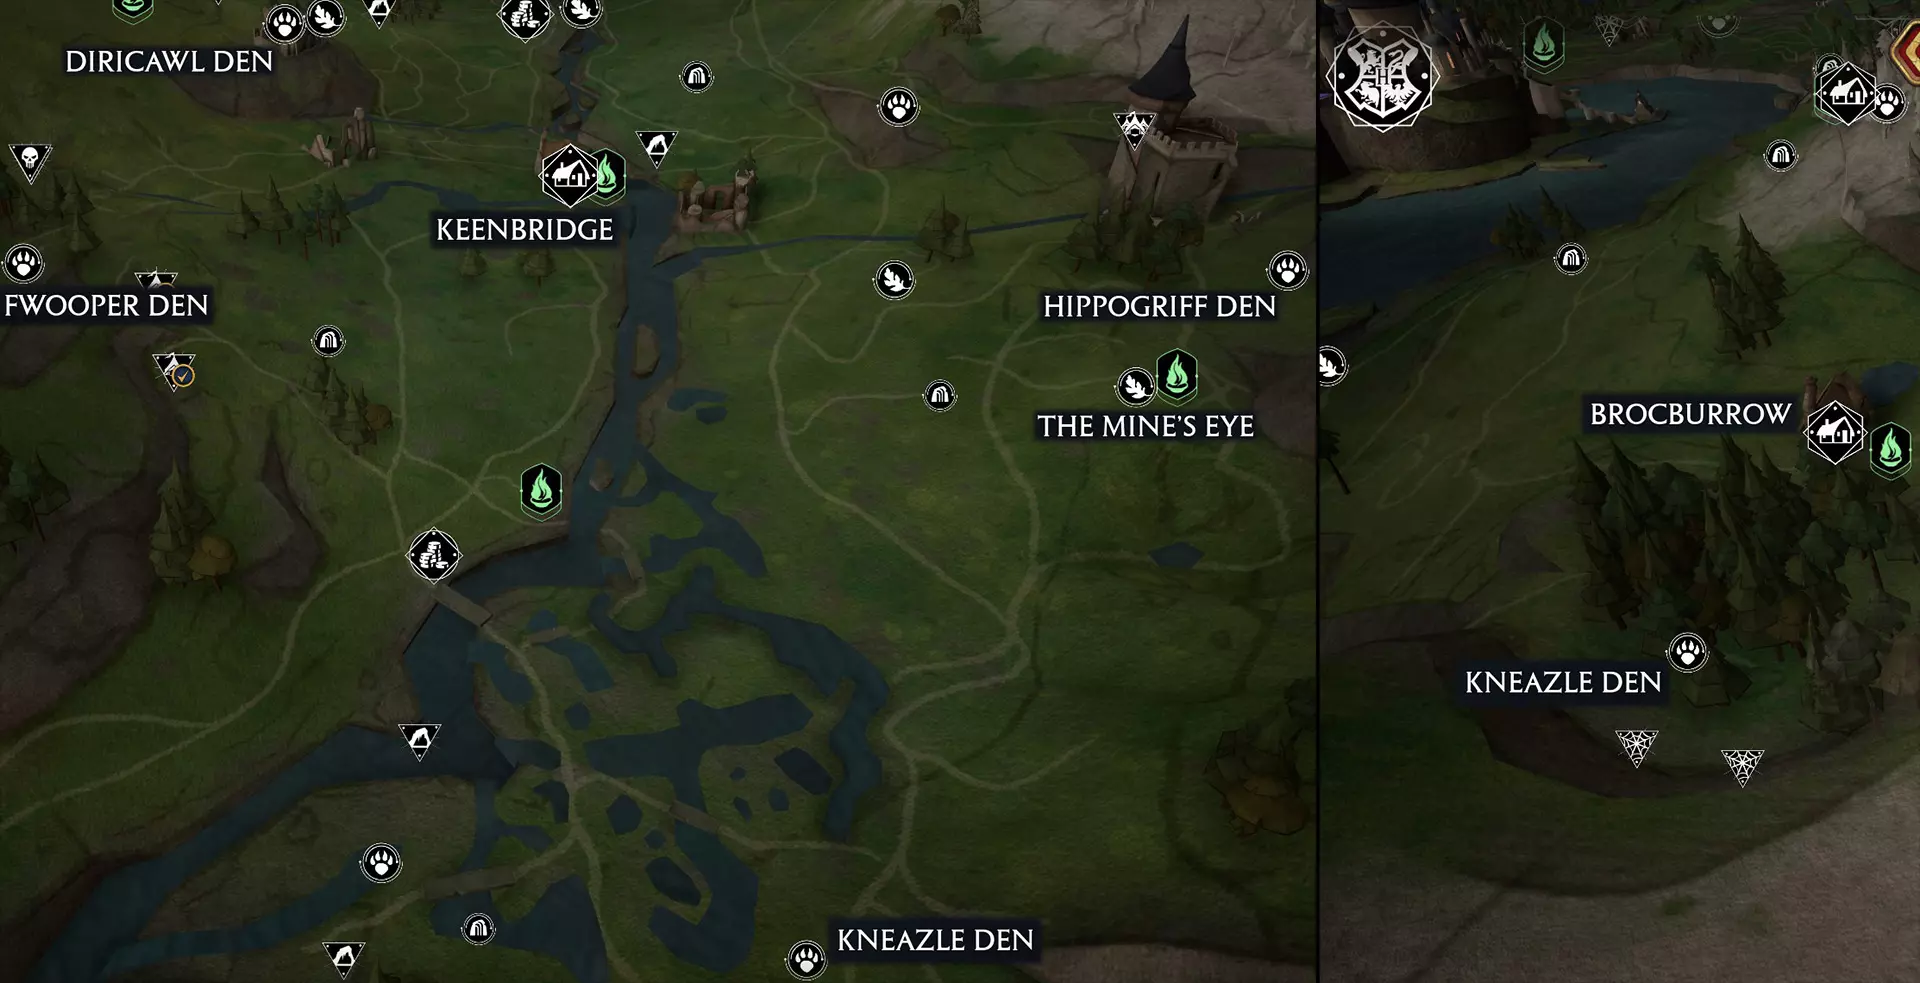
独角兽巢穴位于禁忌森林的东部边缘。 夜骐巢穴在北福特沼泽的东部。 球遁鸟巢穴在金桥镇西北方向。 恶婆鸟巢穴在费尔德克罗夫特西北方向和金桥镇西南方向。 猫狸子巢穴在布罗克伯勒附近以及金桥镇南部的南海沼泽中。 鹰头马身有翼兽巢穴在禁忌森林中部、费尔德克罗夫特东北方向和金桥镇东南方向(靠近矿眼)。 提示16: 这是我用于捕捉神奇动物的咒语组合: 图片15:

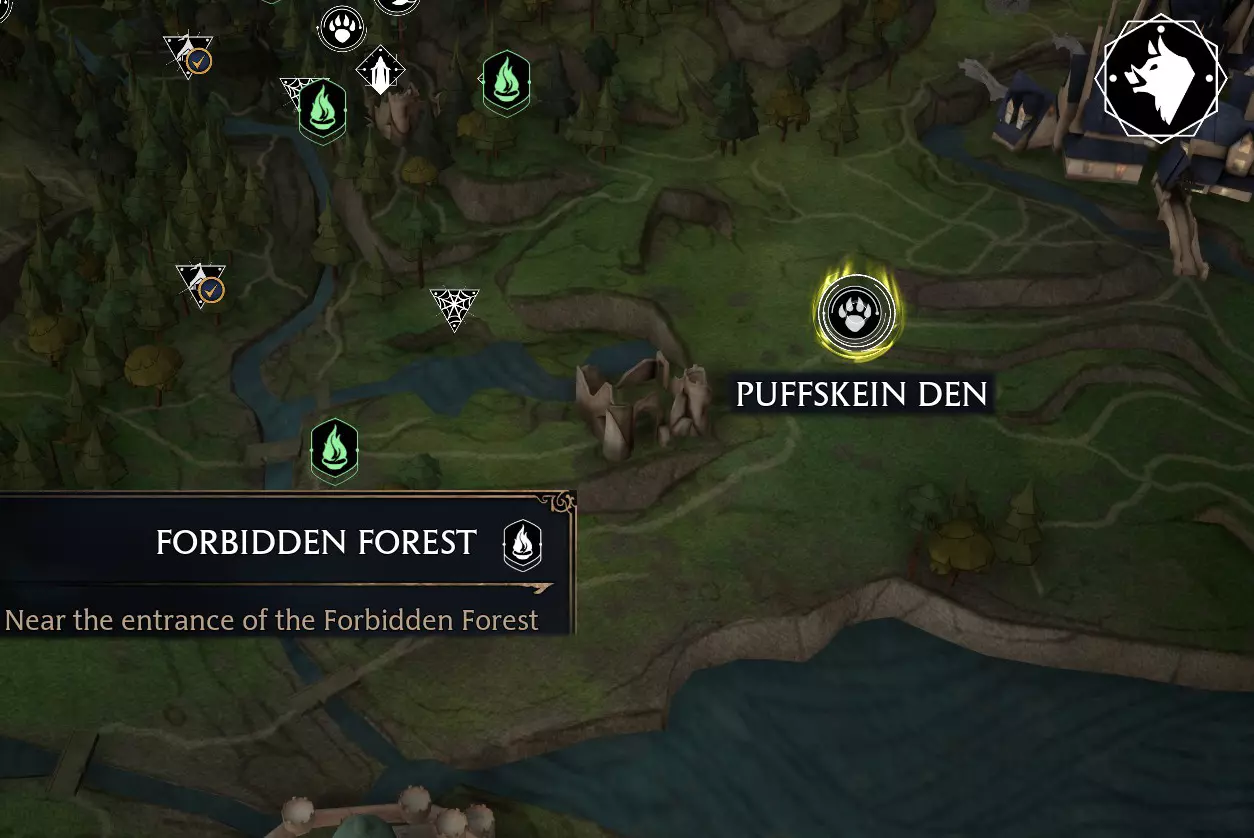
Disillusionment will let you sneak up on the beast so it doesn't run of fly away. Glacius provides the longest immobilization effect, that will allow you to catch the most difficult beasts like Hippogriff or Unicorn, or bring flying birds to the ground. But be careful – it turns the beast into an ice statue that can easily roll down a slope or fall off a cliff. In situations like this I use Arresto Momentum (or Levioso, it works the same way). Another thing you can do is to lower your difficulty level to "Story" for your hunting session, it will make the catching instant with all beasts.Tip #17: Don't forget to cast Revelio – it makes the beasts glow blue and let you see them through obstacles, which really helps to spot them.Tip #18: Naturally it takes about 12 game hrs for a beast den to reset, so it can take you a long time to catch a good number of Unicorns or Hippogriffs when only one or two of them spawn in their dens (or to get rare specimens, like golden Unicorns or black Hippogriffs). But there's a simple way to refill a den: Fly away from the den to about 200-300 meters; Skip time (which is much quicker to do with 'Better and instant timeskip' mod[www.nexusmods.com] – see Tip #14 above – with this mod installed you only need to hit PageDown, then End to skip 24 hrs, just don't do it while moving – the game might crash). When you come back to the den, it will be full again. Alternatively, instead of flying away you can hide nearby, then skip time and save the game (make a manual save), then immediately load this save.For example, if you hide behind a tree near the Unicorn den, then skip time, save, reload and immediately cast Disillusionment, you can literally farm Unicorns in a very quick manner. Fast travel has the same effect as [Save➤Reload], so if you fast travel to Brood and Peck to sell the beasts you've just caught, you only need to skip time to reset the den.Tip #19: You don't have to keep your beasts in the vivarium and wait 25 minutes every time you want their byproducts. All "freshly-caught" beasts give their byproducts instantly when you place them in the vivarium. For example, if you need some Toad Warts, go clear one of the Toad dens (you can get 5 Toads at once), go to the vivarium, move 5 beast from there to your Nab-Sack, move 5 new Toads to the vivarium and collect their Warts (5 Toads will give you 15 Warts). Then you can move the Toads out and sell them. Just remember you need some free space in your Nab-Sack to move your beasts from the vivarium to place the new ones. If you have less than 4 species in the vivarium, you will need only one single free slot in your Nab-Sack to move the beasts (you can move one to the Nab-Sack, then one from the Nab-Sack to the vivarium and repeat this till all the beasts are moved). If you have 4 species in the vivarium, you will need as many free slots in your Nab-Sack as the number of your least numerous species in the vivarium, since you will have to move all the beasts of that species out to be able to move another species in. At the beginning I kept only 6 Jobberknolls and 6 Mooncalfs in my vivarium, then raided the dens of all other beasts one by one, filling my Nab-Sack with them, then bringing them home, collecting their byproducts and selling them to Brood and Peck. This way I quickly gathered all byproducts needed for all future upgrades (for example, 18 Toads give you 54 Warts to cover 9 full upgrades) and earned a lot of cash and XP in the process. You calculate the quantities of all needed byproducts by multiplying the numbers in Table #4 by [41 minus your current level], that is if you attend to buy and fully upgrade a new set of 6 gear items every level.Tip #20: When you deal with Jobberknols or Thestrals and they fly away from their dens, you can just wait for them to return. Cast Disillusionment and move away from the center of the den – in a short time they will fly back and will usually land on the ground. In my experience there's no point waiting for Hippogriffs and Fwoopers to return to their dens, it's faster to reset the den. 4. Money 4a. How to earn money: Again, the game is divided into before and after the crucial turning point of learning how to catch beasts, when during the first half of the game your only two sources of income are looting and side quests. 1. To get as much money as possible from looting you should follow the same advice I gave you in Section 2a (exploring, casting Revelio, looking in every corner etc.). Tip #21: After you learn Disillusionment, you can loot the eyeball chests in Hogwarts and Hogsmeade. There are 30 of them (4 are behind locked doors) and each one contains 500ʛ, which gives you 15,000 in total (or 13,000 before you learn Alohomora). You can find 27 chests out of 30 in this video: https://www.youtube.com/watch?v=vXG8VECKv70 (You can get to the 12th chest also from the Lower Grand Staircase Floo Flame – go downstairs and turn right. 3 chests that are missing in the video are in the Underground Harbor (you can swim to it from the Boathouse – see the screenshot), in one of the 4 secret rooms with moving grates in the Clock Tower (you need Alohomora to get into the tower, then solve the secret to keep the grates open) and at the back side of Flutes and Lutes building in SE Hogsmeade, upstairs behind level II lock – see the screenshot.)You can get a lot of money from places mentioned in my Tips #8a, #9, #10 and #11 in Section 2a above.You can use Save➤Reload method (colloquially called "save-scumming") to maximize you profit from the items you loot from chests and sacks (as described in Tip #7 in Section 2a). With bigger chests you should reload until a purple/gold gear item drops, with smaller chests and sacks the chance to get purple or even gold item ls much smaller, so don't waste time and stop reloading when you get a blue item instead of a green one or Wiggenweld potion.Read the Special Tip at the end of Section 2 – you get 150-200ʛ every time you take that goblin down (+ all the cash that drops from his buddies). 2. Regarding side quests – aside from my previous advice not to ignore them, in some of them you can get 200ʛ more if you ask for extra fee. It may look not very nice (and may not be consistent with your character), but has no consequences on your character's relationships, future gameplay or ending. 3. From the point you learn to catch beasts you start earning good money even without purposefully catching beasts to be sold. You can accommodate a maximum of 12 beasts in your 1st vivarium, but you will catch much more to collect their byproducts (if you read my Tip #19) and sell all the surplus after that. But if you want to catch beasts just to make profit, which species should you choose for that purpose? – One that's the fastest to catch and with the largest number of beasts in a single den, and this is obviously the Puffskein. It's also useful to know how to reset the den so you won't have to wait 12 game hours (see Tip #18 in the previous section). Allow me to suggest one of the fastest ways to earn money in the game: Tip #22: There is a Puffskein den southwest of Hogsmeade (the one where you caught your very first beast). You can get to it from the Floo Flame near the entrance of the Forbidden Forest, it's about 10 sec flight from there: Picture #16 (click to enlarge):
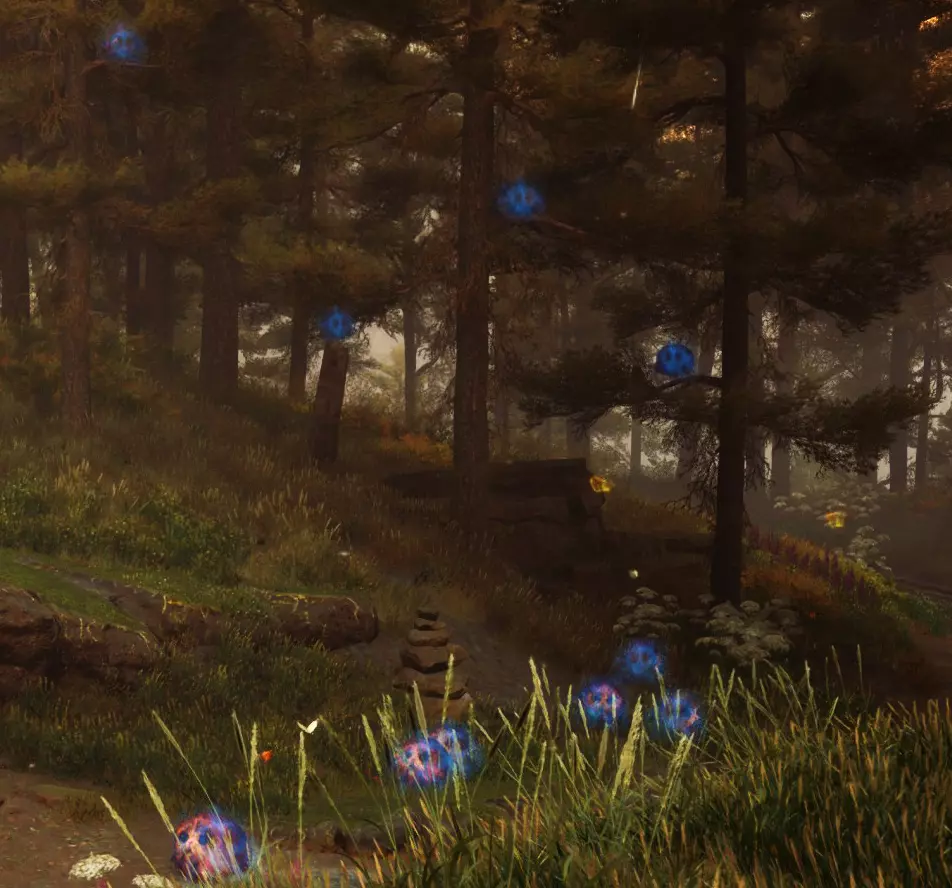
这个巢穴中有10只蒲绒绒(注意其中4只总是藏在地面上方的树上):图片17(点击放大)
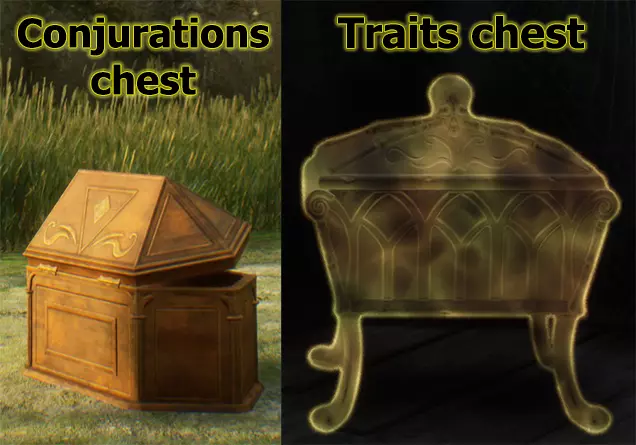
You can catch all 10 Puffskeins, fast travel to Brood and Peck, sell them, skip time to reset the den and get back to it in 3-4 minutes. If you repeat this 5 times, it will take you 15-20 minutes to earn 6,000ʛ. 4b. How to save money: It is very important to minimize your spending, particularly during the initial part of the game, when you anticipate substantial expenses (both necessary and desirable) once you learn to fly and get the Room of Requirement, and on the other hand don't yet have a steady source of income. 1. Don't be careless in your fights, especially early in the game. You may think you have enough money to buy as many potions as you want, but these expenses will accumulate much quicker than you think. Learn to block, dodge and retreat; after you acquire Disillusionment spell, learn how to use stealth tactics. Don't engage in unnecessary fights when you know for sure you will use a lot of potions and you will have to buy them later to replenish your stock. You can knock yourself out once you have access to a potion station and plenty ingredients in your inventory so you can brew all your potions instead of buying them (you can use the cauldron in the Potions classroom after you complete your first Potions lesson). 2. Don't pay money for something you can pick, craft or grow. Don't be lazy to collect ingredients and moonstones around you – it's really easy and you won't ever have to buy them. Tip #23: Naturally it takes 60 game hrs for a harvested resource to respawn, but you can force-respawn all the collectable resources in the game by skipping at least 2.5 days (exactly as you do with shops' inventories as described in Section 2b). This is much quicker to do with 'Better and instant timeskip' mod[www.nexusmods.com] – see Tip #14 above – with this mod installed you only need to hit PageDown⇨End 3 times to skip 3 days.Always pick the loot that drops from defeated goblins and wizards – this way you will collect a lot of Wiggenweld potions (in addition to coins and occasional gear items). Don't avoid fighting creatures that give you the most valuable ingredients – defeating Mongrels, Dugbogs, Spiders and even Inferi is relatively easy once you learn how to deal with them, just don't dive head first into the center of their lairs, there are plenty opportunities to engage 1-2 at a time. (Trolls are a different matter, but you don't really need their Bogeys since Invisibility potion is almost useless.) You can brew your own potions instead of buying them even before you get the Room of Requirement. Once you complete your first Potions lesson you can always come back to the classroom and use its potions station to brew potions. After your first Herbology lesson you can always come back to the Greenhouses to pick 5 Dittany leaves every 10 minutes. (Or better buy Mallowsweet seeds and grow Mallowsweet - you will need it in a short time for Merlin's trials – see Tip #13 in Section 2b. This way you make a one-time investment of 200ʛ instead of paying 100ʛ for each Mallowsweet Leave you need.) And there's no point buying any plants after you get the Room – just buy seeds and grow your own plants - your investment into buying seeds will pay out in a very short time. Tip #24: You don't really have to grow Venomous Tentaculas and can save 1,050ʛ by not buying their seeds if you complete the 'Venomous Valour' side quest, which becomes available very early in the game. This quest unlocks one the greenhouses in the Herbology wing, where 6 Venomous Tentaculas grow. You can refresh all 6 Tentaculas by skipping 3 days as described in Tip #23 above, then fast traveling to the Greenhouses Floo Flame. So you can harvest as many Tentaculas as you want without waiting for them to grow. (You can see more details about this location and several similar ones with other free plants in my other guide cited in the next tip.)Tip #25: There are several easily accessible places where you can farm all plants exept Shrivelfig. Some of these places are available very early (for example, you can get Mandrakes for free once you complete your first visit to Hogsmeade). I created a separate guide where I describe all these places in detail: https://steamcommunity.com/sharedfiles/filedetails/?id=3041248793 3. Sometimes you save the most money by buying the most expensive things right away. When the time comes to spend your money, I suggest to buy spellcrafts for largest possible potting tables and potions station. You will want to buy them later anyway and they will also allow you to grow all needed plants and brew all the potions you want in the fastest possible way from the very beginning. Take a pass on potting tables with 3 small pots, 1 medium pot, 2 medium pots and 1 large pot, and also don't buy medium potions station. This way you will save 4,650ʛ. Here's the list of everything you will need and want to buy once you learn to fly and get the Room of Requirement: 600 – your 1st broom; 2,550 – All seeds except Venomous Tentacula (see Tip #24 above); 2,900 – All potion recipes except Invisibility (see Tip #26 below); 11,500 – Conjuration spellcrafts, which include: Potting tables – with 5 small pots, 3 medium pots and 2 large pots T-shaped potions station Dung composter (it will double the yield of your battle plants and save you a lot of money in the long run)Grand total – 17,550ʛ. (If on top of that you can afford the hopping pot spellcraft (3,000ʛ), buy it, it's very useful, unlike chopping station and material refiner which both are a waste of money if you have all the seeds to grow plants and not too lazy to pick a moonstone when you see one). If you follow all my advice above, at the point when you get the Room of Requirement you will have much more than 17,550 (you get 13,000 just from eyeball chests – see Tip #21). For example, during my 2nd playthrough, just after I got the Room of Requirement and bought everything I listed above (including hopping pot spellcraft), I still had 9,500ʛ left in my wallet. Tip #26: How to complete the last Prof. Sharp's assignment to acquire and use an Invisibility Potion without buying the potion or the recipe? – About the same time you should receive a new side quest from Parry Pippin to deliver 3 Invisibility Potions to Fatimah Lawang in Keenbridge ('Demanding Delivery'). Actually, Parry Pippin gives you 4 potions, but you will have to test one of them in front of Fatimah, otherwise she won't buy the other three. Drinking this potion completes Prof. Sharp's assignment.Tip #27: Small tip on using the hopping pot. If it gives you the potion you can't pick since its wheel slot is already full, you can't empty the hopping pot like you do with plants. – Simply vanish it with Evanesco and conjure a new one, it will brew a new random potion. Or just make the room in your wheel by drinking one of the 12 potions – this is even faster and will have exactly the same effect. And be aware that your hopping pot won't brew potions for which you don't have recipes! 5. A note about Traits Traits are special abilities that provide combat boosts. You apply them to items of your gear with the Enchanted Loom the same way you apply upgrades. Traits that reduce damage from a certain type of enemy are received as a reward to a challenge to defeat a number of those enemies. One trait you get after completion of a certain quest and another after applying a number of upgrades to your gear. The rest are obtained from collection chests at bandit camps throughout the Highlands. You can "re-open" the same chest as many times as you need to get the trait you want, using save‑reload method I described in Tip #7 in Section 2a. This is a really useful method to get the desired trait or conjuration, although it can be somewhat time-consuming (the longest time it took me to get the wanted trait was 15 minutes, with conjurations it can be longer). Tip #28: To reduce the time needed for the desired trait to drop, don't use save‑reload method with the first camps you clear, just loot their chests. It will take a while until you can use the traits, and as long as some accessible chests remain intact, you can always force-spawn specific traits from them. So just keep some of the camps (depending on how many specific traits you want) in the northern half of the world untouched for the moment when you finally learn to upgrade your gear. After obtaining part of the traits you will have a smaller pool to draw from, so the chance of a specific trait to drop is higher, and some of your desired traits may already be in your possession from the chests you already looted. There are 29 bandit camps in the North (including 2 castles with 2 traits chests each). You can track them with this interactive map[mapgenie.io], it's extremely useful. This is how conjurations and traits chests look: Picture #18:
技巧29: 若想对蝴蝶指引的召唤物宝箱使用存档-读档方法,可按以下步骤操作: 在蝴蝶出现的位置存档(不要在宝箱附近!),然后跟随蝴蝶找到宝箱(有时宝箱不会出现,此时只需在蝴蝶停留的位置施放 Revelio【显形术】即可)。打开宝箱后,若想获取其他物品,加载最近的手动存档。你会在蝴蝶开始飞舞的位置附近重生,让蝴蝶移动后直接前往宝箱(若已知道确切位置,则无需跟随蝴蝶),然后施放 Revelio【显形术】来显示宝箱并再次检查。 技巧30: 在大多数情况下,无需清除营地的敌人即可 loot【掠夺】其特质宝箱。它通常藏在某个帐篷里,你可以轻松潜行绕过守卫(别忘了营地城堡里可能有2个特质宝箱,你可以通过打开地图并指向营地来查看)。 另外要注意,即使你在接近宝箱前已经清理了营地,当你重新加载存档时,营地的敌人可能会重生。通常他们不会立即发现你(因为帐篷会把你藏起来),但为了以防万一,准备好在重生的那一刻施放【幻身咒】。 那么你应该寻找哪些特质呢?显然,无论是什么特质,你都只想要三级,因为它能提供最大的加成。除此之外,为了获得最佳效果,你需要堆叠特质,也就是将相同的特质应用到你所有的装备上。如果你同时应用6种不同的特性,那么你几乎感受不到其中任何一种的效果。 以下是许多资深玩家公认的最佳特性(根据我自己的经验,也得出了相同的结论):

专注III使所有伤害类法术(红色法术)的伤害提高9%。这是一个乘法特性,意味着叠加6个专注III特性后,所有伤害类法术的伤害将提升68%(1.09⁶=1.68)。这是唯一真正通用的特性,也是目前为止对于偏好常规战斗风格的玩家来说最好的特性。与毁灭或撕裂等特性(分别为除你武器或神锋无影增加131%伤害)相比,它对单个法术的伤害提升略低,但你不能只依赖一个法术。

无情III使对受诅咒目标的伤害提高30%(不包括植物类攻击)。这是一个叠加特质,意味着叠加6个无情III特质后,对所有受诅咒目标的伤害将增加180%(30%×6)。对于所有广泛且持续使用诅咒的黑魔法爱好者来说,这是最佳特质。但如果你的诅咒使用不稳定,该特质的效果会大打折扣,因为所有未受诅咒的敌人以及诅咒已消失的敌人只会受到基础伤害。

远古魔法III可使远古魔法造成的伤害提升60%。 这是一个叠加特性,6个叠加特性可使远古魔法攻击获得高达360%的伤害加成(60%×6)。这意味着你几乎可以一击秒杀任何敌人,如果你拥有5个远古魔法条并使用所有能补充远古魔法值的天赋,该特性能帮助你快速击败多个强敌。 你无法在宝箱中找到此特性,完成30次装备升级挑战后可将其作为奖励获得(因此你只需将一整套6件装备完全升级两次即可(2×6×3=36))。

草药学III使所有植物的伤害提高75%。 叠加6个草药学III特性可为所有植物增加惊人的450%伤害。如果再搭配3个植物天赋【头痛】【有毒】和【肥料】,你基本上只需使用植物就能赢得任何战斗,无需施放任何咒语。这个特性让所有其他与植物相关的特性都变得过时了。与这4个特性相比,其他所有特定咒语、特定植物或特定敌人的特性都相形见绌。 我唯一还抱有希望的另一个特性是伏击III(在使用幻身咒隐藏时提高30%咒语伤害),因为我真的很喜欢潜行玩法。但在我尝试后却感到失望——在简单难度下,即便是较低等级,使用专注术也足以达到同样的目的(通过单个法术从远处悄无声息地击杀敌人)。在更高难度下,在我达到特定等级前,仅使用伏击术不足以从远处一击秒杀敌人,但当我跨过某个等级门槛后,我又可以再次使用专注术来达到同样的效果,且无需承受该特性在被敌人发现时立即失效的缺点…… 也许是我操作有误,你们可以自己尝试一下。霍格沃茨之遗互动地图。NEXUS上的优质即时时间跳跃模组。Steam指南:霍格沃茨之遗中免费获取无限植物的方法。Reddit帖子:游戏初期轻松获取3150经验值的刷经验方法—— Belgruff the Bludgeoner无限刷新。YouTube视频:霍格沃茨之遗:如何更改装备外观(幻化)、找到霍格沃茨城堡所有150个魔法指南书页、霍格莫德:所有55个魔法指南书页位置、霍格沃茨:所有10个夜骐雕像位置、霍格莫德:所有9个夜骐雕像位置、高地:所有11个夜骐雕像位置、霍格沃茨和霍格莫德的27个眼球宝箱位置。关于剩余3个宝箱的位置,请阅读4a部分中的第21条提示!《霍格沃茨之遗》全部5个 hedge maze 位置 我的其他实用指南和帖子: Steam 指南:《霍格沃茨之遗》全成就存档文件。 Reddit 帖子: - 你的房间中只需要这些植物——极简盆栽设置。 - 我在首次试炼前就解锁了3个古代魔法热点! - 毒牙伏击蜘蛛——开放世界中唯一的刷新地点。 - 《霍格沃茨之遗》中的时间、日期和季节机制——你需要知道的一切。 后记 感谢阅读,欢迎提出你的想法、问题、笔记和建议。
这里可以查看我其他的指南:Akunamatata的指南