换一换
换一换 


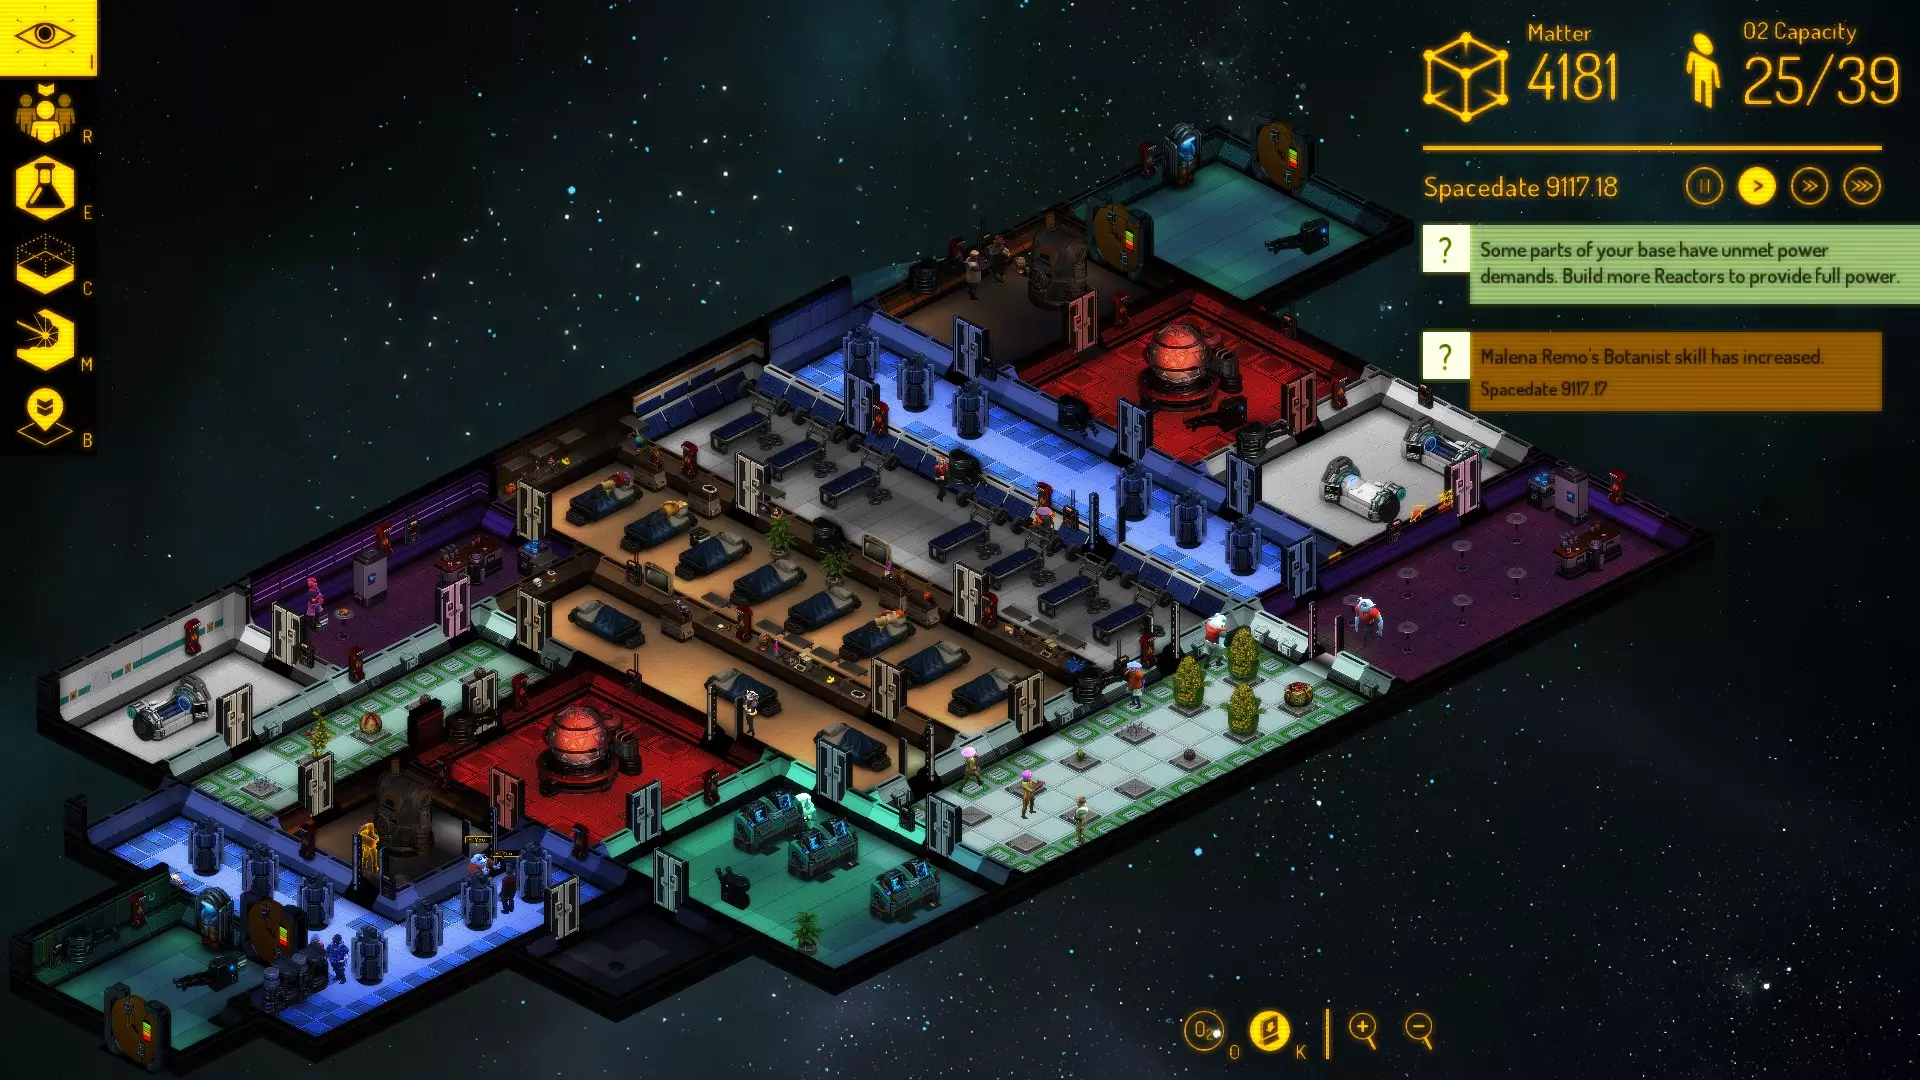
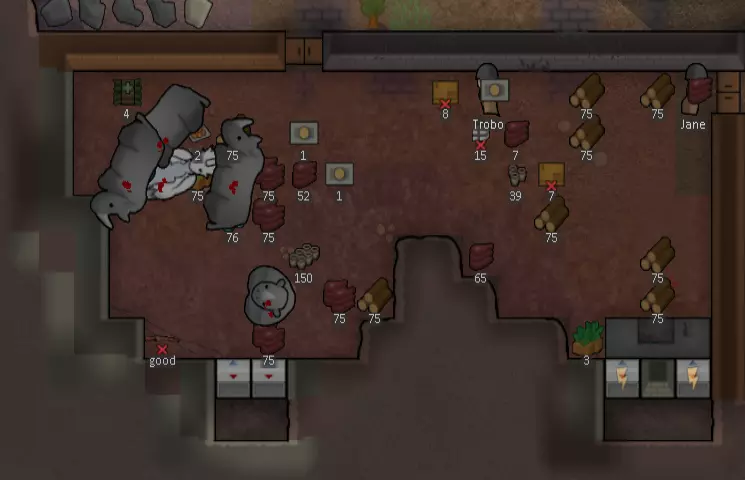
本指南是游戏各阶段殖民地建设的终极参考指南。 基地类型 - 超级结构基地:将所有设施集中在一座大型建筑内。 - 城镇式定居点:将各类设施分散建造,如同一个小镇。 - 山地基地:在山地地图中,向山体内部挖掘建造。优点: - 节省建筑材料和部分空间 - 更能抵抗有毒尘埃 - 温度控制更优 - 行走路径最短 - 灵活性高 - 不需要大片连续土地 - 最能满足户外需求 - 最佳温度控制 - 易于防御 - 免疫迫击炮攻击 - 留出更多土壤用于耕种 - 节省最多建筑材料 - 对有毒尘埃抵抗力最强 缺点: - 如果使用易燃材料,火灾可能蔓延至整个基地 - 需要大片连续的可建造区域,因此不太适合沼泽生物群系 - 灵活性较低 - 满足户外需求的能力较弱 - 总体上需要最多的空间和建筑材料 - 需要更多防御规划 - 温度控制最差 - 行走路径最长 - 基地内可能发生虫灾 - 抵抗力最低灵活开采独立房间和清理石块需要花费大量时间,最难以满足户外需求。以下是“上层建筑”基地的示例平面图,其区域布局高效,可缩短行走距离。
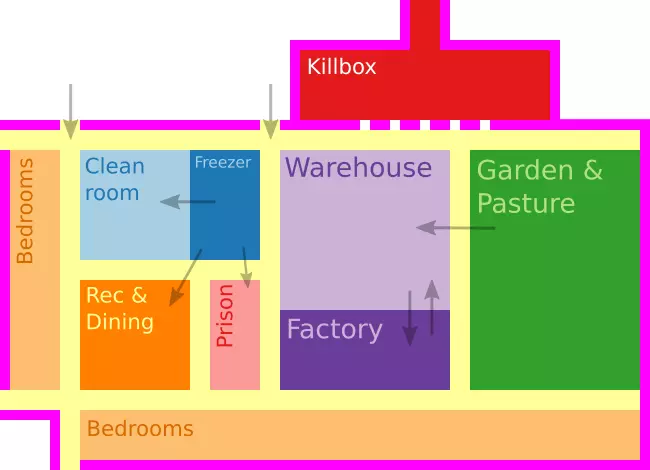
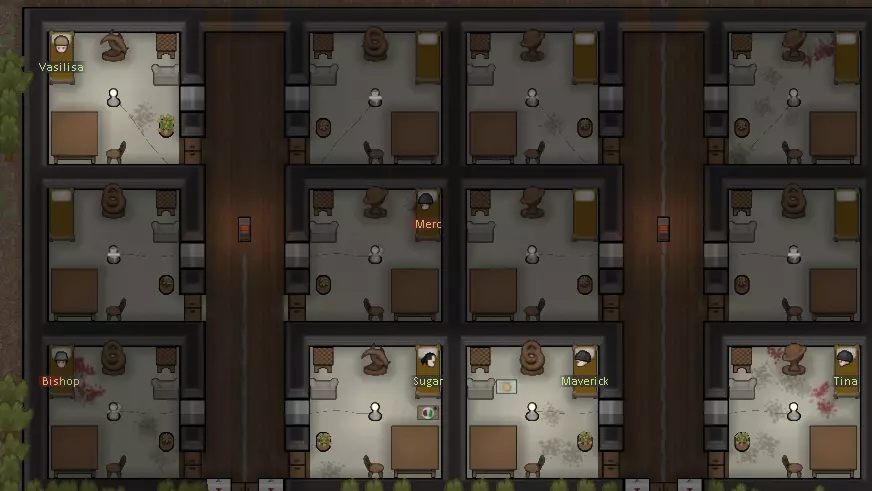
箭头指示物品通常的运输位置。房间大小不一定按比例绘制,此布局的多种变体都是合理的。【杀戮区】并非必需;采用此类布局时,也可以将敌人引诱至长廊,并从门口向其射击。【洁净室】应包含病床和厨房。 基地建筑 不同的建筑适用于殖民地的不同需求。地图生成时周围会有旧建筑,有时只是墙壁,有时是缺少部分区域的方形或矩形结构。如果位置便利,这些建筑完全可以作为起始点,大幅减少低技能角色的初始工作量,并减轻初期一无所有时的压力。存储 目前,我们需要建造的第一个房间是储藏室,因为物品如果放在室外或暴露在外会变质。设置一个储存区,覆盖房间的大部分区域,但要排除靠近门的地砖,因为有时殖民者可能会不小心把物品掉在门口,导致门无法关闭,造成安全隐患。你可以设置多个较小的储存区,并指定允许存放特定类型的物品,以便更好地组织它们。储藏室应建在靠近工坊的位置,以减少原材料的运输时间。 需要特别注意化学燃料或迫击炮弹等爆炸物,它们可能会爆炸并点燃你所有的库存。将它们分开放置在石制隔间中,并远离基地外部,以防止末日火箭筒击中物品,因为它们可以穿透墙壁。在此处放置一个灭火泡沫发生器,以防止火灾点燃弹药。 游戏中期,你可以添加轨道贸易信标,向贸易飞船出售物品。 营房是多个殖民者共享一个睡眠空间的房间。这在游戏初期很容易安置你的殖民者,但事实证明这很不方便,因为走动的殖民者会打扰其他居住者的睡眠,而且非恋人关系的殖民者不喜欢共享房间。床褥或床等家具可以提高他们的舒适度。家具越好,他们醒来的速度就越快,在日程安排中也会变得更有效率。在满足基本需求后,你应该升级殖民地,为殖民者提供私人卧室,同时可以将兵营改造成其他用途,比如医院或囚犯营房。 你可以通过放置雕塑、铺设美观的地板、安装温控设施以及摆放高品质家具(如梳妆台和床头柜)来为兵营添加正面心情加成,这些物品能同时提升多张床铺的舒适度。 殖民者喜欢在醒来后立即进食。初期你可以在兵营内放置桌椅,但条件允许时应将它们移到其他地方,因为进入兵营进食的殖民者会打扰其他人休息。在完成睡眠区建设后,应在兵营附近建造餐厅。 卧室
卧室是私人睡眠空间,可消除其他殖民者导致的“睡眠受打扰”心情惩罚,且比集体宿舍提供更好的心情加成。伴侣希望同床共枕,不会打扰对方睡眠,但需要一张双人床。 你可以通过建造更高质量的床来提升舒适度和休息效率。 殖民者通常会随身携带食物(在装备栏),如果没有桌子,他们会在地上用餐并受到心情惩罚。根据基地整体布局,你可以: 1. 建造“餐厅”并靠近生活区。 2. 在多个卧室附近的户外放置一套桌椅。 3. 在室内放置桌椅。不过,请务必关闭桌子的【聚集点】选项,因为其他寻求休闲的人可能会进入他人的卧室并打扰其睡眠。 通用设计原则
一个高效的基地能让你的殖民者高效工作并保持心情愉悦。他们必须能够及时到达分配的工作岗位,基地也需要舒适宜人,适合工作和生活。基地还应确保安全,但这可能是最容易实现的部分。 高效工作:减少人员流动 不可能让所有地方都易于到达,因此你需要确定哪些地点更为重要,并据此规划基地布局。 这里最重要的原则是不要将生活区放在基地中心。卧室应位于殖民地的边缘:白天不需要使用卧室,放在中心会造成阻碍。

此外,除非你严格限制殖民地的人口数量(并杀死或卖掉其他人……),否则很难提前规划你需要多少张床。如果你的生活区周围有其他建筑,那么不创建全新的居住区域就无法添加更多床位。这很快会导致基地布局混乱,难以防御。 娱乐和用餐区也应该偏离中心,最好靠近睡眠区。娱乐和用餐主要发生在早上和晚上(夜间前后)。殖民者在白天很少去这个地方。不过,这一原则并非适用于所有有床的房间——医院和监狱可以而且应该放在更中心的位置。医院和监狱需要频繁访问,以便照料和喂养病人及“访客”。如果逃犯在基地中央,越狱事件会更容易控制。 确保相关区域位置靠近:厨房、冷库、仓库和工厂车间。有些房间从外部进入的频率很高(冷库就是一个例子)。为这些地方设置便捷的通道。 保持美观 殖民者不喜欢生活在杂乱丑陋的环境中。他们不想总是穿过令人不适的地方。例如,不要将垃圾储存区、地热发电机和殖民地的主要通道紧挨着放置。 对于无法避免的丑陋环境,可以用【装饰轰炸】来解决。制作一些富有表现力的雕塑,直接放在杂乱的地方。比如,可以在主要储存区里分散放置几个大型雕塑。这样能让环境的美观度达到中性,甚至变成“美丽”。和所有家具一样,雕塑不需要加盖屋顶或放在室内,所以可以放在任何地方。打磨过的地板和墙壁,以及地毯,都是有效的美观度来源(每格+2美观度),但制作起来比较耗费人力和资源。
舒适的家具非常重要。要留住一名优秀的木匠(【建造】技能高的),让他们制作基地里所有的家具(尤其是床和椅子)。在所有工作站前放置餐椅(它们既“美观”又“舒适”);虽然不会让任何人工作得更快,但当有人使用工作站时,餐椅能提供心情加成。 关于建造工作,最好让能力最强的建造者优先处理“工匠活”,也就是那些质量等级很重要的家具。次一级的建造者可以负责铺地毯、打磨地板和砌墙等工作。这些建筑结构没有质量等级——建造技能只会影响成功几率和工作速度。遗憾的是,如果没有必要的模组,几乎不可能以所需的方式指挥你的殖民者。安全第一。

加固基地并不难,只要你的布局紧凑。你可以简单地用墙壁包围整个建筑群,并故意留下一个敌人最可能攻击的薄弱点。如果你给敌人进入基地的机会,他们就会抓住这个机会,即使这在战术上并不合理。如果有长长的走廊,你可以利用门口作为天然的掩护,让一名射手站在每个门口,向走廊里涌入的攻击者射击。这是一种有效的策略,即使是中等规模的袭击也能抵挡,而且不需要任何专门建造的防御设施。 在更高难度下,可能需要使用“杀戮箱”和炮塔海等高级战术。 总的来说,你希望攻击者主动来找你,而不是在基地外的开阔地带与他们战斗。攻城小队和独行纵火犯应被引诱至基地附近再进行交战。 相连设施 冷藏室、厨房、餐厅和娱乐室通常彼此相邻。厨房应与其他房间隔离开,以减少因人员走动带来的脏污。餐厅和厨房应与冷藏室相连,这样就无需穿过厨房去取餐。 派对和婚礼仪式在有椅子的聚集点举行,由于 pawns(殖民者)在这些活动期间不会进食,所以聚集点靠近冷藏室便于他们去取餐后回到餐桌。 冷藏室
The Freezer is a stockpile room to preserve raw food, plant matter and fresh animal corpses. In non-freezing biomes, this is accomplished with the addition of coolers set to freezing temperatures. Freezers are vital for food preservation in hot biomes. Cold biomes, on the other hand, may be able to perform well without the need of air conditioning. Even though food freezes at 0 °C (32 °F) you should have your freezer at least set at -5 °C (23 °F) since it will gain heat whenever a colonist comes in. Cooler placement is of crucial importance, as these devices have a very low 100HP, making them the weakest point in a wall from where raiders can break in easily and most likely ignite your food supply. Because of this, one of the best ways to protect your coolers is to place them facing a mountain, if there is one nearby, or to build a wall around their hot side. In both cases, make sure to remove any roofs. If your base is in a cold biome, another option is to direct their hot sides into your living space to help heat it. It is common to make the freezer with double walls to increase insulation. The freezer is vulnerable to solar flares. In freezing biomes, food still needs to be kept from spoilage to exposure. In which case, wall it off and add vents to the exterior to let in the cold air. Unlike any other room, the freezer will need to be expanded as population increases, meaning that you should leave one of its sides unoccupied by other structures so that in the future you can just increase the size of it without needing to deconstruct other rooms. Because you will be storing your harvests here, it is wise to position this room in close proximity to your fields to shorten hauling jobs, with the doors also pointing towards your growing zones. It is common to make airlocks(a door, a short space, and then another door leading to the freezer itself)in the entrance of the freezer to reduce temperature exchange. Since colonists and haulers will enter this room quite often, build autodoors once available to both speed up entry/exit and minimize temperature change. Butcher spots, butcher tables and crafting spots can be placed inside the freezer to butcher corpses, make kibble and make smokeleaf joints since the work to make those is so small and the ingredients are in the freezer your colonists might as well do it there. However, for mass production, it's better to have it close but outside the freezer due to the work speed penalty. Consider making an exclusive stockpile with high priority at the front of your freezer which only allows meals, so that cooks will always store them closer to ease retrieval. The same planning can be applied for two more stockpiles at the front of your freezer for meat and veggies, to speed up ingredient pick-ups (colonists assigned to hauling and trained animals will move ingredients from the back of the freezer to the front). Nutrient paste dispensers act as walls. They are usually placed with their hoppers in the freezer and activation spot in the dining room. KitchenThe kitchen is where your colonists turn raw food into meals to improve colony life by removing the Ate raw food thought. The kitchen should be clean to avoid food poisoning, which can be attained by the following means: The butcher table should be placed in a different room as it creates a lot of filth just by being there, besides all the animal blood. Zone out colony animals. Sterile tiles for flooring. Place your doors so that your dining room has a shorter path to the freezer than walking through the kitchenYou should build your kitchen right next to your Freezer. Shelves or small stockpiles can really improve cooking efficiency when placed right next to your stoves. Set one to accept berries and vegetables only, and the other to accept meals only the as these do not spoil in a matter of days, unlike meat which should always be in the freezer. Hauling colonists will do the transport work for your cooks instead, assuming you can actually spare the manpower and the cook is also useful for other tasks. It is usually a good idea to add a little art since colonists tend to stay there for a long time. It should be temperature controlled for better working speed. Since the kitchen is placed near the freezer, some crafting stations which include plants ingredients may be also placed in here. The brewery and drug lab are good choices. Also, if you making chemfuel with food you may place the biofuel refinery here. Dining roomDining rooms, at their simplest, are simply rooms where you put tables and chairs for colonists to dine in. Still, tables are marked as Gather Spots by default. Colonists will hang out here to relax and also hold their parties and weddings here. Expect your dining room to be pretty crowded during meal times, especially after a party or marriage ceremony, so have enough chairs for at least half your colony. Colonists, as well as visitors, will search in a 20 tile radius for a table to eat at. For this reason, a dining room should be built as close as possible to the freezer/food storage so that your colonists will actually use the dining room, instead of eating on the floor of the storage, giving them a -3 mood debuff. This is especially true for larger freezers, in which colonists retrieving food from the far end may simply give up searching for a table and eat on the floor. Since colonists spend a lot of time here, increase their mood by decorating your dining room with sculptures, plant pots or quality furniture. Having an impressive dining room also provides a small mood bonus to colonists who eat there. Rec roomYou should have a wide variety of recreation sources so your colonists don't get bored repeatedly throwing horseshoes at a pin, or wandering around aimlessly. Putting all of them in a room also provides a mood bonus after a colonist uses the facilities inside, depending on the impressiveness of the room. In the early game, all you'll need is a horseshoes pin somewhere in the colony, and colonists will proceed to use it when they are bored. Once you reach midgame, you can afford more recreation facilities such as chess tables or billiards tables, or Tube televisions, which provide different kinds of recreation for additional variety. In addition, you can also obtain additional recreation sources from exotic goods traders, such as telescopes or megascreen televisions, which offers more recreation than the craftable tube and flatscreen televisions. Similarly to the dining room, decorating it can improve the mood bonus from using the room. Courtyard
大多数殖民者偶尔喜欢到户外走走。在超级结构基地中,你可以考虑建造一个露天庭院,让殖民者能呼吸到新鲜空气。 你可以将其用作公共区域,放置娱乐设施和餐桌供殖民者使用,这样庭院的功能就和露天餐厅/娱乐室完全一样。或者,也可以将迫击炮放置在这里,把它们放在中间有助于减少最小射程的盲区。还可以考虑将运输舱放在这里,但要放在单独的露天区域,因为它们看起来并不美观。 实验室 你可能需要一个专门用于研究的房间,配备高科技研究台、多重分析仪,以提高研究速度并解锁新的研究项目。房间清洁度会影响研究速度,因此请放置无菌地砖以保持房间清洁。为了获得更好的清洁效果,实验室应仅限研究人员和清洁工进入,这样可以减少人员流动,从而减少房间内的灰尘。此外,考虑在此处放置一些艺术品并配备舒适的椅子,因为研究人员将在此花费大量时间。 工坊 工坊是放置所有制作站和工作台的地方。你应该将它们放在仓库附近,这样殖民者在制作时花费在搬运所需资源到工坊的时间会更少,同时由于原材料会降低美观度,所以要将工坊与仓库分开。另外,记得在交互点放置任何类型的椅子,这样殖民者在制作时就不必一直站着了。工具柜有助于提高工匠的生产效率。其提供的工作速度加成相当有价值,每个工作台可受益于两个工具柜。 在工坊内放置雕塑等装饰品是个好主意,优美的环境最多可提供+15心情值,能提升殖民者的 productivity 并偶尔激发他们的灵感。 军械库 你可以选择设置专门区域来存放武器和 armor。若如此,应将其远离监狱,以防囚犯在越狱时轻易获取危险武器。同时,军械库应靠近基地入口,以便殖民者在前往防御基地的途中能迅速装备自己。 医院
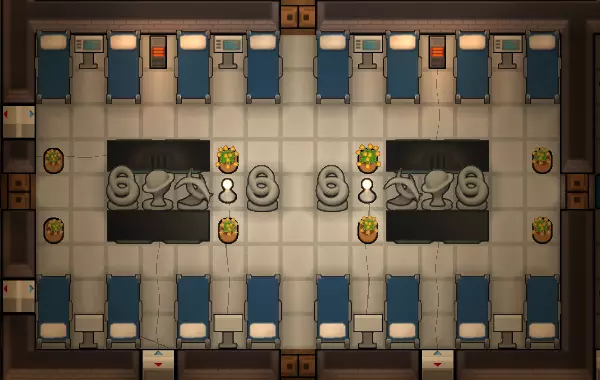
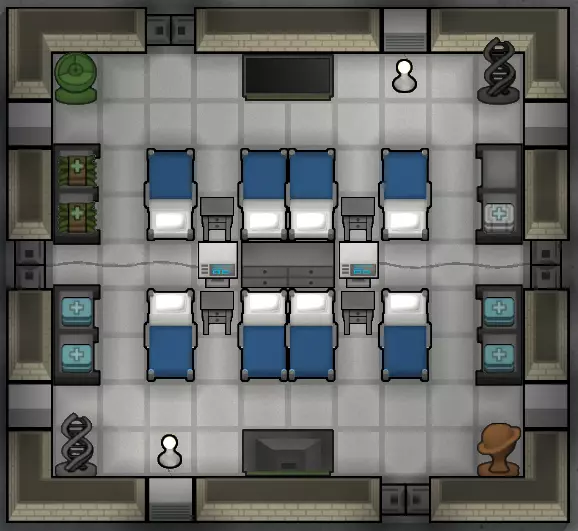
专用医院更像是游戏中期的设施,此时你已有足够资源建造医院所需的专用设备。医院病床能提升治疗质量、免疫力提升速度和愈合速度,这意味着殖民者能更快从疾病和伤痛中恢复,因此是医院的理想选择。生命体征监测仪能带来更好的治疗效果和免疫力提升,所以如果有的话,建议将其放置在医院病床附近。 医院应建在殖民者能迅速将倒下的同伴送去治疗的地方。保持门处于开启状态,或使用自动门,以免阻碍殖民者通行。如果需要,你可以在基地的其他地方建造更多医院。使用货架将药品存放在医院内或医院附近,这样医生就能快速取药为殖民者治疗,避免他们流血过多而死。有时候,这点距离就能决定生死。 医院的地板应使用无菌地砖,它们能提供轻微的清洁度加成,从而提高手术成功率并降低伤口感染几率。要记住,受伤的殖民者会大量出血,因此你可能需要指派另一名殖民者专门负责清洁医院,以提高治疗效果。 装饰医院使其美观可以极大地提升住院殖民者的心情(最高+15,还能增加房间的华丽度评分)。这很不错,尤其是考虑到有些殖民者会在医院待上一段时间,比如重伤、残疾或生病的人。 为了提供娱乐,你也可以在医院里安装电视。躺在电视观看范围内病床上的病人在感到无聊时会看电视来打发时间,这样你就不需要让其他殖民者来安慰他们作为唯一的娱乐来源了。 病人房间 如果你有更多资源,可以为每个殖民者建造单独的房间。虽然他们不介意和其他人一起睡在医院里,但他们确实会被其他人走动所打扰,而且灰尘也更容易影响清洁度。手术室 你可以建造一个独立房间来容纳将要接受手术的殖民者,确保殖民者在最洁净的环境中进行医疗手术。 你的手术室应始终设为禁止进入状态,除非有人即将进行手术。这能防止殖民者将灰尘或血迹带入,弄脏手术室。 兽医区域 考虑在药品储存区附近为动物设置专属的睡眠点和活动区域,并将受伤动物限制在该区域内。这样可以尽快对它们进行治疗。 动物的医疗处理同样受益于清洁度,但不需要专用病床(以及生命监测仪)。进入游戏中期后,无菌地板应该很容易获得。 豪华高效的医院布局
梳妆台和床头柜提供了最大程度的舒适度。两台生命体征监护仪可覆盖所有8张病床。平板电视为患者提供额外的娱乐。医疗用品就在附近,房间光线充足,且各方向均可进入。通风口使房间温度与走廊保持一致。这里可以轻松再安装多达六张病床:四张替换床头柜,生命体征监护仪左右各一张;所有病床都能被梳妆台、电视和监护仪覆盖。 监狱 监狱营房
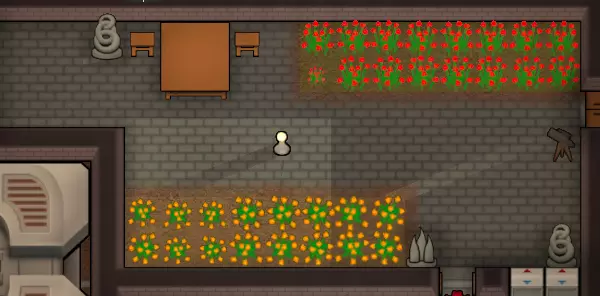
在游戏初期,你可以将任何现有的废墟改造成临时的囚犯营房,或者建造一个简单的囚舍来关押所有捕获的囚犯。尽量不要把它建得离你的主要建筑太远,否则会更难抓住逃跑的囚犯。另一个选择是,在你建造另一个卧室或合适的监狱时,将一名殖民者的卧室标记为临时监狱。 你应该为囚犯配备桌椅。这将改善他们的心情,从而降低他们精神崩溃的几率,并提高招募速度。 与殖民者一样,囚犯如果被关在同一个囚犯营房里,也会因拥挤而受到心情惩罚。此外,越狱事件一旦发生,后果会更为严重,因为同一房间内被关押的所有囚犯会同时越狱,而不同牢房的囚犯可能不会选择参与。因此,你应该将他们分开关押。 每个牢房都应配备一张桌子、一把椅子、一张床和一个光源。这是让囚犯得到体面安置的最低要求。装饰牢房并扩大其空间也能提升心情加成,从而更易于招募。囚犯无法使用牢房内放置的任何娱乐物品,他们也没有娱乐需求,所以除了为提升房间美观度外,无需费心放置娱乐物品。监狱的门应朝向你的基地,这样逃跑的囚犯会朝着你的基地方向移动,而不是远离,从而给狱警更多时间处理越狱事件。 拘留室是一种更大的牢房,有更多床位。它应该只在普通牢房人满为患时使用。将不太重要的囚犯安置在拘留室,同时把更有价值的囚犯分配到普通牢房。 多功能房间更多是早期到中早期游戏阶段的设施,你可以在建造专用建筑(如医院或更大的监狱)之前使用它们。不过,这些房间有时仍然很有用,比如当你的冷藏库或仓库满了,或者你需要一个地方安置大量受伤或生病的殖民者时。这相当简单:只需建造一个空房间,并配备合适的温度控制装置。如果你打算让某人(无论是殖民者还是囚犯)住在里面,可以添加床铺;不用时,你可以将床铺拆卸并收在角落里。 备用方案 你可以在地图上设置多种建筑,以便在紧急情况下拯救殖民者的生命: 【避难所】:建造带有应急物资的小房间,可以让殖民者躲避愤怒的动物。足够厚的墙壁(至少4层)可以阻止袭击者伤害躲在里面的殖民者。 【营养膏分配器】:当食物短缺或你预测食物将短缺时,营养膏分配器可以通过将生食高效转化为营养膏,显著减缓食物消耗。生产 你还需要各种建筑来生产或制造殖民者所需的物资。 农田 农田的操作相当简单。只需设置一个种植区,指定想要种植的作物类型,种植者就会自动去种植作物。 在划定种植区域前,你需要仔细检查土壤肥力。 石质土壤乍一看和普通泥土很相似,但肥力大大降低,会减缓植物的生长速度。 而肥沃土壤颜色明显更深,肥力更高,适合种植恶魔strand(devilstrand)等生长周期较长的植物。 你需要防止大多数动物啃食你的庄稼。你可以将区域设置为不让家养动物进入,但需要建造围墙来阻挡野生动物。如果你不打算建造温室,那就要注意建筑工人可能会自动为这个【房间】加盖屋顶。
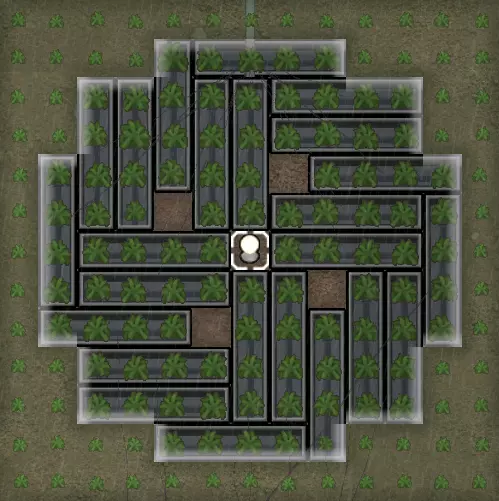
通过温度控制、太阳灯以及可能的水培盆来种植作物的封闭区域。它们能让你不受土壤或天气条件影响,持续种植作物。注意,温室容易受到太阳耀斑等耗电事件的影响,这会导致灯、加热器和水培设备停止工作。水培盆中的所有植物在断电后会逐渐受损,直至被摧毁。因此要小心,太阳耀斑或电网损坏可能会毁掉所有水培作物。 采矿 在游戏的早中期,你只需选择矿物露头并进行标记,矿工就会着手挖掘矿物。 当所有可见的矿物露头都被开采完毕后,你可以通过以下几种方式继续开采资源。露天开采 如果你有更多可开采的山脉或岩石,可以通过挖掘彼此间隔2格的长隧道来进行露天开采。这样可以看到山脉中的所有方块,希望能找到矿藏。 用廉价材料(如木材)覆盖矿井以防止虫灾是个好主意,这样可以低成本完全密封矿井。或者,在矿井入口设置防御工事,直接消灭虫子。 深钻 研究后,你将解锁深钻和地质扫描仪供使用。 不建议在没有启动扫描仪的情况下开始深钻,因为你无法看到矿藏的位置。 有些矿藏会直接位于你的基地下方。你可以拆解或重新放置建筑,以便为钻头腾出空间。在殖民者的卧室附近采矿时要小心,这很容易打扰他们休息。不放置新钻头时,请关闭矿物扫描仪,并且要注意钻头可能会吸引虫子。请准备好应对钻头附近的虫灾。 动物是殖民地极其有用的资产。它们能提供多种产品,从原始食材(肉、蛋或奶)到羊毛,羊毛是一种出色的隔热材料,既能防寒又能防暑。此外,它们还可以用于战斗,或在商队中作为驮兽。实际上,一些体型较大且更聪明的动物可以被训练成搬运工,比如狗,这样就能让殖民者腾出手来从事其他工作。谷仓动物只要不太热或太冷,在哪里睡觉都可以。否则,就需要一个带动物睡眠区的温控谷仓来让动物们感到舒适。 建造动物睡眠箱或动物床可以帮助动物更快休息,但这实际上作用不大,而且成本效益不高。 化学燃料养殖:爆炸羊的独特之处在于它们能生产化学燃料。化学燃料可用于为发电机供能、作为运输舱燃料或制作迫击炮弹。 由于其易爆特性,捕食者不会攻击它们,所以你可以让它们自由漫步,不会有太大危险。将它们圈养起来是很危险的,因为一只爆炸羊的死亡可能会伤害其他爆炸羊,如果你不进行干预,其他爆炸羊也会死亡并发生爆炸,引发连锁反应。电力 太阳能
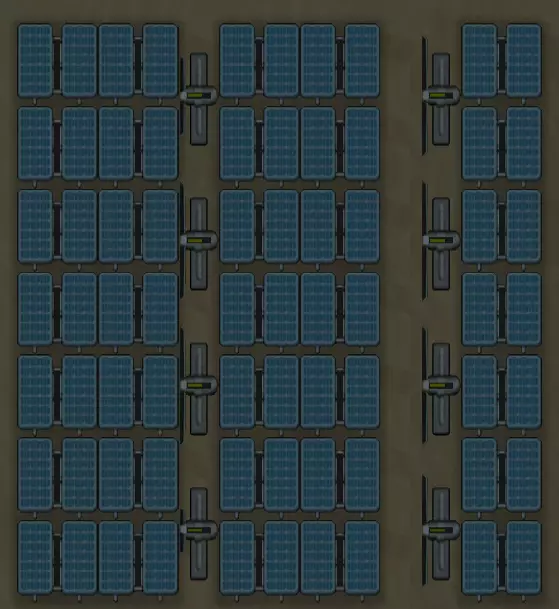
Solar generators provide power only during the day except during eclipses. It provides a constant 1700W, quite a decent figure, but still shouldn't be fully relied on. Wind powerWind turbines provide unstable power day and night. It can provide up to 3450W or nothing at all, and rarely hits its peak production. It requires plenty of open space for maximum efficiency, and any obstacles in its area reduce efficiency. To prevent trees from growing and obstructing the turbines, put down floors, grow crops underneath the turbines or fill in the gaps with solar generators. Fueled generationYou can build the wood-fired generator which runs on wood, or the chemfuel powered generator which runs on chemfuel, constantly providing 1000W of power. It is a good idea to have some of these as a backup power source, or even as your main source in biomes that are loaded with forests that will replenish themselves, such as in the tropics or temperate forests. Chemfuel is significantly more efficient than wood, so once you research the refinery it's a better idea to refine wood into chemfuel before usage as fuel. Boomalope setupBoomalopes generate enough chemfuel to run 1 generator. 3 boomalopes give enough fuel to continuously power 4 generators for a total of 4000W. This is not taking into account any energy costs from growing food for use by the boomalopes. Infinite chemreactor setupInfinite chemreactors generate enough chemfuel to run a generator, which in turn generates more than enough power to run the chemreactor. 3 infinite chemreactors can generate enough fuel to power 5 generators, for a total surplus power of 4100W. Infinite chemreactors are only available as a reward for quests. Geothermal powerGeothermal generators constantly give 3600W of power after being built on a steam geyser, without requiring fuel. It is an important source of power from mid-game onward, as it is constant and high-powered. A basic mid-sized colony can be sustained using 5 generators, around the usual number of geysers found on the map. Research is required to unlock it. The generator itself is quite costly so it's best left to midgame. It is possible to rush the research for geothermal power, though you should be careful not to neglect other more important research projects. However, once researched and built you can have a constant power supply. Make sure your geothermal generators and their connecting conduits are well-protected as they often have to be placed far from base. Walling the generators helps protect them against raiders, but walling the conduits isn't recommended due to the cost and its hindrance on colonist field work. Be aware of the heat that the geysers release. If you closely wall and roof in a geothermal generator, the temperature inside will be quite high, enough to set combustibles on fire (including the generator itself). It is thus necessary to remove the roofs on such buildings. However, if the vent is close to your base in a cold biome, consider attaching it to your own base to help heat it. Power storageBatteries store electricity during times of excess and release it during times when demand exceeds supply. You will need batteries to store power if you're using unstable power supplies such as wind or solar power. Batteries must be kept under a roof to prevent short circuits. They should also be protected from external threats as losing batteries to raiders or mortars can cripple your power supply. Emergency powerSome events will cause you to lose power if you are unprepared. Some colonies rely on wind or solar power to power everything. Eventually, every colony with electricity will suffer from a conduit explosion. Since you will be relying on batteries to store your power, this can cause a lot of disruption if the renewable energy isn't enough to power your base while your now empty batteries recharge. Raiders attacking and destroying power conduits connected to power generators can sever power from the colony, reducing the power available. In all these circumstances, this can leave you without enough power for your freezers, production, hydroponics, temperature control or even your turrets. However, it can be mitigated: Backup batteries: Always have spare power stores, such as separate battery systems with switches. Once charged, flick the switch to isolate them from the rest of the power grid. Only reconnect it when your main grid has run out or the reserves need charging. Backup generators: Have some fueled generators that you bring online only if there's not enough power in the colony. This can allow your backup batteries to discharge slower or even recharge. If they are turned off they will not consume fuel.Vanometric power cellA vanometric power cell constantly provides 1000W of power regardless of any condition and can be placed nearly anywhere. Obtaining it can be quite hard due to its rarity, even in the mid-late game, yet a constant, uninterrupted source of power is always valuable to any colony. It can be used as a good starting power source when you are branching off to start a new colony. If not currently being used, batteries will slowly self-discharge. A vanometric power cell can be placed next to your reserve batteries to keep them topped off (connecting them using conduits makes them vulnerable to short circuits) if you have a large number of batteries, though most of the time it would be better to connect the cell to the main grid instead. Power networkIt's not a good idea to have just 1 conduit spanning the entirety of your base. While it saves materials, short circuits or other events can cripple your power supply to parts of your base. Instead, build a network with redundant pathways so that the grid will continue to function even if there is a break somewhere in the network. Consider using doors to cover up the beauty penalty for exposed conduit indoors. Since geothermal generators must be built on top of existing geysers, they are often located far from your base. It is best to connect geothermal generators to other geothermal generators so that events such as wildfires and raider attacks won't easily disconnect them from your power network, causing severe power shortages. Defenses Unless you're playing on Peaceful difficulty, you will eventually encounter major threats, so you will need to prepare defenses for that. The greatest advantage on your side is cover. While enemies are hiding behind rock chunks, you have sandbags and walls on your side, giving you a significant upper hand. You can even clear the rock chunks to force enemies behind trees which are less optimal a cover choice, widening the advantage. You also get to choose where the enemy attacks(unless they use sappers to tunnel in). It is a good idea to only have one or two entrances with lots of defenses and traps to repel attacks. You can also choose to build turrets if you have unlocked them. They are essential if you don't have enough colonists to defend against raids, most typically the start of the Rich Explorer scenario. Temperature control Room should have its temperature regulated by some method or another, so as to keep a comfortable temperature for colonists to live in, and protect them from extreme temperature conditions such as heat waves, cold snaps or simply the ambient temperature outdoors. Large rooms such as your dining room or rec room should have their own heaters and coolers. If they are interconnected you may want to open doors for faster colonist access and temperature exchange. If you choose to do so, remember to close doors if a fire breaks out in the room. Colonists will complain if sleeping in the extreme heat or cold. Bedrooms and other smaller rooms should be thermally connected to a larger central space via vents. Your heaters and coolers should be all placed outside the bedrooms. This reduces the number of heaters and coolers you need to build while keeping your bedrooms at a comfy temperature at the same time. Keep in mind that you will also need to be prepared in case of a freak temperature event such as heat waves or cold snaps. Without enough temperature devices rooms can get uncomfortably cold or hot, and in severe cases begin to cause hypothermia or heatstroke. Cooler gap preventionAs coolers need to be built as part of a wall, the process of building a cooler involves tearing down the original wall, then putting the cooler in place. This short interval allows temperature to go freely through the gap, which isn't something you want. To fix this, you can plug the gap by building a cheap wooden wall in front of or behind the cooler blueprint, then starting work on the cooler. The wooden wall will prevent temperatures from equalizing easily. Remember to deconstruct the wall after the cooler is done. Protected coolersCoolers are very fragile and must be placed in a wall, so a single explosion or dedicated effort from melee attackers can easily break them down. Protecting the coolers helps fortify your base against enemy raids by eliminating the weak points in your walls. This is done by walling the coolers off while giving it unroofed space in front of the hot end to vent away heat. If your colony is in a cold but not quite freezing biome, consider venting the heat from the coolers for your freezer into your living spaces instead. Cooler columnPlace several coolers in line with the hot end facing an unroofed area where the heat vents out into the open. That unroofed area can be placed within an existing structure, such as inside the freezer. For maximum spatial efficiency, the strips of unroofed area should be 1 tile wide, surrounded by coolers. This method is best used for freezers to keep cool as most cases don't call for many coolers. Temporary temperature controlIf your regular heaters or coolers aren't doing the trick, there's a temporary power outage, or you're a tribe without the ability to harness electricity yet, you can use campfires or passive coolers to heat or cool down your base respectively. Campfires can't heat above 30°C while passive coolers can't cool below 15°C. Also, their temperature effect is full and cannot be throttled. Depending on what gear your colonists are wearing, it's possible for them to be in a room being heated with campfires and complain about it being too hot. These are best used to keep colonists comfortable during heat waves or cold snaps. If you always encounter uncomfortable temperatures during summer or winter, then it's time to upgrade your heaters or cooler system. Miscellaneous Dirt floorsUntil you have enough manpower to spare for cleaning jobs, use the terrain directly instead of building any floors. Dirt trailed on constructed floors makes for a much worse beauty and cleanliness penalty than using dirt floors, so this can actually make your rooms look better and be 'cleaner'. For places like hospitals however, it's better to use sterile tiles and manually clean them instead. Flooring outsideTo reduce the amount of dirt inside your colony buildings, put any kind of flooring covering places where colonists and animals frequently walk. This reduces the amount of dirt formed as well as causes dirt to be left outside where it does not look as bad. This should obviously be done only if you have enough janitors, otherwise it's better to just not build any floors (see above). BridgesBridges allow for fast movement and some building on shallow sections of rivers and marshy terrain types. They're great for allowing colonies to span rivers, as well as making building in swampy biomes a bit easier. Note that some objects cannot be built or placed on bridges. Moisture pumpsMoisture pumps clear out moisture from the ground around them, making solid land that is suitable for construction and in most cases, agriculture. They are excellent in swamp biomes for clearing out shallow water, marshy soil and mud in order to build structures. Their effect is permanent, so they can safely be deconstructed once the land you want to use is dry. Notes Thanks to RimWorld Wiki, Ludeon Studios and friends for providing information for this guide.

特别感谢以下人员提供的图像示例: PigeonGuru Yoshida Keiji Gottoni AvrixSpectre