换一换
换一换 


Compact production chain layouts for most common products that need to be made indefinitely Updates 2023-12-17 Holy crap Falk is alive! I'm now gearing up to play a couple runs through Dark Fog, and the more I play around with proliferators, the more I'm realizing that it's pretty much antithesis to my entire approach to the game (making direct insertion, properly-ratio'd black box chains using geometry/layout placement to accomplish said ratios) and said approach pulls completely in the opposite direction of putting proliferation on each step. I'm pretty sure I can swing *some* interesting designs that proliferate in between anyway, but it's a lot of additional buildings vs just having each individual part be its own row out of an ILS used as a piler, which essentially boils all design back down to its fundamental 'best practice' layout, albeit an ugly one in my opinion - rows upon rows of ILS all managing their own product. This guide has a chance of staying dead/a relic of the past, but hey, if I'm hit with inspiration with these few runs we may see some updates first to the end products (it's a no brainer to proliferate Graviton lenses, rods, science, rockets at least) then backwards just to see how much the designs have to change. tl;dr direct insertion designs are pretty much dead for endgame, and with it the original point/intention of this entire document. Evolve or die, lol ======== 2022-01-24 It goes without saying that this guide is now very largely obsolete for endgame lol Couple of fixes I still want to do anyway (rockets and antimatter rods, really, because of that one balance change to fuel rods in general) just so that things aren't incorrect, then it's likely most of the current content of the guide is going to be sectioned off to 'pre-proliferator/stacker' and I work through a new set of layouts. That's going to be a long, tedious road though! ======== 2021-10-12 - Fixed sorter direction on 3/s Particle Broadband - Condensed Turbines by 1 tile (thanks Pie of Doom in comments) - Updated Fractionator layout courtesy of Zanthra ======== 2021-10-01 (holy shi!) - Updated Oil Refinery section as per the new reality of depleting oil - Added "Mission Impossible!" segment + build order - still working on v8 mall; cracked open the game for the first time in half a year last week (lol) and validated v8 mall for everything in the 10h run, but still requires testing for rockets and Artifical Star, etc. SOON - Deleted old layouts section- redundant now with Blueprint functionality in-game ======== 2021-02-22 - Rewrote Description section as the guide is now more or less content-complete - Added some info about combining Solar Sails into the Rockets layout - Working through layouts to add power draw and dimensions where applicable - v8 mall might take a while yet to publish due to some more tweaking, but can be seen in the video playlist (specifically pt15 which is a clean build on a new planet) - Probably the last update for a while, although i wanna eventually get to some smelter setups and a Deut rod cheat sheet. Satsifactory U4 here we come! ======== 2021-02-17 - Added video playlist to Description - Added special-case 1/s Frame Material Tileable using Spiniform Stalagmites - Added 1/s Antimatter Fuel Rod layout ======== 2021-02-14 - Fixed tileable Solar Sail circuit assembler label ======== 2021-02-09 - revamped Red+Yellow so all inputs come from the same direction, added Storage Tank loopbacks. - I've moved the old giant 6/s layouts for Turbines and Processors to the same Old Layouts section. They really were less efficient to build and much harder to plan partial builds. Same for old Mall stuff. ========= 2021-02-03 - Added 4/s Graphene Tileable - Added 1/s Titanium Alloy Tileable + alt w/ Sulfuric Ocean rare - Added 1/s Organic Crystal Tileable - Added 4/s Solar Sail Tileable - Maintenance edit of 4/s Solar Sail; clarification of Stone Ore (...lol), not Stone ========= 2021-02-02 - Added 1/s Turbine Tileable (rip old layout lol) - Added v7 mall ========= 2021-02-01 - Added lategame 1/s Processor Tileable ========= 2021-01-31 - Added Zanthra's tileable Fractionator layout - Fixed wrong Assembler/Smelter recipe labels in 1/s Graviton tileable layout Heads up that the mall has gone through a rather significant redesign to be more maintainable. Sorry to all the folks who've started on this current layout. It did serve me well, though! Not posting till I take it out for a spin on a new playthrough to catch clerical errors via retracing the layout diagram itself, might be a day or two. ========= 2021-01-30 - Posted my own progression notes because why not. YMMV regarding playstyle, etc. - Added 1/s (lol) Graviton Tileable - Added 1/s Frame Material Tileable - Added 1/2s Small Carrier Rocket Tileable. It's late, expect some errors ========= 2021-01-29 - Added 1/s Particle Broadband upgradeable to 3/s - Added 1/s Plane Filter Tileable ========= 2021-01-28 - Added tileable Refined Oil/Hydrogen layout - Added mall ideas - Fixed mk3 sorter requirement on iron ingot belt -> circuit in 6/s processor setup ========= 2021-01-27 - Fixed 6/s Processor layout not having any output sorters (rofl) ========= 2021-01-26 - Fixed 4/s Sails layout having 3 Graphite smelters instead of 6 - Fixed 4/s Sails layout again - Added 6/s Electromagnetic Turbine layout - Fixed Yellow/Red using Assemblers instead of Smelters for diamond (lol) - Added 6/s Processor layout Description I made these for my own use but thought I might as well throw them up with a little formatting There are a few ways to approach production-line games in general- in-line production, where everything for a particular part is integrated into the chain building it, or modular, where each part is manufactured individually then sent to wherever it needs to go. Factorio, for example, following a Main Bus method of play is largely modular, as things that need to be scaled up are done so perpendicular to the bus. This guide corresponds to a specific method of play that falls somewhere in-between on these pretexts: - Having everything in-line all the way down to raw materials leads to unwieldy, massive layouts for end-game parts. - Having everything completely modular being shipped around by ILS is a needless draw on power and complexity as there are many parts that are ever only used in 1-2 things or buildings which are an inconsistent usage. - On the note of additional things being belted or shipped around vs direct insertion, I feel that regardless of how much optimization the game gets during and after Early Access, it still is a Unity game written in C# and not coded to the metal like Factorio, so UPS will become an issue sooner or later. Direct insertion where possible should (theoretically) mitigate this to some extent in ultra-late game. By breaking down the production chains in the game into a number of tiers, and having later tiers only use inputs corresponding to the outputs of prior tiers, we keep layouts to a manageable size while taking advantage of direct insertion to mitigate the potential issue above with regards to completely modular builds. Tier 1: Raw ores, Crude Oil Tier 2: Iron/Copper Ingots, Titanium, Glass/Stone, Graphite, HP Silicon, Refined Oil, Hydrogen, Deuterium Tier 3: Processor, Turbine, Titanium Alloy, Organic Crystal, Graphene, Solar Sail, Deuteron Rod Tier 4: Frame Material, Particle Broadband, Plane Filter, Graviton, Antimatter Rod In addition, having e.g. Organic Crystals or Graphene being an input rather than in-line also allows for rares (Organic Crystal Veins, Fireice) to integrate into the overall topography without massively affecting the layouts. One of the nicest advantages of this hybrid approach is cutting down the amount of 'things that can go wrong' to the above aforementioned list of parts. For example, since gears are only ever used (discounting the mall) in-line to engines which are used in-line to Turbines, with the layouts being ratio-accurate, production bottleneck issues can completely ignore gears and engines. If Turbines are short, it either means you need more Turbine production, or one of its inputs (iron ingots, copper ingots, magnets) ran out. There never will be a case of specifically gears or engines running short and needing to go to wherever those are being made to scale up. The same is true for the other parts. If Plane Filters run short, it means either needing to scale up Plane Filters, or one of the inputs to that layout ran short- it's never specifically a problem with not enough Casimir Crystal, Titanium Crystal or Titanium Glass assemblers.
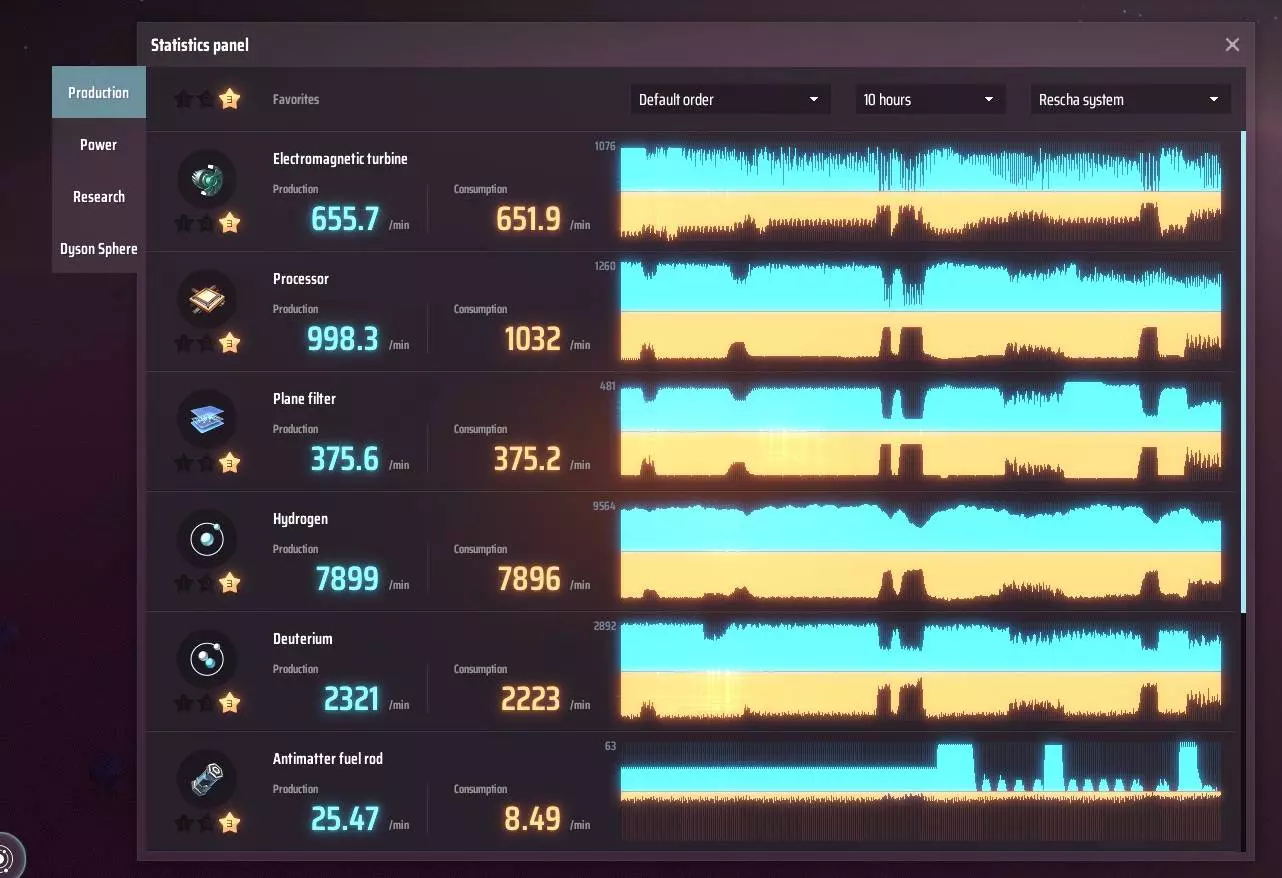
这使得通过【生产】选项卡监控各项内容变得更加便捷。
因此,在本指南中,我将生产链拆分为专门生产特定部件的布局,并假设更复杂的部件会将这些特定部件作为现成的输入。 早期游戏布局(例如红+黄科学包、初始太阳帆)会忽略这一点,而是以一级产品作为输入来构建完整链条,因为考虑到此时物流和其他星球的获取都受到限制。但最高效的布局确实需要模块化,因此相对较早地考虑集中设置熔炉和精炼厂是个好主意,而在游戏后期则将它们分离成各自独立的大型熔炉工厂。 话虽如此,这显然只是我个人的观点,游戏玩法并没有绝对的对错之分——核心原则是,工厂必须不断扩张,而实现扩张的具体方式并不那么重要。如果觉得将所有内容完全模块化并在瓶颈出现时解决它们更容易,那就尽管去做吧!我不会在特定层级之外使用布局,因为划分方式可能有太多种排列组合。 0.8.22版本游玩流程展示了本指南中的许多布局,以及基地和前哨站的整体组织/结构。请注意,这是我首次体验该版本和蓝图,因此我正在制作、改进和编辑布局。 戴森球计划网格特性 由于游戏存在于映射到球面的方形网格上,网格大部分是方形的,但在靠近极点处会出现【网格压缩】现象。实际上,许多建筑在游戏中存在两种不同的碰撞体积——一种决定建筑之间的最小间距,另一种则决定传送带的可放置范围。 举例来说: - 熔炉的占地面积为3x3网格,而传送带可放置在其周围5x5的范围内。 - 装配机同样占用3x3网格,传送带也可放置在其周围5x5的范围内,但装配机之间的最小间距为4格。玩家还可以在这个间隙中放置电线杆。 关于网格挤压与布局的关系: - “网格挤压”效果会对这些碰撞体积产生影响。在除赤道以外的大多数区域,玩家可能无法在装配机之间的强制间隙中放置南北走向的传送带。- 纵轴通常不会受到网格挤压的影响——分拣器在南北方向上始终能够触及3格远的距离。 - 因此,这些布局最好放置在靠近赤道的位置。我设计时让大多数分拣器纵向跨格,所以将图像顶部朝向北方或南方,能最好地确保分拣器可以触及它们需要到达的物品。 - 由于大多数分拣器都是这样排列的,因此在东西方向上通常不需要建得那么紧凑。如果受到网格挤压的影响,只需将物品之间的间距稍微加大一些即可。 红与黄研究 与研究需求呈1:1对应关系。
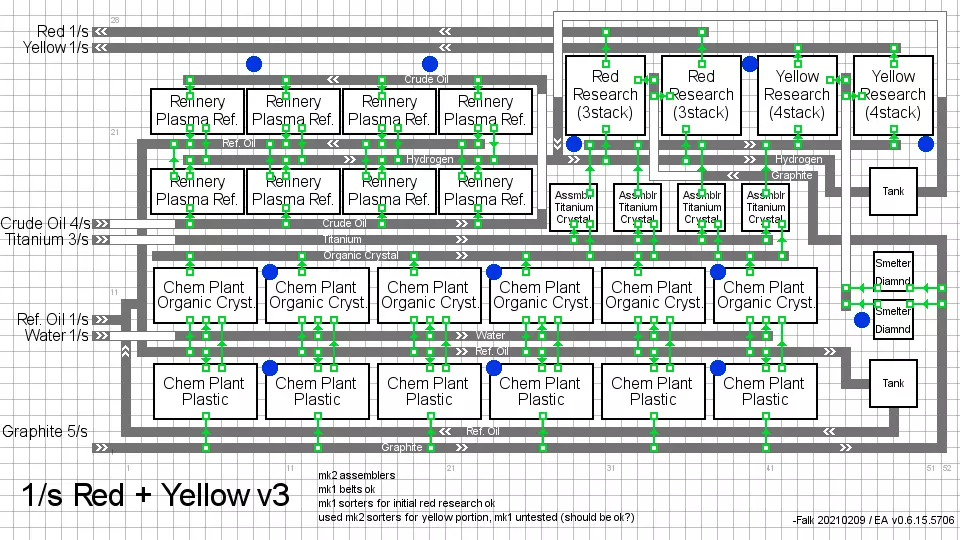
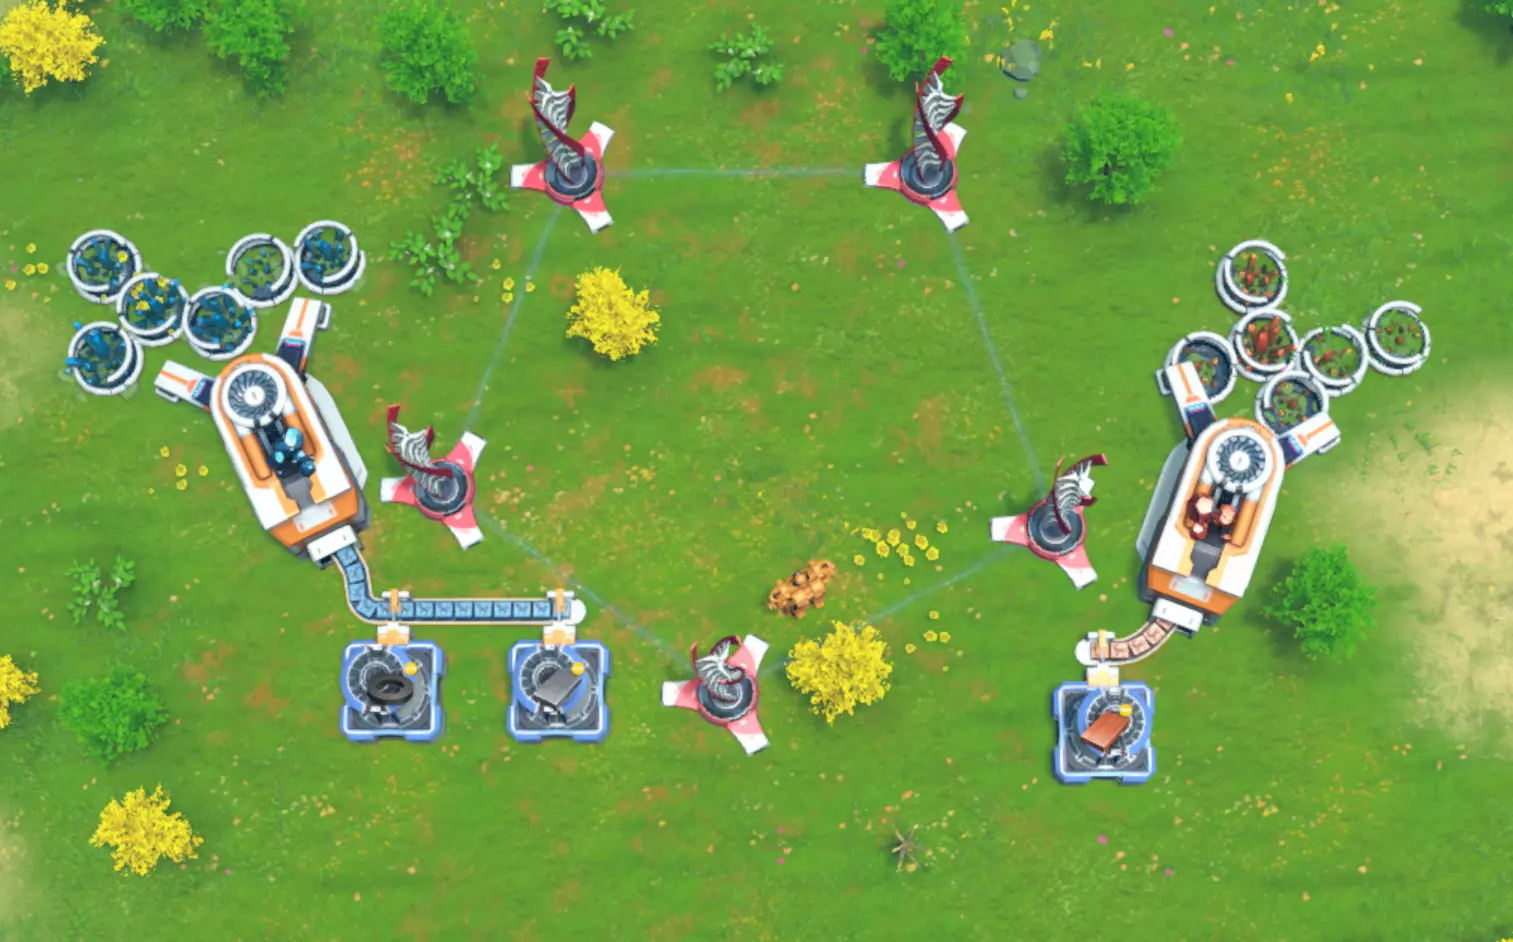
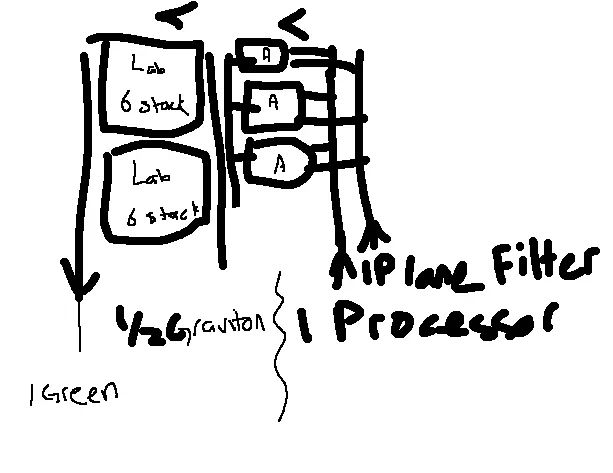
v3版本是对早期游戏设置的改进,该设置需要原油输入。与之前的版本(参见:旧布局部分)相比,它乍一看可能更难理解,但取消了分拣器-分流器以节省电力,并整合了精炼油和氢气的储罐循环系统。 研究到红色科技时,只需要炼油厂和红色科研站。最好将精炼油管道一直连接到储罐,这样可以节省日后重建的时间,但那个储罐可以暂时不用管。氢气储罐应该进行循环连接,因为即使是mk2分拣器也可能无法足够快地从传送带上抓取所有氢气。 这里的总体思路是,单独每秒1单位的红色科研会产生每秒4单位的精炼油,而每秒1单位的红色科研加上黄色科研则会额外消耗每秒1单位的精炼油(根据布局的输入)。因此,在储存精炼油的同时生产红色科研的时间,相当于红色+黄色科研利用储存的精炼油自主运行时间的4倍,而此时主基地的石油设施可以集中化。例如,如果花费2小时只生产红色魔方,这相当于为红色+黄色科研储存了8小时的精炼油,无需额外投入。 精炼油从精炼厂反馈到生产线的传送带布局很重要——这使得精炼厂的产出优先于储罐,而储罐又优先于额外输入。我的流程通常是先完成一套完整的红+黄(生产线)设置,然后再额外建一条红(生产线),黄(生产线)则暂时不完成。第二条生产线储存的精炼油会用于生产钛合金和石墨烯,同时研究物流等科技以简化石油管理。 游戏后期,当所有其他科技都已设置完毕且产能远超2/秒时,强烈建议最终拆除这种布局,改用集中式石油系统,直接向实验室供应石墨、氢气、钻石和钛晶体。但在此之前,这种布局在 warp 阶段之前都能很好地发挥作用。 紫色研究:参考粒子宽带和处理器的布局。1/s 紫色 = 10个实验室,由2/s 处理器和1/s 粒子宽带为其供能 绿色研究 参见平面过滤器和引力子 1/s 绿色研究需要12个实验室,由1/2s 引力子供能,以及3个量子芯片组装机,这些组装机由1/s 处理器和1/s 平面过滤器供能
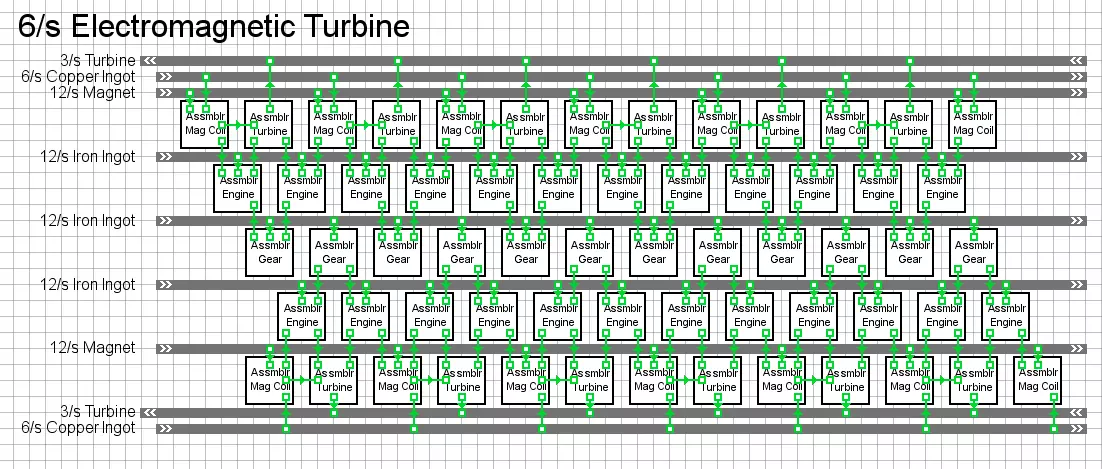
电磁涡轮机 涡轮机在许多中后期配方中都作为零件使用,因此非常适合在其他星球上进行大规模制造。选择一个铁矿石丰富的星球。 更新:可平铺版本在其他地方进行冶炼时,启动和运行速度更快,即使使用MK1装配机也是如此。之后也可以升级。

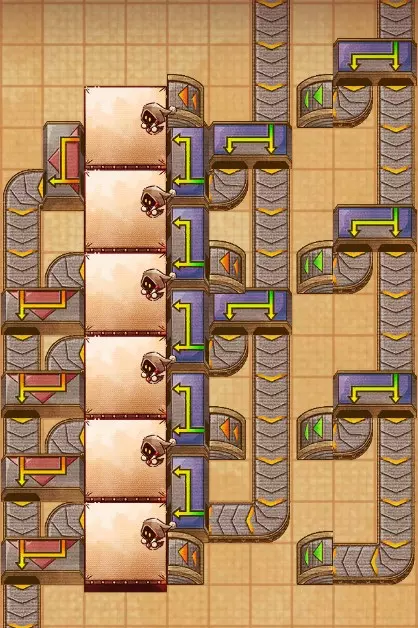
水平平铺示例
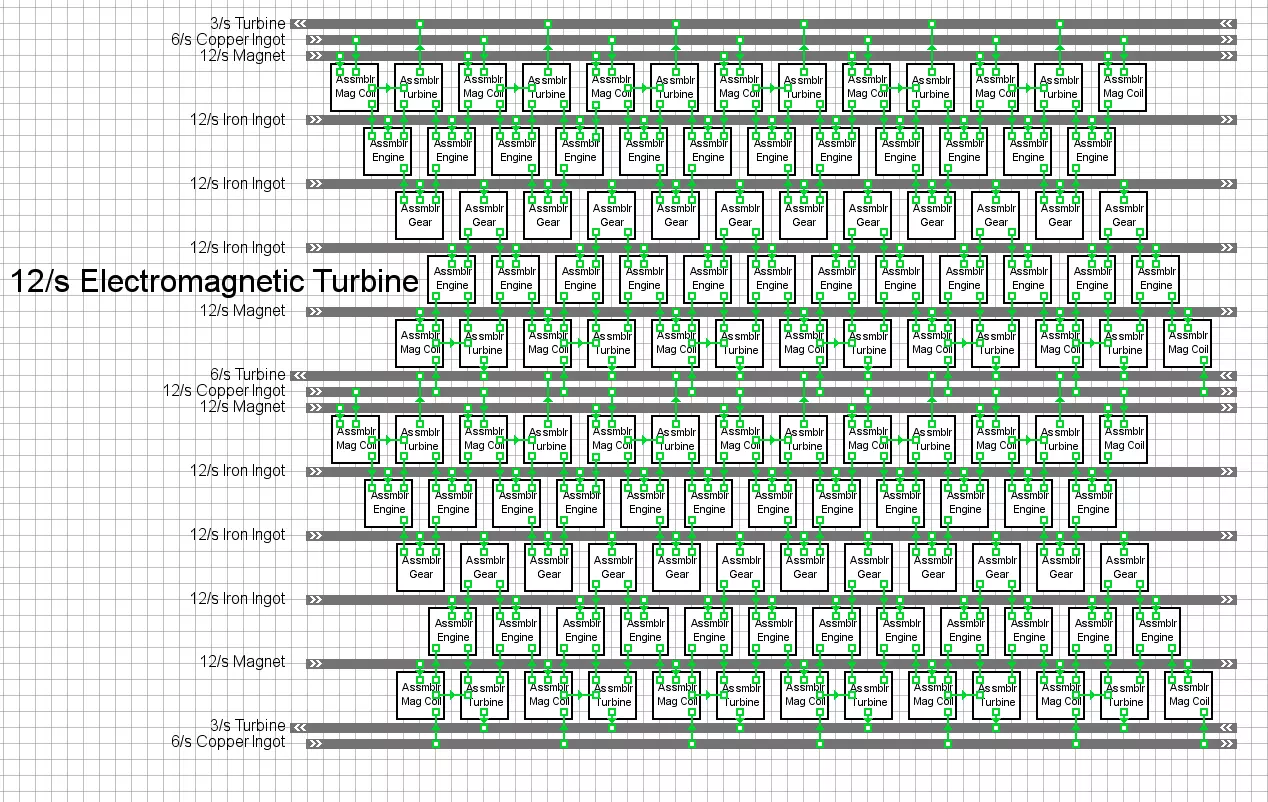
第二个示例展示了垂直平铺——处理器和铜锭生产线相互重叠,形成一个整齐的南北向布局,与磁铁和铁矿石生产线相匹配,因此整个系统仍可使用相同的传送带技术运行。
处理器 大规模处理器制造设施,需建在硅资源丰富的星球上,用于向其他地方出口。

前期可以只使用MK2组装机(甚至MK1),暂时接受产量损失以快速搭建,方便后续维护和扩展。 此布局也可以垂直平铺,右侧的处理器组装机可以改为向下输出。 精炼油+氢气 由于原油是地图上明确显示的资源,中期最有用的任务之一就是开采所有原油节点,并将原油输送到单一地点进行加工。由于原油只能被加工成一种产物,这让我们能够了解该星球产出精炼油的上限,而这又会进一步影响硫磺、有机晶体和粒子宽带的总产量(最终还会影响石墨的产量,如果煤炭完全耗尽的话)。这有助于规划如何同时从有机晶体(钛晶体)和硫磺(钛合金、石墨烯)的主要分支进行生产。就母星的整体布局而言,当解锁物流系统并需要集中化石油产品的生产链(而非让各个布局直接输入原油)时,最好将精炼油+氢气、钛合金、石墨烯和有机晶体的生产设施规划在相近的区域。为了让物流和传送带系统更便捷,氢气处理与消耗(例如氘分离循环、聚变发电等)可以直接从该星团引出。

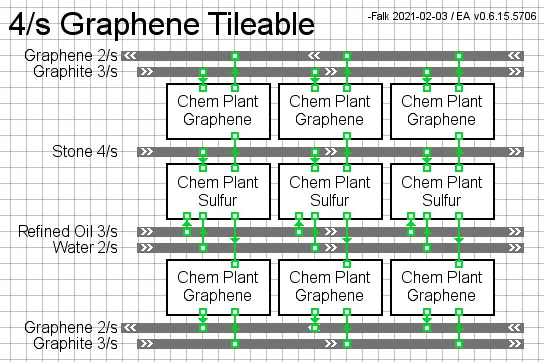
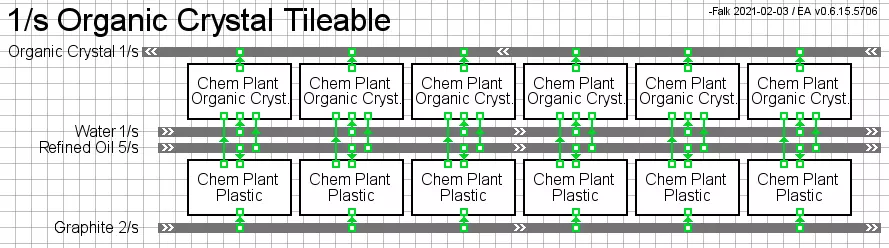
基于传送带速度的可扩展设置 布局思路完全归功于Qitama 【参考研究立方体数量】 蓝色:不使用 红色:不使用精炼油(氢气可从其他来源获取) 黄色:每1个/秒需要5个/秒精炼油 紫色:每1个/秒需要4.25个/秒精炼油 绿色:每1个/秒需要8个/秒精炼油(通过1.5个/秒引力子和6.5个/秒平面过滤器) 因此,每1:1:1:1:1的比例总共需要17.25个/秒原油,在不考虑矿脉利用率加成的情况下,母星在开采所有石油节点后,很可能可以轻松实现2:2:2:2:2的比例。当然,这个数字没有计算任何稀有资源——火冰、有机晶体、硫酸海洋会大大降低这种依赖性。此外,对于游戏后期科技和白色矩阵采用2:2:2:2:2的配置,会使得留给太阳帆、火箭以及其他各种事物(如购物中心等)的资源相对较少。由于母星系统通常缺乏稀有资源(可能除了火冰之外),建议尽早开始开发其他星系,以减少对石油的依赖。在最新补丁中,原油会耗尽,因此尽快离开初始星系的需求变得更加迫切。 石墨烯 布局非常非常简单,上传此图是作为输入/输出比例和建筑数量的快速参考指南。
有机晶体 同上。
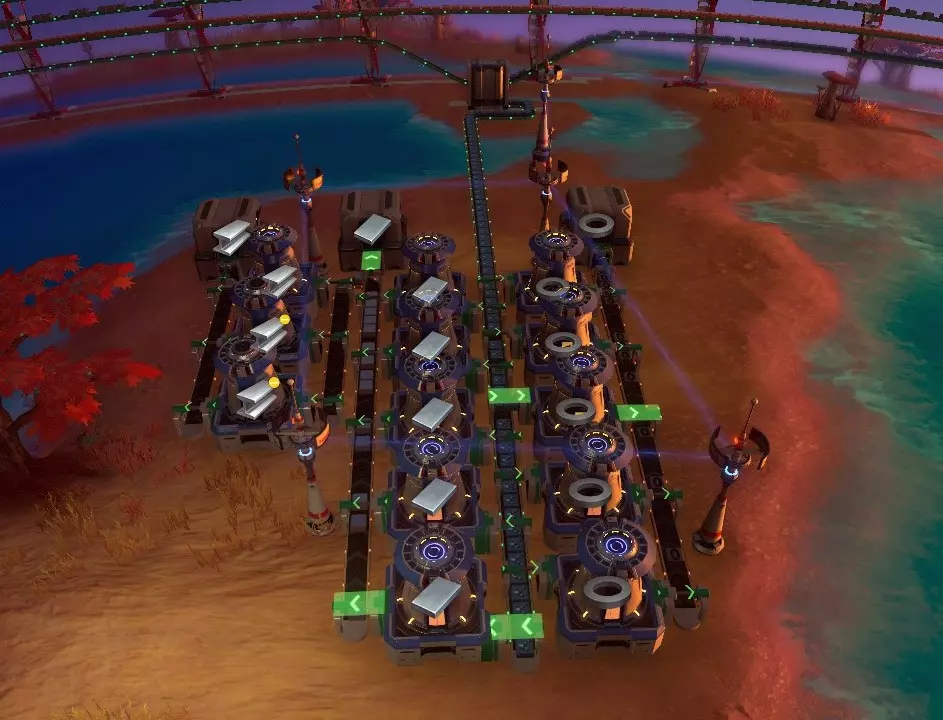
钛合金
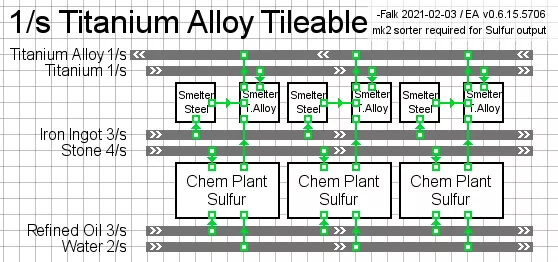
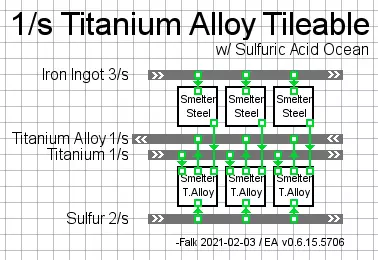
如果硫酸生产集中化,或者存在硫酸海洋,那么生产过程会变得更加简单且紧凑。
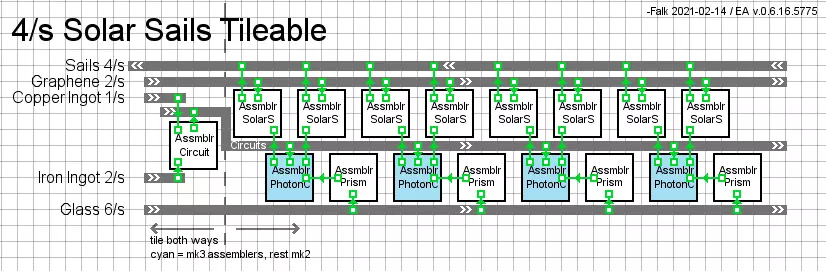
太阳帆 每秒4个的产量足以启动一个帆群。如果你有足够的发射器将它们全部送入太空,帆群中应该会有大约6000个活跃的太阳帆,随着研究延长其寿命,数量会上升到约10000个甚至更多。 太阳帆会非常快地消耗一个星球的石材供应。 这是一个需要原材料输入的早中期游戏设置。
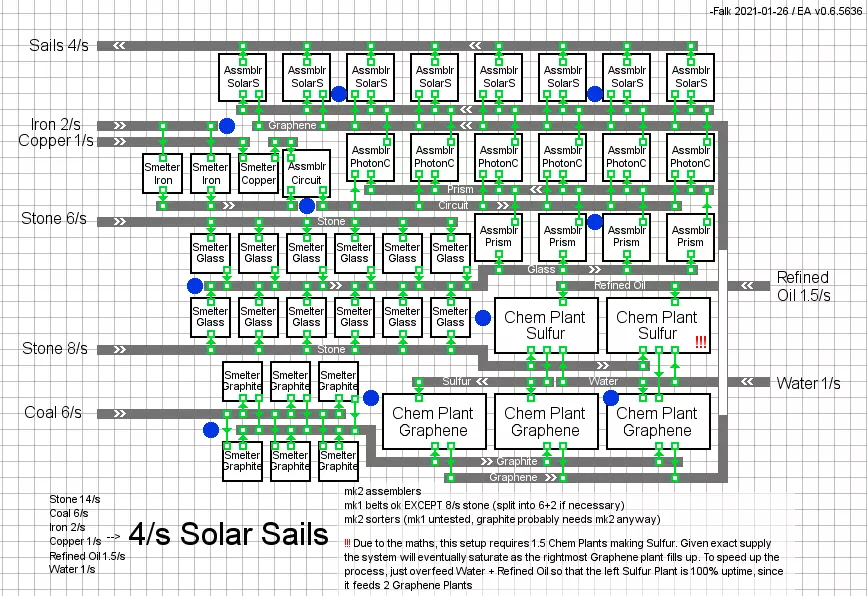
这是一个适用于游戏后期的可平铺版本,前提是已解锁MK3组装机,并且能够集中生产石墨烯、石墨、锭和玻璃。
氘气工厂(通过分馏器) 本布局完全归功于Zanthra,已获得使用许可
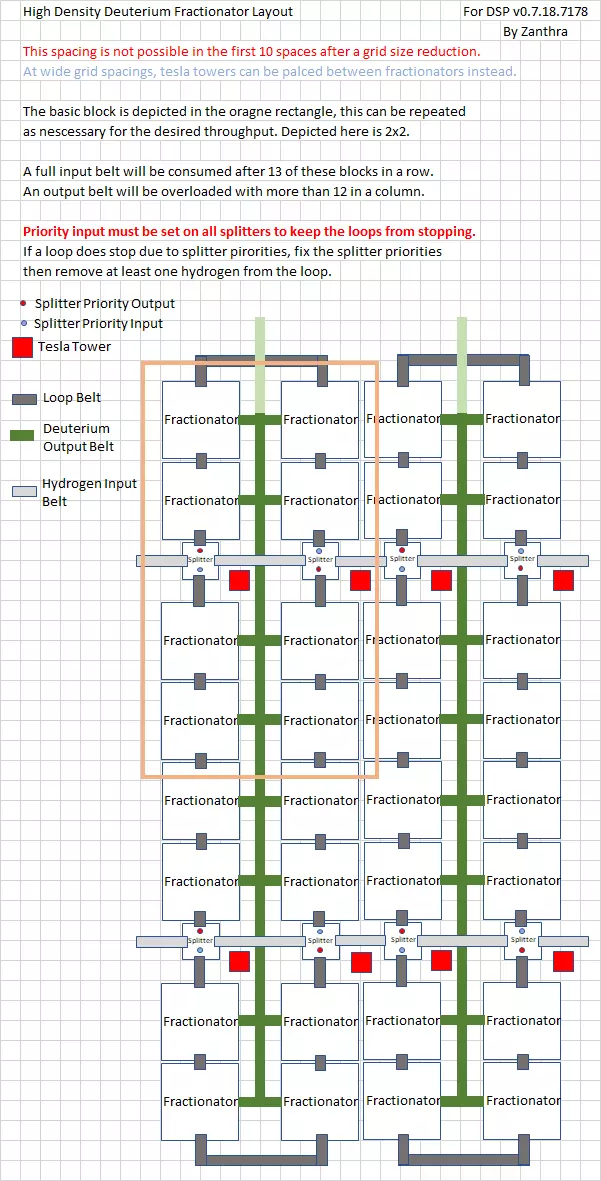
可水平和垂直平铺,每个单元使用mk3传送带时,大约每秒可将2.4单位氢气转化为氘。 将氢气转化为氘,再进一步制成氘燃料棒,是游戏早期到中期扩大能源规模的好方法。 粒子宽带 粒子宽带是一个比较特殊的瓶颈,因为自动化生产一些粒子宽带能让mk3组装机的生产变得容易得多,但同时大量的组装机也能利用mk3更高的生产效率。 因此,这个布局分为两个阶段。早期阶段是每秒1单位的布局,具有非常特定的间距。
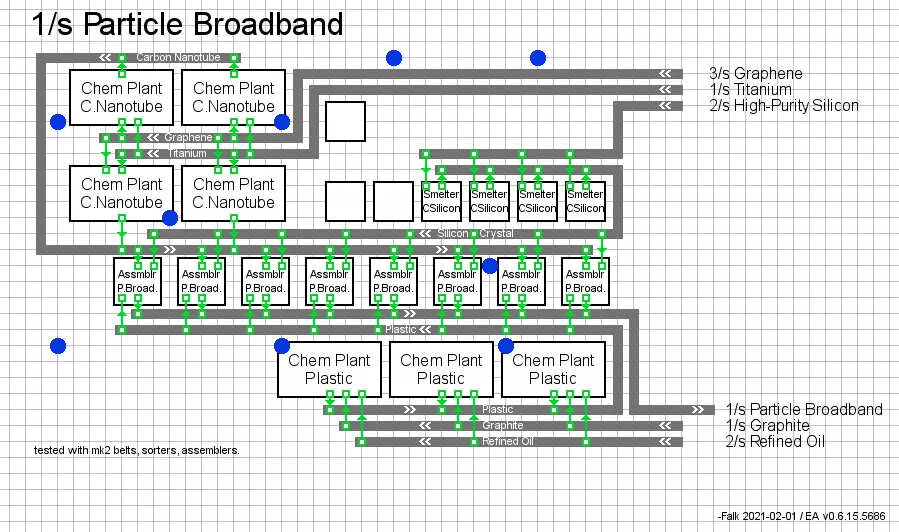
随后直接升级(左侧留出空间)至3/s布局
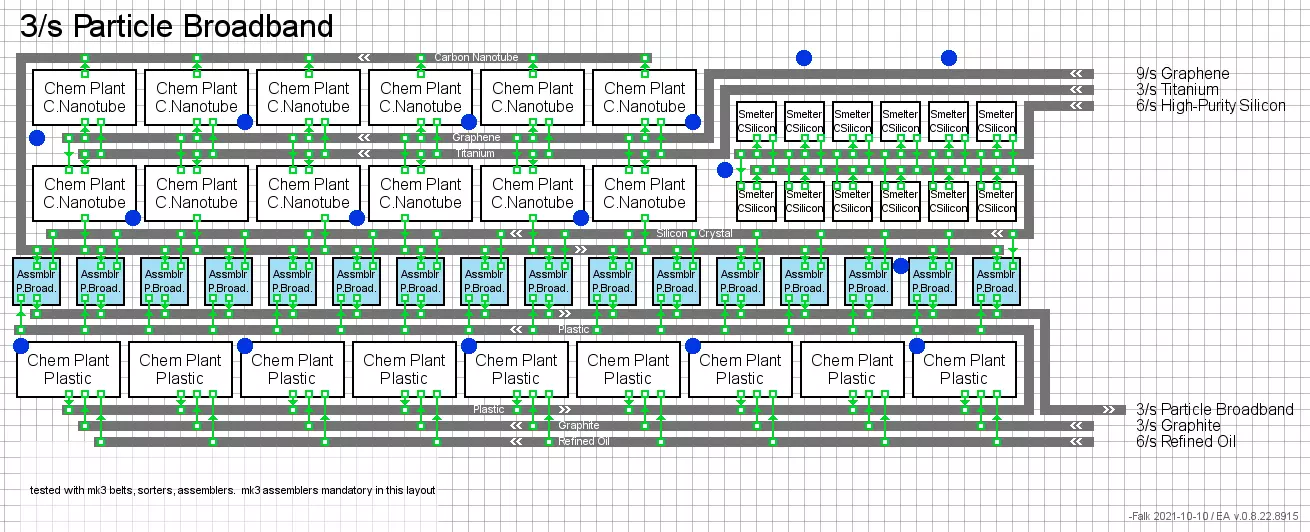
青色=MK3组装机 塑料向下输出并循环的原因在于,使用MK3组装机时,在传送带的大部分区域,每个塑料化工厂的产量为0.333单位/秒,但最终要为两台MK3组装机供料,这两台组装机的总消耗量为0.375单位/秒,最终会导致供料不足,同时还会在生产线左侧造成塑料生产的无用积压。让所有塑料先输出到一条传送带上,再输送到第一台组装机,就能解决这个问题。 平面过滤器
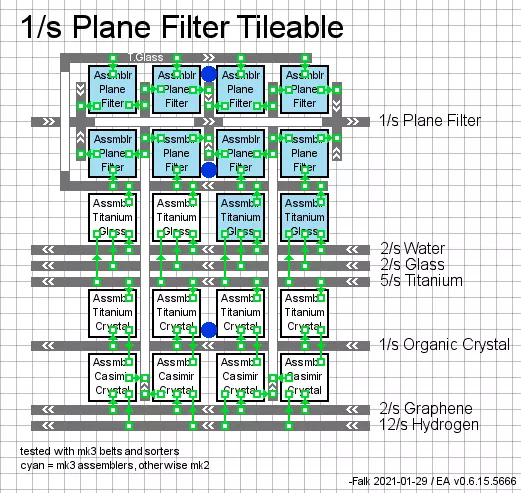
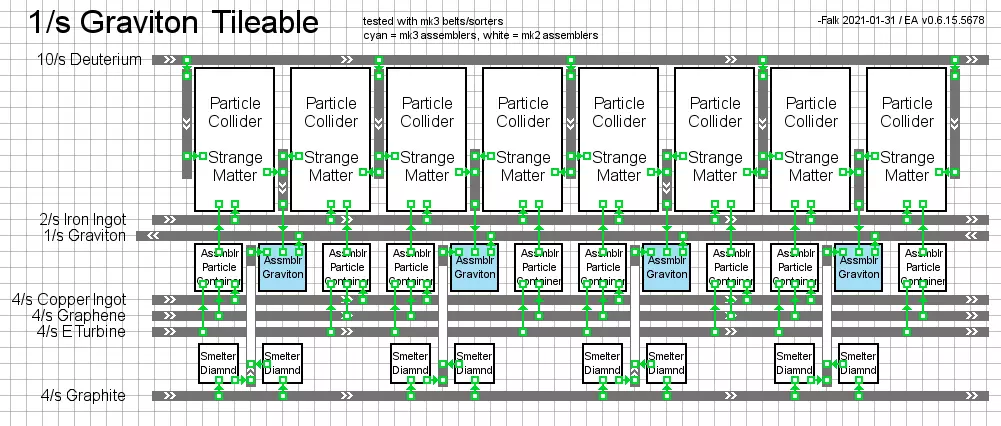
每1秒平面过滤器的钛玻璃传送带桥可平铺,额外增加一列。青色为mk3组装机,其他为mk2组装机。希望这能让数量庞大的组装机布局更整洁。引力子。在刚开始研究绿色科技时,这种布局的耗电量可能过高。记住,每秒1单位的绿色物品只需要一半的引力子,也就是此布局的一半规模。
框架材料 除了集中碳纳米管生产或将其与框架材料并行运行外,这是使用石墨烯的最紧凑布局。这可能是本指南中最不理想的布局,因为这样做没有实际好处,但在没有更好想法的情况下,为了内容完整而包含在内。 编辑:图表中仍缺少用于分流至钛垂直传送带的分拣器。
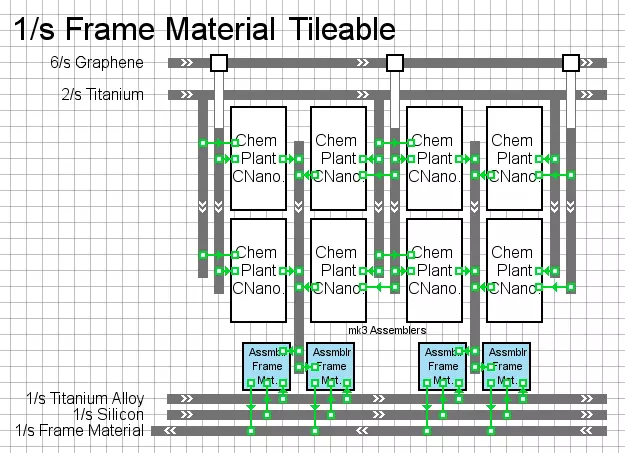
1秒框架材料本质上相当于1/6秒火箭,便于快速计算。不过,如果有石笋可用,通过特定条件可以实现一种相对紧凑的纳米管框架材料直连建造方式。
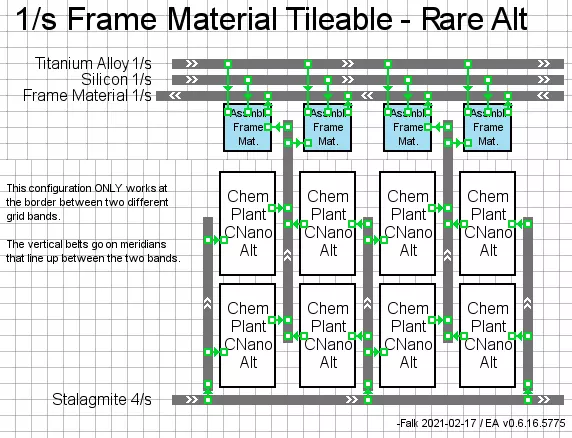
由于这仅在非常特定的纬度上有效,且实际上无法垂直平铺,因此为了可扩展性,预留一段环绕行星的长条区域或环形区域来进行这项操作可能是个不错的主意。
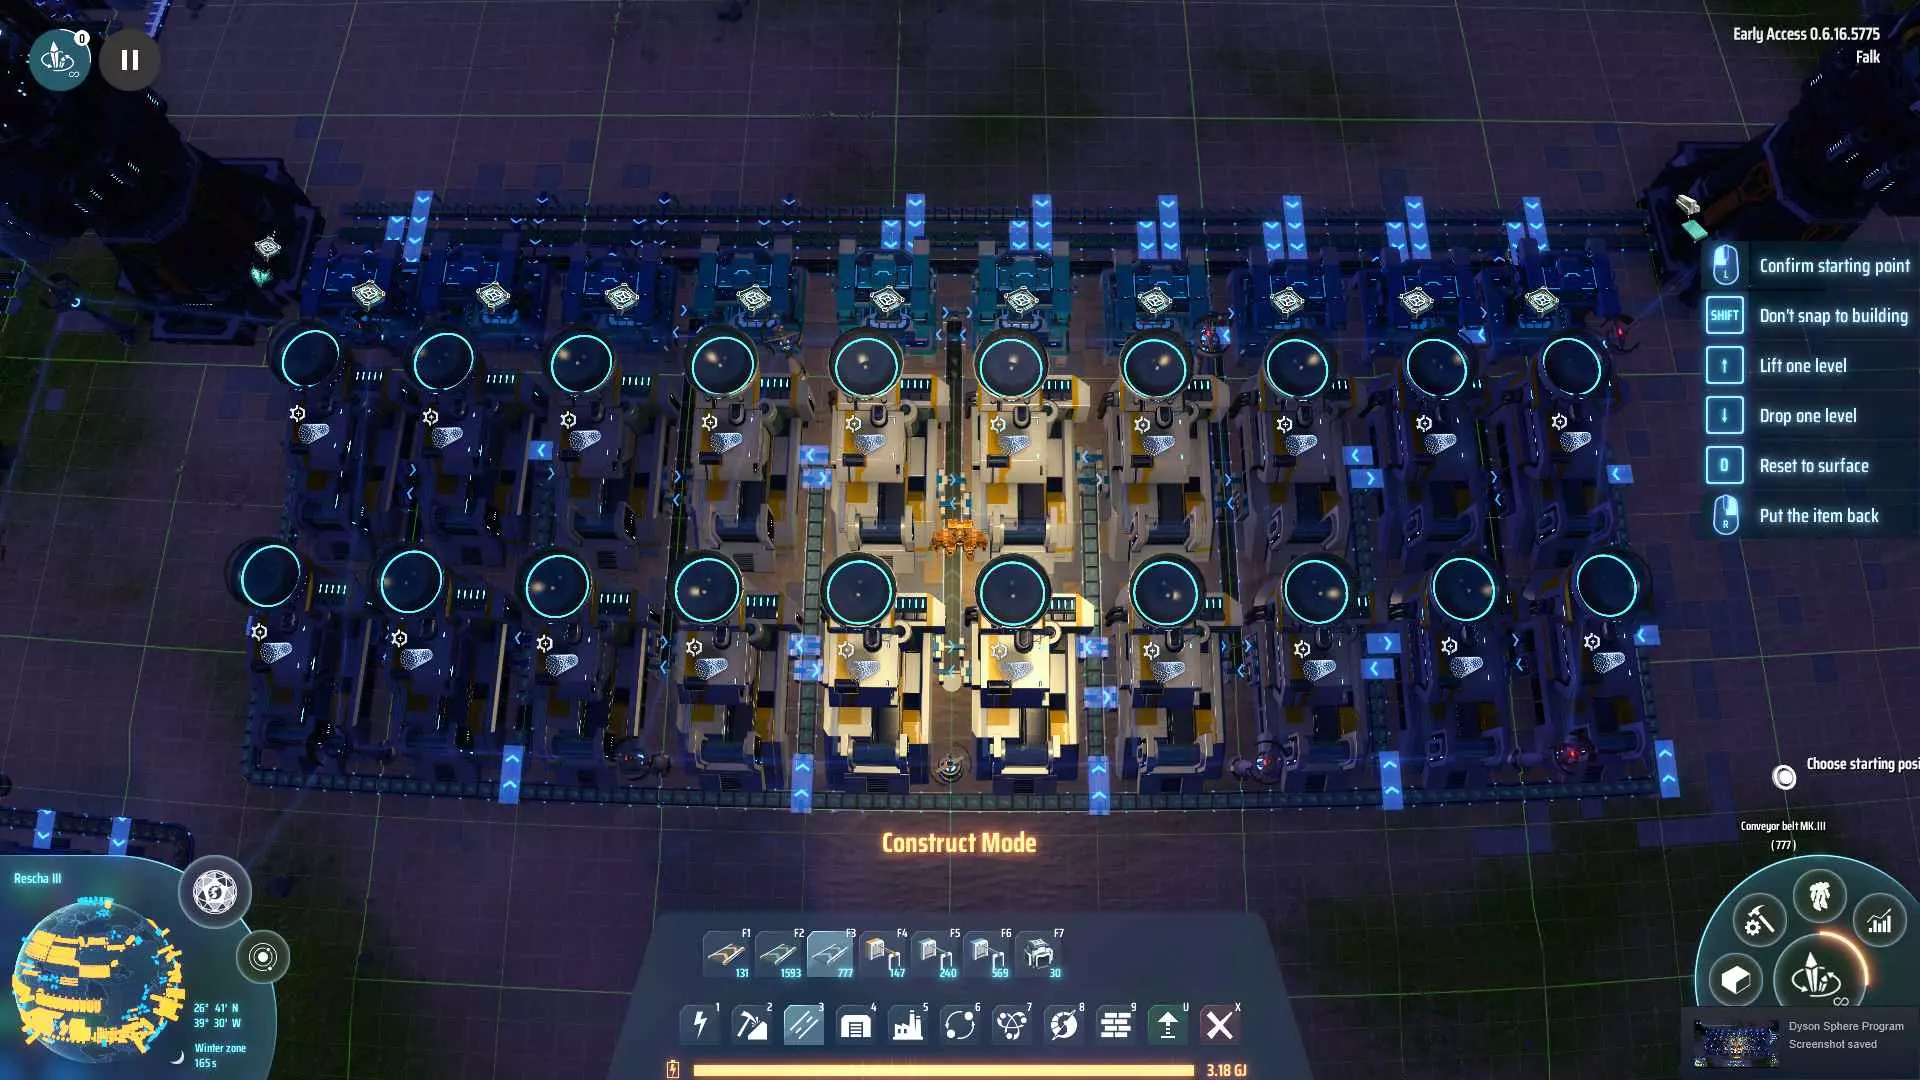
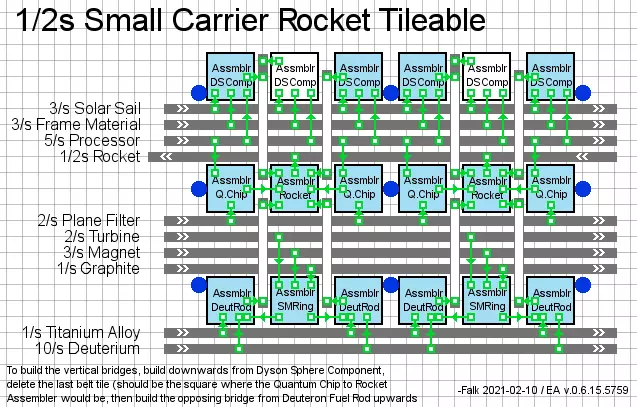
小型运载火箭 真得花点时间感叹一下,我们现在都在大规模发射火箭进入太空,去建造一个能直接吸取太阳能量的巨型结构了,结果居然还在用MK1电力杆。 对于这个项目,或许最好还是慢慢扩大规模。另请参见:框架材料和平面过滤器
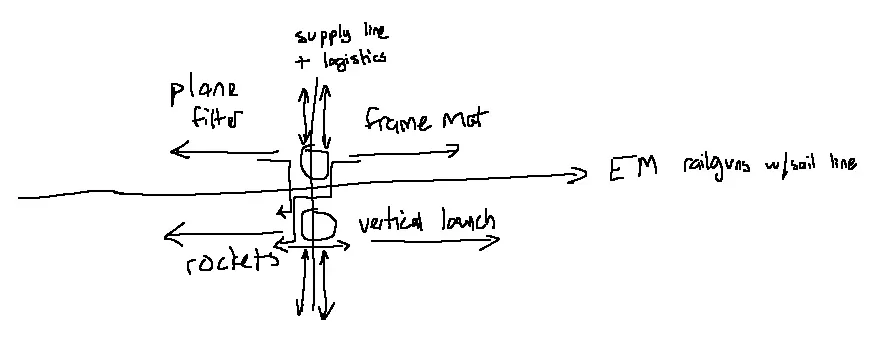
另外,如果能帮上忙的话,我所做的是划定一片开阔区域作为我的火箭建造区,以赤道为界(我的轨道炮也在那里)。四个主要区域代表不同的象限,其扩展范围取决于电力和输入物资的供应能力,更多物资通过南北向的补给线运入,并由【星际物流】补充(例如处理器、涡轮机等)。
如果你想知道为什么我的平面过滤器是从右向左平铺的,这其实就是原因啦——火箭象限是“从左向右”平铺的,因为它是上下翻转的,图中的“上方”指向南方,毕竟它位于赤道的另一侧。
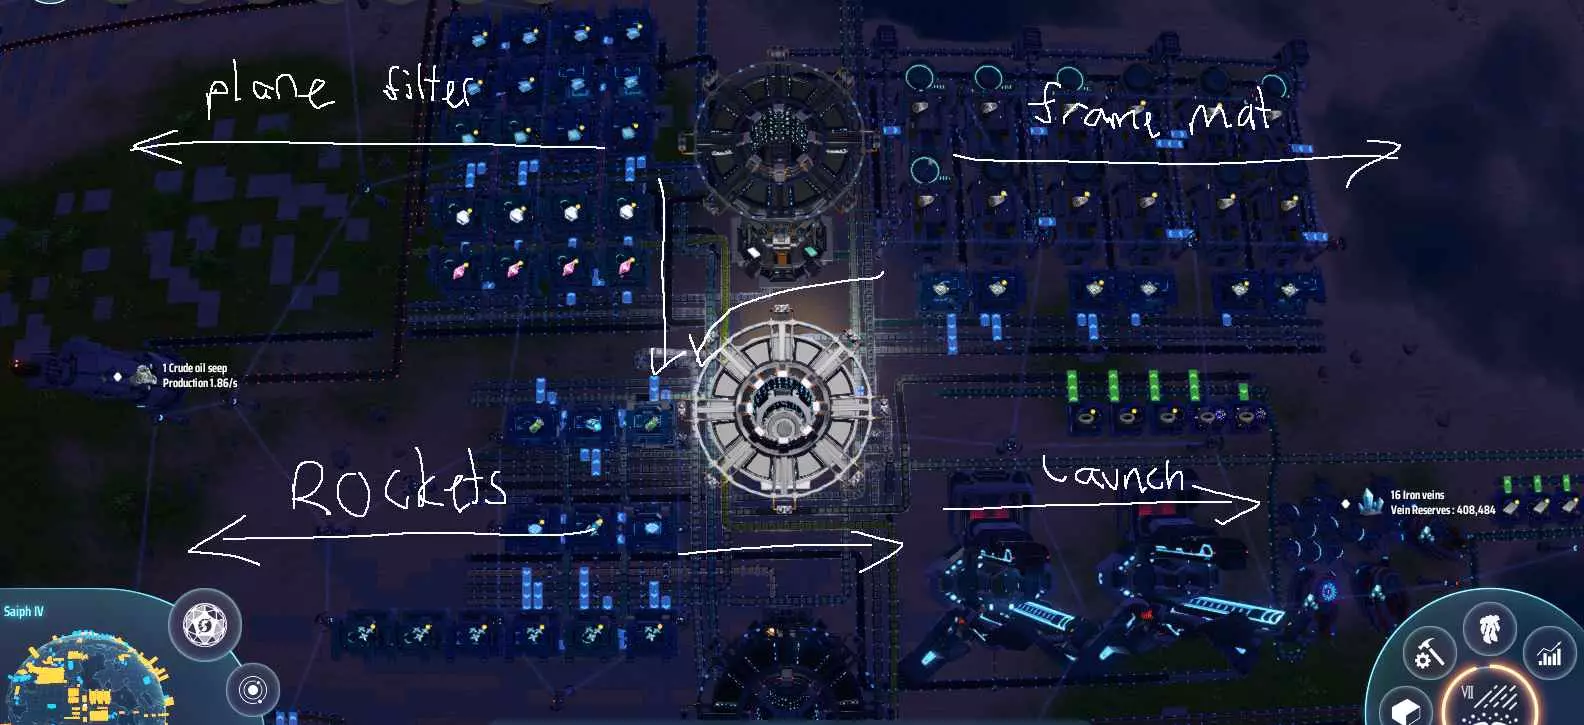
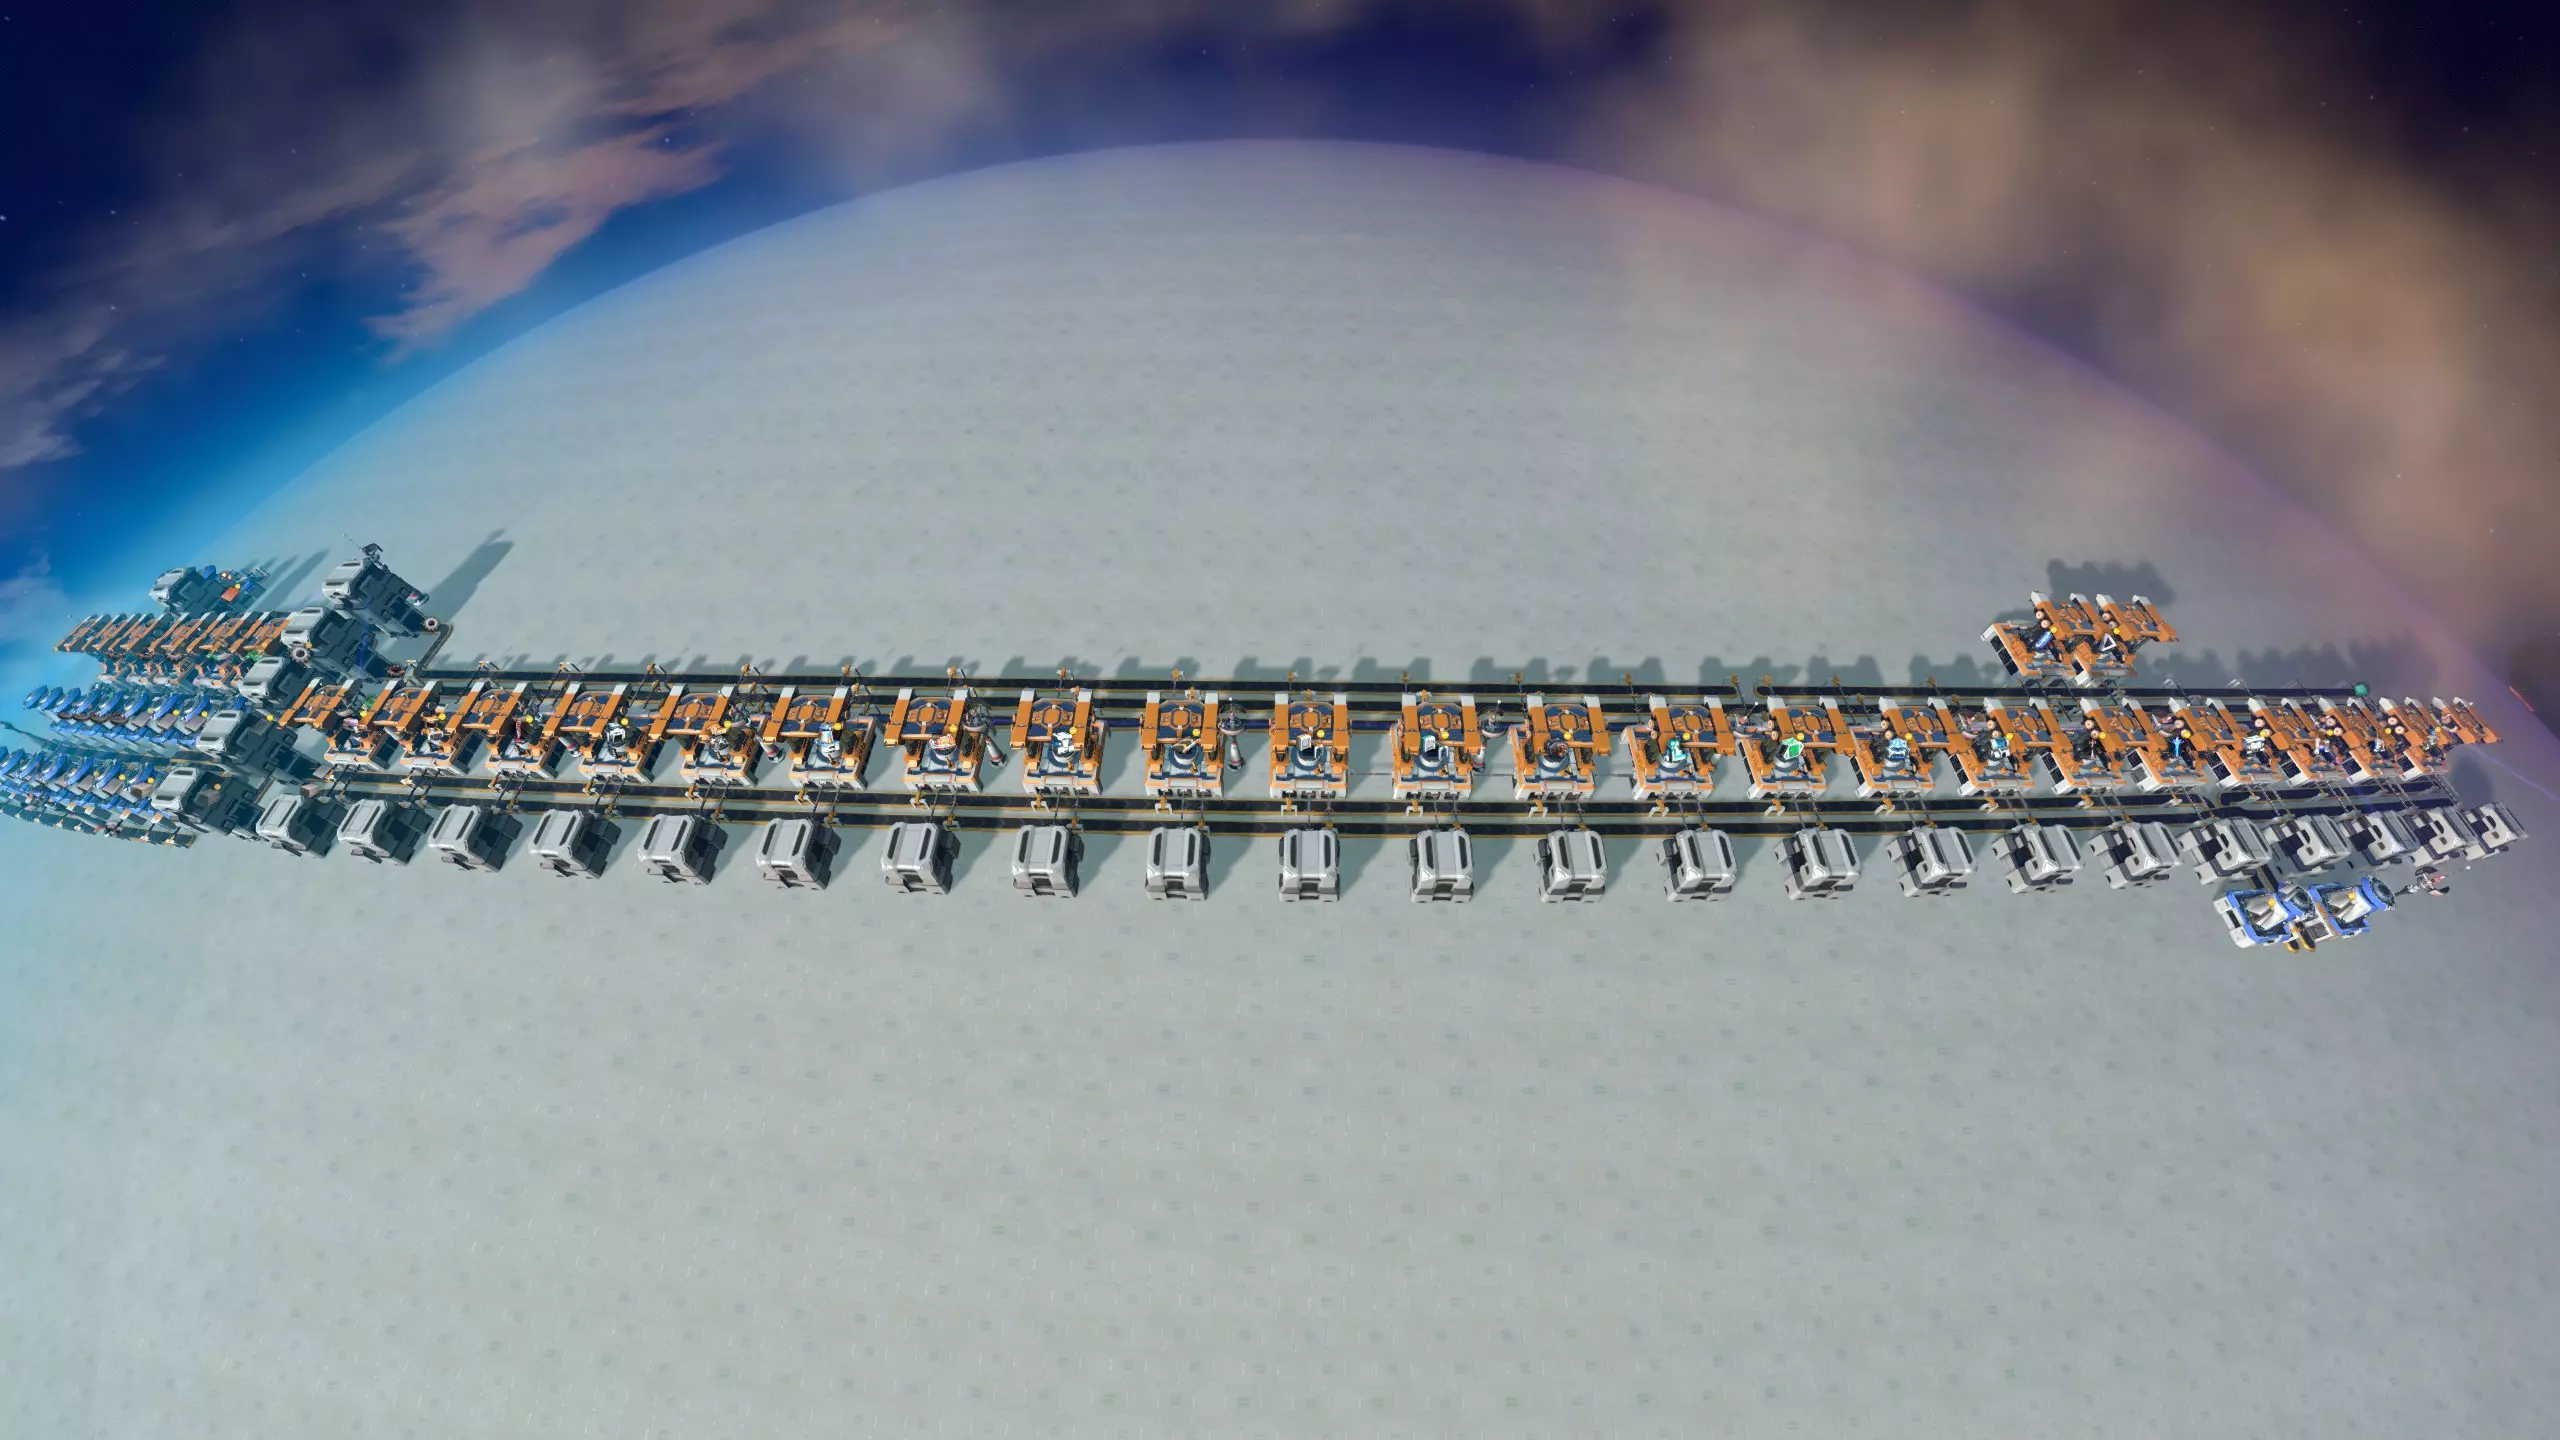
这是一个相对糟糕的位置(被矿石和其他一些东西挡住了),但我在这里建造是为了展示我的框架材料布局实验位置。 中间的混乱部分或许可以大幅清理,但它能正常运作,所以在这次运行中我觉得没必要去改动它。 ---- 关于太阳帆的说明 它们是一条独立的生产线,并且在这个布局中作为输入,因为实际需要的太阳帆数量比火箭生产消耗的要多,毕竟太阳帆还用于建造戴森球(或者用于装饰的戴森云,诸如此类)。不过,通过比例和建筑尺寸的调整,可拼接的太阳帆布局实际上可以附加在火箭布局的顶部,并通过直接插入的方式提供恰好足够的太阳帆。
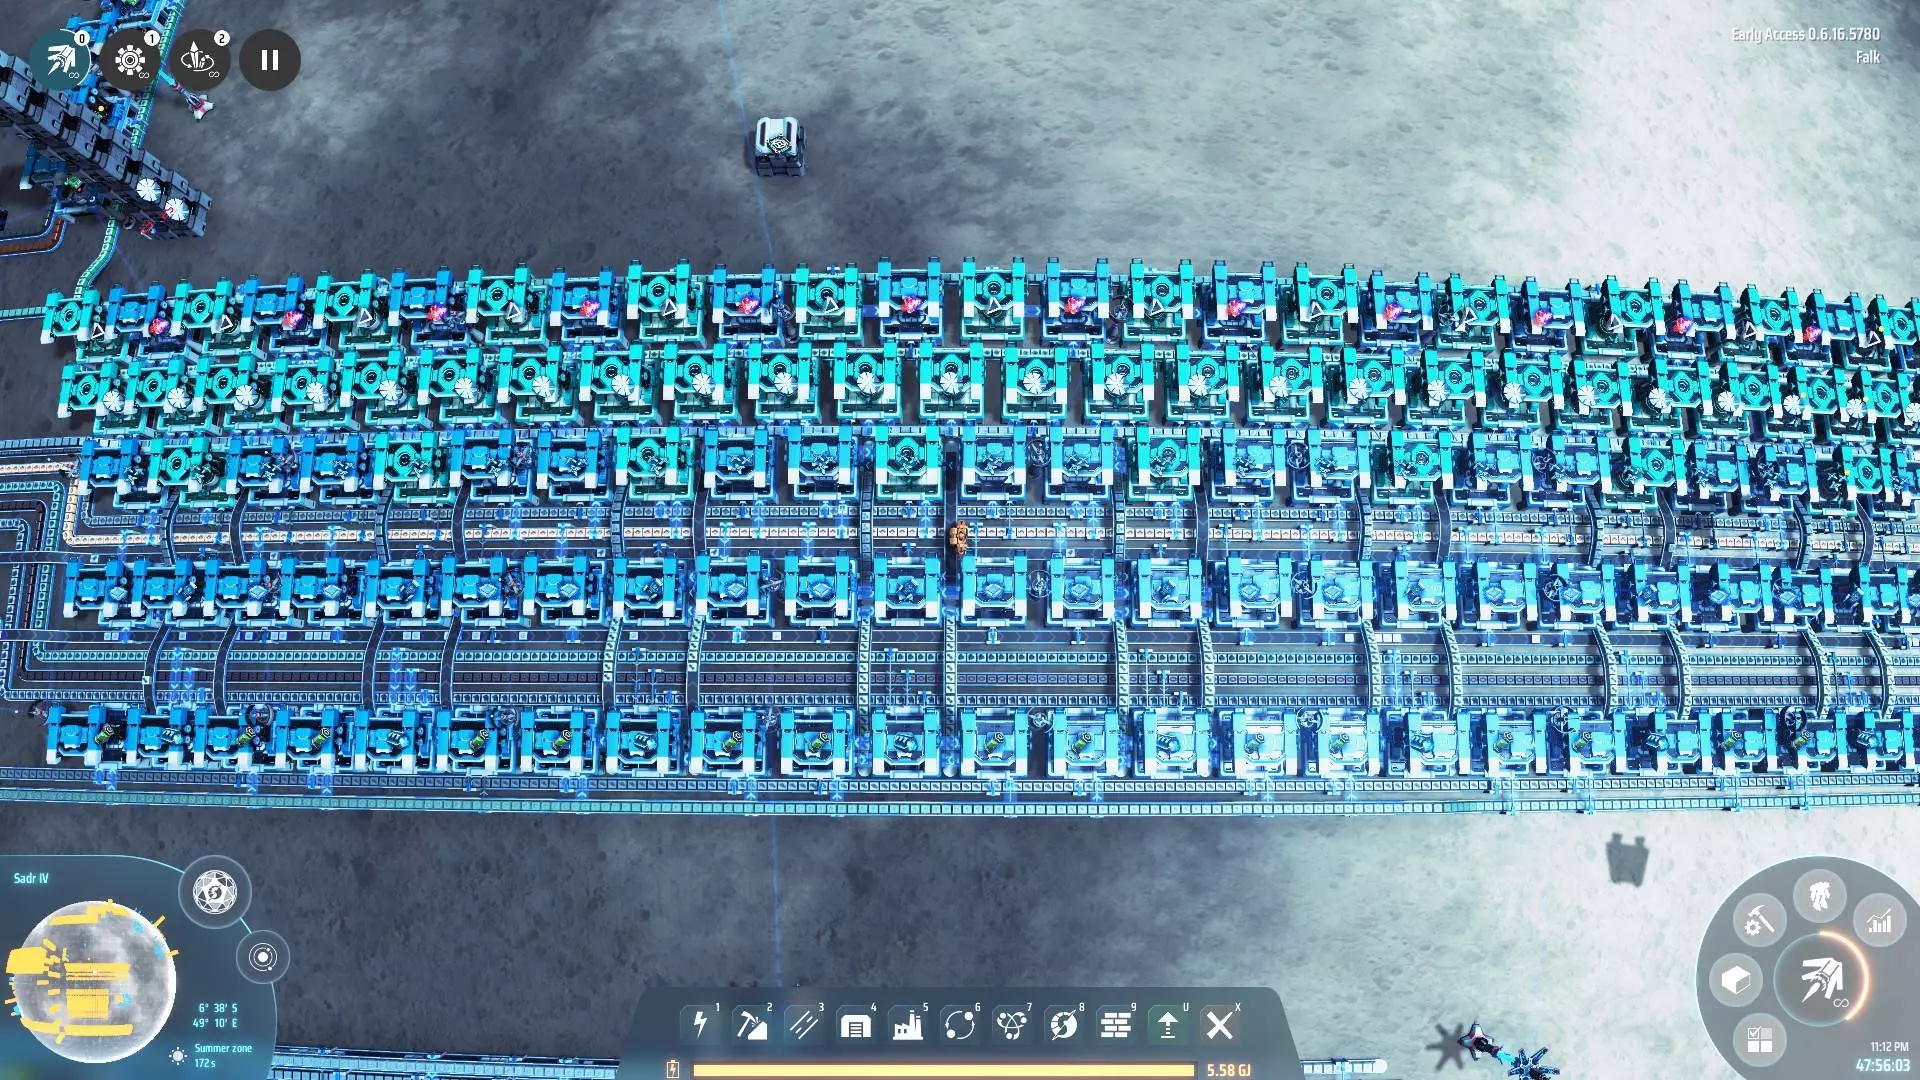
注意,两者都省略了帆传送带,转而采用直接插入的方式。在这种设置中,每个帆组装机必须插入两个相邻的戴森球组件组装机,因此它在MK3和MK2戴森球组件组装机之间平均分配。与涡轮机中的末端磁线圈类似,此布局中的末端帆组装机最终会达到饱和,然后仅消耗预期数量的输入。 反物质燃料棒 可能需要记住的是,反物质恒星产生的能量相当于通过能量模式的射线接收器直接从戴森球获取的能量,但占地面积小得多,且制造燃料棒所需的资源和能量消耗也有少量额外开销。也就是说,1吉瓦的可用戴森球功率可以通过射线接收器直接转化为约500-800兆瓦的能量(基于效率技术),或者通过光子生成,用更少数量的射线接收器产生相同的能量。 这种布局在游戏极后期之前是完全不现实的,并且会受到临界光子生成的瓶颈限制。不过,它有两个作用:一是让你大致了解即使只建造其中一小部分,也需要为扩展性留出多少空间;二是展示维持反物质生产所需的其他资源非常少,这使得它成为一种几乎可再生的能源,可以输送到没有自己戴森球的星系中的大型前哨站等设施。
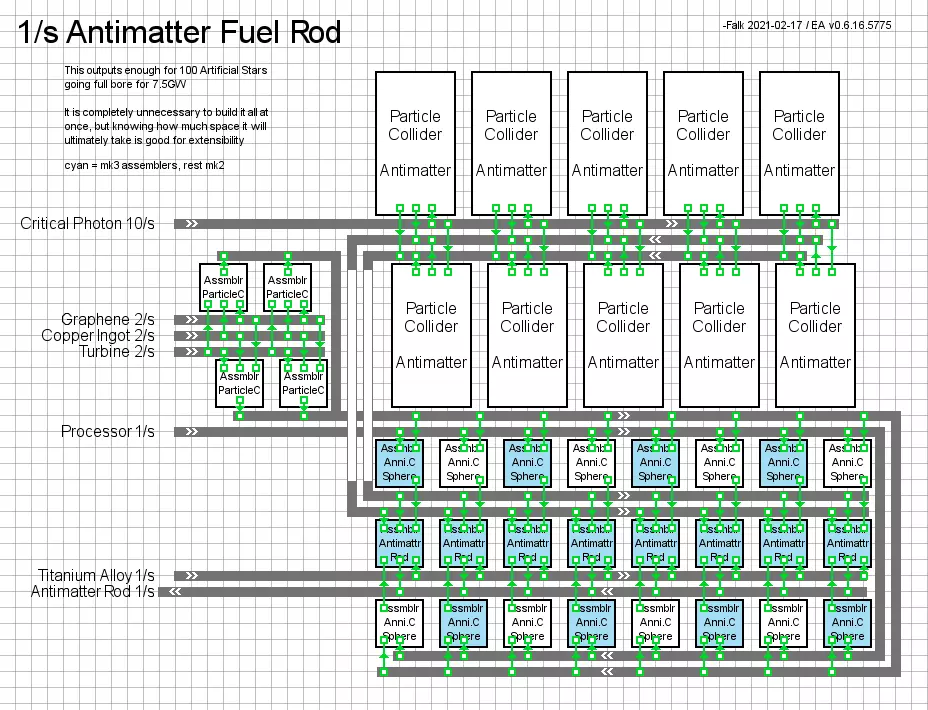
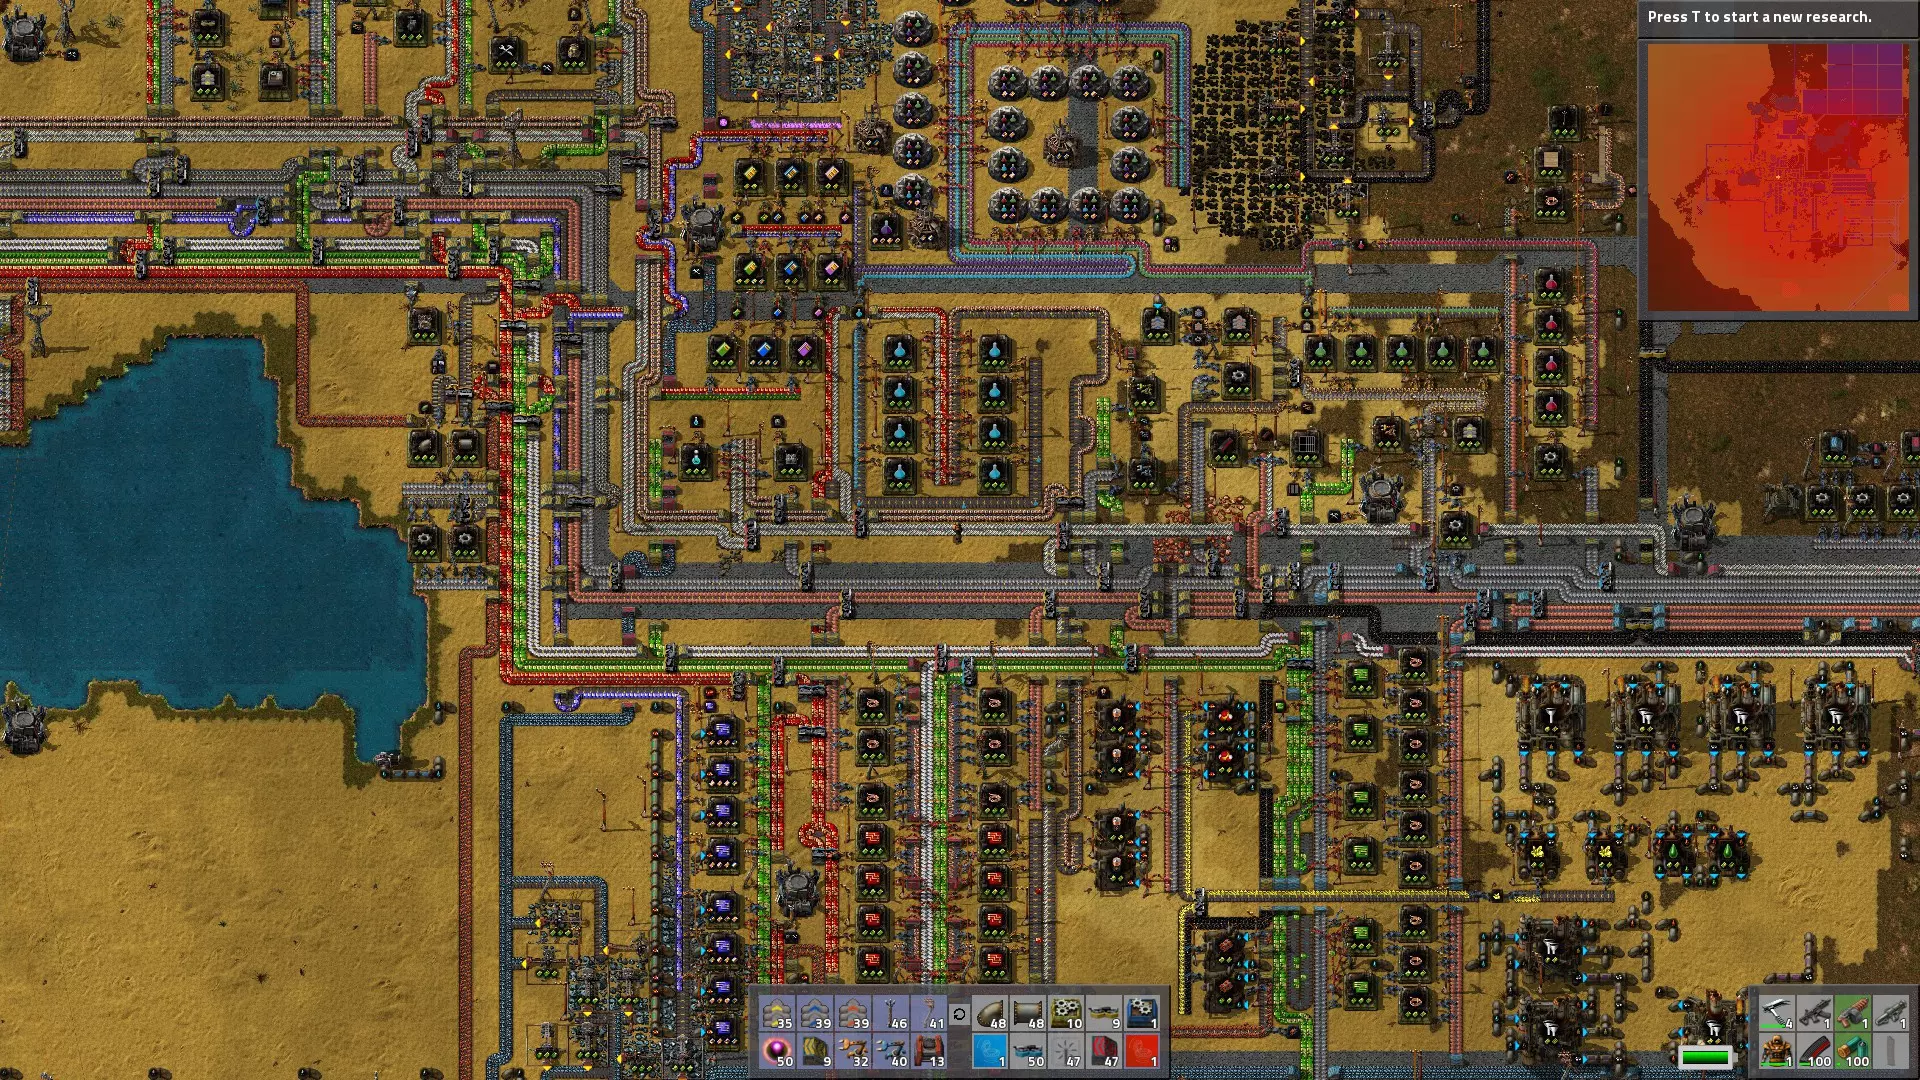
如前所述,【临界光子】将是主要瓶颈——12个【射线接收器】在100%持续发电加成下全力运行时,大约每秒可产生1个临界光子,这足以每10秒生产1个【反物质燃料棒】,为10个【反物质恒星】供能,产生750兆瓦电力。而这需要【戴森球】提供约1吉瓦的能量,具体取决于接收器的效率技术。 作为规模对比,每秒1个反物质燃料棒实际上足以维持多达100个反物质恒星的运行,也就是说,通过运输燃料棒,几乎可以为整个太阳系供能,还能有剩余供【伊卡洛斯】使用。 【购物中心】 我通常只在购物中心将建筑组合在一起。零件/产品确实存在于储物箱中,但通常散布在地图各处,且位置更靠近它们可能被需要的地方。不得不承认,与将材料放在手边以便快速抓取来手工建造新建筑相比,这可能不是个好主意。 以下是我目前使用的中央仓库布局,大致展示了整个仓库所需的空间。随着中央仓库的发展,右侧最好留空,以便应对一些杂乱的线路——因为保持某些传送带持续运转会变得更加重要(说的就是你,SM环)。

为了将内容分解为易于理解的部分,请从这个突出显示的区域开始,然后按照此处的总体说明进行操作。
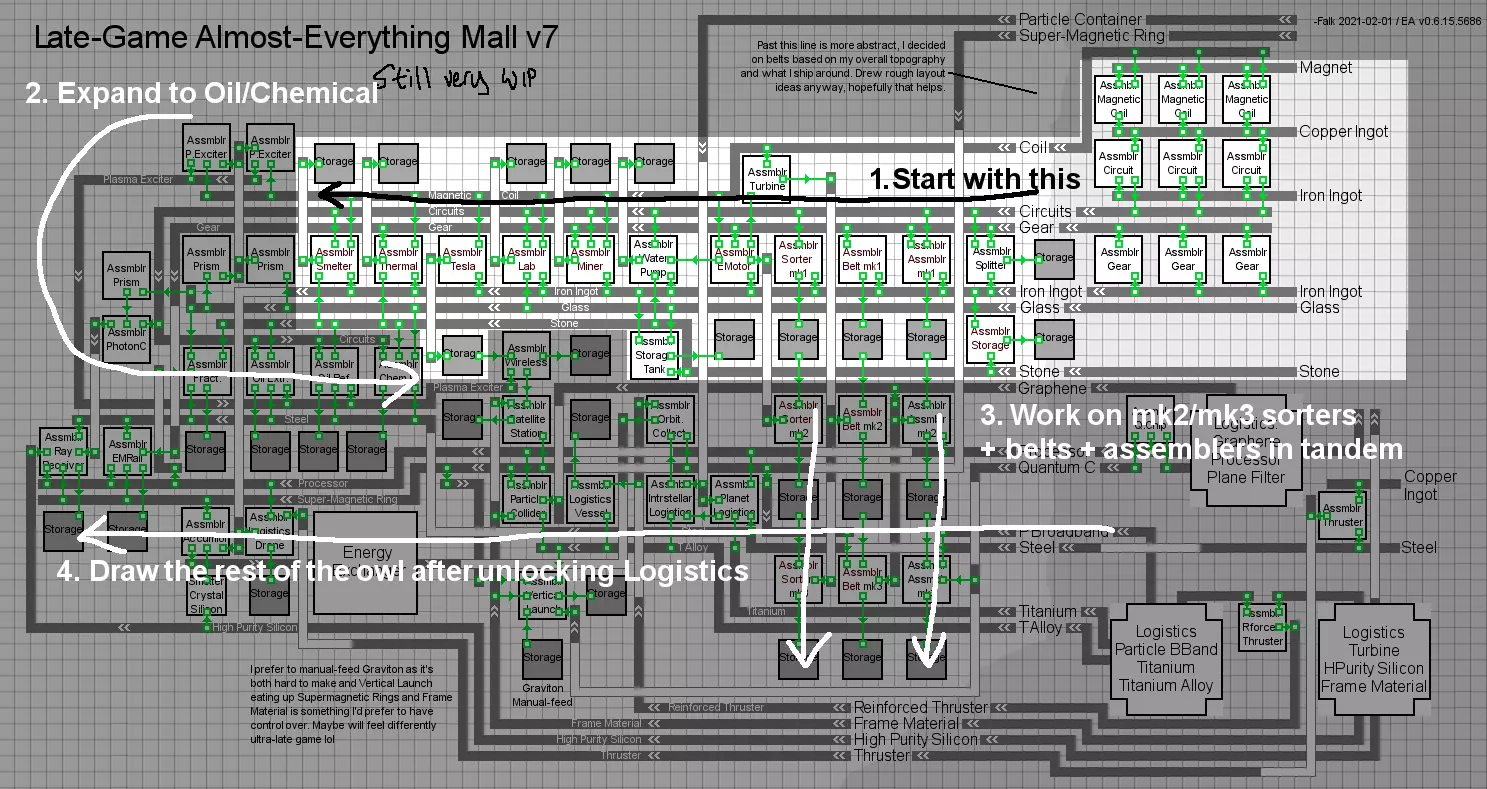
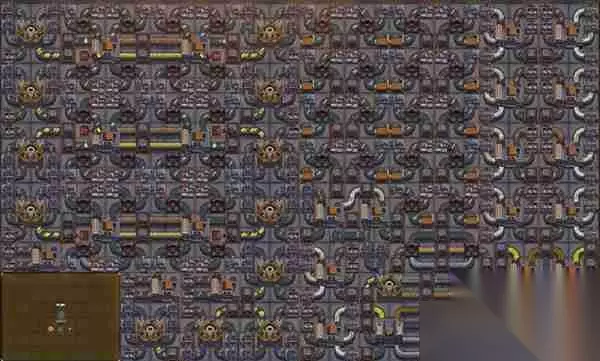
编辑:物流塔右侧的空白传送带应标注为“石墨烯和涡轮机向上输送,用于制造粒子容器和SM环”,但目前正处于迭代调整阶段,为便于运输,这些物品改为在南部生产。抱歉。 与《异星工厂》类似,在游戏早期,将这些物品的输入与其他生产线完全分开是个非常好的主意。尽管可能很想例如从这里的生产线末端抽调物资来开始制造更多部件,但这通常会导致瓶颈或其他问题。之后,当通过物流系统大规模运输零件时,这个问题会变得不那么严重。而物资中心的主要目标仍然是集中扩建物资的领取,尽量减少该区域内的移动,因为我们目前还没有无人机补给的类似功能(也许未来会有?)。 和《异星工厂》一样,建议将存储设施限制为几堆物品,这样物资中心就不会持续消耗零件和能源,毕竟一次性使用所有物资也是不现实的。 当MK2传送带、MK2分拣器和MK2装配机可用时,升级物资中心可能是值得的。但由于游戏往往希望你迁移到比母星更好的位置,一个更好的计划可能是保持现状,然后在新的母星系用全套MK3设备重新建造物资中心,这样就大功告成了。当前的v7布局仍在开发中,我已经想到了一些可以改进的地方(例如,将钢材生产模块上移,从底部开始构建粒子容器,添加聚变工厂,在底部附近设置人造恒星,并在某个交叉节点自动生产湮灭球体),但就目前而言,这个布局可以一直用到游戏后期。从其他地方获取一堆纳米纤维来手动制造聚变工厂也不是什么大问题。在这种情况下,稍微杂乱地添加一些缺失的建筑,对于当前的布局来说是完全可以接受的。 编辑:从处理器传送带向物流运输船输送物品的分拣器缺失了。 Mission Impossible!这些布局是经过精心规划和执行的,但需要说明的是,肯定有更简单的方法来实现这一点——我基本上是直接使用了我指南中的布局,只是为了方便,这导致缓冲区里有很多不必要的东西,尤其是在购物中心。不过,如果有人习惯我的游戏玩法以及我通常运输的物品,也许会觉得这有用。 我可能会整理并上传这次游戏中使用的蓝图集,不过这些蓝图是我在过去一周匆忙制作的,里面有很多随机错误。 种子码是11241067(感谢Selsion提供的冰行星列表)
My run here goes good till the 7h mark at which point I messed up slightly by neglecting to build sails/EM Railguns early enough. (I'd totally forgotten sail life got buffed, and the windup time for stable dyson max energy == sail life time) Proper execution of this fixing that so the last stretch isn't starting at a paltry 0.8/s photon should be a ~9h-9h15 clear, plenty of margin of error. As mentioned, there's a lot of stuff that can be cut like just stockpiling many of the building mats and handcrafting them rather than shipping stuff to the mall, especially Particle Collider, Orbital Collector, Fusion Plants. In the absence of a blueprints pack upload, please make your own sorry lol. Pointers: - DON'T bother with rockets. Too much research and cost compared to a swarm - Don't bother with purple-tier sail life/receiver. Just build and shoot more sails instead. ~2.5GW is more than enough. - Ideally put turbines off-planet. This makes sure that iron shortage on home planet won't mess up turbine production which WILL slow everything down - If using the seed above, just spam thermals all over the map, till ray receivers, no need to get fancy. Burn fireice on the other planet, there's no need to conserve for a 10h run. - PERIODICALLY check science production. If something drops below expected 60/m or 120/m fix it immediately as this is the major bottleneck to everything. If it's severe, reload earlier and pre-fix it (I should be using Production page for this but am more used to glancing over at my labs to see if they're all lighted up) - If going for this while using the guide as a reference for timings, I recommend saving every 30min or so then reloading and pre-fixing stuff that goes wrong/runs out/etc. - You can plan a max-size Dyson sphere but not build anything and receivers at pole have 100% uptime Rough build order and timing milestones https://docs.google.com/spreadsheets/d/1YCAblXHUOYxm_TAaGf6FOR5sfgjnz9NJowbsLpCnQBw/edit?usp=sharing General Build Order These are my own notes- was asked by a couple folks to post it but I don't plan to really maintain it like the layouts themselves lol. How suitable they are depends on your own playstyle. I generally do not main-bus except for oil and oil products as a little concession to hydrogen management and disposal Hopefully they help SOME folks though! updated 2021-02-17 - place wind turbines, place miners + storage on copper/ore/coal/stone, preferably with copper - iron - stone in that order for starter mall - place assemblers to make magnet, circuit, gear, glass, stone, also temporarily place storage - build starter mall, set up Blue research, set up coal gen, - tech to Red, setup mall for Oil Extractor/Refinery/Chem Plant - tap oil, send oil to equator bus, pick a spot for oil refining (see tileable layout), turn ALL combined crude oil minus 8/s (for Yellow+red) that's tapped to fuel/hydrogen, burn excess in thermal gens for now (this should be power positive to tap more and more crude oil nodes in range) - Setup Red research using Yellow+Red early game layout (ignore the Yellow part) while also teching to Yellow - Research Drive 2, finish Yellow+Red layout, tech Universe Exploration to see what minerals the other planets have. - Fly to Titanium planet, setup coal burners for power, setup 6/s Titanium worth of smelters, build lots of storage - Fly to Silicon planet, setup coal burners, setup 6/s High Purity Silicon, build lots of storage (if one planet has two it's OK to just do both on one for now) - Hand carry Titanium back, dump into Yellow+Red setup, beeline Interstellar Logistics - setup automated transport for Titanium then Silicon in that order - Expand Red to 2/s, Yellow to 1/sec - Designate sites on other planets for mass-production of Turbines (copper+ore planet) and Processors (silicon planet, pref. with copper/ore) For now, build 1/s each POWER should be 120MW on home planet, 50MW on outpost Logistics - Plan on interplanetary mass production and shipping of: Copper Ingot Iron Ingot Magnet Graphite High Purity Silicon (first) Titanium (first) Glass Stone Electromagnetic Turbine (first) Processor (first) other than (first) label, necessity is dictated by availability of ore combinations. If one planet has no copper and the other has no iron it’s a big doo doo for processors. - Tech to Deuterium Fractionator and Fusion plant - setup automation for logistics + drones (will be placing a lot of these) - automate Graphene and Titanium Alloy - hydrogen "exhaust" all gets belted towards Fract farm - get mk3 belts to run 10 fracts for 3/s Deuterium - target Orbital Collector, set up a couple before stockpiled Hydrogen runs out, to dump into Fusion plant. Need 2 collectors minimum before fusion. In meantime expand Turbines to 4/s - setup Titanium Alloy automation - ship Titanium Alloy, Magnet, Turbine, Graphite to Hydrogen belt, automate fusion power cell x2, setup Fract line near Hydrogen tank, build 20 Fusion plants. 180MW should be plenty for now. Scale up later to 360MW and remove all fossil fuel burning (conserve coal, divert all oil back to oil products rather than burning) - setup rest of mall- with abundant logistics, possibly rethink planet layout, remove unnecessary belts, drones will carry stuff that’s inconvenient to belt. Overall topography is still important as travel time is a factor along with power draw - tech to purple, setup Particle Broadband automation, make 2/s purple - setup more Orbital Collectors, setup Deuterium Rod shipping to other planets for cheap power. - finish 6/s Turbine and Processor outposts - Setup Organic Crystal automation in prep for Plane Filters - Bump fractionators & fusion plant to 60 generators for 540MW (or 80 for 720 provided there's enough fractionators) - tech to green, setup Plane Filter and Graviton automation, make 1/s green (edit: down from 2/s due to power constraints) - tech to Dyson sphere, setup Frame Material automation, design sphere and start launching some rockets - start seeing what rares nearby systems have - calculate maximum throughput of home planet's oil products. Crude Oil rate (viewable on map) = Sulfur + Organic Crystals, which limits graphene vs titanium alloy vs solar sail rate, discounting rare ore, figure out good tech rate - Tap Organic Crystal and Sulfur from nearby systems if possible. This helps ease production lines massively. Stalagmites are nice but don't really help much if Fire Ice is available from Giant. - start generating Antimatter for Research. The target is 2/s (and 2/s Green as well) which will take 24 Ray Receivers w/o Graviton and ~2GW from the sphere. Dyson should probably be divided between this and boosting power on both home planet and outposts to scale up production depending on where research is. - Scale outposts up. 15-18/s Turbines and Processors should be plenty for getting 2/s white cubes and 1/s Rockets. - start transitioning to Artificial Sun/antimatter power as Dyson sphere completes past 2G or so. Prior to that just spamming more Ray Receivers while focusing on research for Antimatter consumption is probably a better idea. - Abandon the home planet for a better star (lol) while leaving it generating 2/s research. Ship sails and rockets out to jumpstart a Dyson in better system (preferably O, but good B or A star with rares in range and 8 digit resources are a good bet)