换一换
换一换 


深入讨论关于地下军团氏族的一切内容。卡牌策略、机制解析以及充分利用腐生蘑菇的指南! 简介 大家好!我是《怪物火车》的老玩家和狂热爱好者,希望分享数百小时游戏中积累的经验,既有胜利的喜悦也有惊险的时刻。本指南面向《怪物火车2》的新手和老玩家,旨在帮助他们扩展对各个氏族的了解和运用。如果你已是专家,可能不会从中获得太多新内容! 如果你是《怪物火车2》的全新玩家,对游戏系统尚不熟悉且难以获胜,建议先阅读我的新手指南,其中涵盖了多种有助于你提升游戏水平的内容。

《怪物火车2》新手入门指南 其他同类型指南:
火裔氏族战略指南
放逐之城 氏族战略指南
月神女巫氏族战略指南
拉撒路联盟氏族战略指南
地狱号角氏族攻略指南
苏醒氏族攻略指南
冥府守卫氏族战略指南
暗影氏族攻略指南
熔毁残党氏族攻略指南
无官方中文译名,无法准确翻译,故删除。

锻造铁卫与蠕虫氏族说明 本氏族指南在描述策略时不会固有地假设圣约等级,但由于我们常玩圣约10级并定期对抗泰坦,因此本指南中会带有一些偏向性。某些在低等级时“还行”的策略在后期可能效果不佳,而有些卡牌/策略在更高难度下能克服更严峻的挑战。总之,希望你喜欢我们对这支由大量蘑菇和疾病传播者组成的地下军团的讨论! 卡牌稀有度关键提示:【C】=普通,【U】=稀有,【R】=史诗 地下军团:概述

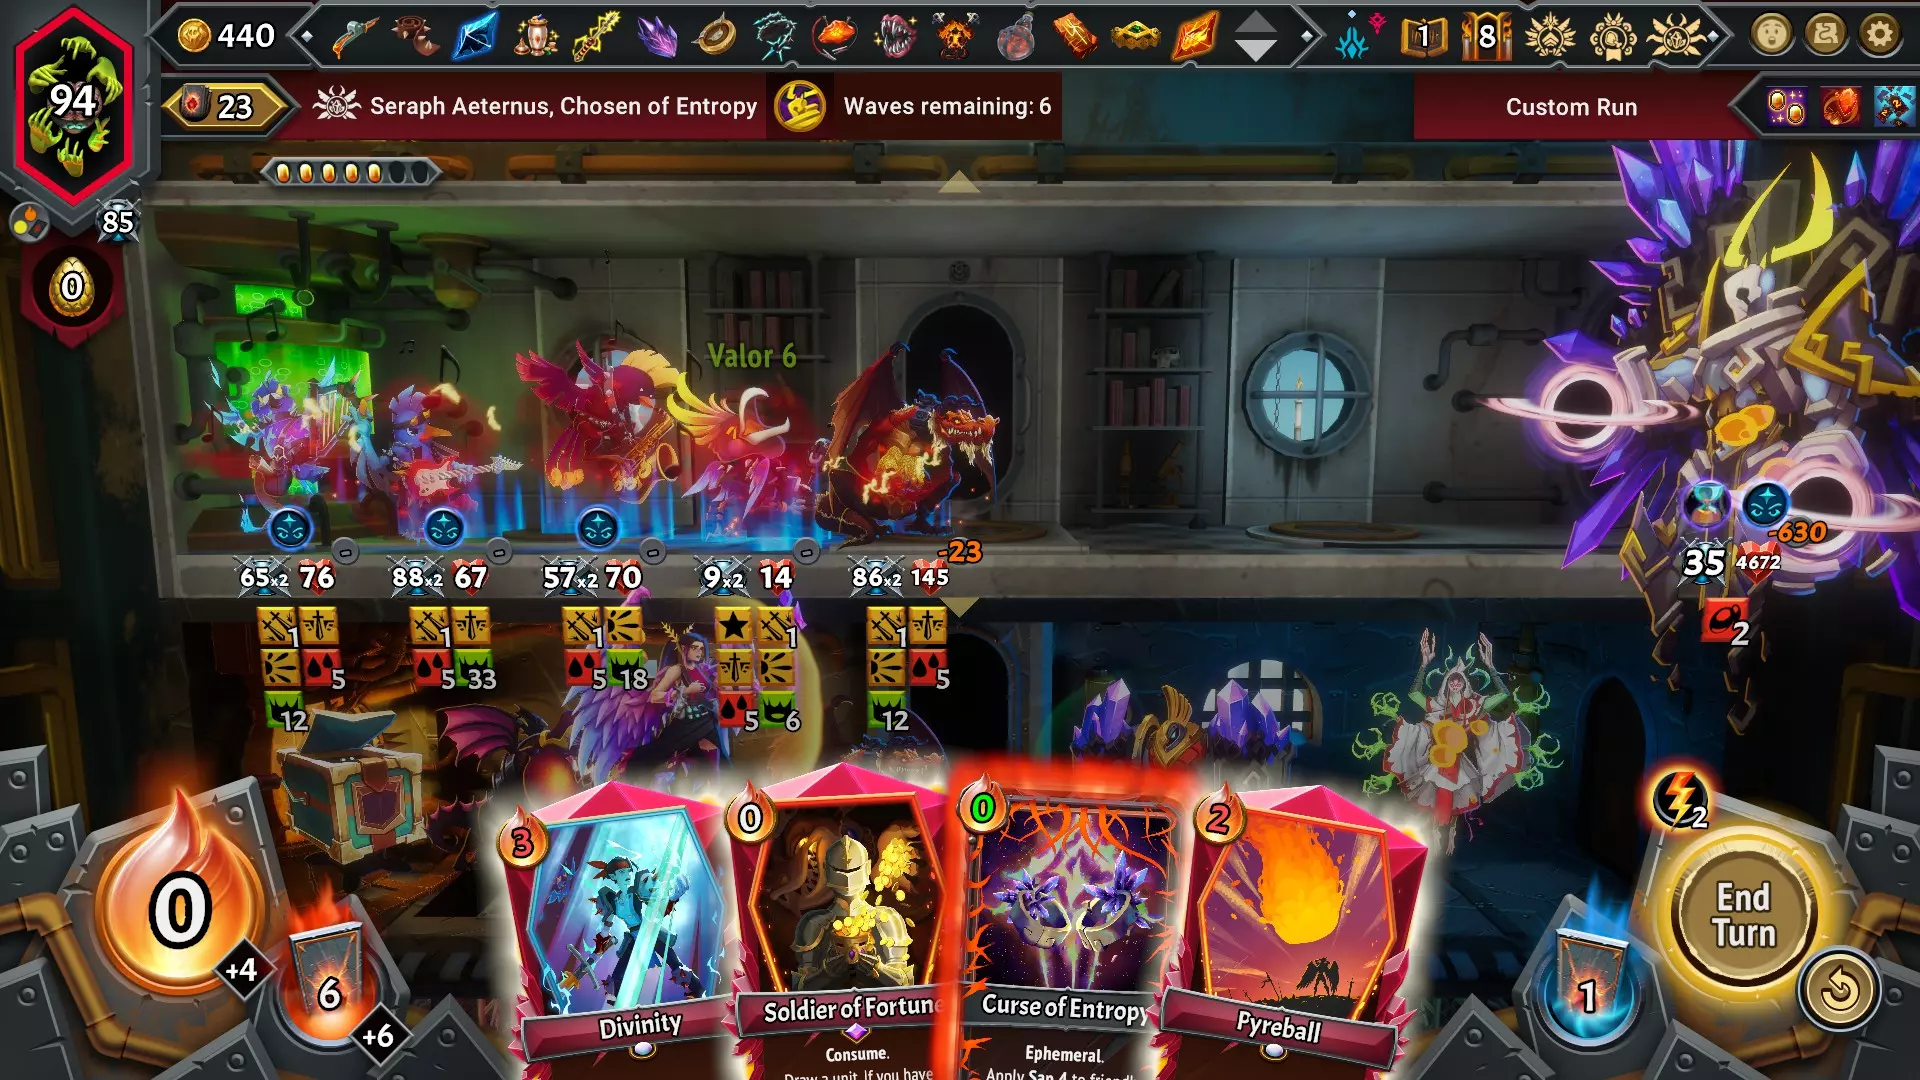
The Funguys & Fungi of the Underlegion make up a clan designed around two key strategies: 1) Growing your team’s Health & Regenerative effects while blocking and countering enemy offense with ever-escalating stacks of Funguy Troops & their Rally triggers. and 2) Thoroughly debilitating the enemies with a powerful offensive debuff in Decay and the ability to wither their offenses away with Sap. If that isn’t enough, their unique effect in Propagate allows them to support any other clans’ array of status effects regardless if they’re buffs or debuffs, and they’re the MT2 clan with the most Card Draw effects as well. The result is a clan that’s extremely good against bosses & Relentless phases of combat, and tends to excel early in the run when their effects are easy to proc and the enemies can rarely overcome their effects. Conversely, several of Underlegion’s effects are more difficult than usual to scale as the run progresses, which may result in challenges later in the run as the enemy’s power has outpaced your own. Luckily, you’ve got other clans to work with and plenty of ways to synergize your effects to leave your enemies deep in the soil, breathing only the stench of defeat. Offensive strategies: Underlegion’s two strategies listed above play most chiefly into the way they choose to beat down the enemies. Decay is their unique offensive debuff that’s a very potent, damaging debuff akin to Frostbite (Poison in your typical RPG parlance); multiple units, numerous spells, and one of their Champions all revolve around this effect, and enough of it can completely decimate waves of enemies turn-over-turn. Otherwise, their unique Troop/Funguy stack mechanic tends to be their go-to mechanic, conjuring gradually-stronger stacks of Funguy to damage enemies, with multiple units, spell cards, and Champion paths dedicated to building up their potency. Defensive strategies: Underlegion is a highly defensive clan, both directly and indirectly. Directly, the Underlegion comes with multiple ways to grant Regen, Health gains, and conjure Funguy stacks in front of any Floor (even if capacity is exceeded!) that can keep your team in the fight. Indirectly, their Sap debuff can wither enemies’ offense away, and all of their unique Room & Equipment cards in some way foster effects that increase your team’s overall survivability. Stat-influencing strategies: Underlegion has a few of these available here! Some of these are unique to Funguy Troops themselves, with units like (U) Troop Leader increasing the Attack stats of Troops, while Executioner Bolete increases their Health potency. However, Underlegion also has an incredibly unique unit in (U) Amorous Enoki that increases the Health of all units on her floor (similar to Lunar Steward Ekka), and Bolete’s Hive Minder path sees him potentially gaining permanent Attack & Health throughout the run. Noteworthy then that Underlegion can potentially increase the Health of other clans’ units, but only the Attack of their own. Support strategies: Underlegion is the first clan you’ll unlock that has a proclivity toward Card Draw effects, giving you some additional potential flexibility if you have the Ember to support this. Unusually there are some cards within the clan that also grant effects like Advance, Spikes, and an Ability that draws random Equipment, but these are limited to individual cards. Instead, the biggest Support element Underlegion brings is through Propagate, their unique effect that escalates any established stacks of buffs and/or debuffs established. Though Rare, Underlegion is the only clan that can make permanent duplicates of a unit card without Empyrean Wells/Lifemother Pyre. Finally, because Funguy Troops can be summoned even in full-capacity floors, Underlegion can uniquely support floor-overstacking strategies even without Movement or Capacity cards. Sweep/Backliner Strategies: Underlegion technically has numerous ways to reach backline enemies despite the lack of any Sweep units. The Exiled Champion Madame Lionsmane is significantly better at this than Bolete. They also have a support unit (U) Cheery Deathcap who does significant AoE Decay on summon. There are a lot of targeted offensive Spells & pseudo-Sweep units in the deck, but outside of (U) Inhale, many are expensive or have odd caveats, such as… (U) Morel Mistress & (U) Spore Launcher can do AoE Decay, but only with Etch and Rally triggers respectively. (U) Prickly Puffball will put significant Decay on enemies as Revenge, but this means he won’t Decay enemies that don’t strike him like Healers or Sapped foes. (U) Pox blasts all enemies with damage and Decay!... but also your units. (U) Mushroom Cloud hits all enemies with damage and Decay, but requires at least one Funguy/Troop on the floor to sacrifice, and is a Consume effect. (C) Rot is the only attack card in Underlegion’s Common pool of cards to choose from, and it costs an overwhelming 3 Ember; not exactly meant for picking off low-Health backliners (U) Wracking Pain & (R) Deadly Variant only work if the enemy already has debuffs.As a result, Underlegion is technically loaded with options, but particularly if this is your sub-clan or you’re using the standard Champion Bolete, you might not get a “simple” solution for backliners here. Unique effects to the Underlegion Note: Two of Underlegion’s unique effects are VERY unique & complex compared to typical effects so this section will get individual sections for Propagate & Troop.

腐蚀:我们先从最简单的效果说起,腐蚀是一种强大的攻击性减益效果,类似于大多数角色扮演游戏中的“中毒”。每层腐蚀会在回合结束时对单位造成3点伤害;腐蚀也会逐渐消退,单位在受到伤害后会失去1层腐蚀。由于大多数基于腐蚀的效果至少会施加2层腐蚀,这意味着普通单位会在多个回合内持续受到这种伤害。此外,由于该伤害独立于任何攻击或法术伤害,因此腐蚀伤害对复活类敌人也非常有效,当腐蚀伤害作用于它们时,复活类敌人会被击败/失去复活层数。没什么别的好说的,【腐蚀】异常强大,是【地下军团】最持续有效的进攻手段,最好大量且频繁地使用!

蚀刻:目前仅(U)毒蕈女王和万蕊夫人狮鬃拥有此特性,但《怪物火车》初代的玩家可能会记得 wyrmkin 氏族也有类似效果。蚀刻的触发条件是:在该楼层使用带有吞噬效果的卡牌。这不适用于净化效果,但适用于战斗中获得吞噬效果的卡牌(例如通过地下军团的法术牌(R)大衰败或冥河的(R)卫兵的赠礼)。除了选取带有吞噬效果的卡牌外,每个魔法商人商店的商品中都会有一个吞噬选项, reroll 后也会有一个,以便你获得更多触发此效果的方式。 钢铁商人:苔石:+10 生命值和 +10 回复。这对坦克单位来说是一项出色的升级,甚至对于那些可能受到附带伤害的单位而言,它也足以提供少量生命值加成。如果装备此道具的单位能够承受住敌人的猛攻,那么+10的生命回复所带来的生命值/防御力提升,将显著超过标准【生命石】的+20生命值。 【地下军团】专属效果:增殖

扩散:游戏中最灵活的效果,每个扩散效果都会增加友方单位和敌方单位身上状态效果的总值。它本身不会施加任何新效果,只是强化已有的效果。其设计完全偏向玩家,因为扩散只会增加友方单位的正面状态(绿色图标增益),以及敌方单位的负面状态(红色图标减益)。除【眩晕】外,所有增益和减益均适用。 由于扩散本身并非增益/减益效果,这意味着你无法通过卡牌提升其数值。例如,像(C)腐烂这样造成15点腐蚀伤害的卡牌,可以通过双重叠加使其提升至30点,因为腐蚀是一种减益效果。同样的双重叠加效果无法应用于像(C)增殖这类具有2点传播效果的卡牌——因为这并非增益效果,所以无法使其变为4点传播。相反,只有法术牌上的法术连锁升级才能让传播效果的数值翻倍。 实际上,传播效果对每个氏族都有益处,因为所有氏族都有自己喜欢施加的增益和减益效果。但关键在于,传播数值特意设定得相当低,且难以提升,因此当它与那些难以大量施加的增益/减益效果搭配使用,或者作用于同时拥有多种增益/减益效果的单位时,其效果价值会高得多。举个例子,假设我们使用优秀的(C)发光升级,它消耗1点余烬可获得2点传播效果。反面例子:你正在玩《放逐之城》,使用了(C)神圣之力消耗3点余烬为一个单位增加10点勇气。然后再消耗1点余烬,通过增殖将其提升至12点勇气。这样你在勇气上获得的余烬价值就低得多了,而勇气是一种很容易叠加到高额数值的效果……你甚至可以双重叠加神圣之力,用3点余烬就能获得20点勇气! 你正在玩《拉撒路联盟》,消耗1点余烬使用了(C)秘密配方后,施加药剂获得4点再生。然后再消耗1点余烬,通过增殖将其提升至6点再生。同样,这里你获得的价值还不到原卡牌的一半。如果你能等待更多增益效果生效后再使用,效果会好得多。回到放逐之地,你可以选择打出消耗2点余烬的【无私牺牲】,为一个单位提供2点伤害护盾。之后再花费1点余烬,通过【增殖】将其提升至4点伤害护盾!注意,这里你仅用一半的余烬消耗就使效果翻倍了。这是因为与可以大量且随意施加的勇气值不同,伤害护盾很难获得! 回到拉撒路联盟,你可以不打出1张消耗1点余烬的【秘密配方】,而是打出3张。这样花费3点余烬就能施加一个提供4点再生、3点荆棘和1点复生的药剂。然后你再花费1点余烬进行【增殖】,现在你的单位就拥有6点再生、5点荆棘和2点复生了!以三分之一的余烬消耗,你几乎让之前3点余烬的价值翻倍,这既是因为你同时增强了多种效果,也因为像【复活】这样的效果更难施加。 希望这能让你明白——总体来说这是个很棒的效果,但游戏不允许你进行大量的【扩散】,唯一的例外是强大的法术【军团之刺(R)】(否则你最多只能看到4次),所以专注于你要【扩散】的对象至关重要。对一个带有40层【衰败】的 Boss 进行2次【扩散】作用不大;但对一个带有1层【近战弱点】、3层【削弱】、10层【衰败】等效果的 Boss 进行2次【扩散】,效果就会显著得多!用【生长室(U)】每回合给所有人1层【狂怒】没什么用,但用它每回合提供1层【潜行】/【复活】/【伤害护盾】就非常强力!地下军团的独特效果:部队与生成

Troop/Spawn (Funguy): Underlegion’s adorable claim to fame just happens to be an extremely unique mechanic with about a hundred caveats & unique aspects to describe, so let’s do an overview and then we’ll get to the unique properties. A single Funguy Troop “stack” can exist on each Floor of the train, and although Troops are Cardless ‘units’ that exist as a green status buff, both their creation (Spawn) or being defeated for any reason (e.g. enemy attacks, Corruption damage, or sacrificing one with (U) Mushroom Cloud) trigger Rally and Harvest effects respectively. This is unique in both fronts: a) Rally can only be typically triggered by placing unit card onto the train, and b) Harvest typically requires the complete defeat of a unit, not simply a reduction in the Troop buff. Each stack of Troop grows the stats of the Troop by +3 Attack & +4 Health, resulting in a situation where the Funguy stack, as it grows, becomes significantly more powerful and harder for enemies to defeat. A small stack might be destroyed by a single wave of enemies, whereas a huge stack may be able to tank multiple waves with minimal troop loss. Several Underlegion cards & units are dedicated to the Spawn mechanic, and the result is this clan has its own unique type of unit it can conjure & grow throughout the battle, both potentially as a big meatshield of Health for enemies to try to fight through, or an offensive threat to do gradually more damage as the Troop count grows. There are numerous complexities and unique components to understand with the application of Funguy Troops, so I’ll try to list them here: A Funguy Troop is only 1 Size on the train, regardless of how large the Troop stack grows. Additionally, you may Spawn Funguy Troop units even when a Floor is completely full. There can only be one Funguy Troop per floor: if there is any existing amount of a Funguy Troop on a floor, Spawning new Funguy will only increase the value of the existing stack. Likewise, if a Troop is Ascended/Descended to a floor with any other Troops, they will simply merge their Troop values. If there is no Funguy Troop on a floor, Spawning any will always put the Troop in front of your floor. This means the only way to not have your Funguys in front of your floor is to either place units after a Troop is established, or to use Advance/Retreat cards to reposition them. Because Funguy Troops are Cardless, you cannot use effects like Endless or Reform on them to reestablish their ranks. If there are no Troops on a floor, only Spawn can reestablish them. Conversely, this also means they’re immune to Purge effects, making the Clanless (R) Void Armament equipment quite useful on them since there’s no risk of losing a unit. To that point, Funguy Troops are still able to be affected by other status effects, given Equipment, moved with Advance/Ascend/Retreat/Descend etc… all of the usual effects you’d expect out of a unit card. Because Troop is a status buff, their numbers can also increase through Propagate, not just Spawn. This is a key aspect of synergy in Underlegion’s cards. There are two units that directly impact the effectiveness of the Troop stack, (U) Squad Leader & Executioner Bolete, which increase the Attack & Health of Troops respectively. In both cases, this only applies to Troops on their floor, not all floors. Should I grab an Underlegion banner? Underlegion Banner thoughts:Underlegion Banner units are quite interesting in how varied they are, and how they largely eschew the traditional Tank & Damage Dealer roles. The majority of their units specifically interact with other Underlegion units, resulting in strategies that become significantly more powerful if they’re teamed up with one another. For example, (U) Cluster Colonel provides direct, powerful synergy bonuses to three other Underlegion Banner Units, and works well in tandem with a fourth. My personal take then is that it’s much better to grab an Underlegion Banner early to ensure you can make use of that unit and their potential synergies, then depending on the Champion/path you’re playing, you may want to repeatedly grab Banners to increase the chance of getting a unit that supports their specific build. But because only a couple of their Banner Units are in the realm of “universally helpful to any run” – I’d be a bit wary about grabbing an Underlegion Banner as the run progresses and you’ve settled into a strategy. Also as a breakdown of the variety (and to illustrate just how volatile these options are), there are: Three units whose functionality is based on Rally (i.e. intended for use with Spawn strategies) One that increases Rally/Spawn potential. One Tank that functions “normally” without other Underlegion mechanics. One Damage Dealer that requires Consuming cards on her floor through Etch triggers to function properly. One Support unit who bolsters the power of Funguy Troop stacks only. So yeah, quite the variety of options that may be offered! Keep these considerations in mind as we discuss Underlegion units! Underlegion Banner Units: Uncommons pt. 1 Uncommon (U) Banner Units:

多情金针菇:一个非常强力的辅助单位,多情金针菇旨在提升生命值属性,并通过集结触发的再生 buff 提供额外的生存能力,而地下军团派系尤其擅长提供这种集结触发。能提升一整排友军属性的旗帜单位相当罕见(在本指南中我们目前讨论过的只有流放派系的(R)死亡舞者,而拉撒路联盟派系则没有),而且它作为一张普通单位而非稀有单位,这点尤其不错。尽管地下军团派系的卡牌中充满了召唤机制,但如果你完全避开这些机制,金针菇的效果可能无法被足够频繁地触发,从而显得不够实用。除了那个特定情况外,这是一个非常实用的单位,是任何氏族的得力盟友,尤其在面对像【支配者塞拉芙】这样的敌人时,而且它不需要任何特殊升级就能发挥作用。 升级/搭配:我要重申的是,【钢铁商人】的升级选项中能提升其性能的并不多——【二元论】在这里确实不值这个成本,而且她的攻击力不够高,不足以证明【速度石】或【多重打击】是合理的选择。如果你想在战斗初期让她与尽可能多的单位挤在一起,【微量石】可能会有帮助,但除此之外,根据你想让她站位的位置,通用的攻击或生命值升级就足够了。更重要的是将她与【召唤】卡牌和【增殖】效果搭配,以持续触发【集结】效果。(U)集群上校或(C)绿色新兵是简单的搭配,能为所有单位提供4点生命值和4点生命回复,但在《万蕊之王》后期,狮鬃女士以及刽子手/斩首者牛肝菌有时甚至能超越这些效果。房间卡牌(C)感染室和(U)培育室在有她的楼层上表现极佳。除此之外,由于除她之外还有更多单位能从激励效果中受益,尝试将她与其他喜欢激励触发的盟友搭配,比如(U)孢子发射器、(R)附魔仙子和(R)死亡帽先知。

魔菇夫人:作为地下军团那位气味浓烈的盟友,她是一名强大的伤害输出者,但其表现与你牌组中【消耗】牌的数量紧密相关。幸运的是,她拥有15/15的身材且仅需1点余烬费用,无论如何都比持矛侍从表现更佳,因此从一开始就是个不错的单位。此外,即便你的卡组中【消耗】牌不多,每次在魔法商人处重随后,都可以为最多两张卡牌赋予【消耗】效果,所以即便抽牌运气不佳,你也可以尝试强行构建这种打法。由于这个蚀刻触发器会对楼层上的所有敌人造成大量腐蚀伤害,她确实能在所在楼层造成巨大破坏,这一点值得注意,因为下层军团单位的 offensive presences 并不强。不过,如果你完全不消耗卡牌,那么有更好的选择。个人认为,即使在选牌时你的牌组缺乏一些消耗卡牌,她的效果也足够强大,值得考虑。 升级/搭配:二元论是她的升级选项,因为16点腐蚀对于整层敌人来说是巨额伤害。由于多张她的复制体可以通过单张消耗牌反复触发相同效果,【微光石】是个合理的选择,能让你在一层部署多张她的复制体。她的属性本身已经不错,所以可以随意给她装备多余的【力量石】来提升些许攻击力。和许多军团旗帜单位不同,她不需要任何【地下军团】的配对,但能与【孢子歌者】和【永恒绽放·狮鬃夫人】产生协同效果。相反,你应该着力在牌组中创造大量消耗牌,并且会特别乐于见到【法术连锁】升级,以便在你的回合反复触发【蚀刻】效果。如果你有一些【固有+法术链消耗】卡牌来开启战斗,只需用大量【二元论】强化的【衰变】触发效果攻击飞行 Boss,就能在短时间内将其击败。

刺球:地下军团中唯一的纯稀有坦克单位是个相当不错的选择,拥有可用的初始生命值,以及常规的体型和余烬消耗。如果将其放置在底层,任何触发其复仇技能的单位在到达柴房之前,最终将受到至少+15>+12>+9(总计36)的伤害,这是相当可观的伤害量,尤其考虑到它会沿途摧毁诸如不朽可怜虫和畸形二重体等单位的复生堆叠。相反,需要注意的是它不会攻击到所有后排单位,因为像治疗者或被削弱的攻击者等非攻击单位不会触发复仇技能。如果在他前方生成了部队堆叠,会产生一定的反协同效应,除非部队死亡或被移开,否则他将无法触发复仇。不过,抛开这些注意事项,他是一个简单、低维护的坦克,几乎可以轻松融入任何构筑。 升级/搭配:这里有很多不错的选择。从进攻角度来看,二元论是一个很好的潜在升级,能将每次触发的腐蚀伤害提升到10点,这是一个相当可观的数值,尤其对多段攻击的敌人效果显著。然而,35点生命值在游戏中撑不了太久,因此除此之外,任何有助于维持他生存的升级都至关重要。如果后续仍能容纳他,巨石能大幅提升生命值,即使没有巨石,心石、苔石和泰坦石也能在不同程度上发挥作用。我也是无尽的粉丝,因为他可能会逐渐被腐化侵蚀,之后你可以直接召唤一个全新的他(如果他从【多情金针菇】队友那里获得了生命值加成,那就特别好用)。最后,由于他能叠加腐朽层数,所以与孢子歌者狮鬃夫人有额外的协同效果。 地下军团旗帜单位:非普通单位 第2部分

小队领袖:一个相当弱小的单位,其唯一的简单用途是位于你楼层的后排,并显著增强你的蘑菇人部队堆叠的攻击力。在游戏进程的早期阶段,通常可以生成大量的蘑菇人堆叠,它们拥有足够的攻击力来清除敌人的防线,因此拥有践踏能力以及每堆叠+2攻击的加成是相当有帮助的,并且可以实现单楼层解决进攻问题。由于它只消耗1点余烬和占用1个空间,所以很容易将它或多个复制体塞进一个楼层。由于它们的攻击力与部队数量挂钩,因此如果你同时让你的部队担任前线坦克,这通常不是一个可行的策略,因为承受伤害会削弱它们。同样重要的是要明白,这个效果的强度在整个回合中会显著降低。【地下军团】很容易就能形成庞大的部队堆叠,虽然这在早期可以横扫整波敌人,但当像【宣誓角斗士】这样拥有375-500生命值的敌人出现时,这种方法就不再奏效了。这时,这种践踏堆叠反而最适合清理暴露的后排单位。 升级/搭配:无法通过【钢铁商人】的升级单独提升【 squad leader】的效果强度,所以可以随意将多余的【力量石】、【苔藓石】或【心石】用在他身上,因为他的属性和效果不值得投入资源。相反,你需要做的是将他与大量召唤效果搭配,并且最好是能从这些效果中获得【集结】效果的盟友。生成单位可以来自法术牌、房间牌(如感染室)、单位(如集群上校)以及英雄(如刽子手牛肝菌和万花丛夫人狮鬃)。由于他体型较小,你可以轻松复制他并获得多次+2攻击力的加成。但我必须再次强调,尤其是在较高难度下,即便有了他,在游戏后期单纯依靠堆叠大型真菌人也不足以提供足够的攻击力,因此在认为这是一个仅凭前期强势就能自动获胜的组合前,确保你还有其他的策略。最后,如果获得无氏族装备铁舌,将其装备在他身上能让他在战斗中也能提供可观的攻击力。

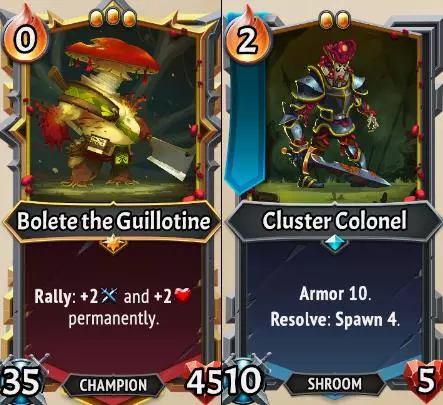
集群上校:一个非常简单易用的单位,当与合适的盟友和阵容搭配时能产生非常强大的效果,唯一的小缺点是其2点烬能消耗,这使得部署多个该单位有些棘手。每回合结束时,集群上校会触发4次鼓舞效果,同时要么生成一个真菌人部队堆叠,要么增强现有真菌人部队的效力。他是那些能触发鼓舞效果单位的绝佳伙伴,例如(U)多情金针菇、(U)孢子发射器、(R)毒帽先知、(R)附魔仙子以及蜂巢管理者牛肝菌。如果你不关心鼓舞效果,也可以用他每回合生成一个肉盾般的真菌人部队,来支援防御薄弱的队伍。或者,部署多个集群上校,尝试生成更大规模的部队堆叠。虽然【U小队队长】的效果会随时间减弱,而且【集群上校】每回合最多只能生成4个,但每回合触发4次【集结】仍然是一个足够强大的效果,能让他在整个游戏过程中发挥很好的作用。 升级/搭配:虽然我通常更喜欢用【微缩石】来缩小大型单位,比如【多情金针菇】,但在这里使用【微缩石】帮助他部署在拥挤的场地上以利用【集结】触发效果也确实不错(尤其是他的最佳搭档【蜂巢管理者牛肝菌】占3个格子)。二元论对他来说额外增加10点护甲并不值得(除非二元论能触发其他强化状态效果,因为它无法影响他的召唤物),所以除了提升一些生命值以避免他被清扫/腐化外,升级对他来说意义不大。就像我之前提到的【无派系】小队领袖一样,无派系装备【无派系】铁舌非常出色,能让他在后排发挥更多作用。如果你能负担得起唤醒他的余烬,多个他的复制体非常有用,可以不断增加每波获得的召唤物数量。
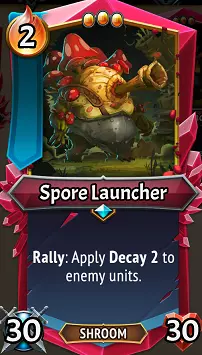
孢子发射器:作为地下军团的常驻大块头单位,它不仅身材魁梧、实力强劲,还拥有强大的集结触发效果,能为整个游戏进程带来显著影响。每次集结都会对楼层上的所有单位造成2点腐蚀伤害。虽然这比羊肚菌 mistress的8点腐蚀伤害要低,但与蚀刻相比,重复触发集结的难度要低得多。凭借30/30的属性,它是地下军团中属性最高的【U】旗帜单位,如果你需要一些坦克或进攻能力,它能提供一定的灵活性。考虑到腐蚀的强效以及游戏中地下军团触发集结的多种方式,孢子发射器是一个非常强力的游戏选择。升级/搭配:有两个升级立刻就适合他使用——a)二元论,将集结触发效果提升至每次集结造成可观的4点腐蚀伤害;b)小石子,帮助克服他初始3体型的不利条件。不过,如前所述,你的游戏进程可能需要一些传统的进攻或坦克能力,因此他30/30的属性也可以通过诸如多重打击、大石子(注意4体型!)、心石或苔石等升级来增强,以弥补进攻或坦克方面的不足。除此之外,你只需要适合召唤的伙伴。孢子歌者和万花海狮夫人都是他的绝佳盟友,如果能在同一层将这两个庞然大物搭配在一起,处决者牛肝菌也会非常强力。房间卡牌【C】感染室是早期的绝佳抽卡选择,因为消灭后排敌人的腐朽效果会触发额外的集结,对剩余存活单位造成进一步的腐朽伤害。【U】集群上校是很棒的盟友,能在回合结束时释放大量集结+腐朽效果,而孢子发射器非常适合与其他利于集结的单位搭配,比如【U】多情金针菇、【R】死亡帽先知和【R】魅惑菌姬。 地下军团旗帜单位:稀有 稀有【R】旗帜单位:

死亡帽先知:和普通稀有单位相比,关于它的可说之处要少得多……死亡帽先知的属性糟糕透顶,但幸运的是它既便宜又小巧,因为它唯一真正的优势就是能让你抽很多牌。用地下军团很容易就能集结它,所以如果你想更快地过牌,避免“我最好的牌又在牌组底了!”这种情况,它就是来帮你解决这个问题的。不过,根据提供的选项不同,它远不是必选单位……抽牌可能非常重要,但仅凭这一点不会像上面提到的一些 uncommon(非普通)单位那样决定一局游戏的走向。 升级/搭配:钢铁商人的升级除了用 Heartstone(心石)/Mossystone(苔石)让它存活,或者可能用 Endless(无尽)达到同样目的外,都是没用的。相反,我上面所说的关于其他拉力组合的一切都适用,但有一些重要的注意事项……默认抽牌数为5,最大抽牌数为10;如果你不从首领神器中获得+1抽牌,仅5次拉力触发就会使你的抽牌数达到上限,这还不包括任何冻结卡牌以及其他会向你手牌添加卡牌的神器/单位互动。因此,搭配一个(U)集群上校是个稳妥的选择。要小心类似奇妙宝箱事件中的大型神秘宝箱这类互动,如果你抽到10张牌,它将无法生效,还有其他每回合会给你卡牌的单位或神器也要注意。

巴尔马贝罗:一个绝对疯狂的单位,与普通的地下军团单位相比完全出人意料。巴尔马拥有惊人的50点生命值,幸运的是体型仅为2,不过3点余烬的消耗可能让人略感安慰。他的【熄灭触发】机制与游戏中其他任何单位都不同,在被击败时,他会将自身现有的所有增益效果叠加到周围的整个楼层。其设计思路是,在他死亡前,你要为他叠加大量增益,这样他就能将一系列效果传递下去,让剩余的盟友完成任务。此外,凭借50点生命值和固有的6点尖刺伤害,他是地下军团中除了(U)刺刺 puffball 之外,唯一一个围绕坦克能力和反击设计的单位。需要说明的是,巴尔马贝洛(Balmabello)是否“值得培养”可能取决于你的子阵营,因为他的价值会随着像拉撒路联盟(Lazarus League)这类拥有大量增益效果的阵营而显著提升,而对于冥府守卫(Stygian Guard)或炼狱之子(Pyreborne)这类几乎没有或只有微弱增益选项的阵营,他的价值则会下降。 升级/搭配:如果你只是将他用作坦克,巴尔马贝洛可以轻松装备大晶石(Largestone)来大幅提升生命值。小晶石(Smidgestone)可能很有用,尤其是如果你打算制作多个巴尔马贝洛的复制体,它们可以将自身的增益效果传递给彼此,从而产生不断升级的效果。二元论(Dualism)对他来说非常强大,不仅因为在12级时能获得再生(Regen)和荆棘(Spikes)效果,还因为其他任何增益效果也会被翻倍。除了作为坦克外,你有两种关键方式使用他:a) 让他倒下并最终被击败,为楼层上的其他所有单位提供尖刺+再生+其他增益,以帮助对抗无情的首领。b) 给他施加大量 buff,然后故意让他被摧毁,这样整个楼层都能受益,而不是单个单位。传播效果在这里作用巨大,所以要留意带有该效果的法术卡、如(U)生长房间这样的房间卡,以及刽子手牛肝菌。使用能提供大量 buff 的氏族可以为整个楼层带来显著提升,尤其是像拉撒路联盟(通过复活堆叠获得近乎不朽的能力)或消融残党(将他燃尽后重塑,持续触发熄灭效果)这样的氏族,效果会非常夸张。
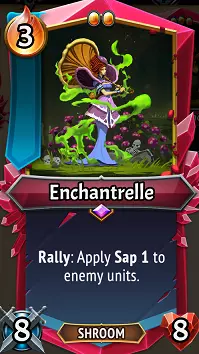
附魔女巫:可以说,她是当前游戏中绝对最强的单位之一。广泛施加【腐蚀】效果的话,其强度足以完全压制游戏中的所有敌人,让你有机会直接让虚弱的敌人走向你的【圣火】自取灭亡。足够的【腐蚀】能让任何 Boss(包括泰坦)都变成你单位面前不堪一击的沙袋。【暗影军团】阵营有很多方法可以召唤她,所以只要你能召唤出几个,就几乎可以无视除了会给你牌组添加【灾祸】之外的所有敌人。将她与一些不错的【鼓舞】触发效果搭配,你几乎可以在接下来的战斗中为所欲为,因为除了那些被大幅强化或暴怒的敌人外,其他敌人基本都无法对你造成伤害。 升级/搭配: 【二元论】再次成为最大赢家,因为【腐蚀2】如果多次叠加会变得异常强大……将其与技能(C)【黏糊烧瓶】对比,再考虑与(U)【集群上校】的单次搭配,这意味着每回合至少能产生4倍的效果。 除了【集群上校】外,【万花丛中母狮鬃】也是一个极佳的组合;如果你能在当前楼层获得一些击杀,【处决者牛肝菌】同样效果显著。 【增殖】效果在这里表现出色,无论是配合【蘑菇人部队】触发【鼓舞】,还是增加敌人身上的【腐蚀】层数。即便她有着3点烬石的高昂费用,但为了能在她的格子上放置更多东西,给她装备【微光石】(Smidgestone)仍然是值得的。附魔女巫(Enchantrelle)的强度高得离谱,在我看来,只要她出现在选牌阶段就必须选。 暗影军团支援单位 每个氏族都有这类非旗帜卡牌单位,而暗影军团的是一些1格大小的蘑菇,它们拥有各种不同的效果和技巧,能为你的战斗提供支援。

绿色新兵(C):这是另一种在战斗中召唤和集结的方式。绿色新兵的优势在于0余烬的消耗和小型体型,使其可以轻松部署来承受伤害,同时增强你的蘑菇人部队并触发四次集结效果。在早期阶段,用它来消灭弱小敌人也相当不错。

欢乐毒蝇伞(U):可持续数天的衰减效果,召唤欢乐毒蝇伞会对所有敌方单位施加7点衰减,若有二元论加持,该数值将达到惊人的+14。

松露(U):拥有技能【拾取】——冷却时间2,将一张完全随机的短暂装备牌置入你的手牌,并使其余烬消耗减少1。它是目前游戏中最“百搭”的单位,能从任意氏族抽取出任何装备,为你带来的效果可能从毫无用处到难以置信地强大。你会抽到什么呢?

蜡盖(U):目前是第二强的削弱者(无人能及附魔妖精),蜡盖在召唤时会对所有敌人造成可观的3点削弱,若配合二元论则可变为非常强大的6点削弱。 有趣的是,这些都是适合无尽模式的支援单位。如果你能召唤蜡盖和愉悦毒蝇伞,让它们被击败后再次召唤,它们就能多次发挥作用;若与二元论结合,两者本身就足够强大,足以显著影响一局游戏的走向。例如,二元论加持的愉悦毒蝇伞对底层敌人造成14点腐蚀,在单位到达柴堆前总计可造成42+39+36(共117)点伤害!而仅召唤两次二元论蜡盖就足以大幅削弱游戏中的所有 Boss,包括泰坦。需要注意的是,蜡盖蘑菇可能会对敌人造成大量 sap( sap 效果),以至于敌人无法击破其5点生命值,因此你可能无法每回合都做到这一点。 同样,无尽绿色新兵是另一种方式,类似于(U)集群上校,能让你在一回合内获得4次 Rally/Spawn(集结/召唤)触发,前提是你有位置将其部署在火力线上。虽然其自身强度远不及蜡盖蘑菇/欢乐死亡帽,但与渴望集结效果的单位如(U)孢子发射器和(R)附魔精灵配合时,效果会非常显著。 最后,松露菌是一张百搭牌。我想说的是,它能为你的战局拉取到极佳的装备……比如,当你有一大群真菌部队时,松露菌可能会为你拉来被放逐的装备(U)翼恩之盾。或者,无氏族的【虚空武装】可以让你的部队获得多重打击,且无需担心净化效果。不过,他也可能给你一些毫无价值的东西,比如当你没有使用月神女巫会时给你一把【月神循环法杖】(稀有),或者在你的单位都带有腐蚀效果时给你一个【玻璃加农炮】( uncommon)这样的负面选项。由于他默认每三回合才能使用一次技能,所以让他拥有无尽特性,使其能够进行炮灰阻挡并尝试每回合为你提供有用的装备,是一个合理的选择。 但我还是坚持认为——他是终极的 wildcard。我曾依靠他提供的装备卡牌摆脱困境,也有过他从未给过我任何有价值物品的对局。不过,无论如何,我们都得承认他依然是个好家伙,对吧?冠军:断头台牛肝菌(标准)

起始卡牌

热切新兵:牛肝菌的标志性卡牌是基础召唤卡,其作用是在早期召唤一些部队堆叠用于防御和攻击,或者关键在于帮助触发其他单位的集结(对巢群守护者牛肝菌尤为重要)。召唤1的效果在没有法术连锁的情况下无法以任何方式增强,因此随着时间推移,这张卡牌的效力肯定会减弱。不过,许多更强的召唤法术卡都是消耗牌,所以这张卡仍能在你的牌组中发挥价值,轻松触发单位的集结效果。
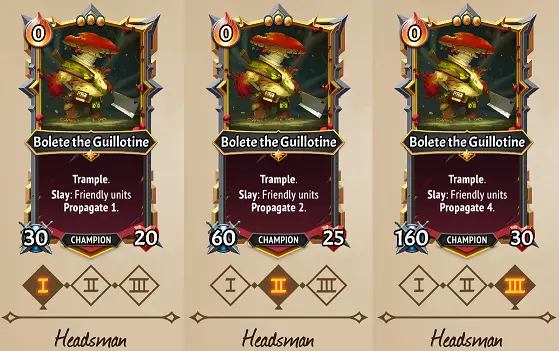
刽子手: 策略:这是牛肝菌唯一拥有【践踏】能力的路线,这是一个非常值得注意的优势,因为它能让牛肝菌在单次攻击中可能触发多次【击杀】效果,进而触发其【击杀】时增殖所有友方单位的增益效果。牛肝菌在此路线中兼具进攻与辅助能力,拥有不错的攻击力,并且能在击杀时扩散盟友的增益效果,包括其所在战场的部队堆叠【集结】效果。刽子手III的【增殖4】通常是单次效果中能获得的最大值,如果牛肝菌能持续强化你单位的增益效果,就能带来非常强大的滚雪球效应。关键在于,此路线下他的攻击力不错,但并非压倒性的。即便他在三级时攻击力提升至160,也很难对【宣誓角斗士】和【恐怖融合体】造成有效伤害,这意味着如果你想充分利用他的【增殖】加成,就必须找到其他方法来应对这些最强坦克。

刽子手: 注意:如果你在游戏刚发布时玩过,这条路线已大幅改动,完全不再是以前的玩法。旧版本中那种触发丰收效果的再生/狂怒牛肝菌已不复存在。 策略:当(U)小队队长提升部队堆叠的攻击力时,刽子手牛肝菌会转而增加他们的生命值,为真菌人部队提供更强的坦克能力和肉盾作用,让你每次召唤获得的生命值比其他任何流派都要多。此外,牛肝菌还获得了虹吸触发能力,当他所在楼层的敌人死亡时,可以召唤更多部队。核心思路是消灭楼层上的敌人,培养出一支越来越庞大且防御性强的真菌人部队,以保护你的后排单位,并更轻松地赢得无情难度的 boss 战。然而,在大多数情况下,你必须依靠你的子氏族来支持这个构筑,因为牛肝菌自身太弱,无法可靠地触发虹吸效果,他的【C】狂热新兵无法帮助他消灭较弱的敌人,而支持这条路线的“最佳”单位【U】孢子发射器体型太大,若没有微尘石或容量加成,无法与牛肝菌放在同一层。这实际上只剩下来自地下军团氏族的【U】羊肚菌女爵能在早期用于此构筑,因此如前所述,你可能需要子氏族的单位来帮助触发虹吸效果。由于这种特殊性,这条路线通常会与蜂巢管理者搭配使用,以提供额外的集结触发潜力。

蜂巢守护者: 策略:牛肝菌最激进的路线使其有潜力成为绝对强大的进攻型角色,如果你能在整个游戏过程中对其进行足够投资,甚至能成为防御强者。这条路线没太多需要解释的……让牛肝菌与任何能为其提供鼓舞效果的单位搭配,主要是【U】集群上校、【C】感染室,以及任何带有生成效果的法术牌(将它们进行法术连锁能获得更多乐趣)。在这条路线下,他的基础攻击力很容易达到数百,生命值也是如此,这使他除了拥有极高的攻击力外,还有可能成为游戏中生命值最高的冠军之一。灵活性潜力:牛肝菌可能是高水平游戏中灵活性最高的英雄之一,原因很简单,永久属性加成、虹吸触发鼓舞效果以及为其技能组添加践踏,这些都是根据你的游戏进程选择的极佳选项。蜂巢守护者通常可以灵活地融入任一发展路线:如果是刽子手路线,那么他不断提升的攻击力现在还会附带践踏和蔓延效果。如果是行刑者路线,那么他在当前楼层的击杀会触发更多鼓舞效果,以永久提升他的属性。行刑者路线升级到三级确实有一定优势,因为牛肝菌拥有可观的100点生命值,而刽子手路线在三级时的蔓延4效果,如果能稳定触发,也是相当强大的优势。 英雄:狮鬃夫人 狮鬃夫人(流亡者)
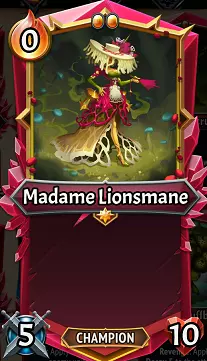
特别说明:复制机制 与塔洛斯类似,狮鬃夫人是一位如果你使用无派系房间卡牌【R】万镜殿或拉撒路联盟法术【U】复制射线来复制她,就能在三条路线上都获得极强效果的冠军。她不像塔洛斯那样拥有飞行能力,因此并非在所有情况下都同样强大,但仍然相当强力。由于这一机制适用于她的所有三条路线,因此在此处统一说明,而非在每条路线中单独提及。

起始卡牌:孢子之触。当我使用地下军团作为副氏族时,这通常是我的首选卡牌,因为它能对任意单位施加腐蚀效果,这对于在游戏早期消灭后排单位非常有利,而且即便在游戏接近尾声时,它的强度也足以摧毁收集者。狮鬃夫人的孢子歌者路线能增强这张卡牌的效果,使其在游戏后期也具备一定的潜在用途。
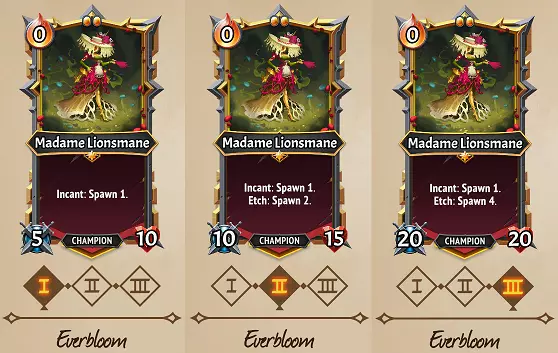
永恒绽放: 策略:尽管缺少用于召唤真菌士兵并触发集结的狂热新兵卡牌,但此版本的狮鬃夫人能自行完成这一过程,每次施法都会壮大军队。该路线的属性极低,这也希望能让大家明白召唤与集结对于此策略的重要性。有趣的是,从等级I到III,施法触发机制完全没有变化,这意味着在更高等级时,要从该路线获得更多收益,唯一的方法就是寻找和/或创造消耗卡牌,以让她触发蚀刻效果。如果与能触发集结的盟友如【稀有】孢子发射器、【稀有】多情金针菇以及【史诗】附魔仙子搭配,或者与能触发蚀刻的【稀有】羊肚菌女爵配合,该路线会非常强力。没有这些的话,这条路线实际上只能为你提供一大队真菌人部队,这不如另外两条路线有用。
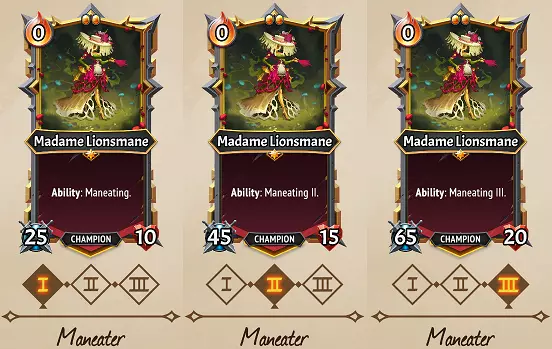
狮鬃夫人获得技能:食鬃 > 食鬃II > 食鬃III。冷却时间1调整为: 食鬃:对一个单位造成2点汲取和5点腐蚀。 食鬃II:对一个单位造成3点汲取、10点腐蚀和1点沉默。 食鬃III:对一个单位造成4点汲取、15点腐蚀和2点沉默。 策略:这是狮鬃夫人一条有趣且具有互动性的路线,她在此路线中获得一些适度的攻击加成,并能通过食鬃技能每回合削弱一个单位。单是汲取与腐蚀的组合就相当有趣,可用于战略性地削弱危险的后排攻击者,或开始叠加腐蚀层数以削弱高生命值敌人。【噬人者II】和【噬人者III】会添加【沉默】效果,该效果非常强大,足以阻止敌人的多种烦人的效果,例如【祈求者】的【决心】和【狂热者】的【咒文】,甚至能完全无效化首领的效果,阻止其更令人讨厌的技能。结合该氏族丰富的【扩散】效果,【噬人者·狮鬃女士】可以在整场战斗中完全封锁首领的效果!与她的其他两条路线不同,这条路线与其他【地下军团】单位没有直接协同,因此如果你的游戏进程似乎不会依赖【地下军团旗帜】单位,这会是一个非常“安全”的选择。
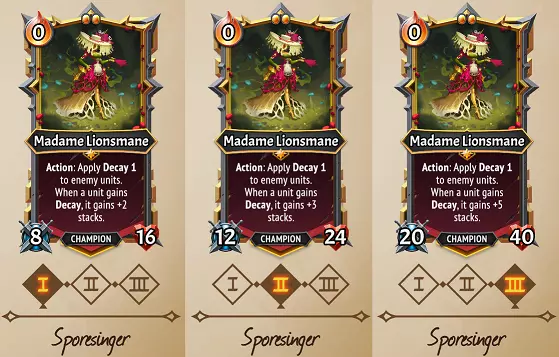
Sporesinger: Strategies: How do I love thee? Let me count Decays. Sporesinger is Madame Lionsmane’s most passive path, allowing her to simply sit in the back of a Floor (usually the first Floor), amplify the effect of any Decay applied, and then drown all enemies in a wave of Decay. This path tends to easily deal with backline enemies as long as she’s kept alive, and helps you establish some Decay on higher-Health enemies as well. If you can apply Decay on her floor before her Action trigger, Propagate effects will also add extra Decay, which is a fun bonus! Much like some other Underlegion strategies, it’s important to note that the ease & simplicity of this path will struggle late in the run without additional support. Her effects in Sporesinger I and II are so strong that it can almost single-handedly win you fights as long as someone’s tanking for her… the same is not true for Sporesinger III, where the effect alone won’t even defeat 20 Health backliners, much less put a dent in dangerous meatshields like Avowed Gladiators & Terrifying Amalgams. This doesn’t mean Sporesinger III is weak – it’s not, but ensure you’re supporting her with other Decay effects, and don’t expect her to solo-carry you through to the end. Great potential partners are (U) Morel Mistress, (U) Cheery Deathcap, and (U) Spore Launcher. A final fun note on this path! Action triggers still happen when in Stasis, meaning you can put the clanless (R) Stasis Crystal on this version of her, she'll continue to load up enemies with Decay, and she can build up stats each turn to then emerge later in the fight. Flex potential: Because her stats are mostly low in each path (sans Maneater’s okay Attack) and the potential of different Underlegion units dictating how your run may progress, Madame Lionsmane is a pretty good candidate for flexing if your starting path isn’t working at its best. Flexing Maneater is nice since it gives her an Ability to use each turn, particularly because Maneater II’s Mute 1 is enough to still solve a lot of potential problems. If you find yourself flush with Rally units, flexing Everbloom is a great idea, even if it’s a single level to get Incant Rally triggers. Finally, adding Sporesinger is an easy way to passively clear backliners, and is a good idea if you’ve gradually added Decay effects to your run you’d like to bolster. Other Underlegion card clarifications (C) Glow Up is an extremely good early Common card to seek out. It’s the only Underlegion card with Advance, which can allow you to reshuffle your Funguy Troops, yank a Collector to the front, or simply use its Propagate effect to continually weaken enemies or empower your own troops. Though you can’t Doublestack Propagate, you can always Spellchain it! Like many Underlegion cards, (C) Infectory will be very strong early in the run, and can even lead to some surprise boss wins as Troops get extra hits or allow extra Decay procs. Although it will remain a useful tool for Rally triggers, beware that the potency of a single Spawn/Rally later in the game diminishes, and as a result you may get more use out of chump-blocking with Funguy instead. (C) Loamcoat only provides a single Regen after a turn to Propagate, and thus is meant for going on units that either have a good Buff to Propagate, or Funguy Troop stacks to keep building them up. Without this, the 2 Ember cost might be a bit wasted beyond the 20 Health increase. (U) Pox hits all units, including your own! Meaning it should only typically be used on an Empty floor. (U) Inhale triggers Spawn on any Slay, including your own units. So using this on a (C) Green Recruit for instance would result in Spawn 6 total. This also makes it a decent option for destroying an Endless Dualism (U) Waxcap, who might not otherwise be defeated due to his Sap effects. Because Sap decreases each turn, (U) Mushy Room’s location is very important. If you’d like to Sap any enemies that make it to the Pyre chamber, the Top Floor is best for this, though it won’t help your units along the way. If you want the enemies weaker when facing your own team, the other two floors are better. During the Titans fight, because Entropy doesn’t move, a Mushy Room will eventually sap him to zero Attack. (R) Spike of the Legion is one of the most powerful Spike cards in the game, as it’s the only effect that can reach more than 4 Propagate. This is an extremely good choice for almost any clan combo, as it could easily Propagate enough say, Sap/Mute to completely neuter a boss, Propagate enough Lifesteal/Reanimate to make a unit virtually immortal, or Propagate a Funguy Troop stack for a ridiculous amount of Rally triggers. You don’t have to apply the effects of Evergrowth to your own units with the (R) Tome of Evergrowth… the Sap 3 is a far more potent debuff to put on enemies than 3 Regen gained is. Want more fun? Put this on a Dualism unit to add an insane 6 Sap each turn to a unit of choice… enough to weaken just about any enemy down to nothing. Want a copy of your unit without Lifemother’s Pyre or an Empyrean Well? Well, Underlegion is the only clan that can do this with the amazing (R) Mitosis Cap… a real gift to duplicating your better units. However, remember that maximum hand size is 10, so if you copy too many Banner units, you’ll get “Hand Full” at the start and might not draw all units & deployable Room/Equipment cards. A Spell card cannot be both Consume & Holdover at the same time, so if your strategy relies on Holdover effects, (R) The Great Decay will take away that option. That said, if you’re heavily utilizing Etch triggers, an Intrinsic copy of this card is incredible. Though you’ll eventually run out of Spell cards, (R) Unearth Treasure can be used to claw a few more back! Speaking of (R) The Great Decay, both (U) Pandemic and (R) Contagious are unusual in that they’ll replicate themselves even when Consumed. This also makes for some potential powerful effects if you winnow your deck down enough and remove Consume with an Eternalstone. Spawn can’t be affected by Doublestack, but because the card also has Armor gains, (R) Funguy in a Suit actually can get Doublestack effects, making the Armor gain 8x the Troop value instead. This is a pretty insane brick wall if you’ve built up even a modest Funguy Troop stack. Underlegion Artifacts This section will briefly highlight the artifacts of the Underlegion. Artifacts can range from "nice bonus" to "run-defining power" and though there are too many potential interactions to discuss, I'll make a point of ones that are particularly potent. Underlegion has many artifacts that are quite useful, but some also have a tendency to require specific situations to function. Reminder: All Underlegion Banner units & support units are Shrooms. Champions Bolete & Lionsmane are not.

【优点】相当不错!除非你完全放弃使用法术,否则这实际上每回合至少能额外获得1点余烬,在中等规模的牌组中则为2点。如果用于法术链卡牌,其短暂复制体不会获得此加成。不过,这仍然能让你实现一些强力操作,例如使用一张留存的法术链卡牌,使其消耗2点余烬,且不会在每回合完全耗尽你的余烬。

如果你拥有【地下军团】坦克,这是一种不错的维持其生存的方法,或者也可以简单地帮助后排单位对抗【腐蚀】效果。不过【地下军团】并没有太多传统的【蘑菇】坦克,所以这可能并非必要,尤其是当你已经在使用【多情金针菇】时。

(+)免费抽卡很不错!但请注意,如果你将牌组精简得足够少,此效果可能会失效。

【新增】一个非常酷的神器,对敌人和友方单位都有效。食人狮鬃毛每回合都会施加三种效果!如果你能为友方和敌方提供多种状态效果,那就太棒了。不过,默认情况下,暗影军团单独可能无法提供超过2个增益/减益效果,所以可以从你的子氏族中寻找额外的增益和减益效果,以充分利用这一神器。

如果部队是蘑菇的话,这会很疯狂。但实际上,这对拥有孢子歌者狮鬃夫人的无尽支援型蘑菇来说是个不错的加成,除此之外就相当平淡了。我的意思是,一个二元性樱桃毒蝇伞的腐蚀伤害都有14点,对比之下就很明显了!

效果极佳,除了部队提供的免费 Rally触发外,还能用于使诸如伤害护盾、潜行、生命偷取、复活等强效增益持续多回合生效,并且能有效阻止怒气值衰减。

如果你采用【小队领袖】+【召唤】策略,这会很有帮助,因为即使是中等规模的部队堆叠,也能通过这种方式获得较高的攻击数值。如果没有【部队领袖】,即便召唤数量足够多,由于缺乏【践踏】效果,这可能也不值得。

有点疯狂,这是一种在战斗中永久复制法术的方法,在游戏中很少见。最好的做法是将寻石者/固有升级添加到一张优质的消耗卡牌上,并赋予它法术连锁/双重堆叠或其他效果来增强其强度。配合莫雷尔女爵,这可以实现非常快速的 Boss 击杀。如果没有这个选项,注意不要复制你实际上并不需要的消耗卡牌,以免堵塞你的牌组。

这东西有好有坏。它能提供一些免费的集结触发机会,快速堆叠蘑菇层数,而且那些免费部队还能在非集结楼层为你阻挡伤害。不过,它也可能占用楼层空间,尤其是当你无法部署足够多的单位时。如果你不打算使用集结技能且需要空旷楼层,拿这个就要谨慎了。不过在对抗泰坦时我会给它个好评,因为它能在多个楼层阻挡统治腐化和熵之打击。

这张牌相当不错,尤其是它能在你的回合抽一张牌,配合【留存】或【无尽】效果可以反复使用卡牌。与【消耗】复制类卡牌如【大流行】和【传染】搭配时也非常强力。

这是腐朽策略的终极法宝,它能让腐朽持续蔓延到敌人身上,足以在回合交替间逐步击败生命值更高的敌人。即使你只使用少量腐朽,它也依然极为强大。 烈焰之心相关考量: 部队堆叠是兵力损耗而非单纯失去生命值,因此温格之灵对这个氏族来说并非特别有用。但有一个例外,那就是巢母牛肝菌,它最终可能达到数百点的惊人生命值,即便如此也能被治疗回满。 野蛮烈焰对于这个氏族而言可能是个相当糟糕的选择,因为部队击杀不算入永久击杀数,腐朽击杀也不算,而这正是地下军团氏族早期获取击杀的两种主要方式。同样,牛肝菌是个例外,尤其是刽子手牛肝菌,它搭配践踏技能会非常喜欢这个增益。阿夸斯的储备提供的+3余烬有助于支付一些前期的高额费用,比如(C)腐烂或(C)壤土外套,或是后期的(R)西装菌人。 (R)有丝分裂帽的存在让地下军团多了一种复制单位的方式,这可能使得生命之母的柴堆变得不再必要。不过,生命之母的柴堆仍能复制非单位卡牌,而且有丝分裂帽是稀有卡牌,所以两者其实无需取舍。相反,我认为生命之母的柴堆在复制法术链消耗卡牌方面有很强的作用,能切实增强你的对局。 考虑到(U)集群上校和(U)孢子发射器这类2余烬稀有单位的前期实用性和强度,赫扎尔的宝库对于这个氏族来说是个相当不错的选择。可部署装备也能为单位增添不少额外的灵活性。 虽然“地下军团”因其随机性而成为我最不喜欢的阵营之一,但它拥有像牛肝菌和孢子发射器这样的大型单位,还有许多体型为2的单位能相互协同,这意味着沼泽蠕虫的“生长”能力可以帮助搭建足够大的平台,将所有友军聚集在一起。 “菲拉的贪婪”是一个非常有助于产生额外金币的阵营。尤其是“蜂巢管理者牛肝菌”,它更愿意从“孵化”卡牌中获得永久增益,而不是通过“复仇碎片”节省1点阵营生命值。当然,这在更高难度的契约等级下更为重要。如果你希望每一回合都能持续触发蚀刻效果,时光之父回响是个不错的选择,它可以冻结你的消耗牌,防止你在一回合内抽到过多消耗牌。 地下军团的许多单位不需要特定升级就能正常发挥作用,而且如果你使用玛莉卡的变幻火堆,他们大量的消耗效果可能会为你带来有用的余烬减少效果,或者像永恒石、冻结石这样的升级。这虽然有潜在风险,但我认为这个氏族比大多数氏族更能从中受益。 统治火堆对这个氏族来说是一个真正的 wildcard 选项,因为有许多消耗牌最终会清空你较小的初始牌组。获得两张(U)小队领袖与获得两张(U)刺刺绒球的影响是截然不同的。相反,像【C】产卵荚舱这样的卡牌要优于牛肝菌的狂热征召兵,而且这个氏族非常依赖容量,可能根本用不上【C】持盾护卫?只有当你非常了解这个氏族的优缺点时,我才推荐这样做。 我强烈不建议几乎任何氏族使用熵之柴堆,尤其是对于觉醒者和地下军团这两个氏族来说,选择熵之柴堆是个特别糟糕的决定,因为这两个氏族都有足够的潜在抽牌效果,甚至无法享受到它的额外效果。 子氏族考量(第一部分)
流放者: 正当防卫(++):总是优先选择这个而非鼓舞。它有很多实用功能,而且某些流放者单位如果没有它会变得非常虚弱。 鼓舞(--):永远不要选这个。它是最糟糕的氏族起始卡牌,并且会封锁某些策略。 你的天使伙伴们能显著提升生存能力,因为他们拥有大量的勇气值和伤害护盾,尤其是伤害护盾是一个非常强大的可传播效果。他们在楼层间上下移动单位的能力对于楼层超载、重新部署你的蘑菇人部队以及让多个能触发集结的单位聚集在同一楼层都有强大的作用。放逐者拥有大量基于生命值的法术和装备,考虑到地下军团在部队堆叠和巢母牛肝菌之间对生命值的关注,这两个氏族组合在一起时可能会非常强大。
Pyreborne: Firestarter:一张简单的卡牌,在整个游戏过程中都有一定用处,早期可以用来清除后排单位,或者施加Pyregel效果,配合Decay时效果相当强大。 Bloated Whelp(+):虽然我通常更喜欢Firestarter,但对于Underlegion来说,这些单位非常出色,因为它们既能触发Rally效果,又能自我摧毁以避免堵塞战场。 Pyreborne通常为任何派系提供两项相同的增益,即a)Pyregel,一种用于提升伤害输出的简单减益效果,以及b)金钱和Artifact获取。Underlegion有时难以展开攻势,因此Pyregel是提升伤害的不错助力。Underlegion自身已经具备很强的生存能力,所以Pyreborne几乎完全缺乏的减伤能力在这里不算太大问题。这更像是分别利用两者优势的情况……让【地下军团】负责减伤,【焰生】提升你的伤害数值。或者,如果做不到的话,那就享受【焰魔】与【腐朽】叠加带来的纯粹破坏吧。
月神女巫团: 织法巫术:在没有灵渠强化治疗效果的情况下表现不算特别出色,但至少它消耗为0,是一个不错的+20消耗选项。 月神仪式(+):在这里比通常情况下稍好一些,因为增殖效果可以增加灵渠的获取。如果你打算使用一些月神女巫团单位,它对其中几个单位来说也很重要。 我认为这种情况更多的是地下军团对月神女巫团的帮助大于虫子对你的蘑菇的帮助。灵渠给地下军团带来的好处并不多,因为他们没有很多能直接从中受益的法术。(C)月之精灵和(U)天文馆卡牌通过向楼层添加部队堆叠能获得一些不错的收益,但同样,这对月神女巫团的好处大于对地下军团的好处。因此,这更多的是发挥每个氏族的优势,比如让月神女巫会用伤害性法术帮助弥补地下军团的进攻,让地下军团传播诸如导管/法术弱点之类的效果,并利用部队堆叠来保护一些较脆弱的虫子存活。
拉撒路教派: 【秘方(++)】:这是我的首选,因为混合药剂能提供多种可传播的效果,而万花丛夫人狮鬃可以通过使用这些药剂释放大量咒术。 【古怪助手】:它们的伤害、实用性以及触发集结的便利性都相当不错,并非必须避开,但【秘方】总体上提供了更多灵活性。 拉撒路的超强多功能性对任何氏族来说都是天赐之物,地下军团也不例外。拉撒路为你的蘑菇单位带来的最大馈赠之一就是装备,因为添加诸如践踏、多重打击、尖刺、复生等效果,能极大增强多个地下军团单位。此外,他们是游戏中【传播】能力最强的氏族,原因很简单,他们能施加种类繁多的增益和减益效果,其中许多效果默认情况下数值较低。【绿色新兵】通过【复活】获得了一些额外技巧,使其可以多次【扑灭】。【腐朽】能帮助敌人达到【不稳定】阈值……这里有大量的组合技;这是一个非常好的搭配。 子氏族考量 第二部分
地狱号角族: 火炬:一个刻意设计得较弱的初始法术,通常用于清理后排的弱小单位。它可以用来消灭你自己的小鬼,但默认情况下无法消灭绿皮新兵或蜡盖菇,所以不怎么样。 女王的小恶魔(+):比火炬造成的伤害高得多,但只能攻击前排单位,并且占用1个空间。作为早期爆发伤害和触发集结的选项已经足够好了。 护甲对下层军团来说不像对其他一些氏族那么重要,但一群具有强大召唤效果的可牺牲小鬼能触发集结,这非常不错!地狱号角族的狂怒恩赐对提升你单位的攻击力非常有帮助,其中一些单位如果攻击增长足够快的话会非常强大(例如,被小队领袖强化的蘑菇人部队或刽子手牛肝菌)。地狱号角氏族还带来了一些【升华】效果,这些效果对于集结你的【迅捷】单位,或是为来自两个氏族的更多能触发召唤效果的支援单位腾出空间都非常有用。
觉醒: 恢复:这是一个有助于解决早期生存问题的可靠选择。暗影军团本身已有不错的生存能力,但该卡牌能防止再生效果随时间衰减。如果你打算获取觉醒阵营的单位,其中三个单位能与这类卡牌的治疗/再生效果产生联动。 根种:曾经是MT1中最佳的起始氏族卡牌之一,如今只能算“还不错”,因为+2攻击力的意义已不如从前,且抽牌也更容易实现。不过,它总体上仍有一定用处。 你的植物伙伴通常能为所有氏族提供相同的增益,即抽牌、治疗和再生。而暗影军团……在某种程度上似乎已经具备了这三种能力,不是吗?相反,我们应该关注的是觉醒者阵营拥有多种应对后排敌人的手段,而暗影军团在这方面则略显不稳定,其中【生命与尖刺】对于暗影军团的坦克单位相当实用。该阵营还提供了许多廉价且可大量使用的卡牌,配合【永恒绽放·狮鬃夫人】能够帮助你获得大量的咒术。最后,觉醒者阵营拥有不少提升属性的卡牌,有助于弥补暗影军团单位属性值较低的问题。
冥府守卫: 冰封之枪:作为MT1中最糟糕的初始氏族卡牌之一……不幸的是,它依然很弱。不过,它在前期进攻以及为蚀刻触发效果叠加+20消耗值方面还算可用。 遗忘之力(+):我的首选。0费使其更容易打出,它可以配合冥府献祭类卡牌触发弃牌效果,更重要的是,它能弃掉灾祸与枯萎卡牌以避免它们的留存效果。 冥府氏族与地下军团有相当多的重叠之处,因为冻伤与腐朽是类似的减益效果,它们是MT1中仅有的拥有 sap(汲取)效果的氏族,而且它们的许多稀有卡牌都严重依赖消耗机制。这使得冥府氏族与狮鬃永恒花夫人的蚀刻触发和咒术效果能形成特别强大的组合,包括将她与喜欢施放咒术的冥府单位搭配的选择。它们冻结卡牌的能力对于把握法术牌的最佳时机以触发【集结】和【蚀刻】效果也非常有益。最后,冥府势力有多种方法帮助你清除后排敌人,因此能很好地弥补深渊军团较为不稳定的一个短板。
暗影族: 裂影者:一张还不错的卡牌,能稳定生成一个残片。在这里这比通常情况更好,因为它能稳定触发战吼。 弹击:通常我更喜欢弹击,但如果你想触发战吼,它的稳定性稍差。不过,它提供了+20伤害消耗的选项,可能有助于清除一些后排敌人。 残片是渴望战吼的氏族最好的伙伴之一,既能触发战吼,又能被吞噬以腾出空间,为下回合生成更多残片。暗影族增加空间的能力是另一种让多个能触发战吼和蚀刻效果的单位聚集在一起的好方法。增殖对于暗影族倾向于施加少量伤害护盾和生命偷取效果的特性来说也非常有效。暗影氏族也有多种方式来增加余烬的获取,这很有帮助,因为地下军团尤其偏爱消耗2点及以上余烬的卡牌和单位。这两个氏族之间有很多出色的协同效果,但要注意的是,它们在持续阻止像狂怒翼刺客这类危险清场单位方面的选择都很有限。
Melting Remnant: Dreg: Cheap chaff units that can help do a bit of damage, doubly able to be Harvest-fodder for some Melting Remnant units or Rally fodder for Underlegion. Primitive Mold(+): Even though Dregs can trigger Rally, they’re not as useful as Morsels/Imps etc., and Reforming a unit with 1 Burnout can also trigger Rally. Because of that and the fact that multiple Melting Remnant units are better if Reformed, this is my preferred option. Defeat isn’t the end of your units with your waxen buddies, which is a nice bonus if you’d like to get multiple Rally triggers out of otherwise-disposable units. Those returned units will by default return with only 1 Burnout stack, meaning they’ll clear up the space they took up a turn later. Or, Reforming can be a reasonable option to keep a tank like Prickly Puffball coming back repeatedly even after it goes down. Melting Remnant was MT1’s clan focused on Gold gain, so like Pyreborne, they can help a bit to increase your coffers for the expensive upgrades you want. Propagation adds another option for extending Burnout which is great for units like Draffs & Lady of the House that need help staying lit. Your waxer buddies give can give a variety of other options beyond Reform with rare effects like Endless, Daze (reminder this cannot be Propagated), Stealth, and Debuff-clearing effects that are incredible for removing pesky Sap/Corruption/Melee Weakness. Final Bosses vs. Underlegion The Savage – Seraph AeternusMr. Savagery loves melting through even modestly-beefy units by Enraging floors of attacks and sweepers, and any tank on Floors 2 or 3 at the outset will have to contend with 60 or 90 damage (Titan trial) first turn if you don’t have a way to block that hit. If you’ve been counting on Funguy Troops to tank for you, these Enraged enemies can cut them down in moments, so ensure you have more than a few Spawns available. Ragewing Assassins can be a huge problem for Underlegion early on, as many of Underlegion’s backline units can’t take that hit, and Underlegion isn’t loaded with options for stopping them. This and the Melee Weakness effects makes Sap a particularly powerful antidote to The Savage. Savage also brings out some massive Health-pools on enemies like pairs of Avowed Gladiators, so be ready with some serious offense as well. This is Underlegion’s toughest fight in my opinion, so prepare ahead of time! The Entropic – Seraph AeternusMr. Entropy loves weakening your forces down to nothing with combinations of Sap & Silence, hoping to stop them from getting their offense going. This is a pretty big bummer for Underlegion’s plethora of Trigger effects, and for Maneater Madame Lionsmane who won’t be able to use her ability. You’ll want to come up with a solution to Deafening Heralds, as they can take away common strategies like Prickly Puffball’s revenge-Decay, and the many Rally-based triggers of this clan. If you can work your way around this, Underlegion doesn’t need high Attack values to function, so the Sap effects, while annoying, aren’t devastating to this clan. Additionally, this is the only Seraph option where a Squad Leader + average-size Funguy Troop strategy can still do good work, as it can potentially mow through waves of Purified Souls. The Dominant – Seraph AeternusAfter two early clans that struggle with The Dominant (Banished & Luna Coven), fortunately, Underlegion are pretty strong against him! A unit like Amorous Enoki alone can completely negate any concerns of escalating Corruption, your Funguy Troops can be disposable heroes to stop the double-Corruption effects, and Decay is great for repeatedly destroying the Reanimation stacks of Deformed Duos. You’ll want to be prepared to stop some of their backliners from filling your deck with Scourges, and ensure your lower-stat units have some Health support so they don’t winnow away from Corruption. Still, Underlegion has many answers to Mr. Dominion, which is nice! The TitansThe Underlegion are very swingy when it comes to the Titans. On the one hand, Sap-heavy strategies can make a joke of Savagery & Entropy, enough Decay applied early and often can result in some fairly quick kills, and champion paths like Maneater Madame Lionsmane and Hive Minder Bolete are very powerful here. Conversely, Funguy Troop strategies will struggle greatly against them, as Savagery’s escalating offense, Entropy’s continuous damage, and an array of powerful enemy waves will make it very difficult to keep Troops healthy & plentiful without major Spawn & defensive investments. Unless the result is Rally-Decay, having a single floor of offense/Rally can make defeating Savagery take some time as you wait for him to loop between floors. If you’re not leaning on Sap & Decay, ensure your sub-clan offers you some other way to build up offense, or you’ll have a long, protracted battle against these foes. Final notes on Underlegion strategies If you’ve read enough of this guide, hopefully you’ve been seeing a theme I’ve been expressing. Underlegion is a very swingy clan, with strategies that are so simple & mindless early on that you can coast through a great deal of the game with minimal input. Putting a (U) Squad Leader & (U) Cluster Colonel on a floor together can make enough of an impact to breeze through early enemy encounters, ditto for Sporesinger Madame Lionsmane, who can just completely wash enemies away without even needing additional Decay. Underlegion tends to breeze through early bosses with their outsized ability to survive Relentless battles, such that it can lead to a real false sense of security as to how strong your run actually is. The crucial caveat here is that many of Underlegion’s effects do not escalate as time goes on. A Squad Leader will never actually help your Funguy Troops build up or do more than +2 Attack, Cluster Colonel will never Spawn more than 4, and Sporesinger Madame Lionsmane’s 4 Decay means a lot more against 60-100 Health enemies than it does to 500 Health ones. With both Spawn effects & Propagate effects being exempted from effects like Doublestack & Dualism, escalating these enough to tackle endgame threats just isn’t as simple as it is for other clans. This is also partly why the section on Propagate was so long, to try to illustrate that since you can’t Doublestack those effects, Propagating effects like Damage Shield, Melee Weakness, Sap, Lifesteal, Stealth, Reanimate etc. are just superior options to things like Valor, Pyregel, Decay, Frostbite, Rage etc… ideally you Propagate something that has numerous buffs/debuffs, but that may not be clear to players trying to develop strategies with this clan. As a result, I’ve tried to continually highlight the things that do work consistently at endgame levels: Rally, Sap, and Decay. So for instance, Cluster Colonel’s Spawn 4 is not enough to put any real dent in the enemies late game, and the Troop won’t be strong enough to tank everything the game throws at you either. However, 4 guaranteed Rally triggers and chump-blocking 30+ damage can still be fantastic! As a result, I recommended him much more strongly than Squad Leader. Sporesinger Madame Lionsmane’s own Decay applied may not win the day, but it absolutely can be if paired with Dualism (U) Spore Launcher, (U) Morel Mistress, or (U) Cheery Deathcap. And Sap, if applied liberally or Propagated enough, can weaken any enemy in the game into nothingness in a way that (almost) no other clan is capable of. So, be ready for some potential growing pains as you spend some time with the Underlegion. They’re not necessarily underpowered, but they have a uniquely strong early-game presence with many units that can easily fail to get similar endgame results. Good luck! Wrapping up This is clan guide #4 for me on Steam! X) I think I spent a lot of time covering various important aspects about playing a clan in detail... I don't personally think it would help to go over every single card or sub-boss. But if I'm wrong, this guide is useful to you, and you'd like to see some other point of discussion, please let me know! We've got enough practice and wins under our belts that I'm ready to write up guides for each clan, but this takes more than a bit of time to do, so (hopefully?) stay tuned for future installments as I chip away at this. Underlegion are both complex and swingy so this one took a bit more time to write than the others so far. Thank you for reading, and enjoy your runs with these mulch-munching morels! =) Updates/Change Log 10/29/25 - Added Artifacts section! 11/27/25 - Added a note about using (R) Stasis Crystal with Sporesinger Madame Lionsmane since Action triggers still work while in Stasis.