换一换
换一换 


我从《铁拳7》开始了我的铁拳系列之旅,最初我选择扎菲娜踏入格斗游戏的世界。然而,随着时间的推移,李洛·史密斯却深深吸引了我——他那引人入胜的背景故事、独特的咏春格斗风格,以及在战斗中取胜所需的精妙策略,都让我着迷。本全面指南旨在帮助你更深入地了解《铁拳7》中的李洛·史密斯。无论你是想掌握他的强大技能,还是寻求对抗他的战斗技巧,这份指南都将成为你铁拳之旅的好伙伴。 简介

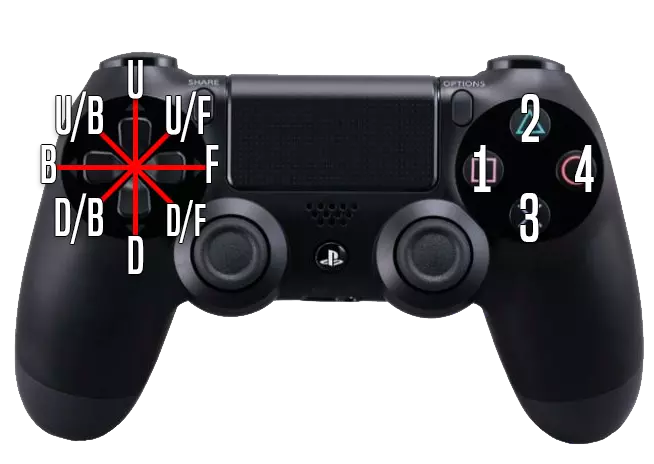
还记得勒罗伊·史密斯的预告吗?很激动人心,对吧?像大佬一样击败洛、雷武龙和冯威。有着咏春风格的“黑叶问”——太酷了!MainManSWE的视频?勒罗伊就是个大佬,伤害高得离谱,还异常安全。我在线上用勒罗伊对战的经历?简直是噩梦。连败之后,我不得不休息一下。2020年日本EVO大赛上的勒罗伊?一众知名选手都被碾压了。八强赛被他统治。甚至看起来都很无聊。社区一片哗然。万代南梦宫对勒罗伊进行了补丁更新,降低了他的伤害,让他变得更具可玩性。我回到了《铁拳》——体验好多了,也更平衡了。现在,面对勒罗伊是一种乐趣,而不是 frustration。铁拳社区一片欢腾,铁拳社区被拯救了! 所有这些事件都发生在三个月内。按钮映射控制说明 基本控制信息: f = 前进键 b = 后退键 u = 上键 d = 下键 Ch = counter hit( counter hit) 1 = 左拳键 2 = 右拳键 3 = 左踢键/左闪避(史蒂夫角色专用) 4 = 右踢键/右闪避(史蒂夫角色专用) df 或 d/f = 下+前键 uf 或 u/f = 上+前键 db 或 d/b = 下+后键 ub 或 u/b = 上+后键 WS = 站立状态 FC = 完全蹲伏(仅按住下键即可) QCF = 前半圆(通过按 d、d/f、f 实现) QCB = 后半圆(通过按 d、d/b、b 实现) SSL = 向左横移 SSR = 向右横移 S! = 螺旋招式 莱尔的姿态说明: 隐士姿态 = HRM 隐士姿态(HRM)

勒罗伊使用隐士架势,这是一种可自动格挡下段踢击和拳击的架势。你可以通过按3+4或使用某些可转入该架势的招式来激活它: 1,2,4 全蹲1,4 全蹲下+1,4 前前+4 下前+4 下前+1,4 下+3,2 下+4,4 前+2,3,4 处于隐士架势时,他拥有多种有效招式: 后+1 - 可击中倒地对手。 前+4 - 也可击中倒地对手,且可接后下2,1+2。可用于墙壁连段。 2,1 - 通常作为连段终结技。 后+4 - 快速的跟踪下段技。 情境招式
最佳按键组合指的是简单直接的输入指令,在许多方面定义了角色的核心特点。这些很可能是你理解特定格斗角色最有效的工具: b+1+2 - 非常出色的 counter-hit 起手技,可用于打断对手的快速压制,但使用时需谨慎,因为被格挡后会有-10的不利帧。 d/f+1 - 优秀的戳刺技,有不错的派生招式,如d/f1+1或d/f1+4。 b+3 - 对空挥惩罚非常有用。 f, f+2, 2 - 另一个不错的空挥惩罚工具。 d/f+3,1 - 骚扰对手的好方法。如果对手下蹲,你可以使用b4或u/f4。 3, 3 - 可略微延迟的终结技。被格挡后-14,所以要注意。 d/b+3,1+2 - 地狱扫腿,迫使对手下蹲,否则他们会被击退,你可以继续你的攻势。前斜+2、3 - 向两侧横移的轨迹,有利于控制。 下+1+2 - counterhit( counterhit)时可以接下后+2、1+2。 前、前+1+2 - 是一个不错的工具,能克制移动过多的对手。 下后+4 - 风险较高的招式,格挡时为-14帧,在蹲防状态下容易被确反。但如果 counterhit( counterhit)命中,可以打出小连招。 下前+2+3 - 李洛伊的独特手杖攻击,每局可用一次。命中后可接小连招。 李洛伊的格挡
勒罗伊的核心机制之一在于他能够格挡 incoming attacks。 b 1+2 - 12帧反击投技,可终止对手的刺拳压制。 b+1 - 41伤害的反击格挡。 b+2 - 可格挡除抓取外的所有攻击,包括肘击和膝击。成功格挡后可用于发动进攻。 u/b+2 - 可格挡所有拳法的捌(sabaki)。 d/b 1+2 - 可同时格挡拳法和腿法的格挡。 连招
f,f+2,2, 下前+2,2,后+4 崩解! f+2,3,4 (等待对手滑地) f+4, 下后+2,1+2 上斜+4, 下前+2, 下斜+4,3, f+4,4 崩解! 小跳步1, 小跳步上斜+3+4, 1+2 后+3, 崩解! 后+3, 下斜+1, 22, 上斜+3+4, 1+2 后+3, 崩解! 突进, 下前+2, 下斜+4,3, 下斜+3,1, 小跳步, 上斜+3+4, 1+2 下斜+2,1+2, f+2,3,4, 高速中段2,1 崩解! 突进上斜+3+4, 1+2 站立2, 下前+2, 下斜+4,3, f+4,4 崩解! 突进上斜+3,4, 1+2 下斜+2+3 杖, 侧身右, 上斜+3, 下斜+1, 下+3,2, 高速中段 2,1 崩解! 突进3+4, 1+2 rage art & rage drive
暴怒驱动:f+1+2【中段,中段,中段】:他的暴怒驱动本身不算很强。被格挡时没有择的可能性,最后一击在连段中使用时可能因距离问题打空,伤害也比较低,只有40点。不过如果对手在墙边,或许能开发出一些技巧。 暴怒艺术:d/f+3+4【26帧启动 中段】:和80%的角色一样,就是一个中段技能,带有超必杀动画,伤害55点,可以用作连段收尾。 他还有一个有趣的招式d/f+2+3。22帧启动,起始为中段,被格挡时-7帧,即使被格挡也会造成眩晕,但和原版李洛伊不同,原版该招式被格挡时+8帧且普通命中时可浮空,而现在普通命中仍可浮空,但有每场比赛一次的使用限制。所以这基本上相当于他的第二个暴怒驱动。惩罚者
以下是勒罗伊的惩罚技: 10帧 - 1,2,4(27伤害,结束于架势) 12帧 - 2,2(30伤害,+7)和4,4(更远距离,28伤害,+3)(2,2类似于King的b+1,2) 14帧 - 1+2,1+2,1(56伤害+击倒) 15帧 - d/f+2,1+2,1或f,f+2,2(更远距离,两者均可浮空。d/f+2,1+2类似于Julia的d/f+2,1,但没有角度重置) 16帧 - f+4,4(是的,它能打到Hei的f,f+2) 站立(WS)惩罚技: 11帧 - 16伤害 WS+4 13帧 - 1,4(30伤害,结束于架势) 15帧 - WS+2(25伤害浮空技) 反制策略
Leroy boasts a robust foundational toolkit, featuring effective poking techniques and formidable defensive options that, when mastered, can prove to be a source of frustration for opponents. His proficiency in punishment and whiff-punishment is notably strong, aligning well with the rushdown-focused dynamics of Season 4. However, a notable weakness lies in his limited range, with most of the cast outranging him. Additionally, his arsenal lacks standout low attacks. Watch out for the following Strings which are highly negative on block: 1+2,1+2,1: [h,h,h,h,h,h,m -17]: If the string is complete than you can launch punish by d/f+2, 1+2. If the string is not complete make sure to only use something to start your rush down that has long range otherwise if Leroy stops in between the string there will be increased distance between the Leroy and his opponent usually nothing reaches him so make sure to be wise. 2+3: [Low 100~279 -26 ]: OK, this move is usually a misinput no one uses this moves intentionally, atleast no one I know who uses this move, people try to use the cane attack which is the almost same input you just have to put d/f 2+3, instead if they input 2+3 Leroy sits down and bring up Sugar (his Dog) who hit opponents leg and Leroy gets Can attack for guarenteed, just side step as this move is so slow. WS+3,1+2, 4 [m,h,h,h,m -16 i14~i15]: This move is usually thrown by the people who are being pressured into a corner and they will then use duck jab to stop pressure and immediately throw this move that ends in a Knockdown, make sure to punish this move accordingly. FC d/f+4, 1 [l,m -13 i15~i16]: Individuals feeling cornered under pressure often resort to this move. They strategically employ a duck jab to halt the onslaught and swiftly follow up with this move, resulting in a pressure being stopped. It's essential to counteract this move with appropriate punishment. f,F+4, 2 [m,m -14 16~17 (16~) ]: Leroy typically executes this move when closing in on the opponent. Additionally, he has the option to cancel it into Hermit Stance or continue with a mid string, causing a knockdown on normal hit and a launch on Counter Hits. It's crucial to bear in mind that this move is susceptible to punishment. f,f+2, 2 [m,m -15 14~15]: Leroy employs this move as a means to approach the opponent. However, it requires a commitment, as it cannot be confirmed on a hit. Also bear in mind to punish this move. d/f+2, 1+2 [m,h,m -18 i15]: This move is Leroy's Breand and Butter Combo Starter and it is Highly punishable on block. So Bear in mind to punish by hop kick or your character's own Bread and Butter Starter. f+3, 1+2, 4 [m,h,h,h,m -16 i15~i16]: This move is typically incorporated within combos. Deploying it outside of a combo doesn't make logical sense, as it doesn't form a natural combo. Its natural combo status can only be achieved if the second or third hit lands as a counter, which is unconfirmable. Therefore, if used independently of any combo, exercise prudence in your punishment. WS+2 [m,m -17 i15]: This is Leroy's While Standing Launcher, it is a very useful tool as you only have to press one button and an animation is played where Leroy hits the opponent twice and stuns him and the combo can be done to that opponent. It is highly punishable so be sure to be ready for this move if blocked. The following are Leroy's 'High Moves,' implying that opponents can duck them and respond with while-standing punishers or while-standing launchers: 2, 2 1,2,1 B+1 B+3 F, F+3 HRM 2,1 HRM F+1 d/b+1, 3 d+3,2 Leroy's Throw (Grab) Game is very medicore, so no need to focus too much on his throws but do know how to deal with those: Input Break 1+3 1 or 2 break 2+4 1 or 2 break f+2+3 1 or 2 break u/f+1+2 1+2 break Conclusion
Leroy stands out as an exceptionally enjoyable character in Tekken. The inclusion of parries introduces an additional dimension to the gameplay, and when executed with precision, he becomes a formidable force. While Leroy may not be the most beginner-friendly character in his current form, achieving proficiency with him doesn't demand the same level of dedication as mastering characters like Zafina or Jin. Leroy Smith - Season 3 Changes Patch [V3.20] Emergency Patch F,1+2 During Rage and after Twin Dragon gates Succeeds - Fixed an issue in which the timing the move could be performed was faster than other moves by 1 frame. 1, 2, 4 (d or u) - Fixed an issue in which the timing for up or down during Hermit was faster than other moves by 1 frame. HRM f+4 - Changed the damage from 25 to 21. d/f+1 - Changed the damage from 14 to 12. d/f+3 - Increased the distance between the character and the opponent when the move hits the opponent while they're down. d+2, 1 - Changed the damage from 17 to 11. Changed the frame advantage when blocked from -11 frames to -13 frames.Changed the frame advantage upon hit from ±0 frames to -2 frames. d/b+1, 3 - Changed the damage from 20 to 17. d/b+1, 1+2 - Changed the frame advantage when blocked from -9 frames to -10 frames. Decreased the distance between the character and the opponent when the move is blocked. b+3 - Changed the damage from 23 to 21. u/f+4 - Changed the frame advantage when blocked from -3 frames to -8 frames. u/f+3+4, 1+2 - Changed the opponent's behavior when hit in midair. F, F+2, 2 - Changed the damage from 20 to 15. d/f+2+3 - (1st hit) Decreased the distance between the character and the opponent when the move is blocked. Fixed an issue in which it was not possible to perform Geese's mid Atemi throw. (2nd hit) Fixed an issue in which the 3rd hit could be blocked when countering. Fixed an issue in which it was not possible to perform Geese's mid Atemi throw. (3rd hit) Changed the opponent's behavior. Patch [V3.21] 1, 1, 1+2, 1 - (2nd hit) Changed the frame advantage when guarded from -7 frames to -9 frames. Changed the frame advantage upon hit from +4 frames to +2 frames. Homing decreased. (6th hit) Changed the frame advantage when guarded from -10 frames to -13 frames. Changed the frame advantage upon hit from +1 frame to -2 frames. (7th hit) Changed the damage from 20 to 15. Changed opponent's behavior when hit/counter hit 1+2, 1+2, 1 - Changed the damage from 32 to 27. d+2, 4 - Decreased the distance between the character and the opponent when the move is guarded. d+3 - Changed the damage from 14 to 10. d, 1+2 - Changed opponent's behavior when guarded which means Frame advantage will become +0 frames to -4 frames on block. Changed opponent's behavior when counter hit. d/b+1 - Changed the damage from 15 to 12. Crouch status removed. b+1 (During Counter Hit)- Changed the damage from 30 to 25. b+1+2 - Changed the damage from 20 to 17. Changed the frame advantage when guarded from -5 frames to -9 frames. Decreased the distance between the character and the opponent when the move is guarded. Changed the frame advantage upon hit from +6 frames to +2 frames. Increased whiff recovery animation by 10 frames. u/f +4 - Decreased the range of the attack. F, F+2, 2 - Decreased the distance between the character and the opponent when the move is guarded. F, F+3 - Changed the frame advantage when guarded from +1 frame to -2 frames. Homing decreased. Can be side stepped now. F, F+1+2 - Changed the damage from 28 to 25. Decreased the distance between the character and the opponent when the move is guarded. WS+2 - Changed the damage from 10 to 8. Decreased the distance between the character and the opponent when the move is guarded. d/b+2 (While enemy is down) - Changed the damage from 15 to 13. d/f+2+3 - Changed 3rd hit's damage from 25 to 15. b+2 (Time with enemy attack) - Increased recovery animation by 5 frames. Patch [V3.30] 1+2 (1st Hit) or 1+2, 1+2 (1st Hit) - Fixed an issue where hitting the opponent's back had them switching places. Patch [V3.31] HRM 4, 1+2 - Decreased the distance between the character and the opponent when the move is guarded. d/f+1 - Changed the frame advantage when guarded from -1 frames to -3 frames. Changed the frame advantage upon hit from +5 frames to +3 frames. d/f+1, 4 - Changed the frame advantage when guarded from -6 frames to -9 frames. Changed the frame advantage upon hit from +6 frames to +3 frames. d/f+4 - Changed the damage from 16 to 14. d/f+4, 3 - Changed the damage from 17 to 14. d+2 - Changed the frame advantage when guarded from -12 frames to -15 frames. Changed the frame advantage upon hit from -1 frame to -4 frames. u/f+1+2 - Changed the frame advantage when guarded from -10 frames to -14 frames. Increased the recovery time by 2 frames upon hit. Leroy Smith - Season 4 Changes Patch [V4.00] HRM 4, 3 - Changed the frame advantage upon hit from 0 frames to +1 frames. HRM f+4 - Changed the attack startup from frame 26-30 to frame 26-29. Decreased the range of the attack HRM b+1 - Decreased the distance between the character and the opponent when the move is blocked. HRM b+4 - Decreased the distance between the character and the opponent when the move hits. f+3 - Changed the damage from 17 to 14. f+3, 1+2 - Changed the frame advantage on block from -6 frames to -12 frames. Changed the frame advantage upon hit from 0 frames to -6 frames. d+2 - Changed the damage from 15 to 11. d+1+2 - Decreased the move's reach. d/b+1, 3 - Changed the opponent's behavior when the move lands as a counter hit. d/b+1, 1+2 - Changed the damage from 29 to 25. d/b+4 - Changed the damage from 15 to 13. b+1 - Changed the damage from 17 to 14. b+1+2 - Decreased the distance between the character and the opponent when the move is blocked. u/b+2 - New Move u/f+4 - Changed the attack startup from frame 21-23 to frame 23-25. F, F+2, 2 - Changed the damage from 15 to 13. F, F+1+2 - Decreased the move's reach. QCF + 2 - New Move WS + 2 (on hit) - (3rd Hit) Changed the damage from 12 to 10. WS + 3 - Changed the damage from 17 to 14. WS + 3, 1+2 - Changed the frame advantage when blocked from -6 frames to -12 frames. Changed the frame advantage upon hit from 0 frames to -6 frames. FC d/f+4 - Adjusted the motion since it was difficult for the opponent in jump status to land a mid attack. SSL or SSR + 4 - Changed the damage from 16 to 17. Changed the opponent's behavior when hit. After Parry b+2 (1 or 2) - (5th Hit) Changed the damage from 20 to 10. Changed the opponent's behavior when hit. Credits Written by Izhaaq996 Insights by Broken Bloodstorm | Ali References Used: AvoidingThePuddle TheMainManSWE Knee King Jae Players to Watch: Knee Chikurin DUSTIEL King Jae