换一换
换一换 


很久以前,我为《微软模拟飞行X》写过一篇类似这样的指南。它受到了很多像你一样的人的好评——那些对飞行或模拟器使用一无所知,但想体验飞行员角色扮演的人。我们不都这样吗? 本指南将教你飞行的基本概念、模拟器中的良好操作习惯(这与现实生活中的操作并不总是相同的),以及如何享受《微软模拟飞行2020》。 享受这款模拟器有多种方式,这取决于你对飞行的理解。希望本指南能为你提供一些启发。 简介 什么是飞行模拟? 飞行模拟是一个小众领域,在某种程度上类似于火车模拟,但又不太像赛车模拟。虽然赛车游戏充满竞争性且节奏紧张,但飞行模拟类游戏,比如火车模拟或《欧洲卡车模拟》这类,则不具备竞争性,也并非特别紧张刺激。不过这也取决于你在游戏中做什么。飞行模拟游戏的玩法丰富与否,完全取决于你自己以及你如何体验这款模拟游戏。 如果你还没购买这款游戏,我强烈建议你先试玩一下。首先,模拟器类游戏通常需要性能强劲的电脑才能流畅运行。虽然帧率不像第一人称射击游戏那样是首要考量因素,但你可能会对低画质或30帧的游戏体验感到不适。此外,这类游戏可能会占用大量存储空间,还需要稳定的网络连接。PC版Xbox游戏通行证可以让你以约5美元的价格,试玩一个月的标准版游戏。我认为Steam的退款政策对于这类游戏来说时间太短了。一个月比2小时更合适。此外,由于启动器的运行方式,你从Steam启动游戏后才会开始下载。我相信Valve会因为这个原因即使超过2小时也会批准退款。但尽管如此,你还是需要玩上一两天才能对游戏有个大致的了解。 《微软模拟飞行2020》显然允许你在任何地方飞行,实时、真实地点、真实距离。不像《卡车模拟》那样缩小世界,也没有无形的墙。那么你要去哪里呢?你很幸运能在这个时候接触到它,现在整个世界基本上都已准确地呈现在游戏中。新手们认为这是理所当然的,因为我们现在有谷歌地图这样的工具。但在目前的模拟飞行游戏中,高质量的实景地图确实是一种奢侈。《微软模拟飞行X》或《X-Plane》自带的标准地图由低精度的图块组成,根本算不上真实。虽然能满足基本功能,但体验并不好。你得花大价钱购买高质量地图,这些地图只能替换世界的一小部分,而且要花费大量时间和数百美元,最终硬盘被占满、钱包空空,却只得到几个机场和部分高质量地图。举个例子,我为《X-Plane 11》安装了几乎整个美国的卫星图像和街道地图,容量约1600GB,细节却仍不及《微软模拟飞行2020》。但即便如此,对我来说体验也已天差地别。 现在,我们可以飞往任何地方,期待欣赏到壮丽的自然风光和宏伟的城市景观。即便是那些非“摄影测量”的场景,也依然远超我们过去20年所体验过的水平。无论你身处何处,低头就能看到真实的景象。这对我来说有着特殊的意义,希望对你也是如此。 你可以探索自然,降落在山脉中的丘陵和海滩上,找到简易机场或只是一片没有树木的空地,让你的小飞机着陆,拍张照片,喝杯咖啡,然后前往下一个地方。这就是所谓的休闲式丛林飞行。或者,你也可以像“专业”的丛林飞行员一样,驾驶飞机前往巴布亚新几内亚或南美洲的偏远村庄,在不稳定的草地跑道上降落,将人员和物资运送到那些没有通往城市道路的地方。《微软飞行模拟2020》不像《卡车模拟》系列那样内置任务交付系统,但有一个替代方案,需要发挥一点想象力。 FSEconomy是一个网站/客户端,它能让你创建自己的飞行生涯,并且已经与《微软飞行模拟2020》兼容。该平台包含货币和合同系统,你可以为自己设定目标,甚至加入航空公司。 或者你也可以忽略这些,纯粹为了乐趣驾驶喷气式飞机。大型喷气式飞机本身就是一种独特的体验,与其他机型有很大不同。驾驶它们不需要太多手动操作,更多的是关于规划和耐心,学习使用仪表和遵守飞行限制的程序性操作。对许多人来说,这正是乐趣所在。
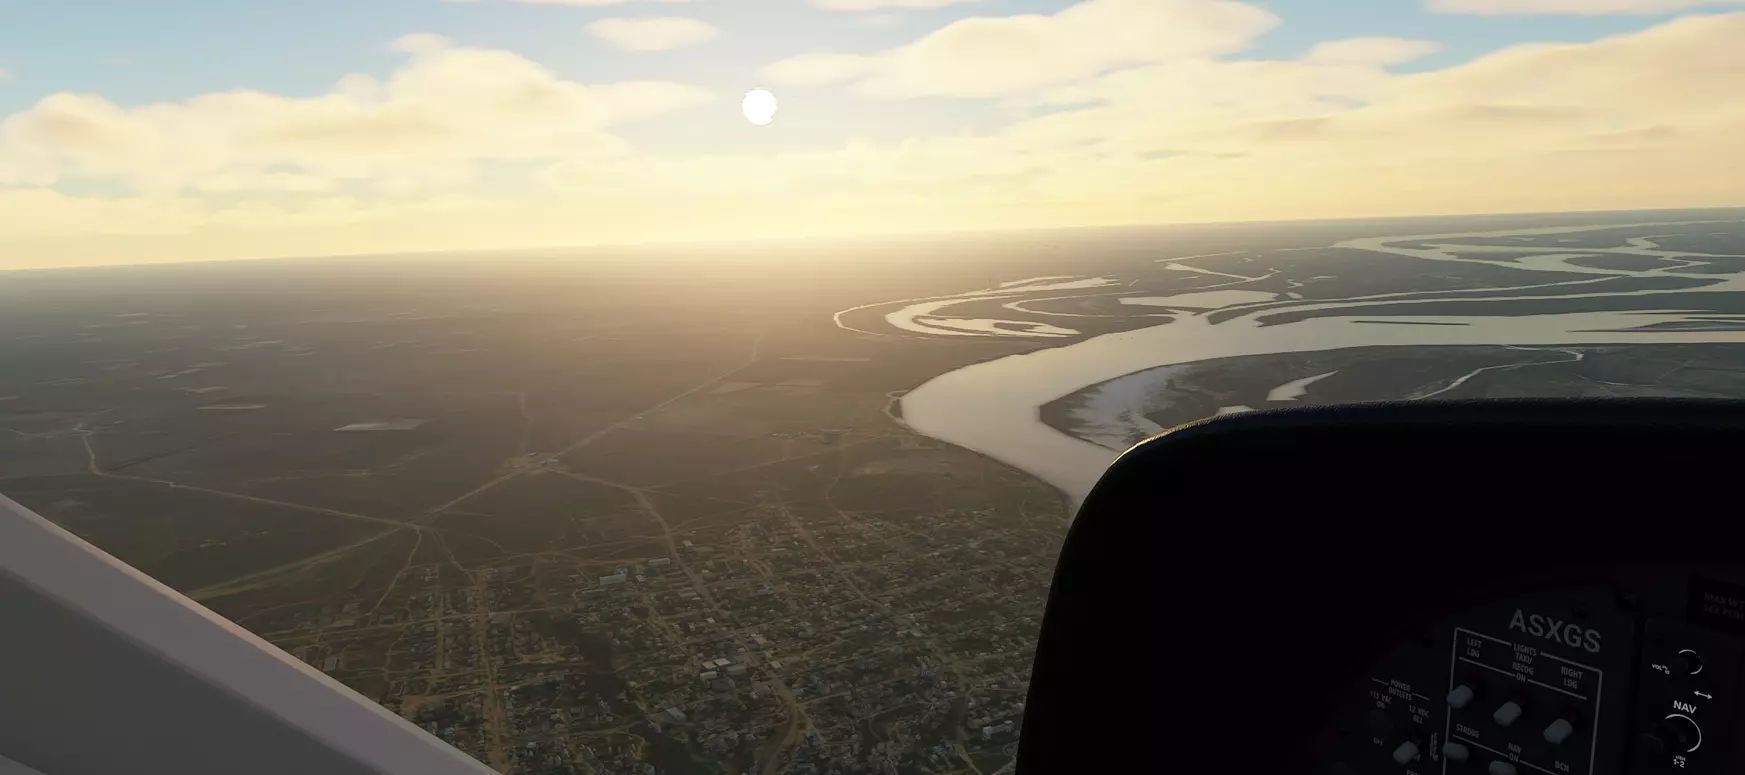
俄罗斯,伏尔加河畔靠近里海的尼古拉耶夫斯科耶 8月20日:新增自动驾驶仪 - 基本术语 8月21日:新增G1000基础操作 8月21日:新增游戏模式和多人游戏 8月21日:新增目视飞行规则、丛林飞行和通用航空飞机 8月21日:新增自动驾驶仪 - A320及A320油门使用方法 8月22日:新增自动驾驶仪 - 787(开发中) 8月22日:新增公告板块 8月24日:更新G1000,增加NEXRAD使用方法 ---- 新增FSEconomy教程 2021年6月24日:新增SimBrief和飞行计划介绍 6月24日:新增CJ4X FMS基础操作 公告 本板块用于提供当前可能对您有用的简要信息。 一般建议 您的Windows操作系统应保持更新。 除非受硬件限制,否则使用SSD或M.2安装可使加载时间和地图流传输更加流畅。 按下Windows+G将启用Xbox游戏覆盖层。这一功能有助于查看好友列表或截取屏幕截图,尤其实用的是你可以启用性能监控器并将其固定在屏幕上。这个小面板能显示CPU、GPU、内存的使用率(百分比)以及帧率。 多人游戏有时不太稳定,且客户端之间可能存在不一致的情况。这意味着有时你能被其他玩家看到,但你却看不到任何人;或者两个人彼此看不到对方,却都能看到其他玩家。这可能由两种原因导致:一是当游戏内玩家数量非常多时,游戏在选择显示哪些玩家方面存在问题;二是其中一名玩家实际上并未连接成功。无论是哪种情况,请检查你是否选择了【所有玩家】而非【在线玩家】,或者双方都必须处于【在线】状态才能看到彼此。如果故障持续发生,按ESC键并切换到其他服务器,让其加载流量几秒钟后再返回你想进入的服务器。这通常能刷新流量。如果仍然无效,可能是全局问题。 实时天气也不稳定。根据经验,似乎需要在新飞行前重启游戏才能正确获取实时天气。如果返回菜单后再次飞行,实时天气会出现问题。如果想使用实时天气,请完全重启游戏。无论如何,这通常是个好习惯,但如果你的硬盘或CPU速度较慢,可能会花费一些时间。切换天气预设无法修复此问题,但可能不会导致问题加剧。 此问题虽已修复,但在极少数情况下仍可能出现,且似乎与位置有关。世界上部分地区可能会出现服务中断或整体服务质量不佳的情况,从而导致天气设置显示空白。 已知问题(11/24)- Asobo 官方微软模拟飞行Zendesk支持
你需要什么 很多人会问“我能用键盘鼠标玩这个吗”。我不想听起来像个 elitist,但这就好比问玩赛车模拟游戏不用方向盘值不值得一样。 当然可以,没有什么障碍会阻止你不用摇杆玩。但玩起来会愉快吗?我不知道。一个罗技3D Extreme Pro摇杆大概50到60美元,具备操控任何飞行器所需的所有基本功能,包括偏航/方向舵控制。 如果你不想买摇杆,你有Xbox手柄吗?那也能玩得不错。如果你完全没有手柄,那就买一个吧。以后你会发现它有很多用处。我认为摇杆和方向盘一样,都属于非必需的外设,你当然可以考虑入手,但如果你不确定是否需要,游戏手柄也完全够用。只要稍微调整一下轴灵敏度,手柄就能提供相当不错的操控体验和必要的按键功能。它甚至支持组合键,让你可以使用更多额外功能。 需要什么配置? 这是每个人都会问的问题,但没人能给出绝对可靠的答案,因为每个系统都不一样,而且每个人的预算和期望也各不相同。建议查看官方配置要求。 如果你不确定,不妨试试游戏通行证。 资源: 有许多网站可以提供不同方面的帮助。 你最可能用得最多的两个是Skyvector和Simbrief。 Skyvector是一个在线航空地图。它有多种用途,可用于目视飞行规则导航,因为它包含地形、部分地标、道路和兴趣点,让你在现实中没有GPS的情况下飞行时能确定自己的位置。显然,机场也会被标记出来,虽然不是所有小型跑道都有,但大多数机场都有标记,点击机场可查看其重要信息,例如海拔高度、跑道类型、尺寸、当地天气以及“航图”——即定义该机场周边程序的独立文件。 它还提供更专业的仪表飞行规则地图,包含航路、信标以及更多抽象信息,供你使用GPS和飞行计划进行导航时参考。 此外,它还兼具飞行计划制定功能。它能够为你提供地点之间的航线,并包含预计时间和距离等信息。 对于飞行计划,通常认为Simbrief是行业标准。Simbrief可以创建完整的飞行计划并导出(目前暂不支持微软模拟飞行2020的计划,但未来肯定会支持)。这些飞行计划还包含燃油使用量、飞行程序、非常完整的导航和天气预测,以及你在机场间飞行时可能需要的所有信息。 燃油计算器也是你可能会用到的工具。如果你不想制定完整的飞行计划,可以使用这个简单的计算器来估算两个机场之间的燃油使用量。Simtoolkit Pro Sim Toolkit Pro 是一款免费且制作精良的应用程序,具备多种功能,例如实时地图、天气、已保存的飞行计划及其他内容。它可与多人网络集成,并连接到你的模拟器以在地图上追踪你的位置。它有点像你的机上平板电脑。你可以为其找到用途,或只是用来追踪自己的进度。 游戏模式与多人游戏 关于游戏模式和多人游戏运作方式的简要说明。
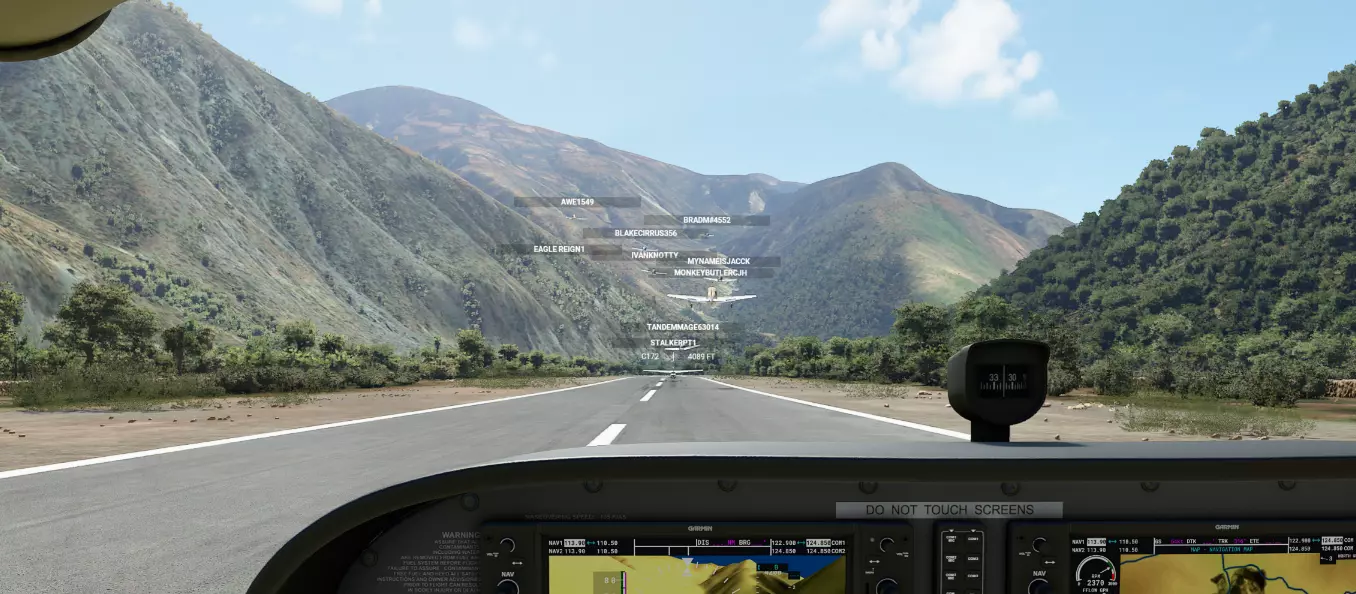
Bush adventures with BradM and the lads around Chagual airfield, Peru. Your basic gamemode is obviously freeflight. You go in there to pick a place to go to, set a flight plan etc and this is your entry into multiplayer. The way MP works is very simple. There is no need to set up a server or a lobby. Everyone on your server region is synced with everyone else. Regardless if you have someone as a friend or not. If you want to fly with a friend or join a group flight, all you need is to spawn at the same airport, or if you want to join in flight you can click on the map and set it as departure and you will spawn in the air. If you match server with whoever you are looking for they will be there. This can be slightly unreliable sometimes where players will disappear or some will not see each other. These quirks will hopefully be fixed with time. The confusion is with the multiplayer settings. Live Players and All Players are slightly different. Live players matches all other players using Live as well. When live you are also forced to use Live Weather and Time. This means all Live players fly in the same condition. And Live players cannot see people who are not Live. All players is simply all players. When set to all you will see everyone and also Live players too but they won't see you. All players also allows you to set custom weather and time. This is the mode you will mostly use when joining groups because everyone can see each other. Except Live players who you can see, but they can only see live players. Group only is as it says. You need to add and invite people as friends and only them will show. Currently there seems to be a problem with Live Weather not working. This seems to be intermittent and until it is fixed, restarting the whole game is the only way to obtain live weather if you exit back to the menu at some point. In general, it is advised to reboot the game in between two sessions to refresh weather. You also might run into the problem of online players not showing. If you are using All Players and people are not there or have disappeared you can try to refresh your server. Press escape and click on your name on the top right. Try switching to a different server, and then back to the one you want. You can also try to set status to offline and then back to online to refresh it though i don't know if it really does anything. In general it can take a bit of time for other people to load in. The Basics of Flying If you are reading this guide you're either a total new pilot, or maybe you've been casually trying it out for awhile, maybe in FSX or XP11 before and you're interested in progressing. In both cases, i think it is essential to start with the ingame lessons. I've done them myself and they are a perfect introduction to what the core mechanics of flying is manually and it's good to be reminded of some things sometimes. So do those lessons. Listen closely to what the instructor tells you and try to get them all completed smoothly. At the end you should already understand the basic behind taking off, landing the small Cessna, and things like trim. The final lessons involves leaving one airport, going to a waypoint and landing at another airport. Just with your compass and your instruments. If you can complete that, you're ready to do the same thing basically anywhere you wish. And that is a massive step forward towards getting the full experience out of this game. "This can't be good for me but i feel great !" - The Postal Dude. ( Except this time, it's good for you ) Here's some of the things that this tutorial covers in a bit more words : Planes use air to fly, to get air, you need to move, and to use the air, you need wings. When air goes around the wings, you create lift that pushes you off the ground. The speed of the air around you is the most important thing to understand and it is not quite as simple as cars. In aviation, the idea of speed is usually referring to "Airspeed", or IAS "indicated air speed". It is called airspeed because it is not defined by how fast you're going in reference to the world, but more like the speed of the air around you, adjusted for air pressure. It is measured with Pitot tubes. You need to move air to fly, this is what you're paying attention to, too slow and you can't fly, you stall and fall down. Too fast and you might break the plane apart. Most of the time, your airspeed indicator is color coded, green is good, red, yellow is probably not good. Wind can change that, as demonstrated by Squirrel in a video, a fast enough wind into your face, can actually lift you up in place. A strong wind facing you back, is the opposite of what you want when you're hanging around close to the ground. It means you need more power and ground speed to get up or stay in the air. But up in the air, it also means you got less air to fight through to go fast. All in all, watch your Airspeed, keep it high enough, and not too high. Every plane has different appropriate speeds, and those vary depending on how heavy you are, and what the wind is like. Another thing about airspeed is, that it is not directly related to your actual ground speed. This is why we fly high up to go fast. Up high, air is thinner. To achieve the same airspeed, you go faster to catch more air, and there is less air to drag you back, so essentially, the higher you are, the faster you go, but your airspeed is mostly the same. And you still risk stalling, or overspeeding the same way you do down below. It is something that you need to pay attention to as well when you fly into areas with high elevation. Being at the top of Everest is like being a 30.000ft. While most of the world is somewhat close to sea level, there are cities and airports built on top of high ground, or airstrip on the side of mountains, landing and taking off from there takes more power and close attention to performance due to thinner atmosphere. With that understood, flying around is mostly handling your plane with consistent, measured inputs. Every plane is different, some are more agile than others. The tutorials in game will teach you some things, otherwise it's simply practicing. Get used to your point of view, to reading the environment and the instruments and how that tells you where you're going to be in 30 seconds. Flying is a game of patience, it's not like spaceships in Star Wars. You want to watch further away than your nose, know what you're going to do, and how it's going to happen.

塞斯纳飞机的前仪表板 姿态是指飞机相对于地平线的朝向,这是一个关键仪表。机头向上,飞机上升;机头向下,飞机下降。这很直观,但这并不意味着飞机总是朝着机头指向的方向移动。 如果机头向上,你会损失空速,速度损失越多,产生的升力就越少,爬升能力会逐渐减弱,直到开始下降。此时你可能机头朝上,但实际上可能在失去高度而未察觉。 观察垂直速度指示器非常重要。它能准确显示你爬升或下降的速度。在正常速度下,大多数飞机不会机头正对地平线飞行,而是机头略微向上以保持“平飞”状态。垂直指示器会告诉你是否真的在“水平飞行”。水平飞行指的是“直线飞行”,既不上升也不下降。 巡航时尽量将其保持在零位。显然这需要不少操作,使用配平会轻松很多。并不要求时刻精准保持在零位,但越稳定越好。 另一个可以观察的指标叫做“攻角”(AOA)。它是机翼与气流的夹角,能很好地反映当前飞行状态。大攻角意味着机翼在强行对抗气流,可能是速度过慢且机头朝上。水平稳定巡航时,攻角略大于0。
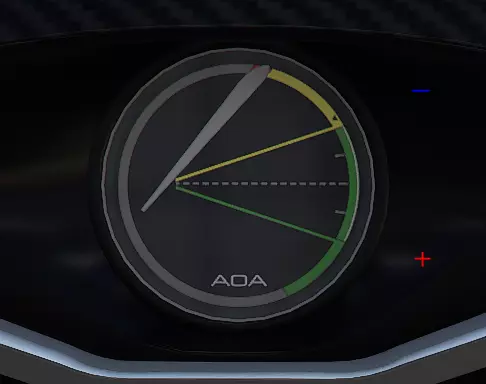
Icon A5中的迎角指示器。下半部分为正角度,数值越大表示迎角越陡峭。上半部分为负角度,通常只有在推杆低头时才会出现这种情况。 飞行基础二 配平就像是给方向盘设置一个偏移量。大多数情况下,你只会用到升降舵配平。升降舵是位于机尾的机翼,用于控制机头的上下俯仰。当飞行速度变化时,升降舵产生的升力也会相应增减。在不使用自动驾驶的情况下,保持直线平飞的关键在于:先维持速度,保持水平飞行姿态,然后进行配平。 如果你松开操纵杆,飞机往往会出现低头或抬头的情况。这时你需要为升降舵设置一个偏移量,以抵消这种趋势,这样即使不触碰操纵杆,飞机也能保持稳定。首先尝试保持相同的高度,注意垂直指示器并将其保持在零位。同时,推拉油门以保持速度稳定。如果必须通过推拉操纵杆来保持水平飞行,则需要相应地进行上下配平。开始配平并观察飞行器的反应,配平过程中慢慢将操纵杆回到中心位置,经过一些练习后,你将能够快速完成这一操作,并且通过正确的配平和油门控制,无需触碰任何操纵装置就能几乎完美地保持水平直线飞行。 如果你想驾驶那些有时没有任何自动驾驶功能的通用航空类飞行器,这一点尤为重要。适当的配平能让你暂时松开操纵杆,查看地图、GPS、空中交通管制信息,或者环顾四周片刻。 襟翼本质上是机翼的延伸部分,可以伸展和收回。它们的基本功能是产生升力。襟翼能让你以更低的速度飞行,但同时也会增加阻力,这就是为什么需要能够伸展和收回它们。使用襟翼时,你需要了解飞机对此的反应,以及在什么空速下使用它们才合适。大多数飞机都有“起飞襟翼”,或者简单来说就是小角度襟翼,能在起飞时提供一定升力,同时不会产生过多阻力,避免需要更高速度和更长跑道才能离地。着陆时,你通常需要使用着陆襟翼或全襟翼设置,目的是获得最大升力,同时保持安全范围内的最低速度,以便缓慢、平稳地降落在正确位置。根据你的目的地和所驾驶的机型,可能并不总是需要使用全襟翼或半襟翼等特定档位。这需要通过练习和熟悉你的飞行器来掌握。模拟飞行中,有很多关于飞机的现实世界视频和资料可以教你这些知识。有些飞机的仪表盘上会有一个标牌,上面标注了不同襟翼角度对应的参考速度和限制,以及起落架应该收起的时机。
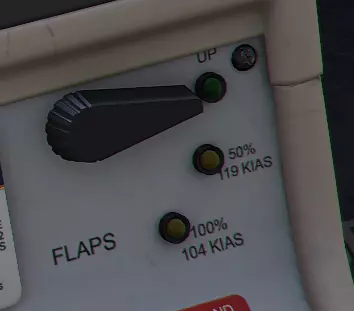
西锐SR22的襟翼操纵杆。注意,每个襟翼位置都规定了空速限制(KIAS)。 目视飞行规则、丛林飞行和通用航空飞机。 目视飞行规则(VFR)是指依靠目视进行飞行的规则。在目视飞行规则下,空中交通管制并不总是对您进行跟踪,并且与仪表飞行规则(IFR)不同,它并非总是一项强制要求。这主要取决于您所在的位置以及特定空域适用的规则。在模拟飞行中,您实际上无需担心这些内容。除非您要连接如VATSIM或PilotEdge等网络,这些网络要求您至少对适用于目视飞行规则或仪表飞行规则的现实生活法规有基本了解。如果您想学习相关知识,应查找现实生活中飞行使用的真实手册和课程。VATSIM在其网站上设有一个内容丰富的学习中心,可作为模拟飞行时真实手册的替代资源。当然,还有其他信息来源。 目视飞行规则(VFR)的一些基本原则正如其名,你应当能够通过目视参考来导航,这意味着夜间飞行和恶劣天气下的飞行是被禁止的。空域也分为不同等级。最值得注意的是,A级空域严格禁止目视飞行,而F级和G级空域本质上是不受管制的区域。 所有这些不同的规则意味着需要了解很多知识,但这并非学习飞行基础知识甚至多人游戏的必要条件。根据VATSIM的标准,这些规则仅在像VATSIM这样的模拟网络中才适用。丛林飞行本质上是在可能不受管制、交通和基础设施稀少区域飞行的代名词。《微软模拟飞行2020》中的丛林飞行模式提供了出色的目视飞行规则体验。它会让你驾驶一架小型通用航空飞机,并提供一份导航日志,其中包含前往下一个机场的描述和指示。 请注意,丛林飞行活动分为不同长度的航段,你可以按照自己的节奏依次完成。导航日志相当简单明了。每一步都有文字说明,还会提供建议的航向和时间。理想情况下,你应按照指定的方向飞行指定的时间,当时间到达时,就可以切换航向前往下一个兴趣点【POI】。这就是为什么它配备了一个可以启动、暂停和重置的计时器。
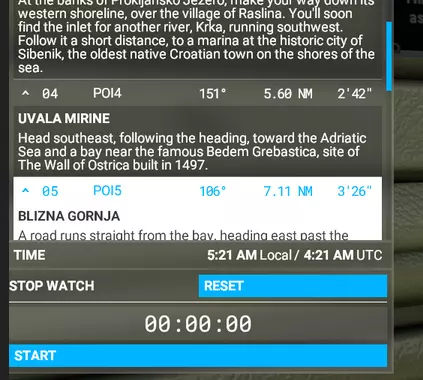
It is obviously hard to be precisely on the clock if you happen to use a different cruise altitude or take a detour somewhere. It is a good idea of how long you should travel in a certain direction but paying attention to your surrounding and what is described is most important. This is similar to driving in the Dakar rally. If you are not on a precise designated track or road, your distance traveled might differ from the book and you should pay attention to the landmarks at all times and use them as reference. If you're having trouble completing those missions, there is as of now (8/21) a way to "cheat" in it. It kind of ruins the challenge and i'm actually hoping they fix it before i try the other challenges. At least for the Rijeka - Santorini campaign - I have notice that the INSET minimap on the G1000 actually has the entire flight plan on it, you cannot use nav to follow it as it is not activated but you can follow it manually This does not apply to the non-electronic instruments for this reason. Note that i don't believe it is required to physically travel through each point of interest to validate the missions. Though the Garmin seems to recognize the POIs as waypoints since it says POI on the navigation helper on the top. You should be able to validate a mission just by going to the next airport which is specified at the end of the log. The VFR map does not have a blip of your own plane so even if you do decide to skip everything and get to the airport, you still need to get your bearings correct to find it if you are in a plane that doesn't have GPS. To validate a trip, you must fully stop for a second or two until the screen pops up. I have once stopped on a taxiway and it worked but on a different strip i parked on the side of the runway and it didn't validate until i moved closer to the runway. So i would suggest you just stop on the runway and save you the trouble. It doesn't matter anyway. Most GA aircrafts are propeller planes as far as basic Microsoft planes go. As for all of those planes, startup procedures are all on the integrated Checklists which you can complete yourself or automatically so you shouldn't have problems starting up. ( Cold & Dark start is only available when spawning at a parking spot, if you spawn on a runway or in the air you will spawn with all systems and engine running ) Some things particular to planes with propeller engines that can be important and are not an issue with the airliners and jets is engine monitoring. Unlike jet engines, props use engines that are more similar to cars. These engines mix air and fuel at a specific ratio to be injected into the pistons. Like cars, altitude means different air density, and cars also struggle at high altitude as they get starved of air, this cause cooling issues and reduces power. Most engines are designed to be optimal at somewhat close to sea level. High altitude driving and flying requires to adapt the fuel intake so the air/fuel mixture ratio is ideal. Now i do not know what specific mixture is appropriate for each altitude as this is varying between aircrafts. But the general rule is that mixture is reduced, or lean, the more you fly up, and rich, the closer you are to the sea. This varies with engines, but you can use the auto-mixture assist in the game settings which should adapt mixture automatically. The mixture setting is usually the red stick, next to the throttle or somewhere else. This does not apply to Turboprops, because air injection is increased. The other concept to look for RPM. No every prop plane is like this, but generally if your plane has a RPM lever ( usually a blue stick next to the throttle ) that plane has a "constant speed propeller" engine. Similarly to helicopters, the propeller is designed to be spinning at the same RPM constantly. By using the throttle, you do not increase RPM but instead increase pitch of the blade. Increasing the pitch of the blade gives it a more aggressive angle of attack on the air, and it will then push more air. As said earlier, angle of attack is how much air you are pushing under your wing, or spinning blade in this case. The blades on a constant speed propeller engine are mounted on a rotating axle which changes the pitch of the blade as you use the throttle. I am not an expert on this but i think the general rule is that when taking off, landing and maneuvering around you should be on max RPM set and use the throttle, but when at cruise altitude, you should be setting the RPM to a lower setting to optimize fuel efficiency and reduce engine stress. Again each plane is different, and each engine is optimized for different RPMs at different cruise speeds and different mixtures at different altitudes. For the most part as a learning sim pilot, you don't need to worry about engine maintenance and fuel efficiency. This is stuff you can look up on the internet and try for yourself, i can't certify those values are realistic and applicable in FS20. IFR and Flight Planning with Simbrief. IFR stands for Instrument Flight Rules. To put it simply, any flying done in any weather considered worse than VMC standard, must be done IFR. An IFR aircraft ( and certified pilot ) can use instruments to fly through weather, at night, use radio, GPS beacons and whatnot to navigate safely. It is also required to fly in class A airspace which is mostly everywhere above 18000ft ASL. Most if not all commercial flying around the world is done IFR, and a requirement for this is to pre-plan your flight in advance, among many other things which i won't get into. As far as the sim goes, you can always do whatever you want it's a game. But if you want to experience jets and airliners using a flight plan is essential as they are designed to be used strictly IFR and work best that way. FS20 can generate a basic plan visually on the world map and works decently well, it will also input your plan into the Flight Computer automatically. Or you can use the SimBrief website to generate a more complete plan, which you can print or read as a pdf and can even come in authentic airline formats if you wish. SimBrief comes especially useful with the FBW 320NX mod or the CJ4X, or Aerosoft CRJ as they come with more complete Flight Computers that can use more of the data given to you by the flight plan. This section of the guide will try to teach you how to read the essential parts of a flight plan. Firstly, you should go to Simbrief[www.simbrief.com] and set up an account, link it to navigraph if you happen to have a subscription, if not you will be using outdated navigation data but in most cases it will not be an issue. Once that is done, use the Dispatch tab to go to the editor and create a new flight.
制定计划时有很多选项可供选择,但大多数选项无需手动调整,可以设为自动。你通常只需选择出发和到达机场、使用的飞机,选择正确的重量单位,以及OFP格式。我一直使用LIDO,因为它是SimBrief的默认格式,而且我认为它相当简单。 关于机身,有很多选择,但在许多情况下,为微软模拟飞行2020中的飞机使用自定义机身在燃油消耗和重量限制方面可能会更好。如果你正在使用FBW 320、WT CJ4X、HD 787或CRJ,这些机型应在各自的官方网站上提供一个链接,让你可以快速复制其自定义设置,以便将来能从下拉菜单中轻松选择该特定机型。例如,如果你点击FBW 320的GitHub上的Simbrief配置文件链接,就会进入已为你填好所有数据的机队页面。只需点击保存,自定义的320机型就可以使用了,燃油、重量和性能数据也会更准确。 此外,你应该将飞行员ID记录在某个地方。这是一个简单的ID号码,微软模拟飞行2020或其他模拟飞行游戏中的部分机型可以使用它来自动同步飞行计划并自动填充FMS,从而提高效率。FBW320、CJ4X、HD787和CRJ机型在各自的飞行管理系统(FMS)选项面板中设置飞行员ID后,即可使用该功能。
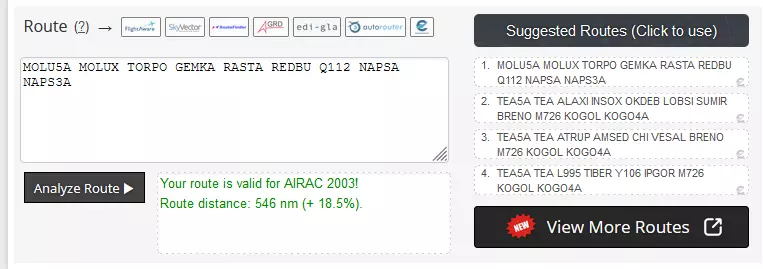
以下是航线规划说明,你可以在右侧选择不同选项,但大多数情况下默认选项即可。在某些情况下,尤其是当模拟飞行和SimBrief的AIRAC周期不匹配时,可能会出现一些问题。如果你在下方地图上看到异常情况,可以尝试使用备用选项。如果在模拟飞行中查看地图时发现某些内容不对劲,你可以随时切换标准仪表离场程序(SID)和标准终端进场程序(STAR),选择看起来更合适的选项。 点击页面顶部的【生成飞行计划(OFP)】按钮来创建PDF文件。 你可以从下一页获取一些信息,或者直接点击【打印/查看PDF】按钮在浏览器中查看完整的飞行计划。 下一部分 > SimBrief 2 我们已生成PDF格式的飞行计划,本示例为驾驶奖状CJ4X WT从意大利那不勒斯的LIRN机场飞往德国慕尼黑的EDDM机场。左侧工具栏中的计划按页面排序,以便快速访问。 页面1:摘要和燃料
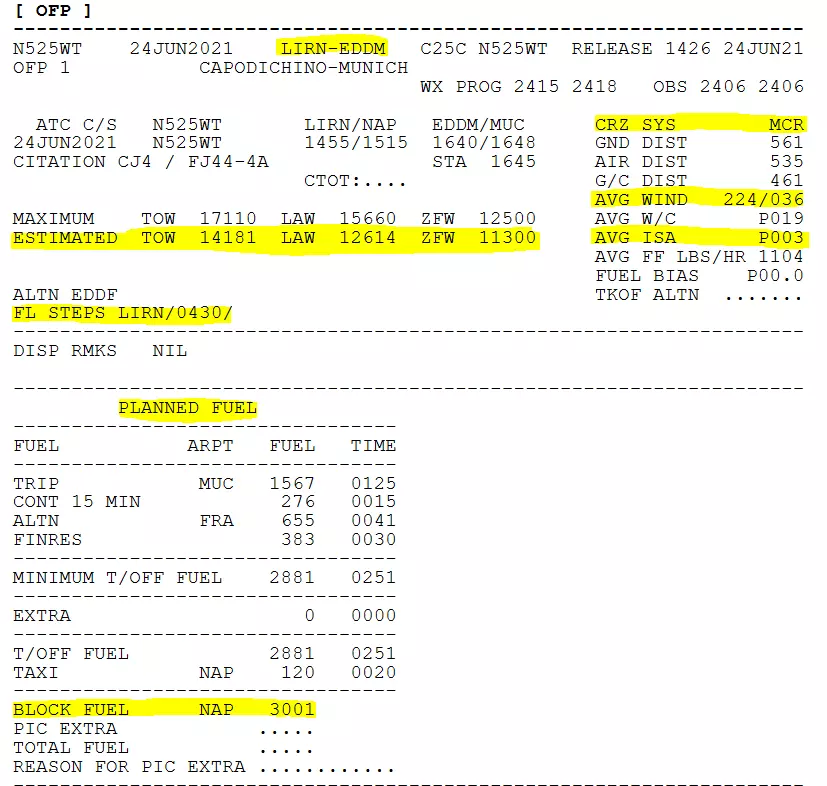
这是第一页。根据你使用的机型不同,飞行计算机可能需要或不需要某些高亮显示的元素。以下是你可能需要了解的部分元素: CRZ SYS即巡航指数,空客和波音机型需要设置。在CJ4机型中,它是一个名为MCR的自定义马赫数剖面,无需设置。如果你使用FBW 320机型,应将其设为8。它本质上是你的经济巡航等级。 AVG WIND是巡航阶段的平均风速(航向/节)。 AVG ISA表示巡航期间该区域的实际气温与标准气温的偏差值(偏高或偏低)。在320机型上,该数值会自动填充,而且据我所知,在微软模拟飞行2020中完全不需要手动设置。但如果你将来尝试其他模拟飞行游戏,这些数据可能会派上用场(例如XP11的波音737 Zibo插件)。以下是您的起飞重量(TOW)、着陆重量(LAW)和无燃油重量(ZFW)的估算值与最大允许值。(无燃油重量指飞机携带乘客/货物负载但不包含燃油时的质量。) 以下是建议的巡航高度。本案例中为FL430,即43000英尺。您无需严格使用此高度。 计划燃油区域显然十分重要。 底部的轮挡燃油是燃油总量。这是您在模拟面板设置重量时需要参考的数值。本案例中显示为3001,且计划单位设置为磅(lb),因此您应在模拟器中将燃油重量大致设置为3000磅。 更具体地说,航程燃油(TRIP)是从起飞到着陆的估算燃油量。CONT是应急燃油,ALTN是当原目的地无法降落时飞往备降机场的燃油。FINRES是额外储备燃油,通常为30分钟飞行时间的油量。 部分系统会要求你在特定字段填写正确的重量,有时则无需填写,系统会自动填充。 2:航线规划与影响
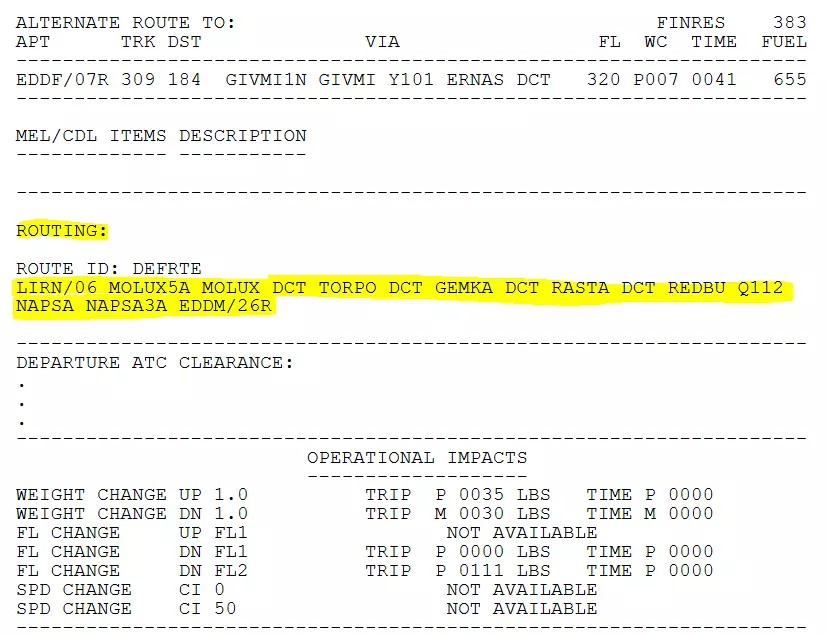
这是航线规划页面,解码起来相当简单。 LIRN/06 代表出发机场和跑道。 MOLUX5A 是离场标准仪表离场程序(SID)。标准仪表离场程序(SID)和标准终端进场程序(STAR)通常带有数字,因此易于识别;而航路点则没有数字。 MOLUX5A 中,MOLUX5 是离场程序,MOLUX 是该程序末尾的航路点。 DCT 并非航路点,它表示“直飞”,与使用航路相反。除了像 MOLUX 这样包含在标准仪表离场程序/标准终端进场程序中的情况外,每个航路点之间都会默认采用直飞方式。 TORPO、GEMKA、RASTA、REDBU 均为航路点,你需要按顺序依次直飞这些航路点,这是默认且相当简单的操作方式。 Q112 是一条航路。航路的识别特征通常是单个字母后接数字的格式。在飞行管理系统(FMS)中,输入航路时必须同时指定其终点。在这种情况下,我们在NAPSA导航点离开Q112航路。 NAPSA NAPSA3A是进场标准仪表进场程序 EDDM/26R是目的地机场和跑道。 因此,其含义如下:从LIRN机场06号跑道起飞,使用MOLUX5A离场程序至MOLUX,直飞TORPO、GEMKA、RASTA、REDBU。使用Q112航路直至NAPSA,然后沿NAPSA3A标准仪表进场程序在EDDM机场26R跑道着陆。 实际着陆程序由你选择(例如仪表着陆系统、甚高频全向信标区域导航或目视等,仪表着陆系统通常是最佳选择) 3:时间和重量
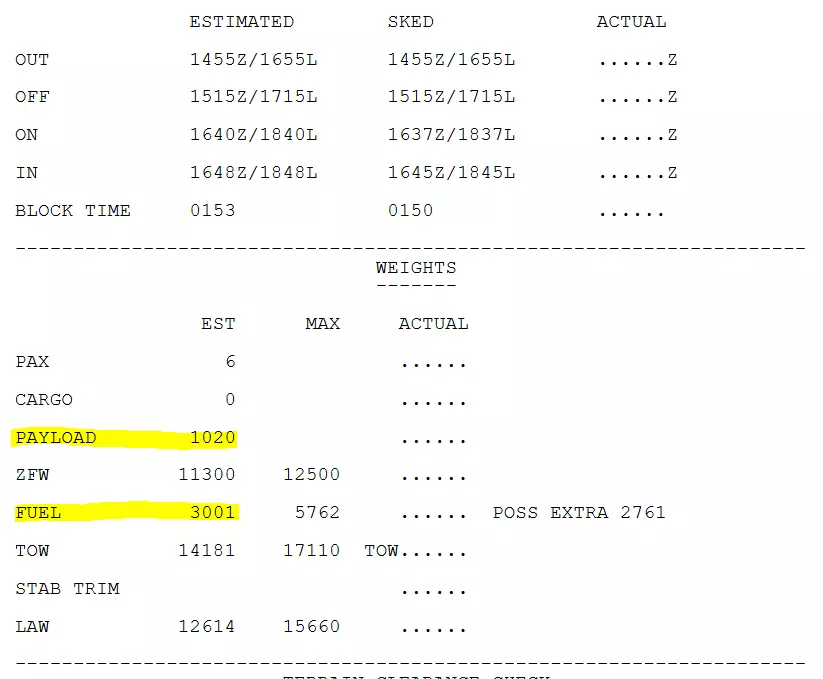
这是你的重量数据,部分飞机可能需要这些数值,或者会自动填充。内容很简单:乘客数量、业载(即乘客与货物的总重量,此处显示为1020磅,但对于大型飞机,该数值通常以总重量的分数形式表示,例如31.6实际上代表31,600磅/千克)。 在此处你可以再次查看估算的零燃油重量、起飞重量、最大着陆重量以及轮挡燃油。 4:机场天气列表
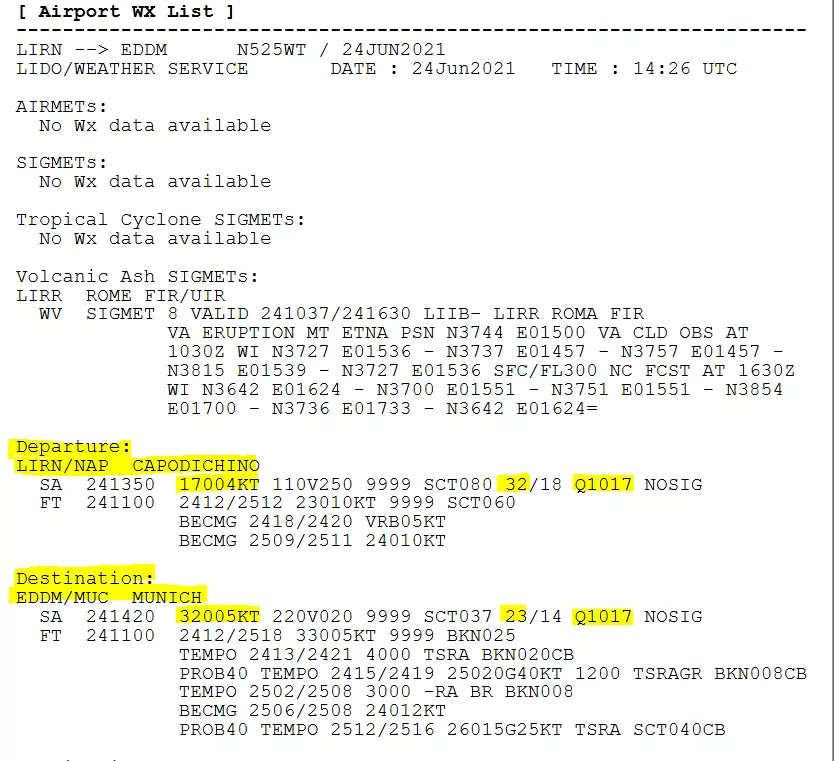
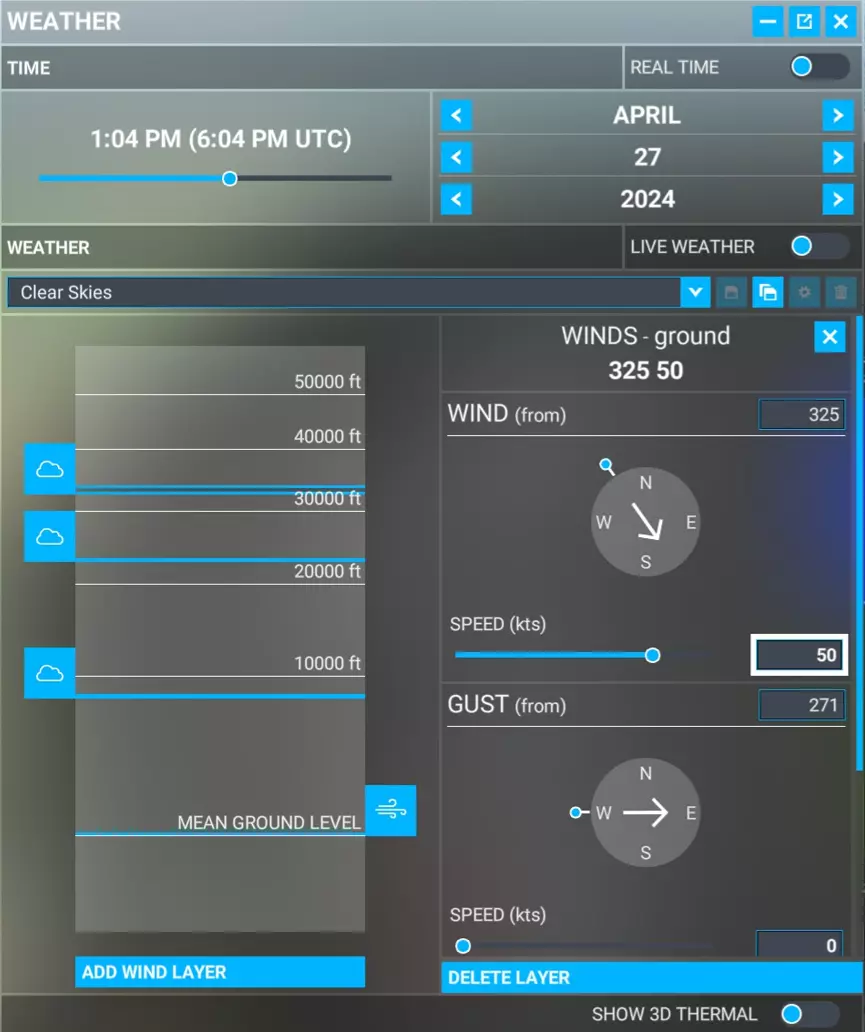
这里是你可以查看天气信息和其他通知的地方。对于模拟飞行而言,最重要的是你需要出发地和目的地的【METAR】(航空例行天气报告)。这些报告可能看起来难以解读,但实际上相当简单。在大多数情况下,你在进行起飞和着陆的性能规划时,会关注风向风速、温度和【QNH】(修正海平面气压)。 以【LIRN】(那不勒斯国际机场)为例,我们看到: 17004KT:KT代表节,这表示的是风向风速。17004意为风向170度,风速4节。在某些情况下,可能会添加VRB(风向不定)或G(阵风),但这些无法输入到性能页面中。在大多数情况下,阵风意味着你在起飞滑跑过程中可能会突然出现空速损失或增加,此时的应对方法是在抬轮前给自己多留一点时间来进行补偿。 LIRN的温度为32/18,你应在温度栏输入32(单位为摄氏度)。 Q1017是大气压力,根据你所在的位置,它可能以巴或英寸为单位。你始终可以使用旋钮进行快速转换,将气压设置到你想要的数值,然后切换到另一个单位,就能得到正确单位的转换结果。在这种情况下,我们的修正海平面气压(QNH)是1017。 如何在飞行管理计算机中使用这些数据因系统而异,我将在另一部分对此进行介绍。 自动驾驶仪 - 基本术语 在深入了解特定系统之前。了解自动驾驶相关术语十分重要。掌握这些术语能让你理解如何在《微软模拟飞行2020》的大多数飞机上使用自动驾驶功能,因为大多数飞机的自动驾驶系统都基于佳明(Garmin)系统,只是布局有所不同。

TBM的自动驾驶面板 这是一个基于Garmin的自动驾驶系统的良好示例,其术语大多保持一致。不同之处可能在于,这些按钮和旋钮的位置可能因飞机而异。以TBM为例,它有这样的面板。像塞斯纳172 G1000这类机型,其相关功能位于两个屏幕之间的操作杆上,而旋钮则在屏幕两侧。 AP - 这是自动驾驶的主要开关,用于开启/关闭自动驾驶 YD - 偏航阻尼器。这是一个自动化系统,通过测量偏航变化来尝试纠正震荡,并动态进行抵消以维持舒适的巡航。通常需要开启此功能才能激活自动驾驶的某些功能,或者完全激活自动驾驶。该功能通常应保持开启状态。 XFR - XFR代表切换。这是一个开关,用于让用户选择自动驾驶仪使用正驾驶还是副驾驶侧的仪表。我不知道微软的飞机是否模拟了这一功能,因为我认为两侧的仪表是同步的,所以可能不需要使用这个开关。默认情况下,它应该设置在左侧(正驾驶侧)。如果你要从右侧座位驾驶,则需要将控制权切换到右侧。 FD(飞行指引仪)是电子仪表姿态指示器上的紫色/绿色箭头或十字。它显示自动驾驶仪将要执行的操作,如果你想完全按照自动驾驶仪的方式飞行,这也是你应该执行的操作。例如,在驾驶空客手动起飞并驶离机场时。你应该尝试跟随屏幕上的指示器,这样就能遵循飞行计划和飞行电脑中设定的正确航向以及爬升/下降指令。如果你愿意,偏离指示器也是可以的。
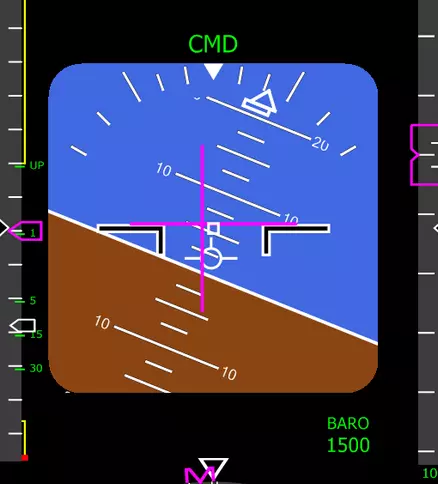
The horizontal bar shows desired inclination. The vertical shows desired roll. ALT - This is the altitude hold. When it is On, the A/P will level off at that altitude when it is reached. there are several ways to get to that altitude and this function is combined with either one of them. ALT SEL - The ALT SEL knob can be turned to set the desired altitude. It can be clicked to instantly set the desired altitude to your current altitude. Clicking the ALT SEL knob and the ALT button together will make the plane level off instantly ( if AP is on ). If you are already leveled off, turning this knob will not make the plane move. You need to combine it with VS or FLC to go from one altitude to another. It is good to prepare your next altitude change in advance. VS - VS is Vertical Speed. This will make the plane climb or descend at the desired rate in feet per minute. If you are 3000ft and want to get to 6000ft. You can set 6000 with ALT SEL, Press VS, and then use the Nose Up or Nose Down buttons/wheel to increase or decrease your rate of ascent/descent. 1000ft/m UP will make you reach 6000ft in 3 minutes. You MUST watch your speed as you do this and set the throttle so you do not stall or overspeed. FLC FLC is Flight Level change is also a way to reach a desired altitude set with ALT SEL except the rate is variable. Instead of setting a rate of feet per minute, pressing FLC will set a speed. The plane will then try to climb or descend will maintaining that speed. You can change the desired speed with the down and up buttons/wheel. This is mostly safer than VS as your speed will be consistent and you can maintain your throttle and the plane will do the work. When climbing, you should increase throttle, or decrease desired speed so the plane can climb steeper. If you are descending, you must reduce throttle first to trigger descent. and increase desired speed to descend steeper. Similar to VS, FLC will be disabled when you reach +/- 500ft from your selected ALT and the plane will level off slowly. VNV - VNAV is vertical navigation. This is used when you have a flight plan set in the flight computer, with the performance numbers correctly defined. This setting will follow the altitude and speed limitations/requirements set in advance. Whether this works in the basic planes or not is not something i'm certain of. Sometimes the numbers can be off but if you have all numbers set you can try. Theoretically, the plane should be able to follow that vertical path entirely by itself. The only requirement is to set cruise altitude when taking off, and bottom altitude before your TOD ( top of descent ). More on that later. DN/UP Wheel This wheel or Nose Up and Nose Down buttons define your rate of vertical speed when using VS, or your desired speed when using FLC HDG - Heading Hold is the most simple way to go somewhere. HDG will make the plane follow a compass heading that you set with the HDG knob. You can also click the knob to set the desired heading to your current heading. NAV - NAV is a more advanced heading function. It can follow your flight plan or when you use the Direct-To function for example ( the line on your map ) Secondly, it can also follow a beacon. If you wanted to navigate using VOR, you would tune your radios to the desired VOR, and the NAV would head towards it. It is required to set your bearing mode to the correct one. This can be found in different locations depending on the plane. The Bearing mode should be on VOR1 or VOR2 for your tuned VOR radios, or to FMS/GPS/NAV to follow the map plan. Note that a white line is not Active. NAV will follow the purple line as purple means active leg. If you missed a waypoint or a bug cause it not to be activated, NAV will try to go back to activate that leg. In the flight plane menu you can activate a leg manually if you want to skip a part and be back on track. More on that later on how to use the flight computers which work in conjunction with NAV/VNAV. APR - APR / LOC / LS is like NAV but intended to be used for final approaches like ILSs. An approach has to be set and the leg active. Once the approach is active in the plan pressing approach would make the plane follow the Glideslope. The Glideslope is the trajectory descending down to the runway, it gives you a lateral and vertical indication of how accurate you are on the landing and you should follow it when using it. This is not always working in small planes and it will not land by itself. I personally fly by hand on final most of the time because it is more reliable and fun. BANK - BANK is a switch or a knob that can set a maximum roll limit. Typically in cruise you would click bank to set Half Bank. This limits how much roll the plane can do so you don't shake your passengers too much. It should be off outside of cruise so you are as agile as possible. BC - As far as i understand Back Course is a used to align yourself on the opposite side of a runway that has a LOC/ILS system. If for instance an airport only has an ILS for one side of the runway, BC would allow you to use that runway on the opposite side and align yourself using the guidance approach system. Even though that side of the runway does not actually have one of those systems. I don't know if it works or not here. Autopilots - Garmin G1000 There's a few things to know about the G1000 related to the previous part. In order for the autopilot to properly follow the purple line on the GPS which you set using a flight plan, or Dir-To. You need to set the CDI to FMS. The CDI like a compass which points to VORs and beacons and your flight plan accordingly. You need the CDI to be set to FMS/GPS mode for the Autopilot to use that as it's NAV heading.
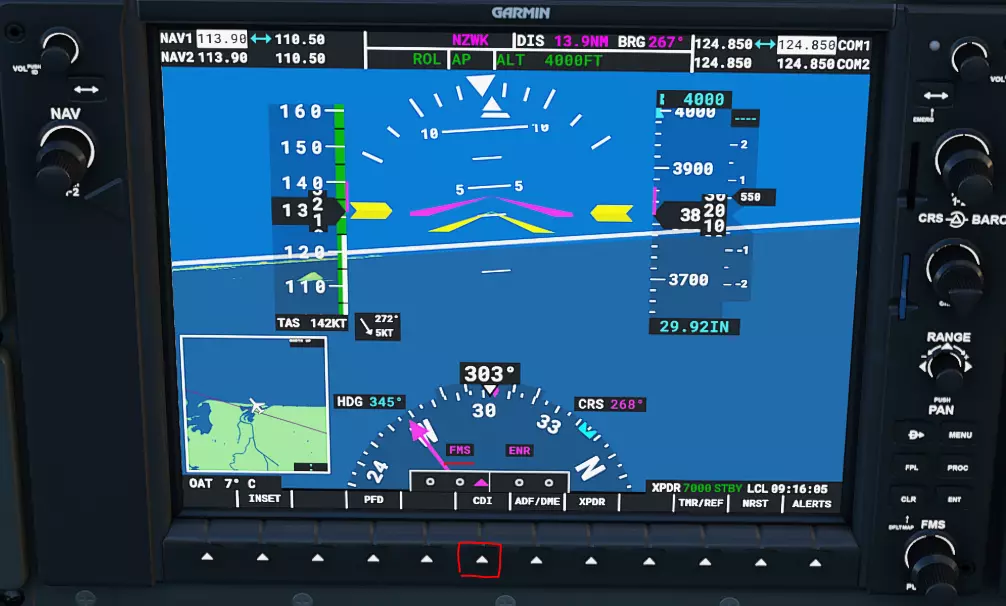
Garmin设备底部有用于激活部分功能的按键。 要使导航功能正常工作,需点击CDI键直至罗盘显示FMS,之后自动驾驶仪便会沿地图上的紫色线路行驶。 此处还有其他可用功能: INSET:即面板左下角的小地图。可通过右侧的量程旋钮对该迷你地图进行放大或缩小。点击INSET后,可激活Nexrad(气象雷达)或Top(地形等高线)功能。 PFD:PFD会打开多个选项。WIND选项提供三种不同的风向显示方式,能显示风向和风速,对于了解周围 wind 情况非常有用。BRG1和BRG2是方位指示器,也可设置为信标或FMS等模式。使用Arc CDI时,此功能不可用。HSIFRMT(HSI格式)从Arc(弧形)更改为Full Compass CDI(全罗盘航道偏离指示器)。这只是偏好设置。在这种情况下,它被设置为Arc(弧形)。 直飞 直飞是一种直接前往任何机场的快捷方式。非常适合VFR(目视飞行规则)。
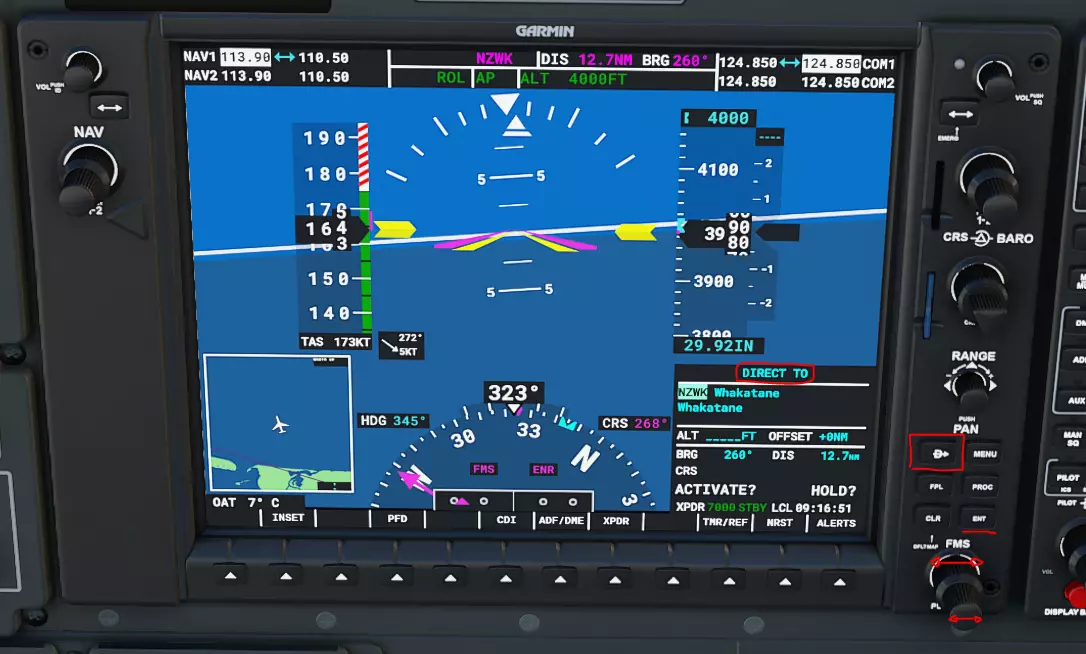
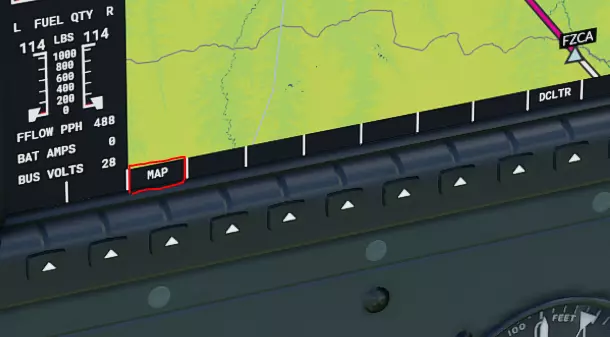
DirTo按钮是Garmin设备右下角带有箭头的按钮。点击该按钮会在屏幕右下角弹出一个窗口,你可以在其中输入机场或航路点的ICAO代码。由于相机抖动,实时使用选择旋钮可能会有些麻烦,建议拉近镜头或使用主动暂停来操作。这需要一些时间适应,较大的旋钮通常用于在窗口内移动,较小的旋钮用于切换字母和数字。点击旋钮可进入或退出窗口。按下DirTo键后,如果窗口没有闪烁,请点击旋钮,然后使用底部和顶部旋钮输入代码的每个字母和数字。注意,在输入字母时,系统会过滤掉下一个不可用的字母,这会使输入速度稍快一些。(如果数据库中不存在【ABC_】和【ABCD】,电脑会跳到下一个字母)因此,你应该按顺序选择字母以避免混淆。 当ICAO代码正确后,你需要检查机场名称是否正确。如果正确,可按下回车键,此时Load?按钮会高亮显示,你可以再次按下回车键。佳明设备现在应该会显示一条直达该机场的航线。此外,你可以按下屏幕底部的NRST按钮,使用旋钮滚动浏览最近机场列表。在列表中高亮某个机场后,按下DirTo按钮,系统会自动将选中的机场填入DirTo菜单,之后只需按回车键即可加载/激活该机场。这显然更快捷,是轻松地从一个机场飞往另一个机场、练习着陆和巡航而无需进行任何规划的好方法。 需要注意的是,DirTo功能不考虑任何垂直导航,因此在山区地形中,你可能需要偏离航线并寻找绕行路线以到达目的地。 FPL按钮会调出飞行计划菜单。如果你已在菜单中设置了飞行计划,它会显示在该菜单中。如前所述,若你的GPS显示为白色线条,可能意味着你跳过了之前的航点。这种情况下,你可以进入FPL菜单,滚动至当前试图前往的航点,按下Enter键将其激活为当前航段,此时线条会变为浅紫色。之后你可以再次使用NAV模式来跟随该航段。 如果你的飞行计划为空,可以手动依次添加航点和机场。 PROC按钮代表程序。它用于选择起飞和进近程序以及跑道。如果你在飞行前设置了计划,游戏会自动填充这些内容,但我发现在从空白页面开始时这一功能似乎无法正常工作,不过这可能是我个人操作的问题。使用NEXRAD NEXRAD是一项气象服务,能让飞行员在其Garmin地图上获取降水和云层覆盖信息。它可以下载获取,或者如果你的飞机配备了NEXRAD雷达,你可以进行实时探测。这在飞行中遇到天气情况时非常有用,尤其是在实时天气模式下遇到更复杂的天气结构时。 雷达会在你前方或地图上显示云层和降水的形成。如果你严格按照目视飞行规则飞行,或者想总体上避开恶劣天气,你可以使用它来尽可能避开主要的天气单元。你可以获取水平读数来指引你绕开它们,还能获取垂直读数,查看天气单元的高度,判断是否可以从上方飞越。 首先,按下右侧显示屏上的MAP键以访问地图选项。
这会弹出几个选项
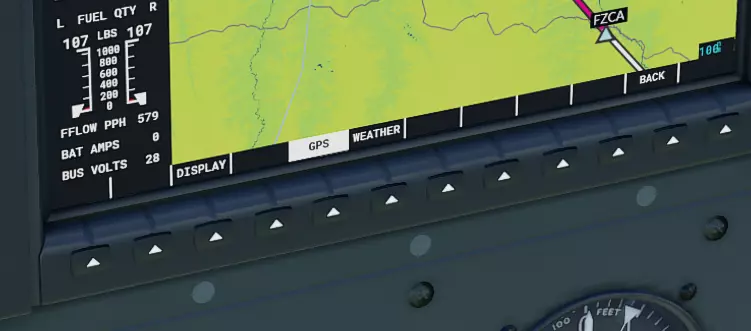
GPS会将你带到可启用TOPO或NEXRAD的菜单。 TOPO是类似VFR(目视飞行规则)中的等高线。它本质上是更详细的地形地图,有助于在IFR(仪表飞行规则)下围绕山脉导航。 NEXRAD会启用雷达探测功能。这将在地图上显示天气情况。实际中,由于NEXRAD探测、处理数据并发送给用户需要一定时间,天气显示会有几分钟延迟,但模拟中可能未模拟此延迟。 【显示】按钮用于切换地图或实时雷达显示(若你的飞机配备相关设备,例如机翼上伸出的管状物体,如TBM或大篷车飞机)。点击【显示】可切换至天气雷达,然后点击【天气】,此时会出现【水平】和【垂直】选项。
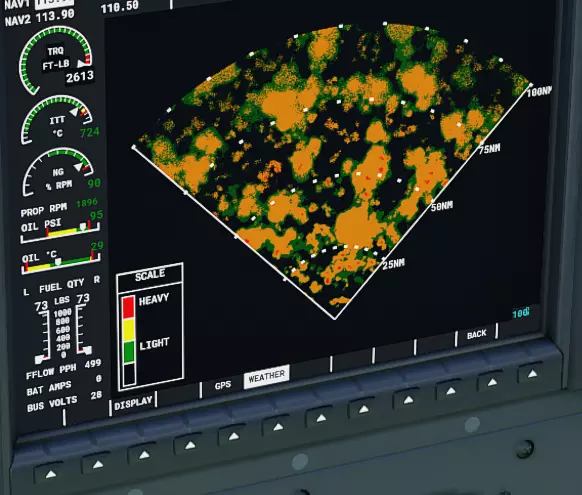
这是水平模式。你会看到前方有一片区域,并且可以改变方向来绕过物体。它每隔几秒更新一次。
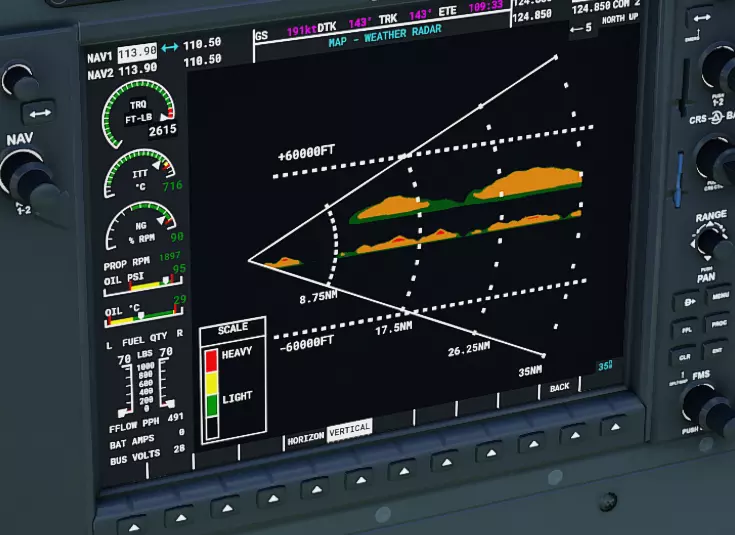
这种垂直模式下,你可以判断应该上升、下降还是保持当前高度以避开云层。注意垂直范围超过60,000英尺。有些看起来可以避开的物体,你需要留意,因为可能实际上无法到达,而且地面也不在雷达底部。要判断是否安全,请观察那些点。中间的点表示你保持平飞时的位置。 在这两种情况下,使用Garmin设备右侧的Range旋钮可以扩大或缩小探测范围,以提高准确性。 自动驾驶 - A320 虽然大多数自动驾驶系统在术语和概念上基本相似,但空客的理念略有不同。主要是与同类波音机型相比时。大多数波音飞机采用相同的通用工作流程,大多数空客飞机也遵循各自的工作流程。不过,我认为可以说波音的自动驾驶系统(A/P)在某种程度上更接近你在佳明系统上看到的功能。 我们先来介绍空客飞机,因为它相当受欢迎,而且由于其差异,可能会让人有些困惑。
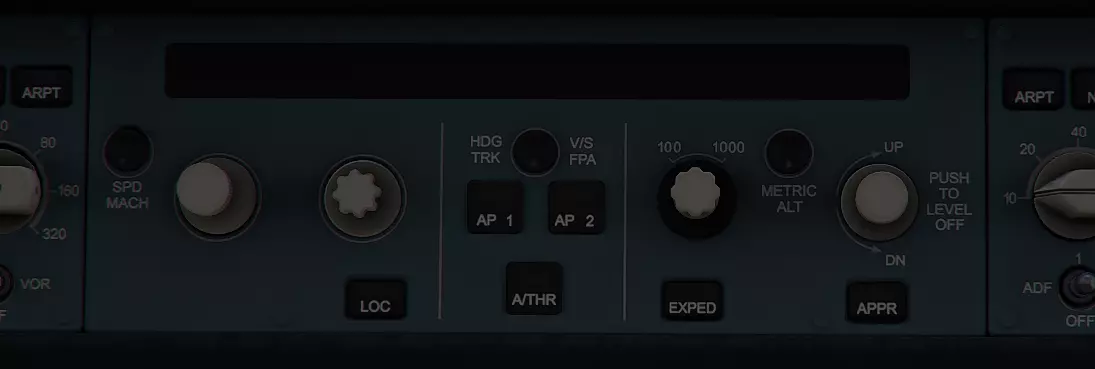
The core premise to understand with the Airbus A/P is the difference between Selected and Managed. Airbuses are designed with more automation in mind. And Managed mode is essentially about letting your flight computer take over control. While selected, is putting the user in charge of selecting the desired values in real time. Managed mode works according to the flight plan specified in the flight computer. If you set a flight plan in the game menu, managed mode will use the values from the flight computer to navigate. I'll explain flight computers in another chapter. Each knob is turned to select the desired value, but it can also be pushed or pulled. This is done by putting you mouse over and clicking on the knob when the arrow pointing up or down shows up. On is engaged selected, and the other is engage managed mode. The way to remember is that when pushing, your are giving control to the airplane ( managed ). If you are pulling, you are taking control for yourself ( selected ). Speed : When pushed, the autopilot will automatically follow limitations specified on the flight plan and the standard operating speeds of the airplane. This means that it will seamlessly switch from the different speeds allowed depending on your flaps setting. When landing, it will gradually lower the speed limit as you extend flaps, until you are in landing flaps configuration at which point it will be set to the final airspeed intended for proper touchdown ( Vref ), depending on weight and winds. It should also automatically switch speeds depending limits. Globally it is always forbidden to go over 250kts under 10.000ft. When you are below 10 thousand, the A/P will set desired speed to 250kts or under, and switch up to cruise/climb speeds once over. this can mean the plane will sometimes level off around 11000 when descending to help reduced speed before heading down below 10k. When using Selected, the desired speed can be set by turning the knob and the value will show up on the top bar and will be used regardless of speed limits, flaps level and situation. This is meant to be used to control speed manually if your flight plan is not set correctly, if you want to cruise faster you can enable it temporarily, or you can it to a desired speed if the ATC asks for it. When using Managed, the speed value is replaced by a dot. There is more to this at the end of this section regarding throttle control. Heading The next knob above the LOC button is the heading knob. Similarly, it is pushed or pulled to use managed/selected mode. Selected mode is like your heading mode in the Garmin. It is used to follow a specified heading. Managed mode is similar to your NAV function. It will turn into a dot on the to panel and the A/P will follow the planned trajectory on the flight computer / map display. the LOC button is used when intercepting a landing procedure on final. The center of the console has three buttons. AP1 and AP2 are the main toggles for the Autopilot. You only need one of two active as both pilot seats and flight computers are the same. A/THR is the toggle for automatic throttle. This is required for the autopilot to be able to control airspeed. Altitude : Selected is like altitude hold, it used in combination with the next knob which is your vertical speed knob. When pushing this and turning on managed mode, the A/P will follow the altitude constraints specified in the flight plan. The A/P will NOT climb or descend to your cruise/landing altitude if you do not specify it on the top bar with the knob. Even if it's set in the flight computer. When taking off, you should have your cruise altitude, or at least you initial climb altitude set, then click managed. Each time you push the knob ( engage managed ), you trigger a climb phase, or a descent phase. If for instance you want to cruise at 35000. When taking off you should have 35000 set. After take off, once you are ready and you activate AP1, the plane will climb up to 35000, if there are altitude limits specified in the plan, the plane will climb according to these waypoints. If there is a waypoint with say 15000B ( Below 15000 ), your plane might pause or ascend slowly to not overshoot that limit, and then climb again once the waypoint limit has been cleared. Equally when descending. When at cruise altitude, you should set the altitude of your destination airport or at least final altitude before final landing. You should see a TOD ( top of descent ) marker on map screen ( arrow pointing down ), which is the point at which you are meant to start descending. If the flight plan is set correctly you will arrive at the airport at the correct altitude, while maintaining the correct speed as well. This is essentially when you should click managed again. Clicking managed when a lower altitude is selected will trigger Descent mode. The A/P will descend down to the specified altitude and might level off to clear a limit ( 15000A would be Above 15000 limit ) or hit a waypoint at the correct altitude etc etc. You can see those constraints in the flight plan, but also in purple, below the altitude column on the attitude screen in front of you. So when changing flight level, if any constraint comes up you will see them switch step by step as you clear waypoints. If you see your plane level off at a purple altitude, it means you are waiting for a waypoint to clear to get to the next step. Your selected altitude should be in blue, and at the top of column.Follow up in the next section - Autopilots - A320 - Using the throttle. How to use the throttle in the 320. Regarding the autopilot on the Airbuses, one of those major difference with Boeings and mostly every other plane is the throttle system.
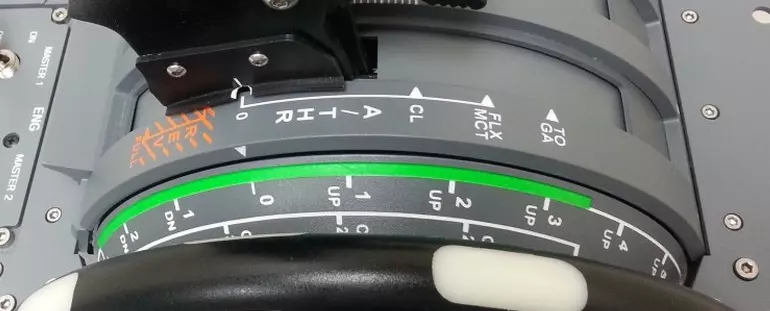
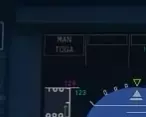
这是空客上的油门杆组件。底部是升降舵配平轮,绿色线条显示配平设置。 顶部是油门杆。杆底部有一个类似准星的凹槽,指向下方的标记。 从左到右依次为: 【REV FULL(橙色)】这是反推范围。波音飞机上有一个辅助油门杆,向你方向扳动即可启动反推。而空客的反推操作是将油门杆拉到零位以下。在模拟飞行中,你需要设置一个按钮来切换或保持反推状态,然后推动油门杆来增加反推力。或者你可以使用键盘并按住按键来实现全反推。 接下来是怠速位,即零标记处。 在0和CL卡位之间是发动机从怠速到全功率的区间。使用此功能时,你将掌控动力。 CL是爬升卡位。FLX MCT是灵活卡位。TOGA是起飞复飞卡位。 这是自动油门启动的区域。在此区域外,自动油门不工作,你需要手动控制。 基本上,起飞时,你需将油门设置为TOGA。在主屏幕左上角会出现一个方框,显示TO/GA或TOGA(前提是在自动驾驶面板中开启了自动油门)。
TOGA会自动将发动机设置为全功率。 FLX MCT略有不同。在某些情况下,出于燃油经济性、发动机磨损或其他原因,你会使用所谓的灵活温度(Flex Temp)或减推力(Derate)。这些是降低的发动机功率预设,会自动将发动机功率设置为飞行计算机中指定的期望数值。 减推力(Derate)用于通过使用略微降低的发动机功率起飞来节省燃油或减少发动机磨损,而灵活温度(Flex Temp)是一种通过选择温度进行减推力的方式。这听起来可能有些奇怪,但原理是当温度高于特定值时,使用全油门会使发动机内部过热。通过选择灵活温度(Flex Temp),你实际上是告诉飞机在假设环境温度非常高的情况下应用最大功率。因此,发动机功率将根据该数值降低。典型的灵活温度可能在40到60°C之间,随着灵活温度的升高,发动机功率会降低。在学习过程中或模拟飞行中,你无需担心这一点,因为燃油经济性和发动机磨损在此类场景中不是问题。起飞后,你应推动油门并将其设置在CL卡位。此后的几乎整个飞行过程中,你都将保持在CL卡位。爬升期间,CL卡位将遵循飞行计算机中预设的爬升推力。为了燃油经济性,爬升推力在爬升过程中通常可能会降低,这意味着你将较晚到达巡航高度,从而延长飞行时间。这属于公司政策范畴,具体取决于公司的经济策略以及所涉及的航线。在某些情况下,飞行时间略长反而可能更有利可图,因为这能带来更好的燃油经济性并降低发动机维护费用。 在CL模式下,自动驾驶系统会先施加爬升推力,然后是巡航推力、下降推力,直至最后进近阶段。此时需切换为手动飞行,并在手动操作阶段收油门。注意,在最终着陆时,你可以使用CL模式来维持正确的着陆基准速度,直到接地前的拉平阶段(抬升机头),然后将油门拉至零位切断动力。 所有这些自动油门档位都会显示在主显示屏的左上角。由于你的摇杆、手柄或键盘按键上可能没有物理档位标记,因此你需要参考这些说明来了解操作方法。 再次说明:起飞时,需开启自动油门(A/THR),将速度、航向和高度设置为管理模式,推动油门直至显示TOGA或MAN TOGA。如果使用灵活起飞,则设置为FLEX MCT。 离地后,拉杆直至显示CLIMB。保持飞机飞行一段时间后,可按下AP1以开启完全自动驾驶。 以上操作均假设你正在执行飞行计划。如果未执行飞行计划,则需使用油门的手动模式,并将速度、高度和航向旋钮设置为选择模式,像使用带有垂直速度旋钮的佳明(Garmin)设备一样操作它们来改变高度。要使用选定的速度保持功能,需将油门设置在CL卡位,并开启自动油门(A/THR)以及选定速度。 自动驾驶系统 - 787 既然我们已经介绍了基本的自动驾驶功能和A320的相关内容,那么波音系统的使用将会非常简单。其工作方式与佳明系统更为相似,并且不像空客系统那样过多依赖自动化,油门系统也没有卡位和模式之分。操作相当直观。
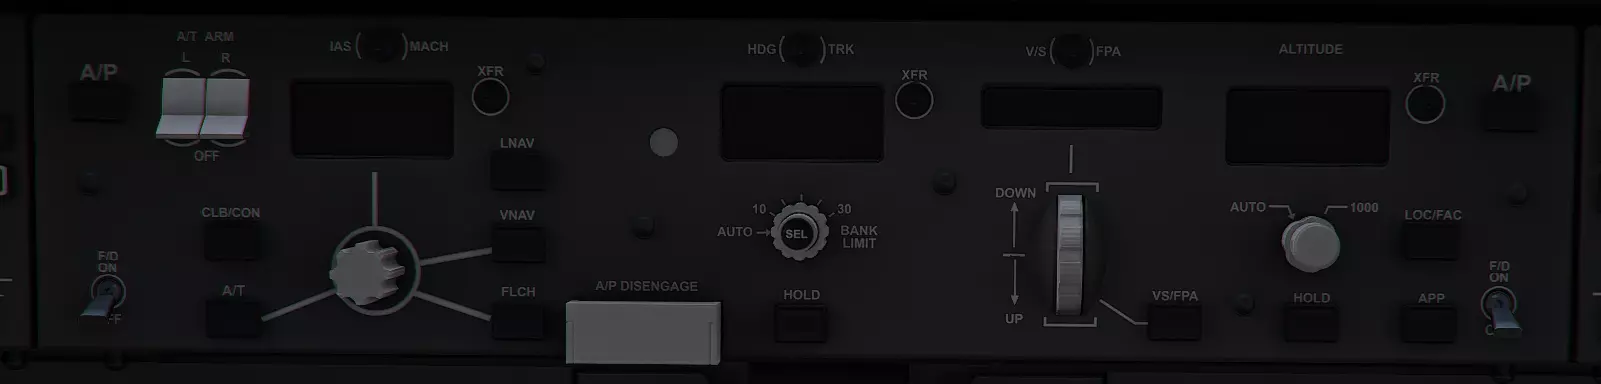
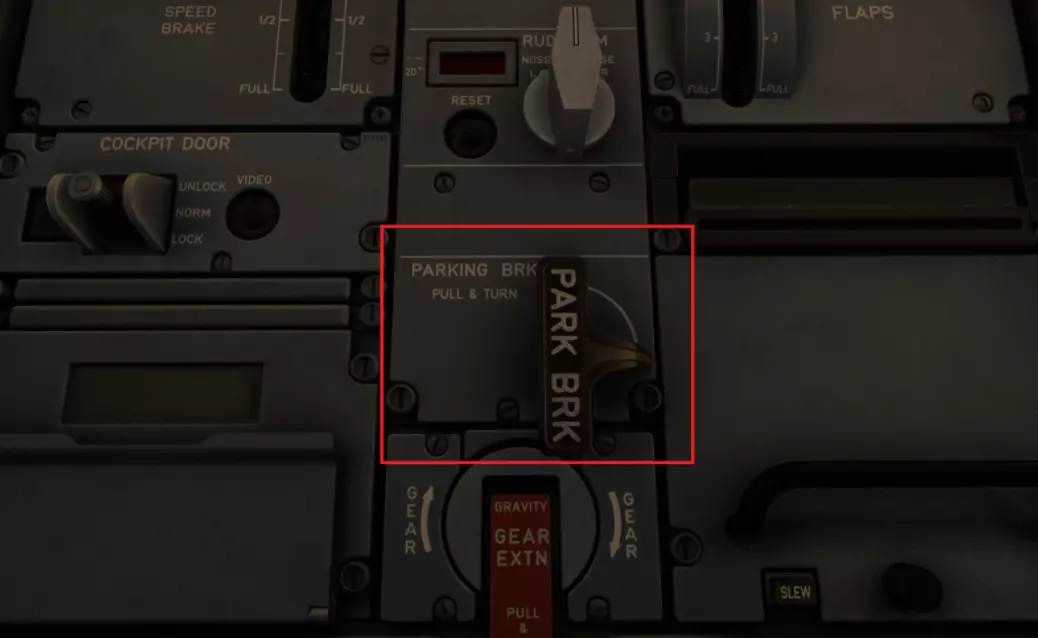
A/P - On the left, and right corner of the panel are the main A/P toggle buttons. Right under them, there is also on each sides and Flight Director switch labeled F/D On Off. A/T ARM - This is the Automatic Throttle toggle. When it is armed ( L and R flick switch turned up ) the autopilot will control your throttle. Speed - The first display on the left is where the speed management goes. As you can see there are three lines drawn around the knob pointing to three buttons related to speed. A/T will act as a speed hold function. If VNAV is enabled it will allow VNAV to control speed. This is required to use any speed and altitude control and it should be on. FLCH is the flight change mode, like FLC in the garmin or hitting the ALT knob on the airbus, this triggers an ascent or descent where the angle of the slope is defined by what speed you are looking to maintain throughout. VNAV is vertical navigation, it incorporates both speed and altitude control, and is the equivalent of managed speed and altitude on the Airbus. If you have a set flight plan and the correct performance numbers filled in, VNAV will follow the vertical path of your flight plan, and the speed contraints involved. Including the under 10k ft speed limit and the flaps/gear speed limits. This doesn't work currently. Use the the regular Altitude functions like alt hold, FLCH and VS. As for speed, if the window is blank, the speed is controlled by VNAV which works. By clicking on the speed selector knob you can use Speed Intervention, this is like a temporary speed override. If need you can set speed manually by clicking on the knob and turning. Clicking again will go back to VNAV control. This is useful to speed up cruise speed when possible. CLB/CON This is the equivalent to switching to climb thrust notch in the airbus. If you are using VNAV this is not required because the switch is automatic. LNAV - LNAV is lateral navigation. This is the equivalent of NAV on the Garmin or Managed Heading in the Airbus. The plane will follow the flight plans waypoints regardless of elevation of speed. A/P Disengage This switch is the quick way to disconnect all the A/P functions at once. The next display is the heading. The knob allows you to pick a heading manually and the Hold button will enabled heading hold, similar to the Garmin HDG button. The knob has two rings, the top ring is the selection, the outer ring is the banking limit from 30° to 10 or automatic which limits how hard the plane can turn. The center of the knob where it says SEL is like the heading knob of the garmin. You click on it to set the heading selection to your current heading. The next display is the vertical speed selection. You can use the VS/FPA button to use a vertical speed hold and the wheel to increase or decrease the rate of climb/descent. The last display is the Altitude selection. The top knob is the selector and the outer ring can switch from 1000ft increment to automatic which changes from 100 to 1000ft when you scroll faster. The Hold button will act like the Garmin ALT button. The LOC and APP buttons are used to follow approach paths. As i said earlier, the Boeings do not use a throttle like the Airbus, instead there is only one function which is the TOGA button. When ready to take off, pressing the TOGA button will initiate the take off thrust and from this point the throttle will automatically switch to Climb, cruise and descent phases as you go along the flight plan. Assuming your plan is complete, the basic procedure is to set up LNAV and VNAV, arm the autothrottle and the Flight Director before take off. Hitting TOGA starts the flight, and after take off you can hand fly following the flight director. When ready to hand over control, you can hit the A/P toggle. If VNAV is not functional, the performance numbers have not been completely filled in in the Flight Computer. By default FS20 should have it completed. If LNAV is not functional, in some cases being at the airport without a departure procedure can prevent it from working. Usually taking off and following your plan until you hit the next waypoint, LNAV should become operable. Your cruise altitude or initial climb altitude should be filled in before take off, this is where VNAV will climb up to. If you are climbing to a initial altitude, you can set that in the altitude selection, and once cleared for the next climb, select it and use FLCH. When reaching top of descent, your bottom altitude or initial descent altitude should be selected with the knob, and the autopilot should start descent automatically. FS Economy FS Economy is a website that can give objectives and a goal if you so wish. It is a fully persistent economy and has been established for many years already. Users earn money by completing transport jobs, they can rent, lease or buy aircrafts. Buy property on the world airports to sell fuel and services to other players, and they can create Groups like guilds in MMO. This is a free service and with the release of FS20, the interest for it has spiked dramatically. Please be patient with the team as they need to manually create accounts for each users, and the servers are sometimes struggling. Also, this is a "long haul" type of deal. You won't be an owner operator of a million dollar TBM in a week. FSE is a slow burn and there are no tricks to earning loads of money quickly. This is for people who want to discover places they wouldn't go to, mostly in small planes, but they don't know where to start. It gives you a purpose to flying around. But as is correctly pointed out by Catstrator. "If you chase the money, you will get burnt out really quick". You can view this as a form of RolePlay version of the sim. To start with you should visit the FSEconomy website and read through their manual and forums once you have created a forum account which should tell you all about how it works. In order for it to work you need to find the FS20 specific client, and you should have the SimConnect plugin installed. There is a version on the FSE website, or if you have downloaded SimToolkitPro or another plugin that uses simconnect, it shouldn't be required. Not that SimConnect is currently broken and causes performance issues. Fortunately, FSE does not cause issues 99% of the time. SimConnect is a file that acts as the bridge between your sim and third party clients and plugins. It allows them to read information from your sim, and inject things into the sim. In the case of FSE, the FSE client will read simple states like you current plane, if it's parked or not and where it is. And when starting a flight, it will inject into the game the correct weight, fuel level and callsign. When you have your forum account, you must create a thread in the correct subforums to ask staff for a Game World Account. It uses different credentials and is used to log into the client and the actual game website. The client should be installed and your game world account should be filled into the settings of it, as for the connection part, it should be set to Remote Computer, 127.0.0.1, port 500. To perform a flight, you would simply go into free flight, and spawn at a ramp in the correct plane, and correct airport. Start flight on the client which sets the fuel and weights, fly to your destination, and when engaging the parking brake, you would finish the flight, or start another leg again etc. The first steps for a new player. When you start off you have no money. When doing jobs, you are only billed, at the same time as you get paid. So even if you have zero reserve money, you can perform your first flight by renting an aircraft, when finished the renting fee is deducted from your salary. Start by looking for an aircraft you can fly in on the website, like the skyhawk or the caravan or anything that is available on FS20. But probably start with one of those because they are cheaper to rent, and you can afford the rent even if you do short jobs. Remember you are only billed when a flight is finished and logged. If you rented an aircraft by mistake on the website or selected a job that you cannot do, you can cancel them and you won't pay anything.
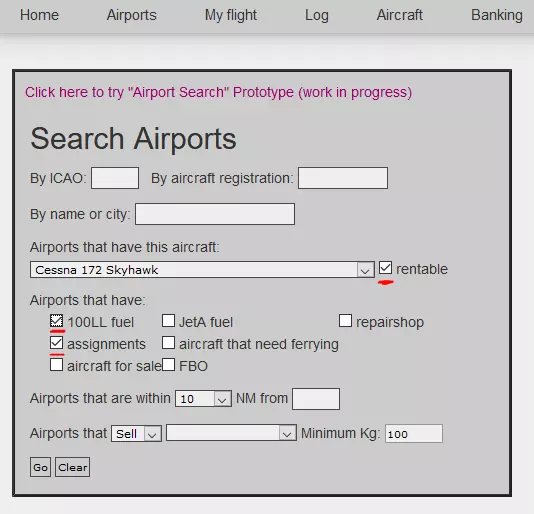
这是“Airports”中的搜索界面。选择一架飞机,勾选“可租赁”框以查找您有权租赁的飞机。勾选“任务”和“100LL燃油”,然后点击“前往”。这将显示所有机场的列表,您可以在这些机场租赁所选飞机、按需加油,并且有可承接的任务。点击蓝色的机场代码可进入该机场页面。机场页面是承接任务和租赁停放在那里的飞机的入口。

我选择了CYHZ(哈利法克斯国际机场)。以下是从这里出发的任务列表。 这些任务从CYHZ前往CYYG。NM代表海里距离,BRG代表大致航向。如你所见,航向旁边有一个箭头,这基本上表示该任务是向北飞行。这一点很重要,原因我将在下一段解释。 任务类型分为T、A或V。详细说明在手册中有介绍,但目前只需选择T类任务,它们是基础任务,你可以同时叠加多个T类任务来规划航线,从而高效利用你的载量。 要选择任务,请勾选所需任务左侧的方框,然后滚动到列表底部。在那里你可以点击“将所选任务添加至>”,这些任务就会被添加到“我的飞行”页面。

任务列表下方是飞机列表,其中列出了停放在本场的飞机。 这里可以看到有两架天鹰(Skyhawk)可供租赁。同时你也能看到,这两架天鹰的【基地】均为CYHZ。每架飞机都有一个基地,飞离基地会在账单中产生罚款,飞向基地则会在账单中获得奖励,这就是【奖励】栏的作用。 第一架天鹰的奖励金额为500美元。这意味着,每飞离基地100海里,你将支付500美元的罚款;每飞向基地100海里,你将获得500美元的奖励。这是按比例计算的,每海里都会计入。在这种情况下,每海里折合5美元。请注意,此距离并非飞行距离,而是到基地机场的直线距离。如果你绕着基地对角线飞行100海里,但出发和到达时与基地的距离相同,那么不会产生奖励或惩罚费用。 这就是【箭头】的用途。如果你接了一个向北的任务,那么带有指向北方的奖励箭头的飞机会让你在该方向上的每英里飞行都获得奖励。总的来说,这并不太复杂。你可以从这里出发,为离开基地支付惩罚费用,但如果你接更多任务并最终返回,你的奖励费用会弥补这部分支出。 作为新手,你可以做的一件事是找到远离基地的飞机,然后接那些能让飞机更接近基地的任务。这意味着你可能是在帮别人一个忙,因此对方会为你飞行的每英里额外支付奖励。要使用飞机,可选择干租或湿租。租金按飞行小时计算。例如,这架天鹰干租时每小时费用为125美元。干租意味着你需要支付飞行期间使用的燃油费用。湿租价格更高,但飞行中使用的燃油由机主承担。在两种租赁方式下,在加油泵加油的费用均由机主支付。选择湿租还是干租取决于你计划使用的燃油量以及是否值得自行支付燃油费用。租赁费用由系统设定,若为玩家拥有的飞机,则由机主设定。 租赁飞机前还需查看其技术数据表。
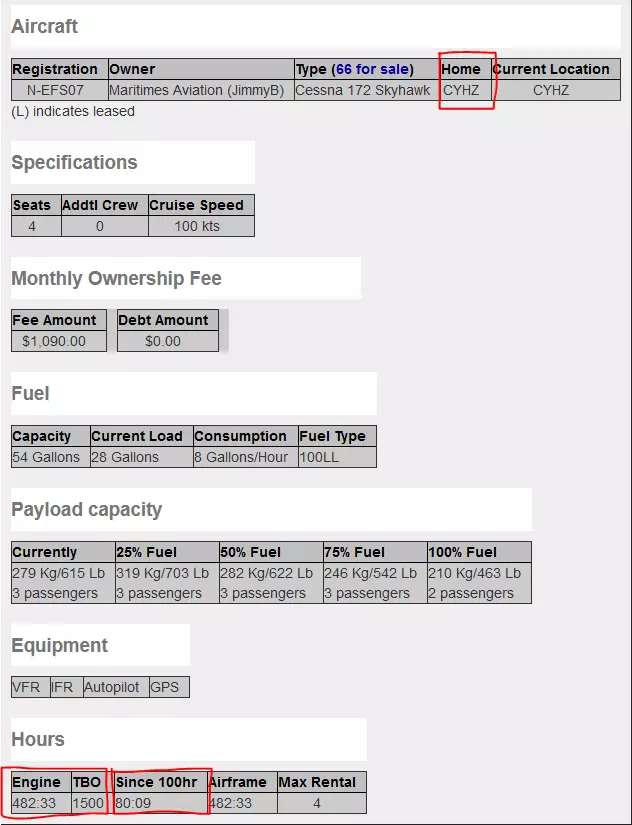
点击飞机注册号可查看其文件。在这里你能看到飞机的所有者、基地以及其他信息。底部是维护数据。 发动机小时数应低于大修间隔时间(TBO)。“自上次100小时检查后”的飞行时间应少于100小时。在这种情况下,发动机寿命低于大修间隔时间,且飞机上次维护是在80小时前,这让你有充足时间在飞机被停飞前由所有者进行维修。 如果这些数值超过限制,你的飞行页面会出现警告信息。 你还能查看载客量。若不确定载客量,仍可点击租赁、选择任务,然后前往我的飞行页面,在正确加油后检查重量和载客量。 FS Economy II
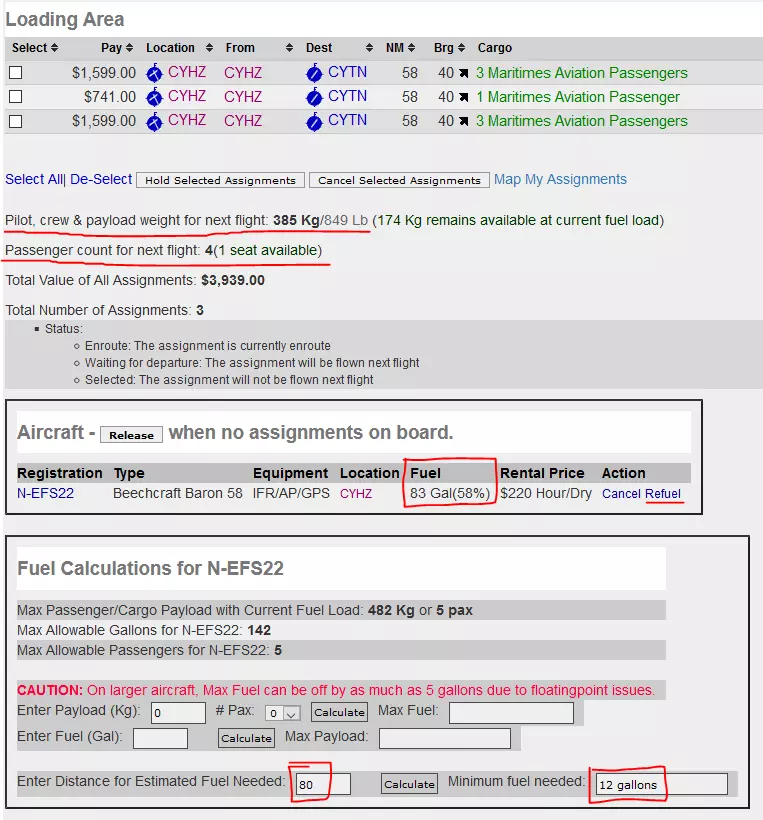
This is the My Flight page. It is where you check your assignments are ready to go and your plane is fueled. Here i have picked three jobs to CYTN, and a Beechcraft Baron 58. Here you can see the load sheet. and you can optimize your load if possible. Payload Weight for next flight is the cumulated mass of you and your cargo/passengers. It also gives you what amount of cargo you can still fit, with the current fuel load. Note that the more fuel you have, the less cargo you carry. You shouldn't be full on fuel if you're not going to burn it all in one job. Fuel as needed. As you can see here, i have 4 seats used and one available. Meaning that my The 3 Passenger job, and the 1 Passenger job is boarded, but the third one is too many, i should cancel it and replace it with a 1 Passenger job if there is one. Or, a cargo job instead, that is less than the max remaining. ( 174kg ) Now of course those jobs might not be available. You will very rarely be perfectly packed and fueled for max efficiency. It simply is rare and you will most of the time fly with some spare room unless. On the right of the assignments, the ones that are ready to go should say "Departing". In this case, the third one cannot fit and it will say "Selected" instead because they cannot board. Before starting you flight, you should check everyone is Departing. and release the assignments you are not carrying. You should not rent planes or hold assignments that you are not going to complete in a timely fashion. Other people might be ready and willing to take those assignments right now and not letting them do so isn't good practice. As you can see the plane is currently sitting with 83 gallons of fuel which is 58% capacity. Our flight is only 58 NM, on the calculator down below, i selected 80NM estimated to give me plenty of headroom in case i burn too much, go of course for some reason, or if the fuel consumption in FS20 is not correctly calibrated. It is recommended to have extra, FS20 does not use the same exact performance values as the other sims which FSE is based on. I have found myself running on fumes multiple times because the sim either burns too much fuel, or i do. This is a rough estimate not accounting for weight, and contingency fuel is a must have. The average airliners in real life will often pack a lot more fuel than what the plan estimate is for safety reasons. In this case, 80NM is about 12 gallons estimated. We already have 83, we don't need to add fuel. If we do, click the refuel link and select the amount of fuel you want to have, it will buy the required amount to add. If you want to cancel renting this plane at no cost, click cancel and find another one, same for jobs, you can cancel them if you think it's not the right ones for you. When you are satisfied with the setup. Boot your sim and spawn the correct plane at a ramp at the correct airport. The client should be connected and it should tell you if you are in the correct plane and location. If checked right, you can click "Action" and "Start flight". On the second tab your load and destination will be there, and a timer showing how long you have before the rent is cancelled. you should complete you flight before that time but it mostly won't be a problem as it mostly is around 2 to 4 hours. It is possible to pick up jobs during a flight. If you have an assignment from A to B, you can look for a place to go in between and find a job going to B that can fit in your plane. Or you can select jobs at your destination so they are ready to go when you land. In both cases the process is simple. When you land and set the Parking Brake. The flight will be ended. If you end a flight but not at the destination, it is not lost. You can press Start Flight again and it will board back. No penalty fee is paid, all you pay is the renting cost for that leg. Meaning that if you land at C with a new job. Pressing start flight will board your current passengers, and the new one together with them. You can then deliver two jobs from two different places at once. This is when you get paid in full for both jobs. If you have new jobs lined up at your destination for your next flight. All you need to do is park, and check your my flight page to make sure your load and fuel is correct for the next flight, and press start flight on the client to start. You do not need to restart the simulator at all. The renting time limit will be reset everytime you park and pay the bill. It is good to use something like Skyvector or simply google/bing maps to plan your trips. Remember the home bonus and flying in one general direction, picking up jobs on the way to the homebase is a good starting job you can do to repatriate planes and discover places on the way. One thing to note is that the FSE database is older and therefore slightly different than FS20. This means that in some cases airports in FSE will not show on FS20. You can check that in the main menu. If an airport doesn't exist in the sim, it doesn't mean you cannot go there. You can check Bing maps and google to see what the aiport looks like. And if you think you can still land there, you can. FSE uses GPS coordinates to know what aiport you are in. If an aiport is closed and not in FS20 but you can land there anyway, FSE will consider you are parked in the correct airport nonetheless. As an example, if you pick a job for Edmonton Municipal on FSE, it will not exist in FS20 because it is now closed. But, it is technically still there.
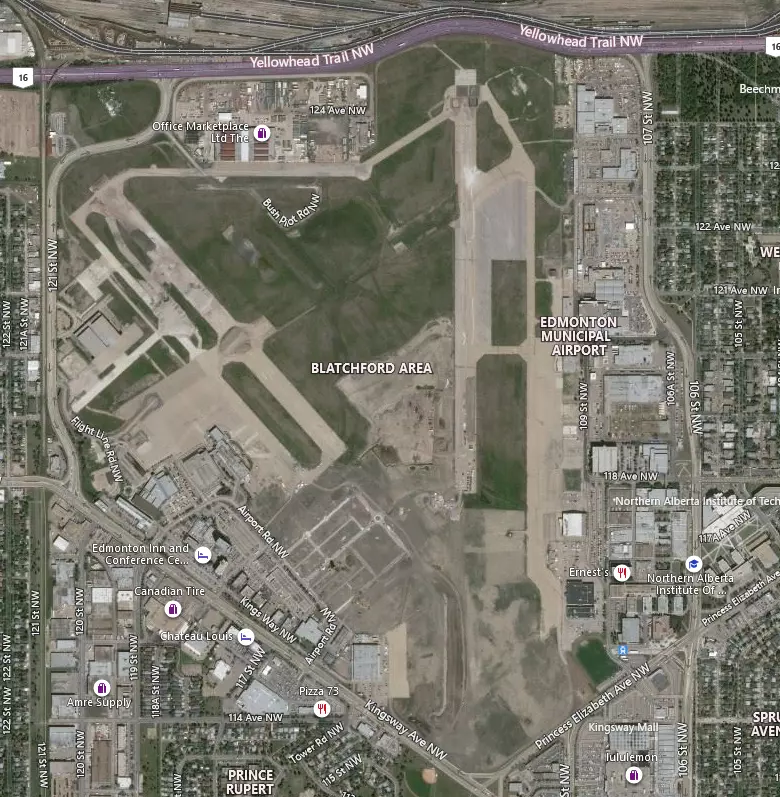
如果你降落到这里,跑道基本上是草地,而且这是正确的GPS位置,所以FSE会认为任务已完成。你绝对应该从这里接一个任务,然后把飞机开到一个真正的机场,因为如果你不这样做,这架飞机可能会被困在这里,因为下一个人将无法从这里开始飞行。 FMS - CJ4X(开发中) 本节将说明如何使用Working Title扩展的CJ4X的FMS基本操作。为了便于说明,我们将使用上一节SimBrief中的飞行计划。大多数飞行管理系统(FMS)遵循大致相同的工作流程和原则,具体取决于你所使用的飞机,部分内容可能会自动填充或缺失。位置初始化(POS INIT)
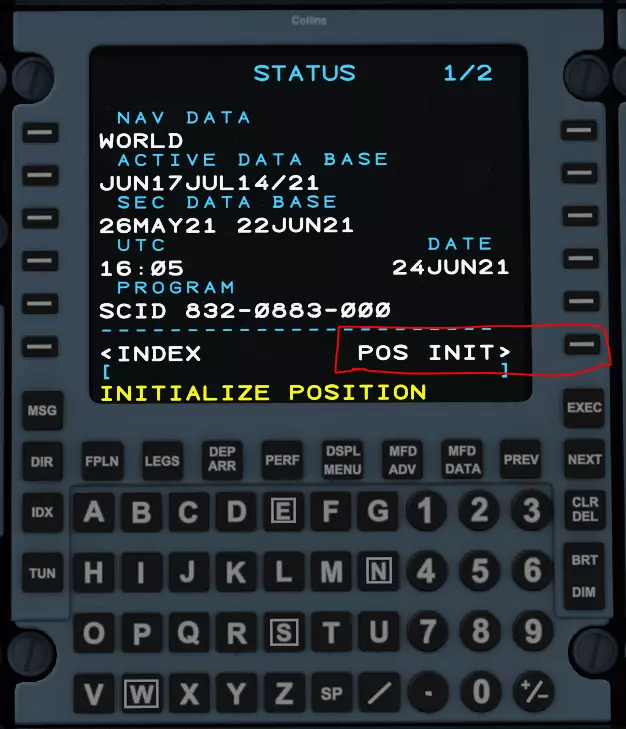
大多数情况下,你的第一页会是状态页面,该页面会显示已安装的导航数据。点击右下角按键选择【POS INIT】(位置初始化)进入该页面。【POS INIT】页面用于设置当前GPS位置,这是IRS系统(惯性基准系统)正常工作以及飞机确定自身位置的必要步骤。如果不进行此操作,基本上所有功能都无法正常运行。在CJ4机型上,IRS是自动的,但在其他客机上,你需要将IRS开关设置到相应位置。
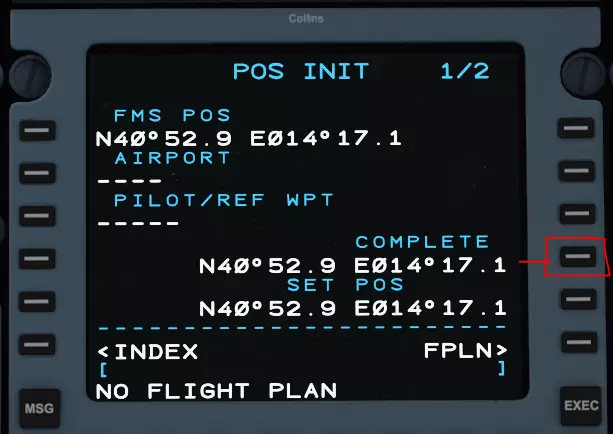
点击GPS坐标旁的按键,将坐标复制到下方空白字段中。完成后,你可以点击FPLN>键进入规划页面,或点击底部的FPLN按钮。
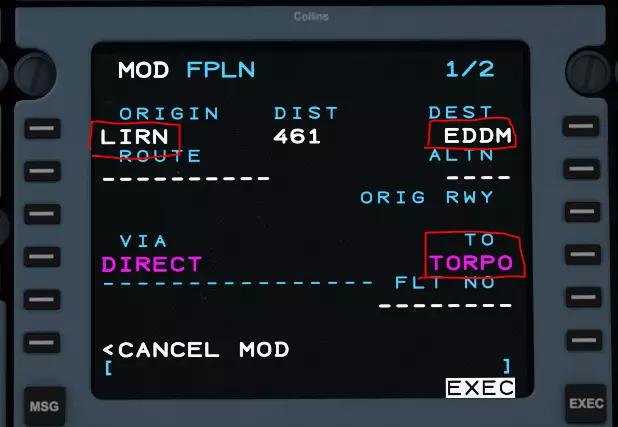
下一步是初始飞行计划页面。在此处我们需要设置起飞机场(LIRN)和目的地机场(EDDM),这会显示出飞行距离。然后我们还可以在“TO”字段中添加第一个航路点。 由于MOLUX包含在MOLUX5离场程序中,因此我们可以将其设置为下一个航路点TORPO。有时你可以将其设置为该离场航路点,在输入标准仪表离场程序(SID)时,飞行管理系统(FMS)会正确覆盖它,但有时不会。无论哪种情况,我们都可以在之后修复航线中的任何重复和错误。 你可以按“NEXT”按钮进入第2页,输入更多航路点。
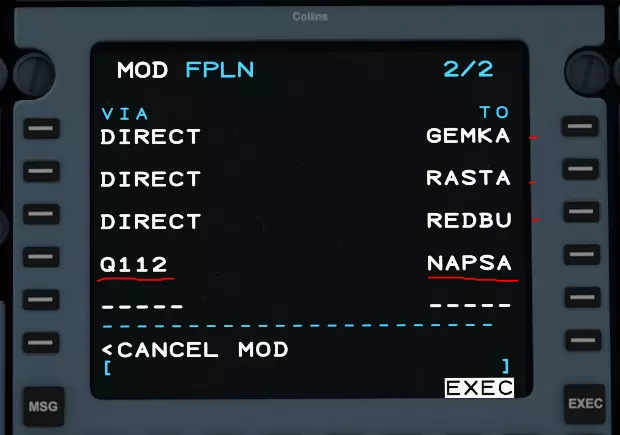
在右侧栏中输入每个航点。在CJ4中,需在左侧字段输入航路名称,然后在同一行右侧输入结束航点。 由于该航路终点为NAPSA,且NAPSA已包含在标准终端进场程序(STAR)中,这会导致重复,我们之后会修复此问题。现在可以继续下一步。 操作顺序没有特定要求,但我习惯先设置起飞和进场程序,再进入性能页面,不过这两项也可以在任何时候进行。 点击底部的DEP/ARR按钮进入该页面。
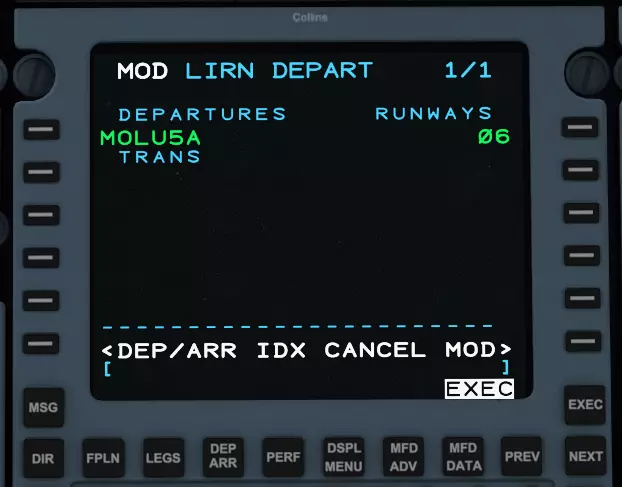
在此我们选择06号跑道,然后选择离场程序,你可以使用下一页/上一页按钮循环浏览跑道和标准仪表离场程序(SIDS)列表。根据先点击的程序或跑道,列表会更改为另一侧的匹配项目。你可以点击进入DEP/ARR IDX的按键来选择进场程序。
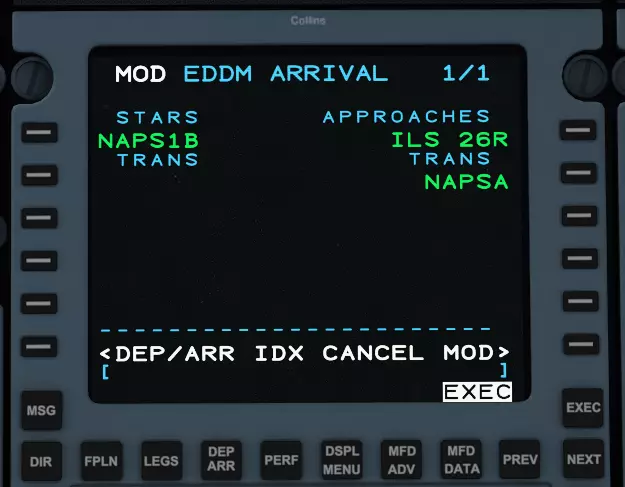
同样的操作,选择跑道、程序和过渡航路点。通常程序名称与你在Simbrief飞行计划中看到的不太一致,这主要是由于AIRAC周期不匹配。记住,当你独自操作时,可以自由选择和尝试不同的程序,并在驾驶舱的地图显示上查看它们,以便在需要时找到更合适的选项。 每次更改后,你可以按EXEC按钮确认。 让我们进入性能页面设置性能参数。
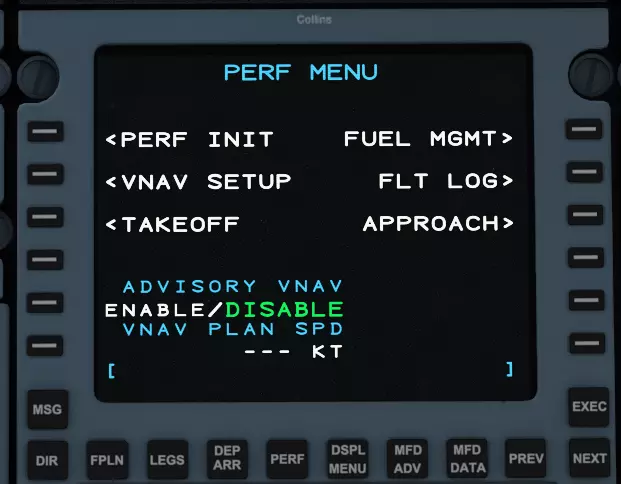
这里有不同的选项,我们将从基础的【性能初始化】开始。
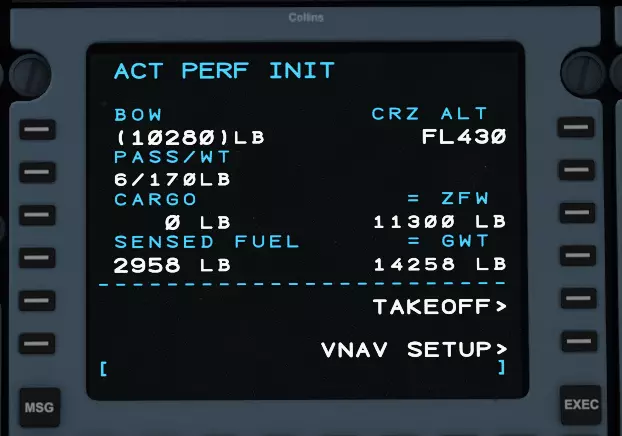
在这里我们将设置巡航高度。这是为了告诉计算机以此作为巡航高度来计算燃油和时间等数据,但最终在飞行过程中你始终可以出于任何原因通过自动驾驶仪调整高度。如果需要(例如为了飞越云层),之后也可以更新巡航高度。 你可以输入6,然后点击PASS/WT旁边的按键,将重量设置为6名乘客。默认情况下,每位乘客按170磅计算(记住这不会影响实际重量,仅用于计算,你需要在模拟器菜单中正确设置这些参数)。货物重量的设置方式相同。 如你所见,我们的燃油量、零燃油重量(ZFW)和起飞重量(TOW)大致与飞行计划中的重量相符。 接下来我们进入垂直导航(VNAV)设置。
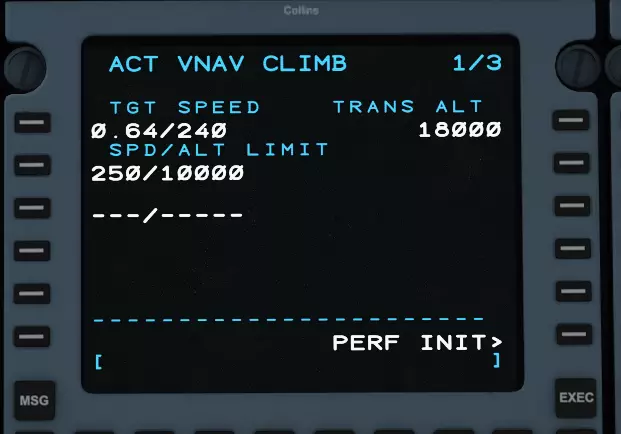
大部分操作由计算机自动完成,你无需进行任何手动操作。如果了解相关操作,你可以修改目标爬升率、巡航速度、下降角度等参数。 现在进入起飞页面。 (起飞页面1) 在起飞页面,你需要根据自动终端情报服务或飞行计划天气报告设置温度、修正海平面气压和风向风速。如果你已选择起飞机场/目的地机场,左侧的跑道信息将自动填充。 按下【下一步】按钮进入第2页。
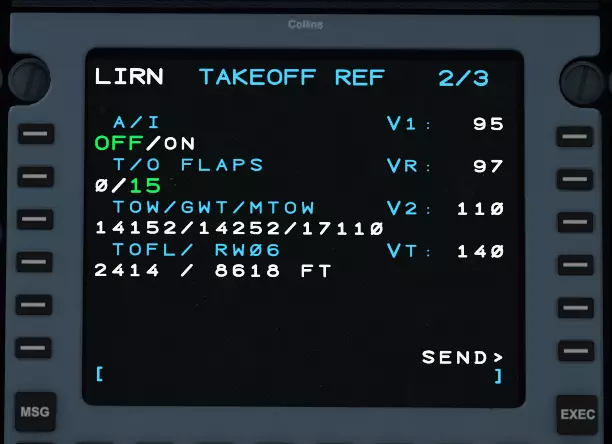
在第2页,你可以调整跑道的干湿状态、起飞时防冰系统的开关状态,以及是否使用襟翼。大多数情况下,你会使用起飞襟翼(TO Flaps),其角度为15度,默认设置即为15度。页面右侧显示根据你所选参数计算出的速度,点击【发送】键进行处理,系统会相应地在你的仪表上设置速度标记。 最后我们来看航段(LEGS)页面。这里详细列出了我们的航路点和飞行程序。
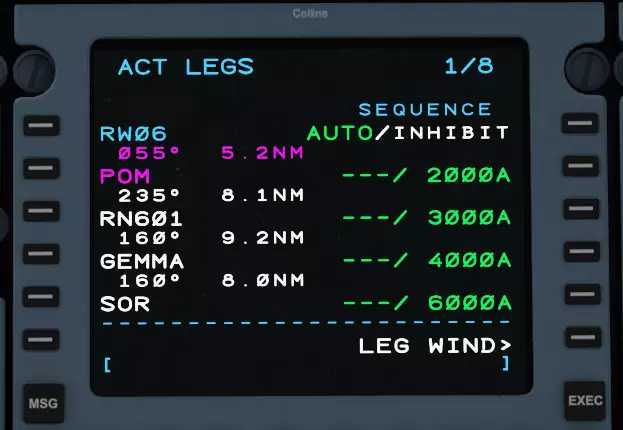
左侧为航点,右侧为速度/高度限制。紫色为激活航点。虽然起飞看起来正常,但我们可以在多功能显示器(MFD)上查看,将其设置为规划模式。
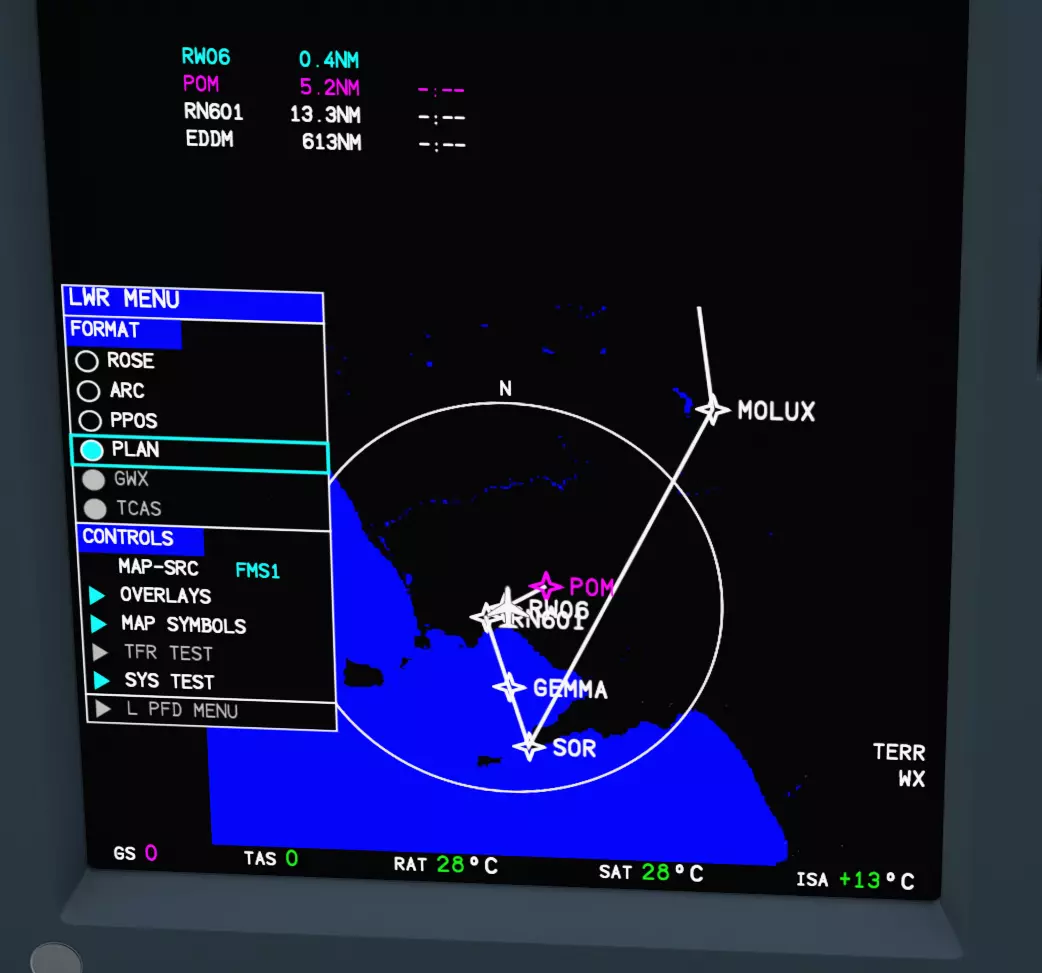
如你所见,这看起来有些奇怪。我们计划于06号向东北方向飞往POM,但标准仪表离场程序(SID)却让我们掉头。在这种情况下,我们可以先飞往POM,然后掉头并按照计划飞行,或者我们也可以更改程序为更合适的,或者更换跑道并取消POM。这由你决定。我们也可以通过编辑航段,让飞机从POM直接飞往MOLUX,跳过那些导致我们绕路的其他航路点。进行此类编辑的简单方法是滚动浏览航段,点击MOLUX进行复制,然后将其粘贴到POM下方,这样会删除两者之间的所有内容。然后执行(EXEC)。 类似地,对于列表中更靠后的NAPSA航路点。由于我们在进近页面和航路点中都选择了它,导致它被重复,从而产生了航路中断(Discontinuity)。
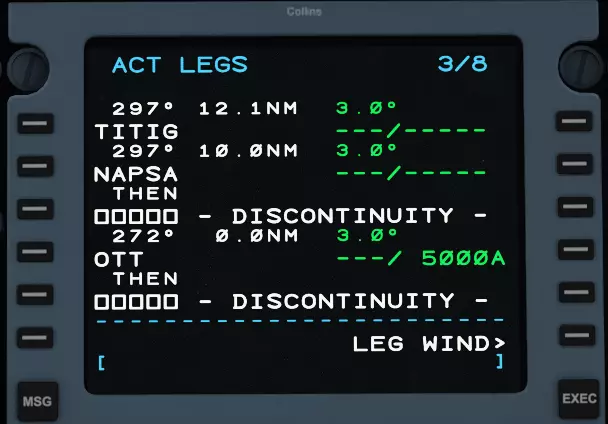
我们可以切换到下一页,那里有最新的NAPSA,点击第一个NAPSA来消除不一致。
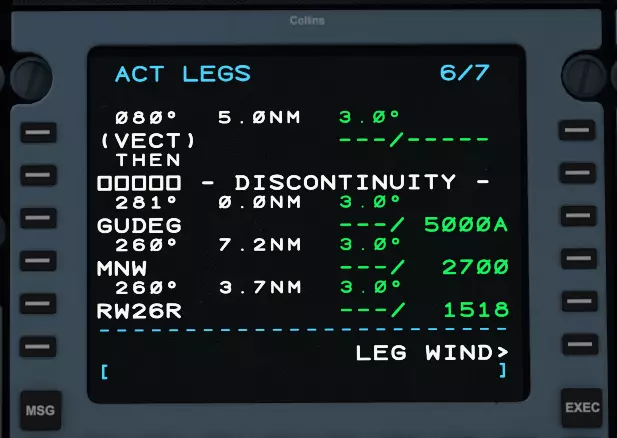
在最终进近前的大部分时间里,会出现VECT(矢量引导)和discon(断开)提示。这标志着进近程序的结束,VECT或矢量引导意味着你应保持直线飞行,直到收到其他指令。这让你可以通过航向选择手动控制航向,为最终进近做好准备。如果有空中交通管制(ATC)负责该区域,管制员会引导你调整航向,以与其他 traffic(交通流量)保持序列并对准跑道。 没有ATC时,你有两种选择。一是保持当前状态自行对准跑道;二是通过输入GUDEG(航向角)覆盖矢量引导,从而清除矢量并断开。这种方法可行,但建议事先查看多功能显示器(MFD)地图,因为有时进近矢量可能与跑道形成过大的夹角,这种情况下最好手动对准,否则自动驾驶可能会出现转弯过度的情况。在这种情况下,MNW是最终航路点,你必须正确截获它才能使用仪表着陆系统(ILS)。使用GUDEG清除航向是安全的。当然,你需要处于正确的高度,我会在CJ4操作部分介绍这一点以及如何使用其自动驾驶系统。