换一换
换一换 


许多新手攻略都已过时。本攻略旨在去除冗余内容,为你提供一条合适的早期游戏上手路线。 阶段一:完成教程 首次启动游戏时,你会进入教程。大部分游戏功能会在完成教程后才解锁,因此请跟随教程矮人的指示,尽快完成冒险以继续体验游戏的其他内容。强烈建议在继续阅读本攻略前完成教程,以免造成混淆。 重要术语
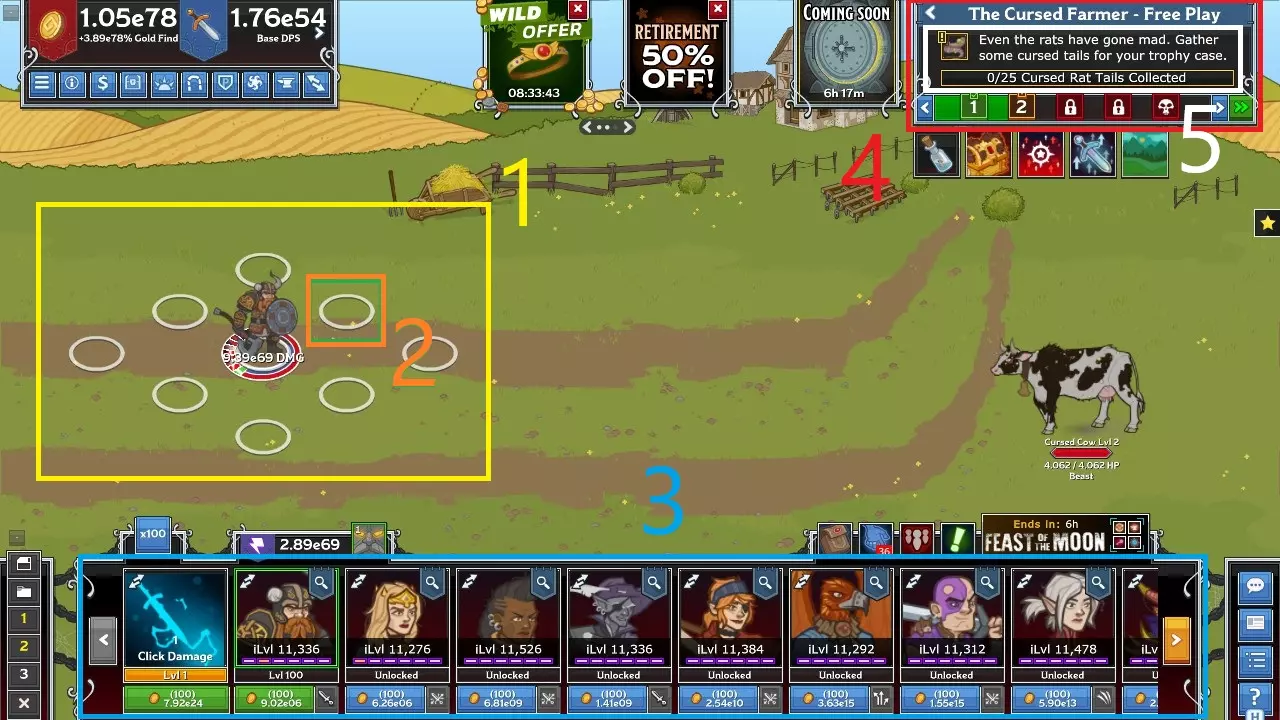
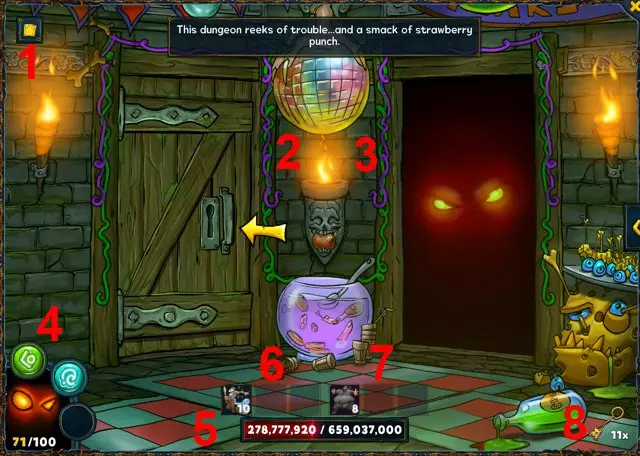
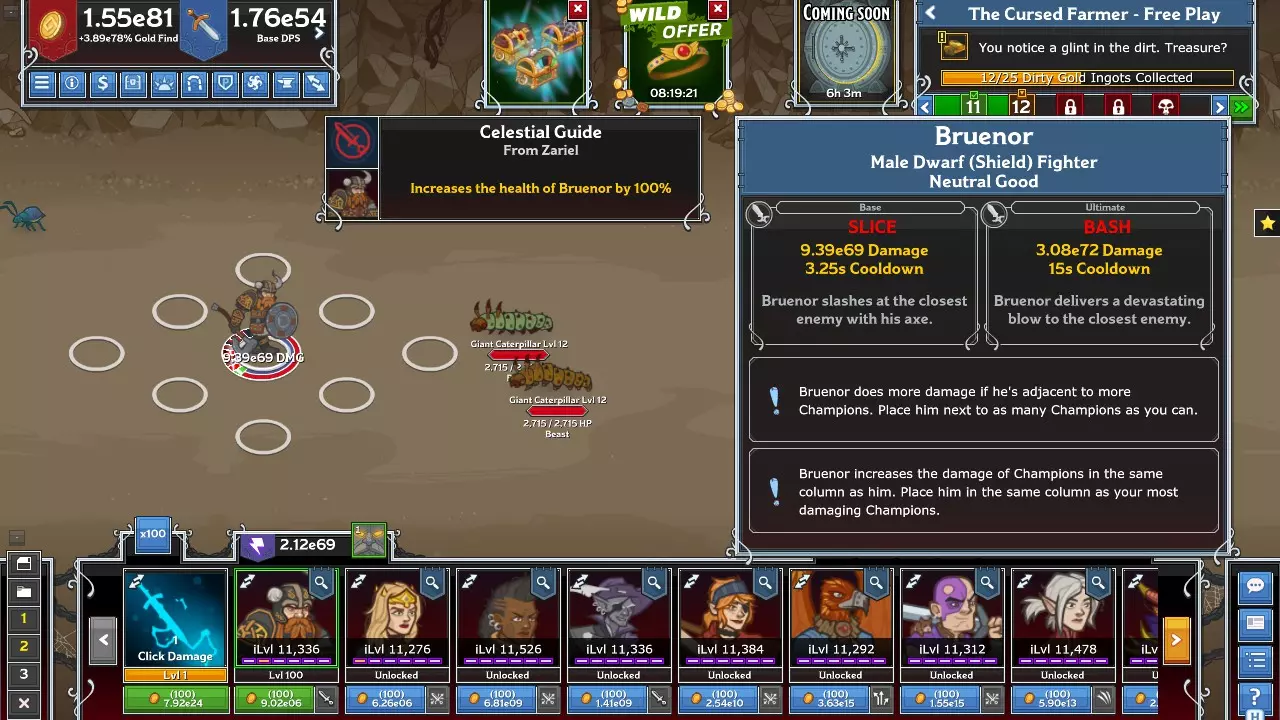
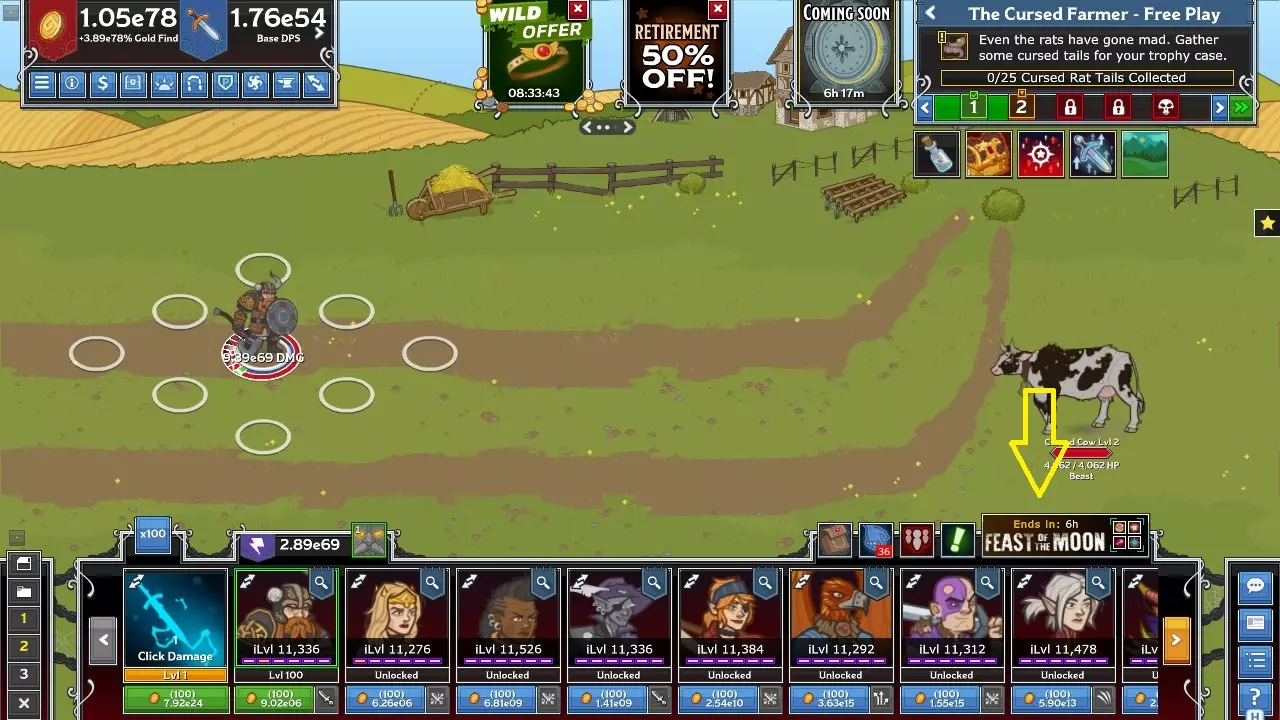
阵型(1)是指英雄在战场上的排列方式。你初始只有布鲁诺(又称教程矮人),但随着获得更多金币并招募新英雄,你将解锁更多英雄。 阵型槽位(2)是阵型中的独立位置,可放置英雄(不要与替补席混淆)。 替补席(3)是屏幕底部的一排头像/按钮。每个独立头像都是一个替补席位(不要与阵型槽位混淆)。游戏中有12个席位,每个席位包含一组独特的英雄,招募后即可使用。 你可以在右上角查看你的区域(4)进度。这有时也被称为“区域”,但本指南将尽量(如果我出错了请纠正我)为了保持一致性而专门使用“地带”这一说法。 每个地带都包含一个任务(5),必须完成该任务才能解锁下一个地带。通常任务要求击杀25个敌人或收集25个从敌人身上掉落的物品。这些物品的掉落率为100%,总击杀要求相同,唯一的区别是你必须像收集金币一样将鼠标悬停在物品上才能收集它们。 一般流程:持续升级布鲁诺并点击伤害,直到你能招募塞莱斯特,然后大致平均地升级这三个角色,直到你能解锁娜耶利,依此类推。最终点击伤害将不再有用,此时你应该停止升级它。继续前进直到第50区域,一旦获得重置选项就立即重置。 此阶段提示: 阅读你的冠军技能。点击替补席上的角色头像以打开其角色面板。滚动浏览他们的技能并实际阅读。这听起来可能像是以一种非常直接的方式开始本指南,但你不会相信有多少人跳过了这一步。这款游戏本质上是一个阵型构建游戏,如果你不了解你的冠军实际如何运作,你将无法走得很远。 选择一个MVP并坚持使用。所有 buff 都会相互叠加,因此让阵型中的一个冠军受到阵型中每个冠军的 buff 是最有效的。在冒险中,这名英雄通常会造成你总伤害的99%甚至更高(通常高到无法用多个9来表示)。这是正常现象,也是你应该追求的理想情况。 切换到(并学习)科学计数法。游戏默认使用“字母汤”计数法。按Y键(或进入选项菜单)可切换为科学计数法。这种计数法对所有人来说都更容易理解,而且你需要尽早学习,因为游戏在达到某个阶段后会强制你使用它。 常见问题:当我将鼠标悬停在英雄身上时出现的弹窗呢?我可以只看那个吗?不行。或者至少不能只看那个。该弹窗仅包含英雄两个技能的基本信息,一旦英雄开始变得更复杂,就不应该再依赖它了。以布鲁诺尔为例。
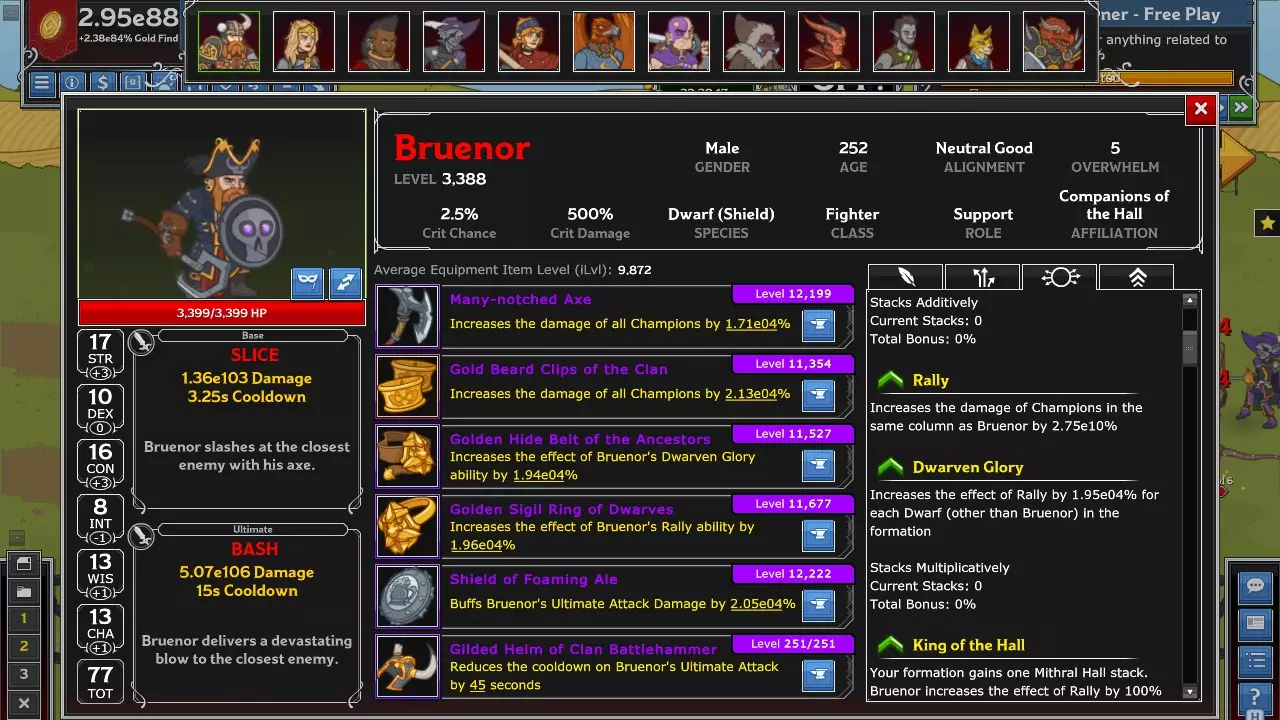
如你所见,弹窗中提到了他的【鼓舞】和【集结】技能,却完全忽略了【矮人荣耀】和【秘银大厅】技能。在当前阶段,这些技能可能与你无关,但未来你需要查看角色面板以全面了解该冠军的能力。 术语截图中橙色方框内的绿色方框是什么?在绿色背景上用这种颜色标记内容是个糟糕的选择。 我应该跳过某些冠军吗?座位更靠后的冠军是否更强大?永远不要跳过招募冠军。你几乎可以随时将冠军拖入或拖出替补席,在9个编队槽位中更换全部12名冠军,所以大胆招募所有冠军并进行尝试吧。任何冠军都比没有冠军强,而且没有真正一致的方法来判断一个冠军有多强大。 阶段2:开始扩充你的名册 在这一点上,提升实力的最大来源是用对你更有利的全新冠军替换掉你那些没用的初始冠军。 重要术语:常青冠军是指不通过活动招募的冠军,但“冠军传说”活动除外。核心冠军是你初始获得的十二个冠军之一。所有其他冠军都被称为活动冠军。
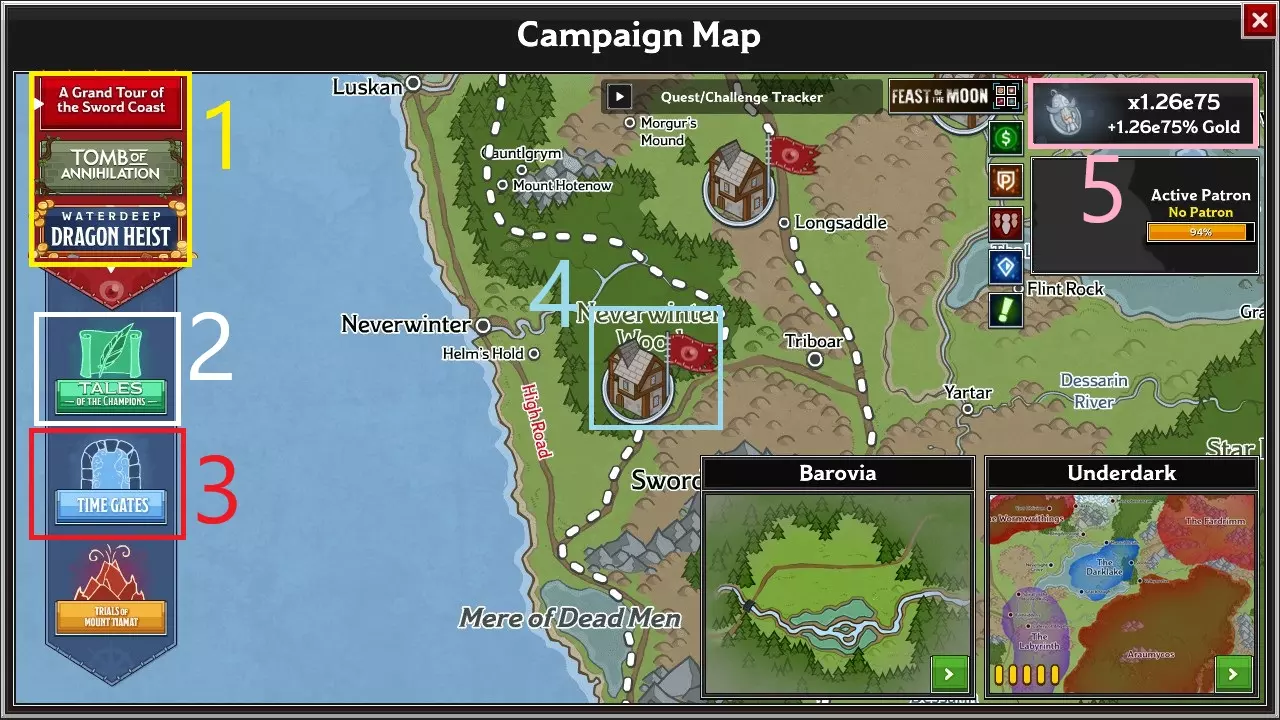
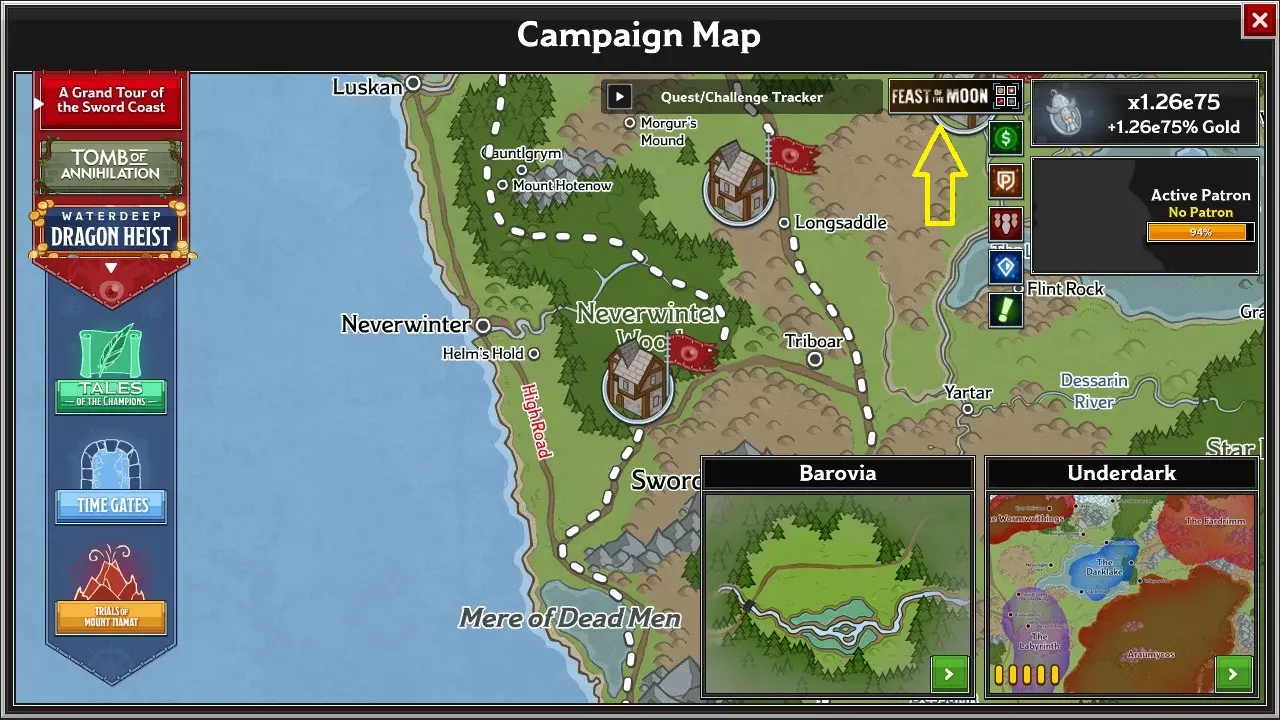
战役(1)是一系列独立的冒险,包含一个完整的故事。 冠军传说(2)是一个独特的战役,作为新玩家的追赶机制,允许随时获取活动冠军。尽管其功能与普通战役基本相同,但它并非普通战役。 时间之门(3)是另一种随时解锁活动冠军的方式,与冠军传说类似,但提供更多选择,且获取速度慢得多。 节点(4)是战役的一个部分,显示冒险及其变体。任何仍有未完成冒险或变体的节点旁会显示一系列绿/红/黄条;所有冒险和变体都已完成、仅剩自由游玩的节点则会升起红旗。好感度是一种元进度机制。每个战役(包括传说、时间之门、活动以及其他部分功能)都有其独立的好感度。好感度仅对获取它的战役产生影响,不会直接影响其他战役(稍后会提到一个例外情况)。
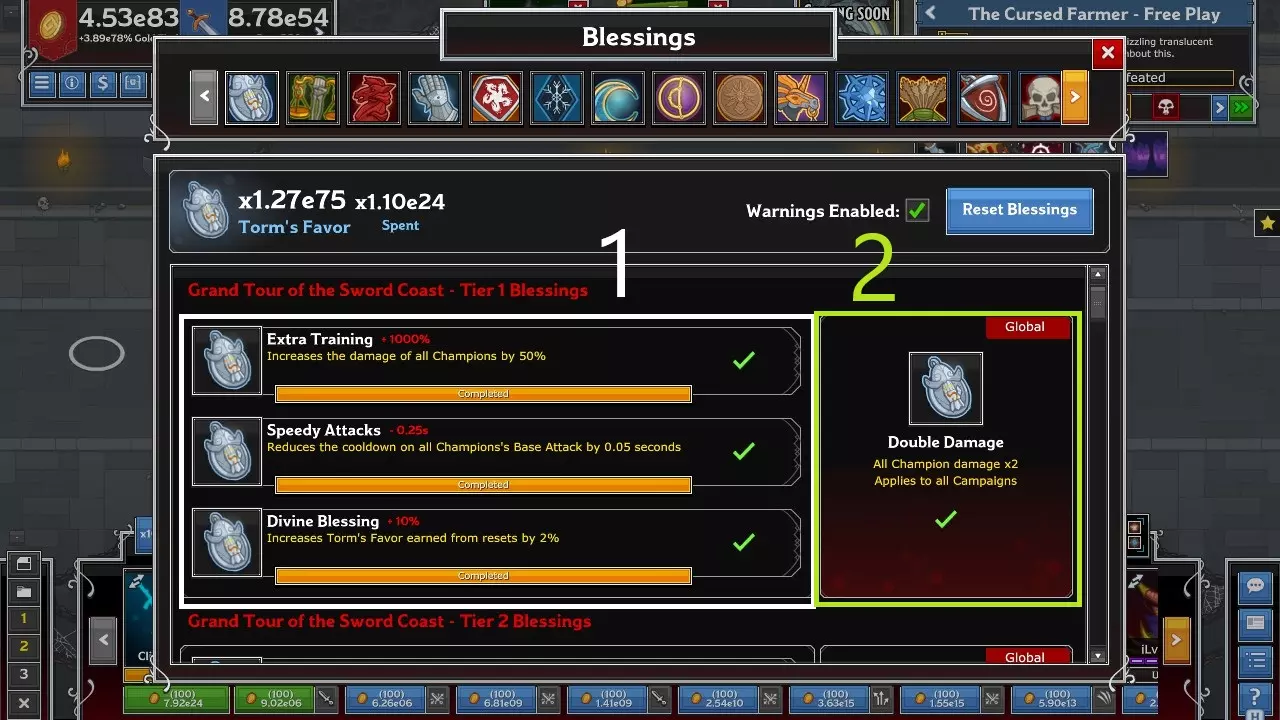
祝福是用恩惠购买的永久升级。【本地祝福】(1)仅影响获得恩惠的战役,而右侧的升级标记为【全局祝福】(2),会影响所有冒险。
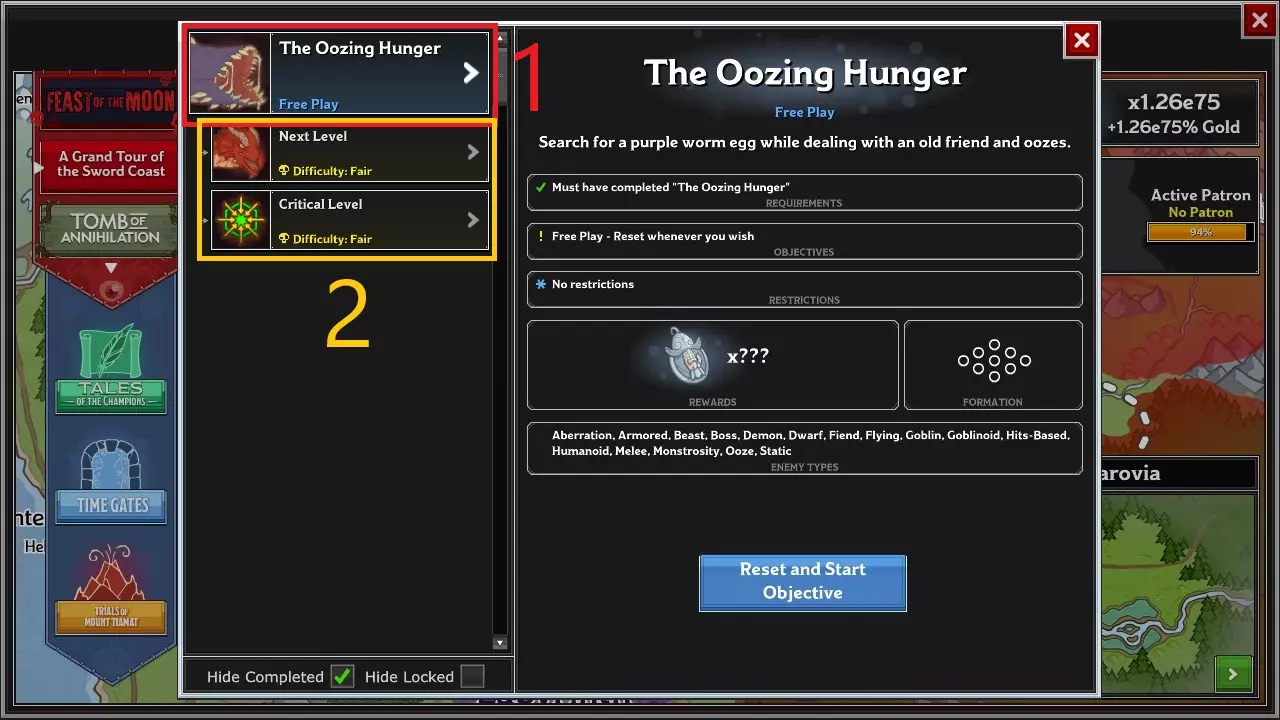
基础冒险是(通常)无限制的冒险,显示在每个节点最大的方框中。完成基础冒险后,它会转变为自由模式(1),其功能相同,但由于没有目标,因此不会提示你重置,也无法“完成”。 完成基础冒险还会解锁最多三个变体(2),这些变体具有更高的区域要求和额外限制。 一般流程 你现在的主要目标是招募尽可能多的新冠军。首先按ESC键并注册新闻通讯。如果愿意,可以使用一次性邮箱。这将为你提供一个代码,用于解锁希奇,你的第一个非核心常驻冠军。完成此操作后,如果你不关心每周宝箱代码,可以取消订阅新闻通讯。现在检查时间门,看看是否有可用的免费时间门。如果有,选择一个并打开它。尽可能完成更多的冒险,这应该不会太难。 现在开始推进“大巡回”战役(你最初开始的那个),完成基础冒险并尽可能跳过变体,直到解锁“迟到的集合”变体。完成这个变体以解锁崔斯特,你的第二个非核心常驻英雄。 大约在同一时间,你会解锁“冠军传说”。这是一个追赶机制,允许你招募一些精选的活动英雄。记住:你在这里招募的英雄【不是】常驻英雄。这一点在后续会很重要。一旦你获得了崔斯特,或者甚至在之前如果你愿意的话(因为它会提前大约两个冒险解锁),前往【冠军传说】并完成所有招募任务。这些任务非常简单,就是无限制地通关到第50区域。你需要完成一些变体任务来解锁部分招募角色,但找到一两个你能完成的应该不会太难。 现在你已经有了一些新招募的角色,是时候开始使用他们了。每个你招募的冠军都有一个固定的席位。一旦你在某个席位招募了新的冠军,你会在角色头像的左上角看到一个小的双箭头图标。
点击该位置可查看该席位上拥有的所有英雄。点击其中一个英雄可将其放到替补席。你几乎可以随时更换替补席上的英雄,所以不必担心。 在游戏过程中,你会获得宝石和宝箱。尽快打开宝箱,保存它们几乎没有任何好处。宝箱会掉落你当前已解锁的任意常规英雄的装备。至于宝石,首先前往商店的宝石标签页购买“法师之手”宠物。宠物是自动点击器,你可以指派它们点击敌人、自动升级英雄或使用终极技能。所有宠物的功能都相同。尽快购买“法师之手”,然后攒钱购买其他宠物。在将宝石用于其他任何东西之前,你至少需要三个宠物。一旦你拥有三个伙伴,就开始购买并开启黄金宝箱。你的目标是让所有常驻英雄的每个装备栏都装备上史诗(紫色)装备。 同时,是时候考虑实际的活动内容了。你可以通过查看地图上的活动按钮或替补席上方的按钮来判断是否有活动正在进行。
Events will also be visible as a separate campaign button above the Grand Tour campaign in the scroll list. Fill your flex slots and do as much of the event content as possible. At this point, it's important to understand how chest loot works. When you open a normal silver or gold chest, you will only get gear for evergreen champions. In order to get gear for event champions, you need to open their named chests, special weekend chests from the newsletter, Electrum chests, or patron chests. Tips for this phaseDon't try to complete every variant. Variant rewards are lackluster and they slow you down a lot. You'll need to complete some for various unlocks but focus on the base adventures first. Some variants aren't very doable for a new player. Don't spend more than an hour grinding. The way numbers scale in this game makes grinding very hard to benefit from. If you've hit a wall, reset the adventure and either try again or try a different one. Use Hank. Hank is a champion you will recieve from Tales. He has an ability that gives you Time Gate Pieces, so put him in all your formations to get as many as possible. FAQThe difficulty rating of this variant is "Deadly". Is it safe to try anyway? Something you need to understand ASAP is that there are several sources of information in this game that actively lie to you. The difficulty rating is one of them. All it does is compare your current favor to the target zone and nothing else. That means a variant that goes to zone 50 but all formation slots are blocked and click damage is disabled would display as easier than a variant that goes to zone 100 but all champion damage is multiplied by a million. Ignore the difficulty rating. It lies. How long do I have to claim Tales champions? Tales of the Champions never rotates the available champions or anything like that. You have all the time in the world. How long do I have to claim event champions? You can see how long the event will run for on the event button and in a few other places. Once that timer hits zero, the event is over and you can't play the mission anymore. How long do I have to claim time gate champions? A free time gate will remain available for three days. Once you pick one and open it, it will remain open for three days from the time it was opened, regardless of when you opened it. Sidebar A: Earning and Spending Favor EarningFavor is earned based on the total gold earned in the adventure. When running base adventures (remember; those are the ones without restrictions) it's a good idea to push as far as you can, even past the zone goal, to earn more gold and thus more favor. KeepingFavor increases your gold find by 1% each, so having 5000 favor means a 5000% increase to the gold you gain. Getting more favor will massively increase your power, up to a certain point. SpendingYou can spend favor to buy blessings. Spent favor does not contribute to gold find. There's a checkbox on the blessings popup labeled "Warnings Enabled". Make sure that box is checked so that the game will give you a confirmation popup every time you try to spend more than 1% of your current favor. Upgrade all blessings until each one gives you this warning, then stop. There are some situations where you may want to spend more (like for certain globals) but usually you never want to spend more than 1% of your favor. The hit to gold find just isn't worth it. Sidebar B: Understanding Events Events are a recurring monthly feature in Idle Champions. They are the main source of new recruits, both useful and otherwise. WhenEvents run from the first wednesday of every month through three weeks. Each month has its own unique event with its own limited selection of champions, which can be recruited during those three weeks. Recruited champions stay with you forever. Events repeat every year, so if you miss a reward or recruit, you can come back next year for another chance at it. WhereEvents are accessible through the event button, but their adventures are only accessible through the world map, by the temporary custom campaign above Grand Tour in the scroll. Featured ChampionsEach event has two featured champions. This is almost always one new champion and one old champion that has recieved an overhaul to their abilities. These two are offered to you for free as the event progresses. At the end of the event, new champions are typically added to the event's roster of recruits, while reworked champions will return to their original event month if different. Flex SlotsEach event also has four total flex slots. One of these slots will be unlocked immediately and allows you to select any of the past year's event champions for free. On the second and third weeks of the event (the second and third wednesday of the month, respectively) one additional flex slot will unlock. These two slots cost three Time Gate Pieces to recruit another event champ. There's otherwise no difference between the three slots. The fourth and final flex slot is only accessible through spending enough platinum on event packs and offers to reach boon level 1 (more on that in a minute). AugmentsEach event has four augments. These are special unique buffs or rewards that are active for as long as the event is. They can also change the rules of the event slightly (e.g. by making flex slots unlock earlier or later). Make sure to read up on the augments each event to understand what's going on and what you need to do. BoonsBoons are a premium feature that grant you bonuses for spending platinum on event offers. These offers will give you boon EXP, and enough boon EXP will level up your boon level, granting you buffs to champion damage, HP, gold find, and game speed for as long as the event lasts. Boon level 1 (you start at 0) will also unlock the fourth flex slot. Boon levels reset at the end of the event. Event Tiers and BuffsChampions recruited in an event will have three unique variants available while the event is running. These variants start at tier 1, but as you complete all three they will unlock again at tier 2, with higher area requirements. Each tier you complete all three variants for grants you a buff to that champion's abilities, and potentially unique feats or items. You can complete event tiers faster by pushing the adventure beyond the goal zone. Each variant will display its goals for all four tiers, and if you pass another tier's goal zone, you will complete multiple tiers at once. You can complete all four tiers of a variant in one adventure this way, though if you reset early you will not be able to run the variant again until you complete the other two variants up to at least the same tier. You will not be able to do T4 variants right away. In fact, you'll be unlikely to do T3 variants right away, and depending on timing you might even struggle with T2 variants in your first event. Don't expect to 100% everything. That's a late-game goal. Just do as much as you can. Time Gates are Explained Here TooTime Gates are mini-events that are free once or sometimes twice a month, being free on every weekend when an event is not running. You can also open a manual time gate for six Time Gate Pieces, though this isn't recommended until you start getting into Patrons. Time gates offer a restrictionless recruit adventure, a second restrictionless adventure for a named gold chest, and a random one of the champion's three variants for another named gold chest. If you already own the champion, the recruit adventure will instead award a third named gold chest. Free time gates give you a choice between three random champions, while manual time gates allow you to choose whichever champion you want. Favor ConversionsAll temporary campaigns (events, time gates, and trials) will force you to convert their favor once they end. Converting favor multiplies the chosen campaign's favor based on the amount of favor collected in the temporary campaign. This is a one-time multiplier and does not affect the favor you earn later in the campaign, so these aren't too valuable early game. Milestone 1: Split the Party By now you've almost certainly gotten a second champion in each seat (including the starter 12). That will unlock Split the Party. This is an important milestone adventure that unlocks Modron Cores, which are an impressive power boost. Split the Party can be found by clicking on the red button above the bench or, more relevantly for you, on the world map.
Split the Party is a unique adventure that is difficult, but rewarding. Every few zones you'll lose half your fielded champions, so it requires some strategy, but completing this ASAP is very important. StrategyStart by leveling up your seat 1 champion, as they were auto-placed in the formation at the start. Do not hire any other champions as this will auto-place them and you will not be able to remove them. Keep going as far as you can with just your seat 1 champion. Once you can't push anymore, pick one other champion and hire and level them as well. Your goal is to beat zone 14 with 4 or fewer champions on the field, but if you can't do that, don't worry too much. Keep hiring champions one at a time and only when you need to until you pass the third split. After that, feel free to fill the formation with your remaining good champions. If you get stuck, don't be afraid to try again. Completing Split the Party will award you with a background party slot and a Modron Core. You will also now start seeing Modron Chests available in various places. Modron pipe puzzles are a different beast, and will not be covered extensively in this guide. For now, assign your fancy new Modest Core to your main party so it starts earning EXP, and if you have any pipes, direct flow to the automation node. Once you've done that, save your formation of choice by clicking on the button in the bottom left corner, then assign that formation to your Modron Core's formation automation and enable that portion. This won't do anything unless flow is piped to the automation node. This won't auto-hire or level champions for you, but in the future when you hire a champion it will automatically be placed in their proper spot, and if you saved specializations in the formation (which should happen by default if the champion was leveled enough to unlock their specialization) then that same specialization will be auto-picked, removing a little disruptive popup nonsense. You can also save familairs with a formation, if you have any, and they will be auto-placed at the start of the adventure. Phase 3: Patrons Now you need to start getting some of the secondary important mechanics in the game. Patrons and certain blessings will be important to get early. Important TerminologyInfluence is a form of currency that each patron has. It is exclusively earned through Patron variants and is used for patron perks. Each patron has it's own influence. Perks are basically blessings, but slightly different. The lefthand column is local perks that only apply to adventures with the patron available. The righthand column is global perks and apply to every adventure. Currency is... well... currency. It is earned from patron variants and free plays, and patron challenges. It is used to buy things in patron shops. Each patron has it's own currency that is only spendable in their shop. ProcedureBy now you should have a decent selection of champions and be getting a lot further in your adventures. Move on to Tomb of Anihillation and get as much favor as you can there to buy the tier 5 global blessing Turn Back Time. This is a very important economy blessing that doubles your passive trickle of Time Gate Pieces, which are needed to buy flex slots and manual time gates. Once you've done that, it's time to focus on patrons. Provided an event was running when you started, you should be pretty close to unlocking Mirt, the first patron. If you don't have enough champions, keep pushing Tomb of Anihillation to unlock two new evergreens; Azaka and Dragonbait. Worst case, you may need to wait for another event. In the meantime, keep opening your chests and gaining item levels until you meet the requirement for Mirt. Once you can unlock Mirt, you should do so immediately and start earning patron currency and influence. You may need to relaunch the game for newly unlocked patrons to appear. This is unfortunately true of a lot of things. Once you've done that, activate Mirt by selecting him on the world map under your favor. You can't do this from within an adventure. You'll need to reset your current adventure to get the opportunity to switch patrons. Right away it's a good idea to buy the time gate piece and save up for the familiar if and when you can. If you've done Split the Party, buy the modron chests too. Medium-term, the champion skin is a good investment as it also unlocks the champion if you don't have them already. Don't buy the golden epics yet as they are pretty bad and you can get a lot out of them if you wait until the later game. Buy feats whenever you feel like, just keep in mind they don't usually do all that much. Once you've bought the important things from Mirt, see if you can unlock Vajra and do the same for her. Remember to check back every so often to see if you can unlock a new patron and get their shop items! They really help. Sidebar C: How Patrons Work How They WorkWhile a patron is active, they apply their patron restriction to every variant and adventure. Mirt, for example, bans all champions that are neutral-aligned on the good/evil axis (this is complicated, but basically if their alignment on their character sheet doesn't say "good" or "evil", Mirt locks them out). These are applied in addition to any variant restrictions. In order to run a patron variant, you must have completed the patron-less version of that variant first. You cannot run patron base adventures, but you can run patron free plays. How to Get RewardsPatron currency is earned by completing variants, with the currency rising exponentially the deeper the variant. Patron influence is earned this way too, with a steeper curve. Generally it's better to run one deep variant than several short variants with an equivalent total zone. Reaching certain amounts of total influence unlocks new items for sale in the patron's shop. Spent influence still counts toward this, so don't be afraid to spend influence on perks. You can also earn patron currency by completing patron challenges. These are a list of 8 special missions that can (usually) be completed in any adventure with that patron active, and award extra currency. You'll also earn currency by doing patron free plays, at a rate of a flat 2 per zone cleared, up to a maximum of 5000 total per week (later increased to 6000 with a blessing). Patron ShopsEach patron shop has a handful of skins, feats, golden epic items, and a familiar. These items are marked in a golden border and never refresh or rotate. All other items - a Modron chest, a Time Gate Piece, and various potions - refresh every week, though they are the same every time. FAQWhy does it say "week 2" in the patron challenge tabs? Because reasons. Ignore it; it's meaningless. Milestone 2: Avernus and Legendaries Your next goal is to complete Descent into Avernus ASAP to unlock legendaries. This is the single largest power vertical in the game, and it's time gated too, so getting it as soon as you can is important. Prioritize limited time things like events and time gates, but put all remaining time towards doing this. TerminologyBUD stands for Base Ultimate Damage. That's the number just to the left of your ultimates above the bench. This is the only reliable number for judging your formation's damage output. Every other number lies. General ProcedureSkip Waterdeep: Dragon Heist and move immediately to Baldur's Gate: Descent Into Avernus as soon as you've unlocked it. Focus on the base adventures. Your only goal is to complete the final base adventure Eltruel's Last Stand. Doing anything else in the campaign is secondary. Once you've done that, relaunch the game (or switch parties, that works too). A new Trials of Mount Tiamat button will appear on your world map. Complete the adventure this gives you to unlock Trials. Trials are a weekly pseudo-multiplayer campaign that has you teaming up with other players to deplete a health bar by doing an adventure every day. Don't worry; it's harder to unlock Trials than it is to complete them. Start your first trial immediately. You don't need to do it solo, but you can and it's usually recommended you do. Assign a champion you don't care about (preferably Makos if you don't care about them) as your Trial champion and start the trial as soon as you're ready. Do the Trial adventure, making sure you set a BUD between ~e180 and ~e300. This will give you time to do all seven daily adventures while still completing the trial. You don't need to do this, but doing this will guarantee you the achievement What Else Have You Got? which is a pain to get otherwise. This won't work if you aren't running the trial solo. Doing the trial solo also guarantees you the She Isn't So Tough achievement, which is also a pain to get otherwise. Combined these two are only a 6% damage increase, but it's nice to get them now while it's efficient. Don't try to solo any trial tier above 1. When your next trial is available, you'll have unlocked T2. Run a T2 with as many people as you can, and repeat the process every week with the highest trial tier you have unlocked until you stop being able to reach the zone requirements. Sidebar D: Trials of Mount Tiamat and Legendary Items Starting a TrialYou are given the option to join or host a trial. You can only join or host trials of a difficulty tier that you have unlocked. Hosting or joining a trial above T1 costs blood vials, which are earned from trials. Once you've hosted or joined a trial, you need to choose an assualt front and assault champion. The AssaultThe Assault Front is the adventure you will be doing for the trial. There are five different fronts with five different enemy distributions, though the zone requirements, damage requirements, formation shape, and rewards are all the same. Your Assault Champion is selected to be sent off to fight Tiamat. This champion will be temporarily locked out of any and all adventures everywhere until Tiamat is defeated or the trial expires. This champion will contribute a special buff to all Trial adventures run by all players in your trial. Assault DamageTiamat cannot be attacked like a normal enemy. She has a massive health bar along the bottom of the trial window. Completing the daily adventure and setting a higher total damage will increase your assault damage, which ticks away at Tiamat's health bar every second. Daily adventures add the listed damage on completion, and your total damage dealt across all adventures in that trial increases your assault damage by 1 for every order of magnitude (so for example, a total damage of e100 will add 100 assault damage). It doesn't matter when these numbers are set within a given day. Tiamat retroactively takes damage as if you'd been at your peak assault damage for the entirety of that day, no matter if it's set 23 hours or 23 seconds from the start of the next day. Earning ScalesRunning trials gets you Scales of Tiamat. You get scales based on the total damage dealt to Tiamat in that trial, plus 50% more if you successfully depleted all of Tiamat's HP, plus another 3x bonus for the first time you win each tier of trial. Spending ScalesOnce you've gotten some scales, the forge button will become available. You can turn any epic item into a legendary item using scales. This doesn't increase the item's base effect, but rather it adds a new one from a pool of six specific to that champion. When you forge a new legendary, it will always get a bonus you don't already have on that champion. Legendary MaintenanceLegendaries can be upgraded and reforged. When a legendary is forged, it selects a random effect and also a random favor from any permanent campaign other than Turn of Fortune's Wheel or Vecna: Eve of Ruin. Tales of the Champions is also excluded. Upgrading a Legendary item takes scales and favor from the designated campaign. The scales cost is fixed, but the upgrade will always reduce the given campaign's favor by 90%, and requires a certain amount of favor to be posessed, increasing for each level of upgrade. Reforging legendary items takes scales, and will reroll the effect and favor. You're only guaranteed to get ones that one legendary item doesn't already have. Every time you reforge, the cost doubles for all reforges, and it decreases by 10% every 24 hours, back down to the base cost of 1000 scales. It's generally advised not to reforge if the cost is above 1111 scales. FAQWhen should I reforge? When the legendary effect does not apply to your DPS champion of choice. Reforging for legendary effects with higher bases is a very high cost for a very low return. Why 1111 for reforges? Reforge costs decrease by a compounding 10% every day. At 1111 scales cost, it takes 6 days to return to 1111. Higher than that, and it will take 7 days or more to return to the initial cost. Reforging at or below 1111 gets you a reforge every 6 days without the cost ever increasing beyond 1111, which is the fastest turnaround on reforges there is. How should I distribute my legendaries? By now you should have a decent idea of who you like to use. Put legendaries on no more than ten champions - the ones you use in your main formation or otherwise use the most. Spread upgrades evenly, as every level has the same effect (x2) but an increasing cost. How do I get Tiamat Blood? You get blood from the special Bahamut chests you get at the end of each trial. What's that faded portion of Tiamat's health bar? A remnant of a now-broken feature. Ignore it, it's meaningless. Phase 4: The Delta There's not much more to do ASAP, but there's still a thing or two to knock out before the main routing is up to you. In no particular order; Split The Party 2Keep recruiting event champions and opening time gates. Try to get a third champion in every seat (including the starter champs) to unlock Split the Party 2, then run that the same way you ran Split the Party. Don't worry, this one will be much easier. This will unlock the Fast Core, which increases the rate at which you will progress through areas like an extra speed champion. Start leveling that ASAP. A third Split the Party exists, but it's not as important to run as the core it gives isn't as broadly useful. The Last Few PatronsBe sure to unlock all five patrons (the fifth might take you a while) and start getting their unique shop items. Continue to hold off on the golden epics until... Milking Shiny PotionsShiny items are 50% more powerful than an item that isn't shiny. Shiny items have a 1 in 1000 chance of being in any chest that contains gear. Once you start opening chests en masse you'll get quite a few of these, but usually only for evergreens. Wait to buy the golden epics in the patron shop until the item is already shiny. If an item is upgraded from shiny to golden, you get refunded a Potion of Polish, which can be used to make an item of your choice shiny. This is very powerful, and you should consult prestack gear lists to find out which items are best to make shiny. Perks and BlessingsTry your hardest to get all the patron perks for every patron and all the blessings in every campaign. This is more long-term, especially for Turn of Fortune's Wheel and Vecna; Eve of Ruin where it's much harder to earn favor. Invest in a Speed and Gold TeamIf you haven't already, try to recruit all the good speed champions; Thellora, Widdle, BBEG, Briv (maybe. Consult your community first), Hew Mann, Diana, and Ellywick. Setting up a proper speed or gem farm formation is a topic for another guide. Also try to recruit a bunch of gold find champions. Consult other guides for how to properly gold farm.