换一换
换一换 


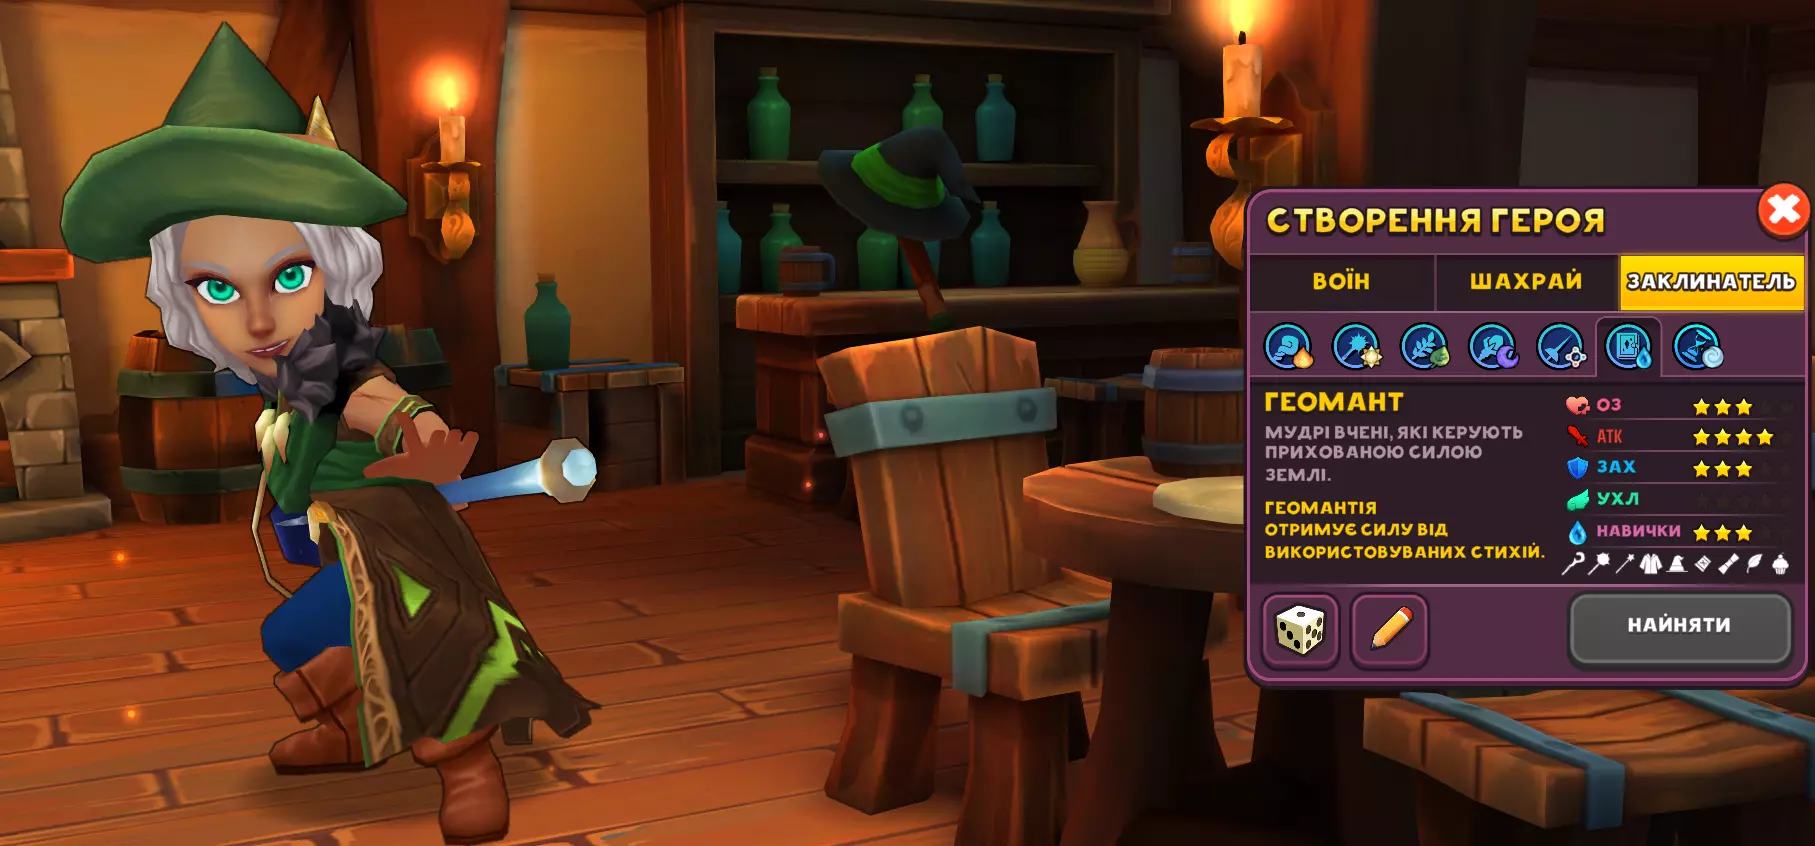
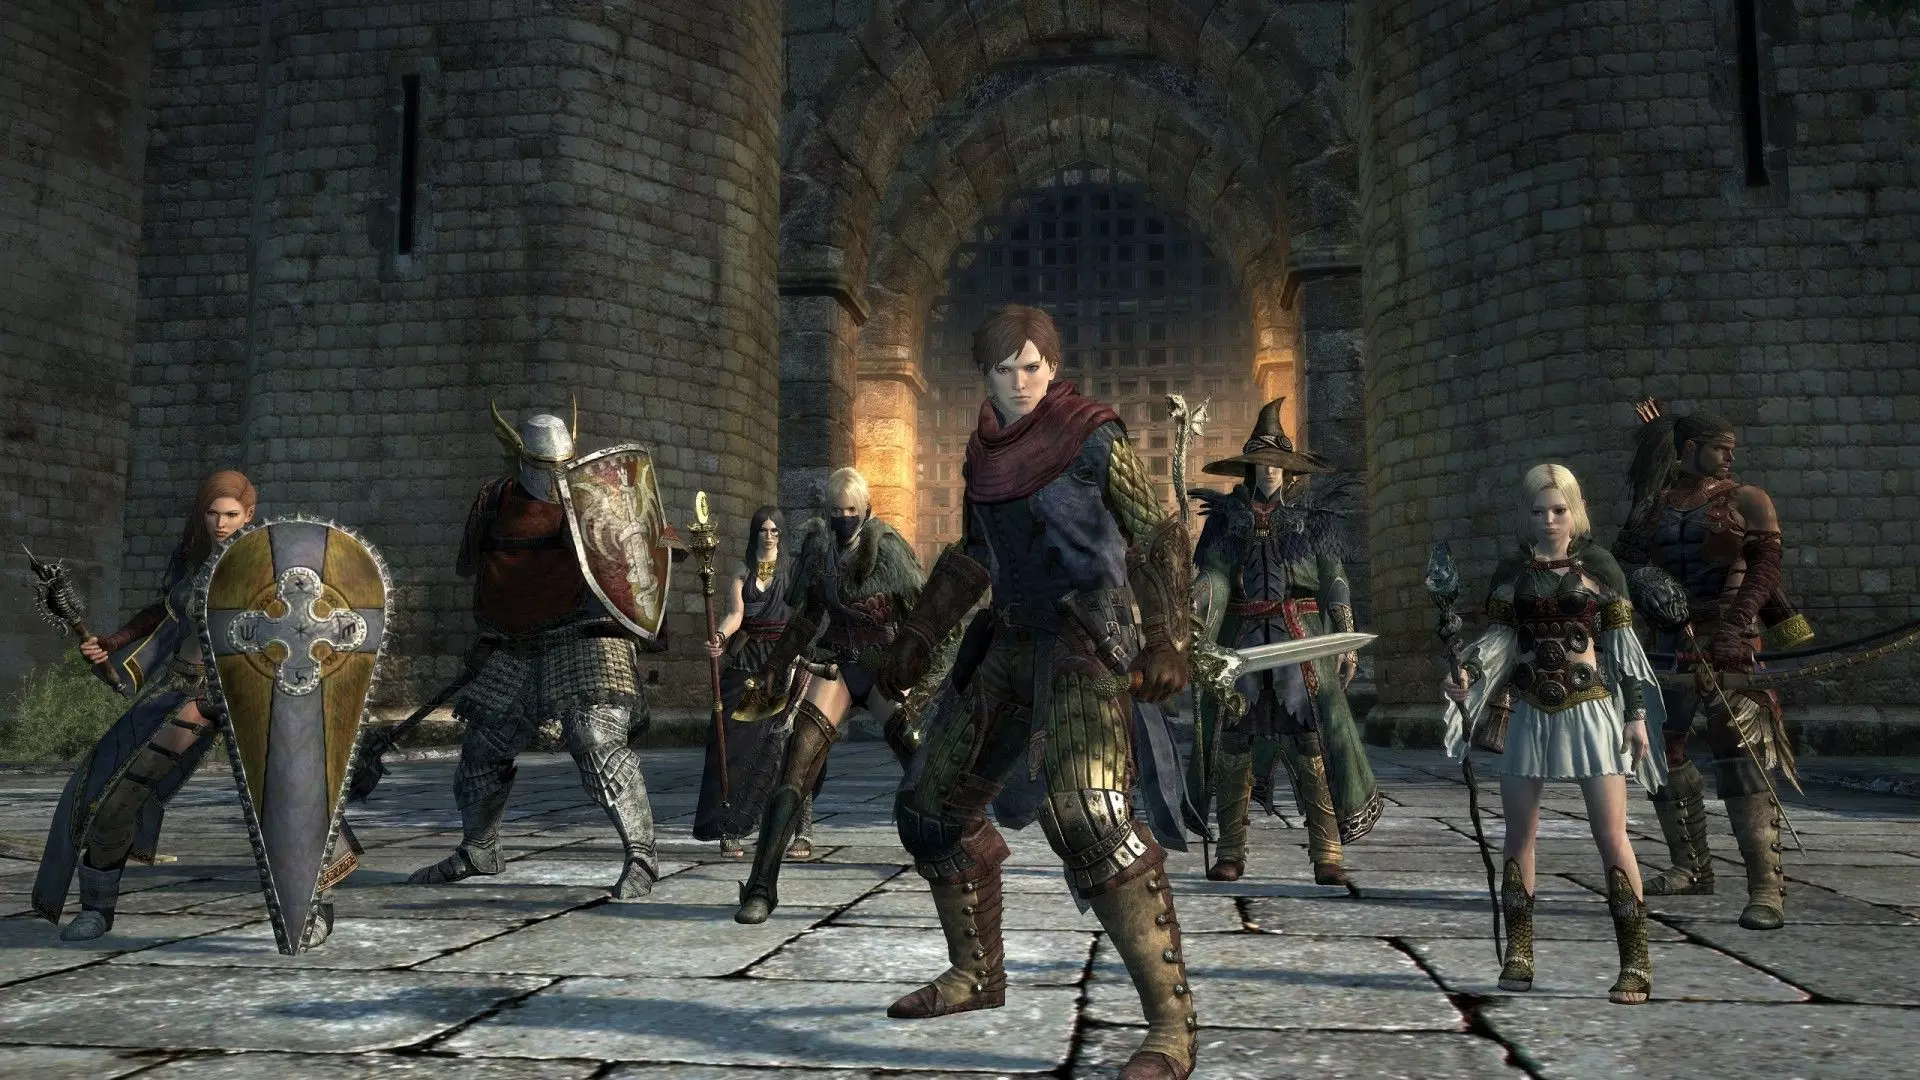
无论你是刚开始踏上讨伐巨龙的征程,还是已经朝着无限等级稳步迈进,本指南旨在详细介绍游戏中每个职业的所有特性、属性、技能、强化以及战术应用。本指南旨在帮助玩家选择适合自己的职业,并确定哪些职业与自己的 pawn 以及可雇佣的支援 pawn 搭配效果更佳。 基础职业 所有冒险都始于一个关键选择:你将选择哪个职业开启你的旅程?这归结为三个非常基本的选择,它们代表了游戏的三种核心玩法风格: 战士——基础近战职业,擅长强力物理攻击与防御、近战技巧,并能承受巨大伤害。 游侠——基础远程职业,以机动性和灵活性见长,能够使用刀剑与弓箭在任何距离对抗敌人,并利用耐力快速攀爬和征服大型敌人。 法师——基础魔法职业,专注于运用魔法攻击与防御,在战斗中施展具有策略性和强大威力的元素效果,同时还能用治疗和防护法术援助盟友。即便你已将自己培养成一名高等级角色,也请始终记住——总有理由回归基础。即便是这三种核心职业,其中也有一些部分对高等级角色而言依然具有价值。战士
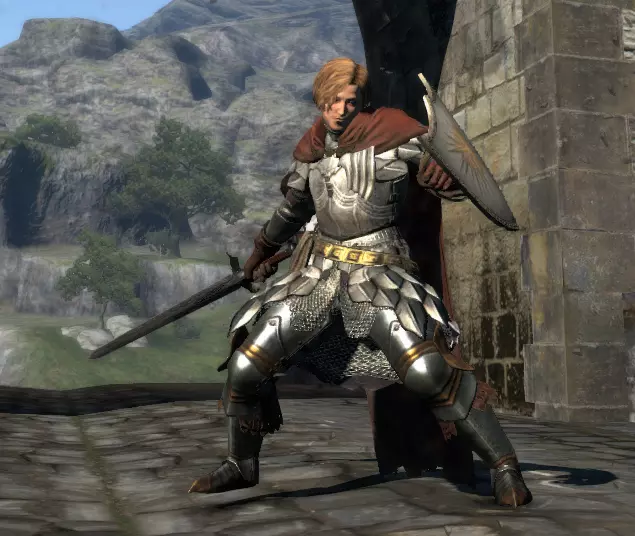
团队功能 - 近战格斗、嘲讽敌人、物理伤害输出 主武器 - 剑 副武器 - 盾牌 可用护甲 - 非拖尾服装(即无长袍)、皮甲和重甲 游玩难度 - 简单 随从受欢迎度 - 高 强化实用性 - 高 战士是一个不言自明的职业,在《龙之信条》的序章(即教程)中,萨凡就使用了这个 vocation。虽然武器装备简单,但剑和盾牌在合适的人手中可以成为高效武器,再加上精准的时机把握和明智的攀爬运用,就能战胜许多不同类型的敌人,无论大小。战士的一大优势在于,他们拥有多种技能,能比其他任何职业都更能生存,同时几乎不牺牲任何攻击力,有时甚至能直接穿透敌人的攻击进行反击。他们最好的防御手段——盾牌,还能通过完美格挡对即使是最强大的敌人造成强力眩晕,从而扭转战局。不过,战士在面对远程敌人或对物理伤害高度抵抗的敌人时会陷入困境,这种情况下,他们需要游侠的弓箭或法师的附魔来协助击败此类敌人。尽管在对抗大量小型敌人时表现出色,但与巡林客、游侠或刺客等职业相比,他们对单个敌人的最大伤害可能略显不足,尤其是在攀爬目标时,这些职业拥有更多样化的攻击选择。 战士通常是 pawn 的不错选择,因为战士的战斗方式不容易出错。战士 pawn 最好的通用倾向包括【散兵】和【缓和者】。【实用主义】有助于促使他们通过抓取来压制或制服敌人。 提升该职业的等级还能让你获得一些优秀的【增幅】,即使在游戏后期也依然有用。 属性成长概况

As a starting class, the Fighter is an optimal choice for any physical-based class (including eventual Striders, Rangers, Warriors, and Assassins). The starting stats boast the highest health, and physical attack and defense, though they do lack in magical stats. In terms of raw numbers, Fighters actually start with the most stats of all classes thanks to their higher health. Fighters naturally excel in these three areas throughout their entire career, boasting the highest health growth of all classes, save during levels 10-99 (in which case the Warrior grants more health). Fighters also consistently boast the highest possible defense gain, and have a decent strength stat growth. Developing fighters will dwindle badly in their magical stats, however (including magickal defense, so pure-fighters get messed up pretty bad by spells!), and can fall behind in stamina as well. Core Skills:Onslaught/Dire Onslaught - Basic light-attack swings with your sword, useful for dealing out damage against light, non-defending enemies. The upgraded version can be obtained at rank 1, and adds a variant combo executed by pausing after the first slash. This version has much stronger stagger power, and can more easily knock around light enemies. Empale/Takedown - Your basic heavy attack executes a slow, but very powerful stab forward that can break through enemy blocks and deals high damage. The upgraded version appends a shoulder charge if you hold down the heavy attack button. Vault/Controlled Fall - Vault refers simply to the basic skill of being able to jump. As an upgrade, Fighters can learn to do a Controlled Fall, which enables them to roll immediately back to their feet after being knocked down. To execute this you have to press the jump button while flying through the air from a powerful hit. On attacks that don't send you flying high, you'll need to predict carefully when you hit the ground in order to get this technique to work. Defend/Deflect - Hold the secondary-weapon button in order to block attacks with your shield, at a stamina cost. Upgrading to Deflect is one of the most important core skills to learn, as it not only enables you to perfect-block attacks to reflect damage, but executing this technique also costs no stamina. Augments:Fitness ★★☆☆ - Its main use is for pinning down or holding up enemies for your allies to hit. Generally it's more useful on your support pawns rather than on your arisen. Its purview is too narrow to be a really appealing choice. If you really need to hold enemies in place, its more preferable to use Soul Skewer. Vigilance ★★★☆ - Grants your character some extra health. The nature of many of these health/stamina boosting Augments is such that they are the most useful early-game, when 100 points of extra health or stamina is increasing your bar on the order of fifths of your base total, rather than an extra 2%. While health in general is an extremely useful stat, it usually will be best if you focus your leveling to boost your health points, leaving more augments open for more specialized choices. Egression ★★★☆ - The confusing description doesn't really describe what this does: Basically, when caught in any grab or attack that you can struggle to escape (i.e. Cyclopes grabbing you, or Harpies trying to carry you off), this will make each input you use twice as effective at breaking out. There are certain parts in Bitterblack Isle that will need this augment if you're in the path of danger. Also keep in mind, though the prompt only shows an analog stick, mashing all face buttons will also help in the breakout regardless of Egression - so keep that in mind in assessing how much you need this augment. Sinew ★★★★ - Almost essential for player characters, if you want to carry as many curatives and tools with you as you need. Also important for heavy-armor characters - and frankly any non-magic class, since they will be carrying more weight in weapons than most mages. Exhiliration ★★☆☆ - If you have the guts to fight at low levels of health (1/3rd), this can grant you a pretty sizable boost to your damage output, but you'll obviously need to be very good at holding on to your health when you get that low. Also enjoy having everything you hear be muffled. Persistence ★☆☆☆ - Generally, performing perfect blocks in this game is fairly easy, so adding an extra 5 frames in which to execute one really doesn't make much of a difference. Vehemence ★★★☆ - A strong component to maximizing your physical damage, it loses out a bit, as it's a weaker version of an augment that Warrior gets, but its power can be stacked on top of Clout to maximize Strength gains. Recommended Pawn Pairings Challenger-inclined pawns can help your allies focus on enemies that you might not be able to reach. Mages or Sorcerers with enchantments will make your attacks much more pertinent against given enemies. Make sure they have high enemy knowledge. Rangers specializing in high-stun arrows will be key in getting aerial targets to the ground. Fighter Skills Sword Skills:Burst Strike/Blink Strike ★★★★ - One of the staples of the fighter, Blink Strike allows the user to quickly close distance on a target, and deal a powerful stab that can send smaller enemies tumbling backwards. It has just about everything a fledgling fighter needs to start out, as it closes distance, creates openings, and can deal impressive damage. Broad Cut/Broad Slash ★★★☆ - A defensive and utility-based attack, Broad Slash will allow you to retreat while throwing out a slice that covers a wide arc. Its one of the more difficult fighter skills to use, but its use in crowded battles is undeniable. Flesh Skewer/Soul Skewer ★★★☆ - A control-based ability that has some applications against surprisingly large targets, with the upper limits including monsters such as giant skeletons and saurians. I find it most useful on pawns rather than on an arisen. Skyward Lash/Heavenward Lash ★★☆☆ - Skyward Lash will do a series of fast, upward swings in an attempt to ward off flying attackers. This attack does have some surprising application against large enemies, such as ogres or cyclopes, and does deal sizable damage. In most natural situations, however, it is too short-ranged to land against typical enemies. Tusk Toss/Antler Toss ★★☆☆ - While an impressive and satisfying attack to land on enemies, its main application is merely to severely punish lightweight targets, and the attack sees most of its use in the early-midgame where smaller, low-knock-resistance enemies are common. The actual damage dealt is somewhat low, which especially shows through when trying to use it on large targets that aren't sent flying. Heavy attacks, in fact, have much more effect in such situations. Hindsight Lash/Hindsight Sweep ★★★☆ - A powerful counterattack ability, Hindsight Sweep starts with a step backwards. During this time, you are immune to damage. You then follow up with a lunge forward to deliver a counterattack, which is more powerful (and has very strong stagger) if you successfully avoid an attack with the first step. You can tell if this effect triggers if you hear a 'hollow'-sounding stereo wind noise when an attack nears you. Interestingly, the move can be cancelled before throwing the slash by using a jump, making it useful for pure defense as well. Stone Will/Steel Will ★★★☆ - If you don't mind giving up an attack skill for this, Steel Will can grant you massive boosts to your survivability, cutting damage down by half, and greatly improving resistance to staggering and knockdown effects. Its most useful in hard mode gameplay, where enemies will do highly-boosted damage. Compass Slash/Full-Moon Slash ★★★★ - Coming out fast and covering all sides, this move not only deals out decent damage and can work well against intense crowds, but it also can be activated in the middle of being attacked or stunned, providing quick escape from otherwise dire situations. Though it requires timing, Full Moon Slash also has some invulnerability frames that can be utilized to avoid the damage of entire spells or attacks. On other vocations that use swords (Assassin and Mystic Knight), this is by far the best shared skill. Downthrust/Downcrack ★★★☆ - An awkward, but very powerful punishing move. This is an optimal choice of attack against downed, large foes such as toppled ogres or dragons. Legion's Bite/Dragon's Maw ★★★★ - Unleashes a rapid, fierce combo. Though somewhat high in stamina cost, it's extremely powerful, can hit many targets at once if it gets them caught inside, and during the combo will render you invulnerable to all hits. Small bit of errata, however - only the final hit from Dragon's Maw can kill enemies, which can be important if you're using it on a large nearly-dead target that can just walk out of the attack while it's happening. Shield SkillsShield Summons/Shield Drum ★★☆☆ - Beats on your shield to draw enemy attention towards you. Can draw in melee flying enemies, but they usually won't stay put unless held onto. Best used as a utility for helping pawns usually. Shield Strike/Shield Storm ★★★☆ - Lays out a powerful shield bash that can throw enemies off balance very easily, even through enemy blocks. The damage on this skill is low, but it's a very reliable way to break through, especially if your stagger isn't strong enough to break through with a heavy attack. Springboard/Launchboard ★☆☆☆ - Stands steady to throw an ally high into the air on your shield. Useful for stunts to reach flying enemies or quickly climb very tall giants, but is otherwise mostly a gimmick. When you use a springboard (or other tandem move), you automatically latch on to an ally when in range, and annoyingly, you also will automatically use a tandem move like this when you move in range of an ally using it. Cymbal Attack/Cymbal Onslaught ★★★☆ - Throws out a rapid barrage of shield hits. It acts much like your light attacks, but can break through enemy blocks much more quickly. Sheltered Spike/Sheltered Assault ★★★★ - A series of rapid stabs forward with your guard up, providing fierce and strong damage while you keep yourself safe. It's arguably the best attack possible for fighting large, immobile enemies. Just make sure to keep mashing the skill button to throw out more strikes! Do note pawns seem to miss with this attack a lot, since it roots you in place. Perfect Defense/Divine Defense ★★★★ - Holds up a guard with absolute protection against all damage types, regardless of shield used. Perfect pairing with a shield-summons, allowing you to draw in enemies to your range, then unleash on them with Dragon's Maw. The caveats include that you cannot immediately counterattack using this technique, and that it will constantly use up stamina while active, with additional hits eating up more stamina. The Strider
职业功能 - 灵活的物理战斗,远程精准打击 主武器 - 匕首 副武器 - 弓 可用护甲 - 布甲、轻甲(皮革甲和链甲) 玩法难度 - 简单 pawn 受欢迎度 - 中等 强化实用性 - 中等 作为多方面速度最快的职业,游侠擅长快速近战攻击,能迅速切换至远程使用工具和箭矢,并有不少专门提升机动性的技能。游侠是非常实用且受欢迎的初始职业选择,在游戏后期也依然保持着很高的实用性。漫游者几乎不存在明显的弱势场景——成型后,他们能够闪避慢速敌人的攻击,拥有足以跟上快速敌人的技能和速度,并且默认情况下比其他任何职业都能更长时间地攀附在敌人身上,消耗的耐力也少得多,因此非常适合寻找大型怪物的弱点。他们唯一的缺点是对重甲敌人的冲击力可能不足,通常需要消耗大量耐力才能击破这类护甲。 漫游者作为随从是一个可以接受但并非最优的选择。虽然他们能够使用技能通过招式干扰和迷惑敌人,但往往缺乏玩家那样的预判能力,无法像玩家那样轻松切换攻击距离。无论如何,漫游者(Striders)通常在【掠食者】(Scather)和【实用主义者】(Utilitarian)倾向下表现最佳,将其出色的攀爬技能与致残攻击相结合。 属性成长概况

Strider is an effective, balanced start for basically any class you might want to play. In addition to its even-keel start, striders also gain all four attack/defense stats equally at the beginning. Even with their balanced stats, however, they do have an edge pointing more towards the Stamina stat than most classes do. Insidiously, during the last 100 levels, they are tied with the other ranged classes for having the slowest health growth, meaning pure-striders can become somewhat fragile if left purely in that vocation during their whole career. Core Skills:Carve/Engrave - Using your knives, you unleash a fast, whirling combo of slices. The advanced version of Engrave allows you to add a pause to your combo, transitioning your slashes into a series of kicks. The kicks have some interesting properties - they don't take up weapon enchantments, but they do use your weapon strength, and count as blunt attacks (making them very strong against golems and skeletons). Two-Step/Roundelay - The Strider's heavy attack is a series of two stabs. With Roundelay, you can hold the heavy attack button down to add two extra hits. Vault/Double Vault - As a special bonus, Striders can learn how to double-jump, granting them access to higher areas, giving them a headstart in climbing tall enemies, and generally making their navigation around the map much easier. Forward Roll - Obtained late in a Strider's tenure, Forward Roll grants you the ability to use the jump button while holding down the dagger-skill trigger to make a dodge roll. This skill is invaluable, due to providing extra mobility and evasiveness at no extra stamina cost. Loose/Quick Loose - Hold the secondary-weapon button in order to aim and fire your bow. Unlike other classes, the ranged vocations require some precision in aiming to hit enemies with their weapons. Augments:Dexterity ★☆☆☆ - Dexterity will only boost the speed at which you climb up ledges, and has no effect on how quickly you can move around on enemies while grappling. Essentially no application in most combat situations. Endurance ★★☆☆ - By all means, this is a great stop-gap augment for early-game when actions as simple as sprinting will drain your whole stamina bar within seconds. Later, while health boosts remain somewhat useful, stamina boosts are overshadowed by just carrying a good supply of stamina-curatives. Much like with health, it's also something that can be stat-levelled around to avoid issues with. Damping ★☆☆☆ - By default, each arrow you loose will move your reticle up a tiny amount. This removes this effect. In truth, enemies are usually so mobile that it usually isn't worth the time to take this augment. Doubtful that it applies any bonuses to pawns. Eminence ★★☆☆ - Eminence has some applications for strange builds that might require the use of many aerials, and directly synergizes with several Strider skills that involve jumps - basically, any physical attack that involves leaving the ground will benefit from this augment. Generally, it's going to be more worth it to go for a more steady damage buff. Grit ★★★☆ - Grit severely shortens the amount of time you spend winded after using up all stamina - if you do deplete it (you probably shouldn't), there will be barely any time taking a breather spent when it occurs, and you can still retain slow mobility until it starts to regenerate again. Still, depleted stamina is something that can very easily be played around to avoid. Arm Strength ★★★☆ - If you're planning to scale large enemies, this is a very viable choice to take, and can pair up with various other climbing buffs you can find. Leg Strength ★★★★ - Leg Strength is the essential counterpart to Sinew, as both aim to make it much easier to maintain high mobility and stamina while carrying heavy loads. In general, the larger and heavier your character's body is, the more likely you'll find Leg Strength to be useful compared to Sinew, as the increased lifting thresholds a heavy character has makes it more difficult for them to be exceeded. Recommended Pawn Pairings Have a distraction-oriented fighter present to give you more time to climb large enemies. Striders can benefit greatly from the enchantments of Mages and Sorcerers. Strider Skills Dagger SkillsScarlet Kisses/Hundred Kisses ★★★★ - Strider's starting move sees its main rise to power much later in the game, as it is a rapidfire flurry of stationary dagger strikes that can heavily punish downed enemies. Not only this, but it's one of the only skills that can be activated while latched on to an enemy, making it an excellent option for wailing into enemy weakpoints. Biting Wind/Cutting Wind ★★★☆ - After a lunge, the strider can make a series of passing dagger slashes at their enemies, cleaving through multiple targets, and perhaps the same target multiple times with fast passing strikes. Useful against both single, mid-size enemies, as well as crowds of small ones. Toss and Trigger/Advanced Trigger ★★☆☆ - A decent disruption move for smaller targets, it deals up a strong upwards slash and throws a fire-damage explosion after them. It isn't very effective against more heavily-armored targets, however, as the charge doesn't have much of an effect unless the enemy is sent flying by the first strike. Ensnare/Implicate ★★☆☆ - Throws out a net that will drag enemies in. Mainly useful for control on pesky small/midsize enemies, but more of a utility rather than a fight-finisher. Can pull flying enemies out of the air, but it requires you to be on even altitude with the target - which isn't that often. Reach is also fairly short. Helm Splitter/Skull Splitter ★★★★ - Extremely powerful for what it is, Helm Splitter deals a jumping somersault strike that punishes enemies heavily. A combination of its capability of hitting high areas (such as the faces of ogres) and its benefits from the Eminence augment make it several orders of magnitude stronger than most other Strider attacks. Dazzle Hold/Dazzle Blast ★★☆☆ - Flings out a crackling flashbang that stuns a crowd of enemies. Its main benefit is that it can apply debilitations to enemies very easily, but it both suffers from some long after-attack lag and low damage. It's best utilized on supporting pawns. Reset/Instant Reset ★★★☆ - Flat out one of the most convenient utility abilities on the Strider, Reset allows the user to use a bit of stamina to just reset their stance. This can be used in almost every situation, save prone on the ground (seconds before if you're being knocked backwards, for example, this can catch you midair and let you land gracefully). It can also be used creatively with slower skills to ready further attacks. Sprint/Mad Dash ★★☆☆ - More of a novelty than a useful skill, Mad Dash allows you to make a long, forward run that can be transformed into one of three actions using the face buttons: either a sliding tackle that can knock targets down, a somersault to cross gaps, and an instant stop. Mad Dash (the upgraded sprint) is notable for having a very long distance, and counts as an attack animation rather than real movement (so you can sprint at full speed through waist-deep water or other obstacles, and at a much lower total stamina cost). It has its definite uses for mobility, but its a slot better spent on something like Reset. Pilfer/Master Thief ★★☆☆ - This skill lets you get rare drops from enemy targets. However, it has a lot of caveats, such as requiring the target to be debilitated or prone in some way (i.e. knocked down, stunned, staggered, etc). Also, stealing will make it such that a target won't drop anything on death, so it's essentially just so that you can nab an item from an enemy and run. Stepping Stone/Leaping Stone ★★☆☆ - Strider's final dagger skill is an odd one, consisting of running up the face of a given enemy. This skill doesn't do actual damage (and actually can let you climb off your pawns), but it does let you perform aerial attacks and can give you a big head-start on climbing tall enemies. Bow SkillsThreefold Arrow/Fivefold Flurry ★★★☆ - While not the best ranged attack in the game, it's a contender for such, and is closely related to the one. This rapidly fires a volley of several arrows in the general vicinity of where you're aiming, and can be used to either deal concentrated damage to one area of a target, or spray-and-pray to take down multiple enemies. Triad Shot/Pentad Shot ★★★☆ - Possibly the most devastating attack to use in close-quarters with the shortbow, it is a bit difficult to aim with at a distance, but it has surprisingly powerful stagger ability, and if each arrow hits, it can cause serious damage - even moreso than the flurry. Cloudburst Volley/Downpour Volley ★★★☆ - It's awkward to aim with, but the Volley provides excellent capabilities for outright bypassing a lot of the precision required to reach the most vulnerable points of some tall enemies - such as the skulls of ogres or cyclopes. It also serves as a reliable AoE attack, and is especially good at even catching flying enemies off-guard if you aim below them. Full Bend/Mighty Bend ★★☆☆ - A slow, charged bow shot, the Mighty Bend is high-ranking in the bow category for staggering and stunning enemies, and well-landed shots to the heads of dragons can force them to the ground with ease. Its downside is that the overall DPS isn't great, due to the slow charging period. Splinter Dart/Fracture Dart ★★★☆ - So all the issues with Mighty Bend are cancelled out here, providing a fairly quick arrow that can explode in a crackly, fire-based explosion that provides similar stun to aerial targets. This is king for ripping drakes and griffins out of the sky, and has even higher stagger rating than the Full/Mighty bend attacks do. Its use against ground-targets, however, is a little more restrictive, as well as its usage in low-ceiling corridors. Whistle Dart/Shriek Dart ★☆☆☆ - The final skill for the strider's bow is... a huge letdown. Area stun that only works on lighter-weight enemies. Against such foes, usually spraying a series of the other arrow types will work better, or even just charging in and using those daggers! The Mage
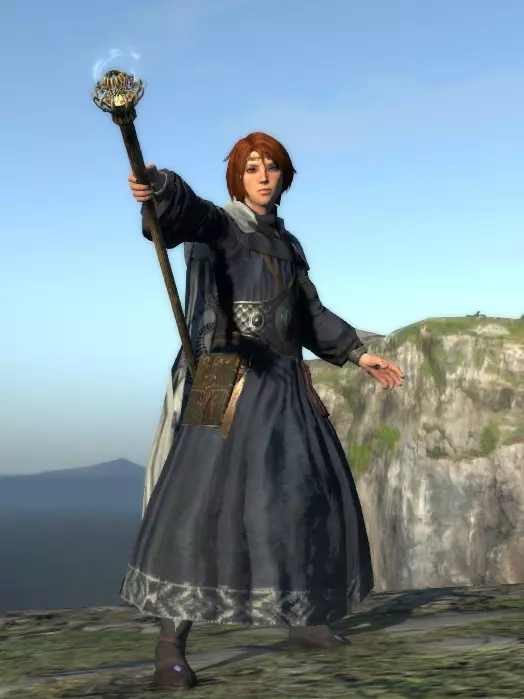
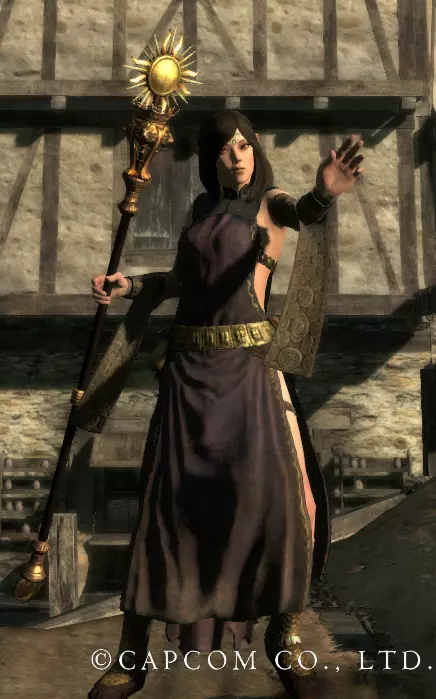
职业功能 - 元素支援、治疗与群体控制 主武器 - 法杖 副武器 - 无 可用护甲 - 法袍 玩法难度 - 中等 pawn 受欢迎度 - 高 强化实用性 - 低 法师通过法杖引导魔法能量,是所有职业中装备最轻的,最适合在远离战斗的位置发挥 - 主要通过治愈魔法、减益云雾以及能利用所面对敌人弱点的元素效果来支援盟友。 了解每个敌人弱点的过程将极大帮助你作为法师的体验 - 你的pawn也会尝试通过交谈来帮助你完成这个过程。所有主要法术都需要一定的准备时间,但如果在合适的时机释放和运用,就能对敌人造成严重的冲击和伤害。问题在于如何创造这个释放的机会——如果准备不足,法师在紧急情况下很难反击。此外,还有相当数量的敌人(尤其是魔像)通常对魔法具有极强的抗性,这是物理职业通常不会遇到的问题。 法师是随从的理想选择(例如法师随从鲁克),因为他们能够了解敌人并执行相关策略,从而快速有效地准备合适的法术来为团队提供增益效果并削弱对手。然而,与其他职业相比,这些随从更需要保护和施展技能的空间,并且他们对随从倾向尤为敏感(例如,你可能不希望你的法师有【分散】倾向……)。最有用的可能是【实用主义】倾向,能让法师充分利用元素弱点。同样有用的还包括【挑战者】(适用于远程战斗)、【缓和者】(如果你希望法师对付大群敌人)以及【治疗者】(用于施加附魔和治疗)。这些倾向中哪一个成为主要或次要倾向,对于决定法师随从的具体行动方式至关重要。 属性成长概况

Mages suffer from some troubling issues early-on. They start with the lowest raw stat total (due to decreased health) and have very poor health and stamina growths all the way to level 100. The low stamina is a particular problem, as that's what's needed to consistently cast spells to lay into enemies. In the final stretch, mages have decent stat growths comparatively, boasting balanced magical stats. In almost all cases, however, the Sorcerer's vocation stat loadout will better suit a mage's playstyle, and many players actually recommend starting magic-centric playthroughs with strider instead of mage. Core Skills:Feather Jump/Levitate - Compared to other vocations, mages have a slightly more floaty jump (possibly?). This comes out in spades once it's upgraded, which gives them the double-jump function of levitating in midair for a certain amount of time. Levitation makes the act of reaching faraway ledges much easier than with any other class, possibly even moreso than with strider. Magick Bolt/Force Bolt - Your light attack will fire out series of 5 homing bolts at your enemy, dealing very light magic damage. The upgraded version, Force Bolt, allows you to hold down the light attack button to charge up a 5-bolt rapidfire barrage to lay into your enemy. Compared to normal attacks, this barrage has much more stagger power than individual hits. The stunning power on this ability becomes absolutely stupid when combined with an enchantment. Seriously. Magick Billow/Magick Agent - The heavy attack of a mage allows them to do an awkward melee swing with the staff to try and knock enemies away (or break open crates). Its upgraded version allows the user to charge up using the Heavy Attack, and when released, causes a series of magic orbs to orbit around the user, providing damaging cover against any enemies that try and get close to you. Augments:Equanimity ★★☆☆ - A magic boost at low levels of health is not a good match for most magic classes, due to their already poor levels of defense. Intervention ★☆☆☆ - The description of this augment is a little vague, but what it basically means is that you won't take damage-over-time from elemental debilitations. The only elemental debilitation that causes DoT is burning, so that's basically all it does: stops you from burning. Apotropaism ★★☆☆ - This is a weaker version of an Augment that sorcerer gets, reducing all damage you take from magic by 30 points. This proves to be useful against small, repeated strikes of damage rather than big bursts - unfortunately, most magic attacks are big bursts. Beatitude ★★☆☆ - Extends the duration of healing spells (such as Anodyne and Halidom) by 50%. Useful for support builds and team layouts that will be mostly stationary, but otherwise a little underwhelming. Perpetuation ★★★☆ - This extends the duration of weapon enchantments, allowing elements placed on them to last 30% longer. This augment remains useful to both sorcerers and mystic knights (especially MKs, which have the powerful, but normally short enchanter/trance spells.) Attunement ★★★☆ - Another Mage augment with a stronger version in Sorcerer. This straight-up boosts the damage of all magic damage done, but only by a somewhat small portion. Inflection ★★☆☆ - This halves damage taken when casting a spell. However it doesn't do much to stop the actual issue of taking damage during a spell cast, which is being knocked down or otherwise being interrupted while preparing the spell. If you do utilize this augment, have an Ogre-Bone ring at the ready. Recommended Pawn Pairings Mages need their space in order to stay separate from a brawl and prepare spells - Avoid any and all Guardian-inclined pawns if possible. A fighter will provide openings for you to cast your spells and apply enchantments to. Sorcerers can cure some of the effects that Mage spells cannot. A warrior will benefit greatly from your strongest defensive spells. Mage Skills Because mages only use one weapon (the staff), this is just a list of the spells they can use with it. Almost all the skills utilize the five elements, or archmagicks, each of which have their own applications for different enemy types: Fire is usually the first element that mages will learn in terms of enchantments and attacks. It is extremely powerful against common monsters and animals, who often will be thrown into panic once they are inflicted with Burn, damaging them over time. Its usage remains high among corporeal undead and humans, but drops off once you start running into enemies such as pyre saurians, drakes, and skeletons. Ice proves strongest against many of the enemies that Fire cannot deal with, though its usage against common monsters such as goblins and wolves is also strong. Ice attacks tend to Freeze targets, making them very vulnerable to the next hit. Ice is extremely powerful against common drakes, but suffers when put up against undead and snowy animals, such as harpies or dire wolves. Lightning deals out a stunning Thundershock, which can knock enemies down and cause them to drop their defenses for some time. The kinds of monsters strong or weak to this damage is a bit vague, but the most notable enemy weak to this damage type are the Cockatrices. Holy magic has very few direct attacks to its name, but is extremely useful in the lategame, especially on Bitterblack Isle, where it shines spectacularly against hordes of undead (with even curative spells causing some damage against them), and otherwise remains neutral to a lot of other enemy types. Incidentally, the few enemy types that resist it heavily are also present on that isle, so beware... If you're going to fight an Ur-Dragon, this is the only damage type the creature is (comparatively) weak against. Dark attacks hit with a black energy, often serving to work well against the enemies that Holy magick cannot harm (such as Dark Bishops or Maneaters). It is strongly associated with most of the other debilitation, such as Blinding, Sleep, and Curse. The rank names of each spell are fairly self-explanatory: second rank spells are usually called "High -" for example. Ingle ★★★☆ - Your starting spell of Ingle lobs out a series of fireballs at your target, attempting to ignite them. It's a fairly basic attack, but it remains useful for its long-ranged and straightforward effect. Anodyne ★★★☆ - The main curative magick of this game, Anodyne creates an aura of healing energy that will restore health as long as you and your pawns stay inside it, with upgraded versions providing some lingering healing as well after they leave. Late-game, its healing power begins to dwindle as character health values reach the mid thousands, and enemies become better at pressuring you out of position however. Frazil ★★☆☆ - Ice's basic attack is a very awkward one, which allows you to summon forth a cloud of cold air around you, and with another button press, to unleash it in a freezing wave. The cold aura will do almost no damage, but can potentially repeatedly freeze and unfreeze enemies for some crowd control. The biggest issue with Frazil is that it's at odds with Mage's main playstyle - it requires the user to be front-and-center to be useful, with even its cone being fairly short-ranged. Levin ★★★☆ - The basic thunder attack will call down bolts of lightning right above the target, providing strong stun and damage. This can hit enemies who are hiding from you, thanks to the bolt's origin. Boon and Affinity ★★★★ - Provides an ally with a temporary buff to their primary weapon, imbuing it with an elemental effect. You can also cast this on yourself by pressing the movement analog stick in (if you're using a controller. If on keyboard, using the Run key might make it work.) If you know what you're coming up against, this can be a game-changer, granting you a powerful elemental edge against your foe to deal massively-improved damage. The only issue is knowing which kind of Affinity buff to bring along... Halidom ★★★★ - This spell eliminates a lot of the requirement for carrying debilitation cures around, being able to clear almost all of the effects with just one spell cast. Silentium ★★☆☆ - Creates a silencing aura, which only serves to be useful against enemy spellcasters. Against more nuanced enemies that might have magic (i.e. wyrms) this technique isn't very helpful... Blearing ★★★☆ - This spell will blind enemies, which can be useful if your team is ranged-centric. Its benefits dwindle if the team is mostly melee-based (as stray strikes can still hit you). It's most powerful when used against enemies such as cyclopes. Comtesion ★★★★ - The advanced Fire spell is defined by its low damage, wide area of effect, and extremely strong knockup and burn-application, making it a decent spell all around, considering how much burn damage can build up. Can be difficult to land on moving targets... Frigor ★★★★ - Frazil's muckup can be excused by how generally good Frigor is, which causes a high-damage spike of ice to erupt from the ground. That's not to say the skill isn't without issues, however, as the spikes from Frigor usually won't be tall enough to quite reach flying dragons - which is what ice is supposed to be good against, and all... Brontide ★★★☆ - While a slightly odd spell, Brontide has one edge on most other short-ranged spells in that it helps preserve a lot of the mobility on the mage that'd make them otherwise vulnerable, and combines this with a large area-of-effect with the swings of a giant electric whip. Grapnel ★★★☆ - Maintains a slowing, net-effect that acts very much like Torpor on a given target. It can only affect one target at a time, and while active, leaves the mage unable to do anything else, but it can be used to keep an enemy fairly well open for allies to hit. Spellscreen ★★★★ - With a maintained incantation, Spellscreen provides all teammates in range of it with massively improved defenses around the board - both to physical and magickal, and even to being staggered. Though it's maintained, it can be released by activating again or jumping, after which its defensive traits will linger afterwards. Mages and Sorcerers under its effects become quite difficult to knock over, while any other vocation becomes essentially a juggernaut. ~~Advanced Vocations~~ After reaching Gran Soren, you are given the opportunity to change your vocations for both your Arisen and your Pawn. This also opens up a new number of possibilities for you two, introducing the advanced vocations, which rely on some of the past experience gained from basic vocations to function. Advanced Vocations are not necessarily better than the Basic Vocations. Their strengths and weaknesses are further focused into the areas they excel in, producing vocations that lean heavily into an intended role. The Warrior - The advanced Melee vocation, focusing on extreme physical damage in bursts, and crowd-control, but foregoing some of the defenses that Fighter had. The Ranger - The advanced Ranged vocation, focusing heavily on ranged combat with the bow for excellent precision damage, but in turn trading off some of the swiftness and techniques that Strider used. The Sorcerer - The advanced Magic vocation, utilizing massive incantations to call down disastrous elemental attacks and debilitations, but as a cost, losing access to most healing magicks the Mage used. Switching to these vocations requires you to be level 10, and costs 1000 discipline points. The Warrior
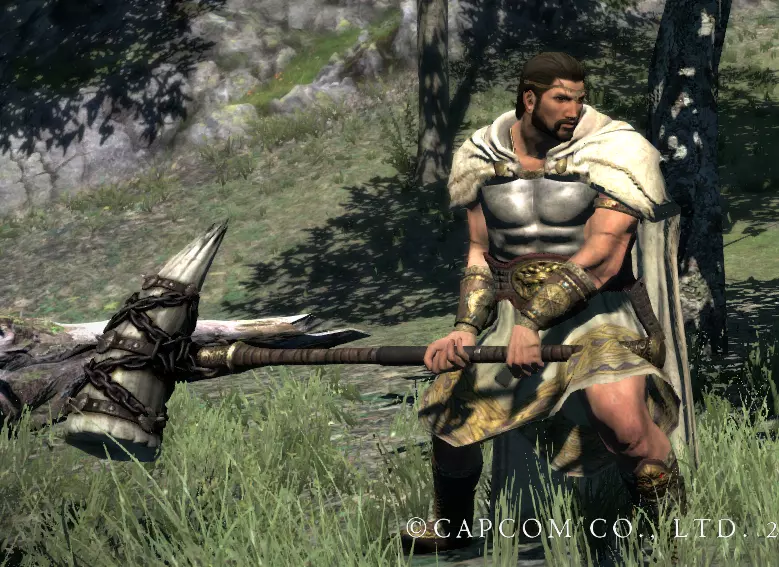
团队功能 - 极限近战、群体控制、击倒生物惩罚 主武器 - 长剑/战锤 副武器 - 无 可用护甲 - 非拖尾服装(即无长袍)、皮甲、重甲板甲以及超重型鳞甲 游玩风格难度 - 困难 随从期望度 - 低 强化实用性 - 极高 乍看之下,战士是纯粹的进攻型职业——不持盾牌,仅使用一把巨大的双手武器,身着厚重的重甲,使他们能够直接冲入战场中心挥舞武器,并通过破甲、击退攻击取得胜利。但最大的问题在于如何抵达战场中心。战士的攻击拥有无与伦比的击晕和击倒能力,同时凭借其 armor 选择和技能特性,对这些效果也有着较高的抗性——由于战士只携带单一武器,他们可以将更多的 inventory 重量分配给穿戴最坚固的 armor,从而让自己能够在前线生存。然而,这种单武器限制也带来了他们最大的弱点——他们是所有职业中技能选择最少的,一次只能装备三个武器技能。他们拥有强大的原始力量,但在灵活性和速度上却严重不足,因此战士需要盟友的帮助来创造机会,以便他们准备发动终极一击。战士类型的随从不像斗士那样具备吸引火力和防御的综合能力,因此通常不如斗士受欢迎。和游侠类似,战士随从在执行任务时表现欠佳,因为它们不太擅长判断敌人何时处于可攻击状态并使用技能。如果你确实要创建战士随从,建议避免使用“解放弧光”这类需要长时间蓄力的攻击技能。战士的招式组合非常有限,所以随从的倾向通常影响不大,但如果一定要选择,建议倾向于【开拓】、【调停】或【实用】。为了平衡这一切,战士职业等级会解锁游戏中一些最重要的【增幅】,这些【增幅】有助于其他所有职业提升攻防能力。最棒的是,战士拥有的那些对全局最有用的【增幅】在低等级时就能获得! 属性成长概况

For the first half of the levels, warriors benefit from having the highest possible health gains of any class, paired along with high strength gains. For pawns, their strength growth is the highest possible they can have. Inversely, their magical stats are similarly weak as with the fighter, and they also suffer from extremely poor stamina growth, tied at worst with the Mage. After hitting level 100, though, warriors undergo a strange transformation. Their stamina growth skyrockets, matching other ranged vocations, but then their formerly-highest health growth goes to the lowest. They continue to steadily gain both strength and defense, and are the only ones to do so in a balanced manner. Core Skills:Hack/Devastate - The warrior's light attack is notable for being extremely slow, but also covering a nearly full circle around the user. More insidious is that, in order to combo, the first hit of Hack needs to land against some kind of enemy or object. Much like with other advanced base combos, Devastate is utilized by pausing your next attack press until the sword is right behind the user. Against most swift enemies (such as wolves) it's more desirable to combine sprints and aerial attacks to chase them down, instead of relying on this attack. Transfix/Eviscerate - The heavy attack performs a running stab at the foe, staggering and dealing high damage. With eviscerate, the attack button can be held in order to deal an extra burst of damage by withdrawing the weapon. Much like with Hack/Devastate, it's required to hit an enemy in order to get this technique to work. Vault/Controlled Fall - Warriors also get access to this technique, but will need to relearn it for this vocation, due to using a different weapon than a basic sword. Augments:Bastion ★★★☆ - Provides the user with a flat reduction of damage by 50 points (higher on both Bitterblack Isle and when playing hard mode) from physical attacks. This can be a huge lifesaver, and much like with Mage's Aprotopaism, can make tiny attacks do no damage. Ferocity ★★★★ - This boosts the damage of all core skills by 10%. Regardless of what class you're using. In most cases this just means you do extra damage while using your basic attacks and combos, which is actually a massive improvement, and even on mages, it helps keep the user useful while waiting for stamina to regenerate. Audacity ★☆☆☆ - This augment is meant to reduce the accumulation of stagger and knockdown by 15%, but there's a serious doubt as to whether it works or not. It might be bugged. Temerity ★★☆☆ - This reduces damage taken while mounting a focused physical attack. Versus Mage's Inflection, this Augment actually works as intended, but is otherwise not as applicable in most cases, and not among as many vocations either. Impact ★★☆☆ - Boosts your knockdown and stagger strength. In most cases, however, it's difficult to tell a difference, and is likely more desirable to go for more raw strength instead... See below! Clout ★★★★ - This straight up grants you an extra 20% physical strength. It's almost a must-have for any physical-damage class, and is the stronger version of Fighter's Vehemence. It also can stack with vehemence! Proficiency ★★☆☆ - Provides a substantial stamina discount of 25% to most weapon skills, but excluding any bow or longbow techniques. Like most other stamina issues, this can be worked around by instead carrying stamina curatives or levelling in a vocation other than Warrior. Recommended Pawn Pairings As far as inclinations of pawns go, Utilitarian is perhaps the most important to Warriors, as this maximizes usage of stunning and utility effects that can create openings. Mages with lots of defensive magic can help you survive while forcing the offensive. Rangers with stunning arrow techniques can help ground large flyers and give you ample openings Sorcerers specializing in control effects (especially torpor) will give you huge windows of opportunity to land mighty blows. Fighters with shield drum can give you a focal point for you to fight around, while not directly taking damage. Warrior Skills Warriors only use Longswords and Warhammers, which utilize the same pool of skills below: Savage Lash/Indomitable Lash ★★★☆ - A charged overhead smash, the Lash will deal out a massive, earth-shattering blow that can go straight through armor (such as the armor worn by cyclopes), and can severely punish all in the way of the attack. It's both preferable, and possible, to do full-charges of this attack thanks to the super-armor you gain while preparing this strike. Of note, the Lash is a little difficult to utilize, as releasing the attack too late or too early will do much less damage than releasing it right on time (when you flash white). Properly charged lashes create a massive shower of flying dirt from the impact, and can even stun enemies further away from the fall of your blade. Pommel Strike/Pommel Bash ★★★☆ - Though humble, the Pommel bash is essential in making openings for the warrior to land their other attacks. The damage and range on this skill is low, but is offset by very high stagger power and being the fastest possible attack the Warrior can unleash. Against sturdier enemies, it's advisable to use multiples of these to throw them off-balance, and make a clearing for your strongest attacks. Upward Strike/Whirlwind Slash ★★☆☆ - The essential mirror of the Fighter's Antler Toss, this stab and slash will send targets hit by the swing flying. The upgraded version also includes a final rear-hit that can be used to help when the warrior is surrounded from behind. Very useful against confined crowds for its range, fairly quick speed, and extreme knockdown power, but underwhelming against large monsters. Escape Slash/Exodus Slash ★★★★ - One of the only defensive skills available to warriors, the strike deals out a first retreating strike with the sword, and then can be used again to charge back in to deal an overhead swing. On the first swing, the user is actually invulnerable to damage, making this useful (when timed properly) to straight-up power through deadly attacks. This is all on top of the attack being quite quick, and also feeling super-slick if you pull the dodge maneuver off correctly. Ladder Blade/Catapult Blade ★★☆☆ - The warrior's version of Springboard, this sends your allies flying if they approach the warrior. Distinct from Launchboard, however, is that this can send multiple different members of your team flying instead of just one. Savage Lunge/Indomitable Lunge ★★★☆ - Holding your blade in both hands, you run forward and mow through your foes. Of note is that you can press the jump button to perform the final hit of this lunge early, providing a 'blink strike' final slash to your enemy at the end of your run. Its one of the good options for punishing downed monsters quickly, as well as charging headlong down a narrow hallway. Spark Slash/Whirlwind Slash ★★★☆ - A full-circle swing that can knock down even mid-size enemies, and even has surprising power against larger ones in the air (if it makes contact with a dangling tail for example.) Unfortunately, it is not a perfect mirror of Full-Moon Slash, and cannot be used to escape stunlocks like it can. Act of Atonement/Act of Vengeance ★★☆☆ - By standing in the thick of battle and charging this attack, you can take damage and unleash it with this strike to deal a scaling counterattack - the more damage you took, the stronger your strike will be (up to around 1.5k damage taken it seems). The main way to tell how ready your counter is, is by how red your character is glowing while charging up the strike. Of special note is that you can use curatives while charging the attack, but powerful staggering strikes and quakes can still interrupt the process. Once again, especially after reaching Vengeance, it is useful against widespread enemy groups, but underwhelming on giant monsters. Battle Cry/Warcry ★★☆☆ - In essence, it's the warrior's reskin of Shield Summons, but without the benefit of being able to block, or 3 extra skill slots. A risky maneuver to be sure. Arc of Might/Arc of Deliverance ★★★★ - This is everything that warrior builds up to... A 10-second charge attack that can destroy even huge monsters, such as chimeras, griffins, and dragons, with a single blow... provided the user gets the necessary cover and positioning for that 10 second window. At the very least, the skill grants you some rudimentary mobility while charging, but you will still be vulnerable, and highly-dependent on your allies to make that opening for you. The Ranger
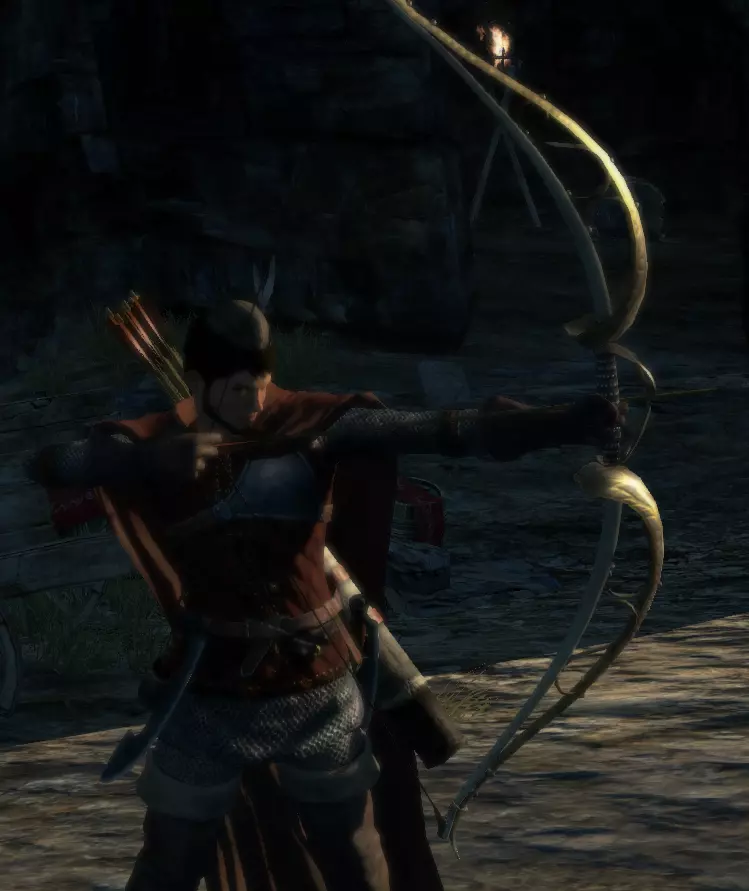
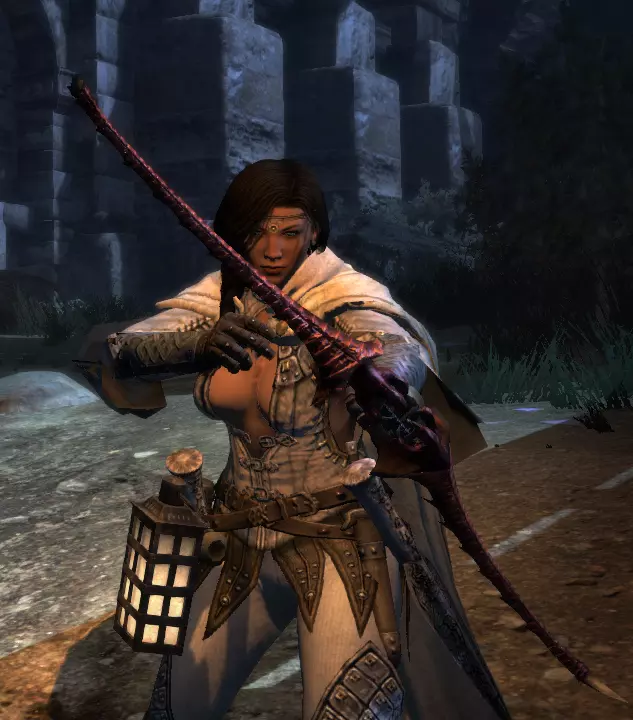
职业功能 - 狙击、物理远程伤害、部分近距离战斗 主武器 - 匕首 副武器 - 长弓 可用护甲 - 布甲、轻甲(皮革甲和链甲) 玩法难度 - 简单 随从需求度 - 中等 强化实用性 - 中等 游侠,顾名思义,是装备了更强长弓的巡林客。与标准弓相比,长弓在更远距离上造成的伤害更高,但反过来在近距离使用时威力稍弱。不过,游侠在近距离也并非完全无助,因为他们保留了许多巡林客使用匕首的战斗技能。游侠拥有游戏中部分最具破坏力的物理攻击,并且能轻松命中飞行或高大敌人的弱点,无需像战士或巡林客那样费力攀爬。他们是制造突破口和发起战斗的理想职业。然而,若被迫进行近战,游侠相较于巡林客毫无优势,因为他们缺少巡林客拥有的多项实用技能。此外,使用长弓瞄准时,游侠的移动速度远不及巡林客,只能以步行速度移动,而非标准跑步速度。游侠 pawn 没有足够的实际射程来提前攻击远处的敌人或使用狙击技能,但弓的纯粹威力使其几乎和巡林客一样有用。尤其是在装备了【Dire arrow】后,它们在战斗中的存在感会很强。为了充分利用游侠的射程,【Challenger】是非常优先的选择,【Mitigator】作为次要倾向也很不错。【Utilitarian】一如既往是个好选择,但通常应稍微避免【Scather】,因为这种倾向会促使 pawn 冲上前去。 属性成长概况

Rangers benefit from having the highest possible stamina growth, alongside a strong Strength stat. Inversely, they lose out some on their defenses and have some of the lowest health growth alongside mages. Curiously, their magic growth isn't bad either (though not optimal). Ranger's stat trends remain similar into the 100+ range, though obviously at a slower rate. Rangers utilize the exact same Core Skills as the Strider does. Augments:Longetivity ★★★☆ - Provides the user with an extra 100 health. This is identical to Fighter's Vigilance, and can stack with it for a total of 200 extra health. Radiance ★☆☆☆ - Makes the glow on your lantern 20% bigger. Shamefully, it also might increase the rate at which lanterns burn, and also has no effect on Pawns. There are much more practical things you could put into an augment slot. Efficacy ★★☆☆ - Strengthens all curatives you use by 20%. Combined with Sinew, this can create a useful item-focused healer, but it otherwise is another augment that likely could be used towards something more direct. Morbidity ★★★☆ - Confusing description aside, this augment increases the chance of your weapon attacks (and also debilitating arrows) applying a debuff by 30%. There's only a small number of weapons that can apply debilitations by default, but combining this with arrows, you can use your attacks to very easily apply them to vulnerable enemies. Trajectory ★★☆☆ - Grants your arrows 25% extra range, though keep in mind it doesn't change the damage curves of the arrows shot - so longbow damage in the extra range will still be non-optimal compared to firing at enemies from a moderate distance. Precision ★★★☆ - This augment actually removes all possible recoil and spread from your bow shots. This means with skills like tenfold flurry, all the arrows will land in the exact same spot, which can make this attack devastating if the user has good aim. However, it can demand some greater degree of skill, so sometimes it can be preferable to pass up on this one. Stability ★★★☆ - While a newer player might think this augment helps against strong winds in the windworn valley, the actual function of this augment is to prevent staggering from wind-based attacks, such as drake wing flaps. Can be extremely helpful when fighting such giant, flying creatures, allowing more openings to be available against such enemies. Recommended Pawn Pairings Having your allies generally be Scatherers is a good idea with a long-distance class like this. Have Fighters or Warriors to keep a monster distracted at a distance from you. Mages can help you immensely with their enchantments. Ranger Skills Rangers have access to Dagger Skills under the Strider tree, but their overall list is much shorter. It only includes: Scarlet Kisses/Hundred Kisses Biting Wind/Cutting Wind Toss and Trigger/Advanced Trigger Dazzle Hold/Dazzle Blast Reset/Instant Reset The context of Ranger and its possible combination moves isn't drastically different from default Strider. Longbow SkillsDire Arrow/Deathly Arrow ★★★☆ - Many of Ranger's skills mirror those of the Strider's bow skills. Dire Arrow, the Ranger's starting bow skill, mirrors that of Full Bend. Much like it, it's an excellent option for stunning and taking down flying targets. Heptad Shot/Endecad Shot ★★★☆ - The ranger's mirror of the Pentad shot, and proportionally even more ridiculously powerful at point-blank. That's right, it's 11 arrows flying directly into an enemy's poor face 3 feet away. This can be highly useful, when considering that Ranger normally has a damage curve with its longbow that discourages close-quarters combat. Foot Binder/Body Binder ★★☆☆ - Control skill that can pin an enemy to a wall. It's a bit finnicky and doesn't always work... Sixfold Arrow/Tenfold Arrow ★★★★ - Strongest contender for best ranged attack in the game, it balances devastating number of projectiles with possible precision, making it useful for both taking down big crowds of enemies, and laying in hard to giant monster weakpoints at a distance. Combined with just about any specialized ammo, or debilitating effect, it will decimate whatever it hits without issue at mid-range. Its one biggest problem is that it has a rather steep stamina cost. Meteor Shot/Comet Shot ★★☆☆ - The necessary sniper skill, which is heavily hampered by its extreme stamina cost and underwhelming damage at extreme range. Comet Shot is distinguished from other arrows by the fact that it's fully hitscan (where you aim is where you'll hit). In cases where the Comet Shot can shine, however, you'd usually be using Deathly Arrow anyways. Flying Din/Fearful Din ★★★☆ - Fires off an exploding arrow, which can serve well for both crowd-control on multiple enemies, as well as stunning large monsters with a well-aimed shot to their head. Though labeled as a crowd-controller in name, it actually is capable of some decent damage. Whirling Arrow/Spiral Arrow ★★☆☆ - The main use of this skill is to drill through large targets with multiple hits, allowing it to hit multiple targets in a line. Its multi-hit effect actually makes it highly-effective at applying debilitation using tools such as poisoned arrows, or a rusty bow. Invasive Arrow/Crippling Arrow ★★☆☆ - Aimed at a large foe, this will provide a defense-debuff against the body part hit. In whole, it's a minor support gimmick, but it can be put to some good use with enemy knowledge. Of note is that the effects cannot stack if multiple cripping arrows are fired at one bodypart. Great Draw/Great Gamble ★★★☆ - This ability will use up all your stamina to fire a guided arrow, which can be directed right at a monster's weakpoint to deal disastrously high damage. Undeniably powerful, and actually fearsomely accurate in a pawn's hands, but will leave you open (both after the shot and while charging) and is not nearly as effective on faster targets such as Garm. The Sorcerer
团队功能 - 元素破坏、增益效果和群体控制 主武器 - 元素法杖 副武器 - 无 可用护甲 - 法袍 玩法难度 - 困难 pawn 实用性 - 中等 强化实用性 - 高 巫师是专精法师,能运用强大法术对敌人造成毁灭性打击。在《龙之信条》的所有职业中,若有机会完成施法,他们能造成最纯粹的破坏,可召唤流星雨、漩涡和地震。 巫师进一步强化了法师的常规玩法,其法术需要更长的准备时间,因此更需要保护以避免被打断。遗憾的是,当法师陷入如此危急的境地时,他们通常需要借助普通的法师法术,比如【火焰箭】,来阻止敌人逼近。为此,法师会大量使用各种减益魔法云雾,这些云雾最适合用作防御屏障,对付那些试图靠近的敌人——任何试图与准备就绪的法师进行近战的人,都可能会受到中毒、迟缓甚至石化等效果的影响。此外值得注意的是,法师是唯一专门使用魔法攻击的职业,他们的法杖从不会进行物理攻击。虽然法师职业的随从可以凭借元素魔法巧妙运用其对敌人的了解,但他们也需要主人更多的关注,因为他们通常是队伍中最脆弱的成员。不过,法师随从可以通过法术同步来相互受益并提供援助,即多名法师施展相同法术时,能够加快彼此的施法速度,从而缓解法师战斗风格中的一大问题。尽管如此,法师仍是将“实用主义”作为主要倾向的绝佳选择,若想专注于进攻,应搭配“挑战者”倾向;若注重辅助和防御,则搭配“治疗者”倾向;甚至如果想让他们进行法术同步,搭配“守护者”倾向也未尝不可。(顺便一提,【 wyrmking's ring 】是一件对法师极为珍贵的特殊物品,它能将所有魔法咒语的施法时间缩短10%,并且可以与下文将要讨论的【 articulacy 】叠加。完成此任务时,你可以将戒指拿到【 the black cat 】进行锻造,上交伪造品,从而保留原戒指及其效果。这个技巧在一定程度上对法师、秘法师和魔法弓箭手也有用,但毫无疑问,法师从中获益最大。) 属性成长概况

Sorcerers have the absolute strongest magical-stat growths of any class, gaining both magic and magic defense at very high rates. This comes at the cost of almost everything else - especially their health, which is the lowest of all vocations. Their 100+ stat gains are more moderate in general, but they still retain the highest gains in magic attack. Sorcerer core skills are the same as Mage ones, but with one very minor difference: Magic Billow with the sorcerer is a different attack, whereas mages will physically swing their staff for their heavy attack, sorcerers unleash a slower, but longer-ranged wave of force that can stagger enemies. Augments:Awareness ★★★★ - In essence, this is the Magic counterpart to Bastion, granting high flat-damage resistance to all magic damage. With its higher defense offered, every little bit can help. It can also stack with Mage's Aprotopaism. Emphasis ★★★☆ - Spells with a knockdown component gain extra knockdown capability. If the aim of your spell choices focus more on crowd control rather than damage (such as Comtesion), this can be a great option that allows you to uproot and stun rather large enemies that normally wouldn't pose such openings. Suasion ★★★☆ - While not useful in the open world of adventuring, Suasion is a very nice Augment to have on hand whenever you're in town, as it will allow you to sell your items for 15% more gold. Not only this, but multiple members of your party with Suasion can also stack, enabling even more resale value. Conservation ★★★☆ - Reduces the stamina cost of using spells by 15%, which can be huge for certain spells such as Maelstrom or Seism, which would normally leave you nearly entirely drained. Of note, it is not usable by Magic Archers or Mystic Knights, unless they are using staves. Gravitas ★★☆☆ - In theory it's supposed to increase your resistance to knockdown and stagger when preparing a spell, but in most cases it won't make too much of a difference - especially against large enemies where you likely would want to use your most powerful spells. Acuity ★★★★ - The stronger version of Attunement, Acuity will grant you an extra 20% magic strength, and it can also stack with Attunement for even more destructive magic power. Articulacy ★★★★ - A must-have for sorcerers incanting long spells, Articulacy will shorten any casting time of a spell by 10%, minimizing the vulnerability when preparing your onslaughts. Recommended Pawn Pairings Fighters and other melee characters who scather are excellent for Sorcerers. Inversely, the issue of Guardian-inclination pawns is much worse for Sorcerers due to their extended casting times. Pair up with other sorcerers who have the same high-level spells as you to speed up casting. Sorcerer Skills The Sorcerer's Archistaff has access to just about every offensive spell in the Mage's spellbook, but none of the curative spells: Ingle Frazil Levin All boons/affinity spells Blearing Silentium Comtesion Frigor Brontide Miasma ★★★☆ - Creates a cloud of poisoning mist, proving useful against most living creatures. Miasma counts as a dark spell, capable of damaging even some enemies immune to poison. Its comparitive speed makes it an overall useful defensive skill, providing buffer space to punish enemies that get near you. Lassitude ★★★★ - Lingering as a floating cloud of slow, Lassitude is one of the most useful debuffs in the game, applying torpor to all who enter its grasp. It can both drag mobs of small enemies to a crawl, as well as punishing larger monsters that stand in the cloud for too long. Perfect setup for most of the other high-tier spells that Sorcerer gets, and you can, and should, cancel out of its long after-spell animation with a jump. (Incidentally, however, managing to get a rusted archistaff and upgrading it will work much faster than this spell can, and with no stamina cost either. Though I've found it's only really much faster if you gold-rarify the staff first.) Necromancy ★★★☆ - A somewhat slow cast brings forth one of the only direct-damage dark attacks in the game, causing a series of skulls to hover around you. These skulls, as soon as an enemy shows up, will fly out and scream at foes to damage and stun them, dealing dark damage. Excellent against those who are weak to dark damage, as well as various flyers. Decent for making a slight opening as well. Its main use, with the passive effect, is to provide some defense for your sorcerer. Voidspell ★★★☆ - Paired up with Halidom, the Mage and Sorcerer have separate spells that can cure nearly all possible debilitations, as voidspell can restore reduced stats, and even clear out petrification. It benefits from an extremely fast cast-time as well. Of note, though, it apparently can cure enemies affected by these debilitations as well. Exeqy ★★★☆ - Creates a long-ranged, red sigil that can kill any enemy if they spend enough time in it... The one problem is that the sigil needs to stay on them, and during this period, you will be losing stamina. The exact amount of time needed to get Exeqy to trigger is related to the health of the target you're trying to kill, and your magickal attack power. Once upgraded, it's viciously effective at clearing out mobs of weak enemies. It's also notable for ignoring many normal magick resistances, capable of even vaporizing golems if executed correctly. Petrification ★★☆☆ - Much like the other debilitating effects, this creates a fog that enemies, if they spend time in, will suffer the corresponding effect. Unfortunately, Petrification isn't effective on most large enemies, limiting its usefulness as an easy way out to destroy mobs of small monsters trying to get at you. Bolide ★★★☆ - The ultimate Fire spell, Bolide summons meteors to rain down from above, striking enemies periodically over time. Its delayed effect and lack of specific range means you can use this spell from comparative safety, but its detonation upon hitting the ground with each meteor means it's not terribly effective if enemies are airborne. Gicel ★★★★ - The final Ice spell summons tall, twisting spires of ice to impale enemies from a distance, like some crazy ice tree that erupts in front of you. It's pretty directly much like a stronger, slower version of Frigor, but it often extends well far enough to reach flying targets. Fulmination ★★★★ This final Electrical spell raises your staff aloft, creating a ring of electrifying energy. Pressing either of the attack buttons will raise it even further, enabling you to electrify your allies, causing the energy to emanate from them. Closely-bunched allies climbing all over your enemy will do disastrous damage in this situation. The one downside is that it's a combination of a channeled cast as well as a maintain with slow movement, making the caster fairly vulnerable while the spell is active. Seism ★★☆☆ - This special, high-level spell is of a Holy element, and causes an earthquake around you. On the player, aiming this spell is almost impossible, but pawns can use it effectively. In player practice, it's usually nearly a point-blank spell, meaning you'll need to be in the thick of combat to get it off... Not exactly optimal for a sorcerer. Maelstom ★★★★ - The special high-level Darkness spell... And I love it. This bad boy calls forth a gigantic, aimable tornado that will suck most enemies in and just throw their corpses into the air repeatedly. If you get this spell off on anything that isn't darkness resistant (and isn't huge), it's game over for them. The one big downside (besides extreme stamina cost) is that it also has a very long post-cast period where you need to stand still, unless you take a hit. Also, standing right next to your tornado will blind you while it's nearby... As a note, that's a good reason not to give this to your pawns if you're a melee vocation, because that's going to make an arisen's job of being able to see things really difficult. ~~Hybrid Vocations~~ Available only to your Arisen, Hybrid Vocations represent the mastery of several vocations in unison, combining two chief playstyles into one. In general, hybrid vocations are much more flexible than basic or advanced vocations, and excel most when played intelligently. The skills of each hybrid vocation can be combined creatively to make them just as effective, if not moreso, than any other vocation. The Assassin - Hybrid of Melee and Ranged vocations, Assassins are fast, ferocious, physical warriors that can make use of Sword, Daggers, Shield, and Bow to face down their enemies. They have knack for using deadly counterattacks and utilizing self-buffs. The Magick Archer - Hybrid of Ranged and Magic vocations, Magick Archers utilize either Daggers or Staff for close-ranged combat, and pair this with an Arcane Bow to fire magickally-imbued arrows at their foes. The Mystic Knight - Hybrid of Melee and Magic vocations, Mystic Knights fight with either Sword or Mace in close-quarters, have the option to use a staff, and pair this with a great Magical Shield that can be imbued with elemental effects to return powerful counterspells at their enemies. Switching to these vocations requires you to be level 10, and costs 1500 discipline points. They heavily borrow skills from other vocations, so having levels in several vocations can be extremely useful. The Assassin
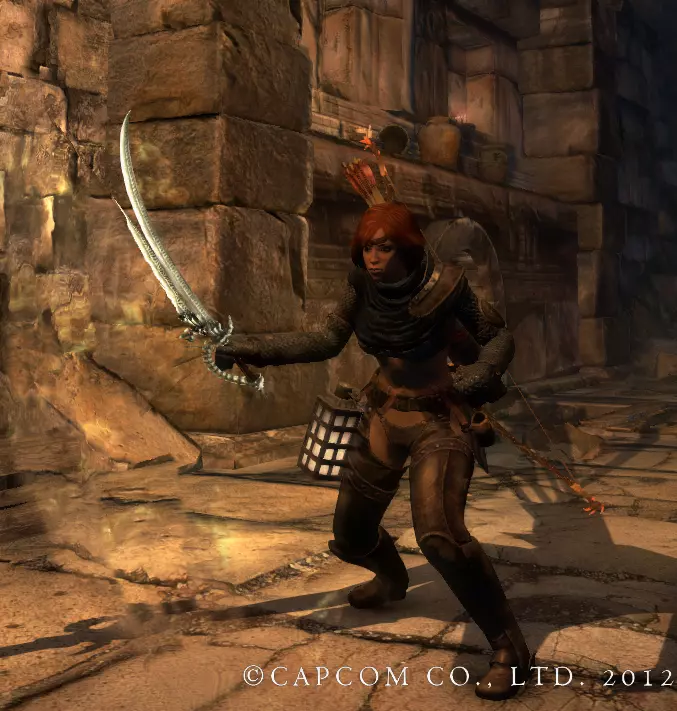
职业职能 - 物理战斗、灵活性、敏捷作战、极限进攻与精准防御 主武器 - 剑、匕首 副武器 - 盾牌、弓 可用护甲 - 轻便服装、皮甲、链甲 玩法难度 - 简单 强化实用性 - 中等 刺客是强大且多才多艺的物理战士,能够使用几乎所有可想象的武器来适应特定情况。他们可以像战士一样使用剑和盾牌,但能以更具侵略性的方式缩短距离,甚至结合一些类似游侠的技巧。同时,他们也能使用游侠的匕首和弓,在战斗中发挥出色的敏捷性和闪避能力,同时还能进行强力的远程攻击。携带全套武器的刺客几乎能独立应对任何情况。刺客的战斗风格在坦克和狙击之间有很好的过渡,只需装备不同武器就能随时切换角色定位。他们还充分利用了“力量”只是众多属性之一这一特点,因此无论偏向坚韧还是敏捷,在几乎所有情况下都能造成极高伤害。其弱点包括无法使用一些最强大的战士和游侠技能,并且严重依赖队友提供元素或魔法效果——不过假以时日,刺客或许可以找到默认就带有元素效果的武器来完全规避这个问题。属性成长概况

Assassins, bar none, have the fastest possible strength growth of any vocation, outdoing even the mighty Warriors. They also boast a strong stamina gain, allowing high usage of skills. In exchange, however, their defenses and health suffer rather heavily, and just about no focus in any kind of magic stats whatsoever. Assassins have the same gamut of Core Skills as the Fighter and the Strider. However, what core skills they use depend on what weapons they're holding. For example, when the Assassin is equipped with a sword, they will be able to recover from knockback using their controlled fall, but are incapable of double-jumping or dodge-rolling. Inversely, an assassin carrying knives will have these mobility options, but won't have access to the fighter's recovery. Augments:Watchfulness ★☆☆☆ - Reduces the amount of damage taken when your weapons are not drawn - this works under the assumption that you'd even sheathe your weapon intentionally while in a dungeon... Which just doesn't happen unless you're doing something crazy like gathering from a rubble pile in the middle of a fight. Entrancement ★☆☆☆ - Provides you a stamina boost, but only at night. Of note, Bitterblack Isle, while it always appears to be night, obeys the same day-night cycle as on Gransys. It's just impossible to tell what time it is, unless you have this Augment and notice you have 100 stamina less. Sanguinity ★★☆☆ - Same as Entrancement, but with health. Bloodlust ★★★☆- Provides a number of buffs to you while at night: extra attack power (for both strength and magic!), and flat damage reduction. The damage boost offered here is on par with warrior/sorcerer boosts (20% extra!) so it's a pretty great deal if you want to go rolling around in the night. Preemption ★★☆☆ - Completely contrary to its description, this appears to increase the damage inflicted by attacks when they hit weakpoints (i.e. cyclops eyes or dragon hearts). Difficult to confirm though... Toxicity ★★☆☆ - Improves the chance of your attacks in inflicting poison, if they can do so. Note it's specifically poison, and sadly not any given debilitation. Autonomy ★★★☆ - Take bloodlust, but change the trigger condition to when you are without any other pawns. Autonomy will activate even when your other pawns aren't fully gone - just having all the pawns down will turn the effect on, making you slightly hardier for when you need to rescue your allies. Combining this with other damage boosts can cause you to do up to 80% extra damage! Just be careful around those big attacks... Recommended Pawn Pairings You can fulfill both physical roles essentially as an assassin if you carry the right tools. Focus more heavily on magic-based pawns. Of the physically-based pawn types, it'll be more beneficial to have a fighter, as they are both more armored and have more techniques with their shield they can use to distract and mitigate damage. Assassin Skills Sword SkillsThe following techniques are borrowed from the Fighter: Blink Strike/Burst Strike Broad Cut/Broad Slash Tusk Toss/Antler Toss Compass Slash/Full-Moon Slash Downthrust/DowncrackIn general, the Assassin's use of Sword is best put to use against large monsters, thanks to the skills above, as well as the best selection of skills that Assassin get: Intimate Strike/Intimate Gambit ★★★☆ - Deals out a stunning thrust, and extra pulses of damage upon withdrawing the sword, which can cause the target to stagger forward. Effective on medium-sized enemies,and can easily apply debilitations, but not the most effective technique for use on large monsters. Powder Charge/Powder Blast ★★☆☆ - Lays down a hidden satchel of powder in the ground. As you walk away from it, you lay down gunpowder behind you, and activating the skill again will light the fuse, leading to a powerful fire explosion where you laid the trap down. The fuse itself can stun enemies, but does less damage. Generally is more trouble than it's worth thanks to long activation time. Clarity/Clarivoyance ★★☆☆ - Intended as a substitute for blocking (if you only have a bow secondary), This acts as an extended parry, where if you take a hit during its window of activation, you throw out a Full-Moon slash like attack with high knockback. Compared to a perfect block (as well as timing a Full-Moon slash), its timing is much more lenient, but it works against less types of attacks. Windmill Slash/Great Windmill ★★★★ - Essentially, this is a Hundred-Kisses reskin for your sword. Keep mashing the skill button to keep spinning the blades in front of you, slicing and dicing anyone in your forward vicinity. The upgraded version can also let you strafe around, and in general this is an excellent technique for applying debilitations, and punishing downed monsters. Its only issue is that it stops somewhat late compared to its input, but the long animation can be quickly canceled by jumping. Gouge/Dire Gouge ★★★★ - This is also a reskin of Hundred-Kisses... For when you're climbing, that is. Gouge is an extremely powerful attack that can only be used while climbing a large enemy. It's potentially the most powerful of its type, and even makes you harder to shake off due to having a somewhat uninterruptible animation (so movements that would normally cause you to reel while holding on would have no effect while gouging). However, it also has no effect when you're on the ground. Dagger SkillsThe shared skills that Assassin gets for this weapon are the same as the ones shared with the Ranger: Scarlet Kisses/Hundred Kisses Biting Wind/Cutting Wind Toss and Trigger/Advanced Trigger Dazzle Hold/Dazzle Blast Reset/Instant ResetVersus swords, the skills that Assassin has for Daggers makes them much more defensive and fickle in nature, but also capable of taking on masses of enemies effectively. Back Kick/Escape Onslaught ★★★☆ - In essence, it's similar to Hindsight Sweep - a backwards lunge with invuln frames, followed by a counterattack kick. Easy Kill/Masterful Kill ★★★☆ - The dagger version of Clairvoyance lets you counter by straight-up shanking your enemy. When executed correctly, you mount your enemy and slit their throat, blacking out the screen and jumping off your prey, combined with high stun. The grapple effect makes it much more useful against single-targets rather than warding off large mobs, and also enables you to avoid further attacks by attaching to your target. Much like with Clairvoyance, it's an easy counter to time. Spiderbite/Snakebite ★★☆☆ - Slow attack that will stab the enemy dramatically and deal out a poison effect. Against middle-sized enemies, it will just about immediately stop them dead in their tracks and send them to the floor, but the attack otherwise is nearly worthless against large targets. Highly recommended to combine with Reset to minimize downtime. Wind Harness/Gale Harness ★★★☆ - After an activation period, this ability straight-up hastens your character, causing them to do everything faster - rolling, falling, attacking, running - this even changes the timings of some attacks. Unfortunately, the skill also will cancel if you switch any weapons (so no super-fast swords, only fast daggers and bow/shield attacks). Stealth/Invisibility ★★★☆ - When activated, you become immune to almost all attacks, constantly draining your stamina. The only thing that can hit you like this are grab attacks, so be careful. Much like with Gale Harness, this also gets cancelled out if you switch weapons... And despite the name, you are still very visible to enemies. Shield SkillsThe following techniques are borrowed from the Fighter: Shield Summons/Shield Drum Shield Strike/Shield Storm Springboard/LaunchboardThe Assassin's shield serves very much as a melee utility rather than a bona-fide way to tank damage - the option still remains, however, thanks to the Shield Drum's existence, but to do so relies much more on advanced parrying techniques rather than sheer grit. Swift Castle/Moving Castle ★★★☆ - A fast forward lurch that serves as a defensive maneuver, combining the best traits of a block and a dodge. The quick movement serves finely to close distance, while its blocking potential enables it to shrug off even high-power attacks. Flight Response/Enhanced Response ★★☆☆ - A counter gimmick that allows the user to initiate a high jump after performing the technique. Much like the other counters, it acts very much like an easier-to-perform perfect block. Mainly finds use in getting a head-start in climbing tall targets. Staredown/Showdown ★★★☆ - A charged technique that, after activation, will place a simultaneous Strength buff and Defense debuff on yourself, making for a high-risk, high-reward style. Use those counters effectively. However, the defense debuff counts as a debilitation - meaning you can drink a curative or have a Sorcerer cast voidspell to immediately cancel out the drawback of this technique. Bow SkillsThe following techniques are borrowed from the Strider: Threefold Arrow/Fivefold Flurry Triad Shot/Pentad Shot Full Bend/Mighty BendAssassins obviously have a huge bonus in fighting in melee, so most of the Bow skills the vocation has are fairly utilitarian in nature. Puncture Dart/Skewer Dart ★★☆☆ - Fires an arrow with high accuracy that pierces several enemies in a row, and on large enemies, can sometimes hit multiple times. Doesn't really have any advantages over throwing out Fivefold Flurries to be truthful. Keen Sight/Lyncean Sight ★★★☆ - It's the Ranger's Comet Shot, but it actually works! Keen Sight scopes you in to fire a highly-accurate shot at a long possible range, with the arrow having extreme damage output - with a similar inverse-damage curve deal as with Ranger attacks (the closer you are the less damage you do). Blunting Arrow/Plegic Arrow ★☆☆☆ - The description says it's supposed to apply torpor, but it both fires way too slowly and its debilitation effect way too weak to have any noticeable impact on the battle. The Magick Archer
职业功能 - 远程支援、增益与减益。 主武器 - 匕首、法杖 副武器 - 魔法弓 可用护甲 - 布甲与法师长袍、皮甲、链甲。 玩法难度 - 中等 强化实用性 - 中等 魔法弓箭手初看之下使用的是游侠的装备,包括匕首和一把大弓。然而,弓的种类是该职业与众不同的关键,其魔法弓是无弦的附魔弓,能射出魔法箭而非物理箭矢。这些弓箭手在需要时也可使用法杖,这种组合使他们拥有出色的能力,既能释放快速强大的魔法效果,也能施展增益 enchantment(附魔)来保护和协助盟友。魔法弓箭手融合了远程与魔法两种战斗风格,兼具法师的元素力量和追踪精准度,以及巡林客的超远射程与机动性——即使在准备法术弓箭技能时,也能保持完全移动。他们最大的问题在于近距离作战:这迫使他们使用匕首与敌人周旋,而在构建魔法弓箭手的技能体系时,匕首技能面临一个选择:要么用于大幅增强弓箭威力,要么放弃这一加成而采用更传统的用法。魔法弓箭手的技能还具有元素特异性,某些技能产生的法术效果仅使用单一伤害类型,这意味着操作简单且伤害高的技能可能并非对所有敌人都有效。他们还需要擅长的属性:魔法弓仅使用魔法属性来输出伤害,而匕首则会利用力量属性。魔法弓箭手需要相当数量的这两种属性,但总体而言,拥有更多魔法属性更为重要,这能让弓箭手发挥出最强大的效果。如果没有强大的魔法属性,魔法弓箭手的伤害会大幅下降。 属性成长概况

The stats gained by levelling as a Magick Archer focus heavily on defenses, notably moreso than any attack stats. The overall loadout favors all magickal stats higher than physical, but overall has high emphasis on all offense and defense stats in general - in exchange, it has a rather poor rate of health growth. The defensive stat growth makes it a highly unpopular choice for a leveling vocation (players generally value their offenses more than defense). Progressing into the 100+ range, its stat growth begins to resemble that of most mages, boasting balanced health/stamina growth. Core SkillsFor Daggers and Staff, the Magick Archer borrows the very same skills that the Mage and Strider use for their respective weapons. However, the Magick Archer has their own twist on their own unique Secondary, with its own core skill: Seeker/True Seeker - While Magick Archers can aim, their spellbow makes use of an automatic homing effect, that lets each bolt they let loose track after their target. This makes them extremely effective against swift, flying enemies such as harpies and gargoyles. Augments:Detection ★☆☆☆ - Increases the amount of space revealed on the minimap while exploring. Not that great. Potential ★☆☆☆ - A bog-standard 100+ stamina boost. Resilience ★★☆☆ - You will only take half-damage from falling a great height. This'd probably be great for me since I keep making stupid jumps. However, fatal falls (such as those into a bottomless pit) will still kill you, and there's absolutely an upper limit to how effective this can be. Allure ★☆☆☆- Boosts the rate at which you gain affinity with NPCs when you hand them gifts. I mean, it's ok if you want to pick a certain beloved I guess...? Regeneration ★★★☆ - Every 3 seconds, you restore a single health point. This can in fact heal past your 'white health', meaning if you really wanted to wait that long, you could get back to full health just by waiting around. Magnitude ★★★☆ - Increases the rate at which spells designed to apply debilitations (i.e. Miasma) apply such effects... Ironically, this is much more useful for Sorcerers in general. Resistance ★★★★ - The description is misleading, but what this does is provides you with small boosts to all (non-elemental) debilitation across the board, with a notable immunity to poison. Sadly this won't stop you from catching fire or getting drenched. Recommended Pawn Pairings Magick Archers are almost exclusively magic-damage in their area of focus, so having physical classes will be of greater help here. Scatherers and teammates that will rush forward are of the essence here, as without proper preparation time for bow spells, Magick Archers have a hard time dealing damage to foes. The Magick Archer's buffs can help out Sorcerers immensely. They can also make a great deal of use of offense-based spellcasters, as they can provide solid curative magick with their skills. Magick Archer Skills Dagger SkillsMuch like with the Ranger and Assassin, the Magick Archer keeps the basics in mind: Scarlet Kisses/Hundred Kisses Biting Wind/Cutting Wind Toss and Trigger/Advanced Trigger Dazzle Hold/Dazzle Blast Reset/Instant ResetThese techniques are important, because they are the only source of physical damage that this class will deal out. In fact, all the other dagger techniques the Magick Archer learns involve... Magick! Sunburst/Sunflare ★★★☆ - The first Magick Archer dagger skill utilizes the Fire element, and performs a high hop and downward stab with a fiery explosion. Very powerful, but also very difficult to land thanks to its hop. To its credit, the explosion on the attack is fairly forgivingly large. Scension/Grand Scension ★★☆☆ - After a short incantation (i.e. you need to charge this up while stationary) you throw out a staggering wave of holy magic that will absorb health from enemies hit by it. Entirely dependent on magick stats. I don't know what it is, but I could never get it to heal me properly when I tried using it. Shadowpin/Shadowshackle ★★★★ - Summons up a dark sigil that will root several enemies in place, including a fair selection of large enemies, such as chimeras and cockatrice. Very useful as a crowd-control ability, and excellent for making openings for your spellbow attacks. Magick Rebuffer/Magick Rebalancer ★★★☆ - The Magick Archer's preference for support begins to show, as the Magick Rebalancer places down a defensive sigil that boosts both the Magick power and Magick defense of allies within. The upgraded version also will harm any undead that get nearby. Backfire/Immolation ★★★★ - Use this incantation to set yourself on fire. You'll take damage over time, but while on fire, you deal (physical blunt) damage to any enemies nearby, while also potentially setting them ablaze as well. Extremely deadly when you climb upon large monsters, and will heavily punish most enemies who try and run after you for melee hits. Staff SkillsUnlike with the Daggers, Magick Archers have fairly standard use of the Staff, and have access to the Mage's selection of normal offense spells: Ingle Frazil Levin Brontide Comtesion FrigorOnly one new spell is added to their skill list: Perdition ★★☆☆ - More for light crowd-control rather than debilitation, this creates a mist that will curse enemies who linger in it, severely impacting their offense and defense. It takes a few applications to really stick, though, unless what you're cursing is very weak. Magick Bow SkillsThreefold Bolt/Sixfold Bolt ★★★★ - The thing about Magick Archer skills is that each one has a different element, and a different effect. Sixfold Bolt shoots an Ice bolt that, on contact, splits into several swirling projectiles for follow-up damage. Possibly the best option against single targets, provided they aren't moving too fast or ice-resistant. Rips most Drakes apart. Seeker Bolt/Hunter Bolt ★★★☆ - Like a magical version of downpour volley, Seeker Bolt differentiates itself by priming up a targeting sequence while incanting the arrow (showing reticles over each target it will hit) and upon releasing, will hit each target with a rain of Holy arrows. Against large targets, the reticles can hit multiple parts of the body, causing grievous damage. Against targets that only have specific weak points, however, this attack doesn't quite work so well. Its combination of range and homing against a mass number of targets makes it insidiously powerful in the open plains of Gransys. Magickal Flare/Magickal Gleam ★★☆☆ - After a long cast, this summons up a glowing Holy orb of energy that will head for its target while the firing button is held. Releasing this button will cause the orb to detonate, causing stun to anyone nearby, and grievous damage to undead targets if the orb detonates right on them. After impact, the orb remains as a light source, in case your lantern went out. Useful for crowd control somewhat, but not that effective against most enemies beyond the first strike. Ricochet Seeker/Ricochet Hunter ★★★★ - Fires out a Lightning bolt, which, upon hitting an enemy or wall, will erupt in a series of extra lightning bolts that home in on other targets. It's extremely useful in enclosed spaces (like Bitterblack Isle's corridors), but is absolutely useless out in the open. Can be used to strike enemies around corners, if Simple Geometry is your style. Funnel Trail/Vortex Trail ★★★★ - Fires out a Dark bolt, which creates a black hole that sucks all enemies right in. It is powerful enough to affect even modestly large enemies slightly, and overall serves excellently to wrangle up enemies for your AoE attacks and arrows. Explosive Bolt/Explosive Rivet ★★★☆ - This shoots a fiery bolt into a surface or enemy, which gets lodged in them. The bolts can be set off when hit with physical attacks, and up to four can be lodged in different things at once. A perfect pairing with the Vortex Trail, but less useful on its own on large targets unless you have pawns to climb or detonate the bolts with arrow attacks. Just make sure to use it on something weak to fire. Bracer Arrow/Great Bracer Arrow ★★★☆ - Fires a holy arrow at an ally that will render them more resistant to staggering. Its upgraded version can target the whole party with this effect. Ward Arrow/Great Ward Arrow ★★★★ - Fires holy arrows that will render allies Impervious - that is, immune to all debilitations. This can remove the need for panaceas for just about anyone other than yourself. It should be noted that both Bracer arrow and this have very long durations (on the order of 2-3 minutes). Sacrificial Bolt/Great Sacrifice ★★★☆ - Do your pawns annoy the heck out of you? Maybe you can put them to good use by turning them into a Sacrifical Bolt, dealing an extreme-power Dark attack, both knocking the primary target way back with extreme force, and then producing a large explosion. The downside of course is that the pawn sacrificed this way cannot be resurrected, and is sent right back to the rift. They're also chosen randomly, so don't get too sentimental to one pawn if you plan on using this. The Mystic Knight
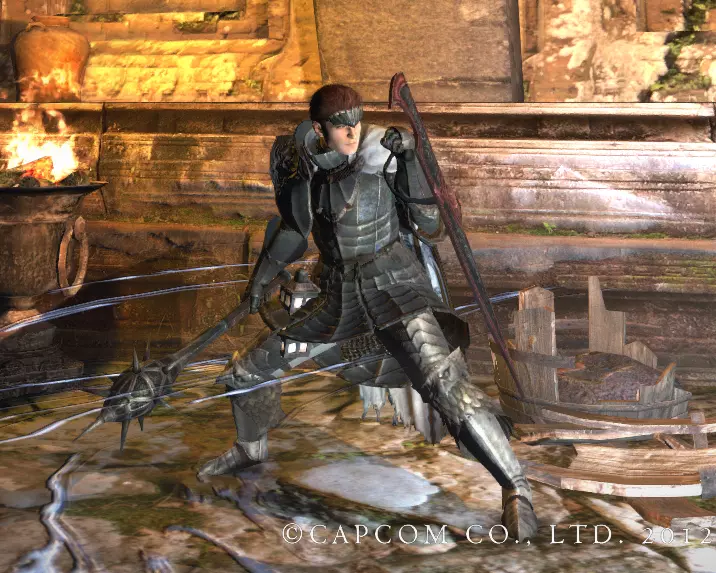
团队职能 - 近距离战斗、团队准备、防御反击 主武器 - 剑、锤、法杖 副武器 - 魔法盾牌 护甲可用性 - 大多数护甲,以及更紧身的法师相关装备,如比尔奥特长袍和萨满长袍 游玩风格难度 - 困难 强化实用性 - 高 神秘骑士手持近战武器和强大盾牌,是能轻松运用魔法与武器的威严存在。他们既能凭借力量在前线直接战斗,也能运用魔法设立防御阵地、为武器和盾牌附加魔法效果,还能使用特殊法术以强大的魔法冲击波进行远程攻击。若情况需要,他们也可以手持法杖召唤基础攻击法术。 秘术骑士从准备时间中获益良多,能够为自己和团队施加全套魔法增益。反过来,他们的锤类和剑类技能不仅提供了丰富的近战选项,还能进行远程攻击,同时赋予他们使用更多法术和符文来应对敌人的手段。总之,秘术骑士若能熟练把握格挡时机,并创造性地组合符文与火炮,就能成为极其强大的战斗人员。但由于需要准备多种增益效果,且这些效果具有时间敏感性,因此要玩好秘术骑士颇具挑战性。虽然他们能够进行远程战斗,但精准度欠佳。和魔弓手类似,他们需要均衡且较高的各项属性才能发挥作用——不过总体而言,和弓箭手一样,他们更倾向于魔法属性高于力量属性:通常情况下,锤类武器比剑类武器威力更大,这可以弥补力量属性较低的不足,而且魔骑士的许多致命技能都高度依赖高魔法属性。 属性成长概况

Mystic Knights have an extremely even-keel stat growth - strongly resembling that of a Strider, but with slightly less emphasis on strength and stamina, and a bit more on their health. Core SkillsMaces and Swords use the same Core Skills as used by the Fighter, while also sharing the same core skills with a Mage for when they hold a staff. Repel/Reflect - Much like with a fighter's standard shield, Mystic Knights can use their Magic Shield to deflect an attack back at an enemy, dealing damage to melee attackers. However they can also combine this with their counterspells, cast through their shield. When performing a perfect block with this active, their Magic Shield can now throw out a spell effect, hitting the attacker with elemental damage. Augments:Fortitude ★★☆☆ - Provides a minor mitigation of physical damage taken (like a weaker bastion). Adamance ★★☆☆ - Halves the stamina cost of blocking attacks normally. This isn't necessary once you get the art of perfect-blocking down. Periphery ★★☆☆ - Improves your stagger resistance while blocking with any shield (including as a fighter). Reinforcement ★★☆☆- When you revive a downed pawn, they gain an extra 20% resistance to damage. Generally using Restoration will be more valuable. Retribution ★★★☆ - The inversion of Reinforcement, providing your pawns with 20% extra attack power and magic for the next minute after being revived! Use it to punish dragonkin who use their roar to down your pawns. Sanctuary ★★★★ - When you health goes critical (less than 1/3) all damage you take is halved. With high-rank armor, this can render you almost invincible during that last bit of health. Undoubtedly useful in Hard Mode. Restoration ★★★☆ - Pawns you revive come back with 75% of their total health intact instead of 50%. Recommended Pawn Pairings Mystic Knights are excellent at setting up defensive perimeters. They work exceedingly well with pawns that favor a more Guardian approach. Striders or Rangers can help Mystic Knights stun and bring down flying targets that require precision-strikes to a weakpoint. They also gain massive benefits from the Knight's ability to provide enchantments all at once. Mystic Knight Skills Sword/Mace SkillsThe Mystic Knight's sword skills are shared with mace weapons, and draw several different moves from the Fighter's set. However the different capabilities of the Mystic Knight change the context of the available fighter abilities a bit: Blink Strike/Burst Strike ★★☆☆ - The classic Burst Strike is still a good option for offense, physical-based Mystic Knights (and is extremely powerful when Abyssal Anguish is active). However, to make the most of the class, utilizing steadier close-ranged techniques helps much more than being able to rapidly close distance. Broad Cut/Broad Slash ★★★☆ - A decent option for Mystic Knight, but its fickle nature again makes it somewhat suboptimal, unless trying to make openings to prepare spells. Sky Dance/Sky Rapture ★☆☆☆ - The first of Mystic Knight's unique moves, and it's not a very good one, acting essentially as a very awkward aerial Burst Strike. By default, the attack will force you to jump, and perform a diving forward strike through the air. It can be used to hit grounded-targets if you execute it in midair when you're about to land, but it's more hassle than it's worth, and once again isn't a great option for the steadier Mystic Knight build. Tusk Toss/Antler Toss ★★☆☆ - Still lacks some basic utility, but it has some surprising combination with the Magick Cannon (explained below), capable of perhaps generating the most possible shots in a single swing. Perilous Sigil/Ruinous Sigil ★★★★ - One of the most important defensive tools for a Mystic Knight, this allows the user to place down glowing sigils on the ground that will heavily damage, and potentially knock-up any enemies that walk into them. It's unfortunately ineffective against flying or stationary targets, but its main purpose is to dissuade walking melee enemies from getting up in your face. You can place up to two down, and with a high magic stat, this attack can pump out some downright deadly damage even on large targets. The damage dealt by the sigil is a mix of physical and non-elemental magic damage, which can also take on the element of any given enchantment the user had when they placed the sigil. Funnel Sigil/Vortex Sigil ★★☆☆ - The Mystic Knight's answer to the Fighter's Taunt is to create a magic effect that just sucks lightweight enemies inwards. It's a bit underwhelming, and won't work on most targets that are decently heavy. Worse more, it also obstructs vision rather badly. Magick Cannon/Great Cannon ★★★★ - Counterpart to the Ruinous Sigil, this is the main offensive technique of the Mystic Knight, and grants them commanding range and magical damage against multiple targets. When used it summons up a glowing, floating ball which can be hit by physical attacks to form homing bolts. Up to three can be deployed at once, which is key to the power of the cannon - deploying two allows you to unleash huge waves of projectiles with even basic attacks. Can be combined with the other sigils as well, which can hit the Cannon to produce even more projectiles. Compass Slash/Full Moon Slash ★★★★ - The Full Moon Slash remains an excellent option for Mystic Knights, since it retains its interrupting defensive qualities. In addition, however, it's also a great option for rapidly hitting a Magick Cannon for masses of shots. Downthrust/Downcrack ★★★☆ - The stagger strength on Downcrack is generally strong enough to create openings on large enemies to prepare your more deadly spells. Even then, it's still a somewhat awkward attack to land. Stone Grove/Stone Forest ★★★☆ - A slow but devastating point-blank attack, this summons up a crushing/fire burst of attacks around you. Can prove an extremely potent punish against large enemies, and is helped heavily by augments and rings that speed casting time. Staff SkillsLike Magick Archers, Mystic Knights can also use the staff, but lack many new abilities to make creative use with it like they can with sword/mace skills. Most of it is once again basic Mage spells: Ingle Frazil Levin Brontide Comtesion FrigorOnly one new spell is added to their skill list: Sopor ★★☆☆ - Another variant of debilitating mist, Sopor will put enemies who stay in the fog for too long to sleep. This is only useful if you aim to focus your attacks on one target, keeping the others asleep - or if you're preparing a mighty attack like stone forest, but in general it's far from the best crowd-control option. Magic Shield SkillsCounter/Riposte ★★★★ - Another core mechanic of the Mystic Knight is their ability to prepare Counters. Using a short incantation, they imbue their shield, and from that point forward, any hits they perfect-block will produce a corresponding spell effect (i.e. perfect block after preparing a Fire Counter will allow them to throw out Ingle Fireballs.) These counters exist for each possible magical element: Fire, Ice, Lightning, Holy, and Dark. Demonspite/Demonswrath ★★★☆ - An alternative to riposting is this; Demonswrath will charge up energy in your shield for each attack you block (with perfect blocks charging even faster). After taking enough hits, you can activate the skill again to throw out a conical wave of darkness that deals damage. Unleashing a fully-charged wave can one-shot even larger monsters, but it requires some conceited blocking to pull off. It should be noted, many of these alternate shield buffs cannot stack with eachother. Holy Wall/Holy Fortress ★★☆☆ - This spell will cause your shield to radiate a huge disc of holy energy, and massively improves your capability of blocking physical attacks (only.) Possibly the easiest of the shield techniques to use, but one of the least useful. Enchanter/Trance ★★★★ - After a medium-length incantation, you enchant all the weapons of your party (both you and your pawns) with a given element. This enchantment is stronger, but has shorter duration than normal enchantments, and can grant your party a huge damage bonus when used correctly. Dark Anguish/Abyssal Anguish ★★★★ - One of the few shield spells with purely offensive intent, this swathes your weapon in a black, squeaking aura that extends its range. Abyssal Anguish has the bonus of also causing your weapon hits to strike multiple times in a single swing (making for a chainsaw-like effect). Can be a huge damage buff against large targets, and even layers on top of other enchantments (meaning you can deal up to three damage types at once using this skill). Holy Aid/Holy Grace ★★★☆ - Instead of your blocks creating attack effects when blocking, holy grace allows incoming attacks to instead heal your health - even past your white-health limit. If effective at performing deflections, this can make you extremely difficult to kill, but inversely it cannot be layered with any sort of Riposte, and will not make any new openings for you to land hits with. Holy Glare/Holy Furor ★★☆☆ - Sort of the shield counterpart to Stone Forest, this summons forth a mighty holy spell through your shield that will create a swirling vortex of holy wisps that will heavily damage all caught within. After the spell completes, however, it drains your entire team of their stamina, which is something that needs to be planned around... A very similar effect can be summoned by just using a Surging Light Tome, which restores stamina instead of draining it.