换一换
换一换 


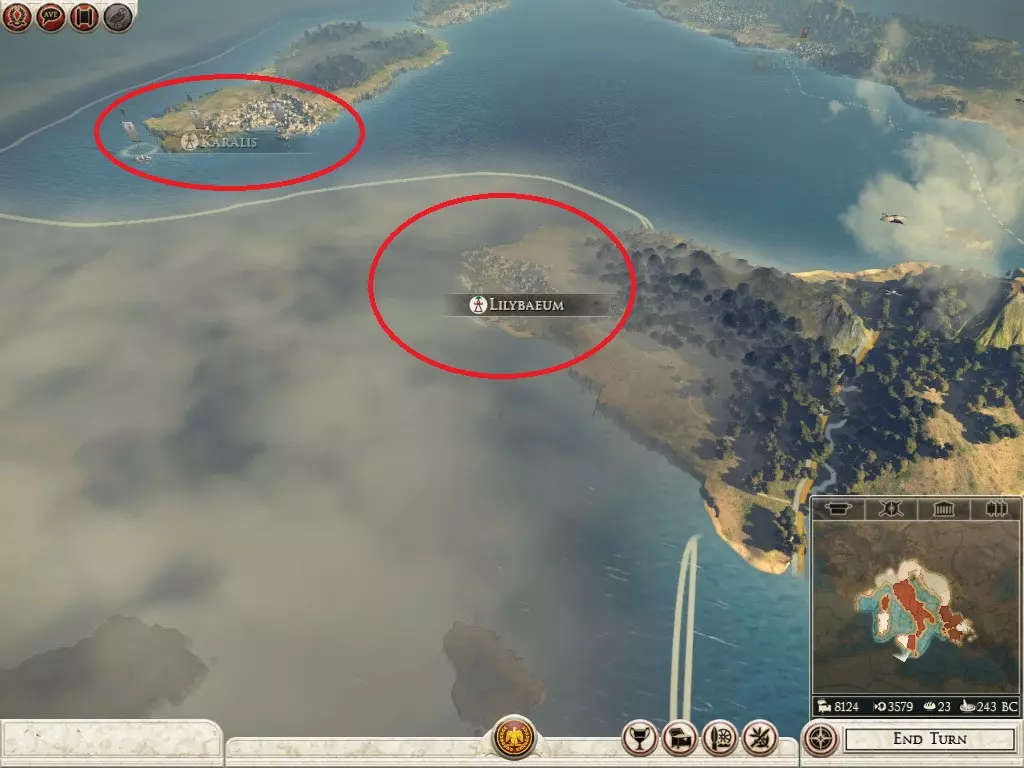
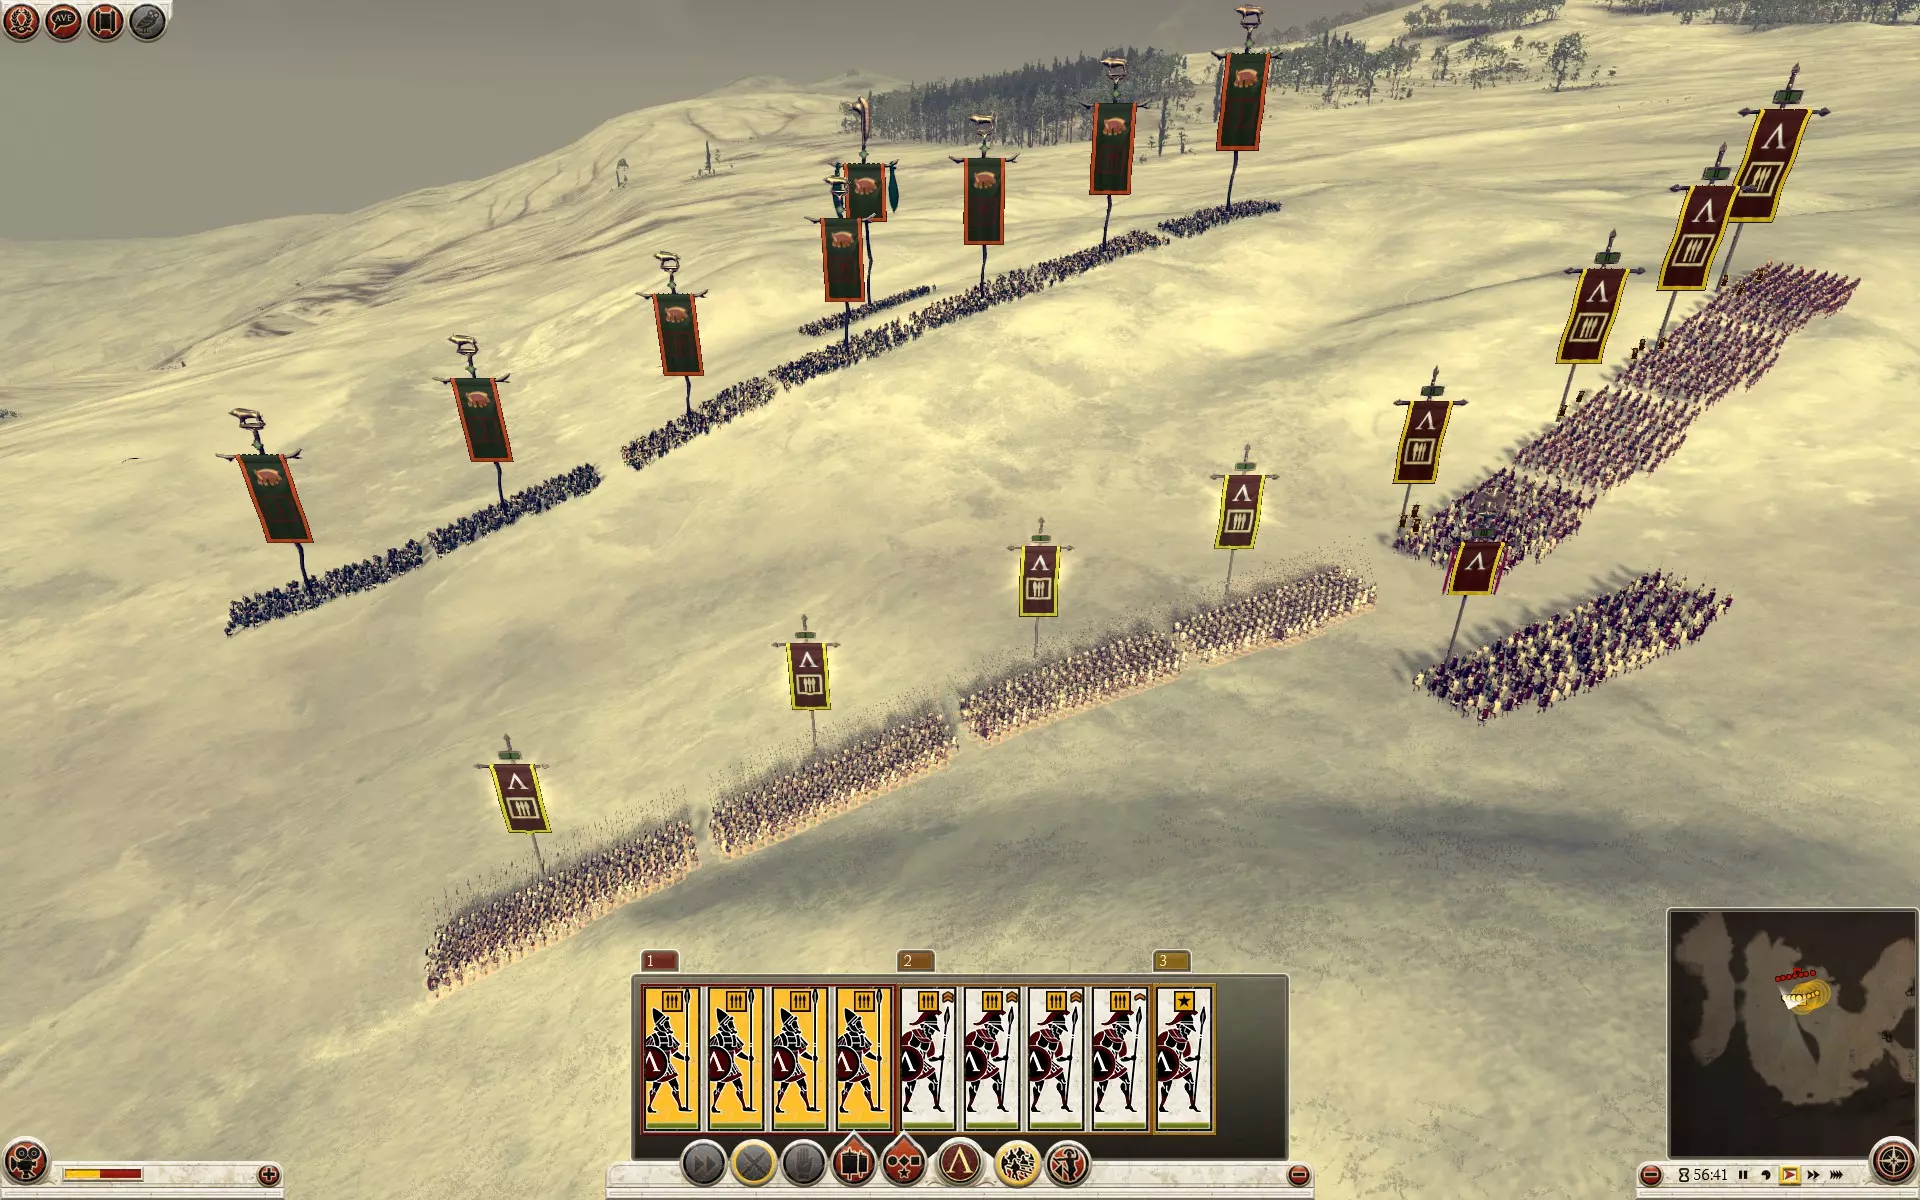
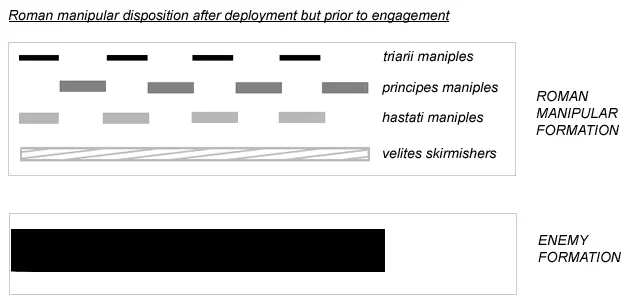
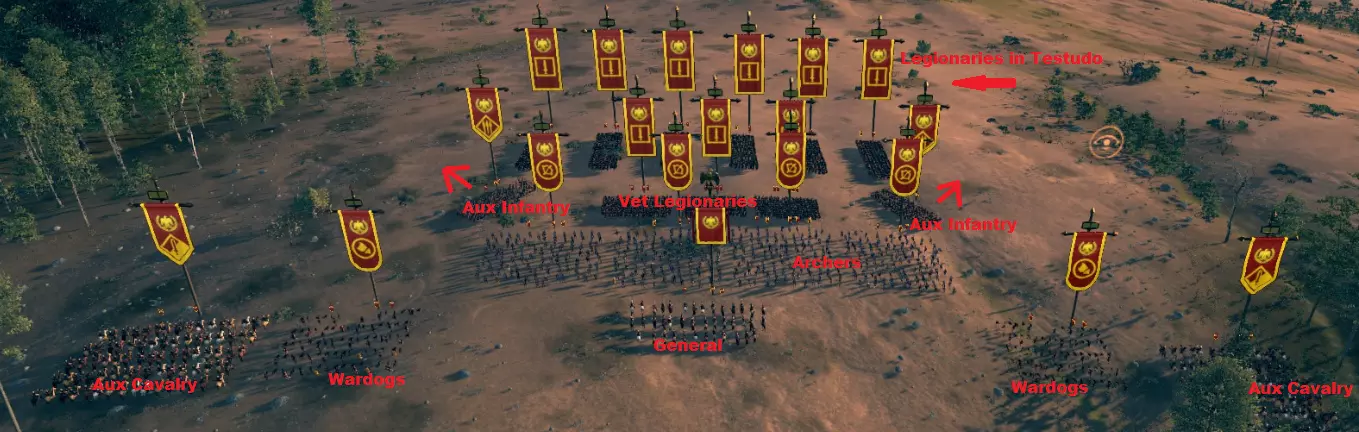
A Guide on effective Roman Battle Formations for all players. Introduction This is a basic guide on how to set up a battle formation using the tactics and layout that the Roman Army used in around 266 BC and onwards through to the Marius reforms, and it can also be applied to later Roman armies as well. It can be applied right as you start, using your most basic units (Hastati, Velites) although to be truly effective as an early game formation, it is wise to unlock Principes, Triarii and Equites as soon as you can. As I play through my single player campaign I will be adding more formations using later game units as well, such as Legionaires, Evocati, Praetorians and end-game units such as Armoured Legionaries and Praetorian Guard. A note: The end results of each battle are taken from the exact moment of victory. I will not chase down routing units after victory is gained because I want the results to be valid and consistant with the formation and tactics. This will better give you guys a more clear idea of how well it works, because anyone can chase down a fleeing javelinman. Basic Formation - Maniple System Going from the Roman formations, the infantry were divided into sections, and these were then divided into rows. This formation is called the 'Maniple system' and was devised around 315 BC by the Romans to fight the Samnites. It was used up until the Marian reforms of 107BC. Let's say you have a full army of 20 units. A well balanced army will have: your general (mounted), 5 Hastati, 4 Principes, 3 Triarii, 2 Velites, 2 Equites and 3 Archers. You can mix and match and vary it to your own preferences, but seeing as Rome loved their infantry this mainly has them (12 of them). You can also have more or less of the Hastati or Principes, though it is recommended to have this balance to maintain your upkeep early game, as well has utilise the correct tactics. Ok so here is a key to the little diagrams I will be putting here. General: [X] Hastati : [^] Principes: [^^] Triarii: [^^^] Velites: {^} Archers: {^^} Equites: (^) One of those symbols stands for 1 unit of the appropriate unit. So here is the layout of the standard formation you can use with the forces mentioned above. Defence.....................................................................................Offense .......................................[^] [^] [^] [^] [^]..................................................................[^] [^] [^] [^] [^] ..................................{^} [^^] [^^] [^^] [^^] {^} ..............................(^)......[^^^] [^^^] [^^^]......(^)...................................................{^} [^^] [^^] [^^] [^^] {^} .........................................{^^} {^^} {^^}.........................................................(^).......[^^^] [^^^] [^^^]......(^) ................................................[X]...........................................................................{^^} {^^} {^^} ......................................................................................................................................[X] This is the basic formation you will be using. It is effective and it does work in both attack and defence, I have used it in Rome 1 and it does work, even on Very Hard. Trialing it on Rome 2 has shown success over 70% of battles on Hard difficulty, and is usually fair on Very Hard. Bascially, this is how it works. Unit Roles Your Hastati are the screening troops, as they were in real times. The young men who were used in this manner, and while it sounds bad, they are cheap and won't drain your upkeep, so can be expendable. But they are heavy infantry so they can hold their own against many types of units. In offense, your Hastati are the ones who charge the enemy, usually slightly ahead of your main force. This gives your stronger units more marching time, thus keeping them from getting tired. This is why you have them in front another 20 or so paces. In defence you have them back with the rest of the army, and they take the charge and the arrows. Your Principies are like your elite reserves. In offense they wait til the Hastati have the enemy engaged battle and then they charge the distance. It's like having 2 charges back to back and can be very demoralising for the enemy, not to mention the pila they throw as well. In defence they stay back from the fight for a bit longer, but they are only a few paces back, so when the Hastati begin to suffer a few losses, maybe around 20% or so, your Principes can engage the enemy, adding more men to the fight and giving the Hastati a break. This also allows them to fight fresh heavy infantry against the enemy's tired men. Your Triarii are the final line due to their superior armour. In Roman times, going "the Triarii" was committing to the task 100%. You may not even need to use these guys, but they are there so you have a minimal chance of losing due to fatigue. You should hold them back for as long as you can, as they not only your final battle line, but also your spearmen versing cavalry. This is why they are along the same like as your Equites. Your Equites can charge and counter any enemy horsemen and engage them as the Triarii run and spear the absolute jimmies out of the enemy cav. They also can come in if needed to help the Principes but this shouldn't normally happen. Your Velites are just for your harrassing movements, they aren't your key units but they are cheap. If you choose you can have Archers instead and this can be better, but Velites are cheap and they can be a good distraction from your other units. This is the reason they are on the far flanks of your Principes; they can continue to weaken the enemy's front lines, engage their archers, screen your general from flanking before you use your Equites, and when they run out of ammo they fair better in hand-to-hand combat than Archers. Your Archers are really straight forward; have them behind your army and just have them pepper the high priority targets such enemy heavy cavalry, chariots, elephants or bunched infantry. Disable skirmish mode so they don't run. Running is for the weak and smelly Carthaginians. Equites are only light Cavalry so don't use them as anything else. Just use them to hit archers and the rears of enemy formations. Never spearmen or heavy cavalry this is a death scentence. Heavy infantry will also wipe them out so only use them in emergencies. They are positioned on the flanks of your Triarii in the case of an enemy cavalry flank, but only use them to screen and hold them in position until your Triarii can come to swap out. Your General is clearly your main guy so keep him well away from spearmen. Other than that he can be used as effective shock cavalry, but don't abuse him and charge him into Heavy Infantry without support. Use his buffs and rallies when needed, and put the demoralising debuffs on the weaker enemy units to cause more routs. Using this formation in attack and defence Attack You saw in the formation section how to set up your units for Attack and Defence, but I have now included a screenshot of what the formation will look like and how you actually move your men. The picture below is a screenshot I took of the formation in Attack. You can see how the Hastati are around 20 paces or so in front of the rest of the army. You will use these men to run/charge into the enemy as they draw fire. It can be beneficial to use the attacking testudo formation in case the enemy has an abundance of missile units. The Principes and Triarii are behind and will walk up at normal pace to conserve energy and fatigue. If your Hastati are being torn to pieces then rush your Principes forward as well, but this should not happen often as Hastati can hold their own against majority of early game units. You can also see the Equites have arrows that move forwards and around the Velites. This enables to not only act as an effective screen but to also flank the enemy. The wider you move them around the more devastating their flank will be. You can use the Velites to hold an enemy unit in position as you charge and this will often route the enemy, or simply hit their archers.

这就是使用这种早期阵型进行攻击的基本方式。它非常有效,能在游戏初期为你节省人力和资金。进攻性龟甲阵以及将军 buff 都十分有用,所以不要犹豫使用它们。历史上,龟甲阵常常帮助罗马人赢得那些本可能惨败的战役。我测试过用这种阵型发动攻击,让基础的青年军(无升级或经验)分别以普通阵型和龟甲阵冲击基础的埃及弓箭手,结果显示龟甲阵能减少 19 人的伤亡。按每个单位对抗每个敌方弓箭手来计算,你就会明白它如何在持久战中为你节省兵力。 防御方面 防御的阵型设置与进攻非常相似,不过所有单位都靠得更近。虽然在对抗敌方攻城炮时场面可能会有些混乱,但罗马步兵都拥有足够的护甲来承受大量远程攻击。将青年兵(Hastati)在前线排成一条紧密的阵线,可以让你更重型的单位免受敌人冲锋和大多数敌方弓箭手的攻击。建议如果敌人用步兵冲锋你的阵线,你应该在撞击前几秒让自己的青年兵主动冲向他们,这样青年兵就能投掷他们的标枪(Pila)并造成相当大的伤害。然而,如果你正被骑兵冲锋,要让他们保持静止以便组成方阵。移动中的步兵单位被骑兵冲锋时会比静止的单位遭受更多损失。其余部分与禁卫步兵和三线步兵相同,他们组成重型预备队,三线步兵还能保护侧翼。
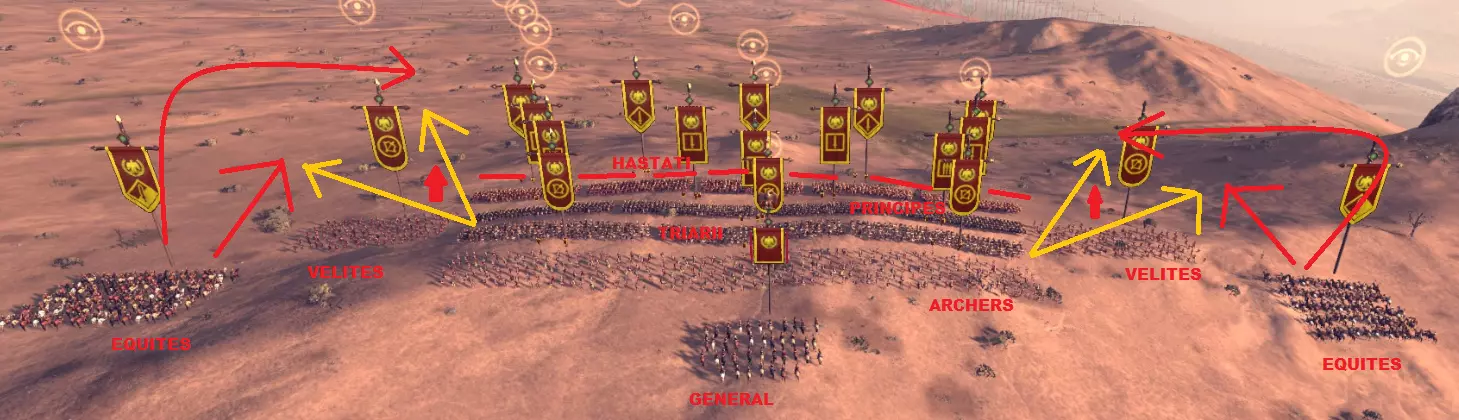
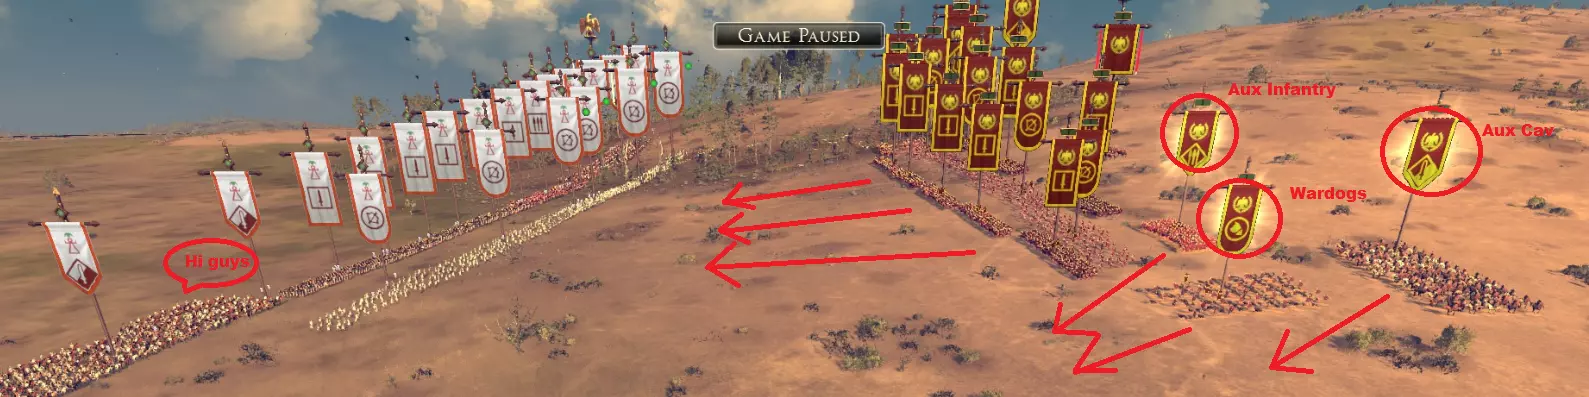
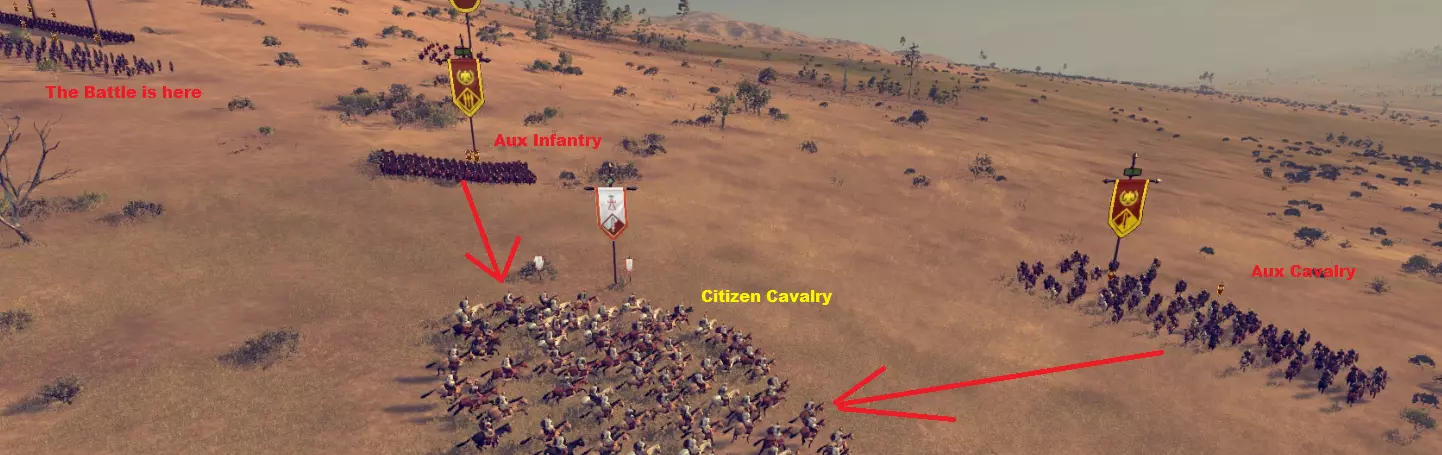
You can see the Triarii have those yellow arrows coming from them? They are the possible routes you can take with them, due to their superior position. They can protect your Velites, they can engage enemy Cavalry flanking charges, or they can continue to reinforce the front battle line. Using your Equites as screens can be good, but try to remove them from hand-to-hand combat once the Triarii have moved in. Prolonged light cav battles can be costly and inneffective unless against archers or missiles. If the enemy charge you with spearmen it can be better to counter with Principes instead, as if 2 units of spearmen battle the outcome is solely based on unit count and armour/weapons grades. If the enemy has not flanked you then you've got more options to use your Equites to flank around and behind up their unprotected and moistly tender rear. Or you can charge straight forward to engage oncoming enemies, the choice is yours. Those are the basics maneuvers you have at your disposal but you can obviously change them if the situation demands it, or if you prefer different units. Pros and Cons Pros This is a trialed formation and does work quite well. It focuses on Rome's strength with heavy infatry, and places them in good supporting roles with lighter units to maximise potential for countering any move by the enemy. It has a good mix of powerful early units while not being a burden on your upkeep. It is easy to keep an eye on all of your men as they are in one disciplined block Cannot be flanked by enemy cavalry Usually the men are not fatigued by the end of a battle Cons With 5 units as your front line, it can be difficult to defend againts a much longer line of attacking infantry. May take a while to unlock Triarii and Principes if you are focusing more on your economy Has only 2 units of cavalry and a general as your horses, so enemy missile cavalry might be a serious problem if unchecked Conclusion of Basic Formation That's pretty much it for the early game formation. Keep your screens and make sure to counter appropriate enemy forces with the right units and you should have a very easy time defeating opposing armies early game. There is another formation in this guide that covers the middle era units however if you wish to keep reading. So that's it, the basic Roman formation that is effective but also predominantly historically accurate. Feel free to drop a comment or a suggestion, and let me know how you go with this formation! Good luck on the battlefield, and may the Gods of War show you fortune. Advanced Formation - Marian Reform System This formation is one I have trialled over the past few days against various opponents on Hard difficulty, and it uses units that you will be using in probably the middle of your game, or around turn 50-60. Again it utilises the Roman focus on Infantry and discipline, with Cavalry and Archers only giving a supportive role. *****IMPORTANT NOTE***** This formation should really only be used if you are facing an opponent of equal or slightly greater strength, as it focuses on risks combined with shock and fixing tactics, and has the possability of losing units. It must also be noted that while this is both good in attack and defence, it is better in defence. Again we will be using a full army of 20 units, and the fundamental structure is as follows: 3 Veteran Legionaries, 6 Legionaries, 2 Auxiliary Infantry, 2 Auxiliary Cavalry, 2 Wardogs, 4 Archers and your General. Ok so again here is the key for the units in the diagram setup. I have changed the icons around to make it less confusing with the first diagram in Basic. General: [X] Veteran Legionaires: [V] Legionaries: [L] Auxiliary Infantry: [Ai] Auxiliary Cavalry: [Ac] Wardogs: [W] Archers: (A) So here is how you will be wanting to set up your formation. Offense...............................................................Defence ..........[L] [L] [L] [L] [L] [L].....................................[L] [L] [L] [L] [L] [L]....<--- Testudo formation .....[W] ( A ) ( A ) ( A ) ( A ) [W]...........................[Ai] [VL] [VL] [VL] [Ai]....<-- Your Ai face outward .........[Ai] [VL] [VL] [VL] [Ai]........................................(A) (A) (A) (A)......... .......[Ac]..........[X]...........[Ac]....................[Ac]..[W]..............[X].............[W]..[Ac].... Compared to the Basic Formation, this one is much more 'flat' I guess you could say, with your units closer together by a few paces each. Unit Roles The Legionaries are again your front lines, they screen the rest of your army and they take all the hits and do all the charging. Such is the life of a Roman soldier. When attacking they charge forward and attack the front lines of the enemy exactly as you would normally, nothing special here. However in defence, it is extremely important you put them in attacking Testudo formation, as if the enemy has any missile troops you can save yourself unecessary losses. There is no need for Testudo in attack as your legions will charge the gap fast enough that it will not matter. It is beneficial to use the ability Use the Whip to give your men an advantage early on in the fight, but this can be dangerous if the battle goes for a long time. Your Veteran Legionaries have replaced your Triarii as your heaviest unit, although they are no longer spearmen. This is both beneficial yet hindering as now they can only take the place of your Principes, and you must use Auxiliaries as spearmen. In attack they again simply walk a few paces behind the charging Legionaries, and in defence they hang back like before. Commit them to fighting where the enemy has placed their strongest infantry, and you will simply overpower them, causing them to route. Then you can move your men freed from combat onto other enemy units and simply steamroll them. Your Auxiliary Infantry are only here to be spearmen. Feel free to replace them with superior Veteran Mercenary Hoplites or similar units, but for the sake of the guide I have used Aux. They stand on the flanks in both offence and defense, yet the direction they face changes. In offence they face forwards with the rest of the army, as that is the direction they will be charging into. But in defence, have them slightly angled out a tiny bit to form a slight | shape between your Legionaries and Archers. A more detailed picture is included further in the guide. Your Aux Inf are there to engage any flanking Cavalry, and that's about it. They won't stand up in a fight with mid-game Infantry so don't bother unless they are supported by your own Infantry. Use their Rapid Advance ability to great effect against Cavalry. Your Auxiliary Cavalry are a step up from Equites, although not by much, Always remember they are still only Light Cavalry and won't hold up in prolonged fights against enemy Generals or Heavy Infantry. Avoid spearmen like the plague. Again all you will be doing here is using them to tie up and hold enemy Cavalry in position until your Auxiliary Infantry spears can come in to finish them off. Towards the end of the battle you can also use them to charge Archers and cause amazing routes. A bonus these Cavalry have above Equites is their 'Draco' ability, which causes other units arround them to become less effective against Cavalry. Use this often but definitely use it if you get attacked by spearmen, then run. Your Archers are here instead of Javelines or Slingers due to their superior range. By mid game you should have access to them via a conquered province (You can get Egyptian Archers in Libya or Cretan Archers near Spain). They will stand behind your main battle line and pepper the enemy's Archers so that they are not causing your own Infantry as much grief. You don't want to fire into the front line and risk hitting your own men. Using fire arrows can be helpful in most cases. A note: don't be alarmed if the enemy breaks your ranks and hits your Archers, this can and probably will happen. Simply move your General to engage the enemy or move the Archers away from the fighting. Your Wardogs are arguably the key unit in the success or failure of this formation. If you don't bother using them, hopefully this may change your mind because they're extremely useful when facing multiple archers or infantry. Wardogs are a sacrifice unit, plain and simple. All you use them for are charging enemy Archers on each end of your enemy's missile line. This effectively removes 2 Archer units from peppering your soldiers, and in most cases will cause them to route. Because the Wardog unit is made up of the Dogs and the Handlers, you can abuse the fact that the enemy will only charge them 1 time out of 10, simply because the Handlers are pathetic fighters. NEVER EVER use Wardogs on Cavalry though. They are useless and the horses just crush them. Archers and Light Infantry only. Release the hounds smithers.... Finally your General (again on horseback) should stay back behind your men and use buffs galore. Personally I believe Raise Banner combined with Inspire work really well as the Banner increases your area of influence as well as defence, then Inspire again causes your men to fight harder. Activate this as soon as it is off cooldown. Using this formation in attack. So hopefully by now you have a reasonable grasp of your enemy and the units they are going to be using. If you're simply leapfrogging from town to town in Africa and massacring the spearmen-and-slingers-ONLY factions then you should probably war with someone who can actually fight back. Due to the more complex useage of this formation, I conducted a tutorial mock battle against a Carthage AI. The difficulty was on Hard, and all of our units were anywhere from 1 bronze to 1 silver Chevron experience. I was using this formation's army, and the Carthage forces had: 1 General on horse, 3 Sacred Bands, 6 Lybian Infantry, 4 Citizen Cavalry and 6 Cretan Archers. For the defence battle they swapped 1 Citizen Cav in favour of 1 Libyan Cavalry (No idea why). Here is a step-by-step guide on what happened during the Battle and what I did to counter it. I was Attacking. I had the hill advantage. Firstly, here is a quick image of what your formation will look like (roughly)

这是用于攻击的,你可以看到所有单位都面向敌人。 按此阵型行军(当所有单位都被选中时,在技能栏的编队标签中将它们编成锁定阵型)。 当你开始接近敌人时,将你的战犬、辅助骑兵和辅助步兵稍微拉到两侧。这样做是为了让它们能从侧面攻击敌人并进行反击。开始这样做的一个好时机是利用弓箭手的射程范围来判断。等到距离敌人大约2个身位长度时再开始移动,这样敌人的反应时间会更少。在这个阶段你仍应保持步行,大致如下: 从侧面看
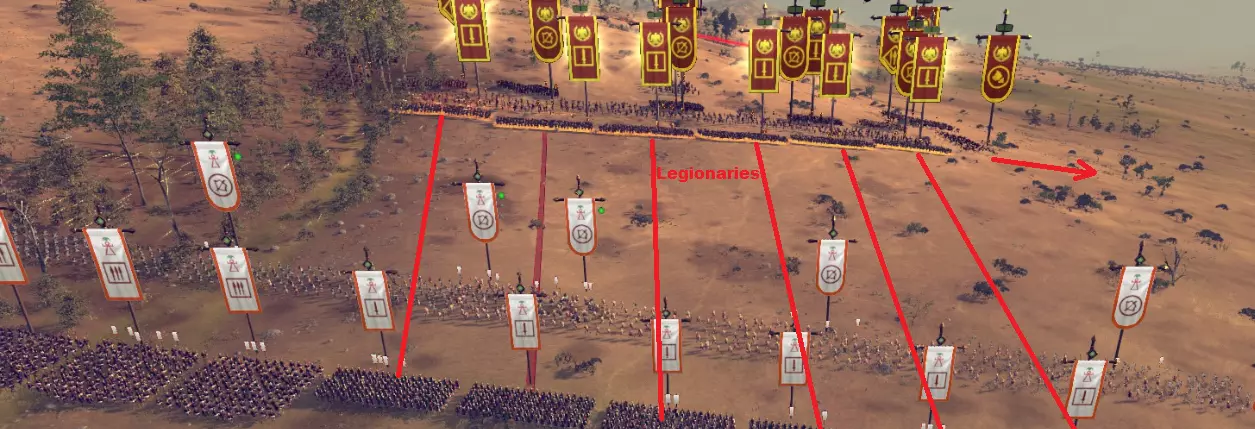
从正面进攻。这也是向你的士兵下达命令的好时机,你可以考虑暂停或减慢时间流速来操作。你需要指挥你的军团士兵攻击弓箭手【后方】的步兵,因为弓箭手处于游击模式,如果你直接攻击弓箭手,却被敌方步兵拦截,你将失去冲锋加成、战斗节奏、投掷标枪的机会,并且会因受到冲锋而遭受减益效果。
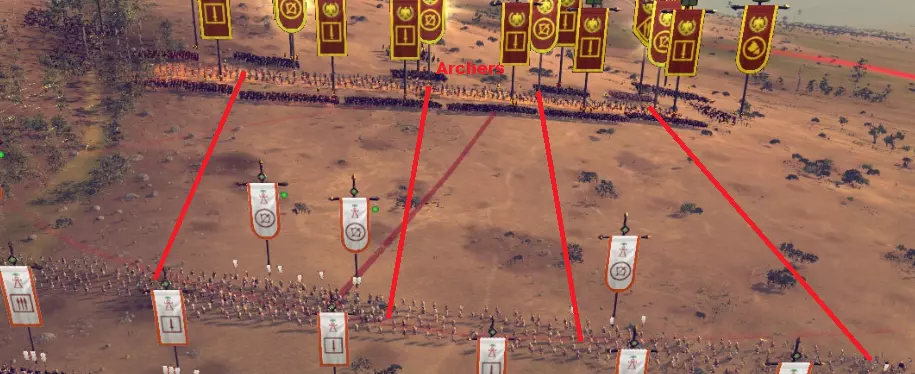
现在我们已经吸引了他们的注意力,而他们就像听话的AI一样,把弓箭手部署在了步兵前面。如前所述,让你的军团士兵攻击后方的步兵,每个敌方单位对应一个己方单位。如果敌方单位比你多,确保不要让任何士兵与大部队分离,保持紧密阵型。 现在给你的弓箭手下达攻击敌方弓箭手的命令。优先攻击那些最靠近中间的弓箭手,因为两侧的两个弓箭手单位会被你的战犬解决。如果敌方弓箭手数量比你少,只需集中双倍兵力攻击即可。
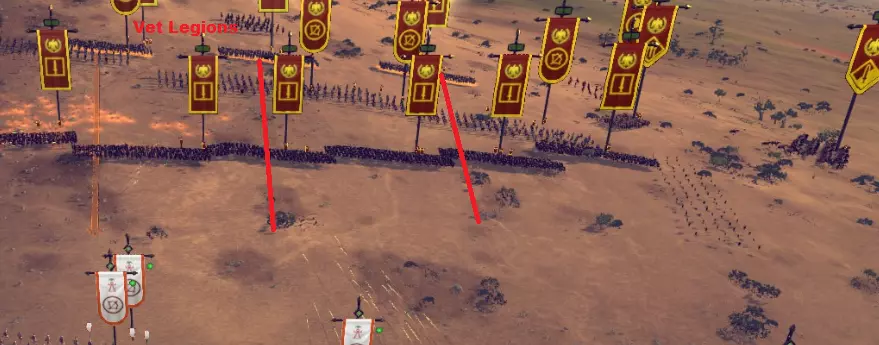
现在让你的资深军团士兵后撤一小段距离,位于主战场后方。此时,向你的弓箭手和军团士兵下达冲锋命令,因为他们现在很可能正遭受远程火力攻击,你需要缩短与敌人的距离。
假设你的军团士兵正与敌方步兵列阵交战,弓箭手也在与对方弓箭手对射,同时你的两只战犬已经冲锋上前,干掉了敌方两名弓箭手(多数情况下,由于敌人往往会忽视单独行动的战犬,战犬会导致敌人溃败)。现在让我们迅速转移到侧翼,看看那边希望正在发生什么情况。
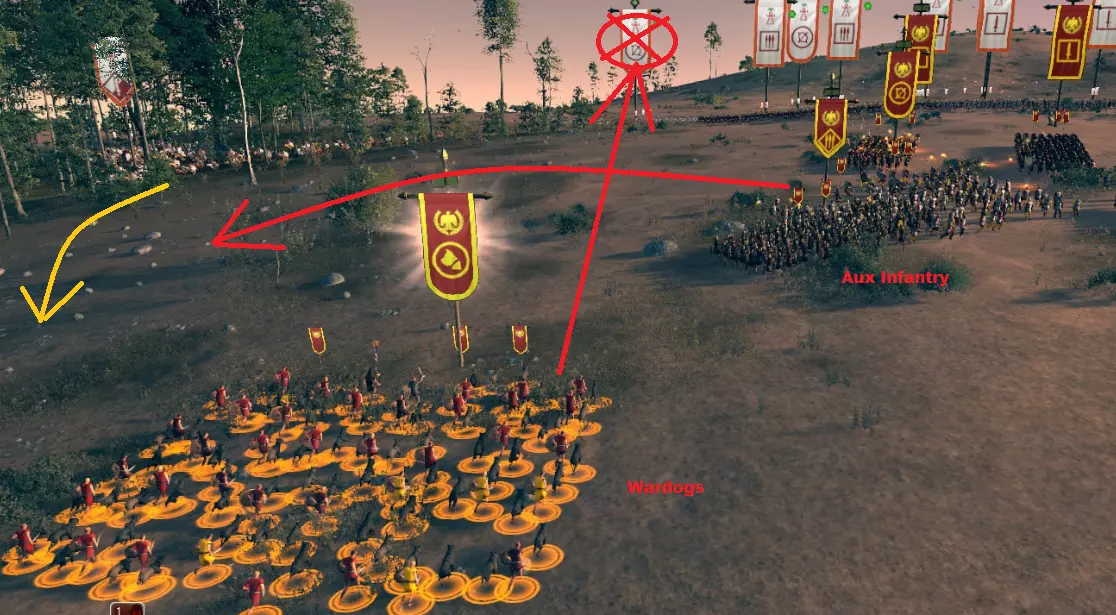
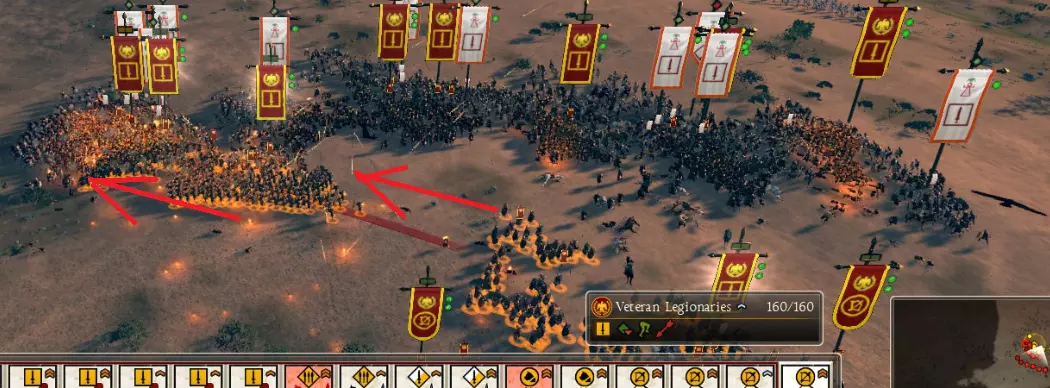
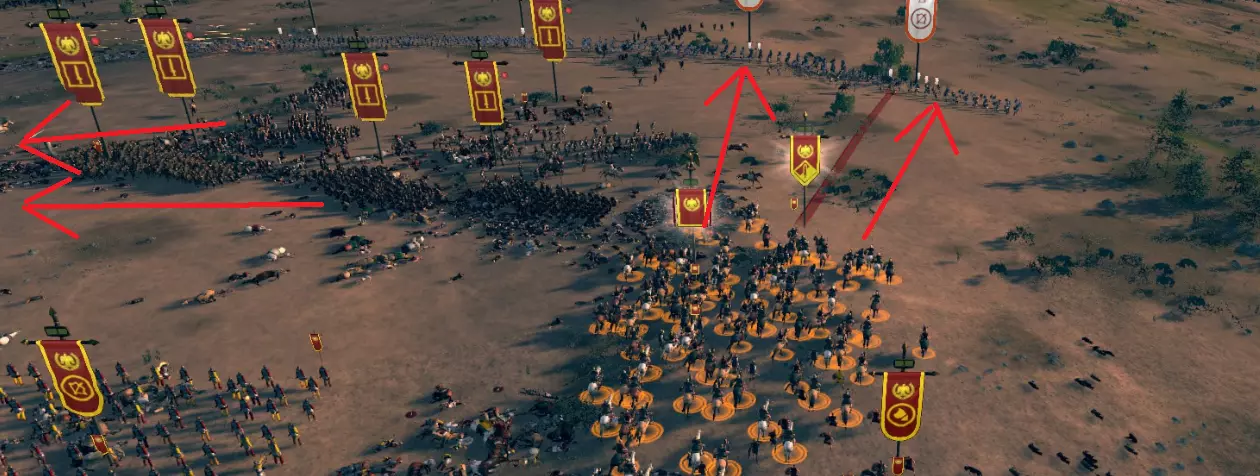
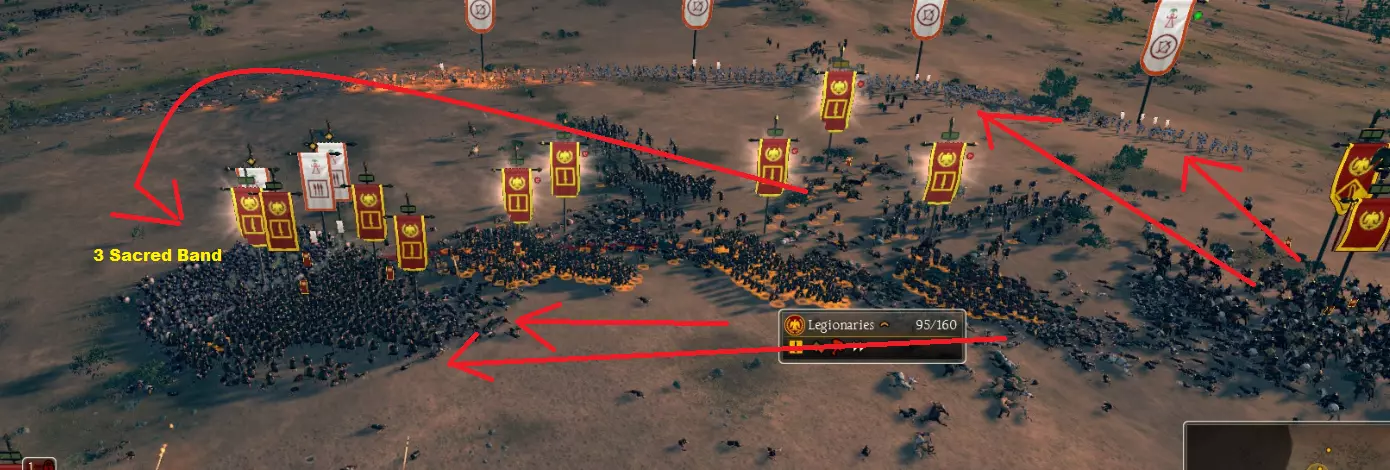
敌军的一支骑兵部队被你孤立的辅助骑兵部队引诱,正在发起冲锋!用你的骑兵进行反冲锋,并调动辅助步兵。这支联合部队应该能将他们击溃。使用快速推进彻底消灭他们。注意:两侧翼可能同时发生这种情况,所以你可能需要再次放慢或暂停时间。 用不了多久那些骑兵就会被消灭,这样你就能获得可自由调动的部队。派遣你的骑兵绕到敌军侧后方,开始攻击他们的弓箭手。在这个阶段,你的弓箭手可能已经溃败,在这场战斗中我的两支弓箭部队就溃败了。用你的辅助步兵去牵制战线中剩余的敌军骑兵,追击他们的将军,或者在没有骑兵需要对付的情况下攻击敌军步兵。一直以来,你的将军本应紧随战线后方进行增益直至力竭,必要时还需派遣资深军团士兵冲锋。我曾派遣3支队伍对抗迦太基的3支圣团部队。战斗场面可能与此类似:
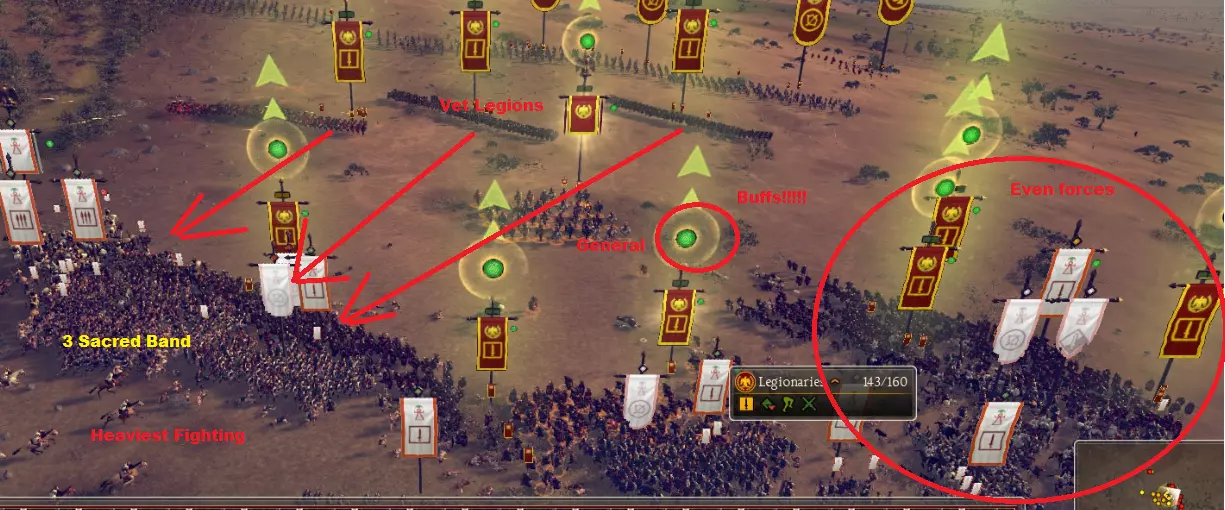
基本上从这里开始,你除了施加增益效果和使用闲置单位持续与敌方交战外,做不了太多事情。如果你持续施加增益,敌方单位最终会开始溃败,你可以继续施压,引发一波溃败效应。
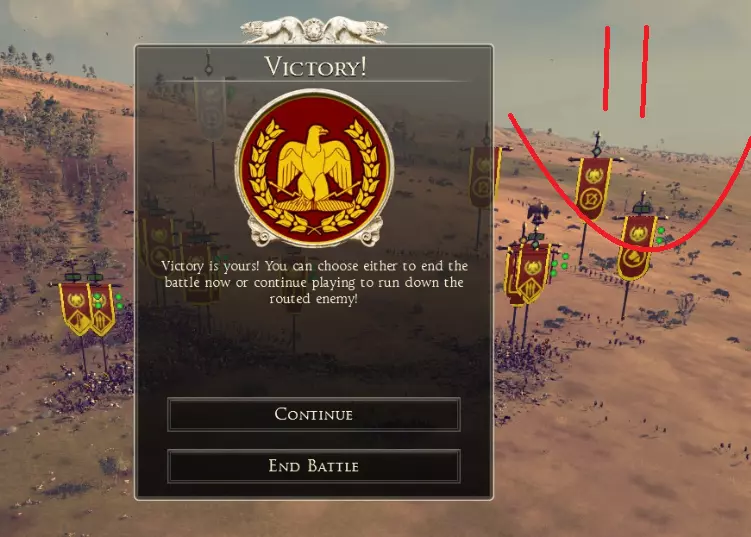
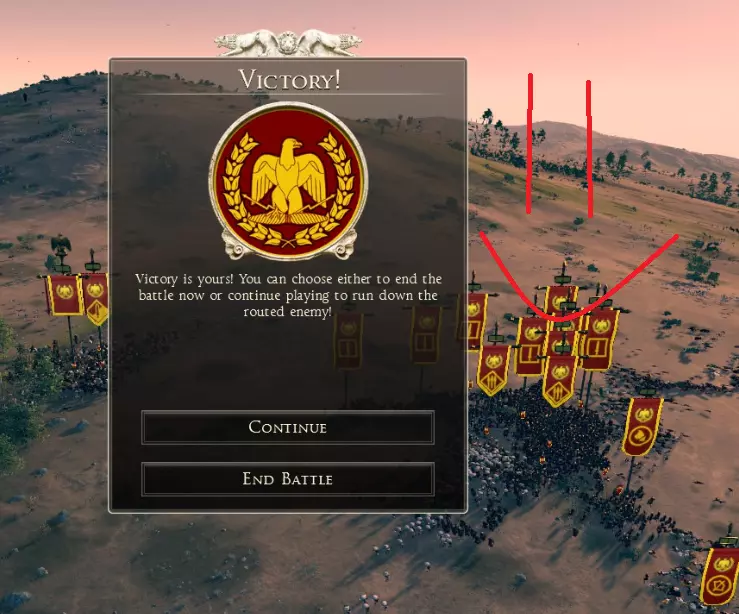
胜利了,不过我损失了一些士兵(主要是因为我当时在专注于截图,没太注意战场上的情况 :P)。我在困难难度下用这个阵型和迦太基、埃及、爱西尼、雅典以及本都的默认军队进行了测试。不过我怀疑它对阵帕提亚或者任何拥有远程骑兵的国家时效果不会太好。 但它确实有效,因为我在困难难度下打的所有战斗都没有输。在极难难度下它的效果可能不太好,因为这是一种高风险高回报的阵型和战术,但它确实能发挥作用,而且通常你的部队不会损失太多士兵导致战后解散。 说了这么多,去喝一杯怎么样? 在防御时使用这个阵型。 欢迎回来。现在我要抵御大致相同的迦太基部队,不过AI用1个利比亚骑兵替换了1个公民骑兵。 我当时处于防御状态。敌人占据了山丘优势。 这里再快速展示一下你的阵型外观。
你会注意到军团士兵都呈龟甲阵(Testudo formation)排列,而资深军团士兵的间距更近。辅助步兵则与资深士兵排成一线,但略微朝外,以便更容易拦截敌方骑兵不可避免的侧翼冲锋。在这场战斗中,我将部队部署在两片小树林之间,虽然这对战斗本身没有太大影响,但确实在战斗开始的第一分钟隐藏了我的骑兵和战犬。 敌人自然会向你推进,在标准AI阵型中,他们的弓箭手会位于主力部队前方。要仔细观察这些弓箭手,因为他们通常会得到将军的 buff,或者在射击前会开始向前跑动。你也可以将鼠标悬停在他们身上,等待射击图标出现。这是行动信号。你需要做的就是让所有单位前进,并保持攻击阵型。派遣一个军团士兵单位攻击敌方的一个步兵单位,但要确保他们处于龟甲阵状态。再次记住,要让单位保持集中,不要分散,否则很可能会失败。
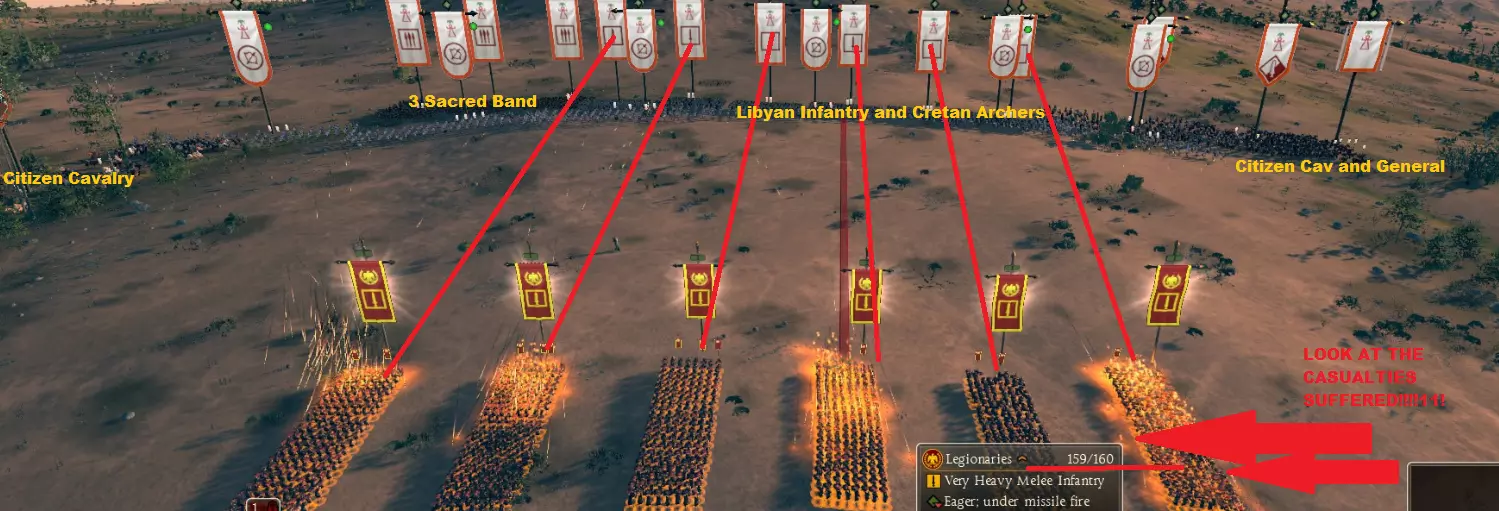
关于图片,我已标出龟甲阵中军团士兵的伤亡情况:1. 在一轮箭雨中仅伤亡1人,而敌人在被迫撤退前最多只能再射出2到3轮箭。这很不错。 现在当你的军队向前推进时,敌军仍在向你移动。如果需要,此时暂停可能是个好时机。无论如何,敌方骑兵会冲击你的侧翼,目标是你的弓箭手和骑兵,因此用辅助骑兵进行反击,并让两队辅助步兵前来支援。在执行此操作的同时,将战犬释放到敌军远端的两队弓箭手单位上。这将把他们从战斗中清除。
完成此操作后,你的军团士兵应该已经与敌人交战,而你的弓箭手会再次向敌方弓箭手射击。在这场战斗中我使用了火箭,但你也可以选择不使用。现在是时候投入你的资深军团士兵了,再次让他们冲向最激烈的战斗区域。
那些神圣军团!战斗可能会像这样持续几分钟,所以要确保你的士兵一直受到将军的增益效果加持,并且让他们保持抱团。很快,你的骑兵和辅助步兵就会解决掉敌方骑兵。接下来重复之前的操作:让辅助步兵前往需要他们的地方(攻击敌方将军、残余骑兵,进行掩护或攻击敌方步兵),同时命令你的骑兵冲锋剩余的弓箭手,将他们击溃。
当你击溃他们的弓箭手时,这会对他们的整个军队产生影响,除了最强的部队【圣队】外,他们会一个接一个地开始溃逃。因此,当你的部队从战斗中解脱出来后,将他们向上调动、迂回包抄,或者直接投入战斗以增援那里的友军。
在我的战斗中,敌方有一支骑兵部队重整态势并重返战场,这种情况下,只需派遣一队辅助步兵以快速推进的方式向他们发起冲击,应该就能彻底击溃他们。

到这个阶段,战斗应该已经结束了!如果还没结束,就清理掉剩余的单位吧。
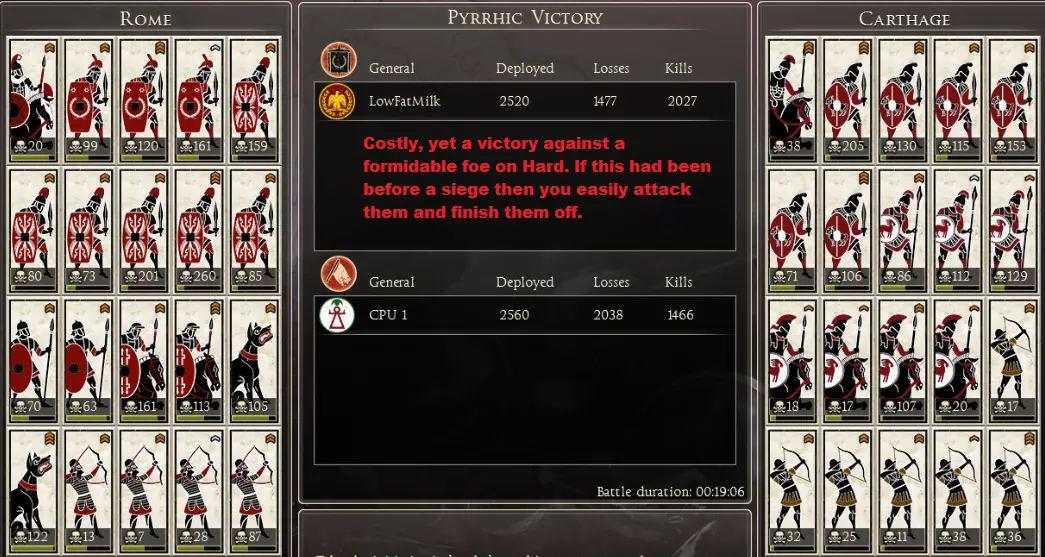
以下是最终结果....
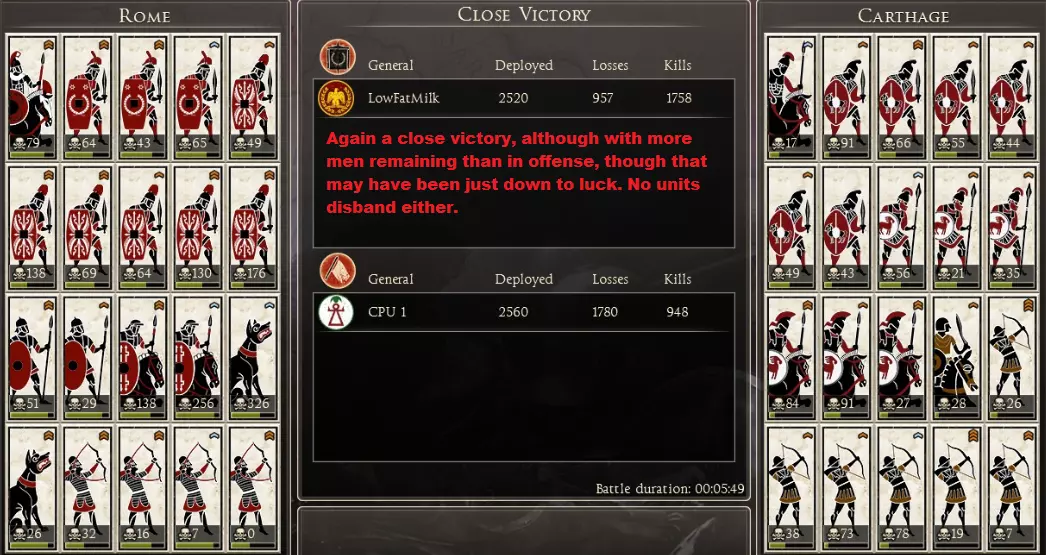
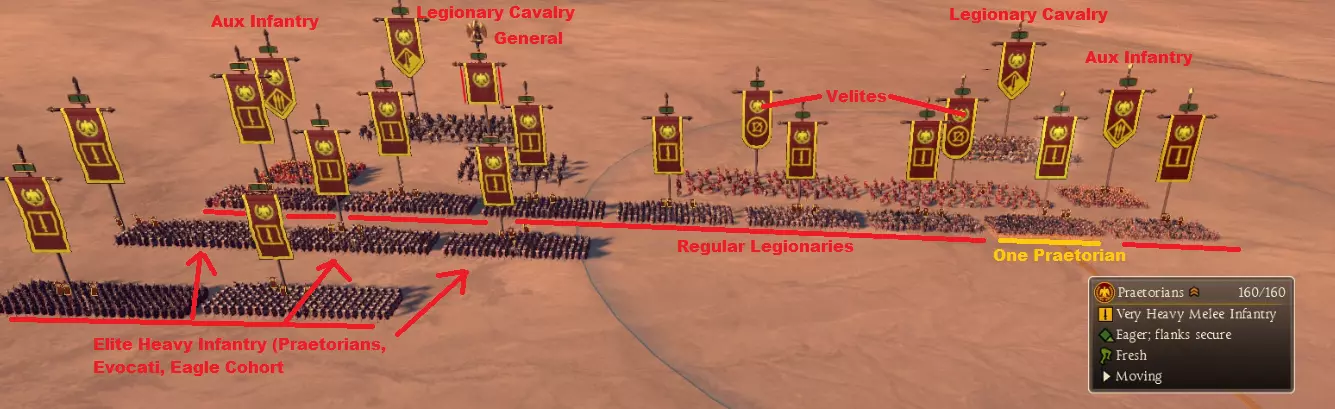
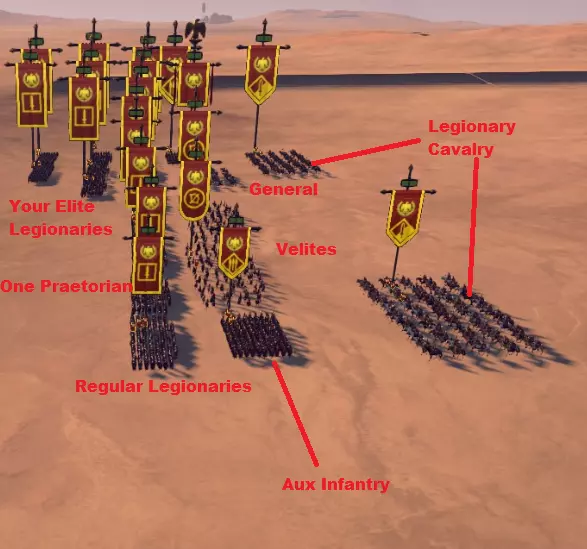
So again, not a bad result considering it was on Hard against a well balanced force of equal strength. Most units retained over half their men, and none disbanded. They should be ready for battle again in 2 or 3 turns if you replenish them, but there are still enough to finish off a siege, or chase a retreating army. Pros and Cons Pros Can survive battles against an equal or slightly stronger foe in mid-game Retains the Roman's strengths of Infantry and line battles combined with supporting Auxiliary units Is appliable in both offense and defense and works effectively Retain enough units to defend again or counter-attack the following or same turn. While still being a mid-game formation it can be used with later game units as well to greater effect. Still uses superior Roman units whilst retaining reasonably low upkeep cost Cons Is not suited to battles against overwhelming numbers or missile cavalry factions such as Parthia. Even when used against an equal force, there is the possability of defeat if the enemy has more of one unit (say if they have far more Cavalry they could flank in greater numbers and beat your Auxiliary Infantry, etc) Much more suited for defending than attacking, despite working both ways High risk associated with using Wardogs in the place of Legionaries or other more powerful standard units Conclusion of Advanced formation That sums up that one, and I hoped you liked it because I came up with that one myself over a few years of playing Rome 1. It works better in Rome 2 however due to the higher quality tactics and buffs and more realistic AI. It can be quite dangerous to use, but if you have no other option it can be quite a good formation to use. I have used it in custom battles and the campaign as well on Hard and did win more than I lost (15 wins to 4 losses). The battle can also sway one way or another depending on unit experience and quality/upgrades, and the elevation can give attacking archers more room to annoy you. If you decide to get rid of the Wardogs or maybe replace an Archer or 2 with more Legionaries then go right ahead, this is just a blueprint for you all to test and build upon!! Hope this can save your necks in a tight situation, and may Ares give you the stronger shield arm and faster sword arm. Elite End-game Formation for Attacking - Quincunx Ok this formation I have been working on the past 3 days against various AI on Hard. I have trialed it in both attack and defence, and the results were; in defence I was utterly anihilated, losing most of my men and hardly scratching the enemy forces. However when I used this in attack it was the opposite, I hardly lost any men, none routed and I crushed my foes quickly and easily. Now you will be using this more late-game when you have research the final Military technology that gives you access to Legionary Cohorts, Praetorians, Evocati Cohorts, Eagle Cohorts and Legionary Cavalry. It may take quite a few turns as you will be waiting for the technology to b researched for a while. I researched it around turn 137 (not sure why I put 200 in the coming soon bit, talking ♥♥♥♥ there haha). Now because these Legionary units are far superior to almost any other infantry unit, this formation focuses on them. You should have majority of your units as Legionaries, with a few elite ones such as the Praetorians and Evocati, having an Eagle Cohort really helps as well. The units I was using for this formation were as follows: 1 General Legatus, 1 Eagle Cohort, 2 Praetorians, 3 Evocati Cohorts, 7 Legionary Cohorts, 2 Legionary Cavalry, 2 Velites and 2 Auxiliary Infantry. You may or may not choose to change some of these units. You might want more Evocati or Praetorians, or you may want to remove the Velites entirely and replace them with more Cavalry or Auxiliary Infantry. That's up to you and that does work. So here is the diagram of what each unit will be represented by: General: [X] Eagle Cohort: [Eg] Praetorians: [Pt] Evocati Cohort: [Ev] Legionary Cohort: [L] Auxiliary Infantry: [Ai] Legionary Cavalry: {Lc} Velites: (V) So here is the diagram of what it should look like. .....................................................[Eg] [Pt]........ ...............................................[Ev] [Ev] [Ev].......... ....................[L]..[Pt]..[L]..[L]..[L]..[L]..[L]..[L]........ ....................[Ai]..(V)..(V)..............[X]......[Ai]....... ....................{Lc}....................................{Lc}...... So you can see that there is a plain concentration of men on the right flank. If you want you can use this on the left flank that's totally fine just flip the formation. It is often easier to use the concentration on the enemy's weakest side, so go with that. The reason I have a Praetorian in the back line on the far side and not up at the concentration is for 2 reasons: 1 is that the Praetorians are just that little bit better than Legionaries, so will hold the line more successfully, and 2 that they have their own influence radius, and it is large enough to cover all of your men, giving them a much needed morale and fighting buff. Again the Auxiliary Infantry are on the flanks behind the main army to counter any flanking horses, and behind them are your Legionary Cavalry. NOTE: It may be better to have the Cavalry on the oncentrated side as well, and leave the other side without Cavalry. This gives you the option to charge 2 units of Cav around the weakest side, instead of 1 per side, but both work. The Velites stand behind your left flank to provide cover fire for your Legions there, also just as some support/bait (you'd rather lose a unit of Velites than Legionaries). Finally your General is safe and sound behind the concentration, boosting morale and throwing buffs around like nobody's business. Unit Roles General: Stays out of harm's way unless there is a lone juicy Archer target, or if victory is 100% guarunteed. Stands behind your concentration and gives buffs. Eagle Cohort + Praetorians: These guys can form as many or as little of your army as you want, however it is recommended that you have at least 1 of each as they give morale and attack buffs to any unit in their spheres of influence. They also have better stats than the rest of your units and you'll need at least 2 to form the first line of your concentration. They will be charging as soon as they are hit by missiles, and they will do alot of damage. Having a second unit of either is also extremely useful and recommended as you can place 1 down the other end of your line for buffs. Evocati Cohorts: Like the Eagles and Praetorians, you can have as many or as little of these guys as you want. Again they are better than normal Legionaries, so if you have the money you can just have these guys instead of Legionaries. However in this case I used and recommend 3 just in case you are having issues with your financial income, or don't feel the need to spend the extra money. This setup gives ample power without draining your banks from upkeep. Your Evocati will make up the 2nd line in the concentration, and will be the ones charging in immediately behind the first line to give support and shock the enemy with Pila and momentum. Legionary Cohorts: The iconic Roman Legions will make up the rest of your army's infantry. I used 7 units of them, so combined that with the 1 Eagle, 2 Praetorians and 3 Evocati gives the formation a solid 13 units of Very Heavy Infantry. So 7 will be more than sufficient, however as mentioned before if you have enough money you can have Evocati instead. Your 7 Legionaries plus 1 unit of Praetorians or buff giving units will make up the 3rd line of 8 units. Make sure you have them in line with the first two so you're forming a sort of blunt arrow head (I just decided to call it the ArrowHammer :3 ). On the concentrated end they will be again charging into battle behind the Evocati, however you may wish to use some of them to flank or charge around as you will begin to see a large grouping of your men at this end. The rest of them in the middle and the far side will be charging up in 1 line to engage the enemy and prevent them from joining the concentrated side. Divide and Conquer. Velites: Stand behind the men on your weaker side to simply give support, harrass enemies and if necessary be used as bait or screens to prevent Legionary losses. These guys can be taken out of your army if you wish and replaced with better soldiers. Auxiliary Infantry: Two units of these guys may be all you need, but if you take out the Velites then it can be useful to have more Spearmen. They sit behind the rest of your Legionaries and they are there to simply find and destroy enemy Cavalry who will be joining the battle. Search and Destroy. The Rapid Advance ability is extremely useful; use it. Legionary Cavalry: Again only 2 units, it is recommended to have 2, you won't really need more, however if you choose to not use Velites then swapping them out of more Cavalry is useful. You may choose to sit them on either side or on one side for the battle. Once the enemy units are all engaged you charge them around and behind the enemy to either attack the infantry already engaged by your Legions, or to hit Archer/Missile units that are annoying your troops. Using this formation (Attack only) So now we have the unit roles and diagram sorted, here is a demonstration of how to apply this formation when attacking. As mentioned before, this formation will result in a loss if you try to use it defending, especially on Hard or above. Use it for attacking only unless you feel unnaturally brave or suicidal. This has been trialed against Egypt, Sparta, Arverni, Carthage and Pontus on Hard, and Carthage and Pontus on Very Hard, all to success. The battle that is seen in the attached photos is against Pontus on Very Hard. Their army was a generated army made up of their General, 4 Noble Blood Cavalry, 2 Scythed Chariots, 3 Theuros Spears, 5 Celtic Warrior Mercenaries and 5 Pontic Peltasts. Both of our generals were rank 3 bronze and all of the rest of our units were rank 2 bronze. Here is an image of the formation from the front.
从侧面
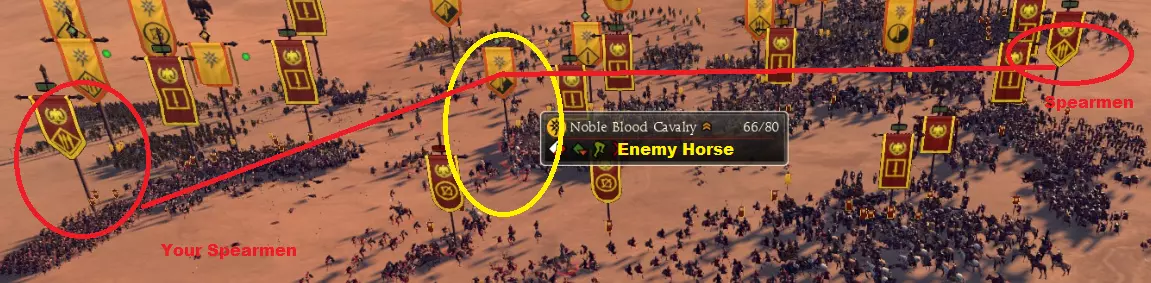
好的,你需要让士兵保持这种阵型步行前进。在遭遇敌人攻击前,不要让他们跑步,以免体力耗尽。理论上,由于你集中了侧翼兵力,你的战线应该比敌人的短。将这条战线与你要攻击的敌方侧翼对齐,例如,如果你集中了右翼兵力,就攻击他们的左翼并与之对齐,就像这样: 敌人右翼....XXXXXXXXXXXXXXXX 敌人左翼 你的左翼.....................................XX 你的右翼 ............................................................XXX .............................................XXXXXXXXXXX 当你调动士兵时,阵型看起来应该类似这样。
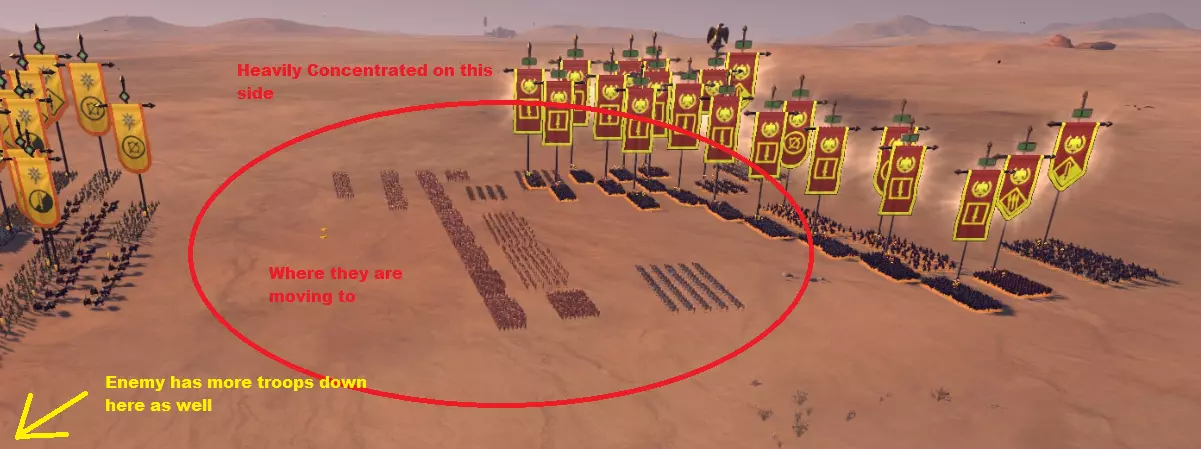
你可以看到我的士兵们在哪里,以及他们要去哪里,而且兵力集中在他们的左翼。这基本上会被歼灭 : ) 好的,一旦你受到导弹攻击,就让你的前两列部队冲锋,也就是你最精锐的步兵,比如【罗马禁卫军】、【鹰旗军团】和【精选老兵】,就像这样。

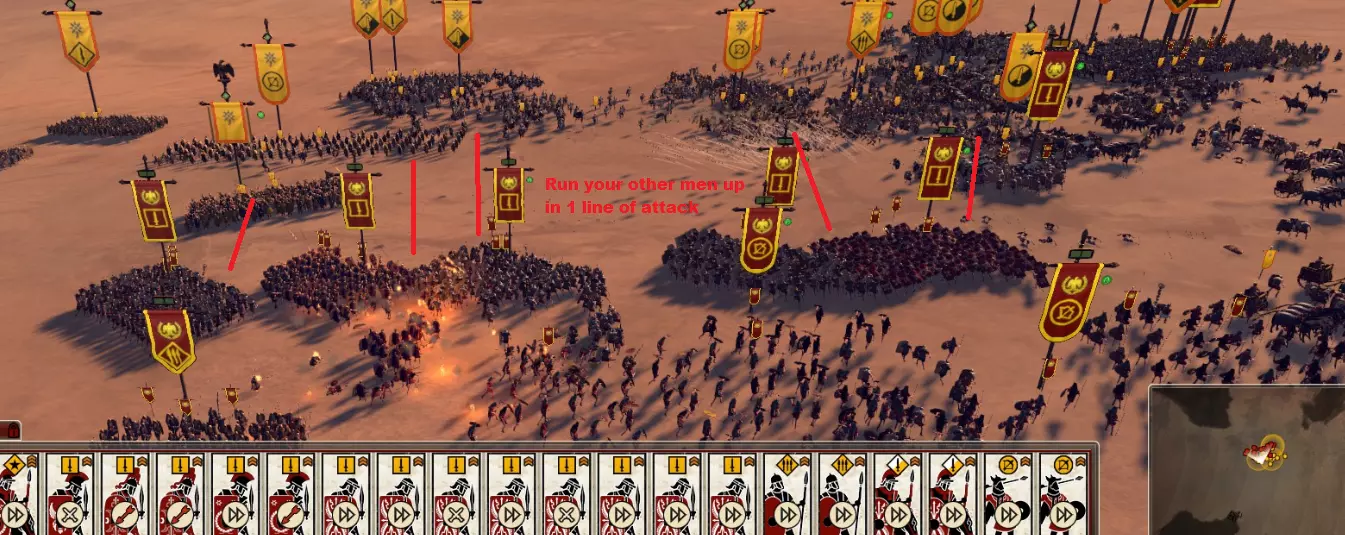
一旦你的部队接敌,立即让其余士兵排成一条直线向前冲锋,这样就能牵制住敌军的其他部队,防止他们四处移动。暂停时间来下达这些命令可能会很有用。操作起来大概就是这样。
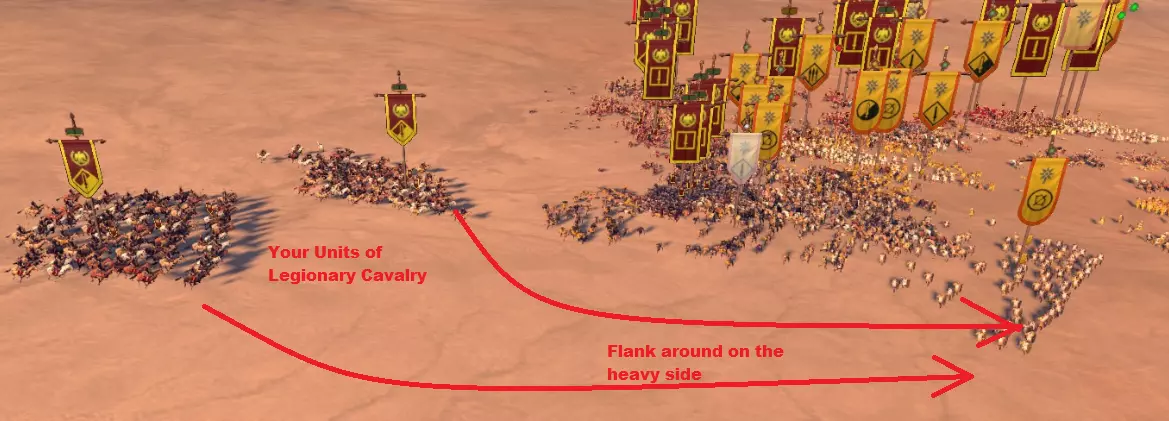
让你的轻装步兵(Velites)靠近战场边缘,这样他们既能投掷标枪,又能在被敌人攻击时起到有效的牵制作用。 现在你需要同时操作两件事,所以暂停时间功能在这里会很有用。首先,调动你的两支骑兵部队,绕到敌人后方。你可以让它们分别从两侧包抄,或者集中从一侧进攻,这取决于你的战术选择。其次,你必须指挥辅助步兵(Auxiliary Infantry)去寻找并牵制那些无疑已经加入战斗的敌方骑兵,就像这样操作。
现在他们已经交战,你的骑兵应该绕到后方,可以消灭落单的单位或冲锋敌方步兵。
现在你只需歼灭敌人。使用将军的增益和减益效果,激活【鞭挞】技能对军团士兵使用可能会很有用,这会刷新他们的疲劳值并使他们攻击更猛烈。虽然效果结束后会让他们更疲惫,但战斗应该会在那之前结束。敌人会开始溃败。不要追击他们,只需选择仍在战斗或即将溃败的新目标,然后全力围攻他们。
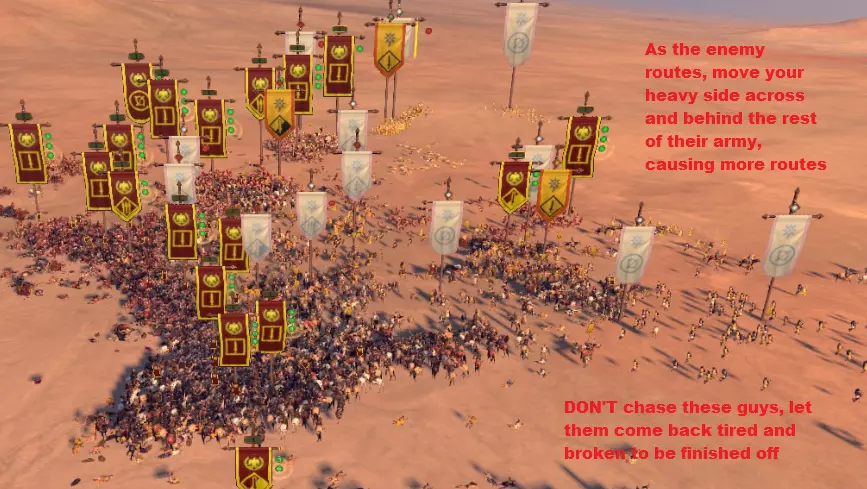
敌人的一侧将陷入完全的劣势,当你消灭他们的士兵时,他们会彻底崩溃,这种多米诺骨牌效应将导致他们的军队大规模溃败。 别跑了,你只会跑得精疲力尽然后死去!!!
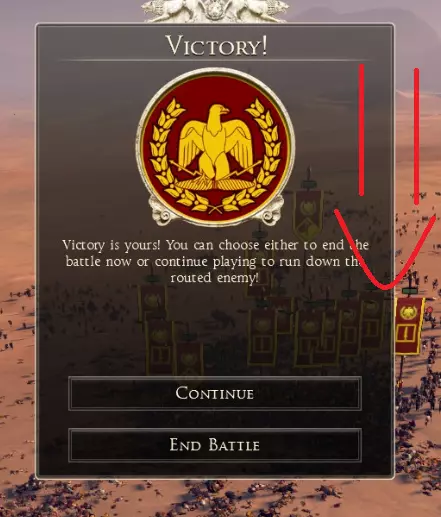
恭喜你已消灭敌人!
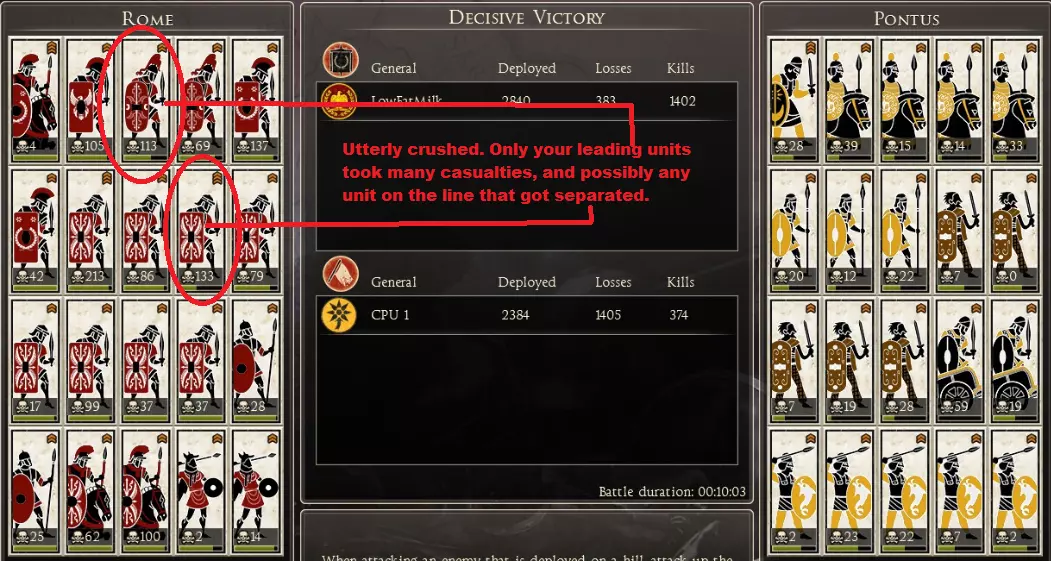
As you can see from that image it was a decisive victory, with the enemy being virtually vrushed. They won't be able to take another battle like that, and they are in no state to charge after you again. I had this result from every battle I used this formation on, even on Very Hard. I will note that as soon as I get the victory notice I end the battle. If you choose to chase down your enemy their casualties will be much, muchm, much higher. Pros and Cons Pros Can potentially destroy an enemy army completely. Uses a lot of Roman heavy Infantry You can use this formation early game as well, you'd just be missing out on the elite buffing units. Was an actual Roman formation that Julius Caesar used against Barbarians. Works extremely well with a full army and mainly Infantry [ *] Can be used with other factions. Can be used (to some degree of success) in multiplayer. I won 4 lost 2. Holds up against Chariots and Elephants Cons Terrible in defence due to the thin middle line and lack of support on one side. Becomes less useful the fewer men you have in your army, or the fewer Infantry units you have. Difficult to use against Parthia or other missile unit factions. Takes a while to field these units, and can be rather expensive Elite End-game attacking formation conclusion. This formation is histroically accurate and it works very well in attacking. You can use this to great success against enemy armies not only in your campaign or custom battles but also in Multiplayer if your opponent has their army lined up. The sheer force of 5 or more Heavy Infantry units focused onto one section of a battle line can cause it to crumble and be destroyed much faster than if you assigned one unit to each of theirs. Adding in a few well placed Cavalry charges can further tip the balance in your favour, and due to the tighly packed infantry battles it may render their Cvalry without a charge. Your spearmen can then hunt them down and make them eat spearheads. This formation is more of a quick morale crushing battle, and will end the battle quickly with minimal casualties on your end. Worth using. Now I think after more reading it may be wise for you to get a snack! :) Defensive Formation. There isn't much to really tell about the defensive formations in the late-game stages of Rome. You just recruit Praetorian Guard, Armoured Legionnaries and Legionary Cavalry. A few Auxilliary Infantry and Archers don't hurt, but late-game Rome has infantry that can wipe out just about any force. Their only real weakness is attacking fortified cities with Scorpion towers. Seriously those things are so OP. Two lines of infantry are all you need, with a few flanking spearmen and Cavalry at the rear. By now you're clearly a skilled enough commander to get this far, so you don't really need any advice in defending. This guide was more about you guys finding out some new tips and tricks and building upon them. So for defence I'm leaving it up to you :) Guide Conclusion So thank you very much for taking the time to read this guide. I hope it helped you, gave you some ideas, and makes you a superior commander! If you have any questions or queries just comment below and I'll get back to all of you. I do plan to make future guides for other factions now that university has ended for the year, so expect guides on various Successor Kingdoms, Barbarians, Nomads and Hellenic factions! As requested by several parties, here are a few links you can look at that go into detail about Roman Infantry tactics ranging from their original battles with the Samnites and Greeks, to their military reforms and further into their 'barbarianisation' of their heavy infantry when they begun to rely heavily on Auxilliary soldiers (towards the collapse of the Western Roman Empire over 95% of their cavalry were Gallic Auxilliaries). How Romans consolidated their power http://www.the-romans.co.uk/weapons.htm Julius Caesar's personal attributes; fight like the famous man himself! http://changingminds.org/disciplines/warfare/commanders/julius_caesar.htm Roman Infantry tactics: keywords to search (ctrl+f) quincunx, line system, phalanx, triple line, Marian reforms, Caesar http://en.wikipedia.org/wiki/Roman_infantry_tactics Cheers everyone