换一换
换一换 


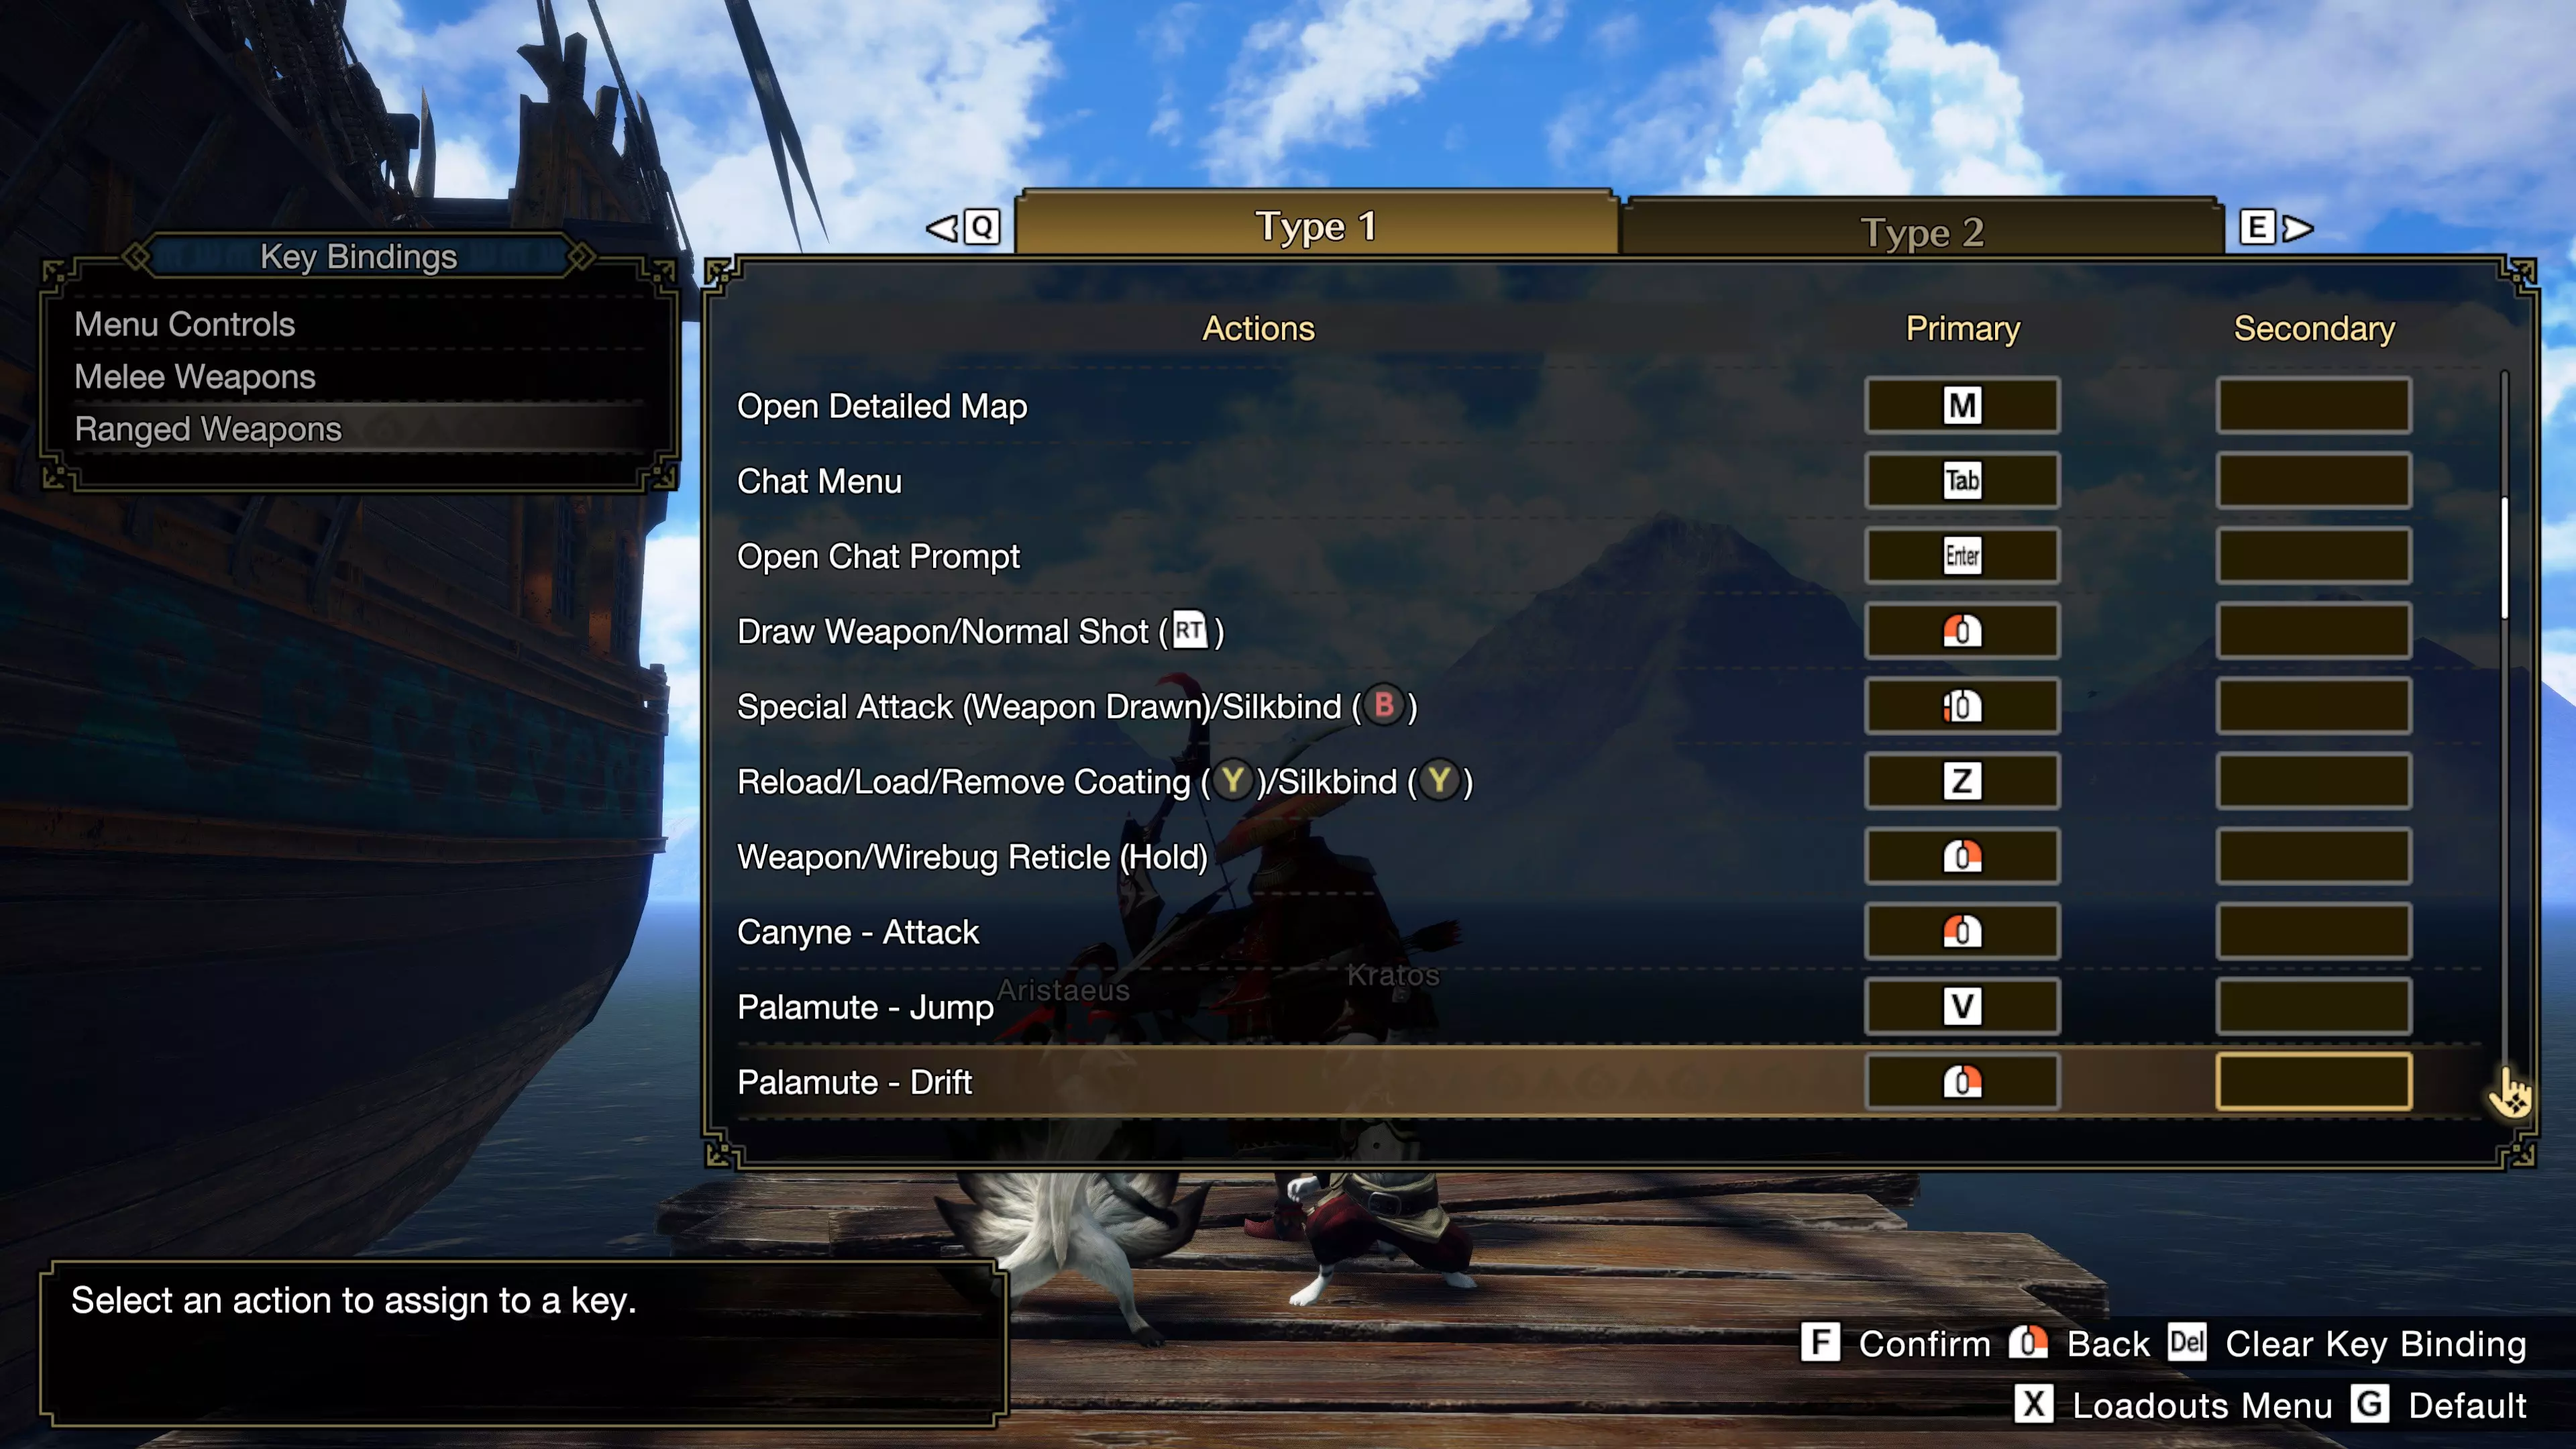
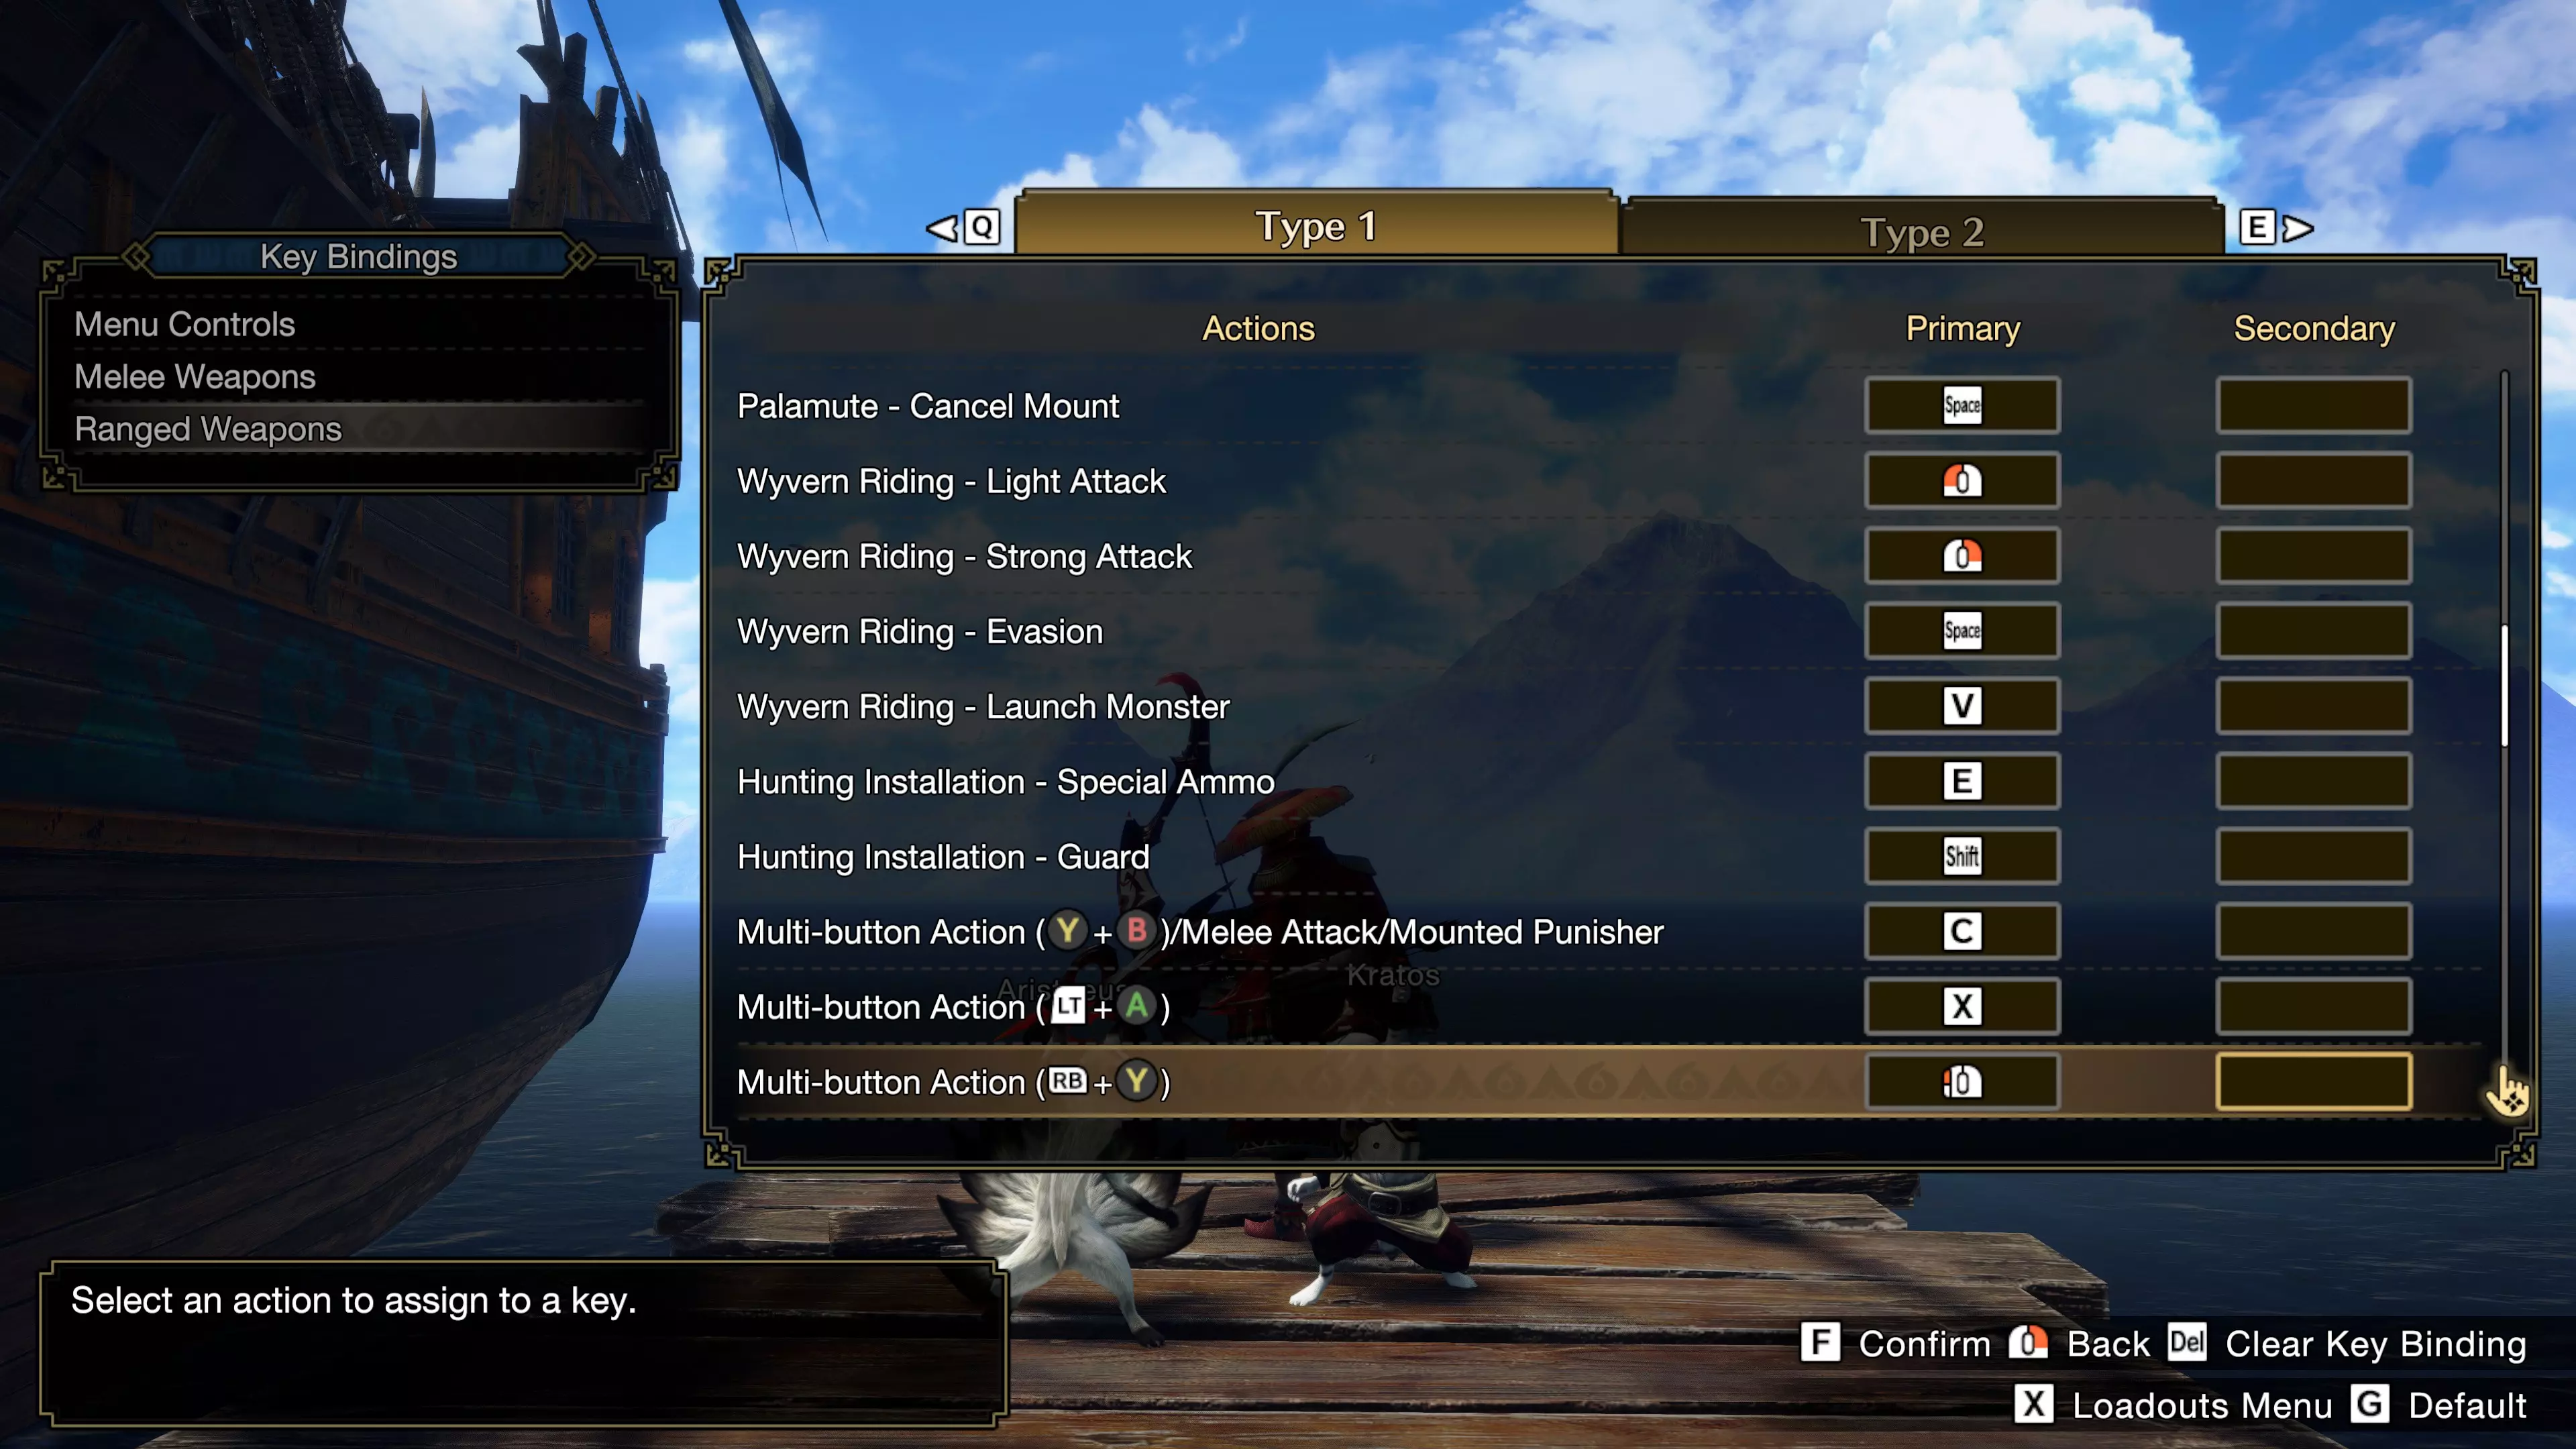
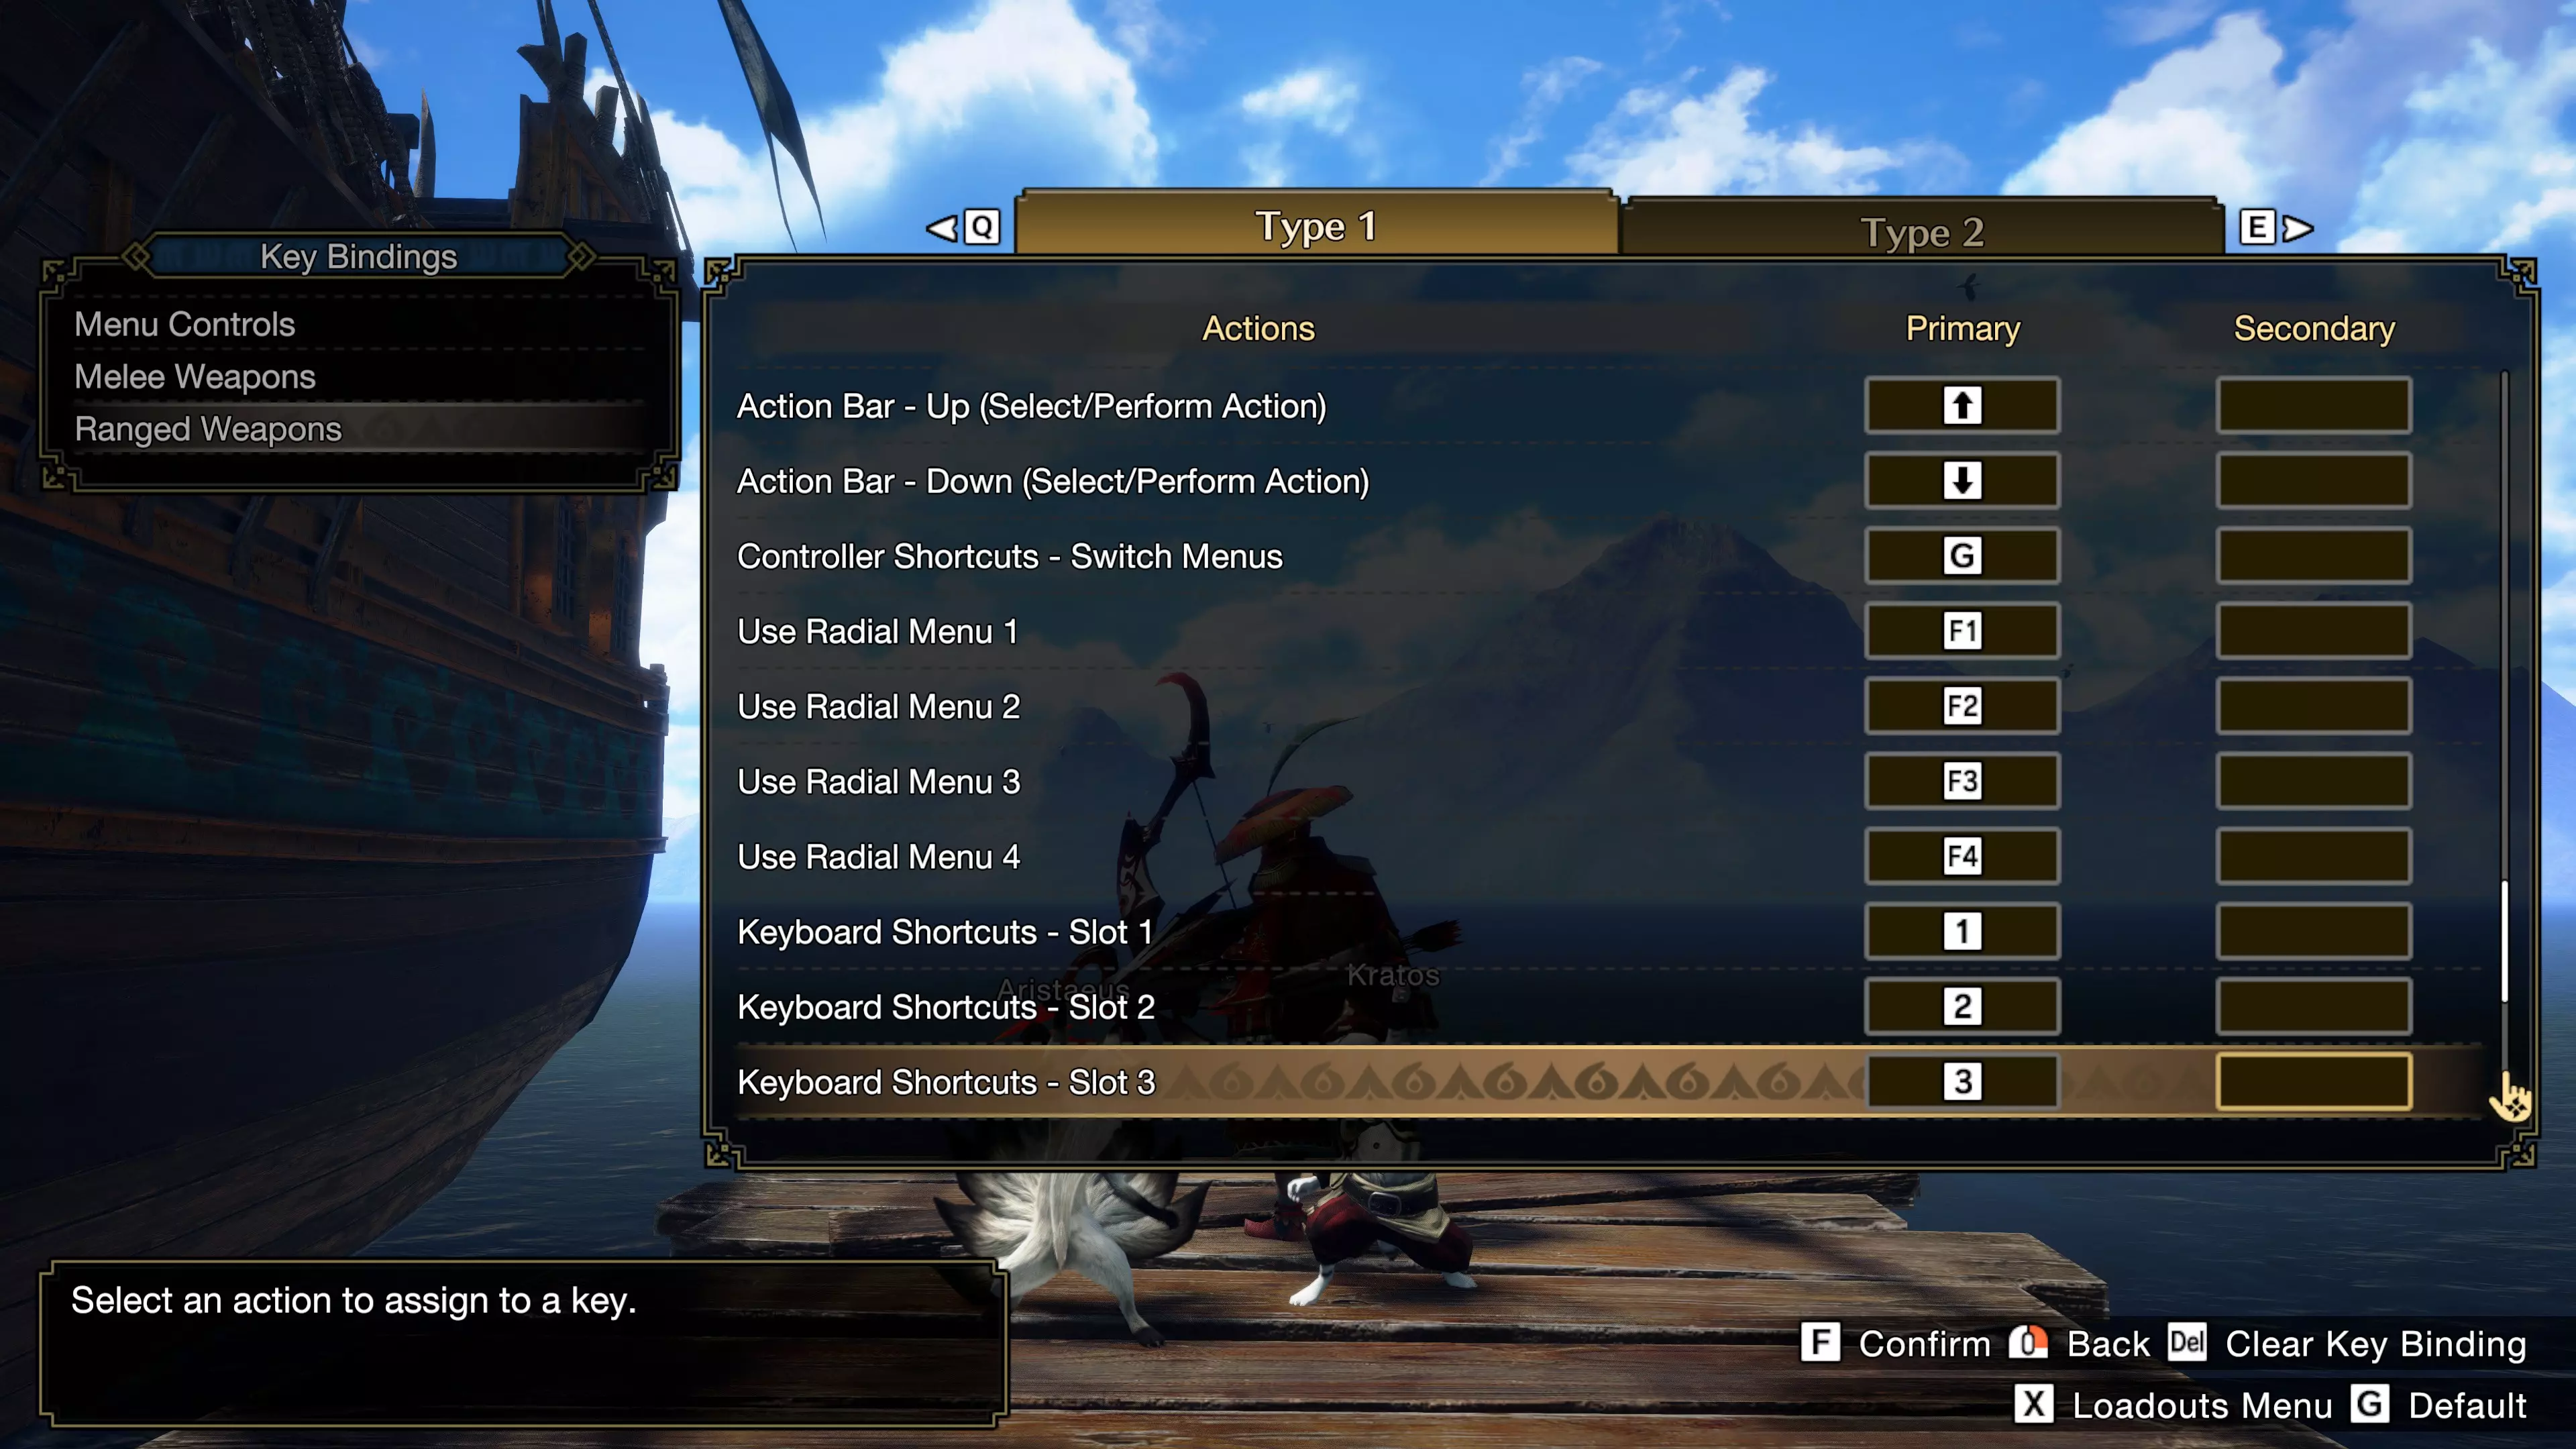
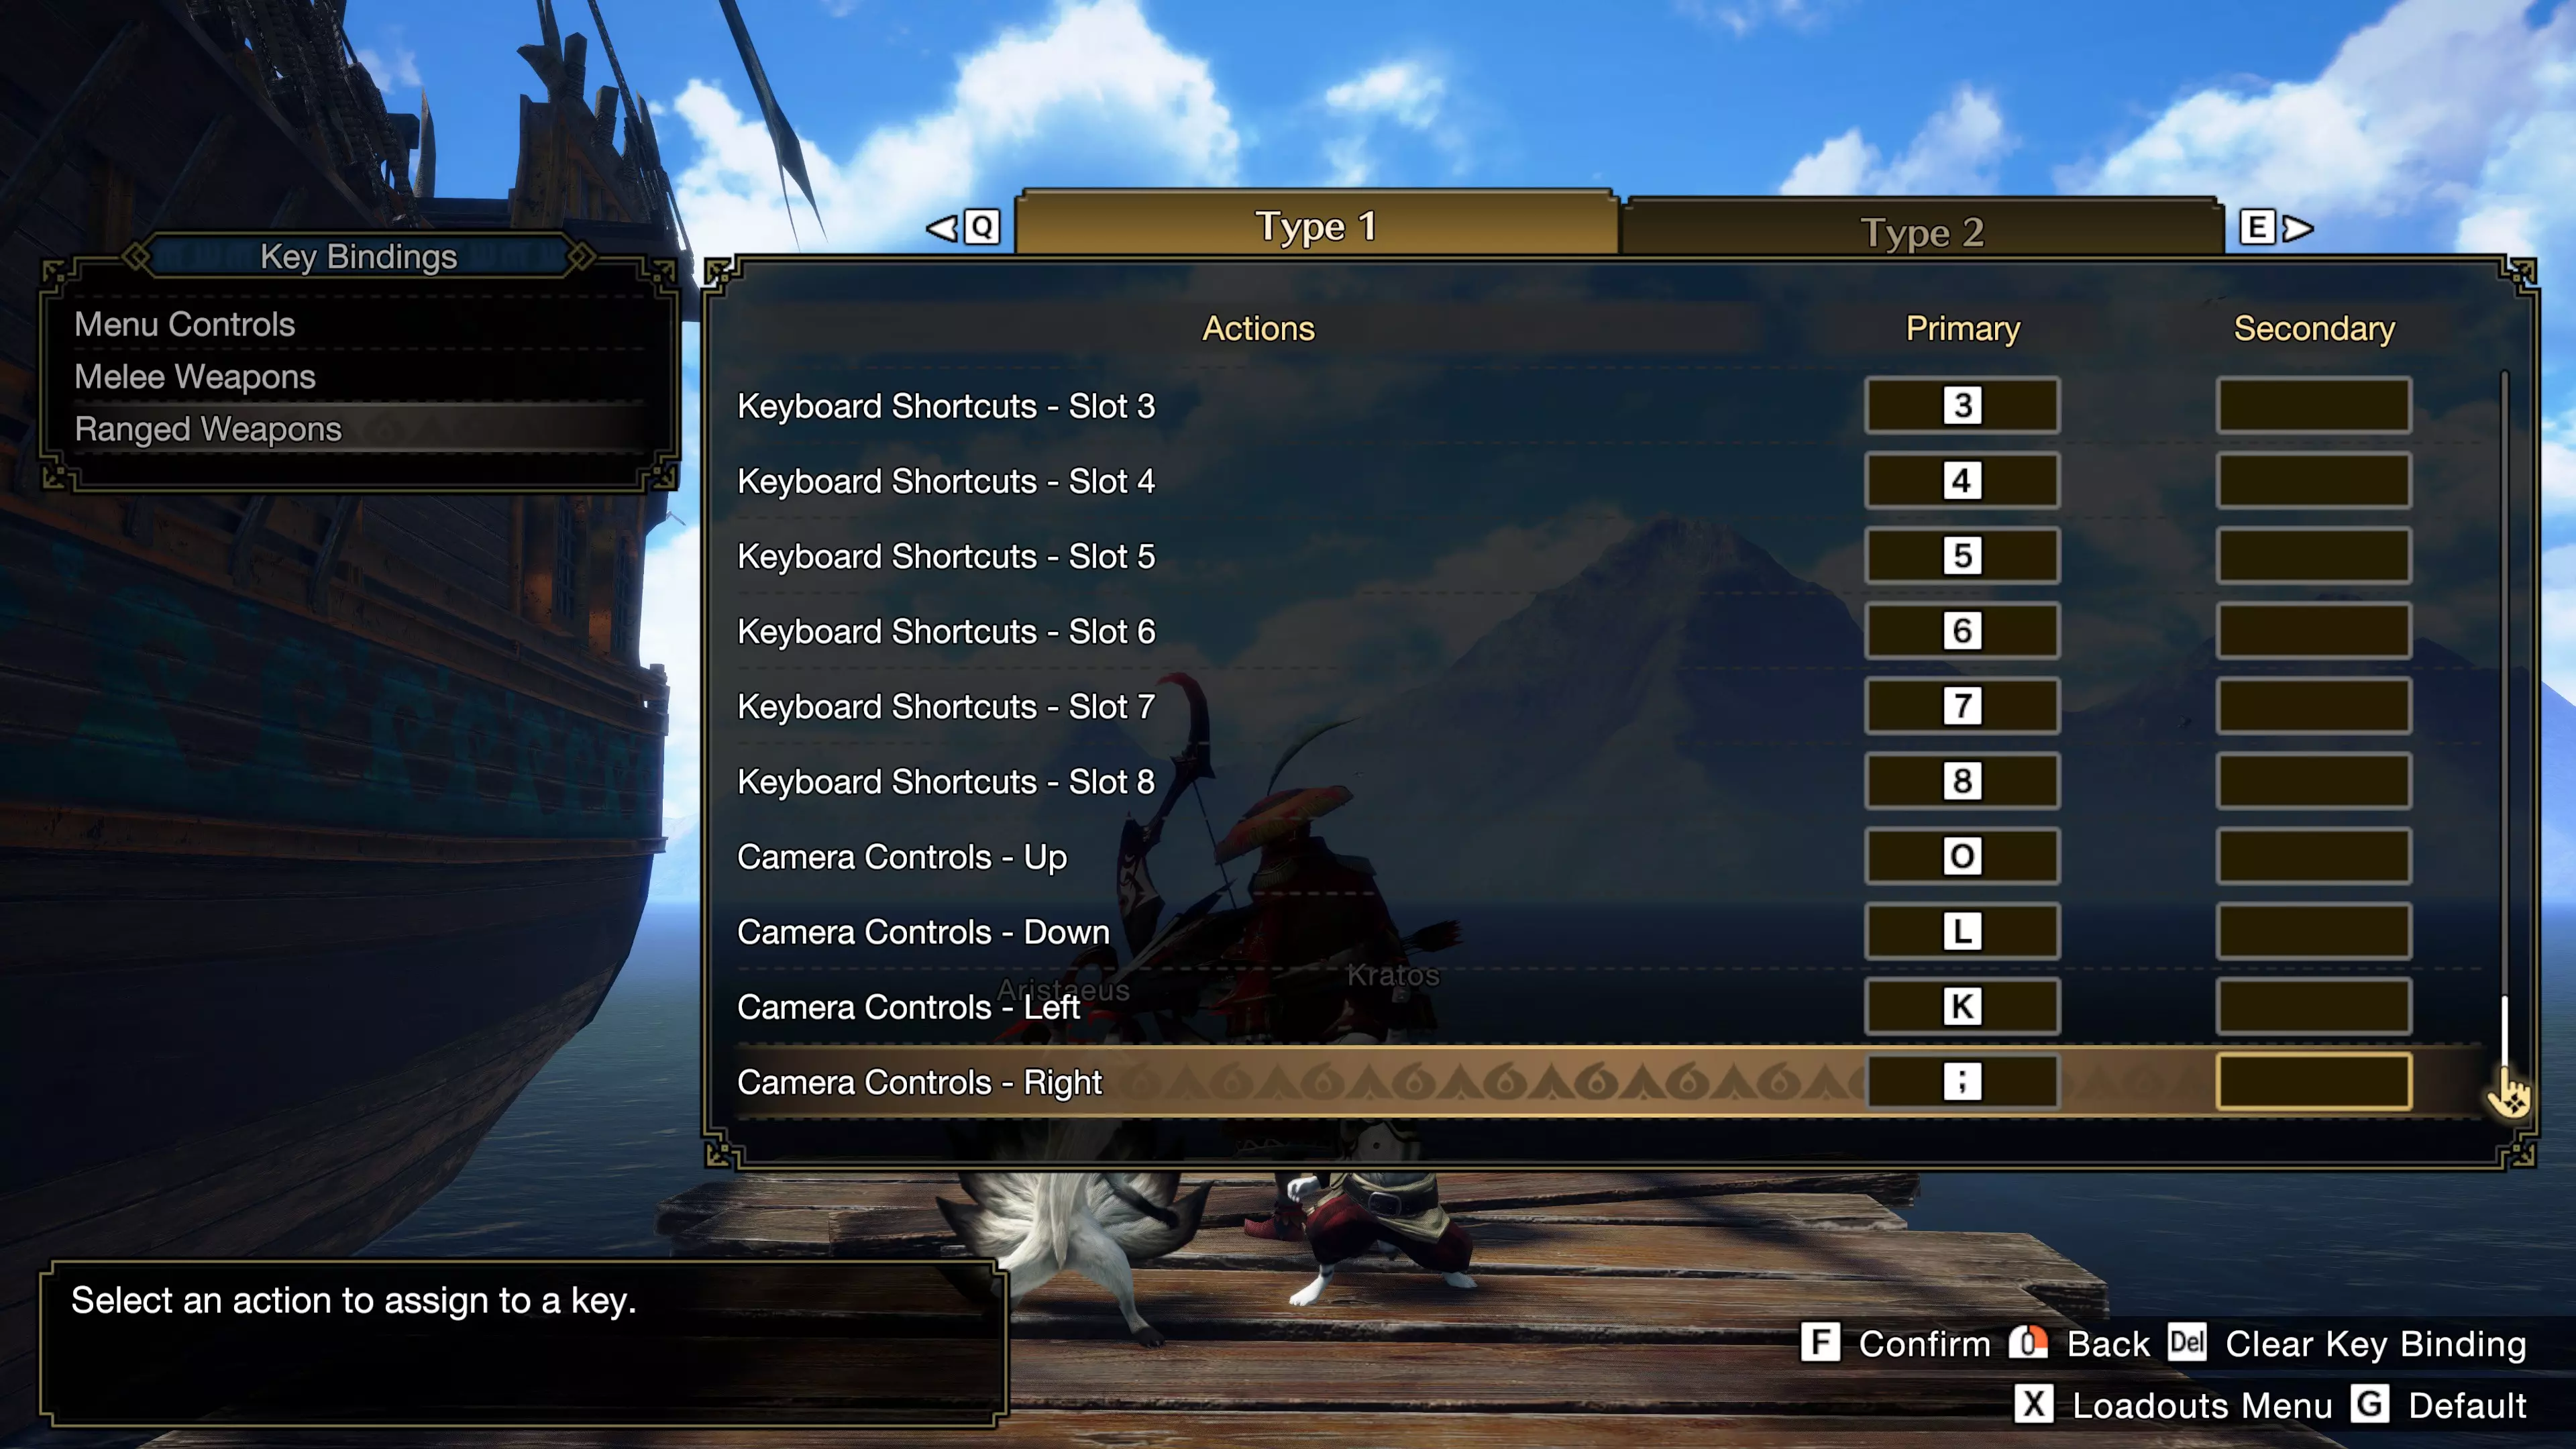
为什么要写这份指南? 本指南的目的不仅是教你如何使用弓,更要让你明白我们为何要这样玩。希望通过阅读本指南,你能了解哪些玩法元素适合自己,哪些不适合。本指南主要面向弓类新手,但内容也相当深入。即便是老手,也能从中找到一些优化弓类玩法的思路。如果你是首次使用弓作为武器,这份指南会很有帮助,但它并非游戏整体的入门指南(请注意剧透)。本指南默认你拥有【曙光】DLC。 为什么是我? 我是《怪物猎人:崛起》中的纯弓玩家。在撰写本文时,我已用箭矢“招待”了近3500只怪物。在这3000场弓类狩猎中,我积累了一些经验,愿意在此分享。有人建议我做一份弓箭指南,我觉得可以试试。这是我在Steam上的第一份指南。 简单总结: 怎么玩?射击 => 闪避 => 重复。 为什么用弓箭?因为它的每秒伤害(DPS)高。 通用设置与按键绑定 默认设置用起来有些繁琐,所以我做了调整。 鼠标和键盘 遗憾的是,游戏仍会将键盘输入转换为手柄输入。这实际上意味着有时候你的武器不会按你的意愿行动,尤其是在使用需要多个手柄输入的技能时。尽管如此,我仍然推荐用鼠标和键盘玩弓箭。 通用设置
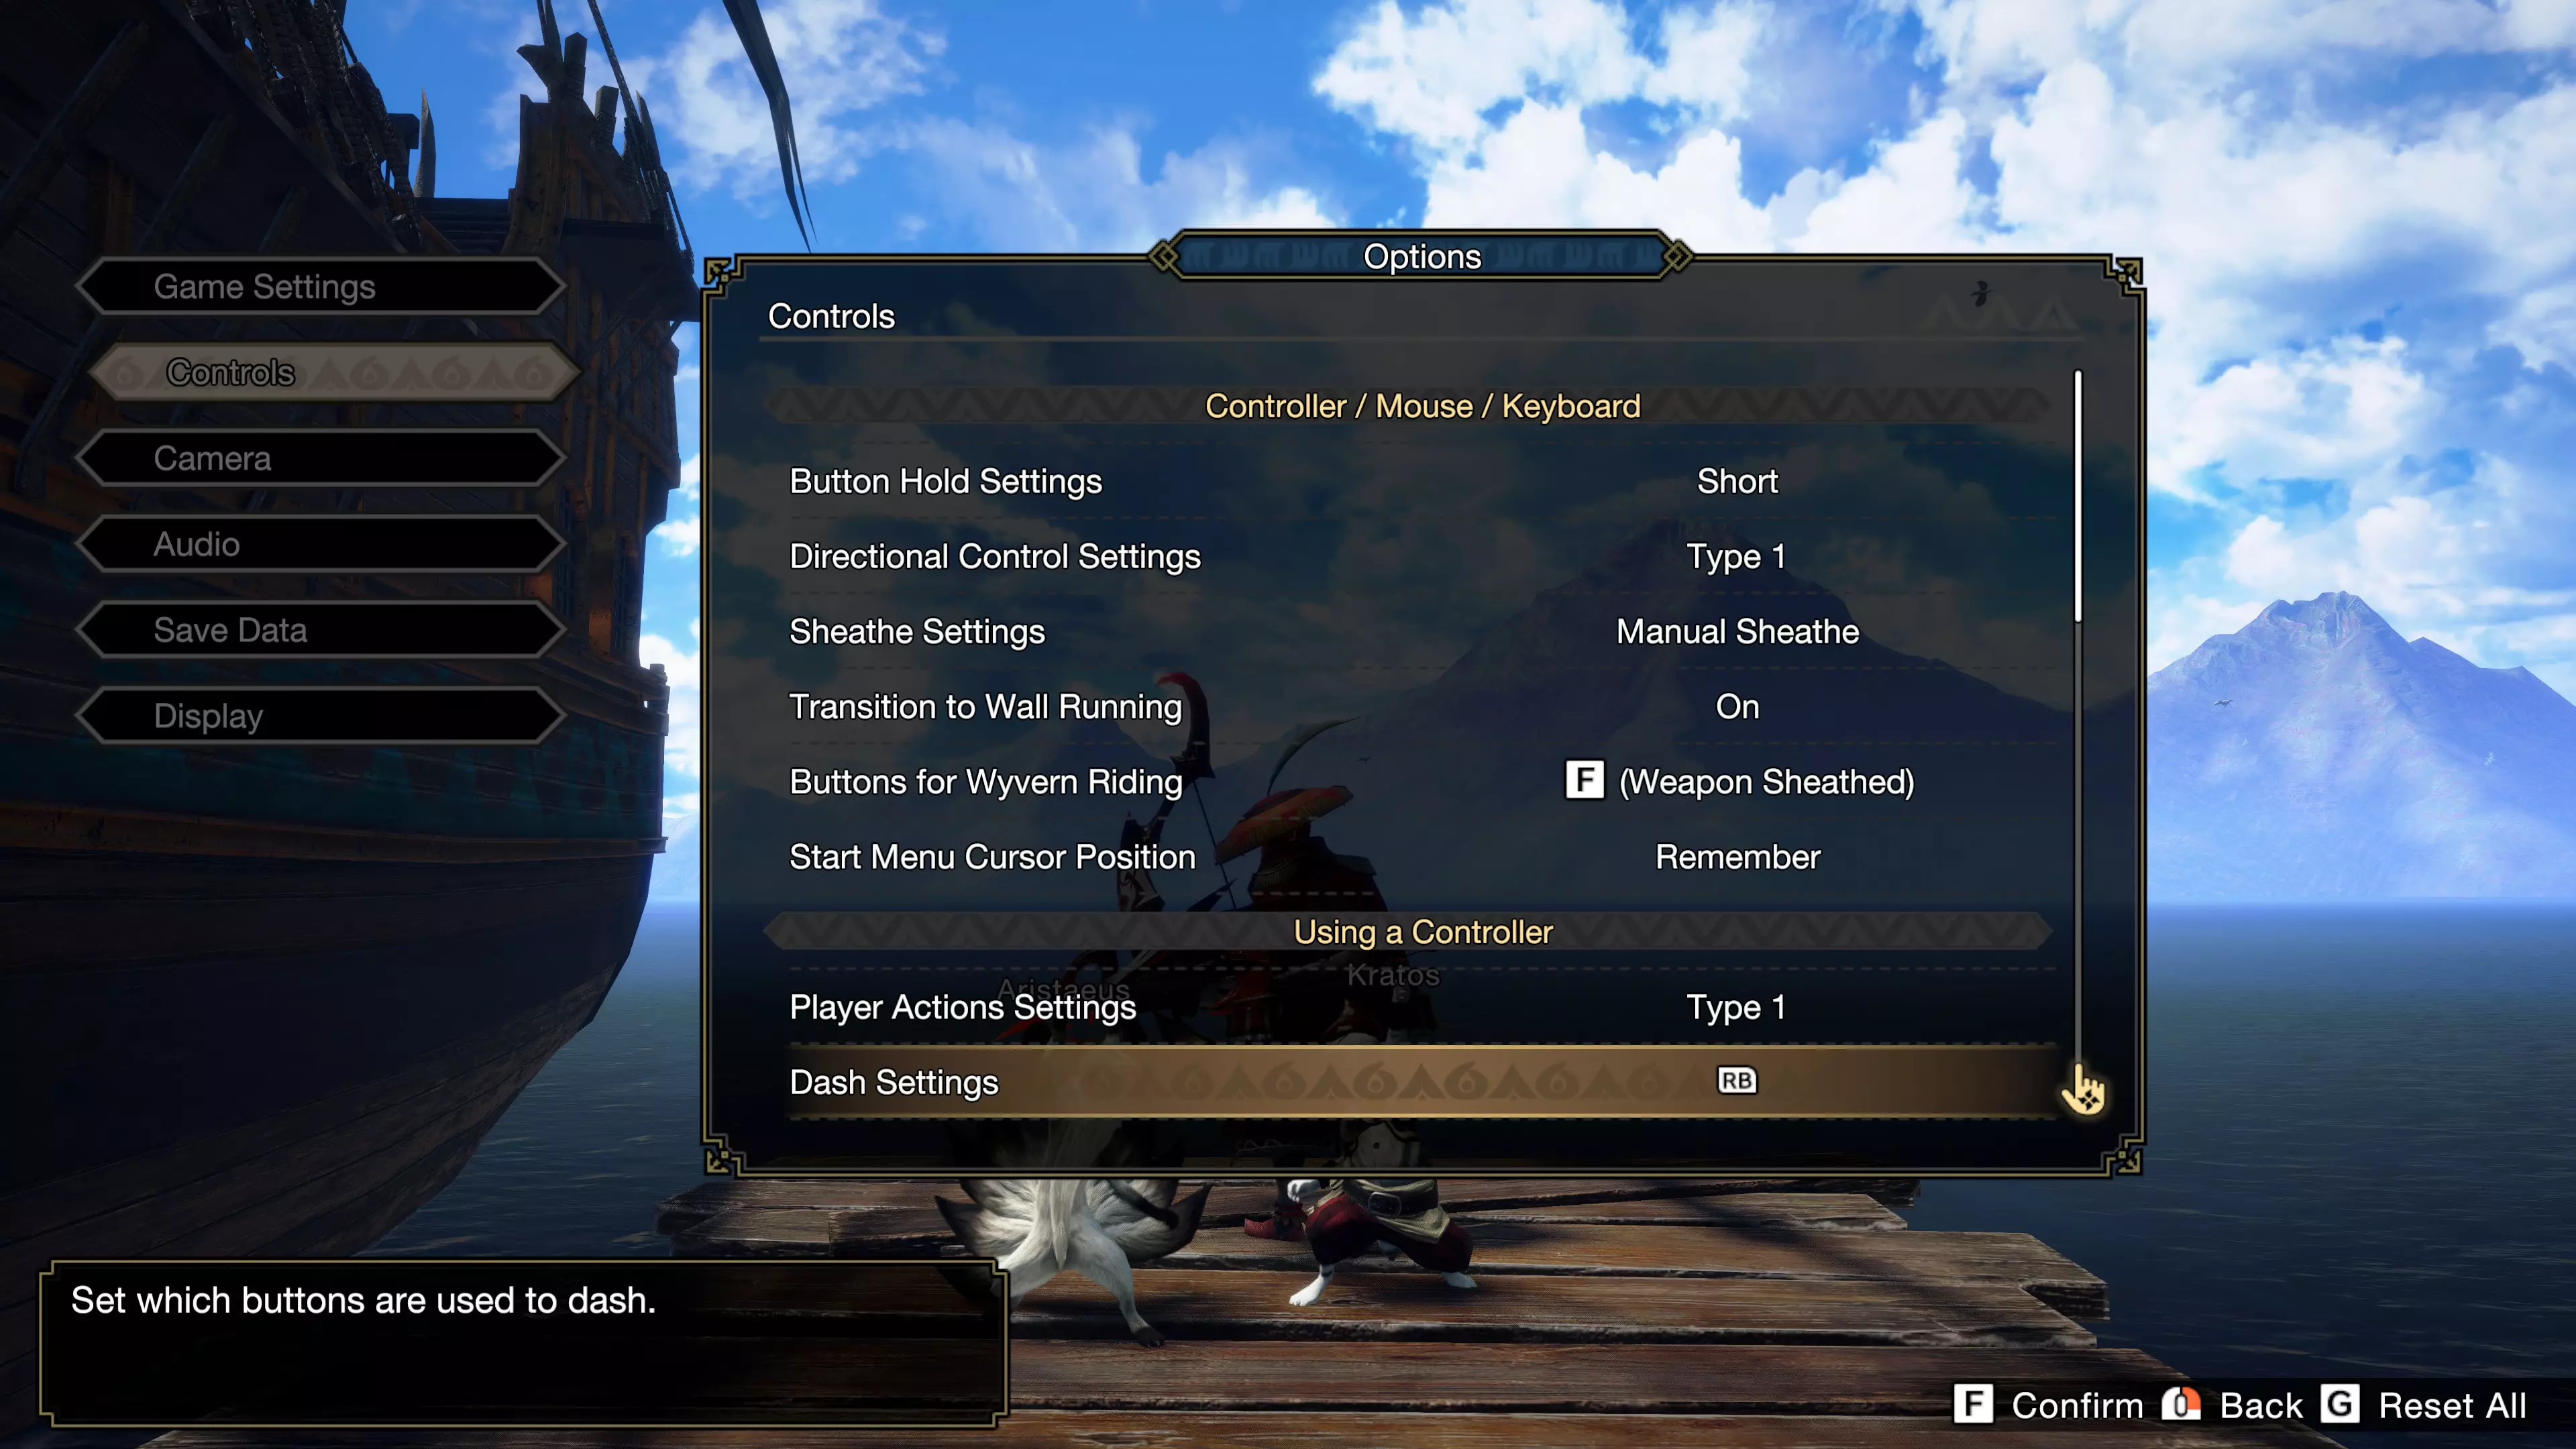
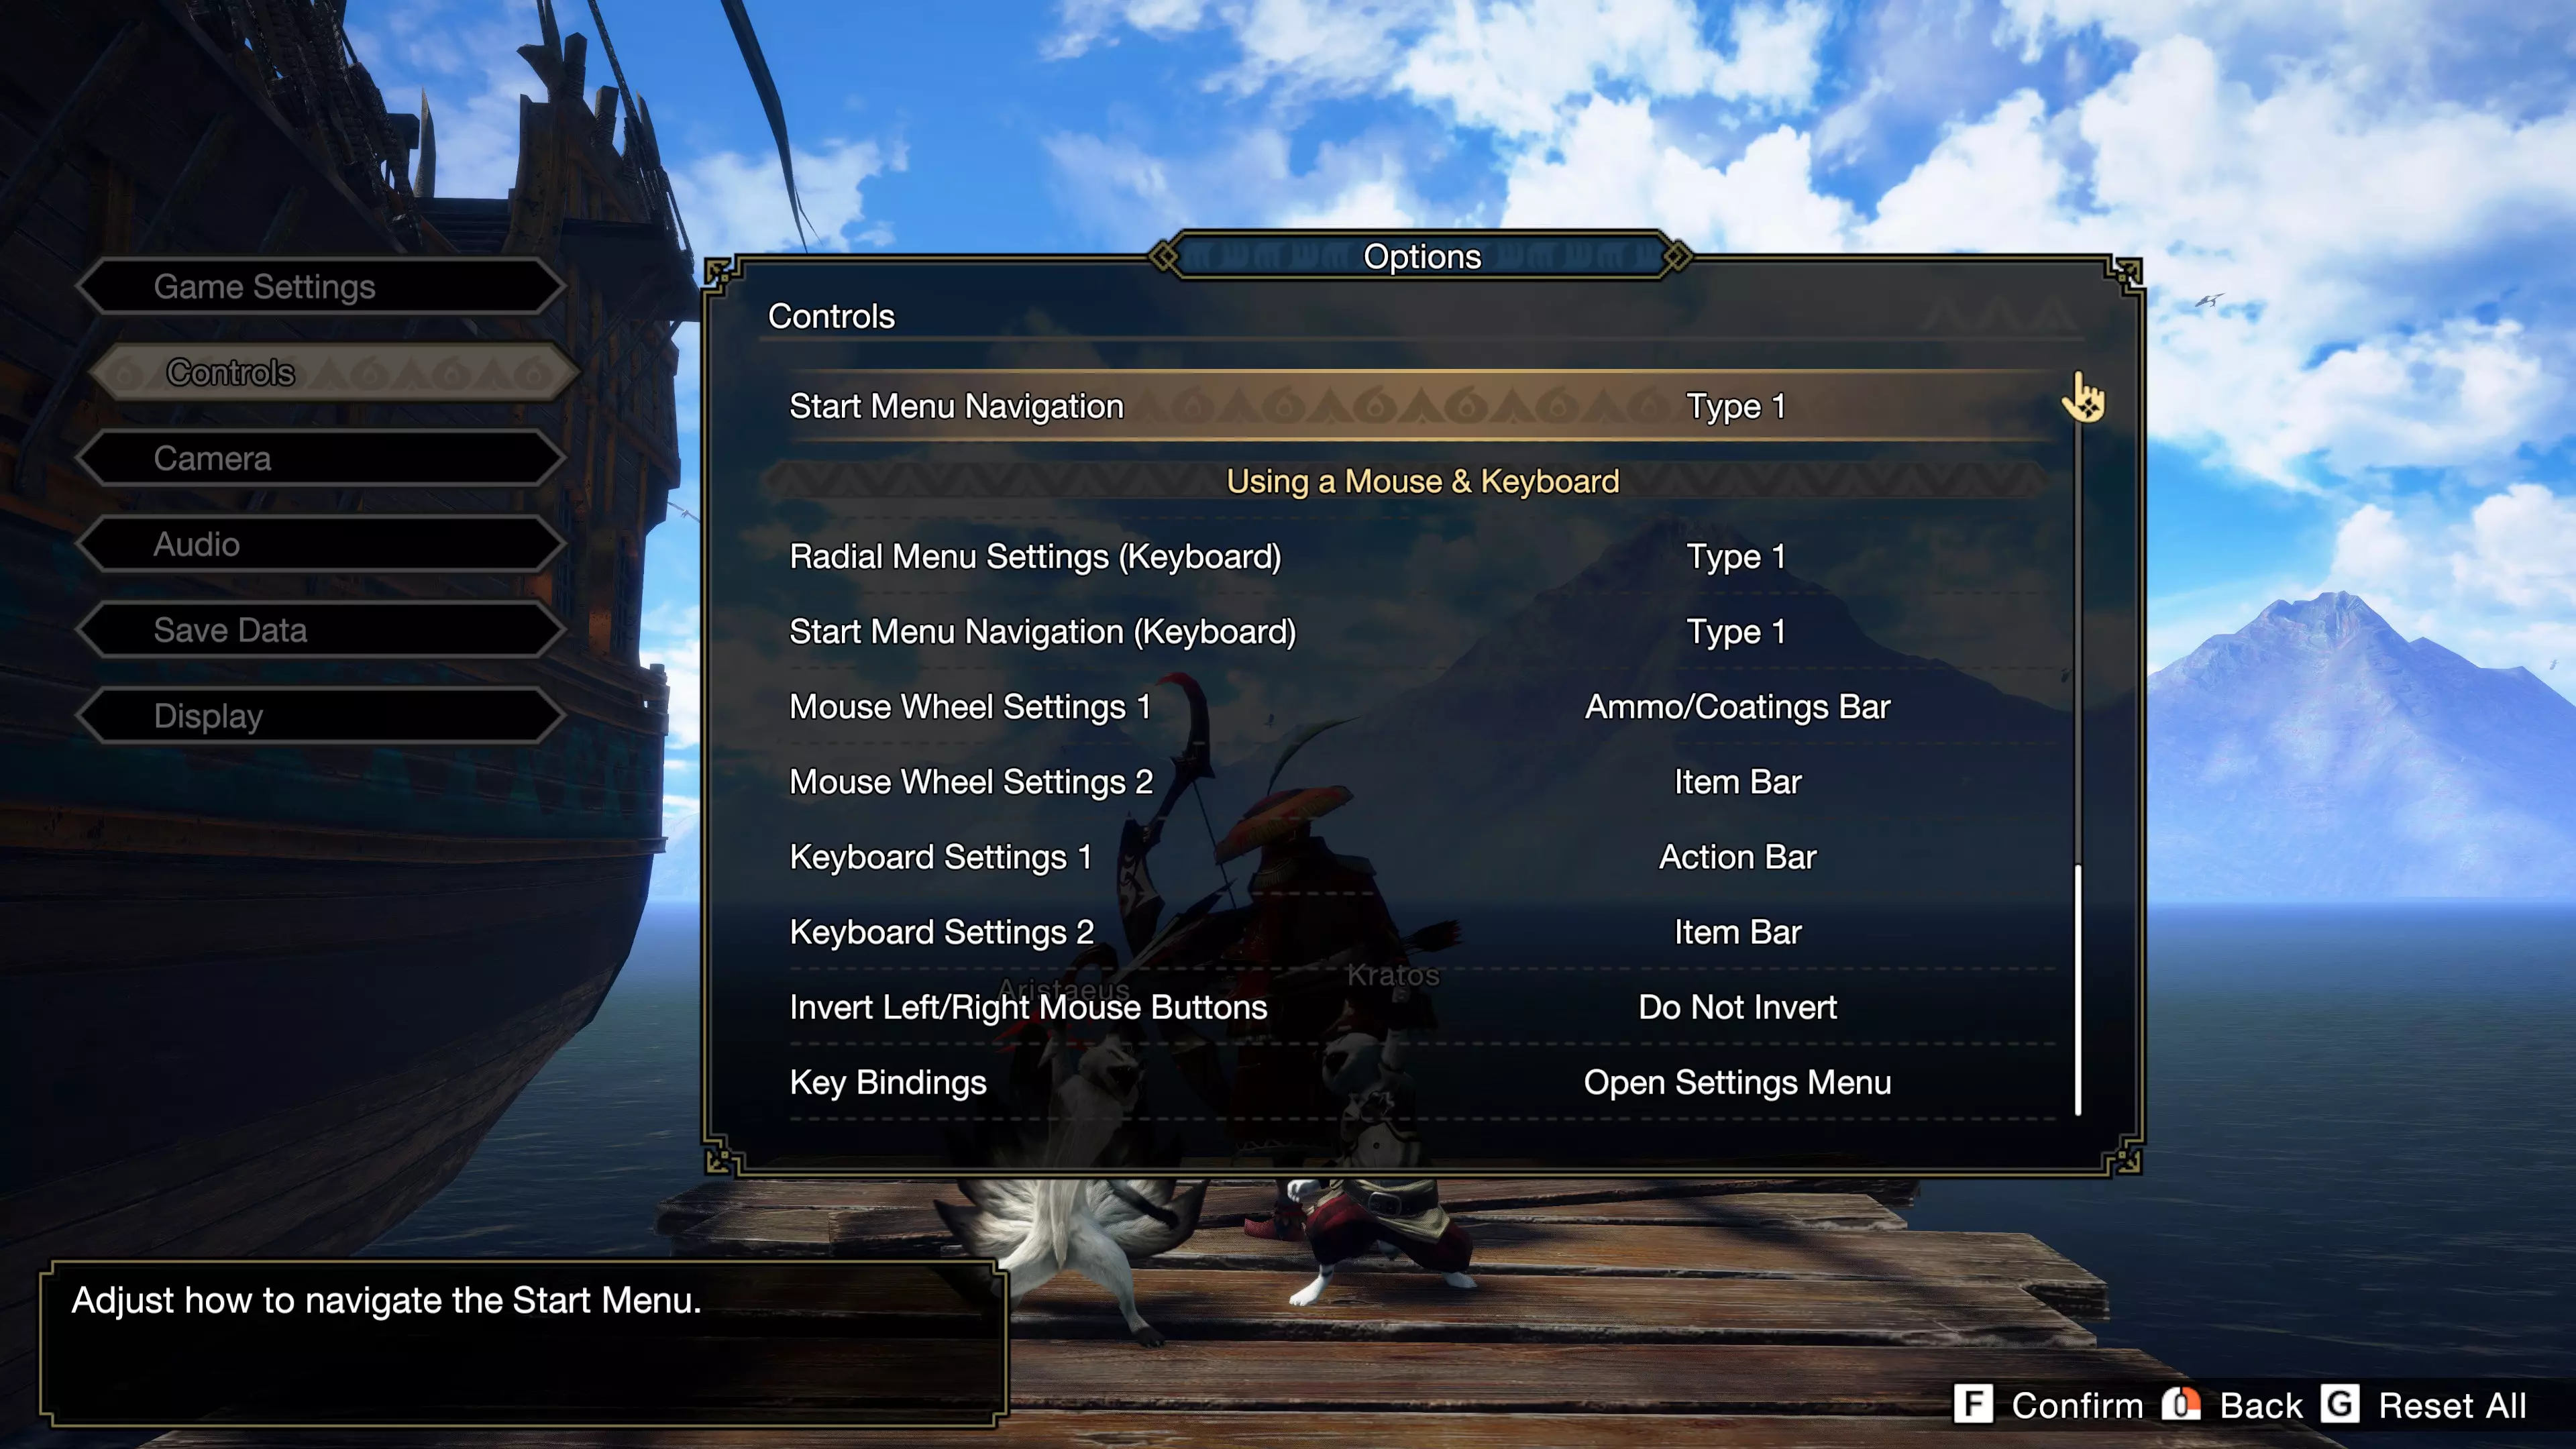
按键绑定 默认按键绑定比青熊兽吸蜂蜜还糟糕。当然,这只是个人偏好,但你可以随意借鉴我的设置。在本指南中,我会全程参考我自己的按键绑定。


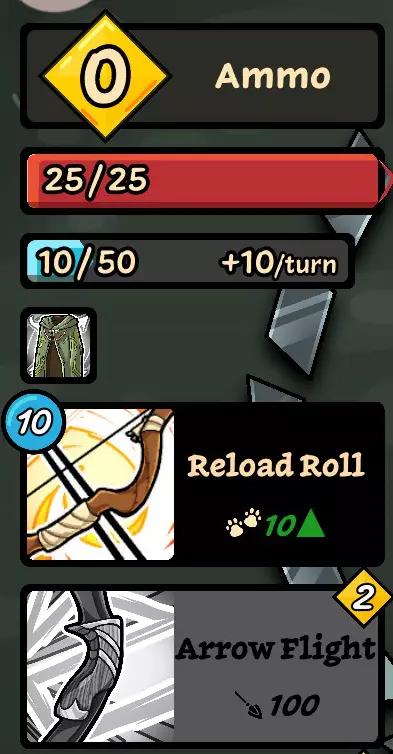
词典 为了让你明白我在说什么。 必须了解的术语 术语定义 蓄力等级 当你射击时,会为弓蓄力。提高蓄力等级会增加伤害。蓄力等级范围为1-4级(部分弓只有3级)。 射击类型(箭矢类型) 指弓发射的箭矢种类。弓使用速射箭、贯通箭、扩散箭,大多数情况下是这些类型的组合。每把弓的四个蓄力等级都对应一种射击类型。从技术上讲,龙杭箭和桩刺也属于射击类型,但它们与蓄力等级无关,这意味着所有弓都能使用这些技能。 为了清晰起见,我通常会称其为箭矢类型。 射击等级 射击等级范围为1-5级,且与箭矢类型相关联。等级越高,动作值就越高,造成的伤害也就越高。这意味着你需要寻找拥有最高射击等级(5级)、偏好箭矢类型(速射、贯通或扩散)以及最高蓄力等级(4级)的弓。蓄力射击(普通射击):顾名思义就是普通射击。用右键瞄准,左键射击。如果未装备武器,你可以使用相同的按键进行钩爪突进。严格来说,这种射击被称为蓄力射击+蓄力等级(例如:蓄力射击1级、蓄力射击2级等)。这就是为什么当蓄力等级达到3级或4级(取决于你的最大蓄力等级)后,你射出的是蓄力射击。为避免进一步混淆,我将它们简称为普通射击和蓄力射击。蓄力射击:以最大蓄力等级发射的普通射击。仅将一发普通射击转化为蓄力射击。下一发普通射击会使弓过度充能并重置蓄力等级。 强力射击:这是你的主要伤害输出射击,也是连招的核心。在蓄力等级达到最大后使用。它被映射到鼠标下侧按钮。 强力连射:实际上就是强力射击,但动画更长,并且会多射出一支箭。它同样被映射到鼠标下侧按钮。 大力抽射:这是连招的主要起手技能。持续30秒,激活时你造成10%额外伤害。它被映射到滚轮点击按钮。 空中瞄准:连招的终结技,也是使怪物可骑乘的最快方式。跃入空中并射出三发附加伤害的箭。使用鼠标上侧键激活。 耐力消耗减少:指降低每项动作消耗的耐力值。 耐力恢复:指耐力开始恢复时的恢复量。 肉质值:弓箭主要使用射击肉质值,但近战攻击、束缚箭和龙箭使用切断肉质值。这两种肉质值均使用弓箭的物理伤害进行伤害计算。 弱点:指怪物部位的物理肉质值至少为45的区域(用于弱点特效技能)。 属性肉质值:指怪物的属性弱点,因此使用弓箭的属性伤害进行伤害计算。带有元素伤害的弓通常基础伤害较低。尽管如此,携带对应元素的弓仍然是值得的。 元素弱点:元素弱点指的是怪物身上元素肉质值至少为20(对于元素利用技能)或25(对于三级元素bane珠)的部位。 怪物生态:在查看怪物的生态标签(猎人笔记)时,你可以看到上述所有肉质值。以大贼龙为例,你应该瞄准哪里呢?
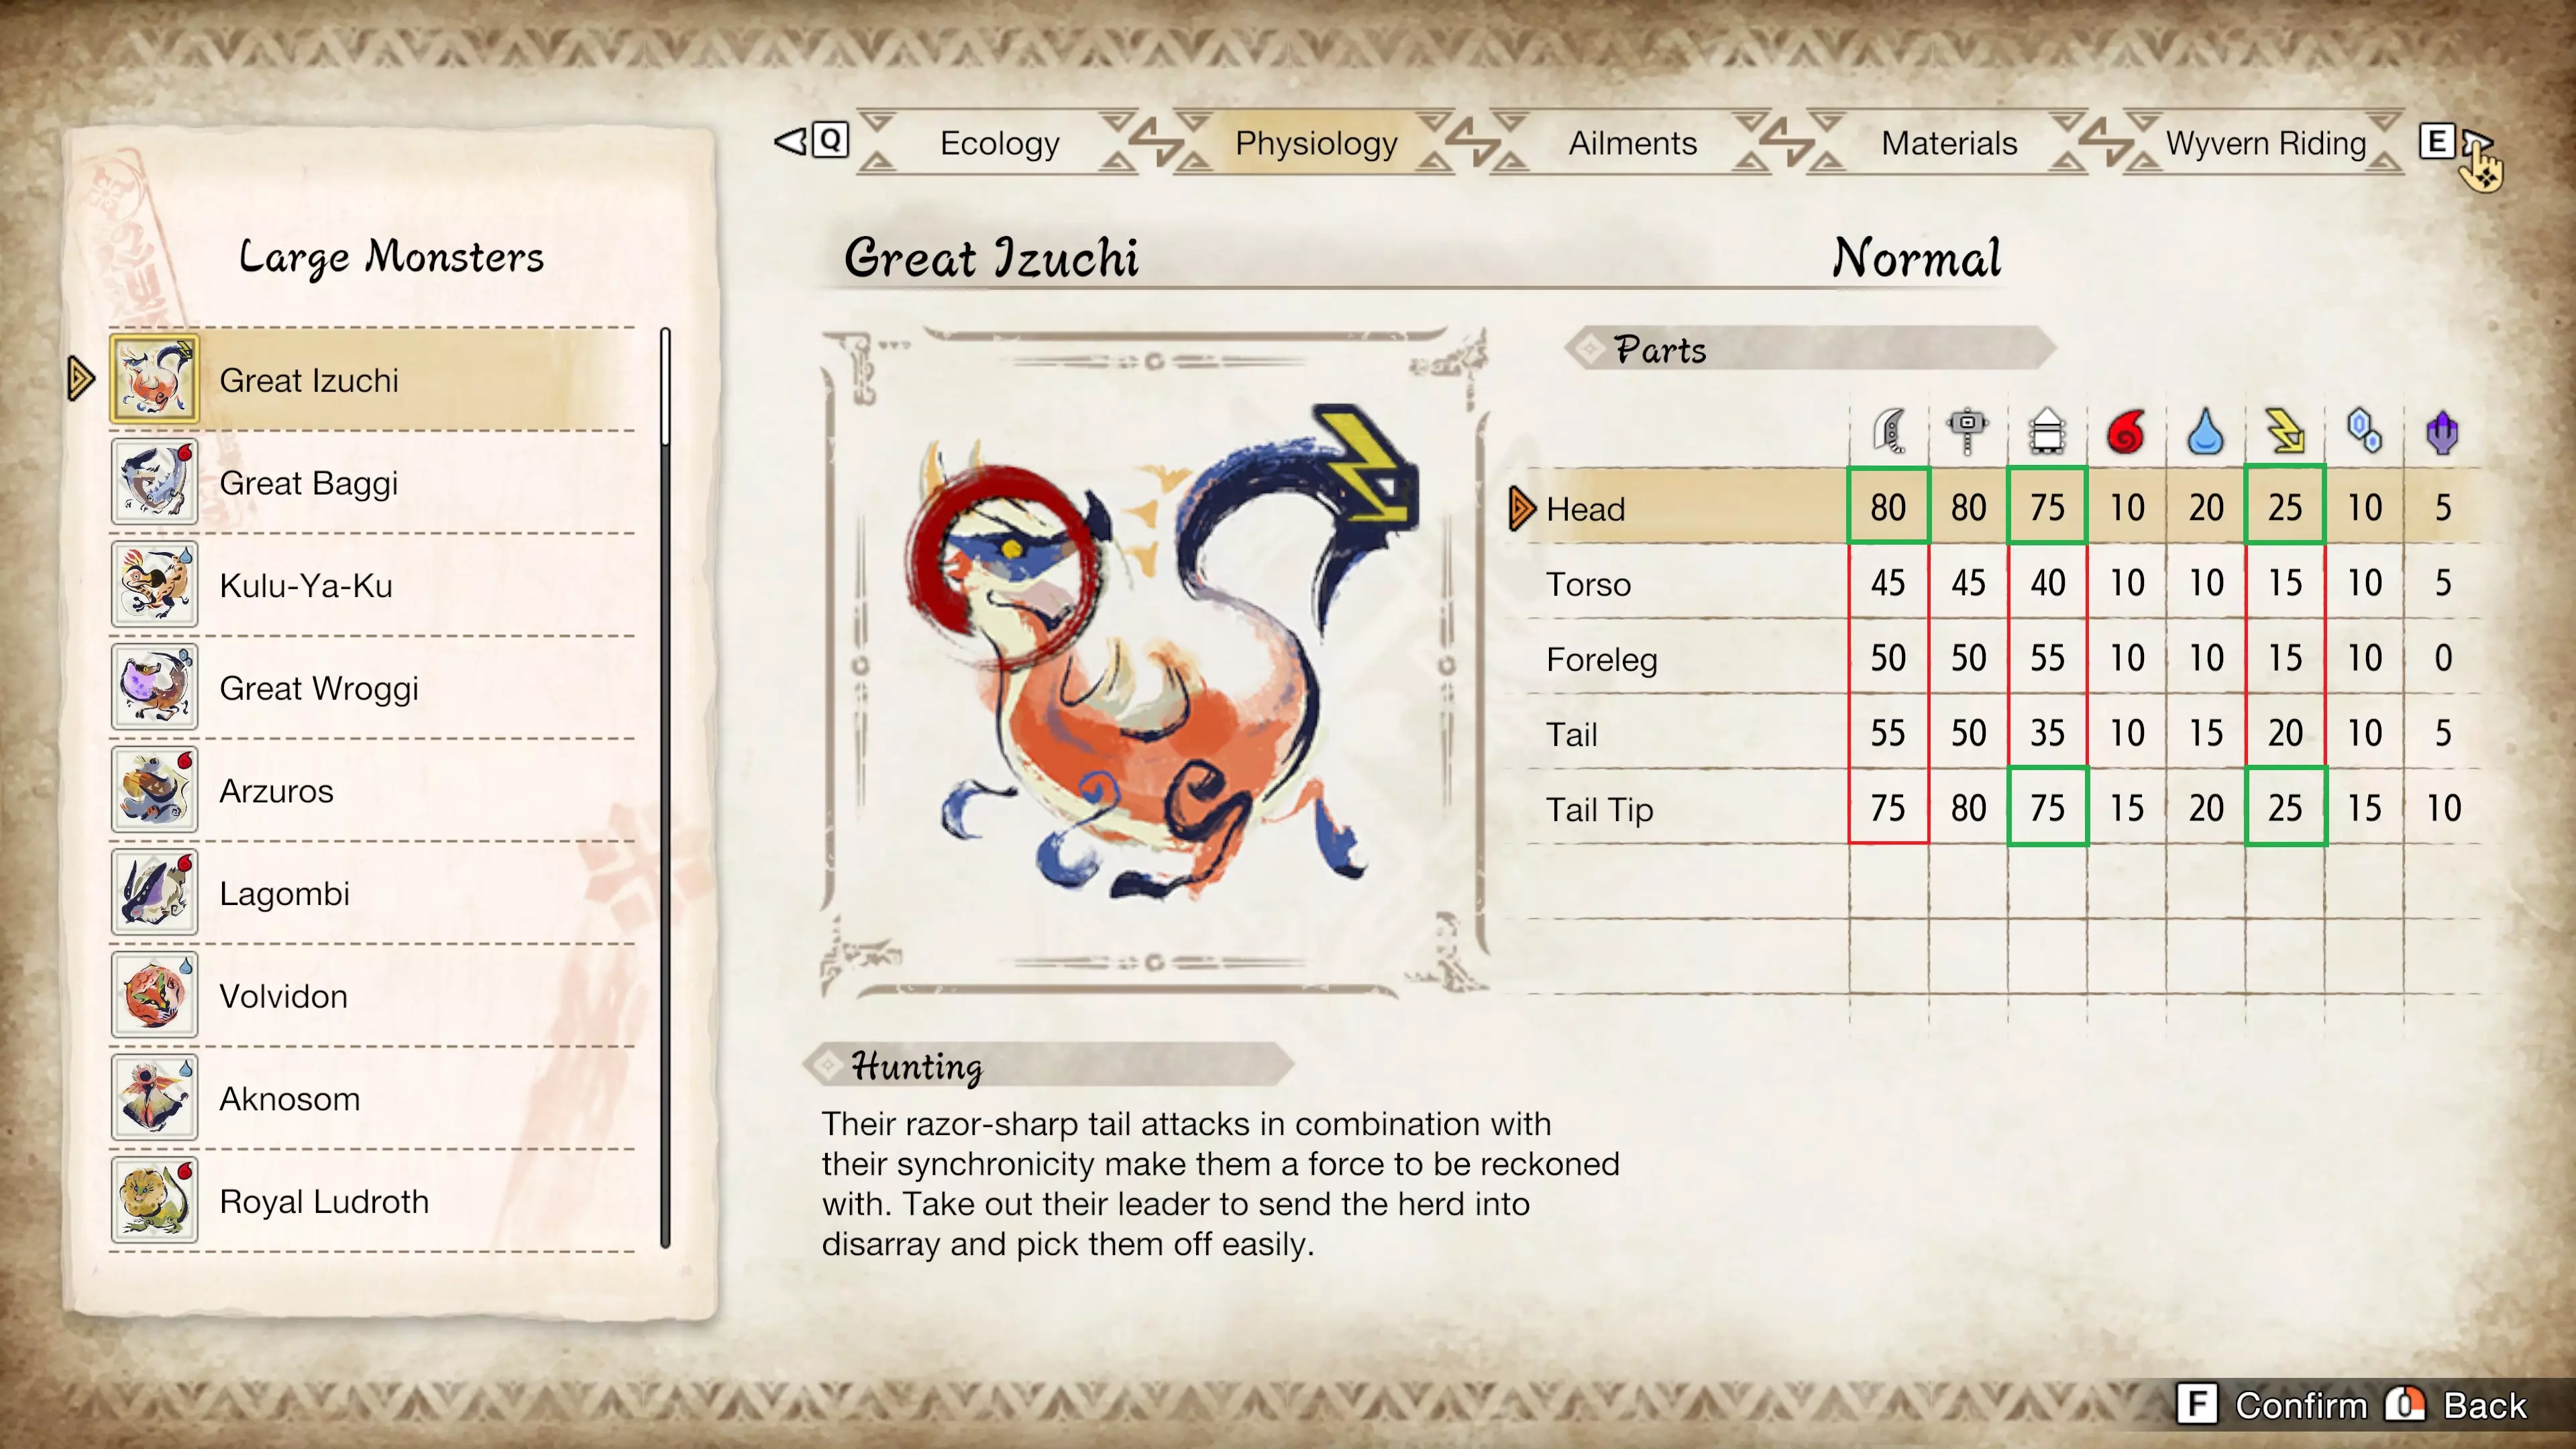
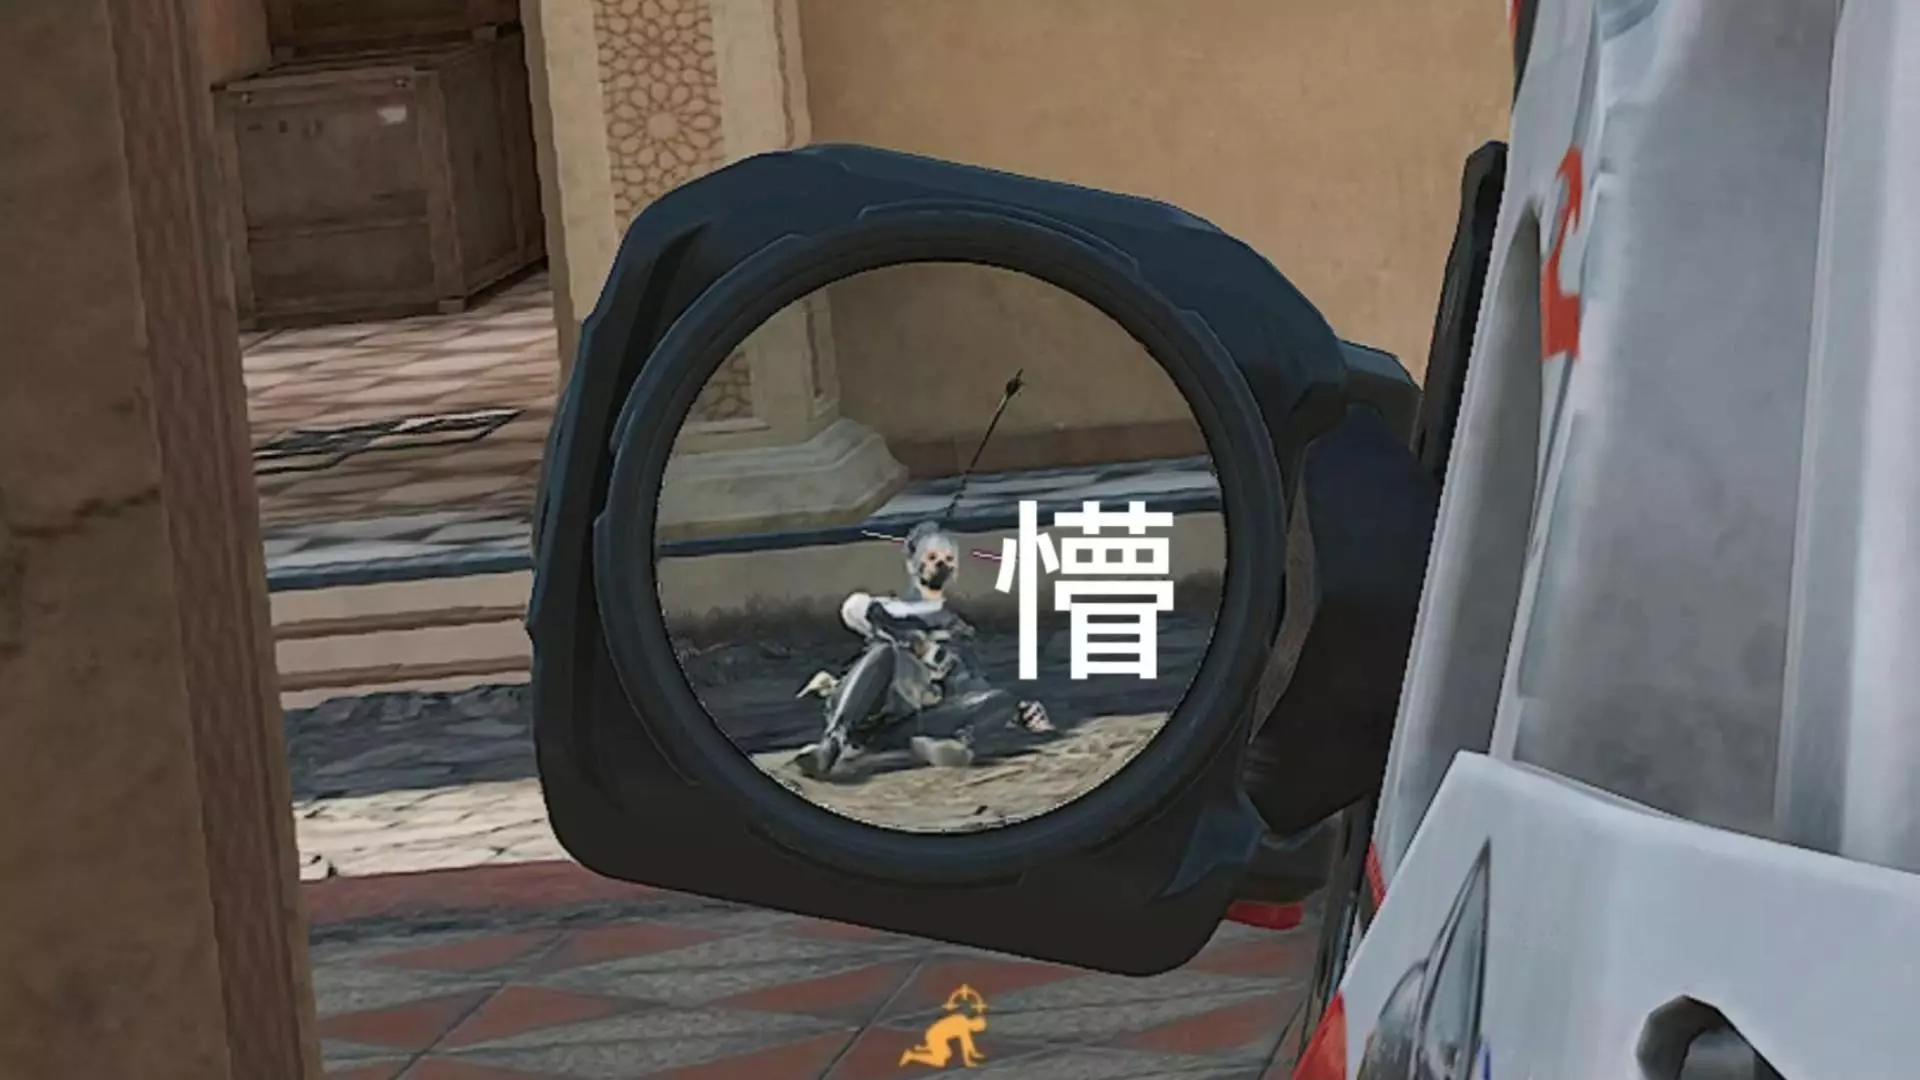
大贼龙的最高物理肉质部位是头部和尾尖,其他部位可以忽略。头部和尾尖的最高属性肉质为雷属性,其他属性可以忽略。因此,你需要使用雷属性弓,并根据当前位置能更稳定命中的部位来瞄准头部或尾尖。如果你使用的技能能造成切断伤害,会发现头部的物理肉质比其他任何部位都高。这意味着你应该始终瞄准头部,同样使用雷属性弓。你也可以对尾巴造成切断伤害以切断尾巴(如果可能)。基础操作在我看来,弓武器易学难精。那么我们先从简单的部分开始学习。

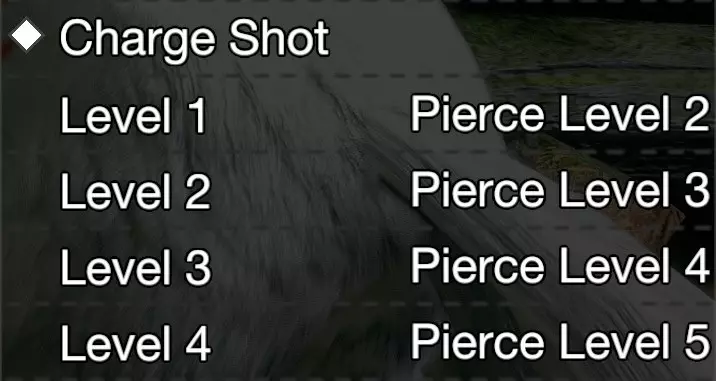
Stamina Bows exchange stamina for damage. Stamina is required for each shot and every dodge. Running out of stamina is the equivalent of running out of arrows. In order to play Bow well, you need to manage your stamina well. You can increase your total stamina, improve your stamina reduction and enhance your stamina regeneration (more on that later). Charge Levels The Bow is a charge weapon. That means each consecutive Normal Shot raises the Bows Charge Level by one. As you increase its Charge Level, you'll gradually shoot more arrows per shot, and thus your damage increases. When you reach the maximum Charge Level (either three or four), your next Normal Shot will turn into a Charged Shot. The following Normal Shot will overcharge your weapon, aka reset your Charge Level. Alternatively, holding the Normal Shot key gradually charges up your Bow without releasing the arrow. Ideally you want to be shooting, but this can be useful if you've to adjust your aim. Since Rampage Bows got f'd (F), we now have to deal with Bows that have an identity crisis. Holding to charge is the only way to somewhat continue the trend of not using those mismatched Arrow Types. Pretty much until you're settled in High Rank, your Charge Level maxes out at three. To unlock Charge Level 4 you need: Firing: Charge on your Rampage Bow (it's bad and redundant); High Rank: Mighty Bow Feather; Master Rank: Mighty Bow Jewel 4. There're some Bows that don't have access to Charge Level 4, and Bows that have access to Charge Level 4 by default. For the latter Bow Charge Plus is redundant. After the first charge, your Bow gains an aura. Its color changes depending on the Charge Level. Knowing which color corresponds with each Charge Level is a great visual cue: Charge LevelColorRaw DamageElemental DamageStatus build-upLevel 1No aura65%80%80%Level 2Red aura100%100%100%Level 3Yellow aura125%110%112,5%Level 4White aura135%120%115% As you can see, Charge Level 3 and Charge Level 4 deal more damage, which is why you want to stay at your maximum Charge Level for as long as possible. Step 1: Choosing a Bow Before you can play with a Bow, you've to decide which Bow. Arrow Types Bows shoot three types of arrows: Rapid, Pierce and Spread. This is referred to as the Shot/Arrow Type of your Bow. Each Arrow Type is associated with a different playstyle. Rapid (medium range): A Rapid playstyle relies on staying at medium range. You can reposition fairly easy to hit weak spots. If you're playing with a full party it's unlikely the monster will target you, but that doesn't mean attacks aimed at others won't hit you. In case the monster does target you, there's enough time to see it coming and respond appropriately. Because the Rapid playstyle doesn't rely on the monsters behavior for DPS, it can be used in literally every situation. Spread (close range): A Spread playstyle relies on staying close to the monsters weak spots. Mainly because Spread Bows shoot their arrows in a cone. You want the entire cone to hit a monsters weak spot. Because you're more likely to be targeted, you have to rely on your counter more often compared to Rapid and Pierce playstyles. This playstyle does very well against monsters that stay relatively close when moving around, and have big juicy weak spot (Goss Harag). This playstyle does really well in Rampage missions too. Pierce (long range): A Pierce playstyle has the highest damage dealing potential out of all Arrow Types, but relies heavily on positioning, accurate aim and suitable monsters. That's because each arrow has multiple hits as it pierces through the monster in a straight line. The goal is to line up and land as many of those hits in weak spots as possible. This can be challenging on its own, let alone if the monster is also moving and twisting around. The Pierce playstyle does extremely well against long monsters that stay relatively still (I'm looking at you, Allmother). To summarize Both Pierce and Spread playstyles deal more damage than the Rapid playstyle, on paper. In practice it's not so simple. The Pierce playstyle requires the right target, and a Spread playstyle requires proficiency with your counter. A Rapid playstyle is a nice balance between the two, and therefor recommended learning the Bow. Shot Levels If you take a look at the Equipment Info of a Bow, you'll see the Charge Levels (1 - 4), Arrow Types and corresponding Shot Levels (1 - 5). Ideally, you want your Bow have Shot Level 5 on Charge Level 4. If you're consistent with maintaining Charge Level 4 for a considerable time, any Bow with Shot Level 5 on the Charge Level 4 becomes viable.
【暴击距离】 拉弓瞄准,并留意准星颜色以找到暴击距离。橙色准星表示处于暴击距离内,黄色则表示距离过近或过远。当处于暴击距离外时,你的伤害会降低约20%。暴击距离因箭矢类型而异,并可通过近距涂层和弹道技能进行调整。
弹道偏移 很遗憾,部分射击会出现弹道偏移。这些子弹会命中你瞄准位置的左下方。

物理伤害和元素伤害 前期提升输出时,几乎应始终优先考虑物理伤害。

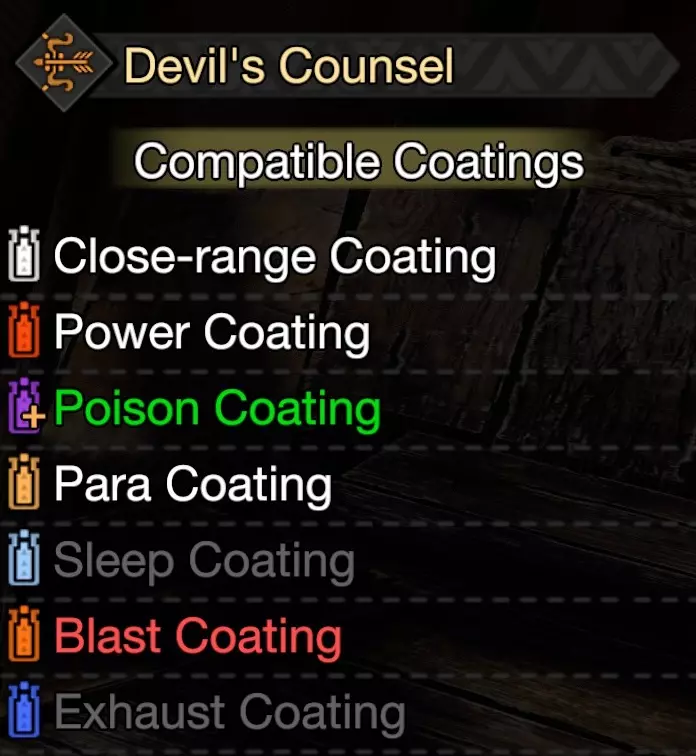
部分弓会牺牲一定的基础伤害来换取元素伤害。通常情况下,这类弓10%-30%的总伤害来自元素伤害。这也是为什么元素伤害百分比加成在初期往往不被重视。 一旦解锁客制强化,你就能为元素弓附加更多元素伤害。凭借额外的元素伤害,元素弓的表现会持续优于基础伤害弓。因此要记住每种怪物对不同元素的弱点。 弹药涂层 所有弓都能使用多种涂层,这些涂层能为箭矢附加从状态积累到伤害提升等多种效果。你应始终装备装填速度等级2,这样就能通过滚动快速切换涂层。若需要,可按Z键移除涂层,但这会重置你的蓄力等级。强击瓶:造成135%伤害,可使用50次。 近距离瓶:造成120%伤害,并大幅缩短临界距离,消除过近惩罚。该瓶子无限使用,适合在强击瓶耗尽或怪物近身时使用。 排气瓶:所有射击附加8点排气值,头部射击额外附加4点眩晕值。此瓶会移除元素伤害,但与绝对蓄力箭配合效果极佳(效果类似,后文详述)。可使用20次。 毒瓶、麻痹瓶、睡眠瓶及爆破瓶:积累相应的状态异常值(具体数值未知)。尤其是【+】系列瓶子,几乎能稳定触发对应状态。这些涂层可消除元素伤害,且可使用二十次射击。
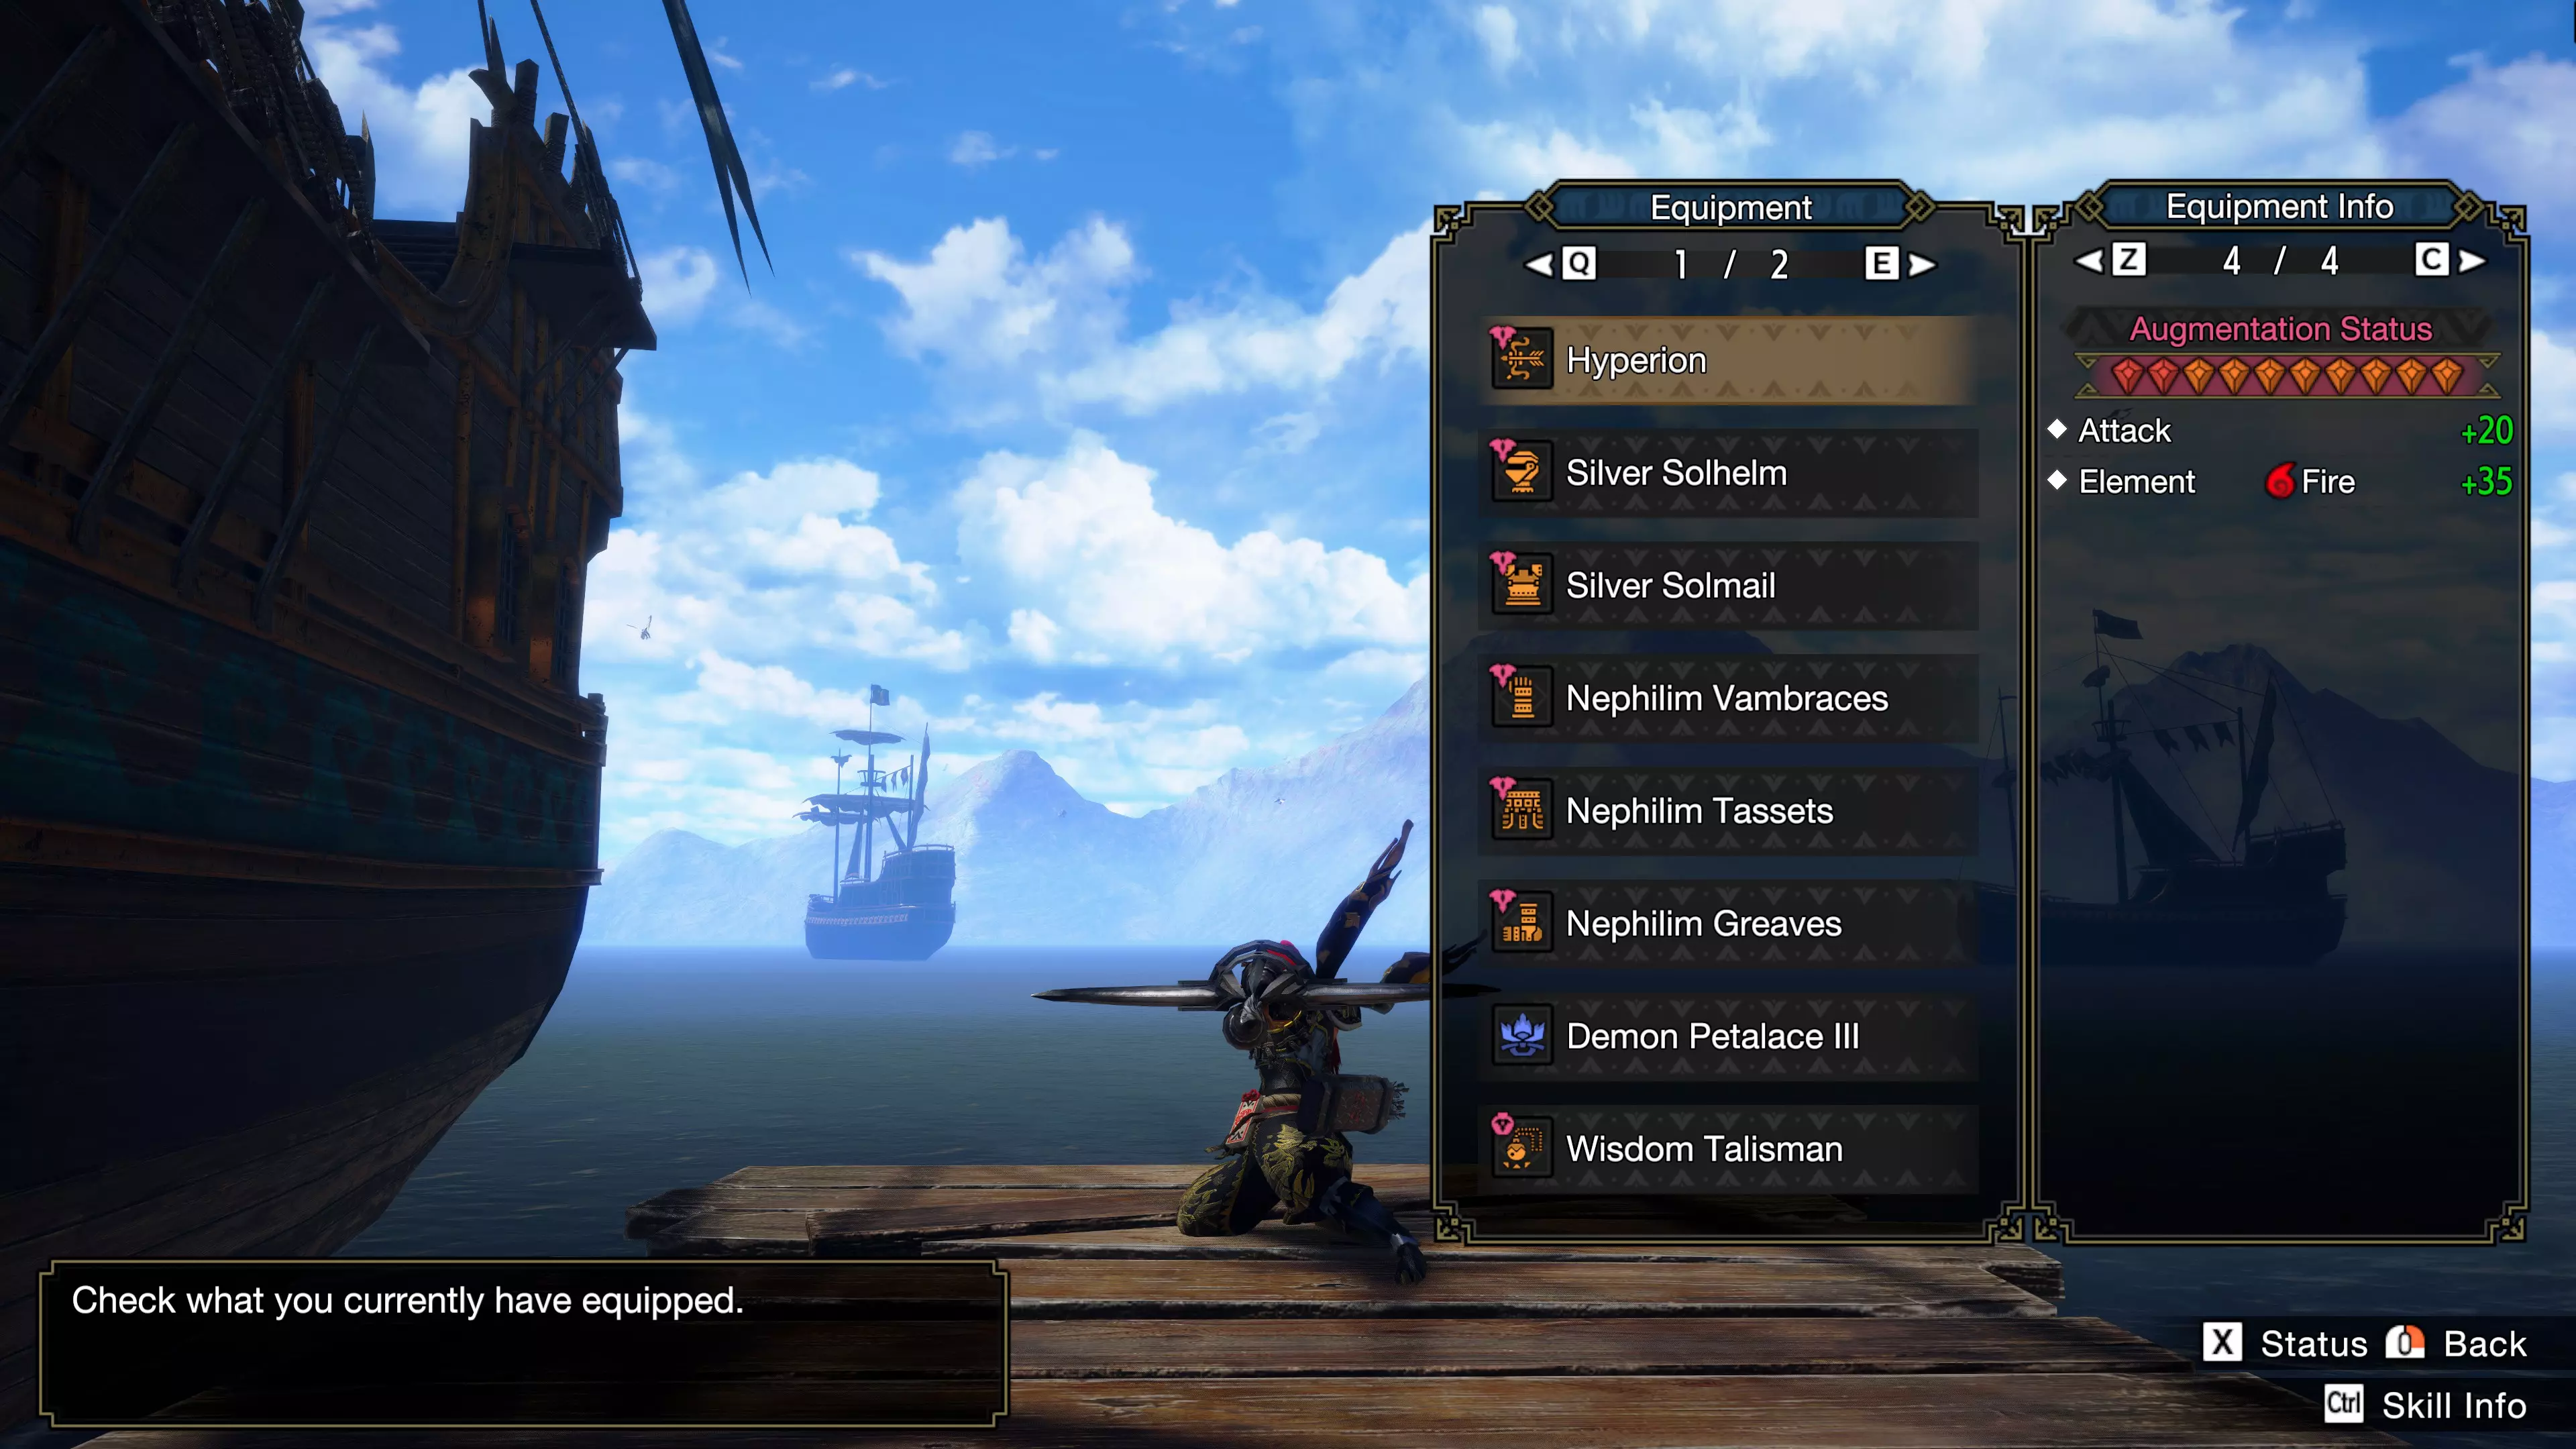
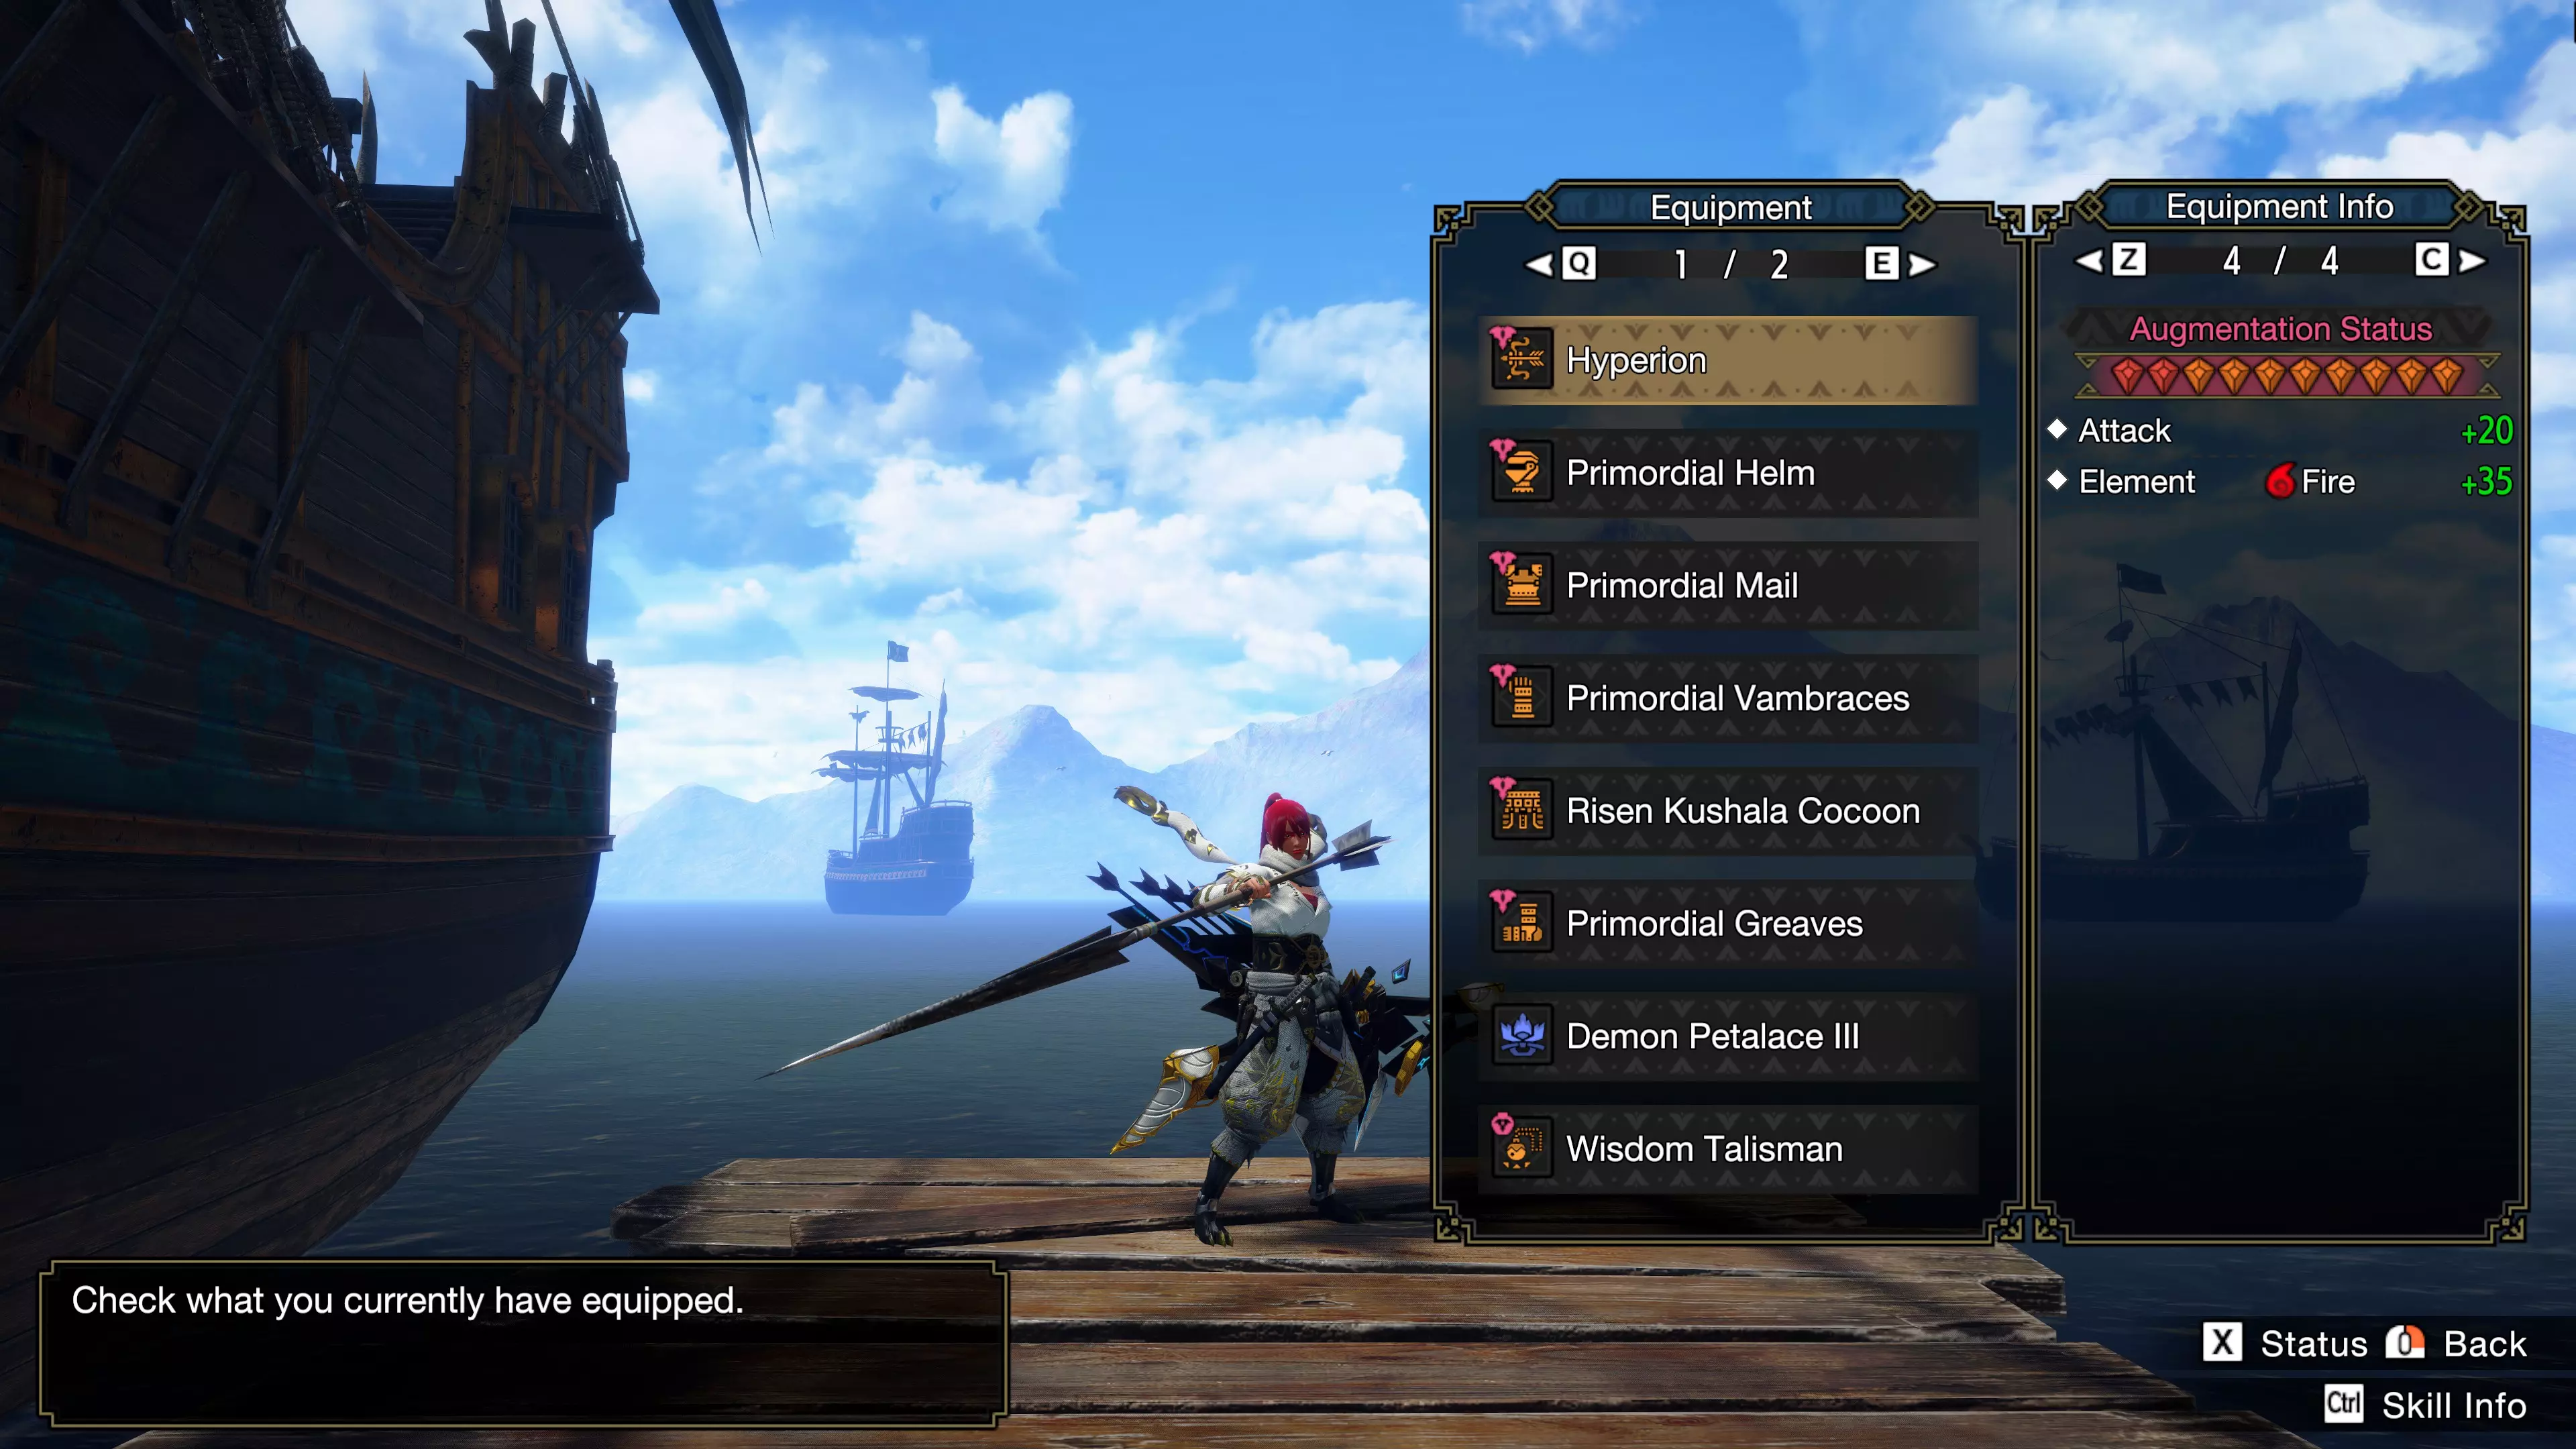
你的近战攻击同样享受涂层效果,且这些攻击不会消耗涂层。此外,你可以在狩猎区域制作更多涂层。 最佳弓 除个别情况外,怨虎龙弓是唯一能稳定使用单一箭矢类型、在蓄力等级4时可使用5级射击、在不错的物理伤害基础上还能造成元素伤害的弓。更重要的是,它同时具备强击瓶和灭气瓶。该弓针对五种元素分别有速射和贯通两种变体,还有一种纯物理伤害的变体。它是你理想中的弓的模板。

Unfortunately there's no Master Rank upgrade for the Rampage Bow. They take quite a bit of effort to craft, meaning it's not worth it if you've bought Sunbreak. Most Bows have an identity crisis, and therefor aren't worth crafting. The Weapon Trees below are worth crafting. Some are good, others are the least bad. Damage TypeRapidPierceSpreadRaw / BlastOre 2 / TeostraShogun / Pyre RaknaChameleos / OrangatenFireSilver RathalosRakna-KadakiRathianWaterMizutsuneRoyal LudrothDaimyoThunderTobi-KadachiZinogreKhezuIceIceKushala DaoraBariothDragonMalzeno / Chaotic Gore MagalaPrimordial MalzenoValstrax Step 2: Shoot, Dodge, Repeat To master the Bow is to master its two components: maintaining your maximum Charge Level and managing your stamina. Power Shot and Power Volley After your Charged Shot, the next Normal Shot will reset your Charge Level. That's why you'll want to avoid another Normal Shot, and use Power Shot and Power Volley instead: Power Shot: Your main damage dealing ability. It costs 25 stamina without stamina reduction and can be brought down to 10 stamina. It raises your Charge Level and can't reset your Charge Level. Despite that, you only want to use this ability when your Charge Level is already maxed out. It's mapped to the lower side mouse button. Using a Normal Shot after Power Shot resets your Charge Level. Power Volley: For all intents and purposes, this is Power Shot. Which is why a lot of people will call this ability Power Shot. It has a longer animation than Power Shot and shoots one extra arrow. Because of the longer animation the extra arrow doesn't necessarily mean more DPS, but it does provide better stamina management. In other words, Power Volley is situational. Which is why I'll make a distinction between the two terms, and not use them interchangeably. Dodging After every Normal Shot, Charged Shot, Power Shot or Power Volley you can perform a dodge. Using a dodge maintains/raises your Charge Level, can't reset your Charge Level and costs stamina. So, why shoot, dodge, repeat? Well...using a Normal Shot, Charged Shot or Power Shot after a dodge, doesn't reset your Charge Level. See how it's coming together? The only way to maintain your Charge Level indefinitely, is to dodge. Until you run out of stamina of course. Total stamina Always eat Dango, you want that extra stamina (and health): From the start: +20 Health & Stamina Reach ★3 Village or ★2 Gathering Hub: +30 Health & Stamina. Reach ★4 Village or ★3 Gathering Hub: +40 Health & Stamina. Reach ★5 Village and complete one quest: +50 Health & Stamina. Stamina reduction Stamina reduction caps out at 75%, and is made up of two sources: Internal Reduction (50%): Constitution (10% for each level) & Dango Fighter (10% for each level). External Reduction (50%): Dash Juice (25%) or Peepersects (25%), Go Fight Win (25%) & Hunting Horn (50%). The general consensus was combining Constitution Level 4 with Dango Fighter Level 2 for 50% internal reduction. But since the release of Sunbreak we can opt for slotting in less Constitution Levels, and eat upgraded Dango Fighter instead. The more we upgrade our Dango, the lower the activation chance. On average you'll have to reset and try again about 1-3/10 times, depending on the Dango Level. Or play with just 20-40/50% internal stamina reduction. Dash Juice (lasts 180 seconds) and Peepersects (lasts 90 seconds) don't stack, but do refresh the timer. There're also diminishing returns. So combining Dash Juice or Peepersects with Go Fight Win gives you a 44% external reduction. If there's a MVP Hunting Horn playing the stamina song (and not the sharpness song for some reason), they can take care of your 50% external reduction all by themselves. The internal stamina reduction of 50% and external stamina reduction of 44% total up to 72% stamina reduction. If Go, Fight, Win is not active, your stamina reduction will be at 62%. Stamina regeneration The base stamina recovery speed is twenty-five for every 1.2 seconds (36 frames @ 30 fps). Stamina Surge Level 3 (adds 10-20-40% for level 1-2-3 respectively) takes care of all your stamina regeneration needs. This does not impact stamina reduction. Make sure you've always got a MEGAPINT of Dash Juice on hand (this consumable becomes available relatively soon).[game8.co] It also replenishes hunger. Pay attention to your stamina bar. Do you see it flashing? No? Time to drink Dash Juice!

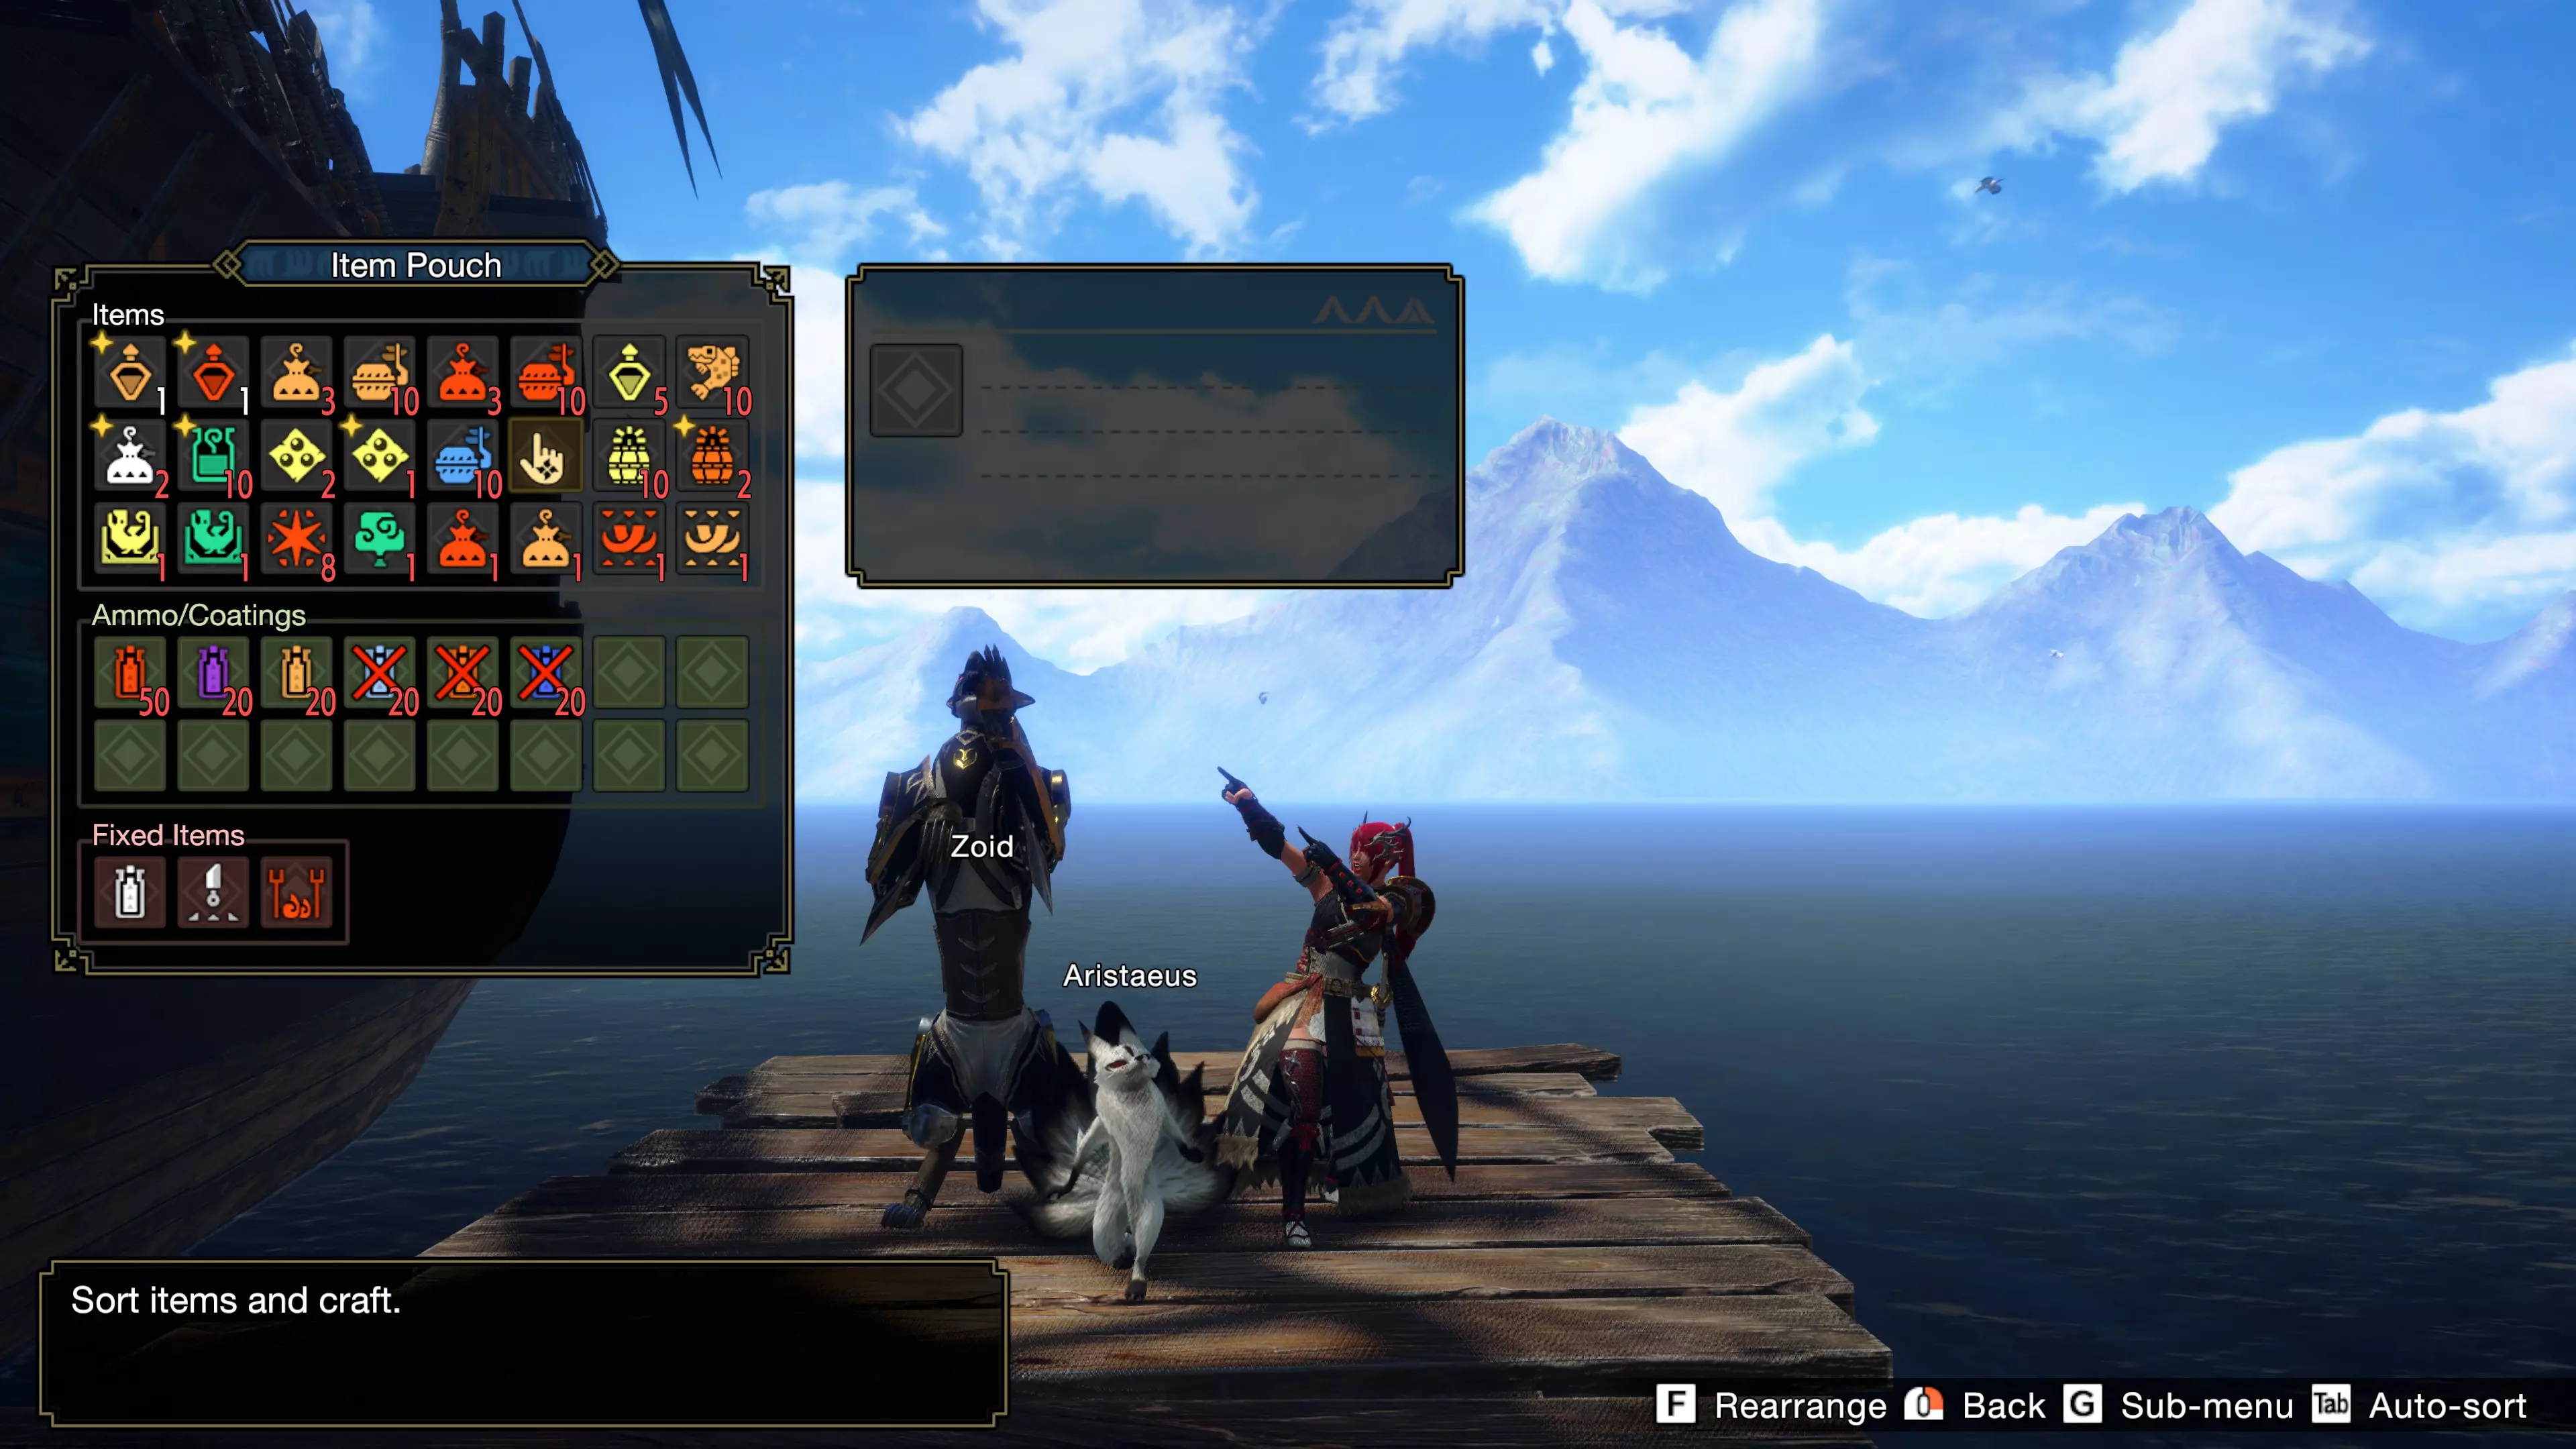
耐力管理 提升总耐力、减少耐力消耗以及增强耐力恢复固然会带来帮助,但这并不意味着你擅长耐力管理。擅长耐力管理意味着你能在不耗尽耐力的前提下,尽可能多地消耗耐力。这很大程度上取决于为你的技能和替换技找到合适的释放时机,以便在它们的动画期间恢复耐力。 无用技能 龙杭箭:目前我尚未解释的一个技能是龙杭箭。它的作用类似于贯通箭,是你伤害最高的箭矢类型。使用龙杭箭前,确保已将蓄力等级拉满。所有弓都可以通过按C键使用此技能。尽管该技能伤害数值很高,但极长的动画时间严重降低了每秒伤害(不过成功反击后,动画时长可减半)。此外,它会使你的耐力恢复失效,你只能略微调整瞄准,且无法取消动画。和你的近战攻击以及屠夫之缚一样,它造成斩断伤害。因此,如果你想用它,就瞄准斩断 hitzone 值最高的部位和/或尾巴。它从来都不是最优选择,使用起来总是有风险,但也总是很有趣。 曲射:说到无用的技能,弓可以使用曲射。这完全是浪费。但如果你按错键,突然放出一个气球,那就是曲射。穿过粉尘可以获得一个增益效果,但在你真正能从中受益之前就结束了。第三步(1/2):物品配置与伙伴 充分的准备是成功的一半。 物品配置 简而言之: 携带增益道具 携带回复道具 携带陷阱/炸弹 携带打消果实 携带涂层
You've got one open slot for whatever you need to fight a particular monster. Meaning items like Herbal Medicine (cure Poison + Heal), Cleanser (cleanse Webbing & Bubbleblight), Deodorant (remove Stench, Hellfireblight & Blastblight) or Energy Drink (shakes off Sleep). If you don't need those, you can fill the slot with utility items like Flash Bombs or Sonic Bombs. If you need more than one space you should clear out the Adamant Seed and Hardshell Powder (in that order). Arguably you don't need the Gourmet Fish if you don't play with health drain skills. Just keep in mind that even a Max Potion won't always restore (more than) your red health if you're afflicted by Bloodblight. In addition, you don't need Dash Juice if you play with Berserk/Strife. Replace it for Immunizer. If you're new to the game, you might want to take a look at this guide to figure out more about useful items: https://steamcommunity.com/sharedfiles/filedetails/?id=2748134725 Palico A Palico with Go, Fight, Win is essential to improve your external stamina reduction. It also replenishes hunger. I'll share my three most used Palico's in order: Support TypeSupport Move 1Support Move 2Support Move 3Support Move 4Support Move 5Support Skill 1Support Skill 2Support Skill 3Support Skill 4FightRousing RoarGo,Fight, WinPower DrumShock TripperFurr-iousStatus Attack UpSupport-CentricArtful DodgerKnockout KingGatheringEndemic Life BarrageGo,Fight, WinPower DrumShock TripperPilferStatus Attack UpSupport-CentricArtful DodgerKnockout KingHealingHerbaceous HealingGo,Fight, WinPower DrumShock TripperHealing HornStatus Attack UpSupport-CentricArtful DodgerKnockout King If your buddies have high defense, you can opt for a more offensive set. Replace Artful Dodger for: Omniresistance + Melee/Ranged-Centric Partbreaker + Melee/Ranged-Centric Equip it with a weapon that deals both Blunt damage (Stun) and Status damage (Sleep, Paralysis, Poison, Blast). For armor pick the pieces with the highest defense. The Secret Support Move is personal preference. I prefer the Lottery Box because the Kittynator is cute af. I've set their behavior to Large Only. Need traps? Consider bringing an Assist Palico (for Poison Purr-ision) and switch out Shock Tripper for Shock Purr-ision. That will give your Palico access to Poison Pitfall Traps and Shock Traps. This might not be a wise idea if you're fighting against Elders or Apexes though. Going solo? I'd advise using one Fight and one Gathering Palico. You could switch out Power Drum for Summeown Endemic Life (more Wirebugs) on one of them. Palamute I'd definitely bring a Palamute (along with a Gathering Palico) when gathering resources, because Sniff 'em Out and the Item Pouch are very useful for that. For those missions I'd use the Guarding Parasol (blocks attacks) and the Diversion Scroll (Palamute takes aggro). Mainly because farming builds aren't really suited for combat. Use weapons that deal both Blunt and Sleep damage and set the behavior to Pincer. I recommend the following Support Skills: Status Attack Up Attack Up (L) / Ranged Attack Up Melee-Centric / Ranged-Centic Knockout King Partbreaker On solo hunts you can bring a Palamute instead of a second Palico, if you're willing to trade in utility for damage. In that case I recommend the Palamute Silkbinder and either the Blitz Scroll (faster status build-up) or Heavy Strike Scroll (more flinches). Keep using weapons that deal both Blunt and Status damage, but prioritize ranged over melee damage. Set the behavior to follow so your Palamute shoots at better angles. I'd use the following Support Skills: Status Attack Up Ranged Attack Up Piercing Attack Up Ranged-Centric Palico vs. Palamute If you're farming monster materials, always bring a Gathering Palico. If not: One Fight Palico is mandatory for both solo and multiplayer hunts. One Fight Palico & one Gathering or Heal Palico is pretty much the go to for solo hunts, because of all the utility they provide. One Fight Palico & one Silkbinder Palamute is a viable option if you don't need Pilfer or the healing utility. It's also a good option if you complete your hunts before you can benefit from the additional uptime on Power Drum and Go, Fight, Win in particular. (2/2): Dango You are what you eat. Dango mechanics Some Dango have the same effect as a skill. Those will stack, but the chances of activating said armor/Dango skill are rolled separately. Using Hopping Skewers boosts your first Dango by two levels (-20% activation chance), second Dango by one level (-10% activation chance) and reduces your third Dango by one level (+10% activation chance). Always use a Dango Ticket for an extra 40% activation chance. Unfortunately it's not enough to guarantee all skills will proc. Dango Fighter is always mandatory and the buffs from Dango Feet/Marksman are borderline mandatory, especially on Level 3 and 4. So I'd always recommend failing an arena quest to reset your chances if those three didn't proc. You can go for Constitution Level 5 and forgo Dango Fighter entirely, but after incorporating that much Constitution your damage is at best, subpar. In other words, enjoy the game as intended and have your friend(s) wait while you get punched to a pulp by a furious monkey five times before every hunt. Or face the wrath of the community and mod your Dango activation chances. Dango effects Dango SkillLevel 1Level 2Level 3Level 4CommentDango FighterGain 10% internal stamina reduction.Gain 20% internal stamina reduction.Gain 30% internal stamina reduction.Gain 40% internal stamina reduction.Essential to compensate for the missing Constitution Levels in your build. Always eat this at Level 2, 3 or 4, unless you're running Constitution Level 5. In that case this Dango is redundant.Dango Marksman (paired with Dango Feet)Gives a 30% chance to deal 5% extra damage (1.5% more damage on average).Gives a 30% chance to deal 10% extra damage (3% more damage on average).Gives a 90% chance to deal 5% extra damage (4.5% more damage on average).Gives a 60% chance to deal 10% extra damage (6% more damage on average).Essential to boost your damage. Always eat this at Level 3 or 4.Dango Feet (paired with Dango Marksman)Flinch Free.Flinch Free.Flinch Free and reduces damage taken by 20%.Flinch Free and reduces damage taken by 30%.The damage reduction prevents some one shots. It comes as a freebie with Dango Marksman.Dango TemperDeal 5% extra damage, but gain -2 deviation penalty.Deal 5% extra damage, but gain -1 deviation penalty.Deal 7.5% extra damage, but gain -2 deviation pentaly.Deal 7.5% extra damage, but gain -1 deviation penalty.A nice damage boost, but deviation sucks. Especially since Bows already have to deal with unintended deviation. On Spread Bows it's more manageable.Dango BoosterLasts 10 minutes and gives +6 Raw damage as well as +10 defense.Lasts 10 minutes and gives +9 Raw damage as well as +15 defense.Lasts 8 minutes and gives +12 Raw damage as well as +20 defense.Lasts 8 minutes and gives +15 Raw damage as well as +30 defense.Always nice to have, but less useful if your hunts take longer than eight to ten minutes. It's a nice alternative if you don't like the deviation from Dango Temper (aka for Rapid and Pierce Bows).Dango Adrenaline (paired with Dango Moxie)When under 10 health you deal +30% damage.When under 10 health you deal +35% damage.When under 10 health you deal +35% damage and gain +50 defense.When under 10 health you deal +35% damage and gain +100 defense.Easy to set up with health draining skills and provides a very noticeable damage increase. It's not worth upgrading to Level 3 or 4.Dango Moxie (paired with Dango Adrenaline)If above 40 health, gain a 50% chance to survive.If above 40 health, gain a 100% chance to survive.If above 40 health, gain a 100% chance to survive and 20 health restored.If above 40 health, gain a 100% chance to survive and 40 health restored.It will save your ass occasionally. It comes as a freebie with Adrenaline. It's not worth upgrading to Level 3 or 4.Dango Defender (Hi)Gives a 30%(?) chance to reduces damage taken by 20%.Gives a 30%(?) chance to reduces damage taken by 30%.Gives a 30%(?) chance to reduces damage taken by 40%.Gives a 30%(?) chance to reduces damage taken by 50%.The damage reduction prevents some one shots. It's not worth upgrading to Level 3 or 4.Dango SluggerGives 5% stun build-up.Gives 10% stun build-up.Gives 15% stun build-up.Gives 20% stun build-up.The percentage increase adds next to nothing because of our base four stun build-up, but we do shoot a lot of arrows. In some cases you might get get an extra stun. My Dango sets My sets are based on the amount of Constitution I've in my build as well as the Arrow Type: Constitution Level 5: Dango Feet/Marksman Level 4 + Dango Temper Level 2 + Dango Booster Level 1. Constitution Level 4: Dango Feet/Marksman Level 2 + Dango Fighter Level 2 + Dango Booster Level 2 (Rapid/Pierce) or Dango Temper Level 2 (Spread). Constitution Level 3: Dango Feet/Marksman Level 4 + Dango Figther Level 3 + Dango Booster Level 1 (Rapid/Pierce) or Dango Temper Level 1 (Spread). Constitution Level 2: Dango Fighter Level 4 + Dango Feet/Marksman Level 3 + Dango Booster Level 1 (Rapid/Pierce) or Dango Temper Level 1 (Spread). Super Recovery Dango Level 4 (lower levels are useless) is quite useful if you play with a Berserk/Strife build. With a Dereliction build you'll benefit more from either the damage reduction from Dango Feet, or the damage increase from Dango Adrenaline. Step 4: Gameplay Loop Now that you've read how the Bow works, it's time to bring it together into a gameplay loop. Shoot, dodge, repeat First make sure you sip a Dash Juice or hit some Peepersects. Then you want to maximize your Charge Level with Normal Shots, followed by a dodge and then a Charged Shot. Next, fire your Power Shot and depending on the situation your Power Volley. Maintain your maximum Charge Level with a dodge, and start the loop again with a Charged Shot. The better your stamina management, the longer you can continue this loop. If you activate Power Shot as soon as the animation of Charged Shot starts, you skip the animation. However, you still fire the arrows. Meaning you get two attacks for one animation. The combo Because Charging Sidestep raises your Charge Level, you only have to shoot one or two Normal Shots to reach your maximum Charge Level (either Level 3 or Level 4). () = Charge Level. {} = only if you've access to Charge Level 4. Dash Juice => Normal Shot (1+1) => {=> Normal Shot (2+1)} => Charging Sidestep (3+1) => Charged Shot (4) => Power Shot (4) => Power Volley (4) => repeat from Charging Sidestep. Dodgebolt doesn't raise your Charge Level, which is why you've to shoot two or three Normal Shots in order to reach your maximum Charge Level (either lever 3 or level 4). If you land a parry however, you either need no or one Normal Shot to reach your maximum Charge Level (either lever 3 or level 4). () = Charge Level. {} = only if you've access to Charge Level 4. Dash Juice => Normal Shot (1+1) => Normal Shot (2+1) {=> Normal Shot (3+1)} => Dodgebolt => Charged Shot (4) => Power Shot (4) => Power Volley (4) => repeat from Dodgebolt. All the different playstyles and builds revolve around these two loops. If you want to become one with the Bow, the Dodgebolt loop has to become muscle memory. Charging Sidestep is a bit more forgiving when practicing with a Bow, but Dodgebolt is our only counter. That's why I recommend practicing with it as soon as you can use Evade Extender Level 1. Step 5: Switch Skills & Wirefall Now that you know the basic loop, you're ready step up your game. Switch Skill Swap You can make two Switch Skill loadouts, a Red Scroll and a Blue Scroll. During a hunt you can use Switch Skill Swap to switch between them by pressing R. You can press the spacebar afterward to perform a Switch Skill Evade. Both abilities maintain your Charge Level. Charging Sidestep vs. Dodgebolt Charging Sidestep dodges a reasonable distance and always raises your Charge Level by one. It's more forgiving and makes it easier to keep up your DPS if the monster topples or moves large distances. Dodgebolt has very little evade distance, but makes up for that with a small parry window and a lower stamina costs than Charging Sidestep. To make up for the small evade distance, Evade Extender Level 1 is mandatory. If you successfully parry a monster attack, your Charge Level is raised by two. If you don't parry anything, your Charge Level neither raises nor resets. Dodgebolt is the only parry available to Bow. I'd highly advice practicing with this ability, since in Master Rank you can't evade most AoE-attacks. Redirection Level 2 (nullifies damage and Swap Evade backwards after a Switch Skill Swap) is another option, but nowhere near an alternative to Dodgebolt. Power Shot vs. Absolute Power Shot Absolute Power Shot costs a lot more stamina than Power Shot (forty instead of twenty-five without stamina reduction), in return for eight exhaust build-up and four stun build-up (on headshots). Which works particularly well if you also equip the Exhaust Coating. The better your stamina reduction, the more viable Absolute Power Shot becomes (from a fifteen extra stamina cost to a five extra stamina cost). Because you only apply stun build-up to headshots, you'll only want to use Absolute Power Shot if the head is a weak spot or if you have a good opportunity for a stun. I bring both and Switch Skill Swap between them when necessary. If I've to play with one loadout I bring Absolute Power Shot. Building up exhaust and stun Dealing exhaust damage on a monster raises a hidden exhaust bar. When said bar reaches 100%, the monster will suffer from an exhaust flinch (if it pukes you nailed it). This is a separate flinch from the normal flinch (i.e. from breaking a part). Each monster has its own threshold before it flinches. At Charge Level 1-2-3-4 each arrow builds up 6-7-8-9 exhaust respectively. Stamina Thief affects this build-up (20-30-40% at level 1-2-3 respectively). Elder Dragons are immune to Exhaust build-up. If exhaust damage hits the head, it raises both the exhaust bar and the stun bar (aka KO damage). When the stun bar reaches 100%, the monster will stun. I suppose you could argue that there's no such thing as stun damage (at least for Bows), only exhaust damage that can cause stun. Regardless, I'm going to call it stun damage. Just remember that it only applies to headshots. At Charge Level 1-2-3-4 each arrow builds up 2-3-4-5 stun respectively. Slugger affects this build-up (20-30-40% at level 1-2-3 respectively). Whenever a status effect occurs, the threshold for that status increases until it's capped out. Melee Attack vs. Stake Thrust Melee Attack is for hunters who've difficulty understanding that arrows are supposed to be shot. It does deal Sever damage though, so you can try to cut tails I suppose. It also gains the effect from your Coating. Stake Thrust is the clear winner. Placing a stake breaks your Charge Level, so only use it if you can follow it up with a parry from Dodgebolt. Hitting the stake with an arrow deals additional Shot Type damage, about equal to 50% of your Raw damage (somewhat less for Pierce). It can proc twelve times and has the same effect as your arrow (the Coating and Stun build-up from Absolute Power Shot). It also has some synergy with Aerial Aim (see below). Focus Shot vs. Aerial Aim vs. Butcher's Bind The first two are best suited as a finisher move for your gameplay loop. Activate it with your upper side mouse button. Focus Shot is an evasive move (with iFrames) that lands you in a crouched position. If there's no follow up attack from the monster, you can stay in position and quickly regenerate your stamina. This isn't required if you've Stamina Surge Level 3. Aerial Aim launches you into air and lets you fire three volleys with additional damage before falling back down. This does consume stamina. However, you can still shoot all three volleys even if you're out of stamina. It costs one Wirebug which needs twenty seconds to recharge. Not only can you use it as a semi-evade, it's also great to make monsters rideable with one or two uses (provided it's not the quest target). Because you've your Bow out after shooting, you can't move or use Wirebugs until you've landed. You can however activate your Stake Thrust in the air with the upper side mouse button. Meaning you can both finish with it and set up extra DPS for your next combo. And last and but not least, Butcher's Bind. First you shoot one Binding Arrow (130% damage). The next Normal Shot that hits the same spot uses Sever Hitzone Values. It's your most effective way to cut tails, so it has that going for it. Other than that, this ability is mostly useless. My personal preference is Aerial Aim. If I really want a tail I bring Butcher's Bind on one of my Scrolls. Herculean Draw vs. Bolt Boost Herculean Draw is an evasive move that increases your damage by 10% and lasts for thirty seconds. The move costs two Wirebugs which both need ten seconds to recharge. They recharge one at a time, so twenty seconds total. It's quite costly and can leave you without any Wirebugs for your Wirefall ability. This also resets your Charge Level. It's mapped to the scroll click button. Bolt Boost actives Super Critical distance for 105 seconds. It costs one Wirebug which takes fifteen seconds to recharge. Super Critical distance is roughly 25% of your default Critical Distance, and scales with critical range modifiers.
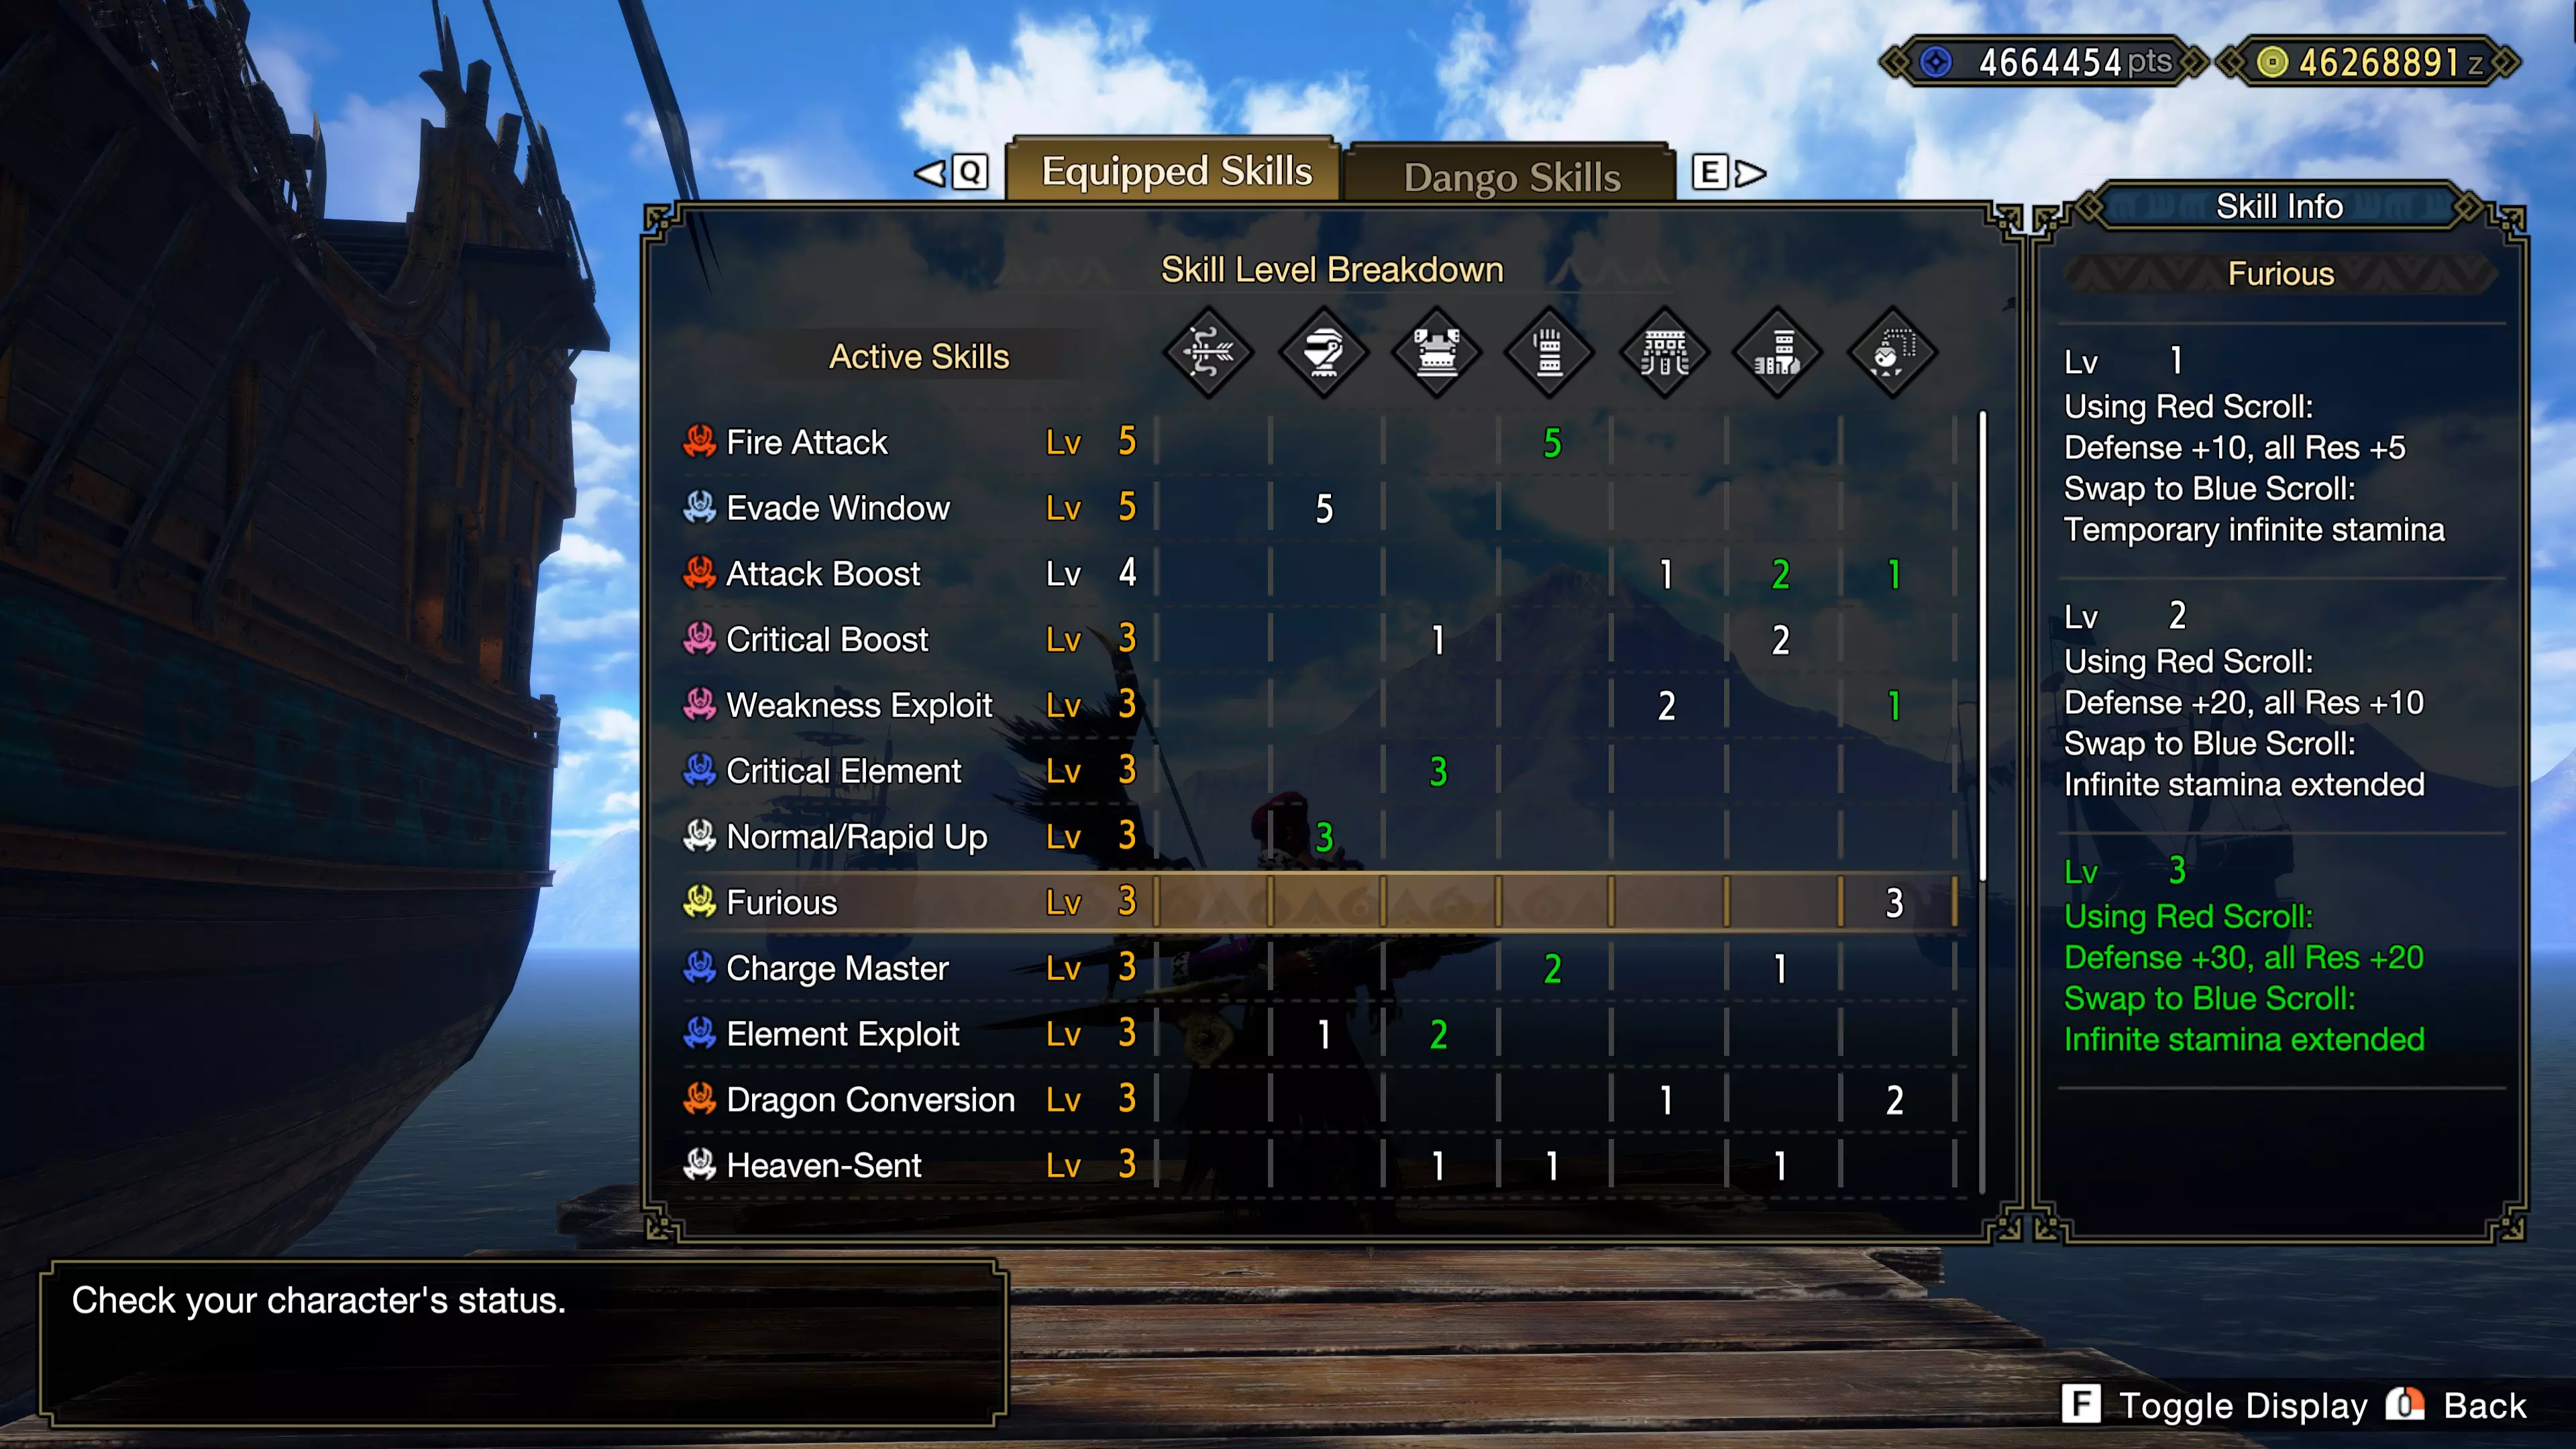
处于超会心距离时,你将获得以下加成: +15% 物理伤害; +10% 元素伤害; +10% 异常状态积蓄; +4 眩晕值积蓄(若应用眩晕值积蓄); +2 昏厥值积蓄(若应用昏厥值积蓄)。 如果我的配装不会影响切换技的使用,我会携带两个切换技。但我总是优先选择蓄力抽箭。 钩爪回避 使用钩爪回避可能会打乱蓄力抽箭的时机,但你也可以利用它获得一些滞空时间并放置桩子。由于我们的防御力并不高,后续的攻击肯定会让我们猫车(如果我们侥幸躲过第一击的话)。安全第一,不要抱有侥幸心理。

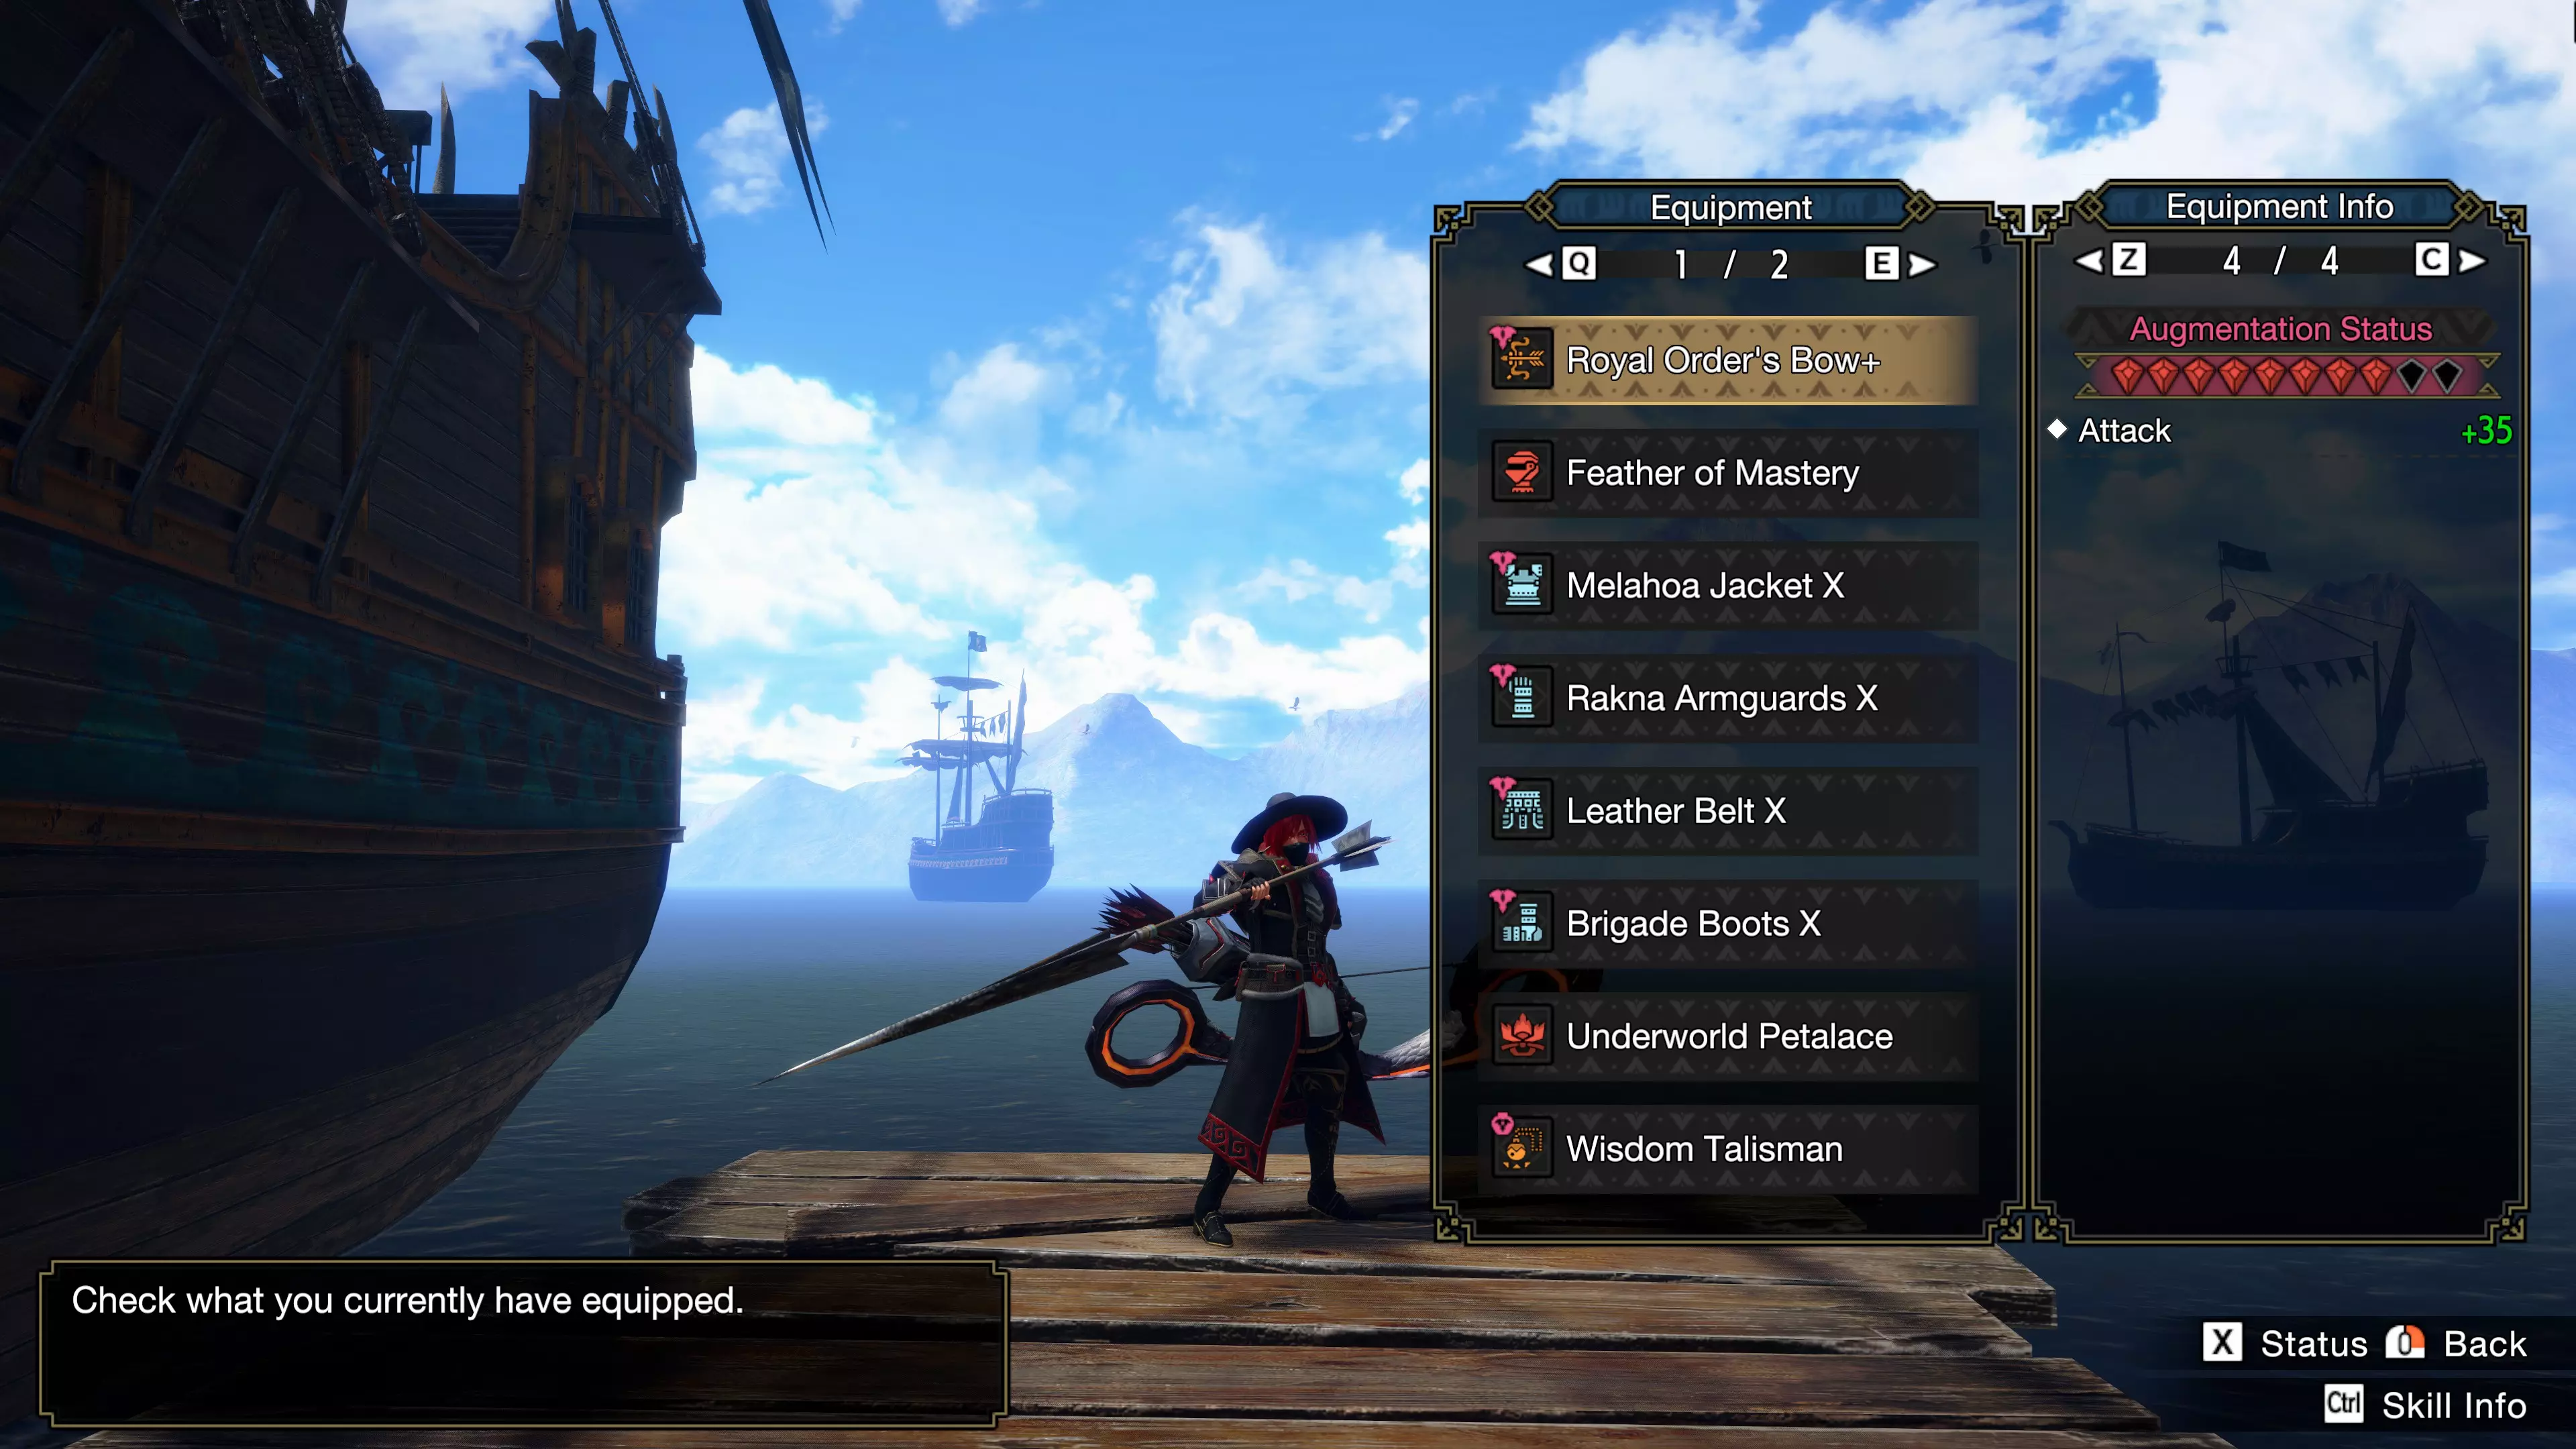
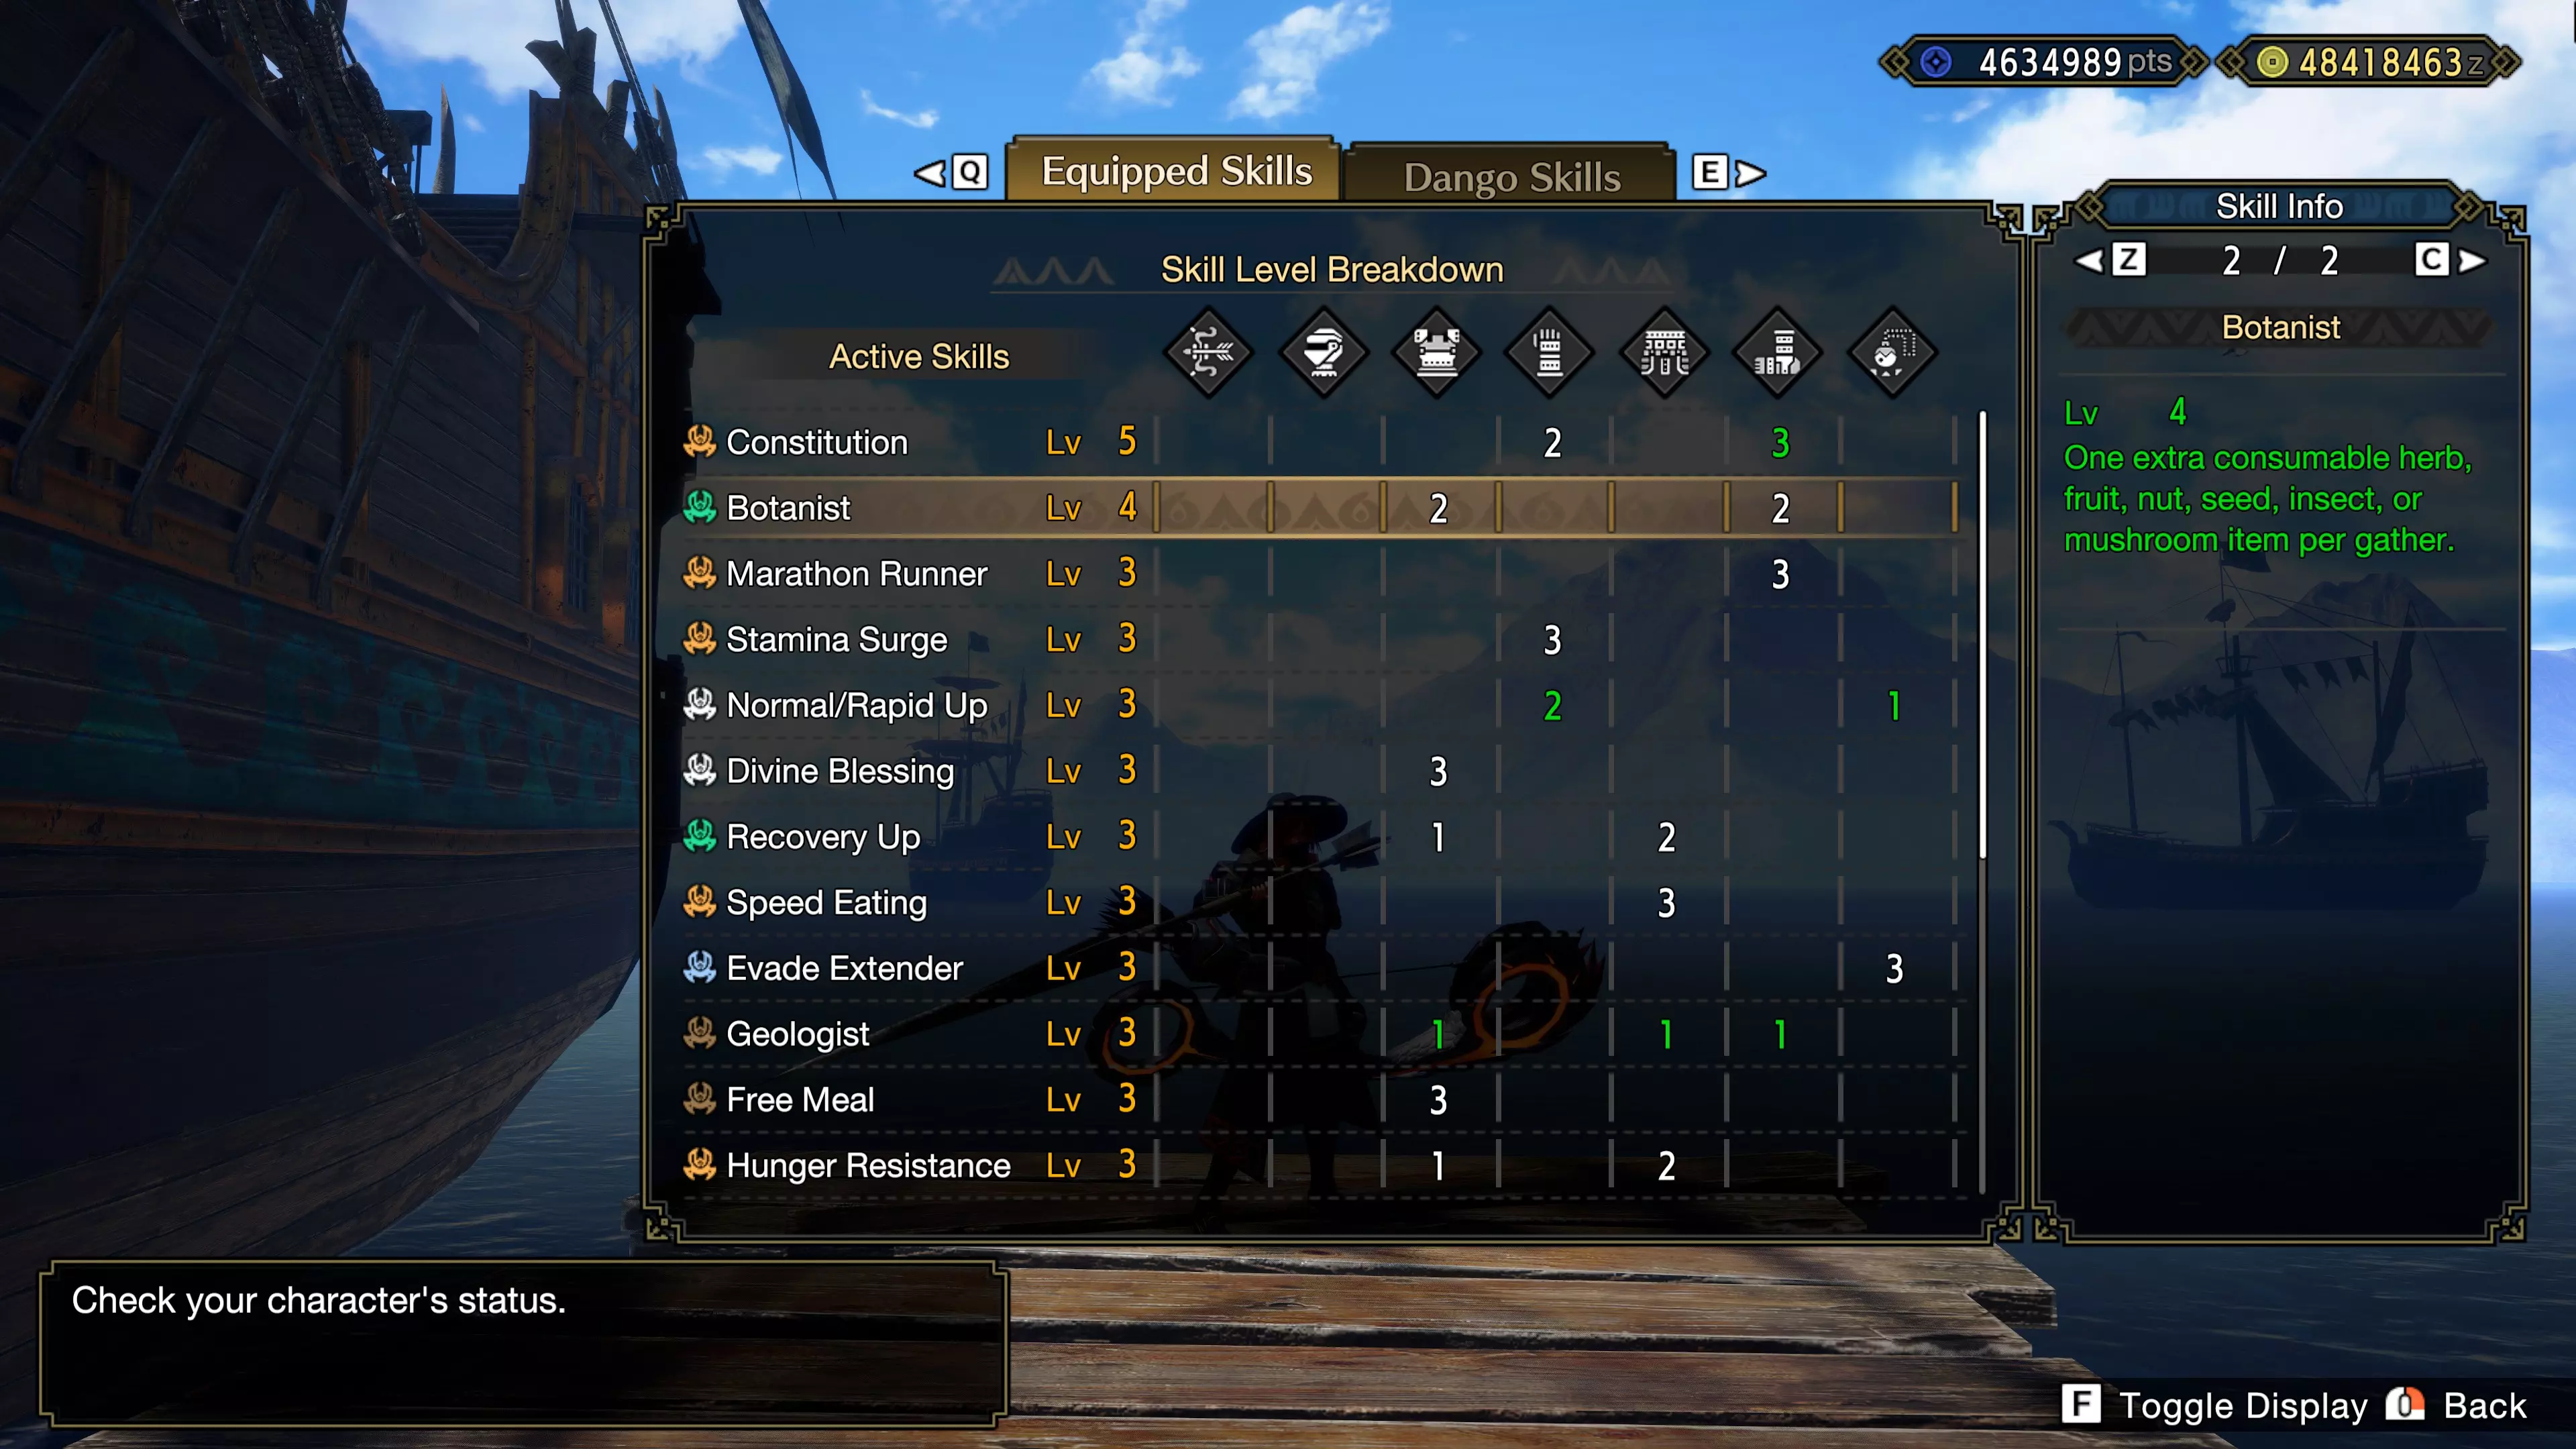
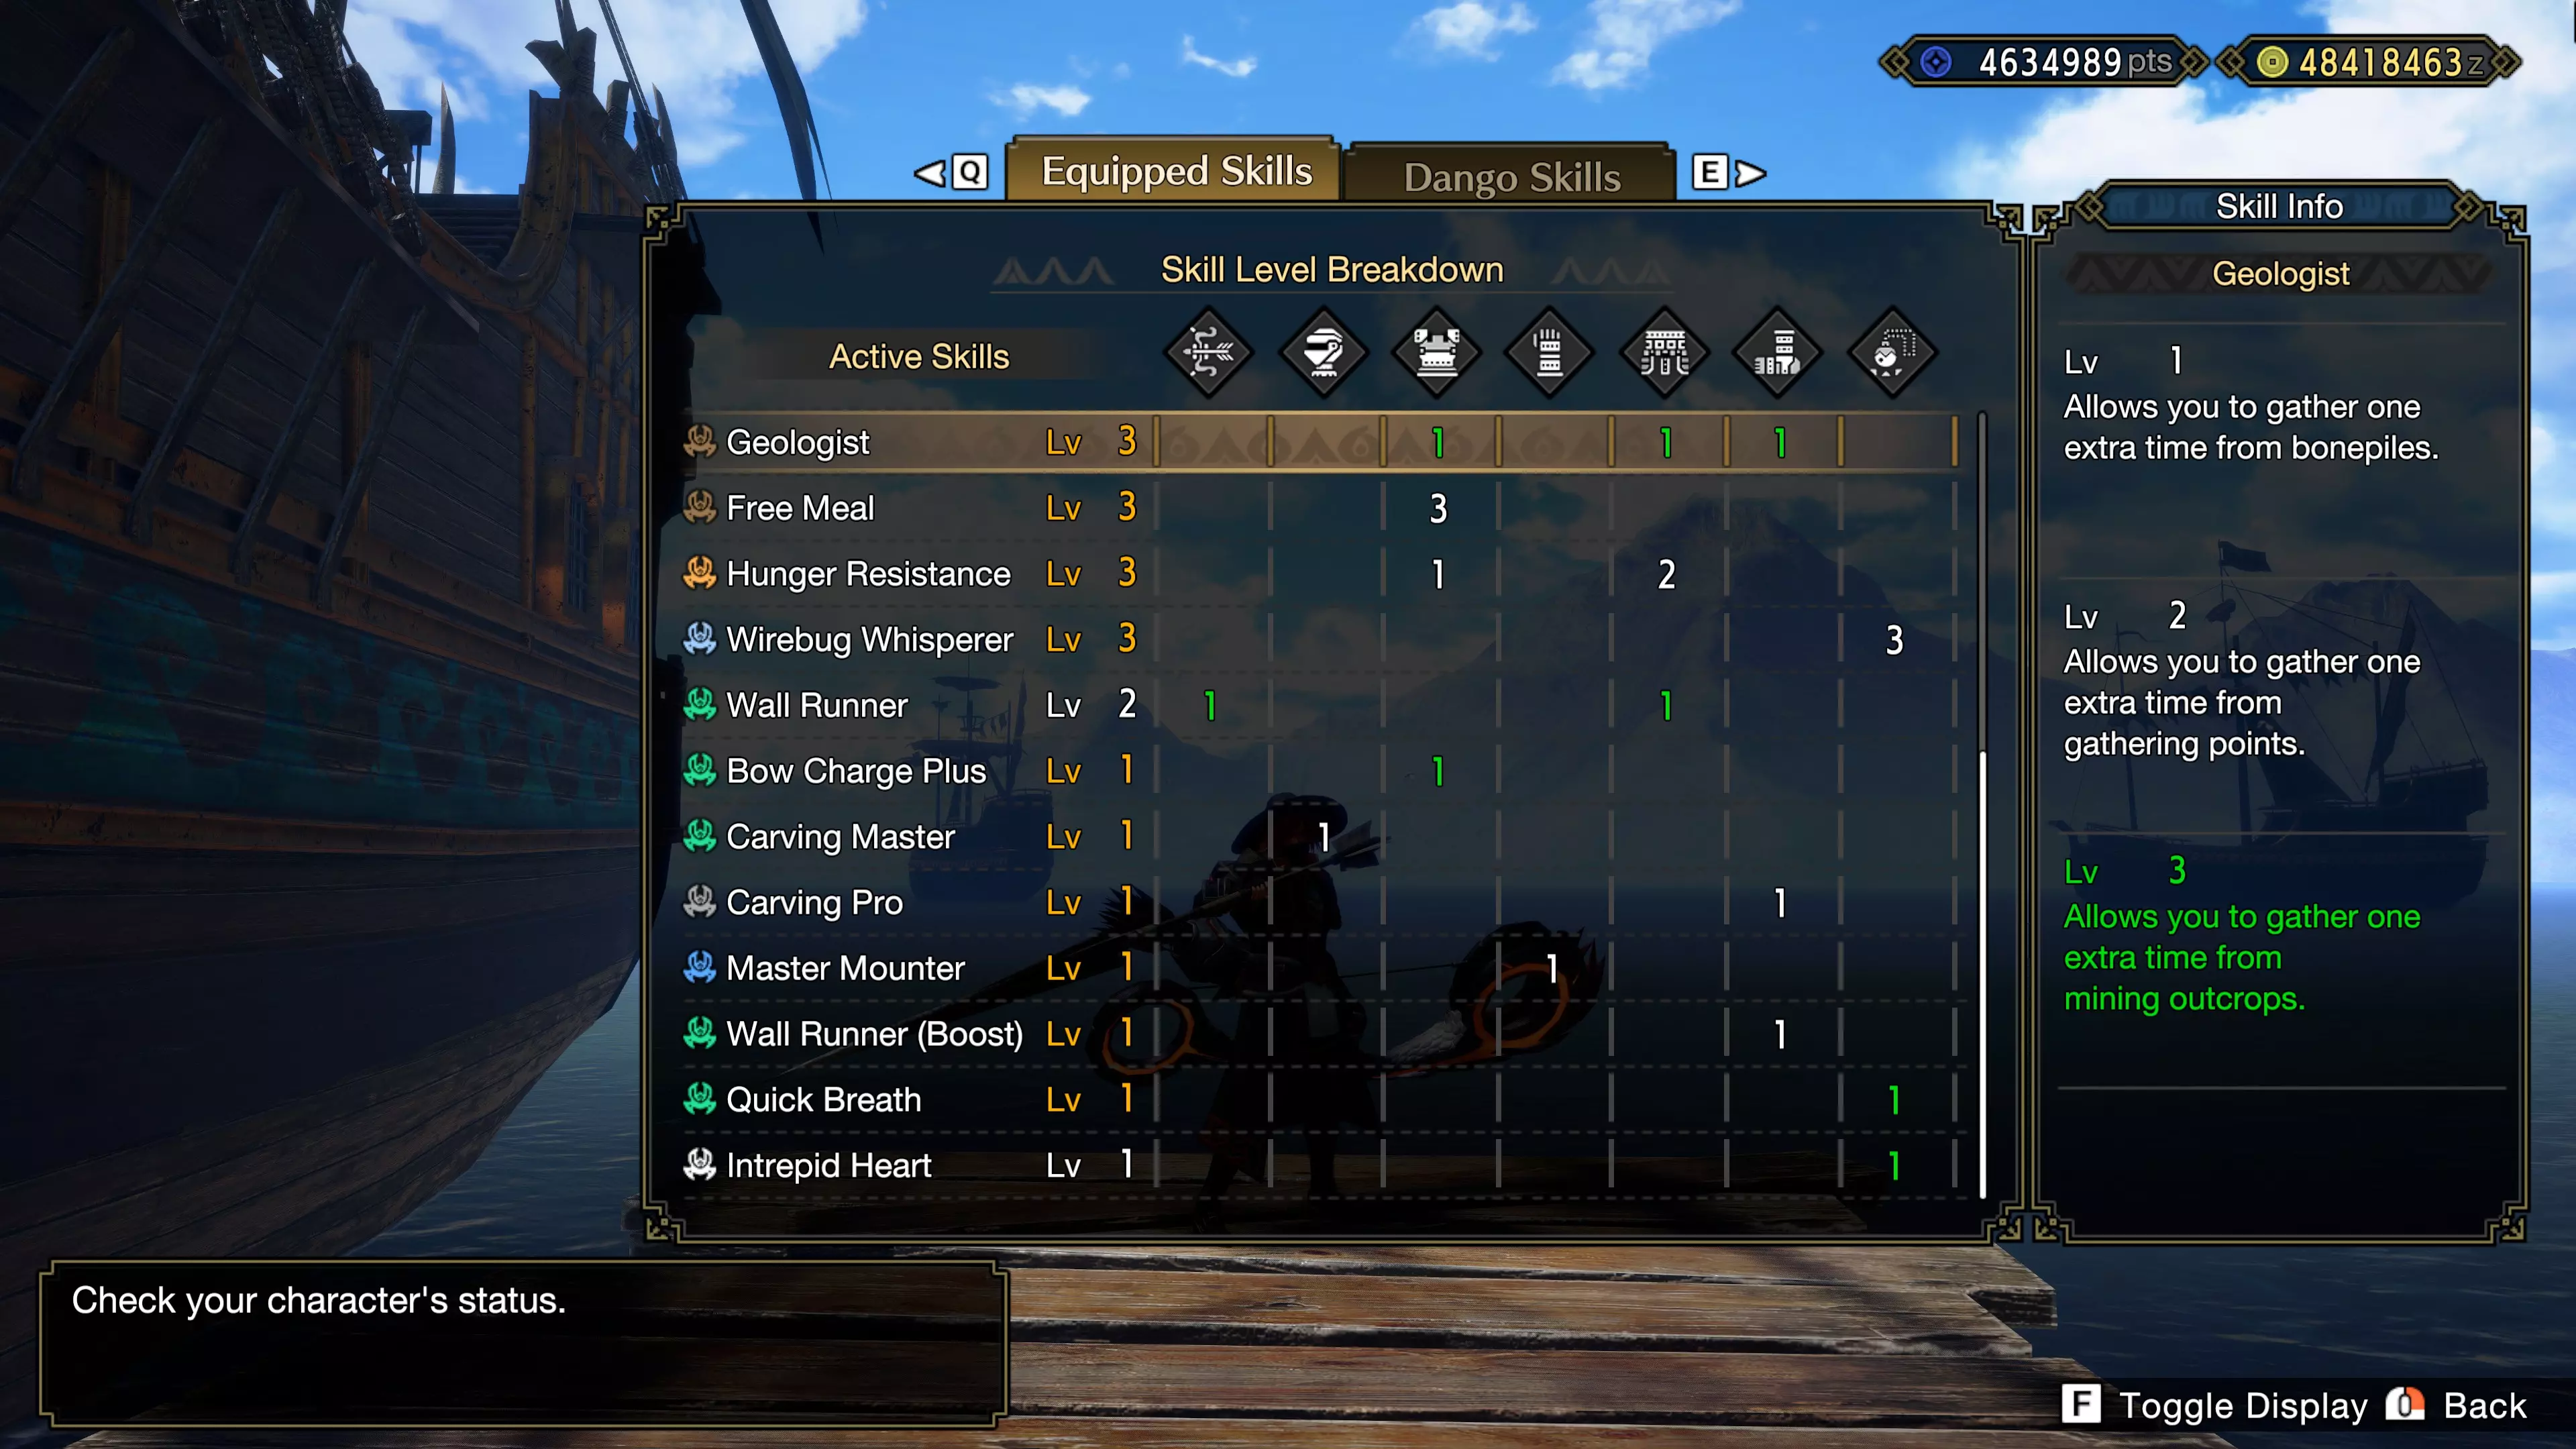
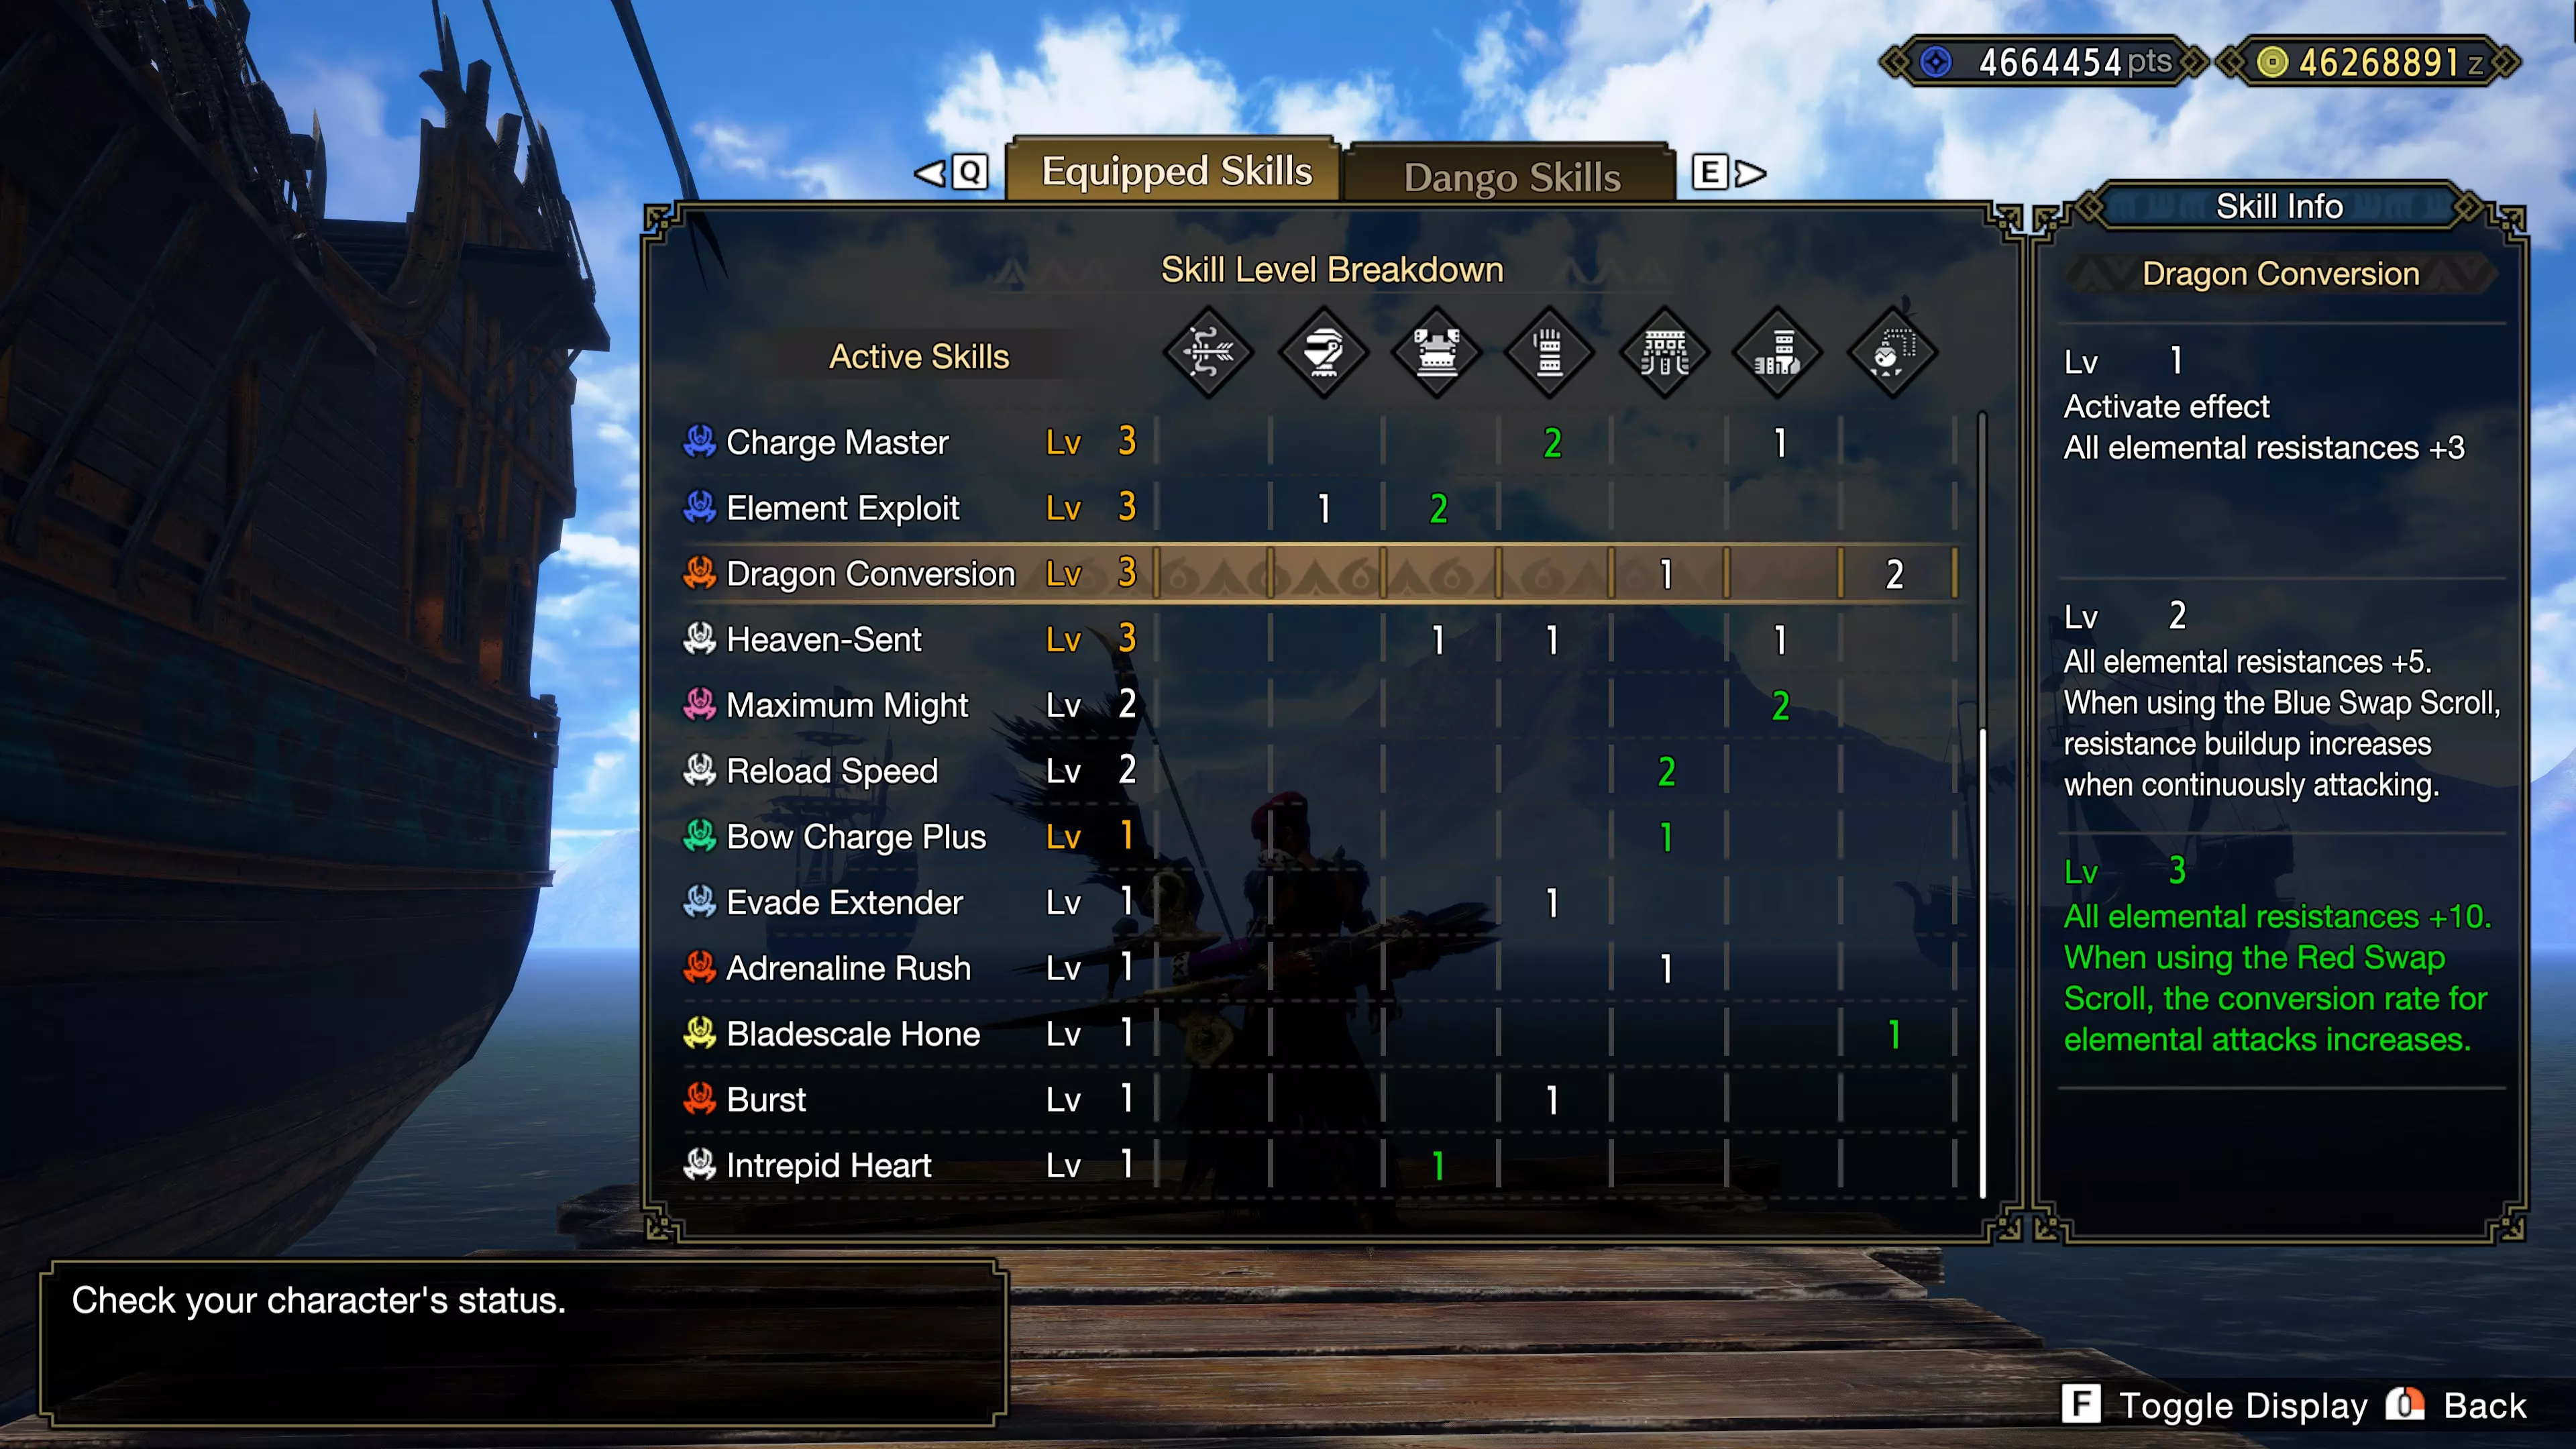
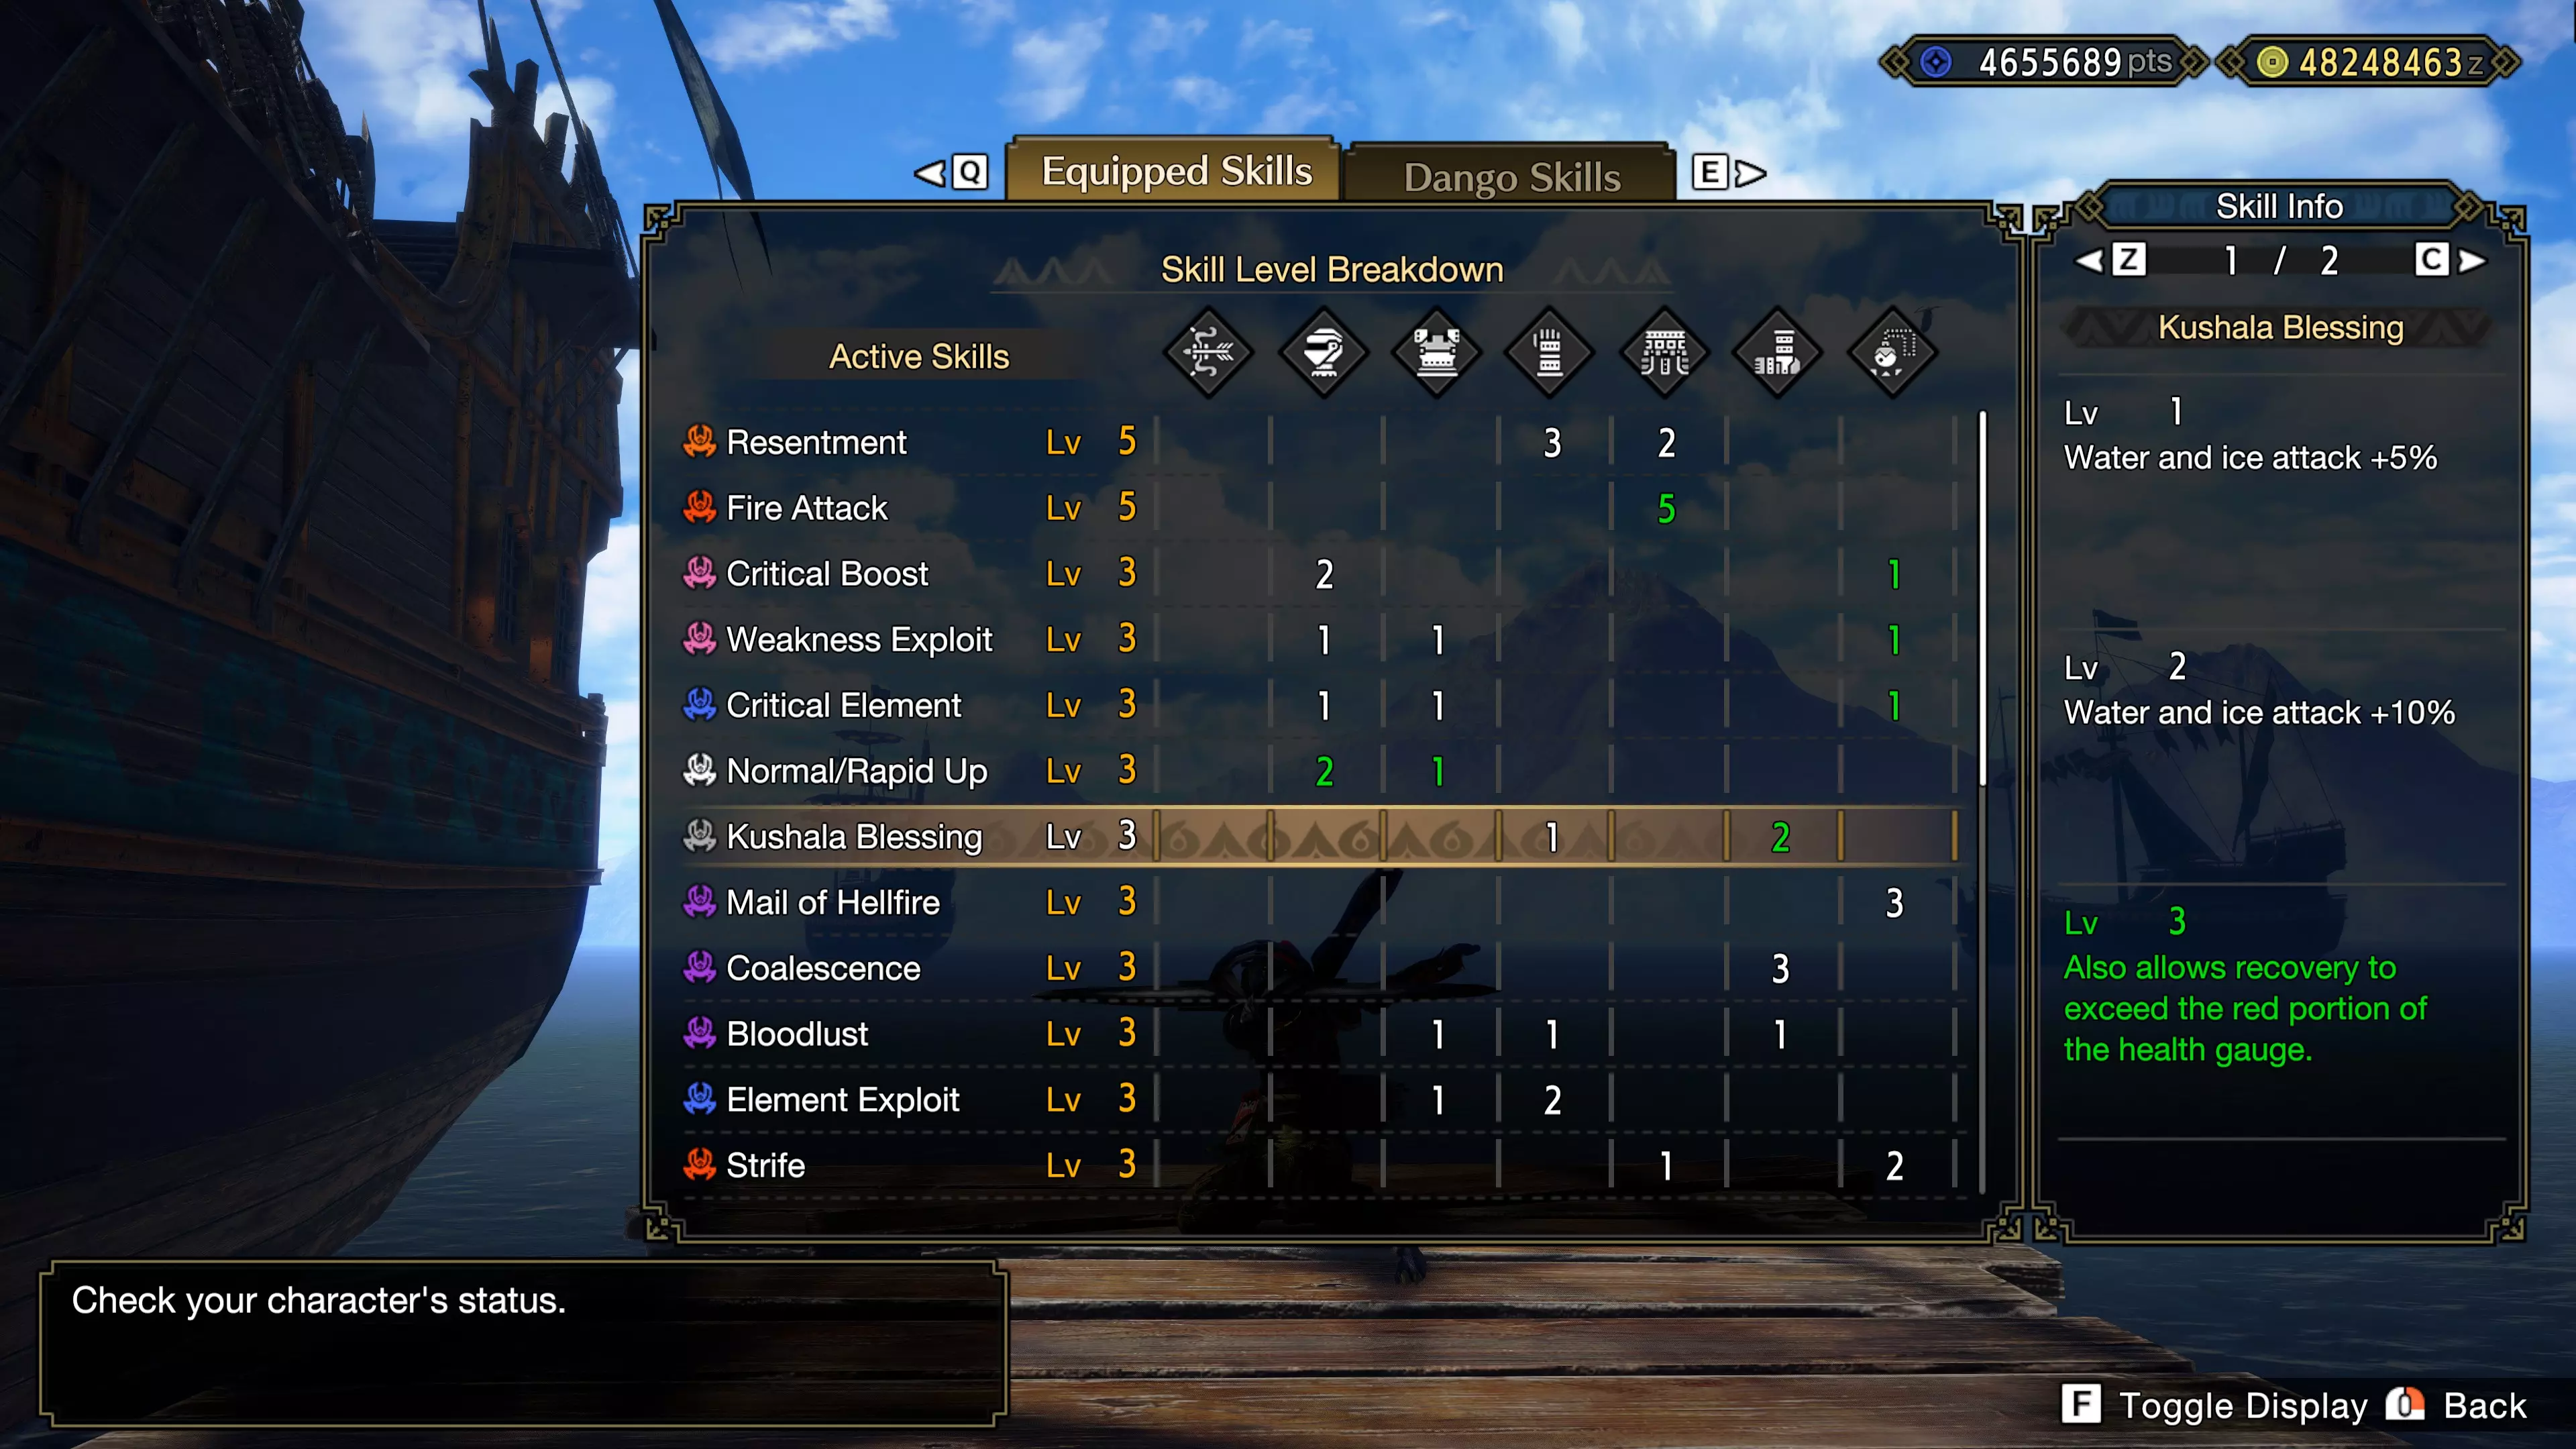
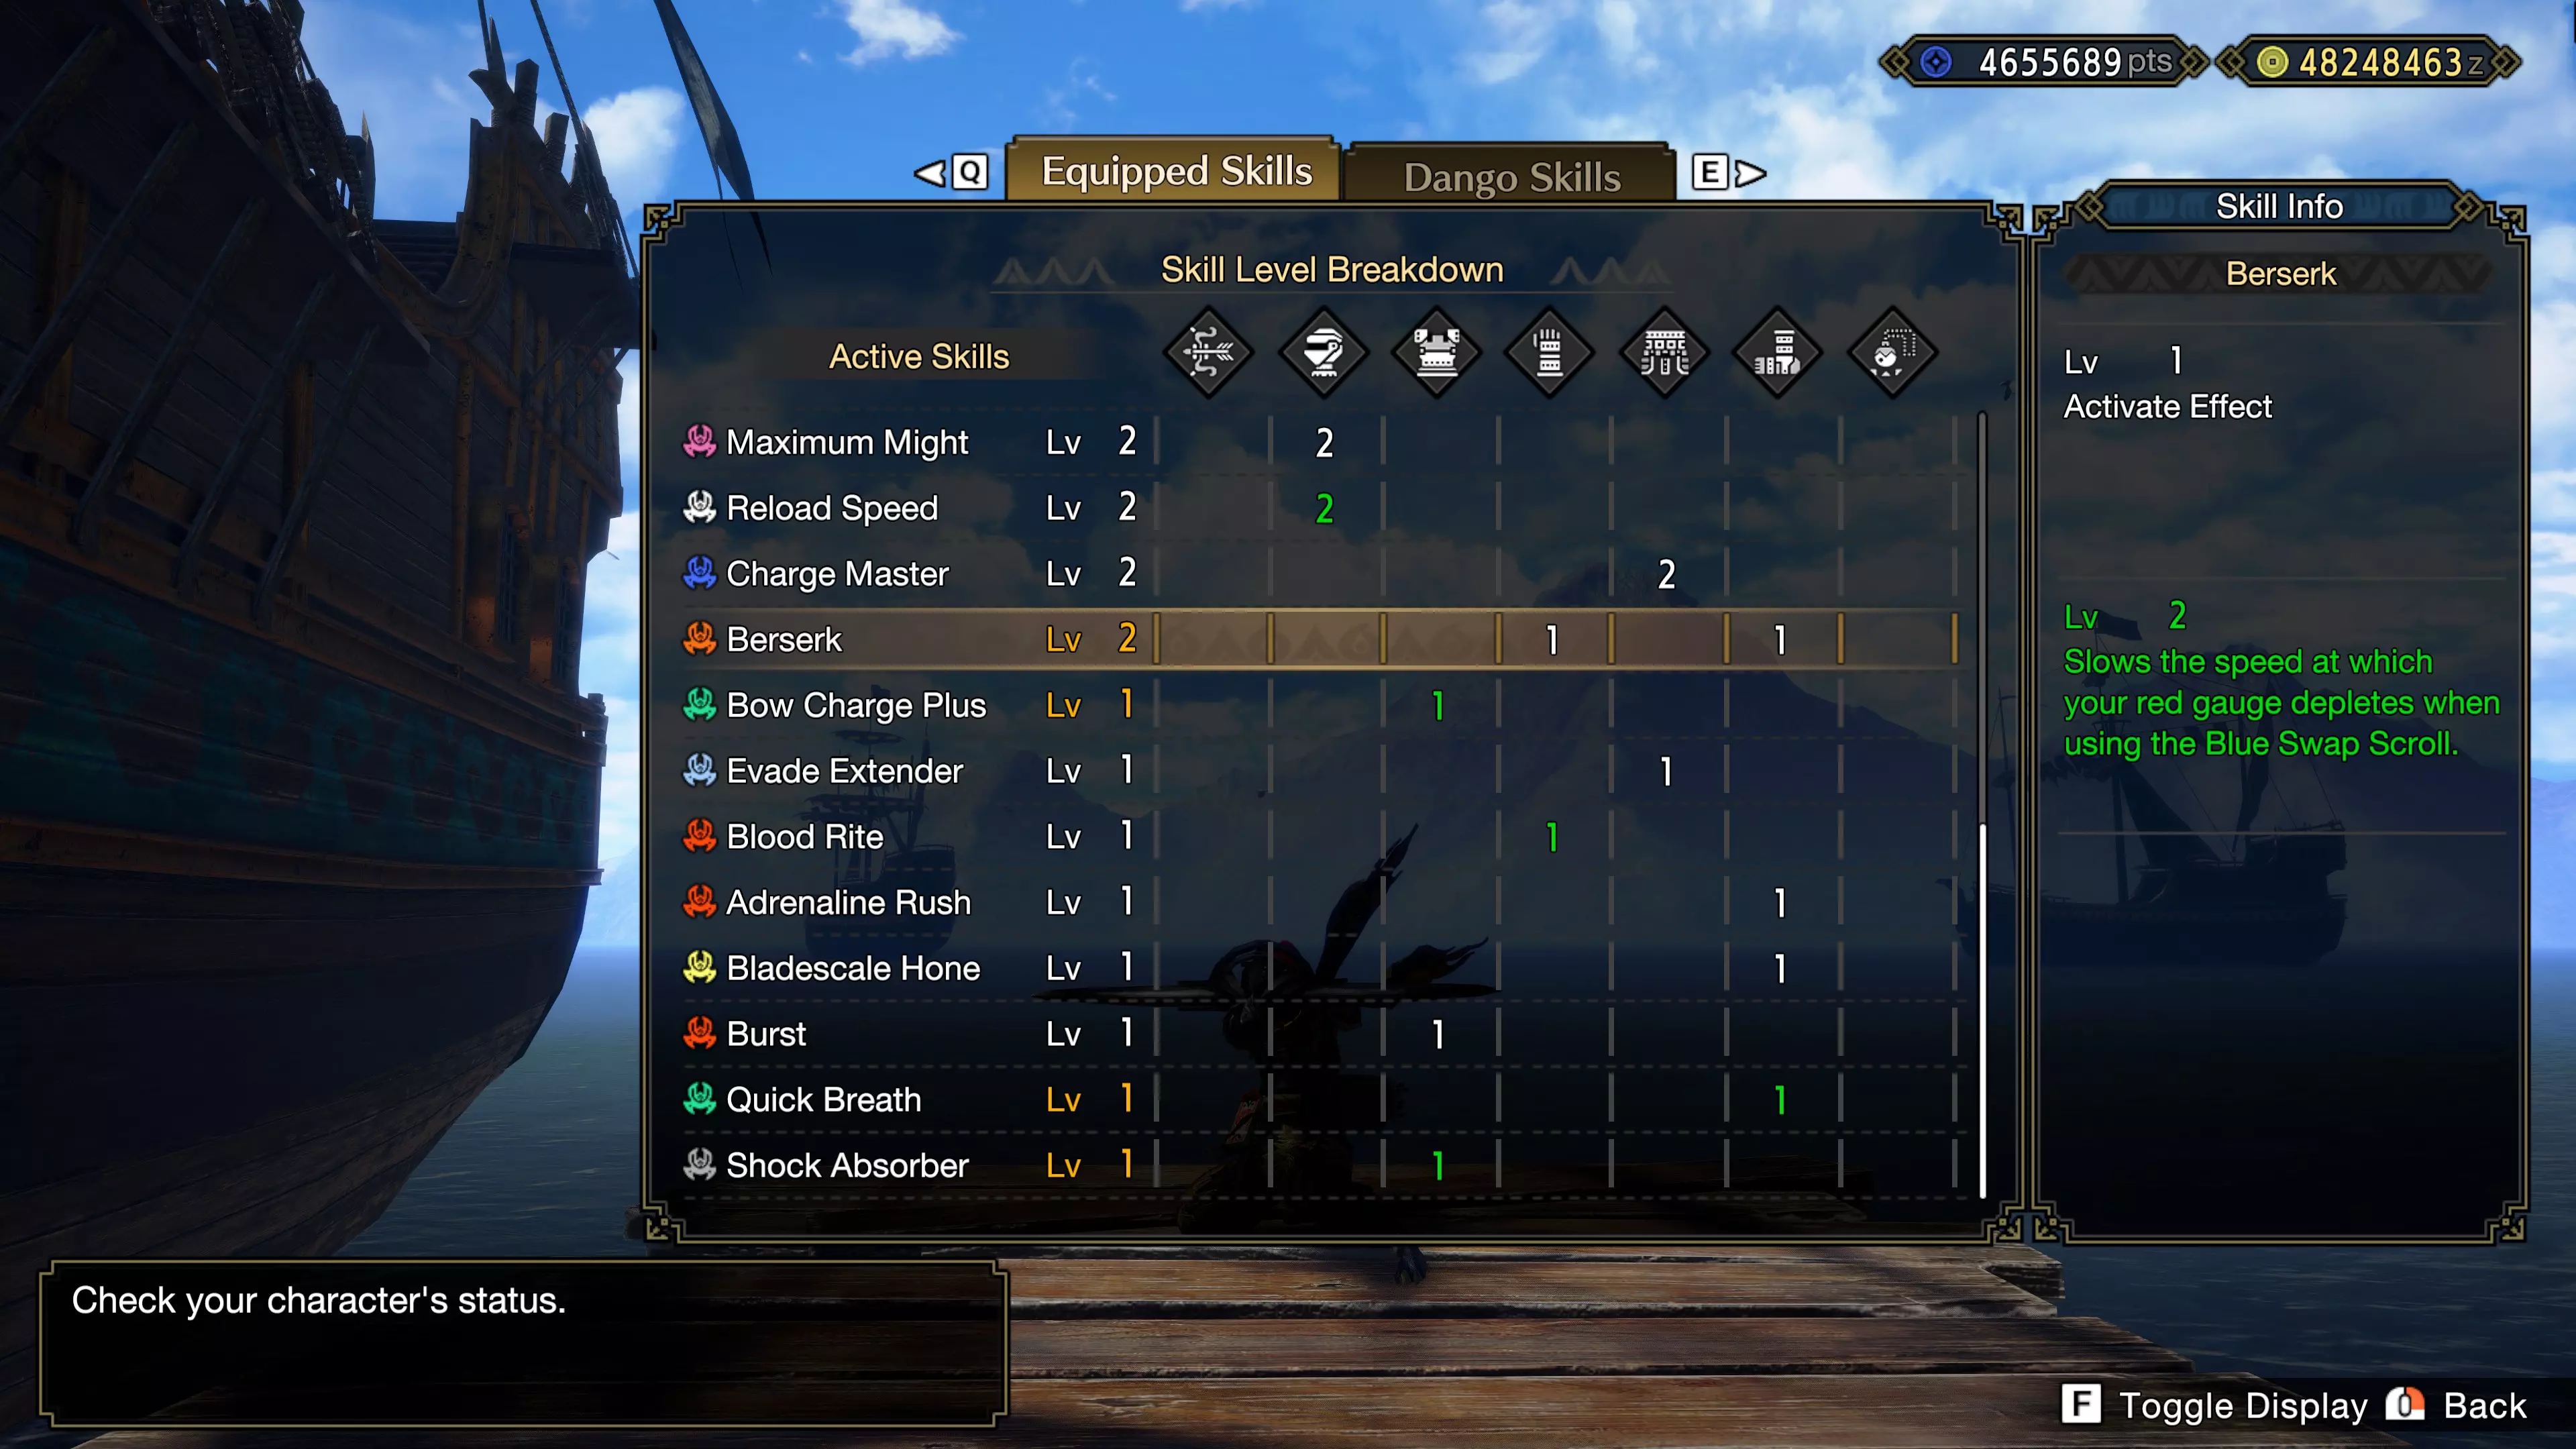
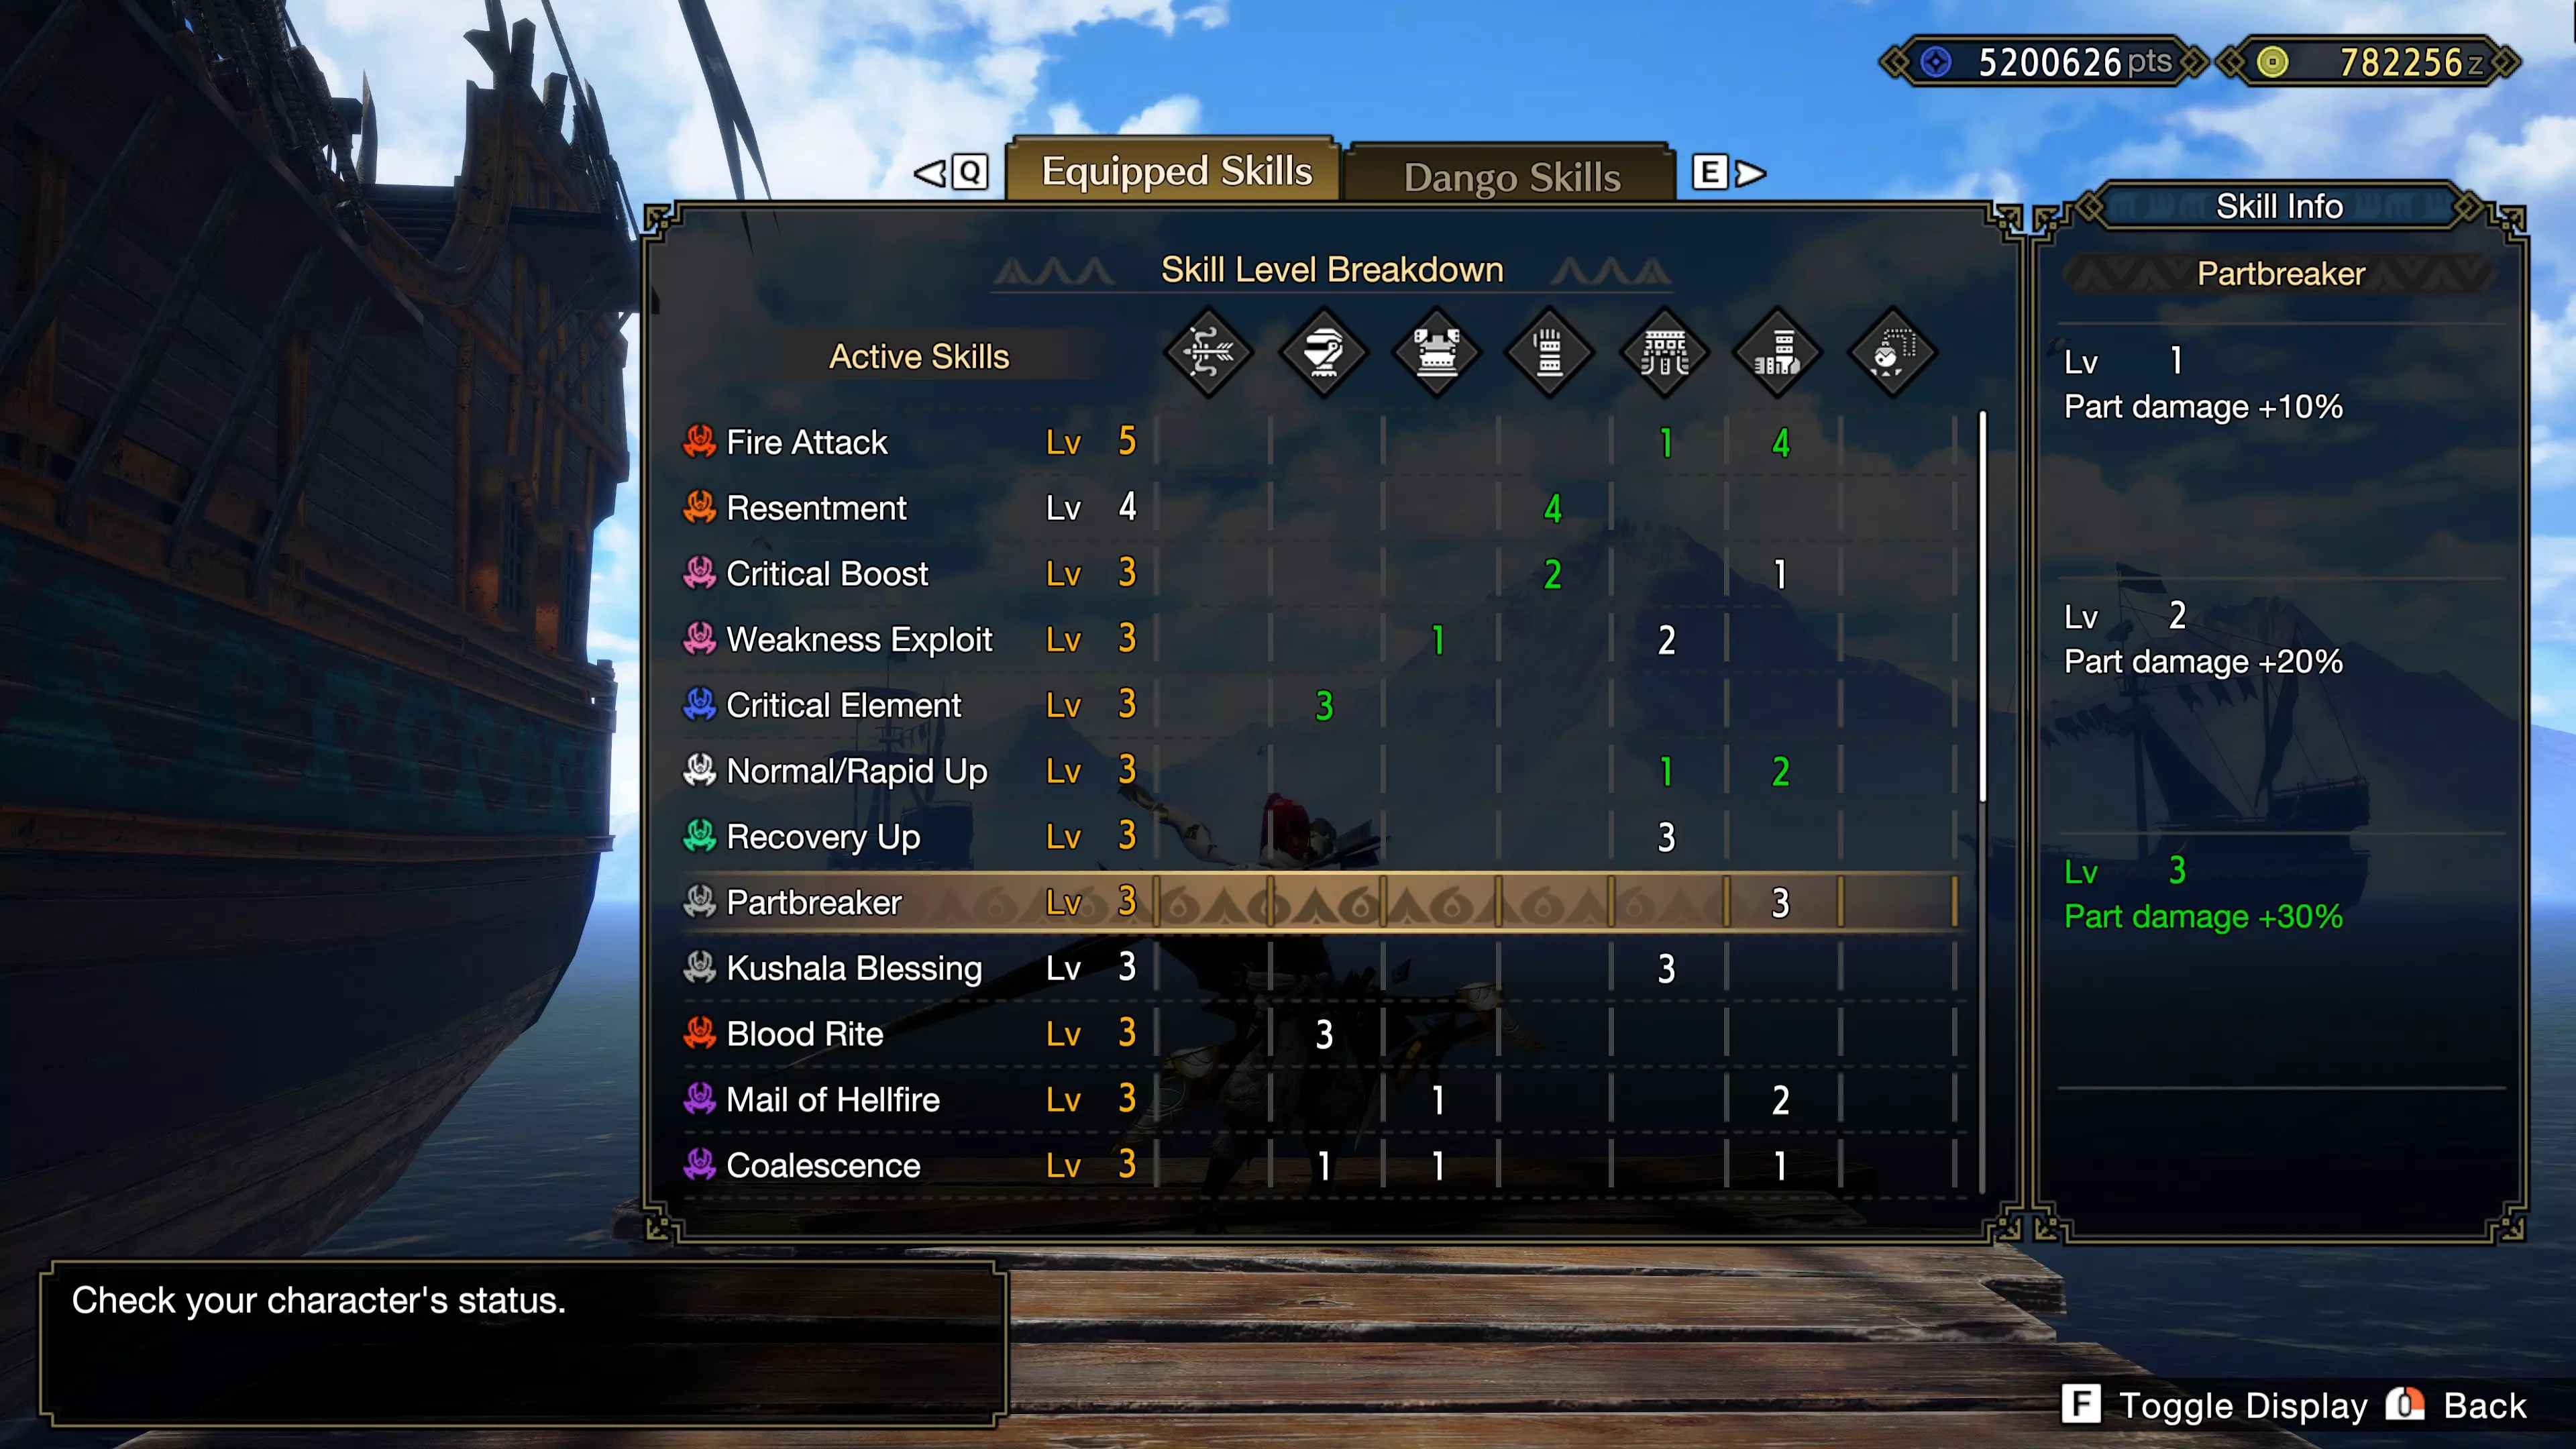
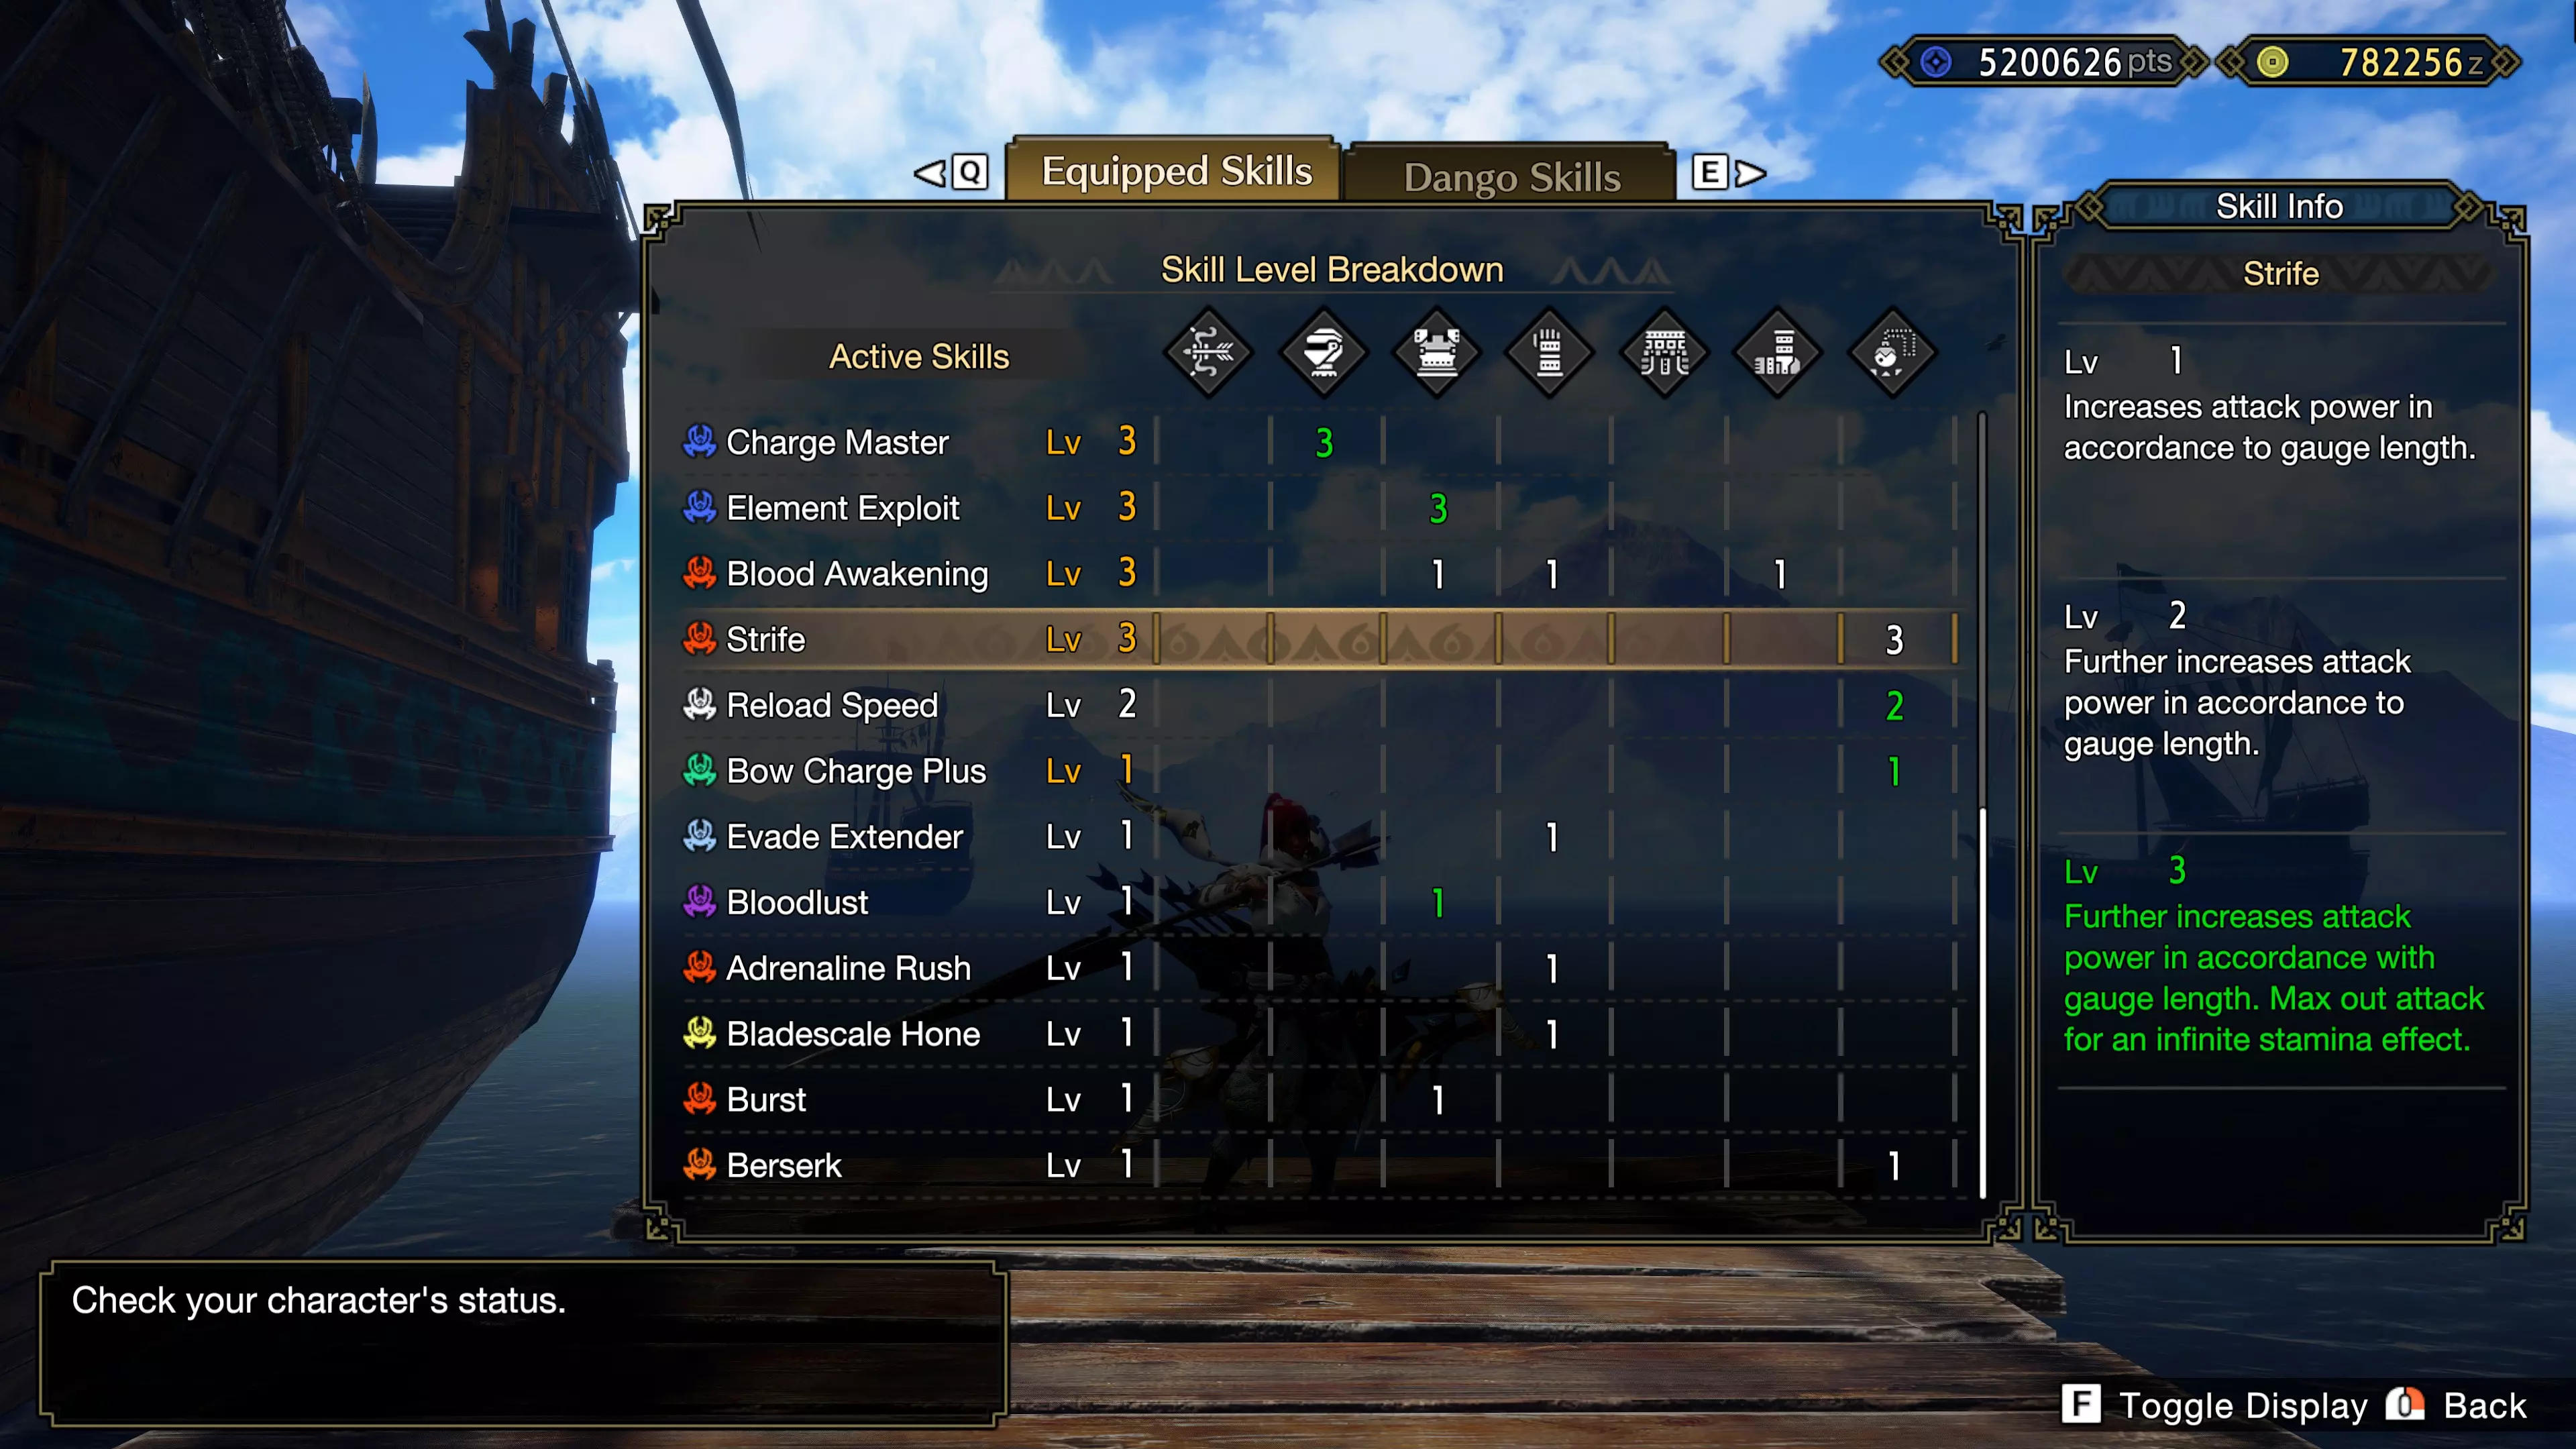
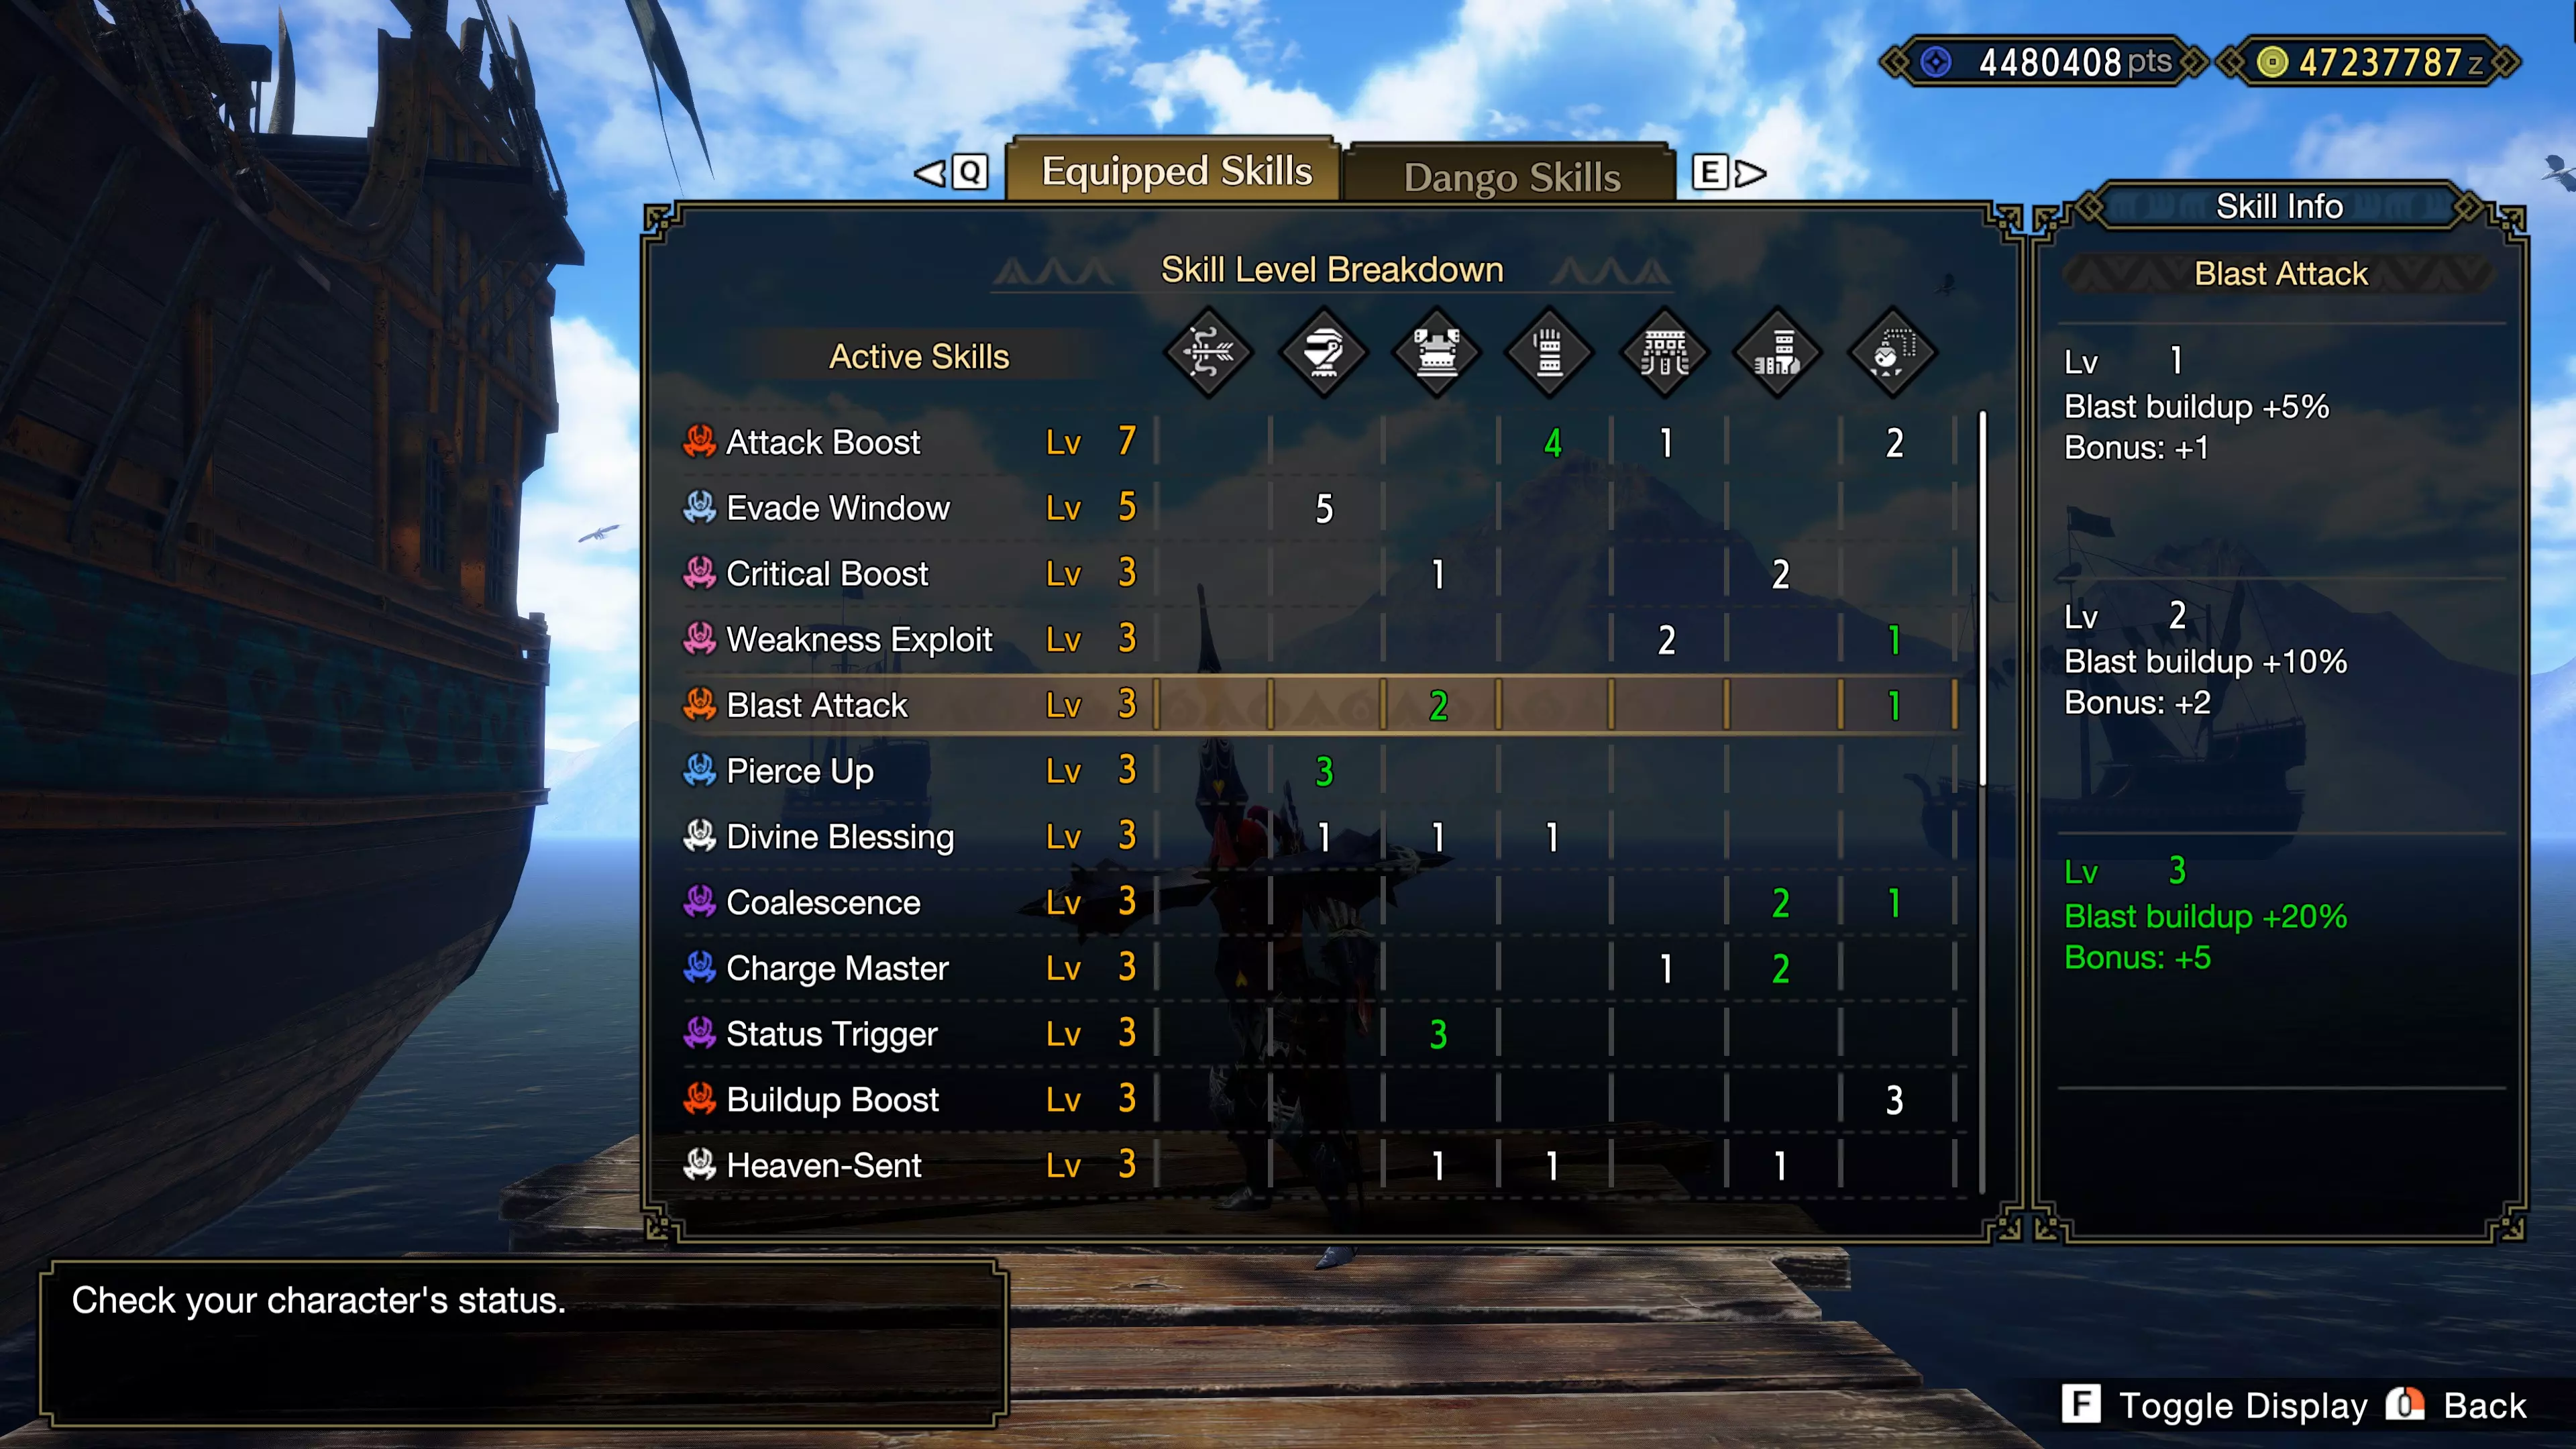
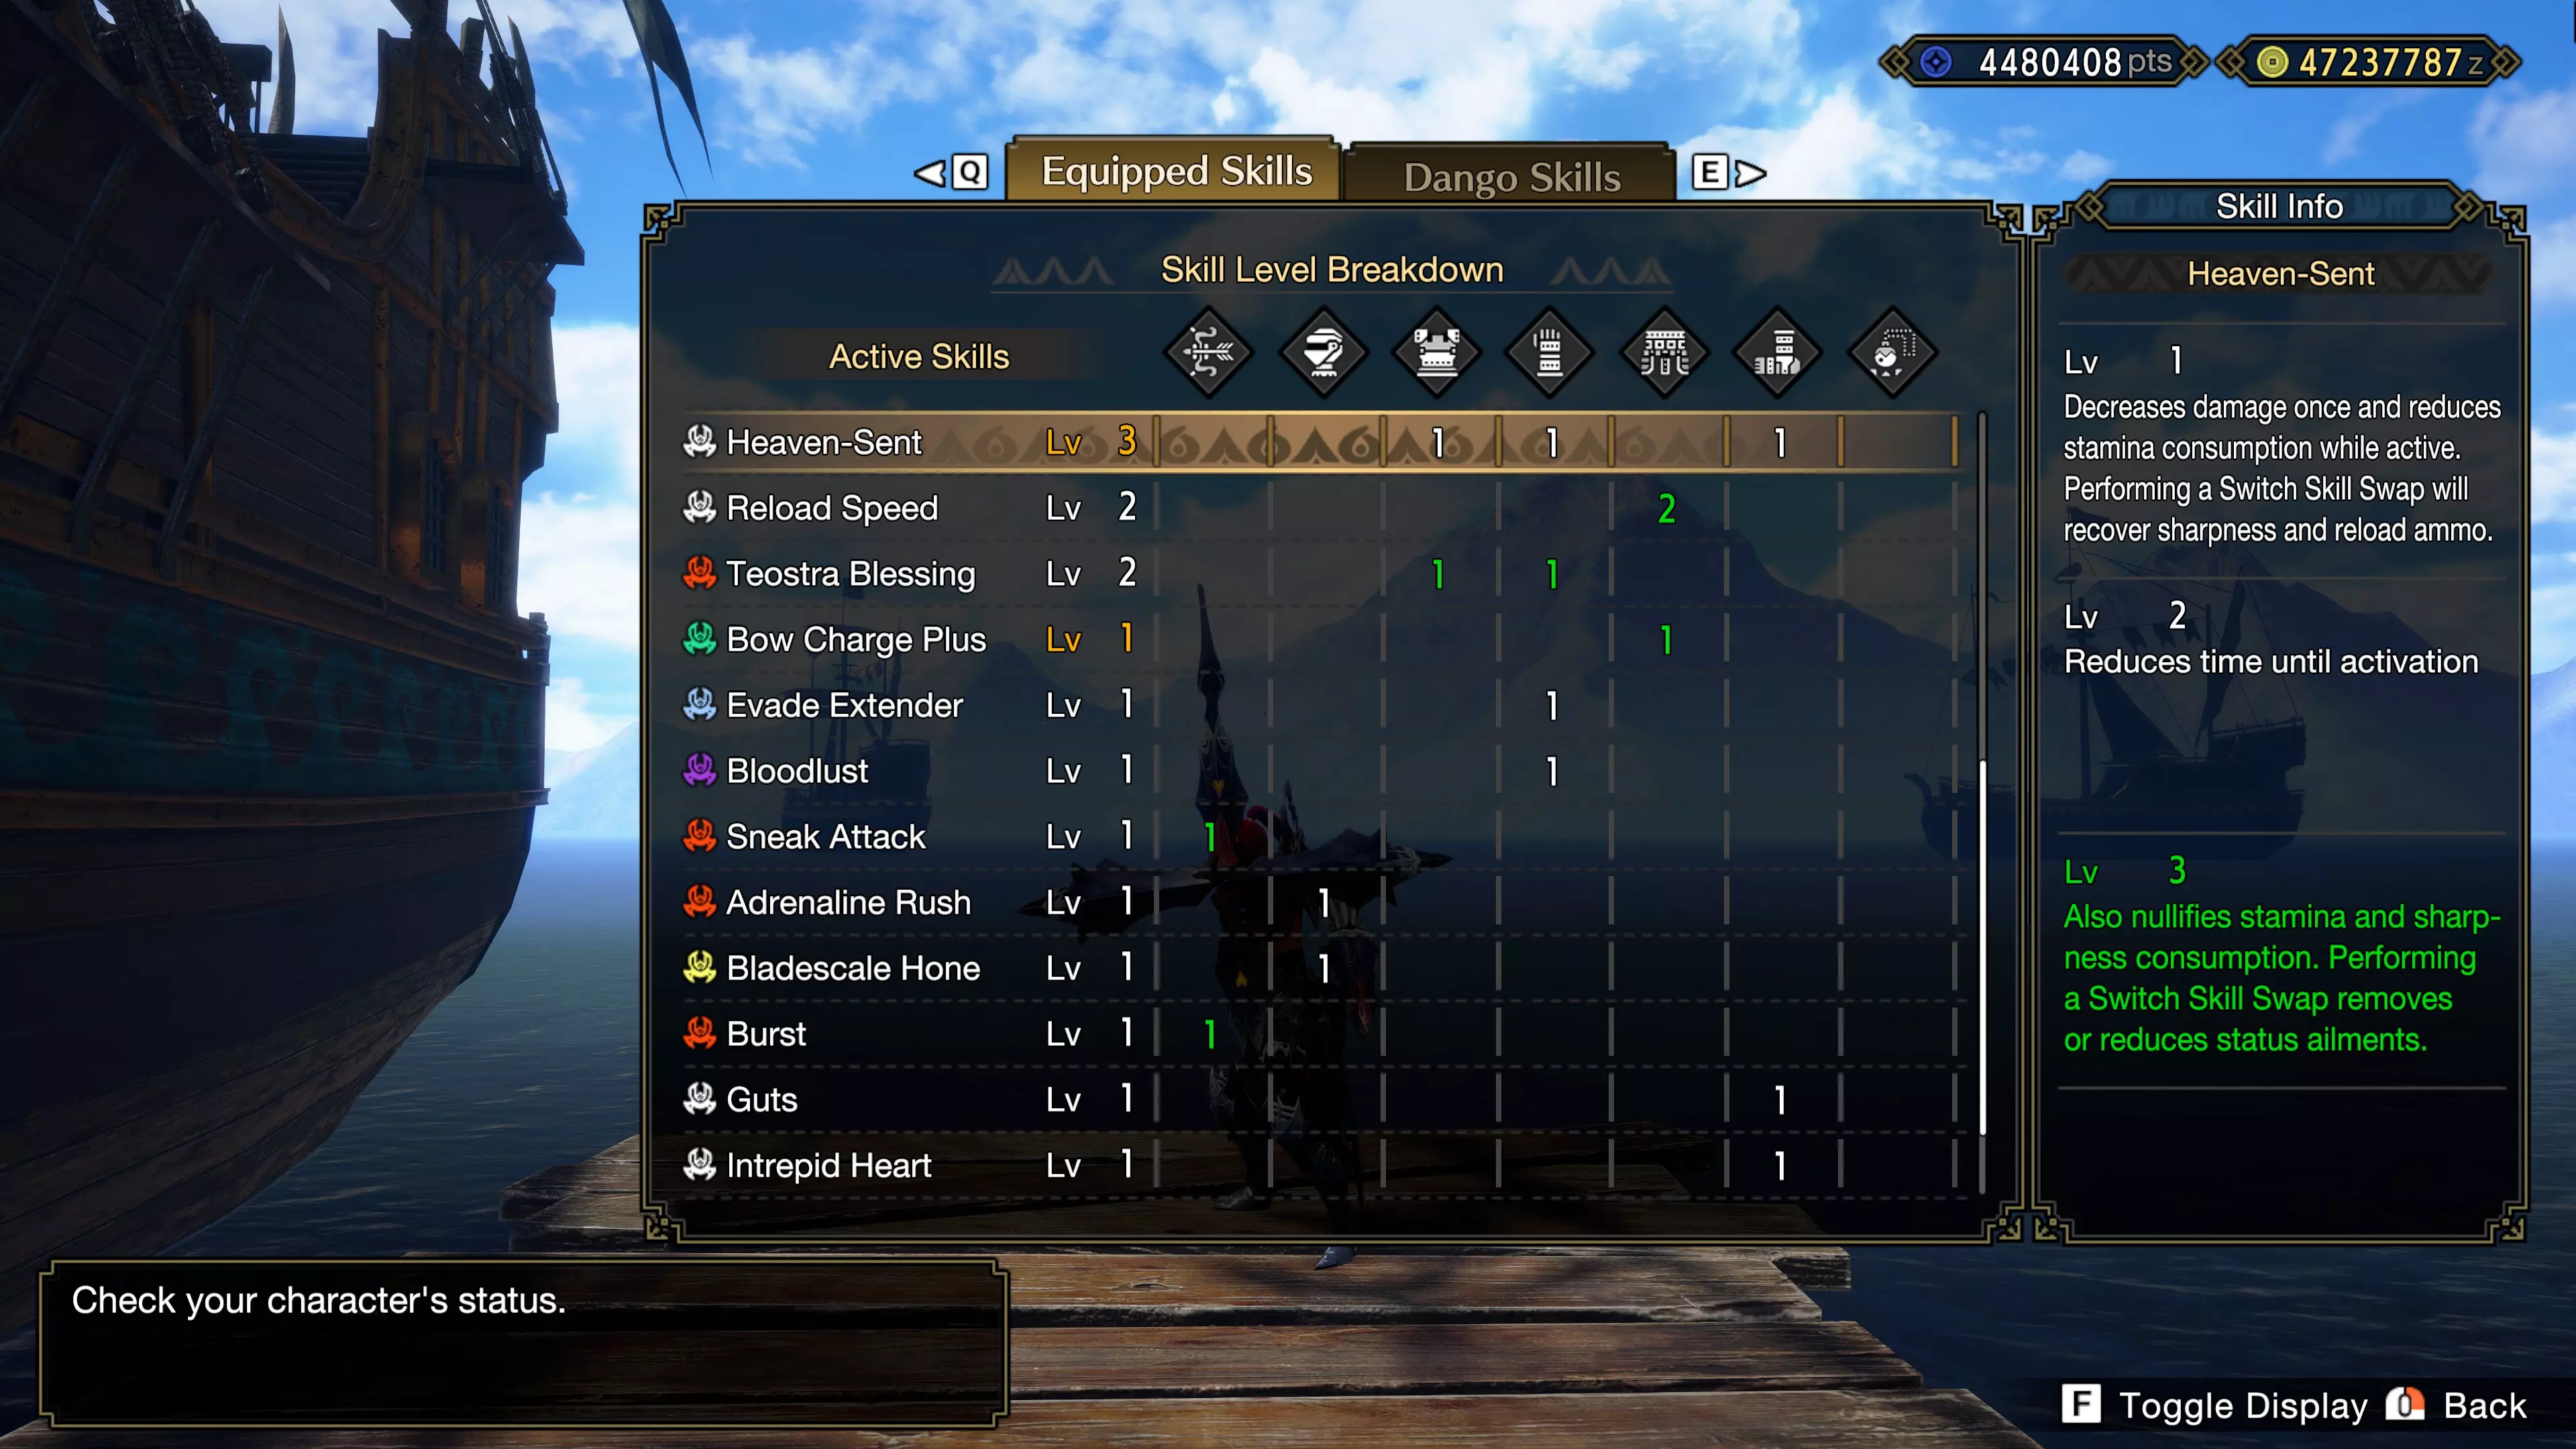
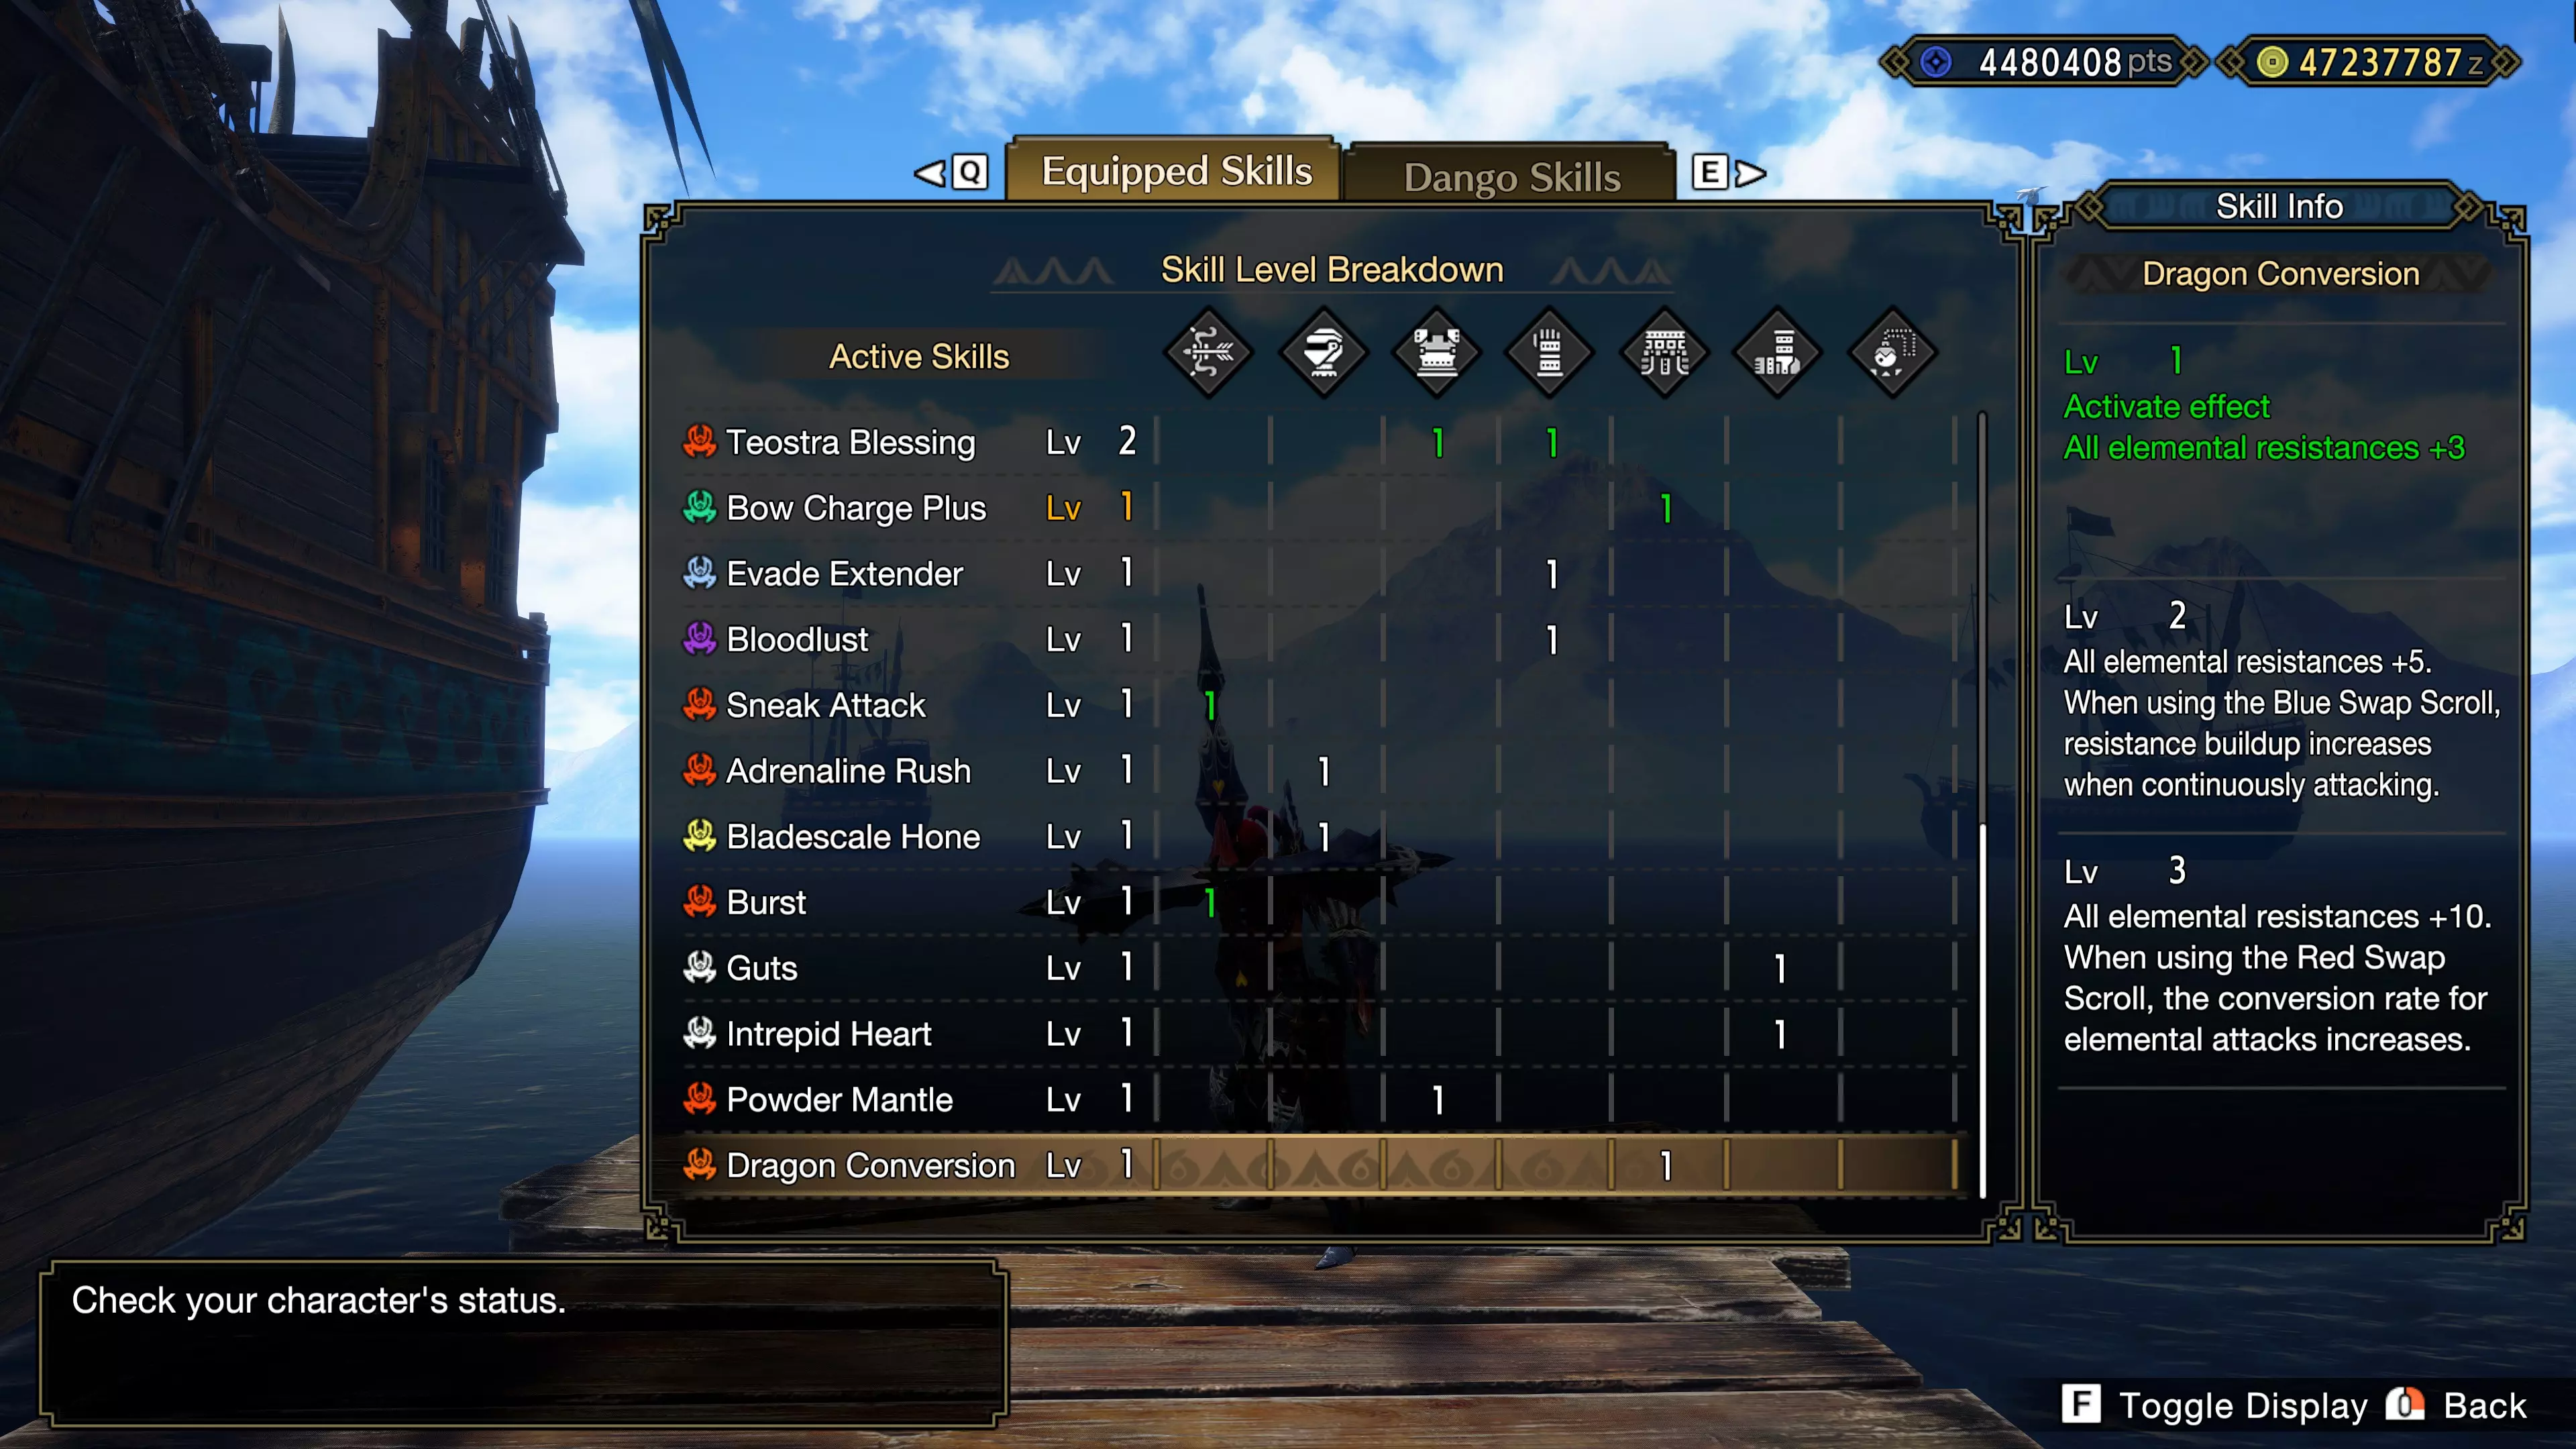
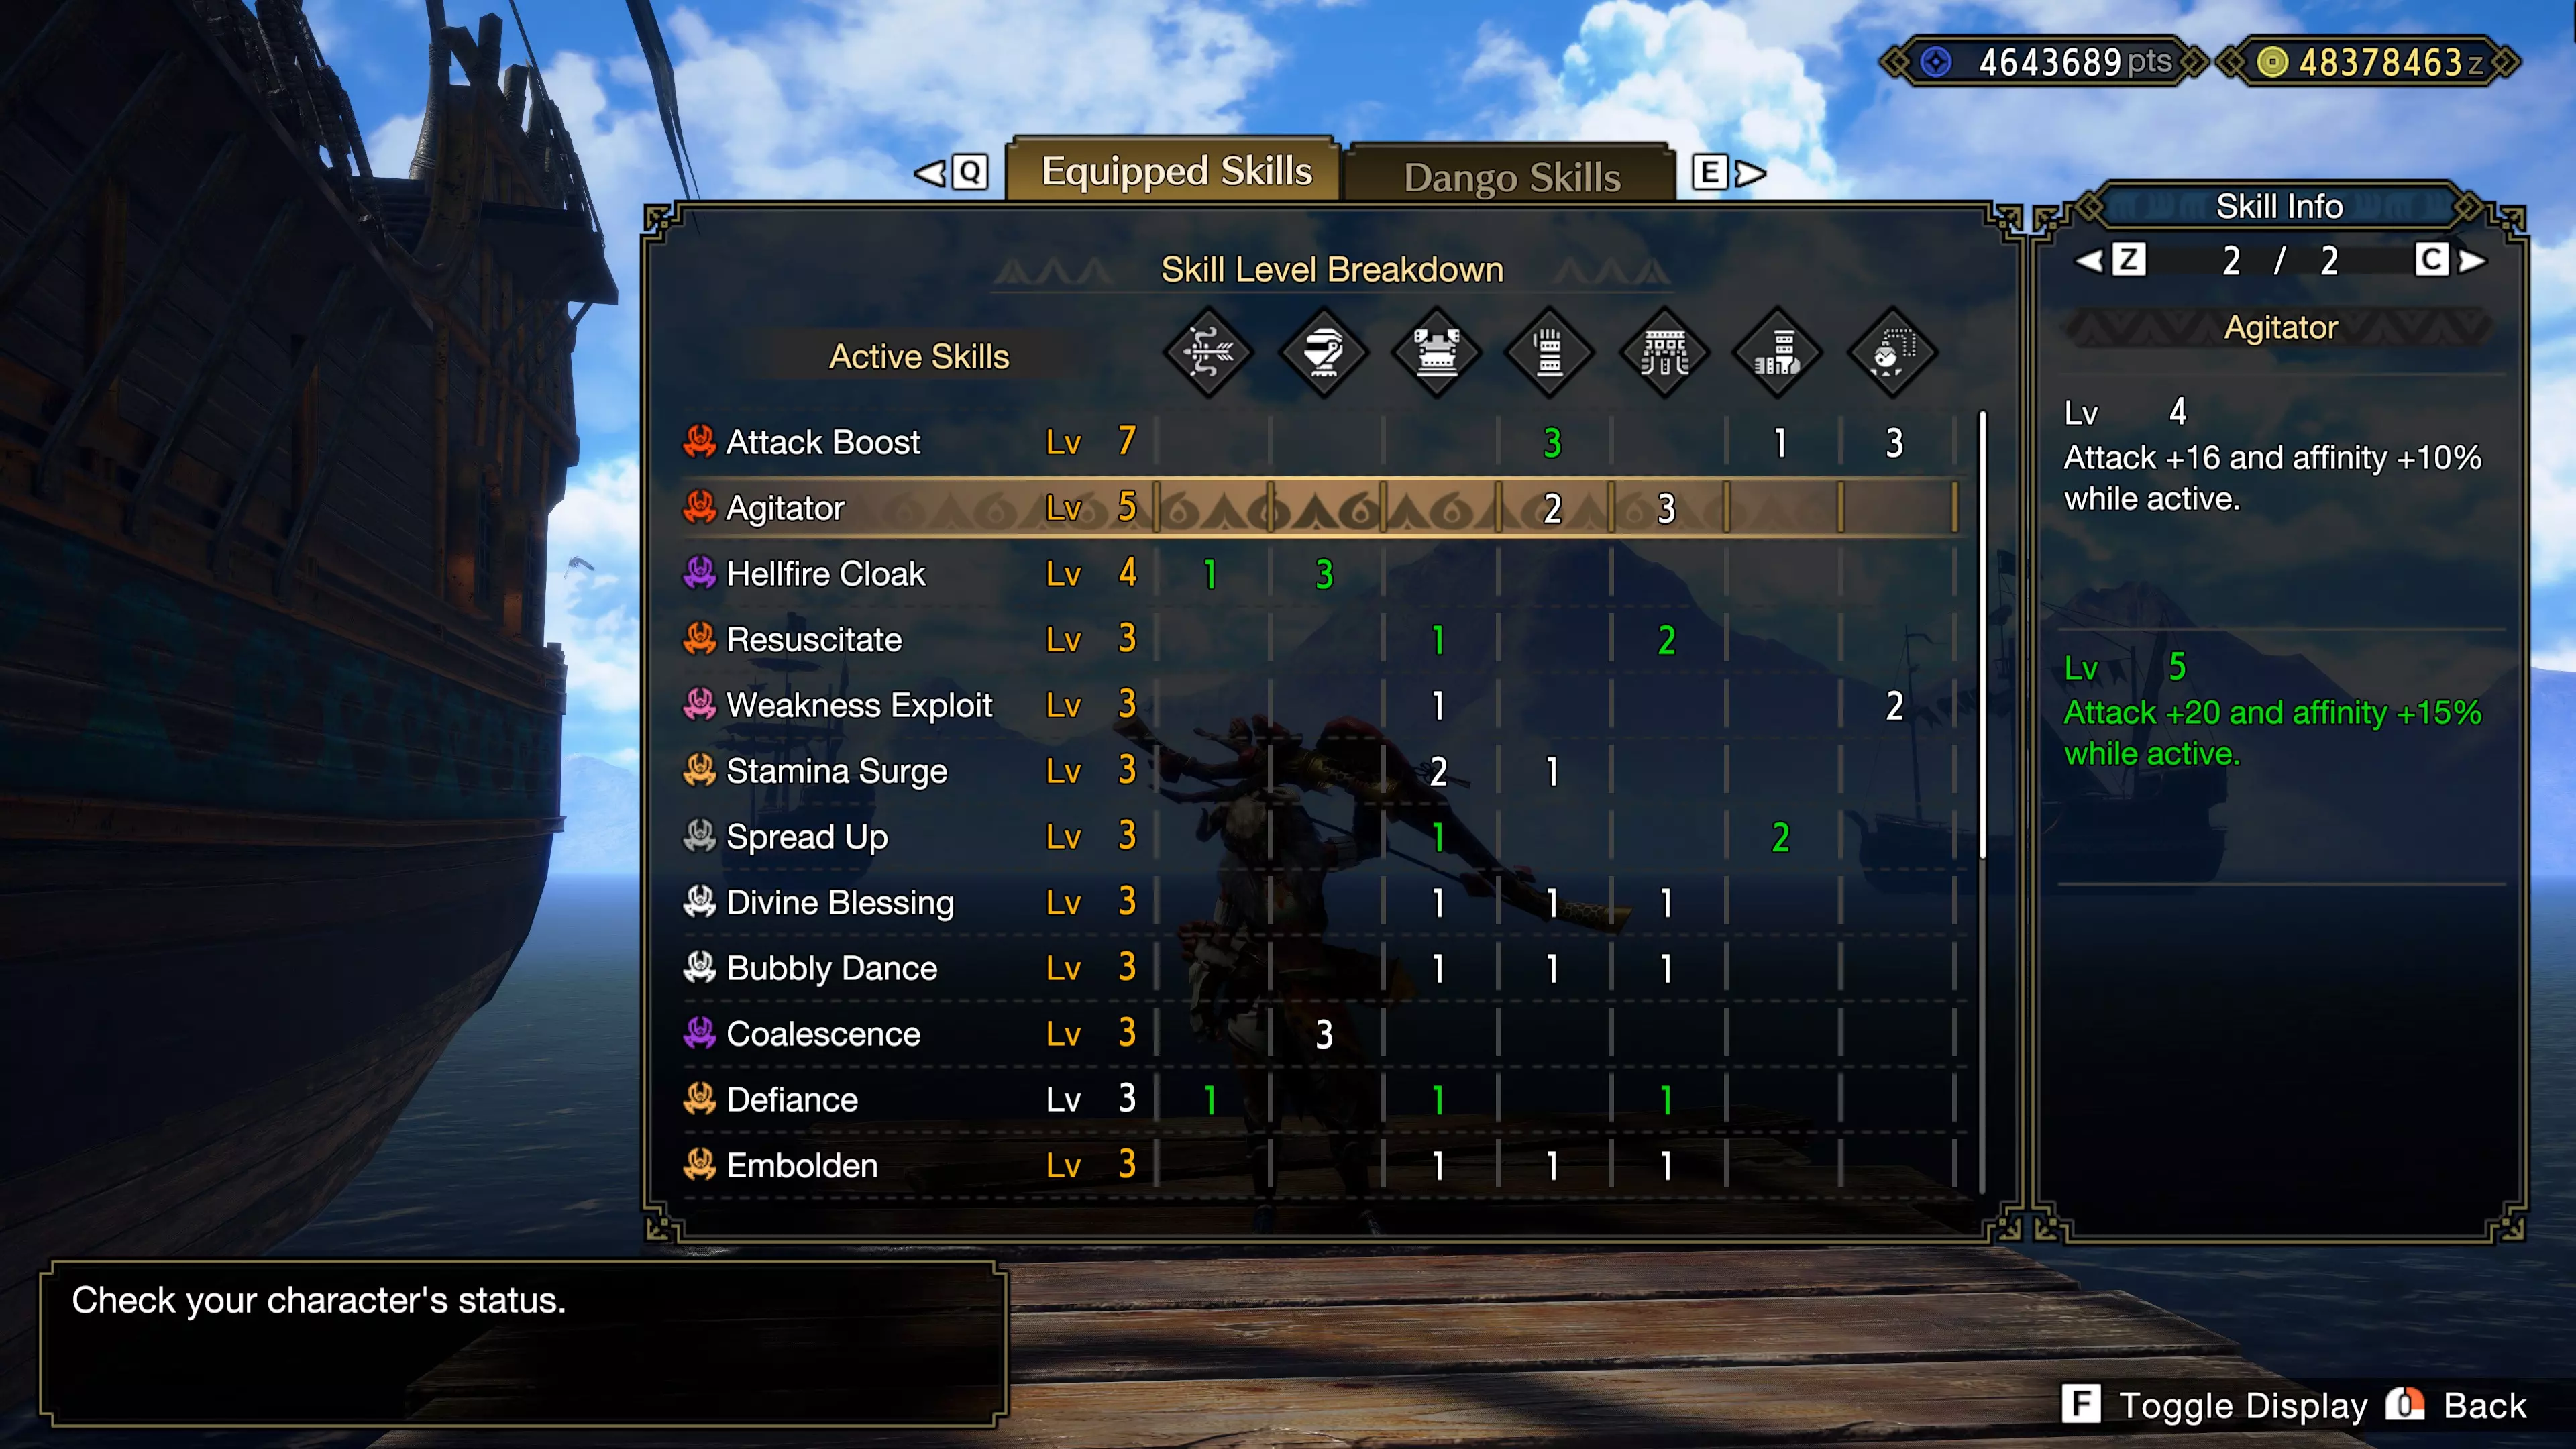
Three Wirebugs Your abilities become much easier to weave together if you've a third Wirebug available: You can activate both Herculean Draw and Bolt Boost via the use of Switch Skill Swap. You can both finish a combo with Aerial Aim and restart your loop with Herculean Draw. However, you'll have to forgo Bolt Boost in this situation. Alternatively, you can use Bolt Boost and Aerial Aim sparingly, in order to have access to Herculean Draw every ten seconds. That makes it a viable evasive maneuver that recharges stamina, but at the cost of resetting your Charge Level. Two Wirebugs If you've two Wirebugs available, you should prioritize opening with Herculean Draw. After you finish with Aerial Aim, open with Bolt Boost instead and reactive Herculean Draw as soon as possible (twenty seconds later). After all, an unused Wirebug is a wasted Wirebug. Step 6 (1/3): Essential Armor Skills These skills are mandatory for your Bow builds. Essential Skills Bow Charge Plus Level 1: Unlocks Charge Level 4. Some Bows have Charge Level 4 unlocked automatically. Constitution Level 2-5: Improves your internal stamina reduction by 10-20-30-40-50% (Level 1-2-3-4-5 respectively). Level 2 or 3 is the sweet spot, since you can compensate with Dango Fighter Level 4 or 3. Maxing out Constitution takes a lot of slots, but in return you don't have to eat/reset for Dango Fighter. Stamina Surge Level 3: Adds 10-20-40% (Level 1-2-3 respectively) to the replenishment rate of your stamina. Normal/Rapid Up, Pierce Up or Spread Up Level 3: Increases your damage by 5-10-20% (Level 1-2-3 respectively) if you're using the corresponding Arrow Type. Attack Boost Level 4-7: Provides +3-6-9-5%(+7)-6%(+8)-8%(+9)-10%(+10) Raw damage (Level 1-2-3-4-5-6-7 respectively). You need at least Level 4 for the percentage increase to make real use out of this skill. Fire, Water, Thunder, Ice or Dragon Attack Level 3-5: Provides +2-3-5%(+4)-10%(+4)-20%(+4) Elemental damage (Level 1-2-3-4-5 respectively). After Level 3 you'll get no further flat damage increase, so you should only slot in Level 4 & 5 as fillers. Element Exploit Level 1-3: Adds +10-12.5-15% (Level 1-2-3 respectively) Elemental damage to shots that hit a Elemental Weak Spot (20 or higher). Level 1 is mandatory for Elemental Bows. The small increases from Level 2 and 3 are not worth the armor slots. For the rampage decoration Elembane Jewel 3 (similar effect) a Elemental weak spot of 25 is required. Weakness Exploit Level 3: Adds 15-30-50% (Level 1-2-3 respectively) affinity (critical chance) to shots that hit a weak spot (45 or higher). Critical Eye Level 1-7: Increases the critical chance by 10-15-20-25-30-40% (Level 1-2-3-4-5-6-7 respectively). Add as much levels as necessary to reach 100% affinity. Critical Boost Level 3: Adds 30-35-40% (Level 1-2-3 respectively) damage to critical hits. Evade Extender Level 1: Increases the evade distance of your dodge. Necessary to make Dodgebolt an actual dodge. Level 2 & 3 make it more difficult to stay in Critical Distance. Reload Speed Level 2: Automatically applies Ammo Coatings. Makes it possible to switch Coatings on the fly, without having to reset your Charge Level. Level 3 is redundant. Berserk Level 2: With Berserk, you become invincible when you switch to the Blue Scroll. However, your health becomes red and starts depleting. If you get hit, your health depletes faster (which stacks with other health draining effects). How much faster depends on how much damage the hit would have dealt. Switching back to the Red Scrolls returns 50% of your remaining health as green health. Strife Level 3: At level 3. this skill negates stamina reduction if you're above 60% red health (making Berserk and/or Dereliction mandatory). With this skill you can forgo Constitution, Stamina Surge, Dango Fighter, Dash Juice and Go, Fight, Win. HealthLevel 1Level 2Level 3Above 60%+10% Elemental damage +10% affinity+15% Elemental damage +15% affinity+20% Elemental damage +20% affinity Negates stamina reductionBelow 60%+5% Elemental damage +5% affinity+10% Elemental damage +10% affinity+15% Elemental damage +10% affinity (2/3): Top-tier Armor Skills These skills improve the build significantly, but you don't have room for every single one. Top-tier Skills Adrenaline Rush Level 1-3: On a perfect evade you gain +10-15-30 (Level 1-2-3 respectively) Raw damage. Bladescale Hone Level 1-3: This boosts the damage of your Close-range Coating by 10% for thirty seconds after closely evading an attack. It has an activation chance of 50-75-100% (Level 1-2-3 respectively). It works with Dodgebolt, meaning Level 1 is enough for a consistent uptime. Bloodlust Level 1-3: If you hit a monster you'll become infected with Frenzy virus. This grants multiple buffs, but drains one healt per second for 120 seconds (it's not fatal). After sixty instances of damage you overcome the Frenzy and your buffs are replaced with an affinity buff. You also restore all your red health, meaning it pairs nicely with Dereliction. If you don't deal sixty instances of damage, the buffs will simply go away. In both instances you've got to wait ninety seconds for the next cycle. Buff sourceLevel 1Level 2Level 3With Frenzy virus+10 Raw damage +5 Elemental damage & Status build-up -10% stamina consumed Evade Window Level 1+15 Raw damage +7 Elemental damage & Status build-up -20% stamina consumed Evade Window Level 2+20 Raw damage +10 Elemental damage & Status build-up -30% stamina consumed Evade Window Level 3Overcame Frenzy Virus+20% affinity for sixty seconds+25% affinity for sixty seconds+25% affinity for ninety seconds Coalescence Level 1-3: When you recover from an abnormal status (like the Frenzy virus from Bloodlust) you gain +12-15-18 (Level 1-2-3 respectively) Raw damage, +2-3-4 (Level 1-2-3 respectively) Elemental damage and 5-10-15% (Level 1-2-3 respectively) Status build-up, for thirty seconds. You can keep this skill active almost indefinitely if you combine it with both Blood Lust and Bubbly Dance. Mail of Hellfire Level 1-3: Each Scroll gains different buffs. Scroll TypeLevel 1Level 2Level 3Red Scroll+15 Raw Damage -50 Defense+20 Raw Damage -75 Defense+25 Raw Damage -100 DefenseBlue Scroll+5% Elemental Damage Damage -10 Resistances10% Elemental Damage Damage -25 Resistances+20% Elemental Damage Damage -50 Resistances Dereliction Level 1-3: You start the hunt with one leech and every forty-five seconds another leech will spawn, with a maximum of three. You gain various buffs when having a leech attached to you, which improve as the amount of leeches increases. If you perform a Switch Skill Swap, you consume one or two leeches and recover the health each leech consumed. Ideally you want to play on the same Scroll for as long as possible, and only use Switch Skill Swap to prevent carting. Then immediately swap back to either the Raw or Elemental buff (depending on your build). This skill always drains one health per second, but it's not fatal. Scroll TypeLevel 1Level 2Level 3Red Scroll+5-8-12 Elemental damage ? Status build-up+7-12-15 Elemental damage ? Status build-up+10-15-20 Elemental damage ? Status build-upBlue Scroll+15-20-25 Raw damage +0-5-10% Stun build-up+20-25-30 Raw damage +0-10-15% Stun build-up+25-30-35 Raw damage +0-10-20% Stun build-up Bubbly Dance Level 3: Level 3 is mandatory, because at that level you can activate the skill on command via three rolls or four evades (Dodgebolt). Because you can reactivate it so easily, it has a lot of synergy with both Coalescence (see above) and Resuscitate (abnormal statuses provide +5-10-20 Raw damage at Level 1-2-3 respectively). Bubbly Dance ends after thirty seconds or if you get hit. While active: Level 1Level 2Level 3Reduces the effects of BubbleblightReduces major to minor Bubbleblight Provides Evade Window Level ?Inflicts Bubbleblight after consecutive evades. Provides Evade Window Level 2 Provides Constitution Level 2 Burst Level 1-3: Gain +5 Raw damage and +2 Elemental damage for every hit. After five hits it maxes out at +10-12-15 (Level 1-2-3 respectively) Raw damage and +4-6-8 (Level 1-2-3 respectively) Elemental damage total. After three seconds of not hitting the buffs reset. Sneak Attack Level 1-3: Adds +5-10-20% attack when attacking the monster from behind. The sides work too, as long as you're more behind the monster than in front of it. This skill is most useful for Pierce Bows. The 12% in the skill description is mistranslated. Powder Mantle Level 1-3: After 150 hits (reduced by 25-50% for Level 2-3 respectively), red powder will form around you. If you get hit, you get sent flying and deal 130% damage for one hit. If you don't get hit for twenty seconds, the powder will turn blue for ten seconds. With blue powder you deal 125% damage for one hit. If you do nothing the powder will keep changing colors indefinitely. Once you've dealt the extra damage, the powder will go away and you've to build it up again. Blood Rite Level 1-3: Recover 3-6-10% (Level 1-2-3 respectively) of your damage dealt as HP when hitting a broken part. Has nice synergy with Partbreaker (part damage +10-20-30% at Level 1-2-3 respectively) and Recovery Up (+10-20-30% more health restoration at Level 1-2-3 respectively). Mandatory Armor Some skills aren't available on talismans, via decorations or through Qurious crafting. You can only get access to them via their respective armor. Therefor you should prioritize these armor pieces. ArmorSkillArchfiend Armor Epine Archfiend Armor ScerosDereliction (3/3): Situational Armor Skills These skills are all useful, but situational. Either because they're too inconsistent, niche, outclassed and/or because they require dedicated builds. Situational Skills Fortify (only slot in after carting once) Blood Awakening (needs Blood Rite or Bloodblight) Resentment (only consistent with Dereliction or Berserk) Maximum Might (only consistent with Berserk or Heaven-Sent) Charge Master (only with the +Element Bow augment) Critical Element (only with the +Element Bow augment) Resuscitate (only consistent with Bubbly Dance) Buildup Boost (only if you use Blast Bows) Status Trigger (only if you use Blast Bows) Peak Performance (only if you use no health draining skills) Wirebug Whisperer (only use Level 1 or 3) Redirection (only useful at Level 2) Quick Breath (only if you can Switch Skill Swap) Heaven-Sent (a worse version of Strife, but without health drain) Furious (the worst version of Strife, also without health drain) Agitator (good, but inconsistent) Defiance (good, but inconsistent) Divine Blessing (good, but inconsistent) Latent Power (good, but inconsistent) Ballistics (only if you use Bolt Boost) Stamina Thief (percentage boost adds little value) Slugger (percentage boost adds little value) Special Ammo Boost (Dragon Piercer isn't viable) Punishing Draw (don't sheathe your Bow) Critical Draw (don't sheathe your Bow) Step 7 (1/5): Progression Builds Quick and easy builds that are meant for progressing through the game. It should be noted that Bow is notoriously difficult in Low and early High Rank on your first run. Defender Gear Like it or not, you've access to Defender Gear. Which is very strong and can be used to quickly progress to the end game. The Defender Bow is great, so feel free to use that over the recommended Bows. The Defender armor set does have high defense, but with little investment you can get a build more suited for Bow. Low Rank Star LevelBowHeadBodyArmsWaistLegsTalisman1Kamura Iron Bow IIIzuchi HelmKamura GarbIzuchi BracesLagombi CoilChainmail Pants-2Kamura Iron Bow II-Ludroth Mail----3Kadachi Strikebow----Kadachi Greaves-3Kadachi Strikebow IIZinogre Helm-Zinogre BracesDiablos CoilZinogre GreavesConstitution Level 1 High Rank Star LevelBowHeadBodyArmsWaistLegsTalisman4Kadachi Strikebow IITetranadon Helm STetranadon Mail SIzuchi Braces SLagombi Coil STetranadon Greaves SConstitution Level 15Yekla Bow------6Yekla Bow IIKadachi Helm SLudroth Mail SVaik Braces SVaik Coil SZinogre Greaves S-7Herald's Battlebow-Zinorgre Mail S--Rakna Greaves- Bow Charge Plus When you unlock Arena 05, you can get the Mighty Bow Feather. With access to Bow Charge Plus you can use Rapid Elemental Bows. These Bows have a higher damage ceiling compared to Raw Bows. You don't need them to finish the story, but it's a nice stepping stone towards the end game builds of base Rise. HeadBodyArmsWaistLegsTalismanMighty Bow FeatherTetranadon Mail SVaik Braces SLagombi Coil SRakna GreavesWeakness Exploit Level 1 Rapid Elemental Bows: Fire: Flaming Rage Bow Water: Heaven's Manna Thunder: Flying Kadachi Striker Ice: Heaven's Glaze Dragon: Azure Elder Bow II If you've bought the expansion you can keep using the Ore 2 Weapon Tree. These Bows have access to Charge Level 4, even without Bow Charge Plus. In early Master Rank you'll be using similar Raw Bows. Building five elemental sets with Bow Charge Plus will make the start of Master Rank more comfortable, but is completely optional. Source:
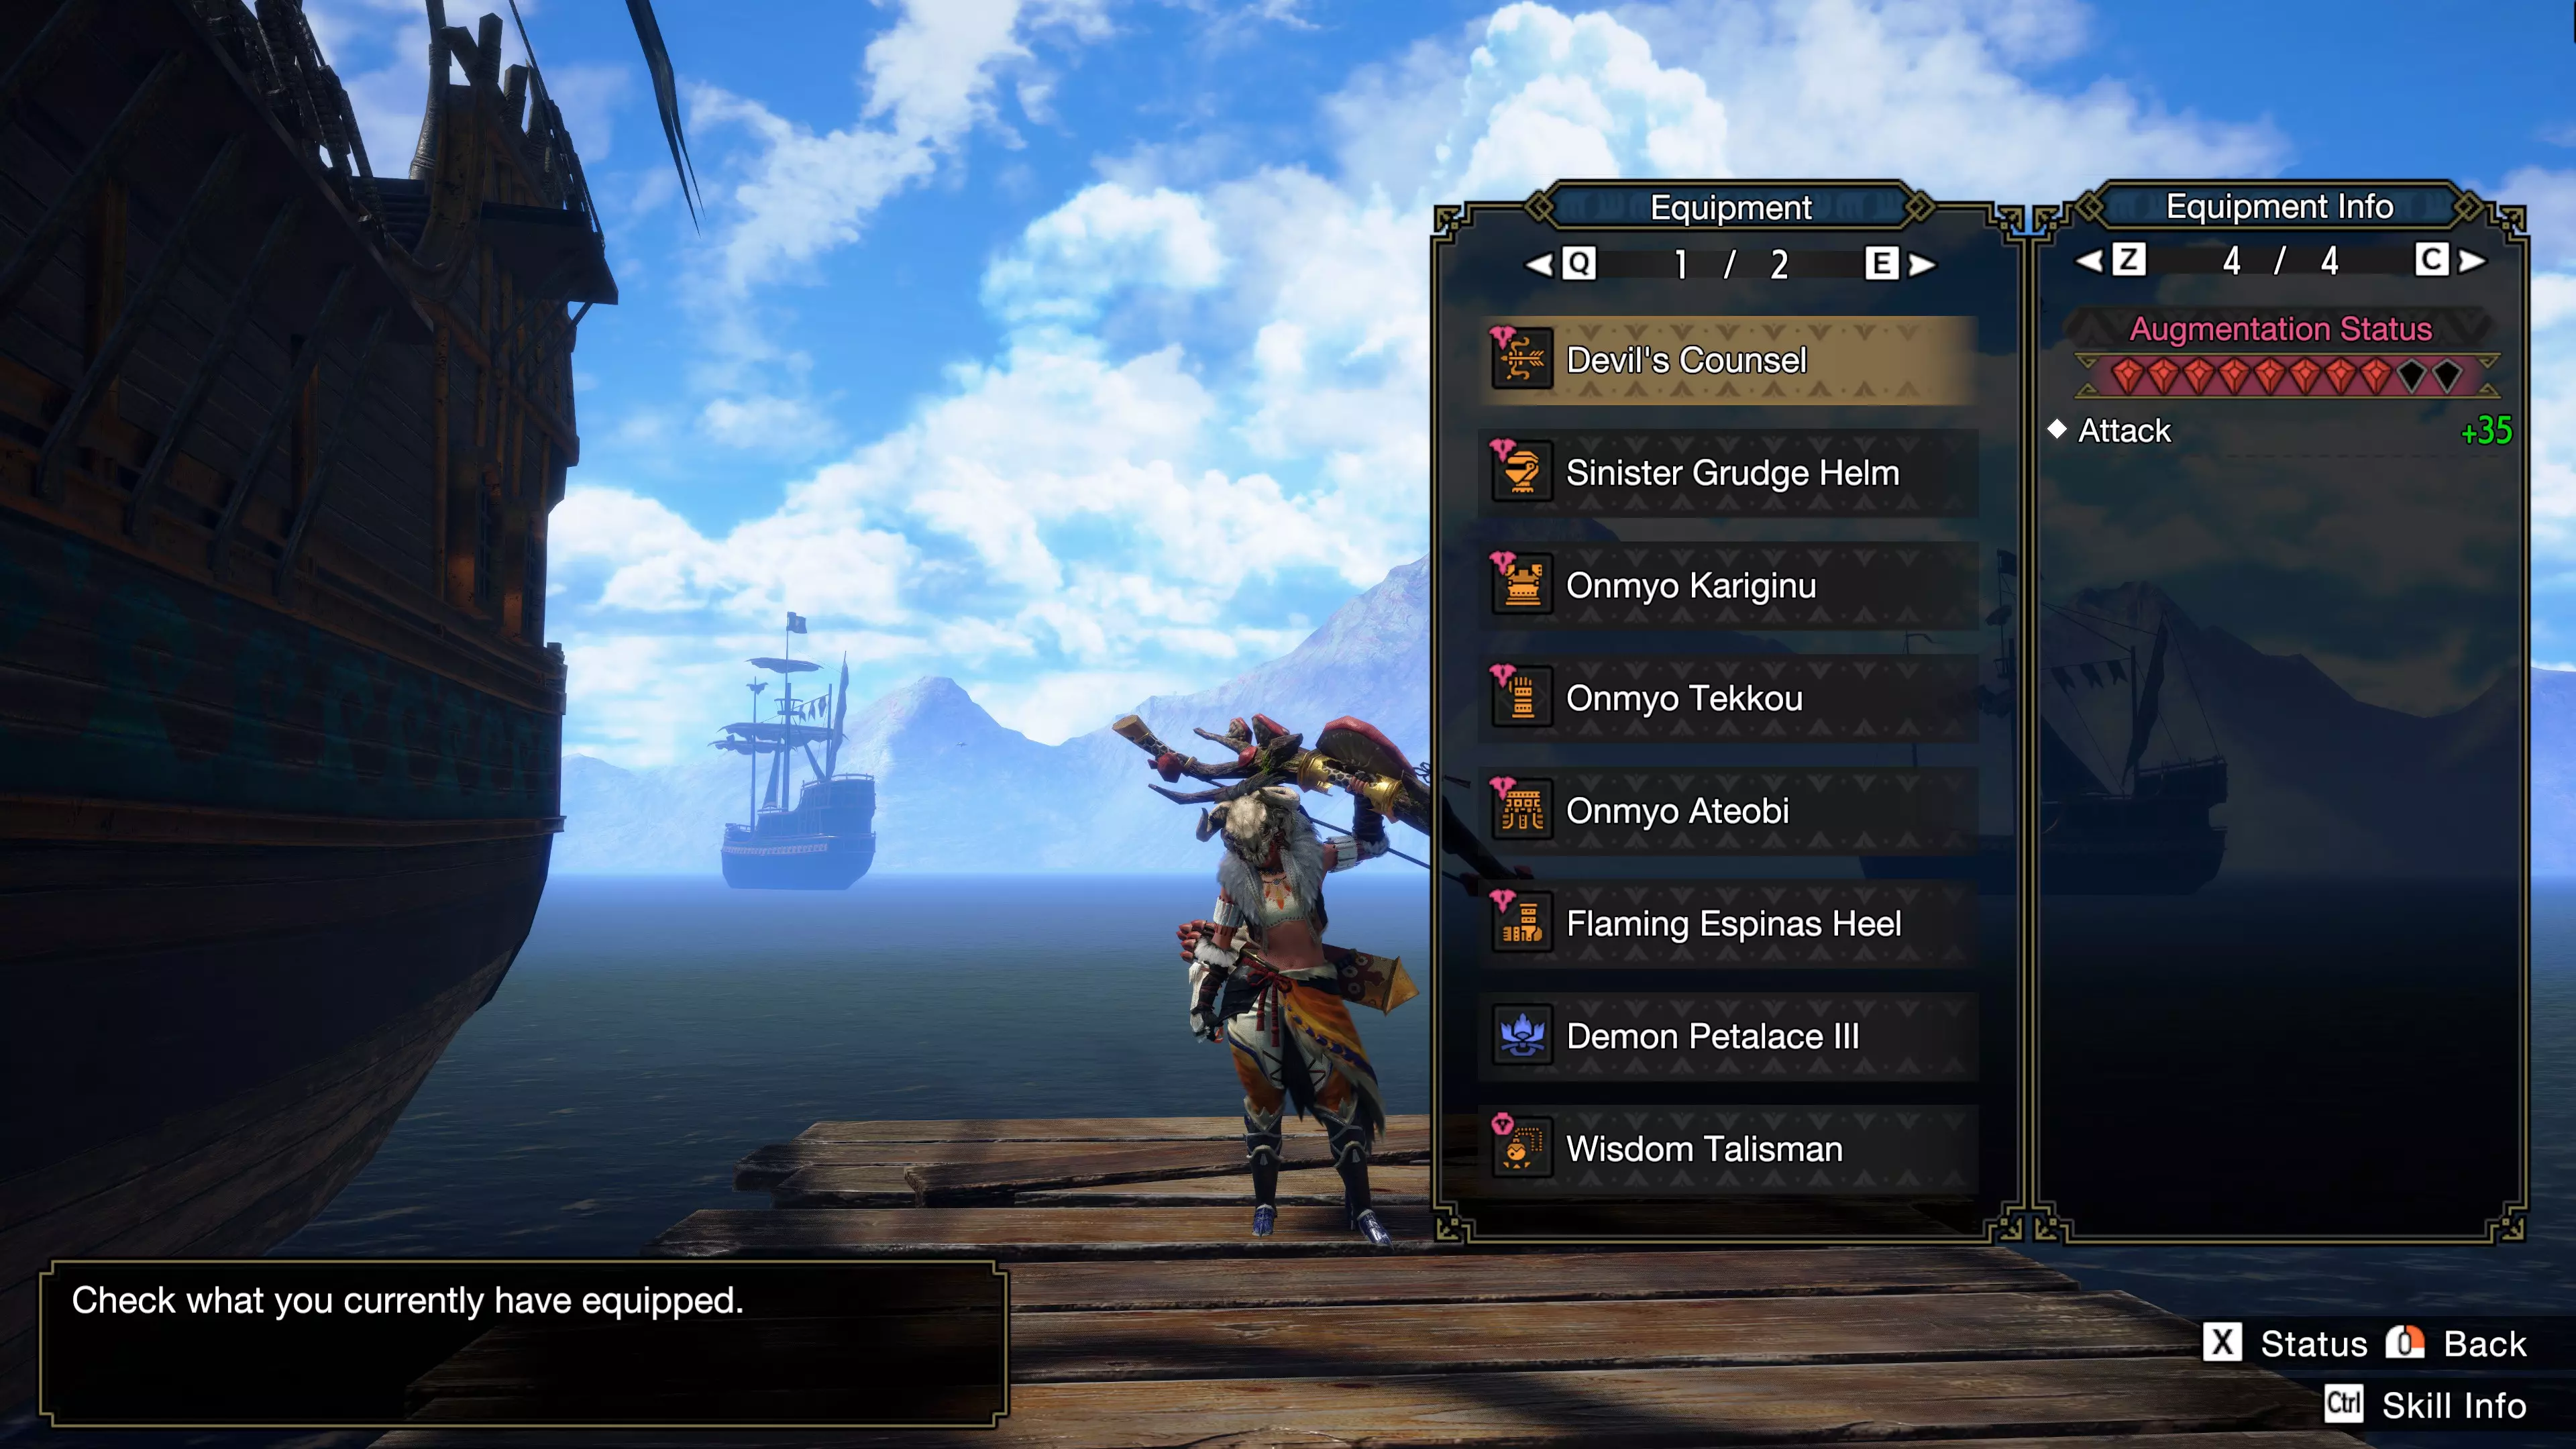
大师等级 你可以使用上位的强弓羽,但技能、装饰槽的缺失以及较低的防御力会带来相当大的劣势。大师等级可视为一个全新的开始,因此建议尽快从上位装备过渡。 星级 弓 头部 身体 手臂 腰部 腿部 护符 1 传令官战弓 水兽头盔X 水兽铠甲X S.鳞甲手套X 白兔兽护腰X 未知护腿X 体力等级1 2 传令官战弓+ ------ 3 先驱战弓 水兽头盔X 水兽铠甲X Rakna Armguards X Spio Elytra X Rakna Greaves X 弱点特效等级1 达到大师等级3后,你可以装备三个3级装饰槽来镶嵌射击类型强化装饰。这样无需依赖特定 armor,就能在三种射击类型中进行选择。你还没有【蓄力箭强化】技能,这意味着你应该使用以下弓: 速射型:矿石2系 扩散型:橙花天牛系 贯通型:将军系 星级 头部 身体 手臂 腰部 腿部 护石 4级 雄火龙X头盔 电龙铠甲 Rakna护手X Spio护腰X 毒妖鸟护腿X 弱点特效1级 5级 Storage/Arc头盔 - - - - - - 【蓄力箭强化】 首次击败加尔姆后,你就可以开始刷4级强弓珠了。和上位时一样,有了蓄力箭强化,你就能打造第一套属性流派配装。 头部:Storage/Arc头盔 身体:狱狼龙铠甲Baulo 手臂:Rakna护手X 腰部:激昂金狮子护腰 腿部:狱狼龙铠甲Sceros 护石:- 大师等级10 达到大师等级10后,你将解锁混沌黑蚀龙套装。该套装几乎能满足弓手所需的一切。我强烈建议在刷取更优化的配装时使用它。 (2/5):刷装配装 这些配装旨在帮助你在任务中刷取资源。对于一般狩猎,这些配装的表现顶多算糟糕。 探索配装 目标 此配装能让资源刷取效率最大化。它仅适用于狩猎小型怪物(以便进行双倍剥取)和驾驭飞龙。 团子 团子剥取术【大】等级4 团子骑手等级3 团子丰收术等级1 团子召唤术等级1 团子采集术等级1 模板
狂暴珠:翔虫珠1或小型怪物珠1。 调整建议: 如果不需要额外剥取,你可以解放头部装备栏。 配装使用: 不需要携带任何物品,清空你的物品袋即可。补给箱提供的免费回复道具已经足够(搭配自由餐券效果更佳)。也不需要携带涂层。 确保至少有一个翔虫卷轴具备空中瞄准技能。获取第三个翔虫和金色翔虫,然后连续骑乘所有怪物,每只怪物可获得6个掉落物。收集掉落物时,击杀所有小型怪物(进行双倍剥取),并沿途收集所需的所有资源。回避距离延长能增加翔虫突进的距离,便于垂直移动。随行兽在长距离移动时会很有用。它还拥有额外的物品存储空间,并且可以通过【Sniff 'em Out】在地图上标记特定物品。收集后你可以返回(不要放弃)任务,并重复此过程。 (3/5):舒适配装 这些配装不使用带有负面效果的技能。 天降配装(元素) 目标 此配装利用【天降】来获得无限耐力 buff。伤害方面则依靠【狂怒】和【龙气转换】之间的协同作用。 团子 团子射手/团子足力 等级4 团子毅力/团子肾上腺素 等级3 团子调和 等级1 或 团子助推器 等级1 团子斗士 等级1 模板
狂暴珠:选择【元素抑制珠3】或【对种属珠2】。 配装调整: 利用弓的装饰孔进一步提升会心值。 配装使用方法: 首先切换至蓝卷。当积累满100次命中以叠加抗性后,切换至红卷将抗性转化为元素伤害。狂怒状态提供的抗性会在切换时自动转化。 天惠效果会在30秒后激活。若不妥善管理耐力,这段时间可能会耗尽耐力,饮用【强走药】可帮助度过这一阶段。天惠激活后,在两种卷轴下均持续生效,切换卷轴可治愈大部分异常状态,但需注意此时需要重新积累抗性。【天赐】会在你离开战斗或被击退时失效。【无畏之心】可周期性防止被击退,而闪光弹能防止离开战斗。若【天赐】失效,【狂怒】可作为备用效果。在红色卷轴状态下,你会积累狂怒值。当狂怒值达到100时,切换到蓝色卷轴状态可获得90秒的无限耐力。 攻击弱点可获得50%会心,若【天赐】或【狂怒】激活,【极限会心】可额外提供20%会心。拥有【鼓舞咆哮】技能的艾露猫能周期性提供剩余30%的会心。 【肾上腺素激增】和【鳞粉研磨】通过【闪避斩】触发,因此要留意反击机会。当【天赐】激活时,你将获得50%伤害减免。【团子之足】提供一定几率减少伤害。两者都能提供一定的保护,但不要冒险承受多段攻击。 (4/5):主流配装 这类配装几乎完全专注于输出伤害。 狂战士配装(元素) 目标 无限耐力、无敌状态以及适量的恢复技能,以应对生命值消耗。一只专注于治疗的艾露猫会非常有用。 团子 超级恢复团子4级。 团子足/射手3级。 团子 temper 1级或团子 booster 1级。 模板

狂暴珠:选择灭尽龙宝珠3或对种属宝珠2。 配装调整 参考“选择弓的部分”来获取最优元素弓推荐。 如果你追求极限,可以加入龙气技能以进一步提升伤害。但仅建议在速通时使用此配置。 配装使用 狩猎过程中,你大部分时间都需要使用蓝卷。使用免疫剂和美味鱼(它们能与风翔龙祝福及大回复团子叠加效果)来大幅减少几乎所有的生命值消耗。进入战斗时,狂龙病毒会激活,这足以抵消你的生命恢复效果。请注意,生命值消耗可能导致你猫车。 切换至蓝卷可抵消耐力消耗。克服狂龙病毒应该不成问题。这会恢复你所有的红色生命值,也就是你在蓝色卷轴状态下的整条血条。 由于你无需管理耐力,完全可以放弃强力截击。仅使用强力射击进行冲刺闪避能造成更高伤害。不过在某些情况下,你可能会想要选择强力截击带来的额外眩晕伤害。 如果你在蓝色卷轴状态下受到攻击,不会受到伤害。但这会加快你的生命值消耗速度。要记住,如果你的红色生命值降至60%以下,无限耐力状态就会结束,这意味着你迟早得切换回红色卷轴。在红色卷轴状态下停留几秒钟,就能将生命值消耗速度重置为初始值。 切换回红色卷轴的时机越早,因过度生命值消耗而损失的生命值就越少。当生命值降至60%以下时,消耗剩余耐力通过嗜血获得免费治疗,然后切换状态。如果必须治疗,在红卷状态下进行。如果可能,先将怪物固定。在红卷状态下,任何攻击都可能让你猫车。此外,低生命值时你会吸引大量仇恨。 切换到红卷状态会触发快速呼吸效果。它还会将剩余红血的50%转化为绿血。另外50%的红血会保留,这意味着如果切换回原状态且未受到伤害,这部分红血会保留。耐力无效效果结束,但狂怒状态的生命值流失也会停止。不过,狂龙病毒不会被治愈,其生命值流失会继续。 你的基础会心为10%。当激昂状态激活时,你将额外获得10-20%的伤害加成,最大威力技能可再提供20%加成。最后的50%伤害加成来自弱点特效。作为奖励,当你克服狂怒病毒时,将额外获得25%的伤害加成。该效果持续90秒,之后你会再次感染狂怒病毒。 你还需要抓住反击的机会,因为成功使出回避性能后可以触发肾上腺素激增和龙鳞打磨。由于有狂化状态,你可以承受高额伤害,因此没有风险。 唯一真正的风险是过度的生命值消耗或不幸的快速切换。狂化、嗜血、中毒、燃烧和血瘴都会叠加。如果受到的攻击同时导致你眩晕或麻痹,情况可能会相当危险。在怪物高度仇恨的情况下,可能很难找到切换的机会。狂战士流派(元素) 目标 该流派专注于血之觉醒及其与血之仪式和部位破坏的协同效果。生命值消耗可能会出乎意料地快,但生命值恢复速度也同样迅速。 团子 超级恢复团子 4级 团子足/射手 3级 团子 temper 1级或团子 booster 1级 模板
狂暴珠:选择【元素抑制珠3】或【对种属珠2】。 配装调整 参考“选择弓的部分”来获取最优元素弓推荐。 配装使用 狩猎时大部分时间使用蓝卷。使用免疫剂和美味鱼(可与风漂龙祝福、大回复团子叠加)来减少生命值消耗。进入战斗后会激活狂气病毒,其效果足以抵消你的生命恢复。注意生命值消耗可能导致猫车。 切换到蓝卷可抵消耐力消耗。克服狂气病毒不成问题,这会恢复你所有的红色生命值,也就是蓝卷状态下的全部生命值。 由于无需管理耐力,完全可以放弃强击瓶。仅使用强力射击进行冲刺舞步能造成更高伤害。不过在某些情况下,你可能会选择使用强力截击来获得额外的眩晕伤害。 当你处于蓝卷状态时受到攻击不会承受伤害,但这会加快你的生命值消耗速度。需要注意的是,当你的红色生命值降至60%以下时,无限耐力状态将会结束,这意味着你迟早必须切换回红卷。在红卷状态下停留几秒钟会将生命值消耗速度重置为初始值。 切换回红卷的时机越早,因过度生命值消耗而损失的生命值就越少。如果生命值降至60%以下,使用剩余的耐力通过嗜血获得免费治疗,然后再切换。如果必须治疗,要在红卷状态下进行。如果可能,先将怪物固定住。装备赤卷时,任何攻击都能让你猫车。此外,低生命值时你会吸引大量仇恨。 切换至赤卷会将剩余红血的50%转化为绿血。另外50%仍保留为红血,这意味着如果你在不受伤害的情况下换回其他卷轴,这部分红血会保留。耐力无效效果结束,但狂化状态的生命值流失也会停止。不过,猛毒的生命值流失会继续。 部位破坏技能有助于快速破坏弱点,以触发血之仪式和回复强化。这能让你恢复足够生命值来对抗过度的生命流失,但前提是你能持续攻击。受到攻击时的治疗(即使满血)会激活血之觉醒,大幅提升伤害。狂怒、嗜血、中毒、燃烧和血瘴均可叠加。若受到攻击导致倒地,情况会相当危险,更不用说同时被击晕或麻痹了。因此,出现破绽时应及时切换状态。 你需要抓住反击机会,成功施展回避突刺可触发肾上腺素激增和鳞刃磨砺。借助狂怒状态,你仍能承受高额伤害,但仅一级狂怒时,生命值消耗会迅速成为问题。不建议进行不必要的冒险。 纷争激活时你将获得10%-20%的会心,最大威力额外提供30%会心,剩余50%会心来自弱点特效。此外,克服狂龙病毒后还会获得25%会心,该效果持续60秒,30秒后你将再次感染狂龙病毒。(5/5):娱乐配装 这类配装玩起来很有趣,但实战不太实用。主要原因是它们侧重于物理伤害,而非元素伤害。不过优点是,每个配装不需要准备十五套装备。 天赐配装(爆破属性) 目标 该配装使用各种爆破属性弓,因此需要【状态触发】和【积蓄强化】技能。【天赐】技能能满足你的耐力需求,还能提供出色的伤害减免。 团子 【射手团子】/【飞毛腿团子】等级4 【不屈团子】/【肾上腺素团子】等级3 【调和团子】等级1或【强化团子】等级1 【斗士团子】等级1 配装模板
狂化宝珠:炎王龙灵魂宝珠2。 适配武器 炎王龙(速射)和猩猩(扩散)武器派生是其他射击类型的最佳选择。后者不需要弓蓄力强化。 若追求更高伤害,可将弓的强化属性从爆破改为物理。但如果以伤害为目标,不如直接打造纯物理流派。 配装使用 天惠效果会在30秒后激活。若不妥善管理耐力,这段时间可能会耗尽耐力。饮用强走药可以帮助度过这个阶段。激活后天惠效果在两个狩技卷轴下均有效,切换卷轴可治愈大部分异常状态。注意,使用红色卷轴时,所有抗性(包括正抗性和负抗性)都会归零。离开战斗或被击退时会失效。无畏之心可周期性防止被击退,闪光弹则能防止离开战斗。 状态触发是这套配装的核心,它为蓄力强化提供了稳定性(除状态瓶外)。可惜其持续时间仅12秒,因此需要抓住大量反击机会。肾上腺素激增和鳞刃研磨也可通过闪避突刺激活。 进入战斗后会触发狂气病毒,随后生命值将缓慢下降。克服病毒后,会恢复所有红色生命值,还会触发凝聚。攻击弱点可获得50%会心,克服狂气病毒后的90秒内额外获得25%会心。神圣祝福和团子射手提供独立的减伤触发几率。若天恩效果激活,你将额外获得50%的减伤。如果上述所有效果都未生效,你可以依靠不屈或团子毅力来承受本会导致猫车的一击。 泡沫之舞配装(物理) 目标 此配装运用了愤怒管理技能。泡沫之舞替代了体力增强,与鼓舞技能搭配提供良好的回避性能。 团子 团子斗士 4级 团子射手/团子足技 4级 团子调和 1级或团子增幅 1级 模板
Rampage Jewel: Magna Soul Jewel 2. Adaptations The core skills don't boost Elemental damage, so I chose to fully focus on Raw damage. The fourth level of Hellfire Cloak is optional, meaning you can use any Bow. As a general rule I'd stick with the Raw Bows though. If you use a Bow with high affinity, you can swap three levels of Attack Boost for three levels of Critical Boost. Utilizing the Build There're no specific benefits for using one scroll over the other. Make sure you regularly swap to keep both Bolt Boost and Herculean Draw activated. Before engaging, make sure you activate Bubbleblight (three rolls or four Dodgebolt). Being inflicted by this blight provides Evade Window Level 2 and Constitution Level 2, so you need to eat for Dango Fighter Level 4. A Palico with Go, Fight, Win and Dash Juice are also very useful. Because it's a blight, it'll also proc Resuscitate. After thirty seconds (or if you get hit) Bubbleblight will end, and Coalescence will activate. You'll lose your two Constitution levels, so pay extra attention to your stamina management until you're inflicted by Bubbleblight again. The build reaches its full potential when the monster is enraged, which will happen quicker thanks to Embolden. Embolden, together with Bubbly Dance, gives you the same evasion as Evade Window Level 5. Agitator and Hellfire Cloak improve your damage, and Defiance nullifies some interruptions. With Agitator you reach 65% affinity if you hit weak spots. Both Adrenaline Rush and Bladescale Hone activate via Dodgebolt. It's quite important to keep these skills activated, especially if the monster is not enraged. You've got plenty of defensive skills to fall back on, so don't worry about taking a risk or two. Step 8: Git Gud The build doesn't make you good, you make the build good. Develop muscle memory Go to the training area, turn on the ranged attacks and set the maximum Wirebugs to three. Practice the following loop until you memorize your Switch Skills & Wirefall: () = Charge Level. {} = only if you've access to Charge Level 4. Dash Juice => Herculean Draw (0) => Normal Shot (1+1) => Normal Shot (2+1) {=> Normal Shot (3+1)} => Dodgebolt => Charged Shot (4) => Power Shot (4) => Power Volley (4) => Aerial Aim (4) => Stake Thrust => repeat from Herculean Draw, or Dodgebolt if not available. If hit => Use Wirefall => Restart from Herculean Draw, skip if not available. When you feel comfortable using your Switch Skills and Switch Skill Swap, set the maximum Wirebugs to two. Replace Herculean Draw for Bolt Boost and get a feel the range of Super Critical Distance. When to use Herculean Draw You'll be able to stay on your maxed Charge Level for longer then thirty seconds. Despite that, it's a good habit to have Herculean Draw active at all times. That's because this skill is most viable for it's stamina regeneration and reposition utility. The extra damage is definitely a nice bonus though. Activating it regularly makes sure you don't run out of stamina. Herculean Draw is the only ability worth resetting your Charge Level over. Doubly so if you can dodge an attack at the same time. All other abilities should be used when you're about to reset your Charge Level anyway, mainly right before or after Herculean Draw. When to use Bolt Boost Bolt Boost offers a nice bonus too, but it's less consistent than Herculean Draw. Hence why we only use it if we're not limited to one Scroll. If you can use both Scrolls, you want to use both skills right after each other. Meaning you'll want to prioritize a third Wirebug. When to use Aerial Aim If you're above ~33% of your stamina, you should forgo Aerial Aim (the stamina cost is too high). An exception should be made if you want to deal mounting damage of course. If you're out of stamina, that's when you're out of options and should finish with Aerial Aim followed by a Stake Thrust. You should finish with that even if the monster is not below you, because your stamina start regenerating sooner compared to falling down. Reposition if needed and follow up with Herculean Draw, during which you recharge even more stamina. After that animation you're ready to continue the assault. Managing your stamina Since you're going to activate Herculean Draw roughly every thirty seconds, you'll want to spend about ~25-50% of your stamina between each Herculean Draw. You want to save ~50-75% of your stamina for when the monster is in a fixed position. When you skip Power Volley, you deal more DPS. However, you also deplete your stamina faster. Which is why we want to have access to most of our stamina when an opportunity presents itself. If you're below ~50% stamina, keep using Absolute Power Shot + Power Volley to deal more Stun build-up and spend less stamina over time. If you can, Switch Skill Swap to Power Shot in order to lower your stamina cost. This is also a good opportunity to take more time reading the monster when it's about to attack. Those few extra seconds regenerate a fair bit of stamina, which you can use right after boosting to Charge Level 3 with a successful parry. You'll most likely run out of stamina after using Aerial Aim (at ~33%). Although Stake Thrust and Herculean Draw regenerate some stamina, it's not a lot. Meaning you'll want to avoid getting this low, unless you're planning on sheathing. Managing your downtime Keep in mind that if you've to sheath, you're going to recharge almost all your stamina. So only sheath if you've almost run out of stamina. You can use this moment to refresh your Dash Juice and buffs, as well as utilize the Endemic Life and your traps. Ideally you don't want to interrupt your Dash Dancing. Effectively that means it's better to sheath your Bow once in order to perform multiple actions, rather than sheath your Bow multiple times for a single action. Thought process behind Power Volley The most challenging part when starting out, is understanding when and when not to use Power Volley. This video does an excellent job at explaining the thinking process behind it: Thought process behind Stake Thrust Stake Thrust is another ability that rewards you for reading and knowing the monster you're hunting. Again, the same content creator does a great job at explaining why: Visualization I used the YouTube guides Tidus69 made as my starting point. The ones I embedded above are examples of them. I highly recommend watching more of his guides to see how he pulls it all together. I also want to give a shoutout to Phemeto. Another content creator who has a very deep understanding of Bow, but overall he focuses more on Light and Heavy Bowgun. Tidus69 Phemeto Hall of Fame The best way to excel, is to learn from the best. I highly recommend to take a look at these speedruns to see when and how everything is put into practice. The builds are also highly optimized for each specific monster, meaning you can use that information to optimize your own builds. You can find the current leaderboards for Sunbreak here.[www.mhrspeedrun.com] And the ones for pre-Sunbreak are found here.[www.mhrspeedrun.com] Anti-species decorations I recommended Anti-Species Jewels for most of the builds. That's because they provide +5% Raw damage against the corresponding species. They do require preparation before each hunt.
伤害计算 为了不过度困扰新手,我略过了不少细节。例如,当我说+20%伤害时,并非简单地造成20%的额外伤害。它指的是物理或元素伤害计算中的某个数值: 附注:以下为曙光DLC前的计算公式。 每箭物理伤害: 总真实物理值×射击类型强化倍率×会心×会心伤害倍率×涂层倍率×蓄力等级倍率×动作值×肉质值×对种特效倍率。 每箭元素伤害:(未使用元素动作值) 总真实元素值×会心×会心元素倍率×蓄力等级倍率×元素动作值×肉质值×元素特效倍率。这些公式没有考虑伤害计算过程中的四舍五入。我在关于耐力减少的部分提到的收益递减,也适用类似的道理。 如今,你说什么并不重要。只要你充满自信地说出来,总会有人相信。然而,最糟糕的谎言是你对自己说的那些。 【曙光】后 我要感谢Dtlnor为曙光提供了大部分数据。你可以在相关文档中自行查看这些数值。 你可以在相关文档中找到每种箭矢类型的临界距离。 如果你想了解更多关于每种弓的属性,请阅读相关文档。关于技能(非100%准确)、 armor、装饰品和护符的更详细说明,可参考相关文档。所有关于客制强化的信息均在相关文档中。部分实用图片由Gaudium017制作。 曙光DLC发布前: 为我(以及其他许多人)提供所有必要数据的人可能是Deathcream或Deathscream。这两个名字都有人使用,我不确定哪个正确,哪个是拼写错误(假设其中一个是拼写错误)。所以为保险起见,还是感谢你们两位。 无需深入研究,你可以通过相关文档自行验证许多数据。其他许多验证信息来自相关网站。 发现错误?许多数值可能会发生变化。这种变化可能会在下个补丁中出现,也可能永远不会发生。如果你发现任何需要我更新本指南的信息来源,请告诉我! 更新内容 发布本指南后,我做了以下值得注意的更改: 说明 明确(并更新)了物理伤害和元素伤害之间的选择。 通过分别为闪避箭和蓄力侧移设计游戏循环,明确了游戏玩法循环。 内容 添加了许多我能够验证的百分比和数值。 添加了更多截图以帮助说明我的观点。 添加了我的一般游戏设置和按键绑定。 添加了每种(相关的)团子在各等级的效果。 添加了特定技能所需的必备 armor。 添加了进阶配装。 添加了关于优化弓箭玩法的额外建议。移除了关于元素bug的说明(已确认其工作符合预期)。 他人内容 链接了我用于验证的来源。 链接了他人创建的经济型配装。 链接了可视化我观点的内容创作者。