


LV.
LV.

转载steam社区指南,侵删

 发帖达人Ⅰ
发帖达人ⅠLV.
游戏档案
0
玩过游戏数量
0秒
总游戏时长
动态

《内心世界》俄文本地化补丁(由Leo制作) 参与翻译人员: 瓦迪姆·“Leo”·列维廷(翻译) 谢尔盖·“ja-s-belov”·别洛夫(资源解析) 安德烈·“catus”·库岑科(测试) iLEXX、Glinn Twein(Steam版本测试) Windows安装说明: 1.下载文件 2.运行安装文件 3.指定游戏文件夹(如果未指定游戏文件夹,汉化补丁将无法运行) 4.安装汉化补丁。 Mac OS安装说明 1.下载并安装WineBottler 2.使用它运行汉化补丁 3.安装过程中手动指定路径,从您的磁盘开始(您的磁盘:Users 用户名/Library/ApplicationSupport/Steam/steamapps/common/TheInnerWorld/TheInnerWorldSteam.app/Contents/Resources 4.启动游戏
优先级、基地建设和发展的基本概念 免责声明 我看过很多优秀的指南,其中详细概述了选择不同事物的原因。但本指南并非如此。不过目前可供玩家参考的资料不多,所以我想整理一些内容,给那些确实遇到困难的玩家一个更好的起点。我实际上还没通过第3波,所以请对此持保留态度,可以说是盲人指路。我大部分时间都在努力以比上一轮更好的状态迎接第2波。不过,我其实已经通过了第3波,但那只是因为怪物们忙着攻击石头而不是士兵。击败那个大家伙费了很大劲,英雄还死了两次……入门指南 机会成本 不要分心导致资源达到上限,尤其是在游戏初期。在木材耗尽前尽早建造伐木营地。这意味着初期只建造1到2座房屋或食物生产建筑。优先进行探索以找到适合建造伐木营地的好位置。注意资源等级,若能找到19-24级的地点,仅一个伐木营地就能让你支撑一段时间。你可能最多需要两个伐木营地。 接下来的优先事项是收集石材。你可能会在基地附近发现3-5个石材矿脉。只有在附近找不到更好的矿脉时,才在这些矿脉上建造采石场。每个建筑都有维护费用,并且会占用人口。通过在你能守住的最佳矿脉上建造,来最大化你的产量、成本和人口之间的平衡。尽量快速侦察到这样的矿脉。 地图生成 如果在基地合理距离内找不到超过4格的石头矿脉,可以考虑重新生成地图。有一局我因为石头匮乏而陷入困境。我出于好奇,生成新地图后立即保存,然后快速探索。几轮之后,我得到了几个相当不错的开局。地图的变化性很大,有些地图看起来确实不公平。如果你觉得这是作弊,那也完全合理,但这毕竟是一款抢先体验游戏。可能存在平衡问题,而你对游戏的享受可能取决于开局是否有利。如果你技术足够好,应该能在最恶劣的条件下发展壮大。专注于享受游戏和学习。 基地建设与扩张 基地布局 这款游戏改变了我建造基地的方式。我喜欢秩序,喜欢网格,喜欢高效利用空间。但在这款游戏中,这样做却很容易让你一败涂地。尽可能分散建造你的建筑,以利用它们的视线范围(LoS)。【1】你无法在没有有效视线范围的地方建造;【2】在死亡之夜期间,即使你的领地内只有一格战争迷雾,也会有不好的东西生成;【3】没有什么比派遣援军到前线时,因为兵营和前线之间留下大片空白区域而受到死亡之夜战争迷雾的减益效果更糟糕的了。视线范围等于控制权。墙壁会倒塌,建筑会毁坏。无论你做什么,都不要让你的储备物资失守。把它们放在偏僻的死胡同里。与其失去这些物资,不如直接输掉游戏。如果在一场持久战中你的资源达到上限,而储备物资又被攻破,那么超过上限的所有资源都会被敌人吞噬。我至今仍对那次失败感到失望…… 瓶颈区域 建造的墙壁越少越好。当面对一条又长又窄的通道时,不要像我之前那样在敌人那边建造墙壁,除非你打算建造多层墙壁。要在你自己这边建造。这样做的目的是在敌人到达你的墙壁之前,迫使他们通过瓶颈区域,从而减缓他们的推进速度。如果能让无穷无尽的敌人排成单列走进你的末日塔楼,消灭他们就会容易得多。让我们把这想象成一个涉及恒定每秒伤害的数学问题。 我可以在特定位置部署足以每秒消灭50个敌人的火力。敌人数量无穷无尽,但他们会占据物理空间,因此必须排队,就像迪士尼取消快速通行证后人们排队等着玩项目一样。 如果我先将敌人引到前门,那么每秒只有40个敌人能攻击到我的城墙。40小于50,这很好,我的城墙或许能撑住。如果我的城墙宽度增加一倍,但每秒伤害保持不变,那么每秒就会有80个敌人能攻击到城墙。由于80大于50,这就很糟糕了。我的城墙会承受大量伤害,我可能还得把敌人一路引回基地内部。
更小的占地面积,更强的火力 = 成功 研究与升级 食物生产 升级后的食物生产设施比初始的小茅屋更大。要为这些大型设施预留一些空间。一旦解锁二级房屋和二级食物生产设施,就要快速扩大食物产量,这样才能依次升级现有的房屋。 一级(食物茅屋)是食物/黄金比率最高的,但占地面积很大。 二级(农场)和三级(精制农场)比一级更节省空间。它们的食物/黄金比率相同,所以如果空间不足且拥有材料,升级到三级是可行的。三级能让更多人口挤在同一空间内。显然,要追求农场的最高产量,并利用茅屋填补那些不太理想的区域。 一级食物设施的最大食物数值:11食物(5.5食物/金币,1人口 二级:31食物(1.55食物/金币,2人口) 三级:62食物(1.55食物/金币,4人口) 住房 木材不成问题,如果你为了优质石料而重开,那么你会受到金币的限制。升级到二级(小屋)能大幅增加金币收入,这确实改变了我游戏的走向。房屋等于金币。尽快将现有房屋升级到二级。 写完这段后我决定计算一下数据,如果空间足够,三级住房(房屋)并不值得建造。首先用二级住房填满所有可用空间。将所有房屋升级到三级会减少约17%的金币/食物产出,而且每栋房屋需要10石料。你更需要城墙,而不是房屋。建造更多二级住房。 研究 一旦解锁一级研究中的所有内容,就卖掉相关物品。它会占用大量人口,并且你只能获得少量资源返还。如果可以的话,用资源储备建筑来替换它。
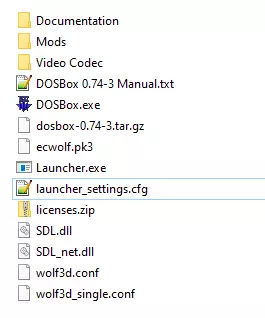
那么,你已经安装好了游戏,并将DOSBox替换为了ECWolf(如果还没有,请搜索相关的最新指南)。你想要玩那些(.pk3格式的)模组,也已经下载了它们,但发现了一些不便之处: - 可以通过将模组拖到ecwolf.exe(如果你覆盖安装了,也可以拖到DOSBox.exe)上来运行,但每次想玩的时候都得这么做。 - 可以创建.bat文件,但需要单独编写并进行链接。 - 在Steam的启动选项中输入包含这些文件路径的命令已经不再起作用了。 不过我发现了另一种通过简单文件编辑来关联模组文件的方法,我想在本指南中分享一下。希望这能帮到大家。 准备工作 安装游戏,安装ECWolf,下载pk3 模组文件,你可以将它们放在任意方便的位置,然后前往《德军总部3D》/DOSBox 文件夹。就我而言,ECWolf 是在 DOSBox 基础上安装的(并重命名了 .exe 文件),我所有的模组都放在新建的 Mods 文件夹中。
我将使用的模组是CeeJay的“Shoe Shine”补丁,搭配3DO移植版原声带。
设置步骤 我们只需用任意文本编辑器(推荐使用Notepad++)打开launcher_settings.cfg文件。
这里我们看到两个参数:BinaryPath 和 Arguments。 在 BinaryPath 中,我们可以看到游戏启动后将要运行的可执行文件名称。(是的,我实际上可以将 ECWolf 安装在 DOSBox 旁边,直接更改此处的可执行文件名称,而无需删除任何文件) 在 Arguments 中,我们可以看到各种启动选项,类似于可以在 Steam 中填写的那些(但实际上对这款游戏有效)。 要链接我们的 .pk3 文件,我们需要为每个文件添加一个参数(在同一行中,包含文件的完整路径):-filename "此处填写文件的完整路径" 以我为例,参数如下:-filename "游戏路径 Wolfenstein 3D DOSBox Mods ECWolf_hdpack.pk3" -filename "游戏路径 Wolfenstein 3D DOSBox Mods ECWolf_hdmus_3DO.pk3" 因此,最终的配置如下:BinaryPath=dosbox.可执行文件 参数=-noconsole -conf wolf3d.conf -conf wolf3d_single.conf -fullscreen -filename "游戏路径 德军总部3D DOSBox 模组 ECWolf_hdpack.pk3" -filename "游戏路径 德军总部3D DOSBox 模组 ECWolf_hdmus_3DO.pk3" 关闭前保存文件。完成! 现在你应该能在游戏中看到变化了。
祝你游戏愉快!
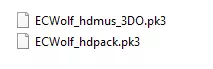

获取这个无聊成就的5个简单步骤(附图片)。 操作步骤: 1. 进入街机模式,就在故事模式正下方。 2. 选择【墓地】关卡,这是第一个关卡,应该在最上方。 3. 向右转,找到两个墓穴之间那个带有花瓶的物品箱。
4. 爬上花瓶 不用担心会掉到另一边,通常情况下是不会掉下去的。
5. 10分钟内不移动也不攻击。你可以去快速处理一些杂事,或者看一段10分钟的精彩视频。
说真的,为什么这个成就的达成率只有7.2%。它明明那么简单。


以下是前往公元前1000年等受限时代(无法直接旅行到的时代)的方法。 如何激活作弊码(基础操作) 众所周知,《No Time》中有作弊码功能。如果你是新手且不了解,下面为你说明。 按下Tab键调出PLC界面。进入文件选项,点击“新建”,将文件从“New File”重命名为“New File.eee”。“.eee”扩展名可让文件执行。在标题下方的输入框中输入: cococrab cocohelp 之后会显示作弊码列表。接下来进入正题。 如何设置年份(实现方法) 只需输入“cocoyear”,后面跟上你想要的年份即可设置年份。你可以通过此方法将年份设置为任意公元前的时间。不过公元年份似乎无法生效,且无法设置早于公元前4000年的日期。可可纪元 -3000年 我看到了一些类似公元前4000年的事物,但又略有不同,还有一种小型火山。这一切都在破坏时间线,亲自去实验吧!
我不想影响Raikazu的0.9.2版本优质指南,所以仅发布此帖作为游戏v0.9.7版本的更新内容。 制作台概述 以下内容直接取自v0.9.7版本的游戏数据,并通过Powershell进行解析。这是游戏中所有可制作物品的完整列表。 统计数据如下: 数量 名称 ----- ---- 53 护甲 214 资源 34 工具 22 武器 总计:323个物品 制作台 从资源部分提取的制作台信息如下。数量 物品组 物品名称 所需工作台 获得数量 制作需求 50 资源 炼金台 -- 1 1个烧瓶,1个研钵,10个原木 99 资源 铁砧 工作台 1 1个石锤,6个铁锭 117 资源 骨砧 工作台 1 20个骨头,4个灵魂宝珠,1个铁砧 48 资源 烹饪大锅 -- 1 1个木水桶(装水),1个营火,1个大锅 288 资源 染缸 石头 1 10个岩石 14 资源 火坑 -- 1 2个原木,5个岩石 54 资源 熔炉 -- 1 4个煤炭,10个岩石 49 资源 宝石切割台 -- 1 10个原木,1个凿子,1个玻璃镜片 268 资源 地狱熔炉 工作台 1 15个黑曜石 46 资源 厨房 -- 1 1个切肉刀,1个擀面杖,8个原木 52 资源 车床 -- 1 1个凿子,8个原木 12 资源 石匠方块 -- 1 4个岩石,1个石锤,1个1 x 黑色染料,1 x 白色地毯 300 资源 蓝色地毯 -- 1 x 蓝色染料,1 x 白色地毯 306 资源 棕色地毯 -- 1 x 棕色染料,1 x 白色地毯 304 资源 绿色地毯 -- 1 x 绿色染料,1 x 白色地毯 303 资源 橙色地毯 -- 1 x 橙色染料,1 x 白色地毯 302 资源 紫色地毯 -- 1 x 紫色染料,1 x 白色地毯 299 资源 红色地毯 -- 1 x 红色染料,1 x 白色地毯 298 资源 白色地毯 裁缝台 4 1 x 布料 301 资源 黄色地毯 -- 1 x 黄色染料,1 x 白色地毯 29 资源 胡萝卜种子 -- 2 1 x 胡萝卜 164 资源 坩埚 铁砧 1 5 x 铁锭 103 资源 箱子 工作台 1 2 x 铁锭,6 x 木板 106 资源 鸡生成器 工作台 1 3 x 鸡蛋,3 x 树叶,10 x 木板 24 资源 凿子 -- 1 1 x 燧石,1 x 木棍 165 资源 切肉刀 铁砧 1 1 x 光滑木棍,1铁锭 57 资源 布绷带 -- 2 1 布料 77 资源 煤炭 火堆 1 1 原木 247 资源 石墙 工作台 4 1 麻绳,4 石头 15 资源 劈开的椰子 -- 1 1 椰子 48 资源 烹饪用大锅 -- 1 1 木水桶装水,1 营火,1 大锅 83 资源 烤神仙鱼 火堆 1 1 神仙鱼 86 资源 烤蝙蝠翅膀 火堆 1 1 蝙蝠翅膀 72 资源 烤浆果 火堆 1 1 浆果 82 资源 烤蝴蝶鱼 火堆 1 1 蝴蝶鱼 74 资源 烤鸡肉 火堆 1 1 生鸡肉 85 资源 烤医生鱼 火堆 1 1 医生鱼 75 资源 烤肉 火堆 1 1 生肉 79 资源 烤鲷鱼 火堆 1 1 鲷鱼 80 资源 烤军曹鱼 火堆 1 1 军曹鱼 81 资源 烤刺尾鱼 火堆 1 1 刺尾鱼 84 资源 烤黄尾鲷 火堆 1 1 黄尾鲷 121 资源资源 铜箭 -- 30 1个 铜锭,30个 木箭 163 资源 铜刃 铁砧 1 5个 铜锭 95 资源 铜锭 熔炉 1 1个 煤炭,3个 铜矿石 112 资源 木箱 工作台 1 1个 麻绳,6个 木板 40 资源 简易木箱 -- 1 1个 麻绳,3个 树皮 155 资源 诅咒之刃 铁砧 1 5个 诅咒锭 91 资源 诅咒锭 熔炉 1 1个 煤炭,3个 诅咒矿石 213 资源 切割琥珀 宝石 1 1个 原琥珀 212 资源 切割 emerald 宝石 1 1个 原 emerald 211 资源 切割 ruby 宝石 1 1个 原 ruby 210 资源 切割 sapphire 宝石 1 1个 原 sapphire 222 资源 防御药剂 药剂 1 2个 铁矿石,1个 烧瓶 38 资源 土墙 -- 1 2个 泥土 45 资源 面团 -- 1 2个 面粉 284 资源 蓝色染料 染料 2 1个 亚麻籽 281 资源 棕色染料 染料 1 1个 树根 287 资源 绿色染料 染料 2 1个 黄色染料,1个资源物品(第二部分) 物品编号 物品类别 物品名称 所需工作台 产出数量 制作材料 286 资源 蓝色染料 -- 2 1个红色染料,1个黄色染料 285 资源 橙色染料 -- 2 1个红色染料,1个蓝色染料 282 资源 红色染料 -- 2 1个浆果 288 资源 染缸 石头 1 10个岩石 283 资源 黄色染料 -- 2 1个树脂 323 资源 邪恶礼帽 -- 1 1个煤炭,2个木棍,20个雪球 190 资源 布料 裁缝台 1 5个蛛网 189 资源 布料 裁缝台 1 1个羊毛 101 资源 栅栏 工作台 3 1个原木 183 资源 纤维 磨坊 1 1个甘蔗 18 资源 纤维 -- 1 1个根茎 51 资源 纤维 -- 1 1个树皮 88 资源 火箭 火堆 10 1个树脂,10个木箭 14 资源 火坑 -- 1 2个原木,5个岩石 93 资源 烧瓶 熔炉 1 1个玻璃 265资源 黑曜石矿场 4级 产出:1个黑曜石 编号182 资源 面粉厂 1级 产出:2个小麦 编号54 资源 熔炉 -- 1级 材料:4个煤炭、10个石头 编号49 资源 宝石切割台 -- 1级 材料:10个原木、1个凿子、1个玻璃镜片 编号92 资源 玻璃熔炉 1级 材料:3个沙子 编号115 资源 玻璃镜片工作台 1级 材料:1个铁锭、3个玻璃 编号123 资源 金箭 -- 30级 材料:1个金锭、30个木箭 编号154 资源 金刃铁砧 1级 材料:5个金锭 编号97 资源 金锭熔炉 1级 材料:1个煤炭、3个金矿 编号98 资源 金戒指熔炉 1级 材料:1个珠宝模具、3个金锭 编号119 资源 金楼梯工作台 1级 材料:1个金锭、1个楼梯 编号204 资源 碎石场 3级 产出:1个石头 编号55 资源 树篱 -- 1级 材料:3个树叶 编号268 资源 地狱熔炉工作台 1级 材料:15个黑曜石 编号267 资源 焰火锭 黑曜石熔炉 1级 材料:1个黑曜石、2个焰火矿石 编号122 资源 铁箭 -- 30级1个铁锭,30个木箭 153 资源 铁刃砧 1 5个铁锭 132 资源 铁鱼竿 砧 1 1个铁锭,1个简易鱼竿 90 资源 铁锭 熔炉 1 1个煤,3个铁矿石 156 资源 铁矛头 砧 1 4个铁锭 118 资源 铁楼梯 工作台 1 1个铁锭,1个楼梯 320 资源 物品架 工作台 1 3个木板 187 资源 珠宝模具 烤箱 1 2个黏土 46 资源 厨房 -- 1 1把切肉刀,1个擀面杖,8根原木 52 资源 车床 -- 1 1把凿子,8根原木 224 资源 皮革 鞣制 1 1张兽皮 12 资源 石匠方块 -- 1 4块石头,1把石锤,1把凿子 105 资源 磨坊 工作台 1 1根光滑木棍,2块圆石 205 资源 研钵 石头 1 3块石头 76 资源 熟蘑菇 火 1 1个蘑菇 25 资源 烤箱 -- 1 5个石块,4个煤185 资源 造纸厂 1 1份甘蔗渣 16 资源 半个菠萝 -- 1 1份菠萝 17 资源 菠萝汁 -- 1 1份菠萝 307 资源 移液管 -- 1 2份玻璃 188 资源 披萨烤箱 4 1份番茄酱、1份生面团 173 资源 木板 木材 2 1份原木 10 资源 毒箭 -- 30 1份毒囊、30份木箭 8 资源 毒飞镖 -- 5 1份毒囊、5份吹箭 221 资源 剧毒药剂 药水 1 1份毒囊、1个烧瓶 214 资源 剧毒宝石 -- 1 2份毒囊、1份切割祖母绿 251 资源 治疗药水 药水 1 1份荧光球、2份次级治疗药水、1个烧瓶 216 资源 次级治疗药水 药水 1 1份蘑菇、1个烧瓶 217 资源 次级治疗药水 药水 1 1份番茄、1个烧瓶 218 资源 光明药水 药水 1 1份树叶、2份荧光球、1个烧瓶 252 资源 魔法药水药水1:1个荧光球,2个次级法力药水,1个烧瓶 219 资源 次级法力药水 药水 2:1个纤维,2个烧瓶 269 资源 黑曜石药水 药水 1:2个火焰花,3个黑曜石,1个烧瓶 261 资源 召回药水 药水 1:3个幻影尘,1个烧瓶 220 资源 速度药水 药水 2:1个糖,1个羽毛,2个烧瓶 78 资源 烤胡萝卜 火 1:1个胡萝卜 226 资源 擀面团 厨房 1:1个面团 180 资源 擀面杖 木材 1:1个木板 7 资源 绳子 -- 1:5个麻线 203 资源 圆石 石头 1:3个岩石 195 资源 麻袋 裁缝 1:1个线,2个布料 89 资源 沙块 方块 1:3个沙子 317 资源 砂岩地板 工作台 1:2个沙子 316 资源 砂岩墙 工作台 1:3个沙子 209 资源 尖石 石头 1:1个岩石 26 资源 简易鱼竿 -- 1:1个蠕虫,1个麻线,1资源 木棍47:1个头骨 资源 骨头5:111个 资源 小木箱(工作台):1个,材料:1根麻绳,4块木板 资源 光滑木棍(木材)2:1块木板 资源 光滑木棍(木材)1:1根木棍 资源 熟蜘蛛肉(火堆):1个,材料:1块生蜘蛛肉 资源 纺车:1个,材料:10根原木,1根麻绳,1个木轮 资源 楼梯(工作台):1个,材料:4块木板 资源 炖菜(烹饪锅):1个,材料:1块生肉,1根胡萝卜,1个木碗 资源 木棍:2个,材料:1根原木 资源 木棍栅栏(工作台)4:1根麻绳,2根木棍 资源 石块(石材):1个,材料:2块石头 资源 石地板(石材)3:1块石块 资源 石锤:1个,材料:1块石头,1根木棍 资源 石墙(石材):1个,材料:1块石块 资源 黑色坐垫凳子:1个,材料:1份黑色染料,1个白色坐垫凳子 资源 蓝色坐垫凳子:1个,材料:1份资源物品(第三部分) 物品编号 物品类别 物品名称 所需工作台 获得数量 制作材料 176 资源 剑柄 工作台 1 1份麻绳,2份光滑木棍 289 资源 白色凳子坐垫 工作台 1 1份羊毛,2份木板 290 资源 棕色凳子坐垫 -- 1 1份棕色染料,1份白色凳子坐垫 292 资源 红色凳子坐垫 -- 1 1份红色染料,1份白色凳子坐垫 293 资源 黄色凳子坐垫 -- 1 1份黄色染料,1份白色凳子坐垫 294 资源 绿色凳子坐垫 -- 1 1份绿色染料,1份白色凳子坐垫 295 资源 橙色凳子坐垫 -- 1 1份橙色染料,1份白色凳子坐垫 296 资源 紫色凳子坐垫 -- 1 1份紫色染料,1份白色凳子坐垫 319 资源 木质桌子 工作台 1 2份木板 41 资源 糖 -- 1 1份甘蔗 43 资源 鞣制架 --凿子 105 资源 研磨工作台 1 1个光滑木棍,2个圆石 25 资源 熔炉 -- 1 5个石块,4个煤炭 53 资源 纺车 -- 1 10个原木,1根麻绳,1个木轮 43 资源 鞣制架 -- 1 2根麻绳,4根木棍 19 资源 工作台 -- 1 1根麻绳,5个原木 注:所需工作台列中部分制作台名称不同。1. 麻绳 x2,木棍 x4 191 资源 缝纫台 2. 麻绳 x1 246 资源 飞刀 铁砧 3. 铁锭 x1 225 资源 番茄酱 厨房 4. 番茄 x3 44 资源 番茄种子 -- 5. 番茄 x1 22 资源 火把 -- 6. 树脂 x1,木棍 x1 250 资源 黑曜石火把 -- 7. 黑曜石 x1,火把 x20 100 资源 部落生成器 工作台 8. 部落羽毛 x5,石块 x3 279 资源 食槽 工作台 9. 木板 x3 192 资源 麻绳 缝纫台 10. 羊毛 x1 20 资源 麻绳 -- 11. 纤维 x2 66 资源 麻绳 -- 12. 蛛网 x3 266 资源 黑曜石墙 石材 13. 黑曜石 x1 11 资源 蛛网箭 -- 14. 蛛网 x1,木箭 x10 28 资源 小麦种子 -- 15. 小麦 x1 255 资源 木箭 -- 16. 羽毛 x1,尖石 x1,光滑木棍 x1 30 资源 木箭 -- 17. 羽毛 x1,燧石 x1,光滑木棍 x1 27 资源资源 木水桶 -- 1 1份麻绳,2份木板 120 资源 木门 工作台 1 4份木板 181 资源 木碗 木材 2 1份原木 174 资源 木墙 工作台 3 1份木板 178 资源 木轮 木材 1 2份原木 175 资源 木地板 -- 4 1份木板 19 资源 工作台 -- 1 1份麻绳,5份原木 工具 物品数量 物品组 物品名称 所需工作台 获得数量 制作材料 --- 270 工具 焰火石斧 铁砧 1 3份黑曜石,5份焰火石锭 133 工具 天青石斧 铁砧 1 1份麻绳,6份天青石锭,1份光滑木棍 136 工具 天青石锄头 铁砧 1 1份麻绳,5份天青石锭,1份光滑木棍 134 工具 天青石镐 铁砧 1 1份麻绳,6份天青石锭,1份光滑木棍 135 工具 天青石铲 铁砧 1 1份麻绳,6份天青石锭,1份光滑木棍 145 工具 铜斧 铁砧 1 1份工具配方: 铜斧:1根麻绳、1根光滑木棍、4个铜锭,制作工具:铁砧,数量:1 铜锄头:1根麻绳、1根光滑木棍、3个铜锭,制作工具:铁砧,数量:1 铜镐:1根麻绳、1根光滑木棍、4个铜锭,制作工具:铁砧,数量:1 铜铲:1根麻绳、1根光滑木棍、4个铜锭,制作工具:铁砧,数量:1 诅咒斧:1根麻绳、1根光滑木棍、4个铜锭,制作工具:铁砧,数量:1 诅咒锄头:1根麻绳、1根光滑木棍、6个诅咒锭,制作工具:铁砧,数量:1 诅咒镐:1根麻绳、1根光滑木棍、5个诅咒锭,制作工具:铁砧,数量:1 诅咒铲:1根麻绳、1根光滑木棍、6个诅咒锭,制作工具:铁砧,数量:1 诅咒铲:1根麻绳、1根光滑木棍、6个诅咒锭,制作工具:铁砧,数量:1 燧石斧:1根麻绳、1块燧石、1根木棍,制作工具:无,数量:1 燧石锄头:1根麻绳、2块燧石、1根木棍,制作工具:无,数量:1 燧石镐:1根麻绳、2块燧石、1根木棍,制作工具:无,数量:1 燧石铲:1根麻绳、1块燧石、1根木棍,制作工具:无,数量:1 金斧:1根麻绳6个金锭,1个光滑木棍 140 工具 金锄头 铁砧 1 1个麻绳,5个金锭,1个光滑木棍 138 工具 金镐 铁砧 1 1个麻绳,6个金锭,1个光滑木棍 139 工具 金铲 铁砧 1 1个麻绳,6个金锭,1个光滑木棍 271 工具 焰火石锄头 铁砧 1 3个黑曜石,4个焰火石锭 141 工具 铁斧 铁砧 1 1个麻绳,5个铁锭,1个光滑木棍 144 工具 铁锄头 铁砧 1 1个麻绳,5个铁锭,1个光滑木棍 142 工具 铁镐 铁砧 1 1个麻绳,5个铁锭,1个光滑木棍 143 工具 铁铲 铁砧 1 1个麻绳,5个铁锭,1个光滑木棍 31 工具 砍刀 -- 1 1个光滑木棍,1个铁刃 280 工具 牛头怪镐 铁砧 1 8个牛头怪锭 273 工具 焰火石镐 铁砧 1 3个黑曜石,6个焰火石锭 272 工具 焰火石铲 铁砧 1 3个黑曜石,5个焰火石锭 62工具 石斧 -- 1 1份麻绳,1根木棍,2块尖石 64 工具 石锄 -- 1 1份麻绳,1根木棍,2块尖石 63 工具 石镐 -- 1 1份麻绳,1根木棍,3块尖石 65 工具 石铲 -- 1 1份麻绳,1根木棍,2块尖石 我几天前发现了各级工具的使用次数: 等级 类别 使用次数 1 燧石 200 2 铜 350 3 铁 450 4 金 600 5 蓝铜矿 750 6 诅咒 950 7 火焰石 1400 武器 物品编号 物品类别 物品名称 所需工作台 获得数量 制作材料 169 武器 琥珀法杖 铁砧 1 3份切割琥珀,1份麻绳,1根光滑木棍 2 武器 蓝铜矿剑 -- 1 1份麻绳,1块蓝铜矿刀刃,1个剑柄 4 武器 吹箭筒 -- 1 1份麻绳,2根部落羽毛,1根甘蔗 110 武器 骨棒 工作台 1 1份麻绳10 x 骨头 35 武器 弓 -- 1 1 x 弓弦, 1 x 弓杆 9 武器 骨弓 -- 1 1 x 弓弦, 1 x 骨弓杆 36 武器 铜剑 -- 1 1 x 剑柄, 1 x 铜刃 1 武器 诅咒短剑 -- 1 1 x 麻绳, 1 x 诅咒之刃, 1 x 骨柄 168 武器 翡翠法杖 铁砧 1 3 x 切割翡翠, 1 x 麻绳, 1 x 光滑木棍 34 武器 燧石矛 -- 1 1 x 燧石, 1 x 麻绳, 2 x 木棍 3 武器 金剑 -- 1 1 x 麻绳, 1 x 剑柄, 1 x 金刃 56 武器 铁矛 -- 1 1 x 麻绳, 1 x 光滑木棍, 1 x 铁矛头 32 武器 铁剑 -- 1 1 x 铁刃, 1 x 剑柄 259 武器 牛头怪战斧 铁砧 1 8 x 牛头怪矿石锭 260 武器 牛头怪法杖 铁砧 1 8 x 牛头怪矿石锭 167 武器 红宝石法杖 铁砧 1 3 x 切割红宝石, 1 x 麻绳, 1 x 光滑木棍 166 武器 蓝宝石法杖 铁砧 1 3 x 切割蓝宝石, 1 x 麻绳, 1 x5 武器 部落长矛 -- 1 1份麻绳,2份部落羽毛,1份燧石矛 33 武器 木剑 -- 1 1份麻绳,2份木棍 162 武器 蜘蛛法杖 铁砧 1 1份光滑木棍,15份蜘蛛尖牙,15份蛛网 170 武器 蜘蛛剑 铁砧 1 10份蜘蛛尖牙,12份蛛网,1份剑柄 258 武器 Taurite弓 工作台 1 1份弓弦,8份Taurite锭纺车被列为裁缝台 火坑被列为火堆 车床被列为木工台 炼金台被列为药剂台 石匠方块被列为石头和方块 宝石切割器被列为宝石 地狱熔炉被列为黑曜石熔炉 装备 物品编号 物品组 物品名称 所需工作台 获得数量 所需材料 ------- --------- -------- ----------- ------- ------------ 202 装备 琥珀兜帽 裁缝台 1 1份线,3份切割琥珀,4份布料 196 装备 渔夫帽 裁缝台 1 1份线,4份布料 249 装备 渔夫铠甲 裁缝台 1 1份线,7份布料 236 装备 蔚蓝铠甲 铁砧 1 8份蓝铜矿锭 238 装备 骨头铠甲 骨头砧 1 7份骨头锭 241 装备 布甲 裁缝台 1 1份线,4份布料 231 装备 铜甲 铁砧 1 7份铜锭 237 装备 诅咒铠甲 铁砧 1 8份诅咒锭 233 装备 金甲盔甲 铁砧 1 8个金锭 232 盔甲 铁甲 铁砧 1 8个铁锭 235 盔甲 贝壳甲 工作台 1 2个龟壳,5个贝壳 240 盔甲 蜘蛛甲 铁砧 1 20个蜘蛛尖牙,20个蛛网 234 盔甲 木甲 工作台 1 2个麻绳,8个原木 199 盔甲 蔚蓝兜帽 裁缝台 1 1个线,3个蓝宝石碎片,4个布料 129 盔甲 蓝铜矿头盔 铁砧 1 7个蓝铜矿锭 152 盔甲 血戒 铁砧 1 1个血石,1个金戒指 239 盔甲 骨盔 骨砧 1 5个骨锭 171 盔甲 铁靴 铁砧 1 1个靴子,4个铁锭 278 盔甲 迅捷之靴 工作台 1 1个幻影粉尘,2个羽毛,1个靴子 150 盔甲 铜头盔 铁砧 1 10个铜锭 200 盔甲 绯红兜帽 裁缝台 1 1个线,3个红宝石碎片,4个布料 130 盔甲 诅咒头盔 铁砧 1 7个诅咒锭 60 盔甲 萤火虫瓶 -- 1 1个萤火虫,1个烧瓶275 火焰石盔甲 铁砧 1 9个火焰石锭 274 火焰石头盔 铁砧 1 7个火焰石锭 127 黄金皇冠 铁砧 1 7个金锭 126 黄金板甲 铁砧 1 3个金锭 128 黄金翼盔 铁砧 1 7个金锭 59 圣水盔甲 -- 1 1个金锭,1份水,1个烧瓶 194 兜帽 裁缝台 1 1根线,4块布料 149 铁头盔 铁砧 1 8个铁锭 125 铁板甲 铁砧 1 3个铁锭 67 蓝宝石铁戒指 -- 1 1颗切割蓝宝石,1个铁戒指 201 翡翠兜帽 裁缝台 1 1根线,3颗切割翡翠,4块布料 277 熔岩行者 工作台 1 1条黑曜石项链,1双迅捷之靴 276 熔岩行者 工作台 1 5块黑曜石,1双水行者之靴 193 皮头盔 裁缝台 1 1根线,4块皮革 151 剧毒戒指 铁砧 1 1个毒石,1个金戒指 198 护甲 箭袋 裁缝台 1 1个木箭,1个线,4个皮革 262 护甲 恢复戒指 工作台 1 1个能量戒指,1个再生戒指 244 护甲 琥珀长袍 裁缝台 1 1个线,3个切割琥珀,5个布料 245 护甲 翡翠长袍 裁缝台 1 1个线,3个切割翡翠,5个布料 243 护甲 红宝石长袍 裁缝台 1 1个线,3个切割红宝石,5个布料 242 护甲 蓝宝石长袍 裁缝台 1 1个线,3个切割蓝宝石,5个布料 58 护甲 贝壳头盔 -- 1 1个龟壳,1个麻绳,3个贝壳 109 护甲 颅骨头盔 工作台 1 15个骨头 161 护甲 蜘蛛头盔 铁砧 1 15个蜘蛛尖牙,20个蛛网 104 护甲 工具箱 工作台 1 5个蠕虫,5个木板 256 护甲 Taurite盔甲 铁砧 1 8个Taurite锭 257 护甲 Taurite头盔 铁砧 1 6个Taurite锭 61 护甲 提基面具 -- 1 5个部落羽毛,1个资源物品(第一部分) 物品编号 物品类别 物品名称 所需工作台 获得数量 制作材料 50 资源 炼金台 -- 1 1个烧瓶、1个研钵、10个原木 321 资源 动物饲料 -- 1 3个小麦 322 资源 动物饲料 工作台 1 3个小麦 73 资源 动物牵引绳 -- 1 3根麻绳 99 资源 铁砧 工作台 1 1个石锤、6个铁锭 315 资源 黑色护甲染料 -- 1 1个黑色染料、1个移液管 310 资源 蓝色护甲染料 -- 1 1个蓝色染料、1个移液管 314 资源 棕色护甲染料 -- 1 1个棕色染料、1个移液管 312 资源 绿色护甲染料 -- 1 1个绿色染料、1个移液管 311 资源 橙色护甲染料 -- 1 1个橙色染料:1份移液管 313 资源 盔甲紫色染料:1份紫色染料,1份移液管 308 资源 盔甲红色染料:1份红色染料,1份移液管 309 资源 盔甲黄色染料:1份黄色染料,1份移液管 131 资源 天青之刃:铁砧 1,5份天青锭 124 资源 天青箭:30,1份天青锭,30份木箭 96 资源 天青锭:熔炉 1,1份煤炭,3份天青矿石 184 资源 甘蔗渣:磨坊 1,1份甘蔗 21 资源 绷带:1,2份纤维 39 资源 篮子:1,1份麻绳,3份木棍 39 资源 床:工作台 1,3份布料,5份木板 248 资源 血石:1,2份治疗药水,1份切割红宝石 215 资源 吹箭:5,2份部落羽毛,1份光滑木棍 6 资源 炸弹:铁砧 2,1份火药,1份铁锭 263 资源 炸弹箭:20,20份木箭,1份炸弹 264 资源 骨头铁砧工作台1级:20个骨头、4个灵魂宝珠、1个铁砧 230 资源:骨箭 骨砧 50级:1个骨锭、50个木箭 229 资源:骨弓柄 骨砧 1级:3个骨锭 228 资源:骨剑柄 骨砧 1级:1个骨锭 227 资源:骨锭 骨砧 1级:1个灵魂宝珠、5个骨头 42 资源:书籍 -- 1级:1个树脂、3张纸 114 资源:书架 工作台 1级:1本书、2块木板 107 资源:弓柄 工作台 1级:1块木板 37 资源:弓弦 -- 1级:1个树脂、1根麻绳 186 资源:面包 烤箱 1级:1个面团 94 资源:砖砌熔炉 2级:1块黏土 318 资源:砖砌地板 工作台 1级:2块砖块 102 资源:砖砌墙壁 工作台 1级:2块砖块 254 资源:铁桶 铁砧 1级:3个铁锭 253 资源:公牛头骨 骨桌 1级:1个灵魂宝珠、20个骨头 13 资源:营火 -- 1级:1块燧石、4根木棍 305 资源:黑色地毯 --
守卫者 狼法师召唤流BD,适用于1.31.1+版本 BD概述 这是一个召唤流BD,召唤物将承担大部分输出任务。 该BD拥有无限伤害来源:【狼牙项链】的技能可让狼的攻击造成无限叠加的流血效果。 我们还会使用【狼法师】符文,使【冰刺/空气冻结】技能能够享受狼的伤害加成。 装备 头盔
生命守卫提供关键的50%直接和间接伤害减免。 韦里克的装备大幅提升基础生命值/法力值/伤害。 我们在头盔上使用+25%间接伤害减免的次级附魔,以帮助达到100%减免。 同时注意,我们会尽可能在各处选择伙伴伤害这一次级属性。 饰品
我们的【魔力套装】第一部分——【宇宙披风】,能让我们的伤害随最大魔力值提升。这使我们的伤害可以无限提升(尽管速度较慢),因为通过职业专精路线投入到最大魔力值的点数没有上限。完全升级后,它能将70%的最大魔力值转化为1.5倍伤害,即每点魔力值提供(0.7×1.5)=1.05的伤害(实际上由于其他魔力乘数的存在,这个数值会更高)。这意味着我们需要将专精点数投入到魔力上(技能/专精部分会详细说明)。 【野性呼唤】符文为我们技能的“多伙伴”版本(小蜘蛛/狼群/火花精灵/ wisps)各额外增加3个伙伴,总共额外增加12个伙伴,从而进一步提升我们从【盖亚】获得的伤害。我们能在这里获得4种全抗性附魔中的一种。另外要注意【+20%宝石效果提升】,我们要尽可能多地获取这类属性来增强宝石带来的加成。 项链
【大师号令】套装是任何伙伴流build的核心。该套装提供高达四种不同的伤害加成(基础伤害×5、特殊攻击加成、+30%攻击速度以及伙伴伤害属性提升),并使伙伴生命值翻倍。 符文方面,【狼牙项链】是必备的,它能使狼的伤害翻倍,并赋予它们无限叠加的流血效果,让狼的伤害能在无尽的异象层数中持续提升。 词缀方面,我们需要20%伤害减免和另一个+25%间接伤害减免,再加上头盔的词缀,就能达到100%伤害减免。我们还需要一个易伤词缀,目标是在不浪费属性的前提下尽可能接近100%易伤。 副手
对于副手武器,守护者职业的召唤流构筑没有太多优质选择。我们在此选用【蓟刺】,因为【冰刺】和【空气冻结】均为自然系技能,所以这能提供双重攻击速度加成。 【狼法师】符文让我们可以将【冰刺】和【空气冻结】与所有狼类伤害倍率叠加,进而使其伤害三倍提升,实现高额攻击输出。 关于附魔,副手武器无法提供冷却缩减或宝石效果,因此我们选择效果持续时间来延长【寒冬使者】终极技能的生效时间。第二个次要附魔实际上是填充位,因为没有其他有用的选项。我选择了召唤物生命值,但这里其实任何附魔都可以。 护甲
魔力套装™的第二部分,能让我们通过最大魔力值来提升防御力。它会消耗15%的魔力值,但随后会将其乘以40。因此,每点魔力值相当于(0.15×40)=6点屏障值。 领袖符文至关重要,它能让狼群召唤一只阿尔法狼,这不仅是盖亚的额外伙伴,还能带来更多冰霜伤害。同时,它还能使所有狼的伤害提高500%,这是一个巨大的倍率提升。 在词条方面,我们获得了额外20%的伤害减免和20%的全抗性。对于这套build来说,护甲的次要附魔选项相当糟糕,因为它们没有伙伴伤害、冷却时间减少或效果持续时间的加成。因此,我们在这里选择+20%的宝石效果提升和魔力消耗减少。 弓
盖亚是该Build的主要伤害倍增器之一,它能为每个伙伴提供20%的伤害加成。当Build成型后,我们会拥有27个伙伴,可获得540%的伤害提升。如果使用【舞动之刃】法典,还能额外获得3个伙伴。 【血腥味】符文能让伙伴(非我们自身技能)对流血敌人造成额外伤害。项链上的【狼牙项链】符文能让狼的攻击附带流血效果,因此一旦有一只狼攻击敌人,你所有的伙伴都会对其造成4倍伤害。 在词条选择方面,我们选择【旋风】史诗附魔,使【追风暴靴】能提升我们的伤害(详见下方靴子部分)。我们还会选择法力值词条,以进一步强化我们的【法力值套装】。对于小型附魔,我们选择冷却缩减和效果持续时间——这两者都是让我们的【寒冬使者】终极技能达到100%覆盖所需的。 鞋子
对于这套卫士(Warden)的配装而言,靴子的选择并不多。从伤害角度看,最佳选择是【追风暴靴(Stormchasers)】,它能让武器上的旋风附魔提升我们最高300%的伤害。 【进军符文(Advancing Army rune)】能将430%的移动速度转化为随从伤害(随后还会因【统帅号令套装(Master's Command Set)】获得额外25%的加成)。这对随从来说是个巨大的伤害乘数。例如,150%的移动速度会转化为(4.3×150)=645%的随从伤害,再经统帅号令套装加成后变为(645×1.25)=+806.25%的随从伤害。太惊人了! 在词缀方面,追风暴靴自带一个固定的史诗级附魔:闪避。这让我们能再roll出第二个史诗级附魔!我们选择【杀戮加速(Kill Haste)】来提升移动速度,进而通过进军符文增加随从伤害。我们还要选择第三个【全抗性+20%】的附魔。最后,靴子能提供25%的【有害地面效果减伤】,这是其他装备无法提供的,所以一定要选这个。戒指
大师命令套装的后半部分。此外,该戒指在完全升级后能使同伴受到的所有伤害降低98%,使其实际上处于无敌状态。这种98%的同伴伤害减免效果非常出色,我们实际上可以忽略装备和技能/专精上所有同伴生命值加成! 纯净能量符文是我们法力套装的第三部分,在完全强化后能使我们的法力值提升3倍。这意味着遗迹护盾的效果提升3倍,同时通过宇宙披风获得的伤害加成也提升3倍。这也是为什么将所有专精点投入法力值比投入伤害或生命值更有效,即使在软上限时也是如此。 在词条方面,我们选择闪避率,以及第四个也是最后一个+20%全抗性词条。最后的主要附魔是法力值。对于小型附魔,我们选择【+20%宝石效果】和【+17%冷却缩减】。 技能 风行者
德鲁伊 我们只从这棵技能树中点出10%攻击速度和10%攻击距离。注意,我们不点树人伙伴,因为它只能召唤1个伙伴。多1个伙伴确实不错,而且树人还能嘲讽,但我们可以通过冬之使者专精系让狼获得嘲讽能力,并且技能栏里实在没有位置放树人了。所以我们不在树人这里浪费点数。
这里我们获得10%减伤和10%移动速度,但仍需额外投入3点来解锁【蜘蛛幼崽】。这3点可以分配到任意地方(我将它们加在了【孢子】上)。我们要把【蜘蛛幼崽】点满,因为需要投入5点才能召唤出4只蜘蛛幼崽。风暴呼唤者
这棵技能树的情况会稍微复杂一些: 我们需要【 wisps(小精灵)】,因为它们是额外的伙伴,并且还能从【野性呼唤】中获益。解锁【小精灵】需要19点技能点。 我们先点出【击中回蓝】和【冲击法球】。【冲击法球】很有用,因为【Sparkies(火花精灵)】会施放它。 将【火花精灵】点满,以获得6个【火花精灵】,并从它们身上获取尽可能多的伤害。【火花精灵】比【Pixies( pixie 精灵)】略胜一筹,因为可以召唤6个,而【 pixie 精灵】只有5个,此外【火花精灵】还拥有麻痹能力。 点满【Flutter(振翅)】,为【火花精灵】提供额外的闪避。 此时我们已用了18点技能点,还需要1点才能达到19点,这1点加在哪里都可以,我把它加在了【Stormer(风暴使者)】上。 投入19点技能点后,现在你可以点满【小精灵】和【强化】了。 【Winter Herald(寒冬使者)】
我们几乎所有的伤害都来自这一技能树,因此自然会在其中投入最多的点数。 狼法师符文意味着我们需要同时投入冰刺和空气冻结。 冰刺的伤害会被狼群伤害完全替代,所以对该技能投入额外点数是无用的,因为它们只会增加冰刺的伤害。只需投入1点即可。 法力消耗减少和冷却时间减少都非常有用,所以我们将两者都点满。 使用冰刺后获得的额外攻击速度也有助于提升我们的伤害,因此也将其点满。显然我们要将【狼群】及其所有关联技能点满,因为它们能为我们的伤害提供巨大加成。 得益于【蓟刺】和【狼法师】符文,我们的冰霜攻击既快又狠,使得【冰雹】【猛击】【痛击】都能成为相当显著的伤害提升手段,所以这些技能也都要点满。作为冰霜技能,它们还能从我们获得的大量冰霜伤害加成中受益。 与【冰刺】不同,【空气冻结】确实能从额外点数中获益,因为额外点数会生成额外的冰块(借助【狼法师】符文,这些冰块实际上会变成额外的狼群之狼)。因此我们要将其点满。 我们还要将【空气冻结】的两个辅助技能【洪流】和【寒冬】也点满。【洪流】与【冰雹】配合能延长【空气冻结】的持续时间,而【寒冬】本质上是一个常驻的+25%冰霜伤害 buff。【寒冬之寒】很重要,并非因为其减速效果,而是由于被冻结的敌人能触发【冰雪爆发】,为我们的【冰刺】/【空气冻结】技能带来额外的范围冰霜伤害。 【冬日微风】能让那些突破伙伴防线靠近我们的漏网之敌被冻结,使我们凭借更出色的移动速度逃离。随着我们堆叠大量闪避值,该技能有很高的触发几率。 【寒冰冲刺】在闪避时能提供70%的移动速度加成,而我们会堆叠大量闪避值。再加上靴子上的【进军之师】效果,移动速度可转化为额外的伙伴伤害,计算方式为(4.3×70)=301%。 最后,我们选择【寒冬使者】系的终极技能。这两个终极技能都很出色,我更倾向于【寒冬使者】,因为它能提供大量闪避值,更关键的是,还能使所有抗性额外提升25%。在神话十四及以上难度中,这些额外抗性需要达到80%的上限。精通
对于这套Build,关于专精的总体策略是选择【所有与伙伴相关的专精】。这需要我们点满所有3条职业专精线,以及额外一条专精线的终点。 我们还需要让终极技能保持100%持续时间,因此需要【终极亲和】 perk,这要求我们点满另一条专精线的终点。 最后,由于我们几乎所有伤害都是冰霜伤害,所以肯定需要【冰霜亲和】 perk,这需要点满【寒冬使者】专精线的终点。 各专精线的详细信息如下: 【风行者专精】
风行者和德鲁伊专精路线几乎都不能为我们的build提供任何帮助。不过,我们需要将这两条路线中的一条点到最后,以获得【伙伴亲和】和【终极亲和】这两个 perk。风行者路线至少能提供10%移动速度,所以我们选择将这条路线点满。 将风行者路线点满还能让我们获得【广泛协同】被动,额外增加25%全元素伤害(不过实际上主要是为了冰霜伤害)。 德鲁伊专精
既然我们要将风行者用到最后,第一个节点只需投入20点。对于典狱官来说,【生命链接】通常是核心技能,但在我们的配装中,我们使用【遗迹】护甲来获得法力屏障,因此不需要生命值/治疗相关的技能。 职业精通
这里有很多内容需要说明,我会逐个节点进行讲解: 节点1:第一个节点没有上限,我们会将额外点数投入到魔力中。“额外点数”是指在其他所有线路都完成后,你才开始在这里投入点数。由于我们的魔力配置,以及额外的魔力百分比宝石,将每一个额外点数投入到魔力中比投入到伤害或生命值中更有效率。我已经计算过了,即使魔力在每个专精点+3时达到软上限,它仍然比10点伤害和10点生命值更有价值。 节点2:我们在这里选择伙伴被动和伙伴伤害。如前所述,由于“大师的号令”套装,伙伴生命值是不需要的。第三条线路是个人偏好,我选择了+30%拾取范围。+30%魔力恢复也(略微)有用。节点3:这些词条大多对我们的Build无用,或是提升游戏体验(QoL)的升级。不过,【灵活】和【稳固】这两个词条都极为有用。【灵活】可防止你被减速或麻痹,【稳固】能阻止你被击退或拉拽。这两种效果都必须防止,因为在更高的无尽层数中它们可能会让你丧命。最后一行主要看个人偏好,我选择了【指挥官】,这样我的狼就能嘲讽走那些离我太近的漏网之敌。 节点4:这些都是很棒的属性——冷却缩减和效果持续时间是让我们的【寒冬使者】终极技能达到100%覆盖所需的。第三行由你决定。我选择了+10%移动速度,但+10%攻击速度或+10%攻击范围也非常不错。节点5:由于生命/生命回复类被动无用,我们选择【对被加冕敌人造成10%额外伤害】、【受到的有害效果持续时间减少20%】以及【命中时获得额外法力】。 节点6:这是另一个包含优质同伴被动的出色节点。由于不需要同伴生命值,我们选择【同伴被动】和【宝石强度】。第三行可在【5%闪避】或【5%伤害减免】中选择,两者效果均不错。 节点7:现在我们开始接触真正强大的内容。【25%易伤加成】和【25%全抗性】对于达到易伤/抗性上限至关重要,因此这两项是必选。第三行在【35%暴击伤害】或【75%冰霜伤害】中选择。我们将从冬之使者路线末尾的冰霜亲和 perk 获得大量冰霜伤害,因此【35%暴击伤害】是最佳选择。节点8:此流派不使用卫星或荆棘技能。需要【+25%随从伤害减免】,因为它会叠加在套装戒指提供的98%减免之上。对于最后两个节点,只有两个伤害被动技能,另外两个是便利性被动(+水晶和+经验)。流血伤害看似无用,但要记住我们的狼牙项链能让狼获得叠加流血攻击。这意味着【+150%流血伤害】实际上是巨大的伤害提升! 风暴呼唤者专精
我们需要点到这条技能线的尽头,以获取【伙伴/终极亲和】两个 perk,除此之外,这里还有一些非常不错的被动技能: +20%暴击伤害 【静电鬼火】使我们的鬼火在暴击时能麻痹敌人——当暴击率达到100%时,鬼火每次攻击都能造成麻痹效果,这为该build提供了大量额外的控制(cc)。 +5%闪避 【蜂群飞舞】为每个闪电伙伴提供+2%闪避。由于我们选择了火花精灵,并且装备了【野性呼唤】符文,我们会获得6个火花精灵,从而额外增加+12%闪避。很不错!虽然与我们的狼伤害相比,幽魂伤害显得微不足道,所以幽魂伤害提升的作用不大,但我们需要在这里投入15点才能解锁后续的技能点。这里的第8个节点能让我们的冰雹技能再获得75%的伤害加成,这是一个很大的提升。寒冬使者专精
这里有很多选择,所以我会逐个节点分析这棵技能树: 节点1:更高的冰霜伤害显然不错,但我们实际上需要那20%的效果持续时间,才能让【寒冬使者】终极技能达到100%的持续时间。 节点2:我们选择额外30%的【冰雹】触发几率,因为它是我们持续伤害的重要组成部分。 节点3:【寒冰冲击】能让我们更广泛地传播【寒冬之寒】,但提高【冰雹打击】的触发频率实际上能带来更高的总体伤害。 节点4:这两个选项都很好,但我们的抗性已经达到上限,所以这里选择额外5%的伤害减免。 节点5:这些选项都不错,但【保护她】是最佳选择,它能让你的狼嘲讽敌人远离你。这不是普通的嘲讽,实际上是一种拉拽效果!这能让你的狼将敌人聚集起来,从而提升冰雹的效果。这是该流派的核心 perk。 节点6:在我们的流派中,冰雹和雪暴都会触发,但冰雹的基础伤害更高,所以这里选择+100%冰雹伤害(我们之前也提升了冰雹的触发几率)。 节点7:这两个选项其实都很不错,考虑到雪暴触发几率较低(45%)且需要敌人处于寒冷状态,我选择了进攻性的冰冻地面。 节点8:寒冬使者专注能为所有寒冬使者主动技能提供25%的固定伤害加成,对我们而言就是冰刺和空气冻结。注意这与冰霜伤害是分开计算的,所以相当于1.25倍的伤害乘数。很棒!节点9:作为最后一个节点,【冰霜亲和】能让我们溢出的魔力值提升冰霜伤害。在高专精等级下,你将获得超过100%的额外冰霜伤害,显然这是最佳选择。 进攻方面 让我们回顾一下进攻配置: 盖亚弓 盖亚弓能根据激活的同伴数量,每层提供最高20%的额外基础伤害。这意味着我们要尽可能召唤更多同伴。因此,我们选择所有“多同伴”版本的同伴技能:蜘蛛群/火花群/狼群,以及风暴呼唤者技能树中的【精灵】技能。 主宰号令套装 对于任何同伴流派来说都是绝对核心,它能使所有同伴的伤害提升5倍,同时使【同伴伤害】属性提升1.25倍。狼相关符文 我们使用4个独立的符文来提升狼的伤害: 狼齿项链 - 为狼提供叠加流血攻击效果,并使狼的伤害翻倍。这让我们能够挑战更高的无尽层数。 狼法师 - 使我们能够用狼的伤害释放冰刺/空气冻结技能,并将狼的伤害额外提升200%。 狼群领袖 - 让狼群额外召唤一只阿尔法狼,这意味着盖亚会多一个伙伴。同时,它还能将所有狼的伤害再提升500%。血之气息 - 此符文使所有同伴对流血敌人造成+300%伤害,由于狼牙项链的效果,你的狼攻击的所有敌人都会触发该效果。 暴击率与暴击伤害 这两项是全面的伤害提升,因此我们要达到100%暴击率,然后尽可能堆叠暴击伤害。100%暴击率还能让我们的 wisps(微光精灵)在每次攻击时都借助静电微光 perk(特长)使敌人麻痹。 压制 在更高的神话难度层级中,敌人开始获得抗性。在最高神话难度下,敌人会获得90%的抗性。压制能让你忽略敌人一定百分比的抗性。注意,这不是直接忽略抗性数值,而是抗性的百分比。因此你需要达到100%压制,这样才能忽略敌人全部90%的抗性。遗憾的是,若不浪费大部分词条刷新机会,就无法达到100%的易伤覆盖率。因此,我们通过以下方式将易伤提升至94%: - 装备上刷新出两条+22%易伤词条(一条在项链,一条在副手) - 职业专精节点7提供+25%易伤 - 在武器/副手镶嵌绿色立方体宝石(当然是最高等级的)。如果你将所有“所有宝石效果提升%”属性都点满至20%,那么该宝石应提供+22%易伤 - 在风暴呼唤者技能树投入25点,获得+3%易伤 攻击速度 我们不会在攻击速度上大量投入,但我们最强的攻击技能(冰刺与空气冻结)都能从攻击速度中获益。我们能获得约50%的攻击速度,此外,通过蓟刺还能为冰刺与空气冻结额外提供+100%攻击速度。冷却缩减 信不信由你,伙伴的攻击并不受你的攻击速度属性影响,它们的攻击被视为技能,因此会受到冷却缩减的影响!我们本就需要冷却缩减来让【寒冬使者】终极技能达到100%的持续时间,而它同时也能提升伙伴的每秒伤害。 冰霜伤害 我们几乎所有的伤害都是冰霜伤害(狼 + 冰刺 + 空气冻结),所以冰霜伤害值得投入。 法力值 最后,多亏了我们的法力值套装,【宇宙披风】能让我们通过法力值来提升伤害。因此,我们通过以下几种方式提升最大法力值: - 将所有额外的专精点投入到法力值中 - 在装备上尽可能选择+800法力值的词条 - 在头盔/胸甲上使用+%法力值宝石(靴子只有1个宝石槽,所以最好用于镶嵌星辰宝石) 防御 防御由多种不同属性共同构成。 抗性 任何超越神话十四难度的内容都需要130%的总抗性,这样在受到-50%抗性惩罚后才能达到80%的最大抗性上限。 这130%的抗性来源于以下方面: - 10%的基础抗性 - 4件装备上各有1条“+20%全抗性”的词条 - 职业专精线路中第7个节点提供的+25%全抗性 - 最后,来自冬之使者技能树的终极技能“寒冬使者”提供的+25%全抗性我们需要通过冷却缩减和效果持续时间的组合来实现这一机制的100%正常运行时间。 减伤 这是通过生命守卫头盔、部分装备上的减伤词条,以及技能/专精提供的少量额外减伤来实现的。 闪避 闪避值来源于宝石、技能/专精、装备附魔,以及冬拥者终极技能提供的额外25%闪避。 间接伤害抗性 我们可以达到100%的间接伤害抗性,这在更高难度下是非常必要的。你可以通过以下途径获得: 头盔上25%的词条(次级附魔) 生命守卫传奇特效提供50% 项链上25%的词条(次级附魔) 关于 stagger? 你可能会疑惑为什么这套build没有包含 stagger 相关内容。原因是我们将【残响】+巨大的法力池作为主要的有效生命值形式。【 stagger 伤害】会无视护盾,所以如果你携带【 stagger 】,就会很快死于【 stagger 伤害】。 技能/腰带栏
伙伴技能必须放在技能栏中才能召唤,这会占用3个技能槽。冰刺和空气冻结是我们的主动技能,因为它们是由狼法师符文转化而来的技能。最后一个技能槽用于放置我们的终极技能。这些技能会按照从右到左的顺序释放。不要使用小蜘蛛技能,因为它会杀死你的蜘蛛,导致你的伤害在瞬间下降。火花发生器的主动技能会麻痹其附近的敌人,是个不错的【紧急救命】技能,但你不应该一冷却好就持续使用它。
对于我们的腰带,我们使用: 【刃舞法典】——它能额外提供3个伙伴,通过盖亚来提升我们的伤害。注意我这个法典是未绑定的——将技能/腰带槽位设为未绑定后,游戏会在冷却时间结束后自动持续施放该技能。 【冷酷头骨】——这是一件你可以在战役中找到的独特遗物,它会施放五级骨咒,能在几秒内使敌人减速100%(相当于让他们无法移动)。独特遗物与法典不共享冷却时间,所以你可以随意使用它。斯兹尔克之翼 - 这是游戏战役中另一款独特的遗物,它能让你进行10米距离的传送,助你脱离险境。 法力药水 - 第四个物品栏确实没有特别合适的装备,但我会携带法力药水,以防法力值被耗尽到紧急水平(当你达到高精通等级后,这种情况应该不会发生)。


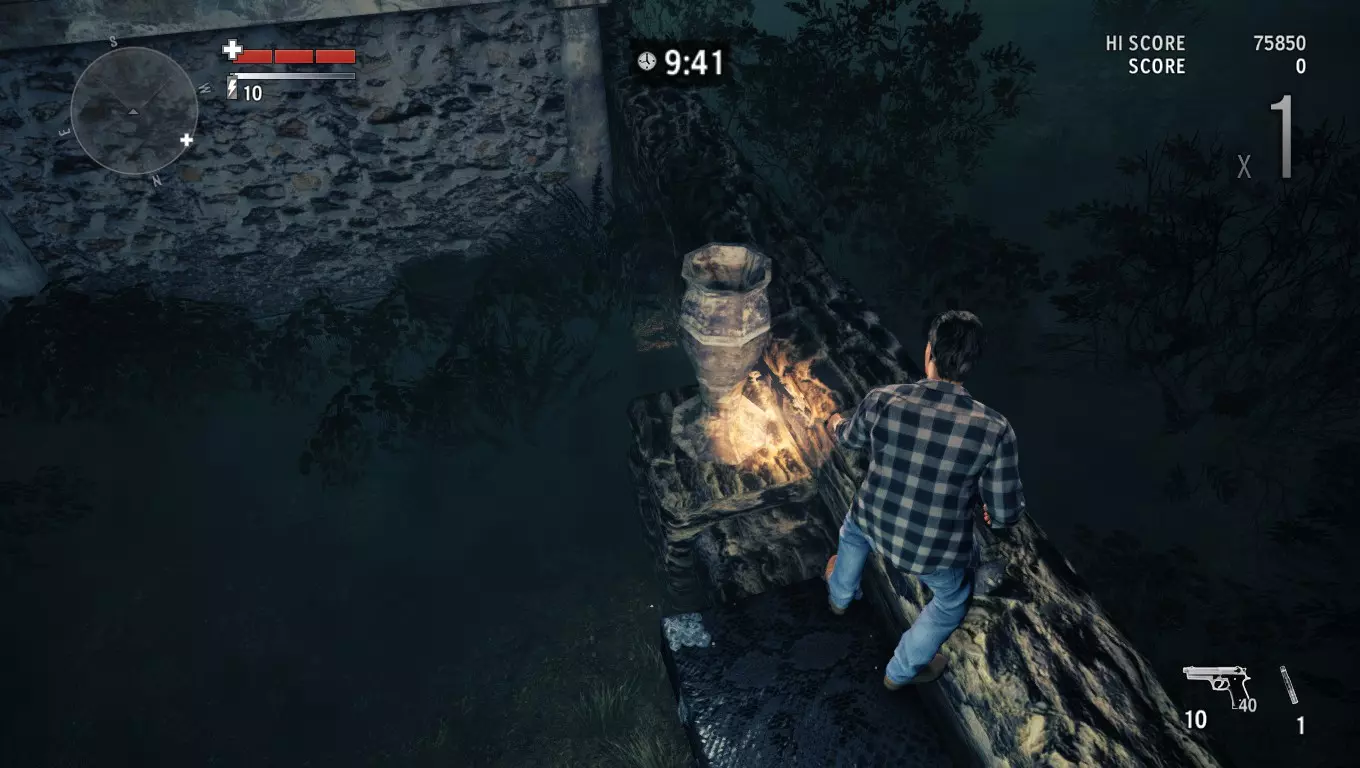
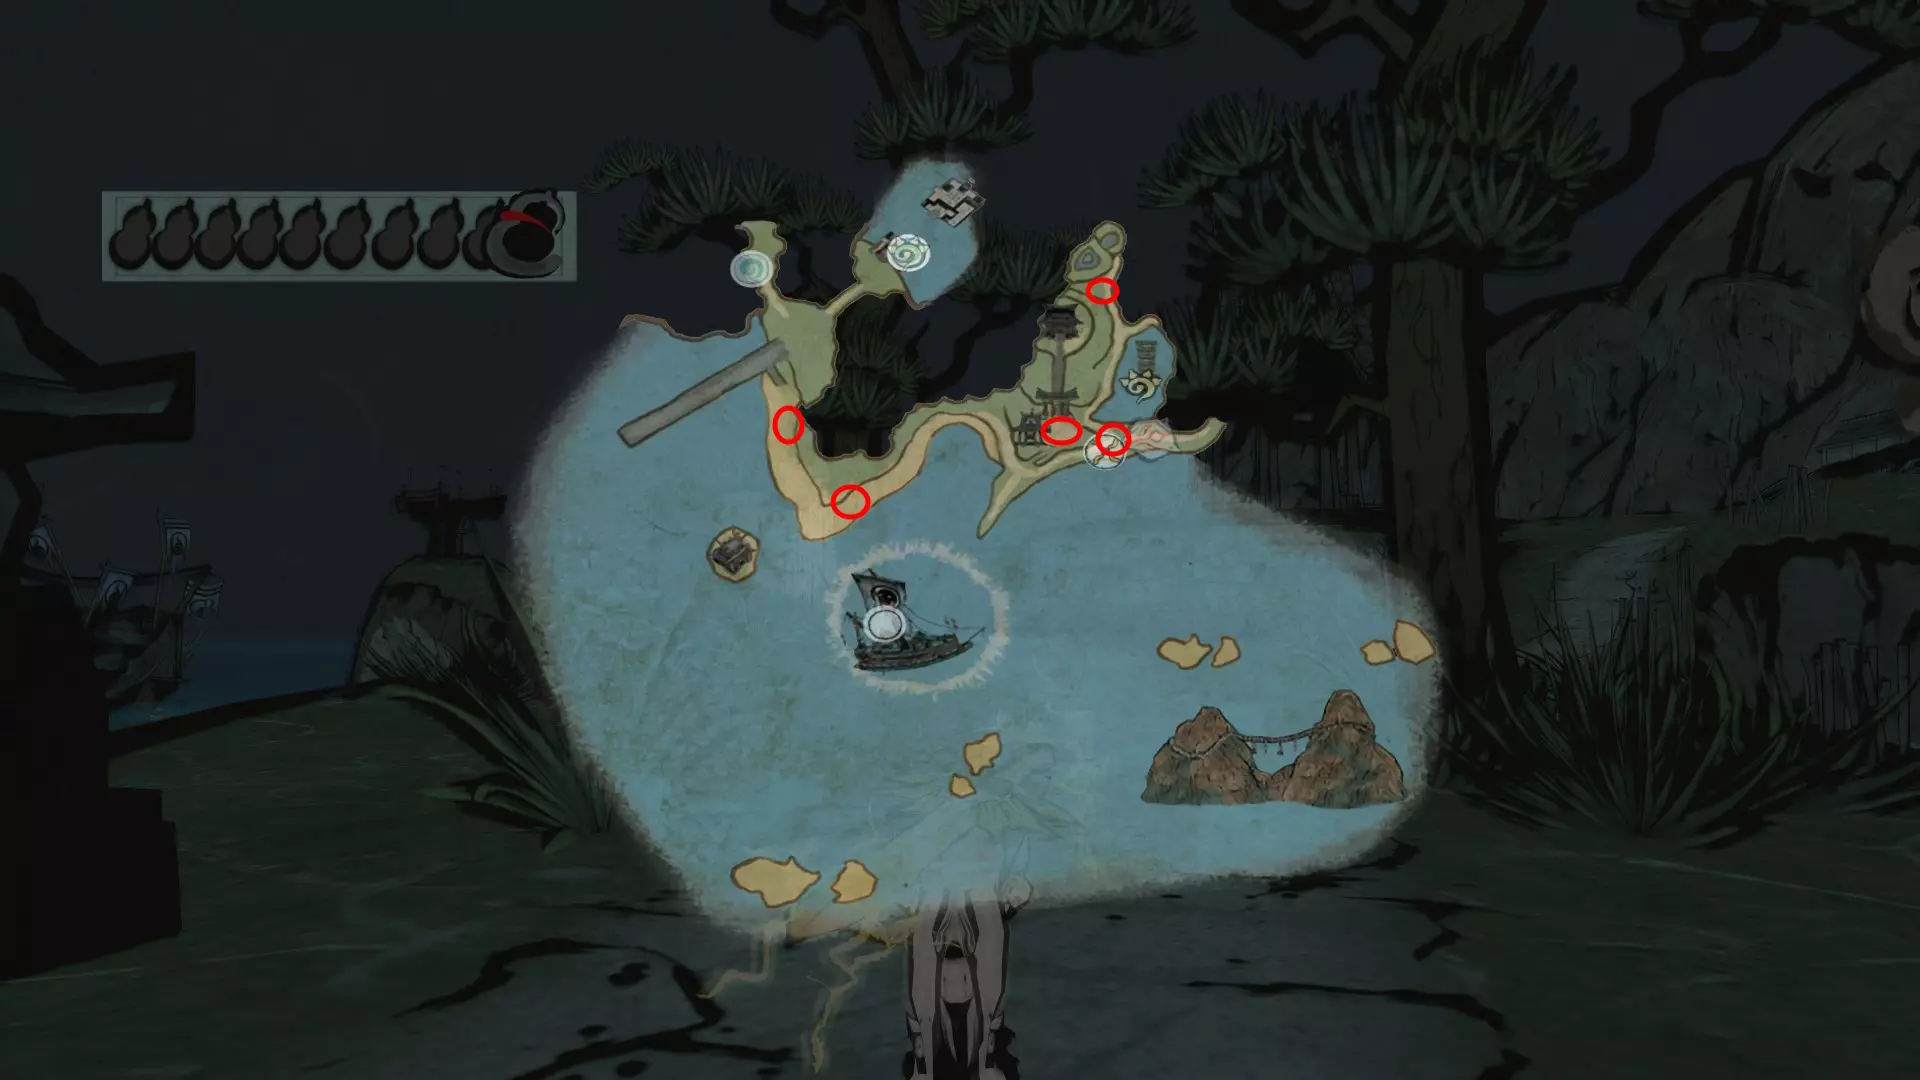
通缉列表 地图上的恶魔位置——它们的所有位置或许能在其他地方找到,但对我来说,即便是在游戏 overlay 中打开第三方资源也很不方便,所以我决定将现有的资料加上自己的改进,转移到便捷的 Steam 平台上,希望能让大家轻松一点。恶魔的位置用红色圆圈标记,只需按住【V】键查看,无需通过菜单打开游戏地图…… 信州平原——妖怪笔记 离开神木村后,你可以和月之洞窟旁边房子里的 Mika 祭司对话,获取这份列表。
鹰之通道 - 复仇契约 第二个清单位于草原村的旅店内。进入旅店,上二楼找到走廊尽头的门,用头撞击门会听到女孩让你离开。离开旅店后,再返回并上楼就能找到这个名叫春日的女孩,她在右侧的房间里。与她对话即可获得清单。
Ryoshima Coast — 怪物清单 你可以在平安京平民区找到第三个清单。前往贵族区入口前的餐馆(在夜晚),找到并与醉酒男子Musa交谈。
神威 - 赎罪之录 最后一份清单由神威的瓦利给出。你可以在该区域的大致中央找到他,他就在自己的房子里,周围有很多标识,你可以和他对话。

LV.
简介
转载steam社区指南,侵删
发帖达人Ⅰ