换一换
换一换 


对《战地模拟器》制作地图感兴趣吗?本指南将带您了解从下载安装《战地模拟器》模组工具到在Steam创意工坊发布地图的全过程! 设置《战地模拟器》工具 感谢您查看本指南以及对为《战地模拟器》制作自定义地图的兴趣!在阅读本介绍时,您可以从《战地模拟器》模组页面获取所需的工具及其他资源。 请注意,《战地模拟器》工具将随游戏一同更新,这意味着部分功能可能会暂时出现故障。我旨在确保使用这些工具创建的任何自定义内容都能在游戏的所有未来更新中继续正常运行,但我无法保证一定能做到这一点!以下是关于《战地模拟器》工具的简要介绍: 《战地模拟器》工具是一系列美术资源、脚本和预制件的集合,让你能够创建自己的《战地模拟器》地图。 这些工具作为Unity项目在Unity编辑器中运行,为你提供Unity编辑器关卡编辑功能的强大灵活性。 该工具设计得易于使用,即使你几乎没有Unity编辑器的使用经验也能轻松上手。 由于官方关卡和自定义关卡均在Unity编辑器中制作,你可以完全掌控自己的地图! 未来,这些工具将扩展支持自定义武器和载具的创建。如果你在使用本指南或《战地模拟器》工具时遇到任何问题,最快的获取帮助方式是在《战地模拟器》Discord聊天中提问。我们设有专门用于地图制作支持的地图制作者频道。 要设置工具,请按照《战地模拟器》模组制作页面上的说明进行操作。 设置好模组制作工具后,你可以尝试导出工具中捆绑的示例场景!示例场景位于Unity编辑器内的Scenes/ExampleScene.unity路径下。双击ExampleScene文件即可在编辑器中打开它。
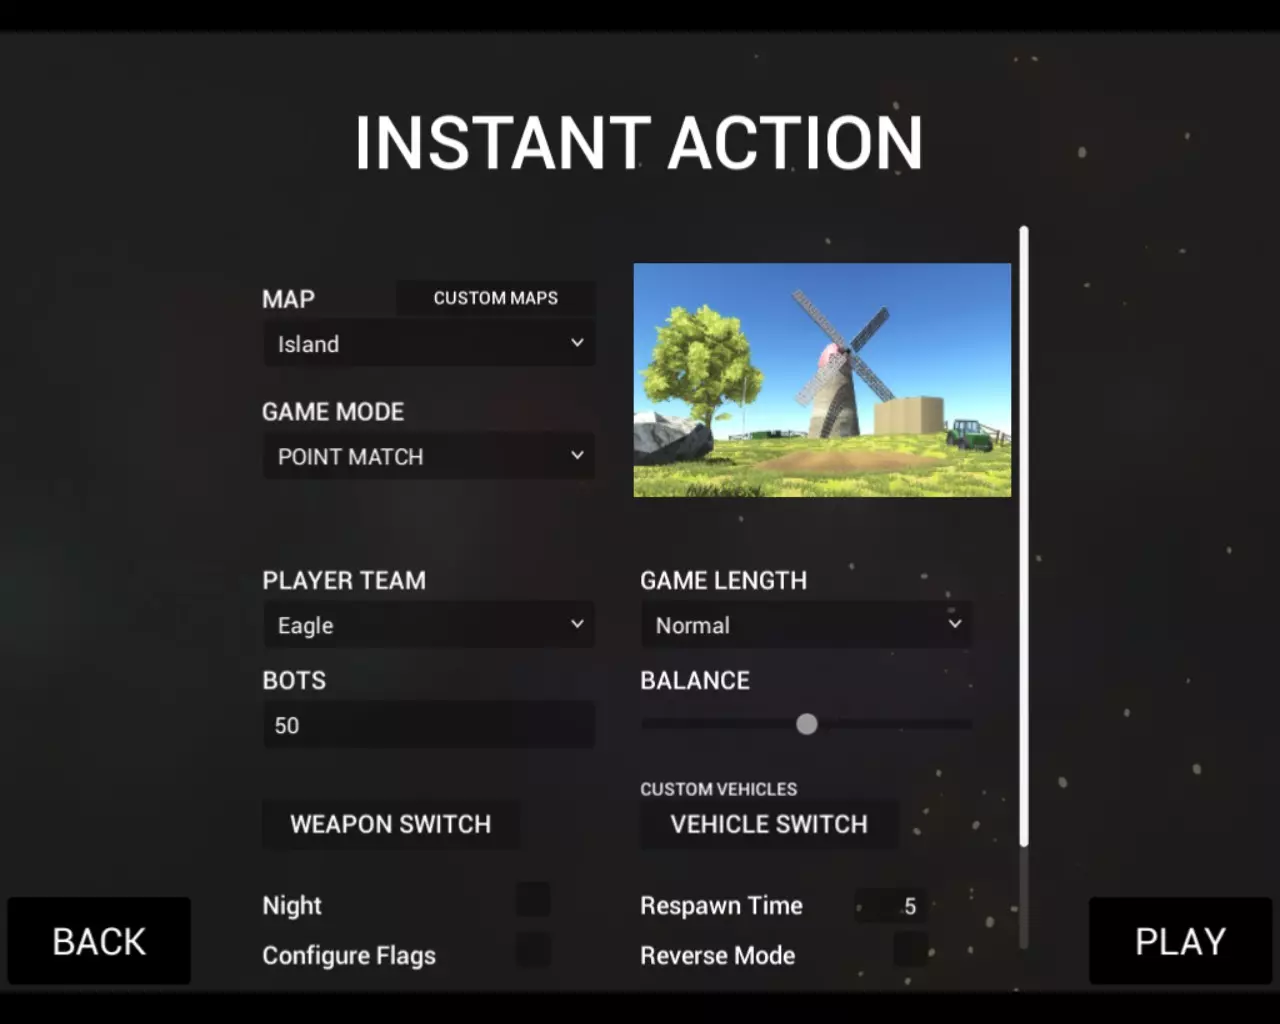
要导出此关卡,请点击“Ravenfield工具 -> 地图 -> 将开放场景导出为地图”。你会收到一条关于正在ExampleScene中操作的警告,暂时忽略它并点击确定即可。导出过程随即开始,完成后你将看到“导出完成”的提示消息。恭喜,你刚刚导出了你的第一张地图! 创建你的第一张地图 - 创建地形 让我们创建一张新地图。最简单的方法是从示例场景开始,因此首先加载该场景(你可以在Scenes/ExampleScene.unity中找到它)。我们通过保存该场景的副本来创建新地图,所以点击“文件 -> 另存场景为...”。将你的新场景放在Scenes文件夹中,并命名为“我的第一张关卡”。我们可以通过查看编辑器的窗口标题来确认新场景已打开。

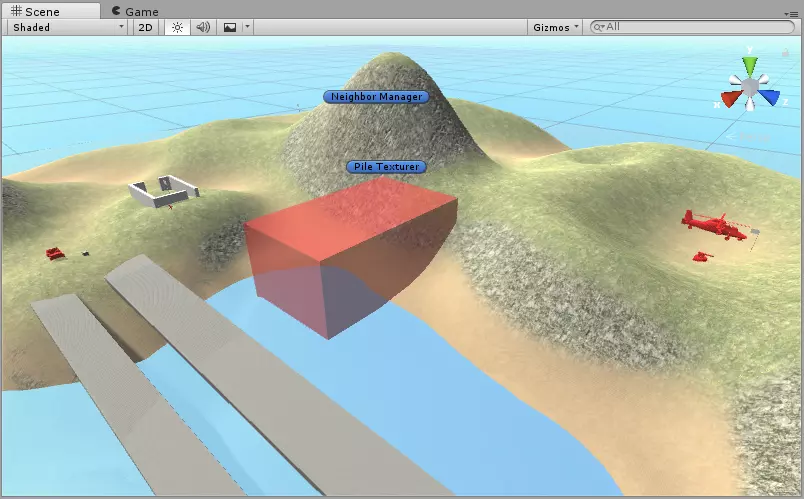
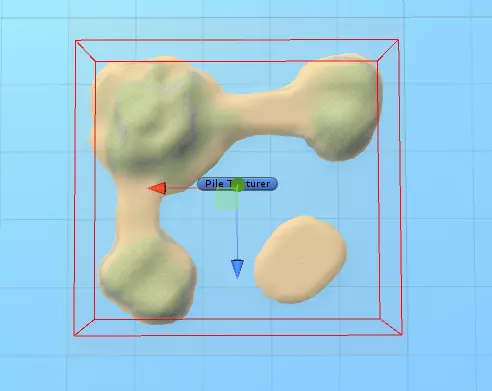
为了本教程的需要,我们先从场景中移除除地形、Pile Texturer和Time Of Day对象之外的所有物体。最简单的方法是在层级视图中选择所有其他物体,然后按删除键。这样就能得到一个干净的关卡。
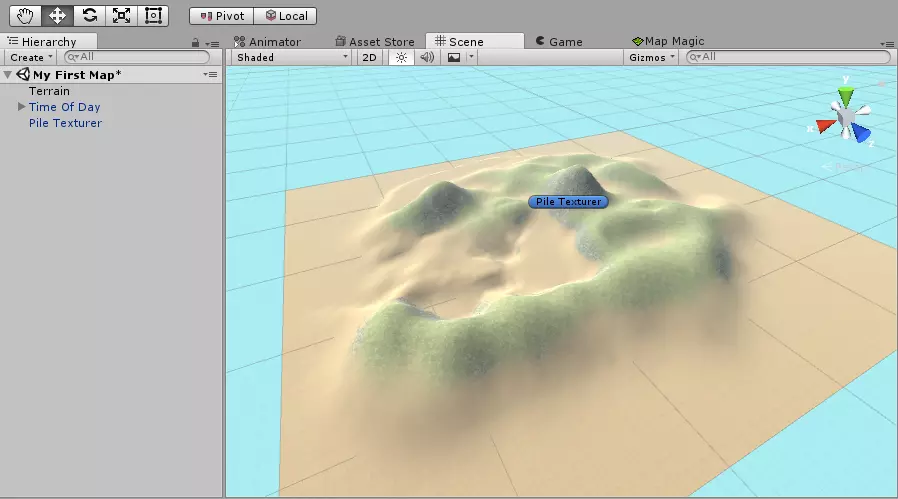
我们在场景中保留“时间”对象的原因是该对象包含一个阳光光源。没有光源的话,关卡设计会变得非常困难,所以我们就把它留在里面!现在我们可以开始修改地形了。本指南不会介绍地形工具的使用方法,但如果你在网上搜索,会找到很多相关教程。稍微调整了一下地形后,我得到了这样的效果:
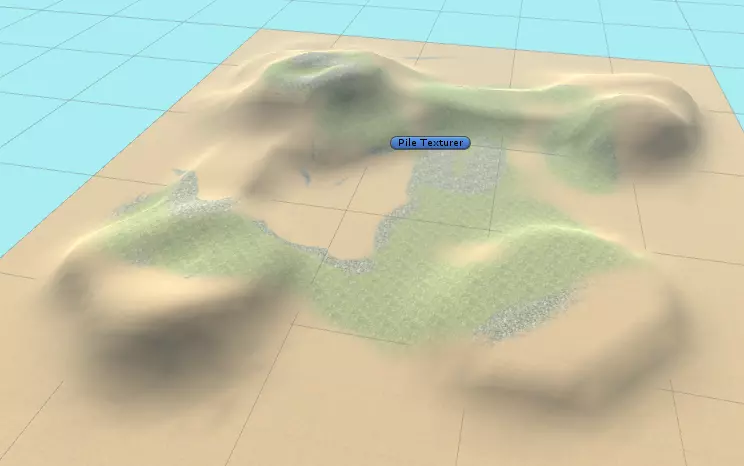
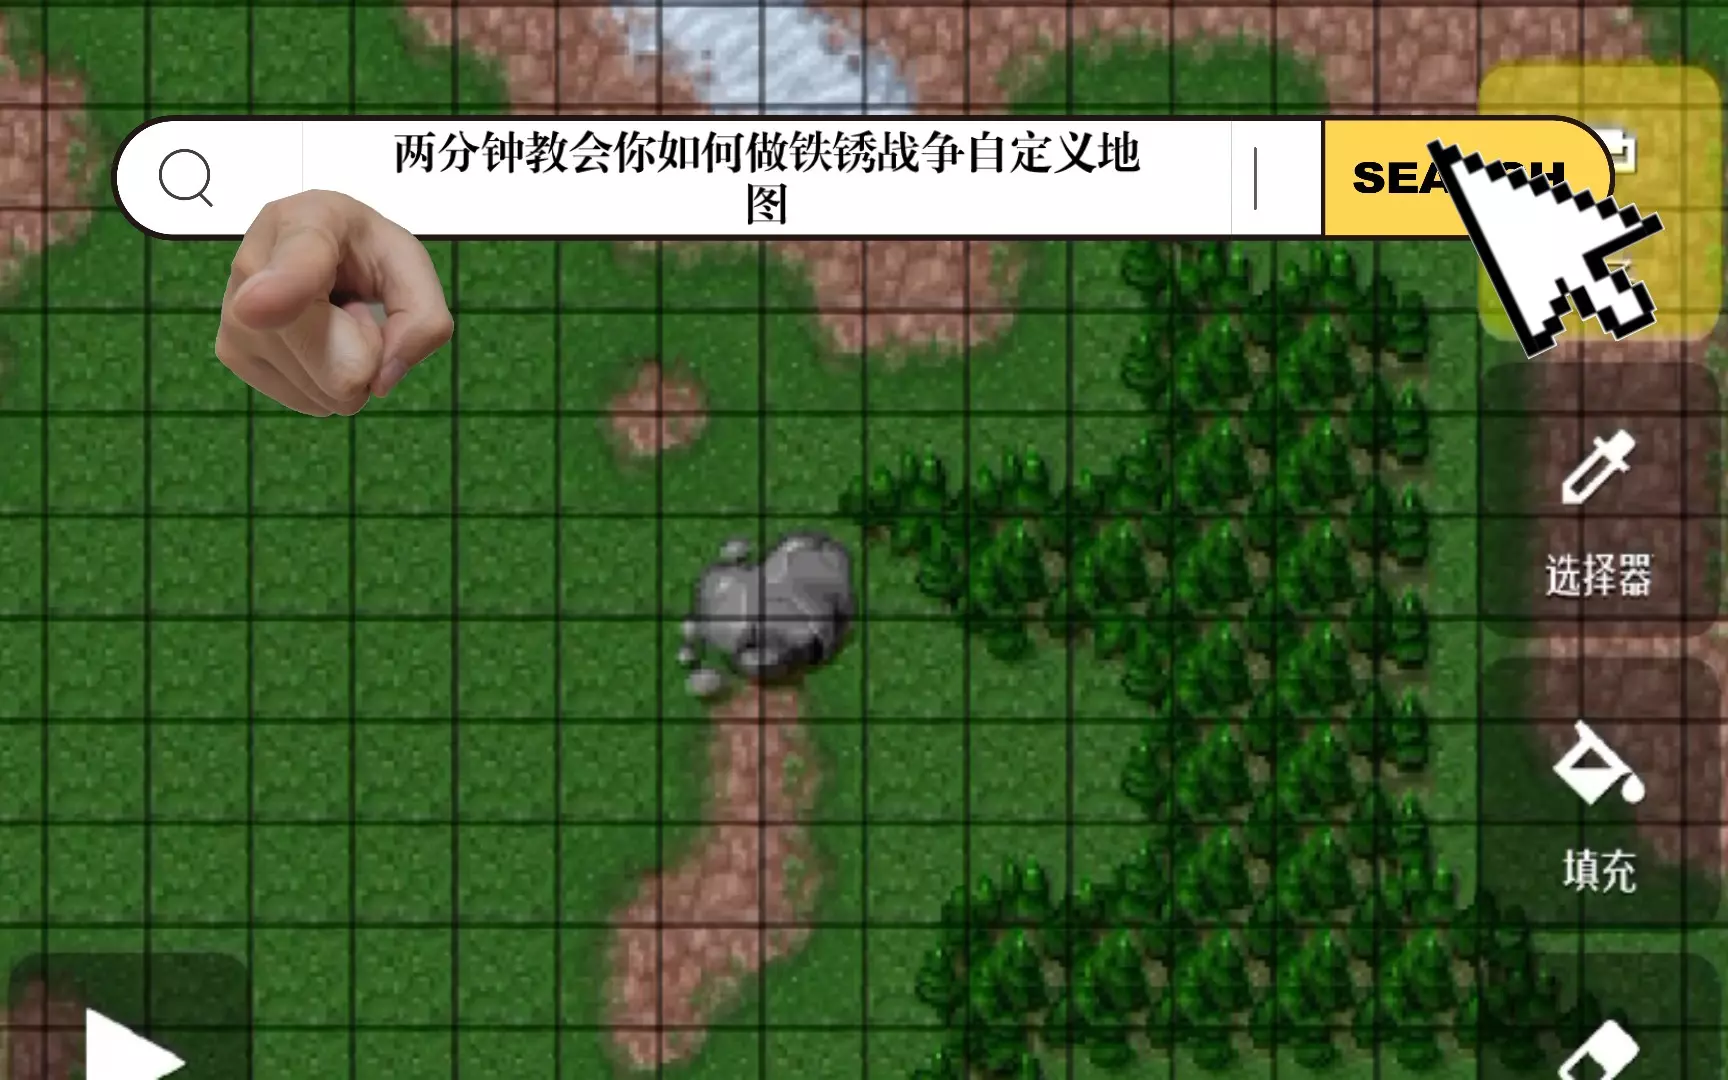
你会注意到我没有更改地形的纹理,这可以让【Pile Texturer】对象来帮我们完成。要使用它,选择【Pile Texturer】对象,然后在检查器视图中点击【Apply Texture】按钮。这就是操作后的结果:
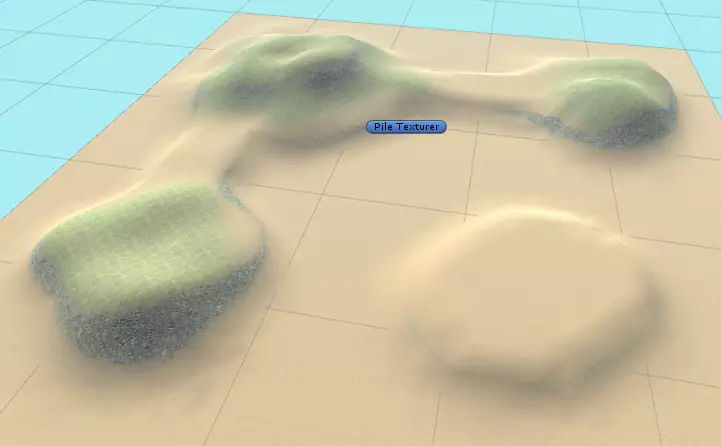
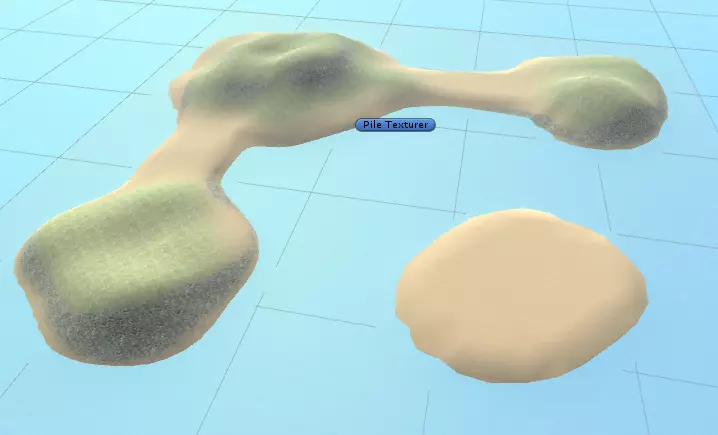
好多了!为了让我们的关卡看起来更完整,我们来添加水元素。在Prefabs/Map Elements/Must Haves/Water Plane路径下有一个水预制体,我们可以用它来实现这个效果。只需将该预制体拖入场景中即可放置!这是添加水之后我的关卡效果:
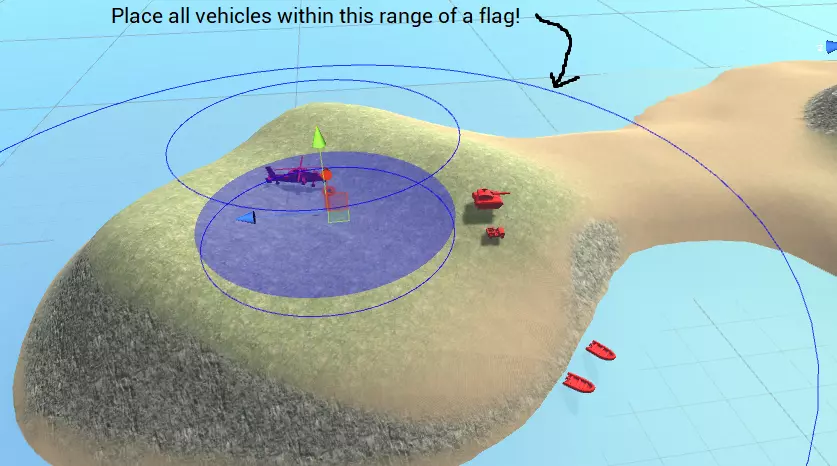
现在让我们尝试导出关卡并看看会发生什么。按下“Ravenfield工具 -> 地图 -> 将开放场景导出为地图”。 执行此操作时,我们会收到一堆警告。这是因为《乌鸦战场》需要在地图中放置一些特定对象才能正常运行,例如旗帜、场景摄像机、小地图摄像机等。幸运的是,我们可以在“Prefabs/Map Elements/Must Haves”文件夹中找到所有需要放置的预制对象。在导出地图之前,我们必须确保放置好这些对象! 从警告中可以看到,我们还需要放置以下内容: - 占领点(旗帜) - 场景摄像机 - 小地图摄像机 - 反射探测器 - 寻路框 - 邻居管理器 在下一部分中,我们将放置这些对象!创建你的第一张地图 - 添加预制件 首先放置一些夺取点,可在【预制件/地图元素/必备项/夺取点】中找到。这些物体是你可以夺取的旗帜,所以确保在你的关卡周围放置一些。旗帜默认属于蓝队(由旗帜周围的蓝色圆圈表示)。你可以通过在检查器视图中更改【默认所有者】的值来改变每个旗帜的所属方。你应该确保每队至少拥有一面旗帜。 以下是我放置夺取点的方式:
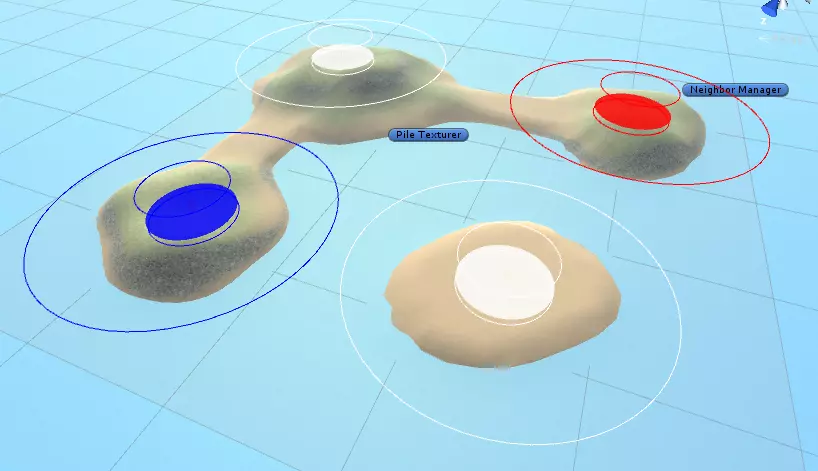
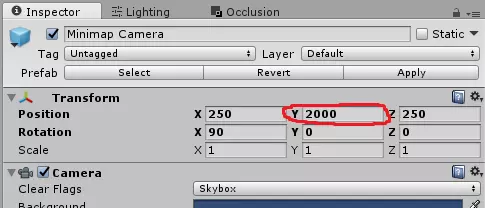
如果你还没有为占领点命名,建议将它们命名为易于识别的名称,例如,我将我的占领点命名为:红色基地占领点、蓝色基地占领点、山丘占领点和岛屿占领点。确保你这样做,因为合适的名称在本指南的后续部分会非常有用! 接下来是场景相机,位于Prefabs/Map Elements/Must Haves/Scenery Camera。这是在游戏中启动地图时显示的相机。你可以将其放置在关卡中任何合适的位置,在游戏视图选项卡中可以查看效果。 然后是小地图相机,位于Prefabs/Map Elements/Must Haves/Minimap Camera。此摄像机用于在你开始关卡时渲染小地图,因此请将其放置在能够俯瞰关卡的位置。默认情况下,该摄像机应放置在关卡上方2000单位处,以获得最佳效果。你可以通过将其变换组件的Y轴位置坐标设置为2000来调整其高度位置。
现在是时候放置反射探测器了,它位于Prefabs/Map Elements/Must Haves/Reflection Prober路径下。该对象完全是装饰性的,在游戏运行时,当视频质量设置较高时,它会为你提供美观的反射效果。将此对象放置在地图中心的某个位置,略微高于地形或水面。除非你想完全控制反射效果的呈现方式,否则该对象的位置并不是特别重要! 我们现在已经放置了所有用于游玩关卡并使其看起来美观的预制件,但我们还需要放置一些其他东西,以帮助AI理解并导航你的关卡!以下预制体将在本指南的寻路部分详细讨论,但我们先来了解它们的基础知识: 寻路盒用于描述AI在关卡中可以行走的区域。在你能够游玩关卡之前,必须扫描寻路盒内部以找到可行走表面——这使AI能够了解在关卡中可以行走的位置。此扫描过程所需时间从一秒到几分钟不等,具体取决于寻路盒的大小。为了加快扫描速度,最好将寻路盒保持尽可能小,因此请尝试让它们紧密贴合你的关卡。现有三种寻路盒类型:步兵、汽车和船只。放置寻路盒,该预制件位于Prefabs/Map Elements/Must Haves/Pathfinding/Infantry And Car Pathfinding Box。为便于设置,此预制件实际上包含两个寻路盒,即步兵寻路盒和载具寻路盒。放置此盒子时,使其紧密贴合地图上有地面的部分,大致如下所示。
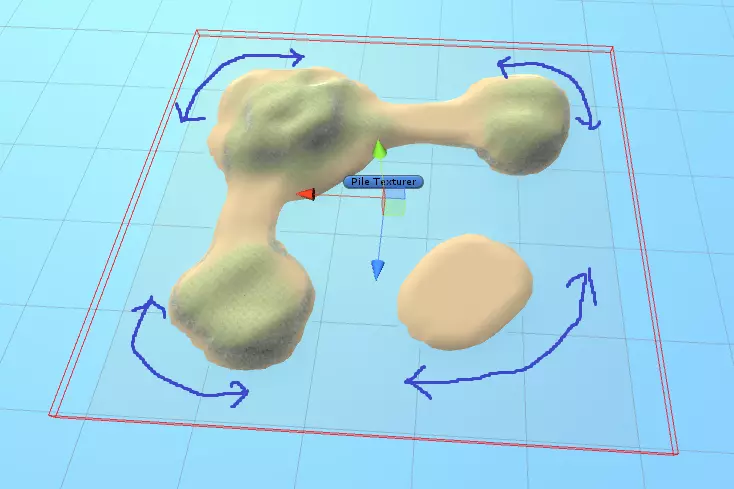
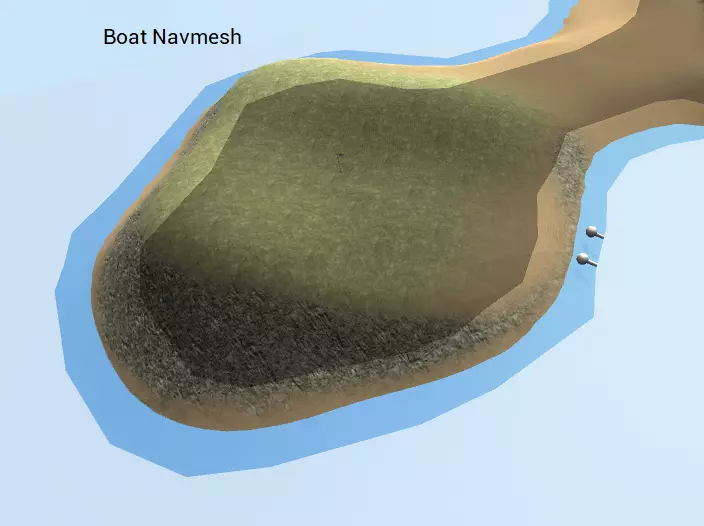
在我的关卡中,我想添加船只,这样士兵就能在岛屿之间移动,因此我还需要添加一个船只寻路框。只有当你的关卡中确实有船只时才需要这样做,否则可以跳过此步骤。确保你的船只寻路框包含水面平面,否则在扫描时将无法找到水域。我还特意在地图边界留出了一些空间,以便AI可以驾驶船只绕过关卡的拐角处(用箭头突出显示)。
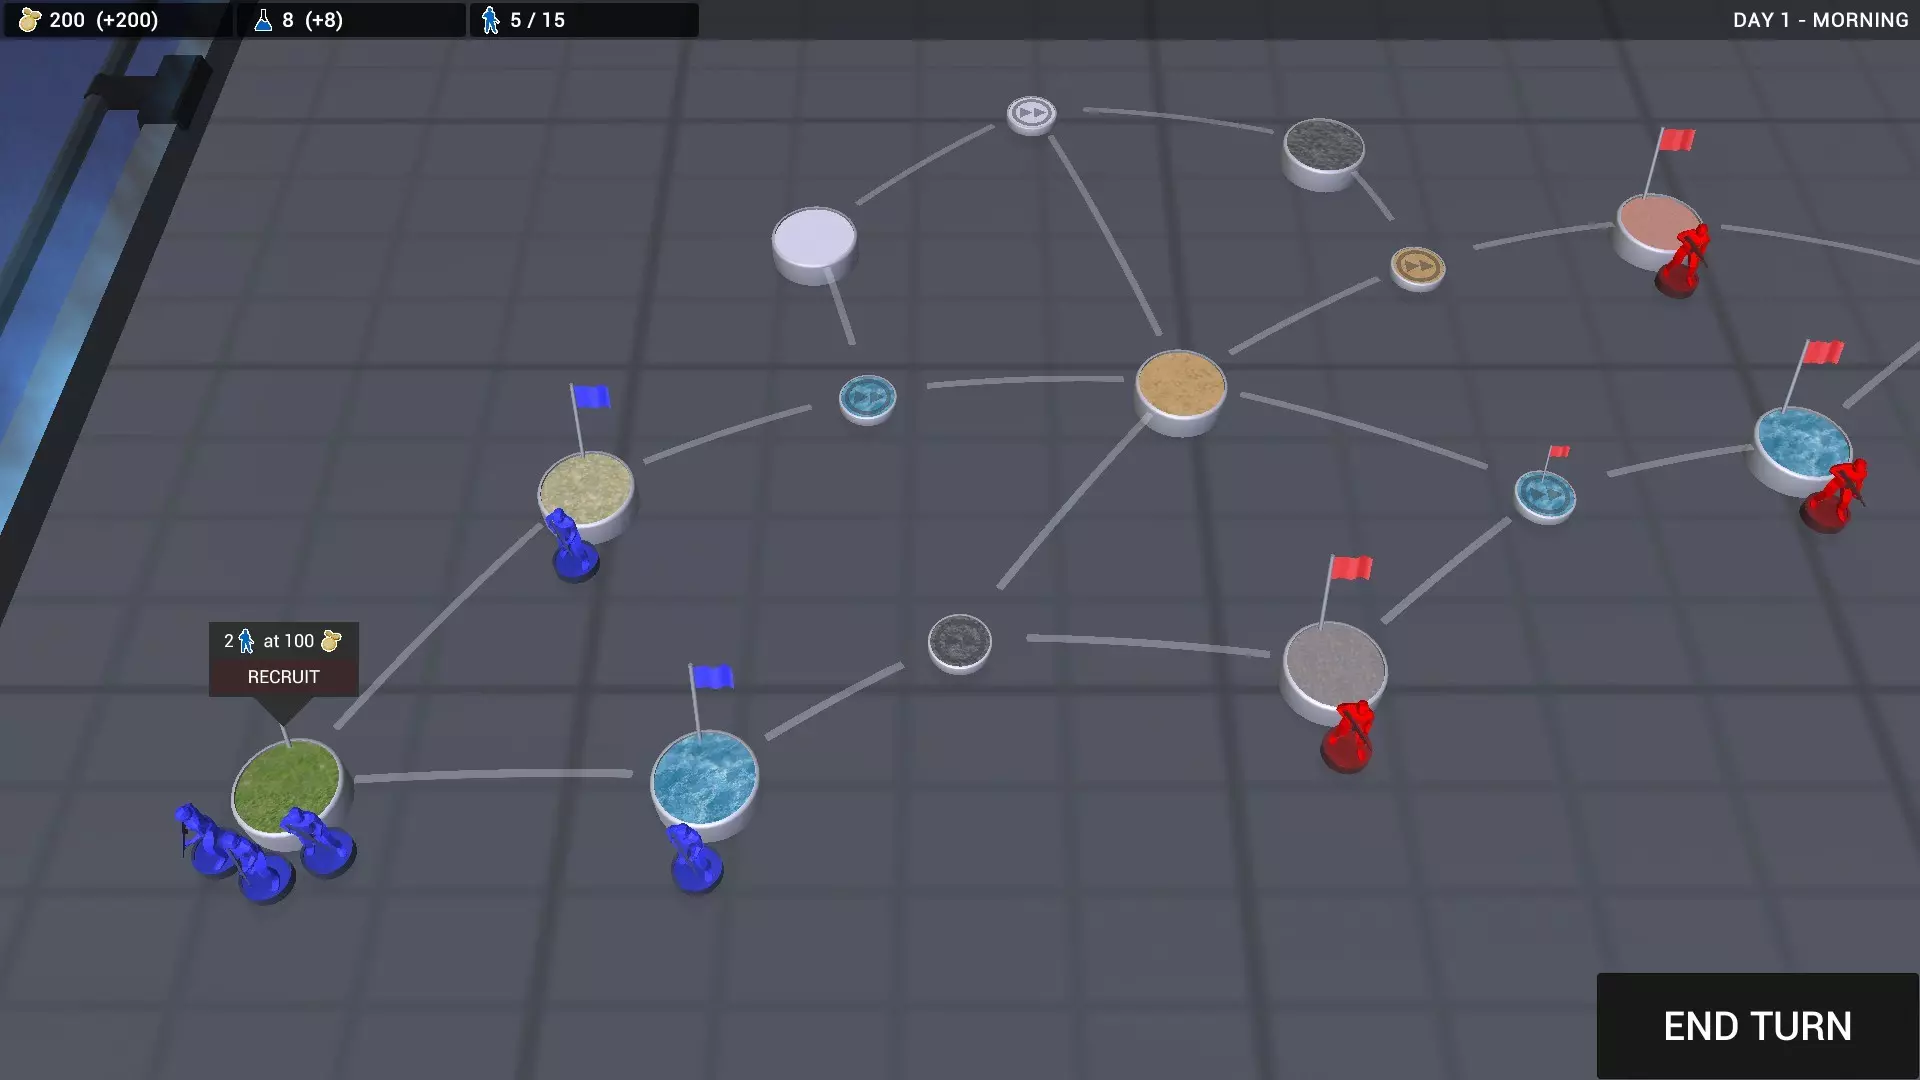
最后,我们要添加一个【邻居管理器】,其位置在Prefabs/Map Elements/Must Haves/Neighbor Manager。AI会使用邻居管理器来确定从何处攻击哪个旗帜。你可以通过在检查器的Neighbors列表中添加元素来在邻居管理器中设置连接。每个连接需要两个占领点,你还可以指定连接是通过陆地、水域还是两者皆可。连接将在场景中显示为粉色线条,根据连接类型还会带有绿色或蓝色的球。这些线条能让你看到地图的整体布局。 这是我使用的邻居管理器设置:

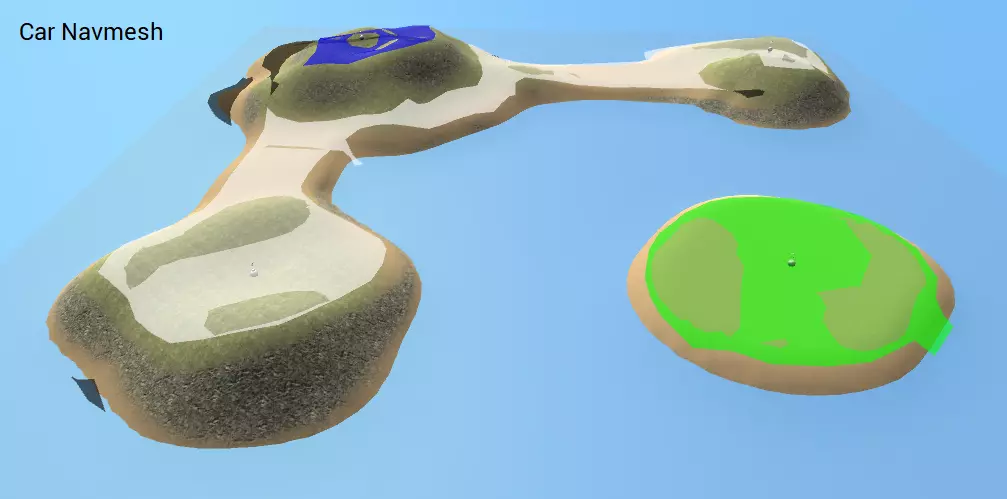
所有占领点都通过水路连接,这会告诉AI可以使用船只在所有点之间移动。两个主基地和山丘之间的连接是水陆两用的,因此允许船只通行和徒步移动。 另外,请注意两个主基地之间没有连接,这意味着AI在未先占领地图中心的两个中立前哨站之一的情况下,永远不会直接攻击敌方基地。当然,可以在邻居管理器中连接两个基地来改变这一点,但我选择不这样做,因为我认为这会让地图玩起来更有趣! 好了!我们现在已经放置了所有玩地图所需的预制件,所以让我们试试看!运行“Ravenfield Tools -> 地图 -> 将开放场景导出为地图”。你会收到一条关于尚未生成导航网格缓存的警告,但目前可以忽略它。导出完成后,启动《战地模拟器》,你的地图应该会出现在地图列表中,尝试运行它吧! 现在你的地图应该可以正常运行了,但加载可能需要一段时间。这是因为我们尚未生成“导航网格缓存”,这意味着每次启动地图时都需要扫描所有寻路区域。要解决此问题,我们可以进行一次寻路扫描,然后将结果存储到地图中。我们将在本指南的下一部分进行此操作! 创建你的第一张地图 - 扫描寻路 要生成“导航网格缓存”(即一次性计算寻路并存储结果以加快加载速度),请运行【Ravenfield Tools -> 地图 -> 扫描寻路】。这将以寻路扫描模式启动《战地模拟器》并加载你的地图。扫描过程中你会看到黑屏。扫描完成后,你将通过 spectator camera(观察者视角)看到你的地图,同时生成的 navmeshes(导航网格)将以彩色表面显示。
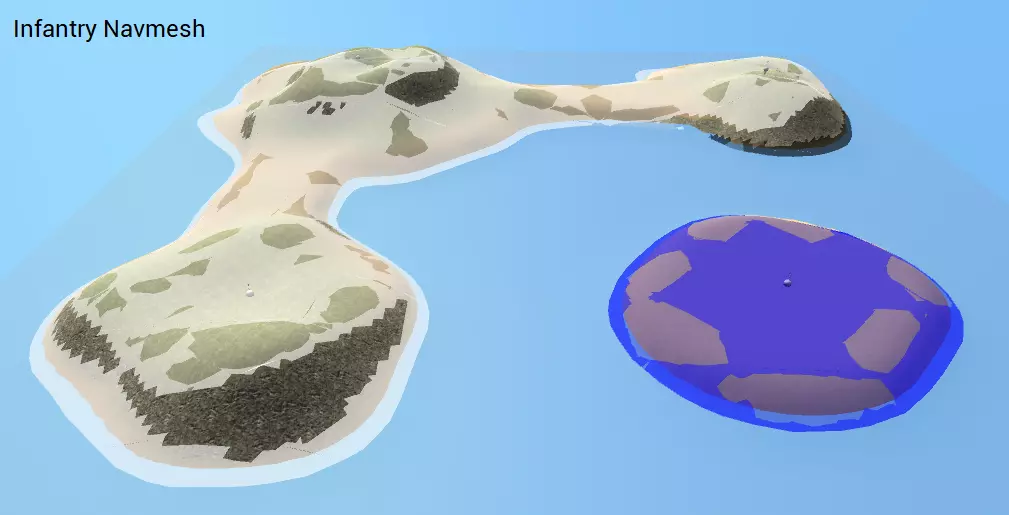
这张截图展示了生成的步兵导航网格。注意可以看到两个导航网格表面,一个白色,一个蓝色。它们颜色不同意味着AI无法从一个表面走到另一个表面——在这种情况下这是合理的,因为它们是两个不同的岛屿。通过按左右箭头键,我们可以查看其他生成的导航网格。这是生成的车辆导航网格。
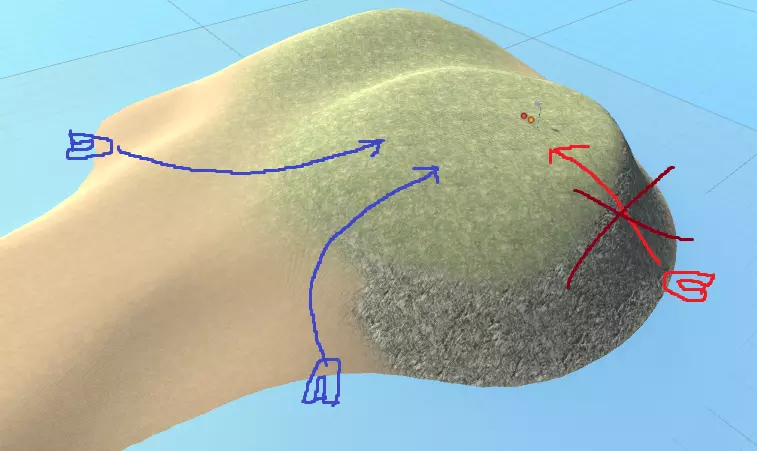
我们可以看到山丘占领点似乎存在问题。导航网格表面呈现不同颜色,这表明它们没有连接。让我们调查这个区域:
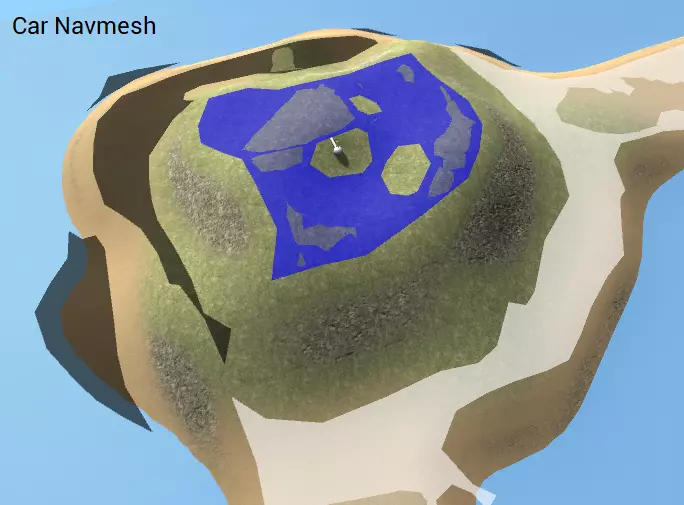
可以看到,这里存在一个问题。山顶没有与岛屿其他区域相连,这意味着AI无法驾驶载具从基地前往山顶。我们还发现了黑色区域,这些是AI无法到达的地方。我们需要确保AI能够驾驶到山顶的占领点并进行占领,最简单的解决方法就是稍微平整地形,让山顶更容易到达。调整海滩并构建一个自然的斜坡通向山顶,然后重新运行路径扫描后,我得到了这样的结果:
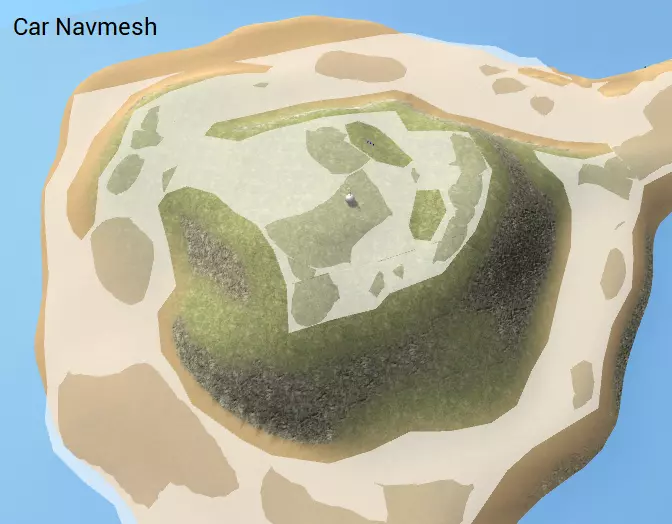
导航网格现已连接,问题已解决!最后,让我们看看船只导航网格:
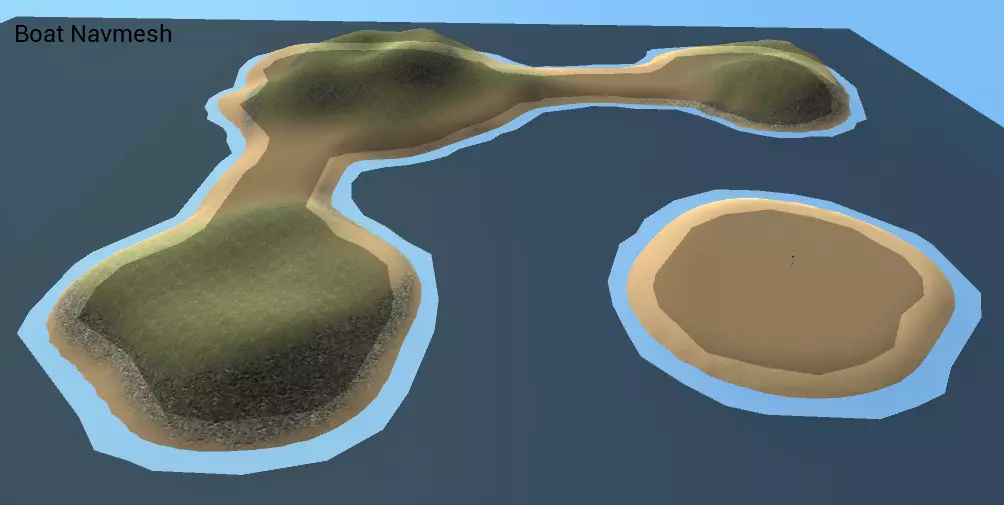
虽然导航网格的形状看起来正确,但它显示为黑色,这表明AI无法到达该区域。这是因为这片水域中没有船只生成器,所以我们将在本指南的下一部分添加它。 扫描寻路时,请记住系统会自动生成“导航网格缓存”。尝试再次导出,这次应该不会收到关于导航网格缓存的警告,因为缓存已经生成。在游戏中启动更新后的关卡,现在加载速度应该会非常快! 重要提示!由于所有导航网格现已保存,因此每次通过调整地形或添加障碍物来更改关卡时,都需要通过再次运行“扫描寻路”来重新扫描关卡。这样可以确保AI知道如何绕过关卡中的任何新障碍物。
是时候为关卡添加载具了! 创建你的第一张地图 - 添加载具生成点 你可以在Prefabs/Map Elements/Vehicle Spawner中找到载具生成器预制件。将其放置在靠近旗帜的位置,确保它处于选中状态,然后查看检查器视图。在这里,你可以将Type To Spawn更改为任何你想要生成的载具。默认情况下,当载具被摧毁后,它将在16秒内重生,不过这也可以在载具生成器检查器中进行修改。 重要提示!由于目前AI的工作方式,只有靠近旗帜的载具才会被AI使用。特别是,载具生成器需要放置在占领点的掩护范围内,才能被机器人使用。你可以通过选择掩护点来查看掩护点的掩护范围。外圈为占领点范围,可在占领点检查器中增大/减小。
你也可以通过放置炮塔生成器预制件在地图上部署炮塔。这些预制件位于Prefabs/Map Elements/Turret Spawner目录下。它们的工作方式与载具生成器类似,但不会重生——士兵必须修理它们才能使其重新运作。炮塔生成器还必须放置在据点的掩护范围内,AI才能使用它们。 如果你在地图上放置了船只,现在是再次运行路径扫描的好时机。这样,水域应该会显示为可通行区域(如果你的关卡中没有任何船只,可以跳过此步骤)。
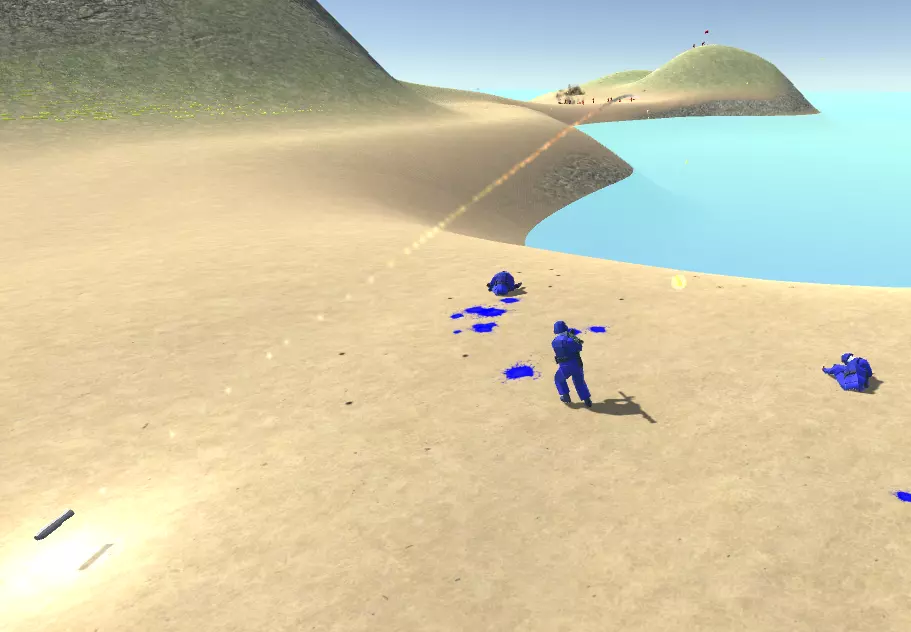
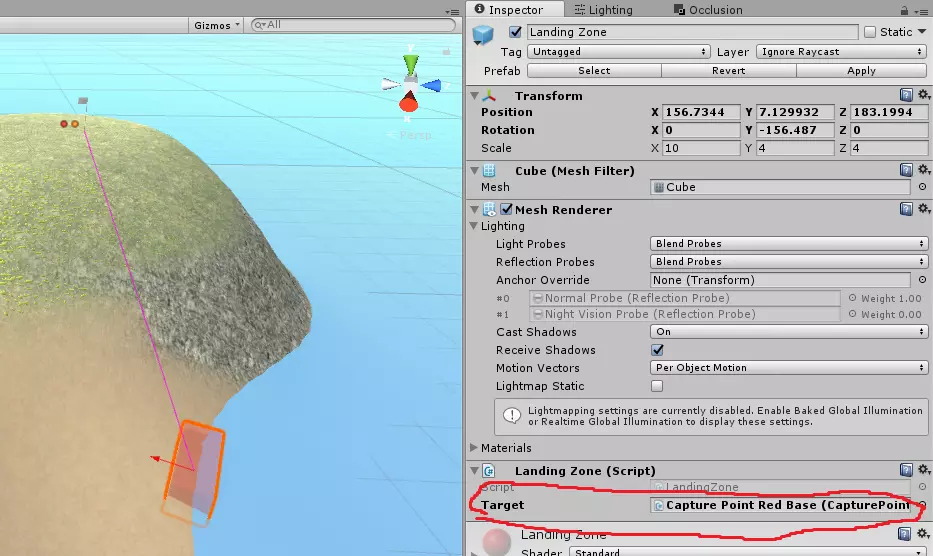
太好了!海洋不再是黑色的了,这意味着AI可以抵达那里!我们还能看到两个船只生成器被可视化为球体,以及它们与海洋的连接方式。有关船只生成器如何连接海洋的更多信息,请参阅【深度寻路】部分。 最后,你可以选择放置【登陆区】预制件(位于Prefabs/Map Elements/Landing Zone),以帮助AI找到运输船靠岸的位置。默认情况下,进攻的AI小队会将船尽可能停靠在目标【占领点】附近,但这并非总是最佳策略。例如,当在红色主基地点靠岸时,最近的登陆点可能会被悬崖阻挡。
为解决此问题,我们希望AI改为在上方图片所示的蓝色点处登陆。请在每个蓝色点上放置登陆区预制件,并在登陆区检查器中将其目标变量设置为红色主基地。确保登陆区的红色箭头指向陆地,且目标设置为粉色线条所指示的正确占领点。
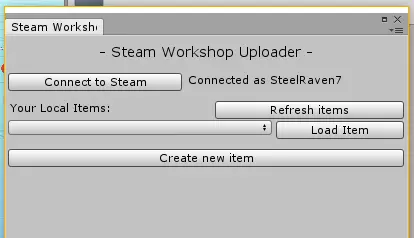
发布至Steam创意工坊 您是否有想要与全世界分享的地图?太好了,这正是Steam创意工坊的用途! 发布至Steam创意工坊前,您需要完成以下步骤: 1. 确保您最近运行过【路径扫描】,以保证导航网格缓存是最新的! 2. 运行【路径扫描】后导出地图,确保最新的导航网格缓存已与地图捆绑。 3. 确保Steam在后台运行,且您已登录自己的Steam账户。 4. 确保您没有在后台运行《战地模拟器》。 5. 准备一张512x512分辨率的.png图片作为炫酷图标,用于展示您的地图或地图合集!确保该图片大小不超过2MB! 准备好发布了吗?首先,通过点击“Ravenfield工具->发布至Steam创意工坊”打开Steam创意工坊发布窗口。点击“连接”以将上传器与Steam连接。如果连接成功,窗口应显示为类似以下的状态。
连接是否失败?请尝试以下操作: 确保Steam在后台运行且已登录。 确保Unity项目根文件夹(除非重命名,否则为RavenfieldToolsPack文件夹——注意不是Assets文件夹,而是其上级文件夹!)中存在steam_appid.txt文件。 确保《战地模拟器》已关闭。 确保登录的账户库中拥有《战地模拟器》。 以管理员/root用户身份重启Unity。 如果仍无法连接,请寻求帮助。
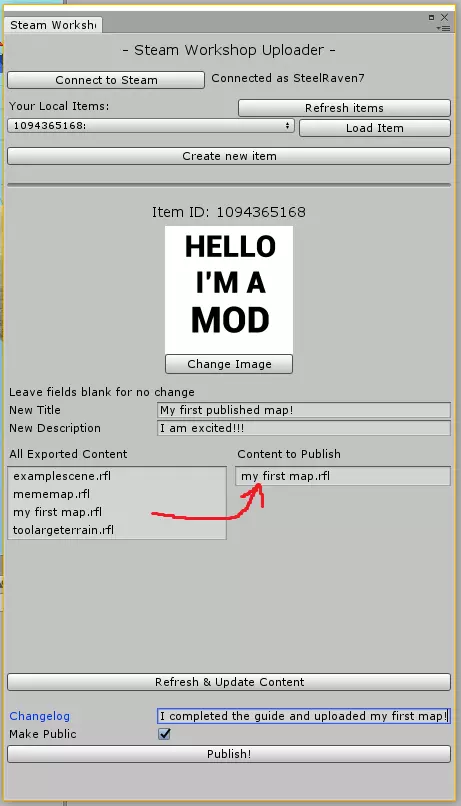
When you are connected to Steam, click Create new item. Give it a few seconds to create your item. When the item has been created, fill in a nice title and description for it. To add your map to the workshop item, simply click on your level .rfl file under "All Exported Content". This will move it to "Content To Publish". All maps under content to publish will be uploaded as your item, so it's possible to create items with multiple maps. Make sure you click Make Public if you want others to see and download your map. Important! If this is your fist time using the Steam Workshop, you will be prompted to accept the Steam Subscriber Agreement. This agreement must be accepted before you can make any of your workshop items public. You can also find and accept the agreement here: http://steamcommunity.com/workshop/workshoplegalagreement/ When you are ready, click Publish to upload your new workshop item! Once the upload completes, you will be taken to your item. Congratulations! Your map is now available for download by anyone, anywhere! For advanced users: You can include a map preview image with your level that shows up in the Instant Action menu in Ravenfield. I haven't added a way to do this inside the editor yet, but for now you can do it manually. Open your workshop staging folder for your item, you can find this folder in RavenfieldToolsPack/Workshop Staging/*item id number*. Simply make a 485x300 pixel .png image, and save it as *map name*.rfl.png next to your map's rfl file. You can also add a json file in the same way that allows you to set the default number of bots. The JSON file should look like this (for 60 bots): {"suggestedBots":60} Save this file as *map name*.rfl.json next to your map's rfl file. Because this hasn't been properly implemented in the workshop publishing window, there is no indication that these files exists in the publish window, but they will be uploaded once you press the Publish! button. Map prefabs - Required prefabs This section lists the included map prefabs and their fields. Any prefabs that must be placed in your map before it can be exported and played is marked as (Required). All required prefabs can be found under the Must Have prefab folder. You can access and tweak the fields in the Unity Editor's inspector window while the placed prefab is selected in your scene. It is recommended that you do not tweak these settings on the prefabs themselves (while they are selected in project explorer window). Capture PointThis is a capturable flag and a spawn point. Place a few of these somewhere in your map. You can also select what team should be the default owner of this flag. Fields: Default Owner - The team that should start as the owner of this flag. Note that this may be override by certain game modes. Protect Range - A range that decides how far the AI will go when defending this flag, visualized by a circle in the scene view. In general, you want this to reach all defensible structures such as towers and wall that the AI should use to defend. This range also decides what vehicles belong to this capture point, and thus will be used by AI. Vehicle Filter - What vehicles can be used to reach this point? Can for example be used for a flag inside a cave to make sure helicopters (Air) and planes (Air Fastmover) do not attempt to attack this point. Short Name - The name that will show up in “Team captured X” messages. Spawnpoint Container - An object that holds all spawnpoints as children. Used to decide where soldiers will be spawned while the flag is not being contested. Contested Spawnpoint Container - An object that holds all spawnpoints as children. These spawnpoints will be used instead of the Spawnpoint Container ones when the flag is under attack. You usually want to place these spawnpoints outside of the Capture Range so points become easier to capture. Capture Range - A range that decides how close to a point a character need to be in order to capture it. Together with Capture Floor and Capture Ceiling, this is visualized by a cylinder in the scene view. Capture Floor - From how far below the flag can we capture it? Capture Ceiling - From how high above the flag can we capture it? Flag Parent - The object that is moved up and down while the flag is being captured. This object will move from a local position of y=0 to y=1 depending on the capture progress. Minimap Camera This camera renders the minimap at the start of a round. It is normally placed high up in the sky (normally around 2000 units up) facing downwards, but feel free to try unconventional camera angles too! A thing to keep an eye on is the camera’s near and far clip plane values, this decides at what ranges the camera actually renders. Fields: None Neighbor Manager This object helps the AI navigate the world and decide what point to attack from where. Generally, you want to add neighbors between nearby capture points that it makes sense to battle between. To add a new neighbor element, increase the Neighbors element count by one, and edit the new element that appears. You can see your neighbor elements visualized as pink lines in your scene view, with a green sphere and/or blue sphere for land/water connections. Here is an example of the neighbor setup in the Island map:

On the island map, all flags are reachable over land, so all neighbors are marked as Land Connection. The coast flags are also marked as Water Connection, which lets the AI know that they can use boats to travel between these points. Fields Neighbors - A list of neighboring capture points that the AI will fight between. Make sure you specify if the neighbor is has a Land Connection, and/or a Water Connection: Land ConnectionWater ConnectionAI will useYESYESFootsoldiers, Ground Vehicles, Watercraft, AircraftYESnoFootsoldiers, Ground Vehicles, AircraftnoYESWatercraft, AircraftnonoAircraft Game Mode Info (Exists in the Neighbor Manager prefab) This component describes special flags for some game modes. Please note that for some game modes, this has not been implemented yet. Fields: Defender Main Base - The starting point of the defenders in a Battalions match. (Not yet implemented) Defender Base 2 - An extra starting point of the defenders in a Battalions match if they start with 2 or more battalions. (Not yet implemented) Defender Base 3 - An extra starting point of the defenders in a Battalions match if they start with 3 battalions. (Not yet implemented) Attacker Base - The starting point of the attackers in a Battalions match. King Of The Hill Base - The point you need to hold to gain points in a King Of The Hill match. (Not yet implemented) Reflection ProberThis object decides where reflections will be rendered from. Generally you want to place this object somewhere on your map, around 5-10 meters above ground. Fields: Normal Probe - The probe to use for normal rendering Night Vision Probe - The probe to use when night vision is on Scenery CameraThis is the camera that the game renders from before you pick your loadout. Fields: None Time of dayThis object allows you to set up day/night versions of a map. Any objects nested under either its Day or Night child objects will only exist either during day or night. In the prefab, some existing objects in here, including a sun/moon directional light, post processing effect cameras, and ambient sound sources. Keep in mind that you can place pretty much anything you like in here, so experiment away! Fields: Night Atmosphere - All settings applied for the night version of your map - Sky - The ambient color from the sky. (Only applies if Environment Lighting is set to Gradient in the Window->Lighting tab) - Equator - The ambient color from the equator (Only applies if Environment Lighting is gradient) - Ground - The ambient color from the ground (Only applies if Environment Lighting is gradient) - Fog Density - The density of your fog (Only applies if fog is enabled in the Window->Lighting tab) - Fog - The color of your fog (Only applies if fog is enabled) - Skybox Material - The skybox to use during night time. Test Night - If this is enabled, you can test the night setting in the Unity Editor by pressing play. Water planeThis water plane is set up to act as ocean water in your level. It also contains a water level component that tells the game at what height the ocean water should be (based on this object’s position in the world). This object must be placed, even if you don't want any water in your map. For maps with no water, you can place this object really far down under your level geometry. Fields: None Map prefabs - Pathfinding prefabs For more information about how to set up these prefabs in your map, see the In-Depth Pathfinding section of this guide! Pathfinding BoxTwo Pathfinding Box prefabs exists: Infantry and Car Pathfinding Box Boat Pathfinding Box These prefabs are set up with the most common settings to create Pathfinding Boxes that specify either a land or water area that the AI can use to travel around your map. While the Boat Pathfinding Box only contains one Pathfinding Box component, the Infantry and Car Pathfinding Box contains two, one for infantry movement, and one for car movement. By default, a cell size value will be automatically assigned to the Pathfinding Box based on its size. If running Scan Pathfinding on your map is taking very long, you can (after disabling Automatic Cell Size) manually increase the cell size and character radius of these components. This will reduce load times, but also lead to lower quality pathfinding. It is recommended that the character radius is at least twice the cell size! You can also increase the Cover Point Spacing value to speed up the Scan Pathfinding process. Fields: Type - The navmesh type to generate with this box. Tiled - Using tiled navmeshes will speed up the scanning times a lot, but it may introduce some unwanted obstacles. Disabling tiled navmeshes will also guarantee that the navmesh exactly fits the pathfinding box, which can be useful when placing Pathfinding Links. In general, you want to keep tiled enabled. Automatic Cell Size - Gives you an automatic cell size based on the size of the Pathfinding Box. Disable this to be able to set the cell size manually. Cell Size - The cell size used to scan the pathfinding. A lower number yields better navmeshes, but will also take longer time to scan. For very large cell sizes (>5), it’s recommended that you also increase the Climb Height to its maximum of 2 meters. Character Radius - The radius of a character, IE how close to a wall or a pit navmeshes will be generated. For best results, keep this at least twice the cell size. Climb Height - The maximum height a character can climb, any value over 2 meters will be ignored. For very large Cell Sizes, it’s recommended that you increase this height to its maximum 2 meters. Cover Point Spacing - How far apart, in meters, to search for Cover Points. For large levels, it can be a good idea to increase this value up to around 1 meter to speed up Scan Pathfinding times. Blockers - If you want to use another Pathfinding Box to scan a particular area, you can block the navmesh generation of this Pathfinding Box by adding the other box as a blocker. Max Slope - The maximum allowed slope in degrees that the navmesh will be generated on. Because we assume boats can only be used on flat oceans and/or lakes, Climb Height and Max Slope values are ignored for boat pathfinding. Relevant Pathfinding PointThese points are used to decide what parts of a navmesh generated from a Pathfinding Box is valid. Relevant Pathfinding Points will automatically find the closest navmesh surface within 20 meters and mark that surface as valid. There are two types of points, Ground and Water - Ground affects Infantry and Car pathfinding boxes while Water affects Boat pathfinding boxes. Relevant Pathfinding Points are automatically generated by Capture Points (Ground points), and Vehicle Spawners that spawn boats (Water points). You can optionally add more by dragging the Relevant Pathfinding Point prefab into your map. Fields: Type - Ground affects Infantry and Car pathfinding boxes. Water affects Boat pathfinding boxes. Map prefabs - Optional prefabs Landing zoneThis is an indicator for the AI where to land boats when going ashore to capture a flag. You need to set up a target spawn point in the inspector for this to take effect. Fields: Target - The Capture Point that this landing zone is used to attack. Resupply CrateAn object where soldiers can resupply and heal. Fields: Range - From how far away can this resupply crate be used? Vehicle spawnerSpawns vehicles. Make sure these are placed inside the cover radius of a capture point if you want the AI to use the vehicles! You can set up when vehicles respawn, how long it takes, etc. The priority value can be used to decide if a vehicle is “more important” than another, that is if the AI will pick it before others. A vehicle with a higher priority will be picked first. Fields: Spawn Time - How long time until this vehicle is respawned? Respawn Type - When will this vehicle respawn? After being moved from its spawn point, after being destroyed, or never? Type To Spawn - What type of vehicle spawns here? Priority - A higher value will make the AI prefer this vehicle when multiple vehicle options are available. Custom Actor ModelThis prefab allows you to set a custom model for each team, so you can make your soldiers fit your map better (maybe you’re making a WW2 map and want soldiers from each side to look different?) In order to properly function ingame, the mesh assigned to the Actor Mesh field must be rigged to the soldier skeleton included in the Assets/Models/Character/Soldier.blend file. Fields: Team - What team to apply the model to. Choosing Neutral will apply the model to both teams. Actor Mesh - The new actor mesh to use. Materials - An array of materials the new mesh should use. This array is identical to the one you set up for a normal model when using a MeshRenderer in Unity. Actor Material - Set this to the material index (in your Materials array) you automatically want to change to the team-specific material. Setting this to -1 will disable any automatic team coloring. You can find examples of this material in RavenfieldToolsPack/Assets/Materials/Actor. This is how the texture is used for the default soldier model:
纹理堆叠器 纹理堆叠器是一种可根据高度图自动为地形添加纹理的工具。其旨在帮助你快速迭代地图设计。该预制件已设置为使用沙子、草地和悬崖纹理为地形添加纹理,详情请参见示例场景。你可以根据需要添加更多图层。目前我会编写关于此工具工作原理的正式文档,但你现在或许可以通过自行试验来了解它的使用方法! 邻居管理器提示 官方地图中的邻居管理器设置如下。本指南的这部分仍在编写中,将在稍后发布!深入路径寻路 以下是如何使用寻路链接和阻挡器使导航网格的部分区域达到高质量的方法:【请注意,在这些截图中,无法到达的导航网格表面显示为红色】 本指南的此部分仍在撰写中,稍后将发布! 故障排除 本指南的此部分仍在撰写中,稍后将发布! 目前,你可以在Ravenfield的Discord聊天中寻求帮助,我们有一个专门用于地图制作支持的地图制作者频道。