换一换
换一换 


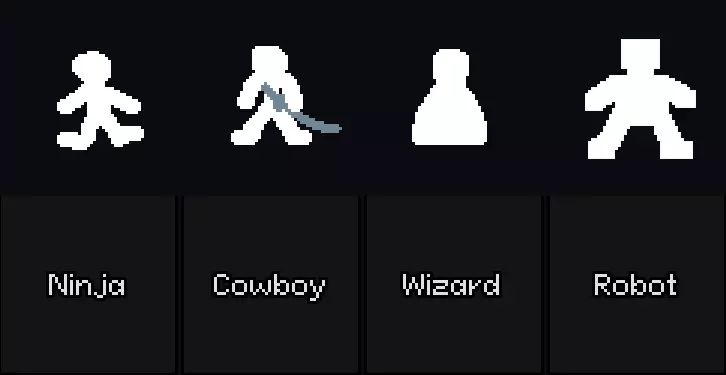
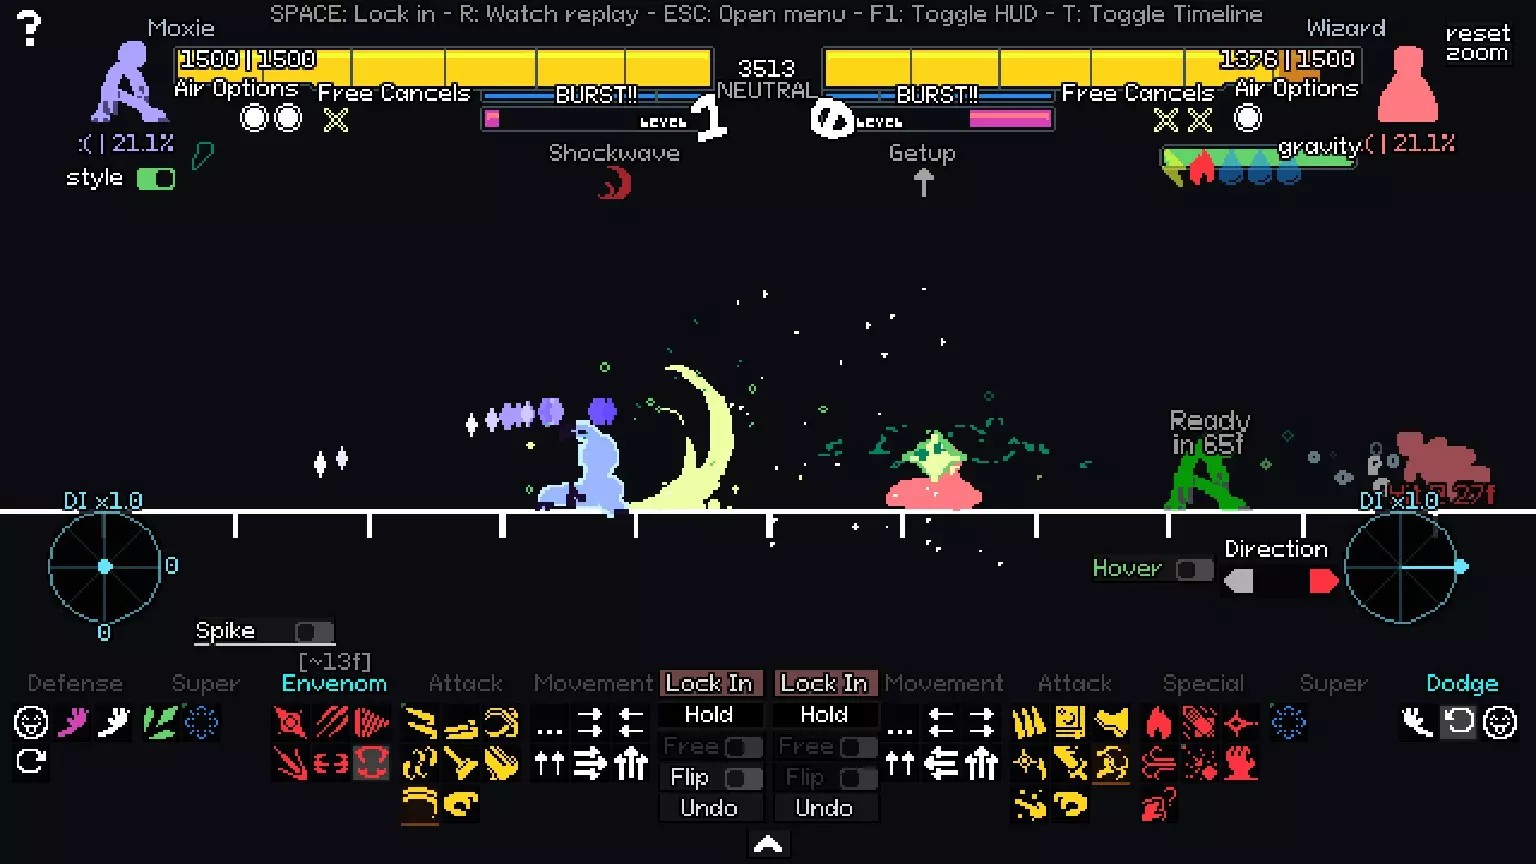
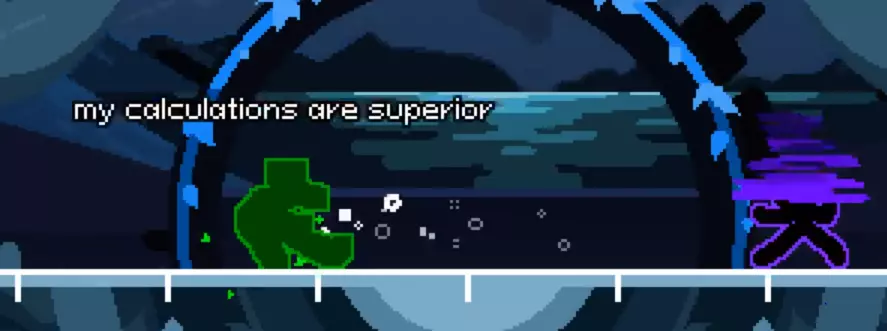
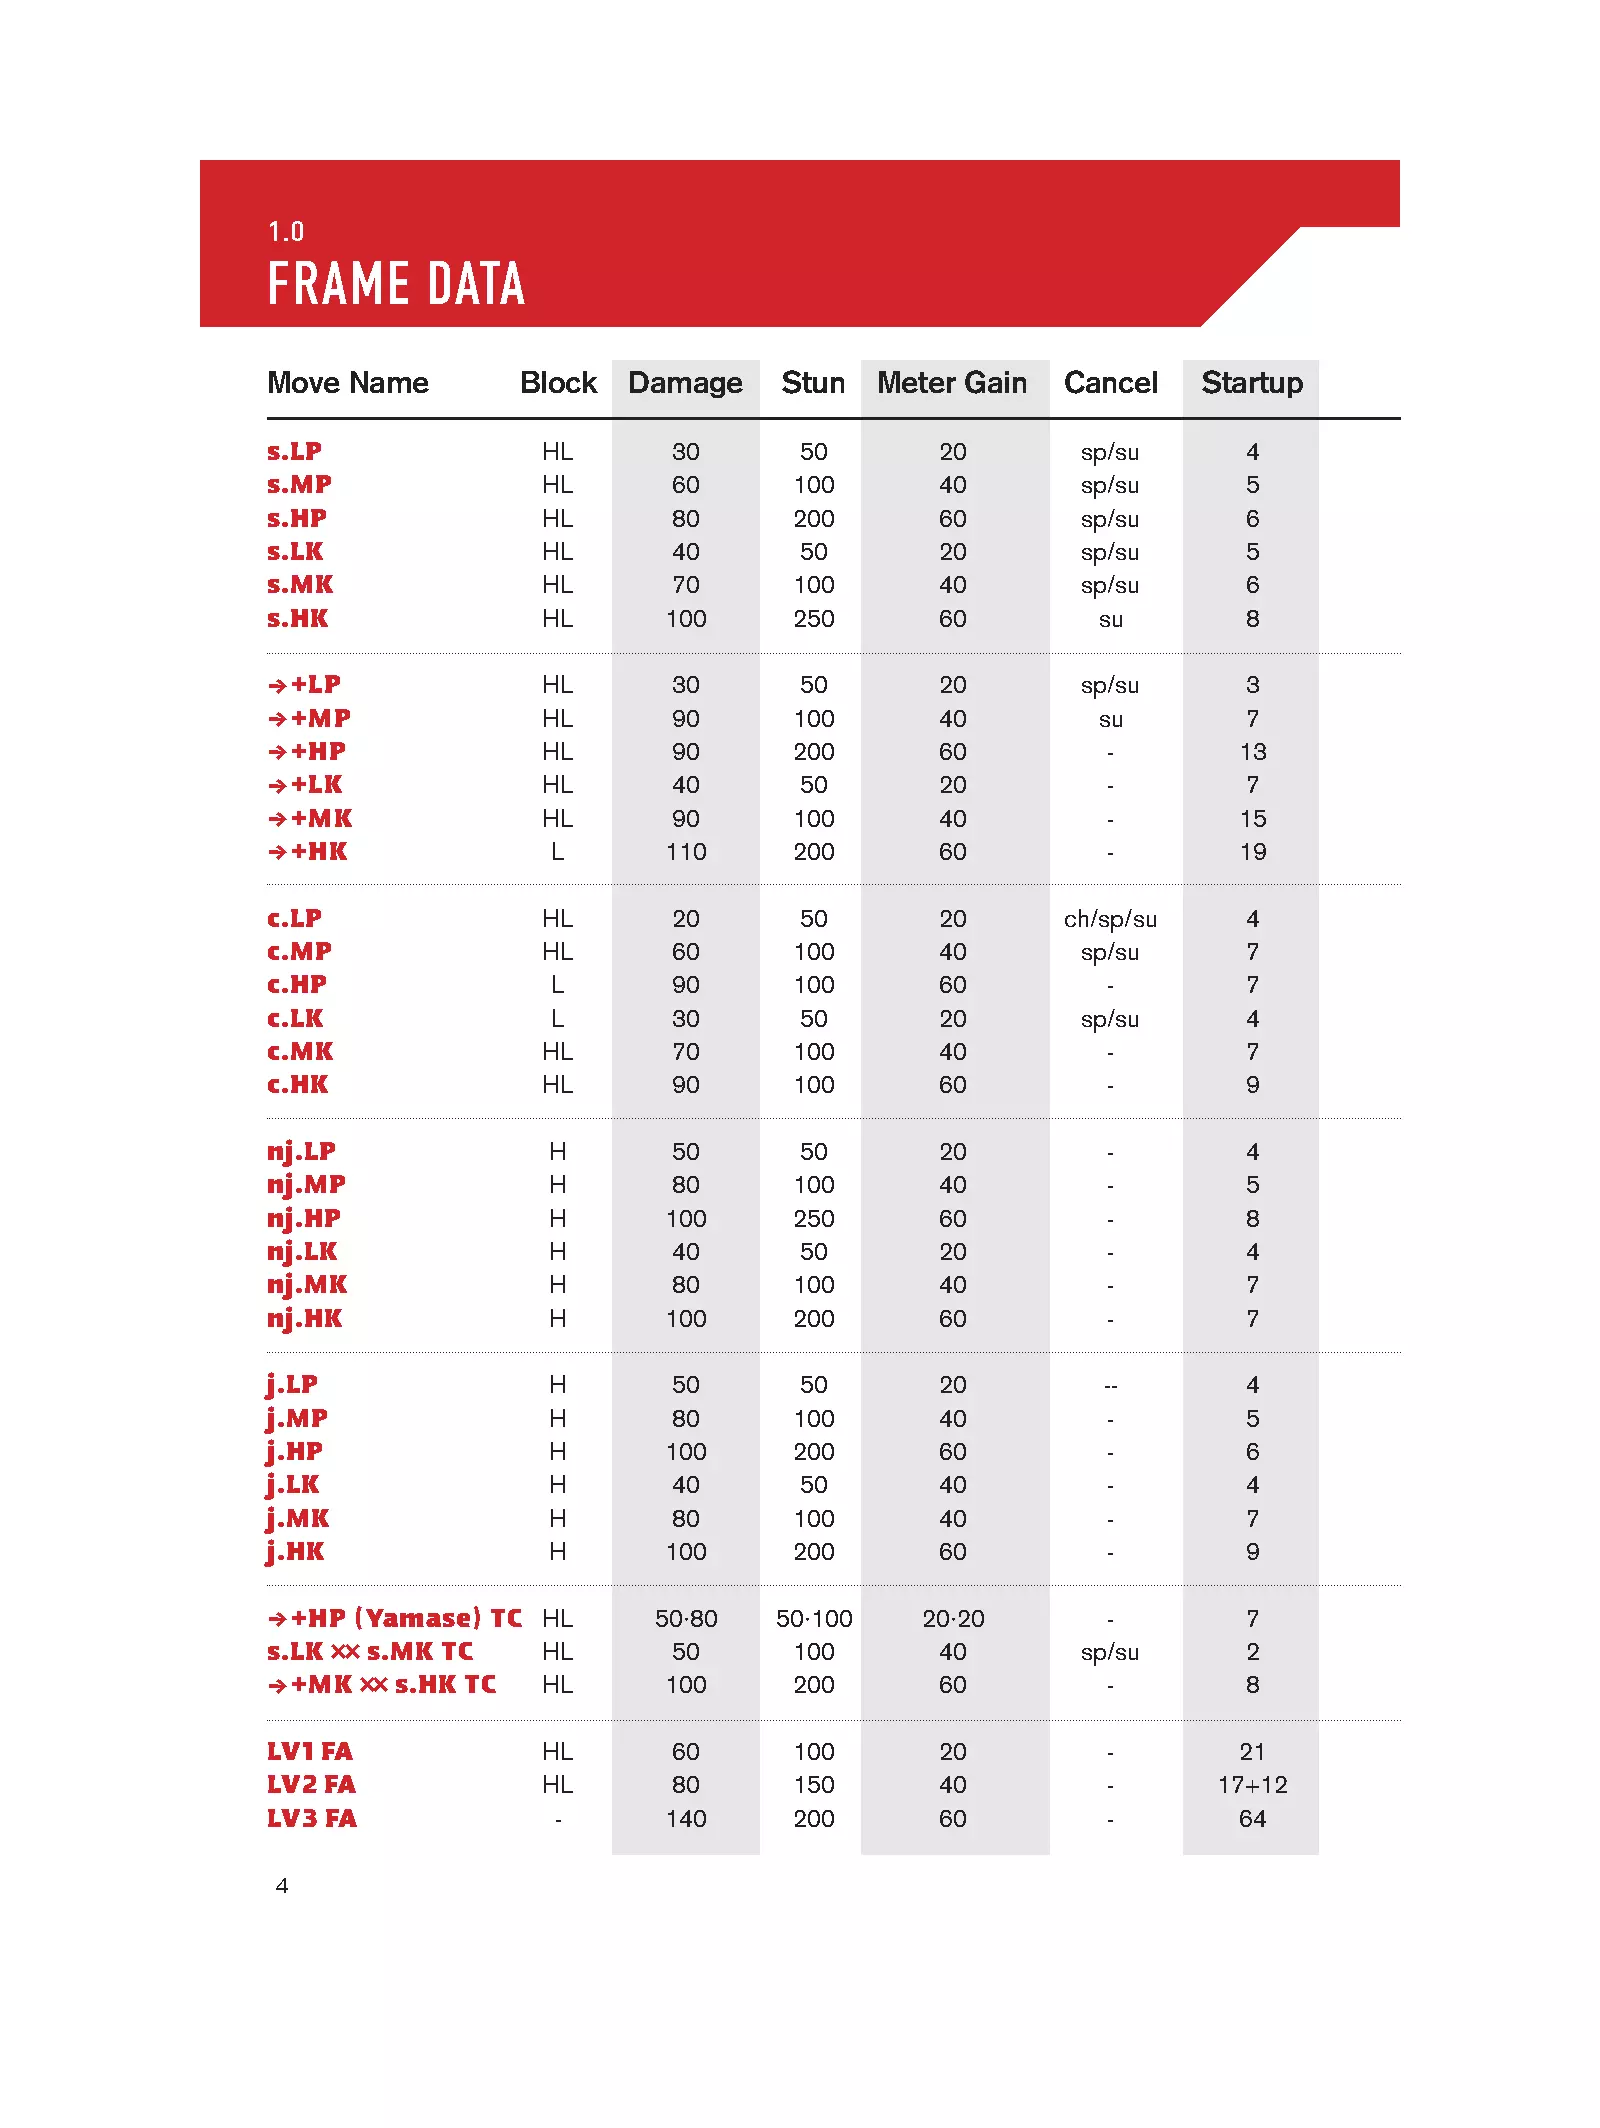
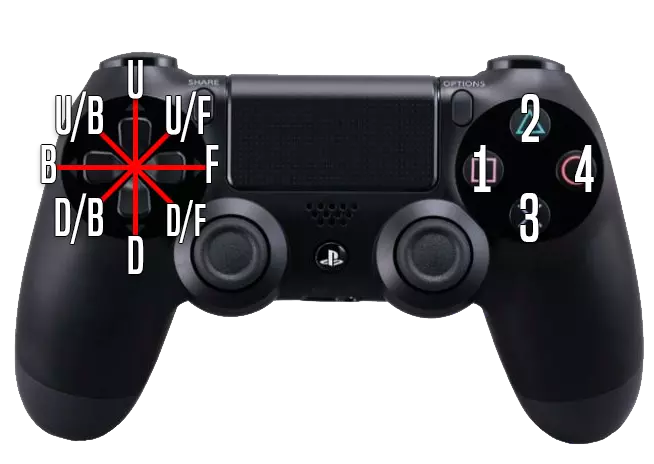
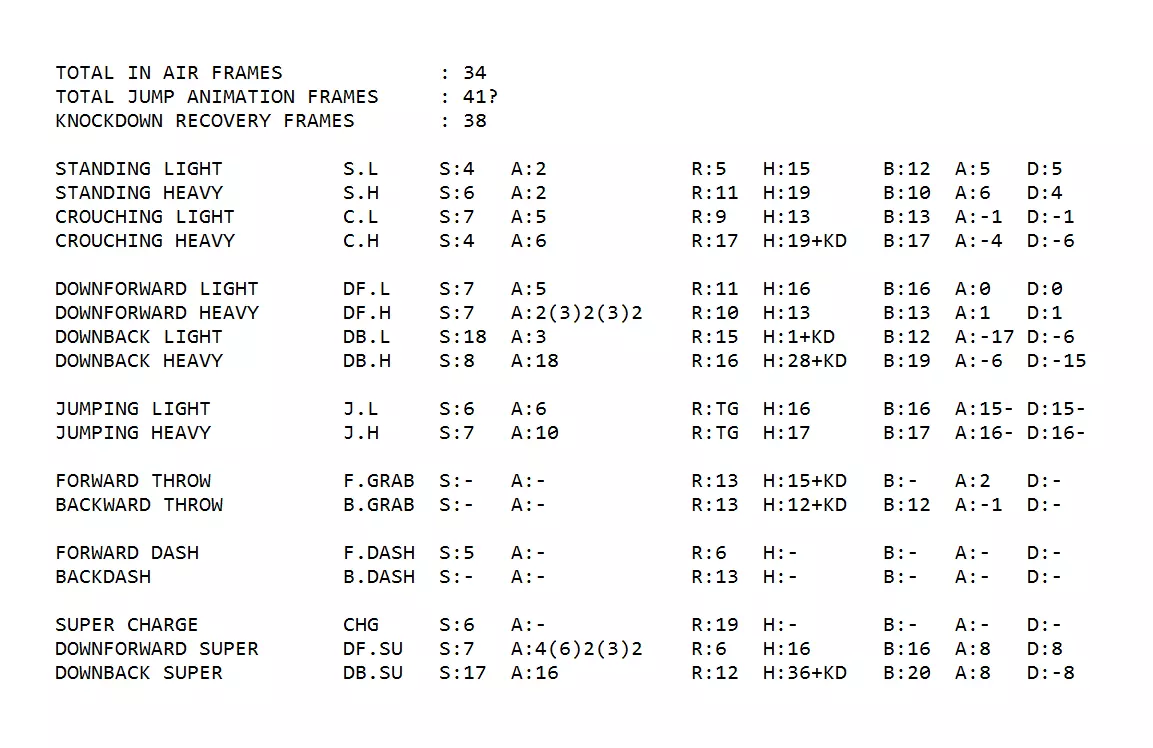
A quick tutorial on how to use frame data to your advantage, also a brief run down on some basic FGC terminology. Welcome Hustlers! If you've never played this game before, Your Only Move is Hustle (YOMI, or YH) is a turn-based 2d fighter. It's similar to something like Marvel vs Capcom but the kicker is every few frames the game pauses like a turn based rpg to request your next movement. The game then saves these bouts in a long video replay which plays back at high speed, making your match look like the best episode of your favorite battle anime! This guide is just a basic introduction to some fighting game terminology and concepts so you can better understand what the YH UI is trying to tell you and then how to take advantage of that. Terminology YH, being a 2d fighter, also utilizes many of the same mechanics any other would. The only difference here really is how your input works being a turn based experience. Here are some broad terms to help you while you read your UI: - Armor: Sometimes called super armor, armor means instead of becoming "hit-stunned" after being hit with an attack, your character will absorb 1 hit and then continue their action. The Robot character has the unique ability to add armor to attacks with a resource meter. For example: You'll notice Wizard's Conjure Weapon will turn his health bar grey for a brief time. During these frames Wizard could tank 1 hit (with some exceptions) and still send the blade out afterwards. - Block/Parry: Chances are you can guess what these do. Things to remember: 1 - You must block high or block low to block high and low attacks respectively. 2 - A parry happens when you block an attack the frame or 2 before it hits, this means if you play a character like Cowboy you can inadvertently feed your opponent by sending out quick projectiles for them to parry if they aren't "hitstunned". - Burst: You'll notice under your health bar is a blue bar marked "burst". When full, this unlocks a defensive/offensive option which when used surrounds your character in a blue explosion which instantly interrupts an opponent's attacks, and any momentum you might have had. Typically used to interrupt an opponent's combo, you can also use the fact it causes "hitstun" to the opponent to continue/begin a combo. Remember Bursting has recovery so it is possible to burst one attack then be hit with the follow up as you recover. - Directional Input (D.I.): You will see a circle on your UI that you can use to draw a line angle. This is called your "Directional Input". Basically, when you are hit by an attack you are generally pushed in a direction. DI affects that direction. For example: Your character is at a small distance to the right of Cowboy, who uses their "Horizontal Slash" attack to barely reach and hit your character. By not using UI, your knockback will be predictable, just like you are practicing with a dummy. However, if I set my DI to the right, I will slide farther to the right away from Cowboy. Set it to the left. and I won't slide nearly as far, ending up much closer to Cowboy. This is handy to force your opponent to use attacks they didn't want to, as you changed the expected position they thought you would be in or perhaps put yourself out of range of having a combo continued on you. - FastFall/Hover: Wizard's special movement options. Use the hover slider to let Wizard keep his position in the air (lasts until "hover" meter empties). Use the fastfall slider to, uh, fall fast. Wizard shoots towards the ground the next frame. Can be used to escape or chase for free. - Frame Data: "frames" refer to animation frames. each move in a fighting game is organized into them. For example: Cowboy's Pommel attack is tied as the fastest attack in the game. This is because it has only 4 "startup frames" . This means 4 frames of animation are required before the attack's "hitbox" is active for another 2 frames then it ends. There is no recovery from this move so Cowboy can easily chain one Pommel into another. This means any character which is standing in range will probably get hit first if they tried to attack cowboy at the same time as pommel UNLESS their attack also came out in 4 frames or less or gave them some type of "armor". A slower move would be Robot's COMMAND: GRAB attack. This one has 5 frames of startup and is active for 4. This means in range Cowboy's Pommel would hit Robot first. This difference in frames is called your "frame data." Since Cowboy's attack will be active on frame 4 and Robot's attack will be active on frame 5, this means if both moves go off simultaneously, then Cowboy has +1 frame data, and Robot has -1 frame data or in other words, Cowboy will be active 1 frame sooner than Robot. Last note on Frame Data, many attacks and actions have "recovery frames" or the frames that need to pass before the character may act again. In the example above, let's say Cowboy is not in range to attack Robot, but Robot uses the COMMAND: GRAB attack, hoping the range difference will keep Cowboy from acting. Since there is distance between the characters, this means animation frames now need to pass as the attack travels from Robot to Cowboy. If Cowboy were to jump or backdash, avoiding the grab, now Robot must wait until the "Recovery Frames" have finished before he may act again. COMMAND: GRAB happens to last for a whopping 57 frames (phew!) meaning missing this attack will ALWAYS leave Robot at negative frame data. To Review: Startup Frames: Animation Frames needed before an attack causes damage Active Frames: Frames during which the attack will hit. Recovery Frames: Frames needed before the character may act again. - Fly: Robot's special movement option: Use the fly slider to have Robot continue gliding in the same direction for a time. Handy to set up angle above your opponent where they typically have a hard time covering themselves. - Hitstun: Attacks have a certain amount of frames they will cause your opponent to be unable to move after being hit. These are called "hitstun" frames. These are what allow for combos in fighting games. Following up with an attack on a stunned enemy is often what makes the slow moves safe enough to use. - Hustle: A taunt which gives you some bar of super. Sometimes ,this really is your only move! - Ready: If you pay attention during the prediction animation, you'll notice a "Ready" sign appear above your character at some point. This is the predicted moment that character will be able to act again. Remember using frame data (if you can) is almost always more precise, but Ready is a great visual indicator for quick reference. - Teleports: Cowboy's special movement mechanic. Cowboy fades away then reappears elsewhere. He also has a special, "Instant Teleport" That allows him to do this with little recovery, giving him crazy pressure to airborne opponents. Using Frame Data Better Understanding what frame data is isn't typically the problem for people, it's understanding how to keep track of it. So for example, I choose an attack and it said +8 Frame Advantage. I lock in, but I STILL get hit! What gives? doesn't +8 mean I go first? Well, it WOULD have, IF your opponent had done nothing to stop you or attack you first. BAITING Remember the game's UI prediction is what will happen "If your opponent is unable to do anything". If your opponent can cancel their attack (the green wagon wheel looking symbol on their side) then they can potentially change their frame data by eliminating the remaining startup or recovery frames. This means if you used an attack that has more startup or active frames you can't cancel, then you are essentially "locked in" to whatever it is you are doing. A typical rule is the stronger the attack, the more vulnerable it will leave you when missed. Many opponents will use "cancels" like these to bait you into using a move to lock you into startup frames, then cancel their move and hit you while you are unable to respond. Don't over commit! CONTINUING / ENDING COMBOS Another example, let's say we have an opponent in hitstun. You have several moves that will follow-up hit them as a result, but which should I choose? One gives me a +8 advantage, one gives me a +4, another gives me a +17. This means that your character will recover with 8, 4, or 17 frames faster than your opponent. All of these attacks will true combo, as a result. Meaning I will hit and the opponent will remain in hitstun potentially. But this also means if you wanted to end the combo with a move with a longer startup, like Cowboy's Impale, you should probably pick something that leaves you with more frame advantage but also keeps the opponent standing so the attack will land. In the above example, let's say I pick the +4 attack. This means In the next turn I now (am predicted) to finish 4 frames before the opponent. This means now I MUST either pick an attack that can startup in 4 frames to keep the opponent in hitstun or I risk them recovering to block, dodge, etc. Remember you can Burst during a combo to free yourself from hitstun. HIGH RISK / HIGH REWARD and SETUPS A final example, let's say you want to use a high risk move, but your opponent is NOT in hit stun. A big miss means a big punishment, and this is where frame data will help you. Characters with fast startups and moves that cause them to dash can often use a move that gives them momentum in a direction, then cancel next frame. Or maybe summon a couple projectiles with bad frame data, but keeping their distance. These are called "setups." All fighting game characters have different setups and learning your frame data will make you more effective at using them. Instead of just trying to directly attack your opponent use you frame data to make smaller movements and create situations that force your opponents to react to YOU, but leave you enough frame data to then move into an unexpected technique. This is called "feinting". Characters like Ninja excel at these types of setups, as they could summon kunai, throw a shuriken, store momentum, then attack from an unexpected angle as these setups close in on the opponent. This creates a situation where the opponent must both dodge your indirect setups and direct attacks at the same time. Another good setup, for example could be Wizard using distance to create 2 lightning orbs and use a gust to push them BEFORE using a move like missile form to continuing the pressure. Although 3 turns would be consumed, you now have a small area you may use as a shield/spear as you approach. DELAYING Finally, don't doubt the power of NOTHING. Sometimes, waiting or holding your action will cause a jumpy opponent to over attack, leading to openings. For example, say you and your opponent get up at the same time or just have a similar frame which you both act on. It might seem that constantly moving,chasing, attacking should be your default decisions but often allowing a frame to go by where you do nothing often causes your opponent to throw out an attack without much thought. By having not acted, this gives you now a free frame to react. This is often a great way to bait parries or bait an opponent into blocking/dodging when it doesn't benefit them to do so. Conclusion YOMI was such a great surprise and I hope it catches on so it can grow into a more complete experience. Remember getting beat is how to learn a fighting game, if you can't learn while getting beat that might be the barrier to you getting better. Understand WHY you got hit, and don't just blame it on the fact you're taking the prediction from the UI too literally. Use your set-ups, bait when it makes sense to, study up on the speed/recovery of your moves and you will start to win matches. Hopefully, this acts as a gateway drug to the larger world of fighters, in general. See you out there, Hustlers....
如何读懂帧数据(及其他格斗游戏术语)

2026-02-20 07:00:18

导读
这是一篇《Your Only Move is Hustle》(简称YH)的格斗游戏术语入门指南,重点讲解帧数据、护甲、格挡等核心术语,还介绍了如何利用帧数据在对局中抢占优势、设置连招、诱敌等技巧,帮助玩家读懂游戏UI并提升对战水平。

评论
共0条评论

《终极街头霸王4》凛道馆圣经:真琴终极指南!
SRK论坛上一位名为blackadde的用户最近发布了《Rindoukan圣经》1.0版本,这是一本针对《超级街头霸王IV:街机版2012》中角色真琴的资料手册…
2026-04-06 16:000赞 · 0评论
《铁拳7》实用游玩技巧
С чего стоит начинать освоение игры? Рассмотрим и детально разберём 3 кита: фунд…
2026-02-19 10:000赞 · 0评论
游戏 【真人快打】可能是你能找到的最详细的格斗游戏术语大全!
如有讲解不清楚或者有误的地方,欢迎大家友好讨论。
2025-09-15 22:440赞 · 0评论
娜奥米基础与帧数据
关于娜奥米的帧数数据、部分连招及一些起手的简易指南。主要是帮助你入门并激发你的想象力。 基础招式信息 轻攻击 = A 重攻击 = B 控制方式会根据你的游玩设备…
2026-03-18 19:000赞 · 0评论
火影忍者 火影手游教你认识街霸6术语!
-
2026-01-04 17:250赞 · 0评论
永劫无间 【永劫无间】用格斗游戏术语解析永劫无间的战斗系统#1
2025-11-29 14:490赞 · 0评论
技巧 当你的靠山失误后,合格的腻腻该如何帮助他脱险
-
2026-05-15 06:340赞 · 0评论

技巧 〔纯干货〕一个视频教会你看敌方热诱CD
感谢“听草长艾草”提供的账号! 励志做好每一个视频
2026-05-06 05:360赞 · 0评论

地铁逃生 自信是优势 但过于自信便是祸根
2025-12-23 09:380赞 · 0评论
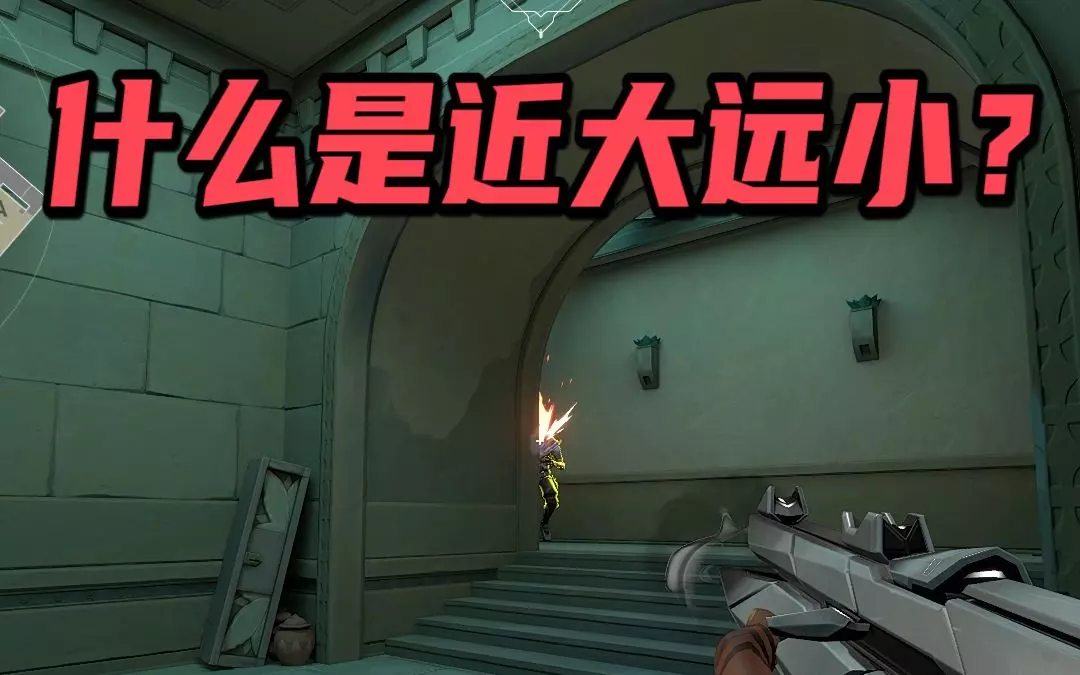
电子竞技 【无畏契约】什么是近大远小?
一个视频让你搞明白什么是近大远小!
2025-12-18 05:330赞 · 0评论
暂无更多
最新更新
- 如何开启《YOMI Hustle》 — 本指南将教你如何开始《YOMI Hustle》(绝对真实非标题党,100%有效,千真万确) 启动游戏 点击【开始游戏】按钮
- 《终极YOMI Hustle指南》 — 刚开始玩游戏遇到困难,或是想提升自己的游戏水平?这份指南就是你唯一的选择! 简介 各位玩家好,欢迎阅读这份适用于所有年龄段和技能水平玩家的《YOMI Hustl…
- 如何在多人游戏中避免立即死亡 — 本指南将告诉你所有你需要知道的事情,以避免被那些住在妈妈地下室、浑身沾满奇多薯片碎屑的36岁死宅瞬间击败。方向影响
- 《Yomi Hustle》常见问题解答(及常见一般问题) — 这款游戏确实可以正常运行。 本指南旨在帮助大家解决游戏运行问题,这次是真的有用。 如果你在游戏中遇到任何问题,只需说“谢谢Ivysly”。 【模组相关问题】角色…
- 如何游玩《Yomi Hustle》 — 我其实尝试制作了一份不错的入门指南。 简介
- 如何玩《Yomi Hustle》以及它的游戏机制是怎样的? — 我制作这个教程是因为看到有玩家对这款游戏感兴趣,但却连基本机制都不理解。我也很清楚,并不是很多人都精通双语(我算是其中之一),而且所有攻略都是英文的,教程视频也…
- 如何读懂帧数据(及其他格斗游戏术语) — A quick tutorial on how to use frame data to your advantage, also a brief run do…
- 成为吉良吉影的指南 — 这是一份杀手(吉良吉影)的玩法指南。阅读本指南后,你将了解如何连招、如何战斗。你将能像真正的吉良吉影一样游玩。
- YOMI Hustle 100%成就指南 — 《YOMI Hustle》成就指南 大家好! 在本指南中,我会教大家如何以最简单快捷的方式解锁游戏中的所有成就。需要说明的是,尽管我会结合自己的经验进行讲解,但…
- Source引擎指南 — Source角色完全指南:由steph制作。涵盖了我能找到的所有内容。 简介 Source是由steph制作的《YOMI Hustle》模组角色,灵感来源于《脑…