Your Only Move Is HUSTLE


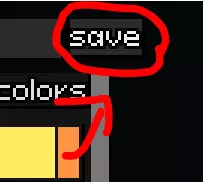
这款游戏确实可以正常运行。 本指南旨在帮助大家解决游戏运行问题,这次是真的有用。 如果你在游戏中遇到任何问题,只需说“谢谢Ivysly”。 【模组相关问题】角色显示为null,进入匹配时游戏崩溃,这是为什么? 你的角色缓存出现问题,无法正确读取模组。只需在重新打开游戏后返回主菜单,在选项中点击【删除角色缓存】。这会关闭游戏,属于正常现象。养成在关闭游戏前执行此操作的习惯通常是个好办法。 2025年5月29日更新:之前发布过一个模组,可以在关闭游戏时清除缓存,但并非100%稳定。 【模组相关问题】我无法和朋友一起玩这个模组,但我们都已下载该模组。模组会偶尔(或极其频繁地)更新,而Steam有时在启动游戏时不会为你更新模组,或者在“更新”时给你错误的版本。前者可以通过以下方法解决:进入Steam库页面,点击页面横幅下方左上角的齿轮图标,选择“属性”,点击“已安装文件”,最后点击“验证游戏文件的完整性”。这将更新你的模组。后者通常只需按刚才描述的方法操作,再额外加上祈祷这一步骤。 常见问题:弹窗提示缺少某些内容 部分模组需要依赖项才能正常运行。这些依赖项通常(如果不是全部的话)是另一个模组。最常见的此类问题出现在【自定义舞台加载器】和各种舞台模组上。【自定义舞台加载器】可在Steam创意工坊下载。 常规问题:点击菜单时游戏崩溃。 你打开和关闭菜单的速度过快。是的,这确实是个问题。是的,这很蠢。是的,没人应该习惯这种情况。目前不清楚何时会修复,我并非Ivysly的工作人员。 2025年5月29日更新:此bug很久以前已基本修复,但仍需注意。 常规(模组相关)问题:打开回放时游戏崩溃。 你安装的某个模组损坏了回放文件并导致游戏崩溃。关闭无线网络以关闭Steam云存档,然后删除回放文件。要找到回放文件夹,请按下Windows键+R,在弹出窗口中输入“%appdata%”(你也可以直接打开Windows搜索栏并查找“运行”应用),然后打开名为“Your Only Move Is HUSTLE”的文件夹。最后,打开名为replays的文件夹,并删除所有文件。 常见问题:我卡在“请求大厅数据”界面。 常见问题:我的游戏毫无缘由地非常卡顿。 这款游戏是用希望、梦想以及由蛋黄酱、奶酪和湿饼干制成的“胶水”构建的。只需重启你的电脑,这能暂时解决问题。有时,模组本身会导致卡顿(THExplosion24制作的Director就是一个典型例子)。这种情况下,进入选项并关闭粒子光环通常会有效。一般问题:我遇到了(X)问题,且本指南中未提及。 相信我,如果我知道《Yomi Hustle》中所有问题的答案,这个页面会比我的英语课还要长。你可以前往相关社区寻求帮助。 一般问题:进入匹配有时会强制加载未选择的模组 这是因为你观看了回放或 spectate 了比赛。截至2025年1月17日,存在一个漏洞,即 spectate 比赛或观看回放会强制游戏“加载”最后使用的两个角色模组中的一个。你必须重启游戏才能修复此问题,并且在重启前无法进入匹配或进行单人游戏。更新:2025年5月29日:不久前已发布一个修复此问题的模组。只需搜索【replay bug fix】或类似关键词即可。


a guide to vixen, the yomi hustle scourge (to most people) and lovely nuclear kitsune. general overview so you wanna play vy shen, ex-yokai of pleasure with a thing for fire, nuclear bombs, and tax evasion hmm?~ well here's a players (likely incorrect) observational guide for ya to teach you the ropes since inkless just... won't. unless you pester them, but you really shouldn't do that. MOVING ON! uniquely she takes both additional and reduced damage compared to most characters and has less health than most characters. starting off she takes DOUBLE DAMAGE and as her health drains, she gets that reduced down to roughly 40% damage taken (60% damage reduction). her starting hp is 12000. her play style is all about getting in on someone and wailing on them with high speed strikes and various dodges at point blank with some short range moves to assist with keeping the pressure on. your biggest problems are people who can parry, or block strings cause quite frankly you just don't have many safe guard breaking moves despite being a point blank fighter that don't cost you a rather large portion of your super gauge or are fast enough that if your within range to use a prior move to get the option to use said guard break in the first place. passives so here's the thing about vixen. she's got 5 passives, she heals her self and gains nuclear charge, leaves wisps of fire on them, and finally sets people on fire! however the third one is what actually enables previous two. her ability to mark people with excess fire, noticeable by the ring of up to 8 flame pips circling them at any given time. ABSORBING now these pips are tied to what i call "absorbing" moves and "marking" moves. if the move is mostly white icon and has no orange flame effects, those are absorbing moves that take a tick off of your enemy every time you hit them with it, causing a bit of nuclear charge to build up and granting healing for a bit of health (IMPORTANT: your heals can CAN EXCEED your max hp, but you will still suffer the double damage, and it will drain away rapidly). these moves make up the standard attacks of her kit. MARKING now that's great and all but what about marking moves? those are moves landed from attacks with orange flame effects on the option icon. E.G. magma charge, your supers (outside of thermal fission), and your post shine options (which weirdly includes lite ant. exceptions to the rules man.). NUCLEAR CHARGE/HEALING nuclear charge is is known as heat in the files and on a little tool tip that was added when mousing over vixen in the previews while furious (IMPORTANT NOTE: i use dev accurate number displays, the the heat preview does not. add an extra zero to the end of it for accurate damage if you're not using a mod that shows dev accurate numbers). it's built through both taking damage (dependent on how much damage you take at once) and absorbing marks with "konsume", but what REALLY charges it at a extreme rate is two things. the use of the super thermal fission which seems to add to your charge via taking the amount you currently have and adding a percent to it. the second however is self damage inflicted by your move glow. however the standard way to get heat is by using the "konsume" option on absorbing attacks. IMPORTANT NOTE: as your opponent gains meter you will gain REDUCED NUKE DAMAGE. this is important because yomi has a rage meter mechanic and grants your enemies meter the longer you combo them. IGNITE while using "konflagerate", using absorbing attacks on marked enemies will inflict 300 delayed damage (if the enemy has meter the damage is significantly reduced until all meter present is gone) to an opponent that is sped up in neutral compared to being in a combo, however the scariest part of this is the fact that this burn CONSUMES ENEMY SUPER OVER TIME (this is directly applied to meter burn as well). IGNITION this is basicly a lockout system due to a major change in how vixen unlocks her moves throughout a match you gain moves from ignition 0-3 by just.... you know, fighting and not losing momentum. this will drain away for being passive with the exception of using "COME ON!" Attacks grab grabs with vixen lack a dash option and have a 3 meter toggle which leads into deep impact/down bad, moves that are guaranteed to combo end sadly. more on those later. flash claws a 7 frame anti-air with a fixed direction (being diagonally above and to either the left and right). it is extremely quick and might allow you to jump normally unjumpable moves at the cost of dealing with the extreme end lag (the move totals roughly 24-26 frames if not free canceled). another great whiff escape tool. tap a non free cancel-able 4 frame punch that doubles on connection. use 3 times (if you keep them in combo and not flying) and you'll send them flying. tilt a basic 5 frame low kick with a very small amount of forward movement. pretty much only there for mixups and toe stubbing. begone the fast guard breaking option (on the ground) that has a aimed over head kick. inherits momentum to a middling degree. really good for building heat if you can send enemies to a wall or DI mix them. ascending sun a 6 frame rising double kick that ignores Ariel attacks up to frame 9. also a strangely good way to get people into a combo from the ground with a large amount of momentum being inherited. descending moon a 6 frame rolling hopping kick that has a fall toggle attack that will dodge lows, but still get grabbed. scam either a way to sacrifice yourself for a massive chunk of heat if you get hit during startup or a way to just sucker punch someone if they use a defensive option. (would recommend getting some temp health and heat before using this as you only get one shot at this if it goes off in heat gain as it is percent based) important note: this move will generate a bar of meter over its duration. AIRBORN double kicks/ high kicks both are 4 frame highs that have a second launching kick and a interrupt if you land the first kick. the only difference is the direction they nudge you in with DK nudging you forward, and HK nudging you upward. drill kick a 4 frame low that has a fall toggle allowing it to add downward momentum to vixen, while also inflicting a VERY heavy meteor (downward) like knock back. good for jumpscaring people who don't mind their heads. Specials cinder req: ignition 1 a none flippable 15 frame invincibility heavy dash (your invincible at frames 5-10). this puts you into what i call the "cinder" state (i know, ♥♥♥♥♥♥ name is ♥♥♥♥♥♥. moving on.) in this state you can use the ant moves. another semi-exclusive attribute to this state is access to the flash dodge (aim-able left and right with some vertical control) additionally your supers will be available as well and if you use flint-wheel (and i think octokick) in this state you'll remain in the cinder state afterwards. finally you'll retain access to shine, magma charge, grab (but no advancing grab), friction, and a modified version of dawn which become a IV heavy speed slam, but is massively block punishable. has a sway option to increase end frames but flow backward. great for lining up a mid-air fire ant or not burn an air option to reposition below you. also ends much faster in combo (i think it's only 8 frame? it's weird.) lite ant a single low damage hit 3 frame backhand punch that out prioritizes grabs and places fire marks. bizarrely long hitstun time if landed with low knockback. great for unleashing a strong left/right! fire ant a speed adjustable flaming clothesline strike that hits a total of 3 times before sending your opponent flying. however be aware there is a deadzone at 0 on the slider that will cause you to whiff. this deadzone, however, also does allow for a very sneaky escape. side notes: if you get hit during the iframes of cinder you will generate 750 N.C./heat shine a 2/10 frame point blank flash of fire that can lead into glow/radiate as well as cinder if your on the ground. however, the move sends enemies flying outside of combos, so in that case it's a "GTFO ME" button, HOWEVER IT DOES NOT HITSTUN OUTSIDE OF COMBOS, so if a opponent *cough* cowboy *cough* has really long reach on it's normal attacks, your getting hit.. also, adds flash dodge, and can be used again in succession. also this move eats your momentum so if your flying out of control with no other air options, use this thing like an air brake! landing shine mid combo will actually put you into cinder stance at point blank. major warning: if an opponent projectile gets parried using shine you will curl into a DI controled fireball magma charge req: ignition 1 a momentum dependent rush down with projectile immunity that comes out in two parts. the contact and the actual uppercut, making this the reliable way to slap someone with two marks at once. however, when used it WILL cut all upward momentum that you have, it will inherit all other momentum, if you can, try to super jump or heat chaser (either version) into this. you'll catapult yourself and make chasing enemies much easier after sending them flying. dawn a 5 frame high flaming flip kick that has minor anti-air qualities. however be warned, this has even more upward knock-back than magma charge. strong left/right req: ignition 2 a guard breaking 20 frame punish with a metric crap ton of armor that will cancel out on getting hit. it also grants a bit of charge, and these come out faster in combo (only by 2~ frames but hey, faster is still better ain't it?) and finally HURTS LIKE HELL AND FULLY MARKS AN ENEMY OR CAUSES DETONATION AT FULL MARKS (so long as it is not whiff blocked or parried). sounds good right? bad news these are a guaranteed combo ender. though it does connect even if the opponent is flat on their backs from a backhanded knuckle to the face. this move generates more charge on hit than the amount you get on whiff (600 whiff/ 900 on hit) heating up req: ignition 1 plants 4 marks. works well as a momentum carrying move or a bit of a mixer mid combo. will be careful as this will usually result in a ignition. spirits a pestering projectile that marks and deals a little damage. like. maybe 100 damage. locked into the move for 15 frames. also acts like a particular teleport attack if they are a decent distance away, and attacking as if they were going to parry the projectile. flipping the attack will attack from behind. gains a more powerful version at ignition 1. friction simple descending kick with an explosive landing or if you don't use the fall toggle you'll hop off a enemys head. it does inherit momentum but the big thing is that it is a hopping move on the ground, which means low attacks won't stop you. however it can still be grabbed unlike a normal hop attack. it can also be used to hit people while they're on the ground. super moves gleam req: 1 super meter it's literally glow but as a super that deals very slightly less self damage, and lacks a followup super equivalent to radiate, likely due to the fact that on hit this move tends (more often than not) to refund a quarter of it's own cost. also, great for burning floored or walled enemies. adds 750 heat on direct hit and 250 on full cast, otherwise and if cast in combo (but not directly hitting it actually ends sooner in similar manor to cinder (i believe it cuts 10~ ish frames off?). surprisingly, it's useful to use it as a close range whiff to add 4 marks and some heat if you can follow up. pain vortex req: ignition 2 a 15 frame projectile launching can be controlled with the mini DI wheel. can hit 4 times and will mark and add hitstun each time. unless your in a combo or far FAR away, be careful when using it. it's somewhat dangerous for you and will end with you losing half your life or needing to burst. this is however a really useful tool for setting up detonations due to holding someone in one place on the right angle~ flint-wheel req: ignition 2 4 high speed air kicks that end with a plummet inducing overhead kick that come out at 6 frames. majorly punishable if you whiff or get blocked. octo-kick req: 2 super meter/ ignition 3 basically flint-wheel trading the massive first hit range for 4 more strikes and faster start up. great for what it is, and it deals some pretty chunky total damage too surprisingly, coming out close to the enemy and even useful as a possible counter charge. burning moon req: 2 super meter/ ignition 3 /must be in the air (?) a marking variant of descending moon that ends with a friction decent and guarantees near max marks, as well as a massive chunk off their hp if you land the full attack. however it does have a bit of a start up issue. deep impact/down bad req: 3+ super meter/opponent must be grabbed with toggle active these two are birds of a feather style abilities that act as a way to either send you opponent away from you in one piece or burning like a meteor on entry in the night sky. the difference is that deep impact sends them to the sun while dealing a little more damage. down bad is the air version that ends them down to earth after tumble roll slamming them. both will end your combo. as a important note, these moves eat all available meter to deal more damage and inflict more flame pips. however, interestingly enough the move seems to refund roughly half of it's meter spent, when used raw due to the sheer damage you put out. THERMAL FISSION req: 3 super meter okay this bugger of a move is so confusing so take everything here as "incorrect" until proven true. what it SEEMS to do is grant you the "sparking" condition which grants heat/nuke charge over time. this condition lasts until your next nuke. WARNING: this move will erupt into a 6 frame blast of fire draining 2000 hp from vixen. also takes a % of your current heat (roughly 55-60%) and adds it on top of your current heat when cast. HOWEVER, you only get ONE use of this per nuke so you'd best build up your heat a bit first. furious creature req: ignition 3 spawns a clone who gets controlled by a mini DI wheel and will go kaput in one hit, while offering a teleport with fire moves. also getting this clone on top of a hitstuned enemy will allow them to add hitpause to a flying enemy to give you a chance to catch up. WARNING: there is a +2 frame start up on teleport and said teleport has a 4 turn cool-down with it being able to be caught by frame 3-4 moves dubious creature req: ignition 3 furious creature but standard attacks. works amazingly as a get out of jail card. NUCLEAR REACTION okay so this section is very much a add on from both passives and a few of the moves. i've mentioned gaining nuke charge throughout this whole guide, but not how to make use of it. to summarize the stages fooked you or your opponent are is the effects on vixen. no vfx: 750+ damage a light glow: 1000+ damage heavy glowing: 2500 + damage RADIATION SYMBOL AND SIRENS: 5000+ DAMAGE !!! when moused over: YOUR DEAD. what are you looking at me like that for, I'M BEING SERIOUS! regardless nuke charge can only be discharged when using certain moves while an enemy has full marks on them (8). the move in question is strong left/right. afterwords if all conditions are correct and your not horrifically desynced from your opponent you'll let off either a small shock wave, a nuclear pulse, or a actual mushroom cloud. no matter what your opponent will be sent reeling. Legacey this section is for moves that i know of that were removed that i know of that where critical in my opinion. deep impact/down bad (detonate) req: 3 super meter/opponent must be grappled/be in cinder state (DI only) while not fully removed, in addition to what was posted above, these moves used to also allow for detonation of your nuclear charge/heat. scratch that itch req: 3 super meter/opponent had to be grappled this move used to eat all marks on your enemy at the time no matter what and plant 3 more afterword, which was great for building healing and nuke charge. however, depending on both your meter and opponent DI this sometimes ended up being a finisher to your combo due to the extreme force vixen throws in her headbutt, or in many cases it was a way to prolong a combo due to the extreme horizontal force it had for the headbutt and fight DIdown. heat chaser req: 1 super meter easily seems like a badly pathed chaser ability however it's affected by your DI dial, and my god, taking control makes this thing ridiculous. it also adds a massive momentum boost to most of your attacks, and practically turns magma charge into a teleporting slam. it also has a nice short range flame burst that can catch opponents off guard and sends them flying with a mark. however you only retain this state for 4 turns. glow/radiate these moves used to be able to be used after shine and each other, which drained a total of 3k hp but would grant massive amounts of heat and super meter.


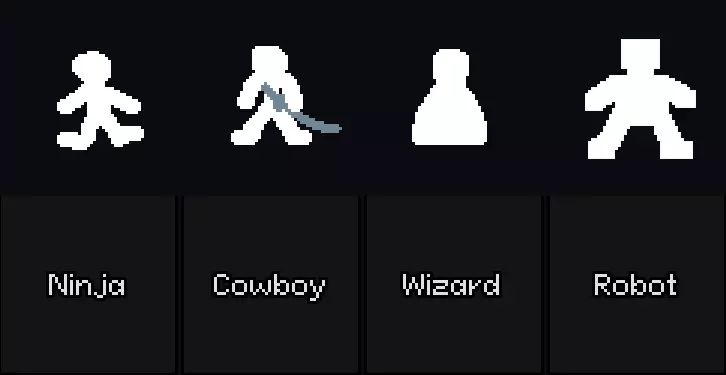


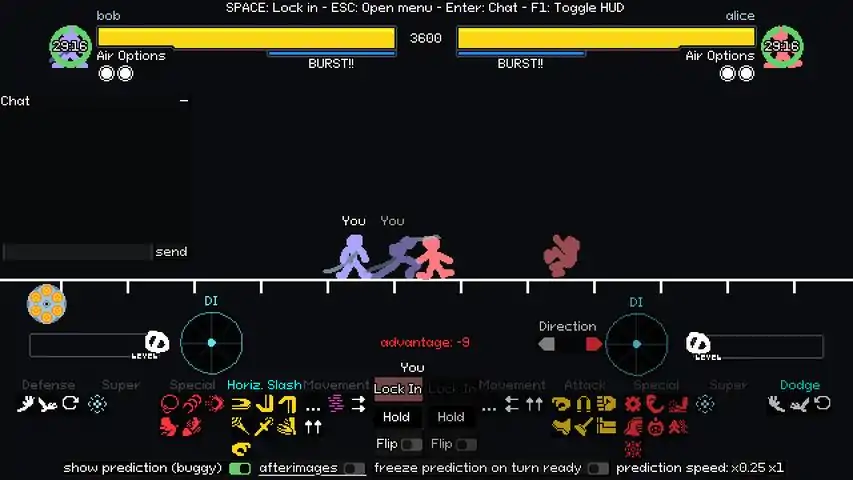
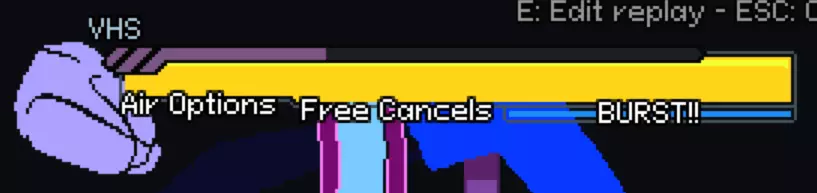
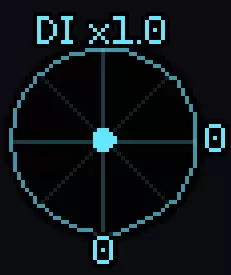
A quick tutorial on how to use frame data to your advantage, also a brief run down on some basic FGC terminology. Welcome Hustlers! If you've never played this game before, Your Only Move is Hustle (YOMI, or YH) is a turn-based 2d fighter. It's similar to something like Marvel vs Capcom but the kicker is every few frames the game pauses like a turn based rpg to request your next movement. The game then saves these bouts in a long video replay which plays back at high speed, making your match look like the best episode of your favorite battle anime! This guide is just a basic introduction to some fighting game terminology and concepts so you can better understand what the YH UI is trying to tell you and then how to take advantage of that. Terminology YH, being a 2d fighter, also utilizes many of the same mechanics any other would. The only difference here really is how your input works being a turn based experience. Here are some broad terms to help you while you read your UI: - Armor: Sometimes called super armor, armor means instead of becoming "hit-stunned" after being hit with an attack, your character will absorb 1 hit and then continue their action. The Robot character has the unique ability to add armor to attacks with a resource meter. For example: You'll notice Wizard's Conjure Weapon will turn his health bar grey for a brief time. During these frames Wizard could tank 1 hit (with some exceptions) and still send the blade out afterwards. - Block/Parry: Chances are you can guess what these do. Things to remember: 1 - You must block high or block low to block high and low attacks respectively. 2 - A parry happens when you block an attack the frame or 2 before it hits, this means if you play a character like Cowboy you can inadvertently feed your opponent by sending out quick projectiles for them to parry if they aren't "hitstunned". - Burst: You'll notice under your health bar is a blue bar marked "burst". When full, this unlocks a defensive/offensive option which when used surrounds your character in a blue explosion which instantly interrupts an opponent's attacks, and any momentum you might have had. Typically used to interrupt an opponent's combo, you can also use the fact it causes "hitstun" to the opponent to continue/begin a combo. Remember Bursting has recovery so it is possible to burst one attack then be hit with the follow up as you recover. - Directional Input (D.I.): You will see a circle on your UI that you can use to draw a line angle. This is called your "Directional Input". Basically, when you are hit by an attack you are generally pushed in a direction. DI affects that direction. For example: Your character is at a small distance to the right of Cowboy, who uses their "Horizontal Slash" attack to barely reach and hit your character. By not using UI, your knockback will be predictable, just like you are practicing with a dummy. However, if I set my DI to the right, I will slide farther to the right away from Cowboy. Set it to the left. and I won't slide nearly as far, ending up much closer to Cowboy. This is handy to force your opponent to use attacks they didn't want to, as you changed the expected position they thought you would be in or perhaps put yourself out of range of having a combo continued on you. - FastFall/Hover: Wizard's special movement options. Use the hover slider to let Wizard keep his position in the air (lasts until "hover" meter empties). Use the fastfall slider to, uh, fall fast. Wizard shoots towards the ground the next frame. Can be used to escape or chase for free. - Frame Data: "frames" refer to animation frames. each move in a fighting game is organized into them. For example: Cowboy's Pommel attack is tied as the fastest attack in the game. This is because it has only 4 "startup frames" . This means 4 frames of animation are required before the attack's "hitbox" is active for another 2 frames then it ends. There is no recovery from this move so Cowboy can easily chain one Pommel into another. This means any character which is standing in range will probably get hit first if they tried to attack cowboy at the same time as pommel UNLESS their attack also came out in 4 frames or less or gave them some type of "armor". A slower move would be Robot's COMMAND: GRAB attack. This one has 5 frames of startup and is active for 4. This means in range Cowboy's Pommel would hit Robot first. This difference in frames is called your "frame data." Since Cowboy's attack will be active on frame 4 and Robot's attack will be active on frame 5, this means if both moves go off simultaneously, then Cowboy has +1 frame data, and Robot has -1 frame data or in other words, Cowboy will be active 1 frame sooner than Robot. Last note on Frame Data, many attacks and actions have "recovery frames" or the frames that need to pass before the character may act again. In the example above, let's say Cowboy is not in range to attack Robot, but Robot uses the COMMAND: GRAB attack, hoping the range difference will keep Cowboy from acting. Since there is distance between the characters, this means animation frames now need to pass as the attack travels from Robot to Cowboy. If Cowboy were to jump or backdash, avoiding the grab, now Robot must wait until the "Recovery Frames" have finished before he may act again. COMMAND: GRAB happens to last for a whopping 57 frames (phew!) meaning missing this attack will ALWAYS leave Robot at negative frame data. To Review: Startup Frames: Animation Frames needed before an attack causes damage Active Frames: Frames during which the attack will hit. Recovery Frames: Frames needed before the character may act again. - Fly: Robot's special movement option: Use the fly slider to have Robot continue gliding in the same direction for a time. Handy to set up angle above your opponent where they typically have a hard time covering themselves. - Hitstun: Attacks have a certain amount of frames they will cause your opponent to be unable to move after being hit. These are called "hitstun" frames. These are what allow for combos in fighting games. Following up with an attack on a stunned enemy is often what makes the slow moves safe enough to use. - Hustle: A taunt which gives you some bar of super. Sometimes ,this really is your only move! - Ready: If you pay attention during the prediction animation, you'll notice a "Ready" sign appear above your character at some point. This is the predicted moment that character will be able to act again. Remember using frame data (if you can) is almost always more precise, but Ready is a great visual indicator for quick reference. - Teleports: Cowboy's special movement mechanic. Cowboy fades away then reappears elsewhere. He also has a special, "Instant Teleport" That allows him to do this with little recovery, giving him crazy pressure to airborne opponents. Using Frame Data Better Understanding what frame data is isn't typically the problem for people, it's understanding how to keep track of it. So for example, I choose an attack and it said +8 Frame Advantage. I lock in, but I STILL get hit! What gives? doesn't +8 mean I go first? Well, it WOULD have, IF your opponent had done nothing to stop you or attack you first. BAITING Remember the game's UI prediction is what will happen "If your opponent is unable to do anything". If your opponent can cancel their attack (the green wagon wheel looking symbol on their side) then they can potentially change their frame data by eliminating the remaining startup or recovery frames. This means if you used an attack that has more startup or active frames you can't cancel, then you are essentially "locked in" to whatever it is you are doing. A typical rule is the stronger the attack, the more vulnerable it will leave you when missed. Many opponents will use "cancels" like these to bait you into using a move to lock you into startup frames, then cancel their move and hit you while you are unable to respond. Don't over commit! CONTINUING / ENDING COMBOS Another example, let's say we have an opponent in hitstun. You have several moves that will follow-up hit them as a result, but which should I choose? One gives me a +8 advantage, one gives me a +4, another gives me a +17. This means that your character will recover with 8, 4, or 17 frames faster than your opponent. All of these attacks will true combo, as a result. Meaning I will hit and the opponent will remain in hitstun potentially. But this also means if you wanted to end the combo with a move with a longer startup, like Cowboy's Impale, you should probably pick something that leaves you with more frame advantage but also keeps the opponent standing so the attack will land. In the above example, let's say I pick the +4 attack. This means In the next turn I now (am predicted) to finish 4 frames before the opponent. This means now I MUST either pick an attack that can startup in 4 frames to keep the opponent in hitstun or I risk them recovering to block, dodge, etc. Remember you can Burst during a combo to free yourself from hitstun. HIGH RISK / HIGH REWARD and SETUPS A final example, let's say you want to use a high risk move, but your opponent is NOT in hit stun. A big miss means a big punishment, and this is where frame data will help you. Characters with fast startups and moves that cause them to dash can often use a move that gives them momentum in a direction, then cancel next frame. Or maybe summon a couple projectiles with bad frame data, but keeping their distance. These are called "setups." All fighting game characters have different setups and learning your frame data will make you more effective at using them. Instead of just trying to directly attack your opponent use you frame data to make smaller movements and create situations that force your opponents to react to YOU, but leave you enough frame data to then move into an unexpected technique. This is called "feinting". Characters like Ninja excel at these types of setups, as they could summon kunai, throw a shuriken, store momentum, then attack from an unexpected angle as these setups close in on the opponent. This creates a situation where the opponent must both dodge your indirect setups and direct attacks at the same time. Another good setup, for example could be Wizard using distance to create 2 lightning orbs and use a gust to push them BEFORE using a move like missile form to continuing the pressure. Although 3 turns would be consumed, you now have a small area you may use as a shield/spear as you approach. DELAYING Finally, don't doubt the power of NOTHING. Sometimes, waiting or holding your action will cause a jumpy opponent to over attack, leading to openings. For example, say you and your opponent get up at the same time or just have a similar frame which you both act on. It might seem that constantly moving,chasing, attacking should be your default decisions but often allowing a frame to go by where you do nothing often causes your opponent to throw out an attack without much thought. By having not acted, this gives you now a free frame to react. This is often a great way to bait parries or bait an opponent into blocking/dodging when it doesn't benefit them to do so. Conclusion YOMI was such a great surprise and I hope it catches on so it can grow into a more complete experience. Remember getting beat is how to learn a fighting game, if you can't learn while getting beat that might be the barrier to you getting better. Understand WHY you got hit, and don't just blame it on the fact you're taking the prediction from the UI too literally. Use your set-ups, bait when it makes sense to, study up on the speed/recovery of your moves and you will start to win matches. Hopefully, this acts as a gateway drug to the larger world of fighters, in general. See you out there, Hustlers....


你可能已经在聊天中见过一些花哨的动态文字了,但要怎么做到呢?大多数会用的人都不愿分享方法,但现在这个秘密不再是秘密了! 怎么做呢? 由于《唯我独斗》(要是能把这名字弄成个首字母缩写就好了)是基于Godot引擎运行的,你可以在RichTextLabel中使用BBCode来进行一些Godot文本自定义。 例如,[wave amp=50 freq=10]glhf[/wave]会让文字以50的振幅和10的频率呈现波浪效果。完整的效果列表可在上方查看,这些效果可以相互叠加,因此你可以通过像这样堆叠它们来创建夸张的效果: [淡入开始=4 时长=14][抖动频率=5 等级=10][波浪振幅=50 频率=10][彩虹频率=2 饱和度=1 明度=2]祝你玩得开心[/彩虹][/波浪][/抖动][/淡入] 自定义程度令人印象深刻,现在去用动画文字刷屏每个大厅吧!
