换一换
换一换 


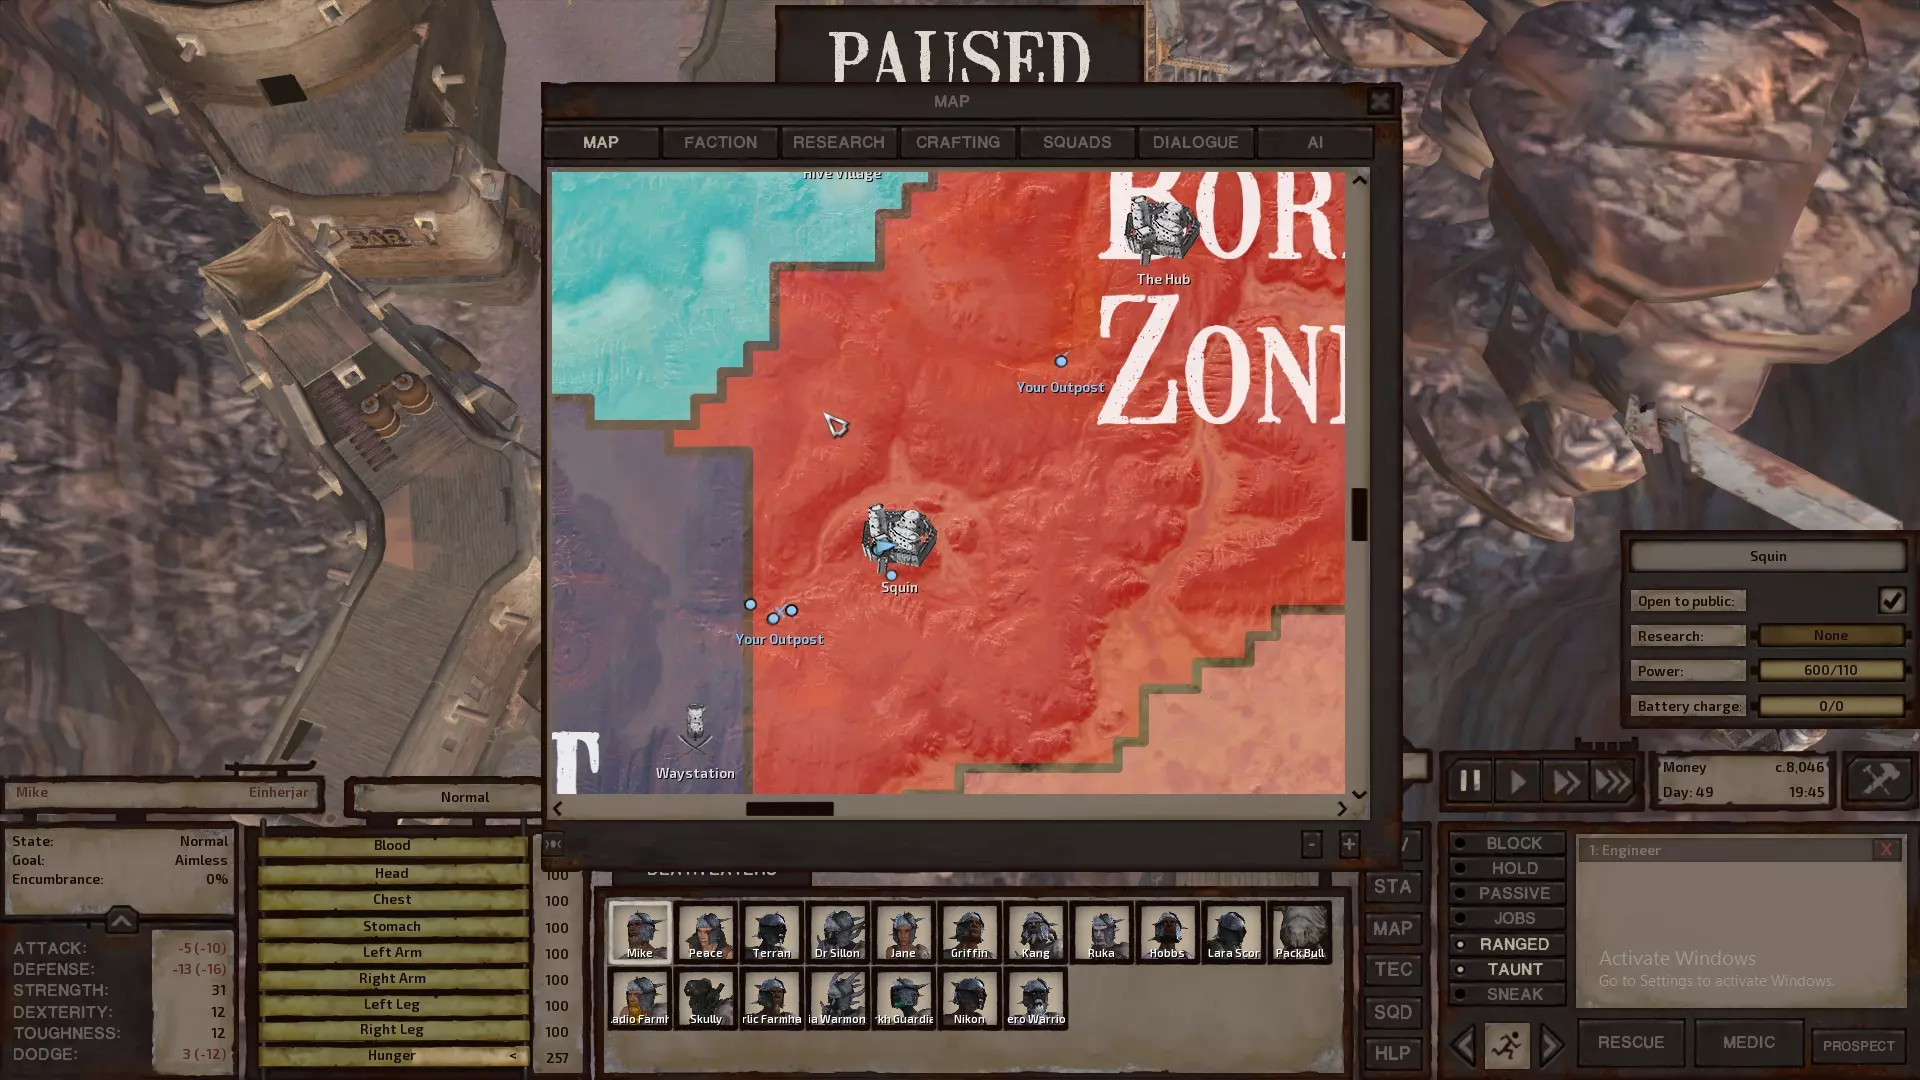
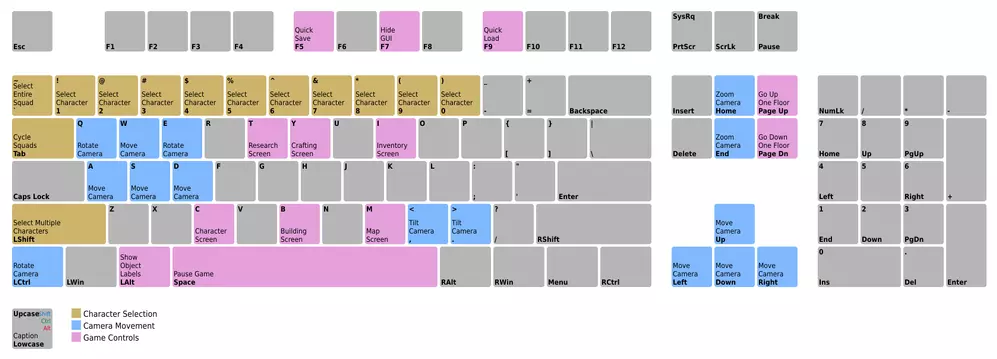
This is my second Steam guide, aiming to help with a feeling of helplessness Kenshi instills on new players. This guide covers the journey from homeless vagabond to controlling a self sufficient bastion, useful tips & tricks, as well as some info about how the world works. Introduction Welcome to Kenshi - Guide. This will help you understand the lessons the game wants to teach you and ultimately master this unforgiving world. Several gameplay suggestions and examples are also included. Table of contents: Kenshi Basics Early Life R & D Final Preparations Settling A New Land Mastery Save Location Sources & Credits Author's Note: This guide avoids spoilers as much as possible. Any lore references are based on my (flawed) understanding and don't necessarily represent the truth of Kenshi. Difficulty This game is brutally hard, no two ways about it. If you want a safe, relaxing experience you might want to look elsewhere or patiently work at it until you are well established. That being said, the game does offer you ways to tweak the experience when you start a new game: Beginning: A lot of role play options here with "Wanderer" being the standard Kenshi experience (hard). Most other options are harder than this with the exception we will be going for in this guide: "The Freedom Seekers" where you start with 6 customizable characters, 4000 cats (currency) and a couple of building materials. WARNING: One of your characters, "Old Soldier" is stronger than others but also a wanted man. (the last on the row) The bounty can be bought off later. Advanced Options: It is important to familiarize yourself with these settings before you begin your adventure as this settings can't be changed latter. (unless you import the game) The options are: Hunger time: In Kenshi, characters need to eat or they will die of starvation. Setting the number higher than 1 means it takes longer for characters to go hungry, alleviating some micromanagement and making sparse food manageable. (recommended 8) Chance of death: Taking damage in Kensi likely means you also start bleeding which will eventually kill you (even if the wound is minor) if left untreated. How major a wound or bleeding is are determined by this. (recommended 0.5) Global damage multiplier: Like the tool tip states, this simply amplifies the total damage of combat. For newcomers a lower number also gives time to understand what is going on. (recommended 0.5) Production speed: How fast labor and crafting is done. Keep in mind that experience is granted on working on something and not finishing it. (recommended 1) Research speed: Similarly, how fast you research stuff. (recommended 1) Building speed: Once more, how quickly construction is completed. (recommended 1) Number of nests multiplier: Initially and over time, the world will be populated with beast nests and bandit camps making exploring or setting up a base hazardous. (recommended 0.5) Bandits loot the player: Just what it sounds like. If you get k.o. bandits will pilfer your items. Since sparing with bandits is a good way to train your combat early on, this makes it risky. (recommended unchecked) Easy prospecting: Prospecting scales off science skill. This, supposedly makes it unrelated, however it's a broken option and doesn't change anything, leave it as is. Once you are happy with your settings you may hit "BEGIN" and go on to customizing your squad. Pro Tip: You can always and at any time import your characters & buildings into a new world state. (effectively a New Game+) You can the change any of the above options, say, after you established your base, to make the game way more challenging whenever you wish. More in importing latter in the guide. Options: These options affect the game difficulty but can be changed at any time from the "Gameplay" section. Squad size multiplier: How many people are in each squad. More people makes harder fights but more loot. (recommended 0.5) Global population Multiplier: How many individual squads roam about. (recommended 0.5) Town raid size: When you set up a town, raids will start hitting. This changes how many arrive. Generally unless you are well prepared you want this as low as possible. (recommended 0.25) Town raid frequency: How often raids happen. (recommended 0.25) Town attacks frequency: How often wandering bandits decide to storm your base. Even if set to "never" if provoked, bandits will clash at your gates. (recommended "never") Dismemberment: In Kenshi, damaging individual limbs can have adverse effects on a character, and eventually permanently loosing a limb. Since replacing a lost limb is expensive early on, it's advised to change this during end game. (recommended "never") Import Game: An important feature of Kenshi. This functions basically as a New Game+ you can do at any time by importing your characters from a save into a new world state. It's recommended to make use of this feature to bypass the odd bug, or to undo mistakes in the progression of your world. It has additional features: Reset squad positions: This takes your characters (and their gear) from all over the world are places them all together in an appropriate starting area. Import Buildings: This makes sure your base and outposts are imported along with your characters. This includes all loot inside your base's containers. Import Research: This imports all completed research to the new world. Import Dead NPCs: Important story NPCs can be killed and affect the world's state. This makes it so that any deaths are remembered. Import Relations: You can ally or oppose the many factions of Kenshi. This maintains your relations with them. Pro Tip: depending on the situation or preference, you can mix and match these options, for instance, starting your base building from scratch is faster than dismantling a fully established outpost manually. Kenshi Basics Here lie some of the terminology used in game and this guide for your convenience. Attributes & Skills Strength: Affects mainly blunt damage and how much you can carry. Is raised by using blunt weapons or being overencumbered. Dexterity: Affects mainly cutting damage and attack & block animation speed. Is raised by using cutting weapons. Toughness: Affects mainly how much damage you take, KO point and how much damage it takes to stagger you. Is raised by getting hit (not blocking). Perception: Affects mainly how you perform with ranged weapons. Is raised by using ranged weapons. Weapons: Each different weapon category has it's individual skill level and is raised by using that kind of weapon. This affects outgoing damage only. Melee attack: Affects every melee weapon hit chance and reduces enemy block chance. Is raised by fighting (landing hits or not) preferably stronger opponents. Melee defense: Every melee weapon (but not fists) can block incoming attacks based on this skill. Is raised by blocking attacks (not getting hit) preferably from stronger opponents. Dodge: Martial arts (fists) can't block so they dodge instead. Keep in mind that while staggered, your character may attempt to doge since he can't block. Is raised by dodging attacks when using fists. Ranged: Affects crossbow and turret accuracy and fire rate and is raised by using them. Precision shooting: When shooting a ranged weapon, bolts have collision and will affect friendly targets if they are in the way. This allows a bolt to pass harmless from friends. Is raised ironically, by shooting said friends in the back. Stealth: Reduces how far your character can be detected when sneaking. Is raised by sneaking with enemies around. Lockpicking: Allows a character to open treasure chests and handcuffs. Is raised by picking locks. (successful or not) Thievery: When stealing, there is always a % chance of being detected by nearby people. Training this will lower said chance. Is raised by stealing. Assassination: While sneaking, you may attempt to KO an enemy. This deals no damage, and is great for capturing potential recruits or bounty targets. Is raised by KOing enemies. (successful or not) Athletics: How fast your character moves. Is trained by moving around but trains faster with no encumbrance. Swimming: Swimming always slows down a character, but with higher swimming skill, less so. Is trained by swimming. Field Medic: Affects how effective first aid kits used by this character are. Is raised by using said kits or making them. Robotics: Affects how effective skeleton repair kits used by this character are and the quality of prosthetics made by this character. Is raised by using said kits or making them as well as crafting prosthetics. Engineer: Affects how fast a character can build & repair things. Is raised by building & repairing things. Science: Affects research speed done by this character but also the area "prospecting" reveals. Is trained by researching and crafting certain components. Smith: Affects how fast a character crafts weapon, armour & crossbows and their quality. Is raised by crafting said gear. Labouring: Affects how fast a character can mine, operate machinery and do other menial choirs. Is raised by doing said work. Farming: Affects not only the speed but also how many crops a farmer ruins due to poor skill. Is raised by doing farm work. Cooking: Affects the speed of making meals or brewing. Is raised by doing said work. Weapon damage ratio: Weapons in Kenshi deal a mix of cutting and blunt damage. Cutting damage scales off Dexterity and Blunt damage scales off Strength. Using any weapon also trains these stats by the % of damage distribution. (ex a blunt only weapon trains Strength 100% and Dexterity 0%) Backpack: Backpacks in Kenshi not only increase inventory space but also allow certain items to stack in the same space. In addition many backpacks reduce the total encumbrance of their contents making them an essential option for manual work or trade. Most do, however, reduce combat stats in some form, so caution is suggested. Armor Mechanics Blunt resistance: A flat % damage reduction of incoming blunt damage. (100 blunt damage -> 50% blunt resistance -> 50 blunt damage) Cut resistance: How much % of incoming cut damage is "resisted" (100 cut damage -> 50% cut resistance -> 50 "resisted" cut damage and 50 cut damage) Cut resistance effectiveness: How much % of "resisted" cut damage is negated and the rest passes on as blunt. (from the above 50 "resisted damage" -> 50% cut resistance effectiveness -> 25 blunt damage) Coverage: The % chance that armor will take effect. (50% coverage means armor will take effect 50% of the time) Layering: When multiple layers of armor overlap, damage passes through all of them in turn and all armor effects take place in turn. (head>chest>pants>shirt>boots) Armour penetration: Certain weapons have a % of positive or negative armour penetration. This counteracts the resistance. (So even with 100% blunt resistance if a weapon deals 100 blunt damage but has 10% armour penetration, it will still deal 10 blunt damage instead of 0) Environmental resistances: Environmental resistances offered by armor are a sum total of all parts. Other Cats(c.): The currency of Kenshi. Jobs: A main feature of Kenshi is automation of certain tasks. By pressing shift+click on a task, it gets added to the "Jobs" section. Clicking the "Jobs" button deactivates all jobs temporarily. Prospect: Shows you the terrain's features in an area around the character. Useful when deciding where to build a base or for finding useful veins around cities. Scales with science. Taunt & Block: Taunt attracts the attention of enemies and block disables a characters attacks but gain a +20 melee defense in return. Useful when used together to create a "tank" character. Stronger opponent logic: Combat experience is scaled in proportion to the power difference of opposing fighters. Attacker's "melee attack" vs defender's "melee defense" Thus, hampering your stats with heavy armor & large backpacks is a great way to train fast. Races of Kenshi Greenlander: One of the two "human" factions in Kenshi. Considered high class citizens. Welcome by the Holy Nation. Scorchlander: The second of the two "human" factions. Considered lower class citizens. Tolerated by the Holy Nation. Shek: Humanoids with a bony exoskeleton. Allowed only as slaves by the Holy Nation. Hiver: An insectoid race of 3 different "breeds" worker, soldier and prince. Allowed only as slaves by the Holy Nation. Skeleton: A sentient robotic race shrouded in mystery. Rumored to have caused a great calamity. HATED BY THE HOLY NATION AND WILL BE EXTERMINATED ON SIGHT. The Holy Nation: A theocratic order of paladin knights with a burning hatred for skeletons and one of the 2 major powers in Kenshi. Settling their fertile lands in the west grants frequent patrols and safety, but every Sunday is prayer day. And you don't wanna skip out on prayer day. The United Cities: A corrupt slaver empire of the east renowned for their elite samurais. One of the 2 major powers in Kenshi, settling their eastern lands offers decent conditions and tolerance to skeletons but comes at a price. That price being 3000c per week in "protection" tax. Minor factions: Kenshi has many other factions with their own relations, allies and enemies from cannibal bandits to tech hunters. Settling their lands grants peace of mind from the major powers but often comes with caveats such as acid rain, poor resources or hostile fauna. Early Life (Walkthrough 1/5) After setting up your preferred options for your new game and hitting "BEGIN" you will be taken to the character creator screen. It is now you will need to make some choices. Starting party composition: Depending on your origin story, you will start with 1 to 6 people and varying levels of resources. For our narrative, we will go with "The Freedom Seekers" as we want to eventually settle a base and build our castle. Different races have different modifiers on the speed of certain tasks. Some are better at combat, others at science and others at fieldwork. While noticeable these differences are not all that important however. Here are the strengths and weaknesses in a nutshell: Greenlander & Scorchlander: Unremarkable jack of all trades humans. The latter are great thieves. Shek: 125 HP instead of the normal 100 HP in all parts due to their exoskeleton naturally makes Sheks exceptional warriors and fantastic tanks. They are poorly skilled in labor and need to eat more than humans however. Hive Worker: Workers are quite weak characters and lose limbs quite easily. Their pathetic 75 health to most parts and inability to wear boots and most helmets further punishes them in combat. They are exceptional at labor and eat less than humans however. All hivers are immune to acid rain. Hive Soldier: Soldiers are equal to humans in terms of durability. Their heads have twice the HP of humans but are unable to wear helmets. They excel at melee combat and have a heavy penalty in all labor. All hivers are immune to acid rain. Hive Prince: Princes are a bit more tough than workers but not by much. They excel at intellectual work and are the rarest of hivers to be found outside of their hives. All hivers are immune to acid rain. Skeleton: Ah skeletons. By far the most unique faction in Kenshi. Skeletons are immune to ALL weather effects and don't require food at all. In addition, they have a massive 200 HP in all parts, making them incredibly durable, though they can't wear helmets, boots and shirts limiting their armor layering potential. The catch? apart from being hunted by all Holy Nation knights, skeletons don't heal over time. Instead, they rely on super expensive repair kits or end game repair beds to get their HP back. Assuming those shortcomings can be managed, they are by far the best race to have around in most situations. For the reasons above, hivers and skeletons are not recommended for your starting crew unless you really know what you are doing or going for a specific RP scenario. By the end you will have 30 people including pack animals and members from every race so don't worry too much about starting with humans only. Now, make your choice and customize your starting gang and let's begin proper. Pro Tip: If your 6th character, "Old Warrior" is a Shek he will be a formidable fighting force for this state in the game. Remember to pay off his 20000c. bounty at some point. Pro Tip: There is an plastic surgeon in certain bars that will allow you to rename & customize your men at any time for a small fee of 200c. Welcome to the world of Kenshi. You will likely start near a neutral town such as "The Hub" but the strategy for this early part of the game changes little per location.

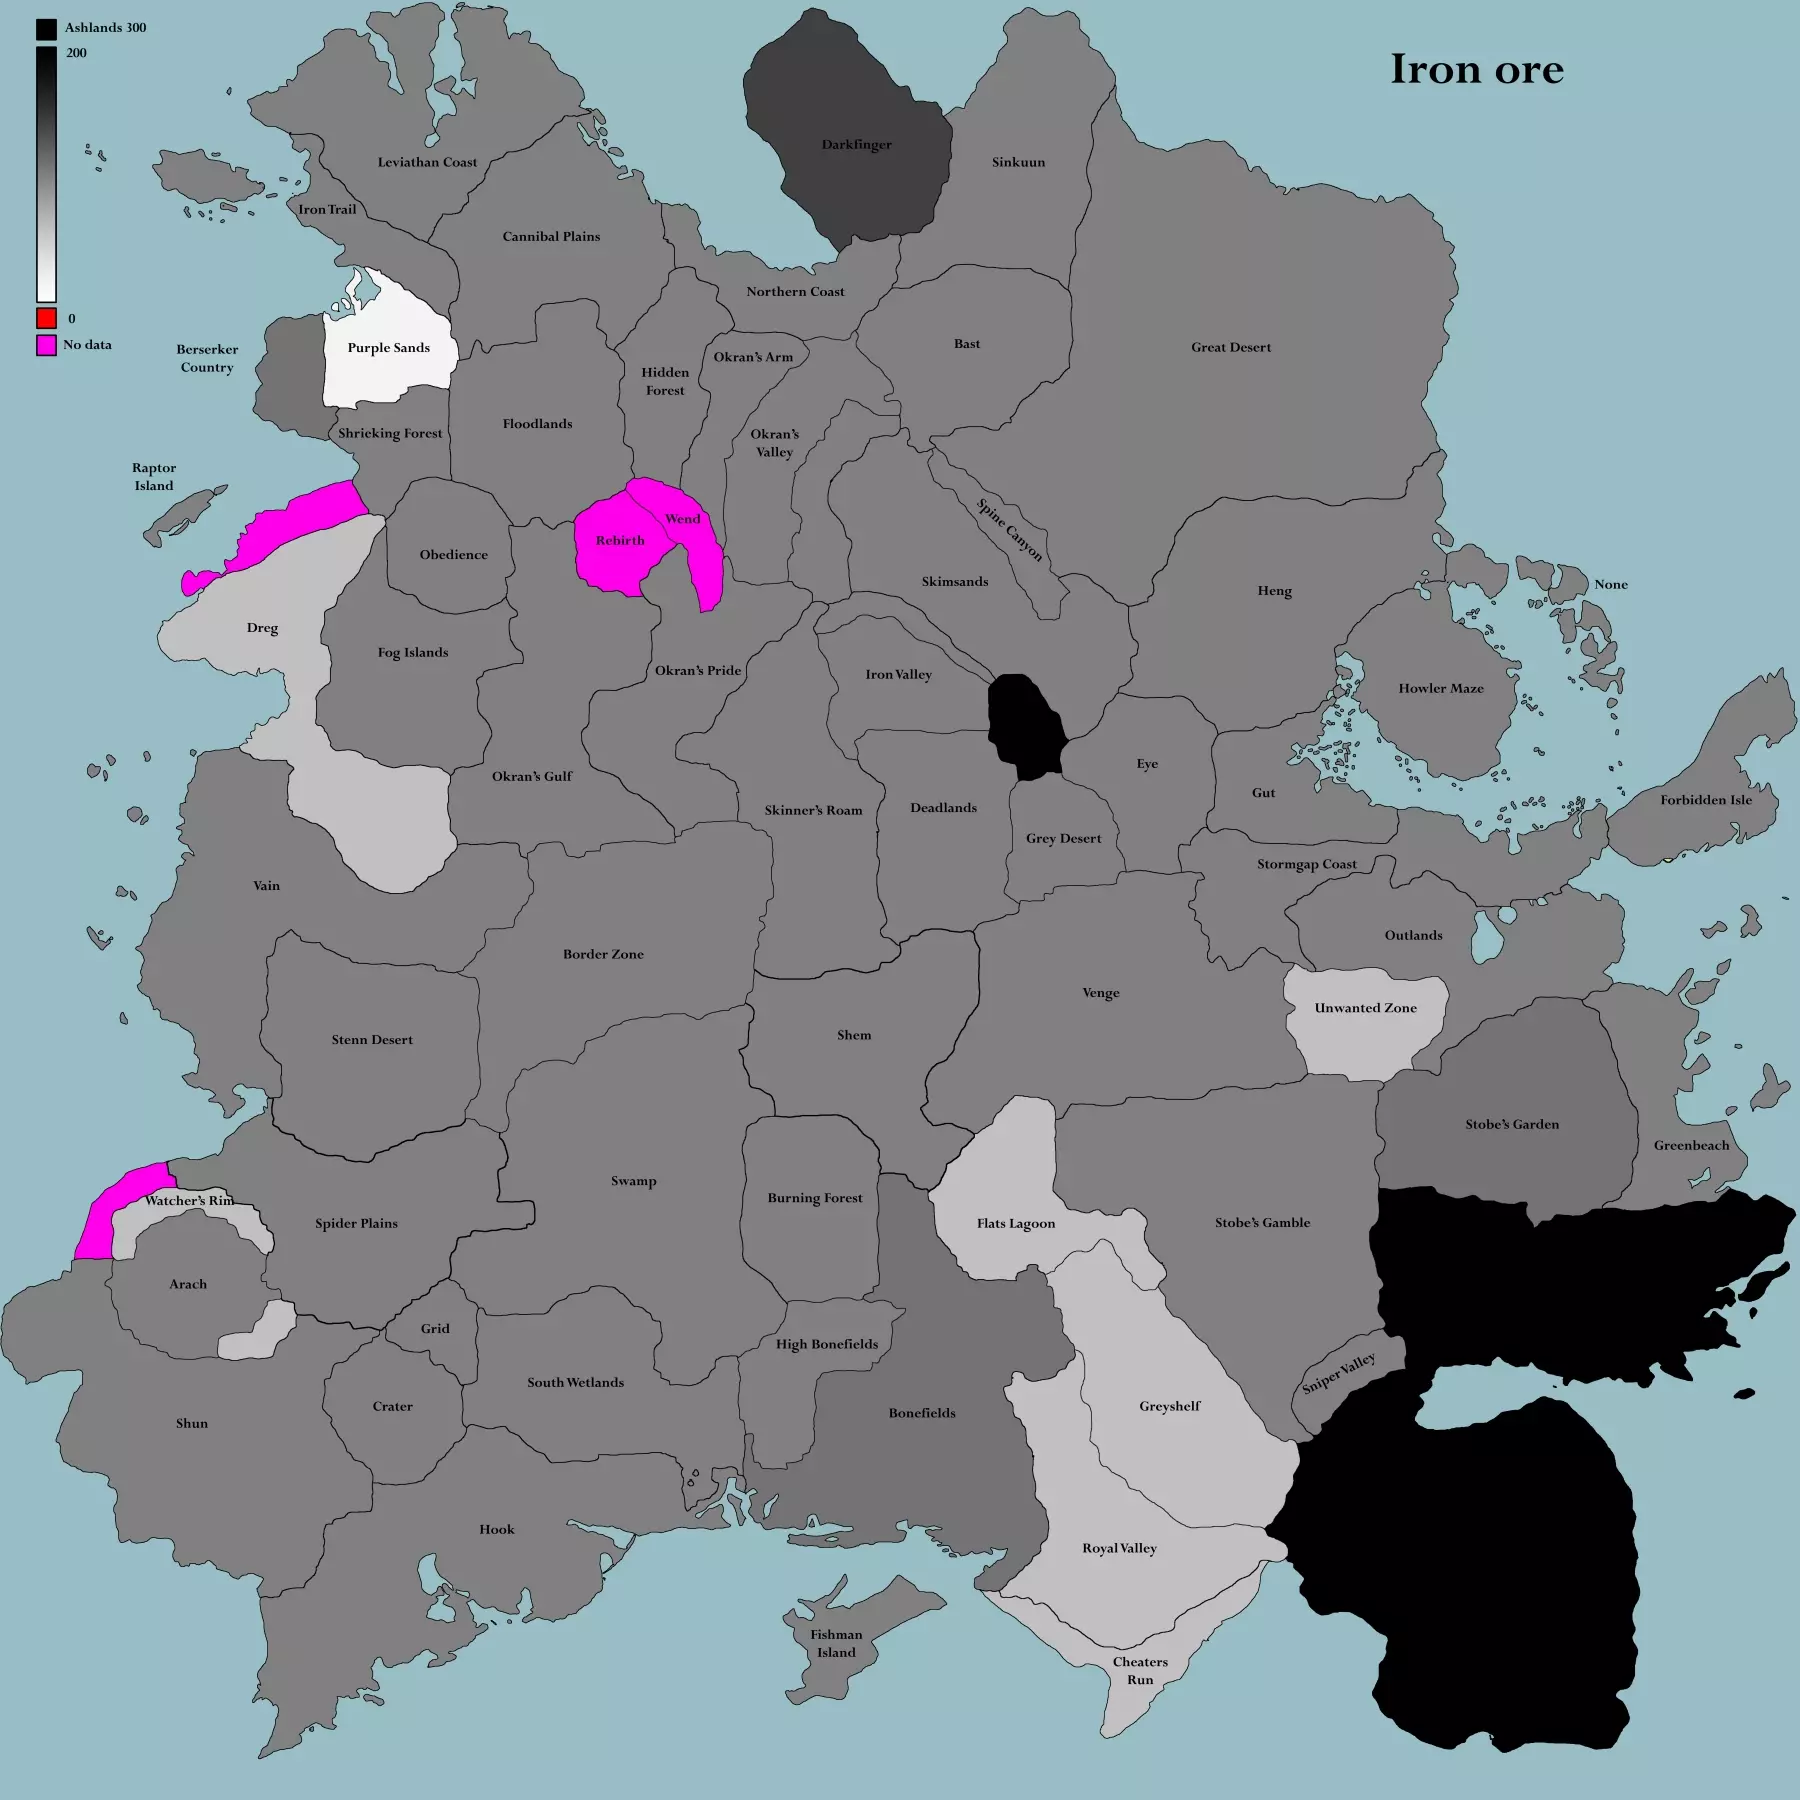
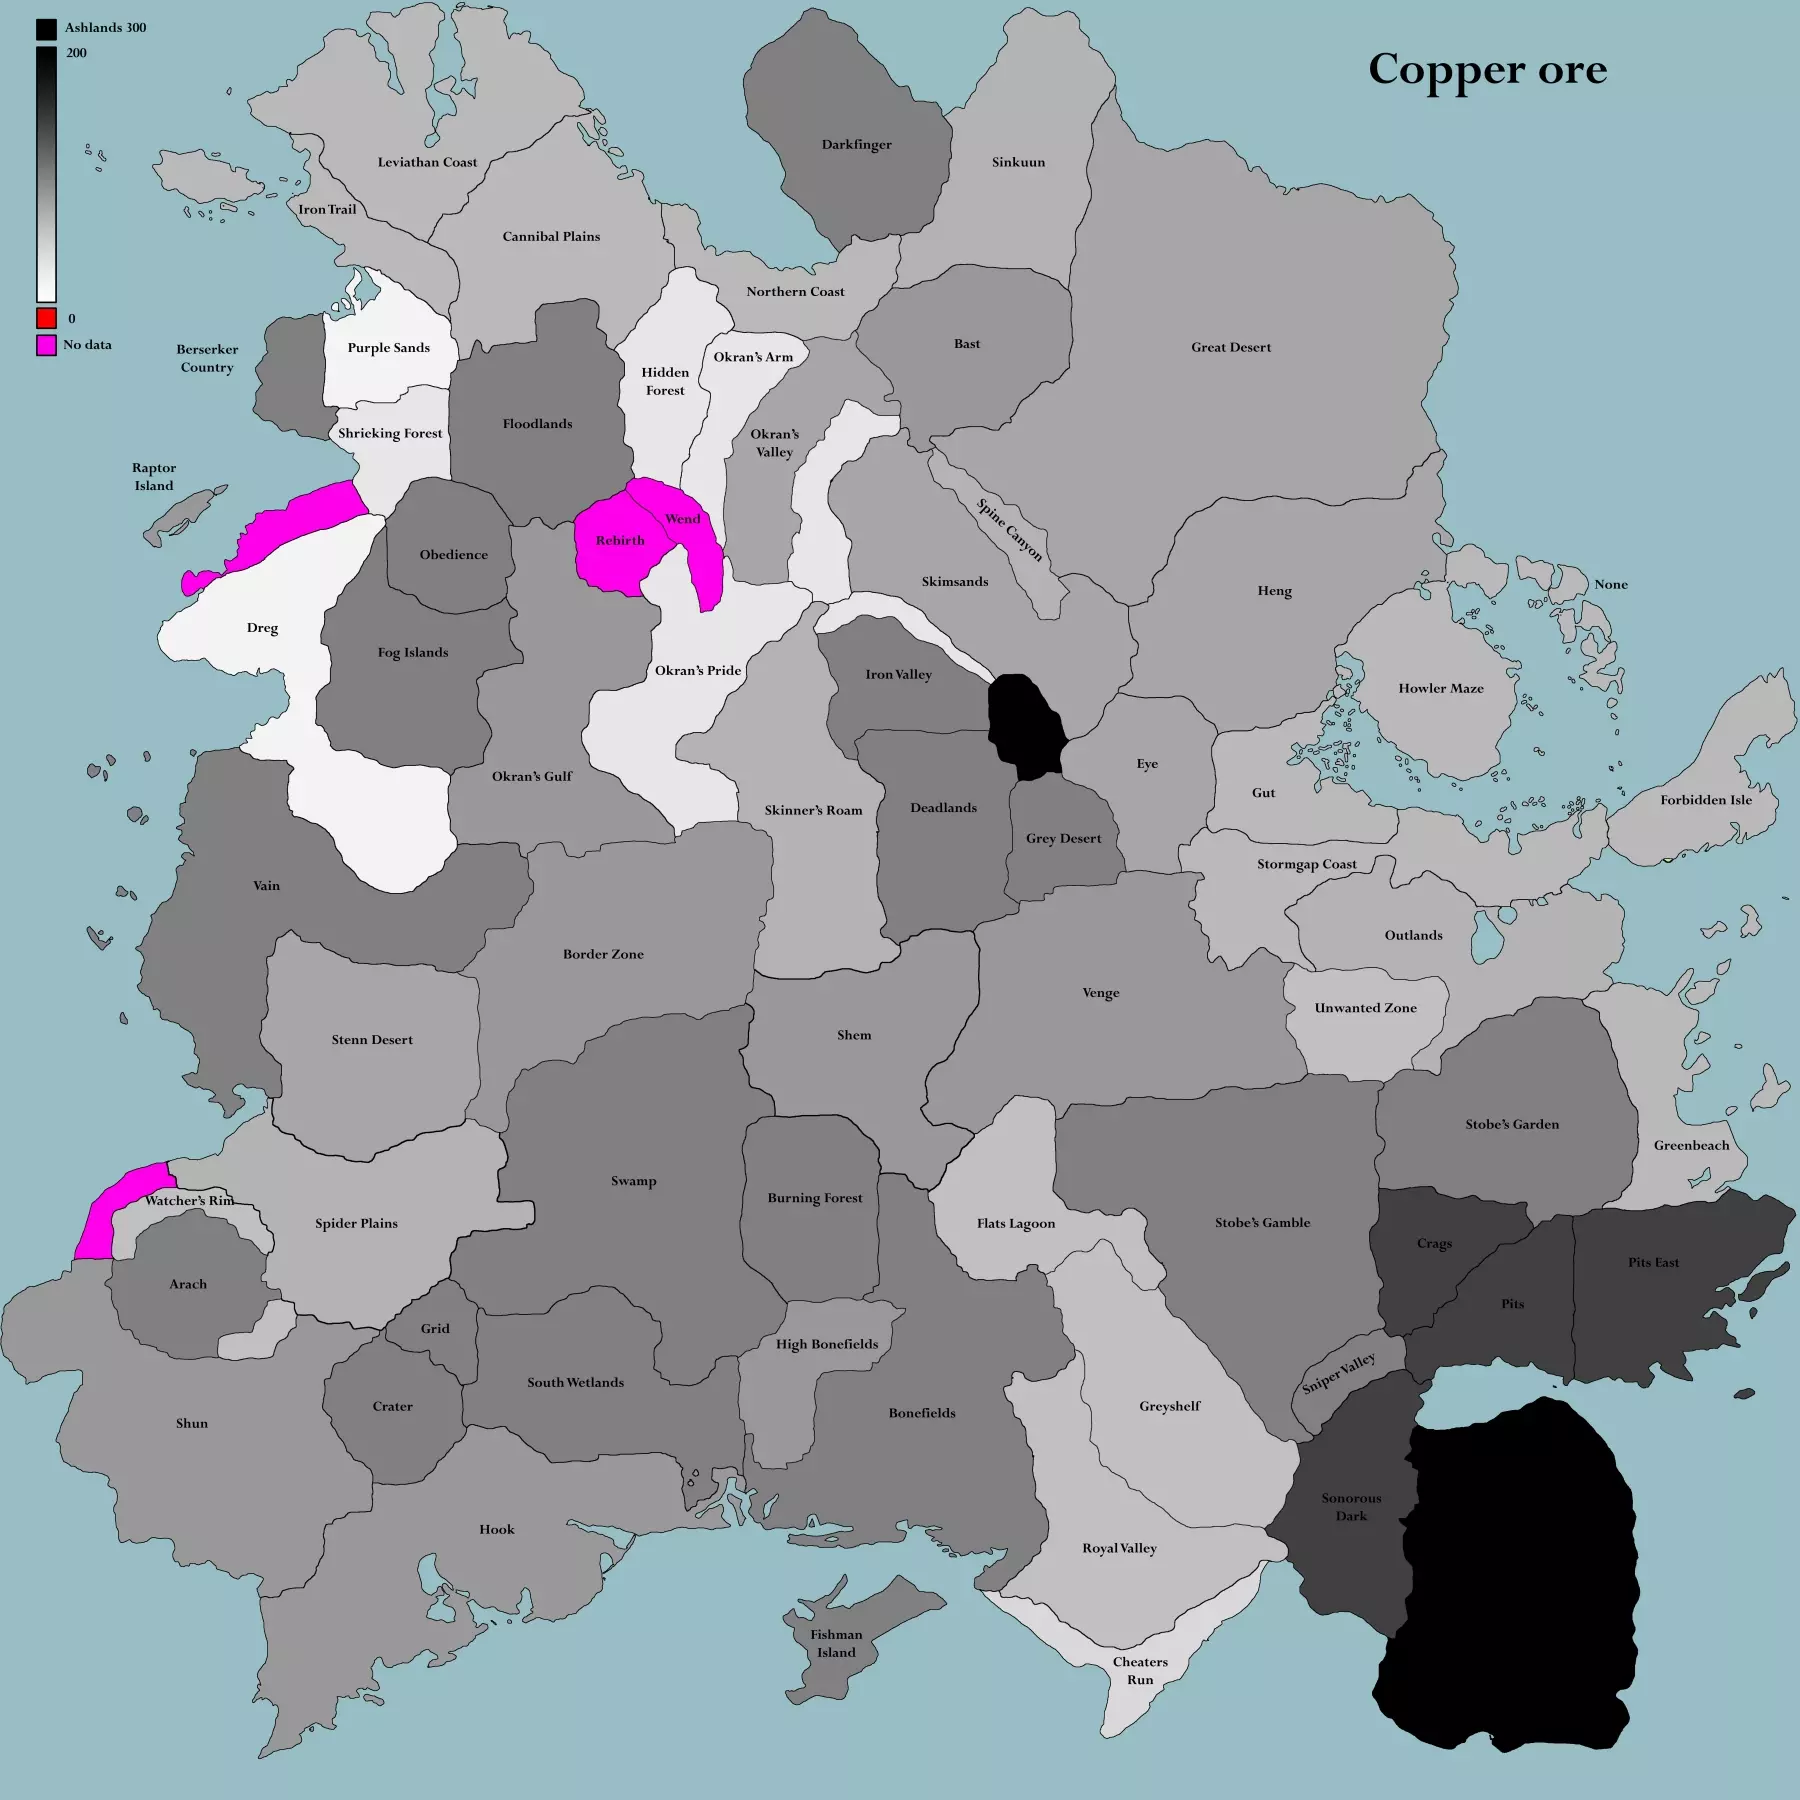
专业提示:本指南后续将提供多张《剑士》的地图。可通过文末列出的来源获取这些地图的更高分辨率版本。 首要任务:你的队员饿了,他们需要一个休息的地方。你可以现在就匆忙去找基地,但这很可能会被喙嘴兽撕碎。你可以用手头的钱买一间最便宜、最破旧的棚屋,必要的话进行修理。如果资金短缺,只有一件事可做:开采铜矿。 《剑士》的世界里遍布铜和铁的矿床,有时它们就位于前哨站和城市附近。这些矿床可以无限开采,日后将成为你建立城市的基础。作为贸易资源,铜比铁值钱得多。在你买得起房子之前,必须小心管理存款并出售铜矿。采矿时若遇危险,要迅速跑向卫兵。 买一间便宜的房子用不了多久。接下来需要解决食物、休息和药品问题。食物可以从酒吧购买,或者更好的是,用从动物身上获得的生肉,在你免费建造的营火上烹饪。购买“睡袋”并建造“营地床”,这样受伤时就能休息。根据需要购买急救包,但尽量避免战斗,因为目前战斗仍有风险且代价高昂。 实用提示:在此期间,你的【运动】和【劳作】技能会随着时间提升。如果给角色增加大量负重,他的【力量】也会慢慢提高。让角色在采矿时潜行,【潜行】技能会同时提升,但会降低铜矿开采效率。研发(攻略2/5) 武器与护甲:到目前为止,你应该已经拥有了一个虽简单但稳定的经济体系,因此值得为你的部队考虑一些初始装备。简单来说,我们要寻找没有负面效果的最佳护甲,主要是轻甲。这套装备包括【防尘外套】【皮质高领衣】【木屐】【武士布裤】和【铁头盔】。此套装无负面效果,具有出色的叠加性和覆盖范围,非常轻便,能免疫酸雨,同时还拥有可观的防御力。武器方面则相对简单,你需要让所有人都手持【长柄武器】长矛。由于我们采用无敏捷惩罚的设定,这把武器的伤害相当可观,拥有最高的命中加成(与无护手武士刀并列)、出色的攻击距离,最重要的是30%的护甲穿透和对动物+50%的伤害。人形敌人和野兽都不成问题,而且如果你大致按照本指南进行游戏,至少在前期不会遇到太多机器人/骷髅敌人。选择【木质背包】,它允许贸易物品堆叠至9个,同时能将包内所有物品的总重量减少50%。 专业提示:你可以购买上述装备的蓝图(不包括背包,所以要多储备背包),之后自行制作更好的版本。 研究:是时候提升等级了。建造一个研究台,然后通过交易或探索废墟获取【书籍】,将其放入研究台进行研究。理想情况下,你应该在开始殖民前完成大部分研究,但目前先专注于【存储】技术等基础内容,并提升科技等级。从2级研究台开始,你将需要电力。你可以在购买的大型建筑顶部建造【小型风力发电机】。
专业提示:如果你决定探索废墟,按住左Alt键可以高亮显示地面上的物品,例如研究 artifact。
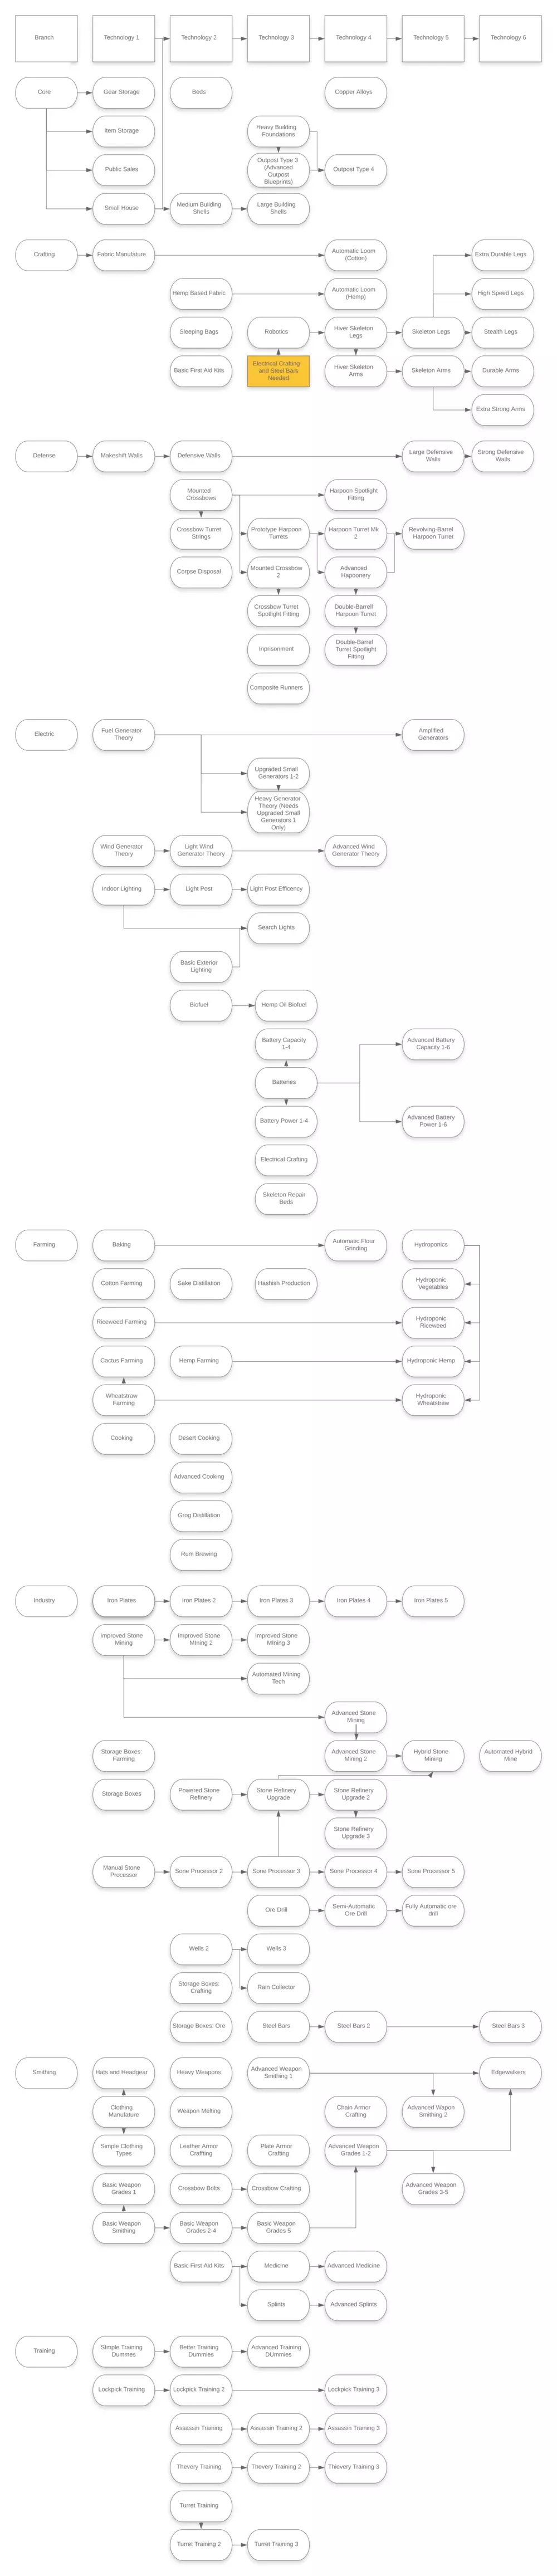
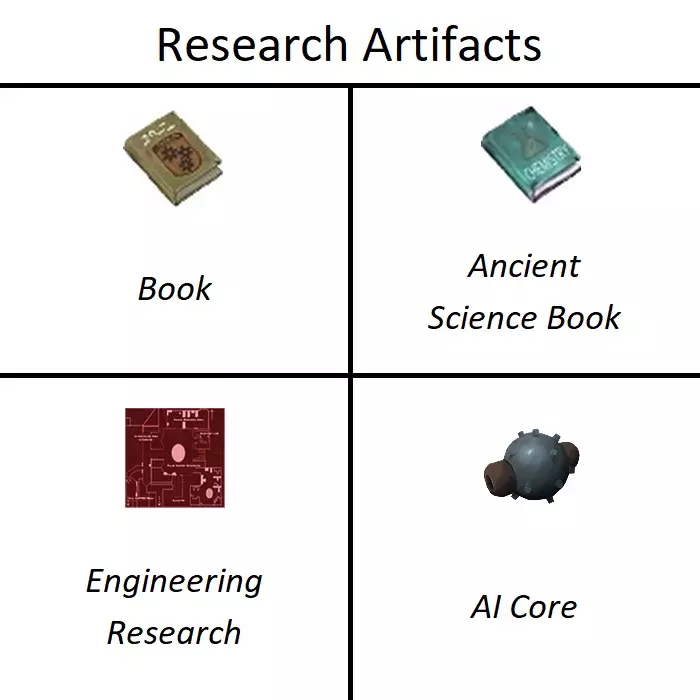
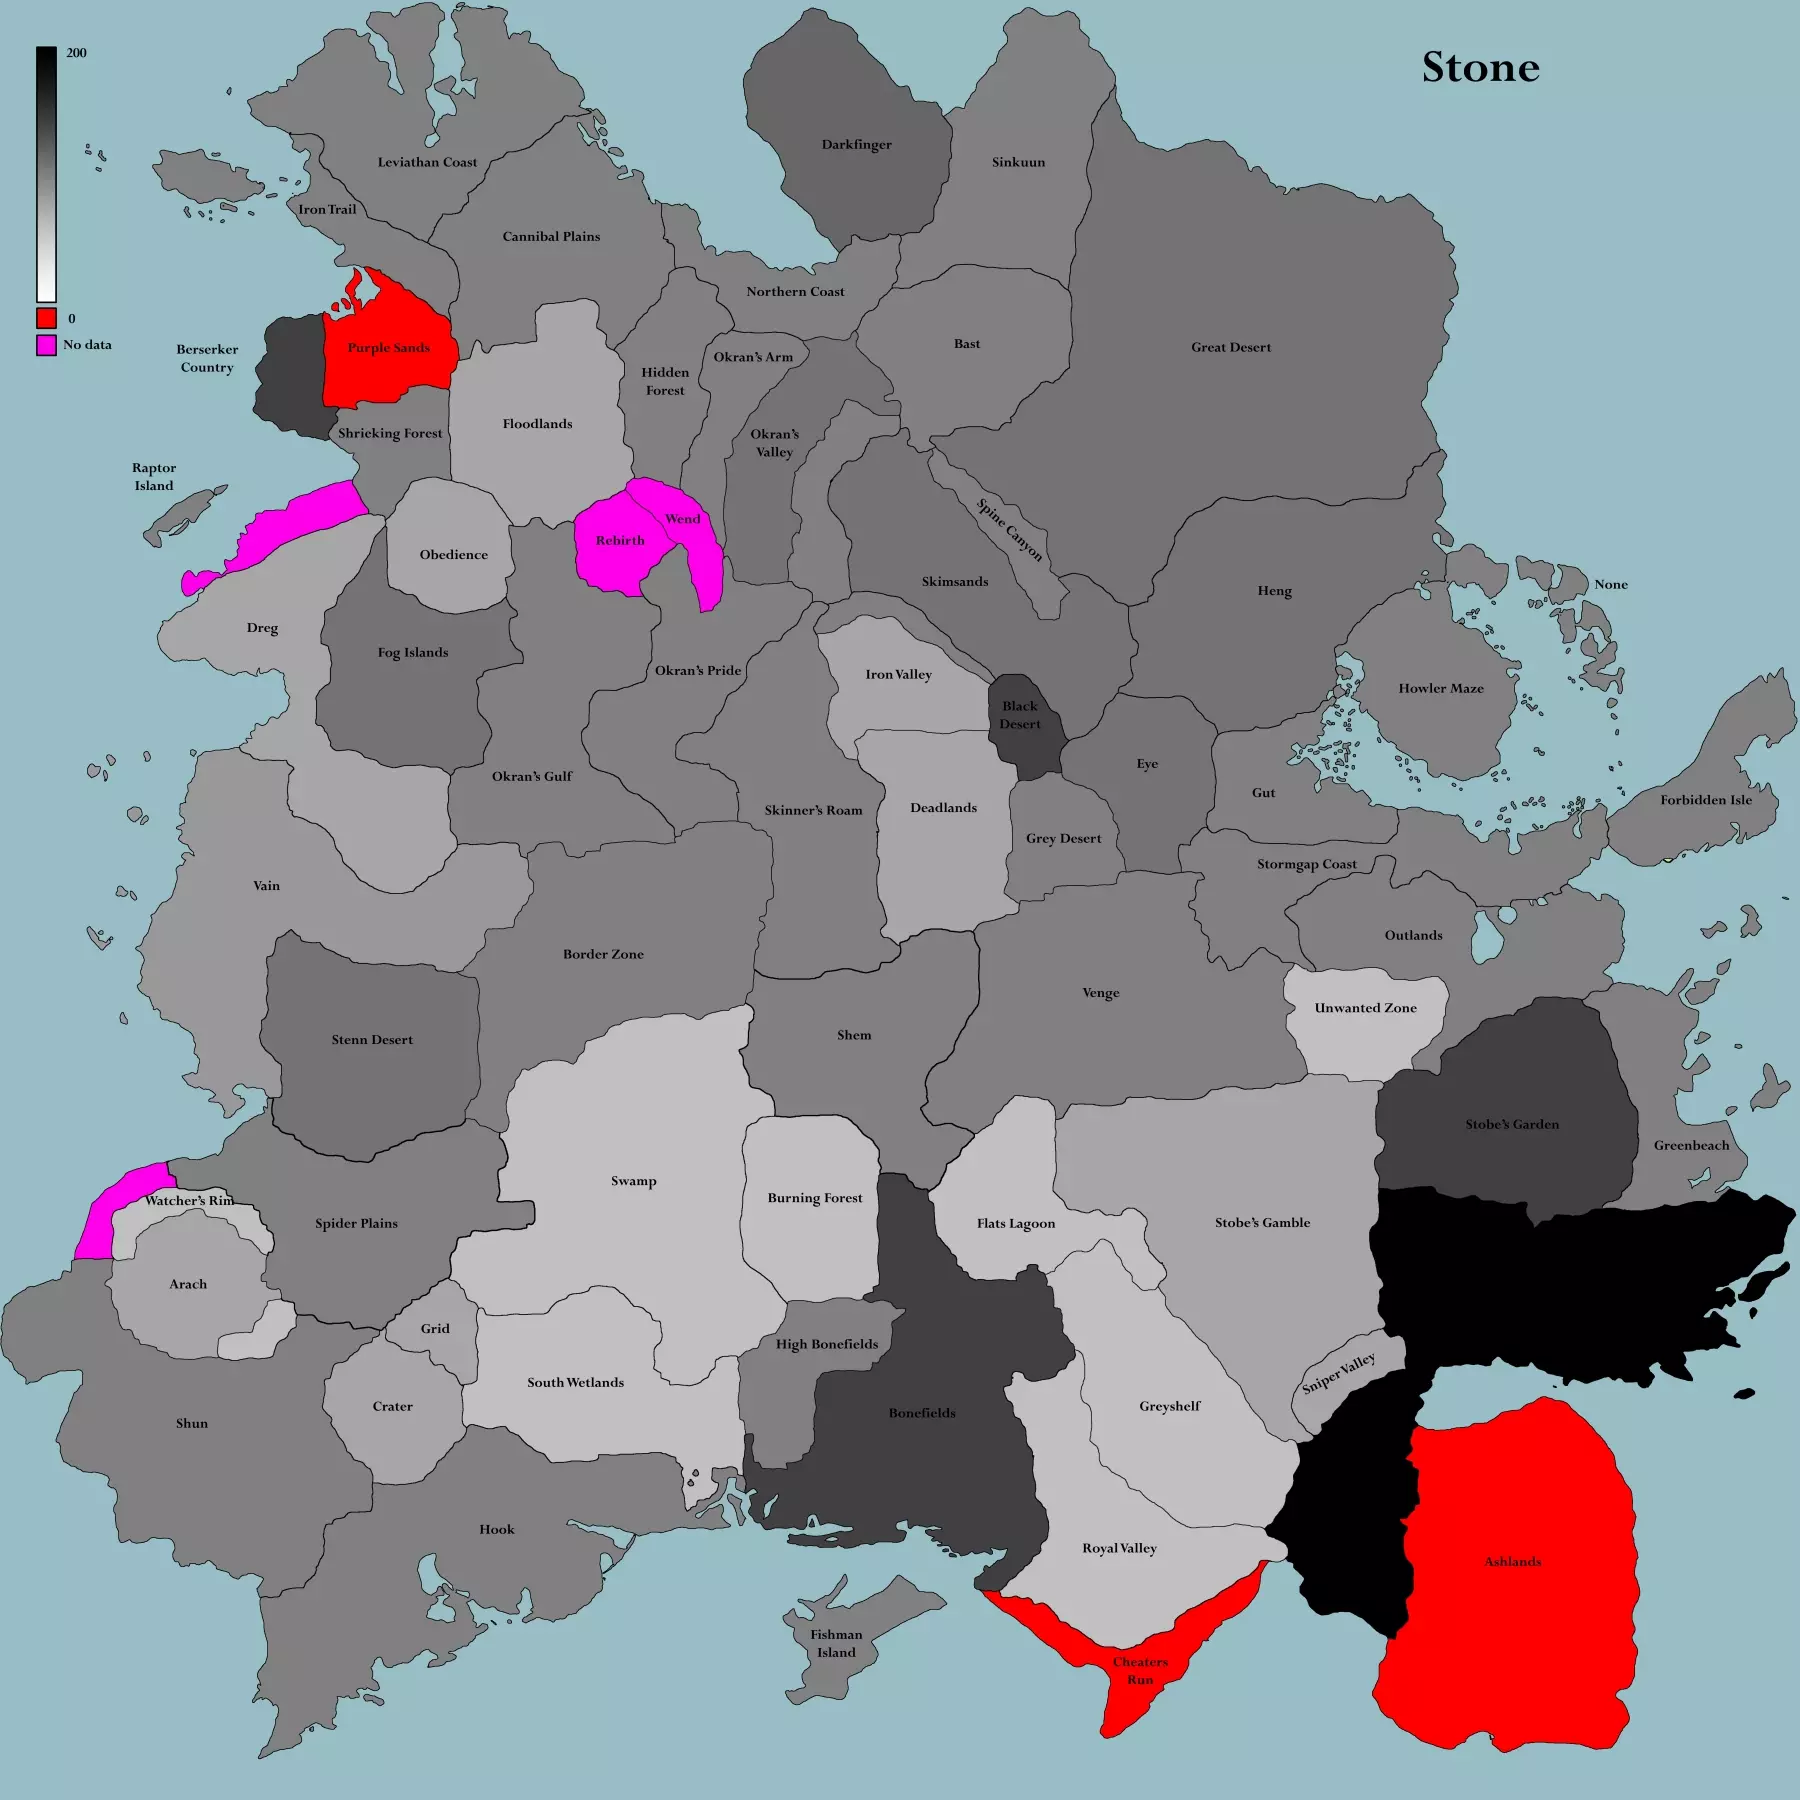
Pro Tip: From "Research Bench II" and onward you can upgrade to the next level of bench without the need of building a new one every time. Certain buildings and instruments can be upgraded in this manner, saving up time, resources and space. WARNING: leaving a town for an extended period will RESET all buildings and make you loose all your loot. Think of owning property as extended rent. You will eventually need to pack everything and move so don't go overspending in real estate. Buy what you need. Automation: Now that you have a house you can build a copper storage and a food storage. These will serve as drop-off points and allow you to assign tasks (with shift+click) You will notice your cats are increasing. When you reach level 3 techs, go for "Electrical Crafting" so you can start making useful (and more profitable) "Electrical Components". If you exhausted your copper production go for "Plate Armour Crafting" research and sell "Armour Plating" made from raw iron. Pro Tip: You might want to visit hive villages in the west and pick up many "Lantern of Radiance". This is the only belt item in the game and emits a light around the character, preventing the "working in the dark" penalty, useful for setting up your base fast or working indoors without a light source. Pro Tip: Consider building a few "Training Dummy MkIII" so your people can safely train combat up to level 15 and not be completely outclassed by starving bandits. Recruitment: Your income should allow for more hands. By the end you will have 30 people in 2 squads including pack animals. For now you can hire up to 20 people, including a few skeletons. You can recruit people from bars or buy them from slavery. Unique characters exist, but keep in mind that re-naming them will still count as you having that unique character and won't re-spawn if you import your game. Pro Tip: The skeletons can be sent on far away towns and check local shops without the need for food or fear of weather. By avoiding fights their repairs should be rare and affordable. Pro Tip: Recruitable variants of hivers and skeletons exist with minor stat variations and cosmetic differences although they are exceedingly rare. Pro Tip: Use the import function to reset a bar if you want to hire many people in a short span of time, or you are looking for specific rare recruits (like skeletons). Breakthrough: Keep researching techs and collecting research artifacts until you know all buildings, mines and refineries. (Tech Level 6) It sounds extreme, and you can set out earlier, but knowing all buildings and machinery will allow you to stock up for the journey. Going early runs the risk of building an inefficient or cramped base and tearing down and expanding is a pain. (and a risk in the wilds). Automated buildings will be a blessing for initial base set up. You can skip on many indoor, crafting and miscellaneous techs if you wish. Pro Tip: Research artifacts include, in order of rarity: "Book" (306 needed), "Ancient Science Book" (154 needed), "Engineering Research" (19 needed) and "AI Core" (32 needed). Most of these can be found in ruins, usually guarded by tough enemies. Ruins restock with the import function. Pro Tip: The "Scraphouse" in the Deadlands is a skeleton research center that has a chance to sell artifacts including the uber rare AI cores. You can send a skeleton to stay at the town and check the store every day or import the game, resetting their stock. Pro Tip: If you wanna buy pack animals, wait until you are about to move as they eat a lot of food and will be a strain in your economy at this point. Final preparations (Walkthrough 3/5) You have done your homework. You have recruited people. You have equipped them. You have amassed a reserve of money. It's time to leave the confines and safety of your town and set out to colonize your own base. The time has come. Before you leave, it's time to buy 1 or 2 pack animals. For variety i recommend one of each "Pack Beast" and "Pack Bull". Pack beast backpacks stack to 6 instead of the pack bull's 5. These beasts can hold MASSIVE loot quantities and will be essential to settle your base and establish long distance trade latter on. Be forewarned: they eat a lot of food as a trade-off. Before we get into the geography of Kenshi, you need to account for provisions as well as some initial materials for when you reach the desired site. As a rule, walling off your settlement immediately costs insane amount of heavy and bulky "Building Materials" you can cheaply make on site. So don't calculate them in your list. You will need a few buildings to put your beds and workshops in. You can get by with a single large building like an "Outpost s-IV", "Stationhouse" or "Y-House" initially. How you will set up your dream city is up to you but make sure this first building(s) are the heart of it. If you have skeletons, account for one "Skeleton Repair Bed" so you can rapidly repair your mechanical friends (and prosthetics) for free. Pro Tip: You can rotate buildings with "<" and ">" but also make them leveled or sloped with "[" and "]" Pro Tip: Beds are essential for resting injured party members and first aid to close bleeding. Bring fabric and first aid with you, since it is not a priority to build these kinds of farms (hemp/cotton) just yet. Pro Tip: Campfires are free and are used to cook raw meat. Use them as a supplementary source of food from the predators that will inevitably descend upon you wile your crops grow. Pro Tip: "Foul Raw Meat" can be found in many beasts in Kenshi. This isn't good for your squad but animals can eat this. To avoid clogging your inventory, build an "Animal Feeder" so your people can store the foul meat there. The second most important thing you need is power. You will need to build a couple of "Wind Generator II" so you can jump start your production line and become self sufficient. WARNING: many buildings have variants or superior versions. For instance, by default the game selects "Wind Generator" when you click on it. Make a habit to double check the version of the building you wanna place with the < and > buttons next to it's name. Next we need a "Hybrid Stone Mine II" to make more building materials and an "Iron Refinery IV" to make iron plates. Automated iron mine and steel refinery are not necessary in this stage of development. Use your materials to build more of the aforementioned structures to boost your industry. Finally, to avoid starvation we need to account for farms. Since these can be upgraded, start with many small variants and latter work your way up. What crops you will bring with you depends on where you choose to settle. (more on that latter) This also means a "Well III" for reliable water for said crops. Next up is a "Cooking Stove" and an "Electrical Workbench" for food & components respectively. Now, note the total cost of all things mentioned above and adjust for your differences. You can start with more resources and build multiples of the above buildings at once, but it's not a good idea to go under-equipped as not having the essentials mentioned above can doom all you have worked for so far. Now, pack all necessary provisions and materials on your people and pack animals and go forth! Settling A New Land (Walkthrough 4/5) And so, you and your caravan of settlers are on the road. It's time to talk about the geography and topography of Kenshi now. The world of Kenshi is an intricate place with biomes, factions and weather effects unique to various areas of the game. For example, "Ashlands" in the southeast, are an inhospitable barren wasteland with no fertility, no water, no stone, slow winds, little rain, colossal hostile robots and poison fog clouds. Therefore, for the purpose of this guide, settling that place is akin to suicide.
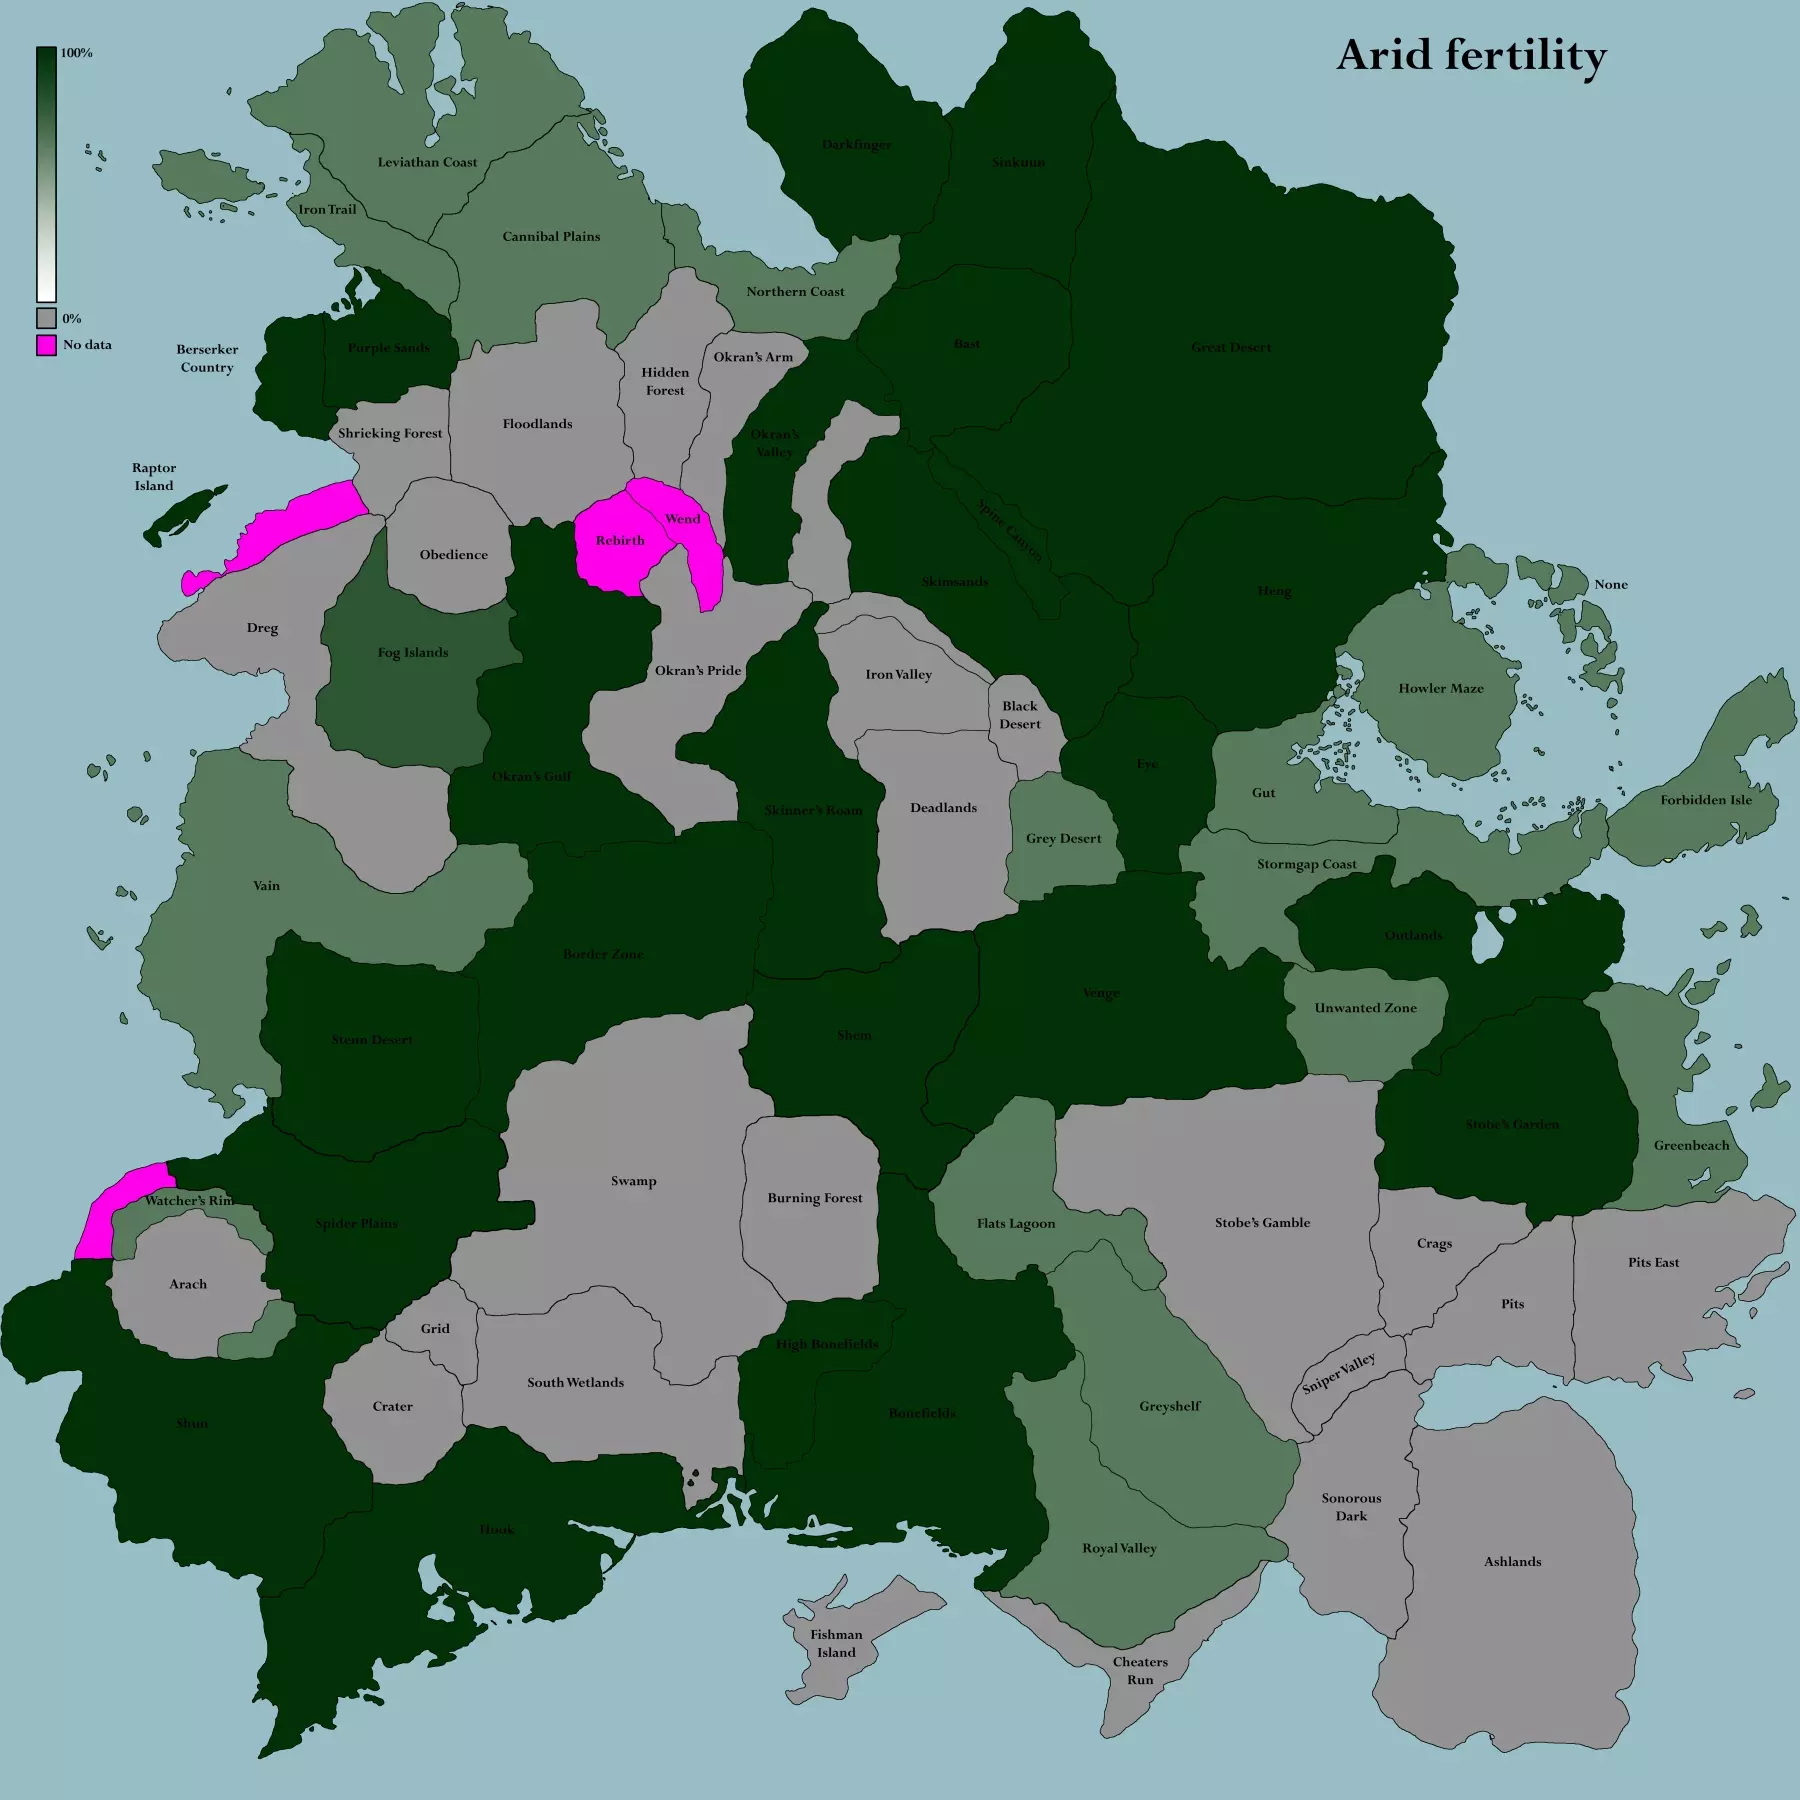
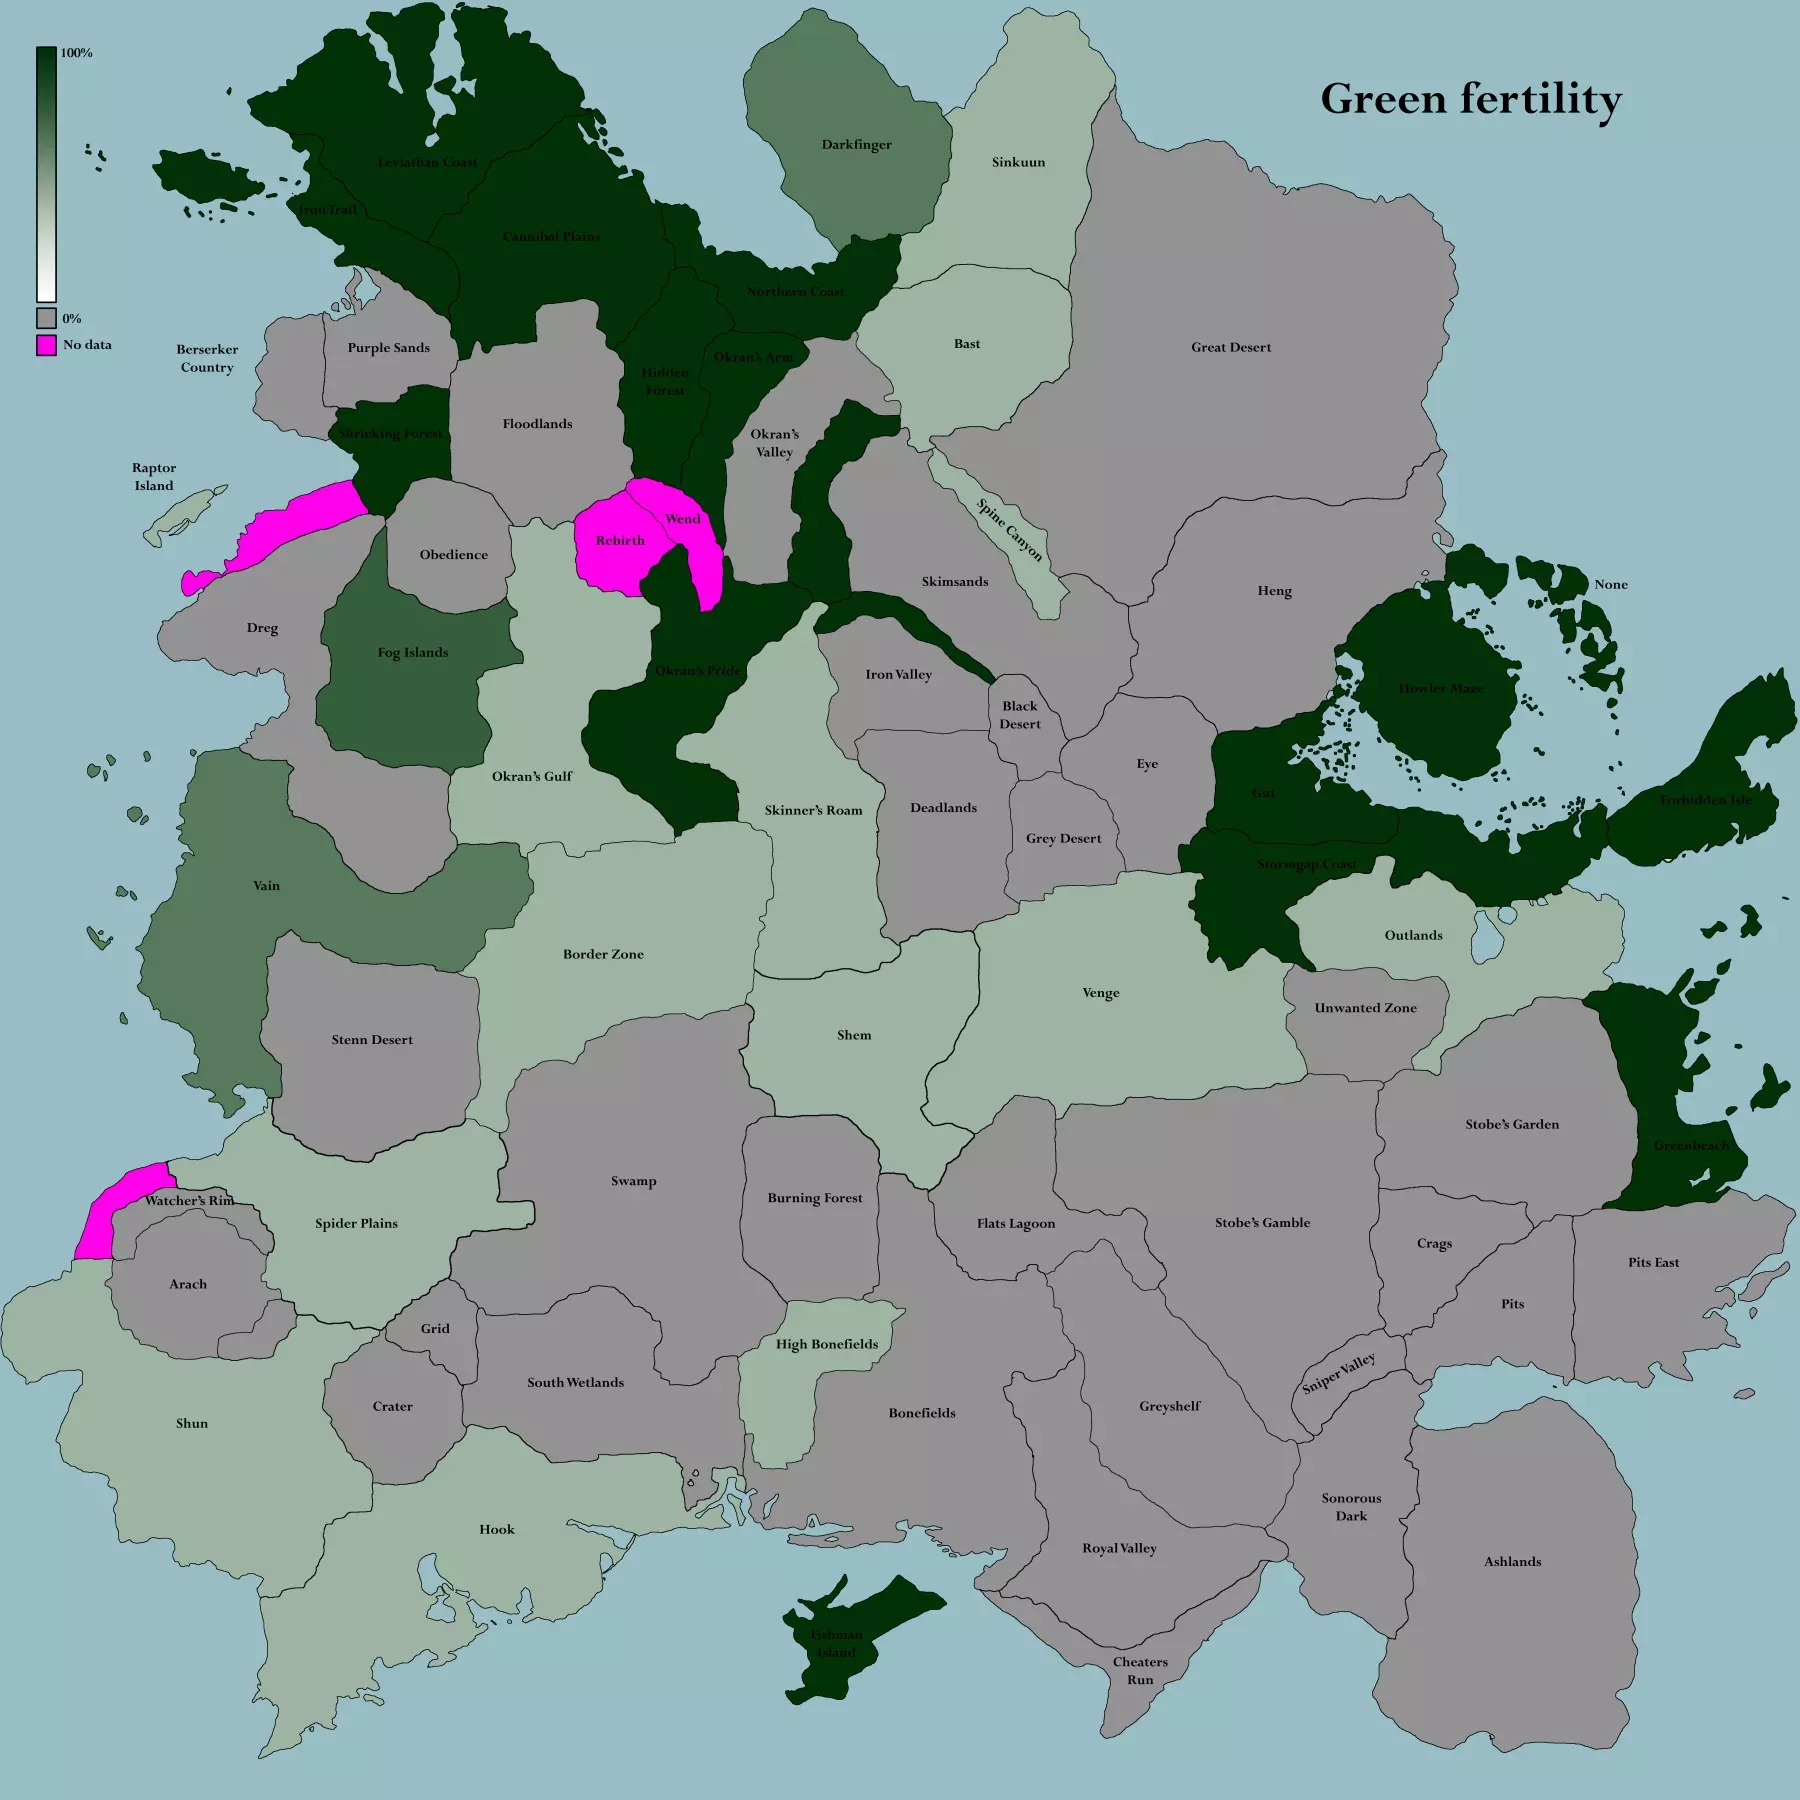
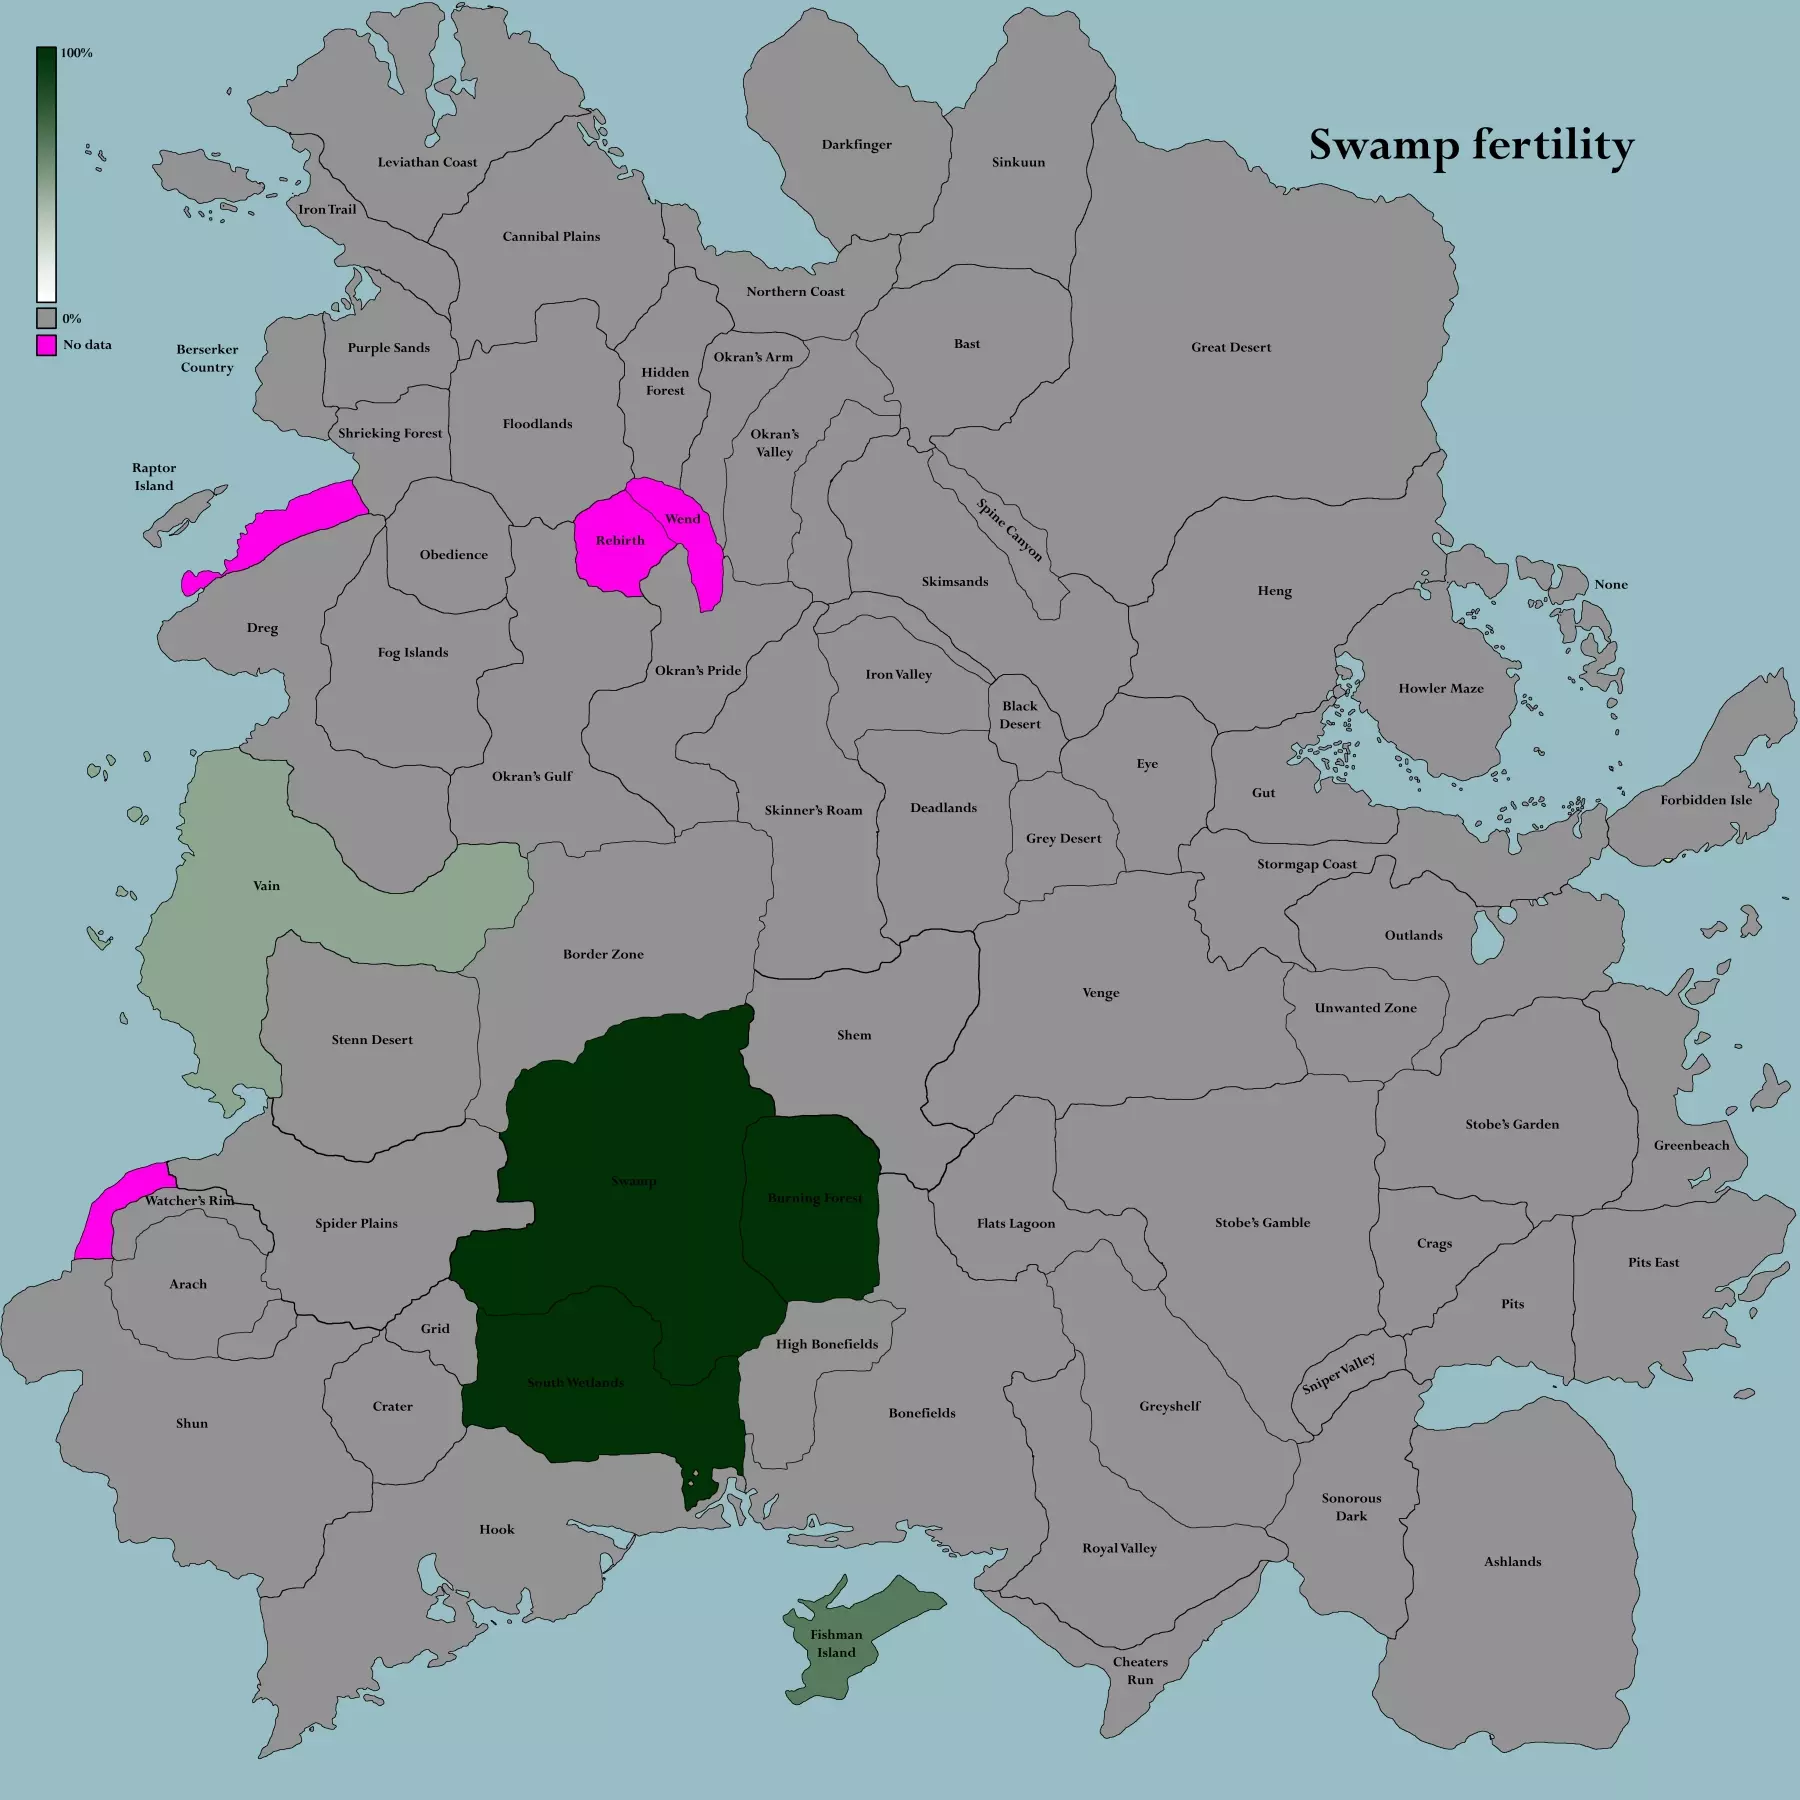


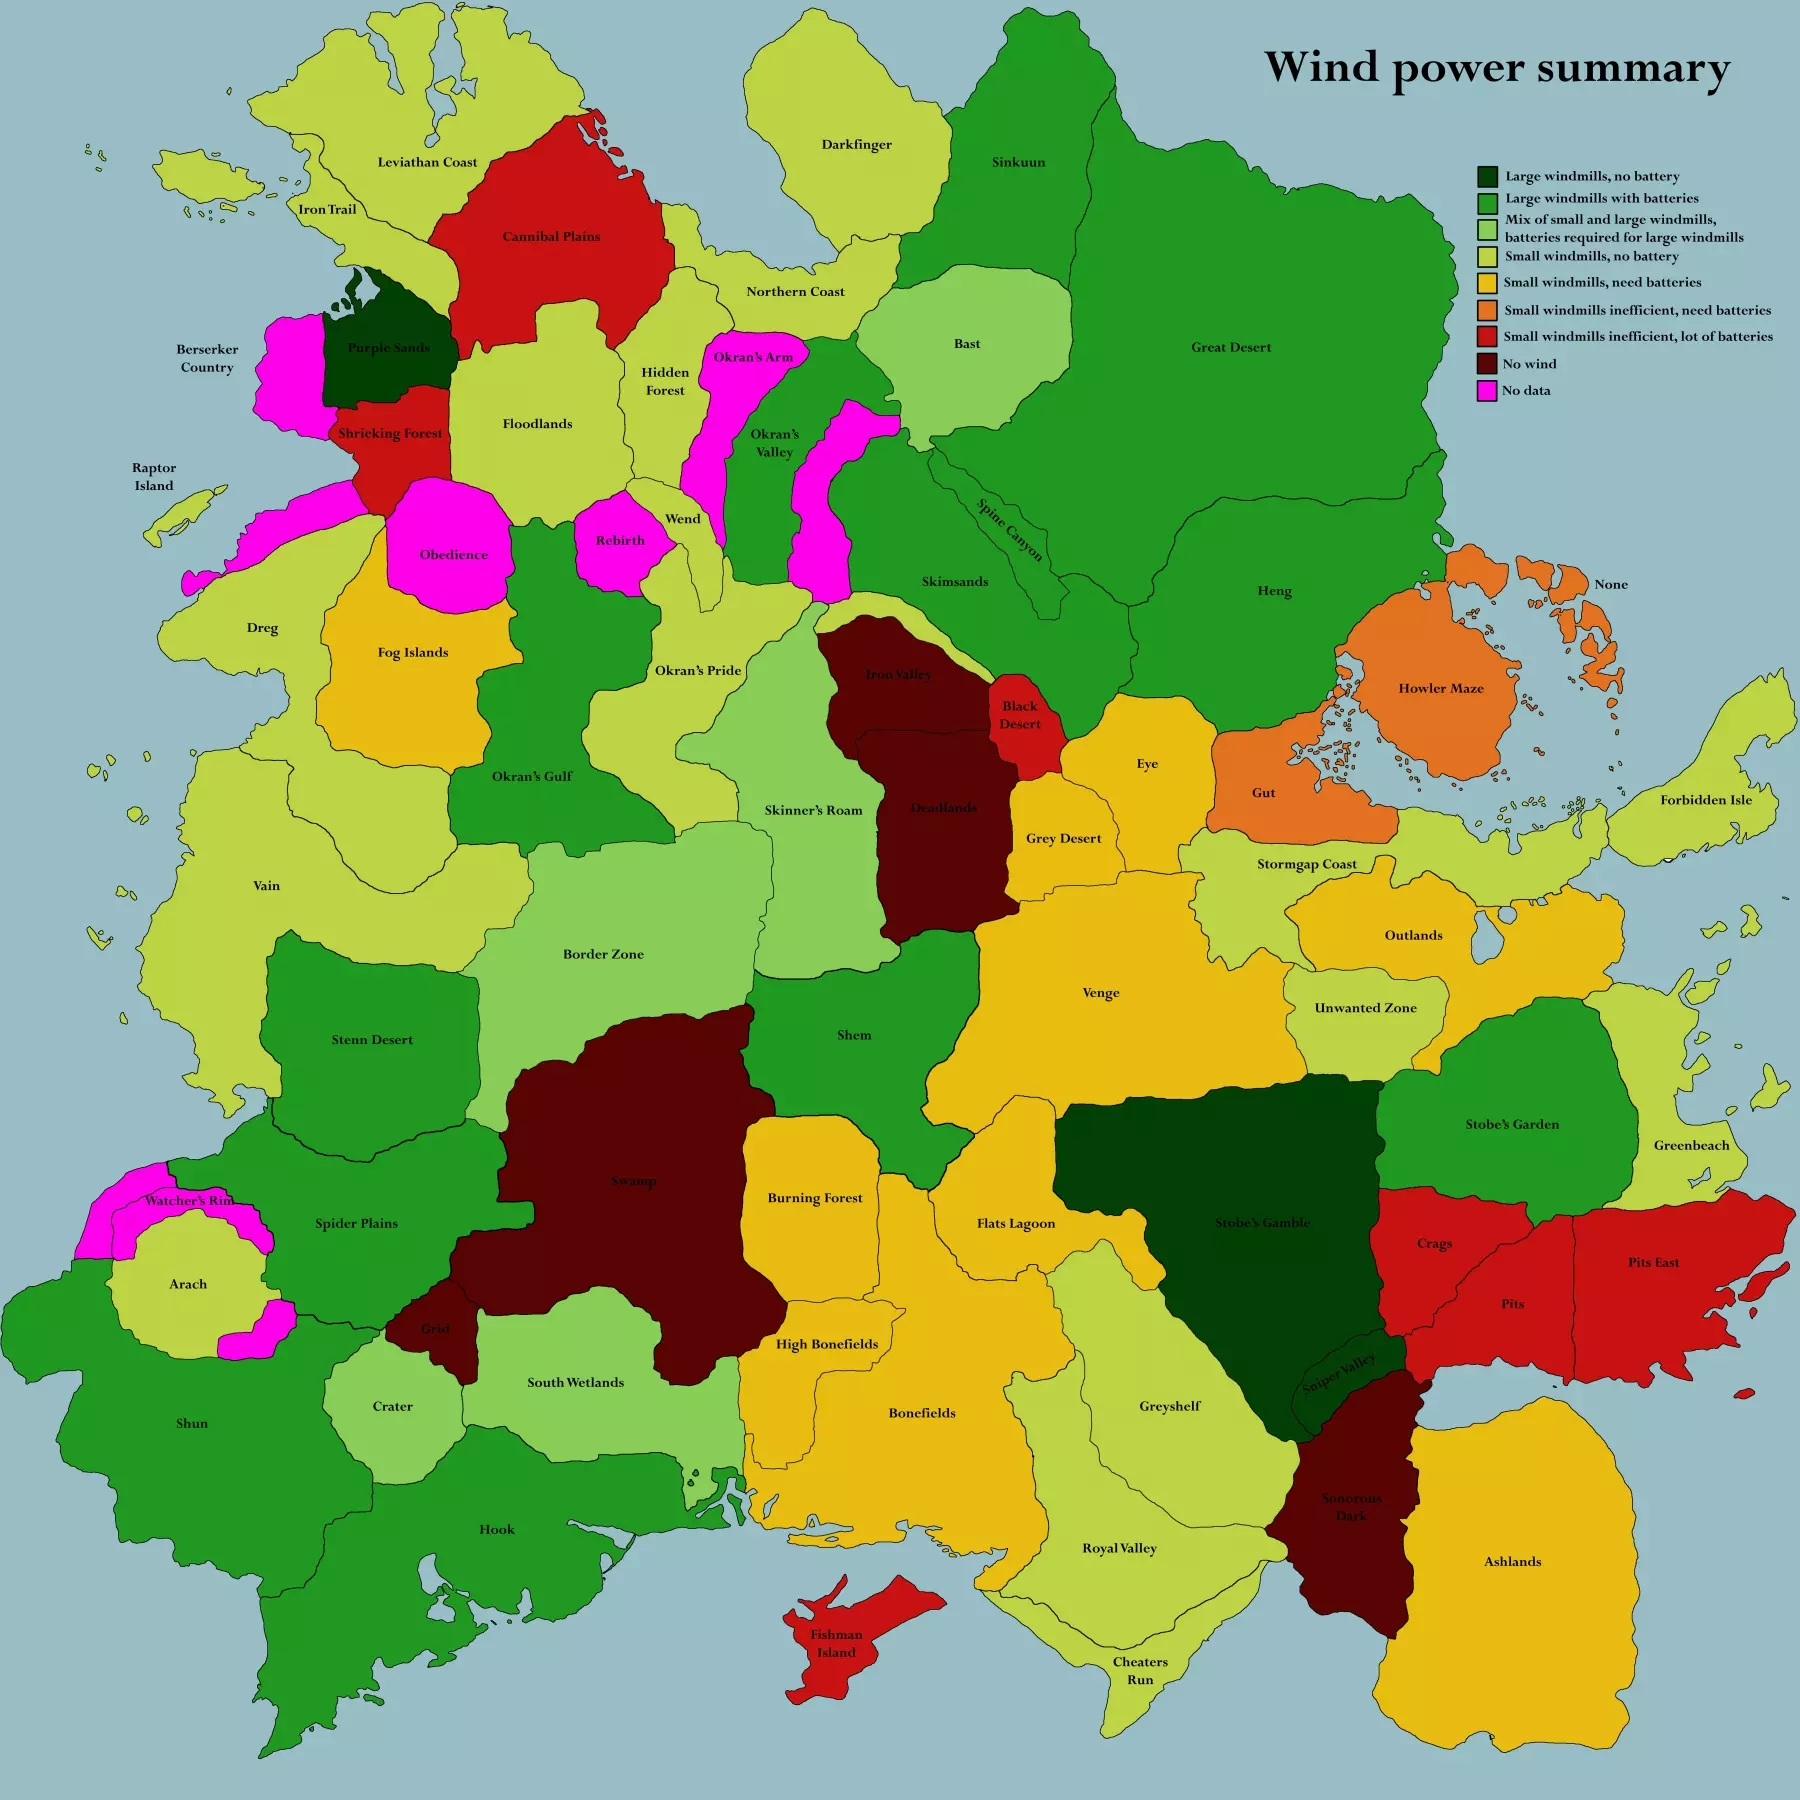
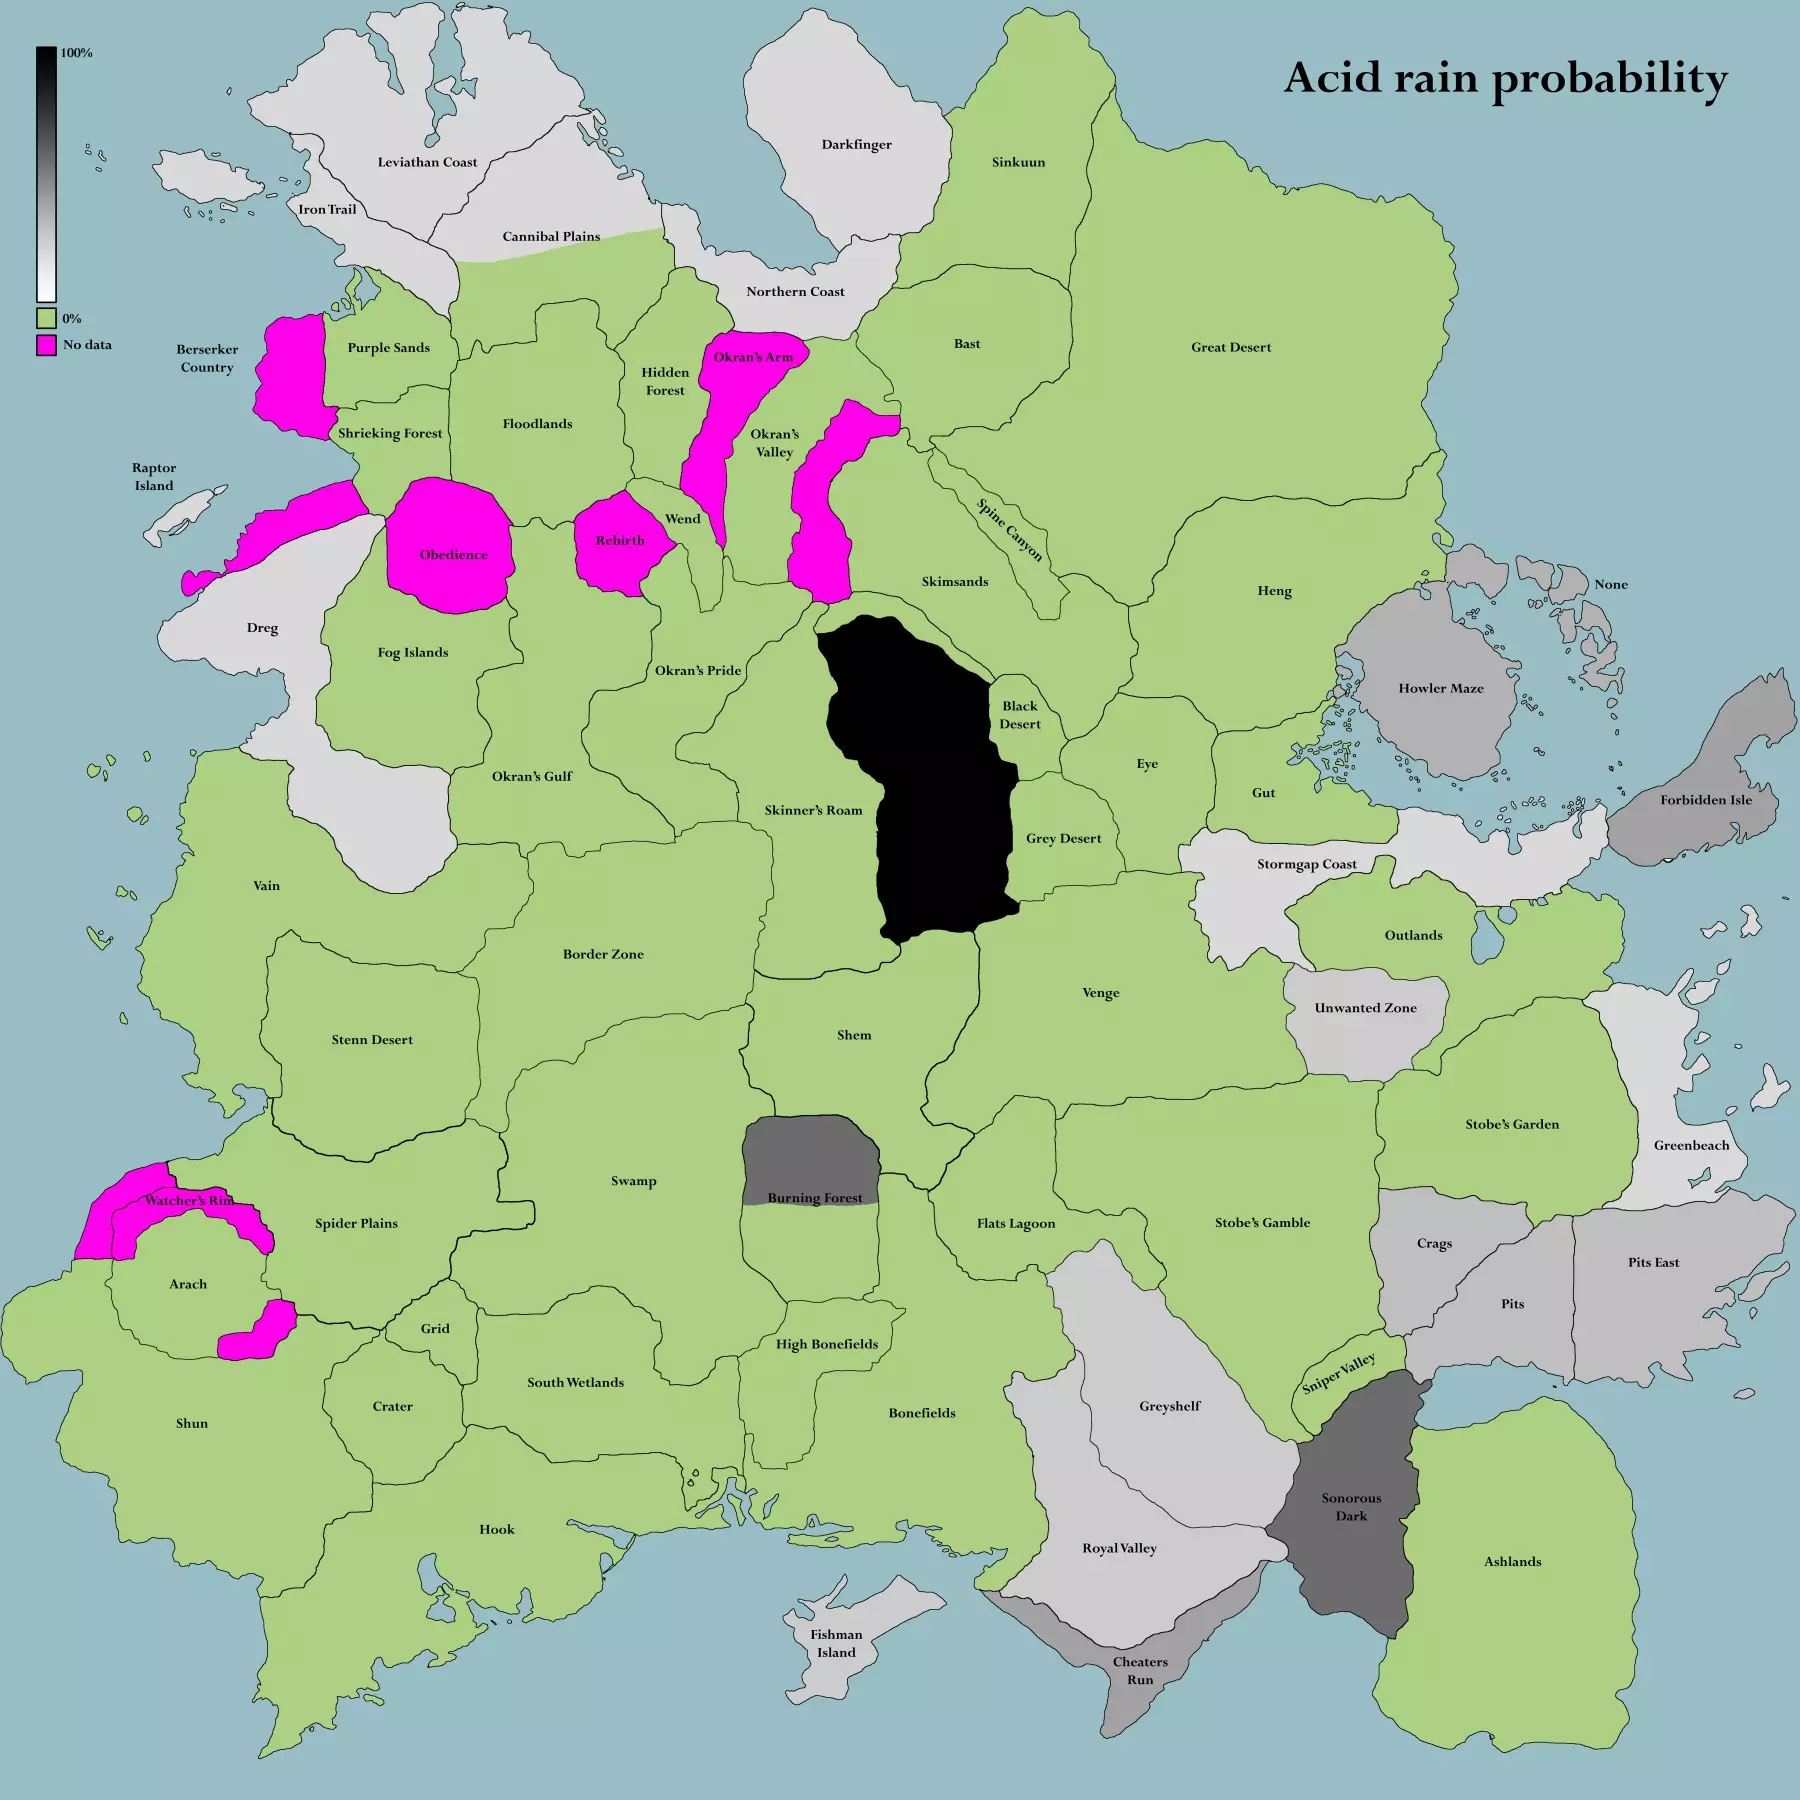
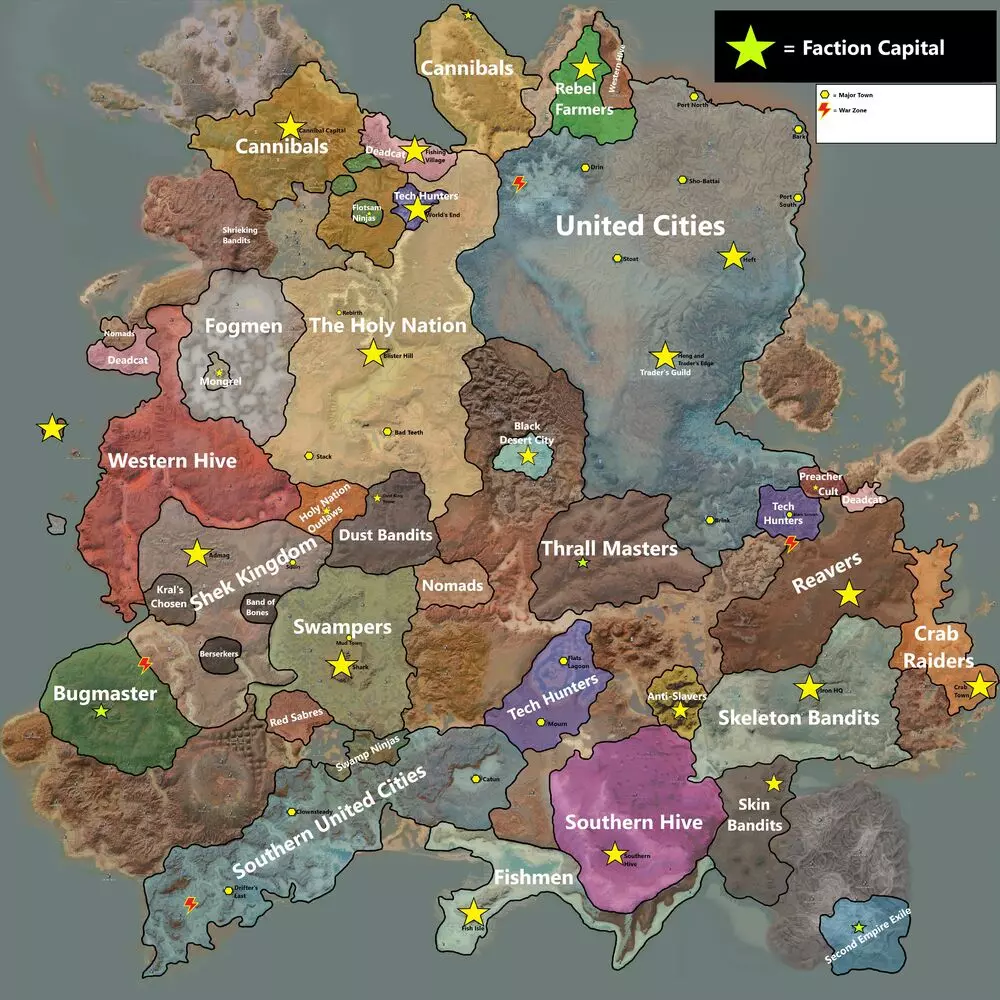
一般来说,你需要绿色肥力,因为有了它你就能大量制作食物块(游戏中最好的食物)和大麻(用于急救、布料、燃料、毒品)。不过,水培系统可以弥补肥力的不足。 你还需要没有酸雨或毒雾之类的极端天气,并且附近有充足的水、石头、铁和铜,以便用厚重的墙壁围起来。 你可以查阅本指南末尾链接的维基和外部资源,思考最佳位置。幸运的是,我已经为你做了一些思考,并提出了3个最佳建议: 谢姆
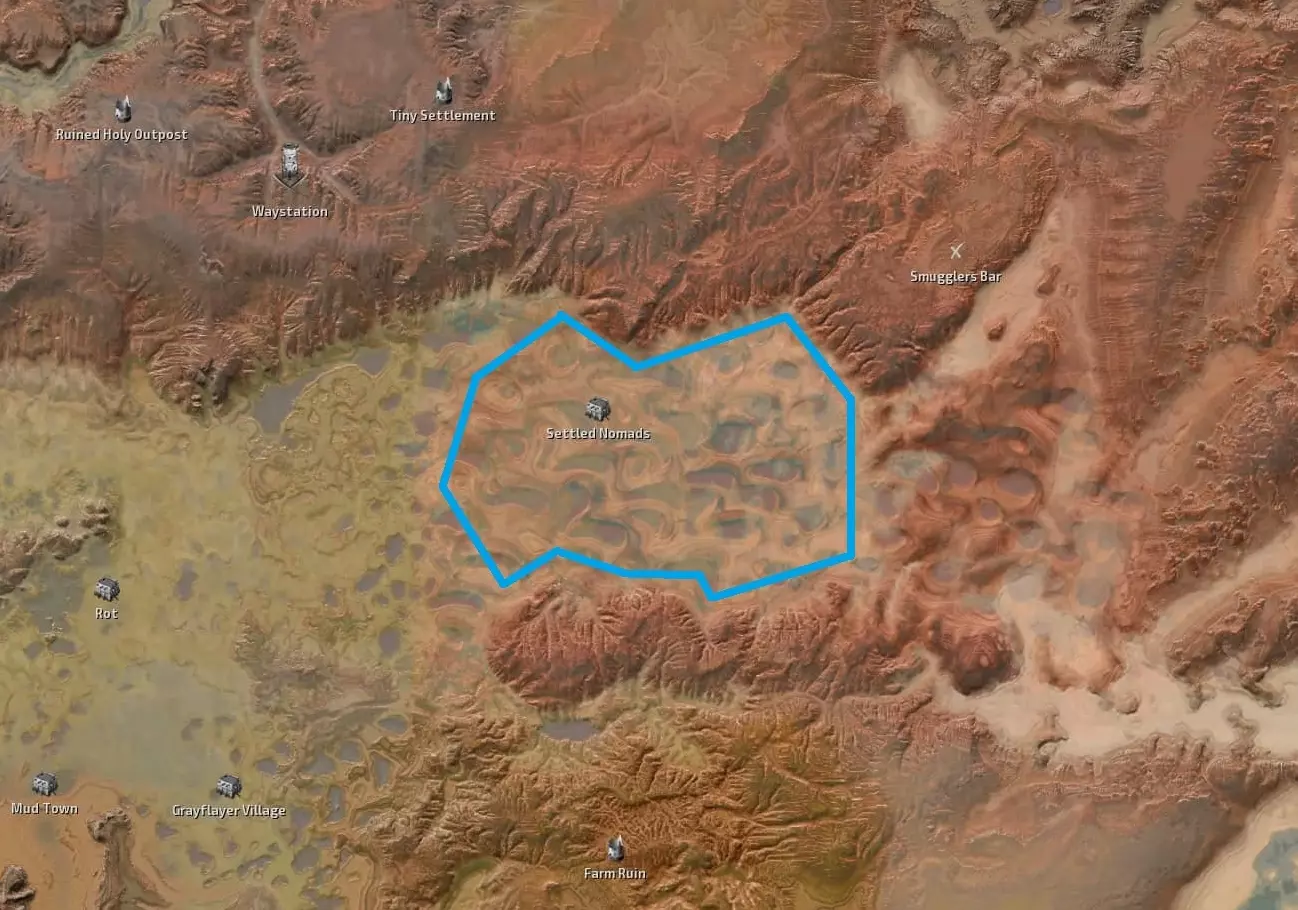
游戏中最简单的开店地点。 这里水和铜的供应适中,但天气宜人,风力稳定,地形开阔简单。最重要的是:这片土地没有任何主要势力控制,这意味着没有税吏或祈祷日。 邻居友好,不会生成巢穴,除了偶尔的土匪袭击和流浪喙嘴兽外,这里是个宁静的天堂。更棒的是,希姆位于地图正中央,非常适合贸易和探索。 缺点:希姆100%是干旱地区,只有10%的绿地,这并不理想,但有了水培技术,最终可以种植游戏中的所有作物。 奥克兰湾和奥克兰的荣耀
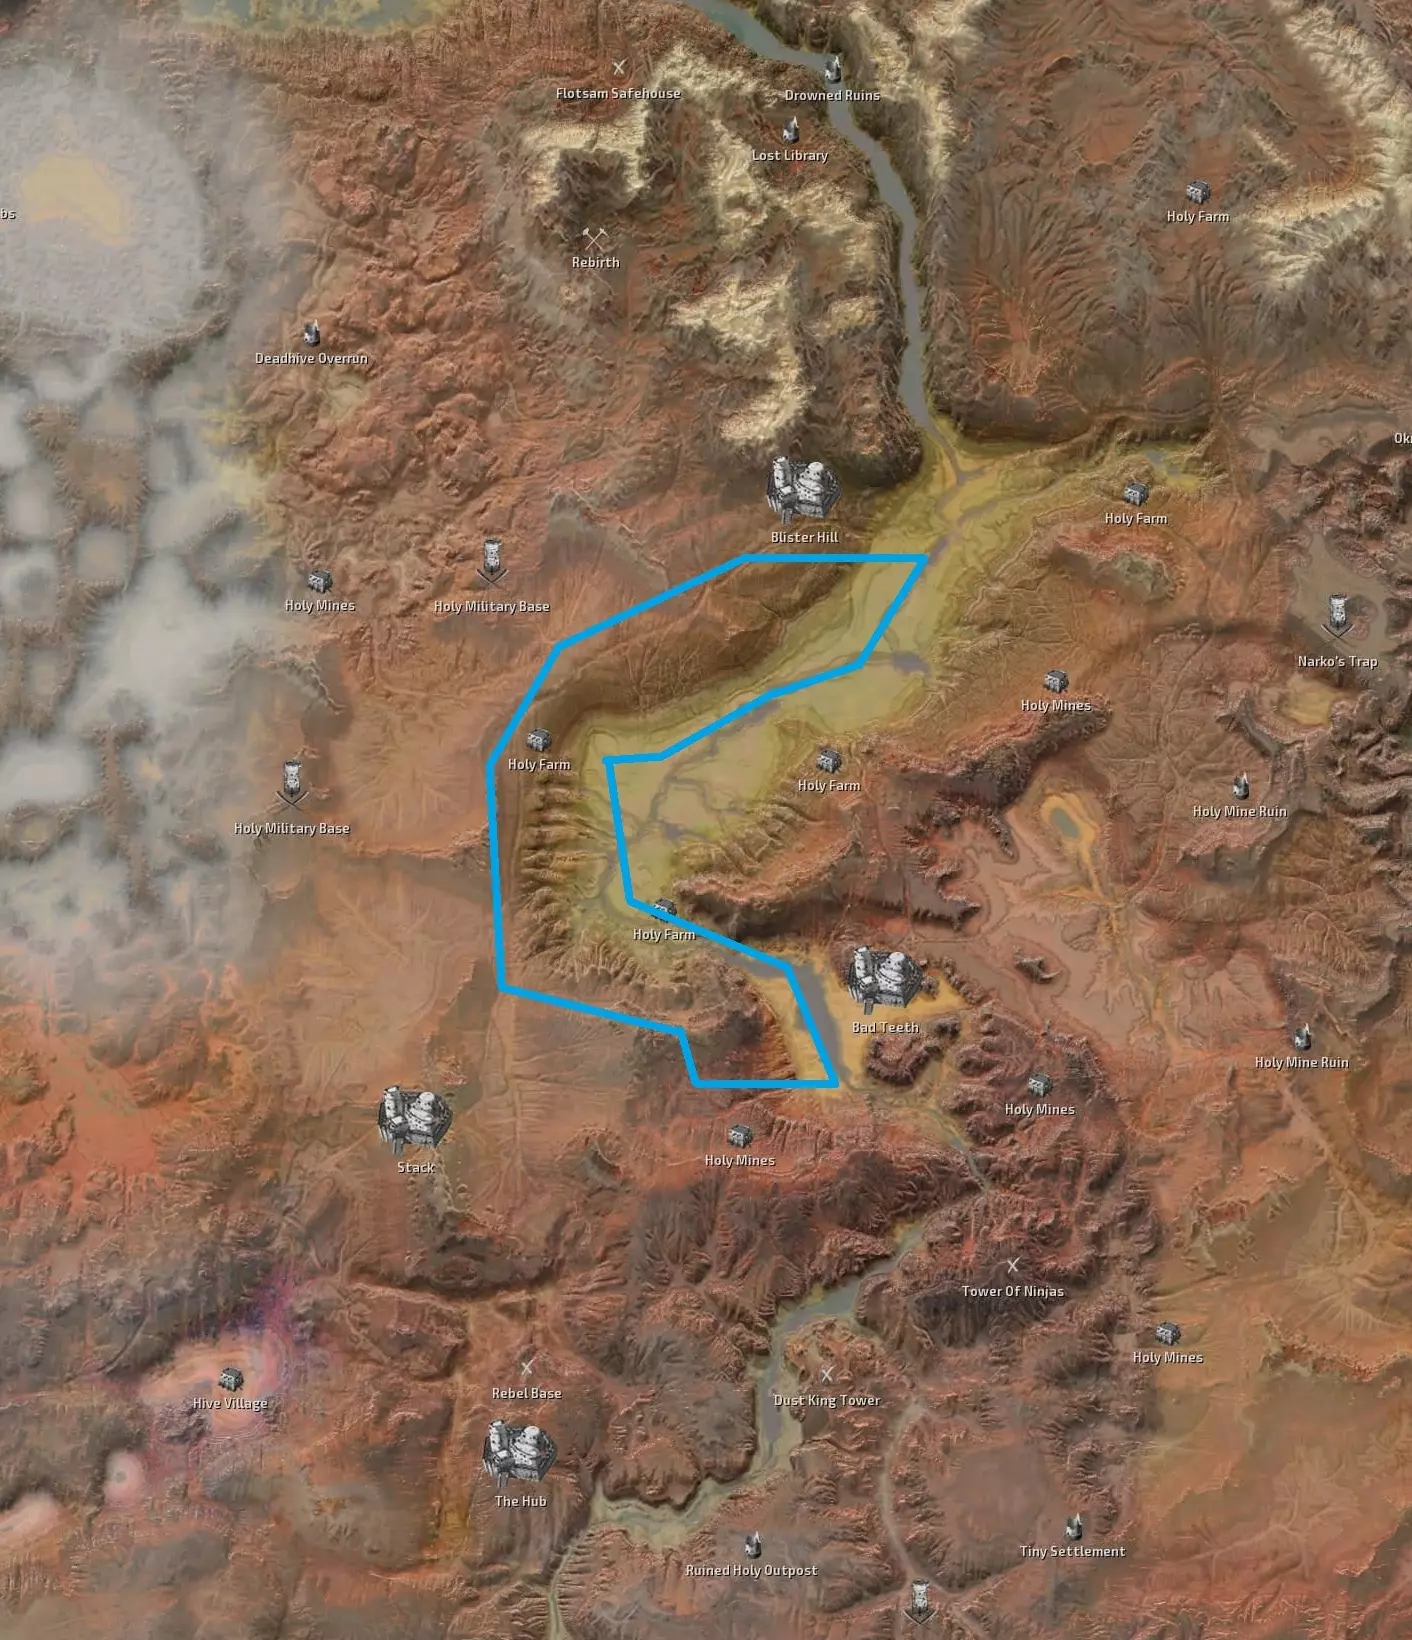
这是一个更高级的地点,因为它利用了两个不同的区域来获取丰富的资源和进行耕种,所以确保你的前哨站建在这两个区域的边界处。 奥克兰之傲河拥有100%的绿色肥沃度和充足的水源,而奥克兰海湾则有100%的干旱肥沃度和巨大的风力。海湾中有大量的铜矿,铁矿也很丰富。这个地点没有恶劣天气。 你的邻居包括许多神圣国度的城市和农场,以及西部的蜂巢族和沙克族。你可能会遇到小规模的土匪袭击,偶尔还有骨犬和河迅猛龙的巢穴。不过,这些容易对付的目标更多的是稳定的肉类和皮革来源,而不是问题。 缺点:你身处神圣国度领土的深处。虽然巡逻队能通过分散危险来提升道路安全,但队伍中若有骷髅,最好让它们躲藏起来,避开巡逻队和城市。每周日是祈祷日,你可不想错过祈祷日。 鱼人岛
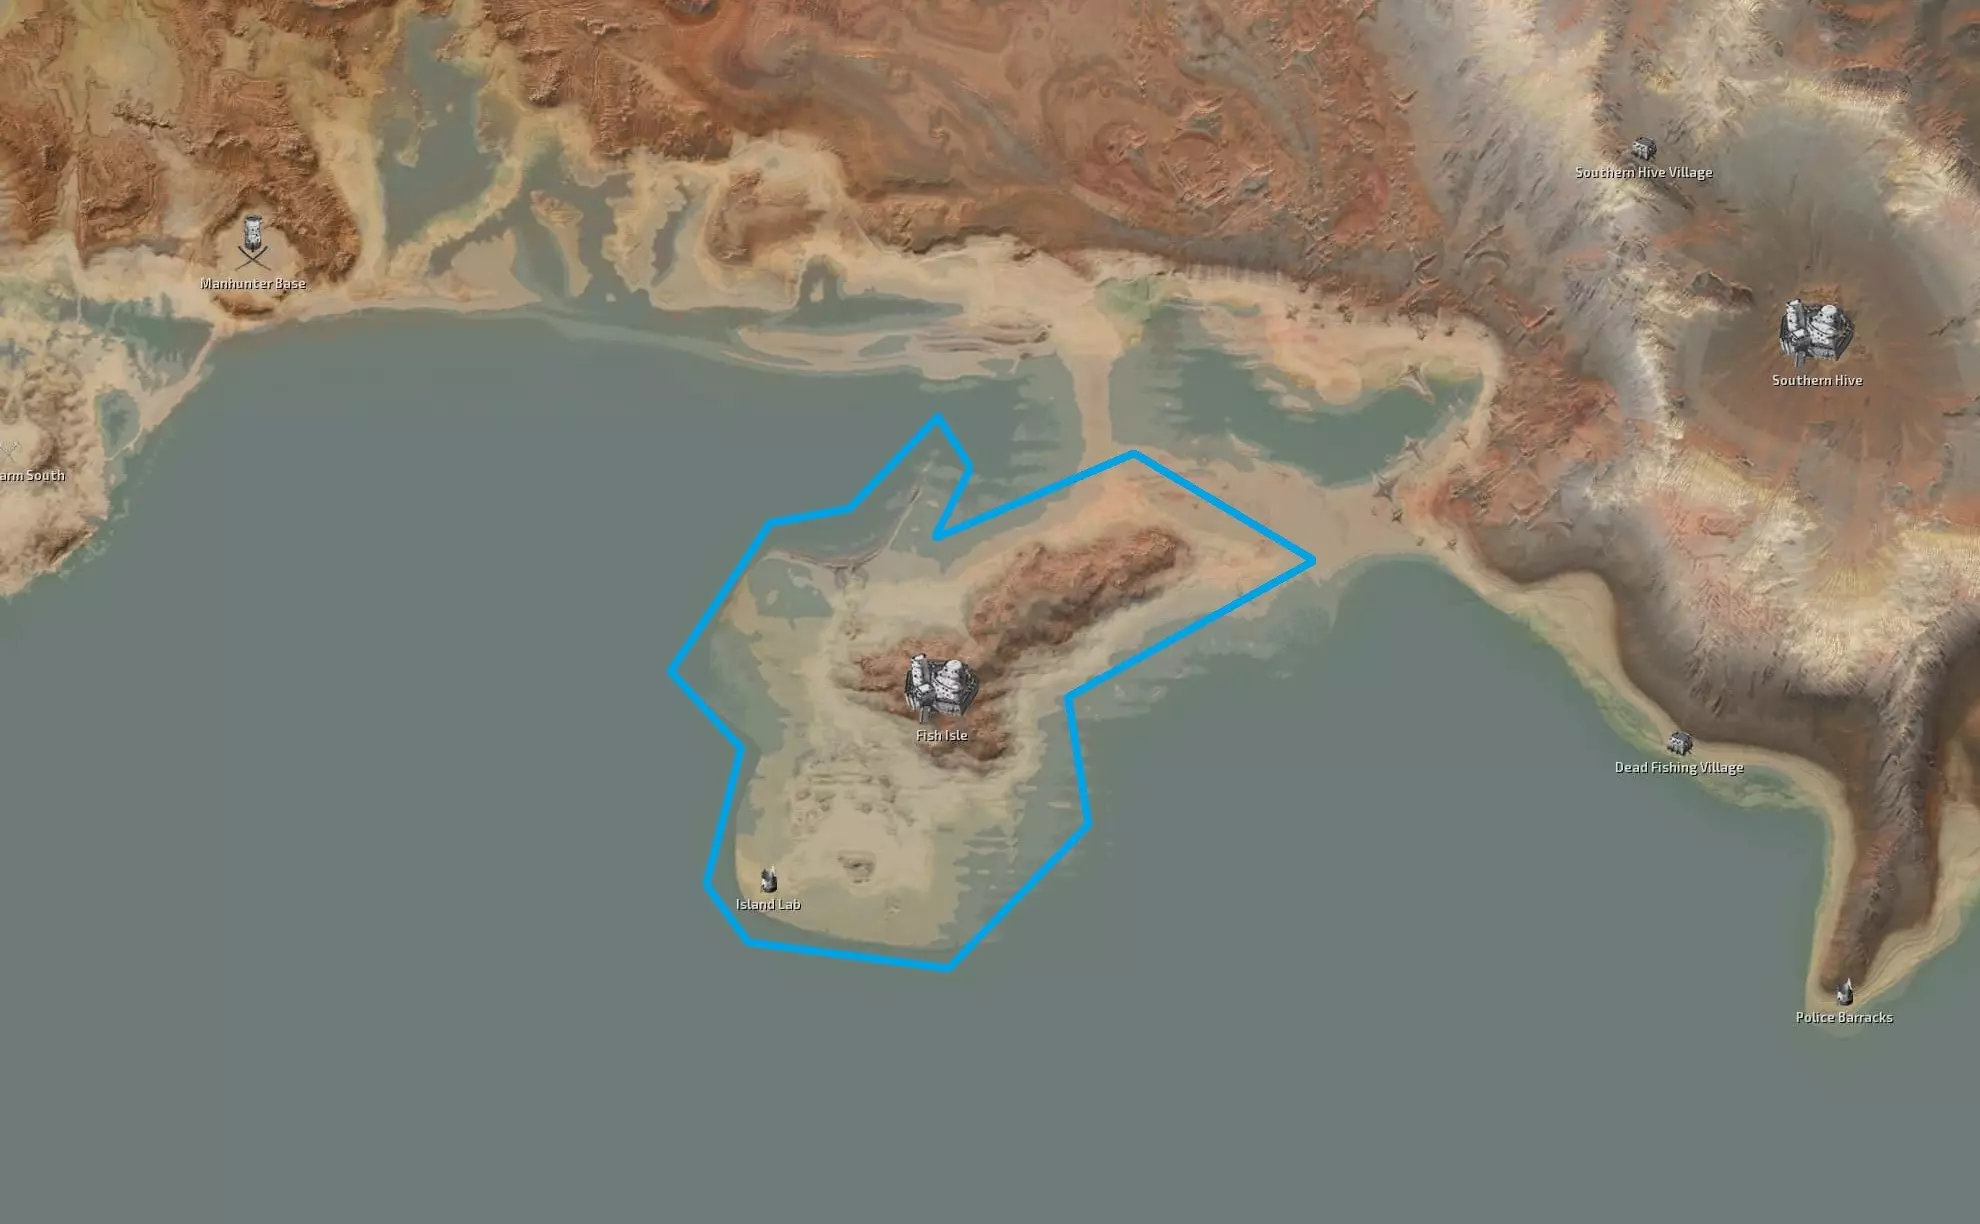
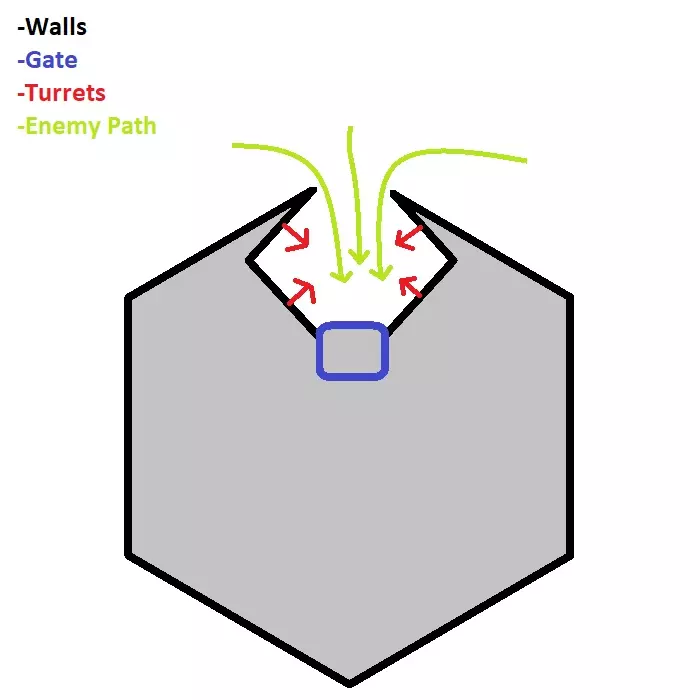
我建议中难度最高的是位于极南的偏远岛屿。这里的卖点在于该岛拥有100%的绿色土地肥力,以及罕见的50%沼泽肥力,这意味着无需复杂的面包制作流程就能生产高级食物。岛上还能找到铜和铁资源。 你的邻居只有螃蟹和鱼人。如果你击杀了它们的首领【古格勒王】,之后就只会刷新螃蟹。岛屿四面环水,你可以建造致命的死亡陷阱,让敌人在穿过墙壁迷宫时被炮塔持续攻击。 缺点:存在酸雨,但程度较轻。如果你按照指南操作,让装备达到100%的酸抗性,酸雨就不会造成问题。幸运的是,你的动物、蜂巢族和骷髅也对酸雨免疫。如果你想进行交易并探索世界,这个基地位置极为偏远,除非之后建造前哨站,否则可能会带来问题。 实用提示:使用勘探按钮扫描区域寻找铜矿,因为铜矿通常较为稀有且分布分散。你可以在单个铁矿节点附近放置多个自动矿石钻机,但铜矿需要手动开采。更高的科学技能一次能扫描更大的区域。 到达目标地点后开始建立据点。先建造一个中心建筑,然后依次建设电力、采矿和食物设施。这是游戏中最危险的阶段,在开始建造围墙时,你需要防御前哨站免受袭击和野兽的威胁。保持耐心和警惕,当拥有足够的建筑材料后,就可以开始加固防御并站稳脚跟了。控制区域:(修改前请保存) 如果您建造的某些建筑属于游牧民或附近派系,请不要惊慌!这是因为这些建筑位于您建造第一个结构和设立前哨站时创建的“控制区域”之外。按Shift+F12打开调试菜单。 在左上角您会看到一个“城镇放置”按钮,点击它并滚动到底部。找到“您的前哨站[1]”并点击,您可以移动指示前哨站中心的灰色雕像。将其移至更靠近未被拥有的建筑处,点击“退出”并保存游戏。 现在退出并重新加载。您的边界应逐渐扩展以覆盖整个基地。根据需要重复此过程。在继续建造基地时,请记住此技巧。专业提示:在同一菜单的中下部分,你会看到一个【修复物品】按钮。多次点击该按钮可以解决长时间游戏后积累的建筑对齐和模型穿模问题。 专业提示:通常,保存、退出并重新加载游戏可以解决轻微的路径寻路、模型穿模和自动化问题。如果你发现任何异常情况,别忘了尝试这个方法。 精通(攻略5/5) “我们现在进入终局阶段了” 你的自动混合矿场正在大量生产建筑材料,基础设施也已稳固。是时候建造防御工事了。 墙壁: 用墙壁包围你的定居点,但不要过度建造。过大的覆盖区域和大量空置浪费的空间并不理想。理想情况下,你的墙壁内至少应有2个铜矿节点和2个铁矿节点。在我推荐的选址中,石料应该很充足,所以不用担心这个问题。如果你打算利用两个相邻区域(奥克兰湾/奥克兰荣耀),要注意区域过渡。 首先确定你唯一的大门入口。大门应该被菱形墙壁结构包围,这样可以让敌人涌入中间,在大门处交锋,并被约16门鱼叉枪射击。你不会想要传统的带大门的平墙。从那里开始,环绕整个营地并关闭你的墙壁。完成后,你将免受突然袭击。用工业区的一些钢材,你之后可以安装鱼叉炮塔来消灭潜在的攻击者。
专业提示:【尸体熔炉】是一种可以处理死亡角色(包括其物品)的机械。你需要将它放置在靠近大门的位置,因为暴动的尸体会吸引掠食者。有时袭击规模过大,部分尸体(和敌人)会被推到你关闭的大门内。 专业提示:拥有安全的基地后,你的生产很快就会提升。你可以安全地支持最多30人组成2个以上小队,因此考虑扩充人员吧,因为你将需要大量人手进行工艺制作。 工业方面: 城镇建立围墙后,就该进行大规模工业化了。在铁矿和铜矿脉附近建造额外的专用建筑,它们将成为你的工厂。3个【工作站】足以容纳多个所有制作和精炼站,并配备许多储物箱。首先建造一座【钢铁精炼厂III】,然后只需增加铁板和电子产品的产量,同时留意电力水平,必要时建造更多【风力发电机II】。自动化的【矿石 drill III】将加快这一过程,靠近工厂的存储容器还能进一步提升产量。 最后一步就是建造至少每种带有相应存储的制造站各一个。我建议至少建造4个【电气工作台】和6个【钢铁精炼厂IV】,作为你建造工作的合理基础配置。 专业提示:【物品熔炉】是一种可以处理放入其中的任何物品(并返回少量铁矿石)的机器。若想完善武器或护甲的锻造工艺,铁匠们常会打造出一些不完美的版本,这些物品你可能会直接丢弃而非费心出售。将此建筑建造在武器和护甲工作台附近,可为此提供便利。 农业方面: 你储存的任何多余生水果现在都可用于将农场升级到最高生产等级。如果你手头没有小麦和大麻,现在应该考虑获取它们,若没有可以进行交易。若干【自动谷物筒仓】会将小麦加工成面粉,之后厨师会将面粉制作成面包,最终制成高效(且昂贵)的【食物方块】。额外的水井和水培设施将确保你拥有充足的原材料。一个大型的食品专用建筑应该就足够了。训练: 一个大型建筑足以同时作为训练场和监狱。你需要高等级的囚犯作为活靶子来训练,这样才能有效地将属性等级提升到15-30以上。这里适用强者逻辑,所以让你的手下装备背包和重型盔甲来降低自身属性,然后集中火力一次攻击一名囚犯。 小贴士:绑架一个骷髅,通过战斗或“剥皮机”移除它的一条腿。把它们放在骷髅床上,不停地攻击它们以进行更高效的训练。 次要建筑: 如果你想涉足烈酒、清酒、朗姆酒、大麻和燃料的生产,可能需要另一个大型建筑专门用于这些生产。如果你想出售产品,建议在城墙外建造一个小型建筑。你最不希望看到的就是当顾客在你的商店柜台结账时,突然有一波袭击者悄悄潜入。 冒险方面: 你或许已经拥有一座堡垒城镇,并且完成了大部分研究,但仍有许多地点等待探索,还有蓝图可供购买,以及稀有武器和背包需要收集。由于一个小队容纳不了30人,现在你的先锋小队应该前往《剑士》的世界,去探索广阔的未知领域。(然后可能会被喙嘴兽或安保蜘蛛残忍地杀死) 存档位置: 为了备份,这里列出游戏的存档位置。游戏的存档文件位于:C:Users(用户)AppDataLocalKenshi save。你还可以保存和导入角色自定义设置,以便在不同游戏的角色创建界面节省时间。路径应为: c: Program Files (x86) Steam steamapps common Kenshi data character bodies export 此路径适用于Windows 10 64位系统。显然,这是游戏的Steam版本。从其他地方安装的游戏可能位于相同目录,也可能不是。 来源与致谢 部分信息是通过以下网站查找并交叉引用的: