换一换
换一换 


你想成为《地狱已满》的顶尖玩家吗?你想独自带领一整队新手,在几乎所有地图上都几乎不受伤害吗?你想能够独自完成最难的地图吗?你想让方圆50英里内的每一个僵尸都对你感到恐惧吗?那么这份指南就是为你准备的。 是什么启发我制作这份指南?我受够了这里其他指南在教导玩家时给出完全错误的建议,同时还遗漏了关键信息,所以我决定自己制作这份指南。本指南不仅旨在帮助新玩家,无论你当前的技术水平如何,如果你立志成为《求生之路:纳粹僵尸部队》(NMRiH)大师,那么本指南也同样适合你。 本指南将针对经典难度进行讲解。 基础要点 ====近战以及不依赖枪支==== 如果你想成为一名优秀的玩家,学习如何正确且高效地使用近战武器是绝对必要的。近战战斗是《求生之路:纳粹僵尸部队》的基础,一旦掌握,你会发现仅凭近战就能独自通过许多地图,甚至完全不需要枪支。 这就引出了另一个非常重要的观点:除非绝对必要,否则完全不要使用枪支。只有在以下情况才能使用枪支:当你陷入绝境时;当你需要快速清理道路或突破瓶颈时;或者更简单地说,在任何近战无法解决问题的场景中。枪支就像是《求生之路:纳粹僵尸部队》(NMRiH)版本的BFG-9000,极其强大且有用,但只有在绝对必要时才能使用。 ====近战基础==== 大多数人会告诉你每次近战攻击后都要推击,虽然这不一定是个坏习惯,但你应该养成无需推击也能成功近战的习惯,这样你就能以最高效率和速度杀死僵尸,同时将耐力消耗降至最低。熟悉近战武器的攻击范围以及僵尸能够攻击到你的距离,一旦习惯了这些距离,你就可以不用推搡也能近战攻击僵尸,比如这样:
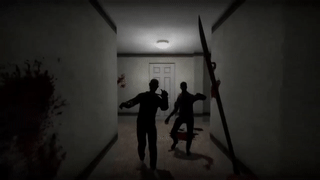
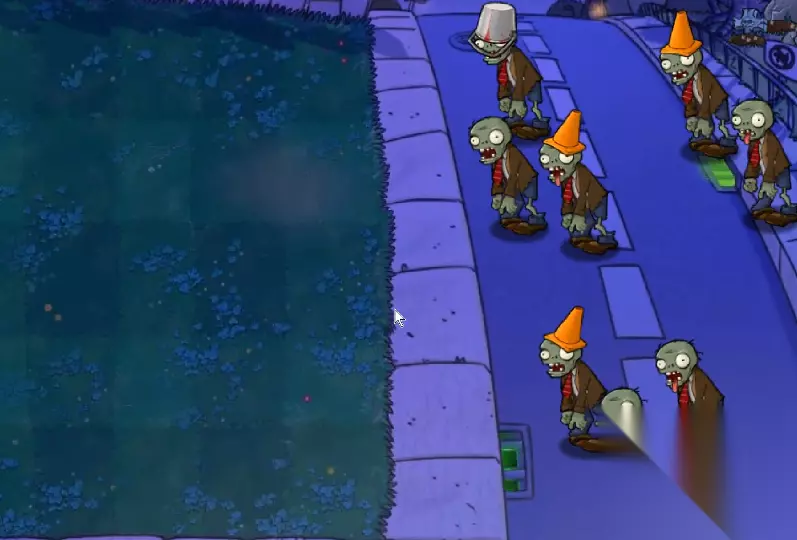
(You don't really have to do this with heavy attacks, with heavy attacks you can still shove after every hit, but with light attacks it's better to do it without shoving if you don't have to shove) Remember, practice makes perfect, so try to practice light attacks without shoving until you get the hang of it. Don't just exclusively use these light attacks though, because it eventually will take a toll on your stamina, so once your stamina starts getting low when you're light attacking, use heavy attacks until your stamina returns to a normal level, and keep alternating between light and heavy attacks accordingly. It's also important to note that your stamina regenerates faster while you're crouching, or if you're standing still, however these effects don't stack. Also, when using 1-hit kill melee weapons such as the Pickaxe and Sledgehammer, if you hold down left click in order to charge up a heavy attack, and you let go of left click as soon as you see the animation start playing and just let it swing automatically, then that swing will use 0 stamina, this trick is essential when using 1-hit kill melee weapons. Also, because 1-hit kill melee weapons can 1-hit kill zombies with a light attack, they can be used to instantly clear a path if a zombie is blocking it, similar to the instant path clearing ability of a gun, making it useful in scenarios where you need that instant path clearing ability but you don’t have a gun or you want to conserve your ammo. However the Pickaxe and Sledgehammer are not the most effective at taking out large volumes of runners and kids, which is a job usually better suited for a light melee or a Fire Axe. However you will almost never need to carry a light and heavy melee at the same time, only on nmo_urbanhazard and nmo_mayday do I feel like it is really necessary. ====To Kill or Not to Kill?==== You should only kill zombies that pose an immediate or potential threat, or zombies that are just blocking the way. Standing around playing zombie slayer for 5 hours straight isn't gonna help you win the map, and this is something that I see a lot of noobs do for some reason. And to clarify what I mean by "potential threat", lemme paint a picture for you: There are some zombies at the top of a staircase, however they are not blocking your path and are not an immediate threat, so you just ignore them and walk past them and go down the staircase, however at the bottom of the staircase there are several runners, so you quickly turn around and go back up the staircase in order to avoid the runners, however those same shamblers from earlier that you didn't kill are now blocking your path and you're now trapped in a chokepoint, and are now dead. Scenarios like these and scenarios that are similar to these is what I mean by "potential threat". Viable and Non-Viable Melee Weapons The following is a list of all the viable melee weapons in NMRiH: -Machete -Hatchet -Lead Pipe -Crowbar -Fire Axe -Sledgehammer -Pickaxe -E Tool (The E-Tool must be used in it's alternate mode in order to do enough damage to be considered viable, the alternate mode can be used by right clicking with the E-Tool) If a melee weapon is not on this list, it is un-viable, and if you have an un-viable melee weapon, you should exchange it for a viable melee weapon at the earliest opportunity. What makes a melee weapon un-viable? If a melee weapon takes 3 or more light attacks to kill a zombie, it is automatically un-viable due to not doing enough damage, and remember, several melee weapons were designed by the devs to be useless, keep that in mind. The Shovel is also un-viable due to it taking up way too much inventory space for its lack of sufficient damage. The FUBAR is also considered un-viable due to it being painfully slow to swing and having a painfully high stamina cost. Not to mention, that a lot of these unviable melee weapons have very delayed and slow shoves as well, such as the wrench, FUBAR, etc., making them even more unviable. No viable melee weapon has a problem with it's shove being too slow, so don't worry. Despite the E-Tool being included on the list of viable melee weapons, just because it's viable, doesn't necessarily mean that it's preferable. The E-Tool should be swapped out for a better weapon if possible as well, due to it's weird swings, timings, hit reg, and range, and also a lack of a horizontal swing. Viable and Non-Viable Guns The only guns in the entire game that are un-viable are the JAE, the Sako, the Winchester 1892, and the Double Barrel. The reason why these guns are considered un-viable is because of their very low ZPS (Zombie Kills Per Second). Both of the sniper rifles and the Winchester are single shot, which makes them extremely dangerous to use, and remember, guns should only be used when you need to clear a path instantly or when your back is against the wall, meaning that if you miss with a single shot weapon in either of these contexts, you're basically dead. As for the Double Barrel, even though it's semi-auto, it only has 2 shots before you have to reload, and the reload time is very long, making it un-viable. As for the Flare Gun and the Bow and Arrow, the Flare Gun is only useful on nmo_miner_detour for killing the special zombies, and the Bow and Arrow, although it is a good means of killing zombies and being able to replenish the ammo used to do so, I still wouldn't really consider it to be practical. ====Fire Modes==== Some guns in the game give you the option to toggle between semi-automatic, 3 round burst, and automatic. You should always try to avoid using a gun on full auto if possible, as this greatly reduces the control you have over your shots and wastes a lot of ammo, and 3 round burst also doesn’t really have any practical use either, since every gun in the game kills a zombie with either 1 or 2 headshots depending on the ammo type. Should you find yourself stuck with something like the MAC-10, try to tap your mouse lightly and fire it in single shots. ====Skillshot Mode==== If you have a pistol, then you can do something known as a Skillshot. Basically what a Skillshot is, is if you stand still while holding a pistol for a certain amount of time (you can still move your mouse), then your screen will turn orange and you will enter Skillshot mode, which allows you to kill zombies with 1 headshot as opposed to 2 headshots with .22 and 9mm. However Skillshot mode has VERY little use, and you will almost never find yourself needing to use it. The only scenarios I can really think of where Skillshot might be useful is maybe if you're trying to pick off a runner from a relatively far distance while in a safe spot with a Glock or something. Like I said, the scenarios where Skillshot is actually useful are very rare and specific, so don't really worry about using Skillshot mode. Dealing With Runners and Kids Contrary to what a lot of noobs seem to think, runners and kids are by no means your worst nightmare, not even in large numbers. They can be easily made quick work of without even using guns (Yes you heard that right, guns are not necessary in taking out runners and kids, not even hordes of them). All you need is skill. ====Kiting==== Kiting is a crucial component of dealing with runners and kids. Basically, as long as you’re walking forward (you don’t have to be running), then runners and kids will not catch up to you, so use this to your advantage. Keep in mind though, that if your inventory is 100% full then they CAN catch up to you, so make sure your inventory is never at 100% capacity. The basic strategy is to charge your melee weapon as you’re walking forward, then once you’ve charged it enough for a 1-hit kill, turn around, swing, then immediately shove, then immediately do a 180 and snap back to the front of you, then rinse and repeat that until you’ve cleared the horde (if you’re using the Machete then you can just do light attacks since the Machete can 1-hit kill runners with a light attack). Here are some examples in action:
混合了奔跑者和小孩的尸潮可能非常危险,因为你要面对两个完全不同高度的目标。应对这种情况的最佳方法是尽力判断挥砍时小孩和奔跑者哪个离你更近。不过,如果你有像消防斧这样具有出色垂直挥砍范围的近战武器,就能轻松同时消灭小孩和奔跑者,如上面的GIF所示。 需要特别注意的是,在任何情况下与奔跑者和小孩战斗时,每次攻击后都一定要推搡。 另外,你不需要蹲下才能击杀小孩,站立时也能轻松击中他们。这款游戏中的僵尸同样只能直线移动,所以当它们想要转向时,必须停止移动并重新调整方向,这一点要记住。 推搡技巧详解 本指南的这部分将介绍一些实用的推搡技巧,以帮助提高你的生存能力。 我接下来要展示的技巧我称之为VQV,因为这是你需要快速连续按下的按键。基本上,这个技巧能让你消除推搡冷却时间:先推搡,然后快速切换武器来移除推搡冷却,接着再次推搡,如下例所示:
你也可以使用这种技巧来取消部分枪械的动画,从而能够在射击后立即进行推搡,具体操作如下:
医疗物品 本指南的这部分将介绍一些关于医疗物品的实用信息,以及使用医疗物品时的一些通用游戏技巧。 ====医疗包使用==== 在《求生之路:纳粹僵尸部队》中,知道何时使用医疗包很重要。记住,医疗包可恢复30点生命值,这意味着理想情况下,你应该在生命值降至约70点时使用一个医疗包,不要等到生命值过低才使用。想一想,你是愿意在10点生命值时使用医疗包恢复到40点,还是在70点生命值时使用医疗包恢复到100点?答案显而易见。====其他杂项医疗物品及医疗信息 -绷带使用后可恢复15点生命值 -仅在流血状态下可使用绷带 -流血时,每次屏幕出现血液飞溅效果即受到1点伤害 -流血状态下无法 sprint,且耐力消耗更高因此,尽快为自己包扎尤为重要。医疗包和医疗箱都能止血。你可以通过低头查看是否有流血效果,或者按住Shift键查看角色是否能 sprint 来快速判断自己是否在流血,记住,流血时无法 sprint。药片不能永久阻止感染,服用一瓶药片后,感染会在短时间后复发。基因疗法同时起到疫苗和永久治愈感染的作用。你的生命值越低,被感染的几率就越高,例如,当你满血(100点生命值)时被咬伤,感染几率非常低;而当你只有20点生命值时被咬伤,感染几率则会很高。被感染的几率非常高——被僵尸感染的唯一途径是被咬到。被击打或抓伤不会导致感染。 ——只有当你的生命值降至40及以下时,屏幕颜色才会开始变得不饱和。 【数值与伤害值】 了解每种僵尸攻击造成的伤害量非常重要,这样你就能大致知道自己的生命值还剩多少,从而判断何时需要治疗等。-小孩的攻击造成8点伤害 -咬击造成15点伤害 -蹒跚者的单手挥击造成15点伤害 -蹒跚者的双手挥击造成30点伤害 -奔跑者的单手挥击造成20点伤害 -奔跑者的双手挥击造成40点伤害 地图知识 地图知识是《求生之路:纳粹僵尸部队》(NMRiH)的重要组成部分,它能为你带来巨大优势,因此务必尽可能熟悉每张地图。地图知识主要是指熟悉特定地图,包括了解秘密地点位置、记住密码锁代码、记住特定物品(如砍刀、基因疗法和医疗包等)的刷新位置/刷新点。或者了解各种地图逻辑(例如在苏州地图中,老城区的僵尸不会刷新,撤离中心周围的僵尸在与收音机互动前不会刷新,还有其他一些因素使得该地图很容易利用机制)。 然而更重要的是记住每张地图上的所有安全点。安全点是地图上的特定位置,你站在那里可以避免受到僵尸的任何伤害,例如:
上帝点(Godspots)会让某些任务目标和最终关卡变得容易利用漏洞通过。 其他提示与信息 本节是一系列各种随机提示和信息,我认为它们不太适合归入其他类别。 -你可以跳过爬行者 -你可以利用爬行者作为跳板跳到僵尸头上。这是一个非常特定的技巧,你可能永远不会需要用到它,但如果你完全被僵尸挡住,且足够幸运附近有爬行者,它可能会救你一命。类似这样的情况:
-进行焊接或与物品互动时,尽量不要背对着僵尸。尝试移动视角,以便在进行焊接/互动的同时留意周围的僵尸,观察是否有僵尸离你太近。 -如果看到地上有与你当前枪械使用相同弹药类型的枪,可以捡起来并按U键卸下其中的弹药。 -站在僵尸的头上实际上是个安全的位置,因为站在僵尸头上会使其无法移动,也无法攻击你,但附近的僵尸仍能攻击你,这一点需要注意。如果你想从某个地方跳下,通过落在僵尸头上而不受到任何坠落伤害,或者例如在苏州地图获取电锯秘密,这会很有用。以下GIF分别展示了这两个例子。
-你的移动速度并不取决于背包的具体填充量。其机制如下:当背包填充量在0-49%之间时,你将以X速度移动;当填充量在50-99%之间时,你将以X速度移动;当填充量达到100%时,你将以X速度移动。 -蹲下或静止站立时,你的耐力恢复速度会更快,但这两种效果不会叠加。也就是说,如果你同时蹲下并静止站立,只会单独应用静止站立时的耐力恢复速率。站立不动时恢复耐力的速度比蹲下时稍快。 - 在楼梯上与僵尸战斗可能会更危险,因为你和僵尸的位置差异导致近战武器需要更长时间才能击中僵尸的判定框,这可能会让你比平时更容易被击中。你可以通过将瞄准位置比平时放低来弥补这一点,这样武器能更快击中僵尸的判定框。这意味着你在楼梯上与僵尸战斗时被击中的几率会降低,因为你的攻击会更快生效。建议先装备枪械,再装备近战武器。这样当你需要快速拿出枪而不用在背包里摸索时,只需按Q键就能快速切换到之前装备的物品,也就是你的枪。 你可以通过查看背包中枪械的颜色来判断捡起来的枪当前是否有子弹。如果物品背景为红色,则表示其中有子弹;如果背景为灰色,则表示当前枪械未装填任何子弹。 -若你希望无需在背包中摸索就能快速使用医疗物品,可以通过开发者控制台将其绑定到键盘或鼠标的特定按键上,例如:bind MOUSE5 "use item_first_aid"。 -你可以将MOUSE5替换为任何想要绑定的按键,其他医疗物品的名称分别为item_bandages、item_pills和item_gene_therapy。 -当你拿出背包中的物品时,按住G键可以将其投掷出去。例如,你可以用这种方式从远处向队友投掷医疗补给品。需要注意的是,物品越重,可投掷的距离就越近。 你不会被小孩抓住。 僵尸被点燃后有几率变成奔跑者,请注意这一点。 格洛克理论上比伯莱塔更好,因为格洛克的弹夹能多装2发子弹,且占用的背包空间略少。 镐子理论上比大锤更好,因为镐子占用的背包空间略少,且挥动速度略快于大锤。 如果你的近战武器在一次挥击中同时击中僵尸和墙壁/物体,会消耗额外的耐力。 消防斧的轻击实际上可以一击杀死奔跑者,但你必须瞄准僵尸的略微左侧才能做到,不过即便如此,也并非每次都能成功。-国民警卫队僵尸被击杀时有几率掉落特定物品,可能掉落的物品包括9毫米弹药、5.56毫米弹药、空伯莱塔手枪、手榴弹或绷带。 -破坏木板时,按H键收起当前武器并切换为拳头。使用拳头是破坏木板和世界中其他可破坏物体的最有效且稳定的方式,因为这几乎不消耗耐力,且攻击总能命中。以下是一些《求生之路:纳粹僵尸部队》的实用技巧,新手通常不会使用,所以当看到有人用拳头破坏物品时,基本可以判断该玩家至少具备一定的技巧或经验: 1. 游玩时务必将亮度和伽马值调至最高,这能帮助你在黑暗区域(游戏中这类区域很多)看得更清楚。根据显示器自身亮度,结合最高伽马设置,几乎所有区域甚至可能完全不需要手电筒。 2. 僵尸无法抓住空中的玩家,所以当你需要穿过狭窄空间或密集僵尸群时,可以在通过时跳跃,确保自己不会被抓住,这是个非常实用的技巧。 3. 你应该习惯精准地进行爆头攻击。不使用瞄准镜射击僵尸。游戏中90%的僵尸都需要腰射解决,因为你通常没有时间通过瞄准镜瞄准来大幅降低移动速度。所以要练习腰射,直到能命中至少95%的腰射目标,这一点至关重要。
致谢/来源 本指南中使用的各类GIF取自以下YouTube视频。结束 希望你能从本指南中学到一些有用的东西,如果你对某张地图的某部分有疑问,或者有任何其他问题,欢迎在评论区提问,我会尽量回答大家的问题。另外,如果你觉得我在本指南中遗漏了某些内容或有未提及的地方,也请在评论区告诉我。 现在去消灭一些僵尸吧