换一换
换一换 


欢迎阅读我的《狂热运输2》进阶策略指南。本指南将聚焦运输原理、规划、分析、设计及技巧,旨在帮助你实现利润最大化、提升游戏真实感并融入美学设计。 本指南默认你已具备扎实的游戏基础和界面操作知识。我将重点讲解铁路网络,因为其复杂度远超其他运输方式——我相信,只要能掌握铁路系统,你就能成功运用任何运输模式。 本指南献给Urban Games,是他们开发了这款我一直以来最爱的游戏之一;也献给YouTube社区,他们的视频在我漫长的学习过程中(至今已累计700小时游戏时长!)给予了我莫大的帮助。致所有和我一样,渴望在《狂热运输2》中打造真实、高效且美观的交通网络的“扶手椅运输工程师”们! 我希望本指南中的技巧能提升你的游戏成功率,更重要的是,增加你对游戏的乐趣。 资源 建议在尝试理解和使用本指南前,观看游戏实况视频、阅读游戏资料、体验战役模式,并充分熟悉游戏的基本功能和界面。维基百科提供了一些不错的入门信息,此外还包含大量你可能想收藏的详细内容:《狂热运输2》新手指南。你还需要记住游戏手册以供参考:《狂热运输2》游戏手册。 以下是一些拥有大量优质内容的视频创作者,他们的内容能帮助你学习游戏,还能让你对游戏充满期待:Stephen Spry、GrandT、Colonel Failure、Ajaxpost Plays。 Urban Games在游戏机制和工具方面做得非常出色,在我看来,即使不使用模组,你也能充分享受游戏乐趣。不过,有几个提升游戏体验的模组我建议你考虑,并且在本指南的某些部分我会假设你正在使用它们: 【轨道/街道建造信息】模组提供了建造路网时的有用数据,尤其是高度和坡度变化。 【更清晰等高线】模组通过提高层级间的分辨率,让地形海拔的可视化更加容易,这对建造实用且真实的路网非常有帮助。 【不同货物图标1.0】模组通过对图标进行颜色编码,让区分车站类型变得更简单。还有许多精美的模型可供选择,让你的车辆收藏更加丰富,所以不要就此止步,去看看吧。 灵感 别忘了借助谷歌地图和图片来激发你的想象力。在全球范围内缩放查看,或者研究历史铁路地图,都是了解城市与铁路如何相互作用的好方法。
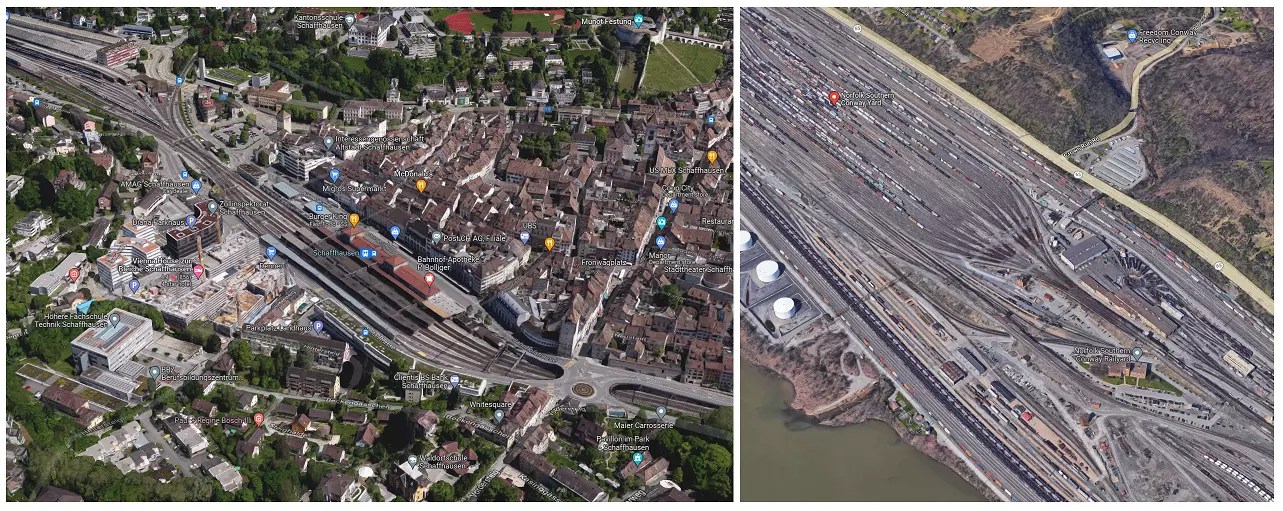
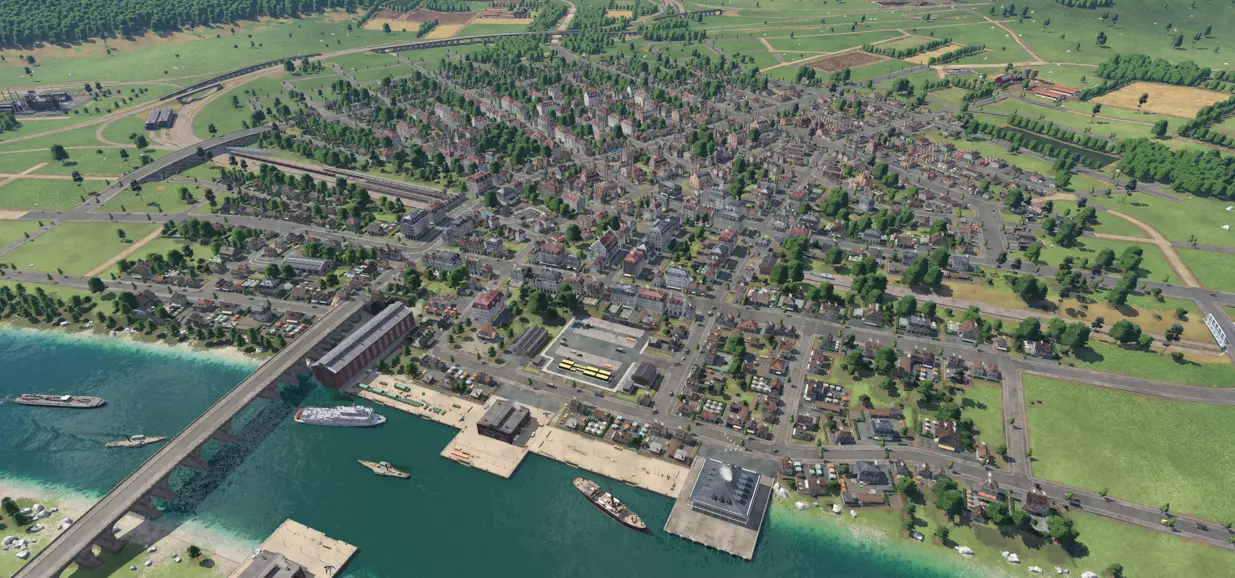
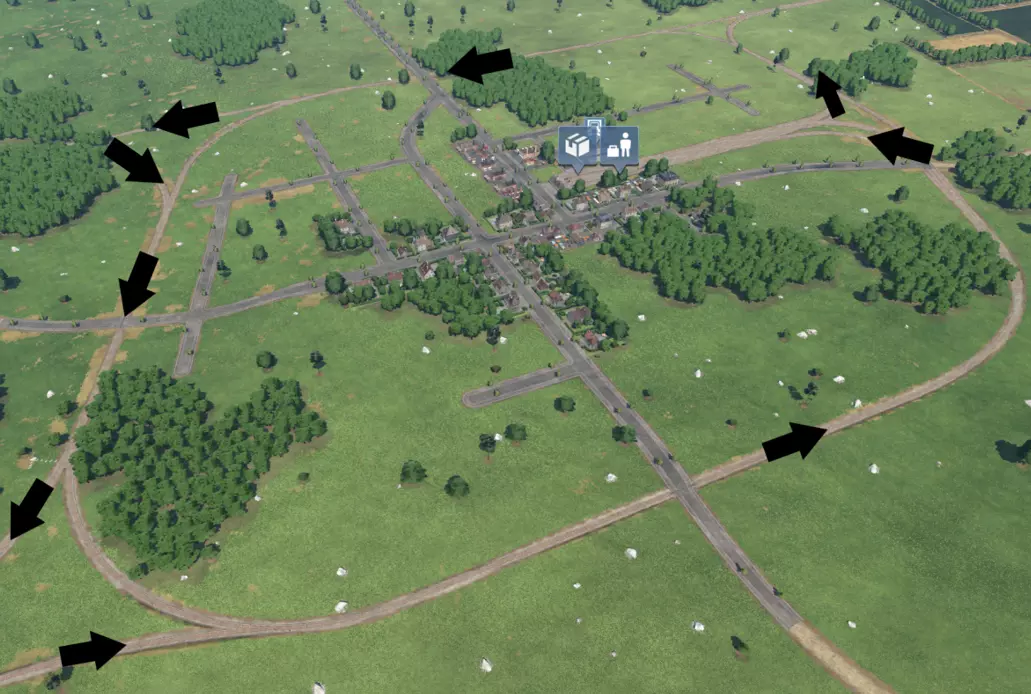
Left: Schaffhausen Station; right: Conway Yard These images can assist you in laying out realistic railways and roads appropriate to the location you are trying to emulate. It will help you design networks that look realistic and even give ideas of how to solve network problems. If you see something in real life, you can almost always recreate it in Transport Fever 2. Background There is some information that will be helpful for you to know to understand the language used and philosophy discussed in this guide. So let's dive in! Terms Here is some jargon I will use in this guide. Disclaimer: these definitions are my own words, and some may not be textbook correct as I am not an expert. grade separation - the characteristic of a junction in the case whereby the two ways do not intersect directly, rather they pass at separate elevations and are connected by ramps/sliproads (or sliprails? it's a thing now.) at grade/level - at the same relative elevation, for example a "level crossing" is "at grade," or a station that at the same level as the rest of the surrounding network is an "at grade" station. junction - an intersection where ways are joined. crossing - an intersection where two ways are joined directly crossing one another at grade. All crossings are junctions but not all junctions are crossings ;) turnout/switch - a railway feature characterized by a divergence of track into two or more tracks. cutting - a depression excavated into the terrain in the interest of reducing the sloping of a road or railroad. node - a point of activity along a route/in a network such as stations where pickups, transfers, or delivereries occur. network - an interconnected set of transport nodes, lines, and/or infrastructure. block - a section of track between two consecutive signals that can be occupied by no more than one train at a time. siding - a section of track characterized by turnouts from a main track that allows for the parking or passing of trains, such as a simple industry or station stop, so as not to interfere with through traffic. wye - a triangular joining arrangement of three rail lines with a railroad switch at each corner connecting to each incoming line. double slip switch - a mechanism that allows a train traveling along a track to cross over or switch to another track (whereas a regular switch will only allow the switching to take place).Network Hierarchy The building blocks of your transportation network are waterways, roads, railroads, and the sky. Waterways and sky are free and offer approaching unlimited space to operate, but roads and railways are finite and expensive. Implementing and observing good road and rail network hierarchy practices will increase the realism and efficiency of your networks. One of the biggest challenges to the profit of your transportation network you are likely to face is delay and congestion resulting from an inadequate network design/crossings/junctions. At the end of the day observing the below hierarchy features will make it easier to make money, for as long as your vehicles keep moving (and you haven't overspent on vehicles), you are most likely going to turn a profit. As such the next two sections are dedicated to providing some background information on these hierarchies. Road Hierarchy While the game will build plenty of roads automatically as cities grow, letting the AI run amok can result in massive traffic congestion as the game progresses. With a little bit of intervention on your part, you will be able to maintain a sensible road network that will function long into the late game. Doing this early on before cities really develop can also save you money in the long run as it can be astronomically expensive to relocate or demolish buildings on occupied roads later. So take the time to (mentally) identify and adjust your road types accordingly. In terms of not only efficiency but realism, remember that major roads lead somewhere. Roads that go and end nowhere interesting are neither useful nor realistic. So as you are tinkering, ask yourself, "do my major roads connect cities to cities? Industries to stations/cities?" etc. Arterial roads whisk people and cargo between cities and into city centers (areas of high density) at relatively high speeds. Having a good arterial system is arguably the most important element of road hierarchy in the game in terms of preventing traffic breakdown so I recommend at a bare minimum planning out these roads in advance and locking them so they don't get funky. They: connect city centers ideally in a continuous way have a bare minimum of junctions (e.g. spaced by ~two blocks) ideally area grade-separated from railways usually work best as large avenues within city limits Collector roads are secondary roads that surround or radiate out from your city center in different directions. Circular routes around your city at a distance from the center provide vehicle shortcuts to other arterials away from your city center, also making it easier to reduce the impact of emissions. on high-density residential zones. Collectors: are long and connect local roads up to arterial roads provide access to key destinations like stations or industries usually end near a city border. have priority by minimizing junctions when possible Medium roads work well for these but sometimes bigger roads are in order. Local roads are your numerous basic small streets that mainly provide access to homes and businesses. They: comprise your city blocks mainly only connect to collectors Small roads are perfect for this purpose Freeways Move sims and road freight long distances at high speed such as between major cities. Freeways can be used to grow your city as it will increase the private transport destinations modifier. Freeways should be grade-separated and connected to arterial roads only to work nicely. Useful in the late game dates when trucks become king. Here is an example of what road hierarchy may look like in game:
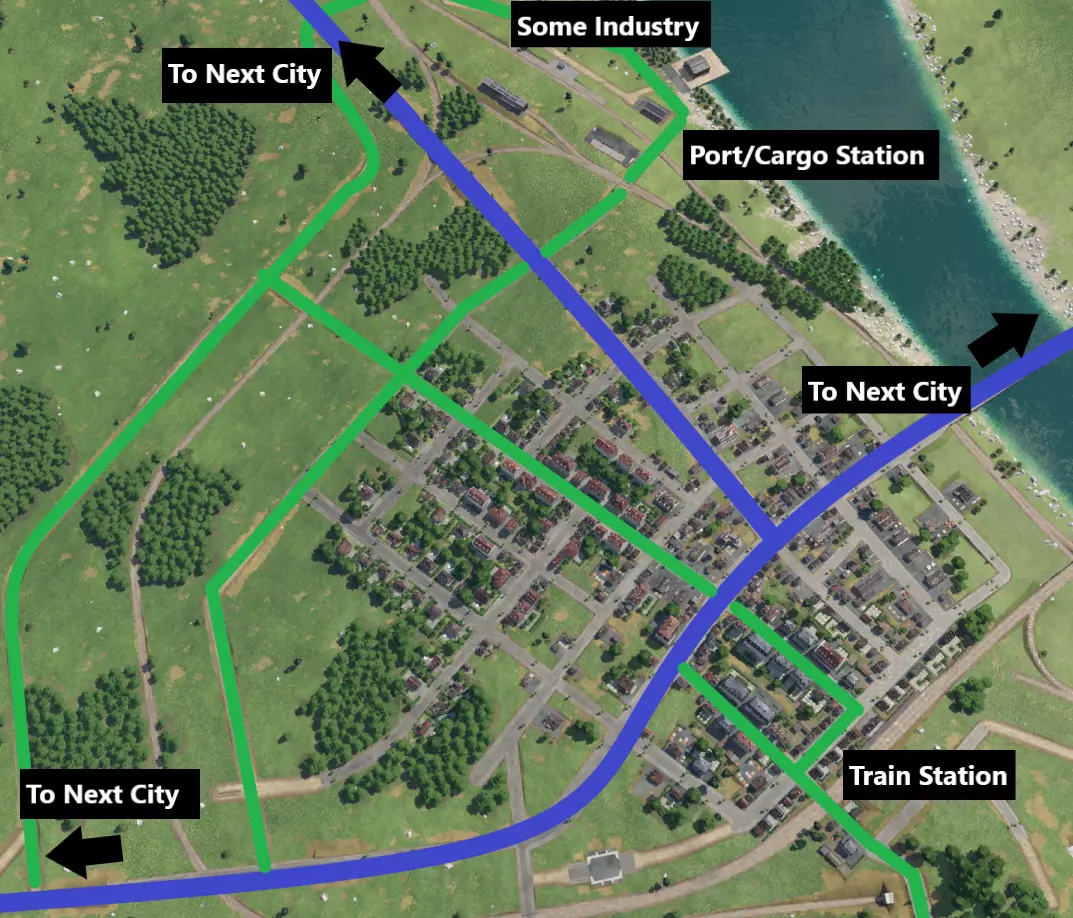
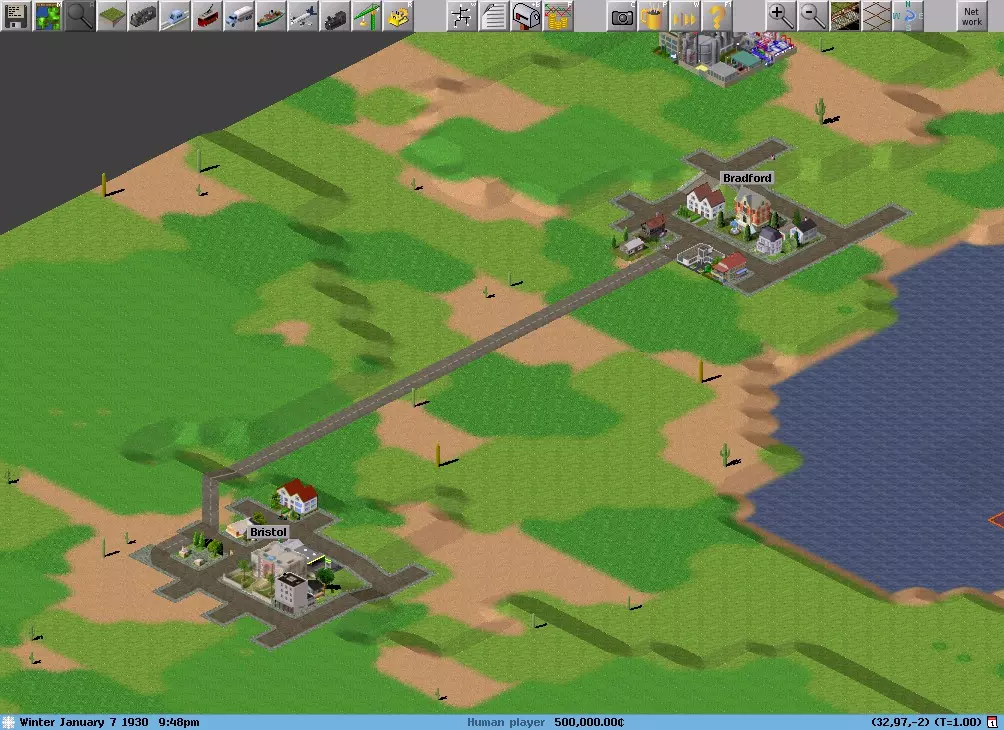
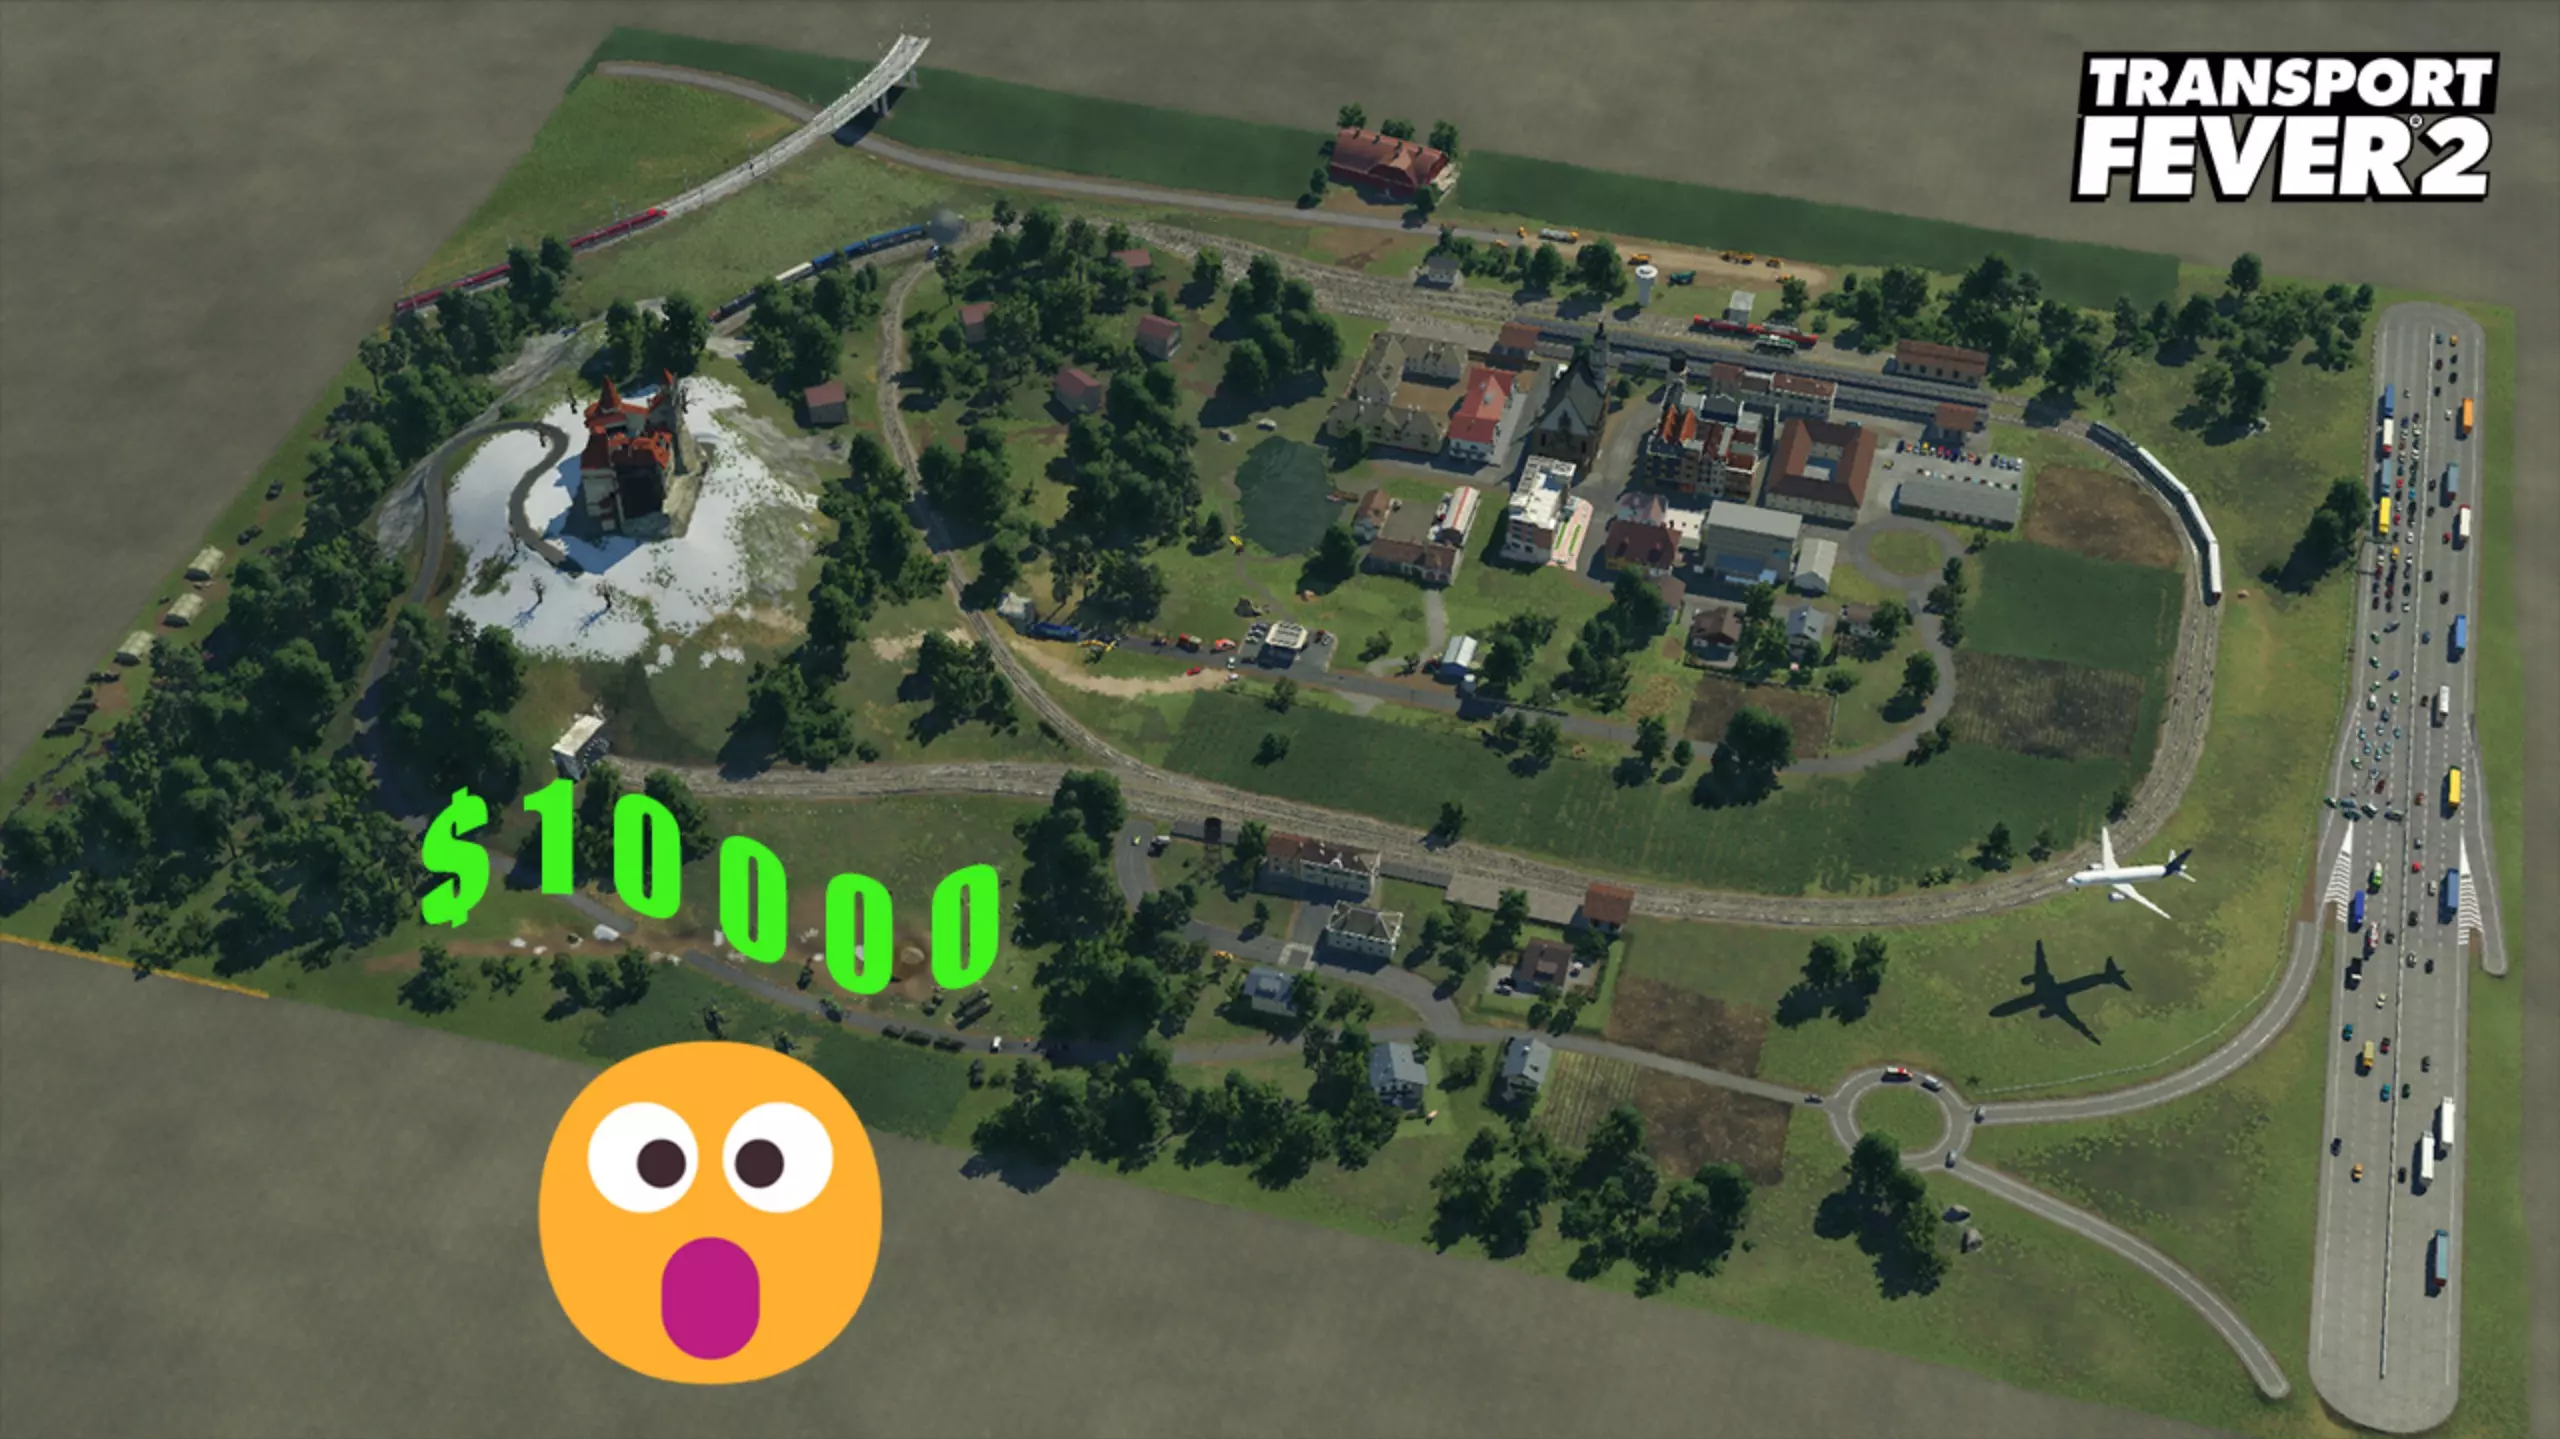
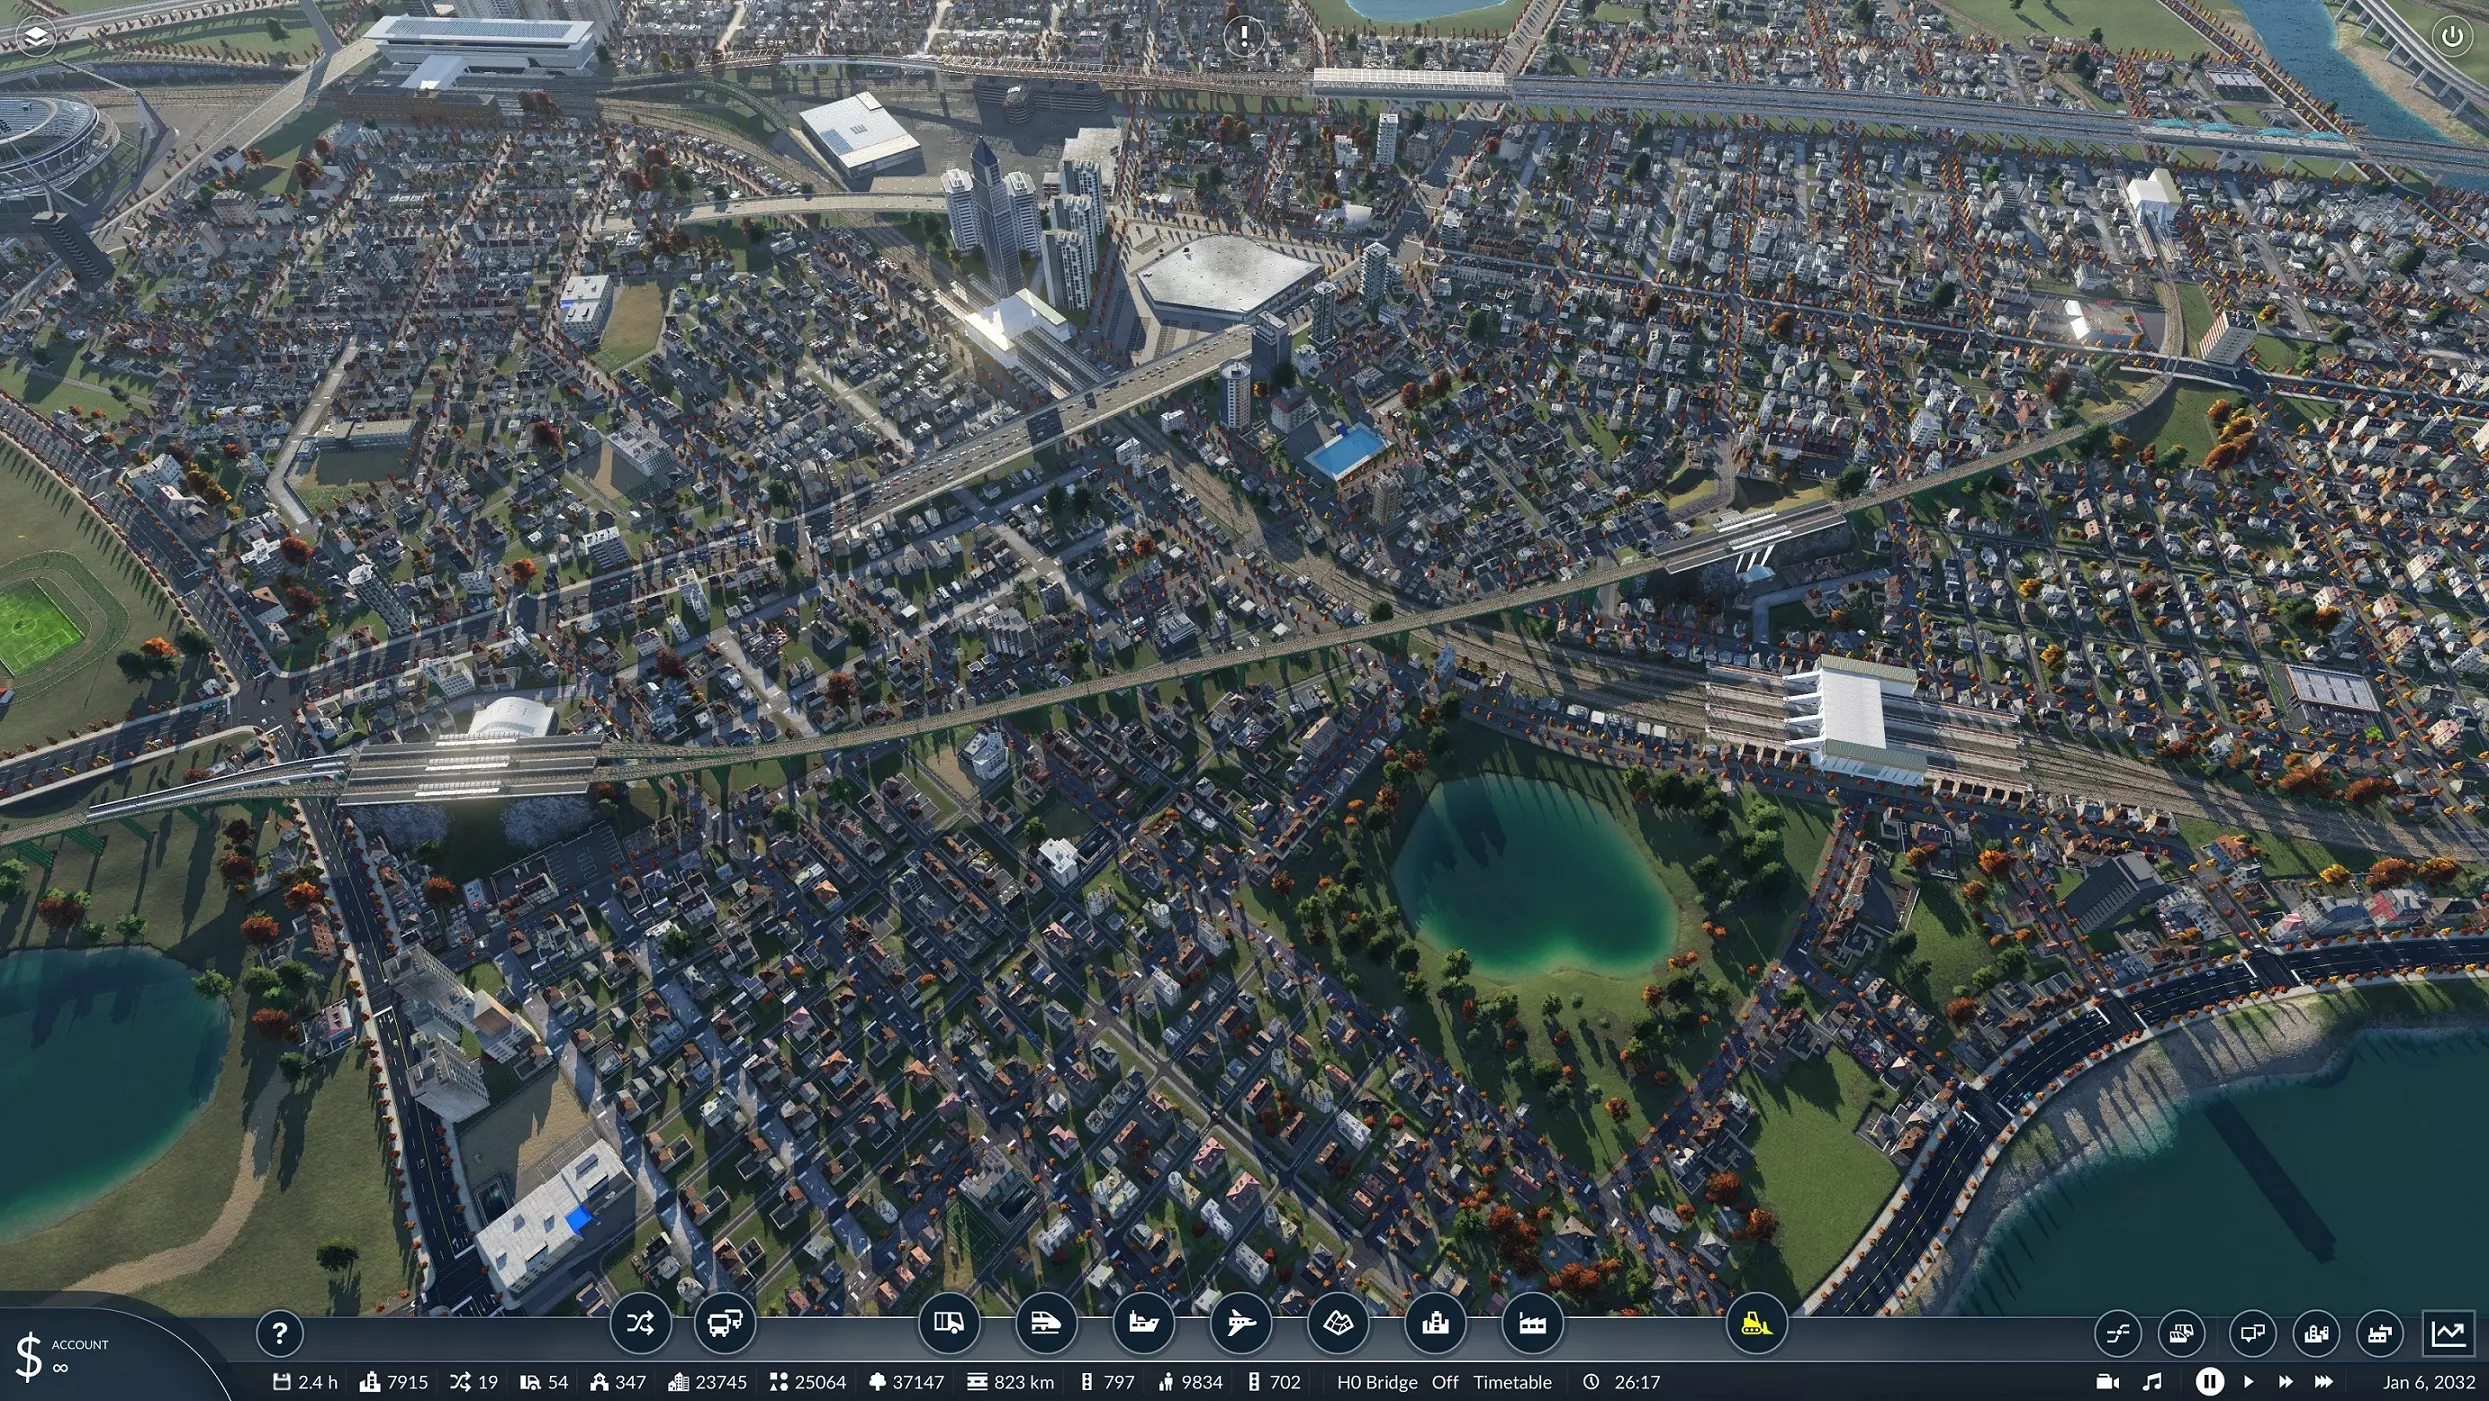
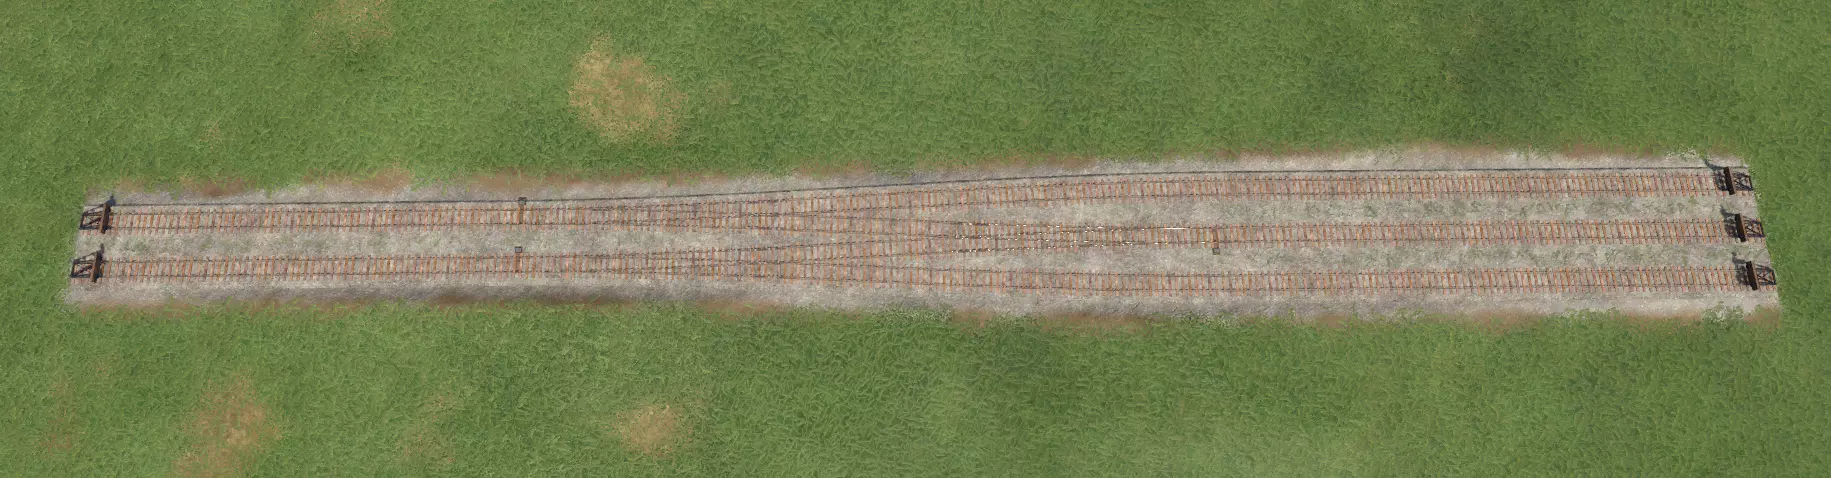
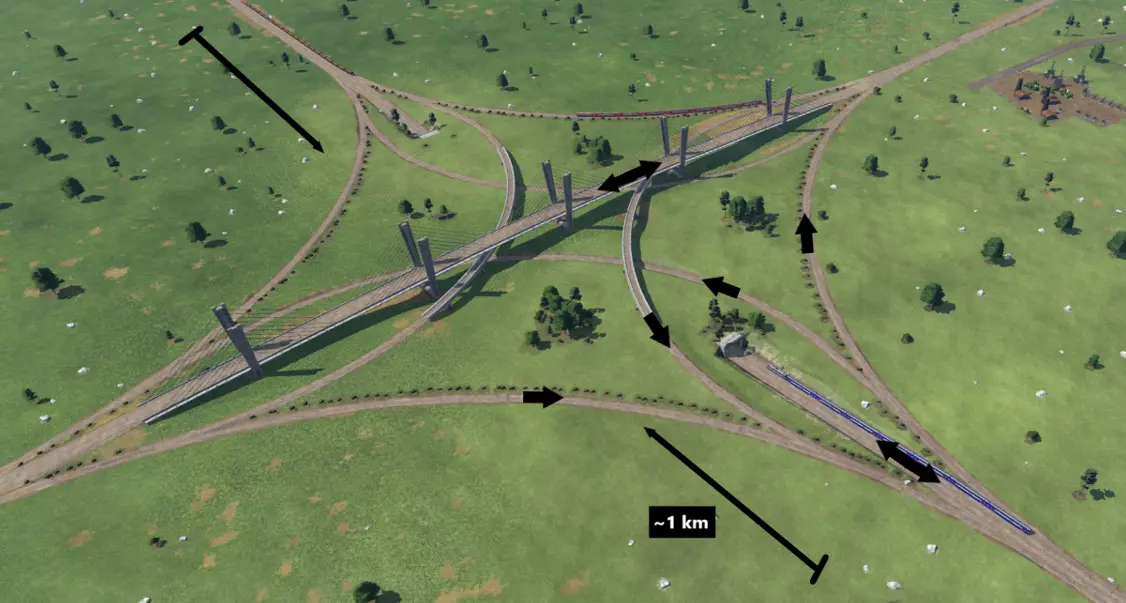
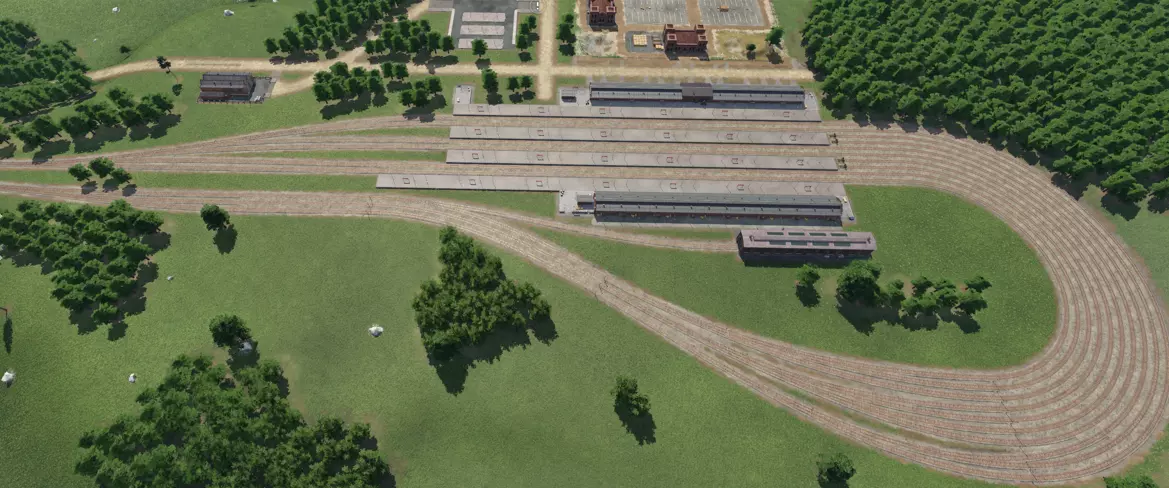
主干道(蓝色粗线)提供城市间通往市中心的清晰无间断路径,以最大限度减少重型交通的停靠和交叉。主干道的路口较少。次干道(绿色)较长;其中几条绕过市中心,为车辆提供另一条前往下一个城市的路线,而非必须通过主干道,从而缓解交通压力。次干道还将包括车站和附近工业区在内的关键基础设施连接到交通网络中。 铁路层级 铁路网络比公路网络给你带来更多挑战。与公路不同,铁路通过信号灯(本质上是铁路交通灯)划分为多个区块,每个区块只能有一列火车占用。每条轨道同时仅允许单向通行,若要实现多列火车双向无间断运行,可能需要一条平行轨道。 干线是铁路网络中的高速公路/大动脉。设计干线时应确保火车能高速、无间断地在主要城市与关键网络节点(如客运站和货运枢纽)之间运行。干线通常具有以下特点: 1. 多为双向专用轨道(左行和右行交通) 2. 可容纳的火车数量仅受区块数量限制 3. 设有常规信号系统,例如每300-600米设置一个信号机在交叉路口和车站可能需要更多轨道,但在较长的无间断路段或不太繁忙的区域可以减少轨道数量。应尽量减小曲率以保持较高速度。优先采用与其他线路和道路的立体交叉设计,尤其是在最繁忙的路口。支线从干线“分支”出来,提供本地服务。指定支线可以将有时必要的慢速车辆和铁路设施(如平交道口、掉头处、停靠站等)与干线的连续服务隔离开来,避免其造成干扰。例如,当连接工厂或偏远城镇的客运站时,如果按照干线的最佳标准来连接会显得迂回、不经济或耗时过长,这时支线的作用就很明显了。支线: 通常为单线或设有会让站 通常一次仅能容纳少数列车,甚至仅一列 可能仅有少量信号机(如在会让站区间),或单列车运行时无需信号机 可能包含部分或大部分平交道口/低速(多弯道)路段 可能与干线完全分离,仅通过连接至共用的车站枢纽实现衔接 可参考下图示例中干线与支线的运行情况,图中黑线代表干线,支线则以其他颜色的线条表示
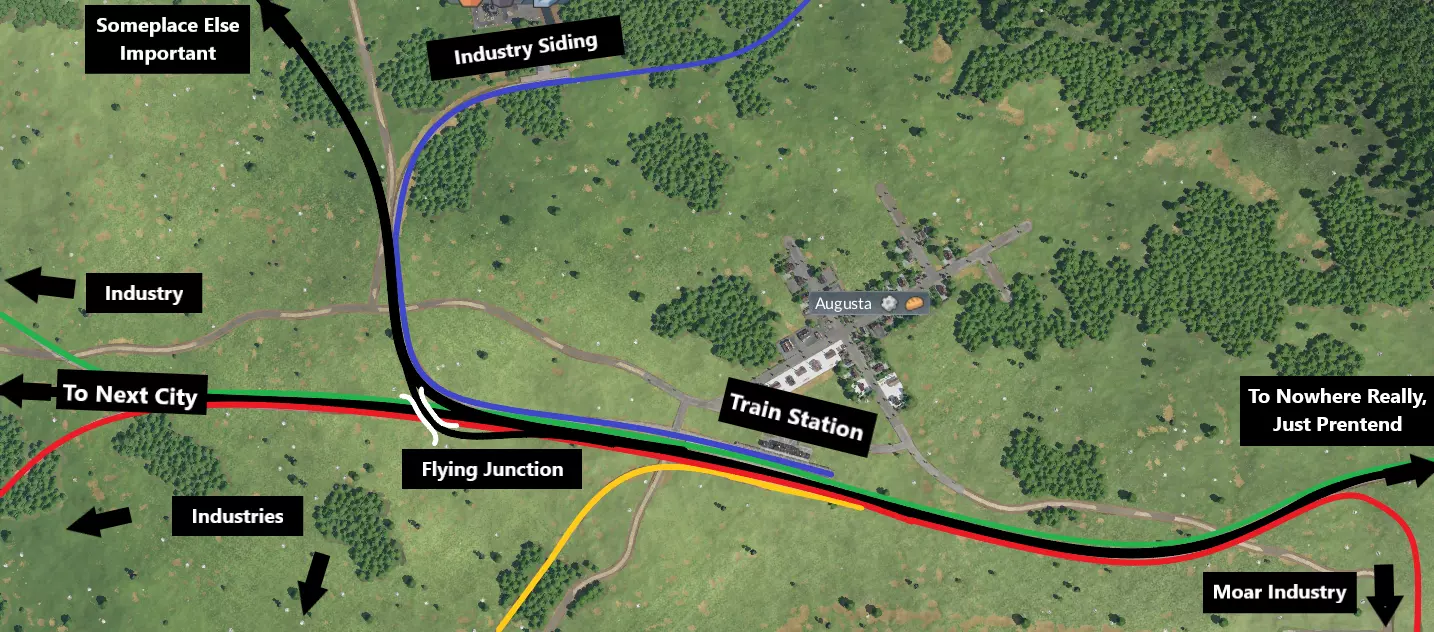
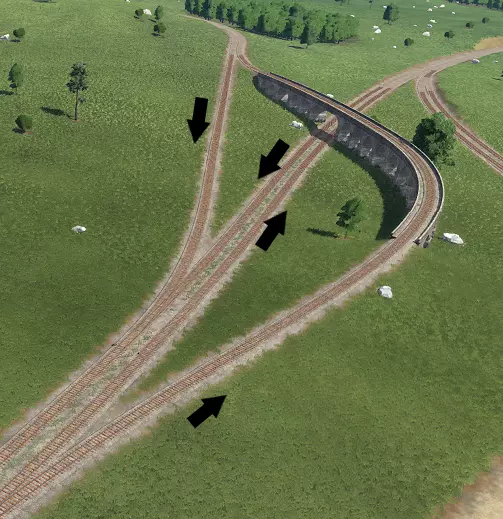
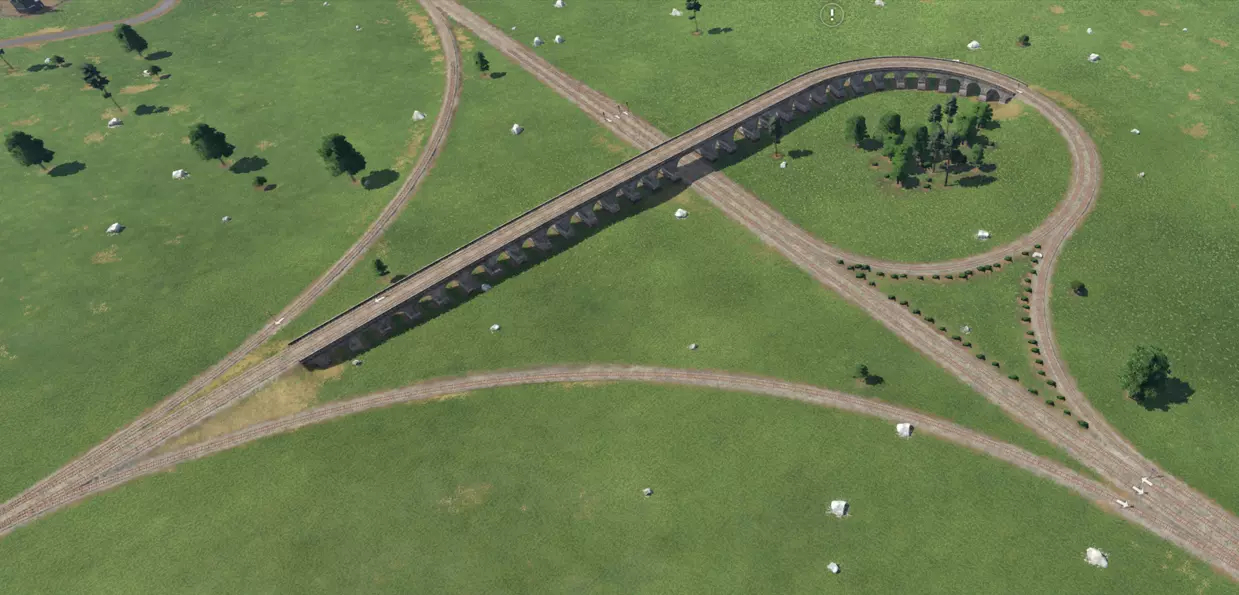
在这个示例中,所有支线都以某种方式与主线平行运行,但不会相交!它们在城镇的货运站连接,并且/或者直接通向附近的下游产业。在这种配置下,所有货物都在火车站集中和转运,不会干扰主线交通。而且,这种布局看起来很整洁。 这种配置的另一个优点是车辆优化。从效率角度来看,主线车辆通常受益于能够通过大型枢纽车站进行长距离大运量运输,并达到较高速度。由于主线设计得更快、更平坦,你可以选择能充分利用这一特点的车辆配置,而无需担心减速问题。同时,你可能需要加速更快但不需要太快的车辆,以满足专注于原材料的支线需求(稍后会详细说明)。这能实现更经济、更高效的运营。 注意干线的平缓曲线,它避开山丘和山谷等地形以保持速度。上图中的关键枢纽(有白色跨线桥)是两条干线的交汇处,东西走向的干线与南北走向的干线相连。在繁忙的干线上,这种立交桥的价值在于允许车辆汇入,同时大幅降低平交道口带来的延误可能性,这被称为【飞跨式道岔】(下方为仓促构建的细节示例,非同一处)。
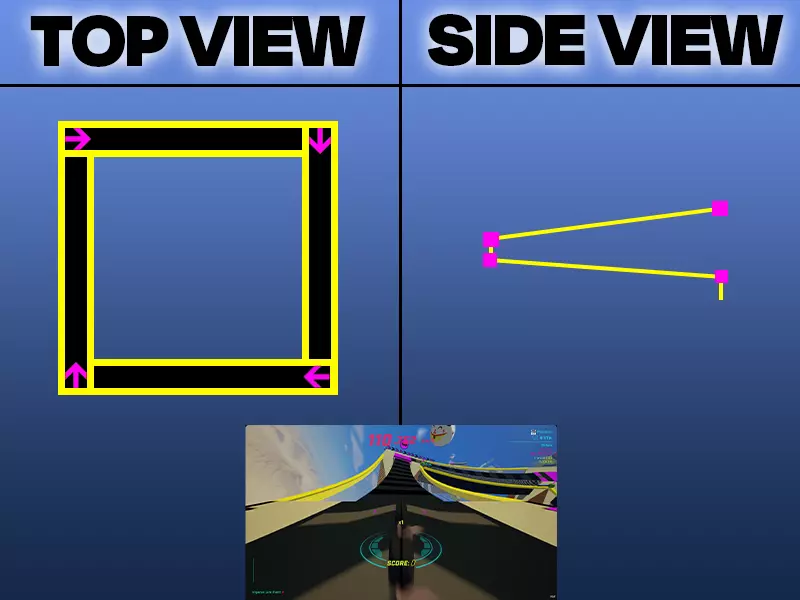
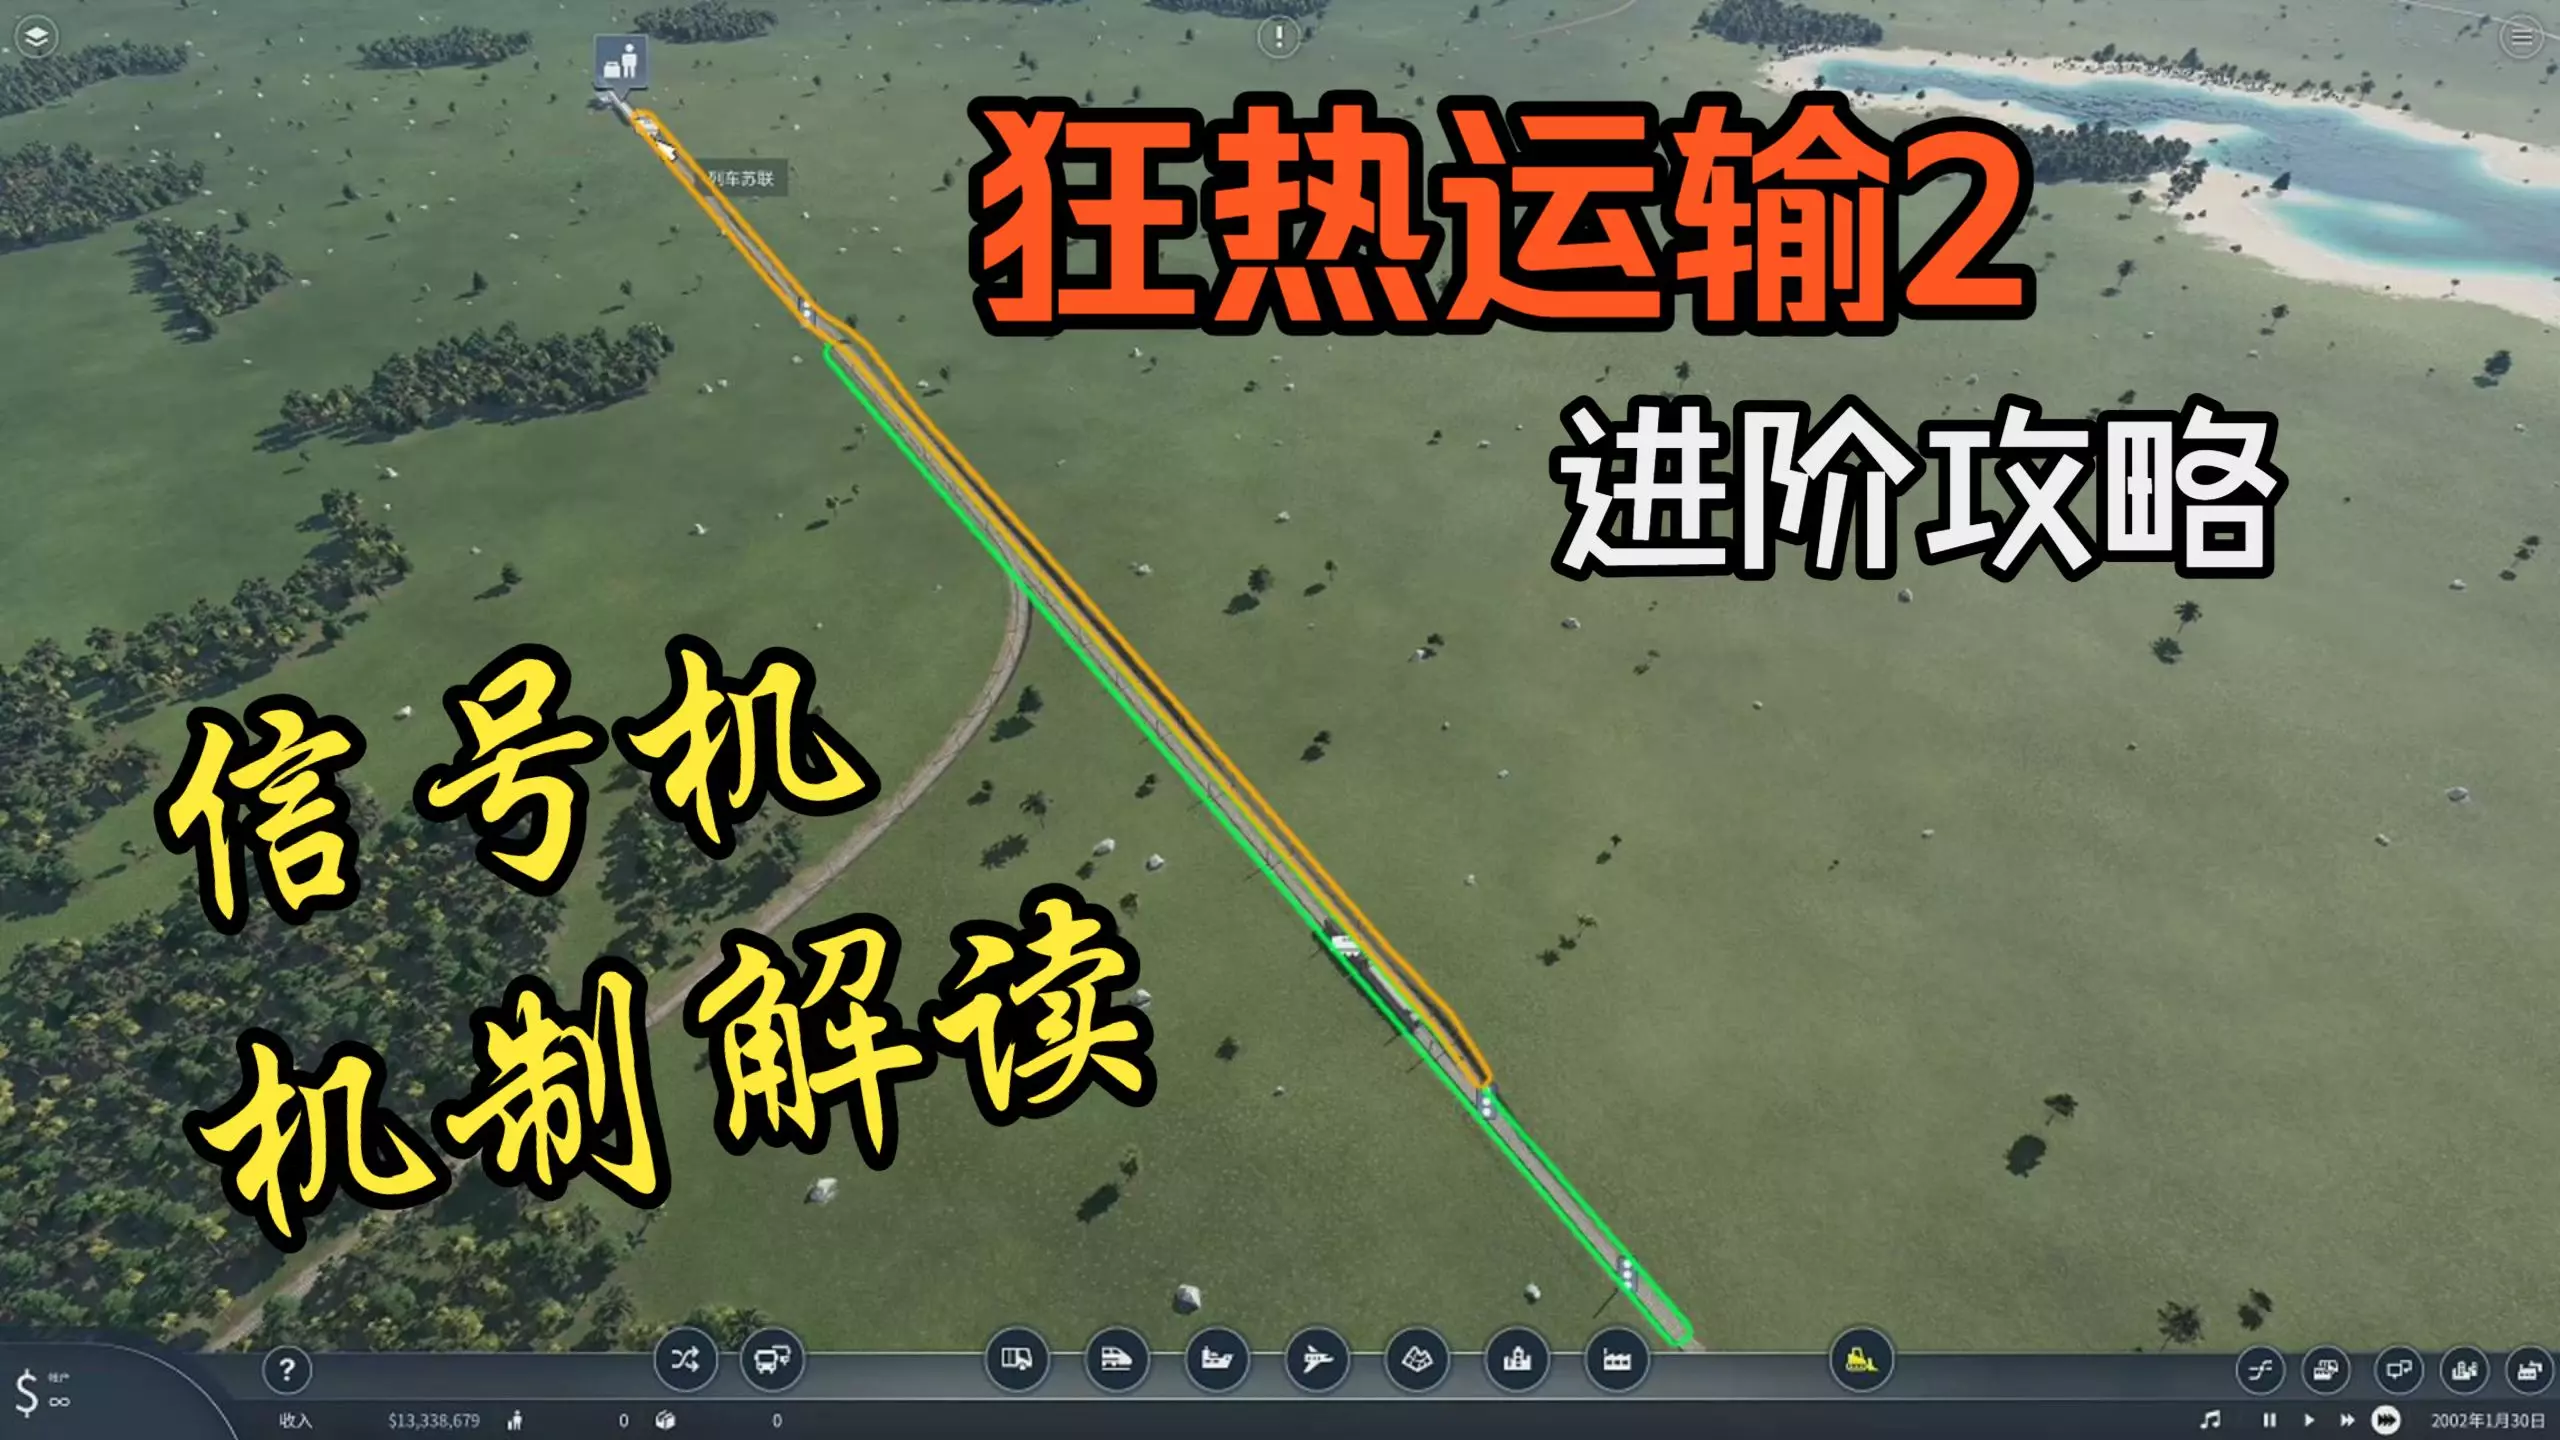
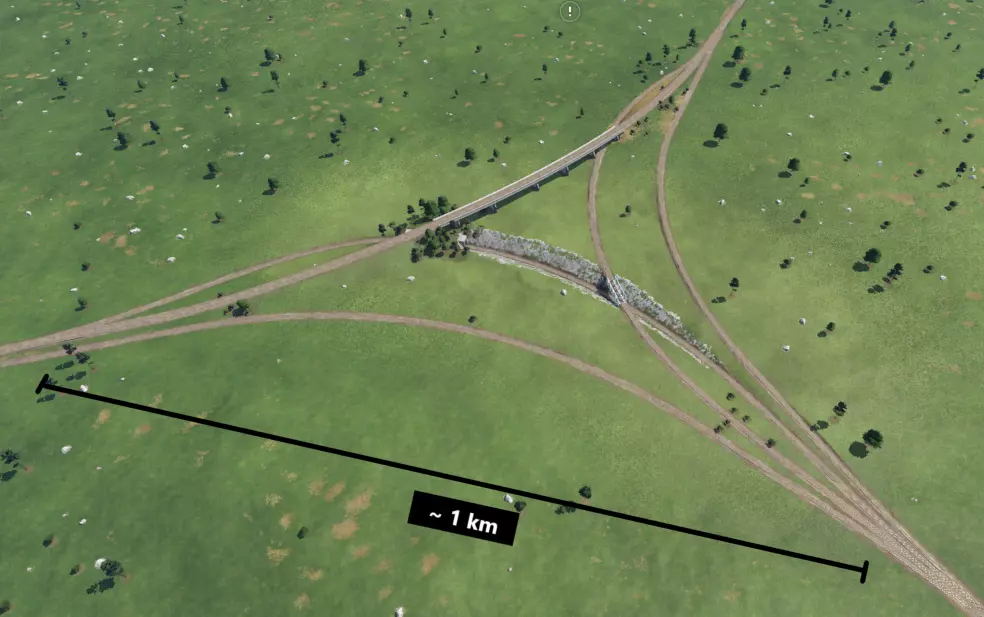
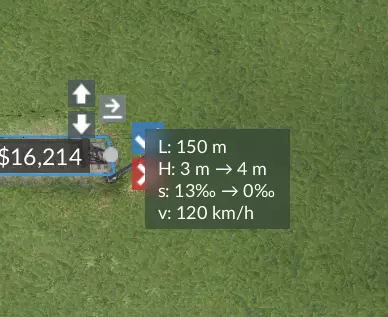
在车站,每条线路都有专用的侧线站台,以便列车停靠时,干线交通能不受干扰地继续运行。 地图设置 你的地图设置将对游戏玩法和网络设计需求产生重大影响,因此请根据你偏好的体验来选择这些设置。在我看来,影响最大的因素是工业密度、城镇密度和起始日期。 起始日期 游戏从1850年开始,你可以选择最晚到2000年的日期。1850年是铁路运输和航运的时代。公路运输能力极低,速度也极慢。 随着时间推移,你将解锁卡车和有轨电车,它们的运输能力可与早期火车相媲美,价格也相应匹配。1920年你将获得飞机使用权,这彻底改变了你的运输选择,消除了网络运输的所有挑战。 与此同时,火车头成本飙升,导致部分铁路网络被淘汰,公路运输成为唯一经济的选择。如果你想进行长期游戏,需要准备好随着时间推移重塑部分网络,以保持利润增长。 【城镇与工业密度】 这些设置会影响城镇与工业之间的距离,进而影响游戏中各种运输方式的可行性。它们还会影响你建设大型网络和立体交叉路口的能力。例如,在低密度地图的游戏初期,你可能需要数百辆卡车才能维持线路效率,因此在大多数情况下,修建铁路成了唯一合理的连接方式。而在高密度地图上,少量卡车或许就能达到相同的效率;但与此同时,由于城镇和工业设施的阻碍,要建造大型的立体交叉路口会变得非常困难。 铁路 了解铁路的各种特性和建造技巧,将有助于你设计出既美观又盈利的铁路网络。 铺设轨道 根据你的预算来选择高速轨道或标准轨道。资金充足时,你可以将所有轨道都铺设为高速轨道,但那样就失去了游戏的乐趣和真实感。标准轨道始终非常适合支线铁路。高铁可以很好地替代干线铁路。 不过,你在游戏初期铺设的轨道可能弯曲度过大,直接升级后无法充分发挥高铁的速度优势。不要固执地尝试用高铁直接替换标准线路,或者让高铁全程与旧线路并行。更好的做法是新建一条尽可能平坦笔直的高铁干线,仅在必要时与旧线路并行,这样更符合现实情况。 在车站附近铺设轨道时,尽量保持至少几百米的0%坡度。如果可以,使用轨道高程调整或“固定坡度”按钮让整条线路都保持0%坡度。借助模组,这一操作会更加容易查看和执行。否则,我建议尽量将坡度稳定在0-30%之间以获得最佳性能。 如果需要大幅改变海拔高度,可以使用等高线图层,它会显示鼠标光标所在位置的海拔高度,这样你就能比较起点和终点的海拔。使用信息模组对此会非常有帮助。如果你在两点之间画一条虚拟线路,模组界面会显示到终点的平均坡度。这有助于了解期望路线的可行性。如果坡度达到50%、60%、70%,那么你需要寻找更平缓的路径。以下是示例:

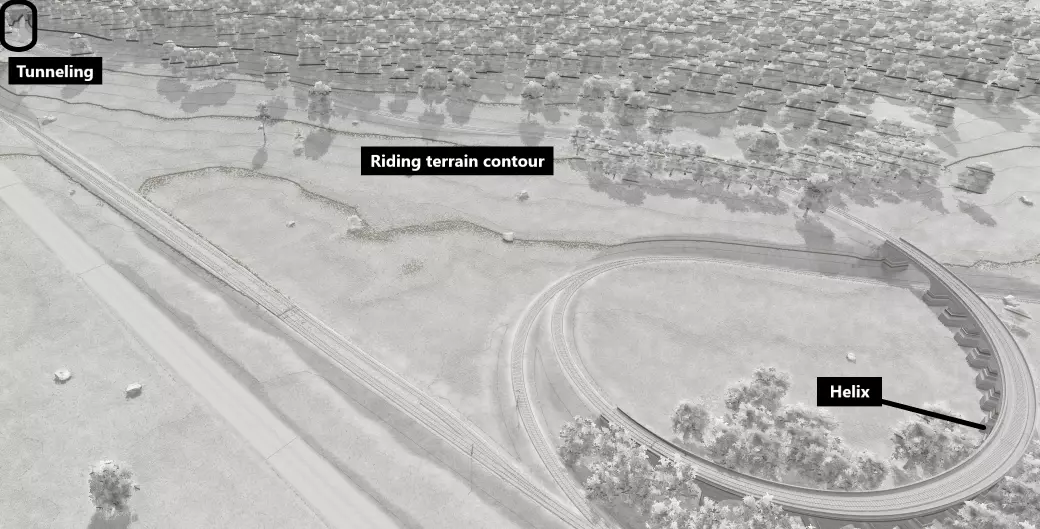
平均坡度达到50%,即便紧挨着附近的山丘,这也很可能不是你想要选择的路线——是时候寻找一条更平坦的路径了。 攀爬时,试着锁定坡度并沿着它前往目的地。你获取的坡度信息有助于找到一个能让你接近目标的理想位置。紧靠山丘等地形特征,沿着等高线平行前进将帮助你控制坡度。以下示例展示了其他几种可用于控制爬升的技巧:你可以使用螺旋高架桥在极短距离内提升轨道海拔,以及通过隧道来避开山坡表面的不平整区域。
最后,可以考虑调整车站的海拔高度,以帮助减少需要实现的高度差。 信号系统 信号系统是在轨道上放置信号,供列车运行的过程。信号相当于铁路交通信号灯。你需要使用信号来保护道岔和交叉路口。当你希望在一个轨道区段上运行多列火车时,信号也是必需的。一系列信号构成一个“闭塞区间”,默认情况下出现在以下位置: - 两个连续信号之间的空间 - 一个信号与后续车站之间的空间 - 两个车站之间未设置信号的整个轨道长度 每个闭塞区间允许一列火车运行。换句话说,轨道的理论容量是线路上所有区块的总和,因此要增加特定轨道区段内可同时运行的车辆数量,需提高轨道上信号的频率。下图展示了如何设置典型的道岔和带信号的区块。

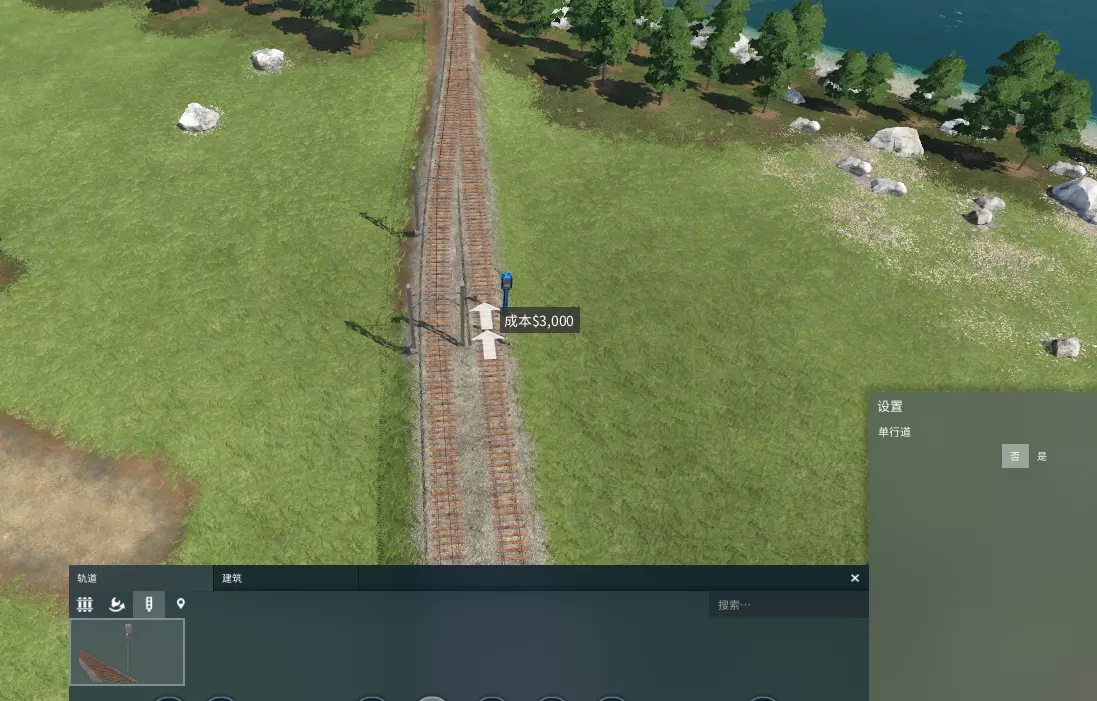
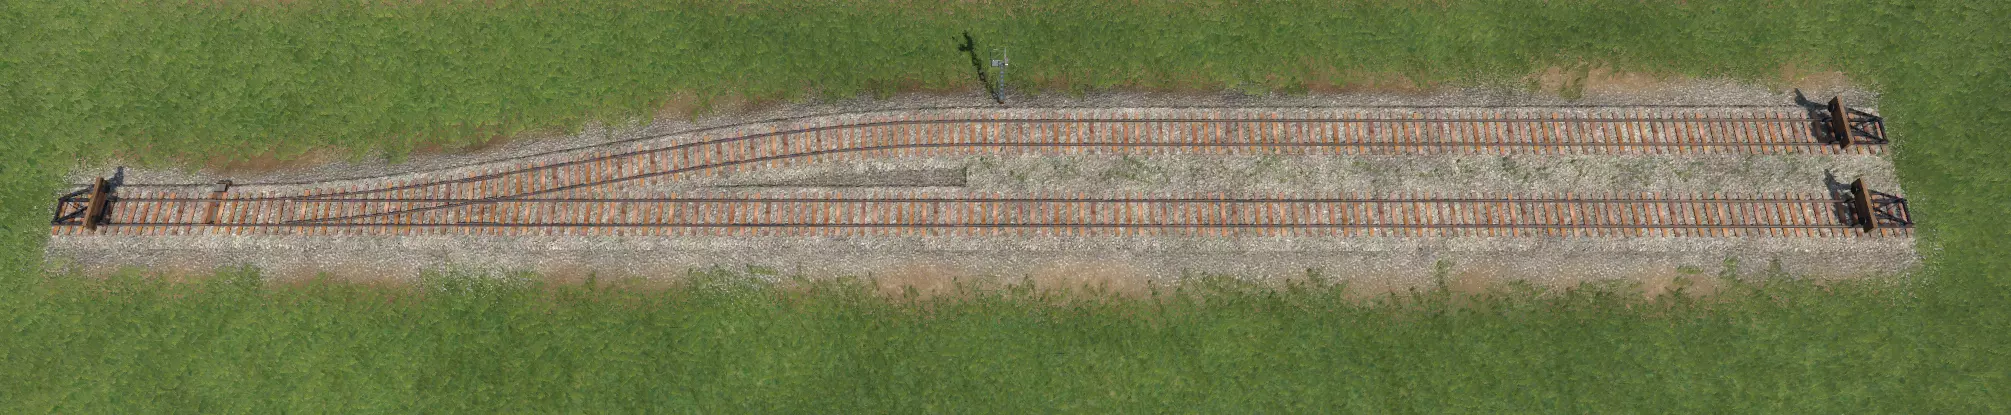
这是一个三向道岔,每组轨道的上行轨道用于西行交通,下行轨道用于东行交通。为道岔设置信号时,最重要的是在通往道岔的引道上放置信号机。这样可以确保道岔保持畅通,因为它会禁止列车进入包含道岔的闭塞区间,直到该区间内没有其他列车。你可以在道岔出口处放置释放信号机,这将允许后面的列车更快地前进,但你将面临阻塞道岔的风险! 根据你想要运行的列车长度和数量,决定信号机的频率和间隔。与支线或仅有一两列火车运行的偏远路段相比,主线、车站附近和道岔处需要相对更高频率的信号来保持车流顺畅。注意那些比你在线路上运行的最长列车还要短的闭塞区间,这可能会导致道岔堵塞(嘿嘿)。 你可以通过设置菜单将信号设为单向,如果你确实想将轨道专门用于单向交通的话。通常情况下,使用常规的非单向信号几乎不会有问题。 道岔和交叉路口 道岔是轨道分岔的地方,允许火车从一条轨道转到另一条轨道。交叉路口是不同方向的轨道(或道路)相互交叉的地方。了解不同的道岔和交叉路口设计及其使用场景,能够提高列车变轨的效率并减少拥堵,这意味着更真实的体验和更多的利润。你的交叉路口设计决策可能会受到以下因素的影响: - 你能够为道岔区域使用的空间/轨道距离 - 列车需要行驶的速度 - 你希望列车在同一路径上能够切换到的其他轨道数量 - 你愿意花费多少时间以及想要设计得多么复杂 以下部分提供了道岔和交叉路口设计的示例以及建议的使用场景。 道岔 单开道岔 标准的道岔。没什么特别的,适用于创建侧线轨道。因为我是美国人,需要靠右行驶,所以在道岔前的上行轨道上有一个信号机,以防止路口堵塞。
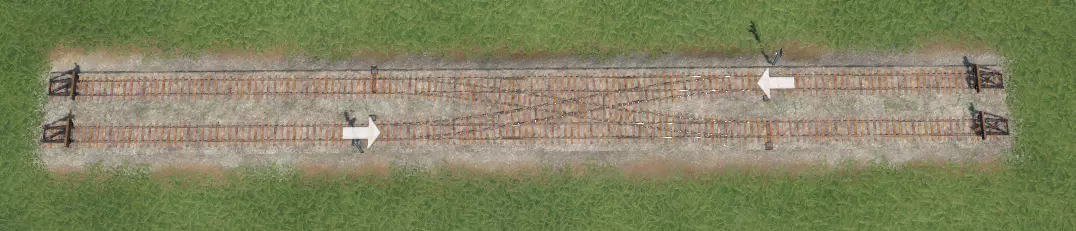
双开关/剪刀式渡线 这种情况下,我们有一个双向系统,信号机在每个方向都保护着交叉路口。当您有多条平行列车线路需要掉头和换向时(例如在终点站),这种方式最为有用,因为列车可以从一条轨道驶入,然后从反向轨道驶出。
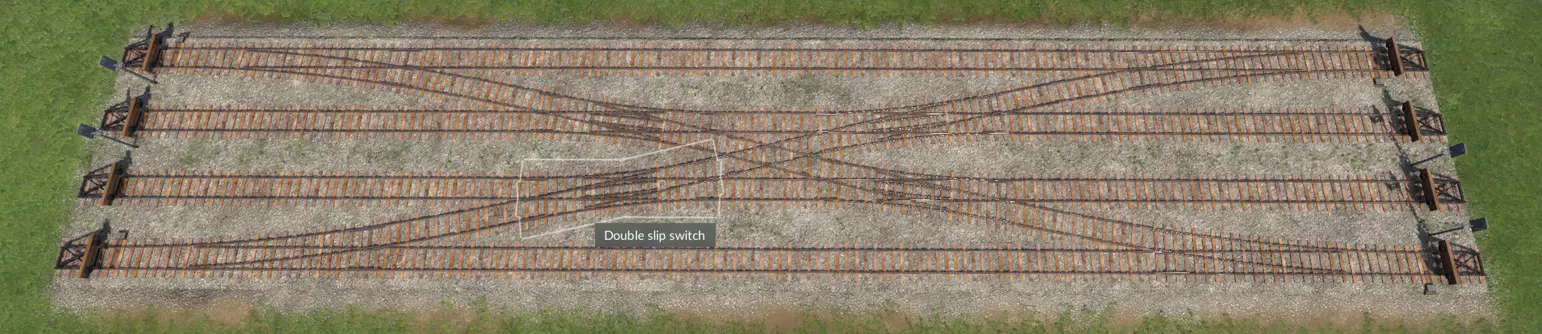
双交叉道岔 这种交叉设计格外精巧(除了拥有最棒的名称外),因为列车可以在四条轨道之间切换。若要添加必要的双转辙器,只需将鼠标悬停在如上图所示位置的四个点上,即可将其启用!请注意,这些道岔最好保留在诸如终点站等低速区域附近使用,因为转辙器会显著降低轨道速度。
双开道岔 道岔的分支角度在给定距离内的偏差仅为上方所示标准道岔的一半,从而形成对称的分支结构,而非单侧旁支。你可以无限平行堆叠这些道岔。这是构建贯通式车站 bypass 的绝佳结构。
梯线 梯线是从同一条轨道分出的一系列连续道岔。这是一种为车站内多个站台提供高效接入的方式,例如用于连接火车车库。建造梯线的关键在于,每条支线的分歧点都必须尽可能靠近前一条轨道。延伸一条新轨道使其平行,直到“曲率过大”的提示消失,继续建造平行的直线段直至终点,然后重复此过程。
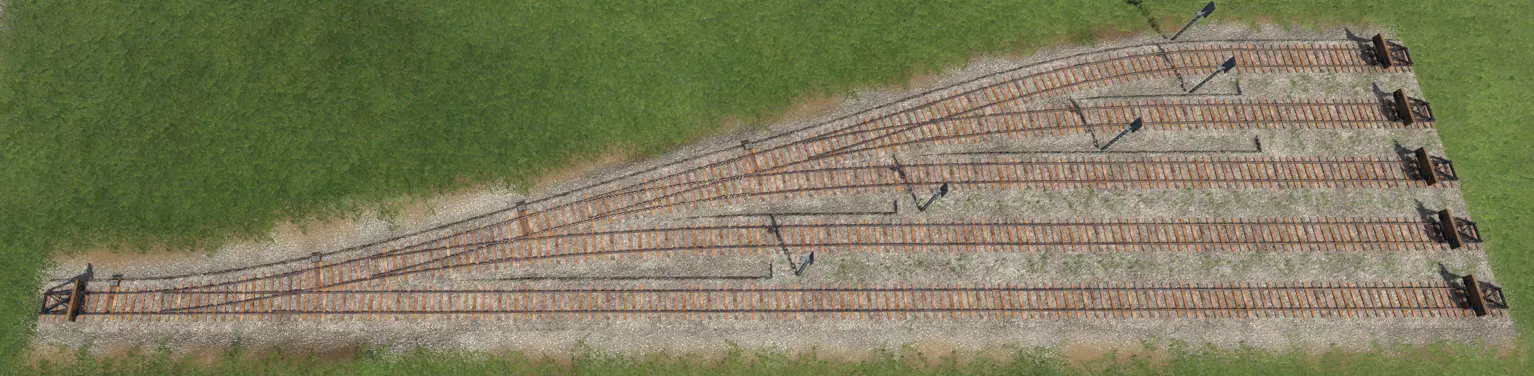
Wyes与双开(良好)道岔 标准道岔和双开道岔建造速度快且结构紧凑,但转辙速度较慢(在通过复式交分道岔时,速度低至40公里/小时以下),并且众多的转辙选项可能导致多列列车在等待通过道岔时阻塞多条线路(不过建造立体交叉道岔有助于缓解此问题)。适用于在终点站或侧线需要高效转辙的场景,理想情况下应是几乎没有直通交通的区域,特别是列车即将停车或仍以低速行驶的地方。 Wyes道岔允许在相对较短的转辙距离内以较高速度转辙,相比标准道岔速度更快(在之前的示例图片中,道岔速度可达100公里/小时)。这使得它们非常适合用于创建【分流车道】,让您希望快速通行的车辆(例如在高速主线)能够快速通过。此外,这样做还能实现平滑过渡,提升道岔的美观度。 不过,【三角道岔】功能单一,只能为列车提供一个转向选择;相比之下,【复式交分道岔】配置则可以同时实现多条轨道的交叉或切换。最后,三角道岔的建造难度较高,您需要凭目测创建三条轨道,然后再进行连接。因此,不要在不重要的道岔上浪费时间建造它们。 案例研究 以下是在货运站实际应用这些技巧的示例。
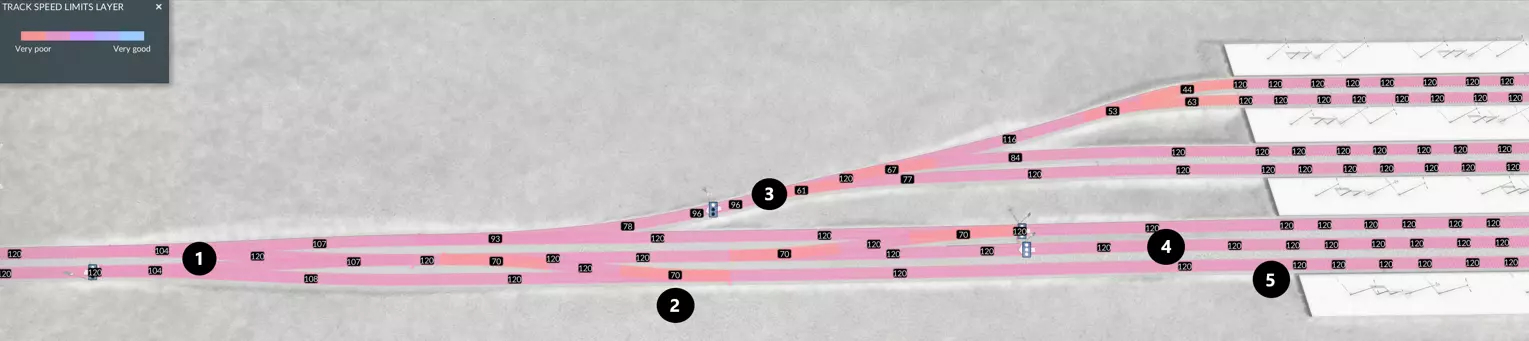
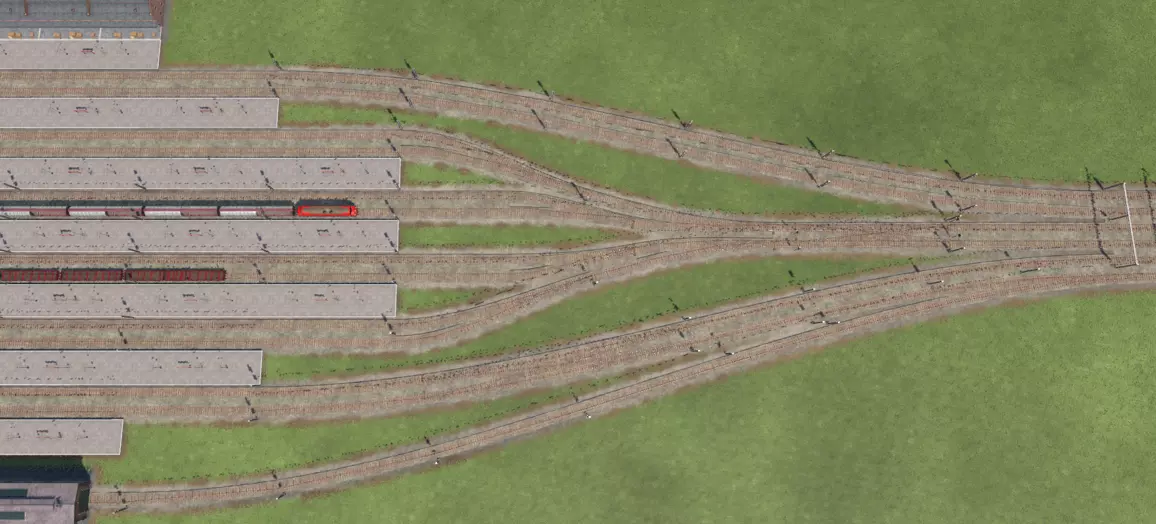
(1)三角线 (2)单开道岔组 (3)梯形轨道 (4)专用避让轨道 (5)双向侧线 三角线(1)通过将干线分叉为第三条轨道,即专用避让车道,为车站提供了高速直通行车选项。侧线(5)可用作列车的主要停靠点,列车停靠后可通过道岔组(2)换向;若侧线未被占用,直通行列车也可使用侧线绕过车站,作为主避让车道的替代选择。车站上半部分通过梯形轨道(3),为上行干线向西行驶的列车提供单向进入多个站台的通道,适用于主侧线被占用的情况,或需要长时间停留的列车。这些特性使该车站能够轻松容纳多列火车和线路,而不会出现拥堵。这种配置最大限度地减少了交叉线路,进一步提高了效率。 道岔 道岔可以是平交道口(也称为平面交叉),也可以是立体交叉(不过道岔也可以是两者的组合)。道岔的立体交叉程度越高,通行效率就越好。平交道口: 占用空间更少 成本更低 建造速度更快、更简便 可能导致交通减速或停滞 适用于支线或主线的偏远路段 立体交叉路口: 可同时容纳更多列车 成本较高,需要建造立交桥和路堑 建造难度大且耗时 允许更高速度甚至不受阻碍地通行 适用于高流量区域和提升车站通行效率 规模可能很大,在短距离或城镇/工业区密度较高的地图上效果不佳 以下是按复杂度和吞吐量递增顺序排列的路口示例。结合多种路口类型的特点,可创建出有趣、独特且美观的路口,以满足特定场景的需求。三路交叉路口 Y型平交道口 建造成本最低且最容易施工,但车辆可能需要完全停车才能通过路口。适用于支线、低速车站区域或低流量干线交叉处。
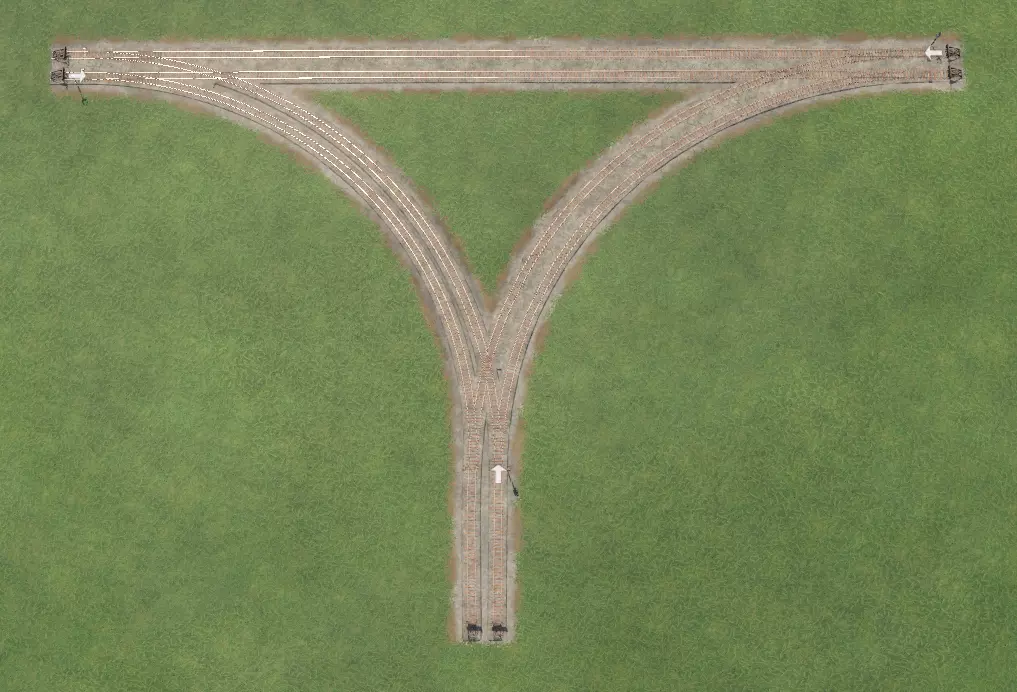
喇叭口 喇叭口在通行能力和建造复杂度之间取得了平衡。螺旋环道适合在短距离内实现显著的坡度变化。除非环道非常大,否则火车需要大幅减速才能通过,而且如果机车动力不足,可能难以爬上斜坡。尽管如此,在低速区域(例如主车站附近),它是一个实用的构造,可用于让火车向垂直方向行驶。你可以建造下沉式环道而非高架环道,或者增加更多环道以升级为四向交叉口。
立体三角线 体积庞大且建造难度极高,但只要曲线足够平缓,就能让列车高速通过或完全无需减速。
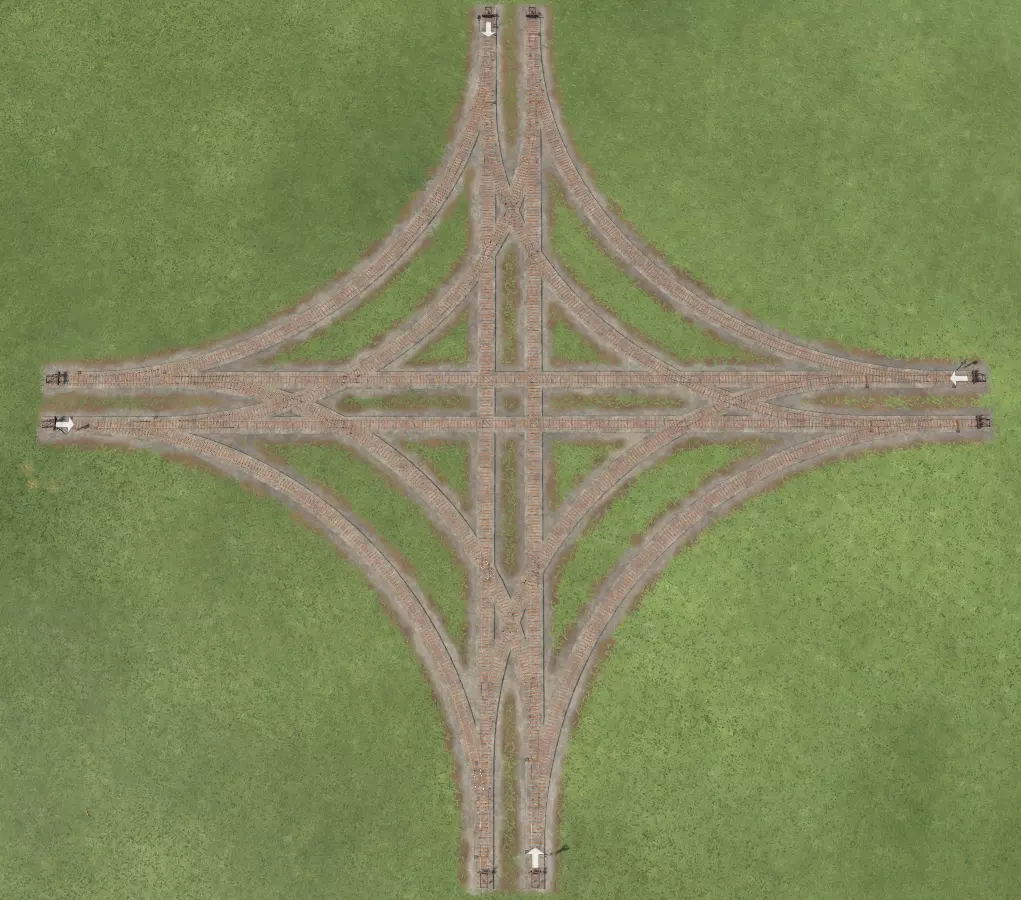
四路交叉路口 平交道口 与三角道岔类似,是建造起来成本最低、最简便的四路交叉方式,但车辆可能需要完全停车才能通行。
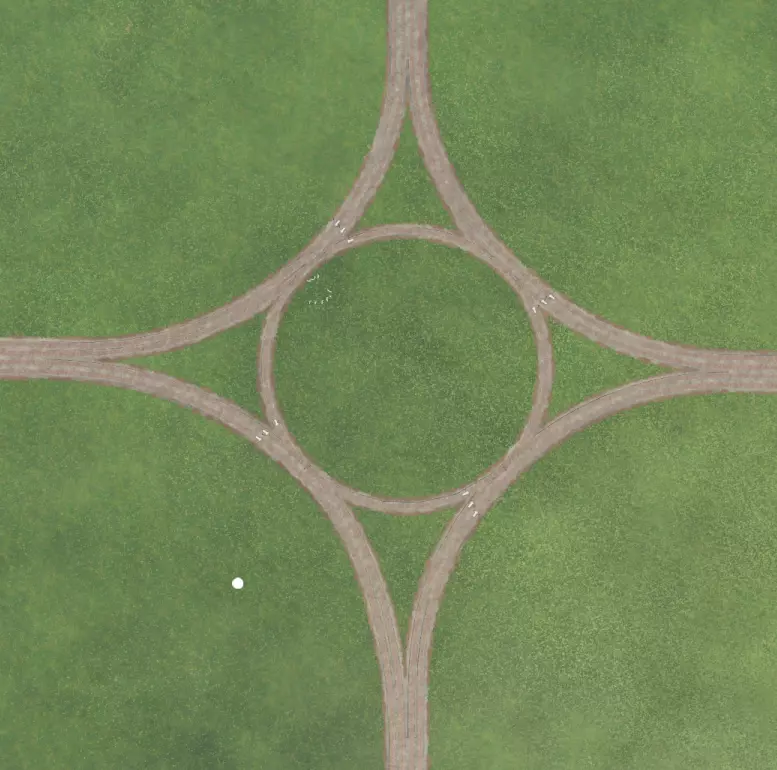
环岛 来个小型旋转通道怎么样?我怀疑现实中根本没有这样的平交路口,但理论上这东西或许能行。虽然它通过让所有方向的交通都按同一方向流动来消除了冲突点,但速度会很慢,而且长长的列车整个绕着圈子行驶会把整个系统堵得水泄不通。我倒要看看失败上校敢不敢试试,然后把列车在这个可笑的玩意儿上堵成一团乱麻的视频发出来。
堆叠枢纽 这个大家伙能容纳大量高速运行的列车。请注意,此建造包含四个立体交叉等级。两条直线穿过的主线坡度最陡,一条通过悬索桥高架,另一条通过隧道下穿。分歧轨道让列车能够切换线路,设有两对相对的轨道,一对略微下挖,另一对略微高架但低于大型立交桥。
分层式交叉口建造技巧 大型建造中,角度和坡度的配合可能颇具挑战。以下是一种能让建造过程更轻松的技巧: 1. 首先在平面上规划交叉口轨道。从确保干线的基本方向处于0%坡度开始。
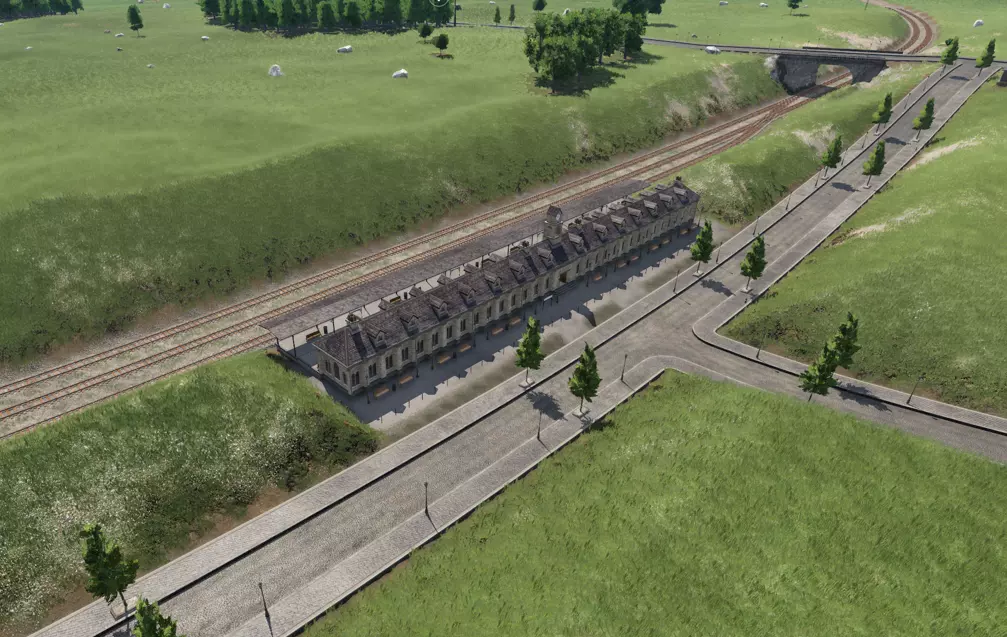
道路和轨道信息模组的用户界面中,【s:】代表坡度。 2. 删除需要立体交叉的轨道区段,在两端保留小段轨道作为引导。 3. 使用吸附功能重新铺设删除的轨道区段,此时可通过M键和N键调整曲率。按住Shift键进行微调,直至刚好避开下一条轨道。若无法获得足够间隙,可能需要扩大轨道规模。 车站 我注意到玩家在建造车站时,往往要么将车站建在城镇的边缘地带,使城镇完全被分割成两半,且两侧均无道路连接;要么将车站建成城镇的边界,导致城镇在车站处异常地不再向外发展。这在游戏的真实性和路网效率方面都是一种错失的机会。以下是一些车站建设技巧以及配套的道路基础设施,帮助你思考如何让车站更靠近市中心。 地面直通车站
贯通式车站允许列车“穿过”车站,无论是停靠还是直接通过。如果你想让大量线路接入此类贯通式车站,务必设置供列车停靠的侧线,并考虑为过境列车添加专用的单轨或双轨 bypass track(避让轨道)。你可能需要使用信号手动引导过境列车进入避让轨道。此外,绝对禁止在繁忙干线上的车站内让列车停在贯通轨道上,否则你的运营将陷入停滞。 附近道路的理想配置是采用立体交叉设计,这样道路交通就不会干扰车站运营。右上角有一条主干道横跨车站,这将使城市能够在车站另一侧继续发展,通过环形车道为立交桥腾出空间。图片前景中,有一条集散道路与车站入口平行,街对面设有一个大型有轨电车/公交车站。将本地和城际公交线路引入该车站,可获得良好的网络连通性。在另一侧也设置一个入口以扩大可达性也是不错的选择。 现在让我们仔细看看这个特定车站中你可能会采用的元素:
这种设计最适合不转向的线路,线路会停靠在与行驶方向相同的平行轨道旁的站台侧线上,然后通过无渡线配置的轨道梯(1)重新汇入主线。此车站没有任何 bypass 车道,但你可以根据需要添加一条或多条。 该车站采用三种站台配置,整体沿一条假想的中轴线对称。从上到下,首先是一个非常大的连续站台,其长度贯穿整个车站(2),非常适合大型快速列车。接下来是下方的岛式站台(3),它被分割为两个部分。通过这种设置,游戏会为你提供两个独立的站台,以便在同一条轨道上运行。岛屿之间设有一些道岔/复式交分道岔,为停车线提供了四种选择,这意味着列车几乎不会因等待站台而停滞。中间是两个港湾式站台(4号),轨道三面环绕,形成了一个小型终点站。这使得红线列车能够进出,而不会与绕行的正线轨道交叉。 下沉式正线车站
这个布局与之前的车站大致相似,但这次主道路立交桥是平交的。需要注意的是,如果你在海平面以下建造,有时会遇到奇怪的水景生成问题,我所知道的唯一解决方法是提高受影响区域的地形高度。开发者们,关于这个问题有什么解决办法吗? 平交终点站
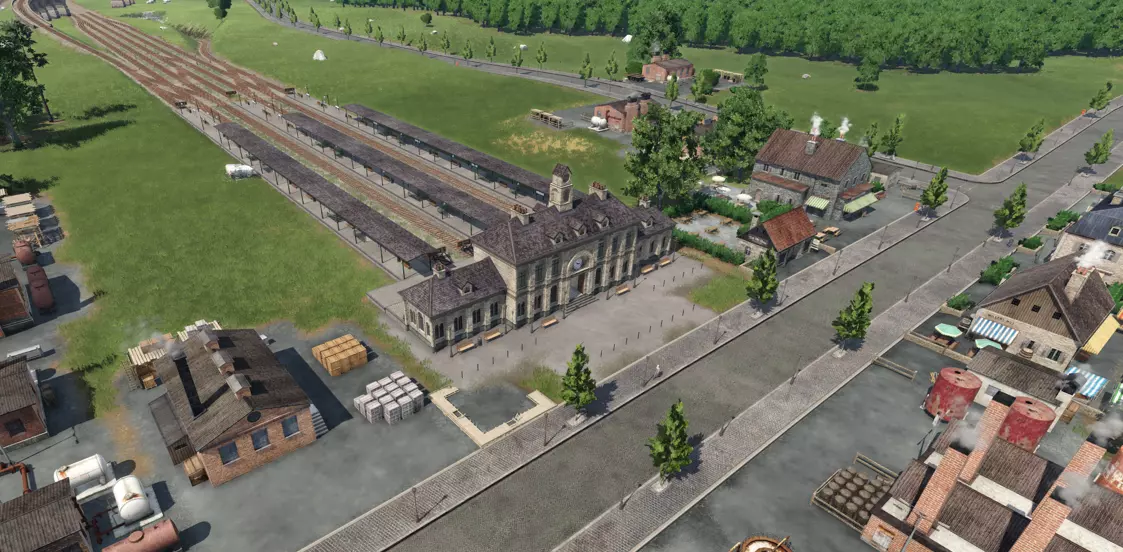
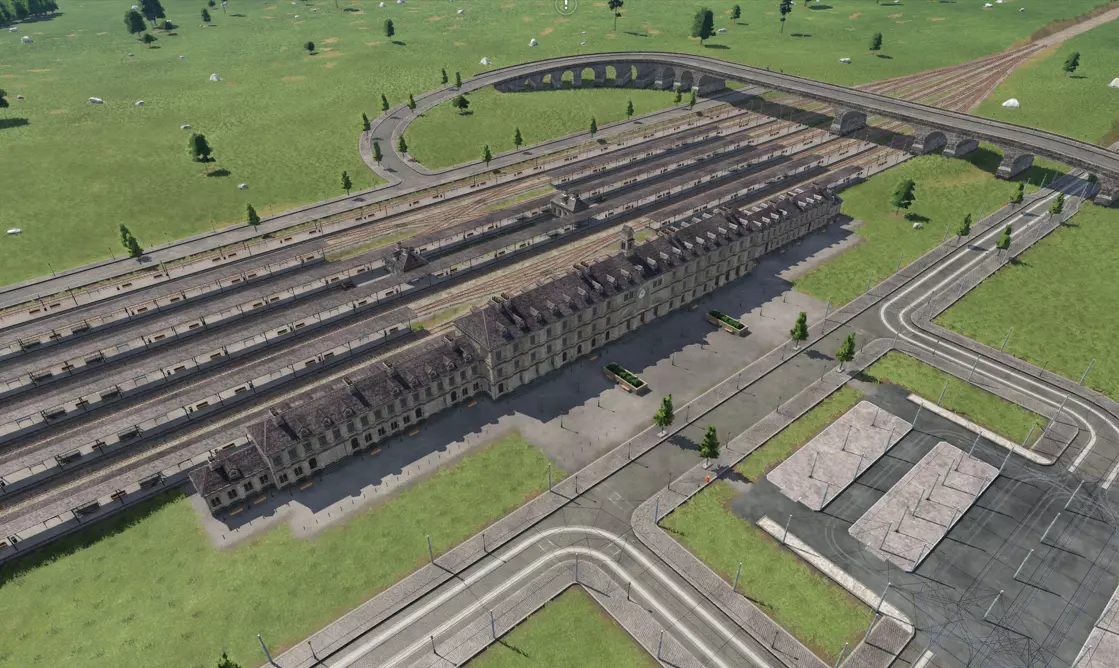
终点站的主要优势在于,它能让列车轻松停靠在市中心,因为大多数主干道和次干道与轨道平行延伸,而非垂直相交。不过,如果车站离居民区过近,排放问题可能会更加突出。因此,我倾向于将终点站的线路规划在城市的商业区或工业区一侧,而非居民区一侧。 最后,要保持繁忙的车站不出现拥堵可能会更棘手,因为你需要设置渡线或立体交叉来保证交通顺畅。以下是通往车站的轨道系统细节,该系统同时采用了立体交叉和隧道,使车站远端的列车能够更轻松地转换方向,而无需穿越大量轨道。
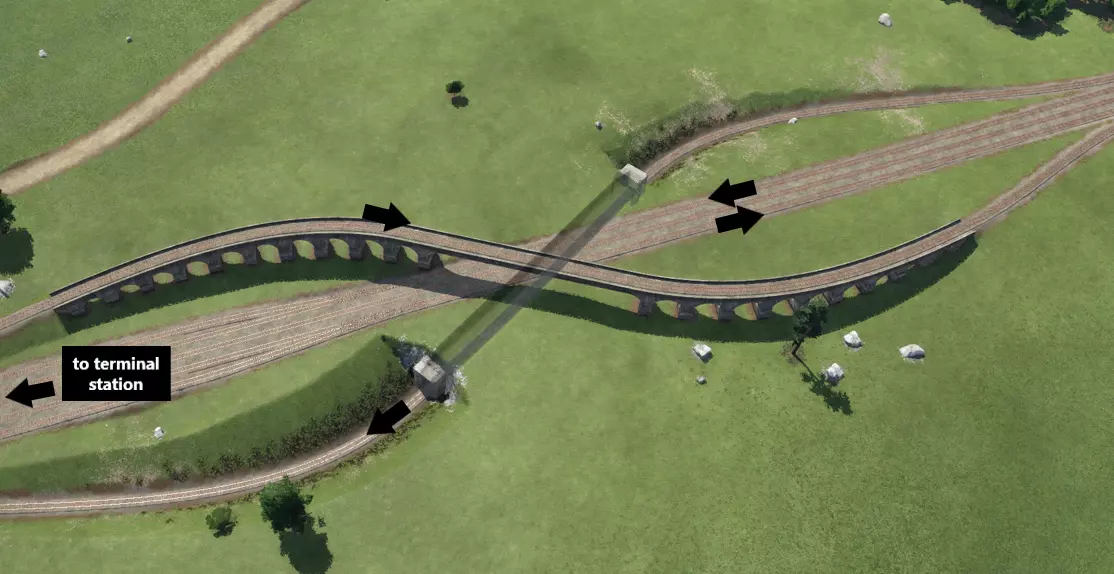
以下是车站与该枢纽之间线路的详细信息,以便了解其布局:
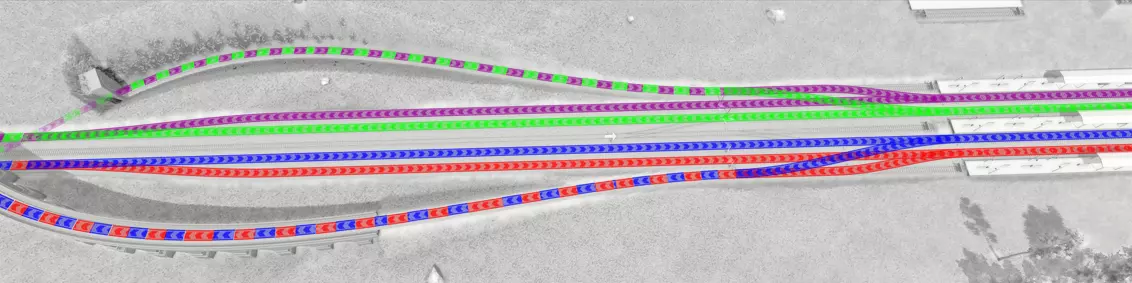
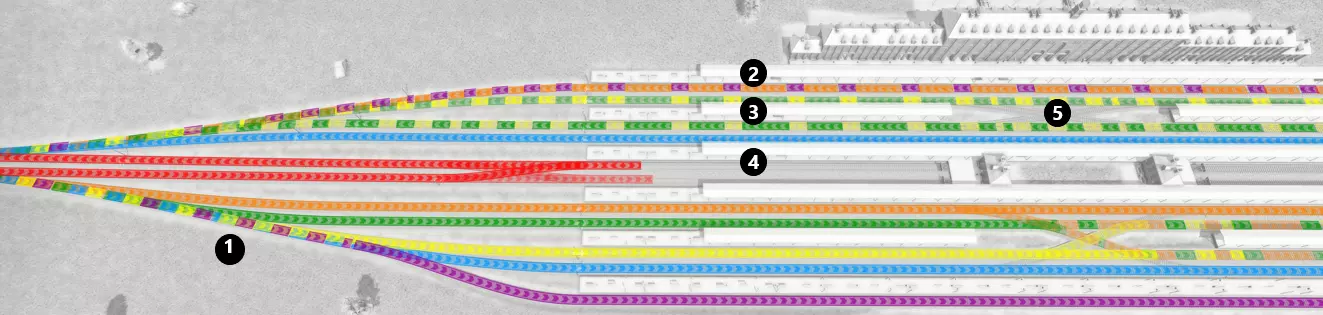
请记住,这个车站正试图保持交通流向的一致性:进站交通从左向右行驶(下方轨道),出站交通从右向左行驶(上方轨道)。例如,如果红线想要进入上方轨道以驶出车站,列车需要通过渡线穿越多条轨道才能到达那里,这会阻塞多个站台。相反,列车通过最下方的轨道以逆向行驶的方式,越过其他轨道后重新加入正常的出站方向,无需穿越任何轨道。对于这样的小型车站来说,这种设计可能有点多余,但随着需要穿越才能到达出站轨道的轨道数量增加,这种配置的实用性会呈指数级增长。 “泪滴形”终点站与“环形回车道”掉头区
这是我最喜欢的设计之一。这个车站是单向系统,列车从左下角进入,在进入站台前,会根据需要在大量且长长的引道轨道上排队等候。由于不需要道岔,你或许可以让无数列火车不停地顺畅通过这里。这里有一些漂亮的颜色来直观展示其工作原理。
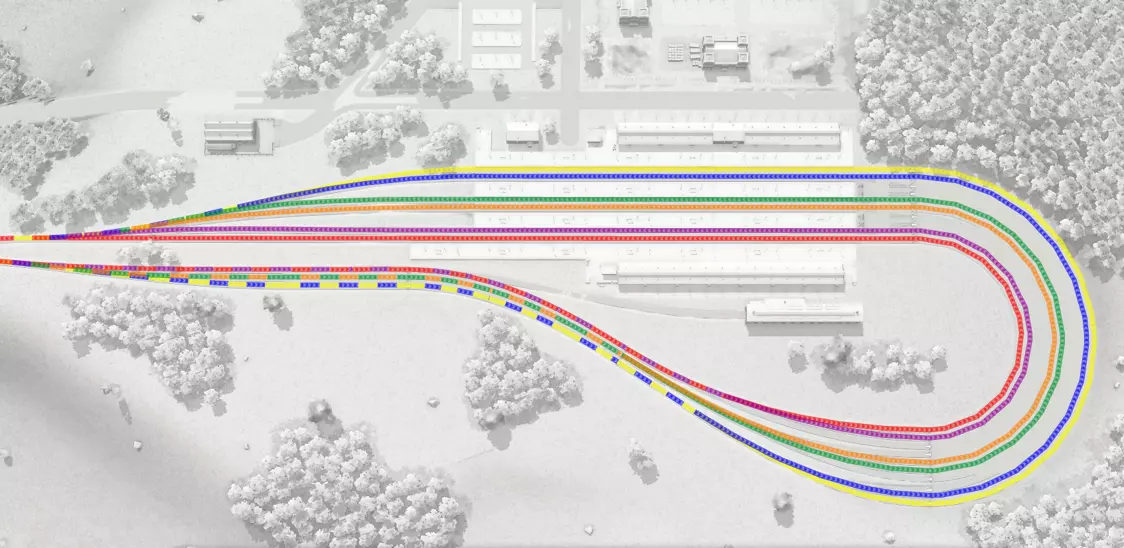
缺点是这会占用大量空间;话虽如此,我在轨道排队设计上确实有点夸张了,你可以精简一下,让占地面积小很多。不过我向来信奉“要么大干一场,要么干脆别干”。 需要注意的是,这个货运场紧挨着一个工厂。虽然你可以让这里进行多种不同的作业,但同时你也可以通过设计,让一种或多种货物直接卸到工厂,无需进一步分配。此外,这还能增加场景的真实感和美观度。 又一个贯通式车站 这是另一个例子,这次的 bypass lanes(旁通轨道)位于车站外围,而不是直接穿过车站中心。相反,中间的梯形轨道通向一个列车待避区,供等待货物转运的列车使用,而非位于车站外侧。
恰到好处的公交站 你可以将类似的技巧应用于除火车站之外的其他车站。以下是如何将公交站配置为直通式的示例:
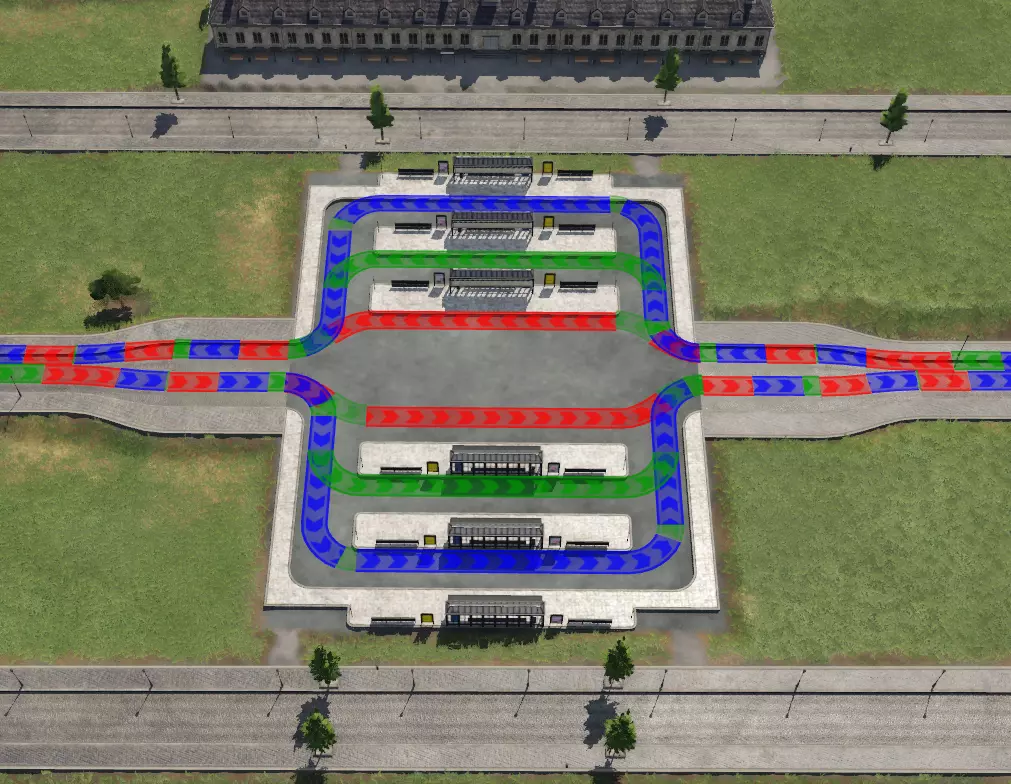
此系统结合将线路设置为使用备用平台的功能,能让大量公交车顺畅运行,避免它们在车站原地兜圈造成各种拥堵。 线路 以下是最大化每条线路利润的方法: 优化站点参数和筛选器设置。这些设置有助于维持负载比例,使车辆在行程的每一段都尽可能接近满载运行。以下是各参数的说明及其通常适用的情况: 负载水平%:例如,若你运营着一条煤炭→铜矿→钢铁厂的运输链,你需要将每个站点的线路负载设置为50%,以避免因供应材料比例失衡而造成浪费。发车设置:【满载(任意)】确保货运车辆充分利用其行程。这也会对线路上的车辆间距产生影响。确保车辆有停放空间,以便其在等待时不会干扰车站的通行交通。 发车设置:【满载(全部)】与【满载(任意)】类似,适用于你希望混合编组车辆以均等比例满载运输的情况,例如向 goods factory 运输塑料和钢材。 发车设置:【有货即装】适用于你需要直达服务且100%满载不太可靠的情况,例如客运。有助于防止拥堵。 发车设置:【最短停留时间】适用于你希望车辆均匀间隔发车的情况,例如客运服务。例如,如果你的公交车发车间隔为10分钟,你可以将终点站的最小发车时间设置为9分钟。这意味着公交车将每9分钟发车一次,但理想情况下会在下一班车到达前1分钟发车,以确保更规律的运营。重要提示:确保有供车辆排队且不会阻塞交通的位置,例如终点站带有长站台的车站。不建议在路线中段或靠近市中心的非常繁忙的站台/车站使用此设置。 发车配置:你希望车辆为遵守时刻表而停留的最长时间,例如,你可能希望客运列车等待不超过30秒。或者,你可能希望在收货车辆放弃等待离开前,留出时间让货物积累;这与【满载】功能配合使用非常有用。3分钟的默认设置相当不错,但有时我会将其设为无限(如果你的补给速度较慢,效果就不太好)。不过,你可以使用线路频率来对此进行微调,方法是根据补给线路预计为转运线路积累满负荷的速率来计算等待时间: 补给速率=(补给车辆容量)/(补给线路频率) 最大装载时间=(接收车辆容量)/(补给速率) 以下是一个计算等待装载原木的火车需要等待多长时间才能满载的示例(假设火车在整个期间都处于静止状态): 补给速率=(30单位原木卡车)/(3分钟频率)=10单位/分钟 最大装载时间=(90单位转运火车)/(10单位/分钟补给速率)=9分钟 在这种情况下,由于补给线路频率较高,所以无需过多担心,但如果你的转运服务频率较低(例如如果时间超过9分钟,你可能需要设置一个最大停止时间,以便有时间进行补充。不过,设置无限时间可能存在风险,会导致等待时间过长,但如果你的供应率可靠,这也是一个简单的选择。 使用备用站台可以减少拥堵并增加车站容量——对于适合类似服务的站台(例如,车辆停靠装载货物,与车辆短暂停留后继续行驶),要定期使用它们。 按理想的节点顺序规划线路(货物)。以下是三个假设场景,描述了货物沿生产路线的流动情况。圆圈代表原材料节点,方块代表工厂,椭圆代表转运站或城镇。箭头的饱满度代表行程中载具的满载程度,百分比则是涉及满载的总路线时间的假设数值。
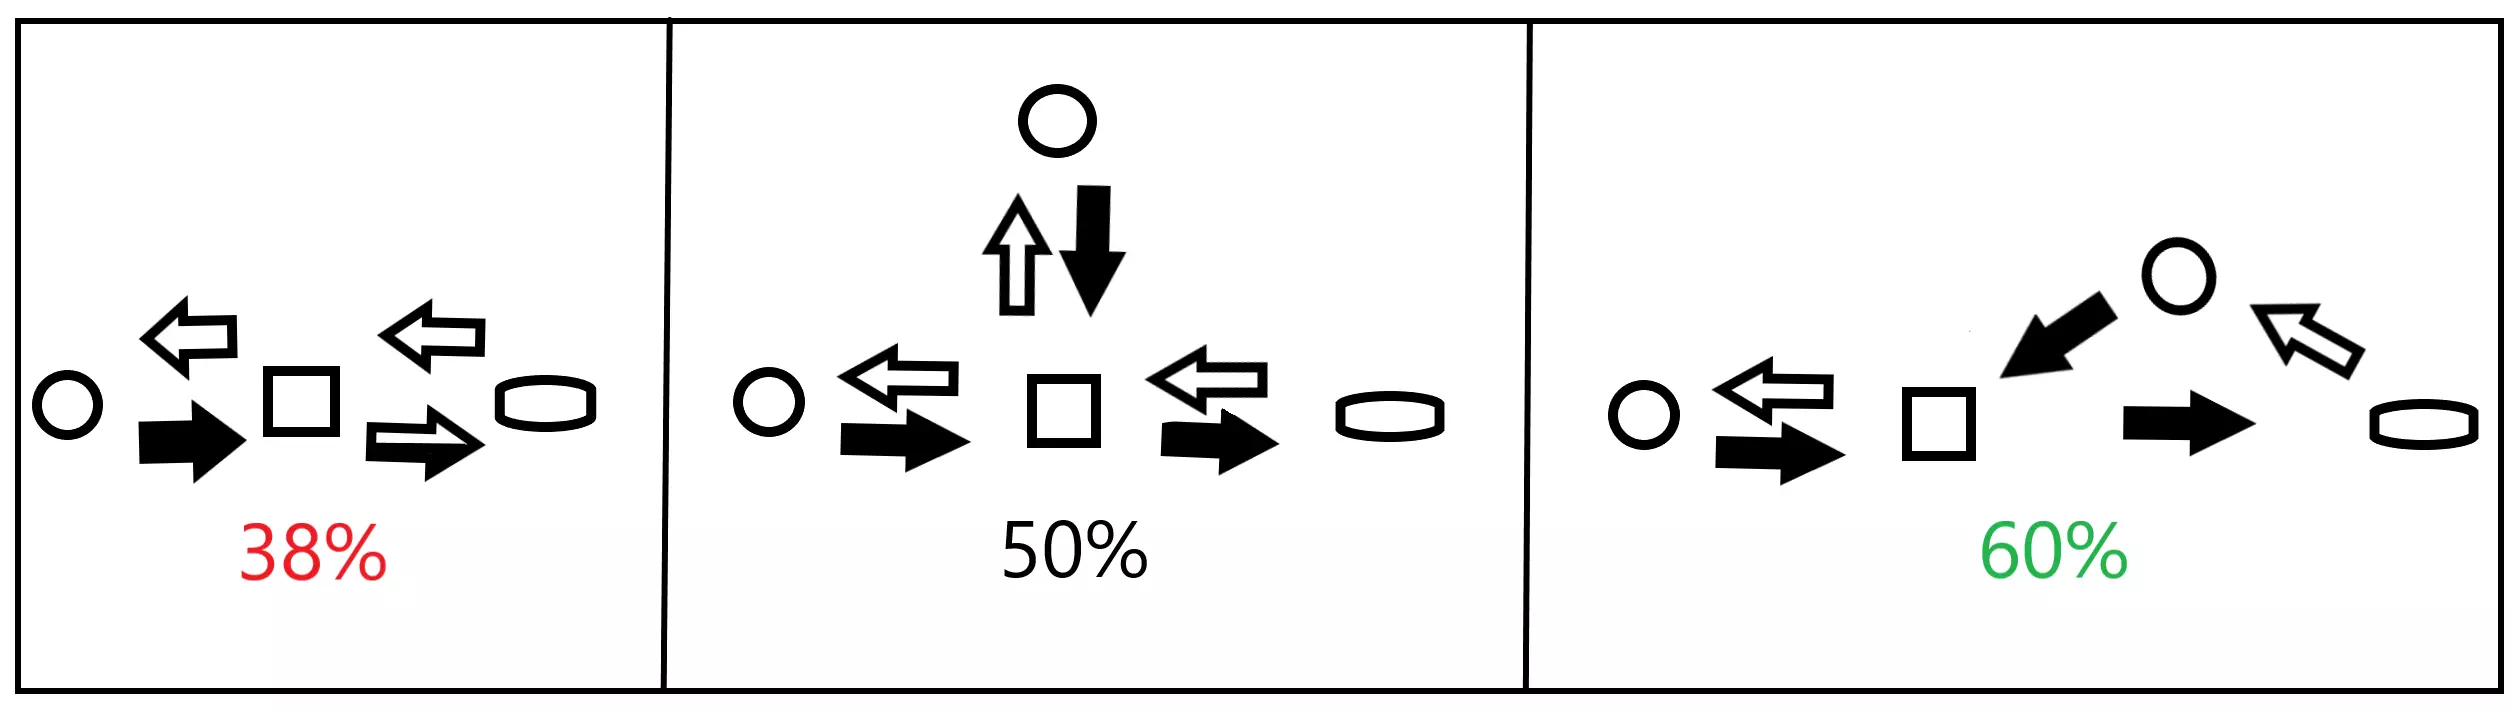
A route that only links one resource to a factory with an onward journey to delivery is the least efficient line route order where the factory does not produce 1:1 output to starting materials, always resulting in a partial load trip (left). The second case (middle) where two batches of raw materials are being brought to the factory before the onward journey is better since it eliminates the partial load trip. Routing to two different raw material industries allows you to maximize the output of the factory but you can get the same effect just doing two runs to the same raw material node. The best possible route order, however, is one where the vehicle is picking up material at some point on it's way back (right). With the right setup and a little luck you can get this number close to 100%! Provided you have a reasonable route and vehicle set up you should be able to turn a profit at 50% load trips, but on higher difficulty you may barely break even and will need to focus on setting up routes that are much more efficient to get ahead. Line Management As the game progresses you may find yourself eventually managing hundreds of lines which can take forever. Standardized conventions for naming lines are helpful for you to identify and find lines very quickly so you spend less time looking for crap and more time playing the actual game. Here's an example of a system that I believe tells you everything you might want to know about a line at a single glance. Plus it looks professional as heck. Anywho, I will share mine with you below. here are the features I use for each line in order: Service/end product type: <4 letter code>. Examples: express passenger service = EXPR; construction materials = CNMT. Vehicle type: - <1 representative letter>. Examples: train = -T; bus = -B. Towns: <four-letter code>. Examples: Dark City = DKCY; Biggleswade = BGWD. route characteristics: come at the end, various.Formatting: < service code >< vehicle code >; <town code(s)><route characteristics> This is read as "cargo/passenger X serviced by Y vehicle type going from X to Y location, so on." Examples: CNMT-R, BGWD Branch = construction material rail branch line local to Biggleswade EXPR-B, BGWD-DKCY = express bus line between Biggleswade and Dark City XFER-S, BGWD-DKCY = multi-cargo shipping between Biggleswade and Dark City ports CMTR-B, BGWD N-S = commuter bus service line running north/south on the Biggleswade main artery CMTR-B, BGWD N-S+1 = first commuter bus service line running north/south right of the Biggleswade main artery Note that there is also a (seemingly secret) little carrot in the line menu that allows you to sort by cargo type. Vehicles and Rate Now that you have identified a line and operating parameters let's talk about setting up vehicles to operate the route. Assignment and Optimization Keep the number of vehicles operating to a minimum. Fewer vehicles are the single easiest way to prevent congestion on your network, resulting in bigger profits. Further, as your number of vehicles increases, so will the demand for complex networks and junctions to support the flow of your network. The ideal number of vehicles operating a line = 1. The only disadvantage of fewer vehicles is when it comes to trains, where the length of the train may become unsupportable at some point to achieve the rate you need. If your line needs 20 or 30 vehicles or more to achieve transport rates, then you should upgrade your line with higher capacity/speed vehicles. If this isn't enough then you may want to upgrade the line to a higher vehicle capacity route type (e.g. implement a branch line to replace a truck route). Assigning vehicles based on rate will also help you keep vehicles to a minimum. Add one or two vehicles to a line and then use the line rate to estimate how many are needed. Here is an easy technique you can use to figure out how many vehicles you will need on the line. For example: 1. you want a line rate of 200 to match the production rate of a factory. 2. you add 2 trucks to a new line, giving you a line rate of ~ 60. 3. you estimate that each truck yields a rate of 30 (60 divided by the two trucks). 4. Add 5 more trucks (7 trucks times 30 u), giving you the desired line rate ~200. Use the most specific vehicle/wagon type(s) for the job. It makes sense to link certain nodes together with the same vehicle, or break down a line into more than one in order to use the best vehicle. Let's say you want to deliver tools by truck. The tools supply chain involves two cargo formats. Here are potential choices: Option 1: run one line for the whole route: "all cargo" truck type. This is the easiest to set up and yields the fewest number of lines. Option 2: run two lines. On line 1, operate trucks with side stakes from forest to sawmill and onwards to tools factory. On line 2, operate all-cargo format trucks from tools to town. This is the cheapest configuration as vehicles matching their cargo format will always offer a higher capacity, allowing you to achieve the same rate with fewer vehicles. Configure and support vehicles to operate at top speed. Aside from discussed techniques for laying out networks and junctions, ensure engine speed, wagon speed (trains only), and network speed (e.g. road level) are as similar as possible to ensure your vehicles operate at maximum speed. Minimize the distance traveled between nodes. You profit each time a vehicle delivers cargo or passengers to a node--any node. Line profit is essentially the sum of profit accumulated across each of the nodes at which vehicles are doing a drop-off. Longer routes between nodes means less profit. The game determines route length "as the crow flies." In other words, your highest theoretical profit would be a straight line from a pickup node to the dropoff node, NOT a straight line from cargo sources to towns. This is very important because it means that transportation hubs where a leg of the journey may be in the opposite direction of a final destination are fully feasible. Minimize the distance that your line needs to traverse by routing straight and flat as possible between nodes. Setting up dedicated, high-speed mainlines will as discussed earlier will further help you achieve this. Upgrades Consider upgrading/replacing vehicles on your line with newer models when you: want to reduce the number of vehicles needed/congestion for the same line rate. want to increase the line rate. want to reduce emissions. want shiny new.An alternative to replacement is transitioning the train to a different use. Trains that no longer provide the performance to keep up with the mainline may work perfectly well on a branch line and could serve as an upgrade to those trains. Maintenance Maintenance expenditure improves the emissions profile of vehicles. This can prevent adverse town growth impacts of vehicles operating through or near residential areas. Here are some examples of when you might want to use the different settings: normal: freight lines operating in the middle of nowhere. high: Commuter trains stopping near residential areas. Inter-city buses that spend most of their time in the nowhere but ocassionally stop near towns. very high: commuter bus lines in a city, delivery trucks. Or, you just want that shiny new look. And, you aren't worried about drivers hitting bears and other animals crossing the tracks due to smoking lots of marijuana. Trains Locomotive Selection Analyzing locomotive performance characteristics during the build process will help you optimize a train's performance and minimize costs based on it's use case. top speed: Important for trains traveling long distances/operating on the mainline. power: ability to reach top speed, useful in assessing trains' speed perfornance on different grades. Lower powered locos can be a more efficient choice for long haul lines. The vehicle menu will display an assessment of the adequacy of a consist's power from "excellent" to "poor." For trains traveling up a steep slope, I recommend keeping the power in the good-excellent range. For trains travelling on flat terrain, feel free to keep adding cars until the power is "mediocre." If the power drops to "poor," consider double-heading, that is, putting two locomotives together on the same train. tractive effort: ability to set the train in motion / accelerate at low speeds. Most useful for trains that make frequent stops or are carrying a large load, like commuter trains or branch line freight. loading speed: useful for trains that make frequent stops, especially freight trains that are delivering raw materials and local service passenger vehicles. length: useful for planning platform lengths. a platform section is 40m long. Later in the game date you can choose between electric/non-electric locomotives. Electric locomotives tend to be more powerful and produce less emissions, while diesels tend to be cheaper. Car Configuration You can create any consist you like in Transport Fever 2. If you want to go crazy you can even combine passenger and freight cars on the same train, so long as you route them to both passenger and cargo platforms to do their duty. This could hypothetically be the most economical consist to deliver goods and passengers to a remote town rather than using two or more trains. While you can mix different types of cars to haul the load you need ("wagonload service"), it's hard to match the efficiency of a single wagon type ("trainload service"). One case where this works would be a train that is being used to transfer cargo between two hubs. For example, "hub A" could send ores (gondolas) and plastics (boxcars) to "hub B" which sends back grain (gondolas) and goods (boxcars). See more on hubs later. Don't be shy to really stack those cars. It's normal to have 10-20 cars on a single train, and not unheard of to have many more. In real life some trains can have 100 cars! Just make sure that if the train needs to park at a station that there is sufficient platform length and/or approaching track space to accommodate it without overlapping onto other tracks. Local Networks Expanding your first lines into an operating area will require you to form complementary local networks that service clusters of cities and industries. There is no strict definition for a local network, although you may identify natural areas of operation based on relative positions of cities/industries and geographical features like rivers, mountains, and areas of significantly different elevations. Here is an example:
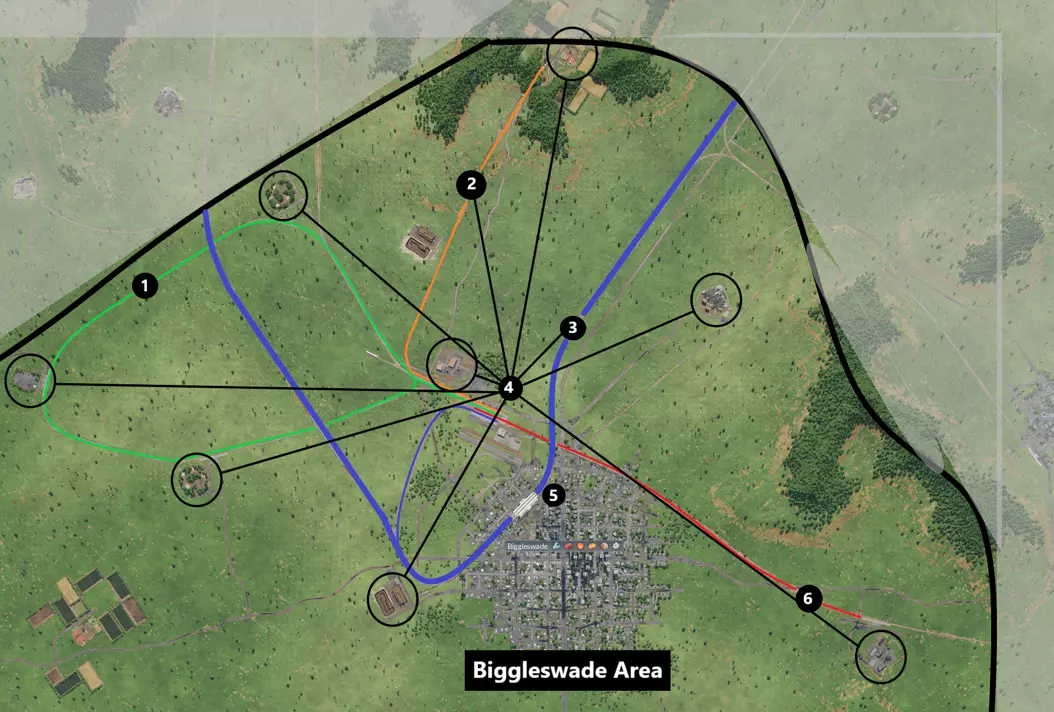
本地区域由粗黑环标记,其周围为自然边界,包括北部和东部的丘陵,以及紧邻南部和西部的地图边界。主线以蓝色突出显示(3),支线则以其他颜色突出显示(1【木板支线】、2【食品支线】、6【钢铁支线】)。该区域设有一个公共交通枢纽(5)和一个货运枢纽(4)。客运枢纽将城际巴士(慢速服务选项,粉线)和火车(快速服务选项,线路未突出显示)的乘客与本地城市通勤服务连接起来(详情如下)。多个活跃的工业设施(黑色圆圈标记)通过黑色线路网络与货运枢纽(4)相连,该网络整合了卡车车站、货运站和货运机场。我用画图3D制作了这张区域地图。在开始工作前,使用这些技巧规划本地网络既高效、经济又有趣,能帮助你梳理出最佳布局,试试看! 公交网络设计 以下是比格尔斯韦德公交网络的详细视图:
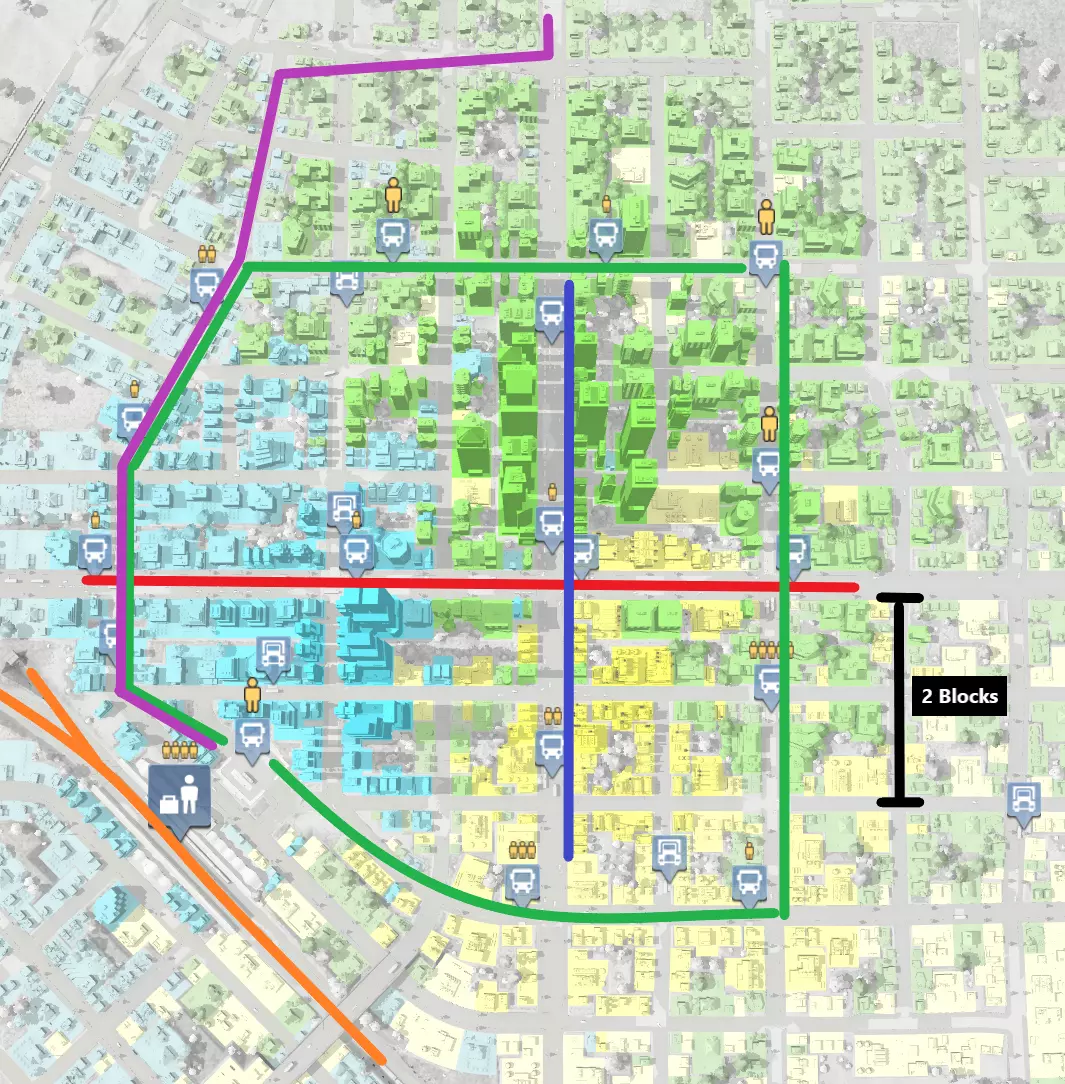
当地公交网络由沿主干道轴向运行的红线和蓝线组成。环形绿线代表沿集散道路双向运行的两条线路。 请注意,站点间隔为2个街区,以实现最佳覆盖范围。同时要注意,线路集中在中高密度区域。你可以将线路延伸至城镇边缘,但这些线路的客流量会较低,从而降低你的利润。在规划线路时,务必仔细查看目的地地图图层,以确认线路的适用性。 对于车辆,这些线路选用低排放、高装载速度的车型。由于靠近居民区,它们的维护成本非常高。紫色线路代表城际巴士线路。该线路通过途经点绕经居民区,以减少排放,因为所选车辆排放较高且维护水平较低。这些线路选用大容量巴士。巴士仅在火车站旁的站点停靠。乘客可转乘当地巴士网络,或步行至隔壁火车站继续行程。 枢纽辐射式网络 你是否想创建充满活力、有许多有趣事物可观赏的庞大网络节点?那么你需要在网络中设置交通枢纽。建设枢纽还能为你的网络带来诸多其他功能优势。网络的一种简单直观的构建方式是点对点系统,即每个源头位置直接连接到目标终端节点。另一种是枢纽辐射式网络,通过枢纽中转货物和乘客,所有事物在枢纽汇聚,从而实现长距离运输。如前所述的比格尔斯韦德地区示意图所示,其中枢纽为点(4),辐射至当地各产业的线路即为支线。 这种网络结构除了美观之外还有诸多优势。首先,所需建设的线路和基础设施数量得以最小化,降低了系统的整体复杂度。其次,这能提高系统效率,让你可以设计车站并配置最适合各段行程的交通工具。最后,监管线路也变得更加容易,因为点击单个枢纽就能在一个菜单或屏幕视图中查看大量内容。以下是货运枢纽的示例:
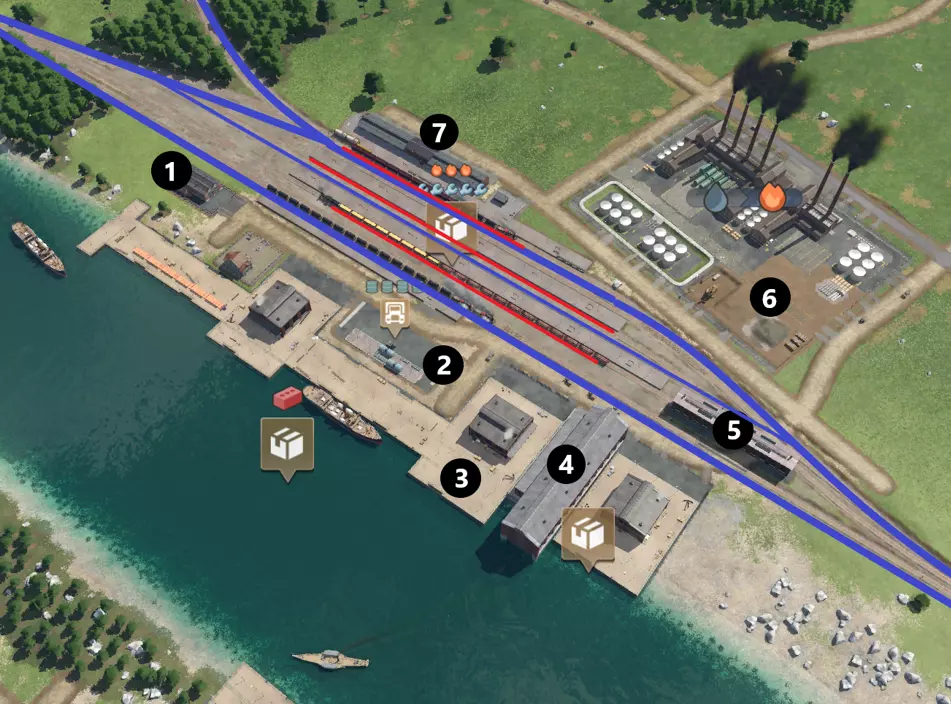
枢纽位于工业区(6)和地图上的河流瓶颈旁,是多式联运的天然枢纽位置。运输方式通过相邻接口实现,允许线路间自动货物转运(车站包括[3]个卡车车站、[3]个港口和[7]个火车站)。车站拥有多种站台长度和额外的存储设施(7)。有多个 depot 可供使用,方便车辆往返于服务线路([1]个公路 depot、[4]个造船厂、[5]个火车 depot)。 火车站设有过境交通车道(蓝线)和供火车装卸及转运货物的停车点(红线)。例如,在院子受保护的中间区域有一个指定地点,你可以看到一列运粮火车正在等待装载从港口运来的货物,还有一列配送火车停在侧线,准备在院子上方区域装载货物运往城镇。 我最喜欢的货运场枢纽位置是靠近货物工厂。货物工厂接收两种货运类型,能为你带来即时利润。其次,该工厂相当独特,它接收和生产的产品都可以用棚车运输(塑料和货物本身)。这使其成为一个天然的枢纽,你可以在往返旅程中满载产品以获取最大利润,还能将货物分发到多个潜在目的地,因为许多最终产品都是通过棚车运输的。替代铁路网络设计 我们之前在指南中提到过“干线”配置,即线路在双向系统中从干线的下游逐渐分支。关于这个话题,我想花点时间向你展示另一种设置为单向系统的方法:
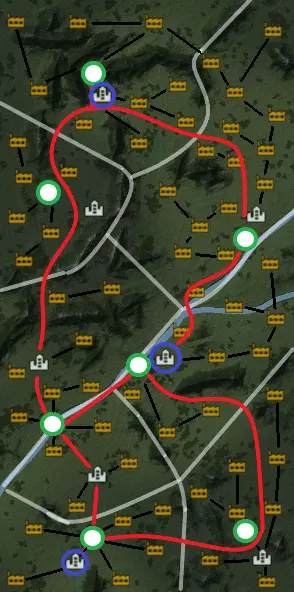
该系统的特点是一个单向环形线路环绕城镇,而非双向贯通线路。图中设有三条主线,分别位于左上角、右上角和左下角,还有一个终点站蜿蜒直达城镇中心(小贴士:你知道可以将客运车站和货运车站合并吗?图中就有这样的例子)。 这种网络布局最明显的优势在于设置极为简便,并且由于单向交通以及能轻松将多条线路连接到环形线路,从运营角度来看几乎不会出现技术问题。 缺点是主线交通的路线会稍长一些,因为需要绕行一段距离,而且弯道处也会有一定的减速。接下来,这种设置容易引发潜在的道路交叉问题——在这种情况下,所有穿过城市的主干道上都设有平交道口。最后,你必须注意排放问题,因为这条线路的部分路段不可避免地会靠近居民区。因此,这种方式非常适合连接那些你不打算发展的偏远城镇,以及/或者不需要快速到达某个地方的直达列车。 区域网络 你的区域网络将在城市和工业区集群之间提供服务,并决定货物和乘客在整个地图上的流动方式。 网络总体规划 考虑为你的网络制定一个总体规划。我通常喜欢在铺设第一条轨道之前就先制定一个大致的计划,然后以该计划为指导来建设各个区域。要做到这一点,我建议在开始游戏前先截取一张地图设置的截图,因为这将是你最后一次有机会看到整个地图的全貌。以下是一个示例:
在这个示例中,我为每个城市划分了一个区域,但你可以按自己的喜好来划分。例如,如果你玩的是高城镇密度模式,可能会希望在一个区域内聚集多个城镇。首先确定每个区域的自然边界(用浅灰色突出显示)。我喜欢利用地图的自然地形特征来帮助定义区域边界。 接下来,我确定了货运枢纽(绿色节点)和客运枢纽(蓝色节点)的可能位置。对于货运枢纽,注意我尽可能优先选择沿河位置,以便提供水陆联运的运输选项。客运枢纽之后会建设机场,提供跨地图的快速旅行选项。 然后,我规划了连接城镇和枢纽的主要路线(红色)。最后(并非必需),我规划了一些潜在的支线路线(黑色),作为将各产业与区域枢纽连接起来的思路。 当你实际开始操作后,随着对地形的了解加深,可能需要调整计划,但这是一个很好的起点。 枢纽到枢纽网络 最后,让我们深入探讨区域货物转运。起初,你可能倾向于尝试控制每一条点对点的供应线。你可能会认为,通过线路运行参数强制货物运往特定城镇和产业是正确的玩法。这种倾向部分源于一种误解,即认为这是实现利润最大化的必要手段。 但实际上,到了游戏后期,这种方式会变得难以维持。AI能够智能地确定货物目的地,城市和工业会非常智能地自动从各种货物来源获取物资。只要你一开始就规划出合理且平衡的路线,你确实能获利。所以,不要再试图一直强迫货物进入特定的运输通道和特定的目的地。一旦你开始构建一个包含线路的网络,让AI能够选择货物的目的地,你就能管理一个规模大得多的网络。 理解货运枢纽之间需要发生什么,对于设置正确的线路和基础设施以实现这种效果非常重要。不过最终,你可以将新产业简单接入自己的网络,理想情况下,网络会自动开始分配资源,无需你进行微观管理。 货运枢纽只有在你设置好连接产业、工厂和城镇之间整条路线的线路后才会开始运作。下图展示了两个服务于不同区域的货运枢纽应如何相互作用。
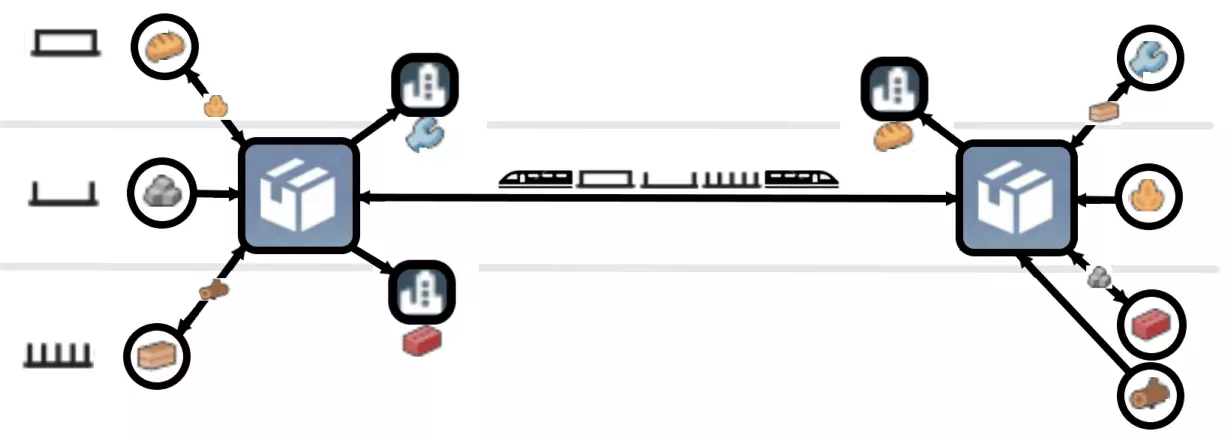
The diagram highlights a consist of boxcars, gondolas and flatcars transporting multiple cargo types between the hubs. Here are the operations going on in and between these hubs: The left-hand hub: - collects stone from the quarry - distributes grain to the food plant - distributes lumber to the sawmill - distributes tools and conmat to the towns The right-hand hub: - collects grain from the farm - collects lumber from the forest - distributes planks to the tools factory -distributes stone to the conmat factory - distributes food to the town The two hubs transfer: - stone in exchange for grain on the gondola cars - planks in exchange for conmat and lumber on the flatcars - food in exchange for tools in the boxcars This transfer route will make an astronomical amount of money because it has the hypothetical capability to run full in both directions, bridging the logistics chains of the two areas. Lastly, bear in mind the same principles will work for passenger transportation. You can imagine this if you were to substitute the two cargo hubs for say, airports and/or major train stations situated in major towns. Buses or trains may pick up passengers from a cluster of other towns that upon arriving at the hub pick up a speedy long distance flight or mainline train service earning you bookoo bucks. Troubleshooting Here are a few common problems you may encounter and potential solutions to consider. My line is not profitable - Run less expensive vehicles/longer trains - Minimize time to get to the drop off point, e.g. congestion, slow, or indirect route - Ensure vehicles are traveling in an order of destinations that keeps them full most of their journey - Do not use more vehicles than needed to meet capacity - Check if cargo/passengers are preferring a faster mode of transport along a similar line of service - use more hub transport/reduce point to point networks Passengers are not using public transport - Service route unsuitable/not enough destinations in the area of service - Upgrade to faster vehicles/roads - make sure passengers can get to a destination of another type (e.g. commercial from residential) - Inadequate network/access to destinations/other cities My city is congested - Ensure arterial roads flow without dead ends - increase road/rail grade separation - Reduce intersections on arterial roads - Implement more public transport - Add shortcut roads that are faster for through traffic - Minimize bus station wait time parameters Transport lines are bunching up - Use line operating parameters to set a node with a min-max wait time based on frequence My truck station is congested - Optimize truck wait parameters/minimize waiting - Use a through station instead of a a dead end - Switch to a higher capacity transport mode/too many vehicles in use My railroad is congested - Operate fewer trains - Increase interval of signaling - Do not mix mainline/branch line traffic my rail stations are congested - Reduce number of crossovers - Ensure trains stop at sidings and not along mainline - Add dedicated bypass tracks in through stations - Add longer sections of track dedicated for queueing - Add more platforms - Reduce number of slow switches My rail junctions are congested - Add grade separation - Increase speed along junction tracks/bigger junction - Eliminate switches/double-switches Fast trains are overtaking slower ones/stopping - Reduce interval between signals - Avoid mixing mainline/branchline traffic - Avoid mixing old trains with new - Avoid mixing high speed rail with standard/traffic Supply chain isn’t working/not producing - Ensure no missing lines/supplies are reaching factory/city - Ensure vehicles are assigned to right lines - Ensure no missing connections/adjacent stations out of range - Ensure no more than one station for automatic transfer No path error - Missing electric tracks - Break in the line - Missing switches - Signals blocking direction Final Remarks Thanks again for reading my guide. I hope you got something out of it and enjoyed reading as much as I enjoyed creating it. Lastly, I have created a supplemental save game for you to look at to see some of the tips in this guide in practice, as I believe a live demo where you can look over a working operation is the best guidance i can offer. You can get the savegame here: https://steamcommunity.com/sharedfiles/filedetails/?id=2817594354 I am happy to take requests, answer questions, and even help you/troubleshoot your maps if you like, just post a comment / drop me a line and post your savegame and I'll have a look! Please remember to leave 5 stars, like, favorite, and tell your Transport Fever 2 friends to stop by :) Happy trails!