换一换
换一换 


I decided to put this guide together mostly to help new players, but also to serve as a resource for seasoned players who can use the information when starting new characters. You will definitely need to make more than one game/character if you plan to unlock all of the achievements available as some of them are conflicting and you cannot get them all in a single game file/playthrough. Keep in mind that there is no one way to play Stardew Valley, so this guide isn't meant to be a rigid "you must do this" guide, but rather has suggestions for optimizing game play for most players, regardless of your play style. My principle goal of this guide is to help players achieve as much as possible in the game as quickly and efficiently as possible, under the assumption that the reader's principle goal in the game is to achieve the best possible rating on evaluation day (the first day of Year 3). Constructive feedback is welcome, and if there's something you feel I should be covering that I didn't, or if there's something that I got wrong, please let me know. Note: All images in this guide were taken from the Stardew Valley Wiki: https://stardewvalleywiki.com/Stardew_Valley_Wiki UPDATES: Part 2 covering Summer can be found here: https://steamcommunity.com/sharedfiles/filedetails/?id=2660051571 Part 3 covering Fall can be found here: https://steamcommunity.com/sharedfiles/filedetails/?id=2663508999 Part 4 covering Winter can be found here: https://steamcommunity.com/sharedfiles/filedetails/?id=2668479973 Year Two Guide is now live! Find it here: https://steamcommunity.com/sharedfiles/filedetails/?id=2680140415 Choosing Your Farm When you begin a new game you have a bunch of character customization options that mostly don't affect game play, so I won't mention them here. The only things that have any impact on the game at all are some 'Favorite Thing' choices ("Concerned Ape" and "Stardew" both change the message you get when you find a Stardrop, but that's just an aesthetic change). However, your choice of farm does have a big impact on the game. It can also never be changed, so choose carefully. I think most people feel it's a matter of personal preference, and while that's technically true, I think some farms are, actually, better than others, so I'm going to rank them from best to worst (in my opinion). But don't let that stop you from choosing whatever farm you prefer. 1. Forest Farm - The Forest Farm gives you several bonuses that, in my opinion, make it the clear winner: A. 8 Renewable Large Stumps, which let you farm Hardwood much, much faster. B. Seasonal forage items, including several non-standard, valuable items. C. Unique weeds that always drop Mixed Seeds. D. A large pond that allows you to catch the Woodskip, and that can double as a river for Crab Pots. So what's the drawback? You lose a significant amount of land as this map has the fewest number of tillable tiles of any map. But ultimately I think the benefits here more than outweigh this negative. Also, you can still place buildings where the Large Stumps spawn for when you reach a point where you need the space more than you need the Hardwood. 2. Four Corners Farm - The Four Corners Farm has the best features of all the maps, and is ideal for multiplayer games. In fact, if you know you're going to be playing with other players, I would actually choose this Farm over the Forest Farm. The advantages are: A. 1 Renewable Large Stump and the unique weeds of the Forest Farm in the top left quadrant. B. Lots of farming space in the top right quadrant, right near your farm house. C. A pond matching that of Cindersap Forest in the bottom left quadrant (you can put Crab Pots here). D. A small quarry in the bottom right quadrant that spawns Rocks, Ore, and Geode nodes, based on your mining level (yes, you can get Iridium Nodes). E. Finally it has the second most number of tillable tiles of all the maps, just slightly behind the Standard Farm. So what's the disadvantage? Well, you don't get as many renewable Large Stumps as the Forest Farm. Plus it's so large and inefficiently laid out, that it can be a handful for a single player to manage by themselves. But if you want a map that has the best features of all the maps, or if you're planning to play with others, then I would definitely choose Four Corners. 3. Hill-top Farm - The Hill-top Farm has advantages that are great for miners: A. There is a non-tillable hilltop that spawns Stones, Ore and Geode nodes in the southwest of the map (although access to the hilltop can be randomly blocked with a Large Stump, Large Log, or a Boulder. I would recommend checking it when you start and don't be afraid to reset and start over if the access is blocked as that significantly reduces the benefit of choosing this farm). B. There is a river that lets you catch Cindersap Forest fish, and is also good for Crab Pots. The major drawback, like the Forest Farm, is a significant reduction in available, tillable land (2nd worst just ahead of the Forest Farm). 4. Beach Farm - Although not a good choice for new players, this map has several unique features that bump it up in my rankings: A. There is good foraging available from Supply Crates that can wash up on the shore. B. You can catch ocean fish from the water, which is a huge advantage, especially when trying to catch some of the rare ocean fish (like the Octopus) which can be hard to hook because of their extremely limited, early morning spawn times. C. Forest and beach foragables can both spawn (like Leeks and Coral). However, the Beach Farm has one, major, significant drawback: you cannot use sprinklers on the 'sandy' soil (there is a patch of 202 tiles where you can use sprinklers, however). This drawback is significant and it's the primary reason this map isn't recommended for new players and why I've only rated it 4th on my list instead of higher. 5. Standard Farm - The Standard Farm is exactly what it sounds like. Although it has a few ponds, they are not useful for catching fish (you'll only catch trash). It's one advantage is a massive amount of tillable tiles (3427) which is easily the most of any map. That being said, you'll probably never even come close to using that much space for your farming. You would have to spend almost all of your time every game day tending your fields, and you'll never have enough time to plant that many crops on the first day of the season anyway, so ultimately I don't consider this advantage to be much of a benefit. But your mileage may vary. 6. Wilderness Farm - The Wilderness Farm has two major features, and one of them is not (exactly) beneficial: A. You can catch fish from the Mountain Lake on your farm, although at a reduced rate (65% of catches are trash) - it is the only map that offers that. B. Monsters (that scale with your combat level) spawn at night. The one advantage is that Wilderness Golems can spawn at any combat level and they do have a 1% chance to drop Iridium Ore. But ultimately having to fight off monsters every night seems like a poor trade-off. I definitely don't recommend this map for new players. Now keep in mind that you can turn off the monster spawning later on (and, in fact, you can turn it on for any map), but it's expensive and you most likely won't be able to do it in year one. 7. Riverland Farm - Finally there is the Riverland Farm. This farm has only one real advantage: A. You can catch both Pelican Town river fish and Cindersap Forest Pond fish, and the catch rate of trash is normal for those areas (trash catching is elevated in every other farm map, including the Beach Farm). The cost of that benefit is not only losing more than half of the normal amount of tillable tiles, but also getting a layout that is extremely inefficient for both farming and raising animals. The other drawback is that you can't catch ocean fish, so you still have to visit the beach. Because of the lack of benefits and the high cost of getting that one benefit, I do not recommend this farm, not even to players that like to fish. You'll be much happier with the Beach Farm, believe me. Day One (Spring 01) Day one is the most significant in terms of the impact on the rest of your game. For one thing, you start off with the least amount of available energy, the worst tools and the lowest skills of any other day. This means that running out of energy is pretty much inevitable, so you must carefully pick and choose what activities to focus your limited amount of energy on. Begin the day by picking up your free Parsnip seeds and checking on the weather and fortune for the day (although these aren't always necessary, you should get in the habit of watching the TV every morning). Your first challenge is to clear enough space on tillable soil to plant at least 30 crops. Don't worry about not getting hay from using your sickle on the grass - you'll have plenty of grass growing for hay harvesting by the time you're able to build a silo. Make sure to also water your 30 plots, and then plant your 15 parsnip seeds. I usually use a 6x5 or 3x10 pattern for the crops, but you might want to also leave 1 or 2 tiles in the middle for placing a scarecrow (and, later, a lightning rod). I highly recommend keeping your plots in series divisible by 3. The reason is that once you get your watering can upgraded to copper level, it will let you water 3 crops at a time by holding down the button, so you'll have less wasted watering if the crops are in rows or columns of 3. The next step after planting your parsnips is to start cutting down trees. You need to cut down 5 trees. Do not remove the stumps yet! 5 trees cut down will accomplish 2 things: 1. It will give you enough wood to build a chest, which you should do as soon as you have 50 wood (you can place it in front of your house for easy access each morning and evening). 2. It should earn you enough skill points in Foraging to increase it to level 1. This will slightly reduce the energy used when swinging the axe and, more importantly, will let you start gathering tree seeds. Once you have those 2 steps done, you should clear as many weeds as you can. Pay special attention to any special weeds, if you have a farm map that can spawn them:

原因是这些杂草一定会掉落混合种子,而你会想要尽可能多地收集它们。记得把收集到的多余木材、石头和其他物品放进箱子里,我还建议把斧头、镐子和水壶也收起来。现阶段你用不到它们,它们只会白白占用背包空间。 接下来你应该前往农场南边的森林。那里有更多杂草可以清理,所以一定要带上镰刀,同时留意【蠕动的虫子】。
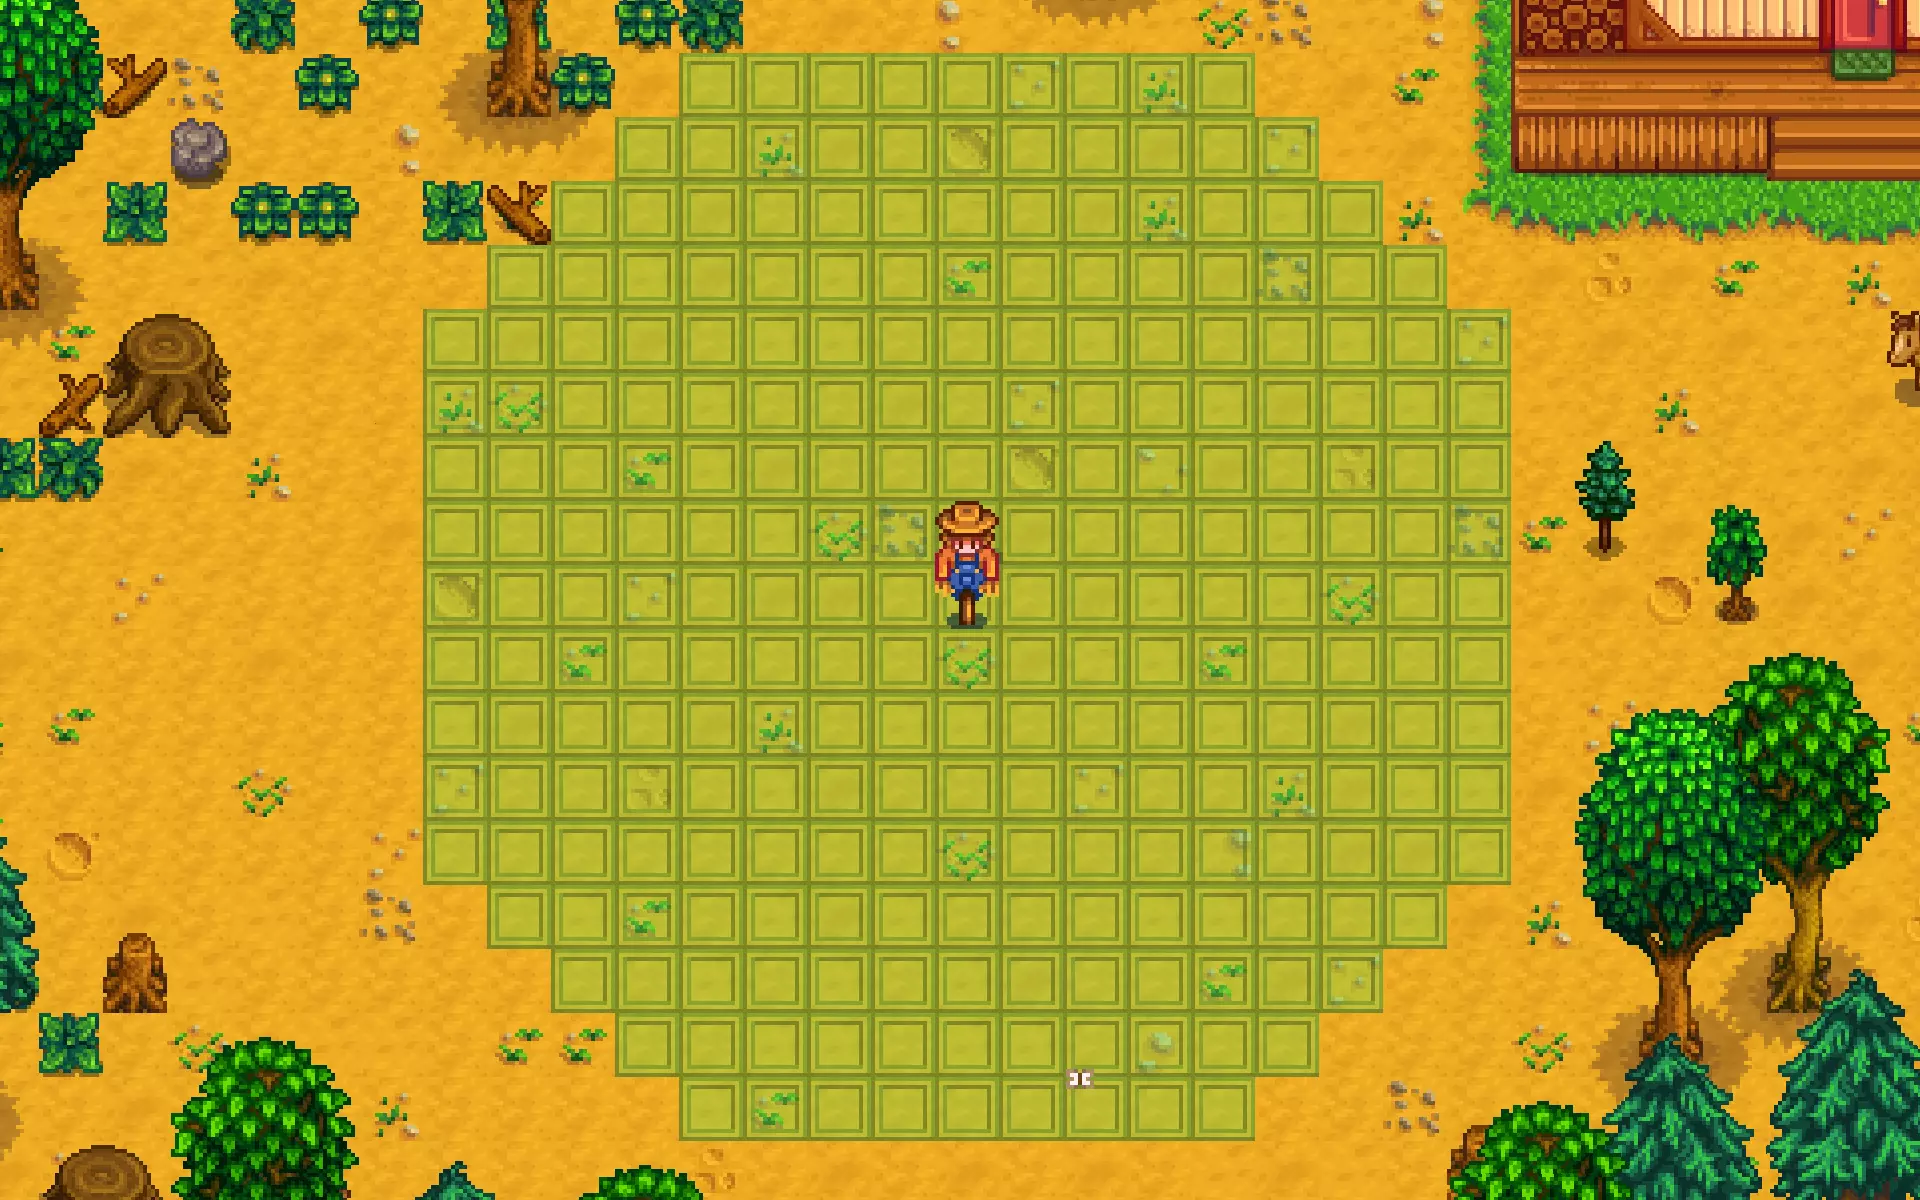
When you see them, use your hoe to dig up the item buried there (but keep an eye on your energy!... And your bag space.) Look for any forageables you can gather (Dandelions, Leeks, Wild Horseradishes, and Daffodils), making sure you visit the fields in the southeast section where Spring Onions can grow (save at least one Spring Onion to ship - the rest should be kept as a cheap source of Energy restoration). You are going to need to keep at least 1 of each of the main forageables for later (and at least 2 Daffodils), but only keep them now if you find enough that you can get sufficient funds for the seeds you need to buy. Once you're done in the forest, talk to any NPCs you find (Haley should be there with her camera, and Marnie and Jas will be in Marnie's Ranch or traveling around, depending on the time of day). Since you have to talk to every NPC anyway, I recommend taking the time to do so now. If you found a fair number of forageables, you can head into town and start talking to everyone you can find. If you don't have at least 4, then you should instead head up through your farm to the mountain area and look for forageables there. You need to stop at Pierre's General Store before he stops selling at 5:00PM. You should sell enough forageables to be able to buy 2-3 each of cauliflower seeds, potato seeds and bean starters. Although 2 is probably sufficient, 3 will better insulate you from possible crop loss due to lighting storms or crows. Any leftover funds should be used to buy as many parsnip seeds as you can afford. When you get back to your farm, plant everything you bought, and also plant any mixed seeds you found. If you have to, dig a few more plots and water them to plant any extras. Finally, before you turn in for the night, make sure to visit the mountain area to talk to Sebastian (he can only be talked to at night, from about 6:30-9:30), and be sure to visit the Stardrop Saloon to talk to Gus and anyone else you may have missed during the day (Shane, Pam, Clint, Emily, and Gus himself will always be there). Day Two (Spring 02) Day Two begins with checking the TV and watering your crops (if you're lucky, you might get a forecast of rain for Day Three). You can then spend some time clearing up some more of your land, and chop down a few more trees (but don't use all of your stamina). Pay visits to the mountain region and the forest to look for forageables, making sure to check for Spring Onions. Ensure that before 5:00PM you pay a visit to the beach to meet Willy and collect your free Bamboo Pole. I recommend you do a little fishing, and try to catch a few fish at the beach, in the river in town and at the mountain lake, if you can. I recommend keeping at least one of each type of fish you happen to catch. This is in case someone asks for one in a Help Wanted quest at the community bulletin board. You'll also need certain fish later on as well for some quests, so having them handy is useful. I would also keep any and all seaweed and green algae you find, as you will need quite a lot of these for crafting fish ponds. Other items you should keep, rather than sell, include all Coral and Clams, and at least one Sea Urchin. You should also keep at least one each of Mussels, Oysters, and Cockles. If you haven't talked to everyone yet and completed Introductions, you should spend any remaining time on Day Two doing that. I recommend keeping either a Leek or a Daffodil handy to give as a gift (only give the Leek, which should be given to George, if you have more than 1 Leek; otherwise give the Daffodil). If you want to have a dance partner for the Flower Festival on Spring 24, I would recommend giving the Daffodil to Haley. Haley is one of only two marriage candidates that the player can get friendly enough with by Spring 24 to be able to choose as your dance partner, but doing so will require giving her at least 2 gifts (and Daffodils work best) each week, and in particular give her one on her birthday (Spring 14) - preferably a gold star quality Daffodil. The other marriage candidate is Shane, but that will require giving him 2 Parsnips each week, and at least one on his birthday (Spring 20) - again, gold star quality works best; although keep in mind you will need to harvest at least 5 gold star quality Parsnips by the end of Spring for a turn in. It is possible to get Fishing skill to Level 1 on Day Two, if you fish enough, but it's not essential to do so. Finally, if you find the fishing mini-game to be too difficult, you should consider buying a Training Rod from Willy. The cost is 25g, so only get it if you're really struggling, especially as it limits the type of fish you can catch and is only useful until Fishing Skill Level 5. Finally, if you have any extra cash, make sure to buy more Parsnip Seeds from Pierre, although it's not critical to do so. If you do, I recommend planting them (you may need to eat some Spring Onions to regain your energy, or, if you have at least 1 each of Acorn, Maple Seed, and Pine Cone, you can make a Field Snack for a quick boost, too). Day Three and Four (Spring 03-04) The only thing of significance to note about Day Three is that it's a Wednesday, and as such Pierre's shop is closed. You can buy seeds from the Joja Mart, if you really feel you need them, but they are more expensive then at Pierre's. Otherwise you can just wait for Day Four. Days Three and Four will just be more watering crops, chopping down trees, clearing your farm, and/or fishing, as you desire. I recommend spending at least a little time foraging or chopping down trees, as you will want to continue to level your Foraging skill. You're looking to get Foraging to Level 4 by Spring 15, so that you can gain extra Salmonberries from bushes during the event. If you only count the XP from trees, it would take 109 trees cut down to get to Level 4, which is nearly 8 trees per day! You do get about half as much XP for gathering forageables as you do for chopping down trees, though, and gathering doesn't use energy so you should also make it a point to gather everything you can find, include things at the beach (they also give Foraging XP). You will need 300 wood to fix the bridge at the beach to access the tide pool section, which is where you can get coral and sea urchins, so it's worth chopping down as many trees as you can to unlock that area - it takes about 25 trees cut to get 300 wood, so if you stick to 5 per day (plus any logs and stumps) you should be able to unlock the bridge by Day Five. Lastly you should make a habit of visiting as many NPCs as you can. Making friends has several key benefits, like getting free stuff in the mail, new recipes that can only be obtained by befriending certain NPCs, and, of course, getting married (eventually). One thing I wanted to add here: if nothing else, you should try to befriend both Marnie and Caroline as soon as possible. Marnie likes Quartz, which is relatively easy to find in the mines. And Caroline likes Daffodils. The reason for befriending each of these ladies is significant, but different for each lady. For Marnie, you need to get her to heart level 2 so you can access her bedroom. The reason is because of a quest item that appears there in Summer. For Caroline, once you befriend her, she will let you visit her "private" sunroom. She will also send you a recipe to craft the Tea Sapling. Tea Saplings take an entire season to grow, and only produce Tea Leaves during the last week of the season. So to ensure you get leaves at the end of Summer, you need to plant them before the end of Spring, preferably by the 22nd. Also, you'll be able to harvest one tea leaf each day from Caroline's Tea Bush during the last week of each season, too (at least, each day you can access Pierre's shop, anyway), so getting to be friendly with her in Spring will grant you early access to the Tea Leaves. Day Five (Spring 05) Day Five is significant for several reasons. First, Day Five is when the Parsnips will finally mature enough to be harvestable (assuming you remembered to water them every day!) Even if you only planted the 15 seeds Lewis gave you, and even if a few got eaten by crows, you will almost certainly reach Farming Level 1 after harvesting your Parsnips. A couple things to note about the Parsnip harvest: A. Make sure you save any gold star quality Parsnips - you will need 5 of them, so start saving them up. B. You should keep at least 1 silver star quality Parsnip, if you get any - this will be a gift for Lewis on his birthday, and will get you quite a good jump in your friendship level with him. C. You should save at least 2 regular quality Parsnips - one for the Community Center turn in, and one for fulfilling any Help Wanted quest that asks for one. You'll probably want to ship at least 1, but all of the rest should be taken to Pierre for quick cash. You should then turn around and buy as many additional Parsnip seeds as you can afford. Now, you may wonder why I recommend Parsnips when they are the least valuable crop and have the worst return on investment of almost any crop in the game. The reason is simple: you're not planting them to make money... you're planting them to level up your Farming skill. Higher level Farming will yield more silver and gold star quality crops, which will result in a much higher profits in the long run. Also, the faster you get Farming to skill level 5, the faster you can pick your profession. I highly recommend taking Tiller - Crops are worth 10% more. When coupled with the increased chance for quality crops, this means even higher profits! Second, Day Five is when Lewis will unlock and show you around the Community Center, if it's a sunny day, and if you enter Pelican Town from the Bus Stop between 8AM and 1PM. Make sure you enter the Center immediately after the cut scene and click on the golden scroll located in the Crafts Room (the lower left room). You won't be able to read it, but it will trigger the next part of that quest. Finally, Day Five is also the day that the boulder blocking access to the mine will finally be removed, thus allowing you to enter the mines. I still recommend chopping down a few trees to keep leveling your Foraging, and make Field Snacks or grab Spring Onions to keep your energy up. When you go into the mines, I would recommend clearing your inventory first, bringing only your pickaxe. You're definitely going to want as much bag space as you can, but you can't get anywhere in the mines without both a pickaxe and weapon (you'll get your first weapon when you first enter, so don't worry about that). The biggest thing to shoot for in the mine is to try and gather at least 20 copper ore (and at least 25 stone, although that should not be difficult), as you will need that much to build your furnace, and reach mine level 5. You should also make it a point to kill all insects you come across, as killing 125 of them will earn you a significant weapon upgrade that will last quite a long time. Just make sure to keep an eye on your health, energy and the time. You need to leave the mine by 1:00AM to have any chance of getting home before you collapse, and frankly I'd head out immediately after Midnight. You definitely do not want to collapse in the mine as you will lose gold and items if you do. As a combat tip, keep in mind it's usually easier to hit and avoid enemies that are "above" you on the map, so always try to approach enemies from "below" when you can. It should be noted that Day Five is a Friday, and the Traveling Merchant will be in Cindersap Forest. However, if you've been following my advice, you won't really have any money to spend at her cart today, and honestly you're better off saving your money at this point. You can always go and browse her wares, if you're feeling masochistic, but I prefer to just forget she's even there. Day Six (Busy Day!) Ok, so assuming you were following my guide so far, and you were able to read the gold plaque in the Community Center, get to level 5 in the mine, and collected at least 1 copper ore, several things will happen on Day Six. First, Clint will show up at your farm to talk about the ore you found and give you the blueprints for making a furnace. You'll also get a quest to make one. It takes 20 copper ore and 25 stone, so if you have enough, go ahead and make it. If not, don't worry - you'll get enough copper ore soon enough. Next you should have 2 letters: one is from M. Rasmodius, the Wizard. He will invite you to visit his tower to discuss the "rat problem" in the community center. The other letter will be from Marlon, the Adventurer's Guild leader. He gives you a quest to slay 10 slimes in the mines. Now, before you tear off on adventures, the first thing you need to do (besides harvesting any parsnips you planted on Day Two and watering your crops) is to craft a scarecrow. The scarecrow costs 50 wood, 20 fiber, and 1 coal, all of which you should have if you've been following my advice. Place the scarecrow in the center of your field (you did remember to leave a space for him, right?) or if you didn't leave a space, you can place him near the edge. The radius of the scarecrow is quite large (8 tiles directly out in each direction, and then curving in to connect the furthest points - all told it's a 17X17 area, or 248 spaces):
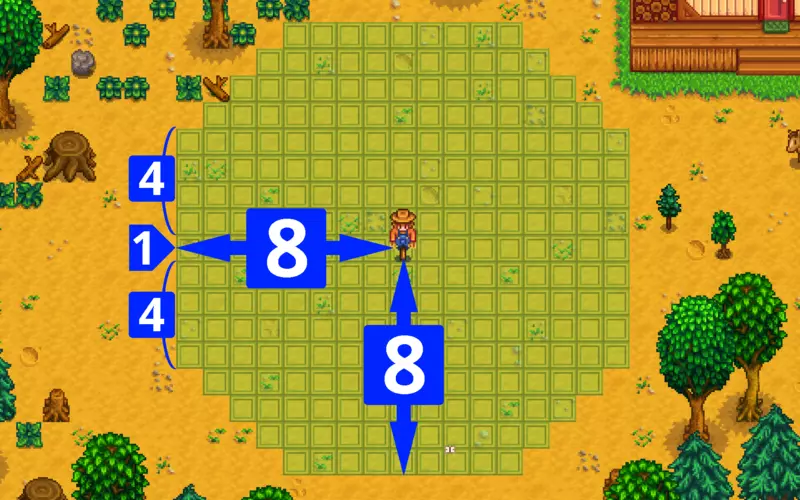
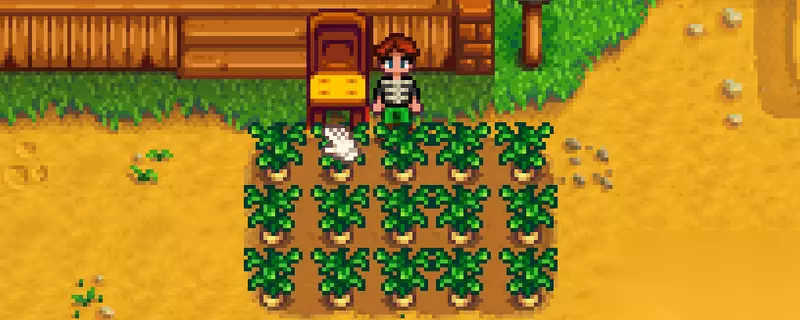
Once you've got your Scarecrow placed, head south to the forest and grab any forageables you find as you make your way to the Wizard's Tower. The entrance is south of the tower, just south of the pond. The Wizard will tell you about the Junimos, which is what the creature you saw in the Community Center was. He then visits the center to translate the scroll, then gives you a potion to let you read the scroll yourself (the potion will restore a little energy, if you're missing any, about 32, I believe). Once you've learned the Junimos' language, you should complete your foraging circuit of the forest, then head to Pierre's to sell and buy more Parsnip seeds. Take the seeds home and plant them, then clear your bags except for: one each of a Daffodil, Leek, Dandelion, Wild Horseradish, and Parsnip, plus your sword and your pickaxe. Then head to the Community Center and turn in the forageables to complete the Spring Foraging Bundle (you don't have to collect the reward just then, but it's fine if you decide to do so), then go to the new golden scroll in the Pantry (the room just above you) and turn in the Parsnip for the Spring Crops Bundle. After that, if you did grab the Spring Seeds from the Crafts Room, I recommend taking them, and any other forageable you may have picked up, back to your farm to store (or ship). You can plant the Spring Seeds if you want to, but make sure to save at least 10 of the seeds if you do plant them (I don't, however, recommend it, at this time). Do note that these seeds take 7 days to mature, so the last day to plant and still get the forageables is Sunday, Spring 21. After you've finished all of that, it's time to venture into the mines again, and kill at least 10 green slimes. You'll probably run out of bag space and need to prioritize drops. It's really up to your own judgement, but I always prioritize rare items (like gem stones and hardwood), or items that you know you need (especially coal!) Depending on how you do, you should reach Mining Level 1 and Combat Level 1, if you didn't already on Day Five. Day Seven (Lewis' Birthday!) and Day Eight (A New Week) Day Seven is Sunday, which means gift giving for NPCs resets. It also means the Traveling Merchant will again be in Cindersap Forest. However the significance of Spring 7, is that it's Lewis, the Mayor's birthday. If you have a silver star quality Parsnip, that's what you should give him. If not, a regular Parsnip will do. Today is also the first harvest day for any potatoes you planted on Day One. Make sure to take one to the Community Center for the Spring Crop Bundle, and save at least one for any requests. Any extras can be sold (shipped or sold to Pierre). Otherwise, this is just another day to focus on Foraging, Fishing, and/or Mining. I recommend at least a little Foraging be done, especially if you've collected enough wood (300) to fix the bridge on the beach and start gathering Coral and Sea Urchins. Remember, you only need to save one (or maybe two) Sea Urchins, but Corals are needed for crafting, so I recommend saving the normal quality ones (you can sell the silver and gold quality ones, though). With most items in the game, I recommend holding on to at least 2 of each item, because you never know when you'll need something. And personally, I never sell Daffodils. They're quite useful as gifts, especially the silver and gold quality ones, which give extra friendship points when gifted. Just ship one for the achievement. The only thing to really remember for Day Seven (other than a gift for Lewis) is to make sure you keep buying all the parsnip seed you can, and plant them all! Don't hold any back! And don't be afraid to eat your Spring Onions or make Field Snacks to keep your energy up. There's nothing really special happening on Day Eight: just more gathering, farming, talking to folks, fishing, and/or mining. I do, again, recommend you focus on gathering and chopping down trees to keep raising your Foraging levels. It's possible to hit level 3 on Day Eight, if you keep it up! Days Nine (Last Day of Planting), Ten, Eleven, and Twelve So Day Nine is somewhat significant because it is the last day you should be planting Parsnips. The reason is that you want to make sure that you can harvest everything on your Farm on or before Saturday, Spring 13. That is because Spring 13 is the day of the Egg Festival and that means you can buy Strawberry Seeds. Strawberries are the crown champion of spring cash crops - nothing else makes you nearly as much money, even despite being planted at pretty much the half-way point of the season which will cost you 2-3 harvests. Yeah, even then, you'll still make a killing with Strawberries. So the point of not planting after Day Nine is both to ensure you have enough space on your farm to plant all the Strawberry Seeds you're going to buy, and to ensure you have as much money as possible on the day of, since you cannot sell your crops to Pierre during the festival (he's the one selling the Strawberry Seeds, but he won't buy anything). I recommend you skip buying Parsnip seeds entirely on Day Nine, but if you do want to get a few more points in Farming (or if you still haven't gotten 5 gold star quality Parsnips, yet), you can buy a few Parsnip Seeds. But I would stick to 4 or less. The reason is that 5 Parsnip Seeds costs 100g, which is the price of a Strawberry Seed, so buying 5 Parsnip Seeds will definitely cost you 1 Strawberry Seed. Of course, depending on how much money you end up having on Spring 13, even buying 1 Parsnip Seed could cost you a Strawberry Seed, but 5 is a guaranteed loss. Also, not planting new seeds will decrease the time and energy needed for your crops, which means more energy for chopping trees and other things, so I definitely recommend you refrain from planting even on Day Nine. Day Ten is Vincent's birthday. You should give him a Daffodil as they're pretty much the only thing you're likely to have that he likes. Otherwise, just keep watering and harvesting crops, foraging, fishing and mining. Note that if it's sunny, you should be getting your pet (dog or cat) on Day Ten, as you should have made over 1,000g by this point. Note that you cannot rename your pet, so choose the name wisely. You can also refuse to adopt the pet, but if you do so you will not have the chance to adopt it again. Day Eleven is significant in that it will be the first day you can harvest Green Beans. Just as before, take one to the Junimos, save at least one and sell the rest (if any). You will also get a quest in the mail from Robin to find her lost axe. The axe is in the Cindersap Forest, near where the Spring Onions grow, on the far right / East side of that area. Day Twelve is just an average day. Harvest, Forage, Mine and/or Fish. It's Friday which means the Traveling Merchant will be in the Forest. Depending on how much money you have, you could choose to buy something. Just make sure you keep at least 2,000g for Strawberry Seeds, although I think you're better off not spending anything at this point. Note that if you didn't get your pet on Day Ten, either because it was raining or because you hadn't managed to earn 1,000g yet, then you should be getting it on Day Twelve (unless it's raining). Just make sure you spend a decent amount of time during this period (at least a full two out of these four day) on Foraging to try and get your Foraging Skill to Level 4 in time for the Salmonberry Season! Day Thirteen (Egg Festival) Spring 13 is the Egg Festival, which is Stardew Valley's non-religious version of Easter. This fesitval takes place in the main part of town, between 9AM and 2PM. What this means is that you must enter the village, either from the bus stop, forest or mountain (you will warp to the bus stop entrance if you enter via one of the other 2) at or after 9AM, and before 2PM. If you arrive at exactly 2PM, there will be no festival and you will have missed it! If that does happen, don't panic. Just exit the game and restart. You'll wake up in your bed on the morning of Spring 13, so you can Groundhog Day the event as often as you need to! Now before you go running off to the festival, you will need to be prepared first. Finish harvesting any remaining crops left. Ship any Parsnips or Potatoes, but keep at least one Cauliflower. If any of your Cauliflowers are gold star quality, hang on to at least one of them too! Next, you will need to till soil and water it - how much will depend on how much gold you have. You will need 1 tilled and watered plot for every 100g you have (rounded down - so if you have 2499g, you only need 24 plots). Once you've got your plots ready, I recommend spending any remaining time using up your energy on clearing your farm and chopping down trees. You can also run down to the forest or up to the mountain to look for forageables, but just watch your bag space - you need to keep at least one bag spot open to carry the Strawberry Seeds. At the festival, just go to Pierre's stall to buy your Strawberry Seeds, as many as you can afford. After that, you should walk around and talk to everybody (except Lewis - he starts the egg hunt, which ends the festival, so speak with him last). Time does not pass at the festival, so feel free to relax and spend as much time looking around and talking to everyone that you can. You will get the daily credit for speaking to each NPC that's at the festival, so it's a very convenient way to gain some friendship points and prevent decay. Once you've spoken with everyone, you can talk to Lewis and tell him your ready for the event. The prize for winning the egg hunt is a straw hat, which you can wear by opening your inventory and dragging it to your 'hat' slot (near the number 5 in the image below):
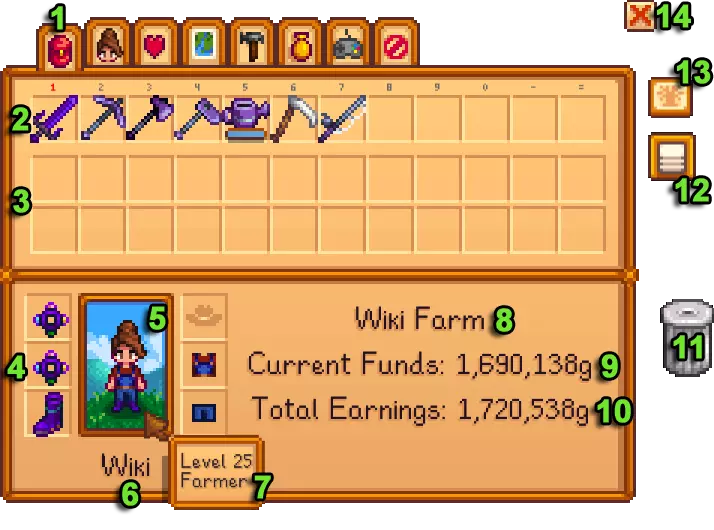
If you don't like the hat, you can store it in a chest (note that you can't drop it or sell it). To win the egg hunt you must find 9 colored eggs; you can look up videos showing the best route and location of the eggs if you really want to win. There's no advantage or disadvantage to winning or losing the festival, except that if you do win, then when you play the following year, if you win again, you'll get 1,000g instead of the hat. Once the egg hunt is done the festival ends and you are teleported to your farm house front door. But don't go to bed yet! First, plant all of the Strawberry Seeds you bought at the festival. Once that's done, grab the Cauliflower (and any other crops you haven't yet turned in) and head to the Community Center to complete the Spring Crop Bundle. This will reward you with 20 Speed-Gros. Take these back to the farm and use them on any 20 Strawberry seeds you planted. This part is crucial, because doing this will get you one extra harvest from each Strawberry plant you fertilized. At 20 plants, that's a bare minimum of an extra 2,400g! And if you get any extra Strawberries or gold or silver quality ones, then the bonus money will be even higher! There's only one thing to keep in mind: you must make sure you water those 20 plants every day until Spring 28 to get that extra harvest, on Spring 28. If you miss even one day, you'll lose the extra harvest for each plant you missed. Day Fourteen (Haley's Birthday) Haley likes Daffodils, so give her the highest quality one you can find. This will almost certainly get Haley to the 2 heart level. If so, and it's after noon and Emily hasn't left for work yet, you can leave their house and re-enter to start a cut scene with Haley and Emily. Your answer will make a big difference with Haley's friendship, so be sure to read the choices and choose carefully! (Or check out the Haley page in the Wiki for more information.) For farming, I recommend you buy more Parsnip Seeds and just continue to plant Parsnips. They will still give you the quickest and best return on your Farming Level. You should also continue to work on Foraging, clearing trees wherever you can. One thing to note: you will likely have reached level 3 in both Foraging and Farming by this point, and that means you can make Tappers and Speed-Gro. You will need 2 Copper Bars (and 40 wood) for each tapper, so make sure to keep up with your mining. You might be tempted to hold on to the Copper Bars for tool leveling, but it's better at this point to use that copper for Tappers. You won't really have the money for tool level ups until later, so there's no point in saving the copper as you'll get more before you can afford the upgrades anyway. If you've spent a least a semi-decent amount of time fishing, you may also have Level 3 Fishing which is significant because it unlocks Crab Pots. Now Crab Pots are a bit expensive, whether you buy them from Willy or make them yourself. But you can 3 free Crab Pots from the Junimos! Best of all, you don't need to even fish to get it. The bundle you want to complete is the Crab Pot Bundle. To do so, you just need to turn in a Clam, Oyster, Mussel, and Cockle, all of which can be gathered from the beach. Of course, you will still need one more item to finish it. However, with a little luck, you can get a Crab in the mines by killing Rock Crabs, which spawn on Floors 1-29. So you should be able to snag one if you keep mining for copper ore to make those Tappers! You can place the crab pots on your farm, if you have any farm other than the Standard one. If you did choose the Standard Farm, you can place the pots either in Cindersap Pond, or the Mountain Lake. Although it's a good idea to put at least one or two at the beach, since there are different fish you can catch at the beach. One last tip: if you find yourself often forgetting to unload your tools before entering the mine, you can always build and place a chest in the mine entrance. That way you can store any mine specific items (like your weapon, bombs, combat foods, etc.) and you can also store your watering can or axe while you venture into the depths. Just don't forget to grab them again before you head home! Days Fifteen through Eighteen (Salmonberry Season) Day Fifteen is the start of Salmonberry Season. That means that bushes around the valley will have berries on them, and you can harvest the berries by 'shaking' the bush. If you managed to get your Foraging skill up to level 4, you'll actually get 2 berries from every bush instead of just one (you can also boost your Foraging skill to get this benefit with some foods, although you won't likely have access to them at this point in the game). One thing to note about the game and the berry bushes: for some reason, the number of bushes with berries is not determined when you save the game at the end of the previous day, but instead at the beginning of the day, just as you enter the game. This is significant because apparently if you exit your game on a berry day and then restart, you will find a lot more bushes with berries then if you played straight through from the previous day. And this is true for all 4 days. At a minimum, I would recommend exiting the game to the title screen just after waking up each morning. Of course, if you have time to kill, you can also use that planned reset to scout out the valley and figure out if there's anything you want to grab, in terms of other forageables, as they will not reset when you restart the day. The difference in the number of berry bushes is quite dramatic, and is generally 2-3 times more than if you played the day straight through, so always make sure to do that reset! Now Salmonberries are sadly the least valuable fruit in the game. As such, you might wonder why you should spend so much time harvesting them. Well, as it happens, they are much more valuable as jelly, so they're a good choice to keep around for the Preserves Jar. But more significantly, there are nine (9) NPCs who like Salmonberries: Demetrius, Jodi, Kent, Leah, Linus, Pam, Robin, Sandy, and Shane. And since Salmonberries are so plentiful (you can easily harvest 500 or so over the season) and so cheap, they make perfect gifts for these NPCs! In fact, you can completely befriend all of them just by giving them Salmonberries. What's more, everyone in the game (except Sebastian) likes Salmonberry Jelly, so you can also use the jelly as a universal gift. And most NPCs also like the wine you can make with it, by placing them in a keg, although Leah and Harvey both love wine, so again, a very cheap, but loved gift for them! Day Sixteen is the last day you can plant Cauliflower Seeds without fertilizer and still harvest them before the end of Spring. If you haven't gotten a gold star quality Cauliflower by now, I recommend you plant a few and use some Basic Fertilizer to increase your chances to snag a gold star quality one - you really want to make sure you have at least one before the end of Spring. Of course, if you can make Speed-Gro, you can actually plant Cauliflower on Day Eighteen and still get the harvest in before the end of the season. Which is another good reason to get those tappers running! Now, if you haven't been turning in gems or artifacts to Gunther at the museum, and if you have any geodes or gems saved up, Day Sixteen is the best day to break open geodes and turn in artifacts. The reason is that with just 5 donations, you will get 9 Cauliflower Seeds, so you definitely want to collect them on or before Spring 16! Finally, Day Eighteen is Pam's birthday. Since she likes Salmonberries (and you should have plenty by Day Eighteen) just make sure you give her one before the end of the day! Days Nineteen through Twenty-Three Since Day Nineteen isn't overly significant, I wanted to mention some of the other crops you can plant in Spring. If you want to get credit for shipping them, or just have them around in case someone wants one, you can plant a few Tulips (Evelyn loves them), Kale (used to make Salmon Dinner and Stir Fry), and Blue Jazz (used to make Lucky Lunch, although you won't learn that recipe until Year 2). Although Blue Jazz does have one significant other use: since you should be at Farming Level 3, you can make a Bee House if you get your hands on some Iron, and Maple Syrup. Maple Syrup obviously comes from Tappers, which I mentioned earlier. Iron requires getting to Floor 40 in the Mine. So if you haven't been doing too much in the mine, now would be a good time to spend a day (or two) trying to get to the lower levels. Level 19 is probably the most challenging to deal with, especially if you go into the mine later in the day, so just be prepared and bring some snacks! That being said, you might want to wait a day because: Day Twenty is significant for two reasons: First, it's Shane's birthday (and if you want to dance with him at the Flower Festival, then be sure to give him a Salmonberry!) Second, if you followed my advice, you should be harvesting your 20 Speed-Gro boosted Strawberries! You can take these to Pierre and sell them directly to him, and then turn around and buy that Large Pack for 2,000g that you've been eyeing for days! This also means it's a great time to go mine exploring, since you'll be able to hold a lot more loot now! Day Twenty-One is the last day you can plant Blue Jazz (without Speed-Gro) and harvest it before the end of Spring, so if you're looking to grow some, now's the time to plant it! This is also the last day you can plant Spring Seeds to grow Spring forageables. It's also a Sunday, and probably the first time that the Traveling Merchant is up that you'll actually have some spending gold. If you do, visit her in the North-West of Cindersap Forest and check out what she's got available. Two things you want to consider buying: Red Cabbage (or Red Cabbage Seeds) and Rare Seeds. Rare Seeds will cost you 1,000g, but you definitely need at least 1 if not more. The Sweet Gem Berry that grows from the Rare Seeds is worth 3,000g, so it's basically a long term investment, but obviously worth it, if you can afford the Seeds - and if you snagged more than 20 Strawberry Seeds, then Spring 21 is when they should be harvestable, so you should be able to sell them to Pierre to be able to buy from the Traveling Merchant. Day Twenty-Two is the last day to plant Potatoes, Kale, Tulips, and Rice Shoots (if you plant them near water). I don't recommend buying rice shoots - the Unmilled Rice actually sells for less gold than the rice shoots cost! But if you find any in the mines, Spring 22 is your last chance to plant them (unless you use Speed-Gro, of course). Unmilled Rice is best put in a Preserving Jar and turned into pickles. You can also place it in a mill to make Rice, which isn't worth as much as the Pickled Rice, but you can use it for cooking at a fraction of the price Pierre sells it for. Day Twenty-Three is the last day you can give marriage candidates a gift before the flower festival to try and get them to dance with you. You need your friendship level to be at 4/8 (showing a yellow dot on their chat screen, next to their portrait) for them to accept you. Also, while technically Day Twenty-Four is the last day to plant Parsnip Seeds before the end of Spring, Spring 23 is the last day you can buy the seeds, so plan ahead! Days Twenty-Four (Flower Festival) and Twenty-Five Day Twenty-Four will be the Flower Festival. Unlike the Egg Festival, this one is held in the Forest, south of your farm, in a unique area that is normally blocked and off-limits. Once you enter, you cannot leave without ending the festival, so make sure you do your harvesting, watering and anything else you want to do before entering the forest. If you managed to get your friendship high enough with Haley or Shane, you can dance with either of them - just ask the one you want to dance with. As with other festivals, make sure to speak with everyone before you talk to Lewis and get him to start the dance. After watching the dance, the festival will end, and you'll be back on your farm at 10pm. Note that dancing with someone will increase their friendship with you by 250 points, which is equivalent to 1 entire heart! So choose carefully! Day Twenty-Four will also be the second harvest day for your Speed-Gro boosted Strawberries, but you'll have to ship them to get money - Pierre is at the festival, but he won't buy anything. Day Twenty-Five will be the second harvest day for your non-Speed-Gro boosted Strawberries. This is also their last harvest day, so you can skip watering them from this point on, saving the energy and time. One last thing, since Spring is nearing it's end: you should make sure to do enough fishing to try and catch at least one of each fish that is unique to Spring. The most challenging will be the Eel, which can only be caught in the evening on rainy days. They aren't too terribly hard to catch, if you can hook one, but getting a rainy day might prove difficult. You only technically need 1 Eel to give to the Junimos, but if you can catch a few, it's a good idea to hold on to the extras. Day Twenty-Six (Pierre's Birthday) Day Twenty-Six is Pierre's birthday. Give him a Daffodil or a Parsnip, preferably a gold star quality one, if you have it. If you have enough funds, you can consider buying the Copper Axe upgrade. I recommend the Axe upgrade first because it will allow you to break up Large Stumps and start collecting Hardwood, which you'll need to get a Stable. The Stable will give you a horse, and will significantly increase your mobility, allowing you to get a lot more done in the limited time of each day. You should also consider buying a Silo at this point, if you haven't already. You'll need 100 Stone, 5 Copper Bars, and 10 Clay, plus 100g. You'll need the Silo in order to have hay to feed your animals. In fact, if you plan to have a full Coop and Barn (24 animals altogether) you will need 3 silos full of hay to have enough hay to make it through the Winter. And I recommend 4 since you'll want a bit extra for early Spring. The sooner you get the Silo built, the sooner you can start gathering hay. You should be careful at this point to not go overboard with spending money. To set yourself up for Summer, and to ensure you get enough of each crop, focusing mostly on the big money maker (blueberries), which require Speed-Gro to hit their maximum potential, you'll need to spend quite a lot of gold. If you were continuing to give items to the museum, you should have gotten 9 Melon Seeds as the second reward for turning in 10 items, which will be a big help when starting for the summer planting. I recommend at least 3 Hot Pepper Seeds, 3 Tomato Seeds, the 9 Melon Seeds, at least 6 plots dedicated to Wheat, 3 for Radishes, 12 for Corn, and 6 for Hops. You can use Speed-Gro on the Wheat, Radishes & Hops, but I would only do so if you have it to spare. The reason is that you want to spend the bulk of your funds on Blueberry Seeds, and Speed-Gro, if you can afford it. Speed-Gro will give you one extra harvest from each Blueberry plant. Each plant give 3 blueberries, with a 2% chance for extras. The base price for Blueberries is 50g each, so spending 100g for Speed-Gro nets a return of 150g at a minimum for each plant. It's also likely that by this point you may have reached Level 5 in Farming and/or Foraging. If so, you will be given the option to choose a profession. For Farming, you can choose between Tiller (Crops worth 10% more) or Rancher (Animal products worth 20% more). I recommend choosing Tiller. While the Rancher bonus is higher, in general you will be selling more crops than animal products, so you will net a bigger increase from Tiller's 10% increase than you will from the Rancher's 20% bonus. What's more, the Level 10 profession options for Tiller (Artisan - artisan goods are worth 40% more, or Agriculturist - all crops grow 10% faster) are significantly better than the Rancher profession choices (Coopmaster - befriend coop animals quicker and cut incubation time in half, or Shepherd - befriend barn animals quicker and sheep produce wool faster). As for Foraging, the general consensus is that Gatherer (20% Chance for double harvest of foraged items) is superior to Forester (Gain 25% more wood when chopping). The reason is that you can always plant more trees to get additional wood, but the benefit of double harvests can't be equaled, especially when you consider that Truffles are a forageable, meaning you can frequently get 2 from each gather. And further, the Gatherer Level 10 professions (Botanist - Foraged items are always iridium quality, or Tracker - Location of forageable items revealed) are both superior to the Forester choices: (Lumberjack - All trees have a chance to drop Hardwood, or Tapper - Syrups are worth 25% more), especially considering there is a finite amount of Hardwood you will realistically need, and generally you don't want to sell Syrups because they're needed so badly for crafting (and a few other things as well). Days Twenty-Seven (Emily's Birthday) and Twenty-Eight (End of Spring) Day Twenty-Seven is Emily's birthday. Emily loves most gems (Amethyst, Aquamarine, Emerald, Jade, Ruby, and Topaz, but not Diamonds), so if you've managed to snag one of them and didn't turn it in or sell it, I recommend giving her one as it will give you a huge push to her friendship (+640 points!) Topaz is the best option because they have the least sell value and are generally the most plentiful. Amethyst is next, although they are also loved by Abigail. If you decide that you really want an upgraded watering can, and you have enough Copper Bars, then today is also the best day to deliver your watering can to Clint for the upgrade - after you water your remaining crops, of course! Since everything you planted that wasn't harvested will die on Summer 1, there's no reason to water anything on Spring 28, making Spring 27 the ideal day to get that upgrade. Personally I prefer to wait, because I don't worry so much about the extra time and energy spent on watering at this stage, and because 2,000g is a significant loss to take just before the purchase of Summer seeds. Of course, you could argue that spending that money now translates into more time and energy to do things, both because watering will be quicker and easier, and because you'll have fewer crops planted. But that's a personal decision, so go with what you prefer. Just know that if you don't get it upgraded now, you'll have to wait for the day before a rainy day that doesn't precede a holiday to get the upgrade. Days to avoid for tool upgrades are: Summer 9, Fall 14 and 25, and Winter 6 and 23. Since the second day from each of these is a holiday, Clint's shop will be closed, and you'll have to wait an extra day to get your tool back. This will mean a missed watering day with the watering can! Finally if it's raining (or will be raining on Spring 28) make sure to do some fishing, especially in the Ocean after 4PM to catch an Eel. This is you last chance to catch one before Fall. The other rainy day fish are Catfish and Shad, both in rivers. Catfish are tough to catch, especially with a bamboo pole, although you can catch them again in Fall too if you don't manage it in the Spring. Day Twenty-Eight is your final harvest day for Spring, so you don't have to water anything. I recommend spending time in the mines, if you haven't yet, and try to get to floor 40 to access Iron. Guide Part 2 will be coming soon, and that will cover Summer, so stay tuned! Addendum (Stuff I Missed) So there are a couple of things I didn't go into in my guide that I realized I probably should mention, so I'm adding this section to capture those things. I will probably update this section a couple of times, especially if there's anything else that comes up in Spring of Year 1 that I might have overlooked. The first thing is about the marriage candidates. I mentioned for the Flower Festival that it's pretty easy to get both Haley and Shane to 4 hearts, thus unlocking the ability to dance with them at the festival (which also gives a further heart boost to 5 hearts). But as it happens, it is possible to get to 4 hearts with all of the marriage candidates by the Flower Festival... it's just not as easy with the others, and requires a lot of attention right out of the gate, since you have to give them 2 liked or loved gifts each week before Spring 21, and then also 2 gifts immediately before the festival. I didn't go into too much detail on this because it's not easy and practically speaking not really necessary, unless you want to get married as fast as possible. If you want to do that, I recommend looking on the Stardew Valley wiki or for other guides. That being said, there is something important I want to point out. It is possible to get married in Year 1, but it is not easy. I recommend deciding on who you want to marry early, and focus your attention on that villager - give them two gifts every week, preferably a loved gift, if you can find one, and talk to them everyday. Once you get someone to 8 hearts, Pierre will start selling the Bouquet, which costs 200g. Giving the bouquet to a marriage candidate at 8 hearts will unlock the last 2 hearts, allowing you to get them to 10 hearts. Keep in mind that if you don't talk to someone you're "dating", you lose 8 friendship points per day (compared to the standard 2 friendship points lost per day). So don't give anyone the bouquet unless you're prepared to talk to them everyday. Now, once you get their heart level maxed out (to 10 hearts) the decay will stop, and after that you're good... until you get married, anyway. But I'll let you look up that elsewhere on your own. Once you've gotten a marriage candidate to 10 hearts, the next obstacle is your Farm House. You must upgrade it at least once to be able to get married (the cost is 10,000g and 450 wood). Finally, if you've gotten a sweetheart and the house upgrade, the last requirement is to buy the Mermaid's Pendant. Doing so costs 5,000g, and you can only buy it from the Old Mariner, who only appears at the tidal pools on the beach on rainy days. And keep in mind - it doesn't rain in Winter! So if you don't manage to get the pendant by the end of Fall, then you'll have to wait until Year 2. Now practically speaking I don't think that's such a big deal, but I only bring it up in case you want to get married in year 1... or you want a Winter Wedding. The next thing I didn't mention was the cave on your farm. Around about Spring 26 or so, assuming you followed by guide, you should have earned enough money that Demetrius will show up at your door telling you he wants to set up an experiment in your cave. He gives 2 options: mushrooms (which will grow in 6 crates, and be harvestable every day) or fruit bats, who will occasionally drop random fruit on the cave floor that you can gather. For the fruit bats, the fruit can be any tree fruit (cherry, apple, pomegranate, peach, apricot, or orange), as well as blackberries, salmonberries, spice berries, or wild plums. The fruits can be any quality from normal to gold, however if you have the Botanist Profession (from the Gatherer Profession tree in Foraging), then the fruit will always be iridium quality. What's more the fruit will also give you Forager xp when picked up. All-in-all, the bats are an ideal choice for beginners and provide a ton of benefits at the start of the game. For the mushrooms, they will always be normal quality. But there will always be 6 to harvest every day, and they can include the rare Red, Purple, Chanterelle, and Morel varieties. And of these types, the purple mushrooms are the most valuable and rare, as they can otherwise only be obtained in the mines (or by tapping or chopping down a very rare Mushroom Tree). Now, if you choose the Forest Farm, you will be able to harvest Common Mushrooms, Morels, Chanterelles, and Red Mushrooms on your Farm. But the Purple Mushrooms will not spawn there. Because Purple Mushrooms are needed for at least 2 Junimo bundles, and because they are an essential ingredient in making Life Elixir, coupled with the fact that they are otherwise extremely difficult to obtain, it is generally recommended that you pick the mushrooms over the bats. While the bats are the better choice immediately (for Year 1), the mushrooms will surpass them in the long run, especially since the Foraging xp gain will become meaningless once your Foraging skill is maxed out, and because the unpredictability of getting the fruit, coupled with it being more valuable as wine (or jelly) means that you really won't benefit from the bats much in the long run, especially since you can grow fruit trees in your greenhouse for year round guaranteed tree fruits. Sorry, bat lovers!