换一换
换一换 


猎人你好!本指南将为你打下理解基础的基石,内容涵盖从界面、狩猎准备、狩猎过程到狩猎后的常规流程。此外,还包括武器、元素、状态异常、百龙夜行等更多内容!已针对曙光扩展包进行更新。
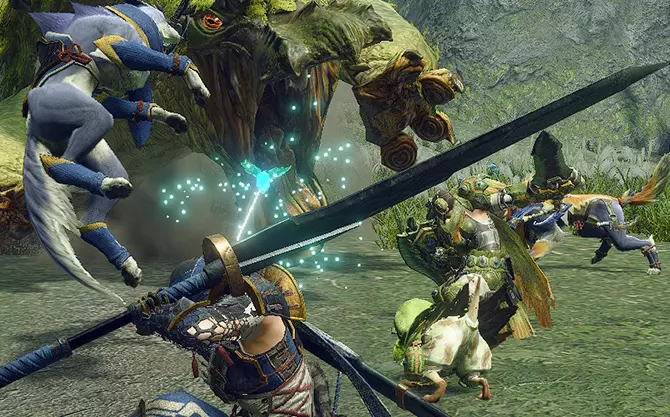
Welcome! Monster Hunter Rise marks the sixth generation of Monster Hunter games. This is a wonderful, quirky series with many obscure and sometimes unintuitive game mechanics. With many games worth of series experience under my belt, I wanted to help those new to Monster Hunter, and perhaps those returning, with a guide to make things easier. I'll never claim to be an expert, but I'll provide plenty of resources for further clarification and research to help you understand the game. If you come across a term or phrase you don't understand, try the glossary near the bottom of the page. Some key things to understand about Monster Hunter: This is a notoriously difficult series to get into. It took me three solid attempts over several years to break in and finally "get" it. With the release of Monster Hunter World, Capcom made great strides in making the series approachable to new players, and Monster Hunter Rise took many of those lessons to heart. Still, don't feel discouraged if you don't enjoy the game; it's not for everyone. Combat is slow and deliberate. It's not a spectacle fighter. When you hit an attack button, you commit to that attack. You can't dodge or block until it's complete. You have to read your opponent and anticipate their attacks so you can respond in kind. That said, Rise is the most fast-paced game in the series yet! Your character has no "stats," and doesn't level up. Your character is almost exactly the same at the beginning of the game as they are at the end-game. You can unlock new moves for weapons throughout the game, but they're a far smaller contributor to your success than the major things that improve, which are your supplies, weapons, armor, and your own skill and knowledge as a player. There's only so much a guide can teach. If you know someone who plays monster hunter, ask them. Nothing can compare to a veteran teaching you the game and answering your questions as they come up. Even if you don't know someone in-person or online, there's plenty of resources dedicated to helping people learn this wonderful series, including the many discord servers dedicated to Monster Hunter[top.gg]. The Monster Hunter Gathering Hall[discordapp.com] is the officially partnered one.All in all, there are two priorities in Monster Hunter: Don’t get hit Hit the monsterThe order is important. If you can remember and abide by that mantra, you’ll be all right. This guide was written using information, screenshots, and sources based on the Switch version of the game. There will be minor differences between PC and Switch versions due to updates, options, and button prompts. Throughout the guide I will also provide links to other useful sites, videos, and informational images where appropriate. The Monster Hunter community is full of people willing to help! What are the main differences between World and Rise? Some of you may remember my Monster Hunter World guide, which this guide is based on. While much of it is the same, you may want to check out the sections related to the notes below, as these cover the big stuff added in Rise. The following are the biggest changes: Vertical movement has been greatly expanded; you can now run and jump up walls and are encouraged to do so. The clutch claw in Monster Hunter World Iceborne does not exist; it is replaced by the Wirebug, which assists in both combat and movement around the map. Weapons now have Switch Skills, where parts of your moveset can be swapped out for different ones. Monsters can be affected by blights. The monster mounting system has been revamped into Wyvern Riding, where you take control over the monster. You can run around and attack other monsters for extra loot drops, knockdowns, and heavy damage. Quests are separated by village and hub quests again. Village quests are solo only and only cover low rank. Hub quests are scaled for multiplayer, but can be done solo if desired. Hub quests also scale differently depending on how many hunters are in the quest. Instead of crafting talismans and having decorations as RNG drops, the game has returned to crafting decorations and having talismans as RNG drops. Good luck! You now have access to Palamutes! These Canynes are the dog-equivalent to Felyne Palicoes, and are more offense-oriented. You can ride them for faster ground traversal, even in town. This game features Rampages, a quest type where you defend against waves of monsters by placing turrets and NPCs, making strategic use of wyvern fire and dragonators, or swinging into the fray yourself. Endemic life has been expanded to help you get permanent or temporary buffs for the quest, or Hunting Helpers which can inflict status effects or alter monster behavior. So, What's the Story? Do I need to know the lore of past games to know what's going on?No. The Monster Hunter series has barely any story at all. Most games can nearly all boil down to: "a big monster is threatening the local ecosystem; can you take care of it?" You can jump straight into Monster Hunter Rise without any trouble. Seriously, give it to me. What's the lore?Take this next paragraph with a grain of salt; very little of it is referenced in the series directly. Some of this info comes from notes from artbooks and concept art, and may or may not be considered canon. A long time ago, there was an ancient civilization[monsterhunter.wikia.com] of many races, including humans and wyverians, who are humanoids with four fingers and pointed ears. They possessed great knowledge and had an advanced level of technology unknown today. They exploited the wyverns and elder dragons of their time. At some point, they performed The Forbidden Act, killing numerous wyverns to create their own massive bioweapon lifeform called the Equal Dragon Weapon/Wyvern Machine Soldier. Many of these bioweapon lifeforms were made. This greatly angered the dragons, sparking the Great Dragon War. It was a terribly violent conflict that left the ancient civilization in ruins and most dragons extinct. With most of the world in shambles and the knowledge and technology of the ancient civilization lost, humans and wyverians adopted a new culture. Instead of directly antagonizing wyverns and dragons, they would instead live alongside them with a healthy respect for nature. This isn't to say conflict ceased entirely: wyverns are a constant threat to humanoids and other monsters alike, and something needed to be done to protect the peace. The Hunter's Guild was formed to maintain that peace. It's the central governing body of the world, and the primary way monster-related problems get solved. Officially-sanctioned hunters are not out to annihilate all monsters, rather, they're more glorified park rangers. They hunt down overpopulated animals, eliminate disruptive invasive species, and protect towns from marauding monsters. Guild Knights are dispatched to execute poachers that disobey these rules. Everything is done to learn more about the world and protect the world's ecosystem. All right. How about Monster Hunter Rise specifically?Since ancient times, the people of Kamura Village have fallen victim to numerous rampages, a calamitous event where many monsters attack the village all at once. The last rampage that occurred 50 years ago nearly wiped out the entire village. Tired of living in fear, the villagers have banded together to train themselves and fortify their home by building a stronghold to repel the rampage. The reason why these rampages occur is unknown.
村是你的家乡,你在这里长大。村民们如同家人一般。火芽和水芸是你的童年好友,她们支持你训练,助你成为一名合格的猎人。训练完成后,你将磨砺技能,装备更强大的武器和 armor,与大家并肩作战,抵御侵袭。运气好的话,或许你能解开 rampage 背后的谜团,彻底终结这一切。 了解用户界面 怪物猎人的屏幕上有很多信息,下面我们来分解一下你所看到的内容,以便更好地了解情况。如果需要仔细查看,可以点击下方图片进行放大。
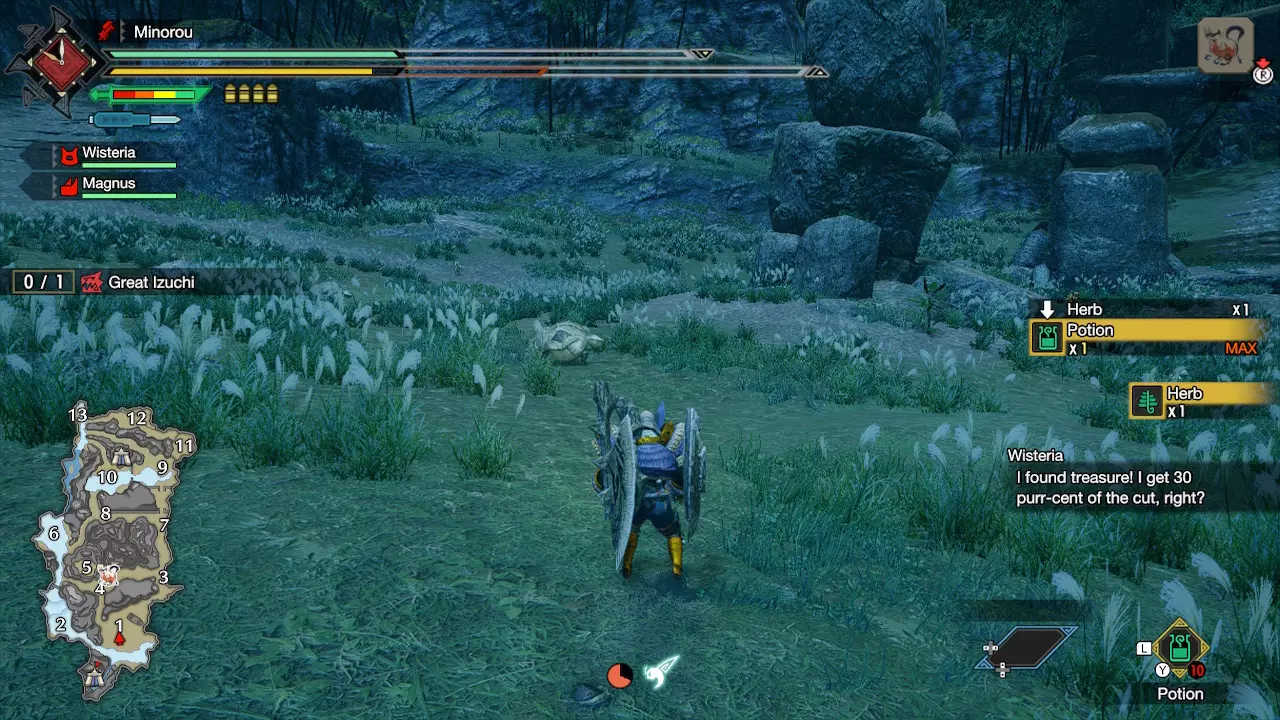
Let's start with the top left and go clockwise. Fittingly, we have the red clock. The white hand starts from the noon position, then slowly moves to indicate how long the quest has been. In the example, it hasn't even budged yet, indicating the quest has just started. The orange hand of the clock indicates the quest time limit. Most quests have a time limit of 50 minutes, though some may vary. To the right of the clock is the player's name, along with your current weapon's icon. Below the name is the green health bar. While this character is technically at full health, the white empty portion represents the potential max health your character can get if they gather enough green health spiribirds. The size of this bar can change depending on your equipped Petalace (which we'll describe later). If you ever take damage, some of your health bar will turn red. The red portion will heal slowly over time, as long as the player doesn't take any further damage. Below the health bar is the yellow stamina bar. It acts similarly to the health bar. You can get more max stamina for a hunt by collecting yellow stamina spiribirds. The red outline here indicates my character is hungry; eating steak or rations will fill up the red portion. You will naturally get hungry over time, though there is no penalty to being super hungry other than a small stamina bar. Below the stamina bar is the weapon status icons. Keep in mind that these icons will vary depending on the weapon type you're currently using. This player is using a gunlance. The four shells and the blue spike are gunlance icons, but the horizontal sword between them is common to all blademaster weapons, and is very important: the sharpness bar. It indicates how sharp your weapon currently is. In this example, this player's weapon is at full green sharpness. During a fight, the green sword around it will fade away, indicating how close it is to dropping into yellow sharpness and thus, less damaging. You'll find a more thorough explanation of sharpness in the weapons section below. Below the weapon status icons are your buddies. You have their names, health bars, an icon of whether they're a palico or palamute, and a space for what action they're currently doing/what status effect they're affected by. If you are in multiplayer, other players will have their names and weapon icons displayed here. The top right on the screen is for large monster icons. They'll show what monsters are currently on the map (or show a question mark if unknown). You can press the indicated button to set a target. If a blue monster head shows below the monster icon, it is ready to be captured. Below the monster icons is a notification area. This is where sidequest progress, player chat, NPC chat, and acquired loot is displayed. At the bottom right of the screen is a small version of your item bar. The most prominently-displayed item is your currently-selected one. Pressing the button displayed there while your weapon is sheathed will use that item. You can change your currently-selected item by holding down the button displayed to the left of the item bar. To the left of that is the action bar. By default, this contains actions such as posing, chat, and emotes. It also has contextual differences depending on whether you're in town or out in the field. While in town, you have easier access to fast travel, and during hunts you can instruct your palico to use a felvine. At the bottom of the screen are your wirebug charges. You usually have two wirebugs, though you can gain a third. In this example, one wirebug was recently used and the cooldown is displayed in a radial timer. The bottom left is the map. It'll show general topography. Colored-in sections are the "standard level" areas where large monsters typically spend most of their time in. Dark gray sections of a map are areas that are much higher or much lower than the standard level. If you hold the radial menu button, not only will the radial menu appear, but the map will zoom in and display extra points of interest such as gathering points. Lastly, above the map is your quest objective. In Game Settings, you are able to select HUD settings to enable/disable every one of these UI elements to your preference. Preparing for the Hunt While you may want to get out there and get killing right away, you need to get ready first. The following is the core gameplay loop: You go out in the field to gather materials and hunt monsters. You return to town to make supplies, arms, and armor to take on tougher monsters. Repeat. Subquests and RequestsEvery time you speak to the quest gals Hinoa or Minoto, they offer Subquests. These are bonus objectives for you to complete for bonus rewards, the most important of which are armor spheres. Always make sure you have 5 subquests selected before each hunt. Pick the ones you're most likely to complete within the next few hunts; there's no point in holding onto a "Harvest Honey" subquest if you never bother picking them up. Throughout the game, various characters will have an icon above their head indicating they want to speak with you. There's a good chance they'll give you an item or ask you to complete a request for them. This may involve completing a certain quest, killing a specific monster, or delivering some items to them. This is important for unlocking new weapons, dango recipes, and other beneficial rewards. Kagero the Merchant

商人卡杰罗站在钢铁厂(城镇中心)希娜对面的小路上。商人迈多坐在集会所的水藤旁边。两者都提供与基础物品商贩完全相同的服务。如果你缺少药水、桶爆弹、陷阱工具、弹药、涂层等物品,可以去找他们。 当你站在他们附近时,如果听到独特的口哨音乐盖过了通常的背景音乐,就说明正在进行促销活动。此时他们几乎所有的商品都会半价,这是大量购买物品的最佳时机。这种情况每完成几个任务就会发生一次。你可以向他们出售物品来赚取金币,不过也可以直接从物品箱中出售物品。随着游戏的推进,他们的库存会增加新的可售物品。在游戏进行到相当阶段后,商店会开始出售力量护符和防御护符。它们永远不会有五折优惠,但你应该购买并保存在背包中,因为持有它们就能提供攻击和防御加成。 当商店进行促销活动时,还会提供抽奖。支付少量费用即可参与抽奖并立即获得奖励。大多数情况下,你会获得陷阱、炸弹、免疫剂等实用的狩猎道具,但如果抽中头奖,你能获得其他地方无法获得的物品,例如房间装饰。每次促销期间只能使用一次抽奖。 龙识船潜艇,又称农场。
农场是无需亲自去野外采集就能快速获取狩猎必备物品的地方。前往伙伴广场与龙人姐妹罗迪娜对话,选择【订购物品】->【交易委托】,挑选伙伴和想要的物品后,随着你完成任务,该物品就会填充到收获箱中。如果选择订购稀有物品,每个任务只能获得少量;若订购普通物品,则能获得更多。你还可以选择【伙伴议价】来提高物品产量、加快获取速度,或增加获得稀有额外物品的机会,但这需要你选择的伙伴达到特定等级。随着游戏进度推进,完成支线任务可以解锁更多潜水艇。 不确定该订购什么时,就多囤蜂蜜吧,蜂蜜是你的生命线。它可用于许多常见的实用合成配方,包括【大回复药】。 龙历院的龙人姐妹也是一些稀有物品的购买来源,记得时常查看她的库存。 猫长老小霞的【猫探险队】 很快你将解锁猫探险队功能。这允许你派遣伙伴代替你去狩猎怪物和收集素材,不过需要消耗一些资源点。操作相当简单:你可以通过与猫长老小霞或家中的管家对话来派遣它们。只需浏览所有选项,查看哪条路线包含你最想要的怪物或采集点,然后选择该目的地和路线。接着,挑选四名伙伴前往该地点探索。伙伴的等级越高,你获得的奖励就越多。这样就完成了!猫车小队完成任务需要五个任务。如果你想提前取消,可以从菜单中进行操作,并获取他们到目前为止获得的奖励。否则,当你完成足够的任务后,聊天日志会提示探险队已返回。 你可以从贸易船和猫车小队那里获得其他地方无法获得的稀有素材,这些素材可用于制作独特的武器和防具。 村训练场村训练场配备了各种设施,让你可以在安全区域练习武器使用和移动技巧。你首次可以从伙伴广场的一艘船进入这里,之后则可以通过快速旅行进入。入口附近有一个装备箱,你可以在那里切换武器和 armor;方便你立即测试不同的 build。从入口向右走,有一系列移动靶,用于测试远程武器。
最突出的特色是【Toadversary】,这是一个由艾露猫驱动的机械训练假人,供你进行攻击练习。它会显示你连招的伤害数值,拥有不同硬度的打击区域,并且可以通过菜单进行配置以呈现不同行为,包括使用物理或元素攻击来反击你,让你能够测试反击或格挡技巧。 在【Toadversary】上方设有一系列绳索、平台和悬崖,用于测试你使用翔虫进行空中机动的技能。 尽管视频中的文字是日文,但它很好地预览了训练区域的使用效果。 选择你的武器 - 第一部分 《怪物猎人:崛起》有十四种不同的武器类型可供选择,你不必局限于使用一种武器。你的角色可以随意使用任意数量的武器,也可以随时切换。每种武器类型都有其可用性。 你一开始就拥有所有类型的基础村武器,所以建议你这么做。这款游戏提供了数十到数百小时的游玩时间,因此至少花5-10分钟在训练区熟悉每种武器。训练区可通过伙伴广场的一艘船进入,之后你可以通过快速旅行前往那里。用那些看起来有趣的武器进行几次狩猎吧。专注使用一种武器类型是完全可以的,但如果你想换个节奏玩,或者主玩钝器却需要切断怪物尾巴,又或者你的主武器不太适合当前目标时,多样化的武器选择会很有帮助。不必纠结于寻找“最强”或“主流”武器类型。《怪物猎人》系列的核心就在于使用适合自己的武器。 选择武器时,可以对比不同武器类型的伤害数值。Capcom在本作菜单中采用了具有可比性的伤害数值,而非《怪物猎人:世界》中那种随意膨胀的数值。这意味着在《怪物猎人:崛起》中,若以相近水平使用,伤害数值相同的武器造成的伤害大致相当。因此,一把120伤害的大剑在整个狩猎过程中的总伤害,与一套120伤害的双剑大致相当。仅通过文字很难理解武器的要点,观看它们的实际动作会更有帮助。这里有一个不错的快速概览,涵盖了每种武器类型、一些基本连招和主要概念。

片手剑常被视为系列中的新手武器,但其实力不容小觑。它在各方面都具备不错的通用性,除了攻击范围外,没有明显短板。片手剑的独特之处在于可以在武器出鞘的状态下使用道具,最适合搭配属性武器和状态异常武器。使用盾牌的攻击能造成眩晕值伤害,有机会击晕怪物。

双剑 双剑以快速攻击和冲刺见长,是元素伤害与异常状态施加的大师。进入 demon mode(恶魔模式)并消耗耐力后,它们会获得更强的招式组合,且对轻微击退效果免疫。若造成足够伤害使能量槽达到最大值,双剑会进入 archdemon mode(狱狼龙模式),提升攻击力并延长其持续不断的攻势。耐力管理是双剑策略的核心。 鲁里克汉双剑指南

长剑 凭借较远的攻击距离和易用性,长剑广受欢迎也就不足为奇了。通过命中攻击,长剑会提升其气刃槽。命中气刃连击的最后一击后,长剑会变得更强。在某种程度上,它可以被视为一种 momentum 武器:只要能保持气刃等级,伤害就会一直很高。它可以在连击过程中使用袈裟斩进行位移,还能无缝反击怪物的攻击。其高范围的纵斩能轻松斩断尾巴。高额的伤害和强大的反击能力使其成为攻防一体的强力武器。 Rurikhan 长剑指南 Arrekz 长剑教程

大剑无疑是该系列中最具标志性的武器。虽然攻速较慢,但它能造成极具毁灭性的伤害。大剑使用者最能从了解怪物中获益,他们通常采用游击战术:攻击怪物的弱点,然后撤离并等待下一次机会。肩撞和翔虫技能能轻松在怪物咆哮时维持蓄力状态,并使出威力强大的真蓄力斩。当怪物处于睡眠状态且不进行捕获时,大剑使用者往往是负责将其唤醒的角色。

长枪 长枪拥有游戏中最强的盾牌,但不要被这一点误导:它是攻击性最强的武器之一。其他武器需要收刀奔跑来躲避危险攻击,而一名合格的长枪使用者则会持续对怪物施压,不为所动。其攻击节奏有时被比作舞蹈。当怪物逃跑时,长枪可以使用冲锋技能追上并放倒那可怜的家伙。 鲁里克汉长枪指南 灯笼鱼的灯笼:如何成为长枪高手

枪 lance,常被称为“欢乐 lance”。这是一种附有短程火炮的 lance。它可以刺击,可以射击!还能通过龙杭炮同时进行刺击和射击,龙杭炮会刺入怪物体内然后爆炸。枪 lance 的射击伤害固定,对于难以破坏的坚硬部位非常有用。最后要说的是,龙击炮需要较长时间蓄力,但能造成巨大的爆发伤害。三种不同的炮击类型适合不同的游玩风格,使得枪 lance 在单一武器中拥有最丰富多样的策略。 鲁里克汉枪 lance 指南 完全详尽的枪 lance 指南 Caoslayer 的播放列表:枪 lance 专家

锤子 简单之中蕴藏着力量。拿起这柄大家伙,直接朝着怪物的额头砸下去。锤子是击晕之王,在多人狩猎中,它对怪物头部拥有优先打击权。通过蓄力,锤子能快速强化自身,然后全力输出。蓄力攻击适合打带跑战术,而大爆炸连招则最适合在怪物被击晕或麻痹时使用。锤子的攻击在命中时会带来格外爽快的打击感。作为钝器,它无法切断怪物的尾巴,但至少能让怪物更快陷入疲劳状态。

狩猎笛 大家都喜欢狩猎笛玩家。在《怪物猎人:崛起》中经过调整后,狩猎笛的人气再度飙升。使用该武器的每一次基础攻击都会演奏一个音符。连续演奏两个音符会自动奏出一首乐曲并获得其增益效果。演奏每个音符各一次并开始演奏,即可一次性获得所有乐曲的增益!但不要只在角落里演奏……你是战斗 bard,不是啦啦队员!你的乐曲威力巨大。用音乐的力量击杀怪物吧!虽然大家都在吹捧其 buff,但鲜为人知的是,狩猎笛是【眩晕之王】。被狩猎笛击中的怪物会比正常情况下更快疲劳,这意味着轻松的狩猎变得更加容易。

操虫棍 操虫棍是一种机动性良好的长柄武器,拥有较高的攻击范围和宽阔的攻击角度,并且配备有虫计量表。当它变形为剑形态时,能够对怪物坚硬部位造成有效打击而不会弹刀,真正发挥出强大实力。当第二个计量表充满后,还会根据操虫棍的种类获得瓶效果加成,可能是额外的物理伤害、元素伤害、状态异常效果,或是击晕/ exhaustion效果。它具备释放元素爆发的能力,能造成持续伤害并以巨大爆炸收尾。只要拥有足够的计量表,你就能在连招过程中无缝切换剑形态和棍形态,实现流畅的攻击节奏。不过要注意管理剑形态的计量表,避免使其过低。想给棍子“上弹”吗?

充能斧 可以说是最复杂的武器,但一旦掌握,就会成为用途最广且最有成就感的武器之一。充能斧通过剑形态的攻击积攒剑能量。用这些剑能量为瓶充能,从而在战斗中获得更多选择。你的武器可以变形为斧形态,斧形态下可以消耗瓶进行元素爆发。进阶用法中,你可以将充能后的瓶注入盾牌,强化斧模式并进一步扩展你的战斗选项。不过,没有什么能比得上它的终极技能——超充能元素爆发,这会引发一系列巨大的爆炸,造成同样巨大的伤害,为长时间的能量积攒带来令人满意的回报。只是别打偏了!

操虫棍 操虫棍实际上是由两部分组成的武器:棍子本身和猎虫。猎虫是一种会听从你指令飞行的虫子。你的首要任务是指挥猎虫飞过去攻击怪物的各个身体部位,收集萃取液并带回给你,为你提供 buff。最重要的是红色 buff,它能提升你的攻击力,并让你的攻击动作更具威力。获得 buff 后,你可以随意指挥猎虫攻击怪物,然后自己再进行攻击。操虫棍拥有空中攻击,这使得从空中骚扰怪物(以及破坏它们的背部!)变得更容易,但伤害最高的连招还是地面连招。

与依赖锋利度的剑士武器不同,弓拥有无限箭矢,但需要携带消耗性的瓶。通过给箭矢涂抹瓶,箭矢会获得额外效果,例如增加伤害或附加状态异常。射击时,瞄准怪物时需确保准星出现两个完整的圆圈,以此保持合适的会心距离。距离怪物过远会导致箭矢伤害降低。按住按键蓄力射击,或连续射击,以保持攻击节奏。龙箭攻击在蓄力时会使你无法移动,但能对怪物造成极高伤害,尤其对体型较长的怪物效果显著。弓还具备提供增益和治疗的能力。

轻弩 轻弩作为弩炮的“小兄弟”,牺牲了部分伤害以换取更高的机动性。弩炮使用者必须购买或制作弹药,但每次狩猎开始时,补给箱中通常会有一些免费弹药。轻弩的独特能力名为龙击弹,这是一种类似爆炸地雷的装置。你一次最多可以在地面上放置三个,如果你从上方投掷,甚至可以直接放在怪物身上。每次对其造成伤害时,它们就会爆炸,对周围区域造成高额伤害。弩炮可以在铁匠铺进行自定义,能够提升攻击力、增加射程、减少后坐力等等。随着你对弩炮进行升级,你将获得更多的自定义槽位。和弓类似,你必须保持在合适的距离才能造成最大伤害,但这会根据你当前使用的弹药而变化。 RazzleDazzleHour的综合弩教程(轻弩) Sam Pham技巧与教程:轻弩指南

重弩 重弩的移动速度比轻弩慢,但弹夹容量更大,威力也更强。弩手必须购买或制作弹药,不过每次狩猎开始时,补给箱里通常会有一些免费弹药。它具备蓄力射击的能力,很像大剑。重弩有两种不同的特殊弹药,具体取决于枪械类型。第一种是龙击炮,能让武器在一段时间内变成机关枪,可以进行短点射或持续扫射。第二种是龙击弹,是一发爆炸穿透弹。如果使用得当,它能对大型怪物造成重创。重弩可以像轻弩一样进行自定义,但重弩的专属选项之一是能自动为你格挡攻击的盾牌。 武器数据 - 锋利度与会心 所有近战武器都有一条彩色的锋利度条,如下所示:
颜色总是按以下顺序排列:红、橙、黄、绿、蓝、白。在《怪物猎人:崛起》中,白色是武器的最高锋利度等级。当你外出狩猎并攻击怪物时,武器会逐渐变钝。因此,武器的锋利度会先降至蓝色,然后是绿色,以此类推。锋利度通过倍率提升伤害,但武器的物理伤害部分和元素伤害部分的提升方式有所不同。物理伤害:

元素伤害

色条的大小表示该武器在降级前能承受的攻击次数。
拥有这种锋利度条的武器,白色锋利度只需几次攻击就会下降到蓝色。蓝色锋利度会持续一段时间后才会下降到绿色。狩猎时请记住这一点。你可以通过使用磨刀石来恢复锋利度,磨刀石能将武器锋利度恢复到最大值。 此外,有些怪物部位比其他部位更坚硬。如果你攻击怪物的某个部位时出现弹刀,说明你的武器锋利度太低。每次弹刀时,你会陷入弹刀动画,并且武器锋利度的损失是普通攻击的两倍。不过,你对该部位仍能造成全额伤害,所以如果你想破坏那个部位,那就尽管去攻击吧。有一种名为心眼的技能可以减少弹刀情况,该技能能让你攻击时不会弹刀(但仍会造成双倍锋利度损耗)。部分武器的攻击天生自带心眼效果。 简而言之,锋利度高则效果好,锋利度低则效果差。要始终将武器保持在最高的两个锋利度等级。如果仍然感到困惑,或许相关视频能更好地解释这一点。虽然视频是针对《怪物猎人4终极版》的,但核心原理仍然适用。 需要注意的是,像锤子和狩猎笛这类钝器也需要磨刀。怪物猎人系列从未真正解释过原因,就是这么富有奇趣。
部分武器还拥有会心。这是《怪物猎人》系列中表示暴击率的术语。暴击会造成25%的额外伤害。负会心意味着负暴击,会造成25%的伤害减少。这相当简单直接。假设一把武器有30%的会心,那么每次攻击都有30%的几率触发暴击,造成25%的额外伤害。攻击时若出现明亮的视觉效果,即表示触发了暴击。一些高基础伤害的武器可能会通过负会心来进行平衡。因此,一把拥有-20%会心的武器,每次攻击都有20%的几率造成25%的伤害减少。 怪物状态异常 怪物的状态异常会在后台积累。它们有一个初始阈值,必须达到该阈值后状态异常才会触发。当状态消失且持续时间结束后,阈值会提高,这意味着你需要施加更多效果才能再次触发该状态。此外,如果在一段时间内没有再次施加该状态,状态的叠加值会开始下降。你必须持续攻击以确保状态触发。 多种不同的状态效果可以同时叠加。 主要状态效果:与每次攻击都会附加的元素攻击不同,主要状态效果仅以一定百分比概率触发。虽然你无法改变这个概率,但可以通过技能提升状态叠加的强度。
中毒 一种持续性状态,对大多数怪物都出奇地有效。触发时,会对怪物造成持续伤害,表现为怪物嘴边出现紫色泡沫。
麻痹 终极的团队协作状态。当麻痹触发时,怪物会原地僵直,数秒内无法行动。这在多人游戏中效果最佳,此时是所有人全力攻击怪物并造成最大伤害的信号。
睡眠 这是所有状态异常中技术性最强的一种。触发后,怪物会陷入睡眠状态,此时战斗音乐会停止。在怪物入睡的动画期间,玩家有几秒钟时间可以停下动作,避免不小心惊醒怪物。对睡眠中的怪物造成的第一次攻击会造成双倍伤害,因此像大剑的真蓄力斩这类高单次伤害的攻击在这里非常有用。你放置的桶爆弹也能享受这一伤害加成。正因为这个加成,有些玩家会采用睡眠爆弹的战斗风格。当怪物重伤回到巢穴时,也会自然进入睡眠状态。
爆破 谁不喜欢爆炸呢?当爆破状态积累到一定程度时,会在怪物最后被击中的部位发生爆炸,造成固定伤害,无视怪物防御力。爆破对于破坏怪物部位非常有效。 次要状态异常
KO,也称为眩晕,是每次对怪物头部造成冲击伤害时积累的状态。当积累足够的KO值后,怪物会倒地,头上出现黄色星星,处于无防备状态。
疲劳状态 当怪物嘴角有唾液滴落时,它们处于疲劳状态。所有怪物都拥有耐力值。每次攻击都会消耗一定耐力,当耐力耗尽时,怪物会变得行动迟缓、脚步踉跄,其攻击也会变弱甚至无法使用。钝器和疲劳弹药能对怪物造成疲劳值伤害,大幅加快其进入疲劳状态的速度。怪物的耐力会随时间自然恢复,而成功进食或完成一次睡眠周期则能更快地恢复耐力。 狂暴状态 当怪物口中喷出白色气息时,它们处于狂暴状态。在承受足够伤害后,怪物可能进入狂暴状态。这会使它们变得更加具有攻击性,速度、攻击力提升,有时防御力也会增强。狂怒状态会改变怪物的行为,例如偏好使用特定攻击、对道具产生免疫或弱点等。狂怒状态会完全覆盖疲惫状态,但当狂怒结束后,怪物会回到疲惫状态。 镇静 虽然并未被广泛认知,但镇静是一种状态效果。当怪物被镇静炸弹或镇静弹药击中时,会积累镇静值,如果施加过早,镇静效果可能会消退。镇静的唯一用途就是捕获怪物。例如,它无法使狂怒的怪物平静下来。 泥浆 有些怪物会用泥浆覆盖自身,这会为它们提供保护并改变其元素弱点。使用水属性伤害攻击它们可以清除保护性的泥浆。 异常状态 【怪物猎人:崛起】新增了对怪物施加异常状态的能力。在各个地图中,你可以找到甲虫,拾取后可留待后续使用。使用这些甲虫并击中怪物时,怪物很可能会受到对应甲虫的元素异常状态影响。同样,骑乘怪物后,用其元素攻击其他怪物,也是对敌人施加异常状态的另一种方法。
火焰异常状态 处于火焰异常状态的怪物会持续受到伤害,且更容易被打出硬直(详见下方硬直说明)。
水异常状态 怪物受到水异常状态影响时,其外皮会变得更柔软。身体部位原本越坚硬,受到影响后就会变得越脆弱。因此,攻击柔软的身体部位只能获得少量伤害提升,而攻击坚硬的身体部位则能获得大量伤害提升。利用这个机会攻击或破坏怪物最坚硬的部位。
雷属性异常状态 处于雷属性异常状态的怪物可被非钝器武器击晕。头部受到攻击时效果最佳,攻击其他身体部位也会积累眩晕值。但只有在累积足够眩晕值后攻击头部,才能触发击晕效果。
冰属性异常状态 怪物受到冰属性异常状态影响时移动速度会变慢。这会减缓其常规移动并增加攻击间隔,但要注意,攻击动画本身仍保持正常速度。不过,冰属性异常状态对力竭的怪物无效。应在怪物处于正常或愤怒状态时使用冰属性异常攻击。 其他 以下三种虽不完全被视为状态,但会像状态一样累积。 畏缩 怪物的每个身体部位都有独立于总生命值的隐藏生命值。如果对特定部位造成足够伤害,怪物会出现畏缩,表现为一个短暂的动画,使其在一秒内无法行动。 绊倒 畏缩的强化版本。对怪物的移动部位(例如,地面怪物的腿部或飞行怪物的翅膀)造成足够伤害会使其绊倒。怪物会摔倒并挣扎,在重新站起来前的几秒内无法移动。 骑乘 当你在空中对怪物造成伤害、使用翔虫技能造成伤害,或用操虫棍的傀儡蛛攻击怪物时,会积累骑乘值。当骑乘值积累到一定程度,怪物会被铁丝束缚而倒下。在怪物处于可骑乘状态时,按提示按钮即可跳上怪物并开始操龙(详见下文操龙部分)。当你进行骑乘龙(Wyvern Riding)并将一只怪物投向另一只怪物时,第二只怪物会受到极高的骑乘伤害。 状态异常(对你的影响)- 第一部分 影响怪物的主要状态异常同样会影响你。你也可能会陷入麻痹或中毒状态,但与怪物不同的是,多次受到这些异常影响后你不会产生抗性。其中有些可能看起来不像状态异常,但游戏本身将它们归类为此类,因此会在此列出。
中毒 受到中毒攻击时,你的生命值条会变为紫色,并留下红色的残留生命值。虽然中毒效果会逐渐消退,但根据中毒来源的不同,可能需要一段时间。如果中毒图标闪烁,说明效果即将结束。你可以通过服用解毒剂或草药、使用【Antidobra】,或返回营地帐篷来立即解除中毒状态。通过中毒抗性技能可以减少中毒效果或获得中毒免疫。
剧毒 剧毒是毒性更强的版本。你的生命值条会闪紫并快速流失。强烈建议立即治愈,因为生命值的损失是致命的。幸运的是,任何能治愈中毒的物品都可以治愈剧毒。
麻痹 处于麻痹状态时,你会立即倒地并失去行动能力。如果你有同伴,使用地图信号告知他们你正处于危险中,他们会帮你解除麻痹状态……前提是他们愿意这么做。其他玩家如果足够留意,也能提供同样的帮助。否则,你只能等待麻痹效果自行消退。你可以通过【麻痹抗性】技能来减少麻痹效果或获得麻痹免疫。
睡眠 与麻痹不同,陷入睡眠状态前你有几秒钟时间调整自身位置,然后才会倒地。倒地前尽量远离怪物或靠近队友。如果你身上携带能量饮料,可以在倒地前饮用以醒来。可以向队友发出地图信号求助,或寄希望于其他玩家愿意提供帮助。通过睡眠抗性技能可以减少睡眠效果或获得睡眠免疫。
爆破异常状态 当受到爆破攻击命中时,你可能会陷入爆破异常状态。此时你会被爆炸粉末覆盖。当猎人再次受到攻击时,你将发生爆炸。或者,若经过足够时间,你也会自动爆炸。可通过翻滚数次、食用打消果实、使用解毒药或返回营地帐篷来解除该状态。你可以通过爆破抗性技能来减少或免疫爆破异常状态。
火属性异常状态 当受到火焰攻击时,你可能会陷入火属性异常状态,通俗来说就是角色身上着火了。你的生命值会缓慢减少,同时留下红色的生命值。你知道该怎么做:停下,趴下,翻滚几次来灭火。在水中翻滚可以立即灭火。食用打消果实、使用解毒药或返回营地的帐篷也有效。你可以通过异常状态抗性技能来减少或免疫元素异常状态。如果你拥有20点火焰抗性,也能免疫火属性异常状态。
水异常状态 当受到水属性攻击(或者不小心踩到怪物的泥沼)时,你可能会陷入水异常状态。此时耐力条会变成蓝色,并且消耗后恢复速度大幅降低。这对双剑和弓使用者的影响尤其严重。可以等待异常状态自然结束、食用打消果实、使用解毒药,或者进入营地的帐篷来解除。通过异常状态抗性技能可以减少或免疫元素异常状态。当水抗性达到20时,你也会对水异常状态免疫。
雷异常状态 受到雷属性攻击时,你可能会陷入雷异常状态。这会增加被眩晕的几率。等待状态自然结束、食用打消果实、使用解毒药或进入营地帐篷均可解除该状态。通过装备技能获得眩晕抗性也能减轻此效果。你可以通过异常状态抗性技能减少或免疫元素异常状态。若拥有20点雷属性抗性,也可免疫雷异常状态。
冰异常状态 受到冰属性攻击时,你可能会陷入冰异常状态。这会减缓你的翔虫恢复时间。等待持续时间自然结束、食用打消果实、使用解毒药或进入营地帐篷均可解除。通过异常状态抗性技能可以减少或免疫元素异常状态。当你拥有20点冰抗性时,也会对冰异常状态免疫。
龙属性异常状态 受到龙属性攻击时,你可能会陷入龙属性异常状态。这会使你的武器失去所有元素/状态属性。等待异常状态自然结束、食用打消果实、使用解毒药或进入营地的帐篷即可解除。你可以通过异常状态抗性技能来减少或免疫元素异常状态。当你拥有20点龙属性抗性时,也会对龙属性异常状态免疫。
狱火异常状态 当受到狱火攻击命中时,你可能会陷入狱火异常状态。若你被攻击击退,将会发生爆炸。此外,若经过一定时间,也会自动爆炸。可通过多次翻滚、使用解毒药、进入营地帐篷,或最理想的方式——使用钩爪冲刺来解除该状态。使用钩爪冲刺时,你会将狱火留在原地。若怪物攻击到该狱火,将会受到爆炸伤害。
眩晕 当被怪物的攻击命中时,你有几率进入眩晕状态。此时你会站在原地,头上出现星星,无法行动。快速转动移动方向或按下按钮可以稍微加快恢复速度。如果你发出信号,其他玩家或你的伙伴可以攻击你以解除眩晕。你可以通过眩晕抗性技能来减少眩晕几率或获得眩晕免疫。
被蛛网击中后,你会被缠住,无法攻击或闪避。使用清洁剂或通过移动和快速按键来摆脱蛛网。 状态效果(对你的影响)- 第二部分
恶臭 你被某种极其难闻的东西覆盖,周围环绕着一股散发恶臭的棕色气体。处于污染状态时,你无法食用任何消耗品,例如药水、口粮或牛排。等待效果自然结束,使用除臭物品,使用解毒剂,或进入营地的帐篷即可解除。
防御降低 受到防御降低效果影响时,你的防御力会下降,从而承受更多物理伤害。可通过等待效果自然结束、使用坚硬化石或硬化皮肤、使用解毒蛇、或进入营地帐篷来解除该效果。
抗性降低:正如其名,当陷入抗性降低状态时,你的抗性会下降,受到的元素伤害会增加。可以通过等待状态自然结束、使用坚硬化种子或硬化皮肤、使用解毒药或进入营地帐篷来解除该状态。
被寄生 有小型怪物附着在你身上。你的生命值会持续流失。通过多次翻滚、使用快速冲刺或投掷苦无来摆脱它。
气泡缠身 若受到气泡攻击(或拥有3级【泡泡之舞】 armor skill),你可能会被气泡包裹。这将为你提供【回避+1】和【体质+1】。
这相当有用,但如果你获得更多气泡并受到【Major Bubbleblight】影响,你会四处滑动,导致难以进行精确移动。可以通过等待效果消失、被攻击命中,或使用清洁剂或解毒剂来解除该效果。
流血 处于流血状态时,你受到的下一次攻击会造成额外的流血伤害。大多数动作,如奔跑、闪避和攻击,都会在流血触发时增加受到的伤害。蹲下、食用肉干、刺身鱼、免疫剂或熟肉排可以移除该效果。你也可以等待流血效果自行消退。
血咒 你的血液已被污染。大多数治疗方式的效果都会降低。不过,你现在攻击怪物造成伤害时会恢复生命值。命中时恢复的生命值与武器攻击的轻重相对应。 狂气病毒 你感染了狂气病毒,该病毒会随时间开始孵化。如果病毒完全发作,所有自然生命恢复(红色生命值)将被抵消,且所有造成狂气的怪物攻击都会造成更多伤害。但如果猎人在孵化期间对怪物造成足够伤害,就能克服病毒并变得更强,获得15%会心几率,且在短时间内免疫再次感染。使用青菇可以延缓(但无法治愈)病毒孵化。完全发作的病毒可通过等待其自然消退或进入营地帐篷来治愈。《Muck》游戏机制说明 1. 某些怪物的攻击会留下雪或泥,身处其中会使你减速。离开泥泞区域即可移除该效果。 2. 固定/吞噬攻击:怪物抓住你或把你撞至特定位置以进行后续攻击。向旁边闪避,最好使用快速冲刺,以避免受到更多伤害。 3. 锻造武器:既然你已经了解武器、元素和状态,接下来我们将介绍武器的锻造和升级方法。
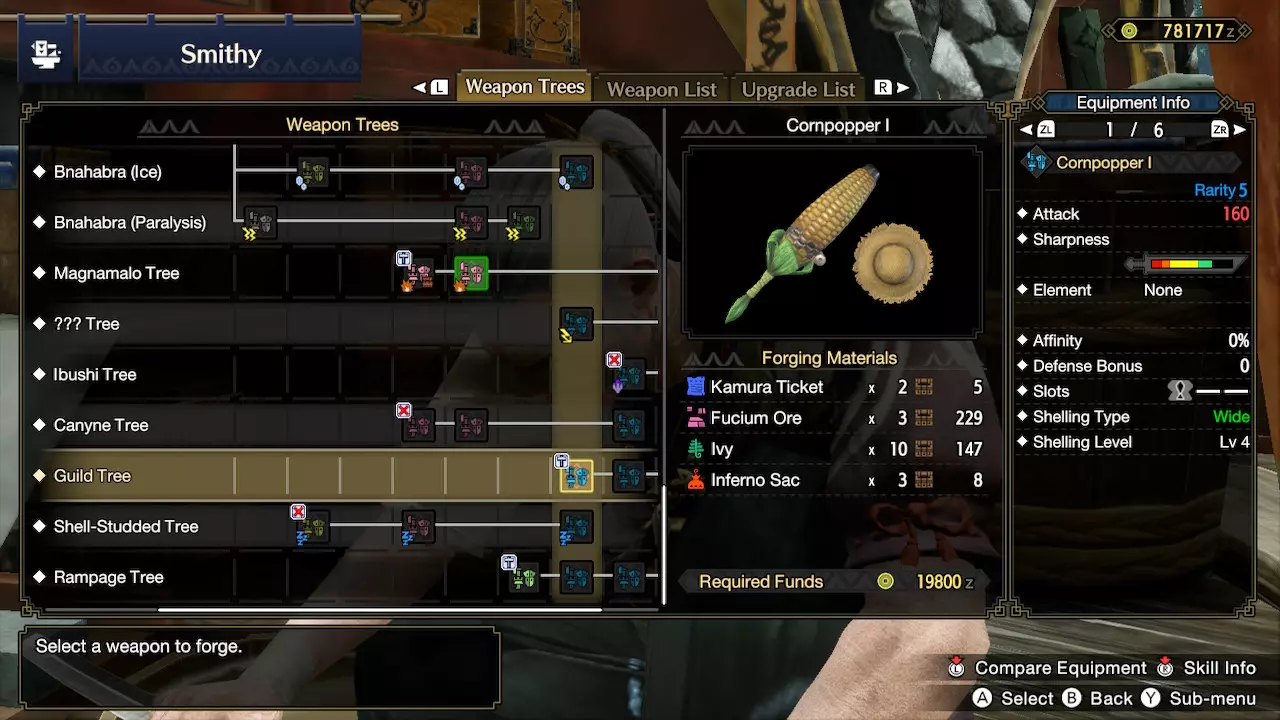
When you run up to the Smithy and select Forge/Upgrade Weapon, then the weapon type, this menu will pop up. If it doesn't, look at the top of the screen and press the button prompt there is to see the Tree tab. This is a good way to visualize the upgrade paths your weapons can take. You start with the Kamura tree, Ore tree, and Bone tree on the far left. As you use materials and zenny, the upgrade trees will "branch" and options will open up, offering a wider selection of possible paths for your weapon to be upgraded to. If the rightmost part of the weapon tree has a question mark, that means that you cannot upgrade further past that point until you progress further in the story. The white lines for each tree is a visual representation of whether a particular upgrade path continues, ends, or branches further. You may see icons all over the weapons in the tree. In the top left can be a small hammer icon. This indicates that the weapon can be created directly with base materials. This applies to the basic ore and bone tree for each weapon, but also can happen to a few weapons further up the tree to skip a few steps and allow you to create a stronger weapon without having to upgrade first. The bottom left can contain a variety of icons; you might recognize them as the icons of the elemental blights or status effects from the above section. This means that weapon deals that form of elemental or status damage in addition to its base damage. So if you see the thunderblight icon under a weapon, that weapon deals raw and thunder damage. If nothing shows in the bottom left corner, it only deals raw damage. If the bottom right of the icon has a red box, that means you have a copy of that weapon in your equipment box already. If it's a green E, then that means you have that weapon currently equipped. If the top right of the icon has a pin on it, that means you have it on your wishlist, which you can view at any time in the menu. You will be automatically notified if you obtain materials related to creating this equipment. After you've upgrade a weapon, it will stay that way. However, if you decide against it, you can revert weapons to an earlier state. You'll regain the materials used to make the upgrade, but the money used will be lost. A few weapons with a solid boundary cannot be reverted to an earlier upgrade, but the game will warn you if this happens. Once you finish your first rampage, you'll unlock Ramp-Up Weapon upgrades. Select that option at the Smithy and choose a weapon you want to give a ramp-up weapon upgrade to. Most weapons have only one ramp-up upgrade slot, and within that slot you can choose from a small set of options. The exception is the Rampage Weapon tree, which has multiple slots for rampage skills, have more choices per slot, and these weapons can be color-customized as well! If your weapon has a ramp-up skill equipped and you upgrade the weapon itself deeper into its tree, it will retain the skill. This can be useful, as the rampage skill choices can be different after the upgrade. So keep an eye on ramp-up options while upgrading your weapon; you may prefer a ramp-up skill from earlier in the tree that's normally unavailable once upgraded. This Armor Isn't Just for Protection When at the forge, select Forge Equipment, then Forge Armor. The central form of character progression is your armor. It's not just about protecting you, however. There are four major things to consider when forging armor: 1. Can I make it? Armor pieces require materials to make. Take a look at the required materials to see what you need. You might have to hunt a monster several times before you get the material. Some pieces require parts of a different monster, too. Some armor sets don't require monster parts at all. 2. Does it have a skill I want? Armor pieces grant skills, which grant you various bonuses. It might make you resistant to status effects, or make you gather materials better, it might boost attack, or mount monsters easier. Similar skills can stack, up to a point. You can specialize or generalize as you please. 3. Does it have defenses and elemental resistances I want? This is a lesser consideration compared to skills. Defense can always be upgraded, and elemental weaknesses can be mitigated in the canteen somewhat. However, it is something to be mindful of. If your armor set is very weak to fire, you should be cautious around firebreathing monsters. 4. Do I like the way it looks? While some players don't care and are fine hunting in a clown suit, you have to admit you'll hunt a bit better if you look cool doing it. Embrace the fashion hunter. As you progress through the game, you'll unlock armor dye options for further customization, or even "Layered Armor Sets" to completely cover up armor pieces with a different appearance. You get bonus elemental resistance if you equip multiple armor pieces of the same set, but keep in mind it's not necessary. You can if you want, but you don't have to. In fact, many people mix and match different pieces to get the armor skills and looks they want, as skills have a much bigger impact on your hunt. Click the image below if you need a larger size.
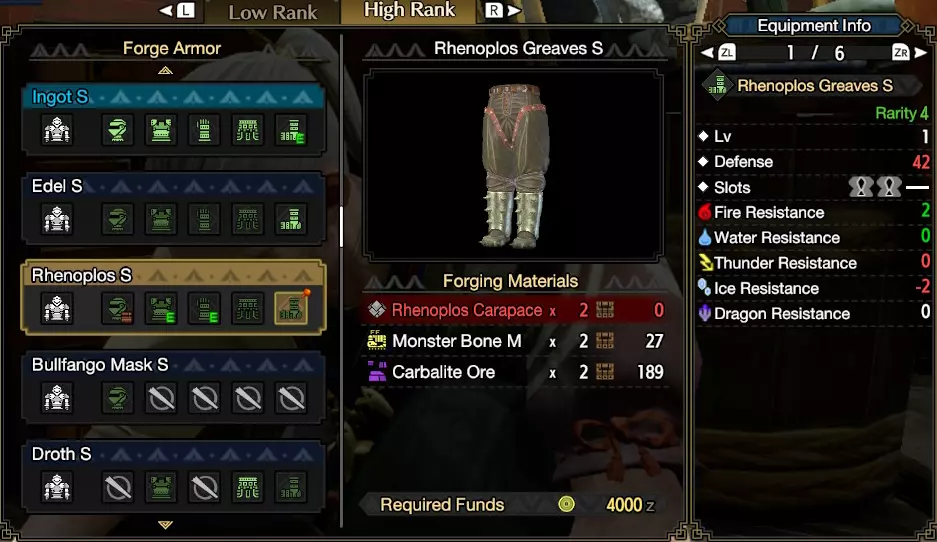
下面为你解释用户界面。左侧显示所有已解锁的 armor sets(装备套装)。最左侧是套装名称,名称右侧是套装本身,按头盔、胸甲、手臂、腰带和腿部的顺序排列。如果图标明亮,说明你拥有制作该装备的材料;如果图标暗淡,则表示材料不足。带斜线的圆形图标表示该物品不存在。并非所有装备套装都包含5件物品,有些套装只有3件、2件甚至1件。装备图标右下角的方框图标表示该物品已制作但未装备。装备图标上的绿色E表示该装备当前已由玩家装备。你可以看到Rehnoplos Greaves S的右上角有一个橙色图钉。这表明玩家已将该装备添加到愿望清单。屏幕中间是当前选中的待制作装备信息,这里以【白速龙护腿S】为例。中间部分可查看所需材料及数量:2个白速龙甲壳、2个中等怪物骨和2个炭晶矿石。其中白速龙甲壳显示为红色,说明玩家缺少制作该材料。材料右侧有一个红色小方框图标及数字,代表这些物品当前在道具箱中的数量。这意味着玩家已拥有大部分制作材料,仅缺少甲壳。最底部显示制作还需花费4000金币。右侧可查看该装备的属性。所有锻造的 armor 初始等级均为1级,升级 armor 可提升其等级。这是一件稀有度4的装备,来自高等级小型怪物。它拥有两个1级装饰槽。护胫的防御力为42,火抗性+2,水抗性0,雷抗性0,冰抗性-2,龙抗性0。这些数值可能显示为红色、绿色或白色,代表与玩家当前装备的同部位 armor 相比的差异。例如,该护胫的基础防御力更低,火抗性更高,冰抗性更低,龙抗性相同等。 在装备信息窗口顶部,你可以看到共有6个页面。按提示按钮翻至第2页,即可查看该 armor 部件的 armor 技能。在这种情况下,护胫提供一级【穿刺强化】技能,该技能能提升穿刺弹药和穿刺箭矢造成的伤害。这对使用此类武器的轻弩手或弓手来说非常有用,但对其他职业则毫无用处。它还会提供一级【震颤抗性】,让你在怪物猛击地面产生小震动时保持站立。许多其他技能的命名方式不够直观,因此在确定装备前,请查看按键提示以阅读技能描述,了解每个技能的作用。注意这两个技能都有3个格子——一个已填满,两个空白。这表示这些技能的最大有效等级为3级。 升级 armor 假设你已经制作了 armor 并且很喜欢它。很好!然而,这只能让你坚持一段时间,很快你又会被怪物的攻击击败。你需要升级盔甲,使其防御力达标。在铁匠铺主菜单中选择【升级装备】,然后选择你想要升级的盔甲部件。如果找不到,尝试寻找用于整理装备箱的按钮提示。
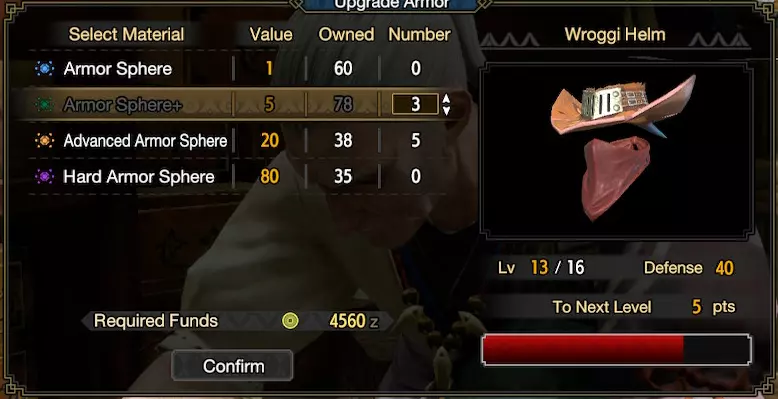
现在你已经选择了想要强化的 armor,接下来需要使用 armor spheres 进行强化。armor 强化采用点数系统,积累足够点数达到特定阈值后,armor 就会提升等级完成强化。界面表格说明如下:【材料】是你拥有的每种 armor sphere 的名称,【价值】是使用时提供的点数,【持有数量】是你当前拥有的数量,【使用数量】是你当前投入的数量。例如,基础 Armor Spheres 仅提供 1 点强化点数,玩家拥有 60 个;Armor Sphere+ 提供 5 点强化点数,玩家拥有 78 个(当前正将 3 个投入到 Wroggi Helm 中)。随着投入数量增加,右侧的进度条会逐渐填满。每当进度条填满时,即可进行一次升级。选择确认按钮,支付 armor sphere(装甲玉)和 Zenny(金币)费用来升级你的 armor( armor)。 Lv 13/16 显示当前升级等级与当前最大等级的对比。随着游戏进程的推进,最大升级等级会提高。你可以根据自己的喜好自由制作新 armor( armor)或升级旧 armor( armor)。 和《怪物猎人》中的大多数设定一样,这一开始可能会让人觉得复杂,但过一段时间你就会熟练掌握。 当你达到高等级后,会发现 armor set( armor set)的属性有显著提升。建议尽快使用高等级材料制作一套 armor set( armor set)。 护符与装饰品 护符是游戏后期解锁的另一种基于装备的自定义方式。前往商人处进行护石炼化。随着你的进度推进,他们会解锁更多炼化选项: 反射池炼化可提供简单、低影响的技能,例如元素或异常状态抗性,以及采集相关的便利技能如植生学和地质学。尽管如此,也有一些对特定配装较有影响的技能,如吹笛名人或强化。 薄雾炼化提供一些中等影响的技能,通常都很实用。包括元素和异常状态攻击提升,快速收刀或装填速度等便利技能,以及防风或泡沫之舞等情境技能。 月虹炼化能提供人们通常想要并为之配装的高影响技能,例如看破、弱点特效、回避性能和回避距离。神秘之息炼化会生成带有随机技能和装饰槽的护符。为什么要这么做呢?虽然上述炼化选项可以让你选择技能,但它们通常槽位不多,技能等级也较低。你应该尽可能使用神秘之息炼化,以期望获得【极品护符】:即带有两个强力技能和/或多个大槽位以便镶嵌装饰品的护符。 重生炼化与神秘之息炼化类似,但它不需要消耗 crafting materials,而是需要献祭其他护符。这是回收你永远不会使用的护符的好方法。 在大师等级时,你将解锁最高级别的炼化: 魂晶炼化与神秘之息炼化类似,但生成的护符可能拥有更高等级或更多数量的技能。转世融合与重生类似,你可以投入不需要的护符来创造可能更好的护符。 极光融合在游戏进程后期才会解锁,但创造优质护符的几率更高。 装饰品 复杂度从未停止,对吧?游戏后期,你可以制作或获得装饰品,这些是可以镶嵌在武器、 armor 和护符插槽中的宝石。每个装饰品都能为你提供技能点,就像 armor 一样。这样,你就可以根据自己的喜好调整和改进 armor 套装。 不过,装饰品需要匹配。每个装饰品根据技能不同而有不同的尺寸。通常,技能越有价值,尺寸就越大。

1级装饰

2级装饰

3级装饰

4级装饰品 你可以通过图标底部的三角形数量快速判断装饰品或插槽的大小。 装饰品只能放入足够大的插槽中。因此,如果你的装备没有3级插槽,就无法使用3级装饰品。不过,较小的装饰品可以放入较大的插槽中。1级装饰品可以放入任何空插槽。制作武器和 armor 时要考虑插槽大小。一把武器可能看起来比另一把更强大,但如果你急需3级装饰插槽,选择提供两个3级插槽的较弱武器可能更有用。技能加成可能会弥补属性上的差距。 前往 armory 制作你想要的装饰品。当然,更好的装饰品往往需要难以获取的材料。 Rampage 装饰品

刚接触《怪物猎人崛起:曙光》的玩家请注意,大师级武器拥有一个 Rampage 装饰槽。这些特殊装饰和普通装饰一样,需要在铁匠铺用材料锻造,但它们只能装配在武器的 Rampage 装饰槽中。其技能效果与上位 Rampage 武器技能类似,例如【Anti-Dragon】能对大多数飞龙种造成更高伤害,【Buddy Rally】则可以提升艾露猫和牙猎犬的攻击与防御。 花链:你的花朵般的坚韧(与火力)

花链是《怪物猎人:崛起》中独特的额外装备。你选择装备的花链将决定狩猎时的属性平衡,因此你可以选择增加生命值、耐力、防御力、攻击力,或是在这些属性间取得平衡。 花链会决定狩猎开始时的初始属性,以及收集翔虫时获得的额外属性加成。例如,恶魔花链会让你初始拥有更高的攻击力,并且每只红色翔虫提供的攻击力加成比其他任何花链都要多。但同时,你的初始生命值会较低,且每只绿色翔虫提供的生命值加成也更少。 火芽和水芸会在一开始给你一个狩猎花链I,随着游戏进程,你可以解锁更多种类的花链(以及它们的强化版本)。长老浮岳龙会在你解锁新的花链时给予你。护石类型 生命值提升 每只精灵鸟提供生命值 耐力提升 每只精灵鸟提供耐力 攻击力提升 每只精灵鸟提供攻击力 防御力提升 每只精灵鸟提供防御力 狩猎护石I 均衡 30 3 30 3 5 1 10 1 狩猎护石II 均衡 50 5 50 5 10 2 20 2 力量护石II 生命/耐力 75 8 75 8 5 1 10 1 坚韧护石II 耐力/防御 40 4 75 8 5 1 30 3 恶魔护石II 攻击 30 2 30 3 15 3 5 1 狩猎护石III 均衡 70 8 70 8 13 2 15 2 力量护石III 生命 100 9 90 9 10 2 15 2 坚韧护石III 耐力/防御 50 8 100 10 8 1 40 4 恶魔护石III 攻击 50 5 90 9 20 4 20 2 绝对护石 均衡/生命 100 10 70 10 15 2 50 5 冥府护石 均衡/耐力 70 10 100 10 15 2 50 5 AmatarasuWolf对护石为何不容忽视进行了精彩的概述正如 AmatarasuWolf 在其指南中所述:装备满级的狩猎护石 II 可获得 50 点额外生命值和耐力,这与狩猎前记得食用团子所获得的数值相同,更不用说还有 10 点攻击和 20 点防御的加成。如果装备恶魔护石 II 并将攻击强化至满级,你将获得 15 点额外攻击,这几乎相当于攻击强化技能加 4 级的效果。你的最佳伙伴:艾露猫和牙猎犬

游戏开始时,你在创建角色后可能还会创建一只狗和一只猫,不过在游戏世界中它们被称为犬族和猫族。与猎人搭档的犬族和猫族分别叫做牙猎犬和艾露猫。它们是你的狩猎伙伴,会在野外协助你。和你一样,它们也装备武器和防具,只是尺寸更小。虽然它们在战斗中会受到伤害,但这只会让它们暂时失去行动能力。它们不需要消耗品来治疗,实际上是无敌的;你无需担心它们的安危。给它们穿上好看的装备吧!不用太在意牙猎犬或艾露猫的防御力。比起考虑防具或元素抗性,给它们穿上看起来酷或可爱的防具更好。你可以选择携带两只艾露猫或两只牙猎犬进行狩猎,但在学习游戏阶段,强烈建议各带一只。牙猎犬擅长快速移动和输出伤害,而艾露猫的支援能力和自动收集素材功能非常实用。 如果你追求高伤害和地面快速移动,带两只牙猎犬来撕碎敌人是不错的选择。如果你已经能熟练使用翔虫和支营地快速移动,且更偏好辅助能力和额外战利品,那么两只艾露猫可能更适合你。各带一只则是不错的折中方案。选择最适合自己的方式即可!在多人游戏中,你只能有一名伙伴与你并肩作战,因此你需要在提供战斗支援的艾露猫和提供速度加成的牙猎犬之间做出选择。 如果你完全不需要伙伴的协助,可以让它们待命。你可能会问为什么要这么做?一些大师级玩家非常了解怪物,能够预测它们的行动并相应地调整自己的位置。如果怪物将目标转向其他战斗单位,会干扰他们发挥出全部实力。 话虽如此,有伙伴在身边还有另一个好处:与艾露猫和牙猎犬一起进行大约每15次狩猎,你就能获得伙伴票。伙伴票可用于制作特殊的武器或 armor,这些装备无法通过其他途径获得。艾露猫和牙猎犬有时能救你一命——如果你陷入眩晕、麻痹、睡眠或其他无法控制角色的状态,它们会攻击你以解除这些异常状态。如果你在地图上标记,伙伴们更容易注意到你是否处于危险中。 伙伴不会在斗技场任务中提供协助。 伙伴装备:在铁匠铺选择【打造艾露猫装备】来制作艾露猫的武器和防具。制作过程非常简单,无需担心升级或防具技能(不过有伙伴专属技能——见下文)。每套装备只有3个选项:武器、头部装备和胸部装备。每件装备只需一到两个常见素材即可制作。考虑到你的艾露猫近乎无敌,猎人通常会根据外观而非属性来选择装备。 事实上,装备属性的重要性并不那么高,因为尽管猎人本身没有任何固有属性,但你的艾露猫有。它会在每次任务后获得经验值,每次升级时其攻击和防御都会提升。随着你的游玩,艾露猫会逐渐变强。 上述所有细节同样适用于牙猎犬,不过它们还能使用不同的装备来协助你狩猎。 伙伴广场:除了在铁匠铺打造装备外,所有其他与伙伴相关的管理都在伙伴广场进行,该广场位于村的主要十字路口右侧,过桥即可到达。
尽快从伙伴管理员伊ori那里招募一群艾露猫和牙猎犬。然后在道场训练它们,尤其是使用【拉尼娅pple】。伙伴等级越高,它们在战斗中的效果就越显著,派遣它们作为【猫猎人】或执行潜艇探险任务时收集的物品也会更多!记得时不时回到广场招募新伙伴、训练它们、领取奖励,并派遣它们执行新的探险任务。 你可以爬上伙伴广场里一棵顶部有【猫头鹰】巢穴的树。每隔几个任务,巢穴就会产出一些蛋,你可以拾取这些蛋来获得稀有且珍贵的物品。这是获取【拉尼娅pple】的主要途径。在埃尔迦德指挥塔顶的城堡城墙垛口处新增了一个猫头鹰巢穴。猫头鹰巢穴会独立收集物品,因此你可以从一个巢穴拾取物品后,再前往另一个巢穴获取更多物品。 招募新艾露猫时需要考虑不少事项。这里有一份关于伙伴技能、装备和推荐的精彩概述。 别忘了装备伙伴技能!等级提升后,会解锁更多技能和技能槽。 伙伴指令:在狩猎过程中,即使没有你的指令,伙伴们也会自主行动并提供帮助。不过,你可以通过手动下达指令来提高它们的效率。
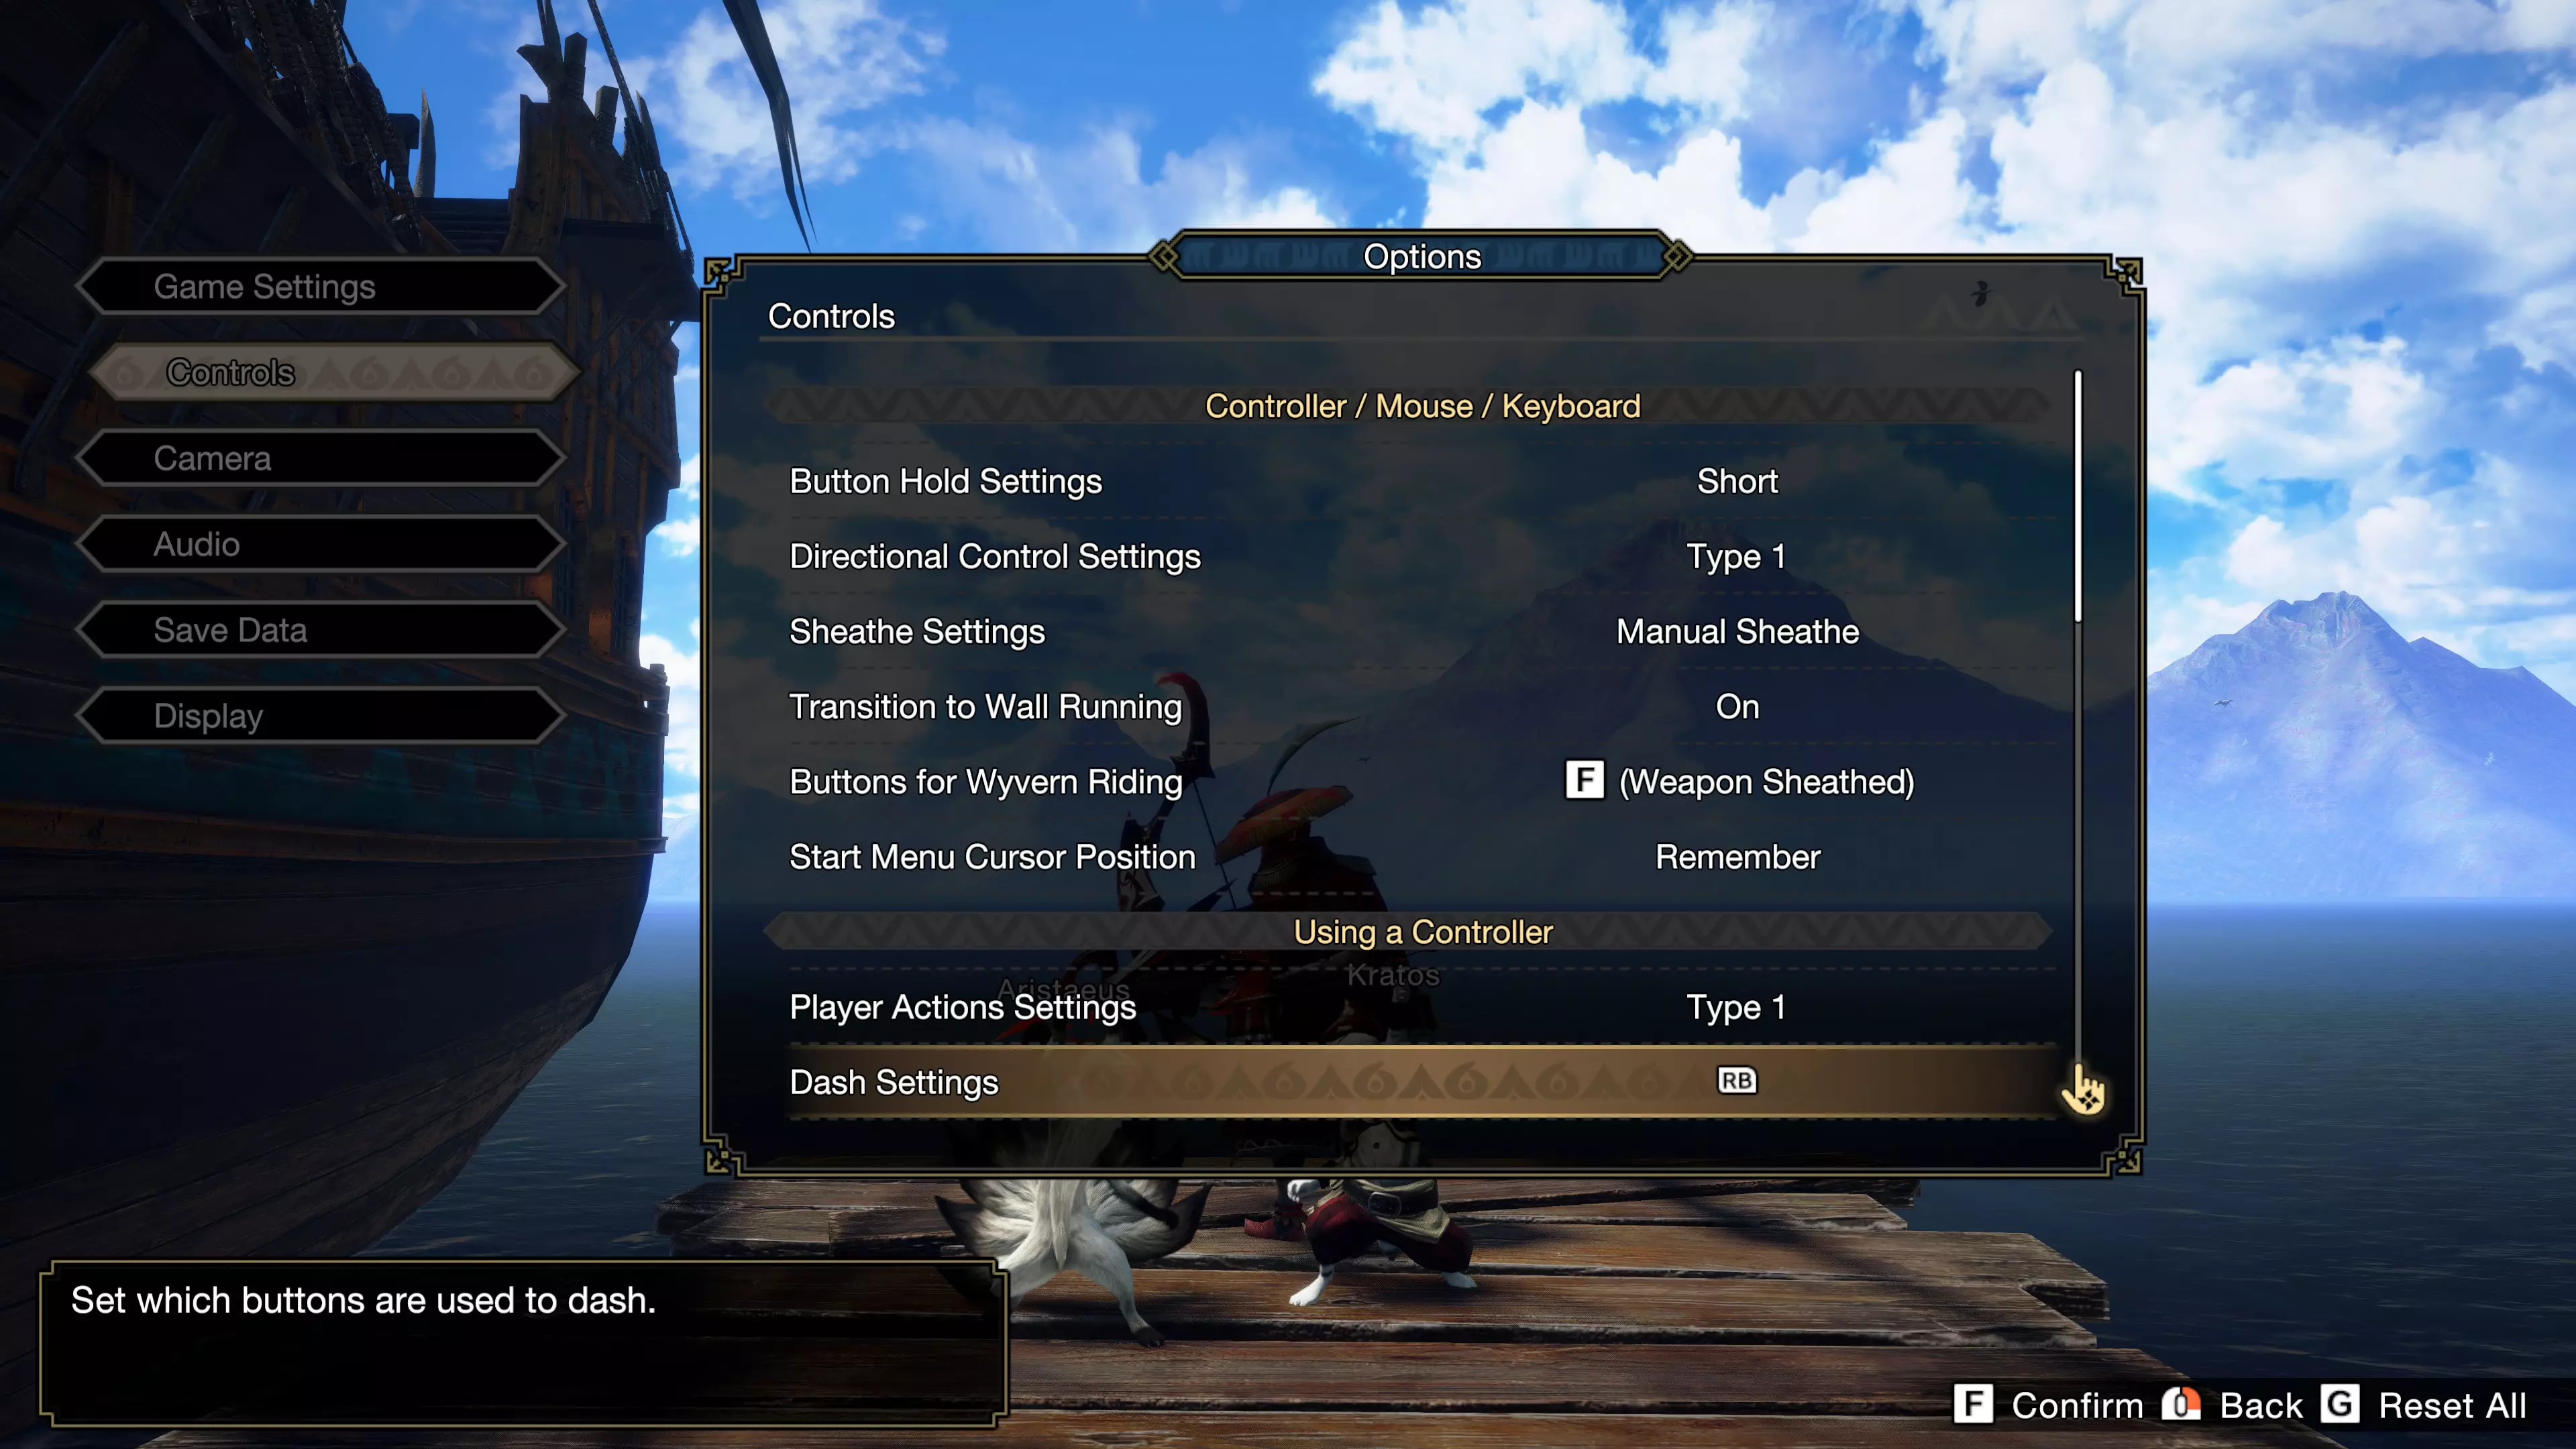
动作栏中的【让我骑乘!】指令会让你的牙猎犬尽快跑到你身边,以便你能更快骑上它。骑乘牙猎犬时,你可以在地图上快速移动,并且在移动的同时可以自由执行采集或使用道具等动作。战斗中跳上牙猎犬可以在紧急情况下逃跑,或者在灵活闪避的同时进行治疗或磨刀。虽然骑乘时可以命令牙猎犬攻击,但效果远不如各自战斗时好。 【使用猫薄荷!】会让你向地面投掷一个猫薄荷叶,在其持续期间为你的艾露猫提供随机增益效果。这些效果包括治疗艾露猫、提升它们的攻击伤害和频率、加快它们使用支援技能的速度,或者让它们更频繁地闪避。拥有两只艾露猫比只带一只效果更好。 【等候!】指令可以让你的伙伴进入待命状态,这样你在狩猎时可以让它们留在原地,或者你可以走到它们身边进行一些有趣的互动。之后你可以指示它们继续跟随你。 牙猎犬骑行:你可以在选项中更改骑乘牙猎犬的速度。 当骑着牙猎犬冲刺时,你无法进行急转弯。停止冲刺并减速以完成急转弯,然后在前方是直线路段时再次冲刺以保持速度。 牙猎犬可以攀爬藤蔓表面,让你在骑乘时获得额外的垂直移动能力。通过茶点和团子增强自身能力
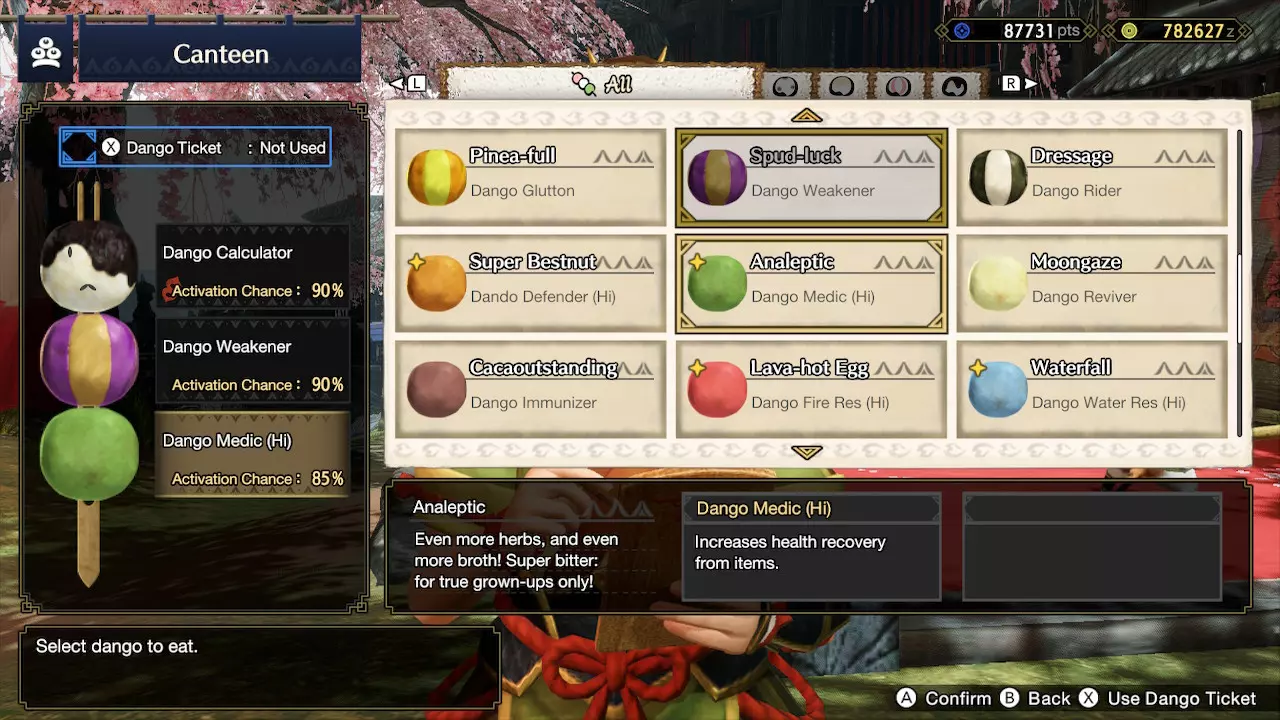
猎人空着肚子可没法好好狩猎!每次狩猎前在茶屋食堂吃些团子,能提升你的属性并获得增益效果和独特能力。本作的食物增益系统比前作大幅简化。你无需再费心搭配各种因素来获得超级优化的食物组合(或是干脆放弃,直接选择预制套餐),在《怪物猎人:崛起》中,你只需选择三个自己最想要的团子即可。选择食材的顺序并不重要。 每种团子都附带一个技能,从技能描述中就能轻松理解其效果。完成厨师阳翔的委托后,你将解锁更多团子选项。随着剧情(村庄或集会所)的推进,你已解锁的团子还会变得更加强大。每种团子类型都有一定的技能发动概率,并非必定触发。如果想提高低发动率技能的触发几率,可以使用团子票。团子票通常通过与团子相关的任务奖励获得,或者利用食堂的“多样混合”功能制作获得。 如果想轻松大量获取团子票,常规方法是去找龙人姐妹罗薇娜,用村点数向她购买大量生肉,然后通过多样混合全部烹饪。不过,如果想获得比全熟牛排更有用的东西,可以尝试去钓波波鱼,并用它们进行多样混合。这样不仅能得到团子票和催化剂,还能获得很棒的回复道具——美味鲜鱼。 注意:与前作不同,使用团子票并不能保证技能必定发动。它仅能将成功率提高40%。虽然这使得大多数团子的触发概率达到100%,但部分技能如【团子足力】、【团子射手】和【团子炮术】仍有失败的可能。 如果觉得每次挑选团子食材很繁琐,可以将已制作的组合标记为收藏,这样在选择【点单常选】时就能显示出来。你可以保存32种【常选】组合,这足以应对任何需要节省时间的情况。
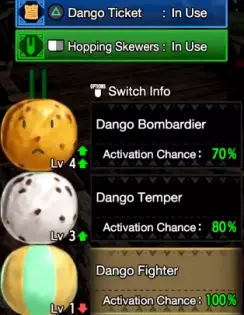
《怪物猎人崛起:曙光》新增了【跳跃串烧】选项。这为食物技能增加了一层小的额外复杂度,但如果使用得当,你将获得巨大收益。 通常选择团子时顺序并不重要,但【跳跃串烧】会分别改变每个选择的等级和发动概率。 第一个/顶部选择的团子,其团子技能会变得更强力,但发动概率降低20%。 第二个/中间选择的团子,会变得稍微强力一些,发动概率降低10%。 第三个/底部选择的团子技能会变弱,但发动概率会增加10%。 你可以通过阅读团子界面右下角的描述,查看食物技能增强或减弱的效果。一定要在茶店用餐!那里非常便宜,而且生命值/耐力加成非常值得。 翔虫

与《怪物猎人:世界》中猎人利用导虫的方式类似,《怪物猎人:崛起》中的猎人会与一种名为翔虫的发光昆虫成为伙伴。这些甲虫能够快速飞出、保持位置,并能用它们特殊的亮绿色丝线将你拉向它们。 每次使用翔虫的动作会消耗一到两个翔虫槽,翔虫槽会随时间较快恢复。默认情况下,你可以同时使用两个翔虫槽,但通过在野外找到翔虫可以将其扩展到三个。基础动作通常只消耗一个翔虫槽,而更高级的动作则需要两个。 在武器收刀状态下,你可以向前或向上进行翔虫突进,这让你在整个地图中拥有快速移动的能力。朝着墙壁冲刺即可开始墙壁奔跑。除非你开始 sprint,否则会自动跳离墙壁,你可以横向、向上或斜向奔跑,持续时间取决于你的耐力。 在空中时,按住确认键可以向自身上方抛出一个翔虫,让你在空中悬停一段时间。这能让你短暂休息并恢复耐力。 只要不主动使用翔虫,翔虫的充能就会恢复,因此结合翔虫冲刺、空中闪避和墙壁奔跑,你可以获得相当长的滞空时间。 或者,当攀登高耸的悬崖时,你可以用翔虫钩向悬崖开始向上奔跑,耐力不足时跳离,在空中用翔虫悬停,然后再次跳回悬崖继续向上攀登。在向上攀爬时,翔虫会自动充能;滞空时按住按键可以恢复耐力。保持良好的节奏能让你爬得比预期更高。 当受到怪物的重击时,你可能会被推倒或击退。如果因此陷入不利位置,可以使用翔虫受身(Wirefall)将自己拉向新的方向,更快地重新站稳。你可以用它来撤退恢复,或者直接拉向怪物重新投入战斗。但要注意——被击倒后,在重新站起前你处于无敌状态。若在错误时机使用翔虫受身,会失去这种无敌保护。如果之后立即再次受到攻击,情况会比不使用翔虫受身更糟。请留意这项技巧,学会在合适的时机使用它。翔虫还能用于驾驭怪物,但这部分内容将在指南的后续章节中介绍。 替换技!你可以自定义武器的招式组合。每种武器都有替换技槽位,每个槽位至少有两个选择。每个选择都会为你的常规技能库增添一个新招式,或是一个利用翔虫(并消耗翔虫槽)的新铁虫丝技。 以下是解锁替换技的方法,你可以按任意顺序完成: 1. 完成首次百龙夜行(从下位到上位的任务)可获得一组替换技。 2. 打造/强化该武器类型的8把武器(例如,打造8把不同的狩猎笛,即可解锁狩猎笛的这组替换技)。完成特定的高等级任务可获得另一组替换技。这些任务的标题中包含武器名称,因此很容易找到。 达到大师等级1时,你将获得另一组替换技。 完成大师等级4中途的紧急任务后,将获得最后一组替换技。 以下是可用替换技的实际展示。以及大师等级解锁的新替换技展示。 技能切换!(或使用正式术语:替换技切换)《怪物猎人崛起:曙光》新增了在野外切换替换技组合的功能。现在,你拥有红、蓝两组技能,且均可通过物品箱或狩猎帐篷进行完全自定义。你的狩猎将从红色切换技能组激活状态开始,并且可以随时自由切换到蓝色技能组或切换回来。建议将你最常用的主要切换技能设置在红色技能组,将更多应对特定情况的备用技能设置在蓝色技能组,但如果觉得这样太复杂,你也可以将两组技能设置为完全相同,这样就能在不影响连招的情况下自由进行技能切换。
你还可以使用技能切换回避,方法是在切换技能后立即进行闪避。该动作拥有额外的无敌帧,因此既可以主动用作更强的防御手段,也可以在你切换技能时机不当即将被击中时进行反应闪避。 选择狩猎方式:单人或多人 与《怪物猎人:世界》不同,《怪物猎人:崛起》回归了系列传统,将村庄(单人)和集会所(单人/多人)狩猎的进度分开。虽然两者的进度是分开的,但它们也不会相互干扰。
村任务被视为《怪物猎人:崛起》主线故事的开端。村任务仅支持单人游玩,无法获得其他玩家的帮助。你可以从坐在村子中央的火芽处承接村任务,也可以通过镇上张贴的任务板,甚至直接从菜单中承接。完成村任务后,强烈建议前往集会所承接更具挑战性的任务。
集会所任务是游戏的在线部分,你可以自由选择单人或与其他玩家共同完成任务。虽然这些任务通常比村任务更难,但会根据猎人数量动态调整难度,所以不必过于担心难度问题。你可以从坐在左侧桌子后的水芸那里接收集会所任务。
与村子中心的邮差千里对话,可以创建多人游戏大厅或加入他人的大厅。 如果你在集会所任务中进行单人游戏且需要额外帮助,可以从任务菜单发送加入请求来召唤其他玩家协助。当然,这仅在集会所任务中有效。相反,你也可以从任务板上响应其他人的求助请求。帮助等级低于你的猎人会获得奖励!通过加入请求进入的玩家不会加入你的大厅,任务结束后会自动离开。 关键任务和紧急任务 当你选择任务时,带有猎人公会纹章的任务被视为【关键任务】。完成足够数量的关键任务后,你将接到【紧急任务】。完成紧急任务将提升你的猎人等级,并让你解锁更多任务和功能。
随从任务 《怪物猎人崛起:曙光》新增的随从任务是可选择的内容,你可以与村和集会所的角色一同狩猎。完成这些任务将解锁新的 armor sets(装备套装)、weapon trees(武器派生树),以及让这些角色陪同你进行额外任务的功能。 探索任务 如果你想在不接取任务的情况下前往野外收集素材或狩猎怪物,可以与火芽或水芸对话进入探索任务。在探索任务中,你无需担心时间限制和猫车次数限制。 建议你时不时进行探索任务。它能提供一个无压力的环境,让你探索、收集、练习,还可能发现专注于任务时无法找到的东西。标准狩猎流程 在营地,你可以进行多项操作。你可以进入帐篷取回储物箱中的物品,更换自己的装备,以及更换你的艾露猫装备。如果忘记进食,可以在小食堂获取食物。 出发前,务必前往蓝色箱子处领取里面的免费道具。若参与多人任务,请保持礼貌,每种道具只拿一个,因为箱子内的物品是共享的。如果是单人任务,且你计划在后续游玩中使用枪械或弓箭,也可以拿走箱子里的弹药。否则这些弹药会被浪费掉,至少你之后还能卖掉它们。
如果蓝色箱子中的物品描述中标注了【补给品】,例如急救药、简易电击陷阱或简易麻醉弹,这些物品会在任务结束时从你的 inventory(物品栏)中移除。因此,建议你优先使用这些物品,再使用自己的补给。 在奔跑、骑乘或使用钩爪移动时,可以尽情收集物品。尽可能拾取一切东西,因为几乎所有物品都有用处。随着游戏时间的增加,你会逐渐了解哪些物品更有用。 可收集并保留的物品带有绿色图标。这些物品将构成你在野外发现的大部分物品。收集物品时,你可能会注意到系统会自动制作药水等物品。这是一项便利功能,你可以在选项菜单中为每种物品单独启用或禁用该功能。即时使用物品和环境生物的图标为红棕色。它们可立即使用以产生效果。击打活力黄蜂可恢复生命值。麻痹蟾蜍会释放麻痹毒素,对怪物和猎人都有影响。请留意观察,还有更多内容等待你去发现。

抬头看!《怪物猎人:崛起》是系列中垂直探索元素最丰富的一作。游戏中有许多可供攀爬的悬崖,上面可能栖息着环境生物、藏有道具,还能提供绝佳的观察点。 低头看!在探索过程中,你可能会遇到下方的长距离落差和陡峭悬崖。但无需担心!怪物猎人系列不存在坠落伤害!就算从数百英尺高空落下也安然无恙,你的膝盖就像用铠玉打造的一样坚固! 金色翔虫通常会出现在适合移动的悬崖附近。收集每一只翔虫都能恢复少量耐力,助你攀上悬崖。试着沿着这些路径探索,发现地图中的新路线吧。 在地图中移动时,别忘了大翔虫;它们是快速穿越长距离的好方法。 看到灌木丛了吗?快速攻击它们;你通常会在里面发现环境生物。 如果你在多人模式中狩猎,请注意其他玩家使用的武器。如果队伍中有锤子、狩猎笛,或者(《怪物猎人:崛起》新增的)广域炮击型铳枪使用者,让他们优先攻击怪物头部,这样他们可以打晕怪物。近战武器应攻击尾部,这样既能消除尾部攻击的威胁,又能获得尾部剥取素材。像片手剑或双剑这类短距离武器,可以通过攻击腿部来绊倒怪物。有些武器的攻击会绊倒其他玩家或将他们击退。请保持礼貌,除非彼此之间有安全距离,否则避免使用这类攻击。
如果你正在与怪物战斗时,发现怪物突然慢慢倒下且音乐停止,立刻停止攻击!这是你的队友让怪物进入了睡眠状态。对睡眠中的怪物发起的第一次攻击会将其唤醒,同时造成额外伤害。通常的做法是放置爆炸桶来唤醒怪物,如果你没有爆炸桶,就交给队伍中单次攻击伤害最高的人(提示,通常是大剑使用者)来完成这次“粗暴唤醒”。 另一方面,当狩猎接近尾声时,怪物可能会一瘸一拐地离开,并试图回到巢穴睡觉恢复体力。此时同样适用睡眠礼仪,但你现在也可以选择捕获怪物而非将其击杀。捕获怪物 捕获怪物有三个要求: 1. 怪物处于低生命值状态。

很简单。击倒怪物,但要打到它快死才行。如果怪物开始一瘸一拐,就很可能可以捕获了。屏幕右上角怪物图标下方出现蓝色怪物头像,就说明该怪物可以捕获了。即使蓝色头骨没显示,你也可以尝试捕获,但蓝色头骨是确定的标志。 2. 怪物处于电击陷阱或落穴陷阱中。 如果你有把握,可以在战斗中放置陷阱,希望怪物会掉进去。或者你也可以等怪物回到巢穴后再在那里捕获它。用电击陷阱还是落穴陷阱都一样,但电击陷阱更常用,因为制作简单且部署更快。你的艾露猫放置的陷阱也有效。 3.怪物已陷入麻醉状态。 默认情况下,猎人会将麻醉弹直接扔向地面,因此要靠近怪物后再开始投掷。使用瞄准镜时也可以投掷炸弹。两颗炸弹就足以捕获一只怪物。如果使用弩炮,也可以使用麻醉弹药。 当以下三个条件同时满足时,怪物就会被捕获。不过要注意,这三个条件不一定非要按顺序发生。你可以在放置陷阱前预先麻醉怪物,这样仍然可以成功捕获。如果你已经对怪物进行了两次麻醉且怪物已被困在陷阱中,可能是因为其生命值还不够低。快速用武器攻击它们,你或许有机会在陷阱失效前将其生命值降低到足够捕获的程度。 关于捕获的补充说明: 【如果营地的箱子里有任务提供的简易陷阱或简易麻醉弹,请优先使用这些道具,以节省你自己的补给。如果操作失误,你仍然可以使用自己的道具。】 【注意,不要对受雷电能量强化的怪物使用电击陷阱。】 【如果多只怪物距离足够近,它们有可能被同一个陷阱捕获。】 【古龙对陷阱免疫,无法被捕获。】 狩猎中猫车(生命值归零) 如果你生命值降至0并被猫车,不必担心,这种情况每个人都会遇到。重要的是你能从中吸取教训。那么,你回到了营地,可能大部分恢复道具都已经用完了。接下来该怎么办? 如果需要的话,回到帐篷里补充所有道具。如果你事先准备了道具配置方案,那就太好了!这能节省很多时间!如果没有,你可以尝试使用补充按钮,但这对那些已经完全用完的道具无效。你得手动重新拾取那些道具。离开帐篷前,先思考一下。你能改变战术吗?或许换一把不同的武器或更适合当前情况的 armor( armor 指盔甲)。
接下来,请确保你对当前的最大生命值和耐力值有信心。如果没有信心,在重新与怪物交战前,一定要收集更多的翔虫来提升属性。或许可以根据自身需求,将护石更换为更偏向进攻或防御的类型。 如果需要食物来恢复耐力条中红色轮廓部分,试着在蓝色补给箱中寻找简易营养剂,优先食用它们。如果没有简易营养剂,可以尝试普通营养剂或熟肉排。如果这些都没有,你可以击杀该区域内的任何草食动物,剥取素材后用烤肉架烹饪。 如果任务中只剩下最后一次猫车机会,再失败任务就会失败,这时你可以考虑退出任务。撤退并不可耻!你随时可以稍后再试。进入选项后,你会看到【放弃任务】和【从任务返回】。它们听起来很相似,所以记住两者的区别很重要。 【放弃任务】意味着你将回到完全没有接取该任务的状态。你会丢失在任务中获得的所有物品,包括拾取和剥取的物品,但你也会收回所有消耗掉的物品,比如药水、药丸、药剂等。放弃任务就像一个重置按钮。如果你在任务中消耗了大量珍贵的消耗品却一无所获,这个功能会很有用。 【从任务返回】意味着你以当前状态从任务中返回。任务中使用的物品会丢失,但你可以保留在任务中获得的所有物品。如果你没有使用大量消耗品,或者在野外发现了一些稀有材料,这可能会很有用。 怪物行为 开发者们不懈努力,力求让游戏尽可能细节丰富,即使大多数玩家可能永远不会注意到这些细节。他们希望《怪物猎人:世界》能给人一种真实、充满生机的生态系统的感觉。例如,毒妖鸟的毒攻击会因它最近在地图上食用的坚果和浆果种类不同而具有不同的特性。 在执行任务时,请记住你正在狩猎的怪物种类。特定的怪物偏好不同的区域,并且会坚守在这些区域。例如,你不会在水中发现铠龙。青熊兽喜欢吃蜂蜜,所以它们经常在寻找蜂巢。如果你了解怪物的巡逻路线、觅食地点和休息区域,那么在狩猎开始、地图上的怪物尚未被识别时,你会更容易找到目标。 有些怪物具有攻击性,有些则比较被动。当怪物看到你时,它的反应能让你对其性情有所了解。它可能会立刻攻击你,将你视为猎物;也可能无视你,认为你不构成威胁。一旦你发起攻击,小型怪物可能会逃跑,而大型怪物(大多数任务目标)则会进行反击。 战斗时要留意怪物的身体动作。每次攻击前,它都会有预备动作或征兆。如果它抬起爪子,很可能会挥爪攻击;如果它扬起尾巴,很可能即将用尾巴猛击。随着时间的推移,你将能够准确判断怪物接下来要做什么。通常来说,攻击的危险性越高,其前摇时间就越长。 在狩猎过程中,怪物会多次离开当前区域并前往新地点。只需跟随它并继续战斗即可。如果你迷路了,地图上总会显示它们的位置。有时,你可以在怪物离开前打断它们,例如通过击晕、骑乘或陷阱。但要注意避免在限制你机动性的狭窄空间中战斗。如果你正在不利的位置战斗,或者某个区域有多个怪物在混战,可以向它们投掷 dung bomb 来强制怪物立即转移位置。 当怪物在战斗中靠得很近时,可能会发生地盘争夺。在大多数情况下,更具优势的怪物会赢得地盘争夺并造成大量伤害。不过,在某些罕见情况下,较弱的怪物也可能获胜,尤其是当优势怪物处于虚弱和疲惫状态,而较弱怪物处于激怒状态时。有些怪物实力更为均衡,战斗结果可能走向任何一方。你可以通过故意将怪物引到一起,利用地盘争夺来获得优势。
在狩猎中承受足够伤害后,怪物会进入暴怒状态。它们通常会通过咆哮宣告这一状态,随后身体会出现烟雾或火焰等其他指示效果。暴怒状态下的怪物攻击速度更快,造成的伤害也更高。当怪物暴怒时,战斗需更加谨慎。如果暴怒的怪物将目标锁定你,它会持续追击你。这虽然危险,但也能为你所用。你可以将其引向另一只怪物引发地盘争夺,或者将其引至有环境陷阱的区域使其倒地。 另一方面,怪物也会进入疲惫状态。怪物拥有耐力,使用攻击和受到钝器伤害都会消耗耐力。当怪物疲惫时,它们的移动和攻击速度会变慢,特殊攻击也可能失败。这是造成伤害的绝佳机会。疲惫的怪物会尝试进食或撕咬猎人来恢复耐力。 当怪物生命值足够低时,就可以对其进行捕获。下次它们离开该区域时,会一瘸一拐地移动到巢穴区域睡觉。怪物睡觉时,对其发动的下一次攻击将造成双倍伤害。人们通常会在怪物旁边放置桶爆弹,以便在怪物醒来时提供额外的爆发伤害。此外,猎人也可以使用麻醉弹和陷阱来轻松捕获怪物。 要警惕返回巢穴后的古龙种怪物。它们对陷阱免疫,因此无法被捕获。在它们的巢穴中战斗时会更加危险,无论是因为它们扩展的招式,还是巢穴本身的环境。建议尽可能在古龙抵达巢穴前将其击杀。怪物若被打至失衡状态,将不再撤退。 骑乘怪物,也被称为【操龙】

设置操龙有四种不同方法: 1. 对怪物造成足够的【骑乘伤害】:这可以通过使用铁虫丝技或在空中进行普通攻击来实现,伤害数字周围会出现蓝色闪光提示。 2. 使用操虫棍的蜘蛛丝,让其用蛛网击中怪物。 3. 两只怪物在地盘争夺中相互攻击。 4. 骑乘一只怪物时,将其撞向另一只怪物。 当满足上述任一条件时,怪物会被铁丝束缚倒地。在这种状态下靠近怪物并按下攻击键,即可跳上怪物开始操龙。 骑乘怪物有以下几个优势: - 提供一种柔和的群体控制效果:骑乘期间,怪物无法伤害你或你的伙伴。使用坐骑攻击其他怪物不仅能轻松造成伤害,还能通过坐骑的元素攻击使目标陷入异常状态。当骑乘结束时,你占据优势,可将怪物撞向墙壁造成额外伤害并使其倒地(甚至可能同时波及另一只怪物)。坐骑也是快速移动的好方法,因为怪物移动迅速,且无需消耗耐力。虽然翔虫攻击是增加骑乘伤害的简单方式,但在翔虫槽恢复时,你可以考虑使用空中攻击来积累骑乘值。部分武器的招式中包含跳跃攻击,例如操虫棍和长枪。其他武器则需要利用环境来骑乘怪物。留意斜坡或悬崖,可从上面跳下发动跳跃攻击。 当你最终骑上怪物后,你可以控制它的移动和朝向。按下攻击按钮并结合按住不同的移动方向,就能使用多种攻击。 你可以随时将怪物向前推出。如果它撞到墙壁,会受到大量伤害,你也会被甩下来,但如果你有额外的翔虫,就可以重新骑上去并再次推出它。推出后,怪物会倒地,为狩猎小队提供攻击弱点的巨大机会。推出时若撞到另一只怪物,会对两只怪物都造成大量伤害。 控制怪物时你还可以闪避,这会消耗一只翔虫。当你在即将被其他怪物击中前闪避,就能化解这次攻击。骑乘时,屏幕上会显示骑龙计量条,其外观如下:

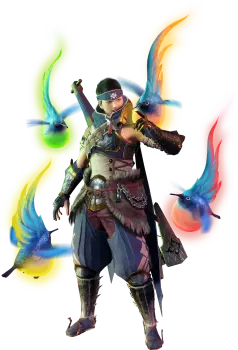
左侧的菱形图标是一个模拟时钟,显示你在被自动从怪物身上甩下来前剩余的时间。在此之前,尝试发动怪物攻击或使用骑乘惩罚者,详情如下: 当你对其他怪物使用怪物攻击或成功躲避其他怪物的攻击时,右侧的橙色计量条会累积。一旦计量条充满,你就可以使用骑乘惩罚者,这是一种强大的攻击,在骑乘期间只能使用一次,使用后骑乘状态会结束。计量条充满后会持续减少,所以如果你打算使用它,一定要在计时器结束并被自动甩下怪物之前释放! 你的狩猎小队其他成员可以自由攻击你所骑乘的怪物。既然你已经控制住了它们,它们就不会有受伤的风险,也不会影响你的骑乘尝试,因为这不会对骑乘计量条产生影响。不过,你的坐骑在被骑乘时受到的伤害会大幅减少,所以其他猎人可能更适合去磨刀、装填弹药、治疗、进食恢复耐力、收集附近物品等。 非任务目标怪物的骑乘阈值要低得多。一个不错的策略是:先找到一只非任务目标怪物,用几次沉降绑定动作骑乘它,向你的任务目标前进,在骑乘状态下用重攻击攻击目标,将坐骑撞向目标使其倒地,然后骑乘你的任务目标,再将其撞向墙壁。这是狩猎的良好开端,能让你轻松对目标造成大量伤害,同时自身风险极低,而且两只怪物都会在地上掉落多种物品。 驾驭特定怪物存在冷却时间,之后才能再次将其击倒: - 若使用与之前不同的骑乘方式(骑乘伤害、操虫棍、怪物攻击、怪物击飞),需等待5分钟才能再次击倒怪物进行骑乘。 - 使用相同方式击倒怪物,则需等待10分钟。 基本上,如果你想尽可能多地骑乘同一只怪物,就要混合搭配你的战术。驾驭是你可以使用的非常强大的工具。特有生物的力量 - 第一部分 特有生物是生活在你狩猎区域中的小型生物。使用你的花链和狩猎助手笼,你可以获得增益效果或将它们用作工具来帮助你狩猎。 常驻增益生物 以下特有生物提供的增益效果将在当前整个狩猎过程中持续存在。 灵鸟 灵鸟是小型彩色鸟类,当你触碰它们时,会根据其颜色为你提供相应的增益效果。

红色灵鸟提升攻击力

橙色精灵鸟提升防御力。

绿羽雀会增加最大生命值。

黄色灵鸟会增加最大耐力值。

棱镜翔虫会将攻击、防御、生命值和耐力提升至护石所允许的最大值。 临时增益生物:顾名思义,这些生物会提供临时增益效果,该效果要么立即生效,要么在设定时间后消失,要么持续到你失去所有生命值。 蝶火

当被触碰时,蝶火会释放出一团红色粉尘云,进入其中的猎人将暂时提升攻击力。 布飞蛾

当被触碰时,布飞虫会释放一团橙色粉尘云,任何进入其中的猎人防御都会暂时提升。 窥视虫

当被触碰时,一群窥视虫会释放出黄色的粉尘云,暂时提升进入其中的猎人的最大耐力值。切叶蝶

当被触碰时,彩粉蝶会释放信息素云,提升亲和度(暴击率)。 活力胡蜂

当受到攻击时,活力黄蜂的囊会破裂,释放出治疗雾气,可立即治愈附近的猎人。 翔虫

当猎人触碰翔虫时,它会短暂跟随猎人,并为翔虫槽增加一个额外翔虫。这使得猎人可以使用更多的翔虫攻击和移动。 变形翔虫:触碰这些更闪亮的翔虫会强化猎人的操龙能力。猎人将造成更高的骑乘伤害,更容易触发怪物之间的争斗,并且翔虫槽恢复速度更快。所有变形翔虫都会赋予上述效果,但同一时间只能激活其中一种额外的独特效果:

红宝石变形翔虫能使骑乘终结攻击造成更高伤害。

黄金变形翔虫可以提高骑乘怪物时攻击怪物的素材掉落概率。 与翔虫类似,灯鱿也有不同的颜色,每种颜色都有不同的效果。

红色灯鱿鱼提供额外亲和度。

绿色枪乌贼会释放小型治疗脉冲。

黄色灯鱿鱼提升防御力

黄金光苔拥有其他所有光苔的效果:它能为你恢复生命,同时提升你的会心和防御力。 环境生物之力 - 第二部分 狩猎帮手 狩猎帮手存放在狩猎帮手笼中,你可以保存它们,之后像使用道具一样使用它们。你的笼子一次最多只能容纳五个帮手。所有狩猎帮手会在狩猎结束时被释放。 陷阱虫

使用时,猎人会在脚下投掷陷阱虫。它们的作用类似铁蒺藜,能减缓任何踩中它们的怪物的移动速度。撤退的怪物若接触到陷阱虫会立即停下脚步,因此将其放置在怪物的逃跑路线上效果尤为显著。 星爆虫

星形甲虫通常以星形图案出现在墙壁上。它们会保持静止,直到被怪物物理击中,此时覆盖在其外壳上的粉末会发生爆炸。这些粉末能够吸收元素异常状态;如果你投掷元素蟾蜍,或者让怪物用元素攻击击中它们,星形甲虫就会改变颜色,并对击中它们的怪物施加该元素的异常状态。 荆棘蟾蜍

投掷后,荆棘蟾蜍会待在原地直到受到攻击。随后它会向空中释放强烈胃酸,使被命中的怪物产生击退效果。 抗毒血清

使用时,抗蛇毒剂会暂时提升猎人对异常状态的抗性,并立即治愈猎人当前所有的异常状态。别被名字误导了,它能治愈所有异常状态,不只是中毒! 酿酒兔

使用时,酿酒兔会增强猎人可使用的部分物品效果。例如,它能提升药水的治疗量。 埃斯库雷戈

使用时,【蜗牛(Escuregot)】会在大范围区域内释放治疗雾气并持续一段时间。元素甲虫

火甲虫会对其击中的任何怪物造成火焰异常状态。

泥甲虫会对其击中的任何怪物造成水元素异常状态。

雷甲虫会对其击中的任何怪物造成雷元素异常状态。

雪甲虫会对其击中的任何怪物造成冰蚀效果。 傀儡蜘蛛

投掷时,傀儡蜘蛛会在落地处释放铁蛛丝。若命中怪物,将造成大量骑乘伤害。 傀儡蜘蛛

投掷傀儡蜘蛛后,它会用丝线附着到怪物身上。如果看到你和怪物之间有丝线连接,就说明成功了。再次按下【使用】键会将怪物拉向猎人。这对于让怪物撞到墙壁以造成额外伤害非常有用,尤其是当墙壁带有星爆虫或熔岩间歇泉等额外效果时。 韦尔纳德

使用时,哀嚎纳德会发出尖叫,将大型怪物吸引到其放置位置。受影响的怪物到达后,发起地盘争夺的几率会增加。屏幕右上角怪物图标下方出现粉色爪印,即表示其生效。 臭鼬貂

使用时,臭鼬 mink 会在猎人身上覆盖一层吸引怪物的信息素。怪物会一直跟随猎人,直到效果结束。通过这种方式引诱的怪物发动地盘争夺的几率会增加。当看到怪物头部周围有白色雾气时,就说明臭鼬 mink 正在发挥作用。 灯笼虫

灯笼虫会附着在使用者身上,若受到攻击则会爆炸,偏转部分攻击并减少对使用者造成的伤害。 风蟹

放置后,风蟹会释放一股强力气流,将使用者高高吹向空中。 极光龟

使用后,猎人下次受到致命伤害时,将由 Aurortle 代为承受。其效果与团子技能【猫的根性】相同,且两者可以叠加! 特有生物之力 - 第三部分 狡猾生物 岩龙蜥

若受到攻击,石蜥蜴会掉落制作材料。用苦无攻击它可获得更多掉落物。 岩蜥蜴

若受到攻击,巨石蜥蜴会掉落稀有制作材料。用苦无攻击它可获得更多掉落物。鳞甲蜥蜴

若受到攻击,鳞蜥蜴会掉落怪物素材。用苦无攻击它可掉落更多素材。 生命束缚:若大型怪物处于正确的效果范围内,生命束缚技能将对其生效。 闪飞虫

若受到攻击,闪飞虫会发出强烈闪光,效果与闪光弹类似。若怪物正对着这道光,就会产生畏缩反应。 巨水龙

如果附近留有肉类,食人鱼会陷入狂暴状态,对过于靠近的怪物造成伤害。枪乌贼

矛鱿鱼的头部极其锋利,会对其游动路径上的任何物体造成伤害。将怪物引诱到矛鱿鱼前方,就能以相对较小的 effort 造成严重伤害。 状态蟾蜍

若被惊扰,毒蟾蜍会释放毒雾,造成大量中毒状态。

若受到惊扰,帕拉蟾蜍会释放出麻痹性气体。

若受到惊扰,睡蟾会释放出一种强效催眠气体。

若受到惊扰,爆弹蟾蜍会发生爆炸,造成高额伤害,且很可能使怪物陷入绊倒状态。

若受到惊扰,诡计蟾蜍会突然活跃起来,并吸引附近大型怪物的注意。回声蝙蝠

回声蝙蝠会向空中释放爆炸性粉末。它们通常会“附着”在大型怪物身上,受到攻击时便会爆炸。 钳爪蟹

钳形蟹常见于悬崖和墙壁上。它们会射出小石块,使附近的怪物陷入僵直状态。 切刃蟹

与螯钳蟹类似,切割蟹会附着在悬崖和墙壁上,并向附近发现的任何大型怪物发射水晶碎片。 幸运生命:若发现这些生物,可增加任务奖励。 幸运猫头鹰

与之互动后,完成当前任务将奖励额外金币。菲莉希克罗

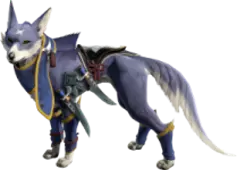
与之互动后,完成当前任务将获得额外的任务奖励物品。 稀有生物:这些环境生物极为罕见。 雪面狐

这种狐狸很少在夜晚出现在神社遗迹的神社顶部。如果你尝试与它击掌,它会回以击掌。 僧侣蜗牛

这种巨大的野兽很少会在夜晚出现在霜牙群岛的东海岸。如果你对它做出动作表情,它可能会发出咆哮。雷吉特里斯

这种翼龙白天很少出现在 Sandy Plains 的废墟深处。如果受到攻击,它会掉落一些矿物。 【Quetzalcobra】

黄昏时分,这条小型神圣蛇类可能会罕见地从水没林巨型金字塔内一间隐藏密室的巢穴中现身。它会对你的动作做出舞蹈般的回应。 狱炎蛇

这种凤凰般的生物极少出现在熔岩洞窟火山最深处,通常在黎明时分盘旋。 其他 金色精灵虫

这些发光虫通常成排出现在悬崖边,帮助玩家找到地图的通行路径。触碰它们可以恢复少量耐力,助你多爬一段距离。它们常是支线任务的目标。镀金发光虫

金色翔虫的大型变种,能恢复更多耐力。大翔虫

Given to you by Senior Hunter Hanenaga in Kamura by the bridge to the Buddy Plaza, and Fran the Stalwart by the giant stack of pretzels in Elgado. If you find a Jewel Lily out on a hunt, you can place one in it, where it will stay indefinitely. When interacted with, it carries hunters over great distances along a set path. Reference SheetSometimes I wonder why I bother putting in the effort when I later find someone else did it so much better: Here's the illustrious Azilorn's reference sheet for endemic life[i.imgur.com]! And here's Azilorn's guide to the Rare Creatures[i.imgur.com]. Your Post-Hunt Routine in Kamura Village Immediately as you load in after a hunt, you'll get updates on things that may need your attention on the right side of your screen. It will tell you things such as when you have enough items to craft something in your wishlist, when your farm is full, when the Meowcenaries have returned, and so on. Take note and adjust your route as necessary. In many ways, your post-hunt routine is just your pre-hunt preparation for the next quest or expedition. This checklist can help you remember if you're missing anything between hunts, but most of the list can be skipped if you're in a rush. If you are unfamiliar with something in the list, continue on and it will unlock later on in the story. Check the Fast Travel option; you'll get icons at each location that asks for your attention. This can involve story, delivery requests/rewards, or new features you've unlocked. Check the Argosy (the farm) and retrieve the items your buddies have obtained. Change out items, buddies, or refresh their skills if needed. While at Rondine, check her other wares since her inventory changes after each quest. Monitor Meowcenaries progress; take any rewards and dispatch them again if the previous expeditions are complete. Check the Cohoot Nest atop the tree next to the Meowcenaries for extra items (especially Lagniapples). Meowcenaries and the Nest both take five quests to fully complete, so an easy rule of thumb is: if you're refreshing Meowcenaries => check Cohoot Nest. Check with Buddy Handler Iori and hire any new buddies that you may want. Train your buddies to raise their levels. A lot of the above (though not all) can be done through your housekeeper; speak with them to handle those activities if you wish. Speak to the Kagero the Merchant, especially during sales. You can refresh hunting supplies or meld new talismans. Go to the armory, create new weapons/armor/decorations, or upgrade existing equipment. Speak to anyone with something above their head indicating they have something to say. This is sometimes tied to main story progression, and sometimes involves optional quests that give you benefits upon completion. Talk to Hinoa or Minoto and check subquests; choose some you'll finish in a quest or two. Use the quest board menu option or talk to Hinoa/Minoto and choose a quest. You can also access the quest board through your action bar. This is especially useful for accepting quests while online, so you don't have to find a quest board while wandering around. While the quest is loading, go to the item box and change items and equipment appropriate to the quest you've just chosen. Use item sets and equipment sets to expedite the process. Go to the tea shop/canteen and choose a meal appropriate for the quest. Ready up and embark on the quest. If you haven't eaten, you can go inside the tent at any campsite to eat (though you can't choose the daily special). General Tips and Tricks - Part 1 At the start of the game, you will be hit with a lot of tutorials. Don't worry! You can dip your toes into the game not understanding everything, then you can always reference hunter notes (or guides like this) later once you have a better grasp on things. Never, ever forget subquests. Always be working on subquests throughout the game, as the armor sphere rewards are important. Choose ones that you think you'll complete within the next few quests; don't sit on a bounty with a high reward if you won't complete it for a while. You're making the game much harder on yourself if you don't keep a steady supply of armor spheres and keep your armor upgraded to a reasonable level. You don't need everything maxxed out to succeed, but any level of defense boost is better than nothing. Hire a good amount of buddies early; you want to train at least 7 and have them high level, to cover the submarine farm and meowcenary dispatch as you unlock them. Don't hire too many early on, though, as buddies will get a higher starting level the further you progress. They start around level 1-4 at the beginning of the game. Once you reach High Rank in the Gathering Hub, they'll be able to hire them around level 20. When you unlock your Hunting Rank (at 8), they'll start out at level 30. Some monster attacks are so dangerous, you need to DUCK AND COVER. That’s where the Superman Dive comes in! If you’re near a monster and have your weapon sheathed, start running directly away from the monster and hit the dodge button. You will leap into the air and flop ungracefully onto the floor. You are 100% invincible for the duration of this animation, which is immensely useful for the most dangerous attacks that large monsters will throw your way. Just remember these in order to pull it off: Your weapon must be sheathed. You must have enough stamina to dodge. You have to be running, facing away from the monster. This has a different animation than regular running. If you get hit hard enough to fall over prone to the ground, you are invulnerable until you get back up. It's sometimes a good idea to not press anything and wait for the monster to finish attacking before pressing any buttons to get back up. This is not a perfect solution, though: after a few seconds you'll automatically stand up, so if the timing is poor you'll just get back up right into another attack. Don't be afraid to quickly jump away to higher ground to get a breather, heal up, and reload/sharpen if things get too crazy to handle. If you're at low health and close to camp, feel free to run back and get into the tent. It will fully restore your health, cure all status effects, sharpen your weapon, etc. Listen to Hinoa or Minoto as they talk to you. They may remind you to eat if you've forgotten to do so, or they may ask you to look into a special quest if you haven't taken it yet. You can eat dango at camp during hunts if you forgot to eat, but the Kamura Daily Special won't be available. Listen to your own hunter. They may shout lines like "It's up to something!" to warn you when a monster is winding up a powerful attack. When fighting a monster and it runs away to another part of the map, don't just run after it; prepare. Heal up, sharpen, reload. Sometimes it will be faster to check the map and fast travel to a camp closer to the monster than to go by foot. If you're feeling cheeky, go to a nearby unrelated monster to mount it and bring it to the next part of the fight.
If you are struggling against a specific quest solo, try doing it multiplayer. Don't forget about the Join Request function; that's what it's there for. If you're struggling to do a quest in multiplayer, try doing it solo. Trust me on this, a lot of difficult monsters can be easier to handle alone. Even though their attention is on you more often, they have smaller health pools and deal less damage, meaning less chance of deadly combos or one-shot kills. Don't forget about endemic life while going through hunts. You'll survive a lot more if you take a short time picking up spiribirds to increase your stats, and Hunting Helpers can turn the tide of battle in a pinch. Spiribirds are most likely to be found in higher elevations, so take the high route when seeking them out. You don't have to sheathe to sharpen your weapon. While your weapon is out, simply use your whetstone or whetfish and your character will begin sharpening as normal. These are the only items that you don't need a sword & shield to use while unsheathed. Avoid fighting in small, tight areas like corridors between zones. Try to keep the fight in large open areas to give you and your hunting party more room to maneuver around the monster. You don’t want to be holed up in a hallway of death should another angry monster or two come by. Pitfall Traps and Shock Traps hold a monster longer if they're exhausted. If enraged, monsters break out of traps faster. Bring some flash bombs against monsters that like to fly out of reach. If you can get a flash in front of their eyes while they fly, it can cause them to fall to the ground, helpless. Fighting a monster over and over to get its materials? Mount another monster and use strong attacks on it; the extra monster drops on the ground might be what you need. It can also help to bring a Gathering palico or two. If you're planning to use a bowgun at some point, pick up the free ammo in the blue supply box at the beginning of each hunt and deposit it in your item box in Kamura for future use. Just be careful if you're in a multiplayer hunt; you wouldn't want to steal the ammo from an actual gunner. That would be rude! If the supply box at camp gives you extra materials you usually don't get, those are hints to exploiting the quest monster's weaknesses or easy uses to environmental hazards. For example, if the box has poison kunai, the monster is weak to poison. If there's EZ Raw Meat in the box, you'll likely be fighting the monster in the water, and you can use the EZ Raw Meat to attract giganhas to attack the monster without having to bring your own. General Tips and Tricks - Part 2 The blue glowing shrine in the buddy plaza remains sealed until you first defeat Magnamalo in the village questline. At some point in the game, the Power Charm and Armor Charm will be available for purchase from the merchants. Simply keep them in your inventory and they will provide a bonus to your attack and defense stats respectively. Later on in the game, you'll fight a special monster that drops their talons. By using item combination, you can combine the Charms with that monsters’ drops to create the Power Talon and Armor Talon, which have a stronger effect. These effects stack with the Charms, so go ahead and buy another set from the merchants. From then on, always keep the Power Charm, Power Talon, Armor Charm, and Armor Talon in your inventory, as they are permanent stat buffs. If you’re playing multiplayer and another player is stunned, asleep, or paralyzed, you can hit them to break them out of their status ailment early. This can save their life if the monster would have hit them otherwise. However, if the other player has the flinch-free skill equipped, you may not be able to help them, as your attacks will be ignored. A guaranteed way to help another player with flinch-free is to throw a mini barrel bomb at them. This game has auto-crafting: you can set options to automatically craft items when you pick up the raw materials out in the field. The game has most useful auto-crafting on by default, so from the beginning you’ll automatically craft potions out of herbs, for example. Keep this in mind if you realize you picked up an item but can’t find it in your inventory: you probably automatically crafted it into something else. Autocrafting has few downsides, as base ingredients rarely have other uses. If you find yourself needing an item that you’re automatically crafting away, you can always turn off that particular auto-craft in the options menu. Take a thorough look through the options; there's plenty of stuff to customize, like having an outline of yourself while you're behind a monster for visibility, or choosing how fast you mount your palamute. Disable auto-sheathe in the options. Despite the name, you'll still sheathe automatically when attempting to run or use items. It just turns off sheathing when standing still for a few seconds. Customize radial menus. You can use items much faster if you become accustomed to the radial menu. Set up item sets[clips.twitch.tv] to reduce down time between hunts. Save item sets after radial menu customization, as radial menu setups are tied to item sets. The same applies to equipment sets. If you have different armor or weapon setups, using loadouts will save a bunch of time. Try not to sell talismans. It's recommended to hold onto them until you can recycle them into a possibly better talisman with Rebirth melding. Need more zenny? Don't forget to sell those trade-in items! Go to your item box and select Sell Item. Hit the button to auto-sort your items (it's a good idea to do that every now and then anyway). Go to the final page or two of your items; before all the scraps should be trade-in items. Their item descriptions will say that they sell for a high price. These have no other use except for selling for money. You might want to sell a few extra monster parts you probably don't need, either. Have 25+ Rathalos Shells? You'll never use that many; sell a few! Still strapped for cash? It's time to go mining! Keep an eye on expeditions with "Locale Info: Upsurge: Mining Outcrops". Go around on a palamute mining every node you can, gathering 9 ore with each hit rather than 1 or 2. If you have a maxxed out Geology skill (easy with low level armor or decorations), you'll get 12! Just note that you only get 10 minutes before the upsurge expires. GaijinHunter has a great example of a route here. If you're handy with the wirebug for traversal, you can take this more lucrative route. If you want variety, here are some more routes for each map. Here's a route available in Master Rank. If you're on the hunt for Kamura points instead, here is a map to gather account item nodes using a similar method to the zenny farm. To speed things up a little more, you can skip the end-of-hunt cutscene by being mid-air when it ends. The easiest way to pull this off is to hold onto a wirebug when there's less than 10 seconds left. Not terribly useful, but you can attract a Rathian or Rathalos to your position if you pick up an egg from their nest. If you're carrying a heavy item for a quest, you're still able to use your wirebug to move around faster. Long gone are the days of dropping the egg accidentally while trying to move. Need an egg from a Gargwa? Sneak up from behind before attacking it, and it'll lay an egg in surprise. You can use a kunai from a distance if you're having trouble. Small insects such as Bnahbra and Altaroth have a high chance to disintegrate if killed, making it so you can't carve them. They'll have a higher chance of leaving behind a carveable body if you kill them with throwing kunai, and a 100% chance of leaving behind a body if you kill them with poison. Altaroths will leave behind extra items if you wait until they gather from a nearby area, in which case they'll have a bright-colored sac. Kunai deal cutting damage, so they are able to cut off monster tails. Take a few potshots while running up to a monster or when it's unsafe to approach during a dangerous attack. You might just make the cut. While in the volcano area, you can make good use of the geysers embedded in the walls. Place a bomb next to one, then detonate it while a monster is nearby to deal heavy damage, knock it over, and inflict fireblight or waterblight to it.
通用技巧与窍门 - 第三部分 上述方法或许有个更简单的版本,那就是骑乘怪物时直接将其撞向爆炸墙,效果是一样的! 岩龙、岩丘龙和鳞龙在被踢击或直接攻击时只会掉落一件物品。但如果改用苦无投掷它们,最多可以获得三件物品。 如果角龙冲锋时撞到墙壁或柱子,它的角可能会被卡住,这会给你创造攻击机会。 狩猎时记得使用快捷栏中的【 Felvine 】选项!它会让你的艾露猫使用 Felvine,使其变得更加活跃。在一段时间内,它们会更快地使用技能,并且攻击也会更加凶猛。这完全是免费的,而且充能速度也相当不错。 别忘了你可以在骑乘牙猎犬时使用物品。在追逐逃跑的怪物时,你可以进行磨刀或回复生命值。战斗中也可以骑乘怪物进行回复,同时仍能躲避攻击。 你的艾露猫会在蓝色骷髅图标出现前告诉你怪物是否可以捕获。 如果多只怪物距离足够近,同一个陷阱可以命中它们。这能让你有机会将它们同时困住,以便同时攻击或捕获它们。 当你像使用翔虫一样瞄准目标时,可以投掷小型炸弹和诱饵。 在空中使用桶爆弹时,你会将其垂直投下,它们在撞击时会立即引爆。这是一个在战斗中秀操作的好技巧,也能在地图移动时增加滞空时间。在钻地的铠龙面前放置桶爆弹,不仅能造成伤害并打断其攻击,还会使其原地挣扎,就像陷入陷阱一样。 在空中使用翔虫跳跃后进行翻滚,可以获得更远的空中移动距离。 剥取怪物时无需连续点击按钮,按住按钮即可持续剥取。 磨刀石的使用次数是无限的,所以你可以随时、多次进行磨刀。 在探索时,你可能会发现一些封闭的小区域,靠近时游戏会提示你发现了适合设置支营地的好地方。回到城镇后,商人 kagero 会发布一个任务,完成该任务后,那个区域就会添加一个帐篷,你在狩猎时可以快速传送到那里。这是Azilorn制作的关于所有子营地位置及解锁条件的指南。以下是由Team Darkside提供的《怪物猎人崛起:曙光》新地图中的营地位置。
除营地外,每张大型地图还有两个伙伴侦察点。发现侦察点后,你可以向猫人佣兵团报告,将其设为快速旅行地点。但此方法有以下限制: - 每张地图一次只能激活一个侦察点。 - 每次狩猎只能快速旅行到该侦察点一次。 - 通过伙伴侦察点旅行每次需消耗100点村玉。 完成村民委托和百龙夜行任务,会定期获得村玉票。村玉票可用于制作独特的武器和防具。 野外物品每4分钟刷新一次。 注意野外具有攻击性的艾露猫,它们被称为小偷猫。如果被小偷猫成功击中,它们会偷走你的道具并试图逃跑。如果你攻击它们就能取回物品,但如果它们成功逃跑,你还有第二次机会——前往地图上的艾露猫家园,在标有“艾露猫收集点”的位置取回。 这些任务会解锁特别重要的功能,如果你只专注于主线剧情可能会错过,所以要留意以下任务: - Only the Good Eggs - 解锁团子保险 - Cultural Exchange - 解锁第二个贸易队(农场)槽位 - Economic Stimulation - 解锁第三个贸易队(农场)槽位 游戏中最好的回复道具之一是隐藏的。在任何地方钓起一条波波鱼,然后用龙人姐妹的潜水艇开始养殖,接着去食堂使用“缤纷调和”将它们烹饪成美味鱼。食用需要一点时间,但能完全恢复所有红色生命值,之后还会在整整90秒内持续为你恢复生命。你还能因此获得大量团子票和催化剂! 如果看到奖励武器设计图的委托,完成它们就能解锁可在铁匠铺打造的新武器。 厌倦了在探索时听到重复的音乐?和你的管家对话,他们有选项可以更改城镇不同区域的背景音乐。 如果你完成了大部分村任务,就能承接特别许可测试任务,完成后可以跳过下位在线任务的进度。 和管家对话可以查看你已经看过的所有过场动画。 踏入竞技场 集会所的水边站着大师教官。与他对话以接受斗技场任务。这些是挑战任务,其规则与标准狩猎不同。每个斗技场任务都会让你对抗特定的怪物或怪物群,并且会提供特定的 armor(装备)、weapons(武器)和道具,你无法携带自己的装备。这是对猎人武器理解和道具运用能力的考验。对于单一玩法的猎人来说,这会迫使他们走出舒适区。 大多数斗技场任务都在斗技场中进行,这是一个专门为这些任务建造的特定小区域。 可参与任务的最大玩家数量为2人。 玩家无法加入正在进行的斗技场任务。 你的艾露猫和牙猎犬不会参与斗技场任务。 所有斗技场任务都有时间限制,并会根据特定的时间阈值划分等级。完成速度越快,获得的奖励越多。初期你只能接触到少量斗技场任务,随着主线剧情的推进,会解锁更多任务。许多猎人会忽略斗技场,但有些武器和 armor 只能通过斗技场奖励解锁。使用弓的猎人尤其应该关注斗技场奖励。建议至少完成每个斗技场任务一次,了解其提供的奖励。 注意:少数斗技场任务会在常规地图中进行,已解锁的支营地会保留。由于斗技场奖励与完成时间挂钩,强烈建议解锁该地图的支营地。 乱入 - 第一部分

乱入是一种特殊任务,你需要在任务中保卫村,抵御一波又一波来袭的怪物。你可以借助炮塔、村民、 siege weapons(攻城武器)和强化道具进行防御,类似塔防游戏。 所有乱入任务都在专为该任务类型设计的据点地图上进行。 地图分为三个主要区域。一是据点基地,你在此开始任务,拥有营地的所有设施,包括帐篷和补给箱。另外两个是一系列需要依次防御的区域。如果怪物群突破第一个区域,你将被迫退守至第二个区域进行防御。 小型乱入可能只使用第一个区域,但大多数大型乱入会使用两个区域。存在多种不同的地图配置。每张地图中总会有一个区域配备龙击炮,另一个区域配备分裂龙击炮,但它们的布局和出现顺序在每次百龙夜行中都是随机的。 在这些任务中,失败条件并非三次猫车,而是最终大门被破坏。当大门受到攻击时,NPC会发出警告。 由于没有猫车次数限制,所以即使猫车也不必沮丧。失去所有HP的唯一主要惩罚是需要跑回战场。如果确实猫车三次,任务奖励会略少,但影响不大。 一旦击败最后一波的【主要威胁】怪物,任务立即判定成功。 百龙夜行准备:任务开始后,第一波怪物会在2分钟时发起攻击。请合理利用这段时间。进入任务时,营地会出现一只彩虹精鸟。抓住它,你的护石属性就能达到最大值。 如果需要,在营地进行最后的调整,比如更换武器或食用团子。
准备就绪后,前往第一个区域的防线,即你左侧的隧道。 你会在该区域发现四处分布的方形轮廓,这些是安装平台,你可以在此处使用资源建造防御工事。
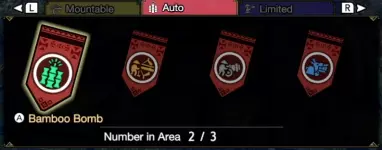
可架设装置 位于左上角的第一个类别,以黄色高亮显示,为可架设装置。这些装置需要猎人进行操作才能发挥作用。 弩炮 - 发射直线飞行的快速射击。弩炮箭是标准弹药,造成普通伤害。岩击弹会附着在怪物身上并爆炸。若命中怪物头部,将造成眩晕伤害。撤退弹可使怪物退缩并可能后退一小段距离。 加农炮 - 以弧线发射爆炸物。所有加农炮射击在命中时都会造成范围伤害。加农炮弹是标准弹药。充能穿刺弹可穿透多个怪物。按住按钮进行充能可造成更高伤害。充能雷电弹会对目标造成雷电异常状态,并且可以通过充能来提升伤害。 机关炮 - 一种快速射击的加特林机枪。只要成功命中怪物,快速连射的装填速度就会加快。快速集束弹射程较短,但伤害极高。 silkbind shots会将目标拉向机关炮。 自动设施第二类以红色突出显示的是自动设施,由NPC操作,安装后无需玩家进行操作。 防御弩炮 - 与可乘坐弩炮类似,但只能发射标准弹药,并且在弹药耗尽或被摧毁时会解除部署。如果你的要塞等级足够高(详情见狂怒 - 第二部分),它们会升级为龙击炮弹药,这种弹药会附着在怪物身上,若被其他攻击命中则会爆炸造成额外伤害。 防御者加农炮 - 与可乘坐版本类似。它们仅发射常规炮弹,除非你的要塞等级足够高,使其升级为雷电弹药,能对目标造成雷电异常状态。 龙炎炮台 - 与其他自动设施不同,这个可以乘坐以“配置”其瞄准和弹药类型。可以将其视为你设置的绊线,当怪物经过其路径时会激活。燃烧弹会发射爆炸射击。火焰柱会喷射穿透怪物的火柱。完成瞄准和弹药配置后,它将自动运行。 竹制炸弹:当怪物靠近时会自动引爆的炸弹。这些炸弹只能放置在地面层。 有限安装:第三类以紫色突出显示,是在每次百龙夜行期间使用次数有限的独特或特殊装置。 诱龙石:吸引怪物到其周围区域,与范围效果装置或龙击炮配合使用时效果显著。 诱龙石战士:与诱龙石类似,但威力更强。将它们放置在龙击炮或范围效果装置旁边。

【村雨武士】:召唤NPC协助战斗,例如长老福金或火芽&水芸。每个村民都有独特效果,包括攻击怪物或提升附近设施的效果。每波百龙夜行只能使用一次,因此把握好时机和位置至关重要。 【重型/特殊设施】:这些设施位于城堡地图的预设位置。它们拥有强大的效果,但再次使用前有较长的冷却时间。 【龙杭炮】:著名的龙杭炮是一柄巨大的长枪,发射后能对命中的怪物造成巨额伤害。按一次使用键/按钮登上开关,再按一次即可激活。务必把握好时机以命中目标!如果你挂载了开关但没有出现机会,可以闪避退出开关。
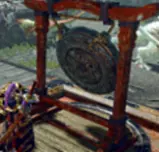
分裂龙击炮:实际上是重型火炮,发射的巨型炮弹在撞击时会爆炸。和龙杭炮一样,按使用键/按钮进行架设,瞄准后再次按下即可发射。闪避可以离开装置而不进行发射。 反击铜锣:被击中时,会触发反击信号,大幅提升所有猎人常规武器的攻击伤害。据点等级越高,攻击加成越高。赶紧加入战斗,尽情肆虐吧! 动力窑:猎人可以添加燃料的熔炉。每向动力窑添加一份燃料,都会减少所有重型装置的冷却时间,让你能更快使用龙杭炮、分裂龙击炮和反击铜锣。在波次间隔的空闲时间里,这是个不错的选择。你可以随时离开动力窑。 狂怒 - 第二部分
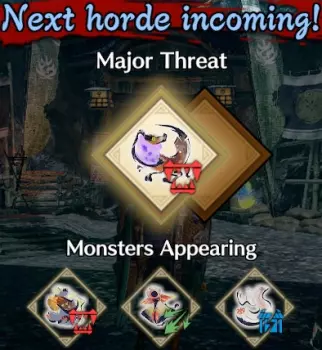
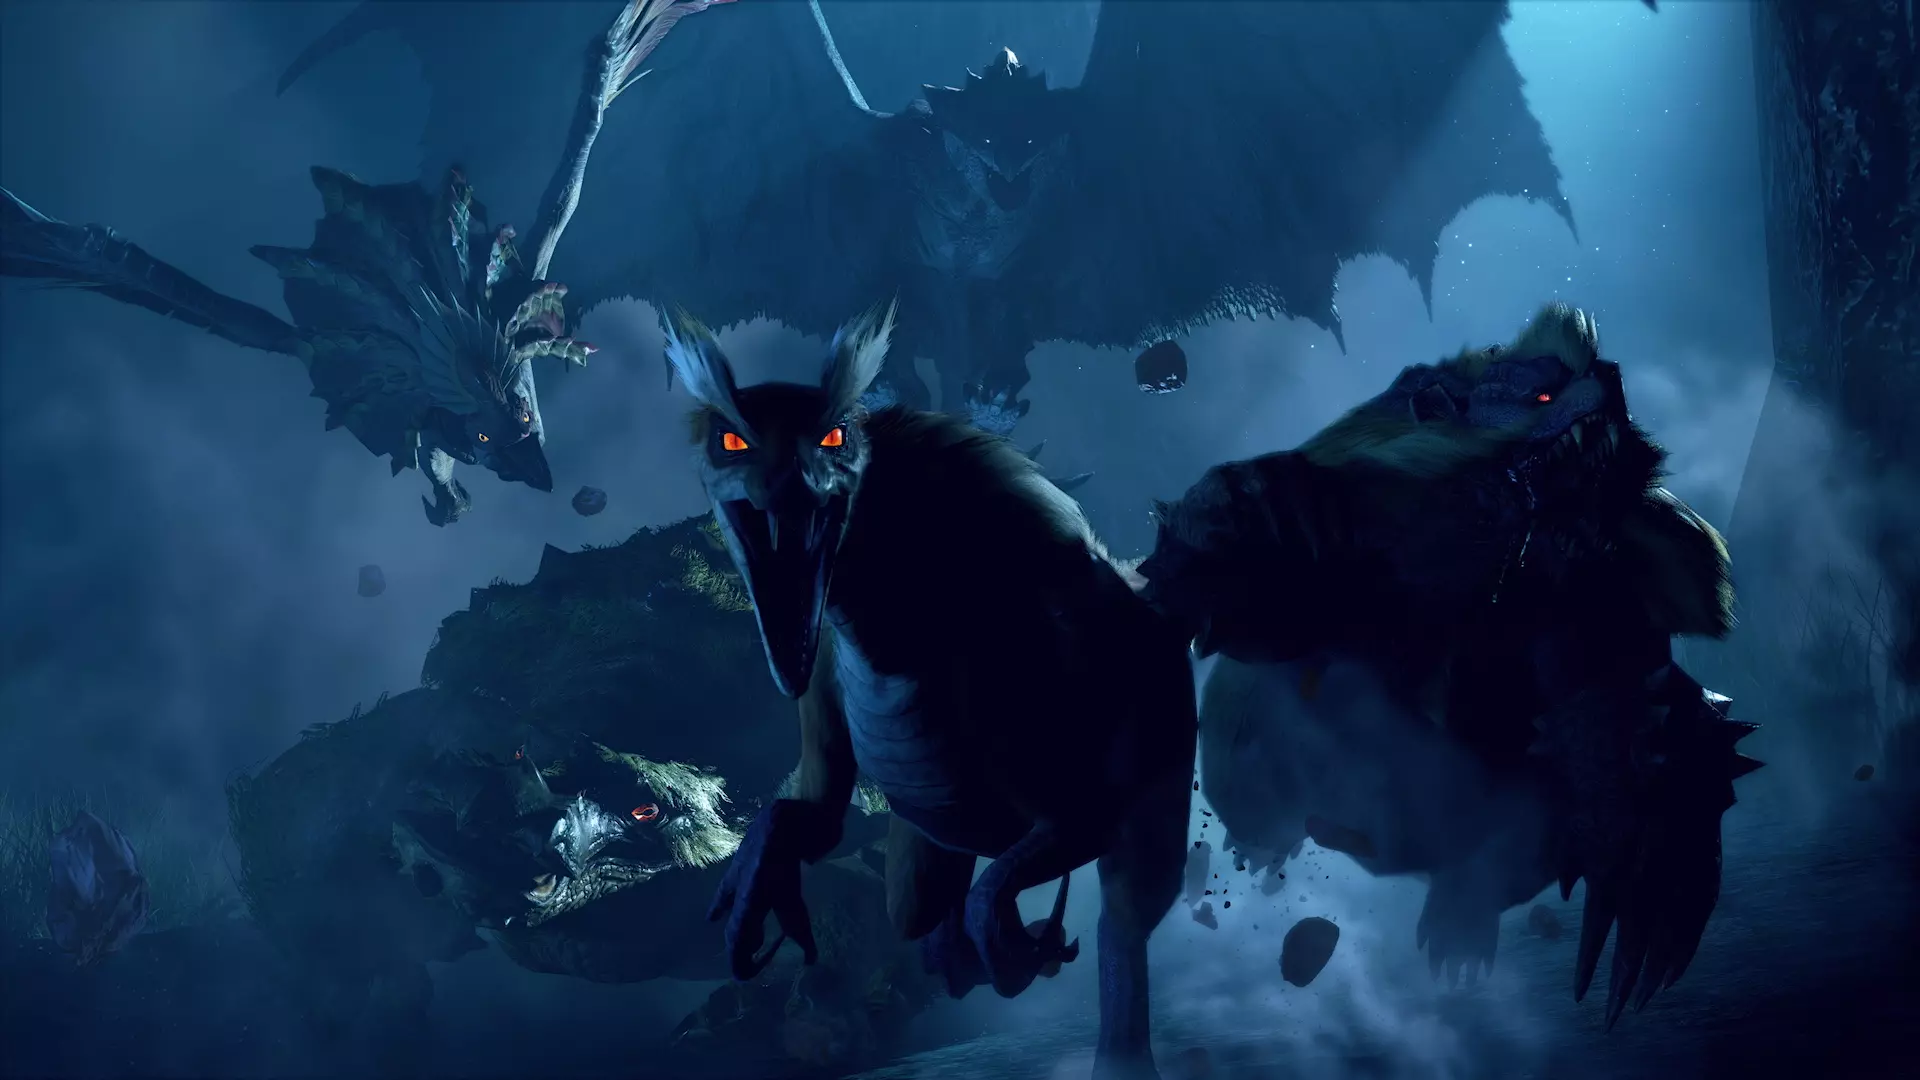
狂潮模式! 怪物会以被称为“群袭”的波次发动攻击。每个群袭由少量普通怪物和一名“主要威胁”怪物带领。群袭的数量根据任务不同,在1到3波之间变化。每波群袭攻击之间,你会获得短暂的休息时间,用于重新部署、建造更多防御设施、更换装备等。如果你已准备就绪,可以提前开始每一波攻击。 怪物类型 在狂潮模式中,每种怪物都被赋予特定的角色,这决定了它们的行为方式。

蓝色图标代表【破门者】怪物类型,它们主要专注于破坏大门。通常情况下,它们会无视猎人,但受到威胁时仍会反击。这类怪物应优先处理,尤其是当它们已经靠近大门时,因为大门的生命值直接关系到任务的成败。

潜行者类型的红色图标表示专注于直接攻击猎人的怪物。这些怪物会近身攻击,制造麻烦,并且还会对玩家操控的任何装置造成伤害。

绿色的【目标型】怪物同样专注于攻击猎人,但它们不喜欢面对面战斗,而是倾向于使用远程攻击。如果不加以注意,它们会造成大量伤害。大多数飞行 wyvern 都属于目标型角色。

The pink icon is for quest target monsters. This is usually reserved for the final boss monster for the quest, but it can also mark an invading Magnamalo that sticks around for a single wave. Special Monster TypesIn addition to the above, some monsters will have an extra modifier that increase their strength, and make them a priority target. Ruffians are larger and have more health than a regular monster of their type, but will give more Stronghold experience accordingly when defeated. Apex Monsters are strong enough to not only destroy installations, but also the terrain they're situated on, eliminating the installation permanently for the rest of the rampage. They cannot be trapped or wyvern ridden. Stronghold LevelLocated above the minimap is the Stronghold Level. As you defeat monsters in the rampage, you will gain "experience" that will eventually level up your Stronghold. Higher levels unlock more hunting installations or make existing ones more powerful. In addition to repelling monsters, on the left side of the screen will be a list of sub-assignments that will also boost Stronghold Level if completed. These are randomized between rampages. You can find more details in the Tips & Tricks section below. The higher a Stronghold Level you have at the end of a rampage quest, the more rewards you receive, so it's a good idea to complete as many sub-assignments as you reasonably can. Rampages are the main way to receive Defender Tickets, which are important for crafting weapons, armor, slotting in Ramp-Up skills, and are a high-value item if used for melding talismans. Stronghold Level does not carry over between quests; it resets to zero between rampages. Reading about it is one thing, but the best way to learn about the complexities of rampages is to see it in action: https://www.youtube.com/watch?v=SpgWAdMHQIE Rampage Tips and Tricks - Part 1 (Somewhat) Optimal Installation Placements:Manual Installations Ballistae function best around the middle or back of each map, as you need line of sight to each monster's head if you want to reliably stun them with Crag Shot. If they're placed too far forward, you'll quickly find yourself facing each monster's backside. Cannons tend to be best near the front, given their short range and area damage potential. Each wave will have monsters jump in around the same time, allowing you easy hits on multiple monsters at once before they start spreading out. Machine Cannons are best around the middle, allowing them to fire practically everywhere on the map, but most importantly, using Silkbind Shot to pull monsters away from blockades and gates.Don't forget that you can guard while on an installation! Better to stop firing a moment and stay standing than getting pushed off, taking damage for both yourself and the installation. Automatic Installations Bamboo Bombs are, of course, best on the ground in the path of the monsters. When you pick up monster shinies and obtain elemental barrel bombs, place them near a Bamboo Bomb so that they'll detonate together. However, don't put a Bamboo Bomb at the final installation platform before the gate; it's better to use a Kamura Warrior there. You can't place a Kamura Warrior while a Bamboo Bomb is charging. Defender Ballistae are versatile and can go just about anywhere you don't plan to put a Manual Installation. Defender Cannons are similar to the Defender Ballistae, but have obnoxiously low range. Best to put these guys on the ground where you don't already have a Bamboo Bomb. Wyvernfire Artillery are often placed on the two platforms adjacent to the final gate, aimed so that they'll automatically fire at any monster attacking it. Use Column of Flame if you're in the first area, where it'll often be attacked by multiple monsters. Incendiary Round is better vs. a single target, so use that in the second area where it's usually only the final boss monster that approaches the gate. You can also place them facing high-traffic areas, using Column of Flame to pierce through multiple monsters at once. Limited Installations Dragonbait and Dragonbait Warriors are best placed in front of Dragonators, making it easier to hit multiple monsters at once. If you don't have a Dragonator on the current map, it's still useful to group monsters together for a Splitting Wyvernshot. Even they're on cooldown, having one is better than nothing when you've expended every other Limited Installation. Warriors of Kamura are more complex than at first glance, to the point where each one has an ideal circumstance of when to use them. Nearly all of them are best placed on the ground near a bunch of a group of monsters, except Yomogi: Hinoa & Minoto are only available during the same wave you unlock them, and you lose the ability to place them if not used. So place them as soon as you can! They deal a massive amount of damage in the area around them. Iori & Buddies are similarly only available during the current wave they're unlocked. Use them right away! They will inflict a lot of blights on every monster around them. Elder Fugen is usually available during the first and third waves. He deals a massive amount of damage in a wide area. I'm not kidding, I've seen him hit monsters from this far away for full damage:
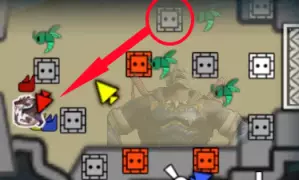
Even if you use him during the first wave, he'll become available a second time during the third wave, so feel free to use him right away. Master Utsushi has a special property where each regular monster he hits will become mountable. He's best used during the final wave, where you can simultaneously take out a wave of monsters, then use them against the final quest target. He has a similarly massive range like Elder Fugen. Yomogi the Chef uses a Machine Cannon, which means she has a larger effective range than others. While on the map, she strengthens all other Installations. Unlike other Warriors of Kamura, Yomogi sticks around until she runs out of ammo instead of leaving after a set amount of time. That means if you place her in a corner far away from monsters, her installation buff can remain for the rest of the rampage. It's up to you whether to use her for her Machine Cannon damage or her installation buff.Naturally, if you're playing multiplayer, other players may have other ideas on what should go where. Don't bother fighting it; just roll with whatever you've got. Rampages aren't particularly difficult. Other InstallationsWhile you can't place these, it's good to know where these installations are and when to use them: If a Dragonator is on a map, there's usually two of them available. When used, they'll fire out massive barbed lances that will deal several hits of damage to every monster in its way. Best used against at least two monsters, but don't feel shy of using it against just one if you're struggling. The two dragonators have separate cooldowns, so you can use one and still fire the other right afterward. The Splitting Wyvernshot is a massive artillery. When you mount it, you're able to aim almost anywhere on the current map before you fire. It deals immense damage to every monster in its vicinity, and effectively one-shots any monster that's not the final quest target. While the Dragonator and Splitting Wyvernshot will recharge on their own, it's quite slow. You can shovel coal into a Power Kiln to reduce the cooldown of everything on the map. This includes both Dragonators, the Splitting Wyvernshot, and refreshing any Installation that's recharging. If you have free time between waves, use a Power Kiln so everything's ready at the start of the next wave. Splitting Wyvernshot is so powerful that spamming it via the Power Kiln is a decent strategy. The Counter Signal is a gong that, when hit, gives you 60 seconds of a massive damage increase to your main weapons. The buff is so strong that it's often better to jump in and fight monsters directly instead of using the Manual Installations. The Counter Signal will be rung automatically a few times throughout the rampage, but you can hit one manually to start it yourself. However, this has two caveats: You can't hit the Counter Signal while an automatic one is already active. Once used, you can't use that map's Counter Signal again. It does not recharge. Rampage Tips and Tricks - Part 2 Stronghold Level and Sub-AssignmentsYou might notice that you don't have access to some installations until later in the rampage. This is because of your Stronghold Level, which determines what installations are available as well as how strong they are. You'll level up the Stronghold Level slowly over time, but the fastest way to level it up is to complete the randomized Sub-Assignments on the left side of the screen. There's a variety objectives it can give you. Some are easy, some are hard; just do your best to complete them if you can. Most are straightforward, like "Repel using Ballista" or "Pick up Monster Drops". As long as you put in a modest amount of effort, those will be completed with ease. Others may take a little finesse: Set Up Hunting Installations - an easy freebie. While you'd naturally complete this throughout the quest, you can finish it right away by repeatedly dismissing and setting up an installation. You can even finish this before the first wave, and get access to cannons before a single monster shows up. Inflict Elemental Blights - Use the cannon's Thunder Shot, fully-charged if possible. If you get any elemental barrel bombs from monster drops, place them next to a Bamboo Bomb or right in front of the entrance where you'll be able to detonate them on a group and (with luck) inflict the blight. You can also set Wyvernfire Artillery's Column of Flame in a high-traffic area and it may inflict fireblight. Inflict Status Ailments - More difficult. The easiest way is to bring your own status weapons and use them during the Counter Signal. You can also mount a monster that inflicts status effects, but this is hardly reliable. Stun a Monster - Use the ballista's Crag Shot on a monster's head to stun it. Most monsters will become stunned after a single hit. They become resistant to stun after the first time, so it's best to focus on stunning a different monster each time instead of repeatedly trying to stun a single one. Don't bother trying on the Apex and other stronger monsters; it'll take too many shots. Repel using Weapons - Deal finishing blows to monsters with your own main weapon. You do too little damage normally; jump in during the Counter Signal to complete this one. Repel with Village Defenders - Difficult, but not impossible. Place them throughout the map and weaken any monster that passes by. Stop attacking monsters when they get low health (the blue icon on the minimap/top right of the screen) and hopefully the Villagers will pick them off. Repel Using Bamboo Bomb - Honestly, don't even bother. It's too difficult to do reliably without also putting your progress at risk. Place 3 Bamboo Bombs and hope for the best. Use a Dragonator or S. Wyvernshot - The phrasing is misleading; it's not good enough to simply use them, you must get a finishing blow on a monster for it to count. Use them as much as you can, refreshing with the Power Kiln if necessary. While most sub-assignments can be done throughout the entire rampage, you can rarely get a sub-assignment that exists only for a single wave. These ones will be at the bottom of the list, highlighted in a dull red. Focus on completing these first, if possible. Most of the time it's one of the regular sub-assignments above, but there is a special one: Repel Magnamalo - Magnamalo will appear this wave. He has quite a lot of health, but he'll focus more on the monsters rather than you. He will leave if not defeated by the end of the current wave. There's also a hidden sub-assignment to cart less than three times. It doesn't have an effect on Stronghold Level, but it does factor into your rating at the end of the quest, which in turn affects your quest rewards. Final tips: Stay aware of your surroundings. There is a lot going on during a rampage. If you focus too much on one thing, you may not notice other monsters about to attack you, or they're about to destroy the gate behind you. Do rampages multiplayer if you can. There's so many moving parts in these quests that trying to do everything yourself can be an overwhelming and sometimes miserable experience. When in multiplayer, try diversifying your roles. You're much less effective if everyone's doing the same thing. 2 ballista and 2 cannons will perform better than 4 of one or the other. The only exceptions are at the very beginning of the rampage, where you have nothing better than 4 ballistae, and the very end, when almost everyone should be attacking the final monster with the Counter Signal. Try to be aware if there's something missing. If no one is using the Dragonators, Splitting Wyvernshots, Counter Signals, or setting up Auto or Limited Installations, step up! Using them at a suboptimal time is still better than never using them at all. Don't fight monsters directly if the Counter Signal isn't up. It's not worth it. Either wait until it automatically goes off or hit it manually. Don't tunnel-vision once it's up, either - the Counter Signal has a limited duration, and you don't want to keep attacking a monster long after it's run out. When an Apex monster arrives and you're still in the first zone, they will very quickly destroy the gate. Don't worry - this is supposed to happen. The Apex always fights in the final zone. Get a few potshots on the Apex in the first zone if you can, preferably with a Dragonator or Splitting Wyvernshot, but your window to do so is quite short. Be ready! When the first gate is broken and monsters are running to the next zone, running alongside them is very inefficient. There's an EZ Farcaster in the supply box at camp; use it as soon as the monsters leave the first zone so you can immediately run to the next area. This will give you time to set up installations and get ready before the monsters even get there. You might find explosive kunai when picking up monster drops. Use these against flying monsters to quickly knock them down to the ground. Monsters that become mountable are considered already defeated. If you don't plan on mounting them, they can be safely ignored. If you're at the end of a wave and are still riding a monster, the wave won't end until you get off. Launch the monster to save time instead of waiting around for nothing to happen. While on a cannon, you can still fire the normal cannonballs while charging a Thunder Shot or Piercing Shot at the same time. You receive a lot of Defender Tickets at the end of each quest. While these are useful for Rampage weapons and Ramp-up Skills, you'll likely use them most for melding talismans, as they are plentiful and worth a lot of points. If you need to meld talismans, rampages are one of the fastest ways to go. During the final wave against the boss monster, the Splitting Wyvernshot and Master Utsushi are the most effective means of wiping out extra monsters. Hold onto them until the monster reinforcements arrive, then defeat them in one swoop by using one or the other. It's not as effective, but if your final map has a Dragonator instead of Splitting Wyvernshot, try the Wyvernbait strategy. The only monster that "counts" as hunted during a rampage is the final boss monster. Everything else is considered filler and won't give you carves or crowns for achievements. They may give you drops in the quest reward screen, however. Multiplayer Etiquette Hub quest supply boxes have more items in them. Be courteous and only take one share of each item from the supply box at the beginning of the quest. Other players would like to have those too! At the end of every quest, you have the option to like other hunters. Unless you have a specific reason, always like all the other hunters! It gives everyone friend points, which grants extra support-style items such as lifepowders via Senri the Mailman. More support items means more successful hunts! Please be mindful of your attacks that can disrupt other players. Some weapon attacks can trip, stagger, or even launch other players, which overall is frustrating and slows down the hunt. Longsword users are particularly infamous for tripping other players. Keep your distance! Same thing with Gunlance Wyvernfire - the area of effect is bigger than you think. Aim carefully! This should be obvious, but don't join a hunt then not participate. It's fine to go around at the start to pick up Hunting Helpers and Spiribirds then jump in. If you're just gathering items or standing at camp, that's wasting everyone's time. Unless otherwise stated, the typical way to decide quests in lobbies is Round Robin. The host will post the first quest, the second person to join will post the second quest, and so on. If you're fighting a monster and notice it slowly toppling over and the music has stopped, the monster has fallen asleep. It's common courtesy to stop attacking and give everyone an opportunity to heal up, sharpen, reload, and lay down bombs next to the monster. Since the first attack against a sleeping monster gets a bonus modifier, the hunter with the most powerful attack is expected to wake it (usually, the greatsword user). Be mindful that monsters have different drops depending whether you capture or carve it. A hunter you're playing with may want to kill a monster instead of capturing, or vice versa, to get what they need. If no one mentions anything beforehand, then don't worry; anything goes. Best etiquette is to listen to others' preference on kill or capture, or bring it up yourself if you need it. Most of the time, people will listen. That said, it's acceptable to capture a monster you'd normally kill if: The group is at 1 cart left and the group is in danger of failing the quest. The monster is nearly dead and someone just carted. Chances are you'll kill the monster before they can get back, which means they won't get any carves. Afflicted Monsters and Anomaly Investigations The main endgame of Monster Hunter Rise: Sunbreak is dealing with monsters possessed by the Qurio. The Qurio grant them greatly increased health and damage, effectively making even weaker monsters dangerous and relevant to players in fully upgraded gear. When an afflicted monster is present in an area, small red particles can be seen in the air. Afflicted monsters themselves have darker coloring, red eyes, and a reddish glow or sheen to their entire body. Their appearance intensifies or lessens depending on the stage of the fight. When pacified, the Qurio influence is held back, and the monster is effectively a normal version of themselves. Over time, the Qurio turns the monster delirious, making them faster and hit harder. Reddish "cores" of energy will concentrate around several body parts of the monster. Prioritize hitting those glowing cores to make them erupt, dealing heavy damage to the monster. The cores will reappear elsewhere on the monster over time. If enough cores are destroyed fast enough, the monster will be knocked over and returned to the pacified state. However, if the monster spends enough time in the delirious state and not enough cores were destroyed, the building energy will overflow and explode in a wide range around the monster, posing heavy risk to all hunters around it.
受瘴气影响的怪物能够造成血瘴异常状态,请注意做好准备。 受瘴气影响的怪物会掉落专属的受瘴气影响素材,这些素材可用于制作终局武器和怪异炼化,下一部分将对此进行说明。 怪异任务与调查 完成《怪物猎人崛起:曙光》的主线剧情后,与学者巴哈里对话即可解锁怪异调查。对于熟悉系列的玩家来说,这些任务类似于《怪物猎人4》的公会任务和《怪物猎人:世界》的调查任务的结合体。 每个怪异调查都是随机生成的,包含随机的遭遇怪物组合、地图、时间限制、允许猫车次数以及允许的猎人数量。每次完成调查后,调查等级会提升,任务目标也会变得更强,但再次完成调查可获得更多奖励。 通过获取异常研究点数可随机生成额外的异常调查,异常研究点数可通过在调查中执行以下操作获得: - 狩猎非目标小型或大型怪物 - 破坏怪物部位 - 从受污染的采集点采集 - 完成调查 完成巴哈里的研究委托可提升异常研究,若成功讨伐他指定的受污染怪物,将获得高额奖励加成。 异常任务是与异常调查类似的另一功能,不同之处在于异常任务没有随机性:其任务参数是固定的,不会改变。完成任务时调查进度会降低。 怪异炼化 如前一节所述,怪异怪物的素材可用于制作毕业武器,同时也可用于怪异炼化,该系统能将武器和防具强化至超出其常规上限。只有完全升级的装备才能进行此强化,且只有大师级防具可进行炼化。 武器的怪异炼化:武器强化过程相当直接。每种武器都有可填充的炼化槽位,你可以根据拥有的槽位数量添加相应数量的炼化效果。部分槽位初始处于锁定状态,需使用高阶怪异怪物的掉落物才能解锁。 炼化选项包括:攻击力提升、锋利度提升、会心提升以及其他类似类型的加成。装备的客制强化 装备的客制强化更为复杂,因为其结果是随机的。通过对装备进行客制强化,可能会产生多种效果,例如: - 提升或降低现有技能等级 - 增加或减少防御力 - 提升或降低元素抗性 - 新增技能 - 增加或移除装饰孔 - 扩大或缩小现有装饰孔的尺寸 虽然部分效果可能为负面,但总体效果通常是正面的。例如,你可能会获得四种正面效果,而仅承受一种负面效果。 装备完成客制强化后,此次随机生成的效果将被保存并应用于该装备。如果你再次进行客制强化,可以选择忽略新结果并保留原有的客制效果,或者接受新结果并舍弃旧的客制效果。虽然只强化高稀有度的 armor set(装备套装)很诱人,但不要忽视低稀有度的 armor(装备),因为它们往往能以更少的投入从强化系统中获得更大的提升。部分低稀有度的 armor(装备)由于更高的加成,其属性甚至可以达到或超过稀有度 10 的 armor pieces(装备部件)。 细节 自系列之初,Capcom 就喜欢在怪物猎人系列游戏中加入一些小细节。比如烹饪三分熟牛排时出现的“真美味!”就是一个例子。《怪物猎人:崛起》中同样充满了各种值得探索的小细节。 营地的帐篷内有一个治疗喷雾装置,这为玩家进入帐篷后能立即恢复生命值提供了符合游戏世界观的解释。 在食物过场动画中,团子的排列顺序与你选择时的顺序完全一致。在同一段团子动画中,若三个团子技能全部激活,你会在茶里看到一根幸运草茎。派遣伙伴去冒险时,有时能在集会所看到他们顺着河流漂流而过。
The short cutscene you get at the end of each hunt factors in your current state. You'll get a different outcomes depending on what combo of palico/palamute you have, whether you're mounted on a palamute, have an extra wirebug, and more. Large monsters close their eyes somewhat when flashed. Badum and Tish in the Hunting Hub hit the drum according to the beat of the music. If you change the music for the Hub, they will instead take a break. There are many idle animations among you, your buddies, NPCs, monsters, and endemic life. Some are rarer than others. There are a lot of easily-missed sounds. Try turning up your volume and hear the unique cries of endemic life, or notice that sound echoes differently depending on the size of cave you're in. If you notice anything or anyone atop high places in town, try calling your Cahoot and sending it at it. If you stun the Toadversary, the felyne controlling it has to get onto its back and wind it back up. Your palamute takes defensive postures to protect you while you are transporting heavy items. There's a secret area in the training zone. Can you find it? There's a hidden NPC in your room that you can talk to. They will gossip and divulge secrets about the other villagers. Great Izuchi will lay down and play with or clean the regular Izuchi it hunts with. Pukei-Pukei's poison attacks have different attributes depending on what plant it had most recently eaten. Bishaten covers its mouth when throwing poisonfruit around to avoid poisoning itself. Tigrex loves to charge back and forth. If you break its claws, it has to spend more effort to move around since it loses traction on the ground. Somnacanth picks up shells from the water and can play with them, or in battle use them as a weapon against you. If left alone, Somnacanth can also sing a tune that resembles the combat music of whatever locale it's currently in. After a quest is finished and the timer ticks down, the grains of sand in the hourglass indicate how much time is left in each 10 second interval. Combat music starts when a monster sees you. Since Khezu has no eyes and can't see you, no music plays when fighting it. It's a long-running joke in the series. If you take pictures of monsters or endemic life, you have the option to replace the painted icons in your notebook with your own. Those watercolor paintings are done by Master Hojo, and you can sometimes see him rapidly paint in the Gathering Hub. Minoto also dabbles in watercolor painting, but and she's self-conscious at how bad she thinks her art is. You can see examples of her art here and also in this next detail: If you look at the character introductions[www.monsterhunter.com] in the monster hunter website, you'll find that the names of the default male character is Lance Gunn, the female default is Ran Page, the palamute is Pup R., and the palico is Kit T. There are three picture frames in your house. You can put any photo you've taken in them. Guild Master Hojo is riding a baby Tetsucabra, a monster from Monster Hunter 4 and Generations. Its name is Tetsy. Rakna-Kadaki sometimes pulls itself via a web. If you're positioned well, you can cut the web to disrupt it. Extra Worldbuilding This section has nothing particularly important about gameplay. It's just some trivia to help give context about the world. Magnamalo is the flagship monster for Monster Hunter Rise. Rathalos is the de facto flagship monster for the Monster Hunter series as a whole. All Rathalos are male, and all Rathians are female. Similarly, all Teostra are male, and all Lunastra are female. Diablos are herbivores. Diablos is classified as a "flying wyvern", even though they can't fly. Valstrax are nomads and are typically not hostile. However, they become agitated and aggressive if inundated with large amounts of dragon energy. Despite what it seems like from the end-game, elder dragons are supposed to be incredibly rare. Seeing one is canonically considered a once-in-a-lifetime event. There are ten relics and two rampage messages hidden in every major map. Each gives you a piece of the history of the map and the mystery of the rampage. Look high and low to find each one, or if you're impatient, here is Azilorn's guide to all relic locations[i.imgur.com]. Hunters, or at least the higher ups of the guild, are a superstitious lot. Long ago, a group of five[monsterhunter.wikia.com] experienced hunters went out to fight an elder dragon. Though victorious, a hunter died in battle. Ever since, sending five or more hunters was considered bad luck. That is why no more than four hunters are ever dispatched to a quest, even against the most dangerous of monsters, with very few exceptions. Makes sense? No? Too bad, this is Monster Hunter. We have sand whales. There's More to Come So, you've diverted the danger of the Malice Tiger Wyvern, uncovered the mysteries of the Rampage, and even conquered the Apex and Elder Dragons. There's nothing else to do then, right? Well, Capcom has a very good track record of continuing to support and update content for the Monster Hunter series, and Monster Hunter Rise is no exception. As time goes on, more monsters, more quests, and more events will become available for you to conquer. Look forward to it, hunter!
Glossary General TermsA list of words or phrases you may come across while interacting with the Monster Hunter community. Not all of these are relevant to Rise specifically, but are included in case you come across them. Affinity - Critical Hit Chance. Positive affinity grants 25% additional damage. Negative affinity grants 25% reduced damage. Carting - Alternative name for dying, being knocked unconscious, or otherwise being brought to zero health. Your character is brought back to camp on a cart drawn by felynes contracted by the guild to rescue you. Carving - Obtaining an item from a slain monster or its severed body part. Carving the tail is often referred to as a Tail Carve. Desire Sensor - An all-knowing entity that prevents you from obtaining the material you want. If you need a gem from a monster, and you hunted it 12 times and it still hasn't dropped, that's because the Desire Sensor knows you want it, and is preventing you from getting it. Farming - Doing a quest over and over to receive a specific resource you want, whether it be kamura points, zenny, monster parts, an item gathered from the map, or even just an opportunity to find a rare spawn. Can also refer to using the Argosy submarines to gain items, much like the farms in older games. HR - High Rank. Designated in World by Orange-Star quests. Monsters have more health, more attacks, and are more aggressive. New materials are available in High Rank maps. Je suis monté - A semi-derisive catchphrase from Monster Hunter 4 Ultimate, where many french or french canadian players would use the insect glaive and spam the mounting attack and mount the monster, which would result in their character saying "Je suis monté!" LR - Low Rank. In Village quests, these are 1 to 3-star quests. Monsters have less health and the basic set of attacks. Often described as the "tutorial" by series veterans. Mind's Eye - An armor skill in the game that allows attacks to not bounce off a monster's harder body parts regardless of sharpness, though the sharpness still degrades faster. Some special weapon attacks always have this effect active without the armor skill. Naked Run - Completing quests without armor. Panic Run - With your weapon sheathed, running while facing away from a large monster puts you into a Panic Run, which is a different animation that goes a little faster but drains slightly more stamina. This enables a Panic Dive. Panic Dive / Superman Dive - While Panic Running, dodge to do this maneuver. You will be completely invincible from the beginning to the end of the animation as you dramatically flop onto the ground. Quest Board - The board in the guild hall where you can accept quests that other hunters have put up. You can also go on other players' Join Requests from here. Slash Axe - Japanese name for Switch Axe. Zenny or (z) - The main currency of the Monster Hunter setting. Weapon Acronyms Acronym Weapon SnS Sword and Shield DB Dual Blades GS Great Sword LS Long Sword SA Switch Axe CB Charge Blade IG Insect Glaive HH Hunting Horn GL Gunlance LBG Light Bowgun HBG Heavy Bowgun Additional Resources This guide is far from comprehensive. Feel free to check the other steam guides out there, as well as these fantastic sources: The officially-partnered Monster Hunter Discord[discordapp.com] Kiranico, The Monster Hunter Database[mhrise.kiranico.com] Well-known content creators that make guides, tutorials, and tips for the Monster Hunter series: Rurikhan Youtube Channel Arrekz Youtube Channel Gaijin Hunter Youtube Channel And for crazy videos in general: Team Darkside, pushing Monster Hunter to the limits Have you powered past this guide, ready for more? Why not aim for absolute completion? https://steamcommunity.com/sharedfiles/filedetails/?id=2717041847 If you'd like some intellectually-stimulating analysis of the biology of the monsters and the ecosystems they live in, Glyde Borealis and Unnatural History History Channel offer great insights. Happy Hunting! Monster Hunter is a massive game with a lot of mechanics. There are many things that had to be left out of this guide for brevity's sake. There are probably several things that I'm mistaken about, due to lack of testing, misunderstandings, or differences in game versions. Please let me know in the comments and I'll make adjustments as soon as I can confirm and make a correction. Monster Hunter is all about cooperation!