换一换
换一换 


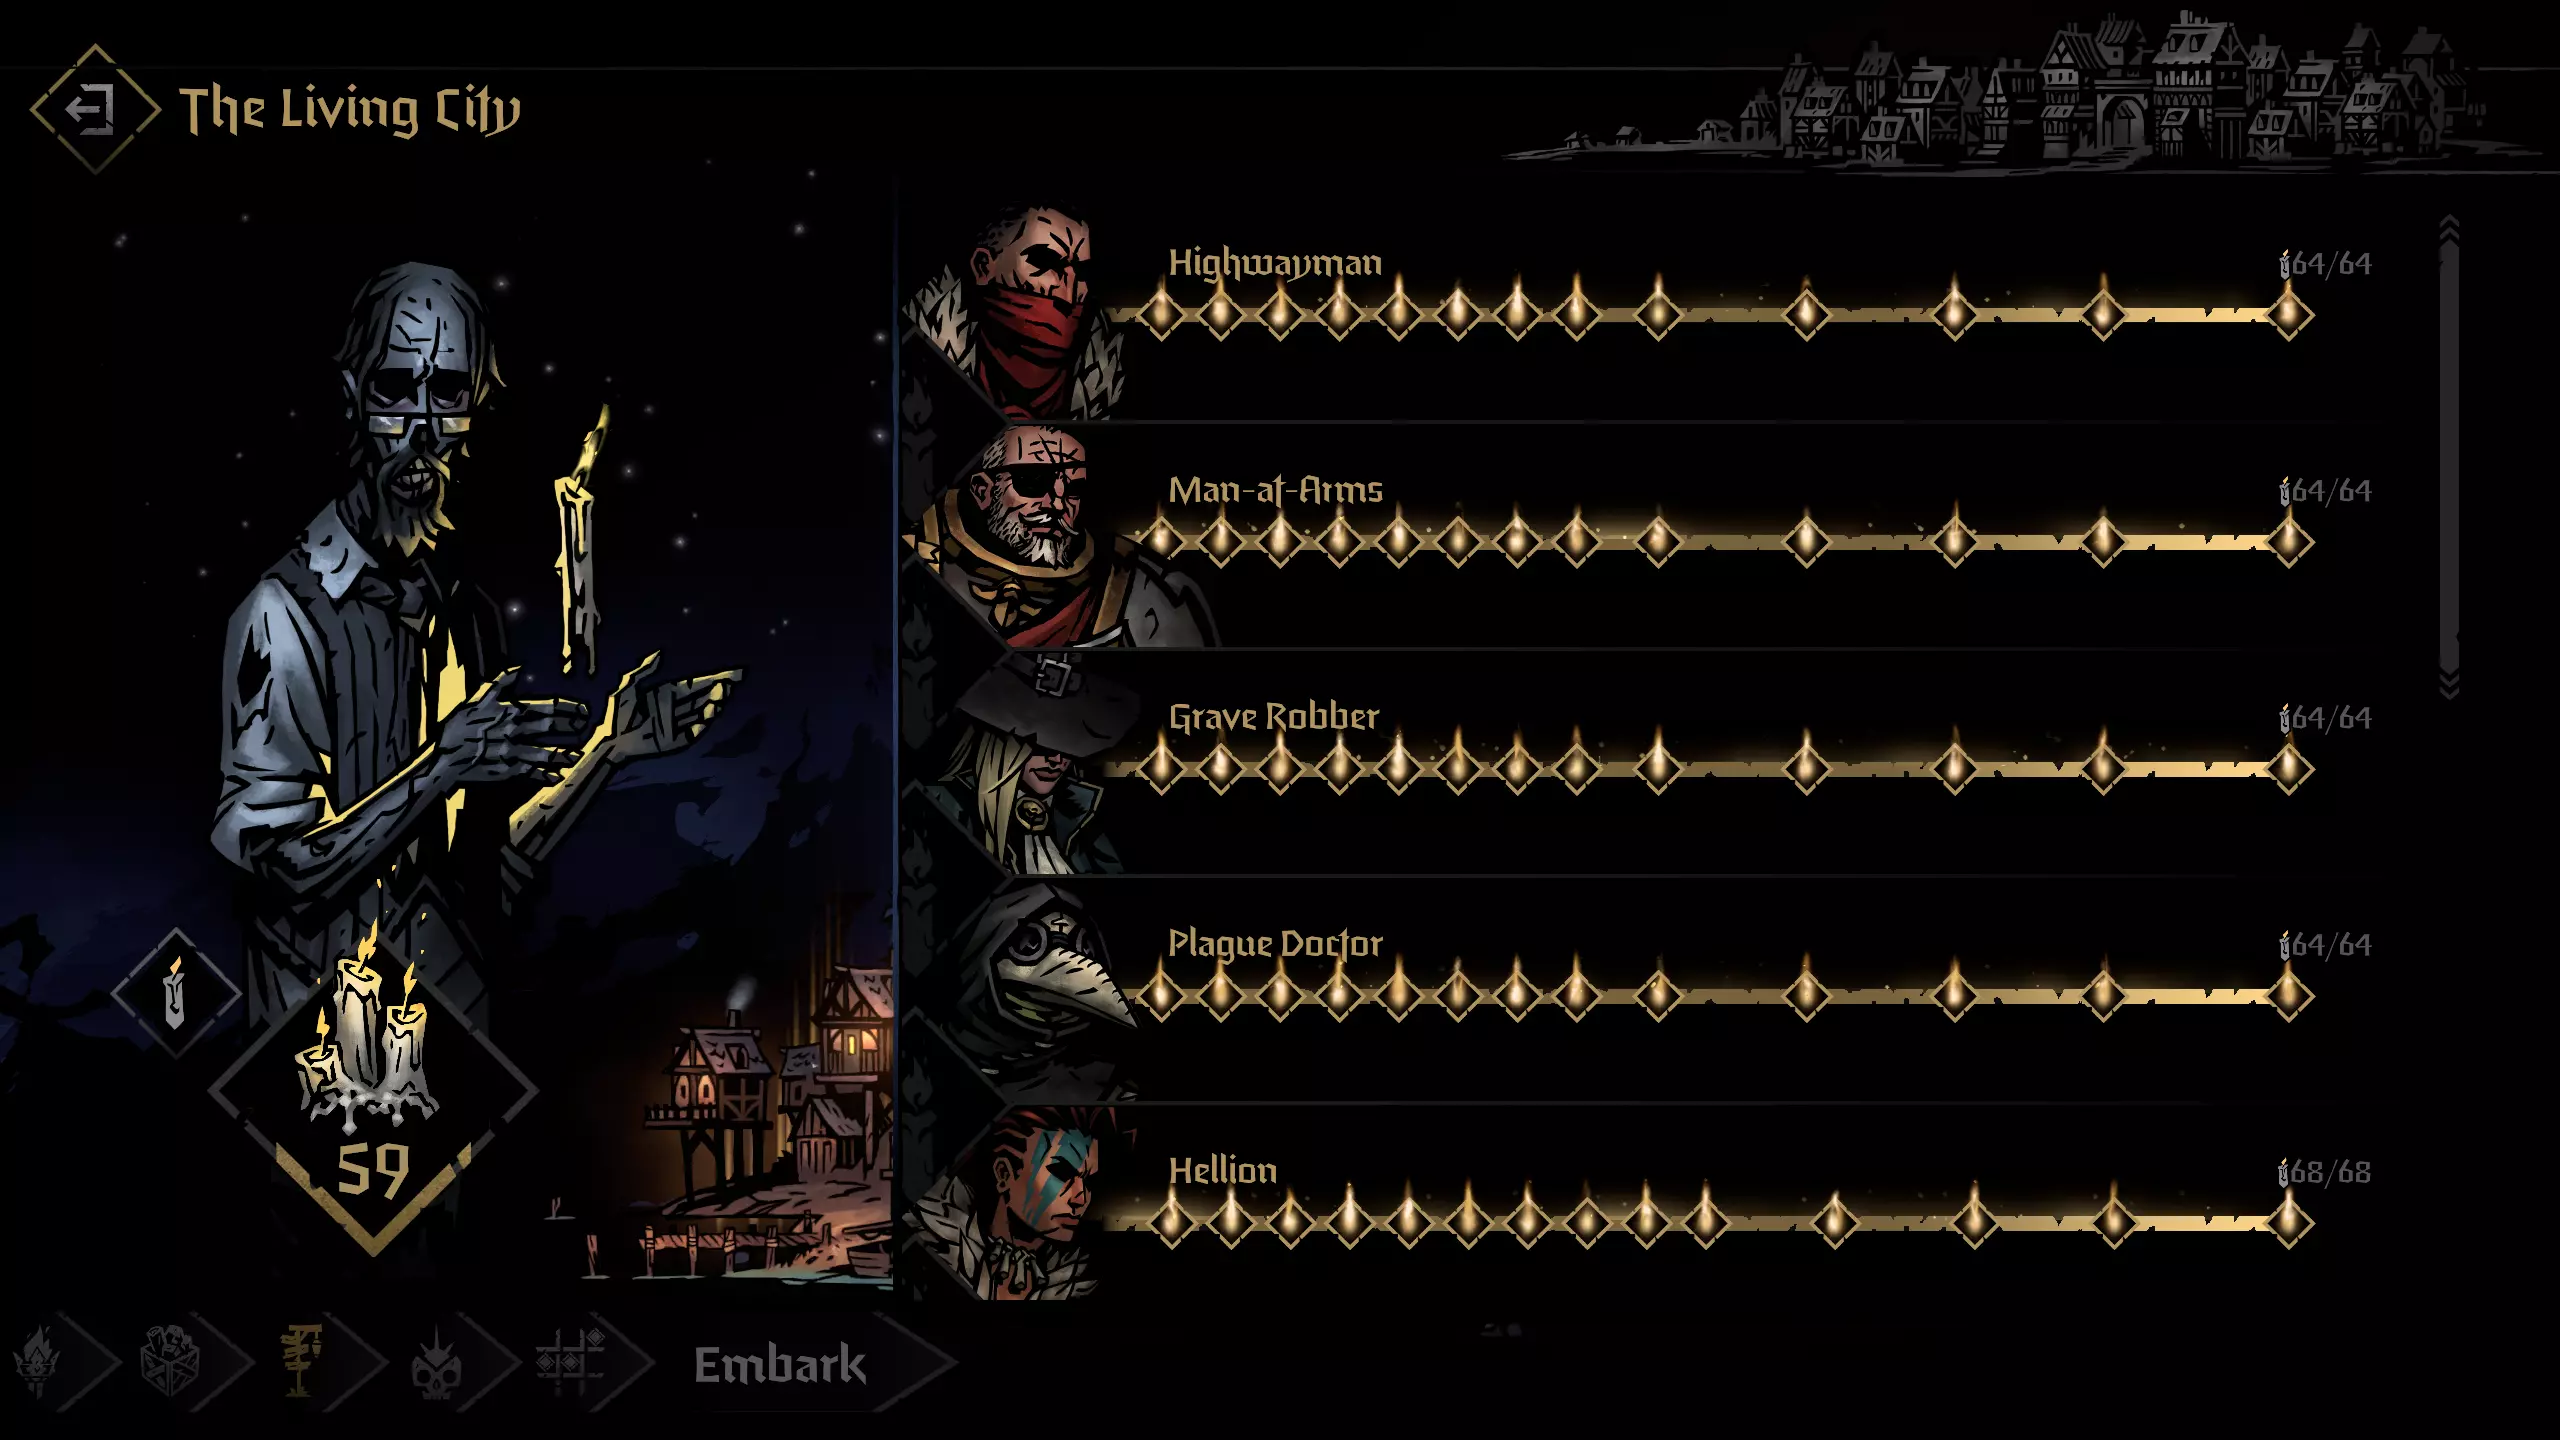
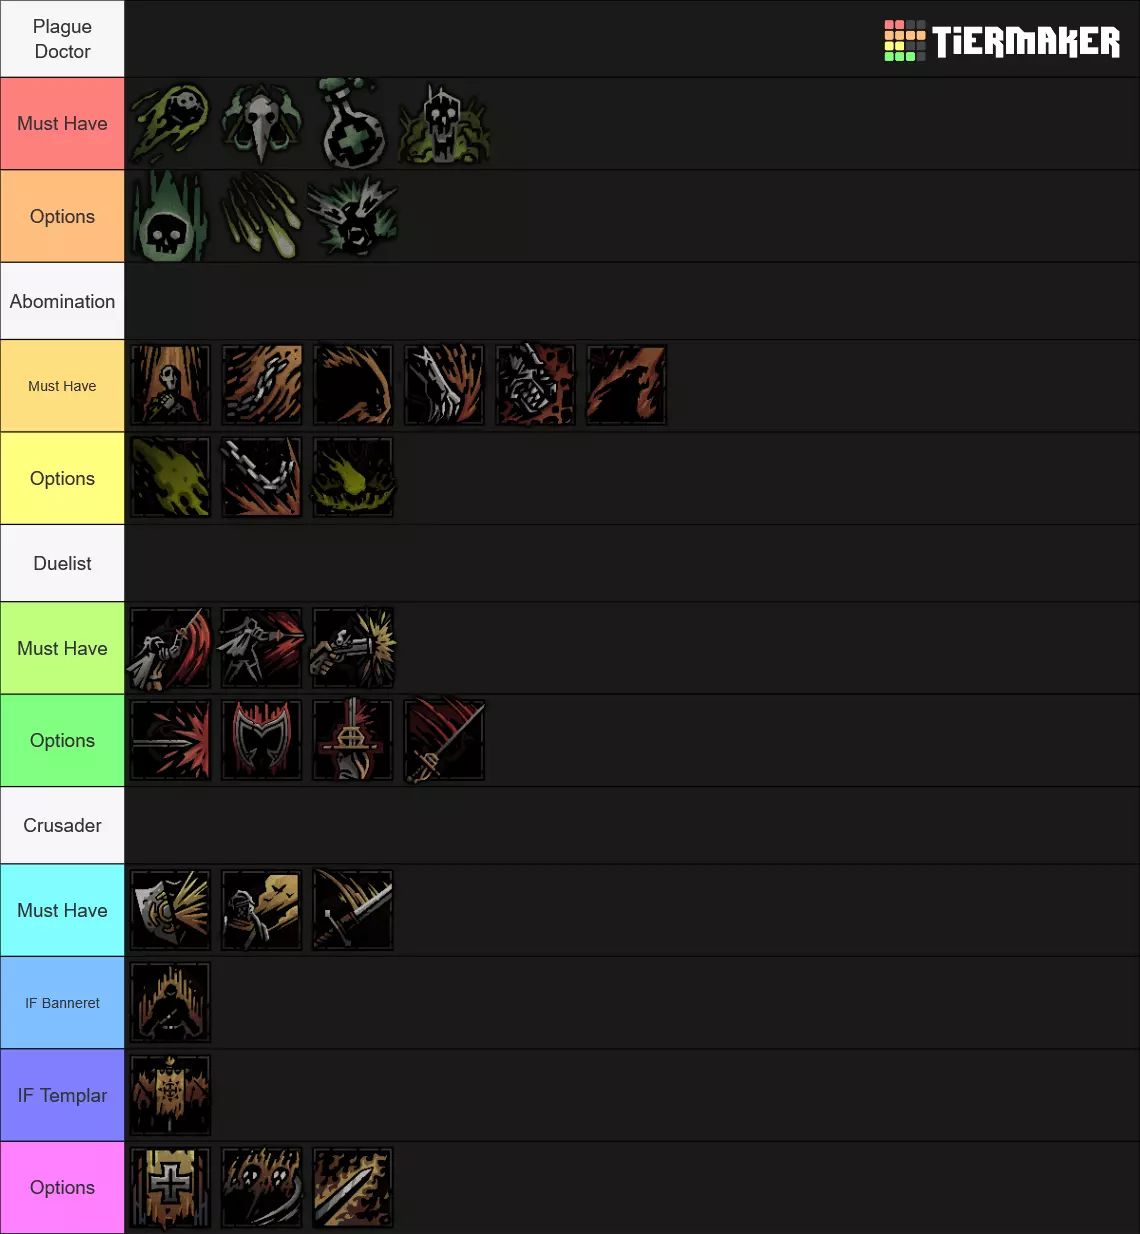
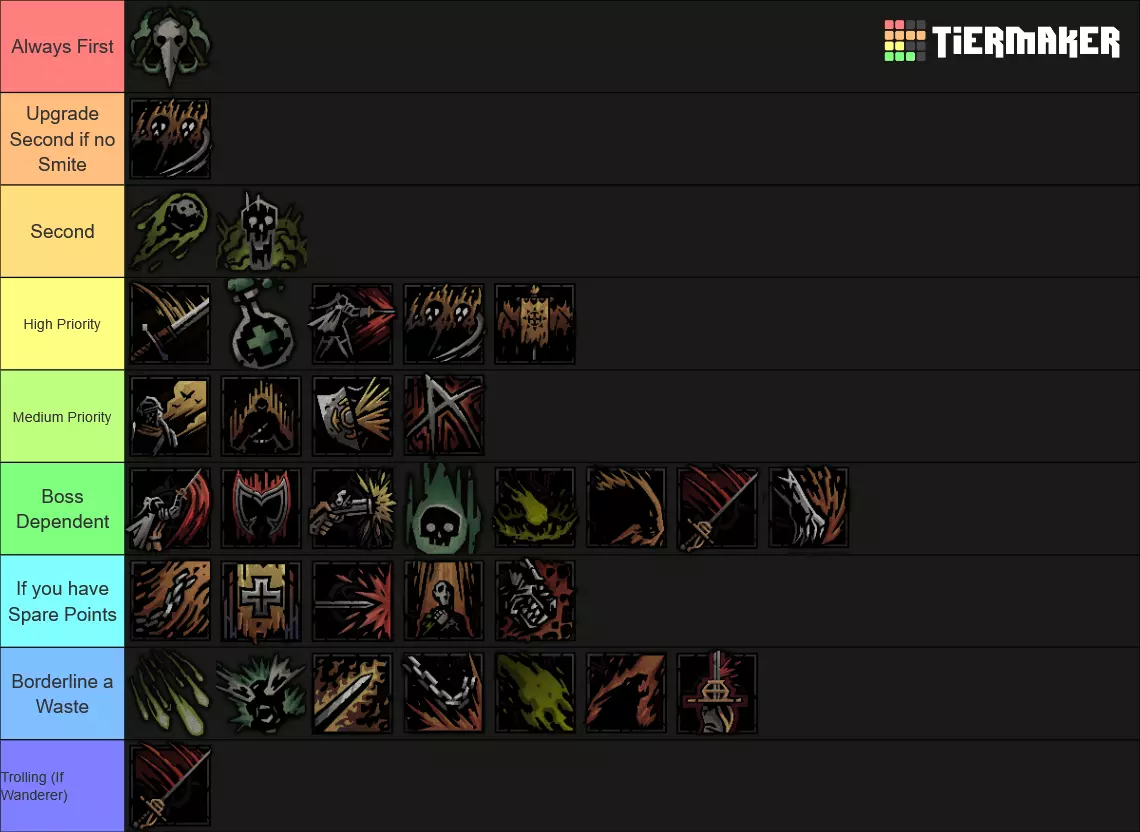
The most efficient and stupid way to get all 5 Memory DLC character achievements. Preface SINCE JULY 2025, PLAGUE DOCTOR'S PATHS HAVE BEEN REWORKED. In my opinion the only main change to this guide needed is to swap Plague Doctor's Path to Wanderer as Abomination applies enough Combo tokens to offset the reduced Blight chance on skills. UPDATE (October 2025): Due to IRL commitments and the video footage is now out of date due to Plague Doctor's Paths being reworked, I will no longer be working on that video. It also means this guide will not be well maintained anymore because of the outdated strategies. If there is another DLC hero released, I will probably make another Guide / Video on that. NOTE 2: This guide is a small variation of the other Grand Slam team guide I made with Crusader and Duelist which I highly recommend looking at over this one. This guide for those who cannot be bothered to go 2-3 full playthroughs for each DLC character and instead do it in 1. As such, this team is a mess with many flaws and is way more risky than the Crusader + Duelist and most other Grand Slam teams. In addition, I am godawful at using the Abomination as my playstyle does not lend itself well to how Abomination is best used. That being said, if you are mad enough, you can earn the following achievements at the same time with this team comp: A Life Well Lived: Apply 5 Memories to any Hero Inquisition's Prize: Apply 5 Memories to the Abomination Maître De La Lame: Apply 5 Memories to the Duelist Battle Hardened: Apply 5 Memories to the Crusader Grand Slam: Defeat all 5 confession bosses with the same four heroes without any of them dying Which is a very impressive feat that requires good planning, decision making and smidge of luck. Read on if you dare. Prerequisites The Binding Blade and Inhuman Bondage DLC (Required obviously) Unlocked the following Skill Paths: Banneret Crusader, Antagoniste Duelist and Plague Doctor Alchemist. Fully Completed the Crusader, Duelist and Abomination's Shrine of Reflection. Complete Chapter 3 of Plague Doctor's Shrine of Reflection.Recommended Upgrades/Unlocks Fully upgraded Timeless Wood. Unlocked Templar Crusader. Full Living City hero upgrades. Unlocking all Skills on Plague Doctor. At least the Orphan Wolf Cub pet but Reanimated Rabbit is preferred. 3 Wheels and 3 Armour on Stagecoach. Blight and Fire RES piercing Trinkets. Annotated Textbook, Early Experiment and Lover's Glove hero trinkets. Why this is a bad idea For a Grand Slam team comp to succeed, it needs to contain some of the following attributes: - Reliable and Strong Healing. Keeping your party healthy at all times will minimise risk of losing a hero and forcing a restart. - Reliable and Strong Tank. Someone needs to be able to take massive damage from boss crits at a moments notice and not waver. This is so that your less tanky heroes are well protected. - Flexible reach and damage. Many enemies and bosses have unique strengths and weaknesses thus a team comp needs to be able to kill any threat thrown to them. So what are the problems with Abomination, Duelist and Crusader? 1. No great tanking. Crusader is the best out of all 3 of them and he isn't a bad tank per say, but there is definitely way better. Man-At-Arms has stronger 75% blocks and rank flexible guarding, Flagellant has insane self-sustain and Chaplin Vestal provides strong healing to allies while guarding them. Crusader has decent utility but it doesn't help him stay alive that well. In addition, Bulwark of Faith has a 2 turn cooldown which means its very likely that multiple attacks may target vulnerable allies. 2. Rank 1-2 heavy. All of each character's strongest damage options are available at either ranks 1 or 2. This would normally mean you would have a frequently rotating team throwing out their strongest skills constantly, however there are some utility skills that throw this plan out of whack. Most notably, Crusader needs to be Rank 1/2 to taunt and sometimes that 1 turn without a taunt is just too risky. This mostly resulted in abomination staying in rank 3 spamming manacles for combo tokens which is a mildly inefficient use of the slot and in a Grand Slam, there is little space for dead weight. Summary and Infographics If you have seen my other guide, most of this stuff is pretty similar, especially anything regarding Duelist and Plague Doctor as they are largely unchanged in their role and moveset. Since I recorded my entire Grand Slam, I am planning to make a Youtube video to compliment this guide with video footage showing major fights as well as just general Grand Slam / DD2 tips. SkillsSkills to Equip
技能升级优先级
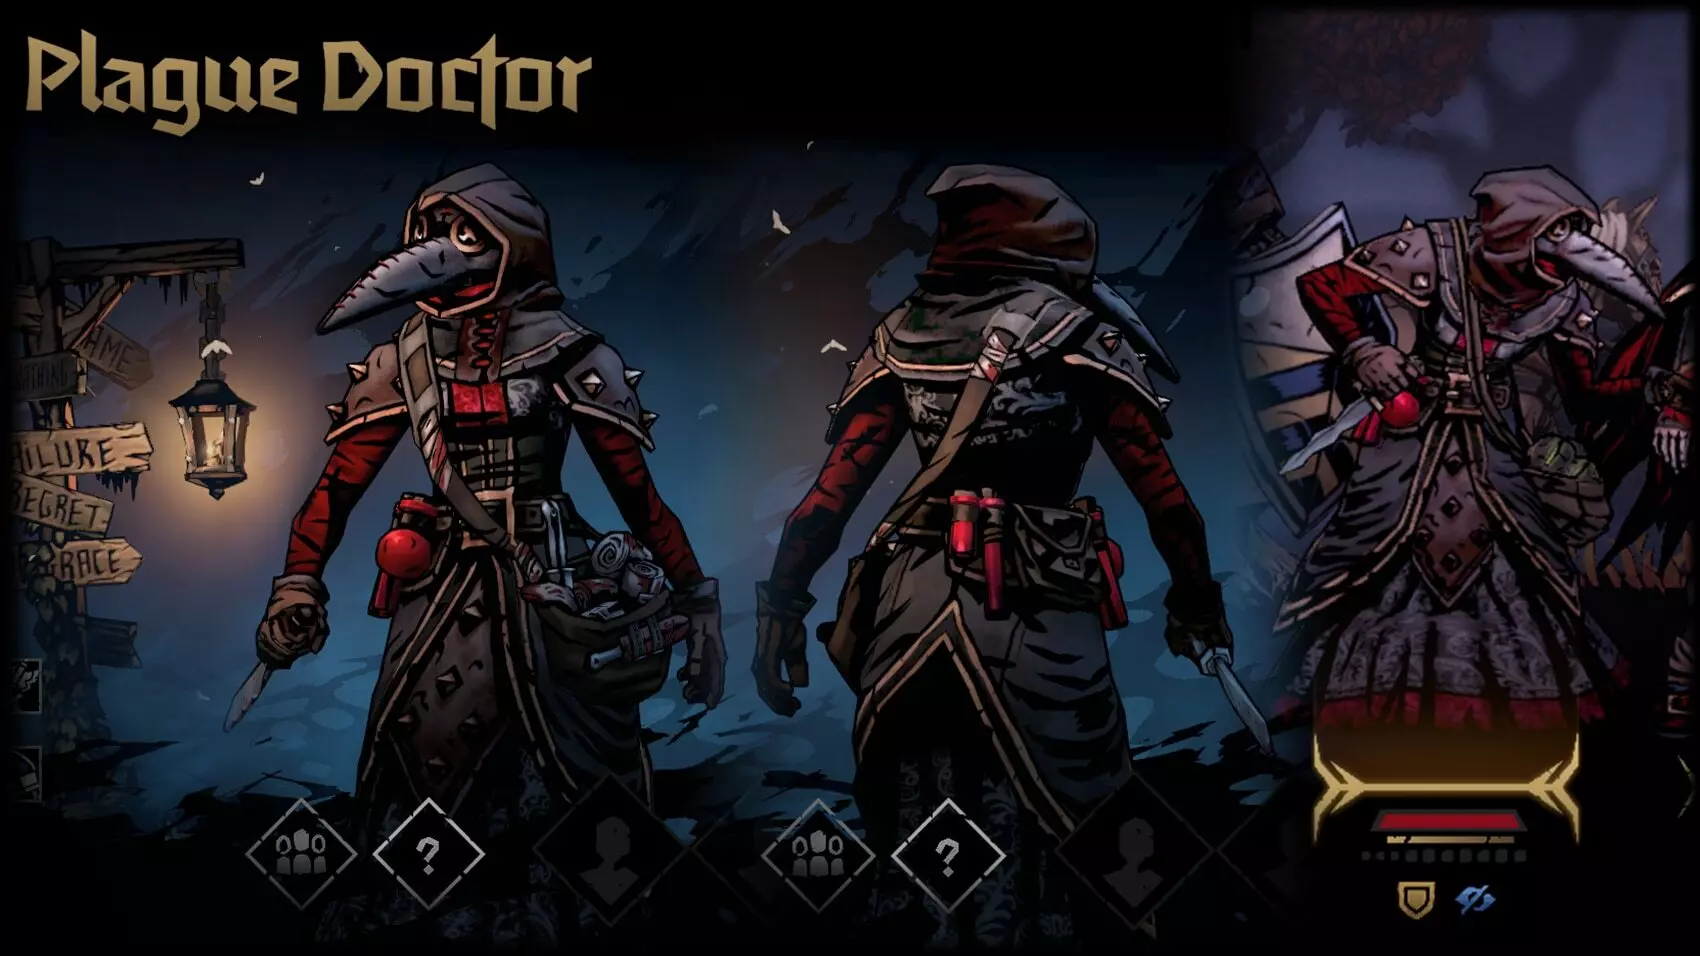
饰品:瘟疫医生
决斗者
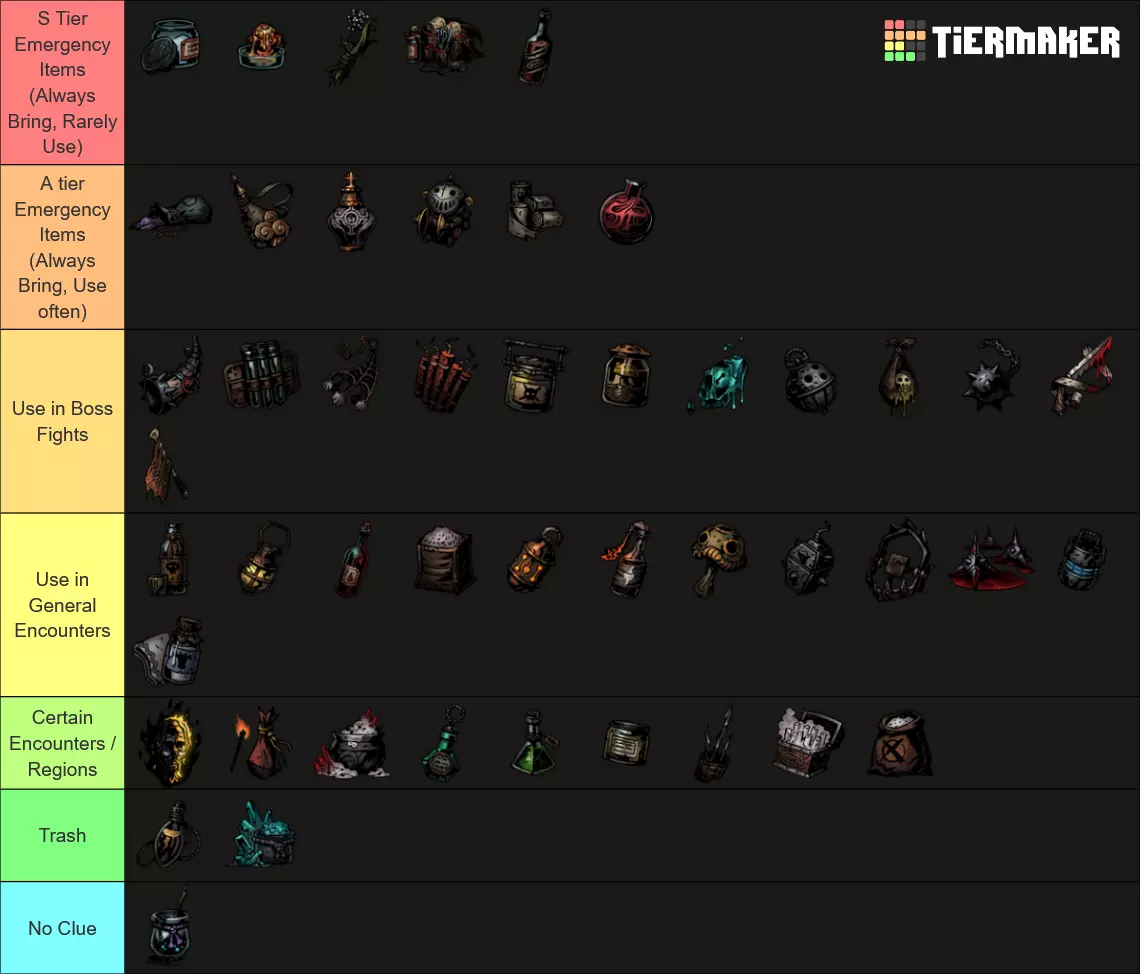
战斗物品
积极特质

忏悔 Boss(按我挑战的顺序)
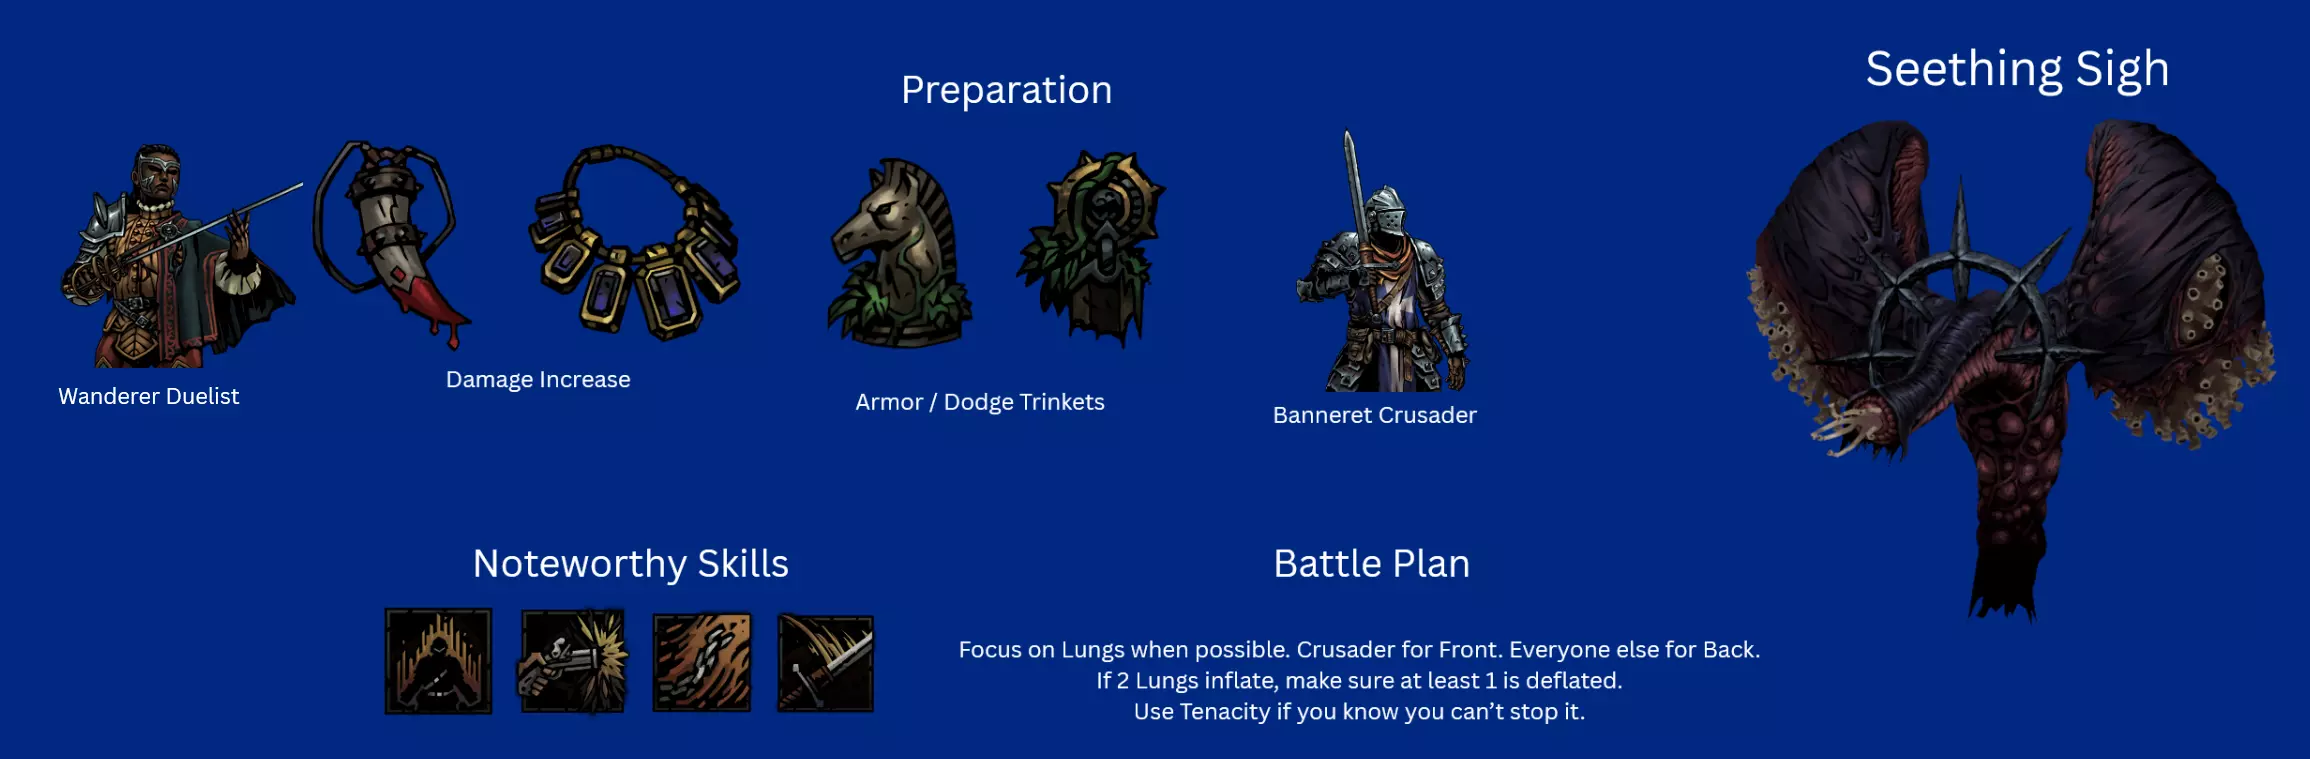
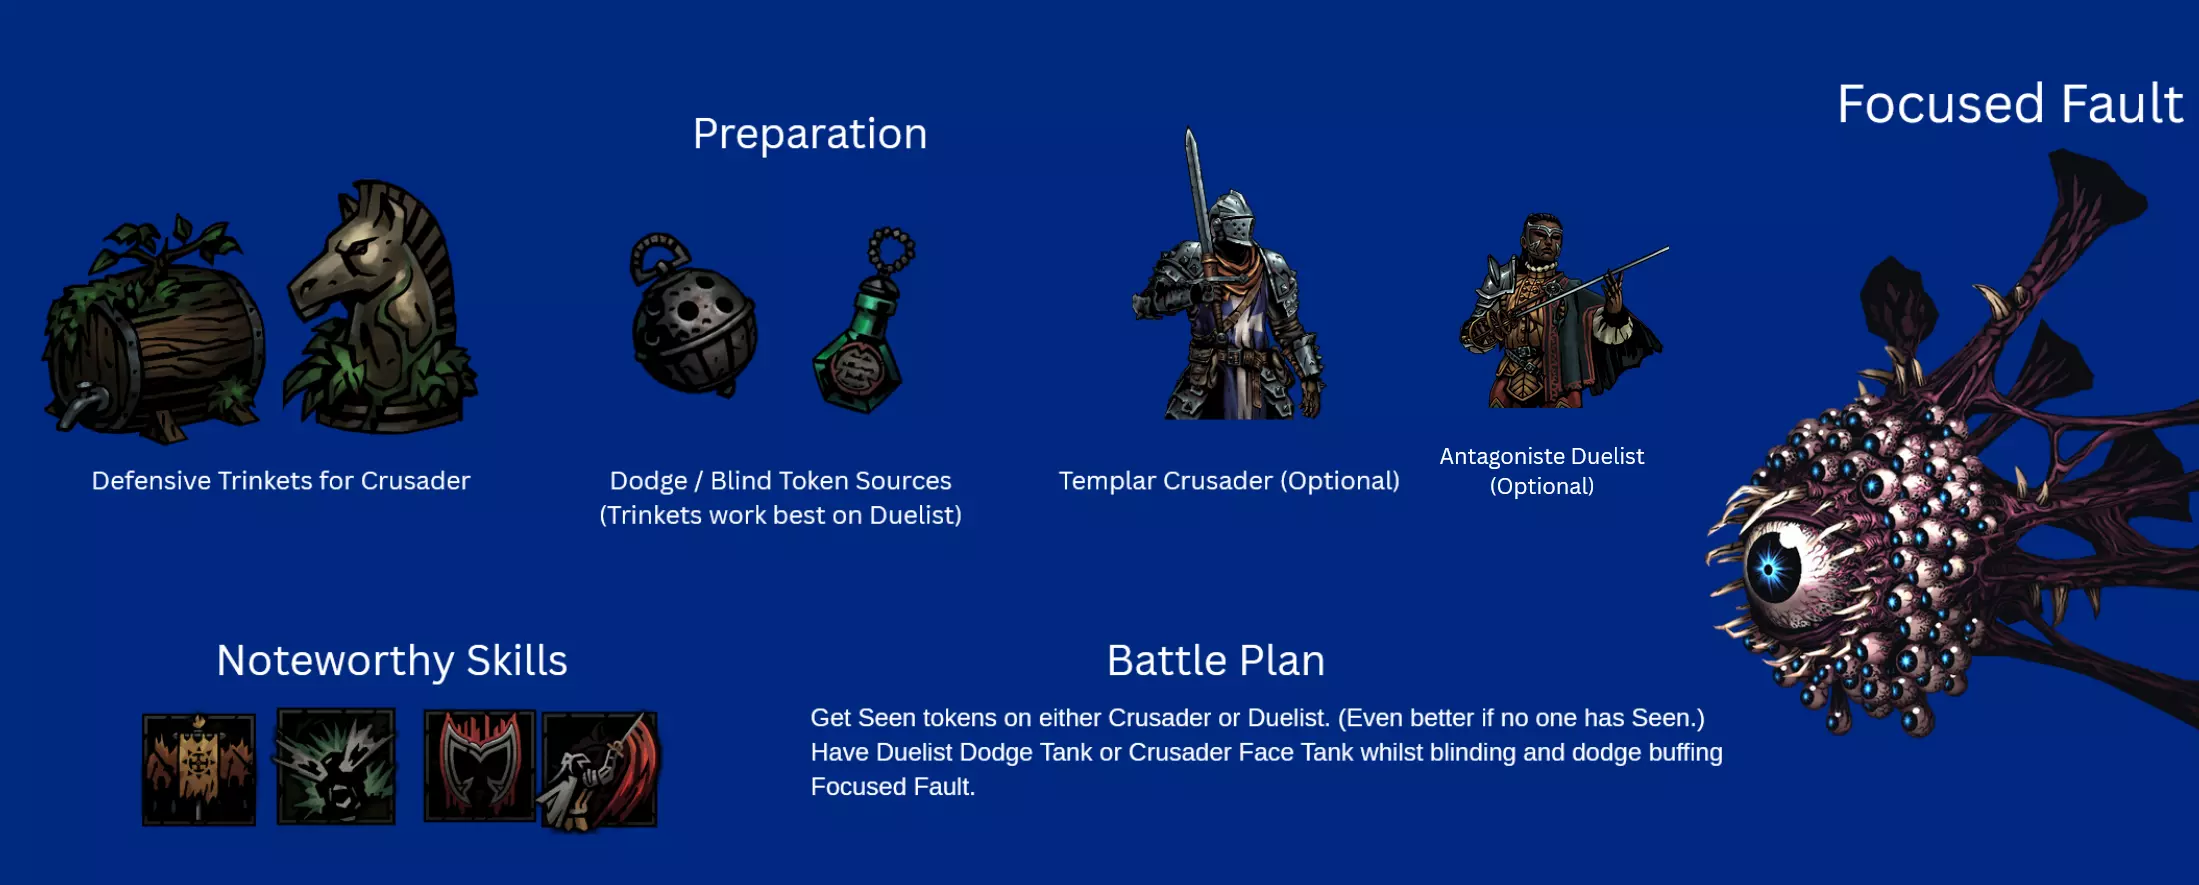
团队 排名1:旗手/圣堂十字军
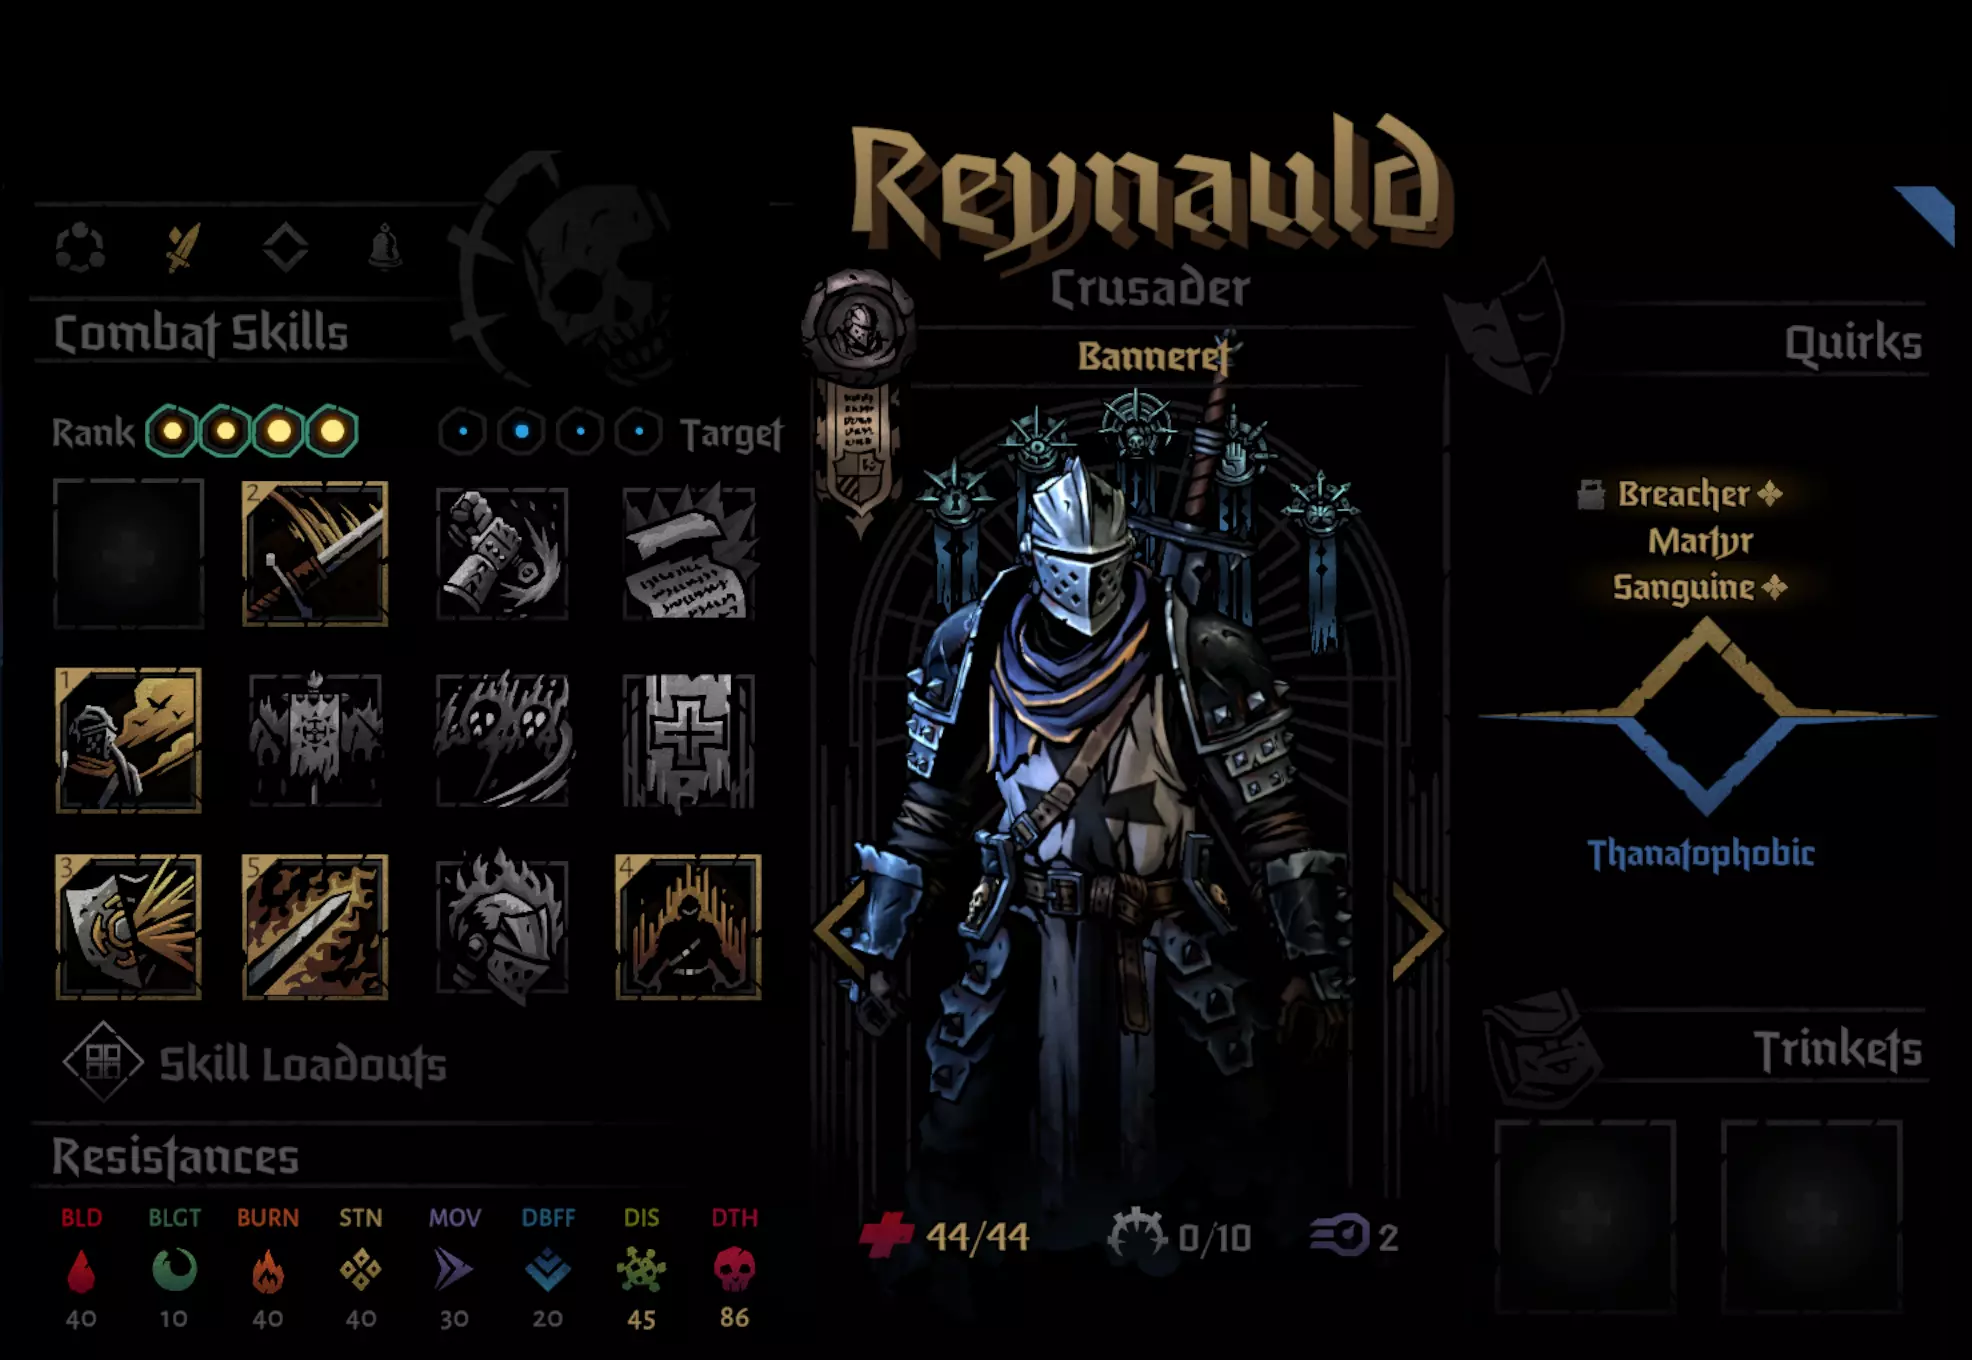
推荐技能(双路线通用):信仰壁垒、鼓舞战吼、战斗治疗 旗手技能:坚韧、重击 圣殿骑士技能:集结战吼、收割 在所有DLC角色中,十字军是灵活性最高的。你期望他承担的职责会改变整个队伍的组成和玩法。在我的另一篇指南中,十字军是远程伤害输出者,而现在他是队伍的专职坦克。信仰壁垒是一个可靠的嘲讽技能,具有2点格挡值和生命值回复,我在大多数战斗的第一回合就会使用它。不过,十字军也能作为次要伤害输出者,装备连击标记的强化重击威力不容小觑。由于他身兼这两个职责,因此可以轻松装备许多其他角色无法使用的各类饰品。治疗、伤害和坦克类饰品的实用性取决于技能组合和游玩风格。我主要使用【战旗手】职业,搭配【信仰壁垒】、【鼓舞战吼】、【重击】、【坚韧】和【神圣 lance】技能,但发现【神圣 lance】很少使用。换成【圣殿骑士】职业可能更好,因其【格挡】技能在对抗特定忏悔Boss时更具优势。等级2:【漫游者】/【敌对决斗者】

推荐技能(双流派通用):致命一击、突刺、调解、脱身 漫游者技能:佯攻 挑衅者技能:触碰 既然没坏何必修?我尝试过一些其他决斗者流派,比如无畏者闪避坦克流,但如果决斗者受到持续伤害效果,无畏者的被动就会失效,所以我又回到了可靠的老流派。这里的决斗者就是用突刺和脱身的循环攻击面前的任何目标。主要区别在于,我在第一到第四幕使用了漫游者而非挑衅者,因为脱身的击退效果能很好地配合憎恶的拉拽,这意味着一个4级连击标记的敌人会直接出现在十字军面前,让其可以使用重击+。此外,漫游者的致命一击对于应对沸腾叹息的第四阶段攻击至关重要。调停升级后也得到了加强,可获得闪避+标记,还能作为最后的嘲讽手段,这在第三章至关重要。 等级3:漫游者憎恶
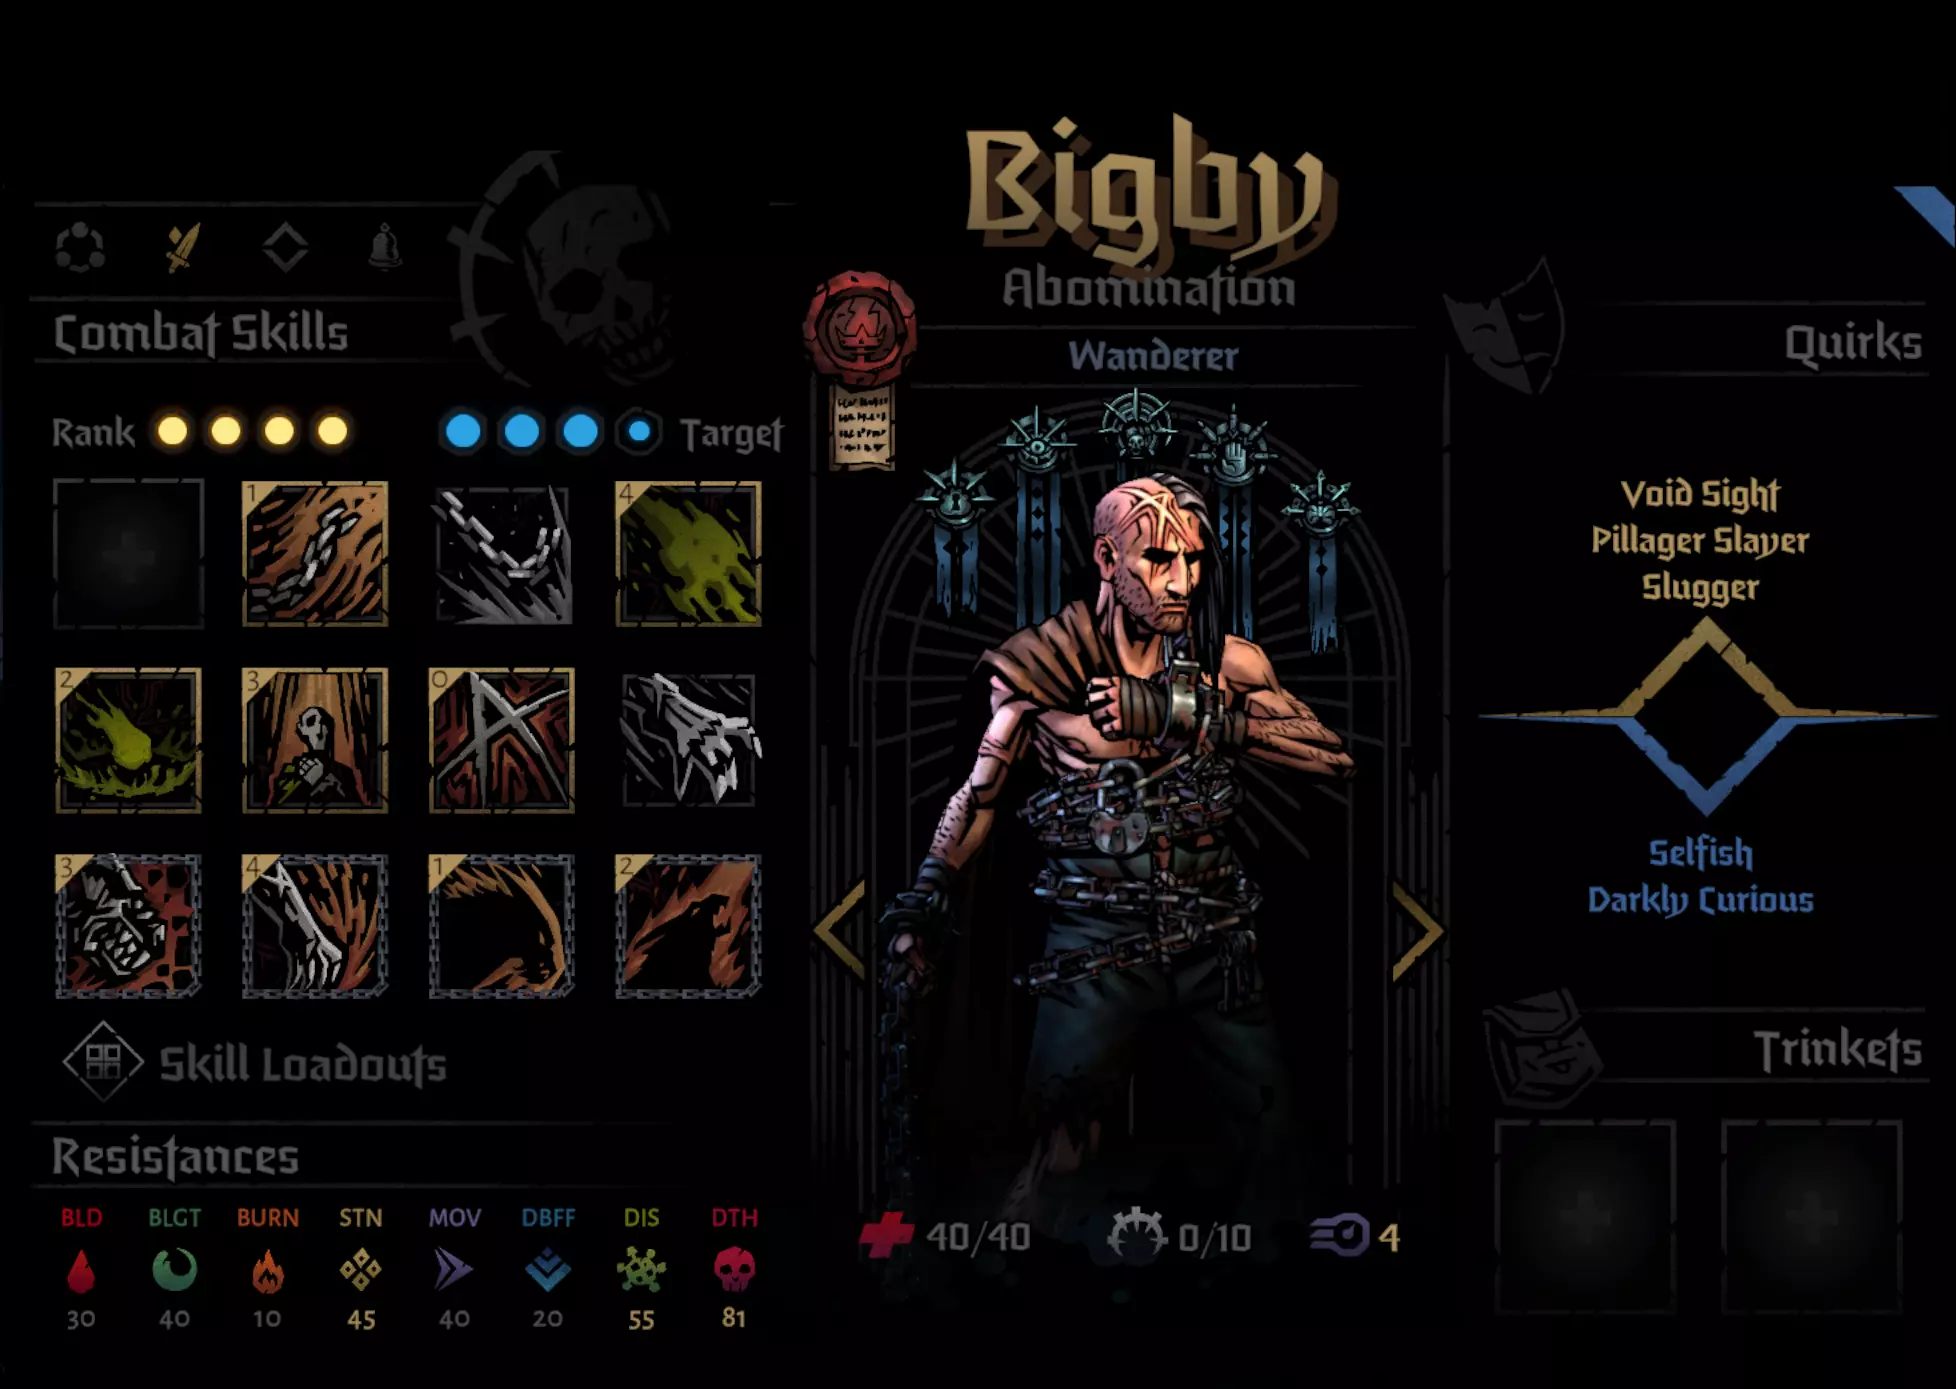
推荐技能(人类形态):镣铐、赦免、兽胆、脓水 推荐技能(野兽形态):猛击、本能、狂怒、重锤 说实话,我不太喜欢憎恶这个角色。我的游戏风格不太适合憎恶那种更不稳定的特性,我喜欢低压力和高友好度的玩法,而如果操作不当,憎恶很容易打断这种节奏。所以我使用憎恶的方式非常保守、安全,而且肯定效率不高。憎恶的主要任务就是使用镣铐。仅此而已。用镣铐打连击,用镣铐扰乱敌方位置,用镣铐移除标记。我偶尔会用兽胆来清除尸体,用脓水对付1号位敌人,必要时使用赦免。 我几乎从不切换到野兽形态。只有在绝对必要的情况下,比如将十字军移出危险区域、进行标记操作,或者需要突然爆发伤害时,我才会变身。我只在使用外科医生、丰收之子、否认之镣铐、贪婪延伸和杰作之躯这些技能时才变身。本能移除反击对于贪婪延伸的第三阶段来说很不错。猛击可以阻止丰收之子到达前排。野兽形态是憎恶者通过杰作之躯击杀往昔幽魂的唯一方式。 我使用憎恶者的主要好处在于几乎不会出错,也不需要投入太多资源。特质和饰品几乎无关紧要,他的技能很少需要升级,而且凭借高基础生命值和赦免技能,他能够保持自身健康和低压力状态。如果你真的想按更接近预期的方式使用憎恶,我曾看到Reddit用户u/Meerdus发布的帖子,其中他们将憎恶当作伪坦克,使用垂死猛击来保护决斗者,因为决斗者是最容易死亡的(而瘟疫医生有自我治疗能力和较高的抗性)。缺乏稳定的嘲讽是我担心的一点,但如果你喜欢这种玩法,再搭配一个频繁使用神圣之枪的十字军,这种选择也是存在的。 位置4:炼金术士(现为漫游者) 瘟疫医生
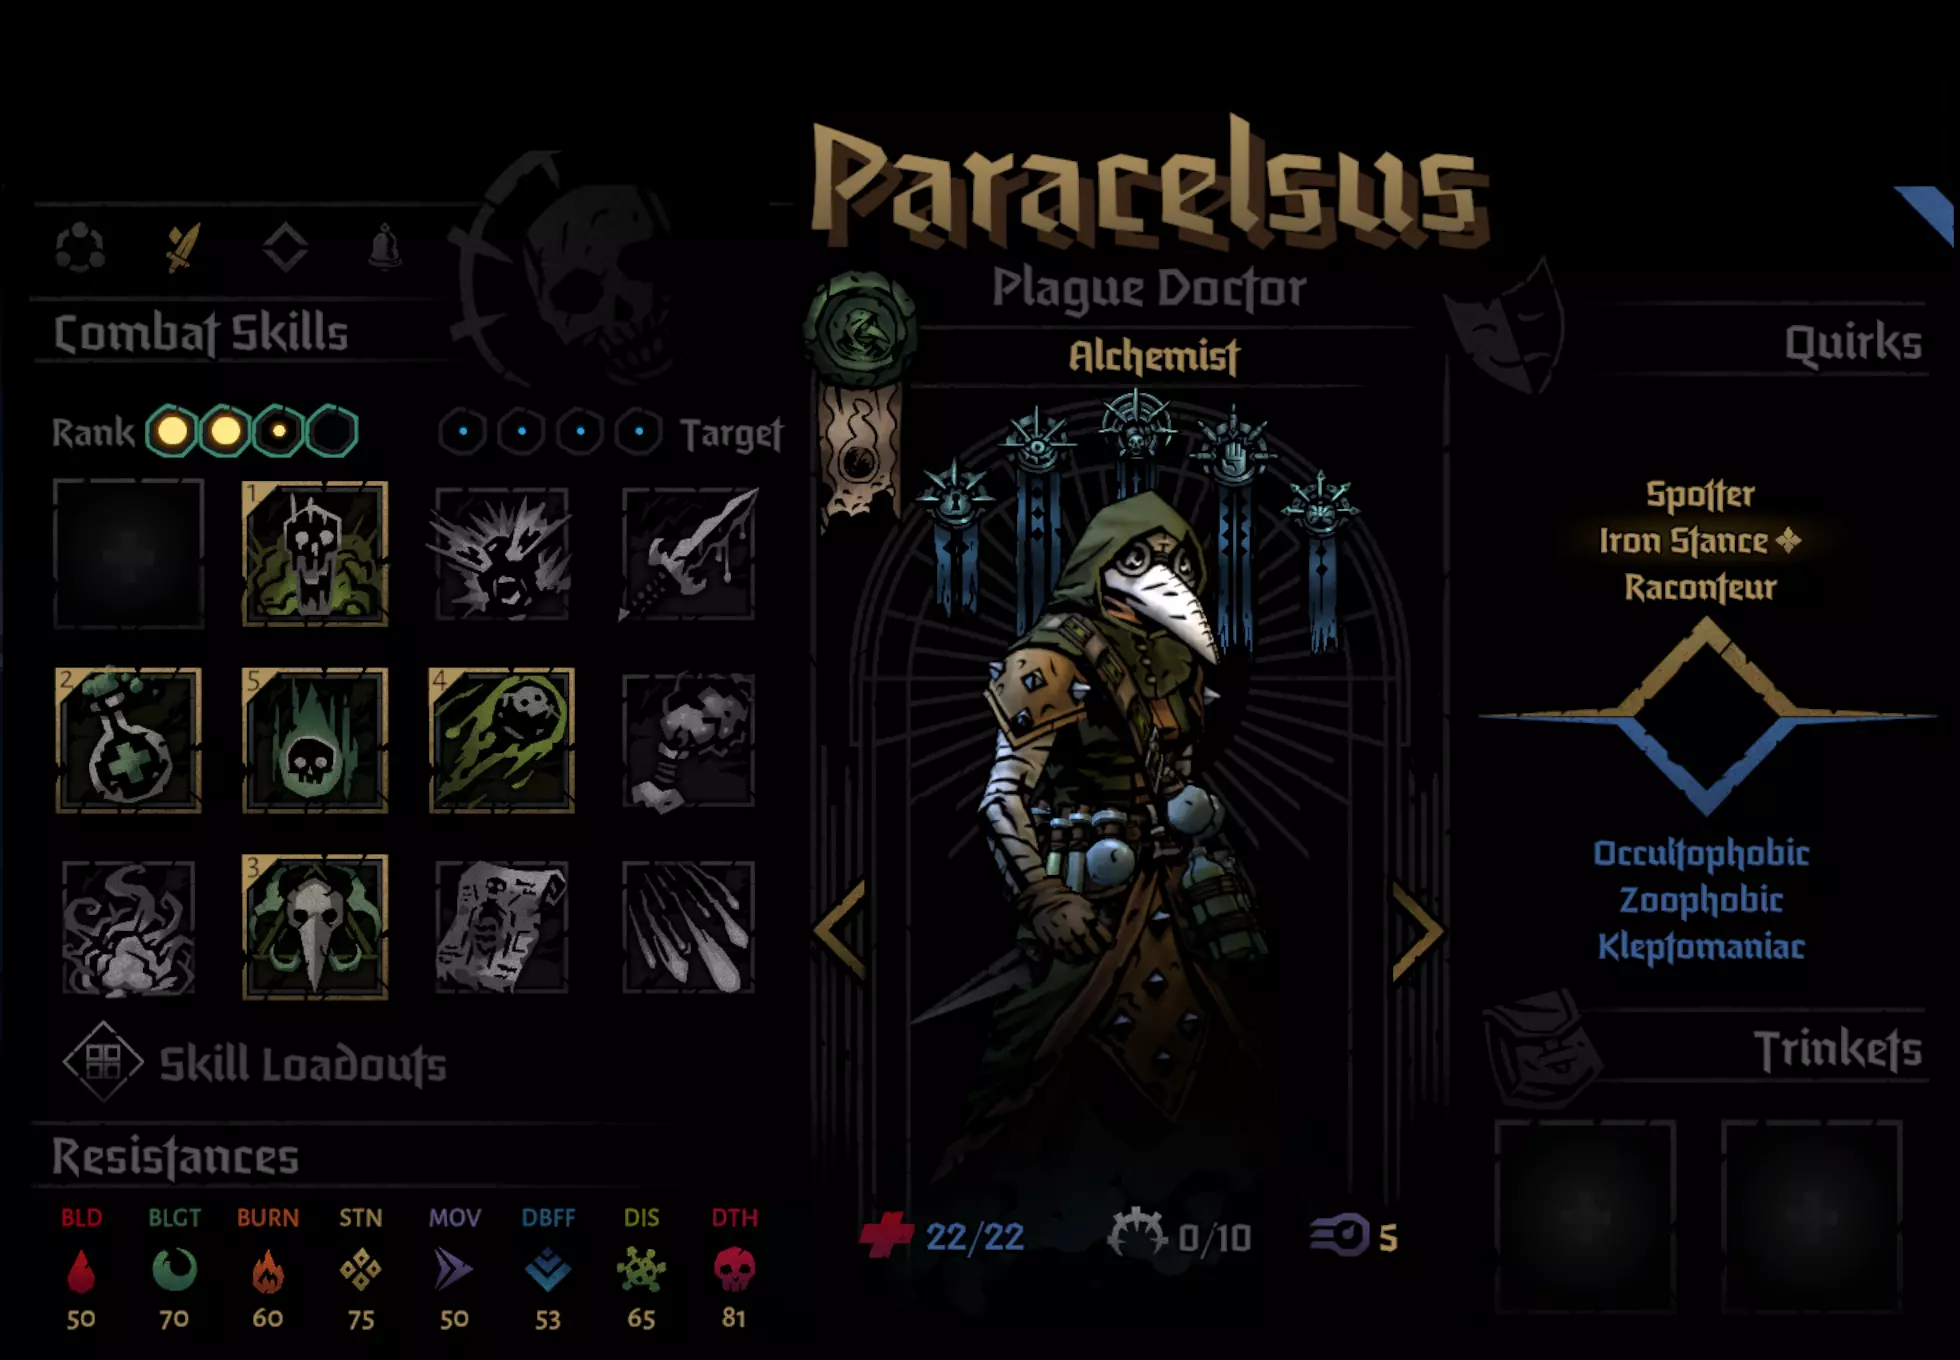
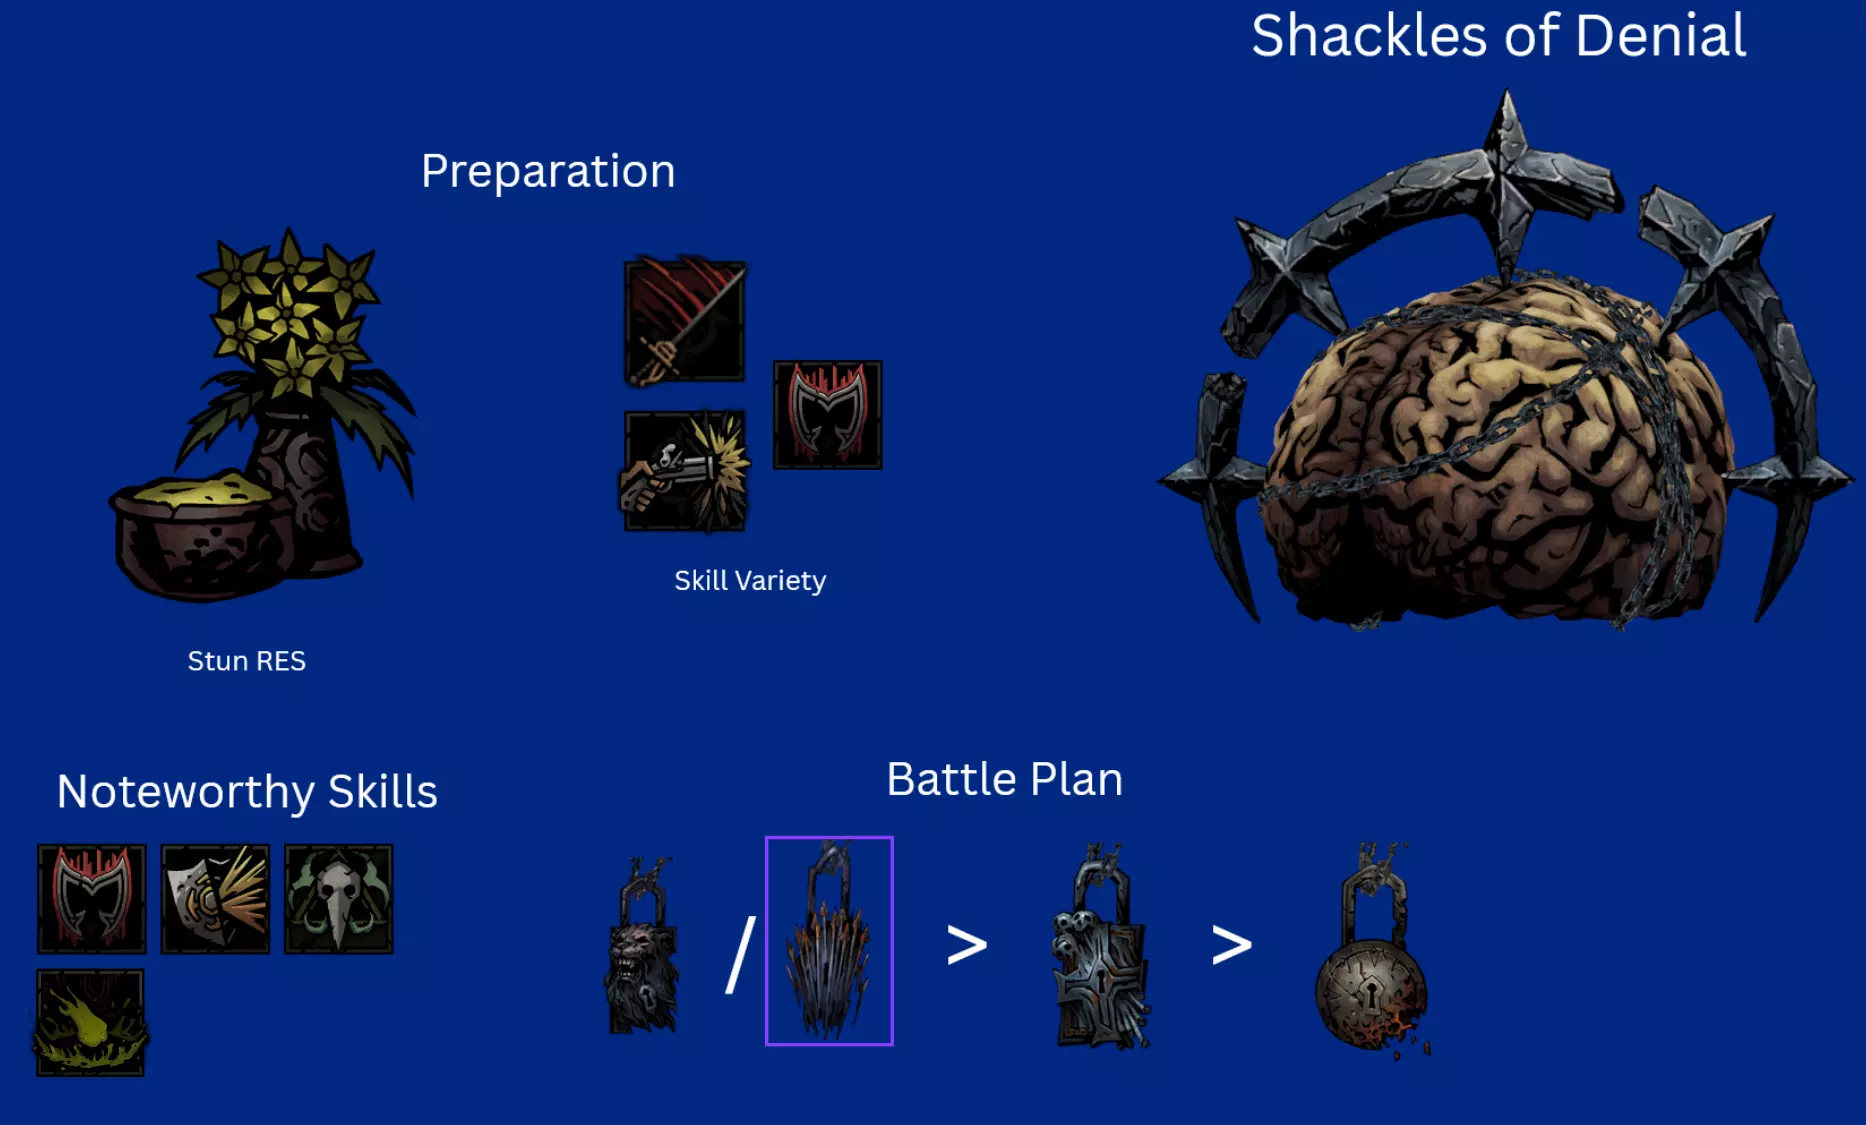
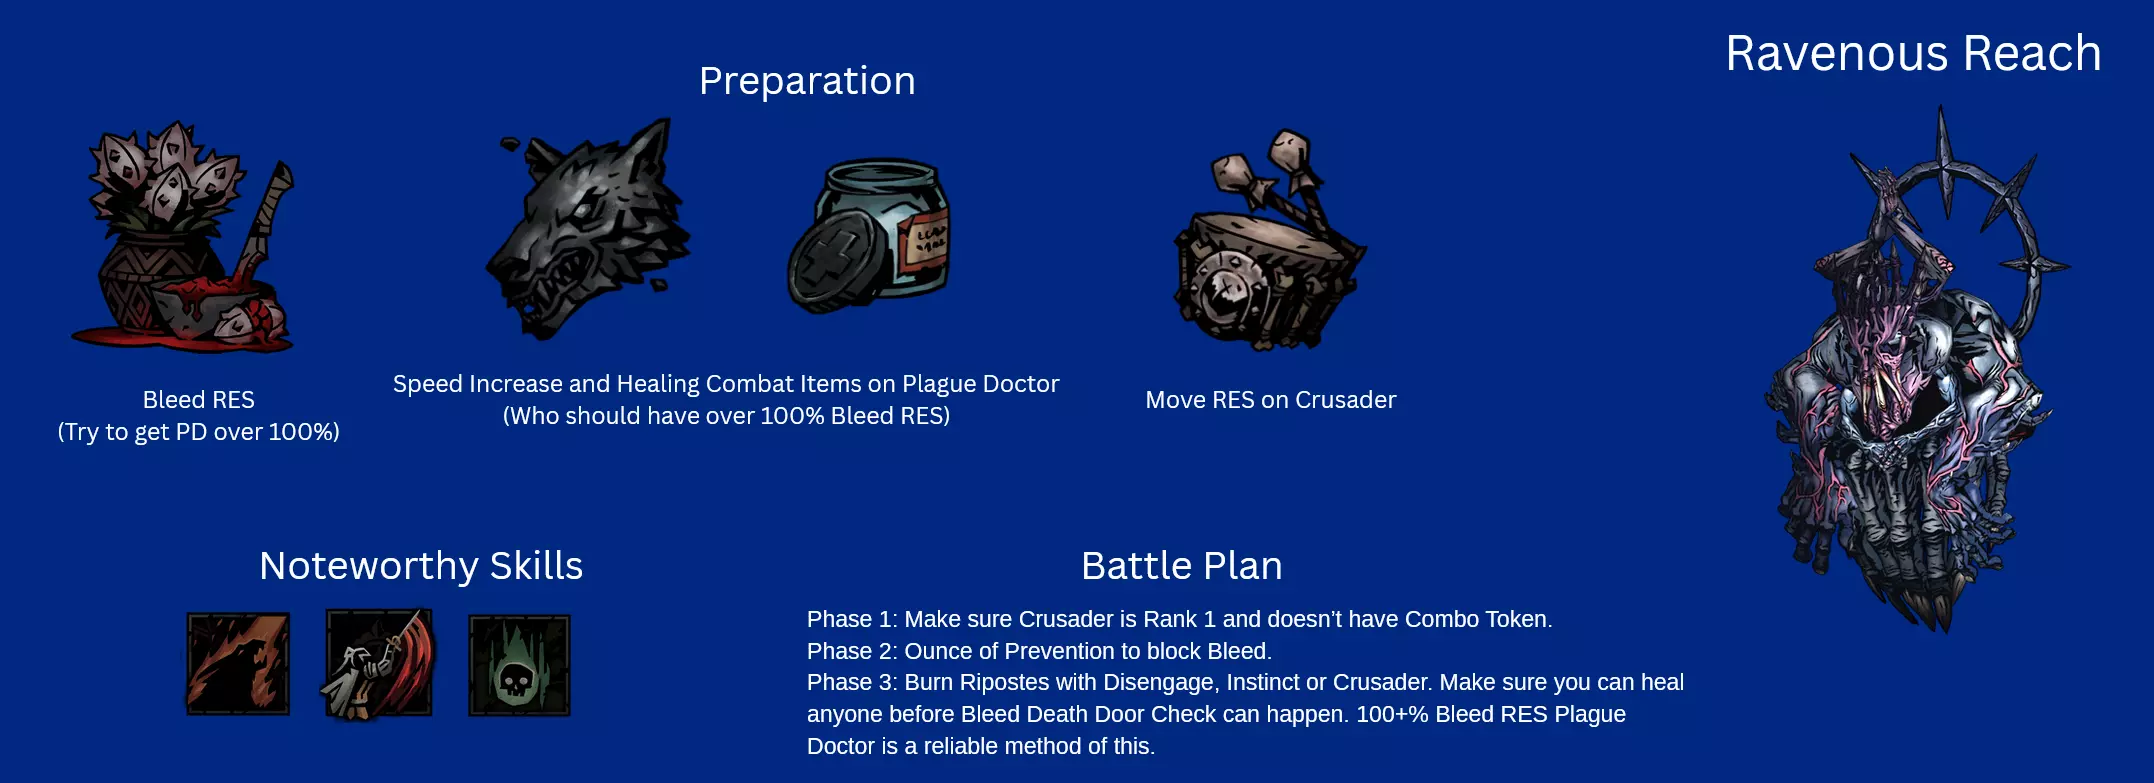
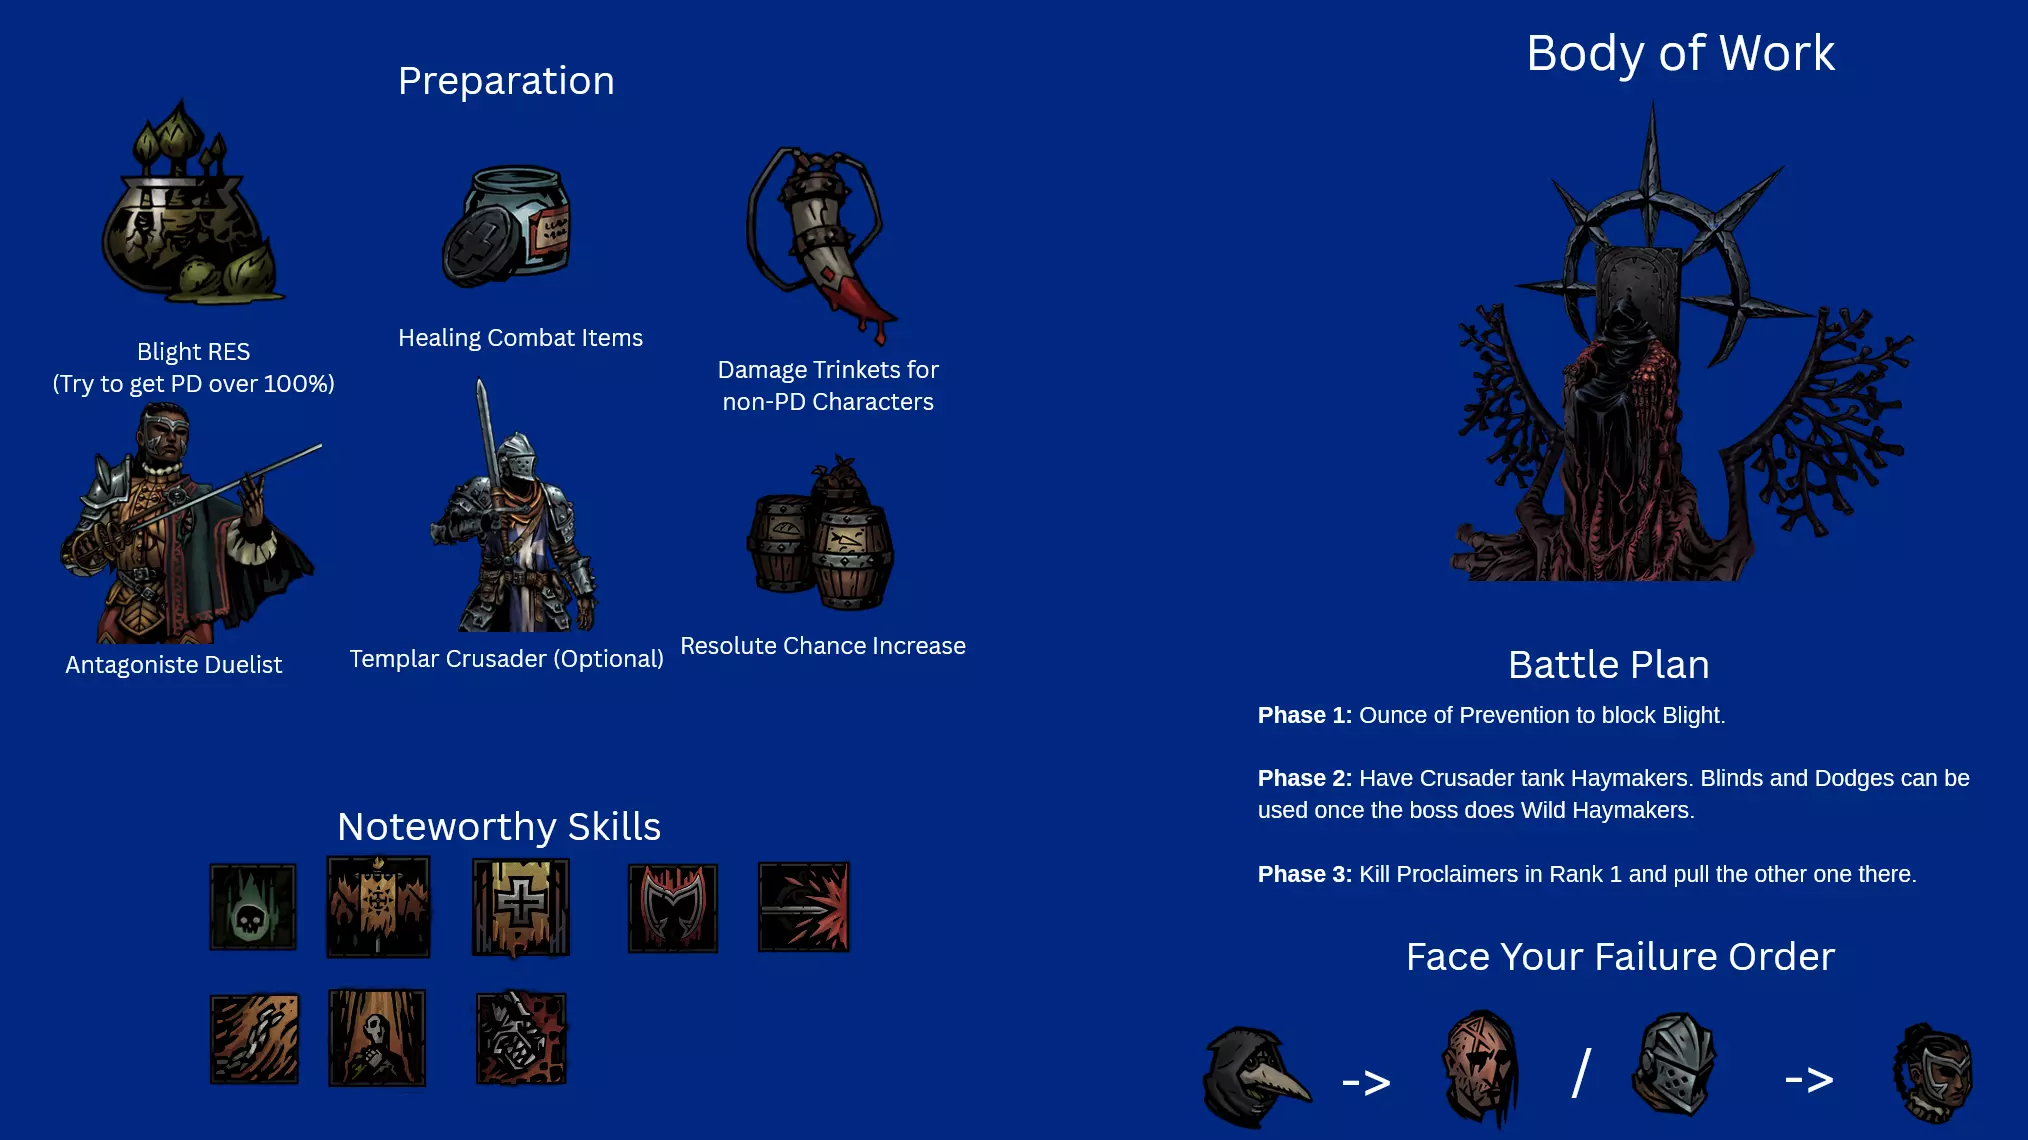
Recommended Skills: Noxious Blast, Plague Grenade, Battlefield Medicine, Indiscriminate Science Viable 5th slot skills: Ounce of Prevention, Magnesium Rain, Blinding Gas Despite the nerf to Plague Grenade, Alchemist PD is still one of the best heroes in the entire game. Innate Blight RES piercing means she does insane damage over time, Indiscriminate science provides insane debuff removal and battlefield medicine provides very strong DoT cleansing as well. If you see my other guide, PD is pretty much identical in every single way. Ounce of Prevention for Foetor, Sprawl, Ravenous Reach and Body of Work. Blinding Gas for Focused Fault. Magnesium Rain for Beast Dens and general encounters. General Pathing When going through regions, my priorities were: Avoid and Reduce Loathing. Loathing Boosted Bosses are end killers and its 100% optimal to End the Run at the Inn to preserve heroes instead of risking it. Plan your route to make sure avoid repair fights. There aren't run killers or anything but can be a slog. Go to Field Hospitals if there you have really bad traits or diseases. Go to assistance encounters for Flame, try to increase Flame if possible. I at most only ever selected -5 Flame options because low Flame gain result in some brutal scenarios (e.g. Quick Volleys in Tangle.) 99% of the time, I chose to fight my encounters has the minus flame + stress was too costly, and I rarely had enough relics to justify choosing that option. Although I would recommend not fighting the Chirurgeon unless you have significantly prepared yourself or are incredibly desperate to remove diseases as the risk is way higher than the rewards. Potential Threats ChirurgeonAvoid fighting the Chirurgeon if possible. I had way too many close calls against him and the rewards are not worth it. You need to bring heaps of Bleed RES as Bone Saw can easily rack up a lot of damage otherwise. Dreaming GeneralThe main thing with this fight is with how situational Duelist and Crusader have Rank 4 access. Giving them combat items that reach there + human Abomination using Manacles and PD will provide enough cover to last long enough before the vines strangle you out. Harvest ChildMake sure that Harvest Child doesn't get to Front as then it'll use Maws of Life which hurts. Debuff RES and Bleed RES is recommended. Careful planning around preventing Feed the Hunger can be done and is very rewarding. For example, you could have your Speed boosted Abomination move to Rank 2 with Slam before the Putrid Meat can use its attack so that only the Crusader is at risk of using Feed the Hunger, not the Duelist as well. Shackles of DenialI will not lie, its kind of embarrassing how much I struggled with this boss. It was my 3rd boss in my route, I thought it would be an easy chance to try to roll for +1 blight damage on Plague Doctor because I still didn't have that memory. How wrong I was. My Grand Slam attempt almost ended there. Do not underestimate Shackles of Denial. I would honestly put them 4th in future grand slams (Assuming 4 DLC character Grand Slam is even possible.) Stun Resist on PD is a friend, by aware that Abomination will spend half his turns unable to transform because transform is a stress and healing skill and the other half unable to use half his skills in human and beast form the other half the time. I would recommend getting rid of the Denial of Arms locket first as Crusader, Duelist and Beast Form like Melee and PD can use buffs or heals to pass Denial of Arms turns. Seething SighThis is the first boss I recommend people to go for because its a perfect blend of challenge, warm up and practise to make sure your team is balanced enough to handle a Grand Slam. Due to the nerfs Seething got, it is much easier but still needs to be respected. Wanderer Duelist is needed here for Coup de Grace's damage as Manacles + Plague Grenade might not be enough. Focused FaultThis boss is the closest thing to an anti-Grand Slam enemy because of how it focuses 1 hero incredibly hard, but there are many ways to deal with it. Changing Duelist to Antagoniste is potentially optimal for Phase 2. Phase 1The main thing here is that you want to make sure that PD has little to no Seen tokens by end of this phase. It may also be preferable if Duelist is the one being Seen due to how Phase 2 works. Phase 2With Dodge+ tokens on Mediation+ and either a Dodge+ or 2 blinds on Disengage+, Duelist is the best hero for this boss and can easily dodge tank her way to victory. Blinding Gas is also beneficial here if someone that isn't Duelist is being targeted. Crusader and Abomination have enough self sustain and damage mitigation that they can also be targeted without much worry. Ravenous ReachWith 3 Phases, Ravenous Reach has a lot of tools that can cause massive issues for less prepared teams. Clotting Poultice is a vital inn item in reducing the risk of Bleeds for Phases 2 and 3. You ideally want to make sure your fastest character have over 100% bleed resist and have a healing item equipped. Plague Doctor is perfect for this role. Phase 1Move Resist Trinkets or Inn items are invaluable here as they can easily protect the target of Ideation from harm. The Blocks from Bulwark of Faith do massive lifting here, making sure that Crusader doesn't get to hammered. Coup de Grace and Flick on Duelist can bypass the blocks and PD / Abomination / Duelist Ripostes don't mind doing less damage due to the supportive utility of their skills. Phase 2Upgraded Ounce of Prevention + Clotting Poultice do massive lifting here. Some debuff resist inn items wouldn't hurt either as the debuff does lower your Bleed RES. Dodge tokens can be removed with Flick or Slam+ and can be easily be burned through with Duelist ripostes. Phase 3Last Grasp is an incredibly scary attack, that will put any bleeding heroes to Death's Door very quickly but because it lifts the Bleed, they aren't at a major risk of being hurt before you can heal them. Removing the Riposte with Abomination Instict and Duelist Disengage is also vital to perverse the team's well being. Body of WorkThe final boss of the game of course would pose a massive risk and requires a decent amount of preparation and some luck on certain trinkets and inn items. Templar Crusader might be optimal here with his Guard for when his allies are battling Spectres. Antagoniste Duelist IS optimal here as disengaging as a Wanderer would send the spectre to the back ranks where Duelist can't hit well. Phase 1Impermeable Poultice is a vital inn item to get for your team as resisting the Blight makes this phase significantly easier. Upgraded Ounce of Prevention is also very strong to help push the team over 100% RES. Phase 2During my run, I was able to acquire a Sodden Sweater from the Leviathan which I put on the Crusader, that combined with the Undertow trophy meant that Crusader could easily sit rank 1, not move and survive a very long time. Phase 3The biggest threat I found was the Spectres of the Past and the Shackles of Denial debuff as the Spectres can easily start to ramp up their damage significantly and some characters would have to waste turns getting to the skills they want to use, especially Abomination because transform is blocked by half the debuffs and a lot of his skills both Human and Beast are Ranged. I must admit I got decent luck with Resolve chances from Food Barrels +10% because it may have been possible I could of lost Abomination in that fight without it. Pets For Acts 1 - 4 I ran the Orphan Wolf Cub because I like to focus on positive relations but on Act 5 I saw Pot and Still in the first Inn and decided to give Reanimated Rabbit a try and... Just go Reanimated Rabbit. +1 speed is insane. Whiskey from Pot and Still counts as food I believe so I was stacking up over 6+ HP at the end. Then I got Food Barrels and I might never look back at anything else. That 10% resolute chance was absolutely insane and probably saved my Plague Doctor and Abomination during the final boss. The main downside is that your inventory starts to fill up with useless food as you want to keep at least 10 but it is absolutely worth it if you have good trinkets on your party. For Act 1, I would still go Orphan Wolf Cub because it may be difficult to get enough Stagecoach Items and Food to justify the Rabbit but for the other Acts, Reanimated Rabbit is incredibly strong and you should think about it. Not Covered Stuff These categories I will not cover as I have already mentioned that in my other guide and little to no new information has been gathered. Negative Quirks, Combat Items, anything relating to Plague Doctor and Duelist are the same. Minor Changes Regions Foetor is less risk, less reward as its much easier beating Plague Eater enemies due to multiple secondary sources of damage like Crusader. Harvest Child is much easier due to more access of knockback and pulls. But Abomination doesn't like the trinkets unlike Flagellant. I avoided the Catacombs for the reasons I avoided the Sluice, just an unnecessary added risk.