鬼谷八荒


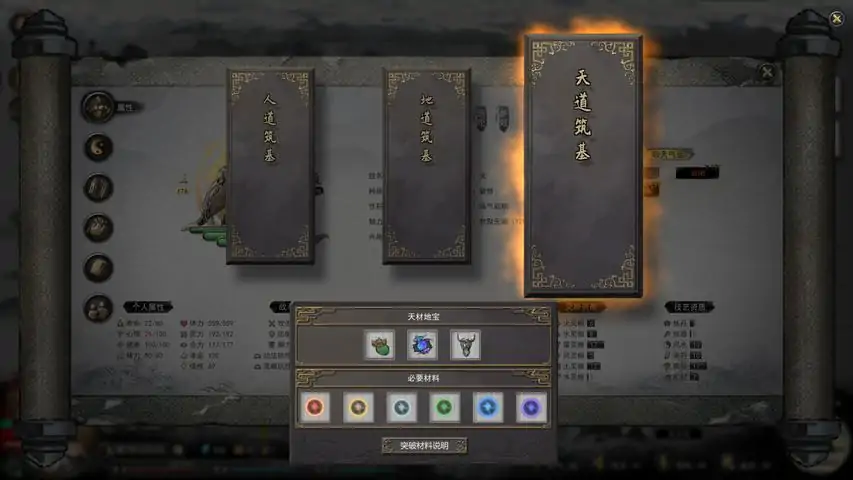

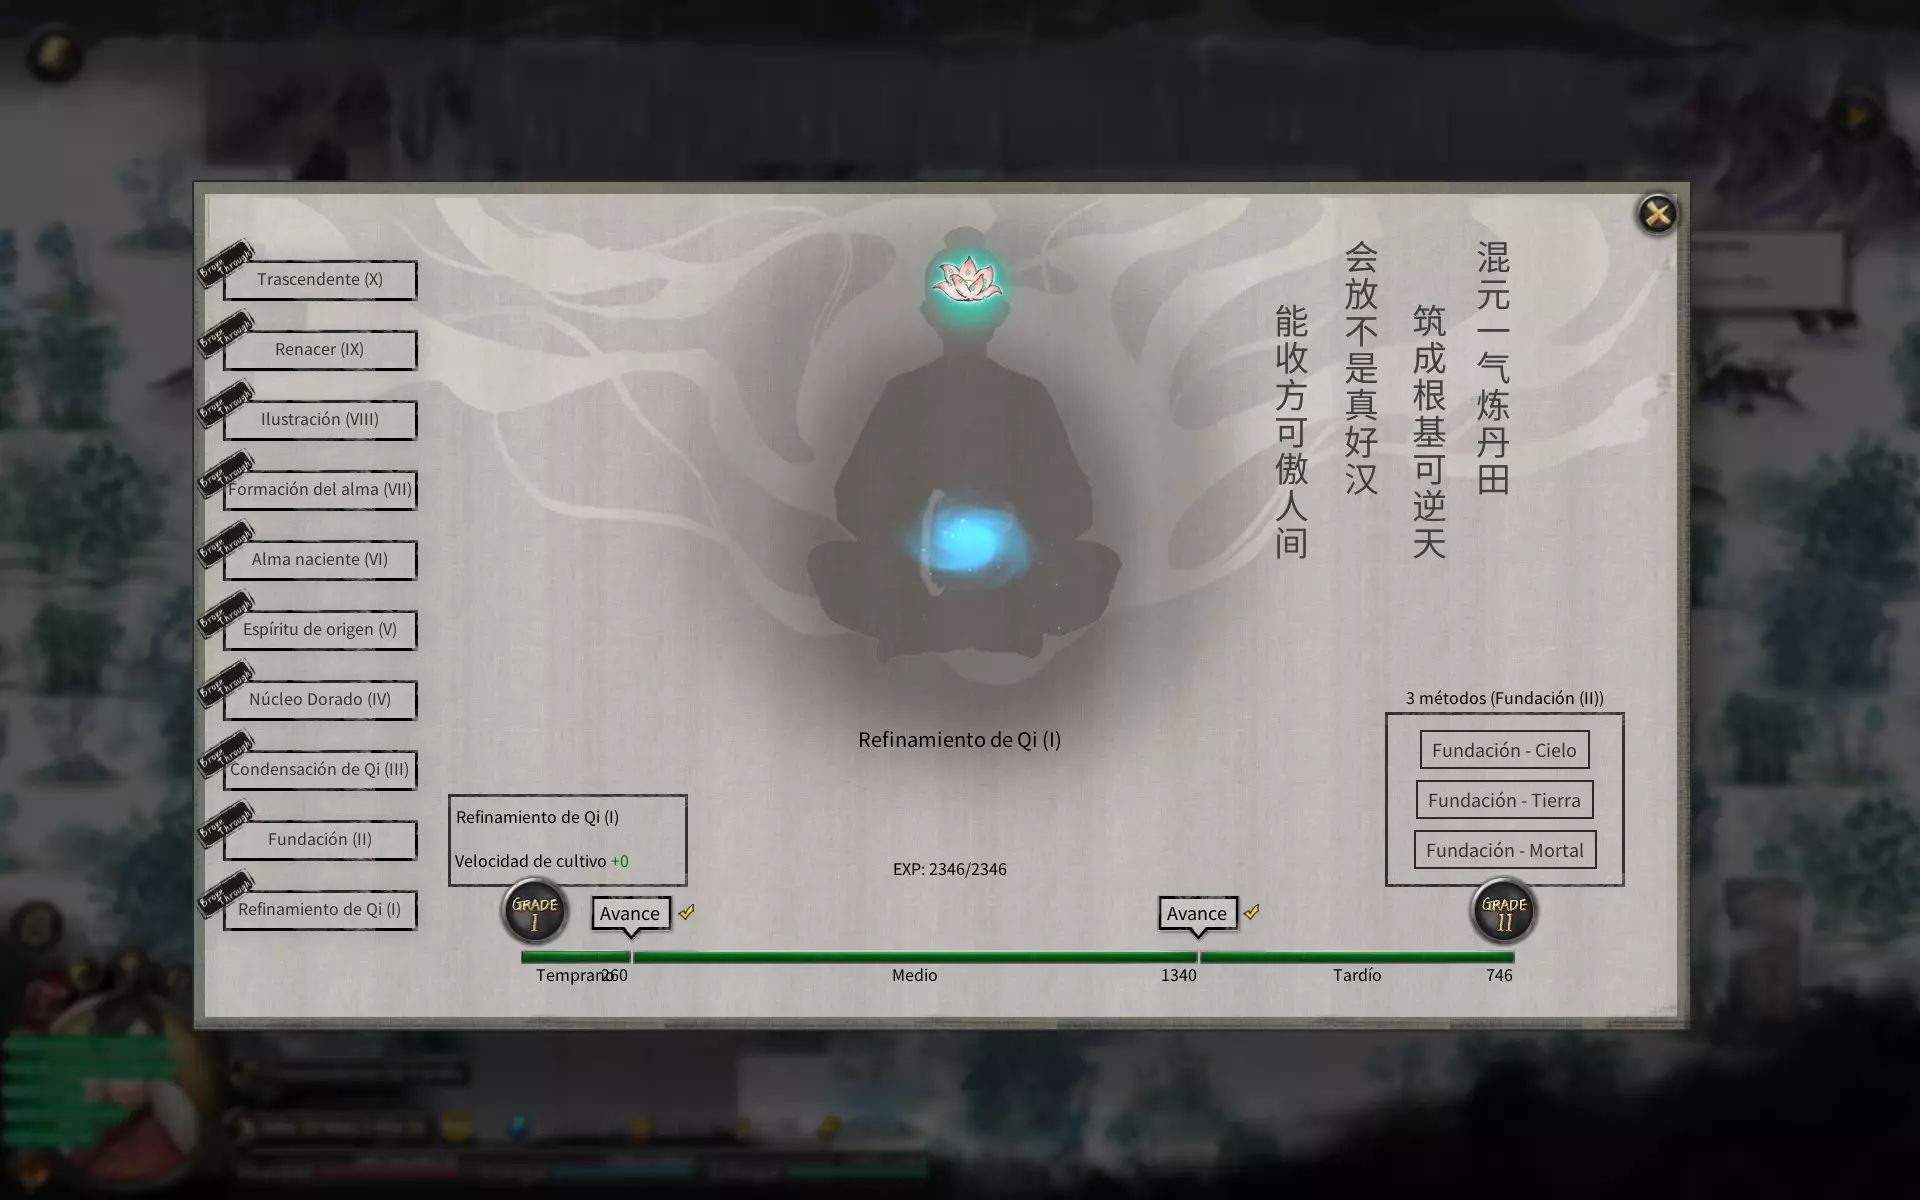

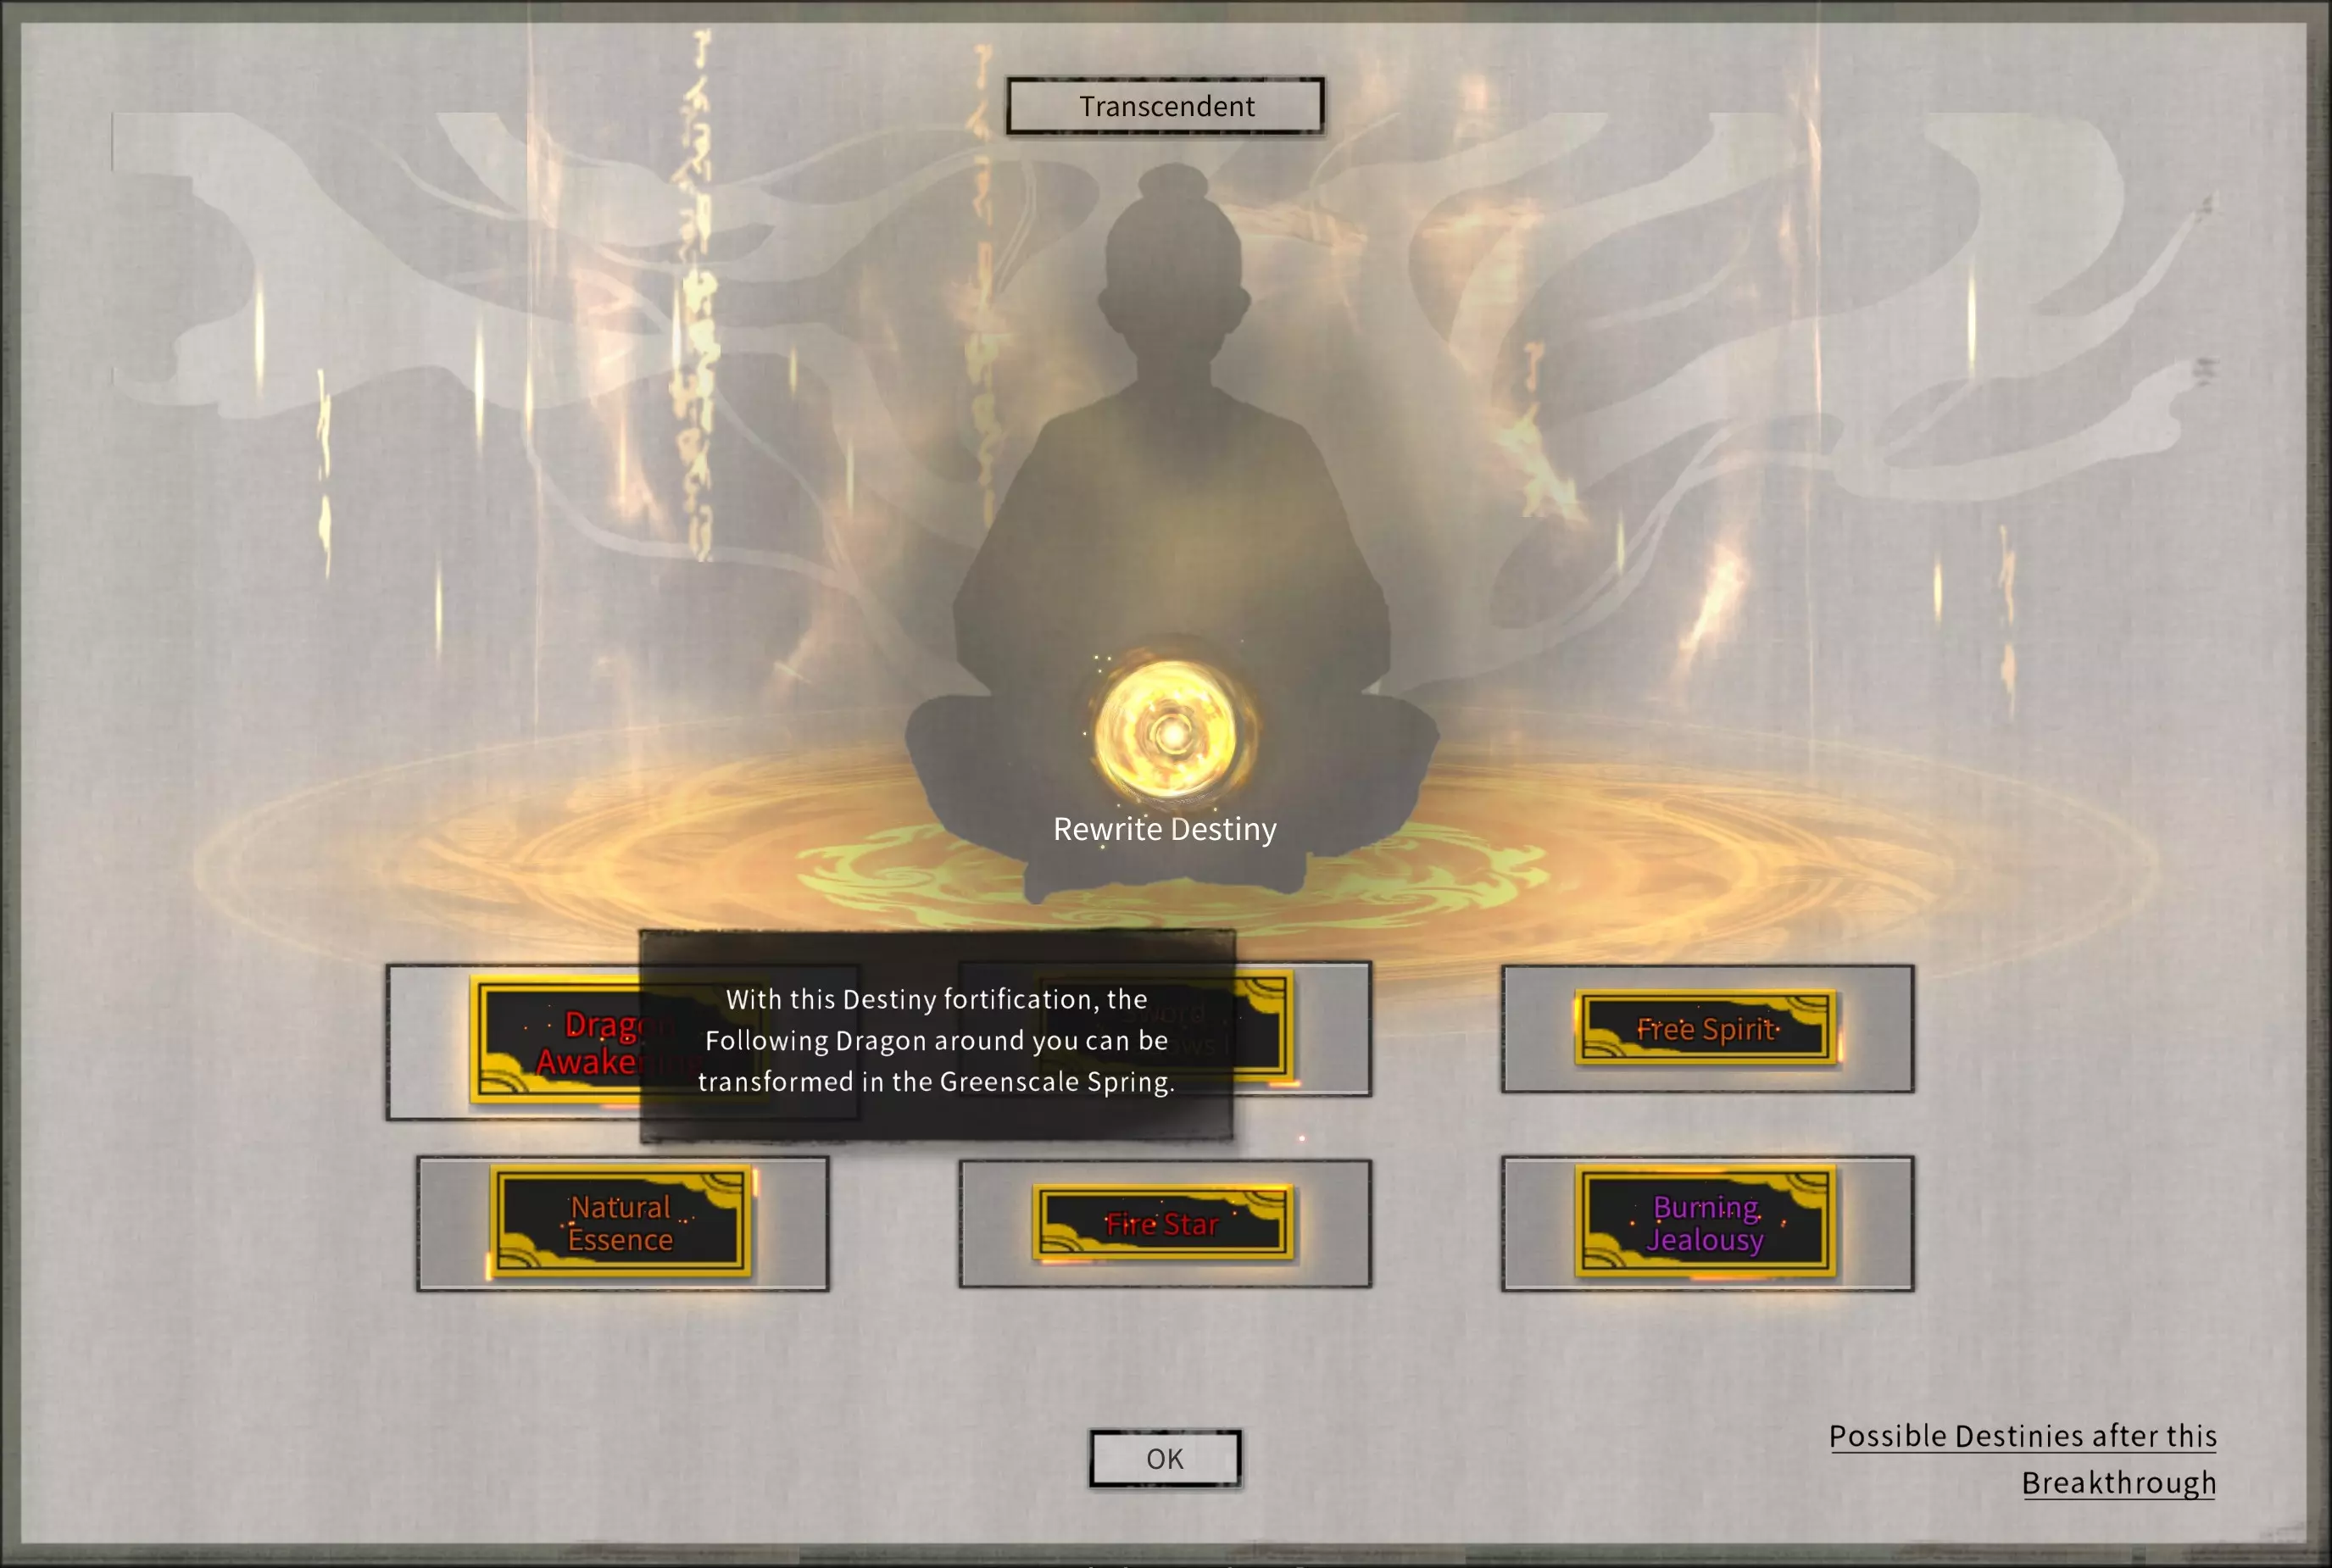

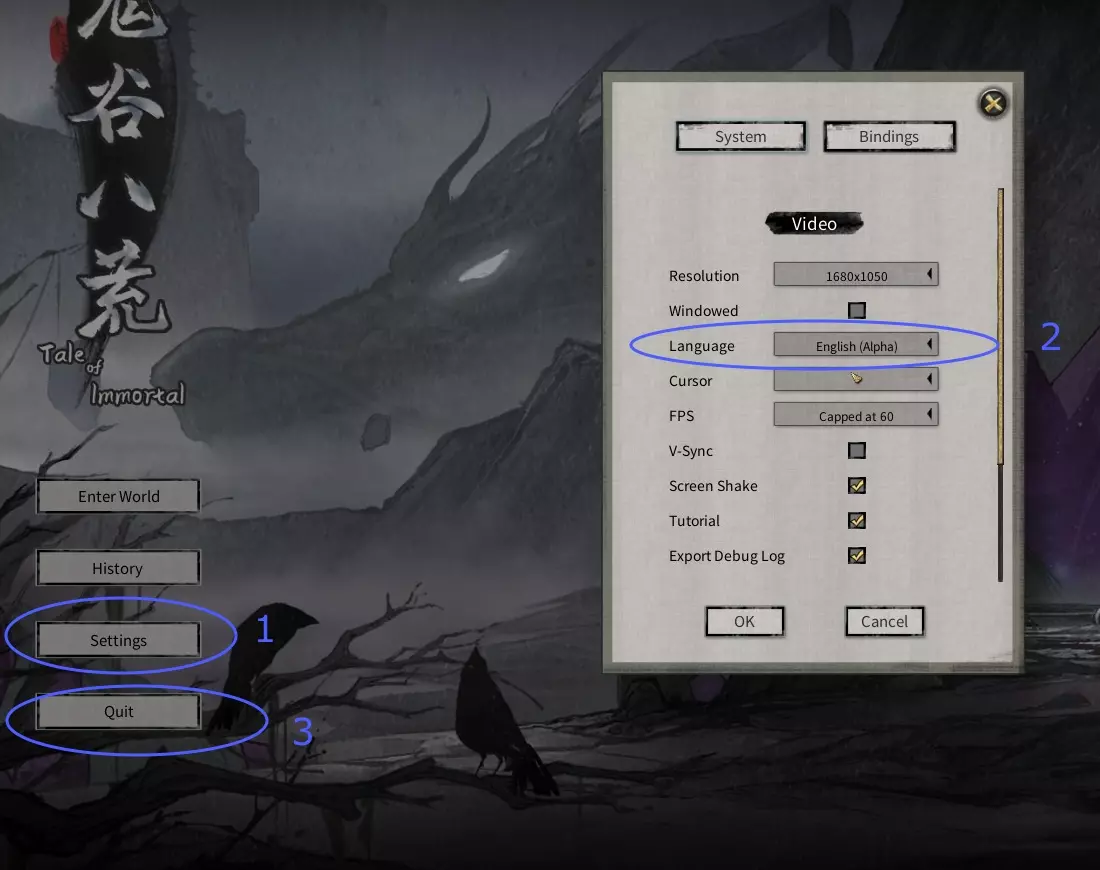

This guide contains an overview of all the ascension stages and most of the systems. It does not introduce you to the basics, but assumes you will instead read the pop-up hints. Does not feature the latest ascension update yet. Intro This is a guide based on me playing through the game a few times. I will not go into detail for the basics, hovering over many items will actually give you a lot of clues with respect to what to do. I also have not fully explored every single spirit's upgrade grid, so I cannot fully judge how good some of them truly are. So you are warned, the game requires heavy grinding due to heavy reliance on RNG for drops. I may occasionally editorialize parts when I feel they are poorly designed, kindly overlook me voicing my frustrations. Savescumming refers to the practice of saving before doing something risky, and quitting to the main menu without saving (manually or the end-of-month save) to try again. You will be doing this a lot most likely. There won't be any screenshots, since to be frank, I'd have to add far too many to cover every aspect in this guide. I will regularly reference the wiki, you can find it here: Wiki link [tale-of-immortal.fandom.com] Furthermore, there is a Chinese trainer by XiaoXing, which alleviates a fair amount of questionable design choices. I cannot offer a link here since it's regularly updated, but you should be able to find it with the name, there are also a few English translations of it available. Alternatively, you may wish to look into Cheat Engine to reduce the mindless grind of certain parts of the game. If you encounter a an error on launch, try to delete "version.dll" if you are not using mods. If you are, you will have to rename the mangled folder names for melonloader/get an updated melonloader. There are a ton of posts in the forum about this. This guide does not feature the content of the sect update in a comprehensive manner, I've just been busy. The update with the final ascension tiers dropped. The translation is half-done and there're reports of progress-stopping bugs in the English version. I'll just wait until that gets solved. Character creation When you create your character's appearance, you may see a red tag applied. This means you picked a clothing choice that boosts your charm. Charm is largely meaningless, so don't worry about this. Out of all your starting stats, only four are truly relevant. You should reroll until you have starting fates with meaningful boosts to them if you want to make things easier for yourself: High Insight will make it easier to learn manuals and more importantly, give you more reroll points for improving traits later. This cannot be increased permanently (except for a breakthrough fate that you shouldn't bother getting), so your starting stat is very important. Aim for at least going over 100, ideally significantly more if you feel like rerolling/using the trainer. Luck is also very helpful. It cannot be increased permanently (also got a breakthrough fate not worth taking) as well and you will encounter a large amount of random events in the game. Less important than Insight, but helpful. Starting Attack/Defense makes the very start easier, but the value quickly becomes meaningless. If you can get a boost, it helps, but it's not critical. It's more important on Chaos mode, where you must manage to overcome the very start of the game. Additionally, Agility is your movement speed in combat. There are only two starting fates that increase this (one for an achievement). The boost is pretty small (20 points) and quickly meaningless, but it does help a bit very early on. You can pass up on boosting this, but it is helpful. All other stats are either not important to boost or any starting fate becomes meaningless almost immediately. Just/Demonic isn't very important, the best quest results tend to come from doing Just things, so you will likely tend to slide to that anyway. Although there's a questline much later where you may be compelled to follow the demonic path even as just character, you will shift by 50 to 100 points for it. If you go for the above-mentioned boosts, a few also have a shift to Just to begin with. Incidentally, almost all starting fates are borderline useless, and the achievements actually add more that you don't need. Getting more achievements makes it harder to get good starting fates. Enjoy the mindnumbing rerolling. There're two artifacts now, here's a quick rundown. The Bagua Jade basically lets you resurrect for free multiple times. It's a failsafe for beginner players, for the first time around. You need to reach a high enough cultivation realm to unlock the other items. According to the patch notes, you can also use it to resurrect allies in the final battles. The Eye of Providence is an item that lets you learn an enemy skill from bosses if you deal enough damage during its phase. In addition, it grants some vision-related bonuses (one more tile range, see more inventory). Contrary to the Jade, it only lets you escape for free once unless you repair it (not possible on Chaos), though you can just quit instead. Most of the skills aren't that good, but a few have uses. Starting tips A loose collection of information you may wish to know ahead of time. NPCs will steal from you like absolute bastards. Sect members will steal from you. Friends will steal from you. Everybody is a thief. It can get patently absurd when five people in a row try to steal the same item. They steal martial manuals, ascension materials and even spirit stones from you. The former include manuals you are studying right now even. If you are being threatened, check the enemy's cultivation realm (early vs. late doesn't matter much). If it's the same as yours, you should win. If higher, due to the increasing ascension bonuses, you will likely not. Reload. If you run during the fight, you still lose the item. You can prevent all of this by storing all your manuals and ascension materials in your cave at the end of the month. If you are studying something and it's not done at the end of the month, teleport back, store it in the cave, and only then trigger the new month. This is tedious, I know, and I rather wish this system didn't exist. Buy teleportation talismans. Always have some handy. Similarly, always upgrade your mounts and equipped ring when you break through. Just go through the first area relatively quickly, items like the books that increase Specializations start at 5 points in the first region, but give 10 in the second. You don't need any specialization in the first, so you can basically grind the points at twice the speed by going to the second region quickly. Later on, the new sects let you buy required pills too, so alchemy may just not be necessary anymore. You can even skip joining a sect on the lower difficulties, though you may wish to do so anyway for a Sect Breakthrough Fate. You can and should savescum breakthrough fates (unless on Chaos), item drops if you're hunting the special metal for artifacts, red books from world bosses, as well as specific breakthrough items. Always save before making pills/artifacts since they can randomly fail. Mood/Health/Energy can give you a debuff if they drop too low, so rest/use hobby items to top them up (for mood, monster drops/buy in town) occasionally. They're pretty superfluous as systems. The first four difficulties only change the amount of grinding required, Chaos difficulty prevents you from rerolling breakthrough fates. You can use the rare mushroom drop from the mushroom man to get a second set of fates though. For whatever reason, a lot of hitboxes in this game are rectangles. You should avoid doing that. In this game it means that some attacks can only be reliably dodged by walking left/right or up/down. You can also attack enemies better from above when they use circular attacks. The tavern boosts are quite powerful, and you can get one for each drink and each region. You should probably get fully drunk before any major boss later on, on higher difficulty levels. Sometimes the world simulation is terrible and you get cultivators with a realm of the next region in your tournament/sect promotion. Usually, you just have to accept the loss and move on. They will eventually move to the next region. As you go through the game, the difference between realms becomes bigger, so overcoming it approaches impossible. Damage is ((TotalAttack - EnemyDefense) / (100 + 10/3*relevantResistance)) * SkillDamage. I'm leaving out modifiers for the appropriate spots for brevity. Martial resistance applies to all attacks under the martial umbrella (armed+unarmed), spiritual is for all the magical stuff. This means that you must have a high enough attack to meaningfully deal damage, that resistance values are much stronger than they appear and that the skill damage value is actually a multiplier. The attack boost pill counts double in its strength in the formula. Due to the above, you should always upgrade all skills after a breakthrough to the new tier. It's really only the movement technique where this matters less. A red skill is roughly comparable to a grey/green skill of the next tier, it's that extreme. Crits compare crit value - crit defense to determine the chance of a crit (it's not that high), and then applies crit damage bonus % - crit defense %. Due to how things scale, defense lags behind and crits become increasingly dangerous as you go through the game. Lategame enemies can crit for 5 times damage, just as warning. Your spirit roots don't just enable you to learn skills, they also give you a chance to greatly reduce damage from an incoming attack, based on how high your roots are. As added incentive, the strongest attack- and defense-boosting traits are based on your total roots (ATK/DEF per x skill). They make a major difference. Your main source of spirit fruits are sects. You basically have to join one as of the sect update. They seem to give around 2-10 fruits for each type they have in their library each restocking. If you look at the values, you may realize that you need a lot. Thankfully you can also trade spirit fruits 2:1 with the behemoth. This at least lets you quickly upgrade your main element. If you become sect leader and take over other sects, you can expand your elements and get a lot more. For the random events, they usually have specific outcomes depending on your choice. Do X, get a spirit fruit, or money, etc. You will probably remember most after a while and after trying a few options. The scholar inquiring about love can give you skill fruits by the way. You will probably see the fortune teller NPC a lot, don't bother. The outcomes aren't worth it. You can also randomly trigger quests like events. This can include quests you are absolutely not ready for yet. It's usually a good idea to put them off if the dialogue lets you, so you can at least reach the Late realm. Making money is most easily done by auctioning ascension materials, as well as red or orange skill books from bosses. More in the town section. Sadly, you will only be informed of zone boss spawns in the area you are in, kinda wish you could always see them. Running depends on your travel speed (mounts boost this) and the enemy count. One enemy makes it easiest, so if you accidentally run into something too powerful, try to run immediately before it summons adds. If you escape with no monsters around, you won't even lose the drops. You can eat pills before a battle starts by clicking the small + symbols next to the bars. You should resolve quests by being kind, helpful and willing to talk before fighting. This usually gets you the best results. Mousewheel zooms the world map camera out. Sadly this setting doesn't stick between restarts. If you want to test something, you can export and import your saves to create duplicate save files. Skill notes The skills are absolutely not balanced all that well. Take this with a grain of salt. Some elements have issues with specific attacks being much stronger than the alternatives. Mix-and-match is an option, but building up special stacks to make the abilities stronger can be outright necessary to reach an acceptable damage output. You should practically always use Wind Movement, irrespective of your main element. Sword is a very good beginner skill (and probably the best overall), since it offers excellent damage and AoE. If you roll a good trait for the single-shot LMB, you can even get piercing on it. Even has a Chaos-suitable build by combining Wind movement for complete invincibility. Blade is lifesteal. Lots of lifesteal. Relatively straightforward to build, suitable for Chaos too. Can utilize breakthrough fates that only make sense for lifesteal builds. Its damage output is pretty lacking, especially early on. You may want to start with Sword first, just for the damage and only later switch. You also want every damage advantage you can get here, so grind those passives. Lastly, you need to build for energy regen since you will be spamming all your skills just to maintain an okay damage output. Spear is generally considered the worst element in the game. Low damage and inaccurate attacks. Fist has a rather fun Boss OHKO build with a specific breakthrough fate, but only up to Nightmare. Otherwise somewhat tanky due to shields, though Fire can be much stronger in that regard. Palm has mediocre damage output and isn't all that good. Some of its attack skills are also flat out terrible compared to others from this element. You must build for status effect stacks to make the RMB skills useful. Since there're three, that means more rolling for books. Many charge skills too, which can cut into DPS if you aren't always getting perfect charges. Finger has decent AoE, and the chain of explosions RMB overlaps a lot. It suffers heavily from not being able to make use of the Combat Expertise breakthrough fate, which greatly cuts into its damage output. Overall not that strong. It can drain enemies of energy through stacks, but that does absolutely nothing outside of a few specific traits and one artifact. Fire can be made really tanky, if you grind out manuals with the correct traits or the lifesteal fate, but it is quite the grind. Perfectly suitable for Chaos even. Flamethrower is pretty fun too. This lets you skip an attack if you time it right, but you could just use Wind Movement to get past an attack while still attacking. Some bosses are completely immune to crowd control. You should build for energy ponds, which is basically necessary to reach an okay damage output. That will consume energy though, so you need some energy regen or it will drain you quickly if you use the beam LMB. Water Beam is pretty fun for crowd clearing. Lightning has a really fun chain lightning LMB that just chews through enemies on lower difficulties, really nice for Fallen Valley. Many of its skills have very high hit counts, but its overall damage output is not high. Wind has the best movement technique in the game, but is otherwise not that good. Damage seems lacking. Earth's summons can be pretty tanky and good at drawing aggro, even from bosses. Suffers on the damage side though. Wood has in my impression worse summons than Earth and not that good damage output either. It gets access to poison debuffs stacks though. Wind is by far the best movement technique. It makes you invulnerable for three seconds (traits can increase this) while you can still attack. It is incredible. Water movement leaves a clone that aggros enemies, this can be useful against specific bosses. The vanishing movements (earth, blade, fire, wood) can be used to break AI attack routines for a short bit, but wind is still better. Generally, AoE skills that leave a red ring area marker (like ultimates) aren't as strong as AoE skills that have no markers like the chain of explosions from one of the Finger RMBs. Since you can overlap them on boss targets, they tend to offer outsized damage. Beams are generally not that strong. Shotgun-type skills can be good, but you almost always need most of the blast to hit one target for that. And standing right in front of a boss is usually not advisable. Rarity is as follows: grey, green, blue, purple, orange, red. For skills, each higher tier of rarity has one more trait than the previous one. Attack skills also get boosts to their base damage. The difference can be up to double the damage from blue to red. This boost is usually very large and a major reason to try to upgrade to red skills. Passive skills similarly receive major base boosts. From blue to red, the difference is about 25% for the base value. Never forget to upgrade your passives if you are able to. They provide absolutely massive boosts to your stats and keeping them upgraded becomes really important around area 3. You need skill points for them, from NPC interactions and Ascension Tournaments in Towns, see info below. You can equip up to 8 different passives. You cannot use two passives that boost the same stat, but sometimes traits can boost stats the skill doesn't. The traits are the other big part of why red skills are king. Having more traits means more boosts, furthermore you can boost traits to the red, highest, level. Some of the traits are even critical for making builds work, good luck getting them to drop on skills you want. Incidentally, around area 4 you will have to grind materials to upgrade skills since doing so through combat becomes prohibitive. Rerolling traits (Comprehend) makes sense until more than half are of the highest tier of the skill. You probably won't have enough reroll points to go much beyond that. You cannot change the nature of a trait, only the strength of the boost. Reroll points depend on your spirit roots and insight, which is why the latter is so important. Unlearning skills to free slots gives you some Comprehension stuff. Item drops from world bosses can be rerolled, but the active skill that gets dropped depends on your highest spirit root (the passive does not). If you go with a single-element build, you absolutely want to make sure that it's also your highest spirit root for a guaranteed source of red books. There are no other guaranteed sources. This is incidentally one of the major issues with upgrading your skills, pray for good RNG. There are a few events that permanently increase some of the spirit roots (elemental ones, sometimes all the martial ones), so you may wish to keep a bit of a gap to counteract this. The other source of red skills is the auction and the ultimate+passive set that the sect has. That's it. Before region 3/4, you can do just fine with purple/orange on Normal though. Potentially outdated info: Sects have +crit +physres and +elemres books, world bosses drop atk, def and vit, the remaining two are only found in auctions. Since Sect stats are supposed to increase the value of manuals, maybe you can push it to red manuals now? Breakthroughs and fates introduction You should basically always go for the optimal breakthrough, with the highest rarity items, since it really doesn't take that much more time usually and the stat boosts add up. Especially on difficulties higher than Normal. You should generally value attack/defense boosts over increases to Vitality etc.. Lower tier breakthroughs give you fewer fates to choose from in addition to lower stats. The purity of the elemental Qi pearls does not matter for the stat boost you get from ascending a realm. You can use 10% or 99% pearls, you get the same stats. They only affect the likelihood of getting a lightning tribulation, which aren't really an issue. Purity only matters for reaching Enlightenment, the purity of the dao souls actually influences your stats. The difference is quite minor though and not really worth caring about much. The minor breakthroughs require a specific pill, just buy it in a town/city. Only cities (the bigger, blue map icon) offer stuff for the second realm tier of a region. Incidentally, there are only appropriate recovery/buff pills for every second breakthrough tier, this means that in the latter tier of a region, you won't really have good pills. Always remember to upgrade your attack skills and your passives after a breakthrough. The later you go, the larger the bonuses for breakthroughs are. Unfortunately this also means that it becomes less and less possible to defeat higher tier NPCs. You can if they're still Early and you have tavern boosts +an artifact with a good spirit, but it may well prove impossible. Honestly, I find that mildly upsetting since surmounting a realm is a core concept of cultivation novel power fantasies, kinda wish the boosting pills were stronger, but harmed you too or something. Every breakthrough has a chance to fail. When that happens you get a lightning tribulation. You can savescum this, or you can endure it with Wind movement + pills. It doesn't even scale up in the later tiers so it actually becomes less threatening over time. Fates are a difficult topic since some are build-dependent, but the gist is that most are bad. Expect rerolling. Many come in tiers with later ones offering better boosts. When you pick a tier I skill, you are much more likely to see the later tiers. You can look towards the bottom of the guide for an overview. Generally speaking, only combat-relevant fates are useful. If you ever can't find something, you should continue exploring the region you are in. All important areas are marked on your world map once you've found them. You can also buy special talismans from stores that allow you to find nearby special zones. The sect update added specific breakthrough fates for sect. They appear in the menu if you break through in the cultivation room of your sect. A few of these seem entirely too powerful. NPCs have special breakthrough fates related to the Wayborn path. It does not seem like you can get them currently. On Chaos, you can't reroll your breakthrough fates, but you can get a different set if you use the Strange Mushroom. It does not work like that for sect breakthrough fates. It only replaces one of the 6 choices you would have normally if you didn't use the mushroom. That said, some sect fates are so insanely good, they're worth taking if your alternatives are bad. Qi Refining (I) This is the first introductory segment after the tutorial. You should know how the basics work. You need pills from stores for minor breakthroughs, and items for the breakthrough to Foundation (II). As a general rule, always pick the highest ascension route. The bonus stats make the new cultivation realm easier. You cannot use an ascension item more than once, even if you have duplicates. To go to Foundation you need 3 special items (for the Heaven Path). The stronger ones come from the "Land of Spirits". These are special places that cost 500 Spirit Stones to enter. After you pay, you enter a dungeon and the boss at the end is guaranteed to drop a specific item of the three. In short, you need to find and visit all three Lands of Spirits. Do not confuse these with the Lands of the Arcane. Those places cost 1000 stones and will murder you right now. The second part are the Qi Pearls. In the region, you can find 6 separate elemental zones. Occasionally a zone boss will spawn and you will be notified. If you hurry over (you get about 3-6 months), you can kill them and get a guaranteed Qi Pearl of high purity of the associated element. The bosses will also drop a purple ascension material and possibly artifact rare metals. Do not throw the last one away. For this region and all others where it matters, you can buy talismans that highlight nearby elemental zones if you have trouble finding them. If you have no luck with spawns, you can manually make Qi Pearls. If you fight monsters in the appropriate elemental zone (don't confuse wind and lightning by the way), you will get Qi Pearl fragments of an element. In towns you can synthesize 100 of these into Qi Pearls, usually of lower purity. Purity of Qi Pearls doesn't matter, it only affects your chance of getting a lightning tribulation, which is not an issue if you got some healing pills in your slots. Remember to pick a good fate and upgrade your skills to Foundation (II) tier. Unused ascension materials make for good gifts, or can be auctioned. You should try to get through this step relatively quickly, since the specialization books in region 2 are worth 10 points. There's little point in trying to grind for Alchemy and so on in region 1. Foundation (II) Foundation is quite similar to the first realm. You should have noticed that you got a lot more stats and are fairly more powerful. Get skills for the new tier, the difference will be noticable. You can only do that in the primary city now. While you're there, upgrade your ring and your mount. Incidentally, there are no healing pills for the Foundation level and the Qi pills aren't very strong anymore. This will happen in every region for the second cultivation tier and is quite bothersome. You need 4 treasures for the final step. One drops from the left world boss in the Lei Ze area, to the lower right. You are automatically attacked in it, so be ready with pills and a teleportation talisman. Three more can come from the Lands of the Arcane, the ones that cost 1000 stones mentioned in the previous section. It's the same as before, dungeon, boss, guaranteed specific drop. The lesser treasures are random drops from the lesser bosses (no red skull map marker) in the Lei Ze area. You also need a breakthrough pill with herbs from the Lei Ze region. You can have the workshop of the city craft them for you, buy it from your sect or craft them yourself via Alchemy. The latter however is a waste of time, grinding Alchemy up is better done later. Just prepare for a potential tribulation if you fail the roll. Once you've broken through, you need to go through the lower right to the next area. Once a month ends in the new region, you will be basically kicked out of your sect and free to continue in the branch of the new region or choose a new one. If you became sect leader of the single non-branch sect in region 1, you will have to transfer it. Qi Condensation (III) You should now shift to the bottom right region, past Lei Ze. As always, get new skills, equipment and so on. There're some new things in this region. You can take part in the Ascension Tournament once you reach the fourth tier, and you can get started on forging artifacts if you want to go through that grind. The books for Specialization skills are now worth 10 points and you may as well get started on that grind once you are Late Qi Condensation or Golden Core. Avoid going to the upper right of the ocean, you will trigger a bossfight you have no hope of surviving. A questline will resolve this later. You can decide what sect you want to join here. If you pick a non-branch sect, you can actually become sect leader in them and start sect wars and more. In return they will be more limited with fewer elements for skill books and fewer spirit fruits until you change that as leader. You can even create branch sects yourself in later regions. To progress, you need to find the four Spiritlock Circles, they tend to be in the lower right. When you enter, a turtle will demand G4 Spirit Fruits from this region from you, 3 for each circle. You will then have to survive an endurance fight while protecting the turtle. Enemies will mostly target the turtle, having mob clearing ability is pretty important. It's not particularly difficult on Normal however. After finishing, you get a treasure. The lesser treasures can be gained if you do this again, or as drops from the elemental zones, but there's really no reason to. You also got another world boss to kill, this time to the lower right in Lei Ze. Lastly, you need Qi Pearls again, it works the same as before. Kill bosses spawning in the elemental zones or get pearl fragments and synthesize. The lesser breakthrough requires herbs from north of the filled in area, where you get attacked automatically. If you're doing the Golden Crow questline from the previous area, you can now finish the fight. You have a single chance to learn a skill if you have the Eye of Providence, but the fight should be tough enough that you will not be able to skip it. During the Filling the Land quest, you will be given a choice to save the girl. The decrease is permanent, but most builds have no use for Focus. She's added to your cave and gives you items depending on the hearts. However, it seems that a new quest was added that she's involved with, which gets you a new bossfight. Keep her around I guess. Golden Core (IV) If you joined a sect, register for the Ascension Tournament. You want those skill points badly. Treasures are the same, only now they are to the north of the filled in area (Hundred Mountains, the place where you will be attacked automatically) in Demonseal Circles. And the turtles demand 5 fruits each, but thankfully there're only 3 circles. The world boss is in the new area, but there's a new snag. While doing the Filling In quest, keep in mind that if you have the Eye of Providence, the Leviathan has an attack you can only learn at this time. I don't think you can refight it anywhere. But the fight is long enough that you probably can't miss it. The pill can be bought from your sect or you make it yourself. Making the pill requires learning alchemy, the workshop will tell you the recipe is too complicated. Thus you must grind your alchemy in this region. The real challenge will be the herbs. You're going to wonder where you can get them from since you won't have them yet. There's a dungeon spot called Cloud Cave in Hundred Mountains (the northern area where you get automatically attacked). In it, you can sacrifice 50 herbs (any will do) to summon very resilient mandragora and tree minibosses for a limited time. You won't deal much damage unless you seriously upgraded yourself, but you can also just trigger it over and over. Almost every kill drops the herbs you need, trees drop more. Good mobclear makes this easier. With that, it's done. Register yourself for the ascension tournament one last time before it's time to go. Origin Spirit (V) Welcome to the first region where things will be a bit tougher. Expect to spend a fair amount of time here, in addition to having to upgrade your skills more than before. Incidentally, this is worst ascension method out of them all. Just so you are warned. The pill must be made by yourself again, so you will need to upgrade your alchemy (and herbology if you want decent drop rates). The superfuntime is getting the heavenly treasures. One is a world boss as usual, but the rest are RNG of the worst kind. First you need to identify Lands of Beyond. You inject your divine sense and are taken to a combat arena. Your goal is to destroy the Array Core in the middle, while being attacked by monsters and constantly taking damage from the area. If you are reasonably upgraded, this should pose no problem. Lifesteal makes it a joke. This will give you a map item. If you pay Spirit Stones, it will show you a spot on the map where you must use Feng Shui nearby to find it. Do not go into the snow area, you are not ready for it. You will find a cave with a fox boss that can be pretty tanky. Once it's finally dead (wind movement is good), it will give you... a completely random treasure. Including the worse ones. Or duplicates. Or even none at all if it feels like it. You need a new map for each treasure, but you can savescum the bossfight itself. If you want the optimal treasures, prepare for a lot of tries to get the last missing one if you're unlucky. (I needed about 30...) I really strongly hope this breakthrough will be reworked, especially since the next tier is the best in the game. The Land of Origin/Land of Beginning work the same as the elemental zones from before, but there's only two this time. Just get the Heaven Qi. You can also go via a pill, but why? Earth Qi is good for selling. Nascent Soul (VI) Welcome to the one ascension segment that I think is actually fun. It's quite involved and very difficult. You are now powerful enough to survive in the northern ice area. First step, upgrade your skills. You will likely spend a lot of time preparing in this breakthrough, so work towards getting red skills. If you have a monoelemental build and it's your highest spirit root, you can kill the hundred mountains area world boss to get red attack skills, and a sect for some red passives. You should probably also visit the auction a few times, and possibly grind up your spirit roots. The latter will let you use a lot more passives and you're going to spend a lot of time preparing here anyway. Upgrade your skills and Comprehend them too. Take part in the Ascension Tournaments for skill points. Now for the breakthrough. When you go into the northern ice area, you will be given a special scroll, read it to start gathering 5 souls. In the area, you can find 5 special zones. If you enter them, you will be attacked by a guardian. They are pretty strong if you are unprepared, but appropriate tier skills will best them pretty easily. The water guardian can summon clones that attack too, you can just stay away from them. Each guardian will give you a quest to fulfill after you beat them. Gouchen wants a pill you need to make with the recipe from the workshop, quality doesn't matter. Herbs are from Everfrost. Xuangui wants three ascension materials from a Land of No Return. It works the same with the maps from the previous tier, BUT this time the quality of the items doesn't matter. Jialong requires an Immortal Lingzhi, which is a drop from the ice area world boss. The ice protection only lasts two years, so only end the quest once you are ready. Chongming requires you to use the crystal in your Other inventory to find a spot like the maps, then get stone for the guardian. This involves a lengthy fight against the untamed. You need to survive for 2 minutes while killing them quickly enough to keep the enemy count below 50. Pretty much a DPS check. If you can't do this, you aren't ready for the bosses anyway. Luwu's Kunlun Wood just has a quest marker. You will then fight Coatl and Harpy bosses at the same time, they can be pretty tough if your passives aren't up to par. I recommend focussing Coatl (the bell chime) down first. Once a quest is done, you can challenge a unique boss. All of them are really powerful. You are hopefully prepared with good skills, passives and plenty of healing pills, preferably the highest quality. You will need them. If Wind Movement doesn't cut it, give Water a try. The clone draws aggro from some of the bosses, which is really convenient. Doubly so if you have reduced CD. Other options are specific traits like granting shield on energy use, energy and health recovery when low, or going through the grind for artifacts. I won't spoil the bosses, they're pretty neat. Once you beat a boss, you earn a soul fragment. You need to Use it in your inventory to add it to your rotation and to gain its boosts temporarily. It's in the Materials tab. Next you must forge an immortal soul via climbing the Stairway To Heaven, always located near the city. This is a very long endurance slog. Make sure you are fully stocked with pills. Your skills are hopefully prepared due to the previous bosses. You can use pills before the battle starts by clicking the small + symbols next to your bars. You are given a 2x5 area that represents the stairway, with one area marked as boss. In each area, you must fight a set of normal enemies or minibosses. Once all are defeated, you gain a soul fragment. You can pick one of three, generally just pick the highest attack/defense combo. You can cut your soul gathering short if you go straight for the boss, but why do that when you can gain greater power? I would suggest wind movement and triggering it immediately the moment the first battle starts. I've had enemies spawn directly around me and take me down to half health with little time to react. That only happened in the first area however. Once you got as many soul fragments as you want out of 9 max, fight the boss. It's not particularly strong, but some of the attacks are not really avoidable. If you still got plenty of pills, you will be just fine. Now you must create your soul. You sacrifice four fragments, and keep one as foundation (the one you don't select). The kept soul will give you special boosts which you can see in the description. Honestly, as far as I can tell Jianlong (blue dragon) is just the best choice for non-lifesteal builds. The attack boost is massive for boss fights and it gets a very powerful special attack too (8000 base), triggered every three RMBs. If you have an RMB CD reduction setup, this becomes very powerful. Passive boosts also increase attack even more. Xuangui (turtle) can help in certain builds (lifesteal), and deals damage as you take damage (1000 base, weak compared to others). Gouchen (red dragon) gets a full sealing + damage skill that triggers on ultimates (1000 / sec base). Since those have long cooldowns, this isn't that strong. Luwu (white tiger), movement speed boost and summons a spirit that deals (seemingly low? 300/sec base) damage whenever you use a movement skill. Unless you have a movement CD reduction setup, this seems weak. Chongming (green bird), restores health whenever you enter a room below 50%, deals a fairly large chunk of damage (5000 base) every time you get hit. Good combo for lifesteal. And you're done. Next up is a horrible grind. If you run into the giant do not continue the questline until you are in Enlightenment (VIII) if you want to complete it fully. Furthermore, you should perhaps stay here for a while and take part in tournaments to gain skill points. The next ascension will take a lot of time before you're ready for the next region's tournament. Soul Formation (VII) This is going to be long and pretty difficult. You really should update your skills and passives for the new tier. Also, more alchemy grinding for the pill. Explore the area to find the strange new dungeons, there will be six total. Each will have two colors together, representing a combination of two elements for the dungeon. In those dungeon, you can find tao stones of the colors that the dungeon's entrance has. Each type of stone has two associated elements, which are in the dungeon's name. Your first order of business is to go into the dungeons, fight enemies (up to the third room, read the next two sections first) and get 1500-2000 of each color of tao stone. Yeah, this is a pretty long grind, but you will need them, trust me. Name Color Martial element Spirit element Ruby Red Blade Fire Emerald Green Palm Wood Obsidian Black Finger Water Amber Yellow Fist Earth Pearl White Sword Wind Amethyst Purple Spear Lightning How do the dungeons work?A dungeon consists of five rooms in a row, ending with a boss fight with one of two bosses. They are dungeon-specific and you should make note which dungeon's bosses you can defeat easily for later. 1. Basic mobs and minibosses, each dungeon has its own set of mobs. 2. More of the same 3. A boss that will be weak usually and easy to defeat. 4. A group of minibosses combined with a cultivator. Depending on the skills the cultivator rolls, they can be pretty strong. The camera will lock when you kill the cultivator, you can be hit while that happens. 5. Each dungeon has 2 associated bosses, one of them is randomly picked for the fight. They are all very powerful if you aren't heavily upgraded. Once you have cleared a room, the action will stop and a two-colored symbol of the dungeon will spawn in the middle. If you touch it, you will continue fighting. If you want to get out instead, hit ESC, and run from the dungeon. Since combat is over, you will keep all the tao stones you got so far. In terms of speed, it's usually best to clear the third room and then run. The cultivator can be a gamble with their skills and potentially a miniboss that can stun you. Modifiers and youAfter you clear a room, you can choose to continue by touching the symbol in the middle. You will be shown a new screen where two new modifiers are determined for the rest of the dungeon, ending in 8 modifiers if you finish the dungeon. These can range from giving enemies health regeneration, damage boosts, to guaranteed crits, increased attack cooldowns and more. A modifier has an associated element, number and color. The element matters for Tao souls, the numbers too and indicate the strength of the modifier, the color is for rerolling. A modifier will only appear if your spirit root of the element is above a threshold. 5 points modifiers are always on, 10 requires >100, 15 means > 200 and 20 point modifiers require a spirit root of their element of over 300. You may find out you have to grind fruits for a while here. Alternatively, having low spirit roots can prevent some of the more dangerous modifiers from appearing. If you encounter a modifier that is too dangerous (like 5 guaranteed crits), you can click the arrow below to reroll the modifier. This costs Tao stones of the color of the modifier. Every 3 rolls, the cost goes up by 5 stones per reroll for all existing modifiers. This cost is reset if you move on to the next room. Now you should prepare to get yourself at least 1000, ideally over 1500 tao stones of every color. since you will be rerolling a lot to get your ideal tao souls. Ignore the part in the middle of the modifiers until you are ready. What are the souls for?After you got enough stones, and hopefully have powered up your character, you should attempt a few runs to the end, to see if you can beat a boss from a dungeon. You will need to in order to gain the Tao Souls for ascension. You can just sell the tao souls in the auction, they're a really good way of making a lot of money. The Tao souls you gain will grant you a new domain ability once you ascend. The properties of said domain are determined by the primary and secondary tao soul elements. The primary (Stat) determines the effect, the secondary (Substat) provide boosts to the statistics. If you have the same primary more than once, it will add up to a different law. (Two sword souls + 1 wood primary soul give a mixed level 2 sword and level 1 wood domain, 3 primary means level 3 of that one element.) You may be tempted to just get a domain for your primary element, but that's not a good idea. Many domain effects are unfortunately not very good. Wiki entry[tale-of-immortal.fandom.com] Sword 3 with Spear and Wood (extended duration) is good for many builds since ultimates hit multiple times and build those stacks up quickly. Blade 3 or Fist 3 are great for blade builds. You can also mix lower-grade laws as long as it adds up to 3 (1+1+1, 1+2). Decide now what you want and figure out which combinations are possible. Fusing dao souls requires matching elements. The primary element of a tao soul has to be either listed in the primary or secondary elements of the other tao souls. This has to be mutual for all three souls. If you make 3 times the same primary, they will all fuse into a level 3 domain of the element you picked. If you wish to use a mixed law (like 1+1+1), then the primaries must be among the secondaries of the other souls. If you want maximum stats from having the highest purity, you must only have one primary and two secondary elements at the end of the dungeon diving. In other words, if you want a mixed high purity soul, your tao souls can only consist of a primary and two secondaries that are the primaries of the other souls. The stat boost from purity isn't large though. A less pure tao soul can have more than 3 elements at the end, which requires a lot less rerolling. However, the two highest numbers will become the substats and they must match each other. You can't just make souls with 6 substats. How do I get the tao soul I want?As you go through the dungeon, pay attention to the modifiers. Each has an element and a number. On the rerolling screen, you can see all the elements with the sums of the modifier numbers. The primary is the one furthest left, which has the highest number. The secondaries are all the other ones with lower numbers. If you have more than 3 elements, you will gain an impure tao soul, you will also lower the probability of actually creating one after you clear the final room. The two highest secondaries will become the fusion substats. Now then, your goal is to reroll all the modifiers of elements you don't want, until you only have elements you want to have. Make sure the biggest number is the primary that you want to have. If you want max purity, the primary must have a value of 50 or more. The sums of the secondaries do not matter for purity. This is what you need all the stones for. If you are unlucky it can take an absurd amount of rolls (I reached a cost of over 150...), especially if you want a pure tao soul. Keep in mind that you can reroll between each fight and the price will be reset after the next one. Enlightenment (VIII) (WIP, waiting for patches) Latest patch dropped, but the English version is reportedly buggy with potential progress-stopping bugs and the translation isn't done either. I'll wait for now. The steam forums can help for the time being. After the last section, you got a shiny new ability, your domain. It takes some time in combat before it can be activated, but then it triggers the effect you picked via your tao souls (you can read it on the breakthrough screen... after you picked it. Not before. Sadly.) As long as enemies are in the range of the ability, they will be affected (with few exceptions). If the domain builds stacks, they stay until the domain ends. Use requires Tao Points which replenish every month, more if you equip a specific spirit. No other way for now. If you want to go west, you need to go through the Giant questline, make sure to keep him healthy. As there are time limits, you should only start it once you are in Enlightenment. If you want a challenge, fight the Fallen Valley boss from the last area with 50 Nether Breaths. Good luck. Save beforehand. Towns Storage caves are all linked, and I think the space is infinite? Nobody can steal from them too. Inns restore all your stats. The quest board lets you earn spirit stones and Mayor Decrees. The latter is the currency for the manual pavillion. You can get new quests every month, but you don't need to finish them in a month. Keep in mind that the quests are tiered. If you breakthrough, you will get more difficult quests. In Area 4, Hell quests will be rough if you don't have a full set of tiered and orange/red skills and passives. Resource quest will be easy since you will quickly have a large amount of items. Avoid the storage ring or assassination quests since that requires stealing/fighting and incurs NPC hatred. The quest for finding treasures with Feng Shui can end with the NPC attacking you. They should not pose a challenge. The treasures are almost always worthless though. Taverns can give you temporary boosts (useful), increase affinity with random sets of people in town and let you trigger a small number of sidequests (purple exclamation mark). Markets let you buy basic pills, minor breakthrough pills, rings and mounts, teleportation charms and some other items. They also have a set of books to learn for the specialization skills. Every town has its own set of books for Feng Shui and Herbology, but not for Mining. So make sure you do a round and buy them all when you're about to leave a region if you're building up those skills. Cities (bigger, blue map icon) offer stuff for the second realm tier of a region. Furthermore, in cities after region 1 the market offers a superior ring at the bottom of the items, added by a patch. This one is only usable by the second realm of a region. Pavillions let you buy martial manuals, excluding Ultimate skills. Usually only up to purple rarity. They require stones, mayor decrees and reputation (from quests). Cities have manuals for the second realm tier of a region. These can be decent if you broke through and need to update your skills. These are refreshed every 12 months, so don't dilly-dally if you need one. Workshops cover forging and alchemy, which will be covered below. Synthesis lets you make qi pearls from fragments and upgrade the materials to upgrade skills if you need more. Exchange rate isn't kind though. You can buy the forging and alchemy recipes here. Cities-only: Immortal wardrobe lets you buy new outfits. It's largely pointless unless you really like one. Auction Houses sell their inventory every 2 years, first month. They cannot be savescummed since their inventory actually comes from NPCs. You can sell tier-appropriate red/orange items here for a lot of cash. This is a primary source of red manuals, make sure to take a look. The manuals are usually only for the second realm of a region though. During the auction, if you like something you can try outbidding the NPCs. Be warned that you can incur hatred here for outbidding someone, though this hardly matters. Furthermore the prices get pretty high, 10-20 times the sale price isn't uncommon, make sure you have a lot of money. Or try to threaten NPCs, causing NPC hatred. NPCs seem to have a specific buy limit, so if you reload you can just bid that directly. Threatening/buying off NPCs if you're more powerful and don't mind the NPC hatred can work too. If you're bidding on a non-elemental passive book though, there may be too many people to threaten. By the way, you can make the game skip all the items you don't want anyway, with quick buy and using the checkbox in the upper left. After the first region, Ascension Conferences are a pretty long tournament for the sake of Skill Fruits. They happen every 3 years. You can participate if you are in a sect, have a high enough reputation (do quests) and are in the later tier of a region. You should always participate since the Skill Points grind is dumb and you can get a lot of points at once. You will be up against the strongest NPCs of the region, and rarely the world simulation may put you up against next tier NPCs. Make sure to drink up first. NPC victories are random, but weighed based on their stats, so rerolling can occasionally let you bypass a cheater. By the way, there seems to be a minor bug where if you reregister immediately after a tournament ends, you don't actually register. Let a month pass. Taoist Hero Board pillars were added. These give you a way of finding out who has a specific title/if someone has it. They give a special buff that grants temporary damage immunity to the element that the character holds the title of. If you want a title, you need the maximum roots for the element for the region to claim it if it's empty, or to challenge the person who has it currently if not. Taoist Titles In each region, there're two sets of Taoist Titles. One group is for the #1 cultivator of an element, the other set is more for miscellaneous deeds. The titles are not transferred between regions. If you surpass the cultivation realm of a region, you lose all your titles. In order to hold a title for an element, you must have the maximum (or more) spirit roots for the element for the region from spirit fruits. Furthermore, you must have learnt LMB/RMB skills of the element. If you unlearn all of them for an element, you will lose the title. If there are no other competitors, you will gain the title at the end of a month if you fulfill the conditions, otherwise you must fight the current holder. In their profile, there will be a double sword icon that allows you to fight for the title. Each region's city has a floating slab that shows all the cultivators that hold #1 element titles. You can click investigate and pay (a lot of) money to get an item that shows you where they currently are so you can challenge them. In combat, the title grants you something like 10 seconds where all attacks with the element you hold the title of will be neutralized, their damage will be halved. It's not that much of a bonus really. The title does not apply for spars for some reason. Possibly other situations too like tournaments? Sect wars? Each region past the first one has 5 to 6 non-combat titles as well: Charmer: If you have a lot of partners, you get a bonus to affection gain with cultivators of the opposite gender. Champion: Win the Open Challeng Sect Tournament (the final part where you fight as many cultivators in a row as possible). You are more valued by the sect, which I guess means cheaper prices or more sect contribution points? Elixir: If you learn all the alchemy recipes of a region, you can claim this. From the description, I think you get more affection from giving elixirs as gifts? Forge: Learn all forging schemes, get title. Your artifact gains more affection from cultivators, I guess if you use it in spars? As gifts? Artifacts as gifts would be really expensive though... Benefactor: Buy a lot of stuff in towns and you get reduced prices. Fashion Connoiseur: Available later, you must own a lot of outfits for this. Gives a bonus to same-gendered relations. Sects Introduction IntroWhy would you want to join a sect? Purchasing Spirit fruits Purchasing higher quality skill manuals Purchasing alchemic cauldrons Higher quality pills than you can buy in cities Occasionally you can buy ascension materials (pretty handy in region 3...) Sect Tournaments and Sect Wars reward you with treasure chests if you do well, which can have a very wide variety of content like red skill books Access to the Ascension Tournament (in the main city), which rewards skill fruits (for dao points) Modest monthly salary Cultivation Chamber that means you don't need to hunt for Qi spots. Unique missions I suppose NPCs may chose not to fight you if you are in a strong sect and have backing. In practice, you are basically forced to join beyond the first region. You need those spirit fruits. In the prologue event, you get a letter of introduction for your first sect, depending on your choice, otherwise you have to fulfill one of two conditions. If you can find higher ranking sect members, you can befriend them by giving gifts, aim for at least elder. If they aren't Heaven Chosen (gold frame), rings and mounts will do just fine. Otherwise, if your spirits are high enough for the sect, you may also join. If you want to join, you need to apply and then win a sect tournament. It's a fight against a few cultivators in a row (you are fully restored between fights). You don't even need to place first, you can be up to fourth. Unless you get really unlucky with NPCs, you should have no problem of passing if you have done basic preparations such as realm-appropriate skill books. The spirit root requirements also indicate which spirit fruits you can purchase from the sect stores, as well as the manuals available from the pavillion. A sect can either be a branch sect, or a main sect, most are branch sects. In those, the sidebar will inform you that there's an upper limit you can be promoted to. If you join a branch, you will automatically be able to transfer to the branch in the next region. On the other hand, if you join a main sect, you are able to take over and become Sect Master. This will be described in a later section. Branch sects will have more elements available at the same time until later regions. They have the same elements as the main branch. Non-branch sects gain more slots as they get transfered to later regions. Sects have two sect rules displayed on the side, as well as two benefits. The benefits aren't particularly large, and most of the time the sect rules don't matter either. A handful can be annoying though, so read them at least once. After you joined, your current sect will be a brighter sect icon on the map than the rest. You will now get access to a new currency, Sect Tokens, the plates to the right of the city medallions. The sect token grind is pretty exhausting if you want to upgrade your spirit roots, you will have to do a lot of missions. Sects have an alignment with Just or Evil. If your alignment doesn't match, this usually means you get some form of penalty. I believe it's primarily a tax on your sect tokens, but there may be more. If you become sect master, you can change the alignment. You should probably check which elements the sect has, unless you want to become sect master and take over other sects. There may only be a single sect of the opposite alignment if you're unlucky. If you leave a sect, you will be banned from it for years and forfeit all sect tokens. If you see a really powerful breakthrough fate offered by another sect, it may still be worth doing so. Buildings The Cultivation chamber lets you trade sect tokens for Qi, this can occasionally be less annoying than hunting for Qi spots, especially in higher difficulties where they're rare. They also have sect-specific breakthrough fates, if you specifically do your breakthrough in the sect room, which can be (unreasonably) powerful. The Treasure Pavillion lets you buy items. This includes the critical spirit fruits, for which sects are the only reliable source. This is also the only place to buy alchemy cauldrons (more later) and flames for refining artifacts. Lastly, given enough time, they will stock breakthrough items for the region which can save time. All prices will be in sect tokens. The sect leader does not need to pay. Ore and Herb items will be restocked when the respective sect points reach a total dependent on the region, hover over ? to see it. The Manual Pavillion lets you buy manuals, mostly up to purple, for both cultivation tiers of the region. If you get promoted to Grand Elder, you can access a set of red passives and ultimates for the elements of the sect. These can still be pretty useless though. Sects are largely not the best source of manuals. Every 6 months, they toss out the non-treasured manuals like the city pavillions. The Grand Elder "treasures" will not change. If the ultimate is not what you need (you got Combat Expertise, but it's an ultimate that requires field objects), or the traits of the passives are bad, you're out of luck. As sect leader, you don't need to pay and can even change the elements available, which will switch out the treasures too. But for that, you first need to acquire more elements. Hospital lets you heal for free, Inns cost so little that this doesn't matter. Council Hall lists the sects higher members, and gives access to various sect management features, if you have been promoted enough. More explanation in the next segment. Mission Hall lets you do sect tasks for sect tokens. I'd suggest avoiding the Kill Sect Enemy and the Retrieve Manuals tasks, since those just cause problems with NPC hatred. Either you kill a named NPC or you steal from them. The Rogue Cultivator is different, it's not a named enemy. It's only generated for the task and has no relationships. You can kill them without worry, but they can be tough. You get new tasks every month, but you don't need to finish them in a month. Some of the missions can end with tasks that give skill points (construction missions) or rare metals (Kill nearby monsters). The missions available depend on your status within the sect. Elder and higher get quests of a difficulty more suitable to the 2nd region of a region. The Behemoth lets you exchange spirit fruits 2:1, feed it to upgrade its realm and talk to it to improve its mood. If you reach about 12.000 for both mood and satiety for a long enough period, the Behemoth can upgrade in realm (within region limits), which matters for sect wars. It will occasionally give you buffs Climbing the Hierarchy Initiate Your status after joining. You have access to sect missions suitable for the lower cultivation realm of the region. You gain access to all sect buildings. For every promotion, you must have enough sect tokens from missions to start a tournament, this time among the Initiates and then place first. This tournament is scaled to the first cultivation realm, too. You may get unlucky with Heaven Chosen, but usually you should be fine. Disciple You are an official member now. Your spirit stone salary is greater and more mission types are unlocked. You can now be ordered to participate in Sect Wars and Resource spot conflicts, but it's not a good idea. Promotion is more complicated. First, you need a higher elemental root for one of the sect elements. You then have to pick an Elder to become a True Disciple under. The first step is beating all Disciples that also applied for promotion (there will be very few), then you must defeat the True Disciple whose spot you wanted to take. The True Disciples will practically always be in the 2nd cultivation realm of a region. Until you break through, you probably won't be able to reach this level. If you manage to pick an empty slot, or a disciple dies between picking them and the tournament starting, you will be facing an auto-generated disciple. And you probably shouldn't pick a Heaven's Chosen unless you are really confident. You will automatically become a disciple of the Elder, you can cancel the relationship immediately afterwards via the social network. Beating the True Disciple will incur NPC hatred from them, they will be forced to leave the sect. You can just buy them off with rings though. True Disciple Higher wages, missions suitable for the 2nd cultivation realm. You can now participate in the triannual sect tournament, more on that later. You can also play a bigger role in sect wars and resource spot fights. For Promotion, you pick an Elder to replace. You fight the other NPCs who applied, then the True Disciples of the Elder, and then the Elder themselves. If you win, you get their spot. The True Disciples become yours to order around. The Elder will hate you and leave the sect. Elder This is the first point where you have power in the sect. First, you can freely assign the ordinary disciples within whatever sect branch you control (like Patrol), you can also pick True Disciples if they accept you as master. You can order True Disciples on special missions. In addition, you can suggest, but not force, battles for resource spots. See below for all this. You unlock more mission types, bigger salary, etc. In Sect Tournaments, you cannot participate as fighter anymore. To promote, you must pick and defeat one of the two Grand Elders, or pick and empty spot to replace if someone died. Grand Elder You now control 2/3 branches of disciples and can freely order them. You can now start resource fights and pick resource spots to control. A number of lower-rank mission types will no longer be offered to you. The next promotion works differently. You must reach a sufficient level of personal reputation (from completing quests) and a specific amount of sect tokens in total, also from completing quests. After some time passes, you will receive mail that the Sect Tradition has taken notice of you. You will be invited to fight the Sect Tradition. This is a randomly generated cultivator, who has received some kind of buff. This can be really tough, so you may need to quite powered up in the late stage to have a chance. If you win, you replace the sect leader. They will hate you and leave the sect. Sect Leader You have basically all the power in the sect. You fully control personnel and can directly recruit, but if you arrange new True Disciples, they still need to accept their Elder and vice versa. You can freely control sect wars and resource conflicts. You can change the sect rules, the elements of the sect (from what it has available after conquests) as well as its alignment. The Sect Tradition will boost you at most every 3 years if you fight in the Sect territory or your sect is attacked. You can even sell the red manuals for personal cash, and change sect elements to refresh them. Sect Management As Sect Leader, you can order the transfer of a sect to a new region. This is extremely expensive to do, but the only way to progress with your sect. Sect Resource Conflicts Sect Wars New Sect System Part 2 (WIP) Sect rules: If you are leader, you can click the paper above the sect name to change them. They really need to fix random out-of-region cultivation realm sect leaders... AI for assignments seems potentially a bit questionable. A few of the sect fates seem utterly busted, sometimes only for lifesteal builds though. Cost is for restocking + expanding if available. Happens once you surpass it instead of per year? That'd allow you to do things a lot faster if you have a powerful sect. First region: 2500 Second: 6500 Third: Fourth: 30000 Up to 10 spirit fruits per actually. There might be a bug with sect elements, since I had a sect with only two when every other had 6. The ones that are branch sects always seem to get 6, while new sects need to somehow get access to more elements? Taking over resource spots: You send x number of disciples depending on the size (8/11/17?) and get herb/ore points or spirit stones every month. You do this from Council -> Sect Territory Click on the grey mountains to see what it is. The sword icon (top) is a fight over an occupied spot. The flag is claiming it yourself. The quality of the disciples (realm? stats?) determines the level of Alert, which I presume means likelihood of preventing an attack? Going by the numbers, you probably want a lot of people. Manually promoting disciples to fill the highest ranks means they're stocked for other tasks. You can separately assign missions. The more disciples you assign, the better the results. Recruitment means more people. Patrol improves stability External grants more prestige points Construction means more Ore+Herb points Training means more money (... why?) Once you have assigned nameless disciples to the categories, you can further assign specific missions. As the game says, the higher the difficulty, the more disciples will die (even on trivial tasks...). So manpower is pretty important. Keep in mind that just assigning categories already improves statistics. The sect Leader can and will override your assignments. Potentially with nonsense. So... maybe don't bother unless you are leader yourself. ... Uh, in my test sect, nobody is recruiting (and overriding my choices) and we are losing disciples every month. This seems like a death spiral. You can assign disciples to resource spots and to missions at the same time it seems. You can gather information on special missions as a % each month? Once you unlock them, you can assign a true disciple to do them. Note their likelihood of success, likely stat-based. Strengthen Seal may be busted because no disciple had more than 0% success for me. As you gain reputation in the sect, once you fulfill both sect leader requirements, a "voice in your head" will tell you about the legacy. Allows a special boss fight against Tradition itself. You will fight a human cultivator with a special condition (such as losing vitality every second). They're somewhat tough, but not too bad. You seemingly need a source to replace a martial arts tradition? From defeating other sects and plundering? You can move your sect into a new region if you want to. Great Elder missions: Save Recruitment Disciples: (Nightmare) One off fight with miniboss Save Lost Disciples: (Nightmare) Lost disciple has hostage: Pay small sum (finishes quest) / ignore Find Missing Disciples (Nightmare): One fight + miniboss Arrest Offending Disciple: (Nightmare) Disciple of first realm of region, random (up to purple?) books Defeat Disciples with Qi Deviation (Nightmare): Cultivator that can summon undead. Somewhat tougher than the offending disciple, gives (up to purple?) random books You can't do missions of a sect you conquered. Sect Competition: You get to hold a speech as sect leader, haha. True Disciples fight in a competition. You better be prepared to deal with HC. World simulation can also break and have cultivators from higher realms appear. Elders and higher pick out treasures for them. You pay spirit stones (rather few though) and get to pick up to 3 times. Each item has a description. Due to how busted Heaven's Chosen are, those should be your primary targets for recruitment and kept at the True Disciple level. You can select disciples who are ordered to fight each round. Winner scores a point. You fight once against each sect. If you want them to use items, you must click the lower right on the selection screen and them pick the disciple whose fight you want to watch instead of settling it via AI. I recommend AI if you have higher stats. While watching you can order them to use items. Health is NOT replenished between rounds. But your best disciples should win without losing health, sooo... All this seems a bit poorly balanced. Next up is open competition. Disciples will challenge each other. Whoever remains keeps fighting. Unfortunately the AI is what it is, so I hope you kept a lot of items to spam from the previous round. HC will mop the field, haha. A single busted cultivator is enough. Artifacts are really good for this if your disciplies rolled some since the AI will always try to focus them down first. Even if it can't or should just ignore them. Any decent lifesteal NPC will probably just win I guess. If you want to win, you need to be stocked with pills, hopefully have some vitality restoration traits. The champion of the competition gets rewards, the winning sect gets rewards. The treasures are in the "Other" tab. They give Spirit fruits, orange and red random books. Yellow exclamation mark on Mission Hall: Special mission unlocked. On Council: -> Territory, left button, expands max sect capacity. Important. Requires prestige above cap and money. More people cost more money though, keep that in mind. Sect War: Find a sect whose leader you can beat. Pick a fight. Use enough resources to fill the green bar. Keep in mind that sects can be allied which can be a bother. The green bar are resources used for fighting. They reduce the casualties you receive during the war, which is generally a good thing. Next month it begins. You get three untranslated choices. Upper left is starting it yourself, upper right is appointing someone. Lower left is cancel. Sect leader holds a speech, battlefield begins. There're 6 outer and 6 inner segments. If you aren't an elder (unsure), you get assigned a spot, disciples are outer realm, true disciples fight the beast. Destroy the outer battlefield to make the fight for the inner easier. All 6 beast parts form the total health bar, damaging any part brings you closer. Assist your people well. Afterwards the sect leaders fight. If you are leader and picked a good target, this should be easy. Treasures get distributed (hold ESC to skip). You then get two choices: Left: Takes over. Pick the people to occupy it. Right: Should be plundering. Taking over takes a lot out of the sect, keep that in mind. You cut your personnel in half and it will take a while until that's all regained. Resource spots also now need to be split between both sects? Gives you access to new elements in the new sect though, and a different breakthrough fate. You can't access allied sects' elements, so you need to conquer them too... Unclear: If you take your sect to the next region, do you maintain all traditions you had access to? Or do you need to reconquer? Is that how you get more elements anyway? When the AI request shuffling, it fills gaps, right? If you conquer a sect, currently you can get their breakthrough fate. New Sect System Part 3 (WIP) Sect stats: Members: Recruiting people, used for tasks like resource points I assume? Territory: Maximum prosperity Reputation: Amount and quality of the sect manuals Stability: Increases/decreases prosperity Prosperity: Amount of money per month Loyalty: How many members leave each month Ore: Replenish the Qi breakthrough items, furnaces, skill training items (the stuff for cultivating skills), forging materials and "other materials". Herb: Replenish breakthrough treasures, pills, spirit fruits and herbs. Ore and Herb points are consumed to replenish/expand the treasury. I have not tested if you can replenish things more often than once a year with very high ore/herb stats. Sect war as Initiate: Complete and utter mess. I was playing defense. So you can freely pick the battlefield, but keep in mind that the inner area will be for disciples of the second realm of the region. They will shred you if you aren't. You will get resurrected if you fall in battle and the sect still has resources. This would probably trigger the Soul Lamp debuff first though. Due to the sheer length and number of disciples you will fight, you need some form of restoration that's not limited like pills are (or elixir recycle) unless you are way more powerful than your enemies. You get treasure chests (inventory -> Other). If you killed a lot of Heaven Chosen (how...), you may well get silver treasure chests that give you red books and similarly valuable stuff. Sect wars are awesome for expanding your sect elements, you will get way more spirit fruits that way. And they're all free as sect leader too. Sect War: Need to be sect leader to kick it off. Take over another sect. Currently this does not let you take their breakthrough destiny though. Might be a bug? The first two disciple ranks fight others, true disciples fight the behemoth, then the sect leaders fight each other. How would this work for branch sects with a realm 9 leader? Just impossible? Winning lets you take resources or destroy the other sect. The latter should give you their special breakthrough fate? The flower over you on the breakthrough screen gives you a wayborne seed when you get 100%. You can also pass it on to other people. This turns them from nothing into Paragons (blue frame). That seems to be the non-Heaven's Chosen that do have a seed. Most cultivators don't. After a while, they can turn the Paragon's status into actual Heaven's Chosen The Heaven's Chosen get some special fate on that screen. All of them are associated with a specific element and seem to be only good for teamfights (sect wars?). They don't seem too strong from what I've seen, so I don't think they matter as much as the hilariously busted stats of HC. You start accumulating tao points (the frame around the seed) by beating other cultivators (and monsters?), and discussion supposedly. You lose points if you lose in fights. Once you have enough points, you can unlock additional feats in that interface. Stage 1 is +5% damage dealt. Stage 2 is -10% damage received. Stage 3 is +10% damage dealt. New Sect System Part 4 (WIP) In sect wars, you don't matter in the first realm of a region. The inner region can be tough to survive. I just not spawning in the most fought-over battlefield or you may get instagibbed by a number of abilities, ultimates and artifacts getting dropped on your face before you can react. Sects can stock basically all of the breakthrough materials on a long enough timescale. That should make Origin Spirit (V) a lot less annoying hopefully. Sect war: On the defense, you must shred as many cultivators as you can, just remember that the inner area with the beast is for the second realm of the region. Thing is, your sect may just lose anyway. If they do, you get nothing, no matter how well you did. They lose all herb+ore if they do. No idea if a hostile sect can take over yours. The outer area seems of limited use, since the disciples of the inner area can just defeat the beast even if most of the outer area is defended. The outer crystals seem to respawn quickly? Is that just a temporary damage buff for the inner area for the offense? Plundering resources gives you additional sect tokens and some low tier treasure chests. It does NOT give you the cultivation elements. You get spirit fruits for EVERY element in your library. Not just the ones selected. The enemy sect leader can also trigger the sect tradition to resurrect in the final sect war battle. Request to take over resource spots: If you aren't in realm 2 of a region, don't bother. Grid map where you must take over specific regions while fighting people. If you want to get promoted in a sect, you need to have a high enough root of their type. If you join a sect that isn't a branch sect, that can be limiting. Sect war postmath: You can't become a True Disciple of an elder that's dead. You also can't skip straight to replacing them unfortunately. If you challenge a True Disciple that's dead, you get a generated enemy with an untranslated name. You then replace them. Resource raid mission: It starts immediately. You can keep watch OR gather the resources. Keeping watch: Defend your ally. You will be attacked by cultivators. Since you should basically always be more powerful than your ally, you should always defend I guess? If your ally gets down to low health, they will flee. You can continue the mission then by interacting with the target while enemies are gone. This is a long endurance slog, just as warning. Hell rating is not a joke. The cultivators are just generated, but many will immediately drop artifacts. Many pills now in the sect. Sect competition as disciple: First up, the turn-based fights: You get given item(s) for the fight, you decide the timing. Some items are really strong, but I don't think the AI will prioritize the good stuff. If your sect is bad, all the true disciples may not even be of the second realm and will do nothing. Thus your sect loses. I've had the sect just give up basically, haha. You often seem to get picked third, no matter how sensible. You DO NOT get health back between rounds. Make sure you have healing pills. Or get lucky with the healing flower as gift. The logic for choosing disciples, I do not understand. If you can, keep items for the consecutive fights afterwards. The top 3 sects fight in the open battle. Defeat as many as possible to score points. If you are well-prepared and in the second realm, you will slaughter a lot of fodder. I strongly suggest going first to get as many points as you can, with the Get on Stage button. Even if your sect leaders make very questionable decisions in the first part, you can just mop the floor with everybody in the open round and make up for that. Winning as Sect and Champion gives you 6 silver-looking chests. They can have some red books. Elements seem to be random? They can be rerolled, but the results are completely random. Branch sects make you fight the Grand Elder on the left. Or presumably the remaining one if there's only one. You can change your loadout on the screen where you give a speech. Sect relocation creates a new branch and splits your personnel. It can also give you random buffs or skill points. So uh, if you take along your old disciples, aren't they entirely outclassed now? You go into Council -> Sect Relocation. Build the ship. Go into it again to get a flag. You go into the new territory to place the flag. Then you go back and now you can move on. You pick the disciples and amount of resources you want to take with you. It may be better to just take nobody along and make friends to recruit first? They'd at least be of the proper cultivation realm. If your old people move up, you would then need to kick them out too, to make space for people of the right realm. Recruiting HC is tricky, you would usually have to give them ascension items. If you're lucky, you can buy them in your sect store though. Alternatively, red skill books from world bosses. You can recruit people as sect leader. The untranslated button above Mark gives you the choice to. Likely depends on relationship. Sects can have 2/4/6 elements in region 2/3/4. You need to relocate your own sect if you want more. You also need to plunder/take over other sects if you want to expand your element selection. Gives you more spirit fruit types per month too, so it's a good idea. But a branch sect you take over seems to retain the amount of elements they offer? Huh. New sects You can find an abandoned sect early on which you can take over easily. If you want to play with the new sect systems with you at the top, this is good. Unfortunately, you will be doing a ton of recruiting. I recommend grabbing Heaven's Chosen. Preferably from the next region for maximum cheating. If you grab a red skill book from the 2nd area boss it will be for the next cultivation tier and make for a good gift. You can also join the secret Dragon Sect if you have the correct birth fate (Don't have the English name handy, sorry). This lets you take a series of breakthrough fates to upgrade the following bug to a dragon human, which is rather powerful. Unfortunately, that requires 5 breakthrough fates, which is hard to justify unless you're on lower difficulties and want to play with around with it. If you attack a sect and it's a branch sect belonging to a higher region, instead of the sect leader, the left branch grand elder will fight you at the end. If you don't want those to last forever, you want ~40% higher ATK than their DEF. The sect tradition seems to boost stats, although I haven't really figured out how it works. It seems to sometimes boost damage, defense max HP or other things? Running your own sect / Dragon Sect storyline (WIP) Should you do it? Cons: Getting a sect to a self-running level is work. Especially all the inviting of powerful NPCs. A lot more interruptions from NPCs. You can't take part in sect tournaments as true disciple for treasure chests, and you can't really rely on the AI to win unless you cheat a little. You practically have to recruit the stray NPCs from the next region just for security. And the world simulation will lead to sect tournaments with Heaven Chosen of a higher cultivation realm than the region should have, so cheating's fair really. Sect wars are kind of terrible due to the random NPCs with way higher cultivation realms. Transfering your sect into a new region means you basically need to do all the recruiting again. You may need to modify the disciple distribution regularly if your sect ends up lopsided in some way, such as not having enough territory and thus income, or very low stability. Usually the AI does a decent job though. Overall just changing sects every region is simply a lot faster than taking your sect with you. The only major advantage lies in the spirit fruits and money. Pros: No need to worry about Qi, just use the cultivation room forever. Completely free sect manuals. You can auction the sect manuals (they get refreshed) and effectively have infinite money. Unfortunately, you will also discover that money isn't really that useful once you have enough of it. Perhaps an unintentional moral. They're also rather good gifts to allow you to recruit many people. Same with breakthrough items. Breakthrough items are now free as well. On a long enough scale, your sect is bound to get them all too. That certainly makes region 3 less annoying. If you conquer enough sects, your sect will pick up traditions for all 12 elements. You can pick and choose which elements you want martial manuals for, including red passives and ultimates. Even more, for every element you have, the sect will have spirit fruits for free in the sect store. This can mean up to 120 spirit fruits (12 elements * 10) every single refresh. Not year, refresh. Every conquered sect has its own storage, you can plunder those fruits every refresh too. TipsYou must first become sect leader. You can only do this in the main sect. Most sects are actually branch sects of a sect from a higher region, it will tell you that you cannot exceed a certain status on the right side window where you can join. The sect leader promotion happens a few months after you reach the necessary personal prestige and sect contribution. You will be informed the "Sect Tradition" has taken an interest in you. This allows you to challenge it. You fight against an empowered human cultivator with random skills. This fight can be really tough, especially on higher difficulties. You need to be prepared. The first region non-branch sect is in something of an awkward position. Sect resource spots don't exist and it doesn't seem to be generated with enough territory to really sustain itself financially. It will also struggle with generating enough ore/herb points to refresh the store. I'd work towards getting all the elements through conquest and then leaving for region 2 or starting your sect leader takeover in region 2. As long as you put grand elders and elders in charge and let them auto-distribute disciples, the sect will largely run itself without trouble. The AI is pretty good at balancing out the sect's needs as long as it has enough territory for money. Territory expansion is pretty important to that end. Sect raids are also a pretty good idea to gain a large heap of resources, but they cost you a lot of sect prestige and will probably kill a fair number of disciples. You may have to manually reassign disciples to build it back up quickly. If you aren't in a hurry, you can forgo these. Not kicking off wars and fights improves relations with the other sects. They will even come to assist you if you get attacked. Likewise, if you attack someone, you may find yourself up against an alliance. If you transfer regions, you are going to run into a lot of troubles. First of all, you need a completely new batch of disciples. Your previous ones are almost certainly outclassed (unless you recruit some from later regions) and thus useless. They will not go up in realm quickly enough to matter. First order of business in a new region is thus getting 7 new people for all the elder positions, you preferably want some of the second tier of the region. Non-HC people are completely fine. You then want to recruit non-HC from a later cultivation region as True Disciples so that you can deal with sect tournaments/sect wars. You can sometimes find them in cities if you get lucky. Non-HC are easy to recruit with rings/mounts/breakthrough items even of tiers below them. So turn them into True Disciples, and then later pass on the Wayward Seed so they become HC. The AI is also cheating with realms since cultivators sometimes just don't leave regional sects, it's all fair. Your elders will quickly start recruiting new batches of initiates. It takes a few years before all the ranks are completely filled, but you need time to rebuild sect resources anyway. If you have some powerful disciples, you can occupy resource spots too. Just keep in mind that they may randomly die in the fights, and getting body reconstruction pills is a pain. You may even randomly lose next region cultivators somehow. You can't get the body reconstruction pill for them, so they're just gone. I generally leave the AI on opportunistic so it occupies empty spots, but doesn't kick off fights. This avoids angering other sects and reduces Sect Wars against you. Chances are, after moving you will get raided pretty quickly since the AI sees you as weak in a new region. Make certain you start recruiting for true disciples and elders the moment you arrive in a new area. Empty out the new sect store for manuals and breakthrough items. I've been attacked within 3 months of arrival before. Once you stabilized the initial elders + true disciples, you can mostly let the sect run itself again. Important note. As you are still sect leader, your sect quests will be of the second realm of the region and way too hard if you just ascended. The difficulty marks are not a joke. Largely this means you can't really support your sect directly until you ascend again. The dragon sectIf you pick the Elder Dragon Aura as starting fate, you get a special questline you can follow revolving around the Following Bug Breakthrough Fate. You pretty much need to pick it fully to get any real use out of the story. As that's multiple breakthrough fates you aren't using for something stronger, maybe don't do this on Chaos. A hamlet sect will be generated in the first area and you will be invited to join it as Initiate without passing the invitation test. All subsequent trials work as normal though. You must become sect leader to really have the storyline go anywhere. It has a unique building, the "Greenscale Spring". For every region, you can upgrade your following bug with a special feature once per region. This costs sect spirit stones. After the first upgrade, you must defeat a giant bee boss to progress (scaled for realm I it seems). You also get the quest: Concerns of the Elder. It's a chain of events requiring you to defeat Bamboo demons and the Bamboo boss. I haven't done more of the questlines yet. Taoist Temple / Mind Pavillion (WIP) Haven't ran into them yet. I probably need to start a new character to do so, eh. NPC relations The entire system is largely superfluous and is really only good for dao/skill points or roleplaying purposes. When people want to discuss the dao with you, always agree and check their personality. Try to answer according to their personality. Everybody likes a yes-man, even the psychopaths. Spars are fine and don't threaten your life, you can agree to them. Dual Cultivation is also a quick end-of-month dao points boost (and requires the least work for grinding skill points outside of tournaments...). Agreeing to become friends is never a bad thing too. As strangers, you can only talk to them. This can backfire if your just/demonic alignment or your three character traits differ too much, but you can just give them gifts once they hate you. It's easier to try to catch them into a town and just buy everybody a round of drinks over and over until you have a base rapport with them. You can mark an NPC like a sect leader with your divine sense and just check occasionally. User ITalkToSky points out that buying and gifting rings works well. I can confirm that. Here. Ascension materials of any tier are always good gifts, but manuals of red/orange quality are only important if they are of the tier of the NPC or higher. NPCs with question marks have quests you can fulfill (giving them items), for friendship points. Maybe just dump rings on them instead. Heaven's Chosen NPC (gold frame) are meant to be harder to build a friendship with, so you may need to do quests instead of just stuffing them full of rings. Stealing from NPCs is only worth it on very rare occasions, such as right after an auction when they have something you want. You need a higher divine sense (or use a specific artifact spirit's ability) to steal and then get lucky with the charm roll to do it unnoticed. Lower charm is better, so unequip your mount if needed and eat the special mushroom. If noticed, you may get into a fight and they will hate you. See below for a tradeoff if you need to. NPC hatred is like a chain of dominos. One person hates you, you kill them, their family hates you, you kill them, it never ends. I would suggest never killing anybody to reduce the sheer hassle. You can give gifts to remove hatred though, ascension materials and books will completely reverse hatred. More annoyingly, if NPCs pick a fight with you, they will hate you if they lose. Same with NPCs during the treasure search quest that decide to attack you before getting stomped. And if you find an unconscious NPC in a dungeon outside of the specific quest for it and heal them, they will attack you too. And then hate you if you knock them out. When somebody invites you to a place, you can perform multiple interactions with them to increase the bond. It's a unique area you can't see otherwise I guess? When somebody there wants you gone, make sure to check their cultivation tier before fighting. You can also marry people etc., but all that is largely meaningless since you really only want skill points from NPCs. If you need to track an NPC, you can use Sense to mark them. This will always show you where they are. This does not remove sense from your bar, instead your maximum sense acts as a cap for how many artifacts you can equip/how many NPCs you can track. They can cultivate and progress on their own, but you can also give them materials they can use. If an NPC dies, you can make a pill of the appropriate tier via alchemy to resurrect them. You got a time limit on that however, and if they surpass your tier, you will probably not make it in time. By the way, NPCs don't play by your rules. Their stats are rolled and can be higher than yours can be. Without even being Heaven's Chosen, they can still surpass your maximum base stats. Skill Points So you need these to equip more passive skills. There're multiple ways to get them. All but the tournament happen as end-of-month event, but you can also trigger them manually. You can look at the NPC section for the NPC interactions that grant knowledge you can transform into points. This tends to be slow and one interaction will give you about 3 skill points. Fastest is usually Training Partner over and over. The last option is the triannual Ascension Tournament. Please look into the town section. I'd suggest participating as often as possible if you are at the appropriate tier. The skill fruits are a huge reward. There is an exploit you can do with these. You must be part of a sect and ready to participate in the tournament. Normally, when you have ascended to the realm of the next region and you enter it, you will be kicked out of the sect and lose the right to participate, however... this event only happens at the end of the month. And teleportation talismans take no time. You can indeed indefinitely teleport back, remain in your old sect while convenient, and sign up for a few tournaments while starting the grind of the next area. Gets tedious, but lets you score a few more skill fruits As a point of reference, a full red passive layout in Enlightenment (VIII) will take about 3000 skill points. Yeah, that is a lot. Feng Shui Largely pointless. If you trigger it, it will identify nearby special areas (herb spots, qi spots, etc.). It can also trigger new special areas that didn't exist before with some of the subskills. After upgrading your stat high enough, you can go into the various towns and buy skill books to learn. Every town has its own unique set of books. Later regions only upgrade your existing skills. Since they are a prerequisite, you always need to start from the lowest tier. The treasure or dungeons Feng Shui can find are almost always useless. Turns out grave robbing can be quite useful. It will reduce your lifespan by 10 years each (and there's an ingame counter, so there may be karma much later?). But you will usually get a Rare Material (the special metals) for forging. This is by far and away the fastest option to savescum for rare materials. Only downside is that Feng Shui, even with the highest skill, only spawns graves very rarely. If you are in Fallen Valley anyway for the spirits, you may as well savescum the random zone bosses instead. If you run into a quest requiring Feng Shui, you can do that even without upgrading the skill at all. You improve it by hunting Blood Puppets that spawn near towns. You will be notified when it happens and you are in the region. They give 5 times region points, this holds true for all skill books. All these special town spawns are somewhat strong, you should either be in late realm 1 or realm 2 for the region to stand a chance. The book grind gets pretty obnoxious for all of the Specializations to be honest. Herbology With Herbology, you can use it in green herb spots to gather materials. It's a good idea to grind this out since it feeds alchemy, and alchemy is useful. A herb spot will only have a single herb, in amounts depending on the quality of the herb spot. Every town, like Feng Shui, has its own set of herbology books. The herbology books let you get a specific plant from an herb spot. If you get weeds, you rolled a plant you don't have the chart of. You can savescum this. The charts also increase the drop rate from monsters significantly. To improve it, you need to hunt mushroom men which spawn near towns. Like the other town spawns, they drop a book. They also drop a lot of herbs, which is handy. The special mushroom lowers charm, recovers vitality and offers a special breakthrough fate. Sadly it's a near-death fate that doesn't seem that good. Alchemy Alchemy is used to make specific pills according to pill recipes you can buy in the workshops of towns and cities, the latter having more charts to learn. Each region has its own set, but all the towns have the same. This is the only reliable way to get red grade pills, which you will probably want down the line. Alchemy is used in multiple ascension quests too. Save before crafting pills. With the sect update, the pills needed for ascension can now just be bought if you wait long enough for them to appear. This makes alchemy a lot less important. Early on, you can use the workshops to have pills crafted for you, but they will be of lower quality. And since alchemy has a chance to fail, you should save beforehand. For doing it yourself you need the recipe from the workshop, the herbs and a cauldron. Herbs require herbology. The cauldron can be bought from sects (by joining or befriending them). Check the passive traits of the cauldron, some can randomly add elements you don't want, which is really obnoxious. Make sure you are using a cauldron of the appropriate region for the recipe, they must have enough slots for herbs. Even within a region, the amount of slots can differ. You want the higher one. Now alchemy requires you to have enough herbs for the recipe. You will also see "Required Elements" bars. Here is where things get annoying. The elements are always calculated in a manner that you need all the herbs in the amounts listed, and one more herb you need to do math to figure out. The cauldron always accomodates one more herb than strictly needed for the realm of the pill according to the recipe, if it's of the correct region. For example, Qi Condensation Elixirs requires 50 of two herbs, these fill Yin and Yang. But then you also need 200 Lightning element. So you need to calculate the elemental amounts missing, and then check which herb covers that. A cauldron of the first region will have 2 or 3 slots, and you should check you get one with 3. You want to avoid adding unnecessary elements too. Only one type of herb always fits exactly what you need. These herbs can also cover multiple elements at once, keep that in mind. Across the regions, you get higher tiers of herbs with higher base stats. You can use the lower tiers too, but it takes more. The max is 100 herbs at once. If you get a rare cauldron that has extra slots beyond their tier, you can be more flexible. Select the pill, the cauldron and confirm. Throw in the necessary herbs in the pre-filled amounts and check what elements are left over. Then figure out what the missing herb is and add it. Finish crafting and you get a QTE. You must stop the bar at the marked ideal spot. If you miss it, you incur impurities. Overshooting seems worse than under-. After you finish, you get a random roll where the cauldron can explode and turn your herbs to ashes (you did save, right?). If not, you get an assortment of pills and a boost to the proficiency of the pill recipe. I assume it improves the odds of getting good pills, but if you exactly correctly fill the cauldron, you will get a bunch of red grade pills anyway. By the way, your cauldron has a durability rating, it can break if you use it a lot. Health pills become pretty important later on, attack pills count double in the damage formula. Doing alchemy yourself or buying from your sect are the only way to reliably get red pills. Mad Alchemists town spawns drop the skill book, as well as a lot of random and useful pills. Sometimes red ones too. Mining / Ore Mostly useless. No really, I mean it. It gives you access to items that drop from Fallen Valley anyway. And since the artifact spirit grind is obscene, you will almost always have more than enough anyway. The drop charts should increase the drop rate in Fallen Valley. You can also mine resins used to refine artifacts, which changes the traits they have. The crystal golem city spawn gives you books, they're worth 5 points times the region you're in. You can reroll mining spots like Botany, but why even bother. Forging Forging is pretty complicated. You first need a high enough forging skill and learn the recipe from a workshop, if you want the best artifacts (you do). You may also want a higher forging skill anyway, just to assure a red artifact. Largely it's not worth it since the artifact + spirit grind is dumb, and they aren't even that strong. Every artifact requires a core material. All but the sword are drops from world bosses that spawn after long periods of time. Since you also need those cores to upgrade them, you better get hunting when they spawn. The sword requires an item that drops from the dragon boss in Fallen Valley, more below. Supplementary materials are simply monster drops. The total impurity of these materials needs to be below an artifact-specific value. Most are found in the Fallen Valley of the region of the artifact (where you can get the chart). The Rare Material is where it gets annoying. Each artifact has its own. You need 10 of these to make a red artifact, which has 25% higher base stats than purple. This is a lot more than it sounds, since it's +25% for all stats. First identify the material, then figure out which zone boss drops it. For example, the bosses in the special elemental zones of the second area drop the metal for the horn. These drops are random. The spawning of the beasts is random, slow, and you are only notified if you are in the area. You can get 3-5 drops per boss monster, but it's far more common to get nothing at all. Or ones you don't need. Can be savescummed. There's an alternate method. Grave robbing. Feng Shui has a skill that generates graves, with a rather low probability even with the highest skill level you can get. The grave robbing will reduce your lifespan by about 10 years (an artifact spirit can negate that), and you will get a region-appropriate rare metal, 3-5 pieces. You can savescum this if you are after something. Grave robbing has a counter in your stats, so there may possibly be something done with that down the line? One more method was added by a patch, certain events (monkey and tree, ice barrier) can give you rare metals of the region for choosing the second option. This is by far the easiest overall method as long as you keep going to ?. If you are past Nascent Soul (VI), you can also refight the five bosses to farm rare metals lategame. The last part is a special flame you just buy in a sect. A higher tier flame can greatly boost quality of a lower tier artifact, but only up to red. From a bit of testing, rare materials limit how high the artifact grade can be (10 for red), your forging skill and the flame used influence how much purity you can get. The normal materials only need to be below a certain level of impurity depending on the artifact I believe. After all this, you need to play a minigame. Read the description, click to zap the bad stuff away. If you have 10 rare materials, you should have an almost filled purity gauge with sufficient forging skill, 0 impurities, and get a red artifact. If you can't (almost) fill the bar even with no errors, you need a higher forging skill or possibly common materials with lower impurity. Artifacts need to be equipped into your pill slots. They are limited by your maximum focus. They also have a durability. If used in combat, it goes down by 2 if you recall it ahead of time, and by 20 if you let it be broken. And unfortunately later bosses will break them almost instantly. You can repair them at the workshop with a material from Fallen Valley and monster drops below a certain impurity. You can also upgrade them. This requires another copy of the core item (the boss drop), a different (and rarer) material from Fallen Valley and a large amount of quartz from Souleater Tower. You have to upgrade artifacts to your cultivation tier if you want them to be useful at all. Unfortunately the Souleater Tower is pretty hard to survive, so you may have to see if you can even survive grinding out the materials before the end of a region. If needed, you can just quickly hop in and out for the first boss, but this will take a while. The realm of the artifact determines from which region you need the quartz. Forging's associated spawn is the treasure fiend, same deal as the others. It drops materials for refining on death. Be warned that its attacks are hard to dodge and you may wish to be in the second cultivation realm of a region before picking a fight. Artifacts and spirits get their own section. Fallen Valley, Acquiring Spirits You want to have good mobclear for this. You will also need to interact with almost every system of the game to fully upgrade spirits. So you made yourself a fancy artifact by forging, and now you want to have a spirit for it, so that it's actually useful. This requires you to buy an item to go to Fallen Valley, to get spirits and items that let you go to Souleater Tower, which has stuff to improve spirits. First you must buy "Ultima Sands" from any market in any town. They're all equivalent and each shop stocks 10. If you need more, just teleport around. It's the same item no matter the region. Next you must find one of the two Fallen Valleys in your target region, either will do. The valleys of different regions are not identical, and far harder. Each entry costs one sand and five days. Take note that the Valley is very dangerous, you should be in the 2nd cultivation realm of the region to be safe. PS: I recommend the chain lightning LMB if you want to grind. Even if you need to get spirit fruits first. Fallen ValleyUnequip your artifacts and pills before entering. See random events as for why. The valley is always a 3x3 dungeon, where you start in the middle. Your goal is to get Soul Lure objects (blue spheres, they can't be taken out of the dungeon), and offer them to the large purple crystal to get crystals shards. Those shards contain a random spirit. The center area is (with one exception) always safe. If you go in any direction, you will start a fight against a large group of monsters and minibosses. These can randomly drop Soul Lures that you need. The trees tend to drop them usually. While fighting, be very careful of the purple spouts and the AoE circles you can see. This are environmental hazards and they deal a percentage of your max vitality as damage. This means they are always dangerous and you can never outlevel them. The explosions only happen once, and if you look closely, you can see which pieces of terrain will explode when approached. These things also damage enemies by the way, might be useful. Once you have found the room with the large purple crystals, you can choose to end your excursion by interacting with it. You will offer your Soul Lures to the crystal and get a number of shards depending on how many lures you offer (... and it's random how many lures you can get to drop, so...). Less than 10 means 2-4, 10-20 seems to be 5-7, about 30 will be 9 or so. More than 30 seems to be wasted. You can hammer space to fast-forward through. A boss can spawn when you interact with the crystal, but it's not too bad if you are in the second cultivation realm. If it happens you get 2 more crystal shards than usual and a treasure chest. You must go near the shards and hold interact with them to... roll the dice. Spirits are gacha. Great. There're three types of spirit rarities (more in the spirits overview section). Aside from the shards, you also get two types of liquids which are used to repair or upgrade artifacts respectively. Fallen Valley Random EventsAside from the purple crystal room, there're a number of other random special rooms you can run into. Most are beneficial. If you see a floating green crystal in the middle of the room, you have to keep attacking it a few times to break it for free soul pearls. If you find a white dead body, interact with it for free pearls. A room can have a random cultivator you must fight. They can be somewhat strong for the region. If you find you are doing no damage, escape right away. You will waste a run, but it's better than dying. They do not seem to scale up. A room can also spawn a clone of your character. The clone can use your artifacts and your pills. They will have your stats and skills, but not your fates (at least not most, martial skill cooldown reduction actually seems to work for it). This makes them unable to use ultimates. The AI isn't too smart, but something like a blade lifesteal build may struggle a bit. They give out a lot of pearls on death. You may run into a treasure chest, this can be a gamble. It can either just give you pearls, or have a cultivator attack you (the odds seem 50:50 or worse). The cultivator can range from very weak to hopelessly powerful, irrespective of your cultivation tier. Even if you are in Enlightenment and visiting a Fallen Valley from region 2, it can still beat you. Peak Enlightenment can be barely enough. Prepare to run if you do 1 damage. If you manage to beat it, you get a lot of soul pearls. Very, very rarely an artifact rat will spawn. This is a special enemy that only takes 1 damage from all attacks, has little health and does not counterattack. You need to kill them relatively quickly to get pearls from it. Lastly you may find a purple pond. The behaviour of the pond was changed. It seems be about a 50/50 chance that it will either take your pearls, or give you double. It's a straight gamble, but keep in mind that around 30-something pearls, you do not get more rewards. Nether Breath As you keep rolling the gacha, you will get duplicates. Initially these upgrade the soul level of the spirit, but once fully maxed, you receive "Nether Breath" items instead. 1 for normal spirits, 2 for rare ones. You can use a large stack of these (up to 50) at the center of the starting area to summon an empowered version of the crystal dragon boss. It will be far more powerful than you may expect. If you spend 50 breaths, it will be scaled to the cultivation realm of the next region. If you don't have one of the busted builds, you will find it difficult to win. If you win, you get a large amount of crystal shards, more if you spent more Nether Breaths. If you spent a lot of breaths (or get lucky?), you can find a special equipment ring here. This ring gives you a percentage-boost to your damage for each artifact you have equipped, but constantly drains your sense. (1%/2%/3% bonus damage per artifact for 2/4/6 sense per second). The damage bonus is pretty negligible sadly (unless you go all in with lower-tier artifacts I guess) and you can't really restore sense. Souleater Tower, Upgrade Materials You must have Soul Eater Stones for each time you want to enter, you can get them from Fallen Valley. The tower is a series of 5 increasingly difficult boss fights, with a timer. If the timer at the top ever runs out, you die. Defeating a boss drops small blue objects that grant additional time. If you aren't at the peak of the second realm of a region, you will probably not survive until the end, but you can still get the drops you want from earlier enemies. Those being Forge Quartzes (used for upgrading Artifacts) and various Dews (used to upgrade Spirits). These are region-specific, so you can't upgrade items beyond your realm. If you finish a tower, you can get a soul sphere, which is an item to upgrade a spirit with. You only get it once, but it acts as equipment you can take back at any time. Some towers also give you mounts. Overview of Spirits and Artifacts So you got your artifacts, and you got your spirits, and you may wonder what next. Artifacts must be equipped in your pill slots (and are used like one). They all have unique special effects. You can read what an artifact does on the artifacts screen you can click on below the bag icon in your inventory, on the left. All artifacts also have a number of skills, which are pretty much traits for artifacts. However, when you refine an artifact, you do not improve the traits, you change them. Some are decidedly more useful than others I'll say. The traits can have tiers, but you cannot pick which trait to replace. You can only replace the whole set at once. To unlock the real power of an artifact, you must combine it with a spirit in the upper right. This process is reversible at any time, but doing so reduces the durability of an artifact to zero. Spirits add their own special abilites to an artifact while it's active. Some also have passive traits that are triggered if you have the spirit merged with an artifact in your pill slots. The tier of an artifact can boost the power of the spirit's abilities (not durations or probabilities though). When a spirit says something triggers on "attack", this means an attack by the spirit itself, not the artifact. Generally, attacks are somewhat slow projectiles (that can miss...), while buffs will home in on you. As far as I can tell, you cannot find the stats like range and cooldown for the spirit's unique attack anywhere. Damage should depend on the artifact. Many effects from spirits only stay around while the artifact is active. Exceptions are for skills that explicitly have a timer (like Charon's boar summons). Artifacts are sadly only useful if you keep upgrading them to your tier. This requires the liquid from Fallen Valley, quartz from the Souleater Tower and another copy of the world boss material. In combat, you summon them by pressing the inventory button. They tend to draw aggro from enemies more so than yourself. You can unsummon them by pressing the button again. This incurs a 10 second wait time before you can use it again, their vitality will stay the same. If the artifact loses all vitality from attacks, it will break. This costs 20 durability total and incurs 60 seconds of wait time, but then it has full vitality again when summoned once more. They sadly tend to break quickly, and on higher difficulties, bosses will shred them. At that point, you may elect to just keep them in your bar for the passive boosts they offer. SpiritsThere's a lot to see on the artifact spirits screen. The left side contains a list of all spirits you have obtained from the various Fallen Valleys. The middle piece is art. The bar below is their soul realm, upgraded by rolling duplicates of the spirit in Fallen Valley. Lower left has a history of the spirit (more unlocked with a higher soul realm). Below you can give them gifts to increase affinity displayed as hearts in the top right. Each spirit has a preferred type of gift (like Mengyi and Iridescent Gems), those are just drops, from the Fallen Valley where you can find the spirit. The very first entry tends to be the special gift that gives half a heart. You can only give a limited number of gifts per year. Once you exceed 10 hearts you can form a pact. This simply unlocks the third combat ability of the Spirit. If you have a soul wisp from a quest, you can give it as gift to greatly increase the soul level, best used for the framed spirits. The right side of the screen contains the abilities of the spirit, hover over them to learn more. Dark skills are not unlocked yet. You do so either by pact, by the Talent web or by increasing their Soul Level. Specialization skills may require the use of Energy. You get it for feeding items to the spirit by clicking on the plus next to the bar or by waiting. Each month spirits seem to recover 2 points of energy. There's no quickfeed button alas... Talents are special upgrades for Spirits, unique to them. Each talent upgrade increases the Spirit Power level. If you want to bind a spirit to an artifact, it's spirit power needs to be lower than the artifact's capacity. So if you upgrade spirits a lot, you must also upgrade your artifacts alongside. The three slots are for items you get for completing a souleating tower of a region. They only drop once and increase all stats by a few percent. You can also take them back out for another spirit if you want. Spirit TalentsIf you click on "View" next to talents, you open the upgrade web. Every upgrade comes with a cost, and increases the Spirit's Spirit Power, keep that in mind. The upgrades will tell you what they need. This can be money, dew from the Souleater Towers (note which region's tower is needed), practically any kind of pill (of specific grades too... You can buy grades 5+6 in towns, 3+4 in sects), interacting with NPCs (even killing them), and a lot more. You need to interact with most systems in the game to upgrade Spirits. Hope you didn't slack with your Specializations. If you see a node that requires you to see an event, these only count after you unlocked the node. This is an issue since some events are one-offs. To combat this, you can also feed the spirit an orange or red skill book, any tier, but of the appropriate type. Just defeat world bosses to have fodder. The upgrade web also enables the second combat skill for the spirit. If you cannot progress in the upgrade web, you may need to increase the soul level of the spirit by rolling duplicates in Fallen Valley. Have fun. The most common spirits have 4 soul levels, the moderately rare ones 4, the ones with a frame 5. The framed ones also have a larger upgrade web. The lower part of the upgrade web is currently not done. Opinions of breakthrough fates All flat stat boosts aren't worth it including insight and luck, unless you really have free slots in your fates of your build, summoning (Chicken King, etc.) doesn't seem worth it either. Spirit fruit gift is a joke. On death skills are pointless since you shouldn't die. Not all fates are available at all breakthrough tiers. Some later quests give items that let you reroll fates once. If you pick a fate that you have higher tiers of, you will be made to change all of them. (Can't just delete a tier 1 and keep tier 2.) Check Sect Fates too. Big thanks to the contributors of the wiki. I'm leaving out a lot of skills since this is just my opinions. Name Opinion Energy/Vitality Essence Restoration from dead enemies. Good for boosting survivability and you can only pick one of the two. I usually go with Energy Essence since life recovery traits seem more common. Needs mobs. Elixir Recycle Excellent survivability since it makes your pills go a lot further, at least while pills are still useful. Jo's Flying Sword Very strong past tier 1. The first level just deals damage, but the second can inflict random status effects. On many bosses. This can be rooting them, but also sealing/freezing them (they can't attack and skip a phase in their attack cycle). If it poisons the target, it will deal full attack damage for a number of ticks. It attacks often enough for this to be extremely powerful. Tier 3 makes it shoot a spread of swords, and if you happen to be near a boss with that, it will deal a lot of damage. Combat Expertise Extremely useful. This lets you skip the requirement of building up stacks for ultimates. This lets you open fights with your ultimate and use it on CD, which is really useful. However there are always two ultimates and one requires objects on the field. This skill does not help with those. In practice this means that half of the ultimates are just worse. You should only get this for the ultimate you intend to use though. Not useful for Finger since both ults require stacks. Martial Skill Specialization Cooldown reduction for LMB is strong if you use those. There is no equivalent for spiritual skills. Blood Claw Hits hard, but requires a lifesteal build to not endanger you. Power of Blood A close-range lifesteal. Ideal for blade builds, questionable due to the range limit for most others. You can regain life through skill traits too, keep that in mind. Spirit Fusion Outclassed by sect fates. Multicast your RMB and ultimate for reduced damage (30% of normal), while keeping energy cost. Works very well for builds that are boosted by a high number of hits. +22.5% damage overall to your RMB and Ultimate at max. The spirit cost only triggers when you get the bonus. Burning Butt Improves agility, by a pretty large %. At the highest level it even reduces damage you take to your back. It's solid. Spiritual Sword Decently powerful if you have an energy recovery setup for bosses. Alternatively you need tier 3 for it to matter. At that tier, it can steal energy for you. Old but Strong +1 def/year, strong very early on, but quickly outclassed. If you take it early, replace it later. Quick Escape Guaranteed escape, Not as useless as it may seem, since it's easy to get into fights you can't win. That said, it has no combat utility to make you win fights. Warlord's Phantom Vitality becomes shields. If you use a shield-burst build with Fist skills, this can be used to OHKO bosses up to Nightmare or so. If you have strong life recovery (traits, lifesteal), this can also be used to double your effective health, but you may not need that with strong recovery? Fight and Learn Iffy. Learn skills from spars. Only happens randomly, and you can't pick the ability. You may think you can get red tier skills from it (and it will even skip the spirit root requirement), but you will mostly get bad passives since NPCs don't tend to have good ones. You cannot learn skills of a higher realm based on a little testing. With the Heaven Chosen, you could savescum for getting some of their passives, but even then. Starlight Funky AoE rainbow. Requires mob kills (useless against cultivators). Deals roughly your LMB damage every tick. Seems okay if the build up isn't an issue. Sword Shadows Deals pretty hefty damage, but takes a lot of hits to trigger. Can only be triggered once per battle, which makes it pretty limited. Not that good, especially since it takes up two fate slots if you want the real damage output. It does last for 30 seconds though. Possibly more useful on lower difficulties where fights end faster? Following Bug Weak. Don't bother unless you are following the Dragon Sect storyline. Commander of the dead The necromancy tree seems weak unless you have plenty of mobs and the tier 3 fate. Shield stance Take 50/100 hits for a time-limited damage reduction after ult, once per battle. Pass. Shield spirit Meh. Near death, gives shields/damage reflect/one damage burst. Burning Jealousy Bonus damage to cultivators with a partner. Utility is far too marginal, and non-human bosses are the bigger challenge anyway. Rain of Energy/Blood Energy One energy refill/vitality for energy. Just use pills/traits for spirit recovery instead of wasting a fate slot. Counterattack You need to take 6 times your max health as damage for a 100% damage boost. This only works out for lifesteal builds, though it is great for them for bosses. Witchcraft Transforming is cute, but it doesn't work against the targets you want it to. Mobs are already fodder. Mirage Pot Ahaha it boosts alchemy and reduces agility. Nope. Not ever. Not even the boost to summons makes this worthwhile. War Drum The damage is decent, and it will reduce boss damage by 25% half the time. Good for blade builds. (Elemental) Burst Various effects (wind pulls, etc.), but none seem worthwhile. Mysterious Shield Projectile shield, sadly only projectiles. AoE-type of attacks do not count, and some of the more dangerous bosses are melee-oriented anyway. First tier blocks them, second causes a damage shockwave every 5 hits and reduces agility for 5 secs, third adds knockback. Enhanced Spiritual/Martial Skill Increases range, marginal utility. Ranged skills don't need it later on. Free Spirit No conditions for artifact spirit skills, apparently strong with some. Remaining Breakthrough Fates (WIP) I've seen the questions come up often enough that I've decided to just list the ones I don't think are ever worth considering here too, such as the static stat boosts. I'll add to this slowly over time as I roll them. There may be more added over time, apologies if something is missing. Name Description Lucky Star Permanent Luck increase, +50 Spirit Fruit Gift You get fruits for your roots every year, of the appropriate tier. It's not many (I think about 10?). Sect Breakthrough Fates and Heaven Chosen Fates You make a fate an option by breaking through in the sect's cultivation room, you need to have joined it to do so. Sub-branches always have the same fates. If you conquer a sect, you replace their breakthrough fate. Sect Breakthrough Fates do not act like the Strange Mushroom. They do not allow you to pick from a new set of Breakthrough Fates, instead they replace one of the choices. Some breakthrough fates are ridiculously good. And you can even get multiple sect fates if you hop sects a lot, which seems silly. Some of them are good enough to make it worth the hassle, Murderous Rise and No Traces Left in Snow for example. There might be some more new sect fates that I haven't seen yet. Name Description Roiling World Damage reduction debuff for every 10% max HP lost. This seems potentially great for blade builds that lose a lot of health constantly. Dipper Tail Footwork 5s of 50% damage reduction after a motion skill. If you are into a motion skill CD reduction build or use it a lot, this could be pretty useable. With enough reduction, wind movement makes you invincible anyway though. Karmic Attraction Damage transfer to highest HP target. You should avoid damage instead and the transfer isn't even a lot. Alchemic Taoist Perfection +25% damage to LMBs only. There are plain better boosts. Halberd Lightning Rod Counterhit when you take damage. So lifesteal builds except other fates are better. Cloud-Piercing Lightning Per x movement points, bonus damage. Caps at 30%. So... a 30% bonus damage in the higher tiers. That's quite good. That's comparable to quadcasting which requires 3 stages of breakthrough fates. Blade of Heaven's Eye Minimum damage is increased, it's not that much though. One of the artifact spirits can do this too. No Traces Left in Snow Purple shield that blocks an attack every 10 seconds. Amazing for most builds that aren't tanking damage. You should usually not get hit that often, outside of boss spam attacks. If you stack this with the passive trait that grants a shield on energy use, you can really increase your survivability. Concealed Nirvana If you take more than 15% maxHP damage at once, it's capped to 15% maxHP. This is useful for preventing the lategame 5x crits nonsense. Only triggers once every 50 seconds though. Murderous Rise After x damage, you get guaranteed crits for 5 seconds. 15s cooldown. This is strong. It basically doubles to triples your damage output for a few seconds. Just dump all your skills once you see the crits. Tiger's Spirit, Dragon's Soul 40% chance for additional damage on RMB hit. 250% damage factor. If you have good single-hit RMB skills, this should be nice. HC NPC special fates: Take careful note which state they require allies and which don't. The ones that don't still seemed tuned for group fights, which makes a few rather unusually strong. Element Description Blade All enemies take 1% of maxHP per second as damage (boss 0.1%). Agility reduced. Lasts 60s. Probably decent. Threatening in 1v1s. Spear Takes 40s to trigger. Allies leave bombs behind that deal damage. Damage numbers seem low? Sword Summons spirit foxes. They transform enemies into frogs for 3s every 40s. Could be nifty if it hits the right target. Can be nasty in duels. Fist Only with allies. 20% of HP is turned into shields for allies. They all receive the full amount. This seems decent. Palm Transmuted Strength: With allies. When below 50% HP, enemies deal 80% less damage (?!) and take 20% more. Lasts 60s. This seems stupid strong outside of requiring allies. Finger With allies. 50% damage reduction +20% more damage dealt. Good. Fire Summons boar lair which summons boars. Summons distract NPCs though, but they seem weak in group combat. However they're really tanky for 1v1 duels. I think these should be restricted to group fights. Stay away if you can. I have not checked if they finally got rebalanced, they need to be. Water Bubbles fall, trap enemies. Others should be better, but quite nasty since it can be used in duels. Lightning Team fights only. Reduces enemy agility by little, triggers lightning that damages ally a little (What?) but then damages enemies around them a lot more. Wind 50% chance that any defeated ally is resurrected in 10s. Most conflicts just amount to using up resources through kills, so this could extend the resources a fair bit. You should try to be strong enough to not need this though. Earth With allies, 60% damage reduction. Unit takes 30% of damage for allies themselves. That sounds suicidal in sect wars unless they're really tanky. Wood If I'm reading this text right, all ATK values are reduced by 50% and all healing pills apply to everybody. If the debuff affects your units as well, this would be pretty bad. So for sect competitions, Sword, Blade and potentially Fire are decent. Sect Wars definitely get use out of Palm, Finger people. For solo fights, Fire seems a bit much and needs balancing. Eye of Providence Skills Part 1 There may be new skills added later. You get the skill prompt during boss fights, during specific attacks. You must reduce their HP by a large amount and you get the skill. Although I've never ran out of time, it's possible that there's a hidden time limit. Bosses can have multiple skills. You need to fight them multiple times to get them all. There seems to be a chance that any given skill triggers the eye, and sometimes a fight doesn't give you one period. You must wait long enough for the attack pattern to appear. You will be able to pick up fights you can't otherwise get (quest choices) in the Tower of Souls as well as the 4th area Tao Dungeons. There're two one-off fights as far as I can tell. The Leviathan and the Golden Crow. But both of those should be difficult enough that you can't just skip past the attack. To upgrade skill realms, you must defeat a sufficient number of boss monsters of that realm, it shows you in the overview. The realm also gets upgraded if you defeat the same boss of a higher realm (recurring bosses like the artisan bosses). The skill tiers matter a fair bit, if you defeat a higher tier boss, you can usually use their skill. Skills that benefit from energy loss require specific finger skills, while "recharging" skills should be the spear skills that use dots. CategoryPersonal suggestionsDamageCoatl: Soul-Tracking Lighting if you manage to get all 8 beams on target. Sphinx Allquake or Trident Lightning if you are up against a large boss. If energy is not an issue, Kui: Ring of Lightning and Qiongqi: Calamity Arrow.StunHatuibwari: Rushing Thunder, Blood Lord: Blood Shadow TracksSkill Cooldown reductionsLeonid: Scorching Fireball for RMB-only. Dangkang: Gust Gust, Mountain Specter: Sandstorm for all CDs.SpecialGoliath Crab: Dig Strike, 3 second evasion move that can also stun. Drought Demon: Scorching Sunlight is a strong recovery for bosses that summon mobs if energy is not an issue. The one-hit damage skills overall seem rather weak compared to the skills with lower numbers that hit more often. Idle thought. Something like Willow Wind deals extremely low damage per hit, but has a huge number of projectiles. If you combine that with skill that raise the minimum damage threshold, I wonder how well that'd work. Jagu Flora Spirit: Drops leaf orbs. They deal mediocre damage, enemies must walk into them and they're spread widely randomly. You recover a small amount of HP% when an enemy is hit. Moderately long cooldown, somewhat expensive. Not really good. Evergreen Willow Wind: Shoots a lot of small orbs that deal tiny amounts of damage. Leaves and Petals: The stream of razor leaves. Pierces, moderate damage. Angle does not change after casting. Bamboo Shoot: Summon the seeds. You must protect them until they hatch, which can be impossible against some bosses.. Then you either get those bamboo creatures that are worthless and die immediately or the Evergreen. The Evergreen is actually pretty powerful and if not a target for the AI, will deal considerable damage over time. But it's up to chance if you get it. If you run a summon-boosting build (like the Horn), you can get use out of this, provided you get lucky. Mushroom Man Hallucinatory Dish: Create a mushroom that boosts a summoned creature, either damage or speed. Also grants recovery from the creature. If you made your summons strong enough to be powerful, this could be good. Most of the time, your summons will exist as tanks though, not as damage sources. Flash Fungus: Throws mushrooms at enemy. Surprisingly high damage if you hit with most of the mushrooms. They're aimed at your cursor, long range too. Only downside is that it takes a while to fire all the mushrooms, but it's still quite good. Dark Crystal Spirit Lava Blast: Hits in cone. Number might look big, but the actual damage isn't all that high. Rain of Sands: Rocks fall in the entire arena, so you need to be rather lucky to get any usable damage here against bosses. Grants minor health recovery. Darkfire Mask Dark Flame - Break: Stream of projectiles. Very high damage if you can be right in front of the enemy for a second. Rather good. Inferno Hell: Projectile blasts around you. Damage isn't high unless you're right in the middle of a big boss, and even then. Taking the cooldown into account, not that good. The spirit recovery may seem tempting, but the skill isn't cheap either. Blood Lord Lethal Tombstone: Slows enemies. Decent AoE damage if the enemy stays in it. Decent CD as well, overall a pretty solid skill. Energy cost is very high however. Blood Shadow Tracks: Dash into enemies. Stun and Silence on a 14 second CD. This is pretty fantastic to interrupt bosses, since most have attack patterns longer than the CD. Energy cost is not cheap, but this is really good if a boss has an attack that's hard to deal with. Some bosses are immune to crowd control abilities, keep that in mind. The earliest available stun. Sword Bambuki Demon Bamboo Sting: Bamboo spears shoot up. Random, expensive. They can attract enemy attacks for a second, but still. Not particularly good. Coatl Arc Flash: Fires three projectiles. The cheapest Eye skill in the game. Its damage is low, but so are its cost and CD. If you just want a very cheap damage supplement, this can work against mobs. Thunder Curse: More expensive, longer cooldown that Blood Shadow Tracks. In return it offers good damage (it hits twice) in a large AoE, a longer stun and larger range. With the CD, BST is probably still better. Soul-Tracking Lightning: 8 Pillars of lightning home in on enemies. The damage may seem low, but it's 8 hits every tick and lasts a fairly long time. If you summon them near a boss and they keep tracking, they will deal a fairly large amount of damage. Summoned mobs will distract them away however, so time it carefully. Vanishing moves will make the beams disperse. Six Tails Fox Beads: 3 sets of 3 piercing orbs. Damage is unimpressive. Demon Cold Fire: Piercing shotgun cone. Damage is passable. Demonic Atmosphere: Projectile rain that targets the entire arena. If it hits a lot, the damage is rather good, but it's pretty much random. Probably more useful against really large bosses. Goliath Crab Crustacean Crush: Melee attack. It's cheap, but it's quite weak. Not useful. Toxic Swamp: DoT AoE, pretty large too. The damage is not high, even if the enemy stays in the field the entire time. +30% agility is good for dodging attacks though. Dig Strike: Create an AoE damage zone, while going underground to evade attacks. The AoE stuns on hit, but you can't attack for most of that time. Longer cooldown, decent evasion option. Fortifying Wall: Recover 10% HP and 50% damage reduction for 10 seconds. Has some uses for tank builds if you have trouble with specific boss attacks I guess. Otherwise, you should use it during fights between Sect Leaders. The HP of both fighters is multiplied by about 10 without increasing damage, which makes the 10% be a lot more HP now and last a lot longer. You can buy a lot of time with this. Eye of Providence Skills Part 2 Dangkang Gust Gush: Wind beam, like one of the wind skills. Low damage, reduces CD with every tick of damage. It hits a good number of times, so it's a good option. Sand Tornado: Fan of pretty fast tornados. Damage is mediocre. Fuse Dash: Rush attack that stuns on contact. Damage is not enough to pick this over BST. Earth Rending Gale: 5 Piercing beams in a spread. Weak. Cooldown reduction for RMB may have niche uses I guess. Harpy Bone Etching Wind: Slow moving wind pillars summoned in a round spread. Low damage. Dust Stone: Launches (pretty fast) rocks at the cursor, they stun on hit. Damage is low, and BST has half the CD if you want stuns. Tornado: Starts a spiral of tornados from you, with a delay. Pretty good damage if you start it very close to a boss. Mountain Specter Sandstorm: Launchs a shotgun spread of earth projectiles. They reduce CD of the skill with the longest timer on hit. The damage is nothing worthwhile, but some builds can benefit from the CD reduction. Galloping: You gain an agility boost and summon tornadoes. The damage is overall very low. You can also steal spirit stones on contact, but the amount must be quite low since I didn't even notice it. Hatuibwari Lightning Field: You summon the field of lightning around you, lightning strikes all enemies in it. The damage is very low sadly. Permanently increases RMB damage for the battle, but only up to 10%. Rushing Thunder: 5 damage AoE attacks at target cursor position. Microstun for each too. A better stun option than BST since it's on a lower cooldown and with lower energy cost, it can even stun multiple enemies out of their attack. Overwhelming Cloud: Targets a single enemy with lightning for tiny damage, pass. Albino Ape Mountain Breaker: Single hit mediocre AoE damage, at best useful for mobclear if you need that. Lava Rain: Summon rocks randomly. Low damage, recovers a tiny amount of health and it's very costly too. Pass. Serial Earth Crack: Multiple AoE zones in a row. Low damage per hit, probably won't land more than 2 at once either. Not worth it. Fel Vermin Ice Tornado: Fan of Tornados, low damage, CD reduction isn't worth it since it usually won't hit often unless against very large bosses. Ice Prison: 9 AoE zones in a 3-spread. Pretty large, it's difficult to hit with more than 3. Damage isn't worthwhile unless most hit. You can increase your agility for the fight if you kill mobs with it. Frost Prison: 6-fold star-shaped AoE around you. Too large to hit more than once for any but the biggest bosses. Rather low damage as such. Three-legged Crow Pyro I think this is a one-off fight during the Golden Crow questline from region 1. Seared Path: Three lines of fire in the direction you aim. Deals okay damage over time. You pretty much need a large enemy standing in it for the entire time to be worth the very high spirit cost. Leviathan This should be a one-off fight during the filling in the land quest of region 2. Leviathan Tentacles: Summons AoE zones at enemies. Extremely costly, with a long cooldown, but deals a very large amount of damage. STL is a bit better since it has a far shorter CD and cost though. You can cast it twice for half the total energy cost and somewhat more damage. Sphinx Flame Flash: A line of projectiles perpendicular to your aim direction, mediocre damage, but cheap. Lightning Spell: Small AoE at cursor, seems to hit about 5 times. Too few hits for the CD reduction to matter. Damage is okay. Allquake: 6-fold star pattern, lots of lightning bolts. If you summon this inside a big boss, you should do a lot of damage. Trident Lightning: 3-spread pillars of lightning, decent damage if you hit with most. Abomination Wind Flurry: Fires piercing projectiles randomly all around you. Expensive and long CD, decent damage if used within a boss. Dense Wind: Spread of tornados that stay. Only worth it against really large bosses. Ninetails Fox Flame: Five large, slow projectiles aimed at an enemy. Very low CD, but pretty low damage too. Enchant: About 120° spread of hearts, low damage, stuns. Extremely expensive. It improves your relationship with a targeted cultivator by two arrows, which isn't really much. The effect is unique though. Fox Necromancy: Summons a swarm of fire foxes moving from the left of the screen to the right. Deals a great amount of damage against large bosses if most of them hit. Pretty costly and on a long CD. Sagittar Rock Fly: 3-lane shotgun. Even if all projectiles hit, the damage just isn't worth it. Lava Meteorite: Single line of AoEs. Won't overlap much and low damage. Sundering Strike: 6-fold star line of AoEs around you, damage does not justify cost. Lydra Wind Blade: Two piercing projectiles, low damage. You regain some health on hits, but not much for how expensive it is. I don't think it's a linear 1% per enemy hit either. Swirling Axe: You throw four large projectiles that stay where they go. The damage is quite good, but the energy cost is far too high compared to STL. Word Spell: Buff/debuff the enemy and you. Can be rooting, minor damage buff, DoT or healing over time. Since they all boost the enemy too, why would you use this? Leonid Scorching Fireball: Fires waves of fireballs, shotgun pattern. Cooldown of RMB is reduced if there's only one enemy. The damage is mediocre, but the CD reduction should be useful for some builds against bosses. The skill's own CD is pretty low too. Fireland Banner: AoE fire area. Low damage, long CD, not great. You can deal a lot more damage with other options. Fire Rain: Fireball AoE, randomly targeting entire arena. Good luck getting any to hit. Burning Belt: Rotating ring of 5 fire projectiles around you. Once more a case of being better for large bosses since they'd hit a lot more, otherwise the cost is rather high. Eye of Providence Skills Part 3 Carpia Icicle Mark: Freeze AoE at cursor. Seems to hit 3 times, other stuns are better. Frost Lance: Small circular spread of icicles with good damage. This would be a great skill if only it had half the cooldown. Ice Blizzard: Five tornados will home in on enemies. They don't circle around though, they just home once. Moderate damage, too costly for that. Sealed With Ice: Another map-wide attack that won't hit much. Freezes on hit though. Qiongqi Earth Anguish: Earth AoE at cursor, mediocre damage with a slowing effect. Calamity Arrow: Piercing 3-lane spread. Solid damage when used up close. Cooldown is pretty low too, but the energy cost is somewhat high. Decent damage skill if energy is not an issue. Soul Breaker: Line of moderately-sized AoEs. Even with overlap, the damage is not that good. Kui Chain Lightning Blast: You fling a whole lot of lightning orbs that create one-hit damage zones on the ground. Sadly the energy cost is way too high for the moderate damage it deals. Lightning Glare: Slowly homing, short-ranged lightning beam. Damage is far too low for the cost and CD time. Lightning Cloud: Large AoE that basically keeps an enemy trapped for the duration. Damage is low, but the CC is okay. It's just rather costly for all this. Ring of Lightning: Two rings of lightning that rotate rapidly. They hit the target a lot and the total damage is actually pretty good if you are close. Sadly the energy cost is just too high, unless you can easily recover it. This would likely be quite powerful against larger enemies where most of the orbs are always in contact. Hellspawn Bloodlust Slash: The damage is a joke. This would be the fastest option to remove the CD on "recharging" skills if you use them. Nightmare Charge: Stun with longer CD than BST. Damage is nothing worthwhile too. Crimson Path: Two lines of attacks. High energy cost, low damage. Blood Frenzy: Character-centered AoE damage. Again, high cost with low damage. Jimeng Corrosive Rain: Large AoE damage zone. The damage is decent, but since it takes so long, you can cast STL twice and deal more damage for almost half the energy cost, so... Water Dragon Cauldron: Effectively summons a turret. The damage is good, but it will likely get destroyed quickly by bosses as it attracts aggro. And sadly it's rather expensive too. Drought Demon If any enemy is killed, it may spawn meat that recovers 5% health each. Really expensive, but could really boost survivability against bosses that summon mobs if you can manage the energy cost. Suanyu This is the Fallen Valley boss that either randomly spawns at the end or is summoned with Nether Breaths. Toxic Mist: Large AoE with okay damage. The energy recovery will not make up for the cost though. Thousand Eyeballs: Spreads some mines around. Not that many and you have to get lucky for this to deal decent damage. Far too costly too. Pupil Sorcery: Summons an eyeball on delay that casts an attraction field. The damage is pretty low and the energy cost is extreme. Pass. Gudio I think this is new because I don't remember seeing it before. No idea where you fight it. Tower? Tao dungeons probably? Feather of Enticement: Projectiles aimed in all directions. Mediocre damage sadly. Tiangou I think tao dungeons? Lunar Eclipse Orb: Three circles of five orbs each, fired at 60° angles. Pierces. Damage should be passable against large bosses where most shots hit. Zhujian Never seen before, no idea where to find it. Rock Eruption: Instant AoE damage in a large area, but damage is not high. Pretty expensive too. Nether Nibbling Ape Same as above, probably new. Calamity Stone: Cast a large amount of damage lines that stun enemies. Far too expensive for how little damage it deals. There are way better stun options. Abyss Roar: Absurdly expensive full-screen damage effect that seals cultivator motion skills. Damage is comparable to STL, but this has the highest Eye skill energy cost in the game. Useful skill traits (WIP) Since the trainer lets you cheat in a lot of manuals, I took the liberty of generating a fair amount to see what kind of traits there are. Since the generation is nonetheless random, this list will be incomplete and is also just my personal opinion, there could well be builds that make use of traits I didn't consider. Tavern Drinks The following was taken wholesale from the wiki and put here for convenience, full credit to the wiki contributors. You can buy them from taverns. Each tavern has three different drinks, which have a selection of different boosts. You can have one boost from each drink active. If you drink the same thing twice, you overwrite the previous buff. You can just keep spending money until you got what you need. Furthermore, each region's buffs count separately. You can get three buffs from your current region, three from the previous one and they stack. Going even further is not that useful since the buffs will be weak. You cannot get a drink from the next region sadly. The strength will be in ascending region order 1/2/3/4/5. 5 may not be out yet, but was datamined. All buffs last for three or six months, it seems random. Nu Er Hong's Placid buff is buggy. The third area should give you 4000 vitality recovery per month, but it only gives you 1000 per month, like the same buff from the second area. It seems to be treated as the 2nd region's buff in the code, since you can overwrite it by drinking from there. Nu Er Hong Name of buff Strength Bloodboil +100/500/2000/7000/25000 maximum vitality Force of Nature +100/250/800/1200/3000 maximum Energy Refreshment +100/250/800/1200/3000 maximum Focus Placid 200/1000/1000 (bug)/14000/50000 vitality recovery per month Lively 200/500/1600/2400/6000 Energy recovery per month Tranquil 100/250/800/1200/3000 Focus recovery per month 18 Luohan Name of buff Strength Killing Intent Crit +20/65/200/700/2200 Body of Steel Crit RES +20/65/200/700/2200 Enhanced Stamina Maximum stamina +10/20/30/40/50, stamina recovery +10/20/30/40/50 Blissful Max Mood + 10/20/30/40/50, mood recovery +5/10/15/20/25 per month Merry Drink Name of buff Strength Mighty Strength Attack +6/24/85/320/1150 Robust Body Defense +6/24/87/317/1146 Light as a Feather Agility +15/25/35/45/55, Travel Speed +400/700/1000/1250/1500 Tao Souls laws Part 1 (WIP) Likely too large, have a gander here. [tale-of-immortal.fandom.com] The trainer lets you easily create Tao souls now, so I can check and verify them all, might as well get cracking. Short reminder how they work. The sum total of tao soul levels needs to be 3. Whether that's a single element (Sword 3), or a mix (Wood 1, Fire 1, Water 1; Sword 2, Blade 1). Your elemental mix is determined by the primary elements of the tao souls you use to ascend. The secondary elements give minor stat boosts. In most cases, you want a longer duration for your law if you go for a level 3, so Wood + Spear it is for secondaries. Name Level Description Sword 1 2 Artifacts Opinions Haven't tried out of all of them yet at a fully upgraded level. Artifacts that deal damage use their own stats for this, this can make them less powerful than it may seem. Or more powerful if you aren't keeping up with your passives. They will tend to break quickly on higher difficulties, at that point carrying one for the passive trait of the spirit may be the best you can do. Many NPCs carry artifacts. If you want an overview, you can just walk into a town of the region where you can find the forging recipe and check out various backpacks. In combat, you only need to expect artifacts from the region you're in. Horn of DesolationSummons boars and offers healing. The boars' vitality is based on the artifact's. Even upgraded, this just seems mediocre. The boars are not strong, the healing is not that strong. Its traits tend to boost summoned units, so you could make it work with wood/earth builds? The spirit Charon also summons boars for tanking. Maybe two summons at once are good for drawing aggro? Typical traits: Boosting summoned units. A debuff that makes enemies take more damage. Lightning SmasherCasts lightning spells with a small AoE in its area. Going by the numbers, this artifact should be dealing solid damage. The spirit root reduction for enemies should be borderline pointless, since enemies rarely get reduced damage anyway. Typical traits: Faster Bolts You can be linked via a lightning bolt. This means additional damage, and an agility boost with another trait. Some traits seem to reduce your Crit RES? I'm assuming this is a typo and means enemy Crit RES. Imperial SwordBasically acts like one of the Sword ultimates, in that it summons a lot of tiny swords. Damage is okay, can be worthwhile. Seems to have low health though for me, even as red artifact. This is your go-to damage artifact. Typical traits: Larger amounts of the summoned swords, damage buffs, debuffs for enemies on hit Cerulean BellTraps and stuns enemies in its area, while dealing minor damage. There're also traits that can further debuff the target, like sealing specific abilities. You want a longer ranged skill to attack from outside the area where your opponent can't hit you. This is pretty much an anti-cultivator weapon, since you can very thoroughly obstruct them. This will usually get destroyed pretty quickly. Do not take this into Fallen Valley with you. Typical traits: Sealing certain abilities, taunting the enemy and forcing them to attack the bell, stuns, damage on destruction Can block items. Bloodwoven MaskDamage debuff for enemies in range, does not last that long. I'd say there are better options. Typical traits: Increased range for each debuff, damage for enemies moving in the area (they will), more debuffs Can block movement skills. While nifty, those shouldn't really be a threat to you in the first place. Solar BannerSomewhat low fire damage in an area. It also absorbs spirit energy that is used by skills, but I'm not sure how useful this is. It requires traits to work. I don't know if bosses even count as expending spirit energy, which would basically only make this artifact useful against cultivators or with a small number of abilities that reduce enemy energy. Fun fact, you can use skills with attraction like Wind Movement to move the flag away from the damage area. Traits: Absorbing spirit energy from enemies triggers debuffs, damage upgrades. Pool of PearlsGenerates orbs that fly to you. Once they reach you, you receive a solid damage boost. Since it's created pretty late, it also does not require lengthy upgrading. If you want to go hunt down traits, you can get some really useful ones. Traits: Faster orbs, more orbs, and new special orbs. Black orb that makes you dodge (take no damage) from multiple attacks for a limited time span. That trait is rather good since it basically makes you invincible in most cases for the time span. Green orbs heal a lot. White orbs make you much faster. Shadowgorged CloakGood healing, minor defense boost, affects your summoned units too. This is a good survivability tool. The range is not very large. Typical traits: More healing, agility buffs/debuffs, more range, one autododge per healing stack, guaranteed crit for a stack, a strong attack within its range Spirits Opinions I have not even come close to finishing all of the upgrade webs, that would be way too much. Most of the upgrades are stat boosts in general, a few offer some new traits like health regeneration. The spirits will be segregated by region, since each region's Fallen Valleys have their own set. Within a region, the valleys are identical. You can tell a spirit's rarity pretty easily. The common ones have no Specialization skill and a max of 4 soul levels. The next has one skill and a max soul level of 4. The last has a golden frame in the menu, 3 skills and a max soul level of 5. The specialization skills that give you stuff can fail, savescum if needed. I will only mention Specializations if they don't explain what they do or are useful. Only one lifepact spirit, so only one third combat skill, or: Debuff 3 years, -20% max vit/energy. Some spirits that seem like they are decent: Region 2 Yunling (energy recovery), Searing Feather (fire DoT) and Youling/Muqing (healing) Region 3 Zhenxin (damage boost), Charon (tanking), Jiuchen (crits), Ningshuang (damage) Region 4 Cangya (First specialization, defense) Region 2 Yunling: Artifact attacks recover your energy. Bosses will likely shred it quickly since it has to be near them to attack them, so limited use for the fights where you may want it the most. Silver Edge: Slows enemies, not useful Searing Feather: Fire damage zone spawns. This can be pretty powerful with upgrades, since it keeps spawning zones in the same spot against bosses. The zones disappear once the artifact is gone, so survivability is once more a concern. Feiming: Attacks, others are better. Huofa: Chance to charm by attacks. Mengyi is better. Youling: Good fit for healing artifacts like the Cloak or the Pool. Specialization acts like resting in an inn, which is useful if you're on a longer trip. Mengyi: Charms on attacks, which disables enemies, and most bosses. Needs to survive to make full use of the damage boosting spirit foxes. Specialization 1 has a number of random results depending on the dream. A random outfit, a temporary buff to Insight or Luck. Survivability is an issue, and a few bosses are immune to crowd control. Can be pretty useful, though charm still only works 1/3 times when upgraded. Her node for talking to friends refers to people in your social web, not just anybody with high affinity. Muqing: In combat, reduces enemy attack, emergency healing, recovering your status means healing. Normal healing range is short. Talents can boost healing pills a lot. Her first specialization only seems to give you money, up to a few hundred thousand apparently. Seems to depend on the realm of the listeners. Third just lets you access your cave wherever you are. Youling always heals. Region 3 Zhenxin: Boosts its own damage, and then all allies' damage if they are in range. Can work with defensive artifacts if you let them boost you. Just remember that you need to stay close. Sharp Edge: Works strangely. Throws out objects that stick to the ground, then retrieves them for damage. Sometimes it just throws them at enemies for very little damage. It will miss if the enemy is directly below the artifact. Overall damage seems low. Sharpclaw: Defense reduction on attack that scales with artifact tier (-141 per attack on Enlightenment). After some testing, this does not seem all that strong, since resistances still matter. Voodoo: Increases enemy damage taken effectively, seems okay. Charon: Summons rather slow boars. They are surprisingly tanky against bosses. Best used with an artifact like Pool that does not have to be near the boss to work. Seems quite good if you want an aggro-drawing artifact. Could work well with the Horn too for even more boars? Darkfang: Deals minor damage when attacking, but gives you a decent AoE that lasts for a few seconds when unsummoned. You pretty much want to summon and unsummon this over and over for damage output I guess? Specialization guarantees success when stealing from same or lower tier people. Jiuchen: Specializes in crits. Normally the crit rate is too low to be relevant, but if you want to build for that, this is your spirit. Skybreak storm should be pretty strong, if your own crits count for it too. I haven't tested that. First specialization gives you random ores from mining/Fallen Valley drops, pointless. Second gives you a chance not to lose lifespan while digging a tomb, but lifespan doesn't matter. Third is a forge you can use anywhere. Ningshuang: Can ignore 50% of enemy Defense on attack, less than it sounds due to resistances, but still enough to be decent. Damage values overall seem pretty high. If you want a damage spirit, this is it. First specialization just gives you random monster drops. The second lets you kill someone unnoticed if you are willing to savescum. Her upgrade web requires doing things that cause NPC hatred like stealing or deliberately triggering revenge. This can be a bit annoying. Region 4 Xuanti: Chance of counterattacks, nope. Bajio: Gains shield for the artifact on attack. Can detonate the shield after 10 attacks. So this spirit would protect your artifact, but artifacts attract aggro, so bosses will deal with it anyway and reduce the shield for the detonation. Furthermore, you want artifacts to survive for the power of the spirit, so this seems kinda backwards? Maybe for Pools or so? Brawler: Slowdown and knockback on attack, and max vitality for some reason. The way the max vitality works can be useful. While it retains the damage taken (You are at 450/500 and go up to 750/800), when it reverts back, if your current HP is above the cap, the damage disappears (you lose more HP to 550/800, go down to 500/500). In other words, if you take less damage than the max vitality boost, it heals sorta. With upgrades, it only takes four attacks. Youling seems better. Rainmaker: Steals spirit roots, deals damage after doing so. First is pointless and there are better damage spirits. Jiuzhu: Increases def, can convert vitality into shield. Def increases can stack and are decent. Second only matters for fist builds. That said, if you need to tank, you can use Charon or Cangya. Muke: Seems weak. Specialization lets you find a revenge target. So you can hunt them, or you can befriend them to end an NPC hatred chain if you want. Cangya: Generates shields for you on attack, pretty small shields though. However, this is actually a good thing. A shield, irrespective of health, will always fully block an attack without bleedthrough. If you have 5 shield and take 10000 damage, only the shield will be hit, no vitality damage. Furthermore, since you should rapidly lose shields, he will also erase projectiles regularly (not AoEs). Third skill should hurt bosses too. First specialization is far more useful than you may think. The bad outcome is a buff to your martial spirit roots, which don't really matter. The good outcome is that training with him increases the Upgrade level multiple times (how many traits you have unlocked) of any attack skill you have equipped. This can save you a lot of time and resources for grinding. Second boosts travel speed, third lets you basically use a town teleporter anywhere. Definitely get him. Excellent defense spirit for non-fist builds and the first specialization will save a lot of time. Bosses may take the artifact down quickly though. Lingge: Her combat skills steal stats, but too little to matter. And it takes way too many attacks to trigger the rest. Does not seem strong. First specialization gives random medicines, they will be of your tier. Since the result is mediocre in quality, and you don't get many, this isn't that useful. Second specialization is the only way to increase your recovery of Tao Points for your domain. Third lets you instantly learn a manual. Specializations have some uses I suppose. Events (WIP) This is likely going to stay WIP for a pretty long time, feel free to contribute if you can. You can't savescum which ? event is picked, only outcomes, but why bother. This list is probably not exhaustive. If you can contribute, feel free to. Events don't give out red manuals, and most items are unnecessary anyway. Apologies for current layout. For chained events, a semicolon (;) indicates a different group of choices based on your first one. Question mark events Event Choice 1 Choice 2 Outcome Fruit on a tree Harvest Success Some restoration Failure Minor loss of vitality or a cave with enemies and money Array: Break through: Good result means a chance of a random manual, always stones and pills. There's a seemingly very small chance of a cultivator interrupting you. They may fight or just leave. If you win, you get the good result. People fighting over fruit: Picking one means fighting the other. You get random materials or pills. Does not seem to incur NPC hatred if you let the loser go. While they're busy means getting one spirit fruit. You can get away with it or get challenged to a fight and trigger NPC hatred. Fish swimming: Failure: Mood down 10. Success: ? Holy Spring: Spring: Cultivation; destroy gives demonic points and an injury; Hut: Chance to get a blade manual and root; barging in kicks you out with injury. Mountain Cave: Can be trap (fight, no treasure), treasure and a fight or treasure without a fight. Sometimes leaving actually gives you the treasure. Black cow: Take treasures: Money; Take dates: 1 Spirit Fruit Thunderbird: Strange feather buff (Spirit RES +10%) Riverbed: Rest: Boosts cultivation, Fish: Materials or recovery, failure means vitality loss Tree with large fruits: Harvest can: fail for nothing, vitality damage or restoration. Field of black plants: Eat: Harm to health Sage asking you questions (Region 4 only?): What is good: Fighting/Being Powerful/Heart/Handsome Handsome: Pick handsomeness above all in the next three questions, you get called a flirt without reward. Non-? eventsMany of these don't even have choices, they're at the bottom. River with parrot: Random item (if you take it +20 demonic points) or Just points River with fruit tree: River: Reduces cultivation Fruit: Medicine that extends lifespan by one. Pagoda with poem: Filling it in lets you do a Training Partner session with a random person. Noise or Light: Lights: Can give Earth root (or other things?), Noise: Reputation Fishing: Success: Health restored (?), failure: Peach Fruit: Success: Boosts mood, failure: ? Watching chess game: Giving tips: Middle aged Man: Allows you to reduce someone's lifespan by 50 (pointless...) or gives you three spirit fruits. ;Old man: Increase someone's lifespan by 50 or three spirit fuits. Watching quietly: Interrupting: Cool barrier: Take the Qi: Just cool down: + rare metal Ruins: Search: Manuals, pills, etc., cultivate: qi Weasel vs. Fox: Help Weasel: Help Fox: Mysterious Force Forest (Region 1 only): Catch deer: Always fails, no reward; Play with deer: Follow: Qi Pearl (random quality) Treasure: Nothing (maybe just a failed outcome?) Wild duck with rat tail: Catch: Plague debuff, -10% vitality per month Ignore: Vitality loss Monkey with tree: Help monkey: money Help tree: Spirit fruit + rare metal Rabbit selling stone: Buy: Costs manual Eat: Demonic points + 20 (it runs away) Region 1 only? Near dead pig: Help: Multiple possible buffs (Travel speed+200 and agility+20; ***); poison too deep: the other to choices again; Law of nature: going away Cool barrier (region 2): Take the Qi: Get Qi, get quest to rebuild the array. Takes 40 monster drops. Purple manual + tiny reputation; Just cool down: Golden Core (IV) Manual + rare metal + virtuous buff (Luck+5, Crit RES +10%) Melon-sized fruits: Max vitality +15, fail: nothing or vitality loss Golden Light/5-colored light (Region 2): Golden: success: money OR qi fail: nothing 5-colored: Mysterious Bridge (region 2): Take money: You lose money and vitality; Throw in: 100: Does nothing, 500: Luck+5 buff, 1000: Luck+10 buff When acquiring Qi from world map: Wall of text: Focus on it: Chance to get more Qi; or lose energy and health Don't: End. Weird fruit falls to you: Catch: Success two tavern boosts/Fail: ? Choice-free: Ape vs black snake: qi Fight between ?: Increases spirit roots Bird nest; Dead body: Spirit stones Vultures; flying fish: Mood down Drinking with a cultivator: Pills Heavy storm; lightning strike; Monkeys: Reduces vitality Heavy storm, downpour: Recovery Rock Cave; Mouse: Random items like pills or manuals. Horned Beast: All martial roots +1 Ranyi fish: Buff +20 mood/month Pool: Either lose materials (about 10% of a stack) or gain random items/pills/money Spirit fox dream: Gem, gift for Fox spirit. (Only once) Wind throws you over cliff and a monster picks you up: Wood +1 Flying snake: Loss of stamina and energy, ~10% Tiger horse: Luck +20 Buff Cultivation spring (Region 2+?): just qi Giant bird hits you (Region 3): Vitality loss Sage Tianbao on flying sword: Gives book for 3 locations with hidden treasures from Jo, find with Feng Shui. You can get these even beforehand though. First region (N:69, E:95, tip of north): Emerald Gourd mount (TS: 300, C: 250) Second region (N:94, E:68, northwest tip): 10 G6 skill fruits (20 points total) Third region: (N:196, E: 72, sorta northeast): Passive manual, Origin V. Questlines Regions 0+1 I didn't even know some of them existed, so I figure some people may appreciate these. Probably going to stay WIP for a good while while I test out some different outcomes. General rule, ? mark events can trigger quests, the purple ! in taverns and special NPC spawns always do. Some quests cannot be done again if not done immediately or rejected it seems. Some can also be pretty expensive. Questlines can be triggered once you are at the realm required, but are usually scaled for the late realm with upgrades. Maybe save beforehand, some bosses are rather tough, and random cultivators can have very effective skills and artifacts. Even more so on higher difficulties. You can get some special fates that assist with attacks, but sadly those tend to run out very quickly. The buffs usually also don't help much. The soul wisp items you can get from quests can be given to artifact spirits as gift and greatly increase their soul level. You should save them for the framed, rare, spirits of course. By the way, Mystery Man Jo always overcharges on any difficulty but Chaos. Region 0Main: Getting through the mountains. You can either kill Jagu or go through the short questline. You are supposed to lose the first fight, but on Normal with damage boosting skills, you can win. That however cuts the entire quest line short and removes the hidden quest, also doesn't let you advance one minor breakthrough for free. Otherwise follow the directions. Not killing her may allow later sidequests to happen, though it should probably be unrelated. Hidden tavern quest: You must return to the tavern after doing the minor breakthrough, but before finishing the main quest. You will see the purple exclamation mark. Fight the bandit camp instead of walking away, but listen to the leader afterwards, or you won't get the rest. Now you need to bury the dead, give the grandmother the maximum amount of stones and hand over hairpin and letter without looking at them (savescum looking at the letter if you want to, it's not interesting though). You get some manuals for it, one should be for your highest spirit root... since that is likely random, the books are basically money. If you don't do the steps, the reward value is decreased/gone. Region 1Main: Golden Crow questline. Don't challenge the first NPC immediately, they're tough and can wait. Waiting also won't change the landscape. You need to reach Qi Condensation (III) to finish the questline anyway. When you fight him, it's a unique boss. Win or loss does not matter I believe. This spawns a world boss that changes terrain into desert (does nothing I believe). The next fight is unwinnable, don't worry. You get tasked with getting two items. Next is fighting the Harpy lord, small dungeon + a normal harpy boss with more health. Then the tree always spawns at the very outer upper right of the land of region 2. You get to talk to them. Pick a fight: Unique boss that's not that easy due to the slow debuff. Get the branch for winning. Request: You get told about a pond that contains a Lydra boss you can only defeat. Then you need to return to get the branch. Take the two quest items back to Hou Yi. He will kill most of the crows leaving you to fight a double boss. Sunny will resurrect Pyro in battle. You need to kill it first. Fight is tricky at Qi Condensation (III), be prepared. They also have a skill you can learn from the Eye of Providence and I don't think you can fight this boss again normally. But it should be tricky enough you can't avoid learning it. Ice field spawn: Your choices are to give her alcohol, fire books or tell her off. Books requires any three fire books, it fails but you get an orange Foundation II skill. Telling her to go back means she fights you for 20 seconds (trivial at Foundation), you get +3 Water, Wind, Lightning each. The best result seems to be getting her rice wine, which costs 1000 stones: +5 Water, Lightning, Wind each. I do not endorse underage drinking. *cough* Random encounter once you hit Foundation: A cultivator woman getting attacked by a crab. Save her and her house spawns nearby. You must memorize this location to continue the questline, it is not marked. I very strongly recommend just focussing on this quest to get it over with, if you want to do it. You should keep visiting her every month if you want to quickly cycle through her events. If you don't visit her often enough, the questline ends, but I don't know the threshold. Tedious, but if you're building your character after breakthrough, you got time. She gives a decent amount of resources. So, the events. She first asks if the truth matters (yes: temporary +10 insihgt), next event she practices with a sword, next event asks if you would pursue a dangerous truth (yes, +5% ATK +10 insight buff), next event gives you a set of grade 2 pills (orange). The event after that is a boss fight against a special bamboo boss you can't fight otherwise. You can also run away, that ends the questline (you feel horrible and get the cowardice debuff, -5% ATK, -10 mood/month, +20 agility), then she asks you to get a book for her. If you decline, she vanishes and the quest is over. If you agree, you get a mountain to spawn with a boss that won't fight back. I don't know the conditions of the next event, but it's not time based. I think you need to go to, or close to, the Lei Ze area (where you get attacked automatically). This gives you one more event where she asks you to visit her in three months. You can pressure her for some backstory her, but it changes nothing. You get a moderately difficult fight against a "monster", a summary of her tragic backstory and a solid bunch of resources. Pills, money and a storage ring. Always a bad ending, either dead or depressed, with similar rewards. Questlines Region 2 Main: Filling in the land, starts upon reaching Golden Core (IV). Some NPCs will tell you about a girl at a shore. Once you talk to her, you will be attacked by a special boss, be ready. You will also be attacked if you try to fly over the ocean, but that boss fight is likely going to kill you. After the fight, you agree to help her find the stone. A village will spawn to the upper left. As you approach, you will find a wounded NPC spawning there. You can either help him or not. If you don't, the village will not trust you. You will be told to hunt the Bi Fang. If you do, a fight to save him follows. You get different dialogue and choices. Bi Fang: If you didn't help the injured person, you must fight it. Otherwise you can negotiate with it and learn the backstory. It's a unique fight, melee-range fire based. If you chose to listen to it, you instead fight a Blood Puppet-type boss with more health. After getting the stone, back to the girl. This time you fight the boss for real. She will heal you during the fight (for relatively little though), but make sure you are stocked with pills. Skills that hit multiple times will be useful. Many of its attacks are too fast and have little telegraphing, good luck. Most offer Divine Sense if you want to keep her in your cave. She's possibly required for a new quest in region 4 too. The earlier you do the quest, the less you sacrifice. So if you can beat it in Early Golden Core, you lose a little less. The Leviathan has skill you only get one chance to learn (Eye), probably not skippable though. Tavern quest: The Journey of You Yuanzhi. This is a rather lengthy series of quests. It keeps getting updated with each cultivation realm. First you need to fund his journey with 20k spirit stone (don't go without the money), and then you will keep receiving letters. The later letters detail a situation from which you must rescue him to continue the storyline. The letters have no time limit, you can take as long as you want to to prepare. The fights can be tough, so make sure you do. If you even once choose not to rescue him, he will die. You will receive a letter about his death and a spawn a special location that gives a random orange manual. Tier of the manual likely related to how far you went with the quest. 105 Skill points Fluffy White Tail -> spawns location in region 2 that restores mood when visited. Deer spirit: Mysterious orb that contains a soul wisp Sect conflict: Get sword tassel. When used improves mood +15. Dark Swamp: First time you must rescue him. Golem miniboss, should be easy. More in Region 3 Random event: Fox demon and human. They will argue, but you can pick either choice. No idea if running away locks you out of a questline, I haven't seen the fox demon again. Random event: People arguing artifacts: Helping either gets you an Ultima Sand. Information on artifacts argument: If you listen and then offer a pill, he will refuse it, nothing lost. You get Fallen Valley info out of him. NPC spawn: Cultivator in a blue robe, Celestial Palace. Somewhat long. May need Origin Spirit (V) on higher difficulties. Or alternatively, is scaled to be easier if you're doing it in Qi Condensation? Agree (you can't reject it anyway), but put it off if you just ascended. Once you feel ready, go to the stele and go in. You will get in a fight and then be made to pick one of four areas. In every area, you will fight ghosts with sword LMBs. You need to finish all four directions. At the end, you get a sword cultivator boss that can be pretty tough. Talk to the robed man again: First choice gets backstory, both choices give you an orange manual (LMB only?) of your realm and highest spirit root. NPC spawn: A Peddler-looking white ghost will sell you a soul lamp for 5000 stones. He will keep spawning until you buy it. This will start triggering a questline the next few months. Malignant, destroy it: Ends quest, does give book Uncanny, examine: Ghosts take over your body and walk you to a grave. Forces fight. Don't pick. Summon spirit: You get more choices in the next part and backstory. You can also put it off. Strongly recommended. At grave: Capturer of the spirits, you must help the sect if you picked uncanny Help Elder: Fight ghost cultivator. Uses water skills. Scaled to your realm Help sect: Fight strong sword cultivator. Scaled to your realm. Observe: Both destroy each other, you only get the book. Quest over. Do not interrupt: Quest over, debuff Resented (-15% ATK) The fight is hard. It's a sword or water/sword cultivator that hits hard. You may want Origin Spirit for higher difficulties (Or it's easier at Qi Condensation III? There may be some oddity with NPC cultivator realm scaling). You get a new location to spawn as long as you pick one of the first two choices. New location: Lamp goes out: Cannot leave empty-handed: Refill with souls (official translation doesn't make it clear, but this is torturing them), can trade for one of three outcomes below. Leave: Soul Lamp buff. A one-time full heal if you die in combat. Would be useful if rechargeable, but it's not. Rune Symbol: +15 to all spiritual roots. That's it. Bone: Unique mount Ghost Zouyu (TS: 700, Cha: 200) Banner: Buff, once per battle, you will be invincibile for 5 seconds after taking a lethal hit. Can be used three times total. Keep Lamp: Same as leaving, only evil. Riverbank with tree spawns: Cultivate: Nightmares, fight strong tree miniboss, gain qi+purple Golden Core IV manual Be suspicious: Burn Incense: Mo Xue's Gift luck +15% for one year Say no: Alert Buff Crit RES +20% Ask questions: The ghost attacks you, not that difficult. You release the trapped souls. Story book + orange golden core manual. +15 Wood Village of elderly: If you get this event, you must complete it. You cannot put it off or do it again. The one fight isn't too hard however. Investigate: Reputation, Just points, fewer quest choices. Not fit for task: Quest ends. Stay silent: You get some money and continue the quest. Offers additional quest outcomes. Choice, only for staying silent Died next day after treasure: Get Cube Jade item, additional quest outcomes, continue Mist began rising 3 years ago: Continue Try: Continue quest Leave: Quest ends Truth: Continue, fight miniboss, not too dangerous if you have any tier 3 skills at all. Leave: Quest ends Reward: Soul pill, gives lots of qi. Buff: Cultivation speed +20% for 10 years If you picked choice 3 at the start: Leave: Ends quest Pay respects: Next choice Woman with cube medallion Give: Give all the money and medallion Continue on: Keep presumably At grave: Bury pill: Get a book, and a special destiny if you also gave away the money too I assume. Just pay respects: Keep it 9 times total. The money and soul pill aren't important, but that the sealing curse is only for 9 times makes it pretty useless. It even triggers against cultivators. It will be gone extremely quickly. Highly disappointing. Upon reaching Golden Core: Dying Wish (Iron Ruler): Has a lengthy series of boss fights, you may wish to prepare some more instead of going immediately once you get the letter. Go to the starting village. Meet Xi, she is going to be important. Dialogue choice does not matter. Investigate the cave to get into a fight. Next up is a fight against the first world boss. You should prepare for that, it will have more HP. And then a Coatl. And then you must go to the spot and use Feng Shui to get a memory. Next step is another boss, this time the bamboo boss. The choice after does not matter. You get Jagu's Memories, an item that lets you reroll a breakthrough destiny of the first two breakthroughs. Next step in region 3: Iron Shard Hunt is in next section. Questlines Region 3 Region 3Main story: Untamed vs. cultivators, happens once you enter mostly via random events. Masked demon vs. cultivator Help righteous: Large fight against demons, hope you got mobclear. Just +50 Help demon: Fight against cultivator, can be impossible, they can be Nascent Soul (VI), escape. Winning gives you materials, +50 demonic points Ignore both: Nothing Get a story for 500 stones: You learn about the leader. You also find out that his daughter was kidnapped. Heavily wounded demon: Let leave: 3 new choices Attack: Demon swarm fight, Get thanked, materials + a manual (blue) Correct direction: Just +50 Wrong direction: Demonic +50 Block them: Gives you some materials from the cultivator. Young demon girl captured: Fight: Cultivator, can be Nascent Soul (VI), check before. Leave: Leaves quest undone. The cultivator can improve somehow while waiting. You must help her. You cannot actually side with the cultivators here. You then escort her to the special region in the lower left, and get a spot of story. Next step is in the ice area. You must be Nascent Soul (VI) to have any chance here. And going beyond that is probably helpful because the fight is kind of obnoxious on higher difficulties. Destination Everfrost: Very annoying fight. Get into peak condition, hopefully with some vitality and energy restoring setup (lifesteal, killing elite enemies maybe?). You need to destroy the two small trees in front of the boss while enemies spawn, so your ally will deal some damage. Unfortunately, on higher difficulties your ally will deal limited damage so you need to do this over and over again. It's quite tiresome and you may want to reach Soul Formation VII first. One last visit to the village, the girl makes you promise to visit her again, but it doesn't seem like you can. Tavern quest: Ask about artifacts and a drunk will ramble about golden crows. If you ignore him twice, you reject the quest and get some resources. Following the questline to the end gives a wisp. Feather of Golden Crow: Visit the hut. Ignoring twice ends the quest for nothing, otherwise you continue. The next hut is in region 1. Then another marked spot. The bird attacks you. It's like one of the birds of the first main quest, not too threatening. Now a chase begins, though you get the three tavern max vit/en/foc buffs again. You fight it once more, it will be a bit stronger. The choice for the spear ends the same way afterwards. A few months later the questline ends. You get the crow feather and a Soul Wisp for artifact spirits. His backpack gives you two wood items (for selling only?) and some skill fruits. You need the feather for a different questline: Wild Magpie: Just talk to it, hear its sorrows. You need the golden crow feather from the above quest to do this questline. You can't actually reject it, only put it off. Once you finish the above quest, you can continue. Giving it to Magpie will trigger an event several months later, you receive a Love Knot item you can give to an NPC. From what I read in the forums, you give this to an NPC to be warned when they are attacked, but it's unreliable. Demonic aura in town: Investigate: You will be attacked. Sword cultivator, dangerous. Winning leads to Broken Heavenly Sword buff, Does extra damage after using an ultimate... three times total. Stay to observe: Blue and white cultivator fight. Ominous: You run. Observe choices: Go up: Join Sword Sect: Fight necromantic cultivator, not too dangerous usually. Gives Sword Stone buff (not broken), extra damage, 9 times now. Join Cultivator: Ghost Banner, vitality < 20%, summon 4 ghost, 3 times. Stop both: Fight both, could be tough. You get both buffs. They still disappear soon. Continue: Repeating choices, if you keep doing this, you get Broken Ghost Banner. Vitality <20%, summon 2 ghosts, 2 times ever. Leave: Leaves The Journey of You Yuanzhi, continued: Dangerous Lei Ze: Fight a miniboss, get three tavern boosts (+max to your bars), scaled to cultivation level. Maybe keep for major fight. Trapped at Pit Bottom: Miniboss, again. Raises mood. Frozen Traveler: Ice miniboss, tavern buffs again. Keep them for important fights. The end. You Yuanzhi wrote a book, it was very successful. He also gives you a map to treasure, but this time he's still alive. Reward is a random red nascent soul (VI) manual. Iron Shard Hunt: Fight against Blood Elder, Nascent Soul recommended on higher difficulties, the miniboss' attacks can be unavoidable. Unique and powerful boss ahead, will fight you either choice. First choice only, after winning: Pick of stones, pills, mood treasures, manuals, all (fight again), or kill him. Second fight is tougher. Choice seems to have no consequences for now. Afterwards: Must rescue Xi, needs Body Reconstruction Elixir II or later (from Region 3 cities or later). Does not seem time limited (I spent more than a year). Needs Everfrost herbs, so Nascent Soul (VI) recommended before starting this. Next step needs Heaven Aura from Region 3. Remember you can grind out shards to fuse. You will be attacked by a rather powerful sword-only cultivator, Nascent Soul recommended again. The choice after does not matter. Get Bi Fang's memories, another destiny rewriting item. (V and below) There's one more quest in the line, once you reach region 4. See next section. Questlines Region 4 (WIP) Region 4Main: Giant questline. I strongly recommend not talking to him until Enlightenment (VIII) if you want to complete the questline, because there is a time-limited part of the quest. You are also going to have to babysit him somewhat for a number of months. If you fail the questline, you can just go with a different choice to break open the mountains though. So it's not that bad. First step is: Visit the Giant. You'll get it once you are in the ice area of region 4. You need to chat with him. The next answer doesn't matter. After this, Agar will move to the next quest spot as time passes. Once you complete the next step, Agar's timer starts ticking, be warned. From then on, Agar will constantly lose vitality, stamina and energy. You can find his status by talking to him. If they drop too low, he can get further debuffs, or even die at 0 vitality and you fail the questline. If they are high, he will move more tiles per month. You must talk to him and ask about nearby water/spirit fruits. A fight will ensue at the location and you basically need to be at Enlightenment if you want these fights to be reasonable. (Or use one of the artifact spirit's guaranteed damage skills I guess, if you have no choice.) Bring the item back and talk to him to give it to him. He stops at a desert. It has a drought demon boss. You can either fight it (no rewards, it might prove difficult depending on how early you try this), or offer to buy something from the auction for it (Expect a cost < 50k stones, reward is a Manual, red passive, Enlightenment tier (VIII). When Agar arrives at a river, he will anger the Grotto Nymph. You can't heal him while he's waiting, but he doesn't lose health either. You can pick diplomacy or fighting. The fight is a Carpia you've met before, can be tricky to dodge though and can freeze you. If you offer to help, you must find the Water Cauldron. Go to the indicated spot and perform Feng Shui to find a cave. If you just take the pot, you will fight a unique boss. It summons turrets and has a shield that performs AoE attacks on hit while it's active. If you wait, you will be offered to trade for it. The Jade are just hobby items marked with the tag Jade, chances are you will have enough. Once you replenish the river, you get one more choice: You can give it blood essence or decline to. If you choose to (will cost almost all your vitality), you will get the fastest mount in the game months later (TS: 1500, CHA: 200). Strangely, even if you bring the cauldron, the river graphics still change to dried up. It gets filled up later when the untranslated boss appears though. Now you must escort Agar to the westmost end of Region 4. You don't need to babysit him, but do check back every few months, you should keep giving him water to keep his movement speed at 4 tiles. He will break the mountains with his death. You can then go further and talk to the Sun for some more story. That's the final part of the game for now. Should Agar die earlier: A set of forest tiles is spawned and the quest ends. If you go to the top west, you can talk to the united Sun that was the three-legged Crow from region 1. It will task you with going to the peach forest where Agar died. When you nourish the tree, you receive a staff for breaking the mountains. This is faster than the alternative. No other consequences for now. No Tavern Quest yet. I did random Feng Shui and got a house to spawn in region 4. You meet a loach inside. Help: Orange manual, Enlightenment (VIII). That seems to be all? Maybe for much later in region 5? Kill: Random pills. Pull on whiskers x3: Get a garment material. Debuff resentment: -500 max focus Leave Bingyi of Wei, she's unhappy you filled in the sea. Notification, with a woman standing over rain. Happens some months after you finished Agar's quest. Either choice she fights you. She's not that dangerous if you're prepared. She tends to seal you during the ice storm, but you can dodge that with wind movement. She seems to use it every 25% of HP? You can get each reward only once. Martial RES passive can have a trait that increases movement speed if you're against a single enemy. It's really good here. You don't die if you lose, but you will lose the soul lamp buff. 30%: Purple skill book, realm VIII 50%: Pills (I got three body reconstruction pills) 100%: Random orange VIII book 120%: Beat 100% to unlock. Red passive manual and a set of carrots that increase specializations by 20 and lifespan by 10. Sadly you can only get it once. You will be notified of a wolf spirit that will kill people in the fourth region? Might be related to Xi's quest? I have no idea what triggers the message either. I was testing some negative outcomes. Could be from killing the river spirit. Xi's Call: Visit the third region's city, talk to Xi in the tavern: She asks for either the Sun Stone, G3 Enlightenment Elixir (the one you use to break through to Enlightenment (VIII)), or you tell her off and just take the ingot. Sun Stone: Auction. Talk to her at least a month before the auction. Probably the simplest if you want her to join you. The Enlightenment Elixir needs to be purple or higher. Save before. If you tell her off: You go alone. Either way, you will visit a fox demon village and be asked to hand over a gift. Xi can give you a hint if you took her along. Give them a Vixen Jade (Fallen Valley or the one off event, pink shiny). They will ask you to get the Fox Spirit Orb for them. Purple fox boss. No different than the ones from the maps. Next up is getting a Primal Soul. You get a fight against the very first humanoid boss (Jagu) from region 0, but it's a lot stronger now. Not too hard if you keep your distance. Followed by another boss fight, a unique black bird. You may wanna be prepared for this, it's rather fast and can be hard to dodge. Get Tushan Jun's memory. Rerolls Soul Formation (VII) and below PS: The fox transforms into a woman with black hair in the text, but the portrait has white hair. Questions? Updates I will try to remember to look occasionally and will include questions that may be helpful to know. Recent updates: Started sorting out the new sect section. The update with the final ascension tiers dropped. The translation is half-done and there're reports of progress-stopping bugs in the English version. I'll just stay with my current patch version until that gets solved. ThatGuyGW pointed out that the behaviour of the pond in Fallen Valley changed. It's now a 50/50, not a bank. I didn't see that in any patch notes *grumble*... All current Eye of Providence skills added. More sect breakthrough fates. Qi Pearl purity does not influence stat gain, only tao soul purity for Enlightenment (VIII) does. Verified this personally. Sect fates do not act like the strange mushroom for rerolling Chaos breakthrough fates. They just replace one you normally get.

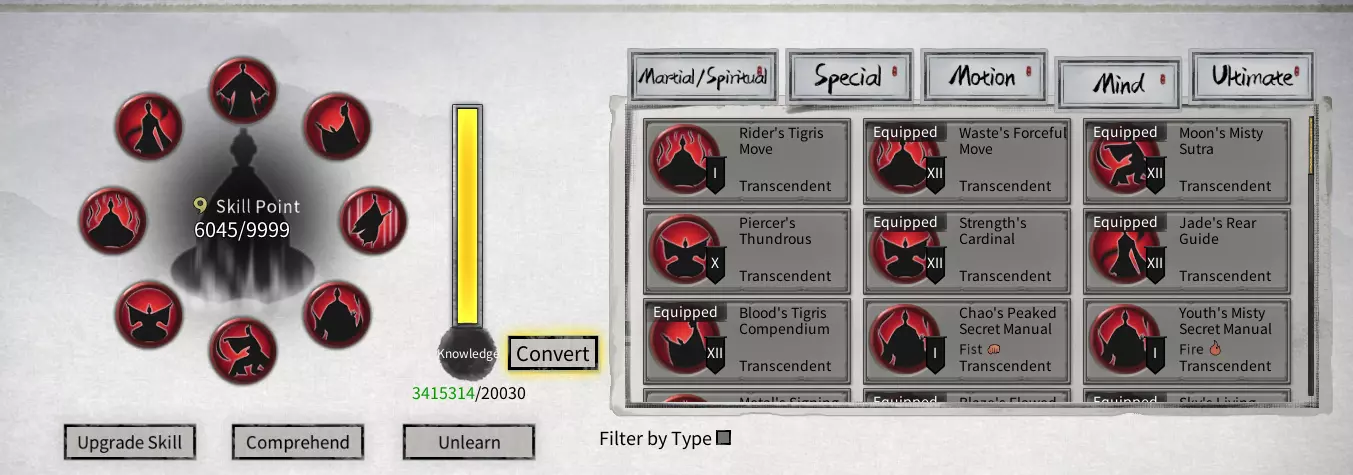

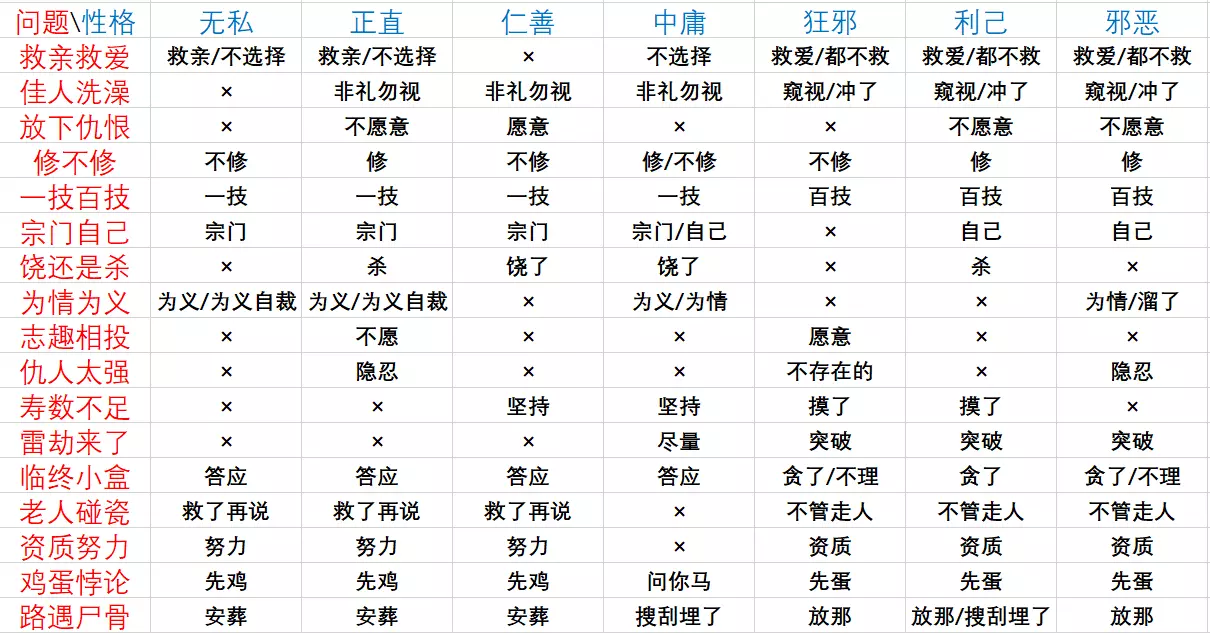

刚开始玩游戏遇到困难了?是不是因为总想刷出完美角色却又不清楚具体标准,结果陷入反复重刷的循环好几个小时?只是想要一些创建好用角色的建议?让我来帮你。 简介 你想开始游戏,却不知道如何创建一个好角色?那我来给你一些建议,帮助你打造一个不错的角色,无需花费十小时反复重刷。 外观与魅力 首先是角色外观。在这款游戏中,角色的外貌会直接影响其魅力值,进而影响他人与你的互动方式。高魅力值和低魅力值各有好处。魅力值高意味着你会成为众人焦点,人们会主动接近你,邀请你加入宗门、提出切磋或共同修炼。 你不必将魅力值升到最高或降到最低,但需要留意它,因为它会影响你对游戏某些功能的使用效果。如果你打算成为社交达人,那么极低的魅力值会让你举步维艰。尤其是锻造,因为你很长一段时间都不会锻造法宝,而当你达到那个阶段时,提升锻造的文本一次能增加10点。虽然之后你会想花时间提升这些属性,但在游戏初期它们毫无意义,并且在游戏进行很多小时后才能带来良好的回报。 有一些技能,如【秃顶天才】和【聪慧过人】,能大幅提升悟性,但它们也有缺点。【秃顶天才】会带来巨大的魅力减益,而【聪慧过人】会将你的悟性设定在一个高等级,不受任何影响,但会对你角色的最大心情值产生重大影响。否则,建议避免使用。 提供物品的命格确实有用,但可能不如你想象中那么强大。英雄之后和魔道之孙都会给予一本随机的紫色心法,但关键在于“随机”二字。游戏中有六种功法、六种灵根,以及不依赖特定属性的无属性功法。所以,你的功法书只有2/13的概率出现适合你计划创建的角色的内容。此外,【传奇】技能有极高的最低技能要求,其技能点需求也需要很长时间才能达到。而且,它们并没有你可能期望的巨额加成。另外,一本【传奇】级别的炼气或筑基期功法书,很快就会被金丹期及以上的更高阶技能所超越。很可能,当你能够学习并装备功法书中的技能时,你已经拥有了更好的可用技能。不过,【传奇】功法书在城市的拍卖行通常能拍出数千的价格,因此在这方面它们可能非常有用。特别是,一本无属性的【传奇】功法书在拍卖行能卖到数万。记住,一到达第一个城镇,就要立刻把【魔典】放进【树木宝库】,除非准备使用或拍卖它,否则不要拿出来,不然很可能会被人扒窃。 不要期望你的【天命】会带来破坏游戏平衡的强大效果。如果你认为在角色创建时选择的【天命】能让你成为不可阻挡的神,那你就错了。虽然有些【天命】能带来不错的增益,但到了游戏中后期,许多【天命】的相关性会降低,甚至变得无关紧要。 最后,有许多【传奇天命】需要通过完成成就来解锁,所以你有足够的动力去尝试创建多个新角色,直到找到适合自己的build,然后再创建一个新角色进行更认真的游戏流程。总结 希望本指南能对您有所帮助,助您踏上培养优秀角色的漫漫仙途。但最重要的是,希望您能在游戏中享受乐趣,而不是一味重开,期待完美的开局。我可以保证,弱开局的角色能带来的乐趣丝毫不亚于强开局。 属性及其重要性 一旦确定了外观,就该进行属性roll点了,这也是你可能犯错的地方。 首先,忽略屏幕底部的属性,除了其中一个之外。它们并不重要。在角色创建时,真正重要的只有五个属性。你看到的几乎所有属性都可以在你提升修为、通过游戏中获得的物品来增加,而且提升的幅度远超过游戏初期所能达到的水平。那么这些属性是什么,如何改变它们,以及它们有什么作用呢?运气:发生好事的概率。默认值,重随不会改变,在角色创建后无法永久提升。 感知:角色学习新技能、升级技能及理解技能的速度。可变值,重随会改变,在角色创建后无法永久提升。 可变值,基于角色外观,重随不会改变,可通过装备小幅提升。 敏捷:战斗移动速度。默认值,重随不会改变,可通过修炼和部分技能提升。 移动速度:世界地图移动速度。默认值,重随不会改变。可通过装备和修炼提升 除悟性外,上述所有属性在重 roll 时均不会改变。而能即时改变这些属性的是你的气运。 选择你的气运 这是本指南中篇幅最长的部分,因为这是创建角色最重要的环节。在创建角色时,你可以从九个气运中选择三个,但气运列表可以无限重 roll。不过,这里有一个容易陷入的误区:为了打造完美角色而不断重 roll。 这就像是在等待行星排列成一线一样。是的,你可以花十个小时重新生成角色,希望能刷出完美的角色,或者你也可以用这十个小时去玩游戏,享受乐趣。 首先我要说的是:你永远也刷不出完美的角色,因为完美的角色并非在角色创建时就存在,而是在你游玩过程中逐步打造出来的。你想要的是一个好角色,一个能让你玩下去的角色。打造一个好角色,90%取决于你为他们选择的【气运】。 气运有稀有度等级,这决定了它们出现的频率以及所提供的增益强度。 灰色:普通 绿色: uncommon 蓝色:稀有 紫色:史诗 红色:传说虽然并非所有【天命】都生来平等,但不要仅根据稀有度来选择天命,因为大多数天命可能无法提供你所需的东西。相反,应根据它们实际提供的效果、对角色和前文列出的五项关键属性的贡献以及整体实用性来进行选择。 我不会告诉你具体该选哪些天命,因为我不知道你想玩什么样的角色。但我会提供一些指导,帮助你理解在选择时需要注意哪些方面。部分天命会同时具备增益与减益效果,但你可能需要游玩一段时间后,才能真正体会到这些增益的强大之处以及减益的无关紧要。 例如,天命【病态天才】会使你的最大寿元减少二十年,但会按百分比而非固定数值提升你的修炼速度与技能学习速度。你的初始寿元为八十年,扣除后还剩六十年。不过,你的角色通常能在二十五岁前完成首次重大突破,晋升至筑基境(即便追求要求最高的天灵根筑基也不例外),届时将增加约四十年的最大寿元。之后的每次重大突破都将进一步增加寿元。所以,除非你数十年都无所事事,否则你极不可能老死,即便你同时选择了【病天才】和【陨落星辰】并将寿命缩短至40岁左右。因此,【病天才】提供了稳定的加成,且随着时间推移效果更佳,而其缺点从长远来看完全无关紧要。 你会希望重新刷新你的气运,直到获得能带来良好、稳定收益的气运。以下是一些建议: 不要试图追求三个顶级气运,因为不花费数小时刷新的话你永远无法得到它们。相反,目标是一个能提供你所需效果的顶级气运,搭配一个有用的稳定次级气运,以及一个中等水平的第三个气运。实在不行,只要一个顶级气运和两个勉强能用的其他气运即可。如果你稍微重刷一下,某个特定的气运总会出现,但某个特定的组合可能好几个小时都刷不出来。 任何只提供正气或魔气而没有其他有用效果的气运都可以忽略,因为这些属性会随着时间变化,且目前对 gameplay 的影响不大。 任何提升或降低武技或灵根的气运也可以忽略,因为游戏过程中你会逐步提升这些属性。你首先要做的事情之一就是找到并加入一个宗门,宗门会出售提升这些属性的物品,所以不要浪费一个可能在其他方面有更好效果的好气运。 那些提升炼丹、风水、炼器或其他生产和采集技能的气运呢?忽略它们,因为你可以从 mini-boss 那里获得能显著提升这些技能的功法。

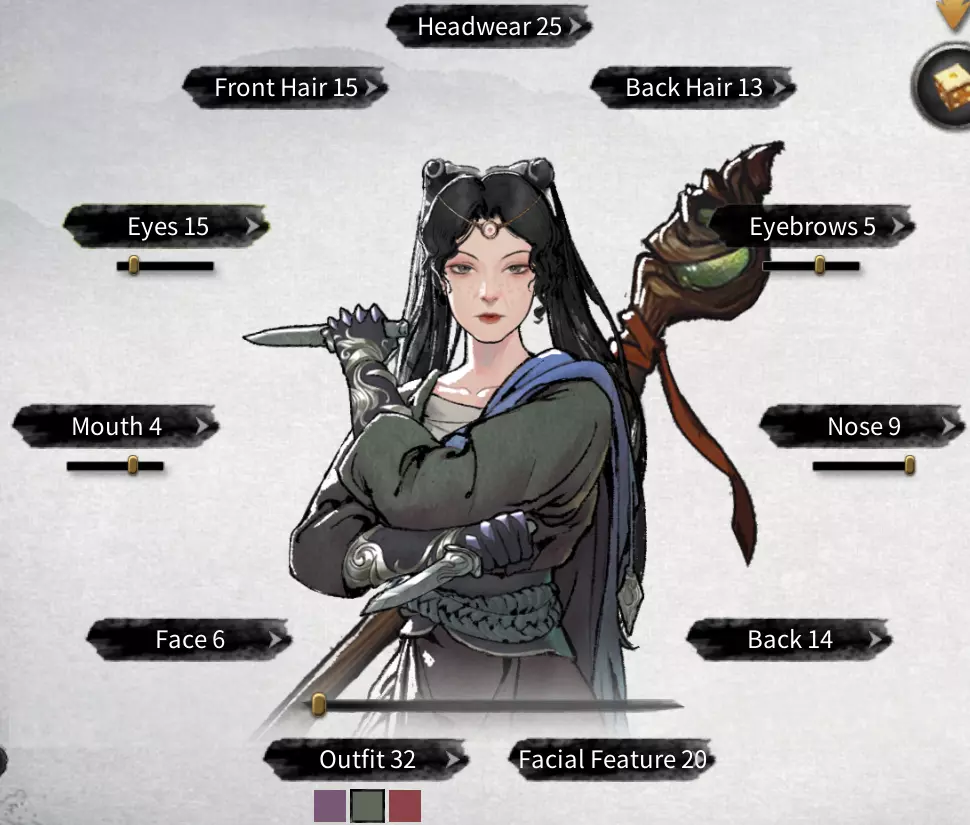


你好,欢迎阅读我的《鬼谷八荒》指南。这份指南一部分是为我自己写的,我想不妨也分享给其他人。很抱歉这份指南有些杂乱无章,这是我第一次写东西分享给别人。 简介 介绍和一些术语 你好,欢迎阅读我的《鬼谷八荒》指南。这份指南一部分是为我自己写的,我想不妨也分享给其他人。很抱歉这份指南有些杂乱无章,这是我第一次写东西分享给别人。我至少尝试通过使用章节标题来使其易于浏览。如果我需要定义我使用的一些术语,我会在这里放一个部分来解释它们。 流派 - 只是【Build】的一种花哨说法。我借鉴了《鬼谷八荒》的术语。 角色创建: 对于你的第一个角色,我认为你应该选择任何你觉得很酷的外观,不要为命格感到压力。花几分钟重新生成角色是可以的,但即使在洪荒难度下,追求“完美生成”也是浪费时间,对于更低难度来说更是完全没有必要。要注意,在角色创建时有些属性在游戏过程中不容易(或无法)提升,特别是幸运和悟性。敏捷和移速更难提升,但属于次一级值得优先考虑的命格属性。你会遇到的主要限制是灵力——确保获取一个带有【灵力低于20%时,每秒恢复x点】效果的灵力技能来解决这个问题。 值得追求的气运:武道·终极技瞬发,原因显而易见。尤其是在你尚未确定具体Build时早早获得它,能让你根据需要或偏好转型为剑修。武道专精1-3,原因同样显而易见。 拳道 护盾引爆Build。相关指南中提到的突破名为女武神,但截至2021年10月9日的当前游戏版本中,其名称为霸王之影。 技法 - 值得寻找的词条 除了特定Build外,我发现有几个技法词条通常比较有用。它们的重要性取决于你的Build和难度设置,但确实让我更倾向于选择该技法。如果一个词条能出现在多个技法上,我会在假设它对每个技法都有用的前提下尝试提及。 心境技能 移动 - 攻击 - 这里没什么特别的。对于大多数Build来说,这个属性有相当一部分无用词条。尽量追求基础属性或特定Build所需的词条。 技法 - 防御 - 和攻击属性一样,许多词条对很多Build来说都没用。一个常见的词条是特定元素会生成领域效果,比如旋风或烈焰,站在其中能获得一些加成。即便效果是你自身生成的类型,这通常也没什么用,因为被击中时受到的伤害减少,不如直接躲开攻击。 【秘籍-神魂抗性】对于剑法而言,我见过最有用的是那些能通过叠加流血或剑斩层数触发的效果,前提是你能施加的层数上限足够高。 【神通-武神魂抗性】与神魂抗性不同,武神魂抗性可以有一些非常实用的词缀。具有缩放增长效果(每X点,你的Y就会增加Z)的技能,在突破境界后依然能发挥很大作用。 【精通-暴击】对于风卷残云与七雷剑诀流派来说,暴击的关键不在于伤害,而在于生存能力。 心法-生命值:正如你所料,这里最有用的词条是提升生存能力的。与接下来要讲的能量技能类似,存在生命值较低时恢复活力的词条。但与能量技能的相关词条不同,它无法单凭自身几乎维持你的活力。不过,无论是在边境区域进行长时间刷怪,还是陷入持久战,它在防止你被逐渐消耗方面都极为有用。它无法让你在承受 Boss 的一套完整连招后存活下来,但能帮助你避免死于某些难以躲避的机制,例如八岐大蛇的闪电持续伤害。对于依赖风系移动的Build,【移动技能期间回复x点生命值】词条可能比【生命值低于25%时回复】更好,因为前者触发更早,而且到了元婴期,你几乎能持续处于移动状态。 指南 - 灵力 - 目前最有用的词条是【灵力低于20%时回复灵力】。第二有用的可能是【场上有精英怪物时回复灵力】,因为有了这两个词条,你在刷怪时几乎不会耗尽灵力,而仅靠第一个词条也能让你在 boss 战中保持运转。 剑技 清风剑 - 最有用的词条是减少冷却时间和穿透(尤其是在较低境界时,剑系缺乏良好的范围攻击是最令人头疼的)。无影剑 - 无影剑流派的【剑心通明】本质上就是直接增加伤害(或攻击更多目标)。引爆每层流血效果时,减少身法技能冷却时间,这是整个【裂风】流派的核心机制。释放技能后增加的敏捷属性在达到近乎常驻的【御风】状态前都很有用,你可以配合敌人的攻击时机释放绝技,获得额外的速度爆发来脱离战场。 神剑 - 我很少在绝技选择上感到纠结,但对于这个技能,我会优先考虑直接增加伤害的词条、降低目标敏捷(减少其移出技能范围的能力——后期能用龙卷风困住敌人后就不那么必要了),或者短时间内减少其他技能冷却时间以提升额外输出。与【裂天剑】不同,此技能的持续时间是固定的,因此无法尝试用它来获取大幅增益和附带伤害。 风系 你需要追求冷却时间减少、至少2个+敏捷加成以及持续时间加成。当该技能与你当前境界相当时,+伤害属性会很有用,但在面对更高境界的对手时,其效果会明显减弱。 材料获取——获取物品的地点(及其用途) 作为参考,我将【魂石】、【魂晶】、【魂玉】统称为“技能材料”;将【悟道砂】及类似材料统称为“悟道材料”。工匠技能书 - 若想提升各类 crafting 技能,目前唯一途径是击败定期刷新的各种 Boss。在区域 1,Boss 会掉落价值 5 点的技能书;区域 2 掉落 10 点;区域 3 掉落 15 点;区域 4 掉落 20 点。 血偶 - 风水(Geomancy) 宝藏面具 - 锻造(Artifact Crafting) 水晶魔像 - 矿石(采矿) 蘑菇人 - 草药(草药采集) 走火入魔的炼丹师 - 炼丹术 ??? - 符箓(当前版本中,无法提升或使用该技能) 低阶材料可合成高阶材料,但所需数量极大,成本高昂(合成比例为5:1,例如1个1阶石头需要25个3阶石头)。若魅力值较高,建议养成定期查看本地修仙者并向他们索要技能材料的习惯,他们通常会愿意给予。宗门任务中的走火入魔修士必定会掉落功法(通常为蓝-紫色品质)和20-30个1阶技能材料。 领悟材料: 5阶沙——1区域元素之地的怪物 4阶沙——雷泽的怪物 3阶沙——2区域元素之地的怪物 2阶沙——千丘的怪物 1阶沙——3区域的起源之地/初始之地G5琉璃 - 极寒冰原中的怪物 G4琉璃 - 道界秘境 法宝及器灵材料 如果在物品描述中看到带有【污秽】字样的内容,则其与法宝存在某种关联。通常,将器灵培养至五重境界时,我会获得大量法宝材料;此外,若能及时处理水晶傀儡的刷新,也可通过开采地图各处的矿石点来获取这些材料。不过需要注意的是,矿石很容易出现供应不足的情况,因为与炼丹/草药不同,矿石并非故事推进或境界提升的关键必需品。对于打造高品质法宝而言,更重要的是特殊材料,这些材料可从不同区域的神兽身上掉落。我希望他们之后能改掉这个非常糟糕的设定,你的外观选择确实会对魅力值产生实际的机制影响——也就是说,从游戏玩法角度来看,你的外貌存在一个最优的机制选择。如果你选择了【天命·倾国倾城】,你的魅力值会锁定为900,这样你就可以随心所欲地选择外观,且没有任何负面影响。绿色品质矿石类炼器材料 - 2阶区域采矿、水晶傀儡、灵谷 蓝色品质矿石类炼器材料 - 3阶区域、水晶傀儡、灵谷 紫色品质矿石类炼器材料 - 4阶区域、水晶傀儡、灵谷 硅石 - 荒芜之角 - 华封州元素之地 悬浮石 - 雷霆击碎者 - 华封州元素之地 阴极石 - 帝王之剑 - 华封州元素之地 铝热剂 - 蔚蓝之铃 - 华封州元素之地 晶化矿 - 血织面具 - 云陌州起源之地 光泽矿 - 太阳旗帜 - 云陌州起源之地、极北之地天界守卫 突破(筑基期至元婴期) 本节将介绍各境界最佳突破所需条件。坦白说,到了元婴期,这就非常简单了,我简单解释一下机制。化神和悟道是更复杂的突破,我打算用更多篇幅来讨论它们。 筑基 筑基突破是你的第一次境界提升。你需要收集6个灵气珠,每种元素各1个。在较低难度下,我通常建议只需等待各元素区域的 Boss 刷新,然后在它们出现时击杀——你会得到一个90%以上纯度的灵珠,而且耗时最少。在洪荒难度下,我的建议则相反——在元素区域刷随机怪物遭遇战,收集每种碎片各100个,然后合成灵珠。其原因在于,在【洪荒】难度下领悟技能的方式与【普通】难度相比,确实更为繁琐。为此,你需要【领悟沙】,这也是上述建议的依据。此外,【洪荒】难度下的 Boss 自然更难对付,这意味着投入的时间和精力可能并不值得。筑基突破的另一部分是【秘境】——在第一区域中共有 3 个【秘境】。每个【秘境】进入需消耗 500 灵石,内部由一系列房间组成,最终会与一只【神兽】战斗。每个【秘境】都会掉落一件宝物(每次掉落的宝物固定,无法通过重复刷同一个【秘境】三次来获取)。集齐 6 颗【灵珠】和 3 件宝物,你就能进行【筑基-天道】突破。灵气的纯度会影响突破成功率,但通过存档读档或硬扛过雷劫也能成功突破。只有在进行凡人突破时才需要筑基丹,而凡人突破毫无价值。 炼气期 再次突破到第三境界仍需宝物。此次,4件宝物中的3件将来自秘境。第一个区域内有2处秘境,第三处则位于雷泽边境区域。你可以携带神念符来帮助定位。我曾见过它出现在该区域的两端——要么就在与永宁接壤的边境内侧,要么就在与华封接壤的边境内侧,所以它实际上可能出现在该区域的任何位置。第四个宝物来自世界 boss【地狱 Dank 灵】,它通常会在你突破至筑基期后不久出现。它和你在灵界遇到的 Dank 灵很相似,但更强大。集齐这四个宝物后,事情还没结束。你还需要收集炼制炼气丹的材料,这些材料由雷泽的怪物掉落。在【洪荒】难度下,你可能本来就在刷这些怪物获取领悟沙,但在较低难度下,这么早领悟技能基本是浪费,因此收集这些材料可能会是个烦人的额外任务。炼制炼气丹需要 50 份丝草和 50 份山药。这就是为什么首先要提升你的炼丹术——理论上可能会有其他修仙者在某个时候将这些丹药拿去拍卖,但我从未见过。 金丹期 哦,你差不多准备好成为一名真正的修仙者了。金丹期与筑基期很相似——你同样需要6个元素宝珠,突破规则也与筑基期相同。这次,你需要5件宝物。其中4件将来自锁灵阵。锁灵阵是一个只有一只非战斗海龟的房间。海龟会向你索要3个四品灵果。提供灵果后,它会“寻宝”,也就是缩进壳里,然后开始刷怪。你需要保护它存活大约2分钟才能赢得这场遭遇战。这里优先选择范围性技能——我之前的裂风流派遇到了些麻烦,直到我获取了月影剑和雷云术(因为我的门派是剑/雷属性,当时他们正好有这些技能),才得以帮助阻挡怪物攻击灵龟。不过总体来说,只要你拥有任何能攻击多个目标的技能,这些战斗都不算太难。你需要的最后一件宝物来自哈图布瓦里世界 boss,它会在你突破至炼气境后出现在雷泽。 元魂 流程类似——这次你需要从千丘地区的锁妖阵中获取宝物,而那些灵龟需要4个果实。这次的世界 Boss 是【Coeurl】,但和突破前要击败的【Leviathan】相比,它相当简单。不过……在【Chaos】难度下,我发现比较简单的做法是通过反复读档穿过东海去打【Coeurl】,然后走到云漠的一个城镇,这样如果需要的话就能传送回来;接着刷【Demonlock】法阵来突破到【Origin】境界,之后再去打【Leviathan】,因为它在【Chaos】难度下伤害很高,同时对于该境界来说血量也非常多。 元婴 元婴可能是我整个游戏里最不喜欢的突破阶段了。和之前一样,我们需要一套宝物,这次是 6 个。其中 1 个会来自世界 Boss,这你现在应该能预料到了,另外 5 个则来自地图。地图可通过前往【异界之地】并击败那里的【阵眼】获得,这基本是一场纯粹的输出竞赛——阵眼会造成你生命值一定百分比的伤害,且似乎不受防御影响。因此,如果你在此处遇到困难,较低的生命值实际上可能对你有帮助,因为每段伤害会更低。【生命偷取】能让这些战斗变得轻松。否则,在【洪荒】难度下,需携带一些不错的【疗伤丹药】,并考虑使用一些【攻击增益丹药】,尤其是当你的单体伤害不高时。 获得地图后,你必须向其注入5000【灵石】,它会为你揭示一个地点。前往该地点并使用【风水术】,即可发现【九尾妖狐】的巢穴。接下来的部分会让你感到有些棘手——九尾可能会掉落11种宝物中的任意一种,但其中只有5种是你真正需要的。这里没有重复保护机制,也无法保证会掉落哪种宝物——地图品质对此可能有影响,也可能没有。此外,北云漠地图实际上可能会生成在极寒之地,而在突破境界之前,你绝对没有准备好进入那里,这可能会带来进一步的麻烦。我的建议是,在进入九尾洞穴前先存档,如果她掉落了你需要的5种传说级宝物之一,那就太好了,继续游戏。如果没有,就读档重来。魅力确实能让你的修仙之路更轻松——作为魅力值高的角色,其他修仙者会主动找你切磋、论道或双修,省去了你四处寻找灵气、或主动寻找其他修仙者来提升心境点数的大量时间(当他们与你论道、切磋或双修时,不会消耗你的时间)。不过这也可能相当烦人,尤其是当你只想专心学习和提升新功法时,每个月都会有20个想成为你朋友或道侣的人来找你交谈。虽然我通常不建议利用游戏机制漏洞,但一般来说,获取所需宝物大约需要击杀15-30次敌人,而反复刷九尾和阵法实在没什么乐趣。或许可以在普通难度流程中不 reload 尝试一次,之后再通过存档读档来刷掉落。 突破(化神期) 化神期 这是突破模式的首次变化。理论上,突破化神期需要6样东西,但实际情况要复杂一些。首先是5个天道守护者之魂,其次是化神之气。只有集齐5个魂魄后才能获得化神之气,所以我们先来说说这部分。 在极寒之地,有5个地点,每个地点都有一名祭司守护。首先,你必须击败祭司,每个祭司都会主要运用与其守护神兽相关的元素。在较低难度下,这对你来说往往是一场轻松的碾压;即使在混沌难度,他们也并非特别具有挑战性,不过和大多数混沌难度的 Boss 一样,如果你掉以轻心,他们很可能会让你吃尽苦头。之后,每个祭司都会给你布置一些在面对守护神兽前必须完成的任务。 蛟龙(雷龙 - 盘龙山地界)—— 希望你喜欢挑战 Boss,因为要面对蛟龙,你需要击败当地的世界 Boss 莱奥尼德。他掉落的一件神话级物品是获得挑战蛟龙许可的必要条件。该许可一旦获得,有效期为一年。勾陈(红龙-幽隐谷)- 你需要获取化神丹。品阶无关紧要。材料可从极寒之地周围的怪物身上收集。 玄龟(土龟-磐石谷)- 哦,又是地图。你必须从无归之地获取3张地图,然后击杀这些地图中的 Boss。幸运的是,在这里只要拿到3张地图即可(重复也没关系)。没有必要特意去刷传说级宝物,不过它们可以在拍卖行出售。 陆吾(白虎-落月山脉)- 你会直接前往另一个 Boss 处,击败它以获取一件神器。这里会有2个 Boss,分别是【Coeurl】和【Harpy】。崇明(驱鸟峰)——你必须运用风水术夺回被盗的神器,但它本质上和你之前使用过的地图类似。遭遇战是生存模式,你会被大量怪物围攻。即使在【洪荒】难度下也异常简单。 注意,你可以获得许可并独立击败每个守护者,这样做可能会有帮助,因为每个守护者之魂都会提供显著的增益效果。关于守护者战斗的具体细节将在 Boss 部分说明。接下来我们前往【登仙台】。你需要攀登一段阶梯,我认为当你到达顶端时,生命值总会被降至 1 点——不过在爬完整个阶梯后,你可以将生命值和灵力恢复至满值。如果你身上携带了大量低阶丹药,现在正是使用它们的好时机。 登仙台奇遇是一系列房间——理论上你只需完成大约一半的房间,但建议你全部完成。每个房间会掉落3个魂之碎片,你需要从中选择一个。在较低难度下,我会直接选择攻击力最高的那个,但在洪荒难度下,你可能不想忽视防御力。我从未在专注力上遇到过问题,能量方面也很少出问题,所以不必担心这两项。最后,你需要击败天门守卫,之后会获得一个化神之息,其属性加成基于你所获得的魂之碎片。一旦进入突破阶段,你会发现情况与之前有所不同——你需要消耗【化神之息】,然后必须选择4个守护神魂进行消耗。未被消耗的那个守护神魂将提供属性加成和一个特殊技能。当前主流玩法是保留【玄龟】或【蛟龙】(乌龟或风暴龙)。 法宝与器灵 在较低难度下,法宝并不值得花费时间。在前两个难度中,你可以凭借纯粹的火力压制 Boss,所以除非你特别想收集,否则无需担心它们。 那么法宝是什么? 法宝是由 Boss 掉落物和多种辅助材料制作而成的 relic。它们是预先设定好的,比如【荒芜号角】总会召唤野猪,【铃铛】总会创建界域场等。不过,除了这种主要能力外,它们还有很多变化。和功法领悟类似,法宝可以有各种词条,这些词条可以用对应品阶的【淬炼树脂】进行重洗。与功法不同的是,重洗词条是全部更换,无法保留部分。你也可以将法宝升级到更高境界——如果你想继续使用它,这基本上是必须的。法宝另一个,说实话也是更有用的部分,就是【器灵】。 那么,什么是【器灵】呢? 【器灵】是拥有多种能力的灵体,你可以提升它们的等级。它们与特定的【法宝】绑定,装备该法宝时可为你提供增益效果。每个【法宝之灵】都拥有一项生活技能,这基本上是一种非战斗技能,能在冷却时间结束后提供各种低调的增益。它们还拥有自己的终极技能,通常需要它们进行攻击并满足某种条件才能释放。有一种突破【天命】可以让它们在召唤时立即释放终极技能,这极大地提升了【法宝之灵】和【法宝】的实用性。 如何获得【法宝之灵】? 【法宝之灵】可在【灵谷】中获得。从第二区域开始,每个区域都会有2个【灵谷】。我认为选择哪个【灵谷】没有区别。进入需要消耗1个【终极之沙】(可在每个城镇购买)和5天时间。每次进入后,你会位于一个3x3网格房间的中心。入口处地面上有一个阵列,可用于增益自身或召唤 Boss。每个房间都有普通怪物和1个精英怪物。各房间周围会周期性出现紫色火焰和爆炸,这些会造成无视防御的百分比伤害,切勿忽视。 清理所有房间的敌人,你需要寻找【灵魂诱饵】。拥有的灵魂诱饵越多,将其放入大型紫色水晶时获得有用魂灵的几率就越高(在清理完地图前不要点击水晶,否则会浪费此次行程)。你将获得1到7个(这是我获得过的最多数量)器灵,以及一些用于升级或修复神器的天材地宝。每个区域中,你实际上只需要两种器灵。不过,仅仅找到它们一次并非全部——现在我们都是抽卡玩家了。首次获得器灵时,它们的灵境等级为1级——你需要再找到2个相同的器灵才能提升至灵境2级,再找到3个提升至灵境3级,以此类推。每个器灵更强大的天赋和能力都锁定在更高的灵境等级中。如果你获得了器灵残魂,可以将其赠送给器灵,以提升它们的灵境等级。但同样是这些人,也很可能会毫不犹豫地给那个曾被他们说过“见君如沐春风”的人一千份当前境界的G3技能材料,所以通常结果还不错。 攻击、防御和其他所有属性后期都很容易提升。有点违反直觉的是,在更高难度下选择至少一个能增加这些属性的【天命】实际上可能是个好主意,因为在混沌难度下, Jagu 可能会很棘手,在击败她之前,你提升实力的选择非常少。你最高的基础属性(灵力/武力)会决定你的初始功法,但这完全没有机制上的区别。【以太】<元素>功法普遍很弱,在游戏开始5分钟内就会被替换掉。我尚未测试它是固定提升1个境界(这意味着最好留到第4和第5境界使用),还是仅计算已找到的副本数量。一旦你的灵界等级达到上限,额外获得的副本将为你提供【幽冥气息】。这些物品可在山谷入口的祭坛处用于增益并召唤一个 Boss(该 Boss 会掉落制作【帝剑】所需的材料)。 即使你不打算大幅增益这个 Boss,召唤它也可能有利可图,因为当你在入口处召唤并击败它时,它还会掉落【魂晶】。 山谷中值得注意的一些遭遇:如果你发现一个紫色的池子,那是一个要么翻倍要么一无所有的赌博。通常,只有在我完整探索后找到的诱饵少于10个的情况下,我才会尝试,因为我不太喜欢赌博。理论上,如果你运气好且顺利的话,可以获得50-60个诱饵。我推测,如果修仙者的运气属性较高,那么获得诱饵的几率也会提升。 无论你的修为境界如何,有两种东西可能会对你构成威胁——如前所述,紫色火焰/爆炸会造成百分比生命值伤害,所以如果你反复刷魂灵(或者实在太不小心),这些伤害会随着时间逐渐消耗你的生命值;另一种威胁是心魔。在每个房间中,都有一定的随机几率会因谷中的暗能量导致心魔狂暴。这基本上是一场与自己的镜像战斗。当然,这战斗的难易程度取决于你的Build,但我的风切流角色就经常出现与魂灵同归于尽的情况。这些东西根本没用,它们除了送死啥也干不了。没错,还记得我说过提升它们的境界基本是必须的吧?如果法宝不是你当前的境界,那它基本上一碰就碎。但总的来说,要是不升级法宝,它们基本就是垃圾。这就有个问题了,因为掉落法宝部件的那些 boss,通常也是你突破境界时要打的,这意味着法宝的境界最多也就比你低一个大境界,除非你开始刷【魂塔】。充分利用神器 我要再次强调:我认为在【噩梦】难度以下,神器并不值得投入时间。要让神器真正成为战斗中的有效工具,需要相当多的努力和资源投入。要将神器提升到更高境界,你需要额外的神器核心(Boss掉落)来打造,还需要材料(不同神器可接受的材料不同,可在锻造菜单的提示中查看),以及来自【魂塔】的材料。【魂塔】是一座外观非常不祥的塔,只能通过【灵谷】的掉落物进入。如果你在【神器灵界5】刷怪,会获得足够的进入道具。塔内有5场连续的Boss战,且有时间限制。首领的难度会逐渐提升——第4个首领通常是游戏后期的首领,而早期的首领则多为游戏早中期的首领。正如你所预期的,深入的层数越多,掉落的材料就越多。第一个首领可能掉落20个材料,第二个30个,第三个40个,以此类推,完整通关一次大约能获得250个材料。首次通关该区域的魂塔还会奖励一个神话级坐骑,它能轻松助你度过下一个区域。魂塔的另一种掉落物是用于升级该区域器灵天赋的宝石。这些宝石是区域专属的——你无法将它们用于其他区域的器灵。 器灵有一个名为【灵力】的属性。这是对法宝可绑定天赋数量的限制——解锁的天赋越多,灵力属性就越高。这是另一个迫使你不断升级法宝以使用更高阶天赋的要素。 法宝与器灵——评论与评价 荒芜号角——基本就是垃圾。也许如果你玩召唤流的话可能有点用,但我除了把它扔出去吸引 Boss 一下注意力外,没从中得到任何有用的东西。 雷霆碎击者——一个小幅度的伤害增幅器。我会考虑在雷系流派中使用它,因为它的一些词缀可以通过雷系特定效果帮助你积累更高的每秒伤害。 帝剑——算是一把可以被打掉的劣质神剑。我其实没用过这个,但NPC用起来没什么亮眼表现。 【青冥钟】——这个你绝对会注意到。大概在你炼气期的时候,就会开始在切磋和宗门大比中遇到金丹期修士,他们会立刻对你使用这个。根据词条不同,它可能只是击晕然后困住你,也可能嘲讽你、封印你的技能,或者在你每次攻击它时对你造成辐射伤害等等。对低境界修士使用时,这基本上就是个必胜按钮,因为他们没有足够的伤害打破它,而且控制效果非常致命。对付高境界修士,你一召唤出来它就会被打碎,但在同境界下它仍然是个有用的工具。此外,它既可以用于防御,也可以对 bosses 进行攻击。部分 Boss 的攻击无法穿过屏障领域,这让你可以将铃铛放在自己身上,安然无恙地躲避冲锋的敌人。 血织面具 - 这件神器的效果理论上有用,但我还未测试它在面对蛟龙等高伤害威胁 Boss 时的实用性,因为我一直在混沌难度中尝试收集材料,以制作传说或神话品质的版本。 烈日战旗 - 它会生成一片火焰领域,该领域会随着你或敌人使用能量而扩大。或许对火系修仙者有用,就像雷系的碎击者那样?我还没试过。实际上,如果你有一个防御技能,其强大的修饰效果基于站在火焰中,那么这件神器可能会让该技能变得非常好用,因为你可以精确控制火焰的位置并使其扩大。尚未测试。梦依——有时也被称为雪狐道侣。作为第二区域的两大善灵之一,梦依是控制能力的强者。一旦解锁了合适的天赋,她就会释放灵狐,对目标造成显著的魅惑效果( Boss 也无法免疫)。这种魅惑还会增加目标受到的伤害。她的终极技能是范围性的魅惑,基础持续时间为10秒。梦依一直是我常用的灵体,部分原因是我让她先于同区域的另一个灵体达到了第五境界,更重要的是她的控制能力非常实用。当与法宝绑定后,她会为修仙者的所有灵根属性+30。她的生活技能是预知未来,似乎会产生从增益效果到物品奖励等多种不同的结果。首领(技艺首领与常青) 常青 最早出现的首领之一。在较低难度下,它不堪一击——在召唤护盾、被你立即打破护盾并进入眩晕状态,然后你将其打入下一阶段护盾的过程中,它几乎没有机会发动攻击。在较高境界中,你很少会遇到它,但它偶尔会出现在药园之类的地方。它只有两种攻击方式:一种是圆形波纹(通常会连续释放,且略有变化,使得圆形范围内几乎没有完全安全的空隙),另一种是直线持续伤害流,通常也会反复释放。躲避直线攻击相当容易。圆形波纹可能有些棘手,但在较低难度下,由于上述的眩晕机制,它很少有机会释放太多次。正邪值影响不大——除非你深陷某一方阵营,否则随时可以切换阵营,而且它对游戏整体影响很小。 按元素分类的Build 对于每一种元素Build,需要注意的是,初始气运应优先选择那些后期无法提升的属性,而非像攻击力加成或特定灵根加成这类属性。我个人的优先级排序是:幸运、悟性、移动速度、敏捷。通常我会尽量选择【天选之子】气运,因为它非常强力,同时至少再搭配一个不错的气运。不过,我认为花数小时重刷来追求完美开局并不值得。如果你真的很在意,那就下载一个存档编辑器吧。混沌难度评价:低境界的长青真人比起低难度版本并没有难上多少,只是伤害有常规提升。真正让我觉得更棘手的是在更高境界(起源境及之后)遇到他。此时他的生命值相对于你的伤害而言足够高,因此他确实能够完整释放其攻击模式。如果你的防御属性不够高,这些攻击可能会相当危险,因为在混沌难度下,他会频繁地将圆形弹幕波与直线范围攻击组合使用,而且和大多数混沌难度的 Boss 一样,除非你拥有境界优势,否则这些攻击无法忽视。 血傀儡 血傀儡由于其控制技能,在任何难度下都是一个烦人的 Boss。他拥有3种攻击方式,其中2种极为相似,且全部带有控制效果。他通常会像大多数 Boss 一样,以召唤小怪开场。接下来的攻击是血阵,在其范围区域内造成伤害并使移动变得困难。在较高难度下,这会是双重释放,通常需要使用位移技能才能逃脱,除非面对的是低境界版本。下一个技能是长距离冲锋——通过灵活移动可以躲避,但如果你的身法不够高,几乎不可能躲开。该攻击伤害很高,并且会使你沉默,无法使用物品或技能。而且他通常会连续冲锋多次(冲锋次数似乎会随境界提升而增加)。随后,他会进行一系列短距离跳跃冲锋,这些冲锋更容易躲避,但具有相同的控制效果,之后会重置并开始召唤,如此循环。混沌评价:虽然血傀儡的招式模式还算简单,但需要较高的身法来躲避,并且要留着位移技能来逃离血阵。血阵的伤害很高,更糟糕的是,当你的移动被限制时,你无法躲避他的冲锋,这意味着你会被击晕,然后在承受血阵伤害的同时,还要遭受一连串的重击。我不建议在你能够不用位移技能就能稳定躲避冲锋之前挑战血傀儡——那些在施展时增加身法的特殊词条对此会非常有帮助。水晶魔像 水晶魔像仅有两种攻击方式——一种是容易躲避的直线砸击,另一种是会制造流沙的陨石雨。在较低难度下,这些攻击威胁不大,砸击也很容易躲开。混沌难度评价:在混沌难度下,它和血火面具无疑是最烦人的两个工匠技艺 Boss。混沌难度下的陨石雨伤害极高——同境界的修仙者只要暴露在其中几秒就会致命(除非你是土系修仙者并能中和它)。这会让提升矿石技艺变得非常困难——我通常得等到每个大境界的第二个小境界才能在混沌难度下稳定击杀魔像。 血火面具 工匠技艺 Boss 中的另一个。暗火面具基本处于静止状态,其周围存在一个伤害性的范围攻击区域。在较低难度下,这一威胁可以忽略不计。它拥有两种攻击方式:一种是一系列爆发性爆炸,在靶心图案中有两个安全区域(站在其伤害范围区域外侧是相当安全的位置);另一种是一连串的伤害射击,若与它保持一定距离,通过左右移动可以躲避。混沌评价:和水晶巨像一样,血火面具在每个境界的第一区域都是噩梦般的存在。它拥有极高的伤害,一旦未能成功躲避其攻击,很容易一击就将你的修仙者生命值从100降至0。如果你近距离战斗,没有位移技能几乎不可能躲避他的伤害流,而且在你获得多个减少位移技能冷却时间的技能之前,他使用该技能的频率会比你的位移技能冷却完毕的频率更高。如果你远程战斗,战斗可能会慢得令人沮丧,因为他的靶心爆炸几乎会填满以他为中心的整个屏幕,这就需要保持最大距离——而对于境界较低、技能射程较短的角色来说,这甚至可能无法做到。和石人一样,我通常会等到该境界的第二阶段再尝试这些战斗——提升炼器技能并不值得花费时间和精力,因为通常你需要在该境界末期才能轻松 farming 到的材料,才能炼制出好的法宝。走火入魔的炼丹师 本质上是高生命值的随机修仙者。战斗开始时,他们会随机获得基础技能、移动技能和特殊技能。对付修仙者的策略同样适用于他们。 蘑菇人 一个辅助型首领,基本上是一个体型巨大的精英怪物。他会放置蘑菇,这些蘑菇会为其他怪物提供增益效果(有时也可能是减益效果,这点很难分辨)。他唯一的直接攻击是快速发射一连串蘑菇。除非你的身法足够高能够直接跑开,否则要留着移动技能来躲避这个攻击。即使在较低难度下,正面承受这个攻击也会造成相当大的伤害。混乱难度评价:这里没什么特别的——从技术层面来看,蘑菇人简直简单得可笑。要么你有足够的敏捷来躲开他的蘑菇弹幕,要么你就得使用身法技能。主要问题在于,混乱难度下 Boss 的生命值极高,这让你有很多犯错的时间,而且那个弹幕伤害很高。但总体来说,我认为蘑菇人可能是游戏中最简单的 Boss。 Boss(元素领域) 巨螯蟹 仅在低境界出现,巨螯蟹是水元素领域的 Boss。它有 3 种技能:一种是冲锋挥砍,会连续释放;一种是毒性范围攻击;还有一种是自我治疗/增益。这里没什么复杂的,只需尝试通过移动技能躲避冲锋(在第一境中,你不太可能有足够的身法完全躲开他),远离毒雾,并持续输出伤害。混沌难度评价:没什么新花样,只是容错率比平时更低。 山魈 土元素领域 Boss,后续在起源境还有世界 Boss 版本。它有两种攻击方式——一种是简单的土系锥形投射物,你可以从间隙中躲避;另一种我称之为狂暴模式——场上会出现大量龙卷风,山魈会四处追击你。完美躲避这一招很 tricky,你必须在躲避它冲锋的同时避开龙卷风。万不得已时,可以穿过龙卷风来躲避它的冲锋——龙卷风的伤害比它本身要低。关于在【龙卷风+冲锋】阶段躲避的主要建议是:虽然【幽魂】移动迅速且似乎一直在追击你,但它必须移动固定距离后才能改变方向。如果你有足够的【身法】,可以侧身躲避它的冲锋并绕到它身后。频繁改变方向有助于拉开距离,因为它会朝着你开始移动时的方向冲锋,并且每秒最多只能改变一次方向。像【孟婆】的【魅惑】这类控制技能在缓解这个阶段也非常有帮助。【混沌】评论:【元素之地】的低境界版本有一定危险性,但如果你难以应对它,它并非完美突破的必要条件。而世界首领版本则相当棘手。七雷之道 - 雷/风系 这是我首次通关游戏时使用的流派。前期体验欠佳,在获得元婴境界左右的紫色雷电主力技能前,操控起来颇为别扭。由于在初始区域切换元素较为容易,或许先以剑系开局会是更好的选择,待突破至炼气境后再转雷系。若想全程使用雷系,闪电鞭可作为备选技能,但伏电射击(Voltshot)实在是毫无用处。 风系仅用于移动,但在筑基期使用风系技能时我确实感觉更为顺手。在雷云术和黯雷术可用之前,推荐使用追雷术。由于需要击杀他才能完美突破元婴,所以你不能之后再回来(或者说,你可以回来,但至少要在突破前击杀他一次)。即使你不是风修,我也强烈建议提升你的风灵根,以减少当你必须穿过龙卷风躲避他的冲锋时不可避免受到的伤害。 六尾 九尾的低境界 sibling。六尾通常出现在火属性区域。它只有两种攻击方式:一组3个宝珠,会以沙漏形交叉模式移动——你可以在交汇点附近躲避,或者有足够身法的话完全侧身躲开攻击;还有一道火焰喷射——有足够身法的话很容易躲开,或者为这个技能留着你的位移技能。六尾是一个基本不会移动的 Boss,因此带有良好 DPS 的小型持续伤害领域对其非常理想。混沌评价:或许是混沌难度中最容易的元素领域 Boss。 Dank猪 巨型猪人和风元素领域 Boss,同时也是首个世界 Boss。它有 3 种攻击方式:三向分裂猛击,通常会快速连续释放;一组长距离的风 tornado;以及会造成短暂眩晕的快速冲锋。三向猛击很容易躲避,每次只需移动一小段距离——它会在释放间隙调整位置以将攻击中心对准你,你只需站在攻击线条之间即可。tornado 通常在你处于远距离时使用,通过同样的原理在它们之间躲避也相当容易。Dank猪真正的危险在于冲锋。闪避移动基本上是必须的,建议你远程与他战斗,这样能给你更多反应时间。混沌建议:保留你的移动技能,尤其是带有无敌帧的移动技能来应对他的冲锋。他的冲锋很容易两下就击败你,而且击晕效果意味着如果你被击中,很难躲开后续攻击。 雪豹 雷域 Boss。坦白说,它是最简单的 Boss 之一,即使是金丹期的世界 Boss 版本也是如此。它有四种攻击方式:三向闪电喷射;一种出乎意料地容易躲避的冲锋,通常会连续释放;一个施法速度较慢的近距离范围攻击;以及同样通常会连续释放的追踪闪电。将你的移动技能留到最后一种攻击上——它不会改变方向,所以一旦你躲过它,就安全了。混沌评论: coeurl唯一真正的危险是追踪闪电。如果你的身法没掌握好,很可能会死。不要将身法用于其他任何招式。如果你操作失误,在它开始释放追踪闪电时身法处于冷却状态,你最好的希望是尝试躲到闪电后面。 鹰身女妖 风元素 Boss。会释放一个不断扩大的旋转龙卷风圈,你可以选择远离它或者尝试在风圈间隙移动;还会释放多波龙卷风;此外还有些奇怪的是,会有岩石从空中落下。这些岩石会使你眩晕。在较高难度下,这可能会导致死亡,但由于它的攻击模式压力不是特别大,所以这些岩石相当容易躲避。 Boss(中期) 狮虎兽 这只人形老虎是一个基本静止的 Boss。你通常会在第二个区域开始遇到他,并且他会成为第三个区域【镇妖任务】中的常见角色。他的大多数攻击都很容易躲避:一道直线远程攻击;一组他会抛出并留下的旋转飞斧;然后是他真正危险的机制——一组不同颜色的小光团会无情地追击你。我还没有确定他是如何决定使用哪种光团的,不过我认为这与他身后的表情环有关。绿色和红色光团类似,都会对你造成持续伤害。白色光团会使你和 Boss 都无法移动(不过他并不在乎),持续数秒。这通常会紧接着他向你头顶扔出一把旋转飞斧,除非你正在碾压低阶领域,否则这是致命的组合。 哈图伊布瓦里 雷系神兽,从第二阶开始会定期遇到,同时也是第二个世界 Boss。该 Boss 的主要攻击方式包括:一系列的球状闪电攻击,被击中会使你眩晕;他周围地面上有一大片云,进入其中会受到伤害(这片云几乎占据整个屏幕);还有一种无法躲避的持续伤害效果,虽然伤害较低,但在长时间战斗中会累积起来,尤其是当你没有回复技能或生命偷取能力时。混乱难度心得:强烈推荐使用远程攻击——近距离躲避球状闪电难度大得多,范围伤害攻击在战斗中约占三分之一的时间,在混乱难度下无法像低难度那样忽略。如果被一连串攻击中的第一个球击中,后续的球很可能会因伤害较高而将你击杀。 九尾妖狐 通常只要保持移动就能躲避蓝色法球。魅惑弧光会被地形阻挡,或者当你距离足够远时,可以在弹幕之间穿梭(不过如果她连续释放多道弧光,或者有多个法球跟随一道波次,这就比较棘手了——最好承受法球伤害也不要被魅惑命中,因为魅惑会使你眩晕2秒)。我通常会留着风系身法来穿过狐妖的波次——我认为如果没有某种身法,是不可能闪避过去的(除了剑系和水系之外,大多数身法应该都可行)。你可能需要多次挑战这个 boss——元婴突破需要刷地图,地图会显示九尾妖狐的位置,击败她会掉落随机宝物(没有重复保护),直到你获得所需的宝物为止。混沌难度评价:有趣的是,这是混沌难度中最容易对付的 Boss 之一。她的攻击模式很简单,只要不吃魅惑技能,就非常容易躲避。大多数用于刷地图而与她战斗的洞穴中,至少有一到两根柱子可以阻挡她的魅惑投射物——如果必须站在柱子后面,并且通过吸收蓝色法球来躲避魅惑,那就这么做。 盘龙祭司 盘龙山地的 Boss 前祭司。使用扩散圆形闪电、三重闪电锥形攻击,并在地面留下闪电法球。这些闪电法球伤害很高,不要踩上去。 落霞谷祭司 玄龟的 Boss 前祭司,该祭司是土系使用者。说实话,他相当容易对付。他的3种攻击方式分别是:短距离投掷石块,很容易躲避;召唤土傀儡,若没有移动技能我从未成功躲避过;他的 durability相当高——尽管混沌难度下莱奥尼德世界 boss 的生命值比他高出约50万,但我击杀他所花的时间比击杀莱奥尼德更长。 幽谷祭司 勾陈的前置 boss。对于剑修和其他远程攻击者而言非常简单。他会释放缓慢移动的三轮火球;倾泻而下的流星火雨,落地后留下的灼烧区域无疑是这场战斗中最危险的部分;一圈火狐,到达目的地后也会留下灼烧区域;还有一个火焰风车。和大多数流派一样,【终极技能免费释放】气运是该流派的必备选择。在我的游戏过程中,我最终点满了3级【生命偷取】气运。这与【雷霆反噬】终极技能搭配效果很好——你可以站在目标上方,通过风系身法进入无敌状态,然后看着你的雷云/暗影闪电和雷霆反噬对其造成大量伤害(同时你的生命值会迅速回升)。 寻找能够增加雷击次数和频率、提升雷击伤害以及扩大受影响敌人数量的词条(尤其是当你使用【雷阵】终极技能而非【雷霆反噬】时)。近距离战斗十分危险,但在远距离时,他的所有攻击移动速度都很慢,很容易躲避。 月落山祭司 令人意外的是,他是比较危险的祭司首领之一。他拥有快速打击的风锥技能,如果你在游戏后期(至少在【洪荒】难度下)敏捷属性仍然较低,这招会对你造成严重伤害。他还会释放两个快速旋转的龙卷风环,如果你不立即躲开,也会受到快速打击。此外,他还会释放小型旋风效果,这些很容易躲避,同时他还有一个大范围的近距离龙卷风技能。 驱邪峰祭司 水祭司相对简单,不过他有一个技能可能会让人措手不及。祭司会释放移动缓慢的弧形水泡,这些水泡很容易躲避;还会释放水龙卷,在远处也能轻松躲开;此外,他还会召唤数个分身,分身会持续使用水元素射线攻击。单个射线的伤害不高——在混沌难度下,对我造成的伤害约为每段220点。但祭司加上分身共有约8个单位,一旦处于攻击范围内就会被击中,无法通过移动躲避。这可能导致每秒1800点的伤害,而且如果身处他们的阵型中间,还可能同时被水龙卷击中。不过,对于剑修来说,这个祭司并不难对付。保持距离,确保同时最多只有2到3个分身能攻击到你,这样就有充足的时间躲避他的龙卷风和水泡。分身最终会自行消失,所以无需将它们全部清除,只需处理那些妨碍你攻击祭司的分身即可。 卡皮亚 某种冰鱼女士。在元婴突破期间,你至少要与她战斗3次,以获取玄龟所需的宝物。她的技能包括大量冰旋风、会冻结你的追踪冰刺(在洪荒难度下几乎必死),以及同样会冻结你的冰雨。不过,除非你在冰雨即将结束时被击中,且她紧接着使用追踪冰刺,否则你大概率不会有危险。 首领(守护神兽) 玄龟——玄武 五大守护神兽中最简单的一个。在他的右后腿附近有一个相对安全的位置,如截图所示: 他仍然能用甩尾攻击和落石雨击中你,但我个人发现,比起躲避他正面的所有攻击,利用风身法来躲避这些攻击的时机要容易得多。落石雨很容易将你击败——我在这场战斗中受到的大部分伤害,都来自有一次我刚结束风身法,一块石头就落了下来,我被击晕后又承受了更多的落石攻击。 【白虎】陆吾 陆吾是许久以来第一个迫使我进行更具策略性思考的战斗,而不只是“使用风身法,无视机制”。他的冲锋阶段处于无法选中状态,这意味着如果你的防御手段依赖于攻击敌人(比如叠加流血效果后爆发,或是拳系的护盾、剑系的吸血),那么这个阶段会极其危险。如果没有风系身法,我无法稳定躲避他的冲锋。他的直线范围攻击是威胁最小的技能,可以通过横向移动安全躲避。但他的连环冲锋却可能造成毁灭性伤害——我曾被这招暴击29000点伤害。他还有一种贴身范围攻击,会先跳到某个区域,然后在自身周围释放范围技能。孟极和一件元婴级别的【青冥钟】对我来说至关重要。青冥钟能强制他攻击自己,且经过适当升级后可以承受多次攻击。此外,如果老虎处于铃铛区域之外,它实际上无法用冲锋命中目标。孟婆的魅惑效果增加了额外的控制能力。 勾陈 - 红龙 勾陈在“意外简单的 Boss”类别中排名第二。只要你保持移动,它几乎所有的攻击都无法命中你。它会在地面上制造将你困在其中的区域(如果你恰好在它旁边时发生这种情况,可能会致命),猛击自身周围的地面,生成一道追踪的火线(?),并定期释放看起来像锁链的大型圆形范围攻击。只要你不被封印阵困住,只需不断绕着它移动并持续攻击,就能轻松应对。事件与结果 等级适配指的是你将根据所在区域获得相应物品。边境区域似乎算作下一个区域,例如在极寒之地会获得G2级灵果。 猴子与果树 帮助猴子 - 与单个精英花妖战斗。获得灵石和炼器材料 保护果树 - 与单个精英雷猴战斗。果树会给予你一枚灵果 离开 - 事件结束 黑牛与枣子 选择灵石 - 黑牛露出厌恶的表情,但你仍能获得灵石 选择枣子 - 获得灵果 孤独的灵果 采摘灵果 - 与单个精英雷猴战斗。获得等级适配的灵果 离开 - 你离开了 怪鱼 捕捉怪鱼 - 结果1:你抓住怪鱼并烹饪了它。恢复心情 结果2:被鱼咬伤-失去体力 离开-你离开了 不祥光柱 调查-与剑修战斗。不要低估他的伤害,他的攻击可能非常高。掉落破碎的天剑石,一个可使用3次的天命,能增强你的绝技。 留下观察- 不祥预兆-离开 给山雀的礼物 你决定你的名字是山雀-获得魔气值、灵石 贪婪无法控制你-获得正气值 杂乱法阵 尝试突破-通常会有其他修士攻击你。击败他们可获得一些灵石和丹药 离开-离开 黄鼠狼与狐狸 帮助狐狸-狐狸的祝福(+运气,持续6个月) 帮助黄鼠狼-灵石【裂风之道 - 剑/风】 裂风是一套热门的主流Build,因其擅长远程作战,能让你有充足时间应对Boss。它在清怪方面并非最佳(尤其当你难以刷出带穿透属性的清风剑时),但在 Boss 战中表现出色。 这套Build中,我使用清风剑作为武技,无影剑作为绝技。相较于坠天剑,更推荐选择神剑诀作为必杀技,但在炼气期之前,你可能只能先用坠天剑过渡。 风系用于位移——其无敌效果非常实用,而聚怪以及暂时降低敌人敏捷的能力,配合幻影分身能确保敌人持续处于攻击范围内。随着游戏进程推进,你需要选择能够延长移动技能持续时间的心法技能。在第三个区域前后,你可能会开始发现能显著提升该效果的技能。当你的移动技能持续时间超过10秒后,就可以去寻找带有【每引爆一层流血效果,移动技能冷却时间减少x】词条的无影剑。虽然移动技能的冷却时间要在技能结束后才开始计算,但这个词条可以在技能结束前就降低冷却时间。即使在游戏前期,这也能让你快速达到每次仅在几秒内处于易受攻击状态的程度。我认为通过合理搭配冷却缩减效果以及基础冷却时间更低的高境界移动功法,你甚至可以将移动技能的冷却时间降至0。


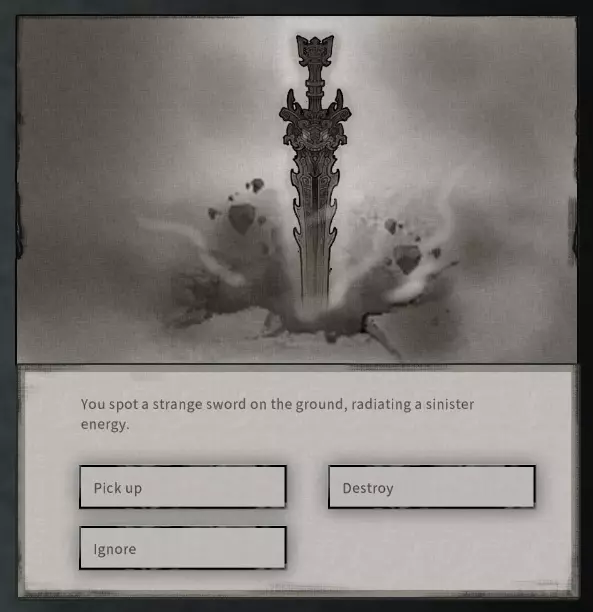
开始游戏前我希望知道的事: 新手适用的强力功法/灵根。 各项属性的作用以及其重要性分析。 一些实用的技巧和窍门。 哪种功法或灵根最强? 简短回答: 对于新玩家,我推荐刀、拳、火或土。 这些在前期都拥有强大的范围功法技能,能大幅加快你的刷怪效率。 我不推荐:木、剑。 我发现这两种前期只有单体功法技能,意味着你经常需要逐个击杀20多个敌人的房间,而不是一两招就能清理5-10个敌人。我对风、水、雷、枪、掌、指这些流派没有经验,如果有人玩过,麻烦告诉我它们初期的体验如何。 长回答: 其实影响不大。要理解为什么,你得先了解游戏的成长机制。简单来说,为了进一步修炼,你需要加入一个宗门。而每个宗门都有其擅长的武学或元素功法。 宗门的珍宝阁会出售能提升对应武学或元素功法的果实。购买这些果实是提升武学/元素功法的主要方式。所以你初始的灵根/武学影响不大。注意:击杀某些 Boss 和完成特定地图事件也能获得一些果实。就我观察,寿命的增减完全没有意义。或许之后开发者会添加一些需要消耗寿命的任务或道具之类的内容。目前,我发现唯一会消耗寿命的是在探索修士墓穴时,如果你拥有风水技能【鬼契】。你需要用几年寿命换取一些还不错的 loot,但也没什么特别的。对大多数人来说,无论是寿命还是这些 loot 都不是特别有用。 声望——通过完成悬赏板和宗门任务,你会积累大量声望。任何微小的初始加成,都能通过两分钟的刷取轻松弥补。 灵力/念力——这些是你施放技能和使用物品时消耗的资源池。不过你可以通过突破境界获得大量此类资源,通过修炼心法获得的则更多,而且游戏初期获得的任何加成在整个游戏过程中几乎都难以察觉。 专精——详见下方的专精说明。 关于专精该怎么处理? 你可以通过击杀世界地图上刷新的特定怪物来获取这些专精,所以不必费心去刷新它们。 炼丹是提升修为境界所必需的,因此这是最重要的专精。 炼器是制作法宝所必需的,若想在较高等级制作出非垃圾品质的法宝,就需要炼器专精。 出于这个原因,强烈建议你每次在世界地图上遇到炼器 Boss(暗面鬼首或晶化巨像,具体是哪个记不清了)和炼丹 Boss(走火入魔的炼丹师)时都去挑战它们。不过,在这些方面,你的初始属性其实并不重要,只要你确保击杀所有出现的怪物,就会有足够的属性来推进游戏。 至于其他方面: 风水有一定用处,但很容易通过【血傀儡】来刷取。 草药有一定用处,但很容易通过【蘑菇人】来刷取。 如果你计划将你的法宝强化到有用的程度,矿石是必需的(但如果你对用器灵打造法宝不感兴趣,也可以忽略)。 据我所知,【咒术】在游戏中尚未实装。 补充说明: 如果你正在刷专精等级,要记住大多数城镇都有市场,里面有一些“药方”可供购买。我觉得这个翻译可能不太准确。不过购买并学习它们可以提高各种矿石和草药的掉落率,如果你因各种原因需要大量 farming 这些资源,这会很有帮助。 角色创建后的其他提示: 1) 如果你是新手,【不要击杀修仙者】。即使是那些看起来罪有应得的人也不行。他们死后你从其背包中什么也得不到,还会树立很多敌人,这些敌人会月复一月地不断追杀你,无情地攻击你。击杀这些敌人会引来更多敌人,最终你的敌人修为境界会比你高,让你月复一月地陷入无法取胜的战斗,并且无处可安身。他们会追踪你到天涯海角最荒凉的角落来揍你。我强烈建议尝试和所有人成为朋友,并且在游戏初期拒绝击杀那些攻击你的人。即使在普通难度下,如果你处于炼气期时每月都被筑基期修士攻击,或者处于筑基期时被凝气期修士攻击,你很容易陷入绝境。被一个属性是你两倍、一击能造成100多伤害而你只能对其造成1点伤害的人反复碾压,这一点都不好玩。 2) 游戏初期积攒一些灵石会极大地加快你的开局进度。特别是当你离开新手村进入第一个区域后,你将能进入一座城市、多个城镇以及数个宗门。在城市里,你可以购买坐骑和更好的储物戒指。我建议先反复完成悬赏任务,直到获得坐骑和戒指。 此外,购买一些传送符来加快探索后的返回速度也很关键,同时准备一些神识符,以便确定所有元素区域、灵域以及秘境的位置。这些区域的 Boss 掉落物价值很高,你可以在拍卖行出售,并用所得来突破到下一个境界。 3) 一旦确定了大部分元素区域的位置(在每个城镇使用神识符,并留意左上角的月度事件标签,查看元素区域 Boss 的刷新时间),你就可以击杀这些 Boss 获取灵气结晶,并在拍卖行出售以赚取大量金钱。要达到筑基(天道)境界,你还需要每种类型的【气结晶】各一个,以及来自三大灵域的三种材料。强烈建议每次突破都进行完美突破,额外的属性加成绝非儿戏,它们会相互叠加,让后续每个阶段都变得更容易。 4) 前期,寻找一本能提供攻击加成的【心法】。它不一定需要是高稀有度的,仅仅额外增加7-8点攻击,在前期就能带来相当显著的巨大差异。 5) 接受所有一起修炼和论道的邀请,以获取【心法】经验。当你有信心获胜时,也应该接受切磋。这些活动都能提供用于提升【心法】点数的经验值,这在很长一段时间内都会是你提升实力的一大瓶颈。一旦你开始击杀一些神话生物并在拍卖行的竞价战中获胜,你会获得远超你点数所能学习的优质心法秘籍。 6) 游戏中最好的突破气运之一是【战斗专精】。这个气运能移除你的绝技所有的条件限制。这使得一些之前在 cultivator 对决和特定 boss 战中无法使用的绝技可以立即释放,随时随地都能施展。它曾单枪匹马帮我度过了无数次 cultivator 战斗和 boss 战,甚至能对抗修为境界比我高出整整一个大境界的对手。 7) 许多身法技能都带有无敌帧。强烈推荐风系身法技能,因为它能提供3秒的无敌时间,并且还能让你在施展过程中进行引导或攻击。即便我只是个炼气期的火修,却因为这个原因一直在用比我低四个境界的风系身法。化身旋风时,我依然能释放绝技或施展武技,这让风系身法显得格外强力。 8) 达到金丹期时,尽量把炼丹术提升到至少40点。否则,你可能会像我一样,为了突破元婴前最后一点属性,苦等整整三年才刷新出炼丹师。真是该死的随机数生成机制。修士对决、宗门大比及切磋技巧 若你在前期修士对决和宗门大比中遇到困难,可尝试选择能穿透岩石的范围型武技,然后躲在岩石或大树后方不断释放武技。若操作得当,敌方修士对你的攻击命中率将降低60%-70%,因此除非双方属性差距极大,否则你最终会获胜。 召唤物和法宝在修士对决中也能带来巨大优势。 不要忘记在修士对决中可以使用疗伤丹药。购买或炼制一些高阶疗伤丹和攻击丹在战斗中使用或许是值得的。将此技巧与第一个技巧结合使用,在前期能取得相当不错的效果。如果你不喜欢初始的功法或灵根,你可以随时切换到你所在宗门的其他功法。或者干脆更换宗门,这虽然是一个较长的过程,但完全可行。 关于宗门的更多信息:所有宗门都是随机生成的组合,但每个地区都会有对应每种功法和灵根的宗门。此外,如果你在教程中选择拯救那两名修士,你将获得两封推荐信,这能让你加入原本可能无法加入的宗门。在修仙者对决中,如果召唤物距离更近,修仙者通常会优先攻击召唤物,因此土行傀儡/花妖/其他召唤物在修仙者对决中表现出色。 战斗专精能轻松应对大多数修仙者对决。你可以在对决开始时释放绝技,在游戏早期就能彻底击败敌方修仙者。不过需要注意的是,有些修仙者可能也拥有战斗专精,并会对你释放他们的绝技,给你带来非常不愉快的惊喜。但如果你使用了不错的身法技能,就可以安全地通过无敌帧躲避。 开发者反馈 我希望在游戏未来版本中看到的内容: 更多与道侣和妻子的社交活动。 更多与师父/弟子的社交活动。 更多与家庭成员的社交活动。 拍卖行筛选功能,以便你可以跳过不使用或不需要的功法和宝物。提升偷窃成功率的方法 进一步优化加载界面。或许可以在世界地图上预加载特定事件,这样当有人在月末挑战我们进行切磋或决斗时,就不用经历两次加载界面了。 增加能让玩家找到提升专精的典籍的风水书籍。 当玩家达到特定声望等级后,允许发布特定物品的悬赏。这样玩家就可以请求提升专精的典籍或一些稀有草药、矿石。 支持与朋友组队进行2v2或3v3的战斗,对抗敌对修仙者。 为修仙术语和社交相关内容配备英文编辑。有网站拥有由既懂中文又有丰富仙侠翻译经验的优秀编辑组成的团队。最后说明 本指南仅为个人观点,仅供参考。 我花了数小时撰写本指南,并在游戏过程中不断补充细节。但我必须承认,我的知识并不全面。 此外,该游戏仍处于抢先体验阶段,未来可能会新增功能、技能,或对现有内容进行削弱、增强,这可能导致本指南中的部分内容过时或不准确。 如果您发现任何需要更正或补充的地方,欢迎在下方评论。当你变得足够强大,原宗门对你而言几乎毫无价值,并且准备前往更高等级的区域时,你在前一区域加入的宗门会授予你荣誉弟子身份并让你“退休”,这样你就能在下一区域加入新的宗门,继续提升实力。 第一区域的宗门可以让你将想要提升的功法/灵根等级提升至50级。 由于在角色创建界面中,大多数初始属性和气运最多只能将你的灵根或功法等级提升到15-20级左右,所以将15级的功法提升到50级与将5级的功法提升到50级之间并没有太大差距,可能只需要十分钟的轻松刷怪时间。 我应该选择哪些初始气运? 有很多非常不错的初始气运。它们大多只是些小加成,可能不会太影响你对游戏的体验。一些小建议: 如果你想加快刷怪效率,我强烈建议至少选择一个能提升攻击的气运,这样能让前期刷怪更轻松。 新手气运带来的那点攻击加成很快就会过时,在较高的境界等级时,+3或+5的攻击根本不会改变你的伤害。但在前期,这是相当大的提升,能加快你的刷怪速度。 此外,至少有一个稀有气运【天选之子】可以提升移动速度。这对便利性来说相当不错,但并非必需。不过,游戏中能提升移动速度的其他东西很少(只有你的坐骑),所以与其他大多数属性不同,这个属性后期无法通过刷取来提升。 如果你在较高难度下游玩,可以考虑提升更高的感知。当你后期能获得大量红色秘籍,且这些秘籍有大量副属性可供重洗时,感知会非常有用。不过,感知在游戏初期作用不大。 想了解更多看法,可以查看下一部分,了解其他值得重洗和不太值得重洗的属性。 哪些属性重要? 会对游戏产生显著影响的属性,按重要性排序如下: 敏捷(战斗中的移动速度。提升此属性非常有价值,且后期很难提升) 攻击(仅在游戏初期有用) 移动速度(每月能探索更多区域)游戏后期很难提升) 感知 - 增加悟道阶段可重roll的红色词条数量。前期完全不重要,但当你拥有13-15个词条列表时,它会变得更重要。一些红色词条非常值得追求。如果你是硬核的极致养成玩家,可能会需要这个。提升难度较大。感知的其他部分 - 更快学习新功法以及升级功法时消耗更少魂石 - 不是很重要,多刷一会儿就能弥补。 如果你想通过偷窃赚钱(这非常赚钱但会树立很多敌人),你需要中等魅力,而不是高魅力。你还需要高专注力。然而,魅力值处于平均水平时,你将更难找到可以双修和论道的人,因此技能点的获取速度会变慢。 运气呢?我必须查看具体公式才能确定。根据游戏设定,运气会影响某些行动的结果。但由于不清楚具体会影响哪些行动以及影响程度,很难说它是最值得优先提升的属性还是最不值得的。 如果你想深入体验游戏的社交系统,魅力值也是值得一提的属性。你可以: 与他人社交, 建立各种关系(师徒、义父母/子女等), 追求异性。 但需要注意,许多社交相关内容的翻译质量欠佳,且据我所知,目前恋爱/ romance 功能尚未完善。你可以与其他修仙者结婚,但婚后并无实际变化。据我所知,婚姻不会带来任何加成、特殊互动、任务或其他相关内容。 从最大化属性的角度来看,魅力主要用于通过切磋、双修和论道获取心境经验。魅力值高的角色能更轻松地积累心境经验以提升被动技能。初期不太重要的属性 防御/武防/法防/暴击抗性 - 防御属性会随着突破新境界自然提升。从被动技能、 farming 灵气珠和天地灵宝中获得的加成,很快就会远远超过任何初始加成。防御属性对刷怪效率的影响也不大,所以我认为它们不是很重要。 寿命 - 除非你真的非常喜欢刷怪,否则你根本用不完它。作为参考,我两次达到化神境时都才30岁出头。两次中途都花了不少时间刷东西。那时,我还剩下300多年的寿命。

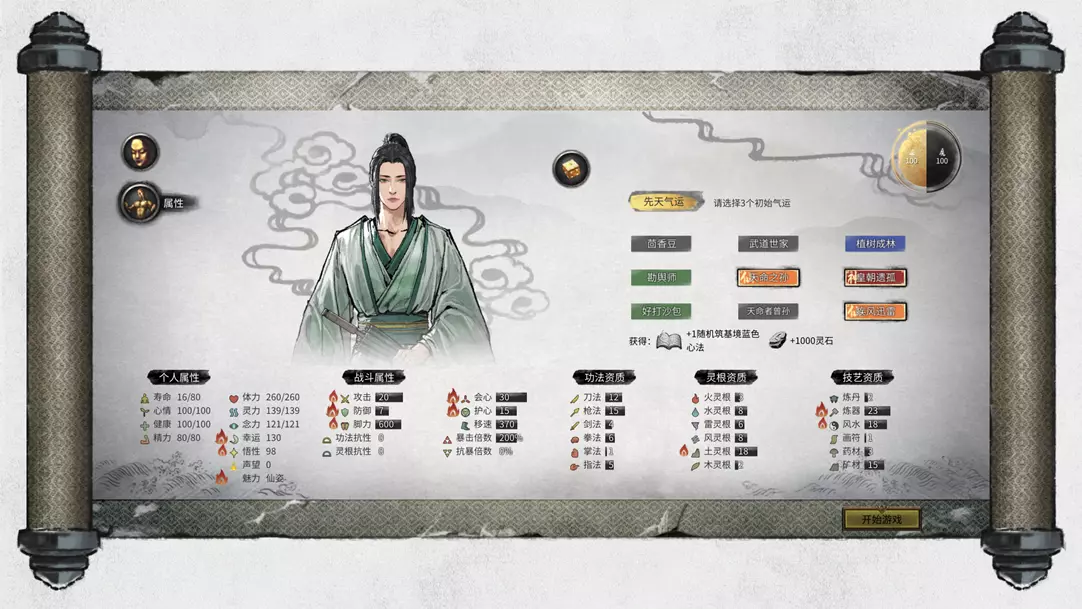
1. 琼芳仙祠(可兑换道心果,每月建议前往,道点不嫌多,随境界提升而变化) 琼芳仙祠与擎苍、昆吾存在联动。需先完成擎苍相关任务,之后通过与擎苍对话得知琼芳的名字,随后在12月前往琼芳处寻求仙法即可。2. 霓狸仙祠(可兑换回复灵力的丹药,丹药随境界变化) 霓狸仙祠寻求仙法流程: - 选择渠渠,渠渠会索要鱼纹瓶(提升心情的道具,城镇中有售),给予鱼纹瓶后继续对话。 - 渠渠接下来会索要药精,无需急于寻找,若周围存在药精可直接击败获取;若没有,可等待触发擎苍相关事件,擎苍会发起挑战,届时会刷出药精供玩家击败,击败药精后继续对话。 - 之后渠渠表示想吃鱼,在附近钓鱼并将鱼交给他。 - 随后选择双双寻求仙法,首次对话会出现精神恍惚的情况,之后再次选择与双双对话,按字面意思回答问题,注意最后不要选择“多谢”选项即可。3. 止水仙祠(可兑换绕指柔、衣服材料,随境界变化) 前往止水仙祠寻求仙法,NPC会告知她要外出,让你稍后再来。离开几步后会遇到她,随后进行一个简单的小游戏即可获得仙法。 4. 月兰仙祠(可兑换绛晶异卵、坐骑,随境界变化) 前往月兰仙祠寻求仙法,NPC会要求你采摘三朵花。按照地图指示寻找即可,其中雷泽的花需要装备雷系功法才能采摘。 5. 影弑仙祠(可兑换萃凝胶、洗练法宝,随境界变化) 携带器灵为厉凝霜的法宝前往影弑仙祠寻求仙法,对话结束后进行抽签。抽签三四次后,厉凝霜会帮忙作弊,从而获得仙法仙力。 6. 天幻仙祠(可兑换尘檀水、刷新法宝天赋盘,随境界变化) 天幻仙祠与烽岚存在联动。首先寻求仙法并进行战斗,之后继续寻求仙法学习琴艺(一年后自动领悟)。完成后外出游历,等待与烽岚的联动事件触发,届时会自动获得相关奖励。7 悬壶仙祠(可兑换回复体力丹药,丹药随境界变化) 悬壶仙祠:携带重伤状态去找仙祠中的NPC寻求仙法,她会为你治疗。之后持续选择治疗选项,即可触发剧情。此时会有两人前来寻求治疗,NPC会让你去采集【仁佑温神叶】,选择【义不容辞】(注意不要选错,选择其他选项无法获得仙力)。将药材交给NPC后,她会让你下个月再来。8 擎苍仙祠(可兑换大力菇) 前往擎苍仙祠,选择寻求仙法并成为其追随者,通过对话聊天得知琼芳仙祠的名字。之后再次寻求仙法,接受向所有仙祠传达计划的任务。返回后,当被问及哪些仙祠不同意计划时,带领擎苍仙祠的仙人前往,击败反对者后返回。选择聊天并进行质问,随后选择告知天下,即可获得本源仙力。 9 离尘仙祠(可兑换背包戒指,随境界变化) 前往离尘仙祠,寻求仙法时需提交材料:1个上品紫电毛皮、10个坚兽骨、30个熊皮、6个尖锐的兽爪、2个碎布片。提交后带领仙人外出游历,一段时间后即可获得奖励。 10 缚命仙祠(可兑换妖兽材料,羽化境后可兑换上品混沌灵息,随境界变化) 缚命仙祠与斗魂仙祠存在联动。首先用十本登仙功法在斗魂仙祠兑换米,再在商店购买一份米。之后前往缚命仙祠寻求仙法,即可完成兑换。11 烽岚仙祠(可兑换玄金,铸造法宝,随境界变化) 烽岚仙祠可提供两个仙力点。若携带沧崖法宝(无需为本命法宝)却无法触发剧情,可参考以下流程: - 选择【寻求仙法】,触发战斗。战斗中沧崖会感受到熟悉气息,对话结束后离开仙祠,行走一段距离。 - 沧崖会提出找沧泷喝酒,此时继续选择【寻求仙法】。 - 沧泷觉得无聊,会找来天幻弹琴。弹琴的攻略是:将7个云尘丝桐(可在华封州陨幽谷获取)放入背包,行走一段距离后会自动开始做琴并弹琴。 - 弹琴结束后天幻会发起战斗,触发天幻仙祠联动。 - 之后继续向沧泷【寻求仙法】,他会表示弹琴无聊,提议再打一架。战斗结束后再次对话并选择【寻求仙法】,他会感谢你找来天幻弹琴。 - 整个过程中,除必要剧情选项外,均选择【寻求仙法】,直至获取所有奖励。12 斗魂仙祠(可兑换增加防御的丹药,随境界变化) 斗魂仙祠:选择寻求仙法并参与战斗,将从离尘仙祠购买的米交给他,之后继续选择寻求仙法(集齐后可获得御鸡天尊称号) 13 星主仙祠(可兑换中品妖兽材料,参悟功法,随境界变化) 星主仙祠:选择寻求仙法,领取打败水神的任务,拿到先天一气水后可完成任务(可改变冥羽) 14 神目仙祠(可兑换上品妖兽材料,修炼功法,随境界变化) 神目仙祠:需要御妖榜排名前三,主线剧情需推进至击败饕餮(注:为主线剧情中的那只饕餮)。对话时选择聊天,持续聊天直至对方提及你身上有珠子(击败饕餮获得的玄珠)并要求给予,给予玄珠即可,其他情况一律选择对话寻求仙法。15 昆吾仙祠(强推最强仙法【拂霜斩夜】) 昆吾仙祠的开启前置条件如下: 进入赤幽州后,会有人前来追杀,击败后可获得【剑修往事1】;随后又会有人前来抢夺,战胜后得到【剑修往事2】。阅读这两份往事,可获得碎片。接着前往参悟剑碑(需记住剑碑位置),能得到【剑修往事3】和【剑修往事4】,阅读后获得神秘剑气。之后需要成为八荒第一剑修,若登仙时间较晚导致第一剑修之位被他人占据且无法找到其位置,该剑修可能已化为冥妖,此时可查看冥妖通缉榜,若其名字亮起,便去挑战。挑战胜利后对话寻求仙法,会触发战斗,战斗结束后再次对话,需帮其前往琼芳绘制一幅画(需消耗20个石尘金),最后返回剑碑再次参悟并战斗即可。注:带上器灵【东方沐晴】【沧崖】【厉凝霜】完成相应剧情,其余仙法需从破碎祭坛获得。 请勿使用修改器添加任务物品,例如神目的珠子和昆吾的剑修往事及碎片,否则容易导致卡顿。 若最后缺少仙力,可能有以下两种情况:境界突破时未完成剧情、使用修改器添加材料,或者是在悬壶仙祠中选择错误。 若想获取仙力且不想手动操作,请勿使用小幸姐刷【先天一气鸿蒙】,否则容易导致存档异常,可直接在其他功能中修改仙力点上限为40。