可运行家庭共享云存档

--

+关注

--

热度

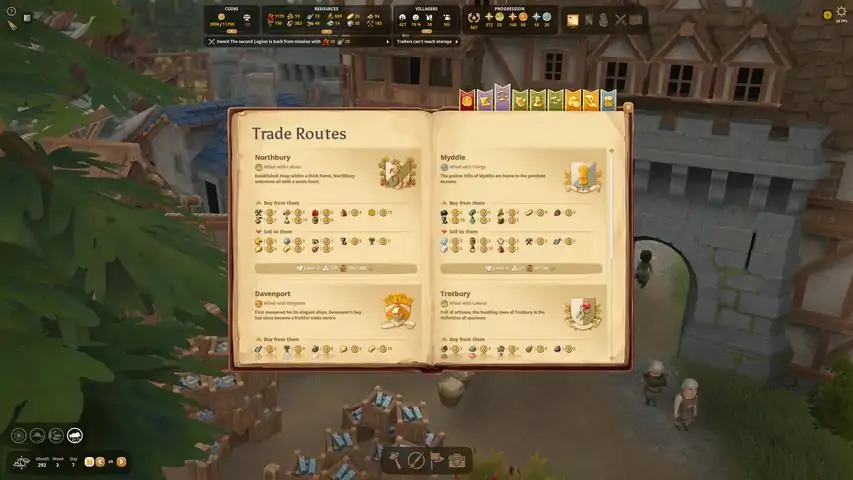
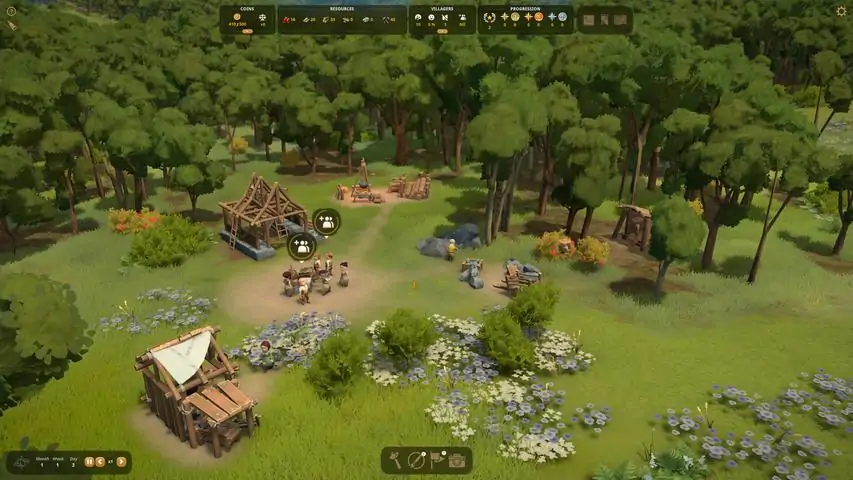
《Foundation》是一款中世纪背景的无网格城市建造游戏。在这里,你可以随心打造模块化建筑,培育有机城市,还得管理好在此生活的村民!打造中世纪有机梦之城《Foundation》将各类自由建造工具与程序生成技术相结合,带来终极有机城市建造体验。管理村庄焕生机指派工作,搭建生产链,把贸易做大做强。在《Foundation》的世界里,你手下的造物都能焕发生机!不疾不徐享景观!本作有不同难度可以选择,想怎么玩就怎么玩!可以选择愿景,积极探索新玩法;也可以投身创意模式,欣赏眼前风景,不失为一种放松方式!特点更为先进的城市建设体验,可无限生成无网格地图,几乎没有任何建造限制。自由建造工具:使用部件自由打造模块化建筑,经过装饰点缀,铸就成宏伟丰碑!挥动独门涂画工具,促进万物有机发展:划定建房区域,给村民指明方向。接下来,规划何处铺路、何处巡逻、何处森林可以采伐……要做的事情可多了!管理村庄:搭建生产链,向村民们收税,还能和邻村做生意,甚至为国王征战沙场。要想发展经济,方式可谓多种多样!和劳动群众、神职人员、王公贵族这三大势力接洽。这是三条截然不同的发展道路,你可以专精一条,也可均衡发展。量身打造专属游戏体验:选择愿景、调整难度,或是在创意模式中打破规则,自由创作。100%支持模组!《Foundation》原声带:由获奖无数的 Audinity 团队担纲创作,时长超过 100 分钟。音乐氛围感十足,仿佛穿越回到中世纪。还有更多内容,等你来体验!
游戏圈
共49条帖子
杀死女巫
2026-02-19 10:00:42 · 发布在 「Foundation」
如何避免玩得很烂——来自多次失败的技巧(Alpha 1.2.4.0611)
I failed a ton at this game before figuring out some basics. Here is a collection of tips to hopefully help other folks similar to myself. Included is a step by step guide for if you're just starting out and can't get a handle on why things are broken, and later I go over common beginner issues in each section so you can look them up if you basically get it but are struggling in one area. INTRODUCTION I struggled a bunch when I first started playing, having to restart the game several times due to massive failures understanding basic mechanics. So, I decided to write down some of my horrible mistakes and turn them into tips for others who might have had trouble starting and didn't want to watch a YouTube tutorial. These tips will help you get through early game, allowing you to survive long enough that you at least understand how things work on a basic level. ARE YOU BLIND I'm vision impaired, so yeah, the default settings for this game are really, really hard to use. Here's how to make it a bit better! First, open the Menu by clicking that tiny white box thing in the top right corner of your screen. Click on the third icon down, which looks like a TV or computer screen, to open the Settings. On the very first tab, you have Scaling! Go ahead and make everything bigger. I selected 2.00, which makes it 1.80 but hey, much better than the default. This does cause some issues with some windows, particularly the Market window, which gets rather long and even though a scrollbar shows up, you still can't see the bottom. You also can't drag it higher up, because you can only drag from the top of the window. But, a minor frustration compared to not being able to play at all. Under the Graphics tab, you can also mess with your resolution and various other settings if you're having framerate issues. WHAT TO DO FIRST 1. Build a village center. 2. Assign Builders-- I usually start with three and then give them new jobs after I've done the initial building. 3. Build a stonecutter camp. You should, like all resources, place this camp as close to the rocks as possible. Basically on top of them is fine! This reduces travel time and generally makes everything more efficient. 4. Assign a villager to the stonecutter camp once completed. Just one for now. You won't get any stone until you assign someone. You need to use the paintbrush over the stone, as well as any trees or berries nearby, or else your people will ignore them. 5. Build a well, your people need this for water so it's always important to do it first. 6. Build a lumber camp, again right along the trees, and assign one Woodcutter. You need wood to build everything else, so this is an important next step. Make sure you used the paintbrush to assign the trees-- I like to just use the fir trees because you can reforest them later on, but the other kind can't grow back. I use them for decoration, though you don't get any Splendor for it. 7. Now that you have wood, build a gathering hut right on top of those berry bushes. Now you've got food and ideally your people will not starve. 8. However! Your people can't just eat berries from your inventory. Therefore, you need to set up a market and sell berries for them to eat. Or else they will starve and abandon you. One might think a minimalist approach is good for the market, but that will actually cause you some problems later on when you want to build a church. So put in a food stall, but add a few decorations-- at least four, that way you have 2 Labor Splendor (Splendor is separate for each group) to unlock fisher's huts. (You cannot upgrade to Serfs without fish or bread and fish is generally easier as long as you have water nearby, if not trade for bread.) When the food stall is done, you need to click on it and assign berries as the item you are selling. You may also choose to assign a shopkeeper to man the stall-- I think people will buy anyway, but they help refill the shop's stock when it goes low so it's important. 9. At this point, you can build a sawmill and stonemason hut. I always do a sawmill first, since stone comes a bit later. But you do need lots of stone for a church and you can't get Commoners without a church, so both is good. I assign one person to each at start, then add another one or two people to each of the camps to make sure I'm getting enough materials. 10. Next you will want to build a warehouse! You can unlock trading once you have 20 planks, but I recommend building a warehouse first. DO NOT build a forester camp before you have one completed warehouse. I don't know why, but this breaks things and your Carpenters will stop producing planks forever. Do the warehouse first, then use planks to unlock your first trade gig. 11. It's time to give your people houses. Use the paintbrush to designate some residential areas for them to build. I recommend getting basic building out of the way early because housing takes up a lot of your builders' time. OF NOTE, individual houses can be upgraded to fit more people-- there is a checkbox that controls this. For now, leave it on, but later, you will want to remember to turn this off for old areas so people actually move into new territory. 12. Build a forester camp, as you are probably running out of trees at this point. Make sure you paint areas that you want reforested, and assign a worker to plant trees. 13. If you have enough stone, I recommend building a church! This will allow your Serfs to level up to Commoners, and that gives you some new territory to work with. You will want to have at least 2 Clergy Splendor through fancy building, but hey, go for more if you can. Church is very important in keeping people happy, and you can build up Clergy Splendor for later on. I usually make this high priority if I have nothing else going on. 14. Now that have free territory from completing quests. Go ahead and select some land! It will increase your taxes, but you'll have more space to expand and hopefully more resources too. You should make sure your people have their basic needs covered before you start using these resources, however. If they have food, water, and housing before you start using the resources, things will go a lot faster because they don't have to run back to your old town center for every little thing. 14. To that end, the first thing you want to set up is a well, followed by a market. Decorate the market! Then use the paintbrush to assign housing. Once the houses are done, you can start exploiting those resources! You should also have a fisher's hut unlocked, since you made a church, and that can help bring in more food. Add a second food stall to your first market and all markets after. You should have about one market per hex, with housing close to the market and well. Make sure to assign fish to the second food stall. Alright, that is the very basics of starting a new game. By following this advice, you should be able to survive long enough to start figuring other things out for yourself. If you don't want a whole list, and are having beginner problems with just one specific thing, feel free to skip down to the appropriate section below. RESOURCES The very first resource you want to get is stone, so you can build a well. After that, you won't need tons of stone until you build your first church, so concentrate on lumber instead. You will want to place your camps right next to the resource in question-- this makes everything much more efficient and is more important the longer you play. In the beginning, each camp can employ up to three people-- if you want to stock up more than that you can build multiple camps. So that you have room, make sure NOT to build your houses right on top of your resources-- give them a little breathing room. Early in the game, you will get the option to reforest and grow back trees. This will be important as you will run out of wood. However, reforestation only applies to fir trees, so if you like the look of the broadleaf forests, don't chop them down. If the firs are right on the boarder of your broadleafs, you can use Q and E to rotate the camera and make sure you're painting right at the border. Also useful if you want to reforest an area and avoid your houses. MARKETS So, I didn't realize this in the beginning, but markets are just like building a multi-part building, like a church or keep. Each shop is actually a piece of the whole market-- not an individual building, the way a sawmill or stonemason hut is. You do not go to the build menu each time you want to add a new stall-- doing so will accidentally create multiple markets, and none of them but the first will be used. Instead, click on an existing stall and select Edit, then add whatever you want! Now, if you're like me, you may think "Okay, I'll just put down a food stall so my people don't starve, I'm not producing goods yet and resources are slim, so why bother with decoration." And that is a mistake. For you see, you cannot unlock new buildings, such as a fishing hut (gives fish) or a manor (increases money cap) without Splendor. And even though they all use the same image, Splendor is separate for Labor, Kingdom, and Clergy. So if you think building a wooden keep will unlock these buildings by adding Splendor, that is not the case. You must make your markets fancy. I personally started with fences, because they're nice and help break up different sections visually. If you want your fence pieces to match up, there's a trick to it. Match up the top circle of the new fence post with the top circle of the old post. If you try to do it another way, such as the green outline, that won't work. Because a bunch of the fence, like when placing other buildings, is underground and thus you won't see it at all. Similarly, if you're placing shop stalls, the bottom of the stall you will see needs to be your guide instead of the green outline. QUESTS / WAREHOUSES Warehouses store goods. You also need to use them if you want to buy things via trade. A warehouse can store up to 50 of one item, with four types of items. You can store all four of the same type if you want. You cannot complete any quests without a warehouse! If you get a quest to provide, say, berries, and you have like 200 berries, so you think "Eh, I'll be fine!" No, you will not be fine. You must put the berries in the warehouse. Now, let's say you set one of the four slots to berries, and then click either Accept or Stock Maximum, but for some reason... Your people aren't putting anything in there? Well, if you are only using the warehouse to trade, then yeah, you don't need to assign a worker there. In fact, you shouldn't as it's a bit of a waste. However, if you need to actually get a stock of items in there for, say, a quest, then you gotta assign Transporters. However, even if you have Transporters and all your settings are correct, you might not be able to save up any stock! Why is this? Well, various workers may be using up your supplies, or storing them in their camps instead of in the warehouse. You can force them to put stuff in the warehouse by using the Stockpile feature. First, open the Resource Tab (the white box next to Happiness at the top). Honestly, it's a good idea to always keep this open in the bottom right corner of your screen, or just the right side as it will eventually get pretty tall. Then, click the Stockpile button next to your berries. BE WARNED however, that for food items this should only be a temporary thing! If you're Stockpiling, no food is going to the market, so your people will starve. It's best to use this for the quest, click the green checkbox to turn it in early, and then stop Stockpiling immediately. Non-food goods which are being stockpiled will also be unavailable for building. So it's good if you want to save up one resource for a big project, like saving stone for a church, but you have to stop Stockpiling before they can use it for said project. SPLENDOR / UNLOCKING BUILDINGS You may have noticed at the start of your game you do not have many buildings. And if, like me, you started playing without watching a YouTube tutorial or watched one but didn't pay attention, you may have gotten pretty far wondering why your Novices have not become Serfs or similar such questions. As it turns out, Foundation has a stat called Splendor-- and actually this is three different stats all with the same name. You have Labor Splendor, Kingdom Splendor, and Clergy Splendor. Even though they have the same name and icon, they are in fact different. You will want to make sure you get at least 2 of each Splendor as early as possible as this unlocks many of the basic buildings that you need to survives. In particular, fishing huts, which give fish allowing you to not be solely reliant on berries in early game (as long as you have a water source) and a manor, which is very useful as it raises the gold cap. I played quite far, and did many military missions, wasting a lot of gold, because I had not unlocked manors yet. Very unfortunate, may you avoid my mistakes. Labor Splendor: Gain this by making your markets fancy. Getting 2 Labor Splendor will help you unlock fisher's huts and manors, which you need to upgrade your peeps from Novices to Serfs. If you don't have room for the tents, which latch onto your stalls, you can add fences. They don't take up much space at all, and form a pleasing natural barrier for your market. If you want your fences to line up, the trick is to align them NOT by the green outline, which extends underground and is generally confusing, but by matching the circular top of the old fence to the circular top of the existing fence. It won't be exact, but it will look quite nice! Similarly, when placing your stalls, don't base their position off the green outline, instead the real position will be the non-green posts while the rest will be underground. Kingdom Splendor: Early game, I believe you just get this from completing quests to help the king. I kept 10 Bread in my storehouse and 50 Berries, which allowed me to complete most of the quests that popped up. Later on, you can build fancy military installments and train soldiers. This is a great way to make money! And a good use of spare people without jobs. A basic Wooden Keep will hold up to 10 soldiers, and the King usually asks for only 5 at a time. The reward is 1000 gold and 1 free territory! But if you haven't built a manor, you can only hold 500 gold at once, so the rest is wasted. So get on that! Clergy Splendor: Early game, you can only get this from completing quests and choosing to help the church. After you get 2, you can unlock a new building-- the Rustic Church. You need this to upgrade your peeps from Serfs to Commoners.
master
2026-02-18 19:00:12 · 发布在 「Foundation」
终极新手指南
我的攻略更新即将推出!(2020年10月10日) 开始部分 开始阶段以及你需要了解的内容。游戏本身会提供一些引导,但有些信息只有在你亲自游玩时才能了解到。所以这里有一些提前准备的小技巧,或者供你下次冲击更高分数时参考。资源采集 要进行资源采集,必须先将资源标记为蓝色。操作方法是使用右上角菜单栏中的画笔工具。未标记的资源无法被采集。石头和浆果属于无限资源,你可以在它们周围建造任意数量的建筑(或根据美观需求建造)。 建造建筑 点击右上角菜单栏中的锤子图标,即可查看当前已解锁的建筑。 扩张领地 在右上角菜单栏中找到地图图标,它会显示可解锁的领地。你可以花费500金币购买更多领地。注意:每个领地每周需向国王缴纳50金币的税款,税款会每周自动扣除。士兵任务可用于获取免费领地。收支情况 在右侧上方菜单栏的硬币图标下,你可以查看当前的收入和支出。顶部显示当前周的数据,底部则是上一周的数据。 保存、加载、设置 最右侧的图标可以让你进行保存、加载、调整设置、返回主菜单或直接退出游戏。当你返回主菜单或退出游戏时,不会出现常见的“你确定要离开吗?”这类提示。 开始建造/开始游戏 你的第一次游戏很可能不会是最后一次。为什么呢?因为之后你可能会遇到食物方面的问题,然后在下次存档时改进这些错误。你会不断重复这个过程,直到游戏顺利进行。游戏中还有5张地图可供尝试,其中山地和河床地图对新手特别友好。你从一个村庄中心开始。仔细选择你的起始区域,最好有树木、石头和浆果。初期你需要这三种材料。建造一个伐木营地、一个采石营地、一口井和一个采集小屋,然后等待它们完工。在这些建筑中雇佣工人。你可以在下方指南中了解更多雇佣工人的方法。让村民工作一段时间后,建造一个锯木厂和一个仓库。其余的资源会随着村民地位的提升或新建筑的解锁自动获得。 村民、需求与房屋 你的村民有必须满足的需求,否则他们会因为不开心而离开村庄。他们也可以提升地位。这里我会告诉你需要满足哪些需求以及村民如何提升地位。 需求包括农奴(身份) 水源(水井)、住所(房屋)、食物(1种)、信仰(教堂) 平民(身份) 水源(水井)、住所(房屋)、食物(2种)、信仰(教堂)、衣物(裁缝店) 市民(身份) 水源(水井)、住所(房屋)、食物(2种)、信仰(教堂)、衣物(裁缝店)、奢侈品(修道院)、食物(2种) 身份晋升条件 外来者→农奴:水井+食物 农奴→平民:+房屋+教堂 平民→市民:+第二种食物+衣物 市民→更幸福的市民:+奢侈品 注意:当农奴晋升为平民时,他们不会立即需要第二种食物。只有从你开始出售食物的那一刻起,才必须持续提供第二种食物。 注意:一旦你向村民出售奢侈品,他们会消耗更多食物!我说,他们太贪婪了!村民概况 在左下角可以找到村民列表。在这里你能概览每个村民的幸福度、职业、状态(及其他更多信息)。你可以查看单个村民的幸福度,点击村民还能查看更多详情。在村民窗口中,你可以了解到他们当前的需求、已从事过的职业及相应等级,还能追踪该村民。此外,你也能看到他们的居住和工作地点。哪个村民有哪种需求?一开始似乎很难弄清楚。你知道所有人的整体幸福感以及谁缺少什么,但具体是哪位村民,就需要真正的侦探工作了。除非你发现,还可以将鼠标移到村民列表中的笑脸图标上,查看每个村民的个人幸福感。村民希望住在哪里?靠近市场、水井和教堂的地方。若想了解哪里特别宜居,可点击下方菜单栏中的【宜居度图层】,并选择【居民区】来查看吸引力。通过装饰(灌木、树木、栅栏等)可以提升吸引力。 住宅建筑及其升级:村民的房屋会在后期自动扩建。如果您想阻止房屋升级(例如因为这会消耗材料),可以通过村庄信息窗口(左上角)关闭升级功能,也可以阻止房屋为提高密度而扩建。阻止扩建意味着房屋可以轻松容纳更多村民(最多4人)。混凝土升级还包括房屋本身的外观,这也会消耗材料。在游戏中,你可以点击每栋房屋查看其扩建等级和居住密度。扩建等级为1的房屋,在密度为2的情况下最多可居住4名村民。 如果你在房屋周围建造了装饰元素,建造房屋后请检查入口。这些入口会随着房屋升级而变化,可能会被堵住,导致村民无法回家。 如果关闭密度功能,这只会影响已建造的房屋。若要对所有房屋关闭该功能,你需要时不时重新勾选再取消勾选。这会短暂激活所有房屋,但随后会停用所有房屋(包括建筑工地)。建造房屋 - 材料成本 1级 - 10木材 2级 - 10木板 3级 - 10木板、10石头 村民尝试满足需求时会发生什么? 村民会在这段时间尝试满足所有需求。但他们只会补充那些实际为0(白色条)的需求。因此,所有建筑都位于一定半径内且距离尽可能短非常重要。满足需求的建筑之间距离越远,村民满足需求所需的时间就越长,或者会变得不满。 需要了解的是:如果你创建了一个较大的居住区(绿色区域),村民不一定会去附近的市场/水井,也可能会前往其他市场/水井。你可以为每栋独立房屋标记一个绿色标识,或者换种说法:将标识设置得足够大,确保每个标识内只容纳一栋房屋。 如何获得新居民呢?一开始,新居民加入你的领地需要一些时间。整体幸福感会影响新居民的到来速度。你可以通过村庄信息窗口查看新居民的到达时间。每次固定会有2名新居民加入,不多也不少。当你收到新居民即将加入的消息后,他们需要几分钟时间从地图边缘前往你的中心区域。建筑与纪念碑 1/2 一般来说,建筑物之间距离越近,生产速度就越快(当然是在一定程度内),因为每个建筑的工人都需要获取自己的材料进行加工和制造。 木材与木板生产 将伐木营地建在森林中央,这样可以充分利用其作用范围,让5名伐木工高效工作。理想情况下,应建造1-2个伐木营地和一个护林员营地,这样就能保证木材供应充足。锯木厂最多可容纳3名木匠制作木板,且不应离伐木营地太远。【带水井的锯木厂】 护林员营地:护林员可以在与伐木工相同的区域工作,且需要一个标记区域(浅绿色区域)才能开展工作。护林员会种植新的树木(目前只有浅色冷杉),这些树木需要一定时间生长。如果只想种植某一个区域,之后可以拆除该建筑,再给护林员分配新的工作。每个护林员营地只能有1名护林员工作。【伐木营地和护林员营地】 石料生产:采石营地最好建在待开采的石料旁边。这里最多可容纳5名采石工工作。若要进一步加工石料,需建造石匠小屋,石匠小屋可生产“抛光石料”。注意,石匠小屋只能安排1名石匠工作。石匠【2座石匠小屋】 食物生产:采集小屋可围绕浆果丛建造。该资源为无限资源,不会消失。一座小屋最多可容纳3名采集者工作。浆果是你可以获取的第一种食物。【浆果丛与采集小屋】 渔夫小屋:鱼类获取颇具难度,因为每个渔夫小屋仅配备一名渔夫,所以必须沿水域建造新的小屋,以确保有充足的鱼类供应。【3座渔夫小屋】 猎人小屋:此处有1名猎人,产出鹿肉和皮革。鹿肉可在市场出售。猎人小屋必须标记狩猎区域(橙色)。需要注意的是,该标记会取消所有其他标记,且仅在森林中生效。皮革目前无法加工,需通过仓库定期卸载。只有当皮革清空后,猎人才能重新开始工作。【猎人小屋】 服装生产流程: 羊场需1名牧羊人进行运作并生产羊毛。 织布小屋可容纳2名织工进行运作并生产布料。 裁缝店需1名裁缝进行运作并生产服装(衬衫图标)。 以上生产流程仅在建筑彼此靠近时有效: 1间织布小屋可为1-2名裁缝提供足够布料。【绵羊农场】 顺便说一下,4-5只绵羊就足够让牧羊人产出足够的羊毛了。其他东西看起来不错,但没什么实际意义。另外,当游戏崩溃时,不要因为绵羊数量太多而向开发者抱怨哦。;)【裁缝与编织小屋】 面包的生产流程: 小麦农场可配备3名农民进行小麦种植,种植前需划定“农业”区域。 风车需2名磨坊工将小麦加工成面粉。 面包房需2名面包师,使用面粉和水制作面包。请在面包房附近建造水井以获取水源。 建筑间需保持近距离,以下为合理配比: 1个小麦农场可供应2-3个风车 1个风车可供应1-2个面包房【小麦农场,已收割一半】风车【面包房】 建筑与纪念碑 2/2 工具生产 煤屋可将木材加工成煤炭,因此将其建在伐木营地附近较为合理。煤屋最多可安排3名烧炭工。铁矿只能建在铁矿石矿床旁(放置铁矿时,地图上会以绿色标记矿床)。无需标记铁矿石矿床,铁矿最多可分配5名矿工。铁矿石需通过最多2名炼铁工,使用煤炭和铁矿石冶炼成铁锭。最后,由2个锻造厂使用铁锭和煤炭来制造工具。无法识别内容,已删除。铁矿炼铁【市场】 你可以在特定半径范围内建造食品摊、商品摊和奢侈品摊。若该半径内空间用尽,可在附近建造另一个市场。每个市场摊位需要1名市场工人。你还可以为市场摊位添加装饰,消耗“劳动力”来增加其华丽度。初期应暂不建造帐篷,因为此时你还无法生产布料。 重要提示:市场工人会自行从相应建筑或仓库获取待售商品。 重要提示:一旦村民购买过某种商品,他们就会持续需求该商品。因此,若你开始销售衣物,就必须确保始终有充足的供应。这也是不建议销售葡萄酒的原因,因为目前你无法自行生产葡萄酒。【2个豪华市场摊位】 仓库:材料可存储在仓库中。运输员(最多2名)将材料从建筑运送到仓库。当某个材料处于“仓库为空”状态时,运输员会尝试将其转移到另一个仓库。你应合理放置仓库,以便运输员和需要资源的建筑之间路径更短。 若你通过贸易发布了可购买的材料,仓库中必须为该材料预留一个槽位,且“接受”选项的绿色勾选必须激活,这样商人才能购买该材料或将其出售给你并存入仓库。 运输员不会将货物运送到生产建筑。 重要提示:不要通过右键点击清空仓库槽位,否则货物将完全消失。【仓库】 纪念碑 乡村教堂/教堂 教堂为你的村庄带来信仰!乡村教堂后续可进行扩建,在放置教堂及周边建筑时请注意这一点。如果路径过长,可以建造多个教堂,以便快速满足信仰需求。主建筑和所有“扩建部分”会为教堂容纳更多村民创造空间。乡村教堂由石头和茅草屋顶构成,后续你可以在三种风格(蓝色、红色、石头)中进行选择。【教堂,风格:石制】 修道院:修道院需要一座礼拜堂和一间宿舍。如果你已解锁药草园和养蜂场,在未完成上述两项建筑前,指派村民到修道院并无实际意义。若要生产药草和蜂蜜(奢侈品),你必须通过“派遣村民至修道院”功能,指派一名失业男性村民前往修道院。一旦“修士们”在修道院生产出足够的产品,你就可以开始在市场的【豪华摊位】进行销售。此外,修道院可根据需要进行扩建。【带有2个蜂房和药草园的修道院】 新增:修道院酿酒功能 要进行酿酒,首先需要一座修道院。在修道院内,你可以选择建造“葡萄园”(田地)和“酿酒厂”。葡萄园需要3名酿酒师(僧侣),而酿酒厂则需要一名酿酒师(僧侣)用葡萄和木桶来酿造葡萄酒。 木桶需在修道院外的桶匠铺制作,制作木桶需要大量资源:木板、铁条和工具。制作过程耗时较长,建议在开始酿酒前先着手制作木桶。桶匠铺葡萄园酒庄 领主庄园 领主庄园目前只有一个用途:每个宝库都能扩大你的【现金】容量,让你可以储存更多黄金。你可以指派士兵驻守庄园,但这并非强制要求。 如果你已为庄园解锁并建造了管家办公室,就可以在那里选择一名管家。每名管家都有一项增益效果。当前已选中的管家无法更换或移除。 学习速度提升10%。 运气受影响程度降低10%。 士兵训练速度提升10%。 市场收入增加10%。【小型宅邸】 木质要塞:目前(2019年3月),你可以在要塞中分配士兵(最多10名),当有使者请求帮助时可派遣他们。不过这并非必需,因为不会有外部攻击。要塞仅提供两项益处:一是为“王国”区域增加声望,从而解锁任务;二是通过这些任务可获得免费领地、1000金币和葡萄酒。 对于使者发布的士兵任务,你需要派遣1-5名士兵。【木堡】 交易 游戏开始时你会接到一个任务,需要完成首次交易,只需按照指示操作即可。之后你可以解锁额外2条贸易路线。商人每周会来一次,在你的仓库进行买卖。因此,仅在“交易”界面停止买卖是不够的,还需要为商人在相应仓库中腾出空间。在贸易商品箭头后方设置的数值表示商品数量(例如:浆果,最多购买50=你从商人处最多购买50个浆果)。你无法影响价格,因为价格由贸易路线决定(你可以在贸易中的邻城选项下查看)。 要完成需要特定数量浆果/鱼类等的任务……商品必须在仓库中可用,你才能点击【绿色对勾】(左上角任务栏)。 你可以点击路过的商人。这样可以查看他想要购买或出售的商品以及数量。辉煌值与建筑解锁 有三个领域可以解锁内容:劳工、王国和神职人员。在每个领域解锁内容,你需要一定数量具有特定身份的村民、一定的辉煌值以及影响力点数。影响力可以通过完成偶尔出现的任务/任务(例如,为神职人员提供30个浆果等)来获得。建造某些建筑时你会获得辉煌值,建造每个建筑部分时,你会看到能获得多少辉煌值。辉煌劳动:辉煌等级2/10 农奴:渔夫小屋、领主庄园、树篱 辉煌等级20/20 平民:领主庄园:石制组件、宝库、执行官办公室 辉煌等级50/10 市民:领主庄园:税务所 带来辉煌值的建筑:领主庄园、市场装饰。 辉煌王国:辉煌等级0/10 农奴:木制要塞、木制城墙、大型石墙 辉煌等级15/20 平民:猎人小屋 辉煌等级40/10 市民:武器锻造坊 带来辉煌值的建筑:木制要塞。 辉煌神职:辉煌等级5/10 农奴:教堂:附加部件 辉煌等级20/20 平民:小型石墙、教堂 辉煌等级50/10 市民:修道院、修道院:药草园、养蜂场、抄写室 带来辉煌值的建筑:乡村教堂、教堂、修道院。实用提示与知识 提示:如果居民突然扯掉我头上的头发该怎么办?首先你应该做的是:降低速度甚至暂停游戏。然后你必须找出原因。如果你想继续运行游戏并停止移民,这也会有所帮助。 知识:停止移民 村庄信息窗口(左上角)。在这里你还可以看到接下来的2名村民何时会来到你这里。全局幸福感越高,新居民来得就越快。 知识:查看资源面板 在全局幸福感的右侧,你可以查看每种材料的列表和当前数量。知识:工作场所列表 所有提供工作场所的建筑概览,此外可以直接在这里分配工人,点击建筑名称后的十字准星可直接跳转到相应建筑。提示:隐藏领土边界。在地图图标上方菜单栏的左下角。适合截图时使用。截图模式(无菜单栏)-> Ctrl + U知识:合理/高效地让工人占据建筑 在游戏后期,玩家常遇到村民住所与工作地点距离过远的问题。因此,让住在附近的村民占据建筑是合理的做法。开发者也考虑到了这一点。如果建筑仍有空位,在“分配可用村民”选项后方会有一个包含3个要点的可勾选框。在那里,你可以看到来自周边区域的村民,并对他们进行分配。 提示:如果在新村民到达后尽快进行工作分配,且激活了“允许提高房屋密度”功能,新村民将会在工作场所附近定居。如果你选择了已有职业的村民,记得你需要填补空缺的职位。只需使用工作场所列表即可完成。提示:重新找到健康的存档 这里指的是村民仍有足够食物且没有村民离你而去的存档。此外,社区用户(luetten30)提供了一个小技巧:用村民的整数数量来命名存档。 例如:村民数量为150时,存档命名为:Riverbed_150 提示:在游戏中切换到其他窗口 对我个人而言,按下Windows键可以调用其他程序,同时《Foundation》会继续运行。但有些玩家表示此方法无效,这时可以使用ALT+TAB组合键切换窗口,前提是已经打开了其他窗口。 如果你想以窗口模式运行游戏(目前游戏不支持此模式),可以在《Foundation》的Steam属性中输入“-window”。建筑拆除 拆除建筑可返还50%的金币!此外:若建筑需要金币放置且尚未有建造者开始施工,将全额返还金币。 生产场所暂停 通过新更新,您可以暂停任何生产建筑!只需点击小屋并按下暂停按钮。此外,建筑的维护费用将减半。 近距离分配村民 若要近距离为生产设施分配村民,可使用三点按钮。勾选右侧复选框后,您将只显示失业村民及其与工作场所的距离。建筑策略 在此为大家介绍一些生产链的建筑策略,这些策略已在我和其他玩家的实践中得到验证。 制作面包 | 策略1 所需设施及人员: - 4座小麦农场 | 12名农民 - 6座风车 | 12名磨坊工 - 6座面包房 | 12名面包师 - 1座仓库 | 仅用于存放面包 - 每3座面包房配备1口井 磨坊工的小麦由农场直接供应,因此只需为面包设置专用仓库。首先将小麦农场集中建造,然后建造风车,并在风车旁直接建造面包房。生产实现盈利需要一定时间,请保持耐心,无需慌张。根据村民数量和市场摊位数量,你可以重复建造此结构。 提示:解锁相关建筑后,请尽快开始建造生产设施。当你制作出第一批面包后,不要立即在市场摊位上出售。等到仓库装满后再进行销售,这样能为首次销售提供良好的缓冲。 需要了解的是:1名磨坊主会获取1箱小麦(4单位),并在磨坊中将其磨成面粉(4单位)。之后,磨坊主会在一天结束时补充自己的需求。这意味着每个磨坊配备2名磨坊主可生产8袋面粉。【图片及策略来自BaumeisterMoritz】 我亲自尝试过这个策略,效果非常好!在拥有166个村民的情况下,我已经生产出了1000个面包。这是我的建筑布局:我建造了两个仓库。地图:概览与资源 上述截图由社区经理Ash友情提供。资源是通过原始地图放置在游戏中的,否则在图片中无法显示。因此,我无法保证100%的准确性。点击图片可以更清晰地查看资源。

下载233乐园APP

专心推荐好游戏

关于我们 · 联系我们 · 隐私政策 · 营业执照

侵权投诉 · 开发者中心 · 用户协议 · 免责声明

不良信息举报中心

纠纷处理及不良内容举报电话:

4006600910 (工作时间: 9:00-12:30,14:00-18:00)

北京市朝阳区启阳路4号院2号楼15层1803室

本公司产品适合10周岁以上玩家使用 未成年人家长监护

首页 / Foundation

抵制不良游戏 拒绝盗版游戏

注意自我保护 谨防受骗上当

适度游戏益脑 沉迷游戏伤身

合理安排时间 享受健康生活

京ICP备18003564号-3

经营许可证编号:京B2-20181741

京公网安备:11010502052873

Copyright © 2025 233leyuan.com All Rights Reserved

北京龙威互动科技有限公司版权所有

热门游戏: 我的世界 | 三角洲行动 | 原神 | 王者荣耀 | 超自然行动组 | 蛋仔派对 | 和平精英 | 火影忍者 | 二重螺旋 | 英雄联盟 | 梦幻西游 | 明日方舟 | 斗罗大陆 | 光遇 | 鸣潮 | 无畏契约 | 模拟山羊3 | 樱花校园模拟器