


颂钟长鸣
 Steam Deck
 抢先体验
抢先体验 家庭共享
家庭共享 云存档
云存档 可用手柄
可用手柄 在线合作
在线合作

自从被诬陷谋杀王子并被王庭判处死刑后,您一直活在阴影之中。在侥幸的又一次逃过刺客的暗杀后,您发现了了一张刺客的合同,事情的走向开始变得扑朔迷离 - 您被诬陷仅仅是因为不幸吗?还是说背后有更大的阴谋?为了寻找答案,您决定结束背井离乡的生活并回来调查。您将逐步领导一场叛乱,反抗这片土地上的统治者的剥削并走向胜利。一路揭开您家族秘密的真相。自由的钟声将再次响起!建立并扩展属于您自己的领土,解放村落,帮助村民,并招募其他人加入您的事业。了解关于你的背景故事并同时了解更多您不得不放弃的过去。期间会有各式各样的人加入您的行动中,帮助您积累资源和力量以对抗王室。指挥您的部队,通过战斗证明您的勇气,并巩固您作为人民英雄的地位。生存與探索 - 收集,狩獵,建設,製造!在一個嚴酷的世界中收集和管理資源,生存並跨越這片土地尋找其秘密和冒險!王室及其皇家軍隊可能不是這片王國裡您唯一的敵人…征服与扩张 - 从一个小营地开始努力蜕变成一名伟大叛乱的领导者。与领土上的人改善关系,扩张您的军队,从王室手中解放村子并让他们加入您的事业之中。途中招募具有独特知识的追随者,并发现新资源以推进您城镇的技术.资源与城镇管理 - 从王室的剥削影响中解放村庄时,您可以通过新招募的成员建设、管理和升级您自己的前哨站和城镇。组织您的工人为您添砖加瓦, 训练出王国中最强壮的士兵为您保驾护航。考验技术的方向性战斗模式 - 从各种中世纪武器和装甲中选择您的装备。从剑和斧头到重锤和长矛以及弓箭。选择适合您的独特战斗风格,并在考验方向性的战斗中磨练您的技能。军队指挥 - 领导您的军队进入战斗,指挥您的小队和阵形,并运用巧妙的战术获得优势。按照您的意愿装备和训练您的部队,并在战场上控制它们,证明您的技能和力量。富有深度的游戏进展 - 提升您在战斗和生存方面的技能,训练您的士兵,看着您的工人成为大师级工匠。每一个新成员都将带来独特的知识,从制作更好的箭矢到在您的城镇建造更高级的建筑,因此请明智选择。成长的机会无限!游戏故事与角色扮演 - 当您扩大您的军队和影响力时,也会逐步揭开您家族的秘密. 了解关于您被指控谋杀的王子的背后真相。王国的秘密等待着您…
游戏圈
共53条帖子

会长天下第二
2026-02-19 04:00:22 · 发布在 「颂钟长鸣」
一份实用的进阶指南,助你精通游戏。
简介
欢迎!首先:
游戏版本:0.0.35875
如果你遇到崩溃问题,请降低视野距离。如果崩溃问题仍然存在,也请降低其他图形设置。其他建议包括禁用Steam覆盖层、更新显卡驱动、关闭其他应用程序,以及使用风扇控制器将电脑风扇调至最大(例如风扇控制软件)。
1. 通用1. Speed up woodcutting by timing hits, counting swings and aiming so that they hit just after starting. Holding the button prevents excess swings but is slower.
2. Hunting is easier during winter due to visibility and meat will offset the lack of plant foods. A good early hunting spot is southeast of Haerndean on both sides of the river, which you can jump across using the underwater rocks. Place two signs at hunting spots so you can fast-travel to one, clear the area and exit at the other.
3. Roads reduce sprinting stamina costs. Player-built roads also provide a movement speed bonus. Build plenty in your settlements, including to distant gathering buildings. Built roads can also improve treks between signs and villages!
4. Coins are best spent on agility/strength books for yourself, then for your best followers, and food seeds to get your food farming started - they're cheap in Blackridgepool.
The books' required level is Haerndean (1), Padstow (3), Bradford (5), Farnworth (7), then Horndean, Blackridgepool and Crasmere (9).
5. Put "!" before a building's name to list it first in the N menu. Especially useful for research while away from the settlement or easily finding your main crafting facilities.
6. Recruit the best settlers. Their renown cost goes up after each one so any savings are small, plus they'll need time to train their skills. You can dismiss bad settlers to regain their cost, but take their equipment first.
7. While hiring and faced with a bad recruit, hire him/her anyway and use this trick:
Take bad recruits' clothes to mark them as "don't check", then dismiss them to refund 100% of their hiring cost. Then check another clothed recruit. Repeat until you find one that you want and keep him/her.
The next time you recruit here, repeat the process. You'll never have to check a bad recruit again, because the bad ones you've checked are already stripped.
8. Recruits from quests are cheap and highly skilled so always recruit them. Examples are the harvester northwest of Padstow, two warriors around Blackridgepool and a knight on the beach southwest of Farnworth. If you don't have enough renown to hire them, exit the dialogue using TAB and leave the quest open, else the option may not appear again (bug).
9. The Nomad trait adds a speed bonus, which is amazing for all settlers.
Neurotic is for dedicated workers. Keep them unarmed so they don't fight.
Stalwart is for dedicated warriors and has a wrong description: It improves combat skills, not strength/agility.
Porter may appear great for haulers but the speed debuff makes it decent at best, especially since you'll later get backpacks and because of small hauling demands.
10. Use the map to give your companions a distant move order, like running back to base after a skirmish (if dismissed they'll walk instead).
11. Morale is important because it grants significant stat boosts, both for workers and warriors. "Productivity" works as a modifier to job skill bonuses. Better housing provides morale boosts at the cost of construction effort.
12. You need an apprentice Carpenter as soon as possible for the River Dock, making Padstow a great first liberation target. More on liberation below.
13. The N menu building list shows which building uses which job. Jobs correspond to work attributes: Crafting also applies to smelting, harvesting also applies to woodcutting, construction uses labourer and delivery uses nothing. The others are self-explanatory.
14. Easily set job priorities based on the attribute maximum (it'll level up over time): The best attribute to 2, medium to 5 and worst to 8. Fine-tune using adjacent priorities (1/3, 4/6 and 7/9).
With enough workers, jobs that have gain differences (farming, hunting, harvesting) should be disabled for less skilled workers, though hunting can also be used to train settlers' agility.
15. Always have a settler with max research priority. The job is temporary and you'll want it done fast. For research requiring an apprentice, have one of each type with max research priority even if they're bad researchers.
16. Use settler nicknames as notes. Ugly but it works as I almost never look at my settlers' stats. Here's what my nickname-code looks like: "!Far/Cra 1N" or ">War STe".
Legend:
"!" for specialist, later "!!" for endgame-worthy.
">" for guard
Role: "War" for warrior, or the first three letters of their best job skills
"1" onehander+shield/"2" twohander/"S" swordsman/"B" bow
"N" for neurotic
"T" for temporary (looking for a replacement)
Before unlocking gear presets, "e" for needs to be equipped
2. Combat and equipment1. 弓具有较高的移动速度,能让你风筝一群敌人而不被击中。优先击杀弓箭手,然后再清理追你的杂兵。
2. 近战战斗时,首先要专注于不被击中。格挡后可以持续攻击,直到敌人格挡,然后格挡他们的反击,如此循环。面对多个对手时,你需要抓住机会,边后退边寻找破绽。在寡不敌众时,移动速度、盾牌和武器长度都非常有用。
3. 在群体混战中,如果敌人正专注于你的盟友,就持续攻击他的背部。利用攻击方向来避开盟友。
4. 对于 armor 和 weapons,价格便宜是一个主要优势。一旦获得装备预设,拥有几套不同的 armor(盔甲)会很有用,这样可以分摊材料成本和力量需求,让每个定居者都有不错的选择。
5. 没有速度惩罚的盔甲最适合工人。给所有人配备中型盔甲是可行的,尤其是在 T1(第一阶段)。有些中型盔甲没有速度惩罚,且护甲值比普通服装更高,因此更具优势。但到了 T2(第二阶段)之后,工人几乎不会参与战斗(除非你使用集结地给他们配备战斗装备)。
统一着装的工人看起来很单调,虽然这是主观感受,但我还是建议让他们穿着多样化的服装,不戴帽子和手套。
6. 如果你打算混合搭配盔甲类型,最好将头盔、手套和靴子选择最重的。这些部位的护甲与速度比是最理想的。出于这个原因,我个人大部分时间都会使用旅行者的躯干和裤子装备——它们非常适合风筝、探索和完成任务。
7. 默认装备预设非常适合自动装备。【先锋】意味着双手武器搭配重型护甲,【步兵】意味着盾牌搭配中型护甲,【射手】意味着弓搭配中型护甲。
8. 手动创建预设时,可以通过启用整个装备类别来简化操作,因为殖民者会自动装备最强的选项。例外情况是穿着100%速度中型护甲的工人,这需要特别指定,以及为【剑士】特质设置切割伤害预设。如果弓箭手和持盾者使用重型护甲,则需要新的预设。
有时启用整个类别然后禁用不需要的装备会更简单。同时为每个类别准备备用方案,否则如果找不到所需内容,它们会保持槽位为空,因此重甲预设应包含优先级较低的中甲和轻甲。
9. 清理一个地区的强盗营地会使该地区更安全。这对于保护前哨站很有用,但你可能会故意让你的主要定居点继续刷强盗。如果附近有足够的强盗势力,包括来自邻近地区的强盗,他们可以重建营地。
10. 突袭条会根据各种行动(杀死强盗、扩建基地等)填充。当突袭条满时会触发突袭,之后突袭等级会提升。守卫会减缓突袭条的进度。如果你遇到困难,也可以保持队伍规模较小,以降低突袭频率。
11.虽然防御工事并非必需,但你可以用栅栏设置入口瓶颈,例如___|^|___/的结构。在袭击期间,将持盾防御者部署在入口^处,并让弓箭手从___|位置射击敌人的背部。你可以在预期的强盗队伍路径上建造类似的防御工事。
12. 敌人通常会忽略手无寸铁的工人,工人在受到攻击时会逃跑或躲进房屋。具备战斗能力的工人可用于早期抵御土匪,但盔甲带来的移动减益、卫兵的袭击缓解效果以及后期区域中更强的强盗,使得在游戏早期之后进行工人/卫兵的专业化分工是个不错的主意。
3. 建造与定居点1. 在道路附近建造快速旅行路标,每个定居点以及有食物和储物设施的中央玩家枢纽都要放置一个。探索时,使用常见材料制作路标(和斧头)。可以大量建造路标以获得最大移动自由,但要注意每个路标需要消耗150声望。在地图上,启用定居点内路标的导航点,以便更轻松地快速旅行,它们也会显示在小地图上。将路标切换到新的【个人】前哨站,以防止守卫“保护”它们。也可以使用此前哨站来阻止定居者访问个人储物箱。对没有储物设施的前哨站发动的袭击,袭击队伍会在地图上漫无目的地游荡,不会采取任何行动。一个好的基地位置需要具备以下条件:视野良好,有道路可供设置旅行路标,拥有平坦的建造空间(尤其是农场),并且能够方便地前往你进行小规模战斗的区域(后期可以考虑靠近河港)。资源虽然有用,但除了初期阶段外,都可以通过前哨站来补充。
3. 理想的首个临时营地位于Haerndean东南部,河流上方。这里有芦苇、铜矿石和丰富的野生动物。在利用现有材料完成所有可研究内容之前,建议留在这里。
4. 首个长期定居点的理想位置在Padstow东部(湖泊北部)。附近有泥浆、锡矿石、芦苇、大蒜和野生动物。
如果你选择这些位置,可以将首个临时营地改造成铜矿石前哨站,这样你将拥有T1阶段所需的一切资源,以及T2阶段的大部分资源。上图是法恩沃思南部的海滩,风景不错但除此之外并无特别之处。
5. 前哨站选址必须具备重要资源、相对安全且靠近道路以便设置路标。关于前哨站的更多信息如下。
6. 迁移到新定居点是项艰巨的工作,除非你喜欢建造,否则不应掉以轻心。先在目的地建立一个小型前哨站,包括一个物资储存点和几名负责伐木/采集的定居者,然后利用他们的运输能力运送建筑材料。
通过地图从新位置移动建筑。如果有可用的存储空间,定居者可以完成大部分工作,不过这需要时间。从那里逐步扩展。
7. 位于土匪总部和他们的回收目标之间的定居点会自然地“拦截”他们。这既可能有用,也可能带来麻烦,因为守卫不会作为一个有凝聚力的单位作战。我建议待在强盗的路径附近,但不要直接挡在路上。
8. 在被强盗占领的村庄旁建造建筑,然后激怒强盗,会使你的守卫不断与刷新的驻军战斗,从而持续保持强盗的敌意。我建议将定居点建在村庄驻军的攻击范围之外。这样可以避免无法放弃村庄以及无法让强盗重新变得友好的情况,不过如果你已经到了那个地步,被动地收集他们的战利品也是很有趣的!
9. 如果你还没有解锁谷仓,建造储物堆时可以按照比实际需要大10%左右的规模来建,以便日后轻松升级。首先移动旧的储物堆,放置谷仓,复制移动后的储物堆的设置,然后将所有东西移回。虽然麻烦,但谷仓容量增加了150%(达到1000)。
10. 大多数稀有资源并非特定区域才有,不过你可能需要主动寻找它们。使用地图覆盖层可以更轻松地看到资源图标。
部分资源有特定位置:芦苇生长在水边,小麦分布在强盗麦田以及河流以南的部分区域。蔓越莓、泥炭和苔藓生长在西部沼泽周围。南部有大量棉花和铁矿。
12. 不要亲自建造需要锤子的建筑。这速度慢得离谱。为提升美观度:使用装饰物品、大量栅栏、一些战利品、少量厕所、额外的 drying racks(晾晒架)和立式火把(尤其是在营地入口和农场周围)。
道路若以短路段建造并带有平缓曲线,看起来会很棒。
武器架也可以当作工具架使用!
4. 供应链1. 专用储物设施是指带有物品筛选功能的设施:如箱子、储物堆、谷仓、武器架等。它们是聚落物资交付的必要设施,既可作为物资来源,也可作为目的地,并且能显著减缓食物腐烂速度。物资交付还可用于建造村庄扩建部分。
2. 有两种最佳储物方法:
- 使用带有补充收集指令的专用储物设施,并限制数量(你仍可设置储物上限以防止意外堆积,或为某类物品设置多个目标储物设施)。这通常是最佳方法。大多数搬运任务是前往 crafting stations(制作站),因为它们需要少量物品,因此将原料放在附近可提高效率。
- 中间不设置专用储物设施的工作场所储物。有一些最佳使用场景,比如水资源,应该在靠近消费者的地方生产。通过设置主仓库的较低库存上限,二级采集小屋多产出的一些浆果/蘑菇也有助于保持干燥架的填充。
3. 如果工作场所仓库中有可用物品,搬运工就会尝试填满每一个未达到容量/上限的物品,这会导致来回进行大量琐碎的搬运订单,效率极低。因此,除了专门的搬运工外,应将配送工作的优先级设低。采集者完成采集配额后会将物品存放在采集建筑中,而搬运工会将这些物品转移到专用仓库。
4. 食物至关重要。保质期长的食物能减少花在进食上的时间,但种植的农作物生产效率非常高。殖民者更喜欢熟食,所以这类食物会先耗尽。最好的种植食物是洋葱,其次是土豆和甜菜根(不是芜菁和萝卜)。
5. 使用房屋储物箱存放多余物品供日后使用,比如早期的兽皮。当主储物箱有空间时,殖民者会自动将这些物品移过去。
6. 厕所旁边的垃圾储存箱可用于处理不需要的物品,你需要偶尔清空它,这样可以防止堵塞。
变质食物会慢慢堆积。
农场会产出多余的种子,如果不收获,就无法种植新的作物。
伐木会产生树种。
狩猎会产生多余的物品。
采矿会产生石头作为副产品。
7.具有单一产出的被动制作站(如堆肥堆/ drying racks)可通过存储限制进行数量控制,但拥有更高的补充优先级,这会让定居者在它们为空时立即补充。
鞣制架也可以通过设置单一类型的生产指令来实现专用化,从而达到相同效果。将它们的优先级设得高于普通制作站,可确保其始终处于使用状态。
5. 前哨站1. 大多数前哨站会收集目标资源(泥土、矿石、原木、大蒜、野生动物等),不过也可以有更具创意的用途。优质的伐木营地拥有高大的树木,这些树木含有更多原木。要注意,有些树木是硬木,这是一种不同的资源。前期,前哨站还应进行蘑菇采集和木材获取。后期,农场食物运输会更高效,这样可以解放工人,让他们专注于次要资源的收集:木材、采集的植物、原木等。将次要资源收集设置为较低的建筑优先级——这只是防止工人闲置的额外收益。
2. 通过将重要物资列在首位来确定运输优先级:运往前哨站的食物和工具,运往主要定居点的稀有物品和损坏工具。其他所有物资都排在后面。你可以设置额外的运输任务来导入变质的食物、种子、多余的木材等物资,但需将它们列在下方。
3. 接收地点的运输上限为每个居民20单位。对于补充运输,大幅超过上限是个好主意,因为当目标存储已填满时,运输容量可能无法被使用。
4. 要让多个前哨站为某个定居点的收入上限做贡献,可将每个前哨站设置为“每日”运输少量物资,以避免过度消耗某一个前哨站,同时对接收方设置存储上限以防止物资堆积。这一方法可用于清理营地地面上的矿石:将这些矿石设置为每日运输,然后在下方设置主采矿营地的补充运输订单,这样矿脉的使用寿命会更长。
5.将损坏的工具/陷阱送回主定居点修理,比在当地修理更容易设置,还能节省前哨站工人的时间。当地修理需要运送所需资源,但确实能减轻运输系统的压力。
6. 偶尔检查主仓库,看看是否有多余物资堆积。
7. 现场加工在一定程度上有助于减少运输量。例如,每根原木占用9个运输空间,将其加工成3块木板后,运输空间仅为6个。
8. 可以创造性地利用运输系统,将定居点的部分区域改造成“区域”前哨站。这样物品会在夜间批量运送,你还可以控制不同人员食用的食物类型。然而,每个区域都会激活突袭机制,若规划不当,存储空间的限制可能会成为阻碍。
9. 目前,种植多种作物的农场无法完全自动化。解决方法是每个农场只种植一种作物,这需要大片平坦区域,因此前哨站是最佳选择。将这些专用农场的补充量设为1000,由厕所旁的中央谷仓存储来限制(偶尔用于倾倒种子)。这样工人就能保持田地作物充足,并食用自己生产的食物。
10. 我列出的早期前哨站存储设置清单,对新游戏很有用。使用补充收集来限制数量:
资源:采集的植物种子(10)、粗石(10,采矿副产品)
所有食物、所有工具
其余物品无关紧要( armor、weapon、ammo、quest、others)
11.早期前哨站收集/生产设置清单及(推荐数量):
食物:蘑菇(50个)、烤蘑菇(20个)、熏蘑菇(20个)。可选:浆果(20个,仅在蘑菇不足时),后期三种种植食物(各10个,替代其他食物)。未烹饪的蘑菇堆用于过冬。
前哨站特定资源:原木(10个)、矿石(20个)、泥土(30个)、河芦苇(30个)、木材(60个)、采集植物(20个)
6. 其他1. 当与某个村庄建立保护者关系后,你可以将其从强盗手中解放出来。【时机已到】任务虽为可选,但能提供大量声望。无论是否接受该任务,你都需要先建造一座钟楼,它能提升声望和信任度。之后,小型强盗收税队会开始造访村庄。
2. 敲响钟声后,村庄状态将变为【叛乱中】。此时守卫会变为敌对状态,需要将其消灭。强盗总部会定期派遣收复队。消灭第一支收复队后,解放任务即完成——之后你可以通过地图点击村庄进行交易、招募学徒,并获得更多信任度(现更名为繁荣度)以提升其民兵实力。当回收队进入已解放的村庄时,他们会与村庄的民兵战斗,每杀死一名民兵都会降低村庄的繁荣度。随后,回收队会前往预定地点,回收村庄并摧毁钟楼,这会进一步降低繁荣度。可招募的村民不会攻击土匪。
4. 允许村庄被回收除了暂时失去解放带来的优势外,没有其他负面影响,因此你应该尽早解放村庄并雇佣一些学徒。
5. 拥有已解放的村庄会提高土匪的最低敌意值,而杀死土匪会增加暂时的敌意值。
6. 二级村庄建筑会增加永久繁荣度,因此即使村庄被回收,它们对于村庄的长期发展也非常有益。
7.这个机制很繁琐,所以我不用它,而是把经验值获取率设为120%:在高级书籍读完之前,吃加经验值的食物:鱼炖菜(+20%)、云莓(+50%)、蔓越莓(+30%)或苹果(+20%)。
帕德斯托东边,湖边的南端有个商人,他卖的鱼炖菜很便宜。在这里放个路标,再在西边的沼泽放一个,用来标记蔓越莓的位置。克拉斯米尔的商人卖云莓。
根据胃里已有的食物情况,在还剩6-12分钟时吃加成食物,如果你打算很快睡觉(睡觉会推进胃里食物的消化,但不会推进阅读进度),时间可能还要再提前一些。
8. 以下是《贝尔赖特》的漏洞利用方法,我不建议使用,希望能被修复:可以通过引诱敌人,借助土匪的力量来清理村庄附近的强盗营地。只需四处跑动就能获得营地战利品。
建造栅栏阻挡敌人,这样你就能在他们站着不动时进行爆头。
想要大量声望?解放一个村庄,等它被重新占领以触发另一个【时机已到】任务,然后再次解放它。重复此过程。如果你真的想组建一支能让电脑崩溃的百人大军,这就是方法。
9. 现在你已看完本指南,这里有个最后的额外内容:因为我喜欢破解游戏,所以我去地图未完成的边缘探索了一番。地图上显示的地形确实存在,尽管尚未完成。
在碰撞检测不完善的故障山丘中,有小片森林和沼泽,甚至还有蔓越莓、蘑菇、树木、粗糙的石头等,但没有矿石或泥土等稀有资源节点。我把普通地图放在了亨丁东边,瀑布北边。这是完整的路线图。


纳加加
2026-02-20 01:00:16 · 发布在 「颂钟长鸣」
如何在《贝尔莱希特》中创建、设计并合理自动化各类前哨站以最大化生产效率
什么是前哨站?
前哨站是《贝尔莱希特》的独特功能,在生产链中极为实用。其主要作用是作为主村庄的独立部门,避免工作优先级冲突。这样一来,你可以高效地规划前哨站的工作优先级,从而实现极高的生产效率。
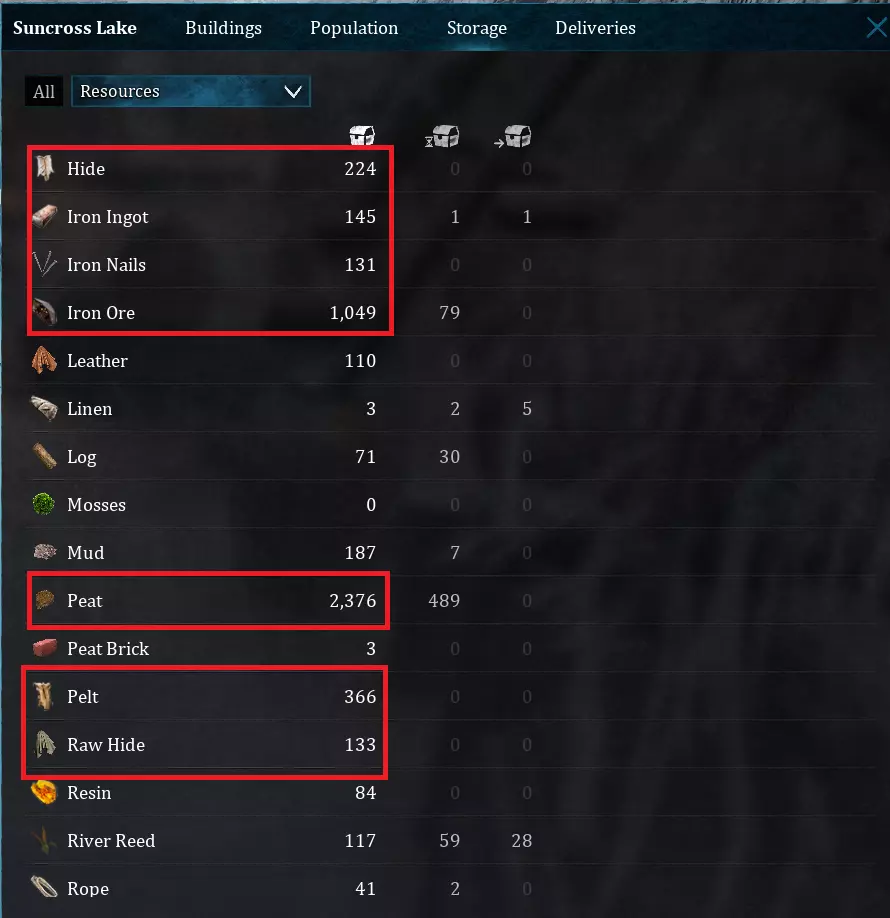
以我上一局游戏为例,在第二阶段后期,我通过前哨站收集到了大量铁矿石和泥炭。刚开始建造前哨站时可能会让人望而生畏,尤其是当生产线的自动化因一些小问题而中断时。不过,本指南的目的是帮助你轻松创建第一个前哨站。更重要的是,它将帮助你理解为什么你的前哨站没有达到最大产能,以及如果村民没有按预期行动,为什么可能需要重新审视工作优先级。
什么是自动化?为什么这么称呼它?
简单来说,自动化是应用流程以最少的用户输入来实现结果的过程。在《Bellwright》中,自动化的目的是通过生产创造资源,而无需你不断干预——更不用说亲自去制造这些资源了。如果你每天晚上都得花时间制造资源或建造东西,那你一定是忽略了优先级系统或前哨站系统的某些要点,才导致自己不得不亲力亲为。
夜晚本该是你大肆剿灭土匪和强盗的时间,而不是干这些粗活!你比这强多了,振作起来!
如何建立基础前哨站:
1. 提前明确你需要生产什么,以及这些生产是放在主村庄更好,还是放在前哨站更合适。并非所有东西都适合放在前哨站生产。(更多细节见后续章节)
2. 为你个人需要生产的物资寻找合适的地点。例如,如果你在游戏初期需要木材,就应该把前哨站建在有很多幼树的区域。幼树会重新生成,如果你选择了合适的位置,就能获得稳定的木材供应。
在离你位置最近的道路旁建造一个路标。这样,万一自动化出问题,你可以快速传送到这里。
在该位置建造一个住房帐篷。
在该位置建造一个储物堆。
在该位置建造你需要的用于采集或生产的营地(例如:采集营地、伐木营地、狩猎小屋等)。
在该位置建造一个工作台。(这样他们就可以在现场修理工具。请注意,如果损坏的工具被放入营地 inventory,而不是储物堆,他们将不会修理任何东西。)
示例前哨站:建造一个用于获取木材的伐木营地前哨站。
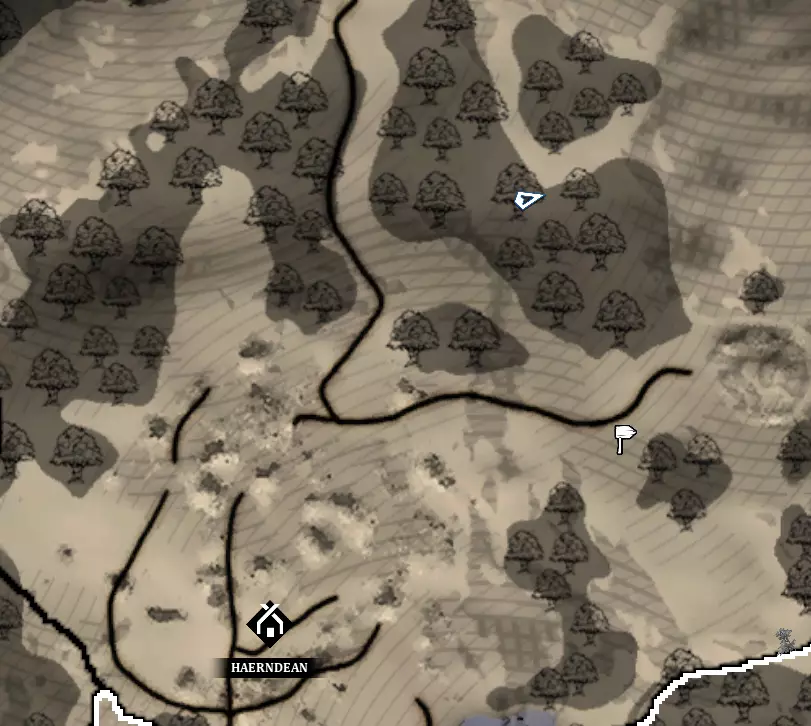
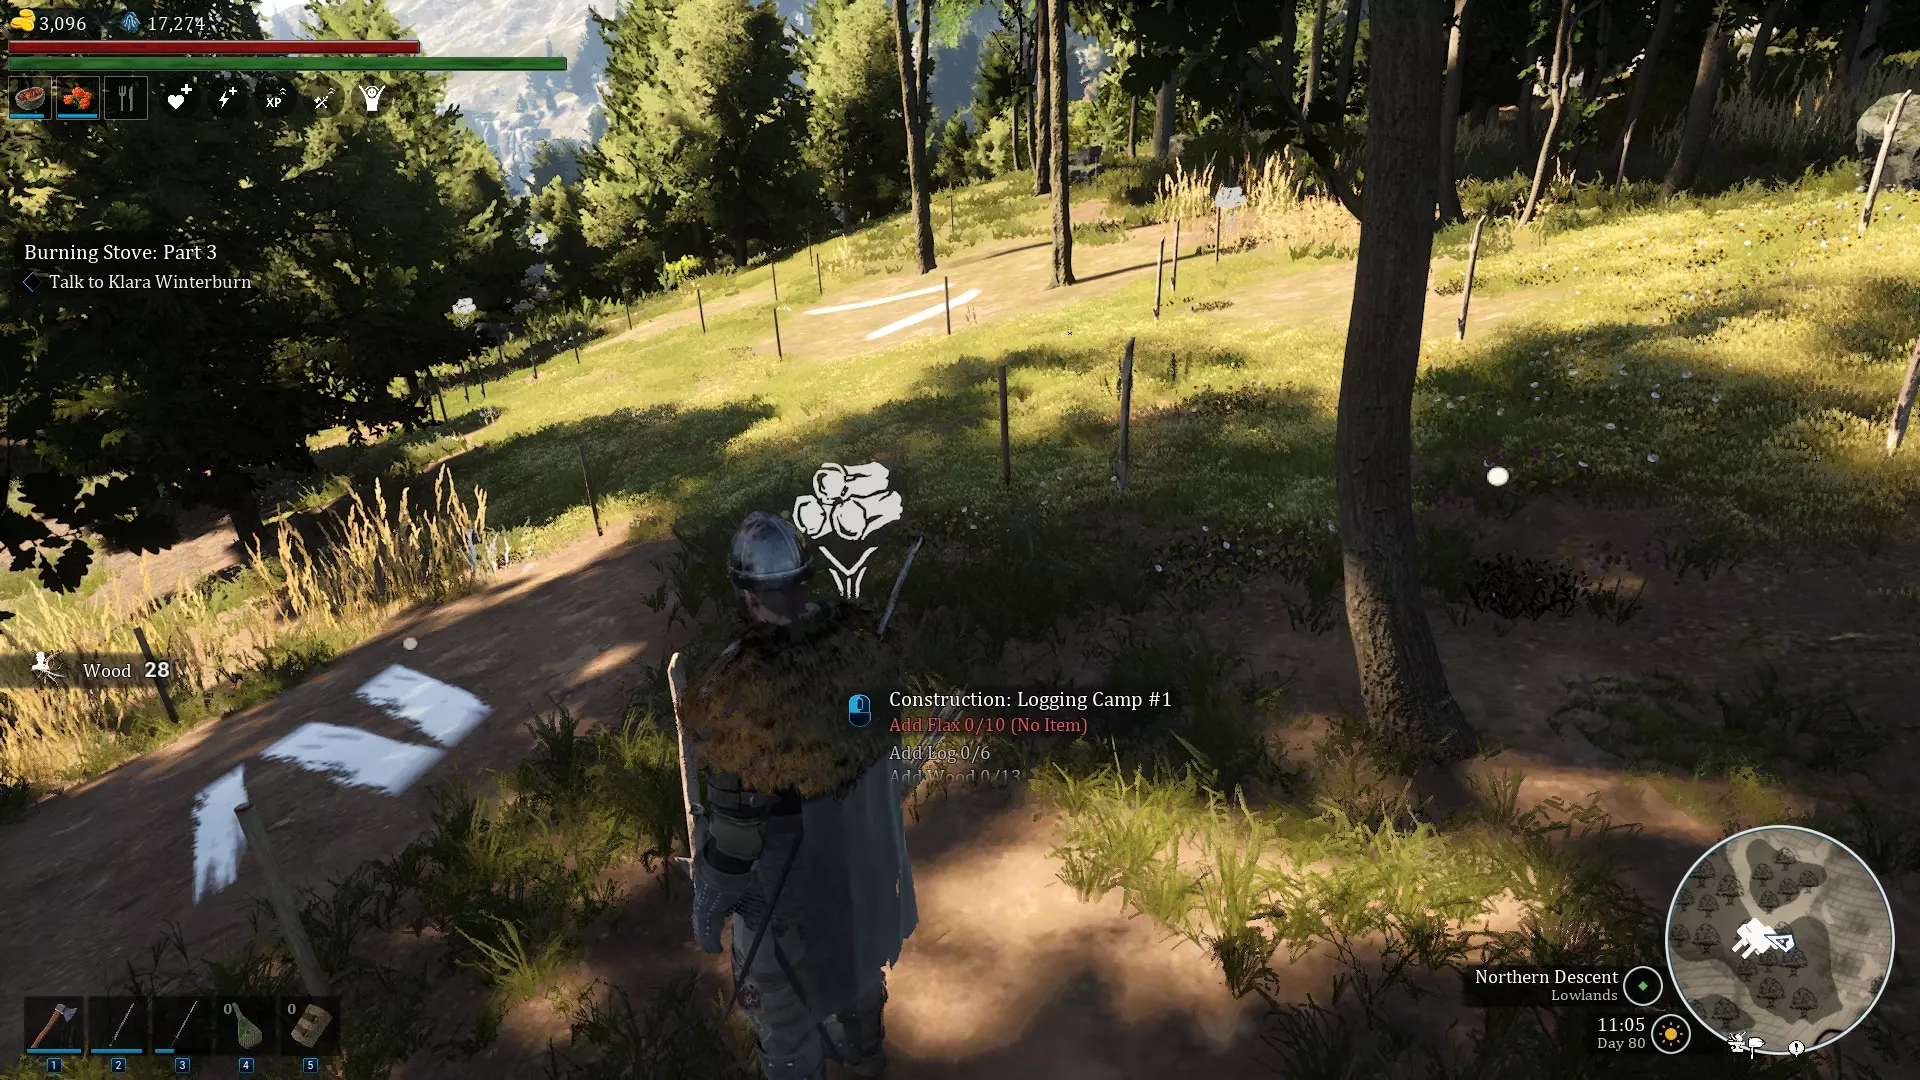
步骤1:找到你想要建造的地方,然后前往该位置。最好选在路边,这样你就能像我一样设置路标。附近有了路标,这个过程会容易很多。在这个例子中,我想要一个前哨站来砍伐“幼树”获取木材。所以我选择了赫恩迪安东北部的这个位置。步骤2:针对这个特定的木材营地,我现在要放置一个【储物堆】、【住房帐篷】、【工作台】和【伐木营地】。步骤3:按下N键,点击【建筑】选项卡,然后找到你刚刚放置的4个建筑。点击该建筑最右侧的【住房】图标。步骤4:你可以选择自己建造整个前哨站,或者让村民为你建造。如果你不想让村民浪费时间四处奔波运送物资或建造这个前哨站,请跳至步骤5。
步骤5:点击图标,调出下拉菜单。点击【创建】,然后为你的新定居点命名。步骤6:按下N键,点击【人口】,然后点击你想要派往该前哨站的村民姓名。此时会出现一个名为【Switch V】的按钮,点击后会弹出包含你所有定居点/前哨站的下拉菜单。我点击了我的新伐木营地名称【Hearndean Wood Logging】。那个村民现在住在那个前哨站,并且只能在前哨站活动或工作。我们现在需要设置物资运输,确保他们有足够的食物和材料维持生活,同时也能将收获的物资送回给我们。
如何设置物资运输:
1. 按下N键,点击第四个名为【运输】的标签页。
2. 找到你的主村庄。
3. 在【创建新订单】下方,在搜索栏中输入你想要运输的物品,然后选择它。在这个例子中,我们将使用伐木营地的【木材】。
4. 当木材添加到列表后,点击下拉菜单,然后选择你想要从中运输木材的前哨站。在这个例子中,是我们的伐木营地【Trilog Logging】。
5. 点击中间的下拉菜单,选择【一次性】进行单次运输,选择【每日】则会在每天午夜(0:00)进行运输。或者选择“每周”,表示每7天午夜(0:00)进行一次物资运送。
在显示0的方框中,将数字更改为你希望运送的数量。我通常会将其设置为一个较大的数字,因为我希望物资能尽快转移。
点击运送界面左上角的<或>箭头,可以切换物资要发送到的前哨站。在这种情况下,我会将浆果和蘑菇发送到这个前哨站,这样我的村民就有食物可吃,然后才能工作。我喜欢每天各发送大约5个,这样能保证他们正常活动。不过你也可以根据自己村民的需求来决定具体数量。烟熏蘑菇也是一种不错的食物来源,但在此之前你需要先设置好烟熏房和烹饪设施。常见交付问题:
如果村民未将木材转移到储备库,木材将无法交付。交付直接从主仓库提取,可在仓库界面的【可用】栏中查看。
若你拥有木材,但木材位于营地而非储备库,会显示为【待提取】,即仓库界面中间一行数字。任何处于【待提取】或【交付中】状态的物品,交付系统都不会进行交付。
前哨站示例:设置伐木营地前哨站的交付。
步骤1:按下N键,然后点击【交付】,调出主村庄“Blackgardius”的界面——我希望将木材交付到这座城市。因此在底部的小搜索栏中输入“Wood”,即可显示可选选项。点击木材后,它现在会显示在我的交付界面中。步骤2:我使用灰色下拉菜单选择木材的发货地点。我选择“赫恩迪安木材采伐场”——我希望每天都能收到木材,所以我使用第二个下拉菜单将“一次性”改为“每日”。由于我比较贪心,我希望能收到尽可能多的木材。因此,我将限额设置得非常高,比如1000。即使没有1000单位的木材,他们也会从库存中发送尽可能多的木材来满足这一需求。
因为我希望损坏的简易斧头能被送回,所以我还将“损坏的简易斧头”添加到我的清单中。这样,任何损坏的斧头都可以在我的主村庄进行修理。
我还将“简易斧头”添加到配送清单中,因为我希望所有多余的简易斧头都被送回主村庄,这样它们就不会在新的伐木营地堆积起来。步骤3:现在我的木材已经准备就绪。我点击交付界面左上角的<或>按钮来切换想要进行交付的城市。我找到了“赫恩迪安伐木场”,这是我接下来要进行交付的地点。
因为我需要浆果和蘑菇供村民食用,所以我每天添加5份。
因为我希望村民能在现场修理他们的简易斧头,所以我每天添加2块石头。
由于损坏的斧头有时会被退回,所以时不时地送回新的简易斧头通常是个好主意。我通常每天送一把,因为根据我们之前的设置,任何多余的简易斧头都会被退回。好了,哨站现已完全建立,物资运输也已正常运作!
优先级及其高效使用方法:
大家似乎面临的最大问题之一就是如何处理优先级系统。这在哨站中尤其成问题,因为你无法日复一日地监督那里的行动。
我对哨站优先级设置的建议如下:
- 运输应设为1级
- 熔炼/“定时”生产应设为2级
- 采集/伐木应设为3级
- 制作应设为4级
为“主动”生产方式安排第二名村民。我不建议在只有一名村民的哨站使用主动生产。就我个人而言,我根本不在哨站使用主动生产,而是将所有主动生产都放在主村庄进行。为什么将其称为“定时生产”和“主动生产”?两者有什么区别?
在本指南中,我对这两种生产方式进行了区分:定时生产是一种不需要村民在旁值守的生产方式,例如熔炉,它就是定时生产方式,村民只需将矿石放入、点燃炉火,然后即可离开。烹饪也是定时生产的另一个典型例子,你只需将食物放在熏制器上,然后离开,直到食物可以取出(如果太久不取就会烧焦)。
主动生产则需要村民坐在工作台/坑锯旁,等待正在生产的物品完成后,才能去执行其他任务。配送应放在首位:
村民在哨站最重要的工作是将生产或收获的物品转移到仓库。如果物品不在仓库,而是放在熔炉、工作台、营地或小屋中,就无法通过配送系统进行配送。
生产应放在第二位:
假设你希望在现场生产物品,例如在采矿营地冶炼矿石。你会希望生产成为第二重要的工作。这能让村民立即取用仓库中的物品,并在熔炉或工作台上投入使用。
熔炉在这方面尤其适用,因为熔炉冶炼需要时间。我把这些称为定时生产法。村民会利用这段时间进行更多开采。
需要注意的是,如果伐木营地只有一名村民,那么放置坑锯并不是个好主意。那些需要村民在生产期间全程待在生产设施旁的生产工作,会占用他们做其他工作的时间。在这种情况下,坑锯会让村民无法生产木材/原木和运输,而是会把大部分时间花在切割木板上。这类工作通常更适合放在主村庄,或者更好的做法是在营地安排第二名村民,专门负责切割木板和运输。
收割应该排在第三位:
奇怪的是,前哨站最重要的工作优先级却是最低的。是不是很有趣?显然,采集工作会让村民行走的距离最长。通过制造需要运送的物品,村民就会转而进行运送工作。但如果没有可运送的物品,村民就会去采集可运送的东西。这形成了一个良好的循环,确保营地中的物品不会长时间堆积,所有东西都能得到妥善运送。
制作应设为第4优先级:
除非你使用坑锯,或在现场使用工作台进行生产。制作应是最低优先级。原因很简单,如果制作不是用于生产,那就只用于现场维修。
遗憾的是,在《贝尔莱特》当前版本中,维修系统仍然存在不少bug。你可能需要安排运送损坏的工具,并且如果你的村民有将损坏工具放在营地的习惯,每天都要送回新工具。(如果工具在营地,可能无法被修理。)
我应该建造哪种前哨站?建造多少个?
早期T1:
1个伐木营地(木材和原木)
1个采集营地(浆果、蘑菇、芦苇)
中期T1:
1个铜矿营地
1个锡矿营地
中期到晚期T2:
1个狩猎小屋
1个铁矿营地
1个泥炭矿营地
可选营地:
蔓越莓采集营地
挖泥营地
仅用于获取木材的伐木营地
仅用于砍伐/补种原木的伐木/护林员营地
用于开采花岗岩的泥坑
我个人最喜欢的前哨站位置Lumber Camp (Green Circles on Map):
North-east of Hearndean there is a very large "Young Wood" forest, which respawns. Making it a perfect location for a lumber camp. You can guarantee wood harvesting with very few hiccups here.
North-west of Padstow there is a very large "Tree" forest, which is also in range of a decently sized "Young Wood" forest. The trees will not respawn until you've reached Tier 2 and set up a for
ester. However, it'll remain useful long afterwords as a secondary Wood creation location.
Foraging Camp (Blue Circles on Map):
South of Hearndean there is a herbalist hut, which happens to have nearly a hundred mushrooms growing in the location. There are also a wide array of berry bushes found here. This is a great location for your first foraging camp if you move close to the east river, or padstow lake. If you do not live near the water, you will instead want a location closer to water so you can gather river reeds early game.
South-east of Hearndean by the east river is a good location for mushrooms and river reeds especially. The main issue with this location is that wolves are guaranteed to respawn in this area. So you will need to do some minor babysitting - or you'll need to equip your villagers who work this region very well so they can kill the wolves for you. If you notice this area stops producing, it's because villagers are being beaten or scared off by the wolves.
East of Padstow by the lake is a fantastic location for garlic, flax, sage, mushrooms, berries and river reeds. I usually start in this area so I rarely get to make a camp. Of course, the reason I put my main village around this area is because it's so wonderful for early game foraging - especially the river reeds. If you don't plan to move here, I would highly suggest putting a camp around here.
Mining Camp for Copper (Dark Red Circles on map):
South-east of Hearndean, except you're actually going to want to put it central to as many copper nodes as you can. The reasoning for this is simple. The range on the mining camp is actually fairly far, and you're going to want to get maybe 2 - 5 copper nodes in range. This spot is fantastic for getting multiple nodes in range. Mining Nodes will eventually disappear as the game progresses and your villagers mine them out, so it's always a good idea to prolong the lifespan of your outpost without needing further effort.
West of Bradford has two copper nodes that're very easy to get in range of a centralized mining camp. A good backup if you need extra harvesting, or if your initial outpost runs out.
Mining Camp for Tin (Silver Circles on Map):
North-east of Padstow by the hunter camp. There are two tin veins in range here, which should last you a decent while.
Far North-west of Padstow, way out in the boonies, are two tin veins, and one copper vein. You can make use of all of these as a backup if you should need it.
Hunting Hut (Purple Circles on Map):
South-east of Hearndean has an area where wolves, boars, crows and deer spawn regularly. It also happens to overlap with the copper node where 3 wolves will constantly respawn. So it's actually a very good idea to have a hunter kill them regularly so your copper miner isn't being harassed.
South-east of Padstow has an area where a metric butt-ton of deer will spawn. For those of you who are getting bottlenecked by Hide, this is a great location to put a Hunter Hut down for deer.
Mining Hut for Iron (Dark Grey Outlining Light Grey on Map):
South-west of Blackridgepool has around 2 iron locations that aren't even marked on the in game map. This location where the circle is, is close enough to them. Go look for yourself, you'll be surprised to find it there when it's not clearly marked.
North-West of Horndean has a big bandit camp that can be cleared. Once it's gone, you'll have access to the two iron veins there.
East of Horndean has two easily accessible Iron Veins that if you are careful with the placement of your mining hut, you won't have to worry about roaming spawns. If roaming bandits become a problem, you will have to deal with the two bandit camps in that area sadly. That's why this is so low on my list. It's a bit of a gamble.
Mud Collector for Peat (Light Grey Outlining Black on Map):
West of Padstow, hidden in a horrid marsh area that you might not even notice on the map, is the ONLY peat location that won't be constantly harassed by bandit spawns. It's hard to build here, so be patient if you plan to use this spot. It's also very very far from roads, so don't expect to get here easily.
The central island, north of Blackridgepool without any bandit camps on it. Sadly, you 'will' have to kill off every single bandit camp in this area for the peat diggers to not be murdered constantly. Of course, once you do, this is a compact island with very low roaming spawns locations.
Foraging Camp for Cranberries (Pink on Map):
This island north of Blackridgepool is one of the few locations I've found with enough cranberries to be worth it. The villager will also cross the marsh occasionally to get the cranberries on the mainland, and it's surrounding areas.
Mud Collector (Brown on Map.)
This is the most no-brainer outpost location for you. I don't need to tell you where to build this, but in case you want a location where I'd build it?... east of Padstow.
Pit for Granite Mining (Marked in Purple Outlining Dark Grey on Map):
South-west of Blackridgepool is an area with a wide abundance of Granite. Four major node areas can be found here, with zero roaming bandits. This is pretty much my favorite granite spot.
Kill the bandit camp north-west of Horndean, and you'll have access to even more compact Granite. Of course, you'll have to work for these ones, but it's still nice to have.
Troubleshooting: Why aren't my villagers producing anything!?
This will be a work in progress, but off hand what I can remember stopping my villagers from working included:
Not setting priorities correctly. Having a priority too high over what I want them to actually do, will prevent them from doing what is needed. Researchers commonly have this problem as people don't set their priority high enough over other jobs.
There are enemies nearby scaring your villagers away from working. Go and kill those enemies to make it safe.
Your nodes ran out. Typically this happens mostly with mining camps. It's very common, and you should prepare long term for this to happen. Usually you'll get a few thousand ore per node location, which is why I advocate for outposts between multiple node locations.
Their tool broke, or they put it in the stockpile and it got delivered. This can actually fix itself if you set your delivery system up correctly. They'll either fix it or you can just wait a day. Otherwise, you'll need to go down to the outpost and give them a new tool to work with.
Conclusion.
Outposts and Deliveries are worth learning. Doing it correctly can reduce the time you spend doing your own harvesting, and it will even help prevent bottlenecks in your technology or advancement.
Let me know if anything has changed since this guide has been made. I'll work on a revision after a few patches are released that make a difference to outposts.
下载233乐园APP
专心推荐好游戏
纠纷处理及不良内容举报电话:
4006600910 (工作时间: 9:00-12:30,14:00-18:00)
北京市朝阳区启阳路4号院2号楼15层1803室
本公司产品适合10周岁以上玩家使用 未成年人家长监护